Page 1 of 1
FS13 Isa
Posted: Sat Mar 19, 2016 9:03 am
by gonandkarl
Hi,
As someone asked why there are no posts about the FS13 builds I decided to show the first 2 pictures of my FS13.
She will be named Isa after my 2 nd granddaughter who is recovering well after 2 heart surgeries in the first 3 months of her life.
She suffered a stroke after the second operation and seems to put even that away. She is now 5 1/2 months old and gives me a big smile when I visit her. By the time she can walk her FS13 should be finished.
Actually I want to splash it this summer together with my other boat AD14.

Greetings from Karl ( Austria )
Re: FS13 Isa
Posted: Sat Mar 19, 2016 10:01 am
by Dougster
Best wishes for for your granddaughter. It must have been hard seeing her go through that, but I bet her smile and this build is good therapy. I'm thinking about doing the wider version so sure look forward to this thread. I made a 1/3rd scale model of the FS13 and everything fit together well, with no problems. Looks like your bottom panels are spot on and your pics are great. I like clicking on them and blowing them up.
Watching Isa Dougster

Re: FS13 Isa
Posted: Sat Mar 19, 2016 10:04 am
by Corto Maltese
Isa and grandpa should have many joyful moments on this boat.
Re: FS13 Isa
Posted: Sun Mar 20, 2016 9:49 am
by gonandkarl
Hi,
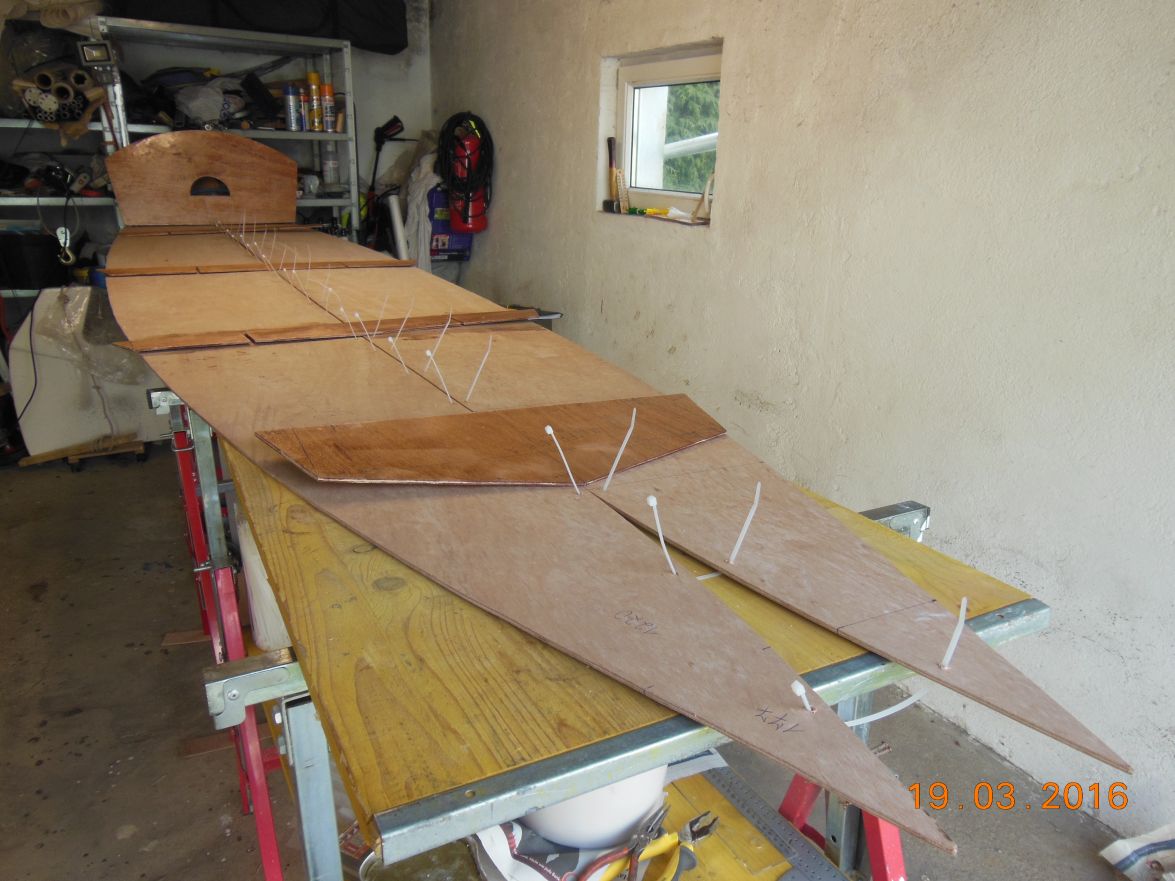
Again a little progress on the FS13 and the dry fitting of stringers, frames, sole and deck was done easily this Sunday morning.
Here are a few pictures of it:
Greetings from Karl ( Austria )
Re: FS13 Isa
Posted: Wed Mar 23, 2016 12:14 pm
by gonandkarl
Hi,
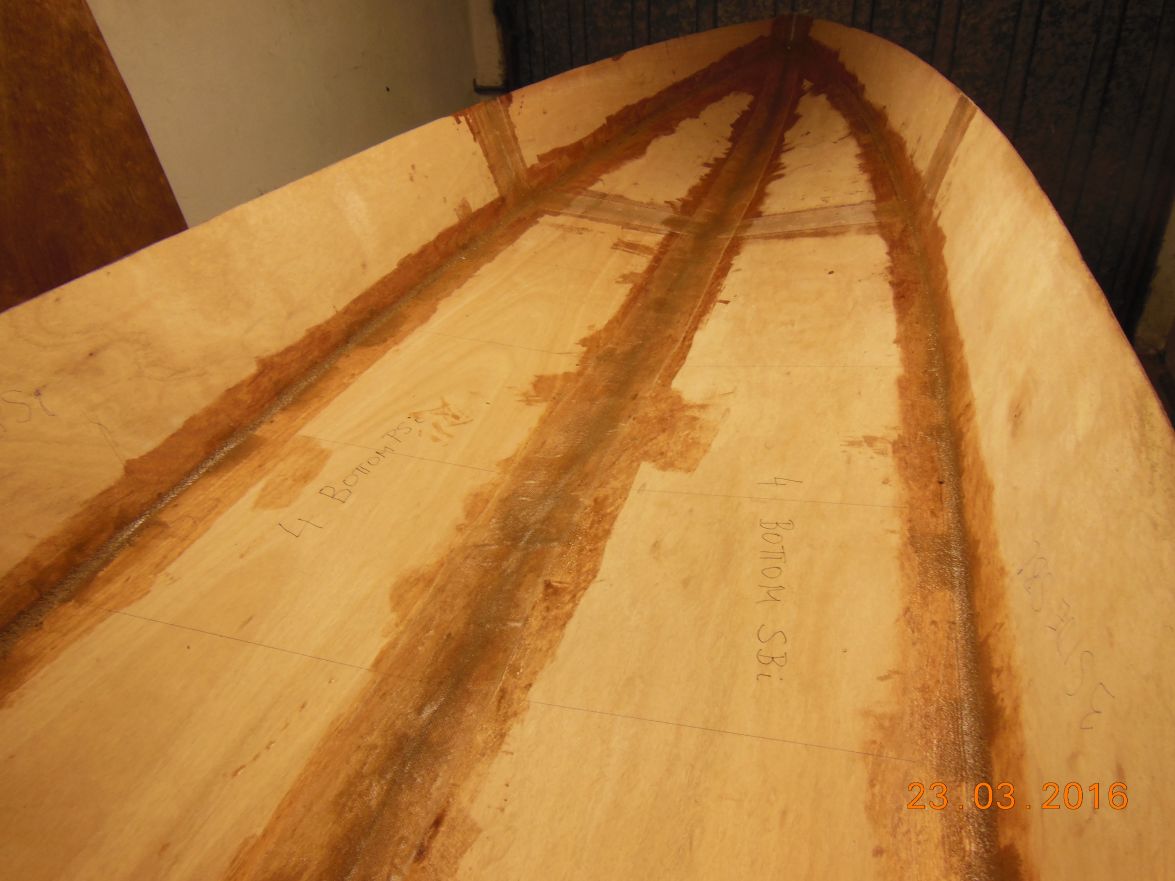
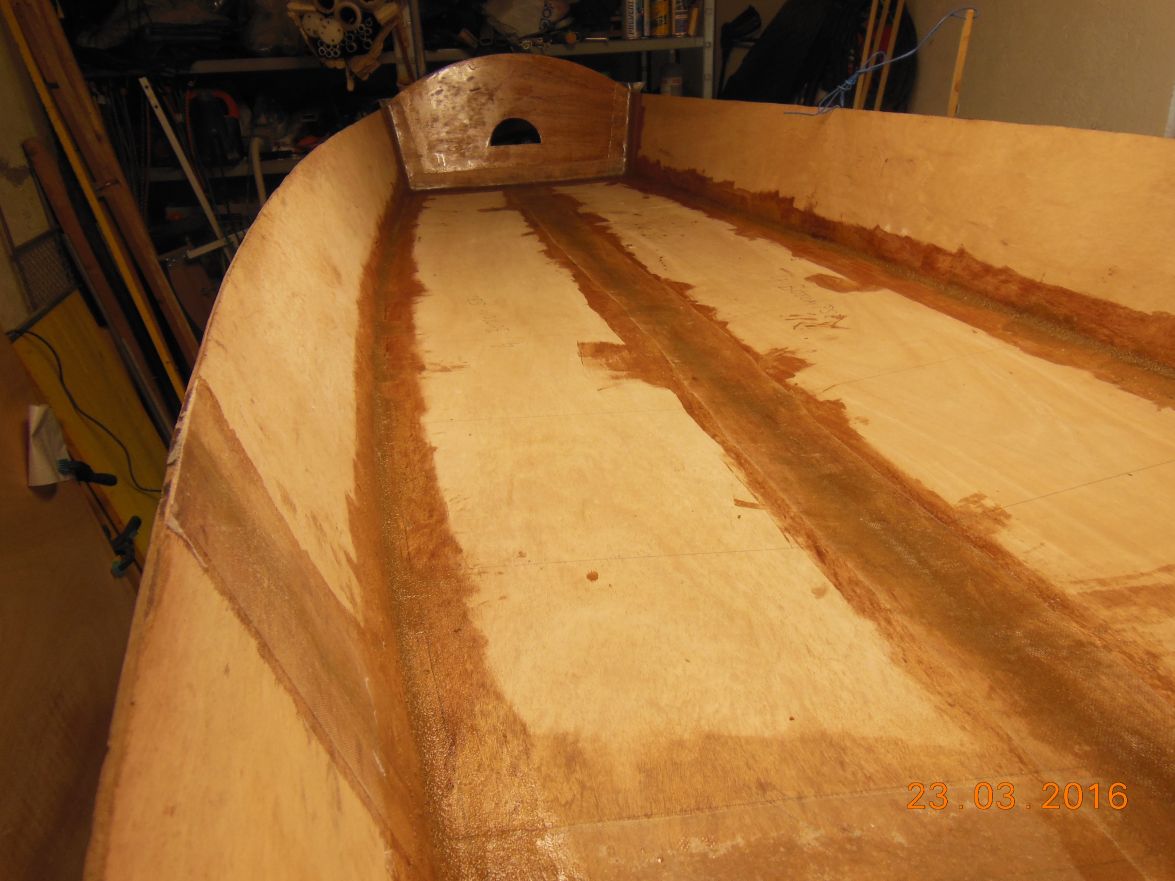
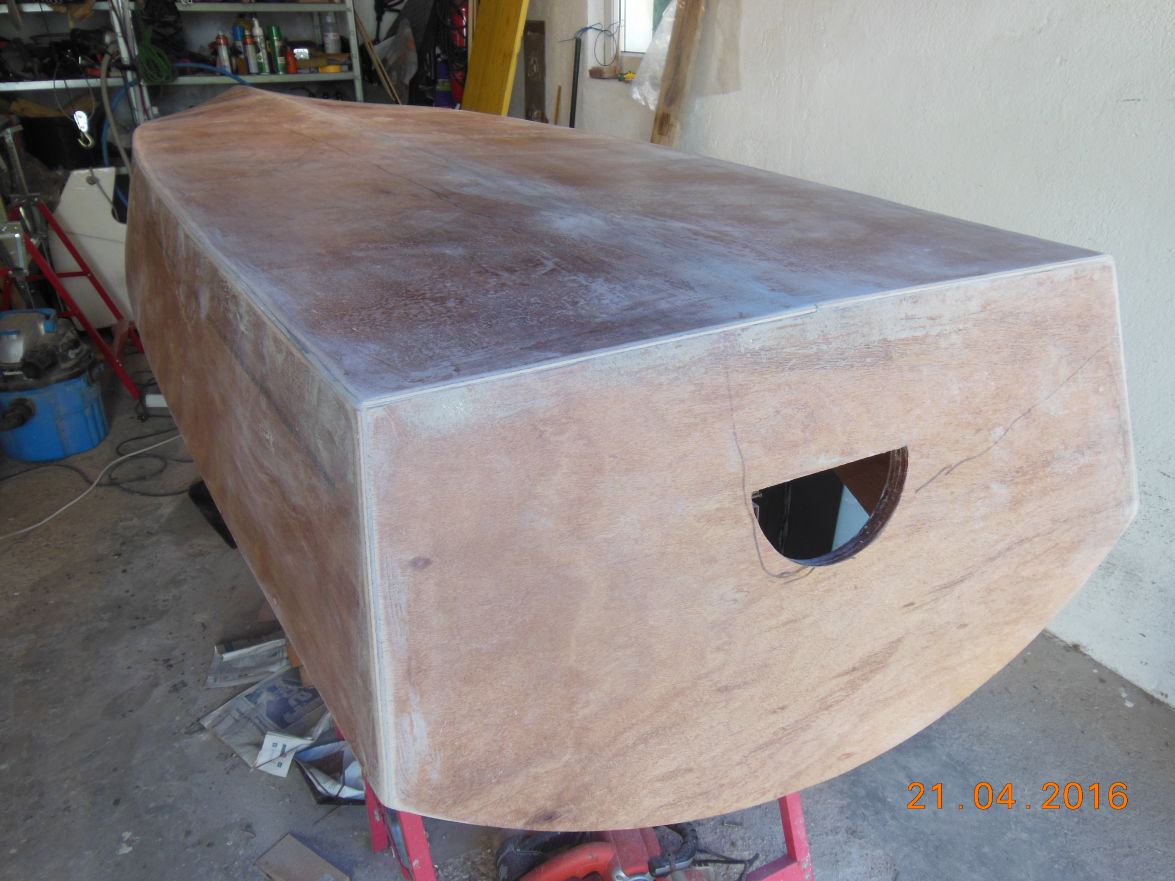
Slowly but surely I am progressing a bit. Unfortunately still battling with the cold climate so I have to run the gas heater in the garage whenever I work with epoxy to have at least 15 degrees celsius. For the taping of the bottom , bow and round the transom seams I removed the stringers and frames to be able to work over the whole length of the boat. Tommorrow morning I will glue the stringers and frames into the boat. Last night I had a knock out. Not to loose too much heat in the garage I went in and pulled the heavy steel door directly behind myself down and slammed it smack on my head. But I was lucky because all that happened I was lying dazed for a few seconds in the driveway until I realized what I did.
Here are the latest pictures after applying the tapes for the light version of the FS13. Actually I should have built the heavy version to go with my overweight body. But I decided for the light version because it is easier to lift and I hope to make it lighter than designed by using Paulownia wood ( strong but very light ) for all the cleats onto which the sole will be glued.
Greetings from Karl ( Austria )
Re: FS13 Isa
Posted: Wed Mar 23, 2016 12:32 pm
by pee wee
Wow, Karl, I thought I misunderstood you when you said you had a knock out. I'm glad you weren't hurt too badly. You're making good progress on the boat, just try not to do that again!
Re: FS13 Isa
Posted: Sat Mar 26, 2016 2:51 am
by gonandkarl
Hi,
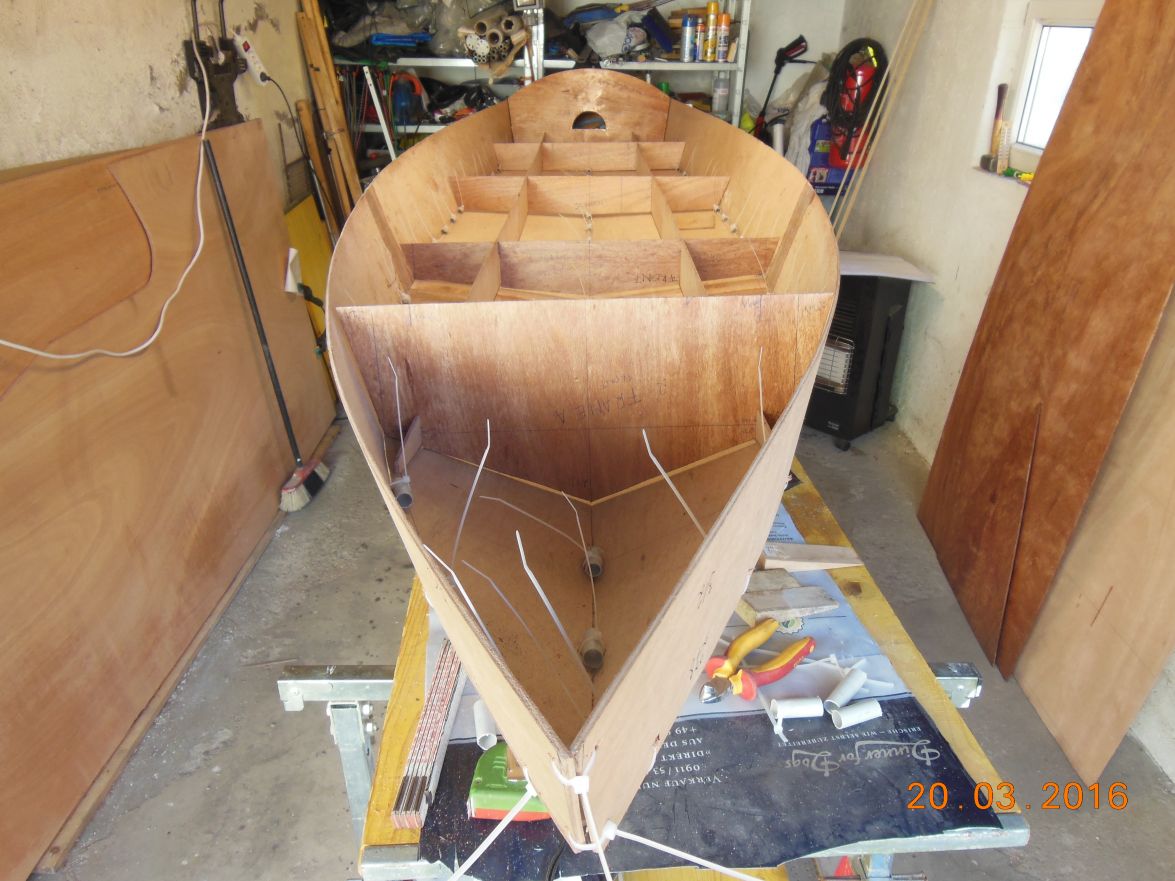
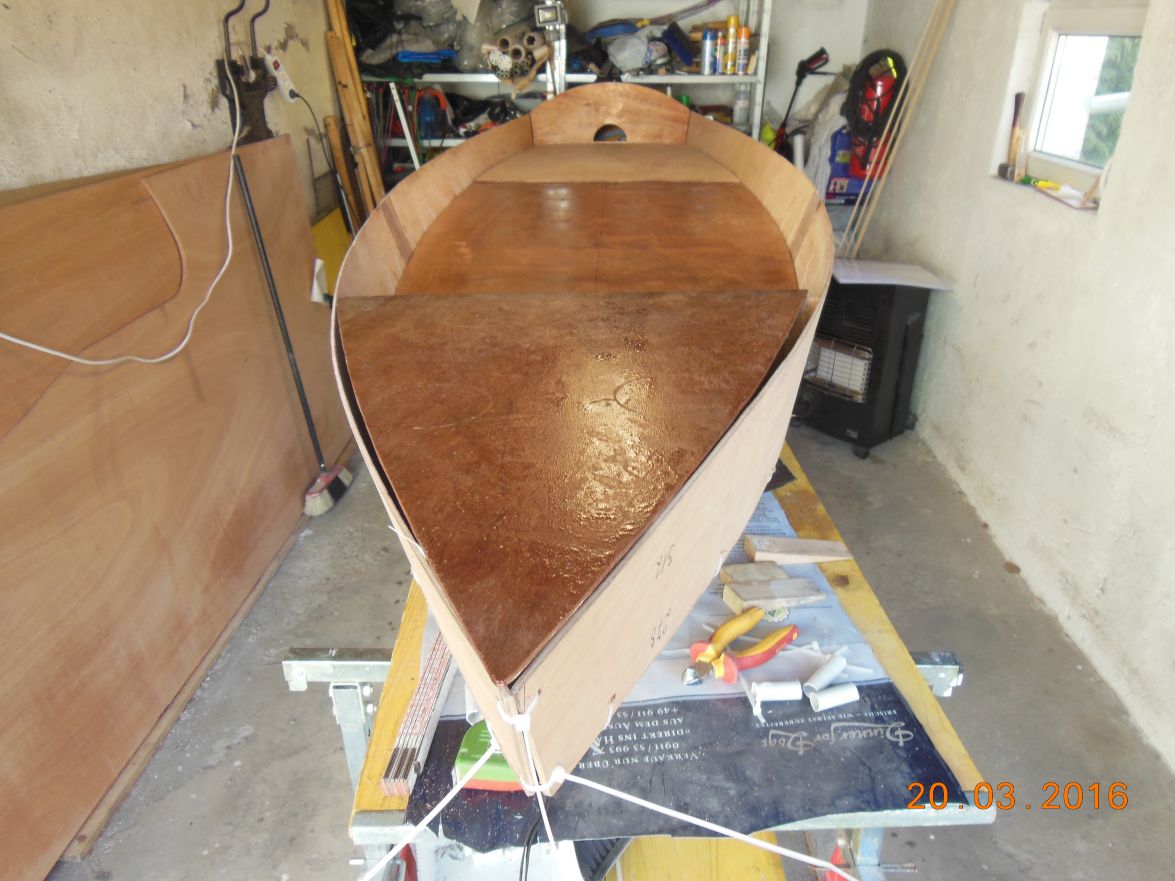
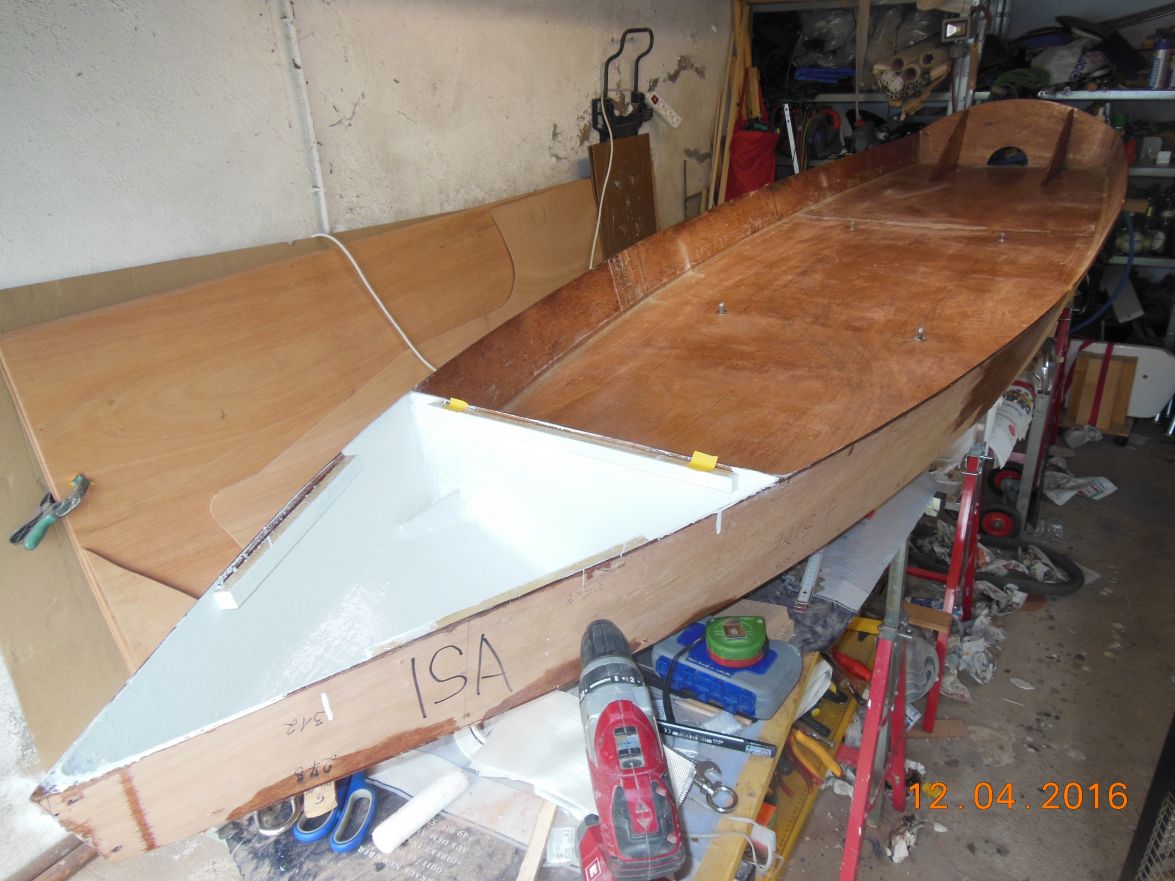
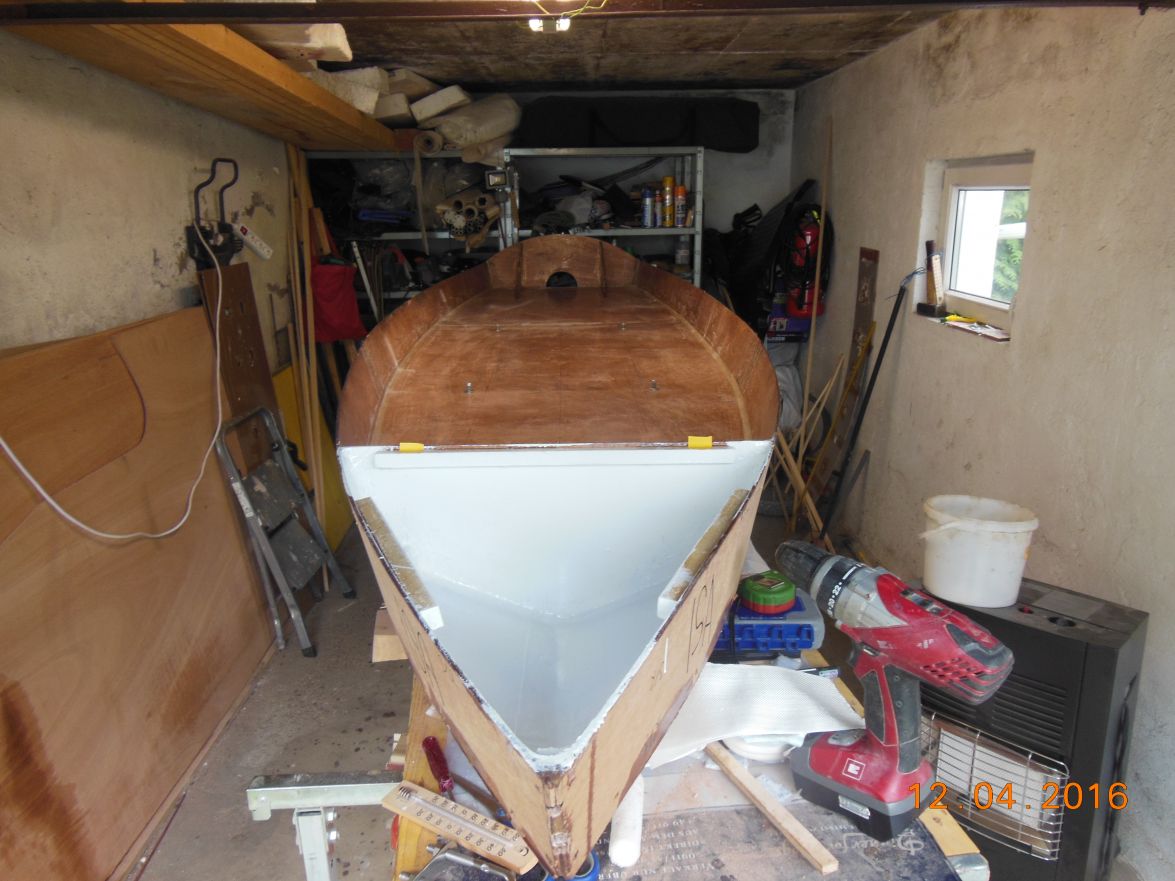
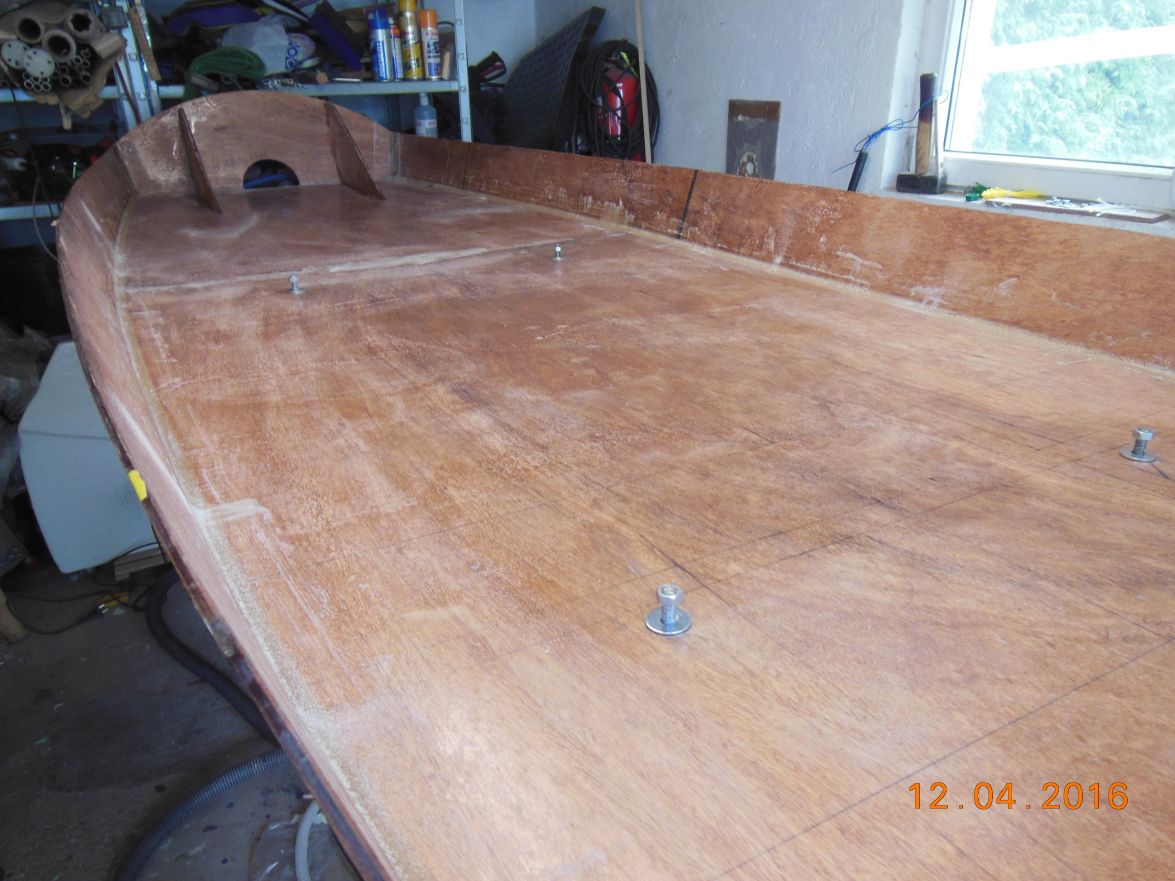
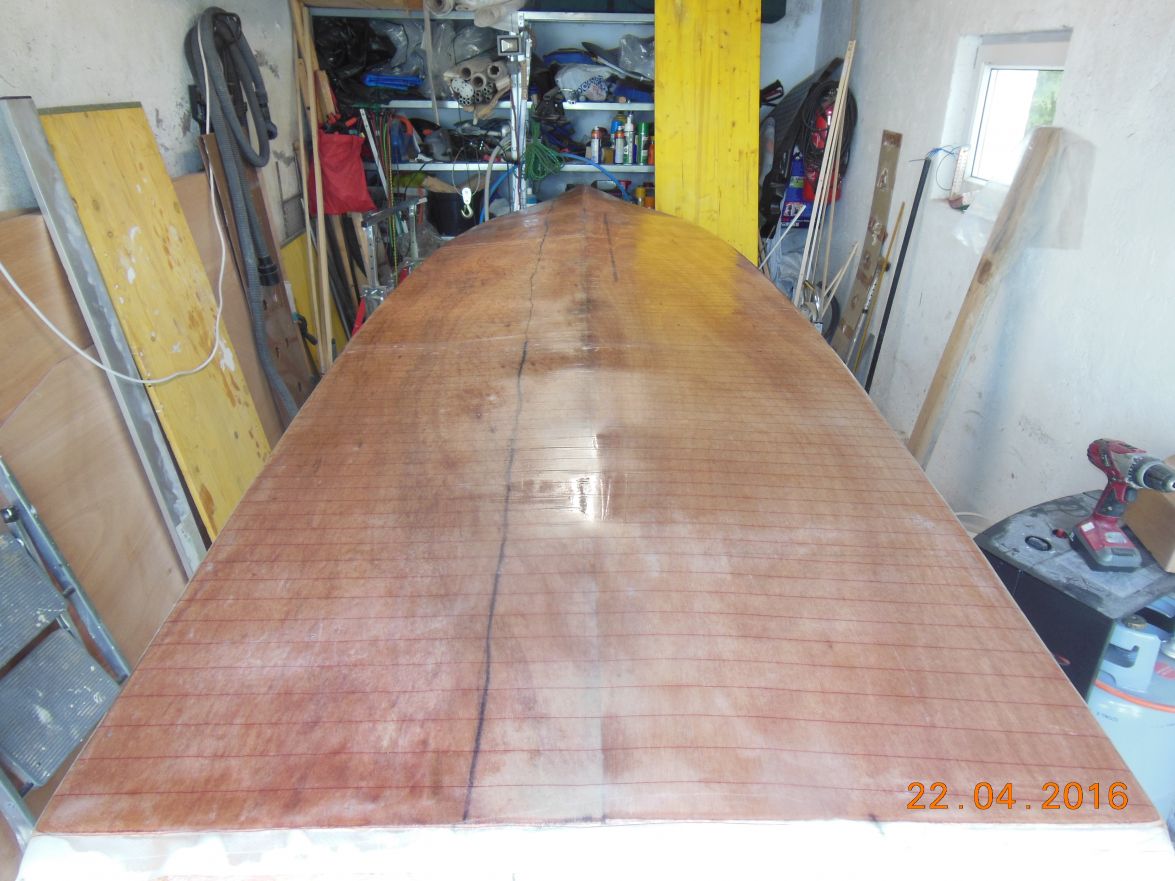
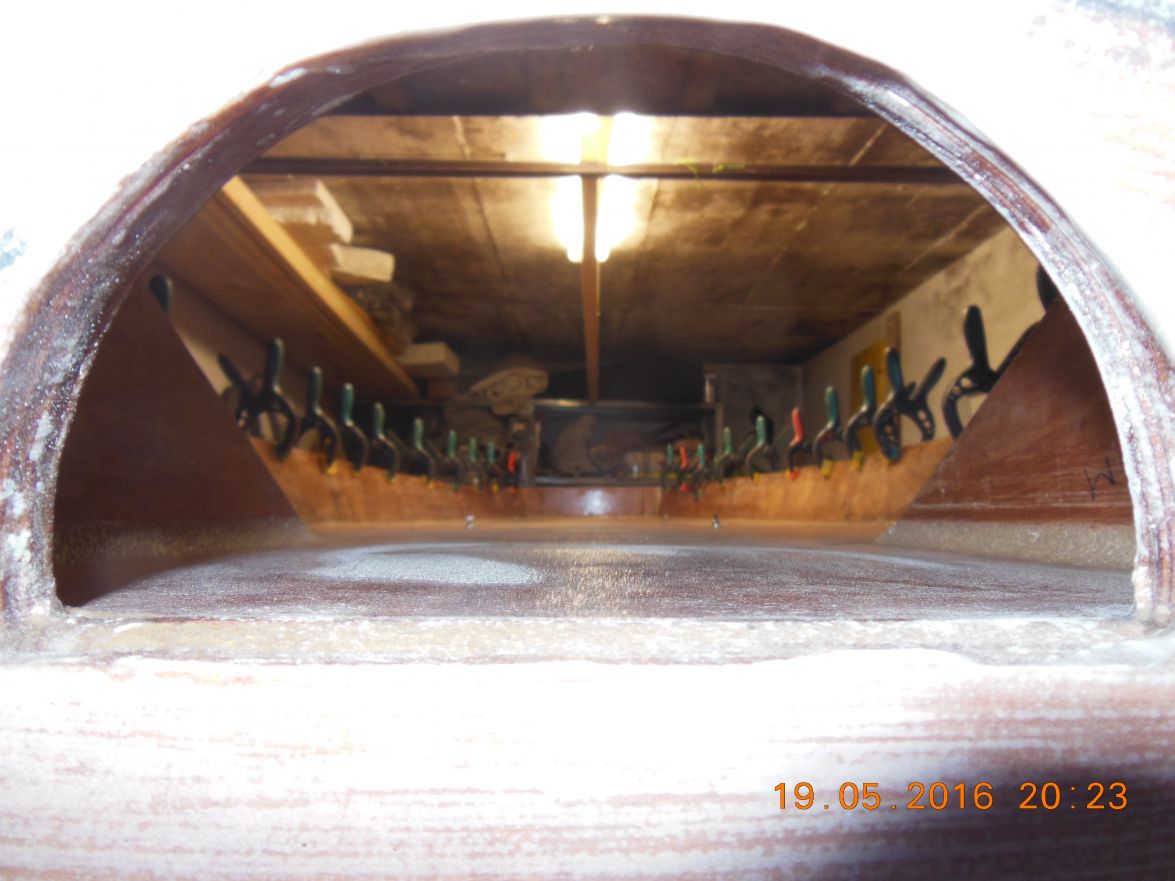
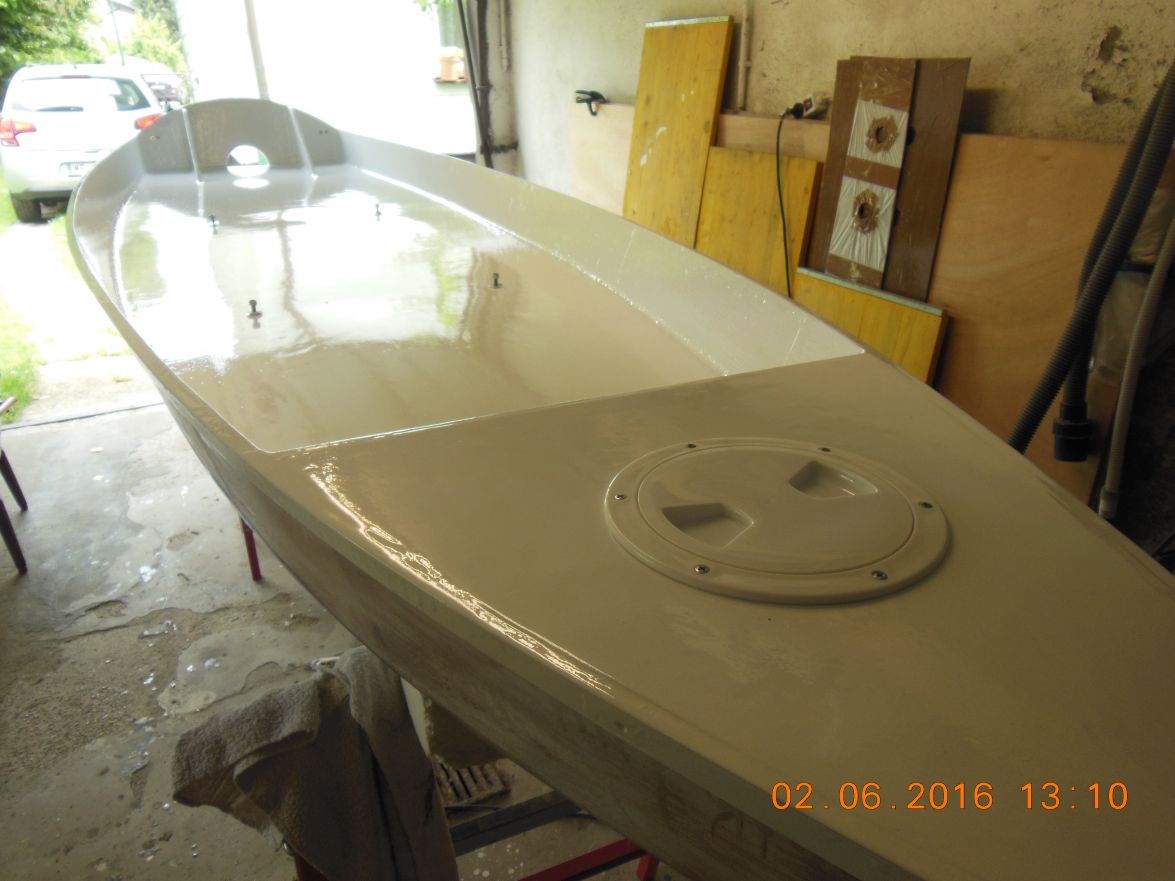
Now I have the frames and stringers glued to the boat and at the same time I epoxied the inside:

And this is the last dry fitting of sole and deck before I install the cleats into the boat onto which the sole will be glued:

Greeting from Karl
Re: FS13 Isa
Posted: Sat Mar 26, 2016 9:30 am
by Dougster
It looks very good to me, very clean. What kind of power are you planning on? Also, that looks like a lot of room for storage under the deck at the bow. Will you put a hatch there?
Dougster
Re: FS13 Isa
Posted: Sat Mar 26, 2016 11:30 am
by gonandkarl
Hi,
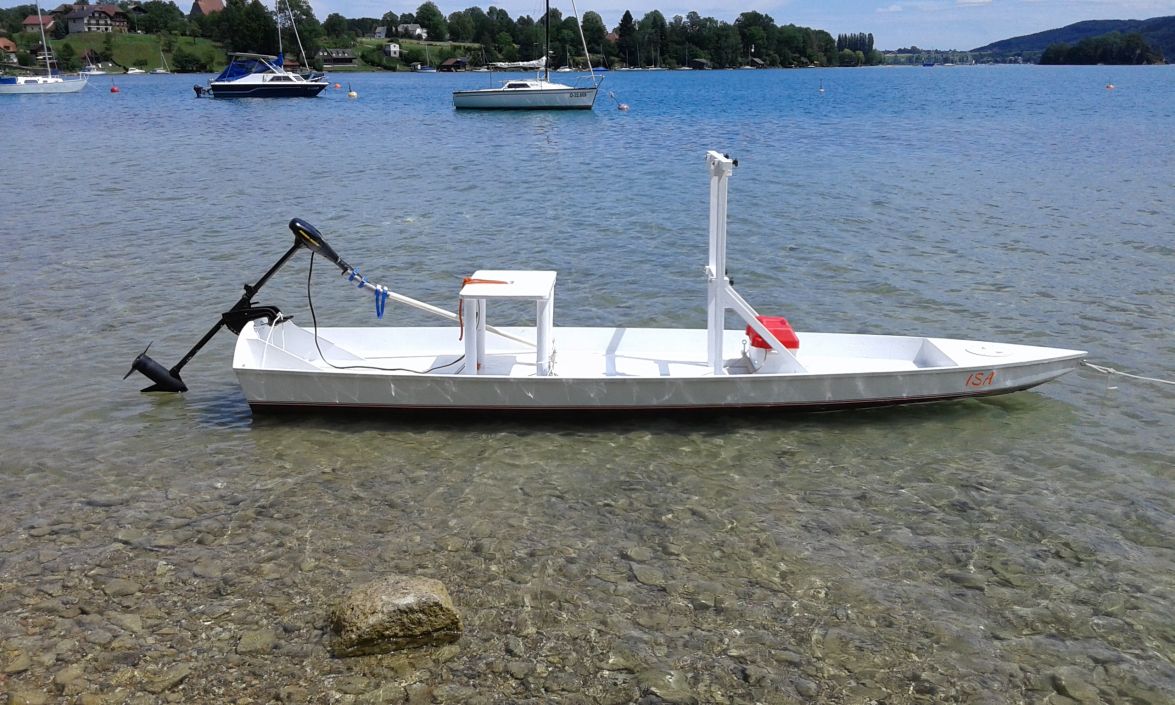
I have an electric outboard motor ( Minn Kota C30 ) which I have actually bought for my sail boat when there is no wind.( AD14, should have a common splashing with FS13 this July ) I will try this electric outboard on this FS13 as well with a steering extension to the middle of the boat, because if i would move too far towards the transom with my weight, the boat would shoot out of the water with the bow and I will be diving over the transom into the lake. It has a very long shaft 91 cm ( 35 " ) which is ideal to use it on the AD14 transom. As I am also toying with the idea to get the small Honda BF2.3 air cooled motor I would try that one as well on the FS13. I will definitely get a paddle set to try out stand up paddling as well as paddling sitting down on a kajak seat.
The building notes say one can make a round inspection hatch under the fore deck to use the space underneath as storage, or one can fill it with foam like underneath the complete sole. I think I will use it as storage and mount a round inspection hole. My son had the idea to put the battery for the electric motor into this bow area to have a good weight distribution.
First I have to get it finished then I will document all my different propulsion tries.
Greetings from Karl ( Austria )
Re: FS13 Isa
Posted: Sat Mar 26, 2016 1:22 pm
by jacquesmm
Very nice, clean job.
The center of gravity is just behind the grabrail. That means, one MUST use a long tiller or a tiller extension. That extension can be a simple PVC pipe. You can walk towards the stern to lift the motor but be careful, it is not very stable.
Re: FS13 Isa
Posted: Tue Mar 29, 2016 8:45 pm
by ks8
Re: FS13 Isa
Posted: Thu Apr 07, 2016 12:16 pm
by dgerm87
jacquesmm wrote:Very nice, clean job.
The center of gravity is just behind the grabrail. That means, one MUST use a long tiller or a tiller extension. That extension can be a simple PVC pipe. You can walk towards the stern to lift the motor but be careful, it is not very stable.
Is it stable enough for fly fishing
Re: FS13 Isa
Posted: Thu Apr 07, 2016 12:59 pm
by jacquesmm
Yes, some people fly fish from narrower boats but a lot depends on your weight and sense of balance.
There is a wider version name SK14:
http://bateau.com/studyplans/SK14_study.php?prod=SK14
Re: FS13 Isa
Posted: Thu Apr 07, 2016 1:24 pm
by gonandkarl
Hi Jaques,
Thank You so much for restoring my posts from your backup. Your new server is a real improvement as the response time is ten times better and the upload to the gallery is nearly instant.
Greetings from Karl
Re: FS13 Isa
Posted: Thu Apr 07, 2016 1:30 pm
by jacquesmm
Yes, it works great.
Sorry for the little problems: this is a very large forum with 50,000 pictures . . . and even more posts.
We tried to prune it: remove old posts but it has to be done manually. Some of the old post are worth keeping.
Re: FS13 Isa
Posted: Thu Apr 07, 2016 1:39 pm
by gonandkarl
Hi,
I will never be fishing from this boat, but hope to stay in it with a kayak seat or a stand up paddle. As soon I have got it in the water ( hopefully in July and the Attersee lake a nice 24 degree celsius ) I will post pictures of my movement in the boat. I am mainly building it for my grandchildren to fool around with it.
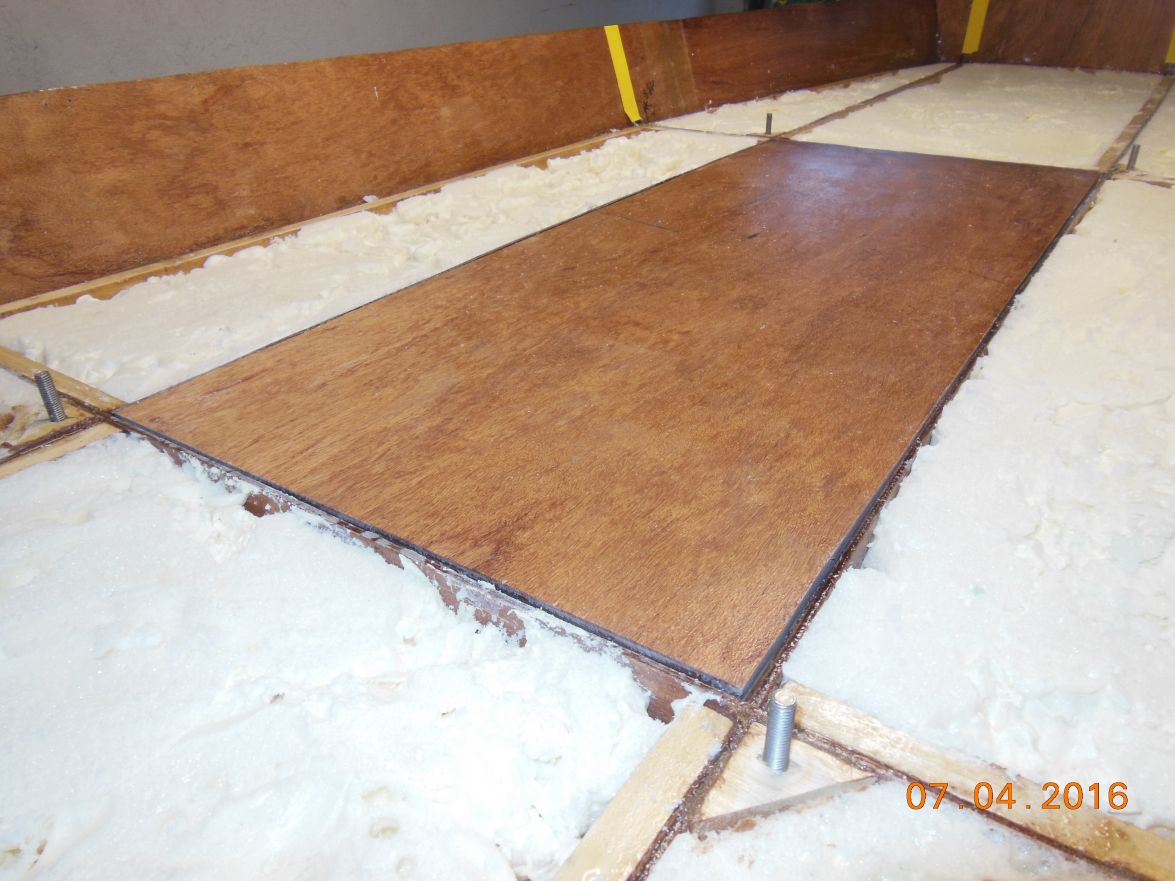
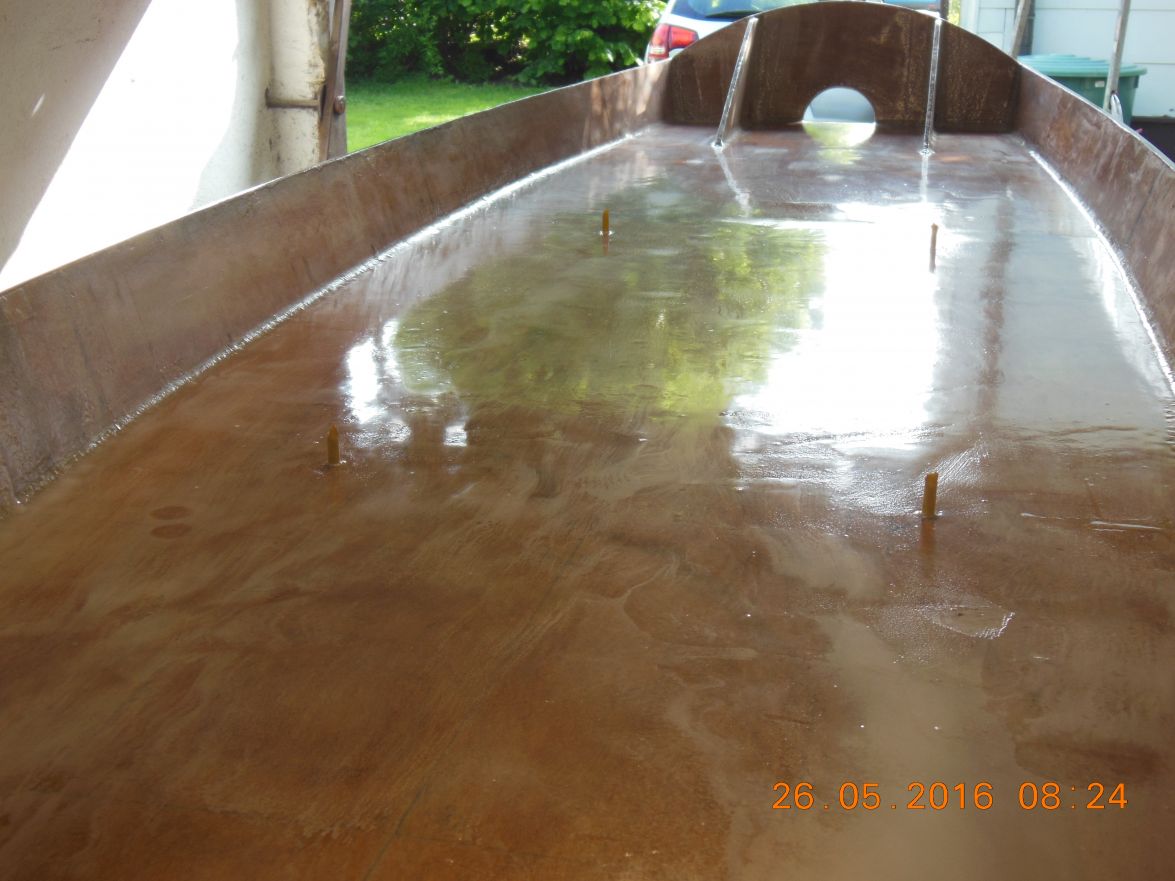
Right now I put the under sole foam between frames and stringers and tommorrow I will glue the doubler in its place:
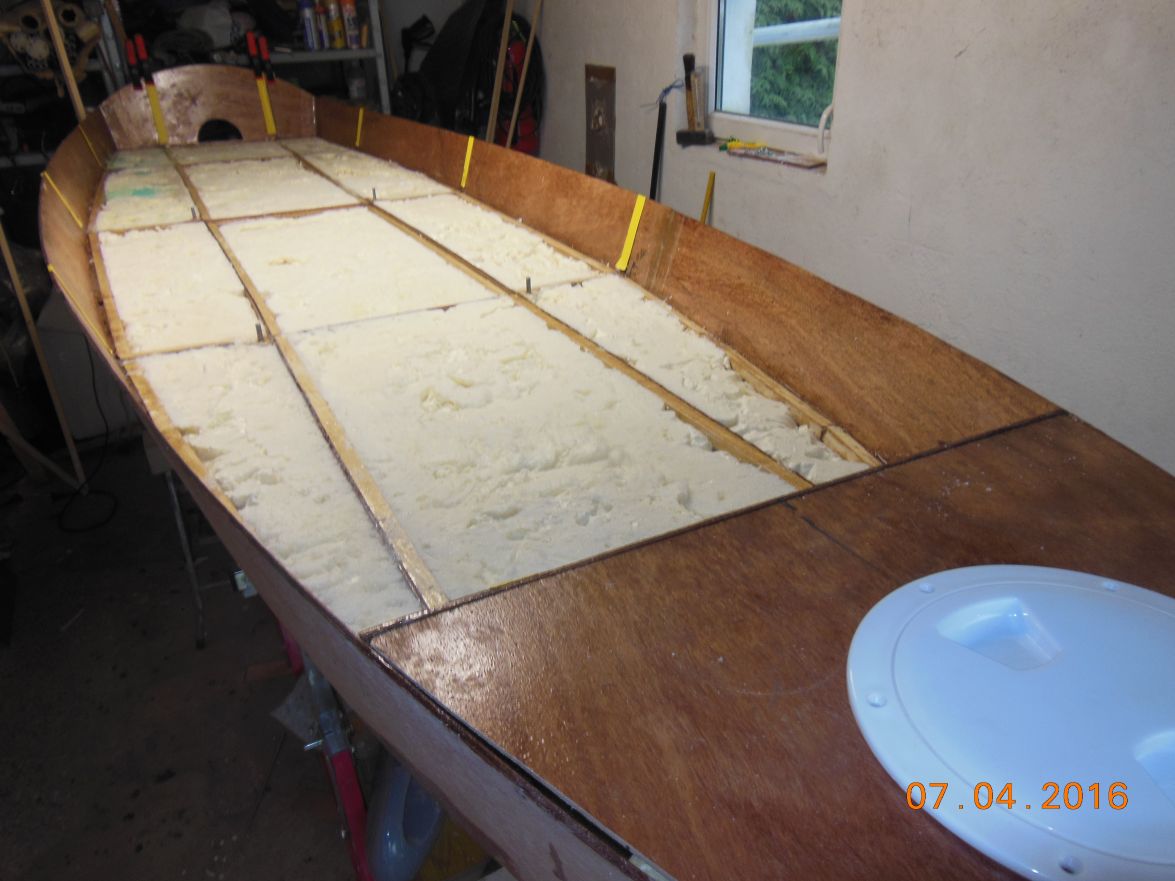
and then it should look like this:
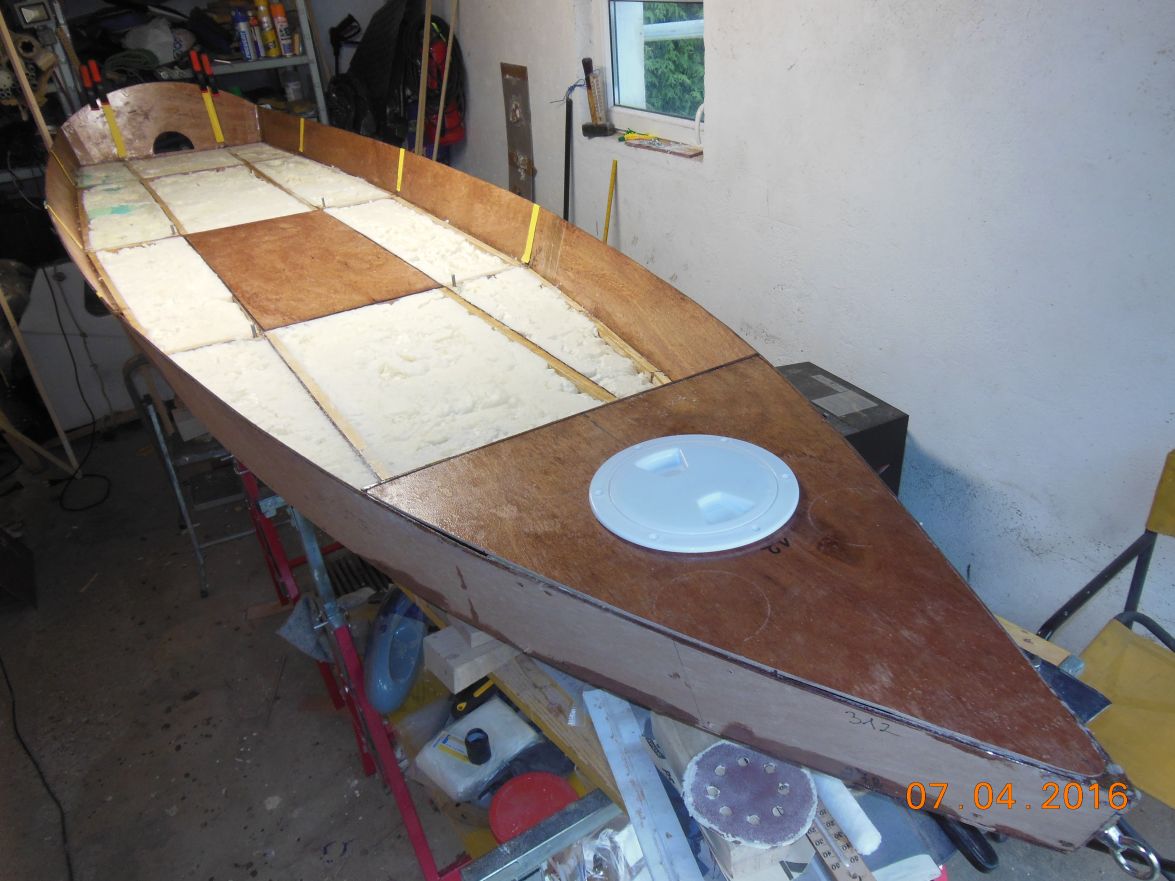
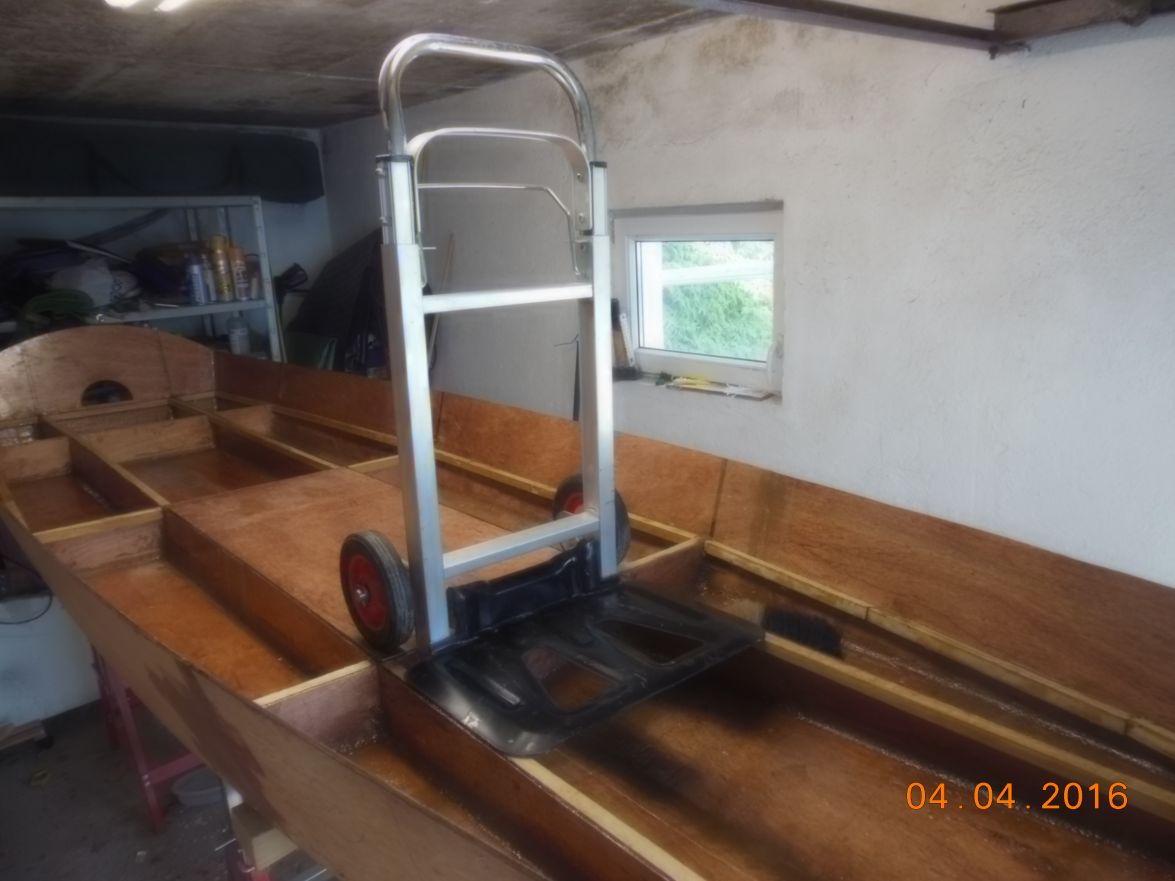
I have put 4 plywood cleats on the outside corners of the doubler and fixed stainless steel bolts from underneath going thru the sole and then I hope to attach things like the grabrail or a kayak seat or any other fixtures:
I will not put the grab rail into the boat straight away because I think the balance in it will help me decide where to put it.
This I will test with a sack barrow in to positions.
Forward of the doubler I can test it as a grab rail:
and at the rear end of the doubler I can test with sitting on it and leaning the back against it:
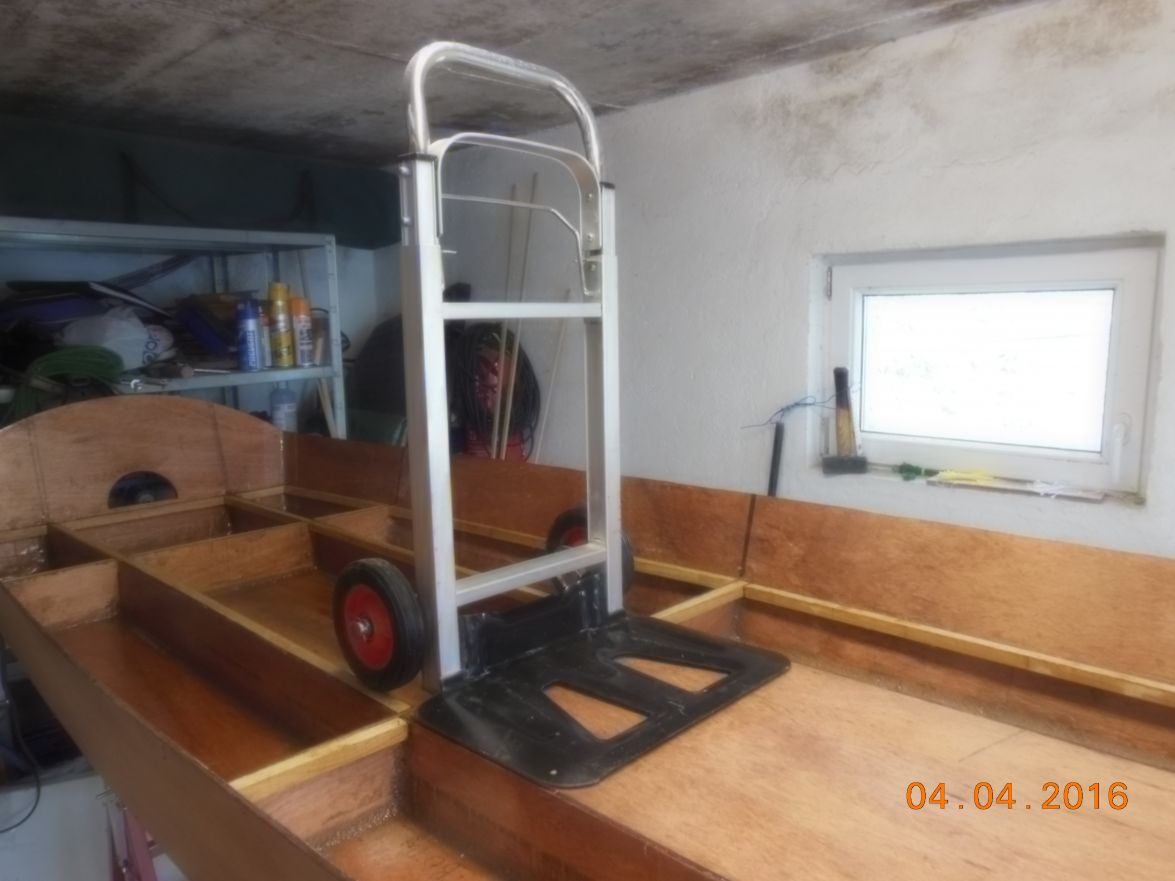
I got the idea using a sack barrow when I thought how I carry the boat the short distance to the water.
If it is temporarily attached to the transom it can act with its 2 wheels as a dolly and I only have to lift the bow and pull it.
That is the plan but already Shakespiere knew the best laid plans of men and mice may suddenly go astray.
Greetings from Karl ( Austria )
Re: FS13 Isa
Posted: Thu Apr 07, 2016 1:50 pm
by dgerm87
Thanks Jacques
very nice job Karl cant wait to see more pics
Re: FS13 Isa
Posted: Thu Apr 07, 2016 2:10 pm
by jacquesmm
Is that doubler flush with the cleats for the sole? The sole is supposed to be glued to the doubler and the cleats, all at the same level.
From the pictures, it looks like the doubler is above the cleats.
Look at drawing B315/5, especially the cross section.
Re: FS13 Isa
Posted: Thu Apr 07, 2016 5:42 pm
by gonandkarl
Hi Jacques,
Yes the doubler is flush with the surrounding frames and stringers and the sole will be glued flat on top of it. I think the picture is not taken all that well and I have got a small 2 mm gap between the doubler and the surrounding stringers. I have the cleats for the doubler 2cm lower than all the other cleats for the sole, so it will be fine.
Greetings from Karl
Re: FS13 Isa
Posted: Thu Apr 07, 2016 5:50 pm
by jacquesmm
Good, I am re-assured.
Re: FS13 Isa
Posted: Fri Apr 08, 2016 5:29 am
by stickystuff
Smart idea with the bolts. I like that.. I have a lot of experience doing similar things like that over the years in my trades. Good job. Boat looks awsome. Comes together really fast. How much time do you have in it now?
Re: FS13 Isa
Posted: Sat Apr 09, 2016 12:43 pm
by gonandkarl
Hi,
Another step towards the finish, yesterday I glued the smaller sole part into the boat and today the bigger bow part. I am getting more and more confident about the thickness I need for the glue but I am still at a loss when it comes to judge how much of it I have to prepare. Yesterday I wet the sole where it touches the cleats and the cleats with 78 gram of mixed epoxy and prepared 3 lots of 200 gram resin and 110 gram hardener in 6 plastic cups and then I needed only one lot of epoxy ( 310 grams ) for glueing the sole. Today I just made it with 930 grams of mixed epoxy for glueing the sole.
The question how much time I spent building this boat so far I cannot answer, because I kept no record of it and I get side tracked by all my family members for this or the other drive to pick them up or drop them somewhere and I spend a lot of test drives with my grandson who needs to practice 3000 km before he can make the practical driving test for his drivers licence in October. He wants to have it exactly on his 17th birthday. Just to get it with 17 one has to do the 3000 km, if he could have waited for his 18th birthday you need just 15 one hour lessons with the driving instructor of a driving school. But I think this Austrian system of L(earner)17 is good because a lot of mileage gets one fit for the normal traffic madness.

Greetings from Karl
Re: FS13 Isa
Posted: Tue Apr 12, 2016 11:18 pm
by JaredH
Looking good! Its nice to see all of the steps I have ahead of me documented like this.
Thanks,
Jared
Re: FS13 Isa
Posted: Wed Apr 13, 2016 6:11 am
by gonandkarl
Hallo Jared,
Yes I want to document the build also for myself to check on any earlier stage, because one thinks such a lot about the present things to do and forgets what one has done 3 days ago.
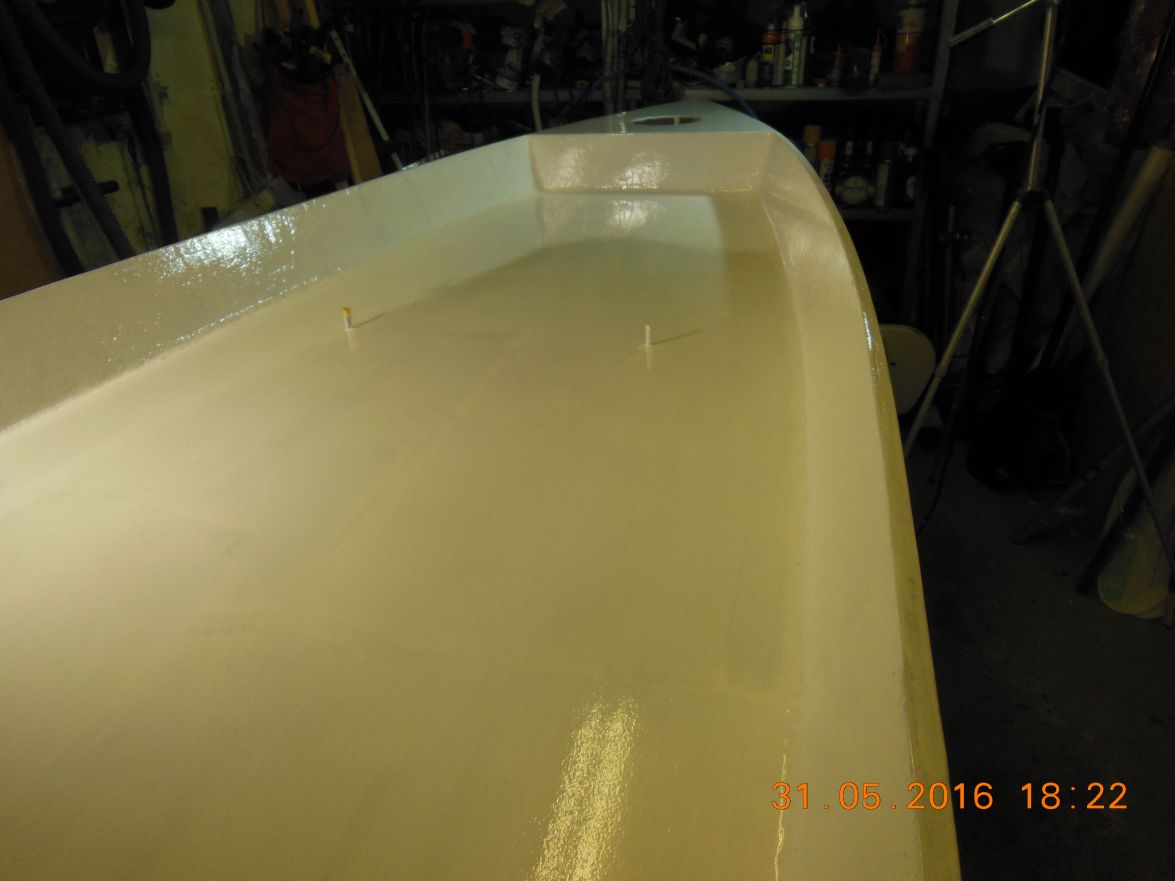
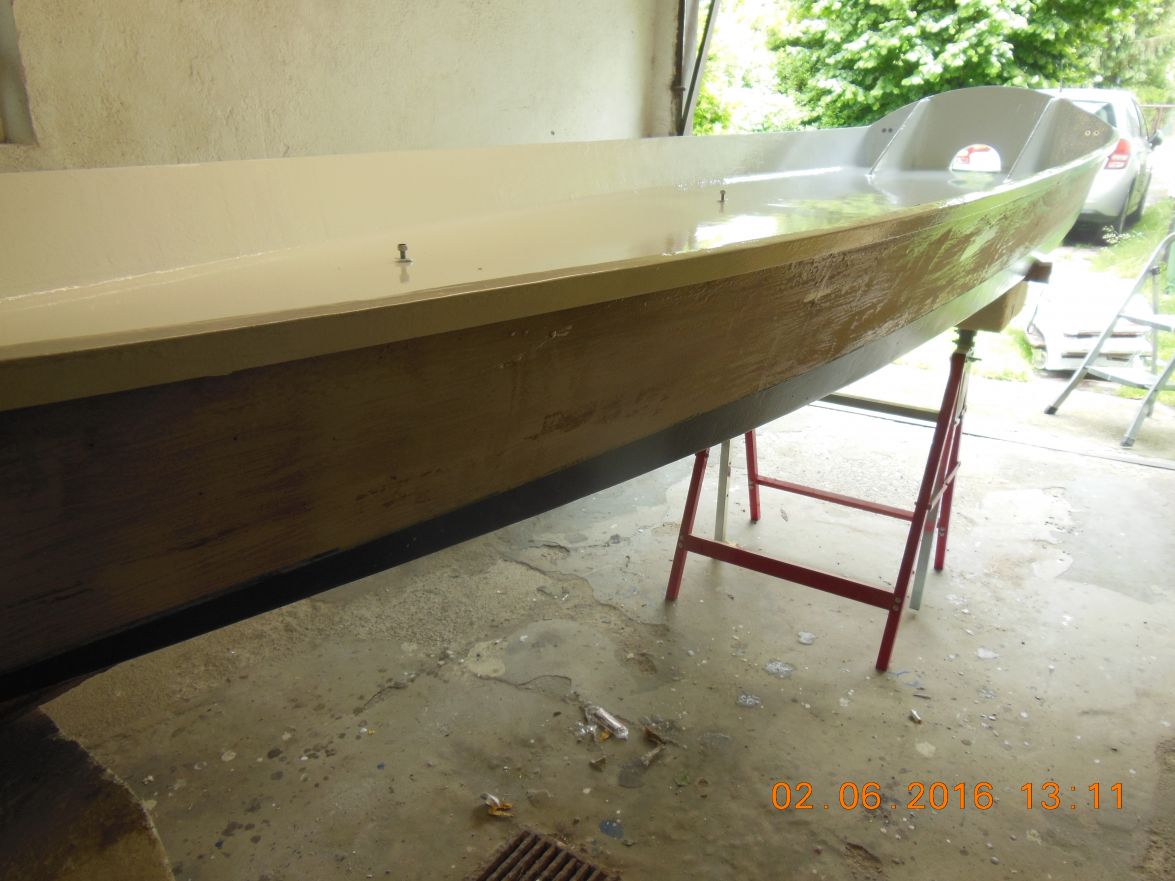
After a cold spell here I did not work on the boat yesterday except spotwelded the transom knees and with the access glue I stuck 2 one cm thick plywood pieces on the inside of my AD14 for good backing for the bow eye.
One more coat of paint for the bow locker before the deck gets glued on:
The whole beauty half finished:
Transom knees spot welded fillets and glass tape on each side still to be done
Greetings from Karl ( Austria )
Re: FS13 Isa
Posted: Fri Apr 15, 2016 3:59 am
by glossieblack
Very nice work Karl. Given your earlier posts about peel ply, how much are you using it in this build?
Re: FS13 Isa
Posted: Fri Apr 15, 2016 4:57 am
by gonandkarl
Hallo glossieblack,
On this build I will use peel ply very soon when I fibreglass the outside which is the only glassing to do. This will be the practice run for the outside glassing of the AD14. I am building this FS13 also to practice the application of epoxy with graphite at the bottom.There is tape inside at the keel and around the transom and up the bow. As these tapes are hidden under the sole and in the forward compartment I did not use peel ply over them. The only visible tapes inside are transom to the sides and the splices of the sides. With fairing I am sure I can get even these disappear.
Spring is bringing already good temperatures, so I can get stuck into epoxy work without any heaters.
Greetings from Karl
Re: FS13 Isa
Posted: Fri Apr 15, 2016 12:18 pm
by JaredH
Looking good, I think you will have me beat on splash time. I like the integration of the mounting bolts. What are you planning on mounting with them? The dimensions almost look like corner chocks for a cooler.
Re: FS13 Isa
Posted: Fri Apr 15, 2016 1:37 pm
by gonandkarl
Hi Jared,
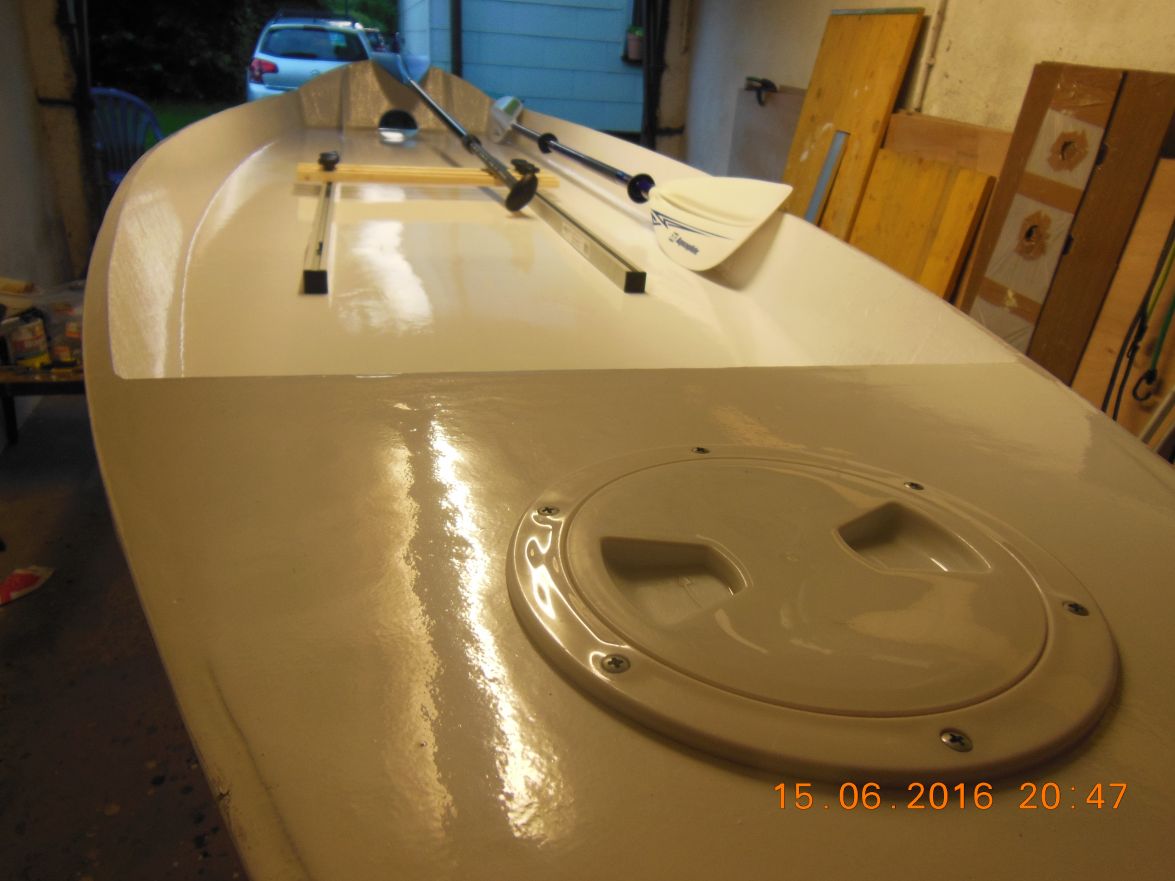
I want to screw 2 parallel rails on the 4 screws PS and SB and then try to attach the grab rail to these rails and hopefully be able to push it forward and back until I got the right position for the grabrail. In addition to that I would like to attach a kayak seat on top of a battery box for the occasional ride with my electric outboard motor.
And I wont beat you to splashing the FS13 because I am also busy with my AD14 which needs to be flipped to get the bottom finished. ( Cutting centreboard shoe hole, mounting the shoe, fibre glassing, epoxy graphiting and painting the hull. ) I want to splash both boats at the same time this summer and combine it with my 70th birthday party.
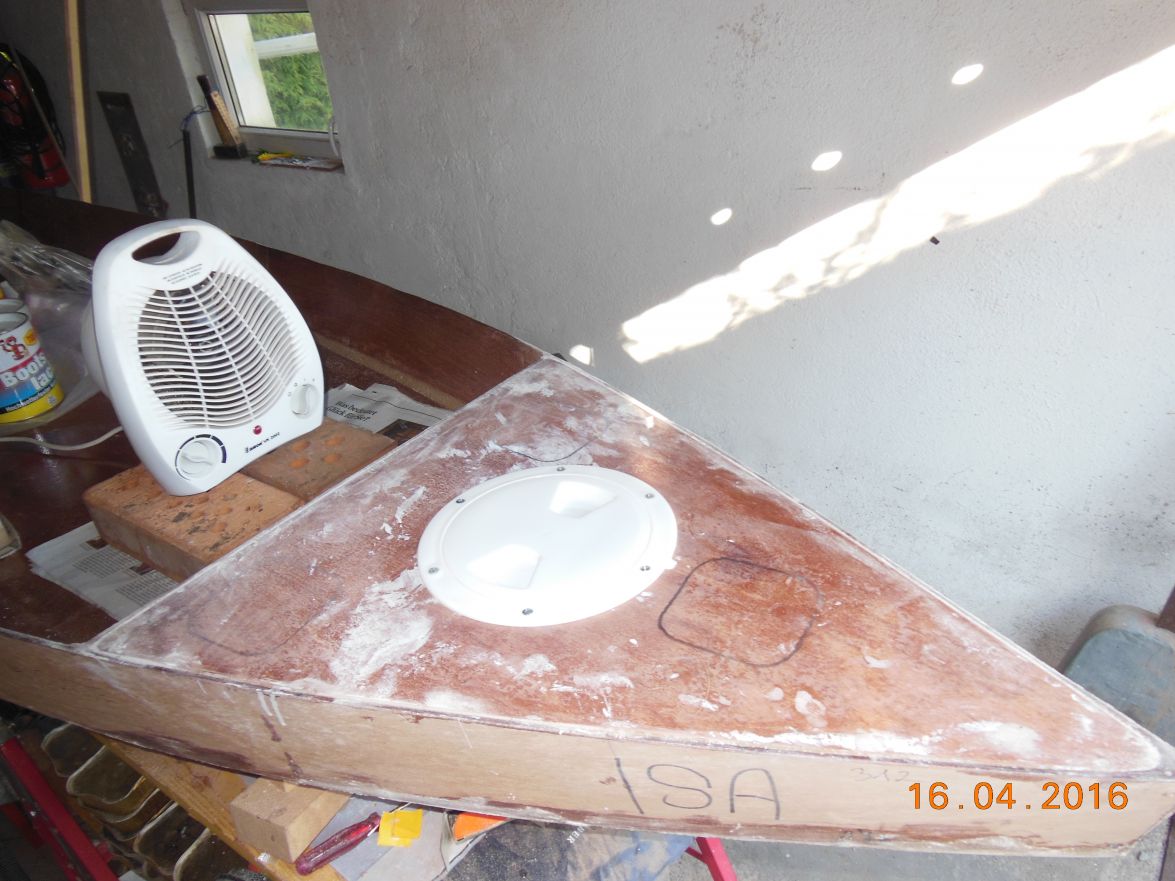
And at the rate I am going right now it seems still a long way to go. The main reason being very slow in all my building steps is most probably my clumsiness and arthritis in the fingers worsens it.
Today for instance I took the whole afternoon to prepare the FS13 deck to fit nicely in the bow triangle and mounted the inspection hole with screws and washers and nuts already as if the deck is mounted just to see if I can remove it thru the hole again when I will paint the deck. That was tricky enough because I had to get my left hand thru the hole to hold the washer and with my right hand as well to screw the nut onto the screw which was pushed thru the top. Each one of the 6 washers and nuts I dropped for sure more than twice into the locker . But that is the fun of boat building for sure.
Greetings from Karl
Re: FS13 Isa
Posted: Sat Apr 16, 2016 3:04 am
by gonandkarl
Hallo,
The deck is glued on at the bow and with the watertight compartment under the inspection lid there is quite some space to carry sandwiches and beer cans if one should get hungry and thirsty from pole pushing the boat.
I hope all of you boat builders are having industrious fun with your boats this weekend.
Greetings from Karl
Re: FS13 Isa
Posted: Tue Apr 19, 2016 2:29 pm
by gonandkarl
Hi,
After my grandson helped me flip the boat within 2 minutes I could put glue on the outside seams where it was necessary and then I epoxied the whole outside. The weather does not permit wet on wet or I would have to run the gas heater permanently, so I decided to let the epoxy of the outside go hard and that will take a day or 2.
In the meantime I played arround with the following:
I dont know of all you great boatbuilders how often you have to reverse onto a slip with the boat trailer behind the car. Most probably if you do it often you are aiming down any slip perfectly.
I am not so lucky. I only bought the boat trailer last year and took my rowing boat maybe 6 or 7 times to row at the local river.I battled each time to reverse the trailer down the slip into the water. I think it took me longer to get the boat into the water than what I was rowing it afterwards. So I stumbled across an advert in the Practical Boat Owner :
Launching made easy and when I visited their homepage
http://www.watling-towbars.co.uk and saw their video I was longing to buy such a front towbar. Then the drawback 200 pounds and the delivery to Austria would definitely be unaffordable for me.
As they mentioned that the mounting is done on the chassis where there is normally a provision for towing the car, I had the idea to mount the towing eye according to the cars manual and see if I cant get a tow ball attached to it. It is not in the middle of the front bumper but half way to the right side. I thought this would be a problem because my whole width of my small car and trailer was a calculated 2,3 metres. But this turned out to be a blessing when you drive the car you see nicely past the trailer and what move it makes.
It only cost 16 Euros and it looks like this:
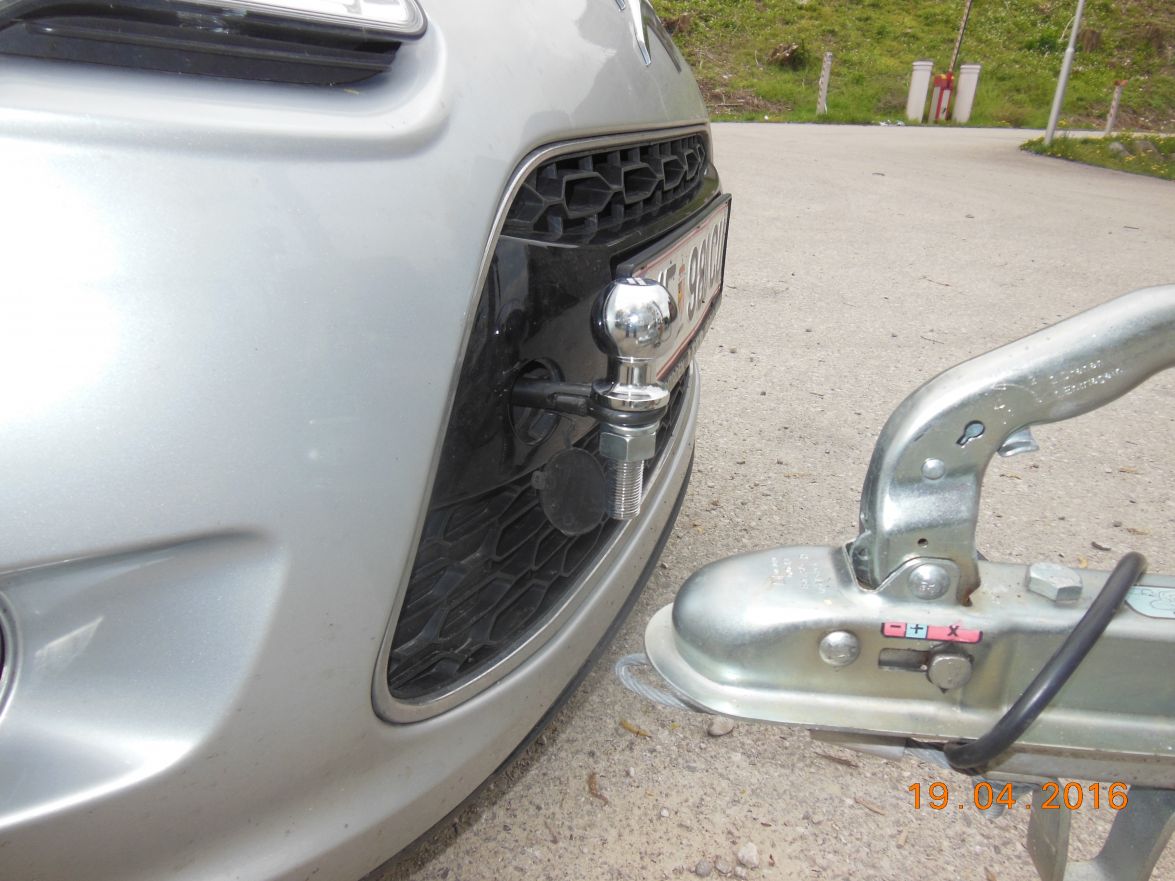
I naturally tested it this afternoon at this slip and it took no time to push the trailer into the water:
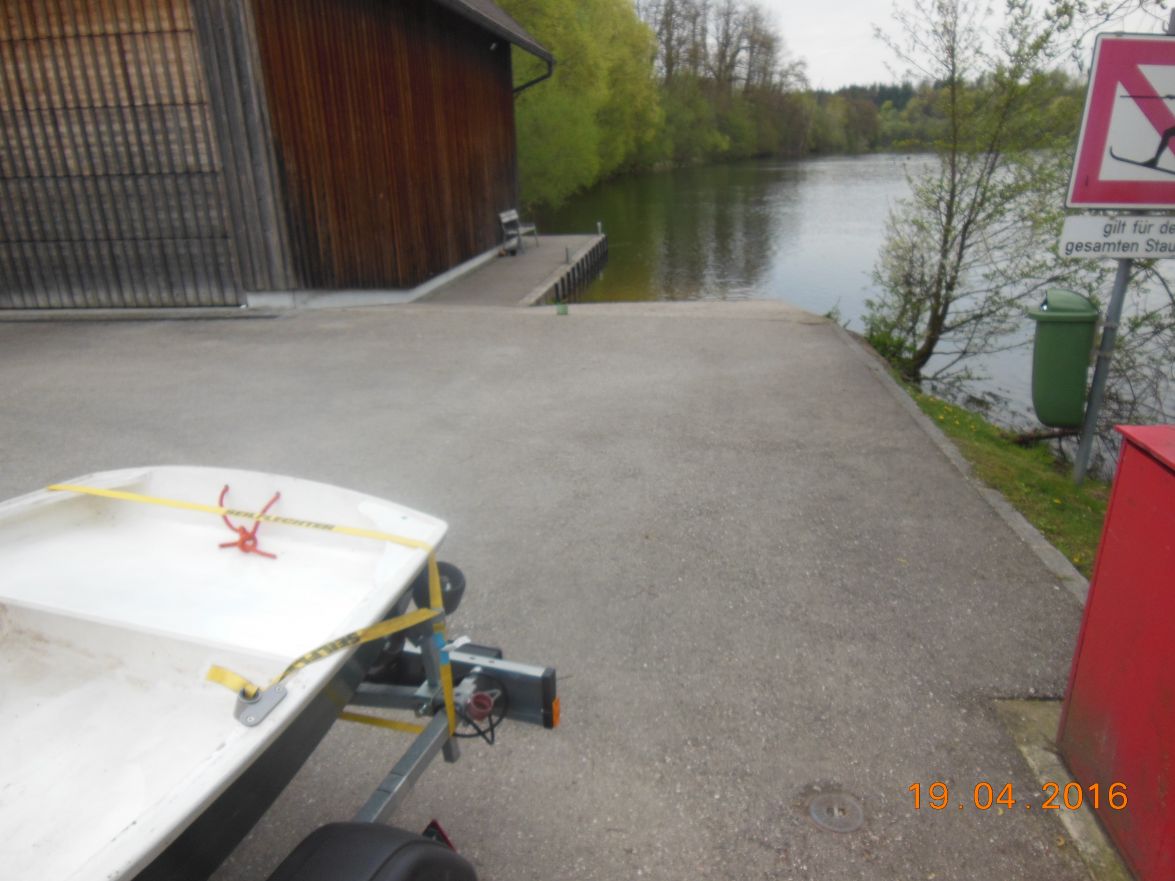
Afterwards I pushed it from the street in a 90 degree angle into my narrow drive way and parked the trailer right next to my garage which is 2 metres offset to the driveway avoiding my wifes favorite Magnolia bush as well as a cherry tree.
I think this is the cheapest idea I had for my boating activities but I know now already I will never ever battle to launch my boat again.
Greetings from Karl ( Austria )
Re: FS13 Isa
Posted: Thu Apr 21, 2016 10:05 am
by gonandkarl
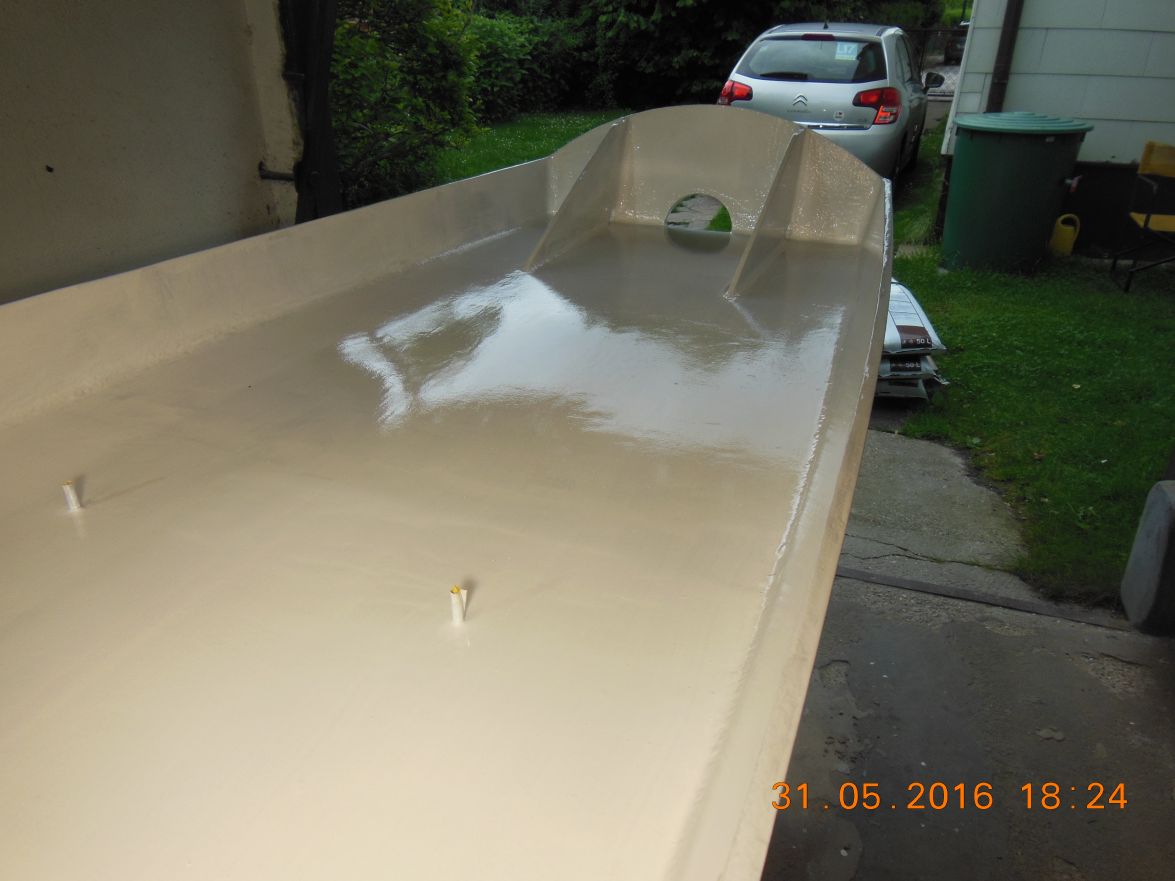
Hi,
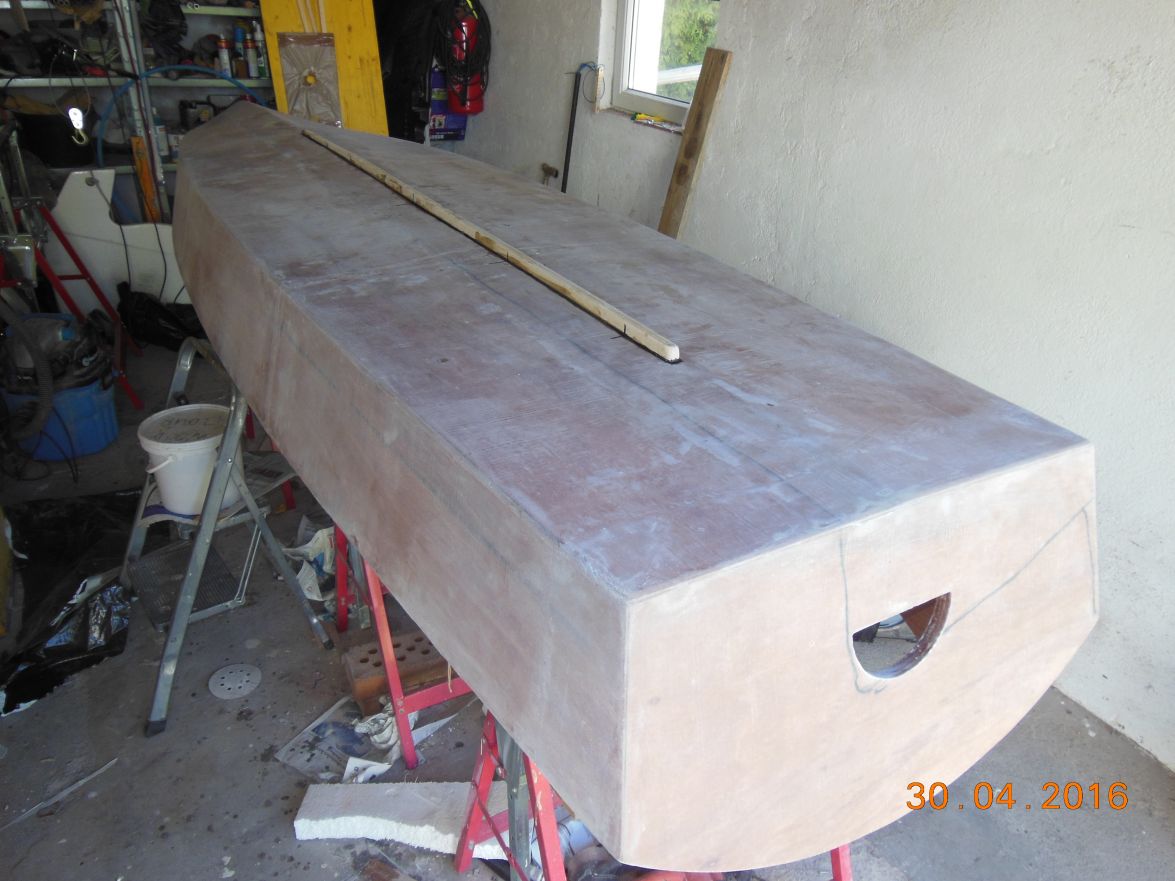
Hull flipped and all corners rounded I think it is ready for the glassfibre.
Greetings from Karl ( Austria )
Re: FS13 Isa
Posted: Thu Apr 21, 2016 6:15 pm
by glossieblack
Very nice Karl. Looking forward to your application of peel ply

Re: FS13 Isa
Posted: Fri Apr 22, 2016 9:37 am
by gonandkarl
Hi,
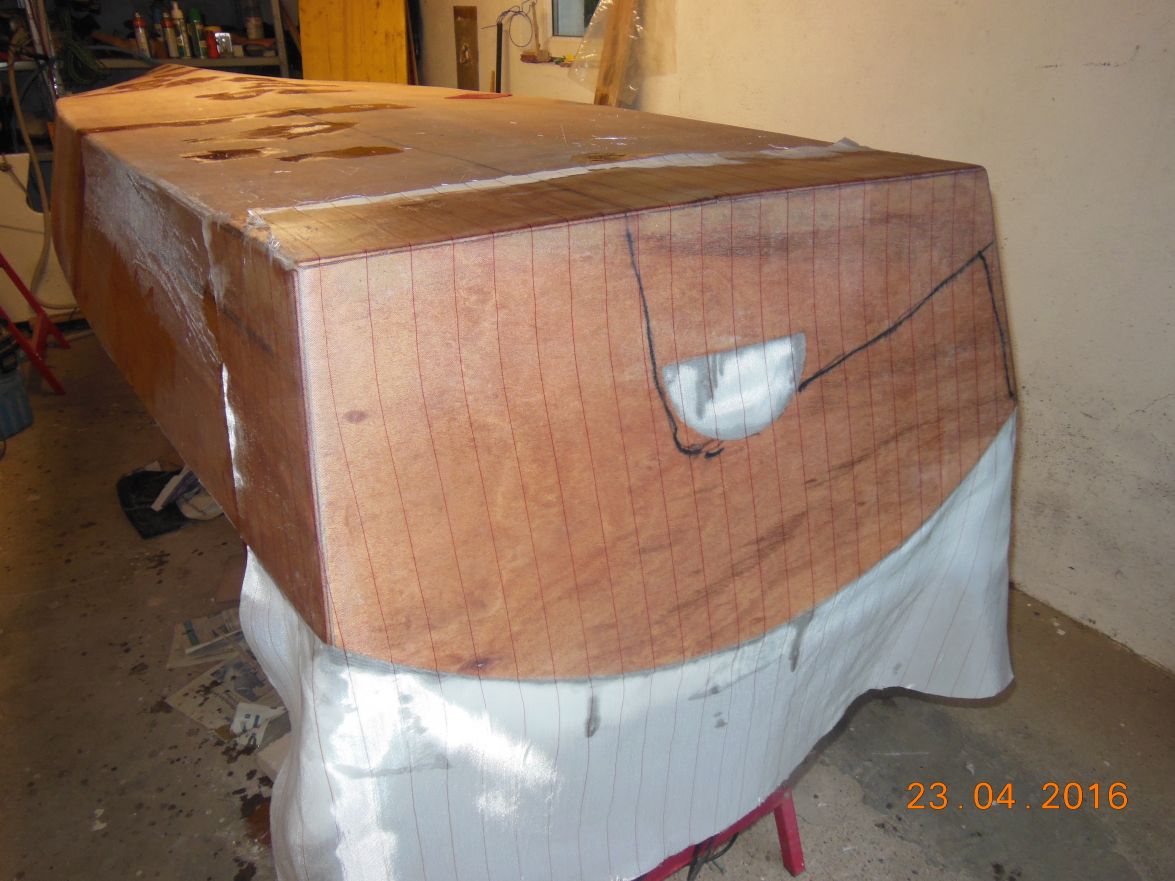
Today was the big day for applying the fibreglass to the hull. I had the help of my wife to stir prepared cups of resin and hardener.
I weighed the fibreglass and it came to 1500 grams. I think I read in some post that one should use the same weight of mixed epoxy.
So I prepared 5 lots of 310 gram epoxy which my wife kept stirring one after the other. I put it on the hull starting at the transom and after I had finished rolling the epoxy on approximately 1,5 metres I put a one meter wide peel ply on and smoothed it with a plastic spatula. It took all in all 40 minutes from transom to bow and unfortunately I had to weigh out some more epoxy. I made 155 gram just to find out that half the amount would have been perfect. I used the leftovers on a seat of my AD14. So I used for 1500 grams of fibreglass a total of 1600 grams mixed epoxy. I think it is ok because the hull was only covered with epoxy a few days ago which was completely hard but then only I finished the seams with putty and sanded the hull and the edges round showing again the bare plywood. So it got a good dunking of epoxy for sure and hopefully it will turn out as nice as Glossieblacks hull from where I copied the idea to put the 1 metre wide peel ply across the hull as I went forward. I think it was a good practice run for the outside fibreglass session on my AD14. Lesson learned it is not a good idea to have different size fibreglass cloth as specified in the BOM, because mine was only 100 cm wide, so I could use only on the PS a long piece over the hull while on SB I had to use 3 1/2 one metre bits naturally overlapping but therefore not as smooth as on PS.
Here is a picture of my todays work with the help of my wife:
Greetings from Karl
Re: FS13 Isa
Posted: Fri Apr 22, 2016 9:42 am
by jacquesmm
That is a very good resin ratio for an hand layup, very close to 50%. Congratulations.
Re: FS13 Isa
Posted: Sat Apr 23, 2016 5:34 pm
by gonandkarl
Hi,
I had a bit of a surprise when I pulled off the peel ply of the hull this morning. There were 3 cm diameter blisters visible which must have developed long after I was finished with the peel ply on the hull because there I had no air whatsoever under the peel ply.. It is not really a big thing I sanded them away and patched them with pieces of fibreglass when I did glass the transom today.
Here are the pictures:

Greetings from Karl
Re: FS13 Isa
Posted: Mon Apr 25, 2016 5:24 am
by glossieblack
Nice work Karl. On balance, did you find using peel ply an advantage?
Re: FS13 Isa
Posted: Mon Apr 25, 2016 5:43 am
by gonandkarl
Hi Glossieblack,
Definitely is peel ply the answer for me to get a smooth surface. I hate sanding and when I sand I sand too much until I have to put new goo on. I admire you that you leave the peel ply on the inside of your boat so long on. I am too nosy to see how it turned out thats why I pulled it off the very next morning even before breakfast. I will now fair the FS13 with an epoxy silica and micro balloon mixture as I can not get Quickfair here or even if I could get it, it would be too expensive. I will first glue the 2 m long skeg onto the keel and as it should be 20 x 20 mm I will round the edges a bit and let it become 10 mm high towards the bow. That is how it looks for me on the study plan pictures.
Greetings from Karl
Re: FS13 Isa
Posted: Mon Apr 25, 2016 6:48 am
by glossieblack
Karl, like you, I like the smooth finish peel ply produces, requiring less filling and fairing. When I removed it from the interior, like you, I found that in some areas, remedial work was required. I've yet to remove the peel ply from the exterior of the hull. That will happen when I flip it once again for fairing and painting, but expect a similar result. Cheers, Michael.
Re: FS13 Isa
Posted: Wed Apr 27, 2016 11:24 am
by gonandkarl
Hi,
On a rainy day with even snow coming down I did not feel like boat building, so I just took a picture of yesterdays work which was also not all that much. I sanded the hull with 120 grit sandpaper and prepared the skeg for gluing to the keel. I put my lead weights on the keel as a test because that is how I want to weigh the skeg down when there is the glue underneath.
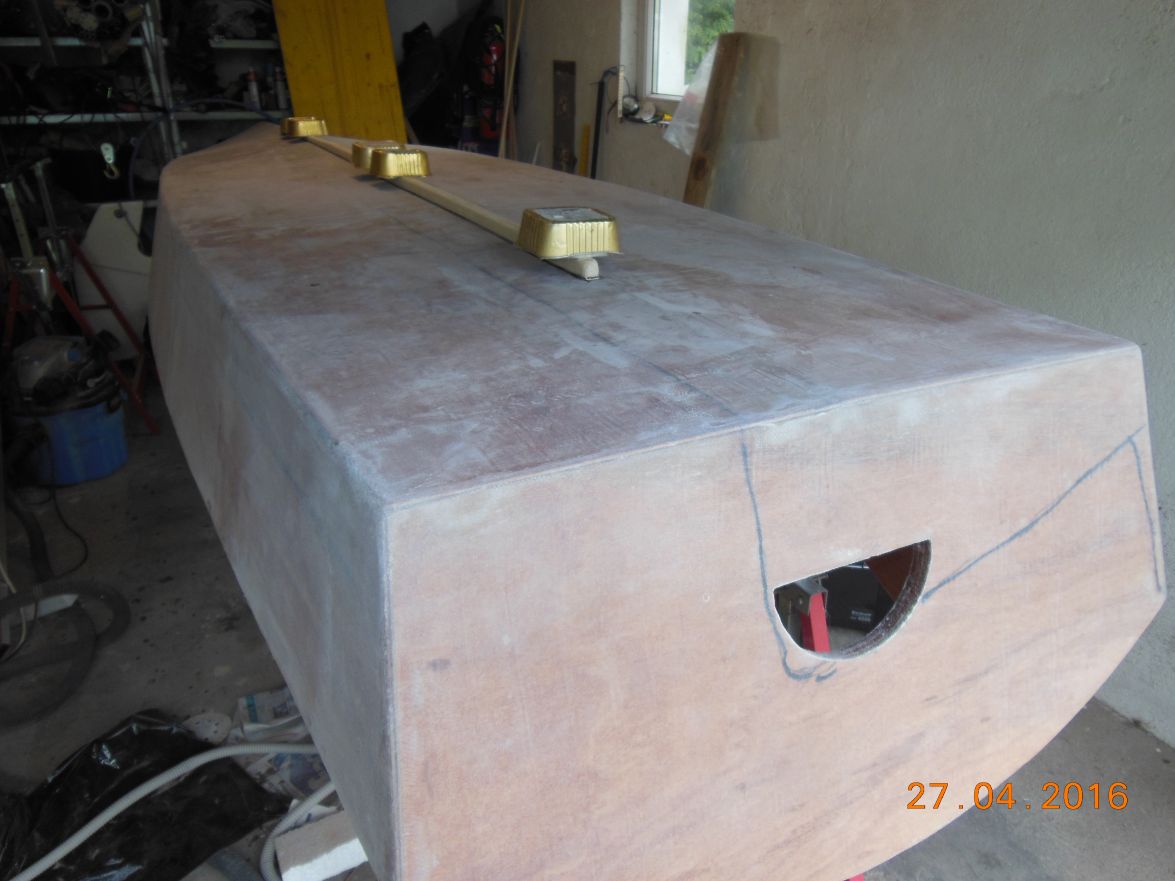
Afterwards I will fair the hull with epoxy, silica and micro balloons and than 180 grit sanding.
Or is this overkill because below the waterline I then want to apply 3 coats of graphite/epoxy according to Larrys instructions ?
Or should I just fair ( + 180 sanding ) the part of the hull where there will be no epoxy graphite mixture ?
Greetings from Karl
Re: FS13 Isa
Posted: Thu Apr 28, 2016 1:51 am
by gonandkarl
Re: FS13 Isa
Posted: Thu Apr 28, 2016 3:20 am
by stickystuff
Listen to Larry He is a master builder. I know him personally.
Re: FS13 Isa
Posted: Thu Apr 28, 2016 10:28 am
by jacquesmm
It's overkill to go further than 120 IF you coat the bottom with epoxy graphite.
Re: FS13 Isa
Posted: Sun May 01, 2016 8:55 am
by gonandkarl
Hi,
So I have the skeg glued to the hull. All that is left is the fillet on each side of it. I did not want to do it at the same time as I glued it down being scared I move it away from its straight line on the keel and the lead weights on top of it would have been in the way also.
Oh and the rubrails I also still have to mount. But I think I first fair the hull paint it on the outside ( bottom graphite/epoxy ) except for the part where the rubrails get glued on. I will put a plastic tape along the sheer line the size of the rubrails.
Here is the picture:
Greetings from Karl
Re: FS13 Isa
Posted: Mon May 02, 2016 5:06 am
by glossieblack
Nice approach Karl
Re: FS13 Isa
Posted: Wed May 11, 2016 9:17 am
by gonandkarl
Hi,
Today I dared to put the first coat of epoxy graphite on Isa even that I was not completely happy with my sanding result of the fairing.
The first question was how much I have to mix. I have read somewhere 9 ounces and a third in volume graphite or 20 % in weight. I am working metric and went this way:
I first sifted with a tea siff 60 grams of graphite which was not really necessary as the graphite I bought from Algin Chemie is very fine and it says d50: 15-20 ym whatever fine grading that is. Then I wanted to mix 233 grams of epoxy ( 150 resin and 83 hardener ). I always do it on a small scale and pour the resin first watching the scale and because I was all of a sudden on 160 grams I decided I will mix 200 resin and 133 hardener. This was way too much mixture which I found out after the bottom of the boat was finished and I had lots left. And now that I checked on my mixing table I found out that because of a bit of nervousness while pouring out hardener I should not have used 133 grams hardener but 110. That means I made my first mixing plunder that I know of. Maybe I have also mixed too much hardener in the past because I run out of hardener always earlier than I should.
Hopefully It will get hard and I just wasted hardener by using 15 % more than necessary.
As Larrys rule says one should put 3 thin coats wet on wet of the stuff on the boat I will check in 6 hours if I can put on the second coat. I understand wet on wet should be within 6 - 10 hours.
Here is the result of my first epoxy graphite coat:
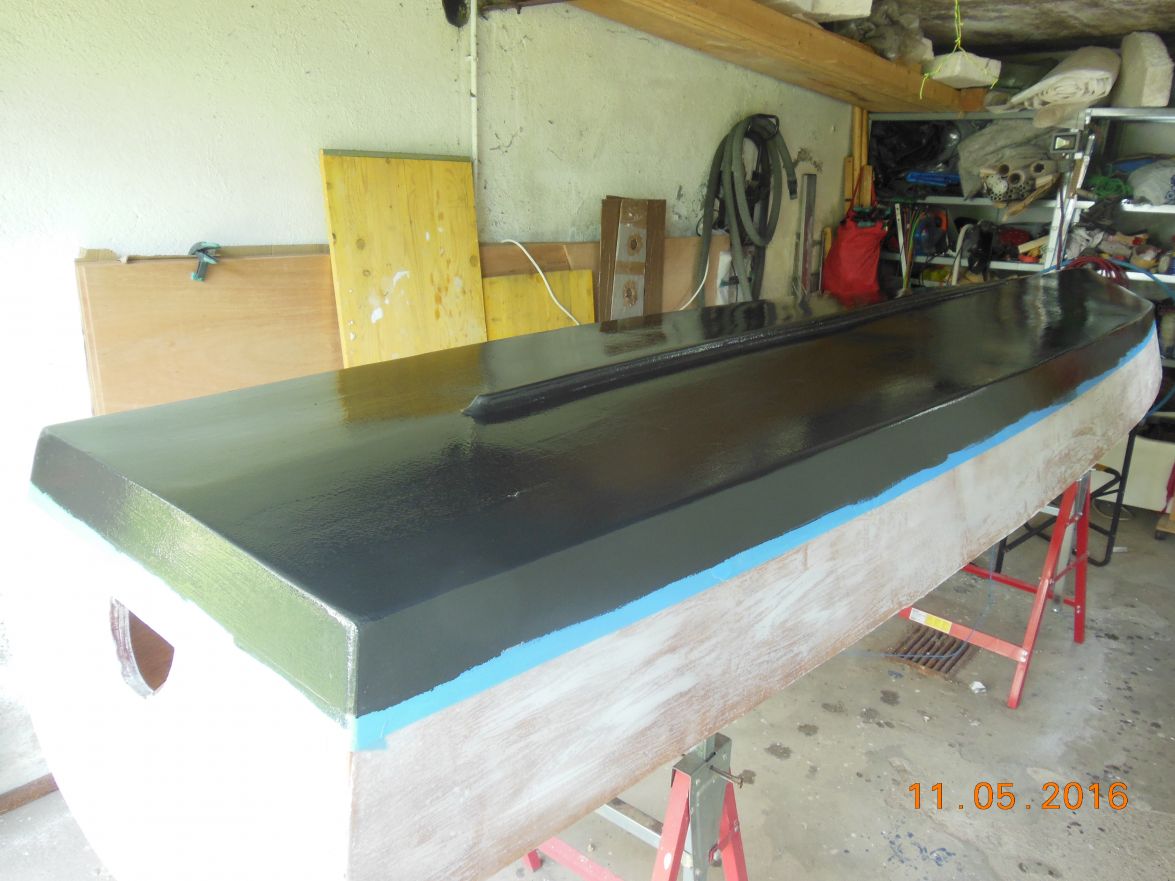
Greetings from Karl ( Austria )
Re: FS13 Isa
Posted: Wed May 11, 2016 9:19 am
by jacquesmm
The database server was down for a few minutes, it's working again now.
Re: FS13 Isa
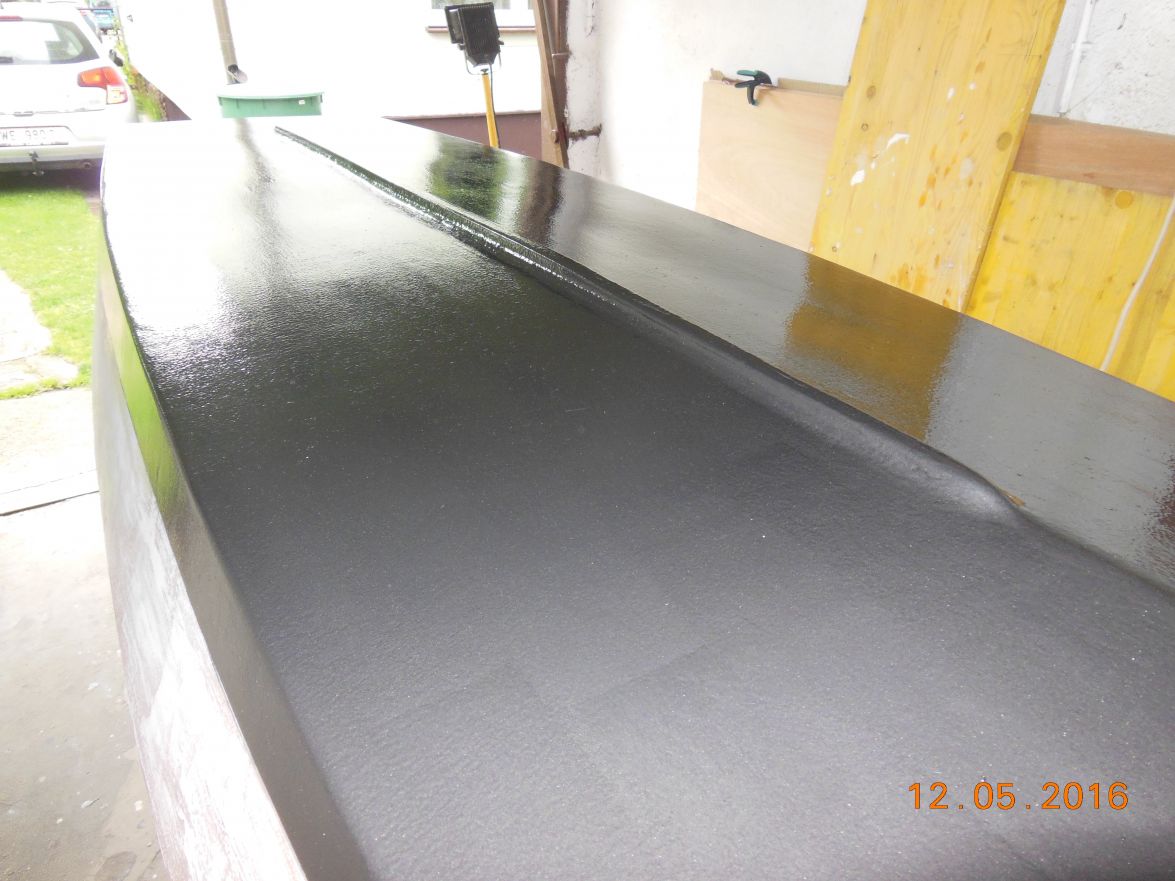
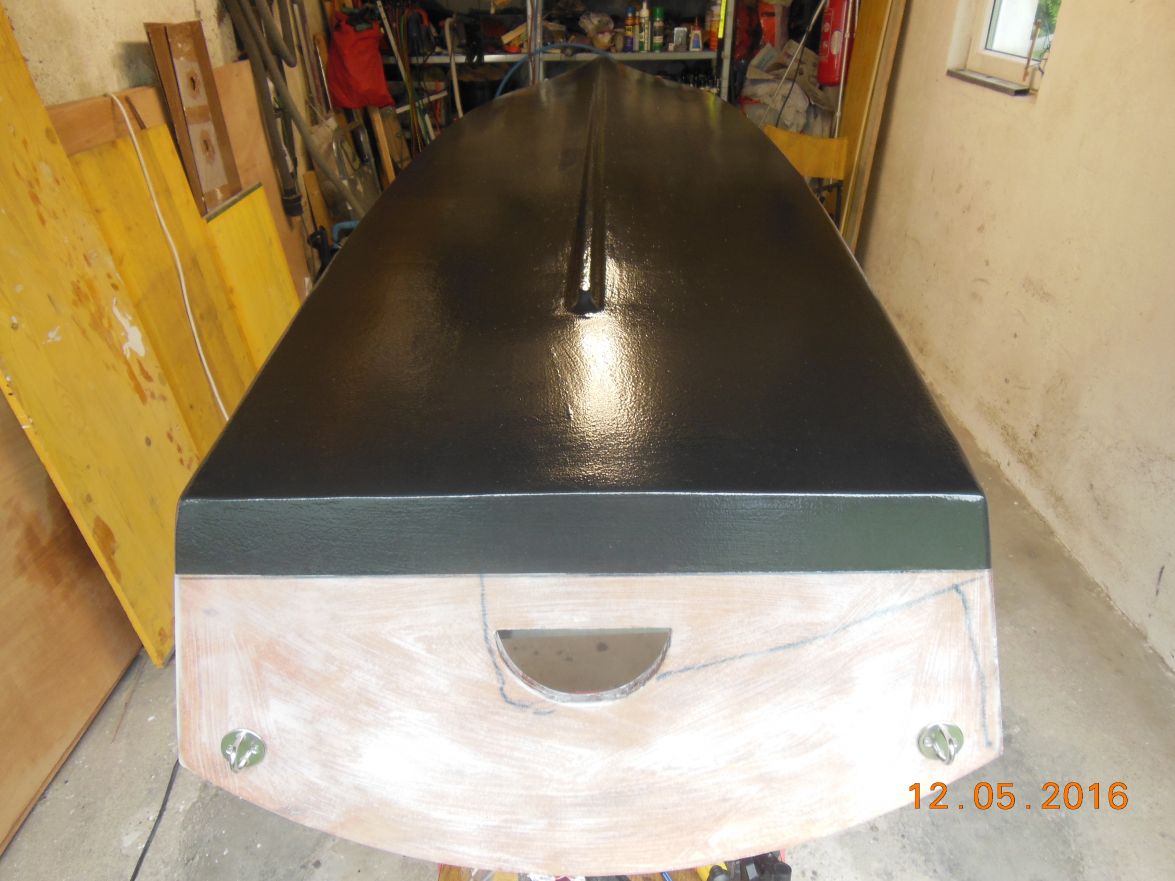
Posted: Thu May 12, 2016 12:13 pm
by gonandkarl
Hi,
In the last 24 hours I put the 3 coats of graphite epoxy below the waterline and could remove the ( very expensive ) masking tapes easyly. I had 2 layers of tape on top of each other and I really got a clearcut line. Luckyly Larrys instructions for the graphite epoxy application are perfect even for one like me with clumsy hands. I got at least a quality to the surface which is acceptable for me whose eyesight is not anymore 20 / 20
I mounted the bow and 2 transom eyes temporarily that I can turn the boat this time all by myself.
Here is the result:

Greetings from Karl
Re: FS13 Isa
Posted: Thu May 12, 2016 1:49 pm
by Cracker Larry
Looks great
Re: FS13 Isa
Posted: Fri May 13, 2016 1:59 am
by glossieblack
Very nice.
Re: FS13 Isa
Posted: Fri May 13, 2016 1:45 pm
by terrulian
Karl, good work.
I learned that for myself, getting a really top-notch looking bottom of epoxy and graphite was not going to happen. But it looks good enough and I'm very glad I did it. I would have scraped right through paint on the rocks.
Re: FS13 Isa
Posted: Thu May 19, 2016 3:27 pm
by gonandkarl
Hi,
Whenever I have an epoxy job ahead no matter how small I am still always a bit nervous. I dont know why that is so, because it is poisonous, expensive stuff or I am not sure if I have prepared everything possible or what if I will be mixing the wrong quantity and have I been to the loo and scratched my nose because it will not be possible for the next half an hour.
Anyway today I planned to glue the rubrails to my FS13 and screwed the front parts in with 4 screws, 3 near the bow because there is no way to clamp it because of the already mounted deck and 1 near the end of the 2.4 metre where I scarfed the shorter piece towards the transom with just a 45 degree scarf. Only had to glue the prepared scarfed pieces to the front ones and clamp them.
I wanted to mix 78 grams of epoxy to first wet all surfaces to be glued and then another 78 to mix with wood flour but just when I was pouring the resin I have gone over the weight it should have on the scale, so I decided to mix 155 grams and it worked out perfect with one little spoon of glue left when I was finished with all 4 rubrail pieces.
And the I took this picture thru the hole in the transom to document even such a small job like the clamped rubrails and with my wifes words mounted rubrails are boring for me they at least look good from this different view angle.
Greetings from Karl
Re: FS13 Isa
Posted: Thu May 19, 2016 3:48 pm
by jacquesmm
Fancy picture
Re: FS13 Isa
Posted: Thu May 19, 2016 7:52 pm
by Newt
Good depth of field! LOL
Newt
Re: FS13 Isa
Posted: Thu May 26, 2016 3:00 pm
by gonandkarl
Hi,
Now I have got the inside ready for painting. I think putting on another layer of fairing mixture and sanding it off again for the umptieth time wont make it any smoother thats why I will sand it with 120 grit paper a last time and then I paint. The weather is getting so nice it is pulling me and this paddle FS13 to the water. I bought on my last visit to Vienna a max. 2,50 metre standing and a long double paddle in case the standing and paddling will not work so well for me CLOOF who stumbled the other day over the edge of the carpet on the floor.
Lets hope for the best.
Greetings from Karl
Re: FS13 Isa
Posted: Thu May 26, 2016 6:03 pm
by Fuzz
You better put down lots of non-skid. That sole looks as smooth as an ice skating rink

Re: FS13 Isa
Posted: Thu May 26, 2016 10:14 pm
by glossieblack
Lovely work Karl.
Re: FS13 Isa
Posted: Tue May 31, 2016 1:34 pm
by gonandkarl
Hi,
I put the first coat of pure white glossy paint on the inside after three coats of primary coating. With the primary coatings I used a method I read in the British Practical Boat Owner. I mixed for the first coat some grey dye into the paint to see it well against the whitish sanded inside. The second coat I left white which was again good visible against the first grey coat and for the third coat it was again grey dye. This was again an advantage for the first glossy white topcoat. I used a foam roller and then I tipped it with a nylon brush after having watched the video on TJ s V10 post on page 32 maybe to inhale a bit of the magic this guy produces. I think Tony also watched it a couple of times to achieve such a beautiful paint job. Here is the link again for anyone interested:
https://www.youtube.com/watch?v=k-SGcSl ... r_embedded
I am happy with my attempt of painting even that my wife s comment to the colour was it looks like a bath tub.
Greetings from Karl
Re: FS13 Isa
Posted: Tue May 31, 2016 7:18 pm
by glossieblack
Consistently nice work Karl.
Re: FS13 Isa
Posted: Thu Jun 02, 2016 9:07 am
by gonandkarl
Hi,
Got the inside painting finished but have to wait for a couple of warm days because of the cold weather the paint is not hard enough to flip the boat and I would be worried that whatever I put it on like plastic or styrofoam or a carpet might get stuck to it.

All that is left is to paint the 2 sides and the transom outside. I want to definitely flip it so I have the graphite/epoxy bottom at the top can put a good masking tape and plastic sheeting over it and whatever paint I mess will run down.
Greetings from Karl
Re: FS13 Isa
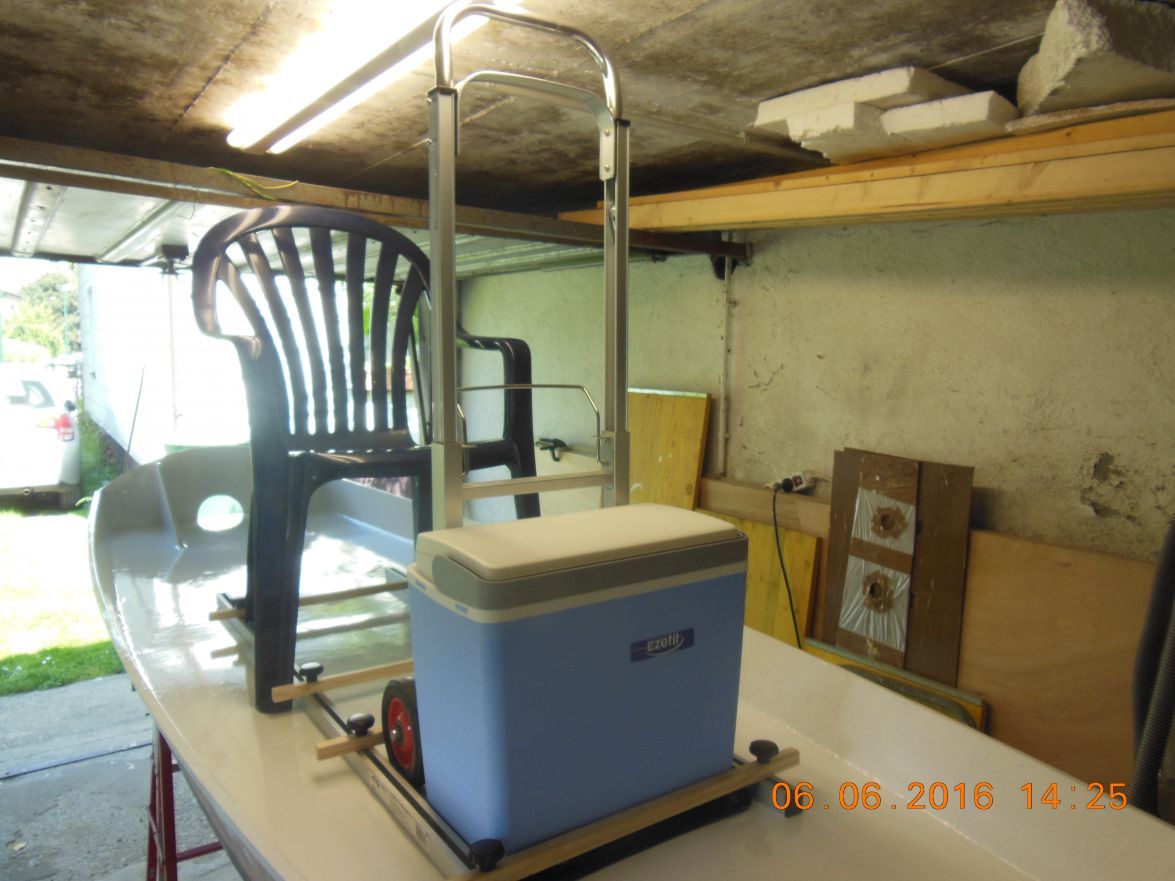
Posted: Mon Jun 06, 2016 9:23 am
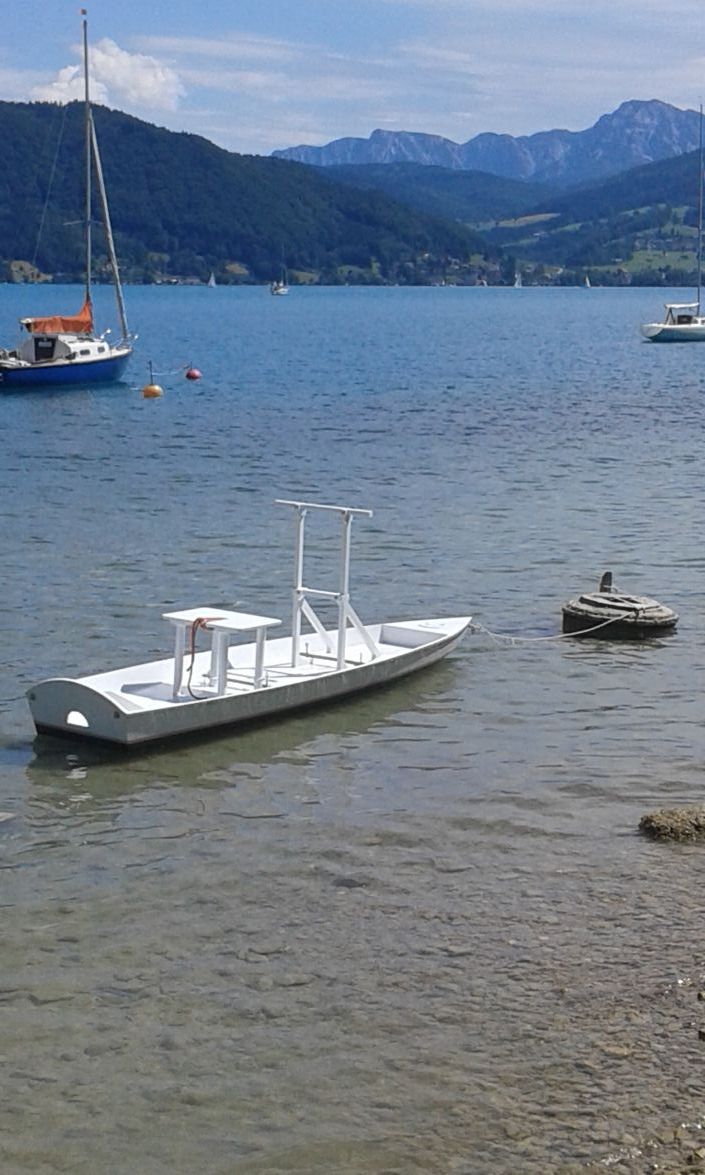
by gonandkarl
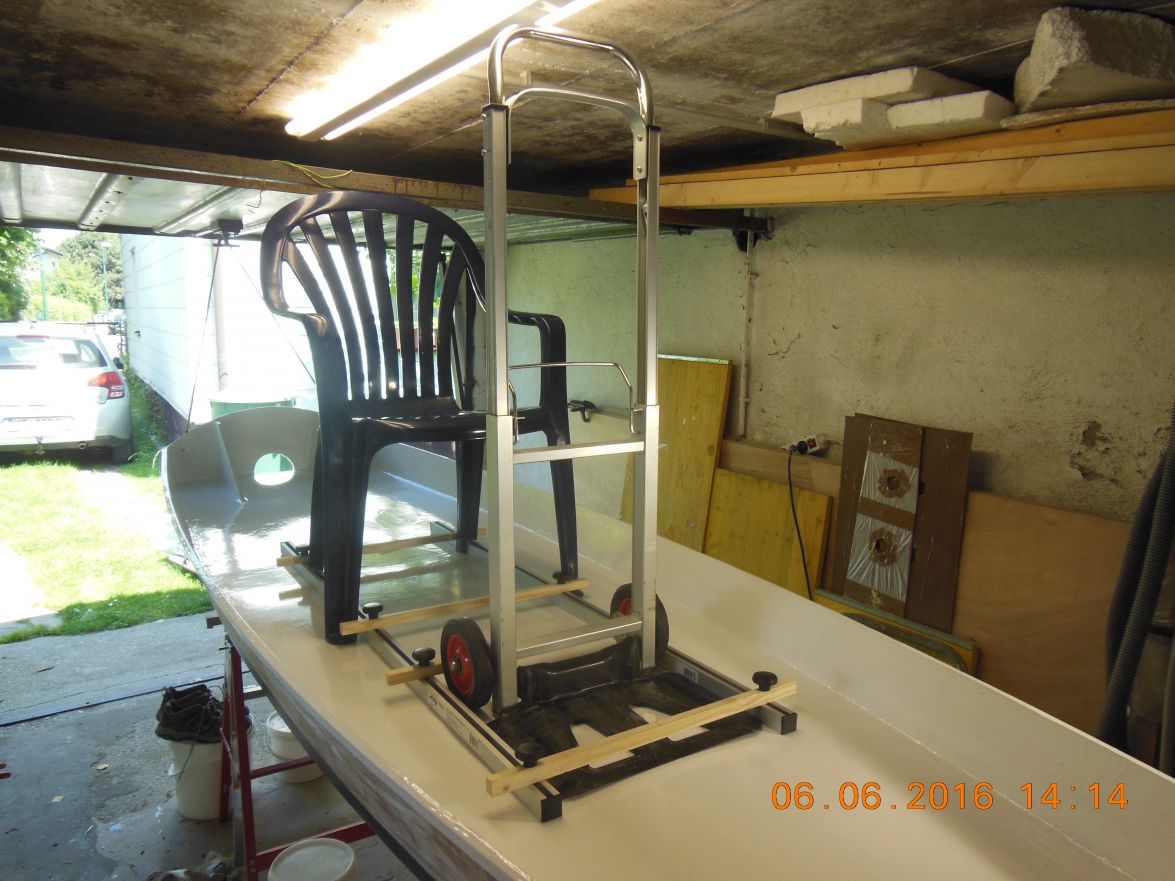
Hi,
Two rails with adjustable crossbars, chair and grabrail mounted for the first test on water. Only then I will decide on a final chair and grab rail. And before I can test it I have to flip it a last time to paint sides and transom.
Greetings from Karl
Re: FS13 Isa
Posted: Mon Jun 06, 2016 11:09 am
by jacquesmm
Funny set up but it makes sense to get a feel for the layout.
No seat on that "boat".
Re: FS13 Isa
Posted: Mon Jun 06, 2016 12:26 pm
by gonandkarl
Hi Jacques,
Not even a kayak seat ?
When you are 70, overweight and tired of stand up paddling I have to have a seat and drink something refreshing from the cooler.
That is my plan. Or do You say no seat on this boat, because one will fall over one side or the other within seconds ?
Greetings from Karl
Re: FS13 Isa
Posted: Wed Jun 08, 2016 10:24 am
by jacquesmm
I am 70 and overweight too
Yes to a kayak seat but no to that chair!
Re: FS13 Isa
Posted: Wed Jun 08, 2016 2:14 pm
by cape man
What about a small leaning post?
Re: FS13 Isa
Posted: Wed Jun 08, 2016 4:08 pm
by gonandkarl
HI,
Thank you for the idea of a leaning post. One can easily put it flat down in the boat when one is paddling standing up. I can imagine to use something like that and sit on a small blow up cushion.
I really like lots of ideas that will let me rest on this rather bare boat. The first test on the water will be the earliest in a weeks time, because I still need to put one more primary coat and 3 finishing coats to the sides and transom. And the first tests on the river will be short and if I get tired I just paddle back to the slip.
Greetings from Karl
Re: FS13 Isa
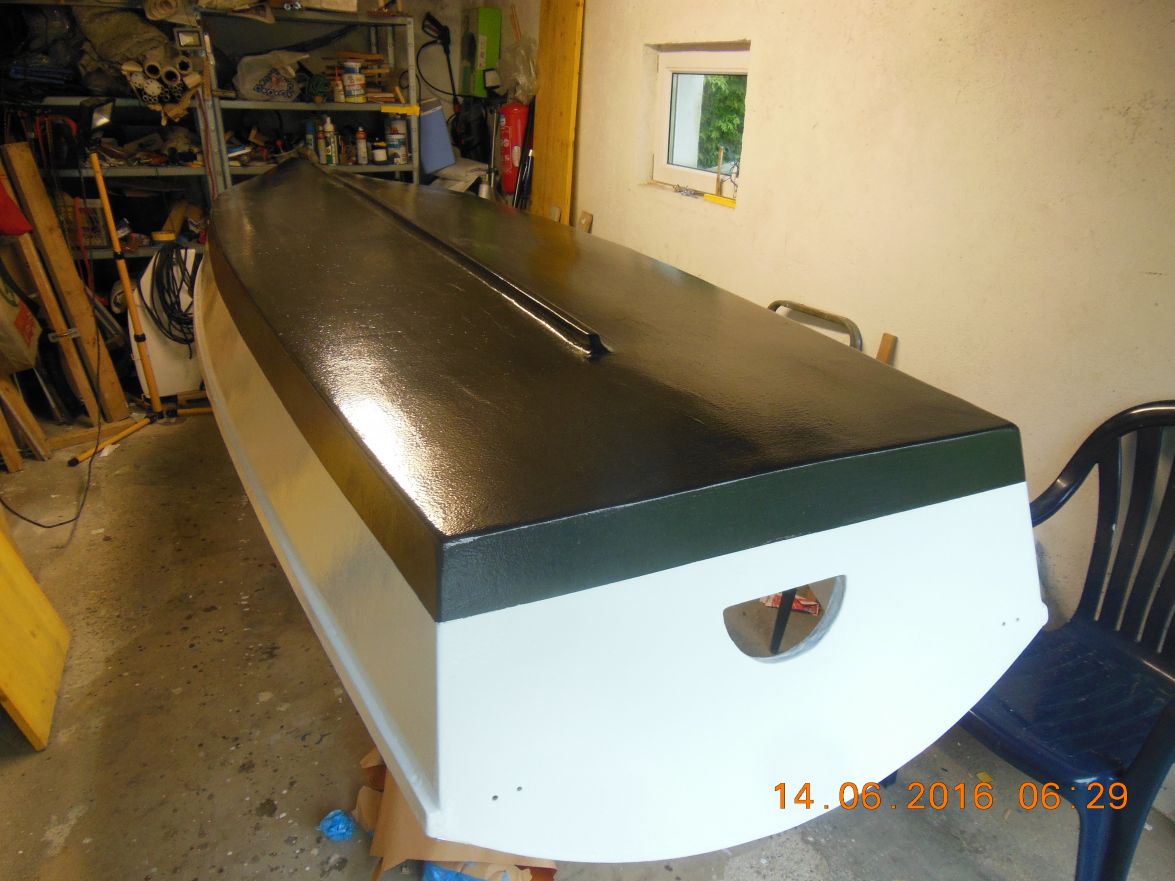
Posted: Tue Jun 14, 2016 12:52 am
by gonandkarl
Hi,
Yesterday at lunch I have finished painting the boat and when the weather is hopefully getting better soon I will show it on the water.
I used 3 epoxy/graphite coats for the bottom, three prime coats and three coats of glossy white for the inside and the sides and transom. I am happy with the result and the not 100 % perfect outcome I cannot see as my eyesight is twindling according to age. The more I am practising with the paint the better the results.
Greetings from Karl
Re: FS13 Isa
Posted: Tue Jun 14, 2016 7:20 am
by Cracker Larry
That looks great, Karl
Nothing wrong with that.
Re: FS13 Isa
Posted: Tue Jun 14, 2016 9:41 am
by terrulian
Good work, Karl, can't wait to see the pictures on the water.
Re: FS13 Isa
Posted: Thu Jun 16, 2016 5:38 am
by glossieblack
Very nice Karl.
Re: FS13 Isa
Posted: Thu Jun 16, 2016 9:11 am
by cape man
I can't wait to see some pics of this new design on the water. I'm fighting the urge to build one myself! Looks great Karl.
Re: FS13 Isa
Posted: Thu Jun 16, 2016 12:29 pm
by gonandkarl
Hi,
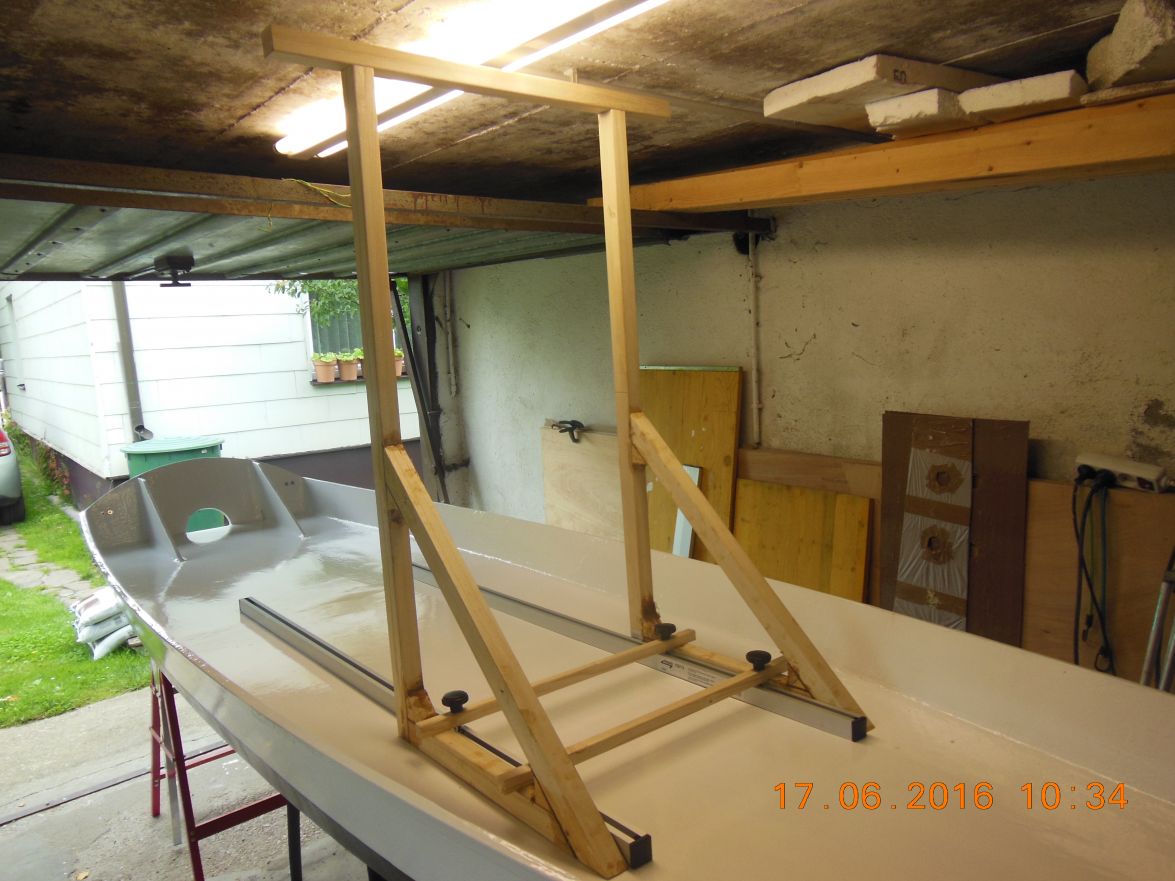
It was fun building this new design and it went rather fast because my other build the AD14 I neglected a bit always working on the FS13. Today I glued with epoxy/woodflour a wooden grab rail together out of Paulownia wood. It weighs next to nothing nearly as light as if it were made from balsa wood. The 2 types of paddles are waiting already in the boat. But my family made me promise to wait with the watering until my son comes home from Vienna this weekend to watch and help with the launching, because they fear I crack my skull getting into the boat on our rocky river shore without supervision.
Greetings from Karl
Re: FS13 Isa
Posted: Thu Jun 16, 2016 2:05 pm
by terrulian
Cool, Karl. I'm not sure I get what the grab rail is for. Is that the wooden structure in the middle of the boat?
Re: FS13 Isa
Posted: Thu Jun 16, 2016 3:05 pm
by gonandkarl
Hi,
No this wooden cross bars hold things down to the alu rails like the grab rail I am building and maybe a kayak seat lateron. It is a 1 metre high rectangular wooden frame standing on the sole and one can hold oneself while standing on the boat using a standup paddle or holding the tiller extension of the electric outboard. On the study plan Jaques shows an aluminium grab rail but I cannot buy such one here in Austria that is why I built it. I will take a picture tomorrow when I put it in the boat. No more time today I have to watch the soccer matches of the European championships. Everday 3 matches is nearly as tiring as boat building.
Greetings from Karl
Re: FS13 Isa
Posted: Thu Jun 16, 2016 7:22 pm
by Jeff
Really looks great Karl!! Get us some full length pictures!! Jeff
Re: FS13 Isa
Posted: Fri Jun 17, 2016 5:06 am
by gonandkarl
Hi,
The first test of a grab rail I did with a sack barrow, but that thing is much too heavy and looks awful on top of a boat.
That is why I made a wooden one and this is now the second test of a grab rail in the boat. It weighs exactly 1860 grams. I will still make the handle bar removable and will fit an also removable crossbar at half of the height with a final weight of just over 2 kg. Then I want to round all the corners to make it more streamlined and paint it. I can take my time doing that because splashing wont take place this weekend as the weather forecast is miserable for this time of the Year.
Greetings from Karl
Re: FS13 Isa
Posted: Fri Jun 17, 2016 8:25 am
by Jeff
Really nice job Karl!!
Re: FS13 Isa
Posted: Fri Jun 17, 2016 9:56 am
by terrulian
I think you should stick with the sack barrow, as you call it. It's a very original look.
Re: FS13 Isa
Posted: Fri Jun 17, 2016 9:59 am
by Jaysen
terrulian wrote:I think you should stick with the sack barrow, as you call it. It's a very original look.
and could double as a dolly to move Isa.
Re: FS13 Isa
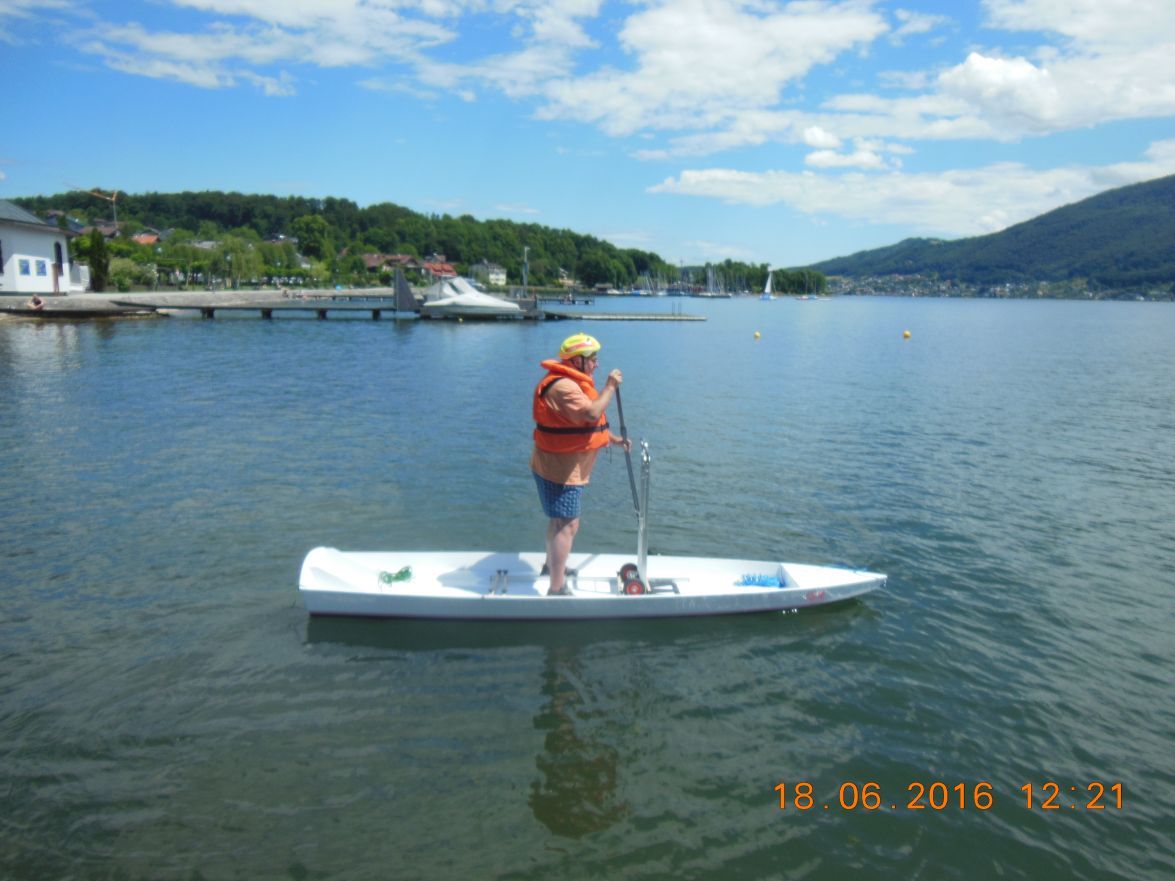
Posted: Sat Jun 18, 2016 9:35 am
by gonandkarl
Hi,
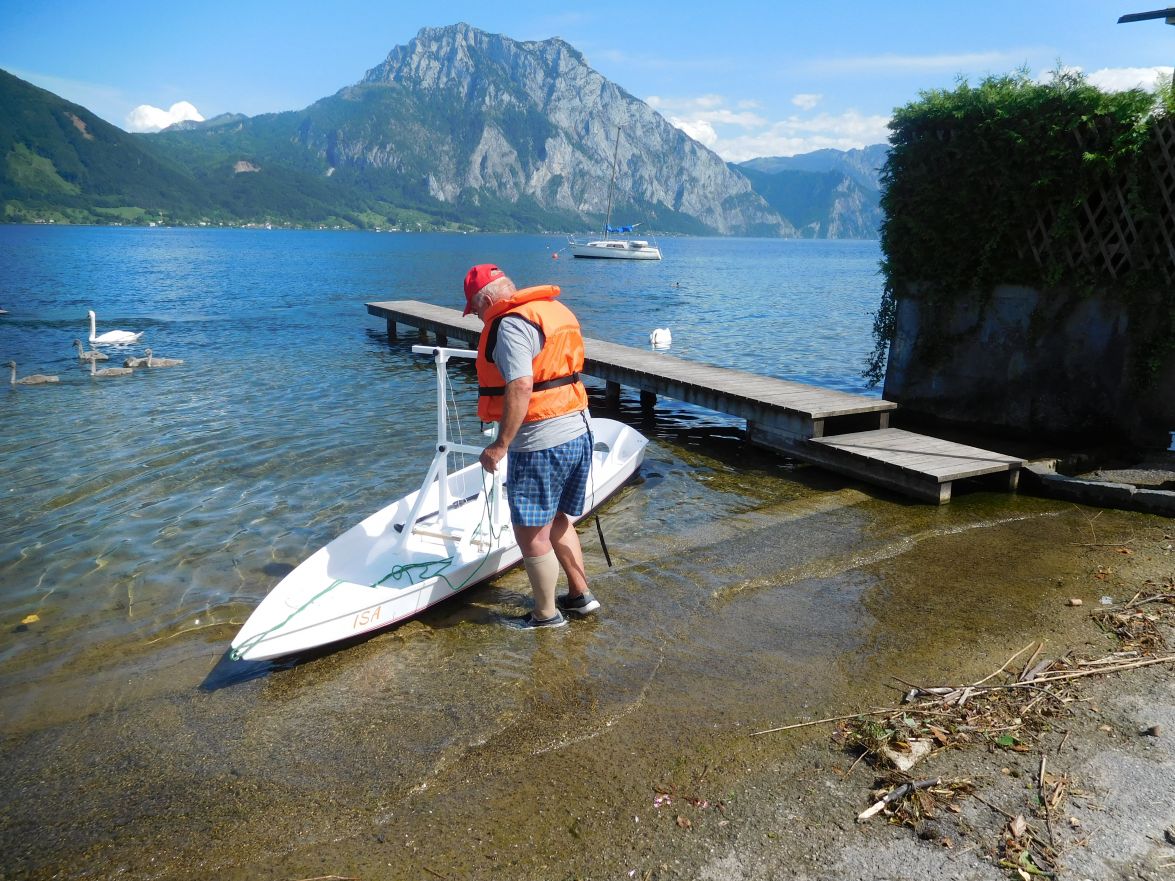
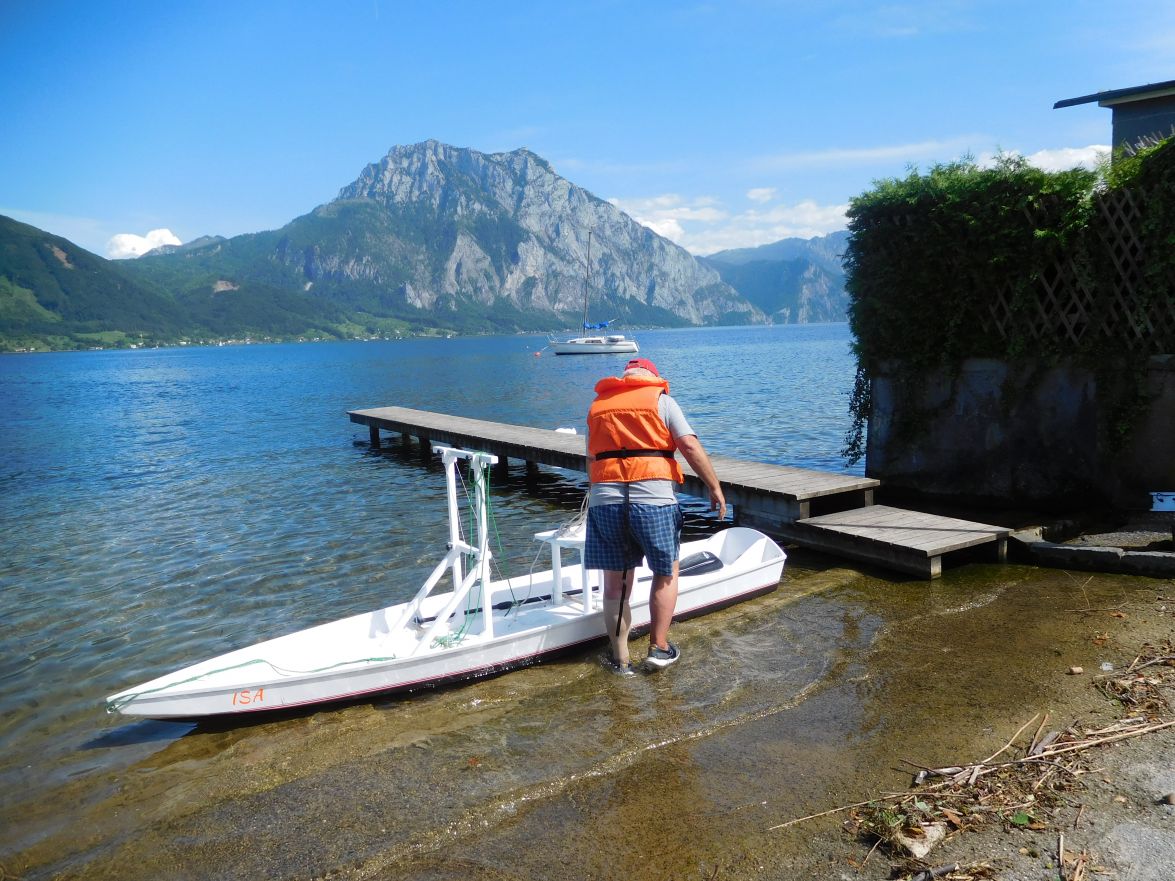
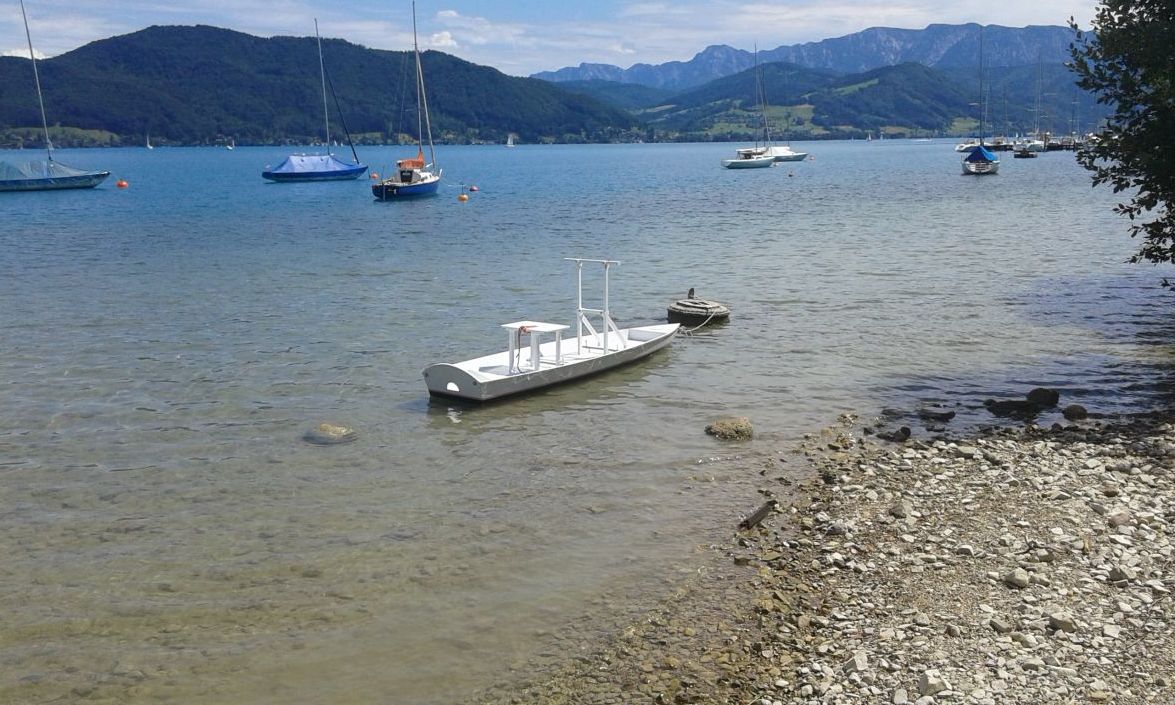
As the weather turned out better than expected we splashed FS13 on the local lake Traunsee. My son and his girlfriend tried the standup paddling first, being young sporty and slim it was no problem for them and then I also dared the balancing act. I mounted my sack barrow into the boat, wore a life jacket and my old cycle helmet and then I started on this wobbling boat I built. The building of the boat was much easier than paddling the first 5 metres. But I am sure with lots of practice I will master the standup paddling and wont be tired after a 300 metres paddling near the shore like I did today.
Here is Isa before the half hour drive to the beautiful Salzkammergut lake:
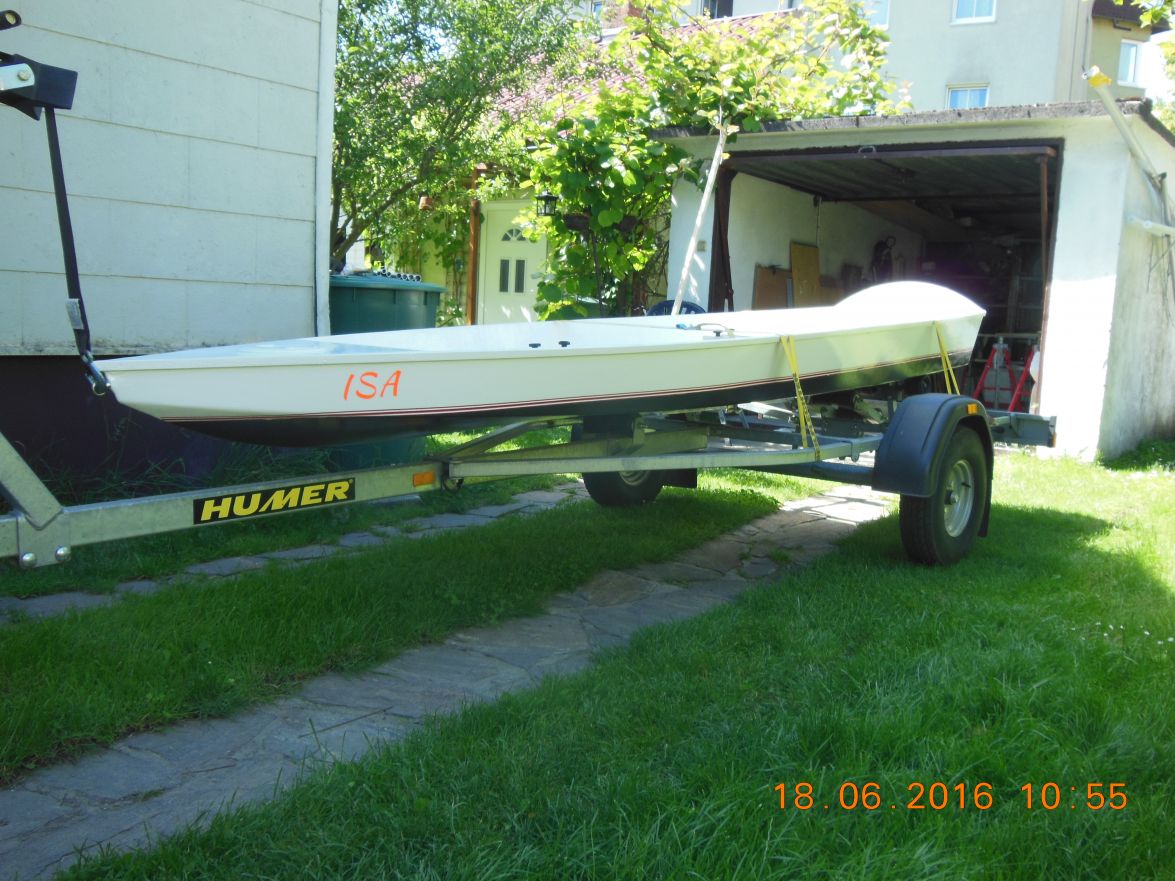
and here you see the proud boatbuilder who did not fall into the water during his 10 minute paddling spree, which speaks for the designer Jaques whom I want to congratulate herewith for having designed a perfect fun boat. I am looking forward to the next outings on the lake with the electric outboard or a kayak seat and the double paddle. Fun is not forbidden when you are 70 and overweight:
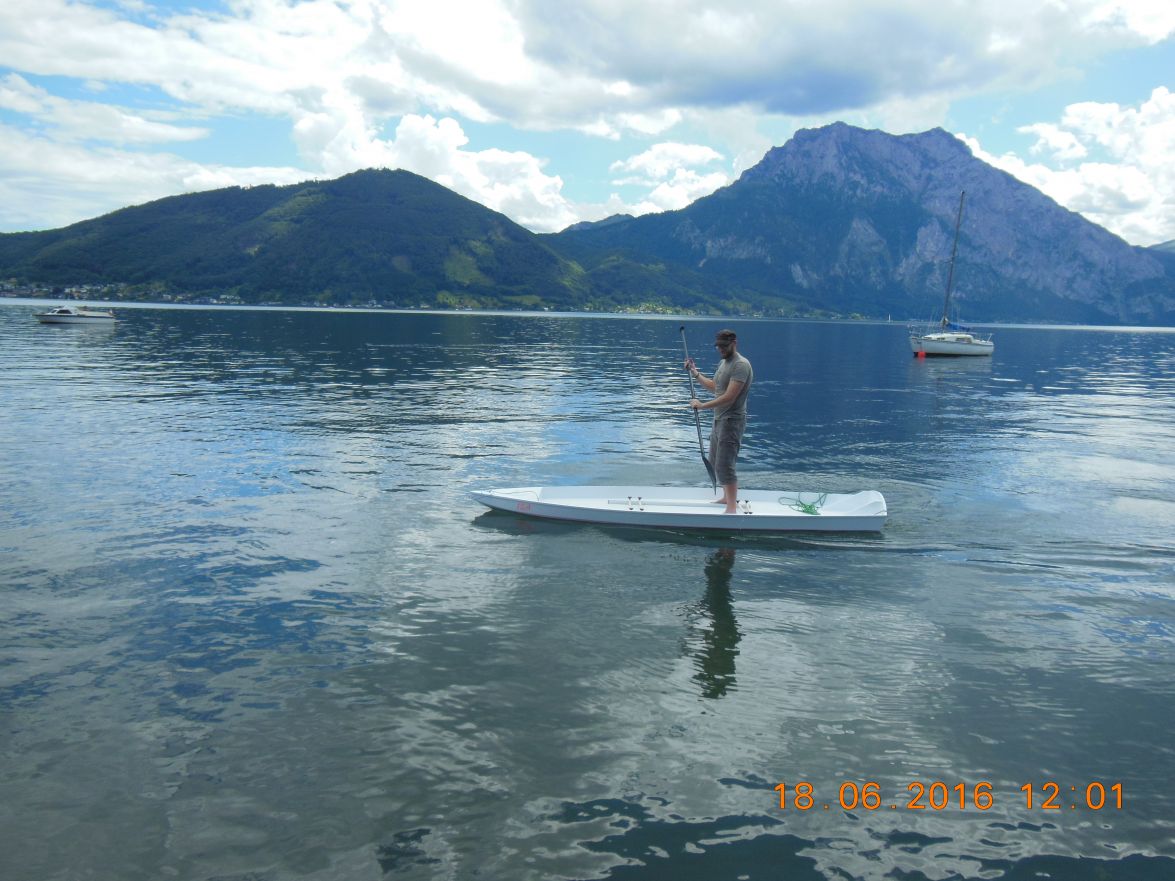
And this is my son Gerhard paddling in front of the beautiful mountain called Traunstein:
There are some more pictures in my gallery and I also have a 38 second video which I will only watch when I want to see myself as a Parkinsons desease patient on a paddling board.
Greetings from Karl ( Austria )
Re: FS13 Isa
Posted: Sat Jun 18, 2016 9:44 am
by poleposition
Congrats, Karl---really a nice job that all of us enjoyed following. The pic of your son / lake is postcard worthy!
Re: FS13 Isa
Posted: Sat Jun 18, 2016 9:51 am
by jacquesmm
Bravo!
I see that your weight and size is close to mine. You were very prudent with the big life jacket but that lake water must be cold.
It looks like the balance will be perfect with a small motor on the transom.
Once you"ll get a feel for it, you"ll be zooming around full speed with it.
Thanks for the very nice pictures.
Re: FS13 Isa
Posted: Sat Jun 18, 2016 10:09 am
by terrulian
Bravo, Karl.
Re: FS13 Isa
Posted: Sat Jun 18, 2016 12:56 pm
by Cracker Larry
Re: FS13 Isa
Posted: Sat Jun 18, 2016 4:03 pm
by gonandkarl
Hi Larry,
My son forced me to wear a helmet at least at my first try because he thought if I fall into the water close to the shore I might hit my head on the rocks. But after a few minutes I knew I wont fall in even that I had a few problems balancing. Some guy said here in the forum that the rails should be flush with the sole because they are a bit in the way of ones feet. I agree with that but for my build it is too late without ripping out the sole. I will concentrate on exersizing a lot and then my balancing will become better and should I fall in it is summer and I used to be a life saver swimmer in my jouth.
Greetings from Karl
Re: FS13 Isa
Posted: Mon Jun 20, 2016 10:47 am
by gonandkarl
Hi,
My wife thinks I should share with you my builder collegues my 38 second video of me balancing on FS13 Isa.
https://www.youtube.com/watch?v=1MUeikJm1aI
I am not sure if it works.
Greetings from Karl
Re: FS13 Isa
Posted: Mon Jun 20, 2016 11:00 am
by Jeff
Great balance Karl!!! Jeff
Re: FS13 Isa
Posted: Mon Jun 20, 2016 11:21 am
by terrulian
I am not sure if it works.
What in particular is your concern? You are standing erect, in a manner that separates our species from other hominins. The boat is floating. It's a beautiful day in a beautiful spot. Seems all good to me.
Re: FS13 Isa
Posted: Mon Jun 20, 2016 11:22 am
by cape man
Whoa! Whoa! Karl! Slow DOWN!
Awesome looking boat. So are you going to put a motor on it?
Re: FS13 Isa
Posted: Tue Jun 21, 2016 4:47 am
by glossieblack
Beautiful Karl. Congratulations.
Re: FS13 Isa
Posted: Mon Sep 05, 2016 2:45 pm
by gonandkarl
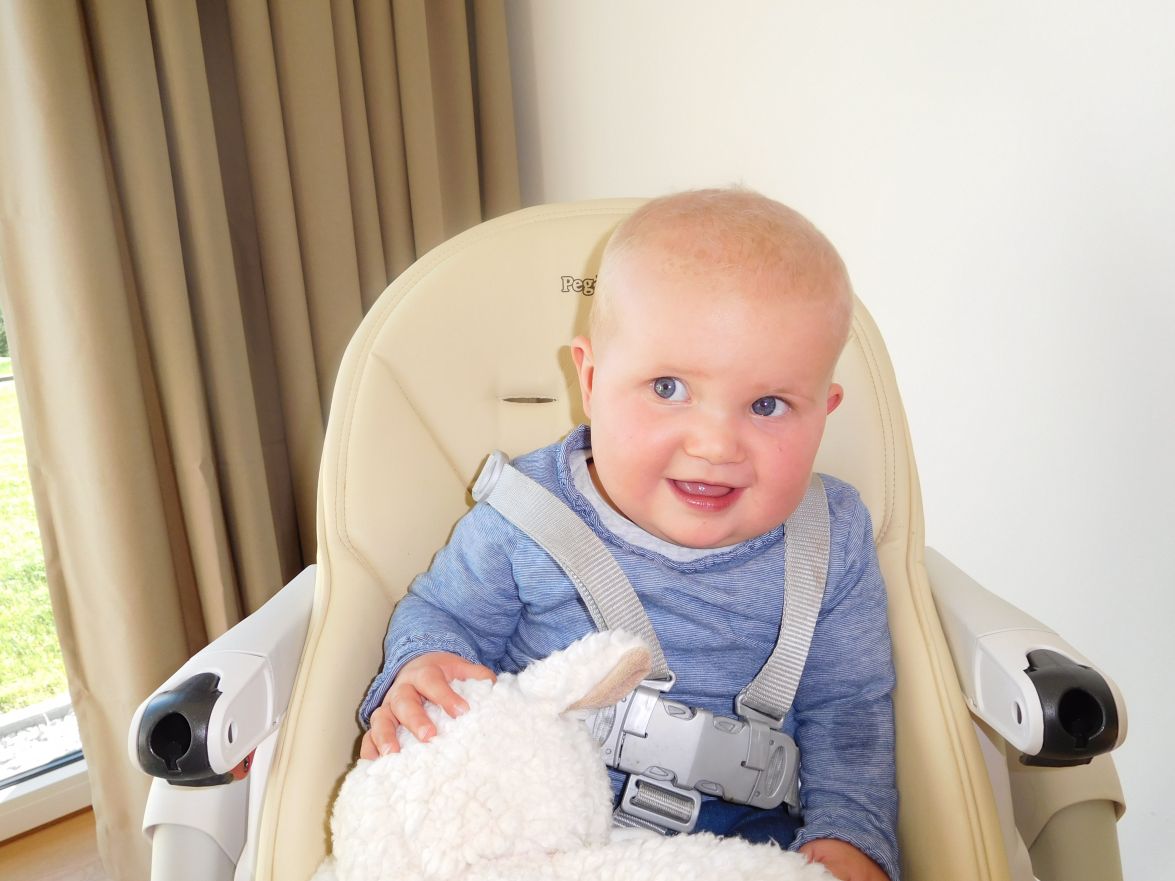
Hi,
I forgot to show that I made this FS13 for my lovely youngest granddaughter Isa who survived 2 heart ops 5 days after birth and when she was 3 months old.
Here she is on her 1st birthday
Greetings from Karl
Re: FS13 Isa
Posted: Mon Sep 05, 2016 3:41 pm
by Jeff
Beautiful granddaughter Karl!! I am sure she will love her boat!! Jeff
Re: FS13 Isa
Posted: Mon Sep 05, 2016 5:38 pm
by Cracker Larry
That's awesome, Karl. She sure looks healthy now
She'll be tough from the start, if she started like that.
Re: FS13 Isa
Posted: Tue Sep 06, 2016 6:41 am
by stickystuff
Fantastic . Beautiful young Lady. When their that young and can survive this she will be the toughest girl on the block.
Re: FS13 Isa
Posted: Wed Sep 07, 2016 12:37 pm
by BB Sig
Great looking boat!
Re: FS13 Isa
Posted: Mon Oct 03, 2016 6:52 am
by gonandkarl
Hi,
It took me ages to finish the grab bar and a seat for the FS13 but now that it is done I can prepare the whole lot for Winter.
I know the grab bar now on offer from Bateau in alu looks better and is most probably stronger but the shipping to Austria would not have been worth it in addition to the 275 $ price. Here the picture of grab bar and seat in the boat made from Paulownia wood weighing next to nothing:
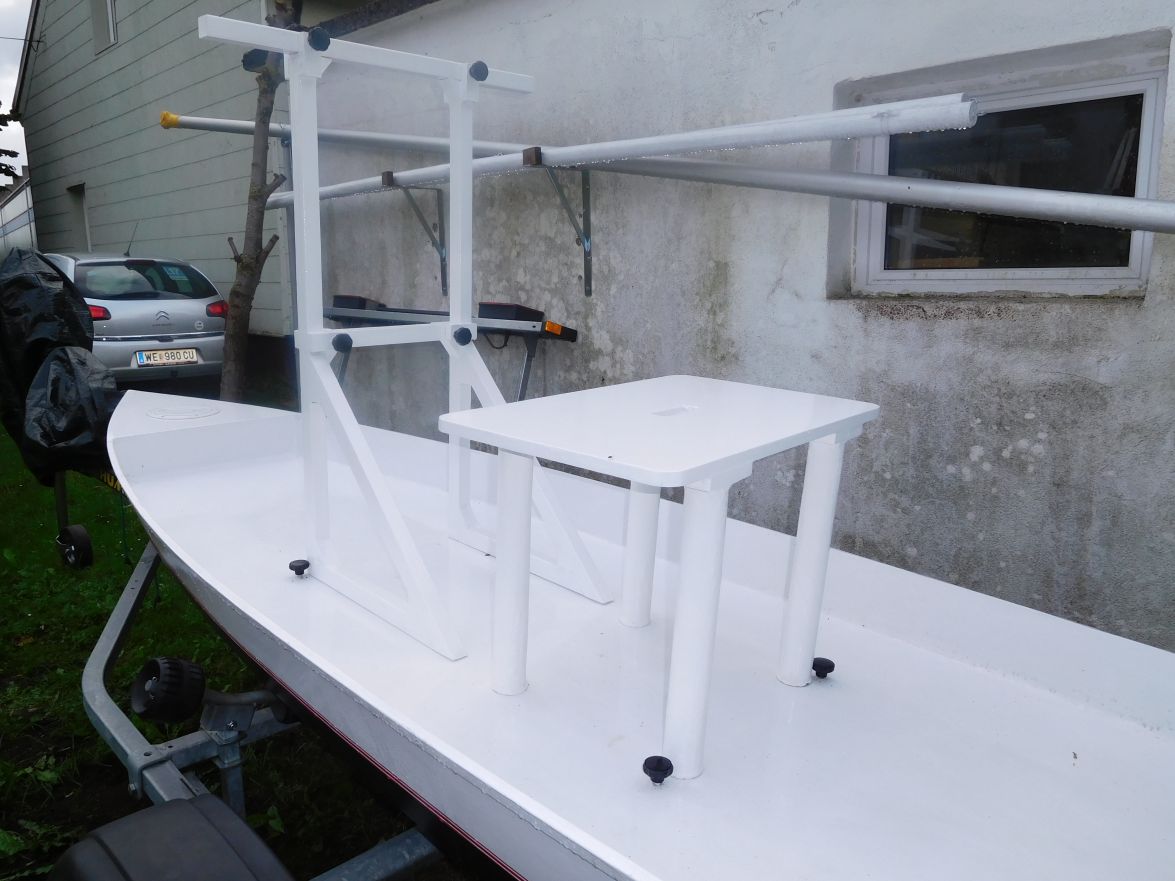
Greetings from Karl
Re: FS13 Isa
Posted: Mon Oct 03, 2016 7:52 am
by Jeff
Karl, looks great!!!! See you in a couple of weeks!! Jeff
Re: FS13 Isa
Posted: Thu Jun 08, 2017 11:40 am
by gonandkarl
Hi,
My FS13 Isa got some attention today, I made a dry run with the electric motor, the grabrail and the seat in position.
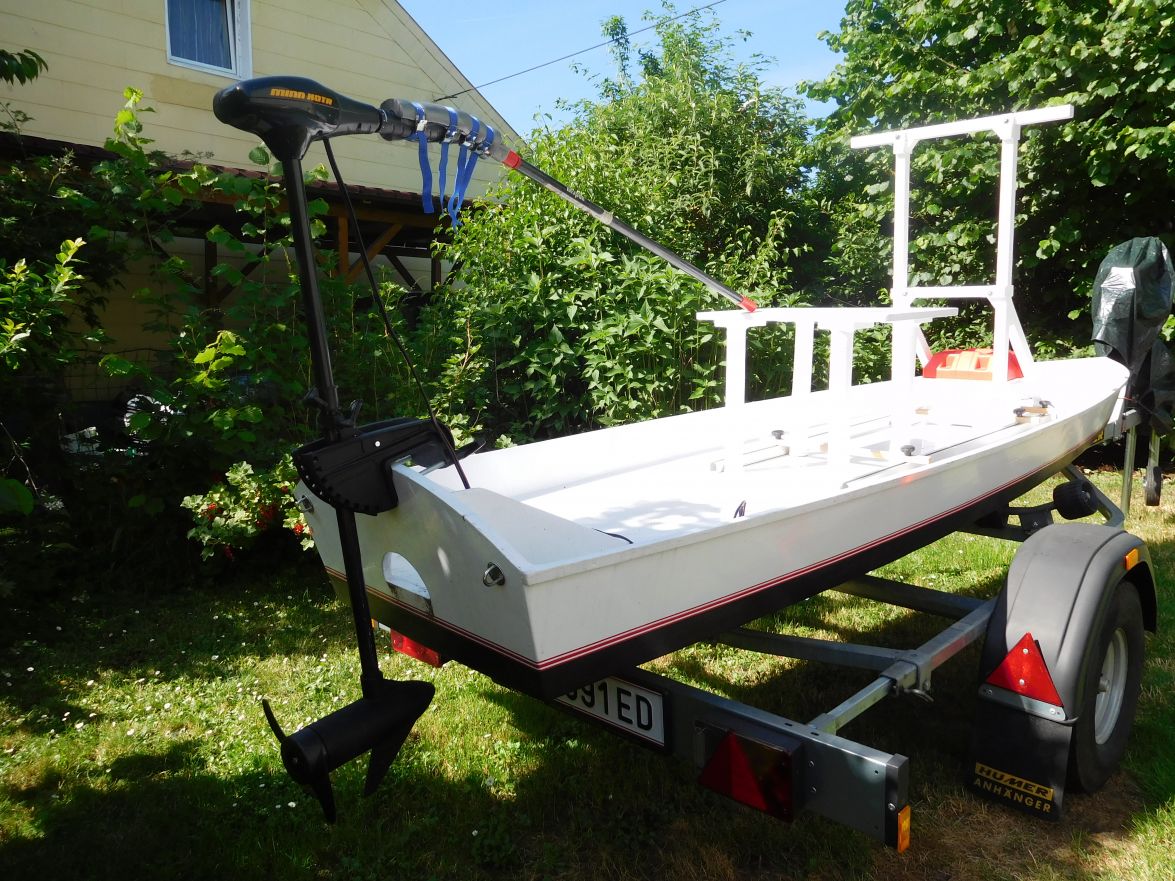
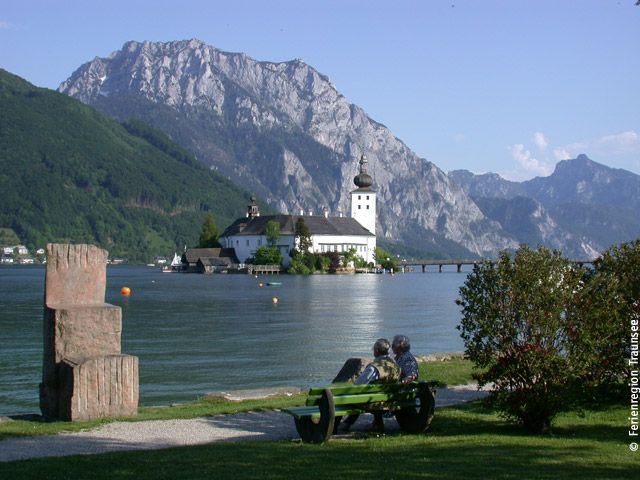
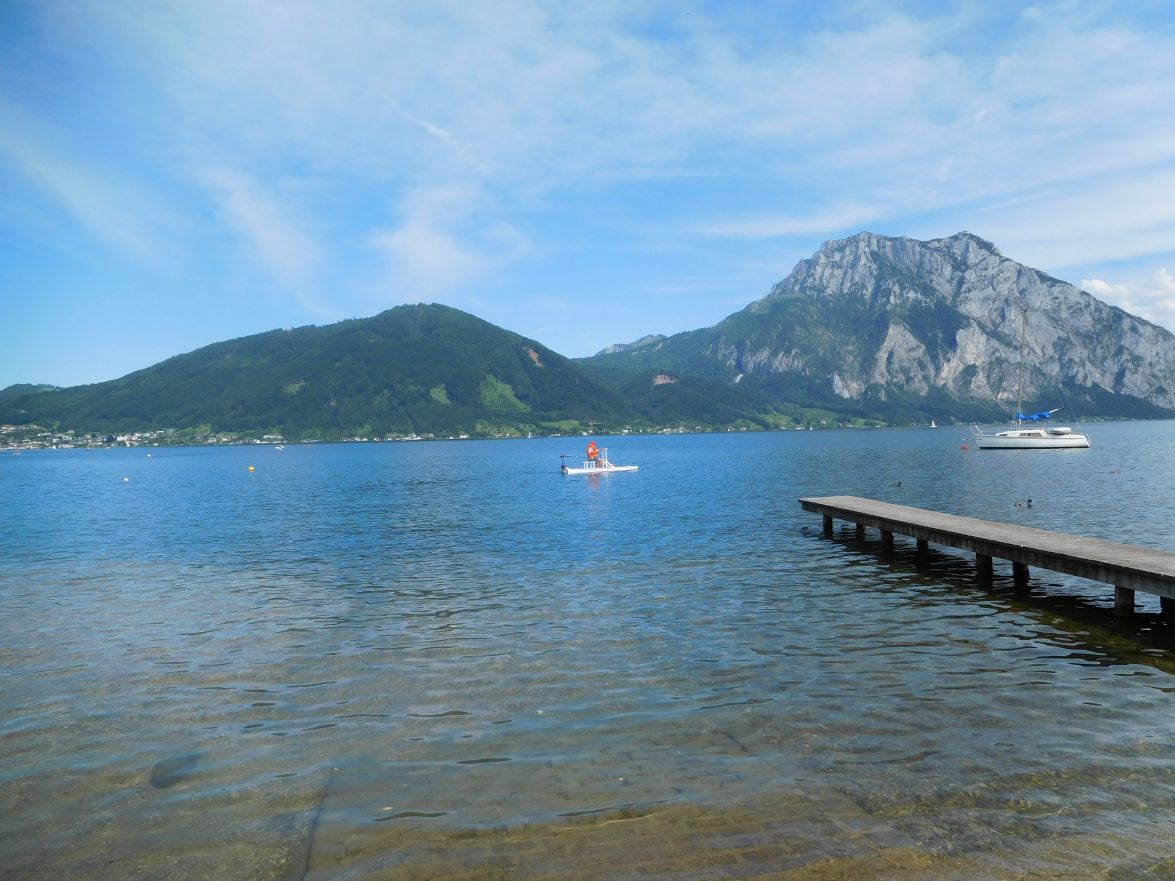
Tomorrow I will try it on a nearby lake. My wife will come along to take pictures from the shore and as my contact to the water rescue should I nosedive into the Traunsee. Here you can see how picturesque the lake looks.
Greetings from Karl
Re: FS13 Isa
Posted: Thu Jun 08, 2017 12:02 pm
by terrulian
Excellent! I look forward to the photos and review.
Re: FS13 Isa
Posted: Thu Jun 08, 2017 12:22 pm
by Jeff
Karl, that is one beautiful lake area!! Please do show us more photos during the trial period!! Jeff
Re: FS13 Isa
Posted: Fri Jun 09, 2017 3:55 pm
by gonandkarl
Hi,
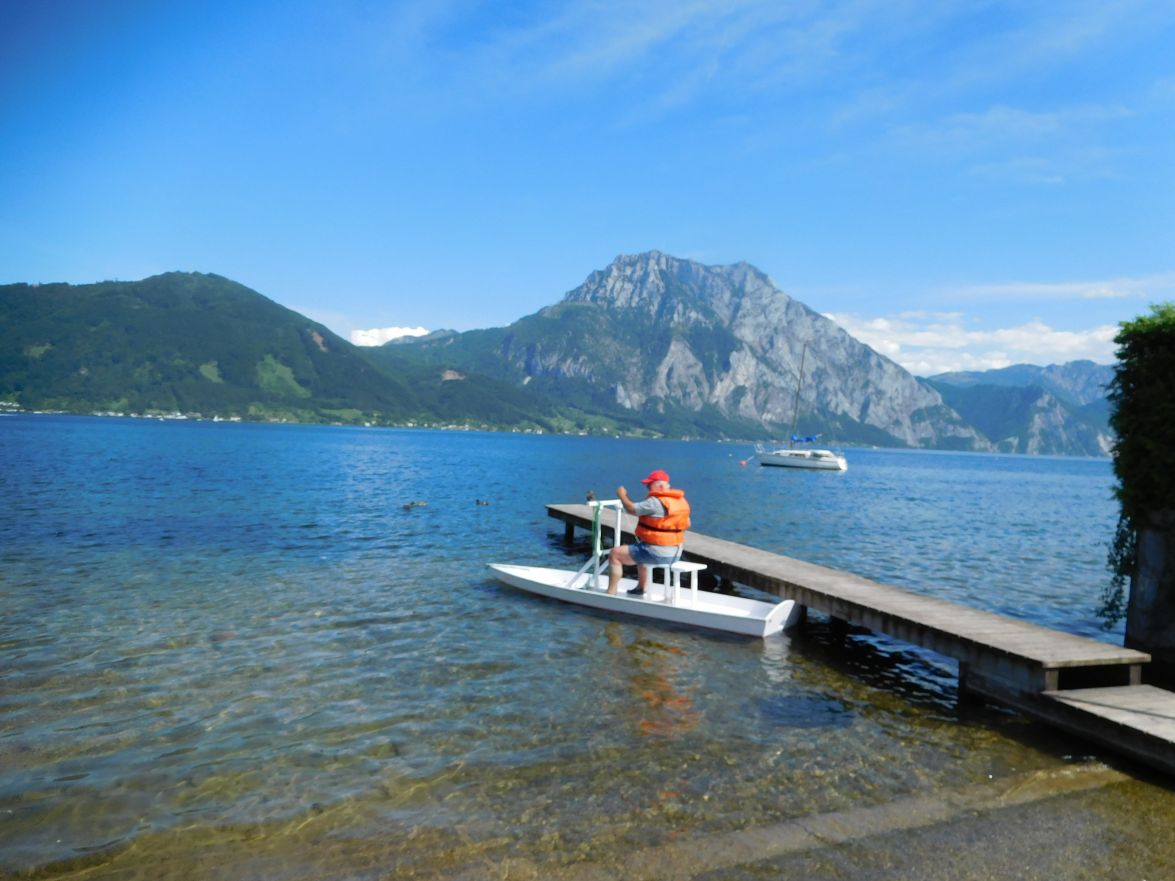
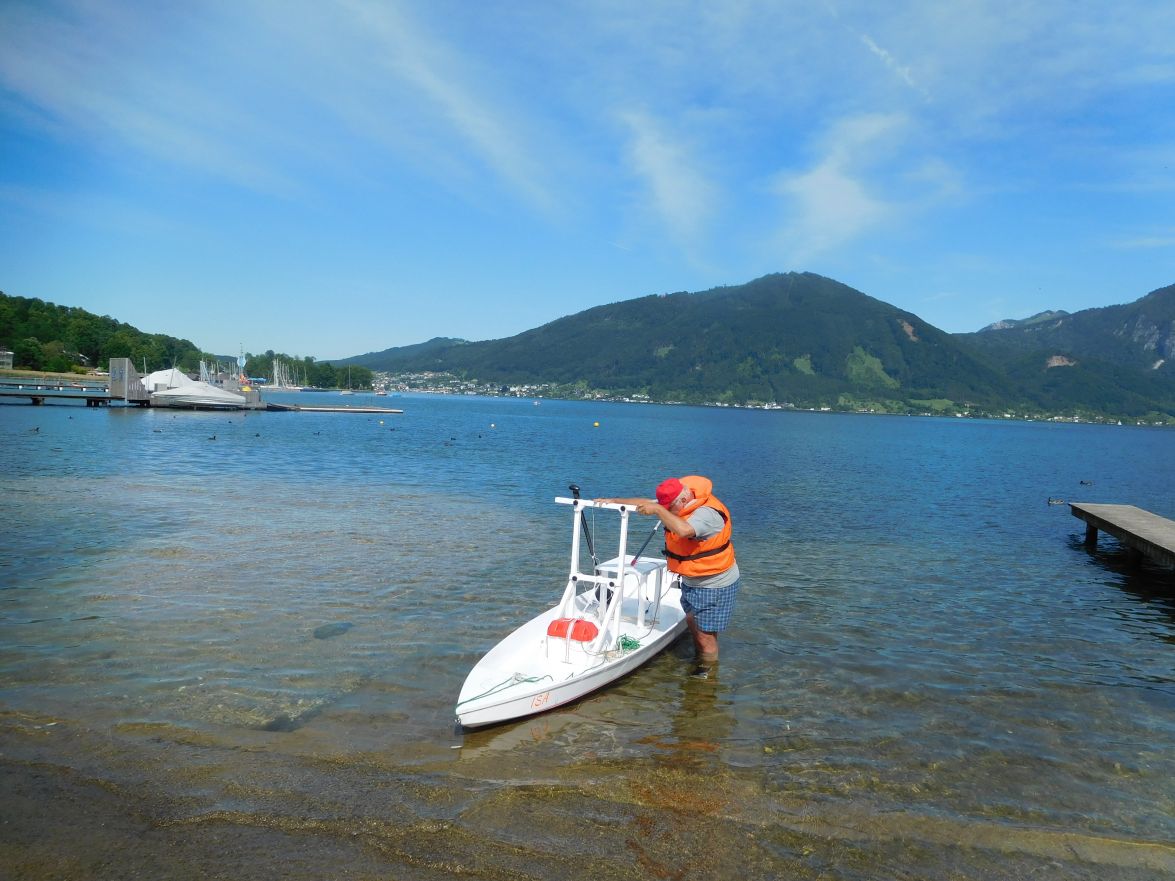
It took me the whole morning to get ready for the trip to the lake packing a battery trolley into my cars boot and a boat trolley and test tye the grab rail, the chair, the battery and the electric outboard to the boat then everything also disappeared into the boot. By two in the afternoon I was ready to drive to the lake and could convince my wife to come along as a photographer as long as we were back by six so she wont miss a tv program she likes to see. After 2 miles drive I returned to get my boatshoes with white soles as I was only wearing slippers. By three we were at the lake and then it took me half an hour to mount the grabrail, the chair and the transfer from the trailer to the dolly to push it 10 metres to the water. Lesson learned next time leave the dolly at home as well as the battery trolley and drive the trailer into the water and the cars boot will not be clobbered so fully that the dog could not come along. Then I paddled one round against small waves and hardly any wind and because my paddling is not so good I nearly got pushed back to the jetty.
Then I mounted the electric motor and the battery and started with my self made tiller extension behind my back which turned out to be too long so I had to sit right on the front side of the chair. And after a while I realized I am going backwards the sign that I changed from the 5 forward gears to one or both of the reverse gears. Other than that the electric round I made was nice and easy and the FS13 completely steady so no danger the battery or the motor to land in the water. By 4 o clock it was time to pack up and luckyly 2 young guys who wanted to slip their motor boat carried my FS13 from the waters edge to my trailer 15 metres away and we made it home by 5:30.
My conclusion it was a test ride and I will never use the FS13 for just 1 hour that is definitely not relaxing. My next outing will be 3 to 4 hours have some lunch on the shore and spend the afternoon again on the water exploring all bays and creeks of the lake.
Here are some of the pictures and you must note that I am wearing the red Bateau cap, the beige one was blown away during my sailing courses near knock down.
Greetings from Karl
Re: FS13 Isa
Posted: Fri Jun 09, 2017 4:58 pm
by Jeff
Karl, you look great out there and glad your FS13 was steady and trustworthy!! Absolutely beautiful place to take the FS13!! By the way, were those geese as big as they looked in the photo? Have a good weekend!! Jeff
Re: FS13 Isa
Posted: Fri Jun 09, 2017 5:02 pm
by pee wee
That looks great, Karl! A pretty boat with very nice scenery . . . you can look forward to next time when you can do some exploring.
Re: FS13 Isa
Posted: Fri Jun 09, 2017 6:09 pm
by BB Sig
Wow! What a beautiful place to launch a great boat. Congratulations.
Re: FS13 Isa
Posted: Sat Jun 10, 2017 4:44 am
by gonandkarl
These big geese were swans and there are lots of them on the lake. When I took the boat out of the water I was also surrounded by ducks together with their ducklings. Yes it is a nice place to do some boating and I only have to drive half an hour to get there.
Re: FS13 Isa
Posted: Sat Jun 10, 2017 5:01 am
by glossieblack
Congratulations Karl. Well done.
Re: FS13 Isa
Posted: Sat Jun 10, 2017 10:49 am
by Jeff
Great Karl!! It is always fun watching mama ducks with the trail of babies!! Jeff
Re: FS13 Isa
Posted: Sat Jun 10, 2017 11:01 am
by terrulian
Congratulations, great stuff, Karl. Next time the launch will go easier with lessons learned. Fabulous location. I'm sure more pictures will follow after your next outing.
Re: FS13 Isa
Posted: Tue Jun 13, 2017 1:50 pm
by cape man
Awesome Karl!
Re: FS13 Isa
Posted: Sun Jul 02, 2017 2:22 pm
by BB Sig
Karl,
Now that you have had some time with Isa, how far from the transom would you say the fore and aft balance point is? I am sure there is a technical term for this but I think you know what I am asking!

I'm planning to eventually put a trolling motor and a battery on mine. Just trying to find a point near the center of the boat to run my conduit to. I will be paddling at first but I don't want to have to rip out the sole!

Re: FS13 Isa
Posted: Mon Jul 03, 2017 7:16 am
by gonandkarl
Hi Barry,
I went out to the boat to measure where I think the point is. I think it is where I stood and it felt comleteley even in the water and that is exactly 200 cm measured from the tip of the bow. I did exactly the trolling motor bit with a tiller extension forward to my seat and the battery in front of the grabrail which was placed about 170 cm from the tip of the bow.
Greetings from Karl
Re: FS13 Isa
Posted: Mon Jul 03, 2017 10:20 am
by BB Sig
That's what I was looking for! Thanks for the help.
Re: FS13 Isa
Posted: Thu Jul 20, 2017 9:16 am
by gonandkarl
Hi,
I let my arm twist easily by my sister yesterday when she said lets try out your boat on the lake. A good excuse to interrupt sanding my AD14.
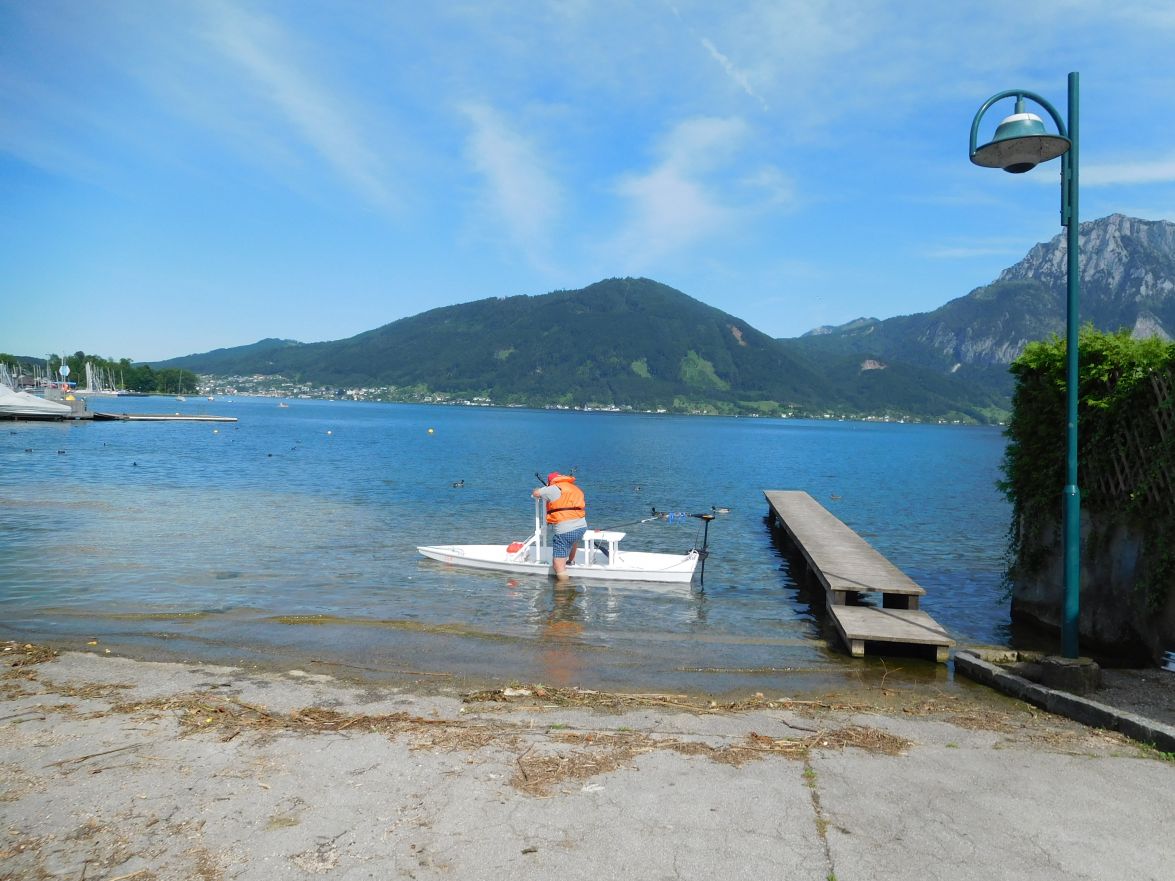
Here is the boat ready for some fun:
And here after using the electric outboard motor:
And here the same picture with nice mountains in the background:
And here the electric outboard in action and it would not be my niece having to use the mobile while motoring on the lake:
My sister told me my niece does not want to be on the net so I removed her picture.
That the FS13 standard ( not the wide version ) can also take my weight (116 kg = 255 pounds ) you can see on this picture:

And I am still excited about this little boat because the more often I am on it I realize that it is very stable and to step onto it is best done in very shallow water by grabing the grab rail and put the first foot into the middle of the boat and sit on the chair. I was once asked if I can imagine to do fly fishing from this boat, yes a fisherman can do it for sure standing in the middle or sitting like I would prefer on my chair. Dont worry I only eat fish and will not fish the nice lake empty.
Greetings from Karl
Re: FS13 Isa
Posted: Thu Jul 20, 2017 9:21 am
by Jeff
Karl, You look great on the boat!!! Looks like the trolling motor pushes it along well!! Beautiful lake and surroundings!! Jeff
Re: FS13 Isa
Posted: Thu Jul 20, 2017 9:44 am
by cape man
Nice to see you taking a break and having some fun. No point in building these things if we don't enjoy them once in a while!
Re: FS13 Isa
Posted: Thu Jul 20, 2017 9:55 am
by terrulian
Karl, you and the boat look great! Although, with apologies, the niece looks better. The cell phone shows how confident she is handling the boat and also how stable it is. No worries.
What a beautiful place you have to enjoy your boat!
Still following the Tour de France?
Re: FS13 Isa
Posted: Mon Jul 24, 2017 11:41 am
by gonandkarl
Hi Tony,
As a sport interested guy I naturally followed the Tour the France right up to Yesterdays end. There were 3 TV stations transmitting everyday the whole Tour. Right now I am watching the European women soccer championship. The Austrian girls are doing great and there is hope they go on to the quarter final. Any sport on TV gives me the rest I need after sanding for a couple of hours. Tomorrow I will sand the last part, the port side of the keel shoe and then I am ready to epoxy graphite the bottom.
Greetings from Karl
Re: FS13 Isa
Posted: Wed Sep 27, 2017 2:05 pm
by bateau-webmaster
Karl,
This is overdue. You have attained the rank of Bateau Builder, Congratulations!
Re: FS13 Isa
Posted: Wed Sep 27, 2017 2:16 pm
by terrulian
Karl,
The Tour de France is over but uncharacteristically they've been showing some other races here in the US. They never have quite the drama of the Tour, though.
Once again I am reminded of what a low profile your boat has, and given that, how much buoyancy and stability.
Re: FS13 Isa
Posted: Wed Sep 27, 2017 2:41 pm
by Fuzz
bateau-webmaster wrote: ↑Wed Sep 27, 2017 2:05 pm
Karl,
This is overdue. You have attained the rank of Bateau Builder, Congratulations!
My congratulations also
Re: FS13 Isa
Posted: Tue Dec 05, 2017 12:52 pm
by Cody1771
Wow! what a little boat. i was thinking of building the 14 foot bigger brother but it's to wide to comfortably paddle IMO. this looks much better!
have you weighed it by chance?
Re: FS13 Isa
Posted: Tue Dec 05, 2017 1:30 pm
by gonandkarl
Hi,
The designed weight is 85 lbs but I think even that Jeff raised my status to a Bateau builder I am not so sure if I stand up to it with the weight of my built boats. I did not weigh my FS13 but I think I am about 10 percent above the designed weight because I always put on too much fairing and even that I sand most of it off again I am always too heavy with my builds.
I can say it is easy to pull off the trailer directly into the water or onto the 2 wheel slip dolly I also have. 2 People can easily carry it over a 100 meter distance like my niece and myself with handle ropes attached to the 2 metal rings at the rear and the bow ring. It is a lot of fun and it is very stable which I only found out after a couple of uses. I got more confident every time and have not fallen into the water yet.
I want to get a low seat so I can use it with a double paddle and do away with the chair and the grab rail. The width of the boat is ideal for paddling sitting down as well as standing up with a long paddle. I think Jacques designed with this boat a fun boat for a lot of uses. I think with a small 2.5 hp outboard it will just race across the lake because it moves already very fast with my electric trolling motor.
I hope you will also build an FS13 and we can follow your build on the Bateau forum.
Greetings from Karl
Re: FS13 Isa
Posted: Tue Dec 05, 2017 1:45 pm
by gonandkarl
Hi,
I will weigh it in the next few days and then I report it here. As I have it resting on the trailer under my new carport I can even do it in the Winter and try out the instructions to weigh a boat with a bathroom scale on a trailer of which the weight is known. I will weigh it without the grab rail and the chair and some weight I could have saved if I would have made the transom straight at the top like on the plan but I made it round because when I did draw the radius of the transom top sides I found out that drawing from left to right the circle fitted on the wood and later I forgot to cut it off straight at the transom knees. I found that out only after painting so I left the transom round.
Greetings from Karl.
Re: FS13 Isa
Posted: Tue Dec 05, 2017 3:50 pm
by Cody1771
perfect thank you. reason i am wondering is if i am curious if 2 people can muscle it onto a kayak rack on the hard top of a larger boat.
Re: FS13 Isa
Posted: Wed Dec 06, 2017 2:05 am
by gonandkarl
Definitely 2 guys can muscle it when I at 72 and my niece 36 could carry it over a hundred yards and then down a steep embankment to the lake quite easily.