Page 1 of 1
P-14 1958 CLASSIC GLASS RENOVATION
Posted: Thu Jul 10, 2008 7:43 pm
by MTECHMARINE
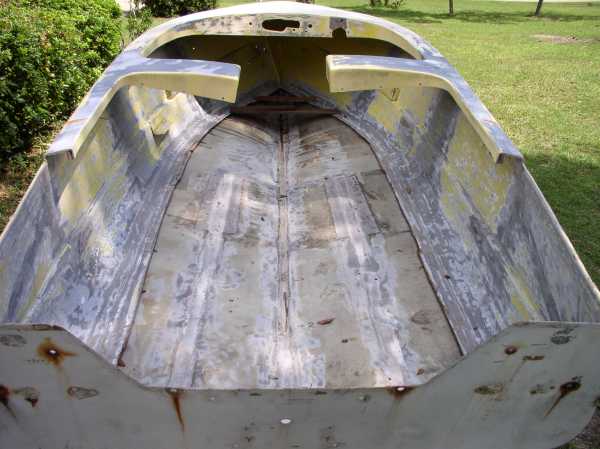
SO FINALLY WE BEGIN - -
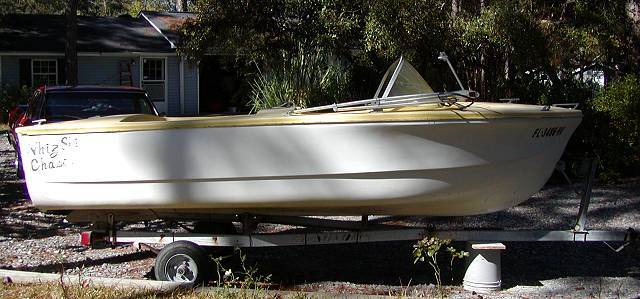
I have had this project hull for 5 years now, it was on eBay and nobody bid on it, so I contacted the owner and purchased it for $200. Drove all the way from here (NW Florida) down to Clearwater to pick it up.
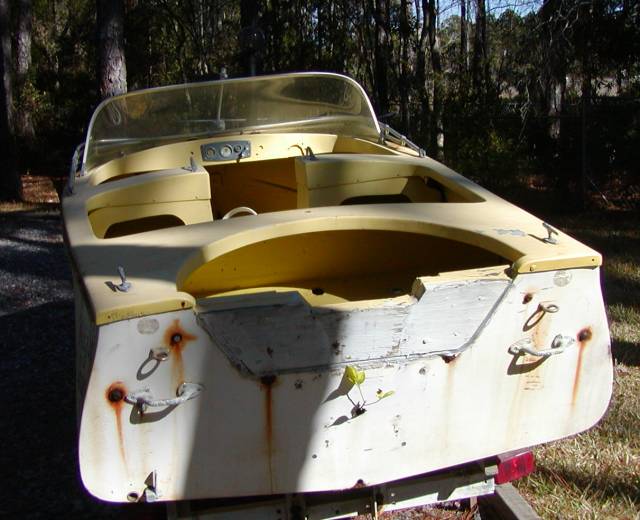
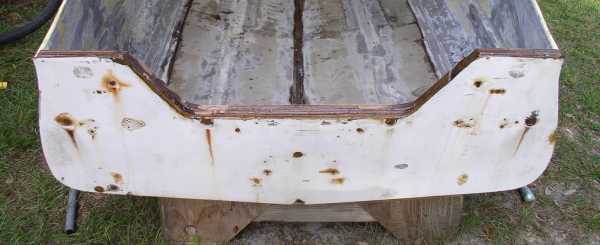
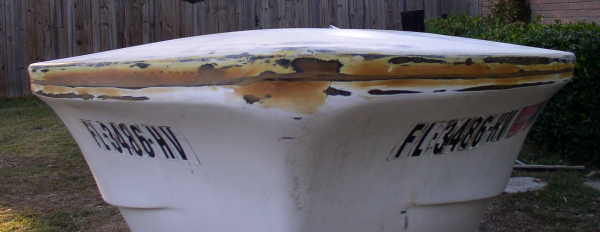
A good indication of the transom's inner condition can be seen as it was fertile enough to grow a plant!!
Having recently relocated from Hawaii with no feel for distance it became an overnight trip. So hauled it back to Navarre and parked it in the garage for future reference. Unfortunately my little ideas were put on hold by Hurricane IVAN. As you can see in the picture the boat wound up off the trailer, on the end of the winch cable in the drive way. 24 antique and classic outboards got a saltwater bath, the only thing that saved the shop was the tree on the roof. Windshield was broken on the boat, but only minor hull scrapes.

Now we have a little more time out of that thing called life to simply mess about in boats. so the cutting has begun on the old Whiz Ski Chaser. Plans are to restore to former glory, but not as a restoration, but more a renovation into an antique outboard meet fun craft - a hot rod if you will.
I'll post more tomorrow when A: my server isn't down
And B: I figure out the proper path to embed these pictures.

I have a lot more, we are to the grinding stage!

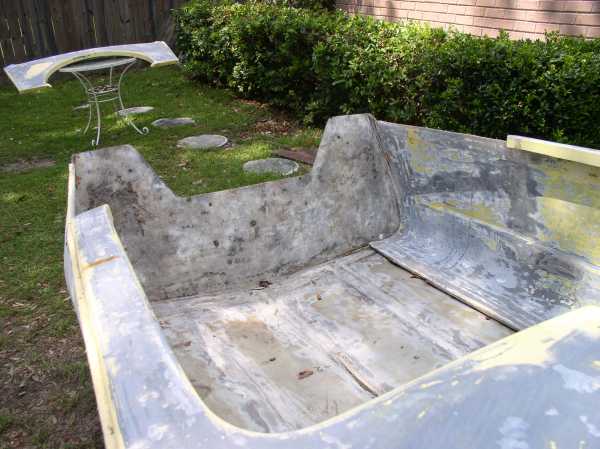
Friday, June 11th - OK, got it. Servers' back up so here's some shots as we clean out the old innards.

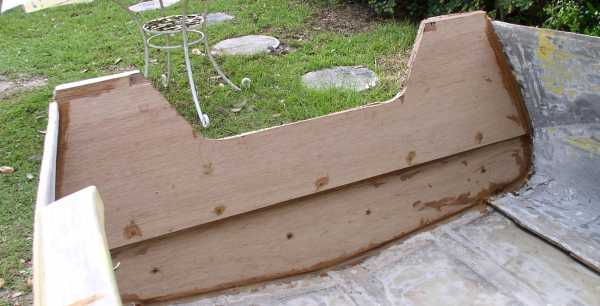
It was easier, IMHO, to remove a portion of the aft deck to get at the transom and wet well structure. I didn't remove the entire deck as it is actually tabbed together as original, or else someone else in the past did it for me.


FINALLY got the wood off the transom. used a 5" saw to cut strips and chiseled if off line by line.
Air chisels' a great idea, but I am replacing tools ruined by IVAN as I go so all I can add so far is a Roto-Zip router and a new 7 inch grinder.

Finally ready to grind it out.

Posted: Tue Jul 15, 2008 11:18 am
by tech_support
The worst part is almost over

, looks good. Only removing the aft section of the deck is fine, its easy to put back and fair it in.
Posted: Tue Jul 15, 2008 9:44 pm
by MTECHMARINE
OK, now that I have got this thing cut up, I think i will go to work as follows -
1st, build a proper support / jig to set the boat on while restoring the inner structure.
2nd, replace the transom 1 1/2" thick wood with 2 layers of 18MM Meranti. The original top portion down to the well was 1 1/2, below that 3/4. I don't intend to run anything bigger than a 50's, 60's 40 -50 Merc around 175 pounds, probably more like 145, so the original thickness bolstered by knees and wet well box should easily handle it. I will be putting on an inner and outer 1/4" aluminum motor plate as well.
3rd, restructure the floor stringers with 3/4" up the center and a couple of hardwood 2x?? alongside mid way to the chine, similar to original except all the way forward.
Now, questions - I intend to "frame" as follows - front of well, front of center deck (where the steering station will be relocated), front of front seat and another bulkhead at the front dashboard. I will add some 3/4 X 1 1/2 around the inner and outer edges of 6Mil Meranti. Now - Should I put the bulkheads in all the way to the floor and install the sole in sections? Or will we be stronger to put in a one piece floor (which certainly will be easier) and frame on top of it - - the latter is my choice, I can build some smaller cross frames below the sole if you think I need it.
I was thinking of adding another layer of material to a triangular area aft where the boat will be running most of the time. MY objective here is to keep this boat as light as practical. My ideal powerplant will be a 95 pound Mercury KG-9Q which I have with a long quicksilver unit. should be able to roll near 50

with this cutie if it stays LIGHT!
The boat has a slight hook in it, hopefully as thin as it is new stringers will straighten it out. The centerline and keel are straight. Looks to me like the side stringers were used to create this hook, or maybe it just deformed sitting around.
Take a look, give me your thoughts.
Posted: Thu Jul 24, 2008 9:21 am
by tech_support
The transom thickness is more than adequate. Transom is tabbed to hull side and botom with 2 layers of 12 oz. biax tape. Then 2 layers of 12 oz. 50" wide cloth over the transom - overlapping to the sides/bottom (over the tape)
I would make my stringers from 2 layers of laminated 3/8" with the joints staggered so that you have one continuous 3/4" stringer. Stringers are tabbed to hull with 2 layers of biax tape.
frames: 3/8" meranti spaced at around 30" - tabbed to hull with 12 oz Biax tape.
You will then epoxy glue cleats (little pieces of wood) to the top of the stringers and frames to provide glue area for the sole. I would prefer to glue the sole down in a couple pieces - so there is plenty of time to mix and apply the epoxy glue. Then the sole gets tabbed to the hull sides with the same 12 ox Biax tape. Sole can be 3/8" or 1/2". I would only put a light cloth on the top side of the sole.
Fillets for transom/stringers/frames/sole should be about 3/8" to 1/2" radius
you will need at least the following to get to the prime/paint stage:
-2 rolls of 12 oz. biax tape
-5 lbs of woodflour (for making glue and fillets)
-3 quarts of quick fair (or 1/2 lb or blended filler if you prefer to mix your own fairing putty)
-enough wide biax cloth to cover your transom as described above
-3 gallons of epoxy to start ( I will guess you may use 6 gallons total on the rebuild)
-plywood: make a drawing of all the parts so you can see how you will cut them out to make the most efficient use of the wood
Posted: Wed Sep 17, 2008 11:53 am
by MTECHMARINE
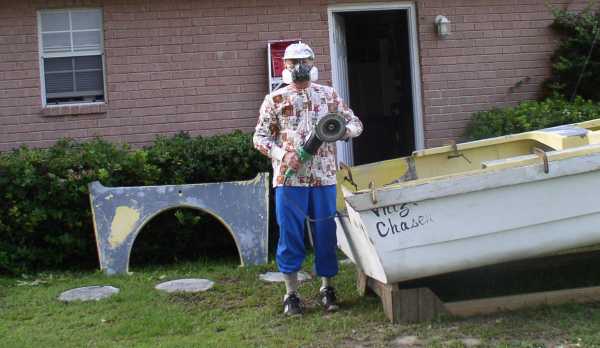

READY TO GRIND IT OUT - LITERALLY
AFTER A COUPLE OF EFFORTS IN 90+ DEGREE AUGUST HEAT WE GOT THE NASTY JOB FINISHED!

THERE WERE 3 LAYERS OF PAINT AND GEL COAT ON THE INTERIOR. GOT THE WORST OF IT OFF AND SMOOTHED DOWN.
AFTER A HOT, HUMID AND BUSY AUGUST PLUS SWEATING OUT STORMS, MY ORDER OF MATERIALS HAS FINALLY ARRIVED AND THE WEATHERS COOLING DOWN, NOW IS THE PERFECT TIME TO "GIT 'ER DONE"!
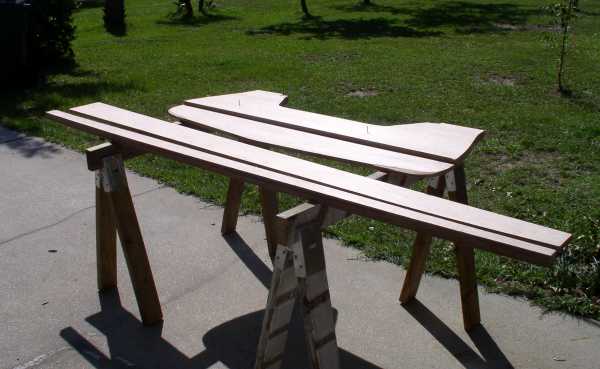
CUT OUT AND FIT THE TRANSOM AND 3 MAIN STRINGERS YESTERDAY PM SEPTEMBER 16TH.
TRANSOM IS INSTALLED!
I TAPED OVER ALL THE HOLES AND THEY FILLED IN NICELY.
IT WENT BETTER THAN I THOUGHT, I FIRST COATED BOTH BOAT AND INNER TRANSOM SIDE WITH EPOXY, THAN APPLIED THICKENED EPOXY WITH A TILE MUD SPREADER TO FILL IN. LOTS OOZED OUT. FILLETED WITH THICKER MATERIAL USING THE CAKE DECORATING TECHNIQUE. WORKED OUT PRETTY WELL.
OCTOBER 1ST AND THE GOOD WEATHERS HOLDING. BEEN ABLE TO WORK ON THE BOAT EVERY DAY THIS LAST WEEK.

THE TRANSOM TABBED AND COVERED WITH 2 LAYERS OF 16OZ BIAX.

CUT AND GLUED IN THE 3 STRINGERS, THEN CLEATED THEM WITH 3/4 X 3/4. NOT SHOWN ARE 2 SMALL CROSS FRAMES THAT WILL BE LOCATED BELOW DECKS WHERE THE FRONT SEAT BACK AND THE REAR BULKHEAD MEET THE FLOOR.


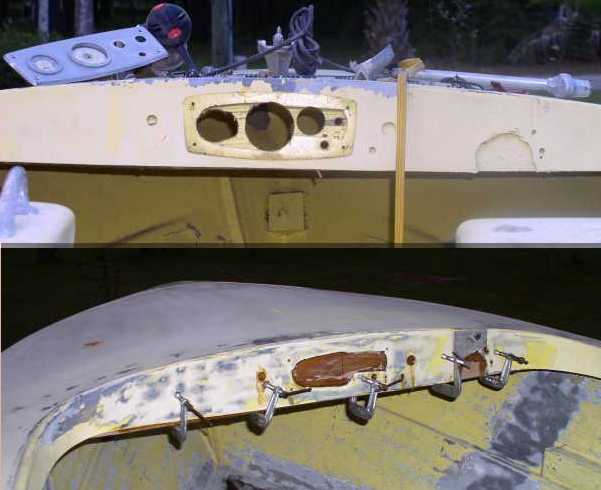
TORE OUT THE OLD DASHBOARD THAT SOMEONE ELSE REPLACED IN THE PAST, THEY HAD GLUED AND TABBED IN WITH POLYESTER. I WAS ABLE TO EASILY REMOVE IT. THIS SURE SHOWED ME HOW POORLY ANY POLYESTER/POLYESTER REPAIR WOULD COME OUT.
NOW ABOUT READY TO INSTALL THE FRONT HALF OF THE SOLE. I LEFT ABOUT A 2 INCH LIP AROUND THE PERIPHERY OF THE BOAT TO ACT AS A GLUE FLANGE AND HELP STIFFEN THE COMPLETED BOTTOM. CHAMFERED THE SOLE EDGES SO AS TO MAKE A SMOOTH TRANSITION FOR THE TABBING.

AS THE HULL SHAPE WAS DISTORTED BY THE REMOVAL OF THE AFT DECK I REINSTALLED IT. BOY THAT SURE HELPED SQUARE THINGS AWAY. I AM REMOVING THE POP RIVETED FLANGE WHERE THE DECK AND HULL MEET AND FAIRING THE 2 INTO ONE SMOOTH TRANSITION. THE INSIDE IS TABBED TOGETHER, I WILL ALSO RUN A SMALL STRIP DOWN THE EXTERIOR TO BE SURE IT WILL NOT SEPERATE. I PUT AN 18" BLOCK AT THE JOINT WHERE THE REAR DECK CAME OFF AND TABBED THE HECK OUT OF IT AS WELL. GENEROUS AMOUNTS OF THICKENED RESIN BEDDED IT ON TO THE TRANSOM AT THE TOP.

GOT THE SOLE IN. THE EDGES WERE A BIT OFF RELATIVE TO THE REMAINING FLANGE BUT MY ELECTRIC PLANE AND DISC GRINDER SOON SMOOTHED THE TRANSITION. A BIT OF FAIRING WITH THICKENED EPOXY AND THE TABBING WENT EXCEPTIONALLY WELL.


JUST PUT BUTT BLOCKS EXTENDING 2 INCHES AT THE JOINT, TIGHTENED THEM UP WITH TEMPORARY SCREWS. HAD TO SCREW A COUPLE SPOTS ON THE SOLE AS WELL TO ENSURE COMPLETE CONTACT. ALL SCREWS WERE REMOVED AFTER RESIN SET.

THE PORT SIDE CENTERDECK AREA OF THIS OLD GIRL EVIDENTLY HAD AN ARGUMENT WITH THE DOCK AT SOMETIME PAST, OR PERHAPS WAS WHACKED BY SOMETHING IN THE HURRICANE. IN ANY CASE THE TAB ALONG THE GUNWALE WAS LOOSE AND THE DECK ITSELF WAS CRACKED SO I GROUND IT CLEAN, RETABBED AND ADDED A LAYER BENEATH THE CRACK IN THE DECK. THEN FIGURED THE INNER CENTER DECK AND SEAT SUPPORTS.

FITTING THE BULKHEADS. ALL THIS AREA AND THE SOLE DONE WITH 9MM MERANTI.

MORE TABBING - -

SAW WHERE ANOTHER BUILDER DID A NEAT TRANSOM DRAIN BY CUTTING A LARGER HOLE, PLUGGING IT WITH EPOXY AND DRILLING THE SMALLER HOLE IN THE CENTER SO AS TO ELIMINATE ANY CHANCE OF WATER PENETRATION. GREAT IDEA, HERE'S HOW MINE CAME OUT. I PUT A LITTLE CHOPPED GLASS IN THE MIX FOR EXTRA STRENGTH.

WITH RAIN IN THE FORECAST WE GOT THE SOLE SEALED UP, GOOD THING AS THE RAINS CAME TODAY THE 7TH.

NOW IT'S NOVEMBER 8TH, WE HAVE MADE SOME PROGRESS ON THE BOAT, WEATHER IS REALLY NICE NOW ALTHOUGH GETTING CHILLIER AT NIGHT. HAD TO MAKE A 3000 MILE TRIP TO WASHINGTON STATE TO PICK UP MY OUTBOARD COLLECTION FROM STORAGE.
I HAVE DILIGENTLY LOOKED AROUND ON THE BBS AND CAN'T FIND ANY SIMPLE "POST" ICON SO I KEEP ADDING TO THE SAME PAGE - ANYONE CARE TO COMMENT? IT MUST BE SO OBVIOUS BUT BEATS ME!

INSTALLED A REAR SEAT BACK, THIS WILL ALSO ACT AS THE FORWARD BULKHEAD FOR THE MOTORWELL

FRONT SEAT SUPPORT AND SEAT BACKS TAKING SHAPE

MOTORWELL INSTALLED. IN ORDER TO SAVE CUTTING A NEW SHEET OF WOOD I WAS ABLE TO SCARF 2 SCRAPS TO CREATE THE WELL FLOOR.
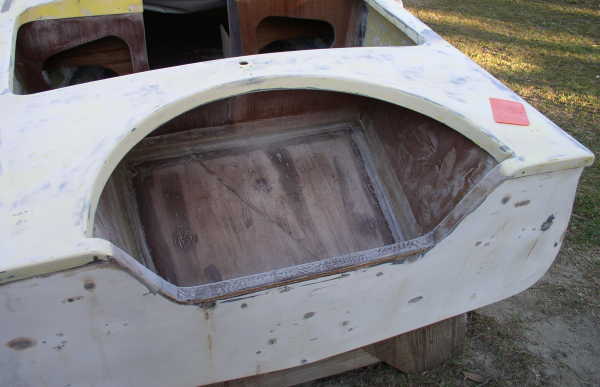
THE 2 REAR SEAT SUPPORTS ARE CANTED AS THEY ALSO FORM THE SIDES OF THE MOTORWELL. THEY WILL BE CLEATED TO ADD STIFFNESS AND SUPPORT THE CENTER OF THE SEAT. AN OMC "DURA TANK" JUST NEATLY SLIDES INTO THE SPACE ON EACH SIDE OF THESE SUPPORTS.

THIS BOAT HULL AND DECK WAS ORIGINALLY FLANGED AND POP RIVETED TOGETHER. THEN THE INSIDE WAS TABBED. THERE WAS SIGNIFICANT DAMAGE TO THIS FLANGE, FILLED WITH SILICONE, ETC SO I HAVE CUT THE ENTIRE THING OFF AND WILL FAIR AND TAB THE OUTSIDE TOGETHER. THEN 3/4" STAINLESS TRIM. UNFORTUNATELY THERE IS A PRETTY BAD MATCH BETWEEN THE 2 HALVES! SO WE GOOBERED IT UP, WITH THE ADDED TAB MATERIAL IT SHOULD ROUND OUT AND LOOK OK. I DID THIS ON MY 21" MFG AND IT CAME OUT REALLY COOL!
LOOKING DOWN ONE SIDE

TOMORROW NOV 6TH I WILL ADD MATERIAL TO THE PERIPHERY AND GLASS THE MOTORWELL FLOOR AND SIDES WITH 8 OZ CLOTH. THEN WE HAVE TO START THINKING ABOUT THE FINISH.
WILL QUICKFAIR FILL IN THE NASTY GEL COAT SPIDER CRACKS OK? DO I NEED TO PRIME THE GLASS 1ST? I AM IMPRESSED WITH THE SMOOTH FINISHES I SEE USING THE ROLL AND TIP PROCESS. I HAVE ALWAYS SPRAYED, BUT PRESENTLY HAVE NO GUN NOR GOOD SHELTER. HOW LONG DOES IT TAKE THE STERLING PAINT TO TACK OFF?? I MIGHT BE ABLE TO RIG A TEMPORARY SHELTER FOR THIS JOB IF NEED BE.
11-21-2008
I AM ABOUT READY TO ORDER SOME FINISH, I HAVE SOME QUESTIONS REGARDING APPLICATION AND COVERAGE.
IN ADDITION TO THOSE PRIOR Q'S POSED IN THE FORUM -
WHATS THE DEAL WITH THE GRAPHITE BOTTOM PAINT - I CAN'T FIND IT ON THE BBC SITE.
HOW MUCH STERLING PAINT REQUIRED FOR MY:
DECK (ORDER 1 QT?)
BOTTOM (ORDER 1 QT?)
HULL SIDES AND TRANSOM (ORDER 2 QTS?)
OVER TOP OF QUICKFAIR - SHOULD I PUT A COAT OF RESIN AS STATED ON THE CONTAINER OR WILL PRIMER SUFFICE?
PRIMER - BRUSH OR SPRAY?
CAN I JUST PAINT OVER THE EPOXY ON THE INSIDE WITHOUT ANY PREP OTHER THAN SANDING?
CAN YOU RECOMMEND AN EPOXY INTERIOR FINISH SIMILAR TO THE OLD "ZOLOTONE" SPATTER TRUNK OR HULL INTERIOR FINISH THAT WILL LAST FOR A BOAT? I USED GEL COAT IN HAWAII BUT THAT SEEMS OLD SCHOOL.
I HAVE BEEN ADDING TO THIS BBS BUT I CAN'T FIGURE OUT HOW TO ADD A NEW POST! OR A NEW PAGE. ALSO WOULD LIKE TO SET UP A PHOTO GALLERY OF THE PROGRESS ON THIS BOAT, WHERE DO I START?
Posted: Tue Nov 25, 2008 2:16 pm
by tech_support
bump
Posted: Tue Nov 25, 2008 2:56 pm
by tech_support
WILL QUICKFAIR FILL IN THE NASTY GEL COAT SPIDER CRACKS OK? DO I NEED TO PRIME THE GLASS 1ST?
Most of the time, yes. But it depends how bad they. I would roll some epoxy over the gelcoat to seal it up, then use the quickfair to fix the cracks.
I AM IMPRESSED WITH THE SMOOTH FINISHES I SEE USING THE ROLL AND TIP PROCESS. I HAVE ALWAYS SPRAYED, BUT PRESENTLY HAVE NO GUN NOR GOOD SHELTER. HOW LONG DOES IT TAKE THE STERLING PAINT TO TACK OFF?? I MIGHT BE ABLE TO RIG A TEMPORARY SHELTER FOR THIS JOB IF NEED BE.
Its takes several hours, or you can ad a bit of the accelerator and it will skin over in an hours (give or take depending on temp)
WHATS THE DEAL WITH THE GRAPHITE BOTTOM PAINT - I CAN'T FIND IT ON THE BBC SITE.
Its just graphite powder mixed in with your regular epoxy. You roll on a couple thin layers to get a nice sealing coat of epoxy plus a great slick surface. Its in the fillers section of boatbuildercentral.com Here is the link...
http://boatbuildercentral.com/products.php?cat=13
HOW MUCH STERLING PAINT REQUIRED FOR MY:
DECK (ORDER 1 QT?)
BOTTOM (ORDER 1 QT?)
HULL SIDES AND TRANSOM (ORDER 2 QTS?)
The paint goes a long way. The trick is to do a good job with the primer.
Hull sides, transom, and deck (2 quarts max)
bottom, another 1/2 quart
inside, 1 quart max
OVER TOP OF QUICKFAIR - SHOULD I PUT A COAT OF RESIN AS STATED ON THE CONTAINER OR WILL PRIMER SUFFICE?
The epoxy primer is fine
PRIMER - BRUSH OR SPRAY?
roll and brush, some like to spray but I can roll on a nice coat in less time it takes for me to clean a spray gun. Not to mention rolling/brushing is MUCH better for your lungs. If you spray epoxy you need a serious respirator.
CAN I JUST PAINT OVER THE EPOXY ON THE INSIDE WITHOUT ANY PREP OTHER THAN SANDING?
It will take at least twice as much paint that way, use primer ! the primer not only fills little voids, but most importantly to painting it give a uniform background color.
CAN YOIU RECOMMEND AN EPOXY INTERIOR FINISH SIMILAR TO THE OLD "ZOLOTONE" SPATTER TRUNK OR HULL INTERIOR FINISH THAT WILL LAST FOR A BOAT? I USED GEL COAT IN HAWAII BUT THAT SEEMS OLD SCHOOL.
Some builders have used the topcoat paint with a splatter paint effect.
I HAVE BEEN ADDING TO THIS BBS BUT I CAN'T FIGURE OUT HOW TO ADD A NEW POST! OR A NEW PAGE. ALSO WOULD LIKE TO SET UP A PHOTO GALLERY OF THE PROGRESS ON THIS BOAT, WHERE DO I START?
You need to hit the "post reply" button at the bottom of the thread, this then pushes your thread to the top of the message board. If you "edit" the same post, it does not show up as being anything new
Joel
Posted: Wed Nov 26, 2008 2:47 pm
by MTECHMARINE
OK, I KNEW IT HAD TO BE SIMPLE TO DO A "NEW" POST.
PROGRESSING, I TURNED THE CRITTER OVER TO DO THE OUTSIDE 1ST. THIS REVEALED THAT THE BOTTOM, WHICH I THOUGHT WAS STRAIGHT, IS ANYTHING BUT. SO IT LOOKS LIKE WE'LL BE GRINDING AND FILLING A BUNCH. I WILL LAY UP PROGRESSIVELY LARGER ELLIPSES OF GLASS 'TIL I REACH A CLOSE PLANE, THEN FAIR IT IN.

FORTUNATELY THIS SIDES THE WORST, THE OTHER SIDE IS ONLY OFF BY ABOUT 60 THOU AND UP ABOUT 2 FEET. ONE OR 2 LAYERS SHOULD FIX IT.

THE REST OF THE BOTTOM, WITH THE EXCEPTION OF THE OUTSIDE OF THE HOLE I PATCHED FROM INSIDE IS PRETTY GOOD FOR A 50 YEAR OLD!

I HAD SOME SERIOUS STAINLESS EYES LEFT FROM ANCIENT INVENTORY, YOU COULD USE 'EM FOR A 40 FOOTER!! NEVER HURTS TO USE OVERKILL ON ANY BOAT.

Posted: Wed Dec 03, 2008 8:41 pm
by MTECHMARINE
BEEN BUSY CHASING DOLLARS THE LAST FEW WEEKS, NOT MUCH PROGRESS, BUT WE HAVE GROUND AND FILLED MOST OF THE HOOK. I CAN'T FIGURE OUT WHY THE OUTSIDE OF THIS THINGS' SO WARPED, THE STRINGERS I LAID DOWN INSIDE WERE PRETTY FAIR TO THE BOTTOM. O WELL, IT'S A "HULL"OF A LOT BETTER THAN IT WAS!
WEATHERS' BEEN COLD WHEN I HAVE TIME, OR ELSE RAINING. I HOPE TO GET SOME GOOD WEATHER NEXT WEEK, WILL BE FAIRING THE BOTTOM AND STARTING FINISH WORK!
Posted: Sat Dec 13, 2008 12:20 pm
by MTECHMARINE

ADDED THIS MUCH TO THE BOTTOM B4 IT GOT COLD. IT NEEDS JUST A LITTLE MORE MATERIAL AND THEN I CAN FAIR IT ALL WITH ONE FELL SWOOP WITH A PAINTERS' EDGER. STILL COLD TODAY BUT THE WEATHERS' FORECAST TO WARM.
ORDERED MY PAINT,

3 QUARTS STERLING AND PRIMER, ETC. WOW, IT COST NEARLY AS MUCH AS THE REST OF THE MATERIALS FOR THIS JOB! BUT IF IT WORKS AS WELL AS IT SHOULD THAT WILL MAKE IT ALL WORTH THE EXPENSE!

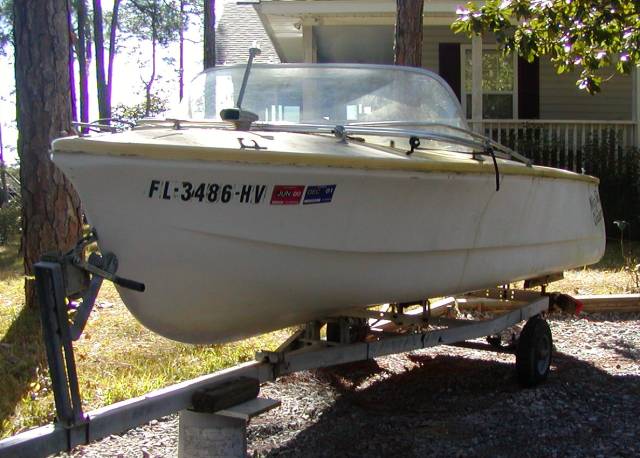
OLD ORIGINAL CAL NUMBERS WERE UNDER THE FL ONES. THIS BOAT WAS BUILT IN PARAMOUNT CAL BY "MOTORBOAT DISTRIBUTING COMPANY"

PRIOR TO, I PATCHED THIS HOLE FROM THE INSIDE, NOW GROUND OFF THE IRREGULARITIES AND THE OLD POLYESTER PATCH, FILLED IT IN WITH BIAX AND EPOXY.
Posted: Sat Dec 13, 2008 9:14 pm
by Mad Dog
Really looking good. Keep up the great work.
MD
Posted: Sun Dec 14, 2008 5:54 am
by steve292
I admire people who do this repair stuff, it looks a lot harder than new building.
Steve
Posted: Sun Dec 14, 2008 12:14 pm
by MTECHMARINE
THANKS. IT'S A LABOR OF LOVE. JUST BEEN A BOAT NUT SINCE MY GRANDPA GAVE ME A JOHNSON 2 1/2HP AND I RAN IT ON A STARCRAFT 12 FOOT TIN BOAT. I WAS 12 YEARS OLD. WHAT A SENSATION, FREEDOM TO GO ANYWHERE ON THE LAKE!
Posted: Sun Dec 14, 2008 12:19 pm
by tobolamr
Hey! I'm still fishing out of a 15' Starcraft!
Posted: Mon Dec 15, 2008 2:27 pm
by MTECHMARINE
THAT MOTOR GRAMPS GAVE ME WAS A 1940 JOHNSON 2 1/2, I WORE IT OUT! NOW I AM PLAYING AGAIN AT 68. AND I AM SHARING WITH AN 11 YEAR OLD. TOOK HIM FOR A RIDE IN MY OLD B STOCK AIRBORNE, NOW HE'S HOOKED!

THOUGHT YOU ALL MIGHT ENJOY A LOOK AT BEFORE AND AFTER, MY 20 FOOT MFG PROJECT IN HAWAII. HAVING CURRENTLY LEARNED A LOT FROM THIS FORUM, WOULD HAVE DONE SOME OF THIS DIFFERENTLY HAD I KNOWN. AT LEAST I USED EPOXY. THE FINISH IS IMRON, NASTY STUFF TO WORK WITH BUT SURE CAME OUT NICE. HOPE MY STERLING LOOKS THIS GOOD.


HEY, IT'S WARM TODAY, I'M OUTA' HERE TO THRASH SOME MORE ON THE P-14!
Posted: Fri Dec 19, 2008 7:20 pm
by MTECHMARINE
It looks like I miss mixed Quickfair the other day and it just made a mess. Not sure how, as I used a scale at 7:3 per the container. Stuff only semi-set after 4 days. So I spent the day scraping it off the bottom with a chisel. Believe I'll just use wood flour and resin.
See the post under Resins, Fiberglass and Paint.
O yes, and no more caps posting,
sorry, habit, I do all my other work with upper case.
Posted: Fri Dec 19, 2008 10:08 pm
by Daddy
If you are looking for a fairing mix don't use wood flour, use the blended filler, it works great and sands easily (wood flour does not). Mix it up fairly thick and trowel it on, does a great job, cheaper too, and when you say resin I assume you mean epoxy (resin and hardener)

.
Daddy
2009 is coming around tonight!!
Posted: Wed Dec 31, 2008 4:53 pm
by MTECHMARINE
Still wating for my materials order, so I guess we will wait 'til next year for another progress report. Right now working on a 1958 Merc MK78 for another restorer.
HAPPY NEW YEAR TO ALL, and thanks for your support.
Posted: Wed Jan 28, 2009 5:15 pm
by MTECHMARINE
Materials finally arrived along with colder weather so I have been working between cold spells, FILL. GRIND. Repeat. Layers of glass, resin and finally quickfair (now behaving

). Good way to build your upper body, I used a 12" plane iron with sandpaper glued on to true it. Phew!
Bottom is true to within .020 for the first 4 feet forward. After 50 years there are some humps & hollows forward of this, but were I to try to straighten that too we'd have a 2 ton boat!
Nearly there - -

Flat and sharp edge for planing surface. Ready for S3 Hi Build primer.I am going to coat the bottom to the waterline with the graphited epoxy mix.

Posted: Thu Jan 29, 2009 8:42 am
by tech_support
MTECHMARINE wrote:
Bottom is true to within .020 for the first 4 feet forward. After 50 years there are some humps & hollows forward of this, but were I to try to straighten that too we'd have a 2 ton boat!
That should be just fine. For the speeds you will take this boat, it will not be noticeable
Posted: Tue Feb 10, 2009 7:05 pm
by MTECHMARINE
Finally got some time to pass on the continuance of this project. A few weeks back I got a nice day near 70, and decided nows' the time to put on the S3 primer. Rolled and tipped, tipped and rolled. The finished product looked just like - yes, a barn brush job. 4 hour drying turned out to be 3 days. Then it got really cold and nasty so I couldn't sand it. Finally Last Thursday we got a break and crew started to sand. What a job. Now keep in mind this is a 13' 6" hull - 2 people (Yes, "Sandy" and I) spent 3 days and umpty discs and pads trying to smooth this stuff out. I finally gave up and ground it off with 80 grit discs. They would last about 10 minutes and even tho they felt sharp and were'nt plugged all they did was polish the stuff. Saturday it was a gorgeous day so I decided to graphite coat the bottom. Same roll and tip resulted in another barn job. The roller (new short nap acrylic proof) shed lint even tho I had blown it off B4 use. Nice and shiny but back to the brushmarks, sags and general uneveness.


Then that night after I covered the boat as best I could with my gazebo tent the first 3 feet or so blushed pretty badly.

SO now with the hard work of
1st. fairing the bottom and dealing with uncured quickfair - -

2nd. refairing the bottom after priming - -

3rd. now I think I'll just re sand this graphite smooth with 320 and leave it dull. Thread on a high performance boating site after some discussion determined a sanded bottoms' faster than a slick one! And that matte surface looks pretty cool too.
I approach the Sterling application with a good deal of trepidation after these experiences. Any advice (besides a warm, dry place to work)??
Sterling should smooth out better. I'm going to try the upper portion of the transom 1st as a test.
Posted: Tue Feb 10, 2009 8:52 pm
by MTECHMARINE
shine wrote:MTECHMARINE wrote:
Bottom is true to within .020 for the first 4 feet forward. After 50 years there are some humps & hollows forward of this, but were I to try to straighten that too we'd have a 2 ton boat!
That should be just fine. For the speeds you will take this boat, it will not be noticeable
Yeah, with any luck most of the bottom won't be touching the water!
Posted: Tue Feb 10, 2009 9:51 pm
by Mad Dog
Posted: Wed Feb 25, 2009 3:59 pm
by Cracker Larry
Patience is a good thing in boatbuilding
Posted: Wed Feb 25, 2009 5:49 pm
by Cracker Larry
Patience is a good thing in boatbuilding
Posted: Wed Feb 25, 2009 7:32 pm
by tech_support
I think the spammer is blocked.
I wish some of the stimulus money could be spent tracking and shutting down spammers. We loose several hour a week of work time to deal with spam, mostly through email.
Test, just a test
Posted: Sat Feb 28, 2009 1:16 am
by anonymous
+1
Posted: Sat Feb 28, 2009 10:46 am
by peter-curacao
shine wrote:I think the spammer is blocked.
And back jeezzz what’s this guy’s problem?
Posted: Sun Mar 08, 2009 9:51 pm
by MTECHMARINE
Got out the other day and sanded the graphite bottom with fine discs and only needed 3 discs and 2 hours to do the entire bottom. It now has a nice smooth matte graphite finish. Looks good.
SPRING HAS SPRUNG!
Orders in for vinyl for cushions, hydraulic hoses for steering and SS trim for the rubrail.
Now that the weather is getting better, the boats coming out of hibernation. Spent the weekend cleaning out my shop sos to be able to wheel the boat inside after finish applications. I expect to get the sides done this week and will post some pictures. Spent the last couple of weeks sorting and accumulating parts for the 3 motors I will use on this boat. All Mercurys from the mid 50's, 2 more or less stock, one highly modified. If you want to see some of what we are doing with motors take a look at this.
http://www.boatracingfacts.com/forums/s ... php?t=6393
Master machinist Doug Kay has reworked my motor block similar to the Mark 40H shown here.
I need some rubber gunwale molding strip for another boat I am doing some work on. Can anyone here steer me in the right direction? All I seem to be able to find is insert type. I need some for both flange and shoebox type seams.
Posted: Mon Mar 09, 2009 9:54 am
by Mad Dog
Were all those engines restorations or well kept? That's pretty cool stuff. The first thing that caught my eye was the pitch on prop with the performance gear case.

That's going to be one nice classic restoration.
MD
Posted: Mon Mar 09, 2009 11:06 am
by MTECHMARINE
Mad Dog wrote:Were all those engines restorations or well kept? That's pretty cool stuff. The first thing that caught my eye was the pitch on prop with the performance gear case.
That's going to be one nice classic restoration.
MD
They are restorations, these engines done by master machinist Doug Kay in Michigan. He got laid off from auto industry and started working from home, now he's backlogged for months! Need any machine work done, he's the best. Call him at 586-212-5917 10 til 8PM or so central time.
Yes, those little props are nifty, I have a boxfull. But expensive, mine have been accumulated over about a 20 year period. Old Mercury motors are practically a cult thing these days!!
Here's a 1953 Wizard WK-7 12HP I did a while back. This engine is similar to a Mercury Mark 20 but only 18 cubic inches. Played a few tricks with it, should be = to the Merc now.

and one of my Mercs underway, a 1955 Mark 55.

Posted: Mon Mar 09, 2009 2:40 pm
by Mad Dog
Now that's some pretty neat projects. So, do you have to fabricate most of your parts or is there a secondary market?
I had couple engines, many years ago, of the vintage in your avitar. Couldn't make them run, didn't think I could find parts, so my dad sent them to the scrap yard. What a waste.
Older and wiser?

MD
Posted: Thu Mar 19, 2009 11:04 am
by MTECHMARINE
The collecting and restoring of old outboards is probably about at the same stage as automotive stuff was 20 years ago. There are a surprising amount of new old stock parts around for early outboards - in fact a good deal of the sales from my website are for 20 year or older models! Some fabrication is being done of hard-to-find parts, but for most all the old Mercs there are sufficient leftovers available with patience to do most any motor. One of my clients just brought me a pair of 1961 Merc 800 80HP with racing speedmaster gearcases. There MIGHT be 5 pairs like this left in existence. Still he bought them for less than $5000 the pair. They are in excellent condition as well needing only fuel lines, wiring and cosmetic replacements.
This would be like finding a Dodge Dart 440 needing tires and a tune up. And that car is worth 6 figures! And not nearly so much fun!
A perfect day, I got busy and did the remaining hull exterior with the S3 water base primer. But this time I SPRAYED it and it came out great. I had used a similar grey epoxy primer under imron on my MFG in Hawaii but it wasn't water based as I recall. A couple of thin spots, a couple of runs, easily sanded out. Not too bad for new gun, new compressor, new paint. Gun was really easy to clean up too.


Now it's a uniform gray so we can put on the Sterling cream. I will TRY the roll and tip on the transom, if it looks good I'll do the rest Saturday. Getting anxious, been a looong process!!
Re: P-14 1958 CLASSIC GLASS RENOVATION
Posted: Tue Mar 31, 2009 9:16 pm
by wmax
So finally did the cream on the bottom last week, it was a learning experience. I had the usual bugs, runs and misc. unidentifiable motes in the paint. Transom came out 99%, but the 1st side had too much paint applied and runs developed. I was able to brush them mostly out. Used less paint and brushing on side 2 and it's lots better. This paint sure lived up to it's reputation for a glossy hard finish.But I think I will trade in my brushing thinner for some reducer and spray the deck. After attending the Lake Dora FL. AYBC meet last weekend I saw some really impressive glass finish work. Mine stands up to anything else you see 'til you get your nose into it and the irregularities show. All in all I'm happy with it.
The motors for the boat are coming along as well, I have several in work, it will be fun to try them out soon.
Had trouble with the forum last night, can't get in same as B4, had to post as a guest
Re:
Posted: Wed Apr 01, 2009 4:35 am
by shinchan
shine wrote:The transom thickness is more than adequate. Transom is tabbed to hull side and botom with 2 layers of 12 oz. biax tape. Then 2 layers of 12 oz. 50" wide cloth over the transom - overlapping to the sides/bottom (over the tape)
I would make my stringers from 2 layers of laminated 3/8" with the joints staggered so that you have one continuous 3/4" stringer. Stringers are tabbed to hull with 2 layers of biax tape.
frames: 3/8" meranti spaced at around 30" - tabbed to hull with 12 oz Biax tape.
You will then epoxy glue cleats (little pieces of wood) to the top of the stringers and frames to provide glue area for the sole. I would prefer to glue the sole down in a couple pieces - so there is plenty of time to mix and apply the epoxy glue. Then the sole gets tabbed to the hull sides with the same 12 ox Biax tape. Sole can be 3/8" or 1/2". I would only put a light cloth on the top side of the sole.
Fillets for transom/stringers/frames/sole should be about 3/8" to 1/2" radius
you will need at least the following to get to the prime/paint stage:
-2 rolls of 12 oz. biax tape
-5 lbs of woodflour (for making glue and fillets)
-3 quarts of quick fair (or 1/2 lb or blended filler if you prefer to mix your own fairing putty)
-enough wide biax cloth to cover your transom as described above
-3 gallons of epoxy to start ( I will guess you may use 6 gallons total on the rebuild)
-plywood: make a drawing of all the parts so you can see how you will cut them out to make the most efficient use of the wood
Cool project and great posts!
Sorry, I just wanted to make sure I understand this because I'm in the process of doing the same right now to a 1962 PT-14 that was abandoned (shell only- no stringers, floor or cap):
By "tabbed" you mean covered over, as in fiberglassed with? So are the stringers bedded in thickened epoxy, then fillets put in and then tabbed?
The sole (floor) edges rest directly on the hull- should I put extra reinforcement to ease a hard spot under the edge or taper the sole edge or...?
Is the bottom of the sole (side that faces the stringers) painted with epoxy then screwed/glued to the top of the stringers?
Last question- do you think if I glassed 1/2" PVC/Divinycell foam to the inside of the hull, from the sole to the gunwales, throughout the inside-would it make it a more durable boat?
I saw this type of boat fishing 8+ miles offshore in Hawaii with two men aboard and they caught two 150 lbs+ ahi(tuna)(yeah, the boat was low in the water
) but the boat sure looked filmsy and flexed a bit when they hit the chop so I was hoping I could somehow make this one a little more durable/stiffer.
Mahalo for any info, Randy
Re: P-14 1958 CLASSIC GLASS RENOVATION
Posted: Wed Apr 01, 2009 8:08 am
by D2Maine
nm
Re: P-14 1958 CLASSIC GLASS RENOVATION
Posted: Wed Apr 01, 2009 8:34 am
by shinchan
Holy crap, I think I found everything I wanted to know and then some!
Plenny mahalos for the links!!!
Sorry for the interruption, please continue the great posts...
Randy
Re: P-14 1958 CLASSIC GLASS RENOVATION
Posted: Wed Apr 01, 2009 6:51 pm
by MTECHMARINE
Aloha, I lived on the Big Island for 22 years
and saw some P-14's in use there. They were BRAMCO / Seaswirl built, mine is older yet - -
Finally got the ivory Sterling on the sides with mediocre results. (see page 3, I posted prior in the wrong place) Looks good from a distance, but up close not so good. I have a little less than half a can left, thinking about maybe a second coat sprayed on.

Re: P-14 1958 CLASSIC GLASS RENOVATION
Posted: Thu Apr 02, 2009 6:43 am
by frazoo
dang, looks like someone is outboard motor poor
frazoo
Re: P-14 1958 CLASSIC GLASS RENOVATION
Posted: Tue Apr 28, 2009 7:34 pm
by MTECHMARINE
I couldn't stand it after participating in the lake Dora Antique and classic boat meet last weekend of March. saw a lot of classic glass as well as unbelieveable woodwork. My paint job just wouldn't hold up to these standards. Being a Virgo it finally got to me.
Went to the local auto paint emporium and after another half a grand I had replacement paint and clear coat for both motors and boat. Shot the boat last sunday after another 2 day sanding session to remove the runs, lap marks and brush marks from the roll N tip. Result?? WHEE DOGGIES!
Looks like glass. SHINEY!! I painted 2 motors worth of top and lower cowls as well. They look just like Dougs motors pictured prior. Sorry but this is gotta be the way to go for me. The sterling was glossy enough but just wouldn't lay out flat.
I will post more pics when I roll it out and flip it this weekend.. I can see the end of this project, gettin' closer!
Re: P-14 1958 CLASSIC GLASS RENOVATION
Posted: Mon May 11, 2009 12:23 pm
by txtrailerdaddy
Just curious, what paint did you use? I see that you had put down sterling roll & tip and were not happy with the results. I just finished the graphite/epoxy and am not crazy about how it looks. Because of this, I'm not so sure I want to roll the paint. I have painted with a gun in the past and would feel more comfortable with that. I talked to a local paint/body shop that I know have done some boats, but he's insane on his pricing. Also, he puts down Automotive paint, and then clearcoats with a marine grade. I've seen his work. It looks fantastic, but I'm not so sure it is durable. I need to make some decisions in the near future and want to avoid re-doing. TXT
Re: P-14 1958 CLASSIC GLASS RENOVATION
Posted: Mon May 11, 2009 1:01 pm
by tech_support
txtrailerdaddy wrote:Just curious, what paint did you use? I see that you had put down sterling roll & tip and were not happy with the results. I just finished the graphite/epoxy and am not crazy about how it looks. Because of this, I'm not so sure I want to roll the paint. I have painted with a gun in the past and would feel more comfortable with that. I talked to a local paint/body shop that I know have done some boats, but he's insane on his pricing. Also, he puts down Automotive paint, and then clearcoats with a marine grade. I've seen his work. It looks fantastic, but I'm not so sure it is durable. I need to make some decisions in the near future and want to avoid re-doing. TXT
pleas do not compare rolling and tipping paint with rolling our epoxy/graphite. Its not nearly the same thing in terms of what you can expect in terms of finish. You cant get perfect with epoxy graphite, paint is MUCH easier.
Re: P-14 1958 CLASSIC GLASS RENOVATION
Posted: Mon May 11, 2009 1:43 pm
by txtrailerdaddy
shine wrote:please do not compare rolling and tipping paint with rolling our epoxy/graphite. Its not nearly the same thing in terms of what you can expect in terms of finish. You cant get perfect with epoxy graphite, paint is MUCH easier.
I'm not, really. I'm sure it is applicator error/lack of experience on my part. I am planning to paint the console as well. With more angles, insides of hatches, etc. I am thinking it would be better/easier to shoot it. While I'm not so picky about the bottom, or even the inside of the boat, I would like to have good results with the console and the sides... I imagine the potential for sags is greater on shooting it than rolling and tipping. However, since I can't talk Mad Dog into coming over and doing mine, since he's gotten all that practice on his
, I have to rely on me
TXT
Re: P-14 1958 CLASSIC GLASS RENOVATION
Posted: Mon May 11, 2009 2:46 pm
by Mad Dog
txtrailerdaddy wrote:However, since I can't talk Mad Dog into coming over and doing mine, since he's gotten all that practice on his TXT
We both know you don't want
ME painting anything....
MD
Re: P-14 1958 CLASSIC GLASS RENOVATION
Posted: Mon May 18, 2009 9:12 pm
by MTECHMARINE
txtrailerdaddy wrote:shine wrote:please do not compare rolling and tipping paint with rolling our epoxy/graphite. Its not nearly the same thing in terms of what you can expect in terms of finish. You cant get perfect with epoxy graphite, paint is MUCH easier.
I'm not, really. I'm sure it is applicator error/lack of experience on my part. I am planning to paint the console as well. With more angles, insides of hatches, etc. I am thinking it would be better/easier to shoot it. While I'm not so picky about the bottom, or even the inside of the boat, I would like to have good results with the console and the sides... I imagine the potential for sags is greater on shooting it than rolling and tipping. However, since I can't talk Mad Dog into coming over and doing mine, since he's gotten all that practice on his
, I have to rely on me
TXT
I agree, the roll and tip is probably a good way to go with some experience or flat surface /temperature controlled environments. Properly thinned and applied it should be fine. My poor job was NOT the fault of the paint!! I have seen some real good results here on this forum. My graphite job has been wet sanded to matte and I had intended to do that from the git go.I had never tried roll /tip and application to vertical surfaces in an unheated outside location certainly does not help. I have painted a bit with spray and felt much more comfortable using this method.
Bear in mind here I DO NOT intend to leave this boat in the water, not even outside without cover. Paint being an unknown area for me these days I bought the best stuff I could find - PPG Deltron 2000 base coat and 3000 clear coat. It was (pricey but) easy to use, I didn't get run one altho there are a couple areas of roughness in the clear. At the instant I started to clear coat, the wind picked up and was a real problem. Got 'er done tho.
Dries fast, tack free in minutes just like acrylic enamel. YOU MUST USE proper mask and cover for that clear!
FINALLY flipped her back over yesterday the 17th. been upside down since November 25th 2008.

Sanded the deck with longboard some this PM, now we are getting closer.
Re: P-14 1958 CLASSIC GLASS RENOVATION
Posted: Tue May 19, 2009 10:01 am
by txtrailerdaddy
It's looking good! I know mine wasn't upside down very long, but it sure is a good feeling to turn it back over. I feel like I can just check something else off the list. TXT
Re: P-14 1958 CLASSIC GLASS RENOVATION
Posted: Wed Jun 03, 2009 1:06 pm
by MTECHMARINE
After a couple evenings masking work I sprayed on a coat of system3 primer which revealed a lot of unfilled gel coat cracks. Applied 3M acryblue surfacing putty and now its looking good. With any luck we will put more primer on this evening and the finish coat on this weekend.
Sure have learned a lot about current methods on this forum and the guys at Boat Builder Cantral, been quite a learning experience. Now if I could just talk Gary out of this one:

It's a 1959 Glastron Seaflite 17 with twin Merc MK55's, I have gone thru both motors replacing as required, the 2 have very little running time. A joy to work on! Waiting for some starters to convert them from manual to Elecric start.
A death in the "family".
Posted: Sun Jun 07, 2009 9:09 pm
by MTECHMARINE
Jeeze guys, Gary had a heart attack Saturday just B4 leaving to come visit me. They Lifeflighted him to Gulf Breeze Baptist hospital but he didn't make it. SO take every day as a gift and enjoy it because you never know whats next.
He had over 35 boats from the 50's, all the good stuff. And hardly got to enjoy any of it. A great guy, I will really miss him.
I laid the last coat of primer on the deck and finally all the flaws are gone. I was all ready to paint today but the power went out so we will paint next weekend.
Shine, will a dustoff with 600 be OK for the finish coat over the SYS3 primer? I'm going to have to wait over 72 hours.
Re: P-14 1958 CLASSIC GLASS RENOVATION
Posted: Mon Jun 08, 2009 4:02 pm
by Mad Dog
I'm sorry for your loss. Good friends are hard to come by.
MD

Re: P-14 1958 CLASSIC GLASS RENOVATION
Posted: Mon Jun 08, 2009 5:24 pm
by Cracker Larry
I'm very sorry for the loss of your friend
300 grit will be enough over the primer.
Re: P-14 1958 CLASSIC GLASS RENOVATION
Posted: Mon Jun 15, 2009 7:42 pm
by MTECHMARINE
PAINTED DECK LAST WEEKEND!

Tough to capture the glossy finish! Could be better, the clear didn't quite lay out perfect in the 90+ degree heat. But I'm satisfied.

Here's the Mark 50 MOD motor, it's ready to go.

Now I have to finish the interior.
build the seats.
hydraulic steering.
lights.
gunwale trim.
hardware.
I'm a lucky guy. Put down deposit on new 18X28 storage/shop Saturday!!
hardware
Re: P-14 1958 CLASSIC GLASS RENOVATION
Posted: Mon Jun 15, 2009 11:48 pm
by Mad Dog
Sweet finish. So much better than mine ended up. Hydraulic steering? I thought you might go back with the old pulley and cable set up for the "authentic" restoration.
One day I'll describe how one of the systems landed a 20' Garwood 40' up the bank.
Great job man.
MD
Re: P-14 1958 CLASSIC GLASS RENOVATION
Posted: Tue Jun 16, 2009 8:51 am
by Daddy
Beauty!!!
Re: P-14 1958 CLASSIC GLASS RENOVATION
Posted: Fri Jul 31, 2009 6:36 pm
by MTECHMARINE
Thought you all might like to see the near finished boat. Just need to put a few more items on, a stern light and the black walnut trim that will go here and there. I have 2 solid cherrywood plank tops from Ethan Allen sideboards ruined in hurricane IVAN that will become the seats. I will build out a small console on the left to accept a wheel and some simple instruments.

Aft seating area, step pad inserts are black walnut.

Bow shot shows the cool old brass casting I found for the nose.

And dig this cool retro bow light! Actually saw 2 more of these at Lake Dora last spring! I've had this one for near 20 years, waiting for a boat.

Painted the inside with the S3 grey, it's a dream to work with and covers really well. I am using hydraulic steering 'cuz it's easy to run the lines and eliminates motor torque. MD is right - cable and pulley, unless simple it's pretty nasty. Great for race boats with a straight run but too old school for todays speeds and motors.
Re: P-14 1958 CLASSIC GLASS RENOVATION
Posted: Fri Jul 31, 2009 6:56 pm
by TomW
My lands that is pretty. She is something she is something you can be proud of!
Tom
Re: P-14 1958 CLASSIC GLASS RENOVATION
Posted: Fri Jul 31, 2009 7:07 pm
by tobolamr
Fantastic! That black walnut will work out nicely, too. I love the bow light!
Re: P-14 1958 CLASSIC GLASS RENOVATION
Posted: Fri Jul 31, 2009 7:54 pm
by Daddy
BEAUTY
Re: P-14 1958 CLASSIC GLASS RENOVATION
Posted: Fri Jul 31, 2009 8:29 pm
by Mad Dog
I can "feel the Luv" in this restoration.
Great work.
Yeah those pulley systems have their issues. Like breaking and sending a 20' deep vee Garwood 50' up the bank.
Keep up the good work and keep the pics coming.
MD
Re: P-14 1958 CLASSIC GLASS RENOVATION
Posted: Sat Aug 01, 2009 9:57 am
by Cracker Larry
I don't know which is better, your boat restorations, or your engine restorations, but I seriously admire your talents at both

Re: P-14 1958 CLASSIC GLASS RENOVATION
Posted: Sat Aug 01, 2009 5:31 pm
by peter-curacao
This is so cool
that bow light is made for this boat it matches the the lines in the bow perfectly, again very cool job
Re: P-14 1958 CLASSIC GLASS RENOVATION
Posted: Sat Aug 01, 2009 6:55 pm
by cape man
Re: P-14 1958 CLASSIC GLASS RENOVATION
Posted: Wed Aug 12, 2009 6:27 pm
by MTECHMARINE
Thank you all so much for the kind words!
The weather here has been really hot and muggy so not a lot more has been done on the boat. I have put the steering console together and installed it to the left hand side of the centerdeck. Got the steering hoses out of the box and discovered that they use different tube fittings than I have so there will be a delay in installing the steering while I obtain them. I also have to make up some sort of attach hardware to mount the cylinder and link back arm as the older motors being used have no allowance for the installation of motor mounted steering other than cable and pulley!
Looking over my old trailer it appears I'm gonna have to go thru it too. Bought some 12 inch wheels to replace the old rotted 8's. When I installed 'em - Sitting around, the springs rusted between leafs and one actually broke from the pressure. I don't like the bunk supports either. Need to lower it down so the CG improves as well as appearance. The good news is there is a trailer manufacturer very close to the house where I can git 'er done.
I'll post some more pics soon.
Re: P-14 1958 CLASSIC GLASS RENOVATION
Posted: Mon Sep 28, 2009 6:24 pm
by MTECHMARINE
"Dash" for the rear steering.

Boy, has this summer been a scorcher! I have been working on this boat for over a year now. I have sent out portions of the hydraulic steering to be reworked to accomodate the early model motors I'll be running on this boat. As soon as they get back we will be rigging the MOD Mark50 for a test run!
Varnished the inside of the natural wood portion of the hull. Along that line, the varnish I used seems to be awfully soft - I used spar varnish rather than polyurethane, think I shoulda' used the latter.
Also read recently that application of paint and varnish over epoxy amines on the surface will sometimes cause the overcoat not to dry properly. I did wash and sand the surfaces 1st - the boat sat for several months B4 I coated it. It seems to be OK, only time will tell.
Re: P-14 1958 CLASSIC GLASS RENOVATION
Posted: Mon Sep 28, 2009 8:33 pm
by Daddy
Great looking build/restoration
Daddy
Re: P-14 1958 CLASSIC GLASS RENOVATION
Posted: Tue Sep 29, 2009 7:37 am
by cape man
Re: P-14 1958 CLASSIC GLASS RENOVATION
Posted: Mon Nov 02, 2009 6:29 pm
by MTECHMARINE
Had a banner year with the website, but between times been piecing the rig together. Thought you might enjoy a shot of the MOD MK50 initial run on 10/29. After getting a couple bugs out I ran it for about 30 minutes on the red dyno, idles like a fishing motor. We will be heading for the AOMCI classic and antique meet on lake Shipp, Winter Haven FL just south of Orlando on the 13th for the maiden voyage. If you are in the area come by the park, you will see a lot of nifty rigs.

Hope you enjoy the shots!

Re: P-14 1958 CLASSIC GLASS RENOVATION
Posted: Mon Nov 02, 2009 8:16 pm
by Mad Dog
Great job man. A double restoration that looks fantastic. I really appreciate the red dyno! Mine just happens to be pink (formally a daughter's toy tub.)
MD
Re: P-14 CLASSIC GLASS IS ON THE WATER!!
Posted: Wed Nov 18, 2009 11:23 am
by MTECHMARINE
Re: P-14 1958 CLASSIC GLASS RENOVATION
Posted: Wed Nov 18, 2009 12:22 pm
by Daddy
Beautiful all around
Daddy
Re: P-14 1958 CLASSIC GLASS RENOVATION
Posted: Wed Nov 18, 2009 3:16 pm
by peter-curacao
Absolutely beautiful !

any chance for some action pics?

Re: P-14 1958 CLASSIC GLASS RENOVATION
Posted: Wed Nov 18, 2009 4:24 pm
by Cracker Larry
You really have a lot of talent with boats and engines. That is very cool
Re: P-14 1958 CLASSIC GLASS RENOVATION
Posted: Wed Nov 18, 2009 5:43 pm
by TomW
That is an outstanding restoration. One to be very proud of!
Wish I had your talent especially with the motors.
Tom
Re: P-14 1958 CLASSIC GLASS RENOVATION
Posted: Thu Nov 19, 2009 7:39 am
by wegcagle
Amazing restoration. Congrats, you've got to be proud.
Will
Re: P-14 1958 CLASSIC GLASS RENOVATION
Posted: Thu Nov 19, 2009 1:13 pm
by MTECHMARINE
Thanks all for the kind words.
I cut down the 13 pitch prop blade area and slightly reduced the diameter. Also have the Michigan prop from my KF-9 restoration which is a 3 blade 10 pitch, should be good. Not the speediest of props, looks like an old OMC Big Twin with 3 "mickey mouse ear" blades.
So Sunday we are going to the river here and test these 2. I have some video from the Lake Shipp meet but it's pretty grainy - should be able to get some better shots this weekend and I'll get some up on Utube.
Re: P-14 1958 CLASSIC GLASS RENOVATION
Posted: Fri Nov 20, 2009 10:02 am
by cape man
Absolutely, and I mean absolutely, gorgeous!!! WOW! Too freakin' cool.
Re: P-14 1958 RIVER RUN
Posted: Wed Nov 25, 2009 5:16 pm
by MTECHMARINE
River test of the 2 props revealed the cut down one worked better, the 3 blade surprised me with about equal performance. Forgot the camera, sorry. Found a couple more props lying around, we'll retest after I get the speedometer and tach in.

Think maybe we need a BIGGER motor, working on a 1957 Mark 75 inline 6, 60HP. should be ready to run around Christmas!
Happy thanksgiving, enjoy the Christmas holidays.
Re: P-14 1958 CLASSIC GLASS UNDERWAY
Posted: Wed Dec 02, 2009 1:36 pm
by MTECHMARINE
Well turns out I LOST my camera someplace on the lake Shipp trip.
Bit I found this pic of Haven and I underway on the Quincy Looper site, thought I"d share it with you.

Hope you enjoy it, this is the end result of time spent in restoration. When you are questioning your sanity in proceeding. Worth way more than anything you can buy!! BTW, working on a '57 Mark 75 to repower.
The MODMark50 needs to be on a lighter boat.
More pictures from the meet.
http://s793.photobucket.com/albums/yy21 ... CI%202009/
Re: P-14 1958 CLASSIC GLASS RENOVATION
Posted: Wed Dec 02, 2009 2:33 pm
by gk108
That's a great looking job.
The MODMark50 needs to be on a lighter boat.
Hey, man, no need to justify it to us. If you feel like you need to restore another old vintage boat, we'll understand.
Re: Mark 75 and MERRY CHRISTMAS!
Posted: Wed Dec 23, 2009 11:45 am
by MTECHMARINE
It was in the 60's and sunny on the 22nd, so we were able to do a rollout.
Here's my christmas present to myself! This motor was new in 1957 so it will be the perfect accompanyment to the P-14.

I was blessed with a decent engine to start with. This motor done in memoriam of my friend Gary Kempton who passed away unexpectedly last June.

Wishing all here at BBC and forum readers the merriest of christmases! BILL
Re: P-14 1958 CLASSIC GLASS RENOVATION
Posted: Wed Dec 23, 2009 1:14 pm
by TomW
Same to you Bill.
Tom
Re: P-14 1958 CLASSIC GLASS RENOVATION
Posted: Sat Sep 11, 2010 12:33 pm
by mb7644
Fantastic! I wish I had some of your kind of talent and ability. About all I do with the boats in my yard is look at them.
'Mitch In S. C.
MERRY CHRISTMAS, AGAIN
Posted: Wed Dec 22, 2010 8:05 pm
by MTECHMARINE
Another year gone by, how time flys - we had a lot of fun with the P-14 this summer. I took the 4 cylinder off and installed the Mark 75, not a lot faster but more smack!
Attended several vintage meets, and just went to the river here and cruised. Hey, here's what it's all about! take a kid boating today, they will never forget it!

MERRY CHRISTMAS TO ALL ON THIS BOARD!
In February I will be building a 14 foot D mod raceboat, watch for it.
Re: P-14 1958 CLASSIC GLASS RENOVATION
Posted: Thu Dec 23, 2010 9:38 am
by wegcagle
With a smile like that do think he'll be as addicted to boats as his dad

That is truly what it's about.
You do incredible work. Can't wait for your next build.
Will
Re: P-14 1958 CLASSIC GLASS RENOVATION
Posted: Sat Sep 01, 2012 7:18 am
by bayoucat58
Great job on the rebuild i was following this build close and am impressed up until the motor. Why would you put a Suk motor on it?
Re: P-14 1958 CLASSIC GLASS RENOVATION
Posted: Mon Nov 11, 2013 3:00 pm
by master of masters
did u get the bottom straight cause most of those older boats were built with a hook to make it plane at slower speeds with less motor
Re: P-14 1958 CLASSIC GLASS RENOVATION
Posted: Sat Sep 19, 2020 3:03 pm
by MTECHMARINE
It is now 2000, at 80 I still have this boat, still solid, no cracks in structure, but The spider cracks on the deck reappeared after a couple of years. Mercury Mark 75 runs flawlessly requiring only a reset of points and a back water jacket gasket replacement. We run it as often as we can get away. Just survived hurricane Sally, 16 years to the day after IVAN, previously mentioned. Boat in stronger garage this time also no flooding here.
Re: P-14 1958 CLASSIC GLASS RENOVATION
Posted: Sat Sep 19, 2020 4:04 pm
by Fuzz
That is great having you come back and giving the update
Is there any chance you will post some pictures of the boat? Most of the thread pictures are gone now
Re: P-14 1958 CLASSIC GLASS RENOVATION
Posted: Sat Sep 19, 2020 6:54 pm
by fallguy1000
Cool
Re: P-14 1958 CLASSIC GLASS RENOVATION
Posted: Tue Sep 29, 2020 7:35 pm
by boguesounder
Yes, please post a pic. Bummed to not be able to see the finished product after everyone was saying how nice it is.


