
DAYTRIPs Bertram 28 Strech

Re: DAYTRIPs Bertram 28 Strech
Nice work DayTrip!! Jeff
-
DAYTRIP
- * Bateau Builder *

- Posts: 848
- Joined: Wed May 31, 2006 10:32 pm
- Location: North Palm Beach
- Location: NORTH PALM BEACH
Re: DAYTRIPs Bertram 28 Strech
Thanks fellas
-
Seabird254
- Frequent Poster

- Posts: 44
- Joined: Thu Nov 14, 2019 2:20 pm
- Location: Charleston, sc
Re: DAYTRIPs Bertram 28 Strech
Another awesome build. Loving the hatch drains.
I reread the other thread and couldn’t find it mentioned so figured I would ask. Do you core the actual transom like a normal transom would be or does it become a false transom and the bracket transom is all that is needed? Also what is the layup schedule on your bracket stringers?
Keep up the great work.
-
DAYTRIP
- * Bateau Builder *
- Posts: 848
- Joined: Wed May 31, 2006 10:32 pm
- Location: North Palm Beach
- Location: NORTH PALM BEACH
Re: DAYTRIPs Bertram 28 Strech
Hey seabird,
I think I outlined the layup schedule somewhere above. It is 6 skins per side of the clamping bracket, stringers are the same. The tub is 8 skins. All 1708. The transom on this will be cored but not to carry bracket. I have some 2” foam I will use. All load goes thru stringers for the most part. There is one area that I cored with 1” meranti to support any load coming from tub vertical section.
I think I outlined the layup schedule somewhere above. It is 6 skins per side of the clamping bracket, stringers are the same. The tub is 8 skins. All 1708. The transom on this will be cored but not to carry bracket. I have some 2” foam I will use. All load goes thru stringers for the most part. There is one area that I cored with 1” meranti to support any load coming from tub vertical section.
-
Seabird254
- Frequent Poster
- Posts: 44
- Joined: Thu Nov 14, 2019 2:20 pm
- Location: Charleston, sc
Re: DAYTRIPs Bertram 28 Strech
Thanks for the info. I would like to do the same to my mako. I will probably do a normal transom layup just for piece of mind then run the stringers through that.
-
DAYTRIP
- * Bateau Builder *
- Posts: 848
- Joined: Wed May 31, 2006 10:32 pm
- Location: North Palm Beach
- Location: NORTH PALM BEACH
Re: DAYTRIPs Bertram 28 Strech
There is a thread on here where we did a bracket on my nephews 221. Helping my neighbor right now with his 224. Did his transom in coosa 2-1” pieces and will build a bracket at some point soon
-
lelandtampa
- Frequent Poster
- Posts: 111
- Joined: Wed Jun 22, 2005 5:44 pm
- Location: tampa
Re: DAYTRIPs Bertram 28 Strech
Anyone else dying to see this updated?
-
Mike Garone
- Frequent Poster
- Posts: 25
- Joined: Thu Feb 13, 2020 8:06 pm
- Location: Manasquan, NJ
Re: DAYTRIPs Bertram 28 Strech
Hell yeah!
-
boguesounder
- Frequent Poster
- Posts: 171
- Joined: Sat Mar 08, 2014 9:51 pm
- Location: United States
Re: DAYTRIPs Bertram 28 Strech
Ha, yes!
-
DAYTRIP
- * Bateau Builder *
- Posts: 848
- Joined: Wed May 31, 2006 10:32 pm
- Location: North Palm Beach
- Location: NORTH PALM BEACH
Re: DAYTRIPs Bertram 28 Strech
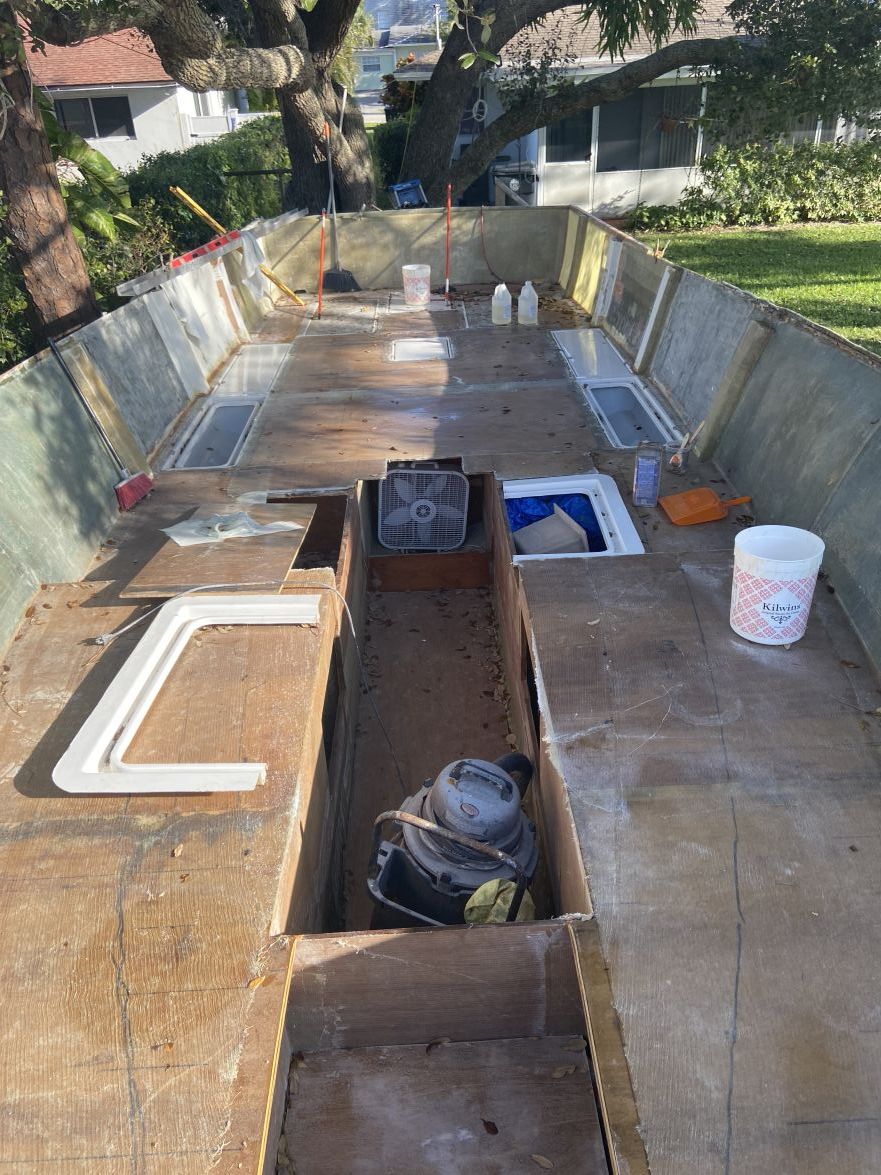
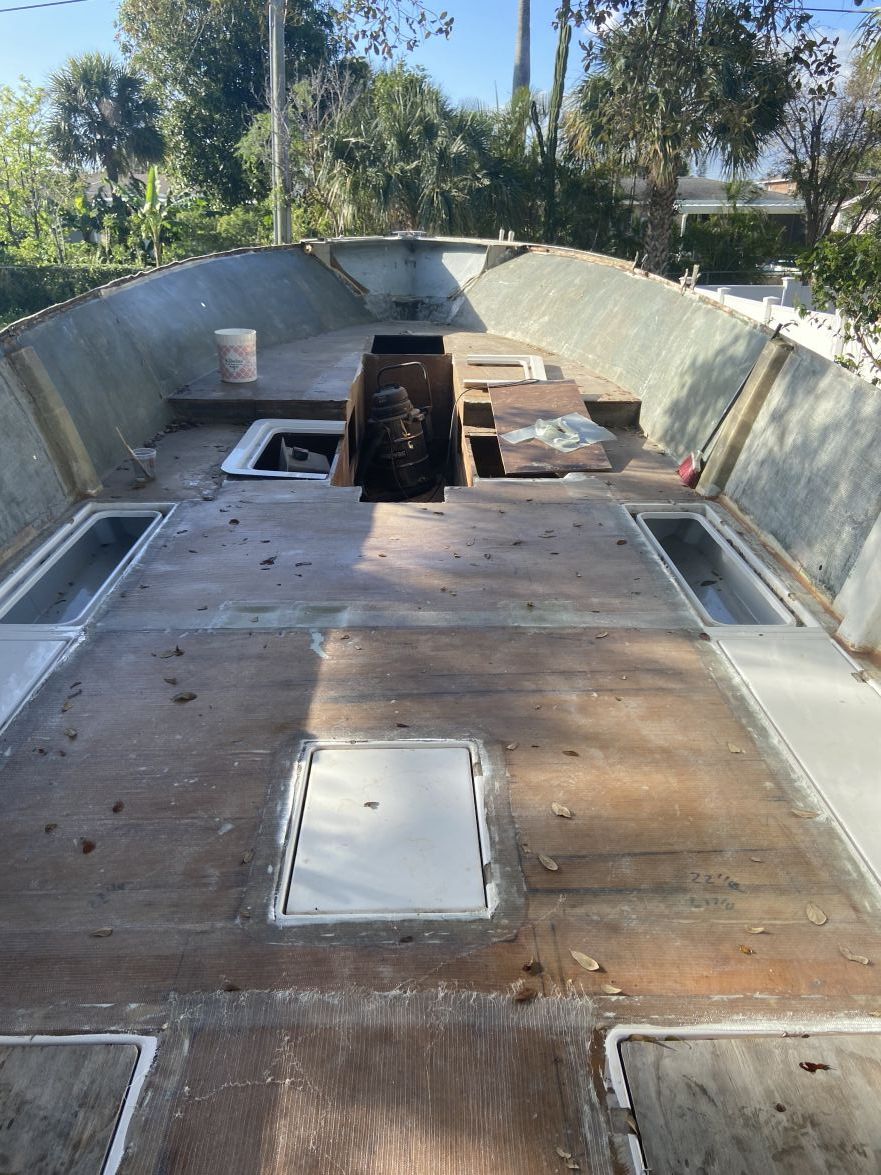
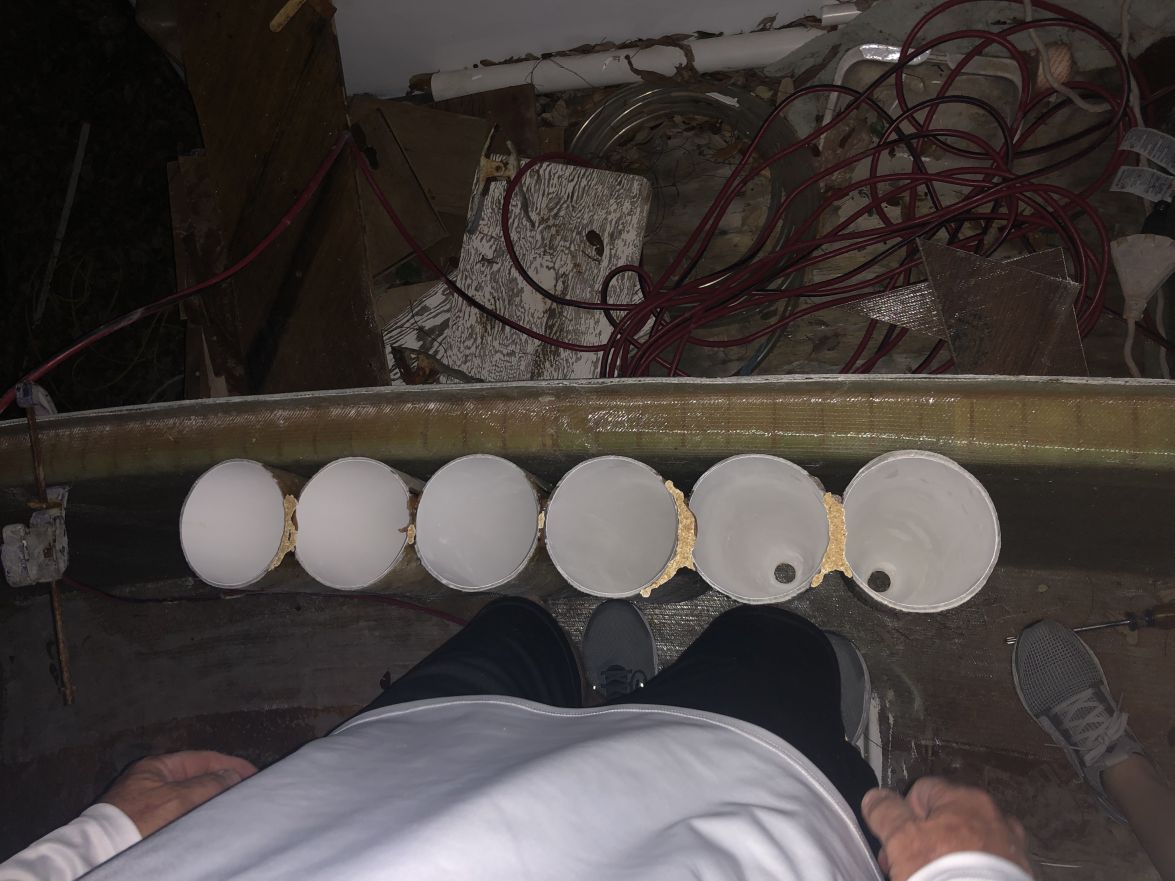
It has been a while! Floors are in, all glassed with the exception of one small section. You can see the layout of the area under the console a bit better now. Had to do the step to keep the width of my gunnels. fourth image are the tuna tubes for the transom. This will make live baiting a lot easier when it comes time to make a move. Final image is the most current layout.
Also ground all the hull sides and added a layer of 1700. Will begin the construction of the cap next. Will first install outrigger supports every 4', less in some areas. Once they are installed I will fair the hull sides. Then I will install the bolster. The cap itself will be glassed and faired on the underside off the boat. Then I will fillet it on the underside to the bolser and outrigger supports. That will give me a nice finished look. Then everything will be glassed on the top side. Up the bolster, over the top of the cap and onto the hull side in the rub rail area. Then she will be ready to flip.

Also ground all the hull sides and added a layer of 1700. Will begin the construction of the cap next. Will first install outrigger supports every 4', less in some areas. Once they are installed I will fair the hull sides. Then I will install the bolster. The cap itself will be glassed and faired on the underside off the boat. Then I will fillet it on the underside to the bolser and outrigger supports. That will give me a nice finished look. Then everything will be glassed on the top side. Up the bolster, over the top of the cap and onto the hull side in the rub rail area. Then she will be ready to flip.
Last edited by DAYTRIP on Sun Jul 05, 2020 9:28 am, edited 1 time in total.
Who is online
Users browsing this forum: No registered users and 9 guests