Page 1 of 1
1979 19 ft Sea Ox rebuild
Posted: Mon Feb 10, 2020 8:43 pm
by Mr Pamlico
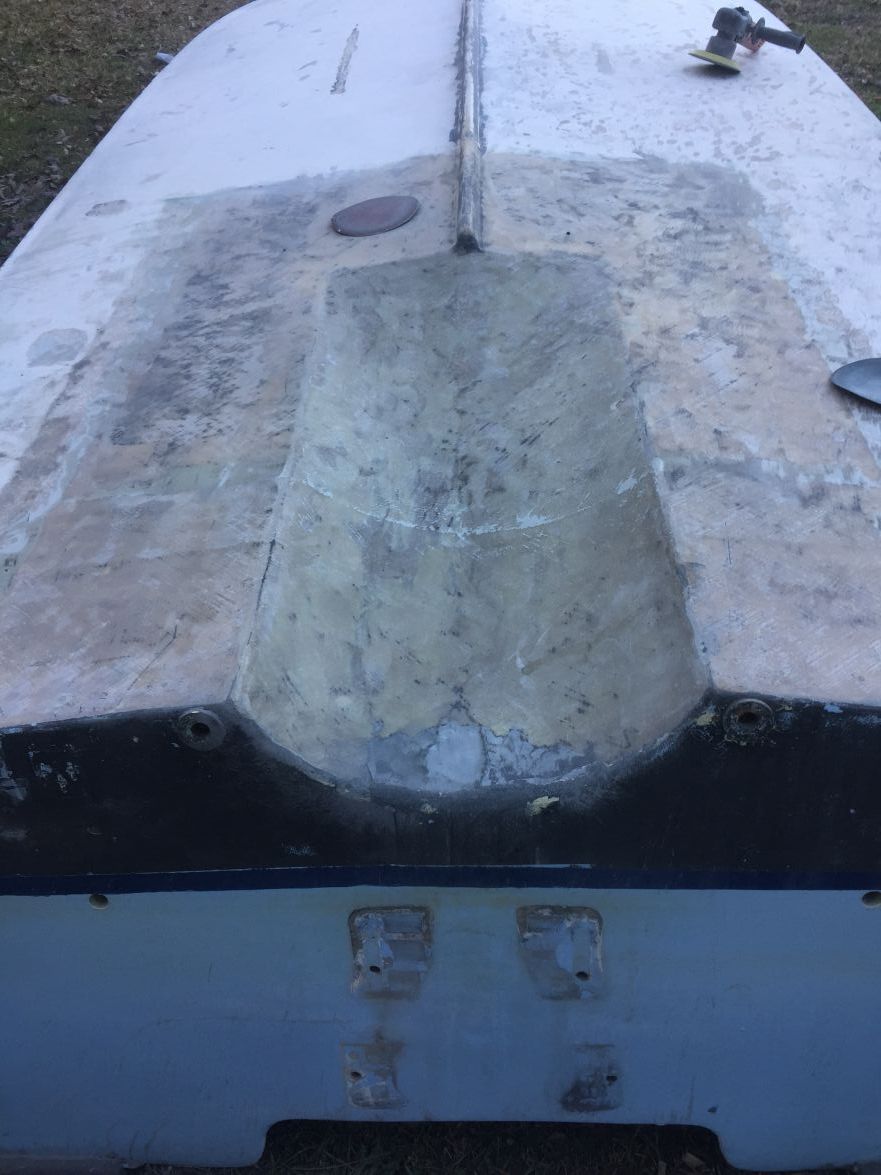
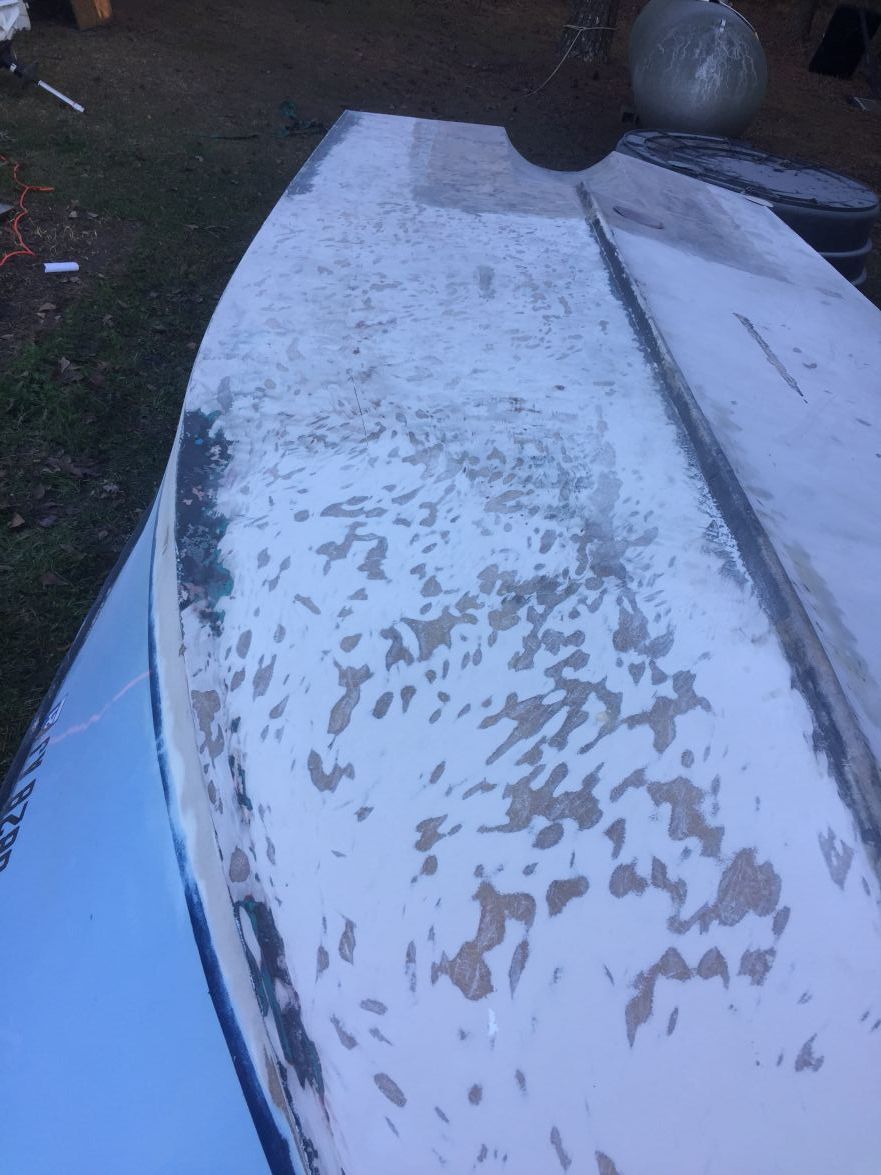
I have read through many rebuilds on this site, mostly privateer and Sea Ox builds, and I have recently started on my first. I have no previous experience with fiberglass or boat construction. I have the boat flipped over and had to work my way through layers and layers of bottom paint. I was using an angle grinder with a sanding wheel and I was too aggressive on the first side I started on. I realized this after the dust cleared. I purchased a dual action sander and had much better luck getting down to the barrier coat on the other side. My question is how can I fix the deep spots I have caused? Do I need to sand all the way down to the fiberglass and get it level that way or is there a way to fill these spots and level them out? There is filler on the back of the boat where the tunnel was put in but I want to make sure when I’m done that it is done right. This hull is going to see a lot of abuse from fishing and especially duck hunting.
Re: 1979 19 ft Sea Ox rebuild
Posted: Mon Feb 10, 2020 8:48 pm
by Mr Pamlico
Re: 1979 19 ft Sea Ox rebuild
Posted: Mon Feb 10, 2020 10:04 pm
by Fuzz
First welcome to our little group

I don't think you have hurt anything with the grinder. You do not need to take all the gelcoat off but you want it well sanded. What I write is based on the use of epoxy. Go over the whole bottom with some 40-60 grit until it is clean and sort of smooth. You can then mix up some epoxy with fillers and put it on with a trowel so its mostly smooth. Then sand and longboard for a fairing.
Post pictures as you go and ask questions. Lots of folks here will help and give good advice.
Fuzz
Re: 1979 19 ft Sea Ox rebuild
Posted: Tue Feb 11, 2020 8:03 am
by Mr Pamlico
Thanks for the welcome. The boat has no gel coat. It was just barrier coat and paint. So in some places where I went through the barrier coat I am at the fiberglass. And the rear of the boat had no barrier coat where the tunnel was put in by a previous owner. I’ll try and get some pics up when I get off work this afternoon. I was having trouble getting the pictures to show up in the thread last night
Re: 1979 19 ft Sea Ox rebuild
Posted: Tue Feb 11, 2020 8:07 am
by Jeff
Mr Pamlico, welcome to our builders forum!! You will receive excellent support and guidance from our members!! We look forward to watching your rebuild!!! Jeff
Re: 1979 19 ft Sea Ox rebuild
Posted: Tue Feb 11, 2020 1:24 pm
by Fuzz
I went to your gallery and left clicked on the picture-copy image location- back to my post-paste
You need to click on the mountain looking icon and click in the middle of the quotes in your post.
Have you run this hull? I ask because I wonder if the PO built the tunnel correctly?
Re: 1979 19 ft Sea Ox rebuild
Posted: Tue Feb 11, 2020 8:38 pm
by Mr Pamlico
Re: 1979 19 ft Sea Ox rebuild
Posted: Tue Feb 11, 2020 9:20 pm
by Mr Pamlico
Thanks for that explanation Fuzz. As you can see I learned from my mistakes after that first side. I ran the boat for a little over a year. It ran bow up very bad with the raised transom and the fuel tank under the lean post. The boat was redone in 2005 but I do question their craftmanship. The second time I ran the boat and got into some rough water the console broke loose, it was not screwed down just glued, and threw me and it down inside the boat. I then put in a console from one of my great uncles old boat builds and hydraulic steering. A few weeks after that running back across the pamlico river the left side of the floor broke loose. I installed trim tabs from the same donor boat I got the console from and it ran 100 times better after that. I also have a jackplate to go on the boat once its time to hang the motor.
Re: 1979 19 ft Sea Ox rebuild
Posted: Tue Feb 11, 2020 9:52 pm
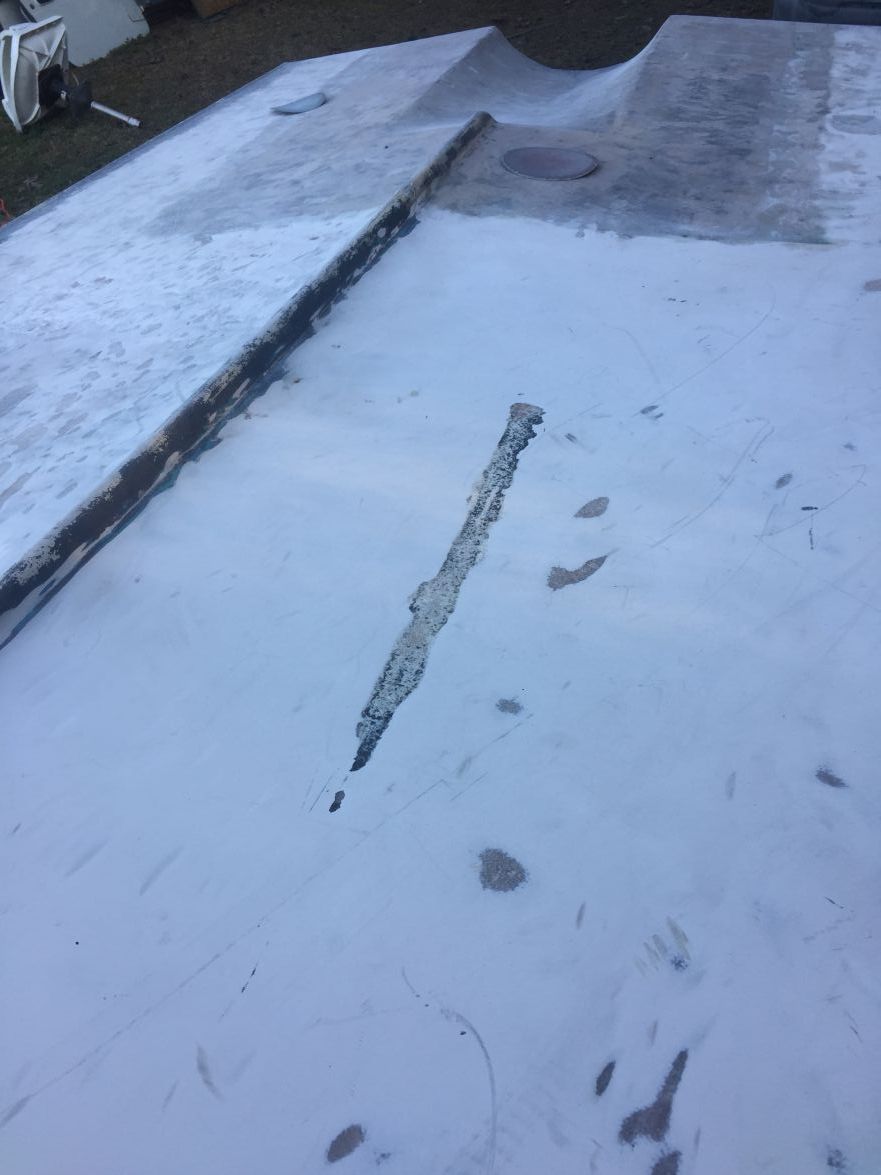
by Mr Pamlico
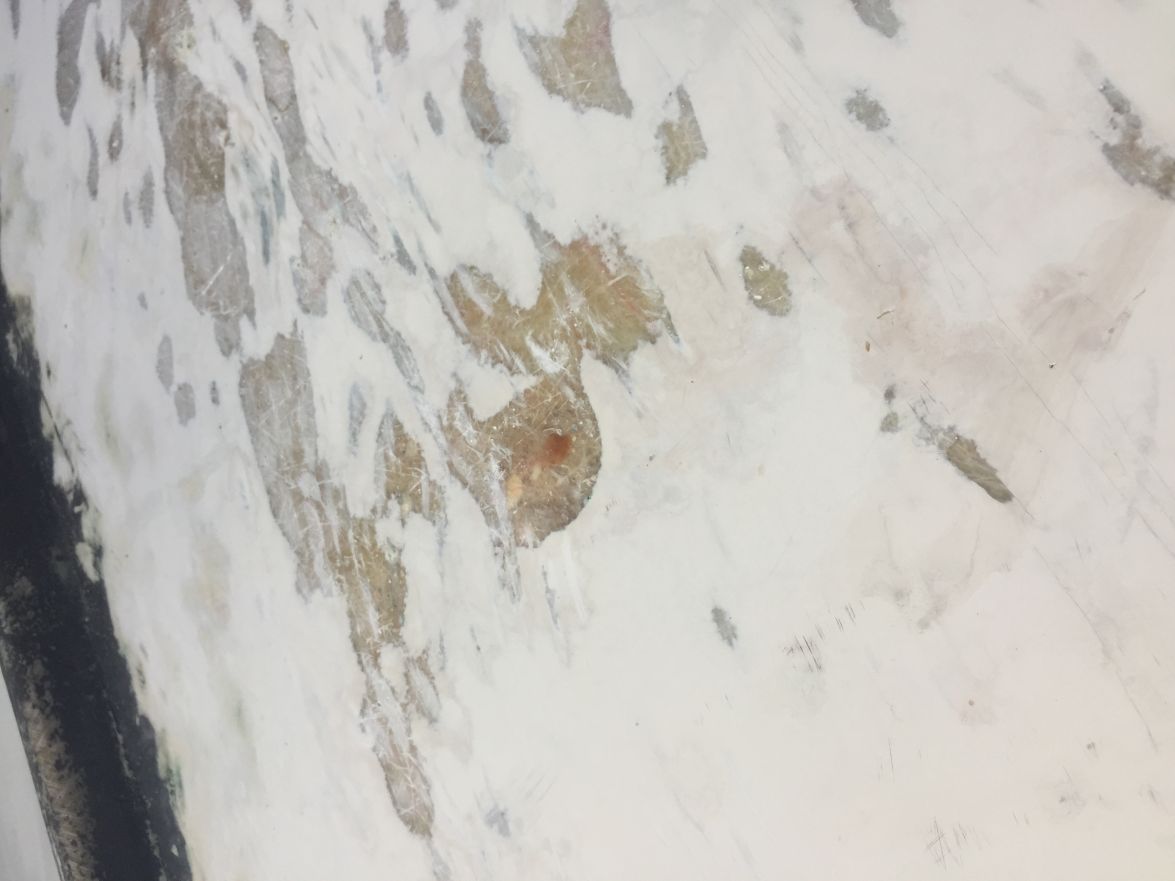
I also have this spot and one more where I went throught the barrier coat that have brown water coming out. What is the best solution for this? Also what filler is recommended to add to the epoxy for this type of filling and is there a specific ratio to mix?
I am guessing I would grind this spot down until I find no water I am just worried about how deep this spot could be and what this could lead too
Re: 1979 19 ft Sea Ox rebuild
Posted: Tue Feb 11, 2020 11:25 pm
by Fuzz
Couple of things. First I am not a Naval Architect nor did I stay in a holiday Inn last night

To me it looks like that tunnel would cause problems. One the water will not flow smoothly through it and two a loss of lift area. I have no idea if you need a tunnel for where you run the boat and that makes it worth while or not but I do think it is the cause of the bow running high.
As for the water in the glass is it water or is it from a blister? I ask because if the hull was blistering that would explain the barrier coat. Not much other reason to remove the gelcoat and replace with a barrier coat. When you were sanding down the bottom did it have what looked like bubbles on it?
Fuzz
Re: 1979 19 ft Sea Ox rebuild
Posted: Wed Feb 12, 2020 7:41 am
by Mr Pamlico
It did not have bubbles. Just where I got down to the glass at that spot was some water. It looks like it could be a pocket of water there but hard to say. I know this used to be a commercial boat and from the looks of it it has not had gel coat or not for a very long time. I went through 8 layers of bottom paint to get to the barrier coat. The original layer being the old red bottom paint popular on the older commercial boats. When they put the tunnel in they just painted over the whole boat again with a black coat of bottom paint with no barrier coat at the tunnel. I do utilize the tunnel and the boat ran good after the trim tabs were installed. I’m also hoping the installation of the jack plate will help as well. Although it will set more weight off the back of the boat my idea is I can have the motor down further but be able to raise it up in the tunnel as needed. I also plan on installing an in floor tank and will have trolling motor batteries upfront to help balance things out
Re: 1979 19 ft Sea Ox rebuild
Posted: Wed Feb 12, 2020 9:56 am
by boguesounder
Mr Pamlico - hey man. I enjoy your waters on occasion (assuming you are a Pamlico Sounder).
I'll throw my hat in the ring but be advised there are others on here that are far more experienced and knowledgeable than me. But I am familiar with Sea Ox's. The new 24' is a sweet ride. There is a thread somewhere on THT that discusses the difference in riding quality between the 19 and 20 with folks seeming to think the boats are vastly different in handling?
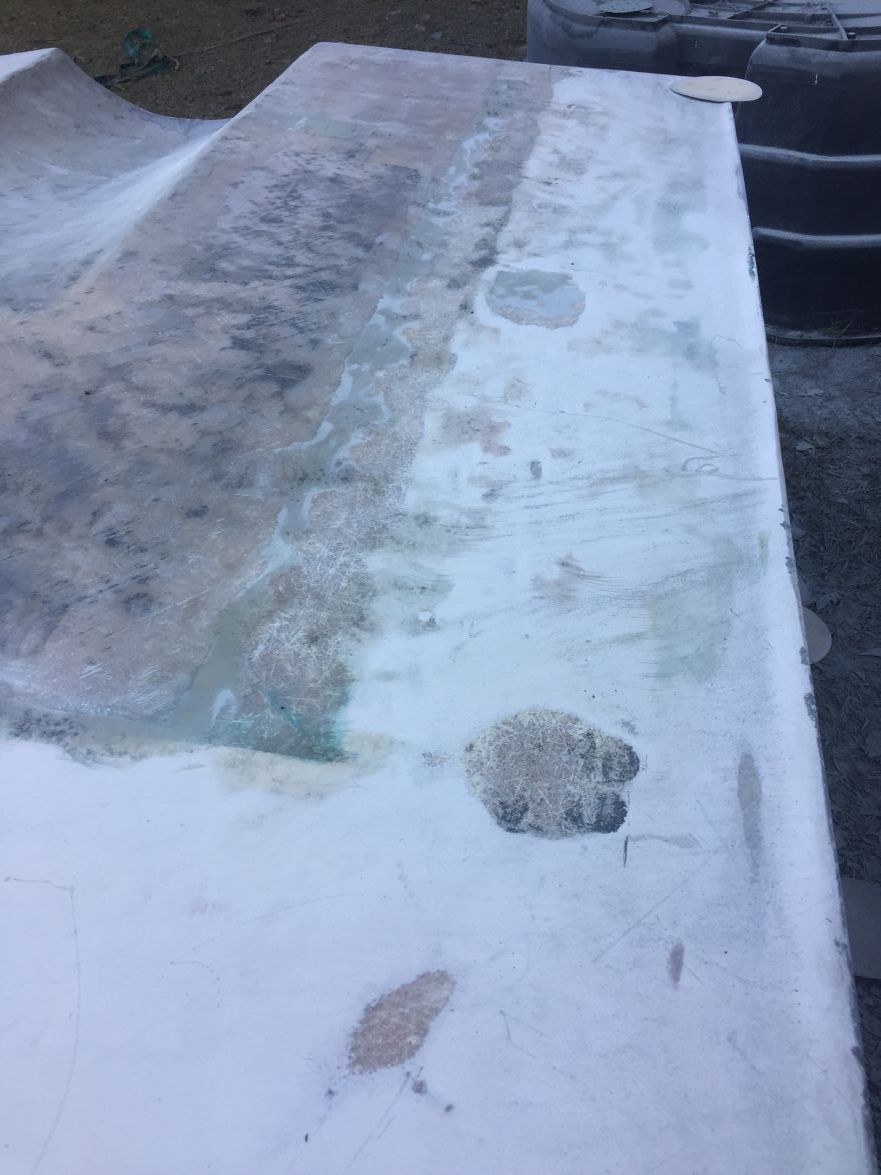
While I haven't' seen your boat, I think that white you are sanding off is gelcoat. Doesn't really matter for what you are doing as you are going to prep and paint over if it is gel or barrier. Obviously where the tunnel was put in there is no gel. I think I would mix up some thickened epoxy (with wood flour or other agent), fill your cuts and scrapes, sand fair, and paint with Interlux VC performance if it is going to be a trailered boat.
It is hard to see how deep you gouged with the grinder. Some of those spots may want to have some glass laid in the repair if bad. I agree that the dark spot is probably just a blister that had some water in it. If so, I would clean it out, fill with thickened epoxy, sand fair, paint.
I just did the same job over the last month on the same sized boat. I hope my input is helpful. Others may chime in and add to or revise my thinking.
Re: 1979 19 ft Sea Ox rebuild
Posted: Wed Feb 12, 2020 10:15 am
by boguesounder
I should add that there are several 2 part fairing compounds you can buy and use also.
https://www.boatbuildercentral.com/prod ... 26+Fairing
This may be more cost effective for you if you already have the interior of the boat fixed up the way you want it. If you intend to do significant interior changes that will require epoxy - then it probably makes sense to make and mix thickened epoxy on the bottom.
Re: 1979 19 ft Sea Ox rebuild
Posted: Wed Feb 12, 2020 11:31 am
by jacquesmm
About the tunnel, Fuzz is correct. Some production boats are poorly designed. You could fill it or live with it.
It may play a part in the bow running high, it depends on the speed. Just at planing speed, that tunnel creates drag, suction.
For the moisture in the glass, read about blisters. To fix that, let the boat dry, very dry. Fill holes, apply a barrier coat which is epoxy.
One very common reason for blisters is a bad setting on the chop gun. The poorly mixed resin will blister. That happens in factory production, never with our hand lay up method.
For the console, see our Console HowTo:
https://boatbuildercentral.com/support- ... lation.pdf
but keep in mind that you need a good foundation. Very wide backing plates or doubler maybe?
Re: 1979 19 ft Sea Ox rebuild
Posted: Wed Feb 12, 2020 8:42 pm
by Mr Pamlico
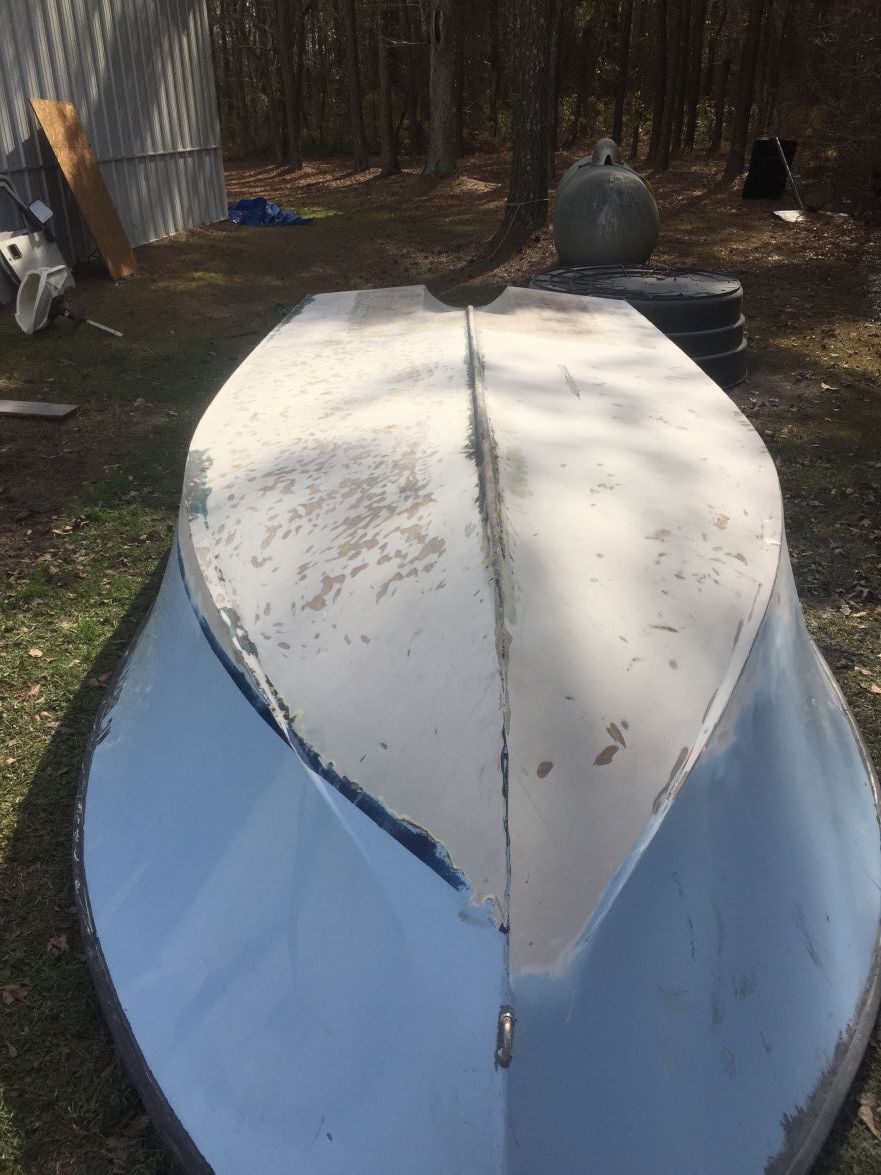
As far as the tunnel goes I am going to leave it alone and run it. The boat ran fine to me especially after the trim tabs were installed. I have always wanted a tunnel boat for certain places I hunt and fish. This is a picture of how the boat ran motor trimmed all the way down, two people and 15 gallons of gas under the lean post. Probably 3/4 throttle

Not being able to get the front of the boat down really beat you in a chop. The trim tabs I salvaged off my uncles old boat really ended up being the perfect size and fixed all running issues.
Re: 1979 19 ft Sea Ox rebuild
Posted: Wed Feb 12, 2020 9:09 pm
by Mr Pamlico
Boguesounder,I have looked through your build and you are doing some great work. I love the privateers and thats actually what I was looking for when I stumbled across this boat. Im hoping my next boat will be a 24 privateer Renegade. Thanks for the advice on the bottom of the boat. I am going to try and have the boat filled and faired this weekend and ready to paint next weekend. I am planning on using the VC on the bottom as the boat will be trailered and will not be in the water for more than a weekend at a time, some of this time will be on a lift, and possibly a week while on vacation in Ocracoke. Do I need to put down a barrier boat or anything when I get done fairing or will the VC being an epoxy take care of sealing where the tunnel was never covered?
It is the Pamlico river and sound that I frequent the most. I live in Greenville and my family has had a place where the Pamlico and Pungo rivers meet my whole life and I now have a camper set up to spend my weekends down there. As far as the 19 vs 20 sea ox goes I can see why the 20 would ride way better compared to my 19. My boat is very shallow and flat in the back and more rounded without a sharp v in the front. It is a very stable boat but it will pound you. What Ive always referred to as a commercial style hull. The 20 to me seems like a much "bigger" boat even only being a foot longer. It has a much sharper V at entry and towards the back of the boat.
Re: 1979 19 ft Sea Ox rebuild
Posted: Wed Feb 12, 2020 9:37 pm
by Mr Pamlico
Also Boguesounder how much VC did it take to paint your boat? I want to come up the sides just a little as well. I just want to make sure I order enough when I order
Re: 1979 19 ft Sea Ox rebuild
Posted: Thu Feb 13, 2020 12:39 am
by Fuzz
The running picture looks nice. What motor do you have on it? And in that picture were the tabs mounted and being used?
Re: 1979 19 ft Sea Ox rebuild
Posted: Thu Feb 13, 2020 5:02 am
by fallguy1000
Buy some commercial grade fairing compound like Quikfair.
Homemade versions seem to pinhole more.
Re: 1979 19 ft Sea Ox rebuild
Posted: Thu Feb 13, 2020 5:47 am
by Mr Pamlico
That picture is before the trim tabs were installed. The motor is a 2005 Suzuki 115.
Re: 1979 19 ft Sea Ox rebuild
Posted: Thu Feb 13, 2020 9:47 am
by boguesounder
Fallguy giving you some good advice on buy some commercial grade fairing compound.
I bought the two gallon kit of VC for my project. I have probably just less half of it left. I would think the 1/2 gallon kit would be enough for your needs. I didn't want to run out as after 24 hr you will need to sand for proper adhesion. I'd spray if you already have a setup for it.
I'm hesitant to give advice regarding the barrier coat. The product sheet is here:
https://international-yachtpaint.com/s3 ... 1574119287. It doesn't state to use a primer prior to VC, but goes on state to use Interlux Watertite in between 1st and 2nd coat of VC if fairing is required. I did not use a "barrier coat".
I would give Interlux a shout on their tech line or shoot them an email for advice. I've found them to be very responsive. Keep us posted.
Thanks
Re: 1979 19 ft Sea Ox rebuild
Posted: Thu Feb 13, 2020 10:15 am
by boguesounder
Bet that boat scoots with a 115. Fair amount of weight on the stern for that hull. I'm sure the tabs help.
Re: 1979 19 ft Sea Ox rebuild
Posted: Thu Feb 13, 2020 7:43 pm
by Mr Pamlico
It is a lot of weight back there and installing the jackplate definitely isn't going to help that situation. I'm hoping putting the tank under the floor and having the trolling motor batteries up front will help that situation. I am also going to raise the floor because as of right now it will not self bail.
It will scoot and the way it is propped it really pops right out of the water great. This is a big plus because when loaded with people,decoys, gear, layout boat etc I am not underpowered. There have been a few times when the wind has switched and we have been caught in rough water that having that throttle response and control when loaded have made me feel safer and always in control.
Re: 1979 19 ft Sea Ox rebuild
Posted: Fri Feb 14, 2020 11:01 am
by fallguy1000
I really like the way Interprotect 2000e goes on. Thin, low orange peel with a roller. They tell you 4-5 coats, but I did two and will add one more and then bottom paint.
Just applies so nice and easy.
The hardest thing about painting a boat is avoiding painting before fairing well. It is tricky because is hard to see wth you have, so we use carbon guide powder and then final sand.
Re: 1979 19 ft Sea Ox rebuild
Posted: Sun Feb 16, 2020 8:31 pm
by Mr Pamlico
I got some more sanding done this weekend and have the repairs to the bottom of the boat done. Next is to fair the hull before paint. Another question I have is about how much epoxy am I going to need for the rest of the project? It is going to be a total rebuild. I ran out this weekend repairing the bottom of the boat. I want to go on and order in bulk what I am going to need for the rest of the job. Also what is the difference between the Marinepoxy vs the silver tip? Is one stronger than the other? I see there is a big price difference. Like I stated before this boat is going to see a lot of hard use/abuse and I plan on keeping it for a very long time. I would rather it be over built or a little over kill than that will be good enough. Which epoxy do y’all prefer for these jobs?
Re: 1979 19 ft Sea Ox rebuild
Posted: Sun Feb 16, 2020 8:56 pm
by boguesounder
I didn't realize you were redoing the interior as well. Cool, I look forward to watching.
Re: 1979 19 ft Sea Ox rebuild
Posted: Mon Feb 17, 2020 12:29 am
by Fuzz
Silvertip is preferred when using foam core. It does not blush and works with all the other System3 products. It is a top of the line product. Marine epoxy will blush unless you are using slow hardner. The blush is easy to remove with a warm water scrubbing. If you want to use a system3 product over it you need to wait for a full cure. This depends on temps but something like 2-7 days will work. I have done this a lot and never had any problems. For non foam core uses I use Marine epoxy about 90% of the time and am well pleased with it.
Re: 1979 19 ft Sea Ox rebuild
Posted: Mon Feb 17, 2020 9:48 am
by Jeff
Mr Pamlico, give us a call at the shop and we can discuss your requirements and assist you in getting what you need!! We can also discuss our MarinEpoxy and SystemThree SilverTip products!!! Jeff
Re: 1979 19 ft Sea Ox rebuild
Posted: Wed Mar 25, 2020 10:29 pm
by Mr Pamlico
I haven’t had much time to work on the boat but with there finally being some nice weather this weekend I’m hoping to have the bottom of the boat finished. A few more things to do and I’ll be ready to paint. Now I’m just trying to decide whether to roll on the vc performance epoxy or spray. I do not have a spray gun but I could pick one up from harbor freight for the job if the results would be better than rolling it on. The boat is outside so I am concerned about the wind if I do spray.
Re: 1979 19 ft Sea Ox rebuild
Posted: Thu Mar 26, 2020 9:49 am
by pee wee
While I love the job a good sprayer can do, you'll have to pick a day when it's not windy or you'll be painting the neighborhood!
I've spent an afternoon getting tiny dots of paint off my boss' mother-in-law's car! Luckily for me, he was the one who did the spraying.
Re: 1979 19 ft Sea Ox rebuild
Posted: Mon Apr 06, 2020 12:34 pm
by Mr Pamlico
Re: 1979 19 ft Sea Ox rebuild
Posted: Mon Apr 06, 2020 12:47 pm
by Mr Pamlico
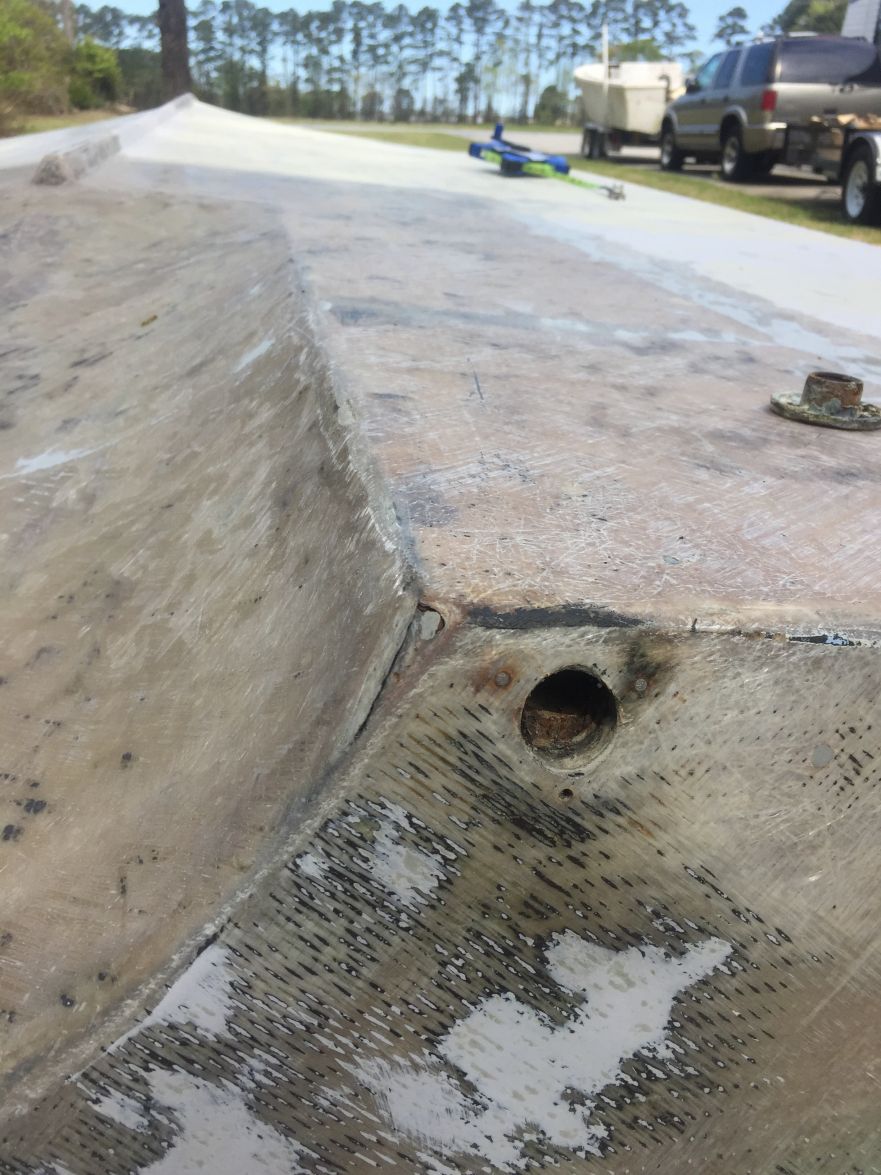
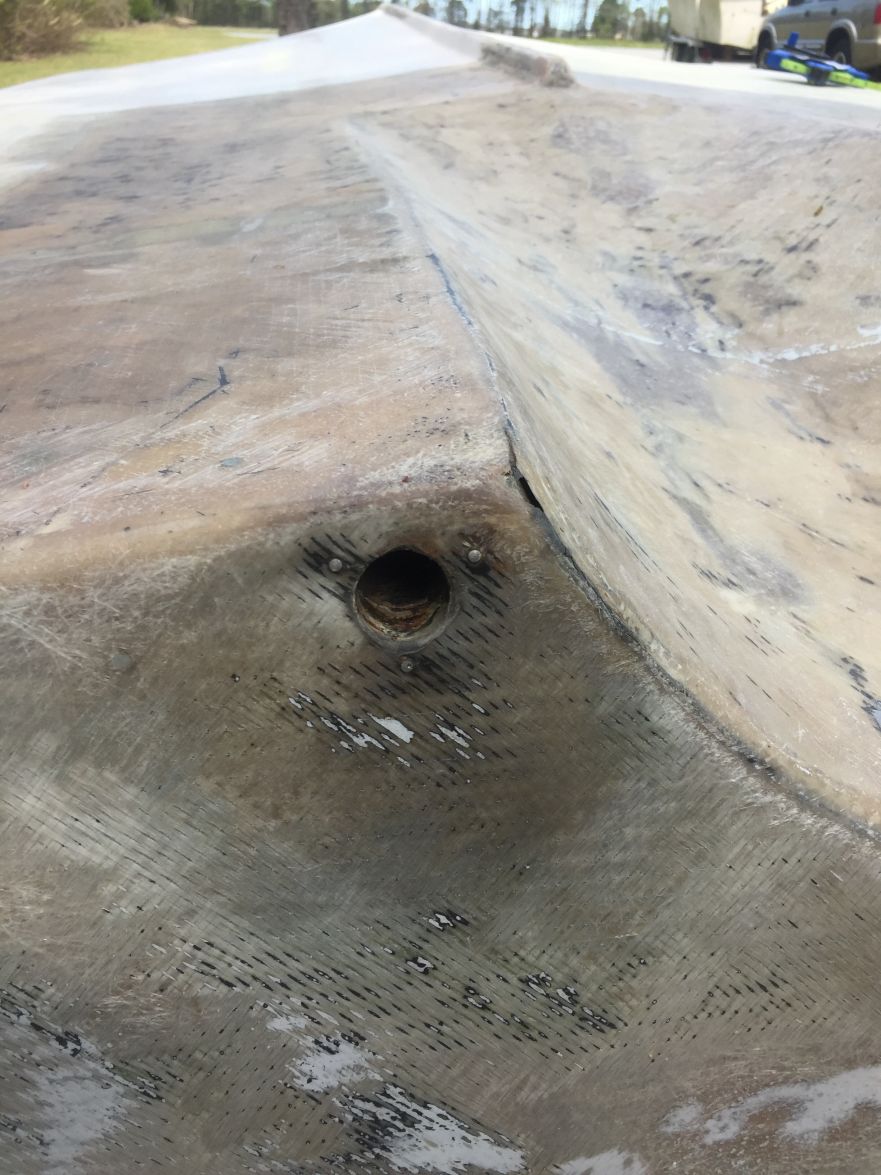
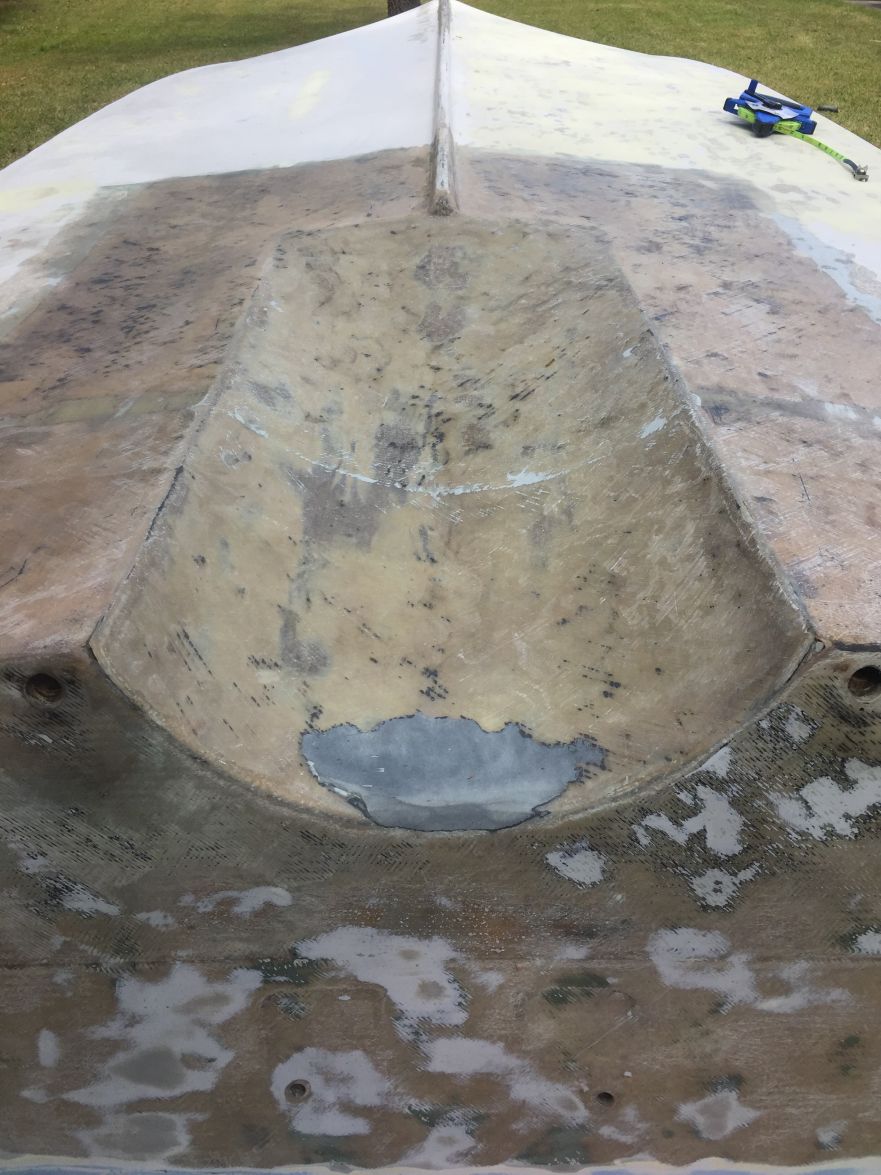
When I was finishing up sanding I noticed the holes at the points where the tunnel meets the transom. Also where it looks thin and is starting to crack where the tunnel runs across the transom. Being that this is my first time doing any type of fiberglass repair I am not sure the best way to go about fixing this before I flip the boat and start gutting the inside. I have some 3/4 oz chopped mat and fiberglass cloth, some tape and some scrap pieces of 1708. The 1708 seems too thick to work with in this area and I was planning on starting with the chopped mat. My concern is how close it is to the drain holes where those screws are broken off flush with the boat. Im guessing I dont need to lay any glass over those. I was planning on getting them out from the inside when Im taking out the rotten wood in the transom. Also I was planning on thickening up some epoxy and smoothing out that area in the middle to glass over. Any advice or suggestions for on the best next move and materials will be greatly appreciated.
Re: 1979 19 ft Sea Ox rebuild
Posted: Mon Apr 06, 2020 3:11 pm
by Fuzz
I am going to make a guess about the tunnel from what I see. The tunnel opening was cut out. A piece of glass was made up and pressed down into the hull to give the tunnel shape and then glassed in. That would explain the fiberglass edges I see all around the tunnel opening. Does this seem likely to you?
After looking a little more maybe the tunnel was built over a mold outside of the hull and then dropped in?
Re: 1979 19 ft Sea Ox rebuild
Posted: Mon Apr 06, 2020 3:18 pm
by Fuzz
Do you have any pictures of the tunnel from the inside of the hull.
Re: 1979 19 ft Sea Ox rebuild
Posted: Mon Apr 06, 2020 8:43 pm
by Mr Pamlico
I don’t have a picture from the inside. I haven’t gotten the floor out yet. It looks like it was a mold and put in. I was debating flipping the boat back over and getting the inside gutted to inspect it but I figured it would be easier to get some glass on it and repair the outside while its upside down.
Re: 1979 19 ft Sea Ox rebuild
Posted: Mon Apr 06, 2020 9:21 pm
by Mr Pamlico
I’m also not sure if I can use the materials I have or if I need to order some other glass that will be better suited for fixing this problem
Re: 1979 19 ft Sea Ox rebuild
Posted: Mon Apr 06, 2020 9:28 pm
by Fuzz
No need to flip it yet. What I "think" is happening is you are seeing the edges of the tunnel mold where it was bonded in. I am not sure there is any problem there. Maybe just sand the area and fill the low spots. I think when you can get to it from the inside you will see where they glassed the mold in. Depending on how that glass work looks you might want to do something to it or maybe not. "We will see" as my wife would say.
For what you will be doing use epoxy. Epoxy does not work well with mat so do not try to use it. Cloth, 12oz biax and 17oz biax are your friends.
Re: 1979 19 ft Sea Ox rebuild
Posted: Mon Apr 06, 2020 9:32 pm
by Fuzz
I would not even think of using 1708 on the outside. Places on the inside are fine if you already have it. The mat part of 1708 is ok as it is stitched on the biax and not held together with a binder that epoxy will not brake down. 1708 can be a real pain to wet out so for most things I would rather use 1700 biax or 12oz.
Re: 1979 19 ft Sea Ox rebuild
Posted: Tue Apr 07, 2020 1:21 pm
by Mr Pamlico
Thanks for the advice. As I said I’m super green to fiberglass work. I have tried to look at all the tutorials I can but haven’t found much about what type of glass to use where. My biggest concern is the holes on either side at the point of the tunnel. I believe this is where water was getting into the transom. Can I use just that fiberglass cloth to cover those holes or do I need to go on and buy some different kind of glass to patch those places?
Re: 1979 19 ft Sea Ox rebuild
Posted: Tue Apr 07, 2020 3:45 pm
by Fuzz
Fixing those holes is no big deal. Use a dremel or something like it to clean up the inside of the holes and rough it up so the epoxy can bind to it better. Mix up some epoxy and a filler like wood flour or glass fibers. You could even tear up some of that mat real fine and make a mash. Make it about peanut butter stiff. Over fill the hole just a little. Use some packing tape to keep it in place and make the outside smooth. If you have slow hardner use it to keep the heat build up down a little.
Re: 1979 19 ft Sea Ox rebuild
Posted: Tue Apr 07, 2020 8:52 pm
by Mr Pamlico
That was my first thought but I wasn't sure if glassing over them was a better option. I do have slow hardener and the tape is a good idea. Here is a better picture of the crack.
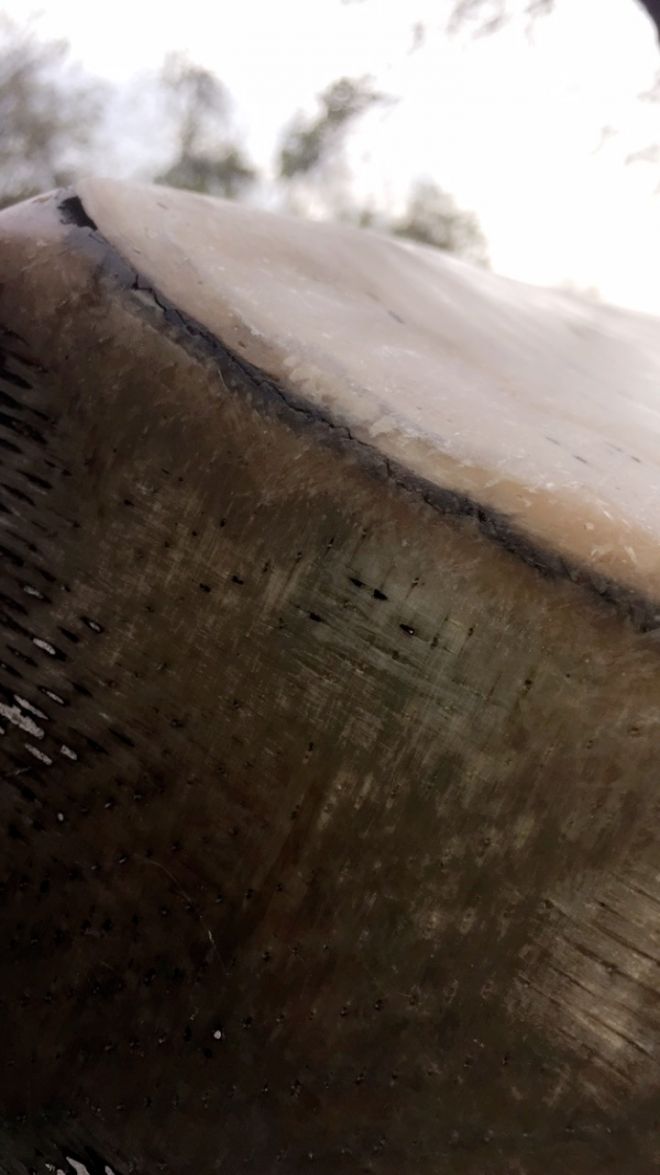
Re: 1979 19 ft Sea Ox rebuild
Posted: Tue Apr 07, 2020 9:23 pm
by fallguy1000
Mr Pamlico wrote: ↑Tue Apr 07, 2020 8:52 pm
That was my first thought but I wasn't sure if glassing over them was a better option. I do have slow hardener and the tape is a good idea. Here is a better picture of the crack.
No idea what we are looking at here. Need a pic firther away.
Re: 1979 19 ft Sea Ox rebuild
Posted: Tue Apr 07, 2020 9:44 pm
by Mr Pamlico
fallguy1000 wrote: ↑Tue Apr 07, 2020 9:23 pm
Mr Pamlico wrote: ↑Tue Apr 07, 2020 8:52 pm
That was my first thought but I wasn't sure if glassing over them was a better option. I do have slow hardener and the tape is a good idea. Here is a better picture of the crack.
No idea what we are looking at here. Need a pic firther away.
That is a closer picture of this side of the tunnel where that crack is running across from the hole
Re: 1979 19 ft Sea Ox rebuild
Posted: Tue Apr 07, 2020 9:53 pm
by Mr Pamlico
And a picture of the overall tunnel
The last time I was out on the boat is when I decided not to run it anymore because the transom was flexing so much. I am thinking that maybe that flexing is what caused that crack
Re: 1979 19 ft Sea Ox rebuild
Posted: Tue Apr 07, 2020 10:37 pm
by fallguy1000
You are gonna need to grind that all back out. You can't leave a crack like that go....it is a serious deficiency...and you don't want a hump in the tunnel like that by jist glassing over
It also looks wet around the hole (darker).
Wow. Hmmm. How to fix that crack is a really important part of this repair.
Do you have access or pictures of the inside?
You are really going to need to see the inside if possible.
If not possible to see the inside, the basic premise of this repair is to grind back at 12 to 1. So, you measure the thickness of the hull at the crack. Let's say it is 1/4", then you grind it back 12*1/4 or 3" each direction to open at the corner. If you don't have access to the inside; that is more complicated...because access to the inside can make this a better repair.
After you grind back all the cracked area 3" in each direction (feathered from 0 to the thickness of the hull 3" away, you need to build the corner back up with biaxial glass by stepping the repair pieces from longest to shorter, each step would be about 1/2" or so.
Anyhow, don't take any action based on my post other than talking about the inside or getting us pictures. It is a little complicated repair, but not too hard if you take the right steps.
Start with a picture or description of the inside and tell me the hull thickness at the hole. Dan
Re: 1979 19 ft Sea Ox rebuild
Posted: Tue Apr 07, 2020 10:47 pm
by fallguy1000
Delete
Re: 1979 19 ft Sea Ox rebuild
Posted: Tue Apr 07, 2020 10:48 pm
by fallguy1000
Re: 1979 19 ft Sea Ox rebuild
Posted: Tue Apr 07, 2020 10:52 pm
by fallguy1000
If you have access to the inside of the tunnel; it is the same repair, but you'll install a backer first with 1708 tapes; so a bit easier actually.
Re: 1979 19 ft Sea Ox rebuild
Posted: Tue Apr 07, 2020 11:30 pm
by Fuzz
I think what we are looking at is a layer of putty that was used to bond the tunnel in. Most likely it was poly and did not bond real well and is not all that strong. Do you see this in other parts where the tunnel meets the hull? I do not see any glass fibers running across the hull and into the tunnel. That is one of the things leading me to the puddy.
Re: 1979 19 ft Sea Ox rebuild
Posted: Wed Apr 08, 2020 12:41 am
by Mr Pamlico
I do not have access to the inside of the tunnel yet but I still have to gut the inside to repair the transom, floor and stringers. I was thinking now would be the time to do the repairs on the outside since the boat is upside down so I could paint before flipping back over and getting on the trailer. If the best way to go is to flip the boat back over and go on and gut the inside to gain access to this then that is what I will do. I believe the tunnel was glassed in. That whole square of open fiberglass you see is what I found under the bottom paint and that all looks like glass that was put down when the tunnel was installed because of the way it is faired to the hull on the bottom of the boat. I will try to get some better pictures of the tunnel in the morning. The only putty I see other than what I believe was used to fair is the black spot in the top center of the tunnel. I was planning on thickening up some epoxy to repair that area to make it smooth again. Not exactly sure why that is there. Im guessing it was used to keep the shape of the tunnel at the back there.
Re: 1979 19 ft Sea Ox rebuild
Posted: Wed Apr 08, 2020 2:39 am
by Fuzz
Well at this point I think I would grind the bad spots out some and see where you are at. I would not go crazy with the grinder until you have a better idea of what you are looking at.
Re: 1979 19 ft Sea Ox rebuild
Posted: Wed Apr 08, 2020 5:30 am
by fallguy1000
You gotta change that. That area is where all the stress concentrates from the transom. If you hang 500 pounds off the transom and wobble it back and forth; that area is the pivot point for that load.
It was not built well enough.
The right way to repair it is to glass tape the inside with a set of 4-5 tapes. Longest first to avoid air. Something like 12", 10", 8", 6",4". You get a couple yards of 1708 and cut them out of it.
Once the tapes are on, you have to grind out the area like I said, minimum of 8:1, max of 12:1. Then you use 1708 to fill it back in stepping down. If you grind back 4" each direction for a 12:1 on a 0.333" hull thickness, your first tape is 8"; and each 1708 tape is about 0.050", so you do 6 tapes. 8,7,6,5,4,3. Again, longest first to avoid air in the repair. Glass gets strength from thickness and good work; not shingling or progressive bites. If the hull is 1/2" thick there; go 8:1 for your relief.
Might need to do the entire transom bottom like that. So hard for me to evaluate the story; that is on you.
Re: 1979 19 ft Sea Ox rebuild
Posted: Wed Apr 08, 2020 5:38 am
by fallguy1000
You can try doing the repair on the outside without the inside being backed up, but it is harder. It would be easier to cutout anything back there for access and repair the inside upside down as the exterior repair is quite a bit harder and you have great access now.
If you need to do it the other way; you can use peelply or plastic and tape to make sure the exterior repair stays up to cure and doesn't fall off to gravity. But you are gonna be grinding upside down so you'll enjoy that bit.
Re: 1979 19 ft Sea Ox rebuild
Posted: Wed Apr 08, 2020 5:47 am
by fallguy1000
Also, you will be very sad if you put a hump in the tunnel because it will create turbulence ahead of the engine. If you opt to not grind; then you would put a radius on the tunnel edge and 3-4 glass tapes like 12,10,8,6 and use db1700. This would raise the edge about 1/8" and you would need to fair the tunnel and transom back out for a clean exit to the engine. Also make sire to square the tunnel edge.
This method is what I would do if I had no inside access. You just need to hope or install the engine deep enough to make sure your cav plate isn't 1/8" too high then is all.
This method also gives you a warm fuzzy feeling that you won't two place crack if the hull is already kinda thin.
This is all epoxy work. No esters will gove you the strength you want here.
Re: 1979 19 ft Sea Ox rebuild
Posted: Wed Apr 08, 2020 9:28 am
by cape man
Are you planning to replace the transom? If so, I would wait until you have dug everything out on the inside and installed a new transom before dealing with the outside of the tunnel. But if you want to go at it now, I would grind/sand down the edges from the corners to the forward end of the tunnel, fill any gaps or cracks with epoxy mixed with wood flour, and lay down at least two layers of over lapping 12 oz biax along both sides. If you do it right and feather out the edges you should be able to get it very close to the current profile, and if it is smooth and uniform it shouldn't create much, if any turbulence even if you raise it by an 1/8 of an inch from the rest of the bottom. I would not mess with taping it to the bottom edge of the transom until you are sure the transom doesn't need replacement. Once you have her upright you can then beef up the glass and epoxy from the inside along the length of the tunnel.
You may need to do three flips and hold off on painting the bottom until the second one - i.e. tape the edges of the tunnel, flip, deal with the inside and transom, flip, tape the rear of the tunnel, bottom, and sides to the new/repaired transom, paint the bottom, flip, finish the insides.
If on the other hand the transom is solid, do all the taping now, go ahead and paint, and then flip her over and beef up the insides.
Re: 1979 19 ft Sea Ox rebuild
Posted: Wed Apr 08, 2020 11:00 am
by Mr Pamlico
The transom is completely shot and I still have a full gut job to do on the inside. I am also going back with a hydraulic jack plate so I want the transom to be as strong as possible
Re: 1979 19 ft Sea Ox rebuild
Posted: Wed Apr 08, 2020 11:04 am
by fallguy1000
I kinda prefer the multi-flip plan...just so you know. You can really get an idea for stress cracking opening the inside.
Re: 1979 19 ft Sea Ox rebuild
Posted: Wed Apr 08, 2020 2:28 pm
by Mr Pamlico
Hopefully I will get it flipped this weekend and start gutting the inside. The hard part will be getting enough guys over here at once to get it flipped and back on the trailer. Maybe I can come up with something with floor jacks and the engine hoist.
Re: 1979 19 ft Sea Ox rebuild
Posted: Wed Apr 08, 2020 8:38 pm
by Mr Pamlico
Well with the engine hoist, ratchet straps, saw horse, some old tires and rims and a little redneck ingenuity the boat is flipped back over. I wish I took some more pictures because it was quite the show. The front is propped up so I should have it on the trailer and be gutting it this weekend.
Re: 1979 19 ft Sea Ox rebuild
Posted: Wed Apr 08, 2020 9:01 pm
by Fuzz
Don't matter what a flip looks like as long as you get er done

I have done a couple of real red neck flips but the boat always survived
Re: 1979 19 ft Sea Ox rebuild
Posted: Thu Apr 09, 2020 10:22 am
by boguesounder
Hey man. Sounds like you are getting it done. Not sure how far you are going with interior rebuild now that it is flipped (stringers, sole, etc). You mentioned putting it back on the trailer. If you are just working on the tunnel issue from inside then flipping back over to finish exterior no big deal. If you end up fully gutting the interior you should think about how you are going to block the boat up to keep its shape when you cut the stringers out if needed. Imagine you know that, but just thought I'd mention.
Re: 1979 19 ft Sea Ox rebuild
Posted: Thu Apr 09, 2020 2:36 pm
by Mr Pamlico
I am planning on replacing the stringers as well. I was planning on getting the boat back on the trailer and leaving the cap on until the new stringers are installed. Will this be enough support or do I need to do more to secure it? I was hoping to be able to leave it on the trailer so I could do all my cutting and grinding outside and back it in the garage when I’m done. If I need to I could block it up in the garage for the internal repairs
Re: 1979 19 ft Sea Ox rebuild
Posted: Thu Apr 09, 2020 3:20 pm
by Fuzz
I think you said you were going to replace the transom also? If that is the case do the transom first. Cut the stringers back 12-18 inches so you have plenty of room to tab in the transom. By leaving the rest of the stringers and deck in place your hull "should" maintain its shape. Make sure to check and check again before glassing in the new transom. After the new transom is in you can check for movement as you remove the stringers.
Re: 1979 19 ft Sea Ox rebuild
Posted: Thu Apr 09, 2020 11:24 pm
by Mr Pamlico
Ok. That will be my plan then. Glad it got brought up because I was planning on gutting the whole boat on the trailer and then starting with the transom. I was hoping to cut the whole floor out to assess the damage and then cut the stringers out flush with hull to be able to use them to cut my new stringers. Also I don’t have all my supplies to start on the transom so that would give me the opportunity to get a lot more of the labor work done this weekend. But if that will compromise the shape of the hull then I will just do as suggested and start with only the transom.
Re: 1979 19 ft Sea Ox rebuild
Posted: Thu Apr 09, 2020 11:26 pm
by fallguy1000
Boats can misshapen easily. You really need to be cautious about removing lots of stuff. Even removing a transom can result in the hullsides flopping.
Re: 1979 19 ft Sea Ox rebuild
Posted: Fri Apr 10, 2020 12:40 am
by Fuzz
If you are wanting to get work done while you wait for supplies I would block the hull to make sure it did not move. I know you want to keep it mobile and that creates a few problems. Can you make some form of cradle for the stern so if you move it when you it back into the work area you can block it back up and make sure the shape has not changed? If you are going to remove the old wood in the transom that will take a few days and give time for other supplies to arrive.
Re: 1979 19 ft Sea Ox rebuild
Posted: Fri Apr 10, 2020 9:30 am
by Mr Pamlico
I will play it safe and just cut out enough to do the transom to start with as suggested. No need to take a risk on causing bigger problems trying to rush it
Re: 1979 19 ft Sea Ox rebuild
Posted: Sun Apr 12, 2020 11:48 am
by Mr Pamlico
I am having a time getting this wood out of the transom. It is all soaking wet but they ran over 150 decking screws threw the back of the boat through 3 pieces of plywood and fiberglassed over it. The screw heads were also fiberglassed over on the back of the boat so I can’t screw them out.
Re: 1979 19 ft Sea Ox rebuild
Posted: Sun Apr 12, 2020 11:55 am
by Mr Pamlico
Also the tunnel looks like it was made as a big fiberglass panel which was screwed onto the boat and fiberglassed in
Re: 1979 19 ft Sea Ox rebuild
Posted: Sun Apr 12, 2020 1:05 pm
by cape man
Time to make a decision and start cutting. Screws embedded in the boat = no bueno.
Re: 1979 19 ft Sea Ox rebuild
Posted: Sun Apr 12, 2020 3:59 pm
by Mr Pamlico
As much as I don’t want to do that, especially since this is my first rebuild, I think it might be my only option. I’ve got a lot of the wood out and have been able to pull some screws through but I cannot get the rest to break loose. I’ve still been trying to get the wood out with hopes I could pull the screws out like I have the others but not muck luck. If I keep going trying to get this wood out it’s gonna destroy the back of the boat anyways. I understood for the most part how to do the transom with the outside skin still attached but I’m not sure where to start if I do cut the back out, which it looks like I’m going to have too
Re: 1979 19 ft Sea Ox rebuild
Posted: Sun Apr 12, 2020 4:41 pm
by Fuzz
Post some pictures of where you are at. This is not brain surgery it is just plain old hard work. Been there and done that more than once. If you do not have a multi tool you need one. Cut the inside skin close to the edges and then start peeling the inside glass off. You can set a saw to a shallow depth and cut things in smaller chunks. It will come out but it may be in small pieces. Just remember every piece that comes out is a step forward. This is one case where the worse shape the transom is in the easier it is.
Re: 1979 19 ft Sea Ox rebuild
Posted: Sun Apr 12, 2020 4:45 pm
by fallguy1000
I'd get a $50 dollar cheap 4" skilsaw and start criss cross cuts
Re: 1979 19 ft Sea Ox rebuild
Posted: Mon Apr 13, 2020 7:48 am
by Mr Pamlico
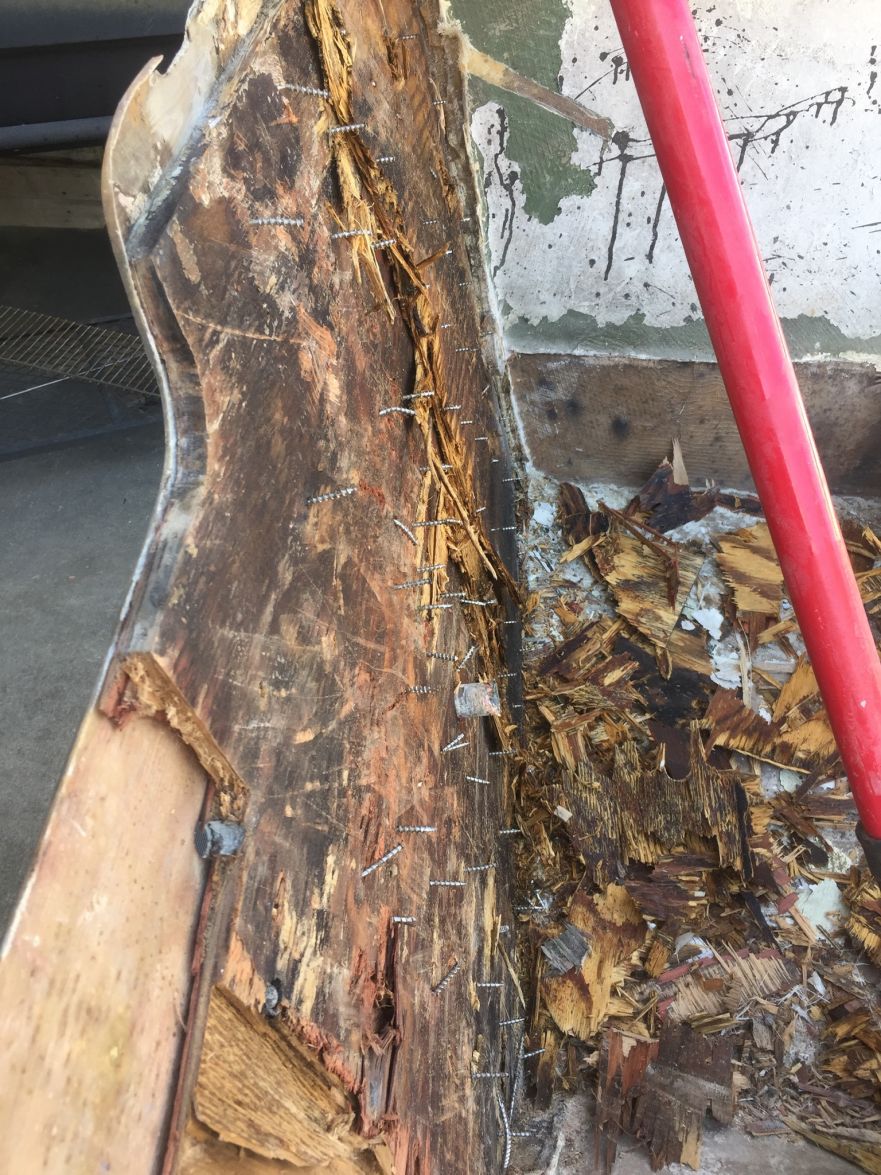
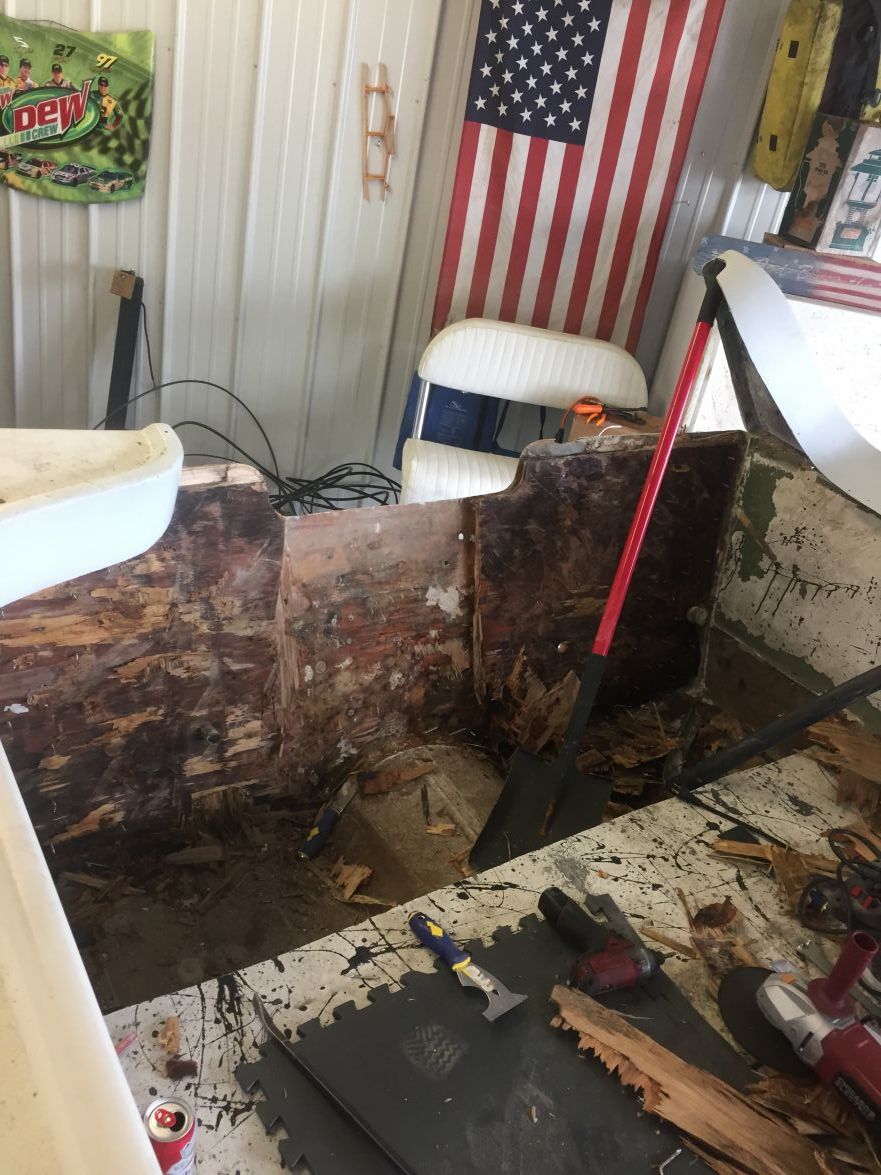
There is a picture to get an idea of the screws I am dealing with and the last picture is where I am at now. I do have the multitool and skill saw. If those stainless steel screws weren't ran through the back of the boat it would have all been out by now. I have been able to pull some threw and have cut some off to try and work around but the outside skin is very thin in some places so those spots have me worried.
Re: 1979 19 ft Sea Ox rebuild
Posted: Mon Apr 13, 2020 8:42 am
by fallguy1000
Keep on keepin on. She is in rough shape.
Re: 1979 19 ft Sea Ox rebuild
Posted: Mon Apr 13, 2020 9:28 am
by cape man
I have never redone a transom, but have watched several here. To be frank, I think you are adding more work trying to save that skin than just going for it and cutting the whole thing out, especially with the issues you posted before you started working on the insides. David (Fuzz) is watching and commenting here, and he has personally done a few of those himself. I'd listen to him on this one.
By the way...I am always impressed with folks taking a classic hull and giving it a redo. I fished out of a 19 ft Sea Ox that was around the same age. It didn't have the tunnel, which I think was added later on your boat.
Have you considered losing the tunnel, or is it worth repairing it for your fishing/boating plans? You do know they cause a significant loss in planing efficiency...
Re: 1979 19 ft Sea Ox rebuild
Posted: Mon Apr 13, 2020 9:32 am
by cape man
Forget the last part. I went back and read where you want the tunnel. Carry on!!
Re: 1979 19 ft Sea Ox rebuild
Posted: Mon Apr 13, 2020 3:27 pm
by Fuzz
Save the outside skin and do not cut it out.
Leaving the transom skin in place will save you a ton of work no matter what it looks like. If those screws are through the skin they have to come out. Get a hole saw just large enough to go over the screw head and start cutting plugs with the screw inside. The transom will look like it was hit with a shotgun but that is no problem. Take it easy getting the wood out and do not tear up the transom skin. Set your saw blade shallow and kerf all over the wood. Take it out in what ever size it wants to. You will use every tool you own. This part just takes time. Each piece out is a gain no matter the size. You can tell when you are taking too big of a bite when the skin flexes and not the wood. The last transom I did was about the same size and it took two long days to get er done. Keep posting as you go, it really helps.
Re: 1979 19 ft Sea Ox rebuild
Posted: Mon Apr 13, 2020 4:16 pm
by fallguy1000
What Fuzz said 100%. Try to keep the skin. If you are a bit worried about deformation at the top; at a minimum measure and mark a few places..maximum is a 2x4 across the top screwed down (but in your way).
I am living vicariously laying in bed reading, so keep the pictures coming.
Re: 1979 19 ft Sea Ox rebuild
Posted: Mon Apr 13, 2020 8:50 pm
by Mr Pamlico
I’m gonna get back at it tomorrow after work and I’ll post some pictures of my progress. I believe I’m going to go back with coosa instead of wood here. I am able to get it at cost through someone I know at a boat plant here and worrying about rot will not be in the back of my mind. What type of fiberglass would y’all recommend I use for this project? I’m going to try and go on and order the fiberglass I need and enough board to do the transom so when I do get this all cleaned up there will be no down time waiting for supplies
Re: 1979 19 ft Sea Ox rebuild
Posted: Mon Apr 13, 2020 10:29 pm
by Fuzz
I like to use lots of the new products, I am a huge fan of Nidacore for decks, but I know nothing about coosia. Please keep that in mind and if you can find someone who knows coosia and they feel different than me it might be best to listen to them.
Once you get all the wood out of the transom and all cleaned up I would lay a couple of layers of glass, 1708. 1700 biax or 12oz biax. I would do all of this work with 1700 biax. Yes using a mix of 1700 and 1800 would be a little stronger but we are not building an Americas cup racer that is stressed to 99% of failure and every oz counts. I would hope to never get close to 50%.
With coosia you may need to use a premium epoxy like System3 I do not know. If you are going to replace the stringers and deck you will need a bunch of material. I would order a full roll of 1700 and at least 15 gallons of epoxy to start with. You will need more than that but 15 is a good place to start. 5 pounds of wood flour or the same amount of cabosil. A couple rolls of 12-17oz 6 inch wide tape also. That will be a good place to start.
Re: 1979 19 ft Sea Ox rebuild
Posted: Tue Apr 14, 2020 12:56 am
by Fuzz
And all those holes from getting the screws out will come in real handy for pulling the new core in tight
Re: 1979 19 ft Sea Ox rebuild
Posted: Tue Apr 14, 2020 5:44 am
by fallguy1000
db1700
Re: 1979 19 ft Sea Ox rebuild
Posted: Tue Apr 14, 2020 12:48 pm
by Mr Pamlico
I’ll work on starting to get some of that on the way. From what I’ve been told you use the coosa just like if you were going back with plywood. The wood in this transom was 1.5 inches thick but there wasn’t much fiberglass covering the wood. I’m not sure what they are typically for this boat but to be safe should I go back with two 3/4 pieces? Or is that overkill. I also have a jack plate that I am going to be installing when I hang the motor back on so I know that will cause some additional stress.
Re: 1979 19 ft Sea Ox rebuild
Posted: Tue Apr 14, 2020 2:03 pm
by fallguy1000
Power demands transom design.
What is the power plan max?
I used two layers of 3/4" 26# density core in my transom and it is very narrow at about 3' wide for 90hp engines. When I hang on it, nothing moves.
Re: 1979 19 ft Sea Ox rebuild
Posted: Tue Apr 14, 2020 5:18 pm
by Fuzz
If the coosa matches plywood for strength 1.5 inches should be plenty. With the glass on both sides I am guessing up to 200hp would be fine. Lots of caveats to that like bracing, quality of work, materials and so on. You need to make sure you get good bonding at every phase. Lets get all that old wood out and go from there.
Re: 1979 19 ft Sea Ox rebuild
Posted: Tue Apr 14, 2020 7:46 pm
by Mr Pamlico
I will plan on that then. Just wanted to make sure how much I needed to order. Im going to try and get most supplies on the way this week and enough coosa to do the transom. I will have to order the rest in phases as paychecks come in lol I’m going back with the 115 Suzuki 4 stroke that was on the boat and the hydraulic jackplate has a 6 inch set back.
Re: 1979 19 ft Sea Ox rebuild
Posted: Tue Apr 14, 2020 9:13 pm
by cvincent
I know the comparison is not apples to apples but my transom is 4 layers of 1/4 aquaplas III with alternating layers of 12oz biax and 10oz plain weave total 120oz on both sides. The transom is also tabbed in with 6inch biaxial tape 3 layers offset on all seams. I have a 115hp yamaha, 6inch jackplate, 2 power poles hanging on the transom. The transom is rock solid. Jacques recommended using 5 layers of 1708 each side plus the tabbing.
Re: 1979 19 ft Sea Ox rebuild
Posted: Wed Apr 15, 2020 5:51 pm
by Mr Pamlico
I looked in to the aqualplass last night but unfortunately the freight to order it is too high to justify. I plan on ordering most of my supplies from the site here other than what would require freight. I have local access to coosa which has a 26lb density I believe and carbon-core fiber board which has a 28 lb density. I’m just waiting on hearing back with some pricing before I make my final decision. They both claim to be used as a replacement for anywhere plywood would be used structurally. I would prefer to lean towards over built just because the boat will see a lot of hard use, especially during duck season, and I tend to be rough on things. My end goal is a solid work horse I can count on for many years of service. I plan on jumping back in with two full days of work this weekend and having all the old wood out. I will update with some pictures then
Re: 1979 19 ft Sea Ox rebuild
Posted: Wed Apr 15, 2020 6:20 pm
by fallguy1000
For a 115 hp motor, I would build it 2 layers of 3/4" 26# or better core with 4 layers minimum each side db1700 and knees far enough apart for bolting (knees tabbed after transom with 3x6" 1708 tapes staggered one inch on the transom, bilge bottom and the adjoining bulkhead...
Overwrap the top with the 4" material, so you will have 8 layers of glass on the top.
Oops> I just remembered you are only gonna have access to the inside. 5 or 6 layers of db1700 or db1708 then, wrapped onto the hullsides and bilge bottom in staggers something like 12", 10",8",6"4",2". DO wrap the top of the transom to close the core, so radius the inside edge of the transom. Square off later with fairing if you want. I might also wrap over the top and onto the other side unless the other side is finished nice now.
Laminate the coosa panels together off the boat using pins. I prefer a 2:1 cabosil/epoxy mix and apply both sides with 1/16" vee trowel. It will take quite a bit, make sure to line it up correctly dryfit by drilling pin placements with some leave in pin like ss or aluminum. Apply pressure up to 5 psi (10" Hg if vac bagging). If you only have weight, balance it out with boards and load it up with whatever you got; you will have a hard time getting to 5 psi. Don't drive a car on it; it might move on you and not be flat....
Re: 1979 19 ft Sea Ox rebuild
Posted: Thu Apr 16, 2020 10:29 pm
by boguesounder
Wow man, that is a lot of screws! You are earning your stripes on that transom demo.
For when you get to the stringer removal, you should get a multi-tool if you don't have one. Cheap is fine. It will allow you to cut flush and not damage the hull. Your old stringers will come out intact and make nice templates.
Those screws though! Man, people do crazy things to boats sometimes....
Re: 1979 19 ft Sea Ox rebuild
Posted: Tue May 05, 2020 11:15 pm
by Mr Pamlico
I have gotten all of the wood out and have a little more grinding to do to get to fresh glass on the bottom of the boat for tabbing. The back skin is in rough shape. There are some cracks and bad looking spots in the glass. I have a 2x6 across the back but I can not get the skin to stay flat. It’s too flimsy. I can push it flat but it pops back out. If I clamped the transom core in it would stay flat but I’m sure I need to do some repairs to the transom skin before glueing in the new transom. There are still also the cracks where the transom and tunnel meet that need to be repaired. I will try to get pictures up tomorrow but when I tried to put pictures up on my album here it said there was a server error. I should have my transom material, filler and fiberglass tape on Thursday.
Re: 1979 19 ft Sea Ox rebuild
Posted: Wed May 06, 2020 12:17 am
by fallguy1000
You may need to widen the spanner across the back.
Hard to tell; not there.
Re: 1979 19 ft Sea Ox rebuild
Posted: Wed May 06, 2020 12:56 am
by Fuzz
Sounds like you need to clamp something across the outside of the transom to keep it straight. And then after doing the prep work I think I would plan on adding a few layers of glass. Maybe 3 with 1708 or 5 with 1700. Sounds like you are basically building a new outside skin inside the old one.
You are not the only one having problems posting pictures lately. Do not be afraid to ask for help if you need some as pictures are the key to good help.
Re: 1979 19 ft Sea Ox rebuild
Posted: Thu May 07, 2020 9:20 am
by boguesounder
Glad you are making progress. Sorry you hit a bit of a roadblock. As noted, it sounds like having a brace across the outer transom would help you keep shape while you glass from the inside. Look forward to seeing your photos.
Re: 1979 19 ft Sea Ox rebuild
Posted: Thu May 07, 2020 10:34 pm
by Mr Pamlico
Re: 1979 19 ft Sea Ox rebuild
Posted: Thu May 07, 2020 10:55 pm
by Mr Pamlico
Re: 1979 19 ft Sea Ox rebuild
Posted: Fri May 08, 2020 3:38 pm
by Fuzz
DAMN! If I had known that transom was that bad I would have told you to cut it all out. Water under the bridge now I guess. You need to get that transom skin flat. Try 2x4s across the stern and glue them in place. I have found hot glue holds a lot better than I thought. After that all you have is a glass mold back there. You will need to lay enough glass to build a skin. Something like 3/16-1/4 inch thick.
I hate to say this but I am thinking the best move is to cut that mess out and start over. I know that is not what we said before and you have a ton of work to get to this point but it might be both easier and better.
Re: 1979 19 ft Sea Ox rebuild
Posted: Fri May 08, 2020 5:19 pm
by MSRiver
Ive been following along and id agree with Fuzz. Look at it this way if you lay a brand new transom your gonna have a lot less headache trying to finish the back to make it look good One! and you know its going to be 100% right!
I wish i had done that on mine cause I've had to go back and do some patching work since. I thought my back skin was flat use a straight edge on both sides and used a bunch of bolts to stick the wood to the glass to only later find out i had a few areas that the putty didn't fill and wasn't touching the glass.
Its a little more time consuming little more material but when you get done your not gonna have to look back at it and worry about it. On top of that its should be easy easy enough to put a little quick fair and the back be done! I'd reference how they did the aquasport.
Re: 1979 19 ft Sea Ox rebuild
Posted: Fri May 08, 2020 10:30 pm
by Mr Pamlico
I appreciate all the help and I know it’s hard to get a grasp of the project over the internet. I’ll try to get better with putting up pictures as I go. So I guess my next step is to cut the back out. I will try and take some measurements of my transom height where the motor will hang before the cut. Do I need some sort of brace across the back before I cut it out? Also once the back is gone how do I go about reforming it? Do I put the new transom board in and then glass it all in?
Re: 1979 19 ft Sea Ox rebuild
Posted: Sat May 09, 2020 12:08 am
by Fuzz
First let me say sorry for you having to do so much work to get to this point

You need to put a couple braces across the hull to keep it from spreading out when you remove the transom skin. If I was doing it I would use a piece of melomine to put up against the hull for an outside mold. Build up skin thickness and tab that to the inside of the hull at the same time. Then install the core and then the inside skin. All this glass being carried out onto the hull will reinforce the tunnel as well.
Re: 1979 19 ft Sea Ox rebuild
Posted: Sat May 09, 2020 9:28 am
by boguesounder
Pictures are definitely helpful. You'll be married to this boat forever! The aquasport transom that was mentioned would be a good reference. Page 1 and 2 on this link will help you visualize what I think Fuzz is recommending. Fuzz, please correct me if I am contradicting you.
https://forums.bateau2.com/viewtopic.php?f=10&t=11294
Thanks...
Re: 1979 19 ft Sea Ox rebuild
Posted: Sat May 09, 2020 11:25 am
by Mr Pamlico
I wish my jackplate had enough set back to go on and close off the transom. Now would be the time. I’m gonna try and get some work done on it this weekend.
Re: 1979 19 ft Sea Ox rebuild
Posted: Sat May 09, 2020 3:20 pm
by Fuzz
boguesounder wrote: ↑Sat May 09, 2020 9:28 am
Pictures are definitely helpful. You'll be married to this boat forever! The aquasport transom that was mentioned would be a good reference. Page 1 and 2 on this link will help you visualize what I think Fuzz is recommending. Fuzz, please correct me if I am contradicting you.
https://forums.bateau2.com/viewtopic.php?f=10&t=11294
Thanks...
Thanks boguesounder that is exactly the thread I was thinking of but could not remember where it was. This cloof stuff sucks sometimes. Nice thing about lots of folks checking these threads is they help cover for each other.
Bobs Machine sells brackets with a lot of set back. Price does not seem too bad and I think Jeff can get them for you. If you think you want to go that way now is the time.
Re: 1979 19 ft Sea Ox rebuild
Posted: Sat May 09, 2020 4:40 pm
by cape man
I've been watching this thread and didn't post as I've never redone a transom on an old boat (actually I did repair my OD 18 transom), but was going to say cut it out and build a new one. It will actually be less work, and in the end you'll have something solid. Fuzz has done one recently and that post on the aquasport is classic how to.
Re: 1979 19 ft Sea Ox rebuild
Posted: Sat May 09, 2020 10:14 pm
by Mr Pamlico
I plan on picking up a piece of melamine and some clamps tomorrow. I'll also order the mold release wax and PVA on monday. I did a little more grinding today and made a template of the back of the boat. I plan to cut the back out tomorrow. I saw in the aquasport rebuild where they mentioned securing the melamine with screws. How do I go about screwing that to the boat without interfering with where I am going to lay glass? I thought about screwing boards on the side of the boat flush with the transom and screwing the melamine to them. I couldnt tell from the pictures exactly how they did it once the clamps were removed.
Re: 1979 19 ft Sea Ox rebuild
Posted: Sat May 09, 2020 11:11 pm
by fallguy1000
I see no reason to cut a skin away that is telegraphing movement.
You generally want to go across the gunwhales, but hard to tell anything without pictures.
Go post pics in anything else.
Re: 1979 19 ft Sea Ox rebuild
Posted: Sun May 10, 2020 4:20 am
by Fuzz
In the rebuild thread you can see how blocks were used to support the weight of the melamine at the bottom. And do like they did on the sides for clamping the top. Just make sure nothing will move when you climb into the boat.
Re: 1979 19 ft Sea Ox rebuild
Posted: Wed May 13, 2020 11:28 pm
by Mr Pamlico
Re: 1979 19 ft Sea Ox rebuild
Posted: Wed May 13, 2020 11:30 pm
by Mr Pamlico
double post
Re: 1979 19 ft Sea Ox rebuild
Posted: Thu May 14, 2020 12:16 am
by fallguy1000
How thick is the lip?
How wide is the lip on the outside on the bottom?
How wide is the lip on the outside on the sides?
The answers will guide my advice.
Re: 1979 19 ft Sea Ox rebuild
Posted: Thu May 14, 2020 12:40 am
by Fuzz
Either now or when you add the melemine make sure the transom has not changed shape.
I am thinking that lip will cause you lots more problems than it is worth. I would go ahead and get rid of it. Plus those bad spots where the hull meets the transom will be gone and no longer be any worry.
Re: 1979 19 ft Sea Ox rebuild
Posted: Thu May 14, 2020 11:00 am
by MSRiver
Pretty sure you can leave the lip but your going to have to feather off the edge all the way around so you have a smooth transition from the hull to melemine board so you wont have much of the old glass left to be filling in anyways. Also before you lay the first layer of glass over the old glass make a thickened epoxy to coat over and fill in any imperfections. Let that get sticky then lay on glass that will help decrease on air bubbles. Ran into the same problem on mine laying new glass over that old roven glass.
Re: 1979 19 ft Sea Ox rebuild
Posted: Thu May 14, 2020 6:33 pm
by fallguy1000
Fuzz wrote: ↑Thu May 14, 2020 12:40 am
Either now or when you add the melemine make sure the transom has not changed shape.
I am thinking that lip will cause you lots more problems than it is worth. I would go ahead and get rid of it. Plus those bad spots where the hull meets the transom will be gone and no longer be any worry.
Why get rid of it? He could grind it on and angle and glass over it.
Re: 1979 19 ft Sea Ox rebuild
Posted: Thu May 14, 2020 6:45 pm
by Fuzz
I am not sure there is a right or wrong answer for the lip. That being said I see lots of bad spots that will be left and will need to be dealt with. Plus the grinding to taper the lip down. I am not sure what is gained by leaving the lip and would prefer to start from scratch. If there is a good reason to keep it I am all ears
Re: 1979 19 ft Sea Ox rebuild
Posted: Fri May 15, 2020 12:44 pm
by Mr Pamlico

top left thickness

top left width

bottom left width

bottom left thickness


the bottom thickness goes from a half inch on the outside down to around .3 in the middle and thickens back up some before the tunnel


bottom right lip


The width of the lip on the right is the same as the left.
I guess a benefit of the lip would be if I was able to temporary secure with screws. With this being the first time I have ever done anything at all with fiberglass work I would like to take the most user friendly route as long as I still end up with a a solid well bonded skin.
Re: 1979 19 ft Sea Ox rebuild
Posted: Fri May 15, 2020 12:48 pm
by Mr Pamlico

Another thing I will need to figure out once the board is attached to the back is how the top of the transom kicks up straight. The transom is angled back a bit but then straight at the top
Re: 1979 19 ft Sea Ox rebuild
Posted: Fri May 15, 2020 3:34 pm
by Fuzz
I still say I would remove the lip but it is your boat and you get to make all the choices

Go ahead and get the melemine attached like is shown in the aquasport thread. Stop it where the transom angle changes and use a thin strip on top to follow the vertical part. After waxing the mold you can move on to glassing. Do as suggested to fill the lows and get a smooth surface to glass to.
Re: 1979 19 ft Sea Ox rebuild
Posted: Fri May 15, 2020 4:33 pm
by cape man
I'm with Fuzz. All that lip does is hold it together which you can do with a frame and seriously complicate the new lay up of the transom.
Re: 1979 19 ft Sea Ox rebuild
Posted: Fri May 15, 2020 11:35 pm
by Mr Pamlico
A few more questions before I get started. How many layers of glass am I going to need for the outside skin and in what order do I need to extend them to the sides and bottom of the boat? I have a roll of DB 1700 but I could also try and get some 1708 if it would be better to have the mat for some thickness. I also have a pack of 8oz cloth and was wondering if it would be a good idea for that to be the first piece to lay down to get started. I ended up getting an inch and a half thick piece of coosa for my transom core and all the work is being done with west systems epoxy. I have five gallons of resin and was thinking that would be enough to get me through the transom and I will order some more when it’s time for the stringers and floor.
Re: 1979 19 ft Sea Ox rebuild
Posted: Fri May 15, 2020 11:44 pm
by Mr Pamlico
Also I have slow hardener and I actually had another gallon of slow hardener come in today that was supposed to be a gallon of fast hardener. The temp here is around 60 to 65 at night and up into the 70s during the day but it does stay cool in my garage. I know the slow cure says it’s for 60 degrees and up and that’s mighty close to the limit. Could I use the slow hardener and then once everything is done use a heater or shine some shop lights on it to bring up the temp/cure faster?
Re: 1979 19 ft Sea Ox rebuild
Posted: Sat May 16, 2020 4:11 am
by Fuzz
Measure across the transom and add two foot for the tabbing. This will give you the yards for each piece of glass. I am guessing you are using 50 inch glass. You will need about 6 layers of 1708 or 10 layers of 1700 for the outside skin. That will give you about 1/4 skin thickness. You can go a little lighter for the inside skin. This will be about 40 lbs of glass. You will need the same weight of epoxy. This is just my best guess and others may feel different. I am in no way a naval engineer this is just what I would do. Some may think this is too much but the transom is one place I want plenty strong.
Re: 1979 19 ft Sea Ox rebuild
Posted: Sat May 16, 2020 4:15 am
by Fuzz
You asked about slow hardner in 60f temps. I keep my shop 60f year around. Fast or medium will be good to go overnight. Slow is set but needs another 24 hours before sanding. Anything you can do to add 5-10 degrees and it will be good the next day.
Re: 1979 19 ft Sea Ox rebuild
Posted: Sat May 16, 2020 11:37 am
by fallguy1000
Mr Pamlico wrote: ↑Fri May 15, 2020 11:44 pm
Also I have slow hardener and I actually had another gallon of slow hardener come in today that was supposed to be a gallon of fast hardener. The temp here is around 60 to 65 at night and up into the 70s during the day but it does stay cool in my garage. I know the slow cure says it’s for 60 degrees and up and that’s mighty close to the limit. Could I use the slow hardener and then once everything is done use a heater or shine some shop lights on it to bring up the temp/cure faster?
Not really. Cure times will be okay for you. The main thing to avoid is allowing the epoxy to ne applied in 60F. It really takes excess epoxy to wetout glass if the epoxy gets cold. So, you would be wise to keep the epoxy indoors or somewhere about 70-80F.
For an example, if I open my shop doors and the shop cools down, my epoxy mixing area cools off and I have found a consistent need to use like 5-10% more for the same wetouts. Very annoying. It drives cost and weight and reorders.
Also, for a large wetout like a whole hull; doing it in comd temps is really much more difficult. Hot temps is worse, but cold requires more epoxy for the same wetout unless u are a squeegee master.
Re: 1979 19 ft Sea Ox rebuild
Posted: Mon May 18, 2020 1:29 pm
by boguesounder
Good info above. I use slow in NC generally. It will be so hot here in another month you will have a hard time mixing and wetting out in large quantiites before it kicks. The ability to climate control (even a bit) your garage will be helpful.
Re: 1979 19 ft Sea Ox rebuild
Posted: Mon May 18, 2020 9:26 pm
by Mr Pamlico
Unfortunately I pulled a muscle in my shoulder Friday afternoon unloading a roll of fiberglass I picked up so I was unable to get anything done over the weekend. I am hoping to have the melamine attached this week so I can start laying glass Saturday. Should I start with a 3 inch overlap on the side and bottom of the boat and work my way out to 12? I’m hoping to get the skin laid and hopefully have the transom glued in over this long weekend coming up
Re: 1979 19 ft Sea Ox rebuild
Posted: Mon May 18, 2020 9:43 pm
by Mr Pamlico
I am planning on using the 1700 since I already have it and will probably just use that throughout the whole project. Other than the 12oz tape I ordered which should be here this week.
Re: 1979 19 ft Sea Ox rebuild
Posted: Tue May 19, 2020 2:23 am
by Fuzz
For the order of laying tabs there is some debate. Longest first is done by most people. You get a lay up with less chance of resin pockets where one layer over laps the next. The problem is if something would cause the glass to release, some form of contamination, the whole thing is not holding.
If you do short to long each over lap has a chance of good bonding and might hang on. The problem is where you lap over there is a ridge that will be resin rich in most cases.
So the choice is yours, I will not tell you what way to go. Others may chime in and have good reasons one way or the other. I do think with epoxy you will be good either way.
Re: 1979 19 ft Sea Ox rebuild
Posted: Tue May 19, 2020 8:43 am
by MSRiver
For 1700 i might do longest first. 1708 the mat on the back would help not have air bubbles when overlapping layers. I would put a layer of mat for the first regardless, it will use up resin but you will have a surface ready to sand to be finished when your done and not sanding into structural glass.
Re: 1979 19 ft Sea Ox rebuild
Posted: Tue May 19, 2020 3:06 pm
by Fuzz
If you are using epoxy skip the mat. There is some mat that will work with epoxy but it is a speciality item. Most mat is held together with a binder that epoxy does not break down so you end up with a mess. Get things sanded up well and the 1700 will work just fine.
Re: 1979 19 ft Sea Ox rebuild
Posted: Sat May 23, 2020 6:53 pm
by Mr Pamlico
Re: 1979 19 ft Sea Ox rebuild
Posted: Sat May 23, 2020 7:01 pm
by Mr Pamlico
Another idea that popped in my head that I know probably isnt the proper repair but just for discussion. Since I am going to redrill those holes to get rid of the silicone would there be a way to block it off at the bottom with say tape or something and force thickened epoxy in the hole until it oozes out of the back? I know I will probably need to keep moving back until I find the end of the void, this was just one of those ideas that popped in my head as I was staring at it in the driveway scratching my head
Re: 1979 19 ft Sea Ox rebuild
Posted: Sat May 23, 2020 10:01 pm
by fallguy1000
Can you take some pictures from further away?
I have lost perspective on the repair, but I am rather nervous about the approach.
Silicone in between that has failed is a big no-no.
As for forcing thixo into a margin; it must vent, so the ideal is to leave the gap. But I don't quite understand it well enough to give good direction.
Re: 1979 19 ft Sea Ox rebuild
Posted: Sat May 23, 2020 10:03 pm
by fallguy1000
If that is liner that has delaminated from the transom; injecting it is not my favorite idea. I would be inclined to remove it.
Re: 1979 19 ft Sea Ox rebuild
Posted: Sat May 23, 2020 10:06 pm
by fallguy1000
I believe the answer here is yes. All loose materials must he removed. If they injected silicone; it, too, must be removed.
I am just confused about the layers here. It appears as though a liner is delaminated from ? Something.
Re: 1979 19 ft Sea Ox rebuild
Posted: Sat May 23, 2020 10:09 pm
by fallguy1000
Don't inject that.
You won't be able to get the injection down into the bottom of the crack.
Grind it all out like a loose tooth. Once the loose tooth is gone; you can do reconstruction surgery. Sorry if I was a bit confused early. Just didn't understand how it delaminated.
Re: 1979 19 ft Sea Ox rebuild
Posted: Sun May 24, 2020 8:39 am
by Mr Pamlico
Re: 1979 19 ft Sea Ox rebuild
Posted: Sun May 24, 2020 8:41 am
by Mr Pamlico
There seems to be a good bond towards the outside of the hull just a void in the middle between the tunnel and the side. I am going to get back on it today and also make sure there isnt an issue like this on the other side.
Re: 1979 19 ft Sea Ox rebuild
Posted: Sun May 24, 2020 2:14 pm
by Fuzz
I know it sucks but you are doing the right thing by getting rid of all the spots with lousy glass work.
Re: 1979 19 ft Sea Ox rebuild
Posted: Sun May 24, 2020 4:22 pm
by Mr Pamlico
Re: 1979 19 ft Sea Ox rebuild
Posted: Sun May 24, 2020 4:24 pm
by Mr Pamlico
I also redrilled all the holes that were filled with silicone. I still have to grind out where there was some cracking around some of those holes
Re: 1979 19 ft Sea Ox rebuild
Posted: Sun May 24, 2020 4:28 pm
by Mr Pamlico
Also I can't thank yall enough for all the help and info. I sure would have been lost trying to tackle all of this without the help
Re: 1979 19 ft Sea Ox rebuild
Posted: Sun May 24, 2020 9:57 pm
by Fuzz
The holes are not too big to fill. Put some tape on the outside to keep it from falling through. I think I would mix up a mash with glass fibers in it for this work. Cabosil is not going to give the strength you need for this job. If the spots are very deep you may need to mix smaller batches and put it in layers. When the first layer has gotten firm but not fully cured you can add the next layer. You do not want it too thick as it could become too hot while it sets. Epoxy is not as bad about this as poly is but I would still err on the conservative side. BBC sells milled fibreglass if you are going to do a lot of this kind of stuff. Mix it with the glass fibers and some cabosil for a nice paste.
Re: 1979 19 ft Sea Ox rebuild
Posted: Sat May 30, 2020 8:03 pm
by Mr Pamlico
Re: 1979 19 ft Sea Ox rebuild
Posted: Sat May 30, 2020 8:14 pm
by Fuzz
That looks much better. It sounds like you have a good plan for moving forward.
Re: 1979 19 ft Sea Ox rebuild
Posted: Wed Jun 03, 2020 9:22 am
by boguesounder
Looks like you have it nicely cleaned up and ready for new transom. Nice, itchy, work!
Re: 1979 19 ft Sea Ox rebuild
Posted: Fri Jun 05, 2020 12:55 pm
by Mr Pamlico
This weekends project will be attaching the melamine board and trying to get the back skin laid out. I have a few questions. How many layers of the mold release wax should I put on the board? I’ve seen mixed reviews. Some say with the melamine you only need one coat or you might have early release issues. The last thing I want is that board glued to the back of my boat lol. I’m also planning on starting to lay the glass 12 inches up the boat and work my way back in with 1 inch increments for 10 layers with the db1700
Re: 1979 19 ft Sea Ox rebuild
Posted: Fri Jun 05, 2020 6:23 pm
by Mr Pamlico
Also I have some 7 inch rollers, 4 inch rollers and 2 inch brushes. Would the 7 inch put down too much epoxy in this situation? I want to knock it out as fast as I can to be able to get all 10 layers done in one go. That little bit of glass I laid on the back lip and across the tunnel is the first fiberglass I have ever put down and I just used a brush. I’d like yalls opinion on the best tool for the job before I get started. I guess if I start small I can always move up if necessary
Re: 1979 19 ft Sea Ox rebuild
Posted: Fri Jun 05, 2020 6:32 pm
by Mr Pamlico
One more thing I just thought up tinkering in the shop. Would putting down some 8 oz cloth before starting with the db1700 give me a better finish on the outside or would that be a waste of time
Re: 1979 19 ft Sea Ox rebuild
Posted: Mon Jun 15, 2020 10:06 pm
by Mr Pamlico
Re: 1979 19 ft Sea Ox rebuild
Posted: Tue Jun 16, 2020 3:15 am
by Fuzz
I am sure how flexible coosia is but you might need to level things a little. Put it in and clamp it to see. You will need to put a layer of puddy on it no matter what. The work you have done looks very good. Much better than it was
Re: 1979 19 ft Sea Ox rebuild
Posted: Tue Jun 16, 2020 1:38 pm
by Mr Pamlico
It seems pretty sturdy. Having the coosa glued in by the end of this upcoming weekend is my next goal. How much of a gap is typically left around the outside of the transom core and between the core and outside skin while glueing? I’m guessing I need to leave enough room to put in some thickened epoxy and then run some tape around the outside. And tighten the coosa up against the transom skin until the thickened epoxy starts to squeeze out and then let it set
Re: 1979 19 ft Sea Ox rebuild
Posted: Tue Jun 16, 2020 2:48 pm
by Fuzz
If you do a good job cutting things to fit I would say 1/8-1/4. You need a little slop to make it easy to install when all gooped up. But too big of a gap means using more puddy and that drives up the cost for no gain.
Re: 1979 19 ft Sea Ox rebuild
Posted: Tue Jun 16, 2020 10:31 pm
by Mr Pamlico
Re: 1979 19 ft Sea Ox rebuild
Posted: Tue Jun 16, 2020 11:01 pm
by Fuzz
You will get small ridges from the stitching, it is normal. Sand them off, just the sticking and not down into the glass. If the glass has any folds in it things will try to pop up after you quit. All in all I would say your glass work looks good. don't sweat the small stuff too much you are doing good.
Re: 1979 19 ft Sea Ox rebuild
Posted: Wed Jun 17, 2020 10:14 pm
by Mr Pamlico

I have cut the coosa and started fitting it. I still have some final adjustments to make before it is ready to be glued in. I'm also not sure if I need to add any tabbing to the skin or when I glue the core in and tab it will that bond everything together good enough. Right now the skin is laid over the lip right to the hull sides and bottom and then I ran some 6 inch 12 oz tape around it. I was thinking about tabbing it in 12 inches with 24 inch wide strips of 1700. Just not sure if that would be necessary or not
Re: 1979 19 ft Sea Ox rebuild
Posted: Thu Jun 18, 2020 12:24 am
by Fuzz
!2 inch tabbing out onto the hull will be a good plenty, maybe over kill.
Do you need to put a seal coat on the coosa first? I have never used it. Also what is your plan for pulling the coosa in tight to the transom skin?
Re: 1979 19 ft Sea Ox rebuild
Posted: Thu Jun 18, 2020 10:57 am
by Mr Pamlico
Everything I have looked into tells me that I do not need a seal coat on the coosa. I am planning on using bolts and 2x6s to clamp the coosa to the skin. After that I will have to figure out how to handle the very top of the transom where it kicks up. I have it cut now where the top of my transom board is even with where that angle starts. I still have to cut down some of the back skin and level it but I would say that kick up is probably about an inch and a half. I could either try and cut some coosa to fit that top section or leave it. On my uncles Parker it looks like they just left that section there. I’m just not sure how well that would work for me if I have to run glass over the top
Re: 1979 19 ft Sea Ox rebuild
Posted: Thu Jun 18, 2020 11:54 am
by MSRiver
Its real easy to sand through that 17oz compared to 1708. Looks real good. Coosa doesnt soak up nearly as much resin as wood does so theres no real reason to coat it other that help wetting out glass. Once you get the coosa fitted where you want it, time to start drilling holes through it! Get 1/2" bolts and predrill holes to cover 8" diameters. You can drill less holes but use a 2x4 to apply even pressure all the way across. So roughly 2-3 - 2x4. Make a thickend epoxy and smear it with a grooved trowel making 1/4"-1/2" epoxy grooves. YOU WANT TO MAKE SURE YOUR 100% CONTACT AND EXCESS COMES OUT!!! Very important! Then just back it up to the glass and tighten down all the bolts. You want it tight but you dont want to squeeze out all the epoxy. Before you finish go ahead and just square off all extra epoxy for a quick sand before you throw your fillet in for inside glass work.
Re: 1979 19 ft Sea Ox rebuild
Posted: Thu Jun 18, 2020 4:07 pm
by Fuzz
MSRiver wrote: ↑Thu Jun 18, 2020 11:54 am
Its real easy to sand through that 17oz compared to 1708. Looks real good. Coosa doesnt soak up nearly as much resin as wood does so theres no real reason to coat it other that help wetting out glass. Once you get the coosa fitted where you want it, time to start drilling holes through it! Get 1/2" bolts and predrill holes to cover 8" diameters. You can drill less holes but use a 2x4 to apply even pressure all the way across. So roughly 2-3 - 2x4. Make a thickend epoxy and smear it with a grooved trowel making 1/4"-1/2" epoxy grooves. YOU WANT TO MAKE SURE YOUR 100% CONTACT AND EXCESS COMES OUT!!! Very important! Then just back it up to the glass and tighten down all the bolts. You want it tight but you dont want to squeeze out all the epoxy. Before you finish go ahead and just square off all extra epoxy for a quick sand before you throw your fillet in for inside glass work.
Good info here
Re: 1979 19 ft Sea Ox rebuild
Posted: Tue Jun 23, 2020 11:33 pm
by Mr Pamlico

This is my final fitment and I feel like I am ready to glue it in. Does that look like enough even clamping pressure? I debated adding another bolt in the middle but Id rather not if I dont have too.
Also I need to figure what to do with the top of the transom where it kicks up at the very top

I think my best bet would be to cut a piece of coosa to fit but I am not sure how to measure the right angle to cut and get the perfect fit. I know on my uncles parker the top portion that kicks up is left just fiberglass. I feel like that would make it difficult to glass over the top which from what I have read would be stronger. I plan on cutting the back skin out to match the coosa once everything is glued in
Re: 1979 19 ft Sea Ox rebuild
Posted: Wed Jun 24, 2020 1:11 am
by Fuzz
I think you have enough clamping to get a decent fit. Not sure about the upper transom it all depends on how you want to finish that part.
Re: 1979 19 ft Sea Ox rebuild
Posted: Wed Jun 24, 2020 11:42 am
by boguesounder
My transom (wood) has a routed interior edge that allows the interior glass to take the curve and to meet the exterior glass. This is then cut / sanded flush prior to finishing and encapsulates the wood well. Not sure how Coosa would do with a router?
Looks like you are just about ready for glassing. I wonder if you should prep your tunnel area to accept additional glass while you are tabbing the transom in? Then you would have wet on wet to beef that tunnel up where it meets the original hull. You could knock it out all at once to avoid having to sand and prep again - pain. I always find it helpful to glass as much as possible when I'm at it - if it will eventually need it anyway.
Re: 1979 19 ft Sea Ox rebuild
Posted: Fri Jun 26, 2020 11:34 pm
by Mr Pamlico

I got lucky and found the perfect angle to fit the top of the transom. I set my saw to 15 degrees and cut a scrap piece and that was it. I still have to fit those pieces and I plan to glue them in at the same time as the transom board. I'm not for sure how the coosa will work with the router but I think it will be fine. We are gonna find out lol. When I do my tabbing to the hull do I cut one piece to wrap over the back of the transom and tie into the hull sides and bottom all at the same time? Or would I cut all my layers out of my transom stencil to cover the coosa and then wrap over the back and tab in to the hull sides and bottom. Is one any better than the other?
Re: 1979 19 ft Sea Ox rebuild
Posted: Sat Jun 27, 2020 12:42 pm
by Fuzz
If you are able to do it one piece it would be better but it is not going to be easy. I might cut one piece of glass and dry fit to see how tough it will be. Also your glass might not be big enough to do it. If that is the case glass the transom and then do the tabbing.
Re: 1979 19 ft Sea Ox rebuild
Posted: Mon Jun 29, 2020 3:49 pm
by boguesounder
You may get a variety of opinions on your question. Mine is just that...
I'm not totally clear how you plan to terminate the top of the transom. You definitely want the interior glass to meet the outer skin. I know you know that. I don't think you want to wrap the interior glass over to terminate on the outer skin if that is what you are asking. It will have trouble making that radius and you will have to fair the beejeeebees out of it to make it look good on the outer skin. I have seen many boats that have a portion of solid glass that rises about an inch above the point where the glasses (interior and exterior) join to encapsulate the core material. Is this what you are doing? I need to find a pic to share. If so, it seemed about right before you added the last little piece of coosa in. Hard to tell from the photo though.
Regarding tabbing, it seems often the glass is cut to match the transom template then the tabbing is accomplished with fiberglass tape. Tape comes in a variety of widths and sizing. This would be vs. trying to get one piece to cover everything. I think the chine turns would present some difficulty for you if you try to do that and the glass will need some cuts made to help it overlap and lay smoothly. I'll let others offer their advice.
Getting hot round here! When you do this, be ready to do it. Have everything cut, done and ready to roll. Your epoxy is going to want to kick quick. An extra set of hands may be nice to have pushing that glass roller. I say that but rarely get the help I need. Good luck and keep us posted!
Re: 1979 19 ft Sea Ox rebuild
Posted: Mon Jun 29, 2020 4:08 pm
by boguesounder

This is how I was describing finishing off the interior to exterior glass. Not my rig. Just a google pic. Just turn yer head to the side to see
Re: 1979 19 ft Sea Ox rebuild
Posted: Mon Jun 29, 2020 4:11 pm
by Fuzz
I went back and edited my last post. I meant to say laying the glass and tabbing in one piece was NOT going to be easy but I left out the NOT..................sorry about that.
Re: 1979 19 ft Sea Ox rebuild
Posted: Thu Jul 09, 2020 8:18 pm
by Mr Pamlico
boguesounder wrote: ↑Mon Jun 29, 2020 4:08 pm
This is how I was describing finishing off the interior to exterior glass. Not my rig. Just a google pic. Just turn yer head to the side to see
I am trying to decide whether to finish like this or fill in the top piece with coosa. I don’t have a preference for looks just whichever would make glassing easier. When I do my tabbing I do need to wrap over the top and onto the outside of the back skin correct? If so I believe filling in the top would be easier than trying to make those multiple bends. I could just finish like the picture and finish on the back fiberglass skin straight up without wrapping all the way over I just wasn’t sure if that would be more likely to separate in the long run with those plies being exposed. I was planning on wrapping over the top to encapsulate everything
Re: 1979 19 ft Sea Ox rebuild
Posted: Thu Jul 09, 2020 9:35 pm
by Fuzz
If it were me I would take it to the top. Round it over and then carry the glass out over the outside. Hot glue a 1x1 2-3 inches down on the outside to give an even place to end the glass.
Re: 1979 19 ft Sea Ox rebuild
Posted: Thu Jul 16, 2020 11:57 am
by boguesounder
Late reply from me, but I'll defer to Fuzz's expertise. I always have trouble with glass on tight bends...
What did you end up doing?
Re: 1979 19 ft Sea Ox rebuild
Posted: Sun Jul 26, 2020 7:18 pm
by Mr Pamlico
I ended up finishing the top of the transom with coosa and rounding the edges with a router

Yesterday I put some filets down around the edges and ran some 6 inch tape around the coosa. I sanded everything today and started trying to fit my inside skin pieces. My fiberglass sheets are big enough to do my skin and tabbing in one piece but I am having trouble getting it to all lay out. The tunnel is what is really causing the trouble. I have to figure that out and then figure out how to cut it to be able to use the same piece to roll over the top of the transom. The motor cut out is what is getting me there. I was planning on doing 5 layers of 1700 with 12, 10, 8, 6, 4 tabbing. Unless that is a waste of materials and way overkill. If I cant get the glass to roll over the top on the same piece I thought about laying all my inside pieces and then coming back separately with a piece to roll over the top. I plan on getting back out there tomorrow after work to figure out my inside layup
Re: 1979 19 ft Sea Ox rebuild
Posted: Mon Jul 27, 2020 1:22 am
by Fuzz
What you have done so far looks really good.
Unless you are real good at layout I think I would run my glass out on the sides and across the transom. You might try to let it run out on the bottom at the same time except for the tunnel area. I would tab the tunnel and transom cap in separately. I think if you try to do it all at once there is too much chance for things to go wrong. 5 layers of 1700 will be 1/8 inch thick and with staggered overlays fairing that out will not be to hard.
Re: 1979 19 ft Sea Ox rebuild
Posted: Mon Jul 27, 2020 1:45 am
by fallguy1000
You will have to cut some darts in the glass where it is shorter on the verticals. Vary the dart locations a bit and sharpie mark them for folds or references to remember of needed.
Looks great. I like the overlap plan, too.
Re: 1979 19 ft Sea Ox rebuild
Posted: Mon Jul 27, 2020 1:57 am
by fallguy1000
Here is a basic way to do the first darts.
Put the fabric up onto the top edge and cut a mirror image dart line of the angle below.
Dart the bottom at the tunnel bottom and middle.
I will upload your transom to my build blog here.
Click the link below and look for the pic. I can't upload pics here.
Re: 1979 19 ft Sea Ox rebuild
Posted: Tue Jul 28, 2020 5:13 pm
by boguesounder
Hey Pamlico,
That looks great! Congrats on a big step. I figured the tunnel would be challenging to tab in. Let us know how the layout goes for it.
Re: 1979 19 ft Sea Ox rebuild
Posted: Tue Jul 28, 2020 10:33 pm
by Mr Pamlico
I am hoping to have it figured out and all done this weekend. I’m going to try and make the cuts suggested to see if I can get it done in one sheet and if I’m not confident with that I plan on capping off the top separate. If I do the top separate how many layers of 1700 will I need up there?
Re: 1979 19 ft Sea Ox rebuild
Posted: Thu Jul 30, 2020 12:32 am
by fallguy1000
Mr Pamlico wrote: ↑Tue Jul 28, 2020 10:33 pm
I am hoping to have it figured out and all done this weekend. I’m going to try and make the cuts suggested to see if I can get it done in one sheet and if I’m not confident with that I plan on capping off the top separate. If I do the top separate how many layers of 1700 will I need up there?
I wrapped 8 layers over the top of mine.... four from each side stepped at 2" or so, 8,6,4,2 onto the opposite side...
Depends on power plan.
Re: 1979 19 ft Sea Ox rebuild
Posted: Thu Jul 30, 2020 7:45 am
by Mr Pamlico
I’m going to have a 2005 115 Suzuki on a 6 inch jack plate. 10 layers of 1700 are on the outside skin, a 1.5 inch pieces of coosa and then 5 more layers. I wasn’t sure if capping off the top was just to encapsulate the transom core or if it would need to be layered for strength as well. If I can do it all in one go I was going to wrap the 5 layers over and stagger them. If I do it separate I wasn’t sure if I would need that many. I had also thought about using the leftover coosa from the transom to run stiff knees from my stringers to the transom. I have no other use in the boat for coosa that thick and I figured it could only make it stronger
Re: 1979 19 ft Sea Ox rebuild
Posted: Thu Jul 30, 2020 3:01 pm
by Fuzz
Capping the transom with extra glass will make a sort of beam there making things stronger. But I am not sure it is needed in this case. If you are thinking of installing knee braces to the transom I like it. The knee braces will take a huge load and I believe will do much more good than extra glass on the cap will.
Re: 1979 19 ft Sea Ox rebuild
Posted: Thu Jul 30, 2020 11:23 pm
by Mr Pamlico

This is my first layer cut out. I couldnt get it to roll over the back all at once so I decided to lay it out like this and then close in the top. I am not sure the best way to handle the tunnel.

If I leave it like in the picture above there is an overlap from the glass on the tunnel laying over the glass on the bottom of the hull. I planned on cutting it along the sharpie line along the tunnel so it will fit flush but that would leave the 2 pieces of glass ending right where the hull bottom meets the tunnel. Im thinking of laying it out where it would be flush with no overlaps and then I could come back and strengthen the tunnel. Just not sure the best way to do that and fill in the middle
Re: 1979 19 ft Sea Ox rebuild
Posted: Thu Jul 30, 2020 11:26 pm
by Mr Pamlico
Also before I finished the transom I repaired the cracks along the tunnel with thickened epoxy and ran a piece of 1700 across tunnel from hull side to hull side
Re: 1979 19 ft Sea Ox rebuild
Posted: Fri Jul 31, 2020 2:48 pm
by Fuzz
You can cut a piece to fill that gap. And then do like you said and lay a little more glass over the tunnel and out on to the hull.
Re: 1979 19 ft Sea Ox rebuild
Posted: Fri Jul 31, 2020 10:43 pm
by fallguy1000
Looks fine; keep the overlaps; add some more glass.
Re: 1979 19 ft Sea Ox rebuild
Posted: Sun Aug 02, 2020 11:02 pm
by Mr Pamlico
Re: 1979 19 ft Sea Ox rebuild
Posted: Mon Aug 03, 2020 2:09 am
by Fuzz
Seems like who ever did the "bubba" rebuild got a heck of a buy on screws

Not surprised the stringers are rotten. The good news is it sounds like they are bad enough to be easy to remove.
Need to make sure the hull is supported well before removing the stringers. You do not want to give it a chance to change shape.
Never used coosia so I am not much help with that. Are you planning on keeping the deck at the same height or raising it?
Re: 1979 19 ft Sea Ox rebuild
Posted: Mon Aug 03, 2020 10:16 am
by fallguy1000
Screws in a boat. Ought to be a law.
Re: 1979 19 ft Sea Ox rebuild
Posted: Mon Aug 03, 2020 1:29 pm
by Mr Pamlico
I do plan on raising the deck. Not exactly sure how much yet. The boat would not self bail before and I know the jack plate will not help that. I’m hoping with the tank under the floor and maybe moving the batteries forward I will be able to make up for that. Before all weight was in the back of the boat. I need to take some measurements and see what size tank I can fit and that might help me determine my floor height as well. Trying to do some research to see how thick I need to go with the coosa for my stringers
Re: 1979 19 ft Sea Ox rebuild
Posted: Mon Aug 03, 2020 1:45 pm
by Fuzz
Not sure the cost of coosia but if it were me I would install 4 stringers 3/4 inch wide rather than two at 1.5inch. The height will keep them from flexing up and down. Bulkheads will keep them from flexing sideways.
Re: 1979 19 ft Sea Ox rebuild
Posted: Wed Aug 05, 2020 10:05 pm
by Mr Pamlico
Re: 1979 19 ft Sea Ox rebuild
Posted: Wed Aug 05, 2020 10:20 pm
by Mr Pamlico
I am having trouble finding that particular tank in stock but hopefully one will turn up. I want to be able to fit the biggest tank I can.
Re: 1979 19 ft Sea Ox rebuild
Posted: Wed Aug 05, 2020 10:25 pm
by fallguy1000
I have a good aluminum belly tank about 35 gallons. Pay shipping and it is yours.
Re: 1979 19 ft Sea Ox rebuild
Posted: Thu Aug 06, 2020 8:13 pm
by boguesounder
Looking good! Depending on how much space the tank takes up, I may consider reinstalling the keel stringer where possible and splitting with a bulkhead around the new tank where they meet. That may not make sense based on the length of tank relative to the keel length, but I think having something there would be a good idea structurally. Others may have a clearer sense of importance.
Re: 1979 19 ft Sea Ox rebuild
Posted: Thu Aug 06, 2020 11:05 pm
by Mr Pamlico
I do think that will be my plan. I plan on having the tank positioned forward in front of the console and I can put a stringer in front and behind of the tank bulkheads. I am leaning on the side of over built because I know this boat has a rough life ahead. Between duck hunting and running the sound looking for tarpon and drum she definitely has her work cut out for her. I tend to be hard on stuff.
Re: 1979 19 ft Sea Ox rebuild
Posted: Thu Aug 06, 2020 11:09 pm
by Mr Pamlico
fallguy1000 wrote: ↑Wed Aug 05, 2020 10:25 pm
I have a good aluminum belly tank about 35 gallons. Pay shipping and it is yours.
Thanks a lot for the offer. Do you happen to know the height of the tank? This boat is pretty shallow so I am limited by stringer height
Re: 1979 19 ft Sea Ox rebuild
Posted: Fri Aug 07, 2020 12:00 am
by fallguy1000
Try to get it measured tomorrow.
Re: 1979 19 ft Sea Ox rebuild
Posted: Wed Aug 26, 2020 12:51 pm
by boguesounder
Hi Pamlico,
Any updates? Get your tank sorted?
Re: 1979 19 ft Sea Ox rebuild
Posted: Thu Aug 27, 2020 10:13 pm
by Explorer 19TV
Pamlico,
Marine liquidators located in Fort Pierce Florida has that exact tank in stock along with about 500 others.... they will also ship. Great people give them your measurements and they will find it.
I found a impossible tank there, 28 gallons nearly flat...
Re: 1979 19 ft Sea Ox rebuild
Posted: Sat Sep 12, 2020 10:23 pm
by Mr Pamlico
Been a while since an update. I slacked off a little because I thought my fuel tank was going to be 4-6 weeks out, and the shrimp showed up thick in the sound so I’ve been on cast net duty. I am going to set my floor height once I figure out how I am going to set up the tank. I ended up getting my tank for 200 bucks shipped and have it already. My uncle was able to pull some strings and get it for me at cost. I have been fighting more bad work from the previous rebuild. They laid a LOT of woven glass on the bottom of the boat and none of it was bonded well. So I have been using a flat bar and a hammer/ripping it up to get a lot of that out. Also where they had filled in the keel did not bond well so I had to chip all of the thickened resin out with a screw driver. I started grinding today and hope to get a bright and early start in the morning. I do plan to fill the keel back in being that the rear part is gone from where the tunnel was put in and my tank will be sitting over a good portion of the rest of it. What is the best way to fill it in? I was thinking of thickening epoxy with milled fibers and 1/4 inch strand and doing it in layers so it will not get too hot
Re: 1979 19 ft Sea Ox rebuild
Posted: Sun Sep 13, 2020 12:13 am
by Fuzz
The only downside of doing what you propose is cost? I am not sure how big of an area you need to fill but a mix of milled glass and fibres will make a tough, ridged keel. After laying about an inch of the mix in the keel you might even use some form of cheaper filler like wood flour if the cost is an issue. Be interesting to see what others think.
Re: 1979 19 ft Sea Ox rebuild
Posted: Sun Sep 13, 2020 5:31 am
by cape man
Can you post pictures of the keel including a ruler or something else to give an idea of the size of the area?
Re: 1979 19 ft Sea Ox rebuild
Posted: Sun Sep 13, 2020 9:48 pm
by Mr Pamlico
Re: 1979 19 ft Sea Ox rebuild
Posted: Sun Sep 13, 2020 9:58 pm
by Mr Pamlico
Man those spots look a lot worse in the pictures than I thought they were lol
Re: 1979 19 ft Sea Ox rebuild
Posted: Mon Sep 14, 2020 1:24 am
by Fuzz
The keel opening looks about one inch wide? If that is true it will not take too much material to fill it in.
Re: 1979 19 ft Sea Ox rebuild
Posted: Mon Sep 14, 2020 5:51 am
by cape man
I would use the epoxy and wood flour mix that Fuzz suggested. Mix it about the consistency of ketchup and make sure to not trap air in the bottom. Use a thin probe to stir it as your pouring it in.
Re: 1979 19 ft Sea Ox rebuild
Posted: Mon Sep 14, 2020 8:43 am
by Mr Pamlico
Cool deal. I will try to get that done this week. What do y’all think about those spots where the stringers were running? Is that something I need to dig deeper into? I’ve had a couple different ideas run through my head but not sure the best route to go. Not sure if I’m over thinking those areas or not
Re: 1979 19 ft Sea Ox rebuild
Posted: Mon Sep 14, 2020 2:09 pm
by Fuzz
After you get the keel fixed I think I would run some 1708 over the whole bottom. You might need to lay a seal coat of neat epoxy down first to get every thing all sealed up. You could then level all the lows with puddy before laying down the 1708.
It looks like you have removed a ton of glass so adding some back in will not hurt. You have done some good work getting things all cleaned up.
Re: 1979 19 ft Sea Ox rebuild
Posted: Mon Sep 14, 2020 9:55 pm
by Mr Pamlico
I agree adding back some glass will be a good idea. I will see if I can get my hands on some 1708. All I have and have used is 1700. I’m sure the mat on the 1708 will help add thickness
Re: 1979 19 ft Sea Ox rebuild
Posted: Mon Sep 14, 2020 10:56 pm
by Fuzz
You probably already know this but 1708 can be a pain to wet out. Works better if you can put some resin down first and then lay the glass over it. If you already have a bunch of 1700 it will give more strength pound for pound but not build thickness as fast. I think either one will do the job for you.
Re: 1979 19 ft Sea Ox rebuild
Posted: Wed Sep 16, 2020 8:39 am
by boguesounder
A fin roller will be really helpful for wetting out the 1708 if you don’t have one yet. As noted, it is tough to wet and coat on the hull before you lay the glass will help.
Re: 1979 19 ft Sea Ox rebuild
Posted: Wed Sep 16, 2020 10:08 am
by MSRiver
Your dealing with some of the same problems i dealt with. If you can tell how much glass you took off say 1 layer id put at least one layer of 1708 back. If you have several of those bad spots go ahead and grind out till you find good glass then build up with 1708 patches overlapping then sand flat. Now here's a key note i found out, if you just lay epoxy down and put 1708 down itll look fine when you wet it out but as it cures small air bubbles will pop up. Just something about that old glass and how they laid it up and just had pin holes. So a remedy to fix that is make sure you cover every square inch with a ketchup thicken epoxy let that get sticky then lay down epoxy which will help wet out 1708. You can look at my thread of how i did it. Its the 1982 dolphin thread.
Re: 1979 19 ft Sea Ox rebuild
Posted: Sun Oct 04, 2020 9:11 pm
by Mr Pamlico
Being that I already have the 1700 and that is what I have been working with I am going to use that. Still undecided on how many layers but I am thinking 2-3.


I was planning on laying it out like this on either side and overlapping in the center so the tunnel and keel would have extra glass. I feel the hull is thin and I would like to make sure that it is plenty thick. We get the occasional freeze and I would like to be able to get out and bust the ice to be able to hunt without worry. What I am unsure of is after I get the first side in how do I lay the rest of the glass out without being able to get inside the boat? I also thought about installing the stringers first and then adding glass but I am not sure the best way to go or if one is stronger than the other. The hull has not lost shape at all but I can feel it flex some when I walk in the front of the boat.
Re: 1979 19 ft Sea Ox rebuild
Posted: Sun Oct 04, 2020 11:09 pm
by Fuzz
Lay out another piece of glass just like that one but for the other side. With 1700 you will not have the same problems wetting it out like 1708 does. You can then fold one side to the outside and wet the first piece out. Then fold the other piece back down. Work bow to stern. When you run out of room you should be able to reach over the stern to finish up. Hope that all makes sense.
Re: 1979 19 ft Sea Ox rebuild
Posted: Mon Oct 05, 2020 6:25 am
by cape man
Put the glass down before the stringers.
Re: 1979 19 ft Sea Ox rebuild
Posted: Mon Oct 05, 2020 12:07 pm
by BrianC
You might also consider running it up the sides about 6" or so.
Re: 1979 19 ft Sea Ox rebuild
Posted: Wed Oct 07, 2020 8:35 am
by MSRiver
Glass hull before stringers, also BrianC might want to go up the sides a little or put some 12 oz tape along corners.
If you are doing both sides at once and multiple layers keep in mind your going to have to sand the whole bottom in between layers. I did one side at a time wet on wet with the overlap to save that sanding time. Once i got one side down i only sanded 8" or so over the center. That way you have plenty of area to work not to mention with my back i didn't need to make it any harder on myself than it was already. Rolling out the glass is the most time consuming, i started at 6pm and i wasn't through until almost 12 both nights. It would be highly advised that it is such a larger area i would roughly calculated how much epoxy you need make that in a batch then pour it out all over the glass to get it wet out as quit as possible, which 17 oz is pretty easy but believe me its gonna take alot longer than you think just rolling out the air pockets.
Re: 1979 19 ft Sea Ox rebuild
Posted: Wed Oct 07, 2020 9:08 am
by fallguy1000
Work wet on green. Let the glass tack up for about 8 hours. Verify no greasy feeling; lay the next one on.
For the number of layers needed. Use Gerr's numbers.
I can work the calc for you if you want. His numbers are plenty robust. Ice work is tricky. Keep a rubber hammer onboard at all times.
For the calc, I need to know length, beam, depth, planned top speed. Depth is basically deck to hull.
Also, if you perceive a now thin hull. It would be good to know the current thickness.
Re: 1979 19 ft Sea Ox rebuild
Posted: Wed Oct 07, 2020 9:10 am
by fallguy1000
The calc would be on the order of 19ft,7ft beam wl, 3 ft deep deck to hull
Re: 1979 19 ft Sea Ox rebuild
Posted: Fri Oct 09, 2020 7:50 pm
by Mr Pamlico
Doing one side at a time is a good idea. I was wondering how to be able to work wet on wet after working my way to the back. And fallguy when you say work wet on green and to let the glass tack up with no greasy feeling is this to be able to get in the boat to lay out the entire hull at one time? Or will it still be too tacky to be able to get in the boat to work. I’m very unfamiliar with glass work as this project is the first time I have ever messed with it. I will get some measurements as soon as I can. Also what is the best way to measure the thickness of the hull?
Re: 1979 19 ft Sea Ox rebuild
Posted: Fri Oct 09, 2020 8:07 pm
by Mr Pamlico
The boat is 19 ft long, the beam is 6ft 3 inches and the height is 2 ft 2 inches in the back of the boat. Before the max speed I reached was 39 mph. I’m assuming with the jack plate and loosing all the weight from the soaked transom, foam and stringers maybe mid 40s on the speed? Not 100% sure on that one
Re: 1979 19 ft Sea Ox rebuild
Posted: Fri Oct 09, 2020 8:11 pm
by Mr Pamlico
I have only ever had to bust ice on the river to hunt a few times over the last 10 to 12 years so it isn’t a common occurrence but if it happens I know I’m going to want to be able to hunt
Re: 1979 19 ft Sea Ox rebuild
Posted: Mon Oct 12, 2020 10:00 am
by LilRichard
Dang, I just read this entire post, you've been working hard. Sorry to see you opened up a can of worms, but best to find it now than later. Your work so far looks really good, especially given your self proclaimed lack of experience.
Keep your head up and make sure not to let this become a chore. I remember the rebuild blues, sometimes it feels like it will never end!
Re: 1979 19 ft Sea Ox rebuild
Posted: Tue Oct 13, 2020 6:07 am
by fallguy1000
Mr Pamlico wrote: ↑Fri Oct 09, 2020 8:07 pm
The boat is 19 ft long, the beam is 6ft 3 inches and the height is 2 ft 2 inches in the back of the boat. Before the max speed I reached was 39 mph. I’m assuming with the jack plate and loosing all the weight from the soaked transom, foam and stringers maybe mid 40s on the speed? Not 100% sure on that one
I will run the Gerr numbers with coffee at 9am for you.
To measure the hull thickness; you generally remove a thru hull. But don't create a hull penetration of none exist.
Wet on green. Green epoxy is epoxy that has cured overnite and is tack free, but still within the primary bonding window of the epoxy. For Silvertip, this is 72 hours. You could sand any really rough spots and vacuum up the dirt as well. Generally, I only use a 24 hour window. And a hot sun will reduce that 72 hour window, but the sun will cause rapid gelation and a nightmare, so hope you are indoors.
I am not sure why you want to add all that much glass.Using 6x18, I get 108 sqft or 12 yards; a 17 oz glass adds at 34 ounces per yard or about 25 pounds with glass and resin.
Re: 1979 19 ft Sea Ox rebuild
Posted: Tue Oct 13, 2020 6:30 am
by fallguy1000
Fuzz wrote: ↑Sun Oct 04, 2020 11:09 pm
Lay out another piece of glass just like that one but for the other side. With 1700 you will not have the same problems wetting it out like 1708 does. You can then fold one side to the outside and wet the first piece out. Then fold the other piece back down. Work bow to stern. When you run out of room you should be able to reach over the stern to finish up. Hope that all makes sense.
1700 needs wetting underneath to work well
I just did my cabin roof.
The way I did it was to roll the glass onto itself. So, dryfit the two pieces with a 2" min overlap. Use a sharpie to draw reference lines like overlaps and length lines on the hull and glass every 3 feet or so. Biax will change length some, so it is good to know in 3 foot increments if yoh are long or short to the dry plan. Like Fuzz says, work bow to stern, so roll from the stern when dry.
Then after you mix your epoxy, you must prewet the area in front of you. It is done with a 3-9" paint roller. You can buy adhesive rollers from HD at 9" and cut them down to 3" or whatever you like. So, you are on your knees in the boat facing the bow. Wet about 18" back pretty heavy and lay the entire rolled up glass down. Use a consolidation or bubble buster roller and go over the whole area. Then pour some epoxy over the top and roll it out and continue that process gently moving the rolled up glass enough to access and wetout the substrate and then topside wetout the glass. You also want a squeegee as you may end up woth a little extra epoxy on the top now and then and the squeegee helps move excess better than the two rollers.
Using this method, each side should take about an hour if you are a semi-pro like me. Mix your epoxy in a big one gallon wide container or it will kick fast in too small a pail.
You may need to cut the glass down widthwise to allow enough room for you on knees on a second pass. I suppose you could try doing both rolls at the same time, bit that is sort of a professional grade effort and will be awful lot of moving of you and I wouldn't.
It looks like your glass dryfit is too wide to fit you in the other side. I recommend you cut the glass down to say 4" past the centerline...maybe 40"? 38" wide glass might have been ideal..oh well. Cut at say 40" and then weigh the glass. It will be about 6 yards or roughly 102 ounces. Epoxy is 9# per gallon. So you'd need say 102/16/9*128 or 90 ounces of resin at 100%. You are an amateur and will need more so, plan about 100 ounces of epoxy. You will be much slower than me and I would recommend using two pours of about 48 ounces each time. I don't know the epoxy or numbers, but a 2:1 epoxy would be 32 oz resin and 16 oz hardener for each batch.. the 48 ounce batch is a good guideline and won't kick too fast in a gallon bucket so long as you have slow hardener
Hope this helps. Sorry I didn't read the Friday posts. Always quote me if you want a faster reply. Or send a direct message.
Re: 1979 19 ft Sea Ox rebuild
Posted: Tue Oct 13, 2020 6:47 am
by fallguy1000
Also, do not attempt to roll up the sides. If you want to do the sides; use 1708 tapes or the 10" cutoff you need to make to get room to work in the boat. The sides are easy to do as a smaller piece, but as a full sized roll; they will tend to be trouble and would also require a thixo fillet--a bit of unneeded headache
Re: 1979 19 ft Sea Ox rebuild
Posted: Wed Oct 14, 2020 1:54 am
by Fuzz
When using 1708 I always do some wetting from the bottom but with 1700 the loser weave has let me wet top down with no problems. This is based on laying a couple of rolls of it.
Re: 1979 19 ft Sea Ox rebuild
Posted: Fri Oct 16, 2020 12:42 pm
by boguesounder
Looks like you had a really clean base for that new glass. Did you put it in last weekend? How'd it go?
Re: 1979 19 ft Sea Ox rebuild
Posted: Sat Oct 17, 2020 10:18 pm
by Mr Pamlico
Got some glass down this afternoon and it was a bit of a shit show lol took a lot longer than expected and I ran in to a few troubles. First time laying that much glass out at once and I definitely learned a lot during the process. There’s some air bubbles I am going to have to go back and address but overall I think the end result was ok. I’m gonna do some sanding tomorrow and I’ll give a better update on everything when I finish.
Re: 1979 19 ft Sea Ox rebuild
Posted: Sun Oct 18, 2020 1:18 am
by Fuzz
If working by yourself laying large amounts of glass can be a pain for anyone. Lots of preplanning makes it a lot better as does experience. Sounds like you are getting some of that experience now.
Re: 1979 19 ft Sea Ox rebuild
Posted: Sun Oct 18, 2020 9:08 pm
by boguesounder
Glad you got it done. It is easy to be overly critical of your own work - I bet you did a great job. Looking forward to seeing the pics.
Re: 1979 19 ft Sea Ox rebuild
Posted: Mon Oct 19, 2020 11:20 pm
by Mr Pamlico

This is where I am at now. I ended up just doing one layer on each side but I did leave them full width so the keel and tunnel would have two layers. I laid the first layer out totally and wet it out and then I started at the front and worked my way to the back with the second sheet.
The first mistake I made was that I was at the lower temperature range for my epoxy and it was too thick. I had trouble with the roller picking up the glass when I was trying to roll it out and I believe it would have wet out better if the epoxy was warmer/thinner. I was just thinking about having plenty of working time but I wasn't thinking about the epoxy temp. I should have done as one of you suggested earlier in this thread and set the epoxy out in the sun or wrapped in a heated blanket to make it flow better.
The second mistake was that I should have waited for the first piece of glass to get tacky or cure more before I laid started laying the second piece. When I started laying out the second piece and working my way to the back about halfway through I realized I needed to reposition it. So when I had to pull it back up and reposition it thats when it started causing issues with the first layer. The first layer laid out great with no air bubbles and if I wouldve let it start to cure more instead of wet on wet I believe I would have had much more success when I moved on to the second layer. I was running out of time in the day so I tried to just work straight through.
I have sanded out the air bubbles but still have to fill them in. There is one I believe would be best repaired by laying piece of glass in it and sanding back flush and the others are so small I am going to fill them with thickened epoxy.
Re: 1979 19 ft Sea Ox rebuild
Posted: Tue Oct 20, 2020 5:05 am
by fallguy1000
Didn't we talk about the need to reinforce those tunnel edges awhile ago? I think I might just add another couples piece around the tunnel say like 3" and 2" overlap each side of the angle and call it done. So 6" and 4" pieces. Then when you get to the other side of the tunnel repair, you can flat sand those cracks with 40 grit and lay in some glass and not worry about blowing through...
1708 would be even better, but you can use 1700 scraps as well.
Re: 1979 19 ft Sea Ox rebuild
Posted: Tue Oct 20, 2020 6:17 pm
by Mr Pamlico
I will add those reinforcements in this weekend when I fix the air pocket spots. Next will be figuring out my tank placement as that will dictate my floor height and stringers. What is the best way to get the contour of the bottom of the boat for the the stringers? I tried to cut the stringers flush with the bottom so I would have a guide but they were so rotten they just fell apart. The back is flat but towards the front the hull drops down for the v and the boat has a sort of “belly” to it. I would like to put my tank all the way forward in that belly as it seems to fit there well. Not sure if there would be any cons to having the tank all the way forward. My plan now is it have the tank situation figured out this weekend and then I can run two boards across the boat at my estimated floor height to take some stringer measurements. Just figuring out the best way to follow the curve in the front of the boat is throwing me for a loop
Re: 1979 19 ft Sea Ox rebuild
Posted: Tue Oct 20, 2020 10:04 pm
by fallguy1000
Mr Pamlico wrote: ↑Tue Oct 20, 2020 6:17 pm
I will add those reinforcements in this weekend when I fix the air pocket spots. Next will be figuring out my tank placement as that will dictate my floor height and stringers. What is the best way to get the contour of the bottom of the boat for the the stringers? I tried to cut the stringers flush with the bottom so I would have a guide but they were so rotten they just fell apart. The back is flat but towards the front the hull drops down for the v and the boat has a sort of “belly” to it. I would like to put my tank all the way forward in that belly as it seems to fit there well. Not sure if there would be any cons to having the tank all the way forward. My plan now is it have the tank situation figured out this weekend and then I can run two boards across the boat at my estimated floor height to take some stringer measurements. Just figuring out the best way to follow the curve in the front of the boat is throwing me for a loop
Stringers are not supposed to be mounted to the hull. The space between the hull and stringer is filled with thickened resins or foam padding and thickened resin.
If you try to cut the stringer to fit, then you will end up with a hard point here or there where the stringer meets the bottom.
Make a cardboard template; shim the stringer up to level; fill under with resin. Be warned. The resin can get awful hot if too thick; limit is about 3/8". You would be best served to tack the stringer in when level in a few places and then fill it the rest of the way next day.
Re: 1979 19 ft Sea Ox rebuild
Posted: Wed Oct 21, 2020 8:57 am
by MSRiver
Looks good, i hate to say i told ya, but i told ya it'd take way longer than ya think. Its ok I did the same thing. I'm sure all your work is very acceptable and at that even better compared to what factories do. Moving forward to stringers, if im not mistaken and your around the florida area. I will highly suggest contacting BBC and ask about the composite foam stringers that you can buy on here. My boat had such a deadrise and shippping was through the roof it wasnt very viable for me to get them. I did however get a set for my gas tank to sit on. The easy of puttin them in is a breeze and as long as they work with your floor height they will save countless hours id say about 1-2 weeks of working time after your day job making wood stringers. Just an option. If not need to get a laser level, make sure the boat is level then set your height of where the floor needs to be take into account deck 3/4" deck height and start measuring every foot.
Re: 1979 19 ft Sea Ox rebuild
Posted: Thu Oct 22, 2020 12:43 pm
by Mr Pamlico
I already have and plan to use 3/4 coosa for my stringers. Before I can start on stringer measurements I have to figure out my fuel tank placement. I would like to have my fuel tank all the way to the front of the boat bc it fits nice where the front of the boat drops down and would allow me to have the floor height I want. I also thought with the engine hanging on a 6 inch jack plate that could help. Would there be any disadvantages of the tank being all the way forward? Not sure if doing away with the center stringer up front there would be a big deal. Once I figure out placement I plan to glass a board in for the tank to sit on and install the neoprene the tank needs to sit on and then take my floor height measurements
Re: 1979 19 ft Sea Ox rebuild
Posted: Thu Oct 22, 2020 12:48 pm
by Mr Pamlico
Re: 1979 19 ft Sea Ox rebuild
Posted: Thu Oct 22, 2020 1:21 pm
by fallguy1000
Typically dynamic or changing weights are best centered which has less impact on trim.
It is not a requirement though.
Re: 1979 19 ft Sea Ox rebuild
Posted: Thu Oct 22, 2020 2:51 pm
by Fuzz
Fallguy is correct on tank placement but like he says if that is what it takes to make it work then you have little choice. Either way it is nice being able to set the stringers around the tank size. I would move the tank as close to center as you can make work.
Re: 1979 19 ft Sea Ox rebuild
Posted: Thu Oct 22, 2020 3:32 pm
by Mr Pamlico
fallguy1000 wrote: ↑Thu Oct 22, 2020 1:21 pm
Typically dynamic or changing weights are best centered which has less impact on trim.
It is not a requirement though.
That makes sense. I need to move the tank around and get my different floor height measurements and weigh out the pros and cons. I also need to make sure I can access the top of the fuel tank with my console installed which might leave me no choice but having it closer to the front.
Re: 1979 19 ft Sea Ox rebuild
Posted: Sun Oct 25, 2020 8:47 am
by Mr Pamlico
I set my console and lean post in the boat so I could get my tank placement and I got the tank mounting pad set in. I then set my tank in on neoprene strips to get it at the correct height and ran a level across the top. I then used a laser level as MSRiver suggested to and the level across the tank to set my floor height. I then took my measurements for the two center stringers. They fit the bottom of the hull great but I did not take in to account the angle on my transom. I think I was concentrating on the laser level and the floor height so much it just didnt cross my mind. So no there is a gap from my stringers to the transom.


I know I need a notch at the bottom to allow water to drain but can I just cut a piece to fill in the top? I am also planning on using the 1.5 inch coosa left over from my transom to make transom braces that connect to these stringers. Could I glue and glass those braces to the stringer/hull bottom/transom and that be sufficient? I assume some of the transom strength comes from the stringers connecting to the transom so I just want to make sure I am good in that area. I think adding the transom braces connected to the stringers would be fine but I just wanted to get opinions and see what my best options were. I would prefer to make these stringers work as the coosa is expensive and I already have them cut out. At the bottom where I cut the angle on the board it is about 3/4" gap and at the very top it is 2 inches
Re: 1979 19 ft Sea Ox rebuild
Posted: Sun Oct 25, 2020 11:36 am
by fallguy1000
Personally, I would template and cut the transom into the coosa you have and slide it back and fill in the front. Then shim up a bit more? No sure the hull gap.
But you can also just piece it in and glue the coosa piece on with thickened resin real good as long as you are glassing it real good.
You do need load path, so the gap must be filled.
Things look pretty good. Don't sweat that little miss.
Re: 1979 19 ft Sea Ox rebuild
Posted: Sun Oct 25, 2020 11:40 am
by fallguy1000
Also, you don't want the coosa pressing the hull. It would press on the outboard edge and cause trouble on the hull bottom.
Re: 1979 19 ft Sea Ox rebuild
Posted: Sun Oct 25, 2020 4:20 pm
by Mr Pamlico
I will go the route of filling it in and make sure I glass it good. I already have the 4 pieces cut out for these center stringers and they fit nice other than that. My plan after I get this hiccup fixed was to lay the stringer pieces upside down on the flat shop floor so they are sitting on a level surface. Join the front portion to the back of each stringer and then put a few 30 inch boards between them as that is the distance from inside to inside. Set it in the boat as an assembly, space it up of the hull bottom, make sure it is level, put my thickened epoxy under and then glass them in. Then use those stringers to set the height of the others
Re: 1979 19 ft Sea Ox rebuild
Posted: Mon Oct 26, 2020 12:09 am
by Mr Pamlico
I have the two center stringers put together and installed in the boat. I set my stringer height just over the fuel tank so I could keep my floor as low as possible. Now I am wondering if when the boat is sitting in the water if I am going to be able to get enough angle for proper fill. The fill pointing straight to the back of the boat does not help. I figured worst case scenario I could raise the front of the stringers and have a small step up. I still need to shim the stringers up 1/4" for the putty so I will do that and get some fuel hose in my hands to visualize it before making any decisions on that. Im going to wait to do any gluing or glassing until I have everything dry fit and figured out.


The fuel tank is just slid off the mounting pad a little because of the front board I have temporarily between the stringers. It looks like it could be just sitting on the hull bottom in the pictures but it is not
Re: 1979 19 ft Sea Ox rebuild
Posted: Mon Oct 26, 2020 9:25 am
by fallguy1000
Just turn the tank around. Then you can put a panel in the front to cover the fuel line And runnthe lines up. The vent line must vent overboard. Then the fill can be on the deck.
Re: 1979 19 ft Sea Ox rebuild
Posted: Mon Oct 26, 2020 9:30 am
by fallguy1000
Also, I would not go 1/4" lift. Too much filler material.
Do the least you can to be level and not hitting the bottom.
Re: 1979 19 ft Sea Ox rebuild
Posted: Mon Oct 26, 2020 12:31 pm
by Mr Pamlico
I’ll do that. Hoping to have the other stringers cut out and fitted this week
Re: 1979 19 ft Sea Ox rebuild
Posted: Mon Oct 26, 2020 2:01 pm
by Mr Pamlico
I also need to decide on the tabbing for the stringers. I was thinking after I get the stringers glued to the hull I would come back and put my filet along the bottom and then run some 6 inch 12 oz tape down that and let it cure. Then come back with 2 layers of 1700.
Re: 1979 19 ft Sea Ox rebuild
Posted: Mon Oct 26, 2020 4:04 pm
by fallguy1000
A good tape plan for that boat is 3 layers of 1708 staggered. Something like 8/6/4 or 6/6/4.
You can also use offcuts for tapes if you have a lot.
Tabbing is all about thickness. Aim for 1/8"+.
All depends on planned horsepower. Under 150, you could skimp some. Up above that and you can fly off wave tops and trough slam a 19 footer quite a bit. So needs better bonding to avoid separation.
Re: 1979 19 ft Sea Ox rebuild
Posted: Tue Oct 27, 2020 8:56 am
by MSRiver
Fill gap between stringers and transom and just make sure you glass it up very well. As far as the gas tank do what fallguy says, turn the tank around. That way you have fill hole just come in the deck or you can run it up the side to the cap as well as the vent hose, just 90deg the hose run it up the side and you can make a good cover for it later. As far as stringer layup, now that you have got some good glass work under your belt the stingers wont be much of a problem. I may be mistaken but i wouldnt bother with the 6" 12oz tape unless you plan of doing that by itself and if i were itd be 4 layer and layered. You've already got good working experience with 1700 id do 3 layers 8-6-4 all wet on wet.
Re: 1979 19 ft Sea Ox rebuild
Posted: Wed Oct 28, 2020 8:34 pm
by Mr Pamlico
I had thought about turning the tank around but I wasn’t sure about the pickup being at the front of the tank. My thought was that if I’m low on fuel getting on plane, or traveling at slow speeds the fuel would be at the opposite side as the pickup.
There is going to be a 115 Suzuki 4 stroke on a six inch jack plate. Before these repairs with it water logged I was pushing close to 40 mph. With the way it is propped it is pretty torquey. I definitely don’t want to skimp on the stringer layup as this boat is going to see a lot of rough water and abuse. The sound and rivers I use this boat on can get pretty nasty. I don’t want to be second guessing my work the first time I’m running across the sound and it blows up. I do plan on using 1700 as that is the fiberglass that I have already and what I’ve been working with. If three layers of 1700 will be plenty sufficient I will do that. But if I need to shoot for an 1/8 inch of thickness with the 1700 I think it would be closer to 5. I know when I did 10 layers for my outside transom skin it was 1/4”
Re: 1979 19 ft Sea Ox rebuild
Posted: Thu Oct 29, 2020 2:24 pm
by Fuzz
If it were me I would add the extra layers. It is probably not needed but I would rather be sure than have a worry in the back of my mind all the time. In the grand skeem of things a few extra layers is no big deal.
Re: 1979 19 ft Sea Ox rebuild
Posted: Thu Oct 29, 2020 8:24 pm
by fallguy1000
I go 5 layers wrapped. Then 3" square backing plates. Down under minimum 1.5" round washers. I also accept no liability for your work.
I would do 5 layers each side wrapped over so the transom would have 10 on top if my boat. I regret my 8/6/4/2 overlapping because my bottom bolts only have about 5 layers of 1700. Do it again, I'd go 12/10/8/6.
Re: 1979 19 ft Sea Ox rebuild
Posted: Sun Nov 15, 2020 2:21 pm
by Mr Pamlico
fallguy1000 wrote: ↑Thu Oct 29, 2020 8:24 pm
I go 5 layers wrapped. Then 3" square backing plates. Down under minimum 1.5" round washers. I also accept no liability for your work.
I would do 5 layers each side wrapped over so the transom would have 10 on top if my boat. I regret my 8/6/4/2 overlapping because my bottom bolts only have about 5 layers of 1700. Do it again, I'd go 12/10/8/6.
I do still have to finish the top of my transom so I will keep that in mind when I get there but here I am trying to figure out how many layers of 1700 to use for my stringers. I was thinking 5 layers there as well. I haven’t been able to work on it as much as I would like but I’m hoping to have my stringers finished in the next 2 weeks
Re: 1979 19 ft Sea Ox rebuild
Posted: Sun Nov 15, 2020 3:37 pm
by fallguy1000
Tab the coosa stringers in with say 3 1708 tapes---8,6,4 or 6,6,4 or 6,4,4 lightest
Cap the stringers with 3x1700; no hard edges so varied overlaps by 1" each onto the tapes
My opinion.
Re: 1979 19 ft Sea Ox rebuild
Posted: Sun Nov 15, 2020 9:50 pm
by Mr Pamlico
fallguy1000 wrote: ↑Sun Nov 15, 2020 3:37 pm
Tab the coosa stringers in with say 3 1708 tapes---8,6,4 or 6,6,4 or 6,4,4 lightest
Cap the stringers with 3x1700; no hard edges so varied overlaps by 1" each onto the tapes
My opinion.
I was planning on cutting strips of 1700 to do my tabbing because i have some big scrap pieces left and I already have the 1700. Just to clarify when you say 8,6,4 you mean 8 inches up the stringer and 8 inches to the bottom of the boat right? Not an 8 inch wide piece that would be 4 inches up the stringer and 4 inches on the the boat
Re: 1979 19 ft Sea Ox rebuild
Posted: Sun Nov 15, 2020 11:40 pm
by fallguy1000
Mr Pamlico wrote: ↑Sun Nov 15, 2020 9:50 pm
fallguy1000 wrote: ↑Sun Nov 15, 2020 3:37 pm
Tab the coosa stringers in with say 3 1708 tapes---8,6,4 or 6,6,4 or 6,4,4 lightest
Cap the stringers with 3x1700; no hard edges so varied overlaps by 1" each onto the tapes
My opinion.
I was planning on cutting strips of 1700 to do my tabbing because i have some big scrap pieces left and I already have the 1700. Just to clarify when you say 8,6,4 you mean 8 inches up the stringer and 8 inches to the bottom of the boat right? Not an 8 inch wide piece that would be 4 inches up the stringer and 4 inches on the the boat
No. I mean the piece is 8". But 1700 is 17 oz and 1708 is 25 oz. I would tab 75 oz 8" wide or 4 each side, 6",4", or 3" and 2" each side. Since you only have 17 oz tapes; you better use 4 tapes; something like 10",8",6",4" or 5",4",3,2" each side. Then cap all the way down; less 1" each side, less 2" each side or so.
Re: 1979 19 ft Sea Ox rebuild
Posted: Sun Jan 10, 2021 9:15 pm
by Mr Pamlico
I have gotten behind working on the boat with duck season being in but I am hoping to pick the pace back up. I got the two center stringers tabbed in yesterday. I did 10, 8, 6, 4 with 1700. They feel very solid. I am going to try and get the tank pad glassed over this week after work and the two outer stringers cut out. Hopefully I can get them tabbed in this upcoming weekend.


What is the recommendation/how should I lay out my bulkheads? I know I am going to block in the fuel tank and then I was planning on running a center stringer from that back bulkhead over the tunnel. Not sure if the center stringer is necessary but I figured it couldn't hurt and would add strength to the tunnel. Still kind of undecided on whether I need the center stringer or not
Re: 1979 19 ft Sea Ox rebuild
Posted: Mon Jan 11, 2021 1:13 am
by Fuzz
Stringers look good. How far apart are they and how thick is the hull between them?
Re: 1979 19 ft Sea Ox rebuild
Posted: Mon Jan 11, 2021 8:01 pm
by Mr Pamlico
Fuzz wrote: ↑Mon Jan 11, 2021 1:13 am
Stringers look good. How far apart are they and how thick is the hull between them?
They are 30 inches apart. I am not exactly sure the thickness of the hull there. I don't know of any way to measure it without drilling a hole. I think I am leaning towards putting one there just to be on the safe side.
Re: 1979 19 ft Sea Ox rebuild
Posted: Mon Jan 11, 2021 10:52 pm
by Fuzz
I do not know if you need the center stringer or not. But I know you think you need it so I would add it in. But then I tend to over build just a tad
Re: 1979 19 ft Sea Ox rebuild
Posted: Tue Jan 12, 2021 8:10 am
by Jeff
Good progress!!! Jeff
Re: 1979 19 ft Sea Ox rebuild
Posted: Thu Jan 21, 2021 12:40 pm
by Mr Pamlico
Re: 1979 19 ft Sea Ox rebuild
Posted: Thu Jan 21, 2021 12:48 pm
by Mr Pamlico
I just looked back and saw where fallguy recommended capping with 3 layers of 1700 so I will plan on that. I just need to figure my tabbing to the transom out. I figured when I cap the stringers and the glass is still wet I would go on and tab to the transom at the same time
Re: 1979 19 ft Sea Ox rebuild
Posted: Thu Jan 21, 2021 1:20 pm
by Jeff
Nice work!!! Jeff
Re: 1979 19 ft Sea Ox rebuild
Posted: Thu Jan 21, 2021 1:45 pm
by fallguy1000
I would tab stringers to transom 8",6",4" both sides at a minimum. 1708, not 1700, largest tapes first
Re: 1979 19 ft Sea Ox rebuild
Posted: Thu Jan 21, 2021 4:07 pm
by cape_fisherman
1700 is fine...no need for 1708. If you've got it, use it.
I'm not a huge fan of the stringer butt joints nearly lining up across the hull. A larger stagger would be preferred...but that's just me.
Re: 1979 19 ft Sea Ox rebuild
Posted: Thu Jan 21, 2021 4:09 pm
by fallguy1000
cape_fisherman wrote: ↑Thu Jan 21, 2021 4:07 pm
1700 is fine...no need for 1708
Sure, but for me, I'd then use four 1700 tapes to get the same or similar weights/thickness. The only reason I default to the 1708 is less work. If you don't have it; that creates more troubles.
1708=25 oz x 3 = 75 oz
17 x 4 = 68 oz
Re: 1979 19 ft Sea Ox rebuild
Posted: Thu Jan 21, 2021 4:17 pm
by cape_fisherman
fallguy1000 wrote: ↑Thu Jan 21, 2021 4:09 pm
cape_fisherman wrote: ↑Thu Jan 21, 2021 4:07 pm
1700 is fine...no need for 1708
Sure, but for me, I'd then use four 1700 tapes to get the same or similar weights/thickness. The only reason I default to the 1708 is less work. If you don't have it; that creates more troubles.
1708=25 oz x 3 = 75 oz
17 x 4 = 68 oz
It's my firm belief that the mat adds less than 1/2 the strength, and uses nearly twice the amount of resin. I've not read this entire thread (to be honest I skipped from page 1 to this page...the last page as I type this). If the OP is using poly, I won't say not to use 1708...but if he's using epoxy, then I stand by the '08 being a waste.
And I would absolutely use four layers of 1700 for those stringers.
Re: 1979 19 ft Sea Ox rebuild
Posted: Thu Jan 21, 2021 10:30 pm
by fallguy1000
cape_fisherman wrote: ↑Thu Jan 21, 2021 4:17 pm
fallguy1000 wrote: ↑Thu Jan 21, 2021 4:09 pm
cape_fisherman wrote: ↑Thu Jan 21, 2021 4:07 pm
1700 is fine...no need for 1708
Sure, but for me, I'd then use four 1700 tapes to get the same or similar weights/thickness. The only reason I default to the 1708 is less work. If you don't have it; that creates more troubles.
1708=25 oz x 3 = 75 oz
17 x 4 = 68 oz
It's my firm belief that the mat adds less than 1/2 the strength, and uses nearly twice the amount of resin. I've not read this entire thread (to be honest I skipped from page 1 to this page...the last page as I type this). If the OP is using poly, I won't say not to use 1708...but if he's using epoxy, then I stand by the '08 being a waste.
And I would absolutely use four layers of 1700 for those stringers.
All good, just trying to get over 1/8 thickness. The only reason I say mat is it is so easy to table wet and move to the boat. I use 1208 tapes same way. Yes. Weight penalty, but work is cleaner.
Re: 1979 19 ft Sea Ox rebuild
Posted: Fri Jan 22, 2021 3:16 pm
by lelandtampa
Isn't 1708 17oz with a 3/4 oz mat?
Re: 1979 19 ft Sea Ox rebuild
Posted: Fri Jan 22, 2021 3:26 pm
by fallguy1000
lelandtampa wrote: ↑Fri Jan 22, 2021 3:16 pm
Isn't 1708 17oz with a 3/4 oz mat?
Yes, but 3/4 oz mat is per sqft, so times 9*3/4 oz per yard is 27/4 or about 7 ounces per sqyd. For some reason I round up to 25, perhaps I am wrong.
Re: 1979 19 ft Sea Ox rebuild
Posted: Fri Jan 22, 2021 4:04 pm
by lelandtampa
I see mat is per sqft not yard. Learn something new everytime out with old Colt Seavers
Re: 1979 19 ft Sea Ox rebuild
Posted: Fri Jan 22, 2021 4:48 pm
by fallguy1000
lelandtampa wrote: ↑Fri Jan 22, 2021 4:04 pm
I see mat is per sqft not yard. Learn something new everytime out with old Colt Seavers
Noone has ever gone the extra step to call me Colt. Sorta fun. Thanks.
fg
Re: 1979 19 ft Sea Ox rebuild
Posted: Sun Jan 24, 2021 10:25 pm
by Mr Pamlico
cape_fisherman wrote: ↑Thu Jan 21, 2021 4:07 pm
1700 is fine...no need for 1708. If you've got it, use it.
I'm not a huge fan of the stringer butt joints nearly lining up across the hull. A larger stagger would be preferred...but that's just me.
It did not even cross my mind the problem of the butt joints being the weakest link in the stringer and all lining up until you just mentioned that. I just cut the first part of the stringer out of a 4x8 sheet and then added whatever was needed to finish. I agree I definitely should have staggered my joints. This is my first boat build so I am learning a lot as I go. Although that should have been somewhat of a common sense decision lol
Re: 1979 19 ft Sea Ox rebuild
Posted: Sun Jan 24, 2021 10:29 pm
by Mr Pamlico
fallguy1000 wrote: ↑Thu Jan 21, 2021 10:30 pm
cape_fisherman wrote: ↑Thu Jan 21, 2021 4:17 pm
fallguy1000 wrote: ↑Thu Jan 21, 2021 4:09 pm
Sure, but for me, I'd then use four 1700 tapes to get the same or similar weights/thickness. The only reason I default to the 1708 is less work. If you don't have it; that creates more troubles.
1708=25 oz x 3 = 75 oz
17 x 4 = 68 oz
It's my firm belief that the mat adds less than 1/2 the strength, and uses nearly twice the amount of resin. I've not read this entire thread (to be honest I skipped from page 1 to this page...the last page as I type this). If the OP is using poly, I won't say not to use 1708...but if he's using epoxy, then I stand by the '08 being a waste.
And I would absolutely use four layers of 1700 for those stringers.
All good, just trying to get over 1/8 thickness. The only reason I say mat is it is so easy to table wet and move to the boat. I use 1208 tapes same way. Yes. Weight penalty, but work is cleaner.
I will be using 1700 because that is what I have. Also this project is the first time I have ever done any fiberglassing so it is what I’m familiar with. I will do the same tabbing you suggested for the stringers to hull bottom to tab them to the transom. 10,8,6,4
Re: 1979 19 ft Sea Ox rebuild
Posted: Sun Jan 24, 2021 10:34 pm
by Fuzz
If you already have the 1700 that is what I would go with if using epoxy. It is just so much easier to wet out for me.
Re: 1979 19 ft Sea Ox rebuild
Posted: Fri Jan 29, 2021 12:45 pm
by Mr Pamlico
I got the middle stringer tabbing sanded last night ready for capping and I am not looking forward to that sanding on the rest of the stringers lol. I also got my fuel tank pad glassed in. When I got finished I put a level across the stringers just to check them again before capping. I am level everywhere but in the middle of the right stringer. It looks like when I had them clamped up and suspended to bed them in the putty it bowed out a little bit in the center. I am trying to decide if I should try and cut a piece to go up there now before capping or deal with it after I cap them. My idea now was to go on and cap the stringers and then glue two strips of coosa on either side of the stringer to make where the floor would sit level. I would then fill in between them with thickened epoxy to level that off before gluing the floor down. I had planned on adding those strips to the top of the stringers anyways to give the floor a bigger bonding area
Re: 1979 19 ft Sea Ox rebuild
Posted: Sat Jan 30, 2021 10:24 pm
by boguesounder
Looking good. How much space do you need to raise that stringer to make it level with the others?
Re: 1979 19 ft Sea Ox rebuild
Posted: Sun Jan 31, 2021 1:12 pm
by Mr Pamlico
boguesounder wrote: ↑Sat Jan 30, 2021 10:24 pm
Looking good. How much space do you need to raise that stringer to make it level with the others?
It varies but in the middle which is the worst part it’s about 3/8s of an inch.
Re: 1979 19 ft Sea Ox rebuild
Posted: Mon Feb 01, 2021 9:24 am
by boguesounder
That is a pretty good sized gap at the deepest point. I wonder what the brain trust would say about perhaps sistering a small section onto stringer to bring that one section up to height. Similar to where you butt joined the stringer sections together - but making the sistered / scabbed section the correct height? May be easier and more structurally sound than trying to epoxy a small piece that changes height over a short span? Make sense? Any other opinions?
Re: 1979 19 ft Sea Ox rebuild
Posted: Tue Feb 02, 2021 9:37 pm
by Mr Pamlico
boguesounder wrote: ↑Mon Feb 01, 2021 9:24 am
That is a pretty good sized gap at the deepest point. I wonder what the brain trust would say about perhaps sistering a small section onto stringer to bring that one section up to height. Similar to where you butt joined the stringer sections together - but making the sistered / scabbed section the correct height? May be easier and more structurally sound than trying to epoxy a small piece that changes height over a short span? Make sense? Any other opinions?
I agree. I think scabbing on a piece of coosa to raise the height is the way I will go. I’m hoping to have the stringers capped this weekend and will move on to that next
Re: 1979 19 ft Sea Ox rebuild
Posted: Tue Feb 02, 2021 10:09 pm
by fallguy1000
Just take two boards and apply ship tape to them and clamp em and fill it up with epoxy putty, before or after glassing for that lil bit.
Re: 1979 19 ft Sea Ox rebuild
Posted: Wed Feb 03, 2021 1:26 pm
by boguesounder
Fallguys idea is clever also.
Re: 1979 19 ft Sea Ox rebuild
Posted: Thu Feb 11, 2021 9:58 am
by Mr Pamlico
I put down some filets and some 12 oz fiberglass tape at the stringer but joints and have them sanded. I did this to keep from having to mess with them when capping the stringers as that area gave me some trouble when tabbing to the hull. I will definitely go a different route on my next stringer project I believe. I’m learning a whole lot on this project as I go.
My next question is do I need to do anything with the top corners of the stringers before capping or will the 17 oz glass make that 90 ok? I know you always want rounded transitions but I didn’t want to round the tops too much and take away for the floor bonding surface. Wasn’t sure the best route or what normal practice is there
Re: 1979 19 ft Sea Ox rebuild
Posted: Thu Feb 11, 2021 10:13 am
by VT_Jeff
fallguy1000 wrote: ↑Tue Feb 02, 2021 10:09 pm
Just take two boards and apply ship tape to them and clamp em and fill it up with epoxy putty, before or after glassing for that lil bit.
Seems like I am doing exactly this way too much on my build. But it definitely works!
Re: 1979 19 ft Sea Ox rebuild
Posted: Thu Feb 11, 2021 10:21 am
by VT_Jeff
Mr Pamlico wrote: ↑Thu Feb 11, 2021 9:58 am
My next question is do I need to do anything with the top corners of the stringers before capping or will the 17 oz glass make that 90 ok?
My instinct would be to bevel those edges at least, if not radius, if only to give you a fighting chance of getting the glass to lay down on either side. If it were me, I'd run a bench test on a sample piece and see how the experience went.
Re: 1979 19 ft Sea Ox rebuild
Posted: Thu Feb 11, 2021 1:31 pm
by Mr Pamlico
VT_Jeff wrote: ↑Thu Feb 11, 2021 10:21 am
Mr Pamlico wrote: ↑Thu Feb 11, 2021 9:58 am
My next question is do I need to do anything with the top corners of the stringers before capping or will the 17 oz glass make that 90 ok?
My instinct would be to bevel those edges at least, if not radius, if only to give you a fighting chance of getting the glass to lay down on either side. If it were me, I'd run a bench test on a sample piece and see how the experience went.
That’s a good idea. I thought about a router or just hitting them with the sander a bit. I will play around with some scrap pieces I have and see which I think will work the best
Re: 1979 19 ft Sea Ox rebuild
Posted: Thu Feb 11, 2021 1:54 pm
by VT_Jeff
Mr Pamlico wrote: ↑Thu Feb 11, 2021 1:31 pm
VT_Jeff wrote: ↑Thu Feb 11, 2021 10:21 am
Mr Pamlico wrote: ↑Thu Feb 11, 2021 9:58 am
My next question is do I need to do anything with the top corners of the stringers before capping or will the 17 oz glass make that 90 ok?
My instinct would be to bevel those edges at least, if not radius, if only to give you a fighting chance of getting the glass to lay down on either side. If it were me, I'd run a bench test on a sample piece and see how the experience went.
That’s a good idea. I thought about a router or just hitting them with the sander a bit. I will play around with some scrap pieces I have and see which I think will work the best
I vote router with a radius bit. Maybe clamp some meat to the other side for it to ride on. Any opportunity to
not sand should be seized upon when doing stitch and glue, IMO.
Edit: just dawned on me that you're doing a rebuild and not SnG. My sentiment stands regardless.
Re: 1979 19 ft Sea Ox rebuild
Posted: Thu Feb 11, 2021 2:46 pm
by Fuzz
If you do not round over the tops of the stringers you will hate yourself. 1/4 inch round over for 17oz glass at least. After laying the glass you can build up the tops or add cleats to stick the deck down.
Re: 1979 19 ft Sea Ox rebuild
Posted: Thu Feb 11, 2021 3:24 pm
by cape_fisherman
Rounding over 90 degree edges should be a rule. Minimums are 1/8" roundover for 1700, and 1/4" roundover for 1708.
Re: 1979 19 ft Sea Ox rebuild
Posted: Thu Feb 11, 2021 3:40 pm
by fallguy1000
Yeah, you need radiuses. 1/4"
Then you cleat or sister and fill them back in for the sole glue surface.
Re: 1979 19 ft Sea Ox rebuild
Posted: Thu Feb 11, 2021 6:36 pm
by Mr Pamlico
I will plan on the 1/4 inch round over and I was thinking of adding cleats for more bonding surface anyways. I’ll have to go pick up a compact router to hopefully be able to round the outside of the stringer closest to the hull side. Also being that the butt joints have given me issues I thought I would do my 3 layers over the buttjoints first then come back and finish the rest. Still undecided on that but I don’t want to be struggling with the butt joints and air pockets while trying to cap the whole stringer at once and racing time. Might be a little more work and sanding that way but I think I would end up with a better finished product
Re: 1979 19 ft Sea Ox rebuild
Posted: Thu Feb 11, 2021 10:23 pm
by Fuzz
When you say butt joints closest to the hull are you talking about the stringer to hull joint?
Running glass over the hull, up the stringer, over and down and then out onto the hull and not have bubbles can be really tough. I have done it with matt, roving and poly but I would not try it with epoxy and 17oz. Good fillets at the hull to stringer joint will make your life much easier.
Re: 1979 19 ft Sea Ox rebuild
Posted: Thu Feb 11, 2021 11:01 pm
by Mr Pamlico
Fuzz wrote: ↑Thu Feb 11, 2021 10:23 pm
When you say butt joints closest to the hull are you talking about the stringer to hull joint?
Running glass over the hull, up the stringer, over and down and then out onto the hull and not have bubbles can be really tough. I have done it with matt, roving and poly but I would not try it with epoxy and 17oz. Good fillets at the hull to stringer joint will make your life much easier.
I was referring to my outside stringers that are close to the side of the boat. The big router I have now is too large to be able to round over the edge of the stringer closest to the side of the boat. Hopefully I can find a compact router to be able to take care of that. I was also referring to the butt joints where I joined my stringers together. I used thickened epoxy there to try and take care of the edges but that area has just given me some trouble. That’s why I was debating tackling them first with 3 layers vs capping the whole stringer at one time and running in to issues there. I think I’ve decided to start with one of the shorter outside stringers and see how it goes and decide on how to do the rest of them then. I have already tabbed the stringers to the hull. I am now capping the top with 3 layers.
Re: 1979 19 ft Sea Ox rebuild
Posted: Thu Feb 11, 2021 11:25 pm
by Fuzz
Got you.
I would not go buy a new router just for the outside stringer. I think I would do a rough round over with a sander. It will be close enough for what you need.
Re: 1979 19 ft Sea Ox rebuild
Posted: Fri Feb 12, 2021 12:07 am
by fallguy1000
What Fuzz said x2.
Just use some 40 grit and a good sander and put a 3/16" flat spot on 45 degrees then rock the sander over it.
Re: 1979 19 ft Sea Ox rebuild
Posted: Thu Feb 18, 2021 11:23 pm
by Mr Pamlico
Fuzz wrote: ↑Thu Feb 11, 2021 11:25 pm
Got you.
I would not go buy a new router just for the outside stringer. I think I would do a rough round over with a sander. It will be close enough for what you need.
fallguy1000 wrote: ↑Fri Feb 12, 2021 12:07 am
What Fuzz said x2.
Just use some 40 grit and a good sander and put a 3/16" flat spot on 45 degrees then rock the sander over it.
I have taken all of y'alls advice to heart so far but I did not let you talk me out of buying a new tool lol
The smaller trim router did work much better than the big router I had that requires 2 hands. I now have all of my stringers capped with 3 layers of 1700.

Next I will tab my stringers to the transom, start cutting out my bulkheads, figure out my rigging tubes, fuel tank, bilge pumps and live well stuff. Im thinking of running a bilge pump on either side of the tunnel. I am going to tab the stringers to the transom 10,8,6,4. What should be my layup for the bulkhead tabbing and capping? I have plenty of 1700 scraps I plan to hopefully make use of while glassing the bulkheads and I also have some 6 inch 12 oz tape.
Re: 1979 19 ft Sea Ox rebuild
Posted: Fri Feb 19, 2021 7:02 pm
by Fuzz
Needed or not there is no reason to waste a good chance to buy a new tool
Boat is looking good! I would say three layers of that 1700 should work just fine for tabbing in the bulkheads.
Re: 1979 19 ft Sea Ox rebuild
Posted: Sun Feb 21, 2021 1:22 pm
by Mr Pamlico
Thanks fuzz. I know I still have a long way to go but I feel like I am starting to see the light at the end of the tunnel.

I got a few of my bulkheads cutout today. Any opinions/suggestions on whether I need to wrap over the bulkheads like I did the stringers? Or will they be fine to put a layer of 1700 on either side and tab them in with 3 layers of 1700? These are 3/4 coosa as well.
Re: 1979 19 ft Sea Ox rebuild
Posted: Sun Feb 21, 2021 1:51 pm
by fallguy1000
What are you defining as a bulkhead?
A 3/4" thick coosa bulkhead probably only needs a piece of 1200 or 1700 each side and a couple of tapes would be plenty.
If you mean floors below the sole; 1200 and two tapes is plenty..
Re: 1979 19 ft Sea Ox rebuild
Posted: Sun Feb 21, 2021 2:17 pm
by Mr Pamlico
fallguy1000 wrote: ↑Sun Feb 21, 2021 1:51 pm
What are you defining as a bulkhead?
A 3/4" thick coosa bulkhead probably only needs a piece of 1200 or 1700 each side and a couple of tapes would be plenty.
If you mean floors below the sole; 1200 and two tapes is plenty..
I was referring to the pieces I have cut out in the above picture that run in between the stringers. I still have more to cut out I just haven’t decided on the exact location for the rest of them.
Re: 1979 19 ft Sea Ox rebuild
Posted: Sun Feb 21, 2021 2:30 pm
by fallguy1000
12 oz glass is plenty, 17 if you have it
2 tapes is plenty
Re: 1979 19 ft Sea Ox rebuild
Posted: Sun Feb 21, 2021 3:28 pm
by boguesounder
Your work is looking really nice. Agree on the 3 layers of 17oz.
Re: 1979 19 ft Sea Ox rebuild
Posted: Sun Feb 21, 2021 4:07 pm
by Fuzz
None of us are structural engineers so we are making our best guess based on our experience. The range has been 24-51 oz of glass. I am going to say do what feels right to you within the range you have been given. One thing for sure is your work looks very good
Re: 1979 19 ft Sea Ox rebuild
Posted: Sun Feb 21, 2021 5:39 pm
by boguesounder
Somehow didn't see Fallguy's rec when I responded. He knows better than me. Agree with Fuzz on making your own call. I'd use the 17 since you have it.
Re: 1979 19 ft Sea Ox rebuild
Posted: Sun Feb 21, 2021 8:42 pm
by fallguy1000
Just make sure to fillet and stagger the tapes and not stack them. I'd go 6",4" or 4",4" staggered.
Main structural components in my build always used 3 tapes; secondary structures used two; non-structural things like cleats used single tapes.
There are no seams in the Skoota untaped. I wish I had used smaller tapes for some stuff. Like 6 oz wovens for the cleats.
I have a forward hatch that is super heavy. Guaranteed to break someone's finger someday. I was gonna glass it cuz it won't dent so easily. It is Aqauplas.
I gotta 2nd Fuzz. The work looks great. I am eager to see it decked. The space across the tank is a bit too wide for walking loads; you may want to glass under that panel if 3/4" coosa. Do some walking tests to see.
Re: 1979 19 ft Sea Ox rebuild
Posted: Wed Feb 24, 2021 9:57 pm
by Mr Pamlico
Thanks for the compliments. I finally feel like I am getting the hang of things and the work is more relaxing than me wondering if I am doing things right. I am definitely going to have to address the gap across the tank. Right now it is 30 inches across from inside to inside of the stringers. I do plan on gluing cleats on the top of the stringers but that will still leave a wide span. I definitely want to make sure it is strong as the front of the boat will see heavy loads. I still have a few bulkheads to cut out but this is where I am right now.

Re: 1979 19 ft Sea Ox rebuild
Posted: Wed Feb 24, 2021 10:03 pm
by fallguy1000
You can make a coosa i beam. How much height do you have above the tank?
Re: 1979 19 ft Sea Ox rebuild
Posted: Thu Feb 25, 2021 2:01 pm
by Fuzz
I might have missed it but what are you going to use for decking? It is my understanding that 1.5 inch carboncore with two layers of 1700 each side will span 36 inches no problem.
Re: 1979 19 ft Sea Ox rebuild
Posted: Thu Feb 25, 2021 5:32 pm
by Mr Pamlico
Fuzz wrote: ↑Thu Feb 25, 2021 2:01 pm
I might have missed it but what are you going to use for decking? It is my understanding that 1.5 inch carboncore with two layers of 1700 each side will span 36 inches no problem.
I am planning on using 3/4 coosa. I will take some tank measurements tonight when I finish cutting out my bulkheads
Re: 1979 19 ft Sea Ox rebuild
Posted: Thu Feb 25, 2021 5:49 pm
by fallguy1000
I made an i beam from glassed both sides 12mm corecell ripped to 1" pieces. Glued and screwed them together with like 1-1.5" flat sections; so they are 2" high. Like a floor joist. Then filleted and taped a piece of 1708 about 2" wide on each side. I can stand on them 29" wide with very little deflection.
You might only need a one inch piece of glassed coosa tabbed to the tank compartment top edges to get enough with the coosa deck or it might not bother you with a bit of sag. I did not like it, so I put two i beams across the 29" spans. My fuel tank sits like 4" below the deck, so I had room.
Re: 1979 19 ft Sea Ox rebuild
Posted: Thu Feb 25, 2021 6:03 pm
by cape_fisherman
Fuzz wrote: ↑Thu Feb 25, 2021 2:01 pm
I might have missed it but what are you going to use for decking? It is my understanding that 1.5 inch carboncore with two layers of 1700 each side will span 36 inches no problem.
That's about what I'd do.
I have seen a sportfisher salon floor...16'...unsupported over the engine room...with 3" nida/carboncore & a standard 2x 1700 both sides...unsupported 16'
Re: 1979 19 ft Sea Ox rebuild
Posted: Mon Mar 01, 2021 10:54 pm
by Mr Pamlico
Re: 1979 19 ft Sea Ox rebuild
Posted: Mon Mar 01, 2021 11:20 pm
by fallguy1000
The best way would be to put say a one inch deep piece of 3/4" coosa glassed both sides with something like 1708 or 2x 1208
Then bond the sides of the one inch deep coosa to the stringers with say 2" wide tabbing.
Then bond the sole to those crossbeams.
The max span say about 20", so across the tank, I'd build two of them.
Re: 1979 19 ft Sea Ox rebuild
Posted: Fri Mar 19, 2021 10:25 pm
by Mr Pamlico
The coosa across the the tank area didn't have as much flex as I expected but I do think the extra support is a good idea. I have all of my bulkheads tabbed in and I got all of my floor pieces except for the very front piece cut out. I wanted to make sure I had enough coosa for the floor and plan on using whats left over to add the strips to the top of the stringers. How deep should I make those pieces? 2 inches? I also have some of the 1.5 inch coosa leftover from the transom and I'm wondering if I need to add stiff knees to the transom or if I will be fine without. I would prefer to not have them in the way when walking behind the lean post but I want to make sure there is enough strength with having the engine on a 6 inch jackplate. For a reminder I used 10 layers of 1700, the 1.5 inch coosa and then 5 layers of 1700. I still have not finished the top of the transom so if I could add more strength with layers there vs the stiff knees I would rather do that.

Re: 1979 19 ft Sea Ox rebuild
Posted: Fri Mar 19, 2021 11:37 pm
by Fuzz
I probably missed it but what is the plan for the transom? Splash well, bracket?
Re: 1979 19 ft Sea Ox rebuild
Posted: Sat Mar 20, 2021 9:18 am
by Mr Pamlico
Fuzz wrote: ↑Fri Mar 19, 2021 11:37 pm
I probably missed it but what is the plan for the transom? Splash well, bracket?
There will be a 2004 115 Suzuki 4 stroke on a 6 inch setback jack plate. I left the same cutout in the transom that was there originally with that engine.
Re: 1979 19 ft Sea Ox rebuild
Posted: Thu Mar 25, 2021 6:35 pm
by Mr Pamlico
If I use the 1.5 inch coosa I have to add the stiffners to the transom, how do I go about adding those? Would it just be strips glassed/tabbed to the transom or would I tie them into the stringers? I think I’m going to add them for extra strength just not sure exactly on the design or exact science behind them
Re: 1979 19 ft Sea Ox rebuild
Posted: Fri Mar 26, 2021 1:01 am
by Fuzz
If I was doing it I would glass them to the stringers. I feel like the force would be better transferred to the strongest part of the boat. Glassing to the deck might be just as strong but for me I do not like the "might be" part.
Re: 1979 19 ft Sea Ox rebuild
Posted: Fri Mar 26, 2021 6:06 am
by cape man
On most of the designs here there is a splash well and space for two hatches on each side that form a "box" which is tied to the transom, floor, stringers, and sides with the bulkhead running all the way from the hull to the top forming the front face. This box transfers the energy in several directions, but with a focus to the stringers. It will be more than knees to walk around so you may have to use a smaller leaning post or move it forward. Given that you are pretty much going from scratch, you can also make the box narrower than the standard spacing Jacque uses.
I love the wide open deck you have now, but I would worry about the transom being able to handle the force of a set back 115 on it's own. I am not a marine designer, so take this only as a comment, not the truth.
Re: 1979 19 ft Sea Ox rebuild
Posted: Sun Mar 28, 2021 12:59 pm
by Mr Pamlico
So when connecting the knees to the transom should I glue them to the top of the stringers and to the transom or glue them to the side of the stringer and to the transom? I’m not sure the best way. If I glue them to the top then I could glass on either side from the knee down to the stringer. If I glue to the side I could run the knee further down the stringer and I feel like once glued would have more contact area. Just not sure how I would glass to the stringer after that approach. Boxing that in would make it easier for rigging and wash down pumps and such. I’ll have to see how much room that would take up
Re: 1979 19 ft Sea Ox rebuild
Posted: Sun Mar 28, 2021 4:19 pm
by fallguy1000
I'd say either or... the piece on top not as strong, but lighter..
Re: 1979 19 ft Sea Ox rebuild
Posted: Mon Mar 29, 2021 6:11 am
by cape man
I need to correct my post. The "box" is not tied directly to the stringers. The sole on my OD18 goes all the way to the transom with a cut out for a small bilge area in the center below the splash well. The splash well and the two hatches are glued and taped to the sole, transom, and sides. There is not a bulkhead going all the way to the hull and stringers and the top of the structure. However, I still stand by the concept that it creates a "box" that transfers energy from the transom uniformly, and stiffens the transom.
Sorry for the misinformation.
Re: 1979 19 ft Sea Ox rebuild
Posted: Mon Mar 29, 2021 8:35 am
by fallguy1000
Honestly, I think a bulkhead full height to the hull would be wise. It does not need to be coosa, but can be. It can be made from light foam or offcuts if you laminate it with db1700 both sides on the table.
Move it in enough for the motor to tilt all the way up.
Build the knees right on top of the existing stringers with an angle.
And build a splashwell.
This is the strongest.
I have seen people build a box, but I think a bulkhead across is a better way to transfer forces to the hull. Spaces beneath are nice stowage for a stern anchor or start batteries and the space between the knees can be used for a sump, pump or drain.
I am not sure you will be strong enough without the bulkhead. The bulkhead also increases your transom to full height and gives you a safety margin from breaking sea.
If you don't like the spaces lost, you might be able to cut in benches on each side. This would be flat topping or modifying the height on each side for a seat. Still a lot of force transfer and you get seating. Not sure, looks quite low now..etc.
You can install the sole after the bulkhead is in..
My 3 cents.
Re: 1979 19 ft Sea Ox rebuild
Posted: Mon Mar 29, 2021 8:45 am
by fallguy1000
Honestly, I think a bulkhead full height to the hull would be wise. It does not need to be coosa, but can be. It can be made from offcuts if you laminate it with db1700 both sides.
Cut it in enough for the motor to tilt all the way up.
Build the knees right on top of the existing stringers with an angle.
And build a splashwell.
This is the strongest.
I have seen people build a box, but I think a bulkhead across is a better way to transfer forces to the hull. Spaces beneath are nice stowage for a stern anchor or start batteries and the space between the knees can be used for a sump, pump or drain.
I am not sure you will be strong enough without the bulkhead. The bulkhead also increases your transom to full height and gives you a safety margin from breaking sea.
Re: 1979 19 ft Sea Ox rebuild
Posted: Thu Apr 01, 2021 8:35 pm
by Mr Pamlico
I did not account for having to build a splashwell in my plans. My original thought, or I guess I should say assumption, was that if I built the transom to 2 inches thick it would be strong enough for the 115 and then a 3/4 or 1 1/2 inch coosa knee on either side of the engine would add extra strength for the jack plate. I was hoping to keep the same layout the boat had as it fit my needs as best it could for the size boat it is. With the tank I have and where it is going and where my console with live well has to be placed to still have access to the fuel fill, sending unit and pickup if I build that bulkhead and splashwell you would not be able to walk around the back of the lean post. As it is now there will be enough room for one person to sit behind the lean post on a bucket to hunt, walk behind the lean post while fighting a fish, or have some room to walk side to side to throw a shrimp net. All of which are the main uses for the boat. I would have to change the fuel tank, console or redesign the stringers to accommodate moving this tank further back and the console forward. I would really like to be able to keep all the room/floor space possible as I used the boats full deck and then some as it was, if there is another route that would make it strong enough. I still haven't closed in the top of the transom so could I do some extra layers there to add some strength? Also what about this brace idea?
I would add this 3/4 coosa piece first and glass it to the stringers and tab to the transom

Then I could come back and sandwich that piece on either side with 3/4 coosa that runs down the stringers. Glue and glass that to the stringers and tab to the transom on either side. Then round of the edges and glass those three pieces together


I also was planning on building diagonal boxes that followed the same lines as the top cap in the back corners to run the rigging up on one side and to put the washdown pump on the other. I was going to follow those lines and keep them as tucked in as possible to not take up floor space. If they are tabbed to the hull side, sole and transom would that add to the strength as well? I understand the reasons that the bulkhead and box design would be the strongest but I know that I would not be happy with that in the back of the boat as a finished product. Would any of these other ways, or anything else, be able to get me to the strength I need?
Re: 1979 19 ft Sea Ox rebuild
Posted: Thu Apr 01, 2021 10:25 pm
by fallguy1000
Where's the start battery going?
Re: 1979 19 ft Sea Ox rebuild
Posted: Thu Apr 01, 2021 11:33 pm
by Fuzz
If a splash well does not work for you how about a 2x running side to side and low enough so it does not interfere with motor mounting?
Re: 1979 19 ft Sea Ox rebuild
Posted: Fri Apr 02, 2021 7:08 am
by Mr Pamlico
There will be two battery’s mounted to the floor in the console. The console is rather big and is part of what is taking up a good bit of space and having to make me try and make the best of the rest of the floor space. But it has a live well, tackle center, rod holders and a good amount of storage. That is another reason I positioned the fuel tank where it is and was able to go a little bigger. I had originally thought about having the fuel tank access in the console and having the fuel fill run up to the side of the console but did not want those two in the same area.
The 2x could possibly work. And I even thought about building those braces and then just boxing them in or building the box off of them to the hull sides but I still don’t think that would leave enough room for someone to sit behind the lean post to hunt. Even with just the knees being there they will somewhat be sitting between them. Being able to have two people sit in front of the console and one person behind the lean post and hunt 3 people and a dog out of the boat blind, also fitting all the gear,and sometimes a layout boat is big. That’s also why I had the console and lean post as far back as I did to leave as much room as possible up front. A smaller console could also give me that room needed but I love the one that I had in there lol it also holds some sentimental value. I’m going to try and get the console, lean post and tank set in the boat to give me a visual of how much room I actually have this weekend and be able to put my eyes on it
Re: 1979 19 ft Sea Ox rebuild
Posted: Fri Apr 02, 2021 6:14 pm
by fallguy1000
Gonna stay with my advice to splash and batteries under with seats on the edges. You need 16" for the seats. Not sure on the motor, but maybe 20" for and 24-30" wide. If you have all that rigging; it is gonna be there anyway. Steering hoses n all from the sides seems difficult.
Re: 1979 19 ft Sea Ox rebuild
Posted: Fri Apr 02, 2021 6:16 pm
by fallguy1000
How many layers of glass on top and sides?
Re: 1979 19 ft Sea Ox rebuild
Posted: Fri Apr 02, 2021 7:28 pm
by Mr Pamlico
fallguy1000 wrote: ↑Fri Apr 02, 2021 6:16 pm
How many layers of glass on top and sides?
There is 10 layers of 1700 on the outside, a 1.5 inch piece of coosa and then 5 layers of 1700 on the inside. I ran those 5 layers staggered up the hull sides and out onto the bottom. I have not wrapped the top yet. I still need to figure out how many layers to wrap over the top. The stringers are tabbed to the transom with 4 layers of 1700
Re: 1979 19 ft Sea Ox rebuild
Posted: Fri Apr 02, 2021 9:20 pm
by fallguy1000
How many layers of glass on top and sides? fyi Jaysen...the buffer held this?
Well, the force on the transom creates tension on the forward side, so more layers on the inside would be better vs the 10.
I would have wrapped the top with the sides pieces.
I can't tell you if the transom is strong enough. The fact it is stronger on the back bothers me. I would say 5 layers of db1700 is a bit light for the plan. How light? Not sure.
The overwrap of the top is going to mess things up a bit, but you can cut tabs if the 115 even has them.
Re: 1979 19 ft Sea Ox rebuild
Posted: Sat Apr 03, 2021 7:12 am
by cape man
Here's a pic from my OD18 of the 2X idea that Fuzz is suggesting. The top piece runs the whole length and the bottom is for the lower bolts for the motor. They are sealed in epoxy and covered with 12 ounce biax, taped on the edges to the transom.

- slippage!.jpeg (49.56 KiB) Viewed 1161 times
Re: 1979 19 ft Sea Ox rebuild
Posted: Sat Apr 03, 2021 9:21 am
by fallguy1000
cape man wrote: ↑Sat Apr 03, 2021 7:12 am
Here's a pic from my OD18 of the 2X idea that Fuzz is suggesting. The top piece runs the whole length and the bottom is for the lower bolts for the motor. They are sealed in epoxy and covered with 12 ounce biax, taped on the edges to the transom.
slippage!.jpeg
Ahh. I was wondering what he meant. Figured I was dumb. I saw the 4" wide cardboard and had all sorts of wrongheaded ideas.
I'd say if you want to go not motorwell, a 3" transom is a good plan.
Re: 1979 19 ft Sea Ox rebuild
Posted: Sat Apr 03, 2021 9:39 am
by Mr Pamlico
Ok that makes a lot of sense. I was thinking of something different as well. I still have some leftover 1.5 inch coosa from the transom. Could I put some glass on either side of that, glue it to the transom and tab it in and it be just as strong as the 2xs? I’ll have to template it and see but I might could make that same design from capemans picture all one piece from my leftover sheet.
Re: 1979 19 ft Sea Ox rebuild
Posted: Sat Apr 03, 2021 10:45 am
by Mr Pamlico
I have enough 1.5 inch coosa left I could just run one rectangular piece across the transom. I could then glass that to the transom and tab it in to the hull sides. Something like this

Or something like this

Re: 1979 19 ft Sea Ox rebuild
Posted: Sat Apr 03, 2021 11:07 am
by fallguy1000
How many layers of glass on top and sides
Buffer notice above.
The coosa has almost no strength without glass. It adds little.
Re: 1979 19 ft Sea Ox rebuild
Posted: Sat Apr 03, 2021 11:29 am
by Mr Pamlico
So could I laminate the coosa before or after glueing in to add the strength needed? That would put me over 3.5 inches thick where the jack plate and engine would mount
Re: 1979 19 ft Sea Ox rebuild
Posted: Sat Apr 03, 2021 2:29 pm
by fallguy1000
Mr Pamlico wrote: ↑Sat Apr 03, 2021 11:29 am
So could I laminate the coosa before or after glueing in to add the strength needed? That would put me over 3.5 inches thick where the jack plate and engine would mount
Well, I don't think 5x1700 is enough. I don't think the coosa is a great idea. I, personally would add 5 layers of glass inside and then knee.
But I can't really understand how you are planning to get cables to the thing even.
If you post over on boatdesign.net, someone might tell you a laminate schedule for no well. I'd say that 170 ounces a side is probably close.
For the additional 5 layers, I'd recommend laying them 10",8",6",4",2" over the top and same on the sides.
Re: 1979 19 ft Sea Ox rebuild
Posted: Sat Apr 03, 2021 2:52 pm
by Mr Pamlico
That sounds like a good plan. I will add those 5 layers as suggested and knee. I was planning on building two small corner boxes that follow the contour of the cap and was going to run my rigging from the back right corner. Just a diagonal piece of coosa across the corner. These would also be where the bilge pumps on either side of the tunnel pump out on either side. After I get the knees finished I will decided for sure. I could box in between the knees and run my rigging up from that and have the bilge pumps pump through the back of the transom maybe and those small corner boxes would not be necessary. That would also give a small box in effect without taking up a lot of room in the back. I just would like the back as open as possible
Re: 1979 19 ft Sea Ox rebuild
Posted: Sat Apr 03, 2021 4:26 pm
by fallguy1000
The top at 5 layers is a little weak here, but it would be a good telltale. If the top gets stress cracked, you'll know its too light.
Re: 1979 19 ft Sea Ox rebuild
Posted: Thu Apr 08, 2021 6:23 pm
by Mr Pamlico
What is everyone’s opinions on flotation foam? My original thought was that I would have drains from the tank back and would seal everything else off completely. That way if I took on a lot of water it would not be able to fill the bottom of the boat completely. Or if I had something puncture the hull it would just fill up that one compartment. I’ve rethought that bc if water ever does get in one of those compartments for any reason it won’t be able to drain out. So I think I’m going to put drains in each bulk head to allow them to drain to the back of the boat. I would like to have some sort of flotation just in case something happens the boat won’t go down completely, especially in the winter time. My worry is the foam soaking up water over time, as I plan on this boat sticking around for a while even when I upgrade one day. I’ve read that if the two part closed cell foam isn’t mixed just right it will soak up water. Any other options? Or just leave it out and don’t worry with it
Re: 1979 19 ft Sea Ox rebuild
Posted: Thu Apr 08, 2021 11:21 pm
by Fuzz
If it were me I would put limber holes in all the bulkheads so water could drain to the stern. I would run drain pipes from between the stringers so I could drain each section between the stringers to a bilge sump. I would make the drain pipes so they could be plugged. This way any water can be drained but if you hole one section it will not flood the other ones.
I like fairly wide gunwales and would try to build them so I could get enough floatation there to hold the boat up and keep it upright if swamped. Part of my thinking is this keeps the foam well above the water line so the debate over absorbing water should be a moot point.
Re: 1979 19 ft Sea Ox rebuild
Posted: Fri Apr 09, 2021 10:21 am
by fallguy1000
I'd foam it for safety.
Build a set of limbers. The trick is always making a path for water. A sacrificial piece of plastic or fiberglass along the bottom spot glued with nylon could work. Plastic laid over the top of that makes a simple path. You just need to make sure the foam doesn't seal off the limbers!
Fuzz' drain pipes idea with holes in the pipe and plastic above can also work, but if you have a vee, a flat thing above it can work and unsealed edges can allow seep.
A dry bilge can be built with a piece of lexan over it. The lexan will fog or condense water if the boat gets wet and so you'd know. Seal the lexan down with butyl tape, add a bilge pump if you want. It can be under the lexan.
My thoughts.
My boat is designed with watertight boxes; the tops are sealed with pvc caps. Last summer, I did not seal the caps with teflon tape and had quite a bit of water enter a few of them. We had like 8" of rain in on month. I spent quite a bit of time dewatering. Now this summer, I plan to run the shopvac in reverse in each chamber to dry them. No system is perfect. I have 17 sealed chambers! Probably gonna need to do annual inspections of them before freezeup. If you have a single inspection spot; that'd be better.
Re: 1979 19 ft Sea Ox rebuild
Posted: Fri Apr 09, 2021 10:40 pm
by Mr Pamlico
I really like the idea of running drains that I can plug from each compartment to the bilge. I have not thought about that. I think I will go with that idea as well as the pour in foam. I am going to use the same cap that is on the boat and I’m not sure if there would be enough room to add enough flotation under there. Hopefully I can build the compartments water tight and keep them plugged so there will be no chance of water getting to the foam unless something is leaking or something bad happens. I will leave the tank and the back center compartment without foam and have everything drain to that back compartment where the bilge pumps and thru hull will be. I’m still trying to wrap my head around how to pour the 2 part foam in and not block the drains. I think I understand what you are saying fallguy about about putting something angled in the corner allowing a drain path to the limber hole. But if water somehow got on top of the foam or say came in to the compartment on the other side would it be able to reach the drain? I might be over thinking this and it could be one of those it is what it is scenarios. I just want to make sure I prevent as many future problems before the floor goes down
Re: 1979 19 ft Sea Ox rebuild
Posted: Fri Apr 09, 2021 10:47 pm
by Fuzz
Take your pipe with holes in it and fill it with sand. After pouring the foam you can wash the sand out. If needed a small drain snake will clean the sand out.
Re: 1979 19 ft Sea Ox rebuild
Posted: Sat Apr 10, 2021 6:08 pm
by OneWayTraffic
I'm going through the same thought process with my build. Two part foam doesn't seem to flow much before it starts to rise. You could build a dam in the centre of a compartment from plastic and cardboard, pour some foam into it, and then remove the dam. I managed to get some higher density polyurethane block foam offcuts from an industrial supplier at a good price. I am thinking of using these glued to the hull at the bottom to form a path for water and for the higher resistance to vibration. Then some pour foam on top, to lock it all in.
Re: 1979 19 ft Sea Ox rebuild
Posted: Sat Apr 10, 2021 8:56 pm
by Fuzz
Regards the sand idea you could just put a layer of sand where the hull meets the stringer. After the foam sets it would be easy to wash the sand out.
Re: 1979 19 ft Sea Ox rebuild
Posted: Sun May 02, 2021 9:11 pm
by Mr Pamlico
I added 5 layers of 1700 to the transom. I wrapped it over the top and up the hull sides 10,8,6,4,2. I made the transom braces out of 1.5 inch coosa. I also wrapped them with three layers of 1700. I glued them in and have them tabbed to the transom and the hull. I still need to tab them to the stringer and bulkhead.


I am going to box them in and run my rigging out of that box. I also thought about having both of my bilge pumps pump out through the transom inside that box. I am also going to have a hole in the transom for the live well drain. Will those holes on either side of where the engine mounts effect my strength at all? I'm planning on drilling them close to those braces
Re: 1979 19 ft Sea Ox rebuild
Posted: Sun May 02, 2021 9:47 pm
by fallguy1000
The work looks great. I am wondering how you plan to finish the top edges of the supports is all.
Re: 1979 19 ft Sea Ox rebuild
Posted: Mon May 03, 2021 11:19 am
by Jeff
Nice work!!! Jeff
Re: 1979 19 ft Sea Ox rebuild
Posted: Mon May 03, 2021 3:16 pm
by Mr Pamlico
I have a few different ideas on how to finish them but it’s going to depend on how much room I have with the engine mounted. After I get the floor in I plan on hanging the jack plate and engine to make a final decision on that
Re: 1979 19 ft Sea Ox rebuild
Posted: Mon May 03, 2021 3:20 pm
by Mr Pamlico
Also, what are y’all’s opinion on spray rails. I’ve never ran anything with them and I’m not very familiar with them. The boat was mighty wet before. I was wondering if I could make spray rails out of the leftover coosa I have to help with that
Re: 1979 19 ft Sea Ox rebuild
Posted: Mon May 03, 2021 3:57 pm
by fallguy1000
Mr Pamlico wrote: ↑Mon May 03, 2021 3:20 pm
Also, what are y’all’s opinion on spray rails. I’ve never ran anything with them and I’m not very familiar with them. The boat was mighty wet before. I was wondering if I could make spray rails out of the leftover coosa I have to help with that
All the work ur doin and u wanna wet ride?
Make some splashers!
Re: 1979 19 ft Sea Ox rebuild
Posted: Mon May 03, 2021 5:55 pm
by Mr Pamlico
fallguy1000 wrote: ↑Mon May 03, 2021 3:57 pm
Mr Pamlico wrote: ↑Mon May 03, 2021 3:20 pm
Also, what are y’all’s opinion on spray rails. I’ve never ran anything with them and I’m not very familiar with them. The boat was mighty wet before. I was wondering if I could make spray rails out of the leftover coosa I have to help with that
All the work ur doin and u wanna wet ride?
Make some splashers!
That’s what I was thinking. I’ve come this far so I might as well. Do you have any suggestions on where I can go do some research or a good thread on how to build them, mounting etc.
Re: 1979 19 ft Sea Ox rebuild
Posted: Tue May 04, 2021 10:37 pm
by Mr Pamlico
After a good stare session I’m wondering if I could make them out of 3 layers of 3/4 coosa strips. For example I could cut one inch strips of coosa so the rail would be 1x 2 1/4. Not sure what the normal dimensions are for spray rails. Screw and glue the first piece on. Then screw and glue the following pieces on to the previous piece. I will just need to figure out exactly where to mount them on the hull to benefit the most. Also if I can just stack them straight out or if I should stagger and then sand to have them angled back down towards the water.
Re: 1979 19 ft Sea Ox rebuild
Posted: Tue May 04, 2021 11:27 pm
by fallguy1000
Mr Pamlico wrote: ↑Tue May 04, 2021 10:37 pm
After a good stare session I’m wondering if I could make them out of 3 layers of 3/4 coosa strips. For example I could cut one inch strips of coosa so the rail would be 1x 2 1/4. Not sure what the normal dimensions are for spray rails. Screw and glue the first piece on. Then screw and glue the following pieces on to the previous piece. I will just need to figure out exactly where to mount them on the hull to benefit the most. Also if I can just stack them straight out or if I should stagger and then sand to have them angled back down towards the water.
I think Fuzz is your guy on the splash rails. But my Lund aluminum skiff has about 1.3" out and is a u channel bottom. Never worked real well.
If you have 3/4 inch coosa, if you rip 45s, you ought to be able to use almost all of the rips if you are careful
Re: 1979 19 ft Sea Ox rebuild
Posted: Tue May 04, 2021 11:38 pm
by Fuzz
Thanks Fallguy but I am not sure I have a good answer for this hull. On both mine and Capemans dories we used 3/4 inch rails and they did the job. I think I would do as said and cut the coosia 45 degrees make it two layers. I am thinking they could start 3-4 foot from the bow and end a foot before the transom but all of this is just a guess on my part. Anyone who has an idea please chime in.
Re: 1979 19 ft Sea Ox rebuild
Posted: Wed May 05, 2021 9:14 am
by fallguy1000
Re: 1979 19 ft Sea Ox rebuild
Posted: Wed May 05, 2021 11:01 am
by Mr Pamlico
I will try to get a better picture of the front of the hull when I can get it out of the garage. I still have a little while before it will be time for the spray rails I just like to have things planned out ahead of time. The front of the boat does not have a sharp v and is more rounded. When the chine starts there is not much there to prevent spray. When my trim tabs are down and I am in rough water the spray runs all the way up to cap at the front and will soak you. I was hoping if I put spray rails up front there where there isn’t a chine it would stop the water before it could spray out to soak me. Also in tall waves would they have any effect keeping the bow up higher instead of “plowing” off one wave into another? The sound I run is relatively shallow but very open so when it gets rough the waves are stacked right on top of each other
Re: 1979 19 ft Sea Ox rebuild
Posted: Wed May 05, 2021 12:18 pm
by fallguy1000
My personal discovery is bow flare and the angles of the sides have more to do with drying out the ride.
I'd stay away from messing with the rails forward much. The last thing you want is adverse effect with a rail too low.
My alumunum boat makes a spray in in one footers. You can probably make some safe assumptions about where to start them. A picture of the side of the hull and I'd be willing to finger paint my take.
Re: 1979 19 ft Sea Ox rebuild
Posted: Wed May 05, 2021 3:18 pm
by Fuzz
It will not take a lot of rail to keep water from running up the hull. Unless they are huge they will not help with stuffing the bow. You just do not have enough area to produce much lift. I would keep them at least a foot short of the bow stem. I am not sure where to mount them on the sides height wise.
Re: 1979 19 ft Sea Ox rebuild
Posted: Thu May 06, 2021 7:08 am
by fallguy1000
Mr Pamlico wrote: ↑Wed Feb 12, 2020 8:42 pm
As far as the tunnel goes I am going to leave it alone and run it. The boat ran fine to me especially after the trim tabs were installed. I have always wanted a tunnel boat for certain places I hunt and fish. This is a picture of how the boat ran motor trimmed all the way down, two people and 15 gallons of gas under the lean post. Probably 3/4 throttle
Not being able to get the front of the boat down really beat you in a chop. The trim tabs I salvaged off my uncles old boat really ended up being the perfect size and fixed all running issues.
If this is the boat, I'd run the splash rail right above the chine. You can run it all the way. My Lund skiff has it all the way, but I don't think the first couple feet do much.
Re: 1979 19 ft Sea Ox rebuild
Posted: Thu May 06, 2021 7:11 am
by fallguy1000
Re: 1979 19 ft Sea Ox rebuild
Posted: Mon May 17, 2021 12:43 pm
by Mr Pamlico
No big updates just lots of busy work. I have the channel made for the fuel fill, have everything sanded and have started pouring flotation foam. Next is to get the tank bolted to the stringers and mount my rigging tubes. One for the engine, one for the live well and one for the fuel line. I was planning on using 316 stainless bolts for the tank but what type of bolts are suggested for mounting the jack plate and engine? I might as well pick those bolts up while I’m getting the ones for the tank. I did a few searches but couldn’t find any definite answers.
Re: 1979 19 ft Sea Ox rebuild
Posted: Mon May 17, 2021 2:08 pm
by fallguy1000
Mr Pamlico wrote: ↑Mon May 17, 2021 12:43 pm
No big updates just lots of busy work. I have the channel made for the fuel fill, have everything sanded and have started pouring flotation foam. Next is to get the tank bolted to the stringers and mount my rigging tubes. One for the engine, one for the live well and one for the fuel line. I was planning on using 316 stainless bolts for the tank but what type of bolts are suggested for mounting the jack plate and engine? I might as well pick those bolts up while I’m getting the ones for the tank. I did a few searches but couldn’t find any definite answers.
316
Fine threads are often used for motor mountings because a fine thread has a larger minor diameter and offers more tensile. But I used coarse..just to make myself nervous..
Re: 1979 19 ft Sea Ox rebuild
Posted: Mon May 17, 2021 6:56 pm
by Mr Pamlico
Gotcha. I have been trying to find a reasonably priced transom drilling jig to make sure I drill the holes exactly 90 degrees to the transom but I’m having trouble finding one. I’m pretty confident I could mark them and drill them pretty dang close. But being that I already have another boat to start on after this one and I’m sure these won’t be my last I’m sure the jig would get a few uses.
Re: 1979 19 ft Sea Ox rebuild
Posted: Mon May 17, 2021 7:55 pm
by fallguy1000
Mr Pamlico wrote: ↑Mon May 17, 2021 6:56 pm
Gotcha. I have been trying to find a reasonably priced transom drilling jig to make sure I drill the holes exactly 90 degrees to the transom but I’m having trouble finding one. I’m pretty confident I could mark them and drill them pretty dang close. But being that I already have another boat to start on after this one and I’m sure these won’t be my last I’m sure the jig would get a few uses.
I just waited until I got the jackplate. Then made a template and use the plate for a drill guide.
Re: 1979 19 ft Sea Ox rebuild
Posted: Thu May 27, 2021 6:08 pm
by Mr Pamlico
I have been finishing up small things here and there and I’m hoping to have my floor glued and glassed in this weekend. Any tips on this step? I’m guessing I will just mix up big batches of thickened epoxy and spread it on top of the stringers and then either screw my pieces down and remove the screws after it sets or come up with a bunch of stuff to put on top to weigh it down. I was planning on putting it in the boat in sections and after it sets make sure everything is fair and then glass over it.
Re: 1979 19 ft Sea Ox rebuild
Posted: Thu May 27, 2021 8:11 pm
by Mr Pamlico
One of my big concerns is being able to get that much thickened epoxy spread out and the floor pieces in before it starts setting up
Re: 1979 19 ft Sea Ox rebuild
Posted: Fri May 28, 2021 6:10 am
by cape man
I borrowed a jig from a marine mechanic. If you can access a drill press you can also make one out of wood. Use weights to hold the deck down. Buckets of water work great, but I'm sure if you're like most of us you have plenty of heavy items laying around. No need to put unneeded holes in one of the most vulnerable part of the boat for water to get in. It's no more epoxy than filets or taping the stringers. Big step! Almost there!
Re: 1979 19 ft Sea Ox rebuild
Posted: Fri May 28, 2021 9:40 am
by fallguy1000
The main thing when setting floors is to not put a ton of force on them and then retract it. So, no standing on them. I drew a line on the hull with a sharpie to make sure I got them down onto the glue enough, but then used weights. After cure, I noticed my sole/bh glue joints were not all that pretty. I also noticed it is nearly impossible to create a watertight top seam on 5/8" thick bulkheads. Use a hawk and lay the thickened resin out thin. Then apply it with a 6" wide trowel 6" per pass. It will go plenty fast at a half a foot at a time. My largest batch of epoxy I have ever thickened and laid is about 18 ounces. That is a lot of mix. Make sure the sole and bh is clean of dusts.
If you keep the resin thin on a board, it may start to kick on you, but it won't be so bad you don't get bonding. But don't you have pieces? Start at the bow and work back. You cannot walk on them.
Re: 1979 19 ft Sea Ox rebuild
Posted: Sun May 30, 2021 1:56 pm
by Mr Pamlico

The floor is in fellas. I was able to get a buddy over to give me a hand this morning and it went pretty smooth. A little messy but overall I am happy and confident with how it went in. I am going to leave it be until tomorrow and then get the weight out and start making sure everything is level and ready for glass. I am going to be using 1700 as I have with the rest of it. I was thinking 3 layers of glass and the same for tabbing to the hull sides? Not sure if I should try to do the floor all at once or half at the time. I thought about doing three layers the length of the boat on one side starting with a long piece that extends over half way of the boat and working back with shorter pieces. Then I would sand that transition after it cured and do the same on the other side. I was thinking that way I could walk on either side of the boat to work. How do yall normally go about it?
Re: 1979 19 ft Sea Ox rebuild
Posted: Sun May 30, 2021 7:27 pm
by Dipper
Looking good man! Congrats, thats a major milestone. I am just getting going over here and it's definitely going to be a long slow process. You been cobia fishing yet this year? Not that I know but that plan sounds good. I would think that a similar approach as when you laid up the whole inside of the hull would work accept possibly a few small adjustments to account for the finishing/painting of the floor. Keep it up, cant wait to see her all grayed out.
Re: 1979 19 ft Sea Ox rebuild
Posted: Sun May 30, 2021 7:39 pm
by fallguy1000
I kinda think one layer of 1708 best. But you can two layer the 1700. Two tapes of 1208or 1708 or 1700 staggered is enough.
If you aren't stiff enough, you won't make it tons stiffer with lotsa top glass.
Re: 1979 19 ft Sea Ox rebuild
Posted: Sun May 30, 2021 8:11 pm
by Mr Pamlico
Definitely excited to have the floor in but no fishing for me until the boat is done. The floor feels rock solid I just wasn’t sure how much glass I needed on top for protection. I’ll go with the 2 layers of 1700.
Re: 1979 19 ft Sea Ox rebuild
Posted: Sun May 30, 2021 8:56 pm
by fallguy1000
Two layers of 1700 is honestly quite a lot. You might be better off with a single layer; sand it good, then fair it with filler and paint. The sole on my boat is triaxial, about 22 oz depending on the roll. Over low density foam.
Re: 1979 19 ft Sea Ox rebuild
Posted: Mon May 31, 2021 4:28 am
by Fuzz
Like Fallguy said three layers of 1700 is over kill. I like to use two layers so I can stager the joints. But if the deck material is pretty stiff stuff one layer of 1700 would be enough. I might take a scrap and lay one layer on it and then do some testing. Drop heavy weights on it to see if it dents and any other test you can think of.
Re: 1979 19 ft Sea Ox rebuild
Posted: Mon May 31, 2021 10:40 pm
by Mr Pamlico
I made a good bit of progress today. I got out there early and filled in around the floor to hull joint and all the cracks where the floor boards didn’t fit exact. After that cured I was able to sand it all pretty fair and get a layer of 1700 over it. Going to get to sanding on it tomorrow after work. I have some 6 inch 12 oz and I’ve thought about staggering those for the floor to hull joint. I could cut some 17 oz tapes like I’ve been doing for everything else but it would be a lot easier to be able to roll out the 12 oz.
Re: 1979 19 ft Sea Ox rebuild
Posted: Mon May 31, 2021 11:35 pm
by fallguy1000
Two 12 oz tapes is plenty.
Re: 1979 19 ft Sea Ox rebuild
Posted: Wed Jun 09, 2021 3:06 am
by TomW1
fallguy1000 wrote: ↑Mon May 31, 2021 11:35 pm
Two 12 oz tapes is plenty.
Agree, stagger them 2x4 and 4x2.
Re: 1979 19 ft Sea Ox rebuild
Posted: Wed Jun 09, 2021 7:47 am
by Mr Pamlico
I did go with the 2 6 inch tapes staggered. Working with that roll of 12 oz tape was a dream compared to using my own cut out tapes of 1700. I have the floor sanded and fair other than a few small spots. The floor is taped in and I have started to make the hull stiffeners that run from the floor up the hull sides. I am making these out of the leftover 1.5 inch coosa from the transom.


I was planning on one layer of 1700 over the stiffeners and then 2 6 inch 12 oz tapes staggered for them as well. I am going to build a box around the fuel fill hoses off of the one beside them. Trying to decide if it will be easier to try to put a layer of glass on them outside of the boat or wait until I have them glued in. Not sure the best way to be able to glass them outside the boat. I thought of screwing them to a board from the bottom upright to be able to wrap them. It would probably be easier to do when I take the cap off but I was thinking I would like to at least have them glued in before I flip the hull to finish the bottom. The only way I can flip it is to get it off the trailer on the ground and then roll it over. I also couldn't come up with a good way to hold them in place while gluing them in so I was thinking of running a small screw or 2 from the outside of the boat into the stiffeners to hold them in place and then fill the holes once the screws are removed.
Once I get the stiffeners figured out it will be time to flip it back over and finish the bottom, seal and then vc performance epoxy. I am planning on removing the cap after it is back on the trailer to be able to run a piece of coosa across the front for anchor and life jacket storage and to paint the rest of the boat before putting the cap back on.
Re: 1979 19 ft Sea Ox rebuild
Posted: Wed Jun 09, 2021 9:21 am
by fallguy1000
For your fuel enclosures, they can be made from just about anything, but 1/2" high density core like coosa would take a foot shot. Or some plywood with glass.
Cut the pieces out with cardboard first, then make them on a table with the real core size adjusted to fit on the corner.
Epoxy bonding cleats on the hull and around the bottom two sides.
Then put the Glassed pieces back on the boat. You can temp screw the two pieces to the cleats or you can make the thing removable for access. To make it removable; just bond the two pieces to each other in the boat. Then unscrew and finish it on the table with seam tape 6 oz..
For temporary cover, use 1/16" butyl. Or to permanent, jist bed it in thixkened resin.
Re: 1979 19 ft Sea Ox rebuild
Posted: Wed Jun 09, 2021 9:26 am
by fallguy1000
By the way, your work looks superb.
These cleats are perm bonded. Use tape or hot glue to make sure they don't move while curing. Notice the cleat would keep water from getting in as well, so make them about 1" high. And you can cut angles in the sole cleat facing side bottom. Jist use an angle finder..
Re: 1979 19 ft Sea Ox rebuild
Posted: Wed Jun 09, 2021 9:27 am
by fallguy1000
If you recess the enclosure behind the gunwhale coaming; you won't need to fair it and it'll look more pro, so make sure the cleats are back far enough to allow that as well.
Re: 1979 19 ft Sea Ox rebuild
Posted: Fri Jun 11, 2021 1:03 pm
by Mr Pamlico
Thanks for the compliments. So far I am happy and confident in all the work, especially with this being my first build.
I have gotten a layer of 1700 on all the stiffeners and hope to have them glued in tonight and tabbed in tomorrow. Then it will be time to start on the bottom. I was planning on using interprotect 2000e for the barrier coat and then using VC performance epoxy on the bottom. The boat will be trailered and and I liked the hard slick characteristics of the VC but I have been rethinking that because of it being white. The rest of the boat is going to be Parker bay grey and I would be happier in the end with the bottom being grey or black. I was rethinking this when I walked behind the shop the other day and saw my boat blind, I imagined sitting in the river or sound with the blind popped up and it being choppy and the white bottom flashing and showing as the boat rides the waves. Any other suggestions for a good paint or coating for the bottom? I don’t want anti fouling that I have to repaint and would like something that will hold up. The boat will be pulled up on the marsh and sand bars a lot and I know the Parker paint will not hold up well on the bottom. I have a friend that painted his whole boat with the Parker paint and has to paint the bottom after every season from the trailer bunks
Re: 1979 19 ft Sea Ox rebuild
Posted: Fri Jun 11, 2021 1:58 pm
by TomW1
A lot of guys use a graphite coating on the bottom of there boat. it is nearly indestructible. A 25-33% graphite to epoxy ratio is a good mix is best by volume. You can find in the store.
https://www.boatbuildercentral.com/prod ... nd-1-2-qt/ Three to four coats are good. I have it on my bottom and tuse he sand islands are not a problems are not a problem for it. Grass marshes would also not be a problem for it. Guys use in oyster shell water also and do not seem to have a problem that I have heard of.
So hope that helps.
Tom
Re: 1979 19 ft Sea Ox rebuild
Posted: Fri Jun 11, 2021 3:17 pm
by Mr Pamlico
I like the sound of that. I will do some searching around on the forum here to do some research on application and tips and tricks. Any guesstimate on how much I should order to cover just the bottom?
Re: 1979 19 ft Sea Ox rebuild
Posted: Sat Jun 12, 2021 3:25 pm
by cape man
A pound will do it and then some. Sift it through a tea strainer or screen, and add epoxy till smooth. You can add the resin first and then the hardener. Mix it really well before adding the hardener and then mix it some more. First time I used it I had clumps. About 25% by volume.
It is not bulletproof, but easy to repair scratches later.
Re: 1979 19 ft Sea Ox rebuild
Posted: Sat Jun 12, 2021 10:40 pm
by Fuzz
Like Capeman said it is a good way to go but do not think it is bullet proof. Best part is if needed it is easy to repair.
Re: 1979 19 ft Sea Ox rebuild
Posted: Sun Jun 13, 2021 10:03 pm
by Mr Pamlico
I have got the boat flipped back over and on dollys in the driveway. I did some much needed clean up in the shop and I am going to try and get it back in there tomorrow night to start getting the bottom ready.


I have read through some threads on the graphite coating and I have seen where some people sand in between coats and I saw where someone recommended wet on wet and to wait 30 minutes to an hour between coats. Will you get good results either way? I would prefer to be able to knock it all out at once and then sand once after all coats are applied. Also can I apply this directly to the bottom of the boat without the barrier coating? I was thinking after putting 3-5 layers of epoxy and graphite that that would seal the boat fine, then I would barrier coat the rest of the hull before paint
Re: 1979 19 ft Sea Ox rebuild
Posted: Sun Jun 13, 2021 11:59 pm
by TomW1
I would say sand the bottom with 40/60 grit to give the epoxy/graphite a tooth to hold to. Then go ahead and do coat on coat as soon as the last coat is tacky to the touch. Probably no more than an hour depending on temp. Wet sand after the last coat, maybe allow it a day to cure.
I am not sure what you are referring to as a barrier coat. Is this a primer over the fiberglass or something else?
Tom
Re: 1979 19 ft Sea Ox rebuild
Posted: Mon Jun 14, 2021 12:05 am
by Fuzz
The epoxy is a barrier coat. Several coats of epoxy and there is no need to add something else.
Re: 1979 19 ft Sea Ox rebuild
Posted: Mon Jun 14, 2021 6:29 am
by Mr Pamlico
The barrier coat I’m referring to is a two part epoxy coating to seal the boat where I sanded through the old damaged gel coat and repaired blisters. I bought interprotect 2000e to do this when I was planning on going a different route with the bottom. I’m hoping to be able to get the graphite coating on this week. Still have some spots to work on on the hull bottom before I can apply
Re: 1979 19 ft Sea Ox rebuild
Posted: Mon Jun 14, 2021 10:12 am
by pee wee
If you need to sand the epoxy/graphite, do it wet.
Those that have tried dry sanding share that it makes a huge mess and they wouldn't do that again!
Re: 1979 19 ft Sea Ox rebuild
Posted: Mon Jun 14, 2021 10:34 am
by Jaysen
I was so pissed off by dry sanding that I swore I’d never sand it again. Ever. Not even wet. Nothing that sees the bottom of my boat should complain. Fish don’t care. People know I bite.
I barely sand it for repairs. Graphite is going to be ugly if it is doing it’s job.
Re: 1979 19 ft Sea Ox rebuild
Posted: Mon Jun 14, 2021 2:52 pm
by Mr Pamlico
If that’s the case I will try to roll it on as smooth as I can and if it’s halfway decent I will let it ride. As long as it functions properly I’m not worried about it being pretty
Re: 1979 19 ft Sea Ox rebuild
Posted: Fri Jun 18, 2021 10:43 pm
by Mr Pamlico
Re: 1979 19 ft Sea Ox rebuild
Posted: Fri Jun 18, 2021 10:56 pm
by Mr Pamlico
Also with the tunnel and engine on the 6 inch jack plate where should the cavitation plate be? I was thinking of starting with the cavitation plate even with the top of the tunnel, like it was before, and starting there. From there I can run the jack plate up and see if I need to move the engine up higher.
Re: 1979 19 ft Sea Ox rebuild
Posted: Sat Jun 19, 2021 1:48 am
by fallguy1000
I profess little expertise on tunnels, but the likelihood of getting the cav plate higher than the top of the tunnel seems low to me.
Re: 1979 19 ft Sea Ox rebuild
Posted: Sat Jun 19, 2021 2:37 am
by Fuzz
If the tunnel is working correctly you should have a solid stream of water coming out of it. If that is the case you might be surprised and able to go higher but you will need to test to know for sure.
The glass damage should not be to hard to fix after all the other work you have already done. Taping the console down would work for me. If you ever need to get under it cutting and sanding a little bit of glass is going to be a very minor part of what needs to be done.
The graphite is pretty unforgiving in the looks department. You would have to have one smooth surface to not see any minor flaws. Yours looks like it will work just fine. Pretty sure the fish will not be put off
Re: 1979 19 ft Sea Ox rebuild
Posted: Wed Jun 30, 2021 6:12 pm
by Mr Pamlico
I have been making pretty good progress. I will try to get some pictures up soon but I feel like I have been doing nothing but working and working on the boat. I was going to hang the motor tonight and hopefully have it in the water over the weekend but I am having trouble finding 316 bolts the right length for my transom to jack plate bolts. I should have planned that better but I was planning on Fastenal having them. One more bump in the road. If I can’t find any locally tomorrow I will just have to wait and order some
Re: 1979 19 ft Sea Ox rebuild
Posted: Wed Jun 30, 2021 9:48 pm
by Fuzz
If that was all that was stopping me from a splash I would use any old bolt till I got the right ones. They are not going to rust away in a few weeks
Re: 1979 19 ft Sea Ox rebuild
Posted: Thu Sep 09, 2021 10:05 pm
by Mr Pamlico
Re: 1979 19 ft Sea Ox rebuild
Posted: Thu Sep 09, 2021 11:03 pm
by Fuzz
Thank you for coming back and giving us an on the water report. It is always good to hear a boat turned out like the builder hoped it would.
Re: 1979 19 ft Sea Ox rebuild
Posted: Fri Sep 10, 2021 6:47 am
by cape man
My boat will not self bail with me or a lot of gear in it, or when the bait well is full. I just plug the scuppers and pull them when running to get the water out. When fishing, especially when throwing the cast net, water always finds a way in the boat! It still irks me a bit, as like you I thought about raising the stringers while building. However. I've learned to deal with it. Empty, on anchor or docked, she self bails the rain out. The fix is to pull the floor and interior, including the casting deck, and raise the stringers and bulkheads. NOT HAPPENING!! Next boat...
Your boat looks amazing, and sounds like its doing exactly what you need except for the self bailing at rest. The smiles in the picture says it all. I watched this rebuild from the start and you didn't skip anything. Congratulations!
Now show some more adventure pictures!
Re: 1979 19 ft Sea Ox rebuild
Posted: Fri Sep 10, 2021 6:53 am
by cape man
Double post
Re: 1979 19 ft Sea Ox rebuild
Posted: Fri Sep 10, 2021 7:32 am
by Jeff
Congrats!! Jeff
Re: 1979 19 ft Sea Ox rebuild
Posted: Fri Sep 10, 2021 8:09 am
by fallguy1000
Just build a bilge well and pump out any water. Scuppers are over rated.
Should be a great fishing rig,
Re: 1979 19 ft Sea Ox rebuild
Posted: Tue Sep 21, 2021 4:26 pm
by boguesounder
Hey! Nice work man. Congrats on getting back on the water!!! I know that feels good. I really like your transom mod. I enjoyed your performance review also.
You are a touch north of my waters but I will keep an eye out for you next time I am up that way.
Re: 1979 19 ft Sea Ox rebuild
Posted: Sat Oct 09, 2021 6:55 pm
by Mr Pamlico
boguesounder wrote: ↑Tue Sep 21, 2021 4:26 pm
Hey! Nice work man. Congrats on getting back on the water!!! I know that feels good. I really like your transom mod. I enjoyed your performance review also.
You are a touch north of my waters but I will keep an eye out for you next time I am up that way.
I appreciate it. I really like the way the transom ended up. It ended up working out great for rigging and also keeping water out. When reversing a lot of water is thrown up between the transom and the jack plate. Instead of it ending up in the boat that mini splash well there keeps it all out. I’ve been on other boats with a jack plate mounted on a cutout transom where that water ends up in the boat on a hard reverse