Page 1 of 1
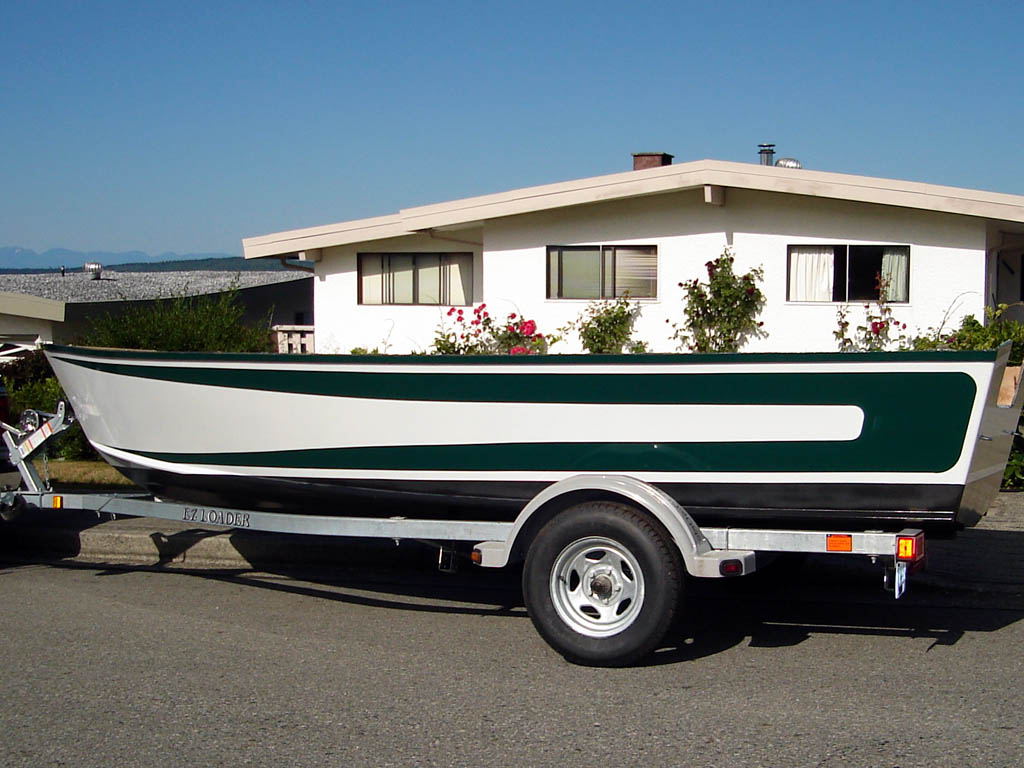
West Coast OB17 update
Posted: Mon Jul 10, 2006 4:50 pm
by Lucky_Louis
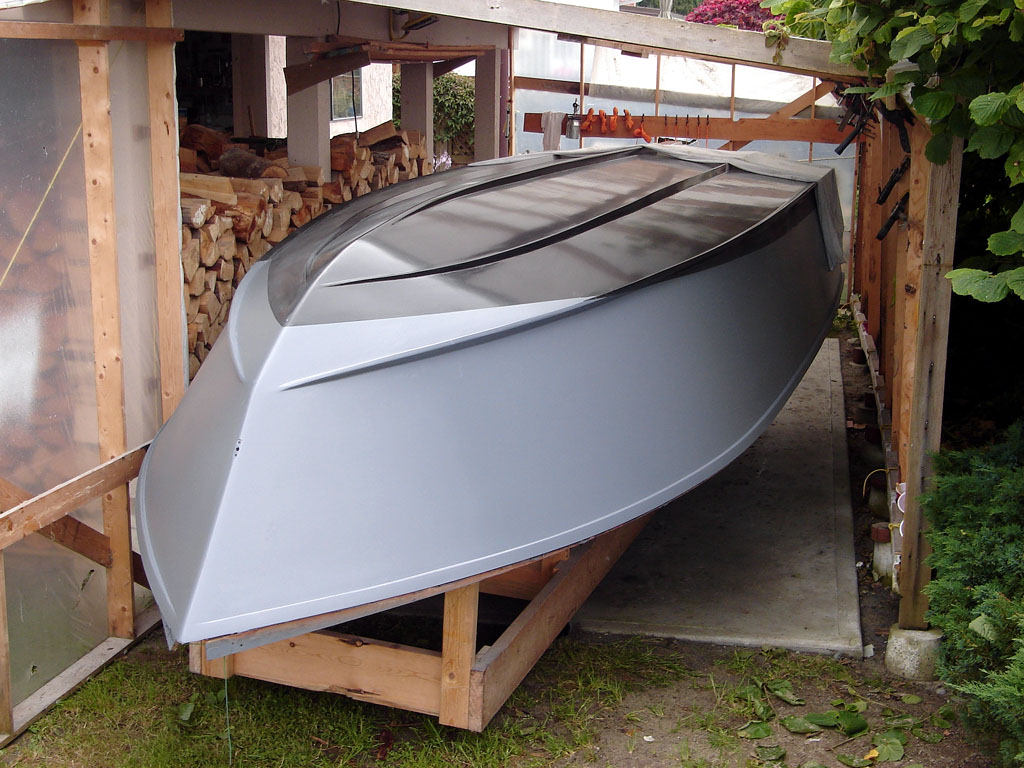
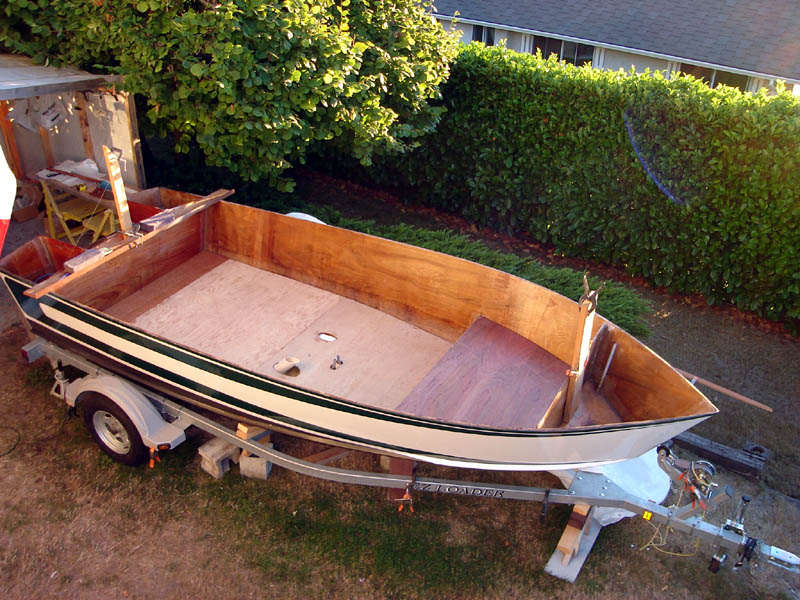
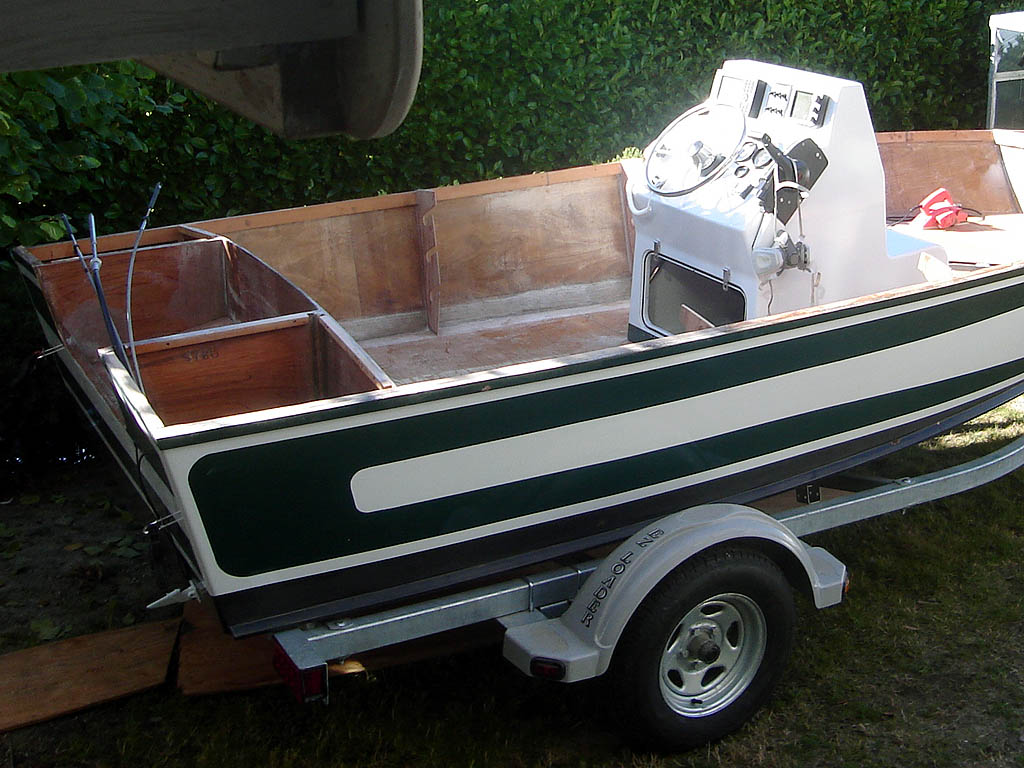
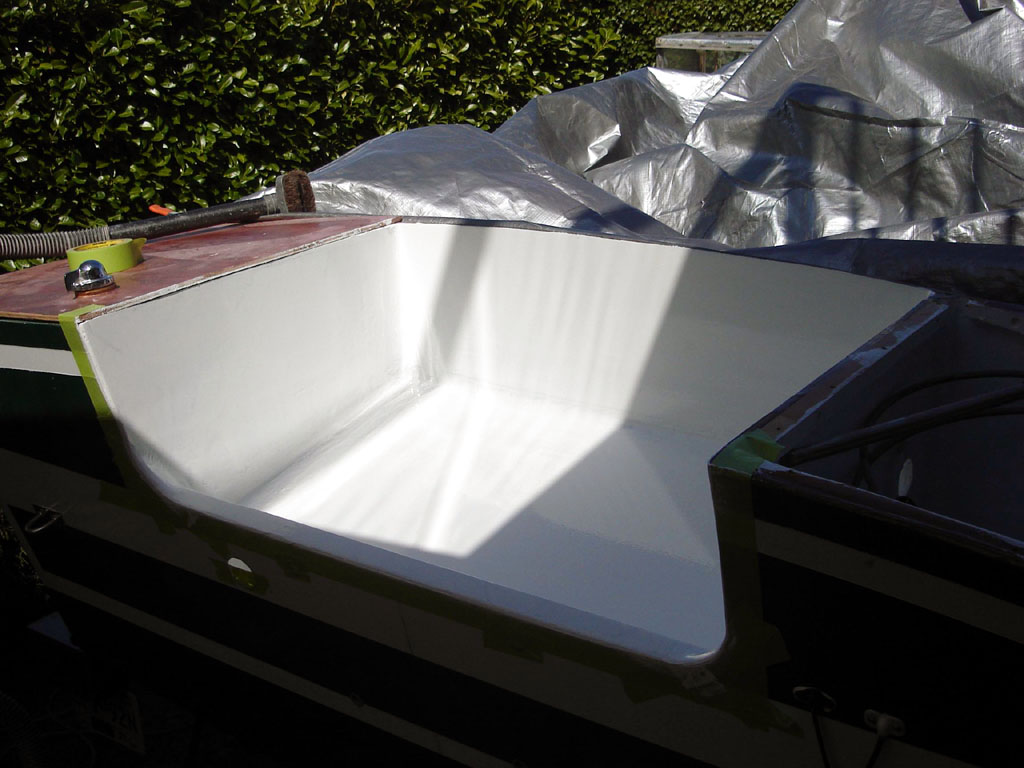
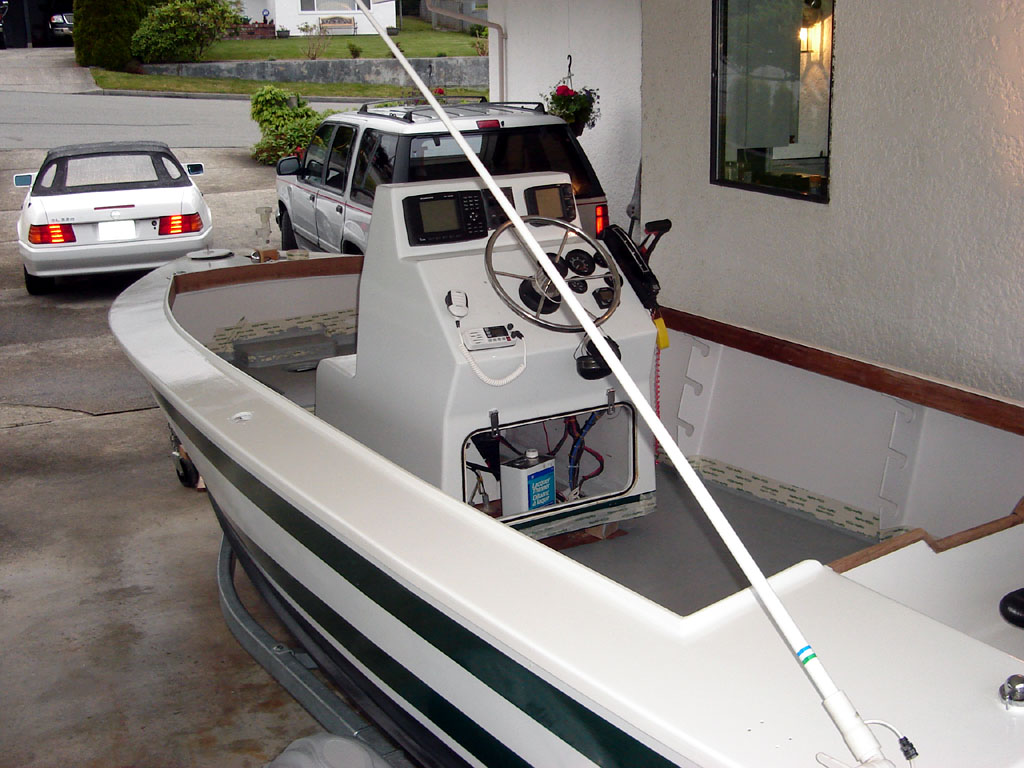
Well, I finally got to park the sander(s) and shoot some paint this week.
A few from the same album are here
http://gallery.bateau2.com/thumbnails.php?album=328
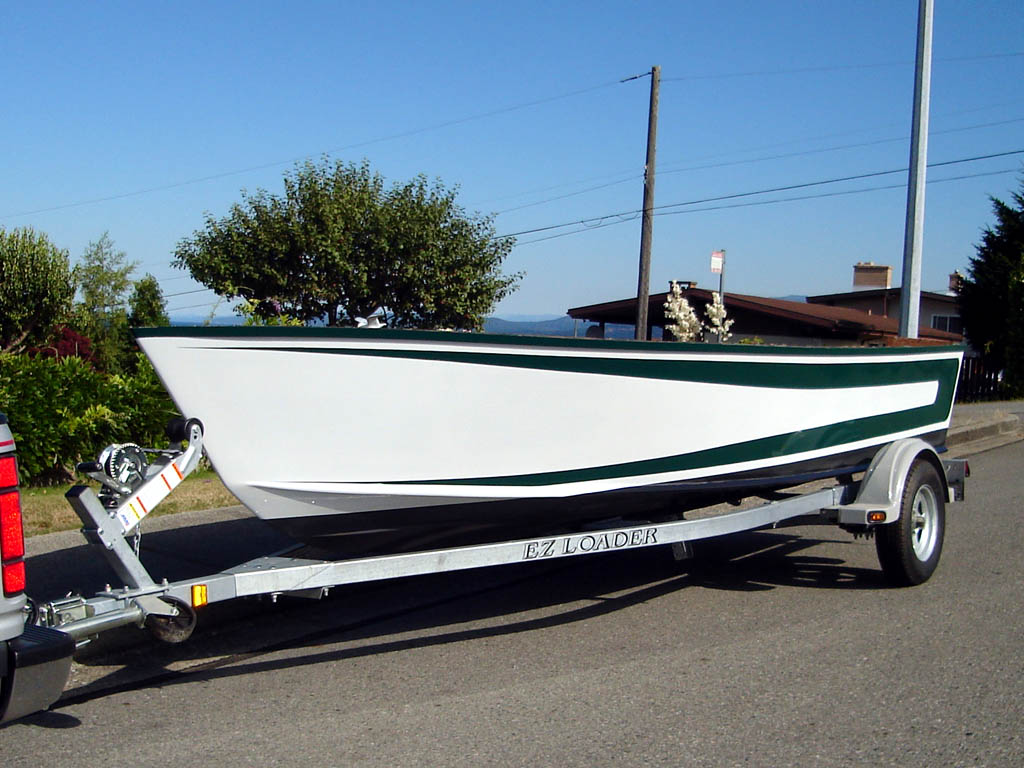
It's a great feeling to see the boat's lines come to life.
Posted: Mon Jul 10, 2006 5:23 pm
by tech_support
Very fair, very nice. Your console looks great also.
Joel
Posted: Mon Jul 10, 2006 8:22 pm
by Mike Adams
Yes, nice job, Louis! But gee, I wouldn't like to see any of those logs fall off the stack and mark your paint!
Mike
Posted: Tue Jul 11, 2006 7:28 am
by Jason C
Very nice. Good work.
Posted: Tue Jul 11, 2006 10:13 am
by Daddy
Beautiful, what kind of mix did you use for the bottom?
Daddy
Posted: Tue Jul 11, 2006 10:54 am
by Lucky_Louis
Thanks for comments guys. Kinda hurts to say it but I burn clear douglas fir, red cedar, and red alder. Yes, as you can see my build area is pretty tight. If my strongback wasn't on wheels I would have been jiggered.
The bottom is MarinEpoxy mixed with 25% graphite powder by volume. I intended to do 2 coats but ended up doing four because of extra sanding caused by disintegrating roller contamination.
Tonite I'll sand the primer with 150 or 220 grit and shoot the top coat on the next warm, calm day. I still have to finalize my graphic design for the sides but it will be white and jade green similiar to Jim W's C19.
Posted: Tue Jul 11, 2006 1:02 pm
by FLYonWALL9
A REALLY FINE JOB! She looked so good
I was wondering if that was the final color
until you said otherwise

.
Posted: Wed Jul 12, 2006 11:31 am
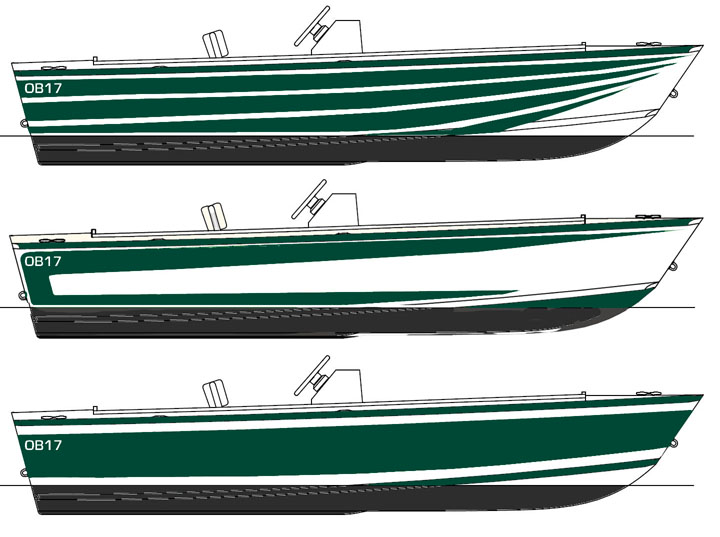
by Lucky_Louis
Posted: Wed Jul 12, 2006 11:35 am
by tech_support
I like #3 the best
Posted: Wed Jul 12, 2006 12:14 pm
by Happychappy
3 is definitely the most common and looks good but #2 is definitely different and looks equally as good. I tried to be a little different with my OB15 and think I might change this coming winter. #1 is just too busy.
Martin
Posted: Wed Jul 12, 2006 12:56 pm
by jeremy
I say 3.
Posted: Wed Jul 12, 2006 1:10 pm
by FLYonWALL9
I'm with Chappy. I like 3 but 2 works also. I think I would
use an off white with that color green rather than just a
bright white. With that color bottom even a pale yellow
would look really sharp or even a cucumber green, like
the inside of a cucumber. Its close to white with a hint of
green almost like a light mint color.
1 would be good on a MG but its too sporty for an OB
IMHO
Also, (sheez i should just shut up)

I would carry a boot
stripe the length of the boat where you have it cut off
looks like at the spray rail. And in one you have it from the
chine to the black.
Posted: Wed Jul 12, 2006 2:53 pm
by BillTwo
Lucky,
I like #2 best. Believe it or not, I am going to be using the colors green and white (not similar to your designs) but it will be a "Sea Green" and "Hatteras Off White". I'm thinking of using Interlux Brightside paint for my top and bottom coats. I might later change my mind and use a light grey bottom coat - when I get that far.
Lucky that center console that you built, what's the dimensions on it. I'm trying to settle on a height, width, and depth design of 37"h X 33"w X 42"d. The depth will include front seating with livewell under. Also, have you considered the type trailer you're going to use. I'm trying to debate that when the time comes to flip my OB17, do I want to build another jig or place it on a trailer?
I like what you have done with the fairing and painting. I hope mine turns out just as good or as close as I can in quality such as you have done. As you know, I had a problem with my first major laminating of 1/2 of the bottom with incorrect epoxy mix. One mixed batch, or lack thereof, had
NO ACTIVATOR added and became a gooey mess. Two weeks later I finally got it off, scraped, repaired with patches of new fiberglass and re-laminated. Now I'm finishing the last side before fairing and sanding and then priming.
I'll be watching your progess closely since we are building similar boats - especially when it comes time for you to flip your boat.
Regards,
BillTwo,
Posted: Wed Jul 12, 2006 3:09 pm
by WobblyLegs
Looking g-o-o-o-o-o-d
I think my choice is 2, but without green on the bottom near the bow - make that white.
You must like masking and painting. I dont.

Posted: Wed Jul 12, 2006 9:56 pm
by bermudian
My vote is for #2
Posted: Wed Jul 12, 2006 11:59 pm
by Lucky_Louis
Many thanks guys, a modified #2 it is. *SWMBO also picked the second one.
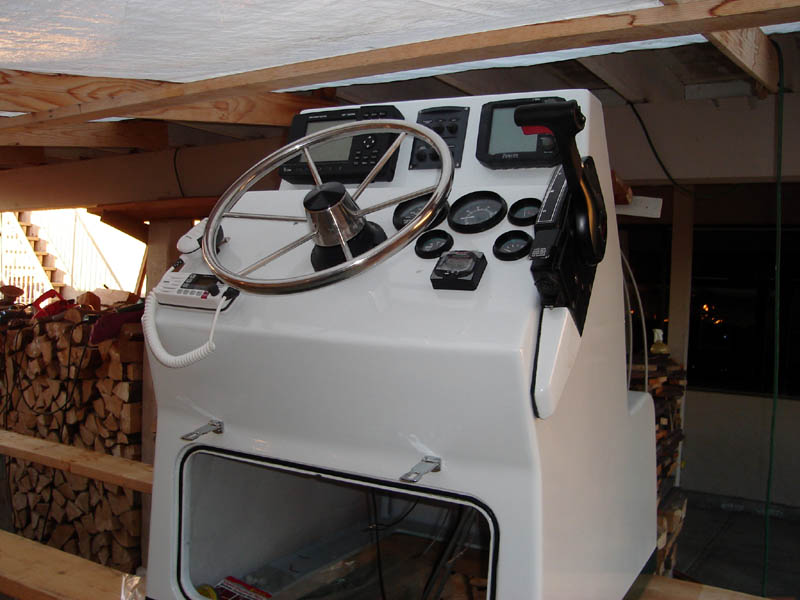
BillTwo: My console is 30" wide at the base tapering to 25" across the top. It's 41" tall and 36" long not counting the slight overhang of the dash.
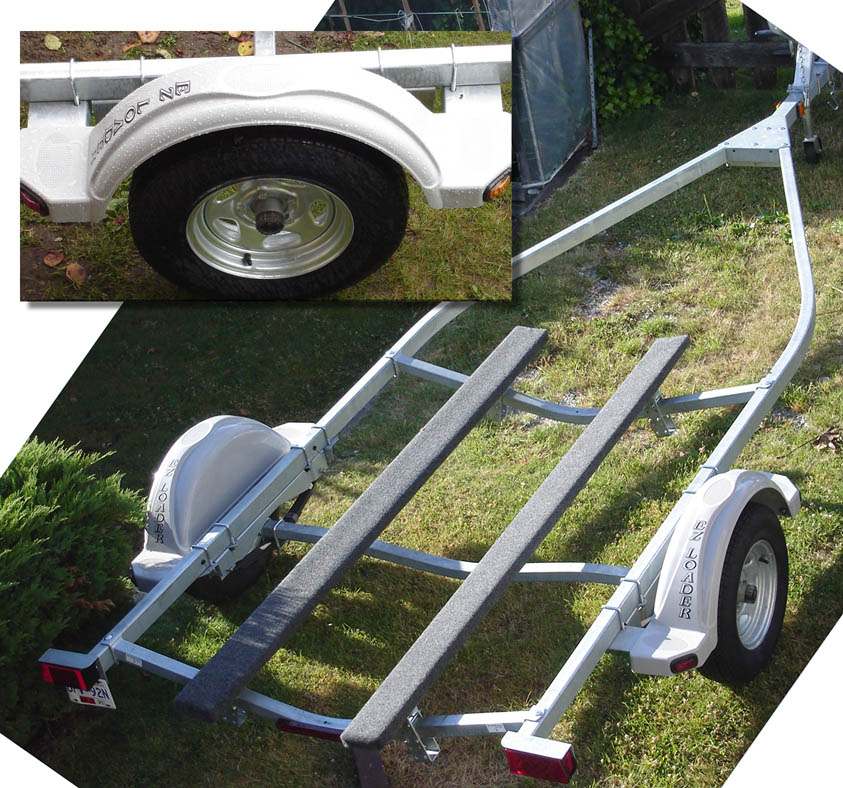
I bought an EZ Loader bunk trailer last fall on sale. Great deal, oil bath hubs, galvanized rims, 100% LED lighting. Wide body, rated for 17-19' 2350 lbs. I think Lief has the identical trailer for his OB17 "Rose Sea".
The plan is to flip the boat right onto the trailer. I'll block and brace the bottom to the trailer frame to make sure everything stays straight until my frames and stringers are in and the sub-sole foam is poured.
WobblyLegs: Yes, actually I do like masking and painting - it's just that other pre-painting process (who's name shall not be mentioned) I'm totally sick of! And you're right, I'll drop the green below the spray rail or carry the white boot stripe around as per FLYonWALL9's suggestion.
I finished the primer sanding tonite so tomorrow I'll start masking. Looks like a sunny weekend coming up.
* She Who Must Be Obeyed
Posted: Fri Jul 14, 2006 12:11 am
by BillTwo
Lucky_Louis wrote:Many thanks guys, a modified #2 it is. *SWMBO also picked the second one.
BillTwo: My console is 30" wide at the base tapering to 25" across the top. It's 41" tall and 36" long not counting the slight overhang of the dash.
I bought an EZ Loader bunk trailer last fall on sale. Great deal, oil bath hubs, galvanized rims, 100% LED lighting. Wide body, rated for 17-19' 2350 lbs. I think Lief has the identical trailer for his OB17 "Rose Sea".
The plan is to flip the boat right onto the trailer. I'll block and brace the bottom to the trailer frame to make sure everything stays straight until my frames and stringers are in and the sub-sole foam is poured.
WobblyLegs: Yes, actually I do like masking and painting - it's just that other pre-painting process (who's name shall not be mentioned) I'm totally sick of! And you're right, I'll drop the green below the spray rail or carry the white boot stripe around as per FLYonWALL9's suggestion.
I finished the primer sanding tonite so tomorrow I'll start masking. Looks like a sunny weekend coming up.
Lucky,
Thanks for the feedback on the Console. Mine will be slightly different and a little bigger than yours - if I can pull it off? I'm not very good at woodworking and it seems that I may need to solicit some help in that area. So far, it looks good on paper.

That EZ Loader Bunk trailer of yours is a good looking one. Is it new? I am looking to buy a trailer before I'm ready to flip my boat. The type that I'm looking for will be galvanized, with "I" beam frames, bunk supported and able to carry at least a 2,300 lb load for a 17ft. boat. I'd like to see how you secure yours on the trailer without it flipping you out of it.
Speaking of Lief, I need to contact him and see how he's doing. We last were discussing designing my boat as a "closed bow" similar to his. Since then, I've decided to go with a center console. I'm sure he's out chasing and catching a lot of fish, he and his wife. Lief, if you're out there, catch one for me.

As far as selecting #2 as your paint scheme, along with Wobbly's and FLYonWALL9's suggestions, I believe that its going to work just fine on your boat. I can't wait until I get to that stage.
 Keep On Building and Posting (KOBP)
Billtwo
Posted: Thu Jul 20, 2006 10:58 am
by Lucky_Louis
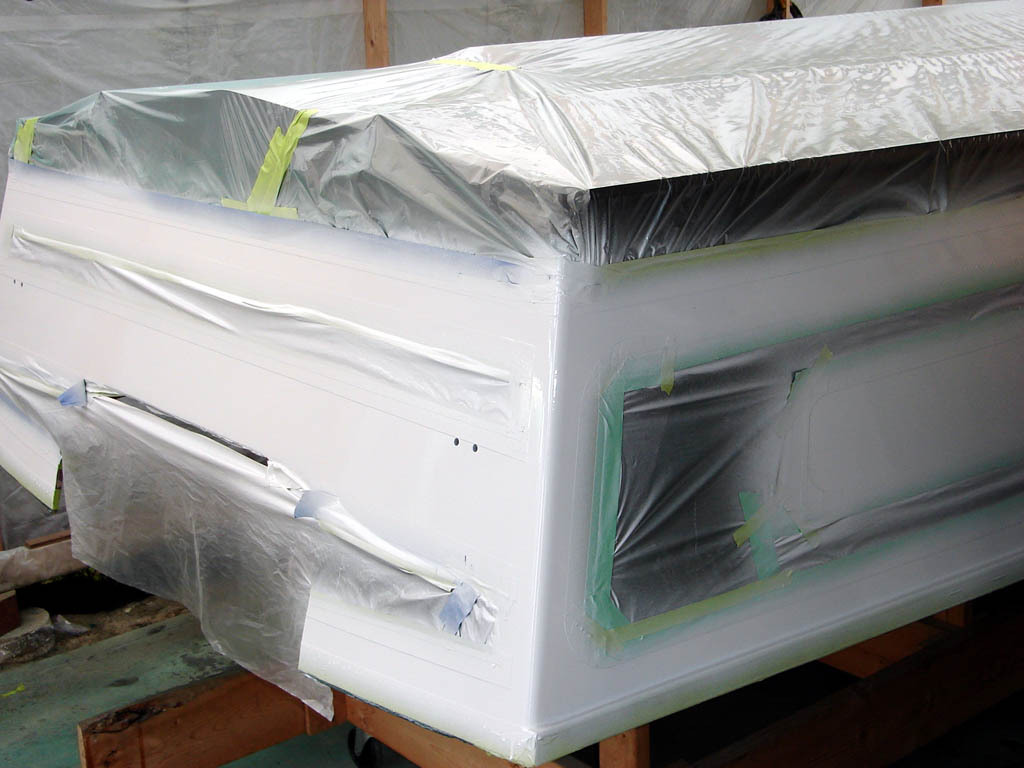
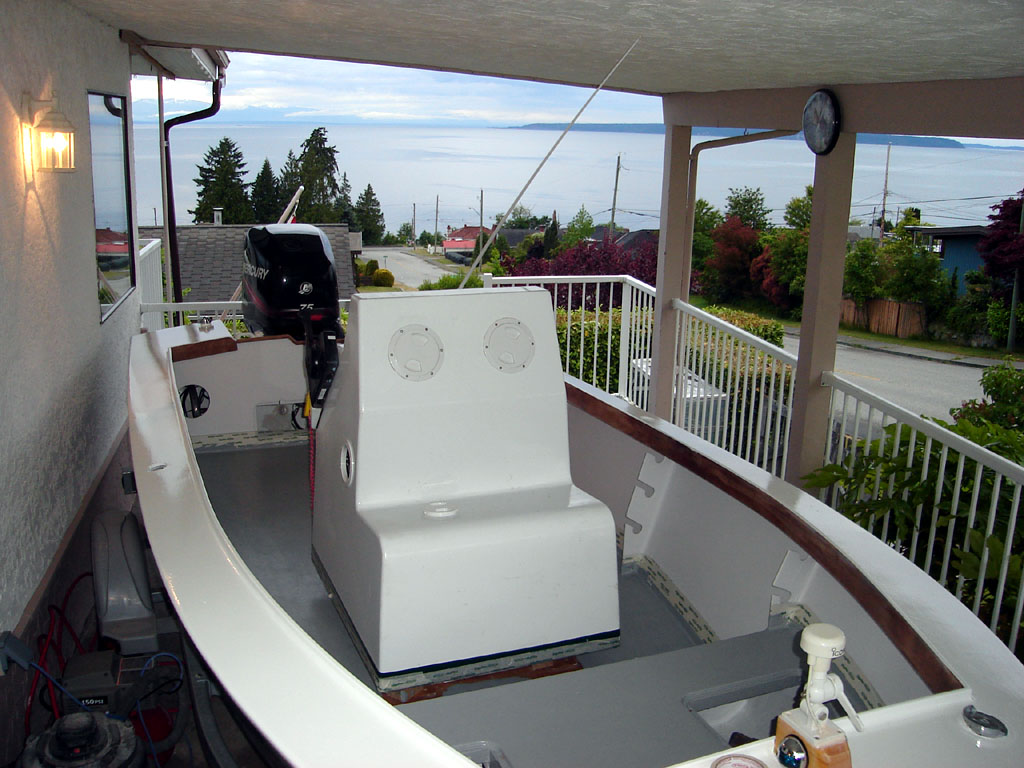
Exterior painting DONE! Masking will be off today, will flip onto trailer tomorrow. Will be a baked on finish as temps are supposed to hit 35C (95F) tomorrow. Started rigging the console as well.
Other pics here
http://gallery.bateau2.comindex.php?cat=11134
Posted: Sat Jul 22, 2006 3:07 pm
by Lucky_Louis
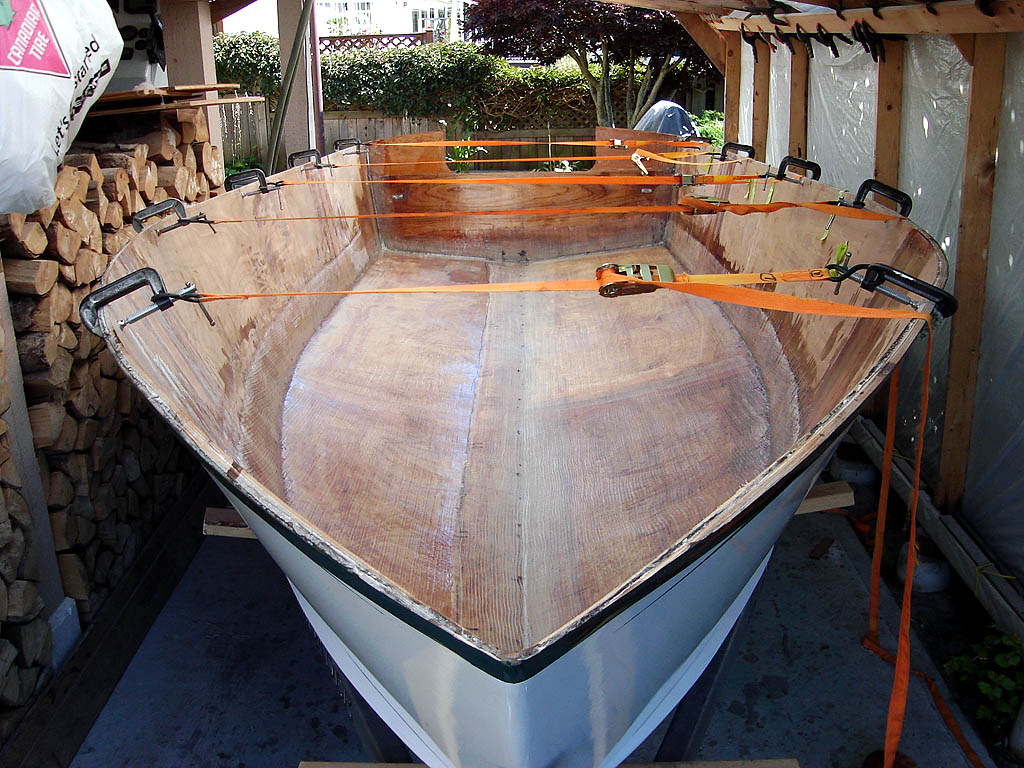
It's safely flipped. Went off without a hitch. I suspended the hull from the overhead with 3 tie down straps, removed the strongback, and encircled the hull in 3 places with more ratchet straps. Four guys and a few beers made it and easy job. Carried it outside, lowered onto a couple of foamies on the lawn, picked up and put on the trailer.
More pics of the flip in my gallery here:
http://gallery.bateau2.comdisplayimage. ... =501&pos=0
Posted: Sat Jul 22, 2006 5:58 pm
by WobblyLegs
Louis, that looks good. Very, very good.
Posted: Sat Jul 22, 2006 8:08 pm
by jeremy
Wow, that's quite a paint job. You are far better than I at masking.
Posted: Mon Jul 24, 2006 11:08 am
by Lucky_Louis
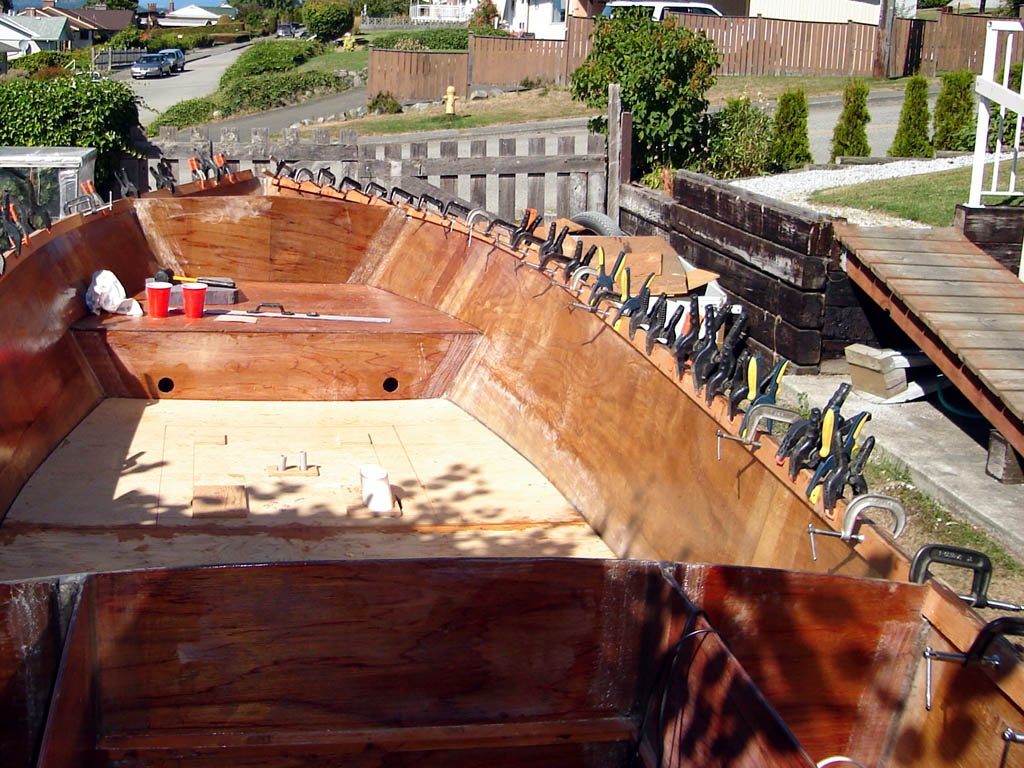
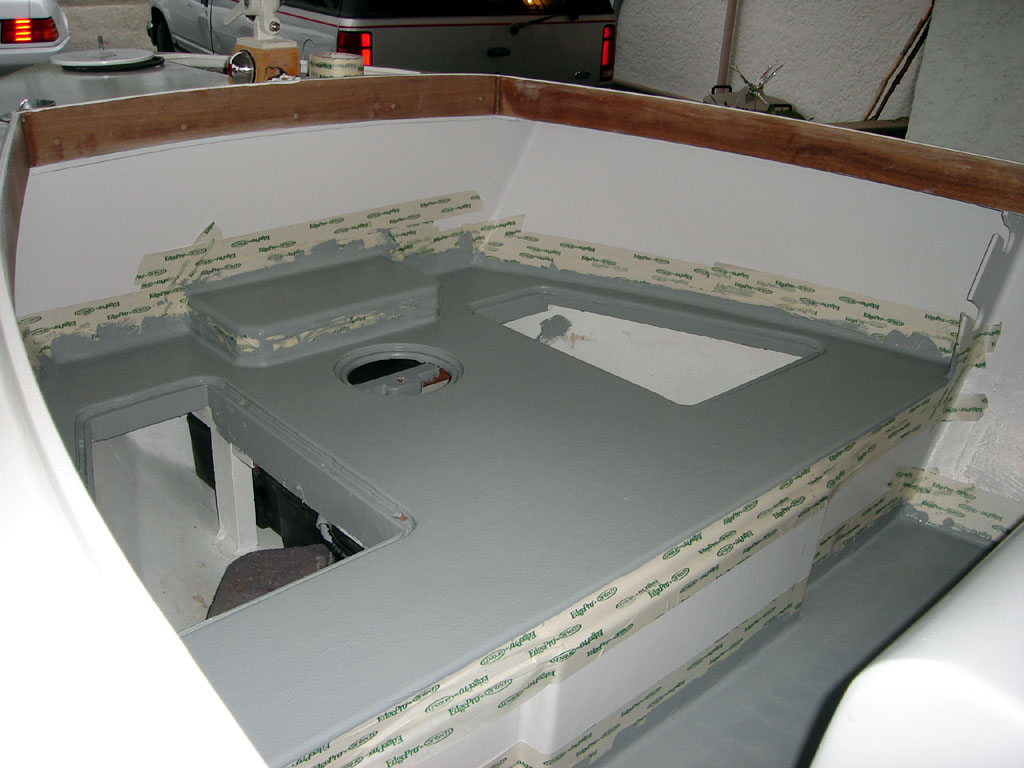
Thanks for kind words guys. Started taping the interior seams on the weekend. Had to quit 'cause there was too much sweat dripping! Temperatures hit 33° Celcius (91°F) here on the weekend. Even with the slow hardener and pouring 4 oz. batches onto a shallow styrofoam plate, my working time was less than 15 minutes for each batch. I hope to have the whole interior taped and ready for glassing by Friday, then I'm taking a week off work to build 10 days straight, 12 hours/day to push to a finish. I'll try to take pics and post as I go.
Posted: Wed Jul 26, 2006 4:59 am
by WobblyLegs
Lucky_Louis wrote:a week off work to build 10 days straight, 12 hours/day to push to a finish. I'll try to take pics and post as I go.
Good luck with it, and I hope the weather holds for you...
I should finish the inside taping of mine this weekend.
Dunno when I'll be able to do final laminate as we're away next weekend.
Posted: Wed Jul 26, 2006 10:49 am
by Lucky_Louis
So Wobbly, it looks like the race to finish is on

Do you have a launch date in mind?
Posted: Wed Jul 26, 2006 12:53 pm
by kdog
Looks awesome Louis!! I might have to add some color to my ob17 other than the white. Please mask off those sides good when you're working on the inside. That epoxy tends to get on everything, don't want to see you ruin that beautiful paint job!!
Posted: Wed Jul 26, 2006 5:05 pm
by WobblyLegs
Lucky_Louis wrote:So Wobbly, it looks like the race to finish is on
Do you have a launch date in mind?
Launch date, well, that was originally supposed to be sometime around Sep/Oct 200
5!!! So, how long's a piece of string?
I've given up trying to set deadlines, and just working to get what I can done when I can, but (optimistically) still hoping for an autumn launch.
Managed to tape the starboard inside chine this evening (three layers), port done last night. Run out of bi-ax tape, collecting more tomorrow. Plan to tape bottom to transom Fri, transom to sides Sat, and then sand the whole inside for big sheets of bi-ax over the coming week. But as with everyting, there's more to it than meets the eye - I have to prepare the sides for the frames to go back in (remember, my boat has overlapping side panels, so need to make a smooth transition between them - fillet). Then more sanding, etc., etc...
See...
I was sitting on my heels to take this pic - this there is
lots of space inside here!!!
I think you're going to splash before me. Still have berths, benches, deck, cabin, windows etc., etc. to make.
But, enjoying it!!!
Posted: Wed Jul 26, 2006 6:37 pm
by Lucky_Louis
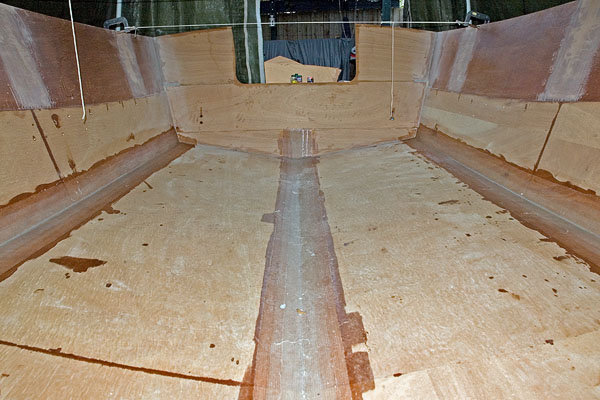
Wobbly, I can't believe how neat you've kept your taping. I've got epoxy everywhere already and I've just started taping too. I did have to do a little extra work on the bottom though. I noticed a 'blister' on a section of the bottom plywood that had obviously delaminated from the rest of the sheet. It was about 6" round so I cut it out and investigated for another 6" all around it which was OK. It looked like the plywood lamination was starved for glue. I mixed up a slurry of epoxy and wood flour and squeezed it into all the edges and replaced the blister piece. Then I laminated 2 layers of overlapping 12oz biax cloth over the whole area. The plywood is BS1088 HYDRO-TEK. Hmmm....
I have one chine and the keel left to tape. I increased the scantlings by one layer of tape for all my transom joints as my engine is quite heavy and at the top of the recommended HP rating. Also, I may end up towing over some pretty rough roads so better safe than deal with cracks later. I'll post pic(s) on the weekend before I too will be glassing the bottom. I hope to be fitting my frames and stringers by Sunday.
Posted: Wed Jul 26, 2006 10:46 pm
by UncleRalph
WobblyLegs wrote:Launch date, well, that was originally supposed to be sometime around Sep/Oct 2005!!! So, how long's a piece of string?
I've given up trying to set deadlines, and just working to get what I can done when I can, but (optimistically) still hoping for an autumn launch.
I considered naming my boat "Next Year", which had become my answer when people asked me when I would be done.
Ralph
Posted: Thu Jul 27, 2006 4:39 am
by WobblyLegs
Lucky_Louis wrote:how neat you've kept your taping.
I use a 4" wide foam roller to coat the length of the the wood where the tape will go, lay and press the tape down, and then brush the epoxy on.
For brushing, I use a 2" wide brush, with the bristles cut down so they're only about 1" long. Generously, quickly (and loosely if that makes sense) paint epoxy onto the tape that's been laid down (without trying to 'wet out') for about 1.5 metres. Once there, where I started will have started wetting itself out, and I go back and paint more on as needed to fill any areas that need it. The shortened (stiff) bristles on the brush help to 'dab' out any stubborn air.
I only use a squeegee for large areas 'cos they dribble epoxy everywhere
Posted: Thu Jul 27, 2006 7:27 am
by Jason C
Wobbylegs,
Don't make deadlines. You'll find that it will either drive you crazy, or you'll start to shortcut with neatness. She's looking good so far.
Deadlines aren't good.
I started my skiff a year ago next week. Just now starting to fair.
Posted: Thu Jul 27, 2006 7:29 am
by Jason C
Oh yeah, that brush cutting trick works great. I do it all the time.
Posted: Mon Jul 31, 2006 11:04 pm
by Lucky_Louis
Perfect weather for epoxy so... spent the week after work taping all the seams. I was going to do the bottom in one go but the logistics of having a place to squat/kneel/sit defeated me. On Saturday I ground down the selvage and bumps, vacuumed and wiped everything down with lacquer thinner. Sunday, I partnered with my good frau and got the bottom pieces measured and cut. Sunday afternoon we (she mixes a mean batch of sticky stuff) placed the starboard side. Monday, I soloed and finished the port side glassing after grinding down the overlap section.
PS: Many thanks to Wobbly for the idea on using clamps to anchor the temporary cross supports. I marked the tie down straps at the correct width with the frames in place so they are real easy to add or remove as needed.
Posted: Tue Aug 01, 2006 4:45 am
by WobblyLegs
Ah, yes indeed, Lucky pulls ahead. Some minor setbacks mean I probably won't be able to do my glass sheets until weekend after next.
I shall be thinking of you this week while you work on your boat and I sit in an office with 28ºC weather outside...
At a rough guess, how much epoxy did you use on the sheets? I'm looking at what I have left (about 10 litres of resin) and am not sure if it's enough to do the whole lot...
Keep it up - I'm looking forward to some pics from you this week...
Posted: Tue Aug 01, 2006 3:53 pm
by Lucky_Louis
Wobbly,
I used about 4 litres (maybe 5) to do the inside bottom. Refitting the frames today. Hope to start cutting the 'good' wood tonite. I made all my mold frames out of the cheapest plywood I could find. That saved me 1 or 2 sheets of the nice 1088 Meranti but created a bit more work.
Posted: Sun Aug 13, 2006 11:15 am
by Lucky_Louis
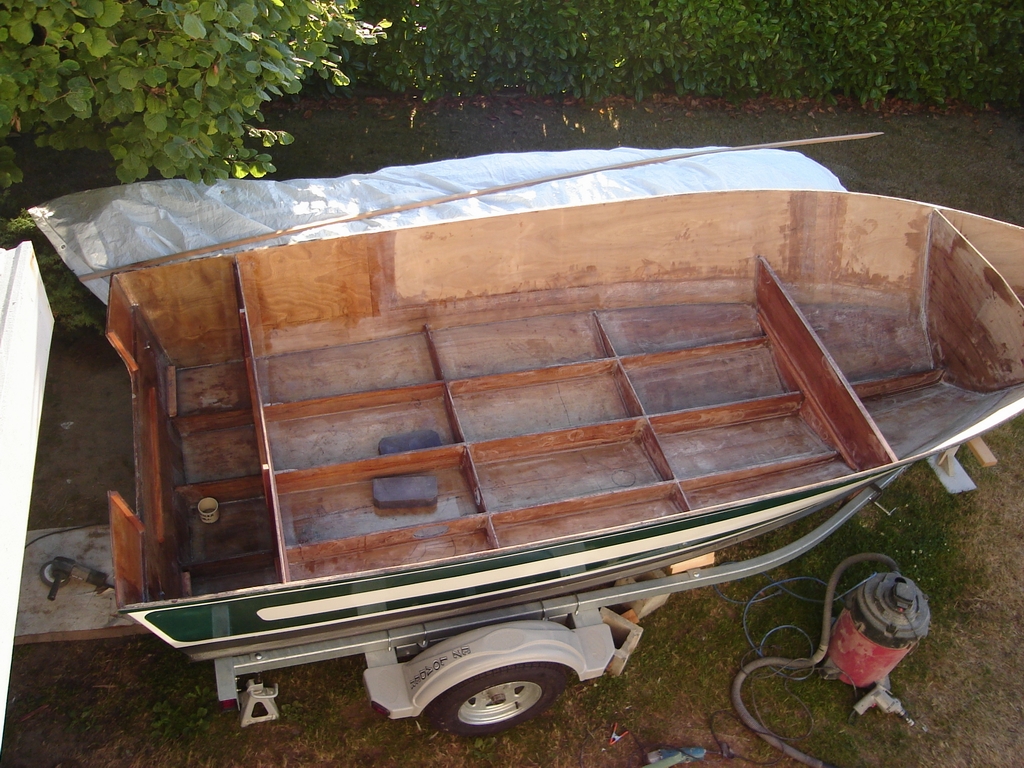
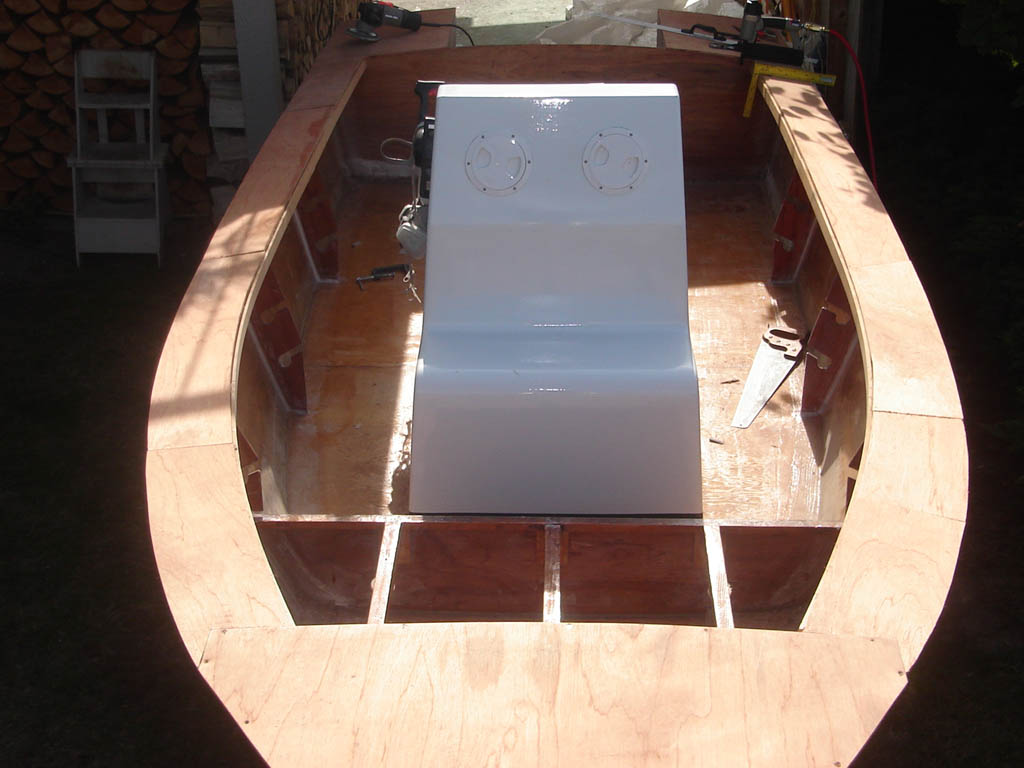
A quick update. Refitted all stringers and cut new frames (I used throwaway molds), cut and fit all motorwell bits, soles, and decks. Flow coated all surfaces of all pieces. Filleted all the pieces in one operation, man! I went through a lot of epoxy that day. Now I'm tabbing and that's about 50% done.
A few more new pictures at
http://gallery.bateau2.com/thumbnails.php?album=501
I've been pre-rigging my completed console during the times when I have to stay out of the boat during curing.
Posted: Sun Aug 13, 2006 12:32 pm
by WobblyLegs
Getting there...
I'm curious: is that centre stringer in your plans? I only ask as my boat only has two stringers... nothing in the middle.
Wobb.
Posted: Sun Aug 13, 2006 3:58 pm
by Lucky_Louis
Yes, the OB17 (and probably the OB19) have three stringers. I believe the "V" on your C17 is deeper allowing you to have a deeper stringer which would give more than adequate strength using only 2. This is just a guess on my part, I'm sure JM will chime in if I missed the mark by too much.
Have you glassed your inside bottom yet?
Posted: Sun Aug 13, 2006 5:10 pm
by WobblyLegs
Lucky_Louis wrote:Have you glassed your inside bottom yet?
I wish...
I was away last weekend in Belgium, did a bit of touch up and sanding of the tape inside yesterday, and have been hit with thunderstorms today

It's getting dark earlier now, so I only have about an hour of decent light inside my tent in the evenings, making me rely on good weather on the weekends. We'll see what happens next weekend.
I also know that a launch this year is not possible, so that is allowing me to relax a bit.
I'll update my thread when I have something to show...
Wobb.
Posted: Mon Aug 21, 2006 12:50 pm
by Lucky_Louis
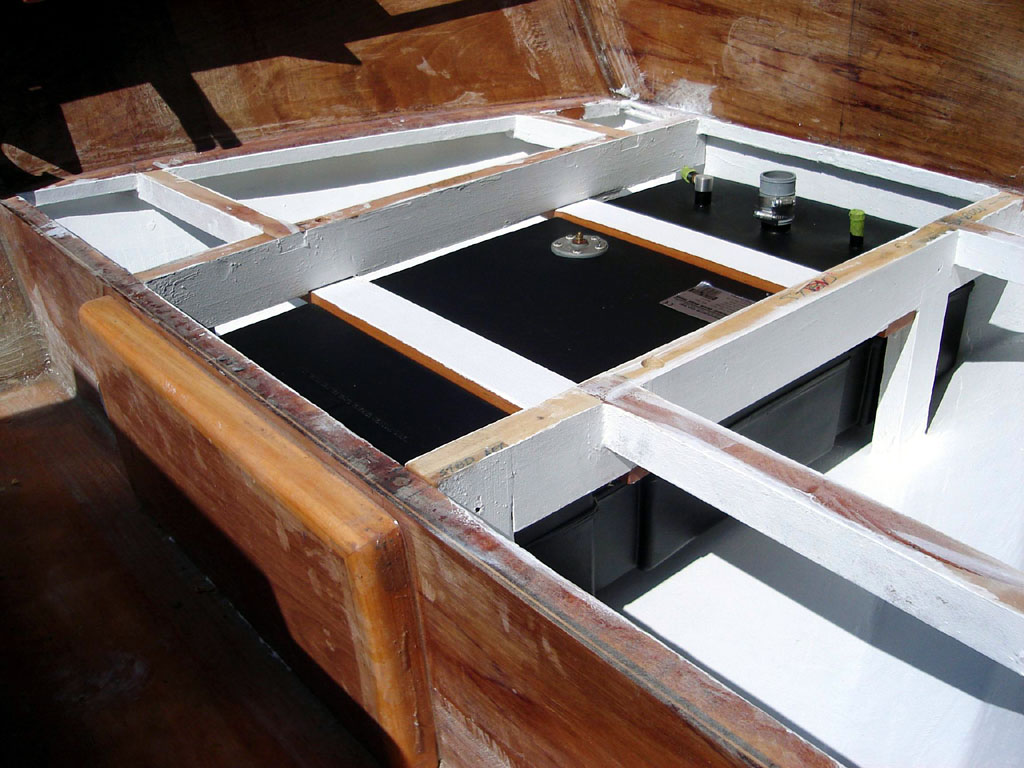
Just a little update. The great weather continues to hold, sunny and temps 20-25. All inside frames and stringers tabbed, anchor locker sole installed and filled with foam. Forward sole under casting deck placed and filleted. Now pouring foam in main cockpit sub-sole, tabbing all motorwell seams. Getting ready to glue in shear clamps, main sole and start inwale fabrication. Console is pre-wired and ready to drop in. Looks like I'll miss my August launch but so what... I'm not on a schedule. I'll post more new pics within a day or so.
Posted: Mon Aug 21, 2006 2:55 pm
by WobblyLegs
Lucky_Louis wrote:Looks like I'll miss my August launch but so what... I'm not on a schedule. I'll post more new pics within a day or so.
Yah, schedules...

Pix, yes please...
Posted: Mon Aug 21, 2006 4:45 pm
by WobblyLegs
Louis, a question for you...
How did you apply the epoxy to the inside fabric? Brush, roller or squeegee? I'm contemplating using a roller to do mine...
I poured epoxy over the outside fabric, and used a squeegee to spread it out, but I'm thinking that could get very messy trying to do it inside, and have a reach problem - a roller means I can reach the sides without disturbing the bottom too much.
Tim.
Posted: Thu Aug 24, 2006 4:43 pm
by Lucky_Louis
Sorry for not getting back Tim, my (work) email spam filter has now decided bateau2.com topic reply is unworthy so I don't know when anyone replies to my thread.

I spread epoxy with a squeegee in one hand and my favourite 1" brush in the other. I did my bottom in 2 passes. I kneeled on the starboard side and glassed the port side. The next day I did the reverse. I'm not a big fan of rollers ever since my 'dissolving roller messing up my graphite bottom' episode. Squeegee and 1" brush clean up in 30 seconds. I was going through a fortune in acetone and lacquer thinner cleaning rollers.
UPDATE: casting deck, sole, and motorwell bottom all cut and fitted, ready for gluing and tabbing. Pictures soon, I promise
Posted: Thu Aug 24, 2006 5:18 pm
by WobblyLegs
Lucky_Louis wrote:I'm not a big fan of rollers ever since my 'dissolving roller messing up my graphite bottom' episode. Squeegee and 1" brush clean up in 30 seconds. I was going through a fortune in acetone and lacquer thinner cleaning rollers.
I did rollers (as you know by now) - first one started falling apart about 2/3's through. Not worried though - it's all going to be under the sole.
As to cleaning - with paint I clean brushes, with epoxy I throw them away - the cost of cleaning (acetone/time) is more than the brush/roller cover is worth, IMO. And, especiallly with epoxy, there is *always* residue that makes them almost unusable. Also, IMO.
Later,
Tim.
Posted: Thu Aug 24, 2006 11:28 pm
by Lucky_Louis
As promised, I posted a few new photos. The sub-sole foam is in place but I forgot to take any pictures.
Console is ready to go.
A few more at
http://gallery.bateau2.comindex.php?cat=11134[/url]
Posted: Fri Aug 25, 2006 8:28 am
by tech_support
Your laminations look very nice
Posted: Fri Aug 25, 2006 10:38 am
by Lucky_Louis
Thanks Joel. And who says the camera doesn't lie?
My filleting putty is made from red cedar dust and cabosil, that's why it's so dark. I plan on gluing the sole down tonite, tabbing tomorrow. Then comes the side frames, decking, and coaming. If I can borrow an engine mounting jig, I may drill the engine mount holes and refill them too. Great weather still holding.
Posted: Sat Aug 26, 2006 12:32 am
by jayb01
Lucky,
That's one of the best looking consoles I've seen on these boards.

Did you design it or was it included in the plans? Either way...great job!!!
Posted: Sun Aug 27, 2006 10:21 am
by Lucky_Louis
I designed it. I played in 3D CAD until it looked right, then I mocked up in cardboard until the scale was right for me. If anyone's interested, I can post the plans in my gallery or email.
Glued the sole down yesterday and glued the 1st shear clamp. I was going to do both sides but never enough clamps! Bought my bilge pump, battery, and battery switch yesterday. Built a battery box and made up the main battery cable. Tabbing the sole and sub-casting deck today, maybe flow coat the sole. Then deep breath and drill engine mount holes.
Posted: Sun Aug 27, 2006 10:44 am
by Jerry-rigged
Lucky_Louis wrote:Console is ready to go.
WOW!
When I saw that pic, I said, no way is that home built - then I checked out your gallery! Very nice job. If you put that level of craftsman ship into the rest of your boat, good luck convensing the guys at the ramp that you built it your self!!
Great job so far...
Jerry
Posted: Mon Aug 28, 2006 12:10 pm
by Lucky_Louis
Thanks for the kind words Jerry. I spent a lot of time playing with the console over the winter(s) when it was too cold outside for epoxy. The console will going into the boat tonite or tomorrow for a dry fitting to locate the mounts.
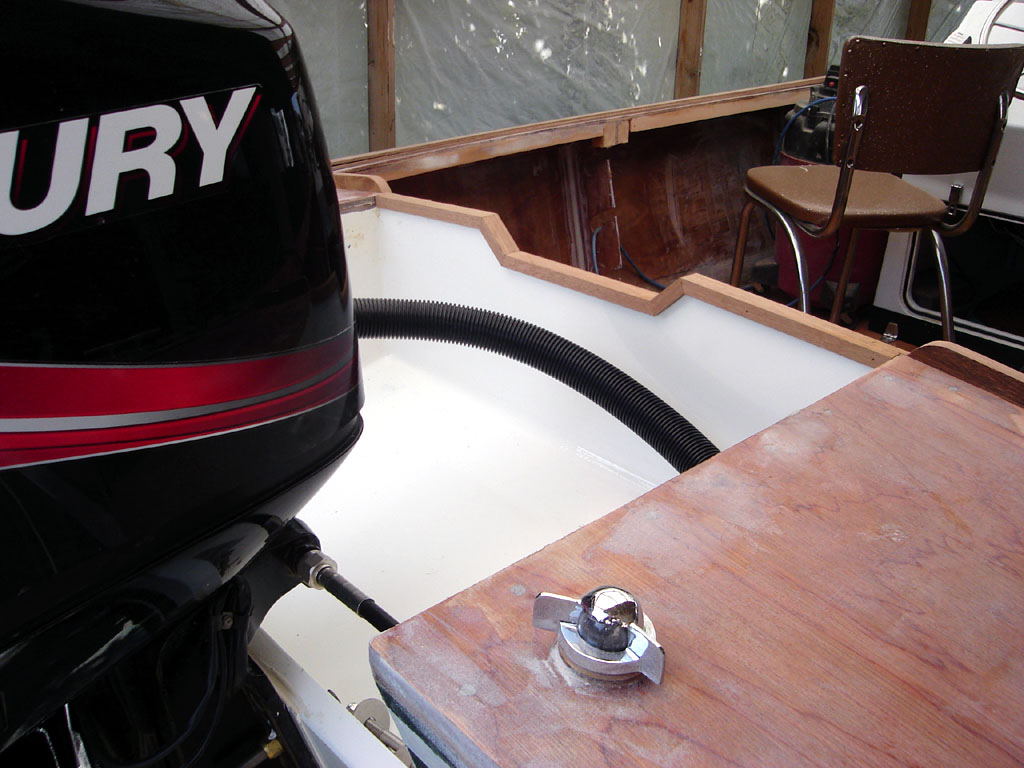
Over the weekend I got the second shear clamp clamped and glued, the last of the motorwell/aft compartment cleats glued on, mounted the bilge pump, drilled and filled the holes for the engine, paddle wheel, and pitot tube. I made a battery box and escutcheon plates for the chase tubes.
More pics in a few days.
Posted: Fri Sep 01, 2006 1:51 pm
by Lucky_Louis
Last update for a couple of weeks - we're California bound for a holiday (SWMBO calls it a holiday away from "that %!('ing boat"
).
Sole is down and tabbed, console is in the boat. Started running the control rigging to make sure the lengths were OK (they were).
What's left:
Cut and place gunwales, inwales, coaming, and hatches.
Purchase and install 18 gallon fuel tank and associated fixtures.
Paint all interior surfaces, non-skid decks
Install deck hardware, lighting, and antennae.
Design/Build/Install the combo seat-icebox-leaning post
Still planning to get her wet this build season but the nights are already getting pretty chilly.
See you in a few weeks!
Posted: Fri Sep 01, 2006 3:22 pm
by WobblyLegs
Lucky_Louis wrote:(SWMBO calls it a holiday away from "that %!('ing boat"
).
I know that feeling!
Enjoy your hol's!
Posted: Sun Oct 01, 2006 11:34 am
by Lucky_Louis
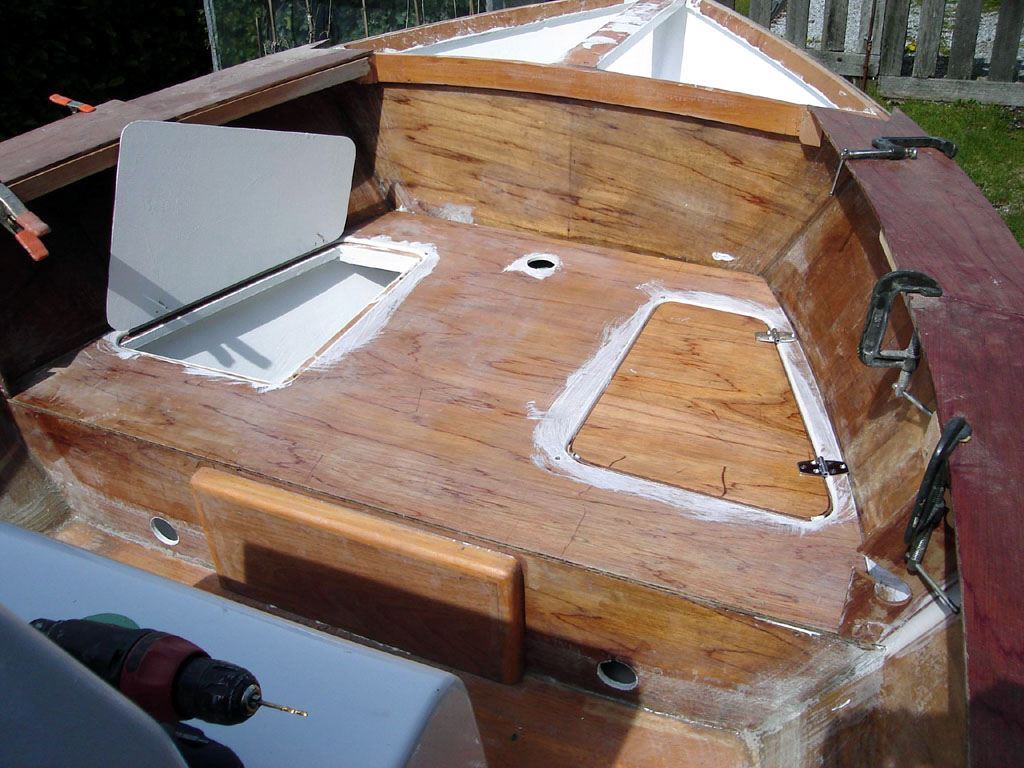
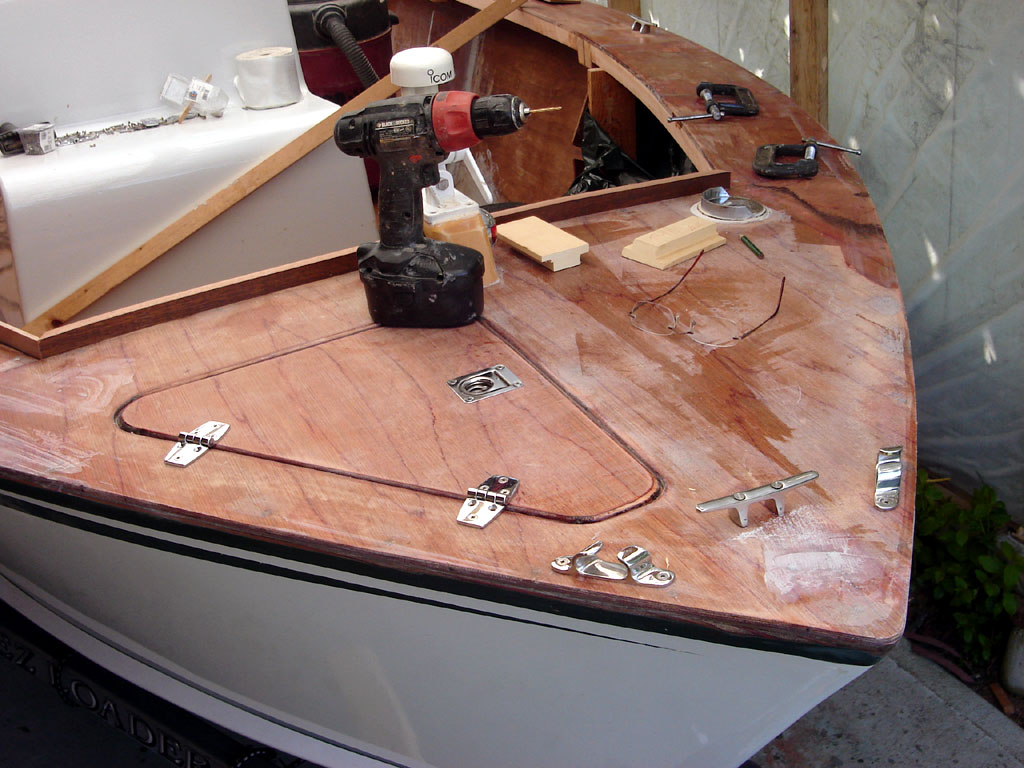
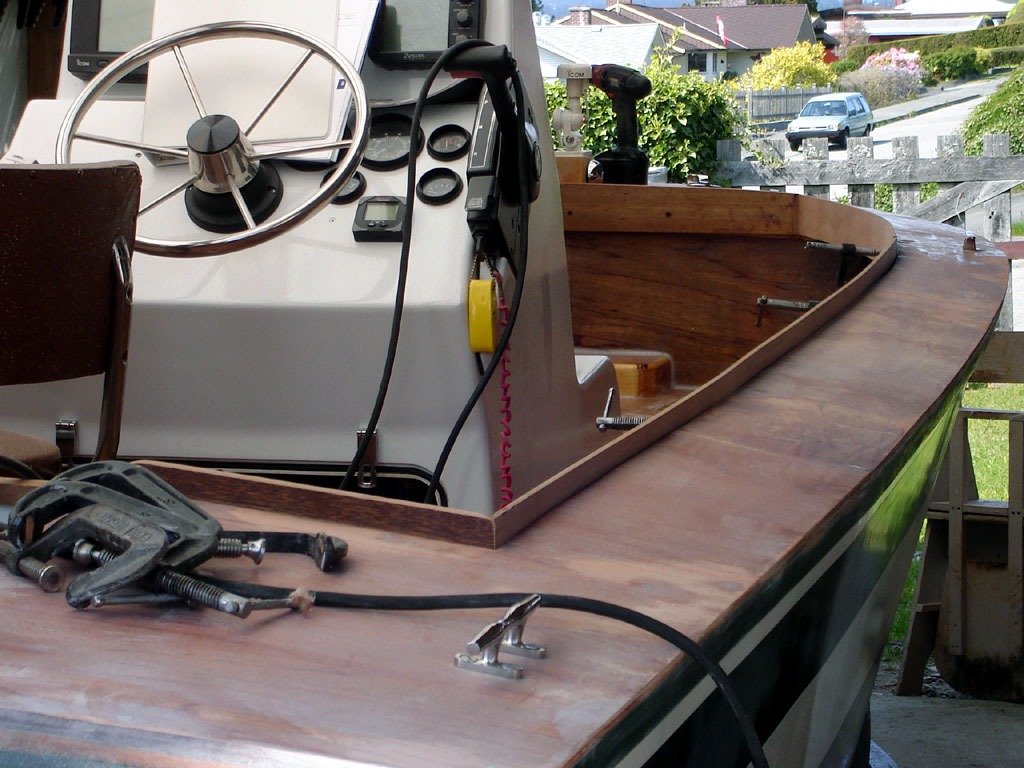
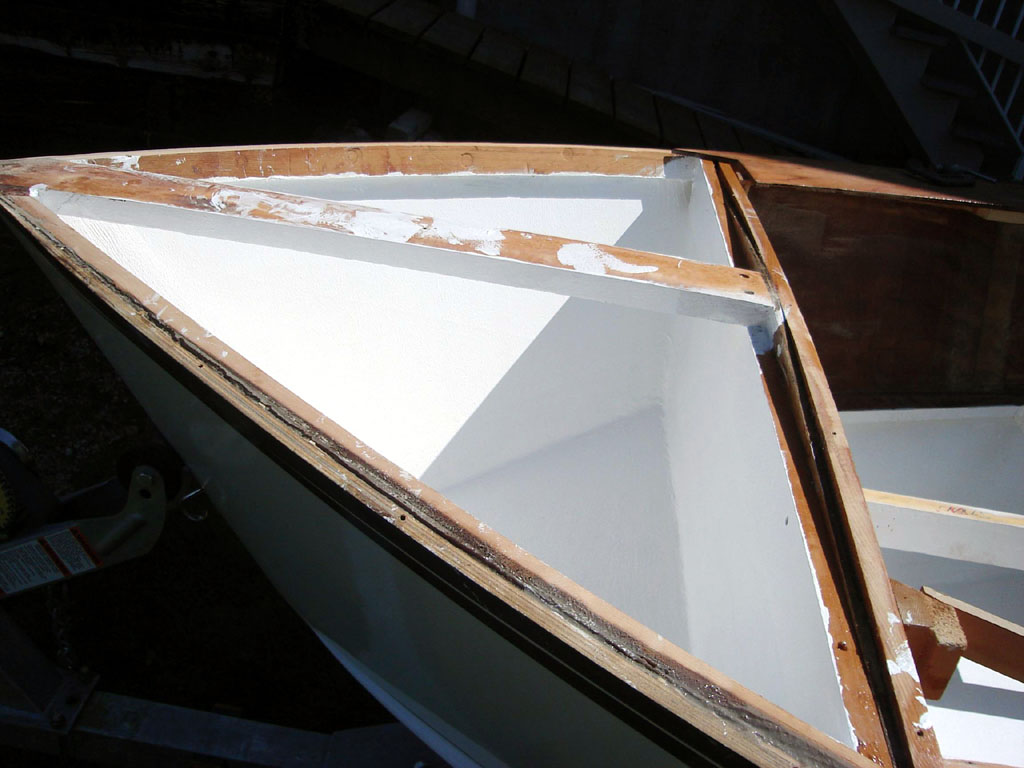
Back from holidays for a couple weeks now. We got a reprieve from the weather and have had great sunny skies and warmer than normal temps so back to work! I've got the interior frames cut and glued in. All the deck/inwale pieces cut and roughed in. I'll use my router and flush cut bit for the final trim after they're glued down. The casting deck stringers and bresthook are done too. Next I'll locate, drill holes, and glue backers for all my deck hardware before epoxy sealing the decking. I managed to nest all the deck pieces on one (my last) sheet of 3/8". The coaming-like pieces are just temporary strips to give me the inside curve and final height of the interior frames.
A few more pictures at
http://gallery.bateau2.com/thumbnails.php?album=539
Posted: Sun Oct 01, 2006 2:26 pm
by WobblyLegs
...and I thought we hadn't heard from you 'cos you'd finished and were out fishing
I like this one:
Later,
Tim
Posted: Sun Oct 01, 2006 7:34 pm
by Poseidon's Rook
That is a pretty sweet looking ride man.
I bet you can't wait to get her in the water.
Posted: Mon Oct 02, 2006 11:07 am
by Lucky_Louis
Yes, getting pretty excited
, trying not to rush. It won't be the end of my world if she doesn't splash this year. Gotta rebuild the cash reserves after the holiday so I can buy the last (i hope) gallon of epoxy, fuel tank and installation kit, and various paint/non skid. I figure $500-600 will see me to the end
. SWMBO surprised me with a nice PC pancake compressor and brad nailer combo for my b'day
Posted: Mon Oct 02, 2006 1:27 pm
by kdog
Looks awesome Lucky!!! I was so pumped to get to that stage with my OB17, you are definately in the home stretch. Now you can really see all that hard work is coming together. Putting all the rigging, cleats and do-hickeys in was the funnest part for me because there was no more epoxy work. Good luck at the boat ramp, you'll find yourself talking to people every single time you go in and out of the water! I had mine out yesterday and I still find myself sitting there and thinking to myself "holy crap, I can't beleive I built this thing!".
What do you plan on doing for the non skid? I had really good results with the S3 top coat and their non skid. It has held up suprisingly well for the first season of abuse.
-JK
Posted: Mon Oct 02, 2006 7:16 pm
by Lucky_Louis
Thanks for the encouragement. Fot the non skid, I'll probably go with a granular rubber like the Spantex I've got on my sundeck. It's a two layer application, expensive but wears like iron if put on correctly. A 10 year life is not uncommon. It cleans well, good non-skid properties and good post sale support.
http://www.spantexusa.com/sub1.html
I'm drilling holes for cleats, chocks, rod holders, antennae, etc tonite before I coat with epoxy so I only have do it once.

Posted: Mon Oct 23, 2006 4:26 pm
by WobblyLegs
Louis,
Have you bolted your motor on yet? I ask as I might need your help...
Can you have a look at
this thread and let me know your thoughts?
Thanks,
Tim.
Posted: Tue Oct 24, 2006 10:56 am
by Lucky_Louis
Hi Wobbs, looks like you've got great advice already. Any outboard dealer I've dealt with was always more than willing to loan me his engine mounting templete. I've over drilled, (by 1/8") filled, and redrilled the holes (1/2") for my OB17 but haven't mounted the engine yet. I want to wait until all the decks are down and painted because once the engine is on, I won't have the easy access to the stern quarter compartments from outside the boat. I know that Mercury and OMC (Johnson/Evinrude) use the same bolt pattern, I suspect that Honda and Yamaha do too, but can't attest to it. I cant remember how I located the motorwell bottom but it's perpendicular to the transom and the holes weren't anywhere near it or the cleats, 2 above and 2 below. I always drill the engine mount holes to place the engine about 1/4" above the transom instead of resting on the transom. I find that with a SS prop you can always pick up an extra mph or so if you get the anti-ventilation plate on the O/B just above the bottom of the boat. The hole drilling templete will also allow you to adjust the final height the maximum amount in both directions. I also made a 3/16" Aluminum plate to go between the engine and the transom just to distribute the pressure a bit more. I'll bond the plate permanently with some 3M 5200 sealant. Never has the caveat "measure twice, drill once" been more true. The key is locating the vertical centreline of the transom, everything else references to this. Draw it, check it, check it again and use a spirit level confirm it.
Posted: Tue Oct 24, 2006 7:10 pm
by ChuckS
All look sharp, but #2 catches my eye every time!
Posted: Thu Mar 22, 2007 12:52 pm
by Lucky_Louis
Just a spring 2007 update:
Weather still too cold and damp to do any epoxy work outside. Global warming, my a$$...
I designed and am building a seat/icebox/leaning post unit. It will keep the fish and beverages cold, a comfy place to sit when trolling or easy cruising, and convert to a leaning post when running hard or in a chop. I made everything from leftover 1/4" and 3/8" marine ply and other scrap bits.
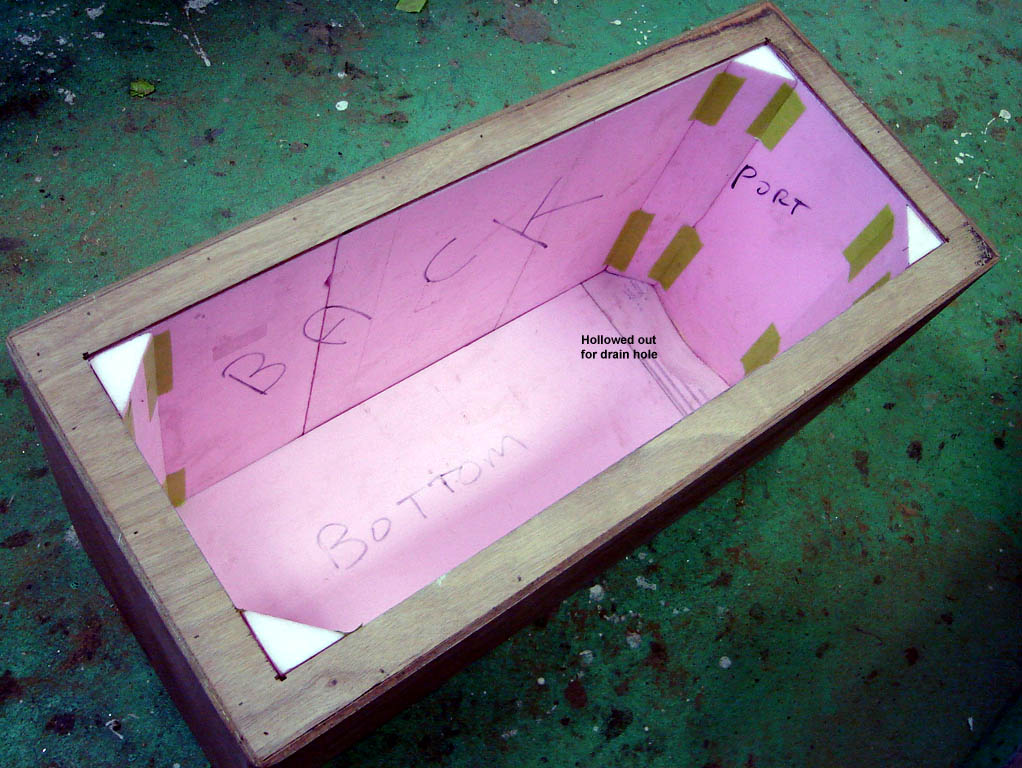
The lid is a hybrid foam sandwich with interlocking stringers and frames. Unbelievable strong and stiff yet feather light.
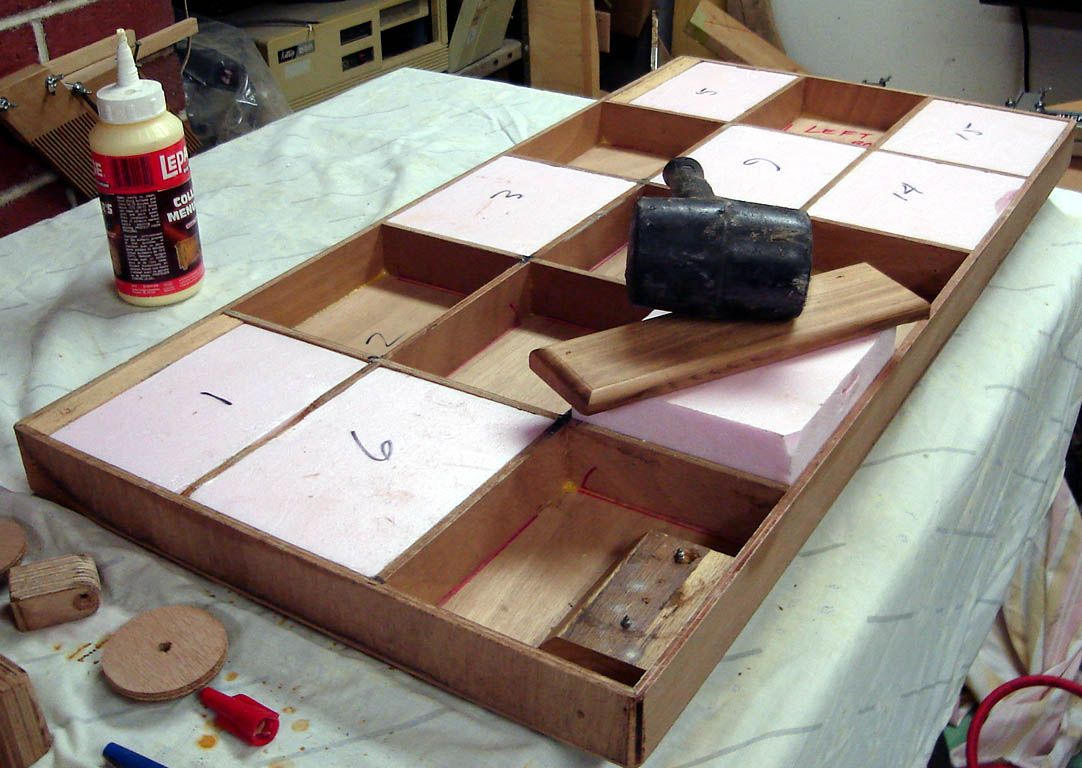
The whole unit gets a skin of leftover 12oz biax inside and out. More pics here if interested..
http://gallery.bateau2.com/thumbnails.php?album=607
On the boat itself, I'm puttering with rigging and wiring. The battery is installed in the console, battery switch connected, heavy starting cables run to stern, and instrumentation powered up. I wired and plumbed the 1100 gph bilge pump yesterday.
Posted: Thu Mar 22, 2007 1:43 pm
by MadRus
Nice work Lucky_Louis, can't wait to see this build complete.
Posted: Thu Mar 22, 2007 3:03 pm
by WobblyLegs
"Lucky_Louis"
I wired and plumbed the 1100 gph bilge pump yesterday.
Louis, I hope this isn't a dumb question, but if the cavities under your sole are filled with foam, where exactly is the bilge pump (and why)?
Tim.
PS, sincerely hoping we both launch in the not too distant future!!!
Posted: Thu Mar 22, 2007 5:35 pm
by Lucky_Louis
No such thing as dumb questions Tim
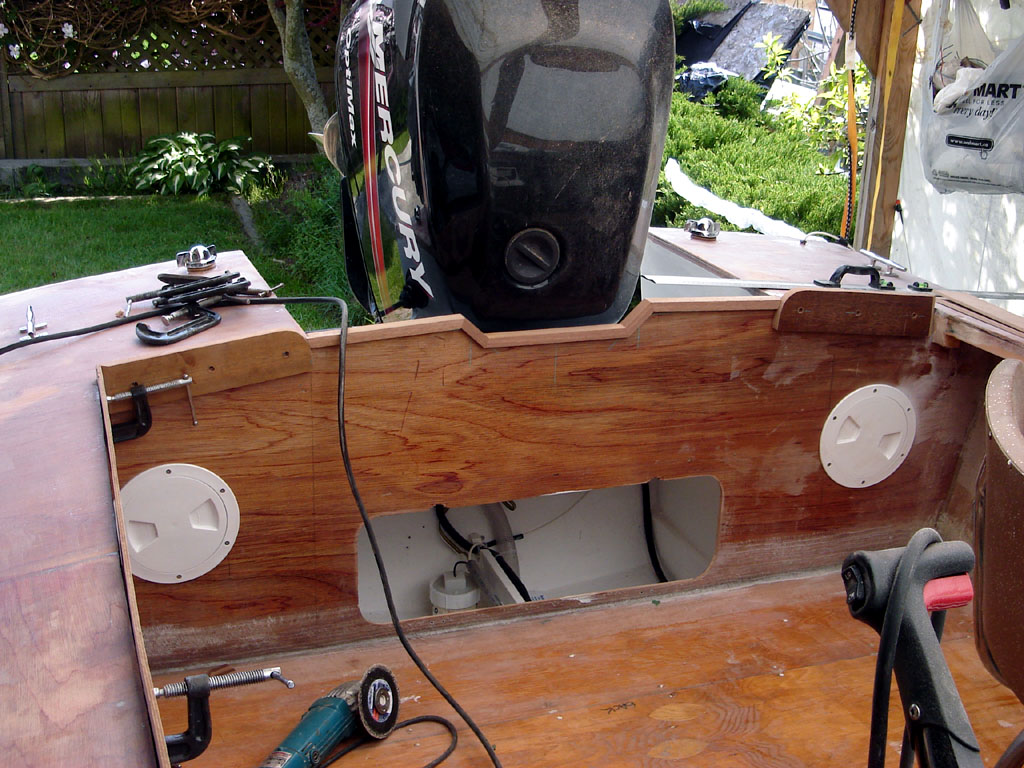
The sole stops at station "E". Between "E" and the transom in the center section under the motor well is the 'bilge'. I haven't placed any scuppers yet because I'm concerned that with my 'heavy' engine, there may be some backwash at rest even though I raised my sole 3/4".
I will probably drain the cockpit into this area where the bilge pump can pump it out. A bailer or manual pump will provide backup. My transducer mounts in a 'well' here, and two chase tubes terminate here. One carries the fuel line from the casting deck, the other one has power for the bilge pump, the tranducer cable, and power for the stern lights.
When I've got this area painted, I'll post a pic or two that will make sense of it all
Posted: Thu Mar 22, 2007 7:14 pm
by WobblyLegs
"Lucky_Louis"
I will probably drain the cockpit into this area where the bilge pump can pump it out.
And that, Louis, is a good answer to my dilema about scuppers that has been on my mind for a couple of months now!
Ideas are forming in my mind right now; a couple of sleeps and it will probably all be worked out!
Thanks!
Tim.
Posted: Sat Apr 07, 2007 11:09 am
by Lucky_Louis
Yah, spring is here! The epoxy once again is flowing freely....
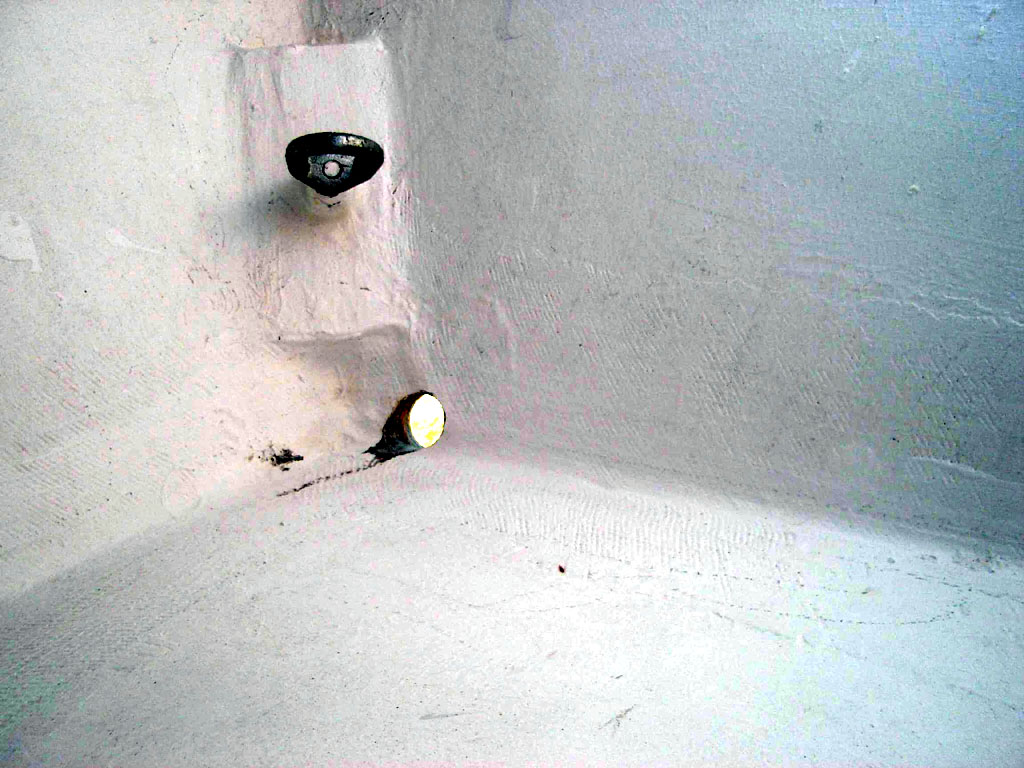
Finished all the rigging in the bilge. Here's how I rigged the transducer...
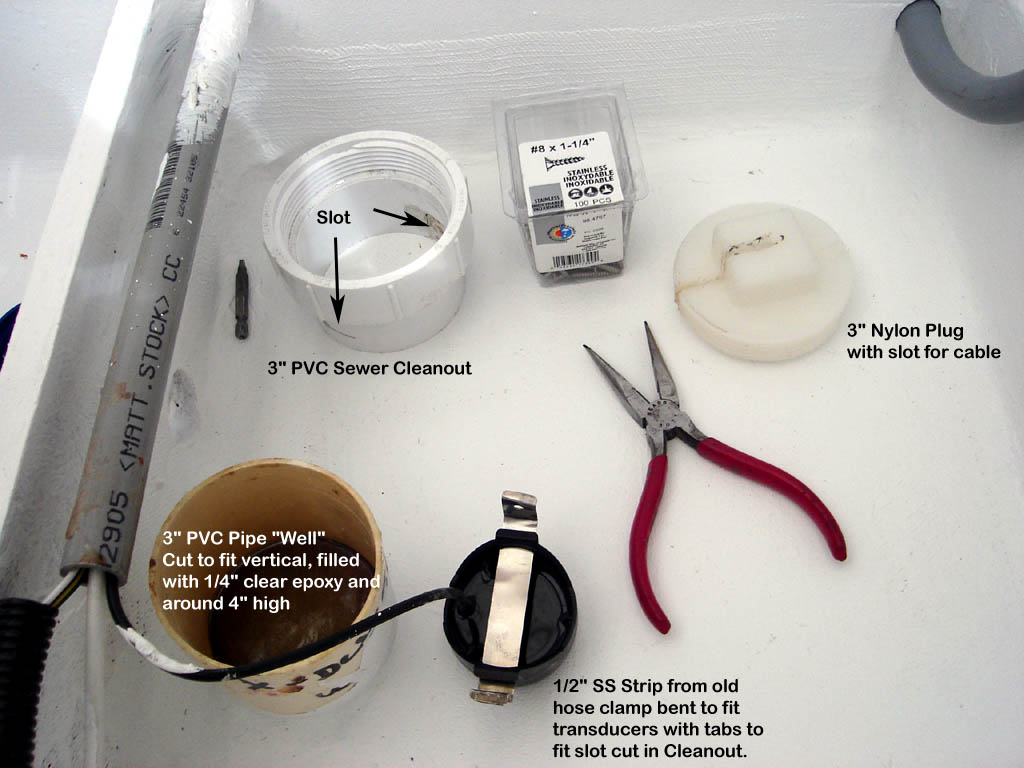
That's the pieces. For the 'how it went together', you can see a few more pics in my gallery
http://gallery.bateau2.com/thumbnails.php?album=539 Remember that you can click on any gallery picture to see the full size image (it will open in new window)
What you don't see is the 2" hole I drilled in the hull before I taped and glassed during early hull construction. I filled the hole with a mush made of epoxy and short biax fibres, ground smooth, and then built normally over the plug. If I didn't get too many air bubbles, the signal should pass right through the hull without too much loss.
This is general arrangement.
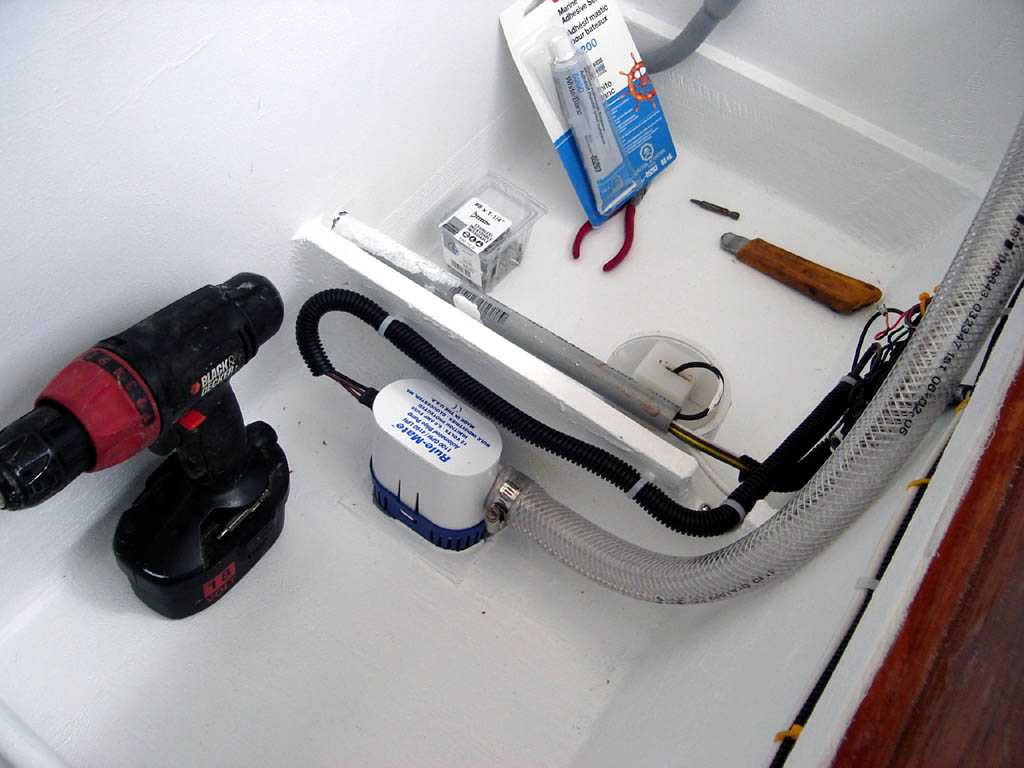
The bilge pump is a RULE 1100gph with internal automatic switch. Chase tubes for fuel line (separate) and cables. The elbow at the top of the photo is just a breather tube for the space between the sole and hull to allow for expansion and contraction of the air in the spaces not filled by foam.
Posted: Mon Apr 16, 2007 2:57 pm
by Lucky_Louis
Another nice weekend so the epoxy and paint were flowing freely...
Finished the 1st topcoat in the motorwell, looking to hang the engine and make final connections next weekend.
Finished the framing for the fuel tank and casting support. Had to do a 1" bump-out to fit the tank, oh well...
Finished painting the anchor locker and started the hatches on the casting deck.
This week I'll focus on the fuel system plumbing.
Posted: Mon Apr 16, 2007 3:22 pm
by TomW
It is really looking good, looks like you will be in the water soon!
Tom
Posted: Mon Apr 16, 2007 4:33 pm
by Cracker Larry
Looks real good. I like the transducer well. Thanks for reminding me that I need to take care of that early in construction.
Will you use mineral oil in the transducer box?
Posted: Mon Apr 16, 2007 5:36 pm
by WobblyLegs
Yep, you gonna be wet before me!
Looking nice.
Posted: Mon Apr 16, 2007 6:02 pm
by Lucky_Louis
TomW: Hoping to splash by mid-May but if not, Father's Day would be appropriate too.
Cracker L. : Yes, mineral oil. Cheap, non toxic, and sheds bubbles faster than water. I started the through-hull process while my hull was still held together with tie wraps. That's when I drilled the hole and filled it.
Wobbly Tim: Of course I'll be wet before you, it's the west coast after all. As a matter of fact, it's pouring right now!
Big enough
Posted: Wed Apr 18, 2007 2:32 am
by Tommy D
Louis,
I think that your paintwork looks amazing! I remember I asked you this before but can't find the thread - what are you planning to use you boat for? Is it as roomy as you expected? I have the OB 17 plans sitting at home and am still debating whether to start it or go for something larger like the c19 or even a c 17 modified as a center console - I have slight misgivings about the height of the prow as I will be using the boat offshore mainly - but it is so hard to tell without seeing the boat oneself!
In the meantime am building a model to keep myself amused and am about to saw open the floor on my od 18!
Cant wait to hear how your boat handles in the water.
Posted: Wed Apr 18, 2007 10:55 am
by Lucky_Louis
Hi Tommy, thanks for the kind words. I'm pretty happy with the paintwork so far. Don't let the pictures fool you too much
it's far from perfect but I hit a wall when I was sanding - I finally said "enough is enough" and went with primer and paint even I knew it could be better.
The boat will be used primarily for salmon and halibut fishing (trolling and jigging) with two on board most times. I will use it locally maybe 80% of the time where bad conditions may be 3'-4' chop on a 3' swell. I will also trailer to the north and west coast of Vancouver Island where I will face Pacific Ocean conditions which could be the same 3'-4' chop but on a 6'-12' swell. I have no concerns about this hull design in those conditions. I too preferred the look of 'well defended' bow of the C19 but the C17 wasn't available at the time I bought my plans and my situation dictated a 17' maximum length. Also, the trade off of the high shear is poor tracking while trolling in a crosswind - all that surface area would make it impossible to maintain that course at 1-2 knots.
There is a surprising amount of volume in the bow of the OB17 and with a self-bailing cockpit I have no worries about sea-keeping capability. I usually wear a full coverall style Floater suit when running so spray is an annoyance, not a real problem.
Posted: Thu Apr 19, 2007 3:56 am
by Tommy D
Louis,
Thanks for your reply. Must get pretty cold where you will be fishing - probably a bit warmer here on the equator! Do you think if the C17 plans had been around when you started you would have gone for them or do you think that the simpler construction and efficient use of building material would still have swung you to the OB17?
The hardest decision with all these plans is which one to choose! It was almost easier when there where fewer ones!
Will you mount a spare engine?
Kind regards Tom
Posted: Thu Apr 19, 2007 11:33 am
by Lucky_Louis
Hi Tom, I guess 'cold' is relative. Compared to TROC (the rest of Canada) we are positively tropical. Our climate is moderated by the Pacific Ocean with the Japanese and El Nino ocean currents having the largest effects. Winter temps on the water will range from 0° to 10°C, spring and fall rises to 5° to 15°C, and summers will average 15° to 25°. Fall and winter are pretty wet and can be quite windy, spring brings a real mix along with fog that can last a week or more. Summers are fabulous with gentle breezes, blue skies, warm but not too hot days. It's those days that have earned our area the reputation of the 'finest cruising waters in the world'.
If the C17 had been available at the time, yes I would have bought and built it as a center console instead of the OB17. Like most people, I preferred the shear line of the C17 over the straight shear of the OB17. The additional material cost and complexity of the C17 wasn't a factor - over the whole build, the cost difference would be insignificant. In retrospect, I'm glad I built the OB17 instead. I used creative graphics to add the illusion of a sweeping shear.
The majority of my boat's 'program' will be trolling for salmon at 1-2 kn. From experience, I know that manoeuvering in any breeze over 5kn at these speeds can be a real challenge. I'm pretty sure the high sides of the C17 would be a drawback in those conditions. Another common use of my boat will be beaching and going ashore on the myriad little islands and secluded beaches in the area. The lower bow and shear will make boarding and beaching easier on the children and grandparents.
I won't bother with a spare engine. My prime mover is at the upper limit of weight that I want hanging from the transom at 375lbs. (170 kg.) Instead, I'll maintain the engine properly, use a quality fuel/water filter system, carry spare fuel, have a working VHF radio and cellphone on board and always file a sailing plan with the Coast Guard. There's a Coast Guard base in town, another 22 miles from here. Military Air/Sea Rescue is based 18 miles away and we have pretty heavy commercial marine traffic year round with tugs, coastal freighters, and work boats.
3rd and final coat of paint on motorwell done. Hatch for lazarette ready for epoxy, working on hatches for casting deck. Engine going on transom this coming weekend. Weather continues to be perfect.
Posted: Thu Apr 19, 2007 9:46 pm
by Dougster
She don't need no stinkin' creative graphics! Got good bones, and generally got it goin' on. Honestly, a very pretty looking way to be on the water. Love what I've been blessed to see of the west coast of Canada. Gonna travel to Vancouver Island this summer and sure look forward to it.
Admiring that fine thing Dougster
Posted: Fri Apr 20, 2007 9:39 am
by PastorBob
Where Can I buy a boat like that?
Who sells those?
Is that a new Boat Company?
You know my dad used to have one like that?
Sure is a nice looking boat?
Is that wood?
NO, you made that?
Must be nice to have all that money and pay someone to make you a boat!
Are you sure it will float?
Is it true that fish just naturally come prettier boats?
***Just these are just the comments you can expect at the ramp
***
THE BOAT LOOKS TERIFIC CAN'T WAIT TO SEE THE PIC OF IT WET AND A SMILE ON YOUR FACE!
Posted: Fri Apr 20, 2007 11:05 am
by Lucky_Louis
Hey Dougster, keep your eyes peeled this summer. The OB17 will travel the length of Vancouver Island by Labour Day. Good buddy in Victoria so we'll fish coho out of Sooke, then up to Port Hardy to harass some halibut for a few days. At some point we may head out to the west coast and launch out of Uclulet or Winter Harbour.
Started filling out the paperwork to get the boat registered and licenced. Doesn't seem too onerous.... yet.
Posted: Sat Apr 21, 2007 7:57 pm
by Lucky_Louis
Had a good day. Got the engine bolted on without dropping it. The trailer tongue weight has dropped nicely to about 60 lbs.
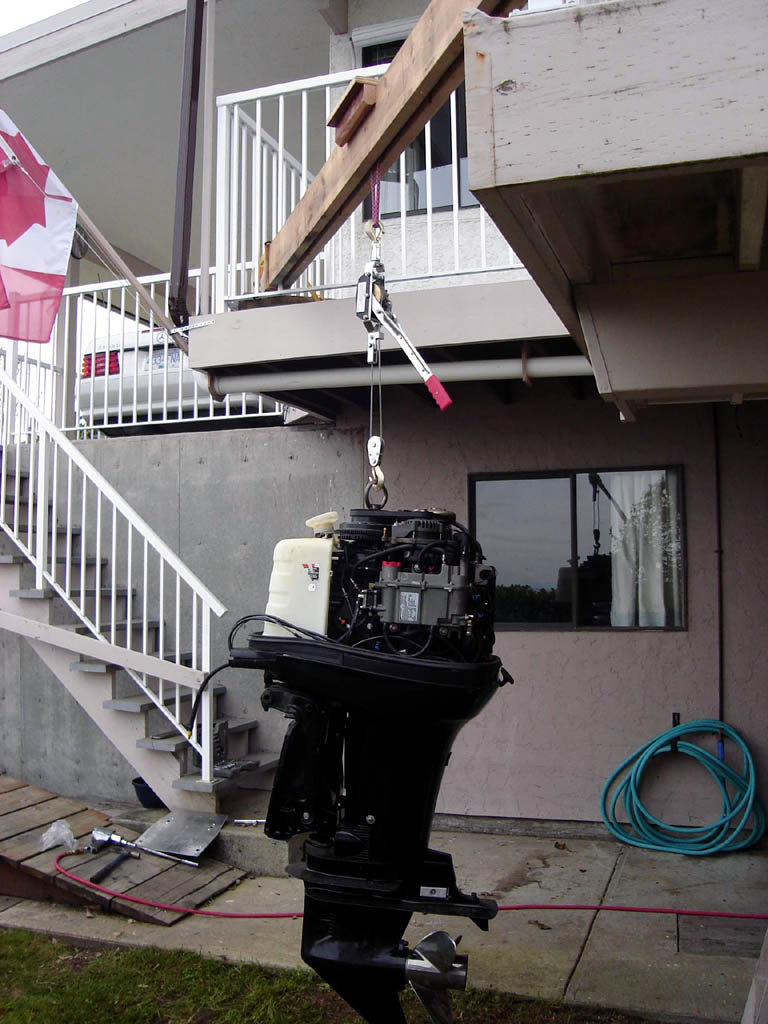
Here's a few more pics of how I singlehanded the black monster into place. 375 lbs and I didn't even break into a sweat.
http://gallery.bateau2.com/displayimage ... 539&pos=17
Posted: Sat Apr 21, 2007 11:35 pm
by Digger873
Good looking boat!
I like the graphics, very nice.
My wife thinks you must be related to me after seeing the way you hung the motor off of the porch. (great idea BTW)
I hung a boat off a tree branch once for a week while I sandblasted and painted the trailer.
Jared
Posted: Sun Apr 22, 2007 10:48 am
by msujmccorm
Awesome work. You won't be able to leave the ramp with all the questions people will be asking.
My favorite one was on splash day a guy asked "What year is the boat?" and my brother replied "Yesterday"
Good Looking boat.
Posted: Sun Apr 22, 2007 11:32 am
by anonymous
Nice job on the boat . . . clever graphics. I like the straight shear and the illusion the stripes create. Awesome view from your home.
Posted: Sun Apr 22, 2007 4:56 pm
by first time builder
Looks fantastic.
Would certainly get some attention here on the broads.
If my little GV11 looks half as good I'll be happy.
Thought I lived close to water, looks a great place to live.
Posted: Sun Apr 22, 2007 10:47 pm
by jayb01
Nice build....
Don't forget to raise that motor when trailering. I have a M-Y Wedge as my "transom saver". More like a skeg saver for me.
 http://www.m-ywedge.com/index.html
Posted: Sun Apr 22, 2007 10:48 pm
by jayb01
Double post removed...
Awesome Boat
Posted: Mon Apr 30, 2007 3:06 am
by Tommy D
Louis,
Thanks for all your in put. Your boat looks better and better the more I check out the photos. I have decided that the only way to make an informed decision is to buy plans for the C17 and then compare the 2 sets of plans.
You are right that when you factor into the equation all the time and effort in buiding a boat things like a few extra sheets of ply and slightly more complex build are minor compared to things like finishing touches and custom paintwork etc!
At the end of the day I dont think that I can really go wrong between the 2 boats.
Did you keep tabs on how much time you spent on the boat? Let me know how your graphite bottom holds up?
Best of luck with getting it wet!
Tom
Posted: Mon Apr 30, 2007 12:32 pm
by Lucky_Louis
Thanks Tommy. You are quite correct when you say you can't go wrong with either design, bateau.com designs great little ships.
I've kept sort of a general diary about hours spent.
Bateau.com says of the OB17
Labor:
The hull can be build in 80 hours but a finished boat will require 200 hours or more depending on the level of detail and the skills of the builder.
Maybe in a fully equipped, heated shop with the doors locked (no interuptions or real life) and an unlimited supply of wood, glass, epoxy, paint, hardware, etc.. Jacques has said before that we can't include thinking time, fetching time, cleaning time, fixing screwup time, answer the neighbour's questions, etc. when we talk about construction time. I believe he has said that the quoted times are an estimate of how long a reasonably skilled builder would take with "hands on tools" to complete a hull and boat to a workboat level of finish. Of course I'm paraphrasing, but I think I got the gist of it and my gut tells me he's probably close.
Now for my reality. To start, please remember that my build took place outside in a lean-to beside my sundeck. I had shelter from the elements except fog. Being outside, my build season is around 6-7 months year assuming I need +10C to properly cure epoxy in a reasonable amount of time. Here's a rough breakdown so far..
Layout and cut hull pieces, laminate transom and stringers, assemble jig 16 hours
Assemble and adjust hull panels and 'stitch' ... 6 hours
Spot weld, precut glass, tape and glass outer hull ... 10 hours
Sand, fair, sand, fair, sand, fair - well you get the idea ... 40 hours
Prime, sand, and paint 2 coats 4 hours
Subtotal to flipping stage 76 hours
Prep, fillet, tape and glass inner hull ... 12 hours
Re-fit frames and stringers, fillet and tape into place ... 12 hours
Build motor well, stern lockers ... 6 hours
Fit main sole, casting deck sole, fillet and tape ... 6 hours
Cut and fit above deck frames (rod storage slots) ... 2 hours
Cut and fit all remaining deck pieces ... 2 hours
Locate, cut and fit backing plates for all deck hardware ... 4 hours
Subtotal boat interior so far 44 hours
Prep hull for engine and steering connection ... 4 hours
Mount engine and make primary connections ... 2 hours
Rig all power and electronics connections ... 8 hours
Install built-in fuel tank and connections (required serious mods) ... 8 hours
Drill and epoxy holes for all fillers, vents, cleats, chocks, antennae ... 2 hours
Prep and paint lockers and bilge ... 4 hours
Build hatches for lazarette, casting deck, and bilge access ... 4 hours
Subtotal rigging 32 hours
Console design, assemble, glass, fair, paint, pre-rig ... 40 hours
(winter project when it was too cold to do anything else)
Seat/Icebox unit - design and build ... 8 hours
TOTAL.. 200 hours to date
Still to go...
Glue down foredeck, splice and glue down side decks, glue down rear quarter decks. ... 4 hours
Fit and install coaming. ... 4 hours
Sand, fair, prime and paint interior. ... 10 hours
Secure seat and console, final rigging ... 2 hours
TOTAL time to splash 20 hours.
The above not withstanding, I KNOW that I've spent well over 500 hours 'working' on my boat. But that includes time staring at a problem, running to the store, masking, fixing a broken tool, making a special jig, cleaning up the shop, cleaning tools, kicking back and daydreaming, jawing with friends and neighbours, mixing endless batches of epoxy, glue, filleting material, and fairing compound. It includes time spent precoating every little piece of wood going into the boat with epoxy. It includes time spent chiselling and grinding cured epoxy off of door knobs, light switches, floors, shoes, hair. It includes the time spent climbing in and out of the boat making the trip to shop to get that forgotten part or tool, to grind a little here, drill a hole there, or throw out the piece because I never totally got the whole 'measure twice, cut once' lesson.
Stay tuned, I'm looking to splash by Father's day. Now where did I leave those prawn and crab traps?......
Posted: Mon Apr 30, 2007 2:56 pm
by WobblyLegs
Lucky_Louis wrote:TOTAL time to splash 20 hours.
Soooooo, what ya doin' next weekend????
You must be getting pretty excited!
Tim.
Posted: Wed May 02, 2007 2:14 pm
by Lucky_Louis
Small update:
Foredeck and rear quarterdecks glued down, lazarette hatch fitted. Side decks tonite and tomorrow night. Tidying up the labyrinth of wiring inside the console. Bless the person who invented nylon ties...
Hoping to be fitting the coaming by Saturday, final sanding will start Sunday.
Posted: Wed May 02, 2007 3:52 pm
by Spokaloo
Im very stoked to see this boat hit the water.
Moreso, if you are ever down in the southern Gulf islands or in the Arm, Id love to see it in the flesh. We are on the eastside of the state but have friends in NW Washington.
Can't wait for Dungeness to pick up again!
E
Posted: Mon May 14, 2007 3:22 pm
by Lucky_Louis
Another mini-update. Spent the weekend fitting the coaming. Gunwales all bonded. Seam between decks and hull all filled and ground down to rub rail. Located all the deck hardware so I can saturate holes with epoxy before painting.
Modified station "E" so I can tilt the engine up high enough to engage the trim lock.
I used solid Phillipine mahogany to mill some trim for the top edge of station "E"
Now fitting the coaming. I'm using 2 layers of scrap 1/4" meranti 3" wide. I've pretty much decided that I'm going to finish the trim and the coaming bright. I hope be to prepping for final primer and paint by the coming May long weekend.
Posted: Mon May 14, 2007 11:33 pm
by retrosub
That is looking so sweet!
Marvelous.
Posted: Tue May 15, 2007 12:21 am
by TomW
Lucky, that is looking so good I just ordered a set of plans to compare to my C19 plans. My salt water days will be limited by the distance to the coast here in NC, 400 mi. and my lake is at the end of the road. Musky, walleye, bass, lake trout, catfish, etc.
Oh, Paster Bob, if you miss any of those Michigan fish you are welcome to bring your boat up when you get it finished until I get mine done. Spartanburg is only 2 1/2 hours away.
Tom
Posted: Tue May 15, 2007 4:32 am
by WobblyLegs
June launch?
Just right for a summer's fishing...
Posted: Tue May 15, 2007 10:57 am
by Lucky_Louis
Yes, probably June but I'm not ruling out a 'stealth' launch this month just to make sure everything is tiddly for the 'official' splash. Tested the bilge pump yesterday - wow! 1100gpm = 20 gallons/min. It could just about keep up to the garden hose running full
Pretty sure I'm going to call her
Odyssey 'cause it's been a real adventure so far and hopefully many more to come.
Lucky_Lou's Console
Posted: Wed May 30, 2007 1:45 am
by BillTwo
Lucky_Lou said,
I designed it. I played in 3D CAD until it looked right, then I mocked up in cardboard until the scale was right for me. If anyone's interested, I can post the plans in my gallery or email.
It's Billtwo back again.
I've been out of the picture since August of 2006 and have been working on a new career in Real Estate Investing. Got laid-off from my regular gig as a contractor with
IBM in July of last year, now I'm learning the ropes of running my own show in Real Estate Investing. Well enough about that. I've been drooling over your last gallery posts and I'm definitely wanting to get the details on that console of yours. If you wouldn't mind emailing me a copy I'd certainly appreciate it. (email:
gjmerchant@bellsouth.net).
If you remember, I had the problem of running epoxy while laying fiberglass on the hull. Well I've fixed that and now I'm ready to do some final fairing and priming of my hull. I'll post some more pictures when I get my Digital Camera back from repair - I dropped it while shooting some pictures of properties.
I like what you've done with your OB17. As you know I'm building one myself. Before the epoxy mess, the lay off last year and now the career change (to which I'm still takeing classes and Boot Camp), I'm ready to pick up where I left off building my OB17. There's much that I can tell you but this isn't the place for such boring stuff! I'm ready to get busy.
So
Lucky, if you wouldn't mind, I'd like to catch up with what I've missed during your build - but I'll inquire a little at the time as I begin progressing again.
Oh! I saw
Wobbley Legs posts and I'm excited about his progress also. Give him a shout for me if you post him before I do.
Regards,
Billtwo
Posted: Wed May 30, 2007 10:51 am
by Lucky_Louis
Hi Bill, good to hear you're back at it. If your new career works out you'll be building a new TW35
in no time. The OB17 would make a nice tender for her...
To deal with your runs, instead of sanding, try scraping instead. Use any razor sharp steel blade held 90° to the surface and draw towards yourself. Start and finish with each stroke with no down pressure. It's very quick, leaves no dust, and the resulting surface is flawless. I used hand plane blades but I imagine a commercial paint scraper would work too.
Minor update - all building now finished, just doing final fairing and painting of decks, interior surfaces, and seat/cooler unit. Had a little setback with a batch of QuickFair that wouldn't completely cure. Don't know what happened. After 5 days, it only got to a stiff putty-like consistency. The hardener came from the bottom 1/2" of a 1 quart kit, and pretty old (3 years). I scraped the sides of the hardener pot and the stuff looked yellower than the Part 'B' in the bottom. Ratio was good and mix was thorough (by now we're all pros). Anyway, spent an hour last night with a quart of acetone and a dozen rags. Came off very easily and cleaned up nicely. Couldn't paint last weekend. Between cooler temps, high winds, and the QuickFair affair, painting was out. Still on track to splash by Father's Day.
Received the hull identification number yesterday (actually the goverment just promises to give us one, they're a year behind but the official letter works as a temporary HIN). That's the 1st phase of the boat licensing and registration in Canada. The next phase is to assemble my major building receipts (to prove payment of federal and provincial sales taxes), the HIN, and a couple more forms. I have to go a lawyer, JP, or notary and swear I really did build it and pay taxes. Then I take all the paperwork back the local gov't agent with $5 and they will issue me the license and number that I have to display on the hull.
Bill, the console plans are at home, I'll shoot them to you sometime today.
Posted: Wed May 30, 2007 5:52 pm
by BillTwo
Lucky_Louis wrote:Hi Bill, good to hear you're back at it. If your new career works out you'll be building a new TW35
in no time. The OB17 would make a nice tender for her...
To deal with your runs, instead of sanding, try scraping instead. Use any razor sharp steel blade held 90° to the surface and draw towards yourself. Start and finish with each stroke with no down pressure. It's very quick, leaves no dust, and the resulting surface is flawless. I used hand plane blades but I imagine a commercial paint scraper would work too..
Lucky if my new career does work out, I'll probably be too spoiled to do my own building of boats. Knowing me, I'll be at some school trying to get a Captain's license.

It feel's good to be talking to some of my peers again.
At this point I have completed the repair of the epoxy runs and re-fiberglassed one-half the Hull. I'm quiet familiar with paint scrapers, window scrapers, knives and sanders of all types (hand, orbital, belt sander, modified drills converted to disc sander and long boards). Now I"m ready to do some fairing and priming of the Hull. But you did bring up a point about fairing compound. When you did your fairing on your Hull, did you mix your own fairing compound or did you buy the ready mix (or 2-part) type? Also, my activator and resin have been sitting in quart and gallon jugs, un-opened, for almost a year. I wonder if the "shelf life" is past due?
At one time, I remember when we were just about at the same stage of build until I had my running epoxy problem. Then there was the lay-off and now you're just about ready to launch.
&
I'm happy for you but sad for me that I'm so far behind. But, not to worry, I don't have a time schedule on this one (Thank God), else I'd be a nervous reck.
Lucky, thanks in advance for emailing the Console plan. I will look forward to receiving it. If I don't build another thing this year, I'll build the console. This will motivate me to press harder to get to that point where my OB17 will require installing the Console.
Regards,
Billtwo
Posted: Wed May 30, 2007 6:31 pm
by Lucky_Louis
I have used various types of fairing compund. The first was a one gallon kit of Silvertip QuickFair I purchased from bateau.com with my original material order. Once that was gone. I mixed my own blend of MarinEpoxy, 75% microballons, and 25% fumed silica. The last batch was some regular System 3 QuickFair in a one quart kit available locally. Each had it's pluses and minuses but my homebrew was the worst to work with except I could mix exactly the viscosity need for the job at hand. All were easy to sand. The dark purple of the regular QuickFair was the nicest to longboard because it is so easy to see the low spots. The curing characteristics of the SilverTip were the best, good working time and predictable curing curve. My recent issue of failure to completely cure was the 1st in over what had to be 100 batches (I should have saved the empty beer cups for a count). I know that I just bought my fifth box of 100 latex gloves.
Posted: Wed May 30, 2007 6:34 pm
by TomW
Lucky glad to hear things are still on track(more or less) for Father's Day launch. Your licensing doesn't sound much different than North Carolina's government always has to get there pound of flesh. Send pictures when you can.
Tom
Posted: Fri Jun 08, 2007 12:29 am
by Lucky_Louis
Another mini-update. Decks now have 2 coats primer and 1st coat of topcoat. Weather has turned cold and wet
again (I swear this is my LAST outside build
) Now focusing on sanding inside frames and hull. I'm not going to get too carried away, planning to paint with semigloss and a shaggy roller for a glare-free, textured finish rather than gloss and smooth.
Took a detour to follow Wobbly Legs (Tim's) lead on draining the anchor locker. He's pretty bright for a Brit
Went very well. Thanks again Tim.
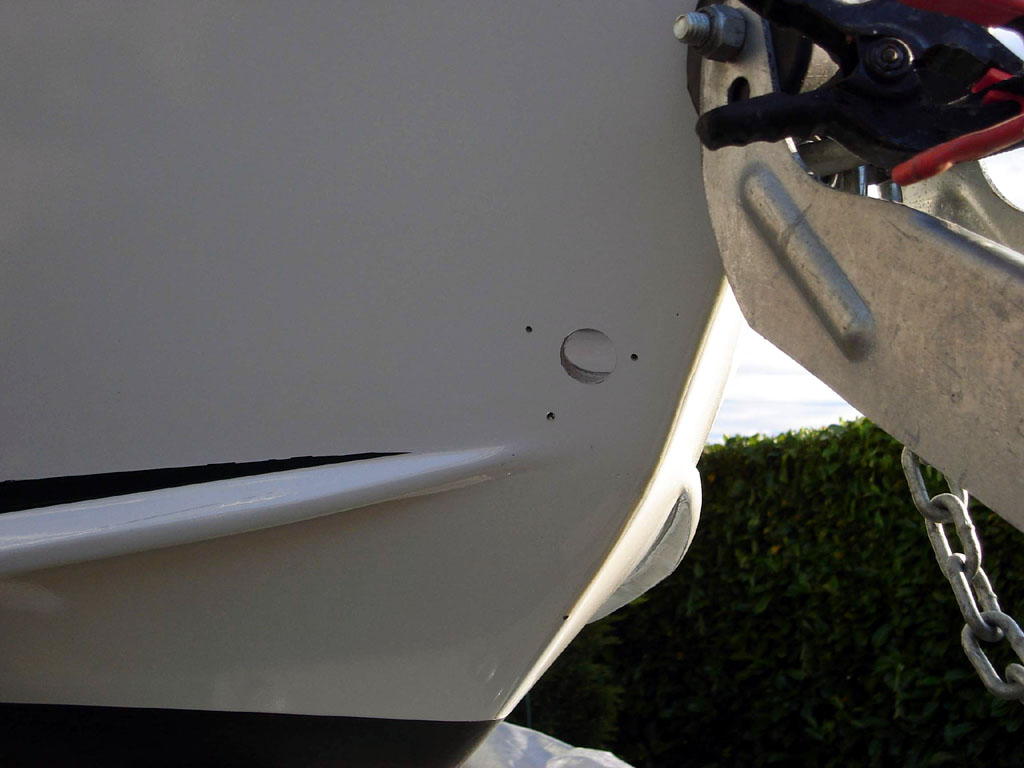
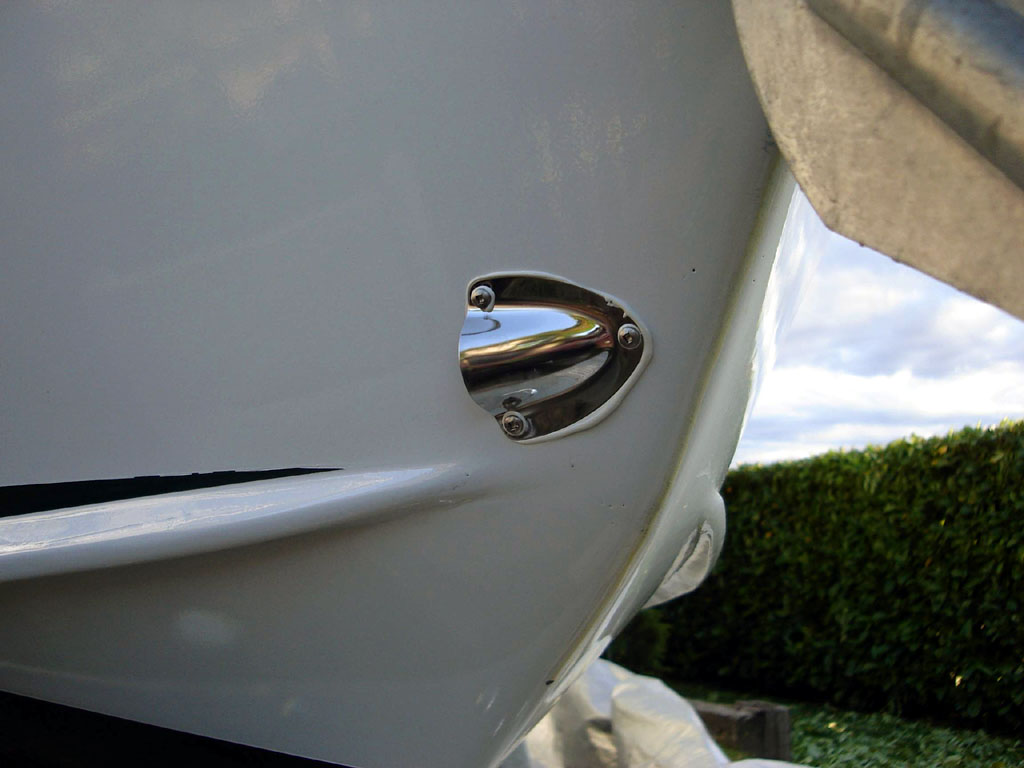
The hole got lined with thickened epoxy, the mini-clamshell and screws sealed with 3M 5200 marine caulk.
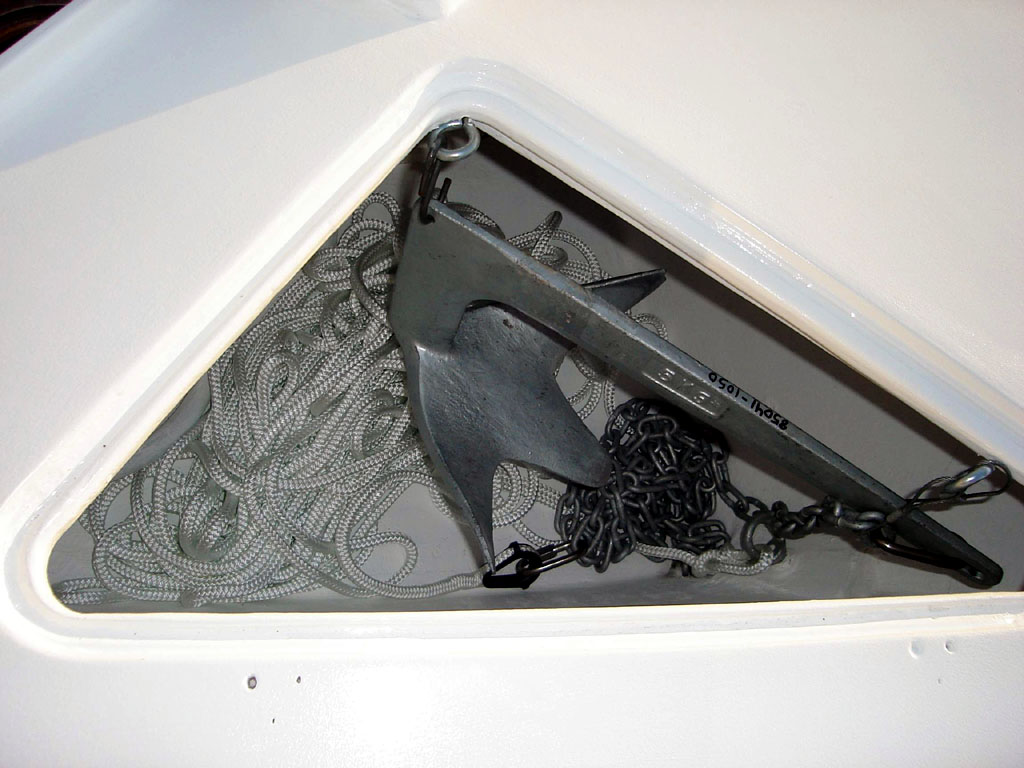
The anchor is a 5kg (11lb) Bruce style, 10' of 3/8" galvanized chain and 150' of ½" nylon braid. Secured to boat by 1-½" galvanized lifting eye threaded onto the end of the towing eye.
Still on track to splash on Fathers Day.
Posted: Fri Jun 08, 2007 12:56 am
by Cracker Larry
Beautiful!
I think the Bruce is the best anchor made for a variety of bottoms. My personal favorite.
Posted: Fri Jun 08, 2007 2:28 am
by TomW
I echo Larry on that one would not go any where without the Bruce. That anchor locker is huge! You could put another couple hundred feet of line in there.
Tom
Posted: Fri Jun 08, 2007 4:34 am
by WobblyLegs
Lucky_Louis wrote:Took a detour to follow Wobbly Legs (Tim's) lead on draining the anchor locker. He's pretty bright for a Brit
Went very well. Thanks again Tim.
Not really my idea, most of the bigger production boats around here seem to have the same arrangement.
I've been thinking using a Bruce as well, seems to be favourable with you lot.
T.
(I'll ignore the "Brit" comment for now, 'cos it's not totally true..
)
Posted: Fri Jun 08, 2007 8:25 am
by JimW
I hope I don't upset people here. But here goes. If this were my boat I'd throw an extra plug in the anchor locker. If you have a leak or other problem and the hull starts taking on some water, it won't be long before that anchor locker drain becomes a liability. Especially if folks move forward to counter balance the engine weight while taking on water. I would not have a hole that close to the water line up front. Larger boats the distance above the water line is much greater. Anyway, just in case, you may want to throw a plug in there in case you need to stop the bleeding if things go bad. The drain is a good idea as long as nothing "weird" or unfortunate happens. Strange things happen with the "free surface effect" when small boats begin to take on water. OK, I'm gonna duck and cover now.

Jim
Posted: Fri Jun 08, 2007 9:14 am
by Cracker Larry
I agree totally with Jim. I'd have provision to plug any hole that close to the waterline.
Posted: Fri Jun 08, 2007 10:08 am
by PastorBob
Truly what is the harm of just keeping an extra plug on hand.... good recommendation... I have always keep extra plugs to fit all holes... live well intakes... drain ports... what ever many times the plugs have been the same dimension as the hull drain plug so I just kept a few extra plugs that fit anything for any need.... never had to use them but it is good to know you are prepared for anything.... especially if you are taking a small boat offshore.... problems can compound quickly!!!
Posted: Fri Jun 08, 2007 10:14 am
by Cracker Larry
Well put, Pastor Bob. Most serious incidents in boats and planes are not caused by one large problem but a culmination of several small ones coming together quickly.
I am ammending my previous statement to say I would have a provision to plug EVERY hole in the boat, no matter it's relation to the waterline.
Posted: Fri Jun 08, 2007 10:51 am
by Lucky_Louis
Thanks for all the comments and concern guys. A plug certainly wouldn't be a bad idea
, easy to do. My anchor locker is a slightly different arrangement than Wobbly Legs C17, there's a sealed bulkhead (frame "A") and is only accessed from the top. Even if it floods, the water would be confined there (hence the drain
) The design of this boat actually has HUGE holes in the sides to drain the cockpit that aren't intended to be plugged (scuppers). I won't drill them until I confirm the loaded waterline is below my sole as my engine is quite heavy.
It was kinda neat drilling the drain hole, like archeology. 10 layers of biax glass and 1/4" of plywood, over 5/8" thick at that point
Posted: Fri Jun 08, 2007 11:18 am
by WobblyLegs
Lucky_Louis wrote:A plug certainly wouldn't be a bad idea
, easy to do.
Certainly generated some interest. An idea: Get a plastic drain fitting, throw away the female bit. Coat the male thread (plug) with epoxy glue (with a release agent?) and push it into the hole from inside the boat. When cured, unscew the plug and you should have a perfect female thread in the hole.
I know, obvious, but I think I'm going to do that.
T.
Posted: Fri Jun 08, 2007 11:28 am
by Lucky_Louis
Good plan Tim. I'll bet that one of those nylon threaded stoppers used in aluminum water and fuel bottles that hikers and climbers use would be about right. One of those lever activated rubber drain plugs would work all right too. Even a tapered soft pine plug would do.
As an aside, I'm not sure if your choice to go stbd with the drain was a fluke but for me it was intentional. I thought about
where my majority of boating would be, the direction I would going to head home, and where the waves would coming be from in snotty weather. Then I drilled the hole on the other side
Posted: Fri Jun 08, 2007 11:37 am
by WobblyLegs
Lucky_Louis wrote:As an aside, I'm not sure if your choice to go stbd with the drain was a fluke but for me it was intentional. I thought about
where my majority of boating would be, the direction I would going to head home, and where the waves would coming from in snotty weather. Then I drilled the hole on the other side
You know, I never even thought about it.
Putting it on the port side doesn't seem right. Can't tell you why.
And maybe that all the boats I've seen like this seem to have it on the starboard side. Subliminal??
Hiking bottle top - nice thick rounded thread. Perfect. How high above waterline is your drain? After all this talk the first thing I do when I get home today is measure mine.
T.
Posted: Fri Jun 08, 2007 12:23 pm
by Lucky_Louis
Best guess..

Posted: Fri Jun 08, 2007 3:45 pm
by WobblyLegs
Love the shark!!
I get about 60cm above the keel (not including skeg) so about 40cm above waterline.
Fitted my first piece of permanent hardware tonight (well halfway fitted anyway) - the bow eye, bedded onto Sikflex. Man, that stuff is sticky, and stringy, and just wants to attach itself to everything!
T.
Posted: Fri Jun 08, 2007 9:24 pm
by BillTwo
Lucky_Louis wrote:
The anchor is a 5kg (11lb) Bruce style, 10' of 3/8" galvanized chain and 150' of ½" nylon braid. Secured to boat by 1-½" galvanized lifting eye threaded onto the end of the towing eye.
Lucky, I'm trying to see how you've secured your anchor in the locker. I see what looks like "eye" bolts that have 'S' hooks looped thru the bolts and one end of the anchor and the other that looks as if looped thru the anchor chain. How do you keep the anchor from bouncing inside the locker? Is the anchor allowed to free-swing or is it held snug against the locker using some type of bungie cord or tie-down?
I like the concept and when I get to that part of my build I will be drilling my drain hole just as you have done. Once I get a clearer picture of how you are securing your anchor, I will be doing the same.
I just realized that you have painted your foredeck. I thought you were going to leave the topside showing clear wood finish. A previous shot of your
anchor locker hatch and foredeck was shown with a natural wood finish. If I can do as good a workmanship on my OB17, I'm going to try for a natural clear wood finish topside.
Anyway, good luck to you Lucky on your "Stealth" launch and may every thing function and perform as you plan.
Billtwo
Posted: Sat Jun 09, 2007 12:50 am
by TomW
Lucky it looks like you are very close to still making Fathers Day as we talked about earlier. May the Sun God look down on you with favor and no more cold rainy days. H, its June now, time to be fishing.
Tom
Posted: Mon Jun 11, 2007 11:16 am
by Lucky_Louis
Tim:Fitted my first piece of permanent hardware tonight (well halfway fitted anyway) - the bow eye, bedded onto Sikflex. Man, that stuff is sticky, and stringy, and just wants to attach itself to everything!
Yes, SikaFlex is
something to work with. I used to bed all the deck hardware on our 27' sloop with that stuff. Sikalex had a door in a frame with the "hinge" made of SikaFlex as their in-store display to demonstrate the flexibility and strength. I'd use it again but I had to try the 3M 5200 because of the testimonials on this forum. In the future, I'd go back to SikaFlex, I find the 5200 too runny and takes way to long to firm up.
Billtwo:Lucky, I'm trying to see how you've secured your anchor in the locker. I see what looks like "eye" bolts that have 'S' hooks looped thru the bolts and one end of the anchor and the other that looks as if looped thru the anchor chain. How do you keep the anchor from bouncing inside the locker? Is the anchor allowed to free-swing or is it held snug against the locker using some type of bungie cord or tie-down?
Good eye! Yes, I have two 1" eyebolts set horizontally through the foredeck support (2"x4" on the flat curved to match the deck). From that I have one "S" hook on the aft eye and a little cable sling swaged onto the forward eye. Unhook the anchor from the "S" hook and the anchor slides aft 4" and it's free. Right now, it can swing sideways but it can't hit anything. I suppose if the sideways motion got severe enough. a fluke could hit the deck but by then I think I would have been thrown out of the boat
I can always add a bungee or some kind of restraint if I need to.
TomW:
Lucky it looks like you are very close to still making Fathers Day as we talked about earlier.
Yes still on track to splash on Father's Day. Maybe even on Saturday. My family is pretty tied up on Sunday so we will probably break the bubbly on June 16.
My weekend was spent dodging rain showers and ducking out of the wind. My poor little Mercedes SL
got the boot from the carport so I could paint rain or shine.. have to think about replacing some windows seals...
So far I've got 3 coats on the inside-sides and frames, 2 coats on the outside deck. Here's the week's plan:
Monday: The final coat on the inside-sides and the final coat on the outside deck.
Tuesday: The first coat of non-skid (the primer/sealer) on the sole and casting deck and prime the seat unit.
Wednesday: 2nd coat of non-skid ( the bumpy, rubber part), mount deck hardware
Thursday: 1st topcoat on seat unit, 3rd and final coat on sole (sealer/smoother coat)
Friday: 2nd and final topcoat on seat unit. Secure console. Re-install hatches.
Saturday: Assemble and install seat unit. Gather family, friends and refreshments. SWMBO breaks champagne bottle on bow. Boat slides off trailer. Boat actually floats! Boat even starts! Pictures are taken and posted!
That's the plan anyway. One son is flying in from northern Alberta for the event. He's quite the videographer so maybe we'll get to post some video on YouTube or something. I should be able to get some good performance numbers, the engine is a year old so no break-in concerns.
Posted: Mon Jun 11, 2007 12:24 pm
by Daniel Huckleberry
Louis
It's looking really good. I know are excited and proud.
Are you still planning to use the spanted on the interior? I am really considering this stuff on my boat and can't wait to see what a real world application of it looks like.
Huck
Posted: Mon Jun 11, 2007 12:44 pm
by Lucky_Louis
Hi Huck,
Yes. I'm going with the Spantex system. I've had it our sundeck for 6 years and it looks like new. My inlaws have the same product on their deck, it's 20 years old now is just starting to look a little tired.
 More info here
The only maintenance we do is a good scrubbbing every spring.
Posted: Mon Jun 11, 2007 5:02 pm
by TomW
Lucky, good luck with the plan and may the weather God be good to you.
Tom
Posted: Wed Jun 13, 2007 12:12 pm
by Lucky_Louis
Another mini-update....
Monday: The final coat on the inside-sides and the final coat on the outside deck. DONE
Tuesday: The first coat of non-skid (the primer/sealer) on the sole and casting deck and prime the seat unit. DONE
Wednesday: 2nd coat of non-skid ( the bumpy, rubber part), mount deck hardware PENDING
Thursday: 1st topcoat on seat unit, 3rd and final coat on sole (sealer/smoother coat)
Friday: 2nd and final topcoat on seat unit. Secure console. Re-install hatches.
Saturday: Assemble and install seat unit. Gather family, friends and refreshments. SWMBO breaks champagne bottle on bow. Boat slides off trailer. Boat actually floats! Boat even starts! Pictures are taken and posted!
I'm amazed at how big the cockpit seems now that it's all one colour.
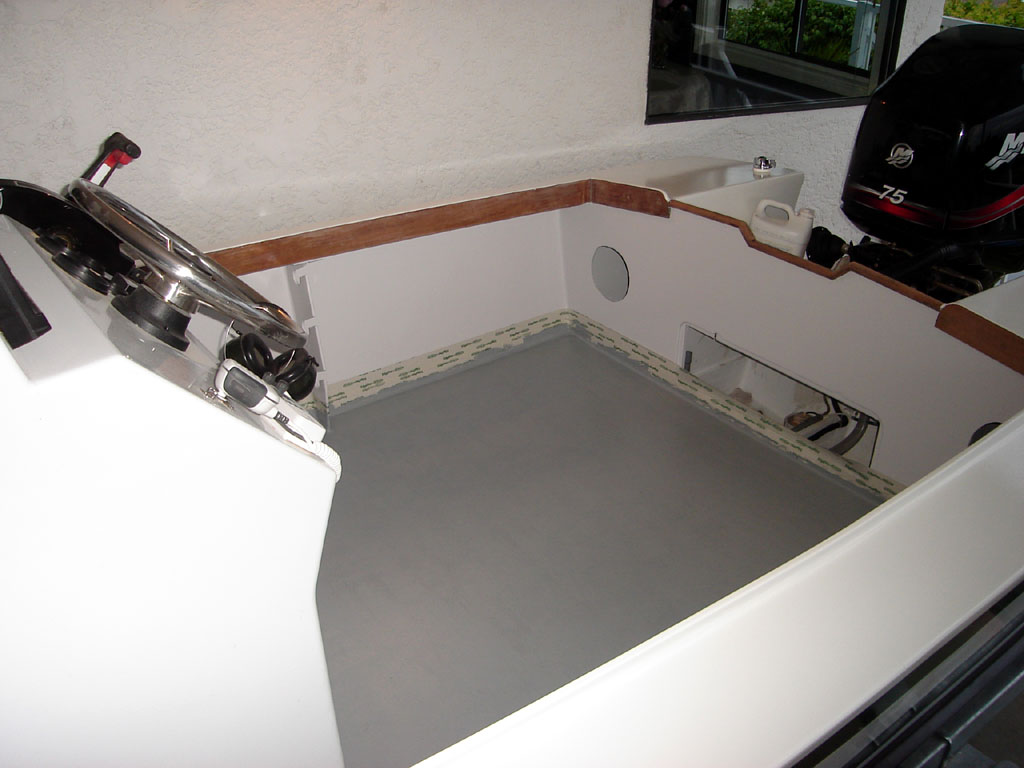
I've taken over the carport until the painting is done. SWMBO and the Mercedes are NOT amused...
The inspection and access hatches are gloss white to match the decks.
The sea calls out to me and the weather continues cool and damp.. sigh.
 My whole picture G A L L E R Y here
Posted: Wed Jun 13, 2007 2:17 pm
by Lucky_Louis
Mini update: The "Odyssey" is now officially a boat. Got my small craft license today. The process was actually much less painfull than I anticipated.
For any other Canuck builders, here's the process:
First, do you even need a license? Any boat powered 10 hp and over must be licensed or registered (registering is whole different process).
Second, apply for a Single Vessel Label. This serves as your HIN (Hull Identification Number) and Compliance Lable. They are a year behind in actually printing the labels, but you get a letter which serves the same purpose until your decal shows up. The application is two forms and 4 photographs of the boat. You provide a few dimensions so they can calculate the capacities.
Third, head to your local Fed Fisheries office and swear a declaration that you built the boat, it's never been registered before, and you paid for the materials.
Fourth, find a Service Canada office and take the paperwork you've accumulated so far. Sign one more form, the computer burps out a shiny new vessel license number.
Fifth, display the number on your boat in accordance with the regs they give you.
It took less than 30 minutes of my time and get this, NO CHARGE. The only delay was getting Single Vessel Label letter which was about 30 days because it has to go to Ottawa and back.
All in all, a pleasant surprise.
Posted: Wed Jun 13, 2007 3:12 pm
by WobblyLegs
Louis,
That is a damn fine looking boat... I like the bright trim, adds class!
Best of luck (as in: good weather - everything else looks in order) for your launch on the weekend.
Looking forward to some pics!
Ya beat me!
Tim.
Just About to Get It "Wet"
Posted: Wed Jun 13, 2007 4:17 pm
by BillTwo
Lucky,
I'm happy for you and wish that everything goes well on "Launch Day!!". I can't wait until my turn comes.
As WobblyLegs said,
"That is a damn fine looking boat... I like the bright trim, adds class!". Ditto for me also.
What can I say, it's what I'm looking forward to for my OB17.
I did want to ask you about whats on your bow? Is that a combination navigation lights and GPS antenna? If it is - Great Idea!!
Billtwo
Posted: Wed Jun 13, 2007 4:25 pm
by fishingdan
WobblyLegs wrote:
That is a damn fine looking boat...
I can't add anything to that. Can't wait to hear about the initial launch.
Posted: Wed Jun 13, 2007 4:53 pm
by Lucky_Louis
Thanks for the kind words guys!
The inside face of the coaming will be finished bright. It still needs one more coat of epoxy then several coats of clear gloss urethane for UV protection. That item will wait until post-launch.
Bill, yes the mini-tower on the foredeck is the GPS antenna and a pair of LED nav lights. Up at our latitudes, satellite angles can get pretty low so I wanted a spot in the open that was safe from grabbing, so the console was out, safe from tangling up a landing net, so the gunwales were out. The quarterdecks are reserved for a pair of downriggers so I built a block to mount the lights on and saw there was room on top for the little GPS mast and the chase tube was already in place for the lights and fuel guage sending unit.
This would be so much easier if I didn't actually have to work for living

Lokks 50-50 so far for Saturday
Now Tuesday looks pretty sweet!
Posted: Wed Jun 13, 2007 5:05 pm
by TomW
You can only do what you can do guy. It sure looks cool and wet on Saturday.

Maybe it will change by then.
Tom
Posted: Wed Jun 13, 2007 6:24 pm
by JIM M
WOW!! Looks great. I hope my ob17 turns out this good .
Posted: Fri Jun 15, 2007 12:13 pm
by Lucky_Louis
Tee minus 32 hours to splash....
Monday: The final coat on the inside-sides and the final coat on the outside deck. DONE
Tuesday: The first coat of non-skid (the primer/sealer) on the sole and casting deck and prime the seat unit. DONE
Wednesday: 2nd coat of non-skid ( the bumpy, rubber part), mount deck hardware. DONE
Thursday: 1st topcoat on seat unit, 3rd and final coat on sole (sealer/smoother coat) DONE
Friday: 2nd and final topcoat on seat unit. DONESecure console. Re-install hatches. PENDING
Saturday: Assemble and install seat unit. Gather family, friends and refreshments. SWMBO breaks champagne bottle on bow. Boat slides off trailer. Boat actually floats! Boat even starts! Pictures are taken and posted!PENDING
Also I'd better put some fuel in it, charge the battery and apply the name and registration graphics

Weather is still iffy, now they're adding NW 15-20 wind to the forecast. I am blessed in that I can launch in salt or fresh water with 1 mile of each other.
Map here! Powell Lake north of town is 50 miles long, Georgia Strait separates southern Vancouver Island from the mainland.
Posted: Fri Jun 15, 2007 12:17 pm
by MadRus
Lucky_Louis, it really looks awesome! Can't wait to see pics on the water.
Posted: Fri Jun 15, 2007 12:41 pm
by retrosub
Wow.
Posted: Fri Jun 15, 2007 3:33 pm
by tech_support
Boat actually floats! Boat even starts! Pictures are taken and posted!PENDING
on the edge of seats
..........[/quote]
Posted: Sat Jun 16, 2007 8:58 am
by msujmccorm
Congratulations on a great looking boat. Can't wait to see her floating.
Posted: Mon Jun 18, 2007 1:04 pm
by Lucky_Louis
Well, she splashed good and proper. I figured it was time to start a new thread so here it is..
http://forums.bateau2.com/viewtopic.php?t=13611
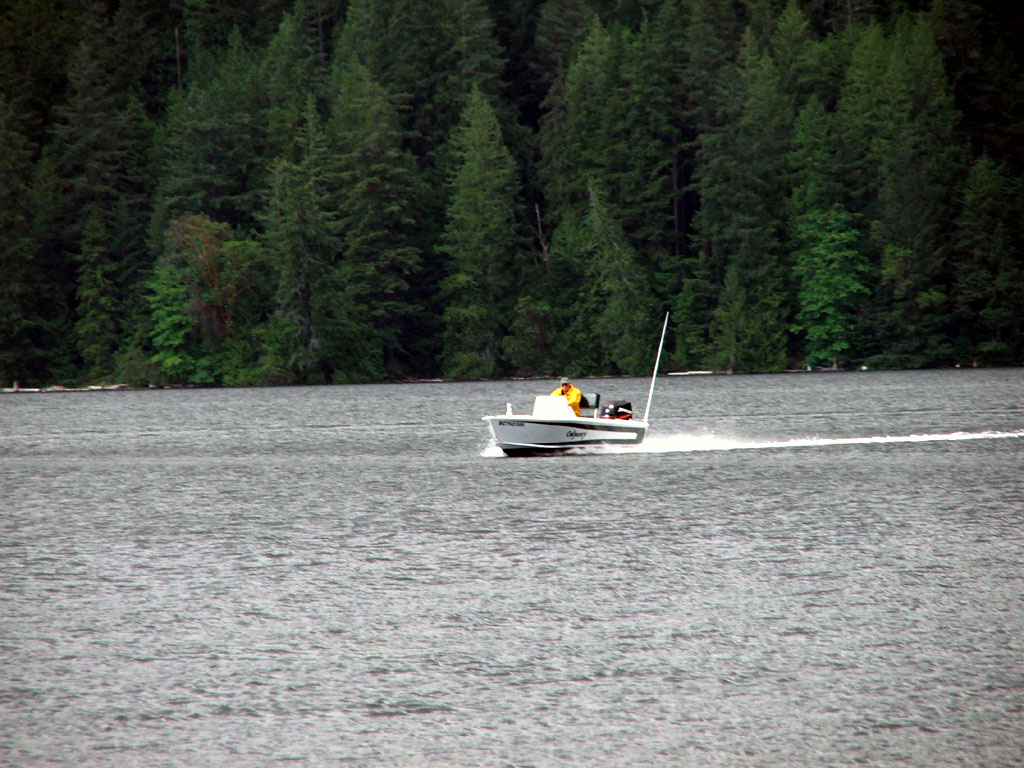
This is what it's all about!
Re:
Posted: Tue Aug 25, 2009 6:01 pm
by Lucky_Louis
Hi Huck,
Yes. I'm going with the Spantex system. I've had it our sundeck for 6 years and it looks like new. My inlaws have the same product on their deck, it's 20 years old now is just starting to look a little tired.
The only maintenance we do is a good scrubbbing every spring.