Page 1 of 1
FS12 Build
Posted: Tue Nov 14, 2006 3:53 pm
by tech_support
Posted: Tue Nov 14, 2006 4:44 pm
by TimF
Great set of photos - thanks Shine ! I look forward to the rest of the build. Must order epoxy for my FS14 and clear the remaining stuff out of my garage.
Tim F
Posted: Tue Nov 14, 2006 7:40 pm
by glcost
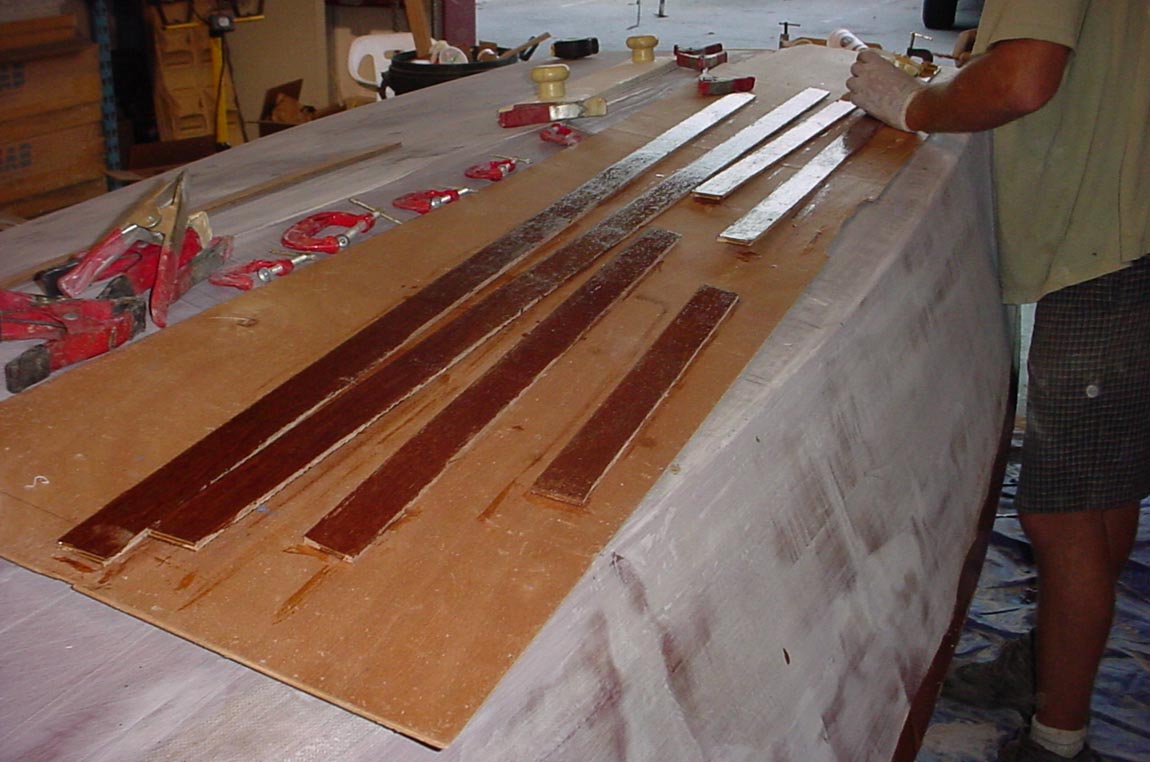
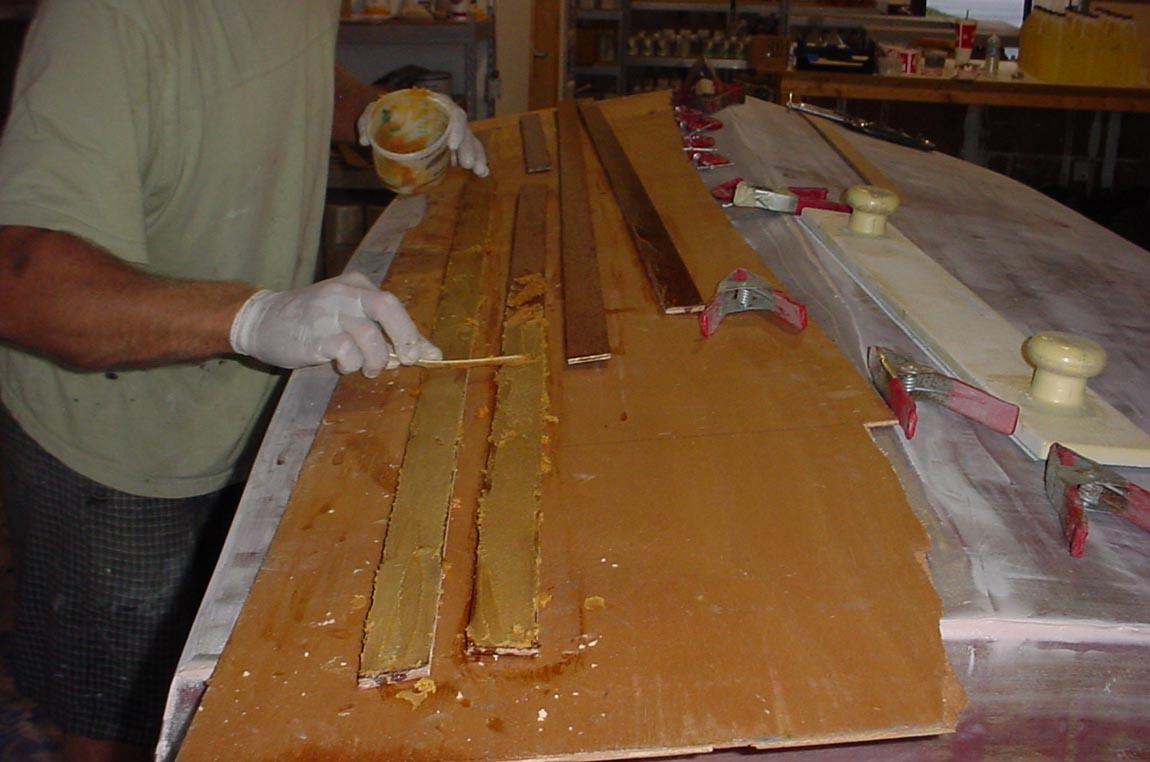
Looks like a good tutorial will be in the "box" too!
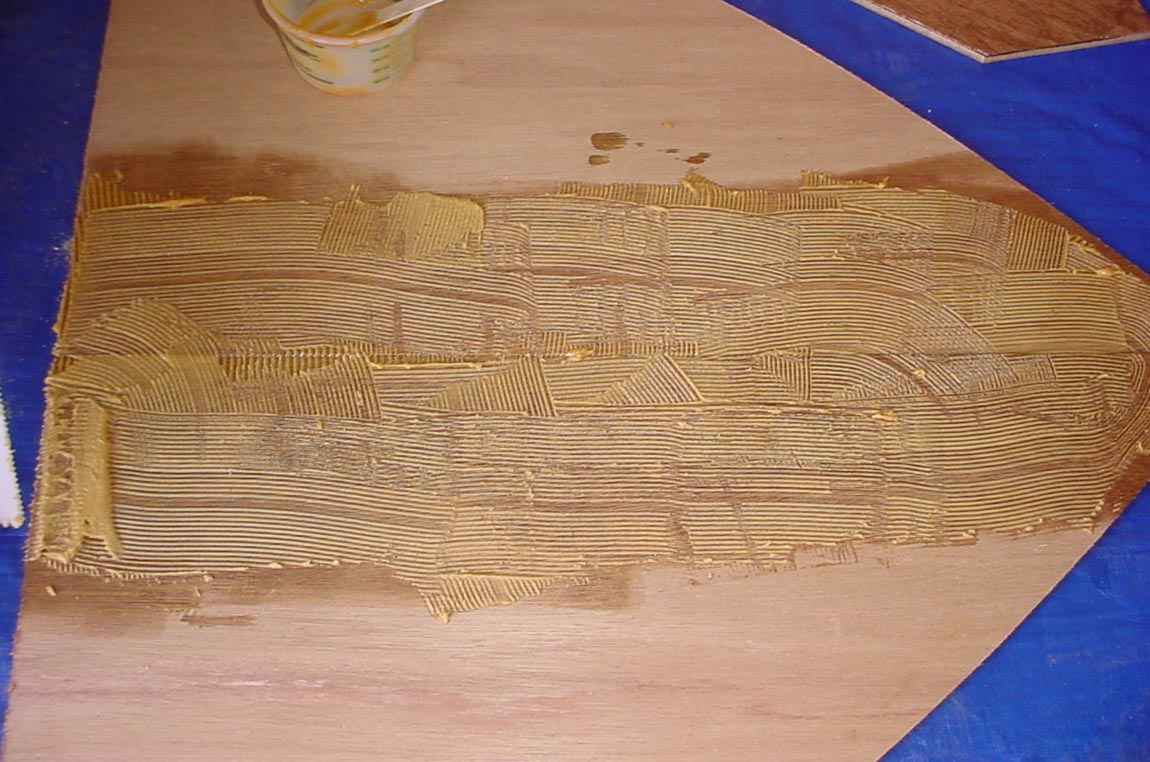
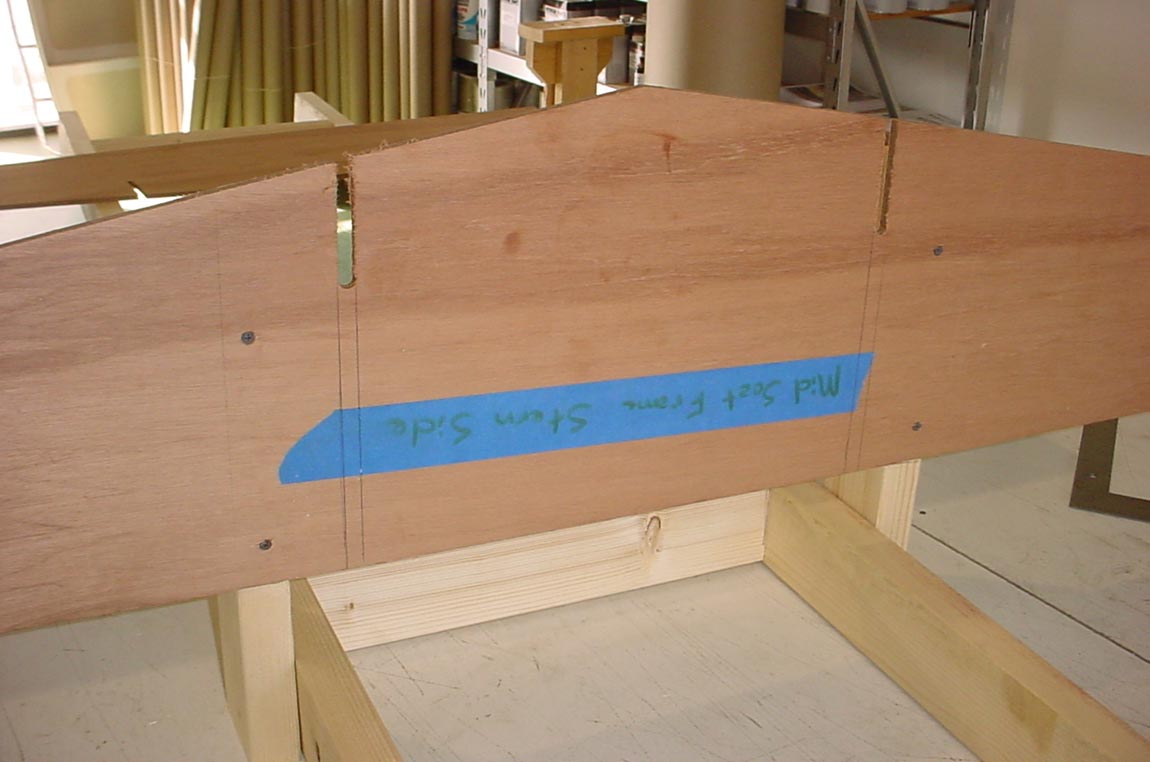
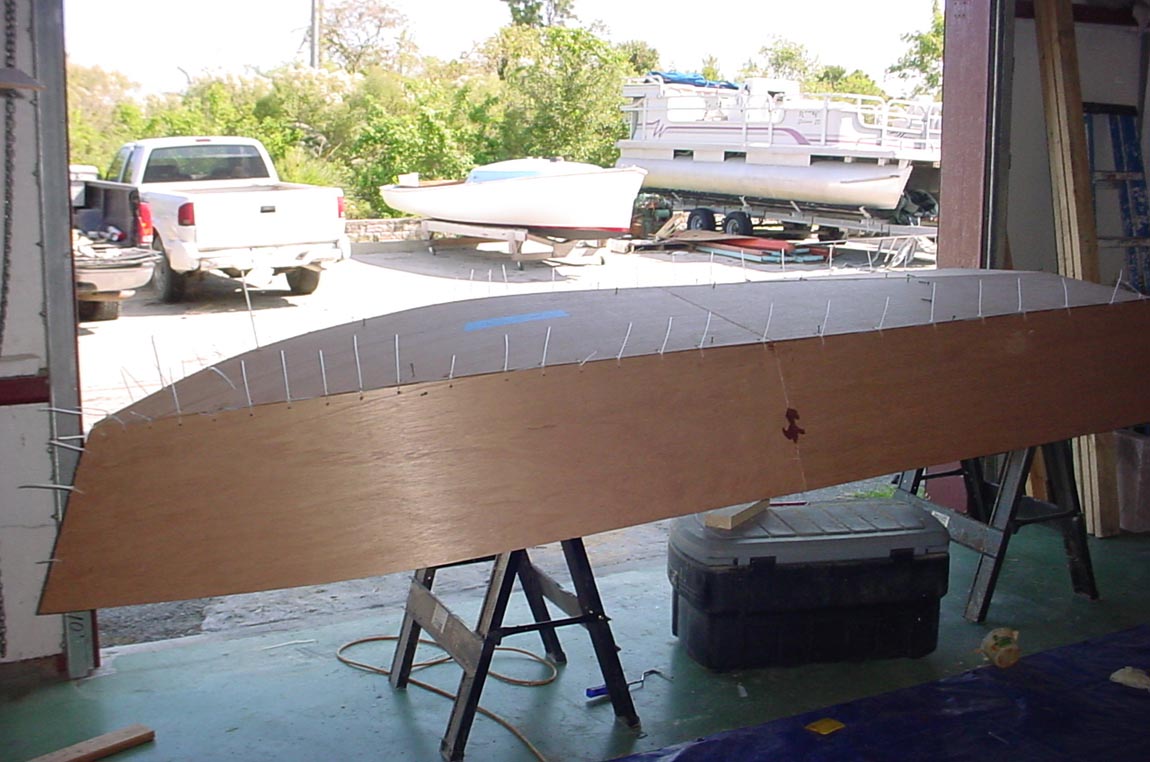
You show some nice details in the photos, like how the epoxy-woodflour glue consistancy looks and how you smeared it on the butt-block joint. All simple but invaluable stuff for builders.
Posted: Tue Nov 14, 2006 8:23 pm
by tech_support
The kit will come with DVD

It will be VERY detailed
Posted: Wed Nov 15, 2006 9:52 am
by dborecky
Joel,
I am going to try to do that this weekend. I wish I would have had the kit for the FS14. That would have made life easier.
I see you did not glue the clamping boards to the transom prior to screwing to the strong back. Why? I already have my transom glued to the clamping boards and was wondering now if I messed up?????
Derrick
Posted: Wed Nov 15, 2006 10:23 am
by tech_support
dborecky wrote:
I see you did not glue the clamping boards to the transom prior to screwing to the strong back. Why?
Derrick
No important reason, just makes it easier
NOTE: If you leave the clamping board off for this stage, you will need to compensate by making the strongback longer (by the thickness of the clamping board)
Posted: Wed Nov 15, 2006 2:41 pm
by tech_support
Posted: Wed Nov 15, 2006 2:56 pm
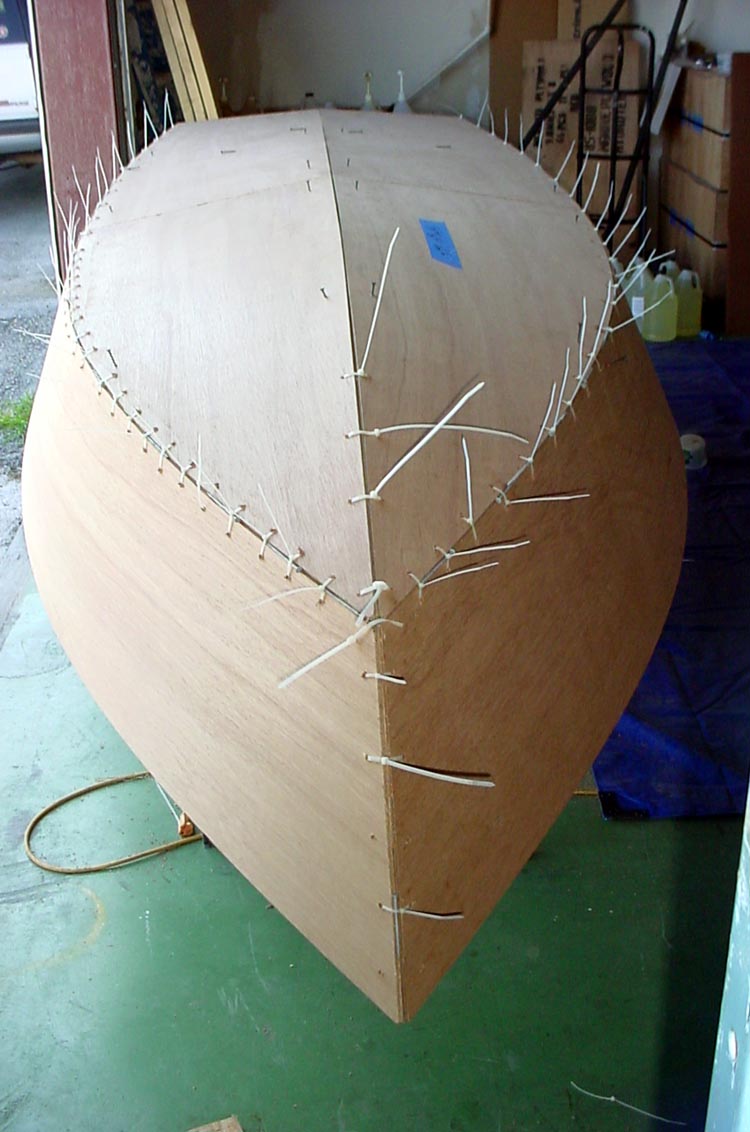
by baba101
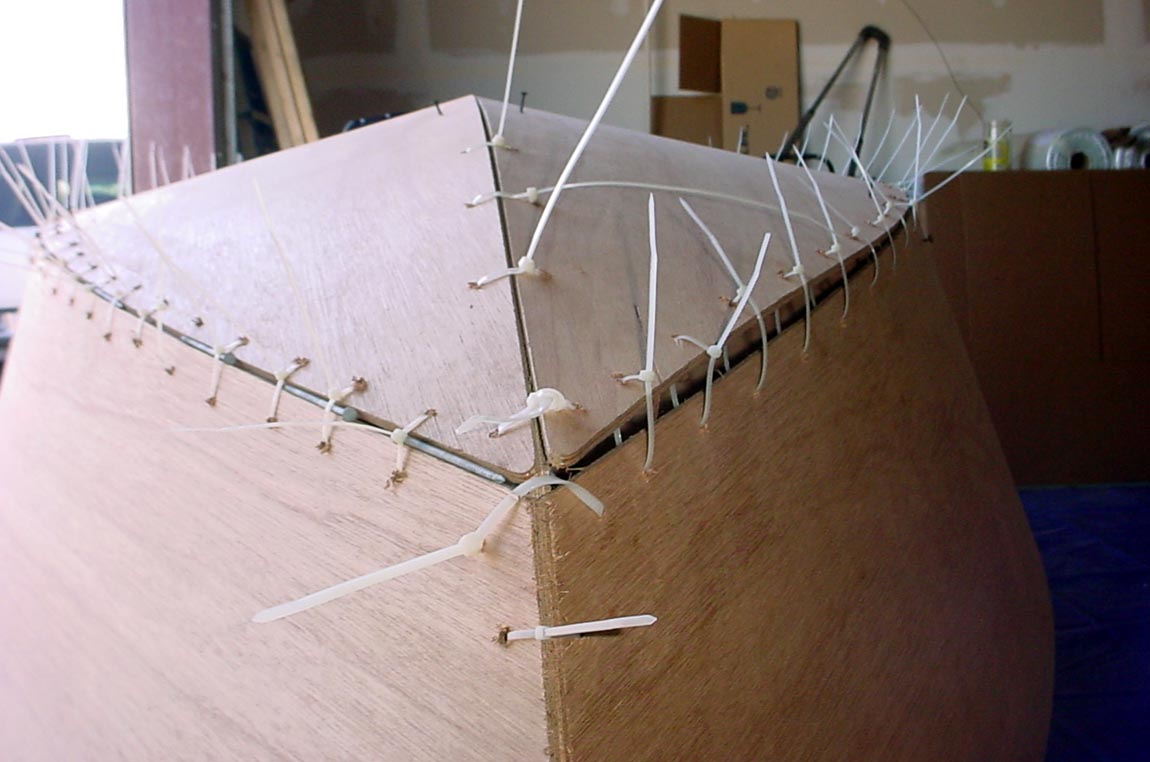
Thats a lot of stitches...compared to my FL14...
Great tutorial...by the way...really makes me want to build another one...
Are you going to be selling the DVD seperately....a download perhaps...? I would like a copy...

Posted: Wed Nov 15, 2006 4:45 pm
by mecreature
Keep the pics coming.. I have my work area cleared and getting ready to start my d-15 so this is good reinforcement..
Posted: Wed Nov 15, 2006 6:55 pm
by Cracker Larry
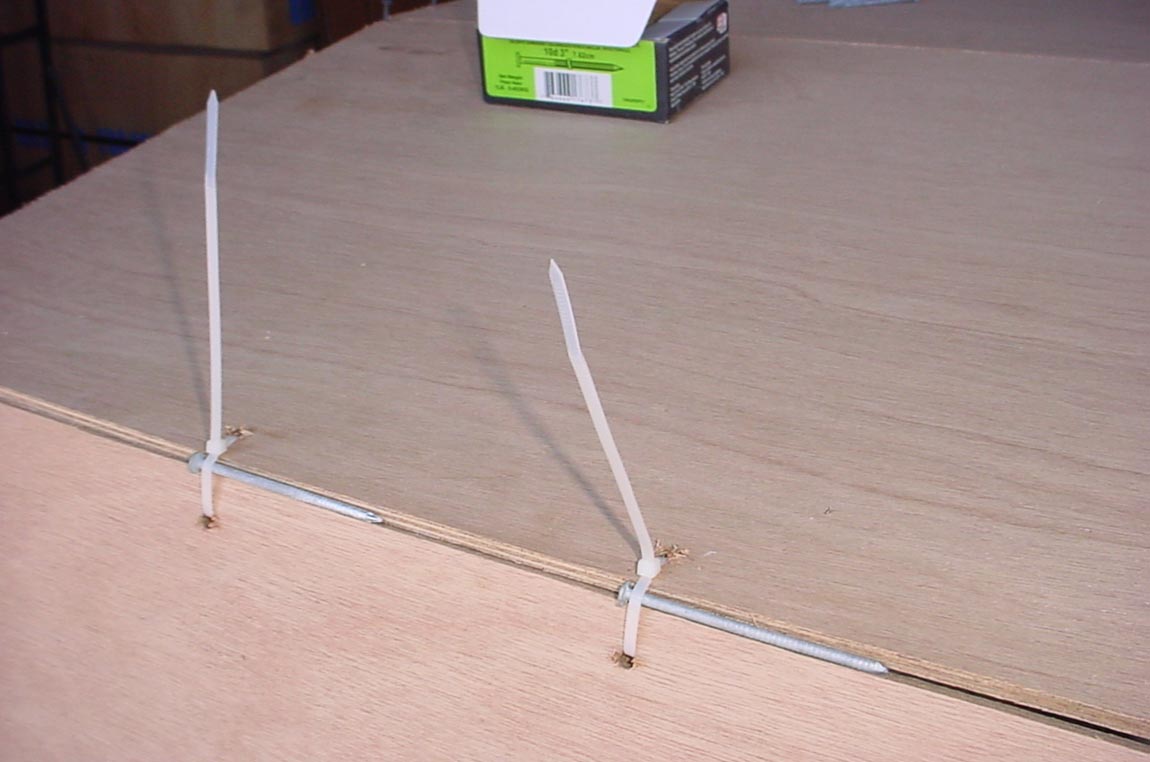
Will you leave those spacer nails in there?
Posted: Thu Nov 16, 2006 7:49 am
by tech_support
Cracker Larry wrote:Will you leave those spacer nails in there?
Hi Larry,
They come out after we put some fillet mix in the joint. Thats what we call "tack welding". The we cut the stitches and remove the spacers (nails), then fill in the rest of the joint.
Posted: Fri Nov 17, 2006 7:36 am
by dborecky
Shine,
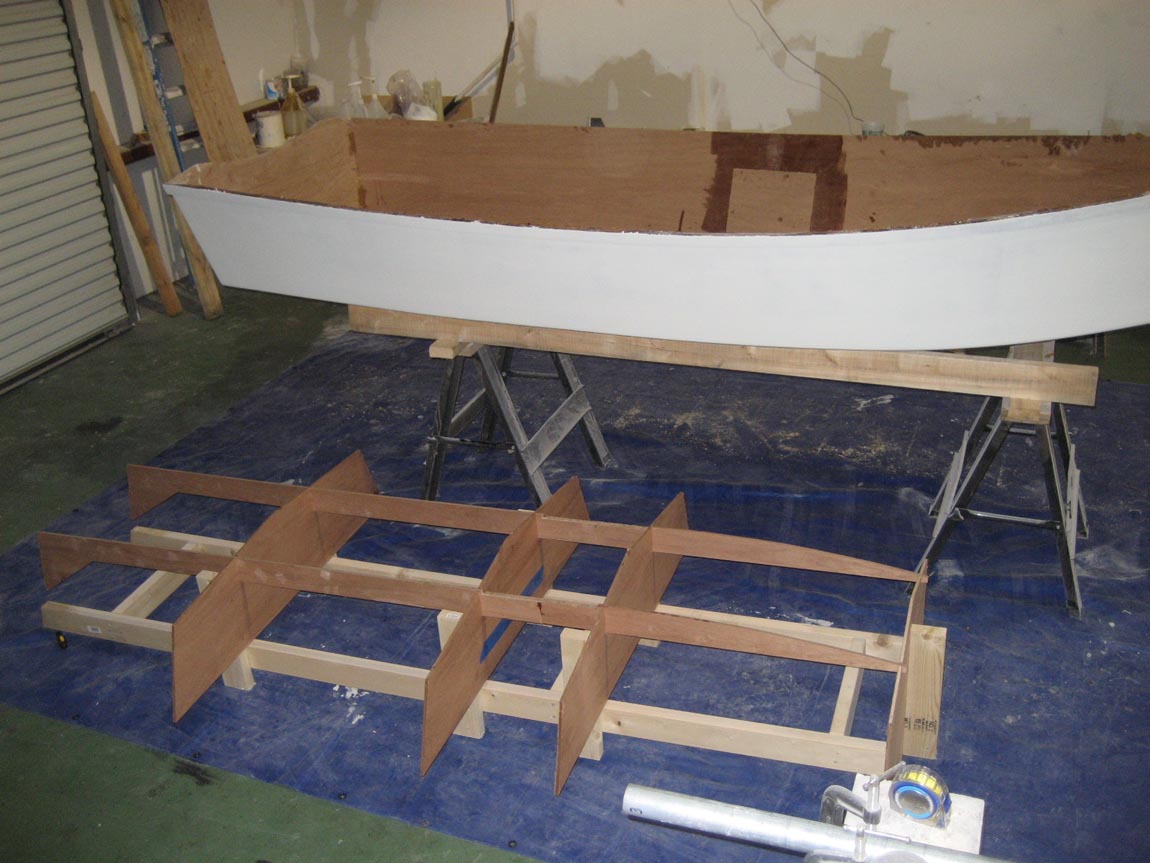
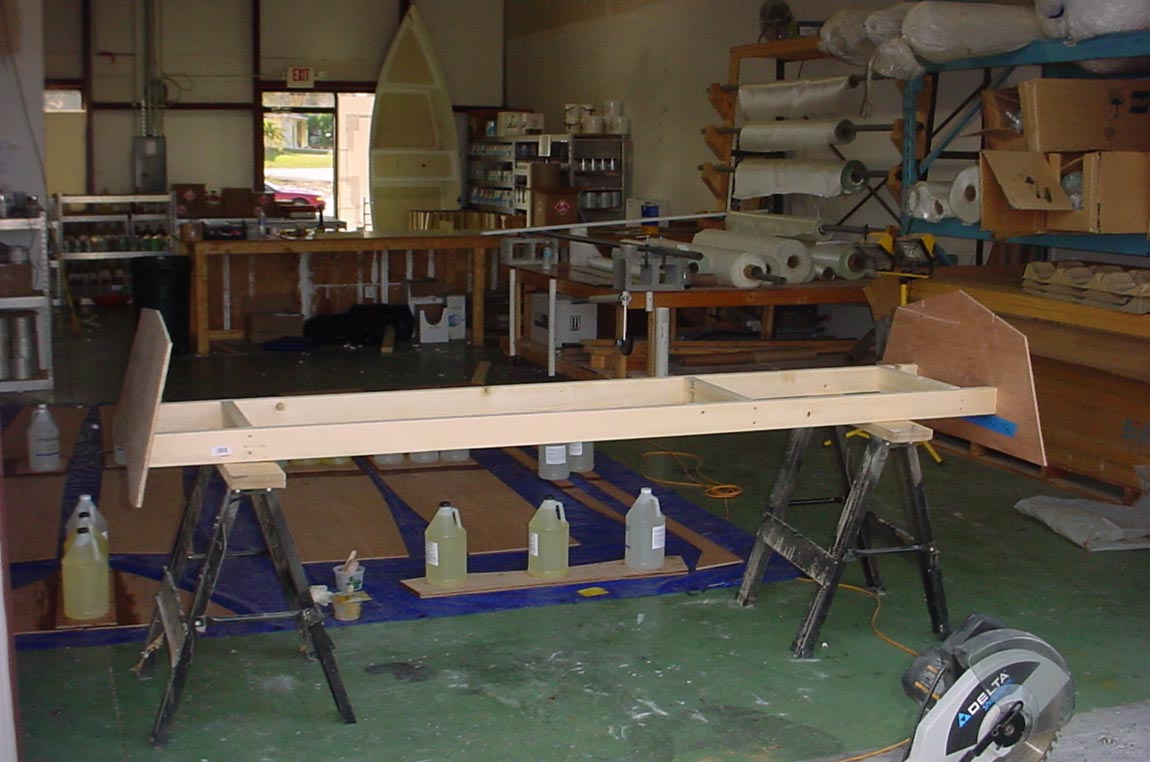
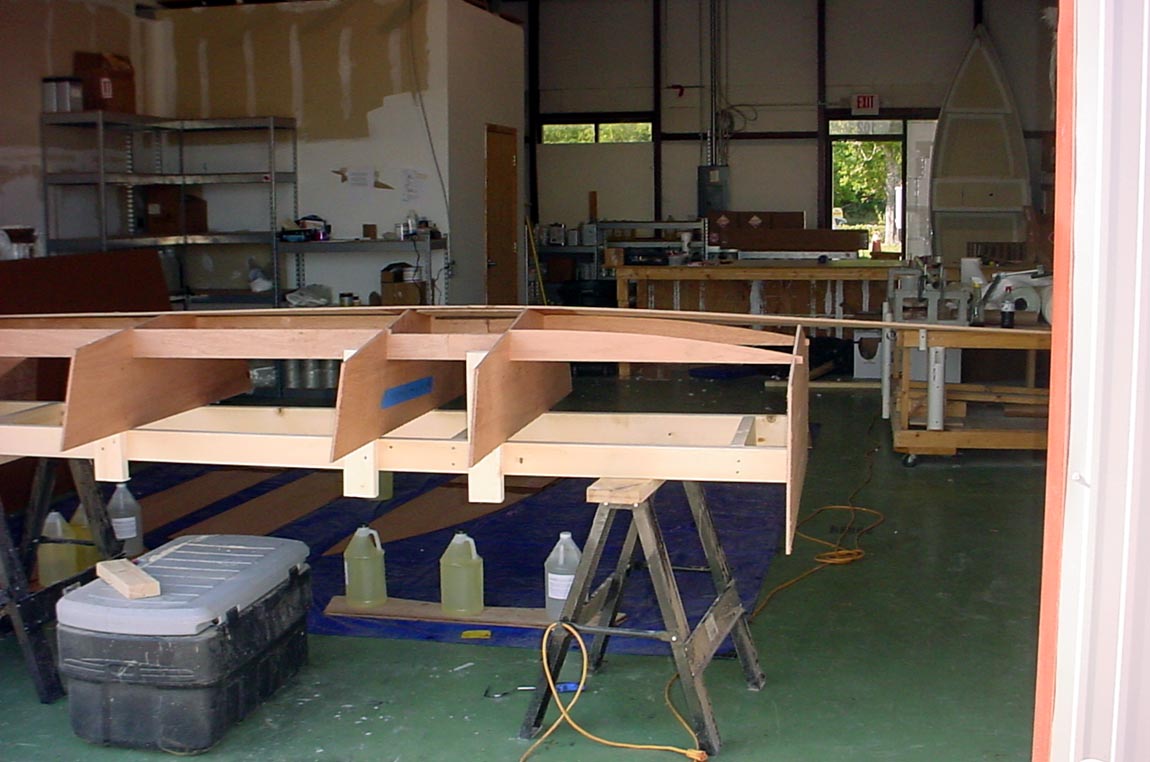
You gave me a kick in the rear with your progress. I have now made the strong back and attached the frames to the 2X4 posts to be attached to the strong back.
I have a few questions for you. How do I know what hight the transom should be? Are the bulkheads supposed to lay on top of the strong back with slight adjustments made for level? Are the transom and the three middle bulkheads level with eachother? And last but not least how do I know what hight to place the bow frame. It looks slightly lower then the other frames from the picture...... I was going to try and get as far as you have this weekend with the panels stiched and all......
Derrick
Posted: Fri Nov 17, 2006 7:56 am
by tech_support
On the FS12: the top (seat level) of the seat frames sit right on the 2x4 (strongback). The plans show this same line on the transom and on the bow frame. You simply draw this line on the bow frame and transom, then secure with drywall screws.
Posted: Fri Nov 17, 2006 8:21 am
by dborecky
shine wrote:On the FS12: the top (seat level) of the seat frames sit right on the 2x4 (strongback). The plans show this same line on the transom and on the bow frame. You simply draw this line on the bow frame and transom, then secure with drywall screws.
Joel,
Thanks. That I can do that. I do have the claming board on the transom but I can drill into that.
Is the hull perfectly level all the way to the front end of the seat frame? I think that is what I see from your pics.
Thanks. I'll take pics this weekend and post as well.
Derrick
Posted: Fri Nov 17, 2006 4:41 pm
by tech_support
More pictures at the gallery. The outside is all glassed took 2 of us 2 hours, all wet on wet. Will desribe process in detail on monday...
http://gallery.bateau2.com/thumbnails.php?album=561
Posted: Sun Nov 19, 2006 8:46 pm
by Jpatburke
How bout a FS14? Will you make a kit for that model?
Posted: Mon Nov 20, 2006 7:51 am
by tech_support
Yes, but we must first finish the FS12. The FS14 may not fit within UPS or DHL limits, so it would be more expensive to ship (By LTL carrier).
Joel
Posted: Mon Nov 20, 2006 8:08 am
by dborecky
shine wrote:Yes, but we must first finish the FS12. The FS14 may not fit within UPS or DHL limits, so it would be more expensive to ship (By LTL carrier).
Joel
Joel,
Now you decided to make a kit after all the cutting and fitting I have been doing...

I tried to catch up to you but no way could I keep up. You need to slow down.

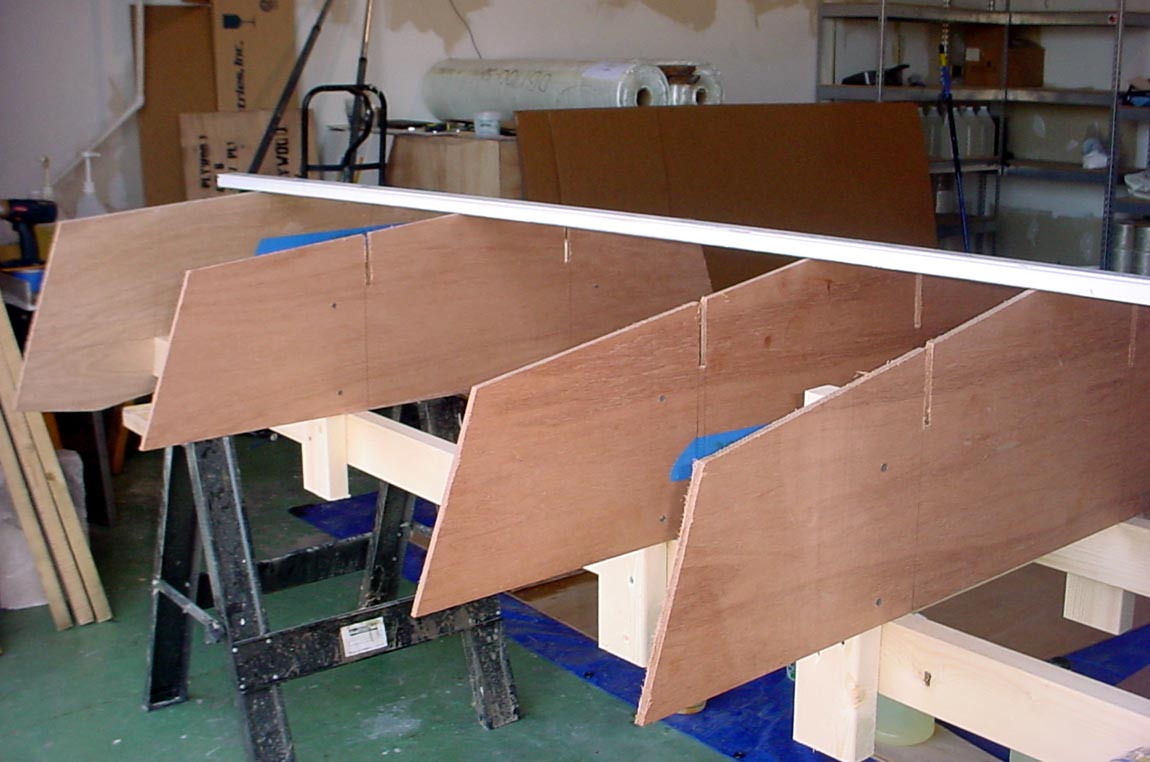
I find I need an extra person to do certain things. I'm now stuck with stiching the side panels. I need someone to hold up the side panels so I can line up the drill holes to make them in the side panels.
I have an idea

Why don't you send over your helper for a few days...
Derrick
Posted: Mon Nov 20, 2006 8:29 am
by tech_support
It could be a LONG time before a FS14 kit is ready
Posted: Mon Nov 20, 2006 8:43 am
by tech_support
Working wet on wet, we were able to do all the outside fiberglass in one shot. It makes for a much cleaner and stronger lamination, uses less epoxy, uses less brushes, and takes less time.
On Friday we:
Cut off stitches and removed nails (spacers)
Used a plane (sanding block could also have been used) to round of the “tack weldsâ€
Posted: Mon Nov 20, 2006 6:45 pm
by Cracker Larry
Joel, in your picture, completing the fillets between tack welds... did you first put duct tape or something on the inside of the joints to keep the glue from dripping through the gaps and running all over the place?
Posted: Tue Nov 21, 2006 8:04 am
by tech_support
Larry,
If there would have been any gaps great enough for the fillet material to sag into, we would have definitely put the tape underneath – as you suggest it saves a lot of time on the inside fillets.
The panels were lined up with the inside faces meeting all around, there was not any place were there was a gap large enough for fillet glue to sag.
Posted: Tue Nov 21, 2006 4:24 pm
by Cracker Larry
Thanks

I better stick with tape.
Posted: Thu Dec 07, 2006 11:55 am
by tech_support
An update on the FS12,
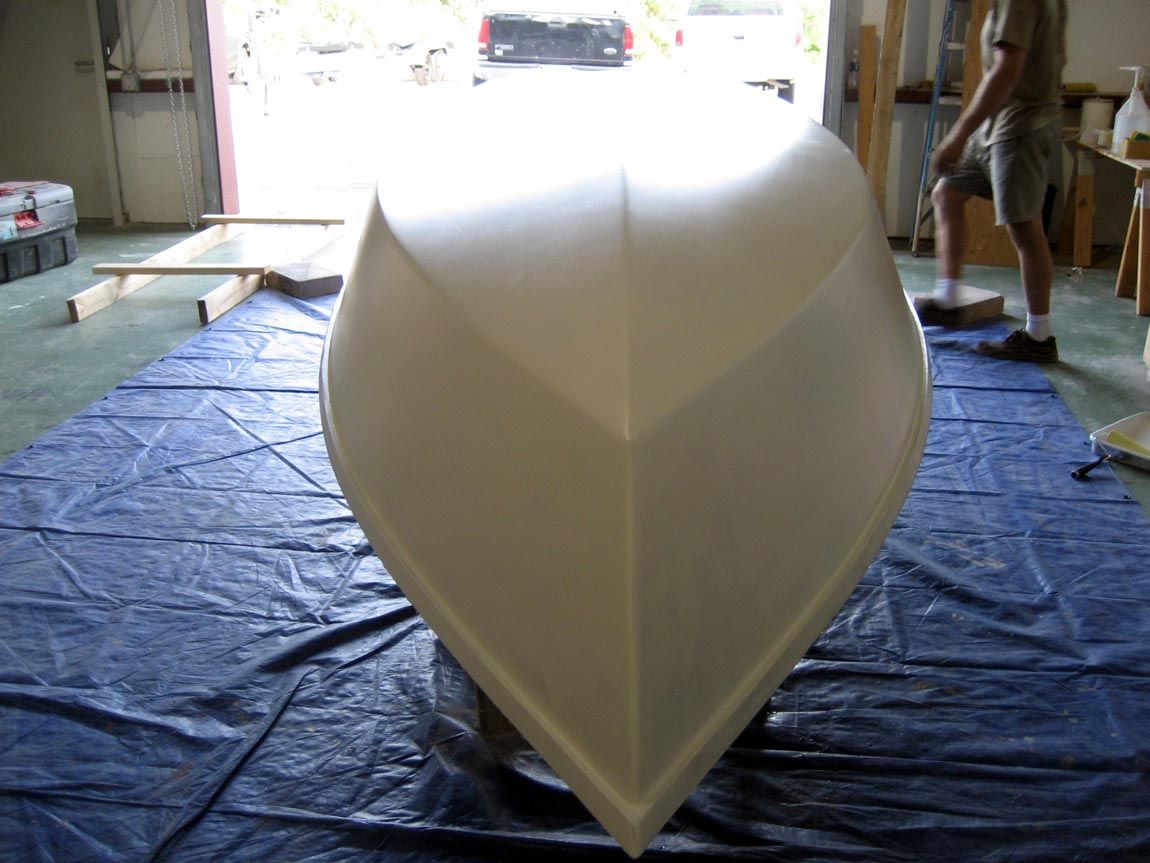
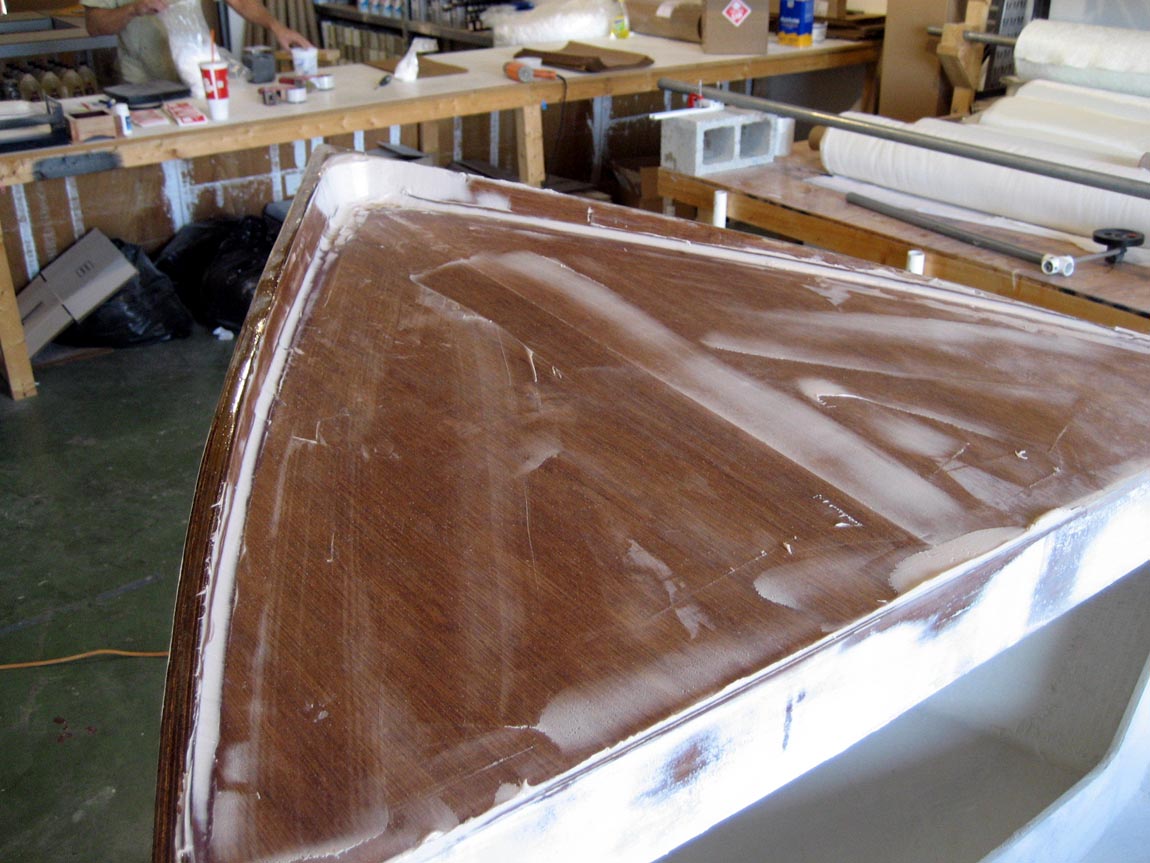
After the all the glass had cured (we did all the bottom laminations in one shot), use a fairing board and grinder to knock down the obvious ridges and hard edges of glass
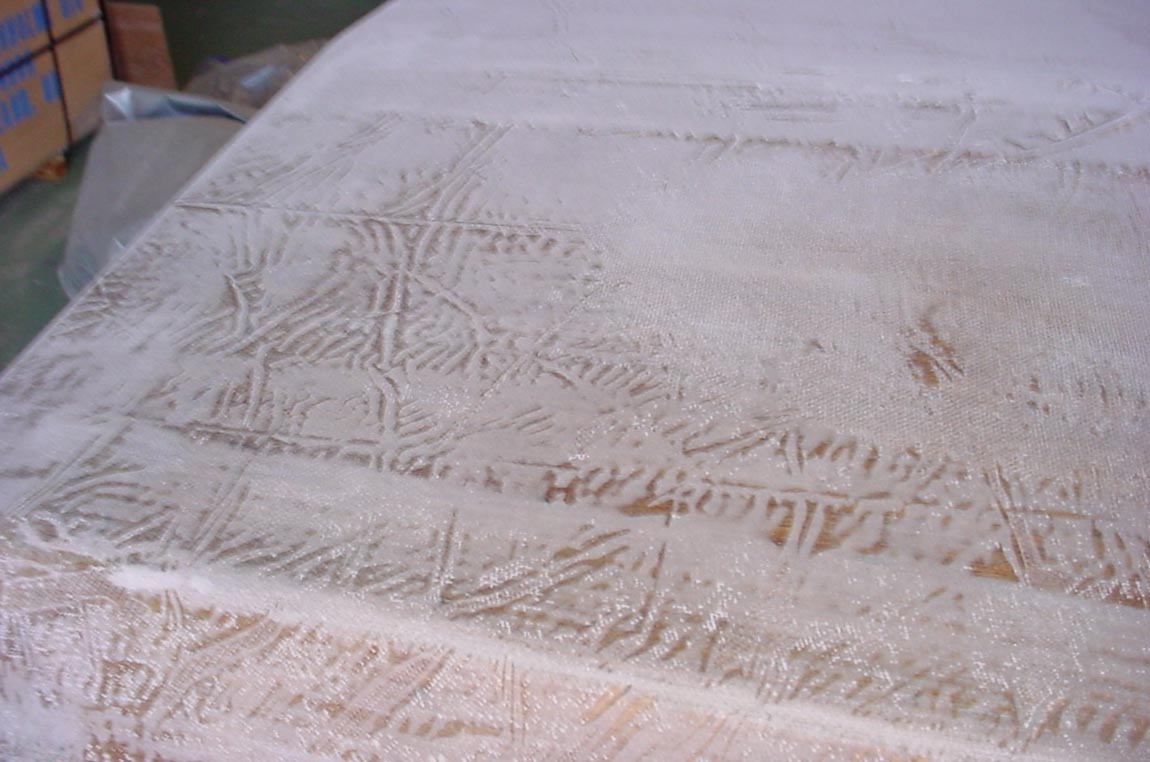
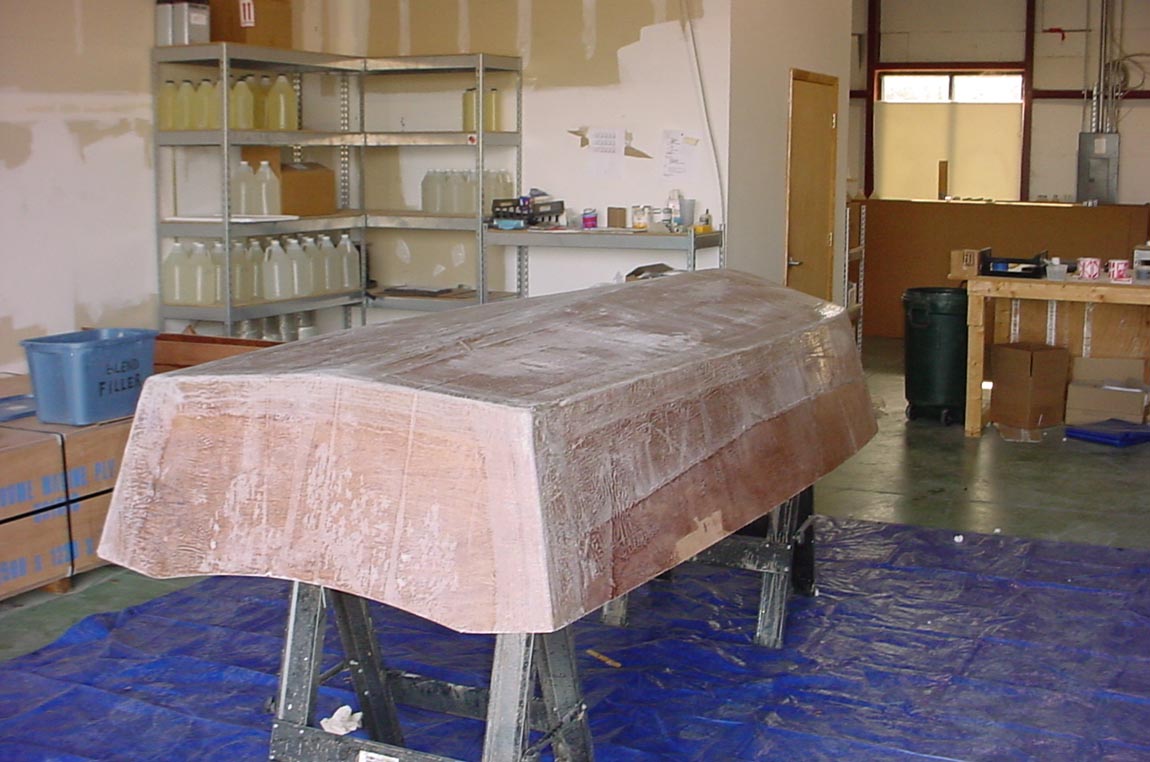
Mix up a loose fairing slurry made from blended filler and regular Marinepoxy. Using a long spreader (the dry wall type) drag the slurry over the edges of the glass layers
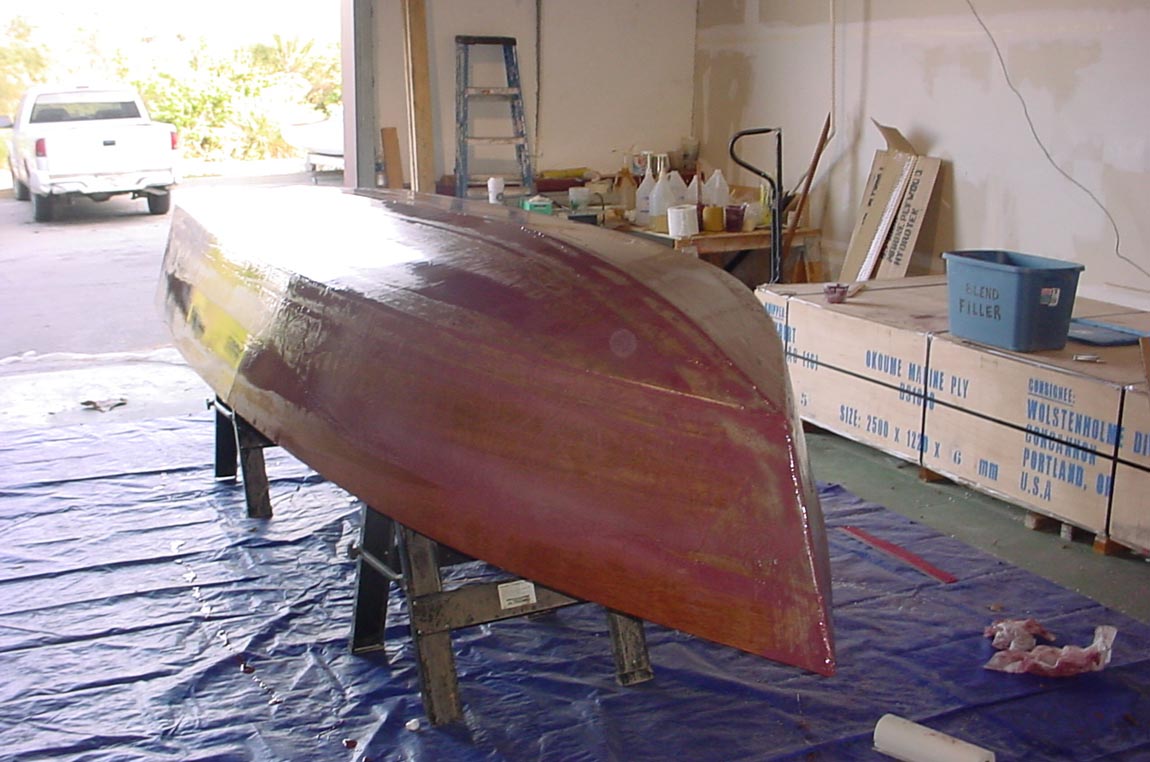
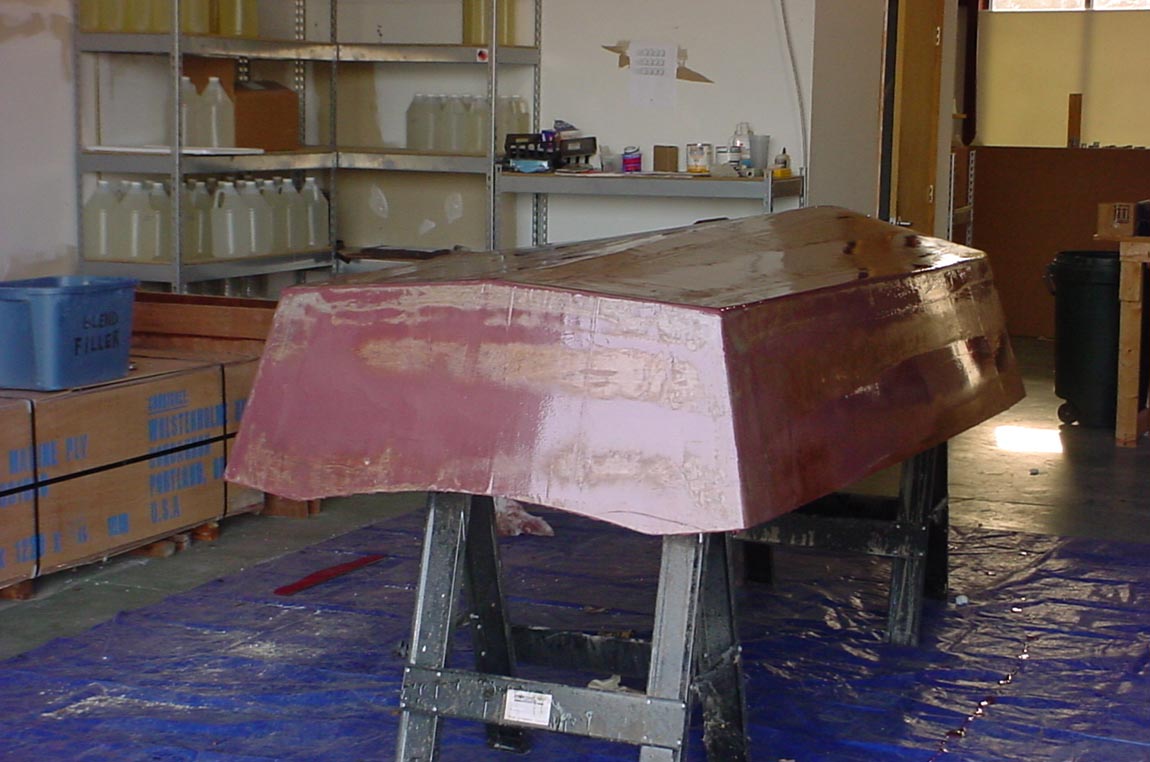
Once slurry has cured, use the fairing board again. The fairing sheets are 60 grit. At this stage we are shaping more than smoothing – that come later with the primer. Use the long board starting at 45 degree angels then lengthwise. You will see we are also putting the rub ail on at this time.
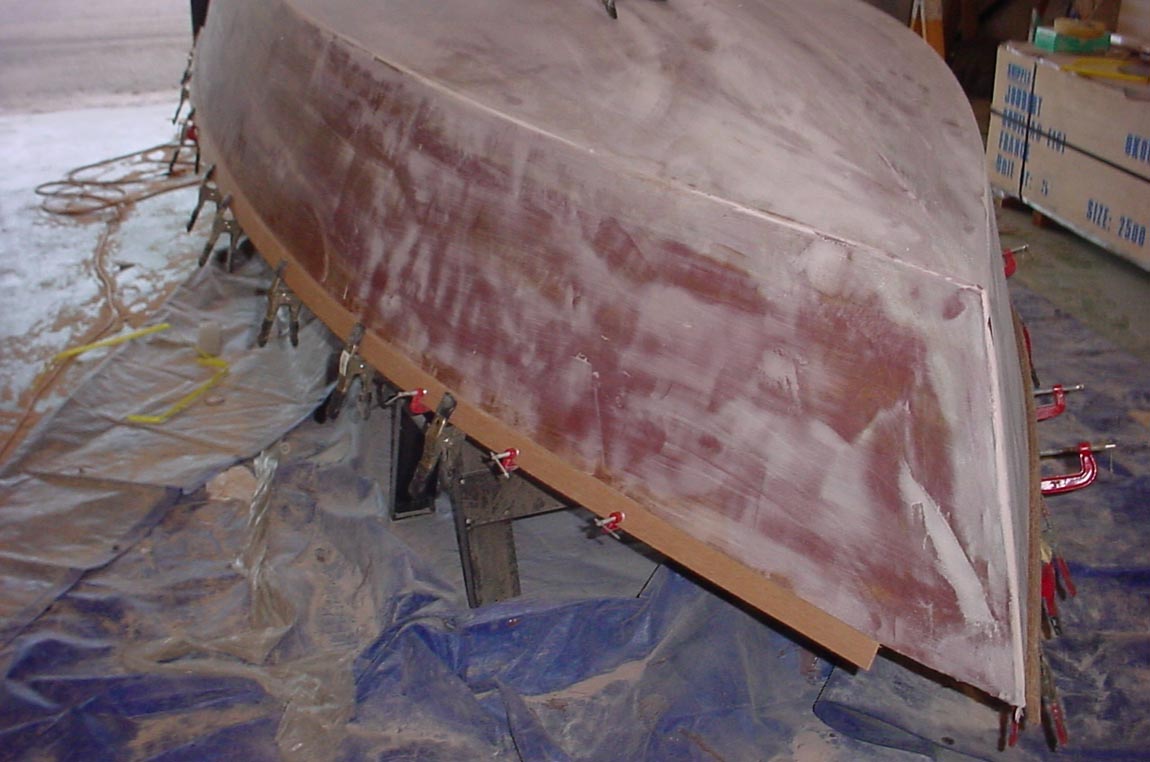
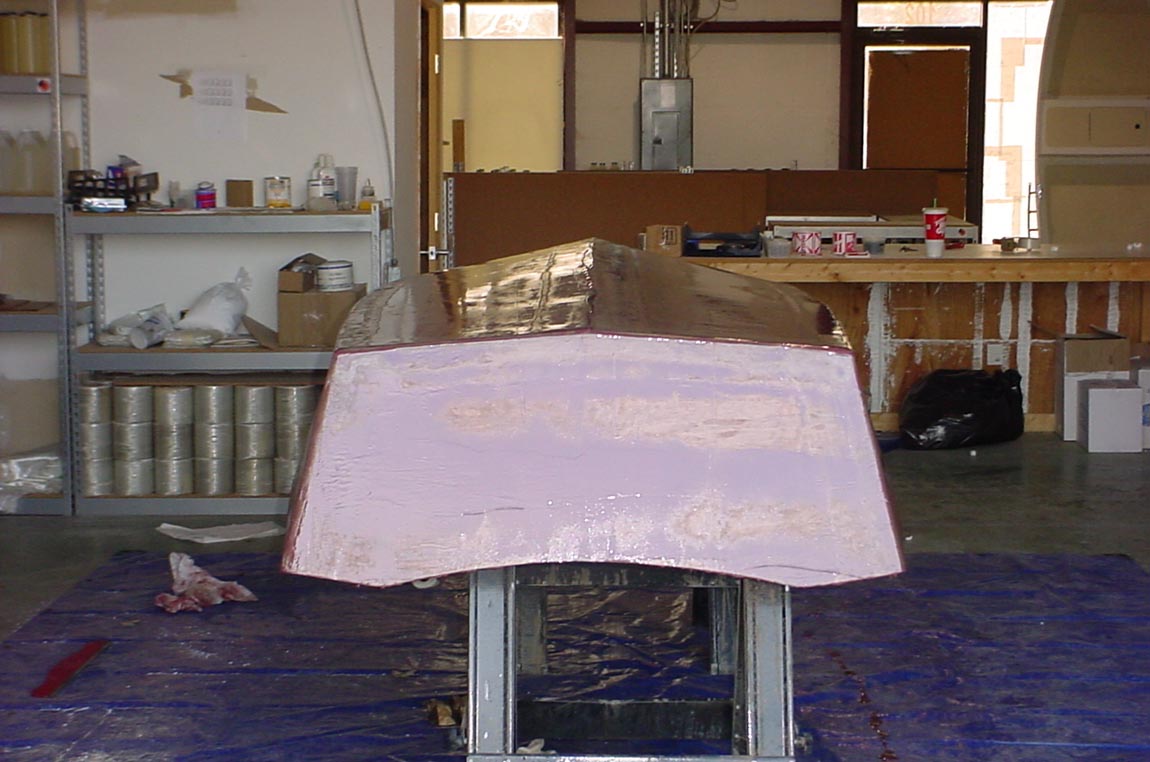
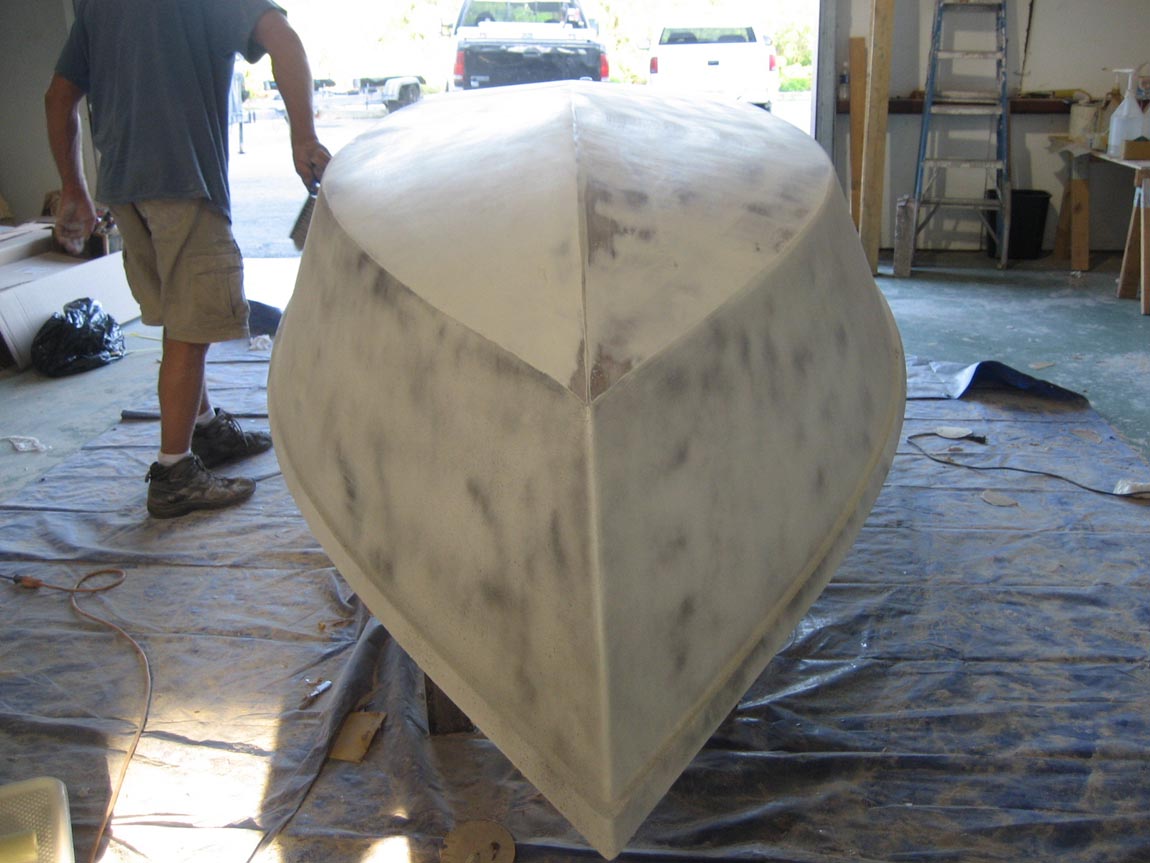
After the initial faring, you will still find some pits and low spots, this is when you mix a thicker fairing paste and spot fill those areas. We used Quick Fair at this stage (it’s the lighter color faring you see int eh below picture)
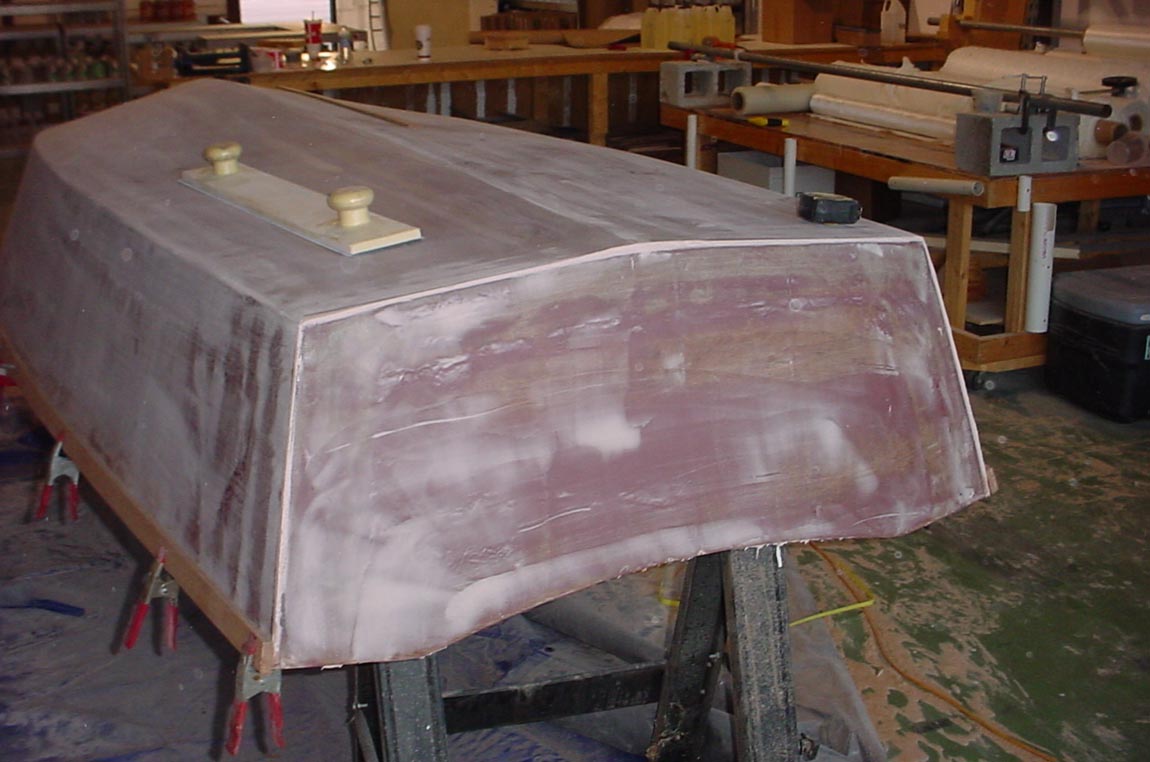
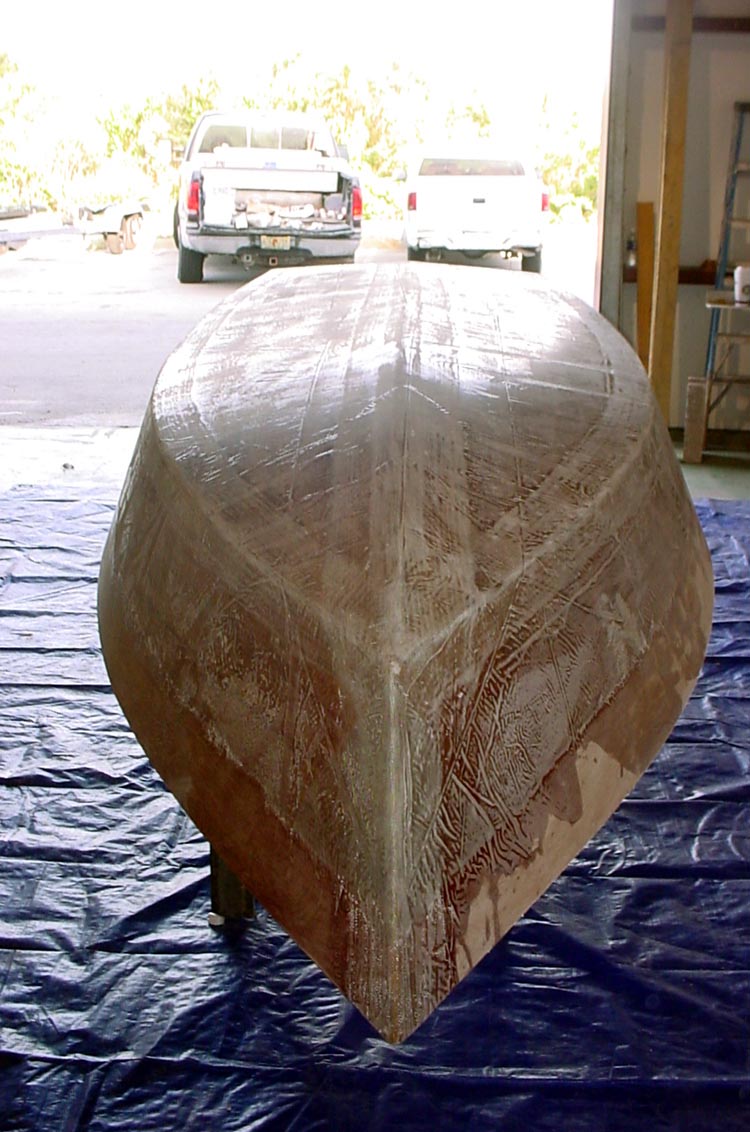
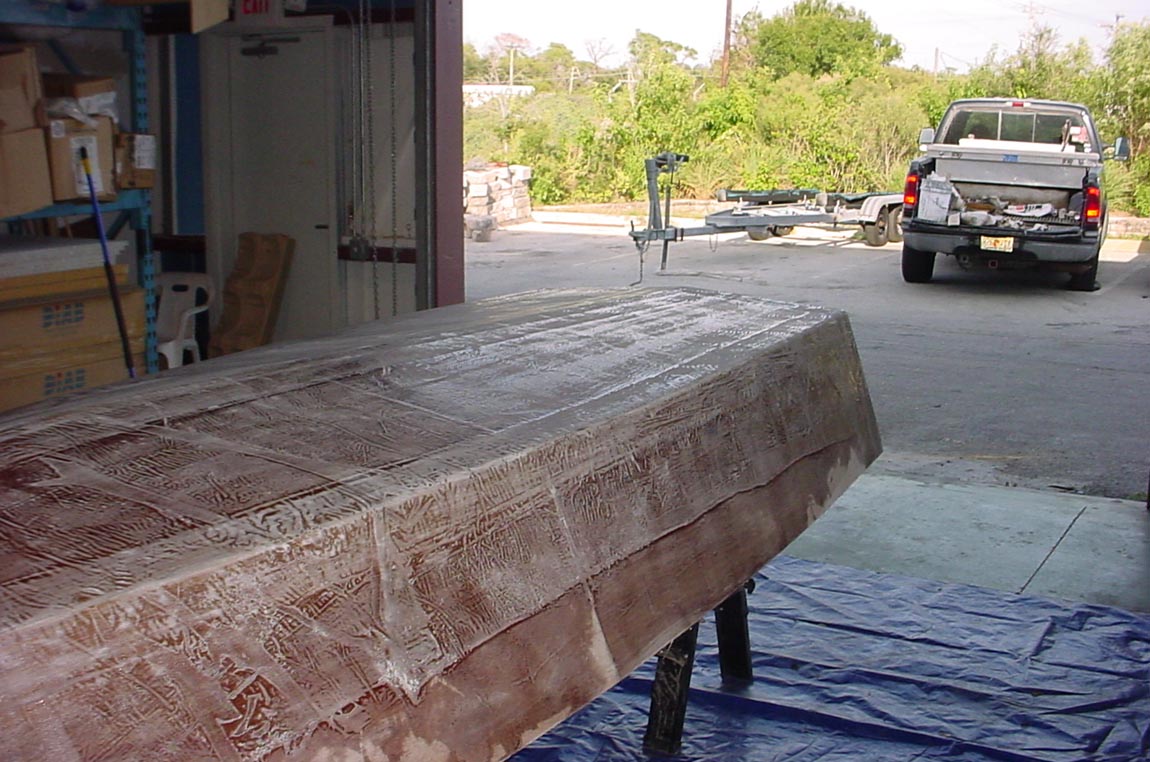
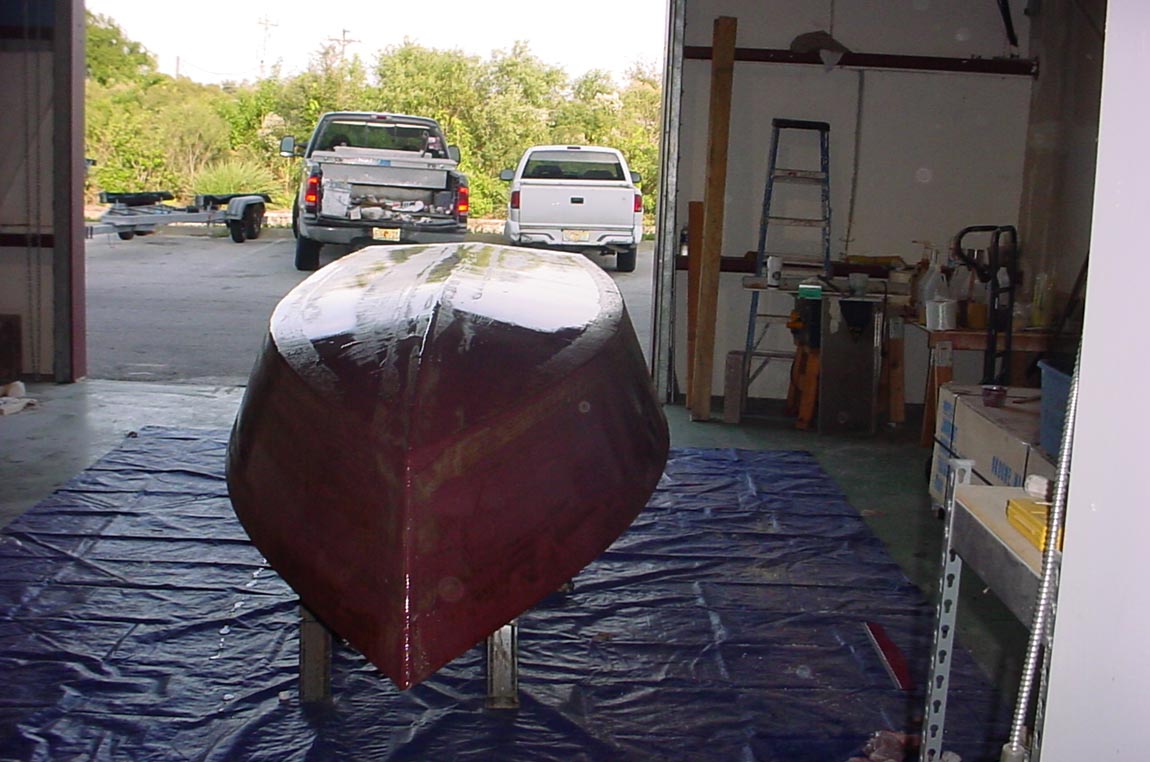
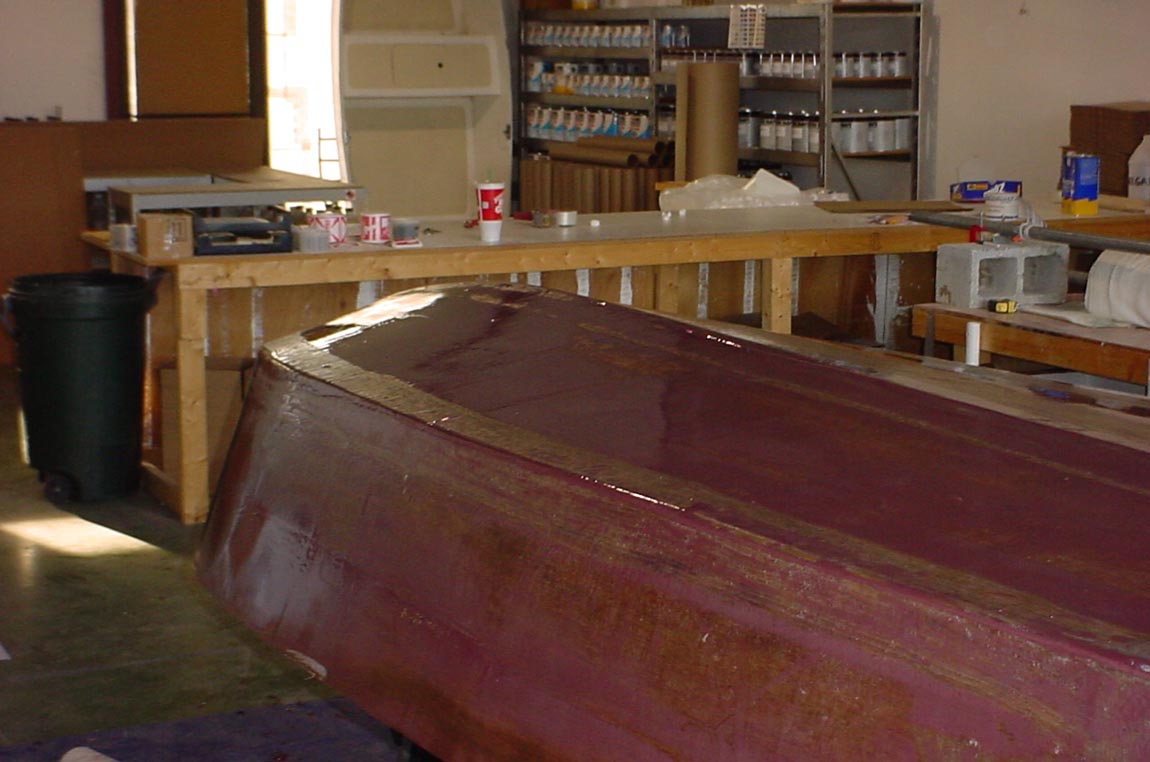
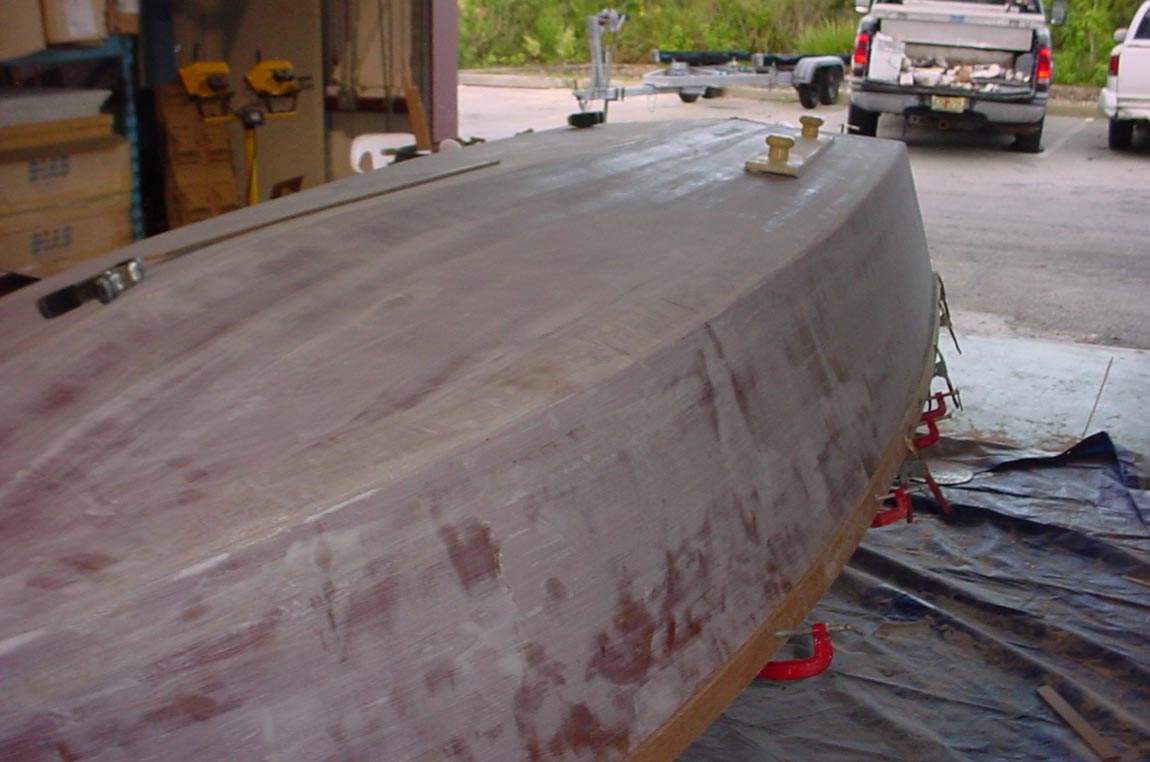
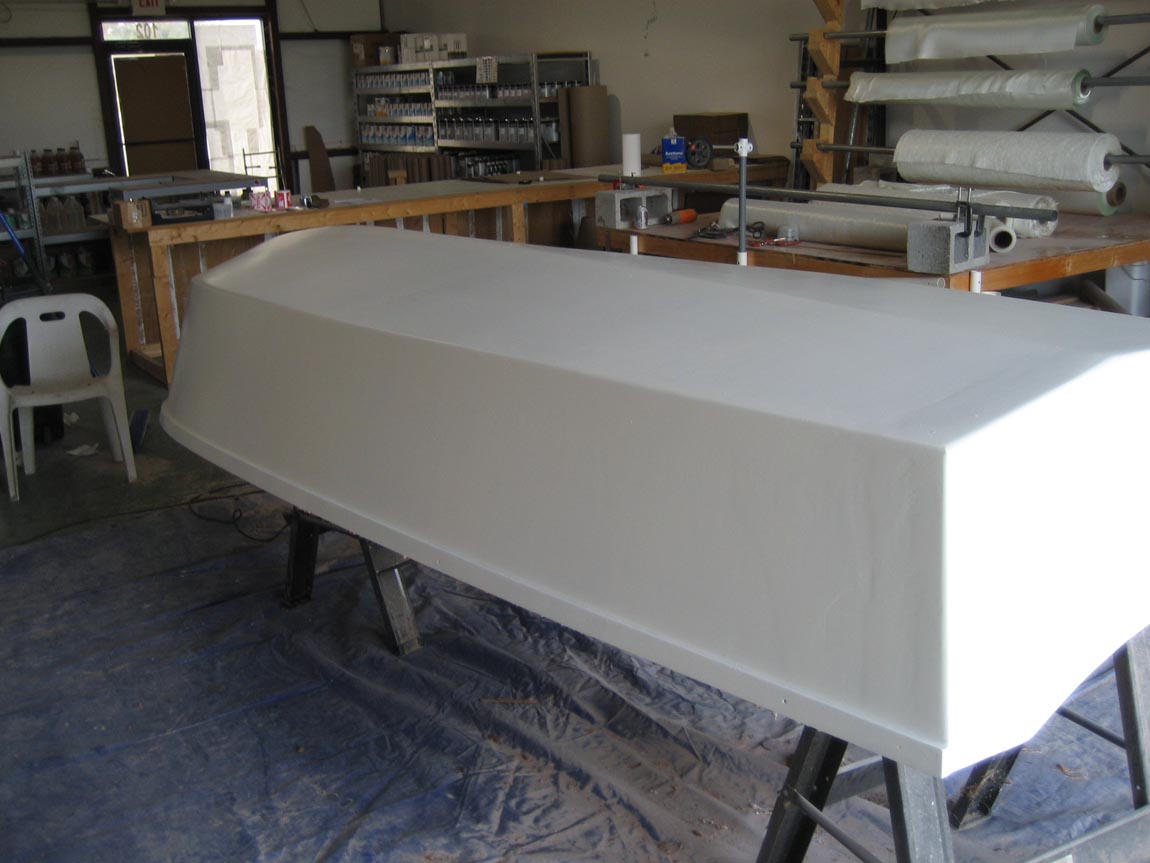
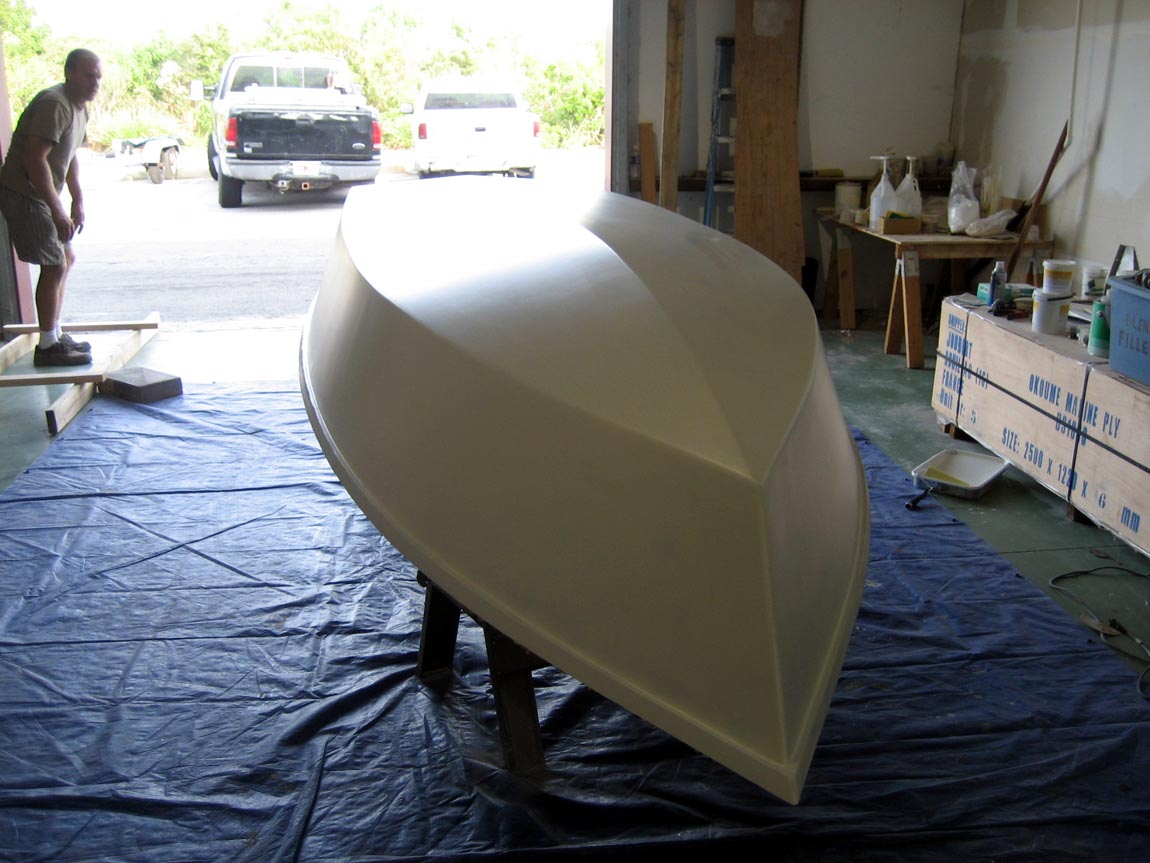
Again, use the long board to shape. Now we are ready for some primer (although the faring is not complete). He is the boat with the first coats of primer. We will sand a lot of this off, but it gives a great contrast when sanded down. This is about 1 quart of primer
 http://gallery.bateau2.comalbums/userpi ... %20002.jpg
[/img]
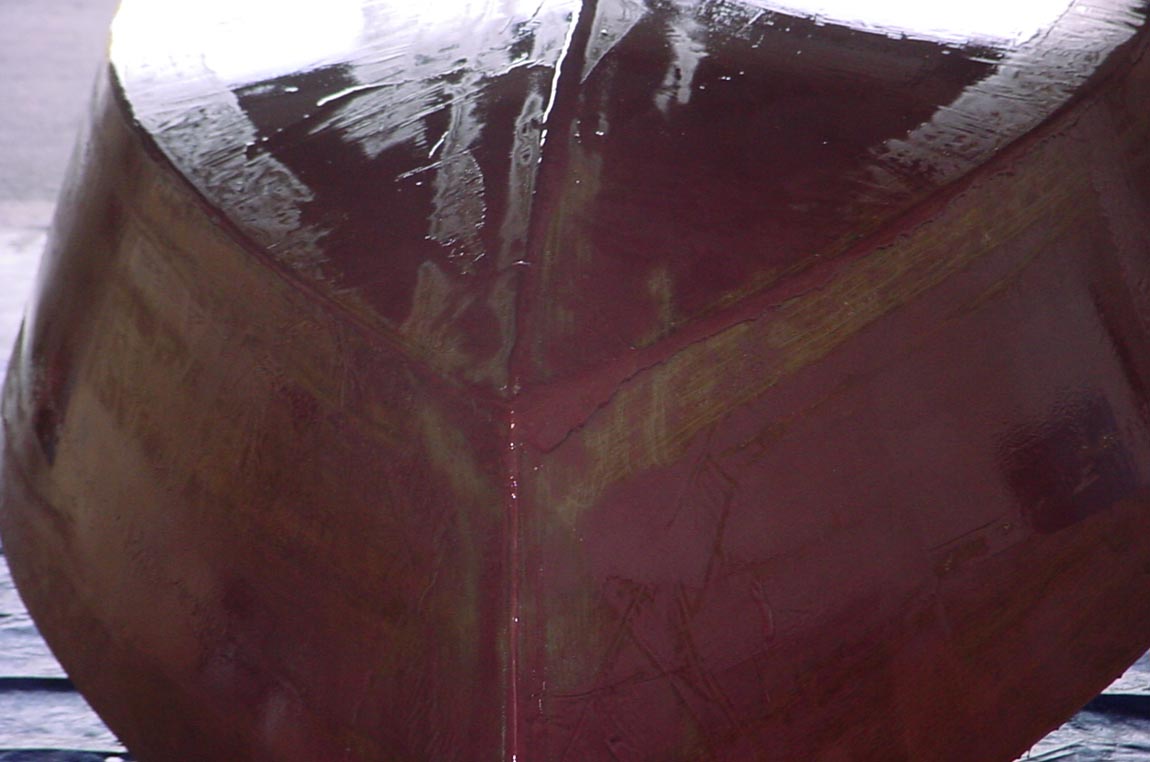
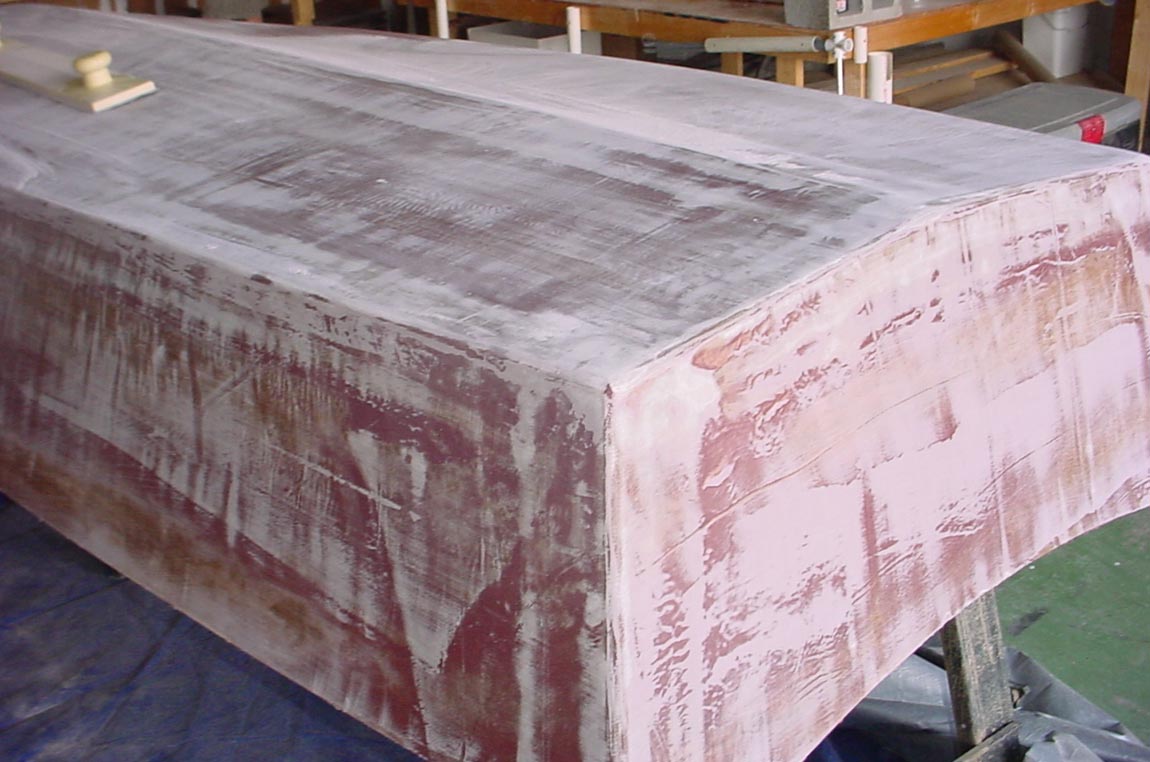
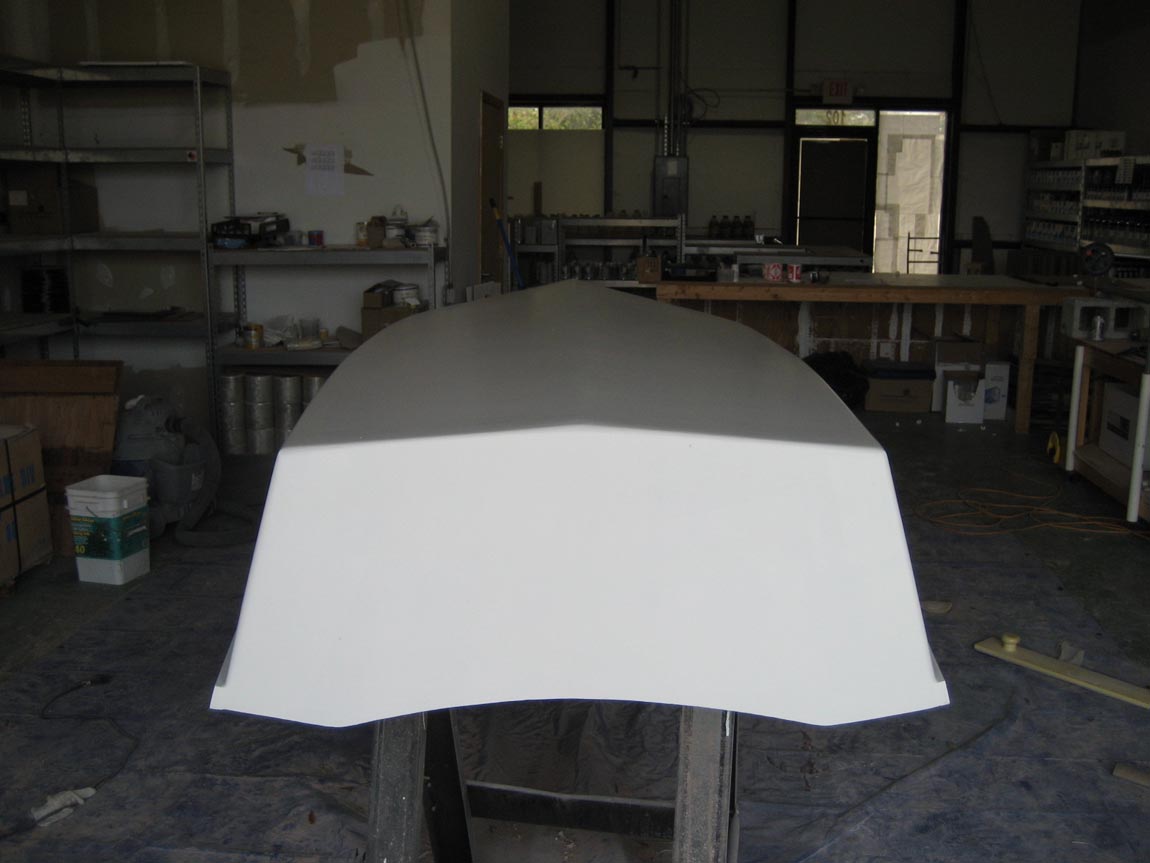
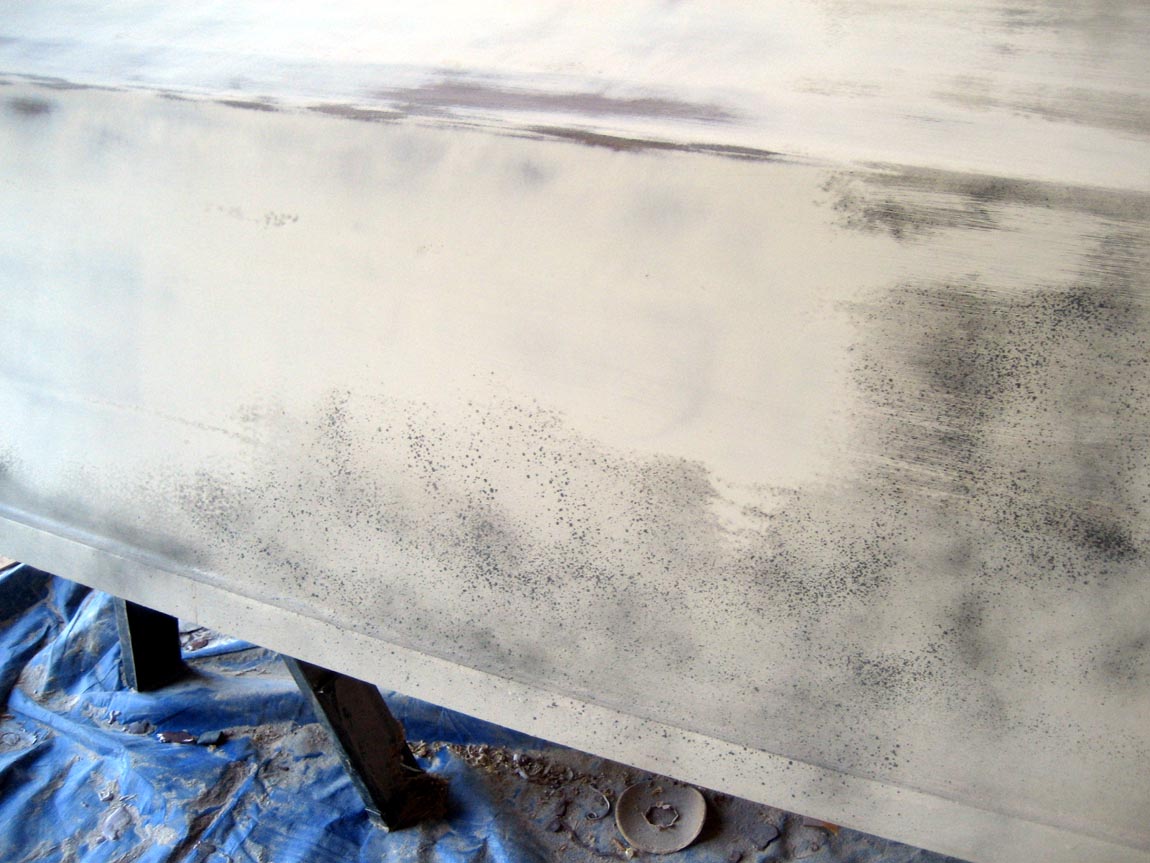
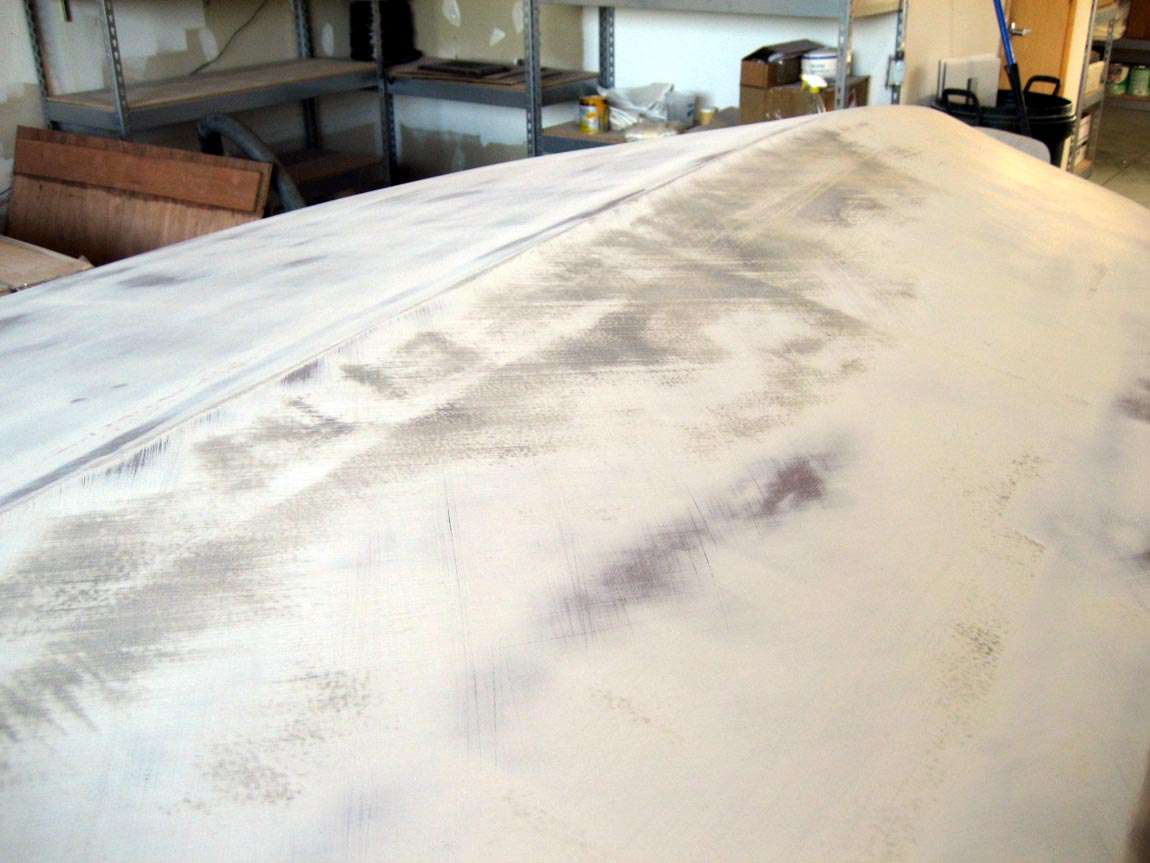
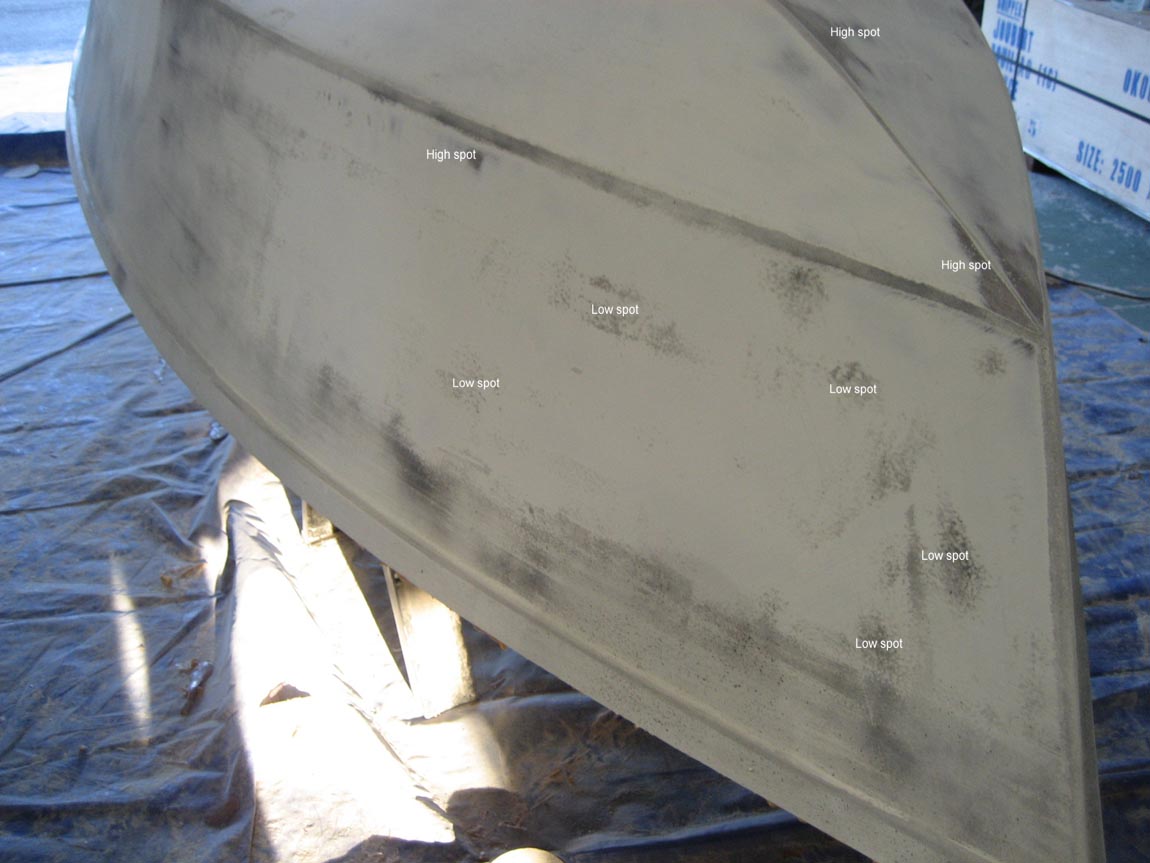
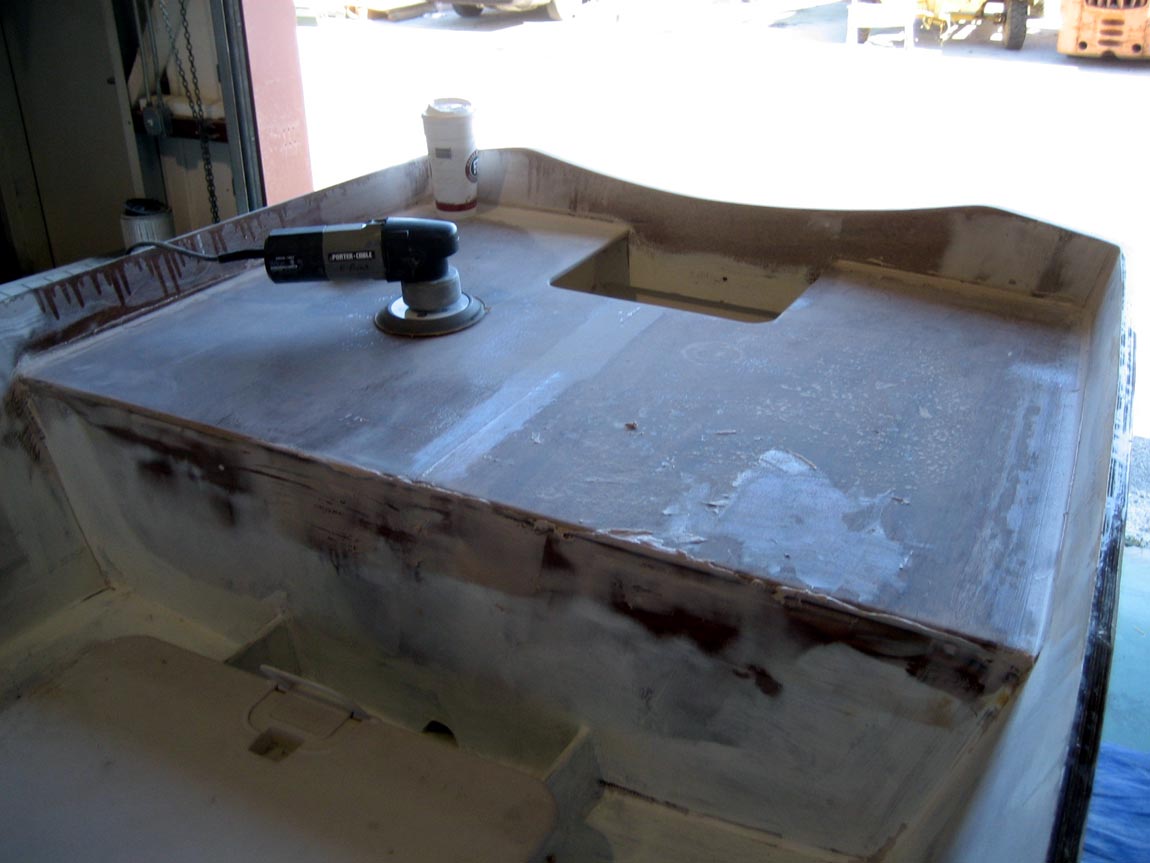
When primer is cured spray a guide coat of a contrasting color. The guide coat can be any quick drying paint. Red or black/gray works well with the white primer.
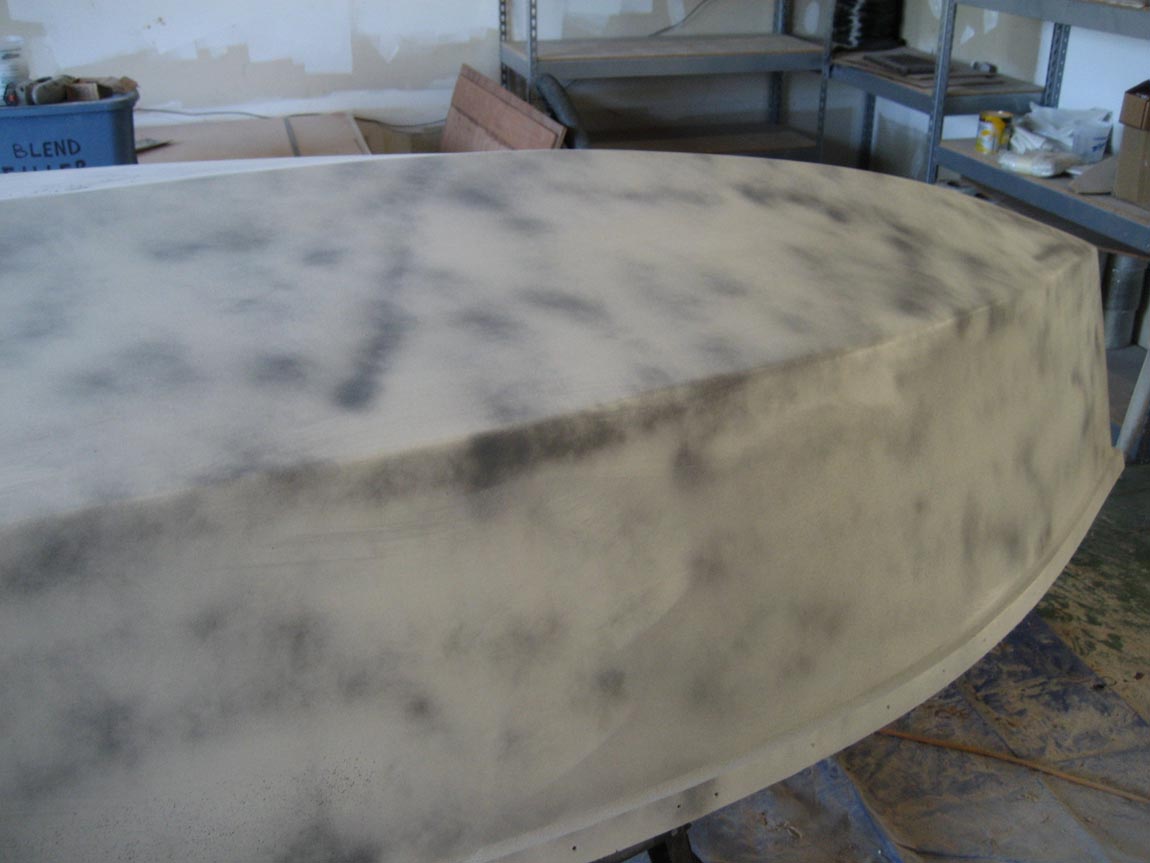
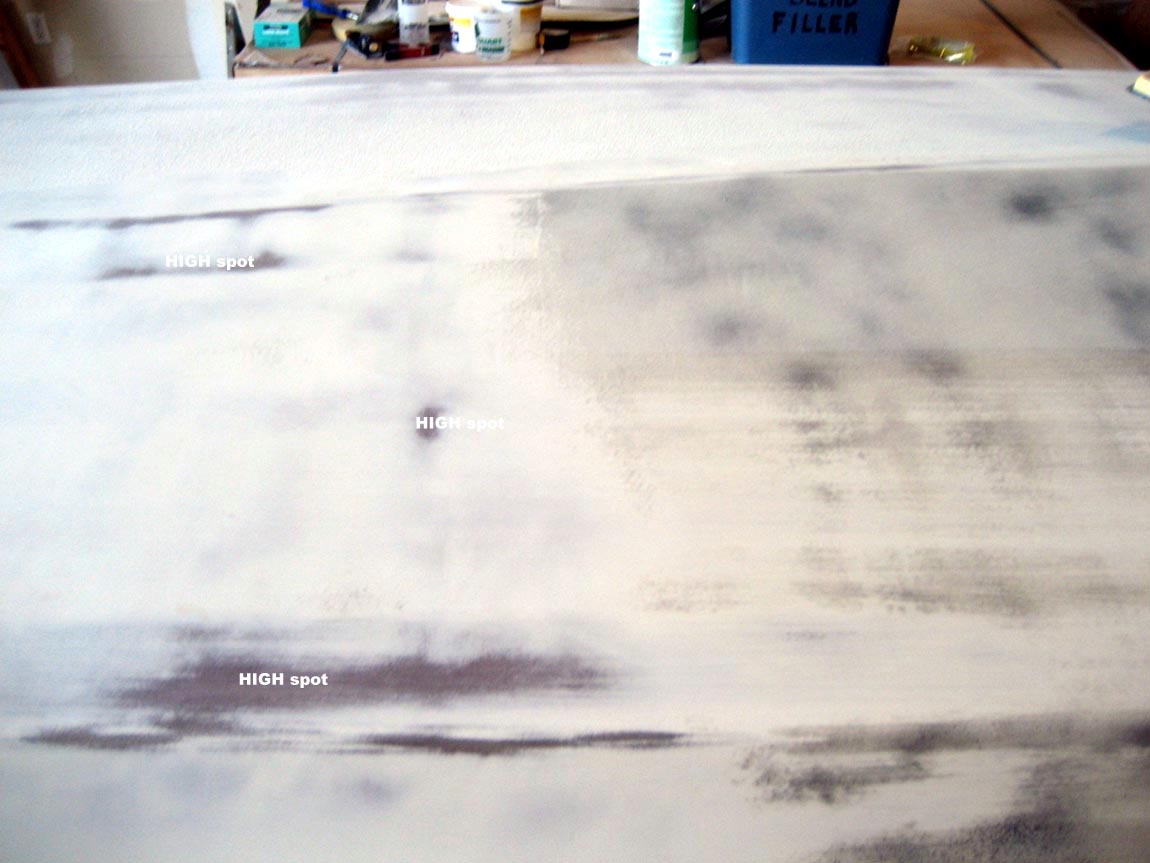
now when you use the faring board, the low spots will stand out as areas with guide coat. In the high spots you will sand through the primer to the darker base.
[/img]
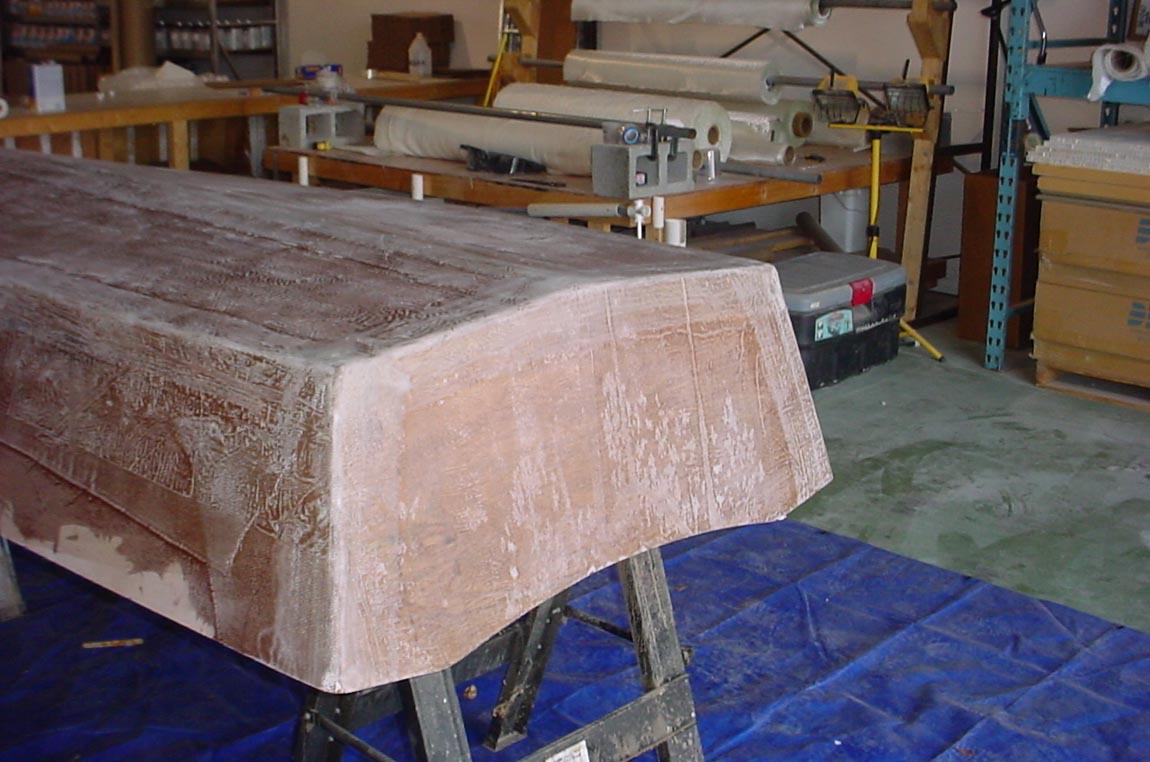
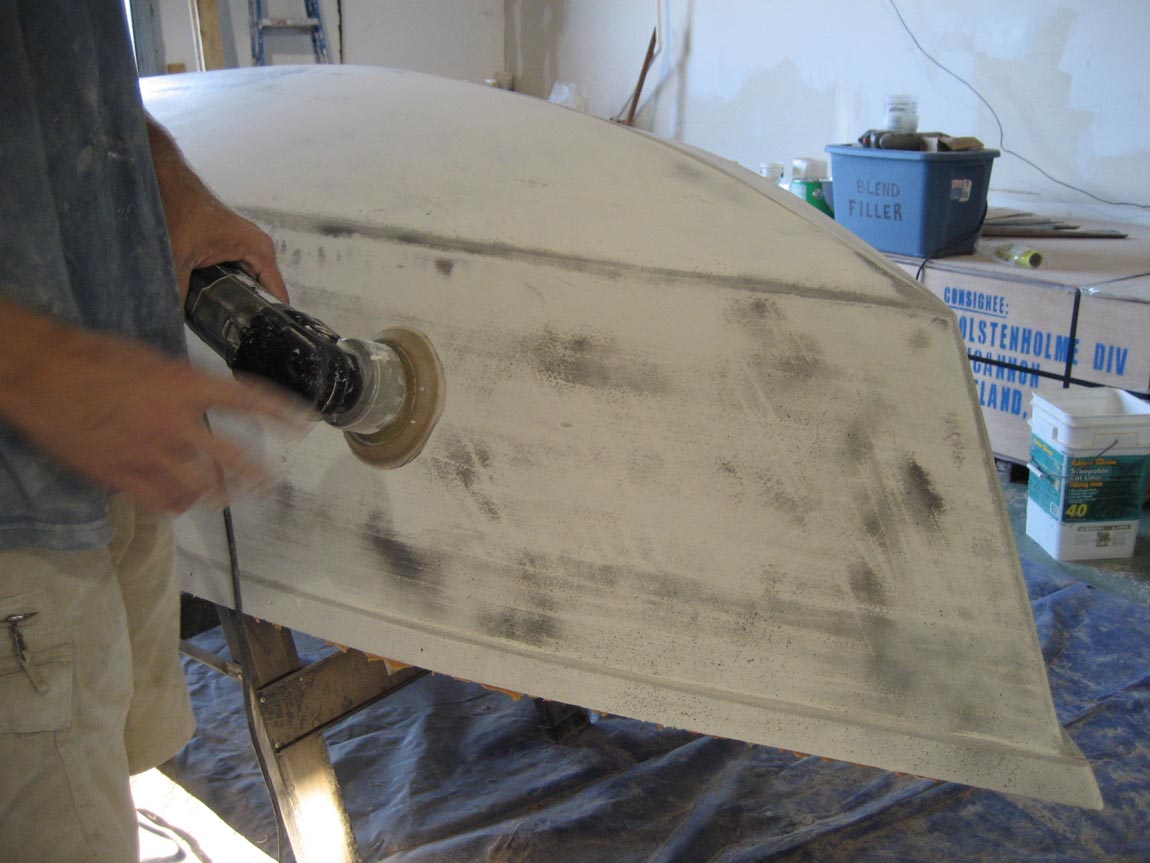
Once you have evened out all the highs and lows, very lightly sand the surface smooth with an orbital sander or sanding block.

 http://gallery.bateau2.comalbums/userpi ... %20018.jpg
[/img]
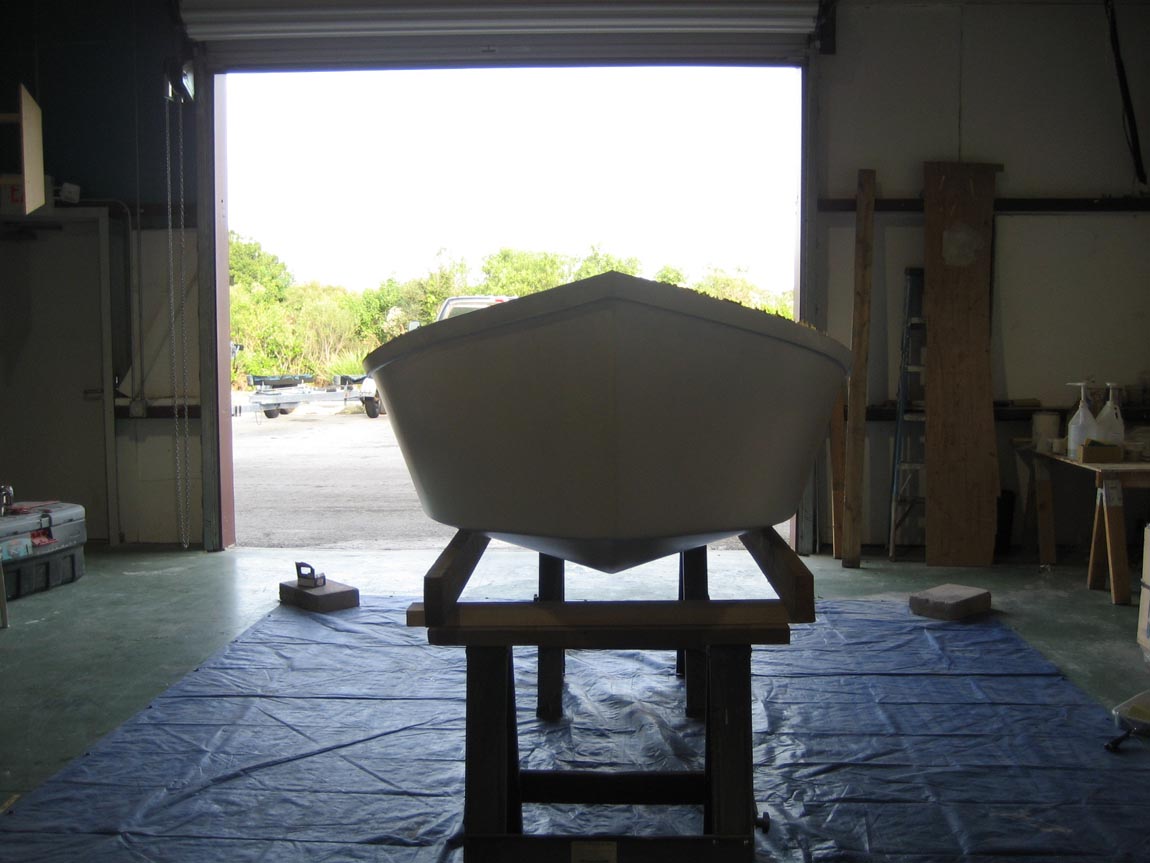
Once the primer is cured, you ready to flip the boat
Posted: Mon Dec 11, 2006 8:34 am
by dborecky
[quote="shine"]Working wet on wet, we were able to do all the outside fiberglass in one shot. It makes for a much cleaner and stronger lamination, uses less epoxy, uses less brushes, and takes less time.
On Friday we:
Cut off stitches and removed nails (spacers)
Used a plane (sanding block could also have been used) to round of the “tack weldsâ€
Posted: Mon Dec 11, 2006 9:26 am
by jacquesmm
FS12 and FS14 are different.
Posted: Tue Dec 12, 2006 11:02 am
by tech_support
We have the kit ready for sale. Right now its just the pre-cut parts. After this boat is complete, the kit will a CD with clips and more details.
http://www.boatplans-online.com/prodde ... d=FS12_CNC
Posted: Tue Dec 12, 2006 11:26 am
by jacquesmm
BTW, about Derrick's question, we decided to cut the wide fabric for the bottom of the FS12 the same way than the FS14.
In the FS14, we propose to cover the bottom in two pieces, one starboard, one port with an overlap at the keel. This was required because of the width of the fabric but it has an advantage for a first time builder: less area to fiberglass at once, less risk to make a mess.
It is a good idea to do it the same way on the FS12 and I will make a note in the building notes.
Posted: Tue Dec 12, 2006 12:37 pm
by jayb01
Posted: Tue Dec 12, 2006 12:50 pm
by tech_support
thanks, i changed the product ID after making the post

Posted: Tue Dec 12, 2006 7:03 pm
by Amerville
Good Job Joel, This will help everyone see what you are talking about when building a boat.
Thanks
Tom
Posted: Wed Dec 13, 2006 6:16 pm
by Dougster
So, regarding covering the bottom in two pieces. I assume one must sand the part of the cloth that will overlap before putting on the second piece of cloth? I'm doing the LB22 and can't see being up to doing it all at once.
Got a cold and haven't done much all week Dougster
Posted: Thu Dec 14, 2006 8:02 am
by tech_support
Yes, you will want to hit the edge of any hardened glass with a rough grit paper or even a grinder. Otherwise, the hard edge will keep the next layer from transitioning smoothly over.
Don’t go crazy with the sander though, just remove rough spots where the glass over laps. If your overlapping biax over biax, then just sand down the stitching that stands proud (its not glass anyway), then your next layer will lay down nice and smooth
If you can manage wet on wet, then you don’t have to grind and the over lap will basically become invisible.
Joel
Posted: Thu Dec 21, 2006 12:45 pm
by tech_support
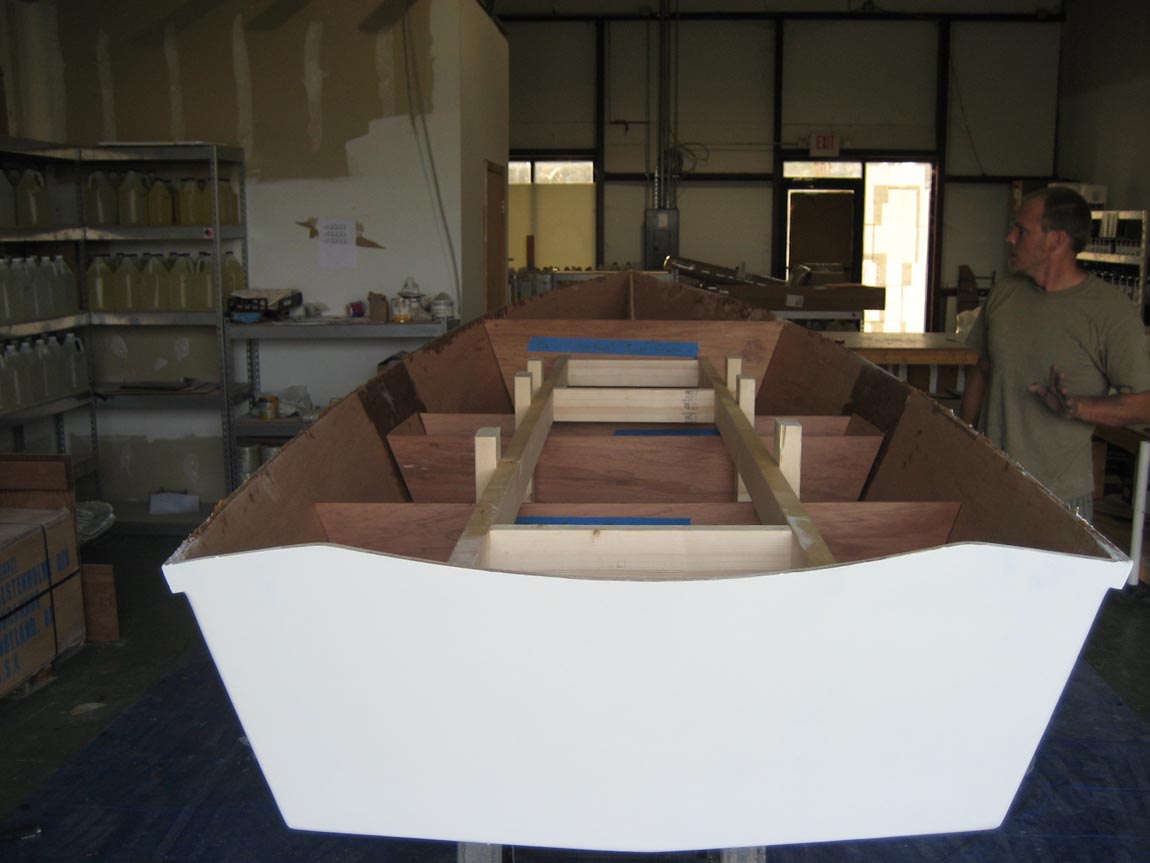
More pictures at the gallery.
Next we lift the strongback and frames/stringers out of the hull.
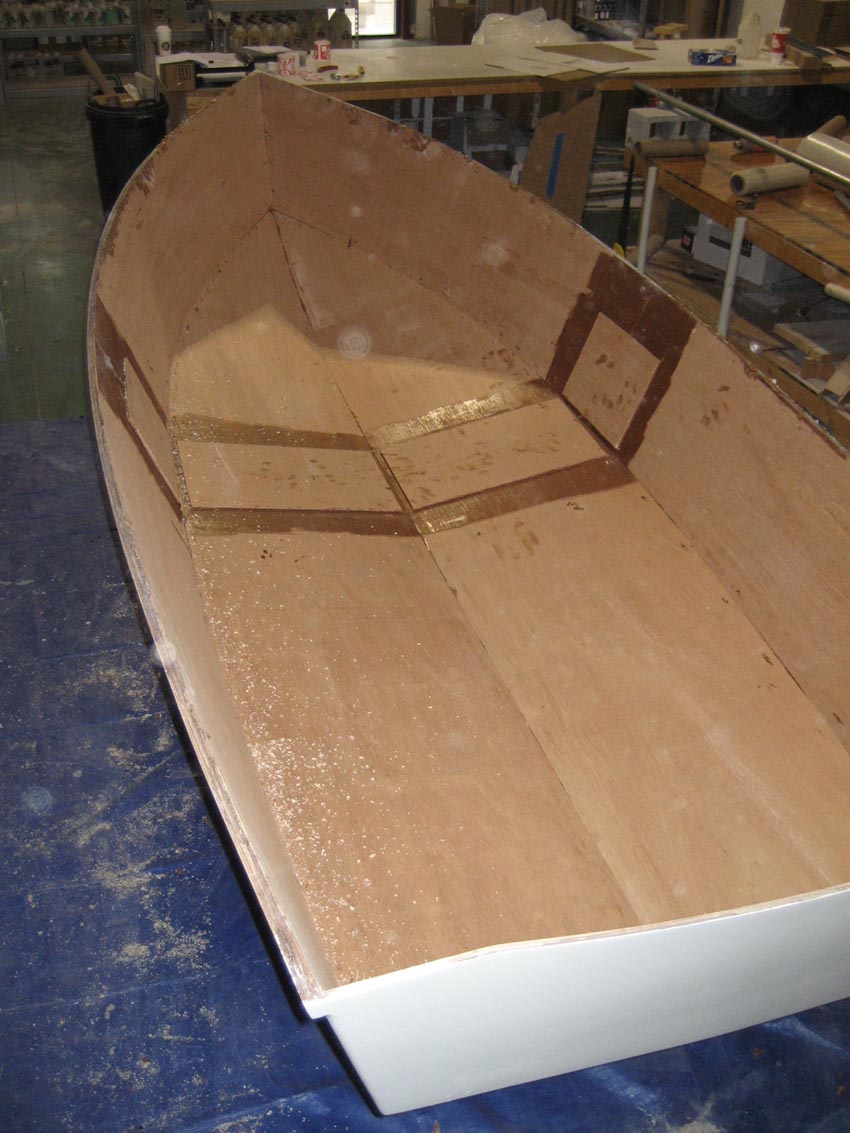
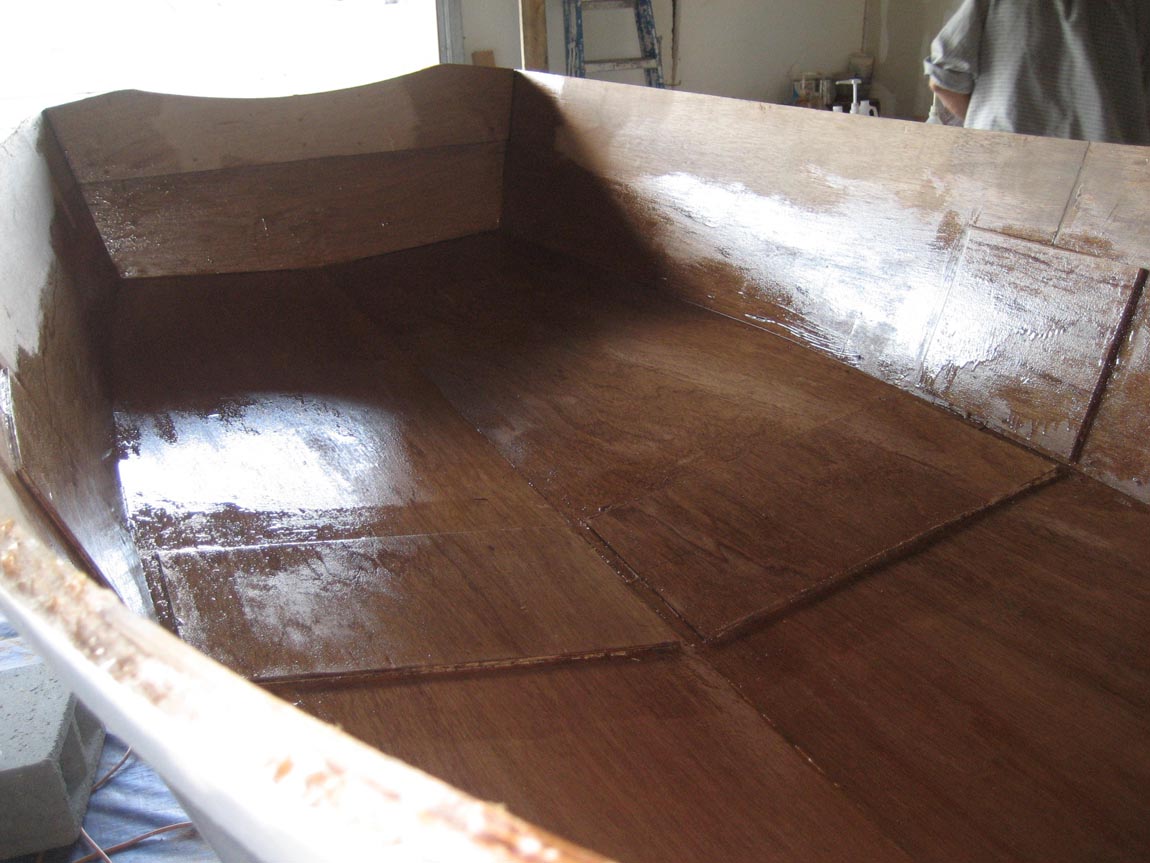
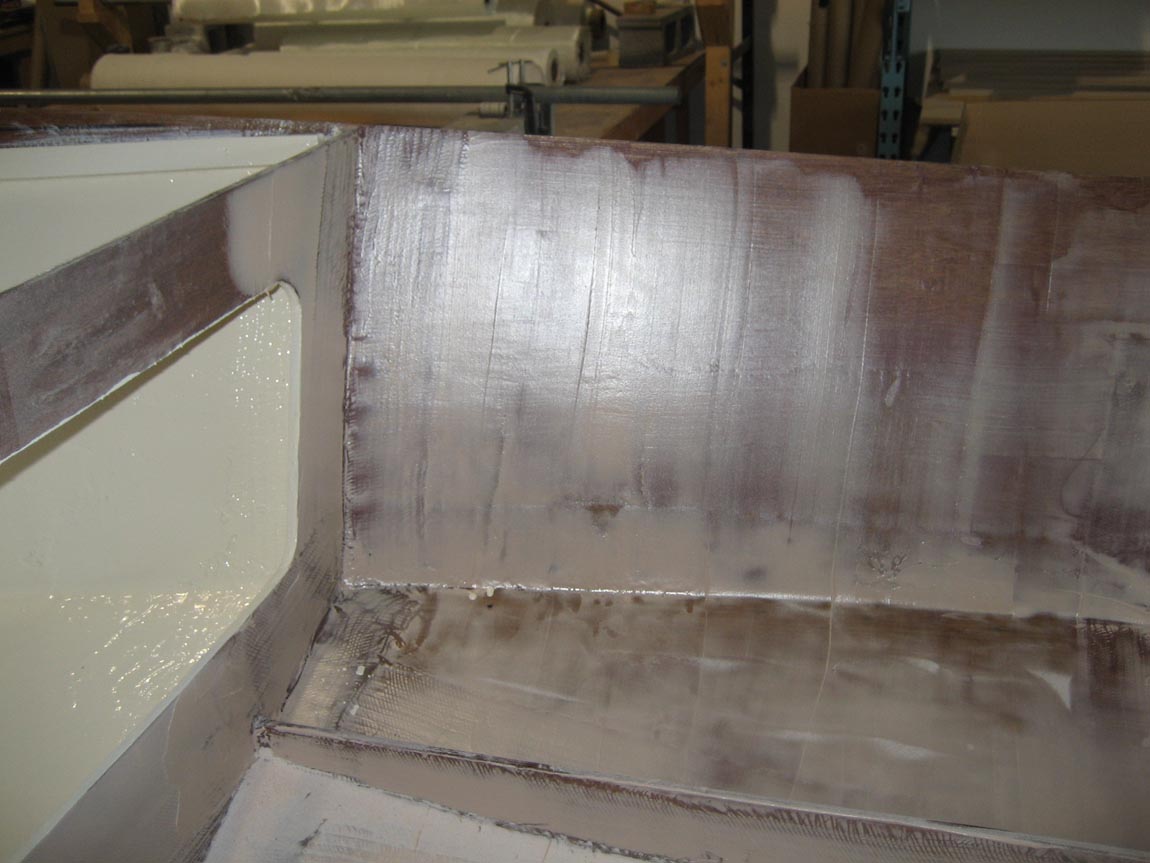
Glass the inside (tape seams and wide cloth). Coat the plywood with epoxy. Give it at least 20 minutes to soak in before glassing. CUT THE TAPE AND GLASS TO FIT BEFORE PRE-COATING !
Lay a bead of fillet mix in the joint
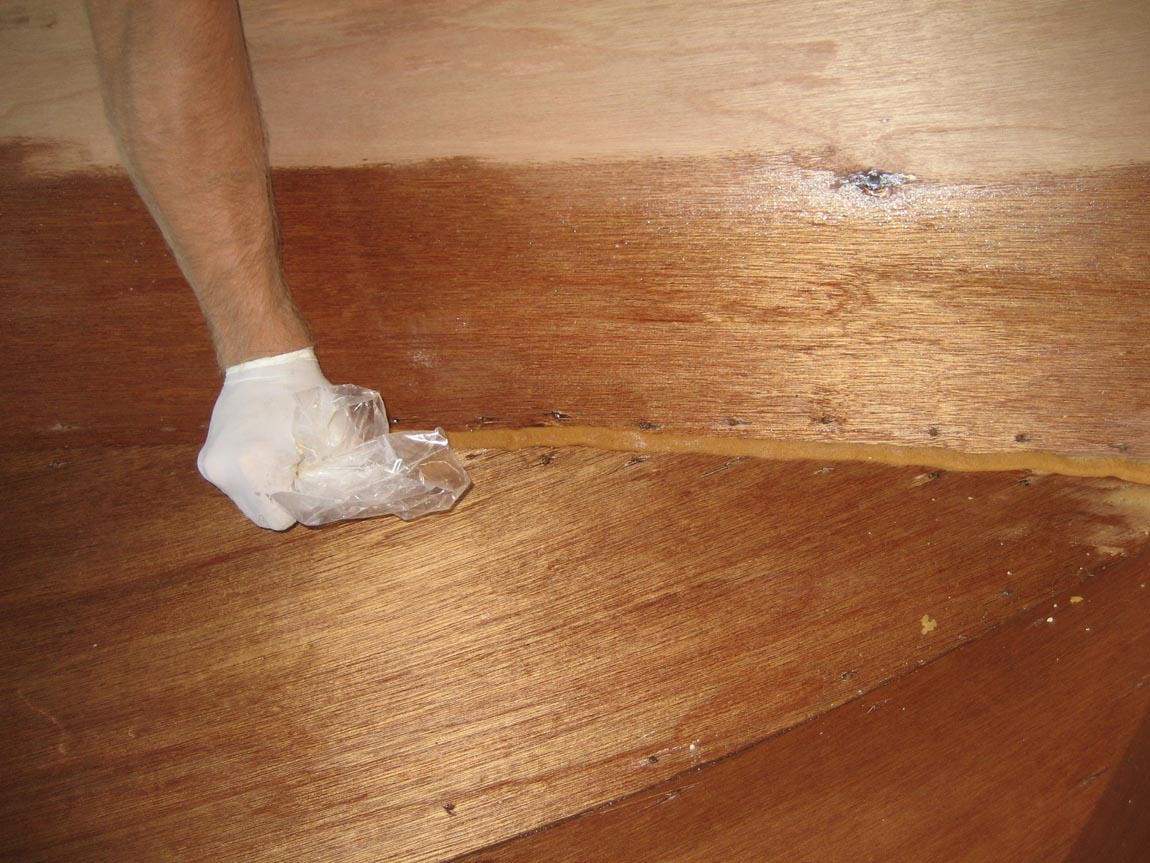
Smooth it out with a fillet tool
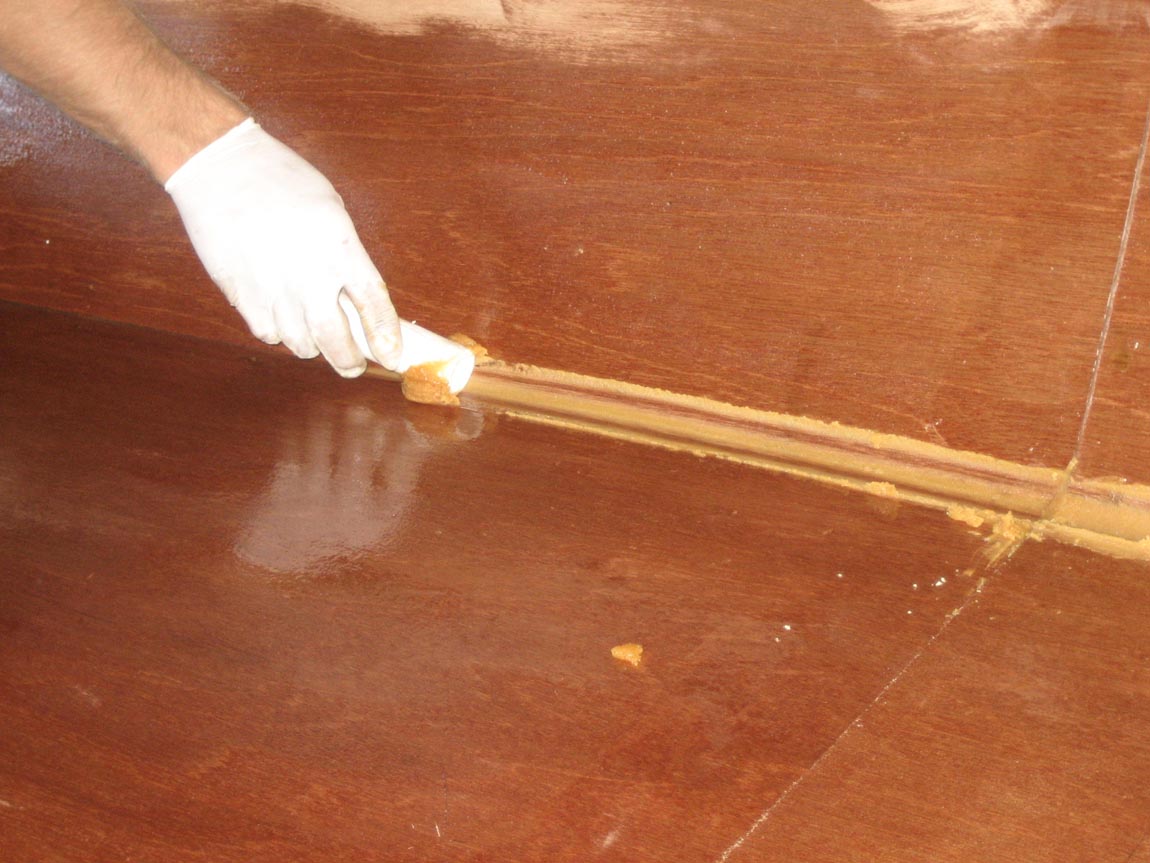
Clean up the excess fillet material. Let fillets become firm before putting tape over top
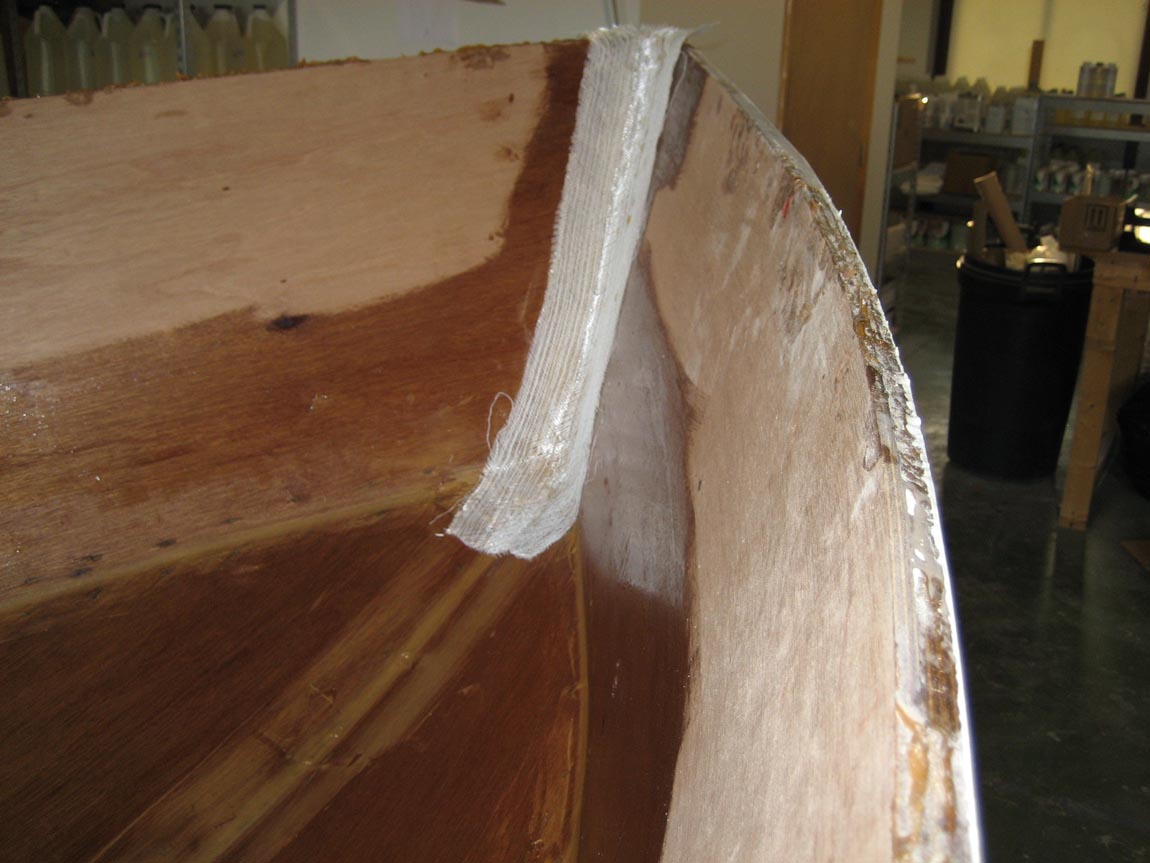
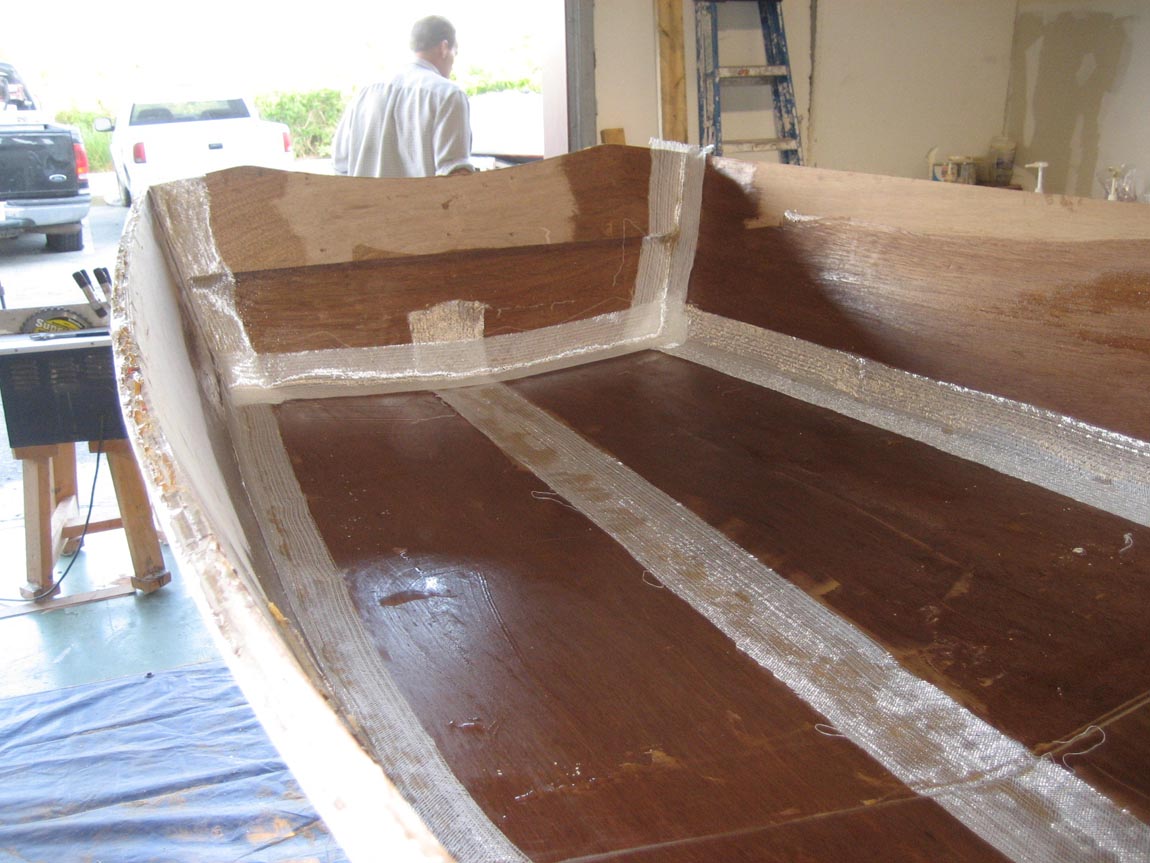
Tape the seams, then wet out the wide cloth. Its easier to use 2 pieces of wide cloth with a small overlap in the center vs. one wide piece.
Once the inside hull laminations have hardened, put the strongback back into the boat. We will use this opportunity to mark the location of each frame in the boat. The strongback will also hold the stringers in the correct spot. “tack weldâ€
Posted: Mon Jan 08, 2007 7:55 am
by dborecky
Joel,
I have a quick few questions.
Should I put on the rub rail before putting fairing compound on the sides? I think I would get a better bond without fairing compund between it and the sides.
I noticed you did not put an additional running board along the keel like on the FS14 plans. Do I need to put that board down the keel? Do you think it will make that much difference in performance?
If I need to put the board, do I put it on before or after fairing?
Thanks,
Derrick
Posted: Mon Jan 08, 2007 9:04 am
by tech_support
Rub rails and keels are best attached before fairing.
Joel
Posted: Mon Jan 08, 2007 9:54 am
by jacquesmm
It is also a matter of personal preference. Like Jole, I prefer to install the rubrail first because it adds stiffness to the sides amking it easier to sand.
For the keel or skeg, I prefer to wait until the fairing is done.
It doesn't really matter.
Posted: Wed Jan 10, 2007 10:12 am
by tech_support
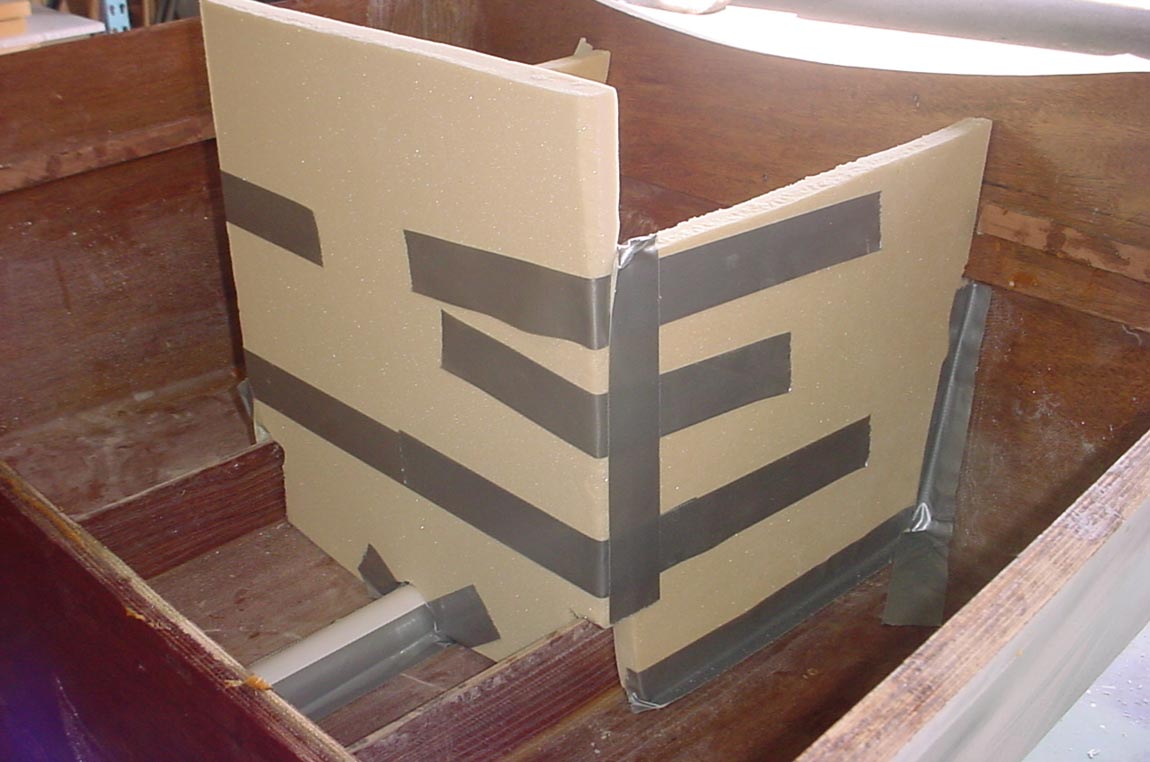
seat compartments primed. Helps to do this before gluing down casting deck and seats.
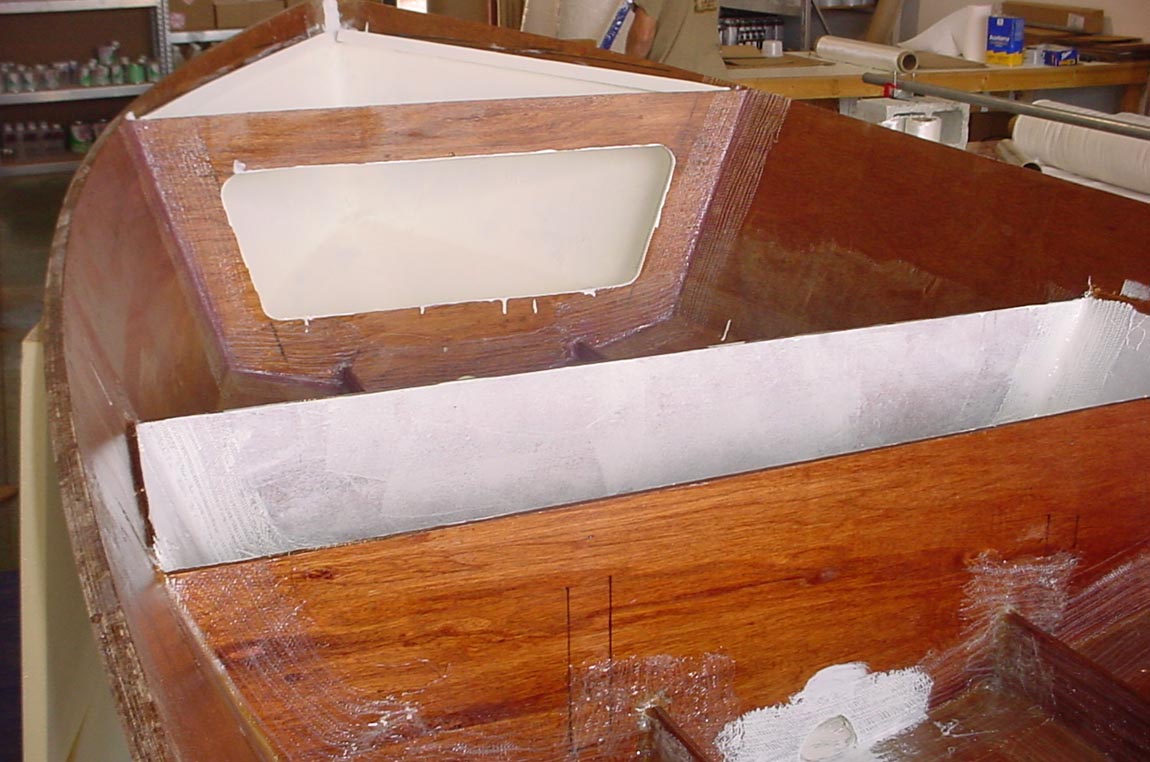
We are using some 1" sheet foam to block off the area under the rear casting deck that will be filled with pour foam (for flotation). If worked very well...

[/img]
Posted: Mon Jan 22, 2007 8:22 am
by dborecky
Joel,
I have sanded the whole bottom and sides in preparation to putting on the rub rail. I just need to sand the back of the transom. I did as you suggested and sanded the two back corners some as it was very thick there with all the layers. I did cut the rub rails with 1/4" Okume.
Two things.....
1. Do I need to clean off the surface after sanding or can I just start fairing and glueing on the rub rails? I did use a shop vac attached to the sander and that leaves less dust behind. I also used Siver Tip Epoxy. If I need to clean it off what should I use?
2. I noticed you did not add a skeg to your keel. Do you think it will run fine without it. It would be easier for me to not add one then to make one...
Thanks,
Derrick
Posted: Mon Jan 22, 2007 9:30 am
by tech_support
You should not need to do anything more than vacuum off the dust before putting on more quick fair or gluing rubrail material.
Make sure you place your rubrail strips so that the long section (8') starts at the bow. Basically you want the long and continuous piece to wrap around the part of the sheer with the most bend - makes a nice fair line that way
Posted: Mon Jan 22, 2007 9:36 am
by tech_support
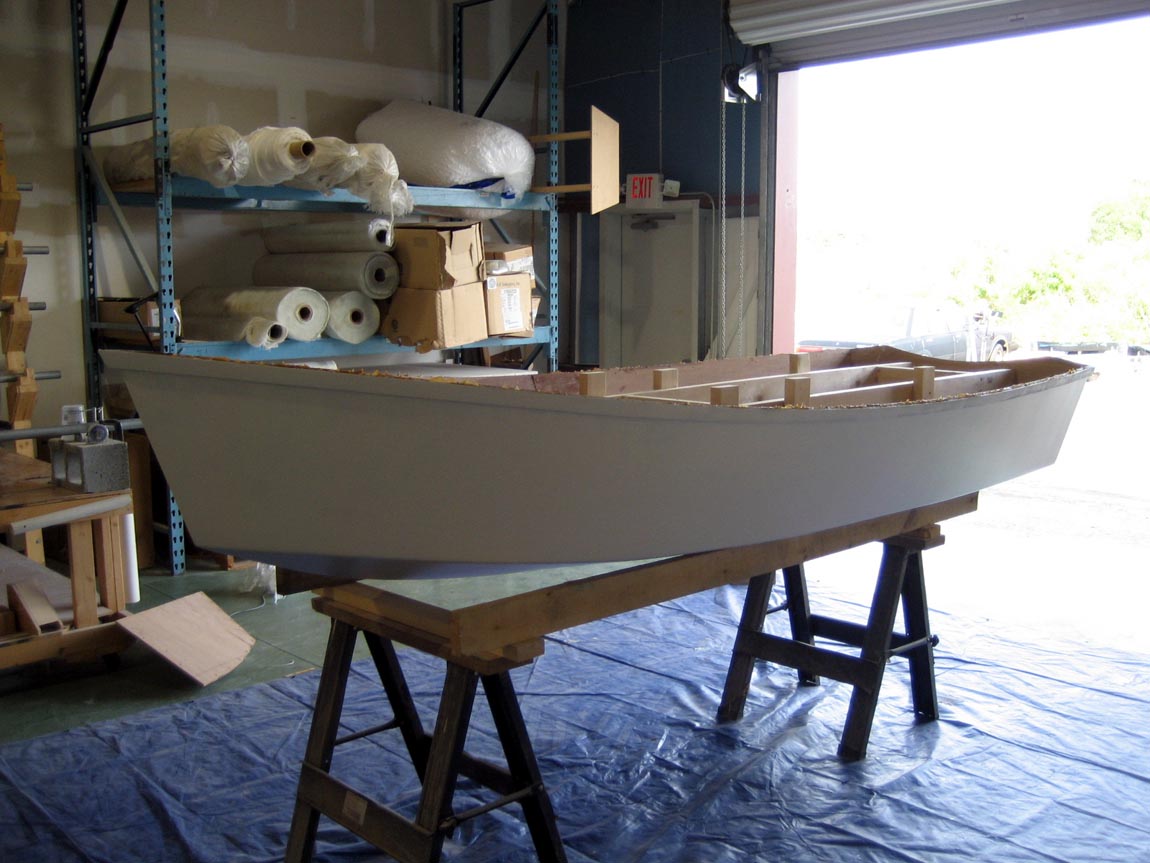
Inside faired and starting with the primer. We painted the compartments before gluing down the seat tops. The plan is to have her finished by the end of this month.
These are bocks of buoyancy foam glued down in the mid seat for flotation.
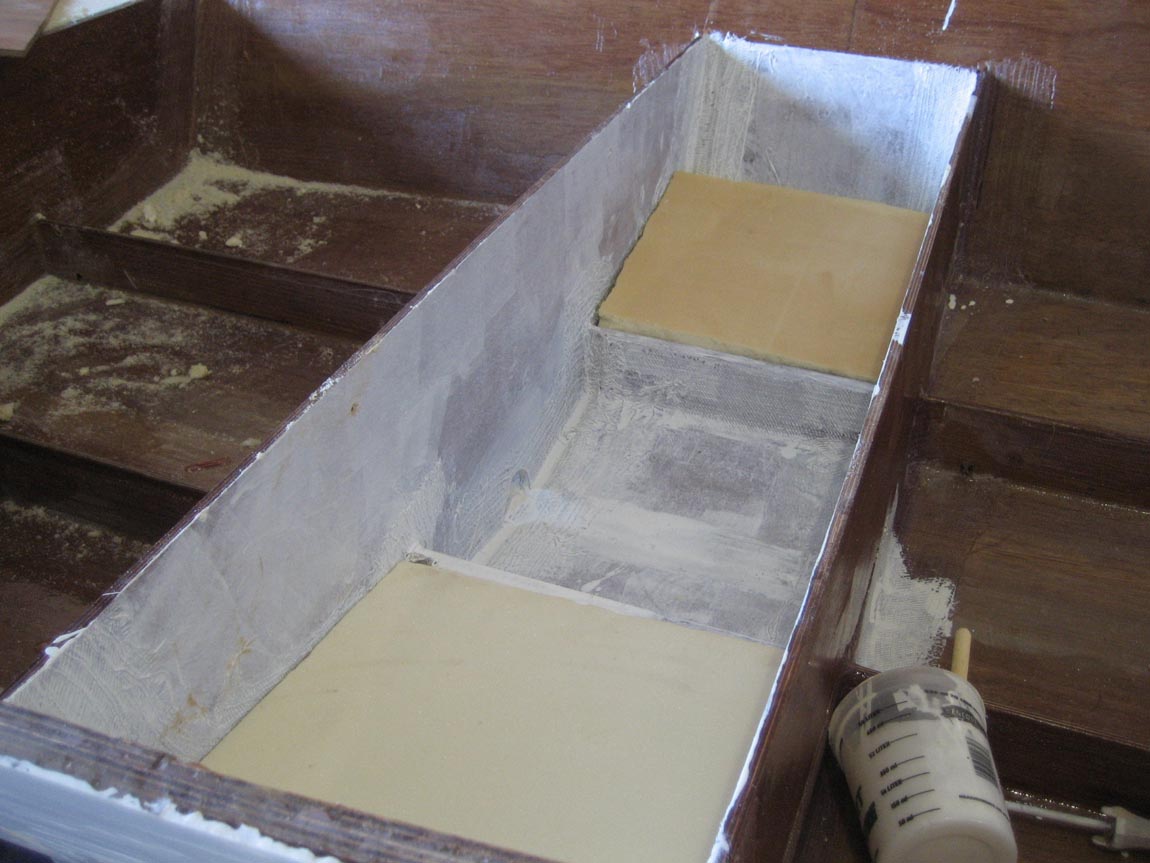
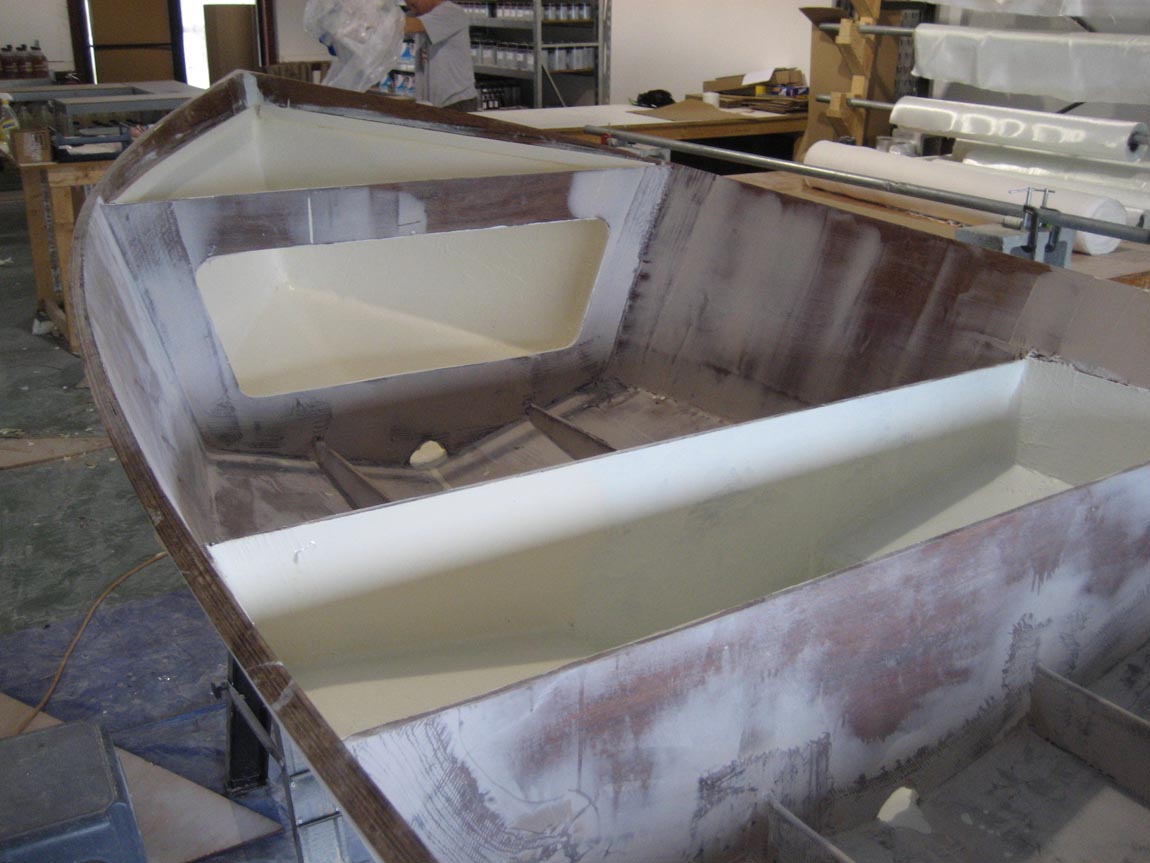
This is the sides with quick fair applied. We will give the outside of this boat a top notch finish, the inside will be "work boat" level.....
Posted: Mon Jan 22, 2007 10:22 am
by gk108
On those foam blocks in the mid seat, they look finished and painted in the picture of the painted compartments. How did you finish them? Also, how did you cast them?
Posted: Mon Jan 22, 2007 10:32 am
by tech_support
On those foam blocks in the mid seat, they look finished and painted in the picture of the painted compartments. How did you finish them? Also, how did you cast them?
We bought them. They are handy to have - but totally impossible to ship! They break and gouge even with fragile handling. If we tried to ship them they would arrive in crumbs.

Posted: Mon Jan 22, 2007 11:04 am
by konaphil
This tutorial and wonderful photos are a significant addition to the Bateau site. Congratulations for a job very well done.
Posted: Mon Jan 29, 2007 12:05 pm
by tech_support
We are almost there

last bit of filling and fairing......
Should be painting soon. I think we will use sterling on the outside to show off the really nice fairing job
Posted: Mon Jan 29, 2007 1:17 pm
by dborecky
Joel,
Slow down!!!!!!

I'll never catch up at this rate.....
By the way,...... are you busy this weekend...
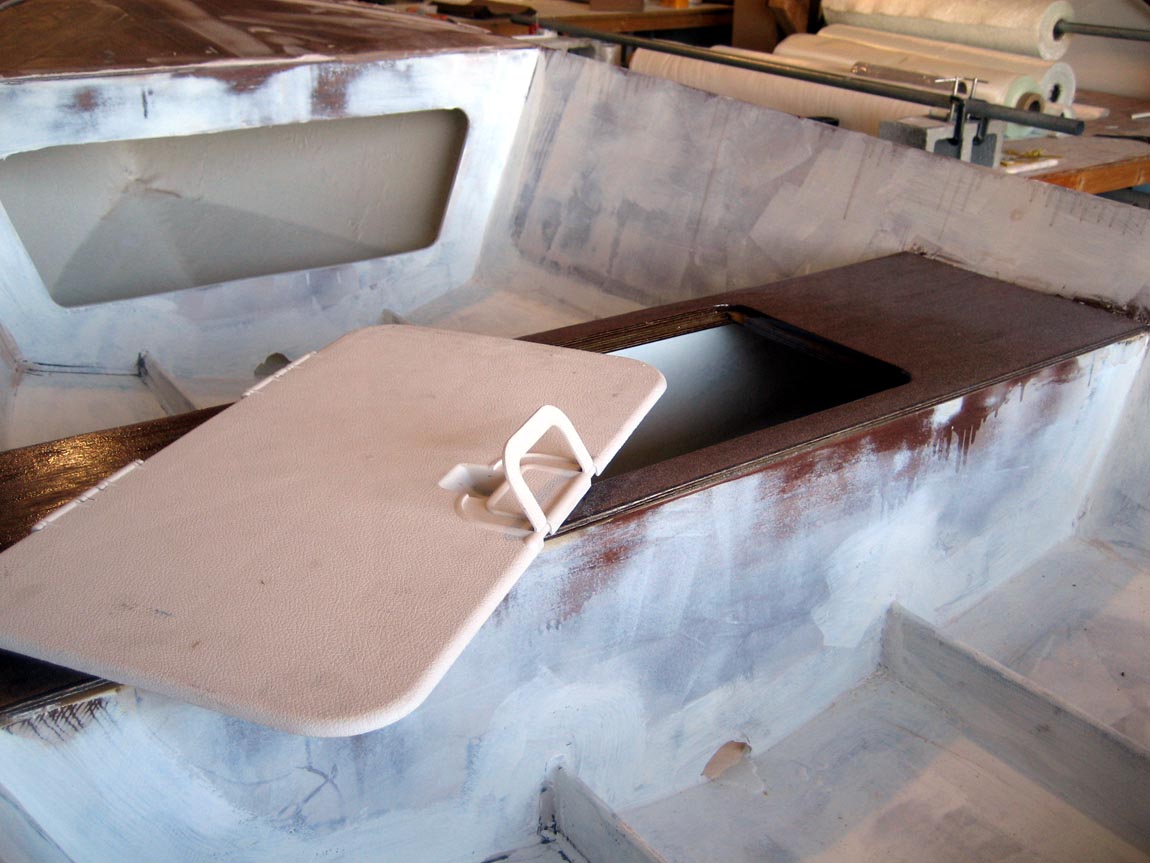
I did not know you could cut a hatch in the middle row seat. I thought it needed to be solid for support.
Derrick
Posted: Mon Jan 29, 2007 1:25 pm
by jacquesmm
As long as you don't touch the cleats.
That hatch came from the Aquasport and fits tightly.
Posted: Mon Jan 29, 2007 1:27 pm
by tech_support
dborecky wrote:
I did not know you could cut a hatch in the middle row seat. I thought it needed to be solid for support.
Derrick
The opening is framed out with 2 more layers of 3/8" meranti to support. It just as well could be 1"x1" fir glued under the seat.
Posted: Mon Jan 29, 2007 1:31 pm
by tech_support
I did not know you could cut a hatch in the middle row seat. I thought it needed to be solid for support.
Derrick
The opening is framed out with 2 more layers of 3/8" meranti to support. It just as well could be 1"x1" fir glued under the seat.[/quote]
Posted: Mon Jan 29, 2007 1:47 pm
by dborecky
I think I'll try to come up with a way to put a hatch in mine as well. I still need to fair the bottom after putting on the rub rail.
I need to take a weekend off of work so I can really get something done on the boat.
You guys (Jacques/Joel) should make your way over to my area when the seas are good for an offshore fishing trip. I would love to try and put you on some good bottom fish.
Derrick
Posted: Mon Jan 29, 2007 2:08 pm
by tech_support
We keep saying that we will will have one of the spring builder's meeting/BBQ over there. The last 3 years its been over here (Sebastian Inlet State Park), and change of scenery might be nice. I will start another thread on this.
Posted: Mon Jan 29, 2007 3:07 pm
by dborecky
shine wrote:We keep saying that we will will have one of the spring builder's meeting/BBQ over there. The last 3 years its been over here (Sebastian Inlet State Park), and change of scenery might be nice. I will start another thread on this.
Sounds great. I could do some of the leg work for places to stay if that is of interest for the event.
Posted: Tue Mar 20, 2007 12:39 pm
by tech_support
Posted: Tue Mar 20, 2007 2:00 pm
by dborecky
Joel,
Do you have a skeg on that thing. I'm not sure if I see one or not.
Derrick
Posted: Tue Mar 20, 2007 2:13 pm
by jacquesmm
We are putting the skeg on it right now.
Posted: Thu Mar 29, 2007 7:04 am
by 2ZTEE
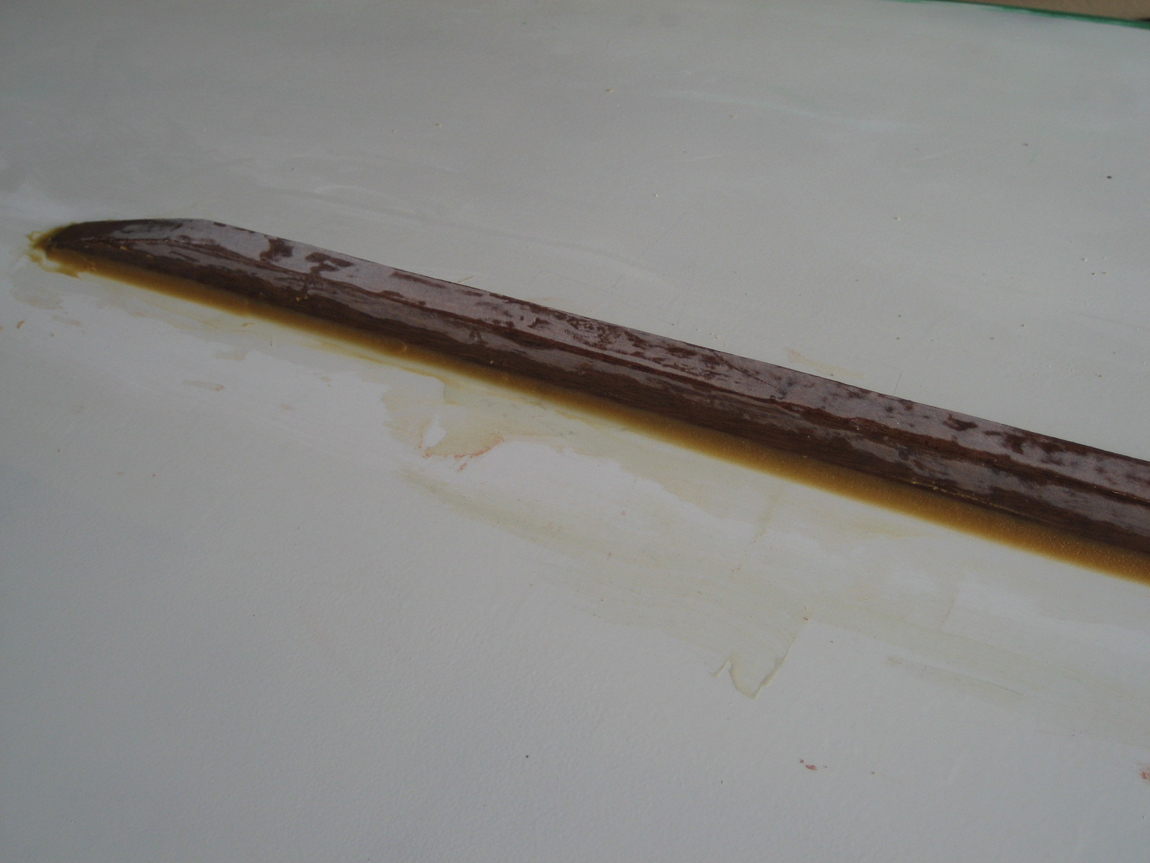
Any pictures of the skeg? How do you apply it to the bottom?
Posted: Thu Mar 29, 2007 7:55 am
by tech_support
Here you go. We have a video of it also. Basically we cut the skeg to shape, put a couple coats of epoxy all over it. Hit the bottom of the boat (under where the skeg is glued) with the tip of the grinder. Glued is down with epoxy glue. Came back later and put down a fillet to round things off.
Posted: Thu Mar 29, 2007 8:05 am
by Old E.
Incredible tutorial. I think the inclusion of a CD, and a video will go a LONG way for y'all!!
Posted: Thu Mar 29, 2007 2:07 pm
by 2ZTEE
How do I get a copy of the video? How long is the skeg? What type of wood did you use to make it?
Posted: Fri Mar 30, 2007 11:06 am
by tech_support
I have not made the video of gluing the skeg - all the clips are shot, I just have to find the time edit/produce it.
Posted: Fri Mar 30, 2007 11:08 am
by tech_support
Posted: Fri Mar 30, 2007 1:25 pm
by tech_support
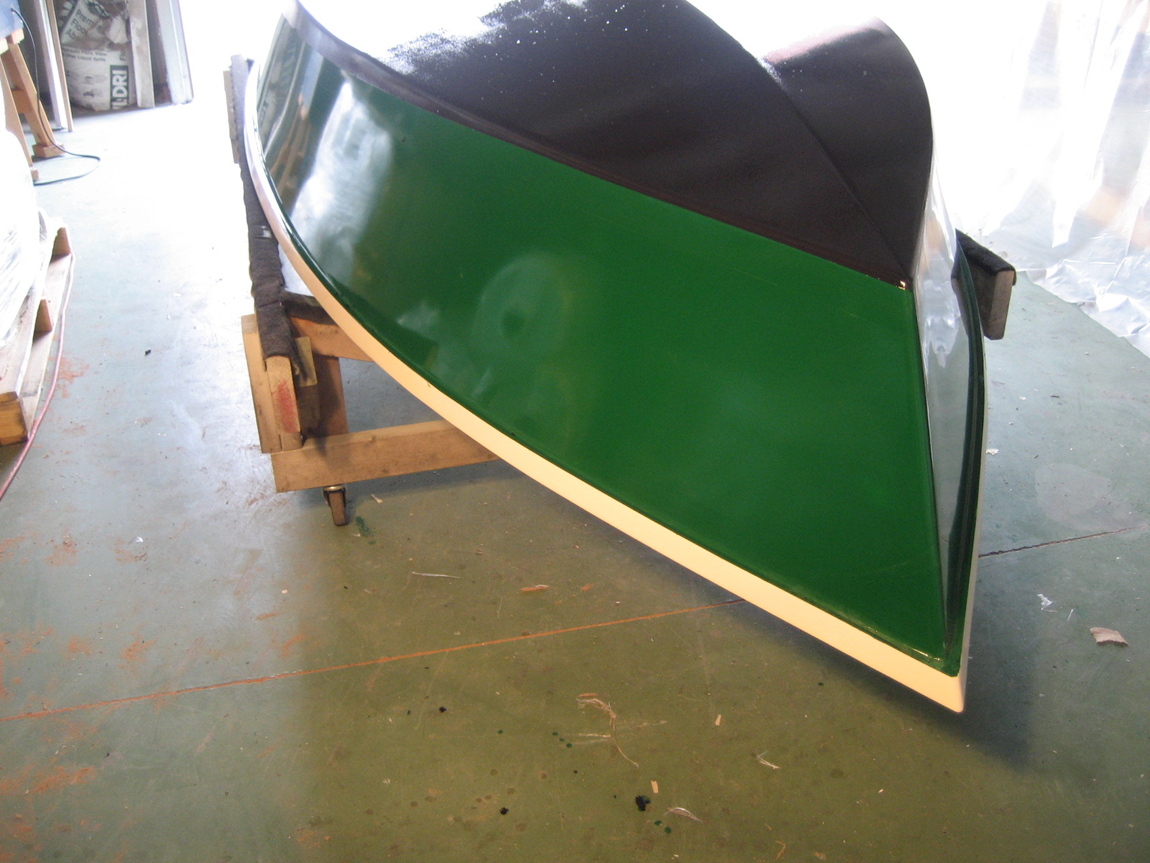
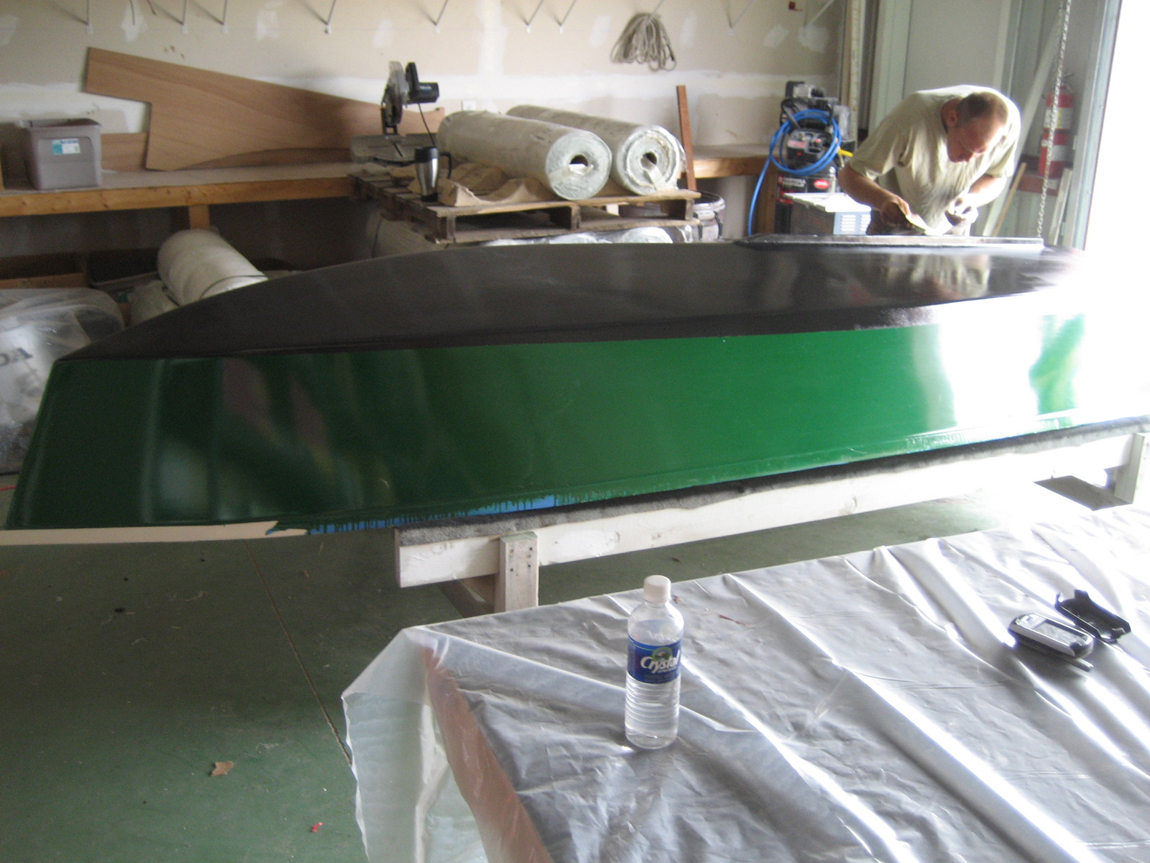
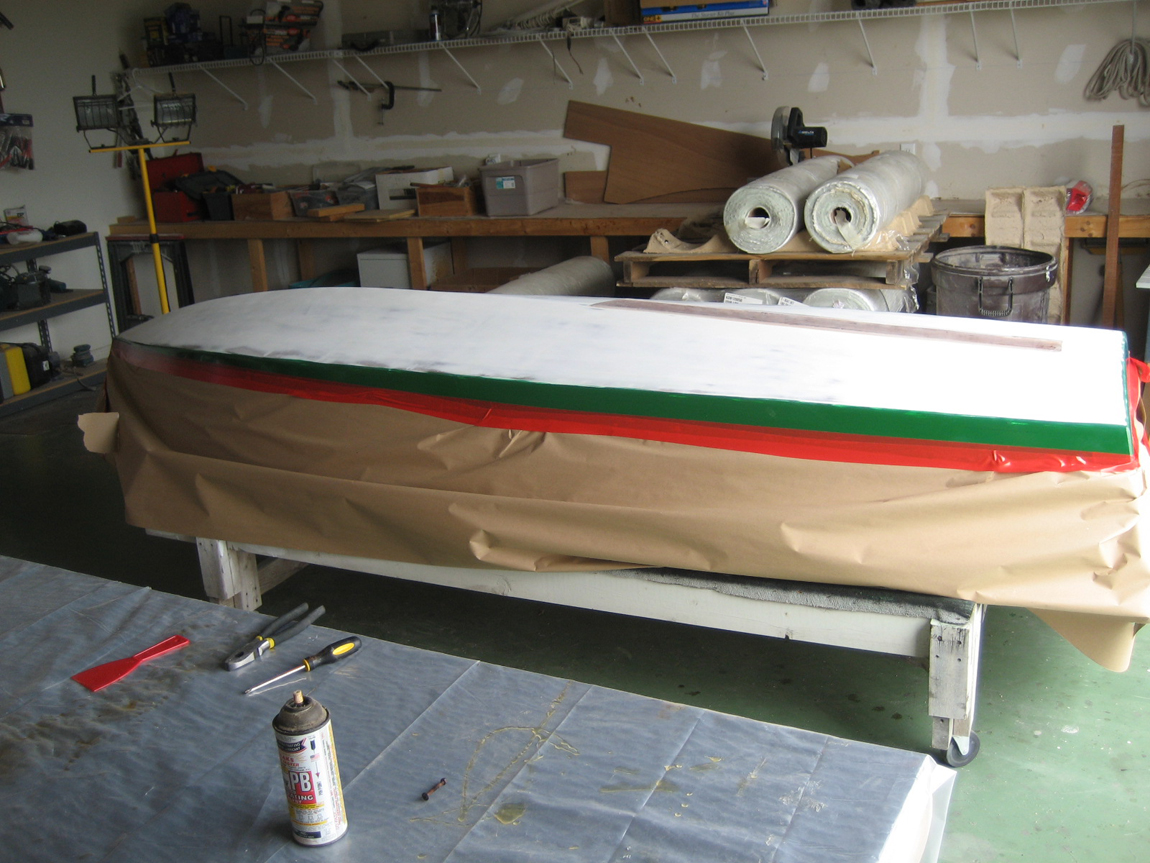
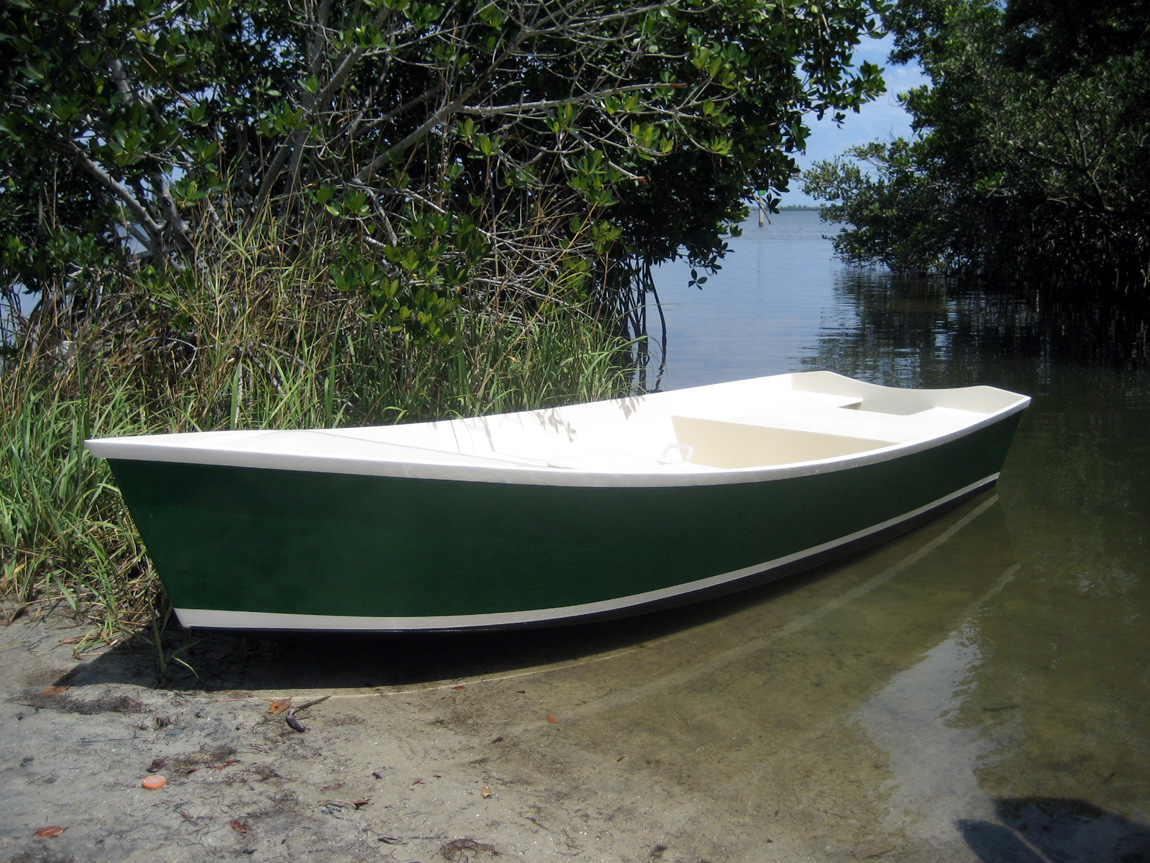
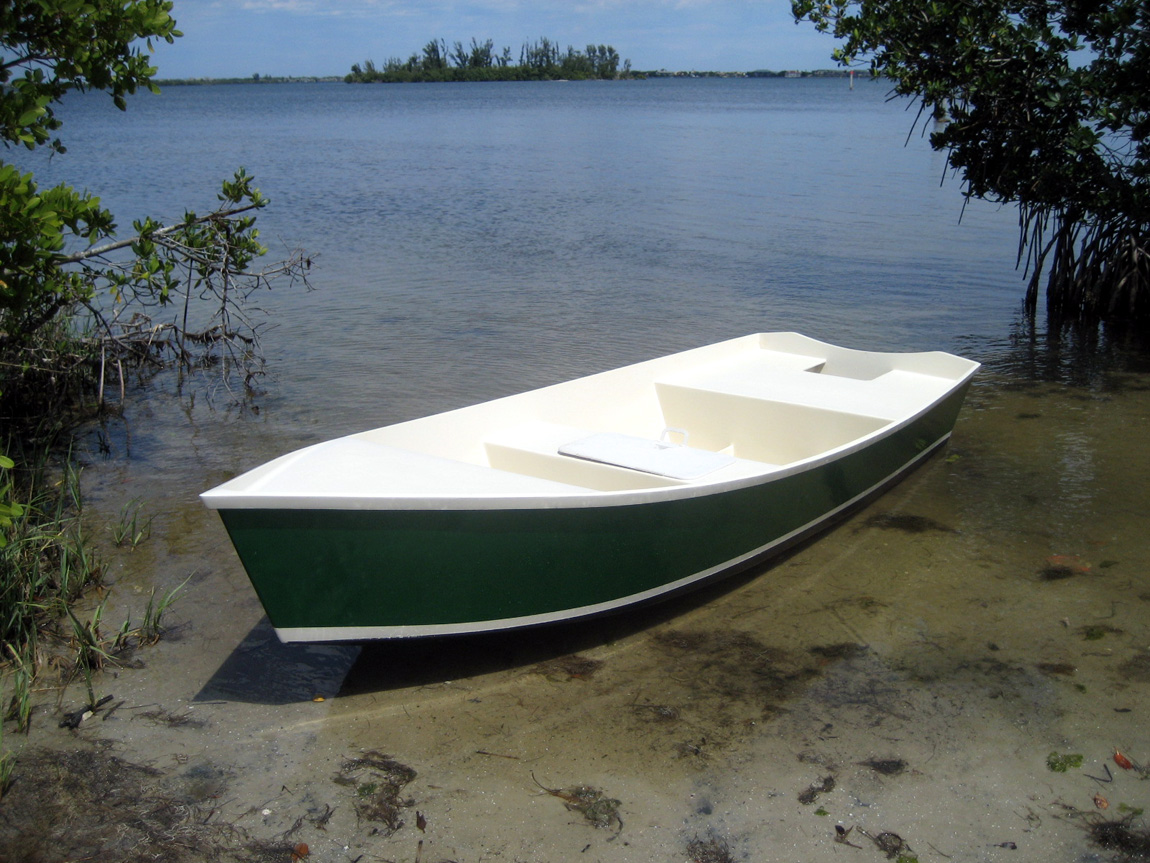
Now we only have the boot stripe to go
...

[/img]
Posted: Sat Mar 31, 2007 10:24 am
by rjezuit
Wish I had a business that would let me build a boat!!!!!!!!!!!!!
Posted: Sat Mar 31, 2007 6:56 pm
by Cracker Larry
That looks great
It may be the color scheme for my OD18. Very nice
Posted: Wed Apr 18, 2007 3:17 pm
by tech_support
Posted: Wed Apr 18, 2007 3:26 pm
by jacquesmm
Does anybody have a nice 5 to 6 Hp for sale? I want to test it.
Posted: Wed Apr 18, 2007 4:32 pm
by mecreature
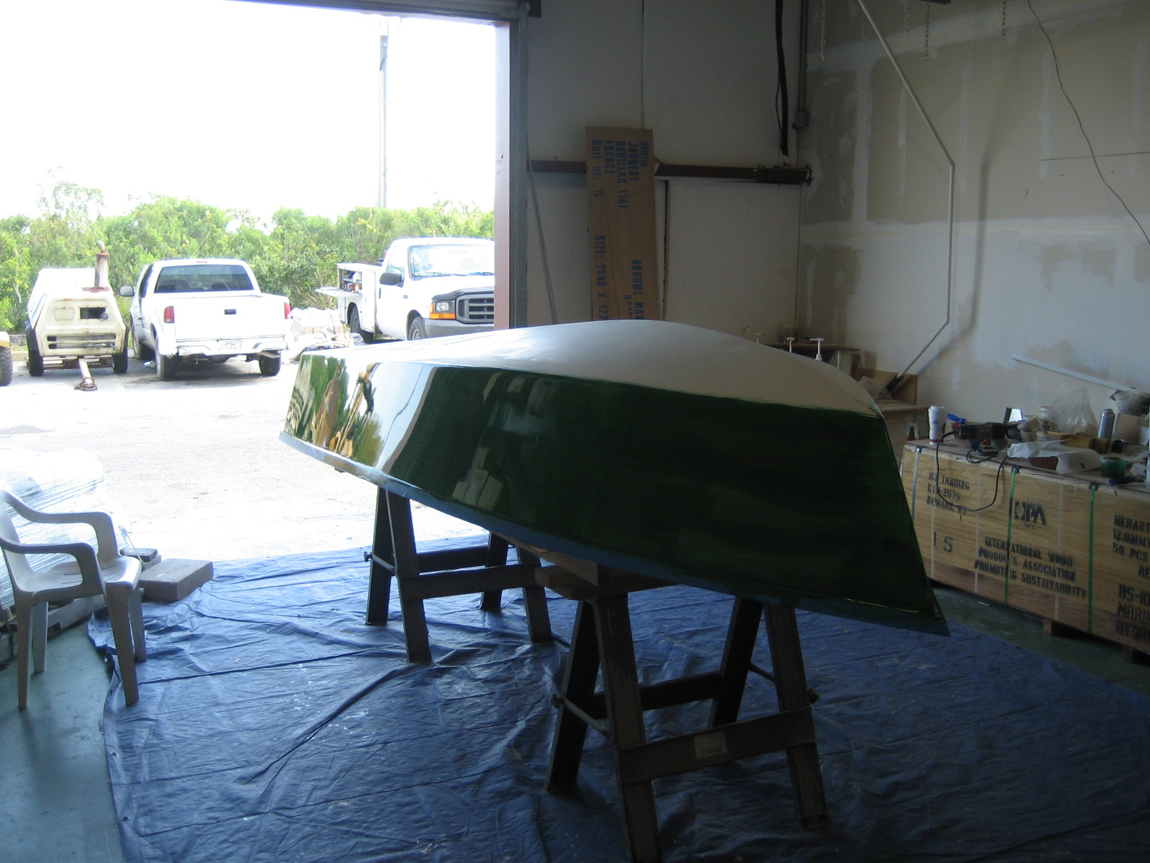
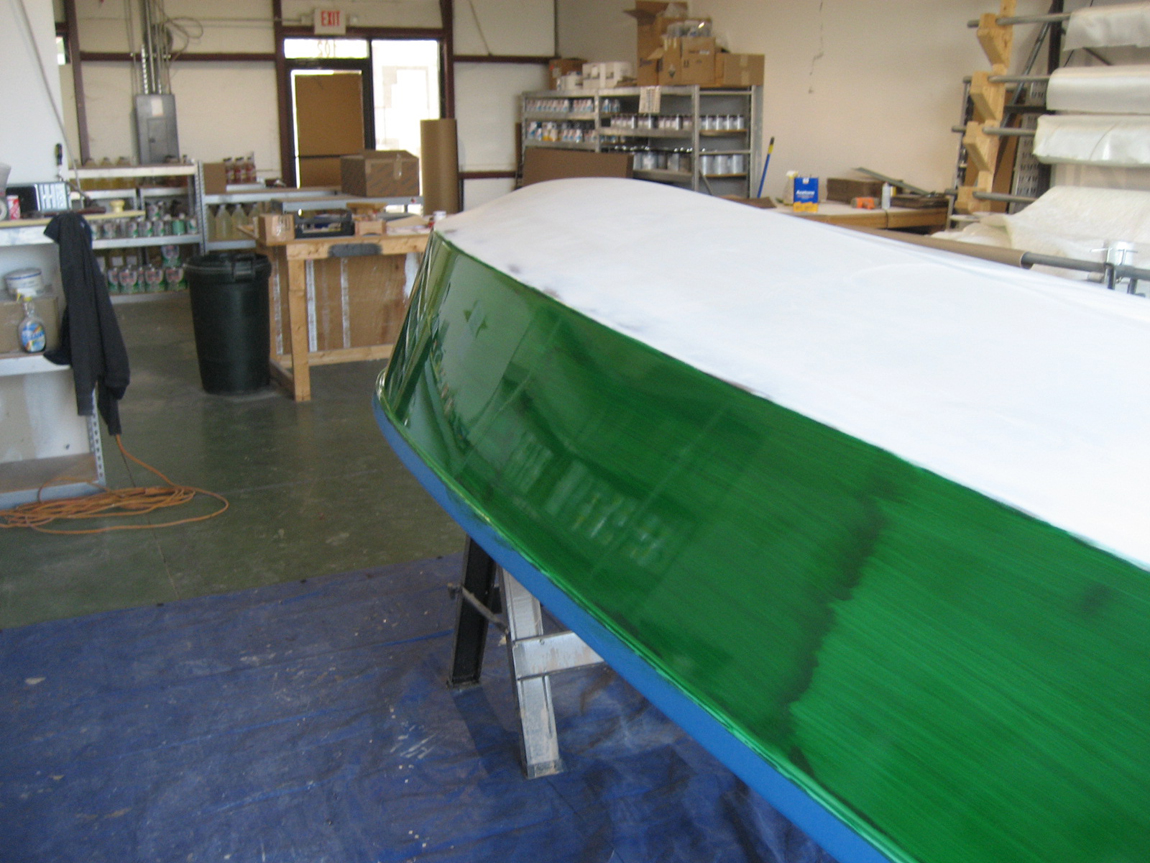
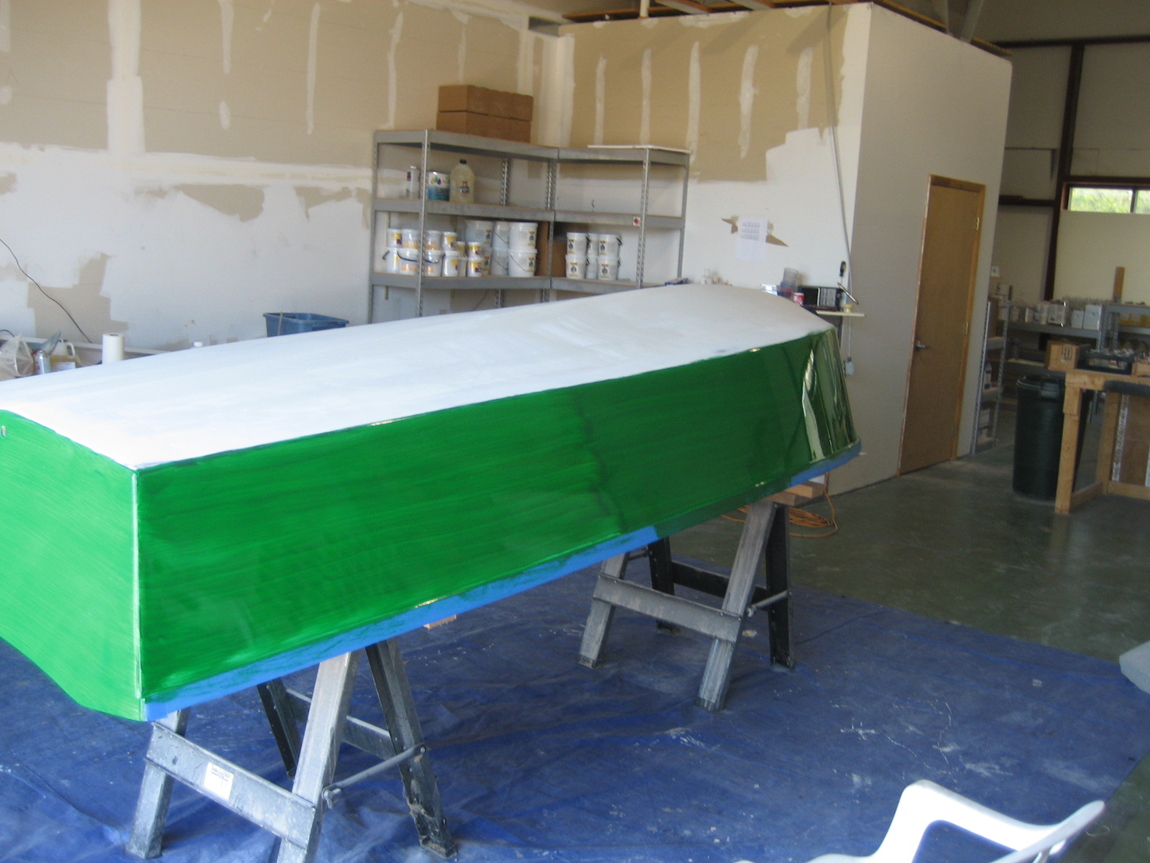
What color is that green?
Posted: Wed Apr 18, 2007 4:37 pm
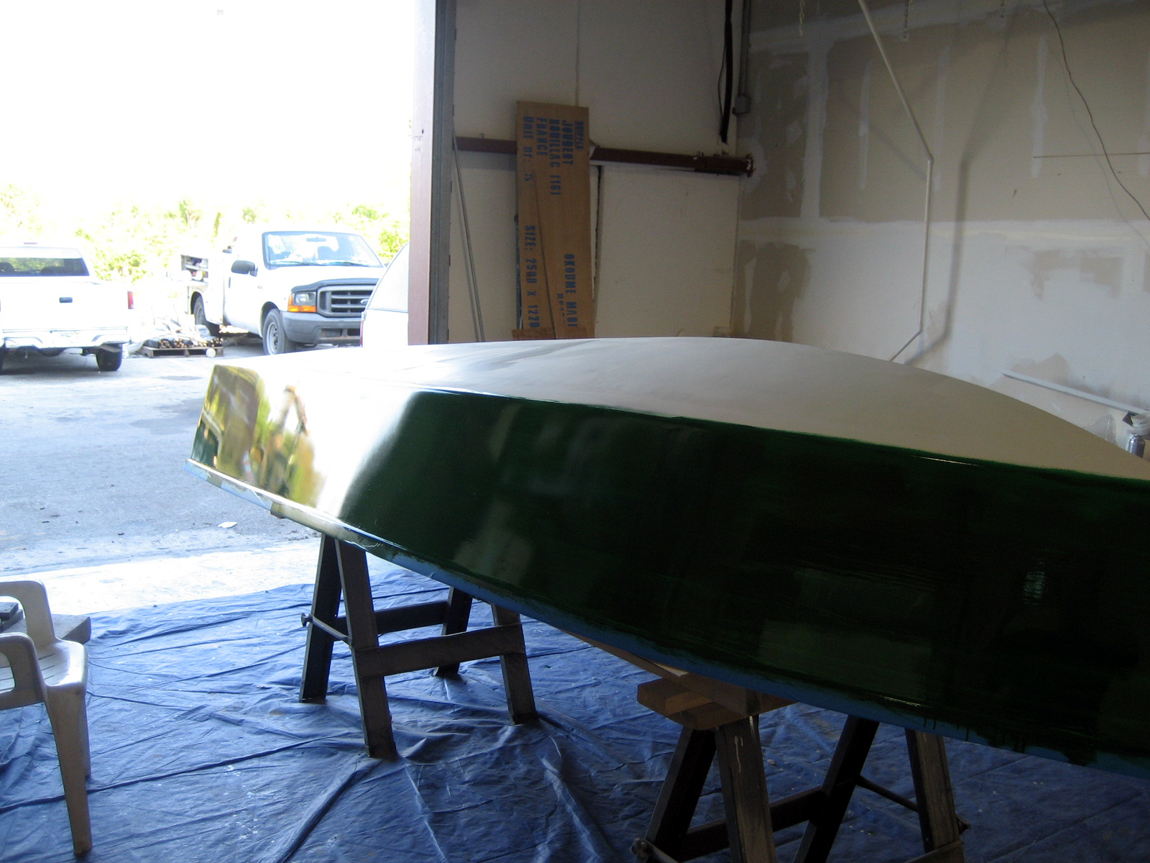
by tech_support
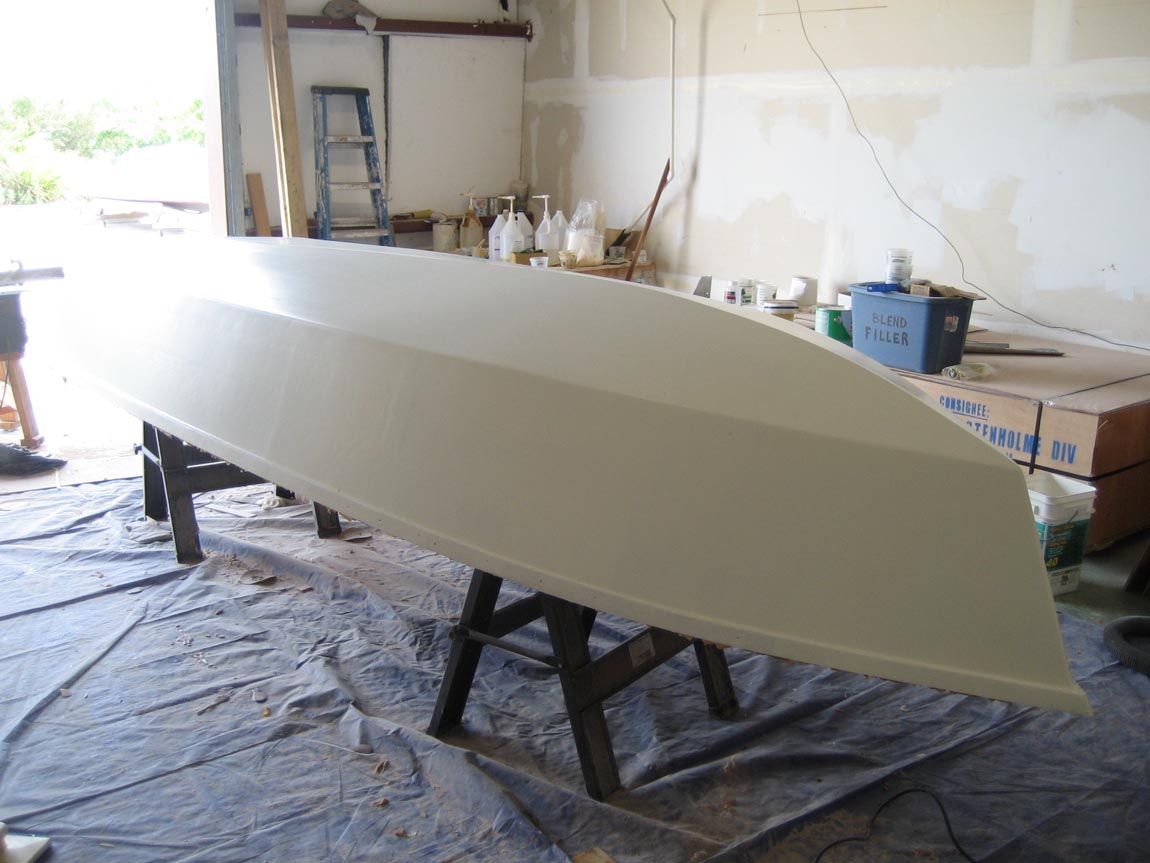
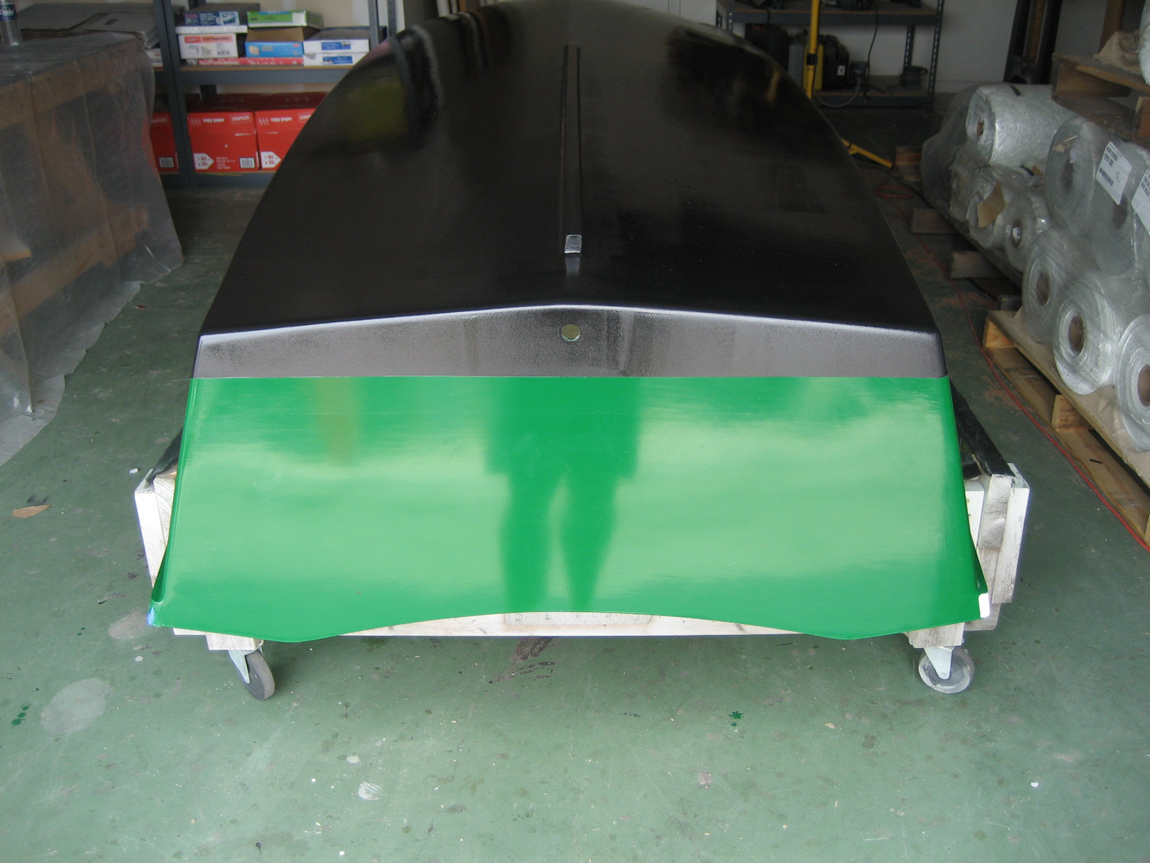
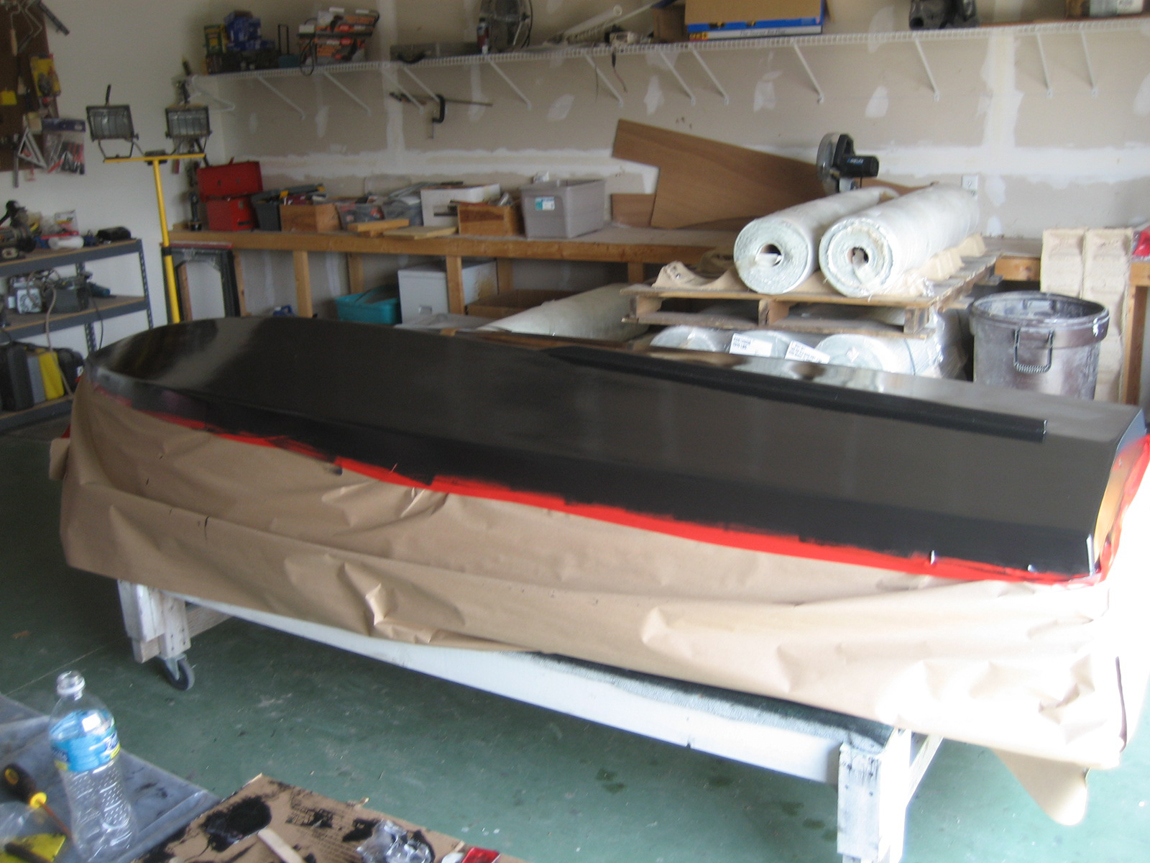
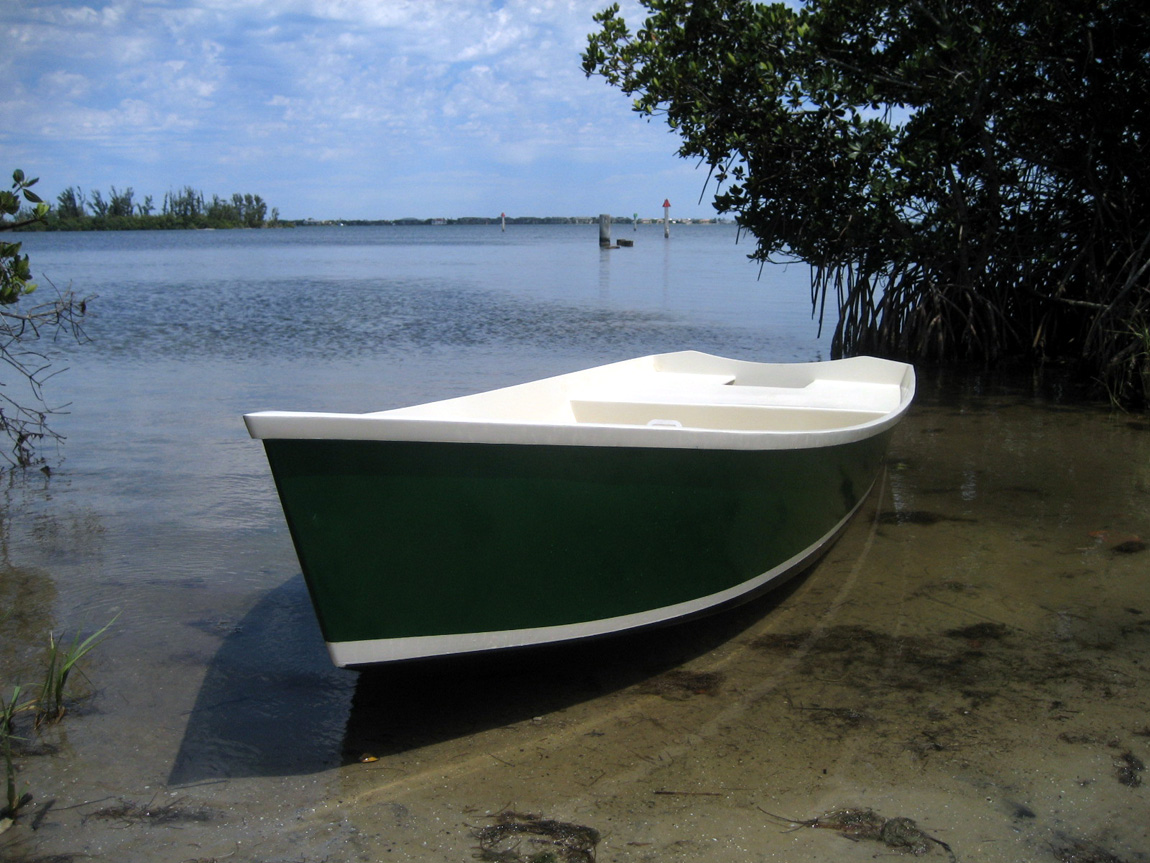
out side is Shamrock Green from Sterling. Its super glossy and very nice. Here is a picture in the shop before the boot stripe
The inside, non-skid, and boot stripe are all System Three Whidbey White...
Posted: Wed Apr 18, 2007 4:41 pm
by mecreature
Sure looks darker on the water then in the shop..
nice..
Posted: Wed Apr 18, 2007 4:44 pm
by jacquesmm
I can make it lighter in Photoshop.

Posted: Wed Apr 18, 2007 4:47 pm
by tech_support
Its VERY bright and sunny today
Posted: Wed Apr 18, 2007 4:52 pm
by mecreature
That is the color scheme I am going with on my D-15... I will be ordering the paint pretty quick...System three paints for all though..
thanks for answering..
I can put a 15hp motor on that boat in Photoshop.. LOL
Posted: Wed Apr 18, 2007 5:51 pm
by WobblyLegs
Can't wait till you find a motor for it - looking forward to seeing some pic's in action and some performance figures...
Posted: Wed Apr 18, 2007 7:48 pm
by Cracker Larry
Very nice little boat
I like the lines, and the color
Posted: Thu Apr 19, 2007 8:07 am
by Daniel Huckleberry
What a great looking little boat!
Wish I was closer as I have a 10hp Mercury 4-stroke you could try. I would love to ride around in that thing! Something fun and special about a nicely done skiff.
Huck
Posted: Thu Apr 19, 2007 11:21 am
by TomW
A very pretty boat. At one time here I read something about not using dark colors in southern hot areas do to heating up the epoxy. Any comments on that beautiful green. Also, how did you apply it.
Tom
Posted: Thu Apr 19, 2007 11:28 am
by tech_support
Roll and tip, and yes that boat will get hot if left in the direct sun. This boat will probably spend most of its life in our warehouse as showcase for products
Posted: Thu Apr 19, 2007 9:39 pm
by Dougster
Ah, an answer to my lingering question. Sigh

, no dark green for me here in South Texas. More lingering is my question about the graphite bottom: I like it and would do it straight off. But what about the heat? Don't say it's the bottom, my Nina will live in the trailer in the hot Texas sun, where it's still dark in august at 8:00 pm. Hot too, and the sun is down low, bangin on the side of the boat. Not for long, though, and I'm hoping it's ok. Any thoughts or better yet, experience?
Likin' the looks of that bottom Dougster
Posted: Thu Apr 19, 2007 9:45 pm
by Cracker Larry
Same with me. I've always liked that color, but it's just not practical. Might do it anyway
Posted: Fri May 04, 2007 8:41 pm
by Dougster
My question on the graphite bottom in tropical sun lingers. SpoKaloo has broached it too. Sittin' on a trailer, sun overhead, no problem. Afternoon sun bangin' on the chine....problem?
Thinkin' somebody knows Dougster
Posted: Fri May 04, 2007 9:31 pm
by gk108
Afternoon sun bangin' on the chine....problem?
I sure hope it's not
Posted: Sat May 05, 2007 1:58 pm
by Spokaloo
Watchin this closely.
I am going to do a seafoam green with red bootstripe (I think) to keep the topsides cool, but she wants a black bottom paint. Curious if when it sits on a boat lift if it will heat up and soften the epoxy.
One option is the black paint and no boatlift.....
Or light bottom paint and a clean bottom thanks to the lift.....
Or just a black bottom that doesn't heat up because its not getting overhead sun!
E
Posted: Tue May 22, 2007 8:12 am
by dborecky
I was going to do the graphite and then bottom paint with antifouling paint. I have black antifoul paint in my garage that I never used. I think I'm going to go with a lighter color then that green though as I want the boat to look bigger then it is....
Posted: Tue May 22, 2007 8:14 am
by dborecky
Joel,
You beat me out to the finish line while I was not looking...... Kind of ironic. I have the engine still in a crate brand new and you have a boat that looks brand new with no engine.....
Posted: Sun Jun 24, 2007 12:29 pm
by Dougster
Wow is this a nice tutorial. The kit with DVD will be perfect first build and I wish I had started like this instead of the dinghy I made. It looks to me like a great teaching project as well.
Admiring this effort Dougster
Posted: Sun Jul 15, 2007 3:21 pm
by Cracker Larry
Joel, am I correct that you painted the bottom with a primer before you epoxy/graphited?
Posted: Mon Jul 16, 2007 8:00 am
by tech_support
Cracker Larry wrote:Joel, am I correct that you painted the bottom with a primer before you epoxy/graphited?
Yes, we primed the whole bottom, but that was not totally necessary. The primer really does help with the final fairing, and we wanted to show the entire process.
Posted: Mon Jul 16, 2007 9:43 pm
by Cracker Larry
So, do you think I should prime, or go from fairing compound to graphite

Posted: Tue Jul 17, 2007 12:57 am
by TomW
Larry don't know if you have read page 2 which is where Shine shows the Primer, Guide Coat, final fairing sequence. Take a quick look if you haven't, it starts 1/3 to 1/2 way down the page.
If you don't need to do that then you don't need primer. At least that is the way I read Shine's first answer to you.
Hope I'm being helpful.
Tom
Posted: Tue Jul 17, 2007 8:41 am
by tech_support
Cracker Larry wrote:So, do you think I should prime, or go from fairing compound to graphite
If your fine with the fairness of the bottom, go right to epoxy/graphite.
I would roll on some straight/neat epoxy first to seal up the fairing, then go to the graphite mix.
Will she be ready for the skrimp in September?
FS12 build
Posted: Tue Jul 17, 2007 10:45 am
by dbldipper1
I am also interested in a graphite bottom for my FL12. How long do you let the straight/neat epoxy cure befor rolling the graphite mixture on? And on a second coat same question.
Posted: Tue Jul 17, 2007 10:51 am
by tech_support
not long
just until it has tacked up. If you roll it on too soon you will get a stipple from where your roller is pulling up the tacky first coat. In the summer (warm temps) you could do all the coats in one day no problem
Posted: Tue Jul 17, 2007 6:43 pm
by Cracker Larry
Will she be ready for the skrimp in September?
No, no way.
I've got a feeling that the real work commences after the next flipping.
And skrimping season is just getting started now, so I'll be keeping the GF16 busy for the next couple of months. Building will slow down a little.
The GF is probably a better bug boat anyway. I sure am pleased with it
Posted: Tue Oct 30, 2007 10:57 am
by tech_support
Here is link to this boat being built in "tutorial" format...
http://boatbuildercentral.com/howto/boa ... /index.php
BTW, the boat is now for sale. It has been finished for several months and never been used
Too many boats, not enough time.
Posted: Fri Nov 02, 2007 8:32 pm
by dborecky
Joel,
Three questions.
1. How did you support the hatch you put in the middle seat? I would like to do the same thing.
2. When you put in the casting decks, I did not see where you taped them in. Don't you need to tape them in? Especially if you will be standing on them.
3. Did you glue the front casting deck flush with the bulkhead face or does it overhang flush?
Derrick
Posted: Mon Nov 05, 2007 6:45 am
by jacquesmm
dborecky wrote:Joel,
Three questions.
1. How did you support the hatch you put in the middle seat? I would like to do the same thing.
Included in the plans, there is a drawing that shows how we frame a hatch.
The hatch you see in the pictures is an after market hatch that was sitting unused in a corner of the shop.
2. When you put in the casting decks, I did not see where you taped them in. Don't you need to tape them in? Especially if you will be standing on them.
It is not required but tape all around if you want a heavy duty boat.
3. Did you glue the front casting deck flush with the bulkhead face or does it overhang flush?
Derrick
It's flush. If it extned over the bulkhead, cut it to fit.
Posted: Sun Jan 06, 2008 7:10 pm
by Boomer
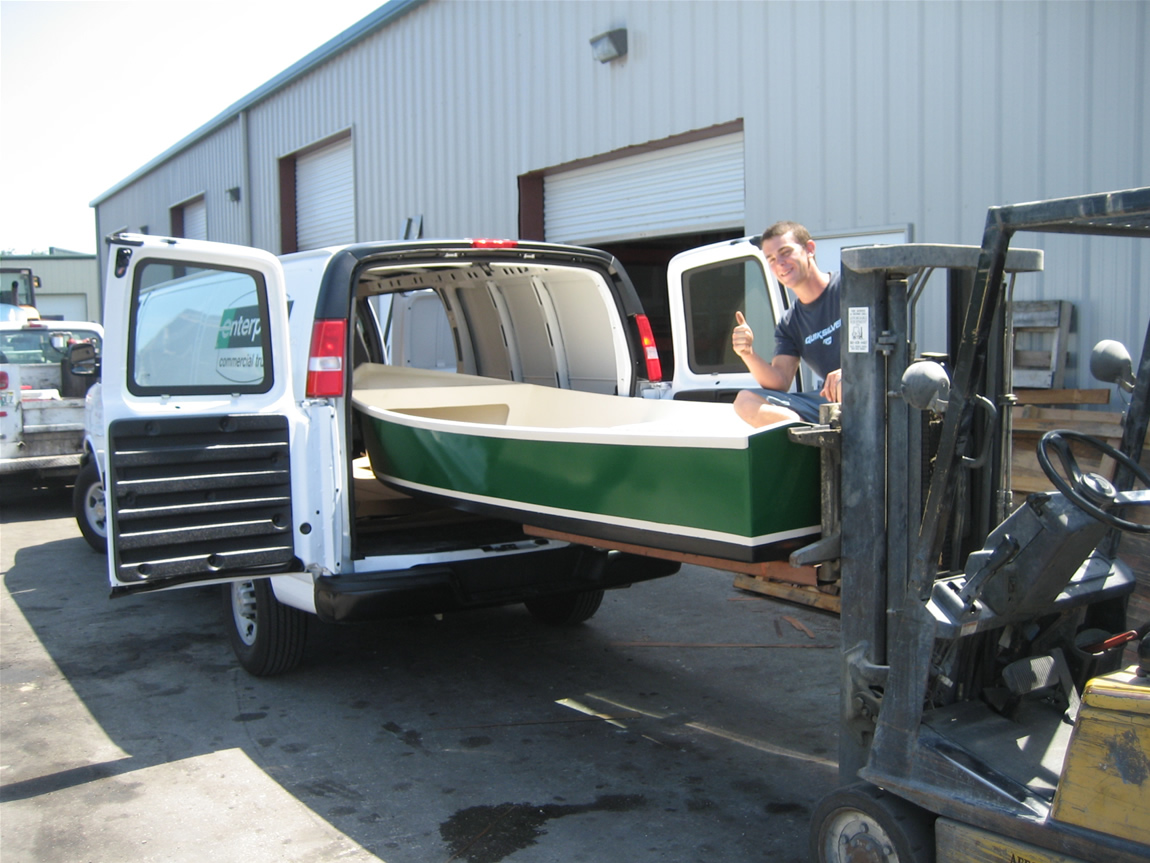
I'd like to see someone sitting in it to get an idea of scale.
Possible?
Thanks.
Posted: Mon May 05, 2008 5:50 pm
by ks8
I suppose it wasn't possible?
Posted: Tue May 06, 2008 9:46 am
by tech_support
ks8 wrote:I suppose it wasn't possible?
Here you go
....
Posted: Tue May 06, 2008 11:50 am
by jgroves
Re: FS12 Build
Posted: Tue Jun 09, 2009 8:09 pm
by cottontop
Shine or anyone else. I would like to see the posted pictures, but I can't get them to come up any way I try. John
Re: FS12 Build
Posted: Fri Aug 19, 2011 8:08 pm
by Marshall Moser
can you give me a bill of materials you used on the finishing of this boat? Primer, finish coat, non-skid, etc and volumes? I know you said it was System 3, but I was curious as to how much you used of the green, the white, the primer, etc.
Re: FS12 Build
Posted: Mon Nov 16, 2020 7:58 am
by glossieblack
Jaysen,
I'm enjoying your upgrades of the website. Thanks.
A minor glitch I've run into: I can open tech support's tutorial on FS12, but I can't open it via build threads.
I'm enjoying your website upgrades Jaysen. Thanks.
A heads up on FS12 coverage.
I go to build threads and try to open FS12 build, but it doesn't open. However I can open it directly.
Re: FS12 Build
Posted: Mon Nov 16, 2020 8:04 am
by Jaysen
glossieblack wrote: ↑Mon Nov 16, 2020 7:58 am
Jaysen,
I'm enjoying your upgrades of the website. Thanks.
A minor glitch I've run into: I can open tech support's tutorial on FS12, but I can't open it via build threads.
I'm enjoying your website upgrades Jaysen. Thanks.
A heads up on FS12 coverage.
I go to build threads and try to open FS12 build, but it doesn't open. However I can open it directly.
I'm able to open it via:
* Click build threads tab
* Click 12 tab
* Click fs12
* Click link to thread
Are you doing something different? Just want to make sure I fix the right thing


