Page 1 of 1
PH18 - Getting Started in LA
Posted: Sat Jan 06, 2007 11:14 am
by Muddler
LA--Lower Alabama
I purchased the Plans for the PH16 and my bride concluded that it needed to be bigger, so here we are ready to make the Plywood and Fiberglass and Epoxy kit purchases and I need to have a few questions answered.
In the plans on the page titled "Lamination Schedule" Step 2, "Fiberglassing the side is optional." My questions are:
1-What is recommended by the builders, cover the sides inside and out or not? Obviously it would be stronger.
I have read that there is not cloth in the Kit for the sides.
2-What would be an adequate amount (additional) for covering the sides?
3-Is there enough FG and Epoxy to cover the console ( could not find that information) or should I get extra for the console and how much is recommended?
Well this should get me started, I got the garage clean so I need something to put in it.
"for a man to be truely happy, he must have many hobbies." Mark Twain.
Re: PH18 - Getting Started in LA
Posted: Sat Jan 06, 2007 11:55 am
by jacquesmm
See below:
I purchased the Plans for the PH16 and my bride concluded that it needed to be bigger,
You mean larger? Like the PH18?
so here we are ready to make the Plywood and Fiberglass and Epoxy kit purchases and I need to have a few questions answered.
In the plans on the page titled "Lamination Schedule" Step 2, "Fiberglassing the side is optional." My questions are:
1-What is recommended by the builders, cover the sides inside and out or not? Obviously it would be stronger.
It is not necessary to fiberglass the sides. The fabric from the bottom goes up the sides, around 6" above the waterline. That leaves maybe 6" without glass but epoxy coated.
I have read that there is not cloth in the Kit for the sides.
No but you can add a few yards if you want that option.
2-What would be an adequate amount (additional) for covering the sides?
A few yards, let's say 5 yards total. Look at your nesting drawing and see the surface of the side panels then consider that they are already half covered: you don't need much.
3-Is there enough FG and Epoxy to cover the console ( could not find that information) or should I get extra for the console and how much is recommended?
Yes, there is enough to build the console as designed.
You will discover that resin and glass use depends on your experience. There is enough but if you waste a lot, then there isn't.

Posted: Sat Jan 06, 2007 10:39 pm
by Muddler
Jacques:
Yes, larger like the PH18. After getting the plans for the PH16, we got the plans for the PH18 and that is what we will be building. Thanks for the feedback on the questions I asked previously. We'll make the order for the Ply and FG kit next week and I'll make the order to include the extra cloth.
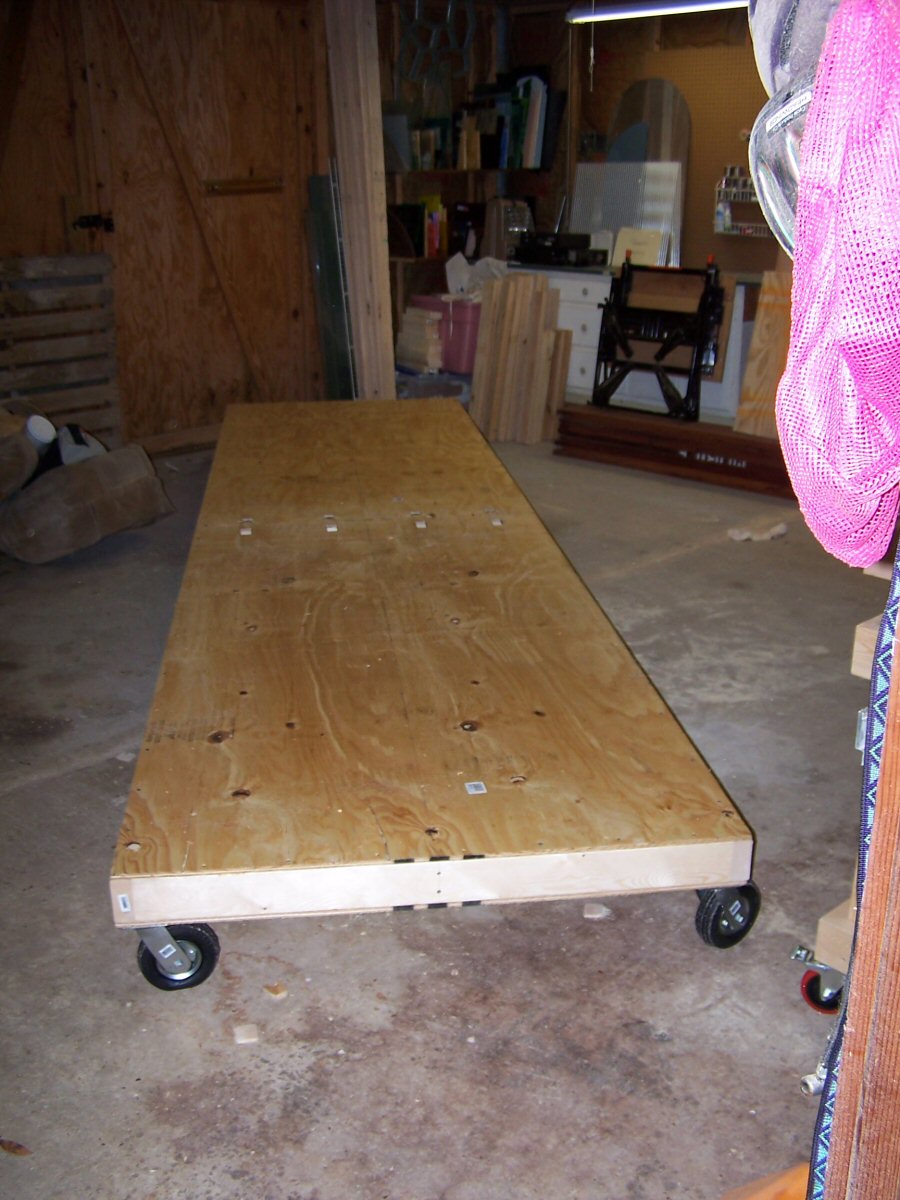
I made the trip to Lowes to get lumber and plywood for a platform to build the boat on and got it put together today, 16 feet long and on wheels to give me the ability to move it around in the garage. I got big casters from Norther Tool. Ready to rock and roll when the materials arrive.
Posted: Tue Jan 16, 2007 11:01 am
by Muddler
We got the Epoxy and some of the other materials delivered yesterday (Monday), plywood should be here later today, (Tuesday, 1-16-07) according to the shipping company. I will be finishing the strongback/framework I will use on top of the platform, which I have already constructed and will be used for moving the boat around in the garage during the build. I have pictures of the platform, which looks similar to others already posted. I will post pics of the completed platform and framing for the use of future builders before I start laying on the panels, etc.
Posted: Sat Jan 20, 2007 9:59 pm
by Muddler
The plywood got here on Tuesday and I got it home on Thursday. Now its Saturday and its time to get to laying out all of the components. I got started early and got the transom, bottom panels, side panels, and the first sheet of 3/8s ply for most of the stringer pieces laid out.
I'll start on the second sheet of 3/8s ply tomorrow morning and should be able to get the remainder of sheets laid out and ready to start cutting.
Tomorrow should be another long day but its been fun so far. I did encounter something in the nesting diagram, are the stringers mislabelled? The inside and outside stringers look to be reversed, I base this on the length and height of the stringers shown on one of the other sheets. I don't think it makes a difference I just haven't seen this mentioned before.
For those that read this looking for information, let me tell you "measure 3-4 times before you even think about cutting". I have already caught several silly mistakes. I also noticed that the sheets of ply are about 3/16 inch longer then 8 feet, and about 1/8th inch wider then 4 feet. I started getting some strange number in that things were not coming out where I figured they should. This could throw off some of the panels if you assume the panels are 4 X 8.
Bill
Posted: Sun Jan 21, 2007 9:57 am
by Poseidon's Rook
Nice to read about your new build Muddler. I am looking over the study plans of the PH18 just about hourly as I try to make my decision to buy the plans and commit to a full build. I live a little further south of you in Chickasaw but my parents live in Andalusia as well. It would be great if I could see some of your progress in person (if you don't mind) the next time I am in the area.
Hope you keep up the good work

Posted: Sun Jan 21, 2007 5:28 pm
by Muddler
Poseidon:
I would be glad to have you stop by. So far I have gotten all of the panels marked up for cutting, except the deck and sole. Those will have to wait till the hull, bulkheads and stringers are together. My dad wants to be part of the build, so I'm postponing the cutting of the marked up panels until he can make it here from Dothan, hopefully next weekend.
I still have to complete the framework (on top of my mobile platform) to hold the bulkheads and stringers before the build can begin.
Bill
Posted: Sun Jan 21, 2007 9:24 pm
by Poseidon's Rook
Terrific! I am happy to hear someone semi-local is getting started on the boat I wish to construct myself.
I hope it is a great build for you and your father.
Posted: Tue Jan 23, 2007 11:39 am
by Muddler
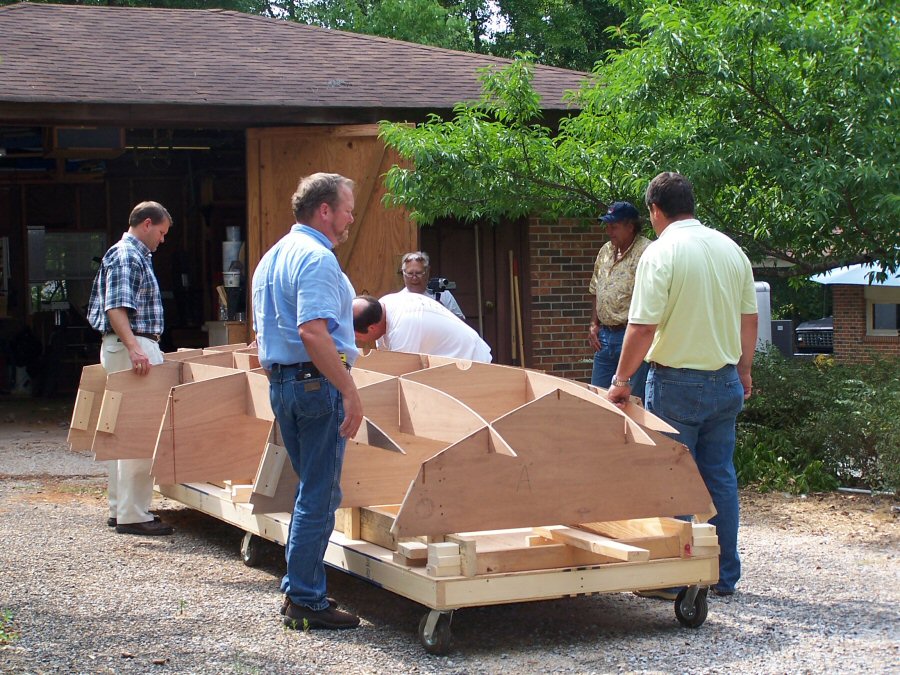
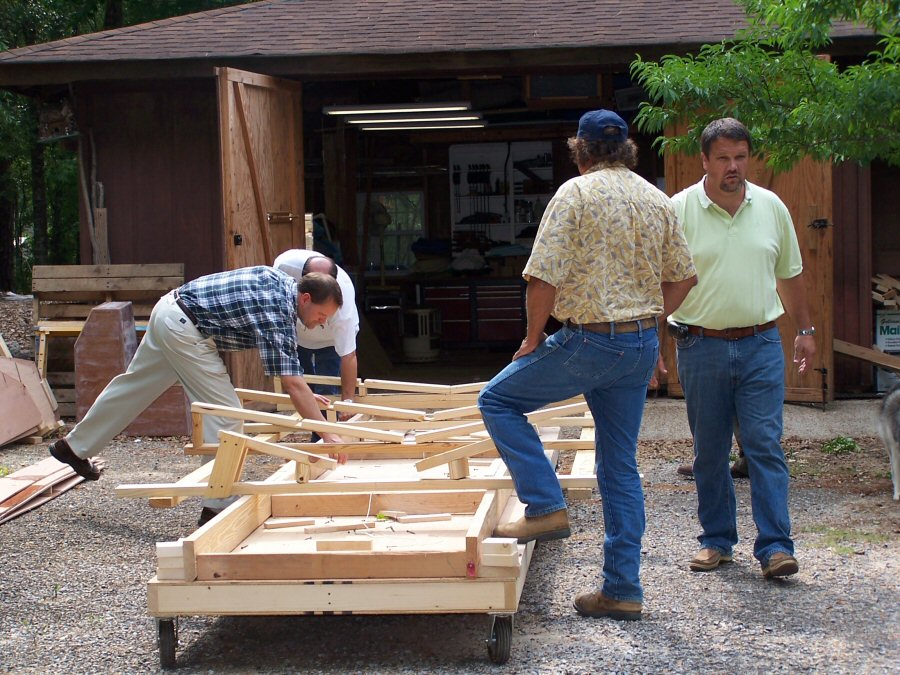
Here is where I will be spending a considerable amount of time over the next several months. This is my mobile platform for construction that I shamelessly stole the idea for from a previous poster.

Posted: Tue Jan 23, 2007 1:09 pm
by tech_support
Muddler wrote:T.
For those that read this looking for information, let me tell you "measure 3-4 times before you even think about cutting". I have already caught several silly mistakes. I also noticed that the sheets of ply are about 3/16 inch longer then 8 feet, and about 1/8th inch wider then 4 feet. I started getting some strange number in that things were not coming out where I figured they should. This could throw off some of the panels if you assume the panels are 4 X 8.
Bill
Thats a good thing to remind us of. Okoume plywood is 2" longer

Posted: Fri Jan 26, 2007 6:46 am
by Muddler
Well the help has arrived, Today we cut...... after we check the measurement of the layouts I have done so far, one more time!
Bill
Posted: Mon Jan 29, 2007 8:31 pm
by Muddler
Well, we got the bulkheads, stringers, and side and bottom panels cut out. We glued the stringers and side panels together in the house (my bride was away for the weekend). We got the transom mounted and should get around to mounting the stringers and remaining bulkheads tomorrow evening.
Now, here is my confession. We would have gotten all of the bulkheads and stringers and probably some of the hull together, but somewhere in the haste and fog of the excitement of finally getting to put something together we glued the forward section of the inside stringer upside down!!! Crap what a mood killer. We had to cut them both apart and re-glue, lost six hours causing us to run too late to get everything done.
Oh well, at least it was repairable and we only wasted a small amount of Epoxy and Fiberglass. Besides the adage, "measure 5 times and cut once", add to the list to "check and recheck everything and call in for a second opinion before applying the glue.
Bill
http://gallery.bateau2.comindex.php?cat=15860
Posted: Thu Feb 01, 2007 3:53 pm
by tech_support
Looking good, the pictures will help other build a proper jig.
Posted: Fri Feb 02, 2007 5:55 pm
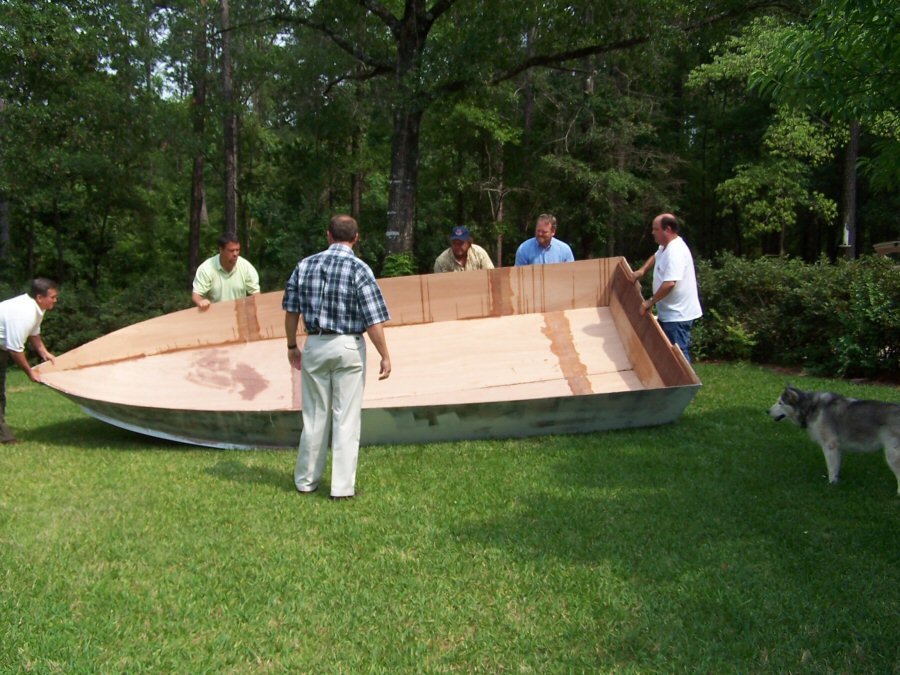
by Muddler
Well there has been more action here in the South. We have gotten the side panels in place and are ready for the bottom panels. We should get to them this Saturday.

Bill
http://gallery.bateau2.comindex.php?cat=15860
Is the Bow mould necessary?
Posted: Sat Feb 03, 2007 9:22 am
by Muddler
I installed the bow mould and it seems to be in the way of pulling the bottom panels and side panels together. Is it vital to the shape of the bow section?
What should the "joint" at the chine look like? I have fussed with the positioning of the bottom and side panels trying to get the overlap looking the same on both sides but the bottom panel sits on top of the sides near the aft, and the bottom panels sit inside the side panels near the bow. This difference is about 1/4 to 1/2 inch between the two. The hull looks to be pretty fair. Can the gaps and overlaps be taken care of (hidden) when the fiberglassing and fillets are done?
I can post pics later if it will help.
Bill
Posted: Sun Feb 04, 2007 8:26 pm
by Muddler
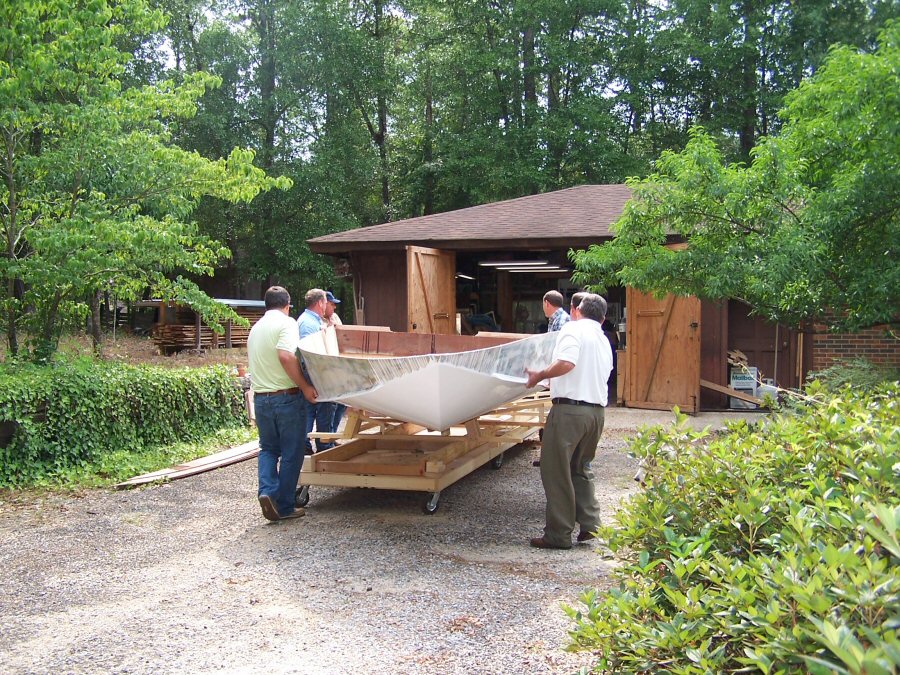
Well the panels are down, and the seams are covered with tape. Long Day!!
http://gallery.bateau2.comindex.php?cat=15860
Bill
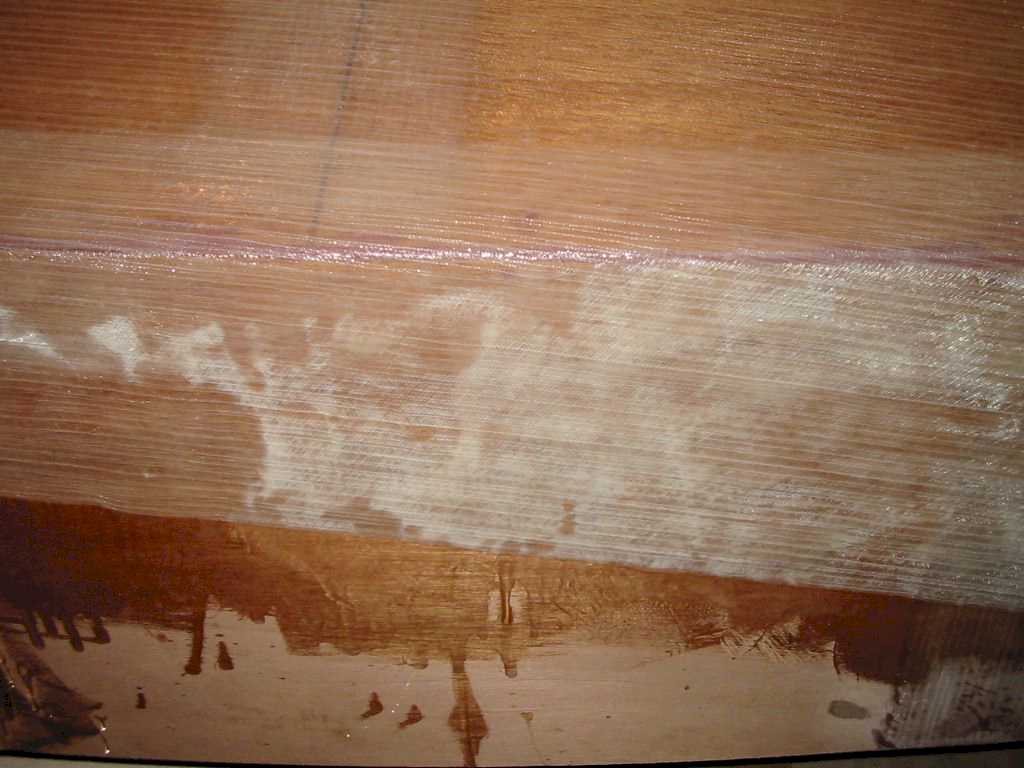
The fiberglass pulled away at the chine.
Posted: Mon Feb 05, 2007 8:56 pm
by Muddler
When I taped the side and bottom panels, I had sections where the fiberglass did not stick where it wrapped around the chine. Should I try to inject epoxy between the fiberglass and the hull? I still have the cloth to go over the tape on the chine.
Bill
Posted: Tue Feb 06, 2007 5:30 pm
by sgorey
I'm not sure what you should do, but for me, it happened with the wide cloth. I was told to replace the bad glass.
I would atleast fill air bubbles.
My bad...
Posted: Tue Feb 06, 2007 6:16 pm
by stickystuff
First off, did you epoxy the seams with thickened epoxy? This is first step. Next after epoxy cures, cut zip ties and remove and fill in any voids with thickened epox. Next sand down any humps and bumps from excessive epoxy globs. Next, wet out the wood on the seams with reg mixed epoxy and then lay your glass tape down across the seams . Use brush or small roller and paint the epoxy on the seams over the tape. Make sure all your tape wets out. You will know this when it turns clear. Use a bondo spreader or special roller to make sure all air is exited the glass. When its all smooth and clear you know it is correct. Word of caution, mix small batchesof epoxy. To much and it will start to accelerate in the cup and you will lose an expensive batch of epoxy. It will get so hot you won't be able to hold on to the container. Don't try and put any on if it starts to kick. Work fast and mix only what you can put on in a 10 to 15 min. time frame. Be very careful in your measurements. 2parts epoxy to one part hardner. Mix thoroughly and go to work. Cut all your glass to length and set aside so all you have to do is reach for it and go to town. Hope I didn't confuse you. I don't know how much experience you have so don't take any of this wrong. Just trying to help.
Posted: Tue Feb 06, 2007 6:19 pm
by stickystuff
Another tip which you may or may not know. Make sure all edges have at least an 1/4" radius. Glass will not lay over a sharp edge. You have to have a radius. You can go more than 1/4" but not sharp.
Posted: Tue Feb 06, 2007 8:47 pm
by Muddler
Ken:
Thanks for the reply. I have read lots of posts but seem to have missed something somewhere. The advice would have made a difference i am sure.
To resolve the voids I have drilled 1/8 inch holes in the voids and have used a hypodermic syringe to inject epoxy into the voids between the fiberglass and the plywood. It will take some time but the first attempt has done pretty good. I have a couple of weeks before the help arrives to put the cloth on. In hind sight It would have been way better to followed you directions if I had them to begin with.
Thanks.
Bill
Posted: Sat Feb 10, 2007 7:01 pm
by Muddler
Well the injection process has worked with marginal success. I was not totally happy and the process was taking to long, squirt, wait to cure, squirt some more, wait to cure. After two evenings of this, I got up This morning and got out the belt sander
I took off the tape at the transom, and from forward of bulkhead "C" back to the transom. I then followed the "Stickystuff" advice. "Thanks Ken"
I wetted the ply, put on the putty, laid on the tape, epoxied and squeegeed things out to a smooth finish. It looks a whole lot better and I will sleep good tonight knowing there are no voids behind the tape.
Bill
Posted: Sat Feb 10, 2007 11:29 pm
by Poseidon's Rook
Its alway better to do it right the first time (or at least before construction is completed) than to finish and have it break and need repairs anyways
Posted: Sun Feb 11, 2007 12:41 am
by FLYonWALL9
Mudder,
Get some of these roolers they can be had at most any
boat store but they will help you push out any air under
your glass. Glad to hear you ground out the old glass
This was the only picture I could find with a quick google
http://www.tapplastics.com/shop/product.php?pid=188&
Posted: Sun Feb 11, 2007 12:49 am
by timoub007
Posted: Sun Feb 11, 2007 7:39 am
by Muddler
Thanks for all of the replies, I have the roller, The issue was the angle at the chine. The fiberglass tape will not make the bend around anything close to 90 deg. After grinding off the first attempt, I rounded the chine and laid in the putty, used a spatula to smooth out any air bubbles. I used the spatula the first time and got the air bubbles out and things looked pretty good at first. I covered the tape with plastic to make things a little smoother (that part worked very well) but when the plastic was removed the tape had pulled off the plywood just on either side of the chine in some long sections.
I used a hypodermic syringe to inject epoxy through small holes into the voids and that seemed to work OK in some spots but in the end it just seemed best to get out the belt sander and do it right.
Bill
Posted: Sat Feb 17, 2007 8:47 am
by Muddler
Well, that half looks pretty straight!
On to side two!

Bill
Posted: Sat Feb 17, 2007 9:34 am
by Dougster
I looks great to me. I'm just behind you a bit with the LB22, and hope to be taping in a week or two. Thanks for sharing, it helps beginners like me progress. I think you did right grinding the whole thing out and doing it over--no nagging worries and sleep easy.
Admiring your work Dougster
Posted: Sat Feb 17, 2007 10:15 am
by robbiro
Muddler,
She's looking great!!

Enjoy the process, I have learned much not only about building, but about me and how I cope with life also, WHOA!!!! That was too deep for a Saturday Morning. Keep after it and before long you will have a thing of true beauty sitting in your garage and then on your favorite body of water.
Robbie
(I see that we use similar barbers)
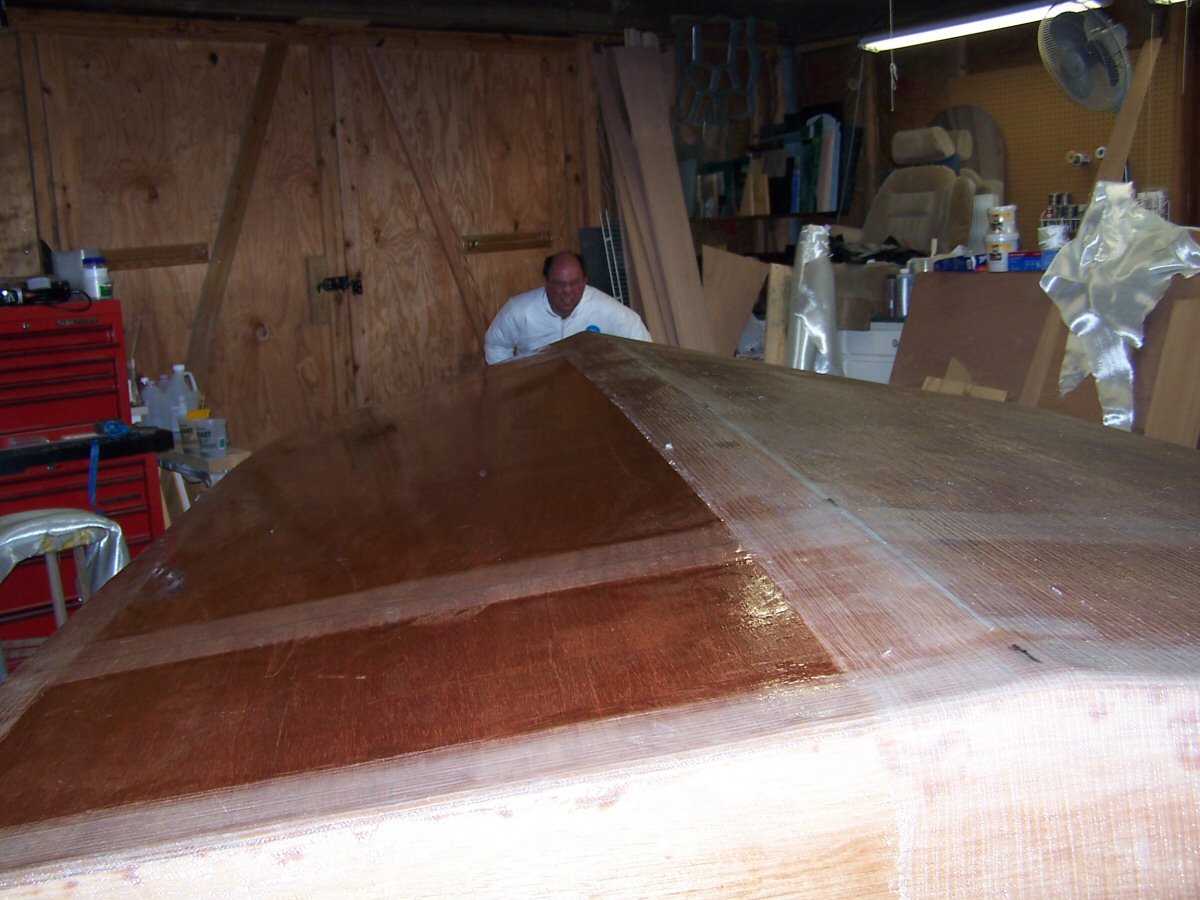
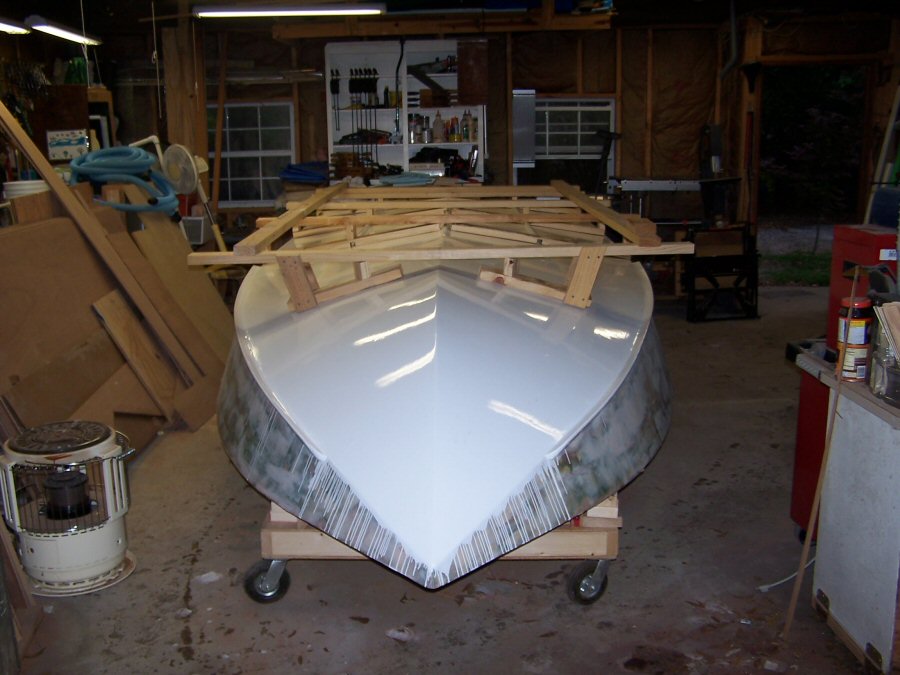
The hull fiberglass is on!!!!!
Posted: Sun Feb 18, 2007 7:33 am
by Muddler
We finished the hull fiberglass late Friday night. It is supposed to get to 25 tonight so we'll leave the heaters on to help things to cure!
Bill
Looking at the end of a long day.
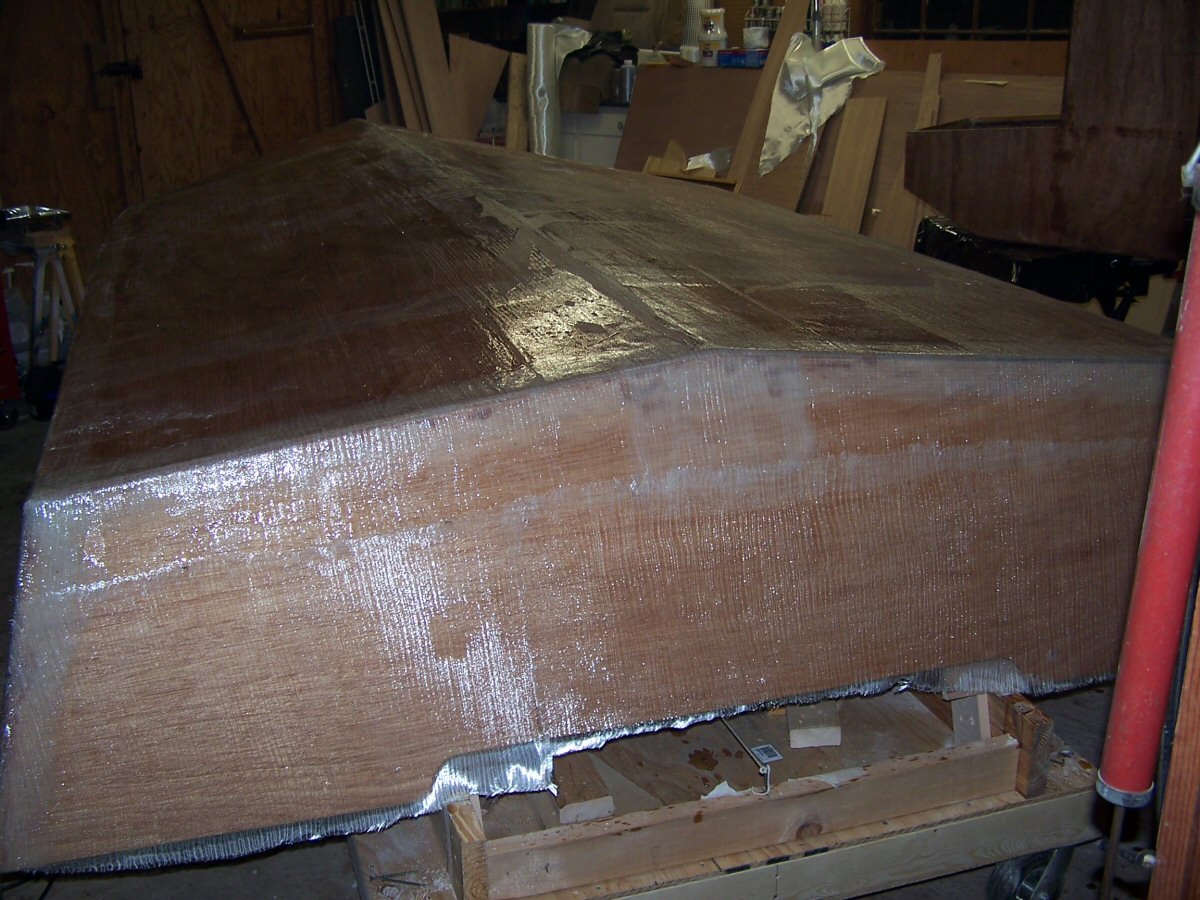
Posted: Thu Feb 22, 2007 8:18 pm
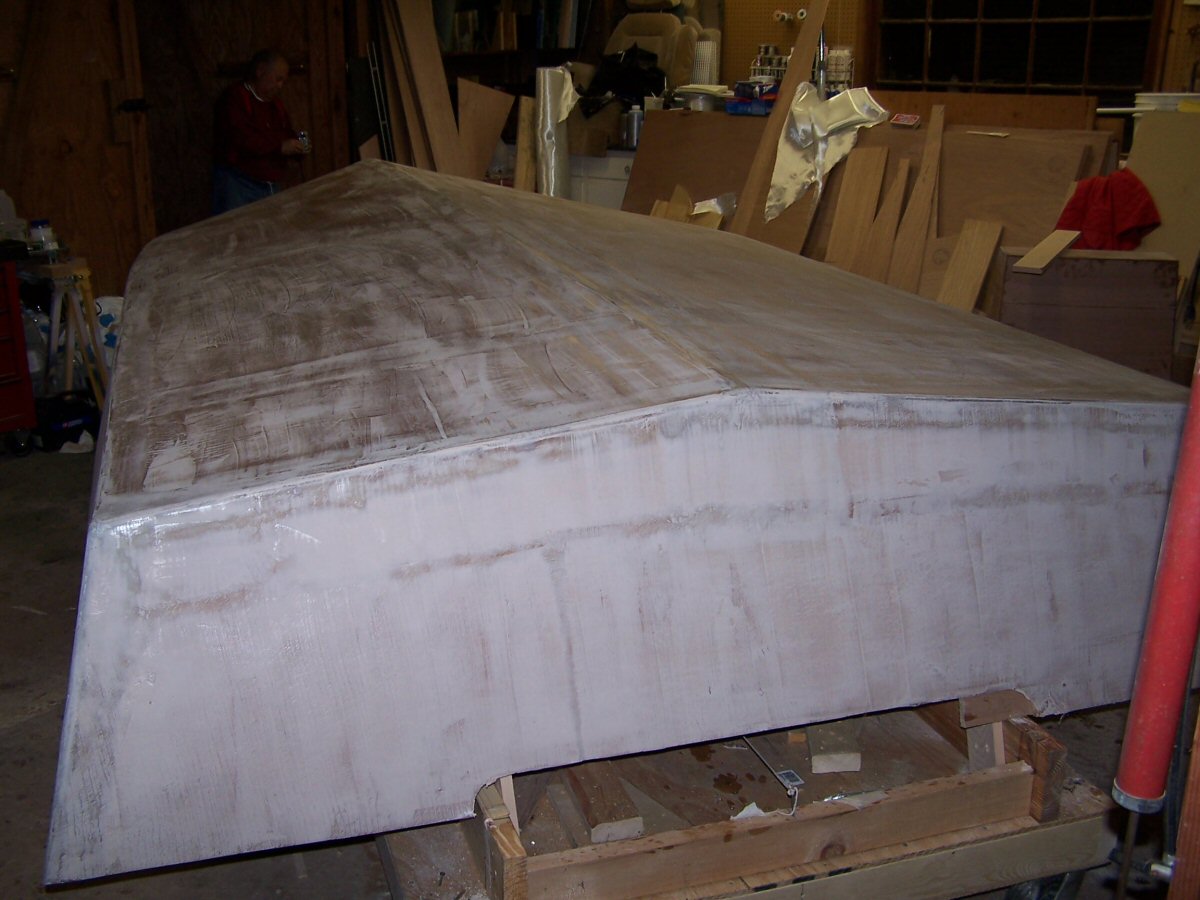
by Muddler
First coat of faring compound.
Bill
Posted: Thu Feb 22, 2007 10:11 pm
by Poseidon's Rook
Man, ya'll are scooting right along aren't ya

Oh, and looking good
Posted: Mon Feb 26, 2007 1:01 pm
by lil' shrimp
looking man, so josh when are you gonna start on yours? let me know cause i wanna help so it will make my build go easier and yours faster.
Posted: Mon Feb 26, 2007 6:01 pm
by Poseidon's Rook
I actually just bought my plans this past Friday. Waiting on them to arrive (estimated delivery is the 28th) so I can look them over. I already have the money set aside to purchase all the plywood and resin/fiberglass...just wanting to look the plans over before I order everything else. Then, I hope to get started in March sometime.
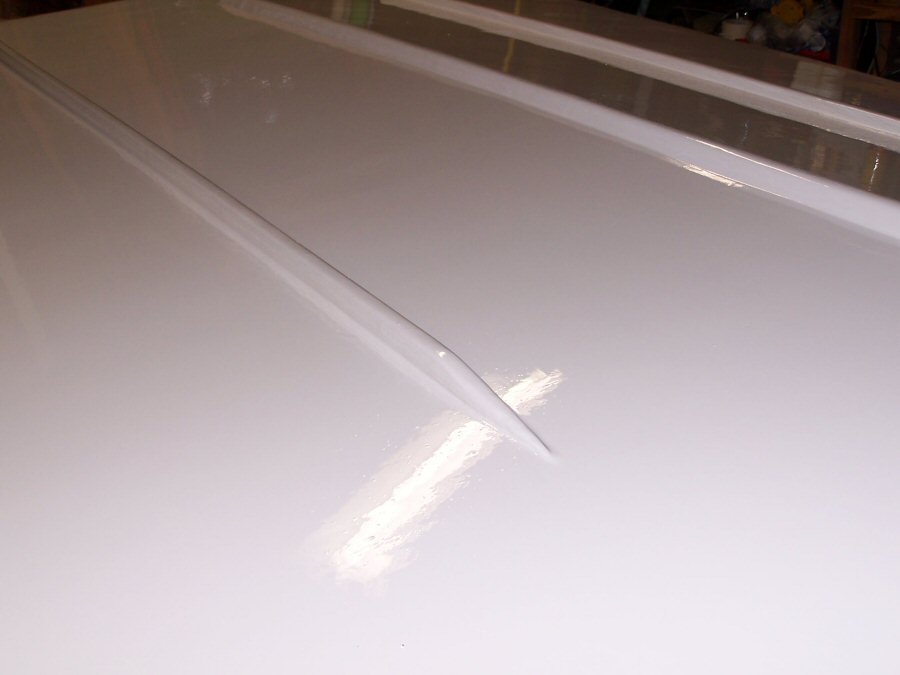
Several Questions Fairing the bottom!
Posted: Tue Feb 27, 2007 8:07 am
by Muddler
I have a couple of things I need advice on. I am in the process of fairing the hull and filling the smaller depressions and bumps is easy enough. I have an area about 2-feet forward of the transom on the port side that when I push down on it it will depress about 1/4 to 1/2 of an inch before it bottoms out on the stringer/bulkhead. If I fair to this "rise" I am guessing that it will not be fair when the boat is turned over.
Looking under the side of the boat I can see that if I where to place on end of a clamp on the bottom of the hull at the chine and the other end of the clamp under the edge and on the end of the bulkhead where it meets the side panel, I could pull the bottom down to where the bottom would sit on the bulkhead/stringer. This would be the more or less the way things would be when the boat is turned over when the bulkheads and stringers are laid in and epoxied in the bottom.
The Second question: How flat does the last four feet need to be and flat in which way? Laying a straight edge on the keel at a 20 deg. angle (as I have read elsewhere) back to the transom I can see areas that need to be faired. Laying the straight edge on the keel and the chine (parallel to the transom) I see other area that need to be faired but not the same areas as above. If I lay the straight edge with one end on the transom (parallel to the keel) I see other areas that need faring but not necessarily the same areas as pointed out above in the other straight edge orientations. This is all rather confusing??? So how flat is flat and in which direction is best? How much gap is to much 1/32", 1/16", 1/18", 1/14"? When I read absolutely flat, I'm thinking <1/64". I just wonder what will happen after I spend a week fairing to that level of fairness when I turn the boat over and gravity and other mechanical forces press on the bottom of the hull from the other direction.
Third question: What is best for the chine edge, rounded or square? I will be adding a spray edge from the bow aft about 8 feet.
Bill
Posted: Tue Feb 27, 2007 11:08 am
by FLYonWALL9
Pictures of the hull bottom with a nice straight edge
would help. I would fix it but without pictures I'm not
so sure how.
You want the edges to be a clean one, some say a
good radius some say sharp edge. I like a little radius
but not rounded. It can be done with your fairing mix
and sanded with your RO. I don't like them SQ because
of dents and so forth.
When putting on your spray rail keep in mind if its at
the water line you may have some slap at rest in chop.
This spooks fish, just put it high enough to be out of the
water at rest and low enough that it will work as intended.
Posted: Tue Feb 27, 2007 12:25 pm
by Muddler
Fly:
If you look at the picture I posted a couple of posts back, the area I am talking about is on the right side just above where the bulkhead is located (about 2 feet forward of the transom). If I lay a straight edge at an angle of about 20 degrees (this is one end about 20 inches forward of the transom on the keel and the other end of the straight edge on the chine up about 10 inches forward of the transom) the center of the straight edge is on the high spot and there is a 1/8" to 1/4" gap just aft of the middle of the straight edge and just forward of the middle of the straight edge. I can post a picture but it will be later tonight.
Like I said my biggest concern is not the process of fairing these areas, but what happens when the hull is turned over and the bulkheads and stringers are placed back in the boat. The hull is currently floating so to speak and not fastened to the bulkheads or stringers. In your experience will the hull change its shape when it is turned? I do not see how it would not change to from to the shape of a cradle or the bulkheads. If I place a cradle, under the hull when turned, in the locations of the bulkheads, will I not change the shape of the hull to fit the bulkheads, which is not what I have now?
Bill
Posted: Tue Feb 27, 2007 1:41 pm
by FLYonWALL9
Bill,
From what I have seen yes they will change shape some until those
internal parts are installed. If I recall the PH boats use regular vertical
stringers. You say you can see this gap translate to those also? Meaning
the stringers are straight and you see a gap between them and the
hull bottom? If thats the case I think once in the cradle and the stringers
are in the problem may resolve itself. Just sounds like the panel isn't
being supported from the inside. IF I'm understanding what your saying.
I'm pretty thick headed when it comes to understanding text but pictures
tell me loads. I know what your saying though. You lay the edge and an
angle to the sheer and you see the issue. I had the same thing in my OB
and I just filled it. Then flipped the boat. I don't see any reason to be in
limbo, you can still sand and fair the sides and bow area
Posted: Tue Feb 27, 2007 3:12 pm
by Muddler
Scott:
Thanks for the reply. So is it your opinion that I fair to a point when the hull is against the stringers? I do have some gap looking under the boat at the location where the stringers should meet the hull. On your OB did you pull the hull to the stringer and then fair? Like I said earlier I could put a clamp on the outside of the side panel and pull between the bulkhead and the chine. The clamp would be on the outside with one end of the clamp on the chine and the lower end of the clamp extending inside and pressing on the bulkhead pulling the two together. Would you recommending securing temporarily with screws so I can remove the clamp?
Thanks again!
Bill
Posted: Tue Feb 27, 2007 3:25 pm
by FLYonWALL9
Well, OB's are different animals well the small ones anyway.
They use flat stringers rather than verticle ones. Here is what
I am thinking and why.
If you take the stringers and push on them so that they touch
the inside of the bottom of the boat, that then fixes the issue?
So, if you fair it now then go in and set the stringers in place
that would then make a rocker in the hull. Tell you what take
some wedges and make it so they push the stringers into the
hull bottom. Then go and lay your edge along the hull bottom
and see if the problem goes away. If so, I wouldn't worry at
all with it. I would leave those wedges in place until you have
the outside of the boat faired. Then flip her over but onto something
that wll support the boat were your stringers will be so when you
glue them to the hull bottom you can put a little weight.
Also, I think Jaq put out a tut. that used 2x4's on the outside
of hulls to pull out hooks and push in rocker. Not sure at what
point those were used but I do recall something like that. I don't
see why you couldn't screw some 2x4s to the hull flip it to glass
the inside and install your stringers then flip back, finish fairing
fill those little holes and press on. Sure its one more flip but that
surely will give you a flat bottom.
I wouldn't put too much pressure on any screw or strap that will
cause a hard spot or bow. Just enough to aid in pulling it out. I
used fairing compound on mind but now wish I used the 2X4
method, I think it took nearly 1/2gal or resin to fill mine.
Back at again!
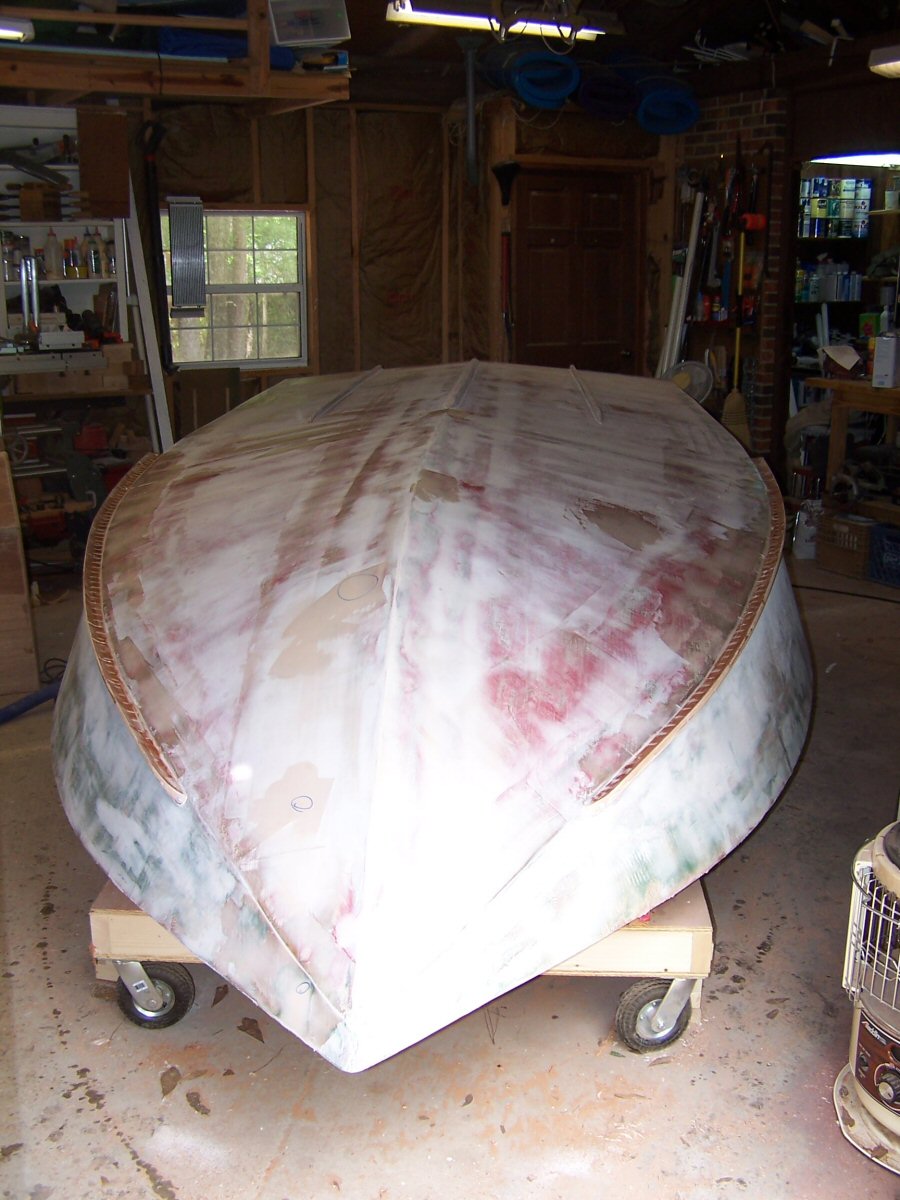
Posted: Tue Mar 27, 2007 7:49 pm
by Muddler
Well I have had take some time off time visit with the granddaughter while she was visiting, and then got sidelined with the upper respiratory creeping crud that kept me out of the garage and from working on the boat. This past weekend I was able to spend some serious time and basically get the hull fair and ready to add a skeg, a couple of strakes and a couple of spray rails. We are hoping to get this done by this weekend and be pretty much ready to prime and paint and do the flip in about 2 weeks.
Posted: Thu Mar 29, 2007 6:53 am
by Muddler
I got the keel and strakes cut last night and hoping to get started on the spray rails tonight. The spray rails will require creating some cove cuts using the table saw, and several angled cuts which will take a little time to think through and get cut. I'll have pictures of all of this posted maybe this weekend, when my bride returns on Friday with the camera she had to go and visit the granddaughter and had to have pictures you know.
Posted: Thu Apr 12, 2007 7:19 pm
by Muddler
Well the strakes, keel and spray rails are on and we are currently sanding everything smooth. A little more faring to do and we should be ready to prime and flip.
Posted: Sun Apr 15, 2007 2:00 pm
by Muddler
Well I finally got the pictures taken re-sized and posted. The spray rails, keel and strakes are on and have been faired and sanded once. A second coat of fairing has been done and we are waiting for things to set up. We are inching closer to getting this puppy turned over. I'll be sanding in preparation for the primer coats and painting the bottom. I will be glade to get to see the top side soon.
 http://gallery.bateau2.comdisplayimage. ... 5860&pos=0
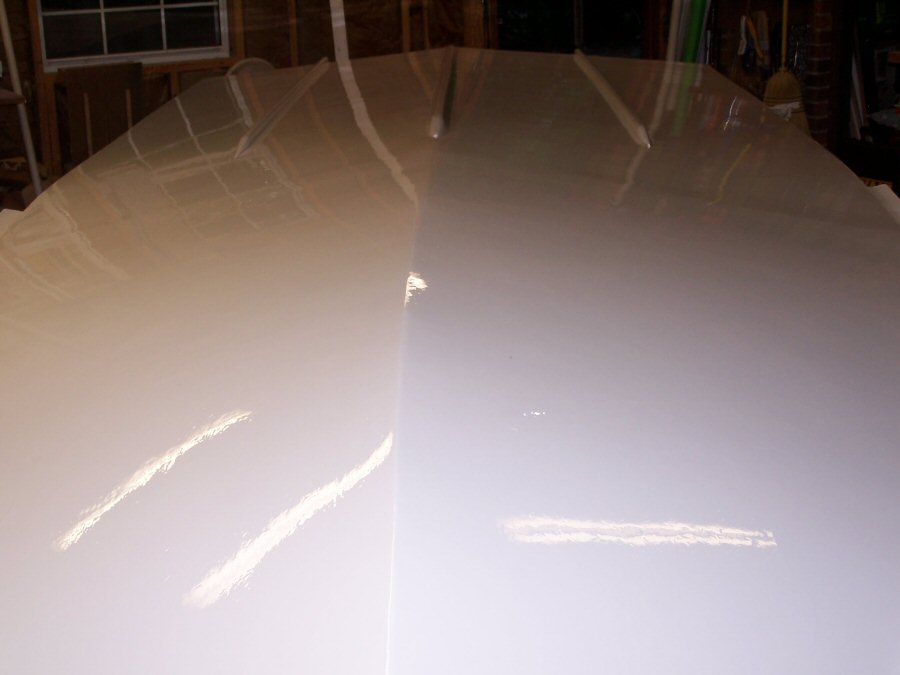
Posted: Thu May 03, 2007 10:58 am
by Muddler
Well we got the primer on (4-coats) 2- coats, sand, now we are waiting on the second set of two coats to cure. We will sand these and be ready to paint. We're waiting on the Orders Desk to send the Sterling Topcoat color chart. Should be here soon. My helper is pushing hard to get this thing turned over.
 http://gallery.bateau2.comdisplayimage. ... 5860&pos=0
paint, wait, sand, paint, wait, sand, paint, wait, sand, paint, wait, sand.
I have sander's elbow!!
Muddler
1
Fairing and sanding
Posted: Sun May 06, 2007 7:29 am
by Kingfish
Nice job Muddler. We have 2 coats of primer on our PH 22 and I know your pain. I told my Dad that only the fish will see the bottom.
Having those strakes and skegs on a boat sure slow down the construction.
Good luck with your build. I would love to see the top side of our boat too!
Here is our latest picts
http://forums.bateau2.comindex.php?cat=16008
Kingfish
Posted: Mon May 28, 2007 10:21 am
by Muddler
Well we've got the bottom painted. Should be ready to Flip by next weekend.
Posted: Sun Jun 10, 2007 8:59 am
by Muddler
Now we got it right side up!! I just got around to resizing the pics, and getting them uploaded to the gallery. I called a meeting on Friday (6-1-07) assigned all of the duties, chilled the beer (the crew would have become unruly if the had to work for free) and we set about getting the right side up.
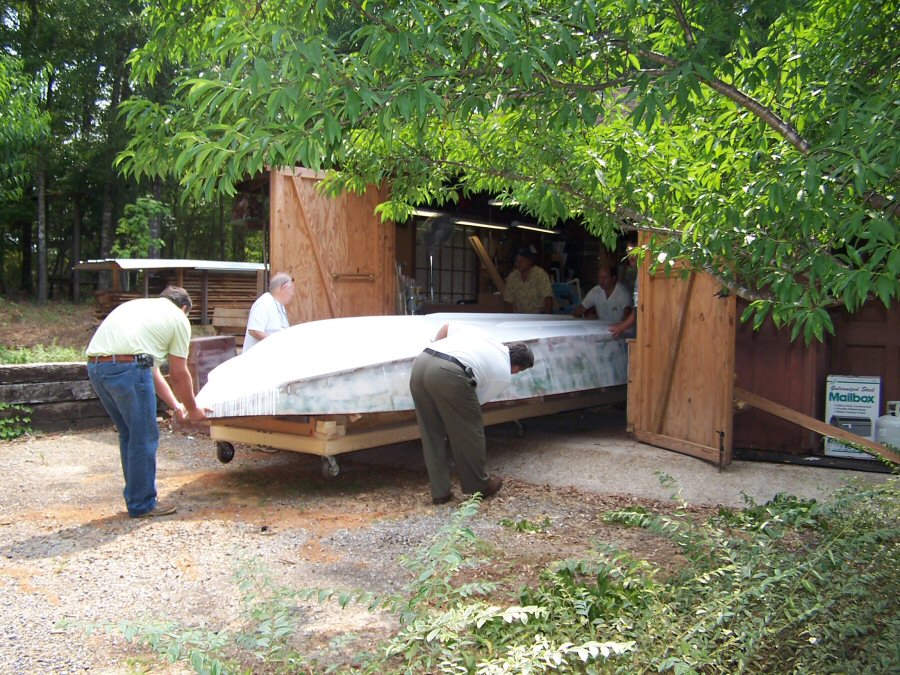
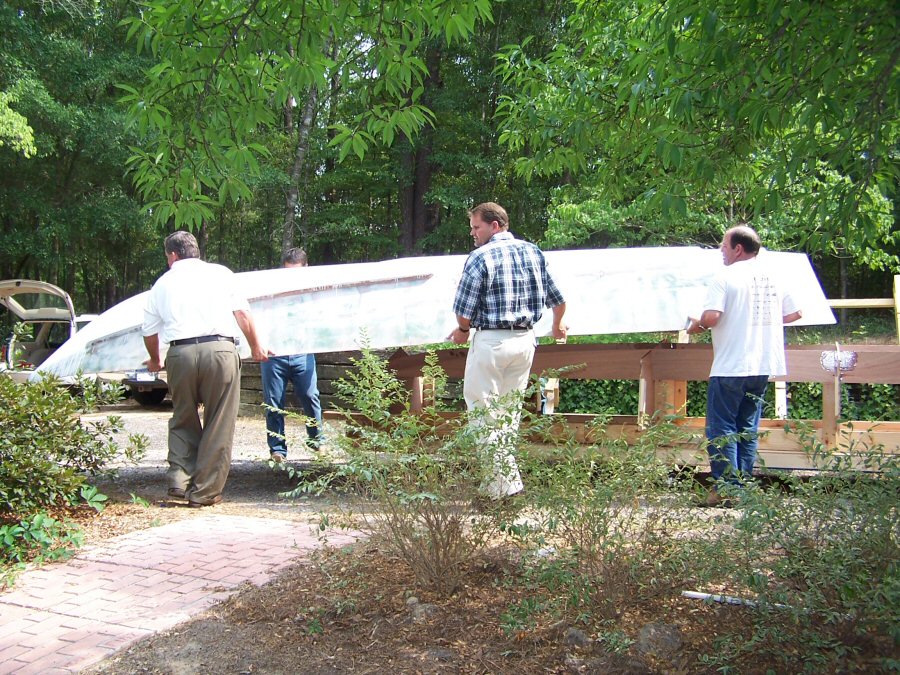
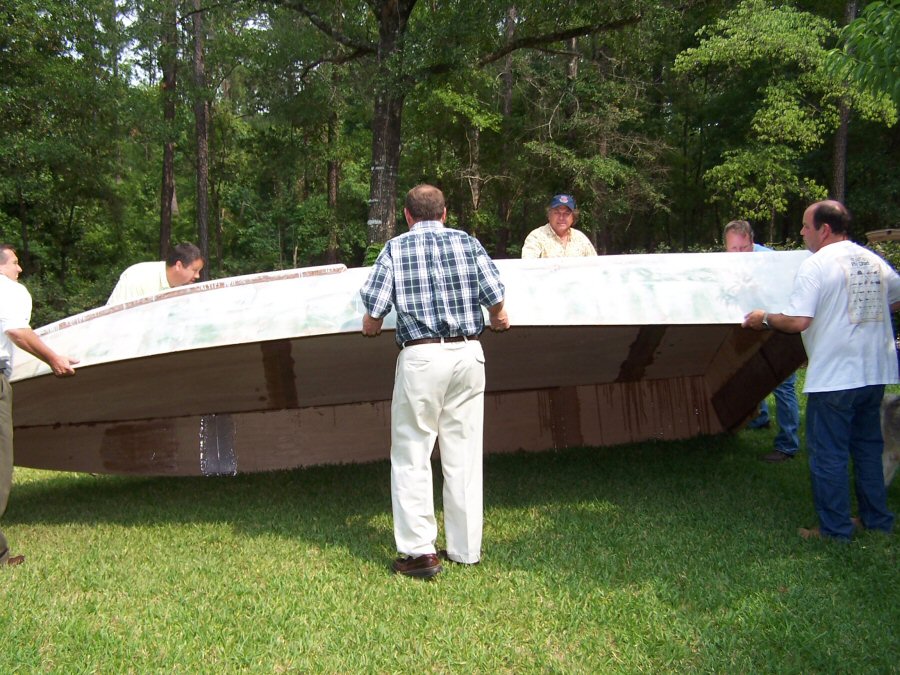
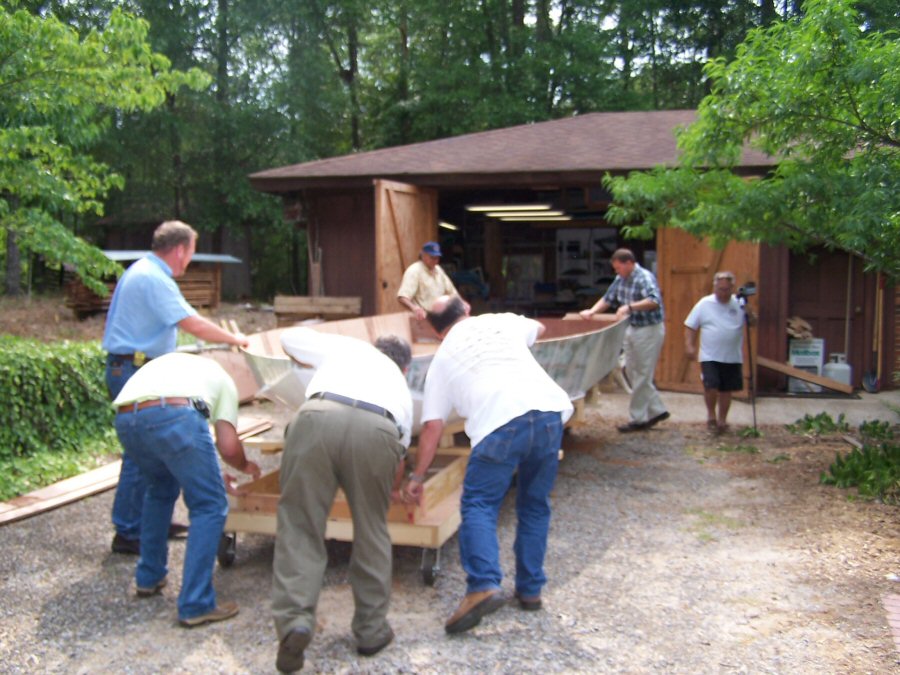
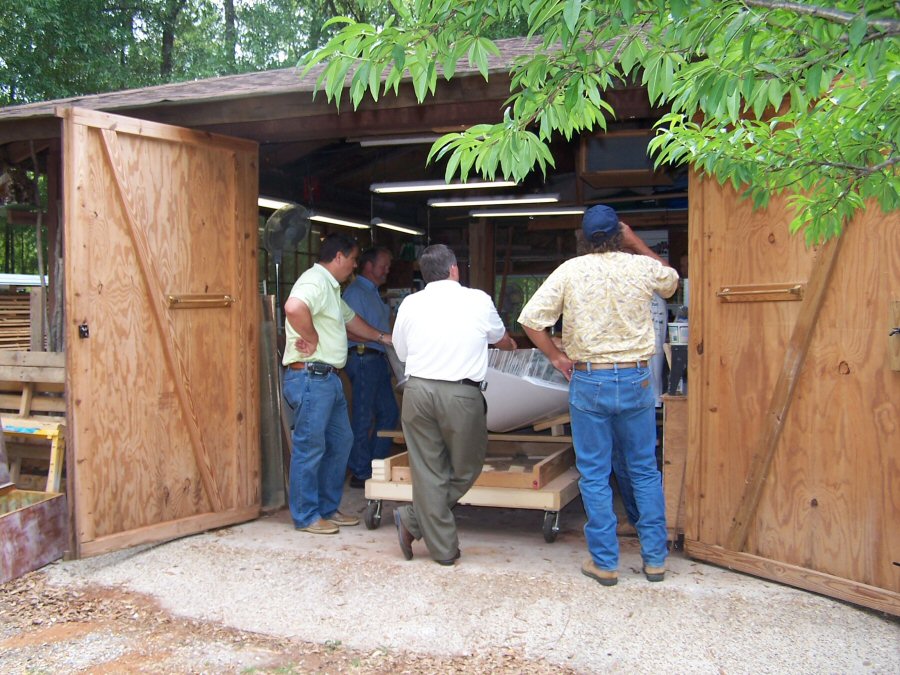
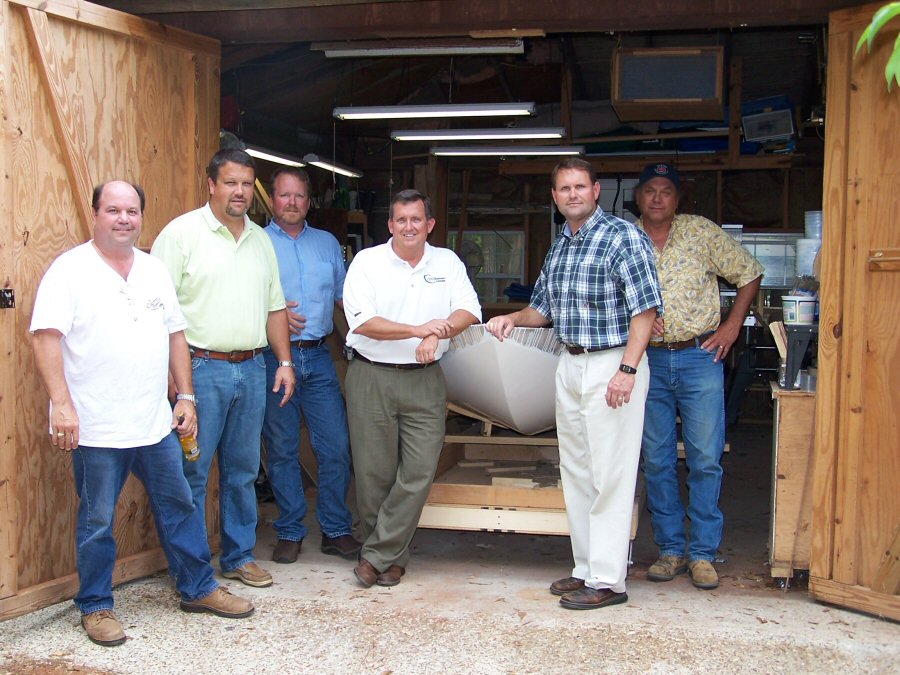
Whew!! I love it when a plan comes together!! Now on to getting the guts put in this sucker.
Since last week's turn-over, I have gotten the fillets done, FG cloth laid and epoxied, and the tape on the keel, inside the chine, the transom and am about ready to put the bulkheads abs stringers back in the hull, fillets, and tape, etc, etc, busy, busy.........
Bill
Posted: Mon Jun 11, 2007 8:24 am
by tech_support
great pictures, thank you for sharing them.
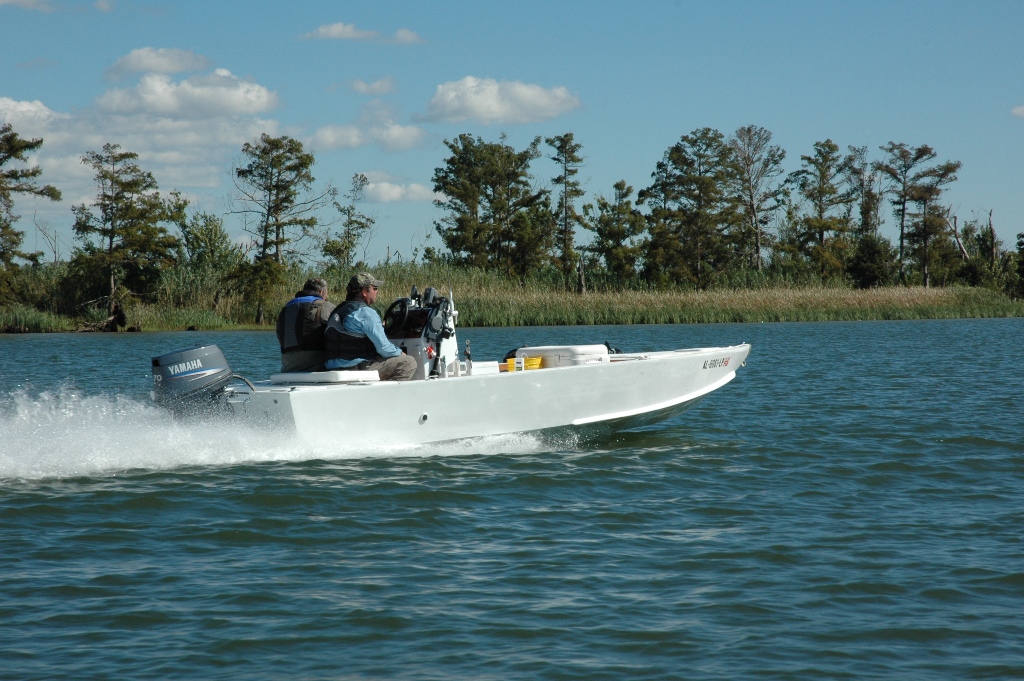
Posted: Thu Nov 15, 2007 7:46 pm
by Muddler
Well the results are in and it floats!
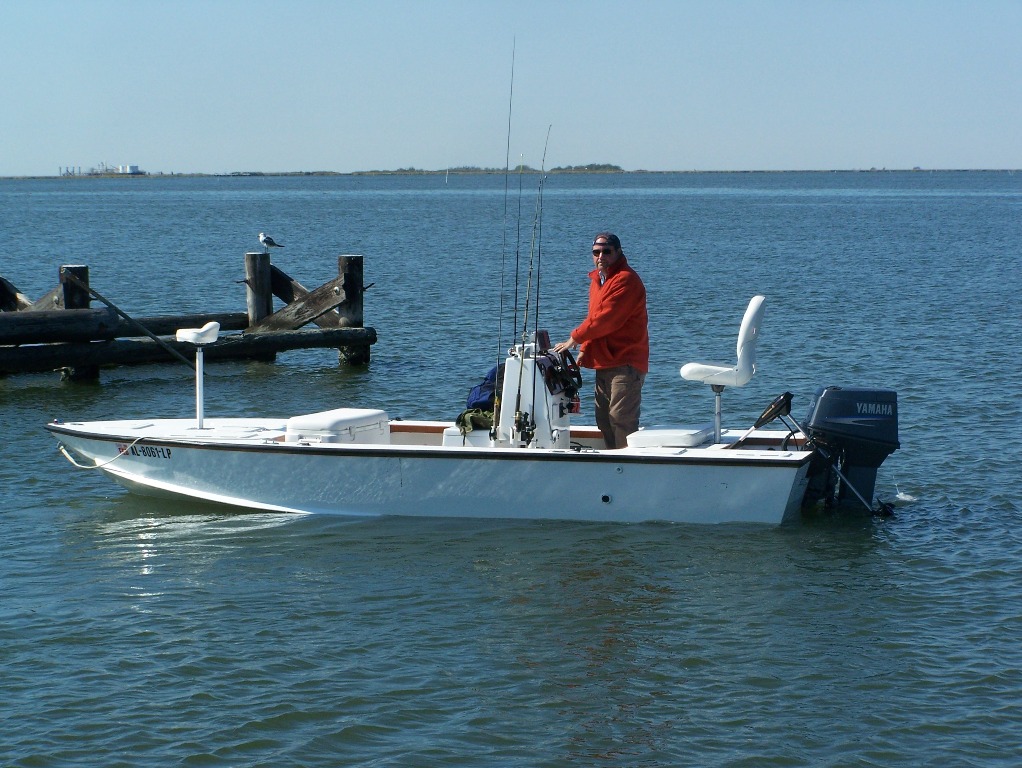
The rest of the pictures are here:
http://forums.bateau2.comdisplayimage.p ... 5860&pos=0
There are a lot more picture that I didn't upload. If you have questions I probably have a picture of the process.
Muddler
Posted: Thu Nov 15, 2007 8:35 pm
by steve292
Beautifull boat...........nice weather,good fishing,what more could a fellow want
Posted: Thu Nov 15, 2007 9:57 pm
by Cracker Larry
Fantastic
Great job, nice boat, nice fish
Posted: Fri Nov 16, 2007 7:19 am
by dborecky
WOW!!!!!!
What more can I say?....
What are the performance numbers with that 70hp engine?
Derrick
Posted: Fri Nov 16, 2007 8:59 am
by tech_support
Nice boat
Nice redfish too. they are staring to school up around here about that size.
Posted: Fri Nov 16, 2007 10:14 am
by Jerry-rigged
dborecky wrote:WOW!!!!!!
What more can I say?....
What are the performance numbers with that 70hp engine?
Derrick
mudders gallery wrote:It will do 36mph @ 5600rpm
That comment on this pic -
Great job, Mudder!
Be proud, be very proud!
HEY TAGGED!!! When you starting yours

Jerry
Posted: Fri Nov 16, 2007 10:18 am
by Jerry-rigged
Mudder - question -
Did you add something to the rubrail after your first run, or just paint it?BTW, I like the dark rail better! Looks a bit plain all white.
Jerry
Posted: Fri Nov 16, 2007 10:23 am
by Muddler
The 70 HP Yamaha will push it at around 36 mph @ 5600 rpm when the trim is just right! I have not done a whole lot of testing till we get through the recommended break-in period for the engine. It really rides nice, and is a very stable fishing platform. I felt very confortable in the boat, it did not feel the least bit tippy even with both of us on the same side of the boat. I poled the boat through 8" of water with relative ease. I was going to put a 4-stroke on the back but the dealer talked me into the 2-stroke to loose the extra weight, it was a good decision. I have a keel about 1.25"x 1.25" and two strakes about 18" from the centerline the boat slides pretty well around the corners. I don't think we would have stayed within the banks if I had not put them on the bottom.
I am verry pleased with the boat. I have some painting to do on the sides. I rushed to get it finished to make this fishing trip. I will post the pictures of the completed artwork when I it is all complete...
Muddler
Posted: Fri Nov 16, 2007 10:26 am
by Muddler
Hello Jerry:
The pictures are actually of two different trips.. I didn't have time to add the rubrail before the first trip. I added a strip of mahogany about 3/4" x 2" all the way around and put a TACO Metals vinal rubrail over part of it. It looks good and took a beating during the second trip, I was glad I had the time to add it.
Muddler
Posted: Fri Nov 16, 2007 11:42 am
by Jerry-rigged
Thanks Mudder!
You boat looks great with the dark rubrail, and it sounds like it scoots pretty good with a moderate sized motor. My brother wants to build one, and you pics may hurry him along a bit...
Jerry
Posted: Fri Nov 16, 2007 5:23 pm
by MadRus
Nice job, beautiful boat! And a great first outing. That picture "A final prayer" is one of the best I've seen, it got me laughing.
Posted: Sat Nov 17, 2007 7:22 am
by topwater
Very nice boat. You guys got me chomping at the bit to start my boat. This site is great.
Posted: Sat Nov 17, 2007 8:50 am
by TomW
Super boat, you did an excellent job. Great fishing trips, hope you have many more!
Tom
Posted: Sun Nov 18, 2007 8:57 am
by Muddler
Thanks for all of the gracious reviews/replys. But I must say it would not have turned out near as well without all of the in put I got along the way. I borrowed a lot of ideas from others and had a few ideas of my own. I really have to mention the help at home that I got along the way. My Dad came and stayed on several occasions and kept me on track and aided in getting a lot of the work done, and I would never have been able to get it completed on time for the fishing trip without the last minute help of my daughter who came in from Athens Ga. to lend a hand. But most of all, my wife was a big encouragement along the way when things were not going exactly to plan.
It has been a real team effort to get it finished and it has all been worth the effort. The results speak for themselves. Much thanks to all of you on the forum for your advice, it would have been much harder without all of the information and advice I got from this forum.
Muddler
Posted: Mon Nov 19, 2007 9:31 am
by Daniel Huckleberry
Congratulations! She looks great! Where did you launch/fish. I may have missed that. Looks like some familiar scenery.
Huck
Posted: Mon Nov 19, 2007 11:18 am
by Muddler
Huck:
The company that I am a partner in has a red fishing trip every year that we do as a kind of client appreciation thing. We stayed
http://www.rodnreel.com/nells/ here on two separate occasions once at the end of October and again in early November. We fished out of the Venice Marina and out of Joshua's Marina both marinas are about a 10-15 ride from the lodge. We fished the flats west of Joshua's and Main Pass and Red Pass (were it meets the Gulf) out of the Venice Marina. GREAT fishing in both locations. The weather and tide flow are the real determining factors on where we went on what day. If you want to go down to the area and fish, let me know I can give you Lat. and Long. on some of the spots we hit!
Muddler
Posted: Mon Nov 19, 2007 11:22 am
by Daniel Huckleberry
Probably gonna take you up on that. Haven't been to venice in over 4 yrs so I KNOW it looks different. Congrats again on a really beautiful boat.
Huck
Posted: Mon Nov 19, 2007 12:33 pm
by Muddler
Huck:
Here is some locations to get you started, I got the coords of of Google Earth they will show you the general areas we fished. The Red Pass and Grand Pass areas are specific locations and the Marsh areas are generalized, we chased reds in the skinny water on the falling tides in the early morning. We fished mullet, live shrimp, and plastics all day in the Grand Pass area Fly fished and plastics in the red pass areas.
We fished the early morning in the flats with plastics and flyrods.
Good luck.
29-12'-49.35"N Red Pass Area
89-28'-10.09W
29-12'-53.52"N Red Pass Area
89-28'-03.44"W
29-14'-00.25"N Red Pass Area
89-20'-35.58"W
29-14'-26.34"N Venice Marina
89-21'-52.66"W
29-20'-56.66"N Joshua's Marina aka Buras Boat Harbor
89-32'-18.07"W
29-20'-41.16"N Marsh Area (flats)
89-33'-17.95"W
29-21'-31.39"N Marsh Area (flats)
89-34'-44.41"W
Enjoy!!
Muddler
Posted: Mon Nov 19, 2007 1:37 pm
by Daniel Huckleberry
Just printed! Thanks
Huck