Page 1 of 1
FS18 Done Deal...
Posted: Thu Mar 01, 2007 10:03 pm
by Bayport_Bob
I've finally got the jig assembled. All the panels are joined. Let the stitching begin!
http://www.wetconcepts.com/FS18.htm
- Bob
Posted: Thu Mar 01, 2007 11:28 pm
by Super Spook
You've now officially passed me up. Looking good man.
Posted: Thu Mar 01, 2007 11:36 pm
by FLYonWALL9
Go ahead on Bob witcho bad self. Lookin good man!
Posted: Sat Mar 03, 2007 6:58 pm
by Bayport_Bob
Stitching complete...
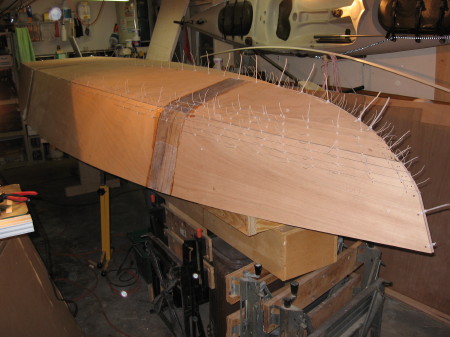
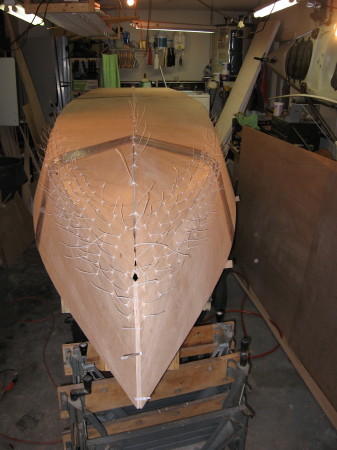
Short slideshow...
http://www.wetconcepts.com/fs18_stitched.html
A description of the complete building process to date:
http://www.wetconcepts.com/FS18.htm
Posted: Sat Mar 03, 2007 9:49 pm
by Dougster
Beautiful, neat work. I'm like everyone else: attracted to this boat. It's fun following this thread.
Maybe someday Dougster
Posted: Sun Mar 04, 2007 4:59 am
by stickystuff
Now I am getting antsy. Its not even been a week and I am ready to build one for myself.You have been doing a beautiful job so far. I was looking at Gordon Boatworks web site yesterday. They make the "canoe style skiff" and waterman boats. Check their site out. They have some neat interior ideas. I really like the rear dry storage boxes that leave an open bildge that is easy access to pumps etc. Also easy tiller steering area. Also have a storage box in center of hull that can be located to help the center of gravity. Of all the hulls I have built I am more excited about this one for my future needs. May have to take a ride south to check yours out. Great job so far.
Posted: Sun Mar 04, 2007 5:01 am
by stickystuff
Gordon Boatworks make the "canoe style skiff" Skiff. Don't know why I said canoe. We--llll its kinda like a canoe. Good site and good ideas.
Posted: Sun Mar 04, 2007 5:11 am
by stickystuff
Hey B-Bob go to Csg.com. This guy makes custom mini jack plates. Perfect for thr FS18 Also go to
www.customskiffs.com. Perfect website for micro skiffs. You will find info on these j-plates and excellent site if you have not already found it.

Posted: Sun Mar 04, 2007 5:12 am
by stickystuff
Posted: Sun Mar 04, 2007 8:12 am
by Bayport_Bob
Hi Ken - Did you mean TsG? If so, I've already ordered one of the electric models! Tom has a website up now...
http://tsgcustom.com/default.aspx
Thanks for the compliments and info - Bob
Posted: Sun Mar 04, 2007 11:43 am
by FLYonWALL9
BpB,
Its really looking good. Your doing a great job keep
us posted.
Posted: Fri Mar 16, 2007 1:34 pm
by Bayport_Bob
I figured I would post these of pics of the '07 Hell's Bay Glade Skiff to give rigging ideas to others building the Flats Stalker 18 design...

Posted: Fri Mar 16, 2007 2:52 pm
by Super Spook
It looks like they've changed it up some for the new model. I'm sure some of this stuff is optional, but I think the front hatch is new, and the bright rod holders are new. The poling platform differs as well. It's a sharp looking boat. I hope can achieve a similar level of finish. Next time I head back to my hometown, I can take any pictures anyone needs of the previous model. I'll take requests before I go.

Elie
Posted: Fri Mar 16, 2007 3:16 pm
by mecreature
Sweet boat -Bob
Posted: Wed Mar 21, 2007 10:04 pm
by Bayport_Bob
I've updated the site with my taping and and glassing the hull bottom.
What isn't on the site yet is glassing the sides and applying the 1st coat of fairing compound. I'll post those steps as time permits (I'll be sick of sanding shortly and be looking for an excuse to get away!).
Thanks for all the encouragement from everyone. Keep the questions coming & I'll answer them the best that I can.
- Boat Builder Bob
Posted: Thu Mar 22, 2007 9:43 am
by Super Spook
Thanks for the update Bob. The detailed information you put on your site is really useful as you're always a step or three ahead of me. Just wanted you to know you're not posting into a void. I've started stitching up the round chine and for the rear half of it, the trick with the little sections of PVC works great. The area near the bow is proving to be "challening", particularly getting the three bottom panel strips to lay vertically. This is where Jacques' trick with the batten has been most useful. Thanks.
Elie
Posted: Thu Mar 22, 2007 9:52 am
by jacquesmm
That web site is one of the best, just like his workmanship.
I will post a link from the study plans page.
Posted: Thu Mar 22, 2007 9:13 pm
by Bayport_Bob
Thanks Jacques. Luckily the pictures are at the 10' distance to blur the "builder's blunders"!
Let me know if there's any thing that could be added. I'm trying to provide enough information so that a new builder with a set of plans & builder's notes can follow the steps with confidence so they pretty much know what to expect, and give them a little guidance on how to get there. Everything is done in "managable", one person steps and I try to think ahead as far as possible so the process goes smoothly.
- Bob
Posted: Thu Mar 22, 2007 10:12 pm
by ks8
Nice!
How's the sanding going?
How much did you scratch up the glass before laying on the fairing blend?
That rounded chine is looking fantastic with your very capable skills! Thanks for the website and photos. They are very helpful!
Posted: Fri Mar 23, 2007 8:41 am
by Bayport_Bob
The sanding is in the "just beginning" phase. I see several hours ahead. The areas that will require the most attention are the bow and the transom sections. This is where the tape and cloth have been built up and the large, low areas will require some attention to get flat. The bow will require some attention for the same reasons - the tape and cloth overlaps create a few areas of low spots and unfair surface.
The sides and a large portion of the hull bottom are close to fair with only a relatively small amount of work. Since the skeg is 8' long, it will cover a large portion of the keel intersection. Normally this would be a nice, very straight angle, but the only portion that will need this detail is about the 1st 8 to 9' of the bow section.
The 12 oz glass has a very rough weave that results in quite a bit of small "voids" in the weave that need to be filled. I basically sanded the large, stitched threads off and down to the surface of the glass weave without removing any substantial amount of glass fibers. This should be more than enough sanded surface area for the fairing compound to bond onto. I filled the weave with a "slurry" consistency fairing compound. This helped reduce pin holes, but I'm not convinced it was the correct consistency since it sagged quite a bit before curing.
Fairing is probably the one skill I can say that I really suck at when it comes to doing it efficiently. I'm sure someone with any autobody or other building experience could do the job in half the time and using a fraction of the materials and sandpaper.
Posted: Mon May 07, 2007 8:29 pm
by Bayport_Bob
Well, I haven't had a chance to update the website. That will happen soon. Basically I faired the hull to a 95% satisfaction level. Installed the rubrail & skeg. Laminated the skeg with unidirectional S-2 glass for extra strength and abrasion resistance. As of today, I have 2 coats of S3 high build primer on. Now back to sanding!


The sharp edges (bow, chines, transom, etc.) will eventually have a radius applied, but I figured it would be easier to get a uniform edges if I made them sharp 1st, then sanded a radius into them.
Here's an example of the stern edges to see what I mean...

(the photo angle makes the transom look deceptively deep. It's not like that in person)
Posted: Tue May 08, 2007 10:22 am
by mecreature
Did you roll or spray that primer on?
any tips?
Posted: Tue May 08, 2007 10:35 am
by jacquesmm
Whatever he did, it looks good.
Posted: Tue May 08, 2007 10:55 am
by Bayport_Bob
The primer was rolled on in 2 coats over microballoon fairing compound. Since this layer will be sanded pretty thoroughly I didn't see the need to spray it on. You can still see some of the fairing compound color through 2 coats of primer. I'll sand this layer & fill in the imperfections with Quickfair & of course sand. Once everything is looking good, I'll apply at least one more coat, or two of the primer (I may spray the final layer(s) on instead of rolling). Pretty much just like Joel did on the FS12 he built. The final coat will be lightly sanded, I'm guessing about 180 or 200 grit. I'll research the right grit for the finish sanding when I get close to that point.
I used foam rollers similar to these...

I thinned the primer ~20% by volume with 50/50 water alcohol mix.
The one tip I can pass on concerning the foam rollers I used, is to use light pressure. If you try to roll with too much pressure the foam will eventually de-bond from the core and start to get out of shape, or worse case, start to fall apart. A light stroke will get the same amount of coverage and save wear & tear on the foam. Since the primer is water based, the rollers could be re-used if cleaned properly. So far , I've thrown them out after using them.
I used about 1/3 of a gallon of mixed primer (unthinned volume) for the 2 coats over the outside hull & transom. I'm guessing I may use a little over a gallon total to primer the whole boat prior to topcoating.
Posted: Tue May 08, 2007 10:59 am
by tech_support
Bayport_Bob wrote:T
I thinned the primer ~20% by volume with 50/50 water alcohol mix.
The one tip I can pass on concerning the foam rollers I used, is to use light pressure. If you try to roll with too much pressure the foam will eventually de-bond from the core and start to get out of shape, or worse case, start to fall apart. A light stroke will get the same amount of coverage and save wear & tear on the foam. Since the primer is water based, the rollers could be re-used if cleaned properly. So far , I've thrown them out after using them.
good tip, we try to get 6 or so uses from each of those roller covers. Something goes with the S3 LPU topcoat, you can wash the rollers and use them several times
Posted: Tue May 08, 2007 11:01 am
by ks8
Before Bob puts a radius on that transom *water* edge, what is the maximum radius to use? If I understand right, a sharp edge there is good on a planing hull.
Looks great. Is it the first primed FS18?
Posted: Tue May 08, 2007 11:31 am
by mecreature
Thanks for the tips.. I think rolling is all I am going to do since I am not so good using my sprayer.
those rollers are what I have a stock of now...
That boat looks great.
Posted: Tue May 08, 2007 11:32 am
by Bayport_Bob
So far, from the builders I've been in touch with, this is the 1st FS18 project that has reached the primer stage. Not that this is a race! I'm not married nor have any kids, so I have complete control on where I spend my free time. A lot of it is spent waiting for epoxy to cure and my muscles to recover from sanding sessions. I'm about 6 weeks behind where I thought I would be in the process, but that's was poor time estimation on my part. I figure I might get this boat wet around Sept. 1st 2007. Any earlier & I'll be that much happier.
Posted: Tue May 08, 2007 12:05 pm
by Super Spook
Looking great man. I think FlaFF is close to you in progress. Out of those who report their progress, I'm in last place

. I've got a lot of sanding to do to get to where you're at. I ordered more Quickfair last night so I won't have any excuses not to sand, not that I have a hard time creating them out of thin air. I have to decide what paint I'm going to use soon, so I can order primer. Are you going to paint before you flip? If so, I may have to come check out the finish you get with the S3 topcoat. Decisions, decisions.
Elie
Posted: Tue May 08, 2007 12:45 pm
by Bayport_Bob
If this was a heavier boat I would seriously consider painting it before it gets flipped. Since it's light enough for 3 or 4 people to turn over, I'll wait until the very end to do the topcoat.
Posted: Tue May 08, 2007 3:26 pm
by Cooper
I would leave the bottom back edge sharp and round the chines a little.
Posted: Tue May 08, 2007 3:57 pm
by Super Spook
If this was a heavier boat I would seriously consider painting it before it gets flipped. Since it's light enough for 3 or 4 people to turn over, I'll wait until the very end to do the topcoat.
My plan as well.
looks good
Posted: Thu May 10, 2007 1:52 am
by mikebro72
hey man the boat looks great...ive been away for quite a while...my fs 18 is still just on paper...i had built a strongback and then scrapped it...my plans are sitting somewhere..i went with my own design(ill be done with it in another week or so...construction is complete, rigging it right now...)....after a couple models and contemplating mods to the design, it just wasnt for me...actually a little too much boat for my plan, if that make sense...
good luck...it seems there are maybe 4 in progress??
ill be posting some pics on another website, but i dont want to take away from bateau...i learned a lot from here
Posted: Fri May 11, 2007 12:16 pm
by Bayport_Bob
My building site has been updated. It's shows the steps up to & including the initial primer coat. Added steps include the skeg, the rubrails and primer.
At the moment I've misted down a sanding "guide coat" of dark gray auto primer and I'm once again back into sanding mode! This step isn't on the site yet.
See the bottom of my post for a link to the site.
Posted: Fri May 11, 2007 12:55 pm
by ks8
Great pictures Bob!
Does the future hold a time when you can break up the *steps* into separate pages? On a slow connection, it takes a looooong time to get to see the most current recently added pictures, way at the bottom.
Looks like you may be in the water first. Great documentation!
Posted: Fri May 11, 2007 1:28 pm
by Bayport_Bob
Yes, I'll be switching the format to separate pages. I realize that if you have a slow connection the load time will be pretty long. Maybe if I have time this afternoon at work!
Posted: Fri May 11, 2007 3:52 pm
by Super Spook
Looks great man. Are you going to do anything to try and deal with the spray or just live with it being wet? I've thought about a small spray rail, triangular in cross section, about 6" above the chine, but am worried it might ruin the lines a little bit.
Also, do you think that a few heavy duty staples might accomplish the same thing as the dowel trick? Just remove them before the next layer is applied. This would be with 1/4" ply.
Elie
Posted: Fri May 11, 2007 5:57 pm
by pete44
I realize that if you have a slow connection the load time will be pretty long.
Bob, the resolutiion of the last picture on your website (Primer_X.jpg) is
395.9k @ 180ppi which is perfect for printing but terribly large for the web. By optimizing it with Photoshop I got it down to
13.78k @ 72ppi without any loss in quality, so you could greatly cut down on load time — and web page size — if you did the same for all your images.
I’m willing to help you out if you need it... you have my email address.
Pete44
Edit:
Sorry, I spoke too soon... the 180ppi through me off. It looks like your images are already optimized... mine would only be about 4k smaller.
Posted: Fri May 11, 2007 8:01 pm
by Bayport_Bob
Thanks for the heads up Pete. I'm in the process of changing the layout with a standard navigation bar. I wasn't planning on being wordy, but as it turns out, it'll be a book before I'm done!
Spook - I'm coming from kayak fishing to powerboats, so I won't know how to act without my ass being wet all the time.
I do plan on putting a rubber (tacomarine.com) rubrail around the structural one, so there's going to be a little bit more overhang, but it will still be a wet ride in the chop.
As far as using staples on the rubrail, if you have another person help putting it on, then stapling would be fast & efficient. If you do it by yourself, the dowels help hold the far end of the strip in good alignment (kind of a third hand) while you slap on the clamps, but I think you could still get a good technique developed by stapling. Now that I think about it more, I wished I had thought about using staples at the time!
Posted: Fri May 11, 2007 9:45 pm
by FlaFF
Use nylon staples and leave them in.
Josh
Posted: Sat May 12, 2007 1:34 am
by Cracker Larry
Please explain the nylon staples. Do they work in a standard staple gun like an Arrow? I'm not familiar with them, but sure could use something to make these rubrails go faster, other than 100 clamps.
Posted: Sat May 12, 2007 5:15 am
by Randy
Very nice work, the primer looks great.
What's the final color going to be?
Posted: Sat May 12, 2007 11:20 am
by ks8
That is one nice looking hull! We have to get a detailed performance report when you run her through her courses.
Posted: Sat May 12, 2007 12:09 pm
by tech_support
great job
Posted: Sat May 12, 2007 10:27 pm
by oysterman
Super Spook I built a 16' flat iron skiff. I kept getting splashed at planning speed 20-25 mph. So I did a spray rail. It was 1.25" x.75" Cypress that I beveled and attached to the boat so that the 1.25" was facing out. It was hard to get to conform to the radius of a pointy skiff. In the end it doesn't do enuogh to make it worth it. If water splashes up in the air ( that strip does not knock it back down) and the wind is blowing you are going to get wet.
Mark
Posted: Sat May 12, 2007 10:58 pm
by Super Spook
I kinda figured as much. I'm coming from a 12' jon boat which is wet .......... well in pretty much all conditions. I can't see it being worse than that. I appreciate the advice.
Posted: Tue Jun 19, 2007 11:28 am
by Bayport_Bob
Another update... Hull Flipping (lots of pictures. I may have more of the cradle, but I have to check on the camera)
http://wetconcepts.com/19.htm
I've finished taping and glassing the insides. I have a few photos showing those steps, but they're not posted yet.
Next up - Glassing the sides with 6 oz biax (not part of the recommended build process).
Then - Installing the stringers.
If I didn't have a portable air conditioner in the garage, I would have to stop working until the weather cooled off (~ October!!!).
Posted: Tue Jun 19, 2007 12:46 pm
by kiwi
Oh s--t I want one of those...
That boat looks so damned sexy!
Tony
Re: looks good
Posted: Tue Jun 19, 2007 12:55 pm
by kiwi
mikebro72 wrote: some pics on another website, but i dont want to take away from bateau...i learned a lot from here
the place for that is amateurboatbuilding.com...
Tony
Posted: Wed Jun 20, 2007 9:50 am
by PastorBob
Bob, You boat looks great and I wanted to add that your web site is great.
Next build I am going to do somthing very similar. Great Work Keep Us Posted!
Posted: Wed Jun 20, 2007 2:30 pm
by WobblyLegs
kiwi wrote:That boat looks so damned sexy!
Sure does!
Posted: Mon Jun 25, 2007 10:17 pm
by ks8
Nice job on changing the format of your website. Navigation is much easier as is load time on a dialup. Boat is of course looking great!

Posted: Wed Jul 25, 2007 3:08 pm
by Bayport_Bob
Another update:

Steps 22 & 23 have been added.
http://www.wetconcepts.com/FS18.htm
Frames are done.
Not on the website yet...
Cleats are going in for the sole section and then I'll fill the cavities with foam.
After that I'll start doing some initial rigging layout - reinforcement under the sole for cooler box attach plates, grab bar reinforcement, etc. Then I'll glass and glue down the sole. Once the sole is attached I'll finish frames c & d with rod holder cuts outs and install rod tubes in frames b going forward and frame E going aft. 3 rod tubes on each side of the hull with a capacity of 12 rods - including 9' fly rods (did I mention I'm a rod builder too :0)
Another shot with the gunwale sections laid on the sides...

Posted: Wed Jul 25, 2007 3:19 pm
by tech_support
Looking good, nice fit of the deck. Did you make the poling platform?
Did you use a 2" chip brush to wet out all the inside biax

Posted: Wed Jul 25, 2007 3:27 pm
by Bayport_Bob
shine wrote:Looking good, nice fit of the deck. Did you make the poling platform?
Did you use a 2" chip brush to wet out all the inside biax
I bought the poling platform used. It's been passed around quite a bit. It's from a guy that had a G_l_a_d_e_s_m_e_n and had a new platform built because after he installed a jackplate his tiller interfered with the platform leg on the left side.
I'm going to sell it because it's too small and I'll end up having the same issues. It was cheap, so I figured I would give it a shot and see if I could use it.
Yes, the 2" chip brush is my friend!
Posted: Wed Jul 25, 2007 3:56 pm
by Super Spook
Awesome man. I thought you might change your mind about that platform once it was on the boat. They're short and seem to be about the size of a cereal box. They do look cool though. I think that the only reason WeakCC has them designed that way is due to the narrowness of their transom and the very low initial stability of the whole boat (don't want to get that CG too high).
Did you base the deck and gunnels on the finished hull or did your boat just come together way closer to the planned dimensions than mine? My fit isn't nearly that good. I'm now kicking myself for cutting my deck parts ahead of time.
Also, did you have a tough time fairing the strips near the bow on the interior? There's not much room to work and the concave curve basically just chewed the edge off the pad on my sander. Can't get any kind of plane in there either with the way it curves. I've gone as far as I want to go on the grinder. Too many visions of slipping and cutting a slit through the hull.
Sorry to hijack, but it may be of use to some of the guys starting soon. Thanks.
Elie
Posted: Wed Jul 25, 2007 4:32 pm
by Bayport_Bob
Elie- The platform turned out as you predicted. I had to give it a shot just to get an idea of what the actual platform needs to be like. Since that thing has been in such high demand and has changed hands about 6 times now, I'll get my money back with little hassle.
The gunwale edges and deck edges came out to about +/- 1/4" of the profile I cut out in the beginning of the build. I used those "J" brackets throughout the build and they held the sides against the frames and maintained the curvature well. I don't think I detailed that step on my site, but I think there are a few pictures where the J-brackets turn up.
I sanded any of the "squeeze through" on the chine slits with an RO and then just filled in the low spots with epoxy/wood flour to get a semi-fair surface. The tape and glass laid out ok and without much of a fuss. Most of it will be hidden in the bow compartment, so I'm not going to get too anal on how that tight area finishes out. Plus. I'm feel pretty confident with the fairing compound these days!
Posted: Wed Jul 25, 2007 4:48 pm
by FlaFF
Looks very good Bob. I'm with Elie as far as the deck fit goes. No reason to have cut it out before the hull was flipped, and it doesnt fit near as well as yours seems to. I'm debating getting another piece of ply and cutting a new one.
Too bad about the "Unnamed Boat Manufacturer" platform. I've got a hookup with a welder and am planning on basically upsizing that platform to better fit the boat.
I glassed the cockpit sole down today, both the bi-ax tape and a layer of 6oz cloth. 6oz cloth is a dream to work with after dealing with that 12oz bi-ax.
What type of paint are you guys using for your decks/interior/under deck storage areas? I'm hesitant to use $$$ enamels for areas that will be mostly hidden from view.
Lastly, TomC emailed me last week to say my jackplate was done. I expect it will be here by the end of this week. Looking forward to seeing it and getting it on the boat.
Again, boat looks good.
Josh
Posted: Wed Jul 25, 2007 7:09 pm
by Super Spook
I think that I'm going to have a good bit of EZ Fillet up in the bow area. There's only so much of the "stair step" effect I can get rid of on the inside. Did you guys just end up with a really big fillet in the inner bow seam, or were you able to stuff the glass in there without too much trouble.
Tom C called me and said that my TsG will be finished this weekend. Now I just need to find the money to pay him
.
Looks great Bob.
Elie
Posted: Wed Jul 25, 2007 8:10 pm
by FlaFF
I didnt get overly concerned with the inside of the bow, as I will not have access to that area after the decks go on. That is, from bulkhead A to the bow, will be sealed. I'm putting an 11 gallon fuel tank in the forward portion of the front underdeack area (but aft of bulkhead A), which cuts off my access to bulkhead A. As I recall, my inside bow was a pretty good mess, I knocked as much down with an angle grinder/flap wheel as I felt comfortable, then filled any bad low spots with flour/epoxy and glassed while that was still wet. Allowed me to press the glass into the still somewhat pliable woodflour/epoxy putty and get a good adhesion. There is a lot of glass overlapping in that inside bow. By the time it's all there, the waviness of the strips is largely gone.
Josh
Posted: Thu Jul 26, 2007 4:32 pm
by FLYonWALL9
These are just the issues I like to read about before going
forward with my build. I think by what I have read I will
tape off the inside parts of the hull so that any runoff will
not leak into the hull as badly. I have several people that
may want to buy these from me and it will have to be very
close ot production quality.
Really cant wait to hear about test runs, speeds, sea conditions
draft and stability. All you guys that are currently building these
little boats are doing a great job and it really gives me the itch
again. no pun intended.
Posted: Fri Jul 27, 2007 8:41 am
by saltponder
Bob,
Very nice job on both the website and boat. A textbook presentation with lots of great tips and information.
Gil
Posted: Fri Jul 27, 2007 11:52 am
by ks8
Fantastic!
Posted: Tue Jul 31, 2007 3:11 pm
by dborecky
Bob,
What size A/C unit is in that garage? You said it was portable. Where did you get it and how much? I live very close to you. I could probably throw a rock and hit your house.... I am dying in my garage. Had to stop my last glassing half way through. I just can't build up the nerve to tempt heat stroke again to finish the inside hull glass.
Posted: Tue Jul 31, 2007 3:30 pm
by Bayport_Bob
I don't have any windows in the garage, but the side door does have a small window. The only type I could use without cutting & framing in a window was to get a true portable unit. I did some research and ended up getting this unit at
http://newegg.com...
 http://www.newegg.com/Product/Product.a ... 6896101722
It's not a cheap alternative to a window unit, but I can also use it in the event that a 'cane knocks out my power since it only draws about 1000W.
If I start it in the morning, it will maintain 80 deg until the very peak of the afternoon. If the sun is beating on the garage, it struggles to stay at 85, but it takes some of the humidity out so it's still tolerable.
It has an exhaust hose that I've mounted to the window in my side door. The air coming out of the unit gets down into the low 60's if the garage is at 80.
Posted: Tue Jul 31, 2007 4:05 pm
by dborecky
Bob,
Thanks for the reply. I was thinking of leaving the house door open and the back add on room door open and see how the temp is in the garage. My wife does not like me to leave the house door open though...
I would love to come by sometime and see the build. I live near the power plant. We could compare notes over a beer...
Derrick
Posted: Tue Jul 31, 2007 7:24 pm
by saltponder
I've got a 36" fan (Home Depot) exhausting air out of my garage through the back doors and a smaller fan pushing air on me while I work. It's been hitting 85 by noon and into the 90s during the day. The fans don't affect the temperature, but the moving air helps a lot. I drink as much water as I can stand. I'm more used to it than I was 3-4 weeks ago, but I'm still sweating buckets here on the Ga. coast.
Gil
Posted: Tue Jul 31, 2007 7:46 pm
by fishingdan
The FS18 will be a nice boat. Nice job!
Posted: Tue Jul 31, 2007 8:58 pm
by Cracker Larry
If the garage is attached to the house and you have central A/C, it might be easy to run a couple of ducts out there and do a little insulating ?
I drink as much water as I can stand. I'm more used to it than I was 3-4 weeks ago, but I'm still sweating buckets here on the Ga. coast.
I'm sweating too. I've got AC in the shop, but the boat won't fit in the shop

Beer is much better than water at easing the pain

Flaff
Posted: Tue Aug 21, 2007 11:17 am
by georgesboyer
I would really like to see FLAFF's pics. Can anyone tell me where to find them? Congrats to all of you building the fs 18, they are all looking fantastic.
Posted: Tue Aug 21, 2007 3:03 pm
by Bayport_Bob
Flaff
Posted: Wed Aug 22, 2007 10:57 am
by georgesboyer
Thank you, Awesome job, Josh!
Posted: Thu Oct 04, 2007 8:47 pm
by jbo_c
BPB,
I know you aren't done, but I'm really close to narrowing down my choices to one. Can you post a pic with you in or very near the boat so I can get an idea of scale?
Thanks.
Jbo
Posted: Thu Oct 04, 2007 10:08 pm
by Bayport_Bob
That's pretty much impossible at this point. In my garage I have about 16" of walking space around the outside of the hull.
My only recommendation would be to look at the photos under my flipping section for the hull out in the open. Or, look at the Hells Bay Glade Skiff photos, they're close to what the finished boat will be like.
Posted: Wed Oct 10, 2007 5:00 pm
by Bayport_Bob
Minor progress. Mostly sole installed, rod holders installed, & fuel locker.
Everything can be seen at:
http://www.wetconcepts.com/FS18.htm

Posted: Wed Oct 10, 2007 8:13 pm
by Aripeka Angler
Great job on the boat and website, your glass work looks perfect! What kind of filler are you using on your fillets?
Posted: Wed Oct 10, 2007 8:34 pm
by Bayport_Bob
Epoxy, wood flour, silica (cab-o-sil).
My method is to add about an equal volume of silica as there is epoxy, then on top I add equal volume of wood flour. I stir that slowly under a vent hood and then adjust the viscosity by adding equal amount of silica & wood flour in small increments.
After you do it a couple of times you can eyeball it with amazing consistency.
Posted: Wed Oct 10, 2007 8:44 pm
by Aripeka Angler
I am using only the silica in my fillets what is the advantage in adding the wood flour? I know it works by looking at your fillets and my glass work is a little shaky. Do you use the same mix for fairing?
Posted: Wed Oct 10, 2007 8:52 pm
by Bayport_Bob
Silica, when used alone makes a rock hard & brittle material. The wood flour cures hard, but is relatively easy to sand if necessary and adds a small amount of flexibility when compared to silica alone. Plus wood Flour is a dirt cheap filler!
For fairing I use phenolic microballoons & silica in pretty much the same preparation method as for fillets. I usually leave the consistency slightly thinner than what I would use for fillets, since typically it's applied in a thinner layer and doesn't need as much stiffness to support itself without sagging.
As a finish layer of fairing compound I use System Three Quik Fair. This goes on like butter, sands beautifully, and leaves an excellent surface for their primer. I don't use Quik Fair for the whole fairing process due to the expense, but many others use it exclusively. A little goes a long ways.
Posted: Wed Oct 10, 2007 11:25 pm
by Jpatburke
Man, you work is inspiring! Soooo darn clean!
Posted: Sun Oct 14, 2007 9:08 pm
by Tagged
Bob,
maybe I missed it, but I don't see a fuel line running from your front locker. Where do you plan to run the fuel hose?
Tag
Posted: Tue Oct 16, 2007 9:23 pm
by Aripeka Angler
Hey Bob I tried your fillet mix and I wish I had spoken to you 3 weeks ago. Great info!
Posted: Tue Oct 16, 2007 9:59 pm
by Bayport_Bob
Tagged wrote:Bob,
maybe I missed it, but I don't see a fuel line running from your front locker. Where do you plan to run the fuel hose?
Tag
If you look at the uninstalled rod holders you'll see 1-1/4" holes up near the top corner of each holder. (The dry glass tape hides those holes on the main page photo)

I'll have a PVC tube running under the gunwale on each side. One tube will be fuel, the other electrical. The tubes will be the last step before I put the gunwales on. I debated running them under the sole but talked myself out of that.
Posted: Tue Oct 16, 2007 10:12 pm
by Bayport_Bob
Aripeka Angler wrote:Hey Bob I tried your fillet mix and I wish I had spoken to you 3 weeks ago. Great info!
I got it from Jacque's How-to's and the forum. The experienced builder's on this site are a wealth of time saving ideas and advice. I just pass on what's worked well for me.
Posted: Wed Oct 17, 2007 7:06 am
by steve292
Bayport_Bob wrote:Tagged wrote:Bob,
maybe I missed it, but I don't see a fuel line running from your front locker. Where do you plan to run the fuel hose?
Tag
If you look at the uninstalled rod holders you'll see 1-1/4" holes up near the top corner of each holder. (The dry glass tape hides those holes on the main page photo)
I'll have a PVC tube running under the gunwale on each side. One tube will be fuel, the other electrical. The tubes will be the last step before I put the gunwales on. I debated running them under the sole but talked myself out of that.
I think I've just found out how to run my fuel line on my FS17........great stuff,thanks for sharing it.
Steve
Posted: Wed Oct 17, 2007 8:12 pm
by Aripeka Angler
Hey Bob I dont want to get off topic here but when I fair my hull bottom should I fair the chine radius to a sharp point as well as the transom bottom.I saw this on your page.Does this promote cleaner water flow and better performance? If so is this edge unsupported by glass weaker on a boat used say .......mostly around rocks and oysters? Is there a trade off on this or am I making too much of nothing? Richard
Posted: Wed Oct 17, 2007 8:32 pm
by Bayport_Bob
A clean edge will make the water break cleaner and reduce the amount it creeps up the side of the hull. On the transom edge you definitely want it sharp. Is the difference noticeable? Maybe.
If you build back up the rounded edge using wood flour & silica, it will make tough corner edge. Use regular fairing compound (microballoons & a little silica) to feather it all smooth.
Will you ding up the edge - yep. But you'll have the materials & know how to repair it when you want.
Just my opinion though, & everybody's got one.
Posted: Wed Oct 17, 2007 9:16 pm
by Aripeka Angler
Thanks I value your opinion because of the quality your work. I will use the square edges on my transom and chines. When you get her done lets go fishing in Aripeka or Bayport. I have fished in Bayport with Luke Magnuson on his Micro draft 20 Big fun!!! Big redfish. Richard.
Posted: Fri Dec 19, 2008 11:35 am
by Chalk
How about an update - I see decks and hatches on your blog - but no details.
I like the decks and hatches
Re: FS18 Done Deal...
Posted: Tue May 26, 2009 4:17 pm
by Bayport_Bob
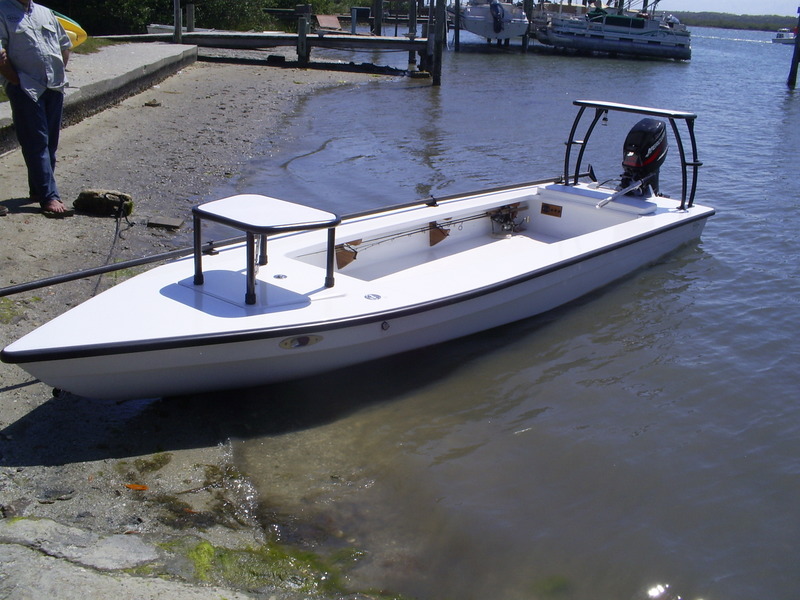
Some pics of the finished project can be seen here...
http://www.wetconcepts.com/platform.htm
Hull: Not officially weighed, but my best guess is ~400 lbs. (that's bare, without motor). Fully loaded, it's probably pushing ~700 lbs with motor, fuel, battery, cooler, safety gear, & misc. stuff.
Poling Draft: Poling by myself the draft is about 6". I'm 250 lbs, so with the motor that's a lot of weight on back for such a narrow hull. If someone was on the bow balancing the weight, the draft would most likely be about 5" or less.
Running Draft: Not as skinny as my prop would like! I'll have to measure the lower unit exposure at my average jack plate running position, but my guess it's about 12".
20 HP Honda 4 stroke:
I've had it up to 27 mph (GPS) by myself, fully loaded.
23 mph with one other person. The prop is currently a stock aluminum 4 blade that's been up to 5950 rpm.
Lenco trim tabs: (these really, really add a large amount of instantaneous trim adjustment for this type of boat). There is no hole shot if you adjust the tabs.
TomC jackplate: Still playing with this to get the ideal adjustment range.
Poling Platform: Monopoli Towers in Tarpon Springs.
Seadek: The Skiff Shop & Castaway Customs.
Just another note... A person coming from a standard flats skiff would probably consider the hull fairly tippy. It does move when weight is shifted to one side, but I got use to it after about an hour of walking around on the decks. After that, I wasn't conscious of the movement. Plus, you learn to walk and move along the center of the boat. Guests may need to be told to keep sudden weight shifts to a minimum and try to move along the centerline, especially if you're standing on a poling platform. The boat meets all of my expectations, but I just wanted to give anyone interested in the FS18 a heads-up of how the boat behaves.
Re: FS18 Done Deal...
Posted: Tue May 26, 2009 4:35 pm
by Aripeka Angler
Very, very nice job Bob. I was hoping to see the finished product and here it is. I love the hatches and decks. Again nice work
Richard
Re: FS18 Done Deal...
Posted: Tue May 26, 2009 5:07 pm
by Cracker Larry
Wow Bob
That is stunning! Absolutely beautiful

We've got to have a picture of that, right here..

The bar gets set higher and higher
Re: FS18 Done Deal...
Posted: Tue May 26, 2009 6:05 pm
by gk108
Plenty of room to swing the tiller under that platform. I like the console, too. Clean and simple.
Re: FS18 Done Deal...
Posted: Tue May 26, 2009 6:27 pm
by Dog Fish
Bob, you should be very proud. She is one awesome ride, I would love to have a boat like that. Let me know on here if you are ever coming down towards Boca Grande,( maybe the 2010 meet ) it would be nice to see her up close and personal. Very very sweet.

The Seadek is icing on the cake. NICE
Ps: Your website is very cool and informative too, I have had it in my favorites for quite a while now.
Brian
Re: FS18 Done Deal...
Posted: Tue May 26, 2009 7:00 pm
by Bayport_Bob
Dog Fish wrote:Bob, you should be very proud. She is one awesome ride, I would love to have a boat like that. Let me know on here if you are ever coming down towards Boca Grande,( maybe the 2010 meet ) it would be nice to see her up close and personal. Very very sweet.
The Seadek is icing on the cake. NICE
Ps: Your website is very cool and informative too, I have had it in my favorites for quite a while now.
Brian
Thanks Brian & everyone else.
The Seadek was a must have. I've planned on putting it on the decks since the beginning of my build (and budgeted the money for it over the project time). Standing barefooted on it all day is a real pleasure compared to traditional non-skid. It's easy on the knees too. But like anything for a boat, it ain't cheap!
I have friends that fish the Pine Isand/Matlacha area a few times each year, so I'll drop you a note when I'm headed that way. - Bob
Re: FS18 Done Deal...
Posted: Tue May 26, 2009 7:45 pm
by Dog Fish
Outstanding, that sounds great Bob. Again she came out great , like cover material for Shallow Water Angler.
Ps: Those are some bad ass coolers aren't they.
Brian
Re: FS18 Done Deal...
Posted: Wed May 27, 2009 12:44 pm
by mecreature
That is an amazing job..
are you going to update your blog anymore.. I would like to see how the decks and hatches were assembled.. looks cool and practical..
she is beautiful.
Re: FS18 Done Deal...
Posted: Wed May 27, 2009 12:52 pm
by ks8
You realize that a few of us are now going to have to build some very *cheap looking* but good boats, and bring that bar way down again. Else some potential builders will get scared away from the idea of even giving it a try.
I think I'm going to leave the orange peel and runs on Measure of Faith, and maybe just spray clear LPU over the primer in the interior.
Excellent job!
Re: FS18 Done Deal...
Posted: Wed May 27, 2009 1:00 pm
by dborecky
Fantastic looking!!!!
Re: FS18 Done Deal...
Posted: Wed May 27, 2009 1:10 pm
by Old E.
That thing is awesome!!!!!!!!!!!!!!!
Re: FS18 Done Deal...
Posted: Wed May 27, 2009 1:39 pm
by icelikkilinc
Perfect finish, great blog on the website as well.
Bravo!!! Enjoy her, you certainly deserved it
Re: FS18 Done Deal...
Posted: Wed May 27, 2009 10:19 pm
by Spreader
ks8 wrote:You realize that a few of us are now going to have to build some very *cheap looking* but good boats, and bring that bar way down again. Else some potential builders will get scared away from the idea of even giving it a try.
I think I'm going to leave the orange peel and runs on Measure of Faith, and maybe just spray clear LPU over the primer in the interior.
Excellent job!
No worries, I got the cheap thing down. LOL
Re: FS18 Done Deal...
Posted: Thu May 28, 2009 12:09 am
by Cracka
Outstanding job Bob. It is an absolute credit to you mate.
Mick