Page 1 of 1
Fs17 build in VA
Posted: Thu Jul 12, 2007 9:46 pm
by colonialc19
Got my epoxy kit today and picking up my bs1088 in the morning, hope to be cutting out ply this weekend. Ive been looking at this site and hoping to build for about a year and a half now. Orignaly bought plans for C19, however buget at this time required something smaller ie. Fs17. The Fs17 looked like a boat I could mount a trollinng motor to and bass fish or take to the Cheasapeke Bay and flounder fish on a nice day, hope it goes as planned. Hopefully will be able to keep this thread up to date will some photos. Please wish me luck in my first time build, Daniel
Posted: Thu Jul 12, 2007 10:04 pm
by Cracker Larry
Welcome! You won't need luck, just a little fortitude. This isn't Black Jack

If you don't know how to proceed, just ask.
The FS17 looks like a great multi-purpose hull. I might build one of those, too.
Posted: Thu Jul 12, 2007 10:06 pm
by timoub007
Like Larry said, welcome.
Put your location in your profile so we know where you are building. That will help sometimes when people want to offer advice or lend a hand sanding.
Can't wait for pics.
Tim
Posted: Fri Jul 13, 2007 12:40 am
by TomW
Welcome, can't wait to see your progress. If you can't find an answer by doing a search or in the How To's do not hesitate to ask. Some of these guys are on thier 3-5th boats maybe more, and Jacque and Shine are always there to correct us when we are wrong.
Tom
Posted: Fri Jul 13, 2007 7:55 am
by tech_support
we should be seeing some FS17 pictures soon, I know of more than a few that have the materials
Joel
Posted: Fri Jul 13, 2007 12:07 pm
by airman40
I'm thinking about making this my next boat, so I can't wait to see the images from this build as well. What sort of layout are you thinking of doing (console, benches)
David
Posted: Fri Jul 13, 2007 9:46 pm
by muscrat100
Daniel
Good luck! I am in richmond and just finished a fs14 and use it on the james and down at the bay. My next build will probably be the fs17 as well so please post your progress.. Get in touch if you want to compare notes sometime.
Steve
Posted: Sat Jul 14, 2007 4:18 pm
by steve292
My FS 17 will be starting in a week or two as well.
Good luck & keep posting as I am going to need all the help I can get,I think.
Posted: Sun Jul 15, 2007 9:14 am
by colonialc19
Thanks for the welcome and words of encouragement. Picked up my ply on friday, however have had to work past couple of nights. Hopefully I can get my jig built this week and start butchering up my beautifull Okume. I have added my location to my profile Tim, and as of now I'm pretty sure I'm going with some sort of center console. Hope to post pictures of my completed jig soon.

Daniel
Posted: Mon Jul 16, 2007 7:35 pm
by kgrover
Daniel
I am pretty close to you and am in Colonial Heights quite often. I would be interested in stopping by and seeing your project. Am playing with the idea of building one myself.
Thanks Ken
Posted: Mon Jul 16, 2007 7:45 pm
by Lower
Look forward to seeing some pictures! I'm putting my wood order in this week. Can't wait to start on this one. Good luck and I'm sure we'll compare notes along the way.
Posted: Thu Jul 26, 2007 5:01 pm
by colonialc19
Cut out some stringers today and the motorwell bulkhead, finally getting going, no pics yet but I'm going to get a weekend off this week so we'll see what I can get done. "kgrover" I'll give you a email when I get my jig set up with the stations. I havent set the jig up yet, figured I'd wait to get all my panels cut and long panels spliced, need the floor room. Thats all for now, I'll post more this weekend.
Posted: Tue Aug 07, 2007 9:49 pm
by steve292
Daniel, how are you doing?Any progress? I'd bust a gut to know how other FS17 builders are doing.
regards,
Steve
Posted: Sat Aug 11, 2007 7:55 pm
by colonialc19
Steve, its going pretty slow right now. I just came back from a vacation in Nags Head/Hatteras, North Carolina. So far I've cut out transom, stringers, motorwell sides, and might get to layout some of the stations tonight?? I have a goal to have long panels spliced and on jig by fri the 17th, thats when I'm to be back at work. Everything is going well so far but havent even opened my epoxy yet, still cutting out ply, seems like as soon as I started on the boat everything around the house turned really hectic, anyway hope to get rockin on this thing this week.

Posted: Tue Aug 14, 2007 3:55 pm
by colonialc19
Slowly getting a few things done, now have about all my 3/8 ply pieces cut out, sole, trans, station A & E, and also have one stringer curing as I type. Will try a few pics, well I'll read a little more then mybe I can post a pic later.
Posted: Sat Aug 18, 2007 8:14 pm
by colonialc19
Posted: Sat Aug 18, 2007 10:59 pm
by Daniel Huckleberry
I remember when my garage was that clean.
Keep up the good work and build on. Can't wait to see on of these finished.
Huck
Posted: Sun Aug 19, 2007 12:10 pm
by steve292
Good stuff, I am clearing my workspace ready to lay out my side panels,how close to laying out the sides are you? I am hoping to have my jig up & the stations mounted by the end of the month/beginning of next month. I look foward to watching the other FS17's being built as well
good luck,
Steve
Posted: Sun Aug 19, 2007 12:50 pm
by colonialc19
Steve, I'm about ready to cut out the side and bottom panels. The way I stacked my plywood on the garage floor was 1/4 or 6mm on the bottom and the 3/8 or 9mm on top, so I went ahead and cut all my 3/8 parts and pieces. I should be able to cut and splice my bottom panels sometime in the comming week I hope. Still havent laminated my transom together, have it ready just need to do it, maybe tonight. Sounds like your off to a good start, I'll post a pic or two if I get to those bottom panels this week.
Daniel
Posted: Mon Aug 20, 2007 9:54 pm
by colonialc19
Transom glued tonight, went well I think. I dry fit the assembly, drilled holes for screws to make sure I got everything lined back up just right, took it apart epoxied and glued everything back together, then ran screws back thru holes. Looks ok, hope the rest of the boat goes together this good.
Daniel
Posted: Mon Aug 20, 2007 9:59 pm
by colonialc19
Posted: Tue Aug 21, 2007 12:43 am
by TomW
Nicely done Daniel, nice dispersion of weight.
Tom
Posted: Tue Aug 21, 2007 8:04 am
by PastorBob
When we moved this spring my Wife asked if I wanted to get rid of my weights "because I never use them" I said NO WAY I need them for boat building
.... I wonder what else I have lying around that I could use...

Posted: Tue Aug 21, 2007 8:17 am
by WobblyLegs
PastorBob wrote:...my Wife asked if I wanted to get rid of my weights "because I never use them"...
I've kept the weights, but the wife got rid of the bar!
That hadn't seen use for a long time.

Posted: Tue Aug 21, 2007 8:19 am
by colonialc19
Pastor Bob, those old weights come in handy, and yes now my wife cant say I dont use my weights
. Thats my kinda workout.
Posted: Wed Sep 05, 2007 5:54 pm
by steve292
How are you doing Daniel?
Steve
Posted: Wed Sep 05, 2007 7:14 pm
by colonialc19
Steve, sounds like I'm about the same place you are at, I have one side spliced of the long panels, there ready to flip tonight so I can splice the other side. I have most of my jig material may need a little more, need to inventory. Have you noticed everything takes about twice as long as you think it should, but slow and steady is fine as long as I get it done right I guess.
Daniel
Posted: Fri Sep 07, 2007 12:24 pm
by Lower
Daniel...I'm going to draw and cut the clamping boards this weekend. Last night I was trying to figure out at what height do you cut the bottom?? Do you base it off the motor well sides?? If so it looks to be around 16" or so (measuring from the top down). At what measurement did you cut them?? Thanks.
I'm trying to keep up with you and Steve...
Posted: Fri Sep 07, 2007 1:52 pm
by steve292
Lower,
I extrapolated the clamping board measurement from the motorwell sides.
I have been wrong before mind.
what did you do Daniel?
Steve
Posted: Fri Sep 07, 2007 3:33 pm
by colonialc19
I did the same as both of you, I took it from the motorwell sides. Before I glued the transom together I dry fited them together and it everything fit.
Posted: Mon Sep 10, 2007 9:41 pm
by Lower
Daniel...I drew out my clamping boards tonight based on the motor well sides. Just checking in before I cut all three out. Mine measure ~9 1/4 from motor well cut to bottom of clamping board. Sound about right?? Thanks.
Posted: Mon Sep 10, 2007 9:48 pm
by colonialc19
Lower, I'll have to get back to you in the morning. I'm at work tonight, I'll check that measurement and get leave a post in the a.m.
daniel
Posted: Tue Sep 11, 2007 7:52 am
by colonialc19
Lower, 9 1/4" is what I have, when I dry fit the sides to the transom evrything lined up. Hope this helps.
Daniel
Posted: Tue Sep 11, 2007 8:47 am
by steve292
Lower,
FWIW
Just been out to the garage
I have 9 1/4"from the MW cot to the base of the boards as well.
Steve
Posted: Tue Sep 11, 2007 9:40 am
by Lower
Thanks guys...I really appreciate it. Now I can cut in confidence. It's nice to have these forums to bounce things off each other. Thanks again.
Posted: Tue Sep 11, 2007 7:16 pm
by colonialc19
Give or take a 1/4"

.... Just kidding
Posted: Fri Oct 05, 2007 11:00 am
by steve292
Daniel, how's progress?
Steve
Posted: Sat Oct 06, 2007 3:56 pm
by colonialc19
Steve, not much progress for about the last month or so. Im ready to go on the jig, still havent made it up on it. Had a busy September to say the least and the first couple weeks of October look no different, however it wont be much longer and I'll be moving on the FS again. Your build looks to be going well, really looking like its going to be one heck of a boat.
Daniel
Posted: Fri Oct 26, 2007 5:15 pm
by colonialc19
I'm getting my jig together FINALLY!!!!!! I'm up to frame "D" on the jig, finding a few mistakes i've made on my molds and having to correct as I go, better now than latter. Now I'm taking a break and looking at some pics of other Fs17's making sure mine looks somewhat the same. With luck I'll get some panels up on the jig within the next few days.
Daniel
Posted: Fri Oct 26, 2007 5:42 pm
by steve292
Take your time Daniel, it's well spent now as the jig determines how accurate your layout will be.You'll be suprised ( I was) how quick the panels go on.
best of luck'
Steve
Posted: Sun Nov 11, 2007 9:58 pm
by colonialc19
Well, took a while but the jig is done. I measured and remeasured and hope its right. Tonight I layed the bottom panels up on the jig, looks like everything is going to line up. The outside edges of my panels overhang mold "B" a little bit, I hope they pull on in when every thing is stiched up.
Moving along slowly,
Daniel
Posted: Mon Nov 12, 2007 3:52 am
by steve292
Great stuff Daniel, It comes into a boat quick as the panels go on.Pictures please!!!!!.
good luck,
Steve
Posted: Tue Nov 13, 2007 9:13 am
by colonialc19
Bottom panels are on and hung one side, botttom panels still hanging over frame "b" a little too much = side panel doesn't want to stich up like it should. Going to recheck my bottom panels before i go any farther. Just wondering Steve or Jeremy or anybody else, how hard was it to get the long panels together and bow pulled down? tried about 1 pkg of cable ties and the bow has a long way to come down. Stichn and restichin.
Posted: Tue Nov 13, 2007 11:00 am
by jgroves
colonialc19 wrote:Bottom panels are on and hung one side, botttom panels still hanging over frame "b" a little too much = side panel doesn't want to stich up like it should. Going to recheck my bottom panels before i go any farther. Just wondering Steve or Jeremy or anybody else, how hard was it to get the long panels together and bow pulled down? tried about 1 pkg of cable ties and the bow has a long way to come down. Stichn and restichin.
Howdy howdy howdy... It took me nearly 5 tries before I got them all to stich up correctly. The final attempt that worked was because I took my dear ole time sinching the straps.
I first laid the bottom on with lots (2"+) of space between pannels. Then attached both sides with 3"+ space between pannels. I started sinching in the middle and worked my way out.... don't rush it! I did one strap then went to the other side. I finished with the bow.
In the bow I used pvc under the straps to keep the pannels from overlaping. Along the chines I used large nails like Mr. Shine used in the FS 12. The nails made the pannels fit snug but with enough space for epoxy to fill.
I found the two days of stiching/cutting/re-stiching to be the most aggrivating of the build so far. I was aggrivated enough that I didn't want to take any pictures of that step. I wish I would have though.
Jeremy
Posted: Tue Nov 13, 2007 12:55 pm
by colonialc19
Jeremy, thanks for the reply, just got started stiching like you advised, but out of cable ties, need to run and get more. After posting earlier I decided it may be a good idea to go back and read the building notes/instructions, it mentions that most people start stiching to tight. Thanks for the info, great to here im not the only one that got a little frustrated, very humbling this build is, thought I had half of a brain till I started this thing.
Daniel

Posted: Tue Nov 13, 2007 2:56 pm
by steve292
Daniel,
I found I only had to stich every 12" or so along the straight bits of the keel & chine. use more around the bow (6" or so apart) or it won't pull in, also I tied the tip of the bottom panels to the bow mold.
some pics-
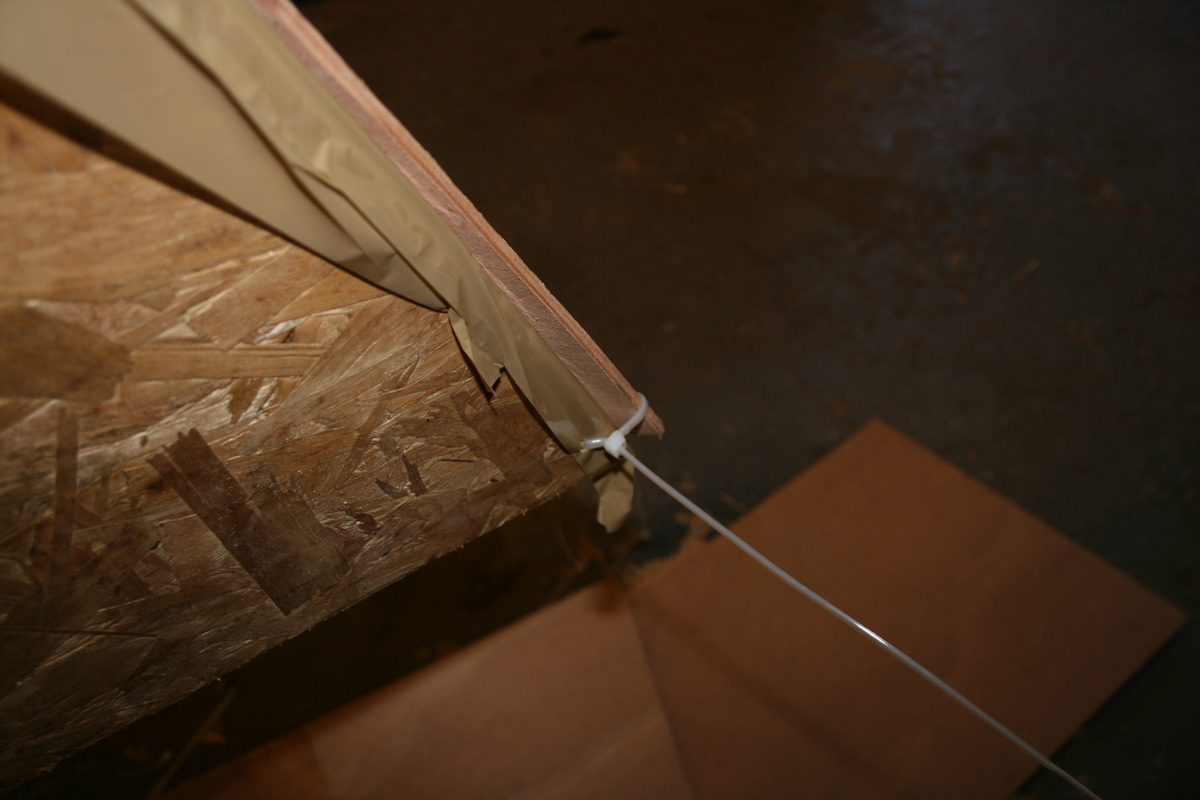
this is the first side panel cable tied to the mold,also if you go into my gallery & blow this one up below, you can see the tie wrap holding down the bottom panel.
I use some 1/2 dowel & some short lengths of 22mm copper pipe(it was lying around) under the ties to stop the panels overlapping.I think i'd still be stiching now if it wasn't for these.
finally, look at this-
the panels, although pinned by 2 screws, have only 3 tight ties along the whole of the keel straight part, don't pull them to tight or you will end up with rocker or hook,I only had to get out a tiny bit.
hope this helps,
keep going !!!!! post pics if you are still struggling a bit(or even if your not
) It took me 4 evenings(3hrs a time) to do mine, main thing is tighten slowly, keep checking, keep a gap in the panels,(I used a jigsaw twice on the bow to get a gap when it dissapeared) you will get it in the end.
regards,
steve
Posted: Tue Nov 13, 2007 3:51 pm
by colonialc19
Steve, thanks for the reply and info, helps alot. I plan to get back on the boat Wends about noon for a few hours I'll let you know how its comming.
Thanks again for the tips and pics!
Daniel
Posted: Wed Nov 14, 2007 10:38 am
by tech_support
Steve, those are great shots of how to get a fair hull

Thank you for posting them
Posted: Wed Nov 14, 2007 9:01 pm
by colonialc19
Everything is comming together nice!!
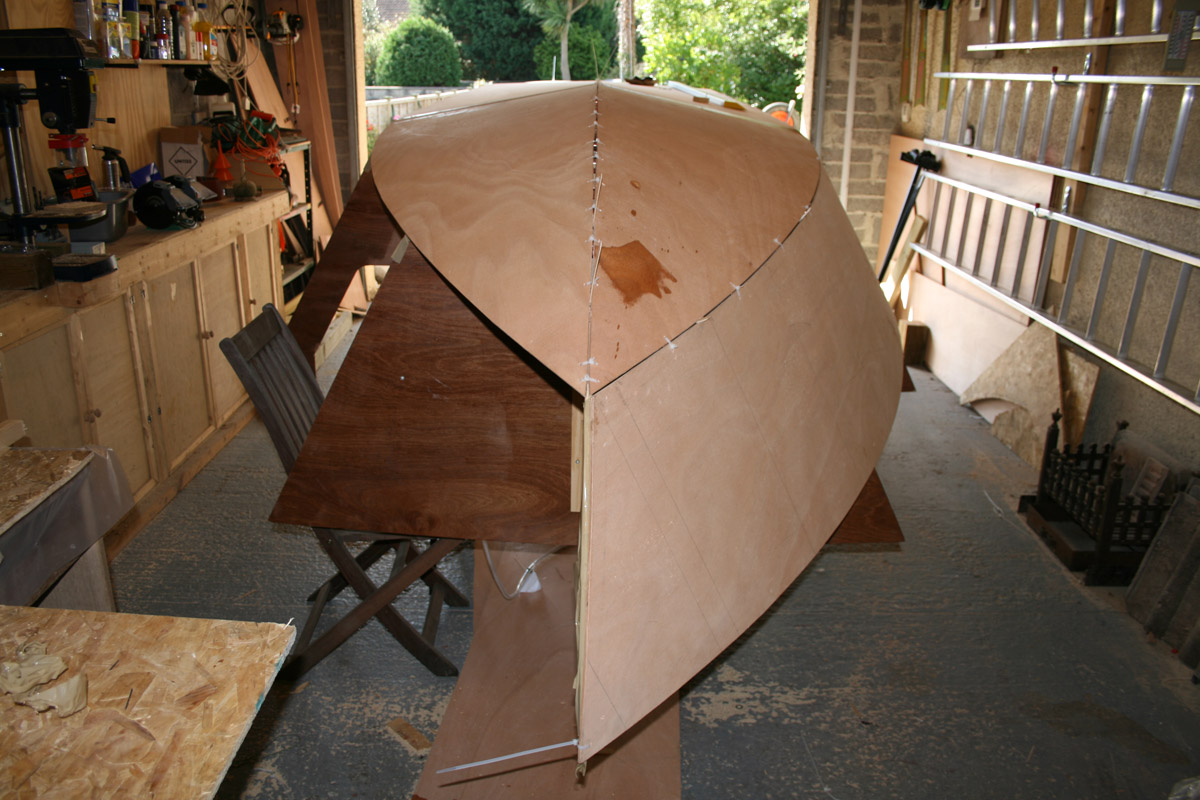
still have a little more to do, but man what a difference. I took out all old cable ties and restiched everything per Jeremy, and Steve's suggestions, looking good so far taking a break right now, will go out and take a couple pics. Man this thing is starting to look like a boat!!!!!!!
Posted: Thu Nov 15, 2007 10:46 am
by Lower
That's exciting. Can't wait to see some pictures. Getting my jig together now. Won't be long and I'll be in your shoes. Thanks in advance to Steve and Jeremy for taking the time to post. It really is helpful.
Posted: Tue Nov 20, 2007 9:28 pm
by colonialc19
Started tacking the panels together tonight. Cable ties come out tomorrow evening.
Just a little progress
Daniel
Posted: Tue Nov 20, 2007 10:51 pm
by TomW
Nice pictures Steve, job well done.
Tom
Posted: Sat Nov 24, 2007 10:25 pm
by colonialc19
More slow progress, working on seams for fg taping.

Posted: Sun Nov 25, 2007 12:50 am
by steve292
Looks good!!! flying along now.
great stuff,
here, let me put a full size pic in for you-

Steve
Posted: Sun Nov 25, 2007 6:09 pm
by colonialc19
Thanks for help on the pic Steve, cooler weather came in this weekend I'm going to have to wait for warmer weather to tape maybe Tues.
Daniel
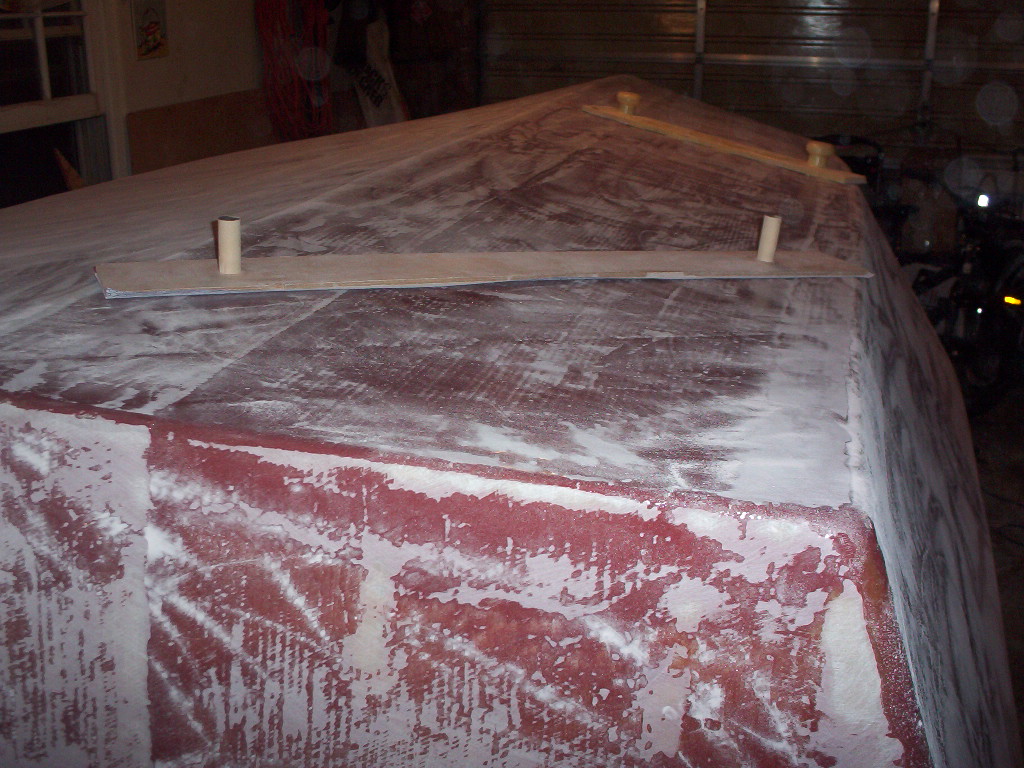
Posted: Sat Dec 08, 2007 10:28 pm
by colonialc19
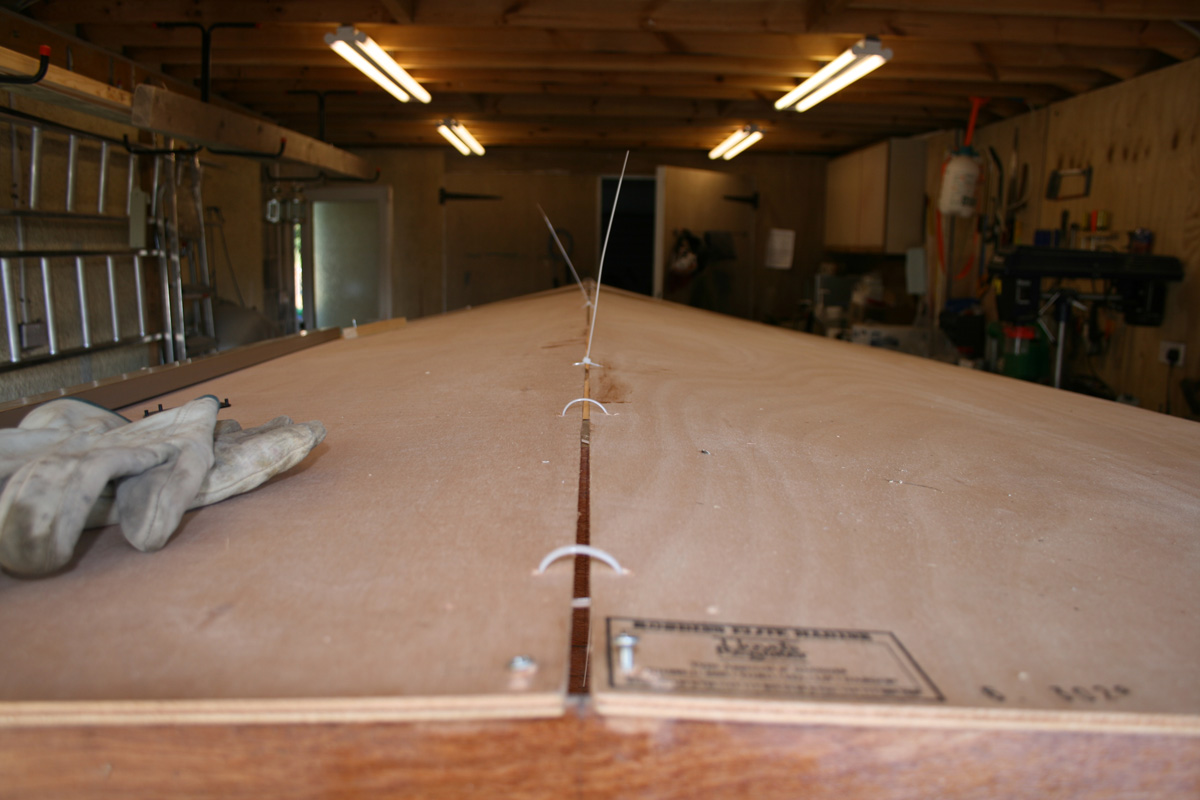
Getting a little work done now, have found a heater and the temps are up a bit. Keel taped tonight
!!
Chine is next, its amost 11pm now and I have to be at work early in the morning, so it will have to wait.
Daniel
Posted: Mon Dec 10, 2007 11:11 pm
by colonialc19
Chines done
I wanted to go ahead and put the 50" glass on the bottom tonight, but my chines need a little work, a couple small air pockets I cant get to wet out

.
Looks like I'll have to drill and fill, when it sets up.
In the morning I'll be at it, maybe some pics of my hull glassed
.
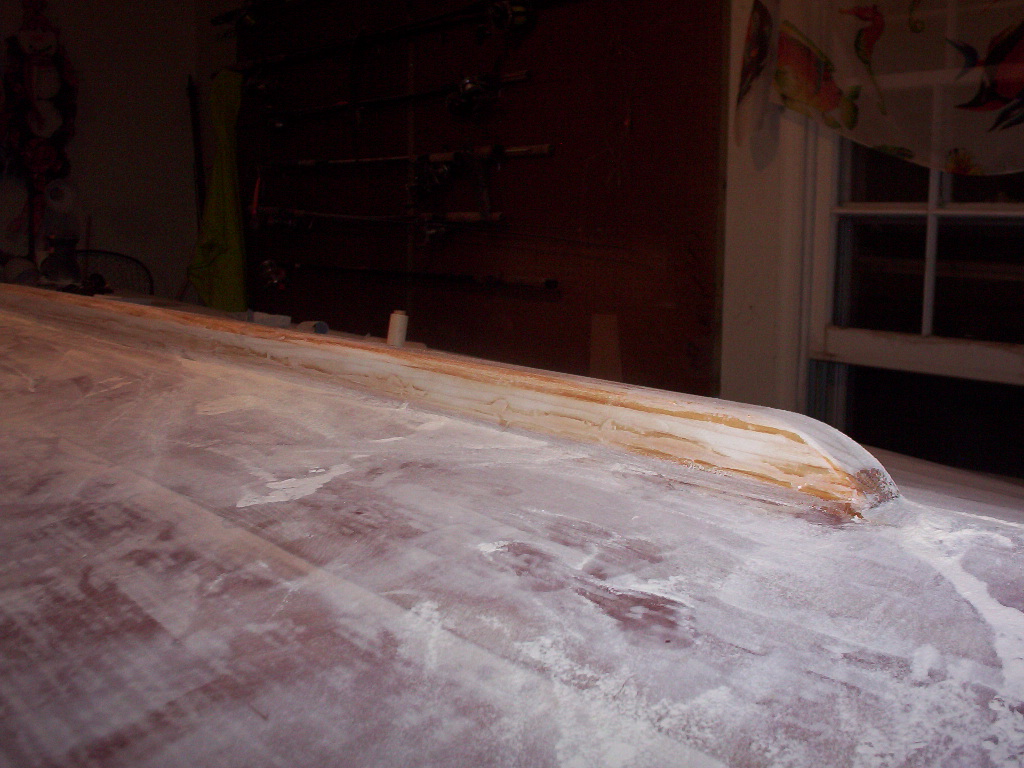
Posted: Thu Dec 13, 2007 6:00 pm
by colonialc19
Made some mistakes, " thought I had a round enough radius on the chine, FG tape went down nice, the biax fabric not so much, it raised up on the chine creating a air pocket.
What to do?
I took my mini grinder and ground them out, I guess I need to smooth it over with a fillet of some sort and retape the chine, first time builder so any advise opions are appreciated and welcome.

Pics are in my album, Tried to put on here frogot how and dont have time to figure out, off to work the night shift.
Posted: Fri Dec 14, 2007 4:54 pm
by colonialc19

ground off bad part of lamination, I also screwed up the bow, really imbrasing
Posted: Fri Dec 14, 2007 5:03 pm
by colonialc19
pic of the bow
, ground off FG that had raised up, any advise on how to proceed is welcome
, I think I need to smooth it over a bit and apply some thickend epoxy to fill and apply FG tape


Posted: Fri Dec 14, 2007 6:40 pm
by gk108
When you have those kind of troubles on corners just use some thin polyethylene plastic over the wet glass. Once you get it smoothed out, it seals the layup so that air cannot get under it. After the epoxy cures you can peel it off. AKA "poor man's peel ply".
Posted: Fri Dec 14, 2007 8:56 pm
by colonialc19
Thanks for that tip, hadn't heard or thought of that one.
Posted: Sun Dec 16, 2007 12:02 pm
by steve292
colonialc19 wrote:pic of the bow
, ground off FG that had raised up, any advise on how to proceed is welcome
, I think I need to smooth it over a bit and apply some thickend epoxy to fill and apply FG tape
Daniel,
I think you have the right idea with the epoxy,to smooth the edges, but I think you ought to get Jacques or Shine to look at those pic's & give their opinion before you go any further. Those are areas of high stress that have this problem.Have you just ground out the bad fabric & left the tape intact? If so this might work but run it past the pro's first.Sand the glass edges smooth, with no sticking up edges & & coat them with a good coat of thickened epoxy, leave it to start to set up & then work wet on wet so that the thickened epoxy helps the biax to conform.
I think if you have some biax left you could cut your own tape,say 10" wide out of it then lay it over the chine,overlaping 5" on each side.I am in work,so I haven't got the lamination schedule,but IIRC there is only one layer of tape on the chine so your DIY tape would overlap that by 2" on each side.or use 2 overlapping 6" tapes like on the keel.you might have to swallow buying a bit more fabric or tape & epoxy to finish the inside glassing,& a bit more fairing,especially with 2 tapes,but you have to fix it .As for air bubbles the couple of small 3/4" dia ones I had I just drilled a small 2mm hole each end & injected neat epoxy with a syringe,worked a treat.
I feel for you, & I hope my suggestion helps,but just remember there is very little that can't be fixed with a bit of patience & epoxy.But I really would get a pro's advice first.
Regards,
Steve
Edit;
I have just looked at the pics again,would I be right in thinking that the bit that rose up is only about an inch wide all allong the chine? if so you might be able to do it with one layer of tape.
Posted: Sun Dec 16, 2007 8:39 pm
by colonialc19
Steve, Thanks for the reply.
The chine was just small spots but many of them, ground off a little all the down the chine, I figure I'll work wet on wet with a some thickened epoxy to fill and just have put another layer or 2 of tape on ( bow and chine ). Spent the weekend trying to clean up the rough edges and thinking about what to do. As you say nothing a little thickened epoxy and FG cant fix.
A learning eperience.
Daniel
Posted: Sun Dec 16, 2007 11:02 pm
by deedee
i would just knock down the high spots and lay some more glass over the area. lay down whatever type that you have compromised by the grinding. if you cut through biax tape , lay down the tape and the same for biax fabric. thats just my measley opinion . even if the whole area is raised you will always be able to apply quick fair to the area and fair the area out smooth. my transom is sorta like that . i used a few peices to finish it as well as whole peices so i had alot of raised areas. the quickfair and high build primer are wonderful and will cover most everything up.
good luck
Posted: Sun Dec 16, 2007 11:10 pm
by deedee
sorry but heres more of my 2 cents. filling the gaps is a must like you said. cabosil or silica is great stuff to thicken it up. keep up the good work. i would rest easy if i filled the gaps and added another layer of whatever glass was compromised.
Posted: Mon Dec 17, 2007 9:25 am
by jgroves
Hey Daniel,
Sorry to hear about the air. I guess I would do what you have done by grinding out the air pockets. Unfortunatly the glass on it wont have an purpose after it is grinded into. Perhaps look at it as a blank canvas. clean the glass off and re do the seams?
Posted: Mon Dec 17, 2007 9:38 am
by tech_support
Could you please give us some closer up pictures of the air pockets? Its difficult to see which is just sanded glass and which is air bubbles. I can the obvious ones that are cut out on the bow/bottom panels.
On the bow (joint between side panels) is the white area sanded glass or air?
If there are air pockets, they need to be ground out and filled. If there are a lot, them they need to be ground out and and new glass put over them. The trick to doing this clean (and avoiding more airbubble in the fix) is:
1- sand the biax all around. Not a hard sanding, just a few passes to knock down the hard stitching.
2- mix up a batch of thickened epoxy and very thinly spread it on the cut out areas.
3 - let the putty set up for 30 minutes or so and then put on your new layer of glass. the thin amount of putty acts like fillet material and eliminates air pockets
Posted: Mon Dec 17, 2007 2:37 pm
by colonialc19
Dedee, Jeremy, Thanks for your comments, always good to here another angle
Shine, The pics posted are after I ground out the air pockets. I am at work now, will post some of the pockets before grinding after work, if it will help.
I pretty much thought I should do just what you said to, but its good to be reasured
.
Maybe santa will bring me some more FG tape and biax for Christmas, oh yeah and an elf to help mix epoxy and sand.
Thanks again for the reply,
Daniel
Posted: Mon Jan 07, 2008 9:27 pm
by colonialc19
Bottom glassed
!
Fixed my problem areas with thickened eoxy, let that set for about 30min layed new glass over wet out and looks good, went ahead and finished the bottom.
Thanks for all the advise on fixing my errors
Next up, Fairing....
we'll see what I can botch up with that
Daniel
Posted: Mon Jan 21, 2008 10:45 am
by colonialc19
Not to much new to post but, i'm going to start cutting some 1/4" ply for my rub rails ( 12deg. here this a.m.) a little to chilly in the shop even with my small heater to do any epoxy work.
I was thinking about the width of the rub rails
, 2 3/4" wide or so, whats everbody else making them??
I was also thinking about the finished boat, maybe going with a tiller, making the bench seat across the back, and a coffin box along the center line torwards mid boat? In the coffin box i'm thinking one side storage and the other baitwell? Oh well plenty of time to think that over, still need to get the bottom done!
Daniel
Posted: Thu Jan 24, 2008 1:41 pm
by colonialc19
Cold again today, so I started cutting out my rub rail, cut it at 2" wide out of 1/4 okume, also cut some up some 3/8 for the skeg.
Skeg is going to be 3 layers of 3/8 laminated and 5' long, not sure how wide I should have cut my ply
so I cut it at 2 1/2" and after laminating I'll cut it down to were I want it.
Still much to be done before I get to that, but a bit chilly in the shop to mess with epoxy today, need to invest in electric heater

Daniel
Posted: Thu Jan 24, 2008 2:27 pm
by mecreature
this cold sure does put a stop to things..
It was 2 here this morning. I am knocking the ice out of the dog bowls and filling with hot water and making them drink it up quick.
they are saying even colder the next few days..
It does give you time to think though...
Posted: Thu Jan 24, 2008 3:54 pm
by colonialc19
Thats one thing about the weather, some down time to think. Alot

Posted: Thu Jan 24, 2008 5:36 pm
by TomW
I haven't worked on the Mirror repair for two weeks as I need to epoxy and my electric heaters and heat lamps can't keep up with the 5-15 degree nights we have had down here either. You guys must be pulling your hair out wanting to keep going on your big boats.
I know I will be if I get this weather next winter.
Well it has to come to an end sometime, I guess we are paying for last year.
Tom
Posted: Tue Jan 29, 2008 5:11 pm
by colonialc19
Some warm weather today so made a little time for the boat, glued up some skeg stock.

Posted: Tue Jan 29, 2008 8:06 pm
by bushmaster
Hi Daniel
Keel is looking good. How thick it is? and how wide?
Did you use 3/8" or 1/4" ply?
Keep up the good work. I finished cutting all my panels today, and epo two side panels.. one side only... Tomorrow I will try to do the bottom panels.
I am looking forward to go to Miami Boat show in early Ffebruary so I can get info on OB's and wiring harness, etc.
Good luck with your build.
Posted: Tue Jan 29, 2008 8:40 pm
by colonialc19
Bush, 3 layers of 3/8", 2 1/2" wide and 5' long. Plan on trimming it down a bit maybe 1 1/4" - 1 3/4" not sure just yet, I've seen other builders make them longer, some wider but thats the size I think I'll go with, I layed a 5' piece on the keel looked proportionate so I went with it.
If anybody knows a different size that will work better please comment would love to hear some different ideas
Oh yeah, Im sure Im not the first to think of it but with the cooler weather I've been keeping the resin bottles Im mixing from on an old heating pad, keeps them nice and warm
Daniel
Posted: Tue Jan 29, 2008 9:26 pm
by bushmaster
Thanks Daniel
I think I will go with your design since I already have some 3/8" left over from the transom and clamping boards.
Bush
Posted: Tue Feb 05, 2008 9:18 am
by colonialc19
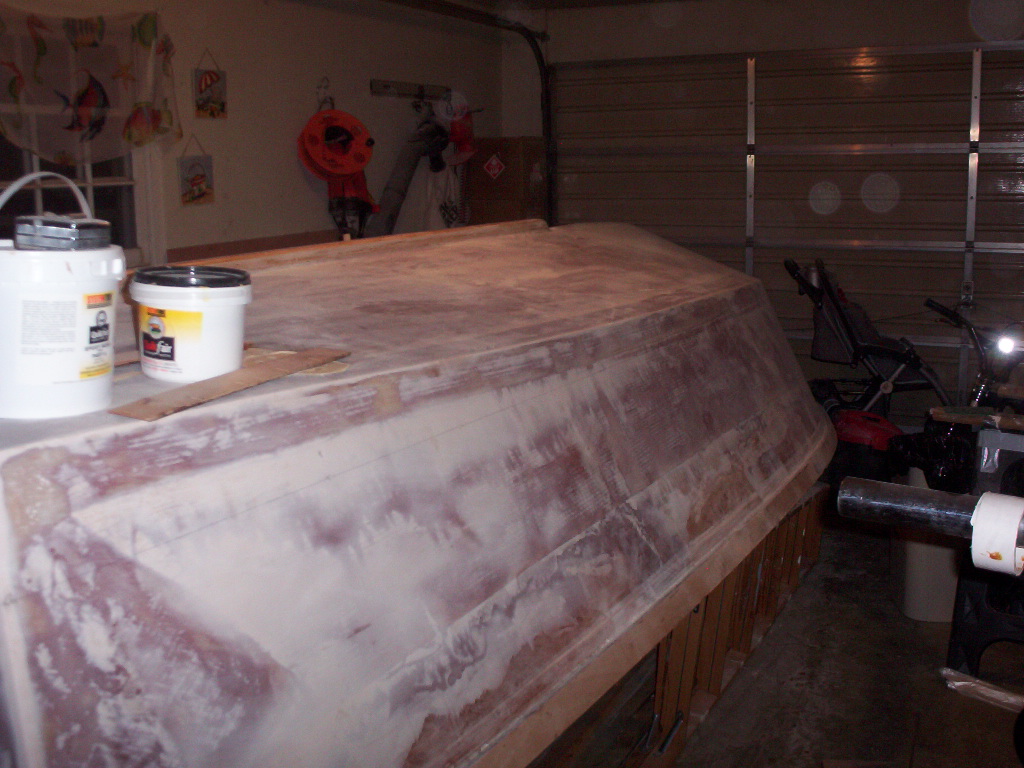
Mixed a loose slurry with the blended filler from the kit, and spread it all over the boat last night. Some places I think I mixed it a little too loose
, this morning it has run in spots, more sanding fun i guess
.
Getting ready to order my Quickfair right now so I thought I'd post the progress.
Daniel
Posted: Fri Feb 08, 2008 5:21 pm
by steve292
How's the fairing going?
Good isn't it?
Posted: Fri Feb 08, 2008 9:03 pm
by colonialc19
Steve, Yeah that fairing is great
, a great workout, a great big mess of my shop, but really dont mind it too much, just glad I didn't jump right into the C19
, I really dont know how Oshow hasn't gone insane fairing the beast he's building.
I've been using the long board most of the week, I think I made mine too big, 36"x 4.5" can't push it long, however it shapes things up in a hurry.
Just working an hour here and there after work, its going to take while.
Thanks for checking in on me, keeps me on my toes,
Daniel
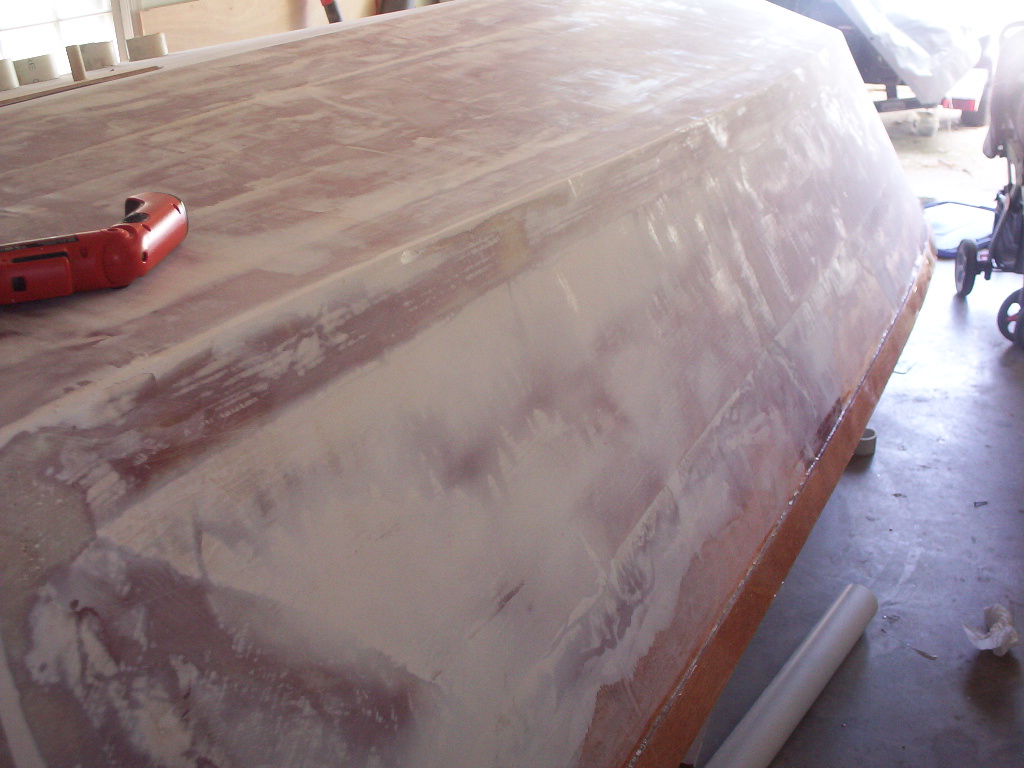
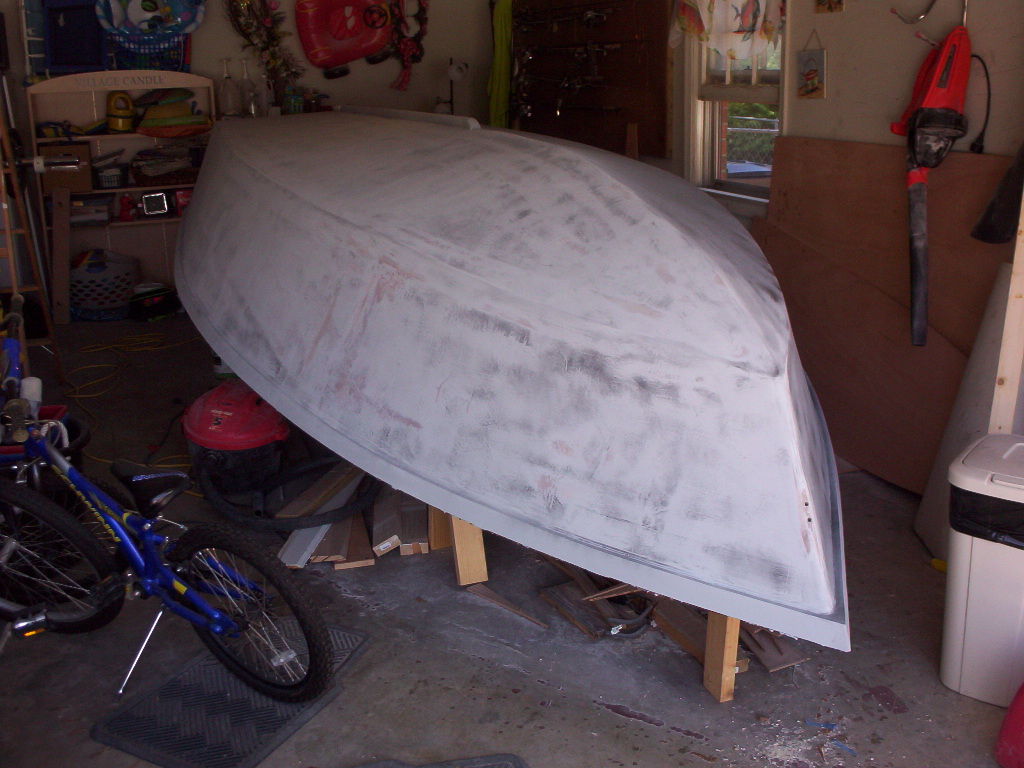
Posted: Sat Feb 09, 2008 8:56 pm
by colonialc19
Posted: Sun Feb 10, 2008 3:07 am
by o-show
What happened to the skeg? Did I miss something? I thought you attached it two weeks ago? Are you going to build up the edge where the transom meets the bottom so tha it is not rounded off?
Posted: Sun Feb 10, 2008 8:05 am
by colonialc19
O, I started building the skeg, I think I need to get some more fairing done before I attach it.
Yeah I do intend to sharpen up my edges, still lots of fairing and shaping to do
.
sorry if my post seem a little crazy, half the time i'm posting after working graveyard shift, or while on shift.
Daniel
Posted: Mon Feb 18, 2008 9:58 pm
by colonialc19
Udate, 1st coat of Quickfair spread
That stuff is nice
like spreading cake icing. Used stick method for about 1/2 the boat with no problem but dont trust myself , so bought a food scale a Target, about $6.00 for reasurence on the rest.
Planning on sanding in the morning
Daniel
Posted: Tue Feb 19, 2008 8:12 pm
by bushmaster
Hey Daniel keep up the faith. Yes, you are right...progress is soo slow..
I am also making slow progress. get tired easily.
Keep on going.
Posted: Sun Apr 06, 2008 8:09 pm
by steve292
Just curious daniel, how's the fairing going?
Steve
Posted: Sun Apr 06, 2008 9:48 pm
by colonialc19
Steve,
The fairing is going ssslllooowwww, working some overtime at my job, and a kitchen remodel over the last month or so have all but stoped my build, however I plan on getting back on it this week
Hope to post some progress soon

Daniel
Posted: Tue Apr 22, 2008 9:44 pm
by colonialc19
First layer of rub rails on
I made a new skeg, I posted a question on the power boats section about the size and Jaq. pointed out what the building notes stated , I must have over looked it
its currently setting up as I laminated 2 1"x2" x8' pieces. I do have pics but need to resize, their too big for the board right now
.
Hope to have bottom graphite on by weekend, its already the 22nd, the spadefish will be at the Cheasapeake Light Tower by early June, if youve never caught them its a 5-10 lb bluegill on steroids, really would like to put a few in the FS but it looks like it'll be next June, probally wont get the FS wet til end of July
, just in time for the cobia
anyway making progress and I'm very excited about that
Daniel
Posted: Tue Apr 22, 2008 9:50 pm
by Cracker Larry
I've always liked fishing for spades. They've saved many a charter fishing trip for me.
Posted: Wed Apr 23, 2008 7:10 am
by steve292
Great to hear you are making progress
. Have you finished fairing now?
Any pictures,I do like to see them
At the risk of spirralling wildly off topic here,what's a spadefish?
don't say its a fish
steve
Posted: Wed Apr 23, 2008 8:20 am
by Cracker Larry
It's a fish..

etodipterus faber
Atlantic Spadefish
Kingdom: Animalia
Phylum: Chordata
Class: Actinopterygii
Order: Perciformes
Family: Ephippidae
Genus: Chaetodipterus
species: Chaetodipterus faber
Full Taxonomy (ITIS)
Atlantic Spadefish Photo Gallery
Description & Behavior
The Atlantic spadefish, Chaetodipterus Faberis, is silvery gray in color with vertical black bars. It is known and named for its characteristic spade-shaped body, which is compressed with a short snout. Atlantic spadefish typically grow to 30-45 cm with maximum lengths up to 91 cm and have 2 dorsal fins and 2 anal fins with high anterior lobes. There are also 9 dorsal spines, 21-24 dorsal soft rays, and 17-18 anal soft rays. Juveniles, which are commonly found in shallow coastal waters, are black in color for greater camoflauge. Atlantic spadefish are frequently curious toward divers and their bubbles.
World Range & Habitat
The Atlantic spadefish, Chaetodipterus Faberis, is found around subtropical reefs, commonly off the coast of Florida and the Bahamas to southeastern Brazil and the Gulf of Mexico in depths that range from 3-35 m. Adults often form schools in open water of up to 500 individuals.
» GBIF occurrence data in Google Earth [Requirements | Tips]
» Ocean Biogeographic Information System (OBIS) [World Map] | OBIS-SEAMAP | [about]
Feeding Behavior (Ecology)
The Atlantic Spadefish, Chaetodipterus Faberis, feeds primarily on benthic invertebrates and plankton.
Zooplankton: microscopic animals that feed on other plankton. They can be larval or immature stages of adult animals, single-celled animals, or tiny crustaceans.
Benthic invertebrates: small animals that live in or near the bottom substrate of a marine environment such as annelids, cnidarians, crustaceans, and mollusks.
Life History
The Atlantic Spadefish, Chaetodipterus Faberis, has a minimum population doubling time of 1.4 - 4.4 years.
Population doubling time: The number of years required for the population of a given species to double its present size, given the current rate of population growth, used to measure a specie’s resilience to fishing pressure or other environmental stressors.
Comments
When ingested by humans, the Atlantic Spadefish, Chaetodipterus Faberis, has been associated with ciguatera poisoning, which is caused by ciguatoxins in the flesh of tropical marine fishes. Ciguatoxins, produced by marine dinoflagellates, grow on algae and are ingested by herbivorous fishes. Larger fish also accumulate the toxin by feeding on smaller herbivorous fishes, and become reservoirs of toxic levels of ciguatoxin. The poisoning can last for several weeks and is diagnosed by signs and symptoms that include gastrointestinal problems, weakness in the arms and legs, and trouble distinguishing between hot and cold.
This species is occasionally found sold fresh in markets and as part of the aquarium trade.
Posted: Wed Apr 23, 2008 8:37 am
by tech_support
jelly balls for bait
Posted: Wed Apr 23, 2008 9:27 am
by Cracker Larry
Since we're already off topic, I'll throw in a few fishing tips. It took me a while to figure out how to catch them.
As Joel said, jelly balls (jellyfish) are a good bait when available. The fish have small but strong mouths that require a small, strong hook and a very small piece of bait.
Surprisingly the best bait I've found is a very small strip of cellophane, from a cigarette pack wrapper. Cut in strips about 1 1/2" long, hooked with a small hook, no weight.
When jelly balls are in season we rig them as a teaser, stringing a dozen or more on a fish stringer and hanging them about 10 feet under the boat. Even with the jellyball teasers we catch more fish with the cellophane strips.
Last trick, when you hook the first fish leave it in the water as a decoy. Just put the rod in a holder and leave it. Their schooling tendancy is so strong that the school will not leave the single fish, just like school dolphin. Using the method it is possible to catch every fish in the school, so don't be greedy please. Leave some for later
OK, back to building....
Posted: Wed Apr 23, 2008 3:15 pm
by colonialc19
Larry never heard of the cellophane trick, Thanks for sharing
Up here we generally catch them on clams and clam chum, it only works thru about the end of June- early July then there's too many jelly's for em' to eat and thats all they want.
Back to the boat, just about done fairing. There's one or two spots on the chines im touching up right now
I'll post a few pics in a minute
Posted: Wed Apr 23, 2008 4:13 pm
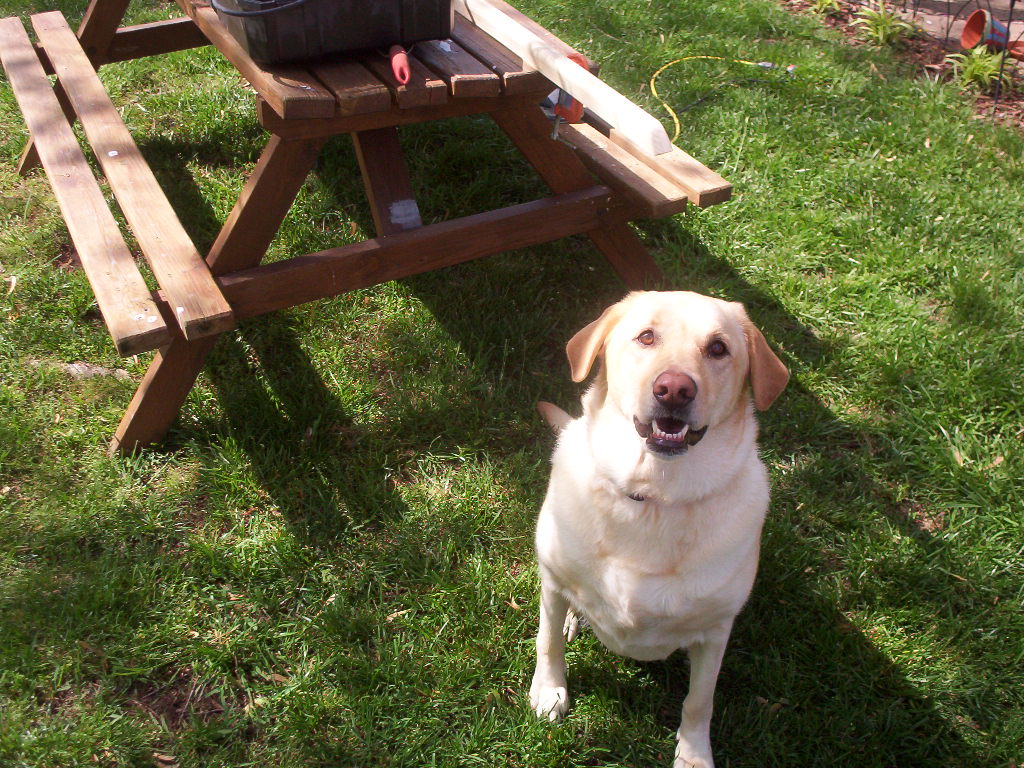
by colonialc19
Posted: Wed Apr 23, 2008 4:15 pm
by colonialc19
Posted: Wed Apr 23, 2008 4:17 pm
by jgroves
Nice lookin' boat and dog! Funny it seems everyone has a dog that helps with the build
Mine hangs out waiting for me to take a break and play with him. Needless to say I have to take alot of breaks.
Posted: Wed Apr 23, 2008 9:17 pm
by stevet
I have been wondering about the dog/boat ratio. Pretty high I suspect. Perhaps we need a "mascots" gallery.
Posted: Wed Apr 23, 2008 9:46 pm
by colonialc19

A very small spade but with great markings, the smallest of that trip if I remember right. Sorry to get off subject again
Posted: Wed Apr 23, 2008 10:07 pm
by Cracker Larry
Up here we generally catch them on clams and clam chum, it only works thru about the end of June- early July then there's too many jelly's for em' to eat and thats all they want.
There's your sign
Switch baits and chum. We can catch them year around, just a little south of you.
spadefish
Posted: Wed Apr 23, 2008 10:50 pm
by Cooper
They are very tame when you're in the water with them:
video:
http://www.pigdogtoad.com/images/chub/spadefish.html

Posted: Wed Apr 23, 2008 10:52 pm
by Cracker Larry
NICE photo
Posted: Wed Apr 23, 2008 10:55 pm
by colonialc19
Sweet pic!
Larry, yeah I have to wear that sign a little too often
Posted: Thu Apr 24, 2008 2:25 am
by frazoo
bream on steroids
Posted: Wed May 07, 2008 10:47 pm
by colonialc19
All rub rails on
, spent a couple hours tonight cleaning them up, I didn't know I made such a mess glueing them on, got glue everywhere

, used the hand plane on the bottom side getting the globs of glue that pushed out , and a little 60 grit.
Also have the skeg on finally, spent some time cleaning up my sloppy work there also,
I was planning on having the hull primed weeks ago, oh well everything is taking twice as long as it should
, thats the way it goes
Better hit the rack, gotta work in the a.m.
Daniel
Posted: Thu May 08, 2008 9:29 am
by bushmaster
Hey Daniel
I at the same point where you are right now, except I haven't laid the skeg on as yet. had lots of trouble with rub rails. How ever they are on as of now, some holes to fill where I had held the laminates with drywall screws. Also to add some filler at the bow where the rub rails meet.
Put skeg on then sand cover with glass, also glass rub rails.
How were you able to center and level the skeg on the keel before gluing(filleting)?
Post some pictures please.
Bushmaster
Posted: Thu May 08, 2008 2:29 pm
by colonialc19
Bushmaster,
I just eyeballed the skeg and put drywall screws through sraight as I could, used mixing sticks to help keep it nice and level with a gap for glue.
Then I used a heavy duty freezer bag to apply the glue, like iceing a cake.
If I had it to do over, I'd probally line it up and predrill, then apply glue to bottom side of skeg and screw it down, being carefull not to overtighten the screws, remove the screws as soon as the resin sets.
I dont plan on glassing the skeg or rub rail, a couple coats of epoxy and primer/paint on rails, and graphite for skeg
I'll post a pic when I get off work tonight.
Daniel
Posted: Thu May 08, 2008 3:56 pm
by Lower
Looking forward to some pictures Daniel. Your making progress! I HAVE got to update my page too. Not as far as you, but have made some progress. See I decided to slow down my build so I could learn from you, Steve, Jeremy, etc!
Just kidding...I'm just slow!
Any paint ideas?
Posted: Thu May 08, 2008 5:31 pm
by steve292
Have you finished fairing Daniel?
How close are you to paint?
Where are the pics,then????
Steve
Posted: Thu May 08, 2008 8:13 pm
by colonialc19
Lower I hear ya about being slow, I'm right there with ya

Im really not sure on paint yet
Steve, I really hope to prime this weekend sometime, I'm off work till next thurs.
, time to make some progress

Bushmaster, a pic
Posted: Thu May 08, 2008 8:25 pm
by colonialc19
I fastened the skeg with screws, then I put "spot" welds under it, once that set I removed screws and used a heavy duty freezer bag and applied glue under skeg, it made a big
mess but worked.

Posted: Thu May 08, 2008 8:54 pm
by colonialc19
Posted: Thu May 08, 2008 8:59 pm
by bushmaster
Thanks Daniel
What type of wood are you using for the skeg?
I laminated 3 strips of 3/8" together, 2" wide, but it did not come out very square. I will try to sand it down on all sides to try to square it else I will get some cypress lumber and use it. Since this is sacrificial any ways.
I decided to glass the rub rails because I am not too sure if the first layer is stuck on real good, i think that the fillet mix was not very good, why the port side two rails popped out. Had to cut the section off and re-glued.
Any special reason why you are not galssing the skeg?
Thanks
Bushmaster
Posted: Thu May 08, 2008 9:10 pm
by colonialc19
Bush, from what Ive read and seen I thought a few coats of epoxy, with a few more coats blended with graphite was all I need, I may be wrong.
I started to make my skeg outa lamiated ply, but like you it came out needing some work to true it up, so I purchased some 1"x2" ( 3/4x1/2 nominal) southern yellow pine, It took a while but found two straight pieces and laminated them together, routed with 1/2" roundover bit.
Posted: Thu May 08, 2008 10:04 pm
by bushmaster
Thanks Daniel
I think I will try to get some yellow southern pine from my local lumber dealer. May have to go up to Miami for this.
Bushmaster
Posted: Thu May 08, 2008 10:16 pm
by colonialc19
Bushmaster,
Check out CrackerLarry's thread page 16 and 17, check out how he did his.
It'll give you a look at another way to do it
Daniel
Posted: Thu May 08, 2008 10:38 pm
by Cracker Larry
Bush, from what Ive read and seen I thought a few coats of epoxy, with a few more coats blended with graphite was all I need, I may be wrong.
If you've got nothing but deep water and soft bottoms around, that will be fine. We've got lots of shallow oyster bars. My skeg has 2 layers of biax and a metal shoe. All covered in graphite.

Consider that the skeg will be the first thing to hit bottom. What kind of bottom is in your area
Are your boat ramps made of concrete like ours are
Posted: Thu May 08, 2008 10:44 pm
by colonialc19
Great point Larry,
Haven't had any problem around the creek here but I find myself more and more in the salt down in the bay,
it won't take much to tape her down, may as well before I prime, Thanks for the advice.
Posted: Thu May 08, 2008 10:48 pm
by Cracker Larry
Much easier to build it tough now than to fix it later. Then when you hear the crunch, you won't have to say "OH SH@T" and worry about it
Posted: Fri May 09, 2008 7:04 am
by bushmaster
South Florida or most of Florida has sand and coral, no hard rocks like up north. The ramps are made out of concrete..almost all..especially in the Miami Dade county and probably all other county ramps that goes into the bays.
I live in Homestead, Florida. Homestead is 30 miles south of down town Miami. The county has several lovely and well kept parks that have concrete ramps that goes into channels and leads to the Biscayne Bay and then to the reef.
The bay depth is shallow with sand and grass beds. Good tarpon fishing, also snook and bone fish.
Come up here some time.
Bushmaster
Posted: Fri May 09, 2008 8:49 am
by Cracker Larry
South Florida or most of Florida has sand and coral, no hard rocks like up north.
My experiences with coral have always found it to be as hard as a rock and generally sharper
Most of those canals in S. Florida are cut out of solid limestone. The one's I've hit have all been harder than the boat
I lived in Miami for about 1 1/2 years and ran a charter boat out of the Ft. Lauderdale Marriott. The fishing was great, but I could not stand living in Miami. Way too many people for this Cracker
Posted: Fri May 09, 2008 9:15 am
by bushmaster
Hey Cracker
You are right. Too many (crazy) people down here. But take heart..they are moving into your area..may be not to the swamp, but they are coming. Too expensive and lots of foreclosures.
Bushmaster
Posted: Fri May 09, 2008 9:23 am
by Cracker Larry
No, my place in the swamp is safe.
I just don't go to town very often. Not sure where they'll end up. We're already full of Mexicans and hurricane Katrina refugees who won't go home.
Not that I have anything against Mexicans, they are a good and hard working people
Posted: Fri May 09, 2008 2:24 pm
by mecreature
they are coming all the way up here to Indiana. Believe it..
that boat is looking very nice.. tape the skeg..JMO
Posted: Fri May 09, 2008 5:53 pm
by colonialc19
Skeg has 2 layers of 12oz biax overlaping
Thanks for the help everybody, I need
all I can get.
I'm always open for suggestions on the boat
Daniel
Posted: Sat May 10, 2008 9:27 am
by bushmaster
Daniel
Glad that you taped the skeg. I was able to pickup a piece of cypress lumber, 2"(1 1/2") x 8' x 6" from my local lumber yard after sorting out tons of the stuff.
Any experience wit cypress and epoxy/fiber glass. Do the adhere well?
Thanks
Bushmaster
Posted: Sat May 10, 2008 11:45 am
by colonialc19
Bush,
No experience with cypress, wish I could help you, I cant remember were I've seen it but somewhere on the site its been used, try searching it.
Posted: Fri May 16, 2008 7:02 am
by cape man
Cypress works great with epoxy. Have a very nice cedar strip canoe a friend made that has cypress gunnels. The boat is 10+ years old and has taken a beating over the years, but the gunnels still look great. They are epoxied but not glassed, but the glass adheres to the epoxy no matter what wood you use. Am considering cypress for the gunnels on my OD18 and keeping them natural (i.e. epoxied and varnished) to give the boat some flare. A lot cheaper than exotic hardwoods, and really pretty stuff if treated right. Nice thing is you can find some really long, clear boards.
My $0.02.
Posted: Fri May 16, 2008 9:15 am
by Cracker Larry
Yes, cypress is excellent and epoxy works well with it.
Posted: Fri May 16, 2008 10:02 am
by jgroves
cape man wrote: A lot cheaper than exotic hardwoods, and really pretty stuff if treated right.
I can't say I know woods.... but a friend was telling me the other day that African mahogany is actually a cedar? He builds/ restores boats and uses cedar in every restoration at some point. Smells good too!
OOOOPS... I got Cedar and Cypress confussed... my bad.
Posted: Sat May 17, 2008 9:40 am
by bushmaster
Thanks guys
I was able to true my laminated 3/8" ply 2x2 with a little sanding and some jointer-planer work. Will post pictures soon.
I will keep the cypress for inside work. 2"x8"x8' cost me about $40.
I have it right now under some 2x4 and 2x6 so i can get some moisture out without too much warping.
bushmaster
Posted: Thu May 29, 2008 4:51 pm
by colonialc19
OK, finally got to work on the boat a little, I havent been able to last couple weeks.
I'm faring in the skeg still
, a little while ago I got tired of leaning over to sand, ( I'm not a big guy, and its a reach ) so pulled out the ladder and climbed up on her to sand
, from what I could tell the hull didn't flex
, at least I couldnt see any from on top. I figure the jig absorbs most of the weight, but thought I'd see some flex since theres only glass on the bottom, gives a little assurance on how strong the hull is
.
Daniel
Posted: Thu Jun 12, 2008 1:07 pm
by colonialc19
Alright, I've got three coats of primer ( system 3 ), a guide coat, and sanded about half the hull. I'll have to say I'm a little disapointed on how my fairing looks at this point

, oh well, its just a little fishing boat. I'm touching up the rough looking spots and moving on
. pics to follow
D

Posted: Thu Jun 12, 2008 3:29 pm
by fishingdan
In the end, you will be your toughest critic. People will be too amazed that you built a boat to scrutinize the finish details.
Was the guide coat picture taken after sanding? I never used a long board, but they are useful. I always used a random orbit sander and a flexible straight edge. Walk around the hull and mark those areas (if any) that really need a little more attention.
Still, don't be in a big hurry at the end. We all have had to deal with that anxiety. Take a close look at your hull and make sure that there are no "bigger" issues that will bother you.
Posted: Thu Jun 12, 2008 3:49 pm
by jgroves
Hey! Moving right along!
I remember when I put my primer on and started to notice all the spots I didn't fair well. I recommend that you fix the ones that bother you now... get them out of the way and move on. On my boat I let one spot linger until I had one coat of paint on the boat. It finally got to me so bad that I had to get out of bed in the middle of the night and go out to the garage and sand a hole in the paint job so I would make sure I fixed it correctly the next day. Otherwise I may wake up decide it was good enough and let it go until the next night I went to bed thinking about it.
Your really close to flipping now! Are you still doing the bench seats and tiller steering? If so it should take you no time to have it in the water!
Jeremy
Posted: Thu Jun 12, 2008 3:54 pm
by steve292
In the end, you will be your toughest critic
Ain't that the truth.The primer does show a lot up.Keep the faith,most of what you see now looks massive,but when you fill them you find they are fairly minor.I spent ages on this bit, but was mixing maybe a tablespoon of QF at a time.What I did was do one panel at a time,so I could see what I had finished & what was left to do,mainly psychological I know,(perhaps Dougster can tell me what that is
)but worked for me.At the end of it,Fishingdan is bang on in what he said about there being no hurry,do what you feel is right regarding the finish,it is your boat,no one else's.
Don't make me come over there to make you finish
Best of luck,
Steve
Posted: Thu Jun 12, 2008 3:59 pm
by mecreature
I like Jgroves ran a sander over spots so I had to give a one more time..
Be at peace with yourself.. Dont rush the painting get it where you want.. and dont forsake the long board... that is the answer.
It is looking very good.
Posted: Thu Jun 12, 2008 4:21 pm
by WobblyLegs
colonialc19 wrote:I'll have to say I'm a little disapointed on how my fairing looks at this point...
I don't know why, it looks good from where I'm sitting!
When I was at that stage, I would just walk up and down the boat running the palm of my hand along the surfaces, sometimes quickly, sometimes slowly, and get a feel for high/low spots. (and probably 'cos I just like caressing my boat
)
So, never mind how it looks, how does it
feel?
Those chines look awfully sharp. Are you going to round them off a bit? Merely curious...
Regards,
Tim.
Posted: Thu Jun 12, 2008 5:06 pm
by colonialc19
Thanks for all the kind words and advice
FishnDan, the first pic was guide coat unsanded, 2nd pic sanded.( whole boat sanded now
)
Jeremy, yeah tiller with a bench at stern, spot for my large cooler length wise in center, small deck up front, small fuel cell up front in deck.
Steve, you and Dan are right, I'm just being a little picky I guess, my wife will take a look and say it looks great, then I start pointing out all my problem spots, she tells my I'm crazy
.
Wobbly, Mecreature, I'm doing my best not to hurry it, after all it'll be a while before I can afford the outboard anyway
I made the chines nice and sharp
hopefully she will perform well with a 30hp suzuki
Posted: Thu Jun 12, 2008 8:06 pm
by Spokaloo
Two words:
PAINT FLATTENER
Flat or semi-gloss paints (or a flattening agent well mixed) can do amazing things to keep you from looking at spots that you think are unfair. Its an old wood boat theory that shiny paint makes you look at the finish, flat paints make you look at the boat itself, the sheer, the rake, etc.
E
Posted: Thu Jun 12, 2008 8:47 pm
by colonialc19
Spook, I'm going with the system3 topcoat, already bought it
, but I hear that high humidity helps reduce the sheen, shoudn't be a problem here in VA.
Thanks,
D
Posted: Thu Jun 12, 2008 8:51 pm
by Spokaloo
C, you can get a flattening agent for that paint if you so chose. Just keep in mind you have to mix it constantly to get an even flattening.
E
Posted: Thu Jun 12, 2008 8:59 pm
by cedarock
Colonial...don't sweat it! I worried over the finish on my fs12 and believe me, there are blemishes that were not corrected. However, I take it out and people do nothing but compliment her. They never see the little flaws that I know are there.
Looking good!
I remember when I put the guide coat on. I skimmed a light layer of quickfair on the dark spots....sanded....re-coated with primer and said that was enough!
Posted: Thu Jun 12, 2008 9:21 pm
by bushmaster
Daniel
My hull looks just about the same as yours. It seems to me that where the panels are joined, that is where it shows up as not quite fair. I have been fairing for days now and I used up 2-1.5 glns. of quick fair so far and I am still not satisfied. I just ordered another 1.5 gln QF
Take your time, you will be happy. I am laying off for a couple of weeks going to spend some time with my grand children in Canada.
Not to worry, every thing will come out alright.
Bushmaster
Posted: Thu Jun 12, 2008 10:59 pm
by colonialc19
Spookaloo, thanks I'll check into it
Cedar, great to know, plan on working on it more tomarrow
Bushmaster, Have a great trip to Canada
D
Posted: Fri Jun 13, 2008 2:04 pm
by Lower
The fish won't care and I bet 95% of the people who look at it won't notice either. Doing a great job. Look forward to seeing it painted.
Posted: Fri Jun 13, 2008 3:03 pm
by donk
Daniel,
Looks good from here.
Still plan on getting up your way one day soon. Got to check out Ed's Marine so might try for a twofer. Been doing dad stuff for my son in PA and assorted wifey things so not as much boat building as I'd like. Also the heat just gets hard to fightl.
Keep plugging.
don
Posted: Fri Jun 13, 2008 5:12 pm
by colonialc19
Lower wrote:The fish won't care and I bet 95% of the people who look at it won't notice either. Doing a great job. Look forward to seeing it painted.
I'm getting excited about the paint, I'll probally get it on by next weekend
, Graphite to waterline, Sanjuan tan to rub rail, black boot stripe
Donk, anytime... just drop a post, I check the forum at least every other day or so. Oh yeah, I ment to ask if youve ever been to Budget Boats in Cheasapeke?????? they have a website, their kinda a boat junkyard and also sell new trailers. I thought about ridding down there and see what they offer.
Posted: Tue Jun 17, 2008 4:34 pm
by colonialc19
1st coat of graphite, have a few runs but nothing the hand plane can't fix
Hope to have two more coats on by the weekend
Daniel
Posted: Tue Jun 17, 2008 4:47 pm
by BWhalen
Daniel,
Budget Boats is just down the street from me...mostly Mercury's new and used. Very good guys, reasonably priced. My father owns Whalen's Marine also in the area if you are interested in Suzuki's, they are only selling new engines though. I am not going to lie to you but Ed's Marine has some of the best prices on the East Coast but I also hear a lot of bad info on people receiving service from them. Just my two cents.
Brian
Posted: Tue Jun 17, 2008 4:53 pm
by colonialc19
Brian thanks for that info, I'll check with your dads place when the time comes
I really like the suzuki's, see alot of them on the bay, wisper quiet
D
Posted: Tue Jun 17, 2008 5:35 pm
by BWhalen
Let me know if you talk to him...I'll do my best to get you the best deal possible.
Brian
Posted: Wed Jun 18, 2008 3:33 pm
by donk
Daniel,
looks like you got your answer on budget boats. I'm curious about trailers too.
I'm real close to Friday's Marine on 17 and his Suzuki are right at $1000 higher on the 9.9 and 15's than Ed's marine. Like Brian said, I've heard a few bad things about Ed's too.
don
Posted: Wed Jun 18, 2008 11:52 pm
by gk108
The bottom looks great. Obviously worth the elbow grease wasn't it?
On the runs, you can minimize some of them by lightly brushing them out in the downhill direction with a foam brush. Just walk around the boat on "run patrol" for a while after you coat it. Leave it alone before the epoxy starts to kick and the brush marks should level out.
Posted: Thu Jun 19, 2008 10:13 am
by Lower
Nice job with the graphite! I plan to do the same. Looking forward to getting to that point. Kinda getting tired of looking at the hull! Ready for a new view.
Those suzuki's are great engines. Just be sure to check the weight on the model your looking at. They run on the heavy side. The 30 hp is around 215 and the 40 hp is 240 lbs. The 25 on the other hand is 160 ish. Just something to keep in mind as I know engine weight on this boat has been discussed.
Posted: Thu Jun 19, 2008 8:15 pm
by steve292
Looking good Daniel !
It's a tremendous feeling getting away from the fairing is'nt it?
Steve
Posted: Fri Jun 20, 2008 12:13 am
by ks8
How does the edge hold up on the hand plane blade, slicing off cured epoxy?
Posted: Fri Jun 20, 2008 9:29 am
by colonialc19
Thanks for all the comments, It was worth the extra work, though it isnt perfect, I'm happy with it
. The blade has held up ok, but I do need to sharpen it up now
.
Lower, those zuki's are heavy, still havent made up my mind for sure on a particular motor
I've owned omc, mercury, and currently running a Yami. I've have alot of faith in my Yami, but Mercury has never let me down either. My dad had a 150 on his bass boat, owned it for 10 hard years, sold it to his buddy and its still running, 20 years old now
Daniel
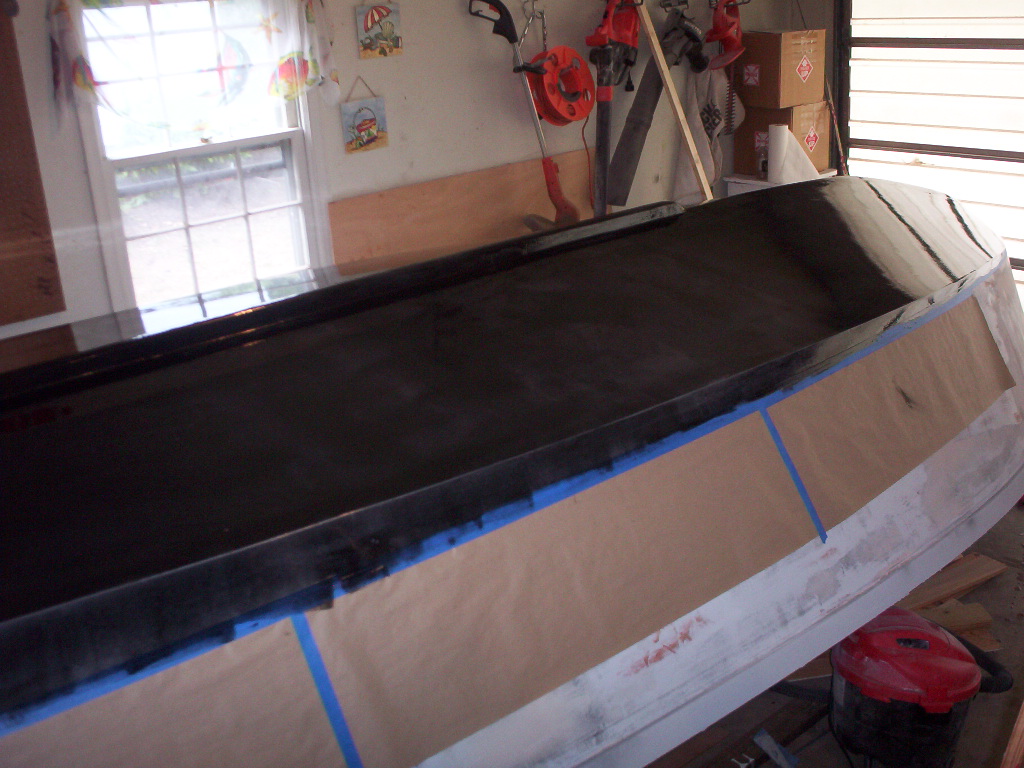
Posted: Sun Jun 29, 2008 7:34 am
by colonialc19
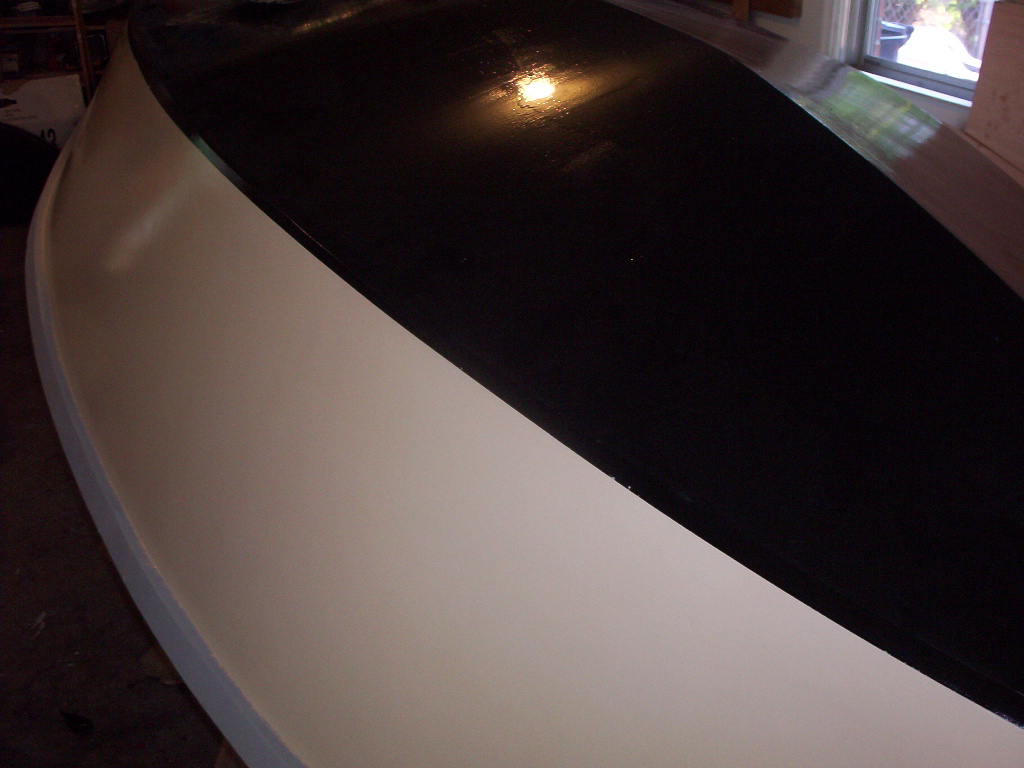
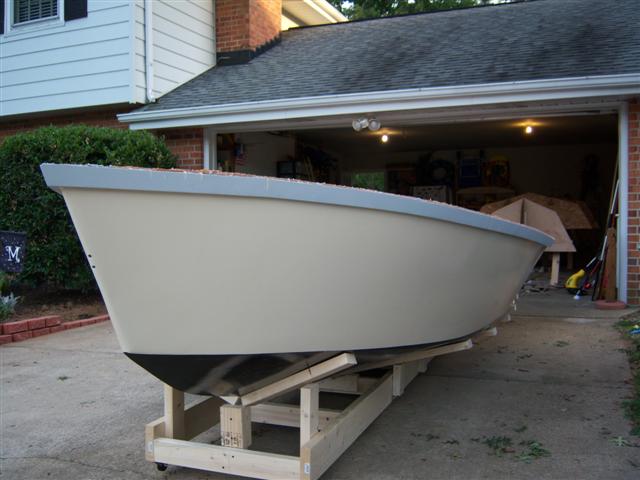
Rolled and tipped 4 coats of S-3 LPU this a.m. just finished up. Had a problem keeping the wet edge, thinned to 25%, The paint looks pretty good now, better than my fairing job
. I might post a pic after I get things cleaned up.
D
Posted: Sun Jun 29, 2008 2:59 pm
by steve292
colonialc19 wrote:Rolled and tipped 4 coats of S-3 LPU this a.m. just finished up. Had a problem keeping the wet edge, thinned to 25%, The paint looks pretty good now, better than my fairing job
. I might post a pic after I get things cleaned up.
D
Great stuff........post pics please.Did you go for SJT in the end?
4 coats of topcoat were needed to get even colour coverage on my hull,which is green as you know,I am curios to how many you used as I am thinking of SJT or Bainbridge white on my interior.
Steve
Posted: Sun Jun 29, 2008 6:30 pm
by colonialc19
Steve, Right now I have 4 coats of the San Juan tan, I'm thinking hard about wet sanding and doing another coat ( for cosmetic reasons ) the color is nice and even though.
Daniel
Posted: Sun Jun 29, 2008 6:45 pm
by colonialc19
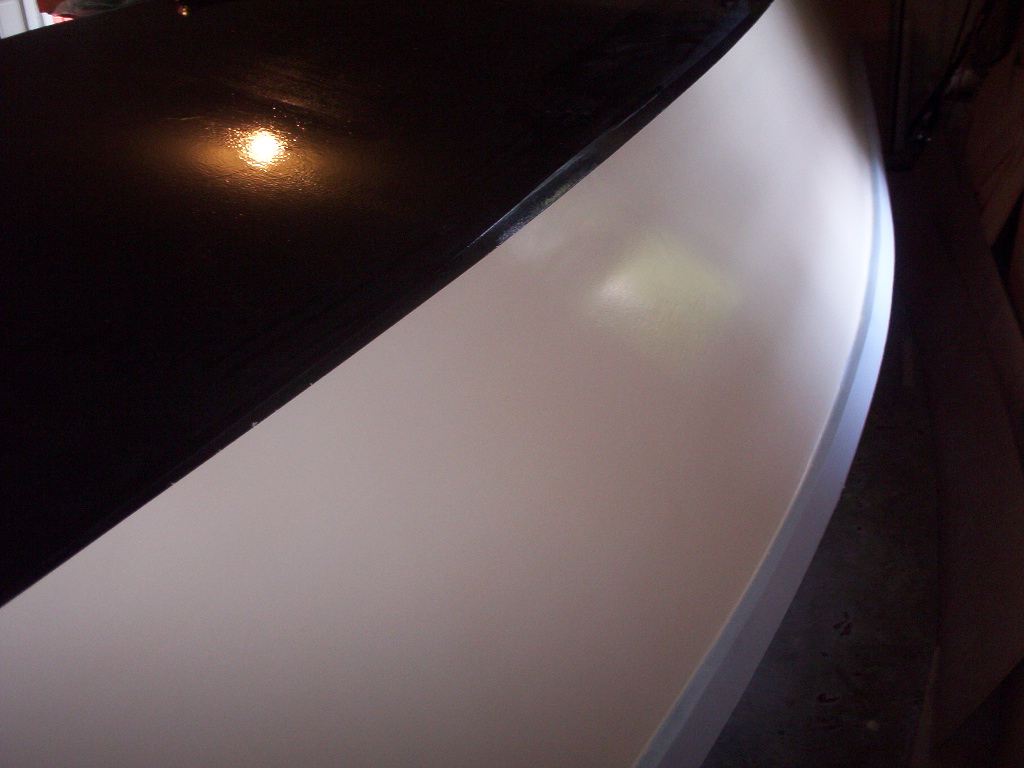
I taped off the rub rail, I'll paint that when I install the gunwales.
Posted: Sun Jun 29, 2008 7:00 pm
by colonialc19
Hope to get it outside next weekend and get some better pics
Posted: Sun Jun 29, 2008 7:55 pm
by cedarock
Looks great Colonial! I don't see any fairing nightmares.
Posted: Mon Jun 30, 2008 5:28 am
by steve292
I don't see anything wrong with that.When's the flip?
Posted: Mon Jun 30, 2008 9:39 am
by donk
Daniel,
Sure looks good to me!! I still want to see it but it seems every weekend is tied up with something besides boat building and anything associated with boat building.
Keep up the good work.
don
Posted: Mon Jun 30, 2008 3:07 pm
by Lower
Looking good Daniel. She'll be flipped in no time!
Posted: Mon Jun 30, 2008 4:18 pm
by topwater
Look's great...!
What is it with you guys building the fs-17?
All youre boats have a show boat finnish
Posted: Mon Jun 30, 2008 5:21 pm
by ks8
colonialc19 wrote:
Hope to get it outside next weekend and get some better pics
hmmm... yes... I see... substandard fairing job... yes... couldn't keep a wet edge... yes... perhaps the next boat will look good, maybe even make it up to a *workboat finish*, then you could cut this one up like Plumber Tuck did his...yes... well... look at it on the bright side... you've learned what not to do, next time, right? Let's put a good face on it and see you get a few seasons out of it anyway. Perhaps launch at night so no one sees those brush marks... or paint over it with flat camo pattern so it is harder to notice...
YOU"RE A LUNATIC!
I know, because it takes one to know one.
Posted: Mon Jun 30, 2008 8:24 pm
by colonialc19
Thanks for the kind comments, Hope to flip this weekend
I hate to put a date on it though, nothing seems to work out if I put a timeline on it
.
ks8, you know how it is
Daniel
Posted: Tue Jul 01, 2008 10:29 am
by jgroves
colonialc19 wrote: nothing seems to work out if I put a timeline on it
.l
Yep! The boat looks great though!!!! You will have it over in no time!
Posted: Tue Jul 01, 2008 4:17 pm
by steve292
topwater wrote:Look's great...!
What is it with you guys building the fs-17?
All youre boats have a show boat finnish
That's Jeremy's fault.If he hadn't done such a good job & set the bar so high,none of this would have happened.
Posted: Wed Jul 16, 2008 1:47 pm
by bushmaster
Daniel
It's looking great. Back from holidays in Canada. I am starting to get back into the routine of things. A few more of those prick holes to fill with fairing compound...man! so many of those prick holes.
I plan to do the same as you with the graphite on the bottom panels coming up above the chime a few inches. Did you prime the bottom before putting on the graphite, and how did you transition the edge where the graphite meets the paint?
Please let me and others know. We learn from each other.
Good building my friend.
Bushmaster
Posted: Fri Jul 25, 2008 10:07 pm
by colonialc19
Bushmaster,
Sorry it took so long to get back to you, its been a busy summer, havent made any more progress on the boat yet
.
I did prime the bottom and sides before graphite and paint.
On the transition, I just taped off the sides then graphited the bottom, after that cured, I taped off the graphite and painted to to it. I have a slight edge there, I plan to wet sand it, to smooth it out.
Hope to post some progress soon,
Daniel
Posted: Sat Jul 26, 2008 8:32 pm
by bushmaster
Thanks Daniel
I see that you did nor prime the side panels before you did the graphite on the bottom. Is there a special reason?
I am at the priming phase right now trying to cope with the South Florida heat..90+ degrees.. an the tropical down pour. I also seem to sand off too much primer, especially at the rub rail where it meets the side panels.
You are doing very good, please keep those pics coming
Bushmaster
Posted: Tue Aug 12, 2008 10:08 pm
by colonialc19
Finally got it flipped check out a pic or two

Daniel
Posted: Tue Aug 12, 2008 11:16 pm
by steve292
Nice
did you lift it off the jig to flip it?. I see the jig in the backround.
Are you still going for the tiller steering & coffinbox option that you disscussed a while back?
Steve
Posted: Wed Aug 13, 2008 9:08 am
by colonialc19
Steve,
I had 4 people, we lifted it straight up and walked it to the side then out the garage, flipped and set it on the cradle. Everything went well took about 3-5 min. at most, she's nice and light
.
I'm still thinking about the console version, I've been back and forth about this, I'll make my mind up soon and go with it. My wife saw the pics of Jeremy's and wants a console, so it'll probally be console.
Daniel
Posted: Wed Aug 13, 2008 9:26 am
by jgroves
HECK YEAH!!!! Looks great! Congratulations on the flip. The rest of the build will be nothin' but fun stuff
I enjoy the console. I will try and post more pictures soon. I have mounted my doors on the console and am making a leaning post.... I know my wife likes the idea of having a leaning post. The other option I like is the tiller steering with bench seats. The boat is large so bench seats would leave lots of areas to stand and fish... neat options.
Posted: Wed Aug 13, 2008 11:50 am
by cape man
My wife saw the pics of Jeremy's and wants a console, so it'll probally be console.
Please! Nobody put a toilet on anything this size (or especially an OD18!), and if you do, NEVER show my wife
Posted: Wed Aug 13, 2008 2:32 pm
by dborecky
I had a toilet in the ceter console of my 27 foot boat. I had it there for about 1 year or so. My rule was if you used it you cleaned it tank and all. It remained new. I finally removed it and now I have more room and she can't complain.
Posted: Fri Aug 15, 2008 3:14 pm
by Murry
Daniel,
Your boat is looking great.
I've been following the builds on this site for about two years or so and
I've hoped to find someone local so that I could see the process
firsthand.
If you ever need a hand or just want to show of your progress.
I live in chesterfield and I'm hoping to build a gf-16 in the future.
Thanks,
Daniel DeJarnette
Posted: Sat Aug 16, 2008 12:02 pm
by colonialc19
Daniel,
Any time you want to check out my build is fine, I'm ordering some more epoxy this week to make sure I have enough for the inside of the hull, as soon as I get that I'm gonna try to do the whole thing wet on wet. I'll make a post a day or few before so you can check out/help the process if you want.
D
Posted: Sun Aug 17, 2008 12:18 pm
by Murry
That sounds great. I hope my schedule will allow me to be apart of the action.
Posted: Tue Sep 02, 2008 3:13 pm
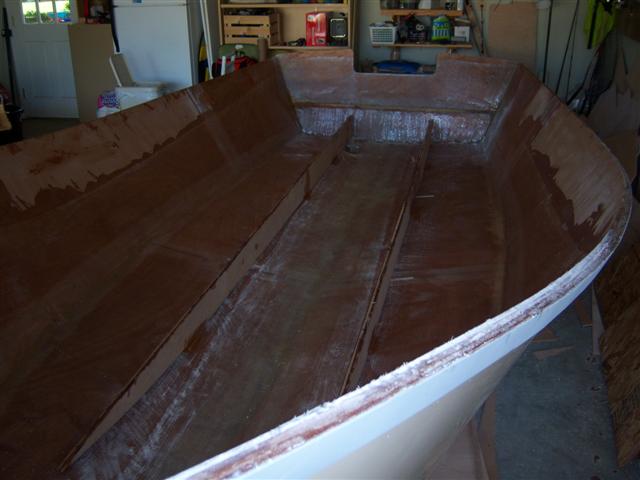
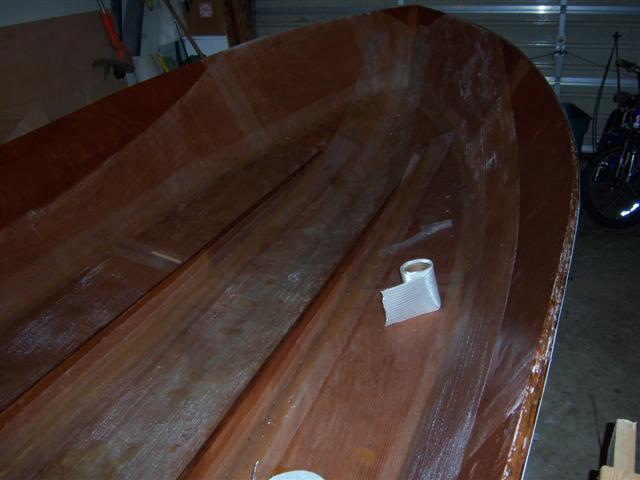
by colonialc19
Well, the wife left me alone on Saturday with no honeydo's and I coundn't help myself, layed the glass on the inside of the hull. Spoted my stringers in yesterday, and may fillet and tape tonight, Hope I have enough resin (I shouda ordered more resin, took more than I thought I would to do the big stuff).
Posted: Tue Sep 02, 2008 3:18 pm
by steve292
Looks good,you'll be past me at this rate
It takes a fair bit of epoxy to do the stringers,cause of the 2 tape layers & long fillets.I think about 3 litres or more by my memory.
Steve
Posted: Tue Sep 02, 2008 6:15 pm
by stickystuff
Going back a few pages BWhalen ,I think that was his name mentioned BUdget Boats in Chesapeake, Budget is owned by Glenn allen and his son Craig. He is my cousin. I bought my 98 Mariner from him 8 1/2 yrs. ago. I remembered when he started the business. He has come along ways. He and I grew up fishing together all our lives when we were growing up. Good people.
Posted: Tue Sep 02, 2008 6:34 pm
by colonialc19
Steve, thanks for that bit of info, gonna put my order in after this post for more epoxy.
Stickystuff, its a small world isn't it
, I'll be headed down there soon, bout an hour and half down the road, hopefully I can find a trailer and posibly some horses for this thing
Posted: Tue Sep 02, 2008 6:54 pm
by stickystuff
Tell Glen and Craig I said hello. Glenn is probably down in Jupiter at his other house. I think Craig runs the show while he is gone. Tell him I still have the 90 Mariner I bought from him. Still runs like new.
Posted: Tue Sep 02, 2008 10:06 pm
by colonialc19
Ken, thanks for that bit of info, I'll be sure to mention your name when I go down.
"Murry" I enjoyed the visit this evening, anytime I can talk boatbuilding with somebody is great, anytime you need anything give me a call.
Daniel
Posted: Tue Sep 02, 2008 11:15 pm
by Murry
I enjoyed it as well Daniel, I really enjoyed seeing you work. Your boat is looking good and I'm looking forward to riding in it.
I tell you what, seeing your build has just about put me over the edge.
Just a couple of more chores I promised my wife I would complete and then I will be able to start on "pedro". I hope to get some more advice when I start posting Daniel. Unfortantely, I may not be able to return the favor due to the lack of experience,
but thanks for all the tips you passed my way this evening.
Please give me a call if you need a hand.
I'll be in touch and thanks again.
Daniel
Posted: Tue Sep 02, 2008 11:26 pm
by Cracker Larry
Unfortantely, I may not be able to return the favor due to the lack of experience,
Sure you can, because you'll gain the experience as you go, and then share it with future builders in a year or 2. We all try to pass the torch
Posted: Wed Sep 03, 2008 12:32 pm
by Murry
I will definately pass the torch when the opportunity allows but
it may be awhile, and the flame might not be very bright.
Daniel
Posted: Mon Sep 15, 2008 10:39 pm
by colonialc19
Update: Stringers in with 2 layers 12oz tape each side offset
Gettin better at my fillets and tape work ( its about time
) and may even post a pic, but I gotta take one first, maybe in the morning
Daniel
Posted: Mon Sep 15, 2008 11:18 pm
by Cracker Larry
One thing about those under sole stringers and frames. It gives you plenty of fillet and tape practice in a place where no one will ever see them. If you don't show us the pictures
Posted: Tue Sep 16, 2008 8:18 am
by colonialc19
Posted: Tue Sep 16, 2008 10:31 am
by mecreature
that boat is looking good Colonial...
Keep it up..
Posted: Wed Sep 17, 2008 7:08 am
by Murry
Daniel
If you need an extra hand installing those frames give me a call.
I know it looks great.
Posted: Thu Oct 02, 2008 8:29 pm
by colonialc19
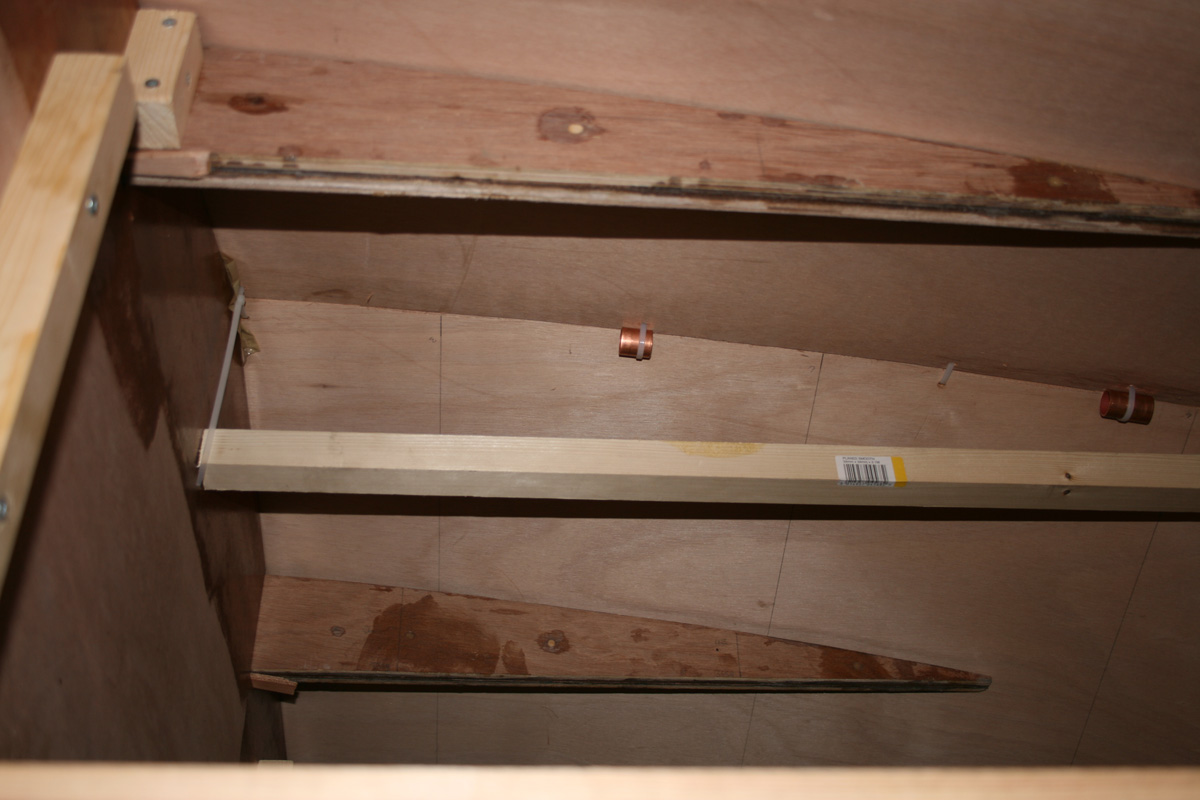
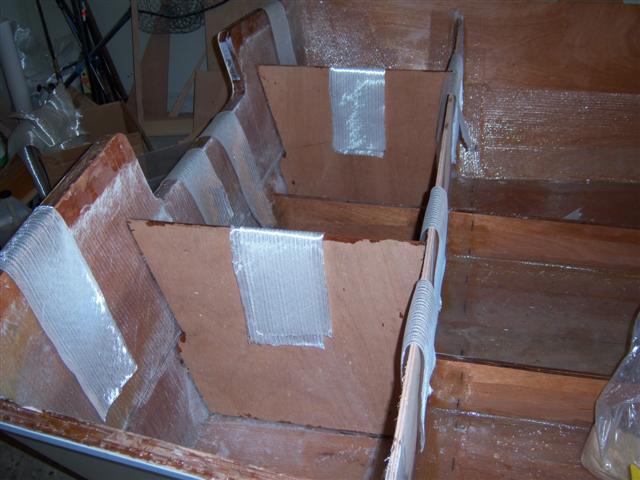
I now have frame E or the motorwell bulkhead glassed in, its kicking off as I type, but now a pic of my stringers that I shoulda posted 3 weeks ago.
Hope to make some more progress soon
Posted: Thu Oct 02, 2008 8:32 pm
by colonialc19
I also have all my frames cut out and fitted, just have to get em' glassed.
Hope to have them down before archery season opens
Posted: Fri Oct 03, 2008 2:02 am
by steve292
Looks good
Are you still going for an open layout with a coffin box?
steve
Posted: Fri Oct 03, 2008 8:37 am
by tech_support
colonialc19 wrote:I also have all my frames cut out and fitted, just have to get em' glassed.
Try to do them all wet on wet, even if it means doing one at a time from start to finish.
Stringer laminations looks good.
Posted: Fri Oct 03, 2008 8:59 am
by jgroves
Your FG work looks very clean! I love the look of glass coverd plywood.
Posted: Fri Oct 03, 2008 3:05 pm
by colonialc19
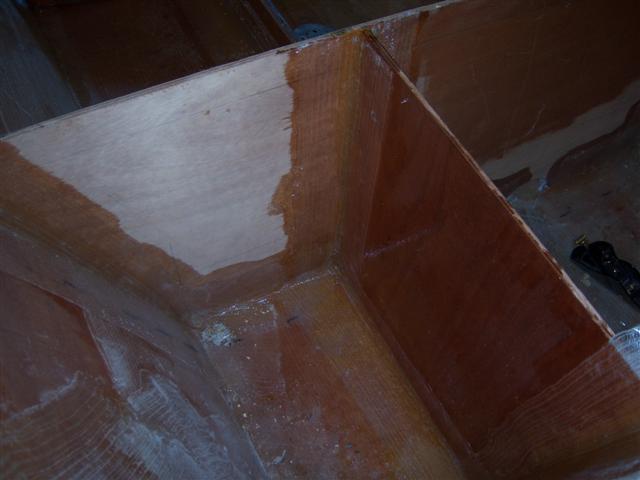
Alright, got a few things done this a.m., filleted and taped in the motorwell sides.
The wife has talked me into the center console version Steve, she'd rather have a wheel to turn when she's driving
.
Sorry about the pic quality
Edit: I used chop strand in my fillets, I think it made it a little harder to get a nice smooth fillet, but wasn't too bad.
Posted: Fri Oct 03, 2008 3:08 pm
by colonialc19
shine wrote:colonialc19 wrote:I also have all my frames cut out and fitted, just have to get em' glassed.
Try to do them all wet on wet, even if it means doing one at a time from start to finish.
Stringer laminations looks good.
I plan on getting em' all wet on wet, I have them just "tacked" in right now with a dap of glue
, gonna be a busy evening
Posted: Fri Oct 03, 2008 3:09 pm
by Lower
Doing a great job Daniel! Can't wait to get to the inside.
Posted: Sun Oct 05, 2008 12:18 pm
by Murry
Looks great Daniel
I'll be joining the fun in just two short weeks
Posted: Wed Jan 21, 2009 7:39 pm
by colonialc19
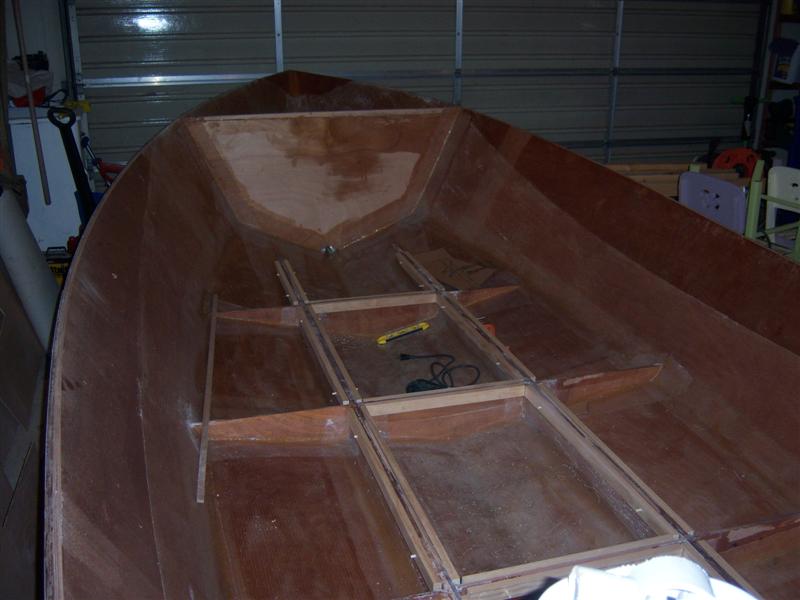
Finally got back to work on the boat this week
, about time
My frames are in and I've started dry fitting some of my cleats, (too cold now to glue), in the pic you can also see were I messed up a cut across the top of bulkhead "A" and had to add on a strip, used a butt block, still needs to be cleaned up. Hope to get my pvc chase tubes soon.
Daniel
Posted: Wed Jan 21, 2009 9:04 pm
by Murry
She's looking good, Daniel
The dowels really make it easy don't they and let me know if you need a hand with the pvc pipe.
Posted: Thu Jan 22, 2009 6:02 am
by steve292
Looking good Daniel.
B****** weather's to cold here as well, if thats any consolation.
How many chase tubes you fitting?
Steve
Posted: Thu Jan 22, 2009 7:47 am
by jgroves
Looks good! Keep us posted.
Posted: Thu Jan 22, 2009 4:02 pm
by colonialc19
Steve,
I'm thinking
two 1 1/2" from console back
one 1" from console to bow
one 1" from console to bilge
one 1 1/4" from bow to stern for fuel line
all electrical pvc
if I'm missing something let me know
Posted: Thu Jan 22, 2009 4:38 pm
by TomW
colonial I'd make your 1", 1 1/4 or 1 1/2. Going aft to the bilge you'll have your bilge pump plus your depth sounder to pull through. The depth sounder plug will be hard to pull with only a 1". Plus you never know what you might want to pull in the future either forward or aft. I think Larry said it best after pulling all his wires, "I'll never use anything less than 1 1/2" again."
Tom
Posted: Thu Jan 22, 2009 5:26 pm
by colonialc19
Thanks for the info Tom
1 1/2 it is
Daniel
Posted: Thu Jan 22, 2009 8:17 pm
by bushmaster
Daniel
Superb....Looks great. How did you do the wide cloth in the inside? Did you do both pieces together or one at a time? I am hoping to flip mine ...FS17... within the week. God permits. Still have some more medical tests to go through with.
Keep up the good work and keep those pictures coming
Bushmaster
Posted: Thu Jan 22, 2009 8:57 pm
by colonialc19
Bushmaster,
I built my fillets for the chines and keel, taped them, then I laid one side then the other all wet on wet
,
I got up in there started at the bow, port side and went to transom, then the starboard, I just wore old clothes, and several old pair of socks, it took more time than I thought,
have your resin handy so you don't have to climb in and out, change socks when they start getting tacky
with the "v" in the hull in the bow area the more you move around seemed like the more wrinkles I got in the fabric, had to watch that.
Wish I were closer I'd love to help, hope all goes well with the Dr./tests
Daniel
Posted: Fri Jan 23, 2009 8:09 pm
by bushmaster
Daniel
Thank you very much for your kind offer to help. I know that you are far away, but I think I can manage to lay the big cloth even if I have to do one side at a time.
I started to put the frame around the hull for a cradle, hope to finish by Sunday, then I have to get about 4 -6 guys to help flip. Will post pictures on Sunday.
Bushmaster
Posted: Wed Jan 28, 2009 4:59 am
by KRE
Daniel,
Boats looking good. I read your string on chase tubes. I built the same boat, used two 1-1/2" chase tubes. I used grey conduit PVC with long radius 90s. Both are chocker block full! They're so full that I had to pull cables in order of end diameter to fit them all in. Go Big!!!
Kurt
Posted: Wed Jan 28, 2009 8:25 pm
by colonialc19
Kurt,
Thanks for that info, I've decided to go big, but this has confirmed my decision to have an extra also
I worked on gluing some cleats onto the stringers, was warmer here today, I got the shop up to 70f, first time in a while for that
.
The first batch of resin I mixed kicked before I coated 1/2 my cleat material
, might of had something to do with that heater I had blowing on the jugs of resin
a clear hockey puck

The second batch I had to put in the fridge before I mixed in the hardner, thought I was ok, till I droped it soon as I got in the boat
.
Finally made some glue and got to work
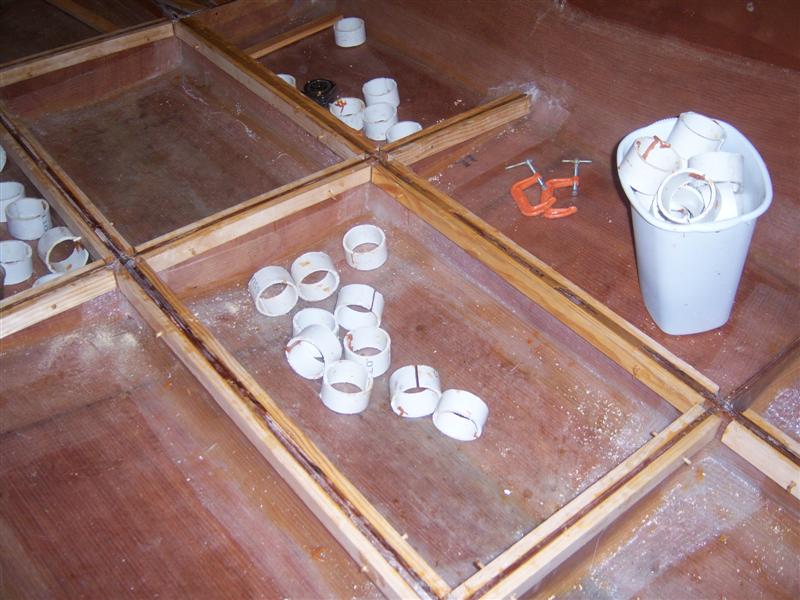
Posted: Thu Jan 29, 2009 7:00 am
by Murry
The second batch I had to put in the fridge before I mixed in the hardner, thought I was ok, till I droped it soon as I got in the boat
.
I may have just gone back in the house at that point.
Looking good.
Posted: Thu Jan 29, 2009 7:19 am
by steve292
Murry wrote:The second batch I had to put in the fridge before I mixed in the hardner, thought I was ok, till I droped it soon as I got in the boat
.
I may have just gone back in the house at that point.
Looking good.
Yup, I'd have given up at that point,& gone to drink beer for the rest of the day.
I wish I could get 70f in my shop, I was going to do some today,shop is currently at 4C (39F),so I don't think so

Steve
Posted: Thu Jan 29, 2009 7:58 am
by colonialc19
Yeah, I almost stopped for the day, but it doesn't get that warm often this time of year.
This a.m. we have a heavy frost
, shop is down to 50f
maybe by noon it'll be warm enough to do a litttle something on the boat
Posted: Thu Jan 29, 2009 1:44 pm
by wegcagle
If it makes you feel any better 2 days ago I was puttying my inside seams when I felt something heavy on my leg. I looked down to see half my zip lock bag of putty on my NEW PANTS.
I was so excited about getting some work done on the boat I forgot to change clothes.
Like you, instead of quitting I just scooped it off my leg and kept on going, I figured there was nothing I could do about it now. I'm still trying to figure out how to tell my wife that one.
Will
Posted: Thu Jan 29, 2009 2:12 pm
by jgroves
wegcagle wrote:If it makes you feel any better 2 days ago I was puttying my inside seams when I felt something heavy on my leg. I looked down to see half my zip lock bag of putty on my NEW PANTS.
I was so excited about getting some work done on the boat I forgot to change clothes.
Like you, instead of quitting I just scooped it off my leg and kept on going, I figured there was nothing I could do about it now. I'm still trying to figure out how to tell my wife that one.
Will
Just hide them in the bottom of the laundry basket. She may not notice.
Posted: Thu Jan 29, 2009 2:22 pm
by mecreature
Boat builders don't cry over a little spilled epoxy...
Posted: Thu Jan 29, 2009 4:38 pm
by chicagoross
You mean your "new boat-building pants"?
Posted: Thu Jan 29, 2009 4:56 pm
by colonialc19
chicagoross wrote:You mean your "new boat-building pants"?
I think most of us have a few pair of boat building pants
Posted: Thu Jan 29, 2009 6:57 pm
by TomW
Go get a new pair an keep those in the shop. Write it off to boat building costs.
Tom
Posted: Thu Jan 29, 2009 8:53 pm
by BassMunn
Don't forget the boat building shoes - If you can get them off the floor
Colonialc19, boats coming along nicely
Posted: Thu Jan 29, 2009 8:59 pm
by wegcagle
Yep, I used the pants again today while I did some epoxying on inside. Now they'll have some hard knees pads tomorrow.
Good thing they're comfortable.
Will
pants
Posted: Sat Jan 31, 2009 10:56 am
by Bluefish2
You might want to consider dipping them directly in epoxy to save time and mike them last longer. I recommend taking them off first, though.
Posted: Sat Jan 31, 2009 12:08 pm
by wegcagle
You might want to consider dipping them directly in epoxy to save time and mike them last longer. I recommend taking them off first, though.
Man, If I did that they really would be the most expensive pair of pants I own
Posted: Mon Feb 16, 2009 9:35 pm
by colonialc19
Got back to work today for a little while,
two, 1 1/2" chase tubes, one for fuel and one for my bow light,& cleats are in
I'm going to apply a couple coats of epoxy on everything under the sole tomarrow and by end of the week maybe play with some foam
I've changed some of my plans for the boat, going with a tiller, basic open boat option.
I've been back and forth on cc or open, I think open tiller will suit my needs better and maybe a lil less $.
Posted: Mon Feb 16, 2009 10:21 pm
by Murry
Your chase tubes turned out very nice Daniel, she's shaping up nicely.
I've been back and forth on cc or open, I think open tiller will suit my needs better and maybe a lil less $
If feels good to reach a long drawn out decision dosen't. I'm sure you've been through that a time or two more than me since you've been building longer but I know the feeling.
Sounds like you made the right decision for what you'll need.
Looking good.
Posted: Wed Feb 25, 2009 7:31 pm
by colonialc19
I've been workin' a little at a time on the foam, and a few pics of the results. The second pic is of my transom corner storage, since I decided to go tiller, I'm foaming and putting a bottom in at sole level in there for a lil' added floatation.
well the second pic isn't that good, but in the lower part of the pic you can see what I was talkn' about.
Daniel
Posted: Wed Feb 25, 2009 8:16 pm
by Murry
Alright, look at all the foam
Great job Daniel
I'll be doing that soon. Can I give you a call to get a couple of pointers since you're a pro now?
Posted: Wed Feb 25, 2009 8:52 pm
by colonialc19
Daniel,
Call me any time, but really it isn't that hard.
I bought some "solo" cups, the colored clear because they were on sale at Target.
I had green cups for part A and blue for part B, I filled some of each to the top of the upper "O" thats imprinted on them, take one with part A and pour it into your cup with part B,
mix, it"ll start to change color, soon as it starts to get a consistant color (kinda like coffee with extra cream, it wont take but about 30-45 seconds) be over your area you plan to foam, and pour.
Hope this helps a lil
D
Posted: Wed Feb 25, 2009 8:57 pm
by Cracker Larry
And don't get lost in a ponder while you're stirring
Posted: Wed Feb 25, 2009 9:53 pm
by Daddy
Gloves, did anybody mention gloves?
Posted: Wed Feb 25, 2009 9:57 pm
by Murry
And don't get lost in a ponder while you're stirring
That one kills me every time.
How much expansion did you get with these temps, Daniel? Lets' say with a full 16 oz. cup of mixed foam.
Can you continue to poor new batches over batches that are still expanding?
Does the epoxy have to reach a complete cure(couple weeks) before pouring foam?
I thought I would just ask them here instead of calling.
Thanks for your help.
Posted: Thu Feb 26, 2009 12:06 am
by gk108
Murry wrote:How much expansion did you get with these temps, Daniel? Lets' say with a full 16 oz. cup of mixed foam.
Can you continue to poor new batches over batches that are still expanding?
Not a good idea. It's better to pour a cup here, then a cup there and give it time to expand, especially at first. The best expansion is obtained around 70°. 55° is almost too cold to get much expansion from the foam.
Does the epoxy have to reach a complete cure(couple weeks) before pouring foam?
If you are working in a cold place, it might be a good idea to warm the areas up with a couple of light bulbs and a tent. If not, then a week at comfy temps would be more than enough time.
Just be warned that this foam is one of the infectious agents that BBV employs to anchor itself in your system.
Posted: Thu Feb 26, 2009 6:55 am
by Murry
then a cup there and give it time to expand, especially at first.
Thanks for that reply.
How much time to expand? Does it need to dry or just stop growing?
Posted: Thu Feb 26, 2009 8:00 am
by Cracker Larry
It will be mostly dry about the same time it stops growing. It only takes a few minutes. I'd strongly recommend 8-12 oz. batches, rather than 16, until you get the feel for it. 16 oz. will do a lot of expanding and it's not fun to trim or sand it.
Posted: Thu Feb 26, 2009 11:15 am
by Murry
Excellent, all of the advice above will help me greatly. I ordered my foam last night.
You guys are fast, Daniel didn't even get a chance to answer.

Posted: Thu Feb 26, 2009 3:45 pm
by colonialc19
I think Larry and gk covered it
, most of my batches were about 12oz, the first couple were about 8oz to get the feel.
I've been keeping my containers inside the house to keep em' warm, and heated the shop to about 60F.
I did pour two batches one after another in the same place, but only after I was familar with it and only in the deepest part of hull.
I poured one section of hull at a time, give it a 1/2 hour or so, trim the excess and put the trimmings in the next section and do it again.
Daniel
Posted: Thu Feb 26, 2009 3:48 pm
by colonialc19
Just be warned that this foam is one of the infectious agents that BBV employs to anchor itself in your system.
oh yeah, Lots of fun
My kids got a kick out of watching it.
Daniel
Re: Fs17 build in VA
Posted: Thu Apr 23, 2009 1:01 pm
by Murry
You making any progress brother.
You've been busy fishin' haven't you.
Re: Fs17 build in VA
Posted: Thu Apr 23, 2009 6:24 pm
by colonialc19

I've been fishing too much
I'll be back at the boat soon though, I haven't been on the forum in a while, I'm gonna take a look around now and check ya'lls progress.
Daniel
Re: Fs17 build in VA
Posted: Thu Apr 23, 2009 8:08 pm
by BassMunn
Nice fish, your exciting time of the year is just getting underway.
I have the same problem, been doing far too much fishing to work on the boat properly
Re: Fs17 build in VA
Posted: Fri Apr 24, 2009 7:01 am
by Murry
Nice fish Daniel.
Is that lake chesdin?
Re: Fs17 build in VA
Posted: Fri Apr 24, 2009 2:45 pm
by colonialc19
Murry, Briery creek two weeks ago on a senko foot and half deep
Re: Fs17 build in VA
Posted: Tue Jul 28, 2009 10:30 pm
by colonialc19
I had to go to page three to find my thread
, its been slow going, mainly because of $$, work has been slow, but is picking up, I've been building the boat with overtime$ which was hasn't been this spring and summer, til here recently.
Sole is down and seams and one side are taped, ordered my last 3 gallons of epoxy "again"
on friday along with some 6oz woven for the sole and topsides. I have next week off so hope to post some progress
Hope this doesn't sound too bad, currently self medicated for a kidney stone thats givin' me hell
Daniel
Re: Fs17 build in VA
Posted: Tue Jul 28, 2009 11:12 pm
by cape man
Hope this doesn't sound too bad, currently self medicated for a kidney stone thats givin' me hell
OUCH! This too will pass (sorry, had to say it)!

Last 3 gallons...I love it! Where does that stuff go?
Re: Fs17 build in VA
Posted: Wed Jul 29, 2009 4:20 pm
by ks8
cape man wrote:Last 3 gallons...I love it! Where does that stuff go?
In the shop vac. That's how it feels when fairing...
Fortunately, enough is left to have a nice boat when its all done.
Fill that weave! Build it up... sand it off... build it up.... sand it off.......... ooooo..... nice...............
Glad to hear of the progress.
Re: Fs17 build in VA
Posted: Thu Jul 30, 2009 1:11 pm
by wegcagle
Hope this doesn't sound too bad, currently self medicated for a kidney stone thats givin' me hell
Big glass of water, bigger glass of beer. Then repeat until you pass that little sucker. Good luck and god speed
Will
PS: DO NOT SELF MEDICATE WITH A BUNCH OF MOTRIN/IBUPROFEN. That stuff is tough on your kidneys and can worsen the kidney stones. Tylenol only for the pain. If you need more call your MD, and get some better pain meds.
Re: Fs17 build in VA
Posted: Thu Jul 30, 2009 3:29 pm
by colonialc19
Its good to hear I've been doing the right thing, h2o & bud2o
D
Re:
Posted: Mon Aug 03, 2009 11:56 pm
by michaelwpayton
colonialc19 wrote:... Picked up my ply on friday, however have had to work past couple of nights. Hopefully I can get my jig built this week and start butchering up my beautifull Okume.
Daniel
I'm in Williamsburg... where did you get your BS1088. I found some in Norfolk, but none on this side of the pond.
-Mike
Re: Fs17 build in VA
Posted: Tue Aug 04, 2009 2:46 pm
by colonialc19
Norfolk is where I found mine ( they were mighty proud of it too, $$), I think there's a place in Gloucester you can get it also, hope this helps.
Re: Fs17 build in VA
Posted: Tue Aug 04, 2009 7:43 pm
by michaelwpayton
Yeah... that's a great way to put it... and they are still "very proud of it"
But, as I have read out here a number of times... the cost the wood is really not that significant in terms of the overall project.
Thanks for the info... I'll ask around Gloucester next time I'm over there. Speaking of which , nice place over there on the York river, "York River Yacht Haven," if you're ever over that way.
-Mike
Re: Fs17 build in VA
Posted: Wed Aug 05, 2009 4:49 pm
by colonialc19
I put down some 6oz woven on the sole today, the 50" fabric overlaps down the center right much, about 36" or so is doubled up,( a lil more protection from those bottom sinkers) I have a couple wrinkles and spots to fix
, mainly from the splice in the aft section of sole, after fighting the woven to get all the wrinkles out Im shocked thats the only spots I have.
Just a lil prrogress
Daniel
Re: Fs17 build in VA
Posted: Wed Aug 05, 2009 5:03 pm
by Murry
Looks good Daniel, I've missed seeing your progress. I'll be back to working on mine in a week or so.
Light woven was a pain on the larger areas I had to do, that had to be tough. My areas weren't half that big.
Looks good.
If you get lonely staring at it by yourself, let me know.
Daniel
Re: Fs17 build in VA
Posted: Thu Aug 06, 2009 5:34 am
by steve292
Nice work, I find the woven a PITA to work with. I put biax on the sole in the end.
Steve
Re: Fs17 build in VA
Posted: Sat Jan 30, 2010 9:11 pm
by colonialc19
I've been trying to get back to work on the boat, the economy put a damper on my build over the last year or so, but I'm slowly getting back on track, now the weather is slowing me down,
working on my gunwales now and hatch lids, maybe this year I'll get her done
Re: Fs17 build in VA
Posted: Mon Feb 01, 2010 1:09 pm
by cape man
Re: Fs17 build in VA
Posted: Thu Sep 09, 2010 9:15 pm
by colonialc19
Time fly's, had to go to page 5 to find my thread, with the kids back to school I've started fairing the inside of my build, I'll post a pic of that soon, but today a friend offered me a lab pup, and I couldn't refuse (she's from a great line of gun dogs), now I've got a yellow and a black
. Just what I need, something else to spend time on
.

Re: Fs17 build in VA
Posted: Thu Sep 09, 2010 9:38 pm
by Bowmovement
Labs are great dogs. Heres mine
Dixie

Matt
Re: Fs17 build in VA
Posted: Tue Sep 14, 2010 12:24 pm
by Doc_Dyer
sorry to hijack but heres Koda the leash has been replaced by steel cable
saw rabbit and broke leash tied to roll bar

Re: Fs17 build in VA
Posted: Mon May 25, 2015 10:03 pm
by colonialc19
Finally back at it, making a little progress, I'm a lil embarrassed over just how long its taken
, but back at it
, hope to post some pics soon