Page 1 of 1
Little Hickman Sea Sled
Posted: Fri Nov 30, 2007 2:27 am
by Fred in Wisc
Well I've had the TX18 plans for quite a while, so it's time to finally start building something.
Project considerations were: Provides a stable fishing platform for max 2 adults and a young 'un. Can power with oars, electric, and little outboard. Fits in the back of my minivan for short trips to the lake. Light enough to load by myself. Gotta fit up the basement stairs 'cuz it's real cold (11 degrees this morning) in the garage.
I live right outside Milwaukee WI. Since it's quite populated, many of the lakes in our area have limited public access (10-20' wide strips of grass for carrying canoes, or access down small shallow rivers). Seems the "fancy people" with waterfront property are sometimes a bit posessive of "their" lake.
Anyway, I have been lurking around here for years, built a S&G canoe a couple winters ago but wanted something more substantial. (Fishing in a canoe with kids.....bad idea. Dogs are even worse....No offense to Captain Sam.)
Thought about a little plastic "bass tender" but only for a minute. Considered the FL12, V12 and some others. But the TX18 is just SO COOL that I figured I'd scale it down and build that. (I'm a sucker for cool looking stuff, shiny things, and things that make loud noises. If I was a fish I'd never have a chance...) Got the plans. The SS18 Sea Sled plans were included. I decided to build that at 55% size and raise the freeboard a couple inches in the rear, creating a pretty much level sheer line. I would have liked to do 65%, but I'd need a wider minivan and some time at the gym to lift it.
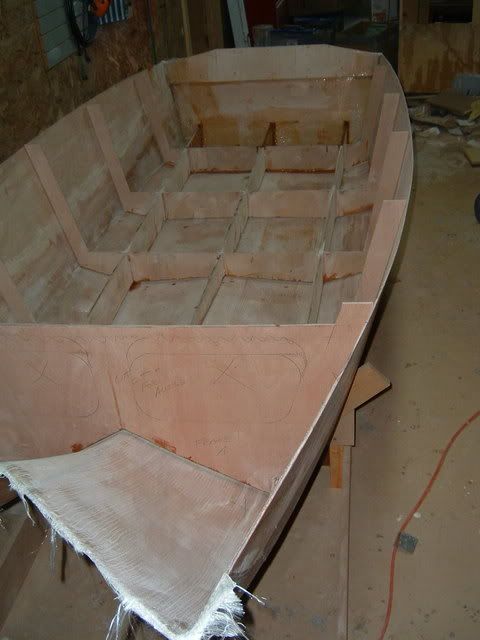
Spent a couple hours messing with the plans and the math to get it so it looks about right, then created the stringer and panel dimensions. Raised the sole 3/4" to get more substantial stringers and frames under the floor.
Using 6mm okume for frames, 4mm for hull, double 6mm for stringers.
Since the boat is so small, I decided to build the frames as single pieces (in the plans they are each 4 parts assembled around the stringers). Worked out the nesting to get all the frames out of one sheet of 6mm. That was sweet. Had about 1/4 sheet left over.
Laminated 2 layers 6mm to form the stringers. Offset the joints about 7 feet. The stringers are only about 9 feet long.
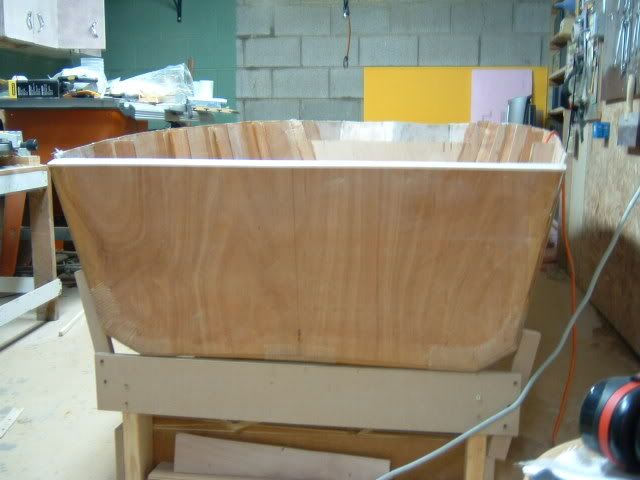
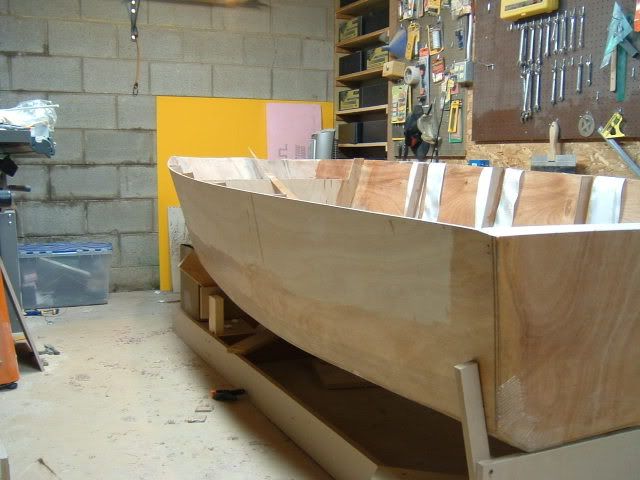
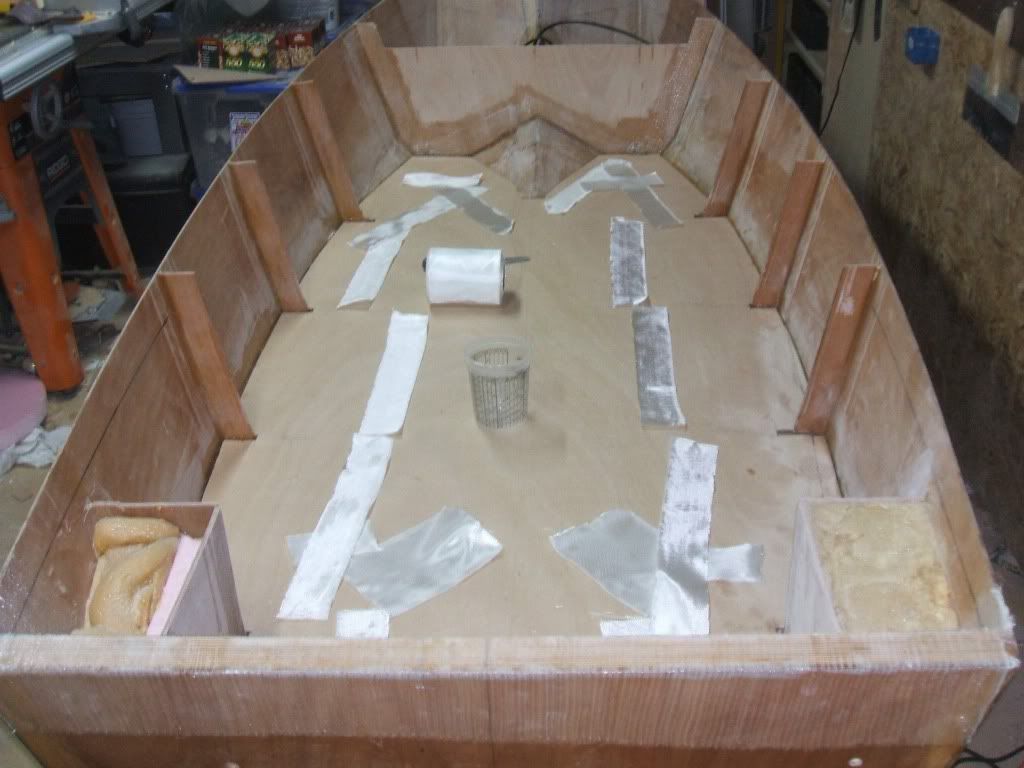
Then I set up notches in the frames and stringers so the whole thing could be assembled and glued up. Covered my cast iron tablesaw in plastic, used that as a flat surface for assembly, squared everything up and started mixing epoxy and woodflour. It was way easier than I expected. And after setting up, it's almost perfectly square and level. Pleasant surprise. The sheer line is close, but will end up needing a little adjusting to get it just right.
The fillets are not pretty, they will need some sanding before taping to the hull, but hey, they're under the sole so who's gonna know? Just me and I won't tell.
Here's a few pics of the progress so far. Let me know if they don't show up, I haven't posted any before.
By the way, I would still be slacking on this except for seeing the pics of Daniel Huckleberry's boat. Thanks for the inspiration, Daniel. That's a beautiful boat.
I'll post more as it comes together.
Fred in Wisc

[/img]
Posted: Fri Nov 30, 2007 8:47 am
by davidtx
This looks very cool! So if I did my math right, it ends p about 9'10" by 4'5". It doesn't look like you are very concerned with speed given your list of propulsion requirements, but I wonder how much motor it would take to make this plane. This looks like fun, please keep posting.
Posted: Fri Nov 30, 2007 10:43 am
by Dougster
Boy that's neat looking. Please keep posting as it goes along. I'm curious too what you'll power it with. Re rough fillets under the sole, well, heck, who cares? Seems like a creative, fun project.
Got the day off and gonna smear some 'poxy Dougster
Posted: Fri Nov 30, 2007 12:03 pm
by Fred in Wisc
Thanks for the kind words gentlemen. Speed isn't too important, I usually fish small lakes ("tanks" to you Texas fellas if I recall) and a little rowing is a good workout. For bigger water, I'm planning to power it with my Johnson 8hp 2 stroke. That little motor planes my dad's 14 foot aluminum with 2 guys so I'm guessing it should be plenty. It's nice and light too.
With the extra sheer, it's a little longer, may turn out near 11 feet depending on how I do the front deck lip. Just about 4 feet wide, the SS is a little narrower than the TX.
Anyway this boat should be good practice for building the full size one some day. That's a big project though. Need some extra shop space at work to do that one.
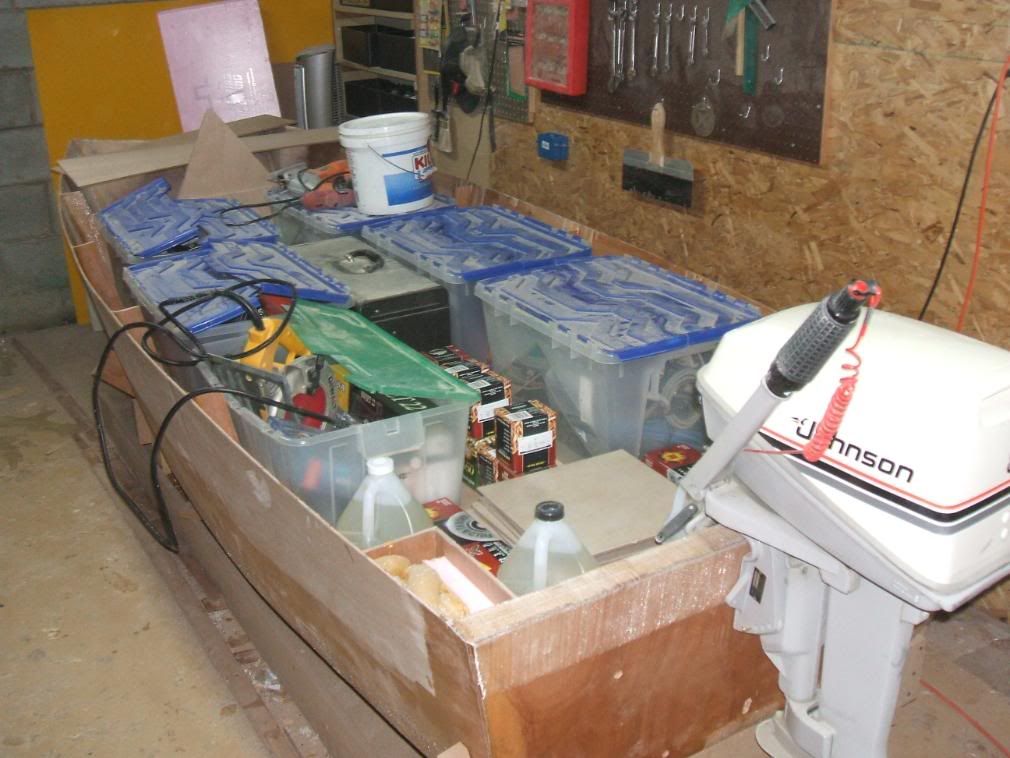
Here's a question for anybody out there: I find 3 and 6 gallon gas tanks everywhere. Really I'd like about a 1 gallon tank to save space and weight. Does anybody know where to get one or will I need to get creative?
Also for all the guys who use Dremel tools for smoothing out fillets and such, I found a great deal on the little samding drums and mandrels at Widgetsupply.com. 100 1/2" sanding drums with a pair of mandrels for 10 bucks.
Fred in Wisc
Posted: Fri Nov 30, 2007 3:43 pm
by Daniel Huckleberry
Cool idea, Fred! Thanks for the compliments on mine. I can't see the pic, but that happens to me alot at work (server blocks them). I will look when I get home. I would love to scale the SS18 up, but more than 10% and I am sure JM wouldn't like that much.
I think that will make a super cool little lake fishin machine.
Keep us posted!
Huck
Posted: Fri Nov 30, 2007 3:58 pm
by AdamG
looks cool! I like it. I'd have cut the sides down, and made it into more of a powersled myself, just to reduce weight, as I wouldn't probably be using it where large waves are an issue. but to each his own.
Question now is does this "mini" version use up your "license" for the TX18, and you will have to buy another set of plans for the full size? Doh!
Posted: Fri Nov 30, 2007 4:16 pm
by sds
Looks good so far!
One issue: the pictures are kinda big at 1,024x768 -- I have to scroll right and left to see them, and to read the text. Alot of other readers are probably in the same boat.
Suggest resizing photos to a max 600 pixel width -- you can probably do this right on photobucket.
Anyway, cool project. Looking forward to see how it develops.
cheers,
Scott
Posted: Fri Nov 30, 2007 10:36 pm
by Fred in Wisc
I guess the little guy will use up my license, but I don't mind paying for another. If I do a TX18 eventually, that should be about the smallest expense involved. I'll bargain hard with the outboard dealers to make it up.
About the pics: They show up fine on my 'puter, just a little short of full screen width. I have to scroll over oa touch to see the last bit of text, but that occurs on many of the forums here for me so I thought it was normal. How are others seeing this? Please leave some comments so I know. I can scale the pics down easy enough. Just want to make it easy to use for everybody.
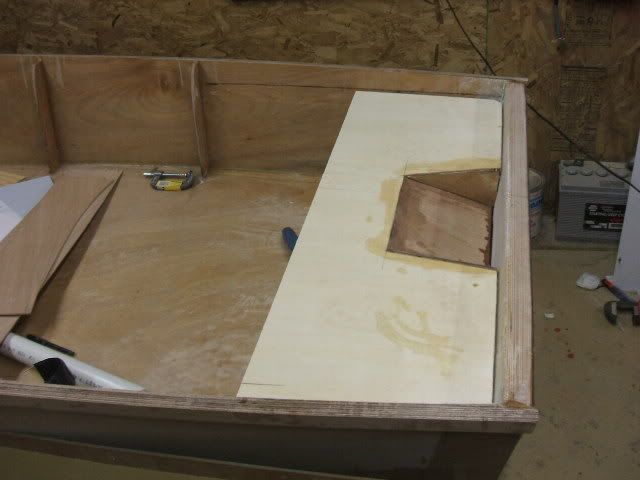
Trimmed up a couple panels today and got the tunnel panels zip tied down. Gotta tinker with them some to make it all fit up nice, so that may be a few days. This may take a bunch of ties to get it all fittin' happy at the bow, lots of stuff coming together there. Doesn't fit quite as well as I'd like in a few areas, but that's what I get for messing around with Jacques' design.
Fred in Wisc
Posted: Sat Dec 01, 2007 3:38 am
by steve292
I resize mine to 600 x 1200, which I find fine. I have to scroll sideways a bit to see all of yours.Nice work on your framing, interesting thing to do, scale down the TX18. It will be good to watch I think.
Steve
Posted: Sat Dec 01, 2007 4:07 pm
by ross61
Hey Fred,
Where are you located? I am in South Milwaukee. Built an FL14 about 4 yrs ago and I still have it. It has held up great. Let me know where you are and maybe I can bring over a sander and give you a hand when you get to the fairing stage. Interesting project. I really admire all the ingenuity of builders on this forum.
I'm typing this from the Dells where we are suffering an ice rain/sleet/snow combination. Oh well, nothing wrong with sitting in front of the fire with a cocktail.
See Ya!!
Ross
Posted: Sat Dec 01, 2007 9:02 pm
by Fred in Wisc
Next pics I'll scale 'em down.
Ross, I live in Hales Corners and work in Waukesha. Wouldn't mind some help with the sanding when I get that far.
It's nasty out here too. Got about 5" of snow mixed with freezing rain sitting in the driveway waiting for me.
Fred in Wisc
Posted: Thu Dec 06, 2007 11:41 am
by SalmonMan
Hey Fred,
Nice work you are doing! Are you building a Texas Sled hull or a Sea Sled hull? The reason I'm asking is because from the study plans I thought that the Sea Sled hull had an inverted vee on the bottom at the transom.
Keep up the good work! It looks great!
Posted: Thu Dec 06, 2007 4:06 pm
by AdamG
Looking at the frames on the second pic, and the way they come up a little along the keel line, I'd say it is the seasled version.
Posted: Thu Dec 06, 2007 9:18 pm
by Fred in Wisc
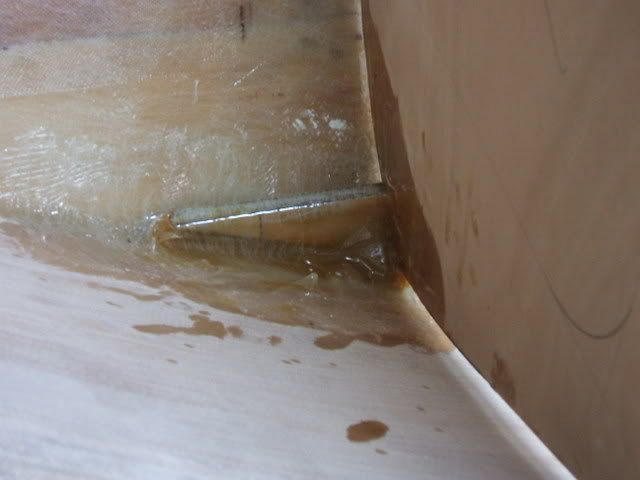
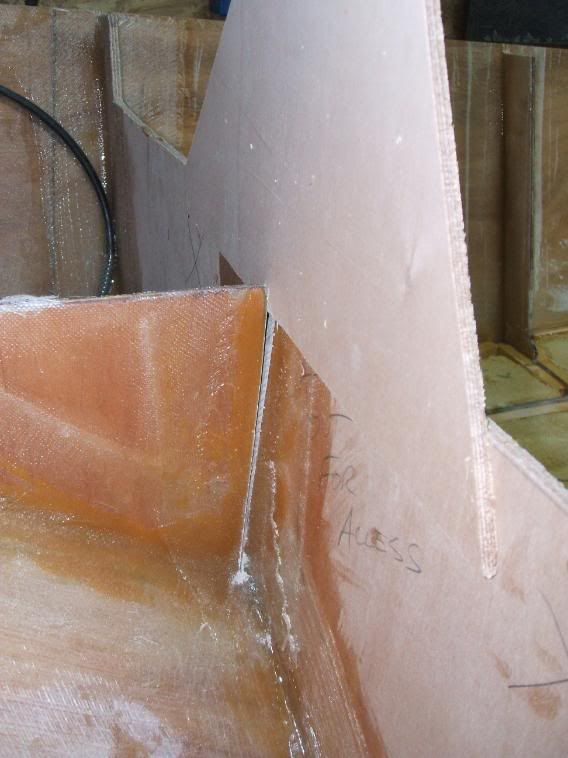
It's the Sea Sled. The inverted V at the back is only a coule of degrees, I think it came out to 3/8" or so at the center.
You can just barely see it in the pic.
I should have pics of the hull plywood zip tied out soon, I've been playing with getting it fair and the gaps pretty uniform. Found a math/cutting error, but nothing I can't fix with a scrap of ply and some epoxy.
Fred in Wisc
RE Sea sled
Posted: Thu Dec 06, 2007 9:36 pm
by Mike Redmond
HI,nice work keep up with the pics...Did you figure out how much it will weigh ,the weight of a boat is a constant preocupation with me ...getting older not stronger...11 you lucky little d...il minus 23C yesterday morning in Edmonton Brrrrrrr winter is not officially started and I cant hardly wait for spring to show up...So have a nice build you seam to have a good start on the project Mike R
Posted: Sat Dec 08, 2007 8:23 am
by Daniel Huckleberry
Fred, I checked your pics at home! They look really good and bring back great memories! I am itching for another build to start already. Scaling that Sea Sled might just be the ticket. I have several offers on the TX sled already! I won't be without a bateau again, though. I love these designs. Next one will have to be finished before I let her go.
Best of luck and keep posting pics!
Huck
Posted: Sat Dec 08, 2007 10:50 pm
by Fred in Wisc
Again, thank you for the kind words. Especially Huck, that means a lot coming from you, your workmanship is excellent.
Mike, I see that you need a boat you can fit out out of the basement. I'm in exactly the same situation. This will just barely make it up the stairs, at least in my house. I suppose all you Canadians have metric stairwells. Sorry couldn't resist.
If you are interested in the little sled, I'll be glad to share my dimensions and sketches. The TX plans from JM are superbly detailed, but he included the Sea Sled plans with less detail (just as stated in the plan description) so there was more to figure out. You'll still need to buy the TX plans of course, but I'll be glad to share the extra stuff I developed with anyone here.
The weight, I'm not really sure yet, I always end up heavier than I plan to. The skeleton is really light, maybe 20 pounds or so for all the stringers and frames. The rest is about 2 sheets of 6mm, 2 sheets of 4mm, and 2/3 sheet of 12mm for the transom. Probably 4 gallons of epoxy if I can control myself there. Then some foam, but that's light.
I'm guessing it will be kinda hard to load alone, but not too bad with my 9 year old neighbor kid helping.
Fred in Wisc
Posted: Sun Dec 09, 2007 7:45 am
by Daniel Huckleberry
Hey Fred, Thanks. But I can tell you that my pics look a little better than in person. I got real tired of sanding! Decided it was good 'nuff! Now that it's got river mud, salt and little bits of grass on it, you can't tell at all!
Good luck and great building. I gotta check this at home again to see your new pics.
Huck
Posted: Wed Dec 12, 2007 1:08 pm
by Fred in Wisc
Finally had a bit of time to work on the boat. It got cold out so we have been buried in remote start installations at work. Well can't complain, it pays the bills.
Anyway, I got the bottom panels and chines cut out and am working on getting them lined up before tacking them together. Gotta do a couple fiberglass splices in the sides panels and they will be redy to go too. You can see where I had a couple of calculation / layout/ cutting errors. The bow was not extended far enough when I raised the sheer, had to glass on a coule more inches of ply. And when I seamed the bottom panels together, for some reason the ends of my ply were not square so I ended up with a gap in the center. I think my miter gauge on the table saw was not right at 90 degrees. It's not a catastrophe, I'll just put that little traingel shaped filler in at the stern. There are a lot of layers of tape over it by the end of the build, so it will be plenty strong.
This is just layed on top, loosely fastened, I don't want to do the final zip tying until I have all the panels and have the table leveled carefully so I can check everything for level and square assembly.
I also was having trouble seeing how I could maintain gaps between the frames and ply, since there are some fairily complex angles and bends in the boat. I came up with the solution of gluing little bits of dowels to the frames to maintain gaps. I used just a tiny dot of superglue on each, so they will snap off with a good tap, then the glue can be sanded off with just a couple strokes with the sandpaper. I zipped a few panels down to test it and it works real well.
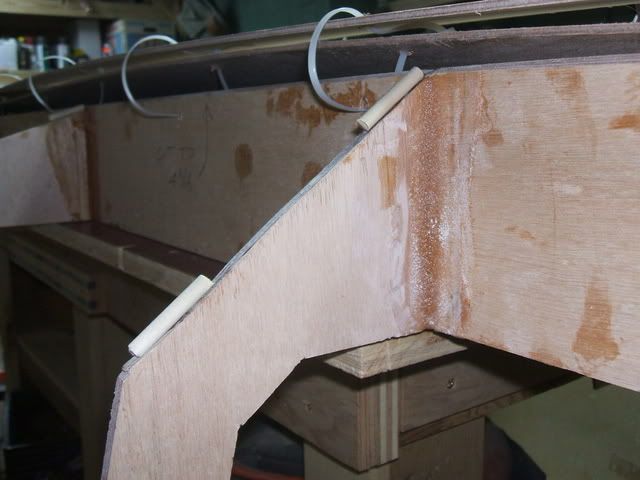
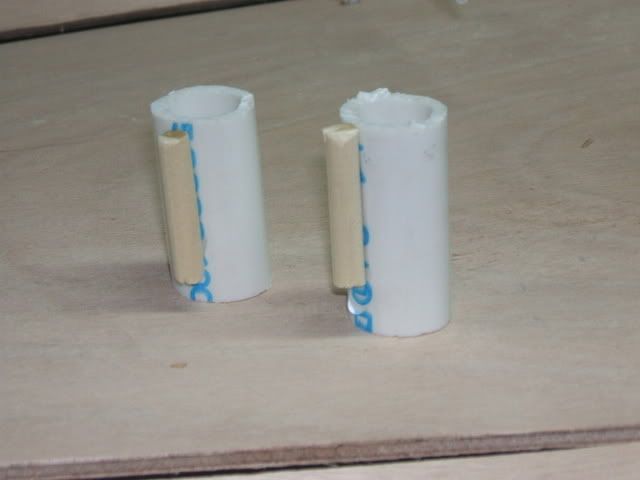
Also tried to use the little pieces of pvc pipe trick to get the center seam to line up nice, but it kept pulling the gap shut, so I made these to maintain the gaps and panel alignment. Works pretty slick.
Once I get the panels all zipped down and aligned nice, I will post more pics. That process is kind of trying my (admittedly limited) patience, but I know it will be way more work later to fix anything that's not laid out correctly now.
Fred in Wisc
Posted: Wed Dec 12, 2007 1:51 pm
by jacquesmm
There is something wrong with the bottom panels.
Are those our panels but scaled down?
If you did not make any other changes, they should fit.
Did you try to flip them? I mean turn them over, try the other edge for the center keel.
Don't worry about the gaps, keep it simple.
Posted: Wed Dec 12, 2007 5:15 pm
by Fred in Wisc
Yeah, there is something wrong, but it's my fault. When I glued up the splices in the bottom panels, I did not notice that theplywood was not cut quite square. They were actually angled out a bit. So they ended up not fitting at the transom.
It wasn't a big enough error that I felt compelled to redo the panels. I just cut a little filler piece and went with it.
Should I redo the panels? It did not seem like that little change at the end of the inverted V would make a difference, but if you think it will, I'll do 'em over.
Or I could splice in a piece on each side to maintain the sharp meeting point at the inverted V. Actually, I think that's what I'll do, it's no more work than the one filler piece. I'll post pics when it's fixed.
Fred in Wisc
Posted: Wed Dec 12, 2007 9:20 pm
by jbo_c
Can't wait to see this finished out. Looks like it will make a nice little boat for protected waters.
Jbo
Posted: Fri Apr 25, 2008 8:46 pm
by sraab928
Any updates Fred? Im really curious to see how she comes out.
Posted: Mon Apr 28, 2008 1:06 am
by Fred in Wisc
Thanks for checking in on it. I have been making some progress, but just a little at a time. Business has been good so I'm at the store a lot and I have a toddler, which really limits my late night power tool use (momma would kill me if I wake baby).
Since I need to do some sanding before the next step, I've been at a standstill for a while. Tried hand sanding, but that is surprisingly loud on a thin plywood hull. Plus power tools are way more fun.
Got a 7" random orbital, I think it was Dougster that suggested that. It's really fast and my new favorite sander. Gotta run it on low speed and watch out, though. I nearly cut throught the 4mm ply in one spot with it. Nothin' a little wood flour putty and an extra piece of biax tape didn't fix....
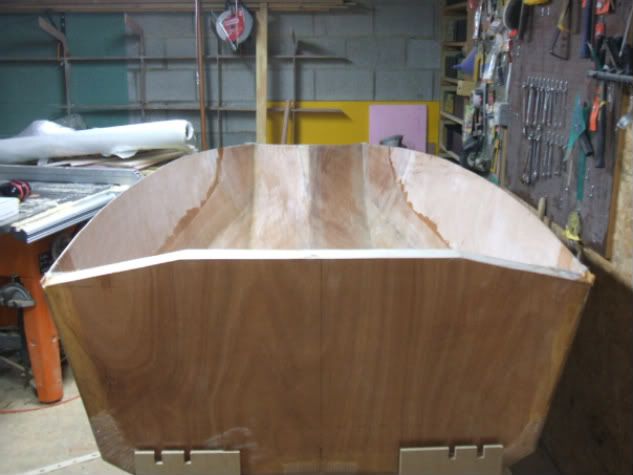
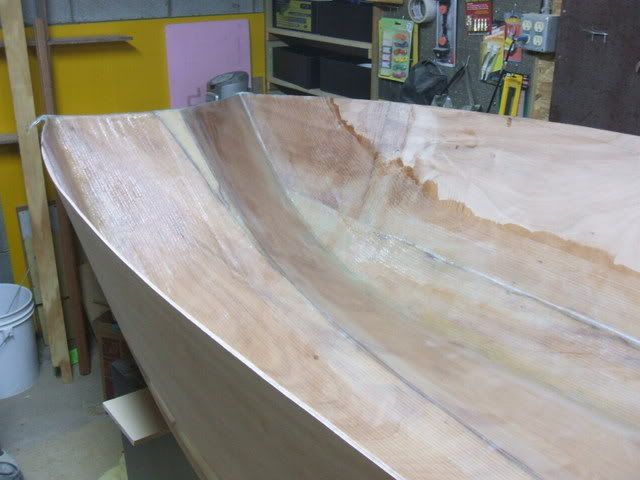
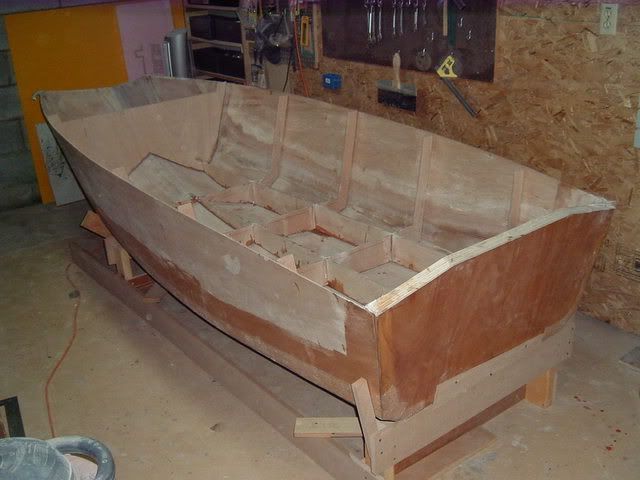
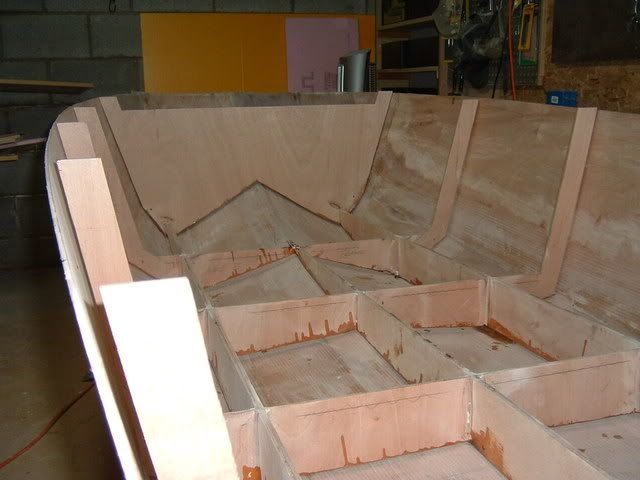
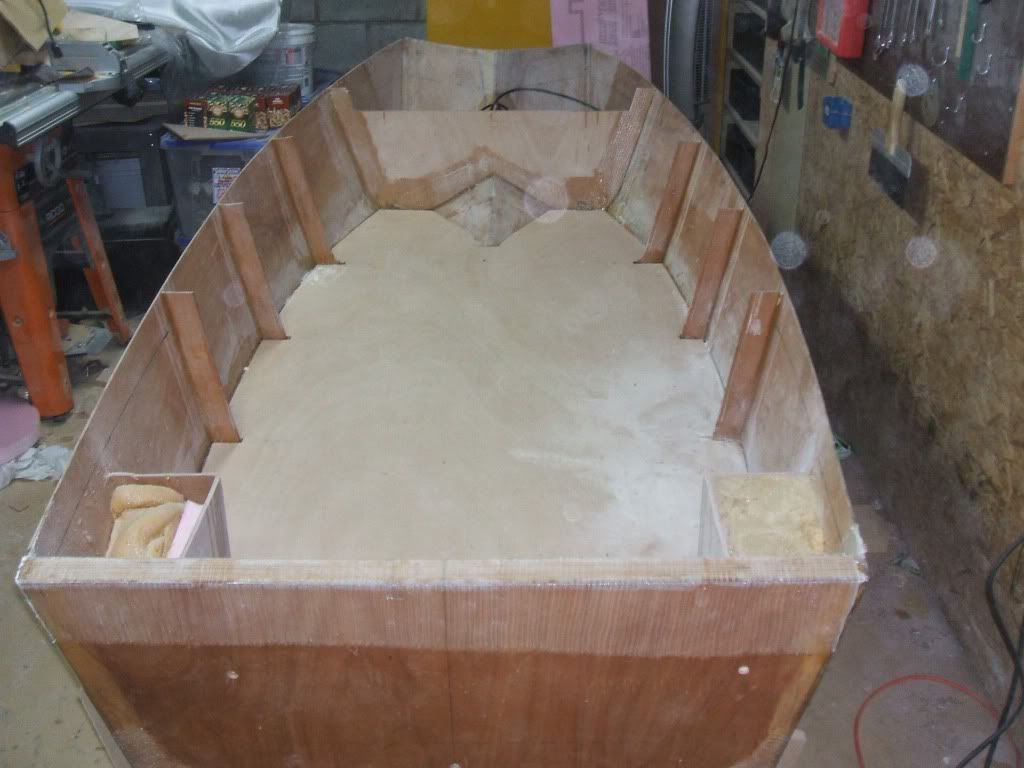
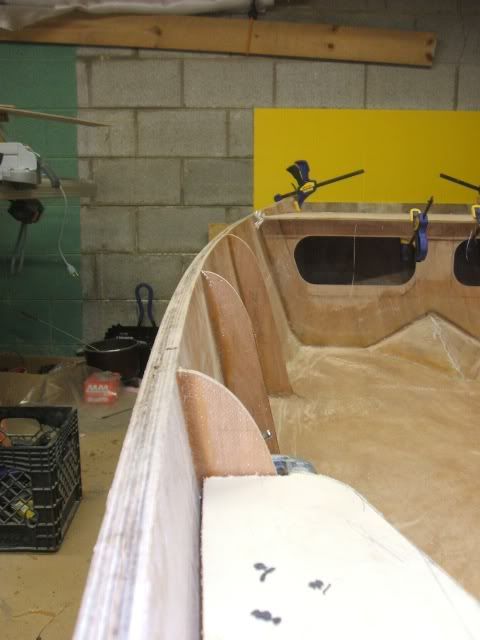
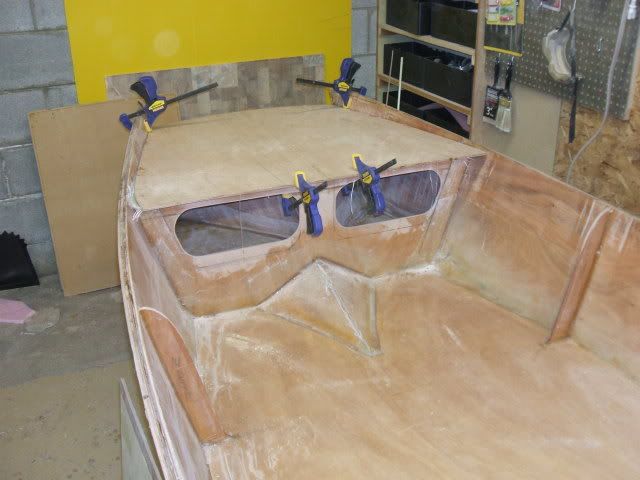
I actually have the hull assembled, taped on the outside, filleted, taped, and biaxed on the inside.
I found that I had 2 math errors in scaling. Both resulted in the ends of the panels not quite touching at the centerline of the boat. Grrr.... Anyway, I just had to splice in some narrow little triangles, do a little sanding, and all is well again. Guys, if you are scaling anything, double check your math when you calculate and when you measure. I spent several frustrating hours trying to bend this into shape before I realized what I had done. And it was no fun at all.
It's flipped upright now so it looks like a boat. Flipping was super easy with 2 guys, the hull weighs probably 40 or 50 pounds.
I extended the sheer up higher, the sheer line is real ugly right now. Gonna cut it down to a pleasing shape once I get the frame / stringer assembly installed.
I'll see if I can get some pics up in the next couple days.
I did find that the biax cloth is wonderful around curvy hull sections, but wow does it eat up the epoxy. Seems like it uses way more than the woven did on my last project. I'll have to order up another batch soon.
Fred in Wisc
Posted: Mon Apr 28, 2008 5:57 am
by sraab928
Thanks for that update Fred - I cant wait to see the pics. Hey business being good is a good thing and I totally get the not waking the sleeping baby angle. We pray for those peaceful moments...lol.
Thanks again and get some pics up! Im salivating here.
Posted: Mon Apr 28, 2008 9:36 pm
by Fred in Wisc
As promised, new pics. It looks like a boat now. That part is exciting.
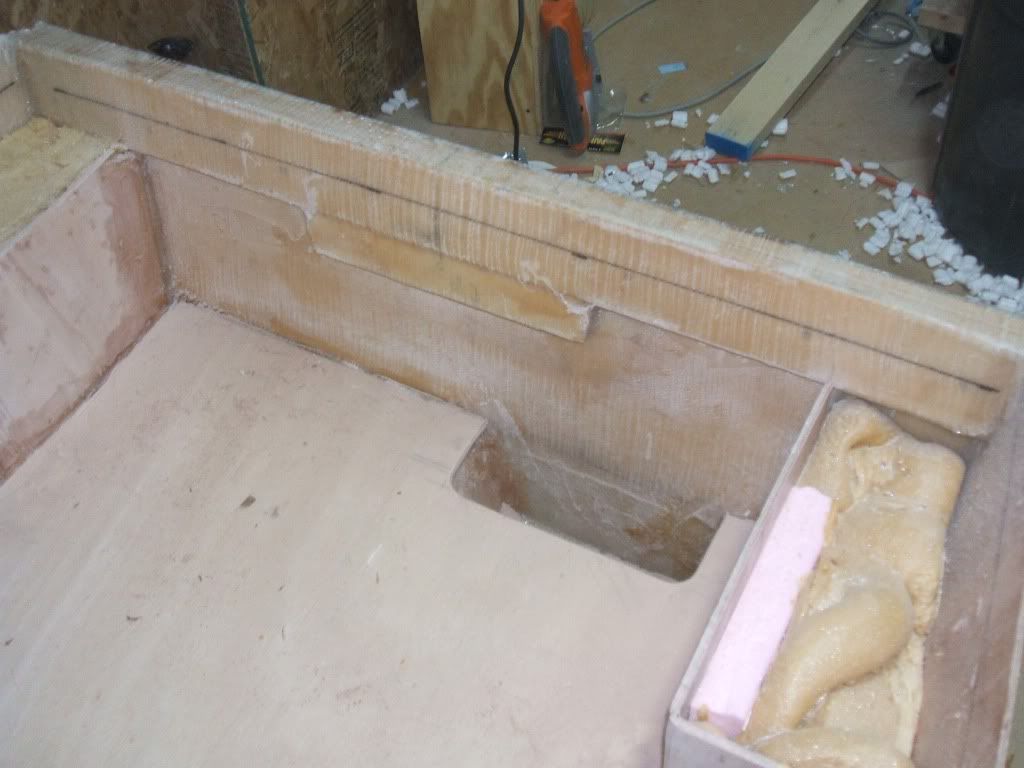
Here you can see the inside is glassed with 12oz biax. I had a little but not much excess resin pool up in the low spots. I did the tape and biax wet on wet, but ran out of time to do the sides in 6oz woven. Gotta sand and come back to them.
Figured some light woven cloth o the upper hull panels wpould be good, I am kind of hard on boats and the hull is only 4mm okume.
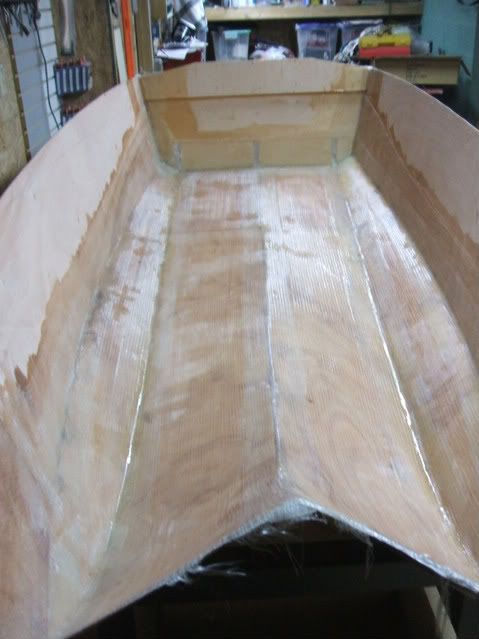
Here you can see the notches in the transom into which the stringers will fit. Need to dremel them out first.
the transom is 6mm okume backed with 1 layer 12mm Baltic Birch and then 2 more layers Baltic Birch as a claming board up top. The birch was obtained locally and has a few voids. those will be epoxy filled with a glue syringe. It should be plenty strong for the 8hp 2 stroke Johnson outboard that will power this boat.
If you look carefully you can see where I sanded almost through the ply and had to fill it in. You can also see where I had to splice in 2 thin triangles to get the bow to meet up correctly. That was a layout error on my part. Be really careful when you are scaling stuff. It would be way easier to buy a plan that is the size you want. I just never seem to do things the easy way.....
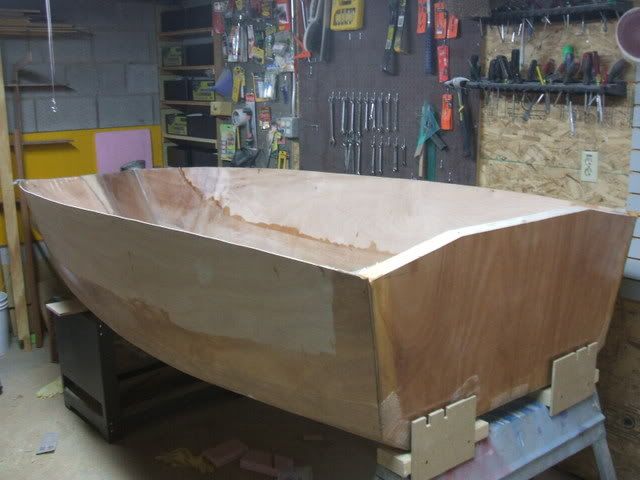
This one you can see how nasty the sheer looks prior to being trimmed. That will be elegant and pretty later on, don't judge now. I was not quite sure how high I would need it, so I made it pretty high. Figured it would be way easier to trim it off than to add it on.
I'm booked solid at work until May 15th or so and then going on a little cruise with the family, so not likely to make much progress until the end of May. Plus it's finally getting warm enough to go fishing here and the neighbor kids are starting to ask me about catching some bluegills.
As a wise man once said "Build on Dudes"!
Fred in Wisc
Posted: Tue Apr 29, 2008 8:31 am
by sraab928
Fred - that looks great! Thanks for sharing! That is going to be one custom little sled!
Posted: Sat May 24, 2008 11:49 pm
by Fred in Wisc
Finally got some time to work on the boat again. Got back from vacation yesterday, my wife and daughters stayed to visit Disney and hang out a the beach a bit.
Hadn't been to Baja Cali before. It's beautiful, love the area around Ensenada. And I got the best tamales I have had in a long time from a roadside stand for a buck. I'd like to head back for a while, spend some time fishing. My cousin Andy caught a real nice marlin at Cabo a couple years ago, so he's ahead of me there. I've only hooked one once, a white marlin off Cancun, lost after a brief fight. Ran towards me and I just couldn't get the slack out of the line.
How can you guys out there stand the sea lions? The ORK-ORK-ORK sound they make is cute for about 15 minutes, then it's maddening. It's like having 800 pound seagulls hanging out at the dock or something.....
Anyway, on the topic of boat building.
Spent a couple hours sanding last night. Got a big cheap 7" sander at Harbor Freight that makes it go real fast. Need to set it on the lowest speed and be careful, though, it removes a lot of material fast. I dremeled the stringer notches out of the transom and chiseled out the epoxy that soaked into them. Set the stringer/frame assembly in place, marked the areas I need to sand to tape the stringers down. Why sand it all if it's not needed?
I remember now why sanding sucks. Messy and itchy. Thinking about a HEPA filter for my Ridgid vac. Has anyone tried them? I hate to spend $30-40 on a shop vac filter without some preliminary information.
Got most of the bottom and one side sanded. Hoping to finish the sanding tomorrow between church and picking up my family at the airport. I can epoxy anytime, it's quiet. traying to get the loud parts done before they get home.
I'll have to get the little RO sander out to do some of the details and areas where the panels meet, the 7" is too hard to control and tends to cut through the glass with the edge of the disc if you touch the next panel over.
Then I'll need to modify the front of the stringers a little, they are hitting the inside curve of the hull and making the shole stringer assembly ride up so the space between it and the hull is about 1/8" at the back increasing to about 5/8 at the front. I don't want to use that much putty so I'll get the plane out and shave down the front 12" or so of the stringers a bit.
I'll post pics when there is something interestng to see.
Fred in Wisc
Posted: Tue May 27, 2008 10:36 pm
by Fred in Wisc
Well, here are the pics of the last few days' progress on the boat.
I sanded down the whole interior with 80 grit on the 7" sander. Did some detail areas where it did not fit with the 5" and 60 grit (it's faster, I'm not very patient with sanding. Swept and vacuumed it out.
Sanded all the old epoxy drips and smears off the frame and stringer assembly, it's been months since that went together so I'd rather bond to fresh wood than old epoxy. Also sanded down all the fillets, they were not real smooth and would have either used a ton of putty to cover or given me bumpy tape seams. That seems like it would give you all kinds of stress risers so I want it smooth. Trimmed the aft ends of the stringers about 1/8" to get a gap for epoxy behind them. Sanding this only took about 20 minutes with the big orbital.
Then I built a strongback of sorts to hold the boat level so it gets assembled straight. I set it up so the stringers and frames are level front to rear and side to side. This will greatly simplify getting the rest of the assembly straight.
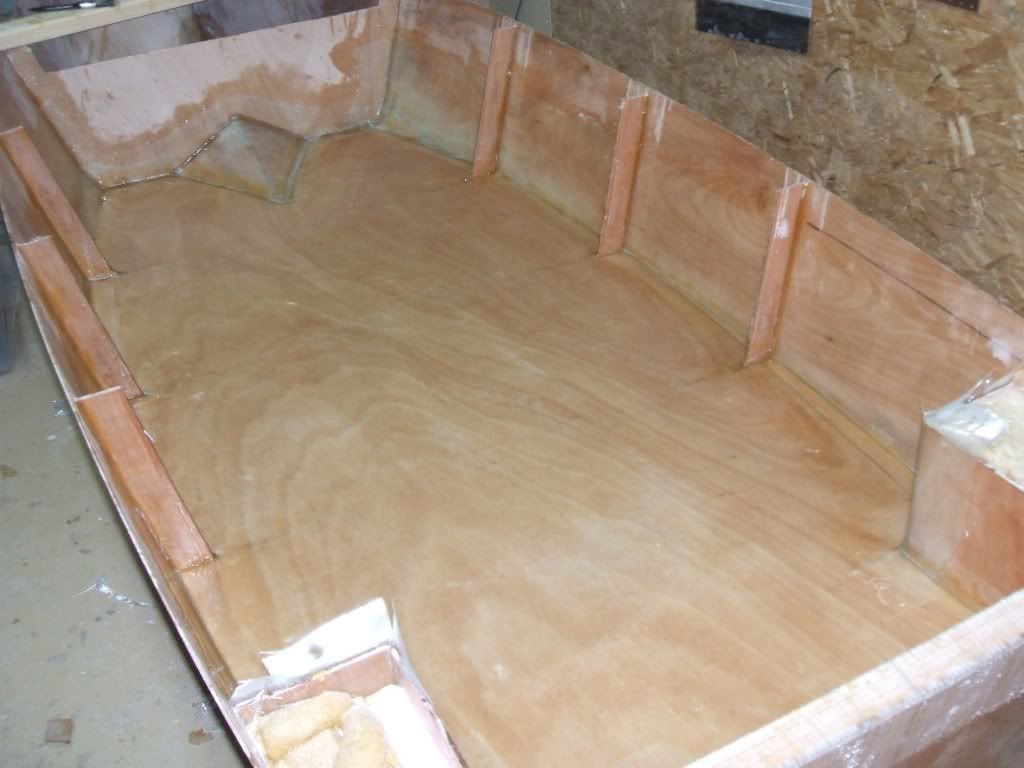
Then I fit up the frame and stringer assembly to the hull, making the gaps between the hull and supporting members as even as possible. This took some time and patience. Lots of planing and sanding. The strong curve near the bow required a lot of work the rest was pretty good, just a little trim way in back where multiple layers of 12oz on the hull made the gap too big. After this, the front to rear adjustment on the strongback needed a little fine tuning. Now I'm quite happy with it, very close to actually being level.
Here you can see that the gap between the frames and hull is prettty even on the sides. I had to plane down the frame nearest the transom just slightly to get this right. The aft gaps are a bit bigger than those farther forward, but putting a little weight on the bow makes it flex just a touch and adjusts that nicely. When I get to that part, I'll weight it down a bit and then glue it.
I pulled the frame back out and coated the bottom edges in epoxy (wow I am excited to be using that stuff again.) Put it back in the hull and set up a couple spacers to avoid hard spots.
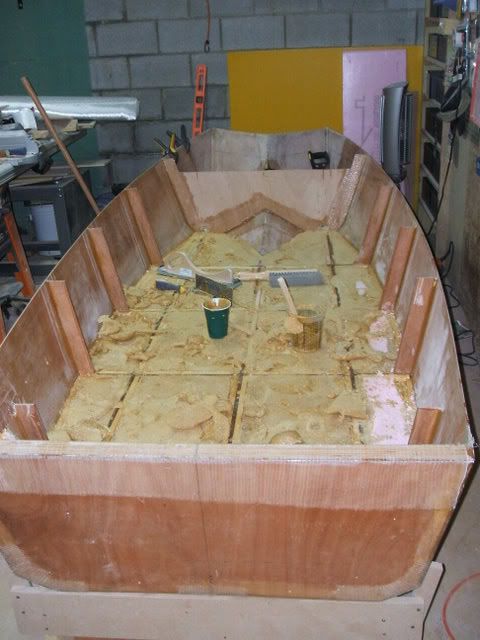
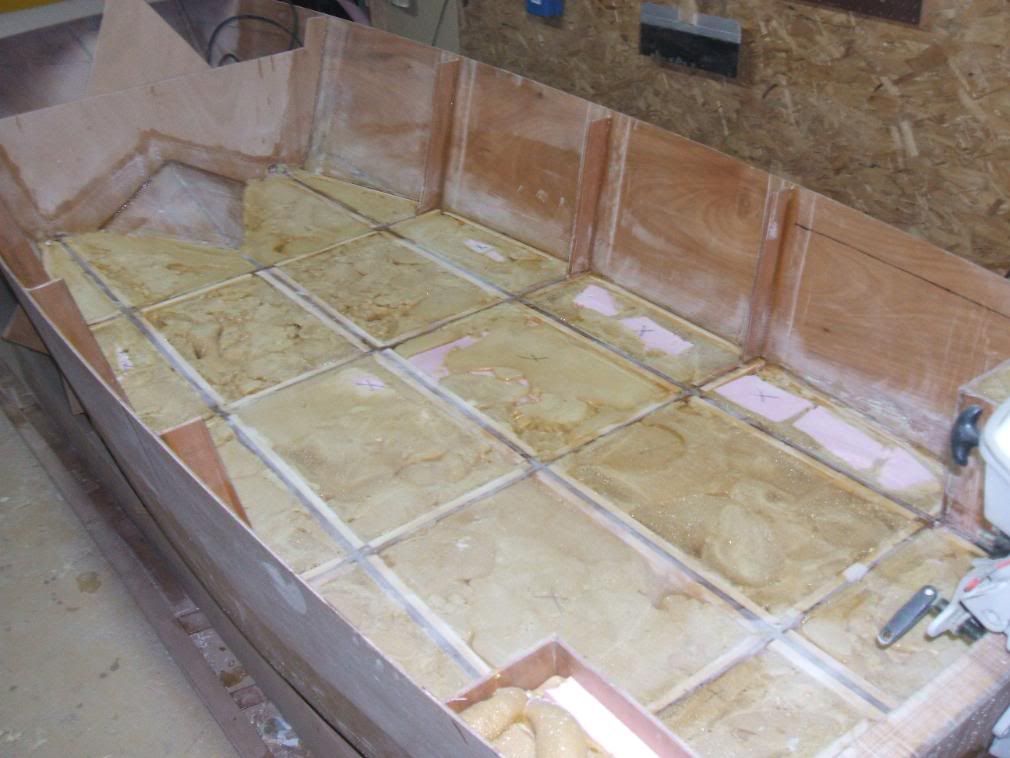
Taped in the first couple sections. Precoat, fillets, then 12oz wet on wet. I figured on using 12oz right near the transom and then 6 oz for the remainder of the boat. That should be plent strong for the lightweight materials here. I figure if I do a couple sections every 2-3 days I will still get chemical bonding, so that's the plan.

I'm using way too much epoxy with the brush. Next work session, I'll get the roller out and wet out the tape on the bench. That should save a lot of resin. Ordered another batch today, along with wood flour and quickfair.
Even a cursory examination of the taped seams will reveal I am no Cracker Larry or ks8. Don't laugh, you probably aren't either. Once the sole is down nobody will ever know.
A ballpark calculation says I can get about 6-8 cubic feet of foam under the sole. Approx 7 feet x 3 feet x 3 1/2 inches. That should supply plenty of buoyancy in case of emergency. Plus I'll stick a little more up in the bow once I work out how the front deck is being configured.
There will be some 6oz woven on the hull sides , it will slip right in between the hull and frames and the whole sheathing, fillet, tape deal will go in wet on wet. That's the plan at least. I don't see why it won't work. Certainly possible that a reason will be revealed later, but I hope not.
Gotta go, I have a pizza ready, the family should be home any time.
Fred in Wisc
Posted: Wed May 28, 2008 1:04 am
by ks8
I really want to see this little giant on the water! Taking shape nicely...

Only one problem with this gem of a scale down. Someone will want to build one, deck it over, and cross the Atlantic... with solar electric... or pedal power...

Posted: Wed May 28, 2008 11:26 am
by SalmonMan
Hey Fred,
Your boat is coming along nicely! You're doing a fine job on it. How deep is your boat? I'm talking about the distance from the top of the stringers (or sole) to the top of the gunwales. It looks like about 20 to 24 inches to me.
Keep up the great work you doing on the boat!
Posted: Wed May 28, 2008 12:24 pm
by Fred in Wisc
It looks really deep but the whole thing is really quite small, since it's only 10' long and just under 4' wide.
The depth from the top of the stringers is 13 to 16 inches depending upon where you measure. That maygo down a little when I trim the sheer, but only an inch max. I'll just be trimming off the stuff that looks too high.
The depth of the stringers is 4 9/16, plus gaps and the hull bottom, so the transom at the center is about 19" high on the outside. Had to raise it a little to accomodate my 20" shaft motor.
Thanks for checking it out.
Fred in Wisc
Posted: Fri May 30, 2008 1:12 pm
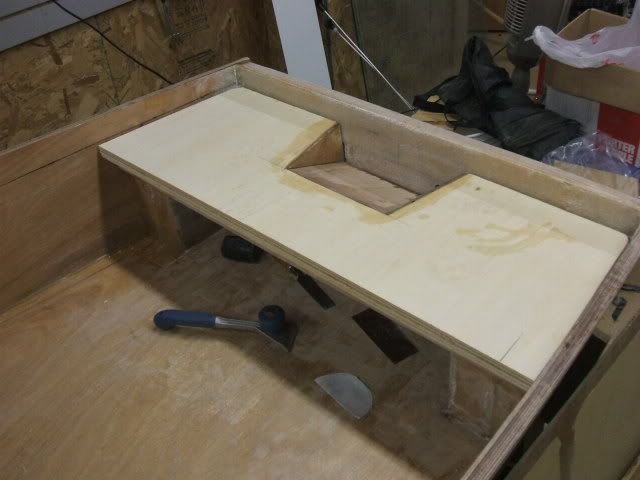
by Fred in Wisc
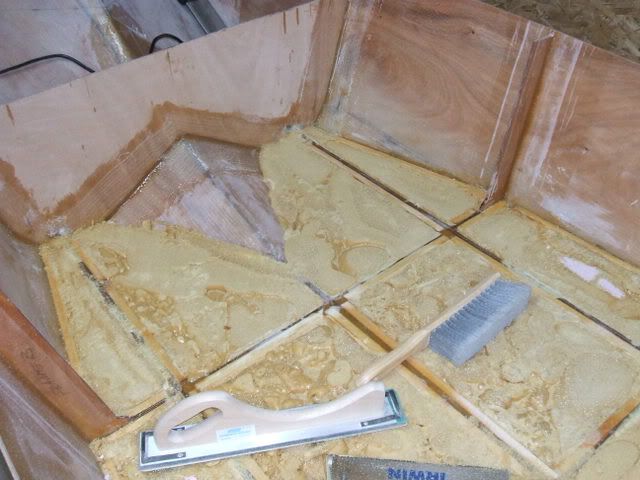
Got a little more done this morning. Filleted and taped several more compartments until I ran low on wood flour. Ordered some on Tuesday so it may arrive today, otherwise Monday. A lot of my gaps are around 3/8 on and it really uses a lot of wood flour to fill them in. I'm making the fillets small, but the gaps really eat a lot of putty.
Used a little roller to wet out the cloth today, much faster than the brush, and it uses less epoxy. Then I go back with the brush to make sure all the corners are wet out completely and stuck to the fillets. If you have not tried rolling resin, you need to. I got 5 compartments done today in about the same time as doing 2 with the brush a few days ago.
Precoated the sides where the 6oz cloth will be installed, I have materials for that, so it may turn into this evening's project. I could get a layer of biax on the inside of the transom also.
Took some pics but they turned out really poorly. Sorry. Not much new to see, just another 25 or so feet of fillet and tape.
Seeking some opinions on interior layout. I've been pondering this a lot, but I may well have missed something. 2 basic options:
1. Flat sole as far up as I can get it (about 6 1/2 feet from transom). Minimal furniture, maybe a couple of removable pedastal seats with extra bases so I can accomodate different numbers of anglers. (Sometimes fish alone, sometimes with one or 2 others- max load 2 adults and a kid.) I like the light weight and simplicity of this option.
2. Mini bass boat setup with front and rear casting decks. Probably not raised all the way to the sheer, might be tippy, and I like a little ledge when I'm fishing with kids. Set up the rear deck like the SC16 where it also functions as the rear seat. I like the storage space (nets, tackle, PFDs and such can tuck under the decks out of the way but in easy reach) and the better position for sight fishing with this option.
Either way, I will probably set up a front clamping board for a bow mount troller (hand controls) with a real small battery. ( I have a 20 amp-hour gel cel that weighs about 15 pounds, perfect for a short trip in a little boat.)On my little Minn Kota motor, you can just take out one bolt that holds the control head to the shaft, turn the head around, and put the bolt back in. Instant bow mount.
Any input on advantages/ disadvantages? Thanks.
Fred in Wisc
Posted: Sat May 31, 2008 11:34 pm
by Fred in Wisc
Made somemore progress after work today. Got the inside top panels glassed with light woven fabric. Turns out I had 4oz, not 6, but it worked out just fine. Very easy to set out after working with all the 12oz biax. Running the cloth between the hull and frames was pretty easy. I just lightly sanded the cured precoated hull to get rid of points where the cloth would catch and fed it in at each frame.
I was able to bend each frame far enough fore and aft to roll epoxy underneath the frames.
It also finished out with a really nice smooth surface that should require very little filling and fairing to make it look nice. The Okume looks so good under that light cloth that I would consider bright finishing just for fun if I didn't need to tape in all those frames.
Also found some coast guard foam left over from my last boat, so I poured one compartment of that. Mostly just because it's fun watchin' it rise like some nuclear mutant bread dough.
I wish I was a better planner, almost out of 6oz biax tape and need more foam. Gotta order again next week. Should have got it all at once.
I see a few folks are following this thread, any input on the interior layout gentlemen? I'm going to be at that point pretty soon.
Sorry no pics tonight, I'll probably have a chance to do that tomorrow.
Fred in Wisc
Posted: Tue Jun 03, 2008 1:18 am
by Fred in Wisc
The DHL van brought me some more wood flour and epoxy today. Yee ha!
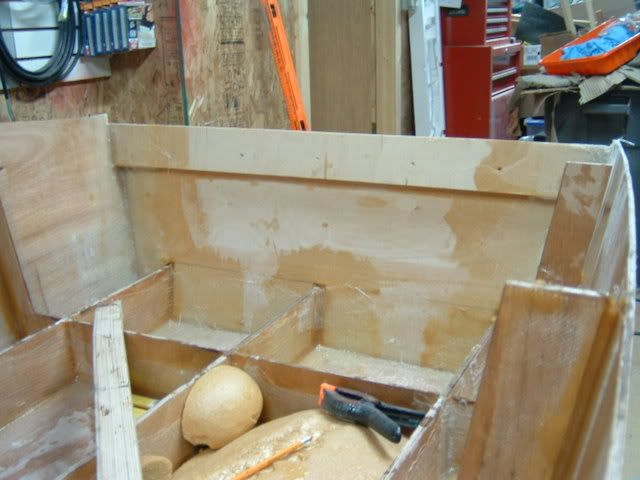
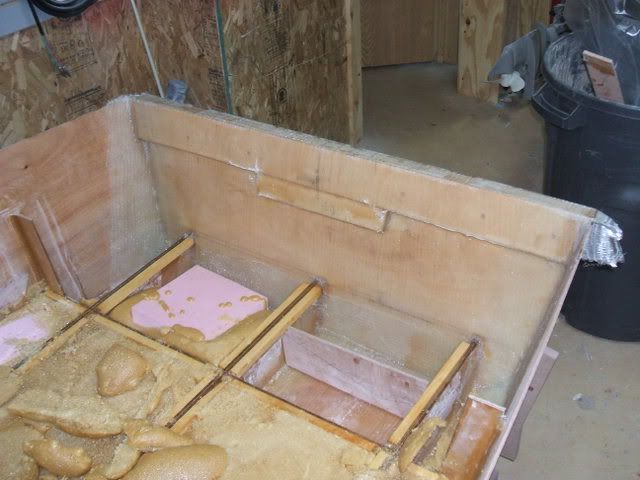
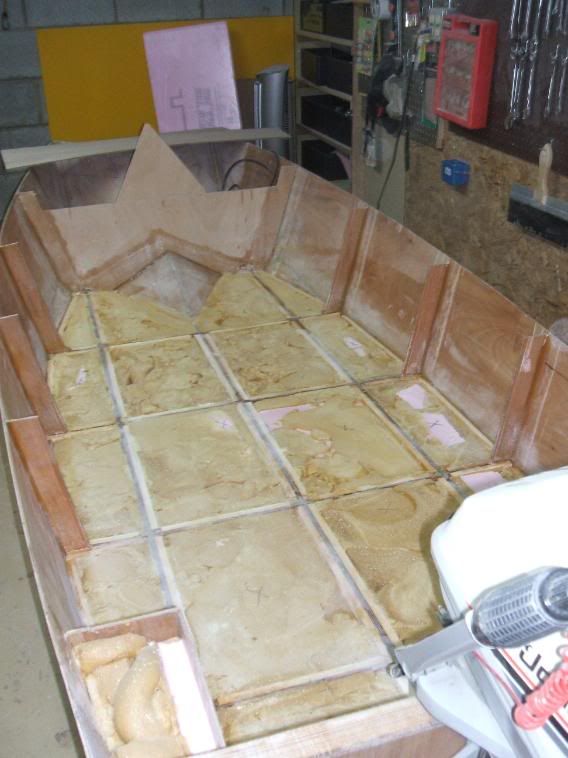
Finished filleting and taping in the stringers and frames up to the chines. doing the pointy ends at the bow took a lot of patience and wood flour putty. Then several small (6x6) pieces of biax over the tips to make sure they will stay put. Seems like an area that will take a lot of stress if (well probably when) I hit something at speed or beach the boat under power. Access here was difficult, had to use the paintbrush to apply resin. The stringers end in some very sharp V shaped portions of the hull., especially on the outside edge of the stringer. The chine panel is nearly vertical there and only and inch or so from the stringer. It was hard to reach the sides of the stringers. Hard to see them even. Ended up using too much resin to make sure everything was well bonded. I'll take an extra 4 oz of weight to make sure my stringers are bonded to the hull well.
I'm debating whether to just fillet and tape the frames up to the sole or all the way up. I'd like to do it all in one shot wet on wet, but I don't think I can get the rear deck in if the frames are taped all the way up. I'm going to do the casting decks front and rear. The problem is the transom is 3/4, but the clamping board on top of it is 1 3/4", so there is an overhang of about an inch I'll need to tuck the rer deck under. The frames easily flex 1", so it would be easy to insert the deck with them loose. Access to the underdeck will not be very fun since the deck is only about 10" off the sole. Good thing those stringers will be hidden below, I can't see that being my neatest work in such a small space. Probably the best bet is to leave the aft 2 or 3 frames loose, and tape the rest all the way up. This should stiffen the boat up a lot, give me easy access for nice neat fillets, and let me put most of them in wet on wet.
For the casting decks I am going to laminate up some balsa core panels. The only 3/8 or 1/2 marine ply I can find locally is fir, which is really heavy. I just can't justify shipping one piece of okume 3/8. The initial plan did not include casting decks, so I didn't order enough plywood. Anyway, 3/8" balsa core comes in 24x48 sheets and one of our regular shop suppliers has it not too far away, so that's the winner. I'm thinking laminating that with 12oz biax both sides should be strong enough. I'll probably put a small vertical beam at the edge of each deck to reduce flex. Then I'll make sure the edges are well sealed and protected to prevent water intrusion. I got 4 sheets, enough for 2 casting decks 30 to 36 inches long and about 40-44 wide, plus one for cutting errors. PS- compared to okume 1088, balsa core is really expensive- about $100 before shipping for the equivalent of a 4x8 sheet. I'll report back on how that works.
For the sole I am using 6mm okume 1088 with 9 oz glass on each side. The frames and stringers cut the floor into sections about 24x16 or so. It sound like most boats use about 1/2" with 6 or 9oz on the top only, but I'm doing top and bottom since the 6mm is pretty thin. Also a little paranoia, my aluminum boat floor was coated on top and rotted out from the bottom. I feel better knowing it's got fabric on , not just resin. Then I know I have not missed a spot.
Sorry for all the words and no pics today again. The camera is being freaky. takes pics with big pink/ red smears appearing randomly acroll the picture. I have another at work, so I'll get some pics up pretty soon.
Fred in Wisc
Posted: Tue Jun 03, 2008 11:16 pm
by Fred in Wisc
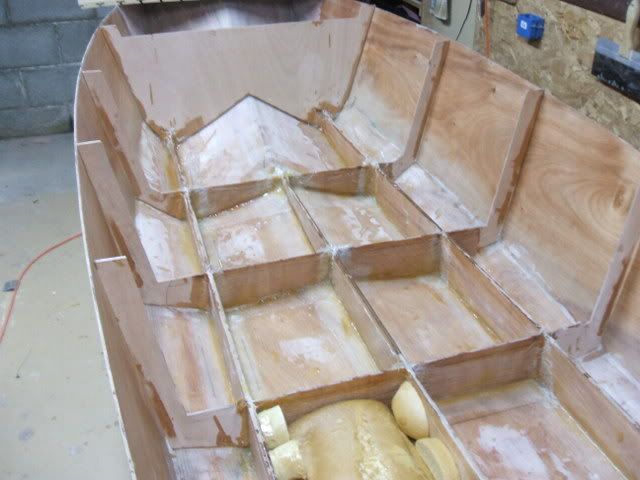
Got some pics guys.
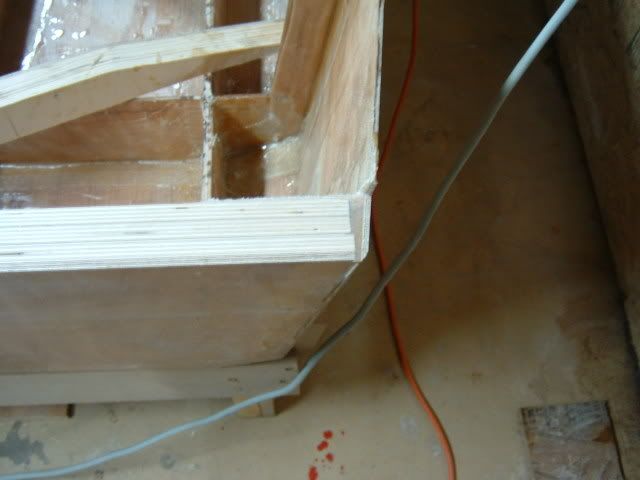
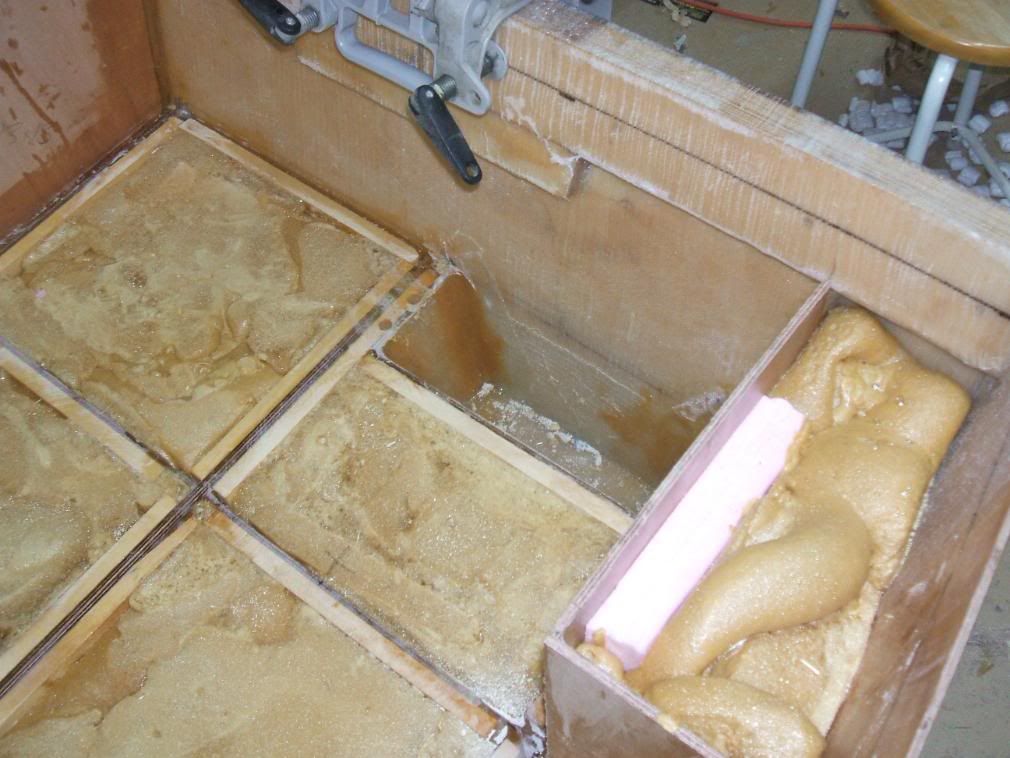
Here is a stringer point glassed in. I wrapped the tape up around the top of the stringer, you can see where there is a little air gap under some of it. I'll have to drill a little hole there and inject some epoxy with a syringe. On both sides, unfortunately. I even covered these with plastic and put some small lead weights on them to try keeping the fabric pushed down but it didn't work so well. A little vacuum bag setup would have been so slick for doing this. Or even pouring a bag of lead shot over the plastic covered lamination. Unfortunately I was not prepared for either, so this is what I have to work with.
Here is a shot of the whole assembly, stringers and bottom frames all taped in. The front one is not done yet, the plywood is slightly warped and I am pondering how to best clamp it straight before making it permanent.
You can see the one compartment where I poured some flotation foam. Found it in the shop and could not resist playing with it a bit.
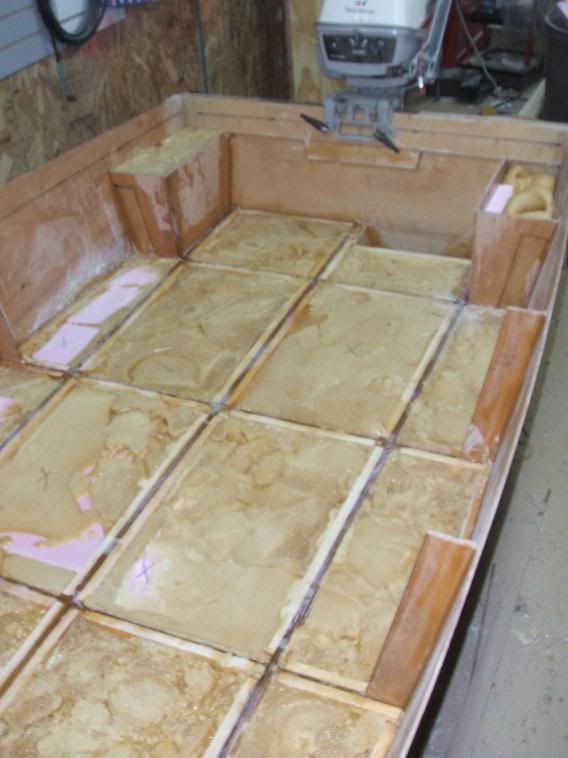
You can just see the board and storage bin on the bow. The hull sides are bowed out just a touch and putting a little weight on the bow (only about 30 pounds) draws them in nicely closer to the stringers. And the sides stay very fair this way, so I think it's better than just pulling the sides in towards each stringer. I could see getting wavy hull sides from that, and a lot more fairing.
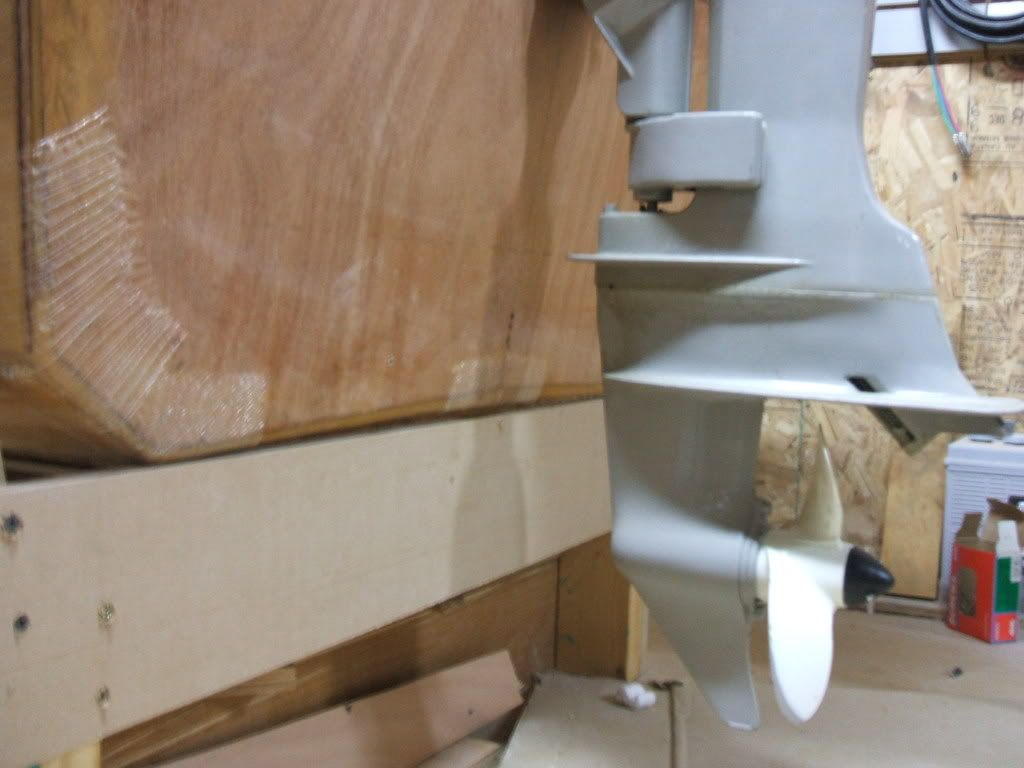
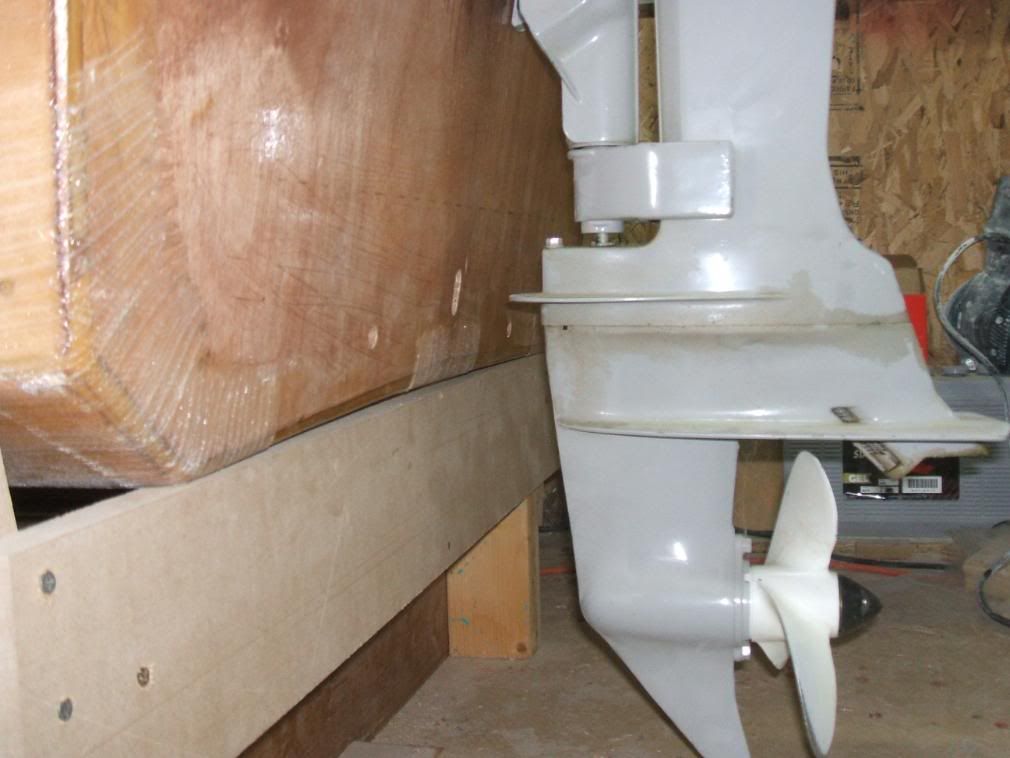
Figured this is the best time to adjust transom height if I need to so I clamped the motor on the back. I can also use this to determine how long to make the rear deck so I have room to sit and steer.
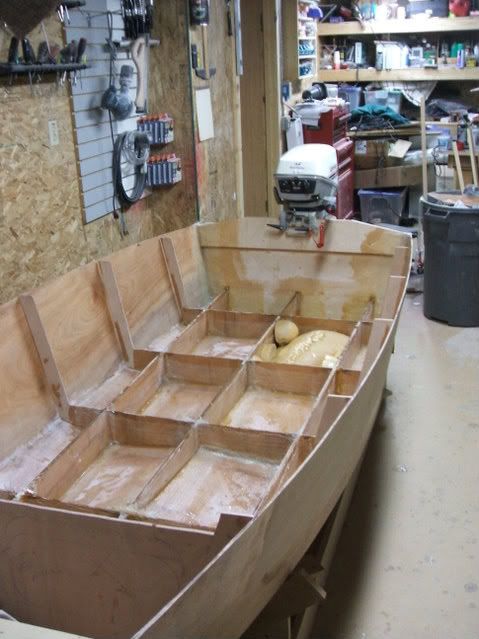
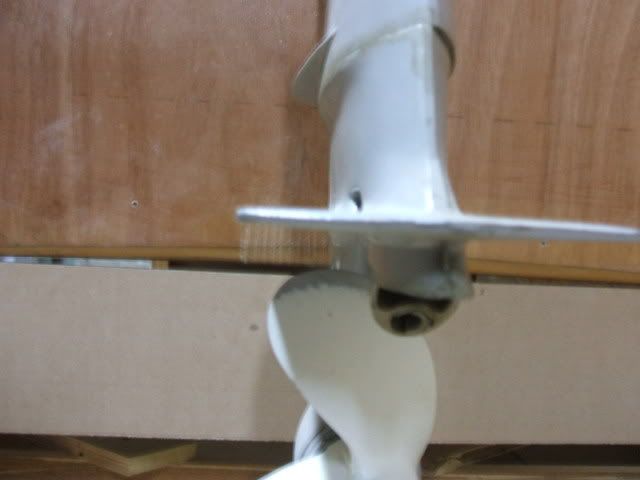
It looks to me like the transom is about an inch too high. I am thinking the anti-cavitation plate should be right even with the bottom of the hull. The inverted V is only about 3/8".
Opinions are wanted here: Should the plate be even with the point of the inverted V or just a touch lower, even with the outside corners of the hull? It's not a big difference, but easy to adjust now and quite difficult later. I'm leaning towards a little lower, I would prefer the prop to bite a little more rather than mazimize speed by raising the prop.
My balsa core came today. Rolled up in a little 10x10x24 box. That was surprising. I'll document that process when it gets started. First, more taping, a transom trim, and a sole.
Fred in Wisc
Posted: Wed Jun 04, 2008 10:14 pm
by Daniel Huckleberry
Nice work. I have enjoyed watching this little build.
I built the TX18 and have some info for you on my engine. I am about an inch below the bottom of the hull. I would make sure your engine can get down below the hull. You can always adjust it up. You would hate to find all this out after you paint. If you plan for it, it will look natural now.
That is my opinion. Jacques even mentioned this in the study plans.
Good luck. I hope she turns out well and handles as well as my boat. The design is excellent.
Huck
Posted: Wed Jun 04, 2008 11:51 pm
by Cracker Larry
That's really nice work Especially with the scaling. Neat job

Opinions are wanted here:
It's too high and will ventillate. Now's the time to lower it

Posted: Thu Jun 05, 2008 1:16 am
by Fred in Wisc
I think it would be unwise to disagree with the voices of experience, Daniel and Cracker Larry. Back to the cutting guide and the circular saw. I'll cut the transom about 1 1/2" lower. That will put the anti cavitation plate about 1/2" below the hull bottom.
I feel pretty smart right now, I was on the right track with the engine height deal. Somehow it makes me feel a lot better to have some consenting opinions before sawing a chunk off the boat.
Spent some more relatively unproductive time pondering about how to insert the sole and decks. The clamping board on the transom extends 1" inboard, so if I tape all the frames in solid, I can't insert the sole without cutting extra big slots for the frames or putting it in in 2 parts, left and right, with a seam down the middle. But I'd really like to do the sole in one big piece. On the full size boat, the frames are made in sections. I thought it was for efficient use of material. It seems that it's also for sole installation.
I filleted and glassed the frame nearest the bow in this evening. The plywood was slightly warped from being stored, so it needed just a little persuading to be straight and level again.
Nothing exciting that needs pics today.
Fred in Wisc
Posted: Sun Jun 08, 2008 1:47 am
by Fred in Wisc
Short day at work on Saturday, so I planned on getting a lot done on the little boat this evening. Unfortunately we had weather that made me consider if any stitch and glue ark plans were available. Today our area got 2-4" of rain in about 3 hours.
Yesterday we had severe thunderstorms and tornado warnings, but beautiful weather once they passed. I was fishing with the neighbor kids an hour after the tornado warnings ended. Clear skies, in the 80's. Unfortunately real windy 20+ mph so rowing the canoe was no fun at all. Only one fish in 2 hours, but the kids were excited because it was a "predator". Sometimes I forget that even a little northern pike is exciting when you are 6.
Spent a couple hours today shop vac'ing water out of my basement and pumping about 5" of water out of my neighbor's basement. That really cuts into boat building time.
I did get a little time work on the boat. Cut the transom down about 2". This will put the cavitaion plate about an inch below the hull bottom. I was thinking about going a little higher, but there really aren't any high perfomance triple cup anti cavitating stainless props avaliable for 8hp OMC engines, so I decided a little more water over the top would not hurt. Best to be on the safe side there.
Also had time to fillet and tape the left side frames. Had a little epoxy left so I did the first right side frame too. Did these with woven tape for ease of fairing, since most of it will be exposed. I can see my fillets are definitely more consistent and neater than when I started. I am still no Cracker Larry or ks8, though. I am however, pretty sore from rowing yesterday. Feelin' pretty old right now....
The frame taping ponderiong is over now. The solution: The rear set of frames will be cut down and only extend up to the casting deck. That's only about 3" below the sheer. It will allow me to insert the rear deck under the clamping board, rotate it down on top of the rear frames, and then it will end just before the second frame. That makes the deck about 32" front to rear.
I'm wondering if I should cut the front edge of the deck flat or slightly concave. I'll usually sit off enter to the right to steer and I like that I can rotate farther to the left with a curved deck. Got some lower back issues, so I want to make sure I end up with a comfortable driving position. That is probably best answered by cutting a scrap wood deck once the sole is in.
I'll try to get some new pics up tomorrow. It's late, the camera is in the van outside, and it's thunderstorming.
Fred in Wisc
Posted: Sun Jun 08, 2008 2:01 am
by Fred in Wisc
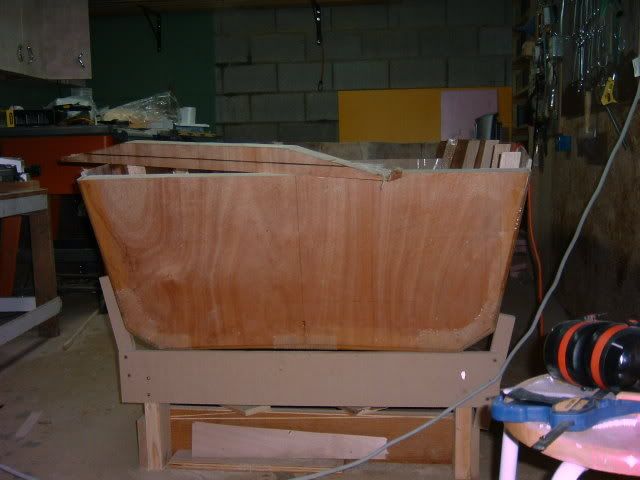
Oh I forgot, got my long batten out and played with sheer lines. Have it close but not quite perfect yet, so that will come in a day or 2 or 3. It looks WAY cooler with the transom cut down and the sheer prettied up.
Fred in Wisc
Posted: Sun Jun 08, 2008 4:57 pm
by Fred in Wisc
Had a little time to work on the boat while baby was napping today.
After trying many options, I decided on the sheerline that looks best, traced and cut it. Just laid it out with the long batten, clamped it where it should be, traced the line. Then cut a little big with the cordless circular saw and planed down to the line. Actually cutting it only took about 40 minutes including moments of hesitation based on fear of screwing something up. The second side should only take 20-30 minutes.
Here you can see the left side is cut but the right is not. Hard to see in the pic but easy in person. The trim was about 3/8" at the transom, 1 1/2" in the center, and tapered to a point at the bow. Now instead of looking tall and fat, the boat looks lean and purposeful. A really big improvement.
You can also see the transom trim from yesterday. I set it up so the motor plate is about an inch under the bottom of the hull. Here is the transom from the inside, I will need to make the clamping board wider in the motorwell area.
It was interesting to take a look at the section of the transom to hull joint after cutting it. This one looks great, the other side had one little pinhole. So I'll post the pic of the perfect looking one.....
The red spots on the floor aren't blood this time. Just paint drips. There has been blood and sweat shed over the boat but no tears yet.
Here's how much I ended up trimming off, extra portion is sitting on the hull.
I also have a pic of the front frame trimmed to the height where the front casting deck will be installed. You can also see the fillet and tape job on the seft side frames, much neater than my first ones on the stringers. I'm not working any harder on them, just getting better at it as I do more of them. I think the lesson here is not to wait too long between boats, your technique suffers.

I am beginning to have some hope of actually using this boat before the end of this boating season. It may not be painted, but I think it's getting launched this year. (I ended up using my canoe for nearly 2 years in primer).
Fred in Wisc
Posted: Mon Jun 09, 2008 12:50 am
by Fred in Wisc
Well momma and baby went to sleep kinda early, so I got the rest of the frames filleted and taped.
Once it's set up, I'll take the level and transfer points for the sheer over to the right side, connect the dots and cut it. I'm pretty excited about that, really wanted to do it tonight, but it would be less accurate with the frames hanging loose. And the saw is pretty loud.
I think I am all done taping frames and stringers. Yeah! Oh, wait, except for the sones I have to add for deck support.
Next up, installing cleats on all the under sole stuff. Extending the clamping board and laying a couple layers of biax on the transom. Then foam. Then cutting out and installing the sole. Then.....Well I guess there's a lot more before the going fishing part.
Fred in Wisc
Posted: Wed Jun 18, 2008 4:12 am
by Fred in Wisc
Wow, it is WAY too late to be posting here, but I'm kinda wired from working on the boat tonight so this is a good way to wind down. Got a good amount done the last 2 days. My wife and daughter are visiting relatives out of town, so I get some extra boat time. Off work tomorrow, so time to git 'er done. Would have got more done today, but my wife's mother and father called, their freezer died, so I took them to get a new one, delievered it to the house, and horsed it down the basement steps. Not nearly as much fun as building a boat.
Thought about fishing tomorrow, but with all the rain we have had, the lakes are about 2' above normal, so the launches are really hard to get at. Lots of lakefront properties under water. One of my coworkers is planning on bowfishing for carp in a flooded section of town, you can actually see them swimming down the street. My guess is local law enforcement won't be too enthusistic about that.
Yesterday I finished gluing in all the cleats for the sole. That took a lot longer than expected. Leveling the outside cleats that glue to the hull was a bit challenging, especially in the bow. I only had enough clamps to do about half at a time, plus I was careful leveling everything so the sole is flat and square to the boat. The frames and stringers were pretty close, I only had about 1/8" of variation to even out.
I found it expedient to epoxy coat the bottoms and sides of the cleats before installing them, the access is so much easier than after. Sanded the drips and such off the tops. Tomorrow they will get a second coat, plus a coat on the top sanded surfaces.
Made a little piece to extend the clamping board down in the center, planning a little motor well, just to make it easier to tighten the motor down (clearance was pretty tight there) and to have a little more clearance when the motor is tilted up.
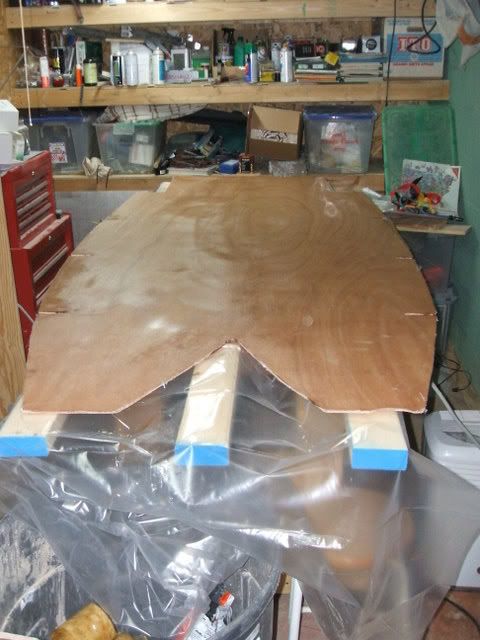
I measured and cut out the sole, then spent a bunch of time with the jigsaw and plane getting it to actually fit nicely. Definite disadvantage of not using the complete plans, you spend a lot of time measuring and figuring out stuff. And of course, I made an error transferring measurements, so I got to glue in a little patch where I cut one area too small. Working too late at night. Shoulda caught that. Since the sole used my last sheet of 6mm ply, I had to fix it. All I have left is a couple partial sheets of 6mm and almost 2 sheets of 4mm.
The sole is pretty thin, so it will be glassed both sides with 9oz woven fabric for strength and rigidity. For a 10' boat, the floor area is pretty impressive. About 7'7" long and 41" across at the widest point. Not that much taper either, it's 35" wide at the transom.
Tomorrow I will add the coast guard foam as well. It looks like I will have about 7 cubic feet with under the sole, in the bow (beneath a couple small storage compartments) and a pair of small transom boxes under the rear deck.
I better get to sleep, lots to do tomorrow. I promise I'll try to get some new pics up too.
Fred in Wisc
Posted: Mon Jun 23, 2008 12:54 am
by Fred in Wisc
After I got all the cleats glued to the stringers and frames, I let them set up for a day or 2, then sanded off the epoxy drips and stray wood flour putty on the tops of them so the sole can sit flat. Then I went back through and gave them another coat of epoxy to cover the areas I sanded through or missed previously.
Then I did a little calculating on the foam, had a little left over from my last 2qt kit, and a brand new 2 gallon kit. It looked like it would come out real colse, so I took some pink styrofoam scraps and put them down in the bigger compartments to take up some space. Then I mixed an poured lots of foam.
If's dang near impossible to estimate how much you need to put in a compartment to fill it. I ended up with several that needed a second dose of foam, and sometimes a third. Then I got impatient on the next ones and had a whole lot of extra up over the top. Best practice here is to do one or 2 compartments at a time, so you can trim the excess off and toss it in the next compartment.
Foam is so much fun. It's such an interesting reaction to watch. I left mine outside in 80 degree weather for couple days before bringing it into the basement, it certainly reacted faster than the stuff stored downstairs where it's about 65. Seems to yield more foam, feel fluffier, not as dense and hard.
Best tool for trimming was a flush cutting trim saw with a reversible handle so I could set it up to cut either direction. I tried to trim the foam just slightly high, going over it with the 36 grit on the longboard next so it's dead flush with the stringers. That will provide better support for the sole, so it does not flex. Got a few scratches in the stringers and cleats, so those will get a recdoat before sealing it up.
Ran out of foam before running out of empty spaces, so I have to get some more. Also need to build a divider in one bottom compartment to put my transducer and a drain plug. I also forgot to glue cleats to the transom to hold up the sole edge, so that will be among the next tasks.
Speaking of the sole, I laminated one side with the 9oz woven fabric. It's way easier to laminate flat panels. Looks like a pro did that one.
Only a couple days until the sole is installed, then I can move on to the decks.
Sorry, still having some camera issues. I'll get some new pics up here eventually.
Fred in Wisc
Posted: Wed Jun 25, 2008 2:07 am
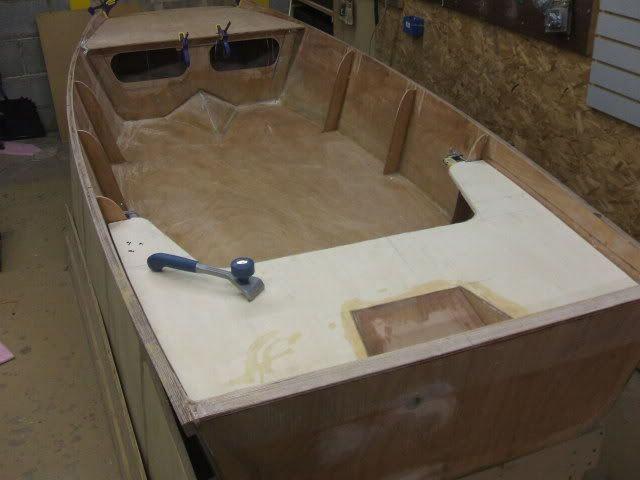
by Fred in Wisc
Finally took a few pics.
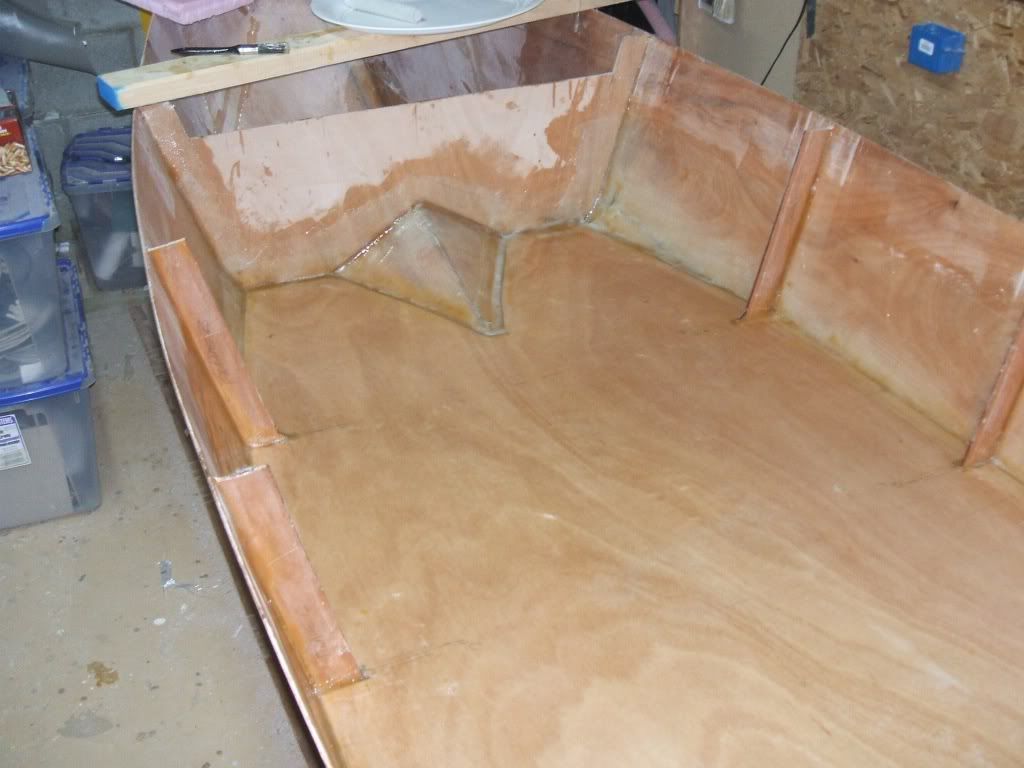
Here is the sole, cut out and glassed on one side with 9oz woven cloth. It still needs minor trimming of the cloth and a little more clearance around a few frames. I want to make sure I have a large enough gap to get putty into it so it's completely filled in between the hull, frames, and sole where the frames come up through the sole.
Here is the hull with foam floatation mostly installed. The foam really stiffened up the hull. I still have to build some boxes for foam against the transom. Kind of a double duty thing, they will tie into the outer stringers, give support for the rear deck, stiffen up the transom a bit, and provide more volume for floatation.
I actually used a whole 2 gallon kit, plus some pink styrofoam, plus some leftover coast guard foam (about a quart) from my last boat to fill this. My wife is a little scared of small boats, so I know it's overkill, but it gives her peace of mind when I have kids in the boat. This thing should have about 550 or 600 pounds of flotation when it's done.
I still need to fill the 2 center compartments by the transom also, but there are a few bits to get glued in first.
One thing I learned: If you are using sheet styrofoam or something to fill in, make sure the expanding foam does not get under it, it will get pushed right out the top of the compartment.
Here is some detail of the bow area, with the foam trimmed nearly flush. I'm taking some time to trim carefully, even using the longboard and some 36 grit, to make sure I don't have any high areas that make the sole bumpy. In the bow, the angle required for cleats is really extreme, so I'm just going to level the foam carefully, cut it back about 3/4" from the edge of the sole, and put a fat bead of putty there to hold the front edge of the sole.
Here is the transom with the clamping board extension. I am planning to have a small area of the rear deck lower here to give some clearance for clamping the motoro on and tilting it up.
The glass work here is less than ideal, I actually wrapped one piece of biax from the inner hull bottom, up the transom, over the clamping board and onto the outside of the transom. I used some plastic sheeting and a lot of blocks and clamps to get it nice and neat around the 90 degree corners. Worked ok, but I have a few areas to fix. Mostly some air spaces in the corners, I'll shoot some epoxy in with a glue syringe and it will be fine. There are 2 areas where the fabric pulled farther away from the corners that I will trim out and reglass. You can see one at the top of the right side of the transom if you look closely. The other is at the left end under the clamping board extension.
I'm going to divide the right middle compartment so I can mount a through hull transducer like Cracker Larry did (that was slick), and a drain plug. Still need to glue in the divider and lay a couple layers of light cloth in it to make sure that area is well sealed. Then install a cleat on top of the divider and on the left side transom, pour and trim a little foam and it's time to install the sole. Exciting stuff.
Time to go to sleep now. Tomorrow is Daddy day (I have baby, my wife goes to work to actually talk with adults) so I had better get some rest.
Fred in Wisc
Posted: Wed Jun 25, 2008 9:03 am
by Dougster
Great pics, thanks for sharing. I'll be foaming in due time and appreciate the "tutorial". What a neat and creative build you've got going. Have fun on Daddy day
Currently learning about fairing Dougster
Posted: Wed Jun 25, 2008 9:49 am
by Mawrob
Nice job with the foam, Fred! I had a similar experience with expanding foam. Unfortunately in my case it was my fish box that got pushed up despite me standing on it to keep it down.
Posted: Wed Jun 25, 2008 6:07 pm
by Fred in Wisc
Thanks guys. The goal with the foam was to make Boston Whaler look like a bunch of little girly amateurs.
Fred in Wisc
Posted: Thu Jun 26, 2008 11:05 pm
by Daniel Huckleberry
Fred in Wisc wrote:Thanks guys. The goal with the foam was to make Boston Whaler look like a bunch of little girly amateurs.
Fred in Wisc
Don't worry! Being here already accomplished that!
Your boat looks great. I am anxious to see how she performs.
Huck
Posted: Wed Jul 02, 2008 12:04 am
by Fred in Wisc
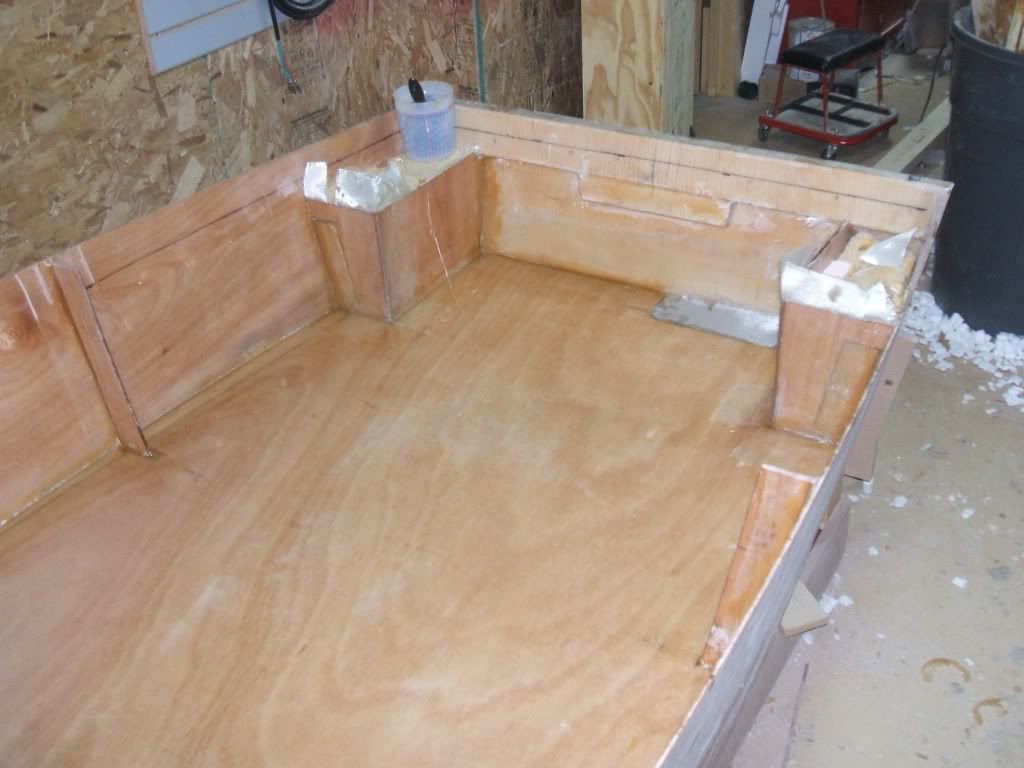
Got a couple hours in on the boat today. Finished off the drain plug / transducer compartment shown above. Sloped the left and right sides in at about a 60 degree angle with 4mm ply. Put a few layers of thin woven glass in it to seal it up nice.
Got the transom boxes cut and tack welded in, hope to be able to finish those up tomorrow. Need precoat, fillets, and probably some 9oz (getting concerned about running short of biax for the outer hull.) They will provide support for the transom and rear deck, an anchor point for the rear deck framing, and about a cubic foot of flotation.
Filled the last 2 floor compartments with foam. Need to finish trimming the foam flush before installing the sole. I was trimming today with the Fein with the flush trim blade and it works amazing for that. I'm pondering building a jig to allow me to trim precisely in one shot. I'll take pics if that works out.
Once that's done I'm going to try recruiting my wife to help lay the sole, since that will require a lot of glue to be laid down fast. I don't want that going off before I'm done spreading it all.
I'll get pics tomorrow if I can.
Fred in Wisc
Posted: Fri Jul 04, 2008 8:34 pm
by peter-curacao
Fred in Wisc wrote:Thanks guys. The goal with the foam was to make Boston Whaler look like a bunch of little girly amateurs.
Fred in Wisc
It look's like a Whaler the hull that is or am I wrong? anyway very nice boat Fred
Posted: Fri Jul 04, 2008 11:11 pm
by Fred in Wisc
Peter,
There are similarities, the Hickman Sled design was modified by Boston Whaler years ago. It's an interesting story, google Hickman Sled and you'll get all kinds lf links.
This is Jacques HS18 scaled down. A variant of the TX18.
Fred in Wisc
Posted: Wed Jul 23, 2008 1:33 am
by Fred in Wisc
After a couple weeks with lots of time at work and lots of summer vistiors (plus 2 short fishing trips finally), I got some more done on the boat.
Took my little girl Abby for her first ride in a small boat. She loves it. Great. Also is very interested in the fishing equipment, wants to crank it in almost every cast. Is terrified of fish however. We'll work on that. Here's daddy's little helper, she'll be 2 next month.

Got the motor height sorted out. It may be a little too low, but I will sacrifice a little top speed for better handling and resistance to ventilating the prop. I can always epoxy a strip of 1/2" ply to the transom top if it's way too low. The holes you see in the transom are from where I screwed it together when I laminated it up. I drilled them out to 3/8 for the first 1/4" of depth, that way I know for sure I can get them filled solid with putty when I glass the outer transom.
Got all the foam trimmed down and sanded level to the top of the frames and stringers. Before installing the sole I vacuumed it carefully and rolled a coat of epoxy over the foam, frames, and everything. Might as well seal it all up so I never have to get under that sole again.
Built some boxes in the transom corners. They will support the rear deck and also strengthen the transom. They are taped inside with biax and laminated with 9oz woven. I need to do some sanding and filiing before they get glassed on the outside as well.
Put in a little well to mount my sonar transducer and put in a drain plug. There are several layers of cloth on the bottom of this so I can cut the wood out when it's flipped and laminate in a solid glass piece to shoot the sonar through. Thanks to Cracker Larry for the through hull sonar idea.
Actually installing the sole took far less time than the prep work. I sanded the stringers, recoated them with epoxy. Planed the edges of the sole to make sure it would not create any hard spots. Wiped the bottom of the sole down with solvent, I glassed it weeks ago. Sanded the frames and hull sides where the sole will be taped in.
Actually gluing it in was pretty easy. Mixed up a 24oz batch of epoxy with slow hardener. Measured very carefully, don't want to have to scrape that all off if it doesn't cure. It was a little scary mixing that big a batch, I usually only use a few ounces at a time. Thickened it with about a third of a pound of wood flour. It took a while to stir that all in. Then dumped it in the big paint tray so I wouldn't get a big expensive smoky paperweight.
Used a bondo spreader to lay a little thicker than normal layer of glue on all the stringers, frames, and hull side battens. Then just laid the sole on. Found one little hard spot, trimmed it out with the Fein and a razor knife. Then got out a collection of assorted SHS (Some Heavy Stuff) clamps to hold it down while it cures. Ran short of SHS clamps and did a quick search of the basement to find extras. Luckily they are all over, you just need to find small heavy things that your wife won't kill you if they get a little epoxy on 'em......
We'll see how it turns out in a day or 2.
Also found some warp in the front frame, causing it to bow toward the bow. I cut the glue joint with the Fein (you just have to play with one of these at the Woodworkers Store, they are so cool) and a hacksaw blade. Put a little plywood chunk at the top to straighten it out, and put a new fillet in the gap. Should be good as new tomorrow.
That's it for now.
Fred in Wisc[/img]
Posted: Wed Jul 23, 2008 8:58 am
by Cracker Larry
Looking great Fred

You won't have to ever worry about sinking

You are really making fast progress. Nice work.
Posted: Wed Jul 23, 2008 11:12 am
by jgroves
Fred,
Been following your build and the boat is looking great! Also, beautiful little helper you have there! Keep up the good work.
Jeremy
Posted: Wed Jul 23, 2008 8:23 pm
by Rob Eades
Fred, you old dog.I thought I was the only guy that used my secret shotgun shell stash (hid in the garage) to hold down a big epoxy job.
Only a clays shooter has that kind of stash.Whats your game? sporting and skeet here.It becomes an addiction quick,kinda like boat buildin'.
I won't tell your wife if you promise to do the same.
sorry for the hijack guys,
Rob
Posted: Wed Jul 23, 2008 11:56 pm
by Fred in Wisc
Pulled the SHS clamps today. The floor is smooth, level and solid. Shortly I'll fillet in the edges, tape and lay a layer of 9oz over the whole sole.
The addition of the sole stiffened the hull up dramatically. Before it felt pretty solid, but you could get it to twist by pulling up on one corner. Now it's rock solid. No twist. Wow. I don't even have the exterior biax layer on the hull yet. Once it's fully glassed this thing will feel really bulletproof.
I got inside and walked around, played a bit with furniture layouts. Since the hull is a bit heavier than I originally thought, I'm pondering minimizing the interior buildout to reduce weght and allow a bit of extra versatility. Probably just a little front deck, maybe 2 bench seats, and some little trays over the transom boxes (store sundry tackle and a place for the fish locator).
I was planning some narrow side decks, but they will reduce room in the cockpit and add weight, so I think I'm gonna skip those. I am going to work on a pattern to finish off the top of the frames in a pleasing way.
Thanks for the kind words Cracker and Jeremy. In person you can see all the flaws, but if I start to obsess over every little thing and try to build to the CL/ GK108 level of finish, this thing will never launch. So I'm making sure everything is real strong and looks, well, pretty good.
Rob, not so much shotgun sports- there's 11 bricks of 22's in those clamps. Only 8 boxes of shotgun shells. My niece and nephews started hunting with me the last 2 years, so I have been trying to get them out to the gun club to practice more. 4 teenagers can go through a lot of ammo in a couple hours. We'll go through lots of 22s, a few boxes of centerfire rifle shells and a couple rounds of trap. I just want them to be proficient so they have some success when we hunt. I've been bulking up on ammo when I find it on sale, the cost increases in that have been ridiculous the last year or so. Actually started using handloads for most of my rifle and pistol shells. I have a hard time knowing each trigger pull costs over $1 with factory ammo.
I was gonna use my ammo storage box as an SHS clamp, but when I lifted it (grunting likd a caveman), I decided my little stands under the boat would not like that muc weight.
Actually my wife suggested I build a locking cabinet for ammunition. She has some idea there is a stockpile, but not to what extent.
No sweat on the threadjack, the builder galleries are more entertaining and threadjack friendly than the technical how-to sections.
Fred in Wisc
Posted: Fri Jul 25, 2008 6:19 pm
by Fred in Wisc
Had some time to work on this last night and today.
Here's a pic of the sole, it turned out well. This is after I did a bit of sanding, so it's dusty. Just sanded the existing epoxy to get ready for taping and glassing.
Here is the rear well for the transducer and drain plug.
Here is the tape all precut and laid out. Not a ton of time to work today so I had to be efficient. I used 6" woven tape cut in half so it's 3" side. Would have preferred 6oz biax tape, but I discovered I'm out of it. Forgot to order that a couple weeks ago. Used full 6" tape on the corners of the transom boxes and on the transom to sole fillet.
Filleted, taped and then applied a layer of 9oz woven extending up about 8" up from the sole. One little problem: I mixed up a 12oz batch of epoxy with slow hardener, noticed I missed a fillet. Poured out most of it into the paint roller tray, saved about 4 oz to mix up wood flour putty. Took a little while doing the putty, then spread out the wide cloth. Started to pour the epoxy onto the cloth when I felt it was pretty hot. Dang. Started to gel a little already. But it was too late, it was on the cloth. Squeegeed furiously to wet out the cloth before it set up. Poured more newly mixed resin on top and squeegeed it again. It kind of worked.
There are a few patches in the middle of the sole where it's not completely wet out. You can see them in the middle third of the sole from about the front of the transom boxes to a bit past the next frame. I'll try peeling it up there once it cures. If I can, I'll cut it out and redo it. It looks pretty much wet out so I think it's probably ok, and it's in a low stress area.
That's it for today. Taking some of my scouts to camp tomorrow, so I probably am done with boat work for the weekend.
Fred in Wisc
Posted: Sat Jul 26, 2008 11:01 pm
by Fred in Wisc
Once the epoxy hardened, I went over the boat again to check my work. Got a few bubbles, nothing too major. You can see the one on the front seam of the sole and transom box on the pic. Wish I'd caught that earlier....
The areas that did not wet our so well from the gelled resin seem to be ok. Looks like the weave is not completely wet out, but well stuck down to the sole.
Got a bunch of runs, drips, and little puddles of resin that I missed before. Odd how that gets overlooked when it feels like your back is gonna snap from working 3 hours at knee height.... Got some sanding and scraping to do and this will be just fine.
After that, finish up the inner transom, a little bit of interior furniture, rubrails, and the biax on the outside of the hull and we'll be ready to fair and paint.
Fred in Wisc
Posted: Sun Jul 27, 2008 5:37 pm
by chicagoross
Fred, I know how your back can announce that the drips and runs are not a critical element of the boat. I built a few boats in the Philippines, singlehanded except for sanding and painting; for those tasks I had an unlimited supply of workers who wanted to finish the boat for $5/per day plus lunch and snacks. The more coats, the better for them.
On my own completely now, finished the primer and starting the real paint, there have definitely been a few drips and runs and blobs that could have been sanded better - I was fortunate to have realized from the beginning that my current boat was going to be "workboat finish". But there's a difference between 18 foot with cabin and a small ope skiff - you'rre will have to be perfect!

Posted: Sun Jul 27, 2008 6:34 pm
by Fred in Wisc
Perfect, no. Pretty good, yes.
Wow, Phillipino sanding help is way less expensive than chiropractor visits!
Fred in Wisc
Posted: Tue Aug 26, 2008 11:41 pm
by Fred in Wisc
After nearly a month with no progress, I finally got some more done on the boat.
Got one rubrail glued on. 3 layers of 6mm Okume. The sheer is pretty sweet, IMHO. Now I have to wait for that to set up, plane the drips off, and match the oter side rubrail real carefully with the level. I kinda trust measuring, but the level never lies. Plus measuring errors always seem to get worse as you go along, the level brings it all back into alignment again.
After much pondering, I got my front deck layout mostlyfigured out. Got the deck rough cut, cut down the bow to fit it in level, and installed cleats to hold the edges.
I'll get some pics up shortly. I might have to clean up the shop first, or you'll make fun of me. My wife "borrowed" my shop trash cans and now there are a lot of stir sticks and gloves glued to the floor.
Fred in Wisc
Posted: Wed Mar 25, 2009 1:40 am
by Fred in Wisc
Well, so much for getting some pics up "shortly". It's been nearly seven months. My thread was on page 3. I'll try not to let that happen again.
Recently life got kind of complicated. In September I sold the majority of the company I started in 2001. Figured the economic outlook was not so good for the small independent guy, turns out that sure was right. Dang, wish I'd had the foresight to get my 401k out of the stock market too.....
Anyway I'm working in one of my partner's other companies now. Quite the change to go back to reporting to somebody else. Of course the part where you know you get money every 2 weeks is pretty nice. My wife likes that a lot.
Did a little work on the boat through fall, spent time fishing and hunting with the neighbor kids and relatives. Got to sit on the stand with my 14 year old niece when she shot her first deer. That was awesome.
Unfortunately, my dad took a bad fall down the basement stairs, ended up spending 50 days in thekhospital. Has a brain injury. That's improving a lot, unfortunately when they were doing MRIs for that, they found a mass in his lung. Turns out to be small cell lung cancer, the nasty kind, and already spread into other organs. Doc says they can't cure it. Dad and the family both decided not to do the chemo, he'd rather have as much good time as he can instead of stretching it out being sick and miserable. Only 63, just doesn't seem fair.
Amazing how your priorities get adjusted when you face the loss of someone important in your life........
Anyway, been driving 400 mile round trips to be up visiting him and mom about every weekend. He's actually doing pretty well, in a rehab home just a couple blocks from his home so they can monitor him. He lost about 2 months of memory, but he's detoxed from all the smoking and drinking he's done recently (was in a bad construction accident years back and hates the pain pills, prefers the Bud light) and now he's the nicest guy he's been in years.
Had great weather last weekend, took him out for lunch and a drive with my little girl.
So I haven't been working on the boat much. But spring is coming and in Wisconsin that means walleyes. Now I'm itching to get it done....
Here's some progress:
Got the tops of the frames contoured nicely, rubrail on (3 layers of 6mm). Unfortunately I trimmed the frames on the other side a little short so I need to glue in some little pieces of ply to get the tops contoured right. Dang.
Got the bow storage compartments near done. Put some 3/8 ply sole in those with cleats, foamed underneath, 9oz woven on both sides. Took some ti9me to get them to fit up nice and sit level. Cutting the access was real easy, made a template, clamped it on and cut with a router and a top bearing pattern bit. Flipped it over to mirror image the other side. Slick. I was kind of dreading that job, afraid I'd screw it up on a piece that's really visible, but it went near perfect and took under an hour. More sanding and some pigmented epoxy and we'll be ready to glue the top on.
Got the rear deck cut and fitted, glassed on the bottom. This is regular pine exterior, wast planning on using some balsa core there, but my experience with it was not so great. Gotta do some more research to lay that up right. Don't have the patience right now. Turns out if you don't edge glue all the balsa blocks together it's not very strong. And it soaks up some serious epoxy, laying it up in one shot is a bad idea- you should probably precoat, set that cure a while and then laminate. Anyway, I have about $50 materials tied up in the unusable piece you see leaning on the wall in front of the boat. At least the dumb tax on that was pretty low, I've messed up way more expensive stuff before.
The exterior pine ply rear deck is pretty light and I will make sure it's completely isolated from the hull with epoxy so if it ever has problems I can cut it out and replace.
For support, I laminated up 4 layers of 6mm about 1 1/2" high and ran it between the flotation boxes under the deck. I'm still a little unsure about putting this in. It started out a lot bigger, I've trimmed it down about 3 times so far. I like the higher deck for casting, but I don't want to take all the floor room up. As it is, the deck is only about 9" off the sole, so it will fit my small gas tank and a little bit of gear underneath.
That blue scraper is from Rockler. Best $20 you'll ever spend. Highly recommended.
That's about it for now.
Keep Dad in your prayers if you'd be so kind. I'm planning on missing him for the next 30 years, but want to make sure I've got him the 3 million after that......
And go see your family if you haven't lately. That boat can wait one weekend.
Fred in Wisc
Re: Little Hickman Sea Sled
Posted: Fri Mar 27, 2009 10:28 pm
by Fred in Wisc
My thread vanished with the forum change, just checking if a new post will bring it back.
Fred in Wisc
Re: Little Hickman Sea Sled
Posted: Fri Mar 27, 2009 10:38 pm
by Fonda@kauai
Boat looks really good Fred. Sorry to hear about your dad. It's sounds like you're spending some quality time with him though, and that's what's important in life. Aloha nui loa.
Re: Little Hickman Sea Sled
Posted: Sat Mar 28, 2009 1:09 am
by TomW
Best of wishes to your Dad and your family Fred. Life does tend to throw us some unexpected loops into the boat building sometimes doesn't it. Good luck to you and to him and all of your family as they enjoy what time you have with him.
Tom
Re: Little Hickman Sea Sled
Posted: Sat Mar 28, 2009 2:00 am
by Fred in Wisc
Thank you, gentlemen.
Fonda, where are you on Kauai? Been there 3-4 times, it's one of the most beautiful places in the world. My wife bought a time share in Poipu before we got married. We always end up looking for ways to stay, but it's too far from family.....
Fred in Wisc
Re: Little Hickman Sea Sled
Posted: Sun Mar 29, 2009 11:53 am
by Dog Fish
Fred, very sorry to hear of the sad news about your Dad. I will keep him in my prayers. I know your pain I lost my Mom at the age of 60 from complications of breast cancer, just to dam young. Stay strong my friend. Good luck with your build and she will be done in do time.
Brian
Re: Little Hickman Sea Sled
Posted: Sun Mar 29, 2009 11:55 am
by Dougster
Hard news Fred. I've enjoyed your posts and the creativity in your build. I can do no more than wish you courage and your Dad a smooth passage.
Says we live in little boats on very big waters Dougster
Re: Little Hickman Sea Sled
Posted: Sun Mar 29, 2009 8:18 pm
by Cracker Larry
Our prayers are with your Dad and your family, Fred. May the passage be easy. I recently lost mine and I feel you grief. I just picked up his ashes on Friday. We were supposed to spread them in the ocean today, but the wind has been blowing 40 kts for a week, so he's still sitting on the shelf behind me. I guess he isn't quite ready yet. For everything a time.
Re: Little Hickman Sea Sled
Posted: Mon Mar 30, 2009 9:47 pm
by Fonda@kauai
I live at the base of Mt.Wai'ale'ale in Kapaa. I love Poipu and Koloa Town, so pretty on that side. Let me know if you head out this way again and we can fish or whatever...
Re: Little Hickman Sea Sled
Posted: Mon Apr 06, 2009 9:54 pm
by Fred in Wisc
Took a road trip this weekend, up to visit Dad for his birthday. It was a good time , about 3 dozen friends and relatives in Mom's little house...... Anyway a long trip is good for pondering and the rear deck in the boat still wasn't making me happy. Just seems to take away too much floor space. I know I want a little deck to hide the gas tank under and give me a raised area for casting (not real often, but there are times when it's an advantage).
A couple hours of pondering turned into 10 minutes of measuring, 2 minutes of sawing and here we have it:
I still need to round the edge of that, but I'll do it at the same time as the front deck.
I will likely be putting in a lightweight pedestal seat, located pretty far forward. As far as I can comfortably reach the tiller handle, that is. Should improve the balance for the times I am alone in the boat.
Seemsmy stuff always evolves as I'm building it, I have a lot of respect for guys who ca plan it all out ahead and execute that plan. It woule be a lot more efficient. One day I'll build one of these boats right to the plans. I bet it's a lot faster....
That's about it for tonight. Might get the front deck assembled tomorrow, my wife is going visiting. Have to see if baby is cooperating....
Fred in Wisc
Re: Little Hickman Sea Sled
Posted: Tue Apr 28, 2009 10:59 pm
by Fred in Wisc
Made a little progress the last few weeks. Been spending a lot of time up north visiting Dad while I still can so the boat has taken on a lower level of importance. Got the flu this Sunday, not the swine won on the news. Felt like the tasmanian alien death flu or something. Pretty unpleasant. Was advised not to go back to work until all symptoms subsided so I sat home yesterday feeling kinda out of it, then today feeling pretty good indeed (but possibly contagious). So I got to work on the boat some. When life hands ya lemons, make a Hickman Sled......
Got the front and rear decks fitted, deck edges built up to 1" thick, rounded over top and bottom with the router, and glued in. Also sealed all the expolsed wood in the font storage comparments. The decks are not filleted and glassed yet, I want to see if I have enough biax left for them after doing the hull or if I have to use woven. there is some other finishing and coating to be done in the interior, but that may just get epoxy coated and used for the summer. We'll see how impatient I get.
Flipped it back over and onto a couple sawhorses. I had initially just taped the outside of the hull in case I really screwed something up and had to cut stuff back apart. So now I have to come back and laminate on the glass fabric. This will be 12oz biax. Way overkill for a hull this size, but I wanted to use some to get a feel for it for when I finally build a big boat. Plus I'm pretty sure this little guy will see some pretty hard use and with biax both sides it will be pretty dang tough.
I'll level and plumb everything before glassing just to make sure I don't build any twist into the hull.
Flipping it only took about 15 minutes by myself. It would have been like 2 minutes with help. It would have been a lot quieter with help, my wife wanted to know what all the banging around in the basement was....
It's light enough to be very easily carried by 2 people, but heavy enough that cartopping it alone is pretty much out of the question without some mechanical assistance or me being in better shape. I'm guessing the outside fabric, fairing and paint will add another 20 pounds or so. It will certainly load in and out of the minivan easily enough with one of the neighbor kids for local fishing trips. I'll weigh it when it's done.
Started to scrape and sand down the tape so I can lay out the big fabric. I'm planning to get all the prep done, then roll a coat of epoxy to seal everything. Then the next day or 2, I'll put some 4 or 6oz on the sides and the 12oz on the bottom. Learned that the roller is definitely the tool to do that when laminating the inside, it is real fast and uses way less epoxy.
Some things I remembered right away: Sanding is no fun. It goes fast with the 7" orbital but it's a huge mess. I got a HEPA filter for my shop vac and run that right near where I'm sanding and it helps, but it ain't perfect by any means. The scraper is fast and creates no dust, but it's difficult to use on any concave surface, the edges tend to dig in and cut too deep. So I'll scrape what I can, then sand and wipe down the whole thing before laminating. the scraper is aesthetically pleasing though, almost like using a hand plane. Makes you feel like more of a craftsman than you really are. At least it does for me.
A pic of last night and today's progress:

Fred in Wisc
Re: Little Hickman Sea Sled
Posted: Wed Apr 29, 2009 8:57 am
by Dog Fish
Hi Fred, It looks like you have had good progress. Looking real nice, that's going to be a fun little boat for ya. Still keeping your Dad in my prayers.
Brian
Re: Little Hickman Sea Sled
Posted: Thu Apr 30, 2009 11:29 pm
by Fred in Wisc
Thank you all for the prayers and kind thoughts. Dad's not doing so well right now. Been up visiting pretty much every weekend.
I had been hoping to take him out fishing a little while for opening weekend (2 days from now), but he's not even up to sitting out on the bank for a bit any more. Pretty hard to watch when he was always the tough guy- Marine MP, ironworker. Certainly makes me concious of taking care of myself better.
Was reading through my old posts, found a comment that I was planning to get it launched some time last year. And here I am turning into KS8, just without the really detailed workmanship......Optimism springs eternal......
I have made a commitment to my young neighbor that we will fish in this boat before the end of this season. He will certailnly hold me accountable to that.
I did not, however, commit to it being faired and painted before launching. that way there's no breaking promises, but still being realistic about my building speed.
Sorry to ramble on, it's just been that kind of week.
Fred in Wisc
Re: Little Hickman Sea Sled
Posted: Fri May 01, 2009 12:43 am
by ks8
Fred in Wisc wrote:And here I am turning into KS8, ......


If real life is what is happening between building sessions, and causing the delays, that will always outweigh a building schedule (within reason
). Visiting your dad ought to take precedence over getting a lamination done, especially now. If that is what you mean by becoming a KS8, I blush in you honoring me so richly. Still, it felt real good to finally get MOF in the water, and I hope you know that joy soon as well.
My meager prayers, if they have any significance at all... it is, maybe, because I try in some bumbling way to pray with someone else whom we are told ever lives to intercede for us. I don't trust for much power in the prayers of KS8, but when they somehow trip and fall into sync with better ones... His prayers I don't feel worthy to try and harmonize to, but how amazing it all is that we are offered the privilege to try, and given such invitation and access. You are not alone in this time. Hoping true joy rules all your visits in whatever way that would best happen. Sometimes it even stings a bit, but it is a good sting, oh so much better than cold indifference. Don't ask me how I know. Prayers for all the family of course.
My... the adventure of how the story unfolds day by day...
You go ahead and post those pictures as they get taken and let real life always rule the schedule, and remember that well includes fishing from time to time. That is one neat little tub you've got coming together.
Please pardon my blabbering wherever it needs pardoning. It's late again...

Re: Little Hickman Sea Sled
Posted: Fri May 01, 2009 12:58 am
by Fred in Wisc
KS-
Your verbal wandering is elegant and welcome.
Nothing but respect for ya, bro.
Fred in Wisc
Re: Little Hickman Sea Sled
Posted: Fri May 01, 2009 9:02 am
by Cracker Larry
Fred, my thoughts and prayers are with you and your family also. Wishing the best that can possibly be.
The little sled is looking great
Re: Little Hickman Sea Sled
Posted: Fri May 01, 2009 1:45 pm
by tobolamr
Fred, Keep up the great build! Our prayers will be with your family, as well.
Re: Little Hickman Sea Sled
Posted: Fri May 01, 2009 5:26 pm
by TomW
Fred keep up the good work it can be such a comfort. Our best to you and your family in these times.
Tom
Re: Little Hickman Sea Sled
Posted: Sun Aug 09, 2009 11:55 pm
by Fred in Wisc
Well after several months away, I finally spent a little time with the boat and the scraper again.
Lost Dad the beginning of June. Probably the toughest week I ever had...... Glad to have a lot of family around during those times. I wasn't doing too bad until the Marine Corps honor guard and 21 gun salute at the funeral service. That's moving in a way that words can't even describe....thanks to all for the support and prayers. Not the kind of community you usually find on the internet. You guys are great.
Had hoped to finish the boat up and take him out in it, but ended up driving up north to visit every weekend. I'll never regret that time spent together, though. I figured the boat would wait. It did.
I think it's gonna get named for him. Either Little Moe (his nickname was Moe Gorilla- actually stealing the name from the pull-around beer cooler he always had up camping, my uncles named that Little Moe since it followed him just about everywhere...) or Proper Planning (his favorite saying " Remember your 6 P's : Proper Planning Prevents P*** Poor Performance".) Just seems right since he was the one that taught me to fish and boat. I still remember how he told me I could drive the boat when I could pull start the outboard. 10 years old, had to put both feet on the transom and pull with both hands to get the 9.9 Evinrude running, but I was MOTIVATED.
Anyway, spent a few hours de-cluttering the shop, got a few honey-do's checked off. Then got down to business. I glued in the front deck and flipped it a few weeks back, so I just spent some time scraping and planing. Got the edges off a lot of the outer biax tape, getting ready to lay the side fabric on the exterior next. Next time that's going wet on wet so I don't have to scrape it. Still scraping beats the heck out of sanding and it's way quieter.
While I'd really like to finish it up this summer, I don't realistically see that happening. Too many other projects (with construction so slow right now my wife decided it's time to do a bunch of upgrades to the house since there are deals to be had. So we got a bunch of interior doors and trim updated, siding exterior tim and soffits, and the new kitchen is coming soon. She's spending money like she's mad at it. Help.) Crashed my old minivan a little, so I'm swapping the good motor/trans into an undamaged one with a bad transmission, plus got a newer motor for my big boat so that's gotta get rigged and ready for salmon season. Plus we're up to our eyeballs in alligators at work, it's been really busy lately, with lots of short deadlines. After that, gotta spend some time hunting with the niece and nephews. No way this is boat is getting done soon.
OK that turned out to be more of a life update than a boat update. Threadjacking myself, kinda. I'll get some new pics up when I do something noteworty on the boat.
As a wise man once said "Build on Dudes!"
Fred in Wisc
Re: Little Hickman Sea Sled
Posted: Mon Aug 10, 2009 12:16 am
by TomW
Good to hear from you Fred, I know you were spending a lot of time with your dad and condolencses in your loss. Sounds like your keeping busy and that you have wonderful memories of your dad that will always be with you. Have fun with the kids and the hunting and catch some salmon.
Tom
Re: Little Hickman Sea Sled
Posted: Mon Aug 10, 2009 9:00 am
by Cracker Larry
Welcome back Fred. I'm terribly sorry for your loss, your Dad sounds a lot like mine was
For everything a time....hoping we make the same impression on our children that our fathers made on us. In that they live on forever.
Re: Little Hickman Sea Sled
Posted: Mon Aug 10, 2009 9:00 pm
by timoub007
Fred,
Very sorry to hear about your dad. I lost my dad at the end of 2007 and not a day goes by that I miss him. As Larry said, it sounds like all of our fathers were a lot alike. That's probably why this site has so many good folks on it. We were all brought up right, by good parents. Can't say the same for many of the Pinheads in the world now adays.
Looking forward to seeing more progress on your boat...in due time.
Enjoy your fall with your family. Making memories...
Tim
Re: Little Hickman Sea Sled
Posted: Mon Aug 17, 2009 1:02 am
by sharpwit
Fred,
First of all, I give you my condolences on your loss. I lost my father on 8-13-04 to cancer and I abandoned a traditional Greenland Kayak build at the time. After that I built the 16 foot canoe NC-16 90% complete and lost my mother in law to a head-on collision with an 80 yr old man who fell asleep at the wheel. After that I posted about my loss, and I lurked for a couple of months. I received many supporting messages from the board, took a new job, moved, let the canoe go to ruins, and dropped off the board all together.
While on a family vacation in Rockport, TX my intrest was renewed, and so I returned to the board only to find your thread still active. I thought that I would see completed pictures of your boat as I had followed your build during my lurking phase. After reading all nine pages of your thread, I was heartbroken and I had the best laugh all at the same time. I had a 15 horse evinrude that was an absolute BEAR to start when cold, and I was rolling when I read your story. Please know that you have my support, so stay with it b/c you have got one of the most inventive builds going on this site. Don't do like I did and drop out due to embarrasment, depression, and distraction. You should know that you will experience moments of pain, anger, regret, remanicence, joy, happiness, and obligation all over the loss of your father. I don't know you, but I can tell by your writing that you were raised like I was - by a good man, to be a good man. Dad is the ultimate scape goat, will take any blame, will give any sacrifice, and will accept no praise to properly complete his task.
I felt like I had so many unanswered questions when my Dad died, but I have come to the conclusion that he spent his whole life preparing me for that day. Go with your gut, he raised you right, don't second guess, and do the same for your kids. Also, when the time comes, tell your daughter all about your Dad.
Finally I must say thank you for your father's service to our country. It is only because of men like him that we are able to concern ourselves with our petty persuits such a boat building. Please email me if there is anything I can do, or even if you just want to talk.
jtsharp30000@yahoo.com
Re: Little Hickman Sea Sled
Posted: Tue Aug 18, 2009 6:49 pm
by Fred in Wisc
Wow. Thanks all for the kind words and support.
I'm gonna finish it. For sure. Dad didn't raise a quitter. He did raise a procrastinator who is kind of easily distracted, though. My fault, not his. I had been bringing pics of the build to him even in the hospital. He was always the guy building stuff so he liked that.
Right now I'm catching up on 6 months of stuff I ignored while going up to visit every weekend. Gotta keep my wife happy. Pretty soon I'll get back to building and actually show you all some progress.
Fred in Wisc
Re: Little Hickman Sea Sled
Posted: Fri Feb 19, 2010 1:53 am
by Fred in Wisc
OK, it's not exactly pretty soon, but I finally made some progress.
After considerable pondering, I finally came up with a bow design that I pretty much like. Got the main panel bent and filleted in, once it's glassed, I'll cut out a section to install the trolling motor up front. Wasn't intending that at first, but I happened across a 24v Motorguide Brute foot control at an auction for $65, so the little electric motor on my other boat will end up on this one.
Sanded the hull since the epoxy has been sitting for a LONG time since I last worked on it.
My wife and daughter went to Chicago for an overnight, some sightseeing. So I had a whole evening free. Got the boat leveled, found I have about 1/8" of twist in the hull. Tried several ways to untwist it, but once that sole is in it's just too rigid. Once it gets to the point of big weights, jacks and lots of clams to make it move, I don't think that one layer of biax on the outside will make it stay that way. So I'll live with it.
Then I got out the big roll of biax and did the outside of the hull all in one shot. The biax is 54" wide, so it covered the bottom and several inches up each side. Cut some smaller strips and went right to the rubrails with it. A little extra glass outside never hurt, I'm kinda rough on boats sometimes. Took about 5 hours working alone. You can certainly tell that the detail work was better at the beginning thn at the end, my hand was cramped up into a "claw" from stirring, brushing, rolling, and squeegeeing.
I was able to do the bottom with an almost continuous sheet of glass, just one small cut in the center near the bow, needed a little more material to accomodate the deep reverse V. A couple seams on the sides, should not be too bad to sand and fair.
Gotta sleep now, work early tomorrow. I'll post pics as soon as I can.
Fred in Wisc
Re: Little Hickman Sea Sled
Posted: Tue Apr 05, 2011 2:03 am
by Fred in Wisc
Life is way too complicated. Finally started working on the boat again, then had some more medical issues in the family. This time my wife. Breast cancer. Good thing is they caught it real early, did a minor surgery, a month and a half of radiation, and some meds for a few years. Looks like that should be A-OK, with a relatively small chance of anything reoccurring. Mary's in fine spirits about it as well, but she still hits me when I complain that she had to have problems with one of my favorite parts.......
Anyway, about the seemingly permanent plywood and epoxy resident of my basement shop: A few months back, I got the outside all fiberglassed with 12 oz biax. Did a lousy job on the last 3 feet or so of the last side. Sanded that back off, which sucked, but not as bad with my new hotrod sander and dust extractor. Also found a piece of closth that did not bond well on the transom (was able to peel some of off by hand and with a pliers, so sanded that off too.
Yesterday would have been Dad's birthday. A suitable occasion for getting back to work on the boat. Again. I Gave the hull a good wipe down, replaced the biax on the side that I had sanded off, and started to square the chines up where they were rounded for fiberglassing. Got back on it tonight- squaring up the transom edge and starting to fair the running surface (it has about a 3/16" hook on one edge).
Got a couple pics:
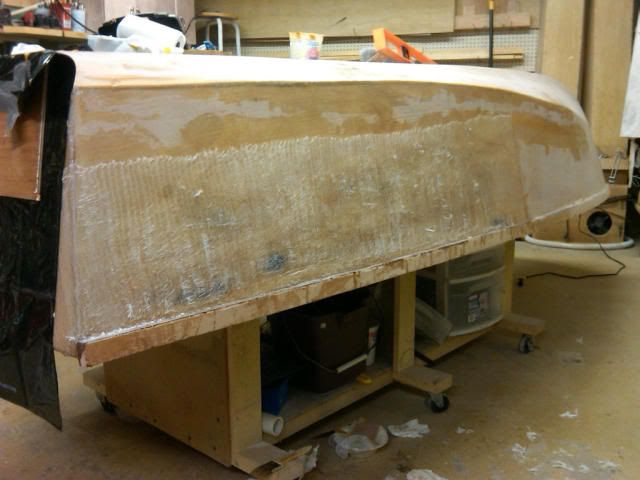
Replaced section of biax. This was still slightly green today so I gave it a quick once over with the scraper, much faster than sanding when fully cured.
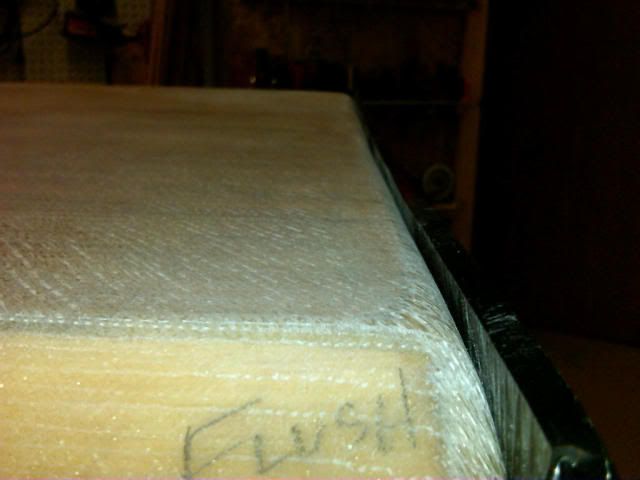
Transom edge before filling. Thanks to Cracker Larry for publishing pics of this method.
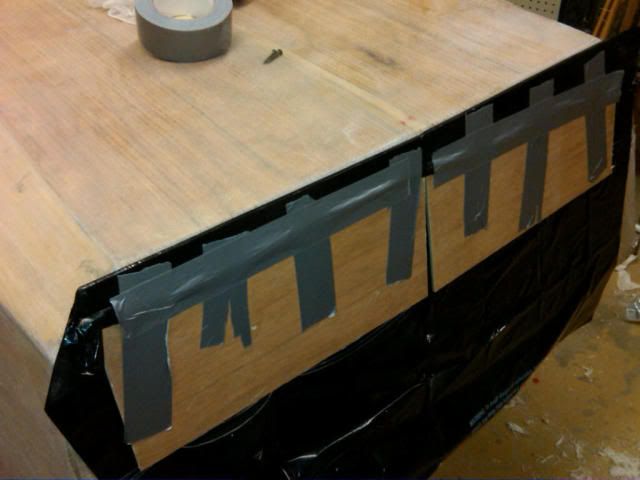
"Dam" for holding shape of rear transom edge. Also served as the guide for straightening the rear running surface.
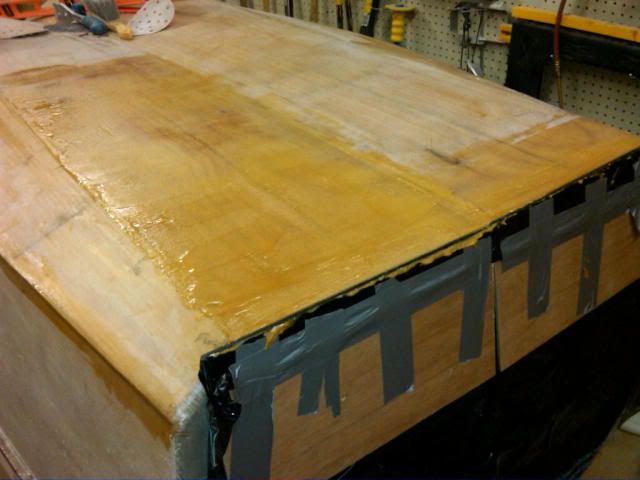
Transom filled and half of bottom roughly faired. Used a long straight board as a trowel to float this epoxy flat to a point 42" forward of the transom. At that point the hull begins to curve more and it would have been difficult to fair the bottom farther forward. It will need additional woodflour/epoxy mix, but I could not get it to come out perfectly smooth in one coat, so it will be done in several. I figured wood flour would make a stronger bottom than microballoons, since this is a kind of large repair.
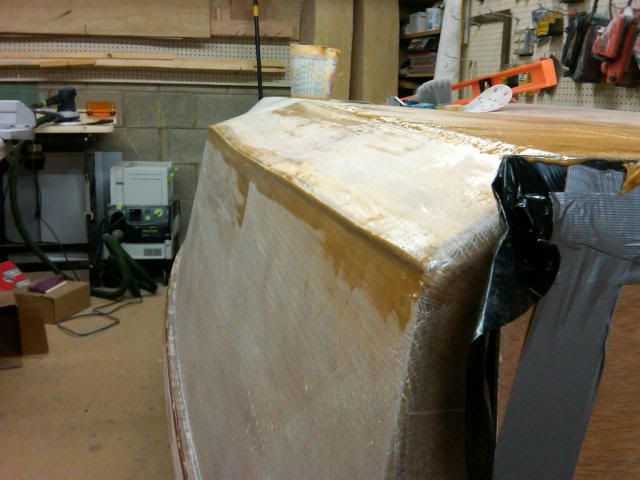
Starting to sharpen the chine. This looks like it will take a litte adjusting to get the line nice and straight.
Re: Little Hickman Sea Sled
Posted: Tue Apr 05, 2011 12:19 pm
by tobolamr
Congrats on the news about your bride! And congrats on getting back into the build! And congrats on the Festool really working out well, too.
Re: Little Hickman Sea Sled
Posted: Tue Apr 05, 2011 12:22 pm
by davidtx
Glad to hear your wife's prognosis is good.
Build is looking good, I like your dam for sharpening the chine. I can't remember what I did. I used quickfair for all the bottom work - big hump just in front of the stern. I sometimes wonder if the QF will hold up.
Re: Little Hickman Sea Sled
Posted: Sun Oct 23, 2011 2:07 am
by Fred in Wisc
Wow, I have not posted here in a long time. Got busy with family and some other hobbies, just putter around with the boat a few hours here and there.
Have the exterior rough faired, need another coat or 2 or 3, but it's not bad. Interior is just about finished, except for details and hardware like where the seat mounts and putting in the rod holders.
Tackled fiberglassing the rubrails tonight. Got one side done, then ran out of clamps and it was getting pretty late. I had been putting that off, since glassing around multiple corners just doesn't work very well for me most of the time. I finally just made a plan and did it. Looks pretty good so far, I'll know for sure tomorrow.
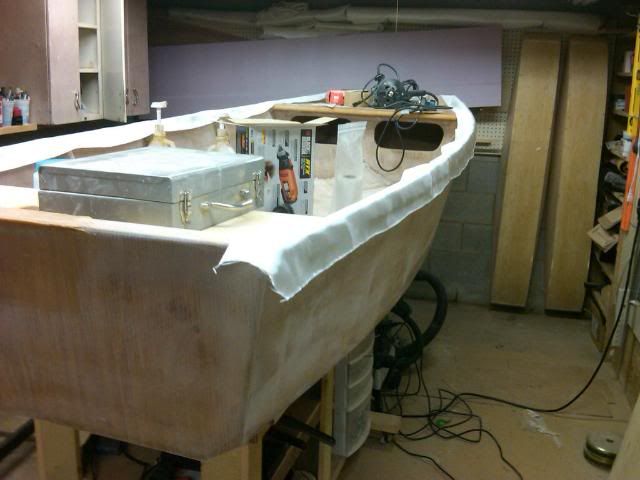
Cut and laid out the glass ahead of time. Decided to use 9oz woven tape 6" wide. I had to choose from that, biax and some 4 or 6 oz. The tape was nice since I could do a whole side seamless, and it laid down nicely around the curves and corners. The biax was a little hard to form around the corners, the light stuff I would have wanted 2 layers (too much work- I was in "git 'er done mode tonight).
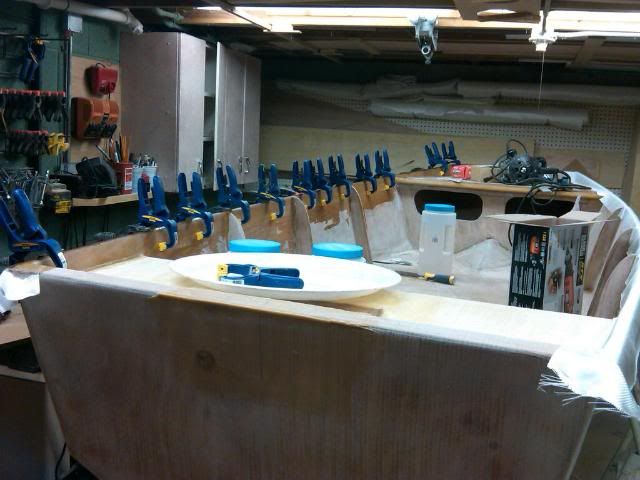
Brushed some epoxy on the rubrail, stuck the cloth on, adjusted it a bit, then brushed on more epoxy until it went clear, sticking the cloth around the rub rail the whole way. There is about 3/4" below the rubrail outside and about 2 1/2" into the interior . I probably have a little excess in there but I don't want it starved. Then took my nice 16' line drawing batten, coated in duct tape, and clamped that right under the rubrail to hold the cloth in while the epoxy set up. I used that trick to wrap the curved edge of the front deck and it worked pretty well.
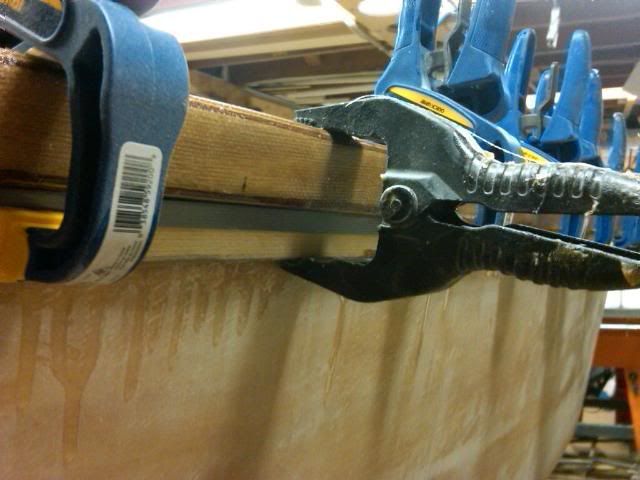
Closer view of the clamping. Wish I had more of those blue clamps, they are really nice. Menards used to run them on sale for like $2.99 with a $2 rebate so they ended up being a dollar a piece. Now they are like $4 and I have not seen them on sale for a while. I got a few small wrinkles from the clamps, but I think I worked them all out. We'll see tomorrow.
Good night all.
Re: Little Hickman Sea Sled
Posted: Tue Oct 25, 2011 2:36 pm
by tobolamr
Fred, it's looking good! Glad to see you're still at it! Every time I drive through Madison, I keep saying "Man, I should go help him one weekend...."
I almost thought about this weekend, but the plans to be in Oconomowoc just got tossed out.

Glad to see I'm not the only crazy Wisconsinite out there!
Re: Little Hickman Sea Sled
Posted: Tue Oct 25, 2011 3:07 pm
by Fred in Wisc
You're welcome to visit and check it out if you are in the neighborhood. I'm in the southwest suburbs of Milwaukee, just off I894 and I43.
Re: Little Hickman Sea Sled
Posted: Wed Oct 26, 2011 5:45 pm
by tobolamr
oooooh that's tempting.... But, as they say, NOT today... I will try to find time to ask to swing by! You're only 4.5 hours away.
Re: Little Hickman Sea Sled
Posted: Thu Oct 27, 2011 1:42 am
by Fred in Wisc
4.5 hours must put you near Merrill or Tomahawk? Most of my family is in the Wausau area. I ended up moving down here for a better job, but really prefer living up there.
Re: Little Hickman Sea Sled
Posted: Thu Oct 27, 2011 4:50 pm
by tobolamr
I'm in a little farming community about an hour west of Wausau off of Hwy 29. Look on the map & You'll find it!
We are going to be in Oconomowoc on Saturday, but will have to head straight home on Sunday - there's just NO time to break away. But, one of my future trips down there, I'll give you a shout to come and at least take a look!
Re: Little Hickman Sea Sled
Posted: Thu Oct 27, 2011 5:21 pm
by Fred in Wisc
Saturday wouldn't have worked for me anyway- actually heading up towards your area to take my nephew and nieces squirrel hunting.
May your travels be safe and your family visit pleasant.
Re: Little Hickman Sea Sled
Posted: Thu Oct 27, 2011 6:01 pm
by tobolamr
Likewise!
Re: Little Hickman Sea Sled
Posted: Fri Oct 28, 2011 11:14 am
by Fred in Wisc
The first rub rail turned out well, a few small bubbles to fill. Did the other one last night, unclamped it this morning. Only a very few tiny bubbles this time. Tonight I'm hoping to do the rubrail at the bow and the edge of the rear deck.
That will pretty much wrap up the fiberglassing except for a couple of mounting pads for rod holders, seats, sonar, etc. Pretty exciting.
Now I can sand for the rest of the winter.....
Re: Little Hickman Sea Sled
Posted: Thu Apr 24, 2014 1:05 am
by Fred in Wisc
Hey all, I'm still alive. My boat project went into hibernation for a while but now spring has arrived and it's awake again (it must feel great, mostly slept through 2 1/2 winters).
Some undocumented work has occurred in that time, but not a whole lot.
Cleared off all the stuff that has accumulated on top of the boat. Odd how horizontal surfaces in the shop breed clutter.
Dug out the quickfair, scraped off and threw out the top layer of the hardener, the cover wasn't completely sealed and it was discolored darker yellow and harder than it should have been. Looked fine underneath, and the resin container looked brand new. For structural resin, that would make me think a lot and probably order mew material but this is a bit less critical to life and family so I used it.
Brushed off the dust, wiped it down and then got the sander out. It's interesting to look back at the pics from the start of the build, my tool collection has been upgraded a lot in the last 6 or 7 years. Gave it a quick sand on the obvious high spots, then started spreading quickfair. I'll probably have one more round of that and then declare it "good enough". I'd really like to get the space in the shop back, so it's time to quit nit-picking and just finish it off. (Not the first time I said that, but I mean it this time. Probably. I think.)
The hull shape still fascinates me. I'm excited to put it on the water and see how it performs.

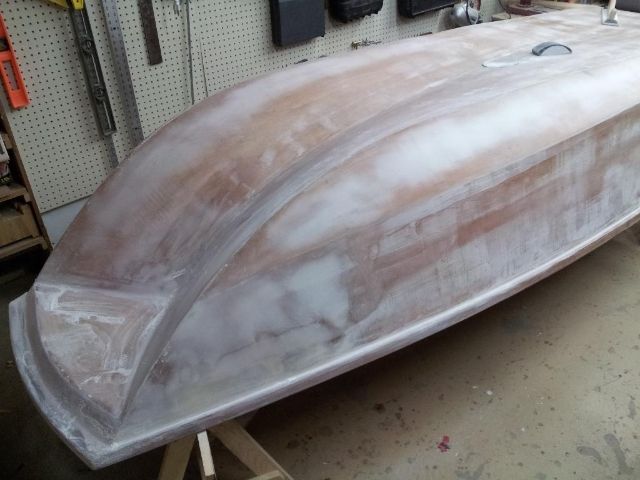
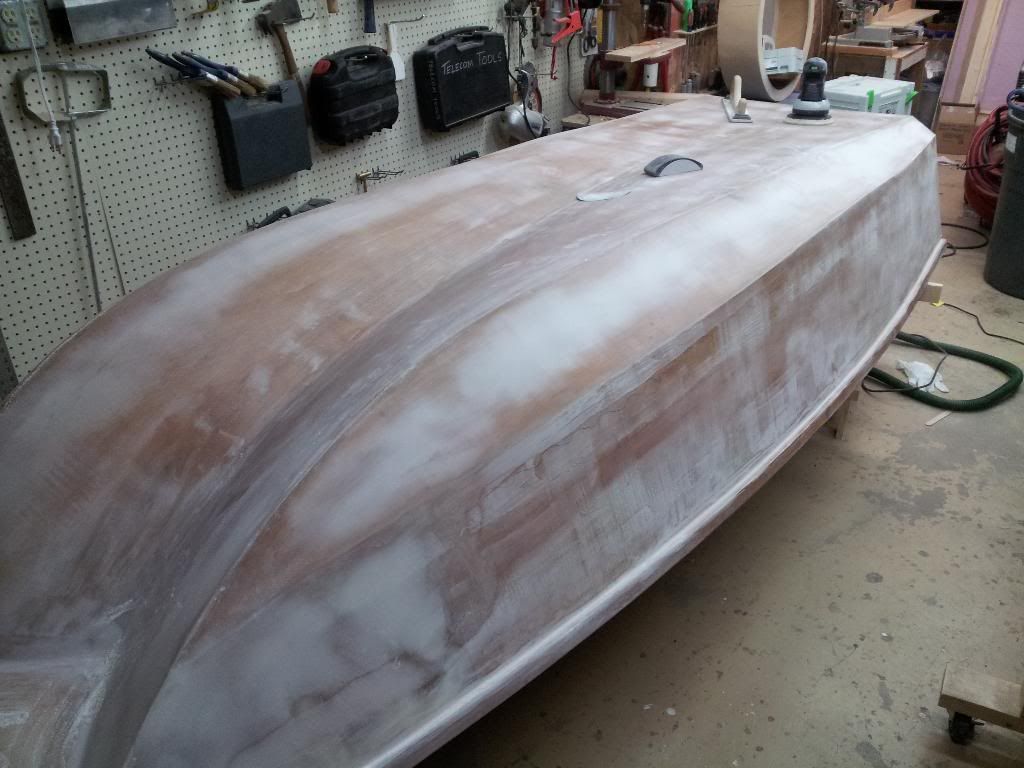
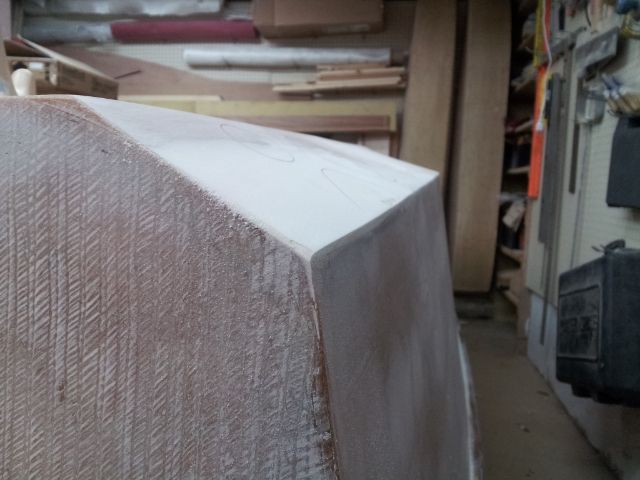
Re: Little Hickman Sea Sled
Posted: Thu Apr 24, 2014 10:02 am
by ks8
Re: Little Hickman Sea Sled
Posted: Thu Apr 24, 2014 12:40 pm
by DSMadCow
Glad to see you back at it, I find this build interesting. good luck and happy building.
Re: Little Hickman Sea Sled
Posted: Thu Apr 24, 2014 12:46 pm
by jacquesmm
I am interested to read a performance report. I love Hickman's sleds, that hull shape should be more popular now that it in the public domain.
Re: Little Hickman Sea Sled
Posted: Wed Apr 30, 2014 10:34 am
by Fred in Wisc
No new pics, but sanded out the quickfair, went over the whole boat feeling for irregular areas, pencil marked them, and then spread another batch of quickfair. It wasn't quite ready to sand last night, so it'll wait a day or 2. I think the outside will be good enough for the high build primer after this coat.
Planning to use the cheap Rustoleum marine paint system again. I used that on my canoe about 8 years ago and it's getting to the point where it needs to be redone, but I think that's a pretty good life span for an inexpensive paint system. And I can buy it within 5 minutes of home.
Re: Little Hickman Sea Sled
Posted: Wed Apr 30, 2014 1:29 pm
by tobolamr
Glad to see you back at it!
Every time I end up in Oconomowoc or Waukesha or even Madison, I keep thinking I should have contacted you and come over with a gift of lovely beverage and ask to see the lil' sled!
Re: Little Hickman Sea Sled
Posted: Tue Sep 09, 2014 11:28 am
by Fred in Wisc
Got the exterior faired "good enough". I adjusted my fairing standards by looking at how much wear the canoe I finished building 8 years ago has, it's got a ton of nicks, scratches, rub marks and wear. Doing this perfect won't make any difference in a few years anyway. So "good enough" is good enough.
Made some strakes and installed them. Cut from pine (I picked the heavier, denser boards), then wrapped in 12oz biax vacuum bagged on. That was an interesting experiment, and I learned that you should limit the amount of vacuum when using biax. I used nylon peel ply and about 25" of vacuum and that was way too much, pulled too much resin out of the cloth and ended up brushing more on to fill the weave back in once it was cured. I think next time I would use a peel ply that leaves more resin in the part, and limit the vacuum to about 10-15". Ah well, live and learn.
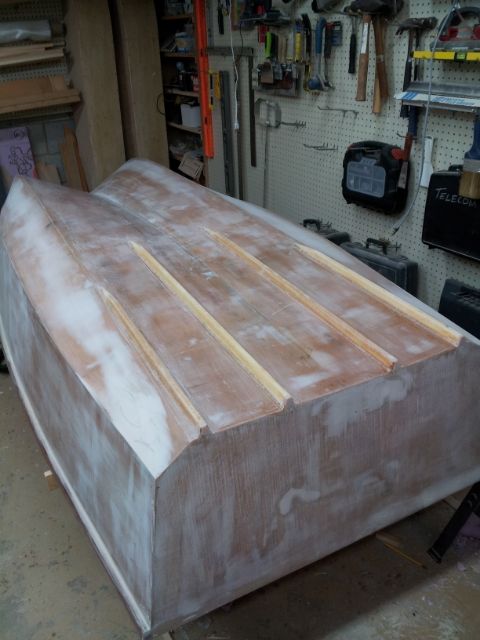
The strakes are not faired in perfectly, especially the fairing on the tips is a little wavy. But these are going to take a lot of abuse so it won't matter after a little use anyway. But they are well glued and filleted so they aren't coming off.
Rolled on the first coat of graphite. Mixed a heaping teaspoon of graphite powder into a 3 pump batch of epoxy (2 resin, 1 hardener). Needed 2 3 pump batches for one coat. It's not cured yet, but it looks slightly textured. I guess I'm going to have to be OK with that. Sanding graphite in the basement is likely to bring on the wrath of SWMBO. I didn't tape edges yet, deciding exactly how I want to determine the line for that, so I just left it a bit short.
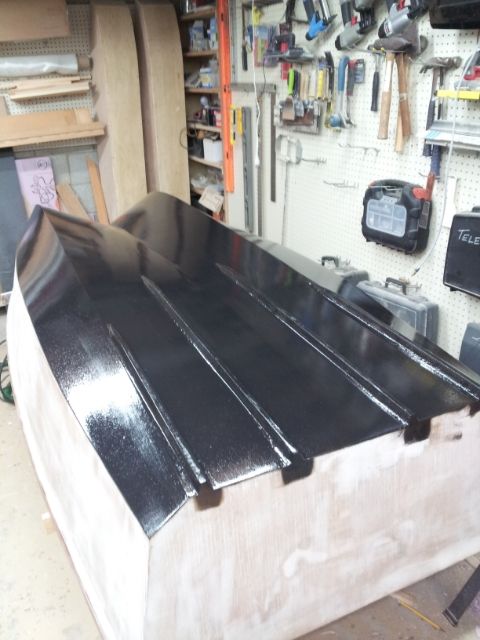
Hopefully I can get the tape on and a second coat of graphite on tonight.
Re: Little Hickman Sea Sled
Posted: Tue Sep 09, 2014 1:34 pm
by Noles309
Nice! I really like that hull style.
Re: Little Hickman Sea Sled
Posted: Tue Sep 09, 2014 11:01 pm
by jorgepease
It's a funky look to that hull but I read all kinds of good things about it, tempted to do something like that myself!!
Re: Little Hickman Sea Sled
Posted: Wed Sep 10, 2014 9:54 am
by terrulian
I admire the practicality of your fairing philosophy.
Re: Little Hickman Sea Sled
Posted: Wed Sep 10, 2014 11:13 am
by Fred in Wisc
Thanks. Mostly I'm just sick of fairing. I'm not that good at it and it's frustrating. In fact, I looked back in this thread and fiberglassing hase been pretty much done since Oct 2011 - the main structure since 2008. I've been loathe to work on it because the fairing process is tedious and kind of boring. I like the "macro" parts of building more than the "micro" parts. I should have come to this point a few years back, but I still had visions of a perfectly smooth mirror shiny little boat in my head.
I admire the workmanship that others have put into their fairing, but that just ain't my cup of tea. I have lots of respect for the guys who can do that.
And I bet my workshop will feel a LOT bigger without a 10x4 boat in there.....
Did a light sanding just to get rid of the worst bumps in the graphite and then rolled on another coat last night. I'm not entirely happy with the line I created with the tape, but I wanted all the corners that will be subject to wear to be coated so it is how it is.
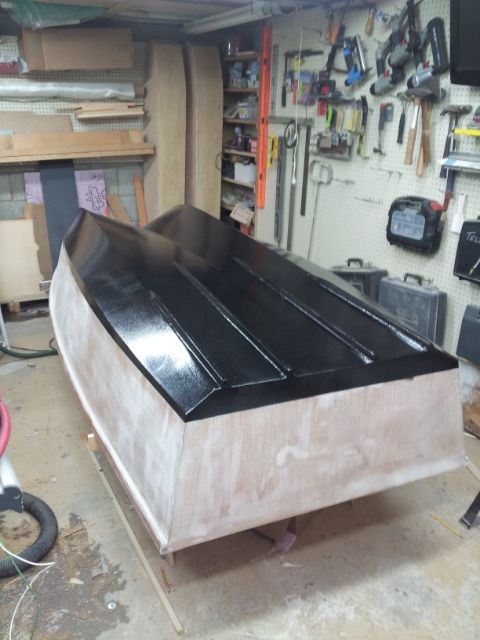
Re: Little Hickman Sea Sled
Posted: Wed Sep 10, 2014 11:51 am
by terrulian
I know what you mean. I think Cracker Larry or someone, perhaps on your thread, mentioned the quote from Voltaire about the perfect being the enemy of the good. I had a look at your build and you are really doing very good work. CL and Shine and others on the forum are, I'm afraid, in a different category from me. I like to think it is just hours at the helm, but they might actually be superior beings. I'm just going to have to live with that. It's OK, I'm going to have a boat!
Re: Little Hickman Sea Sled
Posted: Wed Sep 10, 2014 12:17 pm
by Fred in Wisc
Amen brother. Those fellas are like the Michelangelos of boat building. I'm more of a folk artist.
Re: Little Hickman Sea Sled
Posted: Fri Sep 12, 2014 12:10 pm
by Fred in Wisc
3rd coat of graphite epoxy last night. The second turned out pretty bumpy, more so near the back of the boat. So I had to sand it even though I had intended not to do so. That expensive Festool sander and dust extractor I bought a few years back really paid off this time. Almost zero mess. Gave it a quick low speed sand with 220 grit and it came out pretty good. Wiped down with dry paper towel and then laid down another coat.
Well I figured out why the finish got more textured as I got to the back of the boat- little bits of the roller foam were flaking off. I changed rollers half way through this time, but it's still going to be pretty bumpy. I guess I will have to sand it out again. If it still seems thick enough, then I'm done, otherwise one more coat with a different kind of roller cover.
I doubled the amount of graphite in the mix this time also- 2 heaping teaspoons in a 3 pump batch. Used 3 batches instead of 2, wanted a nice thick coat so I can sand it a little.
I think I need to buy a trailer this weekend and get this thing outside for final fairing (not much of it though, I promise!) and painting. Hopefully it warms up again, it's in the 50's this morning here.
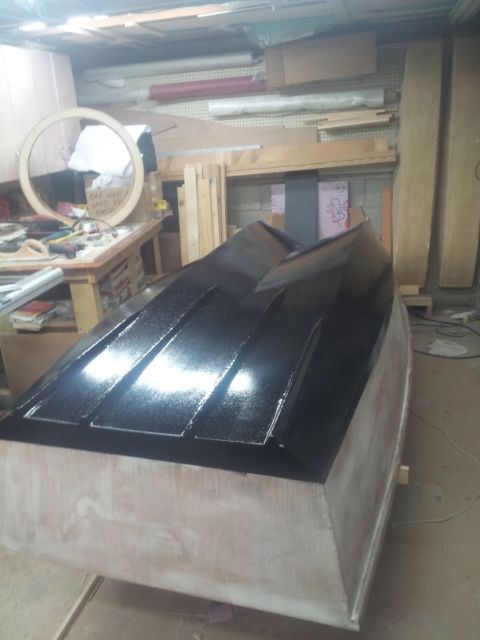
Re: Little Hickman Sea Sled
Posted: Fri Sep 12, 2014 12:10 pm
by Fred in Wisc
Sorry double post....
Re: Little Hickman Sea Sled
Posted: Fri Sep 12, 2014 2:09 pm
by terrulian
Have you tried wet sanding the graphite/epoxy?
Second question: Any way you can give us those proportions in ounces or something other than pumps? I don't use a pump and would like to understand your process and outcome.
Re: Little Hickman Sea Sled
Posted: Fri Sep 12, 2014 2:19 pm
by Fred in Wisc
No wet sanding for this guy. I'm building in the basement. Wet sanding graphite would be a horrible mess and cause significant issues with my wife. Plus that dust extractor vac on the sander is freakin' awesome. I can sand biax with no visible dust in the air, no itching and almost no dust on the floor.
If I was outside and could just wash away the wet sanding residue, I would do that. I bet it gives a really awesome finish.
I'll measure how much a "pump" is in ounces or cc's. I figured most people use the pumps, they are really convenient for mixing my normal sized batches of epoxy, although I measure small amounts with a 60cc syringe and real big ones (over 12oz or so) with mixing cups.
Re: Little Hickman Sea Sled
Posted: Fri Sep 12, 2014 2:57 pm
by terrulian
Thanks!
I used pumps with West System stuff but they always made a mess--using my studied technique, that is. With the epoxy from Bateau I use medicine cups...so thanks in advance for your measurements if it isn't a pain. I'm thinking, say, 33% on the first coat going down to 15% or so on the last.
Re: Little Hickman Sea Sled
Posted: Fri Sep 12, 2014 3:01 pm
by Fred in Wisc
No prkblem. I think Cracker Larry had a nice write up on percentages of graphite someplace.
Re: Little Hickman Sea Sled
Posted: Fri Sep 12, 2014 4:41 pm
by terrulian
It seems to me I've read of people increasing the amount for later coats, and also people who've decreased it.
Re: Little Hickman Sea Sled
Posted: Fri Sep 12, 2014 5:14 pm
by Fred in Wisc
I increased it, but if I did it again, I would do the more graphite mix all the way through. It runs a little less and it's got to be tougher with more solids in it.
Re: Little Hickman Sea Sled
Posted: Mon Sep 15, 2014 10:04 am
by Fred in Wisc
So, have you ever had one of those days where you just can't win? I sanded down the 3rd coat of graphite to get a nice bump free surface, taking off all the little tiny bits of foam roller that were stuck to the boat. They are really tiny, like medium grains of sand.
Figured I would roll on a 4th coat with a fiber roller instead of foam, and call it good.
Well, I dug through my bin of painting supplies, found a short nap roller that seemed appropriate, and went to it.
Started out not that well, roller was shedding some fibers. Figured there were a few loose ones and that would be the end of it. Nope. It got worse. By the end of the boat, it looked like I had applied the epoxy with a big dog, in the spring, when that big dog hadn't been brushed for a while. Thousands of little hairs in the finish. I picked off the clumps and left the shop feeling disgusted.
It doesn't look any better dry. Not at all.
So.........I'm calling the bottom coating done. It's coated plenty well, pretty smooth (the hairs all laid down nice and flat, nothing sticking up), and it's on the freaking bottom of the boat where nobody' else is gonna see it.
Word to the wise. Probably a good idea to buy your rollers from Bateau.
Re: Little Hickman Sea Sled
Posted: Mon Sep 15, 2014 11:06 am
by Cracker Larry
LMAO
It can be frustrating for sure. If you weren't in Wisconsin I'd come fix it for you, but the last time I was there I almost froze to death. Don't plan on going back.
Re: Little Hickman Sea Sled
Posted: Mon Sep 15, 2014 1:04 pm
by tcason
CRACKER LARRY graphite finish tutorial
Rule number 1. Work when it is as hot as possible. I'm not kidding. When I put the first coats of graphite on this boat it was still cool weather and no matter what I did, I got lumps, clumps and bubbles. Have you ever tried to stir powdered coffee creamer into cold coffee? It doesn't hardly dissolve. Stir it into warm coffee and it instantly dissolves. Same for the graphite powder. The last coats were done in the middle of the day, outside temp was about 104, the epoxy temp was near 100. The powder mixes completely and it flows out like water. In the heat of the day the epoxy obviously cures fast, so you have to work fast. This is a big advantage because the faster it cures, the less time it has to accumulate bugs, dust, dog hair and other trash.
Rule 2. Sift the graphite twice, but don't turn the crank or squeeze the handle on the sifter mechanism, just shake the sifter lightly and collect what passes through easily. Discard the rest. This boat needs 9 ounces of mixed epoxy for a full coat, to that I add 3 ounces (volume) of sifted powder.
Rule 3. Mix the resin and hardener completely before adding the graphite, stir it very good, then let it sit a minute before using. This will let any chunks settle to the bottom of the cup. Pour it out slowly and evenly over the entire bottom of the boat, but don't pour out the last 1/2 ounce or so in the bottom of the cup. This is where the uglies live, and they are best left in the cup
Rule 4. Do not use a foam roller, it induces bubbles and usually foam fragments too. I got the best results using a 3/8 nap roller made for glossy acrylic latex kitchen and bath paint. Premium grade, from Lowes. Use a full size roller, the smaller ones leave a lot of roller marks, the wide ones not so much. Roll it out completely in every direction with a lot of pressure, then roll it lightly in one direction only to remove the roller edge lines and smooth it all out.
Rule 5. Roll it out very thin and use multiple coats. I wet sanded with 120 grit between each coat, then before the last coat I scrubbed with a Scotchbrite pad and water. You do not want to dry sand this stuff
Re: Little Hickman Sea Sled
Posted: Mon Sep 15, 2014 1:58 pm
by bigtalljv
I had roller bits as well and CL suggested to roll the new roller on some packing tape to pull off the loose stuff.
Jason
Re: Little Hickman Sea Sled
Posted: Mon Sep 15, 2014 3:14 pm
by Fred in Wisc
Well, I had most of it right. Unfortunately my shop temp is set at 68 year round (basement) so that ain't changing. Dry sanding is fine with a dust extractor, but I hand sanded it a bit and that is a terrible mess.
The roller was the issue. Aside from the foreign material in it, the finish looks really good.
Cracker, thanks for the offer! But I think there's no way you would like it here now, highs in the high 50's low 60's this week.
The bottom coat seems really robust, I'm leaving it as is. Anybody at the boat ramp wants to criticize, they can show me the boat THEY built or have a big ol' dose of shut up.
Re: Little Hickman Sea Sled
Posted: Fri Jan 30, 2015 2:57 pm
by Fred in Wisc
Flipped it over with a friend a few days ago (Thanks Mark!). Spent some time sanding the rough bits in the interior. Mostly just corners and edges. I'll need to add a little Quickfair here and there and then sand one more time, then wait for warm weather to get it outside and paint.
I guess I'll need to sort out seat base locations, rod holders and a few other little misc items like that too.
Time to wrap this up and go fishing.
Re: Little Hickman Sea Sled
Posted: Sat Mar 21, 2015 10:40 am
by tobolamr
Pictures?
Re: Little Hickman Sea Sled
Posted: Thu Apr 30, 2015 3:47 pm
by Fred in Wisc
Still too cold to pull it outside and paint. Hoping for pretty soon.......
Re: Little Hickman Sea Sled
Posted: Tue May 19, 2015 3:00 pm
by tobolamr
I was in Madison a couple of weeks back, and keep saying I should just PM you and shoot down sometime when I'm nearby and take a look. I hear you on cold, too - had someone in the store today saying they had SNOW this morning!
Re: Little Hickman Sea Sled
Posted: Tue May 19, 2015 3:44 pm
by Fred in Wisc
Snow was farther west than us, but it's cold today- 48 this morning, was in the 80's 2 days ago.
Added complication- really screwed up my lower back last week, not supposed to lift anything heavy for a while. I'll have to gather up a few friends and have them carry the whole thing out for me. I'll just drag my pathetic old crippled a** around for a few weeks until I'm feeling better.
Y'all are welcome to stop in if you're in the neighborhood.
Re: Little Hickman Sea Sled
Posted: Fri May 22, 2015 7:01 pm
by fairings
Fred in Wisc,
Sorry to hear of your back injury and hope you improve soonest. I've been following your postings with great interest as the SeaSled design has fascinated me for 10 years ever since I read a historical piece in Wooden Boat. I'm in WA state but know WI a little as I lived 2 years in Madison. I know some docs there who might be able to help you: google "prolotherapy". If you want additional guidance/info from me, just ask as I love this topic too. Prolotherapy is an injection technique that 'nudges' the body into healing damaged connective tissue and can be used on any joint in the body. Fascinating how similar connective tissue is to fiberglass in appearance and function! See at Google Images: "connective tissue".
--- Best wishes.
Re: Little Hickman Sea Sled
Posted: Wed Jun 10, 2015 8:39 am
by fairings
Photographs of Boeing sea-sled available if there is interest. Boeing built many 'sleds in the 1930's and this one is on outside, exposed display in Everett, WA. About 15' long, it had been fitted with experimental hydrofoils. The photos I took 3 years ago but looking at them again now, from the perspective of reviewing the sequential construction photos from Fred in Wisc I now have a new appreciation of certain design details I'd missed before, like chine width. {Thanks, Fred, and I hope your back is improving.} I don't know how to upload photos, however, so would need a Clue from someone.
Re: Little Hickman Sea Sled
Posted: Mon Jul 06, 2015 10:16 am
by Fred in Wisc
Well, I'm able to move around again. Back from 2 vacation trips just a couple weeks apart. Hit a major milestone in the build. The boat is out of the basement and in the driveway.
haven't worked on the Sled in a while, I was pretty much as far as I could go with it indoors. Plus my "big" 16' boat needed some pretty major interior refurb so I've been working on that, my wife says the kids are old enough for some tubing and kneeboarding this summer.
We had a bunch of friends over for the 4th, and a number of them bigger, younger, or stronger than me (some of them were all 3 of those) , so I asked for some help carrying the boat out. They didn't even let me help, I just directed. Fortunately my math was right on and it fit up the stairwell with a couple inches to spare (the close part was the ceiling transition where the boat had to turn upward onto the steps, probably wouldn't have made it if the boat was a foot longer or a few inches wider).
I didn't get any pics going up the stairs, had to help keep everyone coordinated and things were happening pretty fast.
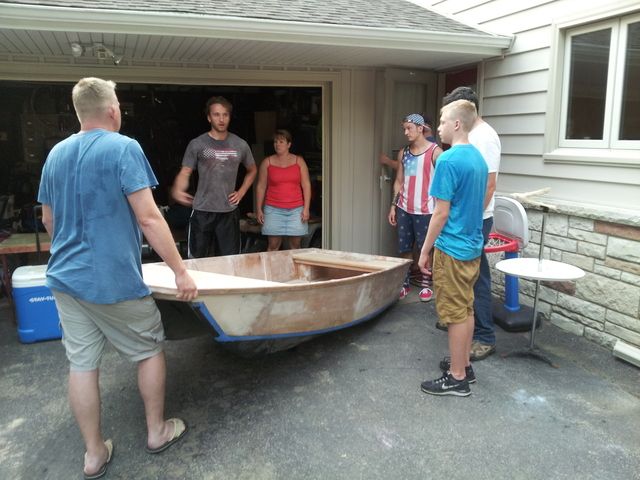
Just got it out the door
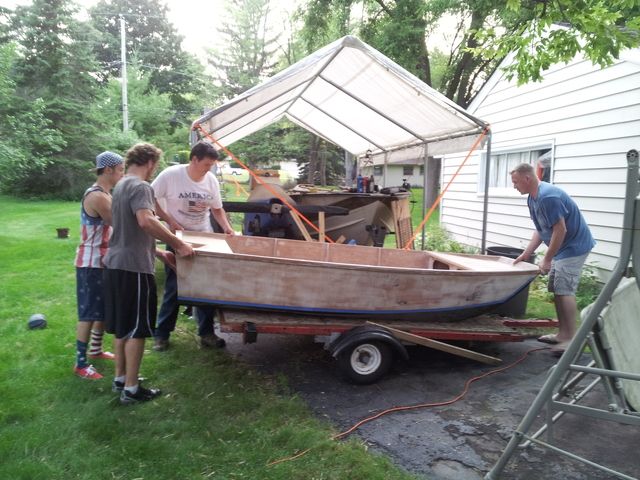
And on the trailer (temporary trailer at least......)
Now I'm sure the better lighting will show some places that need a little fairing. I'll touch that up a tad if it's bad enough that it bothers me, then give it a good wash and get some high build primer on. Then I need to decide what color it's going to be. I'm kind of torn between a natural tan/green sort of thing with an off white interior or a bright color since it's an unusual little boat that should be an attention getter. My daughter put in a vote for "sour apple" which is a very bright light green like a Granny Smith apple but I think that might be a bit much.
Re: Little Hickman Sea Sled
Posted: Tue Jul 14, 2015 11:59 pm
by Fred in Wisc
Launching is planned for tomorrow. A friend who just got a long unused boat has it ready to launch and invited me to bring the kids and fish along with them. Seems like a great idea to have a pair of boats together in case either of us has a problem.
It's not painted and will have only one seat installed for now but we'll take it out and see how it handles.
Got my old motor out of storage. It's a 1980's Johnson 8hp. I got it new in about 1999 from a friend who got it from his father in law. FIL got it when he retired from OMC and neither of them ever ran it. It might have 20 hours on it now. I pulled the plugs, put a little oil in each cylinder and pulled it over for a while to lube it up after 5 plus years storage. Rinsed the gas tank and replaced the hose and primer bulb. Filled half way with 32:1 mix for the first hour or 2 of operation. Pulled and cleaned the oily plugs then hooked up fuel, put 'er in a tub of water and started it up. Took a few pulls and real smoky until the extra oil burned off, then it ran like a champ. Cooling water stream was weak- found the output fitting was mostly blocked with debris. Cleaned that out and it worked great, strong stream of cooling water. Ran it for a half hour or so. Excited to take it out on the lake tomorrow.
I'll need to change the impeller from it sitting, but don't have the parts in stock. My bad. Should be fine for now, I'll keep an eye on the cooling water flow.
My little guy "Zippy" supervising the motor running.
Re: Little Hickman Sea Sled
Posted: Thu Jul 16, 2015 10:47 am
by Fred in Wisc
Well, the first testing was not very successful. Slow and pointing at the sky.
See here.
http://forums.bateau2.com/viewtopic.php ... 93#p364193
Looks like I have a little modification to do.
Re: Little Hickman Sea Sled
Posted: Thu Jul 16, 2015 11:10 am
by Fred in Wisc
PIc on the water. Looks good at rest considering there's no paint on it yet.
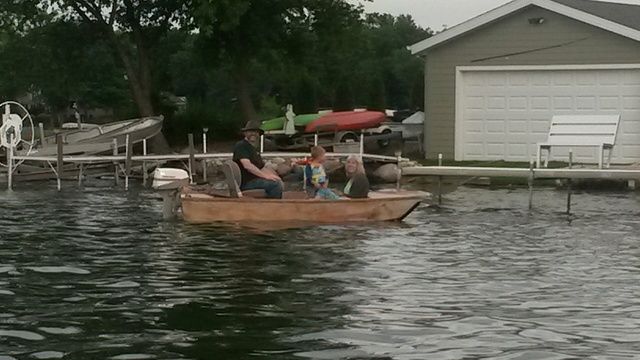
On the good side, the motor runs amazing, started up on one pull on the starter rope every time. Usually just a "flick of the wrist" pull, even.
Re: Little Hickman Sea Sled
Posted: Fri Jul 17, 2015 5:56 pm
by Fred in Wisc
So, the cause of the planing problem has been uncovered. Somehow I screwed up in scaling or construction and ended up with a transom angle of about 8-9 degrees instead of the 15-17 that it's supposed to be. Thanks for the advice on that Jacques and Cracker Larry.
After some discussion on the matter, I've decided to build a little jackplate with some additional angle built in, plus it will allow me to adjust the motor height if needed.
I'll be making something similar to this:
http://www.dillon-racing.com/jackplate/index.htm but a little lighter duty and with some additional transom angle built in.
Work wasn't too busy this afternoon so I ran down to Speedy Metals and got some 6061 aluminum angle 2x3x3/16. 3 1/2 feet of it was only $20.
Used the cold saw at work to cut it into 4 pieces 10" long. Beats the heck out of cutting it at home with a hacksaw or jigsaw, and a lot more precise.

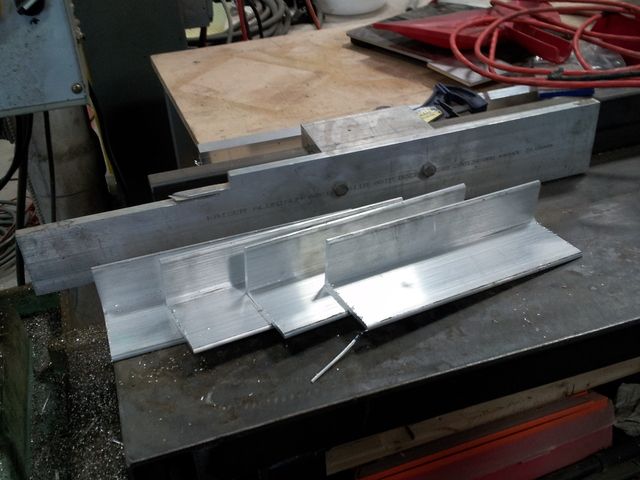
Then deburred the cut ends on a bench grinder with a wire wheel.
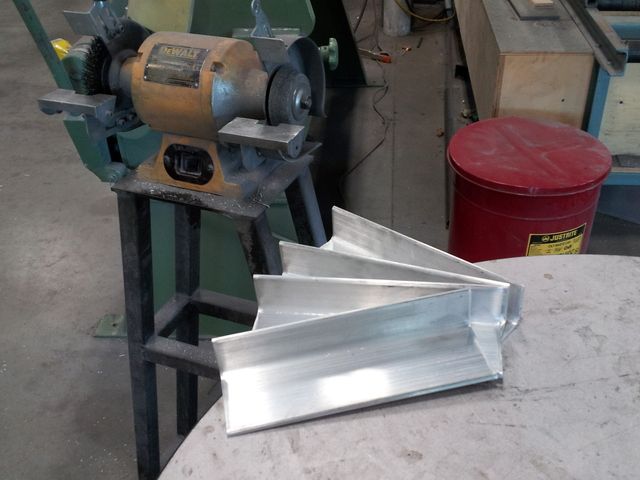
Next steps I can do at home. Drill mounting holes, cut adjustment slots (with a router), make a clamping board and bolt it all together. No welding required, although I may talk one of the welders at work into welding an aluminum plate on for the clamping board instead of bolting a wood or starboard one.
Re: Little Hickman Sea Sled
Posted: Sat Jul 18, 2015 9:09 pm
by TomW1
Nice Fred. Cheering for you that this works for you. Thinks it will. Along with moving the weight forward.
Tom
Re: Little Hickman Sea Sled
Posted: Sun Jul 19, 2015 2:24 pm
by ks8
Ah... a first taste!
Re: Little Hickman Sea Sled
Posted: Sun Jul 19, 2015 3:53 pm
by Fred in Wisc
Alas, the first taste....... Had to send it back to the kitchen......
Re: Little Hickman Sea Sled
Posted: Sun Jul 19, 2015 4:18 pm
by Fred in Wisc
I have the jackplate designed and mocked up in cardboard. Will post pics tomorrow from my pc. It's a hassle from my phone....
Jackplate design
Posted: Mon Jul 20, 2015 10:10 am
by Fred in Wisc
Figured I had better mock this up before building it for real. I found some cardboard that is approx. 3/16 thick, same as the angle I will be using. Measured up the boat and motor. Made it a little wider than initially planned to allow the clamp screws some clearance for mounting (the little handles on them needed some room to swing). The only clearance that concerns me is between the powerhead and transom when the motor is tilted up for transport. I won't have that one for sure until I can hang the motor and plate on the boat for real. Worst case, a little notch in the transom should make it work.
Here are the brackets that get mounted to the boat. The full depth, non angled ones go on the boat side so there is enough clearance to run the plate all the way up and down without the bottom of the movable section hitting the transom.
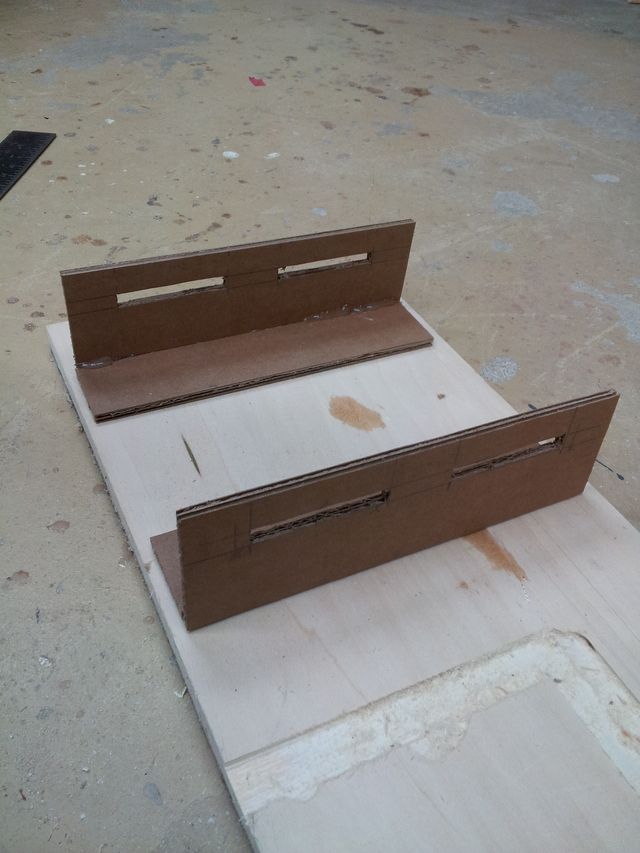
Here is the movable section that mounts to the transom side brackets. The mounting plate will be thicker, probably made of starboard and bolted to the aluminum frame with some flathead bolts countersunk in. The adjusting hardware on the sides will probably be 5/16 grade 5's. Plenty strong, the cadmium plating is fairly fresh water corrosion resistant.
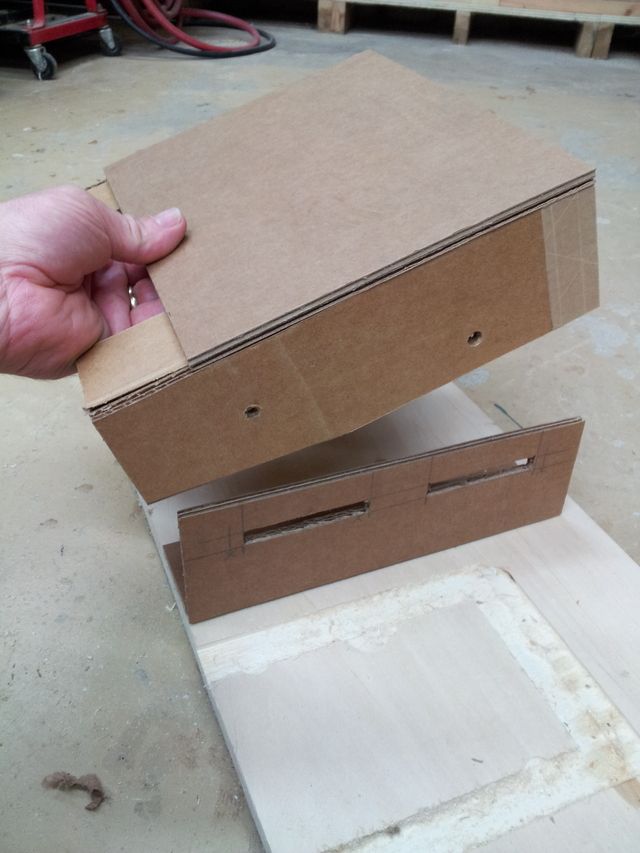
And pics of the plate in the up, center, and down positions.
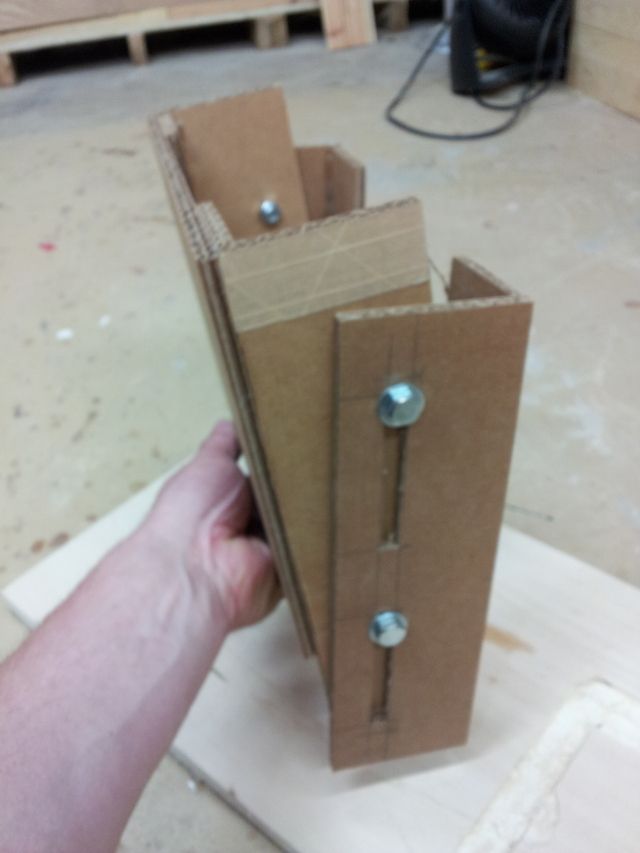
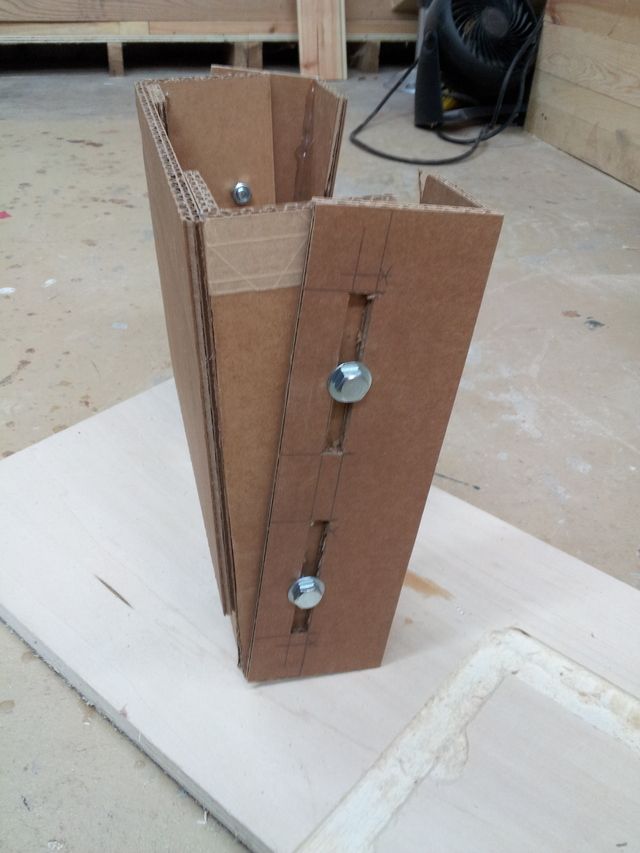
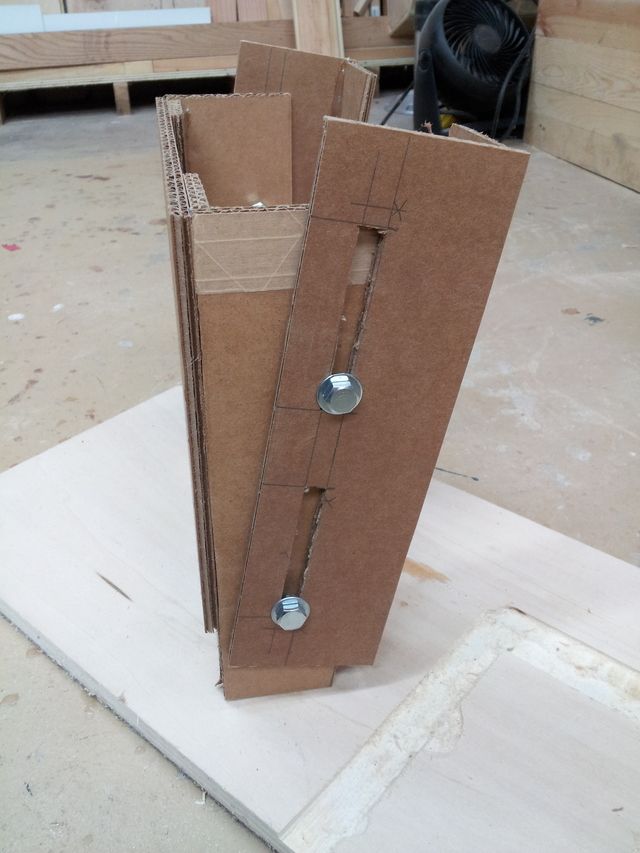
Today I'll see if I can buy one of the metal shop guys lunch or beer and get those slots cut in on the mill instead of messing around with routering them at home. I looked at it this weekend, and it wouldn't be that hard on the router table, but I am not a fan of all those aluminum chips falling into my router.
Re: Little Hickman Sea Sled
Posted: Mon Jul 20, 2015 11:54 am
by Cracker Larry
Looks good to me
Re: Little Hickman Sea Sled
Posted: Mon Jul 20, 2015 6:09 pm
by ks8
Re: Little Hickman Sea Sled
Posted: Mon Jul 20, 2015 8:08 pm
by TomW1
What Larry said.
Re: Little Hickman Sea Sled
Posted: Mon Jul 27, 2015 12:29 pm
by Fred in Wisc
My wife and kids went out of town to visit my Mom this weekend so I got some boat building time.
Got the slotted halves of the jackplate back from a machinist at work. He did a nice job cutting them. Well worth the case of Miller Light that it cost to have done. I would have spent an hour or better and ended up with a router full of aluminum chips doing that. Pics of that process later.
Gave the boat a good wipe down to remove dirt and dust. Let it dry out in the sun for a few hours.
Then wheeled it back in the garage, taped off the graphite line at the transom, and at the rounded portion of the chines near the bow. The rest I just primed right up to the edge of the panels. Just rolled it on with a foam roller. I am under no illusion that I am a good painter. I just ain't. A man's got to know his limitations. I could fool around with this for weeks and still get a substandard result, so I'm just gonna do it and be done.

Well, that definitely showed areas that I should have faired better. But none of them bothered me enough that I felt compelled to stop the painting process and fix them. A few required a little extra primer to fill them in a bit. The kids and the fish won't care at all. I just want to have this done......
Went through and knocked off a few bugs and bits of stuff in the paint, but didn't sand it. If parts are real flat, reflective, and shiny that's only going to emphasize the parts that aren't. I think it's better as an average girl than trying to be a supermodel with spots of acne. Lots of respect to the guys who can get a flawless mirror finish, especially on a big boat. But I'm not one of those guys.
Then a coat of semigloss white Rustoleum marine in the interior and the gunwhale trim. Also a bit where I painted over the graphite to get nicer lines on the sides, I wanted to give the paint an opaque white substrate to keep the color consistent.
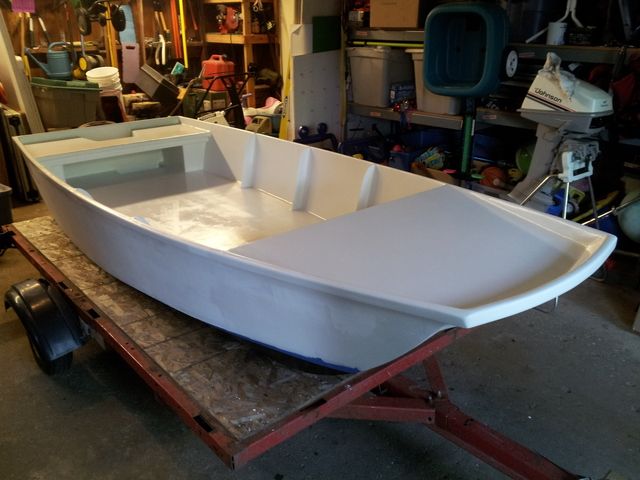

It looks a bit better dry, the pic shows differences in gloss since some sections were dryer than others.
I'm happy enough with it.
Hopefully she gets some color on the sides and transom tonight. My wife said I can have the garage another day or 2 for drying. My daughter picked out the color. Y'all are gonna be surprised when you see it. I'm not sure I I like it, but if not, I can change it easy enough in a year or 2.
Re: Little Hickman Sea Sled
Posted: Tue Jul 28, 2015 2:16 am
by Fred in Wisc
The paint store calls this color "sour apple". It's like a super intense Granny Smith apple green. It sure ain't subtle.
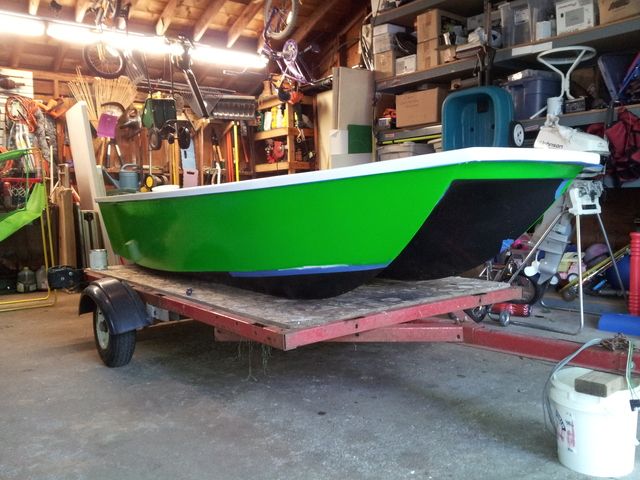
I actually pulled off a pretty decent roll and tip job. At least compared to what I've done in the past.
Removed the masking tape and found a couple little places to touch up where the primer shows a bit. Other than that, there is a little residue from the masking tape I had on before under the paint. Dang. But it's all right near the bottom. I can live with it.
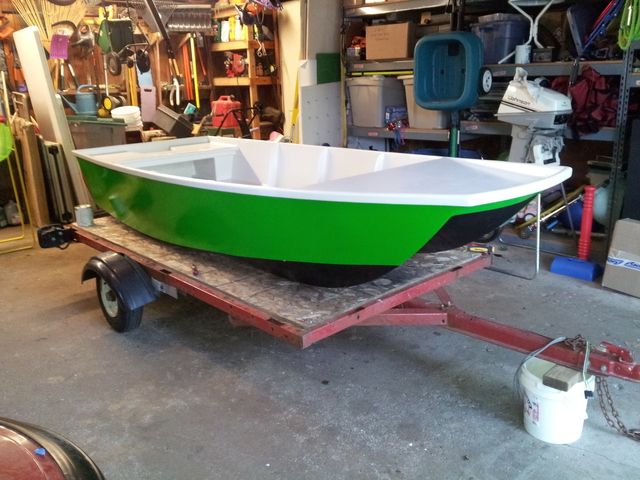
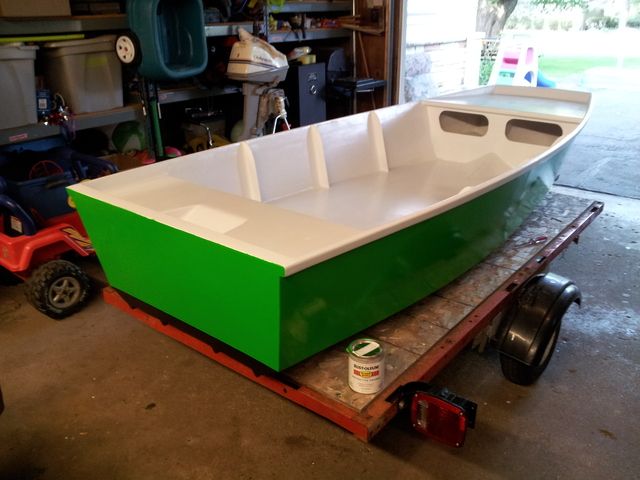
Re: Little Hickman Sea Sled
Posted: Tue Jul 28, 2015 9:31 am
by Cracker Larry
She looks good dressed in green
Re: Little Hickman Sea Sled
Posted: Tue Jul 28, 2015 9:42 am
by pee wee
I think there must be a correlation between how little you like a color and how nicely the paint job will turn out! I wouldn't paint a big boat that color, a little goes a long way, but if you wanted to add some graphics on top of that, it would pop. Fun color, have some fun with it.
Re: Little Hickman Sea Sled
Posted: Tue Jul 28, 2015 10:30 am
by terrulian
Fun color indeed. And the upside of a bright paint job is that SAR will have an easier time finding you.
Re: Little Hickman Sea Sled
Posted: Tue Jul 28, 2015 12:30 pm
by Fuzz
You might not be real happy with the paint job but it sure looks good to me.
I painted my OD-18 Kelly Green at my daughters request so I guess green is the IN color for girls now
I am sure the kids will have a ball with your boat.
Fuzz
Re: Little Hickman Sea Sled
Posted: Tue Jul 28, 2015 2:35 pm
by Fred in Wisc
I'm pretty happy with it. Just had to adjust my expectations ahead of time, knowing that I'm not much of a painter.
Where CL and Peter are the fine artists of paint, I'm more of a folk artist, or one of those guys that carve wooden bears out of logs with a chainsaw........ It's not as fancy but gets the job done.
I think an intense color like that works OK on a small boat, it's kind of whimsical, but I sure wouldn't want 21' of it.
I hope never to need SAR to find me, but just in case there is a whole bunch of foam under the sole. I think I could fill this with water, sit in it, and still not sink.
Re: Little Hickman Sea Sled
Posted: Tue Jul 28, 2015 4:34 pm
by Fuzz
I know what you mean. My heart wanted a much nicer finish on my dory than my hands could produce. Just had to let it go. Boat still catches fish just fine.
Fuzz
Re: Little Hickman Sea Sled
Posted: Tue Jul 28, 2015 4:36 pm
by TomW1
Not a bad color for a small boat.
Re: Little Hickman Sea Sled
Posted: Wed Jul 29, 2015 10:46 am
by Fred in Wisc
Got the metal parts for the jackplate all drilled last night. No high tech machining here, just scribing lines with a combination square, center punching and drilling on the drill press.
This plate will add about 12 degrees to the transom angle, putting it at a total of 20-21 degrees, a little more slope than typical, but the engine has about 14 degrees of trim adjustment, so I can still get it higher than it currently sits in the "full down" position, which is too high. So I won't lose any useful adjustment range.
It will also provide about 6" of setback, a bit more than I would have liked, but required for clearance.
Ran into one small issue, the aluminum angle isn't actually 90 degrees, it's about 89, so it doesn't quite create parallel surfaces if nested with the L side of the angles both on the same side, so I had to flip the ones mounted to the boat around. Otherwise there will be built in stress and probably more difficult adjustment. I like the look better that way, but function is more important.
Side view, you can see the adjustment slots which allow approx. 2 3/4 of vertical adjustment. It's centered at approx. the current transom height.
Interior view- There is an extra set of holes higher and an extra set lower as well. Each of these gives approx. 1 3/8 of additional adjustment. I don't think I'll need them but it was easy to drill them now and it would be a hassle later.
The piece of wood trim mocking up the outboard mounting board will of course be replaced by a plywood or starboard clamping board. I have to rummage around a bit and see if I have a piece of starboard left somewhere. The clamping board will be held on by 6x 1/4 hardware. I'll round off the square corners and sand the mill finish aluminum so it's nicer looking as well.
The plate fastens to the transom with 4 x 5/16 hardware, the transom is 2" thick at the top and about 1 1/4 to 1 1/2 below, so it should be plenty strong. I have to put the top mounting bolts a little close to the top edge than I'd like but it's thick so it should be fine. Gotta predrill and epoxy coat holes.
Re: Little Hickman Sea Sled
Posted: Wed Jul 29, 2015 8:29 pm
by Steven
Hears "put a lime in a coconut" crooning away.
Looking good. Anxious to see how the fix works out. Neat little boat.
Re: Little Hickman Sea Sled
Posted: Mon Aug 03, 2015 10:39 am
by Fred in Wisc
Jackplate mounted.
I made the clamping board from some 3/4 starboard that was in the scrap bin at work. Had to trim off the holes and such but got a big enough piece. Wish it was white, rather than black, but beggars can't be choosers. I have enough that I might double it up and go 1.5 thick, but I'll see how solid it feels with one layer first. I'd rather not hang any extra weight out behind the transom since the boat already is heavy in back.
I clamped the clamping board to the aluminum and drilled used the holes in the aluminum as guides so the starboard holes line up exactly. That worked well. Then countersunk them so flat head machine screws will be flush. The screws in there now are too long, and will be replaced by proper length ones with nylon locking nuts. It's held on with 6 x 1/4" fasteners.
I then assembled the jackplate, clamped it to the boat with a couple bar clamps. Adjusted it a touch until it was centered within 1/16 and as close to square as possible with the top of the transom. Then drilled right through the jackplate mounting holes to ensure good alignment. Removed the plate and drilled the holes the rest of the way through, the drill chuck hit the clamps on the top ones.
Then coated the inside of the holes with silicone, siliconed the stainless bolts and around each of the holes on the outside, and bolted it together. I know it would have been better to epoxy coat first, let it dry and then silicone seal, but time didn't allow. I was real thorough with the sealing so I don't think it will present a problem.
Used 4x 5/16 stainless bolts with stainless fender washers and nylock nuts to secure the jackplate to the transom.
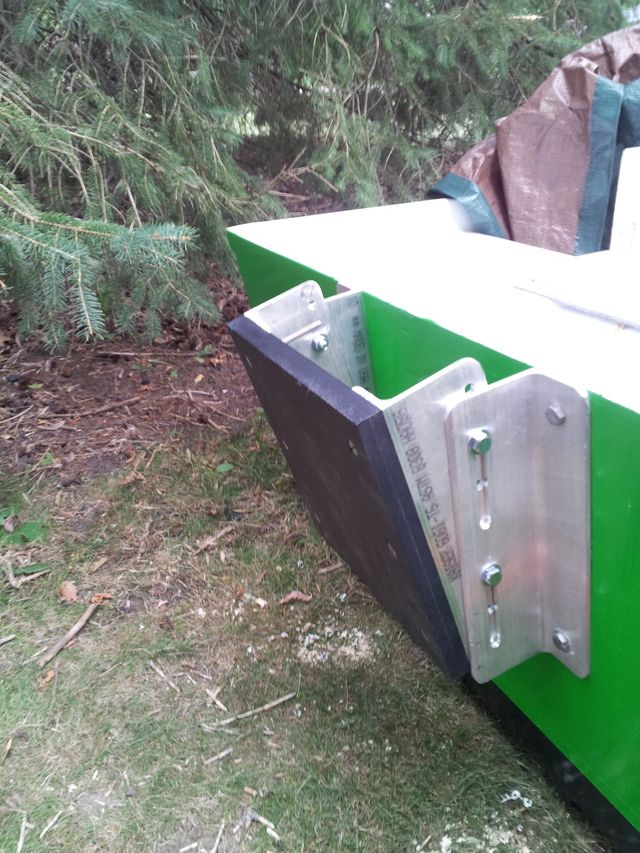

I rounded the corners on the aluminum parts, but didn't sand and buff them out yet, wanted to do a test run first before messing with that. I'll put a little radius on the edges of the starboard as well.
Hopefully I can get it out on the lake for testing in the next couple of days. I'll have to get my trailer back, though. It's currently pulling couch moving duty for my nephew who just bought his first house. So the boat's on the lawn under a tarp.
Re: Little Hickman Sea Sled
Posted: Mon Aug 03, 2015 2:15 pm
by ks8
Mint! Doublemint!
Trying to remember where I've seen that color before.... oh yea....

Re: Little Hickman Sea Sled
Posted: Mon Aug 03, 2015 4:15 pm
by Cracker Larry
That looks like something Raymond would have built
Very nice. Nothing wrong with that.
Re: Little Hickman Sea Sled
Posted: Mon Aug 03, 2015 4:31 pm
by jacquesmm
Very clean: small DYI adjustable bracket.
Re: Little Hickman Sea Sled
Posted: Wed Aug 12, 2015 3:53 pm
by Fred in Wisc
Bracket completed and installed. It's way closer to planing, but not quite there yet.
I still need to get the weight farther forward. With myself as far forward as I can still reach the tiller, and my daughter up front, it won't quite bring the bow back down. But we're moving in the right direction.
It feels a lot steadier underway sitting on the floor than up in the chair. With me on the floor it feels solid and steady underway, especially for such a little boat. I'm pondering adding a real low bench and remote steering farther forward. Probably with a cable or rope setup like they use on little hydroplanes.
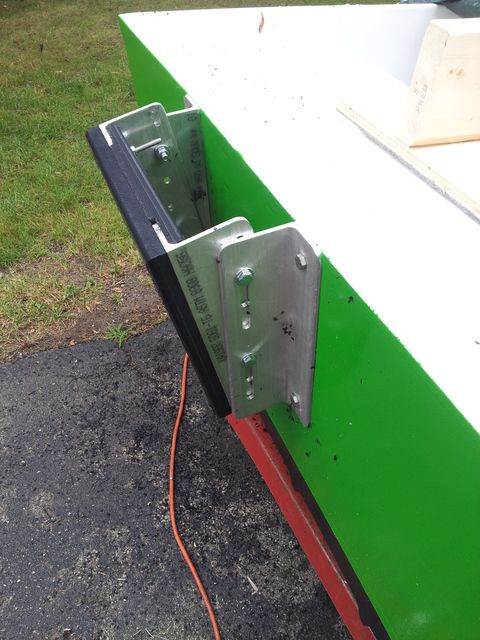

Routering that starboard sure makes a mess, but it works great and gives a nice finish. I think the stuff I got is Seaboard brand, actually, but it's all HDPE. Used a Forstner bit to cut the recesses for the clamp pads on the outboard. I like those- makes it easier to center each time and harder to lose a motor if the clamps work a little loose.
Re: Little Hickman Sea Sled
Posted: Wed Aug 12, 2015 4:36 pm
by Steven
Looks good. Very nice. Do you have a fin/whale tale installed on your motor? One would give you a lot of stern lift. I ran way bow up in my GV11 when sitting on the back deck. The fin made a huge difference, and made it track incredibly well
Re: Little Hickman Sea Sled
Posted: Wed Aug 12, 2015 4:53 pm
by Fred in Wisc
I don't have a fin on it. I'm going to try and sort this out without one if I can. The hull seems to have a LOT of lift as it picks up speed, I actually had to lower the motor quite a bit to keep from ventilating the prop. That may change once I get the angle of attack right so I don't want to drill holes in my motor until I'm sure I need to.
Re: Little Hickman Sea Sled
Posted: Sun Apr 01, 2018 7:38 am
by Fred in Wisc
Pics- sorry they aren't showing up. I don't want to pay Photobucket the ranson they charge to allow links now. But you should be able to see the album there. Under Fredinwisc.
Re: Little Hickman Sea Sled
Posted: Sun Apr 01, 2018 8:36 am
by BarraMan
Fred in Wisc wrote: ↑Sun Apr 01, 2018 7:38 am
Pics- sorry they aren't showing up. I don't want to pay Photobucket the ranson they charge to allow links now. But you should be able to see the album there. Under Fredinwisc.
Try “fototime.com” - costs me A$20 something a year and no other hassles.
Re: Little Hickman Sea Sled
Posted: Sun Apr 01, 2018 8:44 am
by Jaysen
Or just post here on the BBC gallery... personally I like to keep my pics multiple places. One of which is on the site that provides direct context. BBC makes it free and, since it’s in there best interest to keep it open, public.
But that’s just me.
Re: Little Hickman Sea Sled
Posted: Sun Apr 01, 2018 11:06 am
by jacquesmm
The BBC gallery is free and easy to use.
Re: Little Hickman Sea Sled
Posted: Mon Apr 02, 2018 1:12 am
by Fred in Wisc
New stuff will go on the BBC gallery, it's just a case of re-creating the existing. That's gonna take some time which is always in limited supply....
Re: Little Hickman Sea Sled
Posted: Mon Apr 02, 2018 1:15 pm
by ks8
it is good to know that despite no pictures right now, the boat is floating, and certainly catches the attention.
Re: Little Hickman Sea Sled
Posted: Wed May 23, 2018 4:34 pm
by Boatguy30
Did the Jack plate make a difference? I honestly can't see how it will. Maybe in a 20' with like a 150 it could he critical but it looked to me like tour engine angle was similar to what you'd have on a small skiff or rib.
Re: Little Hickman Sea Sled
Posted: Wed May 23, 2018 4:46 pm
by Fred in Wisc
It did help, but not enough. I've got weight distribution issues to work out. A problem with scaling things down.....The weight of the people in the boat doesn't scale with it.
Due to a scaling error I had the back of the boat too vertical, the jackplate corrected the thrust angle problem that I had caused myself there, but there is still too much weight in the back of the boat to get the nose back down and get it on plane. If I put a heavy teen way up in the nose, it's right on the edge of planning, but not quite. Unfortunately the jackplate also moves the moto weight back, not what I needed, but it's only about 3 inches with a lightweight 2 stroke 8hp, and the thrust angle was significantly wrong (about 7 or 8 degrees from vertical rather than about 15 if I recall0
Frankly, I got pretty frustrating messing with it, parked it, and went kayak fishing. I'm thinking I may add a little console with seating farther forward to get the weight distribution to work better. But I moved last fall, so I'm still getting unpacked, finishing up some remodeling, and doing yardwork neglected by the former owner. And the new place is on a lake, so I'm pretty easily distracted from boat building since boat using and good bass fishing is available all the time now.
I have been messing with making a real little kayak for my 5 year old son, a CC14 reduced to about 80% width/depth and 55% length. Built from one sheet of plywood and leftover cloth, resin and other supplies I had laying around. The commercial kid boats were too big for him, he only weighs about 40 pounds but he's absolutely itching to paddle his own boat. Figured a quick build there would be the "cool dad" thing to do.
I'll stick a few pics of that build up, along with dimensions if it works well.
Re: Little Hickman Sea Sled
Posted: Sat May 26, 2018 3:02 pm
by ks8
Nice on the wee one sheet kayak. Looking forward to those pictures too, with happy paddler!
I started boat building after watching some PBS boat building special where the builder made a simple little one sheet dinghy for his grand-daughter, in a day, no paint at all. She got in and away she went, beaming. Quick disposable boat -- lifetime memory for the two of them.
Re: Little Hickman Sea Sled
Posted: Thu Jun 07, 2018 4:02 pm
by Fred in Wisc
Hmmm, the pics are showing up now. I don't know why, but I'll take it!
Re: Little Hickman Sea Sled
Posted: Thu Jun 07, 2018 5:47 pm
by Fuzz

no pictures

Re: Little Hickman Sea Sled
Posted: Thu Jun 07, 2018 5:56 pm
by Fred in Wisc
Hmmmmmm, wonder if that's just because this computer has the password for Photobucket stored? I'll move 'em over to the Bateau gallery at some point.
Re: Little Hickman Sea Sled
Posted: Thu Jun 07, 2018 11:42 pm
by Fuzz
If you are still using PhotoBucket they will no longer let you host them to other sites. That is unless you pay for the upgraded service. I am not sure I have ever seen pictures of the sled and hope you are able to post some.
Re: Little Hickman Sea Sled
Posted: Fri Jun 08, 2018 1:05 pm
by ks8
If you have any in a bateau gallery now, or in photobucket that are now showing up, would you post an updated link here to make it a bit easier for new comers to this thread to take a look?
Re: Little Hickman Sea Sled
Posted: Tue Apr 09, 2019 5:38 pm
by Fred in Wisc
Re: Little Hickman Sea Sled
Posted: Wed Apr 10, 2019 3:54 am
by glossieblack
The pics of the kayak are coming up. Nice! How's the sled coming along?
Re: Little Hickman Sea Sled
Posted: Fri Apr 19, 2019 5:46 pm
by Fred in Wisc
I've used it a bit over the last couple years. Moved to the lake last year, so now it's actually easier to just crank the big boat down on the lift than it is to launch the small one, so I've been lazy about getting it dialed in. We use it with a little electric motor.
Still can't get the weight distribution far enough forward to get it to plane out. With my 8hp motor, me as far forward as I can reach the tiller, all the gear and a biggish teenager in the front, it ALMOST gets on plane, but not quite. I can feel it rise up in the water, on plane I bet this thing will get a ton of lift at speed and really zip around.
I've been collecting some parts to change this up a bit. I'm thinking it could go one of 2 ways: Either add a trolling motor and battery up front and maybe a tiller extension (I'm not real comfortable driving fast with one of those though). Or a bench seat farther up for weight distribution, steering wheel with cable linkage (so I can adjust the play out and have nice tight steering) and swapping out the 8hp Johnson for the 18hp that I have tucked away in the garage. The use it to hot rod around a bit.
Unfortunately, having moved recently there's a bunch of updating on the house that keeps taking priority.
Re: Little Hickman Sea Sled
Posted: Fri Apr 19, 2019 8:55 pm
by Fuzz
I say slap that 18 on her and then have somebody shoot a video. Sort of the old "hold my beer and watch this" deal
Re: Little Hickman Sea Sled
Posted: Mon Apr 22, 2019 9:32 am
by Fred in Wisc
That's pretty much the plan, but I need to figure out how to steer it from farther up front!
Re: Little Hickman Sea Sled
Posted: Mon Apr 22, 2019 11:51 am
by Jeff
Good to hear from you Fred in Wisc!! You guys had a tough winter!! Jeff
Re: Little Hickman Sea Sled
Posted: Mon Apr 22, 2019 12:10 pm
by Fred in Wisc
No kidding. That -60F wind chill, humans just ain't calibrated for that kind of stuff. I'm glad it was only for a couple weeks.