Page 1 of 1
Lung Boy's FS17
Posted: Thu Mar 20, 2008 5:37 pm
by Lung Boy
I've finally committed to building a FS17. The plywood has arrived and the cutting has started. It is a bit unnerving cutting into such expensive wood.
No photos yet. Nothing too interesting to report, but I'm sure I will need some support in the near future. So, thanks to all of the helpers ahead of time.
Good day.
Posted: Thu Mar 20, 2008 5:45 pm
by chicagoross
Welcome to the club! With all the fs17 builders on the board in various stages of their builds, you should have about the best support group of any Bateau plan. Have fun!
Posted: Thu Mar 20, 2008 6:22 pm
by TomW
Lung Boy it's not really very expensive the 1/4" is only $1.70 or $2.00 a sq. ft. just think if you were usng solid teak or walnut at $5 - $7 a sq. ft. It's all in the perspective.

Oh and congrats on joining the club good luck with the build you have lots of help.
Tom
Posted: Thu Mar 20, 2008 6:59 pm
by Aripeka Angler
LB, you will do fine. Stitch and glue boat building is pretty easy. It should be simple for a rocket scientist.

(read your profile) Remember to measure twice and cut once.
I am building a much different boat about 35 miles north of you. I will watch your build with interest including where and what types of fishing you enjoy.
Good luck

Richard
Posted: Fri Mar 21, 2008 10:55 am
by steve292
Nice to see another FS17...

, you will get loads of support from this group of builders,don't be afraid to ask,it will save you time & money.
BTW,Are there any more FS17's in the UK or Europe being built by people lurking on the board?
Steve
Posted: Fri Mar 21, 2008 12:08 pm
by donk
Really like the FS 17 and have been watching the builds. Maybe it'll be my next one but I would also like a cuddy of some type.
Anyway, welcome. You'll get all the help you need here.
don
Posted: Fri Mar 21, 2008 6:48 pm
by Dougster
Welcome to the forum. That choking feeling on cutting pricey wood fades somehow. And it does concentrate the mind
That's a cool boat, looks very functional. Make sure to post pics. Remember, if you can break it, you can fix it.
Done broke it and fixed several times over Dougster
Posted: Fri Mar 21, 2008 8:25 pm
by bushmaster
LB
Welcome to the build.
Study all the posts, ask questions. There is a bunch of guys more than willing to help.
Study the plans and building notes..even then you will have questions...
Use cheap ply to cut through away molds..this will give you lots of practice..
I did not know a darn thing about boat building before I started my FS17, But I am doing OK, 3 and 1/2 months later after I started.
See my gallery so far.
http://forums.bateau2.comthumbnails.php?album=751
You will do well, good luck
Bushmaster
Posted: Mon Mar 24, 2008 2:52 pm
by Lung Boy
Thanks for moral support everyone.
I have made my first mistake allready. I cut the stringer notches in the molds in the wrong spot. I marked the correct 12 inches from the center line, but I cut the notches to the outside of the line and not the inside. Fortunately, the molds are only temporary OSB.
Posted: Tue Mar 25, 2008 3:38 pm
by jgroves
Nice to see another FS17 coming along. Mistakes like that can/will happen

I wish I had a nickle for every mistake I have made in measuring. I bet I would be a couple of sheets of plywood richer
i'm back
Posted: Sun May 11, 2008 12:17 am
by Lung Boy
Greetings all.
The florida boat builders meeting inspired me to get going on my build. I was only there for the bar-b-que but it was great seeing finished boats and meeting some of the other builders.
Last weekend I laminated the stringers, transom and clamping boards. I also spliced the hull panels. I did some good work and some not so good work.
First, I'm not bad at mixing epoxy. All of my batches cured nicely.
The hull splices turned out really nice. I probably could have used a roller to squeeze out excess epoxy from the biaxial tape. That tape seems like it is quite thick.
The stringer lamination went o.k. It is a good thing that measurements don't need to be exact.
The transom and clamping board laminations did not turn out like I had hoped. I could have sworn that I used the transom as a template for the clamping boards. My cutting must have been way off. I'll need to trim and sand the top edge.
The lamination of the last clamping board may be a problem where I could use some help. I pre-coated the last clamping board piece with epoxy the night before and there may have been couple of clumps of epoxy on the board that I neglected to sand. There are definitely some voids along the edges of the last lamination. Should I try to fill those voids with epoxy? Should I try to separate the last lamination and try to redo?
This is an attempt to link to my gallery.
http://gallery.bateau2.com/displayimage ... at=0&pos=2
Posted: Sun May 11, 2008 12:27 am
by Lung Boy

When I upload a photo to my gallery it become the first photo of the gallery. How do I reorder the photos so that the latest upload is the last photo in the gallery?
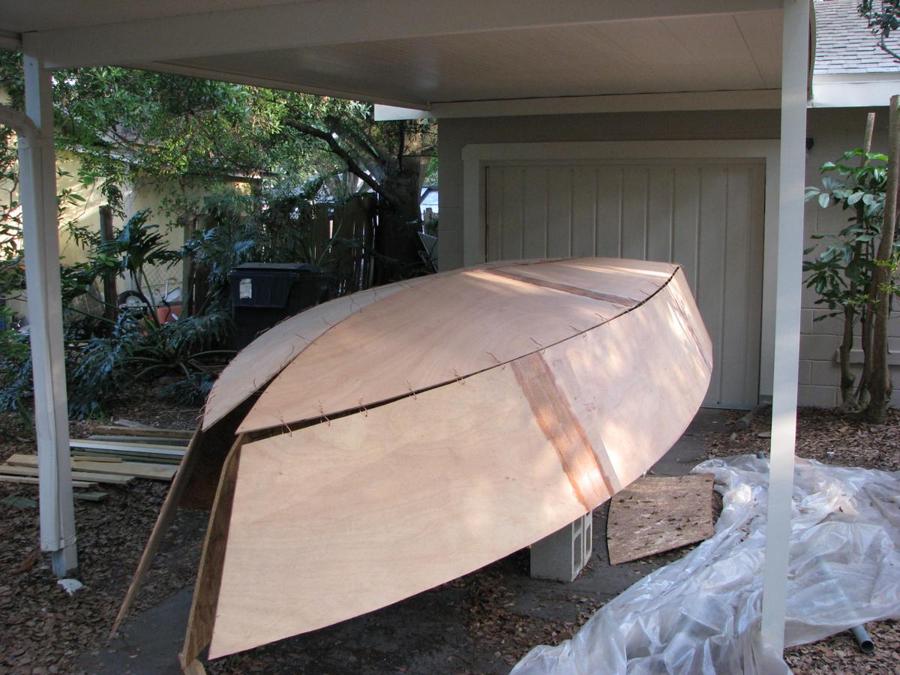
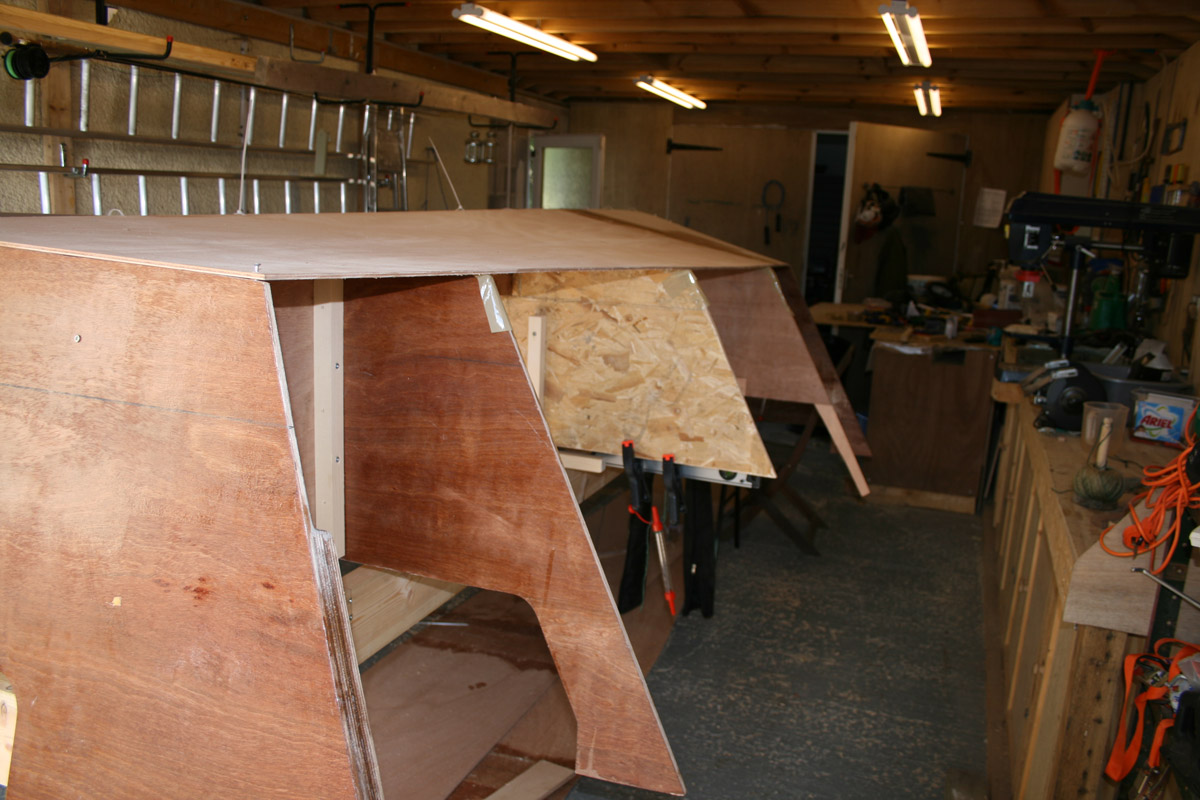
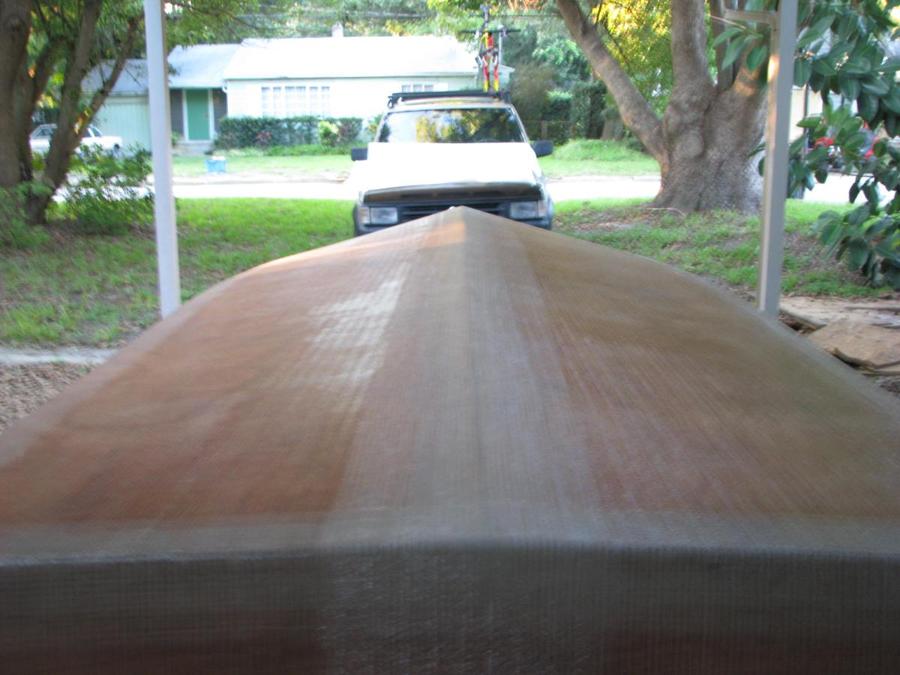
Hull panels loosely stitched on the jig
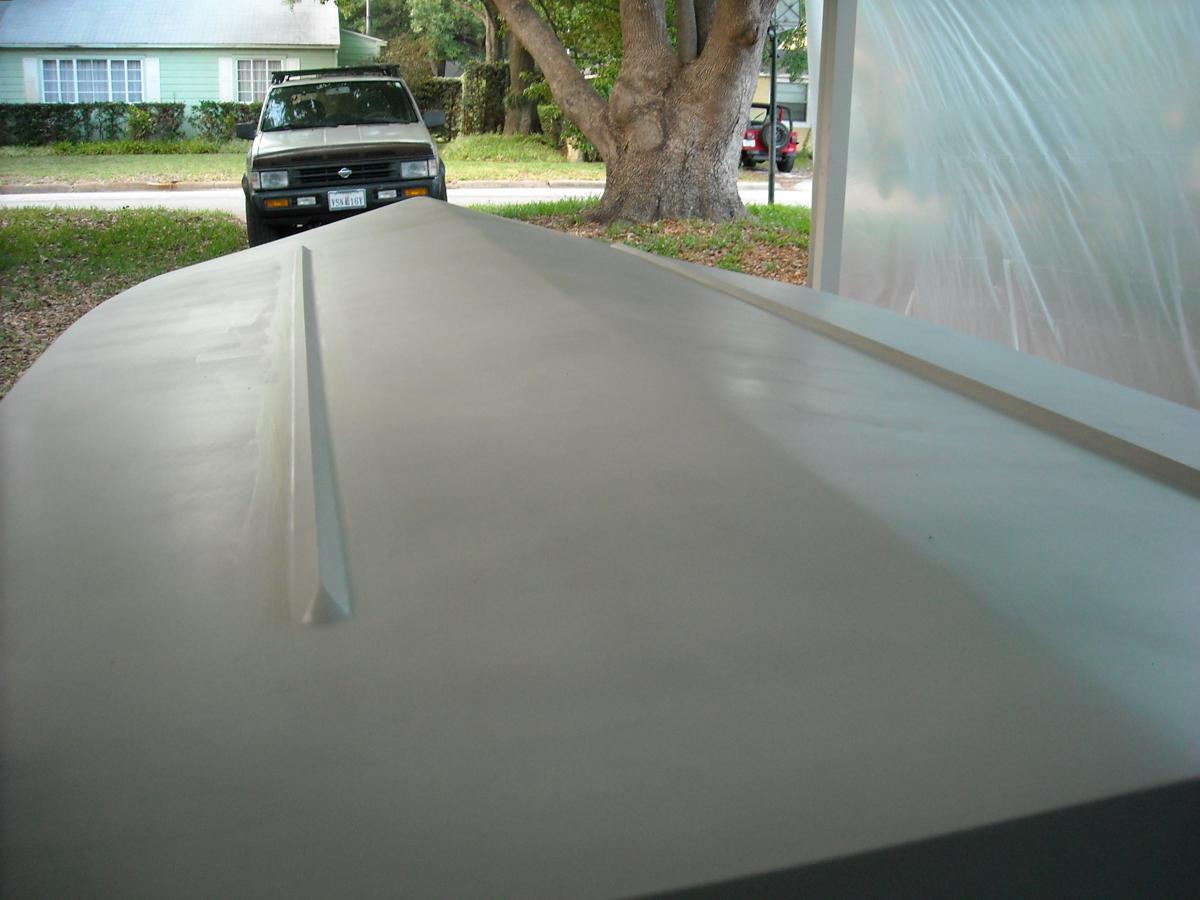
Posted: Wed May 28, 2008 7:53 pm
by Lung Boy
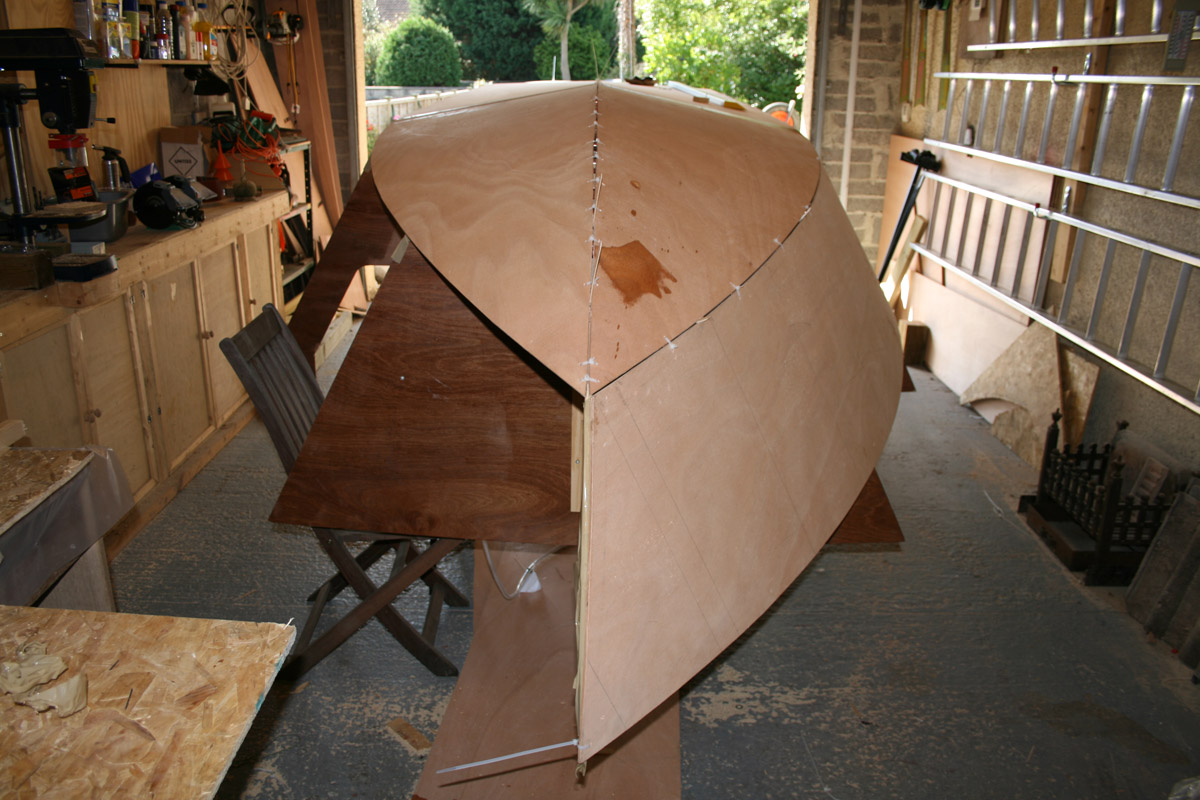
More progress. After tweeking the mold positions I finally got the hull panels up and loosely stitch. No major problems. It looks like everything lines up at the bow.
I will try the 1/2" dowel trick when I tighten the stitches.
Questions:
1. Do you stitch the hull panels to the transom or use screws?
2. Do you stitch the panels at the bow to the bow mold?
3. Is there anything you use as a spacer to keep a gap at the seams?
Re: Hull panels loosely stitched on the jig
Posted: Fri May 30, 2008 3:04 am
by steve292
Lung Boy wrote:
Questions:
1. Do you stitch the hull panels to the transom or use screws?
2. Do you stitch the panels at the bow to the bow mold?
3. Is there anything you use as a spacer to keep a gap at the seams?
1. I used a screw in each bottom panel to hold them on. Don't drive it all the way home, you want the panel to float.
2. I had to stich the panels to the bow mold to get them to come together properly in the end
3. I used tongue depressors as spacers. If the panels are really pushing on each other and it is obvious that they won't come together , I used a jigsaw to run between them to relieve the join, & create a gap.
Use as few stiches as you can, tighten slowly. I put pictures of how I did it in my gallery, and on Daniels thread (ColonialC19)
Hull looks great,very nice job
hope this helps,
Steve
Posted: Fri May 30, 2008 9:47 am
by tech_support
I agree with steve, use screws only in a couple spots (bottom to transom near keel, side panel to transom near chine, and maybe one or two along the keel towards the center.
I also like to but a very thin finish nail tacked into the very top of the mold - this keep the bottom panles from touching and lets you visually line things up. Take it out after you tack weld.
In the FS12 tutorial we used nails to keep the spacing even....

Posted: Fri May 30, 2008 12:18 pm
by Lucky_Louis
lungboy said:
The lamination of the last clamping board may be a problem where I could use some help. I pre-coated the last clamping board piece with epoxy the night before and there may have been couple of clumps of epoxy on the board that I neglected to sand. There are definitely some voids along the edges of the last lamination. Should I try to fill those voids with epoxy? Should I try to separate the last lamination and try to redo?
Separate? Not a prayer at this point, you'd destroy the whole transom trying to get it apart. That's a good thing. A void there can be very bad thing as it will try to wick moisture in. All is not lost. I would take a small circular saw and set the depth to an inch or so. Then I would clamp a 2x4 onto each side of the joint to provide a stable platform for the saw. Run the saw right down the seam. Now you should have a nice, even groove following the seam that you can fill with a real runny mixture of woodflour and epoxy (tomato soup, not ketchup), If you can't get at the area with the saw, use a Dremel or similiar tool to open up the area. The problem with just spreading epoxy over the voids is the air inside won't let the filler penetrate very far. If the voids are few and far between, just drill a 3/16" to 1/4" in the middle of the void and fill that. On non-horizontal surfaces, fill the hole and cover with a piece of masking tape to keep the mix where it belongs (or turn the piece to make it horizontal).
Hope this helps. Remember, there's almost nothing we can fix on our boats given enough epoxy, wood filler, and time
transom problem
Posted: Fri May 30, 2008 7:03 pm
by Lung Boy
Lucky, thanks for the advice. I already made a fix. I was able to remove the section of the clamping board that was the problem. The rest of the clamping board was on solid there was no way of getting it off other than grinding it off. Then I reglued the bad section. I happy with the fix for now. If it bothers me later I will grind it off after the flip.
Posted: Fri May 30, 2008 7:06 pm
by Lucky_Louis
Good news! I'm glad you could deal with the easy way. I'm sure by the time you flip, you'll forget all about it.
stitching
Posted: Fri May 30, 2008 7:19 pm
by Lung Boy
Shine, Steve, thanks for the comments. They were very helpful.
I see what you guys mean about tightening the stitches slowly. It's like trying to plug a hole in a dam. You plug one hole and then two new ones pop up.
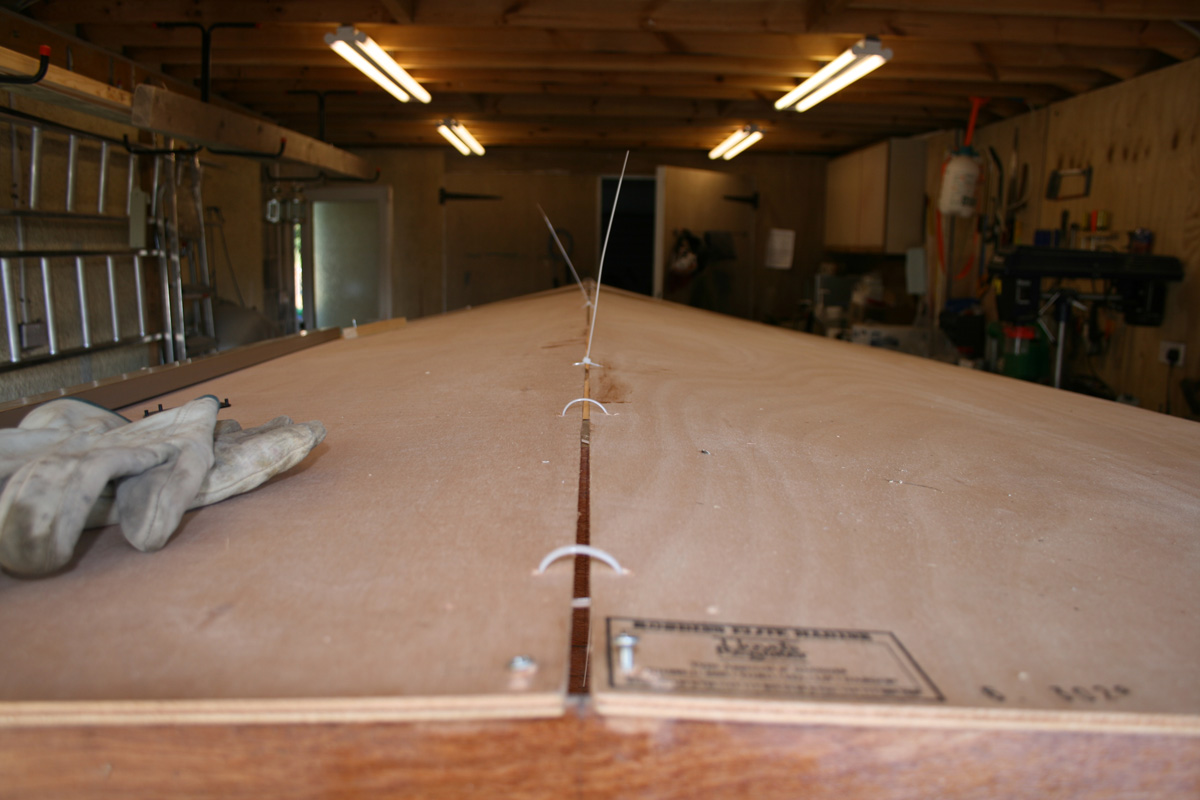
I stitched the keel seam up to the bow and also the chines up to the bow. I need to take a bit off of the front of the bow mold before I do the bow.
My cuts along the chines definately were not perfect. The gaps along the chines vary quite a bit. I think need to break out the jig saw or dremel to get a more consisent gap so that the tension on the stitches will equalize.
When I stitched the bottom panels to the bow, the panels raised up off of frame C a bit. Should I screw it down?
Posted: Sat May 31, 2008 5:34 am
by steve292
To screw it down is a last resort really. It took me about 4/5 goes at it to get it right. It is worth persevering with it for a bit, as it will pay divedends in saved fairing(and sanding) later if you can get a nice flat planing surface, and fair hull now. I would look to see what is causing it to ride up at C. look at this-
Use as few stiches as you can get away with, tighten them the minimum that you need to get the hull fair.I think there are only 2 stiches tightened between the transom & frame B here.without seeing a picture of your hull I would think this is the most likely cause, to many stiches, too tight.I apologise if I am wrong, or you haven't done that
.
You can see here what I used to stop the bottom panels riding over each other.
This is how I did the bow,I used stitches every 6" or so up to about mold B
I gave you some dud info in my last post, sorry. I used 2 screws in each bottom panel, not one.
Here, see the second screw on the chine corner?
You'll get there, it's just a bit of a faff about to get everything to line up properly, hope this helps,
Good luck,
Steve
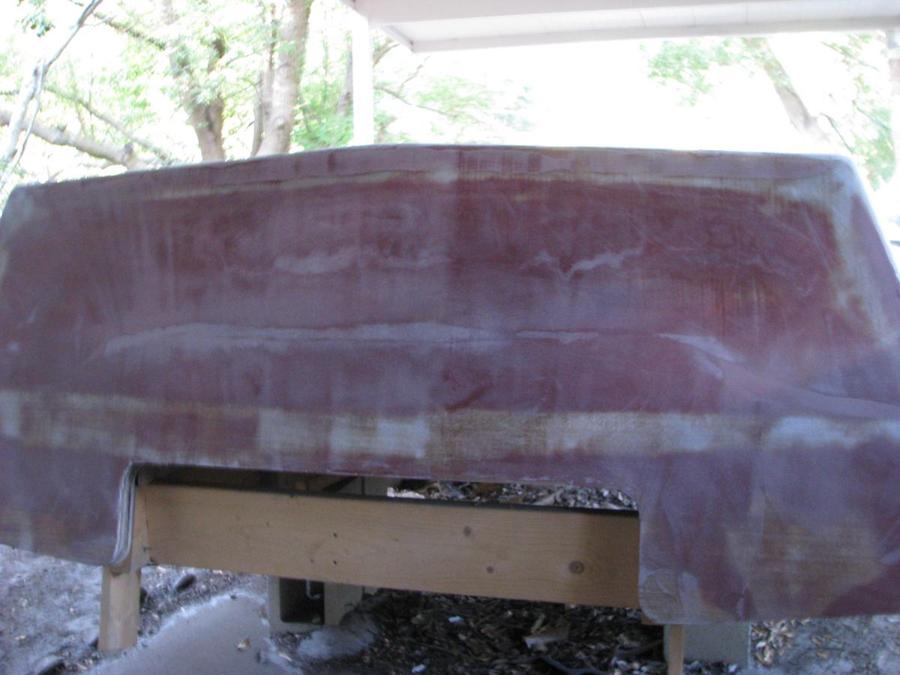
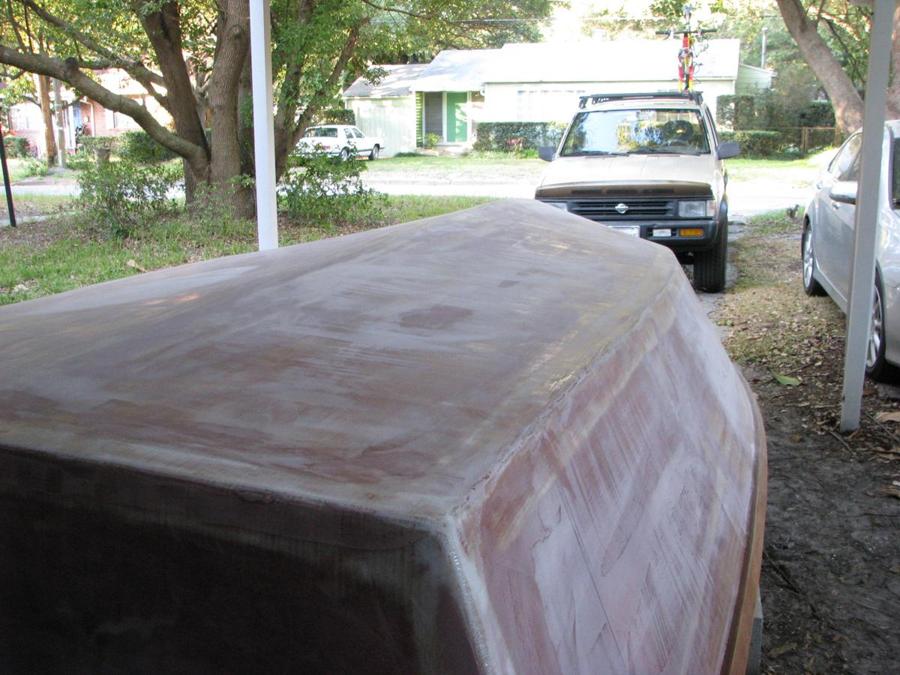
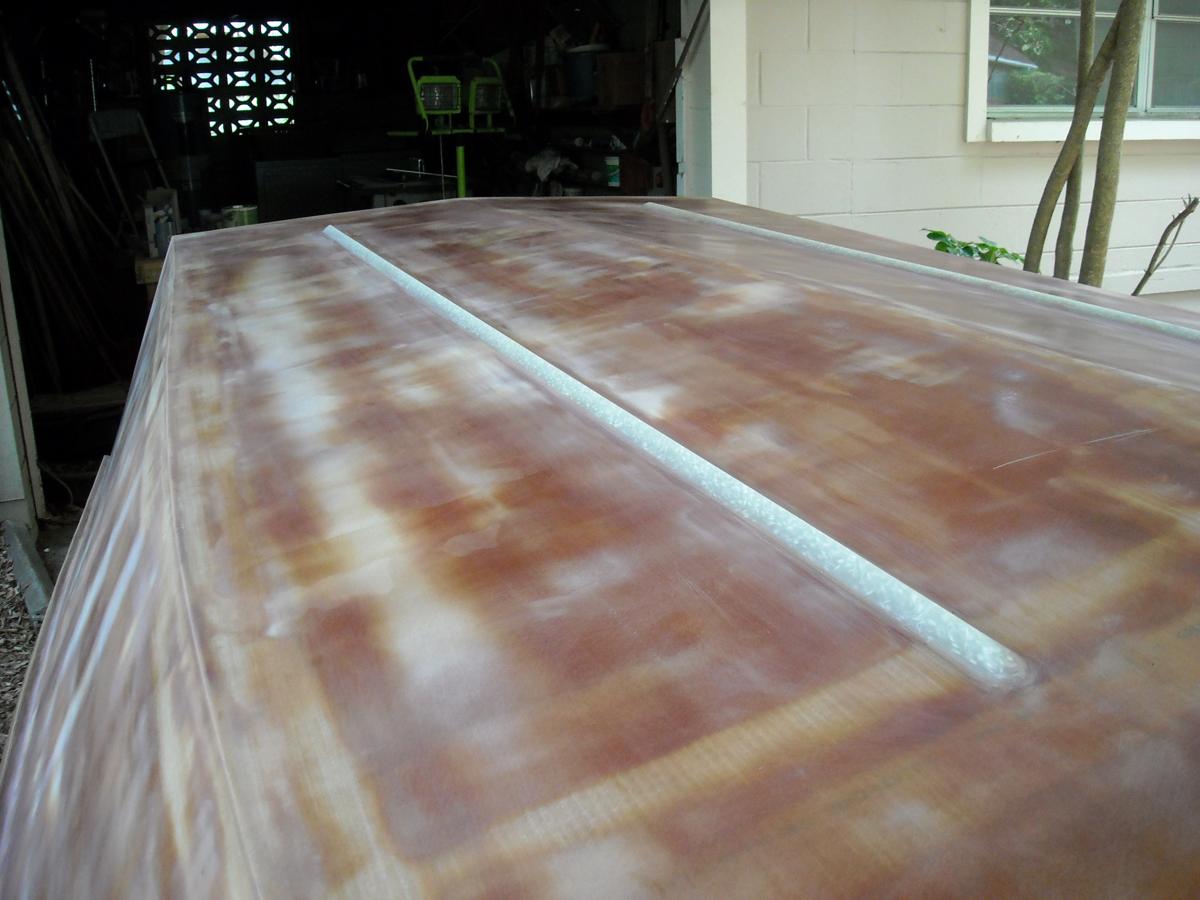
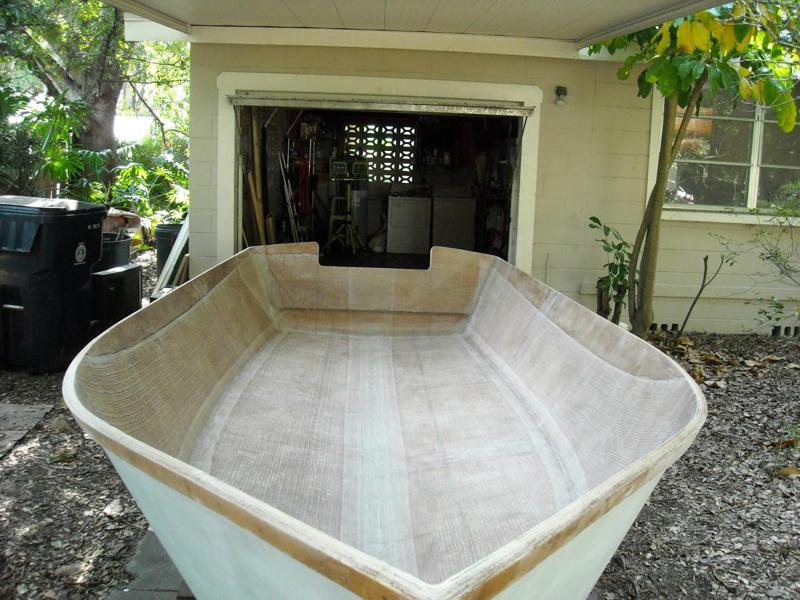
Outer hull glassed
Posted: Tue Aug 12, 2008 12:51 pm
by Lung Boy
I finally got a day on the weekend when I was in town and it did not rain (almost two months of waiting). Weather is a big factor when doing an outdoor build. Wish I had a shop.
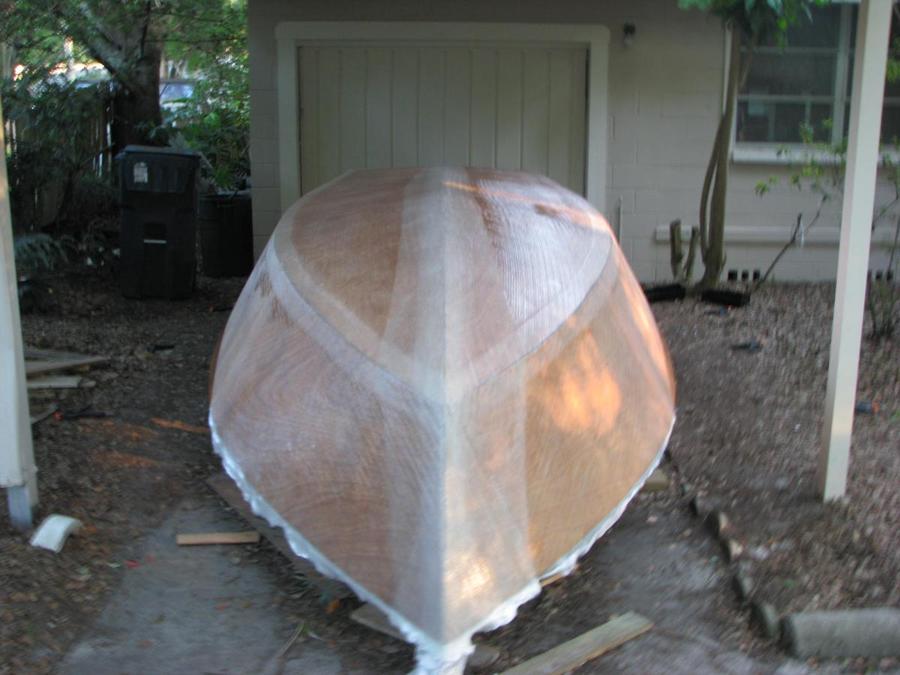
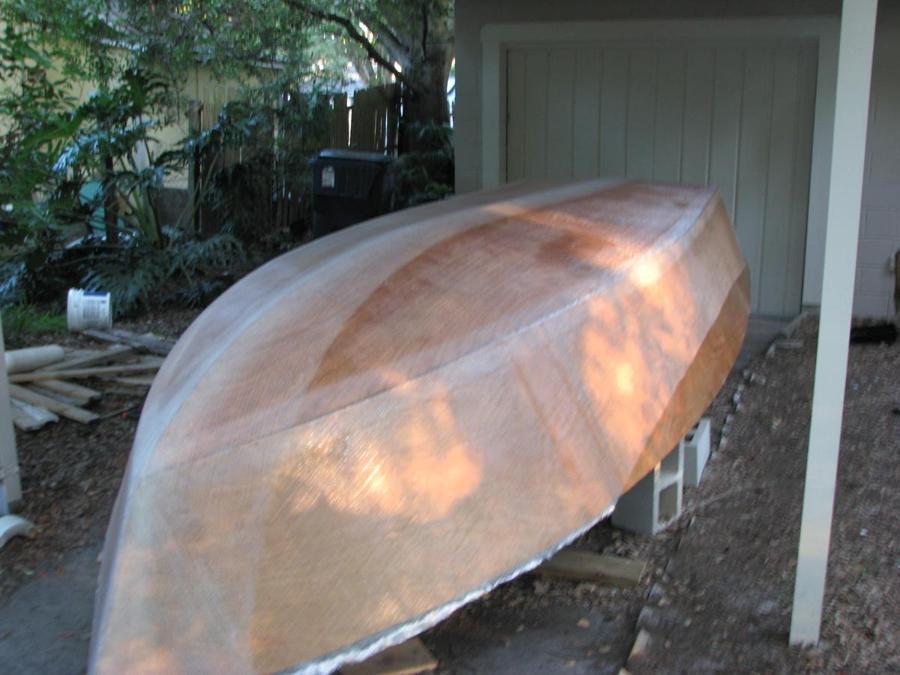
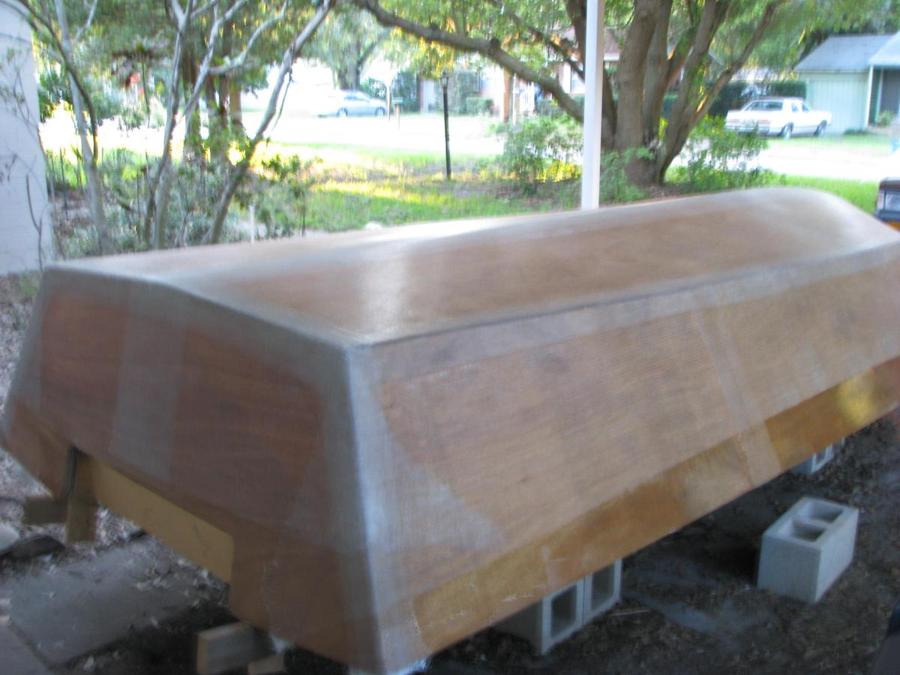
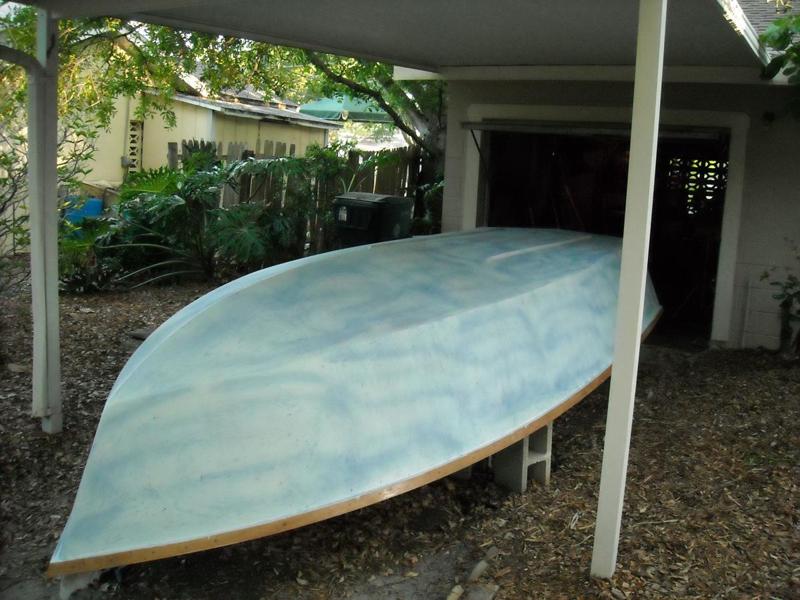
So I was able to do a full scale assult on glassing the outer hull.
Taped the seams on my own. (3.5 hours)
My brother helped with the wide cloth. (3 hours)
Observations:
I don't think I would have made it without help. I could barely move afterwards.
I think I did pretty good for a first timer.
This photo had some bad lighting that looks like a bad laminating job.
Posted: Tue Aug 12, 2008 1:06 pm
by Gramps
Looking good LB! Seeing all of these FS17's come together it is making very tough to pick which boat to build. I'm down the road in Apollo Beach, if you ever need an extra set of hands.
Posted: Tue Aug 12, 2008 1:21 pm
by Cracker Larry
That's a very clean lamination job. No worries there
Posted: Tue Aug 12, 2008 1:22 pm
by Old E.
LB,
Where are you in T-town? I would love to check out the build sometime.
Posted: Tue Aug 12, 2008 1:26 pm
by peter-curacao
good job looking great
Posted: Tue Aug 12, 2008 1:37 pm
by jgroves
Looks good! Regardless of lighting you can tell you did a great job!
Posted: Tue Aug 12, 2008 3:57 pm
by Lung Boy
Gramps wrote:Looking good LB! Seeing all of these FS17's come together it is making very tough to pick which boat to build. I'm down the road in Apollo Beach, if you ever need an extra set of hands.
Careful Gramps, I just might take you up on the offer.
Thanks for the positive comments all.
Mike
Posted: Tue Aug 12, 2008 4:06 pm
by steve292
I agree with the others,that is a very clean job
Steve
Re: Outer hull glassed
Posted: Tue Aug 12, 2008 5:38 pm
by tech_support
Lung Boy wrote:
I think I did pretty good for a first timer.
major understatement there

The glass job is very good.
Posted: Tue Aug 12, 2008 6:15 pm
by gk108
I agree! You and your brother could charge money for that kind of work.
That nice job will really pay off when it comes time to fair.
Posted: Tue Aug 12, 2008 8:24 pm
by bushmaster
Very well done LB. keep up the good work and keep posting those pictures.
Bushmaster
Posted: Tue Aug 12, 2008 8:56 pm
by Aripeka Angler
Mike, fine work
Is that 12 lb. cloth? The cuts look great on the corners. If I didn't have a boat or two this would be on my short list to build. Thought about power yet?
AA
Posted: Wed Aug 13, 2008 9:50 pm
by colonialc19
I Agree with AA, those corners look great, nice clean lamination.
Daniel
Posted: Thu Aug 14, 2008 10:17 am
by Lung Boy
Thanks again for the all the positive comments. I just tried to do what Joel did when he glassed his FS17.
Aripeka Angler wrote:Mike, fine work
Is that 12 lb. cloth? The cuts look great on the corners. If I didn't have a boat or two this would be on my short list to build. Thought about power yet?
AA
The cloth is the standard 12 oz. biaxial 45/45 that comes with the kit.
As for power I was thinking that a 90hp would be sufficient. Just kidding, my short list consists of the following: 40hp Yamaha 4-stroke, 50hp Yamaha 2-stroke, 50hp Honda, 40hp Tohatsu TLDI. I'd like to find a decent used outboard for not much dough (wouldn't we all).
I have also been dreaming about layout. If I were to use jgroves FS17 as a baseline, here are the following changes I might consider.
Add a casting deck between stations A and B.
Have a 15 gallon gas tank under the casting deck.
Add bait well / seat behind the center console.
Smaller center console with no seat in front.
Battery in the console with an optional second battery in the starboard stern compartment.
Posted: Thu Aug 14, 2008 2:47 pm
by steve292
I've just put all the frames in mine,I am going with the casting deck option.
I am thinking hard about a seat behind the console. I think it may be a little cramped behind it,I think I will mock up a console & seat to try it.
2 removable 6 gall tanks in the front of the console for me,fuel is worth almost as much as gold on this side of the pond,so left in is likely to walk.Also the small boat storage yard that I am considering to use for the boat likes the fuel to be out before storing.
Posted: Thu Aug 14, 2008 4:18 pm
by jgroves
A seat behind the console is what I was gonna do as well. I planed to take my time after I got the boat on the water and do a nice box that would hold a cooler. I know Todd makes a bench seat with swingback. I was thinking something like that. However after I built I loved the amount of room behind the console. I am now building a leaning post (pics to come soon). I got my local welder (Ashley Welding) who luckily specilizes in boats to put together the legs. I'm building the seat. I will then add padding. I will post some pics of the post soon.
On a side note I told Ashley welding what a great thing this post is. If anyone else out there needs the legs they are very reasonable and have options such as folding foot reast, stationary foot rest (what I did). I don't know what shipping is but I have been very impressed with them! My design was based off of a local boat company's post (Regulator Marine). I just had them size it to 26" wide as opposed to Regulators 36. My seat will be a total of 32"... the same width of my console.
Lungboy SORRY ABOUT THE HIJACK... BACK TO YOUR BUILD

Posted: Thu Aug 14, 2008 4:21 pm
by Cracker Larry
Jeremy, I'm going to follow your leaning post with interest
I've got to do something with mine, and I'm leaning towards a leaning post too
Then again, maybe Cape Man will call and tell me he's got one
Posted: Thu Aug 14, 2008 4:23 pm
by jgroves
Cracker Larry wrote:Jeremy, I'm going to follow your leaning post with interest
I've got to do something with mine, and I'm leaning towards a leaning post too
Larry, I am going to mount my post the same as you are mounting your tower
I should be mounting this weekend. I will post some pics tomorrow morning of the post so far.
Posted: Thu Aug 14, 2008 4:25 pm
by Cracker Larry
Great
Thanks.
Lung Boy, sorry to borrow your thread, hope it's OK

Posted: Thu Aug 14, 2008 4:54 pm
by Lung Boy
Cracker Larry wrote:Great
Thanks.
Lung Boy, sorry to borrow your thread, hope it's OK
No problem. Any time.
Posted: Thu Aug 14, 2008 6:23 pm
by cape man
Lung Boy,
Great looking build. Won a set of FS17 plans at the Crystal River raffle and have looked at them with a lot of interest. Seeing all of them in progress and Jeremy's launch, looks like a really nice boat for Tampa Bay (or any other coastal area). Nice day should take you out a ways as well. I'm getting ready to flip an OD18 out here in Lithia, and am also spending way too much time thinking about the layout. Leaning post, cooler seat...leaning post, cooler seat... Open cockpit behind the console...
May run it bare for a while and install something if I feel the need. Find myself always standing while under way regardless of what's behind me, but with passengers aboard they may want to rest on something.
There are certainly a lot of Bateau boats in this part of Florida!
Then again, maybe Cape Man will call and tell me he's got one
You never know...a friend just offered a nice cooler seat off a Carolina Skiff...
rubrail, skeg
Posted: Fri Aug 22, 2008 10:22 pm
by Lung Boy
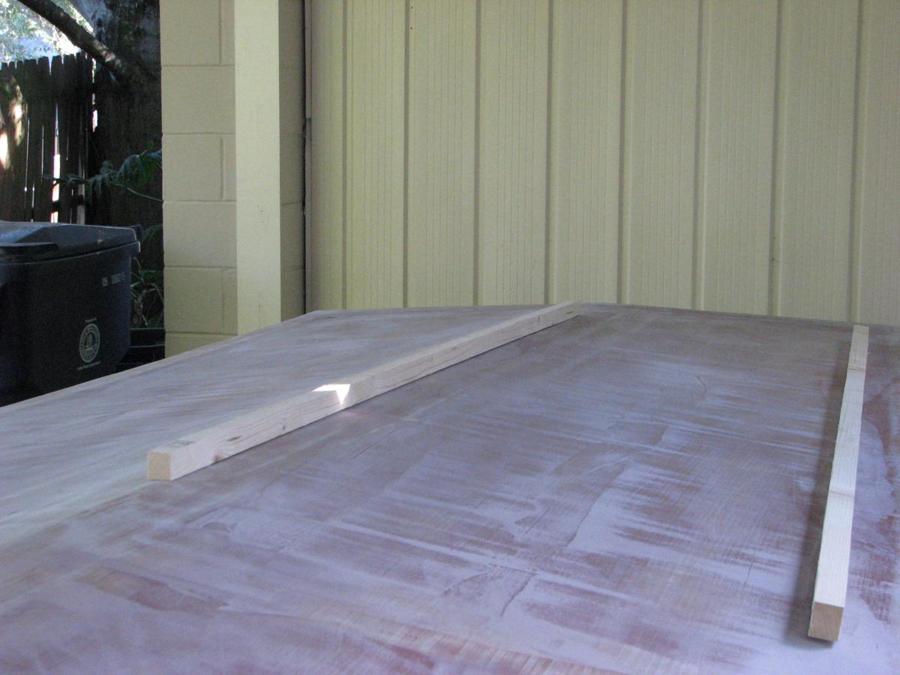
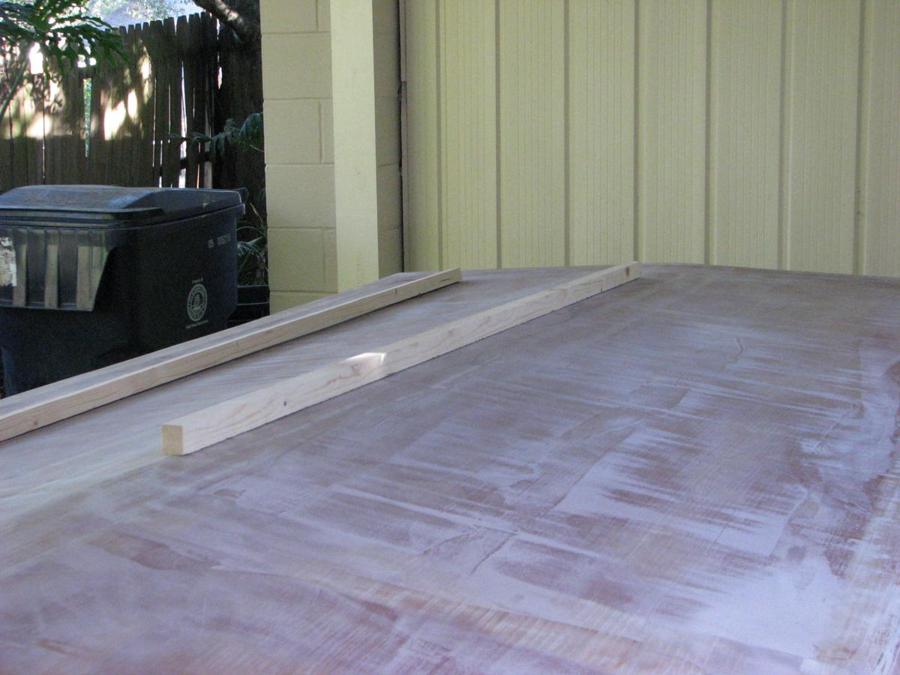
I was think about cutting some ply for the rub rails and the skeg. Not sure what dimensions to use.
For the rub rails: 3 laminations of 1/4" ply with a width of either 1.5" or 1.75". Any opinions?
For the skeg: This is way up in the air. 3 or 4 laminations of 1/4" ply? 5 feet in length? 1" or 1.25" width? Should the ply laminations be oriented perpendicular or parallel to the hull?
Re: rubrail, skeg
Posted: Fri Aug 22, 2008 10:34 pm
by Aripeka Angler
Lung Boy wrote:I was think about cutting some ply for the rub rails and the skeg. Not sure what dimensions to use.
For the rub rails: 3 laminations of 1/4" ply with a width of either 1.5" or 1.75". Any opinions?
For the skeg: This is way up in the air. 3 or 4 laminations of 1/4" ply? 5 feet in length? 1" or 1.25" width? Should the ply laminations be oriented perpendicular or parallel to the hull?
Mike, I can't give a number on the skeg. The rub rail would work good at 1
15/16 inches tall. It can give some options for vinyl rub rail at this height.
This is Taco vinyl over over three layers of African Mahogany. I will try to get you a better picture.

AA
Posted: Mon Aug 25, 2008 2:54 pm
by Lung Boy
AA, thanks for the info. I checked out Taco marine's site and it looks like the possibilities for rub rails are almost endless.
I think Steve292 made his rub rails 45mm wide. The other FS17's out there look similar. Unless anyone else chimes in I going with the 45mm.
Which tool do you use to cut the rub rails? The table saw or the circular saw with a guide?
Posted: Mon Aug 25, 2008 3:09 pm
by Cracker Larry
Richard probably uses a pneumatic table saw or a CNC
He owns a cabinet shop, a very nice one at that, with all the good toys
Personally, working alone I find a full sheet of plywood difficult to handle on a table saw, so I use a circular saw with a straight edge guide.

I made these 2 1/4" W
Posted: Mon Aug 25, 2008 4:54 pm
by cape man
Copied the Cracker and did mine the same way except on the floor with a circular saw. Mine are 1.5", and 3, 1/4" pieces of ply laminated.
Posted: Mon Aug 25, 2008 6:15 pm
by Aripeka Angler
Mike, as Craig and Larry said a Skil saw will work fine. Marine ply, good southern yellow pine, mahogany, cypress will work fine. I actually cut my stock on a table saw. I straight lined the stock in a panel saw prior to ripping to size.
I went back to study my thread and my wood is actually 2-1/8 inches tall. The Taco vinyl is 1-7/8 tall. That said you can find the vinyl in any size if you decide to use the product.
I found a place to buy the vinyl for less than half price of West marine. I will see if I can find it if your interested.
Richard
Posted: Mon Aug 25, 2008 6:18 pm
by Cracker Larry
I'm interested
Posted: Mon Aug 25, 2008 7:19 pm
by cape man
Ditto. Priced it at several places and decided I was going to look at rope.
Posted: Mon Aug 25, 2008 8:54 pm
by steve292
Lung Boy wrote:
I think Steve292 made his rub rails 45mm wide. The other FS17's out there look similar. Unless anyone else chimes in I going with the 45mm.
Yes, I did. I still had to kerf them to get them to go with the sheer at the bow.
Posted: Wed Aug 27, 2008 1:27 pm
by Aripeka Angler
Larry and Craig I'm having trouble finding the rubrail invoice. I think the material was 219 bucks. West was less than 400 but I would have needed to pay sales tax. I will find the thing when I dig through the stuff I packed up when I tore out the shop office last month. I'm pretty sure I will find it..
Richard
Posted: Wed Aug 27, 2008 2:37 pm
by Lon
I went to a local auto parts store and selected a particular profile and width of GM pickup molding for the GV-11. It was put on clean and has stayed on for 4 years. Fresh water only, but the stuff stays on trucks, right? Around $30. Only problem - the lengths are usually but not always too short for most boats.
Pic here:
http://gallery.bateau2.com/displayimage ... 0034&pos=6
Posted: Wed Sep 10, 2008 9:12 am
by Lung Boy
I've been slowly working on the rub rail. I'll try to post some photos soon.
I did try to fill the biax weave with Joel's epoxy/silica/woodflour slurry. The transom was my test subject. The slurry mixed up nice and was like really soft butter. It went on great. I pressed it into the weave with a 12" spreader. It smoothed out nicely. I was very pleased with myself.
The next day when I inspect the transom it looks like corrogated metal.

The slurry had flowed to form a ridge over the biax stitching and a valley in between the stitching. I had sanded down the stitching as much as I could without going down to the fibers. Did I not sand the stitching enough?
Posted: Wed Sep 10, 2008 9:21 am
by tech_support
For a vertical surface the slurry needs to be thicker. I think that was your problem.
You are correct that you must to sand all the stitching off before filling the weave - or it will take too much slurry = sagging issues. For example, the transom of the fs17 it would take maybe 4 oz. of slurry - your only filling that little tiny hole between the two layers of glass.
I would sand it down with 60 grit and make another pass.
fairing
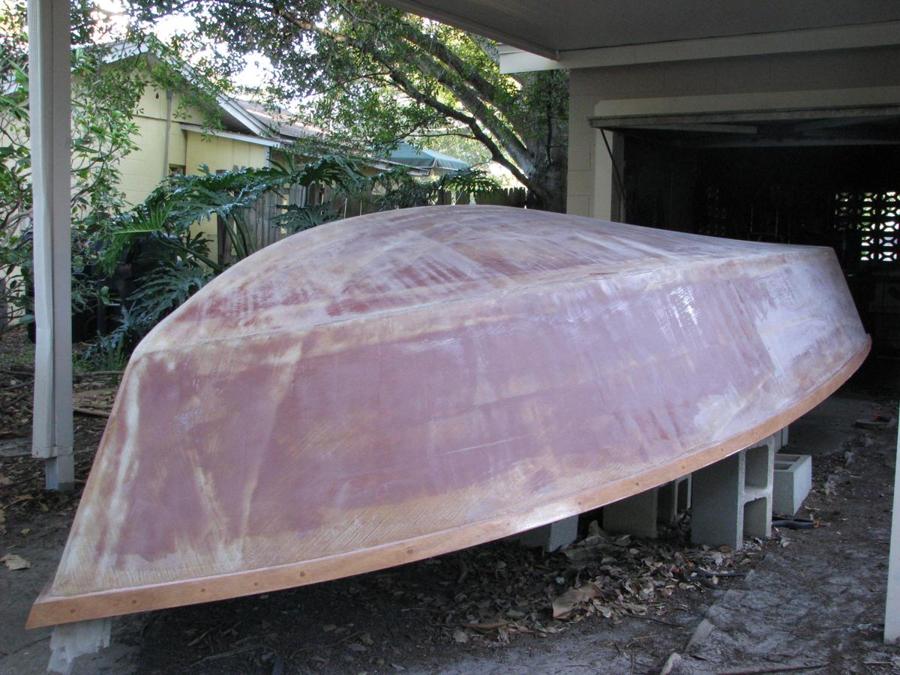
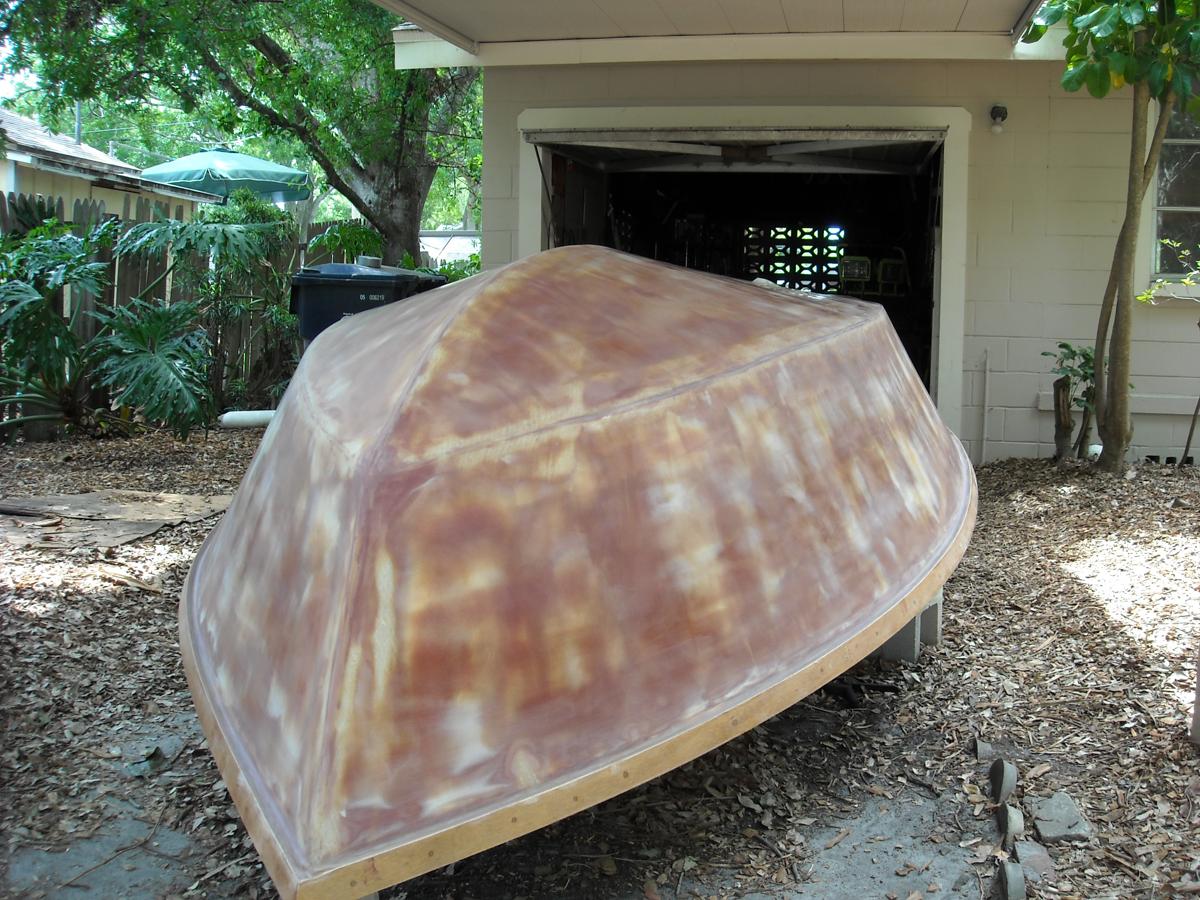
Posted: Sun Nov 23, 2008 5:09 pm
by Lung Boy
done some more fairing. fixed my sagging problem with a thicker mix. my fairing skills are about as good as my drywall skills. i'll have to keep my day job. lots of sanding.
also glued on the rubrail.
Posted: Mon Nov 24, 2008 7:34 am
by jgroves
Looks Good! The rubrail is a tough thing to get on. Keep her crusin'.
Posted: Mon Nov 24, 2008 7:53 am
by cape man
Looking sharp Lung Boy. Had the same thing happen to me with trying to fill the weave the first time. Your fairing looks much better than mine.
Posted: Mon Nov 24, 2008 9:56 am
by Lung Boy
Thanks fellows.
I am pretty happy with the rubrail. I cut the rubrail strips using a table saw. Did not have any problems cutting.
I am going to start using the quick fair and see how that goes.
Also, I need to make the skeg. I am think about dimensions of 9/8" x 1.5" x 6.5'.
Posted: Wed Nov 26, 2008 1:40 pm
by Lower
Lookin good lung boy! Isn't fairing fun!!??
Posted: Thu Nov 27, 2008 3:41 pm
by Lung Boy
Lower wrote:Lookin good lung boy! Isn't fairing fun!!??
As Forrest Gump might say, "fairing is tough".
Posted: Thu Nov 27, 2008 3:56 pm
by Lung Boy
I'm still mulling over my skeg dilemma. Here are two options. Any opinions?
skeg 1 - 1"x1.125"x6.5'
skeg 2 - 1.125"x1.25"x6.5'
I guess my question really is how big does the skeg need to be to sufficiently track in a turn?
Should I glass it to the hull? One piece of tape or two?
Posted: Thu Nov 27, 2008 5:28 pm
by Spokaloo
What do the plans say?
E
Posted: Thu Nov 27, 2008 11:53 pm
by Lung Boy
Spokaloo wrote:What do the plans say?
E
I looked harder and found it, thanks Spok. Skeg (optional), from 2"x2" nominal, epoxy glued, 7' long, 18" from transom.
Posted: Fri Nov 28, 2008 1:33 am
by Spokaloo
E
Posted: Fri Nov 28, 2008 9:41 am
by Daddy
Don't forget to put a radius on the edges and tape them into the hull.
Maybe streamline the front and trailing edges too.
Daddy
Posted: Fri Nov 28, 2008 10:14 am
by jgroves
I'm sure whatever you decide will ge fine. My boat runs great and turns great with the one skeg on the keel.... built to specs in the plans.
Posted: Fri Nov 28, 2008 8:36 pm
by KRE
Lungboy
I was affraid to put the single skeg on mine. You're in Tampa, so I'm sure you have the same "suddenly shallow damn those oysters" fear as I do. I put four small runners on instead. I used a 2X4 piece of cypress. Cut 45 degree strips out of each corner. Imagine a triangle 1-1/2" tall. Their about 6 feet long and stop about 18" before the transom. Thats all it was. The boat corners like a Farrari. No sliding at all.
You got the hard part done. believe it or not, it's fun from here on out! Hull looks great.
Kurt
Posted: Sat Nov 29, 2008 9:03 am
by cape man
Looking great!
Should I glass it to the hull? One piece of tape or two?
Surf around this site and you'll see lots of discussion on tape or no tape for skegs. The plans don't call for it, so I'm sure a well glued skeg will not fail under NORMAL operating...however, I bought into the tape it side of the discussion, and even installed an alluminum shoe down the length of mine, copying what Cracker Larry did on his. Used two pieces of tape, overlapped on the bottom of the skeg.

Adds some time and materials to the build, but I want that feeling that this baby isn't ever coming off or breaking/chipping.
Posted: Tue Dec 09, 2008 10:24 pm
by Lung Boy
Thanks for the input and advice fellows.
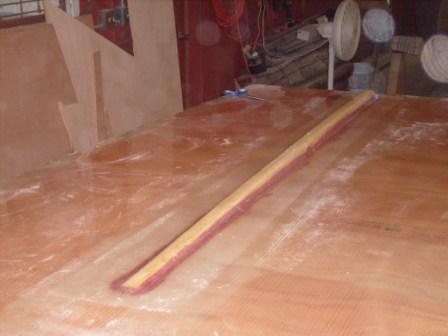
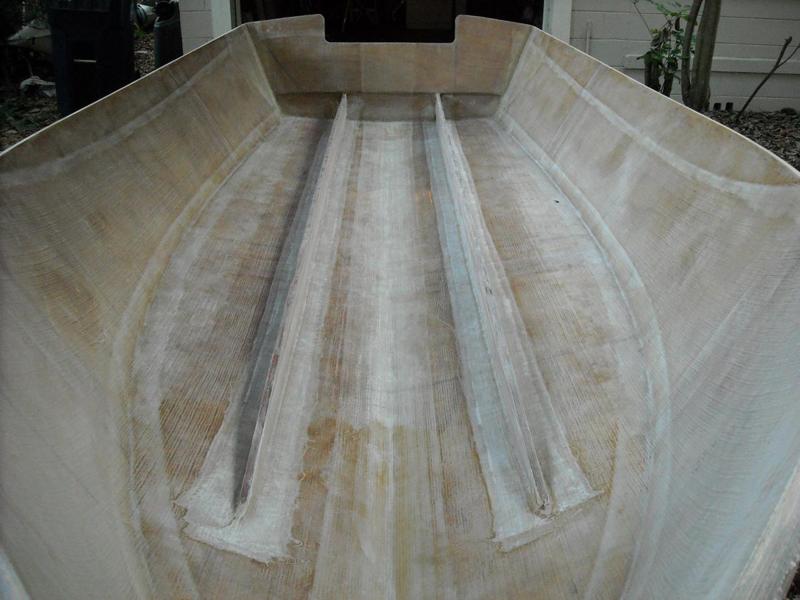
But here comes a curve ball. I abandoned the skeg and have opted for a pair of runners/strakes. When in doubt, imitate someone else. Here they are, runners a la Joel.
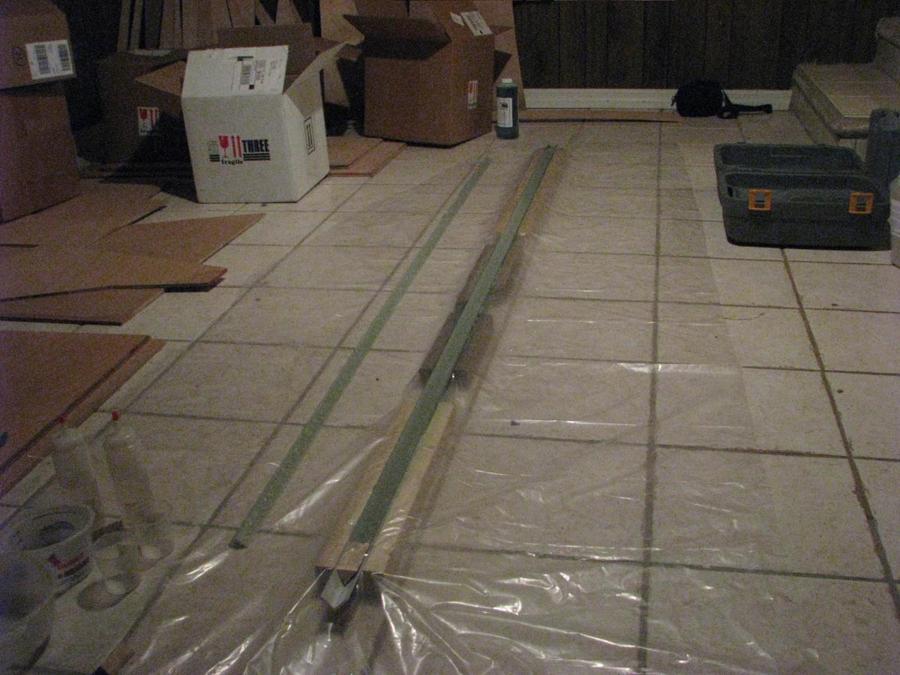
The angle is 90 degrees and 1"x1". I made the length just over 7' feet. The odd thing is that the second one I made is more flexible than the first one. It had roughly the same consistency as the first. Maybe a bit less chopped glass. Maybe it hasn't cured completely (20 hours).
Posted: Wed Dec 10, 2008 8:55 am
by jgroves
Cool. Never a bad idea to follow Joels lead.
Posted: Wed Dec 10, 2008 8:56 am
by Lung Boy
Maybe it hasn't cured completely (20 hours).
The ends did not droop this morning when I picked it up. It is now the same as the first.
Posted: Wed Dec 10, 2008 10:04 am
by jgroves
Great to hear. What kind of epoxy are you using.... fast, slow, medium cure?
Posted: Wed Dec 10, 2008 10:12 am
by tech_support
I went with the strakes because I want the very least draft possible. If I were building a more general purpose FS17 for which draft was not a primary concern, I would have installed a skeg.
The strakes will improve tracking and turning
I think mine are about 12 feet long, reaching close to the waterline (but not above it) as it goes up the bottom to the bow. At that level they will separate water while you are running on plane (improves lift/efficiency and makes the boat a little drier). They also will be below the water line while at rest so they do not cause any slapping while fishing
Posted: Wed Dec 10, 2008 12:09 pm
by Lung Boy
jgroves wrote:Great to hear. What kind of epoxy are you using.... fast, slow, medium cure?
I am using the slow. I don't work fast enough to be confident with the medium or fast. So cure time for the strake was between 20 and 33 hours.
shine wrote:I went with the strakes because I want the very least draft possible. If I were building a more general purpose FS17 for which draft was not a primary concern, I would have installed a skeg.
I was thinking about the draft too. I might still install a small skeg.
Posted: Fri Dec 12, 2008 6:28 am
by cape man
When in doubt, imitate someone else.
That's why this forum is so active. Between the great plans and being able to see your boat built by someone else, gives me a sense of confidence that otherwise would not be there. I like the strakes as well.
This weather is making it difficult to predict cure times. Painted yesterday as that front swept through and the stuff cured almost as as I finshed. Just a few days before it never got above the minimum required to even mix the stuff

Are you going to use graphite on the bottom?
Re: Lung Boy's FS17
Posted: Sun Apr 19, 2009 11:37 pm
by Lung Boy
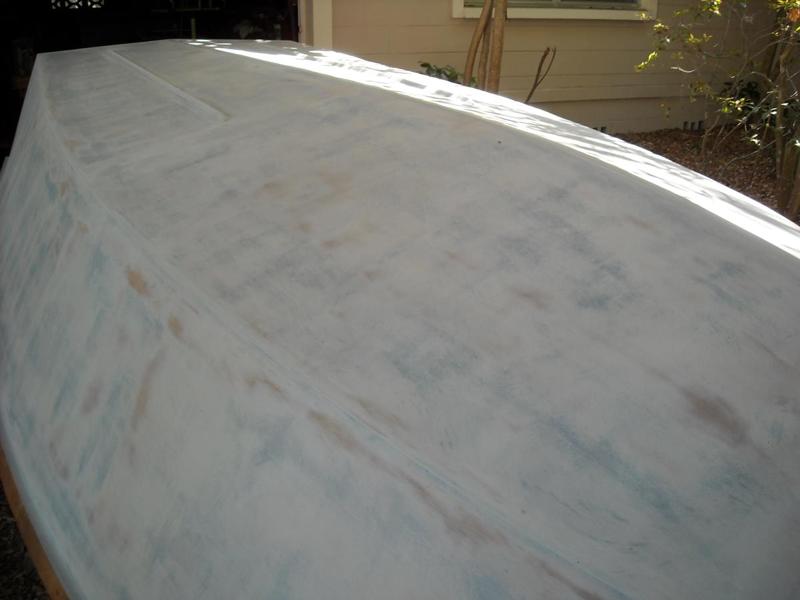
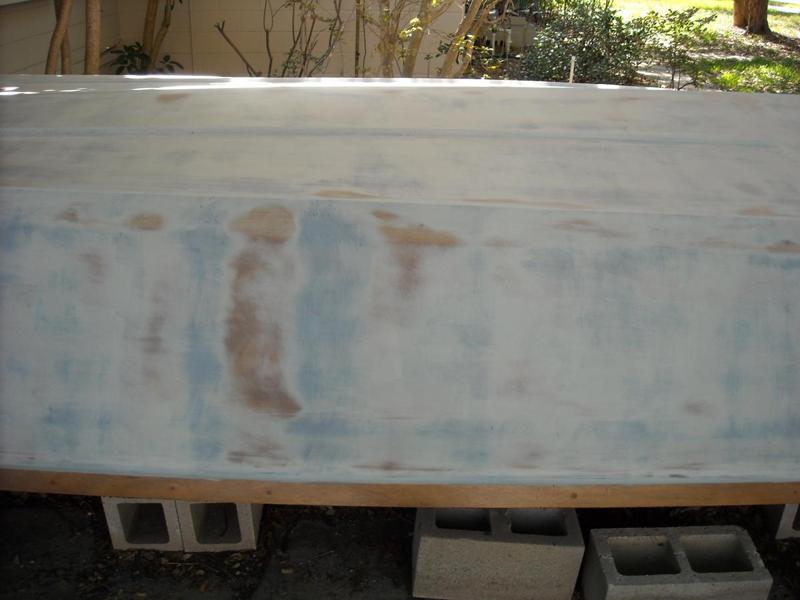
I apologize for my lack of posts. I didn't realize it has been so long. I know how you guys love your boat porn. I got completely carried away with fairing. Here are some photos of my current progress. If you can call it progress.
Runners glued on.
Boat is fair?
Two coats of primer.
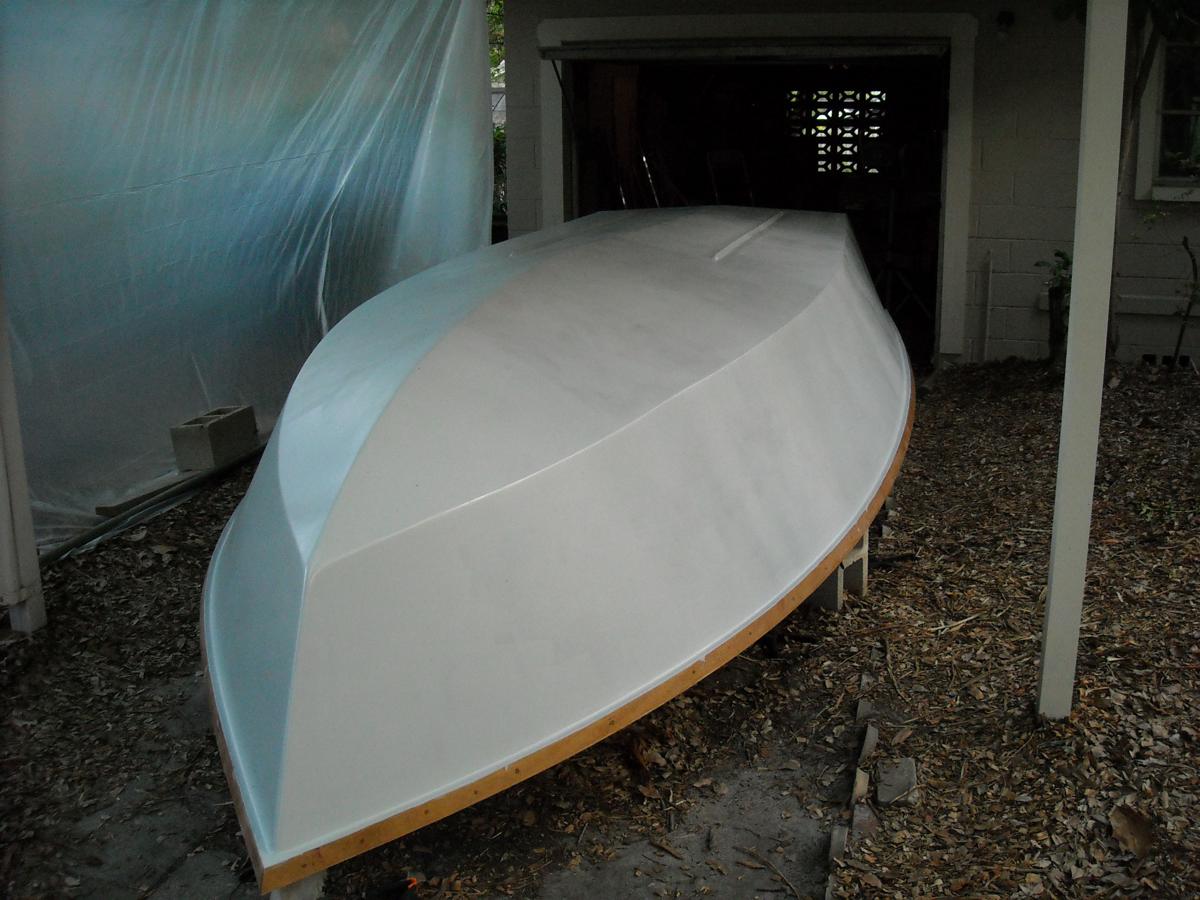
I think the little black specs on the boat are small fruit flys.
yea.
Re: Lung Boy's FS17
Posted: Sun Apr 19, 2009 11:58 pm
by TomW
Very nice LB. Looks like your ready for some bottom coat and a flip.
Tom
Re: Lung Boy's FS17
Posted: Mon Apr 20, 2009 12:34 am
by wegcagle
I agree. It's looking great. It really pays off when you "go overboard" on fairing. Looking forward to the flip.
Will
Re: Lung Boy's FS17
Posted: Mon Apr 20, 2009 10:04 am
by BassMunn
Nice fairing job, boats gonna look great once you've done final painting, hell it looks great already
Re: Lung Boy's FS17
Posted: Mon Apr 20, 2009 10:48 am
by Lung Boy
Thanks for positive comments fellows.
I intend to do the bottom in graphite. Here is my plan of attack. Please help me fill in the blanks.
1. wait a few days for primer to cure
2. board sand primer with 80?, 100? or 120? should I do a guide coat? if I do, what spray paint (brand) should I use? the reason I ask is that I tested some spray paint (forgot the brand) on a piece of scrap. it did not sand nicely at all (gummed up sandpaper and mushed onto the surface).
3. mix epoxy with graphite. I don't remember the mix ratio off the top of my head. 25-50% by volume?
Re: Lung Boy's FS17
Posted: Mon Apr 20, 2009 12:45 pm
by steve292
I sanded with 120, but I had no primer on the bottom of the hull.
50% graphite is to much, I think I did about 30% by volume, stir the living daylights out of it. I found that 3 thin coats gave a good coverage.
Use a foam brush to tip off & you will get a better finish.
Hull looks really good BTW
Steve
Re: Lung Boy's FS17
Posted: Mon Apr 20, 2009 2:54 pm
by Fonda@kauai
If you want a yacht finish do a guide coat, if you want a workboat finish definitely don't. The guide coat will show every little imperfection and if you're like me you'll feel compelled to fix them all. If you're a glutton for puishment though, I would recommend a bright blue guide coat a la TomW, and sand it off with 60-80 grit. Use a primer instead of topcoat in the rattle can so you don't have to sand and scuff the lows. I just finished rolling on my second and final coat of primer after sanding off my guide coat and fixing the little imperfections. I'll post a pic in my thread later today to show the results. Good luck
Re: Lung Boy's FS17
Posted: Mon Apr 20, 2009 3:15 pm
by TomW
LB, if your going for a yacht finish the guide coat is a necessity. Here is what I told Fonda. Get a can of Krylon bright blue 15 min fast drying spray paint. Spray it on so that it speckels the surface and does not leave wide bands. Take your boards with 80 grit after it drys for an hour(just to be sure) and very lightly sand. This will show where the highs are and where the lows are. Go ahead and sand down the highs some with a RO or block sander. Then apply the boards once again. Do this until you have only lows then fill them in. Put on one or two more layers of primer.
I like the bright blue because I think it shows up better than other colors, black is traditional, red is also used, or you can use what ever strikes your fancy, you just have to be able to see it well against the light gray of the primer.
Tom
Re: Lung Boy's FS17
Posted: Mon Apr 20, 2009 4:09 pm
by topwater
Don't worry about the flys they sand off easy....
Re: Lung Boy's FS17
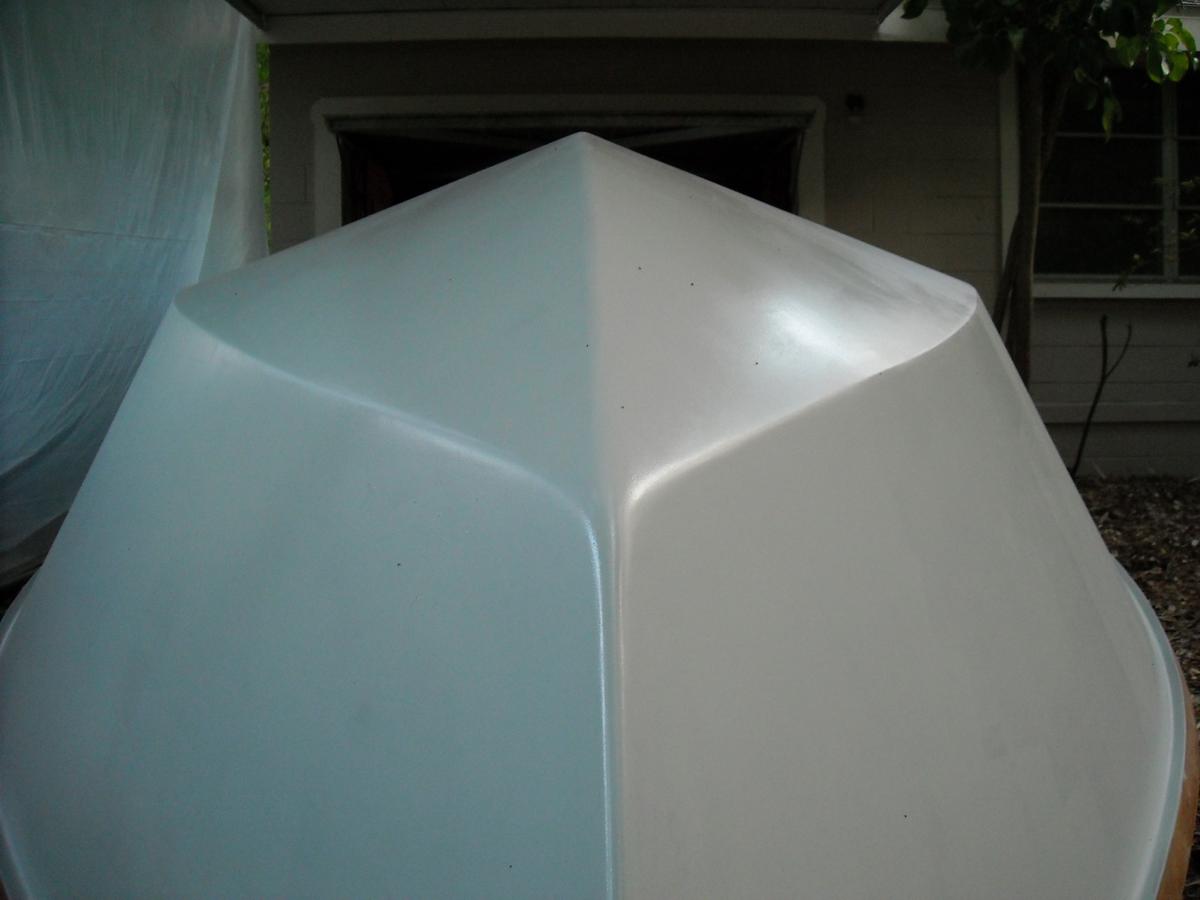
Posted: Sun Apr 26, 2009 6:08 pm
by Lung Boy
Fellows, I went the guide route. I wanted to get money's worth out of the whole boat building experience.
Sprayed on some Krylon indoor/outdoor oxford blue.
Board sanded. Looks pretty good I think. There a few low spots I might fill in.
Here is the worst low.
Do I need to scuff the lows before filling?
Re: Lung Boy's FS17
Posted: Sun Apr 26, 2009 6:32 pm
by wegcagle
Do I need to scuff the lows before filling?
Can't hurt, but I will say don't go overboard on sanding them you'd hate to make the lows even lower
By the way I like the guide coat alot it makes those lows really stand out. She sure is lookin' good so far.
Will
Re: Lung Boy's FS17
Posted: Fri May 01, 2009 2:18 pm
by Old E.
Shoot me an email if you need an extra hand, when it comes time to flip her. I'm happy to help, and just down the road.
I've driven by a couple of times and admired your work from the comfort of my car. Keep up the good work!
Re: Lung Boy's FS17
Posted: Sat May 02, 2009 4:23 pm
by bushmaster
Hey Lungboy
That's coming along very nicely. When you think you will be able to flip.
Keep those pictures coming
Bushmaster
Re: Lung Boy's FS17
Posted: Sun May 03, 2009 10:42 am
by cape man
Shoot me an email if you need an extra hand, when it comes time to flip her. I'm happy to help, and just down the road.
Ditto on that from me. Took six of us to easily flip my OD18, but I am glad I had all the help.
Your finish will be much nicer than mine with all the extra work you have put in.
Re: Lung Boy's FS17
Posted: Sun May 03, 2009 10:15 pm
by Lung Boy
Thanks for the comments fellows. Didn't get any work done this weekend. I played all weekend at the Suwannee spring bicycle festival in White Springs, FL. Anyone that wants to come help with the flip is welcome to come on out. I have a birthday coming up on the 15th. Maybe a cookout and flipping party is in order on the 16th. Hopefully I'll have a clearer picture by next weekend. Cheers.
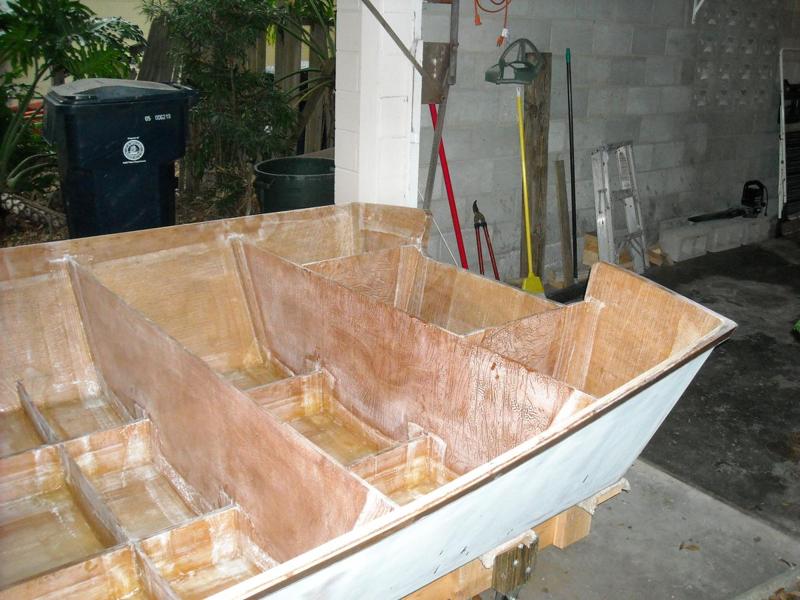
Boat flipped
Posted: Mon Nov 23, 2009 1:24 pm
by Lung Boy
Slowly progressing here. Built a craddle, flipped and glassed the inside.
Does the fiberglass weave on the inside need to be filled?
Re: Lung Boy's FS17
Posted: Mon Nov 23, 2009 1:36 pm
by Cracker Larry
That is a clean looking hull right there
Very nice work!
Re: Lung Boy's FS17
Posted: Mon Nov 23, 2009 1:45 pm
by Fonda@kauai
Wow, very clean. I'm impressed

Personally I would fill the weave at least where you'll be glassing down frames and stringers, to have a solid area for the glass to grab. Probably not necessary though. I wouldn't fill the weave that will be under the sole and forgotten. Looks really good
Re: Boat flipped
Posted: Mon Nov 23, 2009 2:51 pm
by tech_support
Lung Boy wrote:Does the fiberglass weave on the inside need to be filled?
No, just sand down the stitching where you will tab in the frames/stringers
Re: Lung Boy's FS17
Posted: Mon Nov 23, 2009 3:15 pm
by Daddy
Super neat job
Daddy
Re: Lung Boy's FS17
Posted: Mon Nov 23, 2009 3:17 pm
by cape man
Re: Lung Boy's FS17
Posted: Mon Nov 23, 2009 3:58 pm
by wegcagle
Great job on the inside Lungboy. Glad to see you're back at it. You do not need to fill in the weave on the inside, because you will cover it all up with foam, tanks, and the sole. I am going to fill in the areas that are for storage, but the bottom I am going to cover with foam
Will
Re: Lung Boy's FS17
Posted: Mon Nov 23, 2009 6:04 pm
by Lung Boy
Thanks fellows. There were a couple of air bubbles. Nothing major.
Now I really need to plan the interior layout. Stringers and frames are next I believe. The first question to answer is to limber or not to limber. After searching the forum, it seems there is no standard. It seems that Jacque's preference is sealed comparments underneath the sole. I'm leaning toward the sealed compartments with the half tube for draining the front comparment to the bilge/sump area in from of the transom. Also I need to lay out the case tubes. I get back to you later with a list of what I'm contemplating.
Re: Lung Boy's FS17
Posted: Mon Nov 23, 2009 6:22 pm
by Cracker Larry
If you limber them, they will always have water in them. If you don't, and you seal them tight and don't drill foolish holes, it will be many years before they get water in them, if ever. You will also end up with about 15 individually sealed compartments to prevent sinking. With limbers, all compartments are common. I vote for sealing everything tight below the sole.
Re: Lung Boy's FS17
Posted: Mon Nov 23, 2009 9:23 pm
by Bluefish2
LB,
are you going to put in a live well? I was wondering where to put one when I get to that point.
BF2
Re: Lung Boy's FS17
Posted: Mon Nov 23, 2009 11:22 pm
by Lung Boy
Bluefish, I was thinking of doing a livewell in front of the motorwell, a la KRE.
http://gallery.bateau2.com/thumbnails.php?album=914
Although I don't think I'll raise the height of the rear deck like he did.
CL, I like the sealed comparments option. The only problem I see with the sealed comparments is if water ever gets in them, you might not ever know about it.
Re: Lung Boy's FS17
Posted: Tue Nov 24, 2009 6:56 am
by cape man
The only problem I see with the sealed comparments is if water ever gets in them, you might not ever know about it.
Had (have) the same concerns, but built mine per plans with sealed compartments, each filled with expanding foam. I am trusting my skills and attention to details while doing it that water has no way to get in there unless I puncture the sole or the bottom, either of which I will see. The other benefit as CL points out is the boat cannot sink if you build as Jacques has it laid out. Can swamp, but won't sink. With the skills you are demonstrating with your glassing, I would seal them up and forget about them.
Re: Lung Boy's FS17
Posted: Tue Nov 24, 2009 9:29 am
by mecreature
That hull looks great..
It kind of makes you all tingly
Re: Lung Boy's FS17
Posted: Tue Nov 24, 2009 10:03 am
by Daddy
cape man wrote:The only problem I see with the sealed comparments is if water ever gets in them, you might not ever know about it.
Had (have) the same concerns, but built mine per plans with sealed compartments, each filled with expanding foam. I am trusting my skills and attention to details while doing it that water has no way to get in there unless I puncture the sole or the bottom, either of which I will see. The other benefit as CL points out is the boat cannot sink if you build as Jacques has it laid out. Can swamp, but won't sink. With the skills you are demonstrating with your glassing, I would seal them up and forget about them.
My GT23 has 35 individual "water tight" compartments under the sole. No foam. Cant imagine an incident bad enough to hole enough of those to cause it to sink. Have considered inspection plates, 35 of them. From time to time I wonder about it. I leave the boat in the water from May til the end of October. She sits at the same level when launched and when pulled. I guess if there was water getting into the space between hull and sole I would see a difference. Still, I sometimes wonder, guess that is human nature
Daddy
Re: Lung Boy's FS17
Posted: Tue Nov 24, 2009 11:17 am
by wegcagle
You could always drill a pilot hole in one of them, and then refill, sand, primer, paint
Will
Re: Lung Boy's FS17
Posted: Tue Nov 24, 2009 12:55 pm
by steve292
Super neat job of glassing
I would totally seal the sole.
Steve
Re: Lung Boy's FS17
Posted: Tue Nov 24, 2009 6:04 pm
by BassMunn
Wow, that's some pretty neat laminating right there
Re: Lung Boy's FS17
Posted: Fri Dec 18, 2009 2:43 pm
by Lung Boy
Time to do the stringers. I've been searching the forum for the proper procedure but I'm still a bit hazy.
I'm using the molds to align the stringers. Easy.
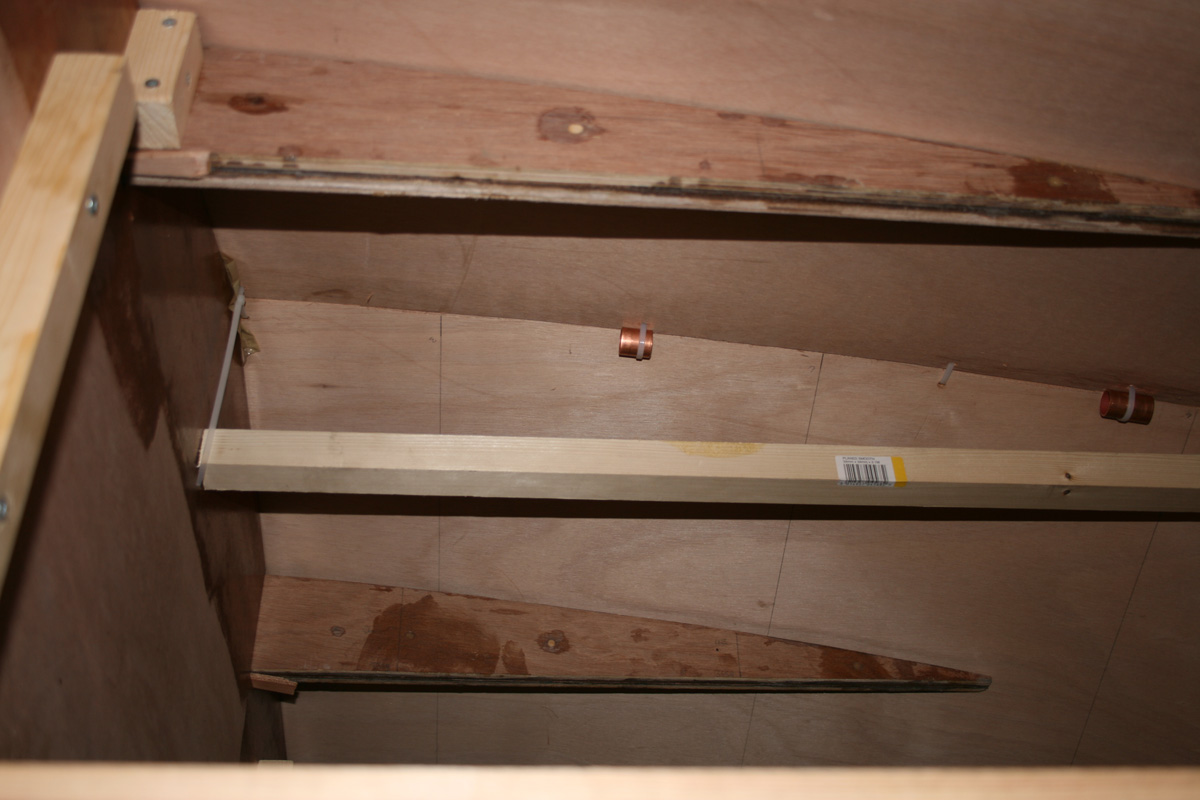
To avoid "hard spots" I need to use spacers to lift the stringer from the hull. How big do the spacers need to be? Next should to tack the stringers in place with a few spots of glue. Let cure? Here is where I am hazy. If you don't have a big enough gap between the stringer and hull it seems like it would be difficult to get the glue in the gap. If the gap is too big then you a lot of epoxy and raise your sole. I'm sure someone could help me out.
I want to try the caulk tube dispensing method. How do you get thickened exopy into the tude?
Re: Lung Boy's FS17
Posted: Fri Dec 18, 2009 2:50 pm
by tech_support
I use whatever is handy for temp spacers, bits of mixing stick, whatever. The space can be very very tiny, the idea is that you put fillet putty in the gap, then the tabbing over that. The loads transferred between hull and stringer are evenly transferred through the fillet/glass tabbing.
I fill the tubes by scooping it out of the mixing pot about 2-3 oz at a time, put it in end of tube, tap it on table until goes to the bottom, repeat until its full or your out of glue.
You have to cut the tip off the dispensing end first so the putty will settle to the bottom when you tap it down.
Re: Lung Boy's FS17
Posted: Fri Dec 18, 2009 3:53 pm
by Lung Boy
Thanks, Joel.
shine wrote:The space can be very very tiny, the idea is that you put fillet putty in the gap, then the tabbing over that.
If I have tacked the stringers in place with few spots of glue/putty and the gap is very tiny, it seems like it might be difficult to get the glue/putty into the gap. I may be worrying about nothing.
Re: Lung Boy's FS17
Posted: Fri Dec 18, 2009 4:09 pm
by tech_support
thats fine, you dont have to fill under it 100% - the glass and fillets carry the load.
Re: Lung Boy's FS17
Posted: Fri Mar 05, 2010 10:57 pm
by wegcagle
Re: Lung Boy's FS17
Posted: Sat Mar 06, 2010 10:54 am
by Lung Boy
I tried to slip one past you guys.
I should have known that would be impossible. Tabbed the stringers. Not too bad. I think I've improved my fillet skills to the level of acceptable.
I've cut out the frames. But before I start installing them I really need to come up with my interior layout. I have a few ideas but I need to sketch them out. Anyone know of some easy to use software? I'd like to run my ideas by you guys.
Also I'm debating on how to drain the forward compartment. Should I build it up to the sole level and drain it to the sole or run a half PVC underneath to the stern/sump area?
Re: Lung Boy's FS17
Posted: Sat Mar 06, 2010 11:43 am
by cape man
I drained the foreward compartment out the side of the boat. Nice job on the stringers.
Re: Lung Boy's FS17
Posted: Sun Mar 07, 2010 9:21 am
by remedy32
Hi LB,
That lamination looks great!
I did a bit of fiddling with the calculator before I decided what to seal and foam on my FS17, sharing the same concerns for water "ever" getting inside. I finally decided to seal/foam the areas outside the stringers. I cut limber openings along the centerline of the frames which will allow any water from the foredeck and under seat area to be removed through a removable plate under the center console. I don't expect to ever find much there. I think the 6 bays I filled provided about 300-350 lbs of flotation beyond that of the hull itself. The boat can be swamped for sure but would be very hard to sink.
You've hit the fun part of the build now (in my opinion). It looks like a boat. You can walk around in it BUT you can sit in it an ponder the hundred different ways to finish it out for days!
Keep the pictures coming....it's looking great!
Bill in CT
FS17
Re: Lung Boy's FS17
Posted: Tue Mar 09, 2010 1:53 am
by lung
Excellent work. Interested in the layout you decide to use.
Re: Lung Boy's FS17
Posted: Thu Mar 11, 2010 4:38 pm
by remedy32
Hi Lung,
You asked about layout so..............
I've got a bunch of images of my boat in my "Builder Gallery" (user:remedy32 gallery:FS17 in CT) which might help visualize what I'm trying to do. A personal favorite here in New England is the Eastern 18 built in Maine. I've swiped many of my ideas from them as to layout. My boat is real simple as our fishing is VERY casual. We wanted a fair amount of dry storage and seating. That led to how I've treated the bow area. I'm planning to power with 25-35 hp; likely a low time OMC 2 cylinder 2 stroke or similar at around 120 lbs. Will be adding a small center console; still not sure about with or without a seat in front.
Here's a look forward.
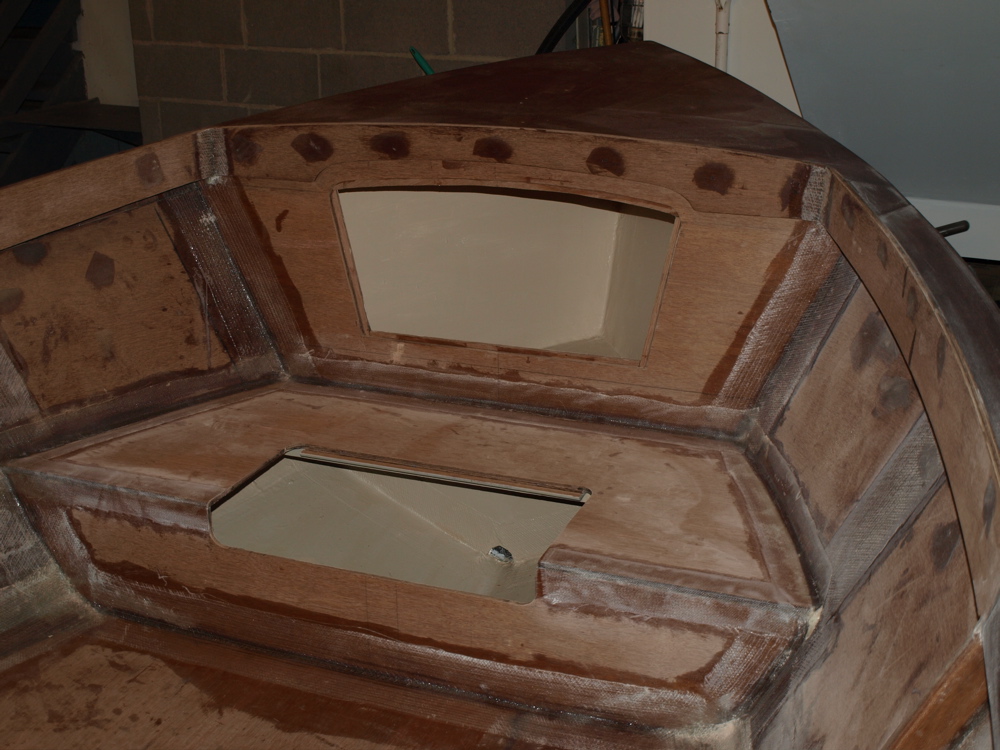
You can get a look at the gunwale and foredeck treatment. Frame A is pushed forward 4" and a frame added to support the seat. The coaming extends 3/4" above the deck line to fend off some of the spray.
I choose to flip the boat and work on the inside with the long Northeast winter. As you can see it's time for lots of sanding, a bit of fairing mud, primer and paint. Then the boat flips again for the bottom. All this can change depending on the weather and available help for the next 2 flips.
This is my first 'larger' boat and I'm very impressed with the way the structure stiffens with the addition of each piece. The bonding of the cockpit sole was probably the most dramatic but adding the gunwale structure is a close second.
Keep the pictures coming. Good luck with the decision making process.
Bill in CT
Re: Lung Boy's FS17
Posted: Tue May 25, 2010 6:50 pm
by cape man
What's happening?
Re: Lung Boy's FS17
Posted: Tue Jun 01, 2010 4:02 pm
by Lung Boy
cape man,
I wish I could report some significant progress, but I can't.
There has been a lull in the action. Hopefully, it's the calm before the storm.
Mike
Re: Lung Boy's FS17
Posted: Tue Jun 01, 2010 4:31 pm
by cape man
Just checking. Maybe this will give you the push you needed...your work was really good and I was looking forward to another Bateau boat in the local area...
Re: Lung Boy's FS17
Posted: Tue Jun 01, 2010 8:09 pm
by peter-curacao
remedy32 wrote:Hi Lung,
Here's a look forward.
Bill in CT
I think that is a very good hatch option for seats, I was planning to do the same thing in my V seats at the bow,in my opinion when finished almost impossible for water to enter there, great thinking

Re: Lung Boy's FS17
Posted: Tue Jun 01, 2010 8:40 pm
by remedy32
Actually the hatch in the casting deck area is missing the rest of the inside trim to channel spray back down into the cockpit. You can see the first piece in place. It's got a groove routed in it to direct the water (hopefully).
Bill
Re: Lung Boy's FS17
Posted: Tue Jun 01, 2010 9:26 pm
by peter-curacao
remedy32 wrote:Actually the hatch in the casting deck area is missing the rest of the inside trim to channel spray back down into the cockpit. You can see the first piece in place. It's got a groove routed in it to direct the water (hopefully).
Bill
I think I know exactly what you are building
that's why I wrote
when finished almost impossible for water to enter there
Re: Lung Boy's FS17
Posted: Sat Sep 04, 2010 10:17 pm
by cape man
Hey Lung Boy!!! Whatup?
Re: Lung Boy's FS17
Posted: Sun Jan 02, 2011 6:27 pm
by Lung Boy
cape man, i'm back.
Taped in the frames and the motorwell sides. Also added a frame. I didn't even ask anyone if it was a good idea to add the extra frame, I just did it.
The layout is going to be a center console. A rear deck up to the extra frame that added. The baitwell will go between frame E and the added frame with storage compartments on each side. The baitwell walls will be lined with 1/2 inch H80 foam. May need some help with a layup schedule.
The forward deck will go back to frame B. A gas tank will go in front of frame B. I envision a wide tank (almost the width of the boat at frame B) of about 15 gallons. I would like to run the fuel line under the starboard gunnel.
I need to figure the number and size of chase tubes for steering, controls, electrical, sounder. Any suggestions?
Re: Lung Boy's FS17
Posted: Wed Jan 12, 2011 4:26 pm
by cape man
Use nothing less than 2" with wide sweeps for the steering and controls or it will not go through. 1.5" with sweeps for the other stuff.
Glad to see you back at it!!!