Cedarock's HM19

To help other builders, please list the boat you are building in the Thread Subject -- and to conserve space, please limit your posting to one thread per boat.

Please feel free to use the gallery to display multiple images of your progress.
cedarock
Active Poster
Active Poster
Posts: 395
Joined: Tue Dec 18, 2007 9:19 pm
Location: Burlington, NC

Post by cedarock »

Come by anytime!
The sound was good this season The stripers are still being caught! Over the weekend I got 22 in about 2 hours.
Thanks Jeremy! I love to catch those devils and it sounds like you had a good time.

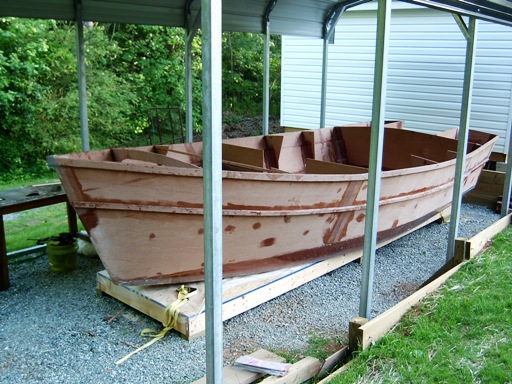
ks8....it will probably splash in Falls first, only because I am more familiar with it. I worked there from 1988 until 1995 and used to fish it 3 to 4 times per week. Never spent much time on Jordan. I will post when I do but I am getting close to the slow boring stuff. I suspect that the sanding will slow me down considerably and then I might force myself to take an occasional break to use the fs12. So who knows when she will get wet! Hopefully by the end of the year.

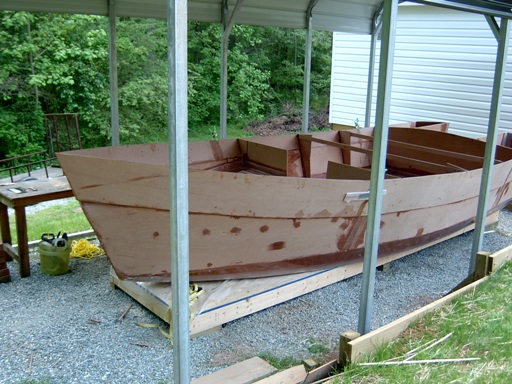
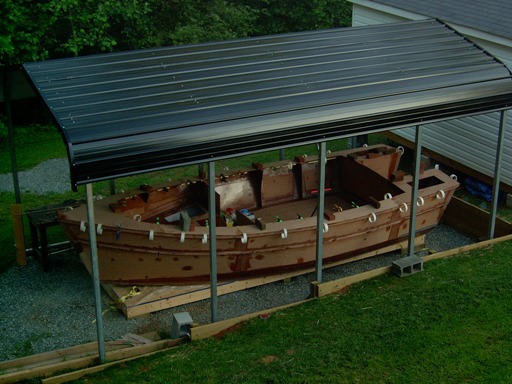
Been thinking about how I am going to flip this thing! :doh: In my mind, I see how I can use the carport trusses and suspend it with come-a-longs and chain hoists. But I am not sure that they will hold that much weight. I guess I will find out soon enough! :D

cedarock
Active Poster
Active Poster
Posts: 395
Joined: Tue Dec 18, 2007 9:19 pm
Location: Burlington, NC

Post by cedarock »

This weekend, I taped the sole down and glued and taped the berth. I glued the cockpit frames in and installed the upper hull panels. I thought that I was going to quit a bit early today and stood back and looked at my project and thought, how will the supports for the pilot house roof attach to those skimpy frames. The forward most cockpit frames were to narrow at the top. I looked at the plans and said to myself, "you big dummy". :doh: The plans read 1'-0 1/4" and I interpreted that as 10 1/4" for some reason. Anyway, I cut them out as close as I could with the jig saw and chewed them to the hull with a 24 grit sanding disc on the angle grinder. Now, it is right! :D

The pic has the narrow frames in it!
Image

Took an inventory of supplies and think that I better order some more wood flour and epoxy. It looks like I won't have enough! I lost some flour to wind and accidentally let some get wet. I only need the flour but while I am ordering, I think that I will go ahead and order more epoxy as I only have 5 gallons left.

User avatar
fishingdan
Very Active Poster
Very Active Poster
Posts: 1376
Joined: Tue Sep 17, 2002 1:00 am
Location: Norfolk, MA

Post by fishingdan »

Looking good. That is a pretty design.

cedarock
Active Poster
Active Poster
Posts: 395
Joined: Tue Dec 18, 2007 9:19 pm
Location: Burlington, NC

Post by cedarock »

Thanks Dan...the design is great. I only hope that I can do the design justice! Looking good so far.

User avatar
chicagoross
* Bateau Builder *
* Bateau Builder *
Posts: 1927
Joined: Wed Aug 29, 2007 3:42 am
Location: Guam, USA, middle of the Pacific Ocean

Post by chicagoross »

Lookin VERY good, Cedarock! Great progress. Don't feel bad about the wood flour - my kit came with 5 pounds and I've used 10 so far, just got the next 5 pounds in which I think will do it as I'm just about ready to start putting the cabin up. I'm at 21 gallons of epoxy right now (instead of 15 8O per BOM).

Every extra you add (hatches, fuel tanks, extra glass, epoxy/graphite bottom. etc. etc. etc.) is adding extra wood flour, epoxy to the buy list. Some of the kits are really for the "hull only" and don't include the materials for the cabins, interiors, etc. I know the kit for my HMD18 didn't have woven tape, for example, although 3 rolls of it are called out for in the BOM, so I suspect it didn't include epoxy for the superstructure either.

Cracker Larry's doing a great job on his boat, he's built Bateau boats before, and I remember reading in his thread "ordered more epoxy again"...

Frankly, I think the BOM epoxy callouts are optomistic at best. I don't think the "average man" can really build a boat with what is called out in the BOMs. Anyone who has really built one of the larger designs for what's listed on the BOM, feel free to correct me. And let me know how much previous experience the "average man" has! :doh: :lol:

ericsil
* Bateau Builder *
* Bateau Builder *
Posts: 332
Joined: Tue Jan 23, 2007 9:36 pm
Location: texas

Post by ericsil »

I don't think the epoxy/glass kit is expected to do the whole boat. The kit for the P19 had about 130 lbs of epoxy and 65 lbs of glass, which is roughly what you need to lay the glass with a 50% fill factor plus a little more. In addition, you need about 2 gallons for filets plus whatever you use to cover bare wood and use for fairing, not counting consols and other. I held close to the 50% fill factor in the compartments, but faired the entire outside with epoxy and filler (rather than Quickfair). I ended up using about 24 gallons when all was done.

cedarock
Active Poster
Active Poster
Posts: 395
Joined: Tue Dec 18, 2007 9:19 pm
Location: Burlington, NC

Post by cedarock »

I had a little detour this morning. An unexpected hail storm blew through last night and left standing water in the boat. I think that I will start covering the boat daily from now on! I have not finished the seam down the middle of the cockpit sole and feared that a significant amount of water would be below. So, I cut holes above each middle compartment and there was water. I am going to leave these plugs out until I am ready to finish the inside so it can dry thoroughly.

Anyway, I have finished installing the cockpit and cabin small frames and have glued on the rub and spray rails. Getting close to turning her over.
Image

I have also cut the holes for the cockpit drain fittings and scupper valves. Then glued backing plates for the stearn eyes. After some cleating, I will be ready for the decking! :D I am going to install the stearn compartment soles a couple of inches higher than designed to allow for the scupper tubing below. I plan to put in an inspection hatch in the compartment bottoms for access to the plumbing.

Image

Spokaloo
* Bateau Builder - Expert *
Posts: 4064
Joined: Tue Aug 22, 2006 5:29 pm
Location: Spokane, Wa
Contact:

Post by Spokaloo »

Cedar, if you can sweet talk SWMBO into it, get some blue tarps and attach them to your enclosure with zipties and tape. When your weather gets snotty, just roll em down for the badness, and roll them back up for the nice days. This will also come in handy for painting time.

E

User avatar
chicagoross
* Bateau Builder *
* Bateau Builder *
Posts: 1927
Joined: Wed Aug 29, 2007 3:42 am
Location: Guam, USA, middle of the Pacific Ocean

Post by chicagoross »

Lookin' good, Cedarock! I better get back to work, you're catching up. You're definitely getting to the little-things-that-take-forever stage... :D

cedarock
Active Poster
Active Poster
Posts: 395
Joined: Tue Dec 18, 2007 9:19 pm
Location: Burlington, NC

Post by cedarock »

Thanks E....got the perfect sized tarps today and will hang them tomorrow. :)

Chicago, thanks but I am a ways behind you! You are at the "I can see the light at the end of the tunnel stage".

Yesterday, I glued the cleats for the decking and today, I glued the decking down. I cut the decking based on the boat's dimensions rather than by the plans. Even with all my screw ups, they fit like a glove! While the deck was curing, I glued the cleats for the coaming. Hope to install that tomorrow and then it will be time to turn her over. I will probably try to turn it on Memorial Day.

Here she is with all decked out in curlers. I used every clamp that I had!

Image

Post Reply

Who is online

Users browsing this forum: No registered users and 2 guests