Page 1 of 1
Cedarock's HM19
Posted: Fri Mar 21, 2008 7:47 pm
by cedarock
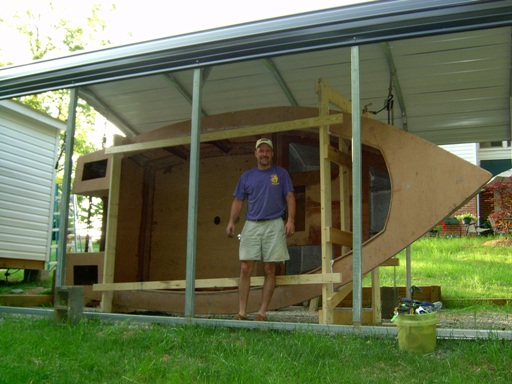
Well, I have started the build and have made my first mistake. I tend to screw up once per day.

I cut the frames too long from the stringer out. I noticed it just before glueing the first layer of the bottom on but after the frames were glued to the stringers. I will contribute that mistake to waking up at 3:00 in the morning and staying awake a couple of hours researching wiring. I measured from the center line instead of from the stringer position. I got one temporary frame right out of the four.
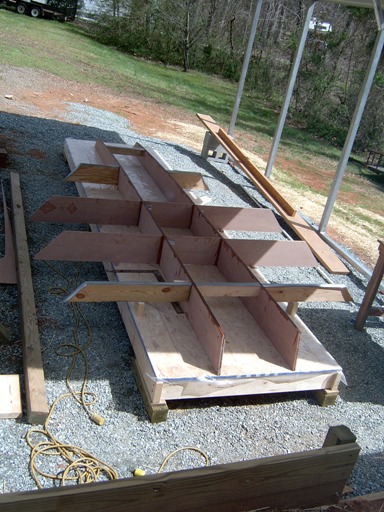
Thankfully, I was able to cut the frames in place. I don't know why I didn't catch it earlier because it was obvious, looking at the pics. Anyway, all is well and I was able to cut them off in place and have glued the first layer of the bottom on.
If I wake up tonight thinking of the wiring, I will start counting sheep.

Busy building day tomorrow. The plans are spot on as they were with the fs12.
Posted: Fri Mar 21, 2008 8:43 pm
by chicagoross
May all your screwups be that easy to fix!

Posted: Fri Mar 21, 2008 9:34 pm
by cedarock
I hope so...thanks chicagoross! You are coming right along on your hm. Looking good!
Posted: Fri Mar 21, 2008 10:42 pm
by Cracker Larry
I cut the frames too long from the stringer out.
Heck, that's easy. It's when you cut them too short that creates a real problem.
Posted: Sat Mar 22, 2008 6:54 pm
by cedarock
Just wait Larry!
I will come up with a good one before this is over.
Today, I glued and temporarily screwed the second layer of the bottom on. While that was curing, I attached the chine panels wet on wet. I have two mistakes of the day. The first is using too much epoxy. I see builders lay tape all nice and neat and I said to myself, that I was going to be more careful on this boat but no, I still have the same messy technique. The second mistake was a couple of air pockets that formed where the chine panel meets the bottom. The putty sank and created an air pocket when I laid the tape. I will fix that with syringe and glue. So far, so good!
Posted: Sun Mar 23, 2008 12:59 am
by chicagoross
A few air bubbles isn't a mistake for me, just a part of the process. For what it's worth, I reduced mine to minimal after learning two things by trial and error, on the HMD I'm working on right now: First, the putty needed to be thicker. Second the "prime coat" of neat epoxy I put down in the area before the filet needs to me at least pretty tacky/medium hard. If it's actually "wet" at all, the putty will slide off of it a bit wherever gravity wants to take it. I try to do the prime coat at least a few hours (this is Guam, very hot) before the actual filets, maybe longer in your clime. Haven't really had any air bubbles under the tape after figuring that out

.
Posted: Sun Mar 23, 2008 5:44 pm
by cedarock
Thanks, I probably do move to fast from filets to glass. I will try giving it some time and see how it turns out. I managed to get a little done today. I flipped the hull and mounted the cabin frame. Then layed a few pieces of tape. It is supposed to get cool tonight, so I hope my mistake of today is not giving the epoxy chance to kick off by fiberglassing too late in the day.

I will have to give it a rest for a few days...it's back to work tomorrow.
Posted: Sun Mar 23, 2008 11:30 pm
by Spokaloo
Looks nice, Im glad to see someone getting on the horse and putting one of these together, its been a while!
E
Posted: Mon Mar 24, 2008 3:53 pm
by chicagoross
Lookin' good, Cedarock! It's fun putting the hull together, seeing the "boat" appear so quickly! You're also doing a nice job documenting the build, keep it up! I really think we'll see a lot more of HM's and HMD's being built, they have a lot of basic creature comforts for the amount of $4/gallon gas that they burn...
Posted: Mon Mar 24, 2008 5:44 pm
by cedarock
Thanks guys....too cold to use epoxy this evening, so I will get out the plans and see if my trimming of the chine panels at the stern will have any effect on the joint between the hull panel and chine panel. For some reason, I had to trim it off gradually to a maximum of about 1/2 inch of the chine panels for the last two feet or so. I couldn't get it to match up with the bottom exactly. Now I am thinking that I will have to adjust the chine mating surface on the transom just a bit to compensate. Hope not!
Posted: Sat Mar 29, 2008 4:24 pm
by cedarock
I managed to work a few hours during the evenings towards the end of the week and fiberglassed more along the bottom at the stringers and chine. I also glued frame f and the motorwell sides to the bottom. And since I planned on spending all of today on the boat, it is rainy and cold. I worked a little inside, cutting frame c and cutting and glueing the clamping boards to the transom.
Posted: Sat Mar 29, 2008 4:40 pm
by fishingdan
chicagoross wrote: I really think we'll see a lot more of HM's and HMD's being built, they have a lot of basic creature comforts for the amount of $4/gallon gas that they burn...
I couldn't agree with you more. A beautiful 19' boat that is comfortably pushed with a 70hp engine is very much underrated in this world (maybe former world) of deep v's with twin 200hp engines.
Keep up the great work. I love the looks of the HM19.
Posted: Sat Mar 29, 2008 5:57 pm
by cedarock
Thanks fishingdan! You all are right. Personally, I wouldn't be able to afford to put gas in a 200hp boat many times through the year with today's gas prices.
I think that the hm's are eye-catching, (caught my eye
) and the low hp requirements will make it very functional for me. Can't wait to see it develop. But, I think that I have a problem....I like and could find a purpose for any of designs. I confess, I am a boataholic!
Posted: Sun Apr 06, 2008 5:48 pm
by cedarock
Another weekend and another weekend of rain. This weather is starting to irritate me!
I hung some tarps and installed the transom and frame C. Maybe, I can finish with the taping of the frames and around the transom during the week.
Posted: Thu Apr 10, 2008 9:13 pm
by cedarock
I have been piddlin' with the taping this week and today I cut a 2 1/8" hole in the bottom of the transom and filled with epoxy putty for a drain. While I had the hole saw out, I cut an oval hole in the bottom to fill and use for a transducer mount. Without thinking, I used the same putty mixture of wood flour and epoxy to fill the transducer hole laying some bits of biaxial tape in it as it filled. I wonder if the wood flour will create any air pockets that will hinder the operations of the transducer.
The mixture was on the thin side...thinner than my fillet mixture. As soon as I finished, I started thinking about others using glass strands and epoxy and can't recall anyone ever using wood flour. Think I am safe or should I cut it back out and re-do?
Posted: Thu Apr 10, 2008 9:41 pm
by gk108
After it sets up, shine a light through it. Air pockets should show up.

Posted: Thu Apr 10, 2008 9:57 pm
by cedarock
Thanks gk...good idea! I am optimistically thinking that it should be okay but I will give it the ole light test.
Posted: Fri Apr 11, 2008 2:19 am
by chicagoross
Cedarock, IMHO this is non-critical. You've got a planing hull, the transom will always be in the water (unlike my HMD); if it turns out that the transducer doesn't work well through the area you glassed for it, you can always hang a transom transducer there. No worry!
Posted: Fri Apr 11, 2008 7:41 pm
by cedarock
Thanks and you are right Chicagoross. I am not too worried but I think it will shoot through the concoction that I made and if not, I will send her over the back!
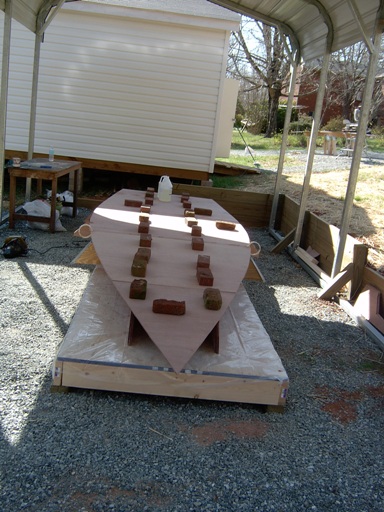
Posted: Sun Apr 13, 2008 6:50 pm
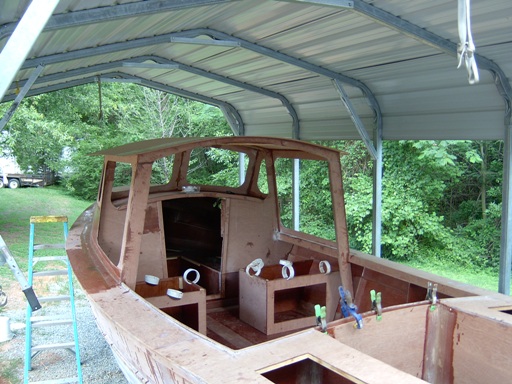
by cedarock
Made some progress this weekend! Yesterday, I finished the taping and started installing the perch for the tank. I am going to glue neoprene to the strips with 5200. The strips are two layers of 3/8" ply glued together with stainless bolts through the top layer.

I had already made up my mind that I would not try to wrestle with the hull panels in one piece, so I cut them out this morning and started installing. BTW, the nesting drawing has the bottom side panels labeled top panels. If I was not on my game, I would have been out there trying to make the top panels fit on the bottom.
Anyway, I got all of the pieces secured to the frames and found that I was going to have a gap at the bow. Fortunately, I decided to install the panels in pieces because I was able to go back and put a small gap at each seam which helped lesson the gap in the bow. I still had a 5/8" gap. I glued a strip of plywood in there and will round it off with putty. It seems that I recall reading about Uncle Ralph having a similiar problem.
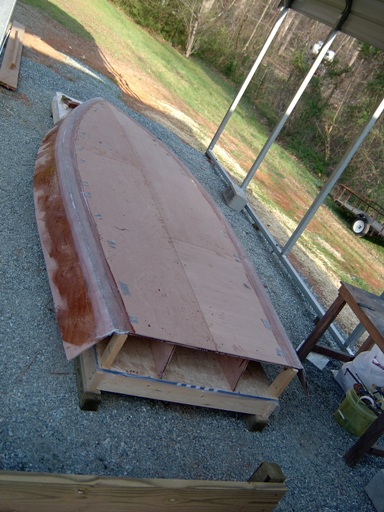
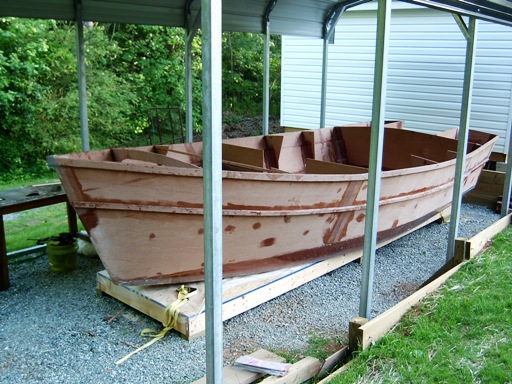
And here she is from above...it is really starting to grow now!

Posted: Sun Apr 13, 2008 10:08 pm
by cedarock
I must have been wrong! I searched and could find nothing on a gap in the bow. Oh well....it will be fine. I will have to think about it again when I mount the upper panels!
Posted: Mon Apr 14, 2008 3:57 pm
by Cracker Larry
I had the same problem with my upper panels at the stem. Sam fixed it by suggesting a mold out of 2 pieces of plywood, covered in plastic and hinged with duct tape. We put this over the outside of the stem and poured it with thickened epoxy and chopped fibers. Let me try to find a picture.
Posted: Mon Apr 14, 2008 4:01 pm
by Cracker Larry
Here it is....


This worked great!
Posted: Mon Apr 14, 2008 5:55 pm
by cedarock
Thanks Larry...that might be what I was thinking about. Good idea and that should work great!
Posted: Wed Apr 16, 2008 8:58 pm
by colonialc19
I had a similar problem in my build as well, placed small narrow strip of ply and used thickend epoxy to help finish shaping the bow.
your build seems to moving along well , looking forward to seeing more
Posted: Wed Apr 16, 2008 9:26 pm
by cedarock
Thanks Colonial....I am glad to hear that I am not the only one. It has been too cool in the evenings this week to do anything. Hope to get back at it tomorrow evening. This cool weather has given me a chance to catch up on the things that I have ignored during the last couple of weeks like mowing the yard.
Posted: Thu Apr 17, 2008 3:11 am
by chicagoross
My HMD surprised me be having every panel fit together exactly. It wasn't due to my stitch and glue experience!

Don't know if it was just luck or if it's easier to build upside down on a jig like the HMD is... Anyhow, sounds like you got a handle on it. Nice progress on your build, Cedarock!
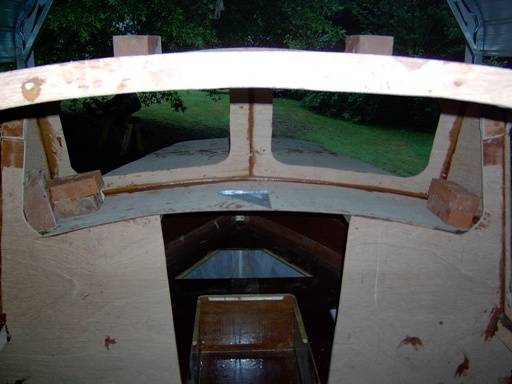
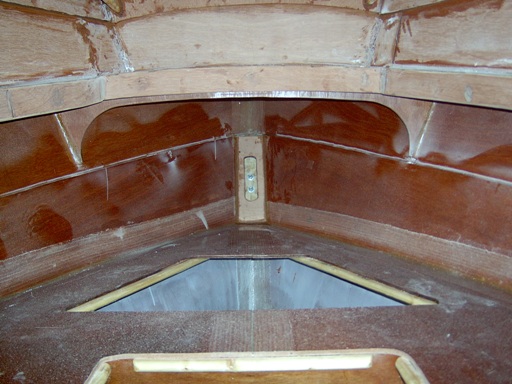
Posted: Sat Apr 19, 2008 6:39 pm
by cedarock
Installed the tank and all of the cleats for the sole today. Thanks to Larry, the suspended ones were a snap with the hot glue. I guess I will give it a few days for the epoxy to cure before making a mess with the foam. Tomorrow, I hope to finish the taping in the cabin area.
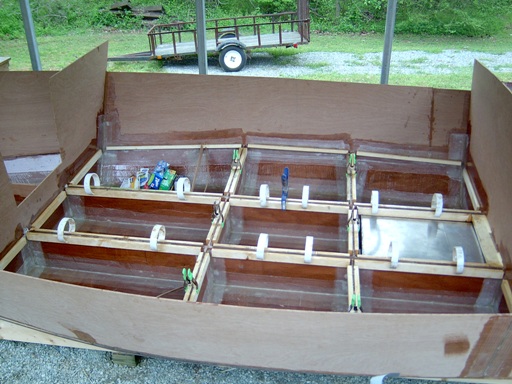
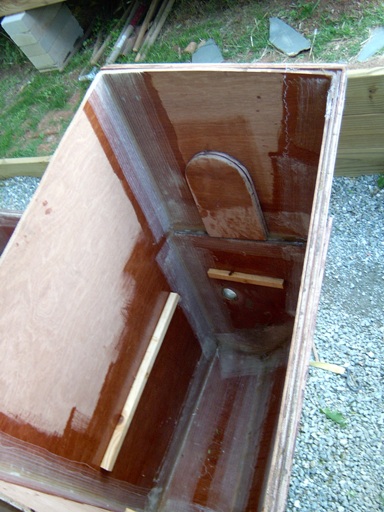
I first looked at the cleats on the sides and thought, how could they be arched when they are at the same level as the top of the stringers. After putting a straight edge back on them, I saw that it was an optical illusion. Had me worried for a bit!
You can see it in the pic. The front and rear appears to be lower than the middle.
Posted: Sat Apr 19, 2008 10:12 pm
by chicagoross
You're really moving along, having that much interior bits and pieces done aleady! Cedarock, are you working on this full time? Nice progress!
Posted: Sun Apr 20, 2008 10:28 am
by donk
cederock,
I'm impressed too.
If I do build anything bigger I plan to use something like what you have for structure to accomplish it. My garage just isn' t big enough and the wife really isn't happy with fairing dust in the house.
Keep up the good work.
don
Posted: Sun Apr 20, 2008 4:50 pm
by cedarock
Thanks guys!
Chicago, I work from 8-5 during the week, so I can only piddle on the boat during the weekday evenings but try to hit it hard on weekends.
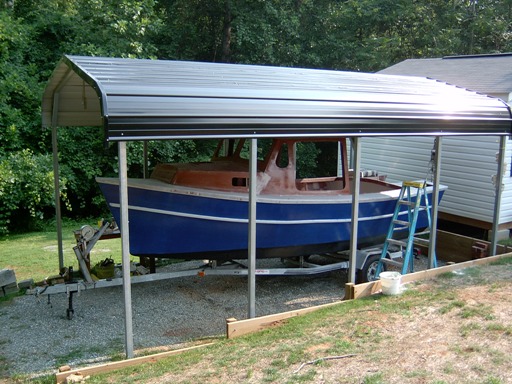
Don, the carport works great except for bad weather will slow you down. I made some more progress today...finished taping, fixed bow screw-up, and installed the cabin longitudinal frames. I didn't take a pic because a thunderstorm blew up and I was rushing around trying to cover as much of the boat as possible with a tarp (downside of the open carport).
Posted: Sun Apr 20, 2008 9:14 pm
by chicagoross
I only get the couple hours a day weekdays - usually weekends end up family time with the kids and wife. You're coming right alon, Cedarock - you're going to be at the point of small, timeconsuming, boring details real soon!
Posted: Sun Apr 20, 2008 9:50 pm
by cedarock
you're going to be at the point of small, timeconsuming, boring details real soon!
I know what you mean...during the storm, I came in and started drawing the chase tubes needed to separate the fuel from electrical wires. I have to cross that bridge real soon and is not something I am looking forward to. I plan to run the control cables and switch panel wiring under the gunwhale, so that part will be easy! Creating the safest way to get it from the battery compartment to the gunwhale is what I have been contemplating. Think I have it figured out!
Family time is more important than boats for sure! I only have a wife and couple of dogs to keep up with! That probably allows me a little more boat building time. Maggie takes some time, but Harley Jane and Cricket Sue could care less what I am doing as long as they get a treat every now and then!
Posted: Tue Apr 29, 2008 4:22 pm
by cedarock
One evening last week, I glued the cabin longitudinal framing to the stringers and poured approximately five gallons of foam under the sole. Didn't have time to do anything on the boat over the weekend but today, I glued the sole down and glued the cleats on for the berth top. Wouldn't you know that my glue gun had to quit on the first cleat, so I had to resort to my old method. They are held up with sticks, scraps, clamps, spring curtain rods and anything else I could get my hands on!
Posted: Wed Apr 30, 2008 9:26 am
by jgroves
cedarock,
Boats lookin' great! I didn't realize you were so close... I would love to see you build next time I'm over your way. My wife went to Elon and my sister in law lives in Burlington.
Keep up the good work!!!
Jeremy Groves
Posted: Wed Apr 30, 2008 10:10 am
by Cracker Larry
CR, that's looking great! You are really moving along.
I've also got a lot of family in Burlington, 4 aunts, 3 uncles, about 6 cousins. I get up that way from time to time. Mind if I look you up next time?
Posted: Wed Apr 30, 2008 6:04 pm
by cedarock
Thanks guys. Small world isn't it! Both of you are welcomed to stop by anytime. I live within a mile of the interstate, so you can hop off and you are here.
Jeremy, I was born and raised right across the sound from you and get back to see Mom from time to time. You are building the perfect boat for that area IMO. Maybe, I can swing by sometime and see your fs17. I have been intending on towing the fs12 down there but got so involved in the hm19 that I have let the striper season slip right on by.
Larry, I would love to have the opportunity to pick your brain for a bit as if I haven't already! I will have the cold beverage of your choice waiting!
Shoot me a line when you guys are in the area...would love to get together!
Posted: Wed Apr 30, 2008 7:58 pm
by Cracker Larry
Will do, thanks
Posted: Wed Apr 30, 2008 9:26 pm
by ks8
When that boat is done, will you be dunking her in Jordan or Falls? If so, say so in the thread. I should be sailing by then. I'd love to see it sitting on the water.
Posted: Thu May 01, 2008 8:41 am
by jgroves
cedarock wrote:Jeremy, I was born and raised right across the sound from you and get back to see Mom from time to time. You are building the perfect boat for that area IMO. Maybe, I can swing by sometime and see your fs17. I have been intending on towing the fs12 down there but got so involved in the hm19 that I have let the striper season slip right on by.
Cedarock,
Come by anytime!
The sound was good this season
The stripers are still being caught! Over the weekend I got 22 in about 2 hours. Unfortunatly they are the smaller ones. I usually release all but one anyhow
Jeremy
Posted: Thu May 01, 2008 6:15 pm
by cedarock
Come by anytime!
The sound was good this season The stripers are still being caught! Over the weekend I got 22 in about 2 hours.
Thanks Jeremy! I love to catch those devils and it sounds like you had a good time.
ks8....it will probably splash in Falls first, only because I am more familiar with it. I worked there from 1988 until 1995 and used to fish it 3 to 4 times per week. Never spent much time on Jordan. I will post when I do but I am getting close to the slow boring stuff. I suspect that the sanding will slow me down considerably and then I might force myself to take an occasional break to use the fs12. So who knows when she will get wet! Hopefully by the end of the year.
Been thinking about how I am going to flip this thing!
In my mind, I see how I can use the carport trusses and suspend it with come-a-longs and chain hoists. But I am not sure that they will hold that much weight. I guess I will find out soon enough!
Posted: Sun May 04, 2008 8:01 pm
by cedarock
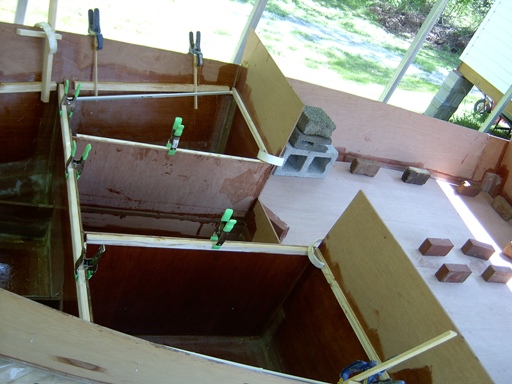
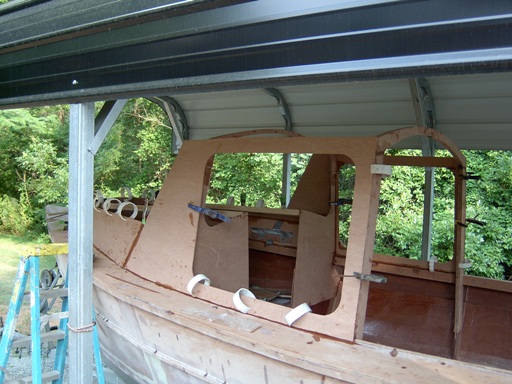
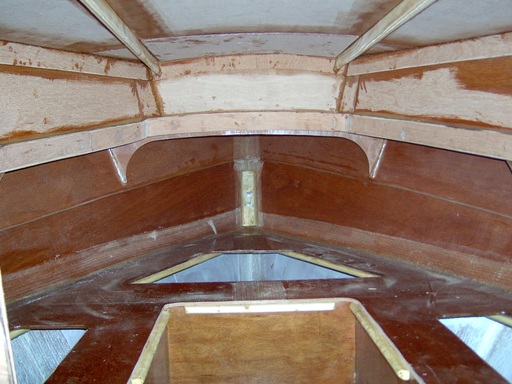
This weekend, I taped the sole down and glued and taped the berth. I glued the cockpit frames in and installed the upper hull panels. I thought that I was going to quit a bit early today and stood back and looked at my project and thought, how will the supports for the pilot house roof attach to those skimpy frames. The forward most cockpit frames were to narrow at the top. I looked at the plans and said to myself, "you big dummy".
The plans read 1'-0 1/4" and I interpreted that as 10 1/4" for some reason. Anyway, I cut them out as close as I could with the jig saw and chewed them to the hull with a 24 grit sanding disc on the angle grinder. Now, it is right!
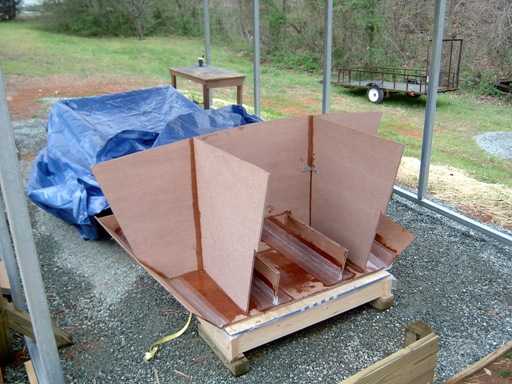
The pic has the narrow frames in it!
Took an inventory of supplies and think that I better order some more wood flour and epoxy. It looks like I won't have enough! I lost some flour to wind and accidentally let some get wet. I only need the flour but while I am ordering, I think that I will go ahead and order more epoxy as I only have 5 gallons left.
Posted: Sun May 04, 2008 8:51 pm
by fishingdan
Looking good. That is a pretty design.
Posted: Sun May 04, 2008 9:03 pm
by cedarock
Thanks Dan...the design is great. I only hope that I can do the design justice! Looking good so far.
Posted: Mon May 05, 2008 2:02 am
by chicagoross
Lookin VERY good, Cedarock! Great progress. Don't feel bad about the wood flour - my kit came with 5 pounds and I've used 10 so far, just got the next 5 pounds in which I think will do it as I'm just about ready to start putting the cabin up. I'm at 21 gallons of epoxy right now (instead of 15

per BOM).
Every extra you add (hatches, fuel tanks, extra glass, epoxy/graphite bottom. etc. etc. etc.) is adding extra wood flour, epoxy to the buy list. Some of the kits are really for the "hull only" and don't include the materials for the cabins, interiors, etc. I know the kit for my HMD18 didn't have woven tape, for example, although 3 rolls of it are called out for in the BOM, so I suspect it didn't include epoxy for the superstructure either.
Cracker Larry's doing a great job on his boat, he's built Bateau boats before, and I remember reading in his thread "ordered more epoxy again"...
Frankly, I think the BOM epoxy callouts are optomistic at best. I don't think the "average man" can really build a boat with what is called out in the BOMs. Anyone who has really built one of the larger designs for what's listed on the BOM, feel free to correct me. And let me know how much previous experience the "average man" has!
Posted: Mon May 05, 2008 8:56 am
by ericsil
I don't think the epoxy/glass kit is expected to do the whole boat. The kit for the P19 had about 130 lbs of epoxy and 65 lbs of glass, which is roughly what you need to lay the glass with a 50% fill factor plus a little more. In addition, you need about 2 gallons for filets plus whatever you use to cover bare wood and use for fairing, not counting consols and other. I held close to the 50% fill factor in the compartments, but faired the entire outside with epoxy and filler (rather than Quickfair). I ended up using about 24 gallons when all was done.
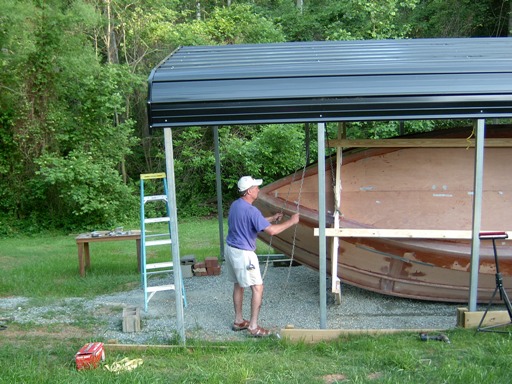
Posted: Sat May 10, 2008 8:20 pm
by cedarock
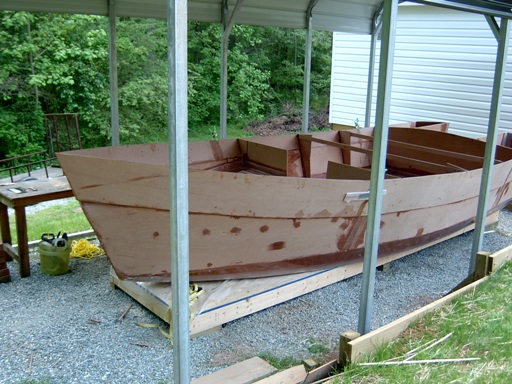
I had a little detour this morning. An unexpected hail storm blew through last night and left standing water in the boat. I think that I will start covering the boat daily from now on! I have not finished the seam down the middle of the cockpit sole and feared that a significant amount of water would be below. So, I cut holes above each middle compartment and there was water. I am going to leave these plugs out until I am ready to finish the inside so it can dry thoroughly.
Anyway, I have finished installing the cockpit and cabin small frames and have glued on the rub and spray rails. Getting close to turning her over.
I have also cut the holes for the cockpit drain fittings and scupper valves. Then glued backing plates for the stearn eyes. After some cleating, I will be ready for the decking!
I am going to install the stearn compartment soles a couple of inches higher than designed to allow for the scupper tubing below. I plan to put in an inspection hatch in the compartment bottoms for access to the plumbing.
Posted: Sat May 10, 2008 11:09 pm
by Spokaloo
Cedar, if you can sweet talk SWMBO into it, get some blue tarps and attach them to your enclosure with zipties and tape. When your weather gets snotty, just roll em down for the badness, and roll them back up for the nice days. This will also come in handy for painting time.
E
Posted: Sun May 11, 2008 12:11 am
by chicagoross
Lookin' good, Cedarock! I better get back to work, you're catching up. You're definitely getting to the little-things-that-take-forever stage...
Posted: Sat May 17, 2008 9:10 pm
by cedarock
Thanks E....got the perfect sized tarps today and will hang them tomorrow.
Chicago, thanks but I am a ways behind you! You are at the "I can see the light at the end of the tunnel stage".
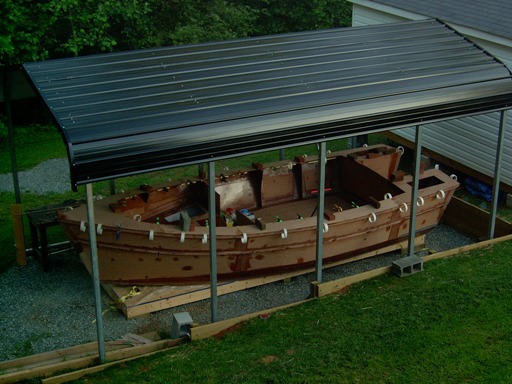
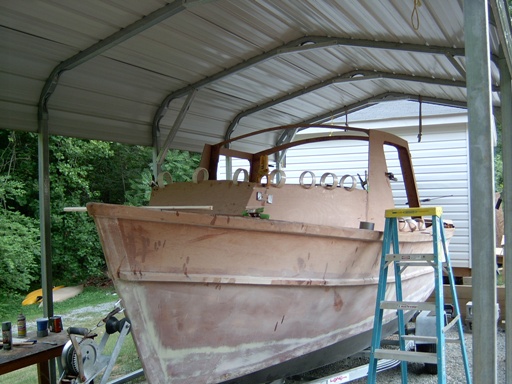
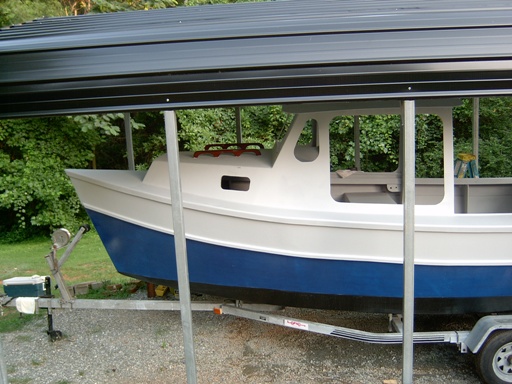
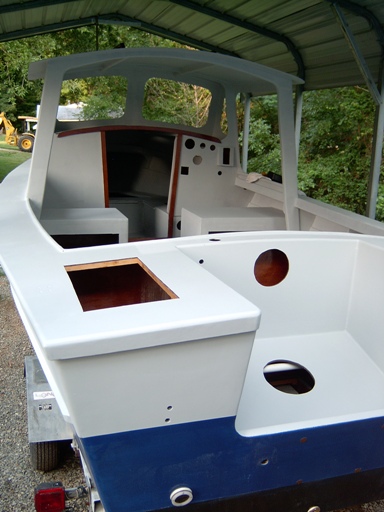
Yesterday, I glued the cleats for the decking and today, I glued the decking down. I cut the decking based on the boat's dimensions rather than by the plans. Even with all my screw ups, they fit like a glove! While the deck was curing, I glued the cleats for the coaming. Hope to install that tomorrow and then it will be time to turn her over. I will probably try to turn it on Memorial Day.
Here she is with all decked out in curlers. I used every clamp that I had!
Posted: Sun May 18, 2008 7:38 am
by ericsil
That is a really nice picture of the progress so far. Most of us are so cramped in our shops we never get to see the job from that perspective. Good luck finishing up the cabin and hull.
Posted: Sun May 18, 2008 8:08 am
by colonialc19
Your making great progress, like ericsil said, that veiw of the build is something you cant get inside a garage
Your from Burlington?
We have friends down that way, they have a farm just outside of town, anyway the boat is looking great.
Posted: Sun May 18, 2008 5:02 pm
by cedarock
Thanks guys! Colonial, stop by if you are ever down here visiting.
I got the coaming glued on today. Man, that was a job....much more difficult than I thought it would have been. I used two 3" wide strips of 3/8 ply. Trying to bend a 3" piece of plywood, even a small amount was difficult. I managed to get close to a 1/2" lip on top all around. I will have to do a little shaping later. Thunderstorm caught me and I didn't get a pic. I was busy putting up the curtains.
Posted: Sun May 18, 2008 7:58 pm
by Spokaloo
Lookin snazzy CR, I can't wait to see this thing floating....
E
Posted: Sun May 18, 2008 9:24 pm
by cedarock
Spokaloo....thanks and you might see it float (without engine), but I am starting to get concerned about the fuel prices.

I can't see myself buying a new motor for her and not being able to afford to tow her to the coast very often. If the gas prices stay like they are, I will probably build it and cover it. When I am in a position to move closer to the water or find a place to store it down east, I will buy the motor. I might put a ragged out engine on it just to see how it will do!
Posted: Sun May 18, 2008 9:37 pm
by cedarock
BTW... I saw a Honda Goldwing pulling a 13' boston whaler down the interstate last week. That was funny, because I have been contemplating a hitch for my Kawasaki Concours to pull the fs12.
Posted: Mon May 19, 2008 3:12 am
by chicagoross
Coming along nicely! And fast!
A 50 hp outboard shouldn't be too hard to find a deal on, there's a lot of them around. I could have bought a new 40hp merc 2 stroke with controls and cables here in Guam for what ordering the 10hp 4 stroke big foot cost...
Anyhow, keep on building - you'll find something to push it when it's time to float the boat!
Posted: Mon May 19, 2008 9:48 am
by jgroves
cedarock wrote: When I am in a position to move closer to the water, I will buy the motor. I might put a ragged out engine on it just to see how it will do!
Hey Cedarock,
Perhaps we could share an engine
I'm sure we could lift a 50 off of one and onto the other
Yep gas prices are certainly keeping my driving and buying to a minimum.
Jeremy
Posted: Mon May 19, 2008 7:10 pm
by cedarock
Good idea Jeremy.
Everybody pardon my bitching last night! I have lived here for 11 years, love it, and consider it home, so it will be a long time, if ever before I will be any closer to big water. I will just have to make do! I know that I won't be able to resist an engine when the time comes and can always use it on the lakes around here!
Posted: Mon May 19, 2008 11:57 pm
by Betowess
Wow, you are really making fast progress. It sure looks great and is one of two or three designs I am contemplating, so I'm following your build with great interest. I'm curious to see how you are going to flip the hull too. I like the lower power required of HM19 and the C17, and that they both have a cabin, though the HM has much more.
Anyhow, I was wondering if you are planning on cutting hatches for storage in the berths, or already have? Any closeups would be great to see... The birds-eye view is great too. Thanks!
Posted: Tue May 20, 2008 3:24 am
by chicagoross
If you look in the last pic you can see a big hatch cut into the starboard berth (already painted white inside the storage compartment). I cut mine (on my guam HMD) much smaller, didn't think about how much more space the cleats to support the hatch lid would take...mine are big enough to fit a 1 or 2 gallon water can. oh well, I'll just have to fold the clothes smaller. I followed the 3" of ply and 3" radius rule, but made the openings square (except for the radius) ; looks like Cedarock followed the 3" along the outside of the hull for a much bigger and easier access opening.
Posted: Tue May 20, 2008 8:22 am
by ks8
cedarock wrote:
I like that picture. Thanks.
Posted: Tue May 20, 2008 12:30 pm
by Betowess
OK, duh, I see it. Thanks Chicagoross.
Posted: Tue May 20, 2008 5:49 pm
by cedarock
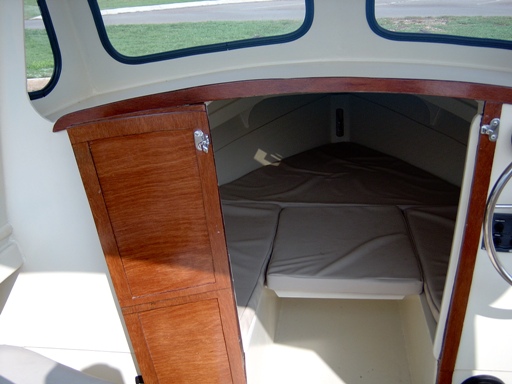
Betowess...I have three hatches cut into the berth. They have a minimum of five inches of ply around them in the narrow sections. I plan to make them as I have seen somewhere on the site, with supports along the edges of the openings and glued tabs to the rear of the covers. They will be covered with cushions, so I think that they will stay in place. In the stearn and seat compartments, I have purchased plastic hatch covers.
As far as turning, I plan to build a 2x6 cradle at frame B and another at frame F. I will tie them together with 2X4s. On the stearn of the boat, I am going to bolt a piece of channel iron using two of the stearn eye bolt holes. Using come-a-longs at the end of the channel iron and on the end of the cradle at frame B, I hope to roll this puppy over. The come-a-longs will be attached to the supports under the shed. I will see if this is a possibility soon because I am going to have to lift the total weight of the boat to remove the building platform and replace with the cradles. Then I can use the materials in the platform to finish building the cradles. If the shed don't support the weight of the boat, I am going to have to think of a plan b. I will post some pictures of my attempt, hopefully on Monday.
That picture was taken from my deck zoomed in by the camera. I like to sit out there with a drink in the evenings and contemplate my next step. I think that the view is nice and my wife has been very understanding. But at some point, I am going to have to install a fence of plant some trees.
Posted: Tue May 20, 2008 8:54 pm
by Betowess
Thanks for the info CR.
When looking at your build site and carport (and I imagine you may have thought of this) couldn't you bolt or screw some beefy eyeholes to the build platform and simply drag it out of the shop with a truck, then flip or roll it on the grass? Then pick it up a bit at a time with a small crew and place back on the platform - and somehow roll (or drag) it back in, perhaps assisted with a comealong...
Just a crazy idea, but it seems kind of simple.
Posted: Wed May 21, 2008 7:59 pm
by cedarock
Yep, that is probably going to be my plan B. But, using the rafters would seem to be the easiest to me. Once the bottom is finished and I flip it back over, I won't need the platform because it will be going on a trailer. If this doesn't work, I will be planning a boat turning party!
Posted: Wed May 21, 2008 9:10 pm
by ks8
cedarock wrote:If this doesn't work, I will be planning a boat turning party!
That's a tempting offer. I'm in Granville county. Wish gas was cheaper, and the back was stronger, but not an unrealistic drive.
Posted: Mon May 26, 2008 8:55 pm
by cedarock
I had to work until 2:00 and didn't know if I would get her flipped today, but everything went as smooth as it could have. Here is a pic of the boat free swinging. The 4x4 brace in the rear was not needed and removed. These carports are stronger than I thought.
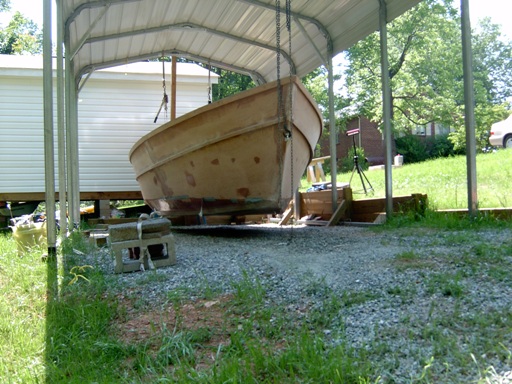
Then she was lifted from the side at two points until it was resting upright.
You can tell in that pic that another coat or two of pigment is needed in those front lockers. You can also tell that I need to mow the lawn. I can't seem to keep up with the new grass back there. Maybe tomorrow!
Then I tried to ease it down, knowing that it was going to swing at some point. All is well, but next time I will add a rope hoist on the opposing side to prevent that from happening.
Should be able to get back at it later in the week.
Posted: Mon May 26, 2008 9:38 pm
by cedarock
Here is another pic. I like this one for some reason. Maggie was snapping photos during the flipping process!

Posted: Mon May 26, 2008 9:58 pm
by jbo_c
Most organized flip I've seen so far. - and with only one person. Frankly, I'm offended.
When we flipped our CC14, we injured two people, and three neighborhood dogs were lost in the flap. We did find one nylabone toy and a small recognizable portion of one of the cars used.
Enjoying your build. Please, at least attempt to look winded in the pictures.
Jbo
Posted: Tue May 27, 2008 1:43 am
by chicagoross
Or sweaty, confused, or something! Looks way too easy and organized...I think you should build the TW28 next, you know, something with a bit more challenge!
I like the real walk-around decks on the HM - my HMD definitely doesn't have that up front by they cabin. Love watching this come together, but the building process is so different than mine - Mine started upside town on the jig, when it got flipped (after glass, graphite on bottome and glass and primer on the sides) is was still very light as the only internal structure was the frames themselves, and no stringers. The only things holding it together were the (outside) chine tapes and the rubrails! Glad you got this move figured out, cause that was a lot more boat to flip than I had!
Oh well, I have a few weeks to catch up while you're playing with the bottom. Are you using graphite? I recommend it as tougher, cheaper, and easier than painting the bottom!
Posted: Tue May 27, 2008 7:10 pm
by cedarock
Thanks guys, but it makes it easy when you have 2" square tubing overhead. The most time consuming part was building the frame. I love it when a plan comes together.
I was starting to fret over having to wrestling with this thing.
Chicago...they do seem to be very differently built. I plan to use graphite on the bottom and the system 3 lopez blue (like my fs12) on the hull outside. I have some of that left over. Thinking about maybe some kind of tan rails and inside, leaving a little bright wood. The system 3 san juan tan looks a little redish on my computer, but that may be my screen.
When we flipped our CC14, we injured two people, and three neighborhood dogs were lost in the flap. We did find one nylabone toy and a small recognizable portion of one of the cars used.
Posted: Tue May 27, 2008 7:17 pm
by ks8
If you had planned so a second set of hands was needed, I might have splurged for the gas and headed over there. Now here I am committed to sanding again instead...
Posted: Tue May 27, 2008 8:03 pm
by cedarock
Thanks for the offer ks8! In the back of my mind, I thought that this would work, but I had a local small army lined up if it didn't. I will be soon joining you with the sandamania!
Posted: Wed May 28, 2008 12:31 am
by ks8
There is a sunny side to it. I think I'm about to buy my final set of cartridges for the respirator, and clean the shop vac filter for the last time. There's a milestone I've been working a few years towards.
May you be there soon as well.
Posted: Wed May 28, 2008 10:43 am
by Lucky_Louis
See Wobbly Legs? Nowhere in his post did KS8 mention that he was or had bought his last gallon of epoxy. This wise builder knows better than to temp the fates

Congrats on another milestone!
Posted: Wed May 28, 2008 8:29 pm
by cedarock
ks...your boat is beautiful! If you need some manpower to prepare for launch, let me know. If I can, I will be glad to help!
Posted: Fri May 30, 2008 8:52 pm
by cedarock
Well, the fun has started!
Sanding.... I have put the first coat of fairing compound on about 1/2 of the boat. This evening, I sanded a litttle of it and found that the dewalt 5" ro sander is not near as fast at my 6" air ro sander that I used on the fs12. I am going to experiment with some discs from Woodworkers Supply tomorrow and if it is no better, I will finish just enough to apply the graphite and wait until I can trailer it around the house to the garage for the rest.
I used quick fair on the fs12 and I am using the blended filler that came with the kit on the hm19. The blended filler is not bad, once you figure out the consistency. I bought some quick fair to touch up and glad that I did...I think that the blended filler will run out before I am done on the outside.
Posted: Fri May 30, 2008 9:05 pm
by ks8
cedarock wrote:...I think that the blended filler will run out before I am done on the outside.
yeah... it goes up the vaccuum.

I'm just getting an eye for where to lay it on, so I don't sand half it off again, and it figures I'm almost done!
I'll post when I'm about to launch. If I get bogged down again, you might be nearly launched when I am. And this will look like a tub next to the HM.
FWIW, I'm glad I went right to the longboard on the bottom panels. That saved some blend right there. The RO really doesn't *fair* unless you're real careful, even meticulous with it. I did that on the topsides, but what a time. I would use a long board there too if I had to do it again.
Happy sanding... sanding... sanding...
Posted: Fri May 30, 2008 10:05 pm
by cedarock
I was able to get the fs12 pretty much faired with the ro but I can see that this is a different beast. I might settle for a work/fishing finish! I don't know if I am up to dragging a long board. We'll see....I thought that I would stop on the finish of the smaller boat and I kept going and wasted a bunch of fairing compound and primer, I'm sure!
Posted: Sat May 31, 2008 7:09 pm
by cedarock
More sanding today...It would be nice if you could recycle the dust that you collect by mixing it back into the epoxy for a fairing compound!
Posted: Sun Jun 01, 2008 8:13 pm
by cedarock
Well, I have just about had it with the sanding. I have used one coat of blended filler, a couple of passes of quickfair, and about 60 sanding discs. Yesterday, I sharpened the stearn bottom edge and today, I prepared the stearn chine panel joint for sharpening.
I remember reading that Tom found some black discs at Lowes that worked well. I started with the red ones, tried two different ones from Woodworkers Supply, and today bought a pack of 40 black ones from Lowes. They are the best so far! (Thanks Tom
) The 5" dewalt ro has impressed me...I have put some man hours on that machine over the last 4 days and it seems to be doing fine. Anyway, a frog stangler ran me in this evening and here is where I am. A little more quick fair and I will try the graphite!
Posted: Sun Jun 01, 2008 11:11 pm
by chicagoross
Movin' right along! Looks like you almost got that fairing licked!
I ran out of epoxy today (thought I had 3 more gallons but when I opened the box found it was the 2 extra gallons of foam that I thought I might need but didn't)...So there's about 26 1/2 gallons into the boat now, just have to put the pilothouse roof on, filet it, and then 2nd coat of epoxy for the insides and whatever fairing I need to do on the insides. Glad the outside's done. No quickfair for me, they won't ship it here. So my fairing is done with the blended filler and the RO. Looks like I'm going to finish with a 30 gallon boat...
Since I can't finish the last few pieces that need to get glued in until the next 3 gallons arrive, guess I'll just be sanding too!
Posted: Mon Jun 02, 2008 7:11 pm
by cedarock
That's tough luck on the epoxy! I have ordered 3 extra gallons so far and I have about 3 gallons left right now. I don't think that I can stretch it out but will probably wait until I get closer to running out before ordering. I am still undecided about fiberglassing the sole. If I do, I am pretty sure that I will not have enough.
Posted: Wed Jun 04, 2008 8:12 pm
by cedarock
Today, I brought home a donor boat that a local boat dealer was selling for a guy....a bass tracker pro 17 deep V with a 1990 Johnson 60hp engine.
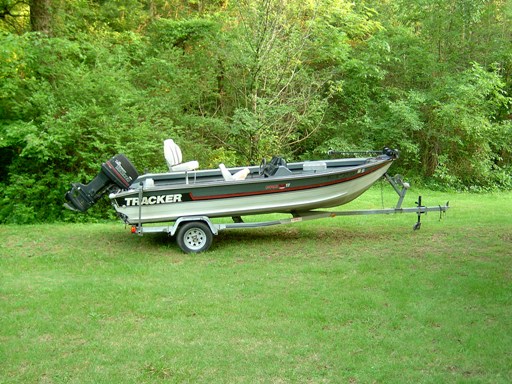
The engine looks a little rough but runs great and has even compression. The guages look like they have been recently replaced. I am going to use the controls, guages, and anything else that is in good shape. The trailer is in good shape but I am not sure that it is long enough. Searching the internet, I think the tracker weighs in around 1500 pounds, which is somewhat equivalent. I think that I will try some 8 foot bunks set back 6 more inches under the stringers and use the shorter ones on the trailer outward from those.....move the boat as far forward as needed and see what happens. If it doesn't work, I guess I can always sell the trailer. At least, it can sit on it until I finish. As far as the boat goes, I will probably scrap it. From what I understand, aluminum is selling high right now! The engine will hopefully be temporary but this will give me a chance to launch and see how it will do with a 60 before investing in a new motor.
Posted: Wed Jun 04, 2008 8:25 pm
by colonialc19
Cedar, If that trailer doesn't work out please let me know, It would be perfect for my Fs17. Burlington is 3 hrs south on I85, no problem there.
Your fairing is comming along quickly, looking good
Daniel
Posted: Wed Jun 04, 2008 8:58 pm
by cedarock
I will Daniel! I thought when I bought this boat that the trailer would be perfect for the fs17. It will probably be a little short for my boat but I think that it would be fine with the weight. It is a Long galvanized trailer in pretty decent shape. The center roller brackets look like they have been recently replaced. I will know the model tomorrow after I go to DMV to get the title transfered. The ID tag is worn and I can't make it out.
As far as fairing....I am a little disgusted! I put my first coat of graphite on this evening and like paint, it shows the imperfections that you didn't see before. I think that I will put three coats on and sand to dull the finish...hopefully hiding some. Then do better above the graphite!
Posted: Wed Jun 04, 2008 9:26 pm
by Spokaloo
Ill take the hull for the scrap price.
Now about shipping.... Anyone going to the NW?
E
Posted: Wed Jun 04, 2008 9:39 pm
by Happychappy
I picked up a '92 (was supposed to be a 94) Mercury 60 hp for mine as well. I'm curious to see what kind of performance you'll get out of it.
A little warning if anyone sees motors from palmbeach outboards, buyer beware! Trim didn't work and was supposed to be a 1994. Long distance purchase so's there is not alot I can do. at least the motor runs well.
Posted: Wed Jun 04, 2008 9:53 pm
by gk108
Don't let that first coat discourage you. As you add more coats it will level out a little more. Right now is the only time you will see it, anyway.
Posted: Wed Jun 04, 2008 11:46 pm
by Cracker Larry
Aluminum is $.68 a pound here, as of yesterday
That tracker will bring a lot more in scrap than a bayliner
Like GK says, it takes a few coats of graphite to level out. It will be fine.
Posted: Thu Jun 05, 2008 12:11 am
by chicagoross
Looks like after you haul the gutted aluminum to the recycler, you can move the bow winch assembly forward, maybe lower it a bit and gain another foot or more that way...
Don't worry about the graphite, after I rolled the third coat on it definitely leveled out nice and smooth. And even if it doesn't, only the fish can complain about it at that point!
Posted: Thu Jun 05, 2008 6:44 pm
by cedarock
Thanks for the moral support fellows! It does make me feel better.
I sanded lightly with 220 and put another coat on today. It is looking a little better now. I will do round 3 tomorrow. I called the scrap metal yard today and it was close to Georgia prices at .65 per pound. I have no idea what it will weigh gutted but I bet I can get $300.00 or so. I might put Maggie on that detail. She likes demolition!
I hate to destroy it but after I get what I want, it might not be very attractive to the buyer.
Posted: Thu Jun 05, 2008 6:57 pm
by cedarock
you can move the bow winch assembly forward, maybe lower it a bit and gain another foot or more that way...
Thanks and good idea Chicago....unfortunately, I have already drilled for the bow eye and it is higher than on the tracker. I think that I will have to weld an extension to the the winch post to even make it work. On top of that, the hm19 bottom will overlap the inside edge of the fenders slightly requiring me to raise the bunks a little making the winch point that much higher. Probably won't work but I will set her on there and let you guys take a look within a week or so!
Posted: Tue Jun 10, 2008 9:02 pm
by cedarock
I have finished with the graphite....it turned out okay but not perfect by any stretch. On the last batch of epoxy, I used a white foam roller from Walmart that looked just like the ones that I have been using from Lowes. It desolved and left little patches of fuzz everywhere on that half of the boat. I should have searched the boards, because I quickly found threads where others have had the same problem.
Had to sand and re-apply.
Anyway, I got the boat turned back over and prepared the trailer by mounting a new set of 9 foot bunks at the width of the stringers. I mounted them about 10 inches further back than they were. I moved the existing brackets outward and put 4 1/2 foot bunks on them. I put a 1 1/2 foot bunk on the tongue to support the front after the pic was taken.
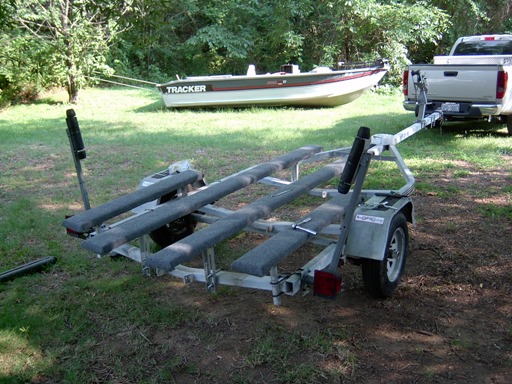
See the poor tracker in the background. Thought about trying to sell it but alot of the wood is rotten, so I will just salvage it.
I lifted the boat and backed the trailer under it and I was surprized. I doesn't seem way too small like I had imagined. It sits a little high but that will make it easy to trailer with the motor down.
Hopefully, I won't have to back down the ramp unit water comes in the truck to launch! If I decide to use it, I will have to extend the winch post about 8 inches to put the roller above the bow eye.

She is a little tongue heavy but maybe the engine will take care of that...if not, I can move the axle forward a little bit.
Does it look crazy to you all. Honest opinions!
Posted: Tue Jun 10, 2008 9:20 pm
by gk108
Can it go any lower or do the fenders get in the way?
Posted: Tue Jun 10, 2008 9:28 pm
by cedarock
The fenders are right at the width of the bottom. I can't go any lower.
Added....looking at the picture, I might could lower the front a bit! I have had skiffs that ride over the fenders and they do fine, but the hm 19 is so tall. I probably need to find a trailer that will lower it between the fenders, but I do want it high enough to trailer with the engine down. I will have to measure the lower unit of the engine tomorrow and see where I stand.
Posted: Tue Jun 10, 2008 11:47 pm
by chicagoross
Might not be what you want to trailer to Baja, but it'll get you in the water! Don't lower just the front, you'll have a hard time tilting it to keep rainwater drained.
I'm worried, now, Cederock, I haven't even bought a trailer yet! Mercury is building my motor though, supposedly last week but haven't heard that it's shipped yet. Meantime I'm laying the final filets and tapes on the Pilothouse cabin with Gallon 28 of epoxy
.
Posted: Wed Jun 11, 2008 10:00 am
by tech_support
I would use the trailer as is for local trips.
Posted: Wed Jun 11, 2008 8:10 pm
by cedarock
Thanks guys! The more I look at it, the more I think that it will be fine. I will have about 8 -9 inches from the ground to bottom of the skeg. That pic is from below looking up and in reality, it doesn't look that high from other angles. I will see how it does around here and if fine, I won't worry any longer.
I do plan to add some guide on bunks and extend or weld a new winch post. I guess this weekend will be spent stripping the tracker and getting it out of the yard...sure would like to keep building, but marriage is a little more important!
Chicago....don't worry, you will be ready to launch in no time!
Posted: Wed Jun 11, 2008 9:56 pm
by Betowess
I bought a new galvanized trailer for a Lund I have, and it sits almost exactly like yours. The trailer's fenders are not quite wide enough to allow for the boat's beam, so the bunks have to be quite high - almost as high as they'll go. So my boat sits a bit high. It works fine, depending on the boat launch and the lake (or the tide). Sometimes I do have to get my van briefly into the water, with a little gurgling out of the exhaust. Sometimes only the tires get wet. Just depends on the boat launch.
But your trailer's tongue looks fairly long, so maybe it will work out great.
Edit; I had mentioned adding some rollers to help, but with a far back as the bunks go, probably wouldn't work right...
Posted: Sun Jun 15, 2008 7:29 pm
by cedarock
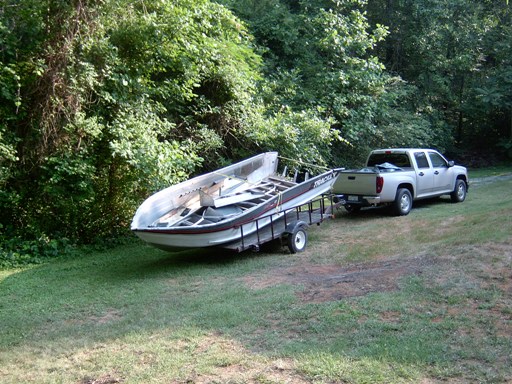
Yesterday, Maggie and I started on the tracker. At the end of the day, it was done and loaded on the trailer. I think that I might have been optimistic with the $300.00 figure. After taking all of the rotten wood off, it is not nearly as heavy as I thought. Anyway, it has to go! I have a pile of neat stuff that came off of that boat....for example in-dash flasher. I probably want use it but I have always liked them. If anyone can use a 10 gallon plastic permanent tank or steering system with 12' cable let me know!
Today, I glued supports along all edges of the compartment hatch openings and cut and glued the top half of frame C. I decided to hinge the rear portion of the berth that covers the floor, so I cut that out and glued some cleats for support. Maybe next week, I can make some progress on the cabin!
Posted: Sun Jun 15, 2008 8:34 pm
by chicagoross
Nice work, Cedarock! The cabin's fun! If it's 1/4" ply like my HMD, it starts out pretty fragile and flimsy, but just like the hull every piece and every filet & tape keeps making it stronger and more rigid, until at last you finally stop worrying about it blowing away in a strong wind!
Posted: Sun Jun 15, 2008 8:44 pm
by cedarock
Thanks Chicago...it is 1/4" like the hmd. Looking forward to the next couple of weeks! I am putting off the finishing of the outside for as long as I can!
I also found a couple of filet knives in the rear of the tracker under the decking. I bet the previous owner has looked high and low for those knives! Probably blamed his wife.
Posted: Mon Jun 16, 2008 1:34 am
by chicagoross

can't put that off any longer...
Posted: Sat Jun 21, 2008 8:12 pm
by cedarock
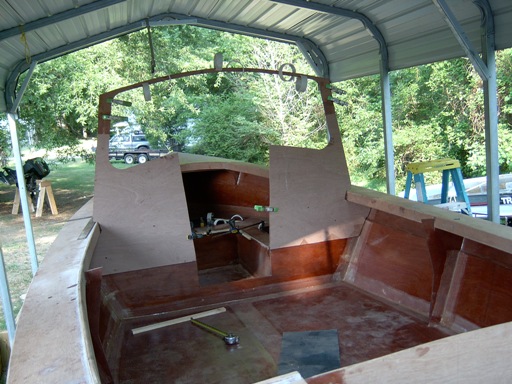
I have finally started on the cabin. I screwed up cutting the first rear most pilot house frame,which now is only two inches wide in the center instead of three. To correct it without buying more ply, I used 1/2" instead of 3/8" for the outer two layers. I think that it will be strong enough! I cut the sides flush with that frame to provide as much open room behind the pilot house as possible.
The cabin sides are on and tomorrow, I hope to glue the roof on. My cabin hatch was on the porch today!
Perfect timing! I am at the bottom of the plywood stack and trying to figure out how to finish without buying more. Cutting the bow portion of the decking in one piece has cost me some 1/4' plywood, but I think I will have just enough to finish the cabin and pilot house roofs.
Posted: Sat Jun 21, 2008 9:42 pm
by Betowess
Hey, that's looking terrific! Now it feels like a cruiser, not just a hull, though it is a nice looking hull. I'm enjoying your build pics - Thanks for sharingl!
I am just curious, about how much do one of those carport kits run and how wide is yours?
Posted: Sat Jun 21, 2008 9:48 pm
by colonialc19
Your making some great progress
Its really shaping up now, I dont know about you, but when it starts to take its final shape, man... its exciting
Great pics,
Daniel
Posted: Sat Jun 21, 2008 10:07 pm
by cedarock
Thanks guys!
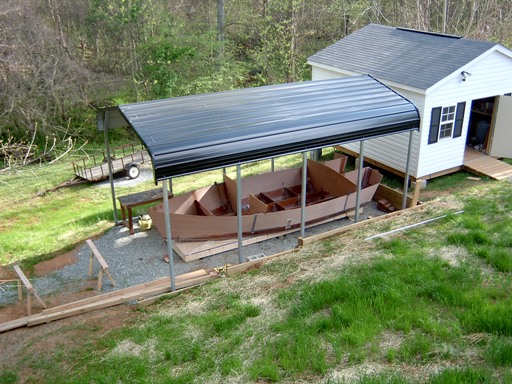
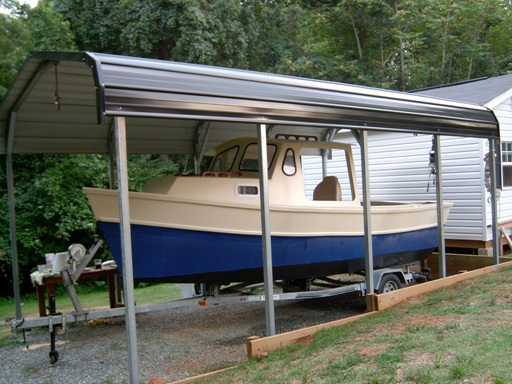
Betowess...If I remember correctly, the carport cost around $800.00 installed on a level surface. It is a 12X21 with 8' legs.
Yep Colonial, it is exciting to see it unfold. Can't wait to back it into the water!
Posted: Sun Jun 22, 2008 4:14 am
by chicagoross
Looking good, Cedarock! Nice to see the cabin going up great work!
Your last post revealed a few differences in the decks and cabins that I wasn't expecting - the decks on the HMD are 3/8", and the cabin doesn't get cleats at the top as I see on yours, just filet and tape
Good luck on the woodpile - you're still going to need a bit more for the seatboxes, right?
Posted: Sun Jun 22, 2008 8:10 am
by cedarock
Chicago....the plans didn't call for the cleating at the top of the cabin. I added a 2" strip of 1/4" ply in attempt to increase the glueing surface. It was the last thing that I did yesterday when I was taking inventory of the plywood. I saw a nice long strip of plywood and said to myself, "that might add a little strength to the roof". Thinking about it this morning, I wish that I hadn't done it. That joint will be getting a nice filet from the inside which will be plenty glue surface. It was a waste but it is there now!
I still have to build the seat boxes, and put the floors in the stearn storage compartments and splash well. I want to run the plumbing for the bildge pump and scupper valves before glueing the splash well and compartment bottoms in. But before mounting the fittings, I want to paint the inside and outside, so that stuff will have to be last and finished separately.
I think that I have all of this timing stuff figured out!
Anyway, I think that I have enough 3/8 and 1/2 left to do all of that. It is amazing how much scrap is left. I have pieces tucked in every corner of the shed!
Posted: Sun Jun 22, 2008 8:06 pm
by cedarock
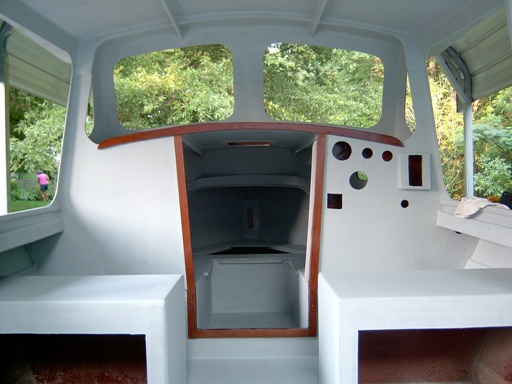
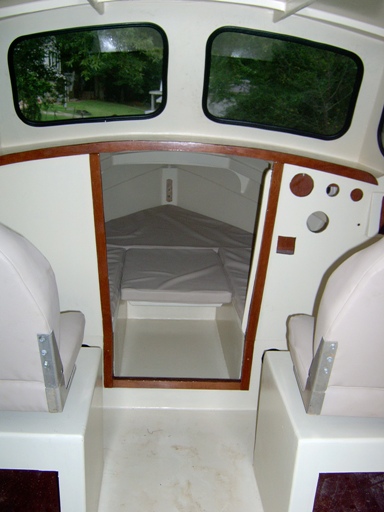
She is closed in!
I have to trim the cabin roof to the sides and tape the joints and around the windshield frame. Measuring everything from the boat is time consuming, but I am a little to far off from the plans to use those measurements at this stage.
Here is a pic of the enclosed cabin. You can see the strip of ply around the top. I also used a 1/4" plywood spice at the seam near the front. I thought that the extra ply there might come in handy. I will try to blend that in with a filet. Makes me want to get a lantern and get in and read a bit!
Posted: Mon Jun 23, 2008 5:54 pm
by chicagoross
That looks familiar! I think you just caught up!
Cedarock, if you're going to put portlights in there, you might want to fit the backings between the inwhale and the upper cleat strip before you filet and smooth everything, save a step and get a smoother result.
What did you use for your filler-cusion supports? I just have a 3/4 x 3/4 strip there now, looks like maybe you used a 3/4 1/2round on top of that? or rounded off a 1x2?
Posted: Mon Jun 23, 2008 6:21 pm
by cedarock
Not hardly, you are way ahead with the sanding....I have an eye full of dust right now!
I am undecided about portlights. If I use them, I would like for them to be able to open but they are so expensive. I might go without them to start with...but thanks and good idea, I should go ahead and plan for them before finishing.
I ripped the supports down to 3/4" X 1" rounded over with a 1/2 router bit on both edges. I plan to put that piece back in with a piano hinge covered with a detachable cushion.
I have been pondering the idea of covering the very tip of the bow from berth to decking with a 1/4 piece of plywood, hiding the bow eye with a mini-cover for access to the nuts
Posted: Tue Jun 24, 2008 9:03 pm
by cedarock
So much for the indecisiveness! Tonight, I ordered the portlights along with the steering system. Gotta cut some holes!
Posted: Wed Jun 25, 2008 3:25 am
by chicagoross
Yup, got my steering system today...
Posted: Sun Jun 29, 2008 6:16 pm
by cedarock
I don't have much building left and then it will be on to the finishing. This weekend, I glued on the roof, seat boxes, cut holes and framed for hatch and port windows, and started a box to hide the instruments and steering. I think that I will need some more epoxy. I have approximately 3/4 gallon left and a lot of wood to coat! I framed around the companionway but my idea of a hatch might be a challenge. I was thinking of a bi-fold door but the shape of the opening might throw some kinks in to it. I think my idea will work but I am not absolutely sure!
I did decide to put a piece across the tip of the bow. It will be a convenient place to run the wires for the bow light and hide the eye nuts at the same time. Now, for hiding the wires for the light on the pilot house and vhf antenna is another story. Still haven't figured that one out! Maybe a piece of hollowed quarter round against the foremost from under the pilot house will work.
Gotta think about this one!
Posted: Sun Jun 29, 2008 8:34 pm
by UncleRalph
cedarock wrote:I was thinking of a bi-fold door but the shape of the opening might throw some kinks in to it. I think my idea will work but I am not absolutely sure!
A bi-fold door can be made to work. I have a small drop board in the lower part where the sides of the door frame are parallel and then a bi-fold door above that where the sides are angled out.
Ralph
Posted: Sun Jun 29, 2008 9:08 pm
by cedarock
Thanks Ralph....I haven't thought about a drop board on the lower section! I knew that you made it work, just didn't know how. As you can tell, your modifications to the side windows has stuck in my mind. I think that I will like the open feeling much better!
I hope to make the door in two pieces and place the first hinge just above the angle with an opposite hinge the same distance from the top, plus one in the middle. If it looks crazy, I will use the drop board.
Posted: Mon Jun 30, 2008 12:35 am
by chicagoross
Thanks, Uncle Ralph! I still have to get that door sorted out too - I dropped my sole 10" in the wheelhouse to allow standing room, so the part where the door is paralell is a lot deeper; just a bigger drop board, I guess.
Cedarock, I agree - I love the way Uncle Ralphs boat looks!
Posted: Mon Jun 30, 2008 12:43 am
by chicagoross
Think I'll hide the VHF antennae wire with a piece of that black corrugated wire conduit...
Posted: Sat Jul 12, 2008 9:09 pm
by cedarock
The last two weeks have been kind of slow. Not much change! I have primed the hull outside and started fairing the inside. I pulled it out of the shed today to wash all of the dust off with the water hose,so I thought that I would post a pic of where I am. It seems that the finish is going to be a little better than work boat, but no where near boat show!
I keep telling myself to be satisfied because I can't take much more sanding.
I decided against using the controls from the tracker. Today, I ordered a small top mount, single lever control to be mounted on the console. I am going to get up at 6:00 in the morning in order to hopefully apply 3 coats of s3 paint on the hull before the temp hits 90 degrees.
Posted: Sun Jul 13, 2008 12:55 am
by chicagoross
Looking good on the trailer! You're going to beat me to the paint (and probably the water) - can't wait to see her with her paint on!
Posted: Sun Jul 13, 2008 5:49 pm
by cedarock
Thanks Chicago! There is nothing that will discourage a fellow about the finish like 5 coats of s3 lopez blue.
It shows every little flaw.
The lopez blue also showed me another problem.
Actually, I saw it when I put the primer on and hoped that it would cover it but it didn't. I have some checking on one of the upper hull panels. That is the only place that it occured, so I am wondering if that sheet of plywood is flawed.
The only place that a portion of the same sheet would have been used is on one of the lower panels which is pretty much covered in glass.

I used hydrocore 1088 by world panel because I could get it locally. It is not real bad yet! Now I have to decide whether to go ahead and sand the paint and primer off of that part and glass it or sand and just coat that section again. I thought that I put two coats on it the first time. I don't understand why the panel that it connects to is fine. I am sure that both received the same amount of epoxy. I might use it for a while and sand it off in the winter. I don't know much about checking. Does it get worse as it ages to the point of allowing moisture to the plywood? It is minor now and I can stand it in the finish but I would not want it to ruin the hull.
Posted: Mon Jul 14, 2008 7:57 pm
by Spokaloo
I just noticed a little check on a panel that got wet during the build.
Nothing a nice drying out, a little unthickened epoxy, a little filled epoxy, and a few minutes with the grinder couldn't fix.
E
Posted: Mon Jul 14, 2008 8:20 pm
by cedarock
You are right E....it is a small thing in the scheme of things and I have decided to go ahead and fix it. I have also noticed a small amount of checking all around above the spray rail. The boat did get wet in a un-expected thunderstorm one night. That might have been the cause. Anyway, I have ordered some 4 oz. cloth and more epoxy in order to cover most of the hull above the spray rail in glass. The rest will get a heavier coat of epoxy.
Posted: Wed Jul 23, 2008 7:22 pm
by cedarock
Well, I think that I have just received the last shipment of supplies from boat builder central for the hm19. 1 and 1/2 gallon of epoxy, another gallon of primer and some 4 oz cloth. Thanks Shine, Jacques, and board members again for another gratifying experience. Shine...thanks for keeping me straight on the last order.
Anyway, I put the 4 oz glass above the spray rails this evening. Hopefully, I will be able to put one last coat of epoxy on all plywood first thing Saturday morning. Then, I am going to drag it under the sun for a while and hopefully mid week, I will be able to prime and then paint the rest the following week. Getting close to the end now!
Posted: Tue Jul 29, 2008 7:33 pm
by cedarock
I have glassed between the spray rail and rub rail. Today, I primed the inside and the section between the rails.
After doing so, I think that I have changed my paint scheme to only use the blue below the spray rail instead of up to the rub rail.
It seems a little cleaner that way. Here is a shot from the rear. Some time ago, I also glassed in a piece of ply about 3" from the front of the splash well, which will give room to run the fuel plumbing and keep it away from anything electrical. It is tapered down to about 2 1/4" at the bottom. I didn't want to take any more of the splash well than neccessary. It might no be wise to tinker with the splash well dimensions but I don't plan to get caught in any seas where it will play a factor.
Here is a closer shot from the rear. I am getting excited now!
Posted: Tue Jul 29, 2008 10:54 pm
by chicagoross
Very nice, Cedarock! You definitely pulled ahead. I'm primed and midway on painting topcoats; mtrailer is bought but not picked up, and the round bottomed disp[lacement hull will need some serious work; motor arrived but no controller, they're asking Mercury what happened...You're going to be wet first!
The hand rails over the cabin look good, I haven't done that yet; did you do them on the pilothouse roof too?
Posted: Wed Jul 30, 2008 7:27 am
by cedarock
Thanks Chicago! I put rails that are one hand grip longer on the roof. They are made from two pieces of 1/2" scrap glued together. After cutting them out, I rounded all edges with a round over bit. I probably should have bolted them through but I just used dowel rods and glued them to supports underneath.
Posted: Wed Jul 30, 2008 10:02 am
by gk108
That sure looks good

Posted: Wed Jul 30, 2008 10:44 am
by MadRus
Jealousy... building ... must ... build ... boat!
Nice work cedarock.
Posted: Wed Jul 30, 2008 11:22 am
by ks8
Nice! Let us know when and where it slides into the water.
You've got my email...
Posted: Wed Jul 30, 2008 12:02 pm
by HungOne
Cedarock, kudos on your build and great pics you have shared. I really like the lines; they look close to a small, downeast fishin trawler. Like you, I shopped for marine ply at the place in your neck of the woods, but ended up at Jarret Bay's distributor just east of Raleigh.
I am at the fairing stage of a GF14 in Raleigh; thinking of a similar paint scheme and would like to check out her out some time. I think my e-mail is accessible via profile.
Posted: Wed Jul 30, 2008 8:11 pm
by cedarock
Thanks guys! I am going to have more checking issues as I have noticed it in the rub rails now. I am planning to use it for a while and during the winter, glass the rub rails and roof. So, the last order will probably not be the last for the hm19.
I plan to launch first in one of the small local lakes to determine prop pitch. The motor has a 14 x 17 prop on it now and I am thinking that I might need a little less pitch. After I get the right prop, I plan to take it to Falls Lake and run from the Hwy 50 ramp to the dam and back giving me a 20 mile run for gas consumption purposes. I will let you guys know and maybe we can hook up or feel free to stop by if you are ever in my area.
Posted: Wed Jul 30, 2008 9:47 pm
by ks8
You mean the ramp right at the Beaver Dam spillway? I've always gone to Rolling View, but I have hiked to the spillway before. I'll have to check out that ramp soon myself. Email me when the trip is planned. If I'm in town, I'll bring my cheapie camera and maybe the ancient camcorder.
What local lake for the prop work?
Posted: Thu Jul 31, 2008 7:18 pm
by cedarock
You mean the ramp right at the Beaver Dam spillway? I've always gone to Rolling View, but I have hiked to the spillway before. I'll have to check out that ramp soon myself.
Yep, that is the one. If I remember correctly, it is 10 miles from there to the dam. Rollingview would be a tad closer and I could use a gps to determine mileage. Just might do that. Anyway, I don't have your email address ks. Can you shoot me a line through my profile address and I will save it.
I couldn't stand looking at the checking on the rub rails, so this evening I sanded the primer back off and put some 4oz. over them as well. That will delay me a little bit. The finish is pretty much work boat below the spray rails and better above!
What local lake for the prop work?
Probably Lake McIntosh or Graham/Mebane Lake.
Posted: Fri Aug 01, 2008 6:37 pm
by ks8
Don't know where they are yet, and just got offered to fish Jordan this weekend, but I may just have to sand instead, though not for much longer! I can almost taste it now.
Posted: Sun Aug 10, 2008 8:10 pm
by cedarock
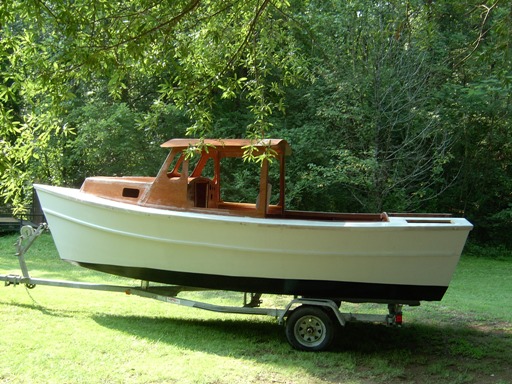
I have finished with the painting!
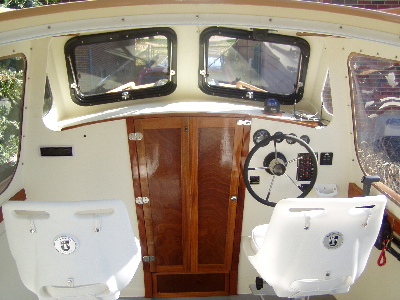
I feel like I have been whipped. Maggie and I have been wrestling with the windows for a couple of days. I used molding that is used for putting windows in older model cars and it has a locking strip that is installed after the window is in place. It took me 2 1/2 hours to put the locking strip in one windshield. I have to find an easier way. I used a screwdriver and worked it 1/8" at a time but it turned out okay! The boat looks like it has been in a battle as well. It has sweat, grime, and dust inside and out. It will get a bath tomorrow!
Between rounds, I have managed to make the cushions for the cabin. For the time being, I am going to use a couple of seats from the tracker. So, I covered them in the same vinyl as was used on the cushions.
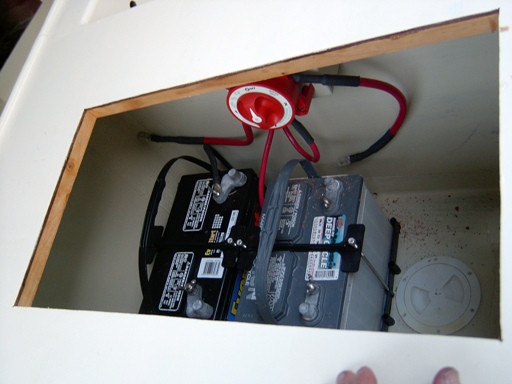
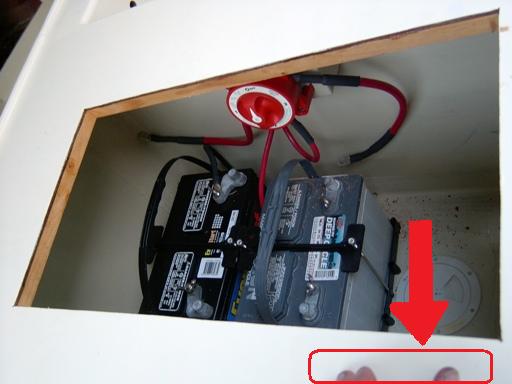
I have also done a little wiring. I am using two batteries with a make before break switch, running 6 guage wire to the pilot house with a 40 amp breaker mounted beside the battery switch. I made up all of my cables today and started putting them in. Hopefully, she will be ready to launch in a week or two. Still have to do a little work on the trailer.
I used the non-skid additive sold here in the S3 paint and it works great. I put it on the sole and around the decks, taping off a two inch smooth border and it seems to have the perfect texture!
Posted: Sun Aug 10, 2008 8:52 pm
by chicagoross
Love it! Looks great!
Posted: Mon Aug 11, 2008 7:23 am
by RR
She's a beauty
Posted: Mon Aug 11, 2008 7:46 am
by WobblyLegs
Wow, that's a nice looking boat. I'm guessing not long to launch?
That's been a remarkably quick build! I'm impressed.
Tim.
Posted: Mon Aug 11, 2008 9:08 am
by Cracker Larry
Looking great, CR
Nice colors. I'm also impressed with your speed, and depressed with mine
Posted: Mon Aug 11, 2008 10:35 am
by gk108
Cracker Larry wrote:I'm also impressed with your speed, and depressed with mine
Makes me wonder how they do it.
Cedarock, your boat looks awesome.
Posted: Mon Aug 11, 2008 11:14 am
by jgroves
WOW looks great and your fast too! I bet once you turn the camera off 15 people jump out from behind you shed and get back to work
Posted: Mon Aug 11, 2008 7:22 pm
by peter-curacao
Wow stunning, real nice

Posted: Mon Aug 11, 2008 7:42 pm
by BoH
Amazing, Cedarock. Fast build, and sharp. Can I borrow the elves when I start the cruiser? I'll need 'em!
Bo
Posted: Mon Aug 11, 2008 8:04 pm
by peter-curacao
BoH wrote:Amazing, Cedarock. Fast build, and sharp. Can I borrow the elves when I start the cruiser? I'll need 'em!
Bo
Why are you saying that?? because of those elves toes on the picture??
Posted: Mon Aug 11, 2008 8:32 pm
by cedarock
Posted: Tue Aug 12, 2008 1:38 am
by chicagoross
The windows really look trick, Cedarock. Too late to try my windshield that way, but would work nice for the "vent" windows - wherre did you get the windshield channel?
Posted: Tue Aug 12, 2008 2:55 am
by ks8
Falls Lake this weekend? I'm still painting, but I could take a break to take a look!
Posted: Tue Aug 12, 2008 9:43 pm
by cedarock
Falls Lake this weekend? I'm still painting, but I could take a break to take a look!
I don't think so! I ran into a snag. I have been jinxed by Chicago!
I posted on his "cables too short" part of his thread and low and behold, my steering cable is at least 2' too short. I called myself measuring the route and it matched the recommendations of the plans, but it is way too short. I ordered a new cable tonight and hopefully, I will get it by the weekend. Still have many little things to do and they seem to take more time than building. Plumbing the fuel compartment took forever and left me with bleeding knuckles, reaching into that small area to tighten the clamps.
Anyway, I did manage to mount the engine, ignition switch, trim switch, and plumb the fuel hoses today. The controls are mounted but they are a little tight because of the limited space behind the console. I can eliminate that but that is another little snag. Hopefully soon!
wherre did you get the windshield channel?
I bought it from jc whitney. It has a 1/4" channel for the glass and the frame and once you install the locking strip, it is tight. I used 1/4" lexan and cut it with a saber saw blade that I bought from the same place that I got the glass. Worked like a champ with no melting behind the cut. I have a some scraps left over and if they are long enough to do your side windows, I will be glad to send them to you but I have no clue how long it would take to get there. I can measure them tomorrow if you are interested! As usual, I made a few mistakes cutting it at first or I would have definitely had enough.
Posted: Wed Aug 13, 2008 2:11 am
by chicagoross
Thanks Cedarock, hang on to the scraps for now; I'm still looking to find the pieces for the windshield, until I can get that figured out the vent windows would look funny, and If I do get the windshield figured out I can probably do the sides from scraps too. I may go the JC Whitney route for the side windows too. Sorry about your steering problem, I got mine licked with a half inch to spare (and half a dozen new holes to epoxy)...
Posted: Wed Aug 13, 2008 9:26 am
by colonialc19
Cedar, I heard youre the man to talk to about those elves, I'll take at least a 1/2 dozen, how soon can I get them??
No, really you smoked this build, and it looks great too! wish I could get my stuff together and roll at half your speed. I like the colors too.
Moving at the speed of smell,
Daniel
Posted: Wed Aug 13, 2008 7:01 pm
by cedarock
Thanks Colonial, but it is not boat show by any means. If you look hard, you can see where the hull panels come together and stuff like that. I plan to use it for a long while and then when she is ready for another paint job, I might re-fair those areas.
I determined earlier that I was not going to drive myself crazy over a few blemishes like I did on the fs12!
I am ready to use it and have planned a trip for the August 30, so I hope it is ready!
Posted: Wed Aug 13, 2008 9:37 pm
by colonialc19
Cedar, looks like you'll be ready for that trip. I too have those places in my fairing, but unless you point them out most people will never see them.
D
Posted: Sun Aug 17, 2008 7:10 pm
by SP
I was looking at your photo gallery and all of a sudden new pics just popped up.
Looks great.
Can't wait to hear how she performed on the water.
Posted: Sun Aug 17, 2008 9:06 pm
by ks8
August 30 Falls Lake? Oh well... I may be in NY then. If not, see ya then!
Posted: Mon Aug 18, 2008 9:06 am
by jgroves
Holy cow!!!! Your on the water! I can not believe how fast you buit that boat! Congratulations, she looks amazing! You will have to tell us how she rides. I hope you travel back over my way with her so I can take a ride!!!!!!
Posted: Mon Aug 18, 2008 10:05 pm
by cedarock
Thanks Jeremy...That is the first place that we planned to take an overnighter. I hoped to launch from Plymouth and spend two to three days messing around in the sound. If I have engine trouble, I have family and locals that can help. I will post when I plan to go and hopefully, we can hook up on the water. I would love to see your boat!
Posted: Tue Aug 19, 2008 7:23 am
by jgroves
cedarock wrote:Thanks Jeremy...That is the first place that we planned to take an overnighter. I hoped to launch from Plymouth and spend two to three days messing around in the sound. If I have engine trouble, I have family and locals that can help. I will post when I plan to go and hopefully, we can hook up on the water. I would love to see your boat!
Sounds great! Talk to you soon.
Jeremy
Posted: Tue Aug 26, 2008 6:38 pm
by chicagoross
Cedarock, great pics in the powerboats section of the boat on the water.
I.m intending campanionway bi-fold doors like yous and Uncle Ralphs, but will likely get wet and leav it on the to do list for a while. Any tips or problems putting yours in? Could you give us a closer-up open and folded pic? Thanks!
Posted: Tue Aug 26, 2008 8:16 pm
by cedarock
I.m intending campanionway bi-fold doors like yous and Uncle Ralphs, but will likely get wet and leav it on the to do list for a while. Any tips or problems putting yours in? Could you give us a closer-up open and folded pic? Thanks!
Sure, I don't have any pics of it open but it works great. I will get some close up shots soon and post. I glued on a rounded over 1x1 along the right side of the opening early on, anticipated using the bi-fold. I got inside and Maggie held a piece of 1/4 ply up to the opening. I traced and cut out the door in one piece. Then just cut it in half. Then I framed the outside of the doors with another piece of 1/4 making it 1/2" thick around the borders. On the inside, I glued another 1/4 x 1 1/2" piece on both halves for the piano hinge, making it 3/4" thick there. Also, a strip along the inside edge for the three hinges and a small pad for an inside latch. Anywhere there is hardware, it is 3/4" thick. I have found that by just using one latch on the right, the middle of the door wants to sag open and inch or so. Today, I bought one of those perko round twist latches that I am going to mount at the top towards the middle of the doors to keep it tucked in nice and snug!
Posted: Tue Aug 26, 2008 9:44 pm
by Happychappy
I'm dying to know how the boat performed with the 60 hp. I have a merc 60 hp and am very curious to see if it will push it along at a reasonable pace.
By the way boat looks great on the water, congratulations on a job well done.
Posted: Thu Aug 28, 2008 9:12 pm
by cedarock
I have some pics of the door for you Chicago. I did another trial run today and am getting very close to having it run perfectly, so I took a few pics while I was out. This is a pic of the door closed. I intended on making the frame one piece but screwed up. Still turned out okay!

This is the door folded out of the way!
And this is a pic of the back side with the additional strips and pads for the hardware!
Hope this helps!
Happy...I think that you will be very "happy" with a 60. Today, I got some good run time and can give you some figures. I have replaced the prop with a 15" pitch cupped prop. My HM will run 32 mph @5,300 rpm's by myself with some trim but will porpoise slightly (when trimmed up). With another 200 pounder in the passenger seat, it will run 31 with a slight porpoise. 30 easy trimmed down and no porpoising. It will jump up on plane real quick! I think that I will settle on a cruise speed of 26 mph. It seems nice and comfortable at that speed! I have to say that I am impressed with the old Johnson. Of course, I have replaced the trim motor, impeller, thermostat, and propeller shaft seals, but it runs great!
I think that I have just about worked out all of the kinks.
The boat is great and thanks to Jacques for designing such a wonderful boat!
Posted: Thu Aug 28, 2008 9:20 pm
by colonialc19
Congrats on getting her settled down, great performance #'s too!
I really like your cabin, great JOB
Daniel
Posted: Thu Aug 28, 2008 9:26 pm
by Cracker Larry
CR, you really did a beautiful job with that
Your helm station, windows, cabin door, all look first class. Very, very nice
Posted: Thu Aug 28, 2008 9:56 pm
by cedarock
Thanks guys! It is starting to look like that I will meet my deadline.
I still have a few things to do and only a couple of evenings to do it (have to work this weekend). But as it is now..... Maggie, Cricket, and I will probably be able to make our first outing next week!
Posted: Fri Aug 29, 2008 12:08 am
by TomW
CR beautiful woodwork on the helm, door and windows. The performance stats sound nice to. Enjoy her well and know you did a good job and can be proud that she's yours from your hands.
Tom
Posted: Fri Aug 29, 2008 5:33 am
by Happychappy
Performance numbers are what i was hoping for, can't wait to get mine finished. It's going to be a long cold winter. I've got to move somewhere warmer!!
Posted: Fri Aug 29, 2008 8:04 am
by ericsil
Cedar you really did a nice job in the cabin area. I still have not put a finish inside mine, but you give me inspiration to get busy.
The performance numbers are interesting compared with the P19. I was wondering how much gas I was giving up to move to a V hull. Judging from your numbers it takes about 30 more HP to get a P19 to the same speed, assuming we are about the same weight.
Thanks for the good post. I know you will enjoy it.
Posted: Fri Aug 29, 2008 5:14 pm
by Betowess
I ditto what Cracker said, its a really clean/professional helm station and cabin!
And thanks for the play by play on the bifolds, which will help me when I get to that point. That was great and threads like this keep Bateau the great forum it is. Beautiful boat and I'm glad your "old" Johnson is running great. My Johnson is a '78 - if that makes you feel any better. bob
Posted: Fri Aug 29, 2008 9:34 pm
by cedarock
Thanks guys! I am very exicited, but my bubble was somewhat busted today. Yesterday, I was running it with an aftermarket thermostat and it got hot, so I took out the thermostat and it ran great for the hour or so that I ran it. I thought that it would be a matter of buying an oem thermostat and everything would be fine. Well, today I went out and tried it and the engine went into the slow mode very soon. I turned around and put it back on the trailer and got it home. I consulted with a local mechanic and he thought that there may be a blockage. I pulled the lower unit and put a strainer under the intake tube. I pressed a water hose tight to the thermostat seal and turned on the water. Guess what...out of the engine came a 3/8" piece of burnt crusted rubber that was part of the original impeller. I flushed it well after finding that thing.
I have said this before, but I think that it will be fine now!
I hope to find time tomorrow to find out.
Thanks again for the compliments!
Posted: Sat Aug 30, 2008 4:20 am
by PaulMcClure
Cedarock, I share your pain
I put my (production) sports boat in the water mid-june. I've been out on it twice since then as the engine wouldn't run properly, died at low speed (great fun in a busy marina). I've replaced plugs, ht leads, installed electronic ignition, replaced the fuel pump, rebuilt both Solex carbs and as of last week, ripped off the carbs and manifold and replaced it with a single inlet manifold with a Weber carb. It now runs fine - at last. I'm off in a bit to fit the throttle brackets I had fabricated yesterday and we should be ready to go, 10 weeks after launch
Posted: Sat Aug 30, 2008 8:31 am
by Daddy
cedrock, great looking job! when you got your window channel from jc whitney, what did you order, part no. etc? I looked on their site but did not find it.
Daddy
Posted: Sat Aug 30, 2008 8:32 pm
by cedarock
I feel your pain Paul!
Daddy, here are the part numbers
xm812557 weatherstrip
xm812568 locking strip
Hope this helps!
Posted: Sat Aug 30, 2008 8:38 pm
by Daddy
Many thanks
Daddy