Page 1 of 1
OB19 build in Texas - I accidentally deleted my gallery They're trying to restore.
Posted: Mon Sep 07, 2009 12:06 am
by Steven
Started my build today, though I haven't purchased the plywood or Epoxy yet. I'll be picking up the plywood in the coming days and ordering the Epoxy kit on the 15th. I picked up some OSB and cut out the temp frames. Tomorrow I'll cut out the bow mold and build the jig frame. It will be on wheels. My garage is about 19 1/2' long so it's going to be tight. Will do most of the work with the door open the boat rolled partially out.
The bottom frame is not as close to rectangular as it seems. The camera can really distort angles.

Re: OB19 build in Texas
Posted: Mon Sep 07, 2009 8:38 am
by onemilehigh
Looking forward to watching an OB19 come together. Are you building it exactly as planned or a modified version?
Re: OB19 build in Texas
Posted: Mon Sep 07, 2009 9:20 am
by Dougster
Good deal, another Texas thread

I used the castors on the frame thing too and it works well. The more $'s you spend on the casters the easier it rolls. Ain't that how it goes.
Says happy labor day Dougster
Re: OB19 build in Texas
Posted: Mon Sep 07, 2009 2:25 pm
by Steven
onemilehigh wrote:Looking forward to watching an OB19 come together. Are you building it exactly as planned or a modified version?
Still deciding on some of the details. It's gonna be a CC. Not decided on cooler seat with swing back or nice leaning post with cooler under it. Console will be ~30" wide. Seat in front with baitwell underneath. Will extend front deck and rear deck some for casting. Will decide how much for sure after getting the hull righted.
Re: OB19 build in Texas
Posted: Tue Sep 08, 2009 10:59 pm
by Steven
Built the rolling build jig. Ordered the Epoxy Kit. Hoping to head to Houston on friday to buy the plywood. I work a 4x10 so I have a lot of time to build each week. If I get the wood on Friday, I'll get the pieces cut out and some glued together(edit. No gluing afterall. Epoxy won't be here until next week. DUH) this weekend. I'll finish gluing up the pieces next week and have it stitched together in 3. I figure that will be about 70 hrs. labor. I'm shooting for a splash in under 6 months. Really want to be on the water for Spring Striper fishing. It's too windy on the big lakes for the GV11 to be comfortable and dry.
The GV11 is being sold and the OB19 is too big for the garage, so the wife will get to park her car in the garage as soon as this is done. She may be more motivated than me.

I'll add pictures at milestones instead of a complete step by step, as it will be hard to beat Larry's build thread for completeness. I'm also going to give advanced estimates for how long I think things will take, as above. Then we can all get a laugh at how ridiculous I am when it comes to optimistic time estimates.
Advice and suggestions welcome.
Re: OB19 build in Texas
Posted: Wed Sep 09, 2009 2:01 pm
by wadestep
Good to hear there's another OB19 in the works - I've got the ply and epoxy already, but I'm going to be about 6 weeks behind your start date. (finishing restoring another boat).
Anyway, I wanted to put the livewell in the seat in front of the console also, like you mentioned. However, how are you going to run the pipes? especially the drain pipe?
I guess my question is: how are you going to get the well to drain and still have the overboard drain pipe/hole above water? For this reason alone I was planning on putting the livewell in the back - but the weight forward would be nice...
I'll get my thread going in 4 weeks or so, hopefully we can help each-other.
Re: OB19 build in Texas
Posted: Fri Sep 11, 2009 10:07 pm
by Steven
Took off with the wife to Houston at 11:30am for the plywood. Rained off and on the whole day and of course poured when we got home at 8:00 pm.

Sat for a bit until it slowed up. There's a boat in here somewhere. The GV11 is going to loose it's home tomorrow.

Re: OB19 build in Texas
Posted: Fri Sep 11, 2009 10:13 pm
by Steven
wadestep wrote:
I guess my question is: how are you going to get the well to drain and still have the overboard drain pipe/hole above water? For this reason alone I was planning on putting the livewell in the back - but the weight forward would be nice...
I'll get my thread going in 4 weeks or so, hopefully we can help each-other.
Haven't given it much thought yet but it's doable. Lot's of boats have them. As long as the cockpit is above the water line, the water in the live well will drain. I will probably run a drain tube right under the cockpit floor and out the transom. A shut off valve at the transom. However, I've yet to research it so that may be a bad idea.
Look forward to seeing your build start.
Re: OB19 build in Texas
Posted: Sat Sep 12, 2009 10:24 pm
by Steven
Started cutting plywwod today. First thing I built a 4'x8' frame out of 2x4's which lay on my rolling table. So I have a waist height table for cutting the plywood on. It rained all day so I couldn't lay out the sides and bottoms. My garage is 19' long so I need to hang out the 3rd sheet of plywood for marking. Ugh!!! I also need the door open so I can rip the stringers on my Table Saw. Gonna rain tomorrow too. Double Ugh!!! I'd like to have everything cut out my Monday afternoon. UPS says my epoxy will be here on Tuesday.
Re: OB19 build in Texas
Posted: Mon Sep 14, 2009 12:39 am
by Steven
The rain has slowed me up but I've made some progress. I have everything cut out except the hull panels and stringers. I'll knock those out tomorrow and will be ready for glue. The hull panels can be cut two at a time, so I'll only measure and mark one side for the bottom and side panels. I'll stack and cut to get duplicates. I rearranged the garage to I'll have room to rip the stringer blanks. That will only take about 15 minutes. Shouldn't be too long a day.
Here's a view of the cockpit sole layout. Lowes or HD didn't have a 20' piece of PVC pipe. Used a coupler which was ok for the sole, but will not be fair enough for my liking for the hull panels. Tomorrow I'll go on a mission to find a 20' stick. I must say, I like using the PVC for a batten. I used a piece of 20' molding for the GV11. PVC is much more manageable.

]
Here's a pick of my rolling workbench with the 2x4 cutting frame on top.

Re: OB19 build in Texas
Posted: Mon Sep 14, 2009 2:25 am
by Lon
"Used a coupler ..."
You might try just using a "to short " batten from one end of your panels (on your finishing nails) and trace your line as long as the batten.
Now, place the PVC batten on the other end of your panel and trace the line "backwards" to meet with the first line traced.
Werkedferme.
Re: OB19 build in Texas
Posted: Mon Sep 14, 2009 12:54 pm
by wadestep
Looks like you're making great progress - keep it up

Congrats for getting underway.
Re: OB19 build in Texas
Posted: Mon Sep 14, 2009 7:31 pm
by Steven
Well, the rain abated some in the morning but was back this afternoon. Desperation or determination. I'm not sure which:

I got all the stringer blanks ripped on the table saw. Stil have to cut them to lengths to alternate the joints. Here's the first one off the saw:

I got the hull panels cut out. Here's a pic of the bottom panels. I took Lon's suggestion and used the 10' batten. Checked with 2 10's coupled togethe and all looked good.

And as I was finishing cutting out the side panels, UPS delivered a present. I don't remember this many boxes for the GV11.
Looks like I'm on schedule to have the hull stitched and ready for fiberglaass weekend after next.

I started with 28 sheets of plywood and am down to 4 uncut.
Re: OB19 build in Texas
Posted: Wed Sep 16, 2009 10:15 pm
by Steven
I didn't plan on doing any work on my work days, but could resist getting my first smell of Epoxy. I like to glue the joints and then glass. This allows me to get the joints to my liking.


Re: OB19 build in Texas
Posted: Thu Sep 17, 2009 11:13 am
by Lucky_Louis
Great build thread so far!
Re: OB19 build in Texas
Posted: Thu Sep 17, 2009 4:11 pm
by TomW
Steven, that is nice but I feel it is an unnecessary step. The gap betweeen the panels should be less than 1/32 while the fiberglass provides the strength for the panels. If the gap is more than 1/32-1/16 you have to start recalculating the distances of the panels and where the curves start. There is really no need to do what you did as long as you are careful with the splices. Have done a few and have not had any problems.

You are really the first to do this, so whether you are a leader or someone wasting time is to be determined.
In my opinion your wasting time.
Tom
Re: OB19 build in Texas
Posted: Thu Sep 17, 2009 4:48 pm
by peter-curacao
TomW wrote:Steven, that is nice but I feel it is an unnecessary step. The gap betweeen the panels should be less than 1/32 while the fiberglass provides the strength for the panels. If the gap is more than 1/32-1/16 you have to start recalculating the distances of the panels and where the curves start. There is really no need to do what you did as long as you are careful with the splices. Have done a few and have not had any problems.
You are really the first to do this, so whether you are a leader or someone wasting time is to be determined.
In my opinion your wasting time.
Tom
I have to agree with Tom on this, unnecessary step, probably you have to sand the glue joint also before glass otherwise you could end up with air bubbles under it.
Your doing a great job but this is indeed not necessary serious
Re: OB19 build in Texas
Posted: Thu Sep 17, 2009 9:08 pm
by Steven
Thanks for the the input guys. Always welcome and I appreciate you checking out my build. There's only 4 hull panels to be spliced, so there's no appreciable time being added to the build. I like the results and the joints are gap free. Not normally what you do for an epoxy joint, but sufficient to hold the joints in place while I do the glass work.
Re: OB19 build in Texas
Posted: Fri Sep 18, 2009 8:22 am
by sideslippa
Nice work there Steven, very neat and carefull. Your time is your own, spend as much as you like! Compared to the time it takes to do the fairing a few minutes extra on your glue joints is nothing.
I did a similar thing with my splices and also used an electric planer to take away some wood at the joint so that the final joint is level. It worked very well and surely helps with fairing. The joint is strong too, I tested a joint done this way to destuction and the failure occurred away from the joint. there are photos in my thread.
regards Sideslippa.
Re: OB19 build in Texas
Posted: Fri Sep 18, 2009 1:45 pm
by Steven
sideslippa wrote:Nice work there Steven, very neat and carefull. Your time is your own, spend as much as you like! Compared to the time it takes to do the fairing a few minutes extra on your glue joints is nothing.
I did a similar thing with my splices and also used an electric planer to take away some wood at the joint so that the final joint is level. It worked very well and surely helps with fairing. The joint is strong too, I tested a joint done this way to destuction and the failure occurred away from the joint. there are photos in my thread.
regards Sideslippa.
Thanks. Your build looks great. I'm planning on recessing the tape around the transom edges and on the bottom panes where they tape to the transom. I don't have a power planer, but the router will suffice.
Re: OB19 build in Texas
Posted: Sun Sep 20, 2009 4:47 am
by sideslippa
Yep. The router will be perfect... a bit slower but perfect.
Re: OB19 build in Texas
Posted: Mon Sep 21, 2009 5:02 pm
by Steven
Got the side panels glued on Saturday. Didn't glue the joints first because I wanted to get them done that day. Got the Transom laminated and one stringer is laminated and curing. Will do the other three throughout the week. Only have enough weights to do one at a time. No pics as there's nothing much to see. I'm on track to have the hull stiched on the frame this weekend. I'll have some pics of that.
Re: OB19 build in Texas
Posted: Mon Sep 21, 2009 7:32 pm
by a_Adel
i'm a fan of the ob19
following closely ur build,. like the level of detail on documenting ur build
keep it up
looking for the stitching pics,.. IMO, tit's the most exciting when u first witness a transformation from a stack of ply into a boat:)
Re: OB19 build in Texas
Posted: Tue Sep 22, 2009 9:19 pm
by Steven
a_Adel wrote:i'm a fan of the ob19
following closely ur build,. like the level of detail on documenting ur build
keep it up
looking for the stitching pics,.. IMO, tit's the most exciting when u first witness a transformation from a stack of ply into a boat:)
Thanks. Here's a picture of the second stringer laminated. Notice the blue painters tape under the plastic to ensure a nice straight stringer. I also committed Stitch-N-Glue sin by using a pnuematic brad nailer along the top edge and bolttom edge of the straight portion. Holds everything in place nicely and they will be buried under the glue blocks for the sole and under the fillet for the stringer to hull lamination, so no need to worry about filling the tiny holes they leave.

Re: OB19 build in Texas
Posted: Tue Sep 22, 2009 9:26 pm
by peter-curacao
Cool an epoxy conga line
tatatatata
tatatatata
Re: OB19 build in Texas
Posted: Tue Sep 22, 2009 10:32 pm
by Dog Fish
Re: OB19 build in Texas
Posted: Wed Sep 23, 2009 12:23 am
by Murry
Nice work Steven and I like your tape line trick.
Daniel
Re: OB19 build in Texas
Posted: Wed Sep 23, 2009 8:41 am
by Steven
peter-curacao wrote:Cool an epoxy conga line
tatatatata
tatatatata
Or the electric slide.
Boogey wooogy wooogy
Re: OB19 build in Texas
Posted: Wed Sep 23, 2009 11:46 am
by bwd3
unless brads are bronze you might want to dig them out and fill. Not too much trouble and
long term, it's hard to think of a worse place to have problems from corrosion/rot/splitting, than along the backbone of the boat....
Maybe this is too uptight an approach for you.
For some though, a half hour of work would pay off in years of having less worries about the structure.
Re: OB19 build in Texas
Posted: Wed Sep 23, 2009 5:13 pm
by Steven
bwd3 wrote:unless brads are bronze you might want to dig them out and fill. Not too much trouble and
long term, it's hard to think of a worse place to have problems from corrosion/rot/splitting, than along the backbone of the boat....
Maybe this is too uptight an approach for you.
For some though, a half hour of work would pay off in years of having less worries about the structure.
I wasn't planning on worrying about it for years.
They'll be deeply encapsulated and plywood doesn't split like hardwood. I just can't envision a scenario where they can be problematic.
Re: OB19 build in Texas
Posted: Wed Sep 23, 2009 5:23 pm
by Lucky_Louis
In the application you describe, I agree completely Steven. The brads will be in place prior to encapsulation, then covered by fillet or cleat with more epoxy. No reason to remove, they won't cause any issues in our lifetimes. That said, most will also agree that using screws to clamp pieces temporarily then remove and fill is a better solution. Drill and pinning with a wood dowel is about the most elegant solution. They all work, some are just 'preferred'. I guess it depends on how much we value our time and where our priorities lie.
Re: OB19 build in Texas
Posted: Wed Sep 23, 2009 9:28 pm
by Steven
Lucky_Louis wrote:In the application you describe, I agree completely Steven. The brads will be in place prior to encapsulation, then covered by fillet or cleat with more epoxy. No reason to remove, they won't cause any issues in our lifetimes. That said, most will also agree that using screws to clamp pieces temporarily then remove and fill is a better solution. Drill and pinning with a wood dowel is about the most elegant solution. They all work, some are just 'preferred'. I guess it depends on how much we value our time and where our priorities lie.
Thanks. I prefer to use the most expedient methods that don't sacrifice quality. I used screws to clamp the transom. I thought about nailing the doublers to the frames where the cock pit glues down, but already decided against that. Not sure I would sufficiently fill/cover the tiny holes.
Thought I'd get the 3rd stringer glued tonight,but came home last night to a leaky washing machine. Had to put on a replacement pump tonight, and while at the parts store i picked up an add on filter for the refrigerator ice/water dispenser. The city water is getting poor.
I'll get the other two done the next two nights. That will leave me Saturday to install the frames on the strongback, and maybe start stitching. By Monday night I expect to have it taped and covered in cloth.
Re: OB19 build in Texas
Posted: Sat Sep 26, 2009 10:11 pm
by Steven
Got the stringers cut today. Glad to not find any voids. Glue up looks good. Got the uprights on the strongback set and base line marked with a water level. I started at the transom and first picked a height that won't be too high to work on, but still allow access underneath for stiching. Got to the bow station and found the height a little too low. The sheer slopes up relative to the Baseline (top of sole), so the bow mold is the tallest. A bit too tall. Since I'm using a temp mold for the bow station, I lopped off enough to get it down to the baseline marked on the frame. Tomorrow I'll get the frames mounted and should have it stiched. Maybe Monday if I decide not to work all day. I'll post pics tomorrow of the frames installed and then of an upside down boat.
Re: OB19 build in Texas
Posted: Sun Sep 27, 2009 6:47 pm
by Steven
Re: OB19 build in Texas
Posted: Mon Sep 28, 2009 1:05 pm
by Lucky_Louis
found a boneheaded screw up
That's great. Seriously! Why? Because you learned that in S&G building, there's nothing a little glass, a liitle epoxy, and a little pondering can't solve. There's no bending in that area so the only down side is some more fairing or fussing. No sweat.
The mold looks great. I would think about laying another brace or two to lock down the tip of the bow mold so it can't flex left or right. Maybe a 2"x4" on the flat from the tip to the front corners of the strongback? That should clear the side panels.
Re: OB19 build in Texas
Posted: Mon Sep 28, 2009 1:49 pm
by Steven
I don't know about great, But it was easily fixed. I've got the bottom panels on and loosely stitched on the back half. Good suggestion on the brace. Thanks.
Re: OB19 build in Texas
Posted: Mon Sep 28, 2009 9:47 pm
by Steven
Re: OB19 build in Texas
Posted: Tue Sep 29, 2009 11:09 am
by Lucky_Louis
Looks good. Very satisfying to see a boat form right in front of your eyes, isn't it?


I know it's probably your camera lens but keep an eye peeled on the fairness of your chine lines and the keel line. In the photo it looks like the transom is drooping. I recall having to fiddle a bit with the ties about 2' forward of the transom to get the OB17 to lay flat. A little piece of dowel in the gap can help when two pieces meet at an angle to stop one from trying to overlap the other. Now is time to get everything true and fair before locking in the hull shape with glue and tape.
Re: OB19 build in Texas
Posted: Tue Sep 29, 2009 12:36 pm
by smilinmatt
Here she is all stitched together. Everything lined up good.
Something must be wrong. The way I remember it, stitching it together involves stitching, cutting out the stitches, restitching, cutting out the stitches, lots of swearing, throwing and kicking things. 3 or 4 hours later everything lines up good.
Looks good, and it looks like it didn't take you too many stitches.
Re: OB19 build in Texas
Posted: Tue Sep 29, 2009 12:41 pm
by Steven
smilinmatt wrote:Here she is all stitched together. Everything lined up good.
Something must be wrong. The way I remember it, stitching it together involves stitching, cutting out the stitches, restitching, cutting out the stitches, lots of swearing, throwing and kicking things. 3 or 4 hours later everything lines up good.
Looks good, and it looks like it didn't take you too many stitches.
Not too many. Still have to add a few to the rear chines, but need to do a little trimming first. I had a hump in the bottom of the side panels. You can see it in the last picture. I noticed it after scribing them and rechecked the measurements. Came out ok so I assumed it would work itself out. I trimmed on the right side sparingly and got more aggressive on the left. The left is looking good. Gonna trim the same on the right and it's ready for glue. After negotiating the underbelly to duct tape the seems.
Re: OB19 build in Texas
Posted: Tue Sep 29, 2009 4:08 pm
by peter-curacao
Looking good let the mixing begin
Re: OB19 build in Texas
Posted: Fri Oct 02, 2009 8:41 pm
by Steven
Spent a few hours trimming and shimming to get everything lined up to my liking. Glued between the stitches. Tomorrow morning I'll cut the stitches and glue the gaps. Sunday or Monday will be glass day.
Re: OB19 build in Texas
Posted: Sat Oct 03, 2009 9:52 pm
by Steven
Cut the stitches, pushed it outside and rounded over the edges. Thought I'd do the glass this weekend, but it will be raining tomorrow, so it will have to wait.

Next to the land barge for a little size perspective.


Re: OB19 build in Texas
Posted: Thu Oct 08, 2009 10:14 pm
by Steven
Getting close to Glass day. Doing one more check around to make sure everything is in order. Checking flatness of aft bottom panels. Found a problem on the port side bottom panel. Somehow, after checking and double checking, I managed to not get the the botom panel flat to the frames. There was a hump at the transom bulkhead from 1/3 way up from the chine down to the chine. I say 'was' because I sawed the hull side to bottom panel joint open from the transom 4' forward. The panel laid down flat with a little weight and I reglued the joint. So tomorrow I'll round over the joint and prep for a shoot through the hull transucer. Gonna rout a circular recess 6" in diameter 1/2 way through the hull panel. I'll glass it in with biax the night before I do the hull glassing. After the flip, I'll rout a 4" diameter hull just into the glass and fill it with biax and resin.
Re: OB19 build in Texas
Posted: Fri Oct 09, 2009 2:07 pm
by Fonda@kauai
Can you explain more about what you're gonna do for the transducer? You plan on there being pure glass for the transducer to shoot through right?

edit: okay I get it now

I would be kinda scared to router that after the bottom's been painted. I cut the hole all the way through, put a temporary piece of backing covered in visqueen under it, and filled it in one shot. Maybe I'm missing something though?
Re: OB19 build in Texas
Posted: Fri Oct 09, 2009 2:26 pm
by Lucky_Louis
Hey Fonda, don't worry, you're not missing anything. That's exactly how to do it. I only made the hole 2" in diameter and that's been plenty. Clean sounding to 600' at 25 knots. Not sure why Steven is making the hole so big and only going halfway through.
I just drilled the hole, duct taped across the inside of the hull, mixed up a cup of epoxy, and made up a mush of loose biaxial fibers until it was thick, and filled the hole in one shot. Ground it flat with Mr. Belt Sander, and glassed over normally.
Re: OB19 build in Texas
Posted: Fri Oct 09, 2009 3:20 pm
by Cracker Larry
I did mine just like LL, works like a champ
Re: OB19 build in Texas
Posted: Fri Oct 09, 2009 3:25 pm
by Steven
Fonda@kauai wrote:Can you explain more about what you're gonna do for the transducer? You plan on there being pure glass for the transducer to shoot through right?
edit: okay I get it now
I would be kinda scared to router that after the bottom's been painted. I cut the hole all the way through, put a temporary piece of backing covered in visqueen under it, and filled it in one shot. Maybe I'm missing something though?
Well, my thinking was that I would end up with a glass filler that overlapped a recess in the ply. I planned on routing from the inside down to the glass I added in the bigger hole from the outside. The inner hole would be just big enough for transducer. Cleary, based on LL and CL replies I was way over thinking the problem. I will be taking the much simpler path of drilling and filling. Just got my order of glass fibers, so I'll mix up a mush.
LL, did you dam up and create a wedge that was level to the water line so the transducer is shooting straight down and not at the angle of the hull?
Re: OB19 build in Texas
Posted: Fri Oct 09, 2009 3:57 pm
by Cracker Larry
Since mine has a flat bottom, it obviously wasn't necessary, But that's how I would do it with a V hull. Just put a plastic collar around it, like a butter container, tape around the outside and pour some goo in it. If the boat is level, gravity will level the thickened resin.
You'd never get a good reading if your Xducer was shooting off to the side.
Re: OB19 build in Texas
Posted: Fri Oct 09, 2009 5:42 pm
by Lucky_Louis
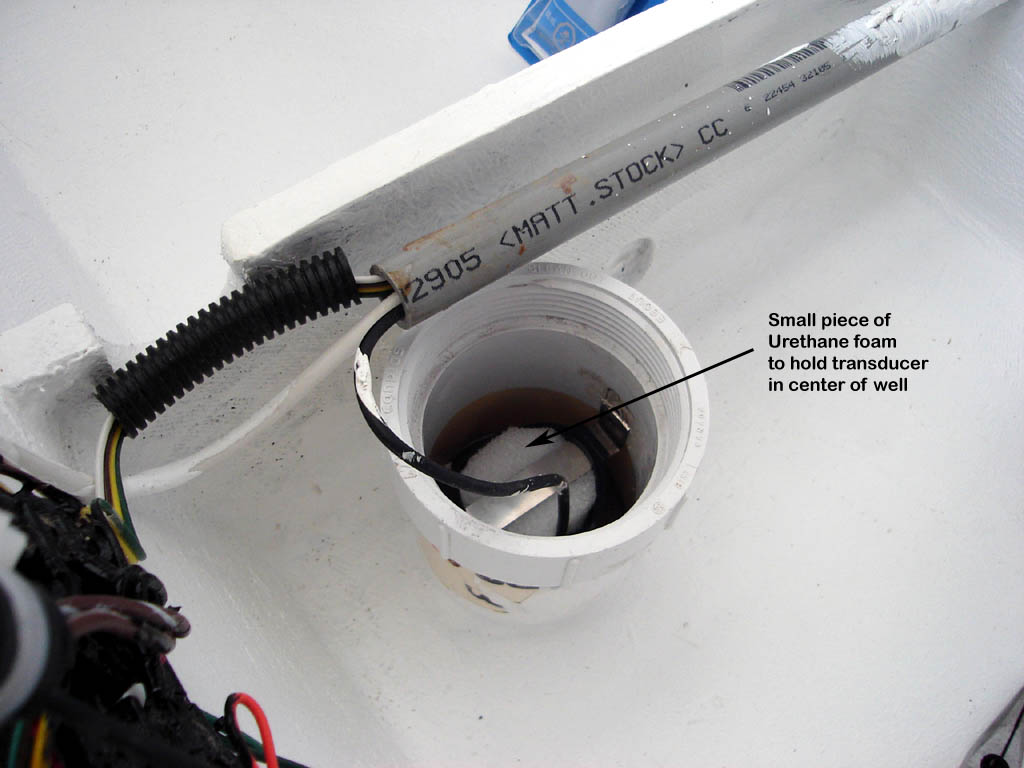
I cut a piece of 3" PVC, glued it to the hull. Poured in straight epoxy to get a level suface. Mounted the transducer about 1/8" above epoxy surface. Then I filled the well with mineral oil to completely submerge the transducer. Finally, capped the well and caulked around the cable.
Re: OB19 build in Texas
Posted: Fri Oct 09, 2009 5:46 pm
by Fonda@kauai
You can also get a transducer with a tilted element inside if you know how many degrees the hull is where the transducer's going.
Re: OB19 build in Texas
Posted: Sun Oct 11, 2009 1:16 am
by Steven
I got the outside glassed today. Started at about 6 pm. Father inlaw, a.k.a Epoxy Mixer, came over at about 7:30. Finished up at about 11:30. A cold front came in yesterday so the temp was in the 50's. Made for nice easy work. No fire balls or melting cups.
Next on the schedule is adding the keel, strakes and spray rails. I'll add the keel tomorrow. Maybe do the spray rails on Monday. By the end of next weekend I'll start the fairing.
Re: OB19 build in Texas
Posted: Sun Oct 11, 2009 6:20 am
by steve292
Your flying! Doing all that wet on wet should save you a bucketload of fairing.
Got any pictures? I like pictures

Steve
Re: OB19 build in Texas
Posted: Sun Oct 11, 2009 11:20 am
by Steven
steve292 wrote:Your flying! Doing all that wet on wet should save you a bucketload of fairing.
Got any pictures? I like pictures
Steve
Ask and you shall receive. I can't imagine doing a larger boat. I'm 6'3 and it took all my reach to do the center. I'm thinking the inside will be interesting. Wet on wet is fantastic. Wish I had done that on my GV11. Your are right about the fairing. It would have taken a lot of time and sandpaper feathering the edges of the tape just to prep for the cloth. I couldn't have done wet on wet by myself. My Father-inlaw was feeding me 24oz batches. He'd have one ready about the time I'd get the previous one worked in. The lamination looks good. It stayed in teh 50's overnight, so it's still green, but setting up nicely. I did the GV with medium hardner, so wasn't sure what to expect with the slow.


Re: OB19 build in Texas
Posted: Sun Oct 11, 2009 11:51 am
by peter-curacao
Looking great
is there a reason you didn't glass under the rubrail, or am I seeing it wrong?
Re: OB19 build in Texas
Posted: Sun Oct 11, 2009 12:55 pm
by Steven
peter-curacao wrote:Looking great
is there a reason you didn't glass under the rubrail, or am I seeing it wrong?
Thanks. When I laid it out dry and cut it, I cut it at the edge of the panel. Didn't end up there when I laid it on wet.
Re: OB19 build in Texas
Posted: Tue Oct 13, 2009 2:53 pm
by Lucky_Louis
Good session! Technically, it's boat now, 'cause you could flip and float
24oz batches, wow! I never went over 8, even with slow hardener.
Re: OB19 build in Texas
Posted: Tue Oct 13, 2009 3:13 pm
by Steven
Lucky_Louis wrote:Good session! Technically, it's boat now, 'cause you could flip and float
24oz batches, wow! I never went over 8, even with slow hardener.
We started with 12, but that doesn't go real far on the Biax. With the temps in the mid 50's, it worked real well. wouldn't have tried it if it had been warmer.
Re: OB19 build in Texas
Posted: Thu Oct 15, 2009 9:34 pm
by Steven
Went over the hull with the sander and smoothed the transition on the side cloth where I'll be adding the side glass. Cut it and all is ready to glass. Will be doing it either tomorrow night or Saturday morning. Hope to get the keel, strakes and spray rails on this weekend. Maybe a first layer of rub rail also. Might be a bit optimistic, but this is the first rain free weekend we've had since I've started the build, which is not the norm down here.
Re: OB19 build in Texas
Posted: Sat Oct 17, 2009 11:15 pm
by Steven
Re: OB19 build in Texas
Posted: Sun Oct 18, 2009 2:48 am
by steve292
Nice work Steve
I like the way you put the glass along the sides, instead of trying to fill a half round, much neater.
steve
Re: OB19 build in Texas
Posted: Sun Oct 18, 2009 8:43 am
by peter-curacao
great job
Re: OB19 build in Texas
Posted: Sun Oct 18, 2009 9:06 am
by Cracker Larry
Steven, did you get the drilling template?
Re: OB19 build in Texas
Posted: Sun Oct 18, 2009 3:31 pm
by Steven
Cracker Larry wrote:Steven, did you get the drilling template?
Larry,
I sure did. Yesterday. Sorry, meant to email you last night. Outstanding job. You made it too easy for me. Much appreciated.
Steve,
Thanks. I decided it would be easier to fair that way.
Peter,
Thanks.
I'm in the process of adding the rub rail now. Just took a break for some chow. Bought some 1 1/8" x 3/8" trim molding. Just about the limit of what can be bent around the bow. Came in 13' sections. I'll have it glued on and some pics tonight. Also pickd up some quarter round to use for the spray rail. Thought about making some triangluar pieces in a mold, but decided these would be just as effective.
Re: OB19 build in Texas
Posted: Sun Oct 18, 2009 11:06 pm
by Steven
Re: OB19 build in Texas
Posted: Mon Oct 19, 2009 6:05 pm
by Steven
Re: OB19 build in Texas
Posted: Mon Oct 19, 2009 6:28 pm
by TomW
Nice
Tom
Re: OB19 build in Texas
Posted: Sat Oct 24, 2009 10:14 pm
by Steven
Re: OB19 build in Texas
Posted: Mon Oct 26, 2009 10:46 pm
by Steven
After a sanding session with RO and some long boarding, and then some more fairing mix and all longboard. Sanded one side today. Will do the other throughout the week. Ordered 3qt. of quickfair. Should be ready for primer after the coming weekend. I used a mixed of West 410 and Blended filler on the bottom panels. Trying to stretch what I have on hand. The side is QuickFair. Man I love the Quickfair. I had a qt. which I've used most of on the sides, and then on the bottom tonight. It just goes on so nicely. Though I have to fight the urge to overwork it.


Re: OB19 build in Texas
Posted: Mon Oct 26, 2009 11:08 pm
by Murry
Man Steven that garage sure is clean. You doing all of your sanding outside?
Looking good. You're rolling right along.
Re: OB19 build in Texas
Posted: Mon Oct 26, 2009 11:23 pm
by Steven
Murry wrote:Man Steven that garage sure is clean. You doing all of your sanding outside?
Looking good. You're rolling right along.
Thanks. I rolled it out to do the initial sanding to knock off the selvage threads, but found the wind kept the dust in my eyes, so it's all inside now. The 6" RO has a vacuum attacment that works fairly well. The long board doesn't put much in the air. Plus I vacuum after every 3' or so of sanding. Helps control the dust and makes the sanding more effective. If there's a lot of dust, it acts like ball bearings. Working on a clean surface makes the sanding go much faster. But the big trick is the clean up after a sanding session. I vacuum up and then open the garage door, hook the vaccum hose to the outlet port and blow all the dust that is left out the door.
Re: OB19 build in Texas
Posted: Wed Oct 28, 2009 12:51 pm
by Steven
I ordered a gallon of System 3 Yacht primer and some Graphite. I will get the bottom faired, primed and coated in epoxy graphite over this coming weekend and next week. I'm going to fair and paint the sides and transom after flipping. I need to cut the transom down some and I may take a few inches off the sheer. Lot's of wind down here and this thing has some tall sides. I'll be able to judge better when it's right side up. I also want to fair the sides after the frames are in to make them more solid for sanding against. I also like painting the sides and transom with the boat upright because doesn't doesn't settle on the sides due to the slope.
Re: OB19 build in Texas
Posted: Tue Nov 10, 2009 9:40 pm
by Steven
No new pictures, but progress is being made. Still fairing so nothing interesting to see. Would be ready for primer, but after inital weave fill and fairing coat with Quick Fair, found a 1/8" dip on both sides from transom 5' forward. Decided to fix it, which cost me a weekend with drying times factored in. Today I put on last leveling coat to fix the dip, and put on final major coating on the side panel. Should only have some minor filling to do after this next sanding. Should have it prepped for primer this coming weekend. Will let it set a week to cure and then prim the following weeding. Then will graphite the bottom and flip. Really anxious to get it turned over and start working on the guts.
Re: OB19 build in Texas
Posted: Sat Nov 21, 2009 11:24 am
by Joe H
Hey Steve,
Great job so far, very nice work.
I'm ready to glass my P19 bottom but I just want to order what it will take to do the bottom for now, do you know how many yards you used to this point? I already have the fiberglass tape.
Thanks
Joe H
Re: OB19 build in Texas
Posted: Sat Nov 21, 2009 12:19 pm
by Steven
Joe H wrote:Hey Steve,
Great job so far, very nice work.
I'm ready to glass my P19 bottom but I just want to order what it will take to do the bottom for now, do you know how many yards you used to this point? I already have the fiberglass tape.
Thanks
Joe H
Thanks. I didn't measure the lengths of the pieces so this is a guesstimate. The bottom takes 2 pieces of 50" approx. 21' long when you account for the transom. I also split about a 17' long piece in half to cover the remaining part of the sides that didn't get covered by the overlap. So for the entire outside I'd estimate 18-20 yds. The kit comes with 27 I think. The intent is to use scrap cuttoffs to fill in the outsides where the overlap didn't reach. I didn't want do to that piecework with the 6" overlaps and additional fairing. So I ordered another 7 yds., which came yesterday, so I'll have 2 full pieces for the inside. On the inside you only put cloth on the bottom with the overlap up the sides. Not sure if the P19 has the same lamination schedule, but I'm sure it's close.
Re: OB19 build in Texas
Posted: Sat Nov 21, 2009 12:49 pm
by Joe H
Thanks Steve,
Looks like I'll have to order 2 ten yard rolls.
Keep up the documentation, your thread has been a good source of information.
Joe H
Re: OB19 build in Texas
Posted: Sat Nov 21, 2009 4:55 pm
by prowlerblue
Steven, I am ejoying watching you progress. You are pretty much at the same stage as me, with my OB15 Build. Your build looks great. I have some irregularities ( small sags), in my hull that I hope the fairing will smooth out. Will you be using System Three Paint for your OB 19? Mike
Re: OB19 build in Texas
Posted: Sat Nov 21, 2009 8:19 pm
by Steven
prowlerblue wrote:Steven, I am ejoying watching you progress. You are pretty much at the same stage as me, with my OB15 Build. Your build looks great. I have some irregularities ( small sags), in my hull that I hope the fairing will smooth out. Will you be using System Three Paint for your OB 19? Mike
Thanks. Small sags seem to be inevitable. They'll fair out. I've not decided on System 3 or Sterling. I already have a gallon of S3 Yacht Primer. It should be ready for primer by Tuesday afternoon. I'll let it set this week for the epoxy to be fully cured and then I'll paint next weekend.
Re: OB19 build in Texas
Posted: Tue Nov 24, 2009 6:46 pm
by Steven
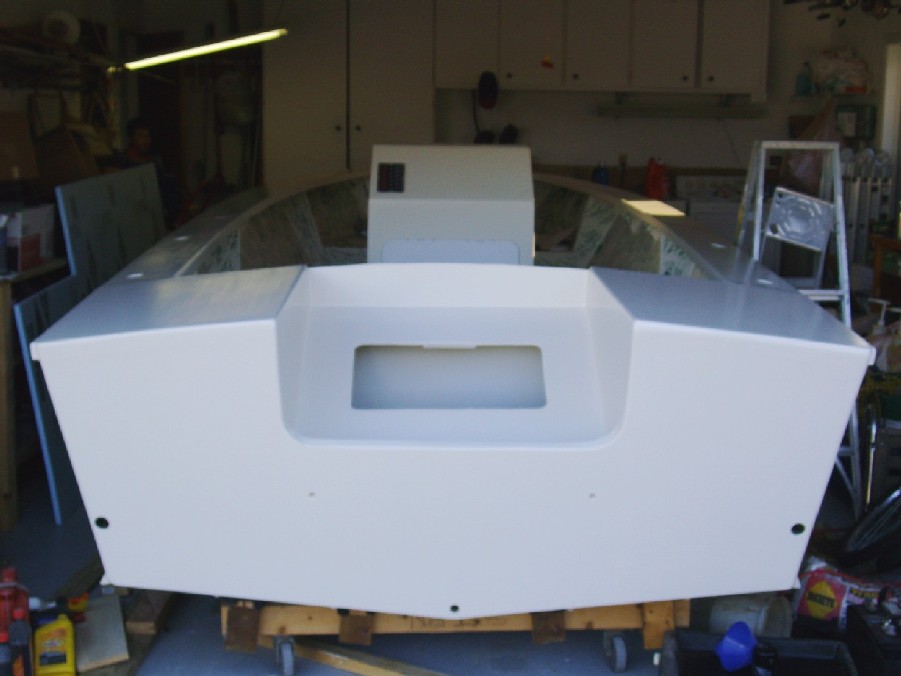
Here it is ready for paint. I'm going to paint the botoom and down the sides about 6" with primer and then epoxy/graphite the bottom. I need to cut the transom down and still haven't decided on if I will leave the sheer as is or lower it. I want to see it right side up before deciding. I applied two coats of epoxy to the spray rails and skeg yesterday and sanded today. Hit everything to be painted with the 6" RO with 80 grit. Will use the small square RO to sand right along the spray rail before painting. Will only take 10 minutes. Had to fight the urge to paint this evening. It's been 30 hours since the last coat of epoxy, but it's cool and I want to be sure it's good and cured.

Re: OB19 build in Texas
Posted: Tue Nov 24, 2009 9:05 pm
by Fonda@kauai
Good job on the fairing, a few coats of primer and she'll be slick
Re: OB19 build in Texas
Posted: Wed Nov 25, 2009 11:35 pm
by Steven
Priming has begun. I'm very pleased with the fairing. Just a few pin holes and one area on an extra overlap where I sanded into the glass a bit. Need to smooth it a bit more. I mixed up just the right amount for what I wanted to prime. Sometimes it's better to be luck then good.
I used 6" white foam rollers. Would like to use a bigger roller for the next coats with a bit more nap to put it on thicker. Gonna post a question for suggestions in the paint forum.


Re: OB19 build in Texas
Posted: Thu Nov 26, 2009 11:08 pm
by Steven
After 2 coats.

Re: OB19 build in Texas
Posted: Fri Nov 27, 2009 7:28 am
by wegcagle
She's looking really good Steven. You can tell you spent alot of time fairing. Just curious, why are you only putting primer on the bottom? Why not the whole boat?
Will
Re: OB19 build in Texas
Posted: Fri Nov 27, 2009 1:02 pm
by Steven
wegcagle wrote:She's looking really good Steven. You can tell you spent alot of time fairing. Just curious, why are you only putting primer on the bottom? Why not the whole boat?
Will
Thanks Will. I've been following your thread. Looking real good. I may cut the sides down after flipping. Also the dimensions in the plans for the transom cut out were wrong. So it needs to be cut down some more. The 2x4's holdidng the motorwell sides to the transom are in the way so I can't cut it while upside down. I'm putting graphite on the bottom, and will flip. Also, painting the sides while right side up gives a better result. I did that on my GV11 too. With the slope of the sides, almost no dust can settle on the sides while the paint is curing. Plus, space is tight and I'm a bit ham fisted. I'm sure to ding the sides while finishing out the inside.
Re: OB19 build in Texas
Posted: Tue Dec 01, 2009 10:09 pm
by Murry
She's looking great Steven.
Re: OB19 build in Texas
Posted: Tue Dec 01, 2009 10:57 pm
by Steven
Murry wrote:She's looking great Steven.
Thanks. I got the primer sanded today. Next weekend I'm applying the Epoxy/Graphite and then flipping the following weekend. I'm ready to get working on the inside. :0
Re: OB19 build in Texas
Posted: Wed Dec 02, 2009 8:26 am
by Cracker Larry
I'm sure to ding the sides while finishing out the inside.
Excellent thinking
That sure looks good, the chines really turned out nice
Re: OB19 build in Texas
Posted: Wed Dec 02, 2009 3:34 pm
by Steven
Cracker Larry wrote: I'm sure to ding the sides while finishing out the inside.
Excellent thinking
That sure looks good, the chines really turned out nice
Thanks CL. I used the same 3/4 round on the GV11 and was happy other than I didn't take it far enough forward. Not making that mistake again.
Re: OB19 build in Texas
Posted: Wed Dec 02, 2009 6:40 pm
by Joe H
Hey Steven,
I also screwed on dams on the side and transom for sharpening up the edges. I needed a flat surface and straight line for the spray rails on the back 2/3', so I did the transom as well
Did you put anything on the inside of the dams to stop the epoxy from sticking to them?
Joe H
Re: OB19 build in Texas
Posted: Thu Dec 03, 2009 11:21 am
by Steven
Joe H wrote:Hey Steven,
I also screwed on dams on the side and transom for sharpening up the edges. I needed a flat surface and straight line for the spray rails on the back 2/3', so I did the transom as well
Did you put anything on the inside of the dams to stop the epoxy from sticking to them?
Joe H
Hi Joe,
I taped them over with Packing tape. Packing tape is great. I used to use cardboard for disposable palets to put quickfair on as I worked spreading it over the needed areas. Kinda like a painters palet. I now have a dedicated 8"x8" 1/4" thick palet covered with packing tape. I just give it a wipe down with an acetone wetted paper towell when done working. The acetone doesn't seem to bother the tape.
Re: OB19 build in Texas
Posted: Thu Dec 03, 2009 4:45 pm
by TomW
Stephen your doing a really nice job on your build! Can't wait to see what you decide on whether you cut her down once you flip.
Tom
Re: OB19 build in Texas
Posted: Thu Dec 03, 2009 5:03 pm
by Steven
TomW wrote:Stephen your doing a really nice job on your build! Can't wait to see what you decide on whether you cut her down once you flip.
Tom
Thanks Thom.
I'm thinking about taking it down 4". That is still plenty of freeboard for the kiddos and the lakes I'll mostly frequent. It will also remove about 6.6 square feet of wind catching sail. Plus I think It will look better proportioned to my eye. Can't wait to get it flipped. Hoping to do graphite this weekend, but cold weather has finally arrived. Gonna have to see if I can maintain enough warmth in the garage. Want to apply one coat a morning, 3 mornings in a row. This will let the warmer day weather help out some.
Re: OB19 build in Texas
Posted: Sun Dec 06, 2009 6:01 pm
by Steven
Put the first coat of Epoxy/Graphite on today. First batch went on well. Then the problems began. I thought I could do it all with one batch. I didn't have any paint tray liners, so after the first batch, I mixed one and just poured and rolled. Not nearly as nice as with the pan. Finished up anyway figuring a little sanding and another coat, using tray liners would do it. Well, after getting done, I have hundreds of tiny fish eyes. Ugh!!! I wiped down the boat twice with Isopropyl alclohol. Wiped the tray down. Wiped the containers out I used to mix. Even wiped down the new 7" paint roller I used for the West brand Epoxy rated roller covers. After scratching my head, the only thing I completely forgot to clean was the brand new mechanical sifter I bought and used to sift the Graphite. Bonehead move of the day. So I'm about to order a new batch of graphite, since the remaining is supect #1. Gonna set me back a week which is aggravating, but as long as I have it flipped by Christmas, I'll be on schedule. I'm taking the week of and plan to have all of the under sole structure done that week.
Here is a pic of the fish eyes. Nice white circles. The little specs are dust.

Looks good from 3 feet.


Re: OB19 build in Texas
Posted: Sun Dec 06, 2009 6:53 pm
by Larry B
Sorry about the fish eyes. Other than that sure looks good. I'm hoping to start my graphite by Christmas.
You might want to try a small batch of that graphite on a different surface and see if it fish eyes? Might not be the grahite???
Re: OB19 build in Texas
Posted: Sun Dec 06, 2009 8:01 pm
by Steven
Larry B wrote:Sorry about the fish eyes. Other than that sure looks good. I'm hoping to start my graphite by Christmas.
You might want to try a small batch of that graphite on a different surface and see if it fish eyes? Might not be the grahite???
I plan on doing a test after this batch cures to confirm. I went ahead and ordered some more just in case. It's cheap and I can always use it on my next build. It's a sickness, but I really want to build a TX18
The OB's for the family.
It could have also come from the blues rags in a box I used. Very heavy paper towells. Maybe they have something in them that caused it. I'll use plain white P. towells next attempt.
Re: OB19 build in Texas
Posted: Sun Dec 06, 2009 9:33 pm
by peter-curacao
C itbgkyt,hujyunbgtjyh A jn.ku//N ktnb N fdddvmt,yyjukj,mnhjT see !!!!!
that's bright
Re: OB19 build in Texas
Posted: Mon Dec 07, 2009 7:40 am
by gk108
I never use paper towels for wiping down. Just about every paper towel formulation leaves some kind of residue, often just lint, but other stuff seems to lurk in some of them. The best luck that I've had is with the white cloth wiping rags sold at Lowe's or old T-shirts. Knit cotton has longer fibers and doesn't need binders like the short cellulose fibers in paper. I think that is what makes the difference.
Re: OB19 build in Texas
Posted: Mon Dec 07, 2009 12:01 pm
by TomW
Dupe see below.
Re: OB19 build in Texas
Posted: Mon Dec 07, 2009 12:02 pm
by TomW
I agree with Gary old T-shirts or purchased soft clothes that are not treated or old bed sheets are best. Paper towels can be treated with absorbatants and other chemicals.
Tom
Re: OB19 build in Texas
Posted: Mon Dec 07, 2009 12:23 pm
by Steven
Thanks guys. Good advice. I'll switch to cloth. I'll go pick up some today from Lowes.
GK, Do you launder them before using?
Re: OB19 build in Texas
Posted: Mon Dec 07, 2009 1:23 pm
by TomW
I do Stephen. No soap just water then into the dryer to remove more lint. I might after there dry even run them two or three times more through the dryer without heat to remove as much lint as possible. Hasn't failed me in 30 years.
Tom
Re: OB19 build in Texas
Posted: Tue Dec 08, 2009 6:39 pm
by Steven
Re: OB19 build in Texas
Posted: Tue Dec 08, 2009 6:43 pm
by TomW
Looks great Stephen! Need the shades for that.
Tom
Re: OB19 build in Texas
Posted: Tue Dec 08, 2009 6:44 pm
by gk108
That looks slick. I guess we forgot to tell you that the other purpose of putting graphite on your hull is to purify the air by drawing all dust particles out of it. Sorta like an electrostatic filter only different.

Re: OB19 build in Texas
Posted: Tue Dec 08, 2009 9:19 pm
by Dougster
Sure looks good. I'm wondering how you avoided all those little nibs I kept getting? I recall just sifting once, and maybe should have done more. Anyway, that looks great so congratulations.
Dunno how you did it Dougster
Re: OB19 build in Texas
Posted: Wed Dec 09, 2009 7:27 am
by Steven
Dougster wrote:Sure looks good. I'm wondering how you avoided all those little nibs I kept getting? I recall just sifting once, and maybe should have done more. Anyway, that looks great so congratulations.
Dunno how you did it Dougster
I sifted twice. Maybe your thread that prompted that.
Once into a clean ziplock and then a second time into another clean zip lock. I used the West System Rollers, and some 6" dense white foam rollers. The first coat I only used the West roller, but its square edge didn't get into the corer where the bottom and skeg meet, or onto the bottom of the spray rails well. I tried brushing these areas with a foam brush with poor results. Couldn't apply a nice even thickness coat. The white rollers have a round end that pushes right into the recesses, applying a nice coat. Now I have to figure out how to keep the dust out of the final coat. My garage is my wood shop, so dust abounds in every crack and crevice. Guess I'm gonna staple up some cheap plastic over as much as possible and lay it out on the floor surrounding the boat. That should help a bit.
Re: OB19 build in Texas
Posted: Wed Dec 09, 2009 10:56 am
by steve292
[quote="Steven] Now I have to figure out how to keep the dust out of the final coat. My garage is my wood shop, so dust abounds in every crack and crevice. Guess I'm gonna staple up some cheap plastic over as much as possible and lay it out on the floor surrounding the boat. That should help a bit.[/quote]
How about damping down the area just before you start. If you use a fine spray it'll take a lot of dust out of the air.
I had to keep reminding myself it was the bottom, & no one will see a few dust specks.
steve
Re: OB19 build in Texas
Posted: Wed Dec 09, 2009 11:18 am
by Steven
steve292 wrote:[
If I could flip it by myself so nobody would see, I'd be less concerned.
Seriously though, it's a bit too much for my liking. I'm going to drape plastic over every thing .That will reduce it considerably. Watering the floor is good too. I did that when I painted the GV11 and it seemed to help. When I do the paint finish paint on this one, I'm completely emptying the garage for a good scrubbing. Every thing will be blown off outside with the compressor and plastic will be put up from ceiling to floor in paint area. Just can't go to that extreme for the bottom.
Re: OB19 build in Texas
Posted: Mon Dec 14, 2009 6:22 pm
by Steven
So I made a booth out of plastic hung from strings strung around the boat. Wetted the floor with water, and kept it damp during the coating. Results: Dust in the epoxy.
That shiny black just shows every fleck. So I put on a final coat today and decided the sooner I flip it and stop seeing the dust, the sooner it will stop aggravating me.
So, next weekend will hopefully be the big flip, weather permitting.
Re: OB19 build in Texas
Posted: Tue Dec 22, 2009 8:51 pm
by Steven
Re: OB19 build in Texas
Posted: Tue Dec 22, 2009 9:13 pm
by Joe H
Congrads on the flip Steven, man that hull looks huge with the kids in there.
Looking good!
Joe H
Re: OB19 build in Texas
Posted: Tue Dec 22, 2009 9:23 pm
by Steven
Joe H wrote:Congrads on the flip Steven, man that hull looks huge with the kids in there.
Looking good!
Joe H
Thanks Joe. It IS huge. The scale increases tremendously after flipping.
Re: OB19 build in Texas
Posted: Thu Dec 24, 2009 6:03 pm
by Steven
Re: OB19 build in Texas
Posted: Thu Dec 24, 2009 8:30 pm
by longrod
Gotta love texas! Dont like the weather, just wait a few hours.I wish it would snow here, my kids would love it.The boats looking good by the way.
Re: OB19 build in Texas
Posted: Sat Dec 26, 2009 11:45 pm
by Steven
Re: OB19 build in Texas
Posted: Sun Dec 27, 2009 5:19 am
by steve292
Nice work
. That was the hardest glassing to do on my hull, especially the bit in the bow. I like the bracing idea as well.
Steve
Re: OB19 build in Texas
Posted: Sun Dec 27, 2009 10:41 am
by Joe H
Looks real good Steven, I can't wait until I get to that point.
Joe H
Re: OB19 build in Texas
Posted: Sun Dec 27, 2009 10:49 am
by Dougster
That looks great---a big job for sure. We had the same snow in Dallas, where I was at my brother-in-law's for Christmas. Glued your pants to your knees? Coulda been lots worse

Says congratulations on the flip, tape, and glass effort Dougster
Re: OB19 build in Texas
Posted: Sun Dec 27, 2009 10:50 am
by chrisobee
Steven wrote:Glued my pants to my knees.
Who says boat building isn't entertaining.
Re: OB19 build in Texas
Posted: Sun Dec 27, 2009 4:37 pm
by smilinmatt
Looking good. You're almost ready to start glassing in the stringers and frames - time to get a good chiropractor.
Re: OB19 build in Texas
Posted: Sun Dec 27, 2009 5:28 pm
by Steven
smilinmatt wrote:Looking good. You're almost ready to start glassing in the stringers and frames - time to get a good chiropractor.
Stringers and frames are next. I already need a good chiropractor after yesterday. The worse of it though are my big toes.
They're both still semi numb from crouching so much. I only have a gallon of epoxy left so I'm going to glue the stringers in place and wait for the 3 gallon order to arrive. Not sure the gallon will be enough to get all the tape down. I'll go as far as I can. Screwed up there. I'm off all week and didn't take inventory of what was remaing. Planned to have all the stringers and frames in this week. But I doubt the order will arrive before the end of the week. Since I'll have some free time, I'm going to cut out my console and get it ready for assembly.
Re: OB19 build in Texas
Posted: Sun Dec 27, 2009 5:35 pm
by Steven
Joe H wrote:Looks real good Steven, I can't wait until I get to that point.
Joe H
It was a heck of a job. Next time I'll do all the sanding and whole filing prep in advance. That added several hours to the day that I could have done without. I crawled around in that thing for 15 hours.
Re: OB19 build in Texas
Posted: Sun Dec 27, 2009 5:55 pm
by Joe H
Steven,
Sorry for the stupid question but if you did wet on wet what kind of sanding and hole filling did you have to do, I just want to be prepared when I do get there.
Joe H
Re: OB19 build in Texas
Posted: Sun Dec 27, 2009 7:48 pm
by Steven
Joe H wrote:Steven,
Sorry for the stupid question but if you did wet on wet what kind of sanding and hole filling did you have to do, I just want to be prepared when I do get there.
Joe H
There were holes from were I attached the spray rail, the skeg and from the stitching. I filled them from the outside, but you have to clean up the squeeze out and fill any spots you find that need it. You also have to grind/chip out any excessive squeeze through along the chine and keel joints. Anything that needed additional filling I did as I layed down the fillets. There is also residue from the duct tape that I applied to the inside seams. Needed to be cleaned up in some areas. Once the clean up was done, I precut all the glass. Total time to do all of this up to the beginning of laying fillets was probably 4 1/2 hours. It would have much better to do all of this on a prior day.
Re: OB19 build in Texas
Posted: Sun Dec 27, 2009 7:53 pm
by Joe H
Thanks Steven,
I'll plan on a day for clean up.
Joe H
Re: OB19 build in Texas
Posted: Mon Jan 11, 2010 10:31 pm
by Steven
Spent the day glassing in the stringers. Worked from the area between the center stringer, so the inboard side of each center stringer is left to do. I pre-wet the tape. Makes it so much easier. I put 1/4" ply covered with poly over two stringers and used as a platform to do the glass wetting. Did one side and then moved the platform to the other side. I wet out one piece of tape, layed the second on top offsett by a couple inches and then rolled up the whole mess. Then just rolled it out. Took some pictures but the gallery upload doesn't seem to be working.
Re: OB19 build in Texas
Posted: Mon Feb 08, 2010 8:48 pm
by Steven
Re: OB19 build in Texas
Posted: Tue Feb 09, 2010 6:39 am
by Joe H
Good morning Steven,
Very nice job on the stringers & Cleats, I noticed the cleats do not look like marine ply, I take it that should be okay as long as they are coated with epoxy? I have some left over 1/2 marine ply but not 3/4, sure would save a little coin if I could just buy a sheet of 3/4" good quality regular ply.
I'll be there soon.
Joe H
Re: OB19 build in Texas
Posted: Tue Feb 09, 2010 6:55 am
by wegcagle
Joe, for the cleats you can use good quality directional lumber. What I did was take 2x4x8 untreated southern yellow pine and ripped it down the middle (width) and ripped the length into 1/3s so that I basically ended up with 3/4" x1" strips. Cut them to size and coat them good with at least 2 layers of epoxy.
Lookin' good Stephen,
Will
Re: OB19 build in Texas
Posted: Tue Feb 09, 2010 9:55 am
by Steven
I did the same as will. Bought some 8' 1x4 and ripped into 3 pieces. The boards were only a couple bucks a piece.
Re: OB19 build in Texas
Posted: Tue Feb 09, 2010 11:53 am
by Joe H
Thanks guys,
Come to think of it I have some what I think is 3/4" left over from when I cut my strakes & chine out of 2X4"s, I'll measure when I get home, if I get home tonight, I'm at work 55 miles south of where I live and we are getting hit with some major snow right now.
Joe H
Re: OB19 build in Texas
Posted: Tue Feb 09, 2010 9:35 pm
by Steven
Clamping of cleats on sides worked out. Initially I thought about using a thin stick sprung between the stringer cleat to the cleat being glued to the side. But, with the slope of the side I figured it would want to slide up. This method applys the clamping force perpindicular to the face of the cleat and doesn't cause the cleat to walk up.

Re: OB19 build in Texas
Posted: Wed Feb 10, 2010 6:55 am
by wegcagle
Nice
Will
Re: OB19 build in Texas
Posted: Mon Feb 22, 2010 6:10 pm
by Steven
Making progress forward with the cleats on the sides. Tedious and finicky clamping.


Putting int glue cleats and frames for the subfloor where the gas tank will live.

Re: OB19 build in Texas
Posted: Tue Feb 23, 2010 3:42 pm
by Steven
Clamps off and with fuel tank deck resting in place. The cleats have all been planed flush with the top plane of the stringers. The chisel is very hand and capable of surprising control and accuracy if kept sharp.


Re: OB19 build in Texas
Posted: Tue Feb 23, 2010 4:26 pm
by Cracker Larry
Looks great
So, how's your back feeling today

Re: OB19 build in Texas
Posted: Tue Feb 23, 2010 5:38 pm
by Lucky_Louis
Great looking work Steven! You'll find that the build starts being more fun now that ALL those cleats are done
Another way to locate and support those pesky curved cleats against the side is to temporarily screw scrap boards like a 1"x3" on the flat across the stringers to locate the height, apply the glue to the cleat or hull, squish in to place, and temporily screw to the scrap board. Make sense?
Before you get absorbed in chase tubes, foaming etc. make sure that you've epoxy sealed all faces of the frames and stringers while they're still easy to get at (not like some guy who shall remain nameless
)
Thanks for the update.
Re: OB19 build in Texas
Posted: Tue Feb 23, 2010 5:44 pm
by Steven
Cracker Larry wrote:Looks great
So, how's your back feeling today
Thank you sir. Not feeling too bad. Been sitting boards accross the stringers to give me a seat. What gets me is the narrow space between the stringers. With the cleats glues on, the foot can catch and if your not careful a severe ankle twist or break is possilbe. Been very careful with that.
I have laid in some blood though. When the plane or chisel slips, there's lots of rough glass waiting to remove layers of skin. Cleaned off one knuckle to day.
Re: OB19 build in Texas
Posted: Tue Feb 23, 2010 5:49 pm
by Steven
Lucky_Louis wrote:Great looking work Steven! You'll find that the build starts being more fun now that ALL those cleats are done
Another way to locate and support those pesky curved cleats against the side is to temporarily screw scrap boards like a 1"x3" on the flat across the stringers to locate the height, apply the glue to the cleat or hull, squish in to place, and temporily screw to the scrap board. Make sense?
Before you get absorbed in chase tubes, foaming etc. make sure that you've epoxy sealed all faces of the frames and stringers while they're still easy to get at (not like some guy who shall remain nameless
)
Thanks for the update.
Thank you. Makes perfect sense. The clamping has gone surprisingly well. The pressure is perpindicular so the cleats don't have a tendance to 'walk'. Just a bit tedious and definately and un-fun part of the build.
Good tip. Once I layout and drill the chase tube holes, I'm having a session of epoxy coating and hole filling.
I had one panic moment after gluing on a couple cleats. The small triangluar areas in front still needed some coating under the existing cleats. After gluing on the last one I realized I forgot to do that. After I planed them down, I can still get to them. Whew!!!!!
Re: OB19 build in Texas
Posted: Tue Feb 23, 2010 7:33 pm
by cottontop
Steven your work looks great. I was beginning to wonder if you were going to get some more pictures posted. Guess your weather has been worse than ours in FL. I used to say I could put on enough clothes to stay warm; but, not take enough off to be legally cool. This winter has changed my mind. Have you decided whether to cut the sides down yet? cottontop
Re: OB19 build in Texas
Posted: Tue Feb 23, 2010 7:55 pm
by Steven
cottontop wrote:Steven your work looks great. I was beginning to wonder if you were going to get some more pictures posted. Guess your weather has been worse than ours in FL. I used to say I could put on enough clothes to stay warm; but, not take enough off to be legally cool. This winter has changed my mind. Have you decided whether to cut the sides down yet? cottontop
Thanks. It was snowing today as I took those pics.
Weather has been crazy. We've actually had a 'real' winter. I can heat the garge up ok, but it's hard on the electric bill.
I'm going to leave the sheer as designed. I marked a straight sheer with a laser level, and decided I like the look as designed.
Re: OB19 build in Texas
Posted: Tue Mar 09, 2010 8:14 pm
by Steven
Got the chase tubes installed. Working around 4 stringers is a royal pain. On the down shot where the console will be, you can see too lines on the frame with a big arrows pointing inward. That is the outside location of the console. Will be 32" wide. Now just need to coat everything below deck, fill some screw holes and foam.


Re: OB19 build in Texas
Posted: Thu Mar 11, 2010 9:48 am
by athen
Hi Steven,
great job so far! I've been building my OB19 June 08 through July 09. What I have seen on your pictures is that you obviously used the original measures for the transom. In October 08 I received an email from Bateau about a plan correction. See below.
We are advising purchasers of our OB19 plans that some plans show a
wrong dimension for the transom cut.
The wrong dimension is on sheet D228/4 in the lower right corner. It
shows 1-11-1/2" (or 595 mm) but it should be 20-3/4" (527 mm).
Not sure if this applies to Europe only but I believe the outboard engine dimensions are the same world wide. 20-3/4" is the height you need for a long shaft engine.
Hope this helps.
Greetings from Germany,
Andreas
Re: OB19 build in Texas
Posted: Thu Mar 11, 2010 11:42 am
by Steven
Hi Andreas,
Thanks and good eye. I became aware of the descrepency after I had already assembled the hull. I'm considering leaving it as is and going with a 25" shaft. More sea worthy, and frankly, I don't care for the looks of the deeper cutout with the motor so recessed. Still deciding though. Do you have a gallery with pictures of your build?
Regards,
Steven
Re: OB19 build in Texas
Posted: Thu Mar 11, 2010 12:43 pm
by athen
Steven,
yes I do have a gallery. Just added a few more pictures that friends have taken last summer. But the boat you are gonna see may look a little different from what you are about to build. I have changed the interior to my personal taste. It is more like a bow rider style fun boat and therefore no longer suitable for fishing

.
http://gallery.bateau2.com/thumbnails.php?album=1020
I have lots more and will post them if there is demand. For example details of the motorwell area and so on. If you want to see something in particular just let me know.
Enjoy,
Andreas
Re: OB19 build in Texas
Posted: Thu Mar 11, 2010 12:51 pm
by cottontop
Good looking pipes. Now the real fun begins. John
Re: OB19 build in Texas
Posted: Thu Mar 11, 2010 1:52 pm
by Steven
athen wrote:Steven,
yes I do have a gallery. Just added a few more pictures that friends have taken last summer. But the boat you are gonna see may look a little different from what you are about to build. I have changed the interior to my personal taste. It is more like a bow rider style fun boat and therefore no longer suitable for fishing
.
http://gallery.bateau2.com/thumbnails.php?album=1020
I have lots more and will post them if there is demand. For example details of the motorwell area and so on. If you want to see something in particular just let me know.
Enjoy,
Andreas
Very nice work, Andreas. Don't know how I missed your gallery. I'd fish from that in a heart beat.
I'll sure be pulling tubes, skies and whatever behind my fishing boat.
Re: OB19 build in Texas
Posted: Fri Mar 12, 2010 4:08 am
by athen
Don't know how I missed your gallery.
The album was not visible to the public as I did not manage to change the view mode from Me Only to Public when the gallery was created in summer 2009. The point is that the website will not allow you to change the view mode as long as there is a password entered in the password box. And I did not even try to delete the PWD as I thought it was obsolete when switching to public view mode

. And just 2 days ago when logged in again I just deleted the PWD and - surprise - its working now as expected.
Hope the temperatures over there are already in a range you can start working in the boat again. Can't wait to see more pictures of the next building steps. Keep us in the loop
.
Thanks,
Andreas
Re: OB19 build in Texas
Posted: Fri Mar 12, 2010 1:49 pm
by smilinmatt
Steven,
I don't think the 23.5" transom on the original plans is the correct height for a 25" shaft - I think it was simply a typo. I cut down my transom with a jigsaw before fairing and priming. It was easy to do, and it probably looks better than if it had been built to the proper height to begin with.
I haven't had any water coming over the transom, and I've had it out in some pretty sloppy conditions.
Transom cut down to 20-3/4":
Re: OB19 build in Texas
Posted: Sat Mar 13, 2010 5:39 am
by athen
I don't think the 23.5" transom on the original plans is the correct height for a 25" shaft - I think it was simply a typo. I cut down my transom with a jigsaw before fairing and priming. It was easy to do, and it probably looks better than if it had been built to the proper height to begin with.
Steven,
I absolutely agree with smilinmatt. And I really hated to cut the transom at this point because it appeared to get difficult to keep a jigsaw aligned under that angle but at the end it was not too difficult. Also I added another 12mm plywood inside the motorwell in order to avoid tons of washers when mounting the engine. The bolts that were delivered with the engine were not threaded up to the head.
Regards,
Andreas
Re: OB19 build in Texas
Posted: Sat Mar 13, 2010 11:37 am
by Steven
Thanks guys. I planned to doublecheck that dimension as I wasn't sure if it was for a 25" shaft or not. I left the outer transom mostly unfaired in case I decided to cut it down.
A couple questions.
1) Motor well sides. Did you take them all the way to the hull bottom or glue the sole to the stringers and then tab to the sole? I assume they should go to the hull bottom. On the stringer side it looks pretty difficult to tape since there isn't much room between the stringer and the motorwell side. I've considered a glue cleat there.
2) Is the full depth, fore and aft, of the motor well requred for full tilt. I'd like to put an 8" wide "deck" across to make a step for moving back and forth. I could glue cleats in the well for a removable deck to rest on after the motor is trimmed down as an option, but would rather it be permanent.
Re: OB19 build in Texas
Posted: Sat Mar 13, 2010 1:55 pm
by TomW
Stephen the motorwell sides definately go all the way to the bottom as they are structural and taped to the transom and bottom and both sides were taped to Frame E. I hadn't looked at my plans lately, but I see what you mean about not having much room between it and the stringer, 2-3" will make it difficult to tape that side. Yikes
If it was me I would consider widening the motorwell and gluing those suckers to the stringers and then tape everything together. Since there are instructions on the site here for widening the transom for twin engines widening 5" is no big deal. Maybe Matt will see this and tell you what he did.
As far as the motor tilt it depends on the motor some take more than others, as the manufacturers are putting some slant on the forward part of the head for pazazz.
You might get by with it as the motor could slip underneath it before reaching it's full tilt position.
Tom
Re: OB19 build in Texas
Posted: Sat Mar 13, 2010 2:21 pm
by Steven
Definately won't be widening the motor well. That will eat into the standing room on both sides. It's narrow. A 1 1/2" tube fills the space from stringer to motor well side, so its just a tad under 2". To narrow for me to get my hands down there to glass. I'll wait for Matt or Andreas to chime in. I'm sure they will. I'm leaning towards a removable deck over the motor well. I can make it deeper from more room that way.
Re: OB19 build in Texas
Posted: Sat Mar 13, 2010 5:39 pm
by athen
Steven,
the motor well sides go down to the bottom of the hull. To tell you the truth I can barely remember whether I really put the tape in there or not. But anyway.... better don't modify the spec.
A good technique for cases like that is to cut the biax tape, fold it 90° so the horizontal part of the tape fits into the gap. Use a paintbrush to apply the resin to the bottom and let the folded tape slide in. Now use a cleat or whatever to push the tape down to the bottom. You can carefully pour some more resin on the tape so if will be saturated at the end. I used a long Japanese spatula to squeeze the air bubbles out. Once the resin starts curing and the tape will remain in its position you can apply the resin to the vertical part of the tape to glue it to the motor well sides (again using the Japanese spatula).
An 8" panel across the motor well directly behind station E should not be a problem. But you should better check the documentation of your engine. There is usually drawings that show the required workspace in both the horizontal and vertical plane. It's better to really know than to guess or to believe
.
Hope I got you right. If not just let me know.
Andreas
Re: OB19 build in Texas
Posted: Sat Mar 13, 2010 5:51 pm
by Fonda@kauai
The distance between stringer and motorwell side on my panga was three inches. Do-able, but a pain. Two inches is tight
athen's suggestion is good, if it were me I'd probably wet the tape out first, then tuck it in there and use a crude/barely effective tool to smooth it out
Maybe one of the mrs. rubber spatulas?
Re: OB19 build in Texas
Posted: Mon Mar 15, 2010 11:00 pm
by Steven
Got the Motorwell sides in. What a pain. Also cut down the transom to the proper dimension for a 20" shaft. Screwed a board to the oustide of the transom for a guide. Plunged cut with the circular saw for the straight portion and used a jigsaw for the radius.
It's a little tight between the stringer and the motorwell side. Laying the fillet was a big pain.


Re: OB19 build in Texas
Posted: Tue Mar 16, 2010 12:42 am
by Fonda@kauai
Knew you'd figure out a way to get the tape in there
Re: OB19 build in Texas
Posted: Tue Mar 16, 2010 8:52 pm
by Steven
Re: OB19 build in Texas
Posted: Tue Mar 16, 2010 11:03 pm
by kdog
Looks real good Steven! Good idea with the mockup of the console and such. I did multiple layouts of my console and seat to get the right fit and thought long and hard before the install.
I must have sat in the boat, walked around the console and seat area every night for about 2 weeks before I was satisfied with the layout. I walked around it with a fishing pole a few times to just to make sure.

Re: OB19 build in Texas
Posted: Tue Mar 16, 2010 11:34 pm
by Steven
kdog wrote:Looks real good Steven! Good idea with the mockup of the console and such. I did multiple layouts of my console and seat to get the right fit and thought long and hard before the install.
I must have sat in the boat, walked around the console and seat area every night for about 2 weeks before I was satisfied with the layout. I walked around it with a fishing pole a few times to just to make sure.
Thanks John. You can see my seating position in the back of the boat on the blue cushion. Sat there for probably an hour yesterday just pondering.
Re: OB19 build in Texas
Posted: Tue Mar 23, 2010 9:31 pm
by Steven
Re: OB19 build in Texas
Posted: Tue Mar 23, 2010 9:35 pm
by Larry B
Re: OB19 build in Texas
Posted: Tue Mar 23, 2010 10:44 pm
by cape man
Wow. You did a really good job pouring that foam!
Re: OB19 build in Texas
Posted: Tue Mar 23, 2010 11:07 pm
by Steven
Thanks Guys. Much appreciated. I tried Larry's method of placing a plastic faced board over the pour, but even with 2 5 gallon buckets of water, it raised a bit. Plus I was concerned I was constricting the expansion some, and with as much as I needed to foam, I needed all the expansion I could get. I have a 2"x24" bow saw blade that is extremely flexible and fine toothed. Flush cutting with it is a breeze, so I just went with it. I placed offcuts in fresh pours. After cutting the remaining work flush, I'll use the offcuts behind the motor well bulkhead. Probably need one 2 gallon kit to complete. I also foamed under the Anchor well bottom. Cool stuff.
Re: OB19 build in Texas
Posted: Tue Mar 23, 2010 11:22 pm
by Larry B
Steven wrote:Thanks Guys. Much appreciated. I tried Larry's method of placing a plastic faced board over the pour, but even with 2 5 gallon buckets of water, it raised a bit. Plus I was concerned I was constricting the expansion some, and with as much as I needed to foam, I needed all the expansion I could get. I have a 2"x24" bow saw blade that is extremely flexible and fine toothed. Flush cutting with it is a breeze, so I just went with it. I placed offcuts in fresh pours. After cutting the remaining work flush, I'll use the offcuts behind the motor well bulkhead. Probably need one 2 gallon kit to complete. I also foamed under the Anchor well bottom. Cool stuff.
I was also concerned about the expansion rate
I was working in low 60's also. I'm thinking I could have saved at least a gallon if the temp would have been higher.
The bow saw sounds like the ticket. The other way I found was to use my sander with 60 grit. It will take it down very fast. I never had a problem with it raising the wood, but I was only pouring about 10oz at a time.
Your foam does look great though
Re: OB19 build in Texas
Posted: Wed Mar 24, 2010 9:38 am
by Steven
Here's a video on YouTube of my foam pour. Repeat about 40 times and you've poured 40 cubic feet of the stuff. You can see the portable heater behind the containers keeping it +100 degrees. I had the garage heated to about 80. Reminded how nice it's been to work in the cool of winter, even if it's slowed me down a bit. Of course, the heat made it necessary to work quickly once combined.
http://www.youtube.com/watch?v=F0LZcZXu68Q&NR=1
Re: OB19 build in Texas
Posted: Wed Mar 24, 2010 10:02 am
by Larry B
Re: OB19 build in Texas
Posted: Wed Mar 24, 2010 11:07 am
by Steven
I only had one pour get a little out of hand. I moved the ladder to the front to saw some excess from under the anchor locker. Poured a large batch intending to put it in the rear of the boat. First problem was my drill battery died just as I finished mixing the previous batch and I forgot to swap it out. Got about two revolutions and panic sets in as I"m trying to mix 24 oz. with a stick. Second problem is I forgot to move the ladder to the back of the boat. I run forward, kick the ladder a few feet forward to were I can barely step over the bow and dump as it is overflowing the cup at an increasing alarming rate. Only got a little on my gloved hand and it was plenty warm.
Can't wait to get it covered.
Re: OB19 build in Texas
Posted: Thu Mar 25, 2010 2:43 pm
by Steven
After wasting time prepping the below deck area for the fuel tank, I've had a change of heart. I say 'heart' because it's based more on feeling then anything else. I've been procrastinating on ordering it because i just wasn't convinced it was the right solution. Nagging doubts about it being so shallow, only 5 1/2". Worry about installing it in a way that would prevent any possiblility of crevice corrosion. Concerns with the aluminum holding up long term to newer fuel blends. Having to route the pick up tube internally to the back of the tank preventing future replacement of the pick up tube. Ok, maybe more then just a feeling.
With a plastic tank, the only real concern for me is the space it will take up under the front deck. But, after having the sole down and looking things over, I will still have plenty of stowage. Plus, I'll be able to have a workable sending unit, which, the more I thought about it the more I wanted it. So, I just odered this from Amazon. $203 shipped and it will be here on Saturday.

Re: OB19 build in Texas
Posted: Sun Mar 28, 2010 1:02 am
by Boater45
Steven,
What size tank is that? I'm looking for something like that.
Re: OB19 build in Texas
Posted: Sun Mar 28, 2010 10:33 am
by Steven
Boater45 wrote:Steven,
What size tank is that? I'm looking for something like that.
It's by Moeller Marine
www.moellermarine.com
23 Gallon Permanent Fuel Tank
•Conforms to all ABYC, NMMA and U.S. Coast Guard regulations.
•Available with CE certification.
Product # 032623
Product Dimension: 24.00L x 20.00W x 12.00H
Re: OB19 build in Texas
Posted: Mon Mar 29, 2010 12:07 pm
by Boater45
Thanks Steven....
Re: OB19 build in Texas
Posted: Mon Mar 29, 2010 9:52 pm
by Steven
Took a little break from boat building today to do some console building.
This is modified off of what CrackerLarry did. Tapered it side to side and front to back vertically. Looking down it is square. Thinking about tapering it forward. From the side of the console to the sheer is a min 29". So I'll have over 20" with the side decks added. The front corners at sole level are 20" from the side. Tapering it would get me 2 extra inches clearance, and I think it would look a little nicer. Overall I'm very pleased with the design and looks in the boat. It 'fits'.
Note the extra slot. Was going to have a more veritcal upper face, but after standing it up, decided I wouldn't be able to see the gauges easily. Made the slope match the lower slope where the steering wheel and throttle will go.


Re: OB19 build in Texas
Posted: Tue Mar 30, 2010 7:27 am
by cottontop
Lookin gooood Steven! What is the blue tape around the outside near the rubrail for? Keep up the good work. John
Re: OB19 build in Texas
Posted: Tue Mar 30, 2010 9:50 am
by Steven
cottontop wrote:Lookin gooood Steven! What is the blue tape around the outside near the rubrail for? Keep up the good work. John
Thanks John,
I was considering cutting a straight sheer and marked it from a laser level with the blue tape. Decided the designed sheer looked better.
Steven
Re: OB19 build in Texas
Posted: Tue Mar 30, 2010 10:47 am
by Lower
Hull looks great and the console sits in there perfectly. Nicely done Steven.
Re: OB19 build in Texas
Posted: Wed Mar 31, 2010 10:31 pm
by Steven
Got the sole panels cut for the chases and ready to glue down. I'll have them glued in this weekend.
Looking into the console. It will be shifted forward so the steering chase is in the rear right corner. I think I'll reduce the width of the console an inch and taper it to ther front an inch on each side. I'll have a nice flat suface above the steering wheel slope for drings and such. I'll add some small trim at the front and on the sides to hold things in place.


Re: OB19 build in Texas
Posted: Wed Mar 31, 2010 11:52 pm
by Cracker Larry
That looks great Steven
Good proportions. That console shape looks familiar too. Are you sure you don't want to add a seat on the front though? My console seat is the best seat, and best ride in the house
Lot's of storage underneath, just a thought....
One question...
'll have a nice flat suface above the steering wheel slope for drings and such.
What's a dring

Re: OB19 build in Texas
Posted: Thu Apr 01, 2010 6:08 am
by cape man
I'll have a nice flat suface above the steering wheel slope for drings and such
"No sir, I haven't had anythink to dring all day."
Re: OB19 build in Texas
Posted: Thu Apr 01, 2010 8:00 am
by Steven
Cracker Larry wrote:That looks great Steven
Good proportions. That console shape looks familiar too. Are you sure you don't want to add a seat on the front though? My console seat is the best seat, and best ride in the house
Lot's of storage underneath, just a thought....
One question...
'll have a nice flat suface above the steering wheel slope for drings and such.
What's a dring
I'm going to use a cooler seat in front of the console. I like the flexibility of being able to free up the space if needed. It will be a lunch/dring
cooler or dry storage, depending on what I'm doing. Another cooler will go under the leaning post for the fishies. I'll add a shelf inside the console at the bottom of the steering wheel slope. Batteries will go underneath that and I"ll have a flush mount battery switch on the front of the console on the vertical face under the steering slope. Going to have a starter battery, and two for a 24v trolling motor. Tool box and spare parts will go there as well. I'll have large hatches on the back of the console and side of the console for access to the console rigging.
Re: OB19 build in Texas
Posted: Tue Apr 06, 2010 3:46 pm
by Steven
Got the sole glued in. Probably used twice as much glue as needed, but, it ain't coming loose.
Notice the oversized hole for the port chase. Managed to mark the panel wrong.

I have a few new 5 gal. buckets in my arsenal.

Re: OB19 build in Texas
Posted: Tue Apr 06, 2010 4:02 pm
by JamesT
Looks good, like your inventive idea of clamping down the sides....dont have to use very many (if any) screws that way.
Im near dallas, glad spring is finally here!
Re: OB19 build in Texas
Posted: Tue Apr 06, 2010 5:18 pm
by Steven
Thanks. I didn't use any screws on the outer perimiter. I used screws at the joints for the butt blocks and on the outer stringers. Being careful not to overtighten.
Re: OB19 build in Texas
Posted: Tue Apr 06, 2010 5:44 pm
by Boater45
What a great idea to clamp down the sole......no screws......I love it!! Great build. Thanks for the posts.
Will
Re: OB19 build in Texas
Posted: Mon Apr 12, 2010 11:29 pm
by Steven
Got the sole glassed down and the casting deck frame glued in place. Gotta order some more epoxy.
I cut the side deck supports with the frame so as to avoid the cracking Larry has on his OD. Also filled in the cut out on the front bow frame as I changed my mind on the front deck configuration.


Re: OB19 build in Texas
Posted: Mon Apr 12, 2010 11:35 pm
by Steven
Steven wrote:Got the sole glassed down and the casting deck frame glued in place. Gotta order some more epoxy. I didn't pre-wet the glass tape for the sole. Mistake. It is a huge pain to wet out the tape in place. I know better. Takes much more time, time spent on my knees as opposed to standing while pre-wetting.
I cut the side deck supports with the frame so as to avoid the cracking Larry has on his OD. Also filled in the cut out on the front bow frame as I changed my mind on the front deck configuration.
Re: OB19 build in Texas
Posted: Tue Apr 13, 2010 9:02 am
by wegcagle
Looks great Steven, you do very clean fiberglass work
I did the same thing when I glued down my sole. Those clamps worked like a charm. After I glued mine down I probably spent 20-30min the next day just jumping up and down and walking the sole to try to find any weak/unglued spots. Good news was that there were not weak spots. Bad news was that my legs were sore the next day
She's coming together nicely,
Will
Re: OB19 build in Texas
Posted: Sun Apr 18, 2010 8:05 pm
by Steven
Since I only have littl epoxy left, and my order won't arrive til Wednesday, I did some cut out work.
Mis-cut the the sides of the casting deck. Kiddos were running loose and distracting me. Looked at drawing and read the measurement 71 3/4 and then walked to the plywood and marked 71 1/4" . Ugh. Would have fit perfectly. Oh well. Just a little more waste of epoxy to fill the gap.

Re: OB19 build in Texas
Posted: Mon Apr 19, 2010 2:03 pm
by Lucky_Louis
To save some material, you could go back to your scrap from that cut and rip another 1/2" from it to fill most of the gap. The tape and fillet will cover the whole 'repair' anyway. Don't ask how I knew that...
Re: OB19 build in Texas
Posted: Mon Apr 19, 2010 8:00 pm
by Steven
Lucky_Louis wrote:To save some material, you could go back to your scrap from that cut and rip another 1/2" from it to fill most of the gap. The tape and fillet will cover the whole 'repair' anyway. Don't ask how I knew that...
That is the plan. Just aggravating when I so carefully measured and marked, only to screw it up. If only this were the first one.
Re: OB19 build in Texas
Posted: Tue Apr 20, 2010 9:40 pm
by Steven
While waiting on my order I got some of the side frames glued in and the rest in place waiting for glue. Once Glued in, I'll glass them all.

I used some 1/4" luan and 1/2" brads to hold the farmes in place. They're held in place snug enough to glue with no clamps.

My order showed up today. More epoxy and some 50" 6oz. cloth for the inside. This weekend I'll finish the glassing and coating inside the casting deck and will be ready to install the tank and button down the deck. Time to order some hatches.
Re: OB19 build in Texas
Posted: Thu May 27, 2010 10:29 pm
by Steven
Heres' a couple updated photos. Got the sole glassed, the side deck frames glassed in, and I'm about ready to install the fuel tank.


Re: OB19 build in Texas
Posted: Fri May 28, 2010 2:11 am
by TomW
looking good guy.
Re: OB19 build in Texas
Posted: Fri May 28, 2010 7:54 am
by cape man
Like your method for holding the braces while gluing. Wish I'd seen that last year. Your really getting there now!
Re: OB19 build in Texas
Posted: Fri May 28, 2010 8:42 am
by Joe H
Eveything looks so shinny and new in your garage and build! Very nice work.
Joe
Re: OB19 build in Texas
Posted: Sat Jul 31, 2010 1:25 pm
by Steven
The build continues. Had to slow down a bit due to family vacation to Disney and my daughters spine surgery. Got the Fuel tank glued down with 5200 on Neoprene strips. Made two brakets out of 1x2 pine and some angle aluminum that go across the top of the tank kind of like a battery hold down. They will not press down hard as to allow for expansion. Put a fairing coat in the front stowage compartment and it's ready for a sanding and paint. Fiberglassed both inner sides with 6oz. cloth. I'm just about ready to glue down the front casting deck and anchor locker dec. Have to get the casting deck down before I can install the side decks. I'm going to fair and prime the inner sides before putting on the side decks. Will be much easier to access now. Once that's done, the side decks go on. I fiberglassed the inside seams of the console sides. Next for that is to install 1x1 for the top panels to glue down too. Then glass the outside seams. Using 12oz. Biax in case I ever decide to attach a T-Top too it.
September 6th. will be a year. I planned to be ready for Motor hanging by Sept. 15th. Bonus time.
Probably be the end of October before the Hull is done. I'll have some updated pictures this weekend.
Re: OB19 build in Texas
Posted: Tue Aug 03, 2010 12:24 am
by Steven
Got the Fuel Tank install complete. Put a small bit of foam in the front corners for a little extra security.


Also sanded the inner sides. Tomorrow I'll put on the first fairing mix. Quick fair won't be here till the weekend.
Re: OB19 build in Texas
Posted: Tue Aug 03, 2010 12:30 am
by Cracker Larry
That looks good Steven! I like the hold down arrangement
Re: OB19 build in Texas
Posted: Tue Aug 03, 2010 7:24 am
by cape man
Nice job Steven. That baby isn't moving!
Re: OB19 build in Texas
Posted: Tue Aug 03, 2010 5:41 pm
by Steven
Thanks guys. Tried to leave as much access for service as I could. Not sure how the sending unit is configured. I think there's enough room to wiggle it out if I have too. If it goes south and I can't, it wouldn't be too much trouble to install a round deck plate at the time of repair.
Re: OB19 build in Texas
Posted: Thu Aug 05, 2010 9:36 am
by Dougster
Wish Id seen that tank hold down system before I struggled through my Rube Goldberg mess! Very neat and clever. Those poly tank installs are tough. They gotta be able to swell/expand yet they can't rattle around. Kinda opposite requirements. Yours looks great.
Knows your glad the tank's in Dougster
Re: OB19 build in Texas
Posted: Thu Aug 05, 2010 5:53 pm
by Steven
Dougster wrote:Wish Id seen that tank hold down system before I struggled through my Rube Goldberg mess! Very neat and clever. Those poly tank installs are tough. They gotta be able to swell/expand yet they can't rattle around. Kinda opposite requirements. Yours looks great.
Knows your glad the tank's in Dougster
Thanks, Dougster. Yes they are tough. Mine didn't have the hold down notches, and Moeller phone support was worthless. They wouldn't even recommend a cushioning material. So I glued down 4 neoprene strips with 5200 then glued the tank too it. Hopefully that will be flexible enough.
Re: OB19 build in Texas
Posted: Tue Aug 17, 2010 8:50 pm
by Steven
Been getting some work done despite the miserable heat. Here's my solution to that. For the epoxy anyway. 5 lbs. of ice keeps it cool for an entire day. It's so hot, even with the epoxy cool it's pretty quick working. Big batches are out so I've been pumping smaller ones.


Glued in the bracing and sheer clamps, and layed in the final fairing compound. A good sanding and ready for paint.

Receiving block for deck bracing.

Bow eye backing plate.

Made a profile sander using hand sanding profile blocks from Rockler Woodworking and my multi tool. These little gems are great. Convex and concave profiles in different sizes.


Re: OB19 build in Texas
Posted: Wed Aug 18, 2010 10:58 am
by wadestep
I was wondering how that deck was going to span that. Looks nice and straight-forward. Good looking work!
wade
Re: OB19 build in Texas
Posted: Wed Aug 18, 2010 12:40 pm
by gstanfield
Nice innovative way to keep the epoxy cool
Re: OB19 build in Texas
Posted: Mon Aug 23, 2010 7:58 pm
by Steven
Heat is slowing things down. I'm ready to primer the anchor locker and front storage but it's not getting below 90 at night. So I did some work on the console


Re: OB19 build in Texas
Posted: Mon Aug 23, 2010 8:24 pm
by gstanfield
Wow, it was 40 something here this morning and the higest I saw my thermometer on the front porch was about 76
Then again in another month we'll start getting the occasional snow and three months from now our lakes will start freezing over.
Console is looking good though. You could probably take smaller parts like the console and do them in your dining room and then the temp wouldn't be an issue
Re: OB19 build in Texas
Posted: Mon Aug 23, 2010 9:22 pm
by Steven
gstanfield wrote:Wow, it was 40 something here this morning and the higest I saw my thermometer on the front porch was about 76
Then again in another month we'll start getting the occasional snow and three months from now our lakes will start freezing over.
Console is looking good though. You could probably take smaller parts like the console and do them in your dining room and then the temp wouldn't be an issue
I don't know about you but I'm a married man. There will be no epoxy work done in my dining room.
I can manage the epoxy in the heat. But painting is another story. I'm going to try some primer tomorrow. I'm keeping the paint in the house to keep it cool.
Re: OB19 build in Texas
Posted: Mon Aug 23, 2010 9:33 pm
by gstanfield
I'll go ahead and brag for a minute. I'm married and when I built my FL14 my wife and I marked and cut out the panels in the downstairs den, rolled out plastic and glued the pieces together on the floor since it was so cold in the garage. We did the actual assembly outside, but while I was out there getting the heater set up she was inside vacuming sawdust out of the carpet from where we did the initial stuff inside
Yep, she's a one of a kind girl
Then again we were working in my Den downstairs and not her dining room or the upstairs living room
At any rate, your build is looking good, keep battling the heat and she'll be done in no time
Re: OB19 build in Texas
Posted: Mon Sep 13, 2010 10:27 pm
by Steven
Really been held up by the hatches. I really didn't want to build hatches. I had purchased some Bomar hatches and after bringing them home decided they sucked. Since they were supposed to be the best, I decided I'd have to build my own. Kicked around numerous designs but really didn't want the extra work. Plus, unless I went with cheap hardware there wasn't going to be any real cost savings. Was in West Marine last week and examined the Tempress hatches and was impressed enough to bring three home to test. I really was wanting a water tight hatch for the front deck main locker, but decided anything truly needing to be dry should be in a dry bag. I like the hatches and will use them exclusively, except for the anchor locker hatch. That will be a simple recessed hatch with a hole for the anchor rode.
I have one drain tube to glue in between the main locker and fuel tank compartment, and then it's paint and finish the lockers and install the decks. Going with Durabak coating in the lockers for durability. Waterproof and extremely tough.
The bulkhead hatch is access to fuel tank fittings and cutoff. The round one is for a dedicated cast net compartment, and the 3rd is the main locker. Great access with that large hatch.

Re: OB19 build in Texas
Posted: Mon Oct 04, 2010 9:56 pm
by Steven
Finally making some significant progress again. About to glue down the anchor locker deck and front casting deack. Major step. Forgetting something here would be bad. Last thing to do is vacuum through some strings for pulling wire.
Console is shaping up nicely. Ready for a slathering of Quick Fair. This thing is bomb proof. 12oz biaxx tape inside and out. Outside covered with 6oz. Maybe overkill, but might attach a T-Top at some point in the future and want no issues with a wimpy console. Still surprising light. Love this construction technique.

Quick fair in forward storage areas and anchor locker. Very pleased with the result. Put on real thin and then painted on a couple thinned coats and got a nice thick relatively smooth interior.

I think I have all the plumbing in.
Seperate fuel, and power/ground chases in the fuel compartment. Power to the side lights, which are going just behind the Anchor well locker. Power chase from port to starboard for the side lights and power for the trolling motor.


Added a header over the fuel compartment hatch so it will stand up to stepping up onto the front deck.

Re: OB19 build in Texas
Posted: Mon Oct 18, 2010 9:04 pm
by Steven
Re: OB19 build in Texas
Posted: Mon Oct 18, 2010 9:29 pm
by Cracker Larry
She's looking great Steven
You're on the downhill stretch now.
This is one big 19 footer.
Yes it is
When I saw Smiling Matt's at Crystal River, that was the first thing I thought. That is a dang big 19' boat
Re: OB19 build in Texas
Posted: Mon Oct 18, 2010 11:41 pm
by kdog
Looking real good! Tons of room in that boat. I love my 17 but damn, if my garage was a few feet bigger the 19 was my first choice.
Re: OB19 build in Texas
Posted: Tue Oct 19, 2010 4:50 am
by sideslippa
That's looking good Steven, lots of room and I like your deck set up. Thanks for the photos.
Kind regards... Slippa.
Re: OB19 build in Texas
Posted: Tue Oct 19, 2010 8:51 am
by macs
Looking good.
Re: OB19 build in Texas
Posted: Tue Oct 19, 2010 10:10 am
by TomW
Looking real good guy keep at it and you'll have it done in no time.
Re: OB19 build in Texas
Posted: Tue Oct 19, 2010 10:04 pm
by Steven
Thanks guys. Got some more work done today. Glued on the long frames. Got the port side inwale marked and cut. Received my cleats. Somehow I ended up with two orders for a total of twelve. Don't order parts under the influence of cold medicine.
Anyone need some very nice cleats at a very reasonable price plus shipping?
Really impressed with these cleats. Very nice and high quality.

Drilled out for the bow eye. I must say, it was a lot easier on the flat bow of the GV.
Actually went pretty well. It is straight as an arrow. Really thought this was going to be a drill, fill and redrill a few times until I was happy with it. I used a drilling jig on my hand drill. That guaranteed the holes would be 90 degrees to the slope of the bow. Left and right was by eye. They can be amazingly accurate. The overdrilled holes weren't perfectly straight, so I was concerned I might not get the holes through without drilling out of my Epoxy plugs. I have to drill through 3+ inches of wood. Used a 1/2" eye. You can hang the boat from that sucker.
You can see the hole at the bow/spray rail juncture for the anchor locker drain. surrounding that is 3 epoxy filled oversize holes for the SS clamshell deflector screws.

You can see the texture of the Quickfair. I rolled on a coat using the Loopy Goopy roller trying not to get too rough a finish. After it dried, I knocked the peaks off with 80 grit sandpaper and brushed on two thinned coats. Came out real nice.


Re: OB19 build in Texas
Posted: Wed Oct 20, 2010 12:24 am
by kdog
Steven, if you haven't already, glue in a nice butt block between those inwhale joints. Mine were only supported by the top and bottom cleats and I ended up having a crack there. No big deal, I just glued a little piece of 1/4" and it was solid.
You're doing such a fine job you probably thought of it already.
It's playtime too when you get all that hardware in.
Re: OB19 build in Texas
Posted: Wed Oct 20, 2010 8:46 am
by Steven
kdog wrote:Steven, if you haven't already, glue in a nice butt block between those inwhale joints. Mine were only supported by the top and bottom cleats and I ended up having a crack there. No big deal, I just glued a little piece of 1/4" and it was solid.
You're doing such a fine job you probably thought of it already.
It's playtime too when you get all that hardware in.
Yeah. It's just screwed on. I plan on gluing a block between the top and bottom cleats for the joint. Thanks. Loving getting the hardware. I'm trying to get all top quality stuff. Really impressed with the BlueSea switch panel. A bit more money now should result in fewer headaches and costs down the road.
Re: OB19 build in Texas
Posted: Sun Oct 24, 2010 9:38 pm
by Steven
Re: OB19 build in Texas
Posted: Sun Oct 24, 2010 11:49 pm
by gstanfield
Good job, she's really coming together nicely
Re: OB19 build in Texas
Posted: Wed Oct 27, 2010 9:32 am
by Lower
Looks great Steven. Enjoyed watching your gunnels come together. Nicely done.
Re: OB19 build in Texas
Posted: Wed Oct 27, 2010 11:22 am
by Steven
Thanks guys. Glued the inwales in this weekend. Then remembered I forgot to cut out the round holes for the 4" access hatches I'm installing for access to the back of the running lights. Nothing like making it more difficult on yourself.
Steven
Re: OB19 build in Texas
Posted: Wed Oct 27, 2010 2:26 pm
by Daddy
Steven wrote:Thanks guys. Glued the inwales in this weekend. Then remembered I forgot to cut out the round holes for the 4" access hatches I'm installing for access to the back of the running lights. Nothing like making it more difficult on yourself.
Steven
I did almost the same thing... but the worst mistakes are the ones you can't correct
Are you going to "cant" the running lights to make them parallel to the centerline?
Daddy
Re: OB19 build in Texas
Posted: Wed Oct 27, 2010 5:15 pm
by TomW
Stephen that's the greatest part of these boats! You can always correct your errors. I can't call them "mistakes"
Tom
Re: OB19 build in Texas
Posted: Wed Oct 27, 2010 8:01 pm
by Steven
Daddy,
Haven't fully decided yet. The arc of visiblity meets regs where I've positioned them. The bulbs are round, so parallel is somewhat relative. There is no flat lens.
Thom,
Yup. I'll cut most of the holes with the jig saw and use a drum sander on the drill to finish the small piece close to the deck. Also had to fill the hole I drilled for the fuel vent. Drilled it before putting down the casting deck, and it is too close to the deck to put the backing on the vent. No biggie. Just some extra epoxy and glass.
Side note: That gunnel added so much rigidty after being glued in it's amazing. There was some flex in the side if I pushed down on the short stub frames. Was even considering an additional frame, but figured the "box beam" would stiffen things up. There is zero flex now, even if I apply all my 225#. When I add the top decks, it will be like a tank. The decks are 3/8" . No worries about tying up to docks or other boats.
Re: OB19 build in Texas
Posted: Thu Oct 28, 2010 4:38 am
by steve292
Steven wrote:
Side note: That gunnel added so much rigidty after being glued in it's amazing. There was some flex in the side if I pushed down on the short stub frames. Was even considering an additional frame, but figured the "box beam" would stiffen things up. There is zero flex now, even if I apply all my 225#. When I add the top decks, it will be like a tank. The decks are 3/8" . No worries about tying up to docks or other boats.
Your right, it's amazing how rigid it all gets. My decks are 10" wide 1/4 ply covered with 12oz biax wrapped down the inwale & rubrail. I can walk on them with no flexing or give at all. I am 210 lbs.(shamefully
)
Thats nice work Btw
Steve
Re: OB19 build in Texas
Posted: Tue Nov 09, 2010 7:46 pm
by Steven
Got the side decks and coaming glued down and routed over to 1/2" radius. Came out very nice. The decks are 8" wide and the coaming is 4" for about 9 feet from stern. It gradually increases to about 6" at the casting deck and about 9" at the anchor locker bulkhead. The coaming is 1/4" and glued to 3/4"x3/4" boards top and bottom. The bottom of the coaming is rounted over with 3/8" radius. If you reach under, the coaming feels 1" thick. It's very stout.
Really glad I went with 8" decks. Originally was going with 6". Some thread on here changed my mind.
They're very comfortable to sit on and wide enough to stretch out on if it's calm.


Re: OB19 build in Texas
Posted: Tue Nov 09, 2010 10:51 pm
by Cracker Larry
Sweet
Re: OB19 build in Texas
Posted: Wed Nov 10, 2010 9:01 am
by wadestep
Looks great - it must be gratifying to see the final shape of the interior coming into view.
wade
Re: OB19 build in Texas
Posted: Wed Nov 10, 2010 10:49 am
by Steven
Thanks guys. Definitely satisfying. There's so much room I'm trying to figure out how not to add any permanent seating.
I'm going to use a cooler with cushion in front of the console. Behind, either a cooler seat, or leaning post with room under it for a cooler.
Re: OB19 build in Texas
Posted: Mon Nov 15, 2010 11:19 am
by texasrds
That is some great looking design work and building on the gunnels there Steven. Now you've got me thinking which is totally dangerous.... Thanks for the suggestion on using a few drywall screws to help in getting my rubrails in place. Helped alot this weekend.
Randy.
Re: OB19 build in Texas
Posted: Mon Nov 15, 2010 7:29 pm
by Steven
Thanks. Glad it helped. I see your location in Aransas Pass . Went there for the first time summer before last and loved it. Did a guided trip in the pass on a 19' Boston Whaler. Caught some very nice Kings and lots of other smaller species. Fell in love with the place. The OB19 will be frequenting the Pass.
Re: OB19 build in Texas
Posted: Fri Nov 19, 2010 3:32 pm
by smilinmatt
Steven,
With my motor tilted up, there is 10" between the back of the motorwell bulkhead to the closest point on the engine cowling.
Matt
Re: OB19 build in Texas
Posted: Fri Nov 19, 2010 7:28 pm
by Steven
smilinmatt wrote:Steven,
With my motor tilted up, there is 10" between the back of the motorwell bulkhead to the closest point on the engine cowling.
Matt
Great Matt. Thanks for checking. Not as much as I hoped. Have to decide if permanent 8" is enough.
Steven
Re: OB19 build in Texas
Posted: Fri Nov 19, 2010 10:40 pm
by Aripeka Angler
Hi Steven, I have been watching your build for a long time. Man it looks sweet
I love the interior of your boat. You are building her right...
Richard
Re: OB19 build in Texas
Posted: Sat Nov 20, 2010 9:23 am
by Steven
Aripeka Angler wrote:Hi Steven, I have been watching your build for a long time. Man it looks sweet
I love the interior of your boat. You are building her right...
Richard
Thanks Richard. Much appreciated. That XF20 of yours is a great example of buiding it right. I can spend hours just going through the various build threads admiring the quality of work and the ingenuity around here.
Re: OB19 build in Texas
Posted: Sun Nov 21, 2010 7:42 am
by Aripeka Angler
I can spend hours just going through the various build threads admiring the quality of work and the ingenuity around here.
I do the same thing Steven
Beats the heck out of watching tv as well. Keep up the good work, I am looking forward to the launch pics...
Re: OB19 build in Texas
Posted: Tue Nov 23, 2010 12:02 am
by Steven
Got the front and side decks glassed. Used some 50' 6oz cloth cut into strips wide enough to go up the gunnel, over the deck and down the rubrail. Got 3 coats of epoxy on it. A good sanding and some minor fairing and they'll be ready for primer.
The forward holes on top of the side decks are for access to the running lights. Using the in hull type that install below the shear. I will be able to change the bulbs and maintain the wiring with little fuss.

The rear two holes on the port side deck are for access to the fuel vent thru hull and for access installing and inspecting the fuel vent hose. The fuel fill will go just behind the further most hole, so that hole will do double duty. I'm working hard to make sure everything is easily accessed and maintenanced.


Re: OB19 build in Texas
Posted: Tue Nov 23, 2010 9:11 am
by Cracker Larry
Looking better every day Steven
Nice work.
Re: OB19 build in Texas
Posted: Tue Nov 23, 2010 9:33 am
by Uncle D
The pics say it all. Fine workmanship. I'll be glad to get to that stage on mine. Still looks like a skeleton. Anyway, looks great and Happy Turkey Day.
Don
Re: OB19 build in Texas
Posted: Thu Nov 25, 2010 9:40 am
by wegcagle
Great job Steven. Clean job. I like the layout.
Will
Re: OB19 build in Texas
Posted: Wed Jan 12, 2011 1:00 pm
by Steven
Working on finalizing some details with the baitwell so I can wrap up construction and get to the final fairing. I'm placing the baitwell in a LeaningPost console. It will be 25 gallons. Plumbing running straight back to the transome. I'll have a 1 1/4" seacock/thruhull for the drain. This should keep up with the pump, which is going on a pickup scoop so water will recirculate even when running.


Re: OB19 build in Texas
Posted: Thu Jan 13, 2011 2:06 am
by flyfishingmonk
Wow Steven this is really coming along.
Re: OB19 build in Texas
Posted: Mon Jan 31, 2011 8:58 pm
by Steven
Got the sole in the stern lockers and motor well glued down. Not picture worthy. Cut out the leaning post components today. Getting close.
Re: OB19 build in Texas
Posted: Tue Feb 01, 2011 7:35 am
by cottontop
Re: OB19 build in Texas
Posted: Tue Feb 01, 2011 5:19 pm
by Steven
Re: OB19 build in Texas
Posted: Tue Feb 01, 2011 10:36 pm
by Aripeka Angler
I like the leaning post and livewell
Maybe hinge the lid of the livewell in the back so it folds down since the opening is small. At least mock up the lid so you are happy with the way it functions. Your boat looks great!! The bar keeps getting raised around here
Re: OB19 build in Texas
Posted: Tue Feb 01, 2011 10:51 pm
by Steven
Aripeka Angler wrote:I like the leaning post and livewell
Maybe hinge the lid of the livewell in the back so it folds down since the opening is small. At least mock up the lid so you are happy with the way it functions. Your boat looks great!! The bar keeps getting raised around here
Thanks. Not a bad idea on the hinge.
Re: OB19 build in Texas
Posted: Wed Feb 02, 2011 12:41 am
by Prarie Dog
Steven, you refer to a scoop for the pickup on your baitwell, do you have a pic of this peice? Don't recal having seen one.
Thanks, Paul
Re: OB19 build in Texas
Posted: Wed Feb 02, 2011 1:35 am
by Cracker Larry
When you are running it will pick up water at a high volume without needing to use the pump. In my case enough water to overflow the bait tank unless I shut that valve about half way

Re: OB19 build in Texas
Posted: Mon Feb 07, 2011 11:37 pm
by Steven
Started on the livewell tank. Had to pick up a sheet of marine fir, as it's all I have close access too. It will be encapsulated in 6oz. cloth on both sides, so it will do fine. I changed the original design a bit. I was going to have the overflow in the side of the tank. However, I really wanted it in the bottom with a stand pipe overflow. The "box" is 27Lx18Wx20H. The bottom of the livewell is raised 5.5" to give room for the plumbing underneath. The inside corners will be well radiused so that the inside of the tank is oblong. Capacity will be between 22-24 gallons. I also wanted it higher to be easier to access.
As pictured, the top of the livewell protrudes 12". I like this as it wil make a nice seat when emtpy. That leaves 20" between the back of the tank and the MW bulkhead. It feel like plenty of room, but still unsure.

Re: OB19 build in Texas
Posted: Tue Feb 08, 2011 12:05 am
by Prarie Dog
Larry, does that peice go in the transom or in the side of the hull? Steven looking forward to seeing this boat at the builders meet, hope you plan on bringing it
Re: OB19 build in Texas
Posted: Tue Feb 08, 2011 8:27 am
by Cracker Larry
Larry, does that peice go in the transom or in the side of the hull?
The bottom of the hull Paul. It goes right where it is laying on that backing block.
Re: OB19 build in Texas
Posted: Tue Feb 08, 2011 9:39 am
by Uncle D
Steven, that leaning post/livewell is coming along nicely. I'm following closely because this is what I'll do. Are you going to leave the outside corners on that livewell or will you radius that also. And I think 20" to the back bulkhead would be sufficient, just my .02, unless big foot will be going on a trip.
Don
Re: OB19 build in Texas
Posted: Tue Feb 08, 2011 10:26 am
by Prarie Dog
Cracker Larry wrote:The bottom of the hull Paul. It goes right where it is laying on that backing block.
Thanks Larry
Re: OB19 build in Texas
Posted: Tue Feb 08, 2011 10:31 am
by Steven
The outside corners will get radiused as well. I used 3/4" radius on the Center Console, which looks very nice, so I'll probably do the same.
Re: OB19 build in Texas
Posted: Tue Feb 08, 2011 9:47 pm
by Steven
Made some progress today. Got the stern locker and Motor Well floors taped in and got the live well box tacked together. Getting cold again for a few days but nice on the coming weekend. I'll apply some 6oz. cloth to all exposed wood in the lockers and MW, and coat with 3-4 coats of tinted epoxy. Getting close to closing them in. Have to make a final decision on cockpit drains. Through the transom or out the sides. I like the idea of nice big side scuppers for clearing the cockpit in a hurry, but don't want we feet under normal use. Kicking around and idea for removable scupper doors.
Re: OB19 build in Texas
Posted: Sun Feb 13, 2011 11:28 pm
by Steven
Weather was fantastic today. Rolled her out of the garage and worked on her in the driveway. Sanded the tape in the stern lockers and motorwell/bilge. Put 6oz. cloth on all surfaces in the motorwell/bilge and on the floors in the stern lockers. Also glassed one side of the livewell bottom. All surfaces inside and out will get glassed. All the wood inside, including cleats will be glassed. There won't be any unglassed wood in contact with any water in the livewell.
Tomorrow I'll glue in cleats for the topside decks and the slanted motor well deck. Will also start rolling in tinted epoxy in the lockers and bilge area. I'm hoping to get enough opacity with 3 coats. Gonna roll her outside again tomorrow and wlil get some good pics of her from a more distant perspective than I can in the garage.
Re: OB19 build in Texas
Posted: Tue Feb 15, 2011 4:53 pm
by Steven
Got a lot of work done this weekend. Got all the cleats for the rear lockers and Motorwell cut and screwed into place. Got the motorwell completely glassed in. Remaining work for rear is to glue in cleats. Glue in pads for livewell thru hull, and bilge pump. Over drill a couple holes to fill and redrill for some drains. Paint on 3 coatings of tinted epoxy and glue down the decks.
There seems to be plenty of room to move about. Nice thing about being outside, is I can stand straight up. Really get a better feel for the size. This is really a big 19' boat. Feels much larger than other 19' boats I've been in. Not sure why. I'm going to ha a 7" deck between the stern decks. I've measured a lot of new boats, and while the Motorwell may be sized to ABYC specs, it is significantly bigger than any other boat I found.
One of my favorite pictures when I first found this site was a pic taken of an OD16 from a roof.

I was planning on using low profile commercial hatches for the stern lockers. However, after fishing a few weeks ago on a guided trip with a similar setup, even low profile hatches make standing uncomfortable. So I either have to build flush hatches, or install commercial hatches on the face of the MW bulk head. I'm leaning towards the latter.


Smoothed the cut out radius curves, routed over the edges and covered with 6oz. tape. Tried 12 oz. but it was to stiff. Just need to protect the top edge of the transome, so 6oz. is plenty anyway.


Re: OB19 build in Texas
Posted: Tue Feb 15, 2011 5:31 pm
by sitandfish
Steven wrote:Got a lot of work done this weekend...
One of my favorite pictures when I first found this site was a pic taken of an OD16 from a roof...
I like the progress shot from the side, too. She looks great!
Then:
Now:
Re: OB19 build in Texas
Posted: Tue Feb 15, 2011 5:54 pm
by TomW
Steven my curiosity got me what is the small round hole for behind the light hole a little way behind it on the port side?
The OB is looking great!!!
Re: OB19 build in Texas
Posted: Tue Feb 15, 2011 6:03 pm
by Steven
Thanks guys.
Tom,
Thats for the fuel tank vent. That's as high as I could get it and still get the hose loop above the vent. It's still a bit of a tight loop, but I think it will do.
Steven
Re: OB19 build in Texas
Posted: Tue Feb 15, 2011 6:25 pm
by TomW
Gotcha, didn't even think of that. It looked a little large for a FT vent but pictures always put on 10lbs.
Re: OB19 build in Texas
Posted: Wed Feb 16, 2011 7:40 am
by cottontop
Steven your boat is one fine nuild. I love the shots from off the garage roof. Really shows how big she is. Beautiful work. John
Re: OB19 build in Texas
Posted: Wed Feb 16, 2011 7:46 am
by Steven
Thanks John.
Re: OB19 build in Texas
Posted: Wed Feb 16, 2011 11:10 am
by Uncle D
Nice Steven, your really rock n rollin I think that's a cool shot from the roof too.
Re: OB19 build in Texas
Posted: Wed Feb 16, 2011 12:07 pm
by flyfishingmonk
Ditto.
Re: OB19 build in Texas
Posted: Fri Feb 18, 2011 1:45 pm
by Steven
Got the stern locker and motor well cleats glued in last night. Next is gluing in pads for thru hulls and drains.
Re: OB19 build in Texas
Posted: Fri Feb 18, 2011 6:05 pm
by flyfishingmonk
Sweetness. Can you take a few pic of this next part to give the rest of us a heads up on what we should be doing?
Re: OB19 build in Texas
Posted: Fri Feb 18, 2011 9:06 pm
by Steven
flyfish2743 wrote:Sweetness. Can you take a few pic of this next part to give the rest of us a heads up on what we should be doing?
I will, but you can come get an up close look anytime.
Re: OB19 build in Texas
Posted: Fri Feb 18, 2011 10:33 pm
by Lower
Looking really sharp! Wow is that grass I see, I don't even remember what it looks like!
Re: OB19 build in Texas
Posted: Sat Feb 19, 2011 12:50 am
by flyfishingmonk
Steven that's right. I need to get over there and hang out some evening. Or maybe a lunch somewhere in-between.
Re: OB19 build in Texas
Posted: Sat Feb 19, 2011 7:20 am
by Steven
Be great to have you over Casey. I work a 4x10, so I'm typically around Sun.-Tues.
Re: OB19 build in Texas
Posted: Sat Feb 19, 2011 7:21 am
by Steven
Lower wrote:Looking really sharp! Wow is that grass I see, I don't even remember what it looks like!
It's more like weeds with a bit of grass thrown in for affect.
Re: OB19 build in Texas
Posted: Mon Feb 21, 2011 11:15 pm
by Steven
Made some progress today, but not as much as I hoped. Had some Good, Bad and Ugly.
First the Bad and Ugly:
The wheels fell off.
They really did. I inset the rear wheels between the outer frames so that I could work over the side of the boat easier. I should have used bolts instead of screws. It was fine for moving about the garage, but rolling it up the ramp created too much twisting force and it snapped the screws and split the frame. So I jacked it up and fixed it properly.

Now the good. I drilled and filled all the holes needed in the motorwell/bilge area. I used Forstner bits and drilled to the outer skin. Worked very well except for one of the screw holes for the bronze livewell water pick up. Went a little too fast and drilled through. The 2-3/8" for the Livewell drill was a horse to hand drill.
In this pic you can see fuel line taped up. I pulled it through this afternoon. Piece of cake in the 1 1/2" pipe. Thanks to CL for documenting his troubles pulling the fuel line. Saved me any grief. To the left, the two upper holes are for the Fuel Filter/Water Separator. On the bottom is for the Bronze Water Pickup. I beveled the edges of a piece of 1/2" plywood, glued it down and glassed it with 6oz. cloth. The red marking on the ends of the cleat marks were the tape is on the bulkhead. I sand these areas back on the cleats to the fit better to the bulkhead for gluing. Take just a few minutes and makes a better fitting joint that doesn't require as much glue.

In this pic you can see the holes on the Transom. Bottom for bilge drain, up to the left for Livewell drain, and just above the MW deck for the MW deck drains. I drilled the MW deck drains a bit below were the top of the deck lies. This will allow me to scallop the MW deck at the drains. You can see in the drian hole for the Livewell I placed a dowell in the center. I did this for all of the larger holes to save epoxy . After filling the holes, I covered them with 6oz. cloth and then clamped pieces of plywood covered in packing tape to create nice flat areas.

Re: OB19 build in Texas
Posted: Mon Feb 21, 2011 11:29 pm
by Steven
Now a question I didn't want to bury in the previous post. I want to seal the fuel line chase. I'm thinking pushing in a 1/2' lengh of foam pipe insulation, leaving a 1/4" recess that I can fill with 5200. Should be easy to dig out if I have to replace the line. Is this a good plan?
Re: OB19 build in Texas
Posted: Tue Feb 22, 2011 7:35 am
by cottontop
Steven, everything looking goooooodddd. I think that will be fine. C Larry did something similar. Maybe he'll chime in. John
Re: OB19 build in Texas
Posted: Tue Feb 22, 2011 7:42 am
by Cracker Larry
I'm thinking pushing in a 1/2' lengh of foam pipe insulation, leaving a 1/4" recess that I can fill with 5200. Should be easy to dig out if I have to replace the line. Is this a good plan?
That's exactly how I did mine. Seems like a good plan to me
Re: OB19 build in Texas
Posted: Tue Feb 22, 2011 7:44 am
by Aripeka Angler
Steven wrote:Now a question I didn't want to bury in the previous post. I want to seal the fuel line chase. I'm thinking pushing in a 1/2' lengh of foam pipe insulation, leaving a 1/4" recess that I can fill with 5200. Should be easy to dig out if I have to replace the line. Is this a good plan?
It would work but would be a little messy to dig out. You could also put a small rubber sleeve around your fuel line and poke it through a pvc cap. You probably wouldn't even have to glue the cap on. I am sure whatever you do will be first class. You do nice work
Re: OB19 build in Texas
Posted: Tue Feb 22, 2011 1:37 pm
by Steven
That's an idea I considered, Richard. A cap with a hole and a grommet. The chase terminates above the water line, so theoretically the water won't get above it unless something really bad is happening.
If I can find a grommet with a nice snug fit, I might go that route. I could run a couple wraps of that tape that bonds to itself to secure the cap.
Re: OB19 build in Texas
Posted: Tue Feb 22, 2011 9:18 pm
by Steven
Glued together the leaning post. 17 components and 50 screws. Went to plan though. After 3 hours I broke loose the screws and re-tightened. This keeps them from sticking and breaking after full cure. Also plumbed in the hose barb for the drain where it comes through the sole. Although the livewell and leaning post will be one unit, I'm putting in a section of hose to absorb any flex. Reduce the likelyhood of fatigue failure. Or so I think.
Re: OB19 build in Texas
Posted: Thu Feb 24, 2011 1:37 am
by flyfishingmonk
Sounds really cool. We need to see pics. Us boat fanatics need our fix.
Re: OB19 build in Texas
Posted: Thu Feb 24, 2011 7:59 am
by Steven
I'll have some more this weekend after I have the screw holes filed and the edges routed to a nice smooth radius. Right now it still looks like a square box.
Re: OB19 build in Texas
Posted: Thu Feb 24, 2011 8:05 am
by cape man
I didn't plug my chases and had water get in them one day when I left the plug out of the aft starboard hatch. Lost the control on the hydraulic jack plate as water got in a pinhole in the wiring and grounded everything out. Took a while with a shop vac to dry everything back out. Like others here have done, I am going to plug them all with a small amount of expandable foam right at the openings. Will be a bit of a job to cut it out and clean things up if I ever have to repull anything, but it's a quick fix, should be almost water tight, and really easy.
Re: OB19 build in Texas
Posted: Thu Feb 24, 2011 9:57 pm
by Steven
Filled the screw holes in the leaning post today. I use a pipe cleaner to wet the hole and then use a childrens medicine syringe for the putty. Also cut the rod holder holes on the port side. The rear is 15 degrees and points straight back. The forward one is a 30 degree and is canted out 30 degrees. Was really wanting to cant it out 45 degrees, but I couldn't keep it centered on the gunnel at 45 degrees.

This shows the plumbing coming out of the sole under the leaning post. The 1 1/2" connector is a hose barb. The 3/4 will go up to the top of the live well. Have a bit of a problem though. The height of the 90 coming out of the sole is below the bottom of the live well. However the 90 out of the bottom of the live well is going to be an inch lower. This will leave some water in the pipe between the 90's. Not crazy about this. Easy to pop off the hose and drain for winter, so not a huge deal, but I'd rather it not be there. I could route the 1 1/2" drain out the side at the top of the water level and then plumb in a drain at the bottom of the side that would drain into the 1 1/2" pipe for emptying. Wish I would have realized this before gluing in the elbow and hose barb.


Re: OB19 build in Texas
Posted: Fri Feb 25, 2011 1:17 am
by flyfishingmonk
This boat just looks better and better each time you post up. We'll have to get them out on the water when we are both done.
Re: OB19 build in Texas
Posted: Fri Feb 25, 2011 11:17 am
by Uncle D
Steven wrote: Wish I would have realized this before gluing in the elbow and hose barb.
It looks like you have enough to cut and re-glue that elbow Steven.
Re: OB19 build in Texas
Posted: Fri Feb 25, 2011 12:05 pm
by Steven
Uncle D wrote:Steven wrote: Wish I would have realized this before gluing in the elbow and hose barb.
It looks like you have enough to cut and re-glue that elbow Steven.
I think so too. My only concern is I didn't have tape below the existing elbow, and as you can see, there is epoxy on it. It will mostly pop off, but I might have to sand some away. I'm not a plumbing geek and I'm not sure if that will cause an issue gluing on a new fitting. Not sure how much tolerance there is for the interference fit.
Re: OB19 build in Texas
Posted: Fri Feb 25, 2011 4:52 pm
by Brettitt41
Steven wrote:Uncle D wrote:Steven wrote: Wish I would have realized this before gluing in the elbow and hose barb.
It looks like you have enough to cut and re-glue that elbow Steven.
I think so too. My only concern is I didn't have tape below the existing elbow, and as you can see, there is epoxy on it. It will mostly pop off, but I might have to sand some away. I'm not a plumbing geek and I'm not sure if that will cause an issue gluing on a new fitting. Not sure how much tolerance there is for the interference fit.
I am not a plumber either but my house is plumbed with pvc and I have done lots of glue joints and a light sanding should not cause any concerns actually it will help the glue bite better. Use the primer for the glue you are using and there should be no problems.
Re: OB19 build in Texas
Posted: Fri Feb 25, 2011 6:04 pm
by flyfishingmonk
I have fit thousand of pieces of PVC from when I owned a swimming pool company. Brettitti is correct and I believe you will be fine. The primer is thin but the glue is thick.
Re: OB19 build in Texas
Posted: Fri Feb 25, 2011 10:20 pm
by Steven
Thanks guys. I'll inspect the pipe and make sure I can clean it up before cutting off the elbow if I decide to go that route.
Re: OB19 build in Texas
Posted: Sat Feb 26, 2011 12:12 am
by flyfishingmonk
I have had luck cutting of a fitting like that without cutting into the pipe. Make a cut in the fitting with a hack saw at a 45 degree angle across the portion of the fitting where it is glued to the pipe.
Then take pliers and pull the fitting off like you would peel an orange, starting at the bottom where the female plastic of the fitting now comes to a point.
You will have to open it up some to grab it with the pliers, try a flat head. It usually will separate at the glued joint. Clean the pipe back up with acetone. If you cut into the pipe a 1/16th with the hacksaw no worries, the PVC glue will fill it back up.
Re: OB19 build in Texas
Posted: Sat Feb 26, 2011 7:58 am
by Steven
Wouldn't have thougth to try removing the fitting. I have a multi-tool, so that should be easy enough. Thanks.
Re: OB19 build in Texas
Posted: Sat Feb 26, 2011 8:47 am
by flyfishingmonk
That should work.
Re: OB19 build in Texas
Posted: Mon Feb 28, 2011 6:07 pm
by Steven
Wasn't paying attention and let myself run low on epoxy, so I'm having to work on small stuff while I wait for my oder to arrive.
I got the Leaning Post and Livewell routed over on the edges. The small wings between the seat and livewell will be glued on last. The tank will get glued and glassed. Then the leaning post gets glued and glassed.
Picked up a sheet of marine fir to redo the back deck. Both sides will get glassed, and the hatches will be recessed and made out of the remaining Meranti I have. I wanted a small deck between the rear side decks. gonna put a couple recessed rod holders there. Based on measurements I made on numerous boats, the motor should still have room to tilt. I'm leaning towards a small manual jack plate anyway.

The rear edge of the in between deck will rest on a 1x4 beam. I routed the bottom of the beam with a 3/4" radius and wrapped glass around it so it is totally encased. Wanted the extra protection since it will be exposed in the motor well.

The beam is recessed into pockets on the motor well sides. Cut them a little too deep, hence the epoxy putty in the bottom of the recess. It will get glassed all around with tape.


Re: OB19 build in Texas
Posted: Tue Mar 01, 2011 9:33 am
by topwater
Steven i like that idea of the deck in between the side decks. I mite have to steal it if you dont mind.
I also will be running a jack plate.
Re: OB19 build in Texas
Posted: Tue Mar 01, 2011 9:54 am
by Mad Dog
Steven, looking good! 149 days and counting.
MD
Re: OB19 build in Texas
Posted: Tue Mar 01, 2011 6:23 pm
by Steven
Thanks MD. Need all the pressure I can get.
Did a little work today. Taped the rear deck beam in with 9 Oz tape. The little remaing work seems to be dragging on at a snails pace. I really want to move on to fairing and painting. Should be just a few more weekends.

Glued corner blocks in the livewell to eliminate the corners. I chamfered the edges to 45 degrees with the router so they fit nicely.
The clamps are blocking them but there are 1x1 cleats in the corners. Not sure what lamination schedule should be. Think I'll start a separate thread to see what would be recommended.

Re: OB19 build in Texas
Posted: Wed Mar 02, 2011 9:50 pm
by Mad Dog
Steven, don't mean to be Johnny come lately, but did you consider using large diameter PVC pipe cut length wise into quarters to round those corners? I saw another builder glue in the PVC and almost make the live well oval. Oh well.
MD
Re: OB19 build in Texas
Posted: Wed Mar 02, 2011 10:49 pm
by Steven
Yes, I considered that MD. Also considered making some half rounds out of foam. I'll use generously sized filets at the corner joints, so it will be almost round. CL just used nice filets in the square corners and hasn't had any issues with bait. Hopefully it will work well.
Re: OB19 build in Texas
Posted: Fri Mar 04, 2011 11:49 pm
by wadestep
Hey Steven -
FWIW I have 2 livewells on my seacraft. One is large and had square edges,and is in the center of the boat. Other is perfectly round, small, and sloshes a lot more. The larger one keeps bait a LOT better. Rounded edges helps, but from what I saw of your photos your tank should be perfectly fine. As long as a current doesn't throw them nose-first into a 90 deg corner, the rest is overrated.
I like your design so far.
wade
Re: OB19 build in Texas
Posted: Sat Mar 05, 2011 10:22 am
by Steven
Thanks wade. I plan on installing the water inlet just above the surface of the water, shooting at an angle to try and promote cirulation.
Re: OB19 build in Texas
Posted: Mon Mar 07, 2011 12:04 am
by Steven
Got the outside of the livewell wrapped in 12oz. Biax cloth. The holes for filling and draining were drilled oversized and filled with epoxy putty yesterday. Did the glasswork in two pieces, each about 4 1/2' long and 20" tall. First piece was easy. Lay box on side and lay cloth over it. The second pieces had to be done with the box upright. That big piece of cloth does not play well with gravity. I have overlaps on each side where the Livewell protrudes from the Leaning post, so little fairing will be required.
Tomorrow I'll glue some 2x2 cleats to the bottom for gluing to the deck, which will happen on Tuesday. I'll finish off the inside after it's attached to the boat.
By the end of my weekend, which ends Tuesday, I should have the insides of the stern lockers and Motorwell complete and the rear deck ready to glue down. The underside of the deck is getting covered in 6oz. cloth since I had to use fir plywood. Getting close to construction done and fairing begin. Gonna have to order a little more 12oz. cloth for the leaning post.
Re: OB19 build in Texas
Posted: Mon Mar 07, 2011 2:03 am
by flyfishingmonk
Cooooollllll
Re: OB19 build in Texas
Posted: Mon Mar 07, 2011 8:35 pm
by Steven
Re: OB19 build in Texas
Posted: Mon Mar 07, 2011 9:36 pm
by flyfishingmonk
Wow that looks great. I need to get over there one of these days.
Re: OB19 build in Texas
Posted: Mon Mar 07, 2011 11:20 pm
by Steven
Thanks. Anytime. Just let me know. It's not as smooth as the pictures make it look. But I'm not giving storage compartments a show finish. They are work boat all the way. And they'll get used that way.
Decided to do a little more after Cubscouts and dinner. Glassed the underside of the rear deck. Great reason not to use fir, but it wasn't worth it to have one sheet shipped. Most of the casting deck areas over the lockers will be hatches made out of Meranti. Going to make flush hatches for comfortable standing.

Re: OB19 build in Texas
Posted: Tue Mar 08, 2011 9:37 pm
by Steven
Put the final coat of tinted epoxy in the rear compartments. Came out realy nice. No pics since It's under plastic to help with dust settling.
Got the bottom of the livewell cleated. Shine recommended doubling the cleats considering the force of the water and people on the integrated Leaning post. I glued some stiffners to the bottom. Once I glue it in I'll foam it in, filling the cavity under bottom.

Cut off the hose barb connector for the drain and glued on the tee. The valve will be for draining the tank. The top of the tee empties the overflow. The valve is just in place temporarily for the pic. It will actually be in line with hose barbs so it can be easily serviced.

Re: OB19 build in Texas
Posted: Wed Mar 16, 2011 12:17 am
by Steven
Glued and foamed in the livewell. Managed to fall out of the boat. Stepped out onto the step ladder. One foot on the step ladder and one foot in the boat and the step ladder folds up on me. Hope that's not a glimpse of things to come.
The side decks are about 4 1/2' off the hard concrete. Banged up my ankle and knee a bit, but I my pride got the worse of it.
I calculated I'd need about 44 oz of foam to fill the cavity before realizing the 4lb/cubic foot foam only expands about 15 times the volume. Fortunately I had some left over 2lb/cubic foot wich topped it off. Combined I had exactly enough.

I drilled some pressure release holes on the sides.

Re: OB19 build in Texas
Posted: Wed Mar 16, 2011 12:31 am
by TomW
My knees and ankles can't take much banging anymore. Glad your okay!
The livewell looks great!
Re: OB19 build in Texas
Posted: Wed Mar 16, 2011 12:35 am
by Steven
TomW wrote:My knees and ankles can't take much banging anymore. Glad your okay!
The livewell looks great!
Thanks. Hope this thing never needs removing, cuz it is glued and foamed down. Tomorrow it gets taped down.
Re: OB19 build in Texas
Posted: Thu Mar 17, 2011 1:28 am
by flyfishingmonk
I'm glad you didn't get seriously hurt. My friend, while getting out of bed this morning, broke her foot! It's amazing how the littlest mishap can cause crazy damage.
Re: OB19 build in Texas
Posted: Thu Mar 17, 2011 10:54 am
by Uncle D
Steven, pride heals a lot quicker than broke bones. Glad you'll be okay. I'm personally keeping a close eye on the livewell. You've are giving me good ideas.
Don
Re: OB19 build in Texas
Posted: Fri Mar 18, 2011 10:56 pm
by Steven
Thanks guys. Must be getting old. Fell while pulling the bicycles out of the shed. Got my feet all tangled up. I never used to fall.
So I put one sloppy coat of faring on the inside of the well. Didn't get it taped down. Took the week off for spring break for the kids and spent most of the week doing family stuff. Zoo, Dinosaur Valley State park, bike riding and even glazed some pottery at the Pottery Barn. Only worked on the boat in between and only did stuff I could drop at a moments notice if everyone decided on a new activity.
I sanded the inside to good enough. Need to fill a couple larger pock marks before painting on a few coats of pigmented epoxy. It already has several coats of straight epoxy after the lamination cured to tack free. I painted it on within 12 hours each time to get a good chemical bond to ensure it's waterproof. The pigmented epoxy is very thick and fills very well. To get the drain and fill as high as I wanted, I had to let them into the glue cleat. I cut semi circles out just larger than the flanges on the fittings. Then I clamped some round forms leaving a small gap between the form and the now exposed wood on the cleats. Used a piece of PVC for one, and a tupperware container on the other. I'm happy to report, for the sake of my health, epoxy does not stick to Tupperware.
I wetted out the wood and sqeezed in putty from a ziplock. This way the wood has a thick coating of epoxy for protection. Couldn't really glass these small semi circular slivers. Everything in the well is as coated and protected as I could make it. I also recessed the lower drain. The bottom of the drain hole is even with the bottom of the tank, so 100% of the water can drain as long as the sole is level. I cut out the recess larger than needed and then filled with epoxy. After the inside was glassed I cut out the recess to the proper size. I'll fill it up with 5200 when I attach the fittings permanently.
You can see the cut out in the cleat here. Any suggestions on screens to cover the inlet and outlet appreciated. The spray head is adjustable so I can set it so it won't over take the outlet. Though the outlet is 1-1/2 inches in diameter, so it should not be problem. Originally I was going to just wrap the inside with 12oz. biax cloth, but I didn't have enough. So I taped the inside corners with 12oz. biax tape and then wrapped it all in 6oz. cloth.

I'm going to put a Tee in the fill line with a valve. I'll add a hose connection. The valve will shut off water to the live well and divert it to the hose connection. This will give me a low pressure washdown. Good enough to wet the deck for scrubbing.
The fitting locations are kind of screwy in relation to the thru deck pipes. I changed plans mid course from a bottom drain to a side drain. I wanted all of the fittings serviceable if needed. Gonna take some creative plumbing to make all of the connections.

Re: OB19 build in Texas
Posted: Sat Mar 19, 2011 11:12 pm
by Steven
Taped the livewell down tonight. Two layers of 12oz biax. I need to decide on the hatch. Commercial or custom flush. I'll have the inside done, fittings permanently installed and ready to glue down the lid this weekend.
Re: OB19 build in Texas
Posted: Sun Mar 20, 2011 10:24 pm
by wej
As usual still looking good Steven.
Re: OB19 build in Texas
Posted: Sun Mar 20, 2011 11:05 pm
by Steven
Thanks. Today I took the plunge and glued down the center console. I'll tape it tomorrow. Also nutted up and drilled the 1" thru hull hole for the bronze scoop that will feed the live well. It's been ready to drill for a month.
Had a few minutes of concern when the screw holes in the scoop didn't line up properly with the epoxy filed holes. Put it down in disgust. A bit later, confounded as to how they couldn't line up, I decided I must not have been holding it on straight. Sure enough, took a second look and all lined up as designed.
I built a mold for making hatch supports/gutters for the rear deck hatches. If that works well, I'll make another sized for the live well.
Getting close to finishing construction. Another weekend or two ought to do it, if I can work on it consistently.
Re: OB19 build in Texas
Posted: Mon Mar 21, 2011 12:36 pm
by Uncle D
Steven wrote: Gonna take some creative plumbing to make all of the connections.
Maybe some heavy reinforced plastic/vinyl tubing and clamps. That's all I used on drains and fills on the Baymaster I rebuilt.
I want to see what you do with the hatches. I can't decide on built or manufactured. Keep the ideas coming. I can't wait to flip mine and get after it.
Don
Re: OB19 build in Texas
Posted: Mon Mar 21, 2011 10:21 pm
by Steven
Re: OB19 build in Texas
Posted: Tue Mar 22, 2011 10:39 pm
by Steven
Uncle D wrote:Steven wrote: Gonna take some creative plumbing to make all of the connections.
Maybe some heavy reinforced plastic/vinyl tubing and clamps. That's all I used on drains and fills on the Baymaster I rebuilt.
I want to see what you do with the hatches. I can't decide on built or manufactured. Keep the ideas coming. I can't wait to flip mine and get after it.
Don
I'm going with a round commercial hatch for the livewell. The kind with a cam lock. They are very low profile and more water tight than a regular hinged hatch. You can't even feel it when you are sitting on the tank. I cut the hole over sized, taped up the hatch ring with packing tape and screwed it in place . Then I filled the gap with putty. That will keep the wood well sealed. The hatch ring was real flexible before gluing it in. Figured it will be easy to flex and pop out and then sand the opening a bit so the hatch fits properly. It's not so flexible now.
Tomorrow evening I'll pry it out hopefully. Don't want to cut it out and waste a perfectly good hatch. Not one of my better plans.
Today I put a second coat of tinted epoxy in the livewell. Was able to fill the pinholes with the epoxy instead of using quick fair. I wanted a chemical bond with the epoxy, so I didn't want to wait for it to cure to use quick fair. It is coming out better than expected. It's good to go as is, but I'm going to put a third coat on just for good measure. I also glued some stiffeners to the underside of the livewll lid. They will get covered with 12oz biax and lots of coats of epoxy. I should be gluing it down over the weekend, at which point it will be ready for the leaning post install.
Re: OB19 build in Texas
Posted: Wed Mar 23, 2011 12:09 pm
by Uncle D
Steven, Man you are really getting after it. Looking forward to the pics. I hope this is the one you bring to the meet
Don
Re: OB19 build in Texas
Posted: Wed Mar 23, 2011 12:12 pm
by tech_support
i like they gray
Re: OB19 build in Texas
Posted: Wed Mar 23, 2011 1:26 pm
by flyfishingmonk
The gray does look good. I think I want to do the same with my boat inside all the hatches.
Re: OB19 build in Texas
Posted: Wed Mar 23, 2011 2:26 pm
by SmokyMountain
I like the gray too
. I got some gray pigment on my last order for my hatches.
Re: OB19 build in Texas
Posted: Wed Mar 23, 2011 4:35 pm
by Steven
Thanks guys. I'm growing fond of the grey pigment myself.
After seeing that my wife proclaimed it is no longer looking home made.
On a positive note, the hatch came out without much fuss. I used a wooden mallet to strike the protruding flange to flex it away and then it pulled out. I'll post some pick in a bit. Gonna work out quite nice.
Re: OB19 build in Texas
Posted: Wed Mar 23, 2011 4:41 pm
by Steven
Uncle D wrote:Steven, Man you are really getting after it. Looking forward to the pics. I hope this is the one you bring to the meet
Don
It will be built by then for sure. Question will be is it on a trailer and rigged. Gonna be close.
Re: OB19 build in Texas
Posted: Wed Mar 23, 2011 4:58 pm
by Steven
flyfish2743 wrote:The gray does look good. I think I want to do the same with my boat inside all the hatches.
I tried the tint on the front lockers, anchor and storage. Didn't like the results. Turns out I wasn't mixing in near enough tint. When done right it looks great and covers very well. At some point I'll be sanding out the kiwigrip on the front lockers and redoing. I'll beat em up first.
Re: OB19 build in Texas
Posted: Wed Mar 23, 2011 5:06 pm
by Steven
Here are some picks of the Livewell top.
I glued on three stiffners and made an epoxy putty ring around the hatch opening. The underside is covered with 6oz. cloth. The stiffners will get covered with 12oz. Biax and I'll lay down some more 6oz around the opening to cover the putty ring.


Re: OB19 build in Texas
Posted: Thu Mar 24, 2011 9:54 pm
by Steven
Re: OB19 build in Texas
Posted: Sat Mar 26, 2011 8:43 pm
by wej
Looking great!! I like the gray, is it just tinted epoxy?
Re: OB19 build in Texas
Posted: Sun Mar 27, 2011 1:27 am
by Prarie Dog
Steven, that looks real nice. Make sure you get plenty of fall in your drain line, I don't have enough on my GF18 and it causes me to have to run the pump a while and watch the level then cycle the pump, kind of a pain.
Re: OB19 build in Texas
Posted: Sun Mar 27, 2011 2:16 pm
by Steven
wej wrote:Looking great!! I like the gray, is it just tinted epoxy?
Thanks. Yes. It has two coats of tinted epoxy over several coats of non-tinted over the glass. Was going to add a 3rd coat of tinted, but it doesn't need it.
Re: OB19 build in Texas
Posted: Sun Mar 27, 2011 2:20 pm
by Steven
Prarie Dog wrote:Steven, that looks real nice. Make sure you get plenty of fall in your drain line, I don't have enough on my GF18 and it causes me to have to run the pump a while and watch the level then cycle the pump, kind of a pain.
The overflow drain goes straight down after it exits the side. It's 1 1/2" so I think it should keep up with the pump so I can leave it on. I'll probably put the pump on a timer so it runs every couple of minutes to bring in fresh water. May put the timer on a relay that shuts it off when the ignition key is on. That way, I won't forget and leave it running while the boat is moving. Won't make a big difference since the pump is fed by a pickup scoop. The spray head is adjustable so I can restrict to the right flow for the drain.
Re: OB19 build in Texas
Posted: Sun Mar 27, 2011 2:42 pm
by Fonda@kauai
That's some of the cleanest work I've seen done with tinted epoxy, very nice
Re: OB19 build in Texas
Posted: Mon Mar 28, 2011 10:30 pm
by Steven
Glued down the top on the livewell. I put packing tape around the inside edge. The cross pieces are holding the edge pieces flat. When I applied the glue I put a bead right on the inner edge against the tape. Hopefully I'll have a nice somewhat fileted bead. I'm going to snap some pictures from the inside tomorrow so I can see how effective it was and to make sure I have a nice seal.

Re: OB19 build in Texas
Posted: Tue Mar 29, 2011 1:23 pm
by Steven
The tape worked well. Kept all of the squeeze out in check. The corners, where I had a lot of putty, need a light sanding to take the edge off the squeeze out. The sides are nice and smooth. If had thought about it, I could have reached in and pressed the corners smooth. Live and learn.
You can see the roughness on the top of the putty ring around the opening. It didn't squeeze through in a few places when I did that. Will make a tape dam and fix it. I put a first coat of tinted epoxy in the Center Console this morning. Second coat will go on this evening after the first is tack free. Pics for that tomorrow. For tinted areas, I put a coat of straight epoxy on, then a couple coats of tint. I do it in succession within 24 hours for each coat. About 12 hours actually. This gives 3 chemically bonded coatings and that way no sanding in between.


Re: OB19 build in Texas
Posted: Wed Mar 30, 2011 7:03 pm
by wej
Steven do you apply tinted epoxy with rollers?
Re: OB19 build in Texas
Posted: Wed Mar 30, 2011 8:45 pm
by Steven
wej wrote:Steven do you apply tinted epoxy with rollers?
Yes. I've tried both the yellow foam rollers and the 4" white foam mini rollers. The mini rollers work best. The yellow foam rollers create a lot of bubbles. Have to tip them out with a brush. The white mini rollers work great. I use the dense white ones from Lowes and HD.
Re: OB19 build in Texas
Posted: Wed Mar 30, 2011 9:13 pm
by Steven
Re: OB19 build in Texas
Posted: Thu Mar 31, 2011 11:35 am
by flyfishingmonk
You do really good work!!!
Re: OB19 build in Texas
Posted: Thu Mar 31, 2011 12:07 pm
by cottontop
Your helper is ready for you to finish so he can enjoy fishing. Bost looks great. John
Re: OB19 build in Texas
Posted: Thu Mar 31, 2011 4:55 pm
by Steven
Thanks guys. He sure is ready. Every time I work on it he asks me when it's going to be done. Definately good motivation. I can't wait to get him, his sisters and mom out on the lake zipping around on tubes. The live well top will make a perfect seat for spotting.
Re: OB19 build in Texas
Posted: Mon Apr 04, 2011 10:39 pm
by Steven
Got the top of the livewell glassed down with a layer of 12oz. cloth. I tinted the part that will be visible through the hatch on the front of the leaning post. The leaning post has 1-3/4" of cleats on the bottom and where it glues to the livewell. I tinted up to the edge of where the cleats will be glued. It will be taped on the outside with 12oz. Biax tape. I didn't feel the need to fair this much as only a small sqaure of it will be visible through the hatch. It is smooth around the openings for the fittings so it will seal water tight with 5200.

Got to fairing the casting deck. Couple sessions of quick fair. Needs one more probably.

These will be the hatch supports/gutters. The plywood will be cut out of the center and a 3/4" drain gutter will be routed out. It will be glued to the underside of the deck.

This is the rear deck cleat. It glues to the back side of the Motorwell bulkhead between the Motorwell sides. I routed the bottom edge with a 1/2" radius and covered it with 9oz. tape. This covers all the exposed wood with glass.

Re: OB19 build in Texas
Posted: Tue Apr 05, 2011 7:28 pm
by Steven
Well, the gutter frames have been aborted. Don't like the way the turned out and I don't think the inner edges will hold up to the abuse they'll get. Working on plan C as soon as I figure out what that is. Got the casting deck and inwalls faired out. Only thing left to do there is lay some pretty quick fair fillets between the deck and the inwalls.
Re: OB19 build in Texas
Posted: Wed Apr 06, 2011 11:58 am
by wadestep
Figuring out how to sucessfully build dry hatches seems to be a common difficulty. I certainly don't know the answer. Many just end up using commercial-bought hatches that are semi-dry. Keep us posted about what you decide!
wade
Re: OB19 build in Texas
Posted: Wed Apr 06, 2011 12:26 pm
by Steven
wadestep wrote:Figuring out how to sucessfully build dry hatches seems to be a common difficulty. I certainly don't know the answer. Many just end up using commercial-bought hatches that are semi-dry. Keep us posted about what you decide!
wade
The only reason I'm going with home made is because I want a flat deck for comfortable standing. Event a small lip over time is annoying. I'm either going to order some 6oz biax. and some mold release and use epoxy, or go with polyester and chopped strand mat and tape. The mat will conform to the tight radiuses well and I can then glue the assembly to the deck with epoxy.
Re: OB19 build in Texas
Posted: Wed Apr 06, 2011 5:00 pm
by SmokyMountain
Steve,
I'm wrestling with the same problem on gutter design... I working up a few drawings / ideas. I'll let you know what I come up with.....no guarantees
Re: OB19 build in Texas
Posted: Wed Apr 06, 2011 10:52 pm
by Steven
SmokyMountain wrote:Steve,
I'm wrestling with the same problem on gutter design... I working up a few drawings / ideas. I'll let you know what I come up with.....no guarantees
I'll take any help I can get. Another thought I had was to cut the opening a little larger than a chosen commercial hatch. then glue a piece of ply under the deck covering the cutout. Then install the hatch in the recess. Route some channels from the recessed areas to drain water and then deal with the little water that might get past the commercial hatches. No idea is out of bounds.
gonna take a stab at molding them and if that doesn't work I'll put the above plan in to play.
Re: OB19 build in Texas
Posted: Thu Apr 07, 2011 8:17 am
by SmokyMountain
Steve,
I basically took Bayport_Bob’s foam-core cell gutter and adapted to all wood. My main concern is the gutter holding the weight of a person or two persons.
I’m showing a 1”x2” cleat notched to a 1”x1” under the gutter to hold that weight. I plan on using ash for the cleats. The right hand detail shows how I would drain the gutters. I plan on using pex from Lowes / Home Depot. I think you could heat the end of the pex and flare in the gutter. I haven’t decided if a light fiberglass layer in the gutter would be beneficial or just a layer of epoxy. I’m trying to keep this as simple as possible. Feel free to find any flaws… I want as a good of a gutter as I can get… also I plan on a thin layer of weather stripping between the hatch / gutter interface.. will make a good tight fit. The detail doesn’t show everything but you get the gist.
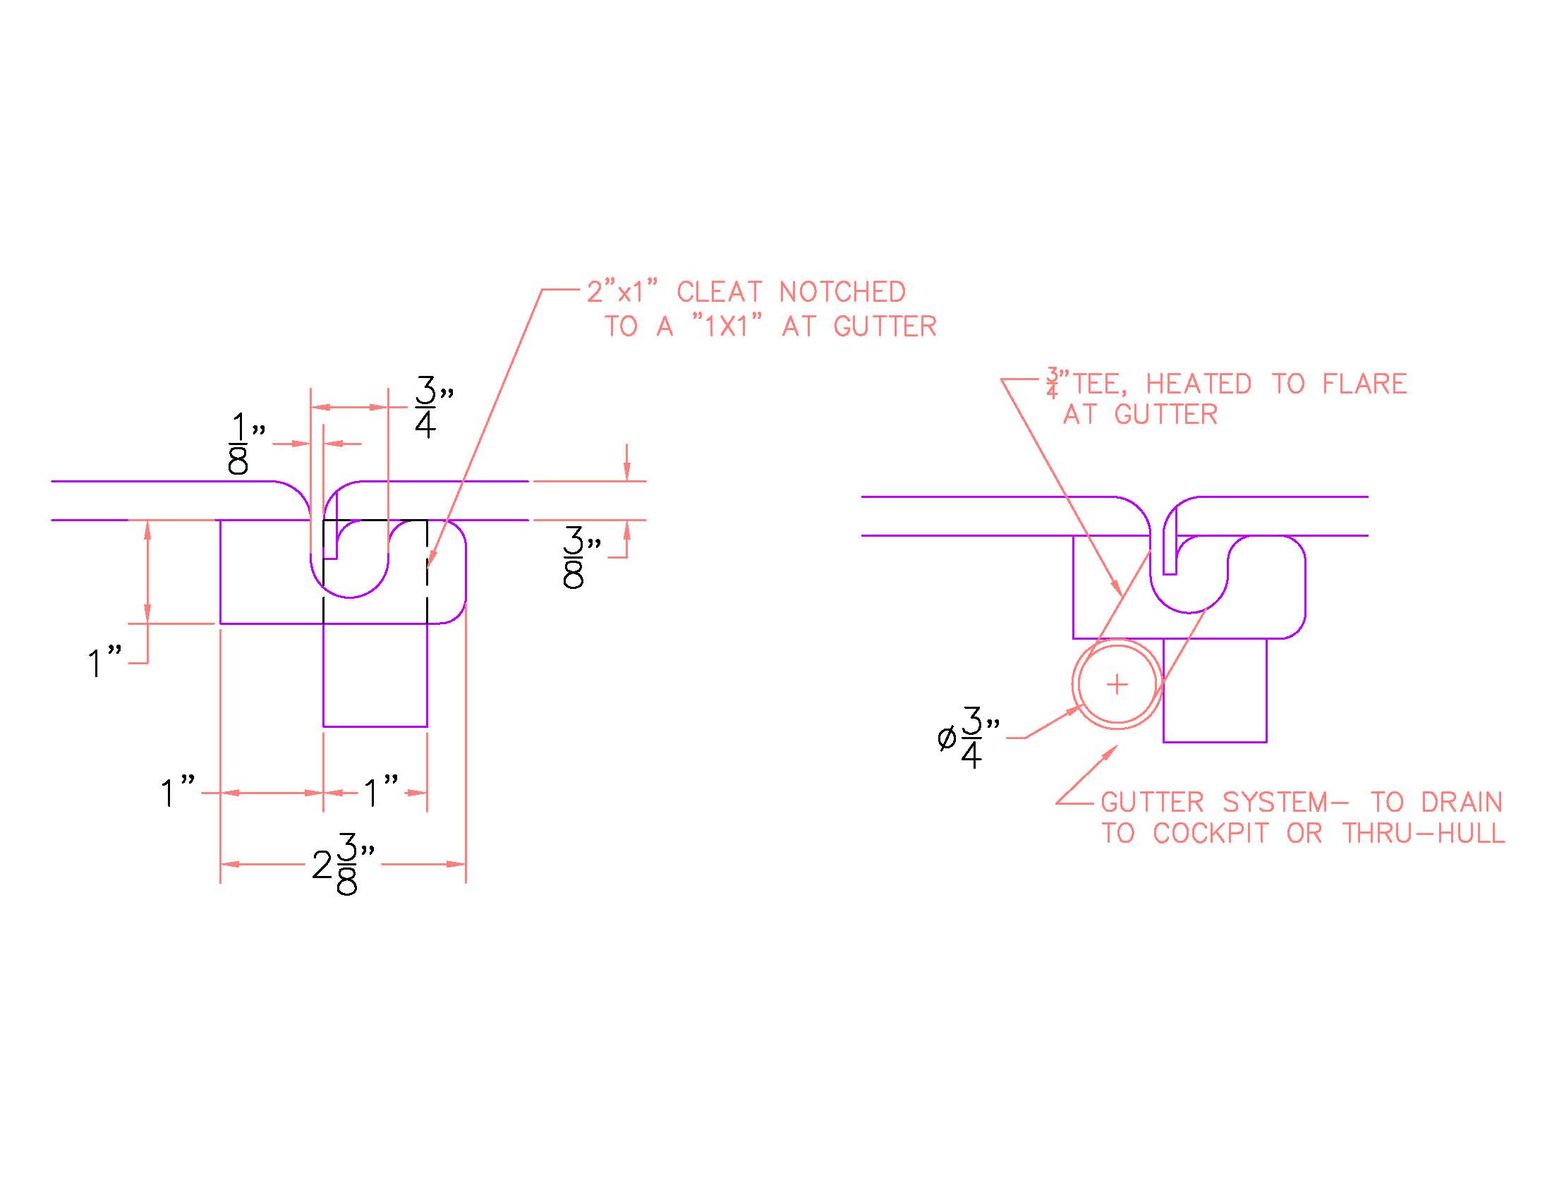
Re: OB19 build in Texas
Posted: Thu Apr 07, 2011 8:39 am
by Steven
That's basically the road I started down this weekend. Following Bob's plan but with wood. Glass in the gutter is a must for waterproofing IMO, but might be challenging. 4oz. cloth would probably work for that. I started with 1x3 nominal. 1-1/4" under the deck and 1-1/4" exposed for the gutter and lip. Also have concerns if that was enough glue surface for the assembly to stay attached, but I think so.
Another thought I had was to make a mould for just the gutter and fill with epoxy/milled fiber. Then glue that to a wood cleat. That would solve a couple of my concerns. 1. Complete water proofing of the gutter 2. A hard lip to stand up to the banging that will occur when accessing the storage area. 3. No learning curve as need for pulling a larger laminated part from a mold.
Re: OB19 build in Texas
Posted: Mon Apr 11, 2011 7:41 pm
by Steven
I resurrected the previousy assembled gutter frames. Part of what peeved my off was a screw up on my part when routing out the gutter. After setting it aside and them coming back to it, I corrected the error and solved the main concern of a soft wood inner edge. I buit up a woodflour/chopped glass edge to handle the abuse of stuff bouncing of it. The gutter is getting 6oz. cloth. Finnaly solved in a manner I'm pleased with. I'll have some pictures tomorrow after it cures.
Re: OB19 build in Texas
Posted: Tue Apr 12, 2011 9:47 pm
by Steven
Mounted the Engine Control to see how it feels. Not sure. It's comfortable but sticks out a bit. Not in the way at all, but a target. I could cut into the console and create a less sloped flat for it. Pretty major surgery. Forward is very comfortable. Reverse requires a slight bend when standing, but is easy reach when seated. Probably a reasonable compromise.

Cut the hole in the Leaning Post for the access hatch. Should have taken a picture with it open. Very easy access to the plumbing and room for storage of small items.

Got a lot of work done on the hatch gutter assemblies. On the right you can see the inner and outer edges have been rounded over and covered with 6oz tape. On the left you can see the fiber reinforced putty build up. It will be routed down for the hatch seal. Any surface that can be contacted has been reinforced with glass. The gutter will be glassed as well.

Heres one screwed into place temporarily. I went from being frustrated with getting these the way I wanted to being very pleased with the results. They will be bonded to the underside and to the deck supports I'll be adding.

Re: OB19 build in Texas
Posted: Wed Apr 13, 2011 6:32 am
by SmokyMountain
Steven,
I like you gutters
. I plan on something very similar or the same... did you use a 3/4" router for the gutter? You're getting close!!!
Re: OB19 build in Texas
Posted: Wed Apr 13, 2011 7:40 am
by Cracker Larry
Those are really looking good Steven! I admire your patience with them, especially this close to being finished
Sure would be easier to slap on some factory hatches like I did, but you'll be a lot more satisfied with those
Re: OB19 build in Texas
Posted: Wed Apr 13, 2011 7:43 am
by Steven
SmokyMountain wrote:Steven,
I like you gutters
. I plan on something very similar or the same... did you use a 3/4" router for the gutter? You're getting close!!!
Yes. 3/4" wide and about 5/8" deep. I'll overfilled drain holes in the rear corners. I'll 5200 in some 3/8" hose barbs and drain through the motorwell sides.
Re: OB19 build in Texas
Posted: Wed Apr 13, 2011 7:45 am
by Steven
Cracker Larry wrote:Those are really looking good Steven! I admire your patience with them, especially this close to being finished
Sure would be easier to slap on some factory hatches like I did, but you'll be a lot more satisfied with those
Thanks. I've been fighting the urge. If I hadn't taken that guided striper trip and stood on factory hatches all day, I'd have done that long ago. I'd have the rear deck glassed in ready for fairing a month ago. These small details eat up time. I could build them in a couple hours complete if there wasn't all the waiting for the Epoxy to cure.
Re: OB19 build in Texas
Posted: Fri Apr 15, 2011 7:32 pm
by wegcagle
Great job on those hatches Steven. Beautiful. You guys make me want to get a better router setup
Will
Re: OB19 build in Texas
Posted: Fri Apr 15, 2011 10:20 pm
by Steven
wegcagle wrote:Great job on those hatches Steven. Beautiful. You guys make me want to get a better router setup
Will
Thanks Will. I ordered some 3.25 oz cloth today. That should be easy to work in the gutter. I think it will wrap around a 1/8" radius but not sure. I will test. If so, i will route the edges to 1/8" and wrap up out of the gutter across the flat where the seal will tape down. That will have everything 100% glassed.
This weekend I'll paint the inside of the leaning post with tinted epoxy. Not sure if I have enough so ordered some more of that also. I'll have enough to do enough to get the leaning post glued down. I'll finish off anything not done through the hatch opening. I did the entire inisde of the Center Console through the same sized hole.
Re: OB19 build in Texas
Posted: Sun Apr 17, 2011 8:40 pm
by Steven
Working on completing the leaning post for install. Added cleats around the hatch opening. Mainly to add some structure to the large plywood expanse.
With a coat of epoxy baking in the sun.

After a first coad of tint. Tomorrow morning a final coat and by tomorrow evening it will be glued to the boat.

Re: OB19 build in Texas
Posted: Sun Apr 17, 2011 9:46 pm
by flyfishingmonk
Steven,
That gray epoxy looks great. Have you decided what color to do your boat's deck in? If it's going to be white, are you planning on using a shade that's not bright white so it doesen't kill your eyes? It seems like I read something about this on another thread and I wondered what you were planning on doing.
Thanks,
Casey
Re: OB19 build in Texas
Posted: Sun Apr 17, 2011 10:33 pm
by Steven
Thanks Casey. I hadn't made a decision other than definitely not bright white. So, I just pulled out the Sterling color chart. I'm going with Seamist Green for the outside. The Moon Dust or Cream look like they would compliment the Seamist Green and be easy on the eye. Moon Dust is a dark cream or Taupe. I may do the Center Console and LeaningPost/Livewell in a sligthly off white.
Re: OB19 build in Texas
Posted: Sun Apr 17, 2011 11:08 pm
by flyfishingmonk
I can't wait to see how it turns out. This boat is going to look great.
When you get a chance, can you share the details of, or direct us to something that covers the gray you have mixed in with epoxy?
Thanks,
Casey
Re: OB19 build in Texas
Posted: Sun Apr 17, 2011 11:42 pm
by Steven
The grey tint came from Bateau. It is very thick, almost like soft taffy. I mix about 1 1/2 tablespoons into 12 oz. of mixed epoxy. Or somehting close to that. I don't really measure it so much now. I use a stick to scoop out what looks right. I can tell when I'm mixing if I have enough. I ordered some more thinking I wouldn't have enough for the LeaningPost, but it looks like I'll have just enough. So I'll have some extra on hand.
Re: OB19 build in Texas
Posted: Mon Apr 18, 2011 12:06 am
by flyfishingmonk
Nice - I'll prob add some of this to my next Bateau order. Thanks for the info.
Re: OB19 build in Texas
Posted: Mon Apr 18, 2011 7:49 pm
by Steven
Here it is in place permanently. Went to Bass Pro Shops this morning just to climb in a few boats, take some measurements to help make the final placement decision. I had a little fore/aft room to play with. I'm going to mount an aluminum foot rest to the back of the console.


Re: OB19 build in Texas
Posted: Mon Apr 18, 2011 7:56 pm
by flyfishingmonk
Looking good. I can't wait to see this boat. We are going to have to spend a day out on Lake Fork when both of our boats are done.
Re: OB19 build in Texas
Posted: Mon Apr 18, 2011 8:01 pm
by Steven
flyfish2743 wrote:Looking good. I can't wait to see this boat. We are going to have to spend a day out on Lake Fork when both of our boats are done.
Thanks. I'm in on that for sure.
And Lake Texoma, and Lake Tawokoni, and Lake ....
Re: OB19 build in Texas
Posted: Tue Apr 19, 2011 2:47 am
by flyfishingmonk
Good call.
Re: OB19 build in Texas
Posted: Tue Apr 19, 2011 1:47 pm
by Uncle D
That's defiantly looking good Steven. I'm going to use a lot of your ideas for the leaning post/livewell set up. Hope you won't mind.
Don
Re: OB19 build in Texas
Posted: Tue Apr 19, 2011 2:09 pm
by wegcagle
Nice setup Steven. You're gonna love this livewell when this baby's done
Will
Re: OB19 build in Texas
Posted: Tue Apr 19, 2011 7:40 pm
by Steven
Uncle D wrote:That's defiantly looking good Steven. I'm going to use a lot of your ideas for the leaning post/livewell set up. Hope you won't mind.
Don
Thanks Don. I'm quite pleased with the way it's working out. I glued on the back side pieces that tie the rear into the live well. Messed up one thing there but easy fix.
More about that later.
Re: OB19 build in Texas
Posted: Tue Apr 19, 2011 7:46 pm
by Steven
wegcagle wrote:Nice setup Steven. You're gonna love this livewell when this baby's done
Will
Thanks Will. Never had one before so this will be nice. I don't do a lot of live bait fishing, but that will change now.
Steven
Re: OB19 build in Texas
Posted: Tue Apr 19, 2011 8:20 pm
by wegcagle
I don't do a lot of live bait fishing, but that will change now
Well the problem is that you're now gonna be spoiled
I did a ton of live bait fishing for stripers before my recent move. The herring we used were notorious for getting beat up and dying too quickly. That system you got there would keep them happy and healthy for sure
Will
Re: OB19 build in Texas
Posted: Sun Apr 24, 2011 11:05 pm
by Steven
Drilled a 2" hole in the transom below waterlevel for the livewell drain. That's one large hole.
Also drilled some other holes that have been needing drilling. Tomorrow I glass in the Leaningpost and install the gutter frames for the rear deck hatches. Getting close to end of construction. I am going to modify the console. The shifter sticks out too much for my liking, and I have to bend a bit for full reverse.
Re: OB19 build in Texas
Posted: Sun Apr 24, 2011 11:51 pm
by flyfishingmonk
Steven,
How often do you get up to West Marine in Louisville? Maybe next time we can hook up for lunch.
Casey
Re: OB19 build in Texas
Posted: Mon Apr 25, 2011 10:54 am
by Steven
flyfish2743 wrote:Steven,
How often do you get up to West Marine in Louisville? Maybe next time we can hook up for lunch.
Casey
Nearly once a week. It's my toy store.
It's only a 15 minute drive from work. I'll probably be up there Friday. Let me know if you are available and we'll hook up.
Re: OB19 build in Texas
Posted: Mon Apr 25, 2011 4:05 pm
by danieloldhouse
Steven thanks fo sharing all these pictures of You're work! Since here Your's one of the most complete and interesting gallery in this range of boats and I'm very grateful to you, I'm going to start a C19 as soon as possible I've received all the plywood and the epoxy but in the meantime I've broke my wrist so I'm waiting to have it ok to start my building. Thanks again please keep us updated! I'd specially like to see a pic of the livewell drain how you have refined it. Regards
Daniele
Re: OB19 build in Texas
Posted: Mon Apr 25, 2011 4:48 pm
by Steven
danieloldhouse wrote:Steven thanks fo sharing all these pictures of You're work! Since here Your's one of the most complete and interesting gallery in this range of boats and I'm very grateful to you, I'm going to start a C19 as soon as possible I've received all the plywood and the epoxy but in the meantime I've broke my wrist so I'm waiting to have it ok to start my building. Thanks again please keep us updated! I'd specially like to see a pic of the livewell drain how you have refined it. Regards
Daniele
Hi Daniel,
I will take some close ups tonight of the drain this evening. Bummer on the wrist. Hope it heals up well for you.
Steven
Re: OB19 build in Texas
Posted: Mon Apr 25, 2011 4:56 pm
by Steven
Got the Leaning Post glassed in. Biggest single session glassing job since taping and glassing the inner hull. I spent about 4 hours working on it. The edges on the sides are rough, but will sand out nicely. Fairing should be easy. Just some small depressions on the center of the side to fill. Otherwise it's fill the weave and sand smooth. Besides the tape on the bottom, it's glassed with 3 pieces. The center piece comes from the sole over tape, up the front over the top and down the back and onto the livewell. So it's double taped on the bottom all the way around.


Also added a second layer of tape around the bottom of the console. A little added security.
You can see from the side view how the control handle sticks out a bit. Doesn't get in the way really, but not sure I like it. I'm not sure how much throw it uses when hooked up. It goes 180 degrees uncabled.

Re: OB19 build in Texas
Posted: Mon Apr 25, 2011 5:00 pm
by gstanfield
Nice
I really like that steering wheel, where can I get one
Seriously though, that should be one strong leaning post you got going there
Re: OB19 build in Texas
Posted: Mon Apr 25, 2011 5:41 pm
by flyfishingmonk
Friday might work for me. I'm about 15 from it as well and we could meet over by there to catch a quick lunch. What time you thinking?
Steven wrote:Nearly once a week. It's my toy store.
It's only a 15 minute drive from work. I'll probably be up there Friday. Let me know if you are available and we'll hook up.
Re: OB19 build in Texas
Posted: Mon Apr 25, 2011 6:13 pm
by Steven
flyfish2743 wrote:Friday might work for me. I'm about 15 from it as well and we could meet over by there to catch a quick lunch. What time you thinking?
Steven wrote:Nearly once a week. It's my toy store.
It's only a 15 minute drive from work. I'll probably be up there Friday. Let me know if you are available and we'll hook up.
I'll check my schedule tomorrow and let you know. Probably in the 12-1 time frame.
Re: OB19 build in Texas
Posted: Mon Apr 25, 2011 7:26 pm
by Steven
Here is a pic of the drains Daniel.
For the overflow drain I used a 1 1/2" THMarine 90 degree thru hull. Purchased at Cabelas. Plugged into it is a cut down THMarine overflow pipe. It's intended use is to plug into a bottom drain. It's about 20" long before cut down.

The drain for emptying it is a 1" thruhull. I milled an oversized recess into the bottom of the livewell before glassing it. Then I cut a recess after that is only into the epoxy filler. I cut the bottom of the through gull flange off. The bottom of the thru hull hole is at the bottom of the tank, so it will completely drain.

Re: OB19 build in Texas
Posted: Mon Apr 25, 2011 7:33 pm
by flyfishingmonk
Sounds good! I look forward to it.
Re: OB19 build in Texas
Posted: Mon Apr 25, 2011 10:38 pm
by Steven
Had a productive day. Got the drain gutter assemblies glued to the underside of the rear deck. Tomorrow I'll glue some braces to the underside to give more deck support and to tie into the gutters for added strength. The stern area is just about done and ready for the deck to be glued down.

Re: OB19 build in Texas
Posted: Tue Apr 26, 2011 7:39 am
by danieloldhouse
Thanks Steven, very nice work indeed! Your's is goin' to be a really illustrated handbook for boat builders, have you any idea about the splashin' date? More or less I mean.
Daniele
Re: OB19 build in Texas
Posted: Tue Apr 26, 2011 9:56 am
by Steven
It should be ready for water in June hopefully. Not sure I'll have the motor then. We have a boat builders meet at the end of July. I'm hoping to take it.
Re: OB19 build in Texas
Posted: Tue Apr 26, 2011 3:32 pm
by danieloldhouse
Looking at your pics I'm sure you'll make it. Have you already decided what motor will be? Can't wait to see it in the water, going to take a lot of advantage from your tips.
Re: OB19 build in Texas
Posted: Tue Apr 26, 2011 5:20 pm
by Steven
danieloldhouse wrote:Looking at your pics I'm sure you'll make it. Have you already decided what motor will be? Can't wait to see it in the water, going to take a lot of advantage from your tips.
Yamaha 90 4 stroke.
Re: OB19 build in Texas
Posted: Tue Apr 26, 2011 5:27 pm
by Steven
Got the Leaning Post sanded and a coat of weave fill on. It is some kind of stout.

A look at the rear deck with gutter frames glued in. Might have a problem here. The epoxy is not cured hard to my liking. It is slow hardener and it was under 50 over night and first half of day, but I think it should be harder by now. It's real firm but not hard. I will not be pleased if I have to scrap the back deck. That's a lot of work down the drain. I can save the gutter frames, but will be a real pain in the pain place. I just packed it in for the day and will check back tomorrow and see how it feels. It did firm up through out the day, so hopefully it's just my non familiarity with slow hardener. Usually stick with medium. Like to feel the heat in my hand. Then I know it will cure properly.

Re: OB19 build in Texas
Posted: Tue Apr 26, 2011 5:49 pm
by Lung Boy
Looking good Steven. Probably no problem with the slow. Under 50 degrees the slow will take about 48 hours before it's hard enough to sand. At least that has been my experience.
Re: OB19 build in Texas
Posted: Tue Apr 26, 2011 6:11 pm
by Mad Dog
Steven, you should be just fine with the slow hardener. I did my whole project with slow even during the cold month (you know I live further south). The only time it didn't cure right it was an mixing error and it never cured at all. So, if it is gradually hardening you'll be fine.
I may have to copy your leaning post and live well, it just looks to good not to copy.
MD
Re: OB19 build in Texas
Posted: Tue Apr 26, 2011 6:20 pm
by Cracker Larry
So, if it is gradually hardening you'll be fine.
Just to pile on, I agree with that too
It is some kind of stout.
Shoot, I reckon so
Yep, she'll be there for a long time. Mighty fine.
Re: OB19 build in Texas
Posted: Tue Apr 26, 2011 7:33 pm
by Steven
Thanks guys. Glad to hear that. It does seem to be getting harder. I'm just used to medium. Anything I do the day before is rock hard the next morning. I've never had a failed cure and this would have been a bad thing to fail.
Any guesses on weight for the whole thing? Leaning post is 1/4" meranti. 1/2 framing interior covered with 12oz. biax. Livewell is 1/4" fir. Exterior is covered in 12oz. biax. Interior is 12 oz biax. and 6 oz. cloth. Top is biax both sides with layer of 6 oz. cloth on the underside. I didn't weigh the components but I have a rough guestimate.
Re: OB19 build in Texas
Posted: Wed Apr 27, 2011 12:16 am
by flyfishingmonk
I'm working with slow as well and I glued up some wood this morning that is still pretty tacky. It's 11:15 pm now.
The last time I worked in these lower temps it was taking a full 24 hours to cure with slow hardener. Everything I did before tonight, in the month of April, has been setting up in about 12. I'm sure you'll be fine.
Either way, you gotta love this weather we are having here in Dallas.
Re: OB19 build in Texas
Posted: Wed Apr 27, 2011 7:18 am
by cottontop
I might as well add my 2 cents. I used slow hardener exclusively. During cooler weather it did take up to 72 hours to dry. Unlike you, I had a bad experience but it was due to a mixing error. Fine build.
Re: OB19 build in Texas
Posted: Wed Apr 27, 2011 8:10 am
by Steven
Well, a sigh of relief this morning. It has hardened nicely. Think I'll order some medium to mix with the slow to make an in between.
Re: OB19 build in Texas
Posted: Wed Apr 27, 2011 8:12 am
by Steven
flyfish2743 wrote:I'm working with slow as well and I glued up some wood this morning that is still pretty tacky. It's 11:15 pm now.
The last time I worked in these lower temps it was taking a full 24 hours to cure with slow hardener. Everything I did before tonight, in the month of April, has been setting up in about 12. I'm sure you'll be fine.
Either way, you gotta love this weather we are having here in Dallas.
Definately loving the weather. Well except for the evening tornados that keep skirting just south of me. 12:30 on Friday is looking good. Any preference on a food place?
Re: OB19 build in Texas
Posted: Wed Apr 27, 2011 11:08 am
by flyfishingmonk
I'm finding slow sets up pretty well, easily under 12 hours, when in the 80s. And under 6 when in the 90s. I like the working time it has. Only once or twice did it get to tacky before I was ready, that's when I was glad I had slow.
Prob something fast if that's cool with you. There is a chiptole there at 35 and 121 if you like buritos.
Re: OB19 build in Texas
Posted: Wed Apr 27, 2011 12:08 pm
by Steven
Chipotles is good. I'll email you my cell.
Re: OB19 build in Texas
Posted: Wed Apr 27, 2011 1:52 pm
by flyfishingmonk
Got it.
Re: OB19 build in Texas
Posted: Wed Apr 27, 2011 10:22 pm
by Steven
Couldn't resist. Whipped out a test hatch tonight to see how it looks and stand on it.
Solid as a rock. I have some meranti set aside for the final copies.


Re: OB19 build in Texas
Posted: Thu Apr 28, 2011 6:45 am
by SmokyMountain
Those look great Steve. What width bit did you use to cut the hatch out ? I was thinking an 1/8" to a 1/4".
Andrew
Re: OB19 build in Texas
Posted: Thu Apr 28, 2011 7:48 am
by Steven
SmokyMountain wrote:Those look great Steve. What width bit did you use to cut the hatch out ? I was thinking an 1/8" to a 1/4".
Andrew
Thanks.
For the opening, I made a sqaure template frame with the opening in the frame sized just larger than the desired hatch opening. Then I used a 1/4" bit with a pattern guide. I used a plunge router so I made a few passes to cut through. I just screwed the template to the top of the deck.
To make the template frame, I cut out a square of 3/8' plywood 6" bigger in both dimensions than the desired hatch opening. I set the fence on my table saw to just over 3 inches from the blade. I then plunge cut the center out of the panel. This left a square "hole" slightly larger than the hatch opening with 3" of surface for the router to ride on. I didn't compensate for the offset of the template bushing. The hatch is cut to fit, so there was no need for that precision.
I'd do it a bit differently though. I'd make the template frame the same size, but use a 3/4" flush template bit with a guide bearing that would ride against the template frame. Jigsaw out the hatch opening a little undersized and the finish up with the flush trim bit. This would give a little larger corner radii, which might look a little better.
The key in either method is to start out with a perfectly square panel to make the template from. This will make it easy to cut the hatch to fit and you'll end up with a consistent gap. Something I'm fighting for my triangular shaped front anchor locker hatch. I threw the template away. Had I kept it, I could have used it with a template bushings on the router to make a perfect fit. I'm considering making a new frame slightly oversized, re-cutting the opening slightly larger and then using the frame to make a properly fitting hatch. Probably just decided to do that.
Re: OB19 build in Texas
Posted: Thu Apr 28, 2011 11:38 pm
by flyfishingmonk
See ya Mañana.
Re: OB19 build in Texas
Posted: Fri Apr 29, 2011 7:46 am
by Steven
Well, I just ordered what I believe to be the last gallon of epoxy I'll need for this build. The only epoxy work left of any size is to glue some extra supports to the underside of the rear deck, glue down the deck and glass it in. Some hole filling and coating a few bare areas. Getting close.
Re: OB19 build in Texas
Posted: Fri Apr 29, 2011 7:46 am
by Steven
flyfish2743 wrote:See ya Mañana.
I'll call you when I head that way. Probably around 12:15. I'll be in a white Nissan Titan.
Re: OB19 build in Texas
Posted: Fri Apr 29, 2011 9:12 am
by flyfishingmonk
Sounds good. I'll be in a white Excursion.
Re: OB19 build in Texas
Posted: Fri Apr 29, 2011 3:07 pm
by flyfishingmonk
Steven - Great time at lunch! Let's do it again soon.
Thanks for your input.
Casey
Re: OB19 build in Texas
Posted: Fri Apr 29, 2011 4:49 pm
by Steven
Ditto. Great to finally meet you in person. Need to synch up for a trip out my way. Working on someone elses build will give you a nice break from yours.
Re: OB19 build in Texas
Posted: Fri Apr 29, 2011 5:10 pm
by flyfishingmonk
That and I will learn a lot. I'll talk to the wife about finding a Sunday afternoon to slip away.
Re: OB19 build in Texas
Posted: Fri Apr 29, 2011 11:27 pm
by Steven
Excellent. I'm looking forward to it.
Re: OB19 build in Texas
Posted: Sun May 01, 2011 11:08 pm
by Steven
Got the first coat of Quick Fair on the Leaning Post/Livewell. I rolled on a thick coat of epoxy/blended filler first to fill some of the weave. First coat of Quick Fair finishes the weave fill and fills in the large depressions. I'll sand this tomorrow and then a second coat. That will get it close to primer ready.


Re: OB19 build in Texas
Posted: Sun May 01, 2011 11:14 pm
by Prarie Dog
Looks real nice Steven. Are you going to put a cushion on top of it, and a foot rest below the hatch?
Re: OB19 build in Texas
Posted: Sun May 01, 2011 11:31 pm
by Steven
Prarie Dog wrote:Looks real nice Steven. Are you going to put a cushion on top of it, and a foot rest below the hatch?
Yes on the cushion. I'll have one that snaps down on the top of the Leaning Post, and one that snaps down on top of the Livewell when it's not in use. The one on the leaning post will wrap down the front about 6". For the footrest, I'm actually going to mount a flip down foot rest on the back of the Console. It feels more comfortable with my feet more forward. I'm going to see about having CL's buddy build it. I don't know anyone down here and his work looks so good.
Re: OB19 build in Texas
Posted: Sun May 01, 2011 11:44 pm
by Prarie Dog
Cool, that sounds like a good plan. Do you think you have enough time to finish before the meet? NO PRESSURE
Re: OB19 build in Texas
Posted: Mon May 02, 2011 12:29 am
by Steven
Prarie Dog wrote:Cool, that sounds like a good plan. Do you think you have enough time to finish before the meet? NO PRESSURE
I'll have the build done in time. Paint will be close. Not sure I can get it rigged and powered in time. If not, i'll bring the GV11.
Re: OB19 build in Texas
Posted: Mon May 02, 2011 12:31 am
by Prarie Dog
I hope you get her done, it's a nice build!!
Re: OB19 build in Texas
Posted: Tue May 03, 2011 12:58 am
by Steven
Sanded the Leanpost/Livewell and put on a second coat of quickfair. Did some sanding on it but a littler remains. One more spot application for the few remaining obvious flaws and it will get primer. I'm at the point were its hard to tell what needs fairing due to the multiple colors.
Re: OB19 build in Texas
Posted: Mon May 09, 2011 7:09 pm
by Steven
Re: OB19 build in Texas
Posted: Mon May 16, 2011 11:25 pm
by Steven
Been getting a lot of work done but nothing really picture worthy. Got two applications of Quick Fair on the sole and sides done. Arms and shoulders are feeling it.
. The LeaningPost/Livewell is almost faired. Put one last Quick fair application on today. Hopefully. The console still has to be final faired. I laminated a layer of 3.25 oz cloth in the hole for the LiveWell drain. It was overdrilled and filled, but it's such a large hole.
The rear deck is prepped and gets glued down tomorrow. Once it's glassed down, construction is done. Since I've been doing fairing as I go, hopefully it won't be too big a job. I have the outside very smooth, but it will need full primer and blocking after a guide coat to be complete. Getting close.
Re: OB19 build in Texas
Posted: Tue May 17, 2011 1:29 am
by flyfishingmonk
I look forward to the painting.
Re: OB19 build in Texas
Posted: Tue May 17, 2011 6:57 am
by cottontop
Your build haqs been beautiful and your pic's great. You won't be unhappy. Have you decided on a type of paint, color, & roll/tip vs. spray? john
Re: OB19 build in Texas
Posted: Tue May 17, 2011 9:57 pm
by Steven
cottontop wrote:Your build haqs been beautiful and your pic's great. You won't be unhappy. Have you decided on a type of paint, color, & roll/tip vs. spray? john
It will be roll and tip. I have a different answer for the paint depending on the day. I'd like to go with Sterling. However, It will drive me crazy going with such an expensive high quality paint and not having a dust free place to apply it. Any dust in that shiny finish will plague me. I'm still plagued by the dust in the graphite on the bottom and I can't even see it anymore.
I have some ideas for making a paint booth, and have a large place to do it in. So I'm still leaning that way. I've been very pleased with the Interlux finish on my GV11. It may come down to just how crazy i get with the fairing. I'm at that "really want it to be done stage", but probably can't power it until September, so I have plenty time.
Re: OB19 build in Texas
Posted: Tue May 17, 2011 10:08 pm
by Steven
Got alot of work done this weekend. Lot's of fairing and the last major guing. Got the rear deck glued down.

Mixed up some fairing compound with blended filler for the console. Finally got the hang of mixing this stuff. Mixing by hand takes too long and I never get it smooth. Used a mixing paddle in the drill and got it nice and smooth. Went on very well. Note the tools of pain on the Leaning Seat. Gave them a good workout this weekend. The LeaningSeat/LiveWell is pretty much faired. Have to just add some smooth fillets at all the intersections.

Re: OB19 build in Texas
Posted: Tue May 17, 2011 10:41 pm
by flyfishingmonk
Looking great! However, I suggest not attaching the shelving unit to the back of the boat. Just my .02.
Re: OB19 build in Texas
Posted: Tue May 17, 2011 10:45 pm
by Steven
Thanks. Hey, I've yet to be on the boat that had too much storage space.
I stil can't get over how much room this boat has, even with the large appendages I've glued to the sole.
Re: OB19 build in Texas
Posted: Sat May 21, 2011 10:26 pm
by Steven
Routed in the rear deck. Tomorrow I'll glass the drain gutters for the hatches and glass in the deck. Probably glue in the motor well deck as well.


Re: OB19 build in Texas
Posted: Sat May 21, 2011 10:52 pm
by flyfishingmonk
Looks awesome
Re: OB19 build in Texas
Posted: Mon May 23, 2011 1:52 pm
by Uncle D
Looks awesome
What he said
WTG, Steven
Re: OB19 build in Texas
Posted: Mon May 23, 2011 4:54 pm
by wegcagle
Great progress Steven. Your work is really clean
Will
Re: OB19 build in Texas
Posted: Mon May 23, 2011 9:32 pm
by Steven
Thanks guys. Got the rear deck glassed in tonight. Last glue down is the motorwell deck which will go in this weekend.
Re: OB19 build in Texas
Posted: Tue May 24, 2011 1:25 am
by flyfishingmonk
Whats the difference between a rear deck and a motor well deck?
Re: OB19 build in Texas
Posted: Tue May 24, 2011 8:19 am
by Steven
flyfishingmonk wrote:Whats the difference between a rear deck and a motor well deck?
The rear deck covers the stern lockers and in my case includes the narrow deck piece I added between them. The Motor well deck is the slanted deck in the motor well itself, covering the bilge area.
Re: OB19 build in Texas
Posted: Tue May 24, 2011 8:31 am
by flyfishingmonk
Ok I got ya.
Re: OB19 build in Texas
Posted: Tue May 24, 2011 10:25 pm
by Steven
Got home tonight and sanded last night's work. It was stll not hard cured, which was good. Put another coat of epoxy on, which makes two coats after laminating in time for chemical bonding.
The inside of the motor well bulkhead will get glassed this weekend and and the motor well deck will get installed. That will complete the construction phase.


In this pic you can see the filled holes in the rear corners of the gutter. I'll be drilling a 3/8" hole in the center and gluing in a npt to 1/4" hose barb using 5200. These will drain through the motorwell sides.
You can aslo see thee rear radius. The outer one on the left had to be done by hand. It's a compound curve, so hand shaping was the only option. Took about 20 minutes a corner and came out very nice. It needed a nice radius so the rubrail will wrap around nicely.

Re: OB19 build in Texas
Posted: Wed May 25, 2011 9:16 am
by cottontop
Steven I love all the fine detail and craftsmanship of your build. What is the height of the sides from the floor up to the top of your gunwales? I read it somewhere in your thread that at one time you considered lowering the shear. What changed your mind? John
Re: OB19 build in Texas
Posted: Wed May 25, 2011 11:43 am
by Steven
cottontop wrote:Steven I love all the fine detail and craftsmanship of your build. What is the height of the sides from the floor up to the top of your gunwales? I read it somewhere in your thread that at one time you considered lowering the shear. What changed your mind? John
Thanks John. I'll take a measurement tonight and let you know. I think the boat would look better proportioned with a lower sheer, and behave better in the wind, but I wanted the security of the tall sides for my kids and for the times I want to take it off shore. The area lakes are also large and subject to sizable wind driven waves. I don't mind the rough if the boat is capable, so my ultimate decision was function over form. Pespective is also tough with it sitting on a 2x6 frame. Usually, such tall sided boats have deeper VEE's so I think that is what appears most disproportionate to the eye. In the water, I think it will look great.
Re: OB19 build in Texas
Posted: Wed May 25, 2011 9:43 pm
by Steven
Hey John. The cockpit depth is just under 19" at the motorwell bulkhead and 2' at the front casting deck.
Re: OB19 build in Texas
Posted: Thu May 26, 2011 6:54 pm
by cottontop
Thanks Steven. I have the plans for a PH 18 but I think I'm going to order the plans for the OB19. What are your thoughts about lenghthening it by 10%? Yours looks huge. John
Re: OB19 build in Texas
Posted: Thu May 26, 2011 8:04 pm
by Cracker Larry
John, I think it's past time that you build another boat
And I think you should ride down to Boca Grande next week
Re: OB19 build in Texas
Posted: Thu May 26, 2011 8:39 pm
by cape man
I second that thought Larry. John's boat convinced me to build mine and he's never seen it!
Sorry for the hijack.
Re: OB19 build in Texas
Posted: Fri May 27, 2011 7:45 am
by Steven
Hijack is good. Wish I could ride down to Boca.
Next year I'm hitting all off the build evnets. Gonna do the circuit. I grew up on the Chesepeake and my folks live there on the water. I've always wanted to go to Boca. I love watching the Tarpon tournaments on the boob tube.
John,
Not sure on lengthening it. I would probably go with the PH22 over lengthening the OB19. I'm not crazy about modifying the running surface of a well designed hull. Matt raves about how well his OB19 performs, and I wouldn't want to do anything to screw it up. I dont' think it would be too difficult. You could just lengthen the stern and add a frame. That would result in a narrower transom. One thing you could do to get a little extra space is to move the motorwell bulkhead back. Matt measured the clearance with his motor up and he had just over 10". I used that space to add a 8" deck between the stern lockers. If I had thought to check with Matt when I was installing the MW bulkhead, I would have moved it back. I have 22" between the MW bulkhead and backup of the live well. It's still plenty of room to move about, but 30" would have been nicer.
I"ve really tried hard to maximize the space and layout everything to be comfortable. The livewell top is the same height as the MW bulkead. Sitting there with your legs on the bulkhead watching the spread will be very comfortable. The Leaning post seat is 14" wide. I made it that wide so it would be comfortable to sit sideways with your feet resting on the side deck. That will likely be my most favorite spot while bottom fishing.
Re: OB19 build in Texas
Posted: Fri May 27, 2011 12:49 pm
by cottontop
Steve, I had thought about the PH22. I'm not not really much on altering Jacques designs either. I like what you've done with your build so far. The little added decking at the back was a great idea. Have a greta weekend. John
Re: OB19 build in Texas
Posted: Sat May 28, 2011 11:41 pm
by Steven
Glued and glassed in the MotorWell deck today. That's the last of any major construction. Have a few odds and ends but it's mainly filling sanding and fairing from here on out.
No really
!!!!
Re: OB19 build in Texas
Posted: Tue May 31, 2011 9:05 pm
by Steven
Got the livewell plumbing finalized minus hose clamps.
I should have used a 90 degree drain. It's 5200'd in very well, so I'm not about to try to replace it. I might eventually if it bugs me enough. That flex hose is really nice. The inside is smooth and very soft. It really sticks to the fittings.


Re: OB19 build in Texas
Posted: Tue May 31, 2011 9:58 pm
by flyfishingmonk
Awesome!
Re: OB19 build in Texas
Posted: Wed Jun 01, 2011 10:30 pm
by wej
NICE!!!
Re: OB19 build in Texas
Posted: Sat Jun 04, 2011 9:46 pm
by Steven
Wrenched my upper back somehow, so no sanding this weekend.
Finishing up some detail work.
Laminated three layers of 3/8" ply to make a block thick enough to contain the length of the drain plug. Glued into the back corners of the cockpit. Still haven't decided how I want the drain into the bilge from the cockpit. Want I want to do will result in holes that can't be plugged. Not sure if that is a concern or not.
I created a recess so the plug will be below the sole level. It's all covered in 1 piece of 3.25 oz. cloth. That stuff will take crazy shapes.


I taped in the motor well deck last week. Doubled up 12oz. tape on the perimeter. I added a layer of 6oz. cloth over the deck to cover the rest of the exposed wood. In the lower corners you can make out the depressions for the deck drains.

Here's a view from the rear of the beam supporting the small deck between the stern lockers. The beam is a 1x3 with a 1x2 laminated to the back side.

Got the anchor locker hatch shaped and glassed on the top side.

Re: OB19 build in Texas
Posted: Sun Jun 05, 2011 3:47 am
by chicagoross
The little details can take as long as the boat!
Re: OB19 build in Texas
Posted: Sun Jun 05, 2011 8:51 pm
by Prarie Dog
Nice looking work Steven. Hope your back improves quickly, been fighting mine for almost forty years now.
Re: OB19 build in Texas
Posted: Sun Jun 05, 2011 9:15 pm
by Steven
Prarie Dog wrote:Nice looking work Steven. Hope your back improves quickly, been fighting mine for almost forty years now.
Thanks. It's just a minor muscle pull. Gets me once an awhile. Feels like dagger thrusted into my upper back. It's mostly gone now. Got the drain holes drilled and filled today and put a second coat of epoxy on the glassed anchor hatch and motor well deck.
Re: OB19 build in Texas
Posted: Sun Jun 05, 2011 10:51 pm
by flyfishingmonk
The drain is looking great.
Re: OB19 build in Texas
Posted: Thu Jun 16, 2011 9:38 pm
by Steven
Been getting small tasks done here and there. Mostly sanding and fairing. Ran low on epoxy and quick fair so placed and order yesterday. Getting closer and closer a little at a time.
Re: OB19 build in Texas
Posted: Tue Jun 21, 2011 9:43 pm
by Steven
Fairing is slow going for picture worthy stuff.
Got the rear deck faired. Cut out the hatches. This weekend I'll build some lips and glass them. The motor well is a few Quick Fair sessions away from fair. The front of the bulkhead is a mess. I had some blended filler left and decided it would make a workable quantity of fairing putty. I mixed up some epoxy and had two problems. I mixed too much epoxy, so it was thinner than ideal, and there ended up being way too much. So what I got on sagged. I only got about half applied before it kicked. So half went in the trash, and I'll have to sand off half of what is applied. Thank goodness Quick Fair is bullet proof.

Re: OB19 build in Texas
Posted: Fri Jul 22, 2011 12:25 am
by flyfishingmonk
How is your boat coming?
Re: OB19 build in Texas
Posted: Thu Aug 18, 2011 8:54 am
by Steven
Hey Casey. Slow but steady. Very slow with this crazy heat.
I've been doing small stints of fairing and sanding. I finished glassing the rear hatches, so that's the end of the glass work. I'll be ordering the rest of the hardware, steering and electronics first of Sept. Once everything arrives I'll finalize the positions and cut and drill all necessary holes. I'm going to use Durabak anti slip on the interior. I'm thinking about doing the interior sides, bulkheads, sole, casting decks and side decks. Any where feet or loose stuff ( coolers, tackle boxes etc...) will come in contact. My father has it done this way on his TwinVee Cat and it is very tough and easy to maintain.
I'll also be ordering the motor and trailer.
Once the heat drops a bit I'll prime and paint. Actually I'll prime in the next week or two since it's not so critical an application. I'm not doing the roll and tip until I can do it without sweating.
Might get launched in late Oct. if the weather cooperates.
Re: OB19 build in Texas
Posted: Thu Aug 18, 2011 7:05 pm
by wadestep
Hey Steven -
I'm at the point where I need to figure out the size of my console. Would you mind posting your console's max height, width, and (bow to stern) depth? I might change a couple angles and add a front seat, but your console looks about the right size for the OB19.
Thanks
wade
Re: OB19 build in Texas
Posted: Fri Aug 19, 2011 6:56 pm
by Steven
Sure thing wade. I'll hazard out there this evening after the temperature drops below 105.
I wish I was kidding.
Re: OB19 build in Texas
Posted: Sun Aug 21, 2011 6:51 pm
by wadestep
I hear ya - I tried to do some work today and finally decided it wasn't worth it. Came in and the temp outside read 99.9. Too hot.
wade
Re: OB19 build in Texas
Posted: Sun Aug 21, 2011 7:16 pm
by flyfishingmonk
I've been hiding inside as well. Although, I have been getting parts ordered and wrote some for my blog. Which is as close to boat building as I can get without melting.
Re: OB19 build in Texas
Posted: Wed Aug 24, 2011 7:55 pm
by Steven
Hey Wade,
Here's the console dimensions. The sides are all canted in 2" at the top.
The length accross the bottom front is 30 1/2".

Re: OB19 build in Texas
Posted: Thu Aug 25, 2011 6:33 pm
by wadestep
Thank you! That info will allow me to order the fuel tank and place the frames.
wade
Re: OB19 build in Texas
Posted: Thu Aug 25, 2011 8:37 pm
by Steven
The width leaves a lot of room around it but is plenty large enough.
Re: OB19 build in Texas
Posted: Thu Aug 25, 2011 9:04 pm
by gstanfield
Looks good to me
Re: OB19 build in Texas
Posted: Sat Aug 27, 2011 2:10 pm
by Steven
Just put in for estimates from a couple local retailers. Trailer/Yamaha 90 hp 4 Stroke package. If I get an agreeable deal, I'll make the purchase in the middle of Sept. I'm going to install and rig the motor and take it back for the Pre Delivery inspection and first starting.
I've been on a spending freeze the last couple of months. I'm opening the coffers on Wed. I'll resume ordering of supplies in earnest on Wednesday. First up is Paint and Durabak non skid. Then Steering and electronics. If only I could get motivated to work in this crazy heat. Went to daughters HS football game last night. She's a freshman in Marching Band. 102 in the shade at 8:00 pm. Ugh!!!
Re: OB19 build in Texas
Posted: Thu Sep 22, 2011 7:06 pm
by Steven
Aside from the slow process of fairing, I've gotten the hatches close to done. I glued on backing blocks where the latches go and have drilled and filled for all the hinge holes. I have to modify the latches. The latch bar is threaded on with a set screw and a jam nut. That doesn't allow for very fine adjustment so I'm going to drill out the threads and use a jam nut top and bottom along with the set screw. Here's the anchor hatch.

Re: OB19 build in Texas
Posted: Thu Sep 22, 2011 9:14 pm
by Cracker Larry
Here's the anchor hatch.
Nice Steven, but...if I may offer some advice? If those hinges aren't etched in stone I would move them to the outboard side of the hatch, and move the latch inboard. Consider that your bow cleat, or cleats will be in the center of the bow. You need to be able to feed line and chain directly out of and into the anchor locker without obstruction, while standing or crawling up there. As it is the hatch lid will constantly be in your way when handling the anchor.
On the forward side of the hatch along the edge, I'd consider cutting out a half circle that the anchor line can pass through with the hatch closed.
Re: OB19 build in Texas
Posted: Thu Sep 22, 2011 10:09 pm
by Steven
Thanks for the input Larry. I considered doing it that way but there isn't a lot of room on the forward deck to be standing after the trolling motor is mounted. Handling the anchor will happen from the casting deck just behind the hatch. It will come and go just over the right front of the bow. I still have a problem with the bow cleat. Ultimately, it's going to end up centered but behind the front edge of the hatch. I can't get it forward of hatch because of the trolling motor. There will be a chock on the right front edge about 8" back from the point of the bow. Hopefully this all makes sense.
Re: OB19 build in Texas
Posted: Thu Sep 22, 2011 10:20 pm
by Steven
Got some more work done this evening on the hatches, and drilled out for the garboard drain and filled the screw holes. The black circle is how large the putty filled hole was. roughly. Plenty of room for error when drilling for the drain. It will get several coats of epoxy for good measure.
Here is the 1" hole for the SS drain I'm using. You can see the filled screw holes on either side. They are filled with a slight bulge which I'll pare off with a sharp chisel
Since the drain is SS, I may change the livewell drain to SS. No way to bond them.

Here is the setup I use for filling holes. The straw allows me to fill the holes from the bottom up, so no air pockets. Since these holes were on the angled transom, I mixed the fill to just a bit looser than peanut butter. It would sag/run off the stir stick very slowly. This allows the hole to be filled and not run out until I get some packing tape over it. I don't press the tape too tight to maintain the bulge.

Here is the underside of a hatch. The latches I'm using recess partially into the hatch. They need 3/8" which is the thickness of my hatch, so I glued on a 3/8" block. I beveled the edge with a hand plane and then sanded a radius on all the edges. It's covered with a layer of 6oz cloth. I find that any block I glue like this without taping, opens up on the edges of the joint. I have a couple in the GV11 I have to fix before selling it. I didn't bevel and tape over the outboard edge because I need a smooth flat surface there. That's the mating surface for the seal. I need it flat and on the same plane all the way around. The underside was already glassed before the block was glued on.
You can see the oversized, filled holes for the hinges on the far side. The hinges are attached with bolts. The nuts near the edge land in the gutter. The farthest one clears the inner edge of the gutter lip. I will have to cut a small notch for the nuts close to the edge as they will just catch the gutter edge when opening and closing

Re: OB19 build in Texas
Posted: Fri Sep 23, 2011 10:01 pm
by Steven
Here you can see how I will be able to work the anchor easily from the casting deck. All I need to do is figure out the cleat situation. I have a center beam fore/aft. It will not be possilbe to bolt the cleat on. The beam is 3" long. Not sure I can find #12 oval head machine screws that long. But I can use really long screws. The force will be shear so it shouldn't matter. I'm quite certain the screws will fail long before they can pull out.

Re: OB19 build in Texas
Posted: Sat Sep 24, 2011 11:35 am
by Mad Dog
Steven wrote:The beam is 3" long. Not sure I can find #12 oval head machine screws that long. But I can use really long screws. The force will be shear so it shouldn't matter. I'm quite certain the screws will fail long before they can pull out.
Steven, Jamestown Distributor carries just about any fastener you may need but I picked up a lot of fasteners from West Marine. When I only needed a few special size and length they always a good selection. I have a dozen 3" ovalhead machine screws I just picked up.
MD
Re: OB19 build in Texas
Posted: Sat Sep 24, 2011 2:34 pm
by BassMunn
Haven't been around for a while - Steven your boat looks very impressive, you got some really nice ideas
Re: OB19 build in Texas
Posted: Sun Sep 25, 2011 12:36 pm
by Steven
BassMunn wrote:Haven't been around for a while - Steven your boat looks very impressive, you got some really nice ideas
Thanks. Now if I could just borrow some of your fairing and painting skills, I could get this thing done.
Re: OB19 build in Texas
Posted: Mon Sep 26, 2011 5:20 pm
by Hope2float
Steven the work looks great. nice neat and detailed. I know it took you a while.
Dave
Re: OB19 build in Texas
Posted: Wed Sep 28, 2011 9:16 pm
by Steven
Got some work done on the hatches.
Got all the hardware fitted. You can see the reliefs drilled in the rear gutter edge so the nuts clear it.

I really like the look of the exposed hardware. The latch is low profile and very smooth, so they won't bother the feet. The hinges are out of standing area.


Re: OB19 build in Texas
Posted: Wed Sep 28, 2011 9:35 pm
by Daddy
Looks great
Daddy
Re: OB19 build in Texas
Posted: Thu Sep 29, 2011 6:51 am
by cottontop
You sure do fine craftsmanship! That is one beautiful build. I bought store hatches for my OD18, but may try to build my own when I start my next build. You've probably listed it in an earlier thread: where did you buy your hatch hardware from? Did you route the "hatch gutter" freehand or did you have a router table/jig? John
Re: OB19 build in Texas
Posted: Thu Sep 29, 2011 7:30 am
by Steven
Thanks. The hinges and latches came from marinepartdepot.com. Really pleased with their stuff. To route the guttter, I used a router table and fence. I clamped stop blocks on both ends of the fence for the stop and start. I raised the bit 1/4" above the tabletop, aligned the gutter frame against the fence and front stop and then plunged it down until it was flat. I pushed it forward to the back stop and lifted. Just a stopped plunge cut. Rotate and repeat and then raise the bit and go again until you get the depth you want. I went 3/4". I made the frames square to make this easier. Just have to be careful setting up the start and stop blocks so that the stops/starts on adjacent sides meet at the same corner point. You can do rectangular frames too, you'd just have to cut opposite sides and then adjust your stop blocks accordingly.
Re: OB19 build in Texas
Posted: Thu Sep 29, 2011 11:07 am
by Daddy
How did you handle the drains?
Re: OB19 build in Texas
Posted: Thu Sep 29, 2011 11:38 am
by Steven
In the rear corners of the gutters I have oversized holes drilled and filled with epoxy. I did this before glassing the gutter. I'm going to drill that and glue in some hose barbs and the hoses will drain into the motor well. I'll probably rig that up this weekend, so I should have some pictures of that.
Re: OB19 build in Texas
Posted: Mon Oct 03, 2011 9:21 pm
by Steven
I'm running out of stuff to do on the outside. The inevitable sanding is looming. Two things remained. Drilling for the Motor bolt holes, and fine tuning the transom to side corners. I tackled the holes tonight.
Here is the drilling rig I cobbled together to drill square holes. Cracker Larry sent me a paper template with dimensions last year. I used the dimensions and marked the holes for drilling 1" oversized holes.
I drilled through the plywood base with the 1" bit. I used a punch to mark the center hole on the transom and then used a compass to draw a 1" circle. I lined up the circle with the hole in the plywood base. Worked great.


Holes drilled

Holes filled

Re: OB19 build in Texas
Posted: Tue Oct 04, 2011 7:23 am
by cottontop
Good idea and great/clean work. When does the glassing start?
Re: OB19 build in Texas
Posted: Tue Oct 04, 2011 8:58 am
by Cracker Larry
Glad you got some use out of that
Re: OB19 build in Texas
Posted: Tue Oct 04, 2011 11:12 am
by Steven
cottontop wrote:Good idea and great/clean work. When does the glassing start?
What glassing?
Re: OB19 build in Texas
Posted: Tue Oct 04, 2011 11:13 am
by Steven
Cracker Larry wrote: Glad you got some use out of that
Made quick work of laying it out. Thanks.
Re: OB19 build in Texas
Posted: Sun Oct 23, 2011 8:36 pm
by Steven
So today I go out to do some Quick Fair work. Yesterday I spent several hours sanding some previous applications. Two weeks ago I ordered some more QF as I was running low. I pull out the new QF to discover I screwed up and ordered Easy Fillet.
So, instead I cut out the console for some of the accessories to be installed. The steering will be Teleflex Baystar Hydraulic which I haven't ordered yet . I downloaded the manual for the cut out dimensions.

I made some round epoxy pucks with tint and milled fiber mixed in. I needed a few pads in the bilge and didn't want to use wood. This is the bilge side of the Motor Well bulkhead. The top one is to give some thickness where the center cockpit drain is. Needed more than 3/8" for the brass drain tube. I made a donut to go around the livewell drain. I'll glue on simlar ones for the other two tubes. I've not been comfortable that the seal at the PVC through the bulkhead would be watertight. So I glued on the donut leaving a gap around the pvc to be filled with 5200. That one is also back beveled so as water runs down the bulkhead it won't run down the face of the donut over the PVC. Basically I made a gutter.

I was going to glue down some pads for the bilge pump and float switch but decided there was enough thickness along the keel to drill and fill for screwss. I'll use 3/8" screws with 5200. I really wanted the switch and pump on the bottom to get out as much water as possible.
You can see where I had to grind a flat for the 1 1/2" livewell drain thruhull. Needed to create a parallel face to the outside of the hull. I have extra layers of glass there, so no loss of strength.

Re: OB19 build in Texas
Posted: Mon Oct 24, 2011 7:07 am
by danieloldhouse
Hi Steven, glad to see your're back at work, every time you post pics I'm impressed for the accuracy you put in the details, surely a longer way, but the result is much better. Can't wait to see it splashed!
Daniele
Re: OB19 build in Texas
Posted: Mon Oct 24, 2011 7:58 am
by Steven
Thanks. I've been plodding along slowly. Nothing really pic worthy for a while. The details definitely slow you down.
Re: OB19 build in Texas
Posted: Mon Oct 24, 2011 2:51 pm
by danieloldhouse
The details definitely slow you down.[/quote]
I know, but that makes the difference between a well done job and another done so and so. I specially love your console, very well designed.
Re: OB19 build in Texas
Posted: Tue Oct 25, 2011 7:51 am
by Steven
The console design was adapted from Cracker Larry's. The over all shape is very similar with dimensions slightly modified to my liking.
Re: OB19 build in Texas
Posted: Wed Oct 26, 2011 3:23 pm
by danieloldhouse
Thanks for giving the measurements in your thread, surely it will be very useful.
Re: OB19 build in Texas
Posted: Sun Oct 30, 2011 9:19 pm
by Steven
Re: OB19 build in Texas
Posted: Mon Oct 31, 2011 7:08 am
by cottontop
Steven, those look nearly sharp enough to cut meat with. Good job! John
Re: OB19 build in Texas
Posted: Mon Oct 31, 2011 9:19 am
by Steven
I ended it up with a camber on the lower third of both sides. I don't recaly the transom sided being cut with a camber, so I must have done the same thing wrong on both sides. I can't totally take out the camber, so from the rear you will see it, but it is slight and should look symentric so it will look on purpose.
Re: OB19 build in Texas
Posted: Mon Oct 31, 2011 10:43 am
by Lucky_Louis
Elegant solution to an tricky hurdle. Nicely done.
Re: OB19 build in Texas
Posted: Wed Nov 02, 2011 9:09 pm
by Steven
Got the huge holes for the cup holder drilled. Been dreading theses. Easy to mess up. Fortunately I got them just the way I wanted them. Inset so the shifter won't hit a drink. Thanks to Cracker Larry for the learning lesson.
Really thinking I'd prefer a recessed compass, but I don't have access to a bandsaw to make the angled shim. Might rig up a slanted sled for the router and make one later. If I'd have had a better idea what I wanted, I would have made the slanted face above the cup holders 3" longer. That would have allowed me to flush mount the depth finder. I'd have made the top flat too, so no need for a slanted shim for the compass. I'll get it right on the next build.
I'd like to get this one launched to fish the winter stripers.

The back corners are coming along nicely. Almost done and looking real good. Nice and straight. I put on some more quick fair tonight. One more sanding and a final touch up of quick fair and they'll be done.

Re: OB19 build in Texas
Posted: Thu Nov 03, 2011 7:04 am
by cottontop
Sure is looking good. How's your back doing?
Re: OB19 build in Texas
Posted: Thu Nov 03, 2011 7:43 am
by Steven
Thanks. Back is good. Not permenant damage. My head is still slightly bruised. I sure wacked it good.
Re: OB19 build in Texas
Posted: Sat Nov 05, 2011 9:59 pm
by Steven
Got a lot of work done today. I sanded the CC, Leaning Post/LiveWell annd motor well bulkhead and put on a coat of epoxy. Another coat going on in the morning. The CC and Leaning Post need some more fairing work, but the epoxy is sanded too thin and I will cut through to the glass if I sand any more. After these two coats cure, I'll sand with a long board, do a round with quick fair and then it's ready for paint.
I drilled the center drain hole in the Motor Well bulkhead. This gives me three 1-1/4" drain holes for the cockpit. Two drain to the outside and the center one drains to the bilge. All the drains are set into recesses to they are below sole level. Should drain the deck dry.

The transom is just about done. I'm gonna drill and fill a couple more holes tomorrow for wire tie downs for the transducers and speed wheel. I drilled out the motor well drains. I overdrilled and filled a while ago. When I did that, I used a forstner bit from the inside to the outer skin. Then I screwed a 1" dowell in from the outside and filled around it. So, on the outside I could see the two small filled holes where the screws were. I used these to locate for drilling the holes. Unfortunately, there was another filled screw hole, which I thought was the right one. Since the boat was in the garage, I only had 3' from the wall to the stern, so I didn't have a good perspective to realize the impending doom. After drilling through the outer layers of glass, I thought it sure is drilling fast. Wait, there's too much wood in the shavings and no putty. Uh Oh!!!!!

Fourtunately it's an easy fix, though my pride is still a little sore. What a dumb mistake. I do like the easy fillet for filling holes. Don't have to fuss with pre-wetting the hole and it's easy to mix just the right amount. It's plenty 'fluid' enough to get into holes, but it has no sag. Good stuff. I tape around the hole with masking tape and then overfill the hole a little. Lay a piece of packing tape over it so it is a little proud. I'll pare it off with a sharp chisel.

Re: OB19 build in Texas
Posted: Tue Nov 15, 2011 12:13 pm
by Steven
Sand, Sand, Sand, Quckfair, Sand Sand Sand. Oh my aching shoulders.
Re: OB19 build in Texas
Posted: Tue Nov 15, 2011 12:34 pm
by peter-curacao
Steven wrote:Sand, Sand, Sand, Quckfair, Sand Sand Sand. Oh my aching shoulders.
I feel your pain, same over here
Re: OB19 build in Texas
Posted: Tue Nov 15, 2011 3:12 pm
by Steven
Frankly, this is the part of the build I suck at, yet is the most critical to perceived qualtiy of workmanship. It will look good, but take far more work than it should. I'll be better next time though. The GV11 wasn't much to fair, and went easily. Building the CC and Leaning Post/Livewell has added a ton of fairing work. If those look gobbled together, the whole build suffers.
Re: OB19 build in Texas
Posted: Tue Nov 15, 2011 3:30 pm
by Steven
peter-curacao wrote:Steven wrote:Sand, Sand, Sand, Quckfair, Sand Sand Sand. Oh my aching shoulders.
I feel your pain, same over here
You feel my pain X 3. I look at all those panel on yours and cringe.
But it is looking sweet.
Re: OB19 build in Texas
Posted: Tue Nov 15, 2011 4:45 pm
by peter-curacao
Steven wrote:peter-curacao wrote:Steven wrote:Sand, Sand, Sand, Quckfair, Sand Sand Sand. Oh my aching shoulders.
I feel your pain, same over here
You feel my pain X 3. I look at all those panel on yours and cringe.
But it is looking sweet.
Well it's far from perfect only you can't see it clearly in the pics
wish I did a better job on the hull, I'm going to try to do a better job on the inside, pita is I can't see sh#t without primer on there.
Re: OB19 build in Texas
Posted: Tue Nov 15, 2011 7:21 pm
by Steven
Yeah. The differing colors make it a pain. I'm about to prime so I can finish the fairing.
Re: OB19 build in Texas
Posted: Tue Nov 15, 2011 11:00 pm
by Steven
More sanding and quick fair tonight. Then as I'm relaxing watching TV, I note that my toes seem to be sticking together. Seems I dropped a little and stepped on it, pushing it between my toes.
Re: OB19 build in Texas
Posted: Sun Nov 20, 2011 1:57 pm
by Steven
More sanding with a little more to go. I have a 4 day weekend for the holiday. One more day of final sanding and it's primer time. Next weekend I should have some pics. Having a new trailer and motor waiting in the wings sure makes the slow going painful.
Re: OB19 build in Texas
Posted: Sat Nov 26, 2011 6:28 am
by a_Adel
that's one fine build thread Steven.looking great
Almost about time for the primer pics?
Re: OB19 build in Texas
Posted: Sat Nov 26, 2011 4:03 pm
by Steven
Thanks. Getting closer every day. Didn't work on it as planned yesterday. Had to do some Christmas shopping. I'm actually on a lunch break from sanding now. The Temps dropped so not sure if I'll get primer on it tomorrow or not, but I'm hoping.
If my neck and shoulders hold out.
Re: OB19 build in Texas
Posted: Sun Nov 27, 2011 11:12 pm
by Steven
Got two coats of primer on today. Big weekend. I'm whipped. The side decks will get completely covered with Kiwi Grip, so I only coated around the radius that will be painted. I'll never understand how after multiple coats of epoxy and several applications of quick fair you have pin holes. I'm going to fill the pin holes before sanding, with Quick Fair. I'll sand those smooth, give the whole thing a light sanding and put on one more coat of primer. Then it's sanding for paint.


Re: OB19 build in Texas
Posted: Mon Nov 28, 2011 5:34 am
by wegcagle
Nice job Steven. She looks great
Will
Re: OB19 build in Texas
Posted: Mon Nov 28, 2011 7:29 am
by BassMunn
Gee whiz that looks awesome. Those pin holes gave me nightmares too, we introduce the bubbles when we mix the fairing compound and then expose the bubbles when we sand. I ended up using liquid spot filler over my primer to get them all as I just couldn't get rid of them.
Re: OB19 build in Texas
Posted: Mon Nov 28, 2011 8:02 am
by Steven
Thanks guys. Can you give me details on the liquid spot filler, BassMunn? I'm not familiar with it and I know that filling these are a pain. They are difficult to fill with Quick Fair because its thick and traps air in which just pushes it right back out as you try to smooth it.
Re: OB19 build in Texas
Posted: Mon Nov 28, 2011 8:26 am
by BassMunn
Steven I've got to get some today if I can for my rebuild, I take a pic of it and post it here if you want. It was basically just like a thick 1 part paint (smells like Aerolak paint), that you can spread on thin, wait a few minutes for it to dry and then sand it off. It just leaves a little behind in the pin holes to fill them up.
Re: OB19 build in Texas
Posted: Mon Nov 28, 2011 8:37 am
by Steven
BassMunn wrote:Steven I've got to get some today if I can for my rebuild, I take a pic of it and post it here if you want. It was basically just like a thick 1 part paint (smells like Aerolak paint), that you can spread on thin, wait a few minutes for it to dry and then sand it off. It just leaves a little behind in the pin holes to fill them up.
I you have a name, that would be fine. I can see if I can find it or something similar. Is it specifically compatible with Epoxy?
Re: OB19 build in Texas
Posted: Mon Nov 28, 2011 9:48 am
by Steven
Doing some searching I find Acrylic and nitrocellulose putties that might work. Not sure of their compatability though.
Re: OB19 build in Texas
Posted: Mon Nov 28, 2011 5:18 pm
by Prarie Dog
Steven, the putty I used to fill small spots and pinholes is called Pirannah Putty, it is a two part that the body guys favor that works real nice, You need to fill the holes and sand then prime and then block, but it will make them go away.
Re: OB19 build in Texas
Posted: Tue Nov 29, 2011 7:45 pm
by Steven
From a thread I started in Power Boats on filling Pin holes:
Pinholes I fear ye no more!!!!!
Cali's suggestion of Kombi and the razor blade made quick easy work of it. I sanded off the quickfair which only worked on about 1/2 the pin holes. The quick fair is harder to sand than the primer, so you can't sand it down without sanding through they primer. Atleast I can't.
The Kombi rocks. If fills the holes with no effort and sands off easily with 220 or finer. You can sand it smooth without sanding through the primer. Thanks Cali.
Re: OB19 build in Texas
Posted: Mon Jan 02, 2012 2:58 am
by flyfishingmonk
I really need to get out there and see that boat.
Re: OB19 build in Texas
Posted: Mon Jan 02, 2012 10:41 am
by Steven
flyfishingmonk wrote:I really need to get out there and see that boat.
Yes you do.
Re: OB19 build in Texas
Posted: Mon Jan 02, 2012 7:29 pm
by Steven
Just a little evidence that work proceeds.
Sanding and painting under the gunnels is a huge pain. I will definately sand and prime before glueing down the side decks on the next build.

Re: OB19 build in Texas
Posted: Mon Jan 02, 2012 7:33 pm
by flyfishingmonk
But I was recently told on my thread that you have to glass the deck down. This seems like I would be out of order.
Re: OB19 build in Texas
Posted: Mon Jan 02, 2012 7:38 pm
by flyfishingmonk
Or are you referring to the inside under the gunnel? I assume that is what you mean.
Re: OB19 build in Texas
Posted: Mon Jan 02, 2012 8:06 pm
by Steven
Yes, inside/under the gunnel. It is glassed down. I used 6 oz. cloth wrapped up the inwale over the top and down the rubrail.
Re: OB19 build in Texas
Posted: Mon Jan 02, 2012 8:20 pm
by chopperman
Wow Steven, you're really moving along. Must be nice to have the primer on.
Re: OB19 build in Texas
Posted: Mon Jan 02, 2012 9:04 pm
by Prarie Dog
Steven, your build is looking sweet, can't wait to see it at the Builders Meet next year.
Re: OB19 build in Texas
Posted: Tue Jan 03, 2012 11:01 am
by Uncle D
Prarie Dog wrote:Steven, your build is looking sweet, can't wait to see it at the Builders Meet next year.
X2, Steven, what is the Kombi. I can't find anything about it.
Thanks, Don
Re: OB19 build in Texas
Posted: Tue Jan 03, 2012 11:50 am
by wadestep
Great picture - you're really moving along there. It's looking more and more finished!
wade
Re: OB19 build in Texas
Posted: Tue Jan 03, 2012 12:52 pm
by tobolamr
Looks really really good! Keep it up!
Re: OB19 build in Texas
Posted: Wed Jan 04, 2012 8:24 am
by Steven
Uncle D wrote:Prarie Dog wrote:Steven, your build is looking sweet, can't wait to see it at the Builders Meet next year.
X2, Steven, what is the Kombi. I can't find anything about it.
Thanks, Don
Kombi is a lacquer based filler. Auto Supply stores sell it. Really fills pinholes easily, but you want to use it after the first primer coat. It's green so you want it covered well.
Re: OB19 build in Texas
Posted: Wed Jan 04, 2012 8:29 am
by Steven
Thanks guys. This last little bit is really dragging. Not helped by the fact that this is my least favorit chore.
Re: OB19 build in Texas
Posted: Mon Jan 16, 2012 10:46 am
by Steven
Fairing is coming along nicely now with the discovery of Dry Guide coat. Makes the job enjoyable. Spent all weekend sanding. Got the entire inside sanded and spot primed the low spots. Will spot them a second time to ensure good filling and then sand them level. That should leave the interior ready for final primaing and topcoat. Got one side of the hull sanded about 90% done. Ordered some more sandpaper. Will finish sanding and spot prime the outside this coming weekend. Nothing really pic worthy yet.
Still deciding on paint. Really want to go sterling, but I want two colors and buying by the quart makes it stupid expensive IMO. Considering Interlux Perfections as a possibility. If the Sterling came in 1/2 gallons it might be worth it. Not sure how much more durable Sterling would be over the Interlux, if at all.
Re: OB19 build in Texas
Posted: Mon Jan 16, 2012 11:50 am
by Uncle D
Is the Interlux tip and roll or will that matter to you.
Re: OB19 build in Texas
Posted: Mon Jan 16, 2012 12:05 pm
by Steven
It is tip and roll.
Re: OB19 build in Texas
Posted: Mon Jan 16, 2012 12:12 pm
by Uncle D
Thanks, I'll look forward to see the results. I want a Teal color but Sterling doesn't have it and won't return my calls when I tried to inquire about custom colors. I'll see what Interlux has to offer.
Re: OB19 build in Texas
Posted: Mon Jan 16, 2012 12:23 pm
by Steven
Here's a great tutuorial video that shows the whole process. It's part I of a 2 part series.
http://www.youtube.com/watch?v=sUv9HNiMQuM
Re: OB19 build in Texas
Posted: Mon Jan 16, 2012 1:58 pm
by Uncle D
Arrgh, No teal, Oh well.
Re: OB19 build in Texas
Posted: Mon Jan 16, 2012 2:16 pm
by flyfishingmonk
Oh man that is a bummer.
Re: OB19 build in Texas
Posted: Mon Jan 16, 2012 2:22 pm
by Daddy
My son fights me every time I pull the RO out of his hands to change the paper. Just gets in the groove and does not want to stop. I would rather cut than polish.
Re: OB19 build in Texas
Posted: Tue Feb 14, 2012 7:42 am
by Steven
Well, the interior is as ready for paint as I care to make it. No matter how hard I try, I can't sand the primer down smooth without cutting through in some spots. I didn't fair the inside to a yacht finish, but it's pretty good. All sanded to 220. I've decided to go with Interlux Perfection, which I"ve already purchased. Matterhorn White. I'll flatten the last coat on the sides and bulkheads to cut down on glare. I'm going to use White Kiwi Grip and tint it with some grey to match the offwhite/greyish hue of the Matterhorn. The exterior has last bit of spot filling done after blocking the first coats of primer. All that's left there is to sand a few filled spots and then 3 coats of primer and more sanding. Getting close.
Re: OB19 build in Texas
Posted: Fri Feb 17, 2012 10:01 pm
by Steven
Ordered a Baystar Hydraulic kit today. That should make for comfortable steering. This weekend I'll be doing the final priming on the outside. Next weekend I'll sand the exterior, then it's ready for topcoat.
Re: OB19 build in Texas
Posted: Fri Feb 17, 2012 10:30 pm
by Cracker Larry
That will be sweet
Next weekend I'll sand the exterior, then it's ready for topcoat.
It's been a long haul, hasn't it
What, 3 years almost, I think. But you've done it right all the way and she will sure be right when it's finished. Can't wait to see her. My only advice is don't rush the details at the finish line. If it takes a month longer, so be it
Re: OB19 build in Texas
Posted: Sat Feb 18, 2012 10:35 am
by Steven
Thanks. Sure feels like a long haul. We're at 2 1/2 yrs. Started two Sept. ago. Things slowed down considerably when I went form my 4x10 to a 5x8 shift. Plus I didn't do much work over the summers. Trying not rush, but it is certainly tempting. I don't want to miss much spring fishing. Once it's painted, the rigging will go quick. I'm trying to keep it as simple as I can.
Re: OB19 build in Texas
Posted: Tue Feb 21, 2012 2:30 pm
by Steven
Woot. Steering will be here on Thursday. Final coat of primer goes on tonight. By end of weekend, ready for paint.
Re: OB19 build in Texas
Posted: Tue Feb 21, 2012 2:31 pm
by flyfishingmonk
Steven wrote:Woot. Steering will be here on Thursday. Final coat of primer goes on tonight. By end of weekend, ready for paint.
Awesome!!
Re: OB19 build in Texas
Posted: Tue Feb 21, 2012 3:40 pm
by Steven
The weather is so nice I can open the garage door and roll it out some. So much easier doing the transom and motor well with the boat diagonaly crammed in.
Re: OB19 build in Texas
Posted: Tue Feb 21, 2012 8:18 pm
by Steven
Got the last coat of primer on.

You can see a few spots on the console and seat where I sanded almost through the primer. No matter how hard I try, I can't seem to sand the primer smooth without getting a few thin spots. I'll just put on how ever many coats of color it takes to cover it.

Re: OB19 build in Texas
Posted: Tue Feb 21, 2012 9:35 pm
by flyfishingmonk
Steven wrote:Got the last coat of primer on.
Steven that just looks incredible.
Re: OB19 build in Texas
Posted: Wed Feb 22, 2012 7:53 am
by topwater
Thats going to be a real nice ride
Re: OB19 build in Texas
Posted: Wed Feb 22, 2012 11:13 am
by Uncle D
It really looks nice Steven. On a side note, I started a leaning post similar to yours but with my phantom it looks odd. I'm back to the drawing board.
Don
Re: OB19 build in Texas
Posted: Wed Feb 22, 2012 11:38 am
by tech_support
the boat look fantastic, cant wait to see it with the topcoat.
I would not worry about those small areas where you sanded through a bit. You can add an extra coat in those places, so long as the last coat is continuous. The pot life for the sterling is long enough that you can roll and tip a coat over corners between your first a second coat, just have the last coat of the day be continuous and you will not be able to see the transition
Re: OB19 build in Texas
Posted: Wed Feb 22, 2012 11:52 am
by Steven
Thanks guys.
I decided to go with Interlux Perfection. I want to flatten the sheen in the interior, and Sterling does not recomend their flattening agent for roll and tip.
I'm even considering flattening the outside just to go a different route. I remember an article in Woodenboat magazine, I think, about flatened paint and I really liked the look. Still deciding on that though. I learned a lot about fairing on this, but it won't be quite a yacht finish. Not too far off. I didn't feather the transitions wide enough, so under close inspection, you will see a bit of it. You'll have to look down the side at a shallow angle to see it, but the extra sheen of Sterling would only compound it. Of course, I'll happily take anyone out for a boat ride who gives it such a close examination. I just won't bring them back.
Re: OB19 build in Texas
Posted: Wed Feb 22, 2012 12:29 pm
by cottontop
Steven, Your boat islooking better and better all the time. People are going to think you purchased it from a dealer. I had that question asked about my OD18 many times: even one of the largest dealers in N. Fl. asked me this question. On the small rub throughs. I had several myself. I just put 4 coats of S3 Orcas White over it and 4 coats of clear. It has never shown through. If I ever get to Texas, I want a ride.
Re: OB19 build in Texas
Posted: Wed Feb 22, 2012 9:08 pm
by Steven
You make it out this way, and we'll definitely go for a ride.
Got the motorwell, rear deck and transom sanded to 220 tonight. Just the sides and the small area of the bottom at the bow left for sanding.
Re: OB19 build in Texas
Posted: Thu Feb 23, 2012 10:14 am
by flyfishingmonk
Steven wrote:I didn't feather the transitions wide enough, so under close inspection, you will see a bit of it. You'll have to look down the side at a shallow angle to see it, but the extra sheen of Sterling would only compound it.
Can you expound some on this? Did you plane your butt joints? The only transition it looks like I will have to fight with, that's visible at least, is where the tape will be on the top and the bottom of the side panels. Everything else is on the bottom of the boat and well hidden up under the reverse chine.
However, the transom would be noticeable. I feathered it out about 8 inches there. Will QF take the loads of the hardware on the transom? Or should I fair with a thickened epoxy for strength and just work a little harder with the sanding?
Casey
Re: OB19 build in Texas
Posted: Thu Feb 23, 2012 10:40 am
by Steven
Mainly my areas of concern are along the chine. I really won't know for certain until I get some gloss on it. I did not recess my tape at the panel joints, so there could be something visible there too. I don't think there's any concern with the hardware.
Re: OB19 build in Texas
Posted: Thu Feb 23, 2012 9:14 pm
by Steven
Got the BayStar steering kit in today.

Re: OB19 build in Texas
Posted: Thu Feb 23, 2012 9:49 pm
by flyfishingmonk
Sweet!
Re: OB19 build in Texas
Posted: Fri Feb 24, 2012 10:18 am
by Steven
In action.

Re: OB19 build in Texas
Posted: Fri Feb 24, 2012 12:04 pm
by Cracker Larry
I like it
Re: OB19 build in Texas
Posted: Fri Feb 24, 2012 5:07 pm
by Uncle D
Looks great Steven, Fits the "Captain" perfectly
.
Re: OB19 build in Texas
Posted: Sat Feb 25, 2012 6:18 pm
by Steven
Got the left side of the boat sanded today and ready for paint. I used a 3"x18" flexible foam sanding block. Did passes with 120,150,180 and 220 grit. Whew!!! I'm actually very excited about how it turned out. If the right side is as fair, it will really look good I think. I didn't have any low areas, and only sanded through in a couple of spots. Tomorrow I'll finish the right side and then its time to empty the garage for a thorough dust evacuation.
Re: OB19 build in Texas
Posted: Sat Feb 25, 2012 6:34 pm
by chopperman
Looks great, Steven. I'm dealing with the same issues with sanding through the primer now. I had to order another gallon, but the areas that need primer are getting smaller and smaller.
I spoke with Joel about it, when I called him about an order. You may already be doing this, but he advised to thin the primer with water a bit (no more than 20%) so that it lays flat when rolled. You can use the RO for the first coats, but for your final primer coats, put down the RO and only sand by hand.
You just reminded me that I need drink holders on my center console. Where did you get your's?
Re: OB19 build in Texas
Posted: Sat Feb 25, 2012 7:13 pm
by Steven
Thanks. I thinned it a little on the last coat I painted in the interior. It does go down smoother. Would have been better to do all three coats that way. I'm not worrying about the few spots I cut through. I'll put enough color on to cover them. I tried the RO, but I find it much slower going than hand sanding. Plust I definately cut through more with the RO.
I got the cup holders at West Marine. They'll price match any internet price. Notice that mine are set in just a bit. I did that so that a drink in the right one won't interfere with the throttle lever. I did the left to match the right. My brain abhors asymmetry.
Learning lesson courtesy of CL.
Re: OB19 build in Texas
Posted: Sat Feb 25, 2012 8:11 pm
by chopperman
Cool
I am going to try thinning it and hand sanding for the next coats.
Re: OB19 build in Texas
Posted: Sat Feb 25, 2012 8:31 pm
by Steven
This is what I use. It has a thin spring steel shoe. Comfortable in the hand and works great. Harbor Freight sells it.

Re: OB19 build in Texas
Posted: Mon Feb 27, 2012 7:51 am
by Steven
Re: OB19 build in Texas
Posted: Mon Feb 27, 2012 8:21 am
by Cracker Larry
That's one of the best feelings in the world, when you finally put that sander back on the shelf
If you wet the surface good with a hose you can get a good idea of how the paint will look.
Re: OB19 build in Texas
Posted: Mon Feb 27, 2012 2:22 pm
by Steven
Thats in the works. I'll be rolling her out before the weekend to hose her off and clean the garage. My only concern with the sanding is if 220 is fine enough. I've never sanded finer than that for any finishes before, and the can says 220-320.
Re: OB19 build in Texas
Posted: Mon Feb 27, 2012 4:09 pm
by cottontop
Steven, Been a long time since I painted "Ezmorning". If I remember right 220 is plenty fine. You want to leave the surface some grip for the paint. I water sanded with 320 then 400 between successive coats. She is still holding up very well. Like you, we're looking for the finished product. John
Re: OB19 build in Texas
Posted: Mon Feb 27, 2012 5:26 pm
by Steven
Thanks John. I'm planning to recoat without sanding. Hopefully I can get it to lay down nicely. But, I'll do what has to be done. The fairing came out better than expected as far as I can tell with primer. So I don't want to mess it up now.
Steven
Re: OB19 build in Texas
Posted: Mon Feb 27, 2012 6:04 pm
by Cracker Larry
I'm planning to recoat without sanding.
So was I, a few times
It never works out for me though. I usually put on a couple of coats, wet sand with 220 to get out the bug legs. Another coat, or 2, and wet sand with 320 to get out the other bug legs, then the final coat
Re: OB19 build in Texas
Posted: Mon Feb 27, 2012 6:39 pm
by chicagoross
Glad I'm not the only one that had to fight the bug legs when I paint...

Re: OB19 build in Texas
Posted: Mon Feb 27, 2012 7:44 pm
by Steven
You coasties keep the bugs to yourselves. I'll be painitng in the garageI'll be hanging sheets around the boat, which I'll wet before painting to hold down on the dust.
Ross, I haven't forgot you on those cleats. I have a box ready to go.
Re: OB19 build in Texas
Posted: Mon Feb 27, 2012 8:28 pm
by Cracker Larry
Hose down the floor, the walls and everything else you can. Of course around here water just draws more bugs, but it does lay down the dust.
Re: OB19 build in Texas
Posted: Tue Feb 28, 2012 12:00 am
by chicagoross
Thanks, Steven! I'm learning things here, never worried about the dust much, the bugs usually hide any dust contamination...
Re: OB19 build in Texas
Posted: Tue Feb 28, 2012 8:00 am
by Steven
The dust will only bug
me until I splash it and get it bloody and grimy. I'm not going to be too carried away with it. I'll just clean the garage well and hope that watering everything down keeps it to an acceptable level. Once I start rigging, thoughts of dusty paint will quickly fade. I'll try to get the console as dust free as possible. That way I won't stare at a reminder. Most of the horizontal surfaces will be Kiwi Grip, so no worries there.
Re: OB19 build in Texas
Posted: Thu Mar 01, 2012 9:47 pm
by Steven
Got her on the trailer. That was a bit tense. I jacked up the back by the jig. Then I placed two jack stands with 2x4's on top covered with carpet under the stringers a foot in from the transome. Dropped the jack and let the jig lower leaving the stern supported by the jack stands. I put a ratchet strap around the jack stands so they couldn't separate. Then I jacked the front of the boat up off the jig. I cut the front 3rd of the jig off and pulled it out from under the boat. I rolled the trailer underneath to the jack and attached the winch strap. I lowered the front of the boat onto the trailer and then winched the trailer under the boat. Whew!!!!!!!
On a down note, my super nice custom trailer is too short. I'm going to call them tomorrow and have them send me a longer tongue. Not real please about this, but the width is perfect. That is what I was worried about. Never thought to check the length.


Re: OB19 build in Texas
Posted: Fri Mar 02, 2012 7:53 am
by Aripeka Angler
Awesome
She sure is pretty sitting on the trailer!
Re: OB19 build in Texas
Posted: Fri Mar 02, 2012 11:08 pm
by Steven
Got the boat paint 'tent' constructed. It encloses 3 sides. All seams are taped and the bottom is taped to the floor. Love me some duct tape. I'm going to lay old sheets on the floor and wet them to hold down the dust. The front is open. Not sure what I'm going to do with the front. I want circulation for fresh air. I might cut in some house filters to allow some air movement and then just drape a piece of plastic accross the front. Maybe a box fan taped to one side to move some air out. Not sure if the fumes from rolling paint can ignite. I don't have an explosion proof fan. Thoughts??


Re: OB19 build in Texas
Posted: Sat Mar 03, 2012 7:35 am
by Aripeka Angler
I have painted two boats with Sterling and helped with a third. I did not use a fan with my painting, but it does get pretty stinky. I am thinking the fan is going to stir up dust no matter how careful you are. I would just leave a hole on one corner, wear a good mask and seal up the enclosure between coats. I would want a little more room in the enclosure too...
Re: OB19 build in Texas
Posted: Sat Mar 03, 2012 8:32 am
by wadestep
Steven - what paint are you planning on using? I used Interlux Perfection on my hull so far. I can tell you, with that paint you'd be about dead in that space without fresh air to breathe. I did mine in the garage with the pedestrian door open and still felt like I was getting high... Maybe Sterling is better, but with Perfection I don't think a charcoal-type respirator would cut it in there.
wade
Re: OB19 build in Texas
Posted: Sat Mar 03, 2012 10:29 pm
by Steven
I hate painting. Can't keep dust down. Ugh
.
Re: OB19 build in Texas
Posted: Sat Mar 03, 2012 11:12 pm
by gstanfield
Steven, even in the spray booth that I use when I paint cars dust is an issue. The easy solution is to grab a cheap garden sprayer and fill it with water, pump it up and mist the entire area with water. It will do wonders for cutting down on the dust as a vast majority of it comes from the floor when you walk. I had a coworker at the bodyshop that would add a teaspoon of dove liquid soap to a 2 gallon sprayer of water. He swore that it helped the water to cling to the dust and slowed the evaporation of the water. I don't know if it really did or not, but the spray booth was always sparkly clean after he used it
Re: OB19 build in Texas
Posted: Sun Mar 04, 2012 9:02 am
by Steven
Thanks George. I'll give that a try. I put a coat on the console. First time using this type of paint. Haven't looked it this morning yet, but I dont' think it was thin enough. Hadn't completely flowed out by the time I left. Today I'll experiment on the leaning post/livewell.
Re: OB19 build in Texas
Posted: Sun Mar 04, 2012 12:43 pm
by Steven
It's shiny but rough as a piece of sand paper. The Seat/Livewell is better than the console after wetting the floor and the sole. I'm using Whiz foam rollers, but I think they're flaking. I'm going to try the yellow rollers for epoxy. This is going to drive me to drink. I don't care a lick about brush marks, but the dust is going to drive me batty.
You can see the reflection of the hatch opening in the casting deck from in this one. Plent shiny.


Re: OB19 build in Texas
Posted: Sun Mar 04, 2012 10:46 pm
by CaseyS
You can take a cheap box fan and place it so that it exhausts air out. On the other side of your tent put a large ac filter. You can should also put an ac filter on the intake side of the box fan. The filter on the fan side should be as open of a filter as you can find so that it doesn't restrict the air much.
Re: OB19 build in Texas
Posted: Mon Mar 05, 2012 7:47 am
by Steven
Considered that but was concerned I'd pull in additional dust from any cracks or crevices. How about a filter on the box fan on the intake blowing into the enclosure? This would put a positive pressure inside the tent, moving dust out instead of in.
Re: OB19 build in Texas
Posted: Mon Mar 05, 2012 8:26 am
by CaseyS
If you use a single filter twice as big or two filters just the same size as the box fan filter then the area you are drawing from should be sufficient. If you notice when u turn the fan on and the tent sides drawin add another intake filter. The cheap box fans do not sidplace much air therefore u won't be pulling much of a vaccuum or creating a strong negative pressure environment.if u place the box fan to blow into the tent I think u will have more problems with dust. Blowing into the tent will kepp the dust suspended in theair and never let them settle or at least take a lot longer to settle into corners or stale areas. If you make the intake side big enough the air will want to draw into the area that has the least resistance. If u have extremely noticeable gaps in ur tent u need to take the xtra time to tape those up or add more plastic.
Re: OB19 build in Texas
Posted: Mon Mar 05, 2012 8:38 am
by Steven
Thanks Casey. The tent is well taped on all seams and taped to the floor. The only opening is the front corner for getting in and out. I'll go with your suggesion and provide several intake filters.
Re: OB19 build in Texas
Posted: Mon Mar 05, 2012 9:00 am
by CaseyS
George is right. You need to spray the floor. Keeping it wet keeps u from kicking up so much dust. With the ventilation there shouldn't be much concern about the humidity level. It should draw out mostof the evaporating water. Some paints like higher humidity but I never used lpu so I don't know.
Re: OB19 build in Texas
Posted: Mon Mar 05, 2012 10:54 am
by Steven
THanks. I have sheets on the floor that I wetted on the second attempt. That pushed the humidity to 60 %. The air movement will help that for sure.
Re: OB19 build in Texas
Posted: Mon Mar 05, 2012 2:03 pm
by Steven
Any thoughts on placement of the fan and intake filter(s). High or low or a mix. Seems like pulling the air up would be good for horizontal and vertical surfaces inside the boat, whild moving it down would be good for the sides since they're sloped in.
Re: OB19 build in Texas
Posted: Wed Mar 07, 2012 10:14 am
by Boater45
Steven wrote:Took off with the wife to Houston at 11:30am for the plywood. Rained off and on the whole day and of course poured when we got home at 8:00 pm.
Sat for a bit until it slowed up. There's a boat in here somewhere. The GV11 is going to loose it's home tomorrow.
Steven, where in Houston did you get your wood?
Thanks, Will
Re: OB19 build in Texas
Posted: Wed Mar 07, 2012 11:13 am
by Prarie Dog
Will
I'm not sure where Steven got his ply, but most of the guys down that way buy theirs at Houston Hardwoods.
Re: OB19 build in Texas
Posted: Wed Mar 07, 2012 1:34 pm
by Boater45
Great!! Thanks Prarie Dog!!
Re: OB19 build in Texas
Posted: Wed Mar 07, 2012 2:02 pm
by Steven
Same. They have a great selection and prices.
Re: OB19 build in Texas
Posted: Wed Mar 07, 2012 3:37 pm
by Boater45
Thanks Steven!!
Re: OB19 build in Texas
Posted: Sun Mar 11, 2012 8:10 pm
by Steven
Re: OB19 build in Texas
Posted: Sun Mar 11, 2012 8:16 pm
by peter-curacao
wow that's awesome!!!!
Re: OB19 build in Texas
Posted: Sun Mar 11, 2012 8:55 pm
by wadestep
Yeah, Steven that is looking GREAT! I'm doing mine in a very similar color, and can vouch for the dark color highlighting imperfections. At least you didn't have a fly in the finish:
I've still got sanding and 2 finish-coats to do, but I can only hope it turns out anything like your pictures. That Perfection is some smelly stuff.
wade
Re: OB19 build in Texas
Posted: Sun Mar 11, 2012 9:12 pm
by Steven
Thanks guys. Is that Lauderdale Blue, Wade? That's what I'm using. It is some smelly stuff, but with the proper respirator cartridge there is no odor. The picture makes it look better than it is, but I'm not going to obsess over it. I'm disappointed by the sanding scratches. I sanded my butt off going through 4 grits to 220. There's no way I could see them until I put on the paint. Hopefully they're only visible when looking at a very shallow angle with a back light.
Re: OB19 build in Texas
Posted: Sun Mar 11, 2012 9:14 pm
by TRC886
Re: OB19 build in Texas
Posted: Sun Mar 11, 2012 9:19 pm
by Aripeka Angler
Steven, nice looking work! I really like the blue paint. Great job man
Re: OB19 build in Texas
Posted: Sun Mar 11, 2012 9:36 pm
by Prarie Dog
Looks really nice Steven. Like the color
Re: OB19 build in Texas
Posted: Sun Mar 11, 2012 10:07 pm
by wadestep
Steven wrote: Is that Lauderdale Blue, Wade?
Yep - Lauderdale Blue hull, Artic White interior, and some Kiwi Grip color TBD is what I've planned. Great minds must think alike. I really like the blue color - dark enough to look really good, light enough not to be too hot under direct sun for the hull sides.
wade
Re: OB19 build in Texas
Posted: Mon Mar 12, 2012 4:02 am
by icelikkilinc
give yourself credit man, that looks good for the first coat..
it will get better with the other coats complete and than all the boatyards here use polishing compounds with machines to smooth things out...
Re: OB19 build in Texas
Posted: Mon Mar 12, 2012 7:29 am
by topwater
Steve the paint looks great
Nobody but you is going to notice the imperfections , because
you are the one doing it so you know where they are.
Re: OB19 build in Texas
Posted: Mon Mar 12, 2012 7:36 am
by Steven
Thanks guys. Tonight I'll wet sand the rough spots and put on a second coat. This stuff covers really well. Two coats will do it. It will look great from 2 feet out.
I'll just keep a cordone around it at all times.
Re: OB19 build in Texas
Posted: Mon Mar 12, 2012 7:47 am
by cottontop
Steven, Your paint really looks fantastic! No one is ever going to notice all the little imoperfections that we as builders see. Bekieve me, you're going to get so many compliments. Looking forward to seeing some pics on the water. John
Re: OB19 build in Texas
Posted: Mon Mar 12, 2012 8:00 am
by chicagoross
The paint looks great in the photo, Steven! I've never got better than a 8 foot paint job...
Re: OB19 build in Texas
Posted: Mon Mar 12, 2012 8:46 am
by Steven
chicagoross wrote:The paint looks great in the photo, Steven! I've never got better than a 8 foot paint job...
I've decided the fish don't care.
Re: OB19 build in Texas
Posted: Mon Mar 12, 2012 10:09 pm
by Steven
Put on a second coat of blue today. Took some pictures but my darn phone didn't save them because the battery was low. Did a much better job of putting it on, but it still didn't flow well. It's one big brush mark. Has a very distinct look. My wife and kids really liked it and said I'm not to 'fix' it. Truth is I like it myself. The texture hides the dust which has declared a total victory over me. I'm actually somewhat pleased with how it turned out.
Re: OB19 build in Texas
Posted: Mon Mar 12, 2012 11:12 pm
by chicagoross
Sounds good, Steven! The worst painting mistake I've read about is the "one coat too many", where each coat gets a little better, and then the "final" coat screws up all the previous hard work. If it looks good to everyone, go fishing!
Re: OB19 build in Texas
Posted: Tue Mar 13, 2012 4:41 pm
by Boater45
It looks great Steven!! Love the color!!
Re: OB19 build in Texas
Posted: Tue Mar 13, 2012 8:11 pm
by Steven
Thanks guys. Went over this evening to take a look. Think it's going to get a wet sand and a final coat. Looks better than after the first coat, but I can do better. Getting the hang of the paint.
Re: OB19 build in Texas
Posted: Tue Mar 13, 2012 11:11 pm
by Cracker Larry
Getting the hang of the paint.
That's what it takes. Then hope that the weather doesn't change
Painting is a profession all it's own, and I'm sure not a professional, but you can get very good results once you get the hang of it.
Re: OB19 build in Texas
Posted: Thu Mar 15, 2012 1:22 pm
by tobolamr
Man, nice job on the paint!
Re: OB19 build in Texas
Posted: Fri Mar 16, 2012 1:22 pm
by steve292
I too got myself het up over the paint, but trust me on this....no one will notice
....& if they do, ask to have a look at the one they built, that'll shut most of them up
Lokks tremendous, i've followed you all the way through this & your work does you immense credit.
Steve
Re: OB19 build in Texas
Posted: Fri Mar 16, 2012 8:54 pm
by Steven
Thanks Steve. I'm giving her one more go on the outside, and that's it. I'm going to paint the interior this weekend. It just gets rolled with no tipping. The white is supposed to flow without tipping. It will be slightly textured which is what I want on the inside. I ordered another quart of blue, so I'll be finishing the outside next weekend. Then it's Kiwi Grip and rigging.
Re: OB19 build in Texas
Posted: Mon Mar 19, 2012 7:14 pm
by Steven
Rolled white in the interior over the weekend. No brush tipping. Just rolled. Really like the look of that. Hopefully I'll get it all sanded down for final coats this weekend. Gonna be good weather finally. No rain . Humidity in the tent has been 70 %. Yuck. Gonna be warm and dry this weekend.
Re: OB19 build in Texas
Posted: Mon Mar 19, 2012 7:20 pm
by peter-curacao
How much more teasing we have to take from you? almost ten days without pics come on I can't take it any more
Re: OB19 build in Texas
Posted: Mon Mar 19, 2012 8:16 pm
by Steven
Re: OB19 build in Texas
Posted: Mon Mar 19, 2012 8:22 pm
by peter-curacao
Very nice thanks for the pics
Re: OB19 build in Texas
Posted: Mon Mar 19, 2012 8:48 pm
by flyfishingmonk
I have been whatching the progress. Looking good.
Re: OB19 build in Texas
Posted: Mon Mar 19, 2012 8:51 pm
by Boater45
Steven wrote:

Are you putting side scupper valves in or are you going to use plugs?
Will
Re: OB19 build in Texas
Posted: Mon Mar 19, 2012 9:30 pm
by Steven
Thanks guys.
Will,
I'm using brass inserts and plugs to start. May add scupper valves depending on how high above waterline they are.
Steve
Re: OB19 build in Texas
Posted: Mon Mar 19, 2012 10:00 pm
by Boater45
I really like the looks of that!! Giving me some ideas!!!
Re: OB19 build in Texas
Posted: Tue Mar 20, 2012 7:48 am
by cottontop
Thanks for the boat porn pics. Steven you sure have the "shine"
on your boat. John
Re: OB19 build in Texas
Posted: Thu Mar 22, 2012 12:46 pm
by Steven
Re: OB19 build in Texas
Posted: Thu Mar 22, 2012 12:48 pm
by Cracker Larry
She looks real good in the sunshine
Re: OB19 build in Texas
Posted: Thu Mar 22, 2012 12:52 pm
by Steven
Thanks. It looked better than I expected. At some point, I'm going to change the blue on the bottom to white, leaving only the sides blue. Will be easy to do and I think it will look better, but that's for another time.
Re: OB19 build in Texas
Posted: Thu Mar 22, 2012 1:12 pm
by peter-curacao
very nice, already like a mirror
Re: OB19 build in Texas
Posted: Thu Mar 22, 2012 1:22 pm
by flyfishingmonk
wow that looks great!
Re: OB19 build in Texas
Posted: Thu Mar 22, 2012 2:51 pm
by Fuzz
Love the color! Is it possible to make one shine even more?
That is one nice looking boat!
Fuzz
Re: OB19 build in Texas
Posted: Thu Mar 22, 2012 2:53 pm
by Boater45
Looks GREAT Steven
Re: OB19 build in Texas
Posted: Thu Mar 22, 2012 3:04 pm
by tobolamr
Man, again - that looks great!
Re: OB19 build in Texas
Posted: Thu Mar 22, 2012 4:25 pm
by chicagoross
Really looking good, Steven - I've got to show these pics to my kids, they've decided that the MM21 tugboat will be blue!
Re: OB19 build in Texas
Posted: Thu Mar 22, 2012 8:05 pm
by cottontop
Steven, We all thank you for the additional pics. You have one beautiful boat! John
Re: OB19 build in Texas
Posted: Fri Mar 23, 2012 8:02 am
by topwater
Nice job on the paint
Re: OB19 build in Texas
Posted: Fri Mar 23, 2012 9:40 am
by Steven
Thanks guys. If all goes well, I'll get her sanded tomorrow and painted on Sunday. I'll order some Kiwi-Grip next week and then there are some details to finish up. I haven't primed and painted the hatches yet. I need to drill the hatch gutters for hose barbs so they drain. The back corners of the gutters have an epoxy plug I'll drill through. The barbs will be glued in from the bottom of the deck. Was going to drain them overboard, but decided there wasn't any real reason to do that. Each stern locker has a 3" hole into the bilge entering just under the highest part of the motor well deck. I'll route the drain hoses into the bilge.
I need to apply one more coat of tinted epoxy to the bilge after making drilling some extra holes and doing some grinding so the Live well drain through hole nut beds flat on the transom. And I"m sure there are a half dozen other items to tidy up. Getting close.
Re: OB19 build in Texas
Posted: Fri Mar 23, 2012 12:22 pm
by Uncle D
Paint looks real good in the pics Steven. If I hadn't already bought paint and Kiwi-Grip I might change my mind.
Re: OB19 build in Texas
Posted: Mon Mar 26, 2012 10:05 am
by Steven
Sanding, Sanding, Sanding. I'm so ready to have this beast done. Took a lot of work to sand out all of the brush marks. Not quite as easy going as Yacht Primer. The lightly shaded areas are dust. I still have to do the small aread of the bottom that's still shiny. I'll be paining it white. Got the console sanded and part of the leaning post/livewell. Still have the insides and bulkheads to do, then it's one coat til done.


Re: OB19 build in Texas
Posted: Mon Mar 26, 2012 2:37 pm
by chopperman
Looks real nice, Steven
Re: OB19 build in Texas
Posted: Mon Mar 26, 2012 3:52 pm
by Steven
Thanks. I have reached my limit of patience on this. Weather is beautiful and I'm at the point I'd like to be enjoying my time with my family on the water.
Re: OB19 build in Texas
Posted: Mon Mar 26, 2012 4:40 pm
by cottontop
It looks beautiful. If it's good enough for you, that should be all that matters. John
Re: OB19 build in Texas
Posted: Mon Mar 26, 2012 7:34 pm
by wegcagle
Absolutely beautiful Steven. Get her finished and go get her wet
You've gotta be getting a little excited huh?
Will
Re: OB19 build in Texas
Posted: Mon Mar 26, 2012 9:55 pm
by Steven
Thanks guys. I'm a 'little excited' for sure.
I can almost feel the waves beneath the keel. l'll be happy with the next coat no matter how it looks.
Re: OB19 build in Texas
Posted: Tue Mar 27, 2012 10:12 am
by Steven
Last night I sanded the interior. All that is left is the coaming, rubrail, motor well and the hull bottom under the bow. Should wrap that up tonight. That will give me 3 days for clean up and dusting. The weekends looking decent for paint early Sat. and Sun. mornings. Going to order some kiwi grip so the following weekend I may get some of that down.
Re: OB19 build in Texas
Posted: Tue Mar 27, 2012 11:48 am
by wadestep
Looking great, I'd sure be anxious at this stage, too!
wade
Re: OB19 build in Texas
Posted: Wed Mar 28, 2012 2:24 pm
by Steven
More sanding last night. Thought I'd wrap it up but couldn't quite finish. Have just the coaming and rubrail tonight. That should take about 40 minutes, then I'll giver her a good hosing off and vaccuum out the paint both and wash it down. That will let it sit for a few days before painting for everything to settle.
Re: OB19 build in Texas
Posted: Sun Apr 01, 2012 8:45 pm
by Steven
Paint is done I hate painting.
Re: OB19 build in Texas
Posted: Sun Apr 01, 2012 9:05 pm
by wadestep
That's got to be a relief!
Re: OB19 build in Texas
Posted: Sun Apr 01, 2012 10:43 pm
by Steven
Re: OB19 build in Texas
Posted: Sun Apr 01, 2012 10:52 pm
by Prarie Dog
Steven, that looks awesome, great job.
Re: OB19 build in Texas
Posted: Sun Apr 01, 2012 11:06 pm
by Aripeka Angler
Awesome!!!!!! You have built one fine looking boat
Re: OB19 build in Texas
Posted: Mon Apr 02, 2012 7:11 am
by SmokyMountain
Steve,
That's on beautiful boat!!
I hope mine looks as half as good.
Andrew
Re: OB19 build in Texas
Posted: Mon Apr 02, 2012 8:01 am
by topwater
Hope mine turns out half that nice, great job
Re: OB19 build in Texas
Posted: Mon Apr 02, 2012 8:20 am
by TomD
Steven your boat is looking really great, I love the colour scheme. Very classy. I read your post about being over critical on the paintwork and had to chuckle - perfectionism can be a real pain sometimes but once its on the water you will forget all about it!
I am building my center console at the moment and trying to get the layout correct. It is a similar design to yours and trying to get the spacing at the back correct - I feel like there isnt much room there (amazing how the floor space shrinks!) but I feel in part thats an "optical illusion" because of the high motorwell bulkhead on the C19. Out of interest how far from your baitwell to the bulkhead on your boat? Does it feel cramped?
Re: OB19 build in Texas
Posted: Mon Apr 02, 2012 9:18 am
by peter-curacao
WOW
I'm speechless, great job
Re: OB19 build in Texas
Posted: Mon Apr 02, 2012 9:30 am
by Cracker Larry
Very nice Steven! Only you will notice the imperfections and the fish won't care. Beautiful
Re: OB19 build in Texas
Posted: Mon Apr 02, 2012 9:38 am
by Steven
Thanks guys. I'm sure once I spash it, I'll forget about the imperfections. Now I have to make a final decision on Kiwigrip color. I really think white would look best, but am concerned about the glare. Since it is not glossy, and is so rough, glare might not be a huge issue. I could tint it down a bit. The other choice is beige.
Tom,
The space between the livewell and motorwell bulk head does not feel cramped. Two people ccould pass there, but not without touching. IIRC there is just under 2'. I'll measure it for you tonight. I could have had an additoinal 6-7" had I tucked the livewell further under the Leaning Seat. However, I wanted the top of the live well to be a comfortable seat with a good sized access. Like everything it was a compromise.
Re: OB19 build in Texas
Posted: Mon Apr 02, 2012 9:47 am
by Cracker Larry
The gray KG would look good with those colors, it's a VERY light gray.
Re: OB19 build in Texas
Posted: Mon Apr 02, 2012 9:49 am
by Boater45
Really nice Steven!!! Great job!!
You should be very proud!!

Re: OB19 build in Texas
Posted: Mon Apr 02, 2012 10:06 am
by Steven
Thanks WIll.
I think you're right on the gray Larry. I used some in my GV11. It would look nice with the blue. I was concerned the biege might be to much contrast. Thanks.
Re: OB19 build in Texas
Posted: Mon Apr 02, 2012 3:18 pm
by cottontop
Grrrrrreat job!!! Steven I'm with Cracker. I think you would like the very light grey. John
Re: OB19 build in Texas
Posted: Mon Apr 02, 2012 5:20 pm
by chicagoross
Beautiful! The paint came out looking sweet!
Re: OB19 build in Texas
Posted: Tue Apr 03, 2012 10:21 pm
by Steven
Re: OB19 build in Texas
Posted: Wed Apr 04, 2012 1:01 am
by chicagoross
Good looking trailer for a good looking boat! That's probably the best support I've seen on a lot of trailers; looks like your ready for hauling on Mexican roads!
Re: OB19 build in Texas
Posted: Wed Apr 04, 2012 2:50 pm
by tobolamr
Looking good!!!
Re: OB19 build in Texas
Posted: Wed Apr 04, 2012 2:52 pm
by Uncle D
Steven, looks like you'll be ready for the meet.
Re: OB19 build in Texas
Posted: Fri Apr 06, 2012 9:02 am
by Steven
FIgured out where the 36 grit crud in the rubrail came from. Brought the boat home last night. Wife noticed a big blue paint smear on the tire tread. I must have leaned over to sight down the side and tourched the brush to the tire. Dumb.
Re: OB19 build in Texas
Posted: Fri Apr 06, 2012 11:08 am
by gstanfield
She looks good sitting there
The fenders are kinda tight, I'd end up running the boat into them if it were mine. That's my kinda luck
Re: OB19 build in Texas
Posted: Fri Apr 06, 2012 12:19 pm
by Prarie Dog
Steven wrote:FIgured out where the 36 grit crud in the rubrail came from. Brought the boat home last night. Wife noticed a big blue paint smear on the tire tread. I must have leaned over to sight down the side and tourched the brush to the tire. Dumb.
Steven your not dumb, that's a beautiful build. What it is, is that dirty dog Murphy lurking in the weeds, he's in my boat building shop, at the daily grind shop and out in the woods. One good example of how he'll lay in the weeds and get you happened to my dad many years ago. My dad and I had a customer who's car wouldn't start. We drove out to the high school parking lot with the lady and started looking it over. It was a one year old Buick with HEI ignition, first one we'd ever seen. Back in the day the first thing a mech. checked on a no start was to see if it had spark. So dad pulled a plug wire off, stuck a pocket screwdriver in the boot, and leaned his body away from the car-- so he wasn't grounded, then asked me to crank it. I did, and he yelled, jumped away from the car and danced around a bit holding his crotch. The lady customer is standing there with an expression on her face that looks like she's wondering if she has the two stooges. I asked dad what happened and he told me, "It sure as hell has spark, jumped about a two incher between my boys and the fender". Murphy was alive and well back then too.
Re: OB19 build in Texas
Posted: Fri Apr 06, 2012 3:50 pm
by Steven
Now that is one funny story.
Re: OB19 build in Texas
Posted: Fri Apr 06, 2012 5:08 pm
by Uncle D
Prarie Dog wrote: "It sure as hell has spark, jumped about a two incher between my boys and the fender".
I'm laughing so hard tears are running.
Reminds me of the dog peeing on an electric fence...
Re: OB19 build in Texas
Posted: Fri Apr 06, 2012 5:09 pm
by Steven
gstanfield wrote:She looks good sitting there
The fenders are kinda tight, I'd end up running the boat into them if it were mine. That's my kinda luck
Yeah. It is a bit tight. but I don't think it will be a problem. If it is, I'll add some wheel spacers and move the wheels out 1-1/2". The feners will adjust out easily.
Re: OB19 build in Texas
Posted: Sat Apr 14, 2012 11:36 pm
by Steven
Mounted the engine today and installed a lot of hardware. Due to server migration, pictures will have to wait. I didn't 5200 the motor bolts yet. Need to research motor height. Right now I have the cavitation plan even with the bottom at the keel, but think it maybe should be an inch higher. I think I'll just order the manual Bob's Jack plate so I can fine tune it.
Re: OB19 build in Texas
Posted: Sat Apr 14, 2012 11:37 pm
by Steven
Mounted the engine today and installed a lot of hardware. Due to server migration, pictures will have to wait. I didn't 5200 the motor bolts yet. Need to research motor height. Right now I have the cavitation plan even with the bottom at the keel, but think it maybe should be an inch higher. I think I'll just order the manual Bob's Jack plate so I can fine tune it.
Re: OB19 build in Texas
Posted: Sun Apr 15, 2012 7:19 am
by wadestep
Steven - I just got done fiddling with the Bob's manual jack plate yesterday. It looks like on it's lowest setting there is a 2-3" lift built-in. IE - I think you'd have to use different holes in your transom? Doesnt' seem like that should be the case, but I spent an hour or so measuring, rearranging it, re-measuring, and drilling holes in the transom yesterday.
Before ordering, I'd get that cleared up.
wade
Re: OB19 build in Texas
Posted: Sun Apr 15, 2012 2:26 pm
by Steven
The Yamaha motor manual says to put the cavitation plate level with the bottom. I'm right at that. I'm going to test it there and see how it performs. The Jackplate should be bolted onto the transom using standard bolt hole pattern and location. I would think you'd only need a little adjustment to get it fine tuned.
Re: OB19 build in Texas
Posted: Sun Apr 15, 2012 6:44 pm
by smilinmatt
I'm pretty sure I'm level with the bottom on mine, I'll check that some time this week. I haven't played with engine height at all, and my prop never ventilates (I could probably raise it an inch or so).
Re: OB19 build in Texas
Posted: Sun Apr 15, 2012 10:50 pm
by Steven
smilinmatt wrote:I'm pretty sure I'm level with the bottom on mine, I'll check that some time this week. I haven't played with engine height at all, and my prop never ventilates (I could probably raise it an inch or so).
Thanks Matt. I just posted a question on wiring in the Power Boats section if you have a minute.
Re: OB19 build in Texas
Posted: Sun Apr 22, 2012 10:33 pm
by Steven
Got the steering head mounted and the drink holders mounted in the console. Still can't post pictures yet, but I will as soon as the forum is fixed.
Re: OB19 build in Texas
Posted: Tue Apr 24, 2012 8:52 pm
by Steven
Woot!!!! Working Gallery. Crap upload is not working. So frustrating.
Re: OB19 build in Texas
Posted: Wed Apr 25, 2012 4:09 am
by chopperman
Can't wait to see all your installed rigging
Re: OB19 build in Texas
Posted: Wed Apr 25, 2012 10:36 pm
by Steven
Photos finally.
The cavitation plate is about 1/2" above keel level when it is trimmed to be parallel to the bottom. That should be just about right. You can see the Aluminum plate added to the back of the transom. It's a bit longer than needed, but I didn't have a way to easily cut it and if I go to a Jack Plate at some point, it will definitely be big enough. I applied genourous beads of 5200.

Got the Baystar Hydraulic unit installed. I"ll run the tubes after doing the quick fair this weekine.
I bought a 3' section of 5/16" x 3' aluminum bar. Cut two pieces out with the chop saw and rounded the edges. Good strong backing plates to distribute the load for only $13 and an hour of work.


Re: OB19 build in Texas
Posted: Wed Apr 25, 2012 10:47 pm
by chopperman
Steven wrote:
I bought a 3' section of 5/16" x 3' aluminum bar. Cut two pieces out with the chop saw and rounded the edges. Good strong backing plates to distribute the load for only $13 and an hour of work.
Great Idea

Your boat is looking real nice
Re: OB19 build in Texas
Posted: Fri Apr 27, 2012 4:31 pm
by smilinmatt
Sorry, forgot to get back to you sooner about the motor height. Mine is almost perfectly in line with the bottom of the vee when trimmed parallel. It sounds like you're about one hole higher than me, which is probably where it should be. I never blow out the prop, and I can run trimmed very high.
Did you get your electrical hooked up on the engine? If not let me know, and I'll see if I can help get it straightened out. I've got a Yamaha shifter wih tilt/trim yamaha key switch and a yamaha tach, so I didn't have to splice any connections. I'm certainly no expert, but I can probably look at my boat and figure which wire goes where.
Re: OB19 build in Texas
Posted: Fri Apr 27, 2012 10:43 pm
by Steven
Thanks Matt. I got it figured out. The brown wire from the start switch to the controller and the orangey brown wire from the controller to the motor make the start lead. They go through the neutral safety switch in the controller. In my case I'll cut off the controller plug and wire that in.
On the back of my key switch, there is a red hot wire that is hot all the time. It's not switched. What did you use that for?
Re: OB19 build in Texas
Posted: Fri Apr 27, 2012 10:49 pm
by Steven
Experimented with the Kiwi Grip a bit tonight. Did a test piece on a scrap of MDF and then did the motor well. I decided to put it there for two reason. On, if I have to clear the prop I'll stand in the motor well. Two, anyone fishing on the decks next to the motorwell might have to step into it if they lose their balance. Don't want any twisted ankles if I can avoid it.
It looks real good. Would like to have the humps level down some more. I rolled it just enough to get an even texture and good coverage. I may have to knock the peaks off with some light sanding on the areas where one might sit.


Re: OB19 build in Texas
Posted: Sat Apr 28, 2012 8:29 am
by peter-curacao
It looks great
Re: OB19 build in Texas
Posted: Sat Apr 28, 2012 5:10 pm
by chicagoross
I like it, looks good with the blue paint.
Re: OB19 build in Texas
Posted: Sat Apr 28, 2012 11:39 pm
by Steven
Got the decks Kiwi Gripped today. Came out rougher than I want. Was warm, and set up quickly. Looks good, but I'll knock the peacks of with a light sanding. It was dusk for the pictures, so you can really see the detail.


Re: OB19 build in Texas
Posted: Sun Apr 29, 2012 8:59 pm
by Steven
Re: OB19 build in Texas
Posted: Sun Apr 29, 2012 9:02 pm
by Boater45
WOW!! Looks great Steven!!
Re: OB19 build in Texas
Posted: Sun Apr 29, 2012 9:14 pm
by gstanfield
Very, very nice
Re: OB19 build in Texas
Posted: Mon Apr 30, 2012 7:55 am
by topwater
I think it looks awsome
Any tips or tricks you found when working with this stuff
Re: OB19 build in Texas
Posted: Mon Apr 30, 2012 8:53 am
by Aripeka Angler
I think you figured out the KG, it turned out great
Re: OB19 build in Texas
Posted: Mon Apr 30, 2012 9:06 am
by Mad Dog
Steven, the KG looks great. Before you hit it with a sander give it the bare foot test first. I found it feels softer than it looks and I have tender feet.
MD
Re: OB19 build in Texas
Posted: Mon Apr 30, 2012 9:26 am
by Steven
Thanks Guys. It's not too bad on the feet, but my girls fannies are a bit more tender than my feet.
It looks really good, but the texture is inconsistent, so I hope to even it out a bit. It will be a very light and quick pass just to knock off the pointy peaks. TIme to schedule an appointemnt with the game Warden.
Re: OB19 build in Texas
Posted: Tue May 01, 2012 8:22 pm
by Steven
Got the Baystar steering hooked up tonight. Probably will do another air purge but it works well. Gallery's not working so Pics will have to wait.
Re: OB19 build in Texas
Posted: Wed May 02, 2012 5:49 am
by Flea
Thats some very neat work, love the kiwigrip, it does look nice with that blue.
Re: OB19 build in Texas
Posted: Wed May 02, 2012 5:26 pm
by Steven
topwater wrote:I think it looks awsome
Any tips or tricks you found when working with this stuff
The cooler it is, the longer it has to settle down. I'd have prefered a constant 70 degrees instead of the 85 I had to work in. The front of the boat must have been warm still from the sun, even though it was in the shade when I applied it. The front ended up much rougher and different texture since it set too quick before leveling out. A quick swipe with 100 grit sandpaper seems to do the trick. If you are going over epoxy with no paint or primer, probably need to use the larger notch if you use the West spreader. However, mine has seen some use, and afterward I notice the points on the notches were worn down quite a bit. So with a new spreader, medium notch might be fine. I am going to use a small solder brush to fill the small specks of sole showing through here and there.
Re: OB19 build in Texas
Posted: Wed May 02, 2012 8:37 pm
by SmokyMountain
The KW grip looks great. I like how you went up a couple of inches on sheer / center console. I'm going to copy that. You got a great looking boat!!
Re: OB19 build in Texas
Posted: Wed May 02, 2012 8:44 pm
by wegcagle
The KW grip looks great. I like how you went up a couple of inches on sheer / center console. I'm going to copy that. You got a great looking boat!!
I was thinking the exact same thing. The other upside is that you don't have to fair the taped area from the sole to the sides as much
Will
Re: OB19 build in Texas
Posted: Wed May 02, 2012 8:55 pm
by Steven
Thanks guys. I like the looks. My primary concern in going up some was protecting those areas. Coolers, bucket and tackle boxes can be slid up against stuff with no risk to the paint. Plus, most of our lakes don't have docks, and the beaches are not sand. It's typically grainy gravel and it tracks in the boat. Really hard on paint, and I already have shoe marks on the sides form my wife helping me bleed the steering and the kids traipsing about.
Re: OB19 build in Texas
Posted: Thu May 03, 2012 8:40 am
by topwater
Thanks for the info Steve
Re: OB19 build in Texas
Posted: Thu May 03, 2012 10:08 am
by Joe H
Steven,
First off, what a beautiful build you have going, give's us something to aspire too!
You may have said earlier but what do you plan to do with the opening in the motor well?
Thanks
Joe H
Re: OB19 build in Texas
Posted: Thu May 03, 2012 10:18 am
by Uncle D
wegcagle wrote:The KW grip looks great. I like how you went up a couple of inches on sheer / center console. I'm going to copy that. You got a great looking boat!!
I was thinking the exact same thing. The other upside is that you don't have to fair the taped area from the sole to the sides as much
Will
Me too, for all the same reasons.
Re: OB19 build in Texas
Posted: Thu May 03, 2012 12:12 pm
by Steven
Joe H wrote:Steven,
First off, what a beautiful build you have going, give's us something to aspire too!
You may have said earlier but what do you plan to do with the opening in the motor well?
Thanks
Joe H
Thanks Joe. I'm installing a Tempress hatch there.
STeven
Re: OB19 build in Texas
Posted: Thu May 03, 2012 12:15 pm
by Joe H
Thanks Steven,
You'll see something very similar on a P19 soon.
Joe H
Re: OB19 build in Texas
Posted: Fri May 04, 2012 6:14 pm
by Steven
Photobucket test.
Steering has been hooked up
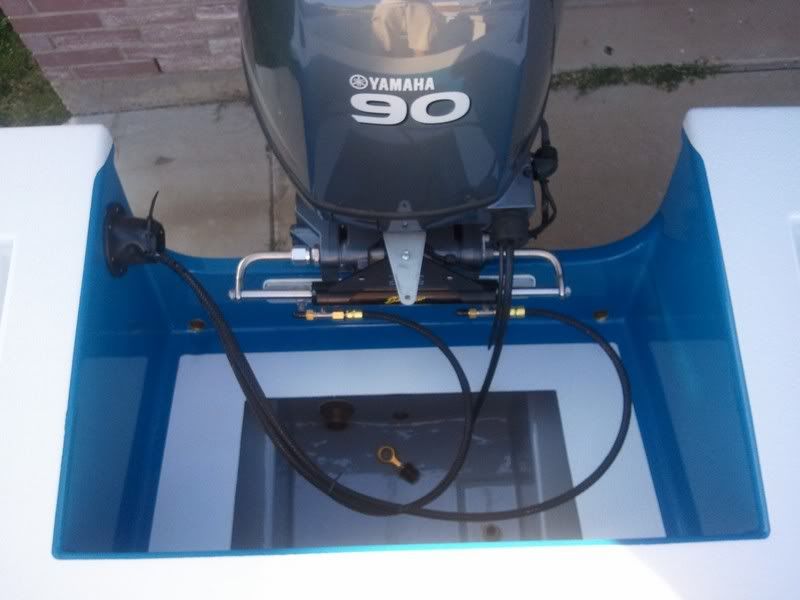
Re: OB19 build in Texas
Posted: Fri May 04, 2012 10:38 pm
by Mad Dog
Bingo!
Am I seeing the set up correctly? Are the bleeder valves on tee fittings? Is that your adaptation or part of the Bay Star system?
MD
Re: OB19 build in Texas
Posted: Sat May 05, 2012 7:11 am
by majorgator
Is that your adaptation or part of the Bay Star system?
Definitely part of the BayStar system. Mine looks just like it.
Re: OB19 build in Texas
Posted: Sat May 05, 2012 11:48 am
by Steven
Yup. That's how it comes. Easy to bleed.
Re: OB19 build in Texas
Posted: Wed May 09, 2012 8:41 pm
by Steven
More Cables. There's no way to make a loop in the control cables with them entering on the port side of the motor. I have some adusting to make it to my liking, but it's all hooked up. Have to hook up the console ends now. Pulling the cables went smoothly. Pulled the wire harness first then the control cables. The hydraulic lines have their own chase. You can't have too many chases.
Note I forgot to overdrill and fill for the hatch screws.
The hatch will cover them fortunately.

Re: OB19 build in Texas
Posted: Wed May 09, 2012 9:47 pm
by Hope2float
Steven that boat looks great! No bullshi I do have a question or two. What did you cover the bilge area with paint or pigmented epoxy? The other is what did you use for the pinholes? where did you get it? The sides of that boat look flawless in the photos. A great looking build and a good tread.
Dave
Re: OB19 build in Texas
Posted: Wed May 09, 2012 10:26 pm
by Cracker Larry
Just a suggestion, but in my opinion there's no need for a dozen screws in a small flat hatch like that. I run a bead of 5200 around it, put 1 screw in each corner and set a concrete block on it until the 5200 sets. The less holes the better.
Re: OB19 build in Texas
Posted: Thu May 10, 2012 8:16 am
by Steven
Hope2float wrote:Steven that boat looks great! No bullshi I do have a question or two. What did you cover the bilge area with paint or pigmented epoxy? The other is what did you use for the pinholes? where did you get it? The sides of that boat look flawless in the photos. A great looking build and a good tread.
Dave
Thanks Dave. The Bilge is coated with tinted epoxy. Great stuff. The fairing came out very good. The paint is only ok, but it looks nice. Anyone who has never painted a boat thinks it looks fantastic, so that's all that really matters. I used Gombi to fill the pin holes. Used a razor blade to fill the holes. Missed 3 little ones on the leaning post seat. Never saw them until the paint was done. oh well.
Re: OB19 build in Texas
Posted: Thu May 10, 2012 8:17 am
by Steven
Cracker Larry wrote:Just a suggestion, but in my opinion there's no need for a dozen screws in a small flat hatch like that. I run a bead of 5200 around it, put 1 screw in each corner and set a concrete block on it until the 5200 sets. The less holes the better.
I knew you did that. Not sure my OCD can stand the empty screw holes.
Plus I've been using 4200 on the hatches. Probably would still hold fine. I don't want the difficulty removing the hatches 5200 would sure provide.
Re: OB19 build in Texas
Posted: Thu May 10, 2012 9:14 am
by Cracker Larry
It's not as hard to remove as most people think. A thin piece of stainless leader wire will cut it right off.
Re: OB19 build in Texas
Posted: Thu May 10, 2012 10:13 pm
by Steven
Got the Controls hooked up tonight. First time every doing this. Wasn't too hard, seems to shift properly. I set it to neutral and then connected to the throttle and shifter on the motor while they were in their neutral positions.


The hydraulic tubes for the Baystar are very rigid. More stiff than the Teleflex tfextreme cables, which are extremely smooth.

Re: OB19 build in Texas
Posted: Sat May 12, 2012 12:10 am
by bwd3
Splashwell is like the outside of the hull, may be wet 50% of the time, or more...
...fill and drill would only take an hour............
Re: OB19 build in Texas
Posted: Sat May 12, 2012 9:58 am
by Steven
???? It's fllrex and drilled.
Re: OB19 build in Texas
Posted: Sat May 12, 2012 10:07 am
by Cracker Larry
I'm with ya ,Steven
Re: OB19 build in Texas
Posted: Sun May 13, 2012 7:55 pm
by Steven
Got a few more things added to the console. I'm going to add a 3" analog Teleflex Tach, which I already have, and a Lowrance Digital Multifunction gage. Haven't drilled holes as I haven't decided on location yet. I think I will put one on either side of center. You can see the fuel fill is installed as well. I have to go to West Marine to get some #12 fasteners for the rod holders and cleats.

Re: OB19 build in Texas
Posted: Mon May 14, 2012 5:55 pm
by Steven
Screwed and glued with 3M in the bilge pump and float. I previously drilled to the keel glass and overfilled so I could attach them directly to the bottom.

Re: OB19 build in Texas
Posted: Tue May 15, 2012 10:04 pm
by Steven
Picked up all of the hatches except on for the access to the live well valves. Installed cleats, hatches and rod holders. On the casting deck hatch, could only glue the hinge side as it wouldn't open enough to put in screws.

Re: OB19 build in Texas
Posted: Tue May 15, 2012 10:54 pm
by Mad Dog
Steven wrote:Screwed and glued with 3M in the bilge pump and float. I previously drilled to the keel glass and overfilled so I could attach them directly to the bottom.
Steven, based on this picture I am wondering how the float switch is going have room to operate? I guess your pump is not in it's final orientation?
MD
Re: OB19 build in Texas
Posted: Wed May 16, 2012 9:48 am
by Steven
Mad Dog wrote:Steven wrote:Screwed and glued with 3M in the bilge pump and float. I previously drilled to the keel glass and overfilled so I could attach them directly to the bottom.
Steven, based on this picture I am wondering how the float switch is going have room to operate? I guess your pump is not in it's final orientation?
MD
Actually the float will be rotated 180 degrees. I just popped it in to the bracket after putting some packing tape on it. The glue squeezed out and I wanted to make sure it wouldn't interfere with snapping the float in, and that was much less messier then trying to clean up the squeeze out.
Re: OB19 build in Texas
Posted: Wed May 16, 2012 5:57 pm
by chicagoross
Love the pic in the driveway - looking good with the hardware installed! Pro job, Steven!
Re: OB19 build in Texas
Posted: Wed May 16, 2012 6:06 pm
by peter-curacao
chicagoross wrote:Love the pic in the driveway - looking good with the hardware installed! Pro job, Steven!
Me to but I'm worried about the trailer fenders, maybe it's an idea to put some soft foam or something on the inside of those? (if not already there) I hate to see that beautiful paint job getting scratched by some diamond plate.
Re: OB19 build in Texas
Posted: Wed May 16, 2012 9:09 pm
by Steven
chicagoross wrote:Love the pic in the driveway - looking good with the hardware installed! Pro job, Steven!
Thanks. Now I can send you the remaing 6 cleats.
Re: OB19 build in Texas
Posted: Wed May 16, 2012 9:12 pm
by Steven
peter-curacao wrote:chicagoross wrote:Love the pic in the driveway - looking good with the hardware installed! Pro job, Steven!
Me to but I'm worried about the trailer fenders, maybe it's an idea to put some soft foam or something on the inside of those? (if not already there) I hate to see that beautiful paint job getting scratched by some diamond plate.
The inside of the the fender is carpeted. But still too tight for my preference
I'm going to add some wheel spacers and move the fenders out some.
Re: OB19 build in Texas
Posted: Wed May 16, 2012 9:31 pm
by Mad Dog
Steven wrote: Actually the float will be rotated 180 degrees.
Gotcha!
MD
Re: OB19 build in Texas
Posted: Tue May 22, 2012 4:21 pm
by flyfishingmonk
Things are looking so great!!!
Here are two questions I just asked on my forum. One is specifically for you. When you get a moment, can you give me a few lines of feedback?
Sincerely,
Casey
flyfishingmonk wrote:To Everybody,
So it's time for me to start thinking trailers. Any thoughts on a tongue that is removable or a tongue that breaks over? I would like to be able to keep this boat in my garage at an angle.
To Steven,
Now that you have your trailer, do you like it?
Sincerely,
Casey
Here is a link to the thread for your convenience.
http://forums.bateau2.com/viewtopic.php ... 80#p278016
Re: OB19 build in Texas
Posted: Thu May 24, 2012 7:10 am
by sideslippa
Hey Steven, Its looking very nice indeed, what a great build, I am keen to see your photos of her on the water. Your gunna be one proud boat builder!
Good work Mate!
Re Slippa.
Re: OB19 build in Texas
Posted: Thu May 24, 2012 10:12 am
by flyfishingmonk
Steve,
Horizon isn't picking up their phone. It's disconnected. I tried emailing a couple times with no response. Do you have a telephone number on your paperwork? The number on their website that doesn't work is (409) 740-4355.
Sincerely,
Casey
Re: OB19 build in Texas
Posted: Fri May 25, 2012 12:19 pm
by Steven
flyfishingmonk wrote:Steve,
Horizon isn't picking up their phone. It's disconnected. I tried emailing a couple times with no response. Do you have a telephone number on your paperwork? The number on their website that doesn't work is (409) 740-4355.
Sincerely,
Casey
Well that's a bummer. I couldn't find any other number. Guess they went under. Surprising considering the quality and customer service.
Re: OB19 build in Texas
Posted: Fri May 25, 2012 1:31 pm
by flyfishingmonk
Bummer for sure.
Any other local options you know of?
Re: OB19 build in Texas
Posted: Fri May 25, 2012 6:08 pm
by Steven
flyfishingmonk wrote:Bummer for sure.
Any other local options you know of?
I found a couple when I was looking. I'll look around again for them. You'll have to get the boat to them for a custom fit. They didn't do universal.
Re: OB19 build in Texas
Posted: Fri May 25, 2012 6:15 pm
by flyfishingmonk
Well the bottom is pretty flat... maybe they can swing it with just the measurements.
I found what looks to be a decent mfg called Coastline.
http://www.coastlinetrailermfg.com/
Re: OB19 build in Texas
Posted: Fri May 25, 2012 6:16 pm
by Steven
flyfishingmonk wrote:Bummer for sure.
Any other local options you know of?
http://roadmaster-inc.com/ in Hurst. I think they do painted and Galvanized. You have to get your boat to them. IIRC they had a loaner trailer you could use. Seems like I might have found a place in Lewisville that could do aluminum but they wanted $1500 more than I paid. I can't remember who it was and it wasn't easy to find. Here's one on the coast I looked into.
http://coastlinetrailermfg.com/
Re: OB19 build in Texas
Posted: Fri May 25, 2012 6:19 pm
by flyfishingmonk
Yeah that coastline is the one I was just looking at. Do all of the mfgs require the boat for the proper fit?
Re: OB19 build in Texas
Posted: Fri May 25, 2012 7:50 pm
by Steven
flyfishingmonk wrote:Yeah that coastline is the one I was just looking at. Do all of the mfgs require the boat for the proper fit?
If the bunk risers are welded and not adjustable they do.
Re: OB19 build in Texas
Posted: Fri May 25, 2012 8:05 pm
by flyfishingmonk
Maybe they offer something adjustable. Horizon did.
Re: OB19 build in Texas
Posted: Sat May 26, 2012 6:38 pm
by Steven
flyfishingmonk wrote:Maybe they offer something adjustable. Horizon did.
I called several and found a couple who did. Here's another one closer to home.
http://www.magnumtrailers.com/boat.html
Re: OB19 build in Texas
Posted: Sat May 26, 2012 6:46 pm
by Steven
Put a coat of paint on the custom hatches today. Another coat tomorrow and they're ready to install. I hate painting. Only other things left is too run the wiring, install battery and battery switch and install the prop.
Re: OB19 build in Texas
Posted: Sat Jun 02, 2012 11:53 pm
by Steven
Finished the 3 custom hatches with Kiwi Grip today and installed them. Have to install the latches tomorrow. I have battery cable and switch on route from Genuinedealz. Should have the wiring complete next weekend. Then it's prop, hull inspection and spash. Also order a Blue Sea 30 amp breaker. Here's my plan.
Battery in starboard locker. Bilge pump direct connect to battery. Main cable from motor to Blue Sea Battery switch in starboard locker. From Switch through 18" of stupid expensive Ancor 2 awg battery cable. From positive on battery with 18" 6 awg battery cable to Blue Sea Breaker. From Blue Sea Breaker 15' of 6 awg battery cable to pos. bus bar in Console. From Negative on battery 15' of 6awg battery cable to neg. bus bar in console. Distribution to fused switches in console for lights, livewell and other accesories.
Here's the breaker. I can trip it when the boats not in use so that the only possilbe draw on the battery is from the bilge. If it's not good to trip it frequently, I'll install a switch. I want to be able to easily kill all power to the console.

Re: OB19 build in Texas
Posted: Sun Jun 03, 2012 10:35 am
by Seadation
Steven wrote:Finished the 3 custom hatches with Kiwi Grip today and installed them. Have to install the latches tomorrow. I have battery cable and switch on route from Genuinedealz. Should have the wiring complete next weekend. Then it's prop, hull inspection and spash. Also order a Blue Sea 30 amp breaker. Here's my plan.
Battery in starboard locker. Bilge pump direct connect to battery. Main cable from motor to Blue Sea Battery switch in starboard locker. From Switch through 18" of stupid expensive Ancor 2 awg battery cable. From positive on battery with 18" 6 awg battery cable to Blue Sea Breaker. From Blue Sea Breaker 15' of 6 awg battery cable to pos. bus bar in Console. From Negative on battery 15' of 6awg battery cable to neg. bus bar in console. Distribution to fused switches in console for lights, livewell and other accesories.
Here's the breaker. I can trip it when the boats not in use so that the only possilbe draw on the battery is from the bilge. If it's not good to trip it frequently, I'll install a switch. I want to be able to easily kill all power to the console.
Hello Steven,
That sounds fine. To easily kill power to breaker supplying console, connect the breaker supply wire to your Battery switch. That way, you go down to boat...turn the battery switch 'on' and go. Come back...turn battery switch 'off' and EVERYTHING is off (EXCEPT the bilge pump power supply). That way you are not using the breaker like a switch.
You may be doing this anyway, but just to be perfectly clear...You want a fuse on the wire from (+) battery terminal to bilge pump. ABYC would say within 7 inches of battery but putting it where it can be easily serviced is important too. Something like this which is itself water resistant

The fuze protects the 16 or 14 ga wire supplying your bilge pump from catching fire when your pump gets some foreign material lodged in the impeller and 'locks up' or in some other way causes a high-amp draw situation. Maybe you already know this, sorry to repeat it.
Your boat looks great.
FAir winds,
.david
Re: OB19 build in Texas
Posted: Mon Jun 04, 2012 1:59 pm
by Uncle D
On my old Baymaster rewire, I did not have a main breaker but individual fuses. I did install a master switch on the console that killed power from batteries forward and a battery switch to kill battery power too.
Re: OB19 build in Texas
Posted: Mon Jun 04, 2012 6:04 pm
by Cracker Larry
I have a main breaker just like that one, and a battery switch. Probably not a good long term idea to use the breaker as a switch. Although you can, it's really not designed for that and will wear out much sooner. If you have more than 1 battery, you need a selector switch anyway.
Re: OB19 build in Texas
Posted: Mon Jun 04, 2012 6:47 pm
by Steven
I bought a Blue Seas battery selector switch from Genuinedealz, which showed up today. I'll only have one battery to start, but figured I'd likely have 2 before it's over.
Re: OB19 build in Texas
Posted: Sat Jun 09, 2012 11:04 pm
by Steven
Did the wiring today. First time ever wiring a boat, so was a bit nervous. Taped the wires where I wanted them and then cut and joined with butt connectors. Got everything working and bumped the starter to test the neutral safety. Green light on every thing. Need to get some screw in and adhesive wire tie connectors to get it all cinched into place. Got a blurry picture after dark. I put the bus bars up high and dry where there is plenty of thickness for using screw connectors to secure everything. I ran 6 gage wire from the battery in the starboard stern locker. Unfortunately they ended up being a little short. Really wish I had a wire lug crimper to crimp battery wire so I could have made them up after finalizing everyting. I changed the battery and bus bar placement a bit. So I'll need to order a couple of patch cables to make up the differnce. Not big problem, just a bit irritating.

Re: OB19 build in Texas
Posted: Sun Jun 10, 2012 12:30 am
by Flea
Thats very neat for a first time wiring job! looks like it all coming together as planned without to many hicups. keep it up mate, shes looking good. Flea.
Re: OB19 build in Texas
Posted: Mon Jun 18, 2012 11:16 pm
by Steven
Re: OB19 build in Texas
Posted: Tue Jun 19, 2012 1:56 pm
by Mad Dog
Steven, do you have a cover for the positive buss bar? That whole strip is live the way you have it wired. Your first time wiring job looks much better than mine. Good work. Looking forward to seeing this build in August.
MD
Re: OB19 build in Texas
Posted: Wed Jun 20, 2012 10:57 am
by Steven
Mad Dog wrote:Steven, do you have a cover for the positive buss bar? That whole strip is live the way you have it wired. Your first time wiring job looks much better than mine. Good work. Looking forward to seeing this build in August.
MD
They didn't come with covers. They are Blue Seas Bus Bars, and I will order one if available. Other wise I'll be making one with some Plexiglass.
Going to be close for the August meeting. I'm still hoping to make it happen.
Re: OB19 build in Texas
Posted: Wed Jun 20, 2012 10:59 am
by flyfishingmonk
Steven wrote:Mad Dog wrote:Steven, do you have a cover for the positive buss bar? That whole strip is live the way you have it wired. Your first time wiring job looks much better than mine. Good work. Looking forward to seeing this build in August.
MD
They didn't come with covers. They are Blue Seas Bus Bars, and I will order one if available. Other wise I'll be making one with some Plexiglass.
Going to be close for the August meeting. I'm still hoping to make it happen.
I had to order a couple of mine separately.
Re: OB19 build in Texas
Posted: Mon Jun 25, 2012 9:59 pm
by Steven
Got the electric in the starboard stern locker tydied
up. Installed the drain assemblies of for the stern lockers. Plastic tube will go to some through hulls. Tested and they are watertight. Worth the effort. Going for registration inspection tomorrow.


Re: OB19 build in Texas
Posted: Tue Jun 26, 2012 8:59 am
by Dougster
Neat looking wiring. What are those white things the zip ties are attached to for securing the wire? Are they glued on over the primer?
Paying attention Dougster
Re: OB19 build in Texas
Posted: Tue Jun 26, 2012 9:08 am
by Mad Dog
Good luck on the inspection Steve. You'll probably get more about how great the construction and finish looks, rather than the USCG standards.
MD
Re: OB19 build in Texas
Posted: Tue Jun 26, 2012 9:12 am
by Mad Dog
Dougster wrote:Neat looking wiring. What are those white things the zip ties are attached to for securing the wire? Are they glued on over the primer?
Paying attention Dougster
Those are self adhesive stick on wire mounts, Doug. I used some but only about half of them stayed put. I have a bunch left over if you are interested. I'm sure Steve did a better job than I of prepping the site to keep them stuck. Thinking about it the ones that came loose tended to be on the course surfaces where I did not fill the weave.
MD
Re: OB19 build in Texas
Posted: Tue Jun 26, 2012 1:27 pm
by Steven
They have a screw hole as well. I used some on my GV11 outside in the elements and they held for years. If they become a problem, I'll screw them in. Just dont' want any more holes than necessary.
Re: OB19 build in Texas
Posted: Tue Jun 26, 2012 1:30 pm
by Steven
Inspection complete. Boat is now legal for water.
Gotta love Texas. An affadavit filled out for why I had no receipts, $105.00 for associated fees, a 5 min. Game Warden inspection and on my way. At first she just wanted to view it accross the parking lot to make sure it was home built. She had to go do a close inspection to make sure.
She may be homemade, but she sure don't look it.
Re: OB19 build in Texas
Posted: Tue Jun 26, 2012 5:36 pm
by Steven
She's officially legal.

Re: OB19 build in Texas
Posted: Tue Jun 26, 2012 6:07 pm
by Mad Dog
Congratulations!!!!!
Not home built looking at all. Great job. Beautiful boat.
MD
Re: OB19 build in Texas
Posted: Tue Jun 26, 2012 6:19 pm
by Dougster
I'll second that! Great looking build, I really like the blue hull. I think I'll try some of those wire hold downs in a few places. I've been gluing in little 1" cleats with drilled/filled re-drilled holes in them under the gunnel and it's a PITA. Again, congratulations on such a nice job.
Admires it Dougster
Re: OB19 build in Texas
Posted: Tue Jun 26, 2012 8:31 pm
by wegcagle
Dang Steven,
You sure you didn't steal that boat. There's no way a home made boat can look that shiney
Nice work,
Will
Re: OB19 build in Texas
Posted: Tue Jun 26, 2012 9:52 pm
by Steven
Thanks guys. I still have a lot I want/need to do, but all I need to get it splashed is a prop. I took off the end of next week for the holiday and I plan on enjoying it on the water.
Re: OB19 build in Texas
Posted: Wed Jun 27, 2012 1:44 pm
by wadestep
That's really looking good, and I'm glad the inspection was no sweat. You must be excited to get her on the water!
wade
Re: OB19 build in Texas
Posted: Wed Jun 27, 2012 2:34 pm
by tech_support
Very Nice, congratulations on finishing. Now its time to enjoy your hard work.
Re: OB19 build in Texas
Posted: Wed Jun 27, 2012 3:11 pm
by Steven
shine wrote:Very Nice, congratulations on finishing. Now its time to enjoy your hard work.
Thanks. There's still a lot to be done, but it's time to enjoy it on the water. Plus it's too fricking hot to be working on a boat right now. I have to secure the battery and plumb the bilge pump, and then it's done til fall.
Re: OB19 build in Texas
Posted: Sat Jun 30, 2012 12:38 am
by Steven
Got the battery and wiring secured. Plumbed the bilge pump. Took her to the gas station for the first time. Very pleased that it took fuel as fast as the pump gave it. I kept the inline valve shut til I got home. Opened the valve and pumped the primer bulb, and pumped and pumped and pumped......
Finally got the fuel to the motor. Left it sit for the night. Will check for leaks in the morning and if all is good will give it a first start.
I have to go to the inlaws and pull the depth finder from the GV11 and install it and I should be ready for first launch. Woot!!!!!
Re: OB19 build in Texas
Posted: Sat Jun 30, 2012 1:40 am
by gstanfield
Soooooo Close, can't wait to see a splash
Re: OB19 build in Texas*****SPLASHED*****
Posted: Sun Jul 01, 2012 1:17 am
by Steven
She hit the water today. Had a busy morning finalizing things. Couldn't be more pleased. Only problem, if you could call it that, was a very minor leak from the livewell pickup valve. I put it on with thread tape, but it had a slight dribble. I'll take it of and put if on with some pipe dope.
We had a beautiful day around 94 degrees. With my wife, kids and inlaws we launched with a crew of 7. No problem with space on the boat. This is really a big 19 footer. All the work on getting the layout right was worth it. Everyone had a blast. Wind was 10-20, so it was a little choppy, but it handled it just fine. I wouldn't have left the house with the GV11. Those days wasted at home are a thing of the past.
Boat performed flawlessly. I can't believe how smooth and quiet the Yamaha is. You cannot hear it at all at the console at 6000 RPM. I followed the break in procedure. It was a very boring first two hours. The prop is not right, so will start a thread for help with selecting a better one. Had throttle left over at max RPM and a little slow out of the hole.
She rides great. I ran accross 2 footers at speed and different angles and never had any unexpected behavior. The bow is very full and carries a lot of load. Everyone was up there while I was running along. With the fuel tank under the deck, and the heavy cooler, we had a lot of weight up there. The boat is not sensitive to weight at all. I'll get some better pics on the water with some video of it running. Today I was too anxious to get underway and do the initial break in to do much picture taking.
I have a video of the launching I'll post a link to tomorrow.


Re: OB19 build in Texas*****SPLASHED*****
Posted: Sun Jul 01, 2012 1:19 am
by 94Virago
Way to freakin' go, Steven!
Tell me, was it hot out there?
Re: OB19 build in Texas*****SPLASHED*****
Posted: Sun Jul 01, 2012 1:46 am
by gstanfield
Congrats on the splash, she's a mighty fine looking craft
Re: OB19 build in Texas*****SPLASHED*****
Posted: Sun Jul 01, 2012 7:04 am
by Rmarsh
Congrats Steven. Your boat looks great!
Re: OB19 build in Texas*****SPLASHED*****
Posted: Sun Jul 01, 2012 8:31 am
by topwater
Congrats Steve , awsome looking boat on the water. Cant wait for more pic's
Re: OB19 build in Texas*****SPLASHED*****
Posted: Sun Jul 01, 2012 8:34 am
by Cracker Larry
Fantastic, Steven. Lot of happy faces on that boat
Re: OB19 build in Texas*****SPLASHED*****
Posted: Sun Jul 01, 2012 9:11 am
by danieloldhouse
Congrats Steven, very nice boat and nice family too!!
Re: OB19 build in Texas*****SPLASHED*****
Posted: Sun Jul 01, 2012 9:28 am
by thb
Beautiful job and well worth it now that it is over. Way to go.
Regards
Tom in Steinhatchee
Re: OB19 build in Texas*****SPLASHED*****
Posted: Sun Jul 01, 2012 1:00 pm
by icelikkilinc
Very well built!!! Fantastic job Steven...
Re: OB19 build in Texas*****SPLASHED*****
Posted: Sun Jul 01, 2012 1:43 pm
by Mad Dog
Two thumbs up.
Looking forward to seeing the video and in person.
MD
Re: OB19 build in Texas*****SPLASHED*****
Posted: Sun Jul 01, 2012 4:03 pm
by wildbill
Excellent craftsmanship. You made it look easy.
Congratulations wildbill
Re: OB19 build in Texas*****SPLASHED*****
Posted: Sun Jul 01, 2012 5:45 pm
by chicagoross
Way to go, Steven! It's all been said, but beautiful boat and family! A great time was had by all!
Re: OB19 build in Texas*****SPLASHED*****
Posted: Sun Jul 01, 2012 6:45 pm
by wegcagle
Absolutely amazing Steven. Those are some priceless smiles.
Will
Re: OB19 build in Texas*****SPLASHED*****
Posted: Sun Jul 01, 2012 7:31 pm
by Steven
Thanks all. Here is the link to the launch video. Next time I'll get some HD video with the DSLR while underway and plenty more pictures will be taken.
My father inlaw is manning the rope while I back her down. They just added this dock, which makes launching so much nicer. Used to have to beach the boat on the ramp or rock strewn bank.
http://www.youtube.com/watch?v=TdmMCKnse4E
Re: OB19 build in Texas*****SPLASHED*****
Posted: Sun Jul 01, 2012 7:55 pm
by 94Virago
Watched. "Liked".
Re: OB19 build in Texas*****SPLASHED*****
Posted: Sun Jul 01, 2012 8:31 pm
by designlady
Looking great. Can't wait to see more pics!
Re: OB19 build in Texas*****SPLASHED*****
Posted: Mon Jul 02, 2012 12:21 pm
by cottontop
Way to go Steven. What a fine looking boat and family. How exciting it is to make that initial launch! I have the PH 18 and OB 19 plans. Don't know which one I want to build now(yours looks so good). You will continue to get many compliments. Get used to the statement "you built that"! Ask the rest of us having built boats know. beautiful .
Re: OB19 build in Texas*****SPLASHED*****
Posted: Mon Jul 02, 2012 12:32 pm
by hockey52
Wonderful job!
Looks and sounds like everyone is excited.
Re: OB19 build in Texas*****SPLASHED*****
Posted: Mon Jul 02, 2012 4:30 pm
by Uncle D
Awesome Sir!!Can't wait to see it up close.Whole family had grins ear to ear.
Re: OB19 build in Texas*****SPLASHED*****
Posted: Mon Jul 02, 2012 9:40 pm
by Steven
Uncle D wrote:Awesome Sir!!Can't wait to see it up close.Whole family had grins ear to ear.
Thanks Uncle. As much as it pains me, I'm not sure yet if I"ll be able to make it next month. Stil trying to work it out. I desperately want to take it out in the gulf as well as meeat all you guys. I may do a bonzi trip. She is so stable and runs so well, I'm still not believing it.
Re: OB19 build in Texas*****SPLASHED*****
Posted: Tue Jul 03, 2012 11:30 am
by Uncle D
We'll keep our fingers crossed
Re: OB19 build in Texas*****SPLASHED*****
Posted: Thu Jul 05, 2012 12:14 am
by Steven
Took the boat out today fishing with the kids. After determining I had the Tach on the wrong setting, I felt better about the behaviour I was seeing. I now top out at 5500 RPM, so I have some room for improvement. My daugher caught the first fish in the new boat, for which I snapped a picture with my cell phone. Later I pulled the phone out of my pocket to text the pic to her mom, lost my grip on the phone and overboard it went. :DOH: She then caught the second fish, for which we were going to get a picture with her phone. I picked up the fish from the deck and squirted out of my hand overboard. Just wasn't meant to be. My son caught a fish and we successfully got a pic of that, which I've yet to have texted to my new phone from my daughter.
The wind picked up as we were leaving and was blowing straight into the ramp, which is on the main body of the lake and protected by two jetties, which were acting as a funnel due to the wind. It's a two lane ramp and there was a boat launching in one lane and a boat taking out in the other. Both having difficulties due to the wind and swells. As I'm cirlcing at the mouth of the jetties, a dipstick in a pontoon boat motors past and ties up to the outboard side of the dock. So, I motor in and tie up to the end of the dock, ensuring my place in line. In the mean time the guy launching has an inboard and he gets sideways and is blowing into the rocks with no hope of recovery. So I run down the ramp, into the water up to my waste to help straighten him out. He shoves off and I turn around to see the jack wagon with the pontoon boat backing down in my lane, which is closest to the dock and from where I have to take out. I give him a good piece of my mind then have to go jockey my boat around so he doesn't hit it with his pile of crap while manuevering around the end of the dock to get to his trailer. He then proceeds to take 15 minutes to get his pile sucessfully on the trailer, while holding up me and one other.
Despite the phone loss and the nimrod at the ramp, we still had a great time. Nothing like taking out the kids for a little boat time.
Re: OB19 build in Texas*****SPLASHED*****
Posted: Thu Jul 05, 2012 3:05 am
by chopperman
Congratulations on the splash! Sounds like you had quite the adventure:!: Sorry you lost your phone, but at least you made some good memories with the family
Re: OB19 build in Texas*****SPLASHED*****
Posted: Thu Jul 05, 2012 4:55 pm
by BassMunn
Steven Congrats on an awesome boat.
Now stop fighting with the Slipway dimwit and get some more pics and videos
Re: OB19 build in Texas*****SPLASHED*****
Posted: Thu Jul 05, 2012 5:29 pm
by Cracker Larry
Now stop fighting with the Slipway dimwit and get some more pics and videos
That's funny. Boat ramp antics are always entertaining, but on the 4th of July they are insane. There are some folks on a local fishing forum that all get together and go to a busy ramp in Charleston on the 4th and have a picnic, and take pics of the fools. Very entertaining
I'll post a link to the pics.
Re: OB19 build in Texas*****SPLASHED*****
Posted: Thu Jul 05, 2012 7:58 pm
by cottontop
Steve, That's really funny(the boat ramp guy). We all been there. My grandmother always said "no good deed ever goes unpunished". I didn't know what that meant until I grew up. The guy you helped appreciated your sacrifice. The other guy is what he is. Before I finished my boat, the guys I work with gave me some very good advice I try to adhere to. Get your boat stuff together before launching and get the boat loaded and off the ramp before getting it ready to leave. I try to remember that, but there are many others out there that don't care. John
Re: OB19 build in Texas*****SPLASHED*****
Posted: Fri Jul 06, 2012 10:50 pm
by Steven
Added a thread in the Finished Boat section. Took her out again today.
Performance with myself, wife and two of my kiddos.
5500 max RPM.
Top speed: 37 MPH
Cruises nicely 3200 RPM and 30 MPH.
I don't have a fuel flow sensor yet, so I don't know about economy yet. Yamaha recommends max RPM's of 5000 to 6000 RPMs, so I have some room for improvement.
Re: OB19 build in Texas*****SPLASHED*****
Posted: Sat Jul 07, 2012 9:07 pm
by Steven
Here is a video of her getting up on plane. I'm accelerating slowing since there are swimmers areas to the sides.
http://www.youtube.com/watch?v=0DadzBvh ... e=youtu.be
Re: OB19 build in Texas*****SPLASHED*****
Posted: Sun Jul 08, 2012 7:36 am
by Cracker Larry
Steven, you are pretty close now. I would drop down to a 17" pitch in a cupped stainless, that should give you about 300-400 more rpms, should be perfect. Keep the aluminum prop for a spare.
Re: OB19 build in Texas*****SPLASHED*****
Posted: Mon Jul 09, 2012 6:36 am
by sideslippa
Well done! What a great looking boat, really nice job there. I have enjoyed following your build. You took the time to do it right and the results are there for you to enjoy. It looks and sounds like it behaves alot like it's little brother the OB17. I have one of those and I love it! Stability is great, it is not weight sensitive, really good manners and Transition to plane is almost not decernable eh? I hope you and your family enjoy the fruits of your labor for many years to come.
Got a few laughs from the boat ramp antics, seems like you have the same morons at boat ramps as we have here in Australia. Boat ramp manners are a rare event here, especially from the "fair weather" inexperienced bone heads
Best regards from Slippa !
Re: OB19 build in Texas*****SPLASHED*****
Posted: Thu Oct 04, 2012 9:17 pm
by Steven
This shows up next week.
Spot lock holds you in one place.

Re: OB19 build in Texas*****SPLASHED*****
Posted: Thu Oct 04, 2012 9:29 pm
by peter-curacao
Steven wrote:This shows up next week.
Spot lock holds you in one place.
Sweet
Re: OB19 build in Texas*****SPLASHED*****
Posted: Mon Oct 08, 2012 11:14 am
by Steven
Woot!!! New motor on UPS truck out for deliverly. Measured up and ordered wiring from genuinedealz.com. Should have a functioning trolling motor for the upcoming weeking.
Re: OB19 build in Texas*****SPLASHED*****
Posted: Mon Oct 08, 2012 11:49 am
by peter-curacao
Steven wrote:Woot!!! New motor on UPS truck out for deliverly. Measured up and ordered wiring from genuinedealz.com. Should have a functioning trolling motor for the upcoming weeking.
Pics would be nice a vid would be great
Re: OB19 build in Texas*****SPLASHED*****
Posted: Mon Oct 08, 2012 1:41 pm
by Steven
They will be forthcoming for sure. Genuinedealz rocks. Placed order yesterday evening and it shipped this morning. I'll definitily have a report on the motor. I'm excited to try the auto pilot and spot lock feature. We have bubble/aeration generators by the dam on the lake I fish. Holds massive bait. Looking forward to pulling up 20 feet away and having the motor hold me within 5'. No more monkeying the big horse in and out of gear fighting the wind and scaring the fish. Next is this puppy. You don't need a separate SideScan module with the new units and it has touch screen.
I"ll be running the engine network to this for the full complement of gages.
http://lr.factoryoutletstore.com/detail ... ducer.html

Re: OB19 build in Texas*****SPLASHED*****
Posted: Mon Oct 08, 2012 2:28 pm
by Cracker Larry
They will be forthcoming for sure. Genuinedealz rocks.
Yes they do! I get all my electrical stuff from them. Top quality, good prices and fast. You wouldn't think so, with a name like that
Re: OB19 build in Texas*****SPLASHED*****
Posted: Mon Oct 08, 2012 8:49 pm
by Steven
UPS says out for delivery all day, but alas, no new trolling motor has arrived. Disappointment
However I did just measure up and send off for a quote on a Windshield.
Wind in the eyes at 35 mph is not enjoyable, especially with the temp starting to drop.
Re: OB19 build in Texas*****SPLASHED*****
Posted: Mon Oct 08, 2012 8:53 pm
by Steven
Oh good grief!!! Windshield place is closed till 10-15 for annual vacation shut down. Darn the luck. Been one of those days. Was going to West Marine today at lunch to pick up a breaker for the new motor. Got held up and couldn't get too it. ugh.
Re: OB19 build in Texas*****SPLASHED*****
Posted: Mon Oct 08, 2012 9:46 pm
by Steven
Woot!!!! Motor showed up late. Looks good on the deck but too dark for pics. Tomorrow I'll line it up and over drill.
Re: OB19 build in Texas*****SPLASHED*****
Posted: Tue Oct 09, 2012 6:39 am
by cape man
I made my own widshield using a piece of 3/16" plexiglass. Was relatively easy. There are lots of tutorials online showing how to heat and bend plexiglass. I had access to a heat strip but have used a heat gun in the past.
Re: OB19 build in Texas*****SPLASHED*****
Posted: Tue Oct 09, 2012 7:38 am
by cottontop
Steven, My wife and I were looking at the "you tube" video of your boat last night. She sure is pretty. John
Re: OB19 build in Texas*****SPLASHED*****
Posted: Tue Oct 09, 2012 11:36 am
by Steven
cape man wrote:I made my own widshield using a piece of 3/16" plexiglass. Was relatively easy. There are lots of tutorials online showing how to heat and bend plexiglass. I had access to a heat strip but have used a heat gun in the past.
I'm considering that as well. I did find some videos on bending small pieces using a heat gun. Thought I might pick up a piece and try to see how it goes. I can cut it and flame the edges, so if I can bend it I'd be good to go. Already have an idea for a simple jig to bend it over to get the right shape.
Re: OB19 build in Texas*****SPLASHED*****
Posted: Tue Oct 09, 2012 11:40 am
by Steven
cottontop wrote:Steven, My wife and I were looking at the "you tube" video of your boat last night. She sure is pretty. John
Thanks John. Much appreciated. I can't describe how much I'm enjoying her. She is incredibly dry. That 3/4" spray rail works perfectly, and she rides so much smoother than any boat I've been on that size. I thing the convex, as opposed to concave production boat, shape at the entry really helps. There's not much harsh slapping.
Re: OB19 build in Texas*****SPLASHED*****
Posted: Thu Oct 11, 2012 12:46 pm
by Steven
So last night I glued in cleats under the console for strapping down 2 trolling motor batteries. I also glued on some blocks to the console inside for mounting the charger and breaker. Realized after mixing the glue I couldn't find my notched spreader.
Then, the temp. screws to hold the blocks to the console sides wouldn't bridge the glue gap enough to clamp them tight enough.
The console sides are 3/8' thick and didn't want to risk longer screws. Had to jury rig a reverse clamp to get proper pressure. Then this morning I realized the battery box I used for spacing the cleats is a group 24.
Best laid plans. I'm going to go with them for now. Really like there location and orientation and can't fit larger ones in their current location. I'm not trolling all over the lake anyway, so hopefully they'll be sufficient.
Re: OB19 build in Texas*****SPLASHED*****
Posted: Sun Oct 14, 2012 2:02 pm
by wadestep
Hey Steven - I was reading your other question about mounting a trolling motor. When you get it installed, would you post some picts? I'm going to installing one at some point in the future as well. My front deck has a camber to it per the plans, so will be a little more difficult maybe.
thanks
wade
Re: OB19 build in Texas*****SPLASHED*****
Posted: Sun Oct 14, 2012 7:50 pm
by Cracker Larry
Wade, I recently made a trolling motor mount for an Aquasport with a cambered deck. I don't want to hijack this with it, but I've got pictures of how I did it. Came out real nice
Re: OB19 build in Texas*****SPLASHED*****
Posted: Tue Oct 16, 2012 7:06 pm
by Steven
Been getting the batteries and charger installed for the trolling motor. Still working out the routing of the wiring. The wires for the chargers are 6' long. A huge pain. I want to shorten them but don't want to void the warranty.

50 amp BlueSea breaker.

Re: OB19 build in Texas*****SPLASHED*****
Posted: Tue Oct 16, 2012 9:00 pm
by cottontop
Steven, Your work is very meticulous. I have a question about plywood. What kind of plywood did you build your boat out of and would you use it again? John
Re: OB19 build in Texas*****SPLASHED*****
Posted: Wed Oct 17, 2012 11:07 pm
by Steven
Thanks John. Got some of that tangle of wire tamed tonight. Had to order another wire from Genuinedealz.com. The wire from + to - between the batteries was too long after settling on the battery location.
I used Meranti 1088. I used Okoume 1088 on the GV11. I didn't really see much difference. I'll use Meranti on future builds again for sure. Only place I'd opt for Okoume is if I had to make a real tight bend. It is a bit more flexible.
Re: OB19 build in Texas*****SPLASHED*****
Posted: Thu Oct 18, 2012 7:12 am
by cottontop
Thanks Steven. I've got the plans for the OB 19 and the PH 22. I've been comparatively pricing the two of them and found they are pretty close except for the difference due to motor size and trailer. My OD 18 i built with plain marine plywood. It took quite a bit more to fair it out. The difference in price between meranti and okume(okume being more costly) would just about purchase the epoxy kit. Will probably start another build sometime late next year. About how many people can ride comfortably in yours? John
Re: OB19 build in Texas*****SPLASHED*****
Posted: Thu Oct 18, 2012 8:51 am
by Steven
cottontop wrote:Thanks Steven. I've got the plans for the OB 19 and the PH 22. I've been comparatively pricing the two of them and found they are pretty close except for the difference due to motor size and trailer. My OD 18 i built with plain marine plywood. It took quite a bit more to fair it out. The difference in price between meranti and okume(okume being more costly) would just about purchase the epoxy kit. Will probably start another build sometime late next year. About how many people can ride comfortably in yours? John
No issues fairing with Meranti 1088. It's very nice plywood. I've taken my wife and 6 kids(not all mine
) out on the lake for the day. No comfort issues. I built mine with no camber on the decks and all the horizotal surfacs make nice seating. When I took it to the coast I took my 4 and my folks, 7 total, trolling for Kings. No space problems. The only reason I didn't build the PH22 is that my garage is 19' 6" long, so 19' was as long as I could go.
But as it turns out, the OB19 is perfect for what I do. plus the need for a smaller motor is good considering fuel costs. That 4 stroke 90 is a gas miser.
Re: OB19 build in Texas*****SPLASHED*****
Posted: Thu Oct 18, 2012 12:38 pm
by cottontop
Thanks Steven. Making a choice is going to be tough. If I build the OB 19, it will be due to motor and trailer costs. You and Wade have really made it tempting to build the OB. I really like the boat and its' looks and size. I would like to put in a set of "jump seats" on each side at the rear, a center console with the "flip back cooler seat, and a seat of some kind in front of the cc". I really like your idea of no camber on the decks. Easier to mount a trolling motor and to walk on. Probably the most to fish off it would be my wife and 2 or 3 small boys. Daughter is due to give birth again ( will make 3 for her: they want them and can afford them.) and the riding would be for pleasure 4 adults and 3 small children. I like the higher sides for preventing them from falling over board. Probably put a removable pedestal seat in front and add the small board on back like you and put a removeable pedestal there. You and others building this boat have really shown how stable they are. Have a great day. John
Re: OB19 build in Texas*****SPLASHED*****
Posted: Thu Oct 18, 2012 9:35 pm
by Steven
Our needs are almost identical. 4 adults and 3 or 4 kiddos is no problem at all. I have seating all across the stern, on the live well, at the helm, on a large cooler in front of the console, on the front deck, and all around the perimeter side deck for the adventurous. Pedestal bases were actually planned during construction in the exact places you mention. Just haven't installed them yet. The sides are high enough to contain kids that need to be contained. So far I like the layout real well. When we all went out at the coast some Dolphin came up to the boat. It wasn't until after they left that I realized how stable it was. Everyone was rushing from side to side and the boat was never tippy at all. Really outstanding design.
Re: OB19 build in Texas*****SPLASHED*****
Posted: Fri Oct 26, 2012 10:53 pm
by AtTheBrink
Steven wrote:Our needs are almost identical. 4 adults and 3 or 4 kiddos is no problem at all. I have seating all across the stern, on the live well, at the helm, on a large cooler in front of the console, on the front deck, and all around the perimeter side deck for the adventurous. Pedestal bases were actually planned during construction in the exact places you mention. Just haven't installed them yet. The sides are high enough to contain kids that need to be contained. So far I like the layout real well. When we all went out at the coast some Dolphin came up to the boat. It wasn't until after they left that I realized how stable it was. Everyone was rushing from side to side and the boat was never tippy at all. Really outstanding design.
Steven, we have a neat spot here that I have took the kids to several time to "fish for skipjack"
at night and the dolphin will eat right out of your hand. We've had the come up out of the water 3 feet and hover right at the gunnel to get a fish! Everyone loves it, you can hear them whistling and clicking underwater, so cool. Its fun to see grown ups turn into 4 year olds and faces light up like christmas trees!
Re: OB19 build in Texas*****SPLASHED*****
Posted: Sat Nov 10, 2012 11:48 pm
by flyfishingmonk
Hi Steve,
I am getting caught back up on some peoples progress. You boat looks great!!!!
Casey
Re: OB19 build in Texas*****SPLASHED*****
Posted: Sun Mar 03, 2013 11:38 pm
by Steven
Time for a few mods. The sole has a 1-1/4" drain hole into the bilge. Fishing Aransas Pass last summer, a few gallons of water dumped on the deck to flush fish guts and slime took far too long to drain. It sloshed right past the hole. So today I got out the handy multi tool and now have a 2x4" rectangular hole cut out. I've coated and glassed the edges. A little sanding, a few more coats of epoxy and kiwi grip and she'll be complete.
Mod number 2. The live well drain is in the front of the livewell due to how I had to route the plumbing. Not a problem except when on the trailer. The $40 round hatch leaks and the water won't completely drain. So I'm adding a rear drain. Should have just built one in. Hindsight.
Boat is fantastic. Been doing a lot of fishing but not much catching. It's great to go out and not be concerned about the wind, which is always blowing down here.
Re: OB19 build in Texas*****SPLASHED*****
Posted: Mon Apr 22, 2013 10:57 am
by Steven
I've been finishing up winter mods. I sanded the paint off the front of the hull bottom and painted on epoxy/graphite. Should have done this to begin with. Looks much better. The paint was taking a beating. I'm ordering a Keel Sheild to install, which I should have also done to begin with. Live and learn.
I'm going to also be adding a swim platform as soon as I decide on what I want.
Before: The paint on the bottom goes back almost to the front of the bunks, then it's epoxy/graphite to the stern.

After:

I enlarged the 1 1/4" cockpit to bilge drain hole to about 2"x3". This should help hold down on water sloshing back and forth.

Re: OB19 build in Texas*****SPLASHED*****
Posted: Mon Apr 22, 2013 1:47 pm
by cottontop
I like it. That should make it nearly bullitt proof. Stupid question, but how did you paint the graphite on the bottom without flipping the boat. Did you just slide it part way off the trailer/hang it and paint the graphite lying under it on your back. How far down did you take the paint. I would like to apply some graphite to the bottom of my OD18 hull when I repaint the outside next year.
I've almost finished the mods to mine. I've added some gunwales and covered the bilge area(after cutting a bilge into that area). I relaseed the entire inside of the boat with 9oz. woven and have just finished priming it this weekend. Hope to paint it again in a week or so. Man what a buch of work.
Re: OB19 build in Texas*****SPLASHED*****
Posted: Mon Apr 22, 2013 11:29 pm
by Steven
Hey John,
I just crawled under and did her where she sits. The paint only went back about 4', the rest was already graphite. I just had to move around the trailer a bit. The graphite comes out to the edge of the bottom. I pulled the masking tape right away and wiped splatter off the trailer with alcohol and a few paper towels.
Steven
Re: OB19 build in Texas*****SPLASHED*****
Posted: Tue Apr 23, 2013 12:13 am
by Cracker Larry
The shadow man
Graphite looks a lot better,
Re: OB19 build in Texas*****SPLASHED*****
Posted: Thu May 09, 2013 8:04 am
by Steven
Received the keel shield and got it installed yesterday. Looks good and should provide excellent protection. Marking out for it was the hard part. The instruction video has you hold it in place and mark around it. It would take 6 people to hold it in place for marking. I made a 6" long cardboard template the same width with center line marks. I marked the end points on the hul and then slid the template along marking as I went. Worked well.

Re: OB19 build in Texas*****SPLASHED*****
Posted: Thu May 09, 2013 9:40 am
by Boater45
NICE!!!
Re: OB19 build in Texas*****SPLASHED*****
Posted: Thu May 09, 2013 10:47 am
by peter-curacao
Very nice! you use her to shave also?
Re: OB19 build in Texas*****SPLASHED*****
Posted: Thu May 09, 2013 1:38 pm
by Steven
HAhaah. Pictures are the best for hiding imperfections.
But it's a boat and looks as good as it needs too.
I'm starting to get the bug again. :ugh: I stll need to add a rubrail and swim platform to this one. I've found myself looking through the boat plans lately. Going to start stock piling materials and supplies.
Re: OB19 build in Texas*****SPLASHED*****
Posted: Thu May 09, 2013 3:23 pm
by Boater45
Steven, did you ever mount your trolling motor? I don't think I ever saw any pictures of the mounting process.
Re: OB19 build in Texas*****SPLASHED*****
Posted: Thu May 09, 2013 5:23 pm
by Steven
Boater45 wrote:Steven, did you ever mount your trolling motor? I don't think I ever saw any pictures of the mounting process.
Sure did. I'll snap some pics tomorrow or Saturday.
Re: OB19 build in Texas*****SPLASHED*****
Posted: Sat May 11, 2013 11:18 pm
by Steven
Re: OB19 build in Texas*****SPLASHED*****
Posted: Sat May 11, 2013 11:18 pm
by Steven
Re: OB19 build in Texas*****SPLASHED*****
Posted: Mon May 13, 2013 10:36 am
by wadestep
Looking really good. I like the graphite much better, even if just for looks alone. I'm still thinking about drainage myself - not quite satisfied yet, and I've already got 4 drain holes! It works, but not excellent. I hadn't noticed you don't have a rubrail on yet - that would be high on my priority list. I also like your trolling motor - my boat still needs one.
Even when they're done, you can just keep pouring money into them...
wade
Re: OB19 build in Texas*****SPLASHED*****
Posted: Mon May 13, 2013 10:56 am
by AtTheBrink
Break
Out
Another
Thousand
Re: OB19 build in Texas*****SPLASHED*****
Posted: Mon May 13, 2013 11:04 am
by Boater45
Thank Steven...I'm looking at doing that but it will be next summer before I do!!
Re: OB19 build in Texas*****SPLASHED*****
Posted: Sun Jul 14, 2013 10:27 pm
by Steven
Lowered the engine one hole and what a difference. No more feeling like the back end is going to slip on turns at speed. No loss in top speed and hole shot is better with no cavitation on turns cruising in a chop. I had the cavitation plate about 3/16" above the bottom at the keel. Really surprised by the difference.
I'm looking at Bimini tops now. This Texas sun is fierce. Carver seems to make a nice one. I'm thinking 8' long, but haven't decided yet. A t-top would bed sweet, but I don't know anyone around here to do it.
Re: OB19 build in Texas*****SPLASHED*****
Posted: Sun Jul 14, 2013 10:38 pm
by Boater45
Steven, there are several T-top kits online that you could install for under $1500.
Re: OB19 build in Texas*****SPLASHED*****
Posted: Mon Jul 15, 2013 9:21 am
by AtTheBrink
Steven wrote:Lowered the engine one hole and what a difference. No more feeling like the back end is going to slip on turns at speed. No loss in top speed and hole shot is better with no cavitation on turns cruising in a chop. I had the cavitation plate about 3/16" above the bottom at the keel. Really surprised by the difference.
I'm looking at Bimini tops now. This Texas sun is fierce. Carver seems to make a nice one. I'm thinking 8' long, but haven't decided yet. A t-top would bed sweet, but I don't know anyone around here to do it.
A little bit makes a big difference! A jackplate will allow you to really fine tune it and find the right engine height.
I am not sure where burlson, Texas is but I am sure you could find a shop that will fab a T-Top for you.
Re: OB19 build in Texas*****SPLASHED*****
Posted: Mon Jul 15, 2013 9:59 am
by Boater45
Stryker T-Tops (non folding $1,149, folding $1,549):
http://www.strykerttops.com/Universal-T ... s-s/37.htm
Fishmaster (folding $995):
http://www.fishmaster.com/
Re: OB19 build in Texas*****SPLASHED*****
Posted: Mon Jul 15, 2013 12:12 pm
by Cracker Larry
A T-top sure looks better when it's built to fit the boat. A custom boat deserves a custom top
There has to be some top builders in Texas!
Re: OB19 build in Texas*****SPLASHED*****
Posted: Mon Jul 15, 2013 5:51 pm
by Mad Dog
Steven, here is a business down in Corpus Christi that get excellent reviews.
http://bluestreakfabrication.com/contact.html
There is a place just south of SA that does really nice work as well. I'll get the name for you and edit this post.
MD
Re: OB19 build in Texas******A Boat is never done
Posted: Thu Oct 31, 2013 6:03 pm
by Steven
Figure I'll add the new work here to continue the thread. Seems like a boat is a continual work in progress. I have to "finish" it at some point or I'll never convince my wife I need to build another one.
My T-Top is ordered and will be built over the coming weeks. Once I receive it, I'll be building a new Console. Along with this I will be re-doing the Kiwi-Grip. A bit of sanding and a re-application. I applied it during the summer and it just didn't come out the way I wanted it due to the heat. I'll be repainting the rub rail edge and adding a rub rail. I'll also be upgrading the Depth finder to either a Lowrance or Humminbird super-duper HD imaging one.
With the T-Top I'm getting a custom Swim Platform, a fold down step for my leaning post/seat and a windscreen for the console.
Once I get all this done the boat will finally fit the vision I had In my hand when I started.
Re: OB19 build in Texas******A Boat is never done
Posted: Wed Jan 29, 2014 10:39 am
by Steven
Now that I have the T-Top in my possession I've started work on the new console. No pictures yet, but soon. I don't have a close enough supplier of Meranti, and it's not worth shipping in 2 sheets, so I'm using Marine fir. Drawbacks here are:
1. Not as flat as Meranti
2. All surfaces have to be glassed to prevent checking
3. Absorbs more epoxy than Meranti.
Ultimately, when it's done, the only negative side effect of the above is that it will be a bit more work to build and will be a bit more heavy. Not a large enough piece to be significant. Cost will be a wash. I will use more epoxy and glass, but the plywood is less expensive.
To date I have the main box built. The inner faces have a layer of 6oz. cloth and the inside corners have been glassed with 12oz. biax. I've cut out the top pieces which I will glue together in place on the console, with some packing tape on the console to prevent sticking. Then the top assembly will be glassed both sides before gluing and glassing down.
I kept the same angle for the steering/shifter face as the original. However I think I want the steering wheel a bit more vertical to make seated steering more comfortable. I like the angle of the shifter so I may build an angled steering box to tip the wheel back a couple inches at the top. Undecided on this.
I also started on the swim platform install. I have the holes drilled and epoxied but it's been too dang cold to install. The 5200 won't cure when it's below freezing.
Here it is temporarily installed to mark the holes:


Re: OB19 build in Texas******A Boat is never done
Posted: Sun Feb 02, 2014 5:50 pm
by Steven
Been cold but making some progress.
console glassed on inside with cleats but and ready to be glued in. The holes are were the hatch cut out goes. Had the heater blowing warm air in to help the cure.

Here is the top glued and glassed. Two layers of 6oz. cloth on both sides. The 12 oz biax tape will wrap around and over the sanded/tapered edge of the layers of glass. Should make fairing easy.

Top resting on console. Stupid marine fir and it's footballs.

Side View.. Bad camera angle. the back edge is vertical as it appears in the picture.

Re: OB19 build in Texas******A Boat is never done
Posted: Mon Feb 10, 2014 8:55 am
by Steven
Got the top glued on this weekend after gluing in and glassing backing blocks for the T-Top attachment points. Also glued in a few blocks where I have accessories attached. Should have snapped a picture before gluing down the top. I'll get one from the bottom.
The windshield was a little too deep and would have overhung first slanted face on the console. Not really a big deal but it would have annoyed me. So, I bought a torch, always good to get a new toy, errr tool, and cut about an inch off the side wings. Used a fine toothed jig saw blade, sanded the cut smooth and then ran the torch over it. First time doing it. Worked like a charm.
Re: OB19 build in Texas******A Boat is never done
Posted: Sat Feb 15, 2014 12:51 am
by Steven
I've struggled with how to fit the windshield. Today I hit on the answer after first routing a rabbet around the edge for it to sit down in. The problem was how to get the rabbet on the front edge angled to match the windshield. I made a jig with a fence for my circular saw and clamped on a support board since only the narrow side of the saw plate would be supported by the jig.
Worked great. Now all that's left is to glass the outside, install and fair.
Here's a side view after making the cut. If you look closely you can see the angle.

The saw rides on the jig and the Masonite edge.


Re: OB19 build in Texas******A Boat is never done
Posted: Sat Feb 15, 2014 8:41 am
by Dougster
That is ingenious and looks great. Nice tip to show. I couldn't visualize it without the pics but they make it clear. You're sure gonna have a fine console!
Admiring Dougster
Re: OB19 build in Texas******A Boat is never done
Posted: Sat Feb 15, 2014 9:07 am
by Cracker Larry
Very slick Steven
Re: OB19 build in Texas******A Boat is never done
Posted: Sat Feb 15, 2014 9:47 pm
by Steven
Re: OB19 build in Texas******A Boat is never done
Posted: Mon Feb 17, 2014 10:36 am
by wegcagle
Great work Steven
Will
Re: OB19 build in Texas******A Boat is never done
Posted: Mon Feb 17, 2014 1:49 pm
by Joe H
Very nice!
Steven, how far up from the Water Line is your swim platform?
Joe H
Re: OB19 build in Texas******A Boat is never done
Posted: Mon Feb 17, 2014 4:13 pm
by Steven
Joe H wrote:Very nice!
Steven, how far up from the Water Line is your swim platform?
Joe H
Thanks Joe. It's a couple inches above the waterline.
Re: OB19 build in Texas******A Boat is never done
Posted: Tue Feb 18, 2014 11:26 am
by Matt Gent
Now that you've got a custom-made console to go with the windshield, may want to think about having a spare if there is any risk of that part becoming no-longer-available. I had to ditch the screen on my boat after a few too many people grabbed or leaned on it and it broke.
Probably a lower risk for you with the t-top tubing around it.
Re: OB19 build in Texas******A Boat is never done
Posted: Sat Feb 22, 2014 11:59 pm
by Steven
Then there was no console. That jumble of wires was neatly routed a few minutes earlier. Had to buy a sawzall and a belt sander for this job. Darn.
. Cut it wit a circular saw, then cut the rest as flush as I could with the sawzall. Had a 3/8" bump to sand down and nothing short of 40 grit on a belt sander was gonna get that done. Still have a couple feet to sand smooth. After that I'll set in the console and top to mark for drilling oversized holes that will get filled with an epoxy, wood flour, chopped fiber mix. Those will be the top bolt holes. I still have some work on he console before gluing it in. Next weekend I'll hopefully be ready for that.

Re: OB19 build in Texas******A Boat is never done
Posted: Sun Feb 23, 2014 7:58 pm
by Steven
Trial fit to mark hole locations.

Re: OB19 build in Texas******A Boat is never done
Posted: Mon Feb 24, 2014 8:03 am
by topwater
That's a great looking tower on a great looking boat
Nicely done
Re: OB19 build in Texas******A Boat is never done
Posted: Mon Feb 24, 2014 8:26 am
by pee wee
When a design is right it just looks right. Even though the installation hasn't been completed it looks like what should be there, that is going to be a great looking combination.
Re: OB19 build in Texas******A Boat is never done
Posted: Sun Mar 02, 2014 10:32 pm
by Steven
Final coat of clear on the outside. Will install it before starting fairing.

Put on first coat of tint inside yesterday evening. 65 degrees and pleasant. Overnight temps dropped to the 20's. No worries. Fired up heaters and blew heat into it all day. Probably had the temp inside the box 70 all day. Still have sticky epoxy. Not looking good. The first batch didn't quite get it done. Mixed up a smaller second batch. May have put in too much tint in the second batch. I sure don't like thinking about cleaning out partially cured epoxy. Never had a failure before.

Re: OB19 build in Texas******A Boat is never done
Posted: Mon Mar 03, 2014 3:54 pm
by Steven
And here's what it looks like when you get something wrong in your mix. 3 boats and I've never had a batch not cure. Going to be a job to get it all cleaned out with Acetone. Actually comes up easy enough. I'm going to put it in a spray bottle so I can moisten the surface and then wipe it up. Soaking the rag just wastes a lot of acetone. Not really sure what went wrong. Only thing I can think is that I was using the proportional measurements on the side of the 1 quart mixing cup and my eyes strayed to the wrong 3 when I was adding the resin. Ended up with a resin rich mixture I think. I usually stick with the ounces or linear measurement. I will for sure for now on. The second mix, which I figured I must have used too much tint in a small batch seems to have cured ok. Figures it would be the first, largest and in the hardest to reach spaces batch.

Re: OB19 build in Texas******A Boat is never done
Posted: Mon Mar 03, 2014 4:07 pm
by tech_support
well at least its not on the outside
Re: OB19 build in Texas******A Boat is never done
Posted: Mon Mar 03, 2014 4:30 pm
by Steven
Well, it just sucks all the way around. I've been methodical in trying to do everything that needs to be done to the inside before installing. I want to be hanging through the hatch as little as possible.
Just a minor speed bump. I was of course going wet on wet to avoid sanding. Now I'll have to sand once I clean off all the mess. But, at least I didn't install it first and then commit this blunder. That would have truly sucked. As is it's just a couple hours of inconvenience and a waste of 6 oz of epoxy/tint mix.
Re: OB19 build in Texas******A Boat is never done
Posted: Tue Mar 04, 2014 10:43 am
by Steven
This is just brutal.
Re: OB19 build in Texas******A Boat is never done
Posted: Tue Mar 04, 2014 11:10 am
by pee wee
Acetone in a spray bottle sounds like lots of fumes. Hope you are doing that outside, would help to have a fan to keep you nose somewhat upwind. Wear a respirator, too.
Re: OB19 build in Texas******A Boat is never done
Posted: Tue Mar 04, 2014 11:34 am
by Steven
pee wee wrote:Acetone in a spray bottle sounds like lots of fumes. Hope you are doing that outside, would help to have a fan to keep you nose somewhat upwind. Wear a respirator, too.
Spray bottle abandoned. Couldn't keep up with evaporation. I always use a respirator with acetone and have garage door open and keep dispensed wipes outside. Quit yesterday after going through a box of 200 wipes. Will continue tonight.
Re: OB19 build in Texas******A Boat is never done
Posted: Tue Mar 04, 2014 3:42 pm
by Matt Gent
If it makes you feel any better, I think I worked an entire day mixing 1:1 rather than 2:1. The neighbor was over BSing while I was working, had the music on in the background, and I'm sure I could come up with more excuses. It wanted to set, but even after about 10 days I could still indent the fillets with my thumbnail.
Re: OB19 build in Texas******A Boat is never done
Posted: Tue Mar 04, 2014 3:45 pm
by Steven
Using Acetone soaked wipes in 26 degree weather is not fun. As it evaporates it lowers the temperature your fingers are exposed too substantially. Had to stop and warm my thumb constantly. Kept expecting to pull off the glove to a black frozen thumb. Of all the places to screw up a mixture, inside a confined space was not ideal. For those who may find themselves in this situation, I found a generously soaked wipe works best. Wipe till it stops coming up 'easily' then get another. I'm using a box of paper towels Lowes sells. Actually think regular paper towels would have been better. Used a few at the end of my shift yesterday and they don't seem to tear apart as easily as the special heavy duty expensive ones. Go figure.
Re: OB19 build in Texas******A Boat is never done
Posted: Tue Mar 04, 2014 3:54 pm
by pee wee
once it's soft, will a scraper remove the bulk of it? I'm thinking one of those hook scrapers that you pull. you'd still have to clean up the last with solvent, but it might help.
Re: OB19 build in Texas******A Boat is never done
Posted: Tue Mar 04, 2014 4:34 pm
by Steven
On smooth surfaces if you are careful. I don't fair surfaces super smooth on interior surfaces. The tinted epoxy fills the weave well. A few coats does it nicely. I sand it 'smooth' so there are no rough edges and tape edges are tapered smooth. I have a few places where its in the weave of the 12oz tape and I'll probably have to use a brass brush to get it clean.
Re: OB19 build in Texas******A Boat is never done
Posted: Sat Mar 08, 2014 10:53 pm
by Steven
Well, made it back to square one finally. Acetone did no get the job done. Switched to Vinegar. Since it doesn't evaporate it soaks in and softens the uncured epoxy. Paint it on like a regular stripper, wait a minute then scrub with a stiff bristle brush and brass wire brush. Sharpened putty knife on tough spots and a tooth brush for the crevices. Clean up with a lot of water and a couple wipe downs with rubbing alcohol. The left behind is the second batch which cured. This was a lot of freaking work. I screw it up again and I'll just toss it and build another console.
Tomorrow I'll start again. This has really but a dent in my completion time. I'd have it installed and mostly faired by now.

Re: OB19 build in Texas******A Boat is never done
Posted: Sun Mar 09, 2014 10:46 pm
by Steven
Second coat is on and setting up nicely. Whew
Re: OB19 build in Texas******A Boat is never done
Posted: Mon Mar 10, 2014 9:29 pm
by Steven
whew. success. Ready to install.

Re: OB19 build in Texas******A Boat is never done
Posted: Mon Mar 10, 2014 9:46 pm
by Dougster
Sometimes it's just not easy. It sure looks good now though, so it's well worth it, and I hope to see it live at POC this August.
Watchin' from here Dougster
Re: OB19 build in Texas******A Boat is never done
Posted: Tue Mar 11, 2014 1:02 pm
by Steven
Dougster wrote:Sometimes it's just not easy. It sure looks good now though, so it's well worth it, and I hope to see it live at POC this August.
Watchin' from here Dougster
Thanks. Would love to come but probably won't make it. The kids start marching band practice in August so we vacation in July. Will be in Port Aransas then. Love me fishing for some Kings.
Steven
Re: OB19 build in Texas******A Boat is never done
Posted: Tue Mar 11, 2014 9:08 pm
by Mad Dog
Steven wrote:Dougster wrote:Sometimes it's just not easy. It sure looks good now though, so it's well worth it, and I hope to see it live at POC this August.
Watchin' from here Dougster
Thanks. Would love to come but probably won't make it. The kids start marching band practice in August so we vacation in July. Will be in Port Aransas then. Love me fishing for some Kings.
Steven
Builder's meet is July 25th!!
MD
Re: OB19 build in Texas******A Boat is never done
Posted: Thu Apr 03, 2014 6:57 pm
by Steven
Console is installed and mostly faired. An Quick Fair order arrives tomorrow. Ran just short. Should be ready to prime by weekends end if weather cooperates

Drilled 3/4" holes and filled with a thickened mixture of Epoxy,woodflour and high ratio of milled fibers. The holes on far left and right sides are drilled through cleats next to stringers. The inner holes are into the foam. Will use 2 1/2" fasteners.

Re: OB19 build in Texas******A Boat is never done
Posted: Thu Apr 03, 2014 6:59 pm
by Steven
Console is installed and mostly faired. An Quick Fair order arrives tomorrow. Ran just short. Should be ready to prime by weekends end if weather cooperates
Drilled 3/4" holes and filled with a thickened mixture of Epoxy,woodflour and high ratio of milled fibers. The holes on far left and right sides are drilled through cleats next to stringers. The inner holes are into the foam. A layer of glass is over the holes. Will use 2 1/2" fasteners.
Re: OB19 build in Texas******A Boat is never done
Posted: Sun Apr 13, 2014 5:41 pm
by Steven
Finally a light at the end of the tunnel. The weather has caused this to just drag on. It just stopped raining an hour ago. Gonna start again around 1 am. This will be dry to the touch in a couple hours. I have a plastic cover for It I used overnight, and it will go on at bed time. Plenty of time for the evaporation part of the cure to complete. Time to buy a place with room to build a shop.
3 coats of System 3 Yacht primer. Great stuff. Pin holes already filled with Quick Fair. All that waits is a final sanding and then topcoat.


Re: OB19 build in Texas******A Boat is never done
Posted: Sun Apr 13, 2014 5:52 pm
by Cracker Larry
Looks great Steven. I hear ya on the weather. We've been really nice here this week, but it's the first week in months. Rain coming again tomorrow, your rain I reckon
Re: OB19 build in Texas******A Boat is never done
Posted: Sun Apr 13, 2014 6:27 pm
by Steven
Thanks. It is our Rainy/Stormy season, so to be expected. Can't really complain as we've been in a drought for a long while now and all of the lakes are super low. But I am losing patience with not getting on the water when it is nice.
Should the top be grounded to the main boat ground? I don't have a dedicated ground plate, it's all grounded through the electrical to the motor. I could run a ground strap from an attachment bolt in the console to the negative bus, I'm not sure I'm crazy about the potential a hot wire the top might chaf and ground out to the top. I'll have a breaker, but it still gives me concern. Of course I'm definitely not crazy about taking a shock from a lightening strike that might be avoided by grounding.
Re: OB19 build in Texas******A Boat is never done
Posted: Sun Apr 13, 2014 9:36 pm
by Cracker Larry
Steven,yes. I ground everything together and the engine is ground. I have a #4 wire bonding the top, the steering helm and the throttle box all to the ground buss. That has a #4 to the battery negative and to the engine. When lightning hits the top I don't want it using me as the conductor to ground. I don't remember if you have mechanical or hydraulic steering. I have mechanical cable steering which gives a direct electrical connection between the steering wheel and the engine, and the ocean. It's a very good electrical bond. If I had one hand on the wheel and one hand on the T-top leg and lightning struck it, it would probably kill me unless the 2 were electrically bonded together. Same with the shift/throttle box. The control cables to the engine are metal so the throttle box is essentially earth ground also, just like a mechanical wheel. The top is not. Bond them all together with battery cable size wire.
Re: OB19 build in Texas******A Boat is never done
Posted: Mon Apr 14, 2014 11:14 am
by Boater45
Stephen,
What gauge wire did you use from your trolling motor to battery/breaker? I'm ordering the same setup you have. How are you liking it?
Will
Re: OB19 build in Texas******A Boat is never done
Posted: Mon Apr 14, 2014 11:46 am
by peter-curacao
Looking great Steve
Re: OB19 build in Texas******A Boat is never done
Posted: Mon Apr 14, 2014 12:43 pm
by Steven
Thanks guys.
Will,
I'll have to check on the gage, I don't recall. I absolutely love the trolling motor. I'm anxious to see how it hold in the wind with the T-Top installed. I've had it hold when it was so rough I had to sit on the bow with my feet hanging over to keep the motor in the water.
Steven
Re: OB19 build in Texas******A Boat is never done
Posted: Mon Apr 14, 2014 12:47 pm
by Steven
Cracker Larry wrote:Steven,yes. I ground everything together and the engine is ground. I have a #4 wire bonding the top, the steering helm and the throttle box all to the ground buss. That has a #4 to the battery negative and to the engine. When lightning hits the top I don't want it using me as the conductor to ground. I don't remember if you have mechanical or hydraulic steering. I have mechanical cable steering which gives a direct electrical connection between the steering wheel and the engine, and the ocean. It's a very good electrical bond. If I had one hand on the wheel and one hand on the T-top leg and lightning struck it, it would probably kill me unless the 2 were electrically bonded together. Same with the shift/throttle box. The control cables to the engine are metal so the throttle box is essentially earth ground also, jus
t like a mechanical wheel. The top is not. Bond them all together with battery cable size wire.
Thanks CL. The steering is Hydraulic. I'll order some heavy duty cables from genuinedealz to use for ground straps. I'll connect them to the stud the main ground from the battery attaches too for best path conductivity. I totally didn't think about the shifter. Thanks for the reminder.
Re: OB19 build in Texas******A Boat is never done
Posted: Mon Apr 14, 2014 1:40 pm
by Boater45
Steven wrote:Thanks guys.
Will,
I'll have to check on the gage, I don't recall. I absolutely love the trolling motor. I'm anxious to see how it hold in the wind with the T-Top installed. I've had it hold when it was so rough I had to sit on the bow with my feet hanging over to keep the motor in the water.
Steven
Did you get the Minn Kota Riptide ST 55 w/ i-Pilot (55 Lbs. Thrust, 54" Shaft)?
Re: OB19 build in Texas******A Boat is never done
Posted: Mon Apr 14, 2014 9:21 pm
by Steven
I got the SP 70 iPilot. It's a 24v motor. 54" shaft. Used 8 AWG wire. I used the genuinedealze site to pick the wire size based on amperage and length of run. I think my total run was 10-11' one way. The batteries are under the center console.
Re: OB19 build in Texas******A Boat is never done
Posted: Wed Apr 16, 2014 9:43 am
by Steven
Re: OB19 build in Texas******A Boat is never done
Posted: Wed Apr 16, 2014 10:07 pm
by peter-curacao
Very nice
Re: OB19 build in Texas******A Boat is never done
Posted: Sat Apr 19, 2014 9:24 pm
by Steven
Got the first coat of paint on today. In a nice dusty 8 mph breeze.
. Nothing for it. Came out pretty good. A few small buggies dived in, but all in all pretty good. Of course it's gone to rain tomorrow. Hoped to finish paint this weekend, Re-Kiwi Grip the deck during the week and then re-rig next weekend. Oh 'well, 1 more week isn't going to kill me.
Re: OB19 build in Texas******A Boat is never done
Posted: Tue Apr 22, 2014 6:57 pm
by Steven
Argh. Sanded and put on second coat. Trying to stretch remaining paint. Don't want to plunk down 70 bucks on a quart of paint for 2 oz. Looks like I'll be doing just that. Just finished and there are little tiny bugs invading it. And I missed over rolling a small spot. Not sure I have enough for another coat. Most irritating.
Re: OB19 build in Texas******A Boat is never done
Posted: Wed Apr 23, 2014 8:48 am
by wadestep
Isn't that how it goes - I'd give you some of mine, since we are using the same paints, but I just discovered the catalyst has all dried up over the past year. If you need any base white (perfection artic white) without catalyst let me know, I didn't check that can yet.
PS - that windshield looks great!
wade
Re: OB19 build in Texas******A Boat is never done
Posted: Wed Apr 23, 2014 9:13 am
by Steven
Thanks wade. I have some catalyst but use a different white. I checked last night and I do have enough for one more coat. Dew settled on it last night and the two horizontal surfaces are a bit motled. Hopefully a sanding and final coat will do it. I'm going to take it over to the in-laws shop this afternoon for the final coat. A pain but want this last coat to go on well and be bug and dew free.
The catalyst seems to be the weak link in keeping some paint on the shelf. The can with the white I had was dried up as well. I bought a can of blue to do some touch up and hadn't opened it yet so was fortunate there.
The windshield came out very well. 3/8" thick it is stout. No worries about grabbing on to it at all, though it will be protected from that by the t-top. I wish I could make the meet.

Re: OB19 build in Texas******A Boat is never done
Posted: Wed Apr 23, 2014 2:51 pm
by Steven
A lunch break light sanding and solvent wipe down and it looks very good and ready for the final coat. The moisture didn't do anything other than mottle the surface. I really put it on thin yesterday because I was trying to stretch for two more coats. I measured remaining paint and have more than enough left. I expect the final coat to come out nice as it will be out of the bugs and the moisture. A little dust will undoubtedly irritate me, but it should come out good. After work I'll move to the shop and lay it on.
Re: OB19 build in Texas******A Boat is never done
Posted: Fri Apr 25, 2014 4:02 pm
by Steven
Got the final coat on and I must say I'm very pleased. Since it was so warm, and I just roll it on without tipping, it has a very slight textured appearance that I like very much . As you can see it is still very shiny. No bugs.
Though there is a small amount of dust, you have to look for it. If I have a productive afternoon, I might be ready to re-apply Kiwi grip in the cool of the morning. I still have to glue a couple battens down inside the console for the battery tie downs and paint around the lower inside edge with tinted epoxy, but I can now progress and get the T-Top on this coming week. wooohoooooo!!!!!

Re: OB19 build in Texas******A Boat is never done
Posted: Fri Apr 25, 2014 4:04 pm
by peter-curacao
Looks great Steve!
Re: OB19 build in Texas******A Boat is never done
Posted: Fri Apr 25, 2014 5:46 pm
by Cracker Larry
Very nice
Re: OB19 build in Texas******A Boat is never done
Posted: Fri Apr 25, 2014 10:59 pm
by Steven
Thanks guys. I did some Kiwi Grip work this evening. Since I put it up the sides 4", I went ahead and taped it off and did just the 4" piece around the perimeter. I would have done the same around the console and seat/Livewell, but I had exactly enough painters tape to go around the outside and not enough time to pick up a roll and get any applied before dark. In the morning I'll finish it up while it's still cool.
Prep didn't turn out to be too bad. I was not looking forward to it. Places where I had to sand the Kiwi Grip off completely for the new console and prep work for the top attachment was challenging even with 50 grit on a belt sander. For prep, I ran to the quarter car wash and power washed it. Then I came home and scrubbed it with soap and water and gave it a good rinse. Then I sanded the sole with 40 Grit on my RO sander. It knocked the rough down without too much fuss. On the 4" sides, I went over it with 60 grit on a black rubber sanding block. I spend probably an hour or so doing the sand work. All in all it will be a nice refresh for not too much effort. I wish I could figure out how to successfully clean Kiwi Grip. I can't get it past looking dingy.
Re: OB19 build in Texas******A Boat is never done
Posted: Sat Apr 26, 2014 7:09 am
by peter-curacao
Steven wrote: I wish I could figure out how to successfully clean Kiwi Grip. I can't get it past looking dingy.
Steve I'm not sure I understand this question, can be cleaning or stripping the kiwi of
If it is cleaning only I can tell you the following I used several specialized boat cleaning products from different brands like for instance Star bright they all work fine, but I find myself using just some Jif on the sole works very well and way less expensive, hose the sole of, scrub some Jif on it with a brush , leave it there in the sun for a moment but not let it dry completely,rinse the sole thoroughly and let dry in the sun, this works great for white kiwi grip.

Re: OB19 build in Texas******A Boat is never done
Posted: Sat Apr 26, 2014 8:47 am
by Steven
Thanks. I'll give that a try on the side decks.
Re: OB19 build in Texas******A Boat is never done
Posted: Sat Apr 26, 2014 8:19 pm
by Steven
Re: OB19 build in Texas******A Boat is never done
Posted: Sun Apr 27, 2014 12:21 am
by willg
Wow! Your boat is is a knockout!!
Re: OB19 build in Texas******A Boat is never done
Posted: Sun Apr 27, 2014 9:49 am
by peter-curacao
Looks great Steve! very very nice!
Re: OB19 build in Texas******A Boat is never done
Posted: Sun Apr 27, 2014 9:42 pm
by Steven
Thanks guys. Today I cleaned up the openings for the accessories and put a couple coats of epoxy on the edges and holes for extra protection. Like a dummy I forget to drill the bolt holes for the steering wheel (previously over drilled and filled) before painting. So had to make a template, line it up with the center hole and mark the holes.
Did some work inside the console that I've been putting off. Hanging through that hatch hole tears up my chest. One big bruise across the pecs. Climbed in it at one point and did some sanding.
Got the outer battery cleats I had to remove when I cut out the console glued in. Also had two cleats on either side behind the chases to glue in where there wasn't enough room for glass. At this point, everything is done that is needed to be done to install the top. Hopefully can round up some help one evening this week.
Re: OB19 build in Texas******A Boat is never done
Posted: Wed Apr 30, 2014 2:45 pm
by wadestep
Steven wrote:At this point, everything is done that is needed to be done to install the top. Hopefully can round up some help one evening this week.
That's exciting. I can't wait to see the top on. it's looking great so far, the top will make a big difference to how the boat looks, should be excellent.
wade
Re: OB19 build in Texas******A Boat is never done
Posted: Wed Apr 30, 2014 10:43 pm
by Steven
Thought I'd get it in tonight but forgot son had baseball practice. Ugh. I did manage to get some of the console wiring done. I installed the steering wheel, Lowrance HDS and the switch panel last night. Little bits here and there. Maybe tomorrow night. Trying to splash on Sunday. Having serious withdraws.
Re: OB19 build in Texas T-Top-erific
Posted: Thu May 01, 2014 9:12 pm
by Steven
Re: OB19 build in Texas T-Top-arific
Posted: Thu May 01, 2014 9:23 pm
by peter-curacao
Re: OB19 build in Texas******A Boat is never done
Posted: Thu May 01, 2014 9:48 pm
by JamesT
Peter, I had the same thought! I think it looks good with that "cabin" on there. Nice top Steven. If your ever out towards tawakoni let me know. Maybe there will still be enough water to launch your boat.
Re: OB19 build in Texas******A Boat is never done
Posted: Thu May 01, 2014 10:44 pm
by Steven
Thanks guys. That's funny. It was getting late and it was the only way to get a side shot. If you know how to fish for Stripers on T-Wak, I'm there. Assuming there's water to launch. I'm wondering if I'll find a place to go. Joe Pool stays full, but I don't really like that lake. I love Whitney for general fun boating. Fishing's tough with the algae kill offs every few years. We really need this drought to end.
Re: OB19 build in Texas T-Top-erific
Posted: Fri May 02, 2014 6:05 am
by Aripeka Angler
Beautiful top on a beautiful boat Steven
The top matches your new console perfectly.
Re: OB19 build in Texas T-Top-erific
Posted: Fri May 02, 2014 8:18 am
by Cracker Larry
I told ya you'd be real happy with Raymond's work
Re: OB19 build in Texas T-Top-erific
Posted: Fri May 02, 2014 8:49 am
by Steven
Thanks. Very pleased. It still amazes me how big a 19" boat this is. That's not a small console. I planned for a T-Top when sizing it to have good room around it. I was still a bit nervous how it would feel once installed. Not an issue. Plenty of room to walk around it and having so many hand hold is great. I'd launch this weekend but son has a game tonight and double header tomorrow. I still have to put the tinted epoxy on the bottom 4" inside the console, fill and bleed the steering and hook up the wiring. Everything's plug and play except the new top lights and that's just a few connections to crimp on. I should wrap everything up by Sunday afternoon.
Re: OB19 build in Texas T-Top-erific
Posted: Fri May 02, 2014 1:04 pm
by Steven
Re: OB19 build in Texas T-Top-erific
Posted: Fri May 02, 2014 1:09 pm
by peter-curacao
Nice welds!
are you gonna put a (cooler) seat between the front legs?
Re: OB19 build in Texas T-Top-erific
Posted: Fri May 02, 2014 2:16 pm
by Rogerdog
That's beautiful.
Re: OB19 build in Texas T-Top-erific
Posted: Fri May 02, 2014 2:27 pm
by Steven
peter-curacao wrote:Nice welds!
are you gonna put a (cooler) seat between the front legs?
Yup
Re: OB19 build in Texas T-Top-erific
Posted: Fri May 02, 2014 7:24 pm
by Cracker Larry
In my whole life of messing with boats, I've never seen anybody who can weld like Raymond.
I was at his shop yesterday and he tried to give me some welding lessons, which was a waste of both of our time because it would take me 10 years of practice with a $10K welding machine to do what he does. The inside of the curves concentrate heat, the outside dissipates heat, all is adjusted by the pulse frequency, the timing between, frequency and amps of the negative pulse, the frequency and amps of the positive pulse, the duration between negative and positive, got to watch the puddle and see if it's too hot or cold, and many other things that make my head hurt. Tungsten cups, aluminum cups, ceramic cups, what to use when fill coats, wash coats
I'm not ever going to be able to make welds like that, but I'm sure glad that I have a good friend who can

You see those welds? It takes Raymond an hour just to describe it to me and tell me how to do it, which he tries, After a few days of practice I couldn't even come close. He can do it in minutes.
Everybody ( well most of us anyway) is good at something. Nobody is better than that at what he does
I'll stick with wood and glass, when I need something welded right it goes to Raymond.
He had to replace a thermostat on his GFs car the other day and wrung off a bolt on the intake manifold. Drilled it and tried an Easyout to remove it. It broke too. He welded a right angle 3/8 Allen wrench right on top of the wrung off bolt, which was below flush to the intake manifold, and screwed it right out. That would cost most people $1000 to repair. 20 minutes and one head scratch for him. I would have welded the wrung off bolt into the hole forever if I tried that.
Re: OB19 build in Texas T-Top-erific
Posted: Mon May 05, 2014 8:36 am
by Steven
Yup. It is definitely top notch work.
Had a productive weekend with one big oops. Motor fired up on first key bump even after a couple months idle. Only thing about the motor that irritates me is that the wiring harness wires are not tinned. But, nothing to do for it.
Got all the console wiring done. Even a second time around knowing where everything goes is a considerable amount of work. It doesn't look like much work but hanging through that hatch opening is a pain. Literally.

Got the batteries charging. Remember the lower right bolt for the next picture.

Yup. Right through. Still not sure how It happened. Well, I know it was one of the last things I did at the end of two days work when I was tired and ready to be done. Should have put it off one more day. Only saving grace is that I'm installing a bumper across the front of the console to hold off the cooler and it will cover it up. No harm, no foul, but irritating non the less. You can see all the zip ties I used. Every one screwed to the 3/8" plywood of the console without a hiccup. I go to drill into close to an inch and plow through. ugh.

Re: OB19 build in Texas T-Top-erific
Posted: Wed May 07, 2014 8:19 pm
by jorgepease
Cracker Larry wrote:In my whole life of messing with boats, I've never seen anybody who can weld like Raymond.
I am about to line out the metal work on my build, where is Raymond located, how are his prices? Maybe I could use him as well.
Nice job wiring that up, much neater job than my dealer rigged skiff!
Re: OB19 build in Texas T-Top-erific
Posted: Thu May 08, 2014 9:09 am
by Steven
jorgepease wrote:Cracker Larry wrote:In my whole life of messing with boats, I've never seen anybody who can weld like Raymond.
I am about to line out the metal work on my build, where is Raymond located, how are his prices? Maybe I could use him as well.
Nice job wiring that up, much neater job than my dealer rigged skiff!
Thanks Jorge. Below is Raymond's info. As far as prices go, I definitely got what I paid for. High quality custom work. It was more expensive than I would have paid from a cookie cutter fabricator to be sure, but not exceedingly so. If you want custom work, I doubt prices will vary much from other quality fabricators.
Martin Marine Design
932 Old Charleston Hwy
Hardeeville, SC 29927
SHOP: (843) 784-6110
EMAIL:
info@martinmarinedesign.com
Re: OB19 build in Texas T-Top-erific
Posted: Fri May 09, 2014 5:28 pm
by jorgepease
Thanks, I will give him a call.
Re: OB19 build in Texas T-Top-erific
Posted: Mon May 19, 2014 4:15 pm
by Steven
Got the foot rest installed. Installed it on the console instead of the seat so that it is completely out of the way when up, and when down it holds in the bucket I keep in there. That's how it travels on the trailer.

I installed some rubber stops. Bought a couple stoppers, cut them down to size and glued on with a little dab of 4200.

Re: OB19 build in Texas T-Top-erific
Posted: Tue May 20, 2014 8:41 am
by topwater
Did Raymond make the foot rest also
Re: OB19 build in Texas T-Top-erific
Posted: Tue May 20, 2014 10:36 am
by Steven
Yup. Just gave him the dimensions.
Re: OB19 build in Texas T-Top-erific
Posted: Wed May 21, 2014 7:50 am
by topwater
Nice
Re: OB19 build in Texas T-Top-erific
Posted: Sat May 24, 2014 4:39 pm
by Steven
Finally got around to making some new guide covers.

With leftover made a cover for the control cables. Didn't have enough width to sew in some Velcro so had to zip tie it. Still better than what I had. Will have to get some black and redo it.

Re: OB19 build in Texas T-Top-erific
Posted: Thu May 29, 2014 11:01 am
by flyfishingmonk
Looks great!
Re: OB19 build in Texas T-Top-erific
Posted: Sat May 31, 2014 11:39 pm
by Steven
Thanks.
Got some on water pics.

Here you can see the swim platform a few inches above the water.

Re: OB19 build in Texas T-Top-erific
Posted: Sun Jun 01, 2014 8:12 am
by topwater
Steven all the finishing touches really look incredible
Thats a sweet ride
Re: OB19 build in Texas T-Top-erific
Posted: Sun Jun 01, 2014 12:19 pm
by AtTheBrink
Now she looks finished! Pretty pretty boat.
Re: OB19 build in Texas T-Top-erific
Posted: Mon Jun 02, 2014 2:41 pm
by danieloldhouse
It really seems another boat, it's wonderful!
Re: OB19 build in Texas T-Top-erific
Posted: Mon Jun 02, 2014 3:28 pm
by tech_support
VERY NICE
Re: OB19 build in Texas T-Top-erific
Posted: Mon Jun 02, 2014 3:45 pm
by mindunderwater
I really like a T-Top for standing at the helm - it's just better at being out of the way than a bimini.
Just watch that over-the-shoulder cast
Re: OB19 build in Texas T-Top-erific
Posted: Mon Jun 02, 2014 4:23 pm
by Cracker Larry
Just watch that over-the-shoulder cast
And the Bill Dance style hook sets
Re: OB19 build in Texas T-Top-erific
Posted: Mon Jun 16, 2014 4:46 pm
by Steven
Thanks guys. That is the vision I had when I started down this path. CC with T-top. To me that's just how a boat should be. The Top makes it so much nicer for passengers. Went out Saturday with 19 MPH gusts. Waves closely spaced 2-3 feet. My son and father-in law able to stand next to me where I can see them and they can absorb the ride as be blasted across the tops at 33 MPH. Oh what fun. So solid. And the big honknig windshield is a blessing. This was roughest I've had it out with water coming over the front at times. Lot of spray but back of boat stayed nice and dry.
Re: OB19 build in Texas T-Top-erific
Posted: Mon Jun 16, 2014 10:23 pm
by Uncle D
Boat really looks great Steven. T-tops complete a CC boat for sure.
Don
Re: OB19 build in Texas - It's never done
Posted: Thu Feb 19, 2015 10:34 pm
by Steven
So this year I'll be doing a lot of smaller things I put aside while doing the T-Top. I ordered the Lowrance NMEA cables to hook the Yamaha to my HDS unit. Got some Boat Buckles I'll be installing this weekend. Going to order some new Battery cable for inside the Console where my Trolling batteries are. One was always a bit short so I couldn't run it just as I wanted. Have to add a couple vents to the upper sides of the new console. I worry about gas building up from the batteries and corroding the various electronic connectors. Once the NMEAA network is installed, I'll order a GPS antenna to go on the T-Top that will plug into the network. Biggest project will be building the Electronics Box for the Top. Really want to get it built and a radio installed. I started it using marine fir and decided the plywood sucked too much. So going to order a quartered sheet of Okoume from here. Need to order a rubrail and get that installed. Before installing the rubrail, I need to repaint the sheer strip, and then retouch the upper deck non skid. Need to modify the fenders on the trailer by adding a raised tilted rub surface to easy loading the boat. If I'm not careful, it will wash over the fender which is tough on the spray rail. So this turned into a jumbled rant and now I'll need to prioritize it all.
Re: OB19 build in Texas - It's never done
Posted: Thu Feb 19, 2015 11:11 pm
by Cracker Larry
Made me tired just reading it
Re: OB19 build in Texas - It's never done
Posted: Mon Feb 23, 2015 5:24 pm
by Steven
I got tired after writing it.
Only thing for it is to just plug a way. Got a few things checked off this weekend.
Turns out I installed a longer battery cable when I installed the new console, but never liked how I routed the Battery Charger cables. Changed that up and made it neater.
Got the Boat Buckles installed. I love these. So much nicer than loose ratchet straps. They are stainless so they should hold up.

Think I've decided on this radio and Antenna. NMEA 2000 compatible so it will just plug into my network.
Shakespeare 5226-XT 8' Galaxy Antenna

Re: OB19 build in Texas - It's never done
Posted: Wed Feb 25, 2015 11:09 pm
by Steven
Technology is cool. Did a test hook up of the NMEA network from my Motor to my Lowrance. Still melting ice in the boat, but I couldn't wait. Temp got to high forties with nice Sun in the sky so had to see how it worked. Had to plug the Lowrance Yamaha Command Link to NMEA 2000 conversion cable into the motor and into the NMEA cable. Crimped terminal ends on the power cable and hooked the NMEA cable to the Lowrance. Fired up the engine and instant data after 15 minutes of work. Not bad. For Trim you have to dig out two wires under the cowling that aren't connected and connect them to send the signal down the NMEA path. That was a pain just because the space is small to get to the connectors and remove the water tight plugs. So I've gone from just a Tach to all kinds of useful data. I'm most excited about the Trim gauge.
I'll be replacing the Analog Tach with a Lowrance multi gauge. It's a standard size so it's just a swap out.

Re: OB19 build in Texas - It's never done
Posted: Thu Feb 26, 2015 8:03 am
by Cracker Larry
That is sweet
Technology is a wonderful thing!
Re: OB19 build in Texas - It's never done
Posted: Thu Feb 26, 2015 9:25 am
by tech_support
super cool..... now you just need a second 7" display for the fishfinder and Nav screen
Re: OB19 build in Texas - It's never done
Posted: Thu Feb 26, 2015 10:50 am
by Steven
Unfortunately, a second HDS7 Display is the best price option at 699.00 for a large color display.
Garmin makes a display that's 549.00 but rather bland. I need to look into this some more to see other data layouts. It's nice and readable.

The Lowrance Multifunction gauge will give me a separate view of a few readouts at a time, but it's nothing like 7" of color.

I'll get one of these and live with it a season to see just how bad I want a separate full sized view. Seems to be a market opportunity here. Full size color LCD display with graphics and customizable layout options. I'm sure there are higher end units, but not practical on a 19' boat.

Re: OB19 build in Texas - It's never done
Posted: Sat Feb 28, 2015 4:10 pm
by Auger01
That Garmin GMI 20 will also display in color I believe. I have two of the older model GMI10's in my boat and I love them. TONS of information in a small space. The GMI10 is still available for around $350 I believe.
http://i1082.photobucket.com/albums/j36 ... 7d9393.jpg
Re: OB19 build in Texas - It's never done
Posted: Sat Feb 28, 2015 4:53 pm
by Noles309
That is some high tech stuff. Looks great
Re: OB19 build in Texas - It's never done
Posted: Sat Feb 28, 2015 8:06 pm
by Steven
I like those Auger. So they use a standard NMEA 2000 connector?
On your wiring pic, where did you get the short wires with the rubber boots?
Been below freezing and snowing/freezing rain for days now. Fired up the electric heaters and got the garage to a balmy 55.
I need to glue in some cleats so I'm coating them with tinted epoxy first. I'm going to tint the glue as well when I glue them in. I ran some screws in the back of the cleats and then hot glued them to the plywood to make them easier to coat.

Re: OB19 build in Texas - It's never done
Posted: Sat Feb 28, 2015 11:38 pm
by Auger01
Yes, the gmi10 works on the nema2k network. It also has an nmea183 input.
Here are the covers that I put on the short battery cables that I made up:
https://www.bluesea.com/products/4012/C ... _0.50_Stud
Re: OB19 build in Texas - It's never done
Posted: Sun Mar 22, 2015 10:17 pm
by Steven
I've been putting a cushion between the console and cooler up to now and finally got around to making and installing a bumper on the front of the console. (As a bonus it covers the hole I accidentally drilled through the console when I was rigging it.
) Ordered some Starboard from boatoutfitters.com and a short piece of rubrail from hamiltonmarine.com and put it together. Now I just need to install a couple hold down rings so I can strap it down.


Re: OB19 build in Texas - It's never done
Posted: Mon Mar 23, 2015 8:38 am
by topwater
That came out real nice
Re: OB19 build in Texas - It's never done
Posted: Mon Mar 23, 2015 9:37 am
by Cracker Larry
That's a cool idea
Re: OB19 build in Texas - It's never done
Posted: Mon Mar 23, 2015 9:27 pm
by Steven
Thanks. I was going to make it out of wood, but by the time I epoxied it, sanded and painted, it would have been more trouble than it was worth. Plus I'm out of primer and paint. Made the starboard much more attractive. I'm also installing a 1\4" thick piece in the motor well where the motor rigging lays. Kids managed to get some shells in there and scratched the paint to the primer. Been bugging me but no good way to touch up these 2 part paints. This is going to look good and solve the problem permanently.
Re: OB19 build in Texas - It's never done
Posted: Tue Mar 24, 2015 7:48 pm
by Steven
Got the motor well scratch eliminator installed.
Now it just needs another bath. I've washed her twice since the last time we've been out. I can't catch a weather break. Hopefully this weekend. Should have done without the non skid here. Seemed like a good idea at the time.
You can see the primer where it's scratched through. Kids!!

Now a nice slick surface for the cables to slide on. Function over form here.

Re: OB19 build in Texas - It's never done
Posted: Mon Aug 03, 2015 10:51 pm
by Steven
Since I haven't been able to get the boat out, lakes are so full the ramps are submerged, I've been doing some maintenance.
One thing I didn't do when I built the boat was build in ventilation to the rear lockers. There is a little ventilation through the drains into the bilge, but I wanted something more effective. I drilled holes into lockers under the side decks, (after fighting off wasp after wasp that kept returning to the location of the nest I knocked down, which was coincidentally under the side deck exactly where I had to work
) , and made some screens to keep the same wasps out of the lockers. Cut some rings from some starboard scraps and glued some fiberglass screen to the backside. These should keep the lockers aired out better.
The knife is a Havalon. If not familiar, check them out. Replaceable blades. They are scalpel sharp, last a long time and you can get 50 blades for about 30 bucks. Years worth. They are slightly flexible and you can do things no regular knife can do, like slice glue, or silicon off a flat surface without hurting the paint. Braided line parts like butter.
The only thing you can't do is pry with them. No pulling staples from the end of dimensional lumber.

Re: OB19 build in Texas - It's never done
Posted: Wed Aug 05, 2015 8:27 am
by Topwater.2
Steven great idea with the starboard
I mite have to steal it if i start haveing problems with bugs in my
rear lockers .
Re: OB19 build in Texas - It's never done
Posted: Sat Aug 08, 2015 9:53 pm
by Steven
Did my first ever impeller replacement today. I pulled a "Dougster"
a month or so ago and cranked the motor without turning on the water to the muff. Realized right away and stopped the engine. Didn't think it was a problem, but since the motor was installed in fall of 2012, I figured it was due. Watched a video on youtube. Good view of how it all comes apart, but since I have a manual, I referenced it for the particulars. Of note, the webby used grease where the manual calls for liquid Gasket Material.
I took my time since this was my first one. Next one will go much quicker.
The impeller was in surprisingly good shape. Must be the Yammy rubber
It was set, but still pliable, and no appreciable degradation of the rubber. I did have to cut It off with a chisel.


Re: OB19 build in Texas - It's never done
Posted: Thu Aug 13, 2015 1:20 pm
by Matt Gent
How did you cut the nice circles in the starboard for the vents? Pair of hole saws?
Re: OB19 build in Texas - It's never done
Posted: Thu Aug 13, 2015 7:27 pm
by Steven
Yup. I clamped the starboard on the drill press table and drilled the inner then the outer with hole saws. Then I split that on the band saw to make two rings.
Re: OB19 build in Texas - It's never done
Posted: Fri Oct 09, 2015 5:21 pm
by Steven
I damaged the carpet covered wheel well protector a while ago and made a hasty repair. So hasty it fell completely off at some point.
So I set out to make a nicer more permanent solution. When I load the boat on the trailer, I back it down so that the top of the fenders are just out of the water. This works well in smooth calm, but I've had the boat push over the fender a couple times with a strong side wind. . There isn't much room between the inner fender and the boat. So I made some replacements from Coosa board. I radiused the inner edge and covered it with 2 layers of 3.25 cloth. It takes the curves and radius easily. The outside I put a layer of 12oz. to add strength against pulling through the screw heads. They came out very nice. I extended them an inch above the fenders to add some protection in a side wind.
I'm going to get some wheel spacers and move the wheels out 1/2" on each side to give more clearance.


I also replace my Analog Tach with this Lowrance Multi-Function gage. Very cool. Lots of data display options. It synchs on the network. If I dim my HDS display, the Multi-Function gage dims as well. You can turn off the feature, but I like it. Technology rocks.
Sorry for bad pic. It is displaying RPM's, Gal/Hr, Mpg and speed over ground. I need to get a paddle wheel. If I adjust the Trim, it displays the Trim gage automatically and goes back to previous view after 10 seconds.

Re: OB19 build in Texas - It's never done
Posted: Sat Oct 10, 2015 12:57 am
by TomW1
Neat Steven!
How's your wife doing on her chemo.
Tom
Re: OB19 build in Texas - It's never done
Posted: Sat Oct 10, 2015 9:09 pm
by Steven
So far, so good. No severe nausea, which was her big fear.


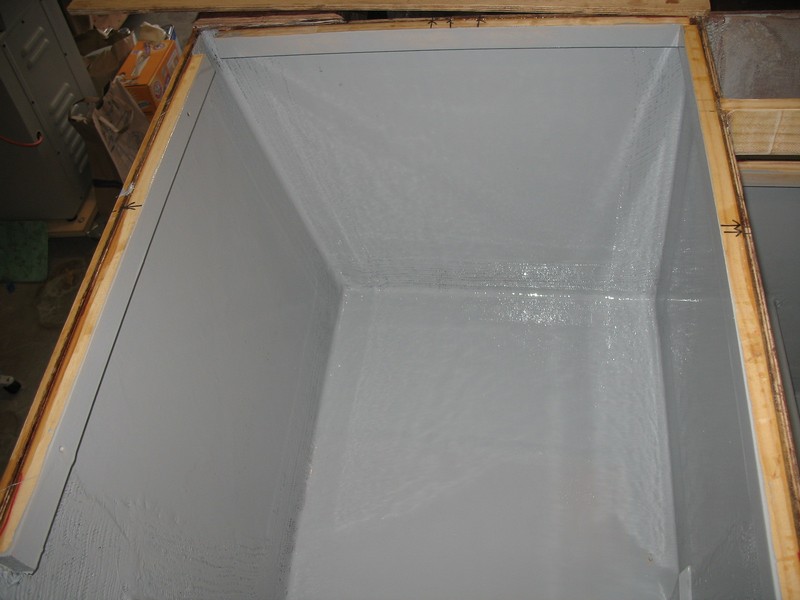


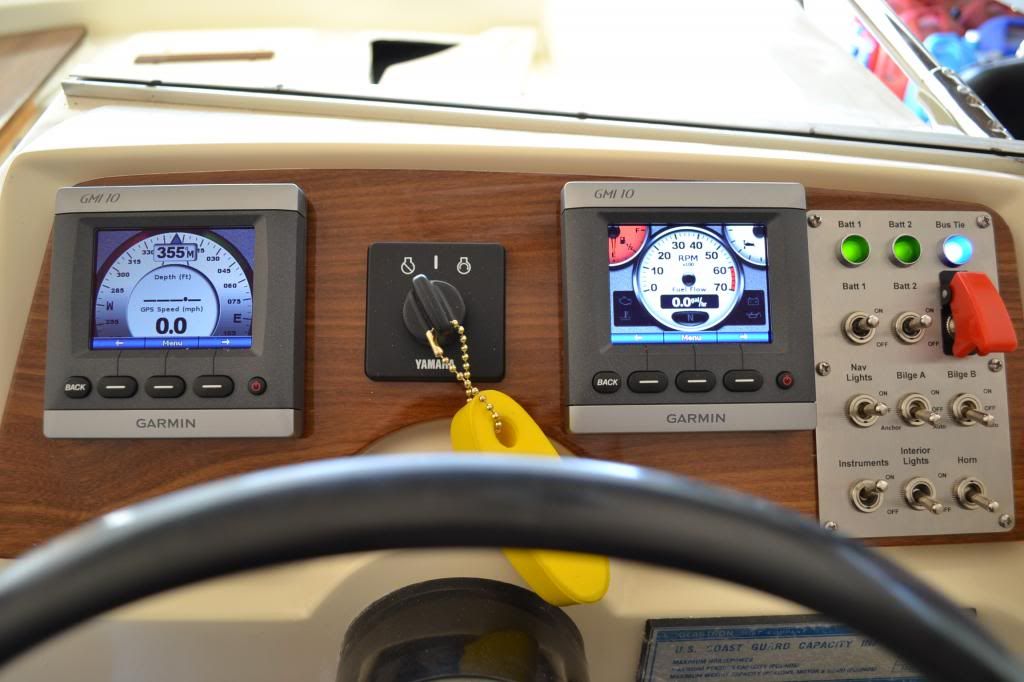