Page 1 of 1
Seadation's FS14 Build - Splashed 12 May 2012
Posted: Sun Dec 11, 2011 9:42 pm
by Seadation
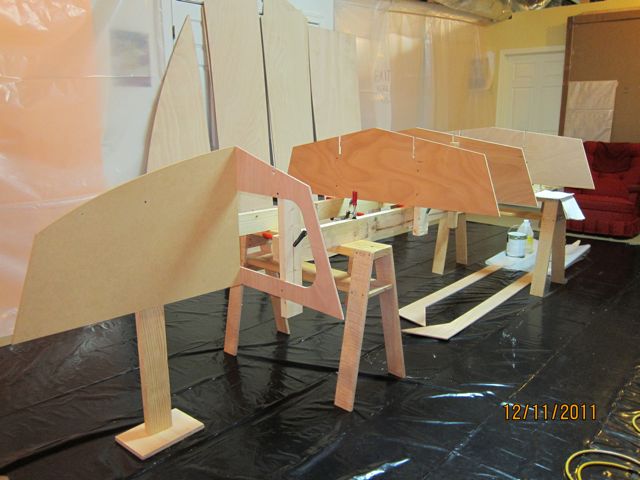
It has begun. I have started building the FS14. I am using the CNC plywood kit. Today I mounted the frames on the strongback. My dogs watched...

I glued the stringers together with butt blocks.
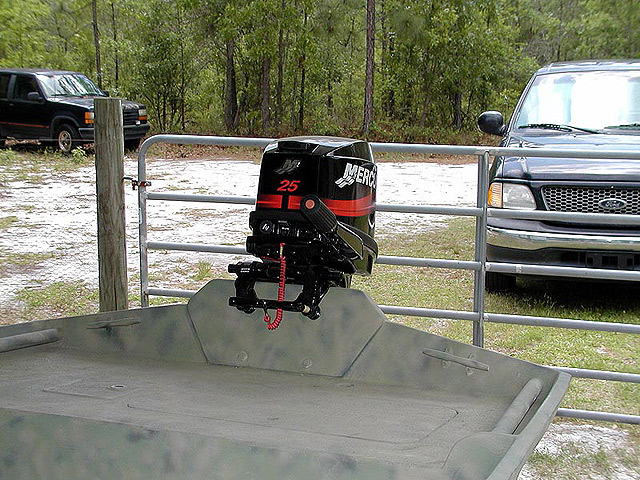
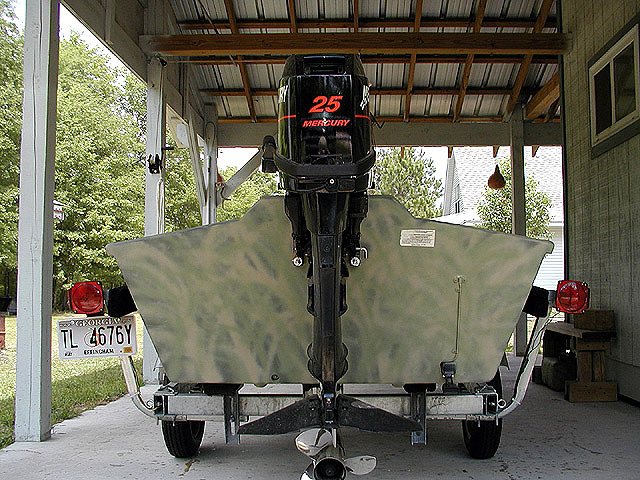
I have a Tohatsu motor...it is a 'long' shaft as specified in the plans. When I put the pre-cut transom piece in position
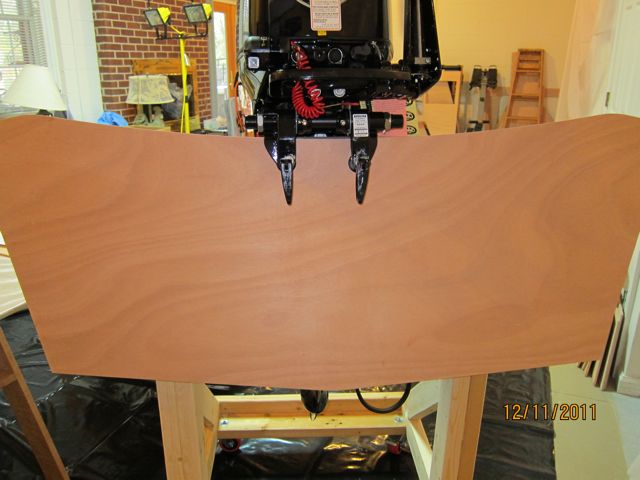
,
the cavitation plate is 3-3 1/2 inches BELOW the bottom of the transom
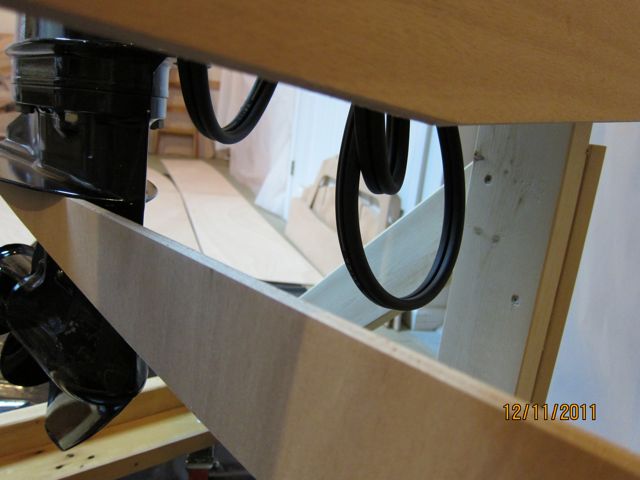
.
How should I "raise" the level of my transom? Is it as simple as adding approx 3 inches of ply on top?
Thanks,
/david
Re: Seadation's FS14 Build
Posted: Mon Dec 12, 2011 10:58 am
by tech_support
yes, your going to need to raise the transom. Its actually probably closer to 4.5" too low when you set the transom to an angle.
Im trying to think of a way to keep the existing pieces of wood so you can mount the motor directly on the transom.
a small jack plate would solve the problem
Re: Seadation's FS14 Build
Posted: Tue Dec 13, 2011 1:40 pm
by Seadation
shine wrote:yes, your going to need to raise the transom. Its actually probably closer to 4.5" too low when you set the transom to an angle.
Im trying to think of a way to keep the existing pieces of wood so you can mount the motor directly on the transom.
a small jack plate would solve the problem
Hello Joel,
Could I glass on more 3/8" plywood onto the top edge of the transom piece...butt jointed? I have enough additional 3/8" to make solid (one piece) clamping boards to go on top of the transom as shown in the plans.
I also have some 8/4 mahogany I could use to reinforce the top of the transom if you thought that might work.
What are your thoughts?
Thanks,
David
Re: Seadation's FS14 Build
Posted: Tue Dec 13, 2011 2:34 pm
by tech_support
Hi David,
Let see what Jacques says as he has final word on his deigns, but this will probably work...
scab a "key" piece into the full transom piece. It might look somethign like this....

next would be a couple layers of clamping board that fit the new profile and completely cover the scabbed in "key" piece. You will need to make these from scrap or some other wood you may have access to, could be some exterior fir as it will get covered with glass anyway. Cover with the 12 oz biax inside an out.
Re: Seadation's FS14 Build
Posted: Tue Dec 13, 2011 4:28 pm
by Seadation
Hello Joel,
Thanks...that look like it would work.
Searching the forum lead me to this (
http://www.theonlinefisherman.com/forum ... -jackplate) idea for a home made jackplate. I had discounted your suggestion of a jackplate because I I thought they co$t hundred$....
The boat budget doesn't support a fancy jackplate but I could make one from 1/4" x 3 x 3 aluminum angle cheaply, so that is a possibility too.
Thanks again,
David
Re: Seadation's FS14 Build
Posted: Wed Dec 14, 2011 9:54 am
by tech_support
Thats right, the jack-plates are pretty simple. Its an easy fix, your up to the top of the max travel of those smaller ones.
You can cheat a little and bring the transom up higher by adding some wood to the bottom of the transom (butt block in a couple inches oaf extra material from the inside. The transom piece will stick up a little proud of the side panels, so would just need to redraw the curve on the op so it made a nice transition. This might get you 3" higher, then get the rest with a jackplate
If you use the butt block, it needs to be pretty stout. I would use at least 3" over lap. So a 3" extension to the bottom of the transom piece, and a 6" butt block that goes 3" above the scabbed in piece - make sense ?
Re: Seadation's FS14 Build
Posted: Wed Dec 14, 2011 4:51 pm
by Seadation
shine wrote:
If you use the butt block, it needs to be pretty stout. I would use at least 3" over lap. So a 3" extension to the bottom of the transom piece, and a 6" butt block that goes 3" above the scabbed in piece - make sense ?
Hello Joel,
I think I understand that. That sounds easiest of the options thus far. I think I'll try it.
Thank you!
/david
Re: Seadation's FS14 Build
Posted: Wed Dec 14, 2011 5:04 pm
by Seadation
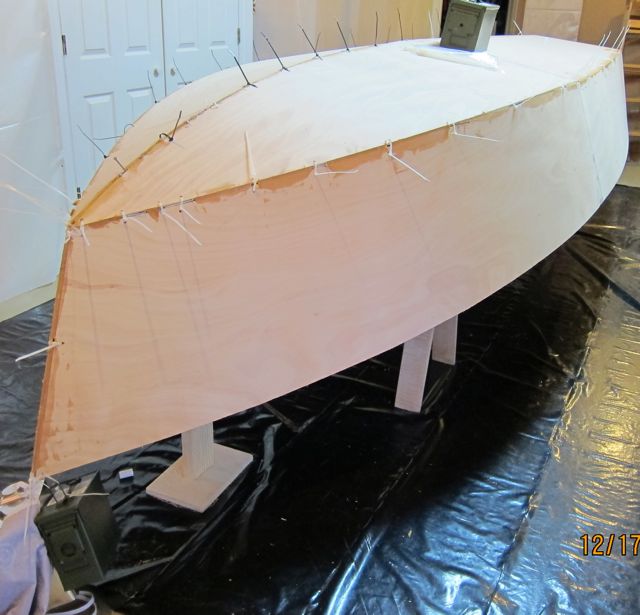
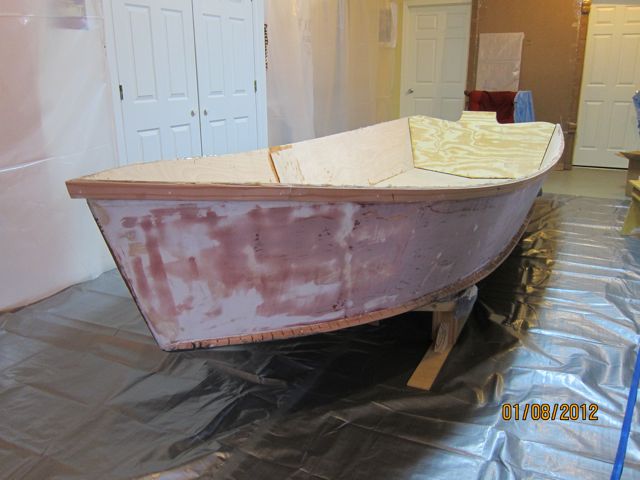
I finished prepping the strongback/frames...
Next, I stitched and positioned the bottom panels with help from a friend
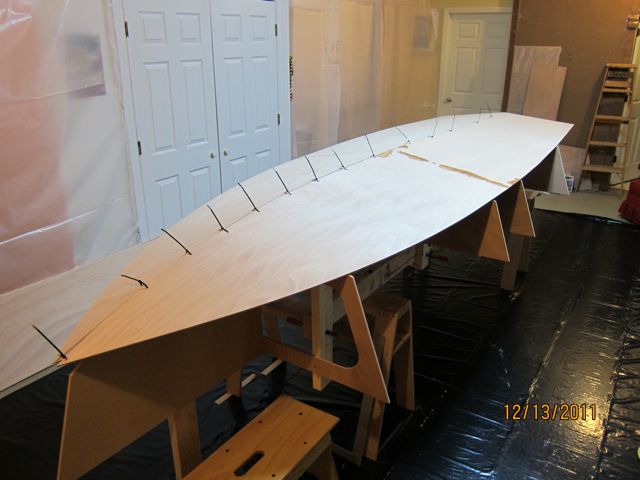

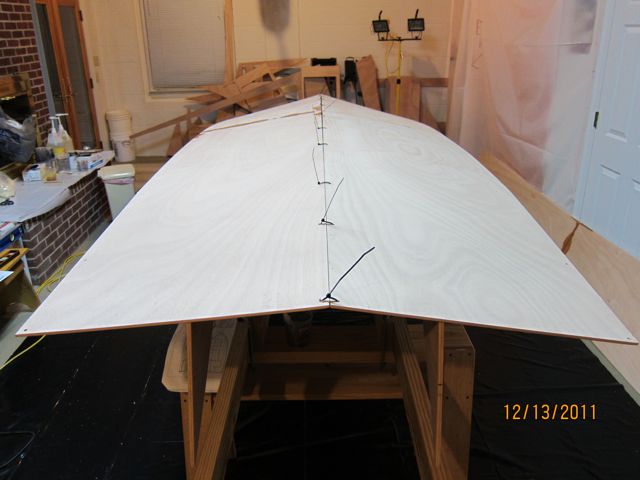
Then we stitched the sides...hey, this is fun!
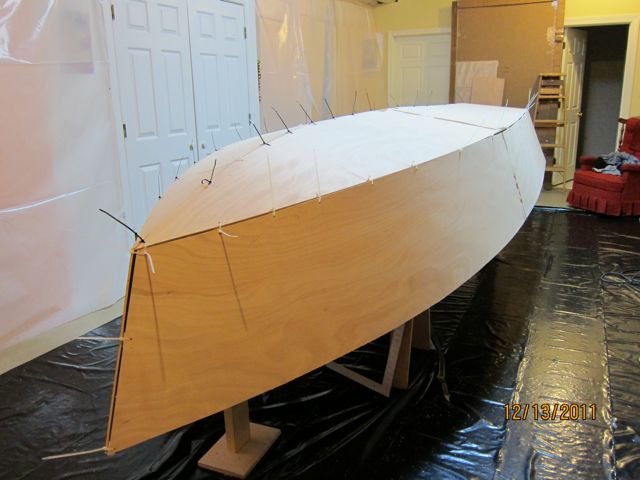


The panels all seem fairly close to the frames. The curves looked "fair" to my untrained eye.
That's about all for now. I welcome your comments and tips.
/david
Re: Seadation's FS14 Build
Posted: Wed Dec 14, 2011 5:37 pm
by thb
David,
The last few pictures look good and gaps look good. How does transom sit on the panels??
It looks like you are ready for some wood flour and epoxy glue on all those panels. You can sort out the transom height issue after the hull is turned over or do the scab job now to extend the transom height.
Looking good. Build on.

Regards
Tom in Steinhatchee

Re: Seadation's FS14 Build
Posted: Wed Dec 14, 2011 7:25 pm
by Seadation
thb wrote:David,
The last few pictures look good and gaps look good. How does transom sit on the panels??
It looks like you are ready for some wood flour and epoxy glue on all those panels. You can sort out the transom height issue after the hull is turned over or do the scab job now to extend the transom height.
Looking good. Build on.
Regards
Tom in Steinhatchee
Hello Tom,
Thanks for the kind words.
The transom piece sits/fits well. I just need to push in the tops of the sides to meet the corners of the transom.
As far as scabbing a piece along the bottom of the transom to gain more height...well, that is a NO GO. It sounded good until I tried it. The FS14 transom is wider at the top than at the bottom. Sort of a 'wedge.' So, as you 'raise' the transom to bring its top edge higher, it brings the narrower part of the transom higher such that ever-larger gaps along the sides are created. If the transom where square or rectangular, then simply raising it with an extra piece would work.
I am planning to scab an extension into the current transom like Joel suggested the first time in his sketch of the transom piece on the motor stand.
I'm itching to start gluing the panels together. You betcha!!
/david
Re: Seadation's FS14 Build
Posted: Wed Dec 14, 2011 7:40 pm
by gstanfield
Here's some pics of how Cracker Larry did it on his GF16 with the extra long shaft outboard:
Re: Seadation's FS14 Build
Posted: Wed Dec 14, 2011 11:06 pm
by Rob Eades
Two dogs to bring good karma to the build....check.Ugly 1980's recliner/moanin' chair in place...check.
The build looks perfect so far.
Rob
Re: Seadation's FS14 Build
Posted: Thu Dec 15, 2011 8:11 am
by thb
David,
I think you misinterpreted my comment about scabbing on to increase the transom height. I saw Joel's input and that is the only way to go unless you have a spare piece of ply to cut another transom out of.
So I assume you are building in your basement as originally planned. Floor's and walls covered was the dead giveaway. Got to keep it tidey for the OWMBO.
Keep up the good work.
Regards
Tom in Steinhatchee
Re: Seadation's FS14 Build
Posted: Sat Dec 17, 2011 3:48 pm
by Seadation
Rob Eades wrote:Two dogs to bring good karma to the build....check.Ugly 1980's recliner/moanin' chair in place...check.
The build looks perfect so far.
Rob
The dogs like to watch...and eat wood scraps. The chair is a Lazyboy from circa 1970...I remember the day my grandparents bought it for my great grandma...somehow it seemed to good too toss when the grandparents died so I ended up with it.
So I assume you are building in your basement as originally planned. Floor's and walls covered was the dead giveaway. Got to keep it tidey for the OWMBO.
That's right Tom...I'm working in the basement. Plastic partitions keep most of my mess on the 'rough' side.
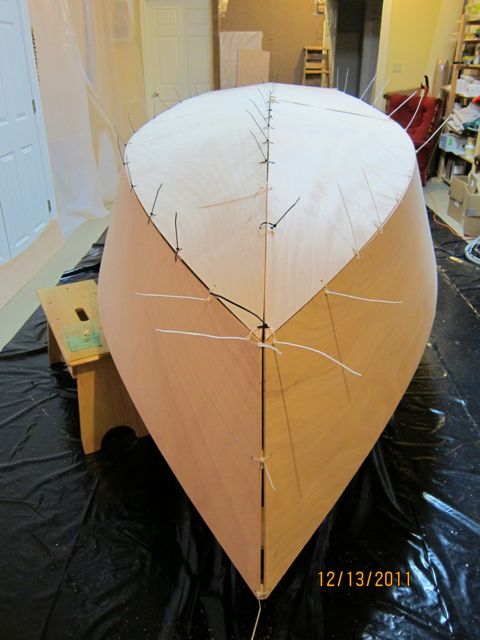
I made a little progress this morning by getting the seams spot glued...here are a few pics to show the results
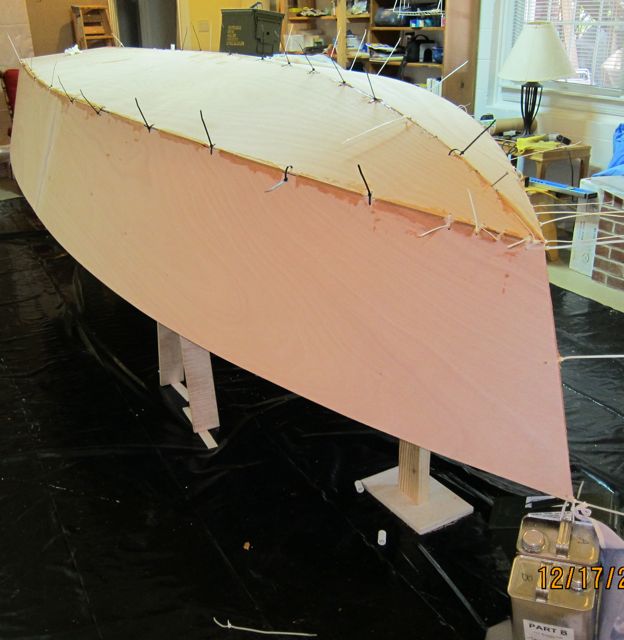
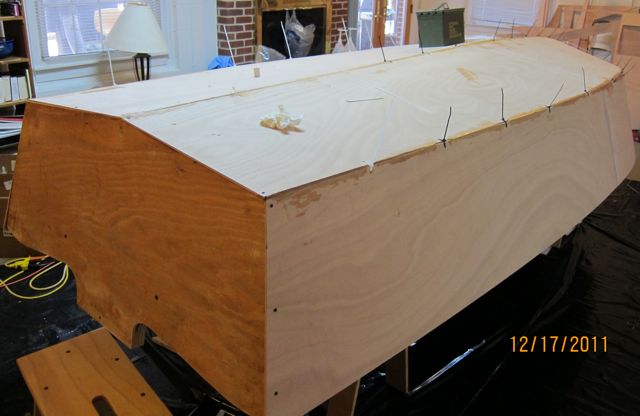
I needed downward pressure on the bow to get my bottom/side panels to align nicely...hence the stuff hanging from the bow.
Thats about it for now...
/david
Re: Seadation's FS14 Build
Posted: Tue Dec 20, 2011 3:08 pm
by a_Adel
looking good, very clean work
Re: Seadation's FS14 Build
Posted: Wed Dec 28, 2011 7:37 pm
by Seadation
a_Adel wrote:looking good, very clean work
Thanks! I'm just muddling through with the help of the forum.
/david
Re: Seadation's FS14 Build
Posted: Wed Dec 28, 2011 7:56 pm
by Seadation
After returning from the Christmas holidays, I have gotten back to work on the FS14.
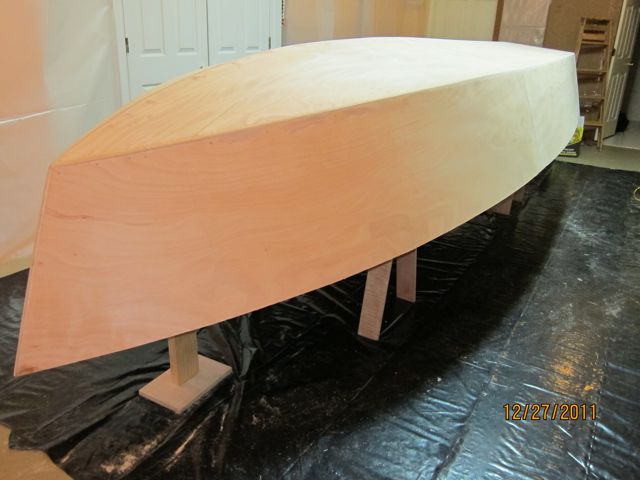
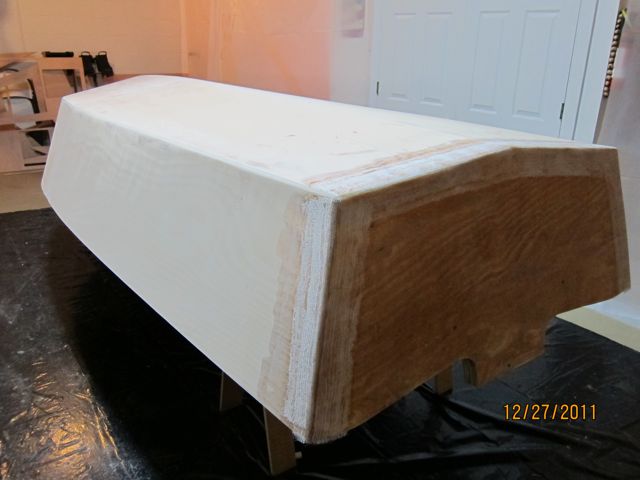
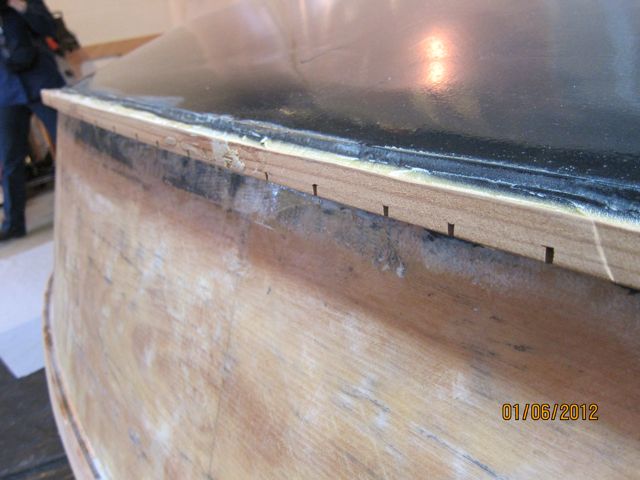
I removed the stitches and filled the remaining gaps. Then, the edges where rounded.
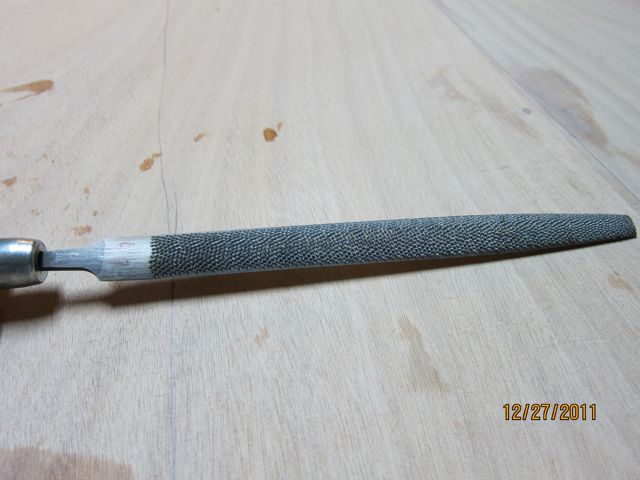
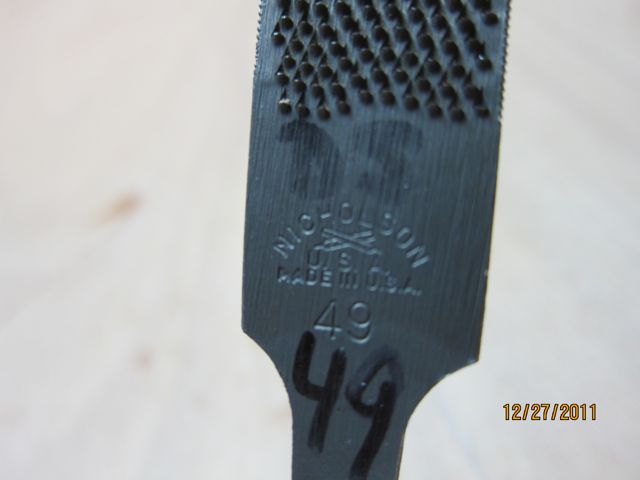
I used Sureform rasps like Cracker Larry has recently recommended. They work good. I also discovered that a Nicholson #49 Patternmakers' rasp works well too. It is old technology and was designed to quickly shape wood. To my knowledge, the only Nicholson patternmakers' rasps made nowadays are the #49 and 50...the 49 is the 'rougher' of the two.
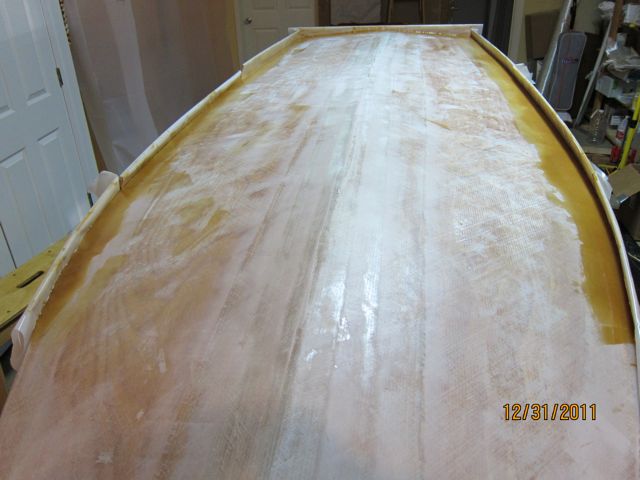
Next, I got a couple friends to help and we got the chines and keel taped. Then we glassed the bottom with the wide fabric. It was good to have helpers!
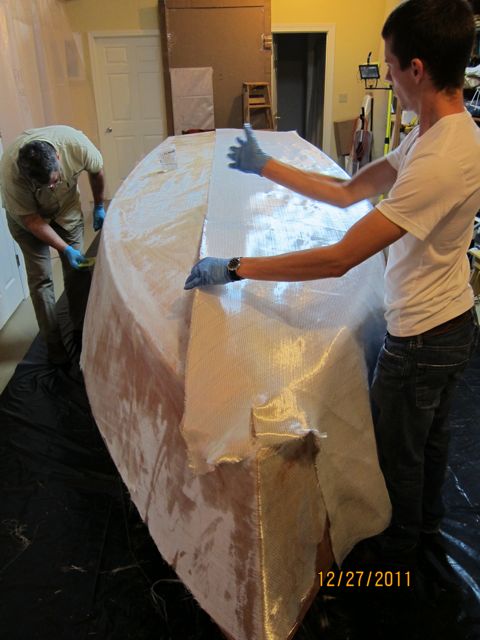
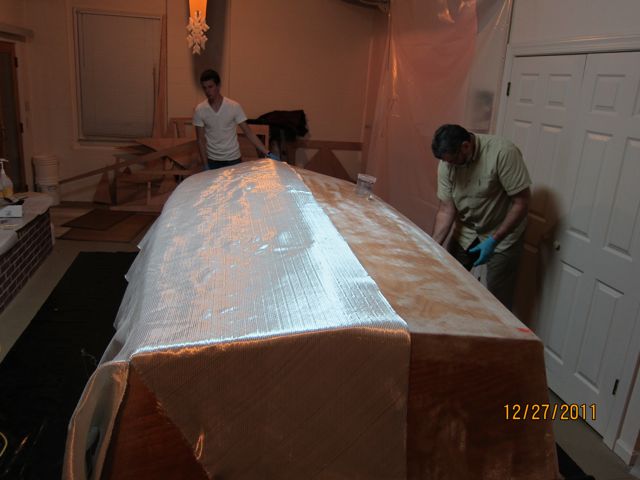
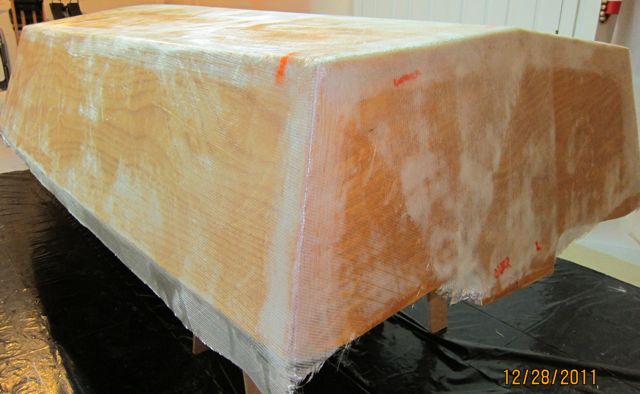
And tonight it is dry. There are some 'whitish' patches where the glass appears to have less epoxy on it. Is this normal?
Next, I'll make some sanding/fairing boards.
/david
Re: Seadation's FS14 Build
Posted: Sat Dec 31, 2011 8:44 am
by thb
David,
Looking real good. The white areas may be a little starved of epoxy. Assuming the cloth is bonded well to the plywood in the white areas, I would just add some more epoxy to the cloth before beginning the fairing. Others with more experience in building will probably pipe in on this. I would not lose any sleep over it from what I can see in the photos. Good Job.
Regards
Tom in Steinhatchee
Re: Seadation's FS14 Build
Posted: Mon Jan 02, 2012 9:59 pm
by Seadation
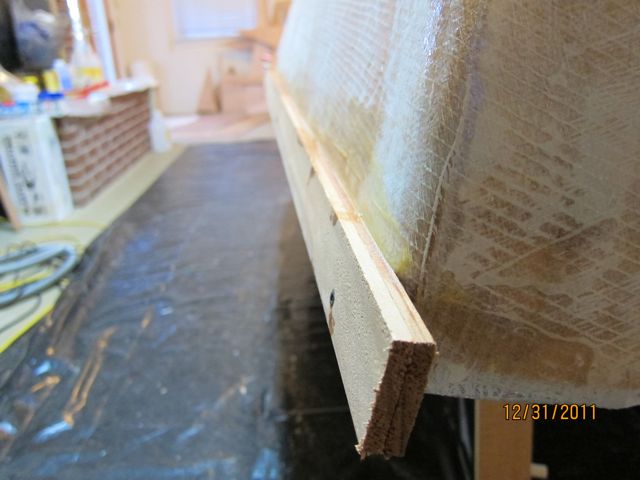
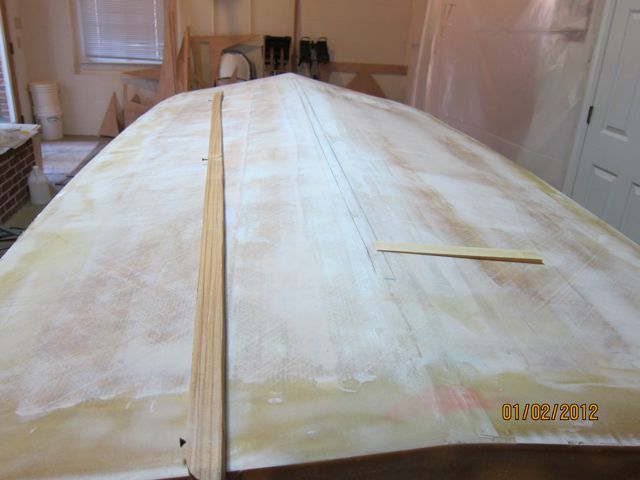
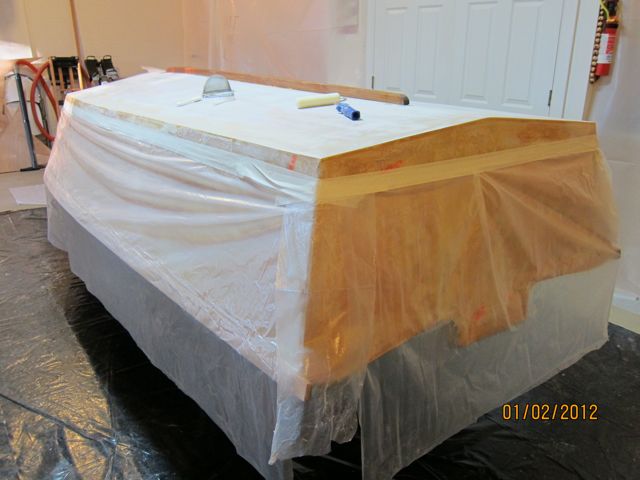
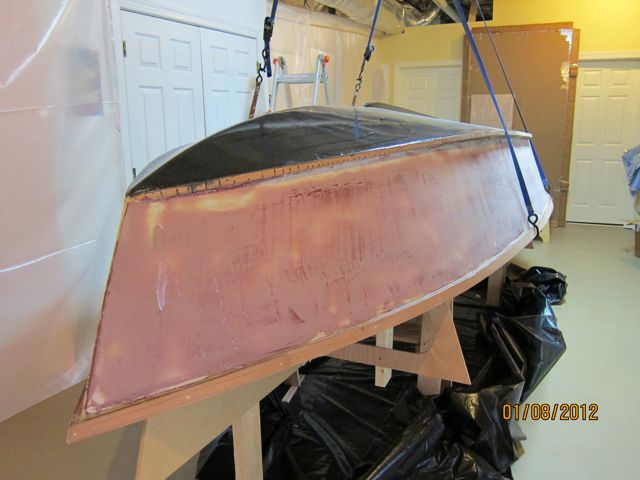
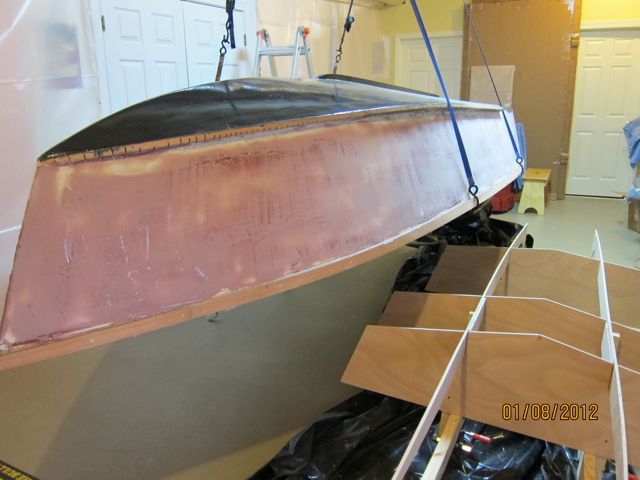
I have attached the rub rail. It is 3 layers of 1/4" material. I attached each layer 'dry' with screws, then detached it and applied Gel Magic from a bag. Sort of like how Shine shows in his FS17 build thread. It is an easy technique since now clamps are needed...the screws do all the work.
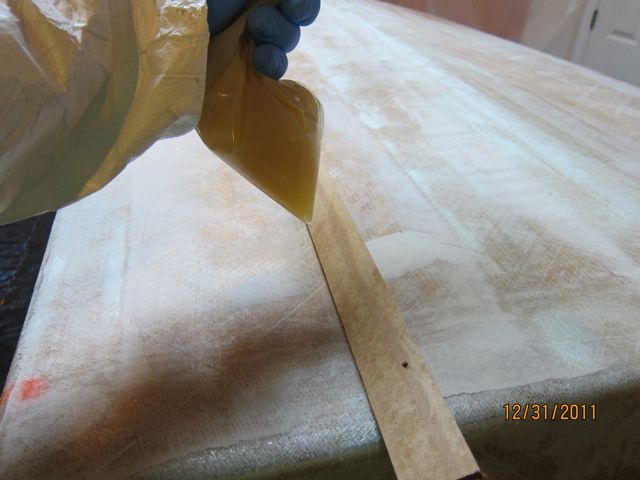
Then I built up the chines and transom to a sharp(er) edge. Again, I used the 'dam' technique Shine shows on his FS17 thread...except I should have wrapped my plywood dams with packing tape like Joel did instead of plastic sheeting which left a 'wavy' edge. Everything sanded down nicely.
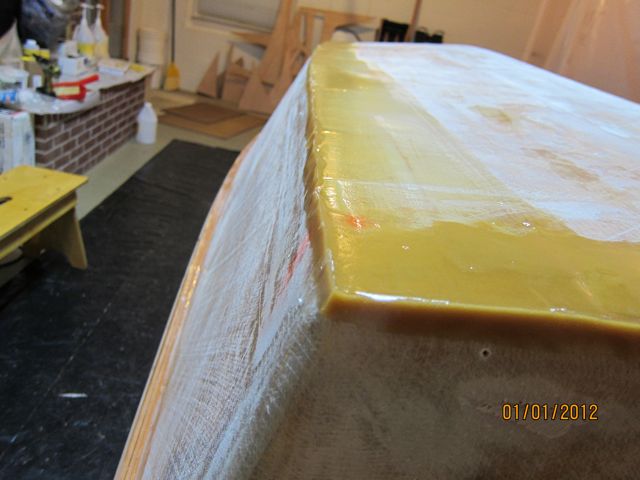
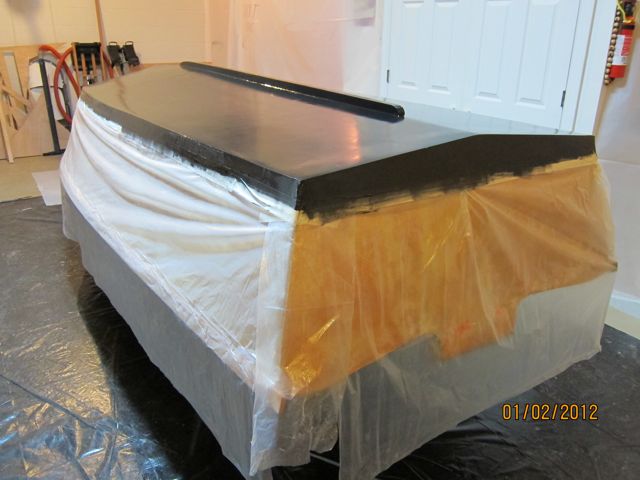
Then, a little fairing and it was time for a Skeg and some graphite.
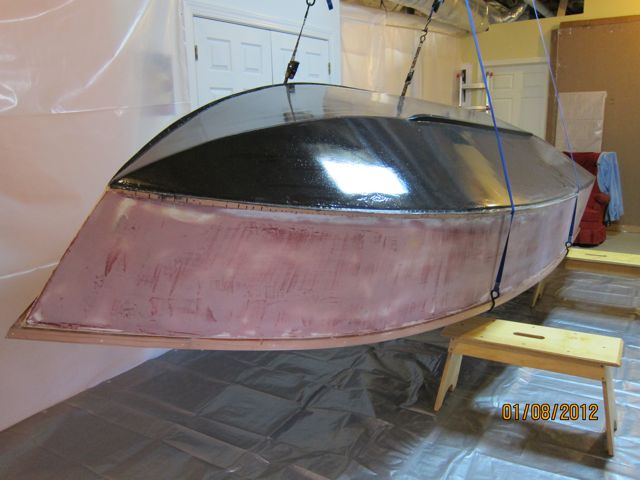
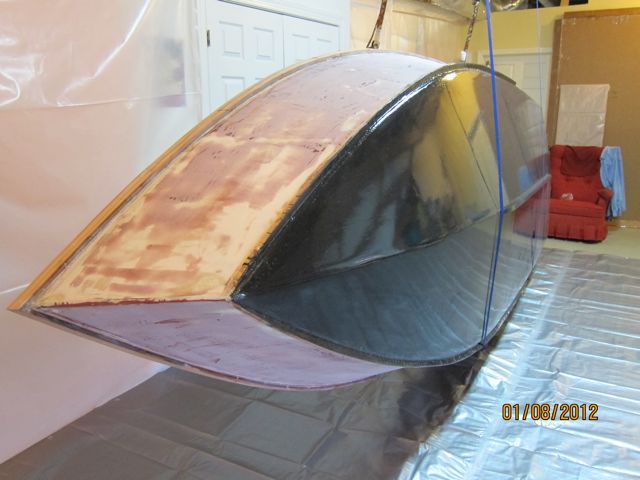
I mixed a 12 oz batch of slow marinepoxy and added 20% (2.4 oz) graphite (SIFTED) after mixing the epoxy well. Then I rolled it onto the hull with a foam roller - THIN coat. I used a chip brush for the skeg. It went on very smooth. It really revealed the areas where more fairing would have been nice. I will have to try to get the sides nicer before painting them. The was just a LITTLE bit left of the 12 oz batch.
Is it necessary to sand the graphite/epoxy between coats?
Thanks,
/david
Re: Seadation's FS14 Build
Posted: Tue Jan 03, 2012 10:59 am
by Uncle D
I think if you sit for more than a couple of days, you'll need to hit it light. lookin' good!!
Re: Seadation's FS14 Build
Posted: Sat Feb 04, 2012 1:41 pm
by Seadation
In the past month I have done some more work...
I added a spray rail
and did some fairing
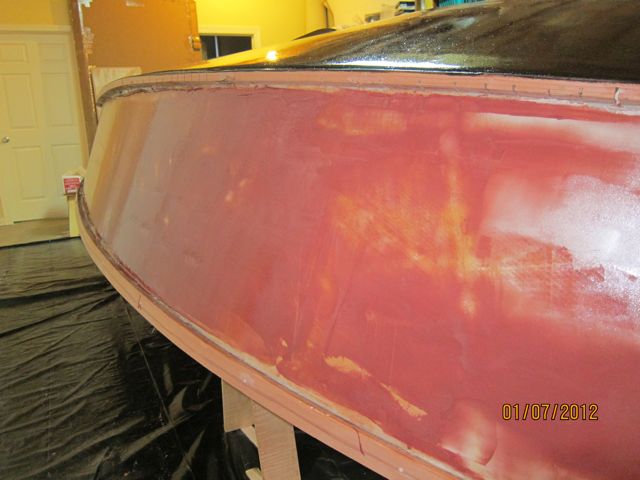
Then, I couldn't stand it any longer and I had to turn her over...by myself as it worked out...
I taped the keel, chines, and transom. Then the biaxial cloth went in. No problems. I glued and taped in some of the stringers and the frames.


And the beat goes on. More later.
/david
Re: Seadation's FS14 Build
Posted: Tue Feb 07, 2012 9:40 pm
by Seadation
I have a question...
I will need to "flatten" the top edge of the rub rail so that the 5" or so wide 'gunwale' piece will mount flush. As it is, the top of the rub rail is fairly flat, but it is at an angle such that if you put a piece of wood on it, the piece would be tilted out (that is, out of the boat. This is probably not very clear....
My question is....do you use a power planer to flatten (or change the angle) on the rub rail? I'm guessing a hand plane might work but would be too slow.
Thanks!
/david
Re: Seadation's FS14 Build
Posted: Wed Feb 08, 2012 8:14 am
by Cracker Larry
I use a hand plane. If it's good and sharp it won't take 15 minutes to level it.
Re: Seadation's FS14 Build
Posted: Wed Feb 08, 2012 9:24 am
by Seadation
Cracker Larry wrote:I use a hand plane. If it's good and sharp it won't take 15 minutes to level it.
Thank you Larry
/david
Re: Seadation's FS14 Build
Posted: Fri Feb 10, 2012 11:32 am
by Seadation
Cracker Larry wrote:I use a hand plane. If it's good and sharp it won't take 15 minutes to level it.
Yes. A hand plane was the way to go. It works good. For my little boat, a smaller (length-wise) plane worked better and was able to get a better 'bite' compared to a longer plane. I used a combination of a small, block plane and a #4 smoother.
/david
Re: Seadation's FS14 Build
Posted: Wed Mar 07, 2012 8:46 pm
by Seadation
I've been working...
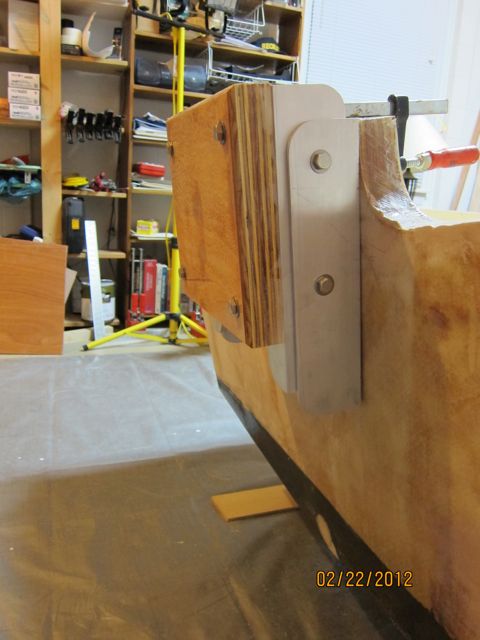
I completed the fabrication of my jack plate. It is very simple - no welding needed. I used (4) pieces each 12" long of 1/4" thick aluminum angle 2" x 3". In the pic below it is clamped to the transom. I ended up mounting it 2" lower to allow it to accomodate both a short and long shaft motor.
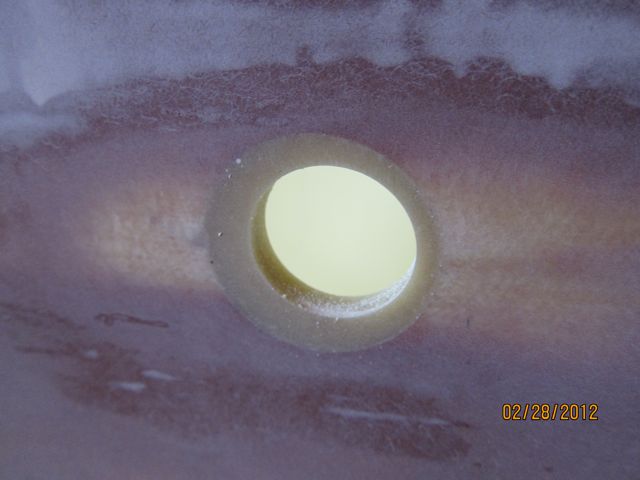
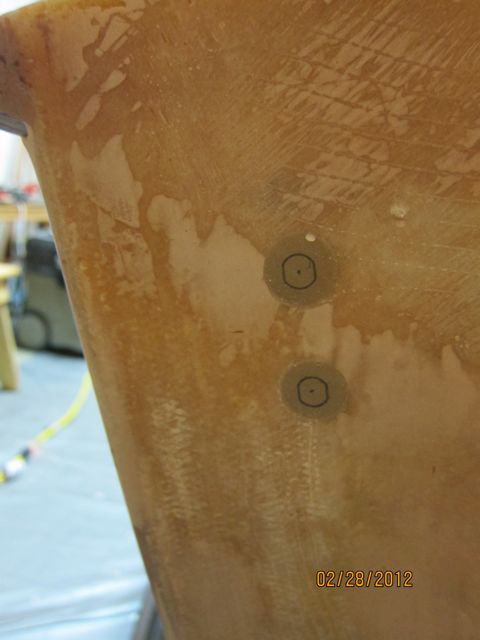
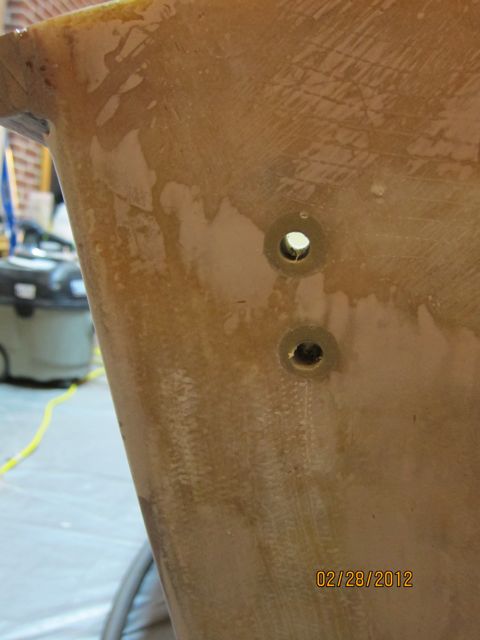
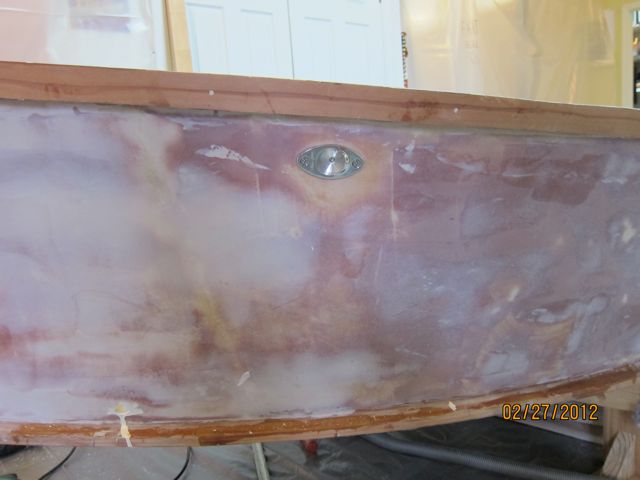
I got busy doing the "drill-fill-drill" thing to prepare the holes for the bilge output, nav lights, jack plate, and bow/stern cleats
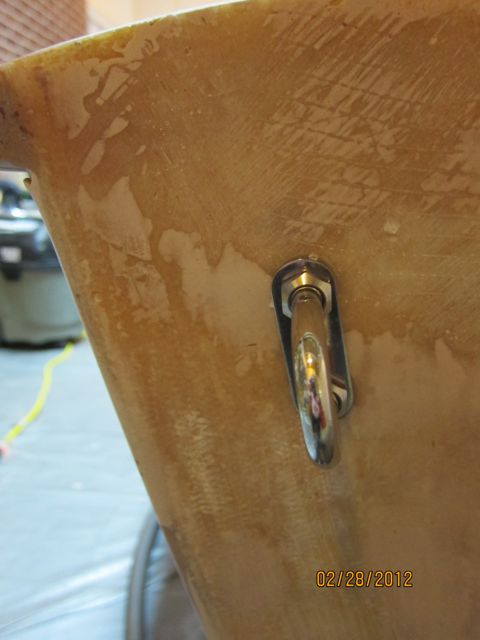
These are Livorsi LED Navigation lights.
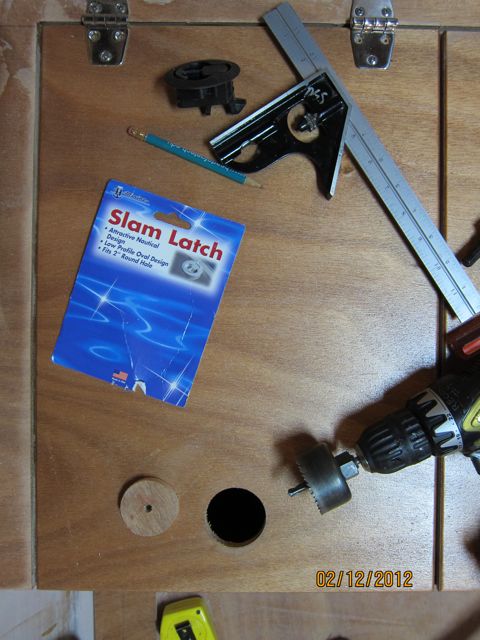
I fittted some T-H Marine slam latches on my stern underseat compartments. I wanted to be able to swing these hatches to ensure they would not interfere with the gunwale width.
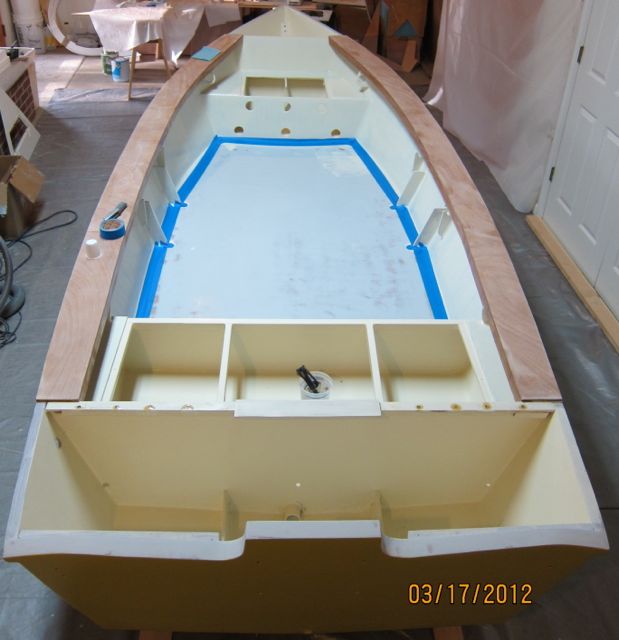
I primed the interior with S-3 High Build Epoxy Primer and painted the compartments with S-3 LPU Whidbey White. I plan to paint the interior Whidbey White.

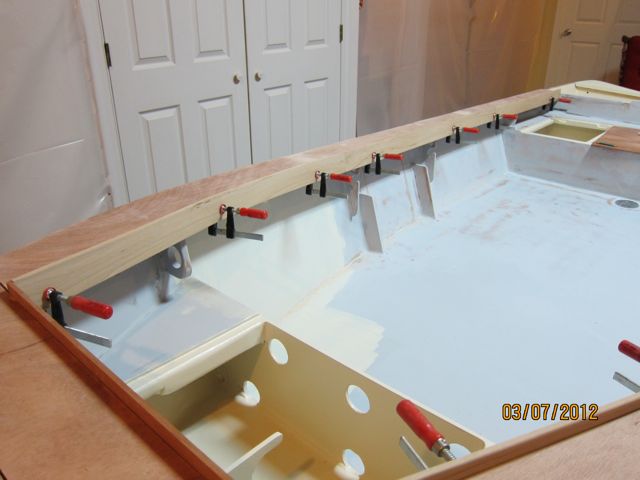
Then I glued on the gunwales
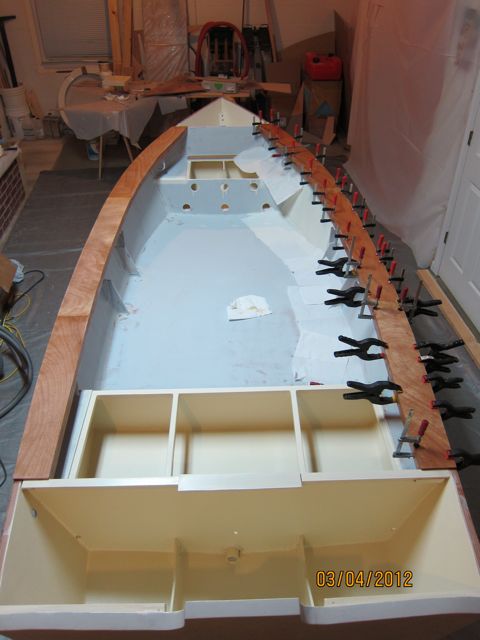
And started fitting the coaming. The coaming is above the gunwales at the moment. I will probably cut it down to flush with the gunwales as they curve aft. I'm not real sure how I want it.
I was having trouble making 'pre-cut' widths bend around to form the coaming, so I tried making the pieces extra wide, then scribing them to the desired width....much easier!
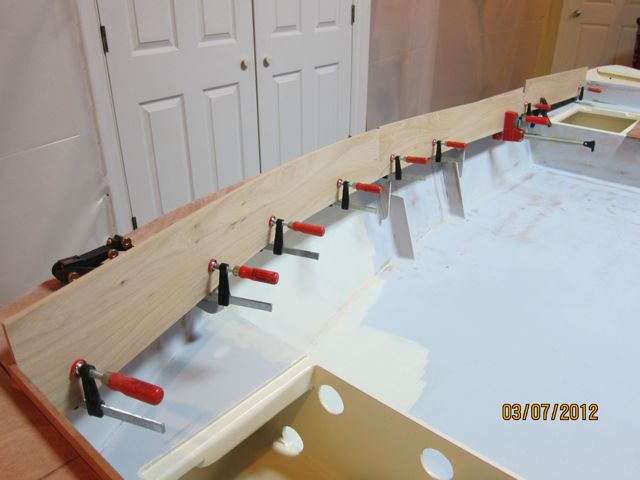
After dry fitting the wide pieces, I scribed the top edge 3/4" above the gunwale and trimmed to that line
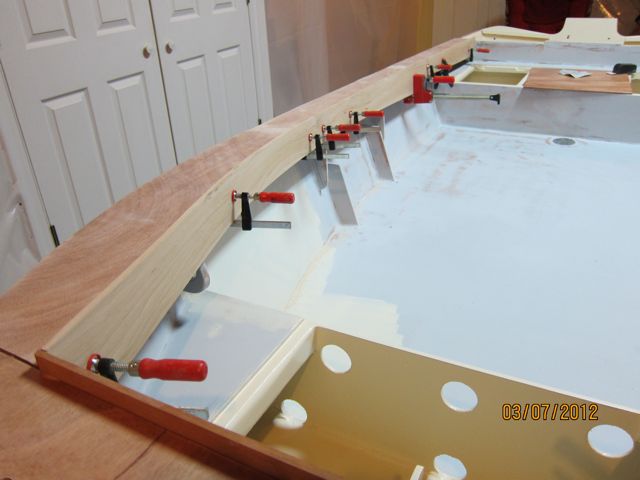
Then I marked the bottom edge of the coaming to be flush with the plywood on which it lies
And that's all so far!
Fair Winds,
/david
Re: Seadation's FS14 Build
Posted: Wed Mar 07, 2012 10:26 pm
by Cracker Larry
Very nice job on those holes. Just like they should be

Re: Seadation's FS14 Build
Posted: Wed Mar 07, 2012 11:33 pm
by TRC886
Seadation wrote:
I completed the fabrication of my jack plate. It is very simple - no welding needed. I used (4) pieces each 10" long of 1/4" thick aluminum angle 2" x 3". In the pic below it is clamped to the transom. I ended up mounting it 2" lower to allow it to accomodate both a short and long shaft motor.
You're coming along nicely on the boat, but I really like that jackplate
It is simple, inexpensive, and neat. I think I'll make one for my tin v-bottom to drop the Merc by 1"; the John shaft is that much longer than the Merc and fits perfectly. You'd think that standardized shaft lengths would measure the same thing and that boat builders would know the exact height for their transoms

Re: Seadation's FS14 Build
Posted: Thu Mar 08, 2012 5:47 am
by Seadation
TRC886 wrote:
You're coming along nicely on the boat, but I really like that jackplate
It is simple, inexpensive, and neat. I think I'll make one for my tin v-bottom to drop the Merc by 1"; the John shaft is that much longer than the Merc and fits perfectly. You'd think that standardized shaft lengths would measure the same thing and that boat builders would know the exact height for their transoms
Thanks trc and CL.
Agree on ob manufactures not standardizing their shaft lengths. The Tohatsu "20 inch" shaft I bought measures 22 1/2"! If their short shaft is 2 1/2" too long, that would have been perfect for my boat. Oh well, the jack plate was fun to make. The aluminum cuts easily with carbide woodworking blades.
/david
Re: Seadation's FS14 Build
Posted: Wed Apr 25, 2012 10:14 pm
by Seadation
I have done more work. The gunwales are glued down, the coaming applied and painting started...
I used S3 LPU Whidbey White with the S3 nonskid additive. I rolled in onto the sole and hatch covers just like the Bateau tutorial shows. Easy.
I rounded over the outboard edge of the gunwales
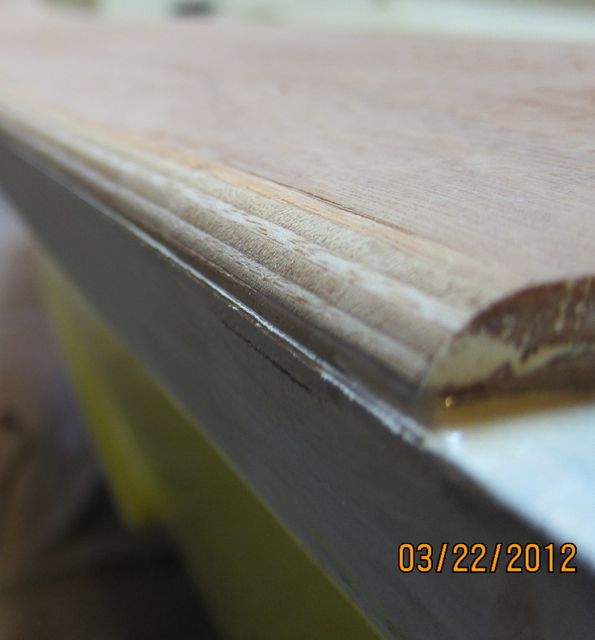
The gunwales got multiple coats of neat epoxy, then several coats of S3 LPU clear coat. I installed the Livorsi nav lights and the rigid rub rail. Wow, that rub rail is really a 'handful.'
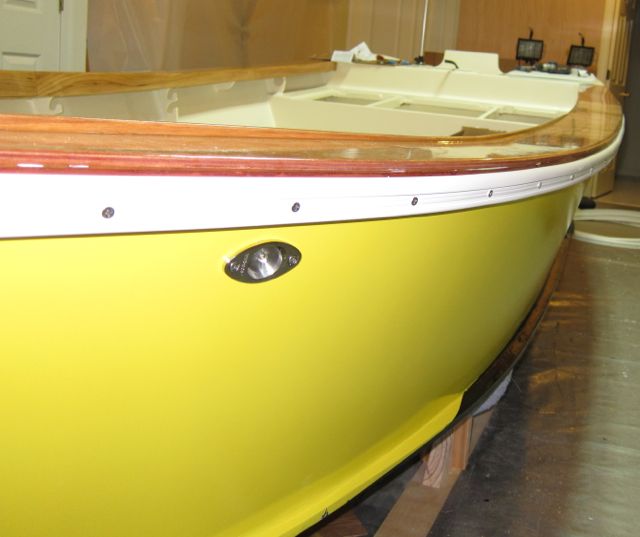
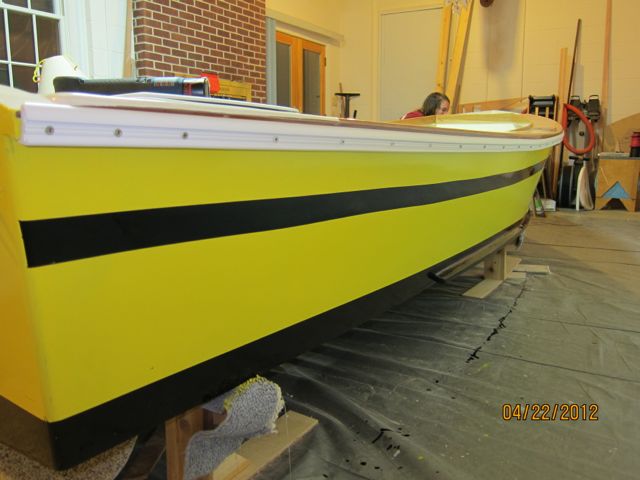
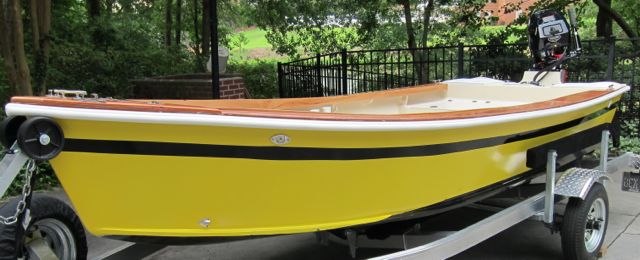
Then I applied a black bootstripe. The exterior is S3 Sinclair Yellow LPU.
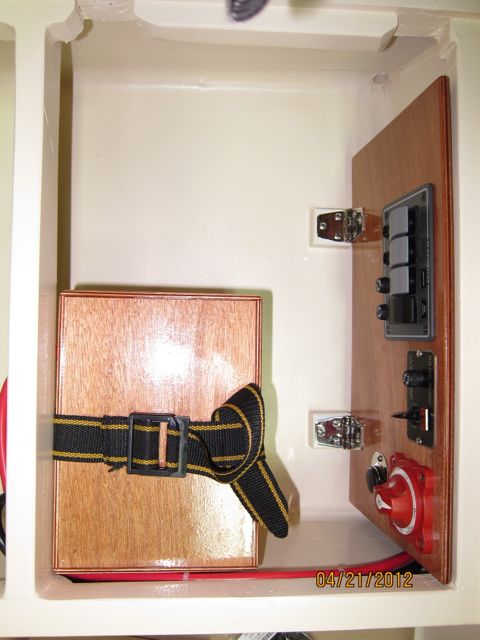
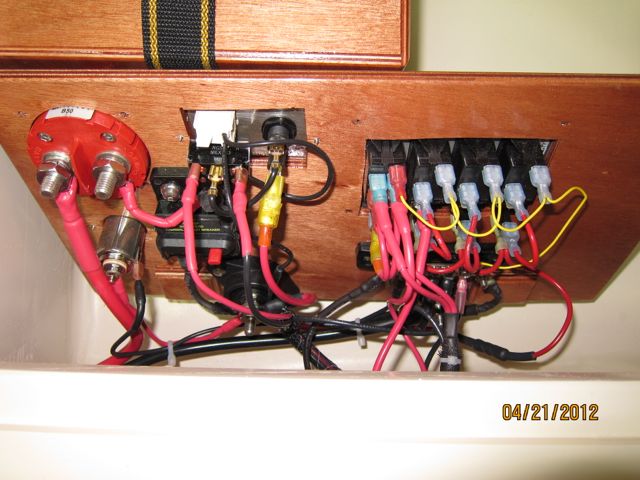
And then I worked on the wiring. I fabricated a small box to fit the size U-1 battery. The electrical 'panel' is a piece of 3/8 ply hinged to the sole inside the rear seating area. The hinge allows the panel to swing so that the backside is accessible for mods or repairs. This location keeps the switches out of harm's way and minimizes water spray although they are 'waterproof.' They are easily accessible but I really won't need to get to them that often most likely. The final wiring will have to wait until the motor is mounted.
And that's where the FS14 is now!
Fair winds,
/david
Re: Seadation's FS14 Build
Posted: Thu Apr 26, 2012 7:58 am
by thb
David,
It really looks great and your configuration is cool. I especially like the combing area being natural wood finish. Where did you pick up the 2x3 inch alum for your jack plate?
Regards
Tom in Steinhatchee
Re: Seadation's FS14 Build
Posted: Thu Apr 26, 2012 10:07 am
by Seadation
thb wrote:David,
It really looks great and your configuration is cool. I especially like the combing area being natural wood finish. Where did you pick up the 2x3 inch alum for your jack plate?
Regards
Tom in Steinhatchee
Hello Tom,
I bartered mine from a local machine shop. If they had not had any I would have ordered from Grainger online.
David
Re: Seadation's FS14 Build
Posted: Sat May 05, 2012 6:19 pm
by thb
David,
I bought some Aluminum angle from Grainger which is 2-1/2 by 2-1/2 so it should work ok.
Looking at your last group of pictures it looked like you were about ready for launch. Whats the latest on status and launch date.
Did you find a trailer yet?
Regards
Tom in Steinhatchee
Re: Seadation's FS14 Build
Posted: Sat May 05, 2012 11:21 pm
by Seadation
thb wrote:David,
I bought some Aluminum angle from Grainger which is 2-1/2 by 2-1/2 so it should work ok.
Looking at your last group of pictures it looked like you were about ready for launch. Whats the latest on status and launch date.
Did you find a trailer yet?
Regards
Tom in Steinhatchee
Hello Tom,
The boat is getting close. I plan to go pick up my trailer this week. I'm buying it from Wefings Marine in Eastpoint, FL (near Apalachicola). It will be an aluminum Magic Tilt.
I have the boat ready to be carried out of the basement and placed onto the trailer. I expect that to happen in the next week. Then I can finish rigging the motor and complete the wiring.
I 'revised' the triangular piece of the boat at the very front. It had been a reinforced piece of Okuome with a door cut for anchor storage. I painted it Whidbey white but after I got the exterior of the hull painted Sinclair Yellow, I decided to paint that triangle yellow. As per System 3 directions, I sanded it well, removed the dust, etc. I rolled/tipped on 3 coats. As i scuff sanded to prep it for the 4 (and final) coat of yellow, the paint began to lift off! All 3 coats of yellow just peeled off!! Yikes! I was spooked by that. I re-designed the front piece to have all bright work. It has a 5" wide birdseye maple plank running down the center with mahogany planks running diagonally in a sort of Christmas-tree fashion. I primed it was several coats neat epoxy then 6-8 coats clear coat...just like the gunwales. I like it better bright.
I will find a local pond to have a trial run. The 'official' splash will be in Apalachicola Bay in mid June when we are at St. George Island, FL.
When will we see your FS14 in the water?
Fair winds,
/david
Re: Seadation's FS14 Build
Posted: Sun May 06, 2012 12:54 pm
by Gopher
David,
Your boat is looking very good. Like Tom, I can't wait to see splash pictures.
How coincidental that you have been working on the breasthook area. I had been planning a bow setup very similar to yours with the gas tank under the bow seat and a raised breasthook fore of the seat. I am at the point in construction where I am still cutting frames and have been researching fuel tanks and all of them look like they’d be too big for the bow seat-may I ask what tank you are using? Does your 'backrest' for the bow seat extend all the way down to the hull to make a sealed off anchor locker? Did you move the bow frame toward the stern any or is it in the original placement? Any pictures you have of that area you might be able to share would be VERY helpful and appreciated.
Thanks and keep up the good work!
Re: Seadation's FS14 Build
Posted: Sun May 06, 2012 11:13 pm
by Seadation
Gopher wrote:David,
Your boat is looking very good. Like Tom, I can't wait to see splash pictures.
How coincidental that you have been working on the breasthook area. I had been planning a bow setup very similar to yours with the gas tank under the bow seat and a raised breasthook fore of the seat. I am at the point in construction where I am still cutting frames and have been researching fuel tanks and all of them look like they’d be too big for the bow seat-may I ask what tank you are using? Does your 'backrest' for the bow seat extend all the way down to the hull to make a sealed off anchor locker? Did you move the bow frame toward the stern any or is it in the original placement? Any pictures you have of that area you might be able to share would be VERY helpful and appreciated.
Thanks and keep up the good work!
Hello Steven,
Thanks for the kind words.
I've looked for pics of the bow area. Unfortunately not too many. Here is one that shows several of the details
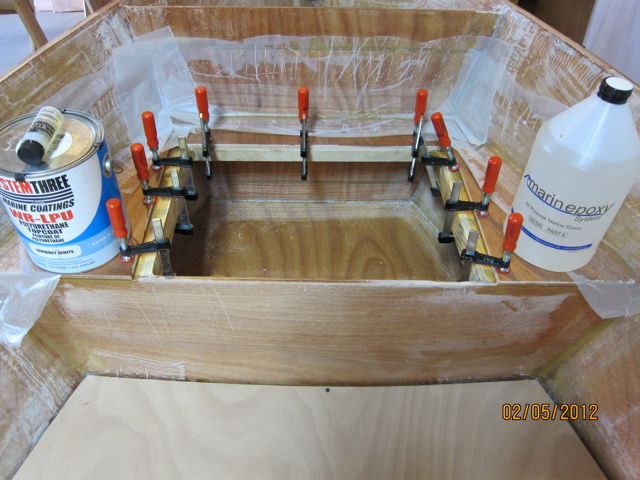
You can see the forward most frame starting at the top/middle of pic & extending down toward middle of photo - it is new. Actually, I recycled the seat frame by glueing the opening back in which was cut out by the CNC as part of the kit. Then, I fabricated a new seat frame. The seat frame is in the original location while the new frame forward of it is where it 'looked good' so as to leave a spacious area to sit. The anchor locker forward of the new frame is drained overboard and there is a floor which is sloped toward that drain. I poured in flotation foam under the floor. The anchor locker is completely isolated from the gas tank storage compartment aft of it. I tabbed in the new frame for the anchor locker like the other structural frames (YES, it extends to the hull). The compartment under the seat is sized to fit (2) Tohatsu 3 gallon cans. The floor in that compartment is sloped aft so it will drain onto the sole. In the pic above, the drain/vent holes are not yet cut. The gas line runs under the port gunwale. I had planned to run it under the sole, but decided it was an unnecessary hassle since it is easy to run it under the gunwale. Repair or replacement of the gas line will be simple in the under-gunwale location and if leaks should occur they will be easily spotted whereas not so with a leak from a conduit-enclosed/under-sole gas line. Plus, it seemed the conduit under the sole was an invitation for water to somehow enter that space. If I needed to run engine controls, etc then under-sole is the way to go. But for JUST a gas line...I chose under-gunwale
Do you have a photo album?
/david
Re: Seadation's FS14 Build
Posted: Wed May 09, 2012 5:30 pm
by Gopher
Seadation wrote:
Hello Steven,
Thanks for the kind words.
I've looked for pics of the bow area. Unfortunately not too many. Here is one that shows several of the details
You can see the forward most frame starting at the top/middle of pic & extending down toward middle of photo - it is new. Actually, I recycled the seat frame by glueing the opening back in which was cut out by the CNC as part of the kit. Then, I fabricated a new seat frame. The seat frame is in the original location while the new frame forward of it is where it 'looked good' so as to leave a spacious area to sit. The anchor locker forward of the new frame is drained overboard and there is a floor which is sloped toward that drain. I poured in flotation foam under the floor. The anchor locker is completely isolated from the gas tank storage compartment aft of it. I tabbed in the new frame for the anchor locker like the other structural frames (YES, it extends to the hull). The compartment under the seat is sized to fit (2) Tohatsu 3 gallon cans. The floor in that compartment is sloped aft so it will drain onto the sole. In the pic above, the drain/vent holes are not yet cut. The gas line runs under the port gunwale. I had planned to run it under the sole, but decided it was an unnecessary hassle since it is easy to run it under the gunwale. Repair or replacement of the gas line will be simple in the under-gunwale location and if leaks should occur they will be easily spotted whereas not so with a leak from a conduit-enclosed/under-sole gas line. Plus, it seemed the conduit under the sole was an invitation for water to somehow enter that space. If I needed to run engine controls, etc then under-sole is the way to go. But for JUST a gas line...I chose under-gunwale
Do you have a photo album?
/david
Thanks a bunch for that picture, that helped immensely. I had been considering draining the anchor locker under the floor of the gas compartment, but might change that to a similar setup to what you've done. It certainly seems like there would be less chance of something clogging the drain AND be easier to clear out if something did. Did you use a clamshell to cover the hole, or just leave it open? You mentioned the 'seat' is sized to house TWO 3-gallon cans, (I was very glad to read that) is the top of the 'new' bow seat frame level with the top of the stern seat frame?
With such a nice gunwale, I can see where that would be the easier way to route the gas lines. I'd not planned on gunwales for mine and doing a sole only from the stringers-outwards, so it seems I'll have to run the line in a chase tube.
Speaking of the nice gunwale, do you have pics of the-now-brightwork anchor locker? I bet it looks sharp.
I don't have a photo album/build thread here just yet, I had been waiting for the forum technical issues to taper off before doing so. (Figures, I started the build just as the Great Forum Migration of 2012(C) commenced.) I did start a blog to chronicle the build, you can find a link to it under my name in the signature.
Thanks again for the response and apologies for the continuous questions. Your boat looks great!
Re: Seadation's FS14 Build
Posted: Thu May 10, 2012 10:32 pm
by Seadation
Hello Steven,
I will have more pics soon. I had a 'boat movement' gathering tonight. Several friends and I carried the FS14 out of the basement and set it onto the trailer. Then we pushed the trailer through the yard to the garage. The boat looks nice on a trailer...finally.
I plan to work on getting the motor on tomorrow, putting the rub rail back on, etc. I might even try a trial run at a local lake on Saturday. We shall see.
Keep asking questions; there are many builders here with lots of experience. My new bow seat frame is the same height as the aft seat frame. I put a clamshell over the anchor locker drain. In my case, the anchor locker is DEEPER than the gas tank locker which means I could not drain the anchor locker into the next compartment aft (the gas tank locker). I preferred NOT to run drains under the sole, if possible, so I did the simplest thing and made a hole in the hull at the lowest point in the anchor locker. This will allow easy rinsing of the anchor and the drain can easily be 'cleared' if debris clogs it.
More pics soon.
Fair Winds,
/david
Re: Seadation's FS14 Build; Splashed 12 May 2012
Posted: Sat May 12, 2012 9:55 pm
by Seadation
I got the boat ready to go yesterday.
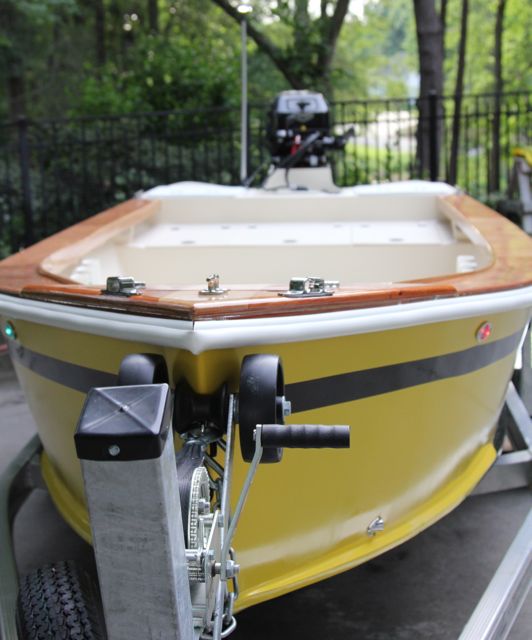
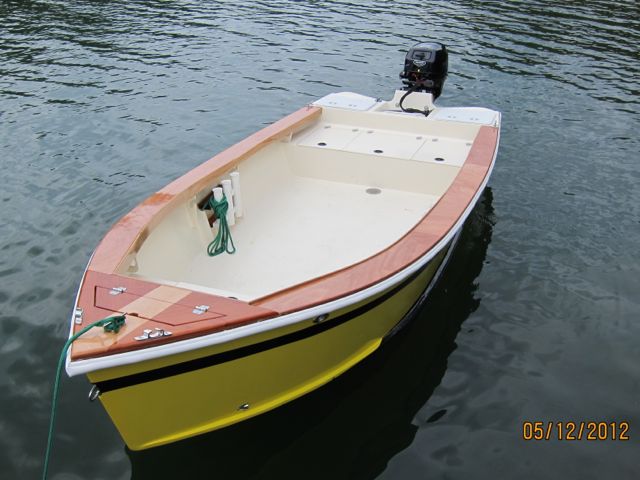
Then, today she went into the water. This is Lake Juliette near Macon, GA. It was a thing of beauty to see!!

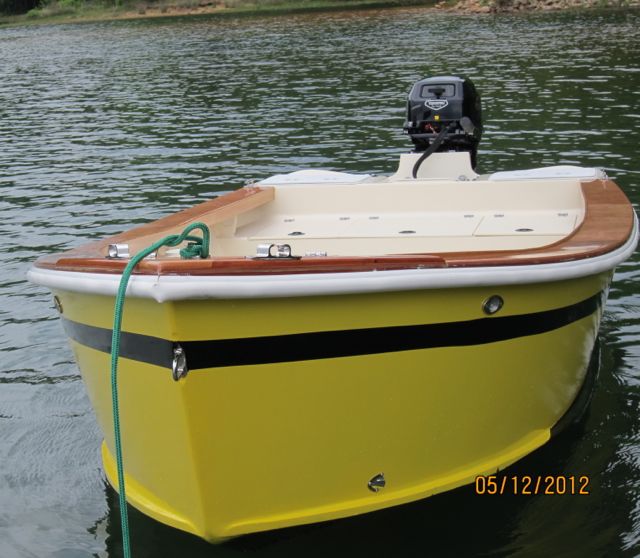
I ended up lowering the engine twice. She now runs very well. There was considerable cavitation at the higher settings. The first setting was with the cavitation plate approx 1" above the bottom of the boat. Since I had 4+ inches of set-back, I thought I could get away with that position...I was WRONG. All is well now. The top of the transom interferes with tilting the foot of the motor all the way up. I guess I will need to cut the highest part of the transom down an inch or so.
All in all I am very pleased with the boat and how she handles. The trailer is a Magic Tilt and I am well-pleased with it too.
The Tohatsu 15 hp gave top speed of 22-23 mph via GPS with either 1 or two adults aboard plus a full 3 gal gas tank, small cooler with ice and drinks, 10# tool box, and anchor with rode. THe engine is not broken in yet, so the WOT runs where brief. I'm very pleased with 20 mph...that feels PLENTY fast in this little boat.
Fair winds,
/david
Re: Seadation's FS14 Build - Splashed 12 May 2012
Posted: Sat May 12, 2012 10:48 pm
by Cracker Larry
Beautiful job, David

Very nice.
Re: Seadation's FS14 Build - Splashed 12 May 2012
Posted: Sun May 13, 2012 7:44 am
by thb
David,
Great Job and she is beautiful. Love the two colors of wood up front. Missed that before in you thread. Are they two types of wood? Encouraged with the performance numbers and how she sits in the water.
Again super looking.
Regards
Tom in Steinhatchee
Re: Seadation's FS14 Build - Splashed 12 May 2012
Posted: Sun May 13, 2012 9:22 am
by Aripeka Angler
Wow, that's a beautiful boat!!! I love the natural wood on the gunwales
Re: Seadation's FS14 Build - Splashed 12 May 2012
Posted: Sun May 13, 2012 10:34 am
by michael c
Aripeka Angler wrote:Wow, that's a beautiful boat!!! I love the natural wood on the gunwales
That's exactly what I was thinking - it really makes the boat stand out. It looks amazing.
Re: Seadation's FS14 Build - Splashed 12 May 2012
Posted: Sun May 13, 2012 12:54 pm
by Seadation
thb wrote:David,
Great Job and she is beautiful. Love the two colors of wood up front. Missed that before in you thread. Are they two types of wood? Encouraged with the performance numbers and how she sits in the water.
Again super looking.
Regards
Tom in Steinhatchee
Hello CL, Tom, Michael, and others,
Thank you for your kind words.
The bow is a 3/4" composite consisting of 1/4" okuome on the bottom then 1/2" strips of hardwood on top which is what you see. The center (lighter colored) wood is birdseye maple and the darker wood is mahogany. The gunwales are simple 3/8" okuome plywood and the coaming is grey elm. The maple, mahogany, and elm are stuff I had lying around left over from other furniture projects. The bright wood has 6-8 coats neat epoxy then 8 coats of cross-linked S3 clear coat. I wonder how long the finish will last...?
/david
Re: Seadation's FS14 Build - Splashed 12 May 2012
Posted: Sun May 13, 2012 1:42 pm
by TRC886
That is one beautiful boat
Re: Seadation's FS14 Build - Splashed 12 May 2012
Posted: Sun May 13, 2012 2:39 pm
by gstanfield
Very nice build David, you should be proud. I'm suprised to see Juliette high enough to use the ramps, it's been pretty low lately. It is a nice fishing lake, as long as you keep that pretty boat out of the stumps

Re: Seadation's FS14 Build - Splashed 12 May 2012
Posted: Sun May 13, 2012 3:45 pm
by Gopher
That, sir, is absolutely one fine looking boat.
The bright finish topside really sets it off well. Congratulations!
Re: Seadation's FS14 Build - Splashed 12 May 2012
Posted: Sun May 13, 2012 4:56 pm
by designlady
That boat looks great! Love the gunwales.
Congrats on getting her wet
Willie
Re: Seadation's FS14 Build - Splashed 12 May 2012
Posted: Mon May 14, 2012 7:07 pm
by whosmatt
Congrats on the splash; your boat is beautiful. I like the brightwork, and the battery / electric setup.
Re: Seadation's FS14 Build - Splashed 12 May 2012
Posted: Mon May 14, 2012 7:23 pm
by peter-curacao
Amazing very nice!
congratulations on the splash
Re: Seadation's FS14 Build - Splashed 12 May 2012
Posted: Mon May 14, 2012 8:30 pm
by cedarock
Very nice and congats! I like the interior layout.
Re: Seadation's FS14 Build - Splashed 12 May 2012
Posted: Tue May 15, 2012 9:33 pm
by Seadation
George, Steven, Matt, Peter, and others,
Thanks for your kind words. Building this boat has been great fun.
/david
Re: Seadation's FS14 Build - Splashed 12 May 2012
Posted: Tue May 15, 2012 10:02 pm
by Joe H
SWEET! That's one nice looking ride, glad she performs well for you.
I'll bet your still pumped up about her, you'll never get tired of hearing "you built that boat?".
Nice.
Joe H
Re: Seadation's FS14 Build - Splashed 12 May 2012
Posted: Wed May 16, 2012 6:41 am
by wegcagle
Beautiful job. That's one great little skiff
Will
Re: Seadation's FS14 Build - Splashed 12 May 2012
Posted: Wed May 16, 2012 11:03 am
by Uncle D
You do beautiful work David. What's next?

Don
Re: Seadation's FS14 Build - Splashed 12 May 2012
Posted: Wed May 16, 2012 3:16 pm
by Seadation
Uncle D wrote:You do beautiful work David. What's next?
Don
Joe, Will, and Don,
Thanks for the compliments.
As for 'what's next'? Well, probably some house furniture and other non-boat related items. I am itching to build another boat though. I would tackle a Stand Up Paddle board as soon as Bateau gets a kit marketed. Those look like fun and I could add that to my fleet easily. I have the FS14 and a factory-built pilot house type boat so there is no additional room for another boat to build until one of those 'goes away' and I don't really want to sell either of them at the moment.
If I had unlimited time, space and money I'd build the Seabright Tunnel 21 with the small inboard diesel. It seems like a neat boat to me.
Fair Winds,
/david
Re: Seadation's FS14 Build - Splashed 12 May 2012
Posted: Thu May 17, 2012 2:23 pm
by Uncle D
Seadation wrote:As for 'what's next'? Well,
How about come to Texas and I'll help you finish a Phantom.

Re: Seadation's FS14 Build - Splashed 12 May 2012
Posted: Fri May 18, 2012 2:36 pm
by Seadation
Uncle D wrote:Seadation wrote:As for 'what's next'? Well,
How about come to Texas and I'll help you finish a Phantom.
Sounds like fun if I could walk away from work/family/etc Without causing an uproar.
Thanks for the suggestion.
David
Re: Seadation's FS14 Build - Splashed 12 May 2012
Posted: Thu Nov 15, 2012 11:00 pm
by flyfishingmonk
Your boat looks awesome!
Re: Seadation's FS14 Build - Splashed 12 May 2012
Posted: Mon Nov 19, 2012 7:37 am
by boat_AUS
A great bit of inspiration and a good picture of what can be done. Question, are you sporting the tohatsu 4st or 2st? I'm planning on going 2st to save weight.
Re: Seadation's FS14 Build - Splashed 12 May 2012
Posted: Fri Nov 23, 2012 9:22 am
by Seadation
boat_AUS wrote:A great bit of inspiration and a good picture of what can be done. Question, are you sporting the tohatsu 4st or 2st? I'm planning on going 2st to save weight.
Hello,
My Tohatsu 15 is the 4S model.
Fair Winds,
/david