
johnnemo GF16

Re: johnnemo GF16
I have found that the circular saw is much more forgiving to the eye than the jigsaw. The little jigsaw blade is hard to keep on target sometimes where the circular saw blade width won't allow you to get off but by so much or it will bind up! I don't have a planer.......need one, but use a 24 grit disc on a grinder for shaping up my mistakes. I will grind down a bump in a second!
-
stickystuff

- * Bateau Builder - Expert *

- Posts: 2219
- Joined: Tue Aug 27, 2002 1:00 am
- Location: Crystal River, Fl.
- Location: Crystal River, Fl.
Re: johnnemo GF16
If you set your circular saw blade 1/4" below the depth or thickness of your plywood you will eliminate the binding of the blade.Just a hint from 35 yrs ofexperience with a saw. 
Capt. Ken Owens
A little saw dust, a little glue, and a lot of love, and she will float.
A little saw dust, a little glue, and a lot of love, and she will float.

Re: johnnemo GF16
I finally got around to ordering the rest of the building supplies (although I'm sure more will be needed). I purchased the GF 16 fiberglass and epoxy kit from Bateau with the slow hardener.
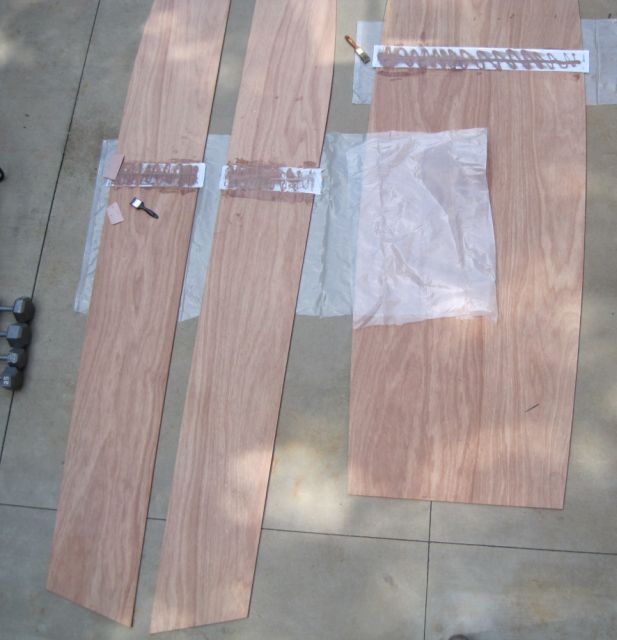
The weather has been spotty but had two good days this past weekend to splice the bottom and sides together. Here is a picture I took from the porch while I was waiting for the FG to wet out. (FYI - I did go back and add more epoxy and completely wet out the glass)
http://gallery.bateau2.com/albums/userp ... Panels.jpg
Now, let me tell you what I did wrong. I used a brush to prime the joint with "neat" epoxy. This was prior to using peanut butter consistent epoxy between the panels. The excess wicked right under the panels and with the poly sheeting on the bottom had nowhere to go. The next day I had mountains and valleys (where the poly was slightly rippled) when I flipped the panels. Clearly I used too much epoxy just priming the joint. My guess is that a roller is better suited to this.
I started trying to fix the problem by sanding with little success. The sun was beating down on me and my fuse was short. I had to walk away. After a few hours in the AC I figured out what I needed to do. I took an aggressive file and brought everything pretty much to level. I mixed the second batch of epoxy and let it seep into the few small voids on side B and placed the FG strips on top. I "pulled" the excess epoxy out of the glass and spread it over the ply and this is what it looked like after it cured.
http://gallery.bateau2.com/displayimage.php?pid=42837
Sorry about the links, but I still am having problems with images. Both images appear to be within the 640 range.
The weather has been spotty but had two good days this past weekend to splice the bottom and sides together. Here is a picture I took from the porch while I was waiting for the FG to wet out. (FYI - I did go back and add more epoxy and completely wet out the glass)
http://gallery.bateau2.com/albums/userp ... Panels.jpg
Now, let me tell you what I did wrong. I used a brush to prime the joint with "neat" epoxy. This was prior to using peanut butter consistent epoxy between the panels. The excess wicked right under the panels and with the poly sheeting on the bottom had nowhere to go. The next day I had mountains and valleys (where the poly was slightly rippled) when I flipped the panels.
I started trying to fix the problem by sanding with little success. The sun was beating down on me and my fuse was short. I had to walk away.
http://gallery.bateau2.com/displayimage.php?pid=42837
Sorry about the links, but I still am having problems with images. Both images appear to be within the 640 range.
-
Cracker Larry

- * Bateau Builder - Expert *
- Posts: 22491
- Joined: Fri Mar 11, 2005 3:39 pm
- Location: Savannah, GA
Re: johnnemo GF16
Nothing wrong with using a brush. I prefer a 4" foam roller, but a brush is fine. I usually pour out the epoxy about like you have here, then roll or brush it out evenly. That's about enough on those joints, it just needs to be spread thin.Now, let me tell you what I did wrong. I used a brush to prime the joint with "neat" epoxy.
Like you did here. That's a good splice, no problem. Not too much, not too little, you got it

Edit: there is nothing wrong with your image size, you just have to put
Completed GF12 X 2, GF16, OD18, FS18, GF5, GF18, CL6
"Ships are the nearest things to dreams that hands have ever made." -Robert N. Rose
-
Cracker Larry
- * Bateau Builder - Expert *
- Posts: 22491
- Joined: Fri Mar 11, 2005 3:39 pm
- Location: Savannah, GA
Re: johnnemo GF16
Not sure where all that %20 came from Just wrap the img and /img around the link, with square brackets around both.
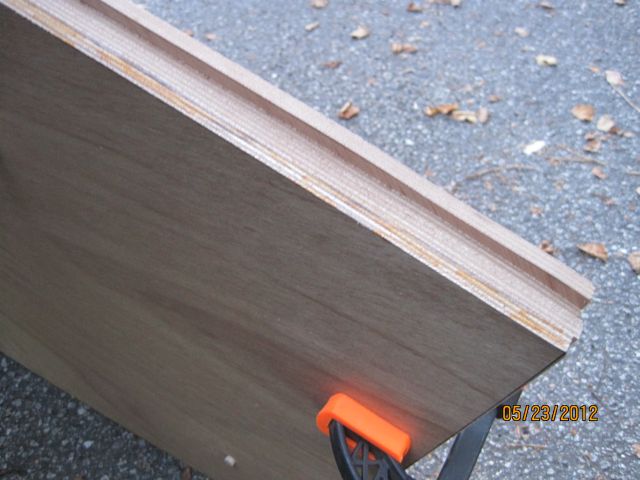
One more suggestion that will save you a lot of work. You see in this pic all those loose single threads on the edges of the tape?
It's going to take a whole lot more effort to sand them off, or fair them in, than it would be to remove them to start with When you cut a piece of tape or cloth to size, take a couple of extra seconds more to pull off all the loose threads before you epoxy it down. This will save hours in the long run.
One more suggestion that will save you a lot of work. You see in this pic all those loose single threads on the edges of the tape?
It's going to take a whole lot more effort to sand them off, or fair them in, than it would be to remove them to start with
Completed GF12 X 2, GF16, OD18, FS18, GF5, GF18, CL6
"Ships are the nearest things to dreams that hands have ever made." -Robert N. Rose
Re: johnnemo GF16
Thanks for the tip CL. The tape was actually together until I started "pulling" the epoxy out of the joint. That's when I got the hanging strings. I tried pushing them back toward the joint, but started pushing epoxy too. I tried pulling them off, but moved the rest of the tape. 
Next time, I will have a razor blade handy.
Next time, I will have a razor blade handy.
Re: johnnemo GF16
I have cut out (3) full size layers for the transom and one clamping board - all from 3/8" ply. This gives me a thickness of 1 1/2" at the top and 1 1/8" on the bottom. Also cut (2) layers of 3/8" for the bow transom. (Note: This is a deviation from the plans b/c I used all 3/8" ply).
I used the dowel trick that I saw on Cracker Larry's build to keep the layers lined up. As you can see, even thought I used the original as a template for the other three layers, there was quite a bit of difference.
I used the electric hand planer to level everything.
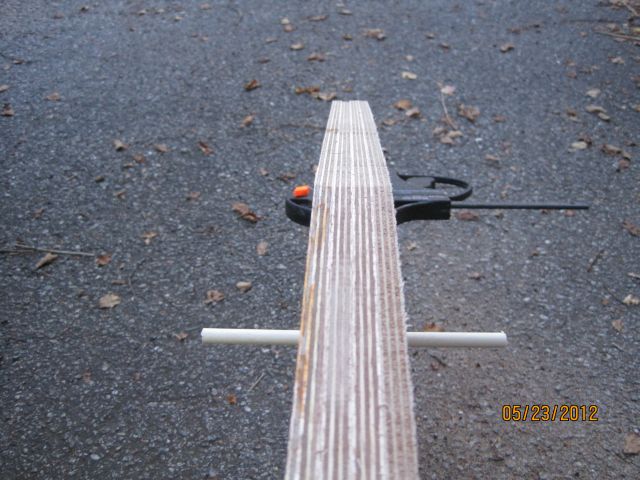
I used an orange Sharpie and highlighted the edge of the original transom. I then planed the others to match. You can see a little of the color in the pictures above.
I used the dowel trick that I saw on Cracker Larry's build to keep the layers lined up. As you can see, even thought I used the original as a template for the other three layers, there was quite a bit of difference.
I used the electric hand planer to level everything.
I used an orange Sharpie and highlighted the edge of the original transom. I then planed the others to match. You can see a little of the color in the pictures above.
Re: johnnemo GF16
Another view of the dowels installed:
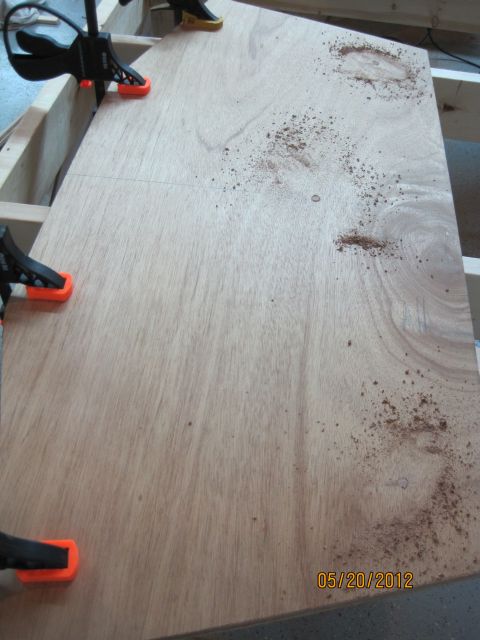
There are two more dowels located up top to align the clamping board. In case you are wondering, the dowels hang out by a few inches on the bottom. They will be trimmed level after lamination.
There are two more dowels located up top to align the clamping board. In case you are wondering, the dowels hang out by a few inches on the bottom. They will be trimmed level after lamination.
Re: johnnemo GF16
In 'myvoodoo's build he makes the following statement....
"I'm 69 and learned some time back that cutting corners only comes back to bite you in the butt, no matter what you are doing in life.......Yes, I might spend a extra few bucks but the finished product but it will be around a long time with peace of mind that I did the best I could and that when I have a impact of a wave on hitting the bottom or maybe hitting a submerged object under water, that little extra insurance comes into play."
(http://forums.bateau2.com/viewtopic.php ... 2&start=20)
I read this before I starting building and agreed with his statement. As my dad would say, the materials are the cheapest part of building a boat. For those of you who have not started building let me elaborate - the man hours you will have in the project will be the greatest 'cost', not to mention hidden costs from maintenance issues (or worse) down the road if you cut corners.
Once again, I am finding out just how true those words are. If you have been following my build you will remember that I found a good deal on some nice 3/8" marine ply locally from an individual who decided to build a canoe instead of a sailboat. Well, at least I was smart enough to not cut corners on the whole marine ply thing. But I am beginning to see some problems with straying from the plans.
Last night I finally got the transoms and frames installed. The frames are thinner that what is called for in the plans. This resulted in less room for error when attaching the sides with drywall screws. I predrilled, but I could still feel the panels bulging as each screw was driven.
My sides are 3/8" too, which I believe is thicker than the 1/4" called for in the plans. This made bending the sides to the frames very difficult, especially since I was working by myself. A few long aluminum bar clamps and duct tape made the whole thing possible.
But this is what its all about - learning as you go. I have heard, "The average man learns from his mistakes, the smart man learns from the mistakes of others." So, this post is for all the 'smart' builders out there.
Re: johnnemo GF16
As I am thinking about the next build steps, I reviewed some of the builds I mentioned earlier in my posts. I missed a few GF 16 ones...
Ziess' Build in Oregon
http://forums.bateau2.com/viewtopic.php?f=12&t=18843
Also '30mill' has (3) nice pictures of his launch here:
http://forums.bateau2.com/viewtopic.php?f=12&t=24601
Lots of build pictures by 'slammed2000':
http://forums.bateau2.com/viewtopic.php?f=12&t=15497
Bryan's GF16 build pics:
http://gallery.bateau2.com/displayimage ... play_media
And since this boat is similar to the GF 14 and GF 18, I also gathered some build links for those as well.
Rapchizzle's GF14 - Creek Rat
http://forums.bateau2.com/viewtopic.php?f=12&t=29026
Cedarock's gf14
http://forums.bateau2.com/viewtopic.php?f=12&t=28560
Nice pics of Bob's GF 14
http://forums.bateau2.com/viewtopic.php?f=12&t=10594
Prarie Dog's GF 18
Can't find the build thread but great pics here:
http://forums.bateau2.com/viewtopic.php?f=12&t=25061
palatpleaser GF 18 pics
http://forums.bateau2.com/viewtopic.php?f=12&t=14582
BLUE GF18 by Jason
http://forums.bateau2.com/viewtopic.php?f=12&t=3356
Amerville - GF 18
http://forums.bateau2.com/viewtopic.php?f=12&t=11779
Who is online
Users browsing this forum: No registered users and 17 guests