Page 1 of 1
Rapchizzle's GF14 - Creek Rat (COMPLETE! 8-23)
Posted: Mon May 07, 2012 1:04 am
by Rapchizzle
Alright, so I've got the GF14 plans in my lap and have put in my order for 7 sheets of Meranti BS6566 and all the fiberglass and epoxy I'm going to need and more! I'll be building this boat while I'm living in the Keys this summer and have to have it ready to roll up to Charleston, SC when I move back home in September.
I'll be using it primarily for fishing, flounder gigging, oyster picking, marsh hen hunting, grass flats fishing, and shrimping in the creeks and harbor of the Lowcountry so it needs to be light and tough as nails. I'll also be making the occasional sandbar run loaded down with ladies and whatnot so I'll want to make sure it looks sweet as well. I hope to have some significant progress done by the time the Builders Bash in June in Marathon so I can put it on a trailer and bring it up to show off.
I've done plenty of reading and am looking forward to getting started as soon as the stuff gets here!
Re: Rapchizzle's GF14 - Creek Rat
Posted: Mon May 07, 2012 8:27 am
by Cracker Larry
Let us know if we can help, Chris. That's a great choice of boats for the Low Country. You will be pleased with it.
Re: Rapchizzle's GF14 - Creek Rat
Posted: Mon May 07, 2012 8:21 pm
by cedarock
Look forward to seeing it come together!
Re: Rapchizzle's GF14 - Creek Rat
Posted: Mon May 07, 2012 8:58 pm
by Prarie Dog
It would be cool to see a GF14 done kinda like the "Mini Muncher".

Re: Rapchizzle's GF14 - Creek Rat
Posted: Wed May 09, 2012 3:14 pm
by Rapchizzle
My epoxy and fiberglass just got here and I've got my work space set up. I've even got van bench seats for the ladies to come hang out and watch me do work! I recently got a fancy camera and am itching to use it so expect quite a few pictures from me.
I did a rebuild on a 13ft Malibu a couple years ago and that's what really got me inspired to build this new boat. You can check out the pictures at this link (
https://www.facebook.com/media/set/?set ... 86f489a40c). I plan to make a photo album on my Facebook and use it to host the pictures to post on this here forum.
Now I'm just waiting for that plywood to get here so I can get to building.


Re: Rapchizzle's GF14 - Creek Rat
Posted: Thu May 10, 2012 6:05 pm
by Rapchizzle
I just picked up some odds and ends at Home Depot today and am getting the wood for the cleats, runners, rub rails and spray rails tomorrow. I am figuring out the exact plans for what I'll be putting in the bow, middle seat and rear seat and as it's looking right now, I'll have my battery mounted in the middle seat powering a CD player and cigarette lighter with a chase tube going up the starboard to the bow to power 2 6" marine speakers, shark eye LED nav lights, and a trolling motor in the event I get one. There will also be a chase tube going to the stern to power a removable LED pole anchor light and an electric start outboard in the event I get one. I'm still considering leaving an opening in the chase tube for a transducer in the event I decide to install a depth finder/GPS unit in the future. Then again, it's just a jon boat so I may wait until I build a bigger boat for all that business...
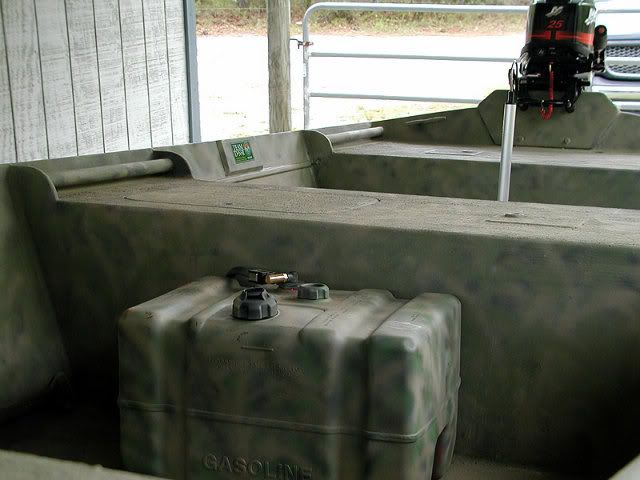
I think I'll design the rear seat to have a 12"x12" cutout for the motor well with drain tubes from the deck so I can easily access the drain plug to empty the boat as I'll be filling it up with water when throwing the cast net while shrimping. The area in front of that motor well will be enclosed and full of foam for flotation. On either side of the motor well/foam will be enclosed hatches for life jackets, tools, etc.
The bow will have the two speakers mounted on either side of the hatch with the nav lights in either side of the hull. There will be wires and whatnot so I'm hesitant to put the gas tank in there and I might leave it on the deck in front. I also will keep my grapel anchor in a bucket with a bouy on the end of the line so I can drop the anchor to chase fish.
Would the gas tank be okay under the bow deck with those wires running about? If I plan to keep it in there, would I be best advised to leave the hatch open?
Re: Rapchizzle's GF14 - Creek Rat
Posted: Thu May 10, 2012 7:21 pm
by cedarock
Sounds like you have things pretty well thought out. That seat looks like a pretty good place to think about things like that!

If you plan to use an ordinary marine deep cycle in the mid seat, you might have to drop it in through a top hatch! I am using a small deep cycle from battery plus (not really sure what it is designed for but works good for running the depth finder for a day) and it will barely fit through my cutout in the upright position.
I wouldn't close a portable tank in with any wiring and in NC, you would probably get a ticket for having a portable tank or even a quart of oil in a closed compartment. I got a warning ticket once for having some 2 cycle oil in a closed compartment!
Have fun with the build!
Re: Rapchizzle's GF14 - Creek Rat
Posted: Thu May 10, 2012 8:05 pm
by Cracker Larry
Nice building space

You could put a permanent tank under the bow and enclose it, but not a portable. It's a simple boat though, better to keep it simple. These boats trim light in the bow and some weight up there is a good thing. I usually kept the tank forward of the center seat and ran the hose through the water drains in the center frames.
I built a little battery box in the center seat and used a lawn mower battery to power lights, pump and a gps/fishfinder combo. It would run everything for days without charging. I didn't have a trolling motor though, that changes everything for power requirements.
Re: Rapchizzle's GF14 - Creek Rat
Posted: Thu May 10, 2012 8:51 pm
by cedarock
I searched batteries plus and think this is the battery that I have been using. It is made for a wheelchair and deep cycle. It is kind of expensive but has lasted for 3 1/2 years now and will manage a small amount of small trolling motor use during the day.
http://www.batteriesplus.com/product/45 ... ga-14.aspx
Re: Rapchizzle's GF14 - Creek Rat
Posted: Thu May 10, 2012 8:55 pm
by Rapchizzle
After much deliberation on where to put the battery, run the chase tubes, mount the lights and speakers and do it all while making sure nothing gets too exposed to saltwater, I've decided I'm going to keep it simple and do without an electrical system. I'll have some clamp on lights for when I'm running and fishing at night and a rechargeable, waterproof, work radio that I can remove when I'm done. I'll save weight, money and time by not worrying about all that because after all, it's just a jon boat for beating around in...
Re: Rapchizzle's GF14 - Creek Rat
Posted: Thu May 10, 2012 9:23 pm
by Cracker Larry
I usually kept the tank forward of the center seat and ran the hose through the water drains in the center frames.
Have you thought about floatation foam locations? I put an additional frame in the extreme bow and filled forward it with foam, and partitioned both seats. The starboard 1/3 of the rear seat is foam filled, the port 1/3 of the center seat, plus the bow section. You can fill this boat with water and it won't sink. We would regularly get it half full while shrimping. No problem.
Re: Rapchizzle's GF14 - Creek Rat
Posted: Thu May 10, 2012 10:31 pm
by cedarock
I almost did exactly what Larry did on the bow but wanted to keep access to the the bolts on the bow eye and cleat. I thought about it and said to myself that a life preserver or cushion will be under there anyway.....it will float more than the boat will weigh!
I concentrated my flotation on the rear and mid seats!
Don't use that life cushion!!!!

It is there to keep the boat afloat!
Re: Rapchizzle's GF14 - Creek Rat
Posted: Fri May 11, 2012 12:17 am
by Rapchizzle
I'm tossing around the idea of using the starboard 1/3 section of the middle seat, the area in front of the motor well, and one of the thirds of the rear seat. I like the idea of leaving the forward portion of the bow clear so that in the event I need to access the bow eye, I don't have to tear everything apart. Then again, if I do it right the first time, why would I need to access the bow eye?
I'm trying to decide what my storage situation will be (if I'll have enough space!) as I'll be trying to house 3 PFDs, 2 throw cushions, boat cleaning supplies, a dry box for registration and fishing licenses, the clamp on navigation and anchor lights, a jug of oil and measuring jar, and perhaps some tools. I'll probably keep the fuel tank in front of the middle seat, with the PFDs, throw cushions and cast net under the bow, and the lights, dry box, etc in the middle seat. The oil, measuring jar, boat cleaning supplies, and tools will go in the 1/3 compartment under the rear seat.
Re: Rapchizzle's GF14 - Creek Rat
Posted: Fri May 11, 2012 12:58 am
by Cracker Larry
Then again, if I do it right the first time, why would I need to access the bow eye?
Exactly. Not in your lifetime.
There is not much dry space on the boat. Especially if you throw a shrimp net a couple of hours. I carried a plastic ammo type container for tools, flares, wallets and phones. Kept it under the rear seat, plus an anchor and life jackets. Both the rear and center seat storage areas are huge in this boat, you could smuggle illegals in there. Plenty of storage, but plan on tupperware or similar to keep anything dry.
Don't try to plan every detail now, it will be easier when you can see it coming together. Just let it evolve, one step at a time. You know what makes a good boat.
Re: Rapchizzle's GF14 - Creek Rat
Posted: Tue May 15, 2012 12:32 am
by Rapchizzle
My plywood came in today and I got to measuring quickly after work. I cut the stern panel of the sides with a fine tooth blade on a 7 1/4" circular saw and found out quickly the blade was dull. I'm not very happy with the cuts but I have no doubt I'll be able to remedy that issue when I start putting everything else together. I then switched to a different blade and the cuts were much better.

My rub rails, spray rails, runners, and cleats all ripped to the correct width. I used 1" x 4"s and 1" x 6"s of Southern Yella Pine and ripped them to the specified widths for each piece.

I'm using Meranti BS6566 and got 4 sheets of 1/4" and 3 sheets of 1/2".

My bow floor all measured out and ready to cut.

My side panels stacked, measured, marked and ready to cut.

This is when I cut the bow side panels. I fine toothed blade was dull so it made cutting hard and I got some pretty crooked and nasty cuts. I figure that with all the extra epoxy and whatnot I ordered, I'll be able to fill it in to the point it's 100% structurally sound and when it's all done, no one will know but me (and you...) about the crappy cuts. I switched over to another sharper blade for the rest of the cuts. I'm not impressed with using the bigger saw and will try to get a smaller one for the rest of the cuts even though I'm pretty much done with most of the curved cuts.

I got my side and bottom panels all lined up with the butt blocks ready for glue.

I have the butt blocks glued and weighted and am looking forward to see how they turn out.

Crooked cuts on the stern side panels.

I found this bad boy floating out in front of our island this afternoon! It's a 110 acre undeveloped barrier island so we get anything and EVERYTHING washing up on our beach. I've found a few plugs, good 5 gal buckets, 1 pair of matching flip flops a couple months apart, message in a bottle, hypodermic needles, etc.
I'm already looking forward to tomorrow afternoon and getting back at it!
Re: Rapchizzle's GF14 - Creek Rat (update 5-15)
Posted: Tue May 15, 2012 8:59 am
by Cracker Larry
Good progress Chris
Nice find on the plug. What did the message in the bottle say

Re: Rapchizzle's GF14 - Creek Rat (update 5-15)
Posted: Tue May 15, 2012 2:47 pm
by Rapchizzle
So I've made my first costly mistake... I glued my buttblocks the wrong way and cannot unstick them to turn and reglue them the correct way. I tried pulling them up when i realized early this morning and they had already cured to the point I cracked the plywood trying to undo my error. I've already got 2 more sheets of 1/4" on the way and will recut the side panels tomorrow evening. I was not happy with my cuts anyways and am not terribly disappointed that I'll get another opportunity to do it correctly this time. I can still use the side panels as scrap and learn from my costly mistake. But hey, this is the first boat I've built so I'm glad that if I were to make a mistake, it'd be early enough for me to catch it!
Re: Rapchizzle's GF14 - Creek Rat (update 5-15)
Posted: Tue May 15, 2012 3:38 pm
by Doc_Dyer
belt sander the blocks off and keep your panels that you have
believe it or not you are not the first one to glue the butt block on the wrong side

Re: Rapchizzle's GF14 - Creek Rat (update 5-15)
Posted: Tue May 15, 2012 4:17 pm
by Cracker Larry
Nothing butt a thing. If you glue your first parts backwards, you'll just go ahead and get it out the way now
belt sander the blocks off and keep your panels that you have
Or use a router to trim them back down flush. Or even the circular saw, it would be faster than the sander, anyway. Set the blade depth the thickness of the block, clamp on a little jig and saw it off one blade width at a time.
If it were mine, I wouldn't use butt blocks at all on the side panels, I'd use a fiberglass splice instead. A piece of 6" biax tape on each side will hold it fine. The problem with the butt blocks is that when you bend the panels over the frames they create a wide flat spot, they don't bend like the rest of the panel, so they are a bugger to fair out. Unless you don't mind a big flat spot
Extra wood is always nice too
Re: Rapchizzle's GF14 - Creek Rat (update 5-15)
Posted: Tue May 15, 2012 6:11 pm
by cedarock
I did that exact thing on my fs12......but only on one panel! It is frustrating but if you are like me, it won't be the last mistake made!
I made a bunch of cuts with the circular saw and then finished with the grinder and sanding disk to remove that butt block.
I had trouble with the flat spot on the fs12 but on the gf14 it is in an area that is pretty flat anyway and I really can't tell where it is. Don't worry about the storage....like Larry, I find that this boat has plenty of it! I am using one of those plano dry boxes stuck under the mid seat and think I will get another!
Looking good!
I just went back and took another look.....could you use the panels and just trim the existing butt blocks to match!

It appears in the photo that you laid them horizontal instead of upright. If so, that might work....but you have the wood anyway!
Re: Rapchizzle's GF14 - Creek Rat (update 5-15)
Posted: Tue May 15, 2012 6:12 pm
by gstanfield
Not that I would ever make the mistake of putting my butt blocks on the wrong side...... but if I did I fixed it with my power planer in about a half hour
Re: Rapchizzle's GF14 - Creek Rat (update 5-15)
Posted: Tue May 15, 2012 6:19 pm
by cedarock
I have gotta to get me one of them power planers!
Re: Rapchizzle's GF14 - Creek Rat (update 5-15)
Posted: Tue May 15, 2012 6:26 pm
by gstanfield
They are really handy for a lot of uses, like putting a bevel on the stem frames for a cedar strip canoe

Re: Rapchizzle's GF14 - Creek Rat (update 5-15)
Posted: Tue May 15, 2012 8:42 pm
by Rapchizzle
Well I decided to scrap the sides I had butted together because I really wasn't happy with the cuts on the rear panel anyways. I've got everything cut and am about to go glue up my transom and clamping boards. I cut the transom 21" tall as I've heard from many sources (here most specifically...) that the alleged 20" shaft motors are more like 21-22". Plus, that's the tallest I could cut the transom and clamping boards to fit within the layout of the pieces on the plywood per the plans.
I may have used a bit much glue last night on the butt blocks so I think I'll reduce the amount for when I glue the clamping boards on the transom shortly.
Re: Rapchizzle's GF14 - Creek Rat (update 5-15)
Posted: Wed May 16, 2012 8:49 am
by Doc_Dyer
Cracker Larry wrote:Nothing butt a thing. If you glue your first parts backwards, you'll just go ahead and get it out the way now
belt sander the blocks off and keep your panels that you have
Or use a router to trim them back down flush. Or even the circular saw, it would be faster than the sander, anyway. Set the blade depth the thickness of the block, clamp on a little jig and saw it off one blade width at a time.
If it were mine, I wouldn't use butt blocks at all on the side panels, I'd use a fiberglass splice instead. A piece of 6" biax tape on each side will hold it fine. The problem with the butt blocks is that when you bend the panels over the frames they create a wide flat spot, they don't bend like the rest of the panel, so they are a bugger to fair out. Unless you don't mind a big flat spot
Extra wood is always nice too
let me clarify ...


I used a chisel to remove the bulk of the butt block then used a sander to clean up the rest
Re: Rapchizzle's GF14 - Creek Rat (update 5-15)
Posted: Wed May 16, 2012 8:46 pm
by Rapchizzle
I tried chiseling it off but wasn't pleased with the job I did. I got the new side panels cut and the new butt blocks glued on this evening. Tomorrow I'll start assembling the pieces of the puzzle and hopefully they'll fit!


I did a much cleaner cut on the side panels this time and am pretty happy with the way they turned out.
Re: Rapchizzle's GF14 - Creek Rat (update 5-15)
Posted: Sun May 20, 2012 9:24 pm
by Rapchizzle
I'll be gluing the rest of the cleats on within the next few days and hopefully flipping next week!
Re: Rapchizzle's GF14 - Creek Rat (update 5-15)
Posted: Wed May 23, 2012 12:08 am
by Rapchizzle
Re: Rapchizzle's GF14 - Creek Rat (update 5-15)
Posted: Wed May 23, 2012 12:17 am
by Cracker Larry
Dang Chris, you are moving along:!: I think you've got the Sea Base crew helping you build that boat too
Good on ZMan, they make some great baits. What a haul!
Re: Rapchizzle's GF14 - Creek Rat (update 5-22)
Posted: Wed May 23, 2012 8:18 pm
by cedarock
The boat looks nice and you are making good progress! I love to hear when a company supports a good cause....thanks for sharing.
Re: Rapchizzle's GF14 - Creek Rat (update 5-22)
Posted: Sun May 27, 2012 2:40 pm
by Rapchizzle
Re: Rapchizzle's GF14 - Creek Rat (update 5-22)
Posted: Sun May 27, 2012 4:57 pm
by Aripeka Angler
You are flying on this build! I will have to check it out next month when we are in the Keys
Maybe you could use some help sanding for few hours?
Sorry to hear about your buddy

Boat building sure is great therapy though when life throws throws a curve ball at you...
Re: Rapchizzle's GF14 - Creek Rat (update 5-22)
Posted: Sun May 27, 2012 6:42 pm
by Rapchizzle
Re: Rapchizzle's GF14 - Creek Rat (update 5-27)
Posted: Mon May 28, 2012 7:27 am
by thb
Maybe its just the photos but where is your fiberglass tape and epoxy on all your exterior seams? I would have done this before any attempts to flip. It seems like the sequence of the build may be off but I have no plans for a GF14 so I am just guessing it is like all the other builds.
Regards
Tom in Steinhatchee
Re: Rapchizzle's GF14 - Creek Rat (update 5-27)
Posted: Mon May 28, 2012 9:56 am
by Cracker Larry
Tom, he is using the correct method for that boat, and the way described in the building notes. Since the GF series are not built on any kind of jig, they rely on the frames and seat tops to square the boat. If you glass the outer seams first, there is no way to insure the hull is square. It just takes an extra flip, but that little boat is simple to flip.
Re: Rapchizzle's GF14 - Creek Rat (update 5-27)
Posted: Wed May 30, 2012 11:59 pm
by Rapchizzle
I have sanded everything on the interior of the boat, glued all of my cleats and filled in any holes I drilled and am ready to start glassing! I cut all of my cloth out tonight and will cut my tapes tomorrow evening. I am fishing monday-friday and will have saturday off, then will fish 6 of 7 days next week too. I hope to get all of the glassing done on the inside of the boat on saturday so it will all cure together, reducing the amount of sanding time! I also shaped up my front bow rail and have an idea as to what to use for a rubrail instead of the expensive Taco kits. I'd like to get my hands off some 4-5 " fire hose that I can wrap the gunnels in.
Been offshore to 2000 ft the past two days and only have 1 dolphin and 1 skipjack to show for it. Offshore is touch this year but at least the weather has been swell. I plan to hit the rEef in the morning and go. Poke my nose out in the afternoon tomorrow!
Re: Rapchizzle's GF14 - Creek Rat (update 5-27)
Posted: Mon Jun 11, 2012 1:46 pm
by wadestep
Good talking to you at dinner. We were talking about drains. Here's how I did it:
http://forums.bateau2.com/viewtopic.php ... &start=220
I bought the PVC at Ace Hardware.
Cheap, easy, and 1.25" drain plugs fit. Might want to get the drain plug at the same time to make 100% sure before glassing it in.
wade
Re: Rapchizzle's GF14 - Creek Rat (update 5-27)
Posted: Sat Jun 16, 2012 9:00 pm
by Rapchizzle
Re: Rapchizzle's GF14 - Creek Rat (update 7-14)
Posted: Sat Jul 14, 2012 10:35 pm
by Rapchizzle
Re: Rapchizzle's GF14 - Creek Rat (update 7-14)
Posted: Tue Jul 24, 2012 6:01 pm
by Rapchizzle
Fairing sucks.
Re: Rapchizzle's GF14 - Creek Rat (update 7-14)
Posted: Tue Jul 24, 2012 6:13 pm
by Cracker Larry
Yep. I know it well
Re: Rapchizzle's GF14 - Creek Rat (update 7-14)
Posted: Wed Jul 25, 2012 12:04 am
by Prarie Dog
Rapchizzle wrote:Fairing sucks.
I put no modifier on this sentiment. Well said

Re: Rapchizzle's GF14 - Creek Rat (update 7-14)
Posted: Wed Jul 25, 2012 9:19 pm
by Rapchizzle
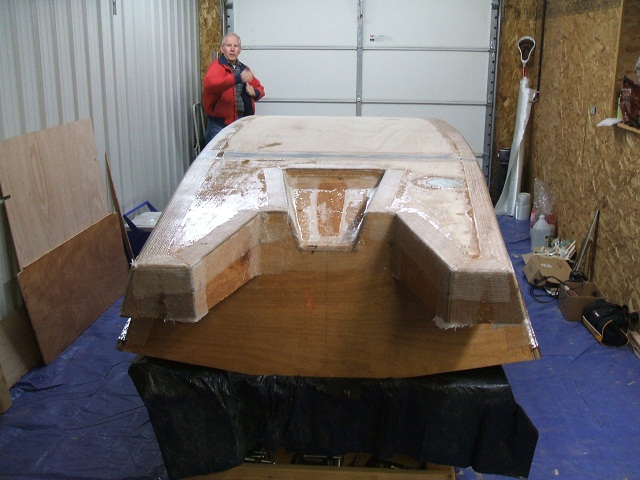
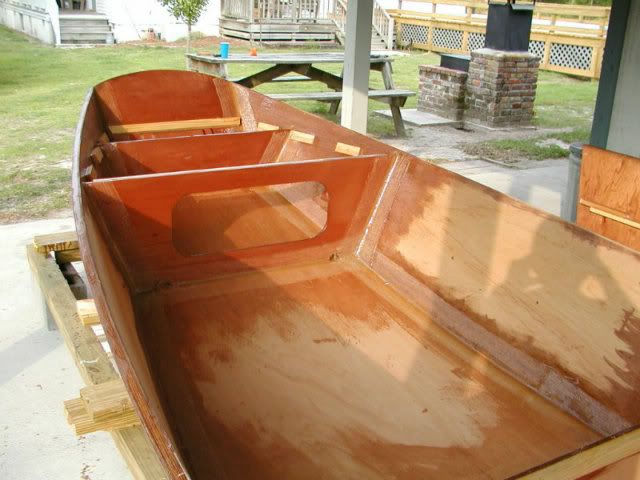
I put the first layer of Epoxy/graphite mixture on and it already had a bug in it by the time I had the first full coat on. I'm going to put two more coats on and see how the wetsanding goes. The boat will be making the trip up to Charleston in 3 weeks so I hope to have it done to the point that it's pretty much finished. I can put the seat and rodholders in when it gets to Charleston but I hope to have it painted inside and out.
Re: Rapchizzle's GF14 - Creek Rat (update 7-14)
Posted: Thu Aug 16, 2012 11:50 am
by Rapchizzle
I've got the first coat of primer on the inside! going to have the inside finished painting within a week or two
Re: Rapchizzle's GF14 - Creek Rat (update 7-14)
Posted: Thu Aug 16, 2012 4:23 pm
by Cracker Larry
Well show us a picture
Re: Rapchizzle's GF14 - Creek Rat (update 8-23)
Posted: Thu Aug 23, 2012 4:39 pm
by Rapchizzle
Re: Rapchizzle's GF14 - Creek Rat (COMPLETE! 8-23)
Posted: Thu Aug 23, 2012 4:59 pm
by Cracker Larry
Very nice Chris
Good luck with the hurricane, we're watching this one close up here, too


