Page 1 of 1
FS14 OZ
Posted: Sat Nov 17, 2012 10:57 pm
by boat_AUS
Hi, I have begun building my first boat, initially I was set on thee P19 as it is exactly what I was after, but after purchasing the plans decided to start with the FS14 and actually have a chance of coming out the other end of the project with a great boat.
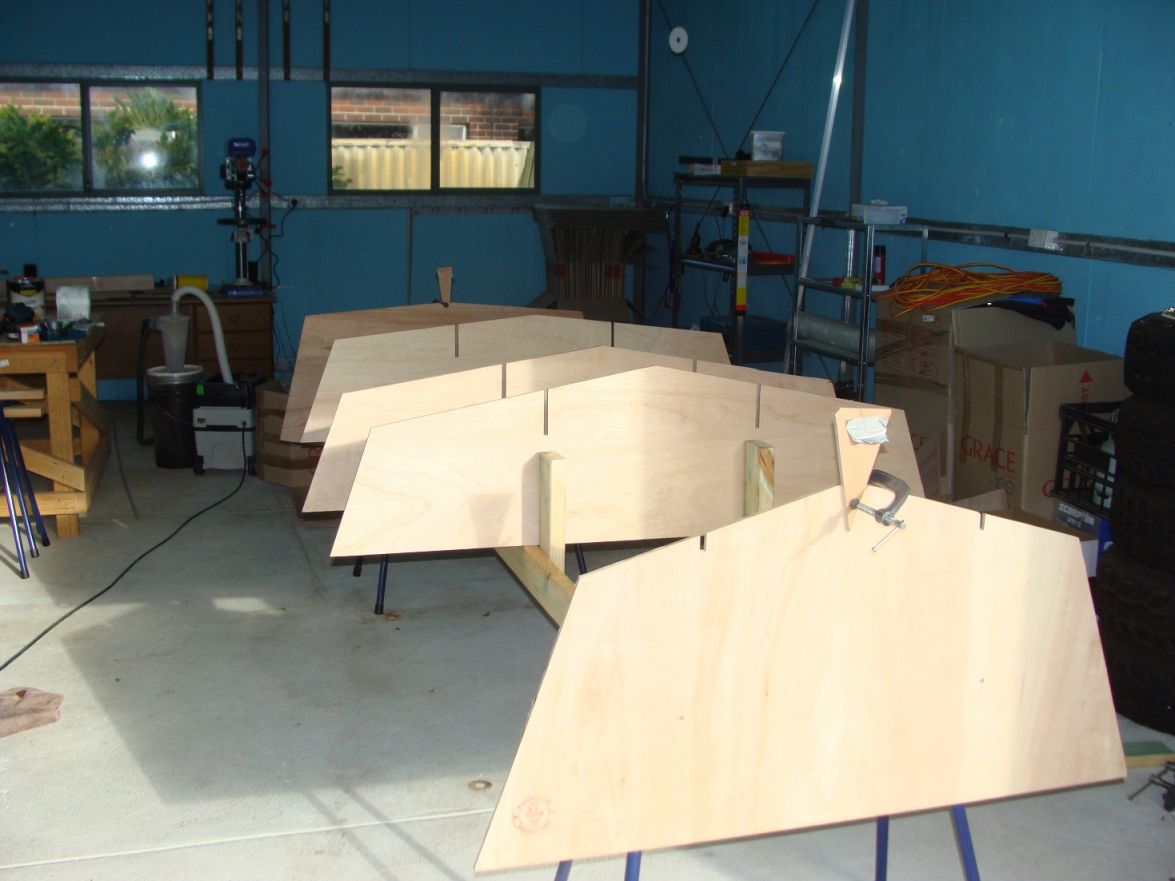
So far I have cut out the hull long panels and butt blocks and am in the process of drilling the stitch holes before I glue the panels together.
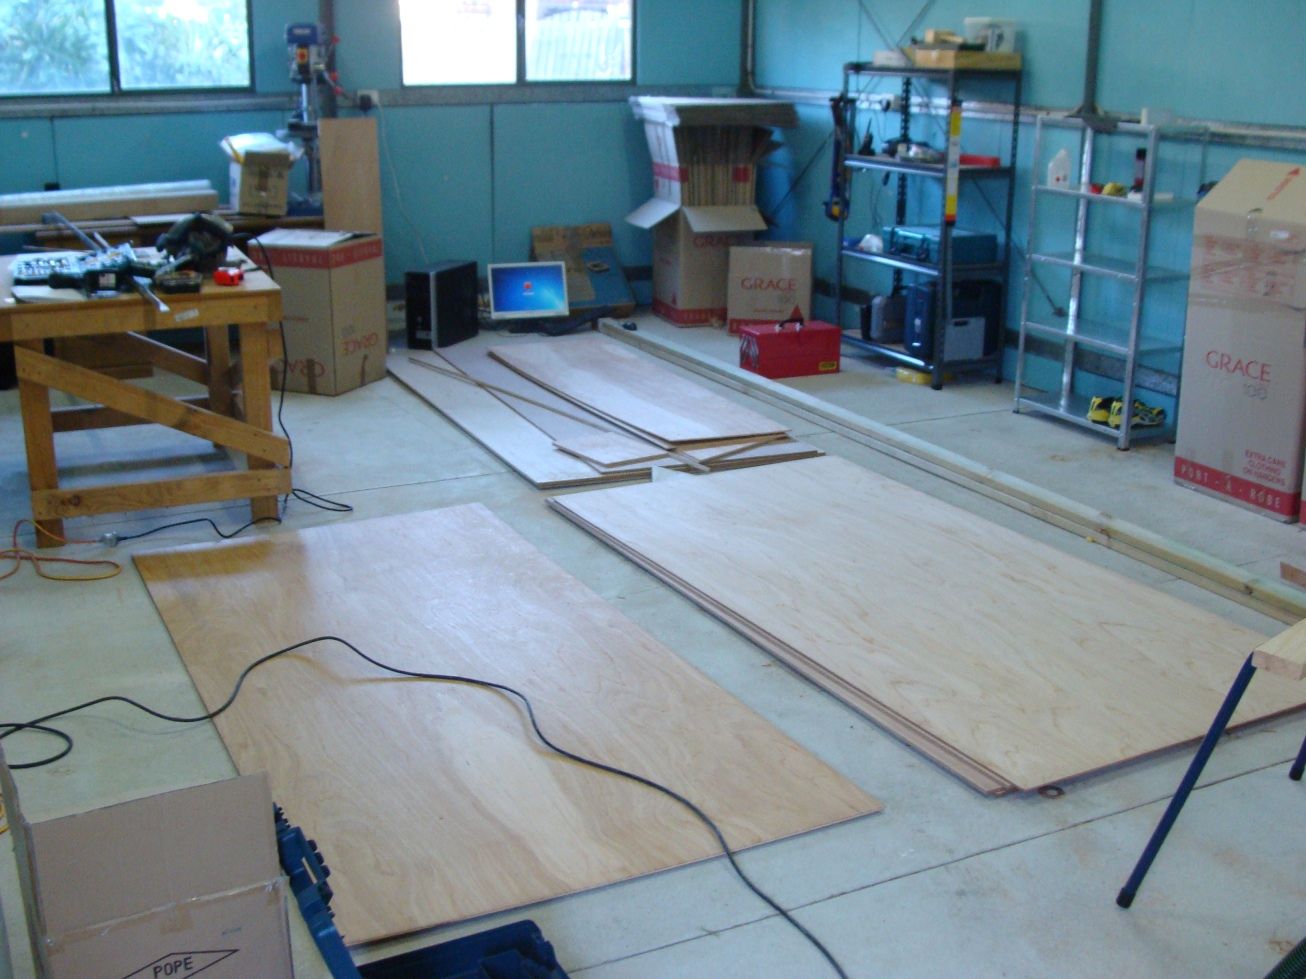
I think I will pre-coat the panels with epoxy before I put the on the frames and apply the fibreglass dry so I can ensure that I get good penetration into the plywood and no dry spots on the fibre glass. (This also allows me to take my time fibre glassing rather than rushing and stuffing things up.)
The next part is to cut out the frames and construct the building jig, but I have a cold (and it’s nearly the start of summer here) and feel absolutely crap so that has put the brakes on a bit (I really don’t think it will take too long to have it built though)
I thought I would give you a run down on my goals and plans for the boat in the next part, feel free to give me any suggestions and thoughts, or not read it.
As the primary users with be me and my wife, I will be changing the boat a little to suit our needs, forward controls instead of tiller and a little shelter from the elements in the form of two very thin and stream line separate consoles with windscreens just in front of the middle bench seat.
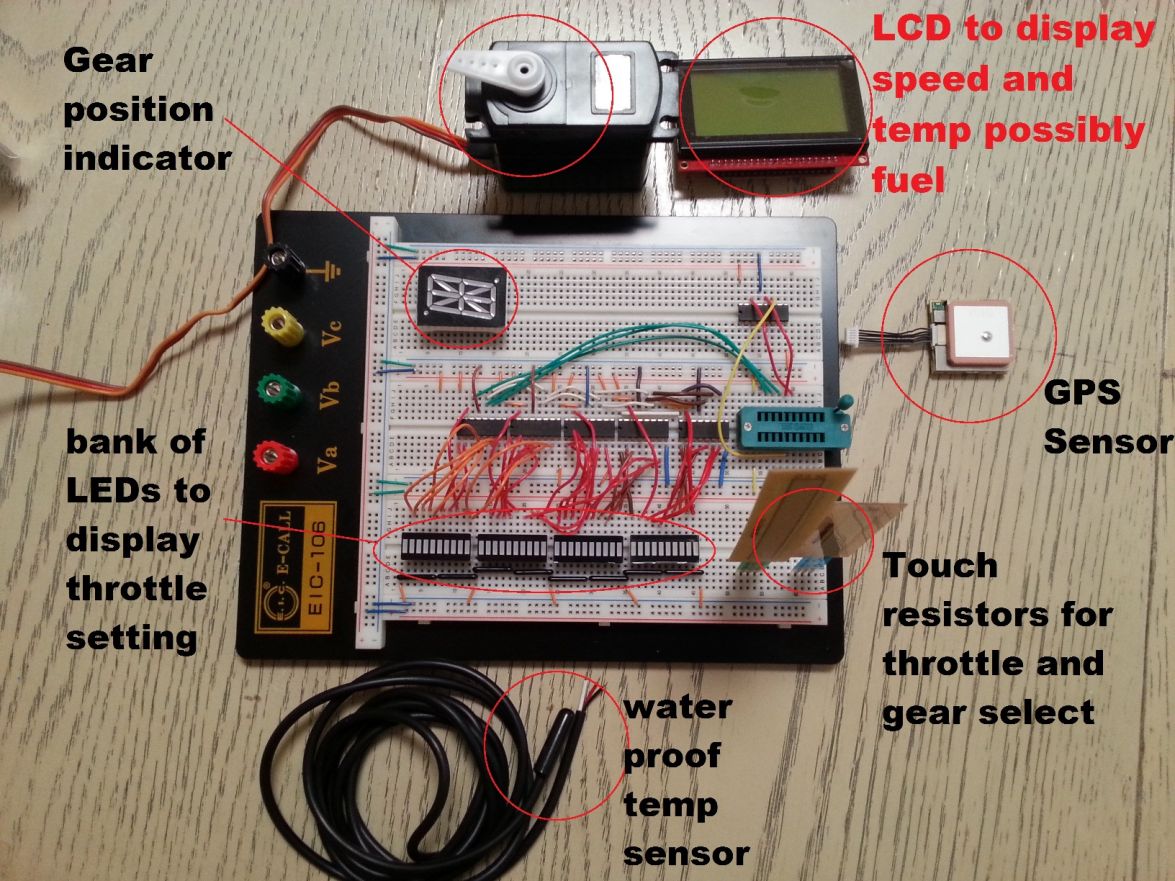
To implement this I will use a picaxe or arduino microcontroller to perform the required functions.
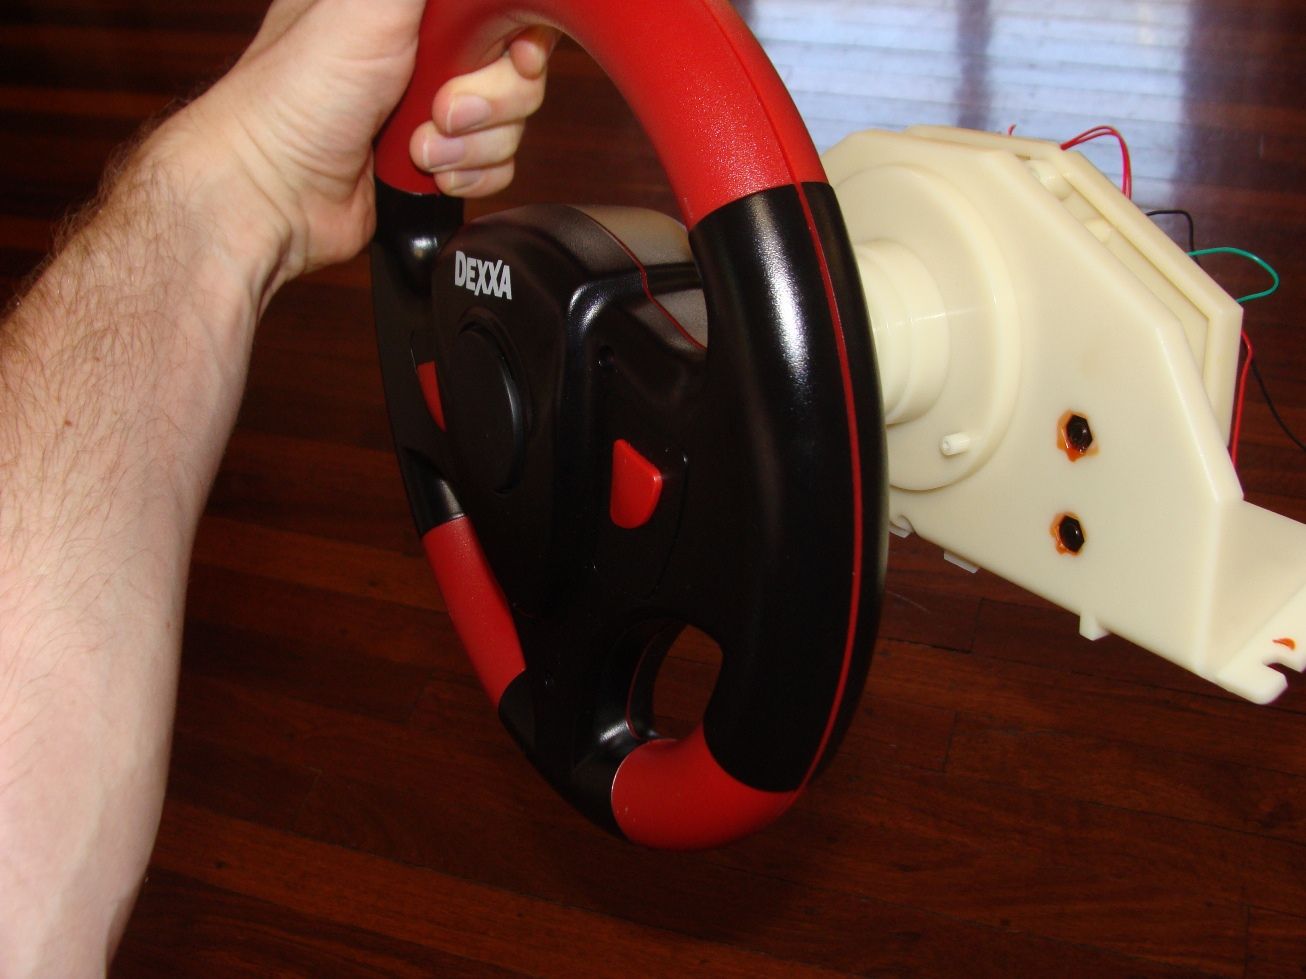
Because it is a small boat and putting in remote steering usually takes up a lot of space I have started designing my own steering, throttle and gear shift controls. These will all be electrically controlled and actuated and will take up significantly less space and will be extremely easy to route the wiring instead of trying to install cabling that can’t be bent around tight curves . I am hoping to achieve a very professional finish and usability.
I picked up a steering wheel a couple of days ago, an old computer game wheel, and have stripped it down ready for testing and installation later. I’ve also order some parts, linear actuator, control board and servos. Originally I was going to program my own controller but the one I have sourced is cheap and does more than I could have a hope of implementing. I will have to make up some mounting brackets to attach the actuator to the steering tube but I will have to wait until I have an engine before I start that.

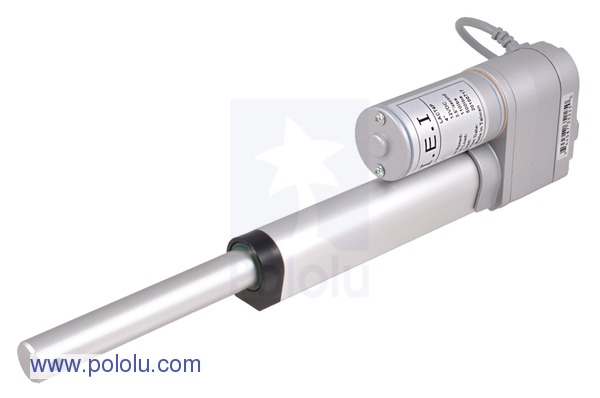
here is a pic of the linear actuator, it has 50kg of force plently for <20hp
Water and electrics don’t mix, especially salt. So devising a way to beat the environment and still have a natural feel to the throttle control is still taking a bit. My first thought was to put together a mechanical switching device very similar to the normal control box, but that defeats the purpose of what I’m trying to achieve. Next I thought that a sliding potentiometer would give you a small foot-print and visual cue of the throttle setting and a smooth throttle transition, but any water would be highly problematic. A little research uncovered a great device that it a waterproof, touch sensitive potentiometer that is wafer thin.
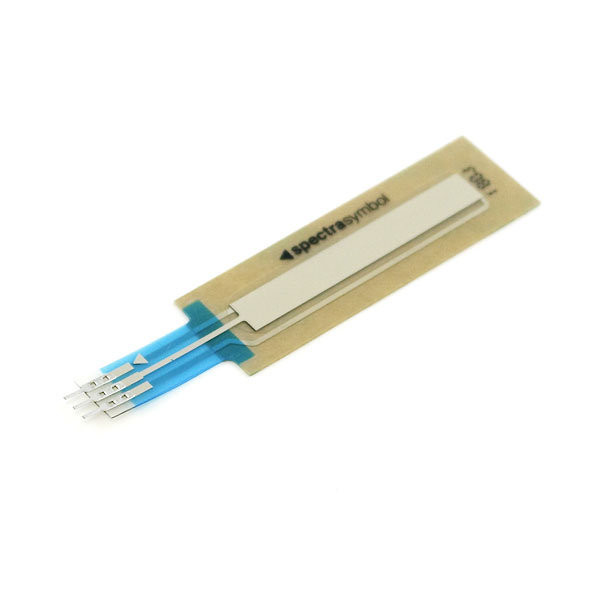
The only down side is that visual gauge of throttle setting is not apparent. Possibly I could use and LCD screen to indicate the throttle.
The gear selector and throttle being electronically controlled will allow me to program in-gear start protection, correct automatic throttle position for starting and automatic choke if the engine requires it.
And since I’m going to the trouble of programming a microcontroller I can put in some cool gadgets too. Ideas are to put in a big LCD screen to display fuel level, rpm, throttle position, gear selector indicator, fuel flow, speed, engine temp (egt or cylinder head), cooling water temp and flow indicator. This is just a wish list at the moment, and none are necessary to get me out on the water but if I’m going to invest the time in building a boat that I can be proud of why not?
Sorry for the long post but for those who made it through I hope it was a bit interesting, any thoughts you have that I could incorporate put them up.
Re: FS14 OZ
Posted: Sun Nov 18, 2012 2:05 am
by TheBroomside
Hi 'boat_AUS', great plans. I am of the opinion that one should build his dreams. ''Flying-by-wire', it has been done. Whether this would use take less space is a point of discussion.
I have two considerations. What is the speed of the actuator, will it be fast enough for maneuvering such a small fast boat? Second I would want a mechanical back-up.
Good luck with the build, enjoy it.
Peter
LUS
Re: FS14 OZ
Posted: Sun Nov 18, 2012 5:12 am
by boat_AUS
yes the speed of the actuator is interesting, the one i have ordered moves at 0.6 inches per second so not extremely fast, but it does have the option of changing the gearing to obtain greater speed at the expense of power, from my experiences though full travel isnt used very often and at speed even smaller inputs are required, but it will be a bit of trial and error.
Re: FS14 OZ
Posted: Sun Nov 18, 2012 8:00 am
by Heloman78
I love what you're doing! I like when people try something that most think can't be done reasonably. With that said, I hope you'll be keeping your'e tiller handle as a backup

. One thing, which you may have have thought of already, is that a boat steering wheel sometimes has to hold tremendous force; in some conditions the forces the driver puts on the wheel to simply hold himself in place can be greater than even his own weight, so structurally the wheel/shaft/ mounting has to very strong, besides it's normal function of steering the boat. Please keep posting, very interesting!
Re: FS14 OZ
Posted: Sun Nov 18, 2012 12:23 pm
by sds
The fs14 is a performance craft. To lose control at planing speed of course would be disastrous.
Heloman has raised concerns with the wheel you've selected. It looks inadequate. You've raised corrosion issues yourself. I'm sure there will be design/programming bugs and outright failures.
I'd prototype on a low performance displacement hull, or severely limit the horses you put on the fs.
Re: FS14 OZ
Posted: Sun Nov 18, 2012 1:20 pm
by AtTheBrink
All that sounds really cool!

I like the out of the box thinking. You sound like you know what you are doing, most all of the computer talk was all gibberish, but still interesting, to me. Hope you can get all the bugs worked out. I'll be following this one closely.
Re: FS14 OZ
Posted: Sun Nov 18, 2012 1:45 pm
by Lon
"I think I will pre-coat the panels with epoxy ..."
On panels that need to bend to fit, a pre-coat will increase stiffness. Be careful.
Heckuva project.
Re: FS14 OZ
Posted: Sun Nov 18, 2012 2:06 pm
by Cracker Larry
On panels that need to bend to fit, a pre-coat will increase stiffness. Be careful.
Yes, I would not do that, except on flat panels like frames. It would also decrease the strength of a curved panel, assuming it would make the bends. A composite gets it's strength from the different materials working with each other and opposing forces. When you bend the plywood, one side of it is in tension and the other side is in compression. Then when you apply epoxy and glass over it in a relaxed state it sort of locks the bend into the wood. For the plywood to move, it would have to put the epoxy/glass in a state of tension and compression. One force opposes the other.
But if you epoxy it first, when you bend the panel you are also bending the epoxy into compression and tension, and you lose the opposing force. If you can even bend it.
Re: FS14 OZ
Posted: Sun Nov 18, 2012 6:17 pm
by boat_AUS
Cracker Larry wrote:On panels that need to bend to fit, a pre-coat will increase stiffness. Be careful.
yes i didnt think that it would increase the stiffness too much only uding epoxy and no fibreglass, but you make a good point and any additional strength that can be gained by pre coating after the required shape has been formed to lock in the tension and compression forces would be much better. the knowlege on this forum is great and to hear people say "coating a panel with epoxy flat will make it very hard to bend into shape" you have to take notice of that advice.
thanks, going to finish breakfast and glue the long panels together.
Re: FS14 OZ
Posted: Sat Nov 24, 2012 3:11 pm
by TRC886
boat_AUS wrote:yes the speed of the actuator is interesting, the one i have ordered moves at 0.6 inches per second so not extremely fast, but it does have the option of changing the gearing to obtain greater speed at the expense of power, from my experiences though full travel isnt used very often and at speed even smaller inputs are required, but it will be a bit of trial and error.
0.6 INCHES PER SECOND IS TOO SLOW

Emergency maneuvering requires IMMEDIATE turning. Think about that barely submerged stump that is less than a boat length away when you see it, dead ahead, and you're running at speed! How about that boat you meet in a blind curve where mere seconds separate you from a crash?
IMHO you need a variable rate turning speed; slow and steady for normal turns; faster for when you meet that boat in the curve; and immediate to maneuver around that stump.
Have you considered stick steering? A lever mounted to the side of the boat takes the place of the steering wheel. Moving the lever forward or back turns the motor right or left. You retain the variable rate turning, the simplicity and reliability of a mechanical system, the space that a console would take up, and only
one corner to route the cable around.
Re: FS14 OZ
Posted: Mon Dec 17, 2012 6:24 am
by boat_AUS
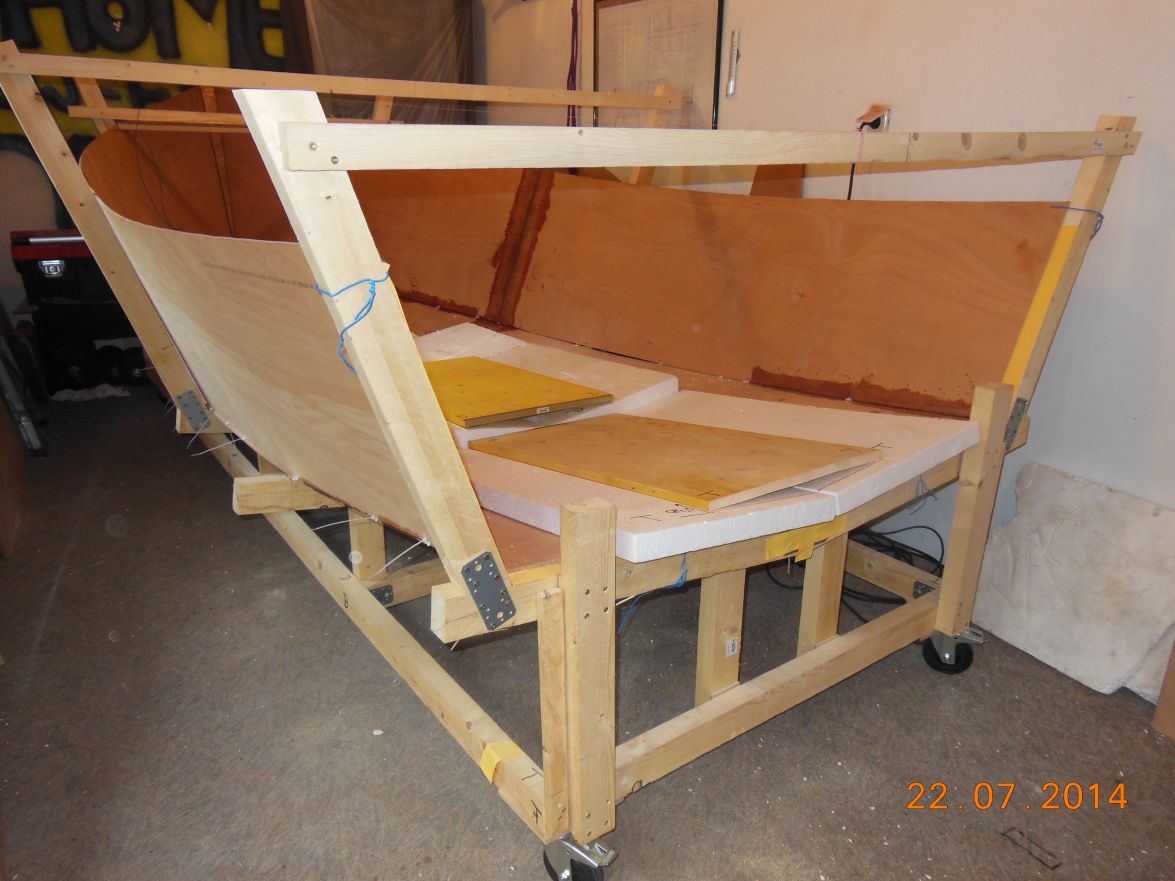
a bit more done, jig is done
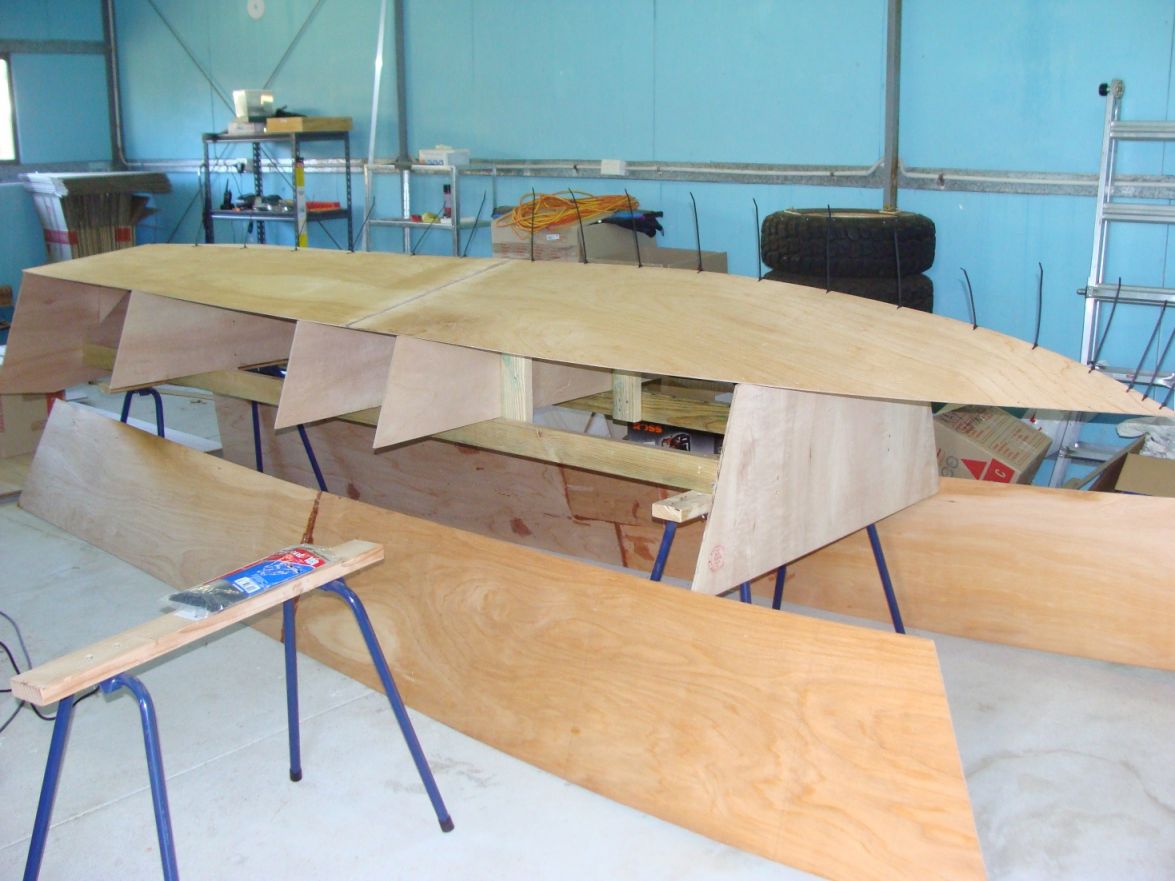
bottom hull is on, edges bevelled and nice fit, ready to tac the seam together tomorrow morning
the transom is sitting about 10mm inside the hull panels, i cant move the hull panels any further forward because of the butt blocks joining the panels and the seat frame, not sure yet if i should trim the back of hull panels flush with the transom or if i should move the seat frames forward.
all in all though im happy with the fit and how it looks, might have to reshape the stringers at the bow end to fit but no biggie.
i will get the side hull panels on tomorrow and make sure everything looks good before things get permenately glued.
all my electronics have turned up for the steering and throttle, ive started programming the micro controller but it is still a work-in-progress considering i have to get the hardware working before i can start testing. looking at changing the gearing of the llinear actuator to moke the steering more responsive.
Re: FS14 OZ
Posted: Sun Dec 30, 2012 5:22 am
by boat_AUS
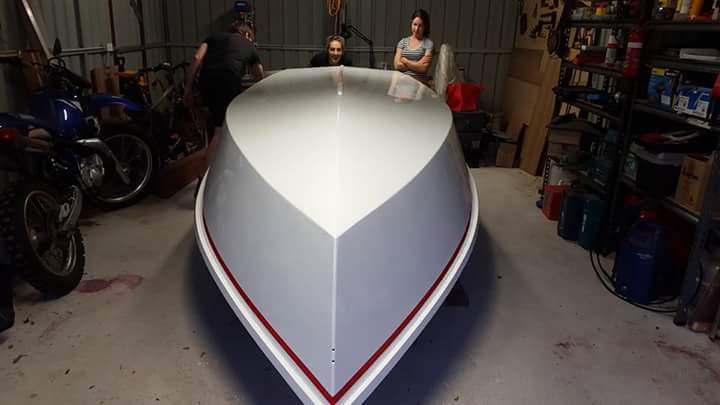
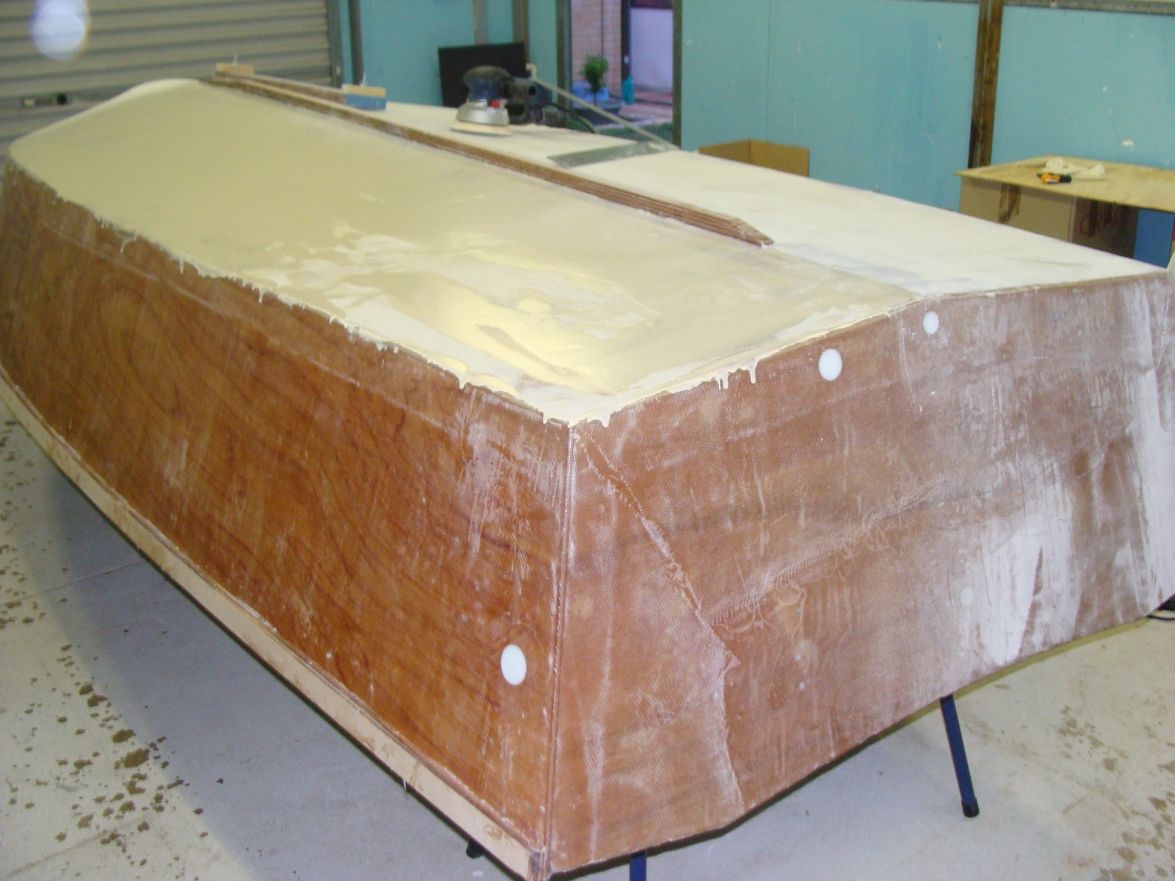
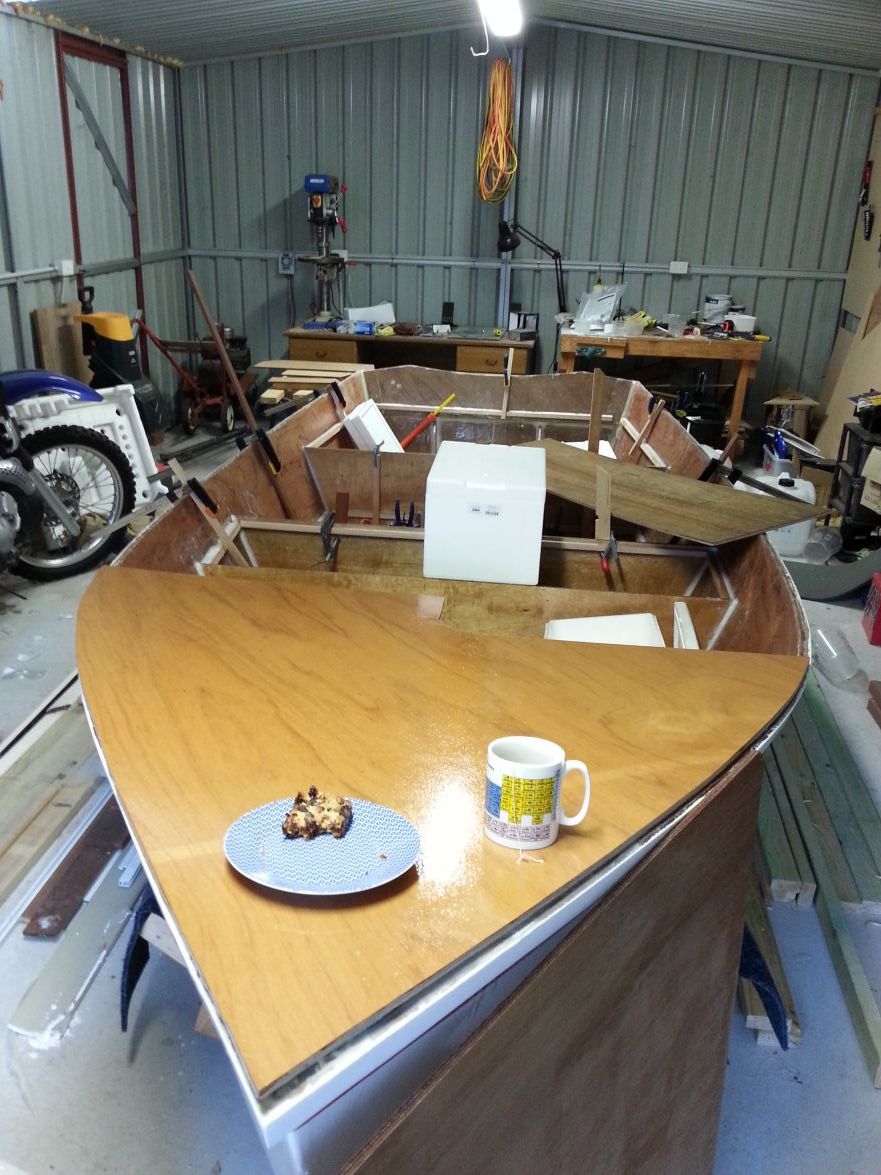
Hull is together, probably put too many stitches in, but everything came together nicely and with fair lines
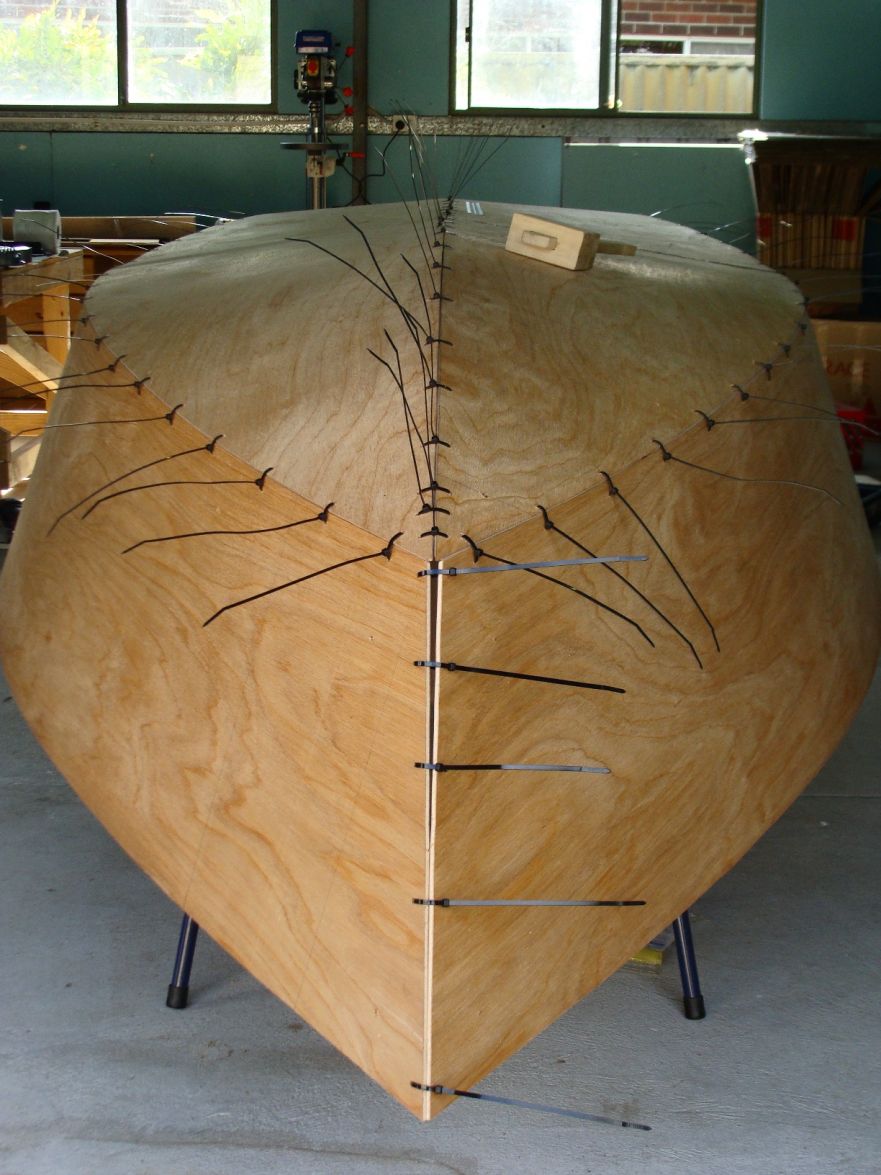
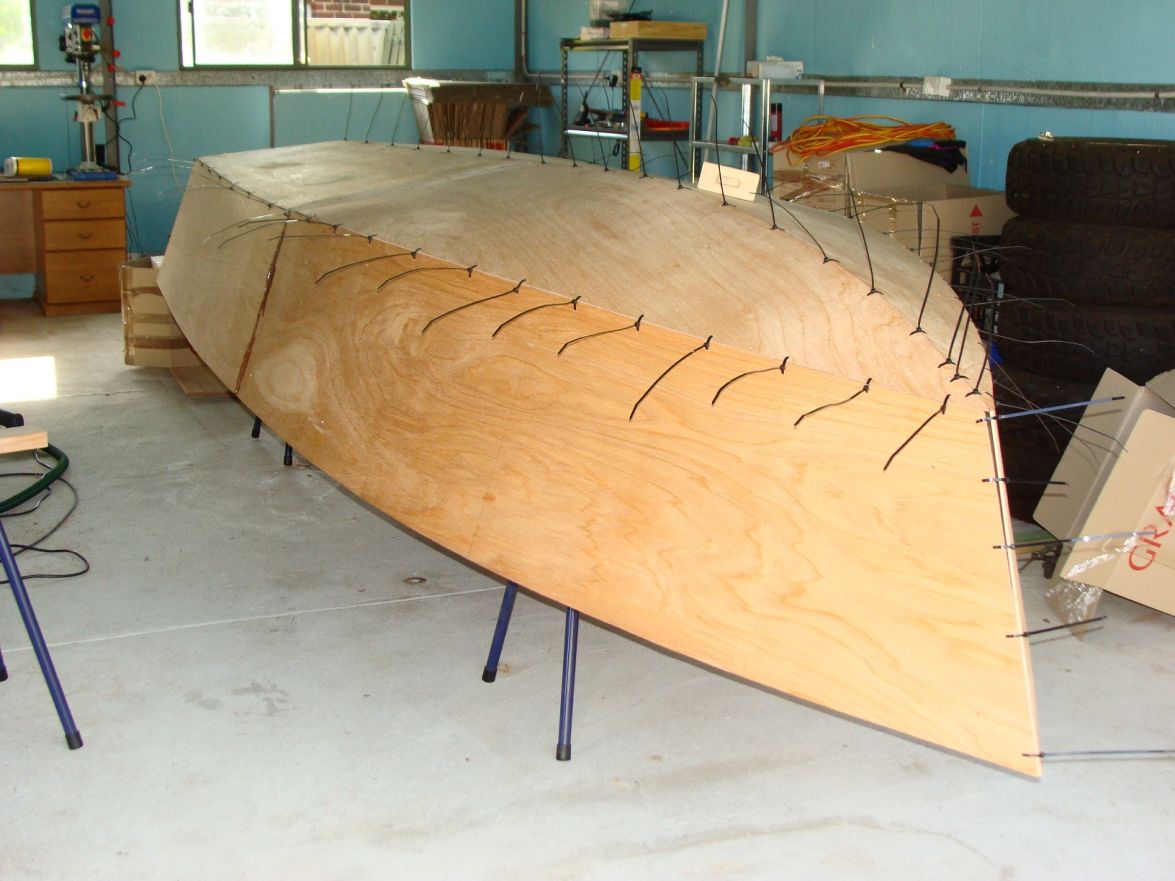
spent today filling the stitch holes and making the joints smooth with the plane and epoxy.
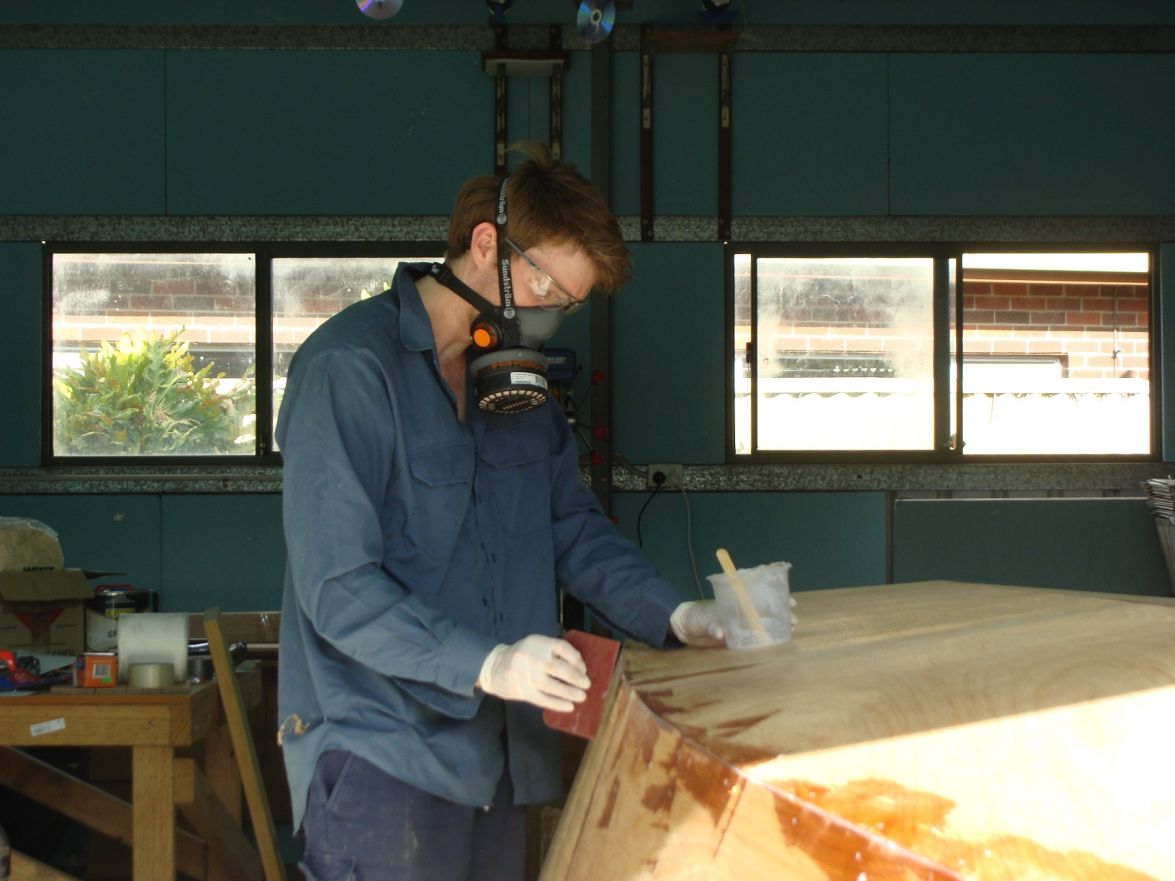
tomorrow i will be finish of smoothing the hull and filling low points and holes in the joints. with the heat at the moment i should be able to give the whole hull a light sand in the evening read to precoat the hull with epoxy ready for fibreglassing.
Re: FS14 OZ
Posted: Sun Dec 30, 2012 10:21 am
by AtTheBrink
Looking great!
Re: FS14 OZ
Posted: Sun Dec 30, 2012 10:24 am
by TRC886
Looks real good
Based on other pics, you've used just the right number of stiches

Re: FS14 OZ
Posted: Fri Mar 08, 2013 4:17 am
by boat_AUS
hi just an update.
seams glassed and sanded ready for glass
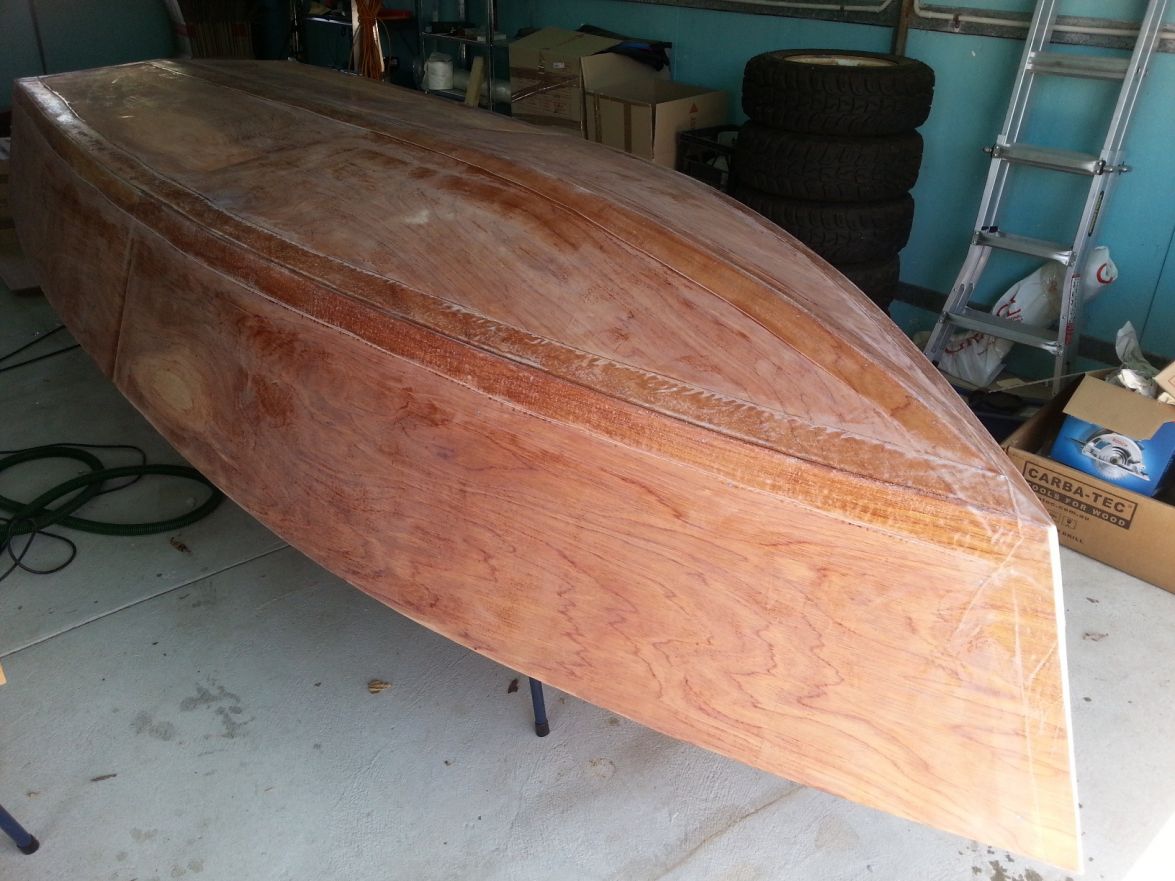
the outside of the hull is glassed

putting on the rub rail and will be fairing soon hopefully.
also got quote and advise on paint and might be going with dulux high build epoxy primer and dulux 2pack polyurethane topcote. if anybody has used dulux i would like to hear how you got on with it. it is a bt cheaper but apparently norglass paints are made by them... its meant to be good to brush.which is also a plus.
Re: FS14 OZ
Posted: Fri Mar 08, 2013 4:37 am
by boat_AUS
forgot to show where im upto with the electronics.
ive programmed the servos that control the gearbox and throttle which are awesome, and the LEDs just need calibrating to show the throttle position(not sure if i will use them yet because they dont glow through the touch sensitive potentiometer).
upto getting the gps and engine water temp guage(cylinder head temp would probably be better with the 2stroke) talking to the LCD screen.
Re: FS14 OZ
Posted: Fri Mar 08, 2013 3:09 pm
by AtTheBrink
Your boat is looking great. Glad it is coming along. You computer thingy looks... I don't have a clue what anyof that stuff is! Good luck with getting it all wired and stuff...!
Re: FS14 OZ
Posted: Fri Mar 08, 2013 6:12 pm
by Heloman78
Looks great!
Re: FS14 OZ
Posted: Fri Mar 08, 2013 8:05 pm
by jorgepease
I love innovation!
Re: FS14 OZ
Posted: Sun Mar 17, 2013 7:21 pm
by TRC886
Beautiful 'glass work
Re: FS14 OZ
Posted: Mon Mar 18, 2013 1:20 pm
by tobolamr
Your glass work looked great! I'm interested to see how your electronics work out in the end, too!
Re: FS14 OZ
Posted: Mon May 06, 2013 6:05 am
by boat_AUS
just a quick update.
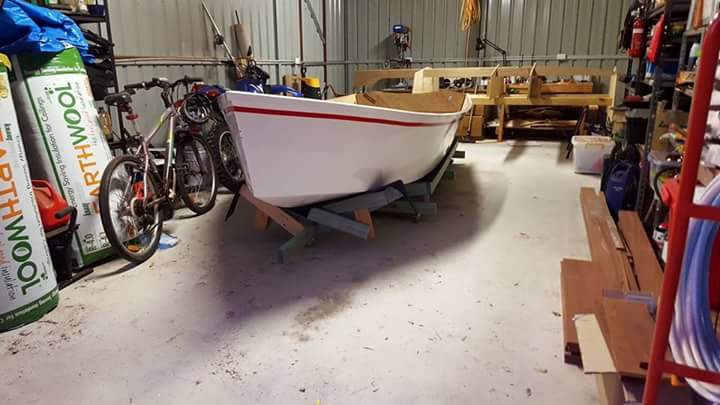
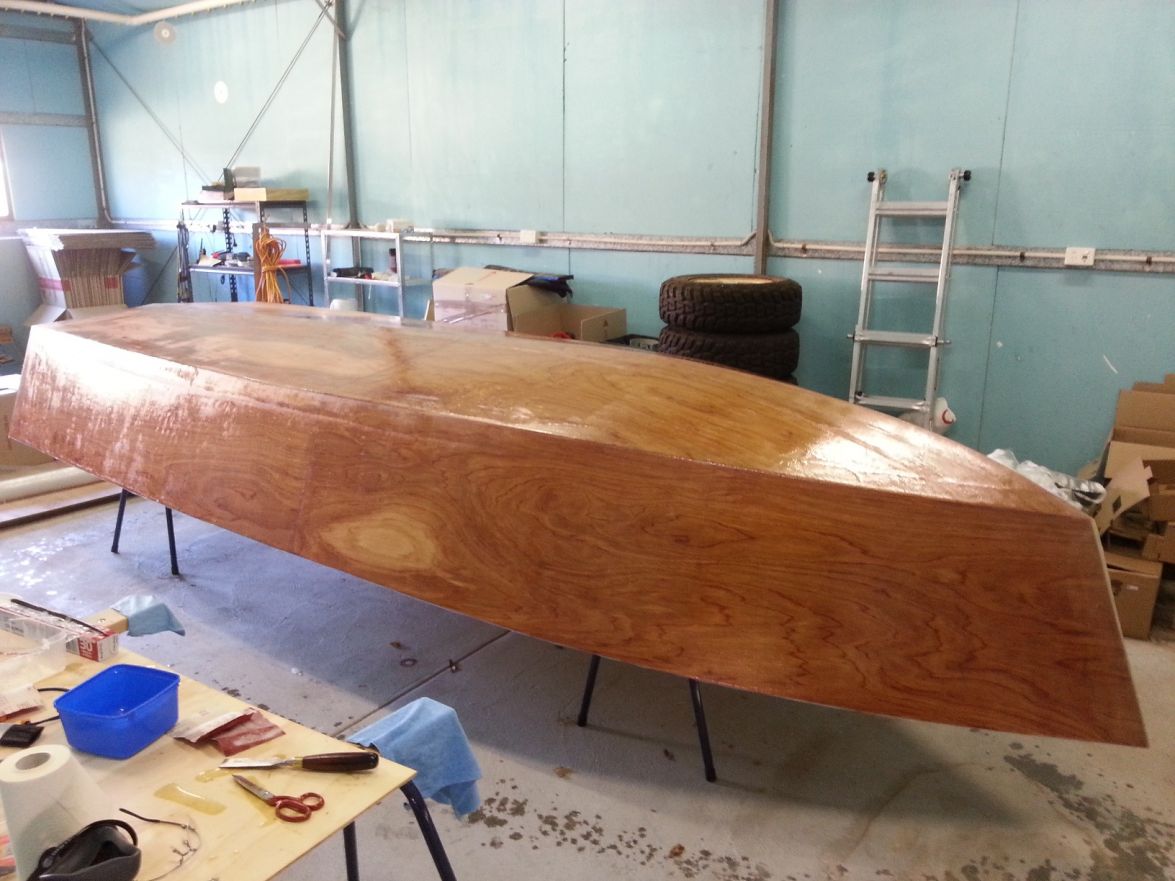
the skeg is on, rub rail is on, transom clamping board is on, started fairing the bottom with the sides to follow.

Ive found it difficult to get a thin even layer of fairing material on the hull, hopefully will get better the more i do it.
i have drilled and filled holes for drain bung, water pickup and water outlet whihc are now ready to be redrilled at the final size. need to drilland fill the tow/tie down points on the transom and the bow.
things are progressing well, replacement gearsets for the steering arrived, free of charge!!! great customer service from the supplier. fuel guages are going to home brewed using weight sensors to determine level (all other sensors are way to expensive over $200AUD)
Quick question for everybody that has done painting. im wanting to paint the outside of the hull before i flip it over, but once it is flipped over im putting a gunwale around to help cover up and protect the rubrail. in regards to gluing the gunwale on and not spoiling the already painted hull, what are peoples solutions???? i was thinkning a pin stripe or some type of feature that is a natural breakline to cover any missmatch. suggestings thoughts please.
Re: FS14 OZ
Posted: Sat Oct 03, 2015 11:12 pm
by boat_AUS
hi all,
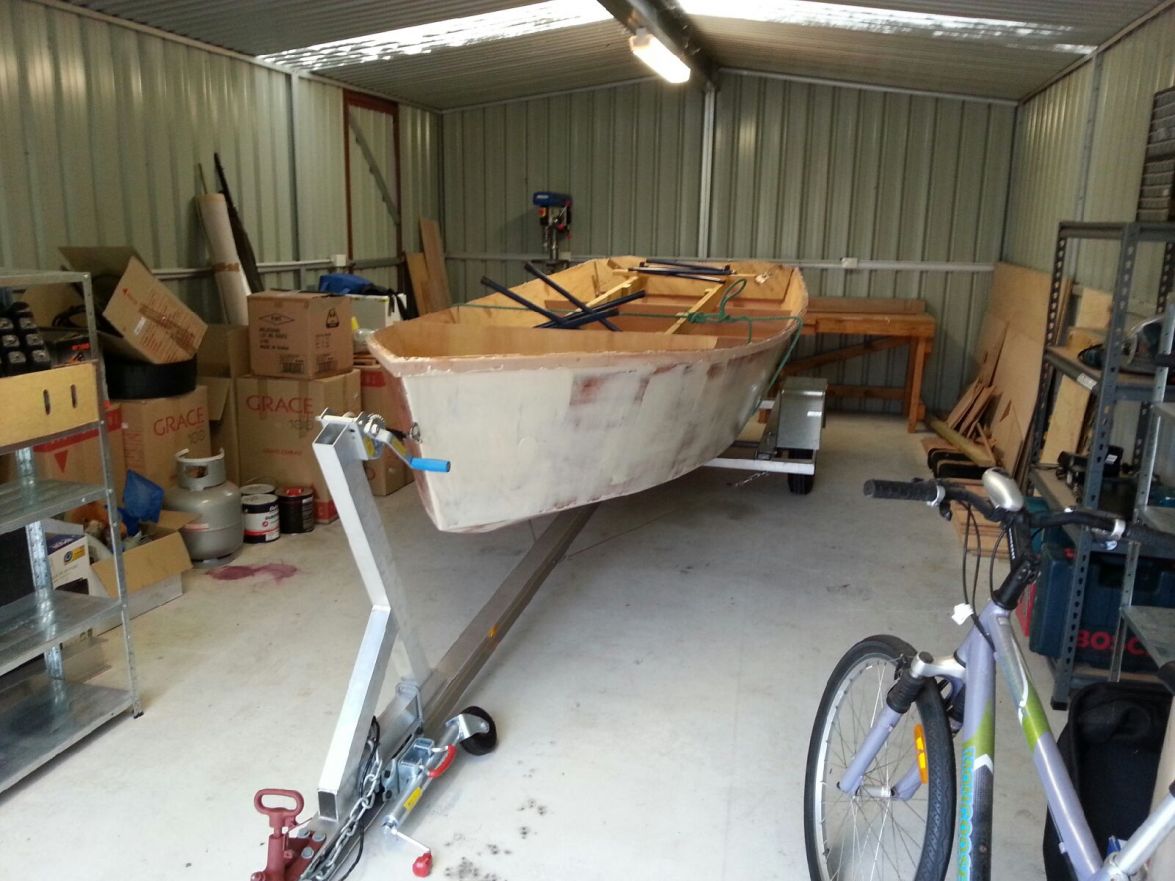
sorry it has been a long time since i have been on and posted. the boat has taken a back seat this last two years, buying a house has taken up a lot of my time, fixing things up. Back onto the boat now though and I have a few photos
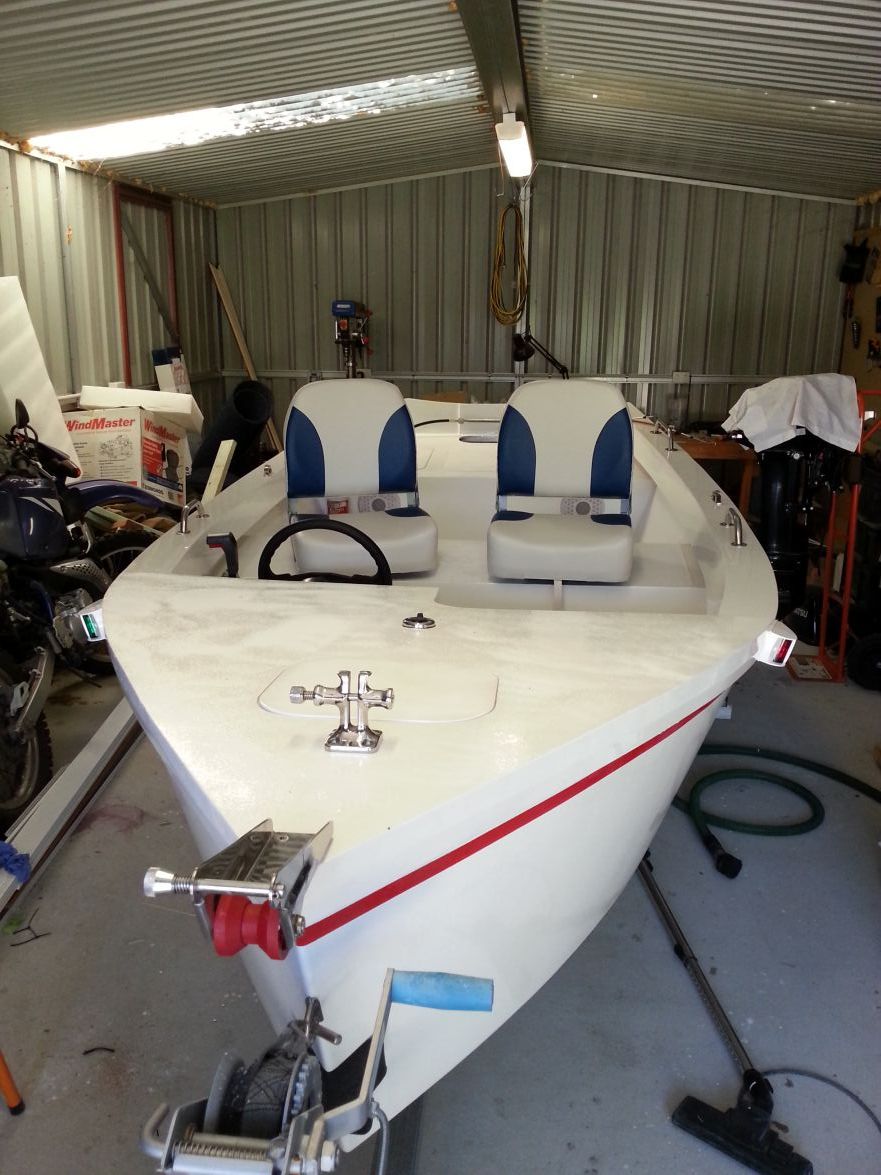
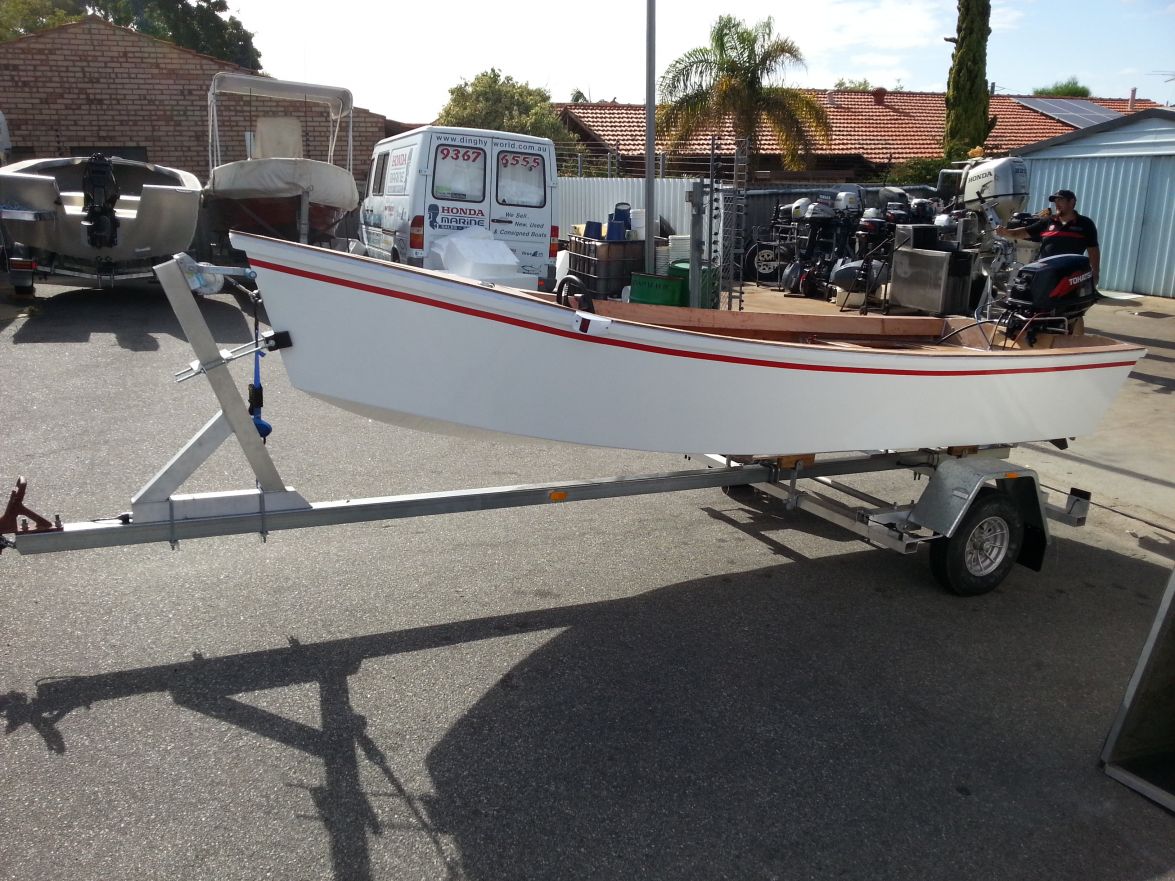
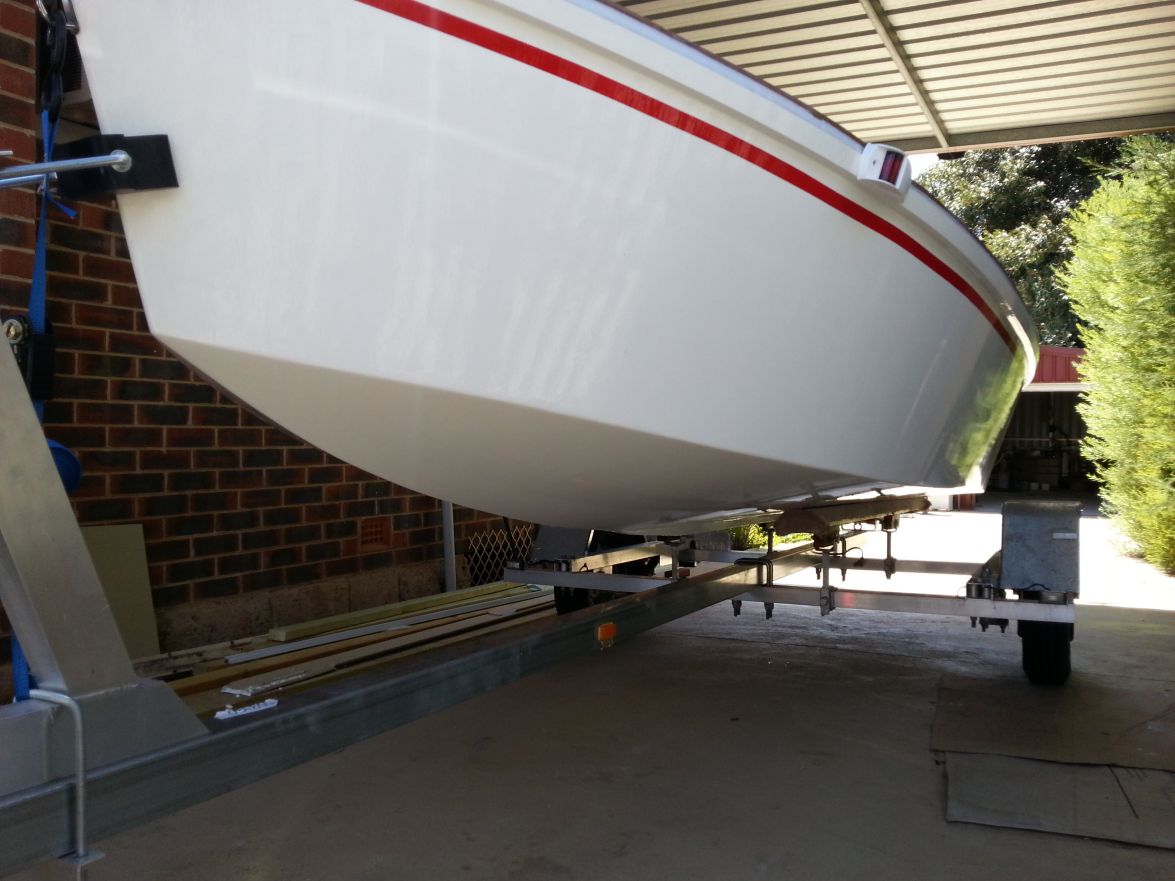
boat in the new shed on the home built aluminium trailer.
Undercoat on, used dulux sandable primer (high build epoxy primer) it was hopeless rolling and brushing. It had a good pot life but as soon as it was rolled out in a thin film you had less than seconds to tip it off. Tried the first coat no thinning, second coat 5% thinners. The thinners helped but not to the standard that I was hoping. It then got a good sand with 150 grit ( there was at least 6months until the next coat) to achieve good adhesion, and a smooth base after the horrible coats. Third coat was applied with brush only and no thinners, this was the best result so far, less brush marks and much smoother. Next day forth coat brush only with 2% thinners. Best results of all the undercoats.
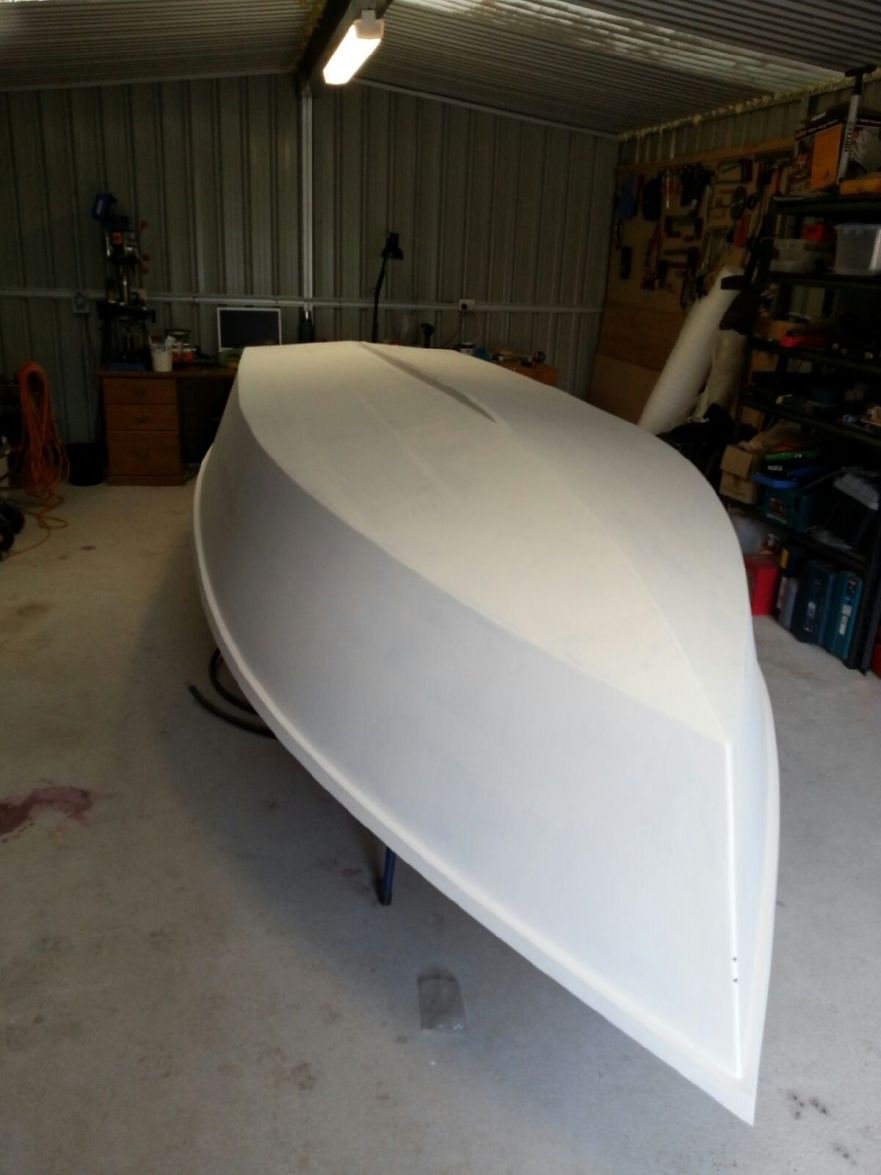
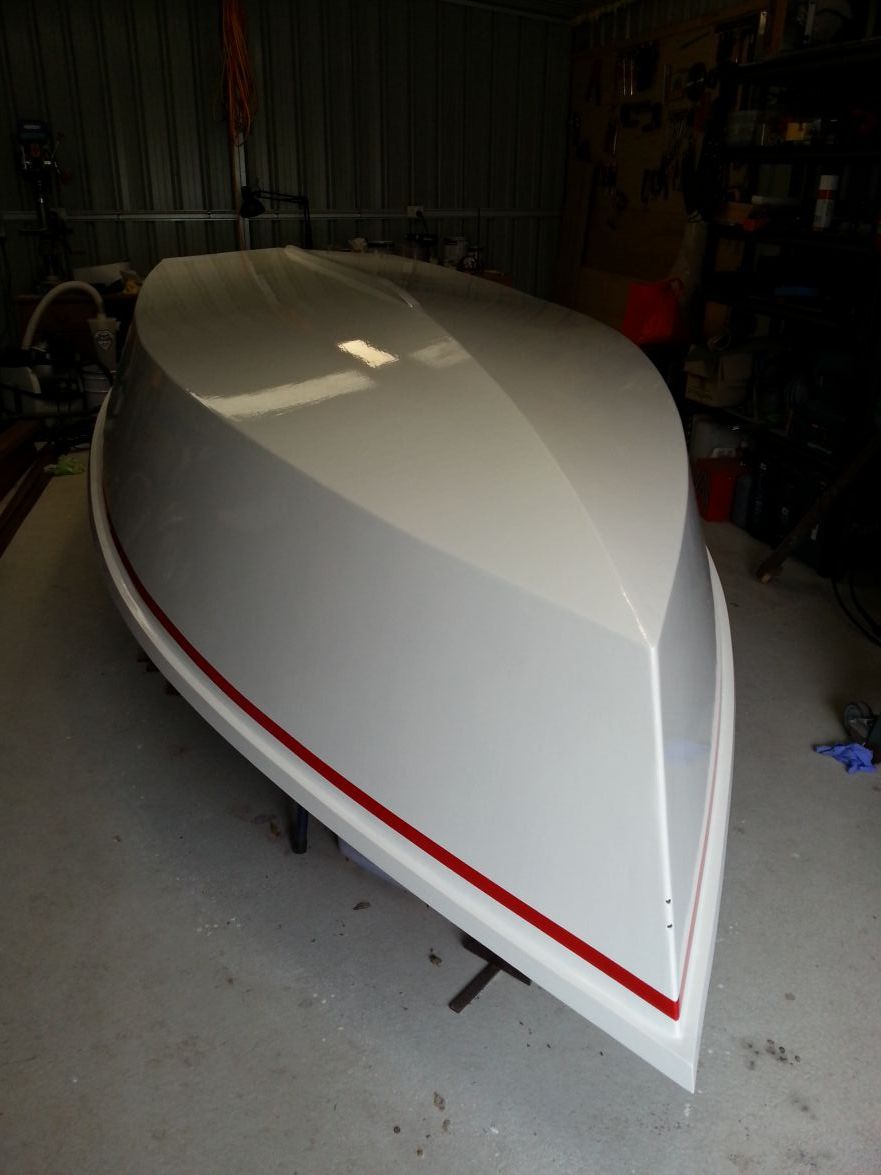
The top coat is dulux durathane poly ureathane, supposed to be very hard with good uv resistance. Gave the hull a light sand to have the best possible base for the final high gloss coats. This was applied with roller and then tipped off, and this work well.
Definitely not to a spraying standard, but with the boat being on hold for a couple of years I need to move to the next stage perfection or not. I will be putting the second topcoat on today, and the red pinstripe tomorrow.
Re: FS14 OZ
Posted: Sun Oct 04, 2015 6:43 pm
by pee wee
Looking good! It must feel nice to be moving again, every step gets closer to the launch.
Re: FS14 OZ
Posted: Fri Oct 09, 2015 8:12 pm
by boat_AUS
Thanks pee wee
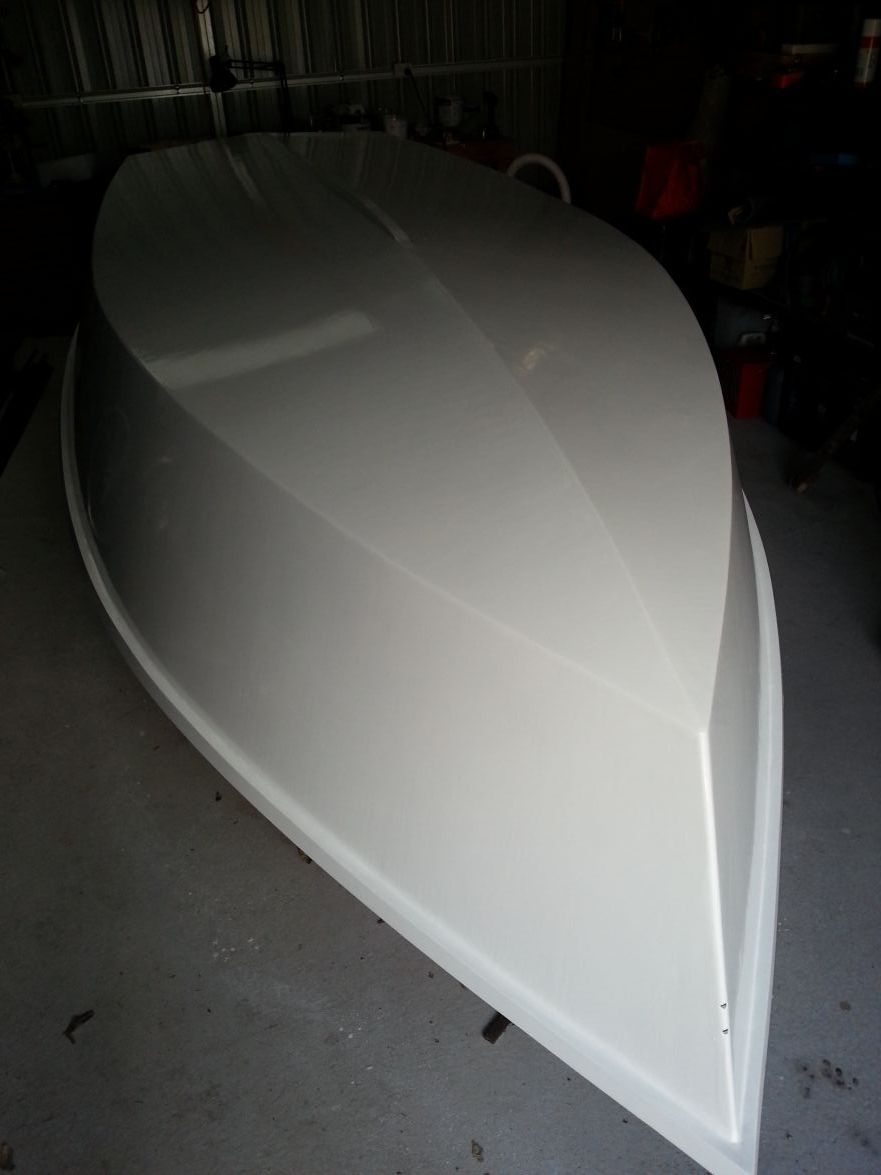
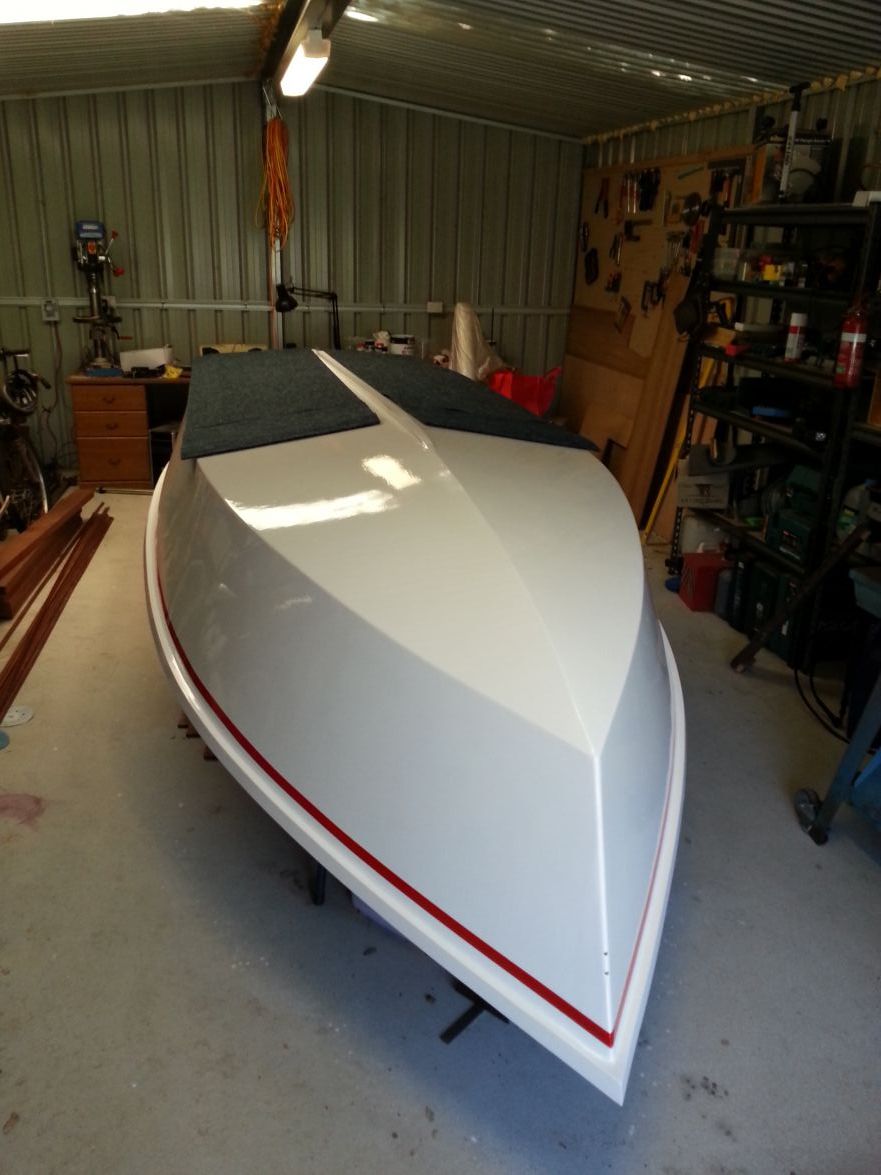
I did get the pin stripe done it just took a while to upload. Chemical bond between all paint layers.
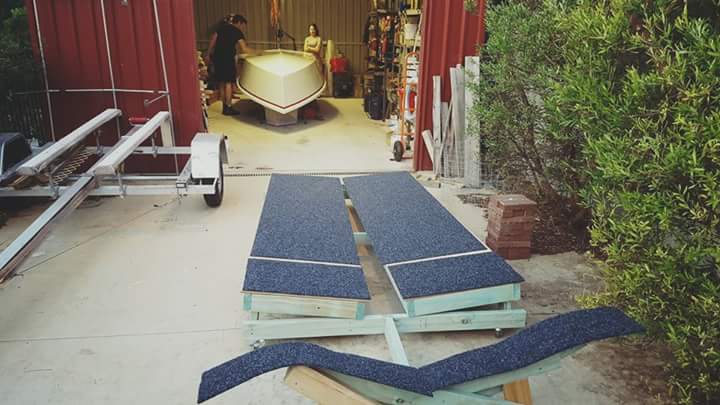
Now to spend some time making a cradle to turn the hull over.
Re: FS14 OZ
Posted: Sat Oct 10, 2015 9:16 am
by Noles309
Man that thing has to be light enough to turn over with two guys. My son and I flipped my GF16 with no problem.
She's looking good
Re: FS14 OZ
Posted: Sat Oct 17, 2015 11:12 am
by boat_AUS
I sent the day building the cradle read to flip and get one more step closer to launch!
I have laid carpet down to stop the paint getting a scratched.
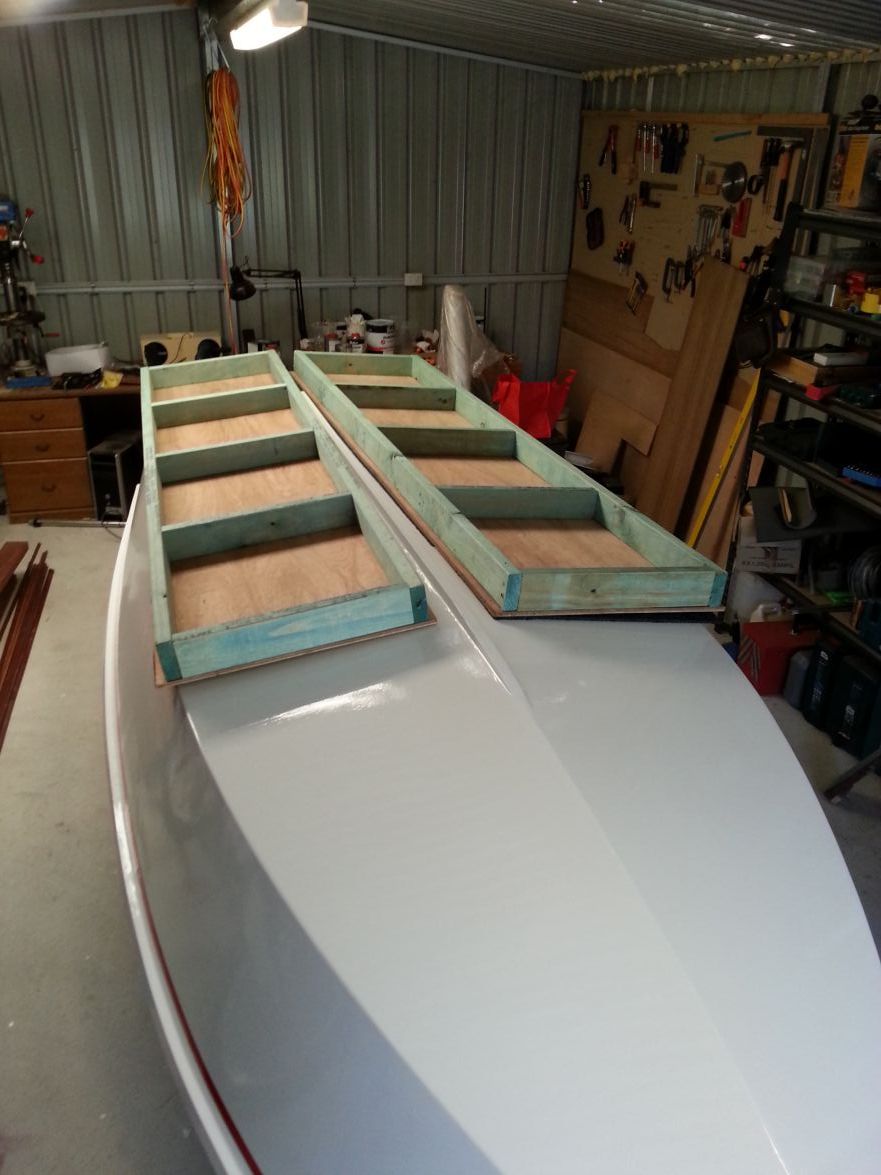
12mm ply with ladder frame to prevent too much flexing.
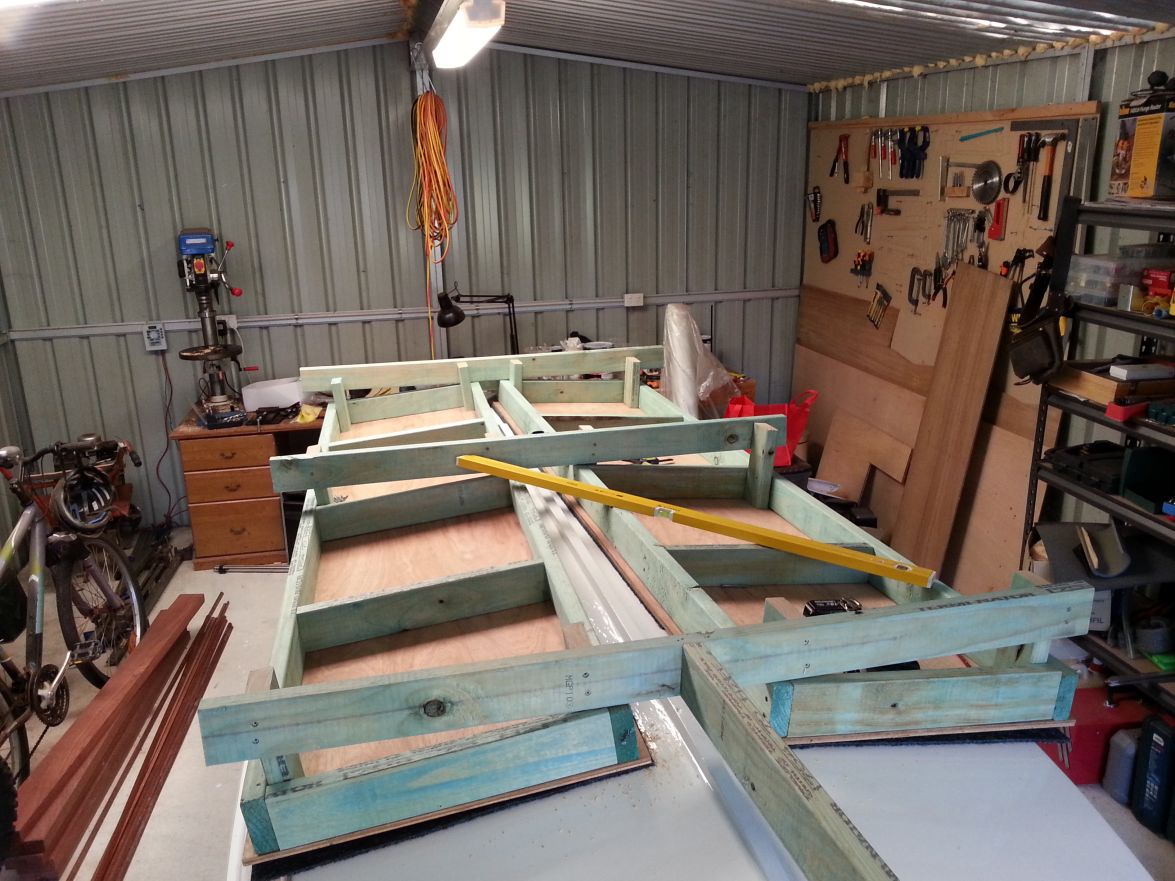
square up and leveled. I only have to make a support for the bow and then I need a to get a few people to help with the flip. The cradle I think will weigh more than the hull!
A quick question, is it worth putting Castor wheels on the cradle to be able to move the boat around? Has anyone put castor wheels on their cradle?
Re: FS14 OZ
Posted: Sat Oct 17, 2015 11:20 am
by Fuzz
I am pretty sure more folks put castors on than not. I know for me I would be lost if I could not move the boat around when I wanted to. And speaking of castors, bigger is better in this case. If you get them way oversized they will be just right when you build the next boat

Fuzz
Re: FS14 OZ
Posted: Sat Oct 17, 2015 12:25 pm
by Noles309
Definitely put it on wheels. Iv'e built one with and one without. Its worth it for sure.
Re: FS14 OZ
Posted: Sat Oct 17, 2015 4:50 pm
by gonandkarl
Hi,
Definitely it is ideal to have castor wheels on the building cradle. Choose the ones with a stop for the wheels and that they can swivel in all directions. I push my 250 kg boat around on these wheels all by myself.
It looks then something like this:
Greetings from Karl ( Austria )
Re: FS14 OZ
Posted: Sun Nov 01, 2015 6:47 am
by boat_AUS
Re: FS14 OZ
Posted: Sun Nov 01, 2015 5:45 pm
by BarraMan
Looks pretty schmick!
Congratulations on your fine work.
Re: FS14 OZ
Posted: Sun Nov 01, 2015 9:02 pm
by Parkrat
Looks good!
So I guess it's better to prime and paint the outside before flipping it? I've been wondering if that was the case. I guess that really cuts down on how many times you flip it. I'm still a long way from that point.
Re: FS14 OZ
Posted: Mon Nov 02, 2015 3:23 am
by boat_AUS
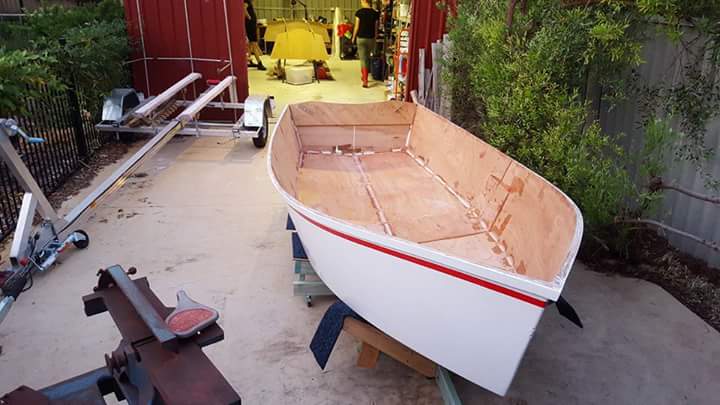
Cheers, the paint is by no means a show room finish, but i could spend a lot more time and money trying to get it perfect. I decided that it was better to progress with the build and test the paint in the real world to see how it holds up with use, sun and salt.
I choose to paint the outside first because it is the first boat i have built and i wanted to give the whole process of fairing and painting a go, the paint is a lot tougher than the fairing compound. Also now that it is the right way up it can stay the right way up.
I spent today sanding and profiling the old epoxy tack fillets and cut the fibreglass cloth to length. Im going to epoxy coat the inside then immediately make the fillets and the glass over the fillets, this will be very shortly followed by the glass sheath. Hopefully all the layers will chemically bond and make a nice strong unit.
Re: FS14 OZ
Posted: Fri Feb 05, 2016 7:28 am
by boat_AUS
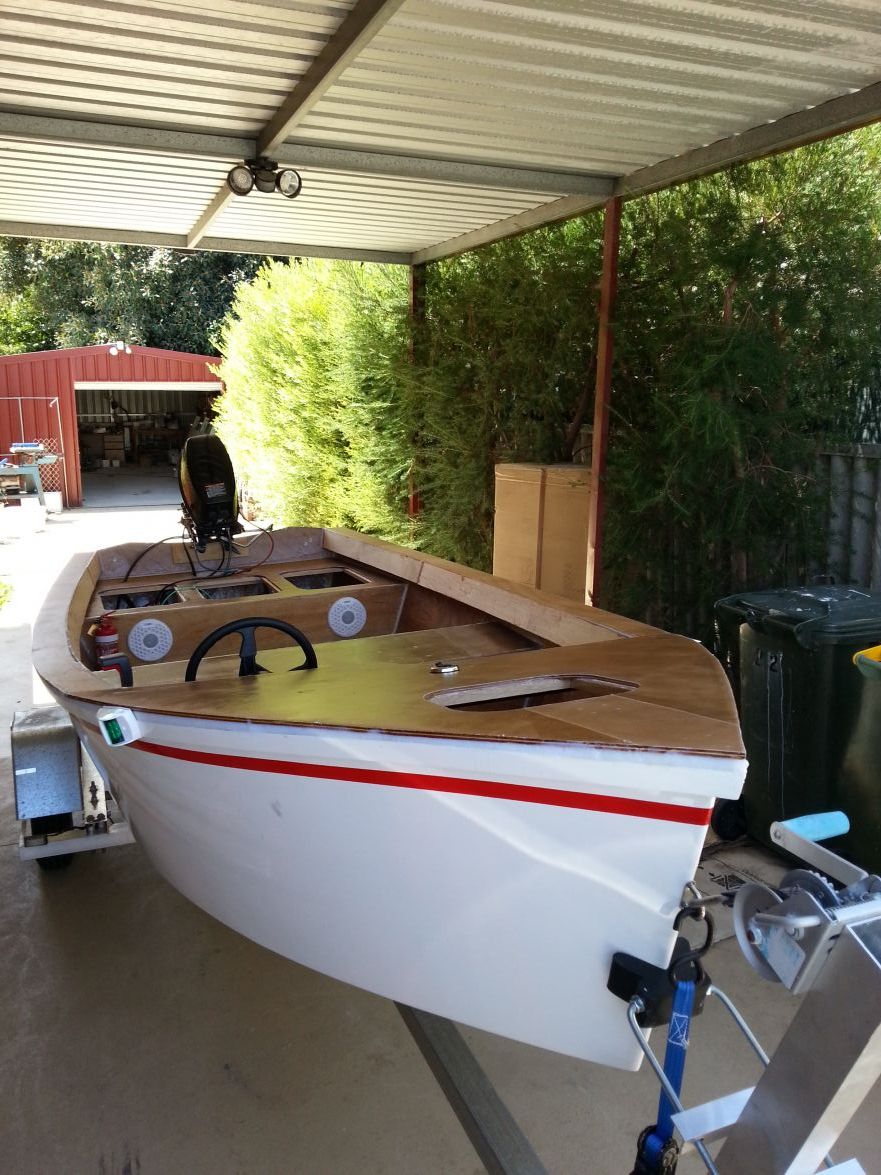
i have put a dead line of floating by easter in time for my parents coming to visit, so i have been really powerin into the build now.
i have all the stringers in and fibreglassing done.

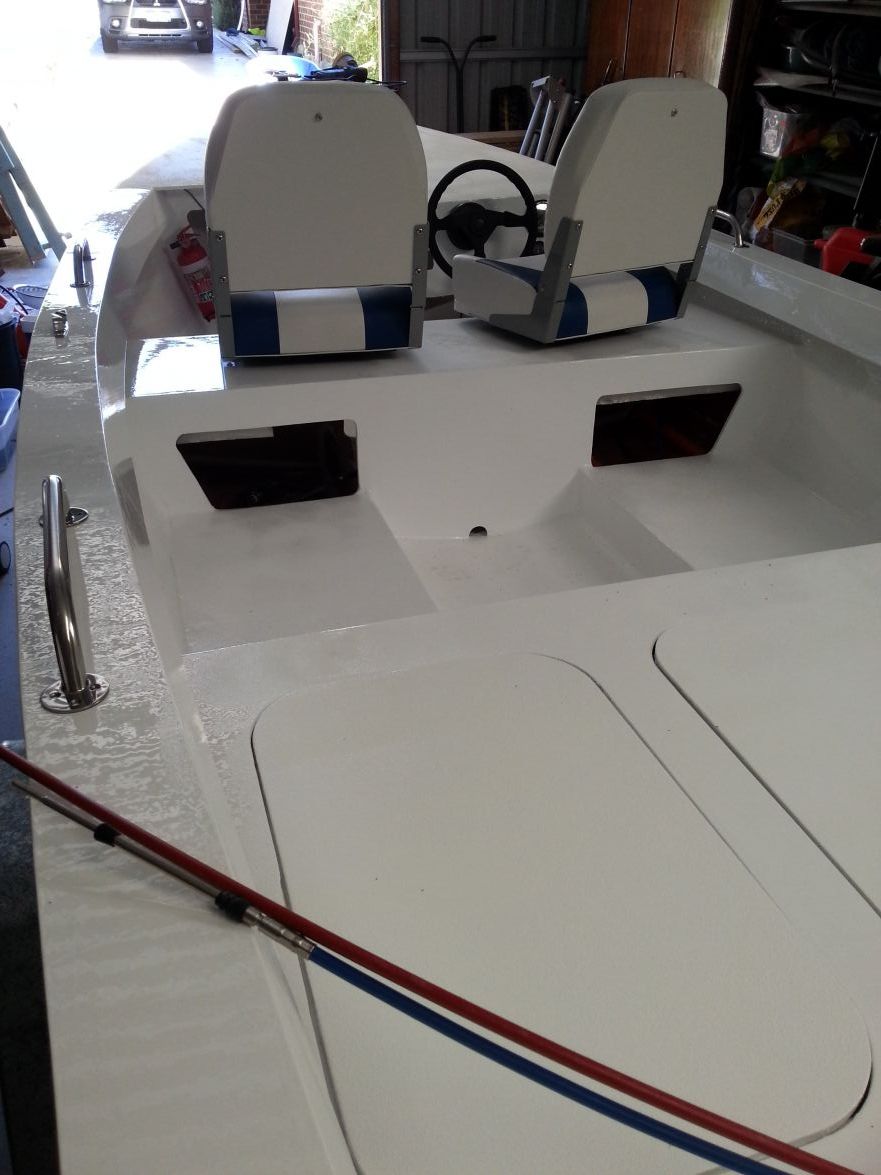
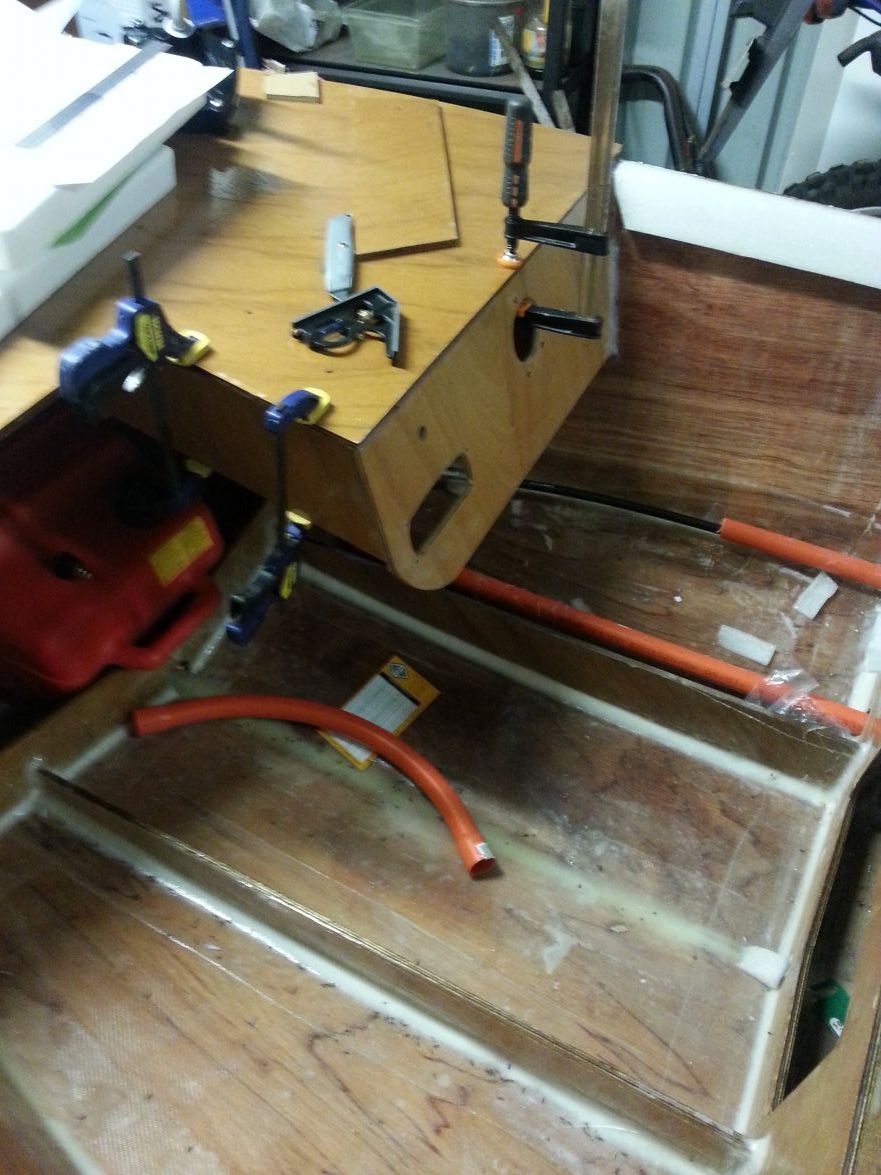
you can see here the bow deck, the foam esky that will be built in (but removable for cleaning x2) and all the battens to support the seating and the decks.
yo can clearly see the chase tubes for steering, electronics and fuel that will we covered up by a decking. this photo is inbetween the front and back seats, im installing decking on the two outside sections but leaving the middle piece open. may change in the future but for now that is the plan.
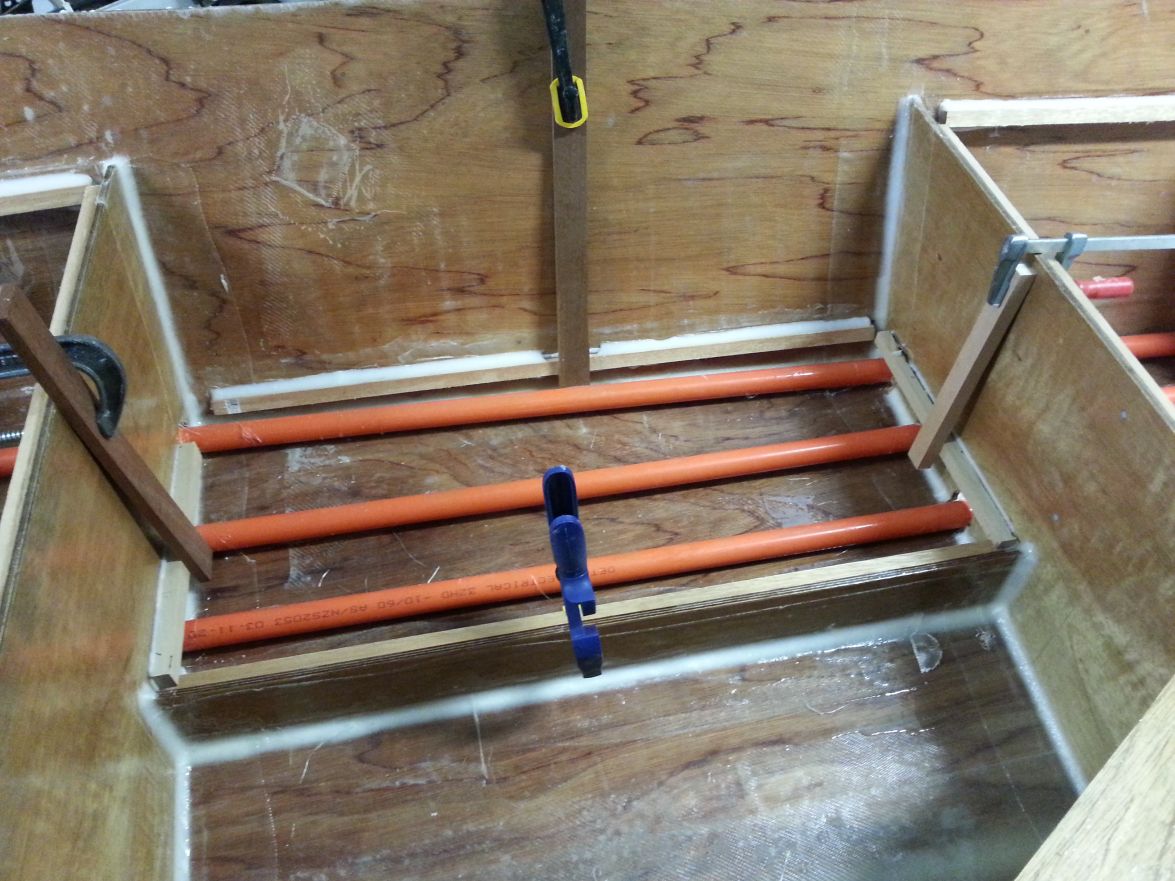
i have started putting in floatation foam around the gunwale and have cut out som plywood to cap it off, will post some photos of it shortly. im not using any pour in place foam but will be using lots of sheet, im also trying to get as much foam as high up as possible to achieve level flotation.
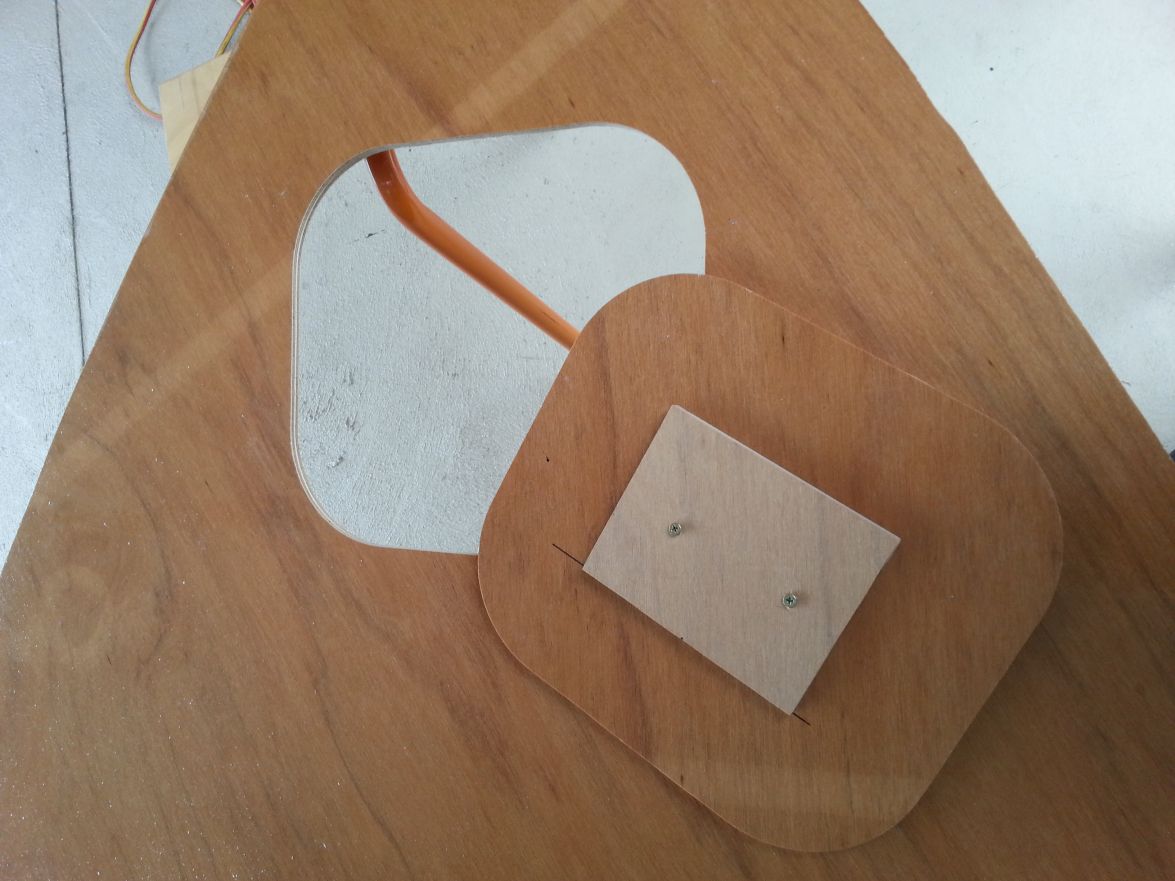
i have cut out hatches in the bow x1, and in the rear seat x3 using the router. i cut a template square taking into account the offset from the edge of the router to the centre of the bit so i could just run the router around the edge, making sure to set the depth of cut just short of all the way through so that the template doesnt move. using a 2mm bit im going to use the cut out middle piece as the hatch and im pretty happy with the results, saving a bit of wasted ply.

my motor arrived today just have to pick it up from the shop, 18hp tohastu twostroke, electric start, forward controls. also my order of all the gear for fit out should arrive anyday now. will aim to get the bare necesities in place to register the boat and then take more time to get the finish done the best i can.
a question for the pros, fibreglass isnt on the plans for the seats, im going to put a layer on the decks and near the anchor for durability, it is a good idea to cover the seats too?
also for the peopl following my build, i havent given up on the steer by wire, but postponed it and will get the boat going with conventional single cable steering and engine controls, then at a less stressful time work on a reliable and robust electronic control system.
Re: FS14 OZ
Posted: Fri Feb 05, 2016 8:46 am
by justin_dwyer
boat_AUS wrote:so i have been really powerin into the build now
You certainly are man, nice work!!
Where abouts are you in WA? I spent the first 26 years of my life in the hills of Perth, I'm in Darwin now.
Keep it up, going great guns.
Re: FS14 OZ
Posted: Sun Feb 07, 2016 2:49 am
by glossieblack
boat_AUS wrote: i have cut out hatches in the bow x1, and in the rear seat x3 using the router. i cut a template square taking into account the offset from the edge of the router to the centre of the bit so i could just run the router around the edge, making sure to set the depth of cut just short of all the way through so that the template doesnt move. using a 2mm bit im going to use the cut out middle piece as the hatch and im pretty happy with the results, saving a bit of wasted ply.
Very nice work.
Re: FS14 OZ
Posted: Sun Feb 07, 2016 2:50 am
by glossieblack
boat_AUS wrote: i have cut out hatches in the bow x1, and in the rear seat x3 using the router. i cut a template square taking into account the offset from the edge of the router to the centre of the bit so i could just run the router around the edge, making sure to set the depth of cut just short of all the way through so that the template doesnt move. using a 2mm bit im going to use the cut out middle piece as the hatch and im pretty happy with the results, saving a bit of wasted ply.
Very nice work.
Re: FS14 OZ
Posted: Sun Feb 07, 2016 3:04 am
by BarraMan
im pretty happy with the results,
So am I!
I gotta give that a try.
Re: FS14 OZ
Posted: Thu Feb 11, 2016 7:43 am
by boat_AUS
I have started the fit out. Pick up a stupid amount of stuff to fit in, wish I had a bigger shed.
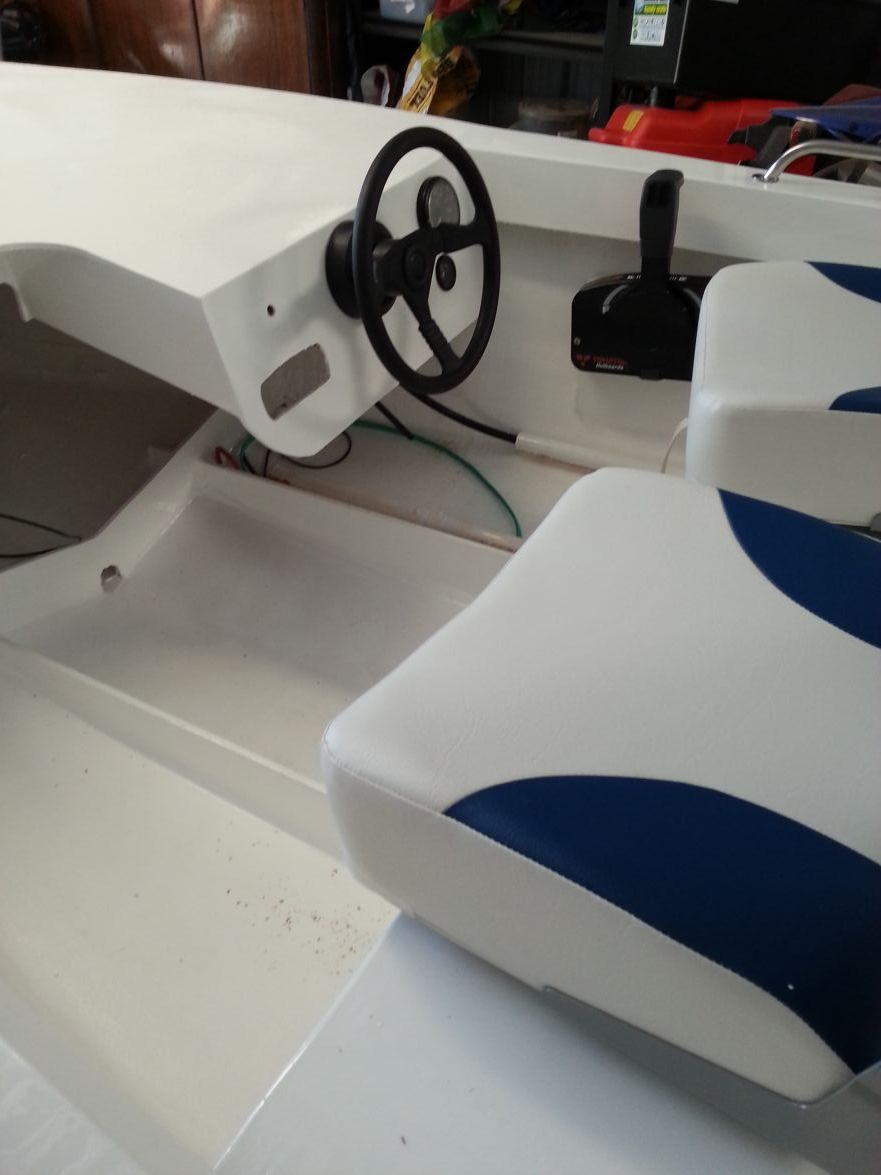
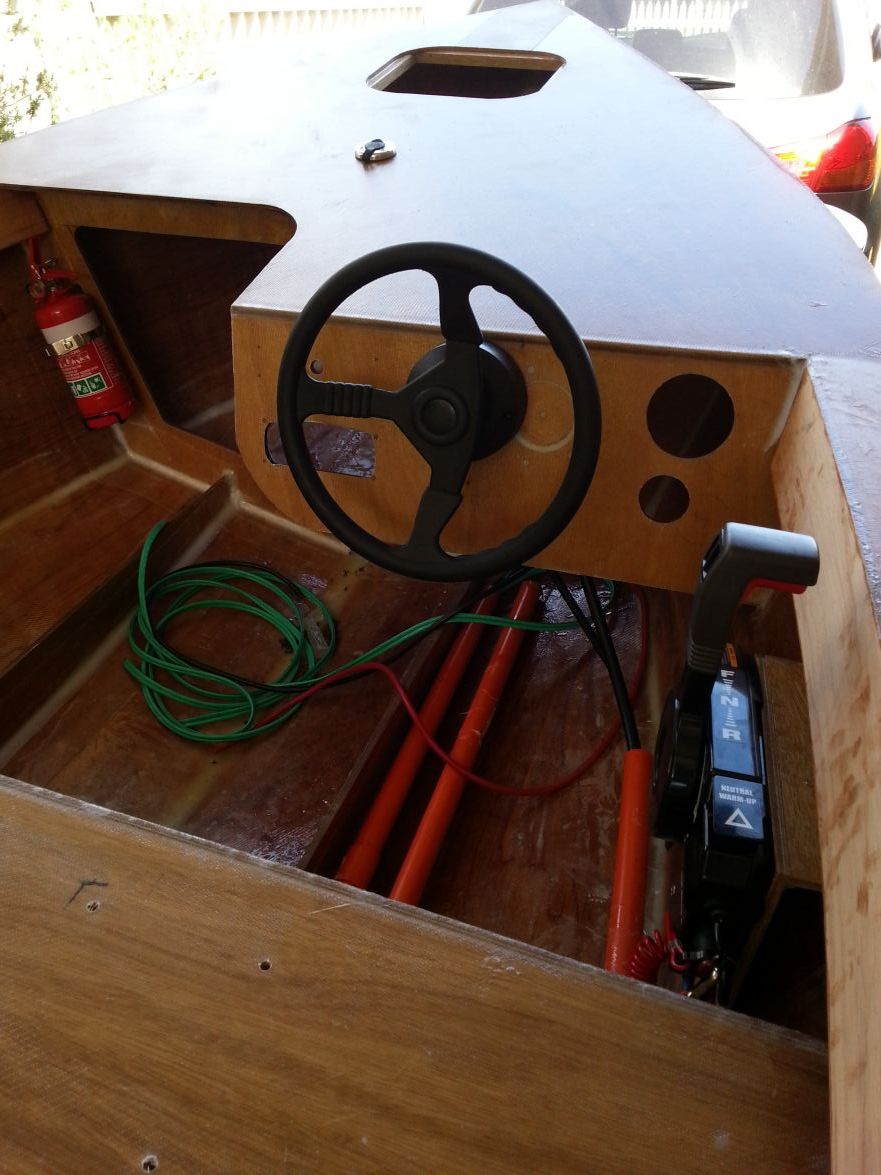
Motor is in place temporarily to get controls cables and steering in place and routed
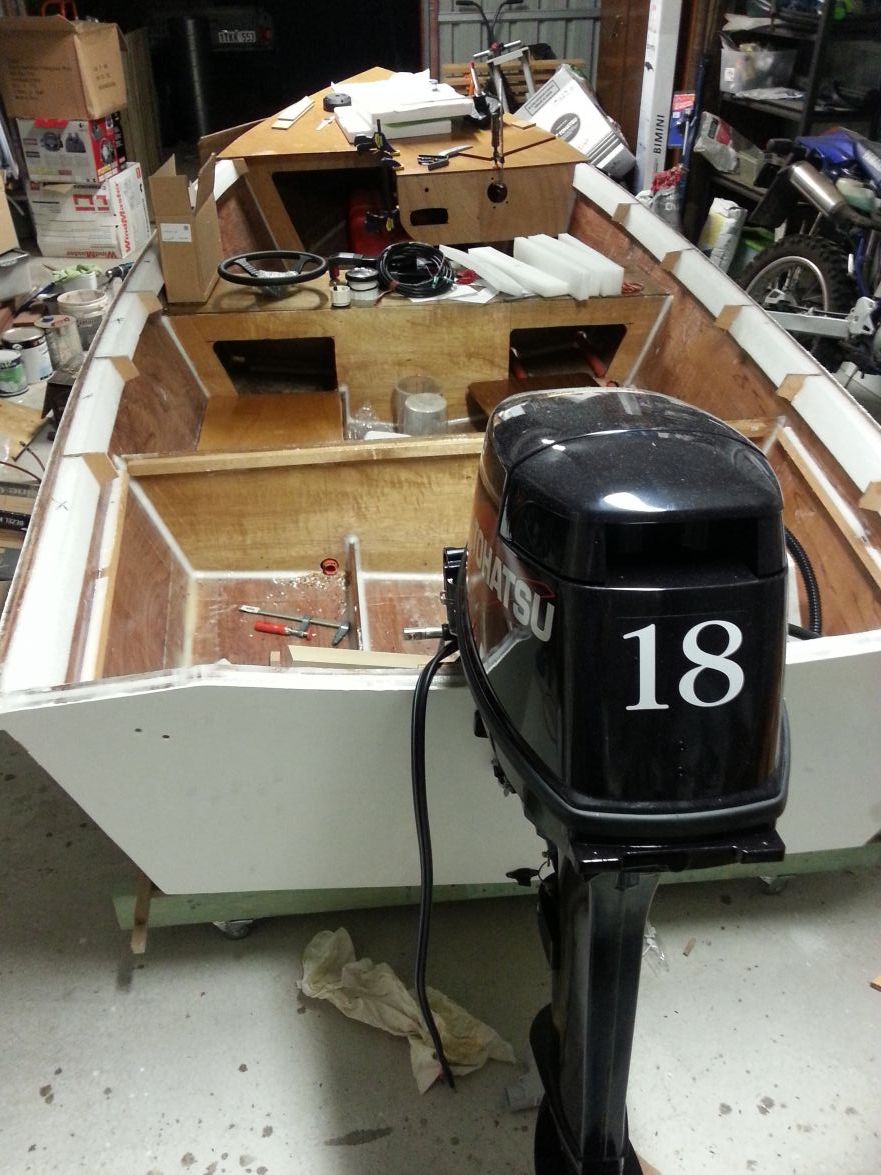
you can also see the helm/cockpit area being fitted up. Need to get the engine controls mounted, but need to have the gunwales on to make sure of clearance.
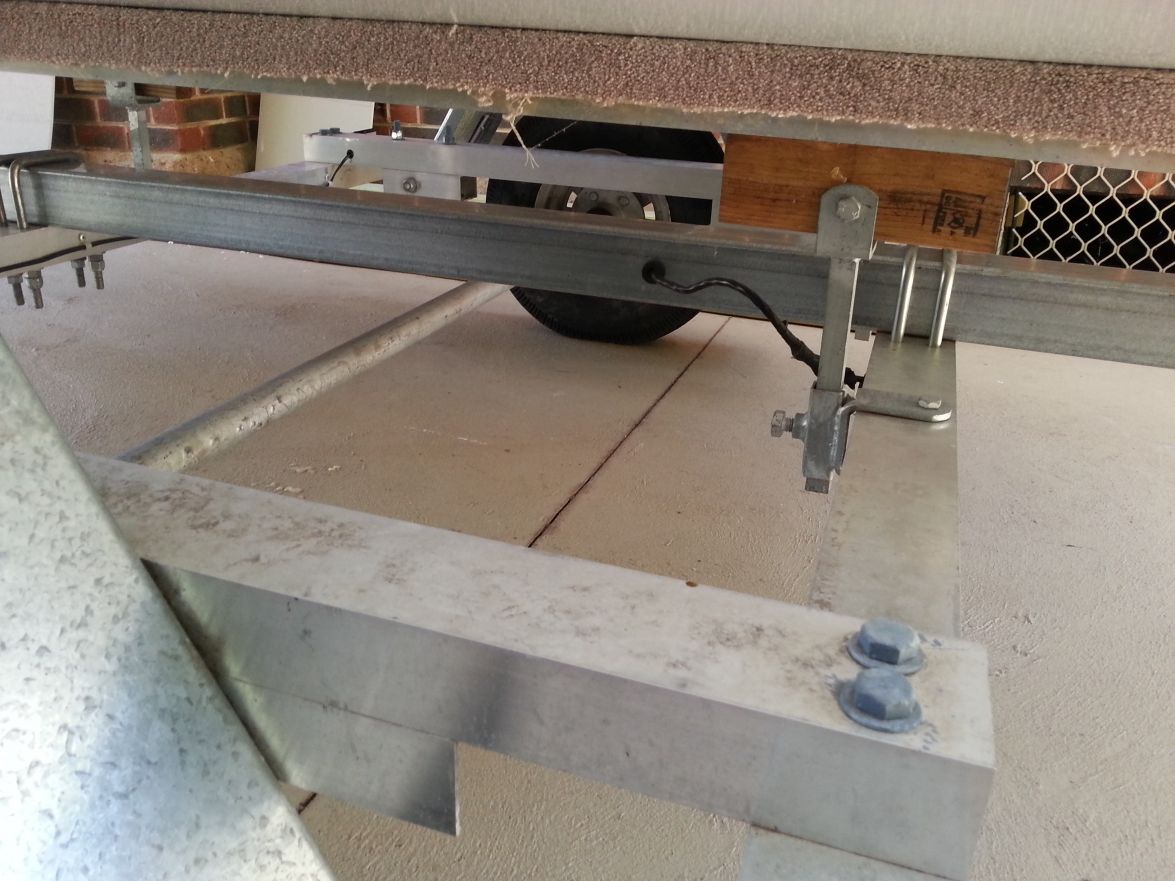
On a different note, the trailer I built for the boat passed inspection and is now registered
Re: FS14 OZ
Posted: Tue Feb 16, 2016 12:18 am
by boat_AUS
some more pictures
I have expoxied all the floors down now, and today I glassed all the top surfaces.

I have gone away from using foam rollers because I haven't had a good go with them. they seem to make the epoxy react really quickly (maybe insulating properties of the foam) and then they fall to bits putting little bits of foam all over the nice glass work. I have been using 5mm nap mohair rollers ( the same type that I used for two pack painting the hull) and they last for ages, and have a great ability to pick up excess epoxy and really pushes the cloth down, this whole topside glassing didn't need any bubbles removed with the ribbed metal roller because the bubbles were being pushed up with the mohair roller.
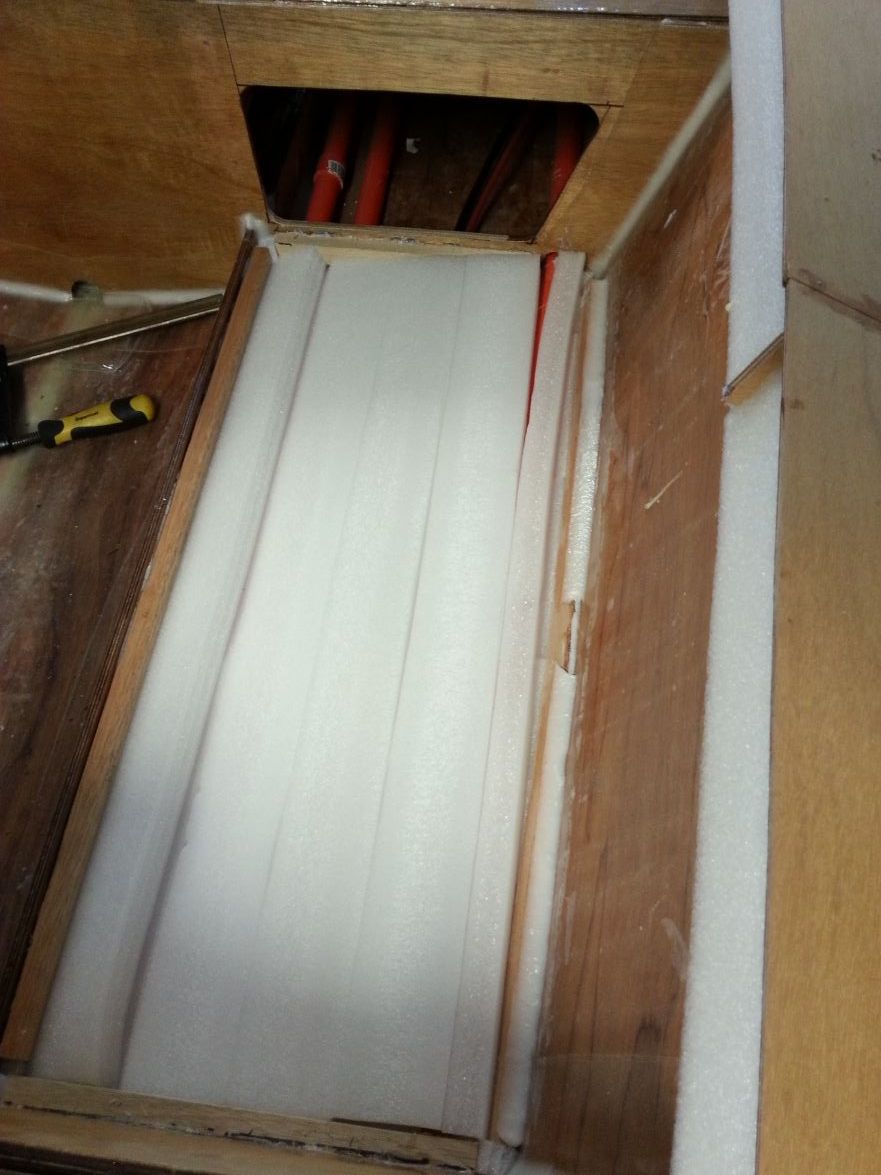
the mid deck has underfloor foam floatation, didn't use pour in place, but blocks of expanded polyethene, lightweight, mould and bacteria proof, has very low water absorption and is flexible (you can see I have used it around the gunwales). the front seat has 100mm of this underneath and the front and rear decks will have some installed in the very near future.
the engine controls have been run and I have adjusted them, but I have to take the setup back to the tohatsu dealer for the "pre delivery" inspection, tuning and such. so ive been good and haven't started the engine yet. I need to get the boat transferred to the trailer first (thinking trying to slide it off the cradle and onto the bunks on the trailer using the trailer winch, might be fiddly)
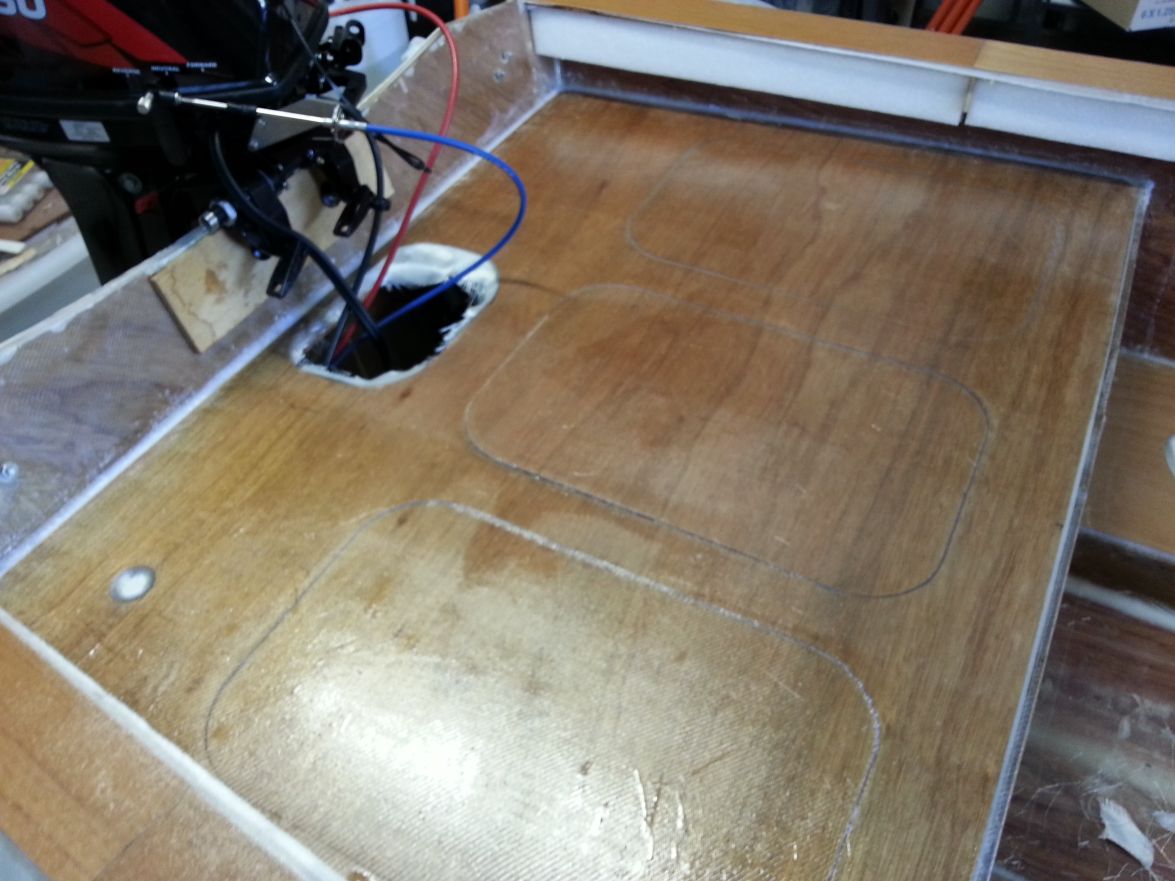
you can also see a white circle in the glass which is the cut out for and inspection port for the mid deck.
the 22 litre fuel tank that came with the engine, didn't fit through the opening in the front seat bench so I have sourced two 12 litre tanks that will do nicely; easier to load in and out of the boat and higher turn over of fuel less chance of bad fuel. I have cut out the space to install a fuel gauge and have only one sender and don't really want wont for each tank ($$$). so I will give an idea from my dad's model aeroplane knowledge a go-> I will put another tank fitting on one of the tanks WITHOUT a pick up tube on it, the second tank will connect to the main tank via this fitting. the main tank will have its breather vent always shut, and the secondary tank will have its breather vent open. this will force the fuel to be drawn from the secondary tank into the main tank. the fuel gauge will read full until the secondary tank is empty and the main tank starts being used. I will post some pictures once I have it put together.
also the motor and gearbox for making a drum anchor winch has arrived today, designing has begun (read super light weight and fast retrieval and not anywhere near the $1500AUD for a commercial one, one I have it operational and tested for reliability I will post the plans and specification up here fro anybody to build.)
I will take some more pictures tonight and put them up
Re: FS14 OZ
Posted: Tue Feb 16, 2016 2:26 pm
by tcason
Looks great
how are you going to finish the foam under the gunnels?
Can you share more information on the foam?
Re: FS14 OZ
Posted: Fri Feb 19, 2016 6:19 am
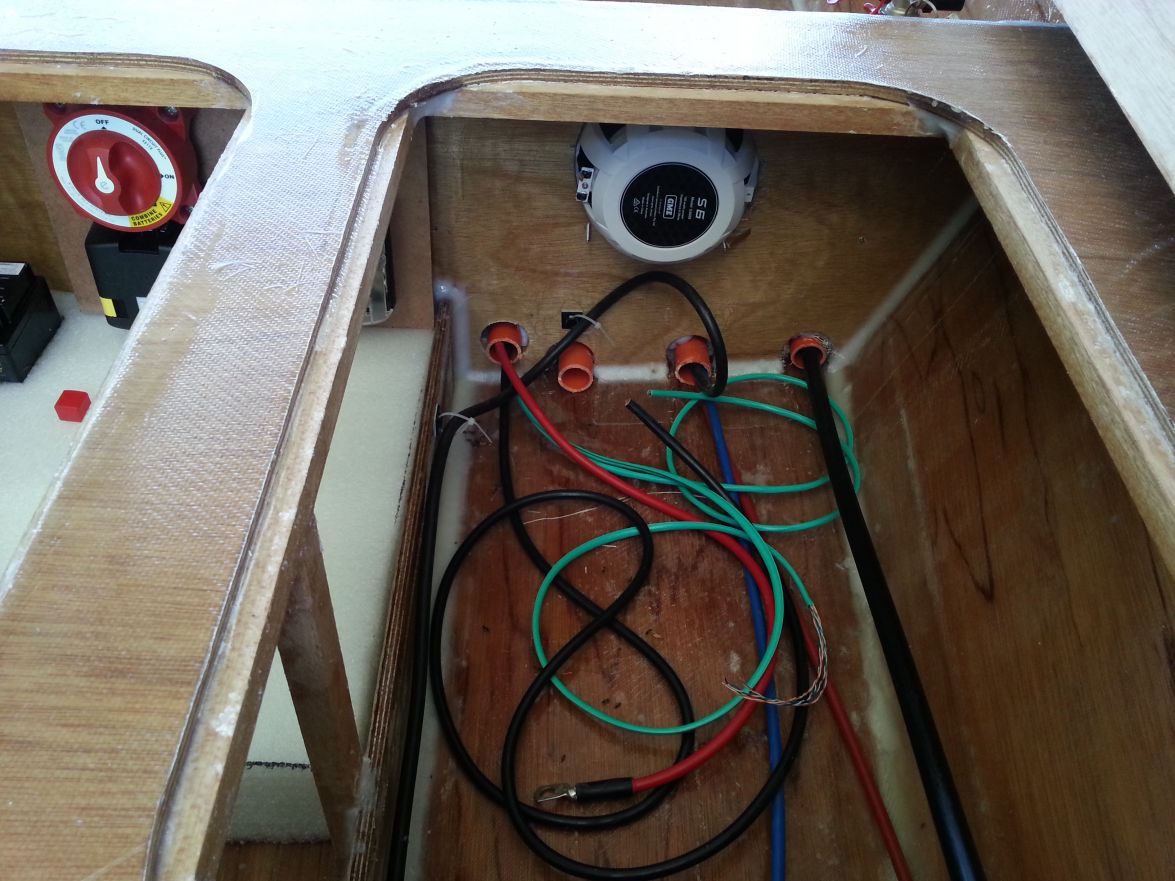
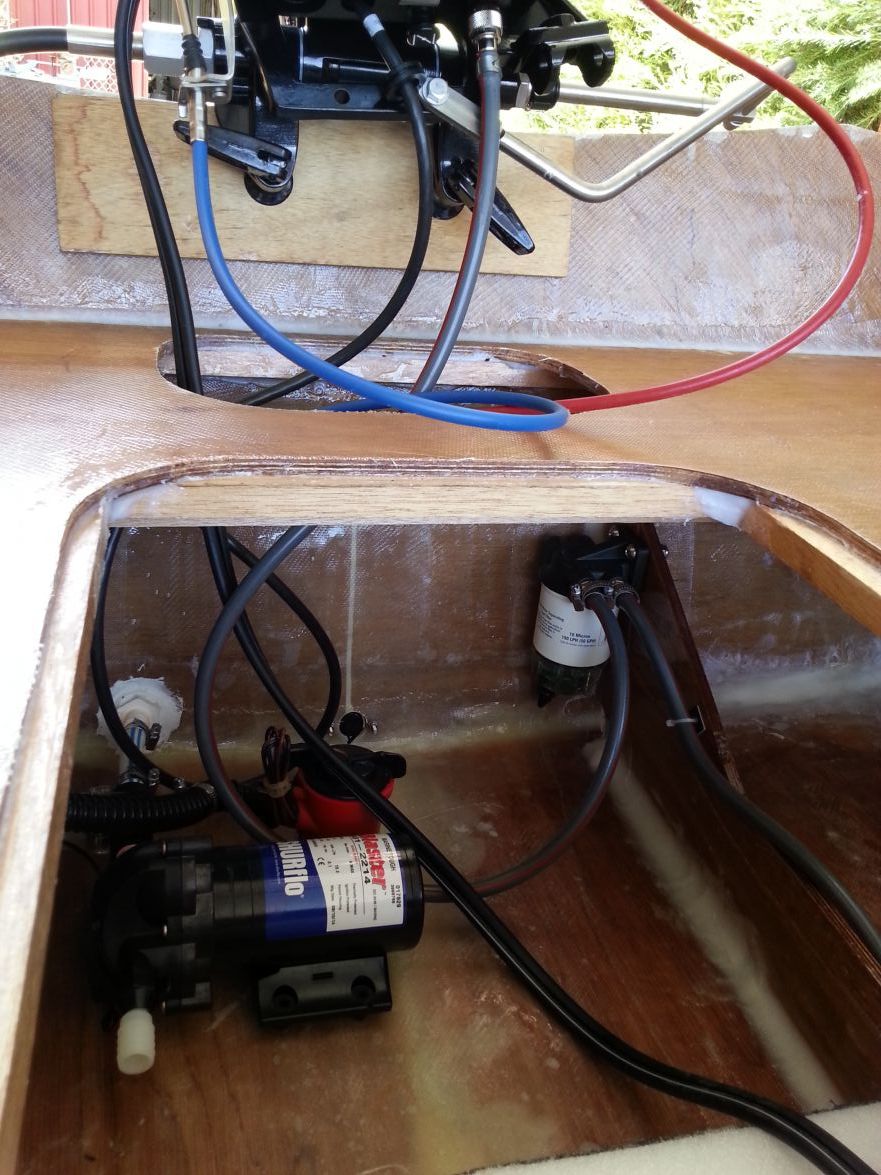
by boat_AUS
boat getting the motor tuned and delivery check up
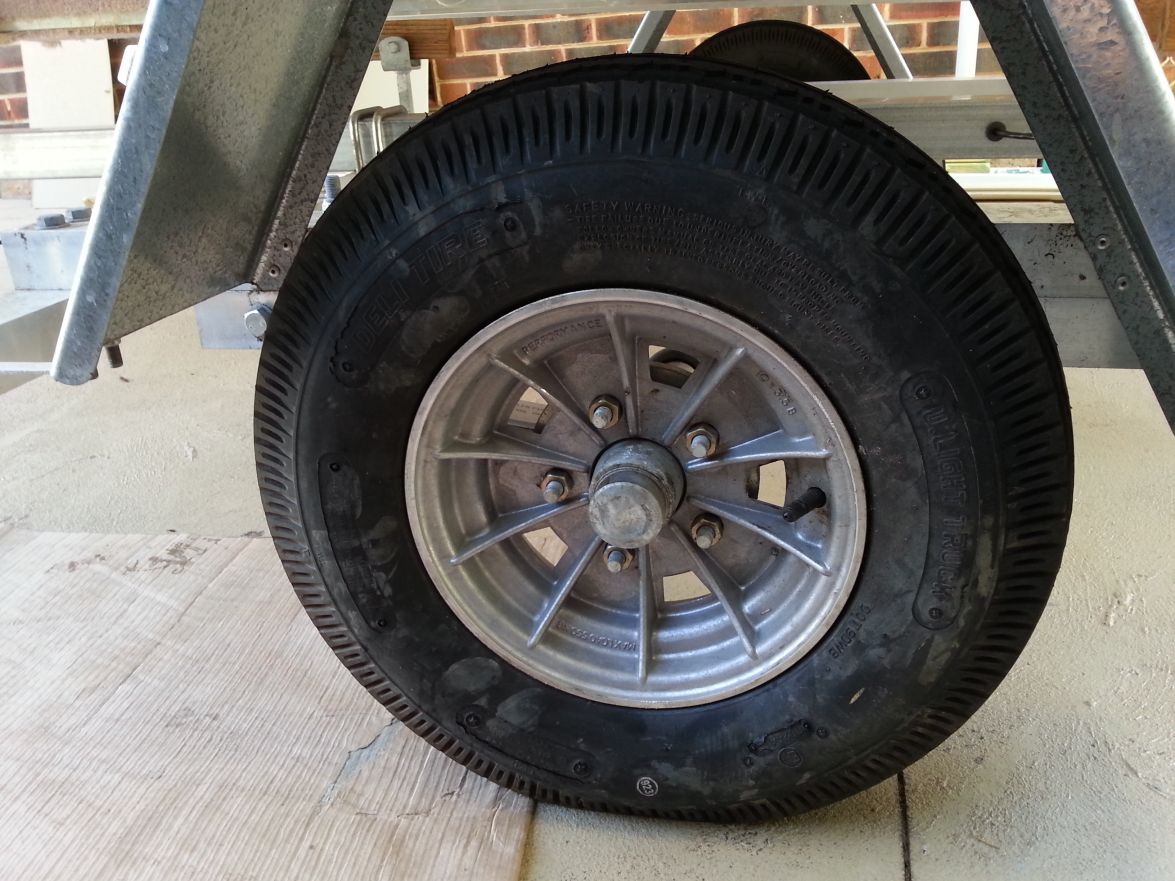
the boat on the trailer, tows well but i need to set the trailer up better for bunk height. little rims are going well.
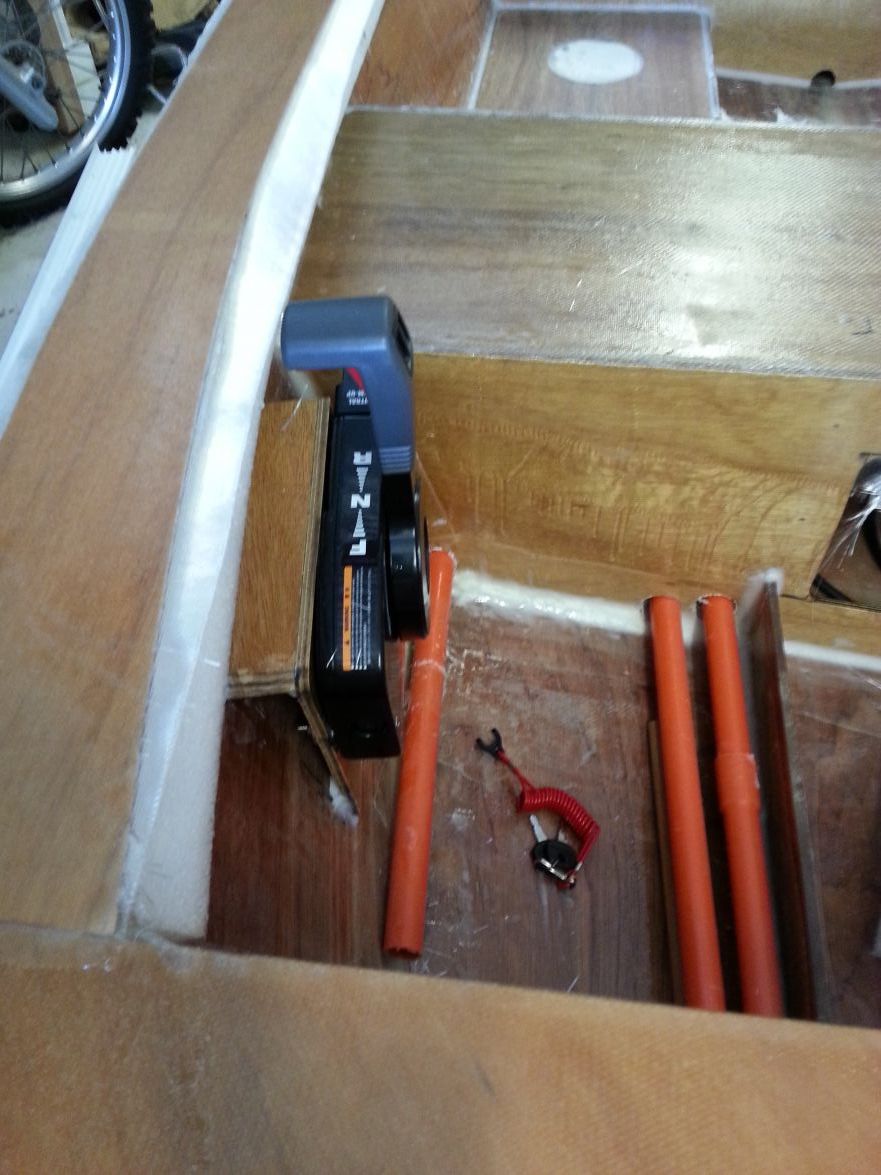
control setup, it might be a little low once the seats are installed. the chase tubes will have a floor put in at a later stage once the wiring is finalised.
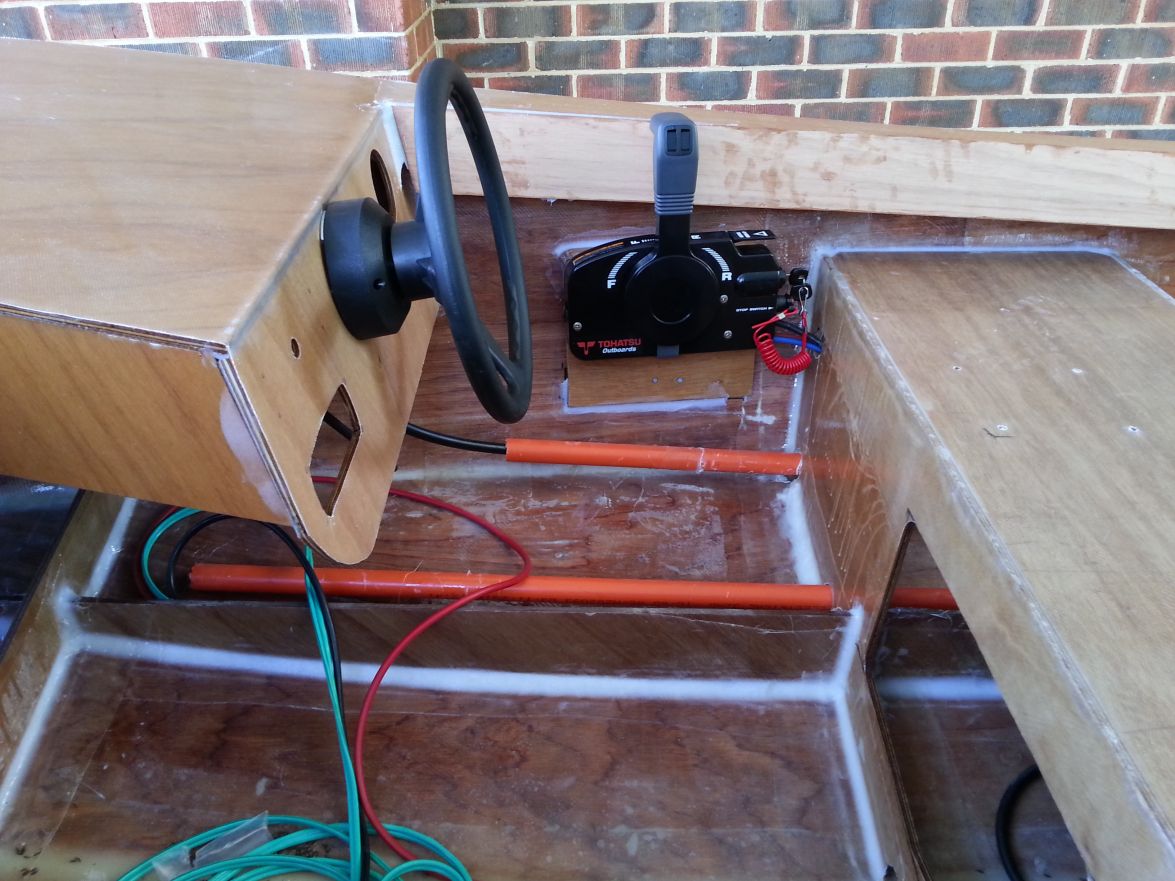
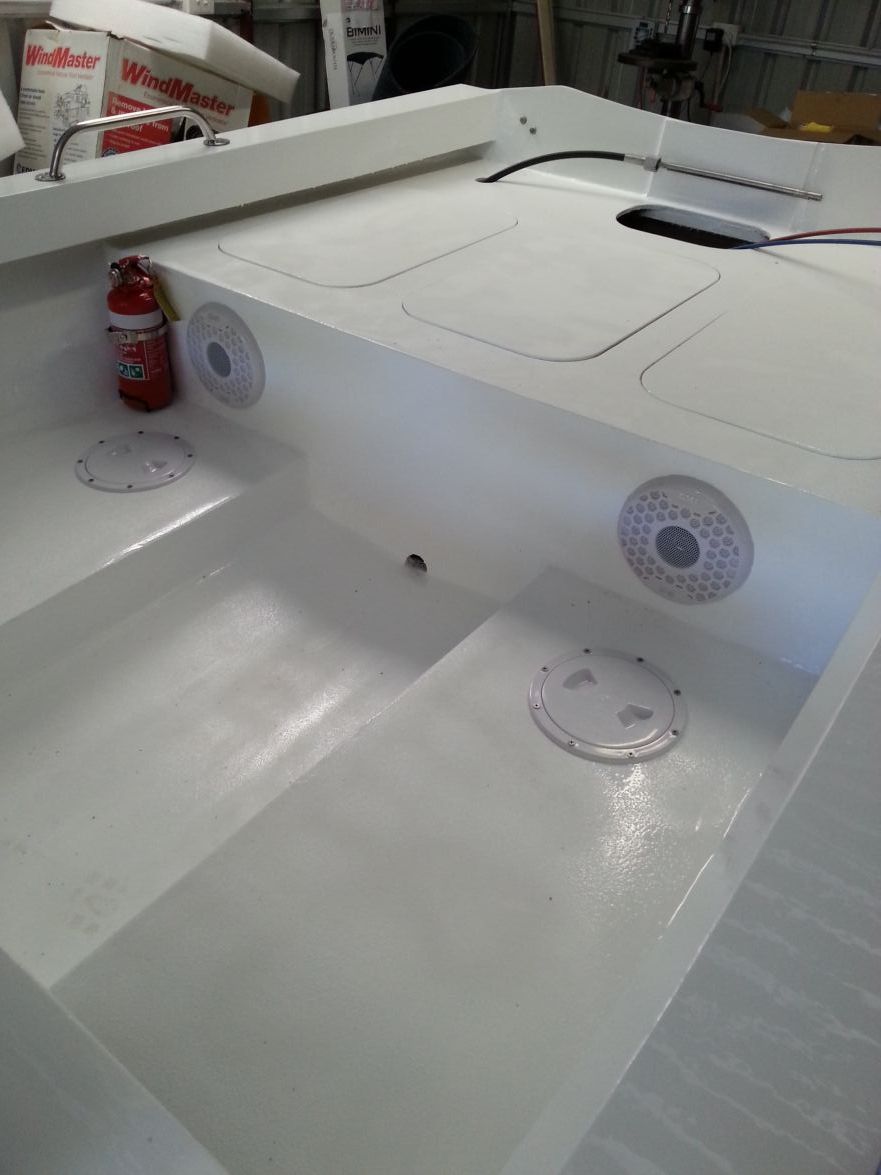
the start of the rear electrical installation. yet to get the second battery, and the electronic controlller isnt mounted yet. the lithium starting battery has lots of grunt and starts the engine effortlessly, 1kg battery
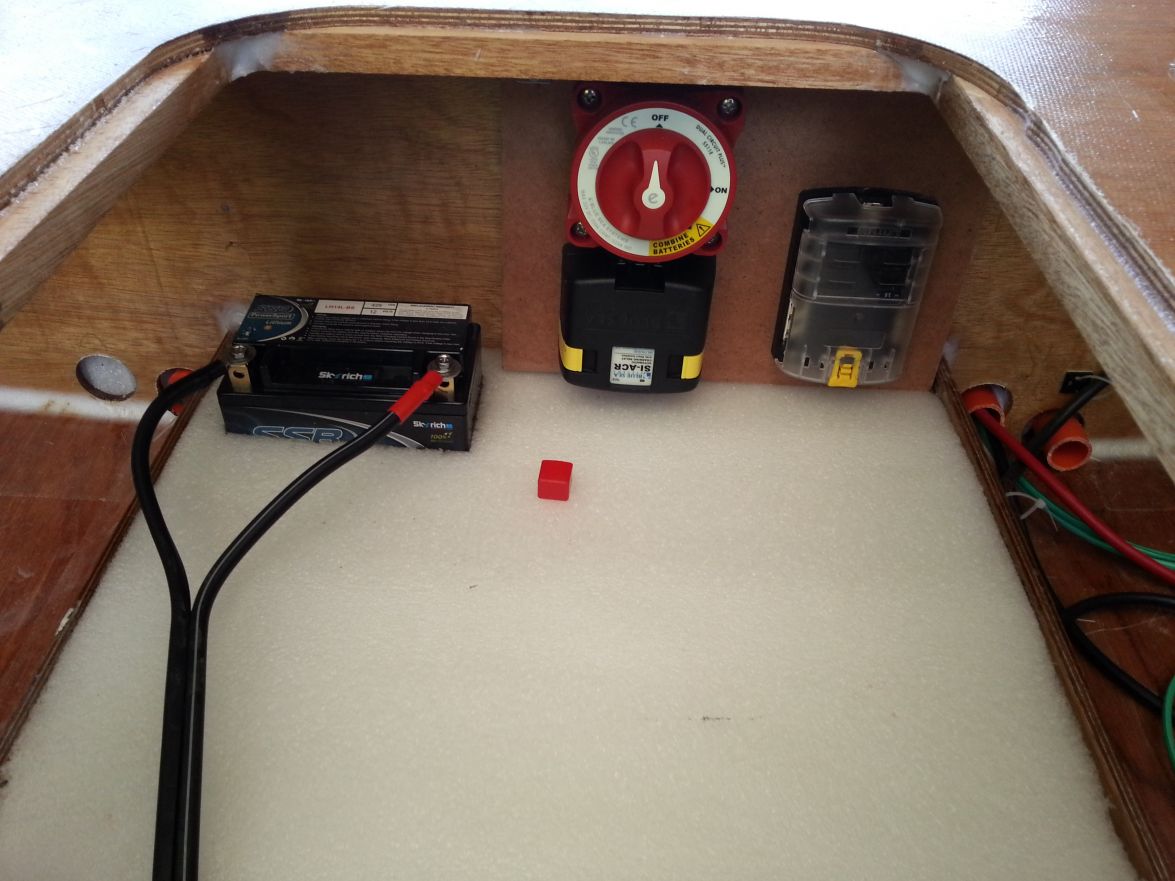
rear chase tubes shoing the install point of the speaker.
the fuel filter/water separator, and bilge and washdown pump. note that the engine is clamped on only for the engine testing, its now been removed for painting the inside of the hull andwll be mounted permenantly with bolts on a glass reenforced backing board.
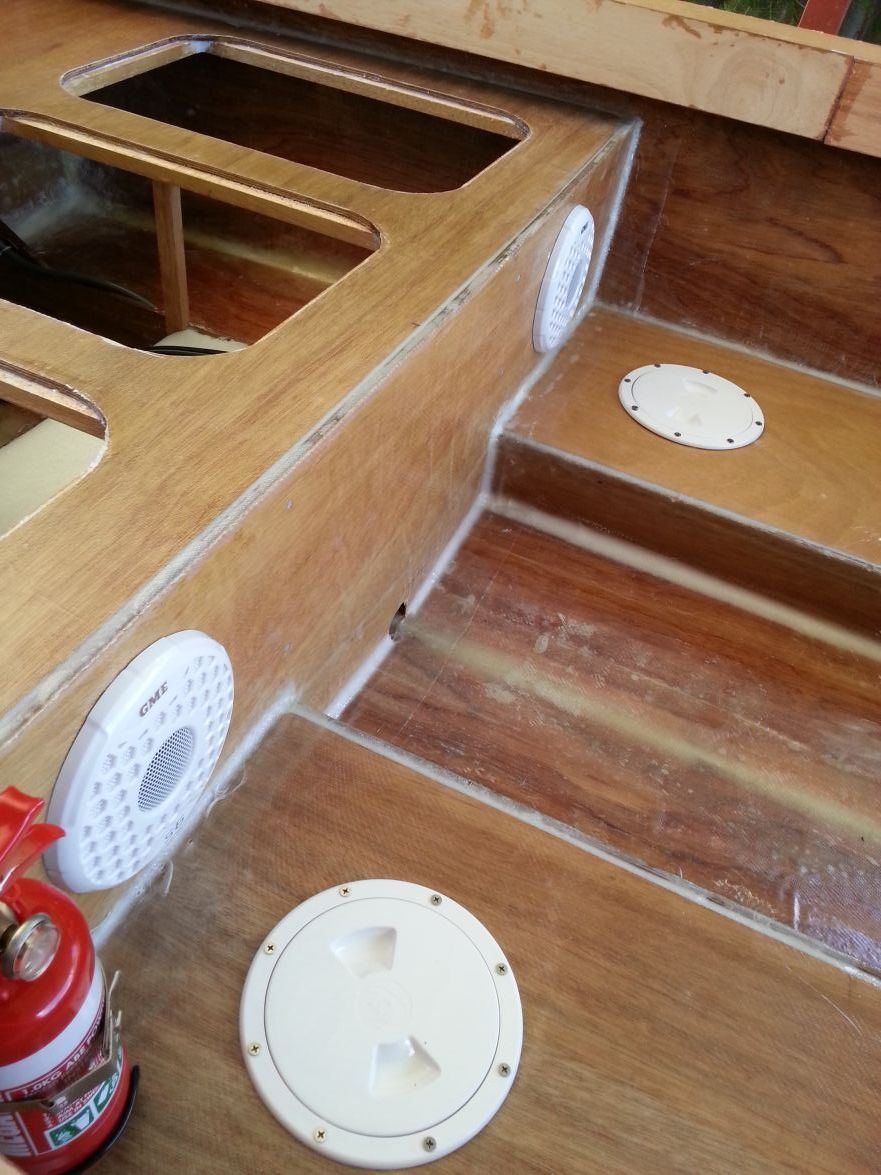
speakers and the inspection hatches for the chase tube decking. note that there are two firing extinguishers, one front and one rear.
dedicated tie down on the drawbar, in my hast to purchase some dedicated ratchet straps that are short, i bought the only ones that have a hook on one end only and the other end is meant to be bolter down. i ended up keeping them and used some bow shackles to attach them to the trailer. they also have a neat feature of a automatic retract, like car seatbelts, so no roll of unused webbing flapping around in the breeze
tcason wrote:Looks great
how are you going to finish the foam under the gunnels?
Can you share more information on the foam?
the gunnels have been covered in and i have glassed those two, though its not shown here.
the foam was bought from a local foam supplier and is expanded polyethene, it meets australian standards for marine bouyancy (AS1799.1).
everything has been removed and now the fairing and painting start on the inside. not excited about this part, but im looking forward to getting the fit out done for the final time. doing the first fitting beofre painting helped alot witht he placement (notice the postion on the steering helm??)
Re: FS14 OZ
Posted: Fri Feb 19, 2016 10:04 pm
by Newt
Is there a reason for the boat to be this high on the trailer?
Newt
Re: FS14 OZ
Posted: Fri Feb 19, 2016 11:43 pm
by boat_AUS
Hey newt.No reason in particular, was just worried about scratching along the mudguards. Being that high will make launching and retrieval harder so I will set up the trailer once I have some guides to protect the hull from the mudguards.
Re: FS14 OZ
Posted: Sat Feb 20, 2016 7:48 pm
by Newt
boat_AUS wrote:Hey newt.No reason in particular, was just worried about scratching along the mudguards. Being that high will make launching and retrieval harder so I will set up the trailer once I have some guides to protect the hull from the mudguards.
The launching was my concern. The higher the boat, the further you have to back in.
Newt
Re: FS14 OZ
Posted: Mon Feb 22, 2016 11:51 pm
by boat_AUS
Just faired the inside, found my spring steel scraper making the job a lot easier. Will sand it late this arvo and get ready for undercoating tomorrow
Re: FS14 OZ
Posted: Sun Mar 27, 2016 6:35 am
by boat_AUS
Re: FS14 OZ
Posted: Sun Mar 27, 2016 6:54 am
by topwater
Looks real nice on the water . Can't wait to see some pic's of her up on plane
Re: FS14 OZ
Posted: Mon Mar 28, 2016 1:43 am
by glossieblack
Congratulations on the launch. She's a beaut!
Re: FS14 OZ
Posted: Mon Mar 28, 2016 8:03 am
by BarraMan
Congratulations - nice looking boat!
Re: FS14 OZ
Posted: Mon Mar 28, 2016 9:12 am
by jacquesmm
Very nice. With all those additions, it became a very large FS14 but she still floats right.
Re: FS14 OZ
Posted: Fri Apr 01, 2016 12:00 am
by justin_dwyer
Nice job, the boat looks awesome

This bridge is in Guildford right, I've done a backflip off that bridge when I was young and stupid

.
Have fun in the boat, you should be proud of it.
Re: FS14 OZ
Posted: Fri Apr 01, 2016 6:51 am
by Walkers Run
Beautiful boat! Great job
Re: FS14 OZ
Posted: Fri Apr 01, 2016 10:44 am
by cape man
Congrats. Love the name.
Re: FS14 OZ
Posted: Sat Apr 02, 2016 7:49 am
by cottontop
Verrrrry Nice!
You will enjoy greatly. John