BLUE GF18 by Jason
Posted: Mon Sep 29, 2003 7:19 pm
I intend to keep editing this first post to reflect the progress of my boat. This way, anyone interested just has to look at the first post to see the history and status of the boat.
If you have any questions, feel free to email me at jasonmcintosh@yahoo.com
Jason
First, current status:
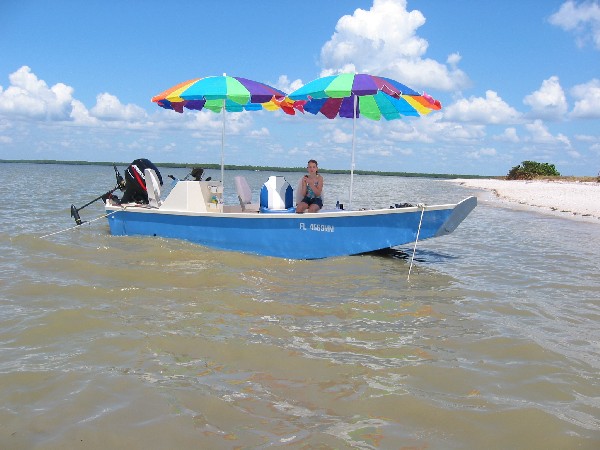
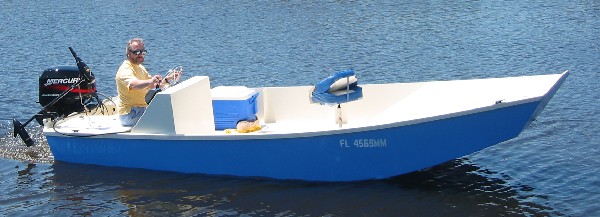
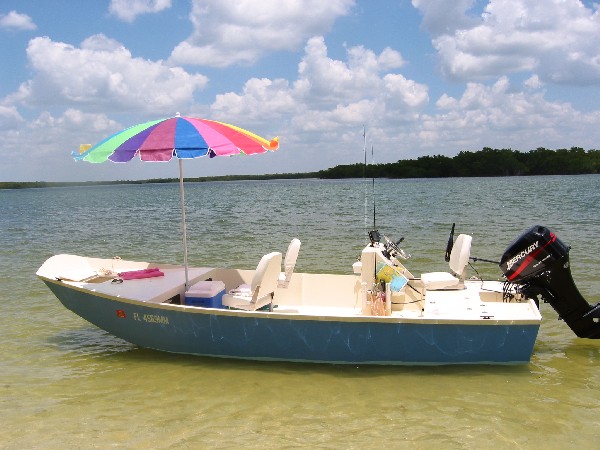
Sept 2004. Enjoying the boat. Here's another picture in the 10,000 Islands, which is the northern part of Evergladed National Park. Sept 2004. You can see my two Wallgreens umbrellas and my daughter on the boat. Fun.
Now the history from the beginning.
I got the plans in May, 2003 and after a several weeks decided to go ahead and build the boat. I got the epoxy and plywood from Jacques’ in early June and started drawing the cuts on the wood and doing some cutting.
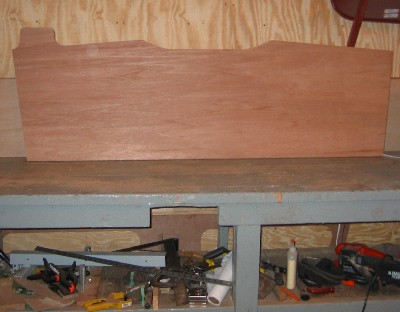
Here’s the side panels cut and already fiberglassed together. The stringers, front transom and internal frames area also cut and laying around somewhere in this picture.
<img src ="modules/Upload/jasonmcintosh/panels_cut_on_floor.jpg ">
This is the rear transom cutout and the three 1/2" thick pieced glued together to make a very heavy 1.5" thick transom. The plans showed the center section to be curved, but I wanted it flat for the motor clamp. I also added a raised "tab" for mounting a rear trolling motor, but I'm thinking that I put it too far out. Haven't coated the wood with epoxy yet.
Here’s the 4 hull pieces cut and fiberglassed together. Flipping these big pieces was tricky as they’d want to fold when they were only fiberglassed on one side. For this reason, I first put two long (16’) pieces together, flipped them and fiberglassed all four pieces together. This way, when I flipped the entire 16’ long by 6.5’ bottom hull panel, only one seam (the 16’ one) wasn’t glassed. I clamped a 2x4 to the panel to give it some support while I flipped it, which helped quite a bit.
<img src ="modules/Upload/jasonmcintosh/hull_bottom_panels.jpg ">
Unfortunately, the digital camera was off on vacation while I assembled the frame, put the sides on, flipped the assembly, and put the bottom panel on. But here it is sitting on the temporary support bed for it. The seams have already been filled in, rounded off, and fiberglassed.
<img src ="modules/Upload/jasonmcintosh/hull_side1.JPG">
Same point in construction, but different angle trying to show the entire boat.
<img src ="modules/Upload/jasonmcintosh/hull_side2.JPG ">
And one from the front trying to show the width. That’s a yard stick on the boat in front of the 1 gallon epoxy jug.
<img src ="modules/Upload/jasonmcintosh/hull_front.JPG ">
Laid the glass cloth on the bottom. Going to do both sides at the same time. <img src ="modules/Upload/jasonmcintosh/hull_w_glass1.JPG ">
Quick tool for marking off 6” around the cloth.
<img src ="modules/Upload/jasonmcintosh/six_inch_marker_tool.JPG ">
And the cloth after it was trimmed.
<img src ="modules/Upload/jasonmcintosh/hull_w_glass2.JPG ">
I put the 10’ runners on the bottom and sanded the fiberglass so that it was ready for the microballoon and Quickfair fairing compound.
<img src ="modules/Upload/jasonmcintosh/hull_sanded_w_runners.JPG ">
I put the microballoon stuff on first to fill in the fiberglass weave, and then used Quickfair. All in all, I didn’t know what I was doing. Hopefully fairing the interior will go better. I ended up using my entire gallon of microballoons and a 1.5 quarts of quick fair. To completely finish off the bottom (all the way to painting that is).
<img src ="modules/Upload/jasonmcintosh/hull_bottom_faired.JPG ">
This is my 2nd coat of microballoon fairing stuff on the sides. I eventually just coated the entire side to eliminate any wood grain that would show through the paint, however that may have been a waste of time since the System 3 primer is pretty good at filling in voids the size of grain. On the other hand, I'm very happy with the resulting fairing job, so maybe it made all the difference. I'll probably never know.
<img src ="modules/Upload/jasonmcintosh/side_2nd_fair_coat.JPG ">
The boat’s pretty much faired at this point and I’m gluing the rub rails on. I ended up putting 2 coats of epoxy over the boat with light sanding using 220 grit on a 5” random orbit sander) after each coat. Sanding the shiny epoxy after fairing really made the big scratches in the fairing material show up. I put the 2nd coat of epoxy on in an attempt to fill them in, but that was pointeless as the System 3 primer would have filled them in just fine. After this, I started painting…
<img src ="modules/Upload/jasonmcintosh/gluing_rubrail.JPG ">
Four coats of primer (light sanding after each one) finally covered the bottom pretty well. Used an entire gallon of the System Three primer.
<img src ="modules/Upload/jasonmcintosh/hull_primed.JPG ">
I didn’t like any of the System Three stock colors, so I bought their white Topcoat paint had the local Home Depot tint it. However, things didn’t go well. The color that I ended up with was much lighter than what I wanted (almost a baby-blue), so I took it back and had them add as much pure blue tint as I thought that the paint could handle. The result was this strip. At $100/gallon I cried for a few days before I decided to give it a shot and just paint the boat and see how it looks.
<img src ="modules/Upload/jasonmcintosh/strip_color.JPG ">
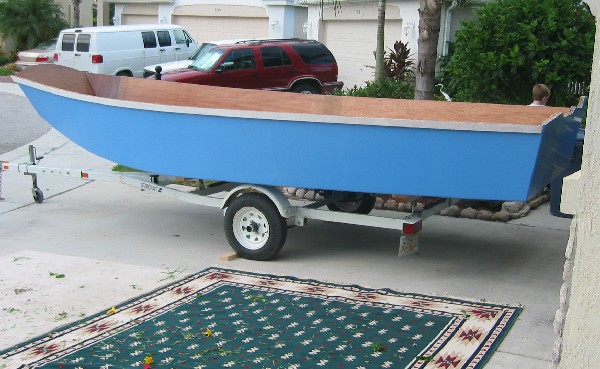
And here’s the result: BLUE! It’s not as bad as I thought it would be, but it’s a lot BLUER than what I originally wanted. Sometimes you’ve just got to “go with the flow” and enjoy the “richness” events addeto your life, whether you'd like them too or not. That’s the way I’m trying to take this…
<img src ="modules/Upload/jasonmcintosh/blue_hull.JPG ">
This was taken after the hull was flipped. On the left is the internal frame that the hull had been sitting on, in the middle are two old area rugs that we set the boat on as we turned it over, and then finally the trailer where it’ll sit until it hits the water.
<img src ="modules/Upload/jasonmcintosh/flip_setup.JPG ">
Picture showing the nice curve of the bow.
<img src ="modules/Upload/jasonmcintosh/on_trailer.JPG ">
One more side view after being flipped.
My transom design. The tab thing on the starboard side is for a trolling motor. I expect that my son will want to spend his time on the casting deck, so I needed to put a trolling motor on the back, but there wasn’t any place for it. I think I put the tab too far out though. Would probably have been better in a 3 or 4 inches.
<img src ="modules/Upload/jasonmcintosh/blue_transom.JPG ">
My son took a picture of me in the boat. It’s about 6.5 feet wide where I’m at. Hard to see that in the pictures though. I’m 5’5”, so I can easily lay crossways if I want.
<img src ="modules/Upload/jasonmcintosh/jason_in_front_boat.JPG ">
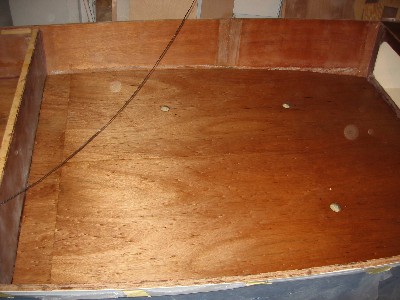
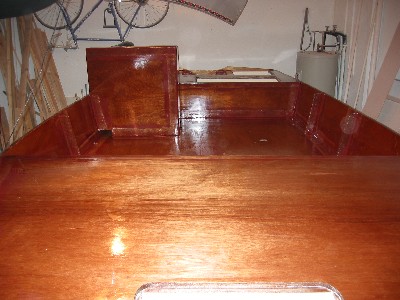
Shot of the bare interior from the front.
<img src ="modules/Upload/jasonmcintosh/rear_interior_w_transom.JPG ">
I didn't get a chance to take pictures of the internal frame as it went together. Here's a picture of it sitting on the support bed after flipping. The stingers are made from 1/2" CDX (?) glued together to yield a 1" thick stringer. The two center frame pieces are made from cheap 1/4" plywood I had around. Since the sole is going in, these frames are only used to shape the hull during its construction.
<img src ="modules/Upload/jasonmcintosh/frame_after_flipping.JPG ">
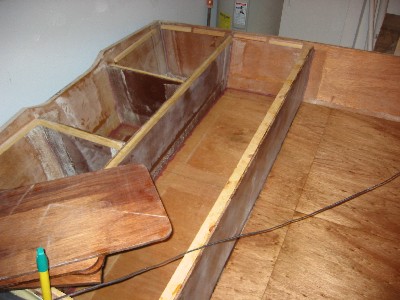
The fiberglass’s been put in the bottom and the frame tabbed in, and now I’m putting in the cleats for the casting deck. I’m glad I’m back to cutting some wood. Much more fun for me than fiberglassing.
<img src ="modules/Upload/jasonmcintosh/gluing_castingdeck_cleats.JPG ">
It’s now the end of September, so from June till now has been 4 months since I started. Actually, I didn’t work on the boat for one entire month, so it’s been 3 months of most of my evenings and a good chunk of my weekends working on it. Hope to be fishing in 2 months or so.
Back to work. Here's the casting deck being test fit. I've added a small hatch in the front for storing an anchor. The casting deck is 6'4" wide at the widest point, and runs 5' along the length of the boat. Nice and big.
<img src ="modules/Upload/jasonmcintosh/fitting_the_casting_deck.JPG ">
Here's the aft deck being fitted in place. I've carved out quite a bit of space for hatch acces to the seat storage area. I'm hoping that it won't reduce its strenght too much. I plan on putting a 13 gallon above deck tank in the rear-most port side compartment, which is the reason why that hatch is as big as it is. The hinges for that hatch will go directly into the transom.
<img src = "modules/Upload/jasonmcintosh/fitting_sern_deck.JPG ">
It's Janurary 2004 now. Had to take a bit over 2 months off from the project.
I forgot to add these pictures before, so their a bit out of order. This shows the hull interior after the seams have been fiberglassed.
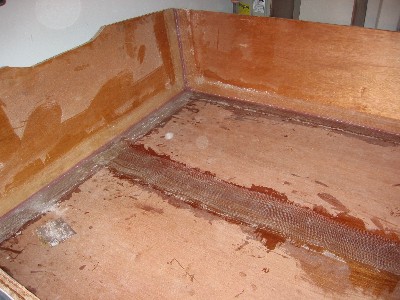
Hull interior during fiberglassing interior surface.
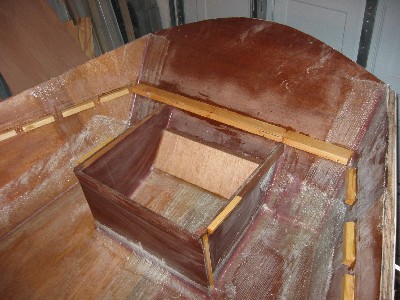
Built an "anchor locker" for top access from the casting deck. Didn't want to make it clear across the bow so I could possibly store longer items under the casting deck on either side of the anchor locker. That was the thinking anyway.
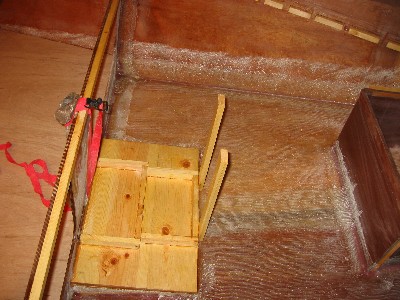
This is a platform I built to hold the trolling and starting battery under the sole. I hope to put the batteries there to get some weight in front, but after finding out how heavy of cable I'll need for the starting battery (2Ga would be best) I'm not sure I'll put the starting battery up here. The batteries place a significant load on the hull at the tip of the stringers, so I'm going to secure it to the underside of the casting deck.
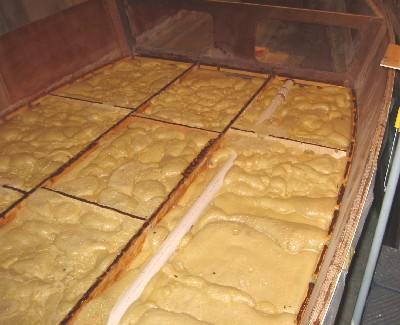
The hull is foamed! I used 6 gallons of foam... The stringers and cleats have epoxy glue on them ready for the sole to be laid down. I ran just one large PVC pipe from front to back for electrical lines.
Note that I didn't use the center seat frames for the sole and wall reinforcements. I used some cheap plywood for the initial framing that the hull was built around, and then just use some pine boards to reinforce the sole where the pedistal seats will go. Unfortunately this meant that I didn't have the 3" wide stiffeners that run up the sides of the boat. Instead I added them just above the sole (see pictures futher down). This caused joint between the 3" stiffeners and the sole to be weak and crack after takign the boat out into 1' chop. Ah, I should have followed the plans closer, but I didn't want to waste that center frame material, but I should have at least ran the 3" stiffeners down the wall to the bottom of the hull.
The casting deck is glued and fiberglassed in place. I also painted under the casting deck as much as I could before I secured. I'm using Whidbel White. The sole is also glued down and coated with epoxy.
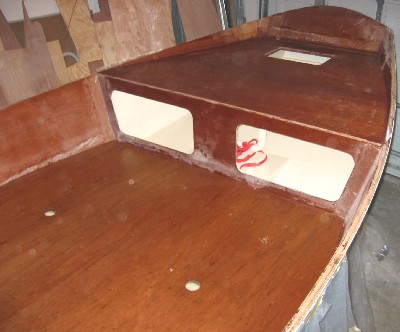
Sole glued and epoxy coated. There's three holes for pedestal seats plates.
The rear seat and motor well area showing the floor in the seat storage area. Most of the hatch covers are lying on top of the seat frames.
This is the console I designed for the boat. It's 31" high and 31" wide and was a pain to design. It's a lot easier to be able to just follow the plans rather than trying to come up with your own design.
The console is only 12" long which kept it's foot print small, but it gave me some concern about how strong it'd be. So far it seems very strong..

Here's the hull with the final coat of epoxy on it to seal the microballoon fairing material and saturate the wood where I sanded it down to the wood during fairing. Nice and shiny! This got another light sanding before putting the primer went on which dulled it considerably.
It's March 7th and I just finished putting the final coats of paint on the boat! The hull is done! I don't have picts of it yet, but here's two showing the hull primed and ready for the final coats. I'll get picts of the finished boat when I can pull it out of my garage and get some good shots of it. Now I need a motor...
April 4, 2004: The boat's done. Here it is at the end of my driveway, just before we left to take it out for the first time. I've only got one of the 3 pedistal seats in. That chair is actually going to go behind the console. I have yet to buy the three for the actual pedistals yet.

Here I am in the water trying not to worry about everything that's not perfect with the boat. (The loaf of bread on the casting deck was for feeding the fish...)
And putzing around by the dock.
Unfortunately, the boat porpoised too much to get the boat on plane for long, and I didn't bring any tools along to adjust the motor's running tilt, so I can't say how it handled under way. We were restricted to just plowing through the water and using the trolling motor. Caught some fish, had fun.
The last last picture above shows the nose sticking up rather high. It did that (and worse) while the motor was anything above an idle. When not running, the boat sat pretty flat in the water. This, despite the motor (40 HP 4 stroke), me, the gas, and a battery in the back. (I have one large trolling battery under the front casting deck though.) Even with my wife and 6 year old son on the casting deck, it still porpoised badly. I think my wife briefly left the deck once.
Hopefully the motor is an easy fix and I'll be saying more about how the boat feels at 30 MPH or so next week.
About the interior color I chose: System Three’s Whidbel White. I’m very happy with it. While it looks really creamy on their color chart (and in my garage) I couldn't really tell that it’s not white when I was out on the water. And the fact that you don’t get the glare that you’d get from Orca White makes it a great choice. At first I didn’t think I’d like it, but I didn't like any of S3's other colors and after my BLUE experience I wasn't going to mix my own! But now I’m extremely glad I chose it.
****************
Working on the porpoised problem. I tilted the motor back to its farthest position (i.e. moved the prop in closer to the transom). This help alot, but still not great. I added 150 lbs of sand bags to the front, which helped sum, but still not great. I put the trolling motor on the front transom, but I didn't like how much it vibrated when I hit some 3" chop, so I moved it back to the aft transom.
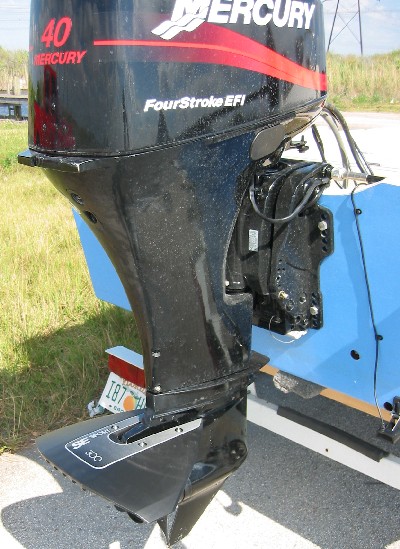
Next I added an SE 300 hydrofoil to the motor's ventalation plate. Here's a picture of it. This has helped quite a bit. I can not get up to 20 mph w/o porpoising, but I'd like to get 30 mph out of the boat. I think the next thing I'll try is raising the motor to the next set of bolt holes.
I added a plug to the side of the boat so I could empty any water that gets into the main floor space area. Its located just above the sole infront of the rear seats. When sitting still, water would _just_ come up to this level, and at 20 MPH the water spray covered it. At least it'll let water out when the boat is on the trailer.
My first prop was a chewed up one of unknown pitch. Probably 9" or 10", with a 10.25" diameter. I changed it to a 10" diamter prop with a 15" pitch. This got the boat up to 20 MPH @ 4000 rpm, but it didn't want to go past 20 mph. I'd push it to 5000 rpm, but the speed only climbed to 22 mph w/o much wind. (Actually, if a good wind was at my back, it'd go to 27 mph, but it'd start porpoising.) Never was able to get the motor past 5000 rpm (max is 6000 rpm).
The boat seemed to start pushing against some "wall" past 20 MPH. I think that the hull is OK (i.e. flat). Going to need some ideas on what to do next.
******************************************
I moved the motor up two bolt holes, which I'd guess is 2". The motor would ventelate just a little bit once in awhile, so I'll leave it at this position for now.
Moving the motor up reduced "the wall" effect quite a bit, but it's still there. I could at least get to 25 MPH @ 5000 RPM, but the motor couldn't go past 5000 RPM. I've still got the 15" pitch prop on. I'm going to replace it with a 13" prop for the next outing.
I think that if I were to trim the motor out (move the prop away from the transom), it'd reduce "the wall" effect even more. Unfortunately, this will also make the porpoising worse. To reduce the proposing I currently have:
1) the hydrofoil on the motor's ventilation plate
2) the motor trimmed all the way in
3) 60 lbs of dead weight in the bow "anchor locker"
4) the motor moved up about 2" above the transom
Along with my 6 year old boy in the fore-port chair allows me to cruise 20 MPH w/o any porpoising. This is pretty close to being acceptable performance for just the two of us.
One of the first comments Jacques made when I reported that the boat was proposing and that my ventilation plate was just under the hull was that I should raise the motor. Once again, he was right.
OK, now for some fun. Pictures...
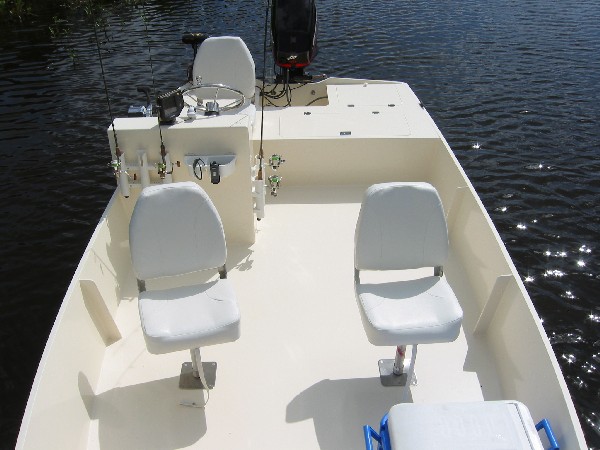
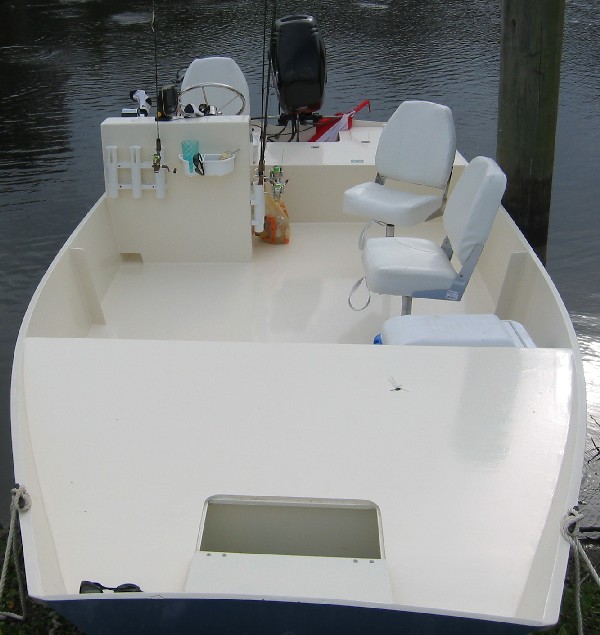
This is a view of my aft layout. It's kind of a "birds-eye-view" that lets you see most of the back of the boat, but the view is a bit off from raising the camera above my head. The 3rd pedestal seat isn't in. I'd go behind the seat you see on the right.
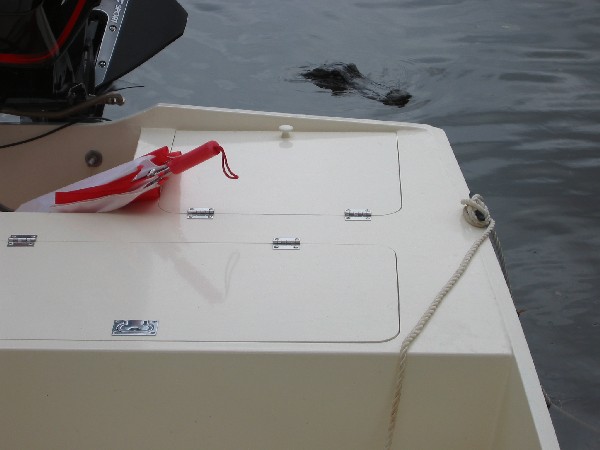
And a birds-eye-view of the bow.

Full view of the boat's interior from the front.
Quite a few "Florida water buffalo" were out today...
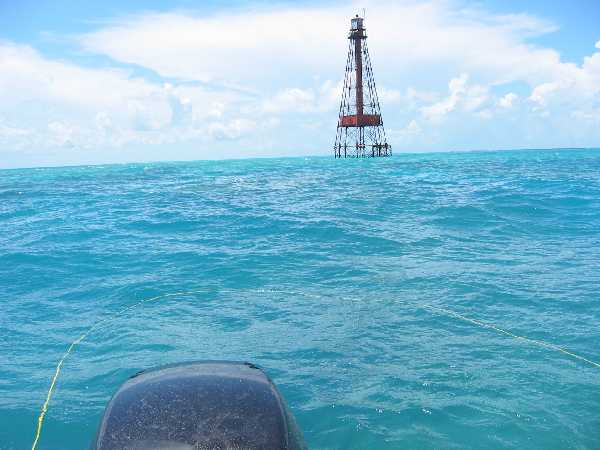
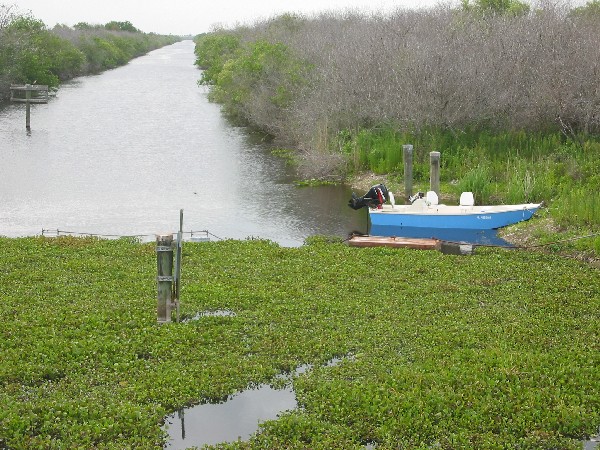
And this is a view of the canal with the boat pullup up on the bank. We climbed onto a bridge to take the picture. I thought that it was a nice view with the boat.
*******************************************
Another week and another set of test results. Put a 13" pitch prop on the boat and took it out on Lake Okeechobee. Hit about 1' chop. The anchors were almost jumping out of the forward anchor locker, so I had to put them under the casting deck. The boat took the chop just fine, but it was definitely rough. Running on plane very doable though. One problem I had though was that the waves would cause air pockets to travel under the hull. The flat bottom combined with the runners funneled the air back to the motor which would effect the prop. The motor was constantly revving due to them. So, if I want to operate in waves that big, I've got to lower the motor, which will bring back "the wall" effect.
A jack plate and power trim would be ideal... Heck, a hull with a selectable deadrise would be nice to...
WOT with the 13" pitch prop only got the motor up to 5300 rpm (6000 is red line) and a speed of about 25 mph. I used my power tilt to trim the motor up a bit. The boat shot up to 30 mph, but started porpoising immediately, so I could only hold it there for a few seconds. Didn't get a chance to look at the tach during those few seconds. Not sure what to do with the prop now... Drop down to 11"?
I’m definitely going to put a gas tank under the casting deck. Probably a 12 gallon low profile from Tempo secured to the underside of the deck. I’m a little worried about the fuel foaming though. I’ll keep the ability to put the 13 gallon tank in the rear, so I’ll have plenty of fuel for a full weekend’s worth of sightseeing.
*********************************************
Suffered my first minor damage to the boat. This is a bit complicated to describe with text, but I'll try. The sides of the walls have two stiffeners on each side of the boat. These are supposed to be cut down from the middle two frames that would have been for the center seat in the non-sole version of the boat.
However, I didn't put those two seat frames in, and so I didn't have these stiffeners. What I did instead was to put pine board supports under where I was going to put the pedistal seats, and I just added some 3" wide boards to the sides to take the place of the stiffeners that would have come from the center seat frames. I figured that since I almost doubled the size of the rub rail, and since I put the sole in, it wouldn't be a big deal to just add the "side stiffeners" later.
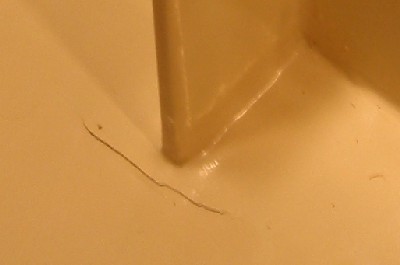
When I took the boat out onto the 1+' chop on Okeechobee, I let the boat pound fairly hard. The next time I took it out, I noticed that there was a crack in the sole about a 1.5" long and a half inch out from the forward, port side stiffener. The crack ran parallel with the side wall. Apparently, the boat bends enough to cause the walls to flex in and out. This puts an enormous amount of strain on the fiberglass joint I made at the bottom of the stiffener where it's glassed to the sole. Enough stress to cause the glass to pull up on the sole and generate a crack. Had I made the stiffeners according to the plans, the stiffener would have run all the way down through the sole to the bottom part of the hull, and this joint at the sole would have been much stronger.
Also, when I fiberglassed the bottom of the stiffener to the sole, I only fiberglassed out along the wall, not away from it. Let me try to explain. The stiffener is 3" wide and made from 3/8" thick plywood. When I fiberglassed it to the sole, I only ran fiberglass along the 3" sections, so the fiberglass only extended 3" away from the wall. I didn't fiberglass out from the 3/8" section (how can you?), and so only 3" of the sole had glass on it (that is,the glass extended only 3" away from the wall).
When the wall flexed, and the stiffener pulled on the sole, the glass only pulled on 3" of the plywood, and the plywood probably separated and cracked. Had I extended the fiberglass more than 3" out onto the sole, it may have had enough strength not to crack.
So what I'll probably do is to sand all around the bottom of the front-port stiffener and reglass all around the stiffener and sole area so that it grabs more of the sole and makes that joint stronger. If that cracks too, I'll have to somehow add more structure to that area, or maybe put a metal plate in with some screws down into the sole so that it grabs more than just the top ply of the sole.
All in all, this is a minor problem. Had I followed the plans, it probably wouldn't have happened. And I'll probably just have to take it easier on the waves...
***
Finally fixed the cracks (sept 2004). After I sanded the area, it showed that the first ply from the plywood broke.
I got a lot of good advice on how to fix the boat. Mostly to cut up the sole and put the internal frames back in. However, in the end I decided not to do it. I decided to stick with my first inclination and just reinforce the area around the bottom of the stiffener. I put down a layer of fiberglass that ran out several inches from the stiffener, put a 1/4" board over that to spread out the load, ran two "blossoming" sheet metal screws through the 1/4" board and 1/2" sole to spread, added several layers of fiberglass on top of all of that, and the result (before painting) was:
I took the boat out in 2-4' waves after the fix (just went 5 MPH though), and the boat's fine. I think I'll live with the fix. I'm thinking that the extra flexibility of the hull might actually make it last longer, who knows...
*******************************************
I took the boat out into the 10,000 Islands, which is the northern part of Everglades National Park. I'd been told that there's lots of nasty stuff to hit if you don't know your way around, so I put my old prop on whose pitch I don't know. I got the boat up to around 27 MPH at 6000 RPM with the old prop. Unfortunately even in the 1' chop (or maybe a bit less) the boat gave too rough of a ride for my wife and I had to slow it down to 15 MPH, pretty much the slowest it'd go and still be considered on plane. After going 27 MPH she asked "why is this wall moving so much?", referring to the wall with the crack at the bottom of the stiffener...
Well, we had a GREAT time on the water. Going out, I went slow as hell and didn't hit anything. We played around on a little beach on one of the keys. Here's the boat parked there. The umbrella was $25 from Walgreens. Quick, cheap, and adds at least some shade to the boat. And look at those colors!
************************************************
Took the boat out into the gulf around the 10,000 islands again. Had something closer to 2’ waves this time, but having grown up in the 10,000 (small) lakes of Minnesota, it’s hard for me to judge just what you’d call the wave size. The waves were to rough to get up on plane with my family on board (four of us all together) directly into the waves, but were able to run at about 20 MPH a an angle into the waves. Hit a few waves about 3’ high dead on at about 7 MPH which gave the boat quite a shake. Made my family quite nervous and caused the stiffener on the starboard side to crack near the sole just as it cracked on the port side. The adventure continues...
****************************************************
Sept 2004. Back to the 10,000 islands. You can see my two Walgreens umbrellas and my daughter on the boat. Fun.
Some comments after using the boat for about 5 months now. . .
The whole layout was to provide deck space for a tent for camping. So far I’ve only done that once, so it hasn’t really been worth it. Hopefully this will change though. The console also makes it impractical to put a regular bimini top on since when you fold one down, you’d want it to go right where I put the console. My umbrellas are actually working out well though, and they don’t get in the way for fishing.
The direction that the boat goes is really effected by the weight distribution on the boat, so with just me in the boat the side console makes it track a bit sideways. When my wife moves from one side of the boat, the boat will change direction by 15 degrees.
With a 10” diameter, 10” pitch prop, I can get about 27 MPH from my 40 HP 4 stroke when the family is on board (wife+2 kids, coolers, etc.). When I’m alone, I can do about 22 MPH w/o porpoising. It’d be nicer to go faster, but when the chop gets over 6”, my wife can’t take the pounding. I can go about 20 MPH in 6” chop before it’s too much for her. In 1’ chop, I can do about 15 MPH.
When the waves get 2-3’, I’ve got to slow down to 8 MPH or less. The front end really pounds on those big waves.
We hit some 4+’ waves the last time we were out. We were just going 5 MPH with my daughter on the bow casting deck having a blast. We weren’t in a hurry, but we probably couldn’t have gone faster than 8 MPH in those waves anyway.
The rub rails are getting dinged up. I decided to use them for what they were for and just let the wood “rub”, but I find myself wishing I had put something over it. I’m going to keep an eye out for some rubber molding or maybe some wood strips that would be easy to replace.
Salt water fishing is making a bait well a necessity. I’m going to be looking for something that I can put in the front. I don’t have a good place for a water supply line though. I wish I would have designed something into the boat while I was building it.
Getting the boat completely dry is a pain. Under the casting deck, there’s a 5” step up to the sole. This fills with water. Easy enough to get out, but I wish I would have just had a drain to the back so I didn’t have to bother with it. The back two storage areas on either side of the motor well don’t have the sole in them, so they go all the way down to the hull. I drain the cockpit into the starboard one, and keep the fuel tank in the port one. Both have drain plugs, but that leaves 1/4” of water in them, which has to be wiped out if I want it to get completely dry. I wish I had a solution for that. In hindsight, it would have been best to slope that area so it would have drained better to the drain plug.
Living in South Florida, I keep wanting to go off shore, but this boat just isn't something you want to do that with, especially with my limited experience and a 'concerned' wife. In the end, perhaps a C17 would have been a better choice for us. But this is a great boat for 1' or less chop. While I've found it to handle well in 3-4' waves, it not a boat you could run from a storm in those conditions.
Jason
If you have any questions, feel free to email me at jasonmcintosh@yahoo.com
Jason
First, current status:
Sept 2004. Enjoying the boat. Here's another picture in the 10,000 Islands, which is the northern part of Evergladed National Park. Sept 2004. You can see my two Wallgreens umbrellas and my daughter on the boat. Fun.
Now the history from the beginning.
I got the plans in May, 2003 and after a several weeks decided to go ahead and build the boat. I got the epoxy and plywood from Jacques’ in early June and started drawing the cuts on the wood and doing some cutting.
Here’s the side panels cut and already fiberglassed together. The stringers, front transom and internal frames area also cut and laying around somewhere in this picture.
<img src ="modules/Upload/jasonmcintosh/panels_cut_on_floor.jpg ">
This is the rear transom cutout and the three 1/2" thick pieced glued together to make a very heavy 1.5" thick transom. The plans showed the center section to be curved, but I wanted it flat for the motor clamp. I also added a raised "tab" for mounting a rear trolling motor, but I'm thinking that I put it too far out. Haven't coated the wood with epoxy yet.
Here’s the 4 hull pieces cut and fiberglassed together. Flipping these big pieces was tricky as they’d want to fold when they were only fiberglassed on one side. For this reason, I first put two long (16’) pieces together, flipped them and fiberglassed all four pieces together. This way, when I flipped the entire 16’ long by 6.5’ bottom hull panel, only one seam (the 16’ one) wasn’t glassed. I clamped a 2x4 to the panel to give it some support while I flipped it, which helped quite a bit.
<img src ="modules/Upload/jasonmcintosh/hull_bottom_panels.jpg ">
Unfortunately, the digital camera was off on vacation while I assembled the frame, put the sides on, flipped the assembly, and put the bottom panel on. But here it is sitting on the temporary support bed for it. The seams have already been filled in, rounded off, and fiberglassed.
<img src ="modules/Upload/jasonmcintosh/hull_side1.JPG">
Same point in construction, but different angle trying to show the entire boat.
<img src ="modules/Upload/jasonmcintosh/hull_side2.JPG ">
And one from the front trying to show the width. That’s a yard stick on the boat in front of the 1 gallon epoxy jug.
<img src ="modules/Upload/jasonmcintosh/hull_front.JPG ">
Laid the glass cloth on the bottom. Going to do both sides at the same time. <img src ="modules/Upload/jasonmcintosh/hull_w_glass1.JPG ">
Quick tool for marking off 6” around the cloth.
<img src ="modules/Upload/jasonmcintosh/six_inch_marker_tool.JPG ">
And the cloth after it was trimmed.
<img src ="modules/Upload/jasonmcintosh/hull_w_glass2.JPG ">
I put the 10’ runners on the bottom and sanded the fiberglass so that it was ready for the microballoon and Quickfair fairing compound.
<img src ="modules/Upload/jasonmcintosh/hull_sanded_w_runners.JPG ">
I put the microballoon stuff on first to fill in the fiberglass weave, and then used Quickfair. All in all, I didn’t know what I was doing. Hopefully fairing the interior will go better. I ended up using my entire gallon of microballoons and a 1.5 quarts of quick fair. To completely finish off the bottom (all the way to painting that is).
<img src ="modules/Upload/jasonmcintosh/hull_bottom_faired.JPG ">
This is my 2nd coat of microballoon fairing stuff on the sides. I eventually just coated the entire side to eliminate any wood grain that would show through the paint, however that may have been a waste of time since the System 3 primer is pretty good at filling in voids the size of grain. On the other hand, I'm very happy with the resulting fairing job, so maybe it made all the difference. I'll probably never know.
<img src ="modules/Upload/jasonmcintosh/side_2nd_fair_coat.JPG ">
The boat’s pretty much faired at this point and I’m gluing the rub rails on. I ended up putting 2 coats of epoxy over the boat with light sanding using 220 grit on a 5” random orbit sander) after each coat. Sanding the shiny epoxy after fairing really made the big scratches in the fairing material show up. I put the 2nd coat of epoxy on in an attempt to fill them in, but that was pointeless as the System 3 primer would have filled them in just fine. After this, I started painting…
<img src ="modules/Upload/jasonmcintosh/gluing_rubrail.JPG ">
Four coats of primer (light sanding after each one) finally covered the bottom pretty well. Used an entire gallon of the System Three primer.
<img src ="modules/Upload/jasonmcintosh/hull_primed.JPG ">
I didn’t like any of the System Three stock colors, so I bought their white Topcoat paint had the local Home Depot tint it. However, things didn’t go well. The color that I ended up with was much lighter than what I wanted (almost a baby-blue), so I took it back and had them add as much pure blue tint as I thought that the paint could handle. The result was this strip. At $100/gallon I cried for a few days before I decided to give it a shot and just paint the boat and see how it looks.
<img src ="modules/Upload/jasonmcintosh/strip_color.JPG ">
And here’s the result: BLUE! It’s not as bad as I thought it would be, but it’s a lot BLUER than what I originally wanted. Sometimes you’ve just got to “go with the flow” and enjoy the “richness” events addeto your life, whether you'd like them too or not. That’s the way I’m trying to take this…
<img src ="modules/Upload/jasonmcintosh/blue_hull.JPG ">
This was taken after the hull was flipped. On the left is the internal frame that the hull had been sitting on, in the middle are two old area rugs that we set the boat on as we turned it over, and then finally the trailer where it’ll sit until it hits the water.
<img src ="modules/Upload/jasonmcintosh/flip_setup.JPG ">
Picture showing the nice curve of the bow.
<img src ="modules/Upload/jasonmcintosh/on_trailer.JPG ">
One more side view after being flipped.
My transom design. The tab thing on the starboard side is for a trolling motor. I expect that my son will want to spend his time on the casting deck, so I needed to put a trolling motor on the back, but there wasn’t any place for it. I think I put the tab too far out though. Would probably have been better in a 3 or 4 inches.
<img src ="modules/Upload/jasonmcintosh/blue_transom.JPG ">
My son took a picture of me in the boat. It’s about 6.5 feet wide where I’m at. Hard to see that in the pictures though. I’m 5’5”, so I can easily lay crossways if I want.
<img src ="modules/Upload/jasonmcintosh/jason_in_front_boat.JPG ">
Shot of the bare interior from the front.
<img src ="modules/Upload/jasonmcintosh/rear_interior_w_transom.JPG ">
I didn't get a chance to take pictures of the internal frame as it went together. Here's a picture of it sitting on the support bed after flipping. The stingers are made from 1/2" CDX (?) glued together to yield a 1" thick stringer. The two center frame pieces are made from cheap 1/4" plywood I had around. Since the sole is going in, these frames are only used to shape the hull during its construction.
<img src ="modules/Upload/jasonmcintosh/frame_after_flipping.JPG ">
The fiberglass’s been put in the bottom and the frame tabbed in, and now I’m putting in the cleats for the casting deck. I’m glad I’m back to cutting some wood. Much more fun for me than fiberglassing.
<img src ="modules/Upload/jasonmcintosh/gluing_castingdeck_cleats.JPG ">
It’s now the end of September, so from June till now has been 4 months since I started. Actually, I didn’t work on the boat for one entire month, so it’s been 3 months of most of my evenings and a good chunk of my weekends working on it. Hope to be fishing in 2 months or so.
Back to work. Here's the casting deck being test fit. I've added a small hatch in the front for storing an anchor. The casting deck is 6'4" wide at the widest point, and runs 5' along the length of the boat. Nice and big.
<img src ="modules/Upload/jasonmcintosh/fitting_the_casting_deck.JPG ">
Here's the aft deck being fitted in place. I've carved out quite a bit of space for hatch acces to the seat storage area. I'm hoping that it won't reduce its strenght too much. I plan on putting a 13 gallon above deck tank in the rear-most port side compartment, which is the reason why that hatch is as big as it is. The hinges for that hatch will go directly into the transom.
<img src = "modules/Upload/jasonmcintosh/fitting_sern_deck.JPG ">
It's Janurary 2004 now. Had to take a bit over 2 months off from the project.
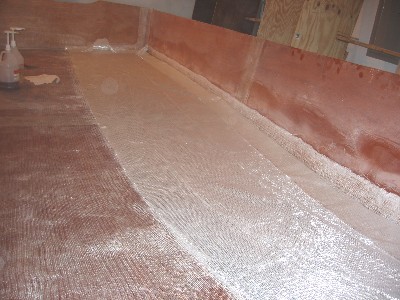
I forgot to add these pictures before, so their a bit out of order. This shows the hull interior after the seams have been fiberglassed.
Hull interior during fiberglassing interior surface.
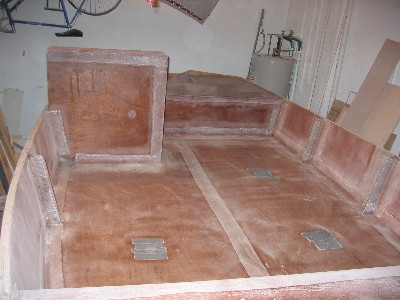
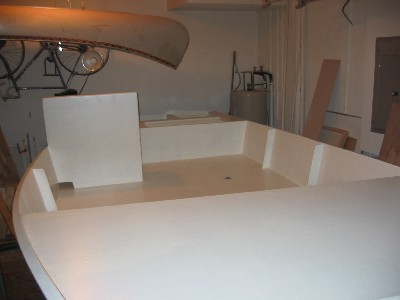
Built an "anchor locker" for top access from the casting deck. Didn't want to make it clear across the bow so I could possibly store longer items under the casting deck on either side of the anchor locker. That was the thinking anyway.
This is a platform I built to hold the trolling and starting battery under the sole. I hope to put the batteries there to get some weight in front, but after finding out how heavy of cable I'll need for the starting battery (2Ga would be best) I'm not sure I'll put the starting battery up here. The batteries place a significant load on the hull at the tip of the stringers, so I'm going to secure it to the underside of the casting deck.
The hull is foamed! I used 6 gallons of foam... The stringers and cleats have epoxy glue on them ready for the sole to be laid down. I ran just one large PVC pipe from front to back for electrical lines.
Note that I didn't use the center seat frames for the sole and wall reinforcements. I used some cheap plywood for the initial framing that the hull was built around, and then just use some pine boards to reinforce the sole where the pedistal seats will go. Unfortunately this meant that I didn't have the 3" wide stiffeners that run up the sides of the boat. Instead I added them just above the sole (see pictures futher down). This caused joint between the 3" stiffeners and the sole to be weak and crack after takign the boat out into 1' chop. Ah, I should have followed the plans closer, but I didn't want to waste that center frame material, but I should have at least ran the 3" stiffeners down the wall to the bottom of the hull.
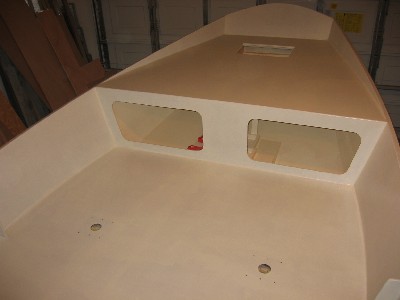
The casting deck is glued and fiberglassed in place. I also painted under the casting deck as much as I could before I secured. I'm using Whidbel White. The sole is also glued down and coated with epoxy.
Sole glued and epoxy coated. There's three holes for pedestal seats plates.
The rear seat and motor well area showing the floor in the seat storage area. Most of the hatch covers are lying on top of the seat frames.
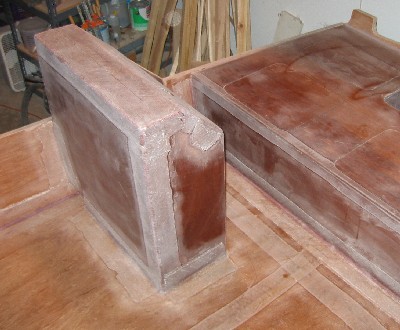
This is the console I designed for the boat. It's 31" high and 31" wide and was a pain to design. It's a lot easier to be able to just follow the plans rather than trying to come up with your own design.
The console is only 12" long which kept it's foot print small, but it gave me some concern about how strong it'd be. So far it seems very strong..
Here's the hull with the final coat of epoxy on it to seal the microballoon fairing material and saturate the wood where I sanded it down to the wood during fairing. Nice and shiny! This got another light sanding before putting the primer went on which dulled it considerably.
It's March 7th and I just finished putting the final coats of paint on the boat! The hull is done! I don't have picts of it yet, but here's two showing the hull primed and ready for the final coats. I'll get picts of the finished boat when I can pull it out of my garage and get some good shots of it. Now I need a motor...
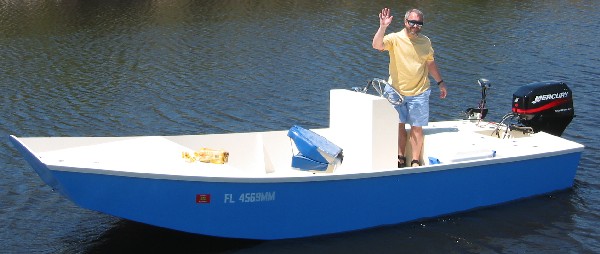
April 4, 2004: The boat's done. Here it is at the end of my driveway, just before we left to take it out for the first time. I've only got one of the 3 pedistal seats in. That chair is actually going to go behind the console. I have yet to buy the three for the actual pedistals yet.
Here I am in the water trying not to worry about everything that's not perfect with the boat. (The loaf of bread on the casting deck was for feeding the fish...)
And putzing around by the dock.
Unfortunately, the boat porpoised too much to get the boat on plane for long, and I didn't bring any tools along to adjust the motor's running tilt, so I can't say how it handled under way. We were restricted to just plowing through the water and using the trolling motor. Caught some fish, had fun.
The last last picture above shows the nose sticking up rather high. It did that (and worse) while the motor was anything above an idle. When not running, the boat sat pretty flat in the water. This, despite the motor (40 HP 4 stroke), me, the gas, and a battery in the back. (I have one large trolling battery under the front casting deck though.) Even with my wife and 6 year old son on the casting deck, it still porpoised badly. I think my wife briefly left the deck once.
Hopefully the motor is an easy fix and I'll be saying more about how the boat feels at 30 MPH or so next week.
About the interior color I chose: System Three’s Whidbel White. I’m very happy with it. While it looks really creamy on their color chart (and in my garage) I couldn't really tell that it’s not white when I was out on the water. And the fact that you don’t get the glare that you’d get from Orca White makes it a great choice. At first I didn’t think I’d like it, but I didn't like any of S3's other colors and after my BLUE experience I wasn't going to mix my own! But now I’m extremely glad I chose it.
****************
Working on the porpoised problem. I tilted the motor back to its farthest position (i.e. moved the prop in closer to the transom). This help alot, but still not great. I added 150 lbs of sand bags to the front, which helped sum, but still not great. I put the trolling motor on the front transom, but I didn't like how much it vibrated when I hit some 3" chop, so I moved it back to the aft transom.
Next I added an SE 300 hydrofoil to the motor's ventalation plate. Here's a picture of it. This has helped quite a bit. I can not get up to 20 mph w/o porpoising, but I'd like to get 30 mph out of the boat. I think the next thing I'll try is raising the motor to the next set of bolt holes.
I added a plug to the side of the boat so I could empty any water that gets into the main floor space area. Its located just above the sole infront of the rear seats. When sitting still, water would _just_ come up to this level, and at 20 MPH the water spray covered it. At least it'll let water out when the boat is on the trailer.
My first prop was a chewed up one of unknown pitch. Probably 9" or 10", with a 10.25" diameter. I changed it to a 10" diamter prop with a 15" pitch. This got the boat up to 20 MPH @ 4000 rpm, but it didn't want to go past 20 mph. I'd push it to 5000 rpm, but the speed only climbed to 22 mph w/o much wind. (Actually, if a good wind was at my back, it'd go to 27 mph, but it'd start porpoising.) Never was able to get the motor past 5000 rpm (max is 6000 rpm).
The boat seemed to start pushing against some "wall" past 20 MPH. I think that the hull is OK (i.e. flat). Going to need some ideas on what to do next.
******************************************
I moved the motor up two bolt holes, which I'd guess is 2". The motor would ventelate just a little bit once in awhile, so I'll leave it at this position for now.
Moving the motor up reduced "the wall" effect quite a bit, but it's still there. I could at least get to 25 MPH @ 5000 RPM, but the motor couldn't go past 5000 RPM. I've still got the 15" pitch prop on. I'm going to replace it with a 13" prop for the next outing.
I think that if I were to trim the motor out (move the prop away from the transom), it'd reduce "the wall" effect even more. Unfortunately, this will also make the porpoising worse. To reduce the proposing I currently have:
1) the hydrofoil on the motor's ventilation plate
2) the motor trimmed all the way in
3) 60 lbs of dead weight in the bow "anchor locker"
4) the motor moved up about 2" above the transom
Along with my 6 year old boy in the fore-port chair allows me to cruise 20 MPH w/o any porpoising. This is pretty close to being acceptable performance for just the two of us.
One of the first comments Jacques made when I reported that the boat was proposing and that my ventilation plate was just under the hull was that I should raise the motor. Once again, he was right.
OK, now for some fun. Pictures...
This is a view of my aft layout. It's kind of a "birds-eye-view" that lets you see most of the back of the boat, but the view is a bit off from raising the camera above my head. The 3rd pedestal seat isn't in. I'd go behind the seat you see on the right.
And a birds-eye-view of the bow.
Full view of the boat's interior from the front.
Quite a few "Florida water buffalo" were out today...
And this is a view of the canal with the boat pullup up on the bank. We climbed onto a bridge to take the picture. I thought that it was a nice view with the boat.
*******************************************
Another week and another set of test results. Put a 13" pitch prop on the boat and took it out on Lake Okeechobee. Hit about 1' chop. The anchors were almost jumping out of the forward anchor locker, so I had to put them under the casting deck. The boat took the chop just fine, but it was definitely rough. Running on plane very doable though. One problem I had though was that the waves would cause air pockets to travel under the hull. The flat bottom combined with the runners funneled the air back to the motor which would effect the prop. The motor was constantly revving due to them. So, if I want to operate in waves that big, I've got to lower the motor, which will bring back "the wall" effect.
A jack plate and power trim would be ideal... Heck, a hull with a selectable deadrise would be nice to...
WOT with the 13" pitch prop only got the motor up to 5300 rpm (6000 is red line) and a speed of about 25 mph. I used my power tilt to trim the motor up a bit. The boat shot up to 30 mph, but started porpoising immediately, so I could only hold it there for a few seconds. Didn't get a chance to look at the tach during those few seconds. Not sure what to do with the prop now... Drop down to 11"?
I’m definitely going to put a gas tank under the casting deck. Probably a 12 gallon low profile from Tempo secured to the underside of the deck. I’m a little worried about the fuel foaming though. I’ll keep the ability to put the 13 gallon tank in the rear, so I’ll have plenty of fuel for a full weekend’s worth of sightseeing.
*********************************************
Suffered my first minor damage to the boat. This is a bit complicated to describe with text, but I'll try. The sides of the walls have two stiffeners on each side of the boat. These are supposed to be cut down from the middle two frames that would have been for the center seat in the non-sole version of the boat.
However, I didn't put those two seat frames in, and so I didn't have these stiffeners. What I did instead was to put pine board supports under where I was going to put the pedistal seats, and I just added some 3" wide boards to the sides to take the place of the stiffeners that would have come from the center seat frames. I figured that since I almost doubled the size of the rub rail, and since I put the sole in, it wouldn't be a big deal to just add the "side stiffeners" later.
When I took the boat out onto the 1+' chop on Okeechobee, I let the boat pound fairly hard. The next time I took it out, I noticed that there was a crack in the sole about a 1.5" long and a half inch out from the forward, port side stiffener. The crack ran parallel with the side wall. Apparently, the boat bends enough to cause the walls to flex in and out. This puts an enormous amount of strain on the fiberglass joint I made at the bottom of the stiffener where it's glassed to the sole. Enough stress to cause the glass to pull up on the sole and generate a crack. Had I made the stiffeners according to the plans, the stiffener would have run all the way down through the sole to the bottom part of the hull, and this joint at the sole would have been much stronger.
Also, when I fiberglassed the bottom of the stiffener to the sole, I only fiberglassed out along the wall, not away from it. Let me try to explain. The stiffener is 3" wide and made from 3/8" thick plywood. When I fiberglassed it to the sole, I only ran fiberglass along the 3" sections, so the fiberglass only extended 3" away from the wall. I didn't fiberglass out from the 3/8" section (how can you?), and so only 3" of the sole had glass on it (that is,the glass extended only 3" away from the wall).
When the wall flexed, and the stiffener pulled on the sole, the glass only pulled on 3" of the plywood, and the plywood probably separated and cracked. Had I extended the fiberglass more than 3" out onto the sole, it may have had enough strength not to crack.
So what I'll probably do is to sand all around the bottom of the front-port stiffener and reglass all around the stiffener and sole area so that it grabs more of the sole and makes that joint stronger. If that cracks too, I'll have to somehow add more structure to that area, or maybe put a metal plate in with some screws down into the sole so that it grabs more than just the top ply of the sole.
All in all, this is a minor problem. Had I followed the plans, it probably wouldn't have happened. And I'll probably just have to take it easier on the waves...
***
Finally fixed the cracks (sept 2004). After I sanded the area, it showed that the first ply from the plywood broke.
I got a lot of good advice on how to fix the boat. Mostly to cut up the sole and put the internal frames back in. However, in the end I decided not to do it. I decided to stick with my first inclination and just reinforce the area around the bottom of the stiffener. I put down a layer of fiberglass that ran out several inches from the stiffener, put a 1/4" board over that to spread out the load, ran two "blossoming" sheet metal screws through the 1/4" board and 1/2" sole to spread, added several layers of fiberglass on top of all of that, and the result (before painting) was:
I took the boat out in 2-4' waves after the fix (just went 5 MPH though), and the boat's fine. I think I'll live with the fix. I'm thinking that the extra flexibility of the hull might actually make it last longer, who knows...
*******************************************
I took the boat out into the 10,000 Islands, which is the northern part of Everglades National Park. I'd been told that there's lots of nasty stuff to hit if you don't know your way around, so I put my old prop on whose pitch I don't know. I got the boat up to around 27 MPH at 6000 RPM with the old prop. Unfortunately even in the 1' chop (or maybe a bit less) the boat gave too rough of a ride for my wife and I had to slow it down to 15 MPH, pretty much the slowest it'd go and still be considered on plane. After going 27 MPH she asked "why is this wall moving so much?", referring to the wall with the crack at the bottom of the stiffener...
Well, we had a GREAT time on the water. Going out, I went slow as hell and didn't hit anything. We played around on a little beach on one of the keys. Here's the boat parked there. The umbrella was $25 from Walgreens. Quick, cheap, and adds at least some shade to the boat. And look at those colors!
************************************************
Took the boat out into the gulf around the 10,000 islands again. Had something closer to 2’ waves this time, but having grown up in the 10,000 (small) lakes of Minnesota, it’s hard for me to judge just what you’d call the wave size. The waves were to rough to get up on plane with my family on board (four of us all together) directly into the waves, but were able to run at about 20 MPH a an angle into the waves. Hit a few waves about 3’ high dead on at about 7 MPH which gave the boat quite a shake. Made my family quite nervous and caused the stiffener on the starboard side to crack near the sole just as it cracked on the port side. The adventure continues...
****************************************************
Sept 2004. Back to the 10,000 islands. You can see my two Walgreens umbrellas and my daughter on the boat. Fun.
Some comments after using the boat for about 5 months now. . .
The whole layout was to provide deck space for a tent for camping. So far I’ve only done that once, so it hasn’t really been worth it. Hopefully this will change though. The console also makes it impractical to put a regular bimini top on since when you fold one down, you’d want it to go right where I put the console. My umbrellas are actually working out well though, and they don’t get in the way for fishing.
The direction that the boat goes is really effected by the weight distribution on the boat, so with just me in the boat the side console makes it track a bit sideways. When my wife moves from one side of the boat, the boat will change direction by 15 degrees.
With a 10” diameter, 10” pitch prop, I can get about 27 MPH from my 40 HP 4 stroke when the family is on board (wife+2 kids, coolers, etc.). When I’m alone, I can do about 22 MPH w/o porpoising. It’d be nicer to go faster, but when the chop gets over 6”, my wife can’t take the pounding. I can go about 20 MPH in 6” chop before it’s too much for her. In 1’ chop, I can do about 15 MPH.
When the waves get 2-3’, I’ve got to slow down to 8 MPH or less. The front end really pounds on those big waves.
We hit some 4+’ waves the last time we were out. We were just going 5 MPH with my daughter on the bow casting deck having a blast. We weren’t in a hurry, but we probably couldn’t have gone faster than 8 MPH in those waves anyway.
The rub rails are getting dinged up. I decided to use them for what they were for and just let the wood “rub”, but I find myself wishing I had put something over it. I’m going to keep an eye out for some rubber molding or maybe some wood strips that would be easy to replace.
Salt water fishing is making a bait well a necessity. I’m going to be looking for something that I can put in the front. I don’t have a good place for a water supply line though. I wish I would have designed something into the boat while I was building it.
Getting the boat completely dry is a pain. Under the casting deck, there’s a 5” step up to the sole. This fills with water. Easy enough to get out, but I wish I would have just had a drain to the back so I didn’t have to bother with it. The back two storage areas on either side of the motor well don’t have the sole in them, so they go all the way down to the hull. I drain the cockpit into the starboard one, and keep the fuel tank in the port one. Both have drain plugs, but that leaves 1/4” of water in them, which has to be wiped out if I want it to get completely dry. I wish I had a solution for that. In hindsight, it would have been best to slope that area so it would have drained better to the drain plug.
Living in South Florida, I keep wanting to go off shore, but this boat just isn't something you want to do that with, especially with my limited experience and a 'concerned' wife. In the end, perhaps a C17 would have been a better choice for us. But this is a great boat for 1' or less chop. While I've found it to handle well in 3-4' waves, it not a boat you could run from a storm in those conditions.
Jason