Page 1 of 1
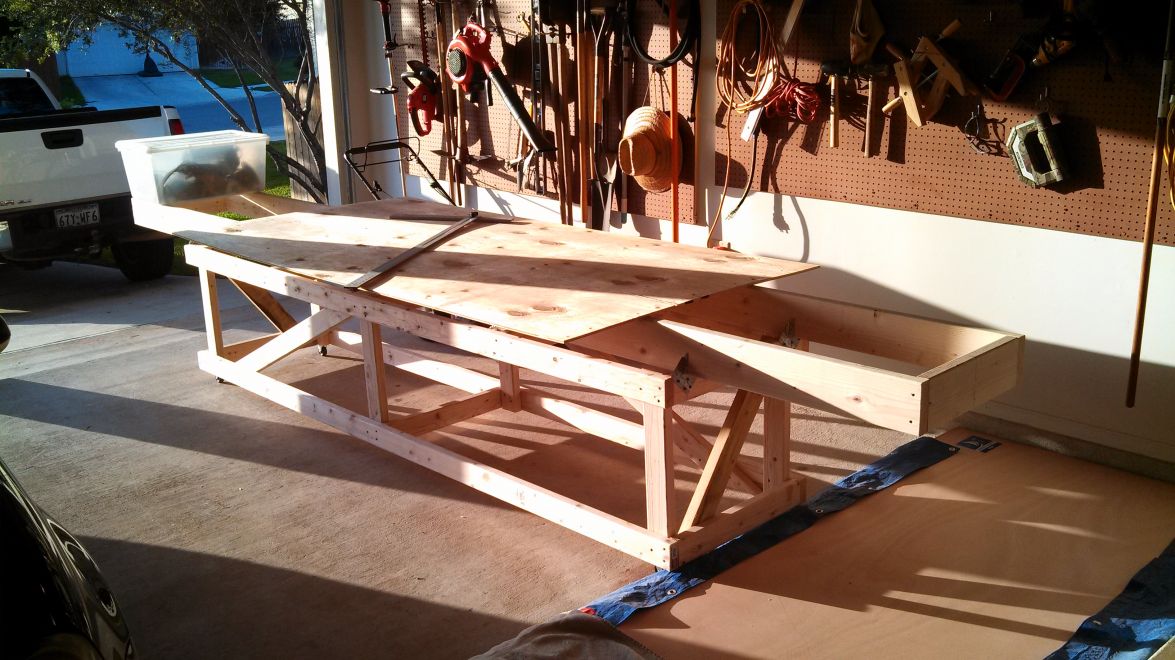
Cannonball's FS18
Posted: Mon Apr 22, 2013 5:40 pm
by Cannonball
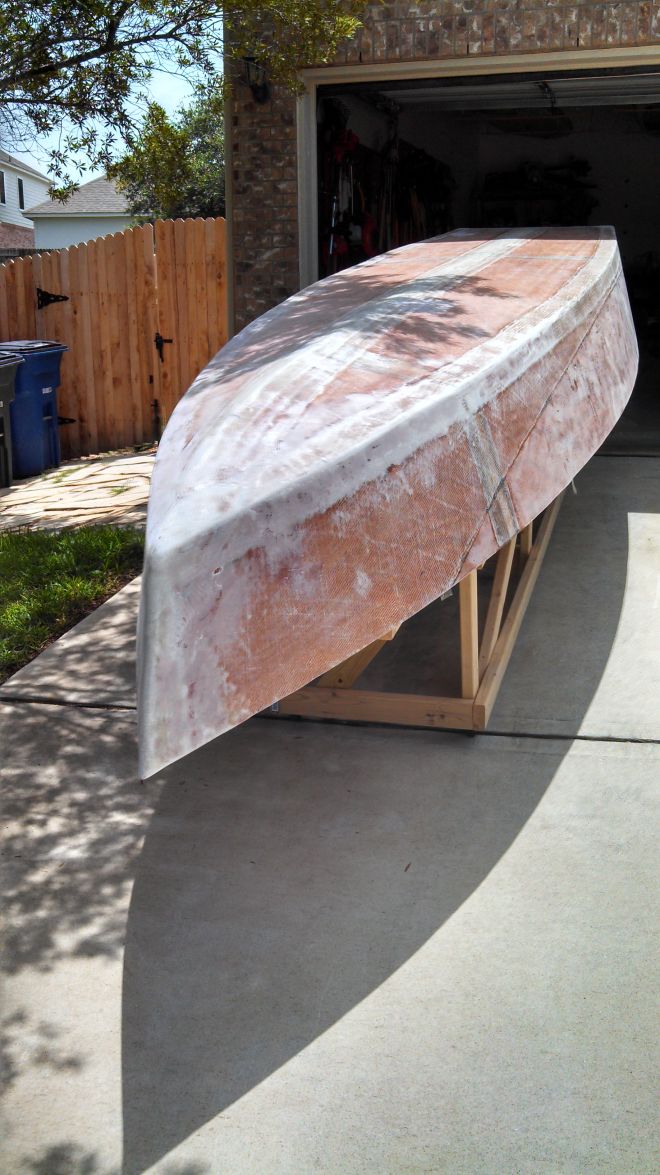
Ya'll know what this means...
Re: Cannonball's FS18
Posted: Tue Apr 23, 2013 9:17 am
by Boater45
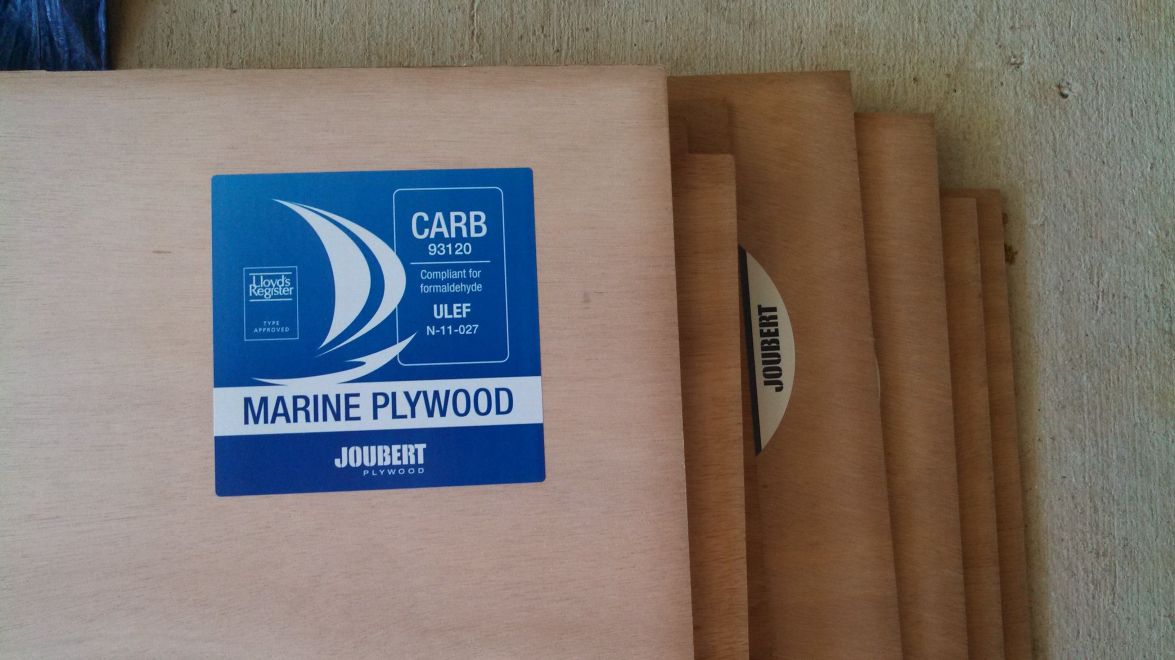
The Lloyd's Register Group is a maritime classification society and independent risk management organisation providing risk assessment and mitigation services and management systems certification.
Joubert Sapele plywood is brown-red in color with rotary cut faces. It is made with Class 3 exterior gluing and complies to BS 1088 and the Lloyd's Register Type Approved.
It's good plywood!!!!

Re: Cannonball's FS18
Posted: Tue Apr 23, 2013 9:44 am
by jacquesmm
It means he got his plywood and will start building a nice boat!

Re: Cannonball's FS18
Posted: Tue Apr 23, 2013 10:01 am
by Boater45
Re: Cannonball's FS18
Posted: Tue Apr 23, 2013 10:25 am
by Cannonball
Yep. The jig is up...
Re: Cannonball's FS18
Posted: Tue Apr 23, 2013 10:48 am
by jacquesmm
No, he is happy to have nice plywood, nothing wrong.
Re: Cannonball's FS18
Posted: Tue Apr 23, 2013 11:35 am
by Cannonball
Sure am. No worries. Ready to get started!
Re: Cannonball's FS18
Posted: Tue Apr 23, 2013 12:13 pm
by tech_support
another FS18

TX is going to have a small armada of FS18's pretty soon
Re: Cannonball's FS18
Posted: Tue Apr 23, 2013 1:15 pm
by tobolamr
TX is going to have a small armada of FS18's pretty soon
That is one heck of a bad pun, but I like it! A "small" armada of FS18's... HA! Thanks for a line that will keep me smiling all day, I really needed it.
Cannonball - Good luck to you! You have a lot of support here to help you get this together!
Re: Cannonball's FS18
Posted: Sun Apr 28, 2013 9:16 am
by JohnC
Hey Cannonball,
Looks like you're off to a good start.
You will find the members of the forum to be very helpful. Did you get the plywood from BBC or elsewhere?
John
Re: Cannonball's FS18
Posted: Sun Apr 28, 2013 8:25 pm
by Cannonball
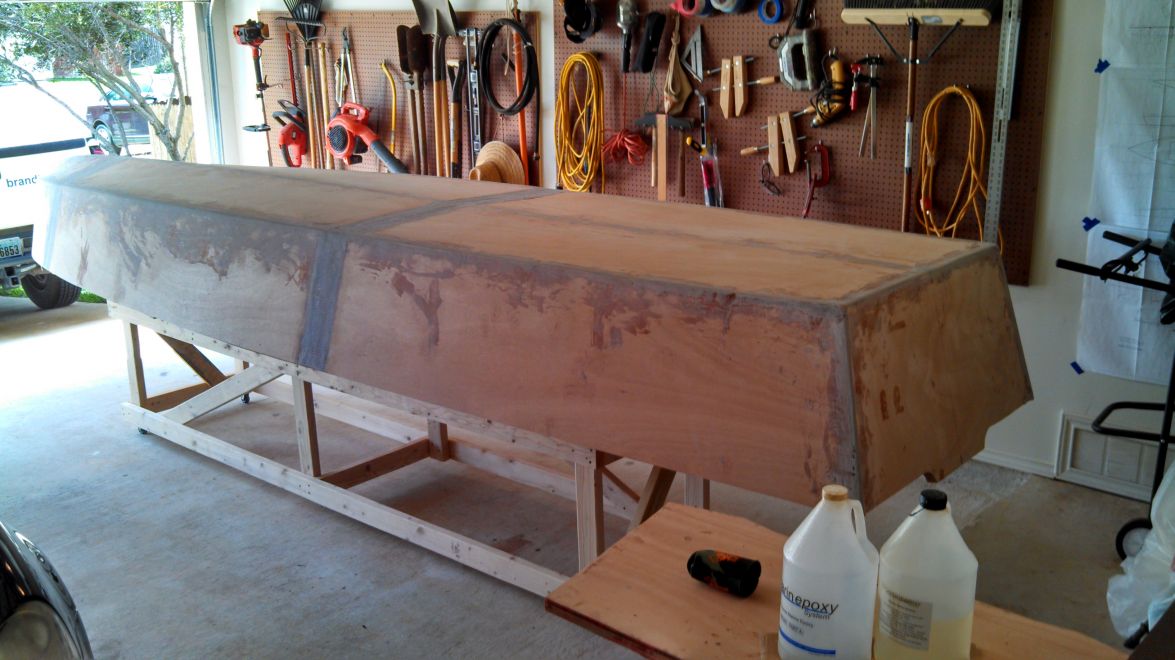
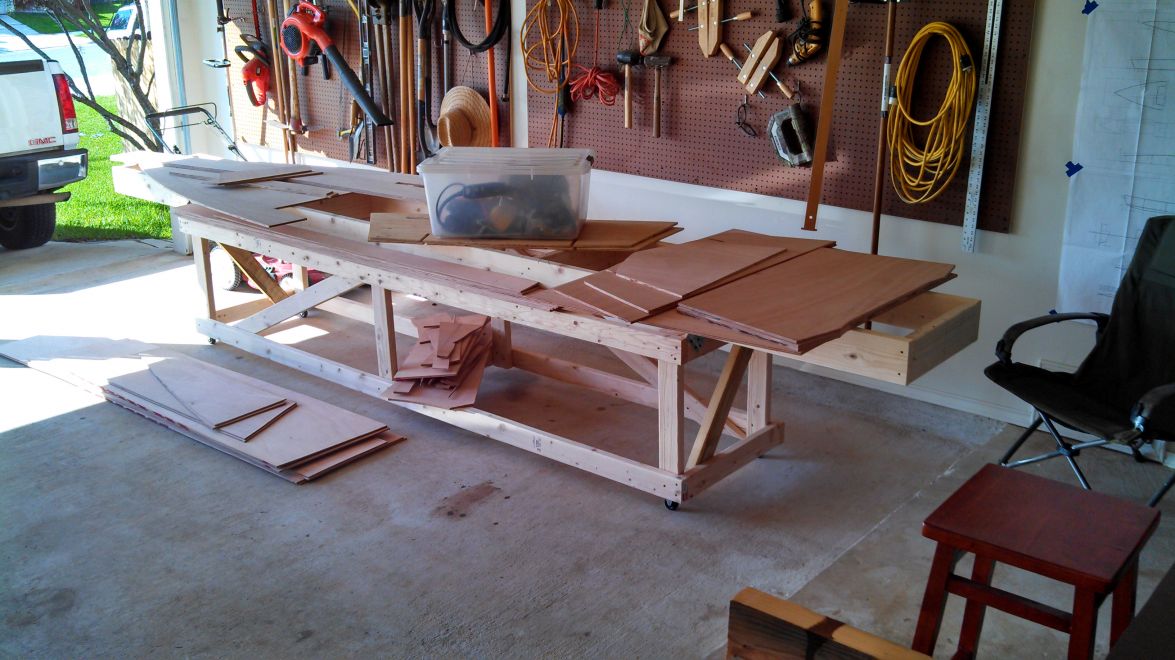
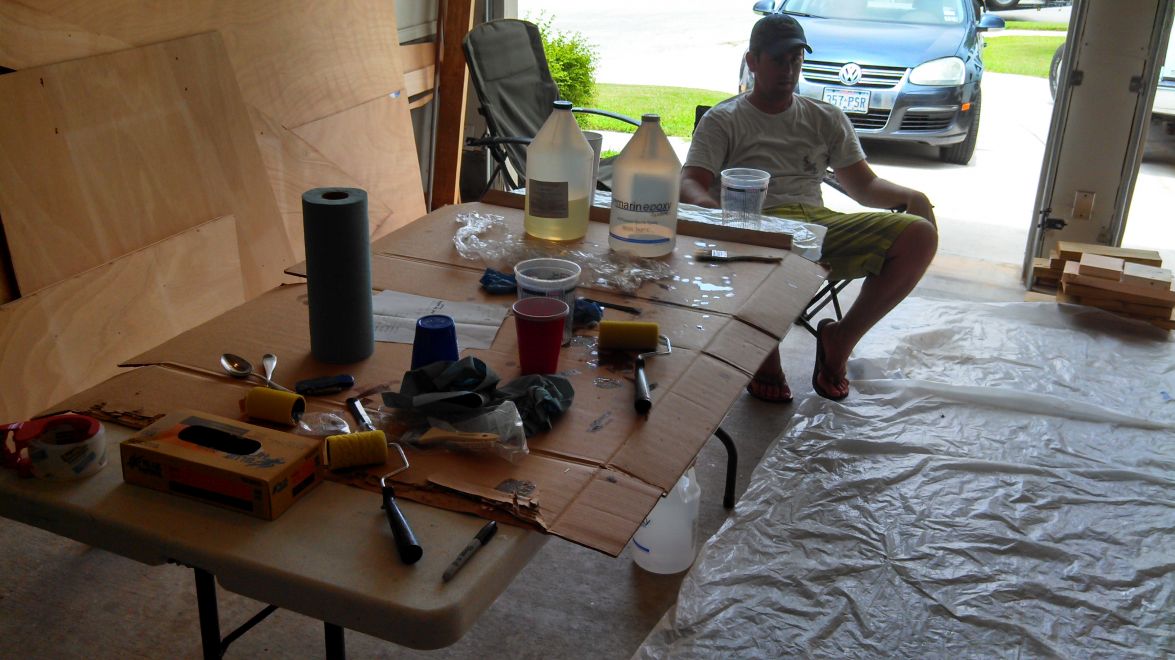
Thanks John. I got the plywood from Houston hardwoods. It was a bit cheaper, but you do have to burn up half a day running to houston and back. Actually just wrapped up cutting out all the parts. Getting this thing on the jig with the hull stitched up is pretty much consuming my life right now. I've got to get some epoxy and glass ordered up tomorrow so I can get the bottom, sides and stringers going. Hoping to have that and the frames standing up on the jig next weekend. Got to get it done before my garage turns into a furnace. Anybody from Texas knows what I'm talking about.
Re: Cannonball's FS18
Posted: Mon Apr 29, 2013 2:35 pm
by Cannonball
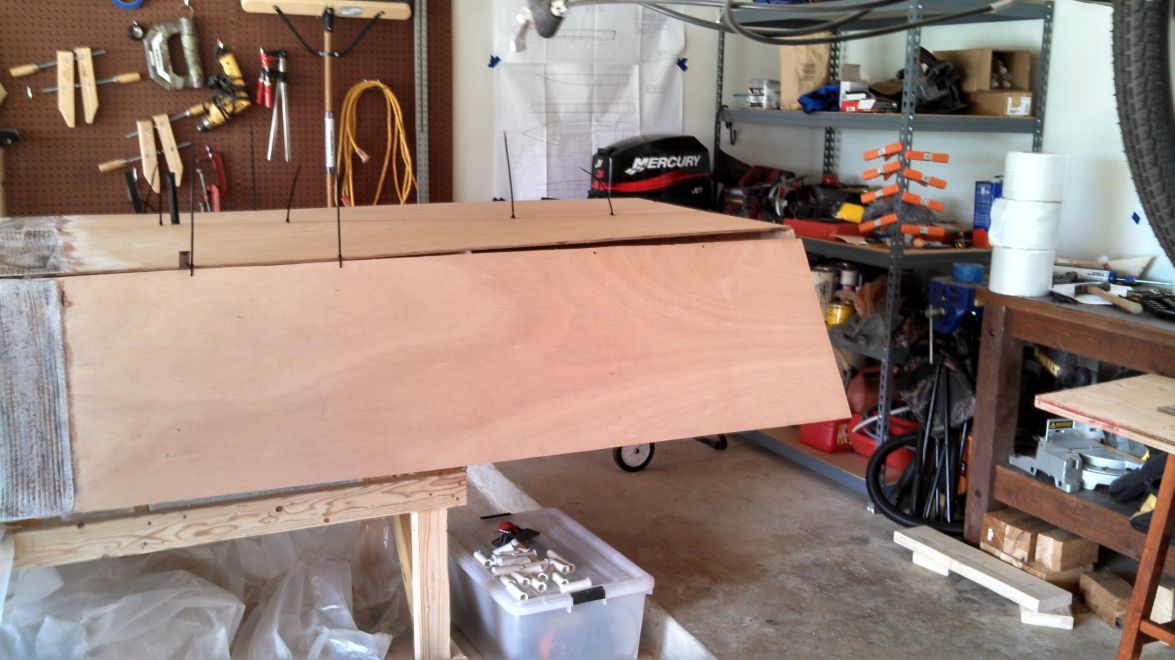
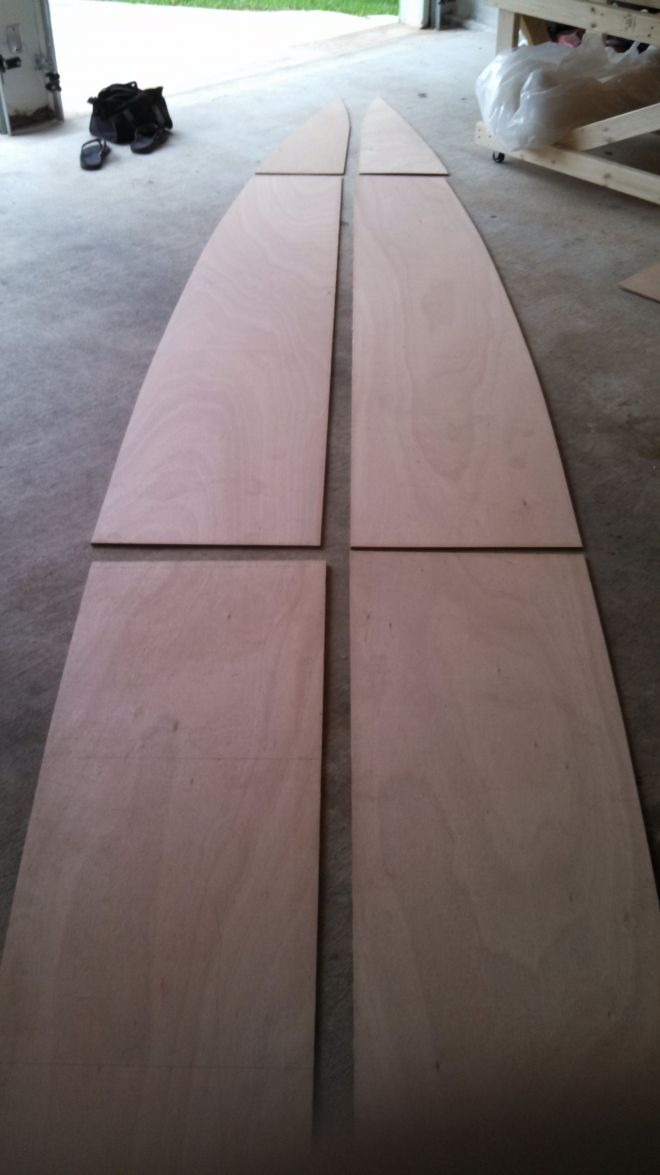
All the pieces are cut up except the sole, rub rail strips and rod holder frames. Amazing how quick you can get all the pieces cut out when you stick to the plan! After attempting my own design in CAD and models, I have no desire to deviate from the plans at all. It's a proven design, and I like to think less and do more. I may try it without the sole for a while and see how it works. I figure I'll be standing on the rear platform 90% of the time anyway, dunno yet.
Re: Cannonball's FS18
Posted: Mon Apr 29, 2013 5:04 pm
by reiko1078
looking forward to following this build! why no sole??????
Re: Cannonball's FS18
Posted: Mon Apr 29, 2013 5:17 pm
by Cannonball
I'll probably end up with it. This is my first build, and I was a little iffy about using 1/4" for the sole. Just seems pretty thin so I left off buying that piece until I can test it out with a piece of scrap. Plus I plan on using a jet and seems like 4 gals of foam + sole + glass would be quite a bit of weight that is really not necessary, but would be nice. No harm in trying it out without it, and then installing later.
Re: Cannonball's FS18
Posted: Mon Apr 29, 2013 6:58 pm
by Cracker Larry
I used 3/8 Okume for the sole in the FS18 I built. It's solid as a rock and not very heavy. A solid sole makes walking around the boat a LOT more comfortable, no stringers and frames to trip over, plus it stiffens the boat a lot and keeps the deck dry. I would plan on it, myself.
Re: Cannonball's FS18
Posted: Tue Apr 30, 2013 2:58 pm
by AtTheBrink
I used 3/8" on my sole, filled all the space underneath with foam and it it rock solid. I probably could have saved some weight and used 1/4". And Larry is right about the sole stiffening up the hull, no twisting or flexing after it is glued and taped in. Foam and 1/4" ply would be my recommendation. Or maybe honeycomb panel and no foam. But the foam sure makes it quiet, important in shallow water fishing.
Re: Cannonball's FS18
Posted: Wed May 01, 2013 12:44 am
by CObob
All the builds i see they foam, then glue down the sole. Why not glue it down, pour in foam to bind everything together, then cap with a solid sheet of glass? I had good results doing this on a false-floor i put in a gheenoe. This would provide a little support to the 1/4" without any voids, glues it all together, and you avoid shaving the foam down and opening the cells. You of course need to pour conservatively, allow plenty of escape routs, and weight the heck out of the sole while it cures.
Saw your Craigslist add Cannonball, i'm up in Austin and will ask to come down some time and see the build.
Re: Cannonball's FS18
Posted: Wed May 01, 2013 7:13 am
by Cannonball
All of y'all have some good ideas, now I just need to decide which one to go with. I would prefer to make it work with the 1/4 since I would only have to buy one more less expensive piece. Even if I need to do a bit extra glassine to stiffen it up. I like the thought of putting the sole on and pouring the foam underneath, but if the floor did any kind of heave ho while the foam was curing I'd have a whole bunch of messy rework to contend with.
Your welcome to check it out anytime CObob. Youre Johnny on the spot on the Craigslist, just posted that yesterday. Hopefully something comes of it.
Re: Cannonball's FS18
Posted: Wed May 01, 2013 8:50 am
by Cracker Larry
I like the thought of putting the sole on and pouring the foam underneath, but if the floor did any kind of heave ho while the foam was curing I'd have a whole bunch of messy rework to contend with.
Very bad idea
Don't do it.
Re: Cannonball's FS18
Posted: Wed May 01, 2013 10:34 am
by AtTheBrink
Cracker Larry wrote: I like the thought of putting the sole on and pouring the foam underneath, but if the floor diis d any kind of heave ho while the foam was curing I'd have a whole bunch of messy rework to contend with.
Very bad idea
Don't do it.
+1!!!
This foam is powerfull stuff! It will buckle and deform your floor at the least and break the floor or deform the hull at worst. If you foam it, put in the 1/4" sole and then cover that with 6 or 10 oz glass and it should be solid solid.
Re: Cannonball's FS18
Posted: Wed May 01, 2013 10:30 pm
by CObob
Listen to these guys, there are some serious risks. I'll post some
Pics up on another there's some time. I want to see some progress this weekend!
Re: Cannonball's FS18
Posted: Sat May 04, 2013 8:30 pm
by Cannonball
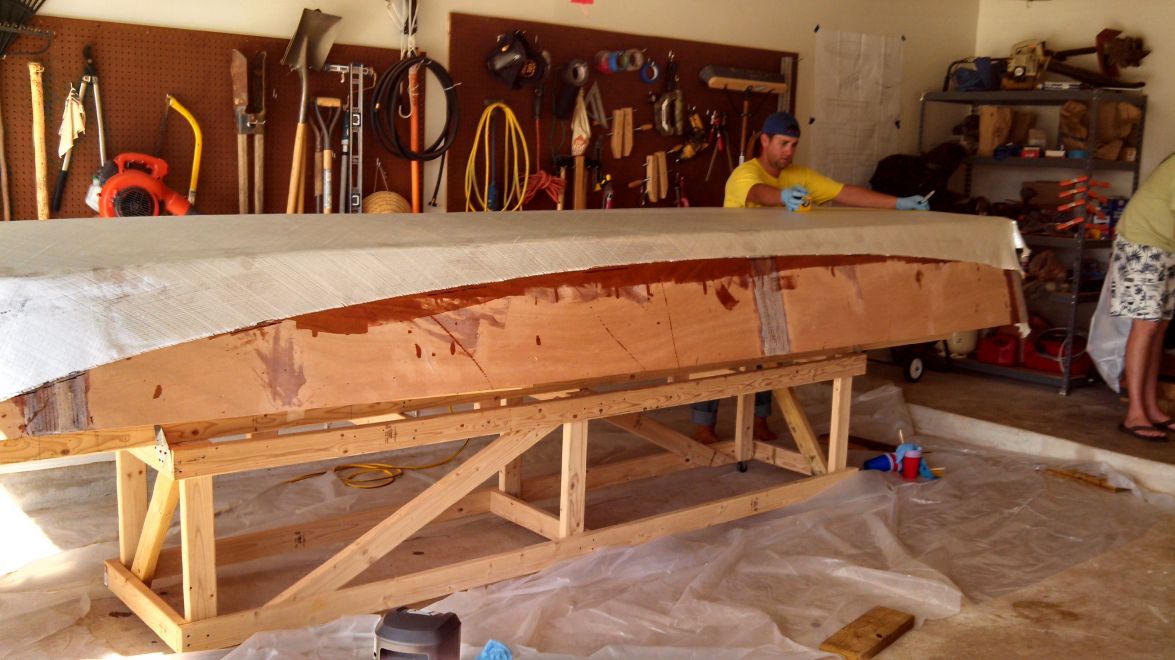
Ask and you shall recieve...
Re: Cannonball's FS18
Posted: Sat May 04, 2013 8:33 pm
by Cannonball
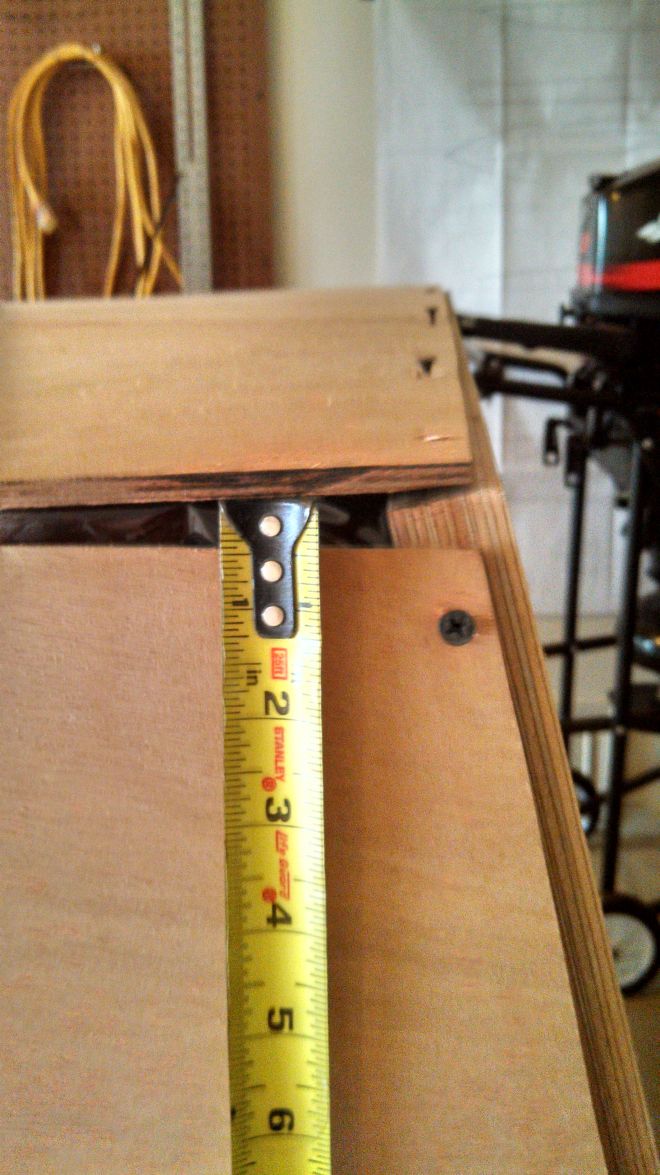
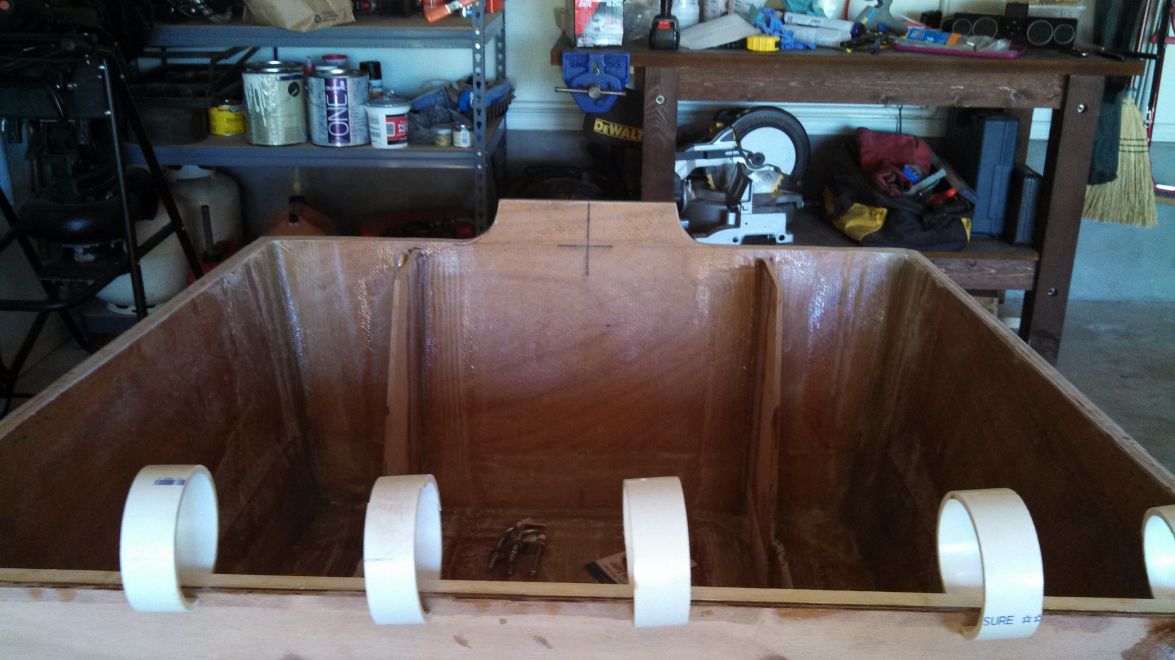
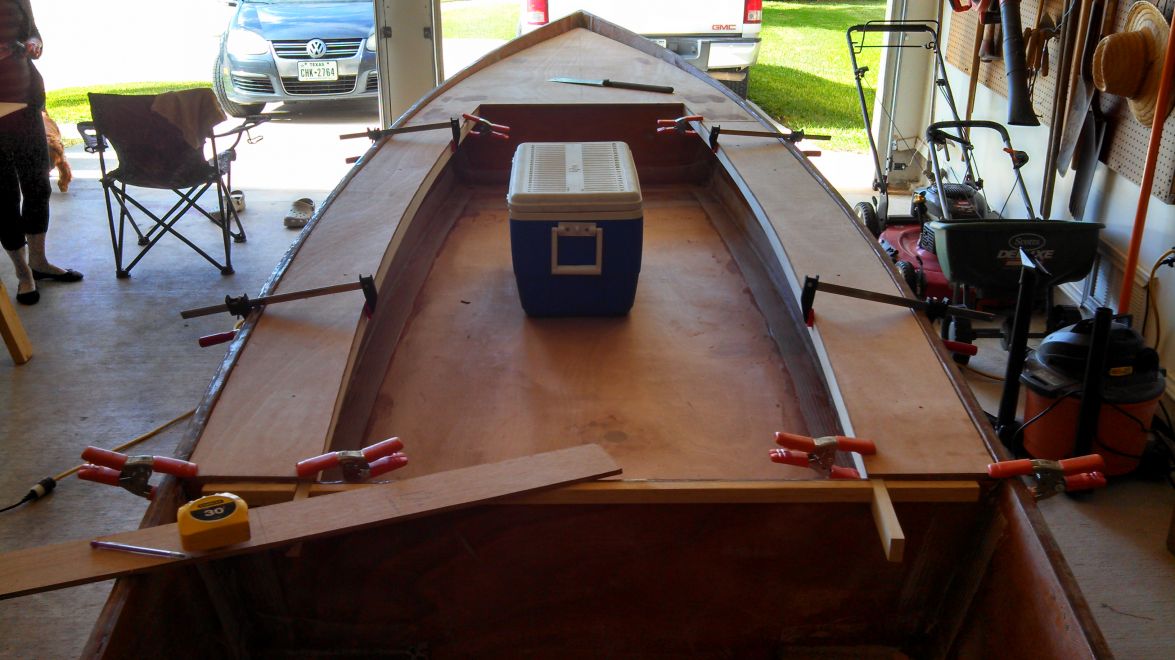
Also made a bit of progress. Interested to know what others used for their battens. The specified 1x1's or 1x2's? Didn't even catch that note until after I already started on them with 1x2's, No big deal to rip them down though.
Re: Cannonball's FS18
Posted: Sun May 05, 2013 2:00 am
by antoniekruger
Cracker Larry wrote: I like the thought of putting the sole on and pouring the foam underneath, but if the floor did any kind of heave ho while the foam was curing I'd have a whole bunch of messy rework to contend with.
Very bad idea
Don't do it.
Hi, good to see another fresh build. I'm a little further than you, but have stopped. I'm waiting for my shop vac to arrive since the glass dust is killing me, although I wear a decent mask and goggles.
Some people just learn by making the mistakes themselves - yip, that's me. I built the CC14 canoe and built a little box as a seat. I filled this box with foam and covered the lid before the foam was fully expanded(OK, its a very small area). I taped the seat lid down with 200g woven. I started finishing and painting the boat. By day 2 I noticed that the foam had broken open the epoxy glue and pulled open the seam.

I'll foam my CS23 under the sole, but I'll give it enough time to expand and shape it back from there.
Good luck with the build, buddy. I like the jet drive. I've never seen one of those, very cool.
Re: Cannonball's FS18
Posted: Sun May 05, 2013 8:38 am
by Dougster
I'll second that on the cool jet drive. I've never seen one up close or been on one. More intimidating is how neat your shop area is
Dunno how you manage that. I'm in New Braunfels often and hope to get a peek at your build one day. Seems like lot of folks like that FS18.
Over here in Blanco Dougster
Re: Cannonball's FS18
Posted: Sun May 05, 2013 10:06 am
by Cracker Larry
Interested to know what others used for their battens.
I used 1X1s, actually 3/4X3/4. This boat requires a lot of cleats and the weight difference between 1X2 and 1X1 would be significant.
Looking good
Re: Cannonball's FS18
Posted: Sun May 05, 2013 10:13 am
by vgant
Same as Cracker Larry. Ripped 1x1 (3/4 x 3/4) from clear 1x6's. It takes a bunch, I'm going to need to make some more soon.
Re: Cannonball's FS18
Posted: Sun May 05, 2013 11:16 am
by Cannonball
Thanks for confirming that one guys. I've got to remember, just stick to the plan!
Your welcome to check it out Doug. I come from a long line of contractors, and it doesnt matter if it's at work or home a clean work area always makes you work safer, smarter, and faster.
Re: Cannonball's FS18
Posted: Sun May 05, 2013 11:50 am
by Cracker Larry
a clean work area always makes you work safer, smarter, and faster.
Smart man
Re: Cannonball's FS18
Posted: Sun May 05, 2013 4:53 pm
by CObob
Cannonball wrote:Ask and you shall recieve...
that didn't take long. Is that built on a 25hp frame or the 40-60?
I spent 8 months searching for a gheenoe anywhere in Texas and finally posted a WTB add in frustration; bought one locally by the end of the day.
Here are some pics on the foamed floor, i think they are around page 3
http://www.customgheenoe.com/forum/view ... 3&start=30
Re: Cannonball's FS18
Posted: Sun May 05, 2013 6:07 pm
by Cannonball
It's the 20 jet from the factory. I actually found the add after I posted my wtb add, it made for good juju anyway.
Re: Cannonball's FS18
Posted: Sun May 05, 2013 10:37 pm
by CObob
Awesome find, I have a basic repair manual that should cover it if you ever decide to work on it
Re: Cannonball's FS18
Posted: Mon May 06, 2013 12:50 pm
by AtTheBrink
vgant wrote:Same as Cracker Larry. Ripped 1x1 (3/4 x 3/4) from clear 1x6's. It takes a bunch, I'm going to need to make some more soon.
+1
good clear 1×6's or 1×4's. Get the good stuff, the cheap stuff will warp and break and has lots of knots. No fun to deal with.
Re: Cannonball's FS18
Posted: Sun May 12, 2013 6:58 pm
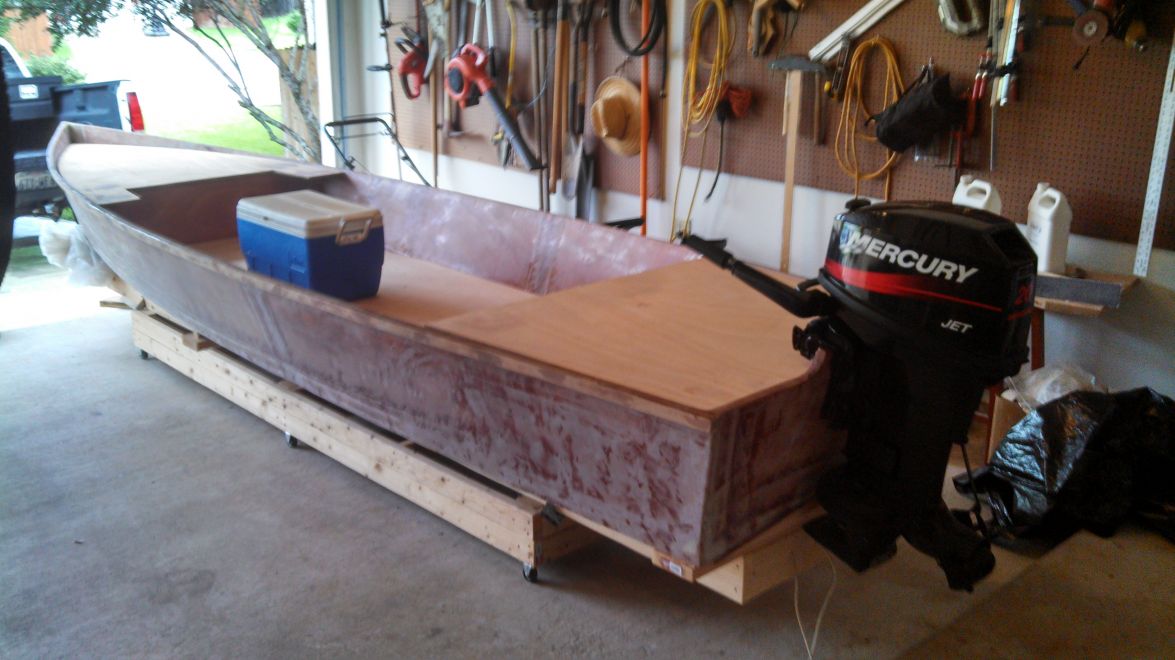
by Cannonball
Boat Builder Supply is where it's at. Ordered my fs18 glass kit on Tuesday and it showed up Friday. Thought I was going to miss a weekend of production without the epoxy, but it got here just in time...
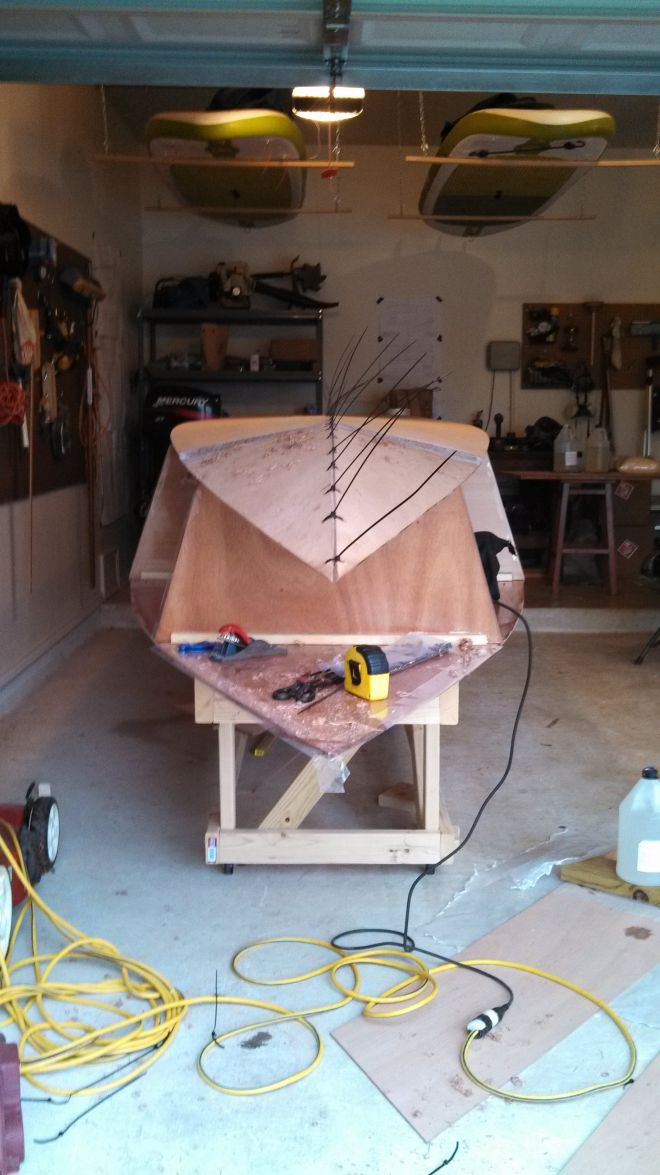
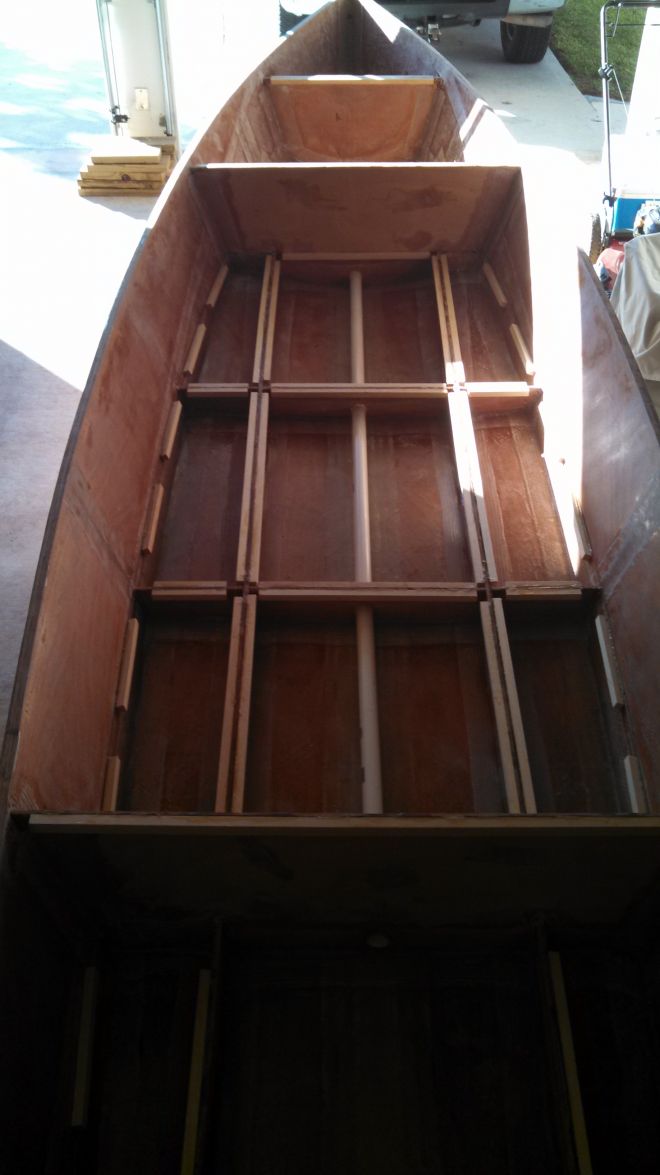
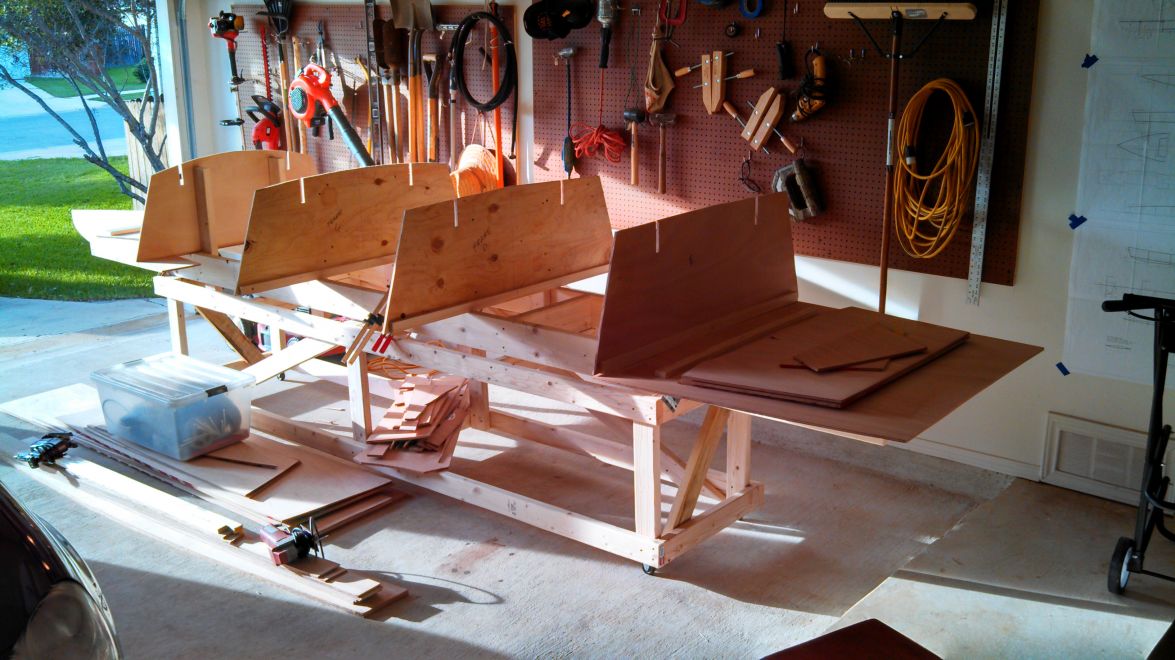
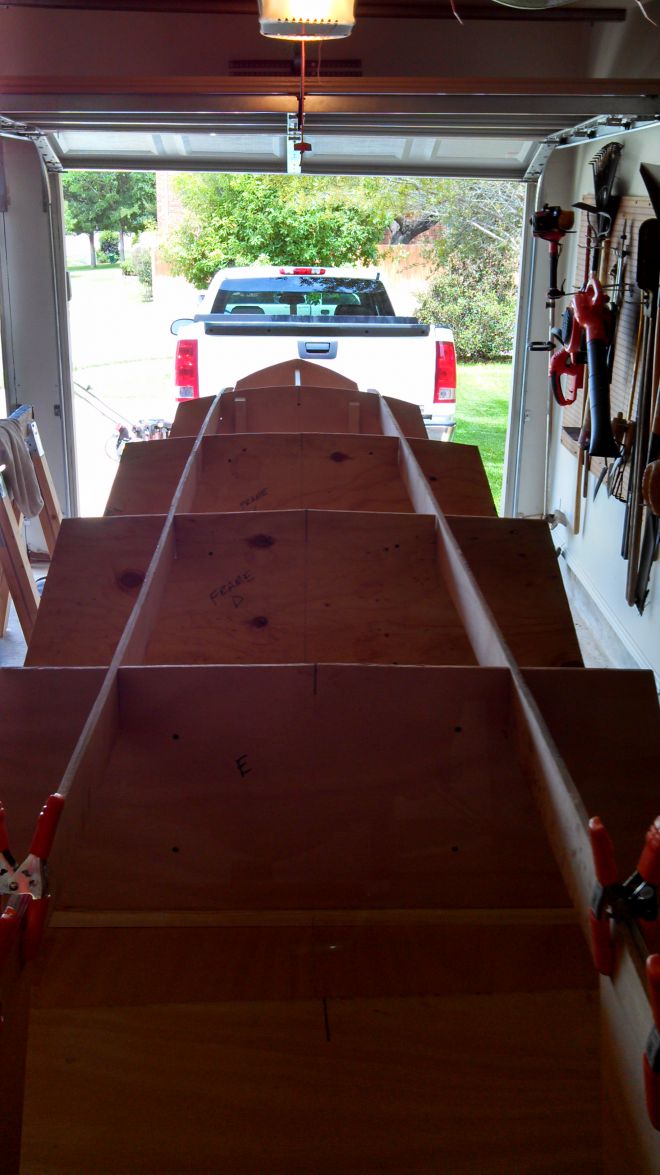
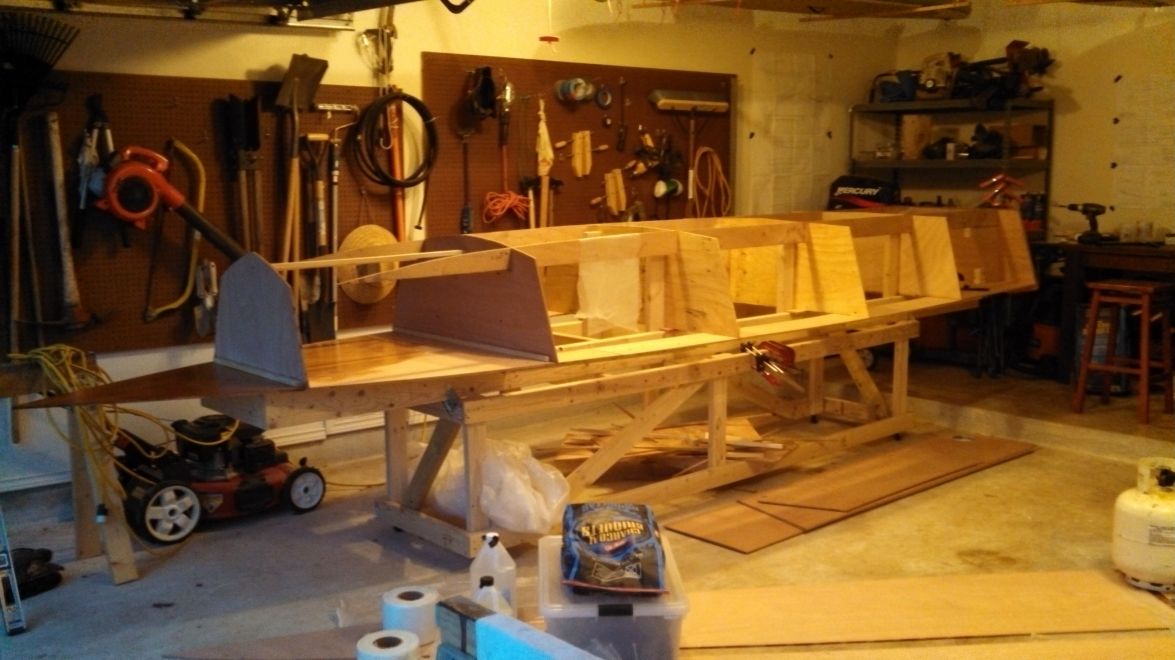
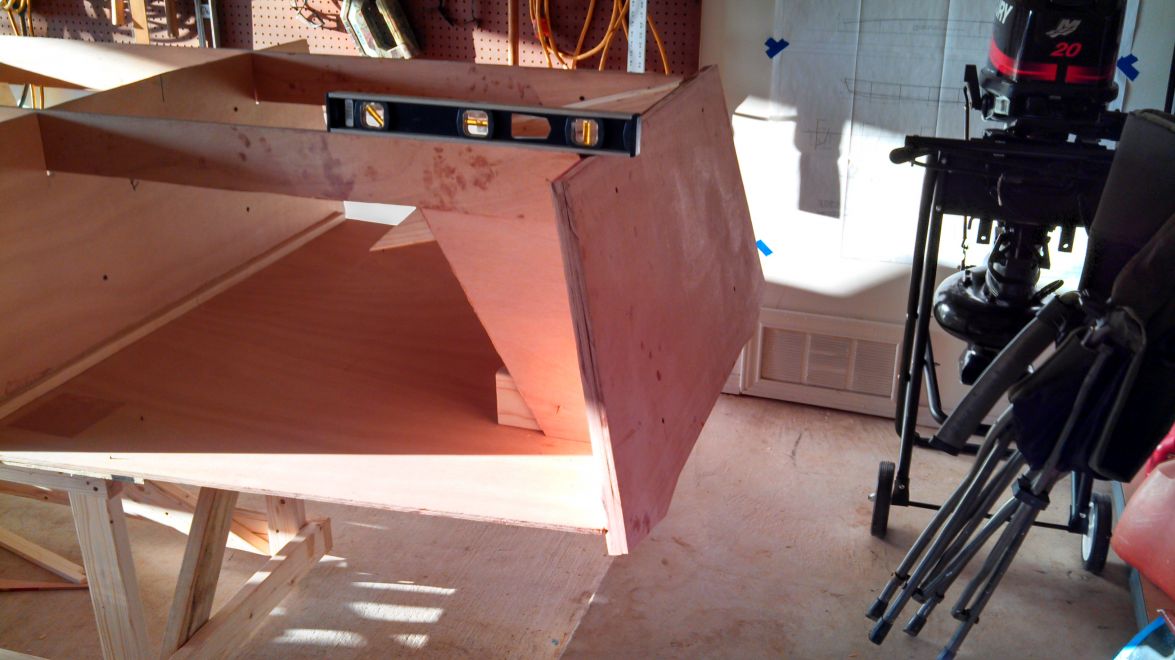
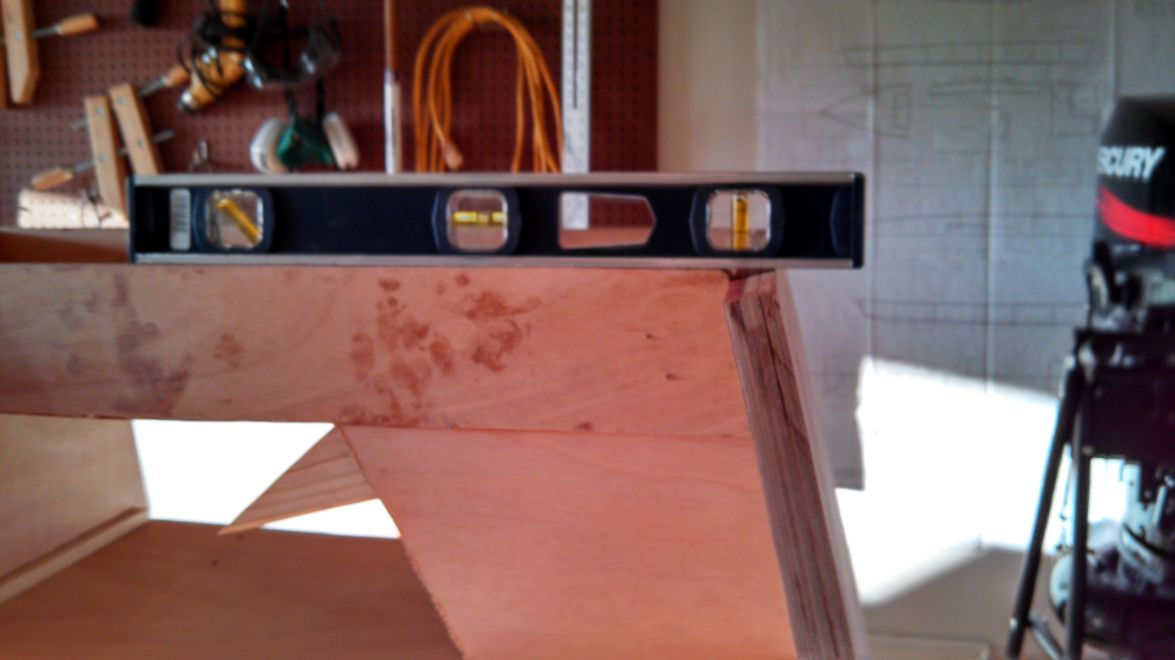
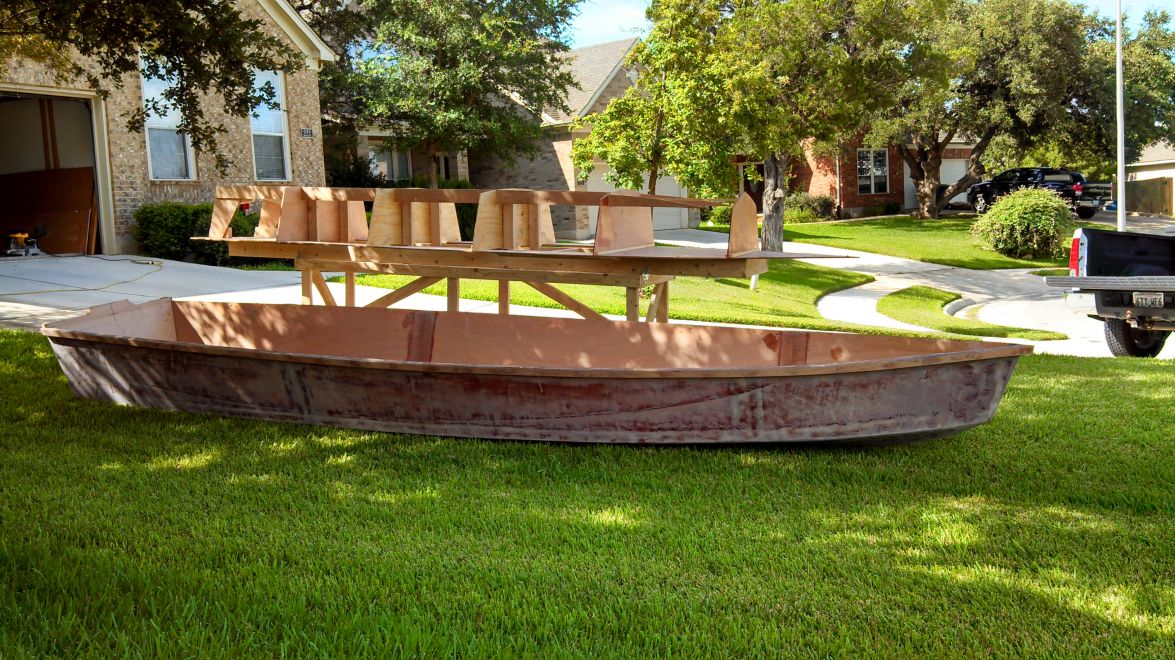
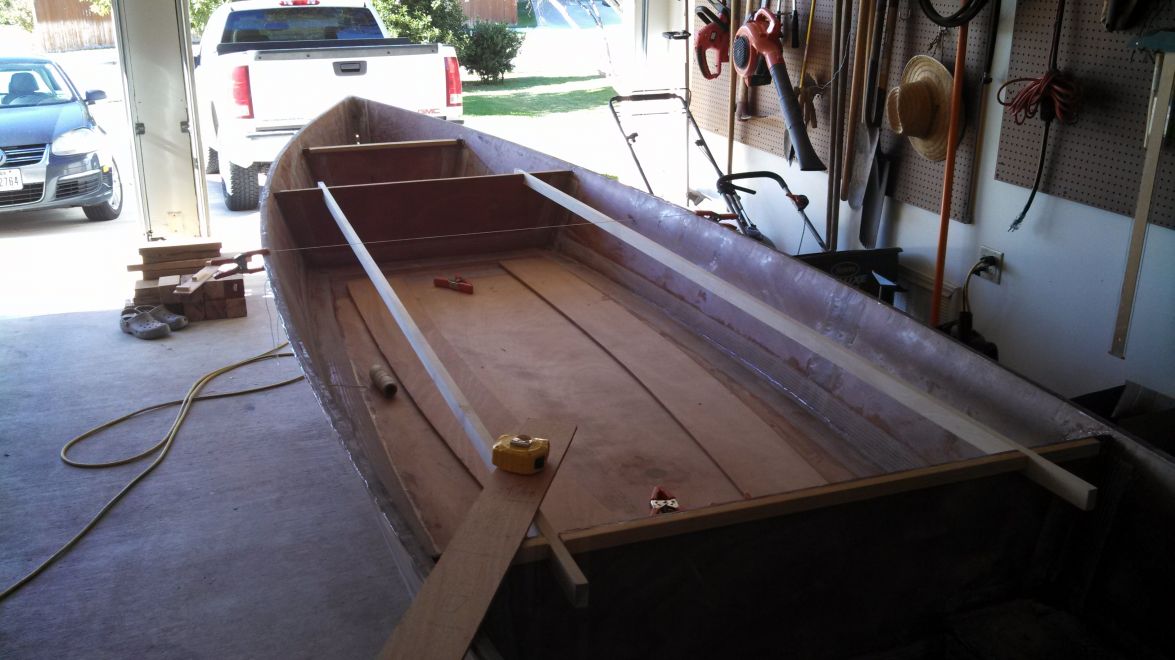
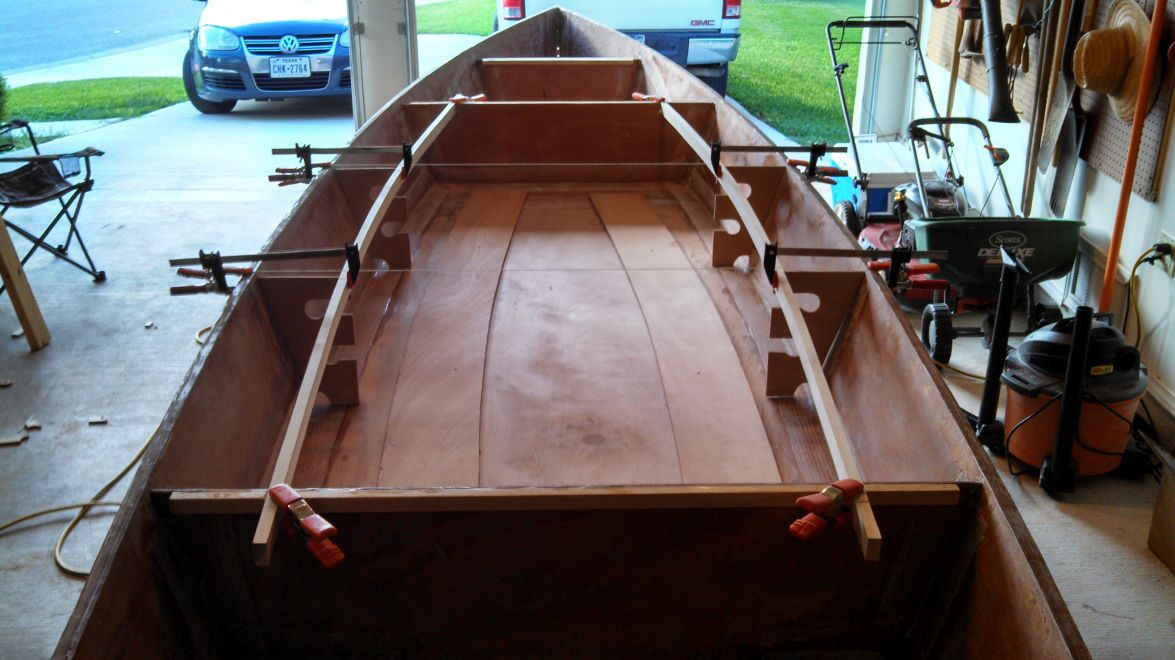
Framing is 90% complete...

This is a true testament to the design. I did no pre-planning, just followed the plan, cut everything up and stood it up on the center line. After getting pretty efficient with hullform trying to attempt my own design and finally giving up over frustration, I really appreciate this and it has taken loads of the pressure off. I'm having a blast. Perfect...
Up next bottom and sides. Stay tuned...
Re: Cannonball's FS18
Posted: Mon May 13, 2013 10:32 am
by AtTheBrink
If you can cut and install a bow mold now. I wish I had done one on mine. It will eliminate a droopy bow and make forming thekeel at the bow much easier. Your build looks great so far!
Re: Cannonball's FS18
Posted: Mon May 13, 2013 9:32 pm
by Cannonball
Thanks mike. It's coming along real nice, if the epoxy hadn't shown up for me to take advantage of a free weekend it would have set me back at least two weeks. Got an engagement party on the island in your neck of the woods this weekend. Dont think ill be able to come by this time though, its going to be in and out. How would you come up with the dimensions for a bow mold? I was thinking just block up the bow, fit it with a stitch and move on, but I agree if it comes in the cnc kit you would think it important for us to include as well.
Re: Cannonball's FS18
Posted: Mon May 13, 2013 9:48 pm
by AtTheBrink
My best guess for making a bow mold would just be trial and error. Not sure how to do it any other way. Maybe you could sweet talk Jacques into giving you some measurements to get you started? Or even better, a drawing!
If you do get a chance to stop by, please do. Just shoot me an email and I can get you my contact info.
Re: Cannonball's FS18
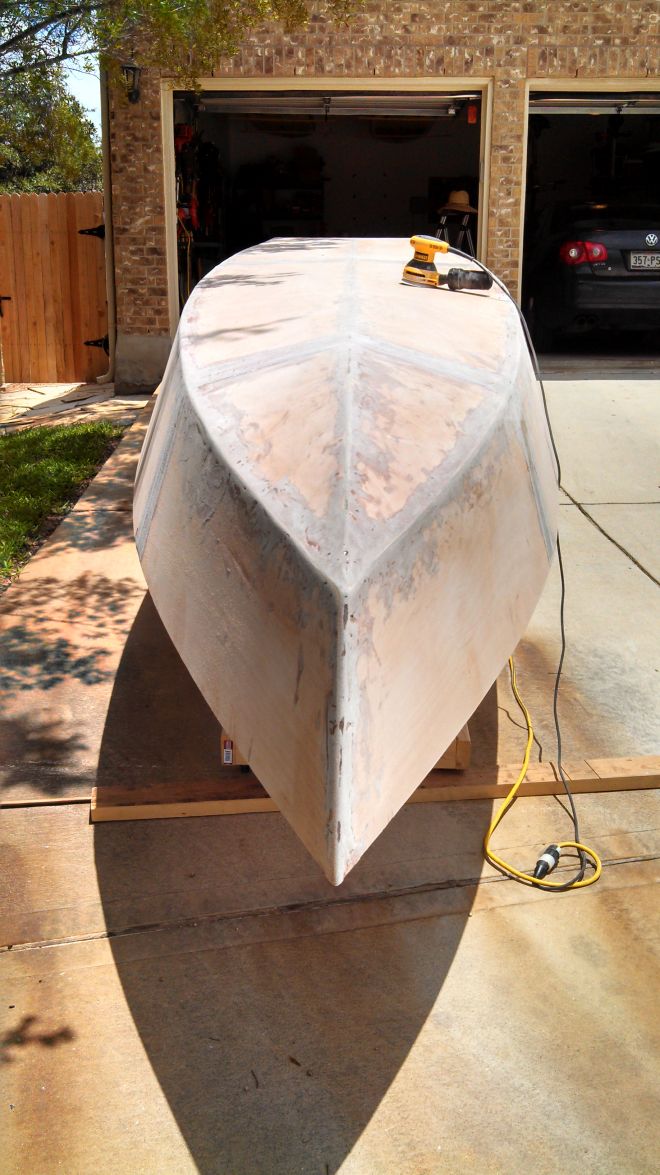
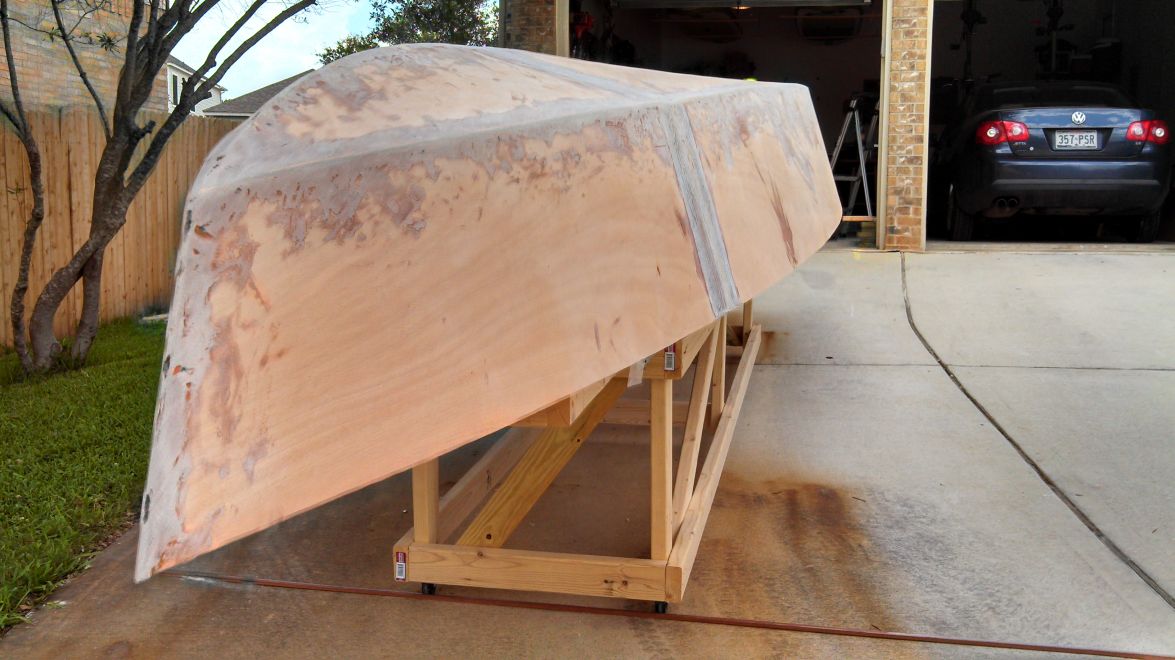
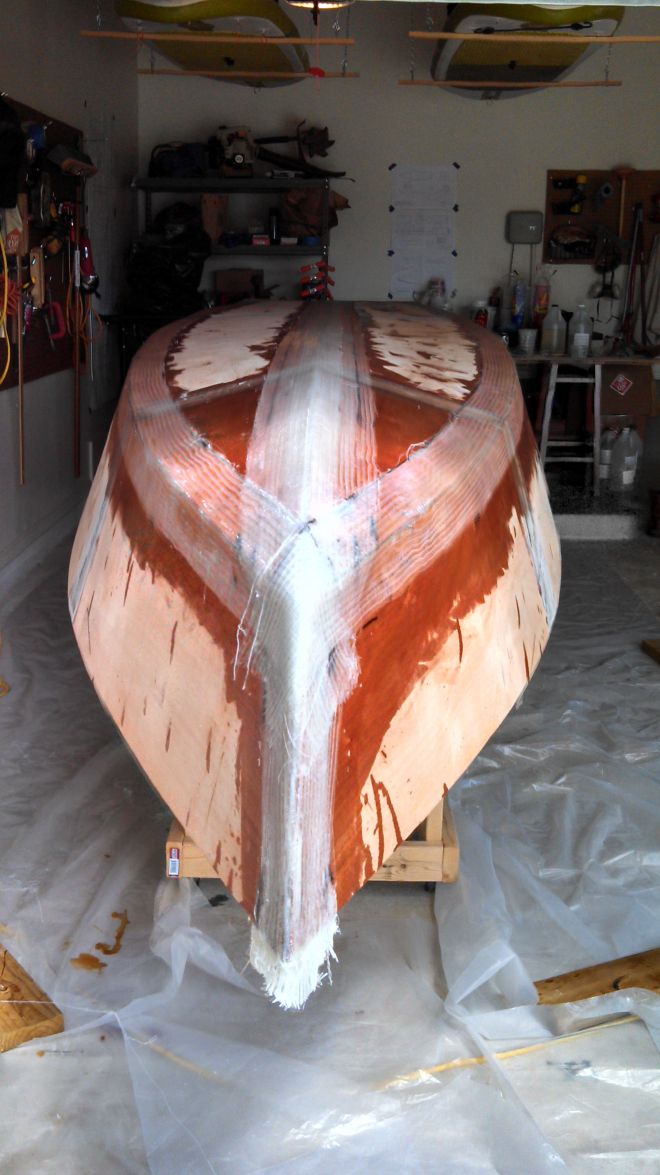
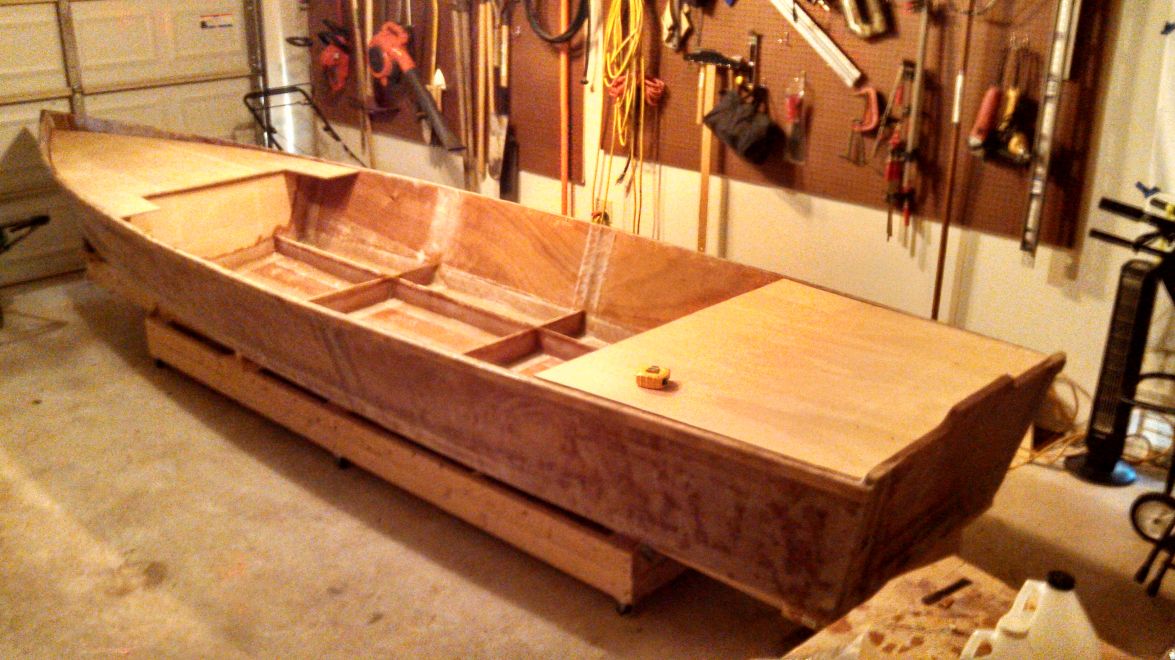
Posted: Thu May 16, 2013 8:16 am
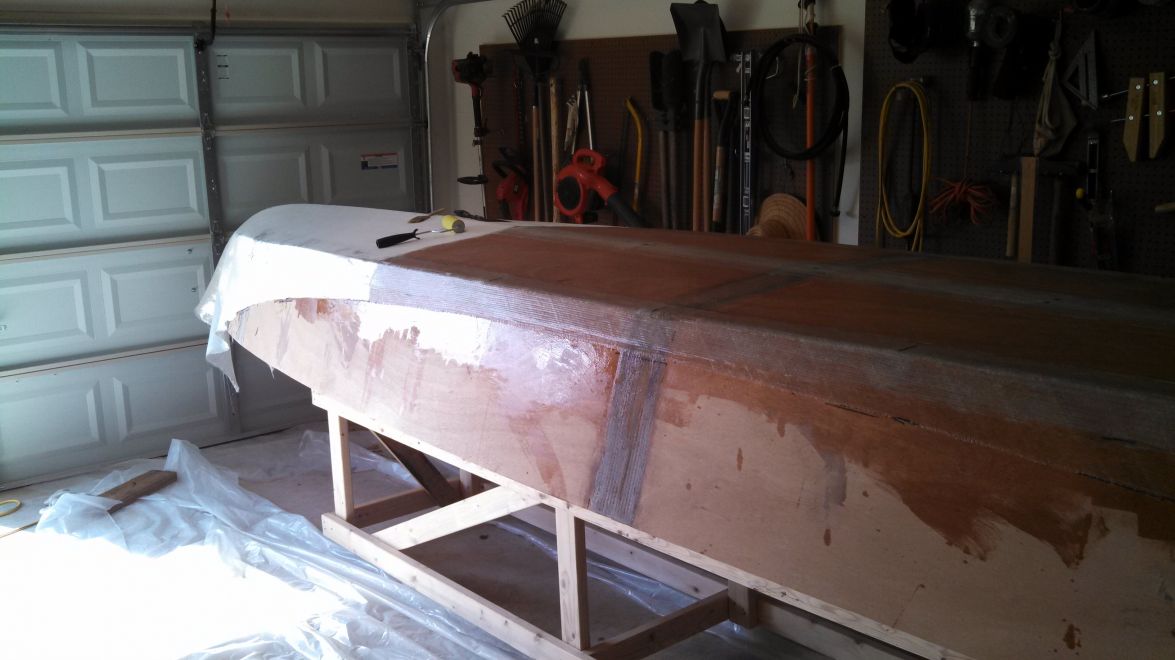
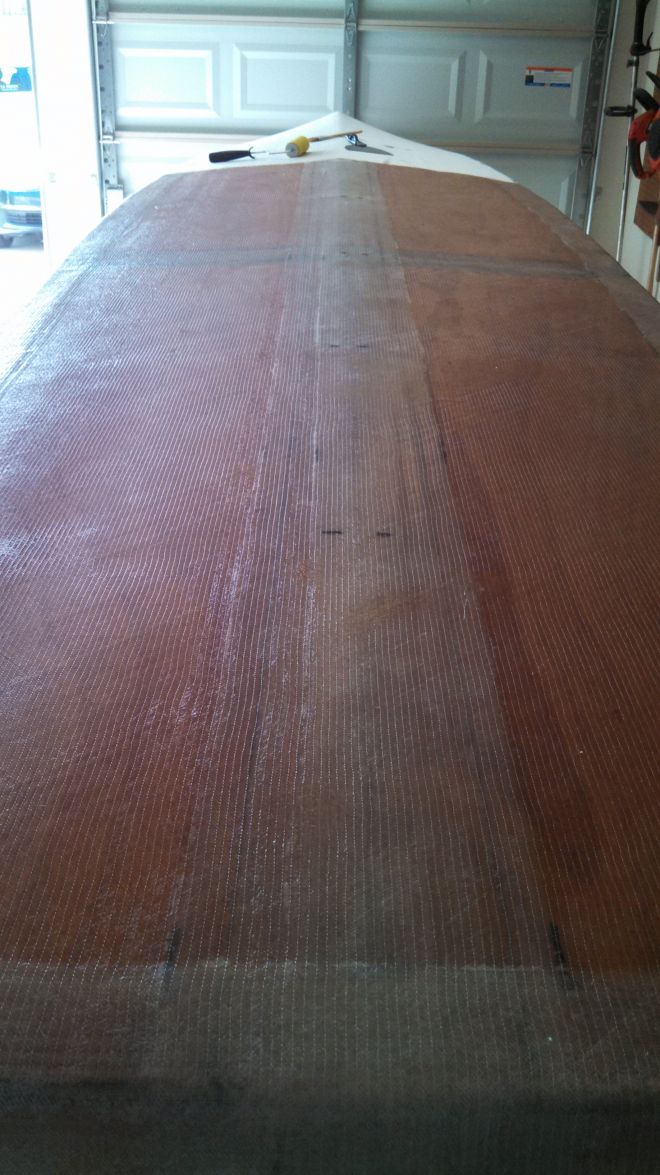
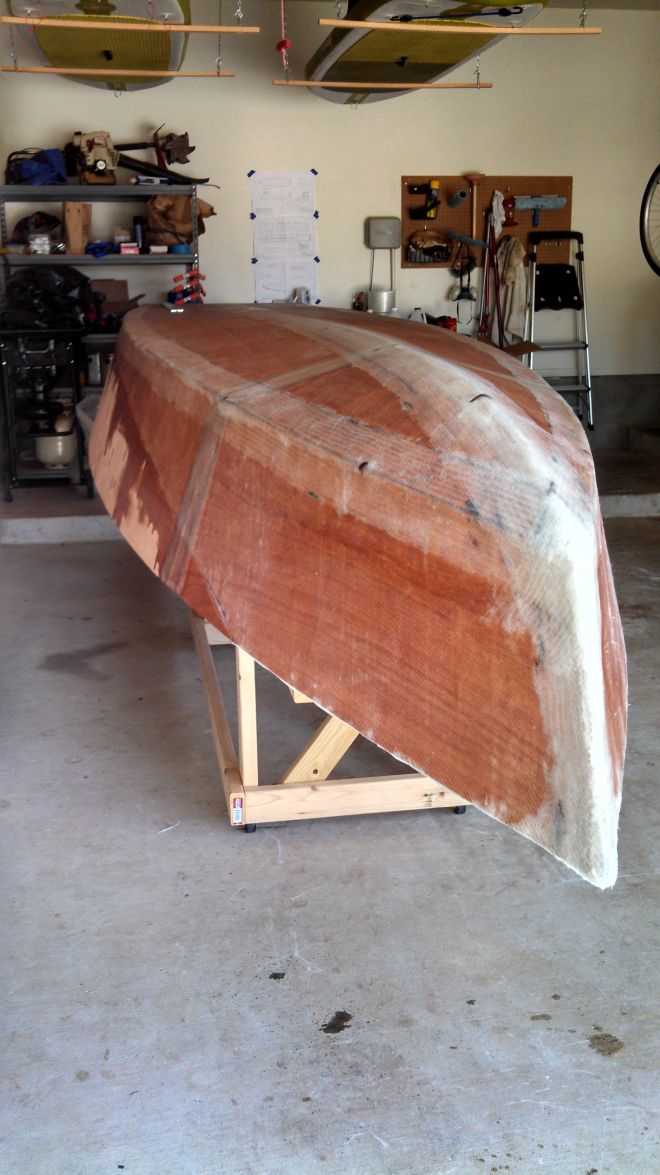
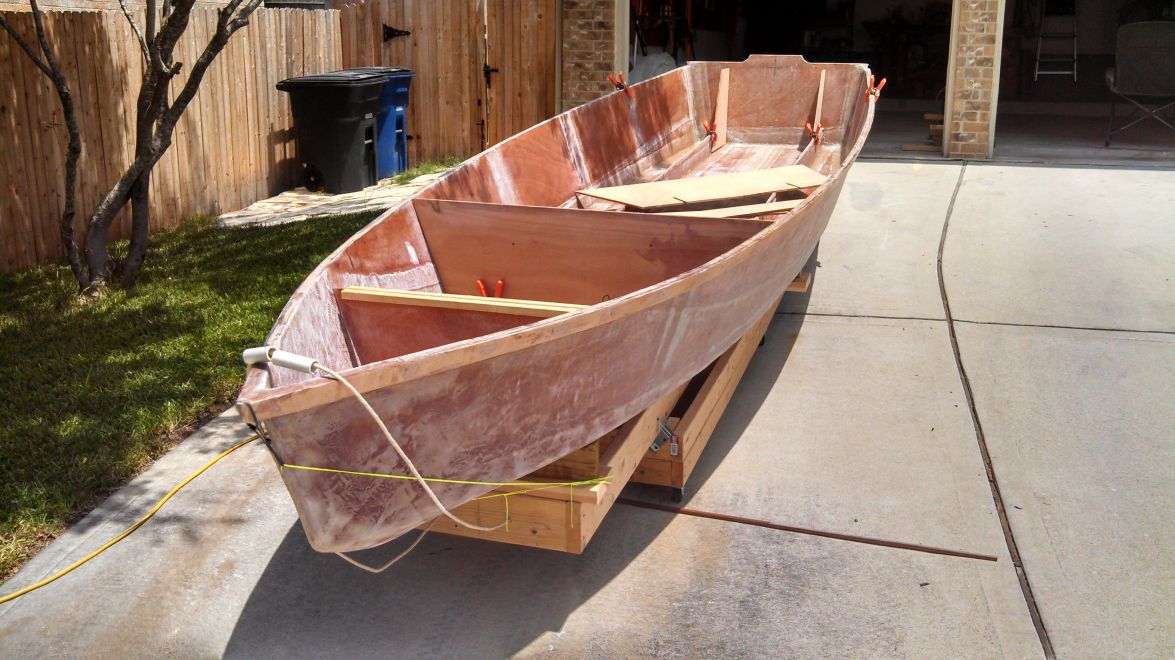
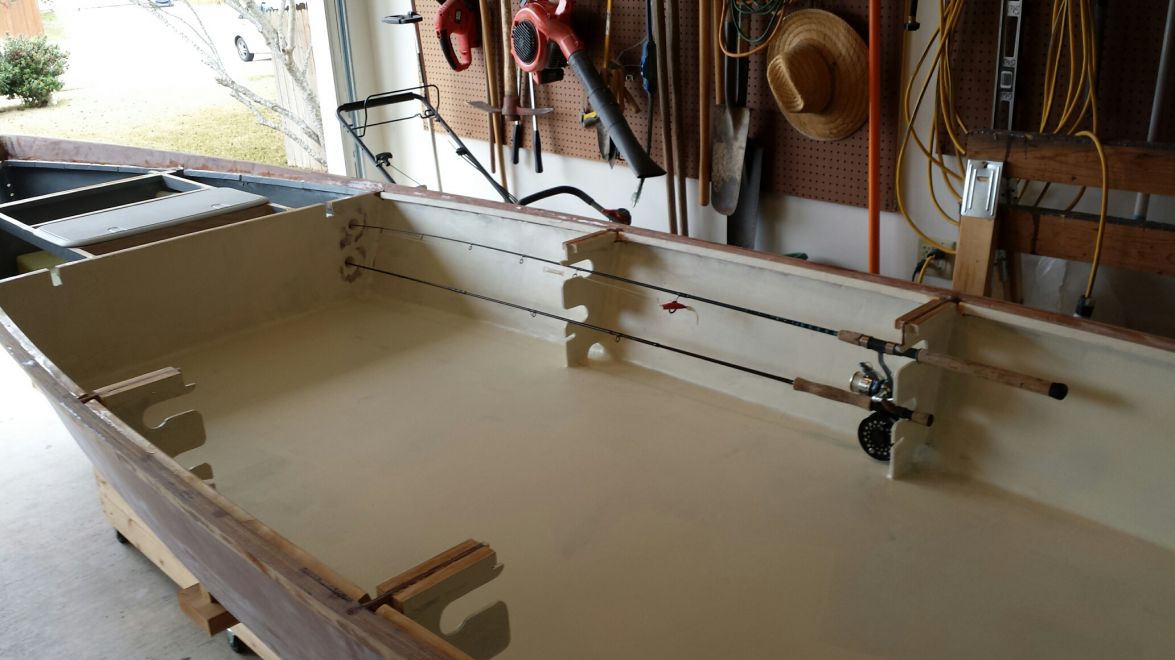
by Cannonball
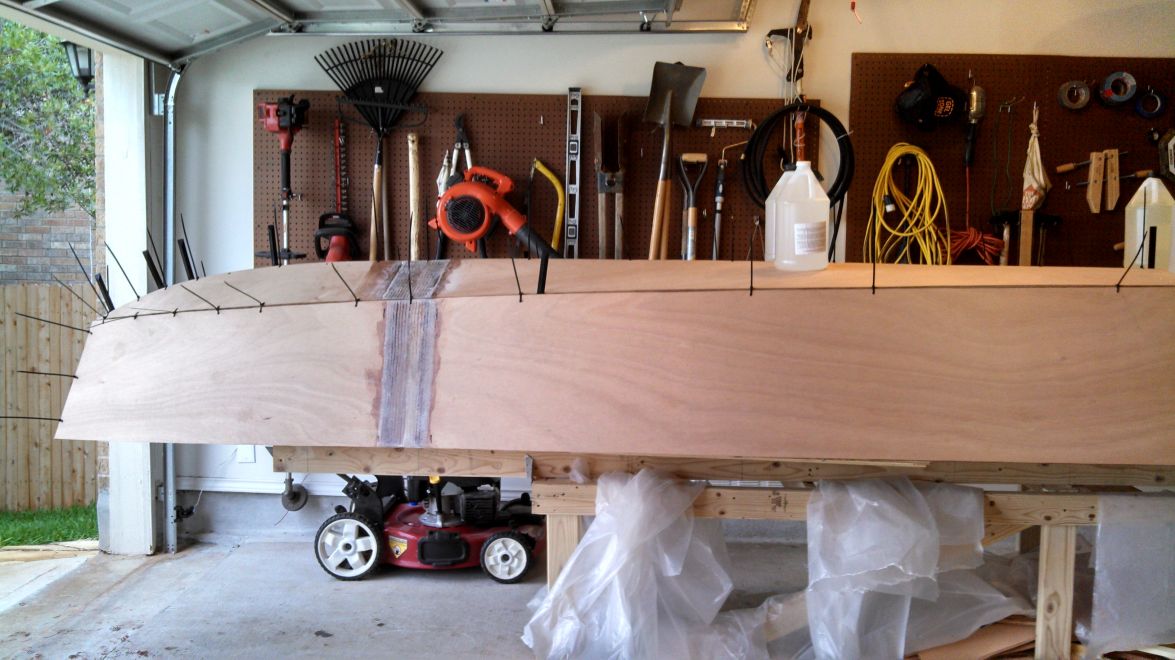
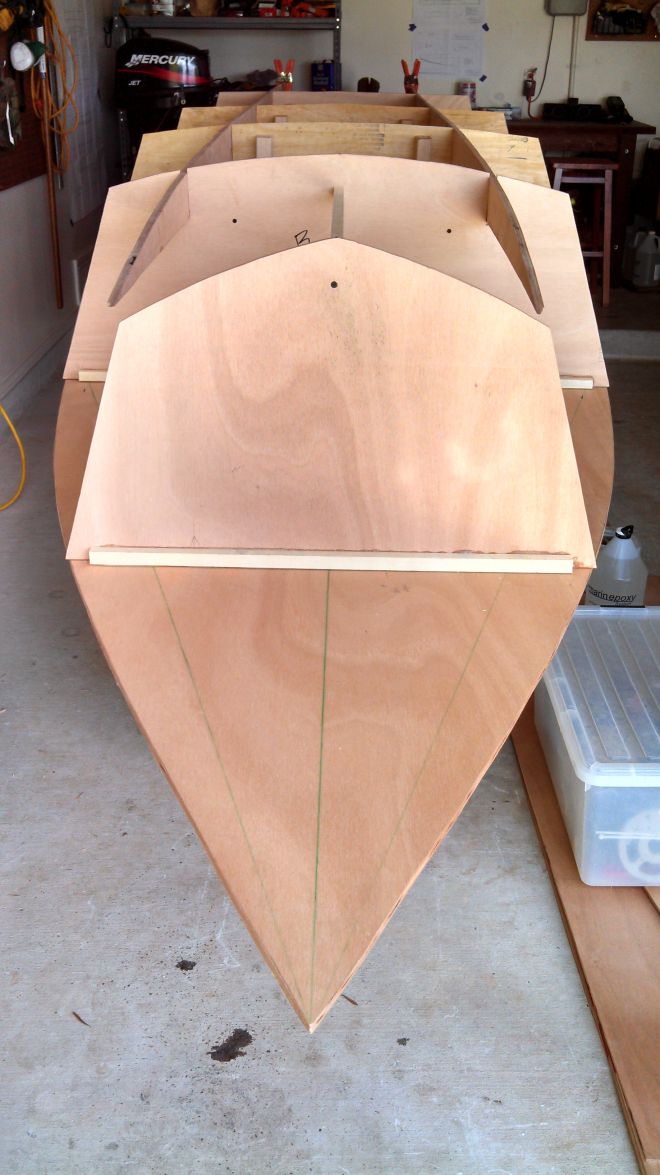
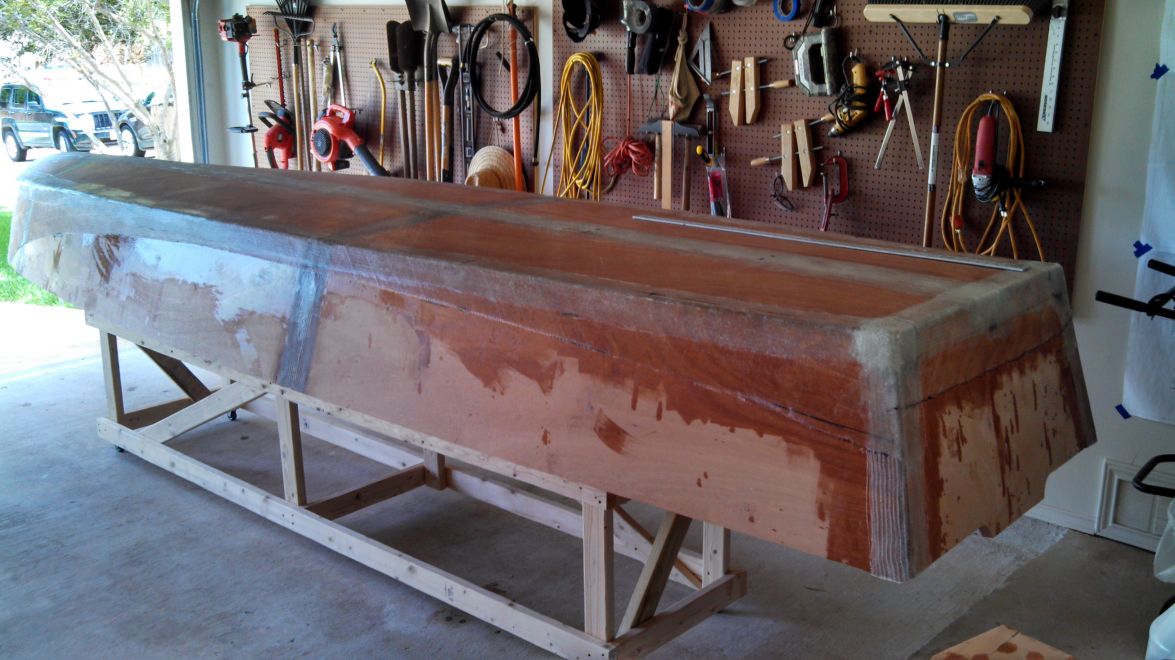
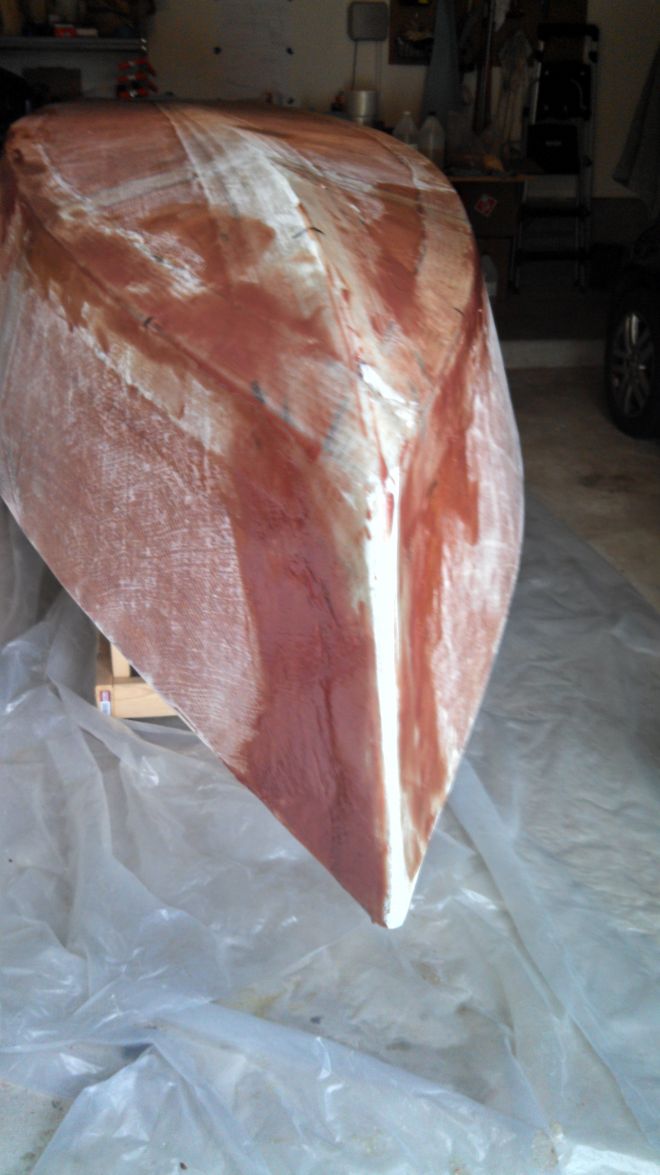
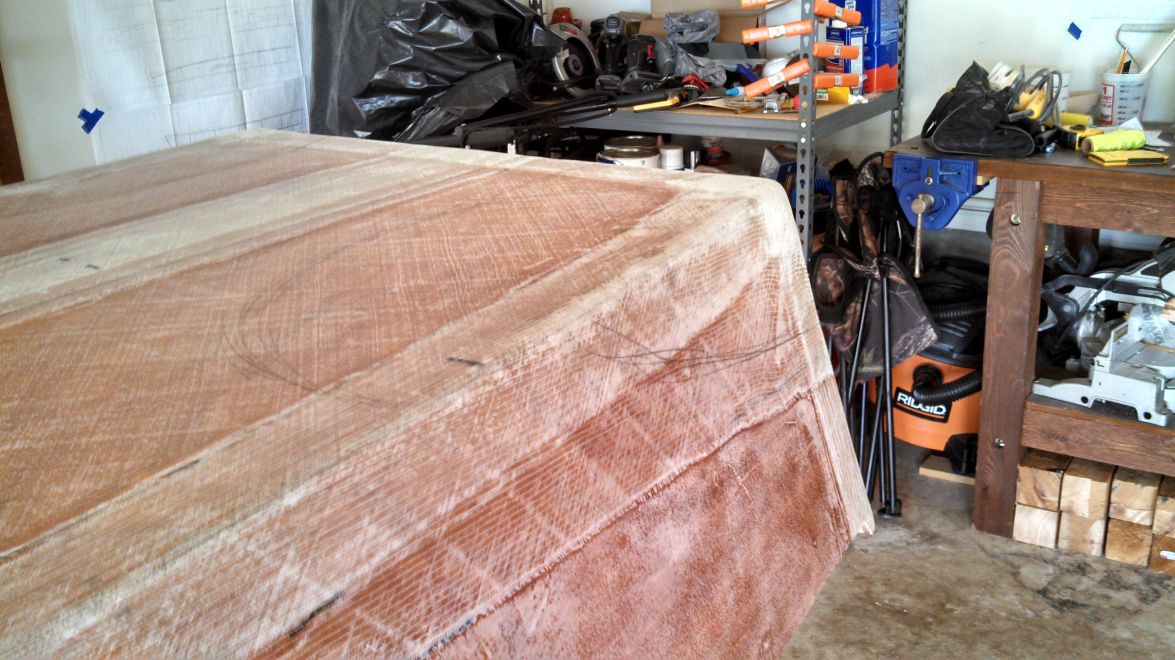
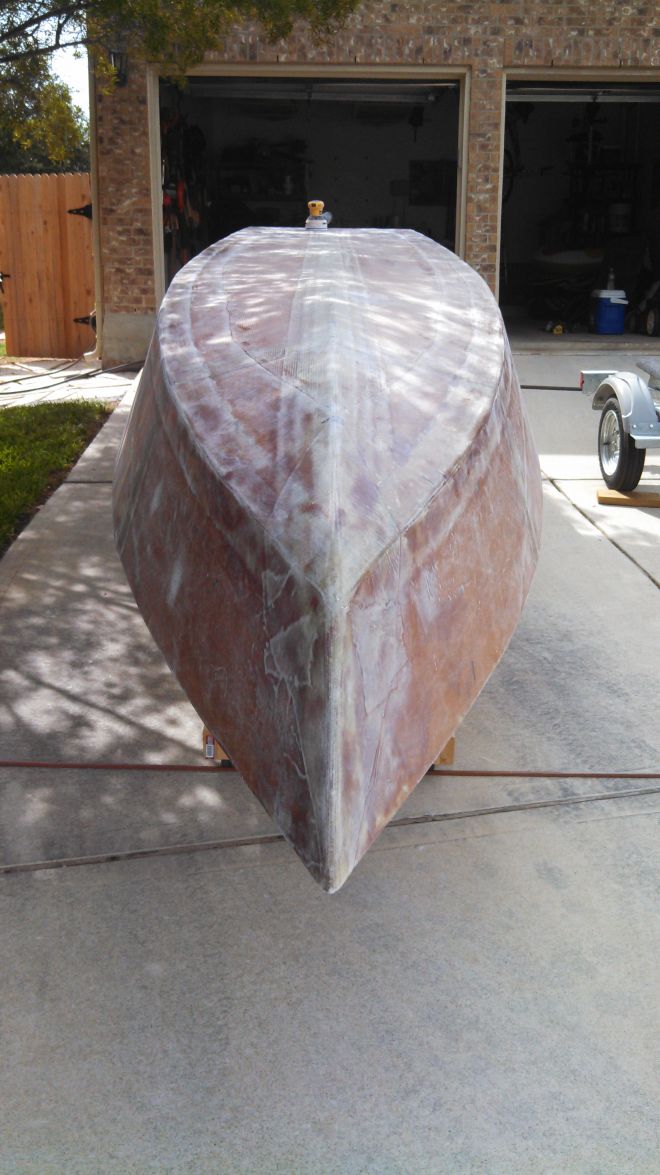
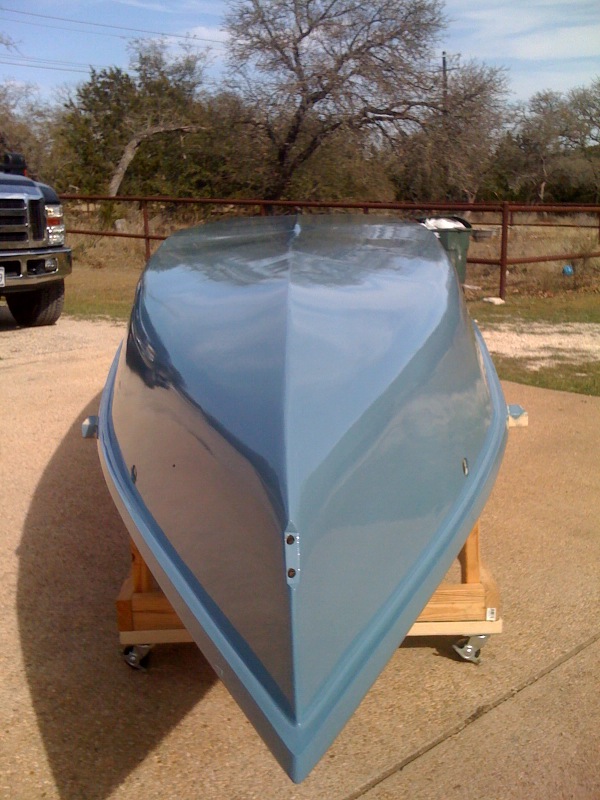
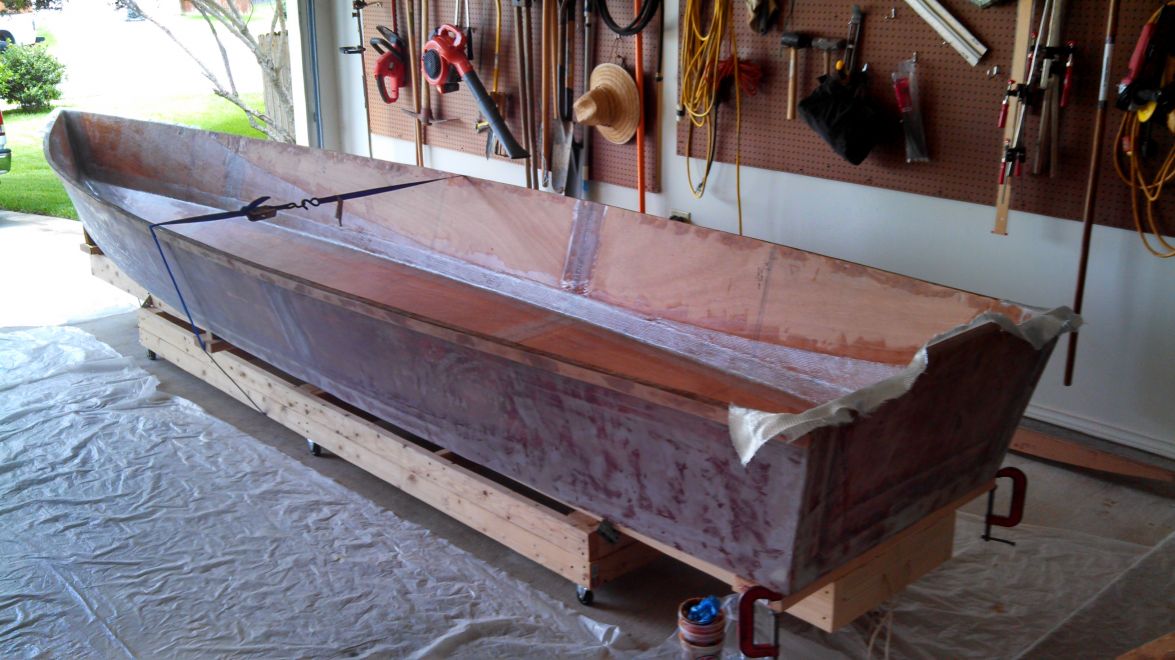
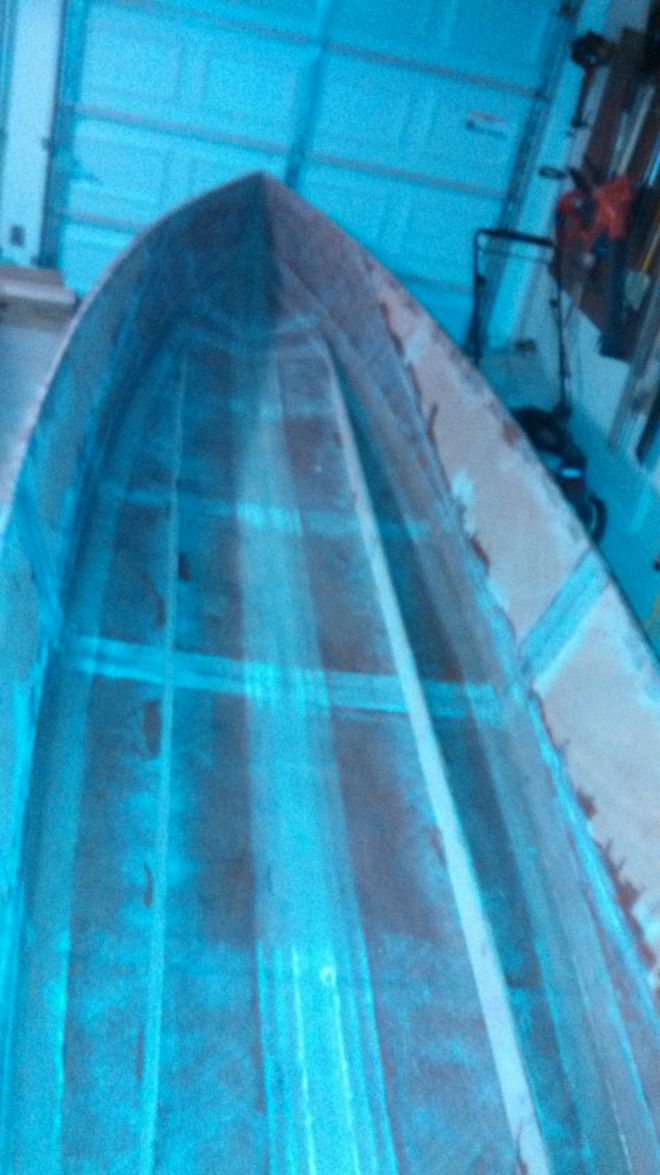
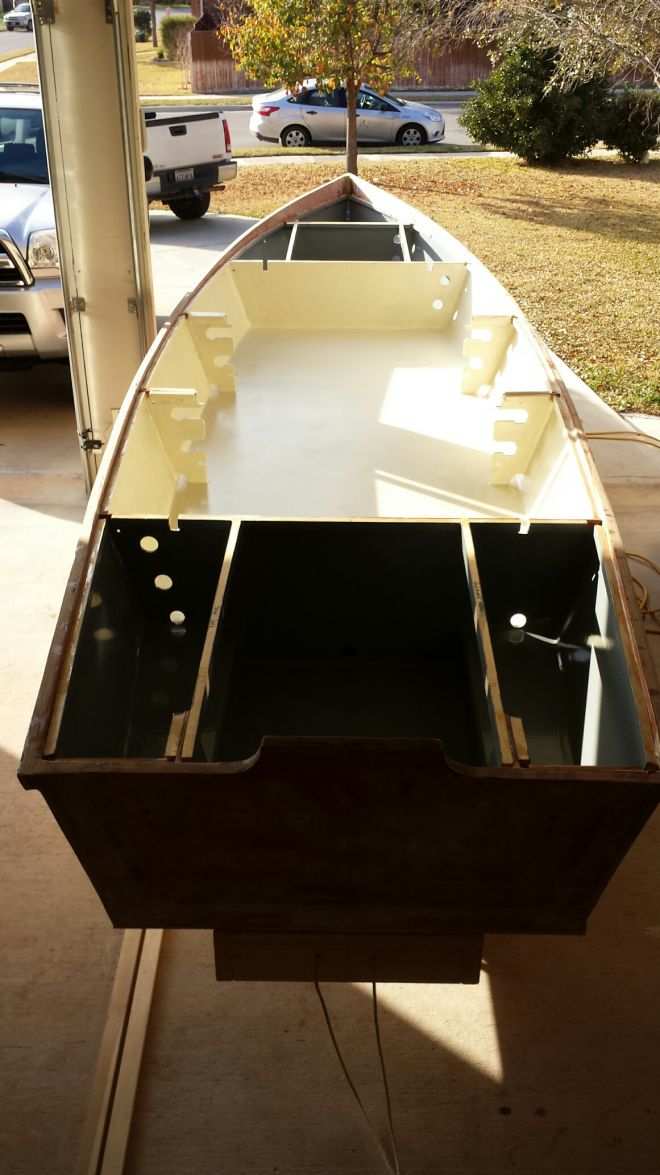
Bottom panels sanded and glassed...
Front quartering view...
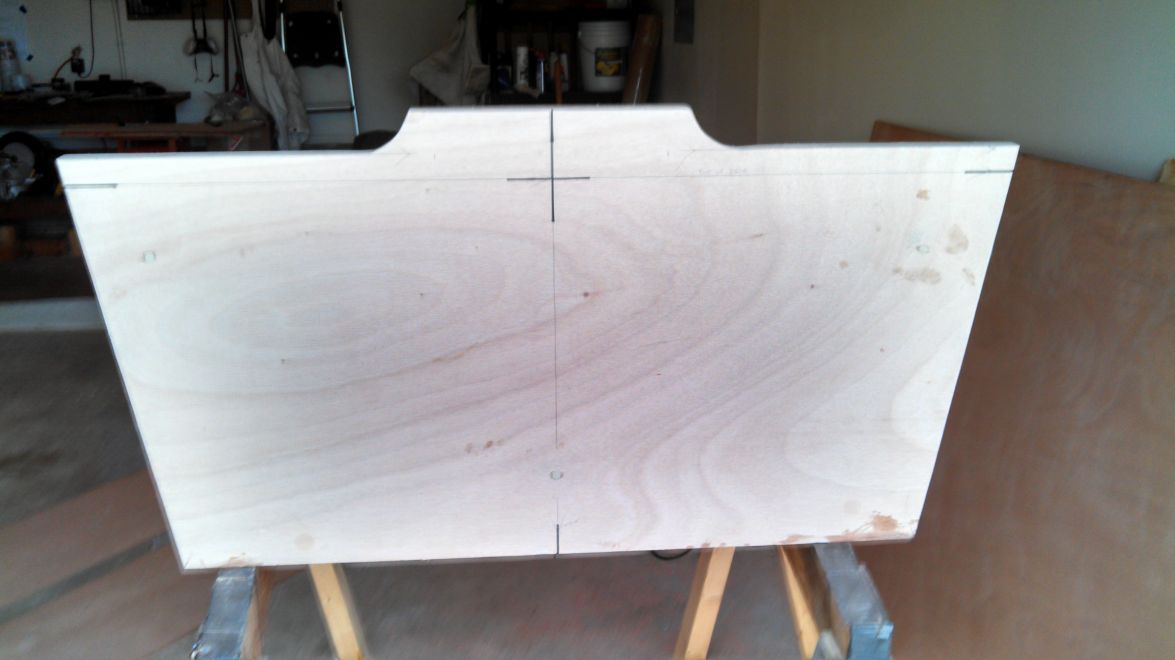
I think I'm going to redo my transom. I cut it to plan the week before I bought the motor and I need an additional inch on it to get the jet set right. It's either spend 90 bucks now on a sheet of ply and it be light and dead on balls, or spend 90 bucks messing around with aluminum plates trying to half way shim it later. I don't like to do things half way, so off to the lumberyard. Ohh well, needed to make another trip anyway for the sole and rub rail strips.
Re: Cannonball's FS18
Posted: Thu May 16, 2013 9:27 am
by AtTheBrink
Better to do right in the beginning than try to rig it later and hope it works out, good job! Where are you getting your plywood?
Re: Cannonball's FS18
Posted: Thu May 16, 2013 1:10 pm
by Cannonball
I've been running to Houston to get the ply from Houston Hardwoods. It's killer, burning upa half a day when I could be building to do it, but it's cheaper that having it shipped.
Re: Cannonball's FS18
Posted: Thu May 16, 2013 4:50 pm
by Randy
Might be cheaper to go to Austin:
http://www.finelumber.com/
Randy
Re: Cannonball's FS18
Posted: Thu May 16, 2013 9:38 pm
by Cannonball
Yep. I called them before I got my first load of wood and they didn't have any 1088. Their catalog also doesnt show any 3/8 1088 okoume. I'm convinced that the good stuff is the way to go especially after working with it.
Re: Cannonball's FS18
Posted: Mon May 20, 2013 8:26 am
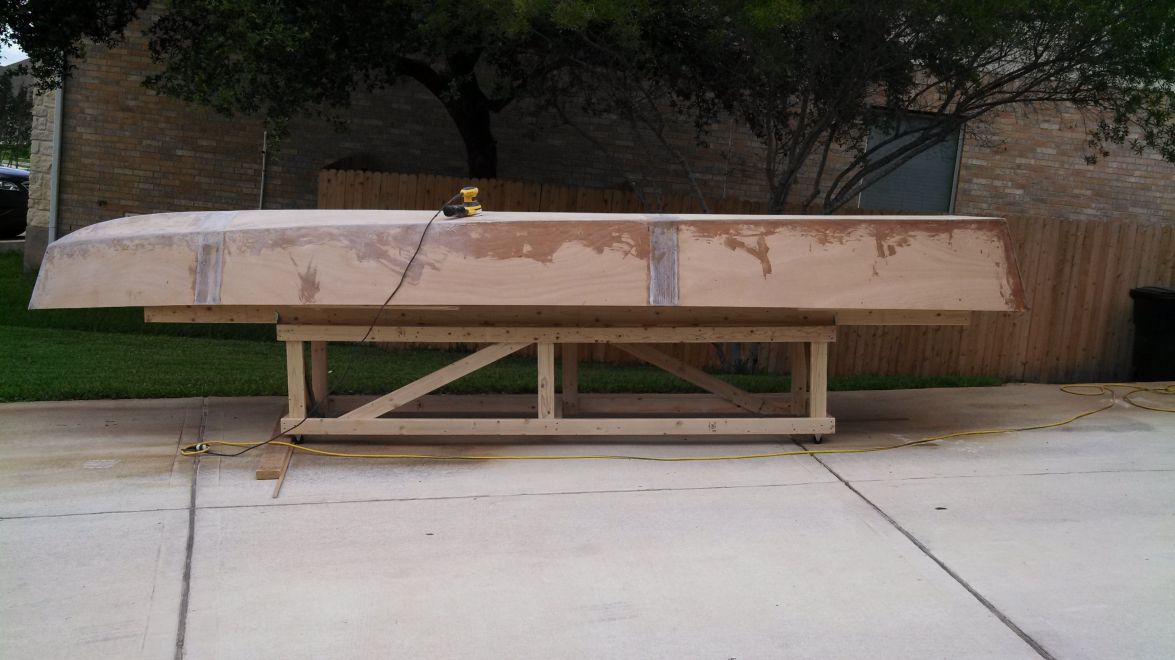
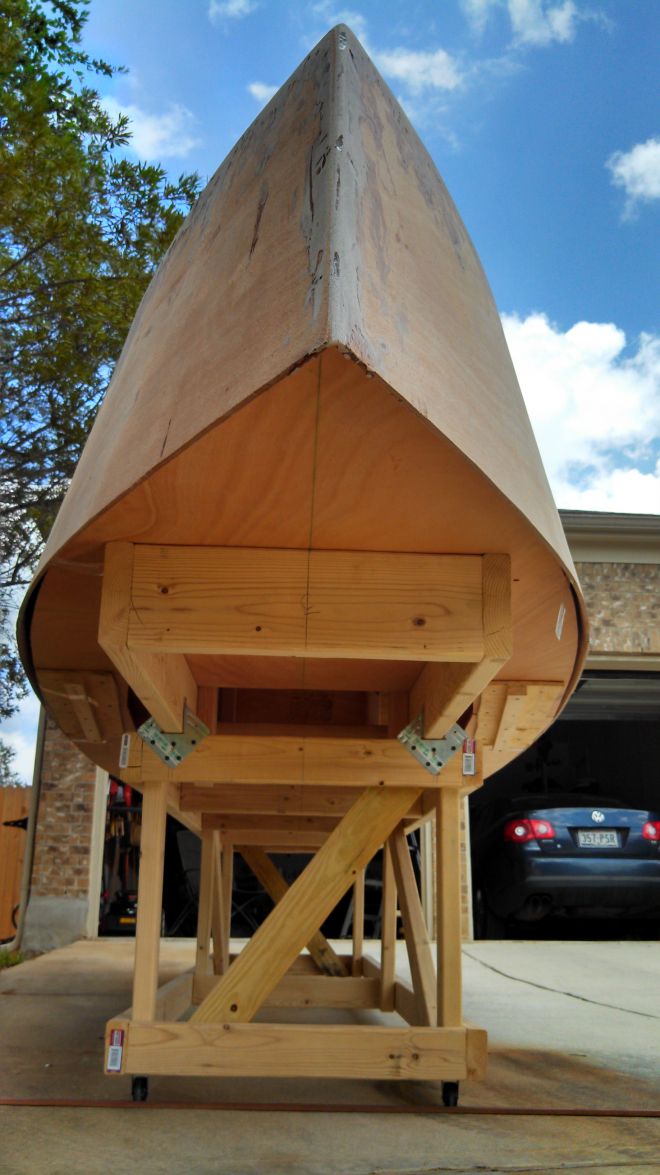
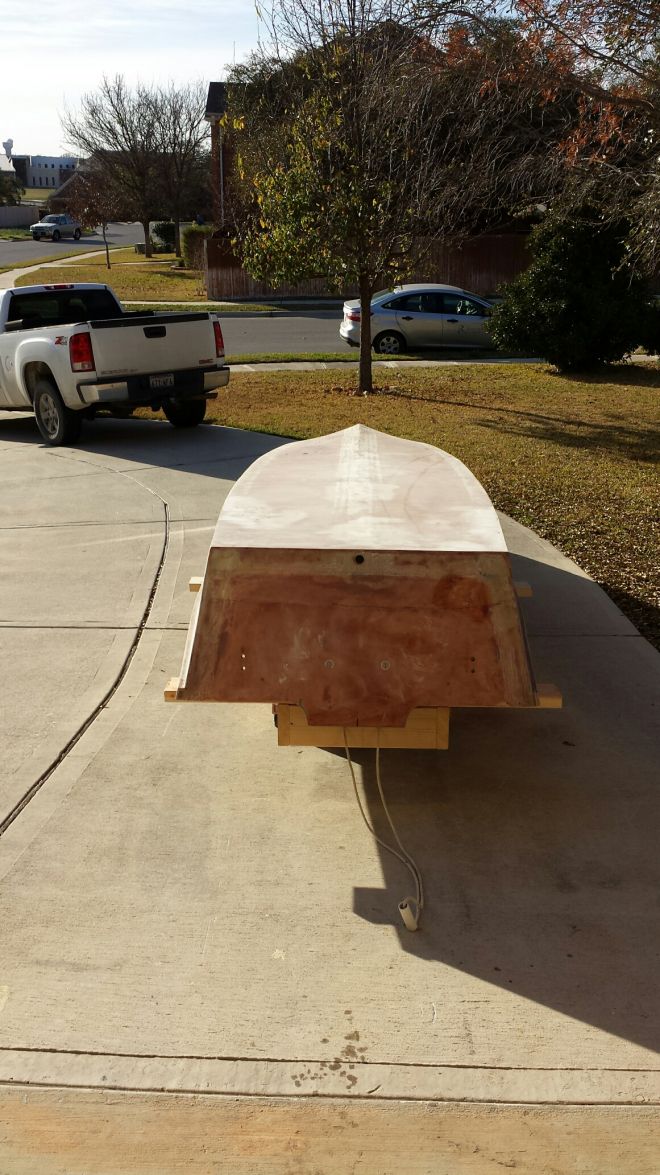
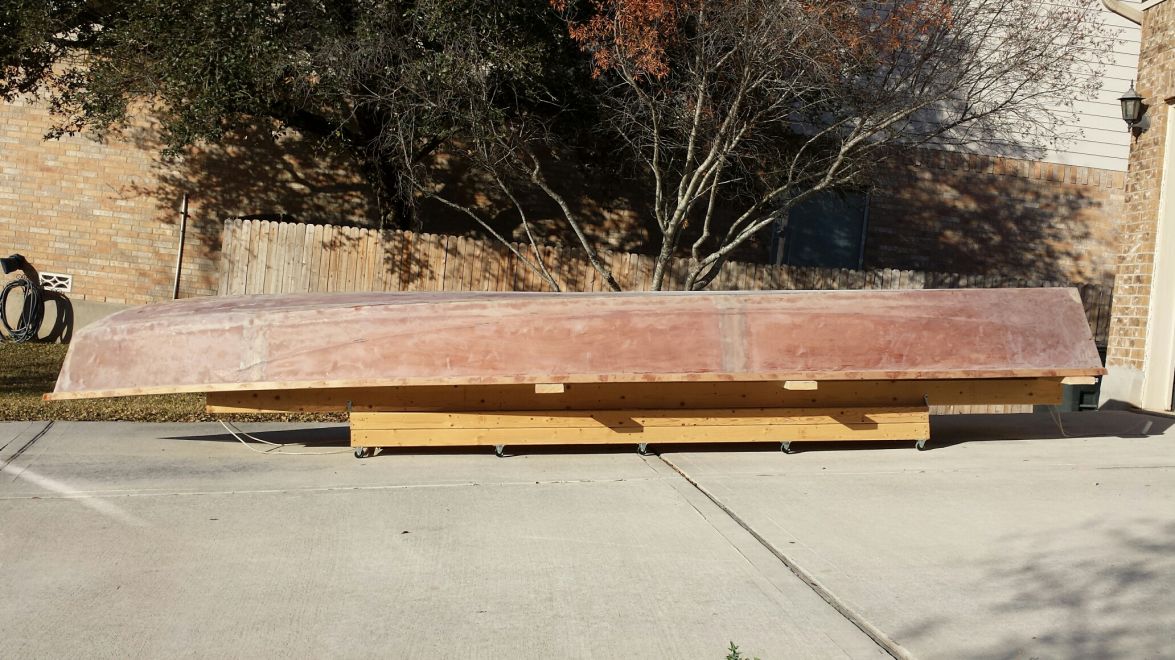
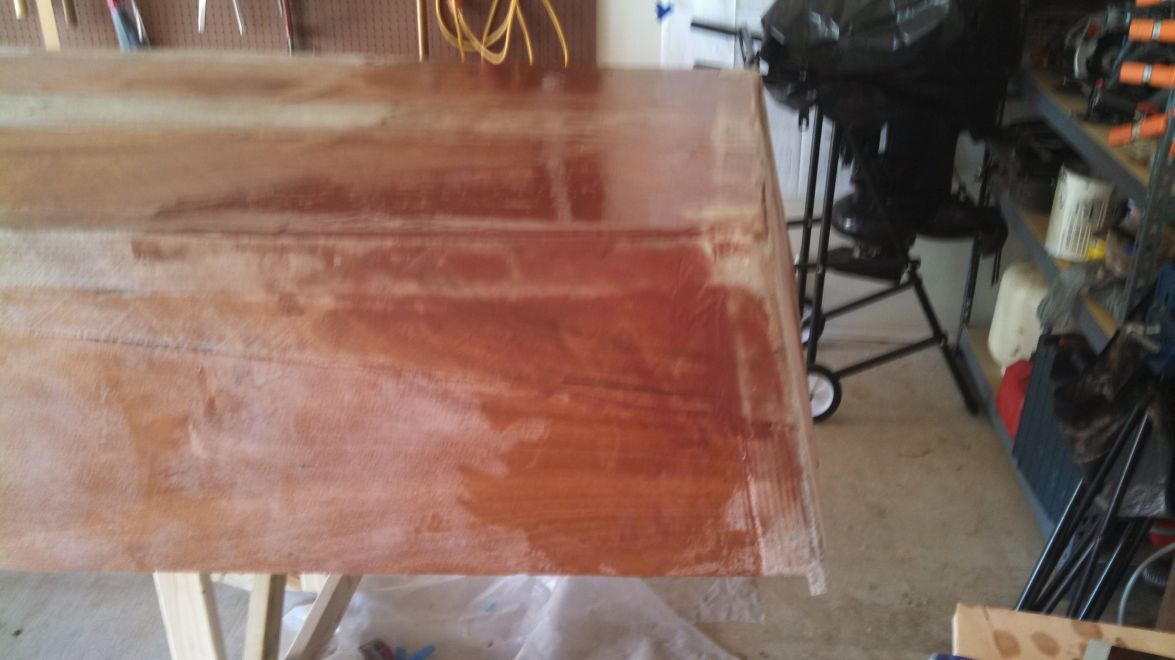
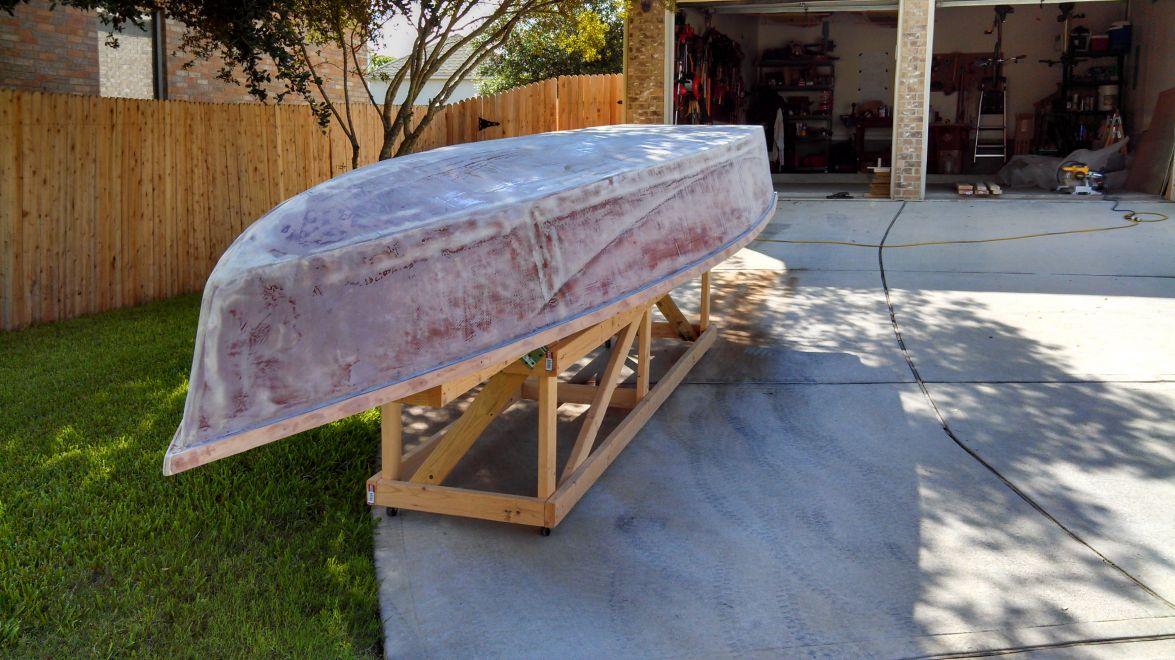
by Cannonball
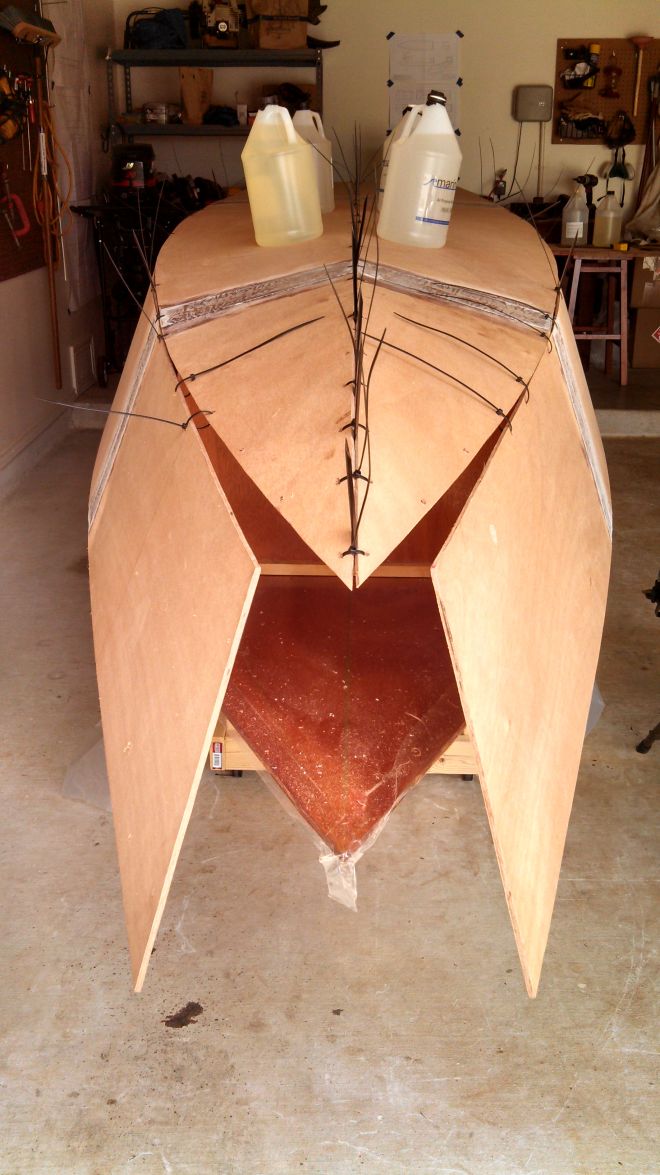
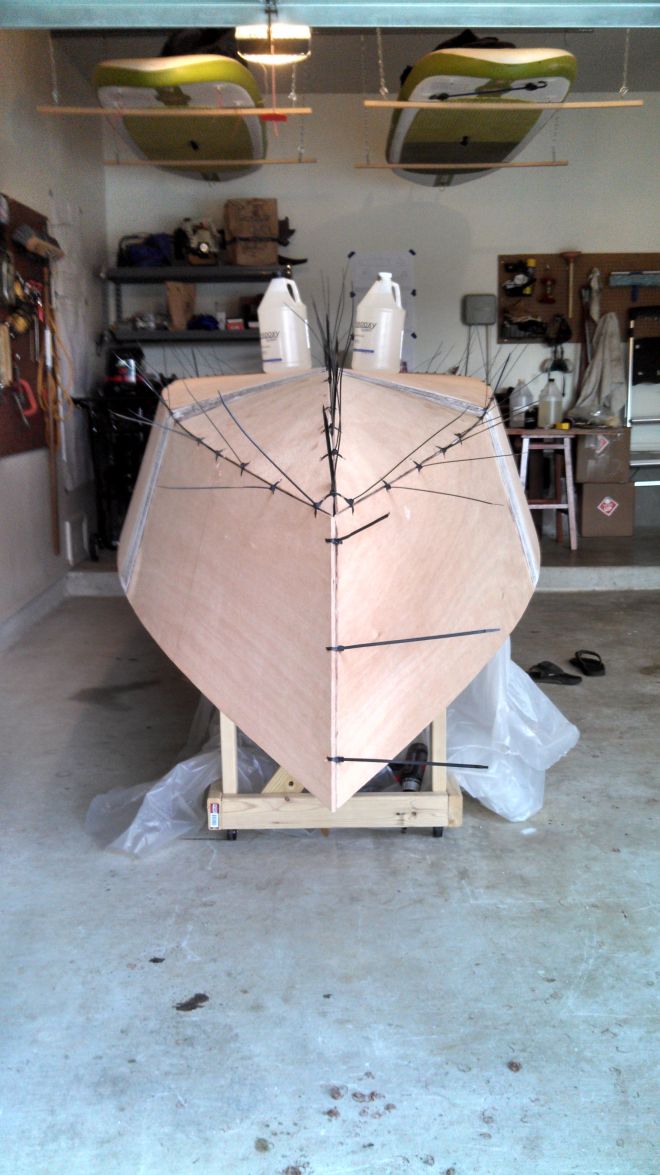
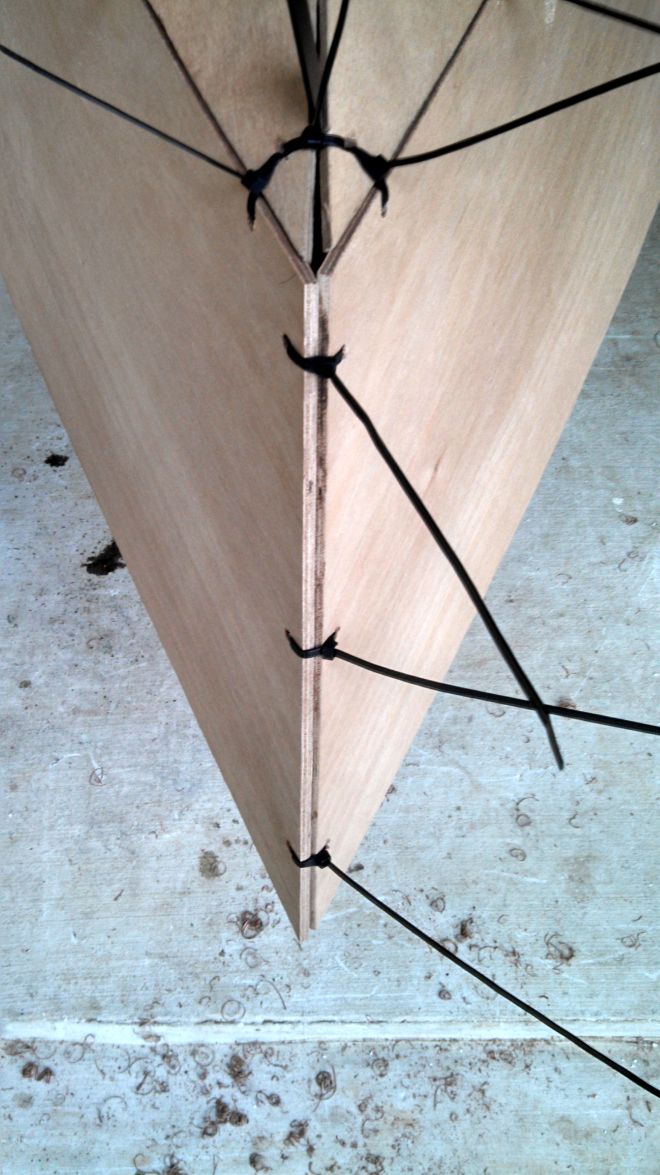
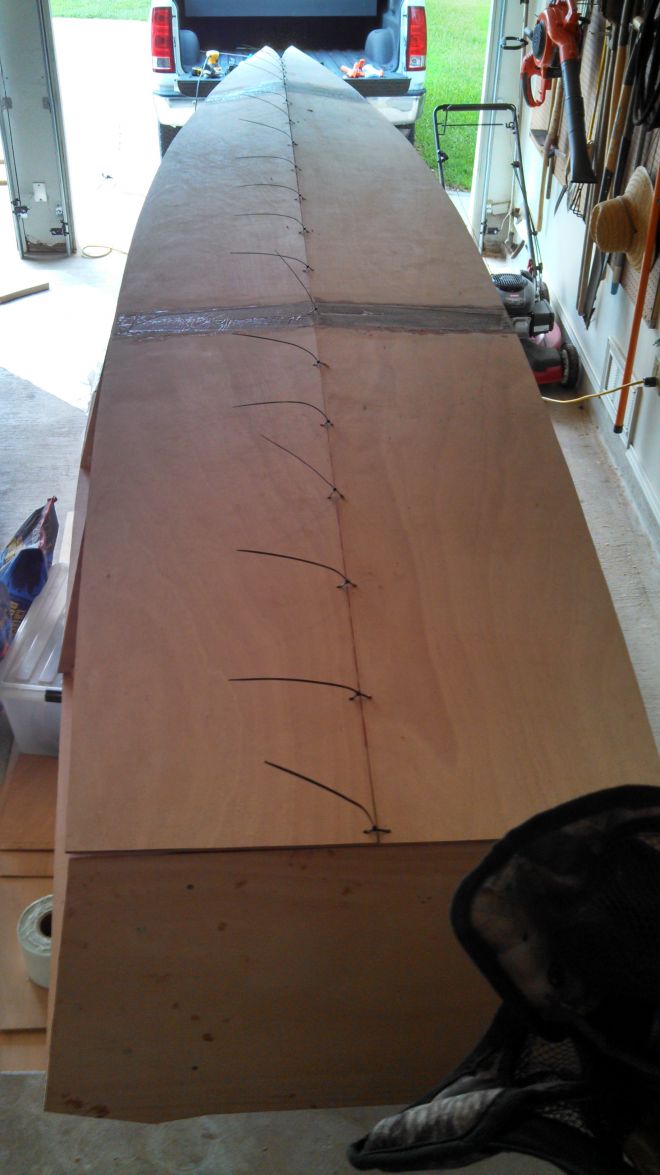
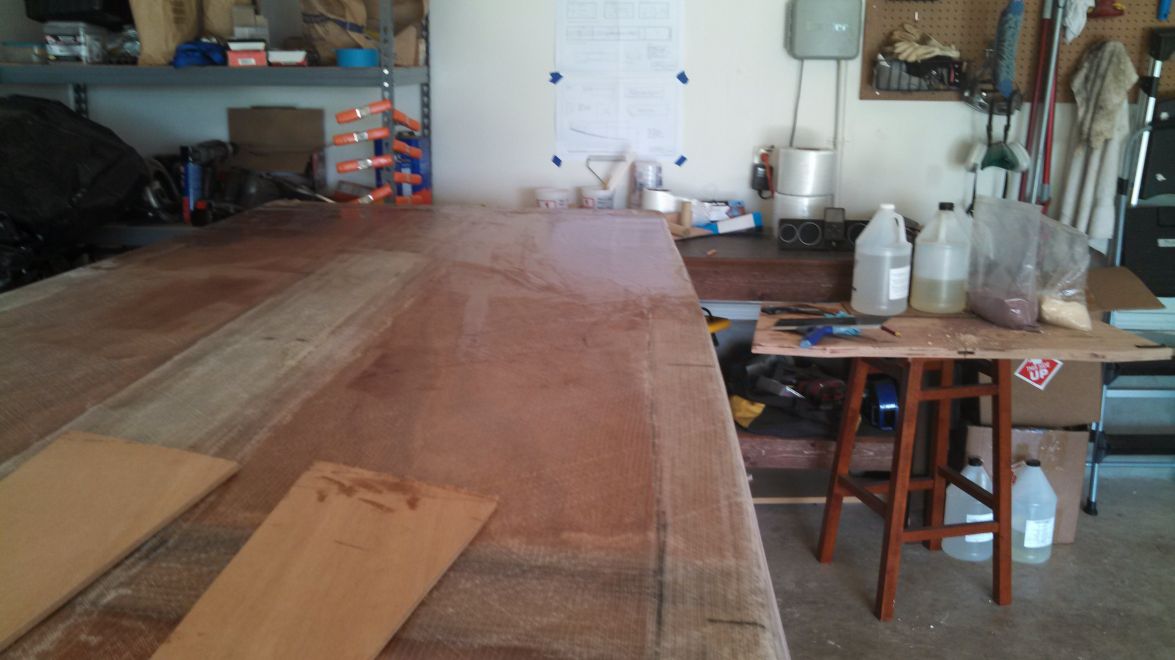
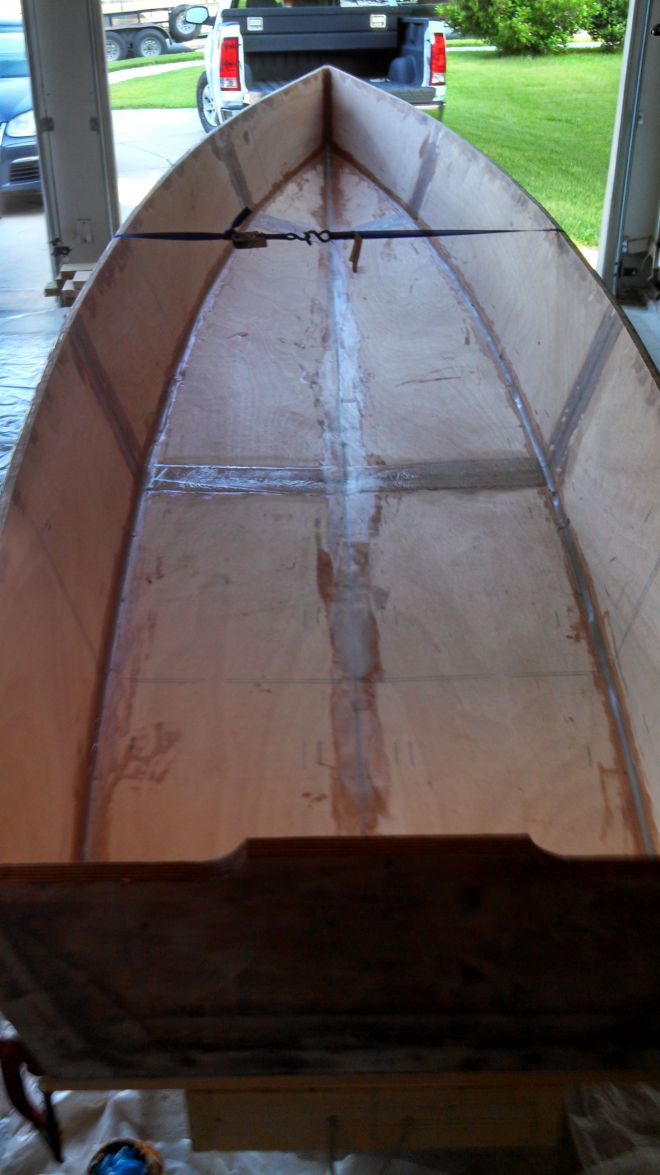
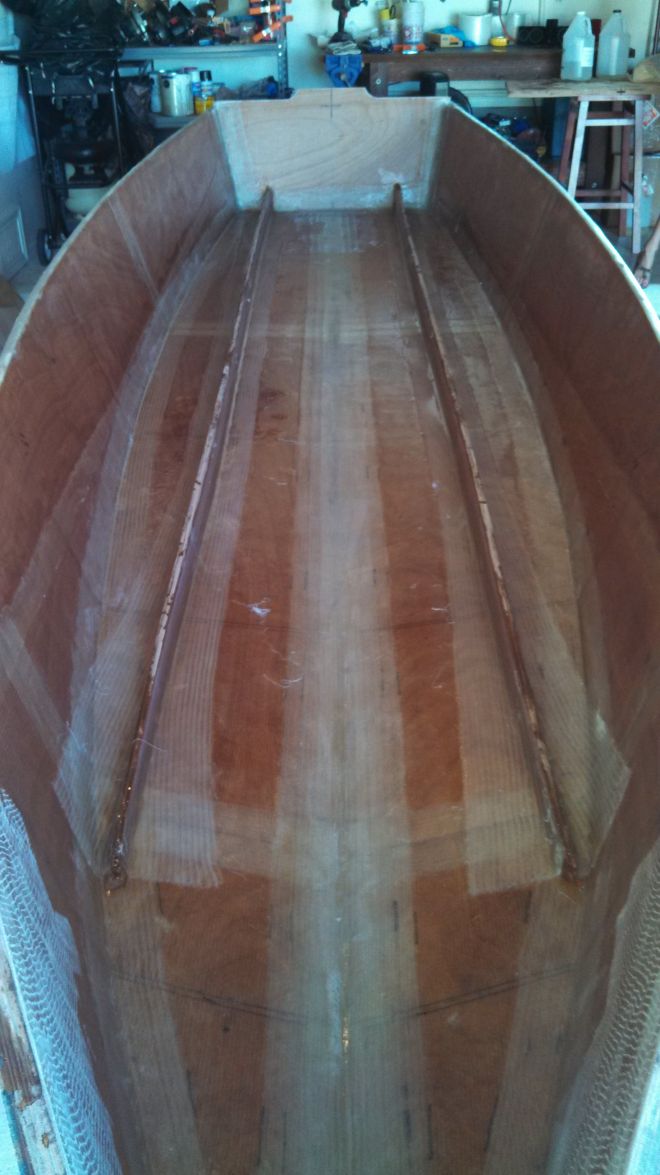
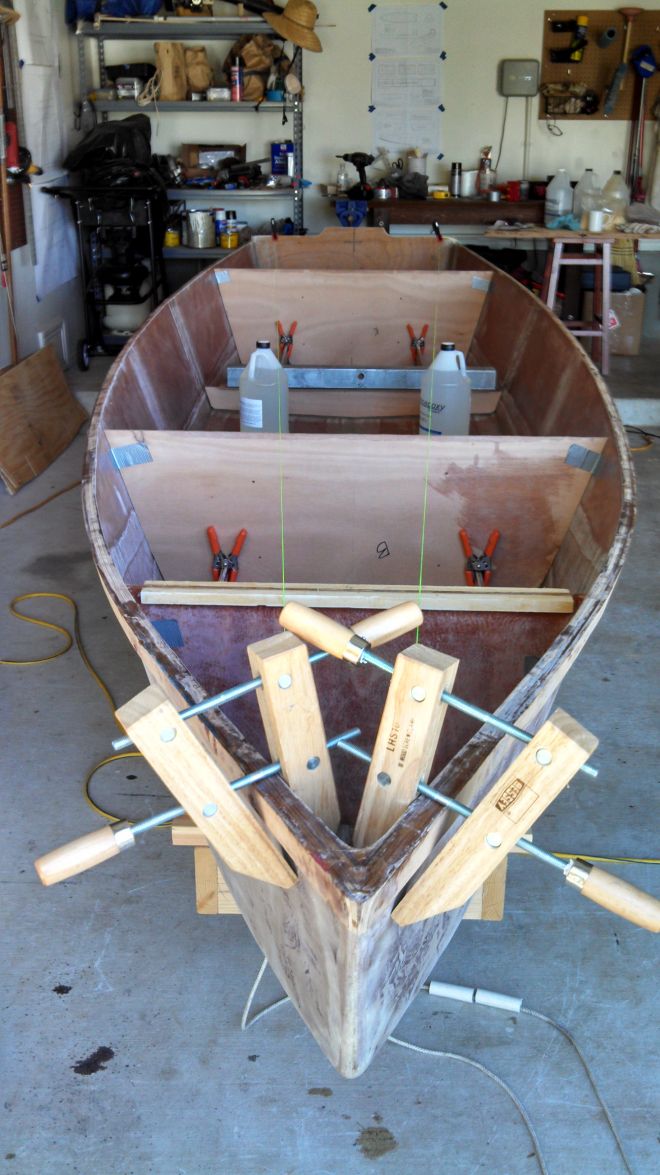
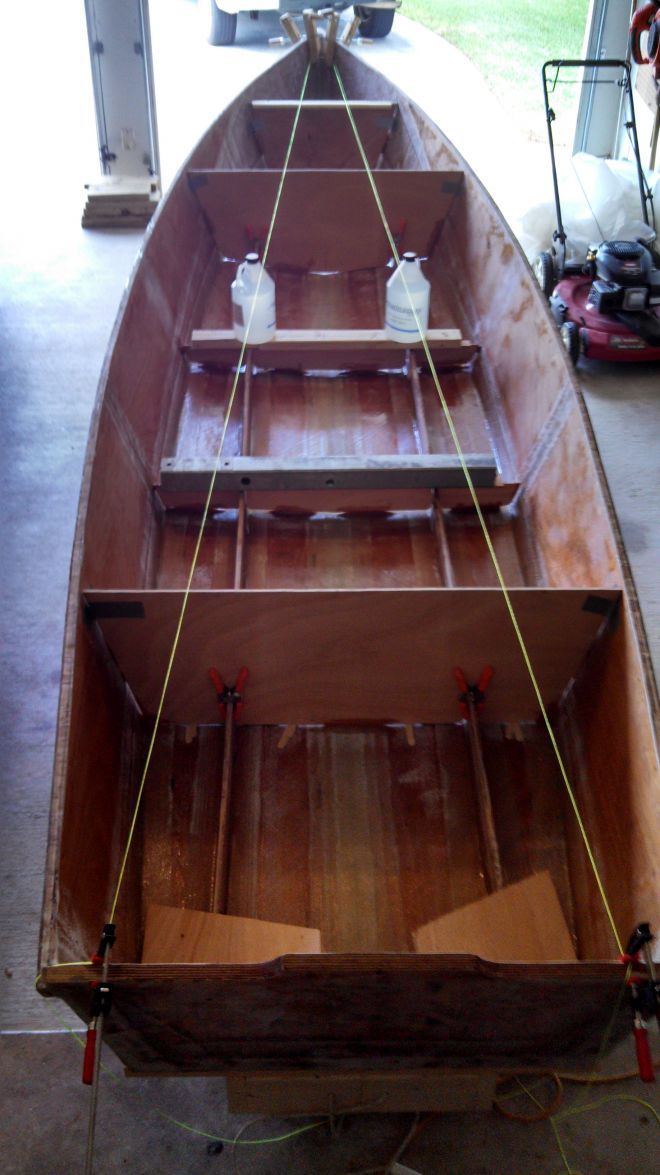
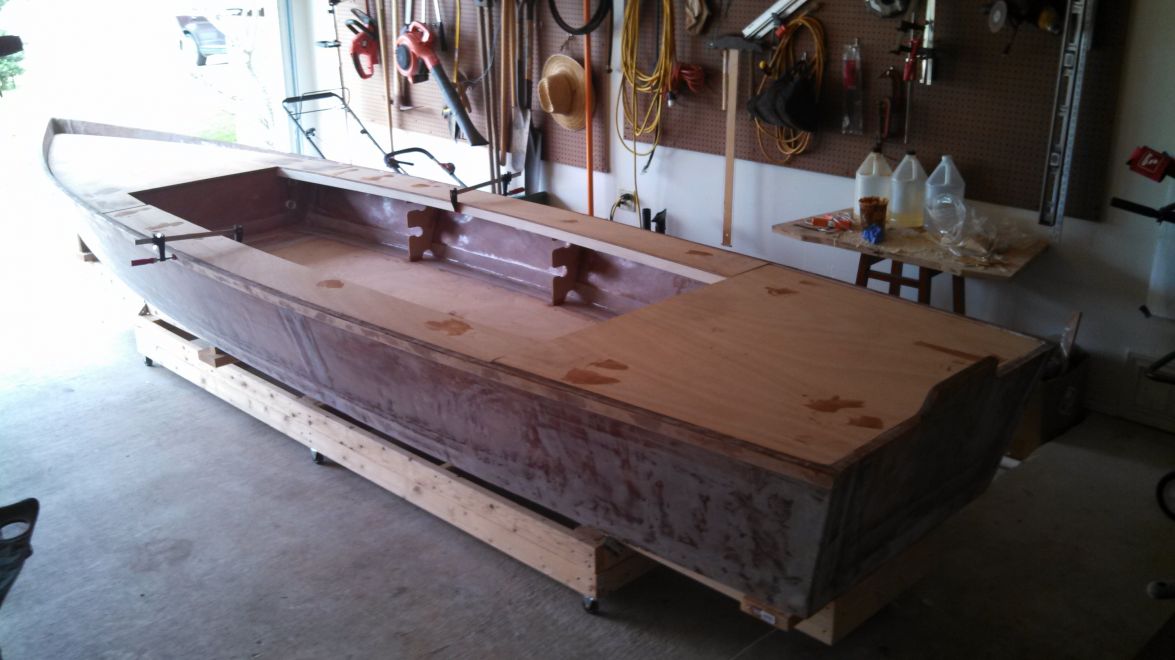
Despite a hangaround from Port A, managed to get a little accomplished on Sunday. Bottom panels cleaned and stiched...
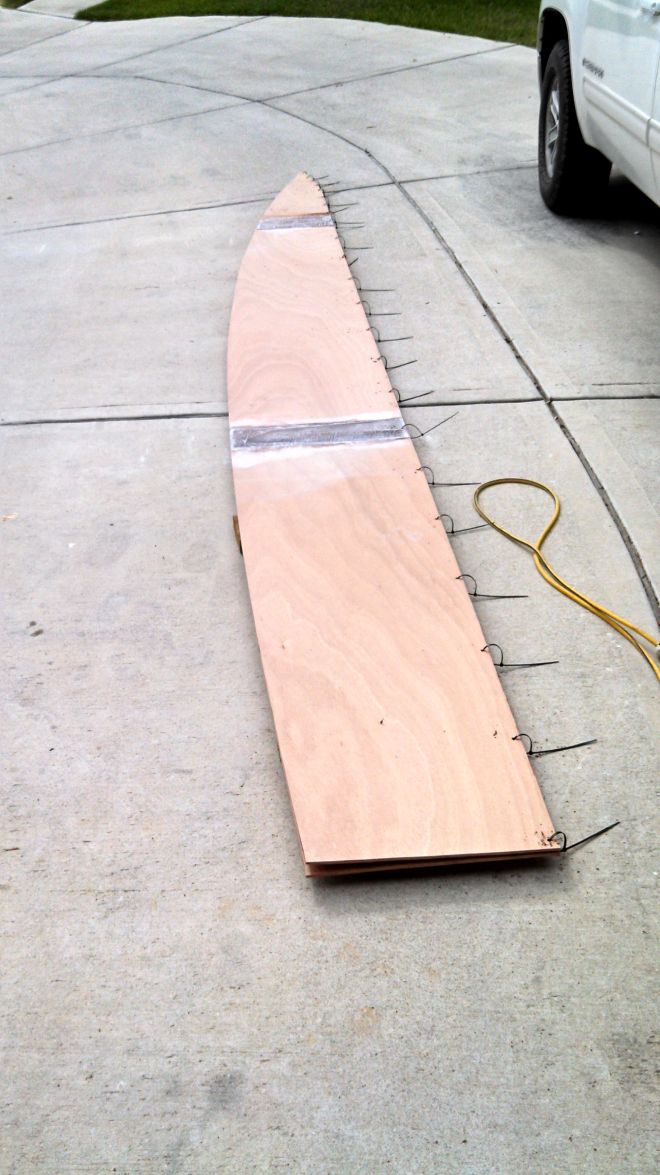
Starting to look like something...
Will join the side panels this week, and hoping to have some glass done by Memorial Day. Got a 3 day boat building extravaganza going at my house this weekend...
Re: Cannonball's FS18
Posted: Mon May 20, 2013 8:46 am
by Dougster
This is a fun part of the build. It looks clean and nice to me. I got two sheets of 1/4" okoume from Fine Lumber last year, which sure was handy. I've made that Houston run for ply and it is a pita. Good luck this coming weekend, it's a good one for staying home and building instead of fighting the crowds

Buildin' in Blanco Dougster
Re: Cannonball's FS18
Posted: Mon May 20, 2013 5:07 pm
by Cannonball
Thanks Doug. I'm telling ya it is a pita. I've got my borther headed there this week for me. He's on a college break so no big deal for him. All it takes is offering up some Granzins dried sausage and a bottle of brown liquor and he's ready to roll.
Checked out your build, and it's looking great. That looks like a sweet trolling rig.
Re: Cannonball's FS18
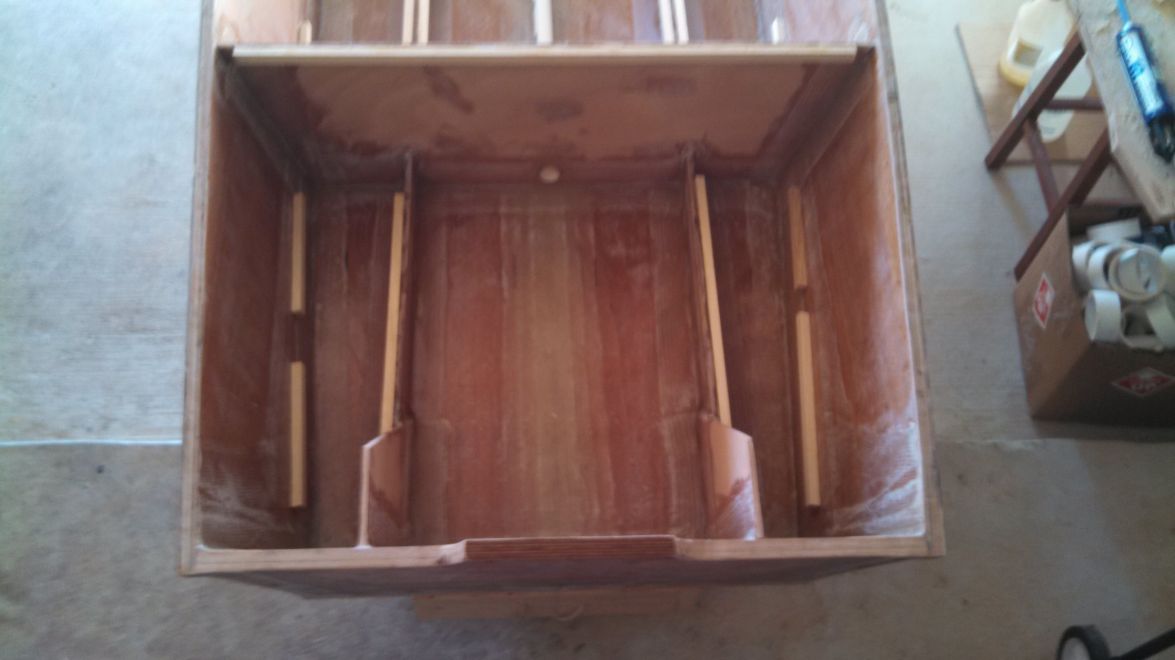
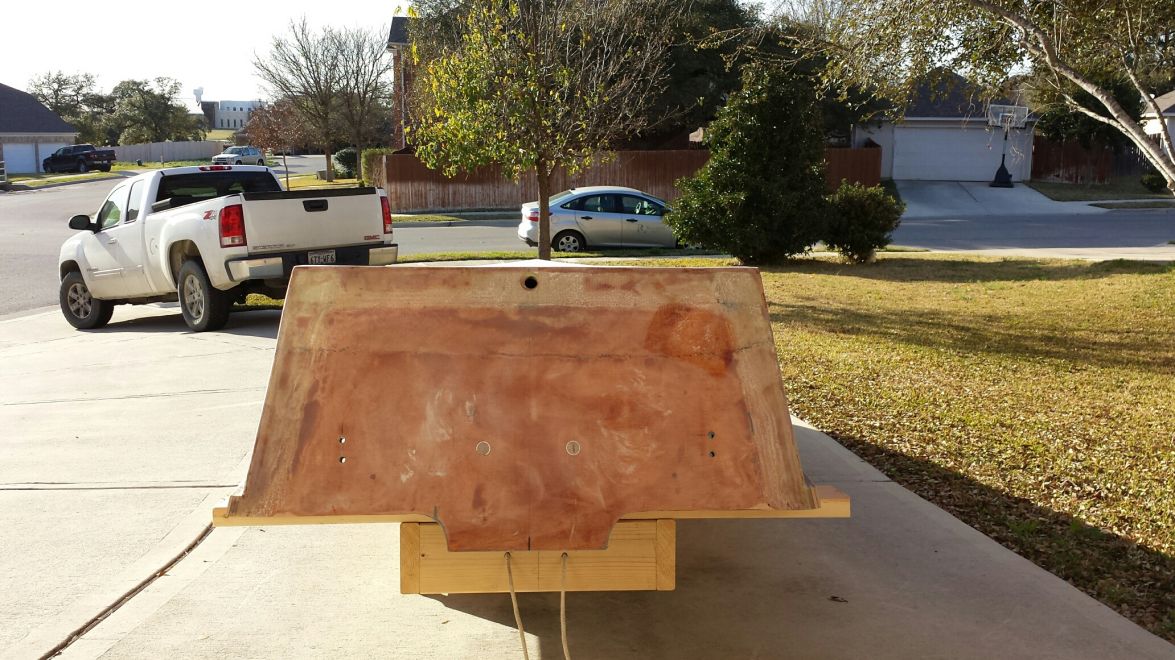
Posted: Thu May 23, 2013 8:23 am
by Cannonball
Got a question. Where should the transom sit. I've seen people do it different ways. My first thought was to mount it where the bottom edge was flush with the stringer height. Is this correct? I'm about to redo the transom before stiching and gluing to accomadate the jet height, but want to also ensure how these planes should meet up.
Re: Cannonball's FS18
Posted: Thu May 23, 2013 8:38 am
by AtTheBrink
You have the transom in the right position. Your build is looking great, you should get a lot done this weekend.
Re: Cannonball's FS18
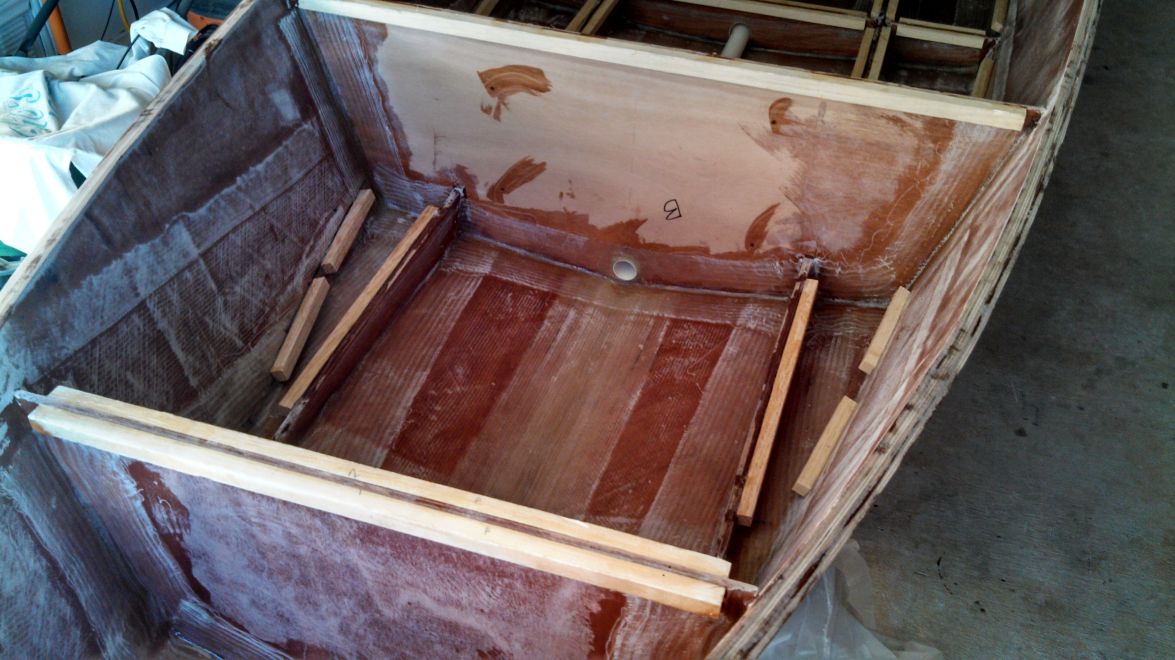
Posted: Fri May 24, 2013 8:01 am
by Pro Wader
I did mine like you have in the last picture and filled in the gap. my next one, I'll cut the bottom of the transom at an angle.
Re: Cannonball's FS18
Posted: Tue May 28, 2013 10:05 am
by Cannonball
Re: Cannonball's FS18
Posted: Tue May 28, 2013 8:30 pm
by AtTheBrink
Try to do your taping and wide cloth all in one session, wet on wet. It will save you a lot of work and make for a stronger boat. You can get it all done in about 6 hours if you can coax a friend into helping you. Looks good! Keep it up!
Re: Cannonball's FS18
Posted: Wed May 29, 2013 6:38 am
by Cannonball
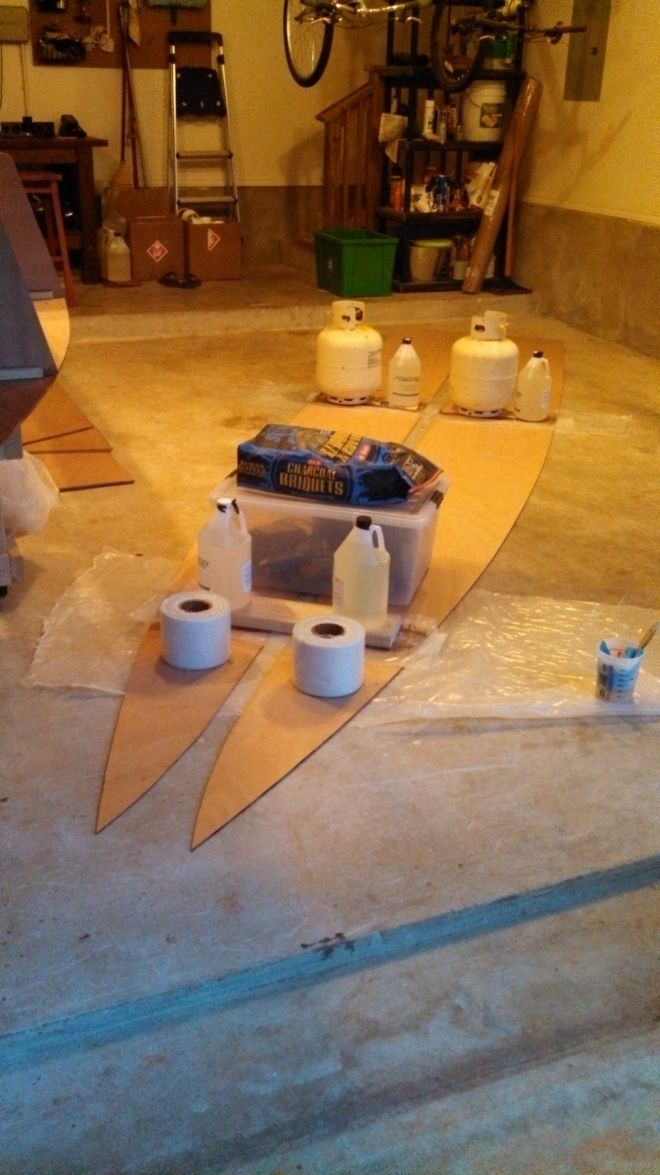
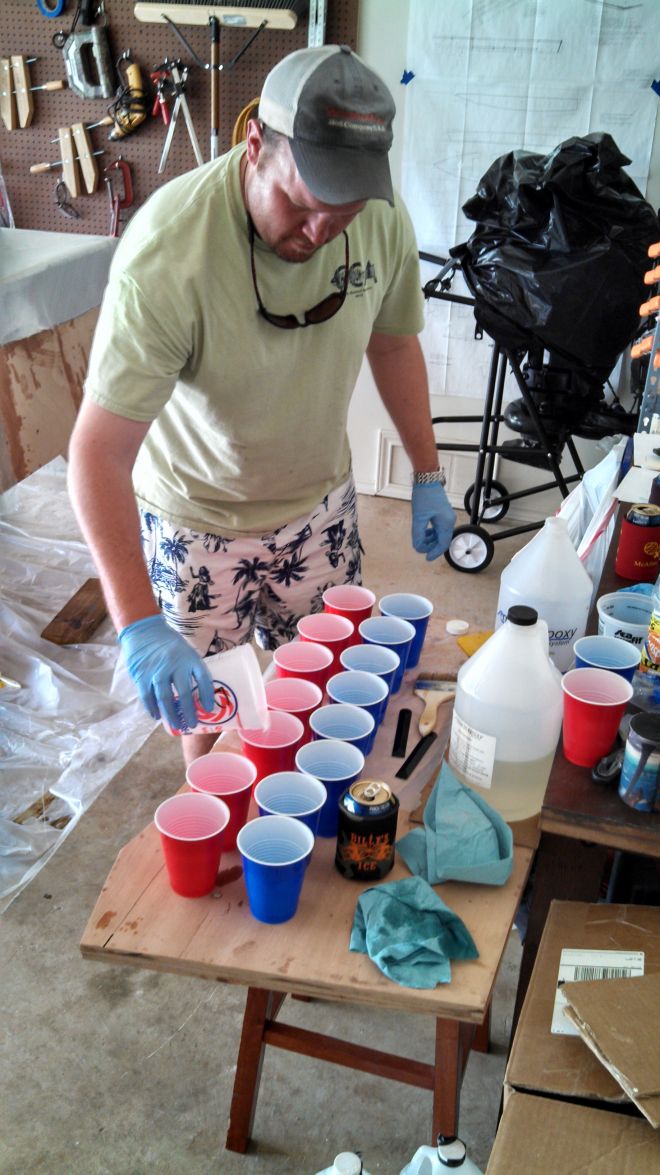
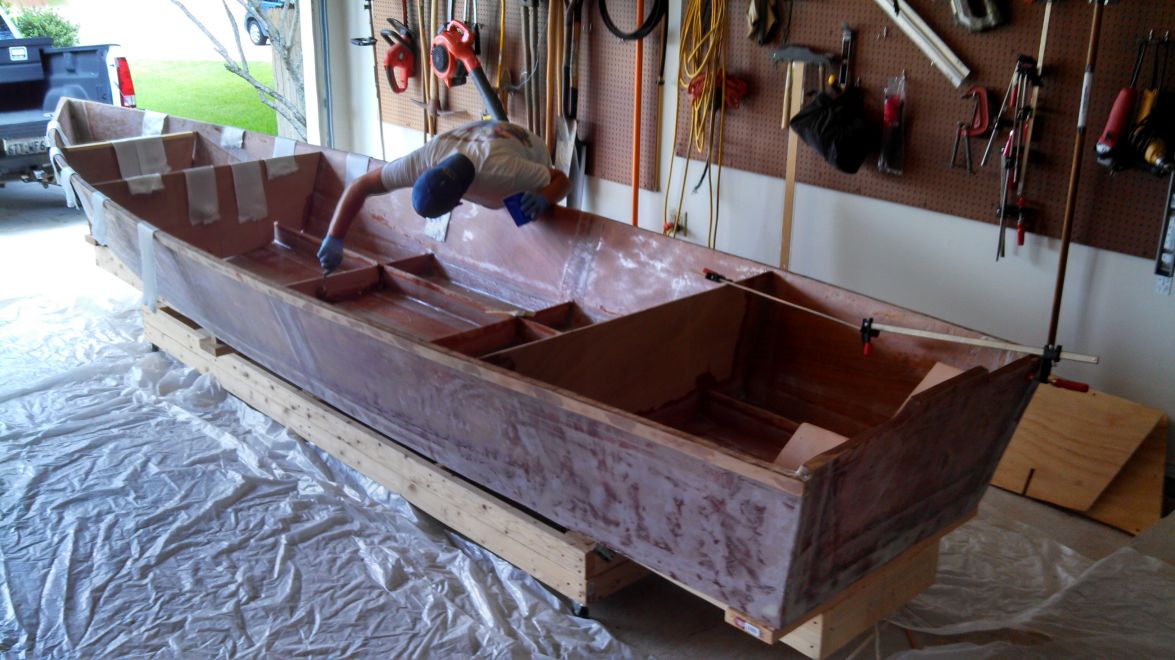
Good advice. I got a little carried away with epoxy on this first tabbing session, and definetly had to deal with the extra work from it, still need another pass with the RO before i,m satisfied. Learned my lesson there, on haste making waste. I'll probably use west systems six 10 on a lot of the interior fillets to save time and make for easy clean up. Just had some areas on the outside that needed to get filled. I anticipated it being hot for glassing and have slow hardener for it. Going to lay everything out, section it off and pre-measure. Can't wait to get it glassed!
Re: Cannonball's FS18
Posted: Sat Jun 01, 2013 11:37 am
by Cannonball
Just had to say thanks to uncle cracker and pro wader for their thread about pushing the hook out of the bottom along frames d and e. I was stumped but now... got it dead nuts right now and am about to start glassing. Love this forum...
Re: Cannonball's FS18
Posted: Mon Jun 03, 2013 9:05 am
by Cannonball
So, was having a hell of a time getting the keel to line up straight without any weight on top of C & B. After stumbling around the forum and seeing Cracker Larry's and Pro Wader's thread on the same issue, the solution... shim the bottom. Duh, can't believe I didn't think about that, but it worked out perfect...
After getting everything aligned, had a friend of mine show up and we got all the tape laid out. After reviewing Cracker Larry's, Bayport Bob's, FruitFly's, & Double Up's builds we ended up with 3 layers of tape on the bottom to make up for the overlap of the 50" cloth. Followed Crackers lead on 1 oz per foot on the tape and pre mixed 9 12 oz batches and she went like butter. Took about 3 hours.
Had another friend show up just in time for the bottom, and we were a well oiled machine by this point. put him to mixing and we got started on the cloth...
Next Day...
Whew! Feels good to hit that milestone. Overall, I'm really happy with how it turned out. I used just a smidge over 1.5 gal of epoxy and could have planned a little better to use a bit less, but for a first time glassing it has a pretty even coat. The heat on the bow from the sun made that part pretty trickywith the cloth layer, and I have some pretty sizeable air pockets. They are luckily contained to the area that already has 5 other layers of glass underneath it. Any ideas on how best to deal with those? All in all a very productive weekend. Best piece of advice after doing this is, don't do it by yourself. Buy beer for everyone and cook fajitas.
Re: Cannonball's FS18
Posted: Mon Jun 03, 2013 10:53 am
by Cracker Larry
Well done
Re: Cannonball's FS18
Posted: Mon Jun 03, 2013 11:01 am
by AtTheBrink
Good job!
For the air bubbles you can use a syringe to inject epoxy to fill them. West Marine sells some that have a long pointy end on them. They work great for getting epoxy in tight spots like that.
Re: Cannonball's FS18
Posted: Mon Jun 03, 2013 12:00 pm
by Cracker Larry
West Marine sells some that have a long pointy end on them.
I bet they are pricey at West . I needed some a while back and went to a local pharmacy and asked them if they had some large syringes. They asked if I had a prescription and I said no, I was using them for glue. They said they wouldn't/couldn't sell syringes without a prescription

So I walked right next door to the farm supply store, where they had cases of them in every shape and size on the shelf for about $.30 each.
Re: Cannonball's FS18
Posted: Mon Jun 03, 2013 1:25 pm
by Cannonball
That settles it. I'll be heading by Tractor Supply on the way home. Thanks!
So, got another question. Everyone keeps looking at me like I'm crazy for not having glass on the sides at work or who I show pictures to, but the plans don't call for it. My buddy Paul aka Doubleup didn't glass his sides and it seems fine not to. What are the opinions out there. I'm pretty much set on leaving it off and just coat it with epoxy and then a coat of fairing compound and call it good especiallys since that area is protected decent enough from anything by the rub rail, but the same quandry is involved on the decks. Remember, I'm planning on a jet exclusively so weight is a factor, but how would the decks hold up with the same, epoxy coat and then coat with fairing compound? Anybody had any experience with decks like this being damage from use other than normal wear and tear? I'm thinking I'd rather leave that off and go with a more durable non skid like kiwi grip to add the extra layer of protection. Thoughts?
Re: Cannonball's FS18
Posted: Mon Jun 03, 2013 1:34 pm
by Cannonball
Another question for you FS18 builders. Everyone is asking me when the splash date is. I'm shooting to be painted and on the water by labor day. I'll still have accessries and little bits to do I'm sure. Is that doable? Seems like everyone that is pretty diligent is at about 6 months build time. With the bottom glass on, what percent complete would you say this is?
Re: Cannonball's FS18
Posted: Mon Jun 03, 2013 1:41 pm
by gstanfield
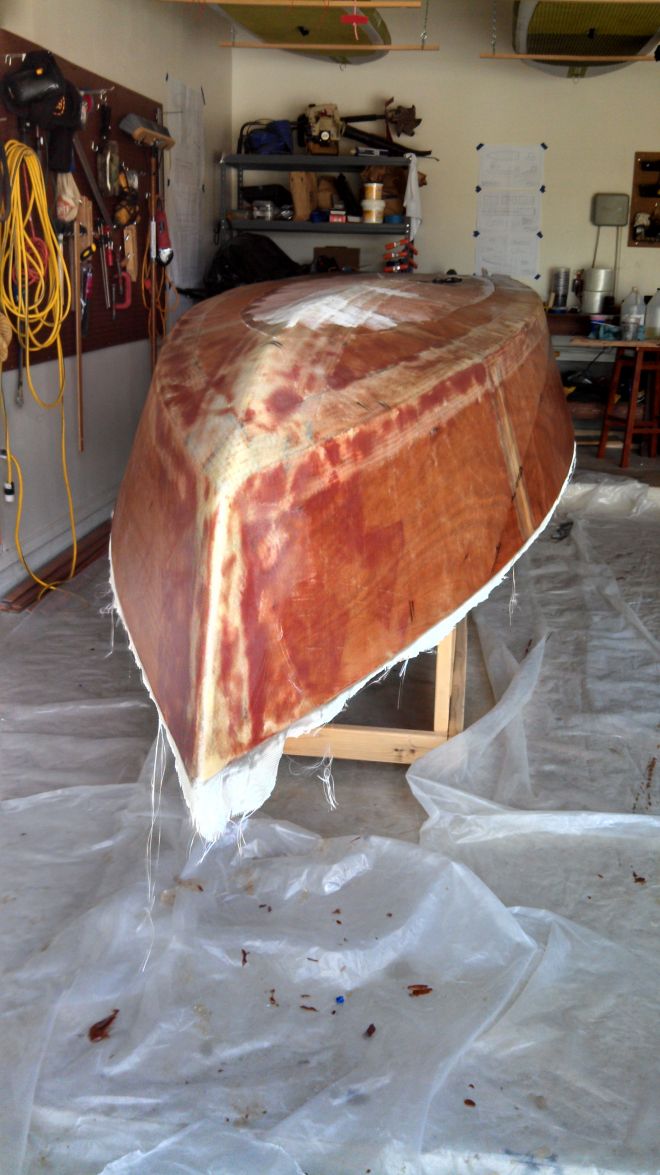
My opinion is to glass everything 100% of the time. Quality ply may not check, or it may not check for a long time, but it's worth the extra price for the peace of mind that you won't walk up to your boat at some point and see this:
 This boat was built with "exterior grade" ply and not good marine ply, but even so I'll continue to glass everything 100% from here on out.
Re: Cannonball's FS18
Posted: Mon Jun 03, 2013 6:07 pm
by Dougster
Some guys have had the marine ply check I believe, so I went with 6 oz ply all around. It was dead easy to work with and gave me a little peace of mind. I think 4 oz would work too. As to how far along you are, it's hard to say. Maybe half way? If you're using tiller steering, that'll save time. Ditto with external fuel tanks. Fitting the internal plastic thing was a pita. Hatches and hardware take an inordinate time with the overdrill/fill/redrill thing. What paint are you gonna use? Are you planning on building a poling platform over the motor? Livewell? It's all in the fit out and, in my case, the pondering time. Well, and the "Dougstering" time (doing it wrong first). I'm hoping to get a chance to drop by one day this month to see her, since I drive to New Braunfels pretty much every week.
Livin' on Blanco time Dougster
Re: Cannonball's FS18
Posted: Mon Jun 03, 2013 8:13 pm
by AtTheBrink
I glassed the sides of mine, inside and out with 6oz woven cloth. I used Okoume for the hull, I know it is good stuff but I want all the protection I can get. For me, this boat is a considerable investment of both money, time and sweat. I saw George take a chainsaw to his drift boat after it started checking, what a shame that was. A few dollars and few pounds is worth the peace of mind. All in all, adding the 6oz cloth added less than 10 pounds.
Re: Cannonball's FS18
Posted: Tue Jun 04, 2013 1:06 pm
by Uncle D
Me too, I'm 100% glassed. Heavier, yes but no worries ever.
Re: Cannonball's FS18
Posted: Tue Jun 04, 2013 4:59 pm
by Cannonball
Ya'll are making it hard on me. I was hoping somebody would say go with it, I'm on a timeline here. I sure would like the designers to weigh in...

I can understand the arguement on the hull but I'm still undecided, how about decks, less important to glass? Would kiwi grip on them give it enough durability with just epoxy coatings for plenty of longevity?
I guess my problem is, I keep going back and forth on decisions to make it fancy or keep it simple. Everytime at the end of the day no matter what my buddies or anybody says I keep coming back to simple... practicle... low maintenance... easy. Fuel tanks... I'm thinking portable. Hatches... I'm thinking openings with elastic cargo nets fastened below the decks. Electrical... we don't need no stickin electrical. I mean, it is in essense a big canoe, why overdo it?
Re: Cannonball's FS18
Posted: Tue Jun 04, 2013 5:48 pm
by pee wee
With all the experience weighing in on the side of "just glass it", I hesitate to open my mouth . . . but I can't help it.

One of the concepts of these designs is light weight, and the designer has stated that (assuming you use marine ply) glass covering is optional in many areas of the boat. If it is really really strongly recommended, why doesn't he just say so?
Re: Cannonball's FS18
Posted: Tue Jun 04, 2013 7:25 pm
by Joe H
I built the OD16 and built it to the lamination suggested by Jacques, no more no less, 6" up the side's, I used a good marine plywood, okoume, and covered everything in at lest 2 coats (more in most area's) of neat West System epoxy, it's been 6 years now and shows no sign of wear, checking or anything negative, I also used a good topside marine epoxy paint, Interlux brightside or topside, something like that.
I would agree that glassing everything would probably be better and I might regret not glassing everything in a few years, who know's, but so far so good!
Good luck on your build, looking good so far!
Joe H
Re: Cannonball's FS18
Posted: Tue Jun 04, 2013 9:31 pm
by Cracker Larry
I'd glass it all. Joe gives great advice, he is a fine builder and a fine fellow too. His wife ain't bad either
But he lives in friggin Michigan where the ice ain't even out but a few months of the year and the the sun don't shine much longer than that. South Texas is a whole nother situation
the designer has stated that (assuming you use marine ply) glass covering is optional in many areas of the boat. If it is really really strongly recommended, why doesn't he just say so?
He says what is necessary from a structural point of view, enough to hold the boat together. But the cosmetics are up to you. I built a GF16 exactly to plans and used BS1088 plywood, well coated with epoxy, well primed and painted. In 2 years of south Georgia sun the wood was checking. Now I glass everything. The boat will be strong enough without it, but it won't look as good over time, unless it only sees sunshine 3 months out of the year. In Texas, I'd glass it all.
Re: Cannonball's FS18
Posted: Tue Jun 04, 2013 10:28 pm
by Joe H
Ha, yeah Larry has a point, my boat is covered 7 months out of the year and summers are kinda mild here, Texas sun and salt water may be a little tougher on her.
Joe H
Re: Cannonball's FS18
Posted: Tue Jun 04, 2013 11:01 pm
by Cracker Larry
Ha, yeah Larry has a point, my boat is covered 7 months out of the year and summers are kinda mild here, Texas sun and salt water may be a little tougher on her.
Ya think


Re: Cannonball's FS18
Posted: Wed Jun 05, 2013 6:37 am
by Cannonball
Well, that's 5 out of 6 experienced commentators that are for. Can't argue that. I need to start working up another BOM.
Are y'all talking glassing every other surface, including both sides of frames and underneath sides of decks, or just exposed areas?
I'll probably go with 6 oz on the sides, any issue with that weight glass on the decks? Should I go a bit heavier there?
Thanks for all the replies, I definetly don't want to have any checking after just a couple years.
Re: Cannonball's FS18
Posted: Wed Jun 05, 2013 8:33 am
by pee wee
Cracker Larry wrote:
the designer has stated that (assuming you use marine ply) glass covering is optional in many areas of the boat. If it is really really strongly recommended, why doesn't he just say so?
I built a GF16 exactly to plans and used BS1088 plywood, well coated with epoxy, well primed and painted. In 2 years of south Georgia sun the wood was checking.
Okay, that's all I needed to hear. I'll cover it all with glass- lesson learned. Thanks, Larry, for sharing your experience.
Re: Cannonball's FS18
Posted: Wed Jun 05, 2013 8:37 am
by Cracker Larry
Are y'all talking glassing every other surface, including both sides of frames and underneath sides of decks, or just exposed areas?
Exposed surfaces only, not the underside of decks.
Re: Cannonball's FS18
Posted: Wed Jun 05, 2013 8:57 am
by wadestep
FWIW - I'm with the majority here. I've also just decited to completely glass even a GV10. If the weight's worth it on a 10' boat, it's worth it on your FS18. I'm using 6oz cloth, it really doesn't soak up much epoxy at all. Varnish and traditional wooden boat construction hold up will in the far north also, but not in S. FL (or TX for that matter).
Re: Cannonball's FS18
Posted: Wed Jun 05, 2013 10:59 am
by AtTheBrink
On my FS18 I plan to cover all exposed surfaces with 6oz glass, Sole, decks, and exposed bulkheads. I also plan to glass the inside of storage compartments and in the battery boxes, any surface that is subject to wear. The 6oz cloth is really easy to work with, you'll like it. It will take 13 yards to glass the hull sides and another 8 or so to glass the decks and bulk heads. Keep on building!
Re: Cannonball's FS18
Posted: Wed Jun 05, 2013 1:55 pm
by Cannonball
That's about what I had figured up as well. Now to see if I can get it here by Friday.
Re: Cannonball's FS18
Posted: Wed Jun 05, 2013 7:28 pm
by Cracker Larry
I also glass all storage compartments, bait tanks, anchor lockers and any interior area that gets use and wear. The hidden forever parts I don't glass over, unless it needs it structurally.
Re: Cannonball's FS18
Posted: Thu Jun 06, 2013 8:40 am
by Cannonball
Gotcha, CL your build and posts have been a big help so far. Thanks!
Re: Cannonball's FS18
Posted: Mon Jun 10, 2013 12:23 am
by Mikem59
Cannonball - I'm over in Nederland, Tx, and just beginning my build. Glad I've reviewed your posts, it has helped, as has the others on answering some questions I have. Looking forward to your updates.
Re: Cannonball's FS18
Posted: Mon Jun 10, 2013 8:57 am
by Cannonball
Got quite a bit of odds and ends done this weekend in preparation for glassing the sides...
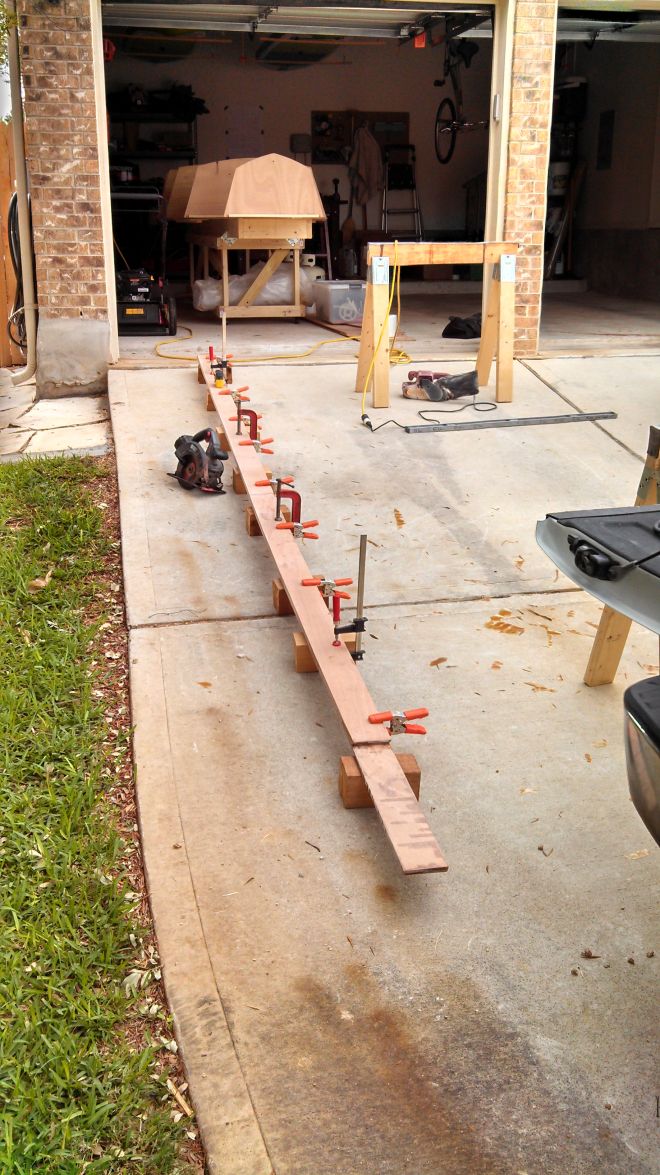
Cut the rub rail strips. This should be an add for the Kreg rip cut. Measure once and cut 15 times...
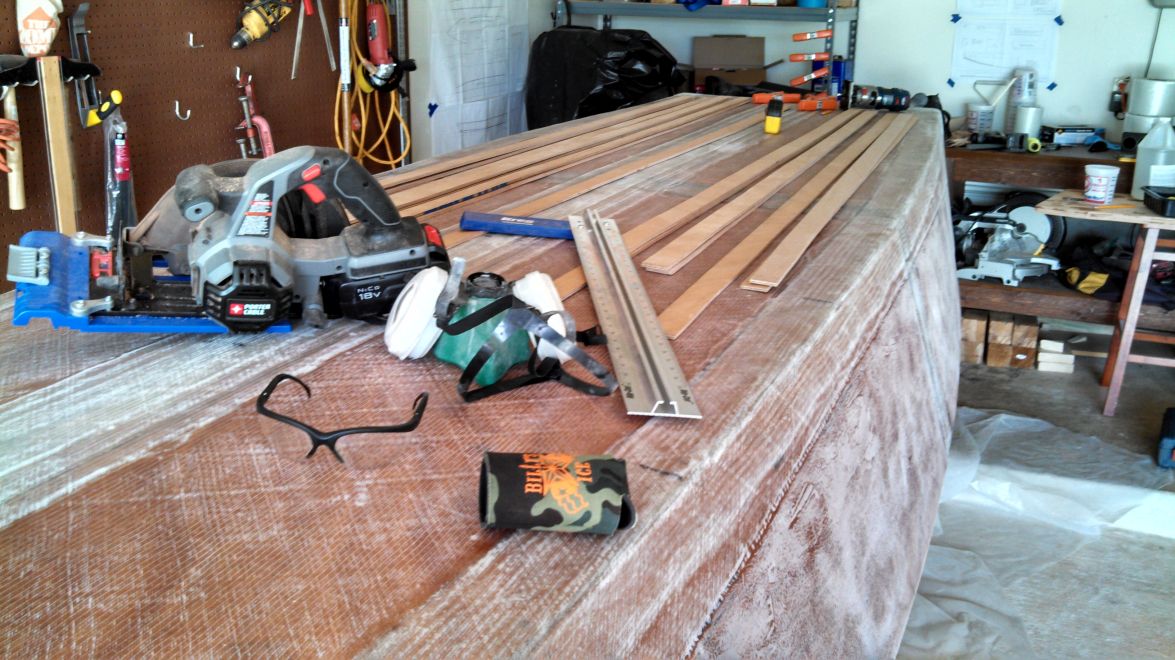
Lowered the shear in the back half of the boat to flush with the baseline height of the deck. I'm keeping the extra bow shear for running across some deep waters that can get a nasty tide swell in order to get to the skinnies. Will come back and cut the transom down when I flip it.
Sanded and faired the remininse of the air bubbles that I injected during the week.
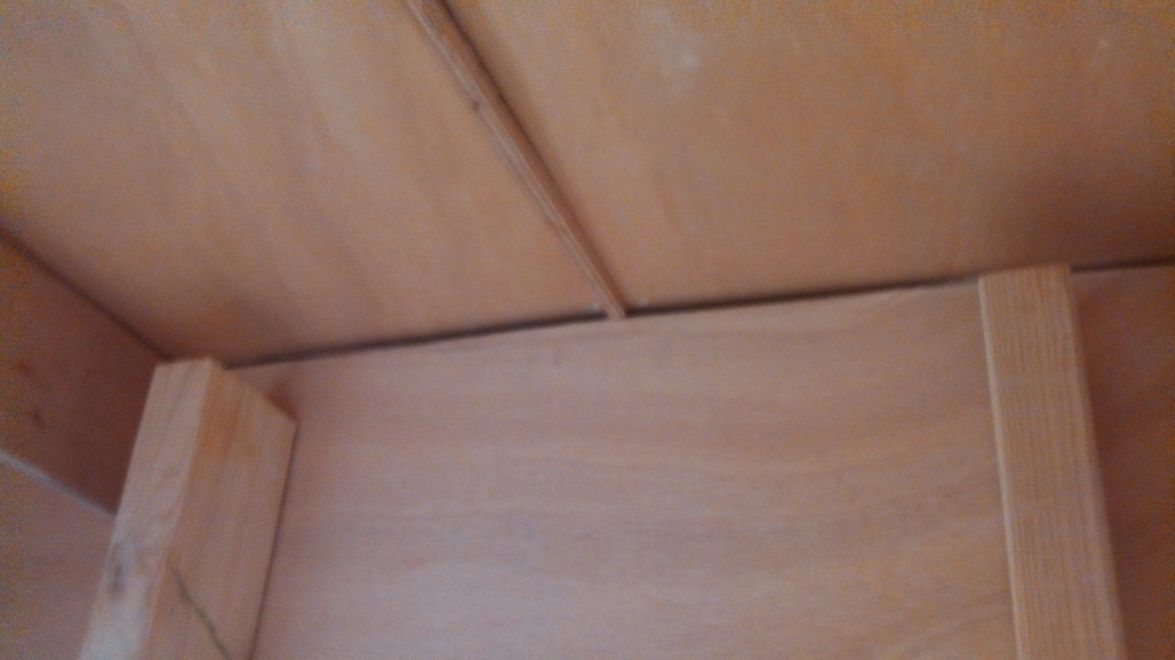
Well, that initial 1/8" where I sucked the panels to tight with stiches has turned into quite the expanse. I'm going to build up a bit with fairing compound before glassing the sides. I'm considering daming this up like everybody does to sharpen the corners, but then round them off before glassing the sides to help correct it. One side is pretty minimal, but even after this first coat I've got still a 1/4" to deal with on the other. Any ideas? Yet another lesson learned, I did a good job glassing 80% of the boat, but the devil is in that 20% where experience helps you deal with the corners and overlaps.
Re: Cannonball's FS18
Posted: Mon Jun 17, 2013 9:19 am
by AtTheBrink
Looks like you are doing a good job! What weight glass are you using on the sides?
Re: Cannonball's FS18
Posted: Mon Jun 17, 2013 10:20 am
by tech_support
Any ideas?
I do what you have described, but do it with wood flour and glass over it before its hard. So you basically giving it the right radius with woodflour putty, then while its still green, you go wet on wet and do you glassing.
Re: Cannonball's FS18
Posted: Tue Jun 18, 2013 2:09 pm
by Cannonball
Thanks Shine, i had built it up this last weekend before I saw your post. Good thing I used majority wood flour, it feels pretty solid. Just need that glass for the sides for a final pass and I'll be back up and running.
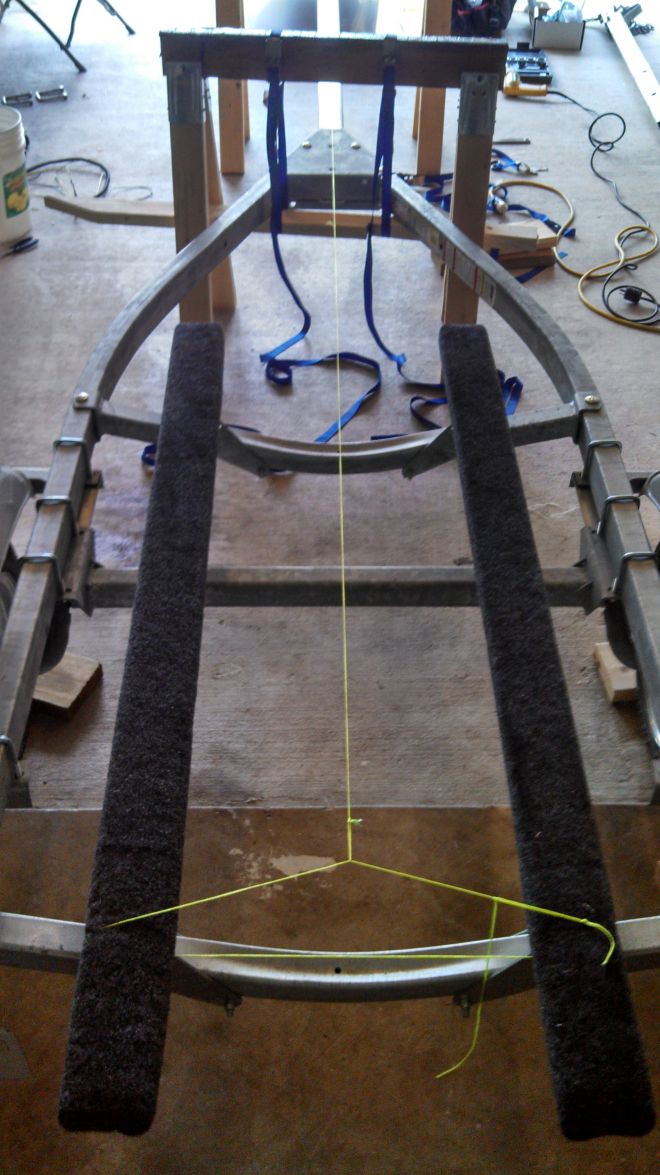
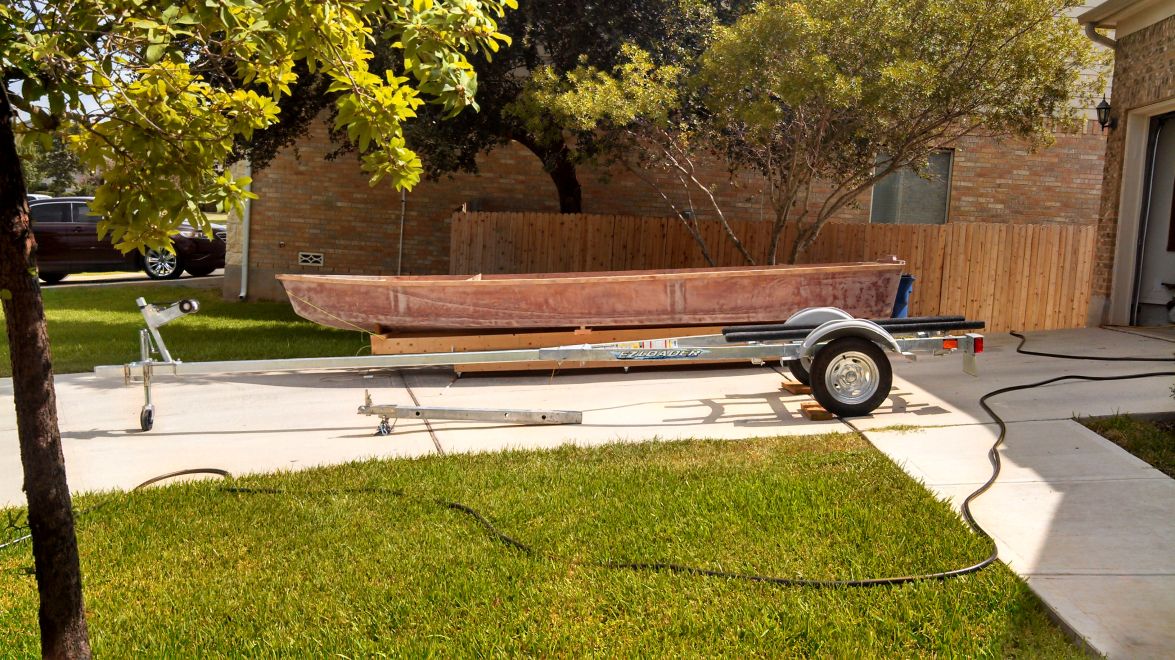
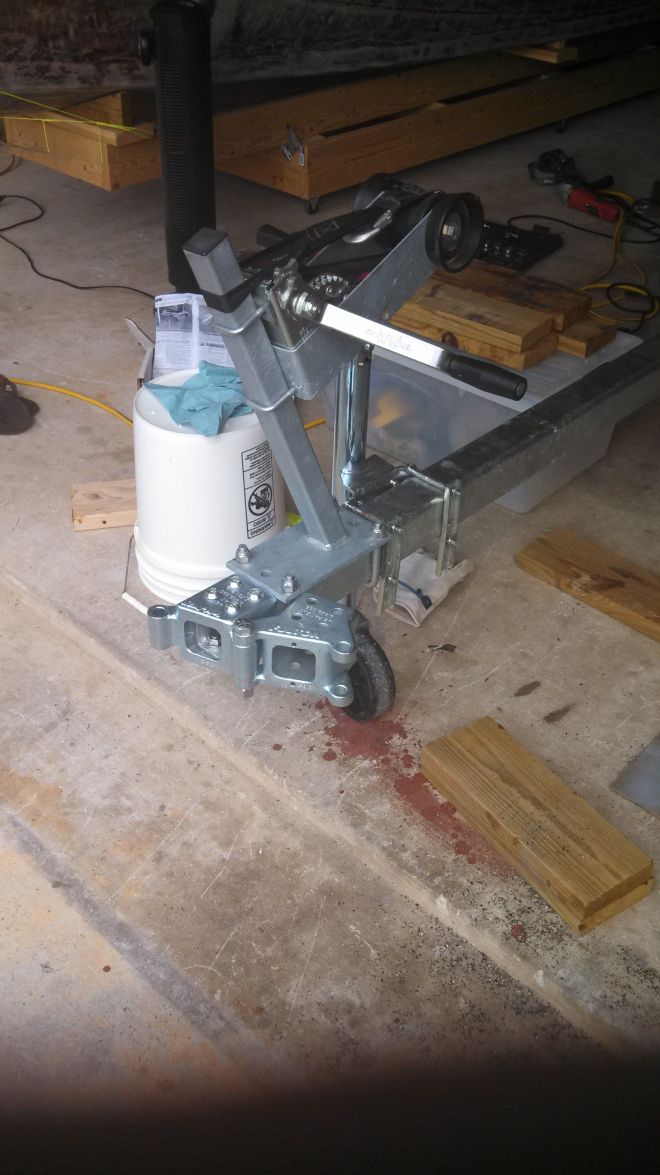
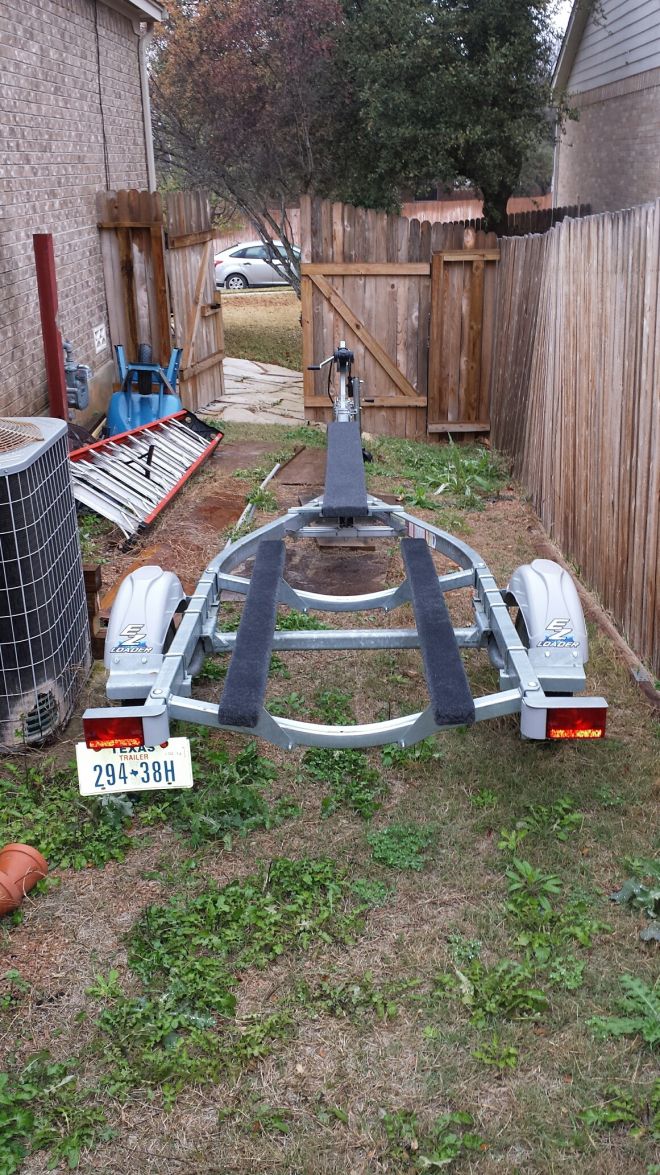
On another note. I've been considering trailer options. I'm leaning towards getting a PWC trailer for the larger 3 seater 4 strokes and extending that so I can keep the set up from swallowing the boat. Most trailers, even for 15-16 jons seem way too wide. The one I've got pictured below I'm going to check out this weekend and maybe make a deal on. It is 45-46" between the fenders, and I figured I could put some roller guides just in front of them to protect the plastic wheel wells. It is a practically new trailer and I would only have to swap out the toungue for a longer one. Price is right, and they are plentiful on craigslist. What do you guys think?
Here is the one I'm looking at GVWR 1250#:
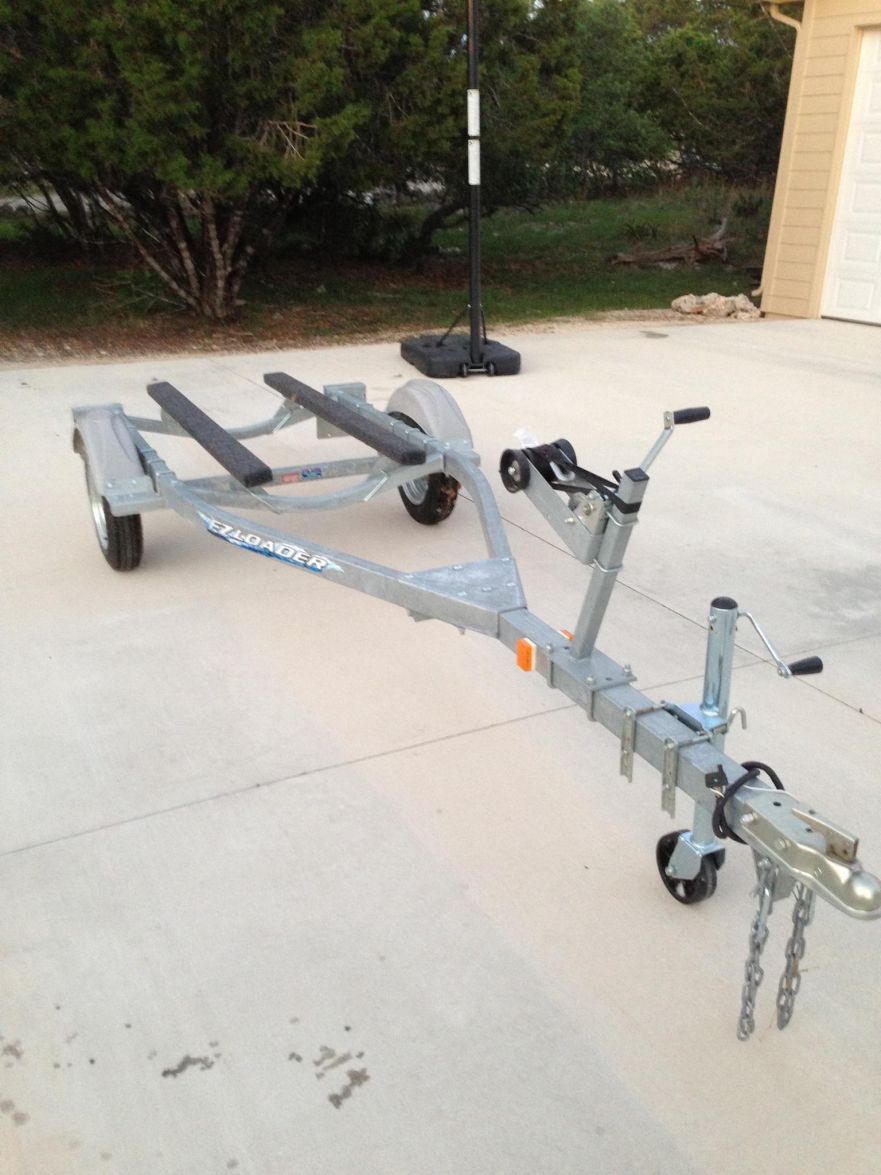
Seems like what the gheenoe guys use, and like it would work well with the FS18...
Re: Cannonball's FS18
Posted: Tue Jun 18, 2013 2:19 pm
by AtTheBrink
I think you could make it work with some modifications.
Re: Cannonball's FS18
Posted: Tue Jun 18, 2013 3:04 pm
by tech_support
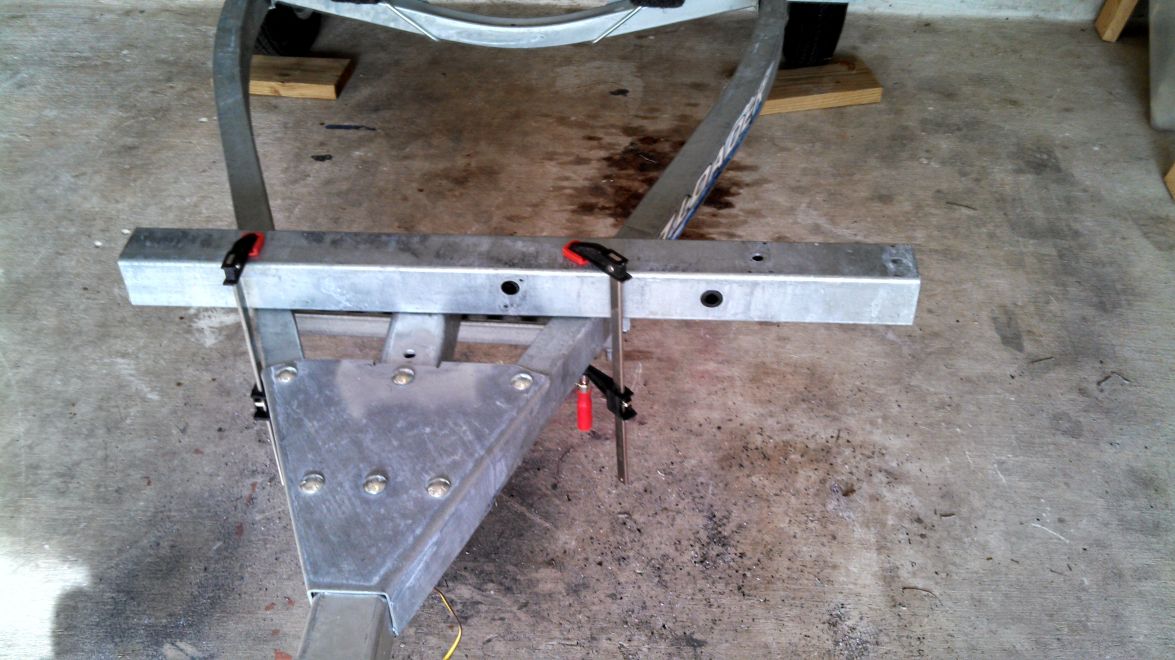
that looks pretty good, there is room to move the axle back and also move the from cross beams up a little = longer bunks
Re: Cannonball's FS18
Posted: Mon Jun 24, 2013 8:36 am
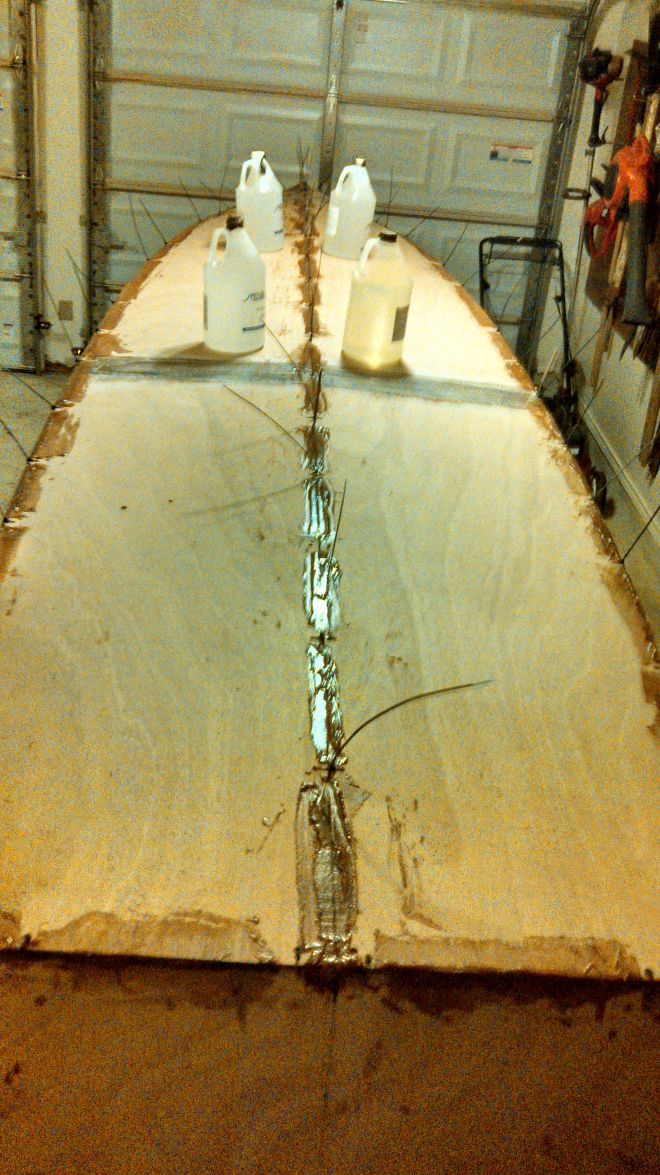
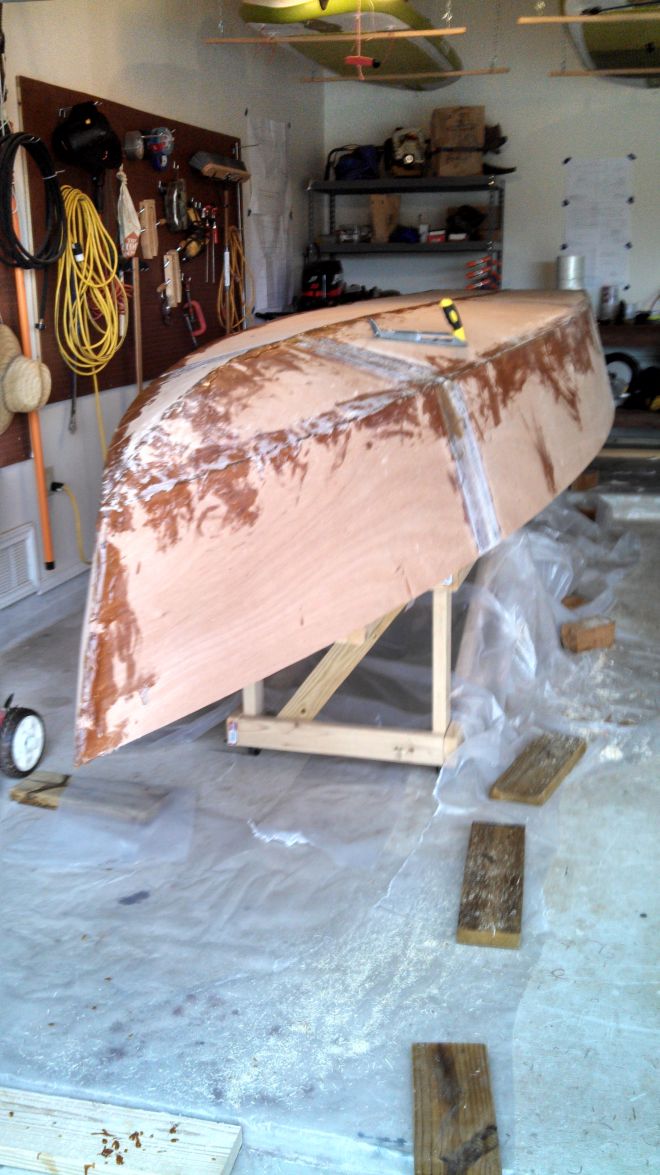
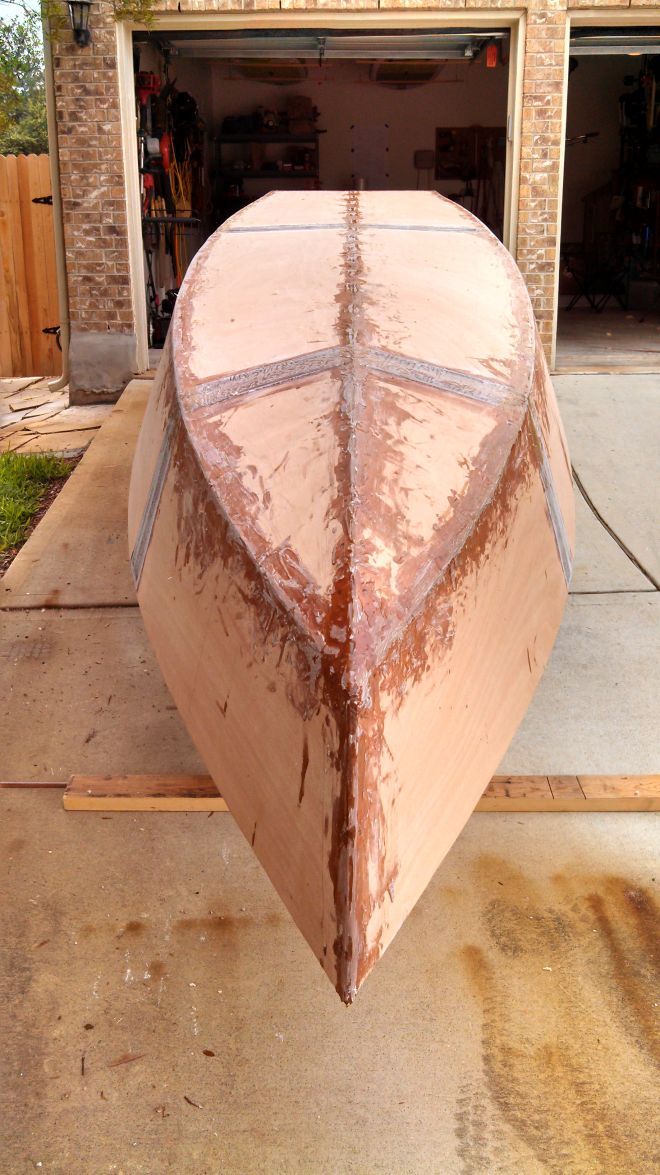
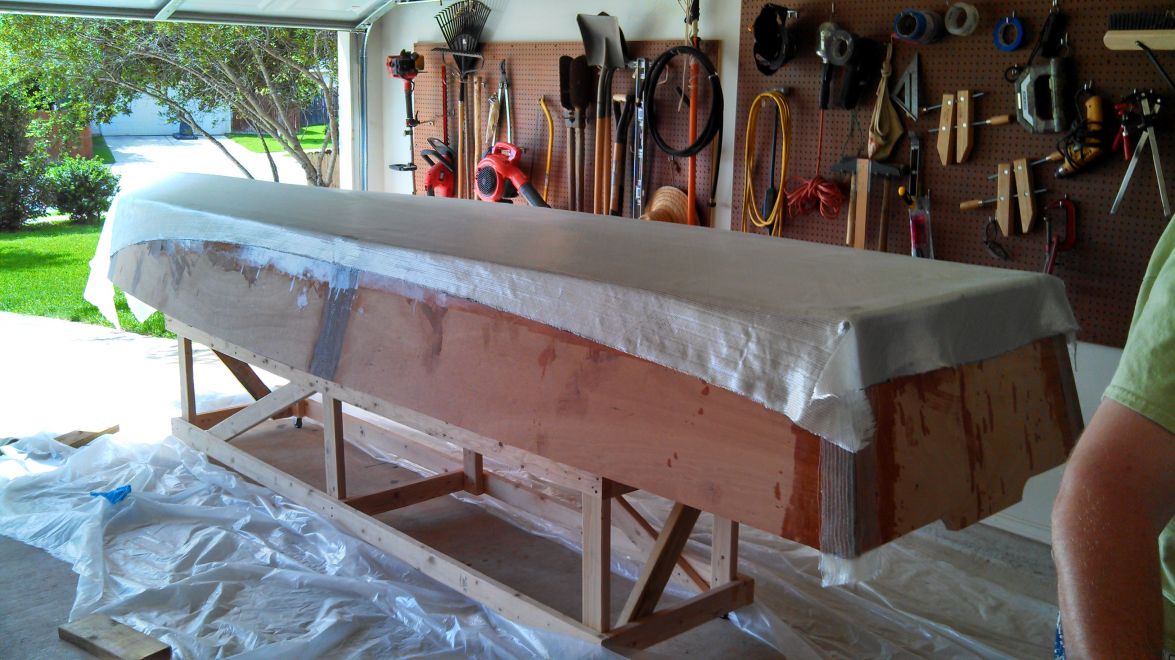
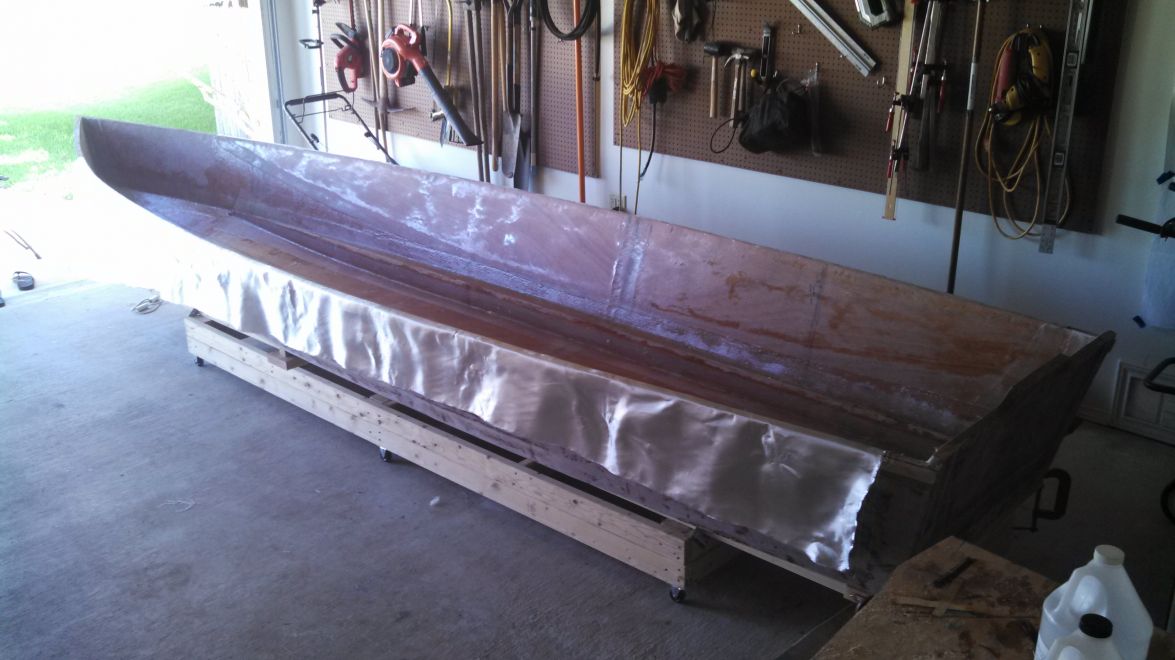
by Cannonball
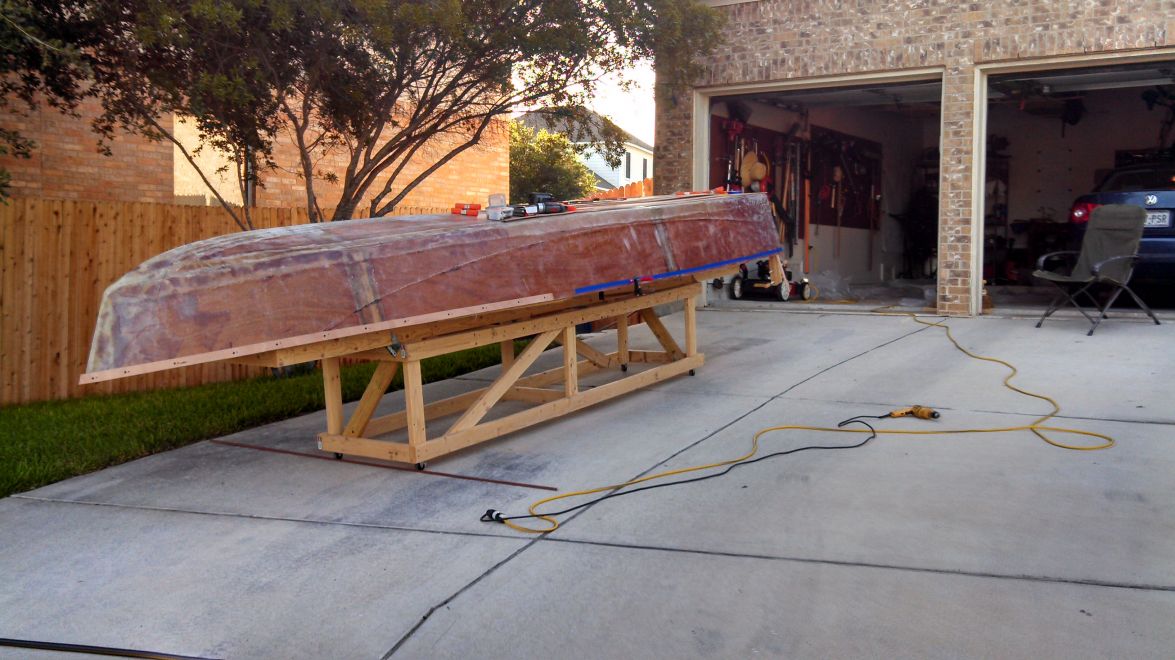
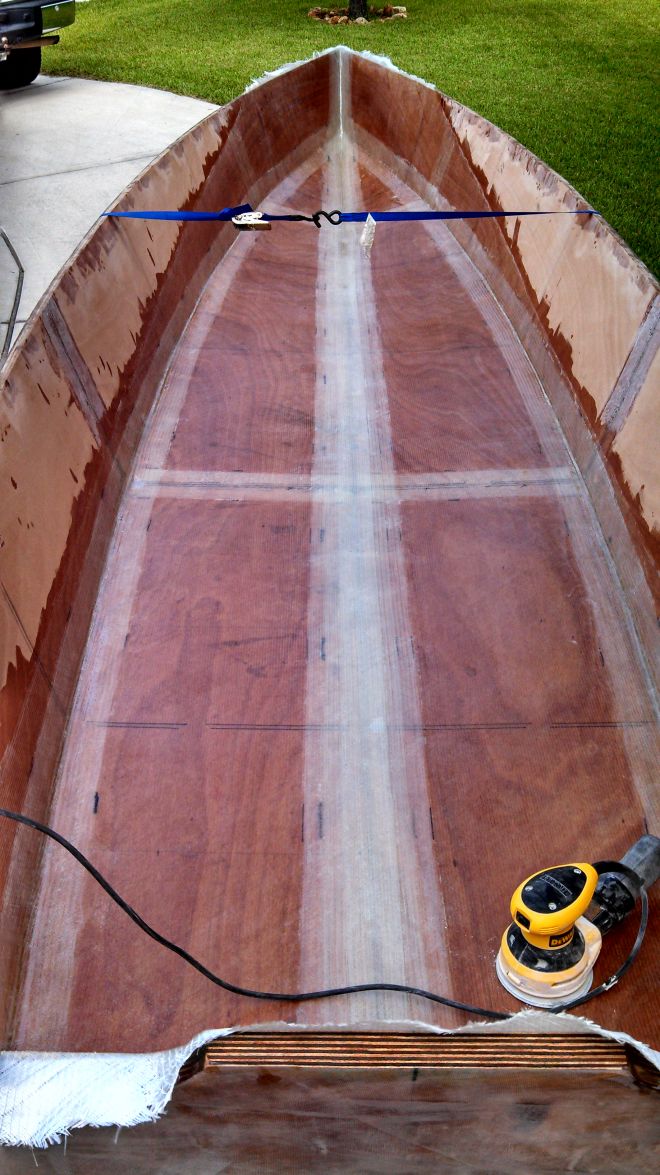
Alright. We are back at it. Got the sides glassed. Ended up with 6 oz woven fabric on them. That stuff is super easy to use. makes me want to build a surfboard after this. The 2 week lag on getting the cloth gave me some time to correct troubled areas and build up the gaps I had in the back. I feel a lot better now that it is 100% glassed, and having the extra layer of glass over some bubbles that I had to sand out and fill with compound gave it a much better starting point for fairing.
Last orbital pass before the fairing boards come out...
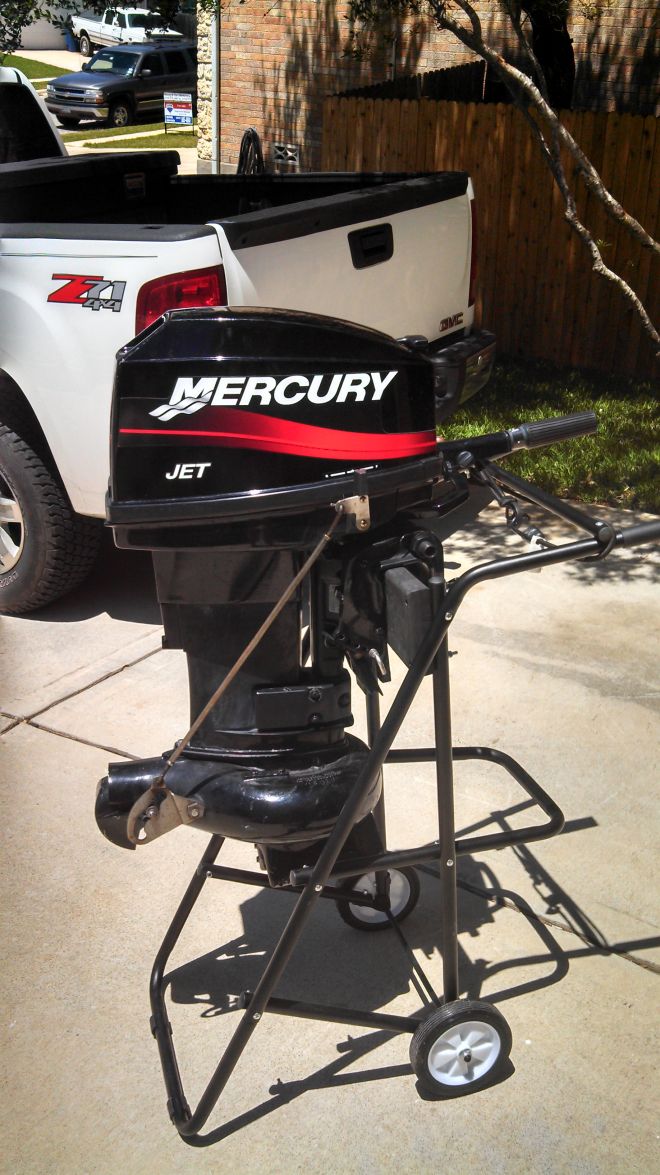
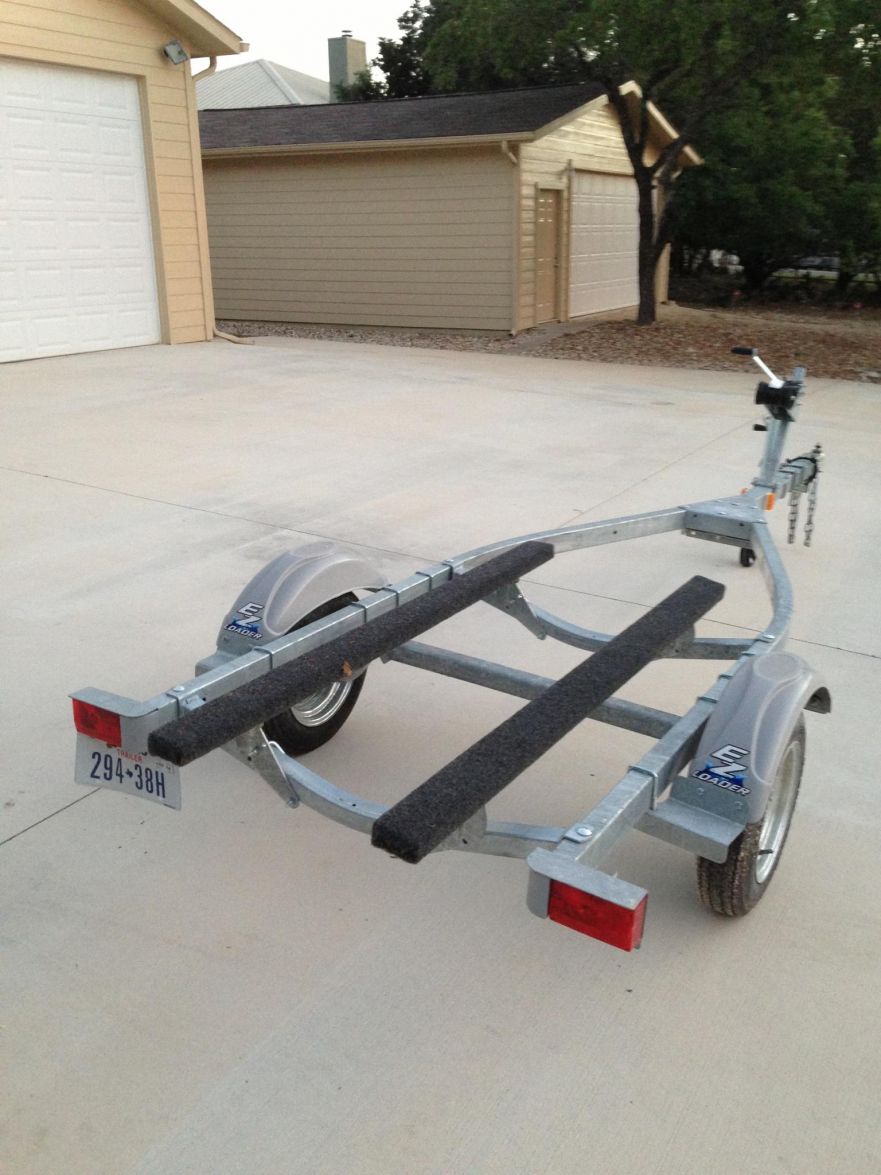
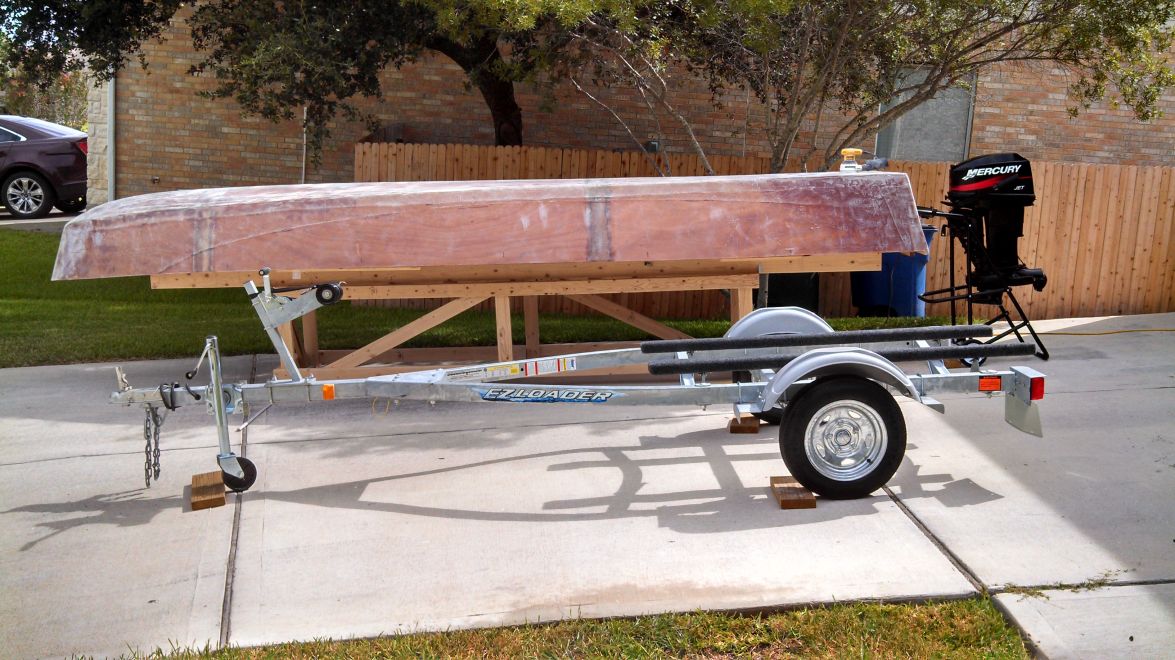
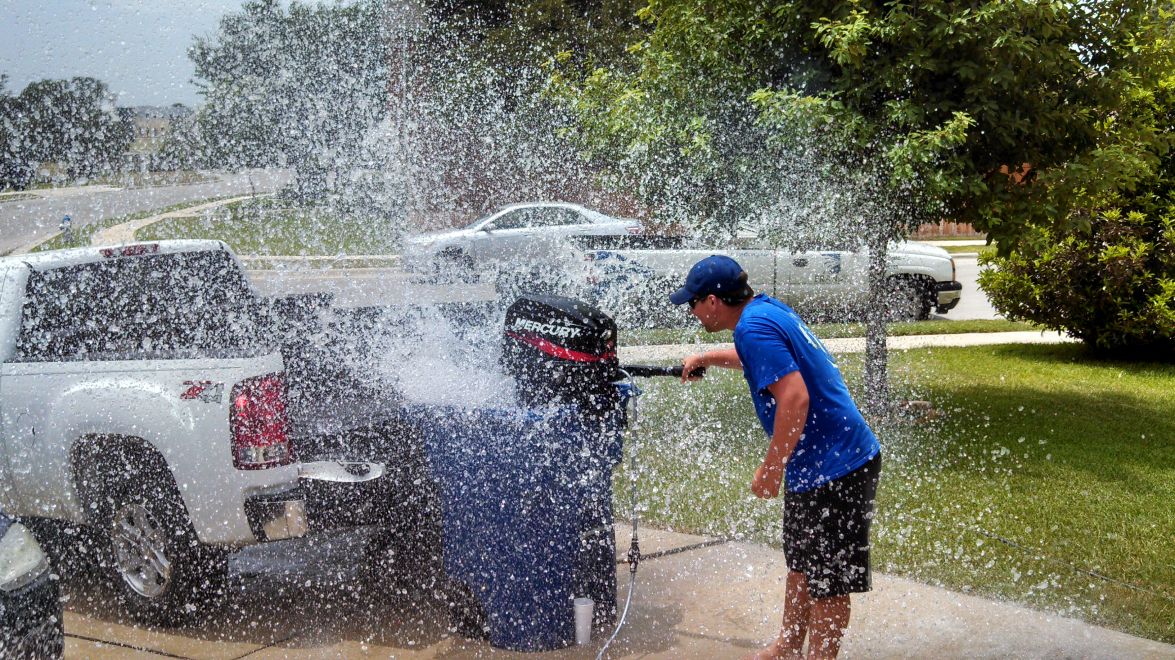
All the major players finally in one place, now I just need to hurry up and get done! I ended up getting the jet ski trailer, it has a 1250# capacity. I'll need to add 8' of tongue to it, and will probably add a swing over bracket and a keel roller. Picked this up for $400 and it is practically brand new, the tires still have the knobby's on them. It has torsion axels, and once I add the swing over tongue it will be tricked out like the trailers the east cape skiff guys use.
Then we couldn't resist having a bit of fun! Happy to report, the motor started on the first pull, and ran smoother and quieter than I anticipated being a 2 stroke. I hadn't run the fuel out since starting it when I bought it, so gave us a good reason to drink beer and rev up the jet motor in the drive.
Re: Cannonball's FS18
Posted: Mon Jun 24, 2013 8:09 pm
by AtTheBrink
That is a cool picture! Looks like it felt good too. It has been Africa hot! Is that a 25 HP jet?
Re: Cannonball's FS18
Posted: Tue Jun 25, 2013 7:35 am
by Cannonball
Yep. It is a 25 powerhead, but is rated for more like 18 at the pump. We were having a good time. And, I'm afraid the Africa heat is just now rolling in. Thank goodness I can roll the strong back off into the grass and get in some shade.
Got a question, what's the best approach for the rub rails? I'm thinking trim the front during the dry fit then work from the bow back? Also, using the dowels, do you drill for each layer, or dry fit all three and then drill?
That and fairing are on the program for this week.
Re: Cannonball's FS18
Posted: Tue Jun 25, 2013 8:06 am
by topwater
When I did my rub rails I dry fitted all three first " I ended up using two layers of 3/8"
Got everything where I liked it, then drilled for dowels , removed the rails and glued
dowels in . Put all the rails on the next day in one shot . worked well.
Re: Cannonball's FS18
Posted: Tue Jun 25, 2013 8:12 am
by AtTheBrink
On the rubrail- the way I did it. Work bow to stern one layer at a time. I used screws to hold everything, dowels might work too. I wish I would have had more clamps. It would have made things easier. If you use screws you have to predrill for every screw and then overdrill those holes to fill them. Kind of a pain but it works.
Re: Cannonball's FS18
Posted: Tue Jun 25, 2013 8:58 am
by Dougster
I worked stern to bow and used dowels for each layer. Ended up with three layers of 1/4". It took lots of clamps and some cussing, cuz the Nina design's got a lot of lift toward the stern and the ply needed some persuasion. The dowels were the persuaders. It's for sure a good thing you can roll her into the shade to work
Says hi from Blanco Dougster
Re: Cannonball's FS18
Posted: Tue Jun 25, 2013 4:23 pm
by Cannonball
Thanks for the suggestions. I like the way Topwater did it and after reviewing his thread, think I'll do the same. Mike, I'm also in the situation where I don't have a ton of clamps, and because I have the deck on the strong back it makes using my makeshift pvc clamps difficult to use. With the dowels and clamps I've got I can get a good dry fit and then suck everything together with some sheetrock screws to make up the difference. We'll see how it goes on the dry fit round.
Re: Cannonball's FS18
Posted: Tue Jun 25, 2013 6:14 pm
by Cracker Larry
Cannonball, see this page and scroll down to the rub rail install..
http://forums.bateau2.com/viewtopic.php ... &start=130
Screws are the way to go
Re: Cannonball's FS18
Posted: Tue Jun 25, 2013 8:38 pm
by Cannonball
That's a great tutorial. Thanks for the tip CL!
Re: Cannonball's FS18
Posted: Tue Jun 25, 2013 9:37 pm
by Cracker Larry
50 screws are a lot cheaper than 50 clamps, and good screws are re-usable
Re: Cannonball's FS18
Posted: Tue Jun 25, 2013 10:09 pm
by AtTheBrink
Yep! Screws are fast and easy!
Re: Cannonball's FS18
Posted: Mon Jul 01, 2013 8:50 am
by Cannonball
Not as much progress as I was hoping this weekend. Got the first layer of rub rail on though and am going to get the remaining 2 layers done before the 4th. I'm planning on flipping it on the 4th and getting the inside framed out before final fairing the outside. Not to mention it will only be 95 degrees instead of a 105 like it has been so good time to get the inside glass done. I've still got a little bit of unevenness along the keel, and I'm hoping if I flip it and set the keel against a board it will help to flatten out the couple remaining dips I have in it. I didn't catch the hook when I went to glue the outside panels together, but was still easy enough to push them out with some shims before glassing. When I pull the shims, the hook shows back up even though it was glassed flat. I think there are a couple forces working against each other now, and hope I want to true that up before I burn a bunch of time fairing. Plus it's fun to be building again!
Thanks for the tip on using screws. That's the way to go. Add some west systems six 10 to the mix it goes like butter.
Re: Cannonball's FS18
Posted: Mon Jul 01, 2013 2:58 pm
by AtTheBrink
I did the sam ething on mine. I put the first coat of fairing on, sanded that then flipped it. It broke up the build some so I didn't get totally burnt out with the fairing. I completed all the inside framing then flipped her again to finish fairing. After fairing I primed, and applied the graphite, flipped again. Now I am working on completing the inside now. I am not sure if I will flip again to paint. I don't really need to but it would make it easier to paint.
Your boats coming along great. Keep on Building!
Re: Cannonball's FS18
Posted: Mon Jul 01, 2013 9:46 pm
by Cannonball
I'm in the same boat
. I'm wanting to continue with progress on the build before I get bogged down with finishing. I'm going to try to get my ducks in a row so after I finish the interior framing and flip, I can finish the outside up to the rails and then get it on the trailer at that point.
Re: Cannonball's FS18
Posted: Mon Jul 01, 2013 11:31 pm
by AtTheBrink
Have you thought about paint color yet? If you are going with Sterling, order it way before you need it. Some kind of backlog at Sterling. I ordered my paint 3 weeks ago and it still hasn't been shipped to Shine so he can ship it to me. Kinds sucks... I know I am going to be extra careful with that stuff when I gets here!
Re: Cannonball's FS18
Posted: Tue Jul 02, 2013 10:03 am
by Cannonball
I keep going back and forth on paint. I've got a friend who has a connection to dealer priced awlgrip so I'm going to go that route, especially with the Sterling backorder issue. Color selection, now that's a different story. I've been thinking some sort of guide green color all over and then white kiwi grip decks with a stainless rub rail, but I keep going back and forth. One day its green next day its blue, every now and then I consider the color hells bay has on the glades skiff with tan and cream. I'm not a colors guy, I just don't care as long as it looks good, so suggestions are welcome.
Re: Cannonball's FS18
Posted: Tue Jul 02, 2013 12:40 pm
by AtTheBrink
I like the guide green color but, my opinion, it is way over done. Every third poling skiff out there is Guide Green. The other 2/3's are Fighting lady yellow and Seafoam. I went with Sky Blue and Cloud white. The cloud white is a little lighter than the cream and not so pink. I didn't want a bright white deck. They look sharp but the glare is blinding!
Re: Cannonball's FS18
Posted: Tue Jul 09, 2013 9:14 am
by Cannonball
Little more of the same this week. Didn't get the boat flipped over the 4th. Pulled a muscle in my back and that put a damper on things for a while, but really was a set back on the build. Did get the rails complete and a layer of fairing compound on the bottom. Trued up the edge of the chines and transom in the back of the boat, so now I'm really ready to flip it. Rails make it look a whole lot more done.
Re: Cannonball's FS18
Posted: Tue Jul 09, 2013 10:43 am
by AtTheBrink
She is coming along nice! Good clean work. Once she is flipped, check and recheck the bottom to make sure it stays flat before you glass the inside. Once it is glassed inside and out any hook or rocker is locked in and a real pain to correct. And you are right about the rubrail making it look more finished, it also stiffens up the sides alot!
Re: Cannonball's FS18
Posted: Wed Jul 10, 2013 1:07 pm
by Cannonball
Anybody have a clue what colors these would be off the awlgrip chart? This is the latest "canoe style skiff" from the East Cape Skiff guys and he said light gray outside with blue on top? Not sure exactly which grays or which blues though. I'd like to duplicate this on mine. Looks good, especially with the black/red engine.

Re: Cannonball's FS18
Posted: Wed Jul 10, 2013 2:04 pm
by tech_support
They probably are using gelcoat, so you wont find an exact match on a paint color chart. The KG is a bit darker, so you would want to mix grey/white together to get a lighter shade. Sterling has a "blue tone white" that looks the same
Re: Cannonball's FS18
Posted: Wed Jul 10, 2013 3:37 pm
by Cannonball
Thanks Shine. I was looking at the kingston gray. I haven't seen anybody go with the gray on the FS18, so I'm kicking the idea around. I got on the hells bay site that has a color scheme seletor...
http://hellsbayboatworks.com/boat-pages ... kiff-specs
I know this thing doesn't exactly give the best rendering, but I'm leaning towards a Kingston Gray hull with a Blue Tone White hull and deck all AwlGrip colors. I think I mentioned it before, but I've got a hook up on some dealer priced awlgrip so naturally will be using those colors. Still might change my mind again tomorrow though. I have no idea on colors.

For you FS18 builders. What quantities of paint primer should I get? In say these categories:
-Interior/Exterior High Build Primer
-Hull Sides (Epoxy/Graphite finish on bottom)
-Deck
-Non Skid
Re: Cannonball's FS18
Posted: Wed Jul 10, 2013 3:52 pm
by Cracker Larry
I was looking at the kingston gray. I haven't seen anybody go with the gray on the FS18,
Hooter painted his with Sterling Jay Gray, it looked great!
A gallon of S3 primer will do the entire boat about 3 coats.
Re: Cannonball's FS18
Posted: Wed Jul 10, 2013 4:01 pm
by Cannonball
Sure did didn't he. I remember seeing Hooter's, that color looks real good, I think I'd like a little lighter shade along those same lines.
Re: Cannonball's FS18
Posted: Thu Jul 11, 2013 10:04 am
by AtTheBrink
I like that jay grey too. I went with the sterling sky blue. Its a couple shapes lighter than jay gray.
Re: Cannonball's FS18
Posted: Mon Jul 15, 2013 11:46 am
by Cannonball
I'm thinking now whisper gray hull/non skid and ice blue interior/trim. What do ya'll think? Looks pretty darn good to me. I'd rather use standard colors than venturing off into trying to mix my own. I can only see that ending up in disaster. Has anybody ever used walnut shells for non skid? I saw a guy that built a jet skiff on the Texas coast not to long ago use them and they were really light cheap and easy to apply or so it seemed?

Going to flip it this weekend, I think. Didn't get any work done on it last weekend, but I did catch a few reds wading mud island. Nice little break from working on the boat, but got me totally pumped to get it finished.
Re: Cannonball's FS18
Posted: Tue Jul 16, 2013 10:27 am
by AtTheBrink
You should have stopped by and had a beer while you were in the area!
I don't know anything about walnut shell non skid but I tried the non-skid additive sold here and had a tough time getting consistant coverage. I applied it on a piece of scrap ply about 2'×3'. I am pretty positive I couldn't get even coverage on the entire sole or front deck. Decided to go with KiwiGrip.
Re: Cannonball's FS18
Posted: Tue Jul 16, 2013 2:30 pm
by Cannonball
I know it MIke, just got to busy drinking beer and catching fish to get in boat building mode. Ready to see some more pictures of that fine vessel.
Just did a forum search and saw the kiwigrip gray is nice and light. That would me much easier than trying to do much anything else. I think that will be close enough even if I do a whisper gray on the outside and the ice blue slick lines will contrast well. I think I'm about set. Now just got to see if my cheap awlgrip deal will go through or if I'll be going with Sterling.
Re: Cannonball's FS18
Posted: Tue Jul 16, 2013 2:54 pm
by Cannonball
Anybody have an idea of which Sterling gray would be the closest match to the kiwigrip gray?
Re: Cannonball's FS18
Posted: Tue Jul 16, 2013 4:28 pm
by AtTheBrink
Probably the Whisper Gray would be the closest.
Re: Cannonball's FS18
Posted: Mon Jul 22, 2013 8:45 am
by Cannonball
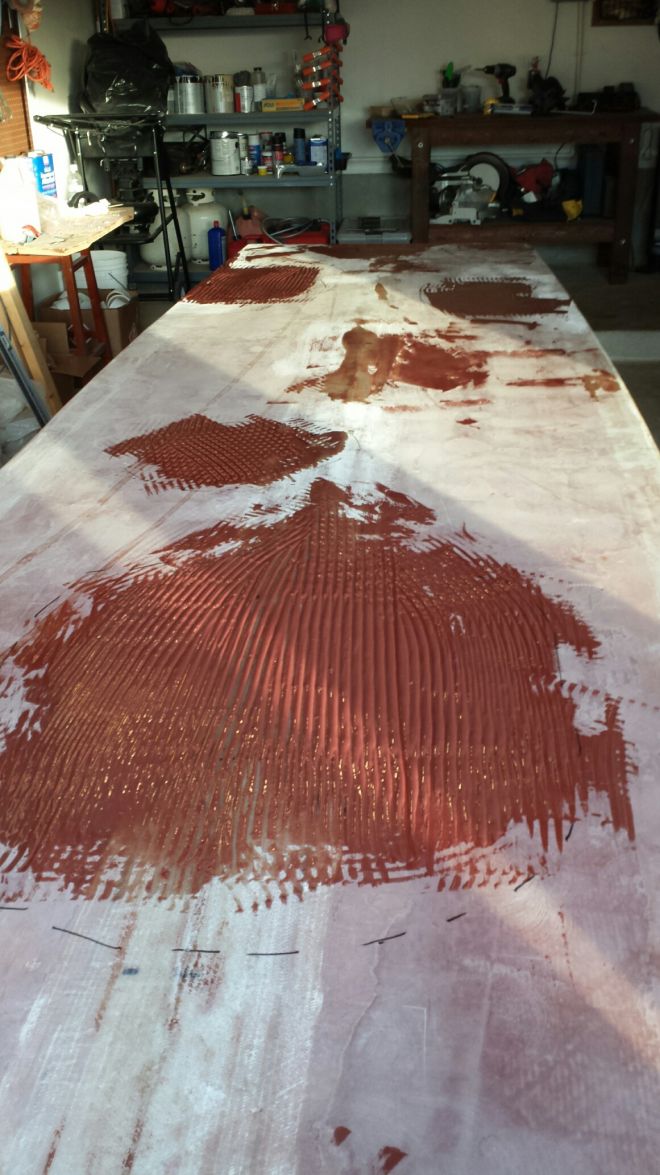
Back in production mode here. So much so that I'm on the wagon so I can stay focused and get this thing built out. I"m shooting to have the interior built out by labor day.
First solid round of fairing done on the bottom...
Flipped! That was fun...
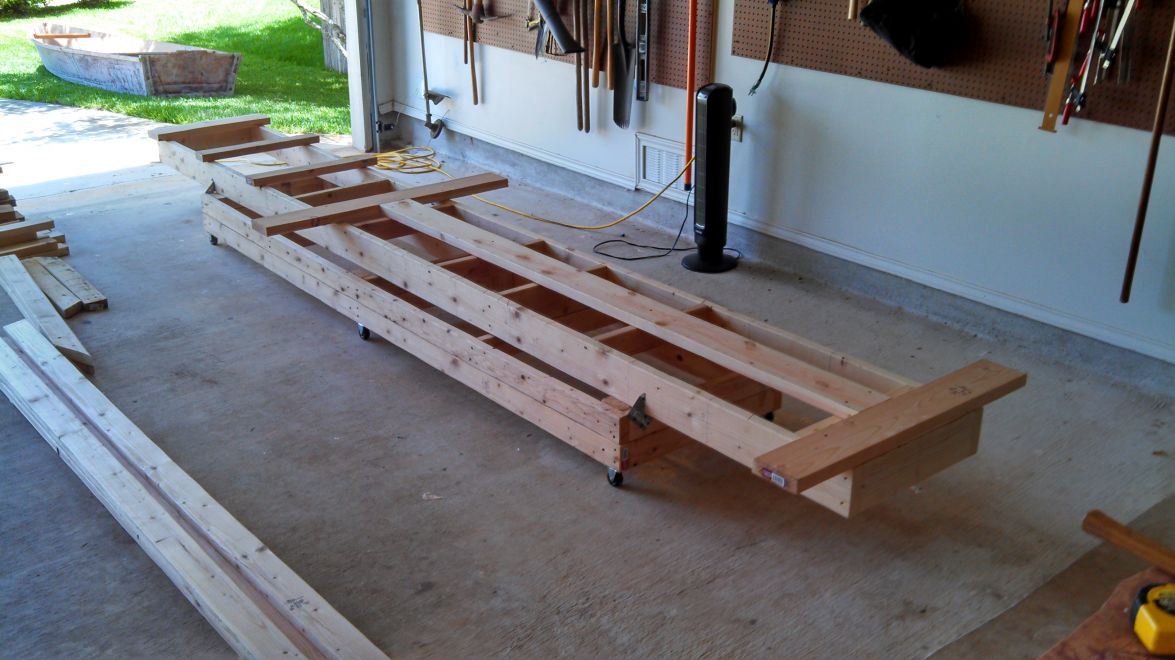
Dropped the strong back, and added some framing to help straighten out the bottom. This is one thing I did right on this build. Built the strong back 2' tall, but made it where it would be easy to drop when I flipped. It was nice to be able to climb up underneath at first, but right now is perfect working height for the interior...
Couldn't help but get an idea of what the sheer was going to look like with the decks in. Lovin it. Straight sheer in the back half, and the front according to plan...
Got all the evil little drips and stuff cleaned up on the inside. Also rough sanded the tops of the rub rails, still more to go, but going to hold off until the decks are on to make that transition nice and even.
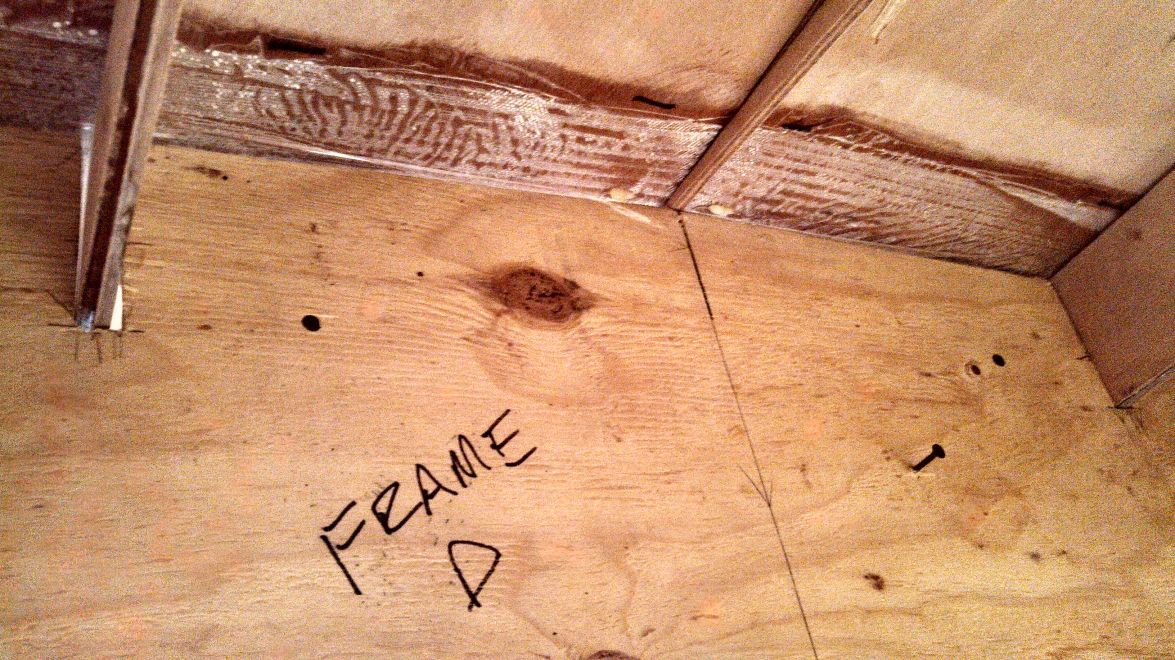
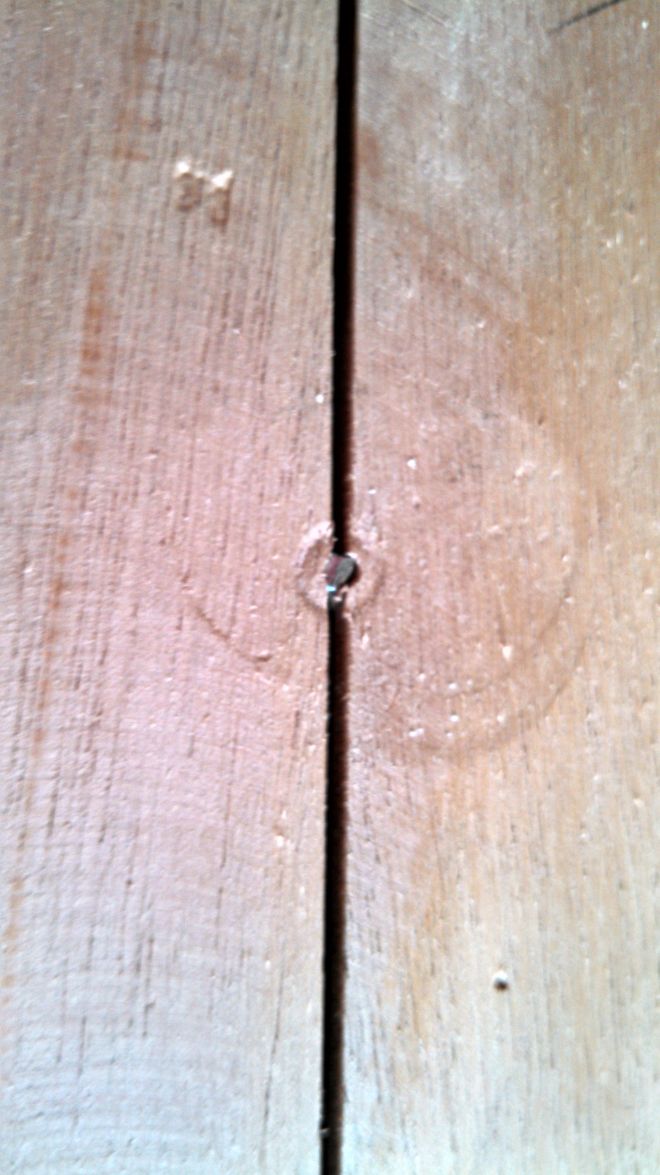
Here's a shot of my fix for the slight hooks I had between E & D and D & C. Drilled some pilot holes and cut the head off some picture hanging nails and drove them into the crack. Still need to punch them down a bit further, but I'm hoping to be able to use these to hold the hook down while I glass, and place the stringers and frames. Then, when I'm ready to flip again in theory it should pop off. We'll see...
Re: Cannonball's FS18
Posted: Mon Jul 22, 2013 9:44 am
by AtTheBrink
Looks great! Congrats on the flip! Everything is looking good. Not quite sure how the nail thing is gonna work but sounds like you got a plan. If you have all your material on hand and put in a couple hours a day you should be farther than you think by labor day!
Re: Cannonball's FS18
Posted: Tue Jul 23, 2013 8:48 am
by Cannonball
Can someone explain the tinted epoxy thing to me for under decks and in hatches? How much tint do you mix in the epoxy? What surface prep is necessary? Do you primer, fair, or just paint it right over the glass? I'm thinking I'm going build the interior out completely including the decks before finishing the outside and would like to use the gray tint to finish the hatch areas. Just trying to get prepared for the next few weeks.
Re: Cannonball's FS18
Posted: Tue Jul 23, 2013 8:56 am
by Cracker Larry
No primer necessary, but I fair them to make cleaning easier. At least fill the weave and smooth it out. I use about a teaspoon of pigment in 9 ounces of epoxy.
Re: Cannonball's FS18
Posted: Tue Jul 23, 2013 8:59 am
by AtTheBrink
No need for primer with tinted epoxy. Just fair, if you want, and roll or brush it on. As far as how much to use, a pretty good blob is usually enough
Re: Cannonball's FS18
Posted: Tue Jul 23, 2013 9:19 am
by topwater
You will need a couple coats .
Re: Cannonball's FS18
Posted: Tue Jul 23, 2013 1:54 pm
by Cannonball
Cool beans. Thanks for the replies. I'm also trying to finalize my paint order, and am unsure about the quantities.. I'm thinking a quart of ice blue for the slick lines, rub rails and interior sides, and two quarts whisper gray to get the outside. Does that sound like enough? How many coats of paint do you put on? How about KG quantites, would a quart get all the decks? That stuff looks like it goes a pretty long way in the videos. Wasn't quite prepared for how much the paint/finish out was going to cost, so trying to nail this down. Any knudge in the right direction is appreciated, not like I'm going to hold anybody to it, if I've got to order more.
Re: Cannonball's FS18
Posted: Tue Jul 23, 2013 3:36 pm
by AtTheBrink
Sterling paint? If so, I was told a quart for the hull and a quart for the insides is more than plenty. Dougster said that he did his 22' boat, inside and out, with less than 2 quarts.
Re: Cannonball's FS18
Posted: Tue Jul 23, 2013 4:32 pm
by Cannonball
Well, that's good to hear, especially for the price. Once I added up primer, paint and non skid using gallons I figured I might as well spray paint it camo and go buy a benelli shotgun instead.
Re: Cannonball's FS18
Posted: Tue Jul 23, 2013 5:19 pm
by AtTheBrink
I hear ya! I could have added lots to my arsenal instead of building this boat! And order your paint early, Sterling has had some hick ups lately. It took over a month to get my paint. Joel said they got the problem fixed but better safe than waiting forever.
Re: Cannonball's FS18
Posted: Tue Jul 23, 2013 9:08 pm
by Dougster
The Sterling worked well for me and did go a long way. 2 quarts for the whole boat. I used ice blue for the hull, Matterhorn White for the cockpit, and outside cabin, and blue Kiwi for the decks. You are welcome of course to come see it here in Blanco if you wish. I do have a sample of the Kiwi I put on a 3' square piece of ply for practice that I could show you. I'm in New Braunfels most thursday evenings and could bring it. These boats aren't cheapo, that's for sure, but even a few hundred bucks for a good looking paint job that may last 10 years is worth it, I think.
Paid the price Dougster
Re: Cannonball's FS18
Posted: Wed Jul 24, 2013 6:13 am
by Cannonball
Appreciate the offer dougster, and I may take you up on that kiwi grip sample another Thursday. This week, I've got some work getting in the way of building, so couple late nights ahead. Saw you gotl that boat of yours loaded and move, looks great. Can't wait to get mine painted and ready for the water, appreciate the comment on the paint quantities.
Re: Cannonball's FS18
Posted: Wed Jul 24, 2013 3:58 pm
by AtTheBrink
On KiwiGrip quanities for our boats, I have heard anywhere from 2qts to a gallon. I have heard it really depends on what level of texture you go with. The heavier the texture the more you are going to use. I am planning on a fairly non-aggressive texture so I am going to start with 2 quarts and see how far that takes me.
Re: Cannonball's FS18
Posted: Mon Jul 29, 2013 8:30 am
by Cannonball
Got the inside glass lay up done on Saturday, wet on wet all the way through fillets to tape to cloth. Much happier with this glass than the outside, also better prepared. The cloth ended up being a little offset, but I don't think its enough to worry about...
Note to self, you're not ready to glass until you have a table like this set up, and a buddy who's willing to start at 7:00 am on Saturday...
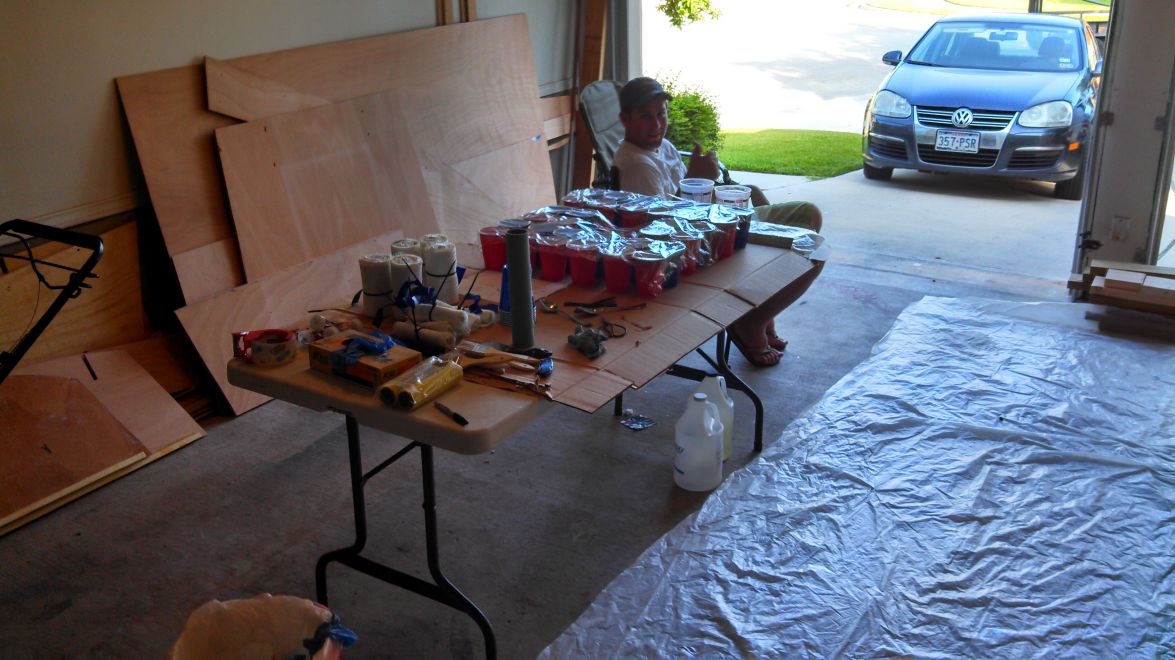
Got started on the fillets, tablespoons work great, another tip from uncle cracker...
Really lucked out it was overcast all morning and temperature stayed bearable...
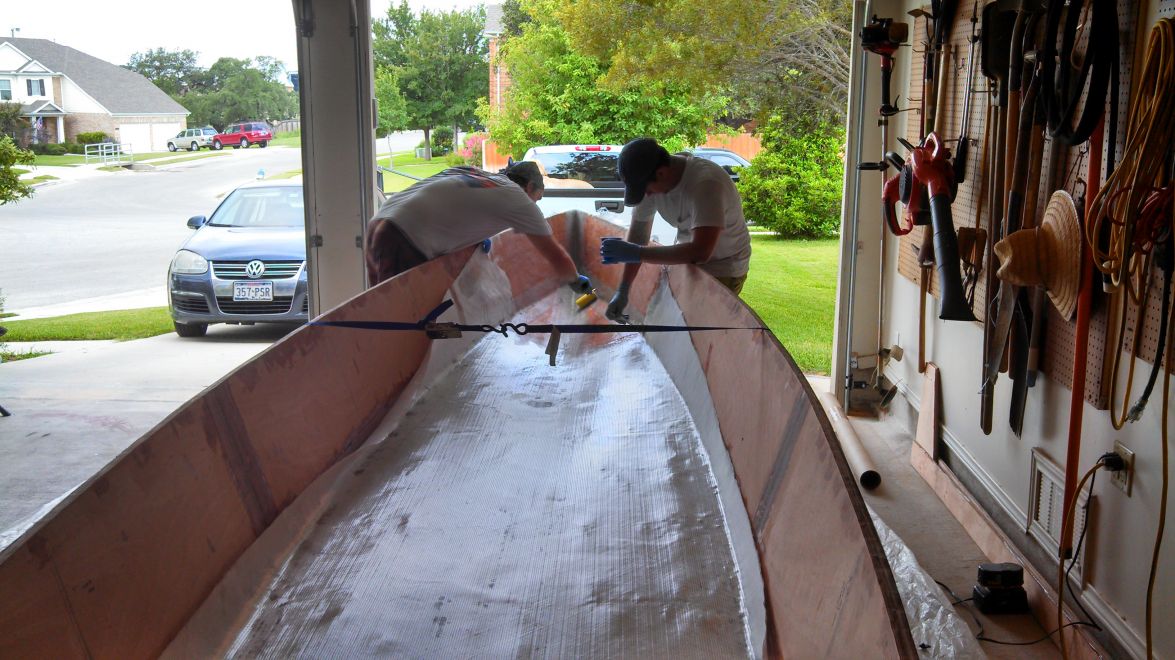
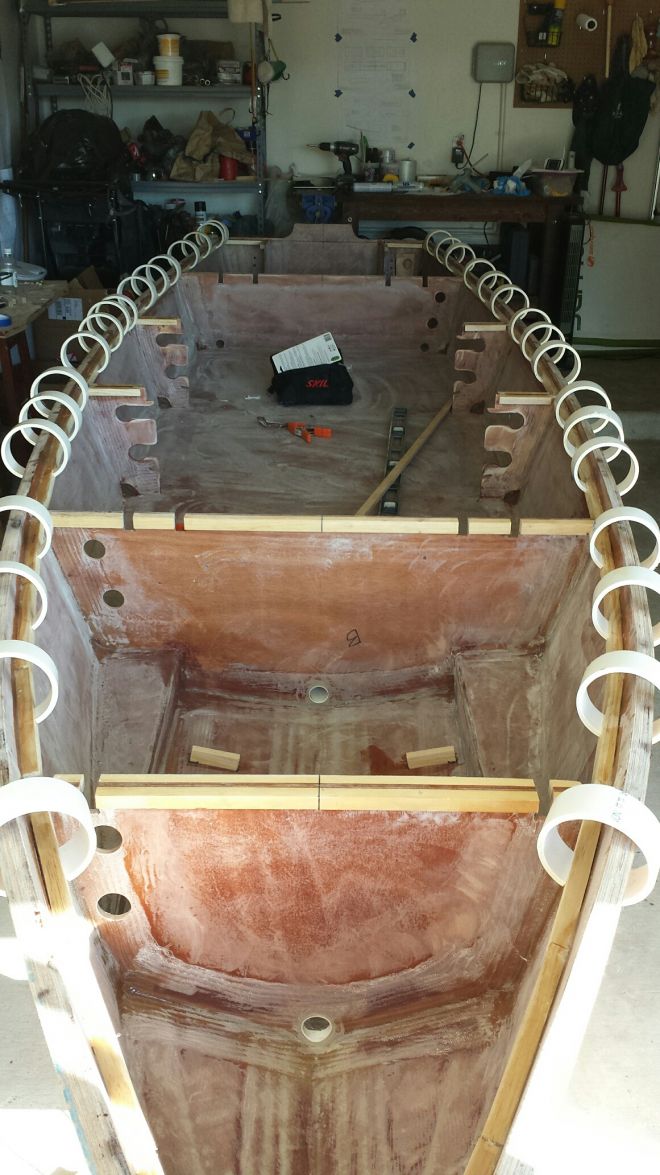
All done. Took us from about 8:30 am to 2:00 pm actual work time. Plus count the 2 hours I spent preparing that morning getting everything pre measured and set up...
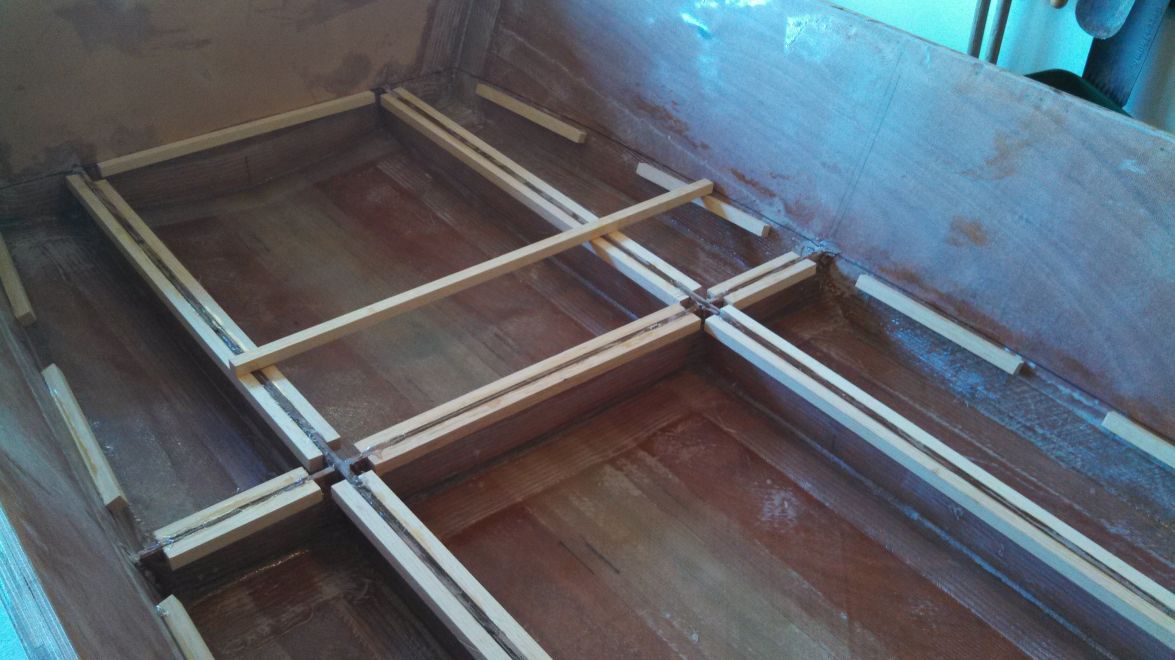
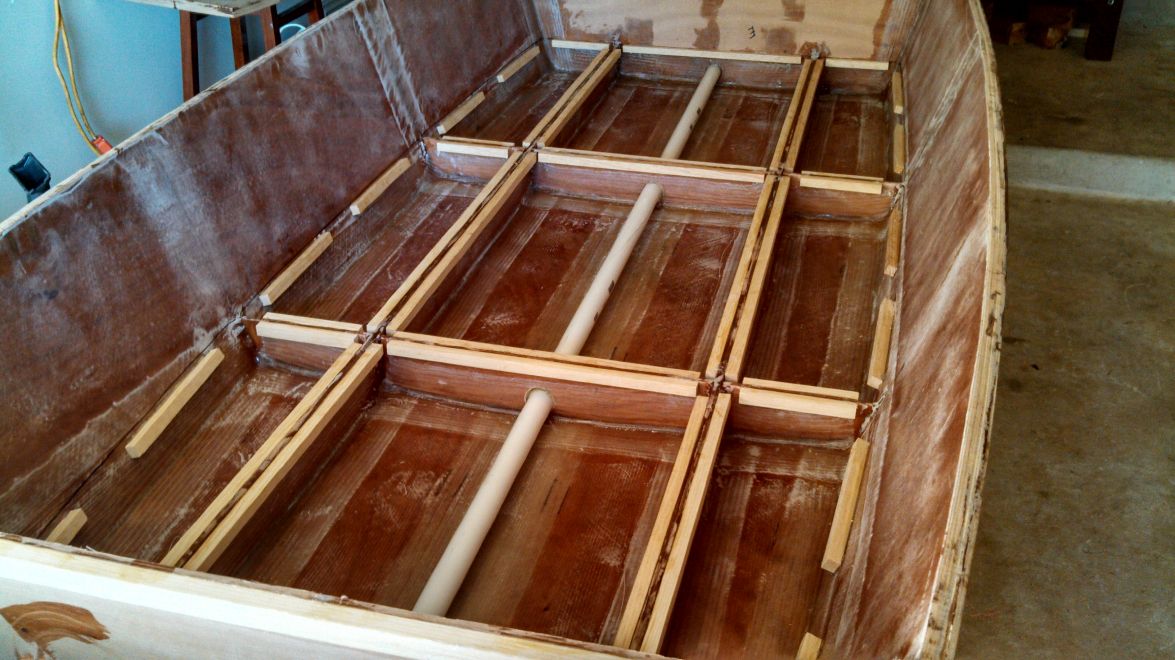
Next day cleaned everything up and got the stringers in the boat. Need to pick up some tongue depressors or some shims to help get those aligned, but shooting to have those done by the end of the week so I can get the frames in over the weekend. Coming together....
Re: Cannonball's FS18
Posted: Mon Jul 29, 2013 8:39 am
by Cracker Larry
Looks great! You've been paying attention
Sure goes faster with 2 people. That is the last of your "big jobs", now it's down to small manageable tasks.
Re: Cannonball's FS18
Posted: Mon Jul 29, 2013 9:39 am
by Cannonball
Sure have, once that joint is primed with neat epoxy, it's "slicker than an eel's pecker!"
Re: Cannonball's FS18
Posted: Mon Jul 29, 2013 8:40 pm
by Mikem59
Look'in good! I'll bookmark a link to this page to remember what my table needs to look like. I'm still a ways off from that stage.
Re: Cannonball's FS18
Posted: Wed Jul 31, 2013 10:02 am
by AtTheBrink
Good work! Build on brother!
Re: Cannonball's FS18
Posted: Wed Jul 31, 2013 10:38 am
by Cannonball
Trucking right along. Got the stringers tabbed. Going to glass these in and get the side glass on before Saturday so I can spend the weekend truing up the frames. Going to do a cut out in the front and go with portable fuel tanks so I need some time to get that cut styled right before I move ahead.
Re: Cannonball's FS18
Posted: Mon Aug 05, 2013 9:07 am
by Cannonball
Another weekend hard at it. Got the stringers filleted and glassed in, and now I'll oficially say I'm over the hump. While able to work those in manageble portions, its no fun to be hunkered over glassing for a total of 60'. I can only imagine doing a real large boat. My hat goes off to you fellas.
Side's glassed with 6 oz...
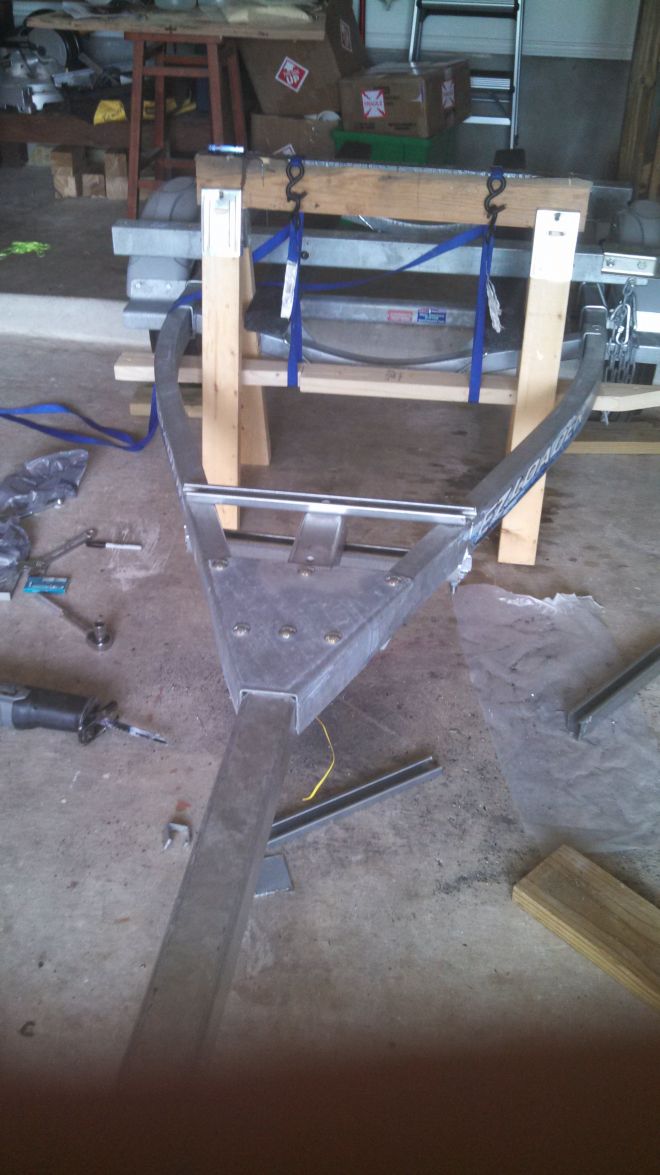
Then while waiting for epoxy to cure, got started on fitting up the tongue extension on the jet ski trailer. Julie wondering if she's ever going to have her parking spot back...

So here's the new tongue vs the old tongue. I plan on moving the axels about 4-6 inches forward and extending the bunks on the rear of the trailer to 7'. The plan along the tongue is to use a couple carpeted 2x8's upright and hug the tongue for the forward bunks along the keel. I'm a little nervous because if I stand on the joint of the tongue I get and 1-2" of flex. The new tongue is 3x3x 1/4" and is quite a bit beefier than the rest of the tubing on the trailer, so I'm not worried about it's strength, but don't want the flex to stress the boat. I'm assuming it will behave a little better with an evenly distibuted load. I'd be totally confident if I was taking the skiff from the ramp to the boat barn, but I want to take it back and forth to the coast which is a couple hundred miles away. Any thoughts, don't be shy? The picture makes the scale look off, but it is set where the transom is on the bunks and the bow would be touching the crank.
Beyond the trailer adventure, got the inside cleaned up and ready for frames to be set.
Re: Cannonball's FS18
Posted: Wed Aug 07, 2013 10:34 am
by AtTheBrink
Lookin' good! I am gonna have to do the same thing with my trailer. If you don't mind, what did that square tubing cost you?
Re: Cannonball's FS18
Posted: Wed Aug 07, 2013 2:32 pm
by Cannonball
The steel, nada, I got it from the scrap pile. Galvanizing it though was a $110 minimum charge at Southwest Galvanizing. I've got to do some additional work on it to eliminate the flex I've got right now. I'm planning on moving the jack to the otherside of the winch and then pushing the tongue back into the A frame of the trailer. That way I can stiffen up the connection with some galvanized strut. Make sure you get the tongue long enough that you get a few good points of connection on the main trailer frame and not necessarily just the obvious point of connection that are there now. I should be able to get 3 bolts across 2' now and I think that will do it, but I wish I had another foot to get it real rigid.
I forgot how much working on boat trailers sucks. I'm now into framing, bunks, and new electrical. Ugh...
Re: Cannonball's FS18
Posted: Wed Aug 07, 2013 5:18 pm
by bigtalljv
Cannonball wrote:
I forgot how much working on boat trailers sucks. I'm now into framing, bunks, and new electrical. Ugh...
The new carpet for my bunks is supposed to arrive today, I'll be joining you in that circle, carpet, electrical, lights,new fender, then I get to try and make the boat fit....
Jason
Re: Cannonball's FS18
Posted: Thu Aug 08, 2013 3:29 pm
by Cannonball
Jason - You look like you've got a little heavier duty trailer work ahead of you. I like that Zodiac project. Going to be cool when it's done.
Re: Cannonball's FS18
Posted: Mon Aug 12, 2013 9:29 am
by Cannonball
Didn't touch the boat this weekend. It's just too damn hot. Looks like we may get lucky and have an overcast weekend coming up. Sure hope so, I've got frames to set.
Did get the major trailer mods about 3/4 done. I've got to put the tongue back on, hook up the new wiring, and make a bunk for the front part. Much happier now with the extra stiffness from adding the strut.
Also got the swing toungue coupler attached to the main frame. Fits in the garage by about 1-1/2". I wise man told me before I started to build the biggest boat you can and you'll be happy you did.
Re: Cannonball's FS18
Posted: Mon Aug 12, 2013 3:12 pm
by AtTheBrink
Where did you get that swing away coupling? It might be just what I need.
Re: Cannonball's FS18
Posted: Mon Aug 12, 2013 3:48 pm
by Cannonball
Best deal I found was on Amazon.
Re: Cannonball's FS18
Posted: Mon Aug 12, 2013 5:47 pm
by AtTheBrink
Thanks!
Re: Cannonball's FS18
Posted: Tue Aug 13, 2013 10:51 pm
by Dustinwg
Does this mean we have another work weekend on the horizon? Better get a bigger ice chest and a louder radio, overcast or not 100+ will require some serious distractions to keep the labor force from going on strike!
Re: Cannonball's FS18
Posted: Wed Aug 14, 2013 8:41 am
by Cannonball
Si senor puro trabajo, going to try and get the frames tabbed in Saturday so count on a fillet and glass session on Sunday.
Re: Cannonball's FS18
Posted: Thu Aug 15, 2013 9:27 am
by Cannonball
Got 39" of trailer tongue left over if anybody wants it...
Re: Cannonball's FS18
Posted: Mon Aug 19, 2013 8:26 am
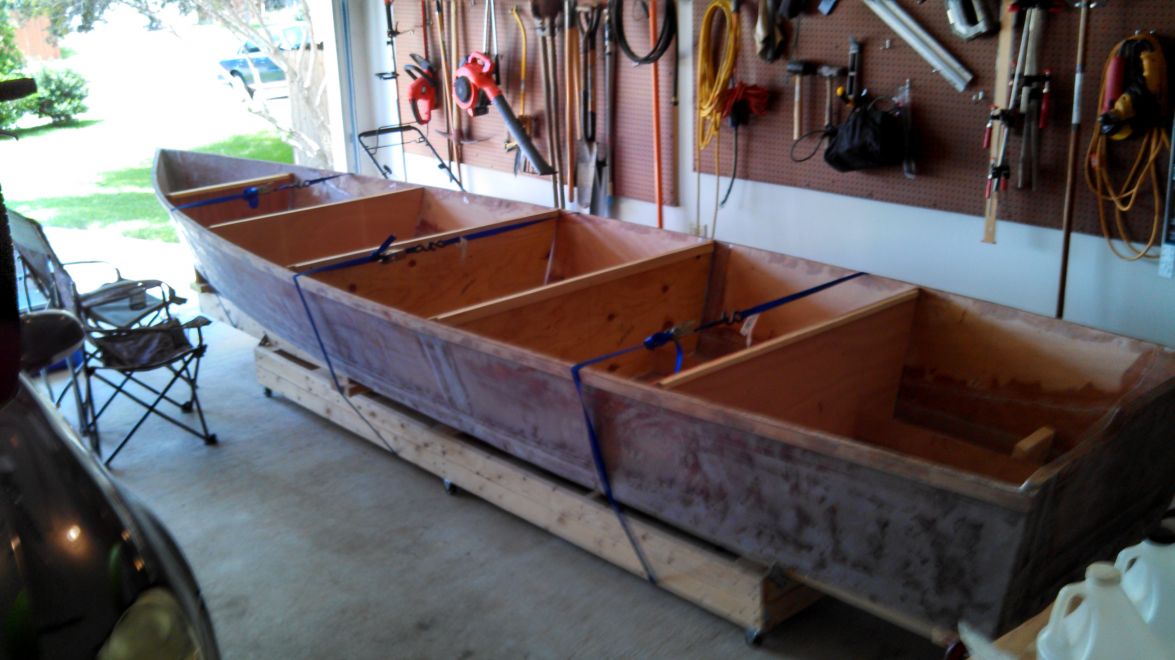
by Cannonball
Hit a real good lick this weekend. Got the frames all cut to fit Friday and then fit and leveled everything and tabbed it in on Saturday morning. Was going with portable fuel tanks, but after seeing how small the cut out was going to be in front of the frames decided against it. The shallow 12 gallon moeller tank will be a good fit and still have some access around it for gear.
Sunday cut out all the tape blew it out and started from frame E forward. We got the transom knees glued in while we were filleting, so still have that to glass, but that should be an easy evening project. These kind of projects are always nice to do in bulk with a helper. Once again Dustin doing most of the work, while I sit back and watch...
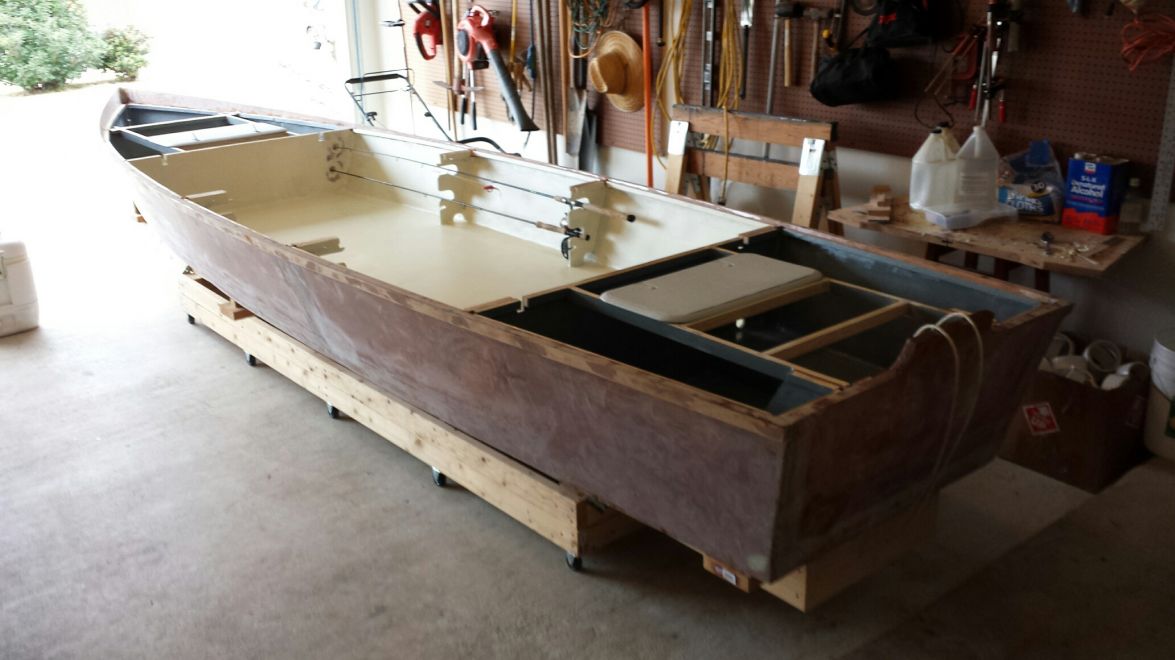
Couldn't help but set the decks on and get another look. She's starting to come together. Makes me want to slap the motor on and tear up Canyon Lake rat rod style...
Re: Cannonball's FS18
Posted: Mon Aug 19, 2013 8:51 am
by Shamrock Kid
That's looking great! With the decks on there it's looks like your almost done.
Re: Cannonball's FS18
Posted: Mon Aug 19, 2013 9:25 am
by AtTheBrink
Good job! Nice to have a helper once in awhile.
Re: Cannonball's FS18
Posted: Mon Aug 19, 2013 11:52 am
by Cannonball
Thanks. So close yet so far away....
Re: Cannonball's FS18
Posted: Mon Aug 19, 2013 12:34 pm
by AtTheBrink
I know exactly what you mean!
Do you have that tank on hand?
Re: Cannonball's FS18
Posted: Mon Aug 19, 2013 1:31 pm
by Cannonball
Nope, but I will in a few days. I ordered up the kit from amazon for the fastners, hoses and tank. Next up is hatches, and I think that will cover me for my thru hull stuff.
Re: Cannonball's FS18
Posted: Tue Aug 20, 2013 8:49 pm
by AtTheBrink
I forgot, are you building hatches? Or going with the plastic ones? If you're building them, swing by next time you are down and I can show you how I did mine. Really simple process if you want to duplicate it?
Re: Cannonball's FS18
Posted: Sat Aug 24, 2013 2:04 pm
by Cannonball
Still up in the air on if I'm going to build them or buy them. Send me an email with your phone number on it mike and ill try and swing by when I'm down there next and check them out. Got some time before I have to decide.
Re: Cannonball's FS18
Posted: Mon Sep 02, 2013 1:39 pm
by Dustinwg
Mike, saw on your thread how you built the gutters for your hatches but wasn't sure how you built the lip on the hatches. They looked great!
Also, did you have to space the hinge side of the hatch differently to keep the lip from catching on the gutter when opening?
Re: Cannonball's FS18
Posted: Tue Oct 01, 2013 2:01 pm
by Cannonball
Back at it! Been a productive month, just not on the boat. Caught a mess of snapper in Mansfield, got a couple friends married off, and cleaned up the dove in beeville opening of south zone dove season. Now I'm back on the boat, got the cleats all cut and will start gluing here soon. Would like to be pouring foam in next weekend.
Re: Cannonball's FS18
Posted: Wed Oct 02, 2013 7:57 pm
by Fishwater
Use the hot glue gun technique. I think it took me an hour and a half over two nights to put them all in.
Re: Cannonball's FS18
Posted: Mon Oct 07, 2013 9:32 am
by Cannonball
Re: Cannonball's FS18
Posted: Tue Oct 08, 2013 6:11 pm
by Shamrock Kid
I like that pic "light at the end of the tunnel". Looking good you seem to be going at it. Great job on the cleats.
Re: Cannonball's FS18
Posted: Mon Oct 14, 2013 8:40 am
by Cannonball
Another update...
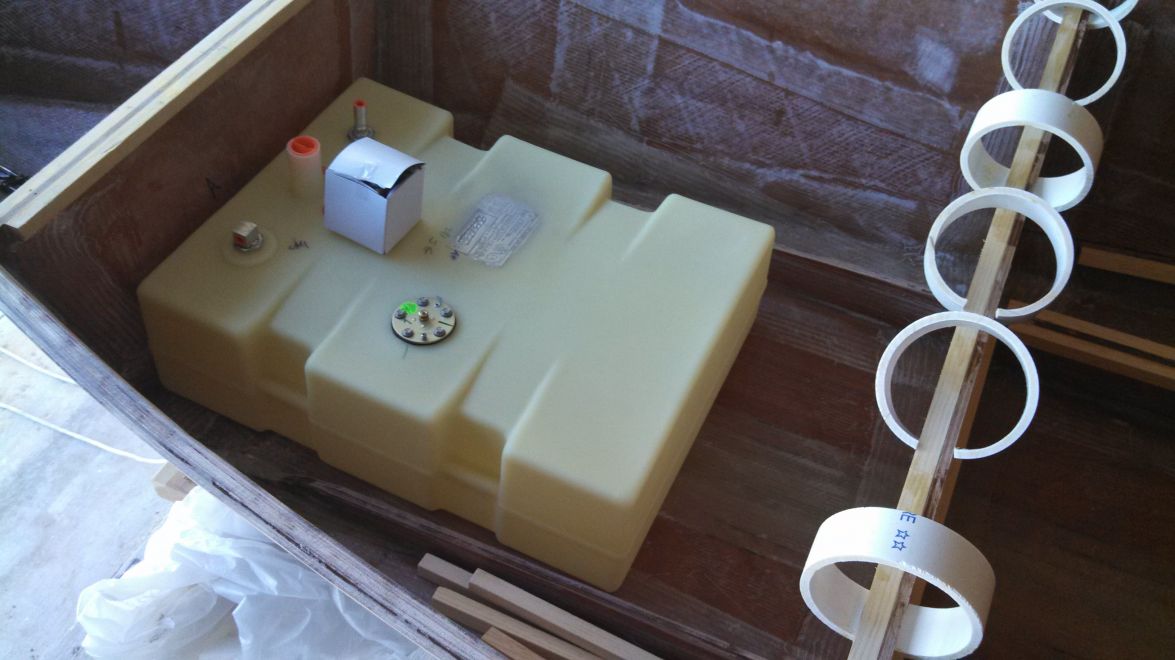
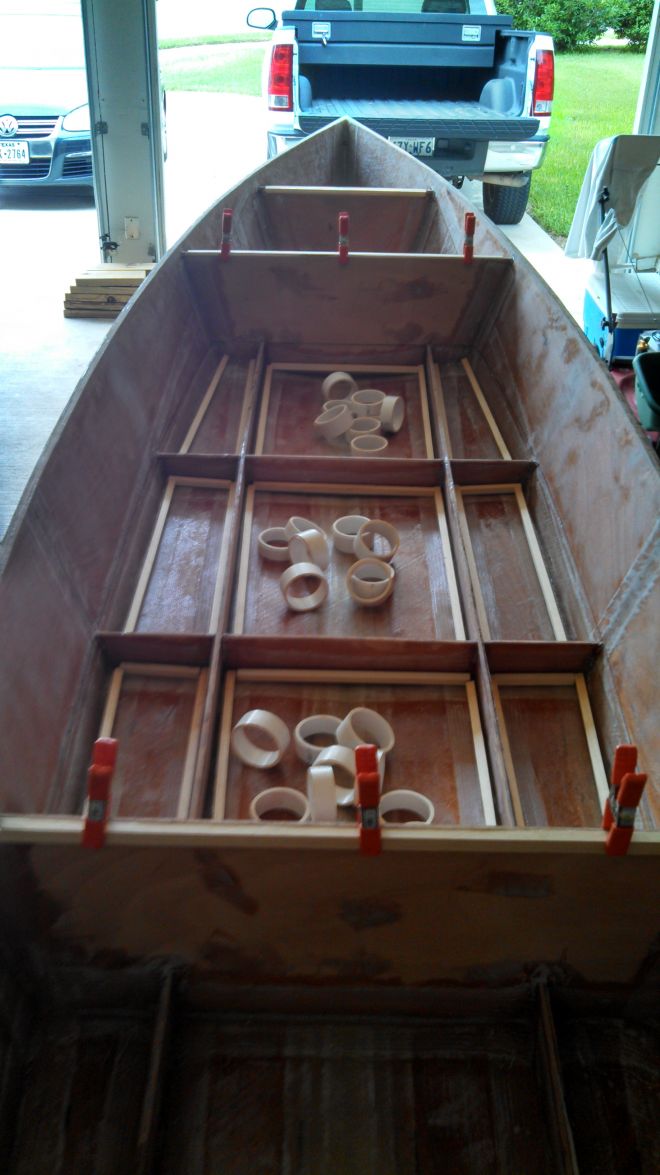
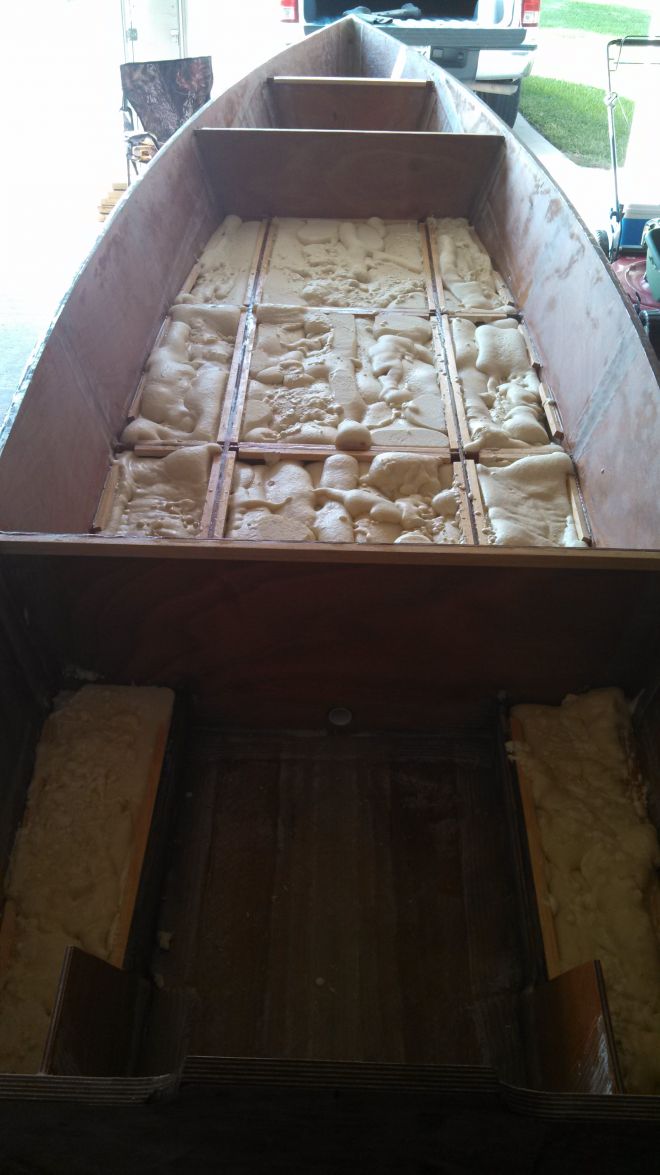
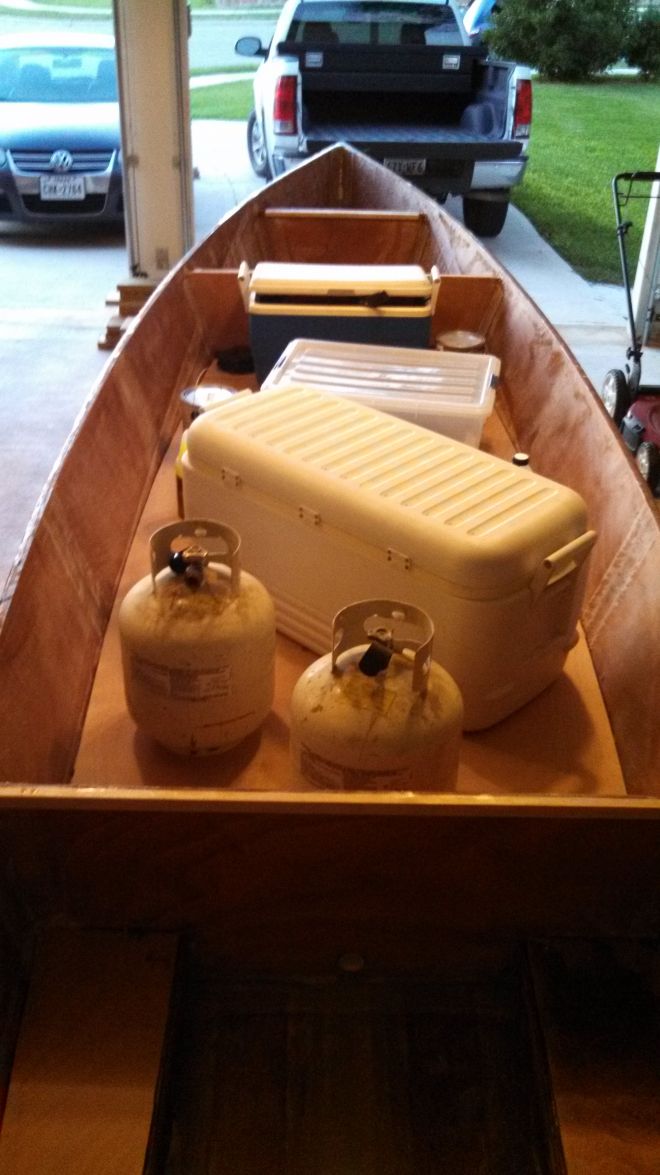
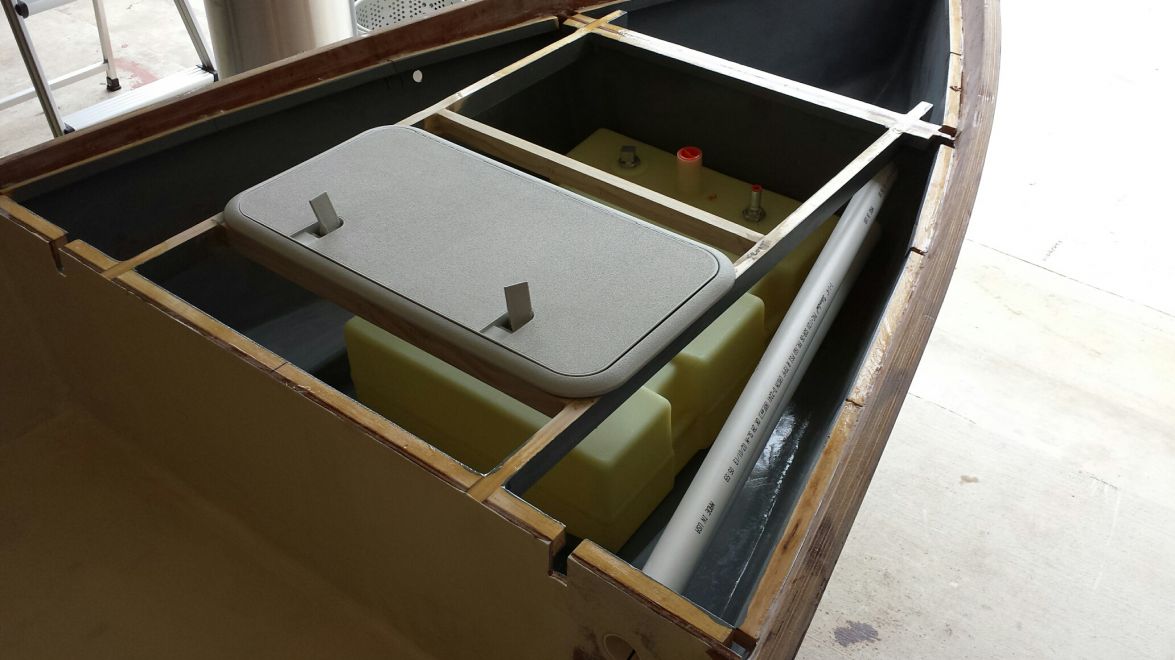
Ran out of foam to get the underfloor space as completely full. Need to order a bit more to fill in the gaps before I glue the sole down. This is what 4 gallons will get you. Need about 4.5 to get it all the way. I'm going with the 1/4" sole so want to make sure I fill it to eliminate soft spots.
Then of course had to try out some cooler configurations with everything roughed in. Charles likes it...

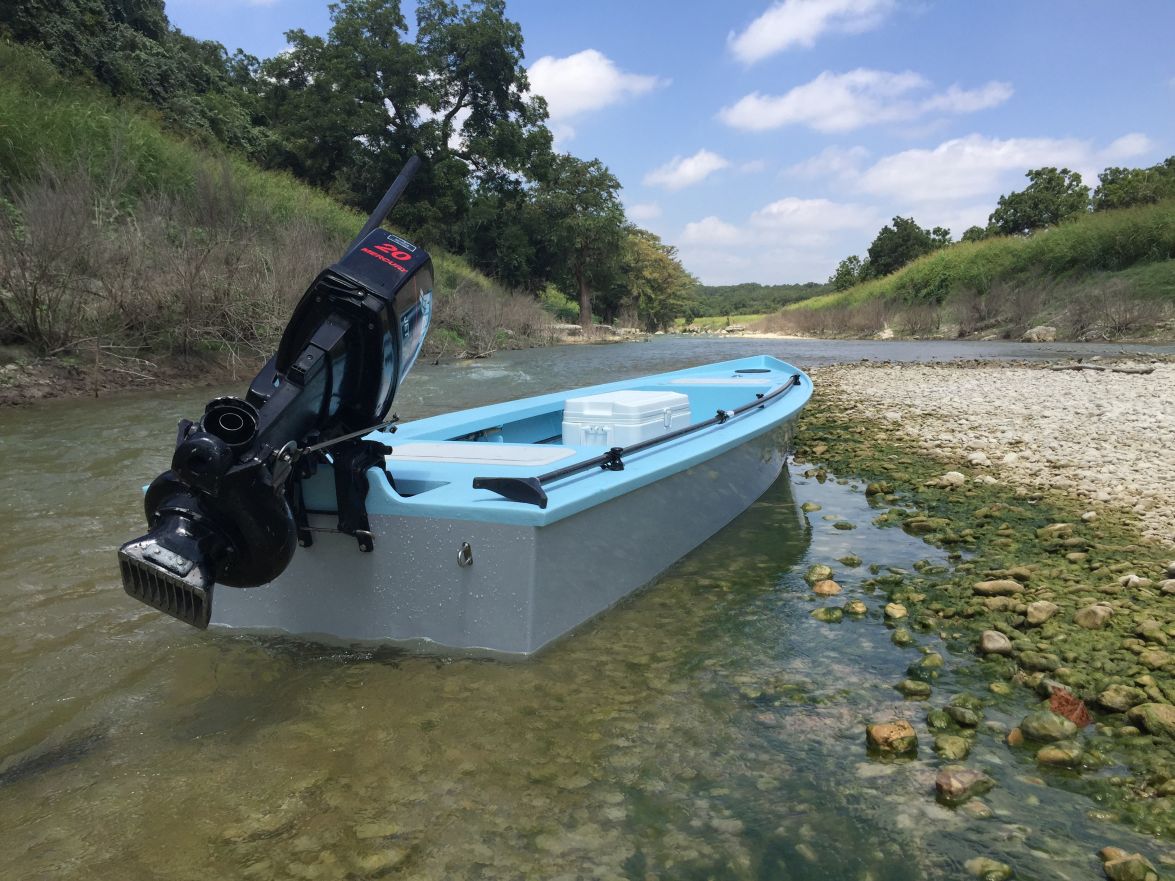
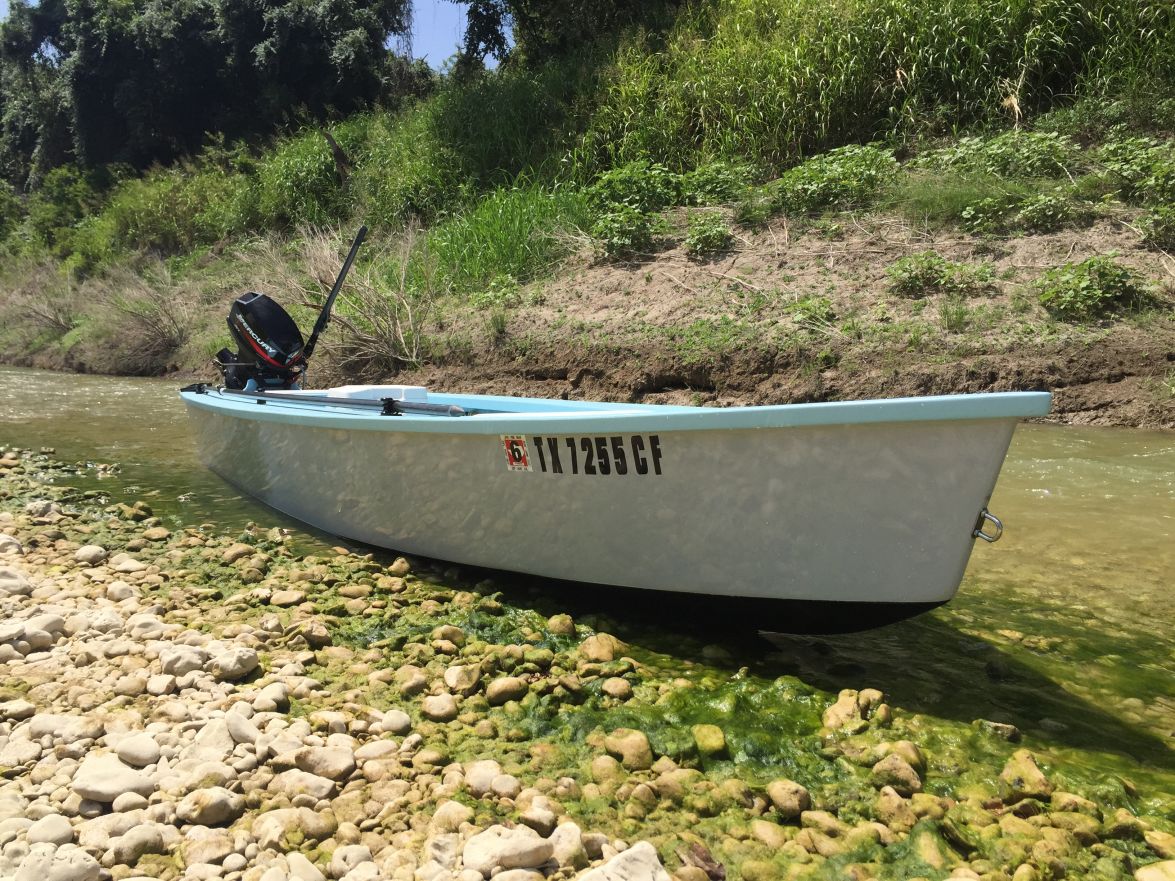
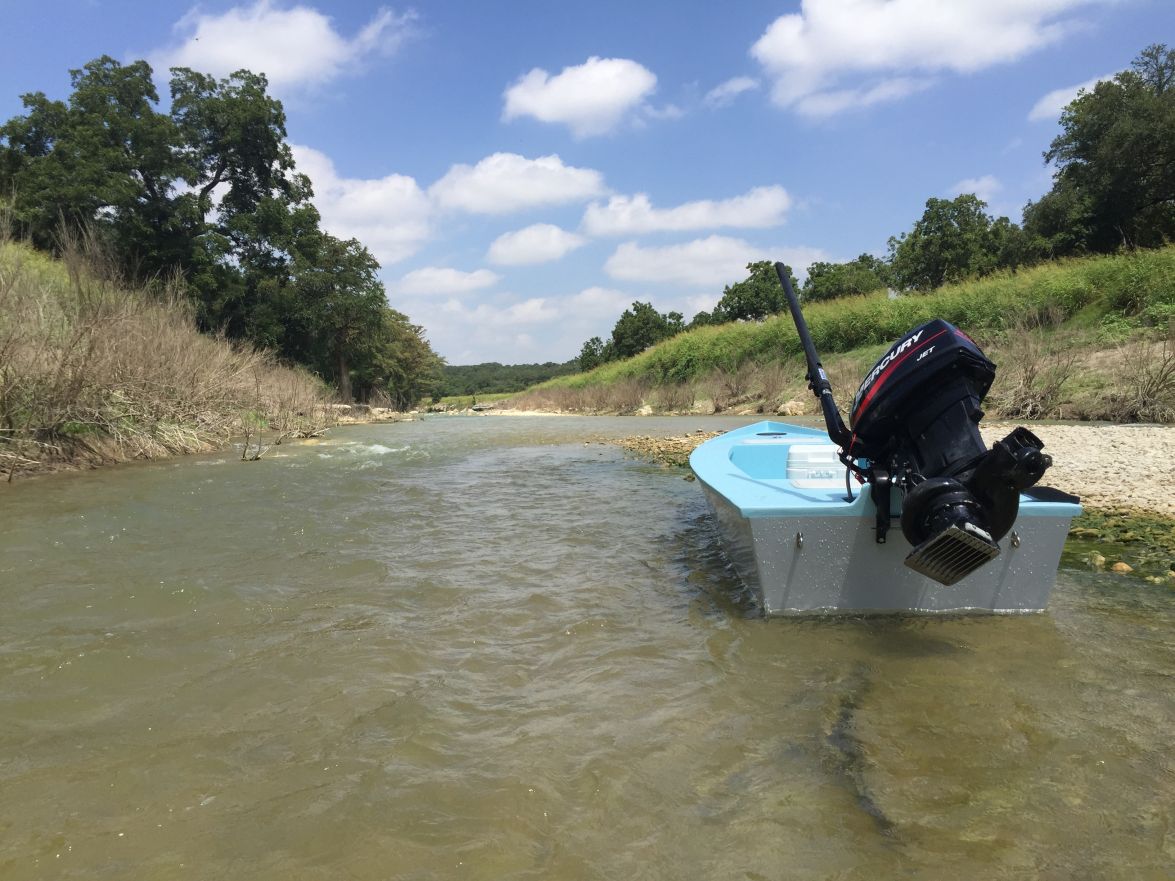
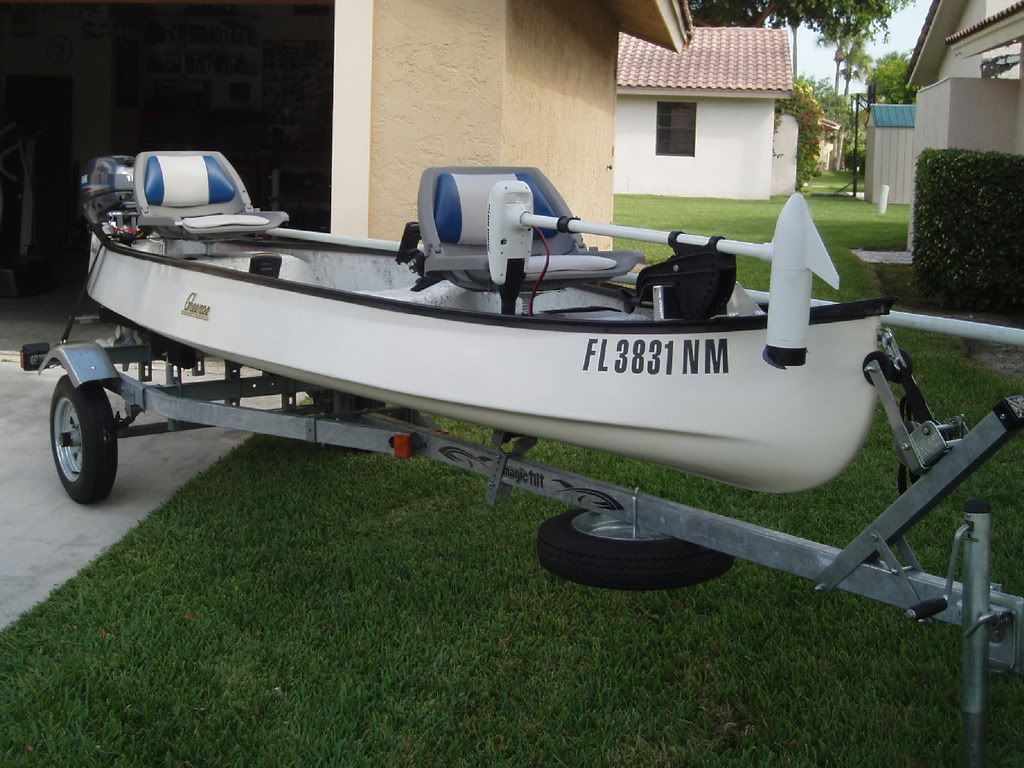
Motor height is set just right looks like. I'm going to sea trial her before painting just to make sure it is perfect before drilling my mounting holes.

Just looking at this pic right now, has me really jones'n to get done...
Re: Cannonball's FS18
Posted: Mon Oct 14, 2013 12:11 pm
by Shamrock Kid
I love the jet drive that is soo cool!
Re: Cannonball's FS18
Posted: Mon Oct 14, 2013 1:16 pm
by Cannonball
Thanks dude! Spent a lot of time standing there in the cockpit dreaming of going 20 mph in 4" of water. The day dreaming really slowed my progress last weekend.
Re: Cannonball's FS18
Posted: Mon Oct 21, 2013 10:11 pm
by Mikem59
Looking really good. Another page I'll bookmark. I'll use your method to locate the hull cleats.
Re: Cannonball's FS18
Posted: Fri Oct 25, 2013 8:34 pm
by snookiehunter
Looking really cool.
Re: Cannonball's FS18
Posted: Mon Nov 04, 2013 8:36 am
by Cannonball
Thanks for the comments fellas, got another lick put on her this weekend.
As the Cracker says, Milestone Complete!
. Got the floor glued in and the foam covered in all the hatches.
It was not without perils, though
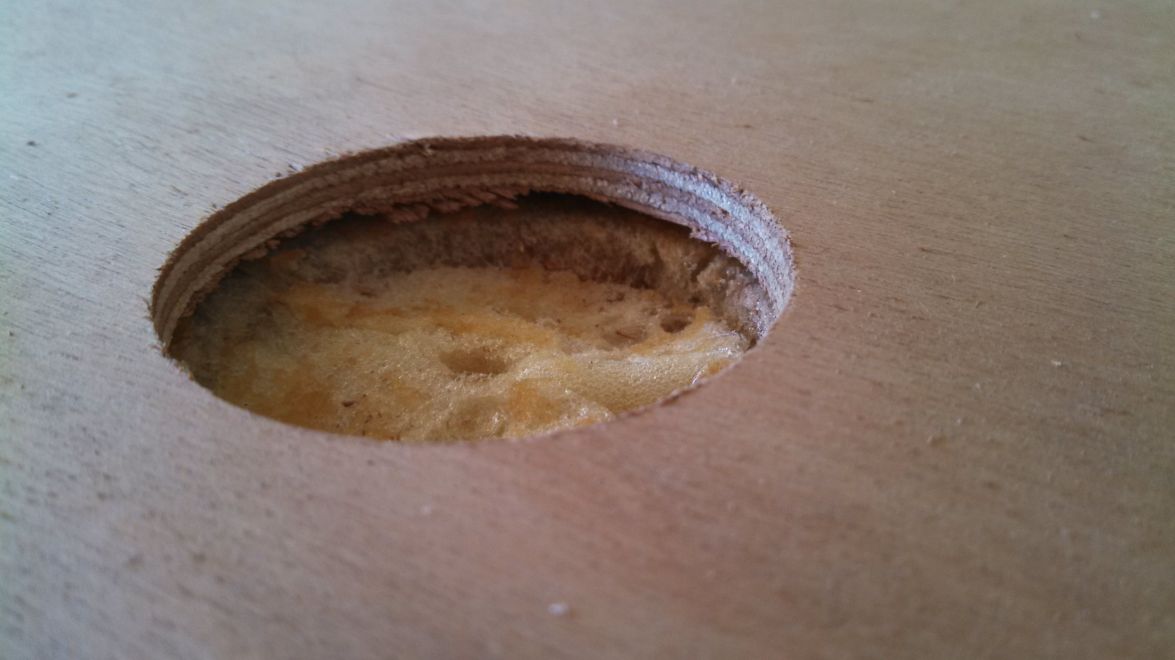
There were a few soft spots and I'm pretty sure that when I spread glue over all the cleats it "floated" the floor a smidge higher over the foam compartments. I was really dissappointed when I noticed it, but once I just tore into my fresh new floor with a hole saw and tossed in an extra tablesppon of epoxy, the problem is solved pretty painlessly. No pain no gain...
After I got over it and moved on to the gunnels and rod holders, made some pretty good progress. It helped a lot that daylight savings time hit, and I didn't realize it until 1:00, so I picked up an extra hour of beer drinking and boat work on Sunday, sweet!
No problem letting the wood fly yesterday. Had to get those devils just right and some just weren't up to par...
Here is a better shot of the floor fix once it was sanded. I'll need to do it in a couple more places to be satisfied before glassing the floor.

Re: Cannonball's FS18
Posted: Mon Nov 04, 2013 8:46 am
by Cracker Larry
That looks real good. Great progress. Those frames are tricky, aren't they
Re: Cannonball's FS18
Posted: Mon Nov 04, 2013 9:35 am
by Cannonball
Sure are. I kept having blow outs with the hole saw, until I finally started to drill it from both sides. That cleaned them up. Plan on glassing the sides with the 6 oz before fitting them. It was nice to do some show work after being stuck on the floor for so long.
Re: Cannonball's FS18
Posted: Mon Nov 04, 2013 9:58 am
by Cracker Larry
Prevent the blow outs by putting a scrap piece of backing board under the piece you are drilling
Re: Cannonball's FS18
Posted: Mon Nov 04, 2013 2:58 pm
by AtTheBrink
Cracker Larry wrote:That looks real good. Great progress. Those frames are tricky, aren't they
Absolutely agree with that! No real good way to hold them square and clamp them in place. But it looks like you got her done. Boat is coming along nicely. when are you headed back down this way?
Re: Cannonball's FS18
Posted: Mon Nov 04, 2013 3:02 pm
by AtTheBrink
Cannonball wrote:Sure are. I kept having blow outs with the hole saw, until I finally started to drill it from both sides. That cleaned them up. Plan on glassing the sides with the 6 oz before fitting them. It was nice to do some show work after being stuck on the floor for so long.
My rod holders are 2 X 3/8" ply with 12oz biax on both sides. Maybe overkill but then will have to hold some weight when they are walked on.
Re: Cannonball's FS18
Posted: Mon Nov 11, 2013 11:56 am
by Cannonball
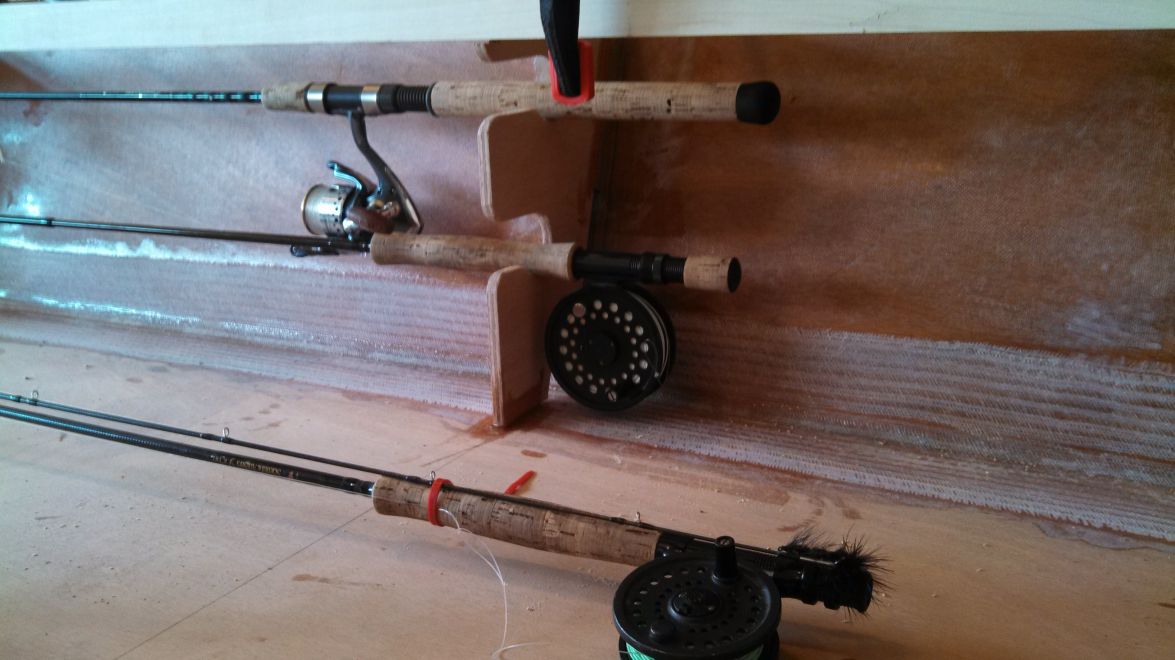
Well, happy to report the rod holder spacing came out just right. Can fit a spinning rod and the 8 weight...
And just can't get enough of setting the decks on there to see how she'll look. I got to stop it and just keep working...
Re: Cannonball's FS18
Posted: Mon Nov 11, 2013 1:05 pm
by AtTheBrink
Looking good! Your rodholders turned out nice. One set closer to the end, keep it up!
Re: Cannonball's FS18
Posted: Mon Nov 11, 2013 6:09 pm
by ks8
There are many times when thinking it out well, and redoing the first attempt, is definitely worth it. Feels good because it is done right. I spent a few days just to get the position of a couple of hatches *just right*, well, better than they were. Having taken a week to fabricate the locker parts, I'm now holding my breath before the fateful cuts. So... you go and keep on dry fitting those decks.

When you know they're right, have at it.
Looking very nice.
Re: Cannonball's FS18
Posted: Fri Feb 21, 2014 2:13 pm
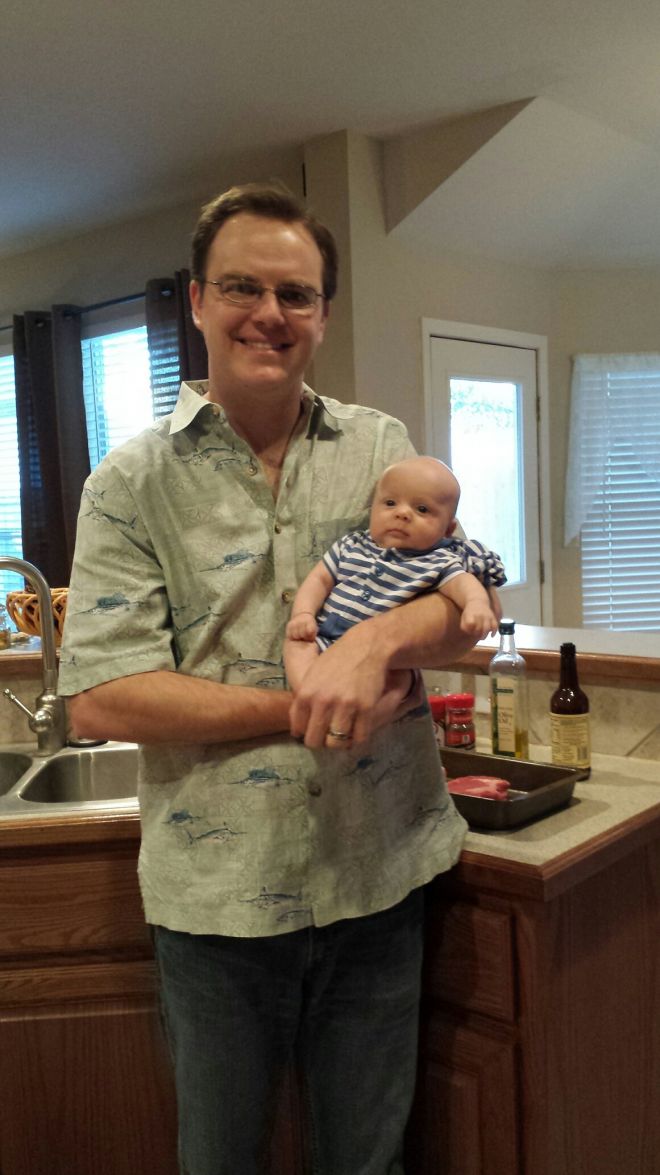
by Cannonball
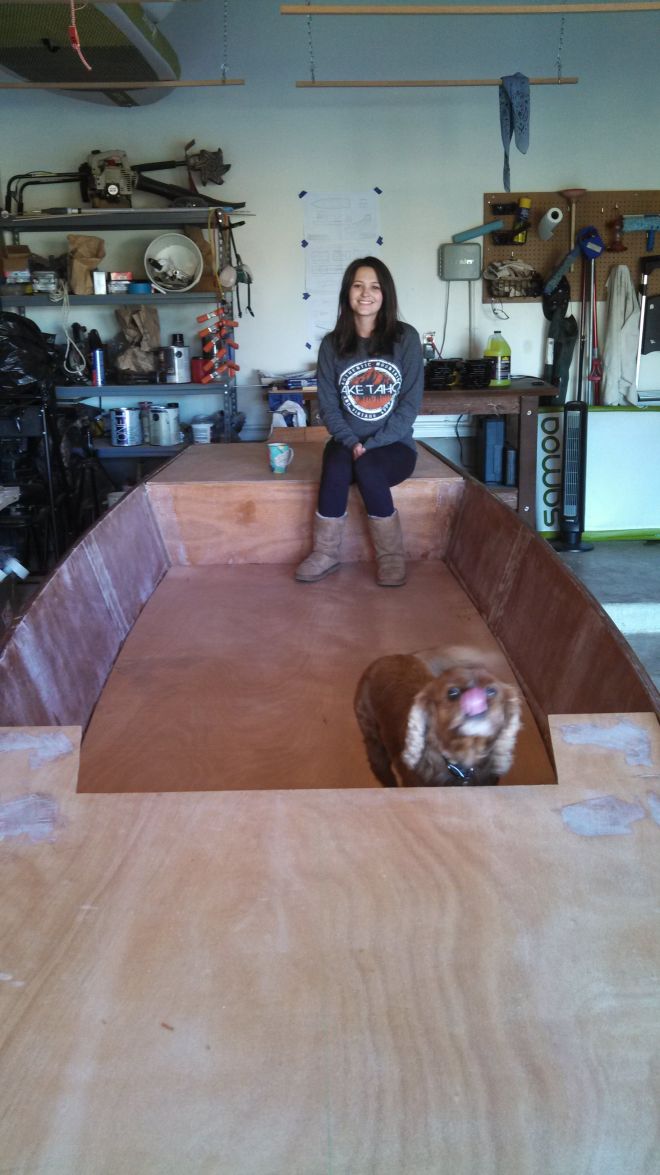
Back at the boat build again finally! It just turns out that my wife can make a baby faster than I can build a boat. Here is a pic of the little dude...
Now, back to business, and the weather is perfect for boat building in Texas. Last weekend I got the inside rough sanded and the cleats for the deck ripped and installed. Even managed to roll her over in the yard and go another round of sanding on the outside which I'll show pics of later. Time to get this thing done, fairing boards and RO's be damned, the variable high speed sander is the way to go! Although, the fairing board did really help me get her shaped, there is nothing like smoothing her up nice and quick with some high speed 80 grit, let it fly!
Should get some bilgecoat on the hatches and the first coat of primer in the cockpit this weekend. Then flip and finish the outside before installing the fuel tank, deck & hatches. Going to be fun finishing her this spring.
Re: Cannonball's FS18
Posted: Sat Feb 22, 2014 6:21 pm
by Fishwater
Congrats on the kiddo.
Boat's looking great. Looks like there's going to be a mess of FS18s on the coast the summer.
Re: Cannonball's FS18
Posted: Sat Feb 22, 2014 8:58 pm
by wildbill
Re: Cannonball's FS18
Posted: Mon Feb 24, 2014 8:05 am
by Cannonball
Thanks Wildbill.
You know there is going to be Fishwater. I'm on a mission over here to get wrapped up. I finished up the last of the bunks on my trailer so it is just sitting there along with the motor waiting to be put to good use. I've got a couple more items to tidy up in the hatches and cockpit and then primer & paint go on before I flip and finish the outside. Hoping to have her ready to flip by the end of next weekend so I can get finished with the outside. I'm really jonesn after having cabin fever with the little one.
Re: Cannonball's FS18
Posted: Mon Mar 03, 2014 8:05 am
by Cannonball
Cockpit primed!...
Going to install the last of the below deck framing for the hatches and the rod tubes before the 2nd coat of bilgekote. After that she gets flipped and the outside gets finished. I'm wanting to have everything below decks done so when I get the outside wrapped up I can put the hardware/fuel tank in and have it on the trailer while I finish the decks.
Re: Cannonball's FS18
Posted: Tue Mar 04, 2014 9:33 pm
by Shamrock Kid
Your work is looking really good! Your flying now. If you get a chance post some pics of the trailer. I too picked up a jetski trailer that I plan to extend. Just wondering how you did the bunks.
Re: Cannonball's FS18
Posted: Mon Mar 10, 2014 8:12 am
by Cannonball
Shamrock, here is a pic of the forward trailer bunk. I'll probablly put some pvc guides on it once I get it sitting on there. I will say I'm a bit nervous about how long it ended up, but I've had it on the highway empty and it seems like it's going to work fine. Would be totatlly acceptable for short trips, so I may be looking for a boat barn down there once I get it wrapped up. I used 1/4" tubing that I got out of a scrap pile and got it galvanized. Be sure to get an extra long piece, and bring it back past the point of attachment with some extra braces. You can see where I had to to this early in my build, but if I had another foot on it it would stiffen it up a bit. Then I put a 2x6 bolted to some strut. It looks a little sketchy up front, but I already mocked up the bow eye, and these boats are so strong, I bet you could hang it from that thing, so I opted not to do a cradle. All in all it should work well especially for the pirce, I'm in this half of what I would be doing it any other way with the swing tongue and all!
Got the last of the below deck framing done and the 2nd coat of bilge paint on the hatches. Next weekend will be a mud bug boat flipping bonanza at my house so I can get the outside wrapped up...
Tank sits nice and low allowing some room for extra gear in the forward hatch. I oopted to leave the space in between the stringers open to allow this to sit a little deeper, and just put some cleats in to keep the tank in position. I'll put a tie down strap of some sort on top of that, but don't think it would go anywhere regardless once the fill cap is mounted...
Really happy with how the rod holders turned out. Yet another perfect opportunity for the west six10 to shine...
Re: Cannonball's FS18
Posted: Wed Mar 19, 2014 8:44 am
by Cannonball
Re: Cannonball's FS18
Posted: Fri Mar 21, 2014 8:05 am
by Cannonball
Well, giving the knothched trowel technique a go for the last of the low spots, sand, then one more splash of microballons before I quick fair everything. Even picked up some 4" sandpaper so I can make another of the dreaded long boards or two to get this thing smoothed up. I realize now, I used way too much fairing compound the first go round and did not sand it down enough the first couple passes. I'd recommend anybody who is doing their first boat to sand the first coat or two with a variable speed sander without going too deep and then come back with quick fair and long board to correct the whirlybirds. That would have saved me a ton of time.
Re: Cannonball's FS18
Posted: Fri Mar 21, 2014 8:07 am
by Cannonball
Another Question - How do most finish the laminated rub rail? I saw Uncle Cracker had put a router to his FS18 .... What size radius top and bottom? Does anybody glass over them or just coat with epoxy? I'm planning on trimming them out with a small stainless rail similar to Shine's jet a bout. Thanks
Re: Cannonball's FS18
Posted: Fri Mar 21, 2014 10:34 am
by Dougster
I ran a router over mine but don't remember the size. It was big enough to let me wrap glass past the deck over and down to the bottom edge of the rub rail. The deck extended over the top edge of the rub rail before I routed it, it didn't butt up against the side panels. Dunno how well I worded that
Your lookin' good from here.
Building in Blanco Dougster
Re: Cannonball's FS18
Posted: Fri Mar 21, 2014 11:38 am
by Noles309
Cannonball wrote:Another Question - How do most finish the laminated rub rail? I saw Uncle Cracker had put a router to his FS18 .... What size radius top and bottom? Does anybody glass over them or just coat with epoxy? I'm planning on trimming them out with a small stainless rail similar to Shine's jet a bout. Thanks
I'm wondering the same for my GF16. I was thinking of rounding over the top edge with a 1/2" roundover bit, leaving the bottom edge alone and covering it with 6oz cloth.
The boat is looking good. I had the plans for the FS 18 but I wanted to try something "easier"
first.
Re: Cannonball's FS18
Posted: Fri Mar 21, 2014 4:14 pm
by Cannonball
Thanks Dougster, that makes sense to me, I think I'll try the same. Your rig is looking real nice.
I hear ya Noles. This thing has definetly been more of a project than I estimated. And right now I'm a construction estimator for a living
I'm on the home stretch though now and am really looking forwad to going 20 mph in 4" of water.
Re: Cannonball's FS18
Posted: Mon Mar 24, 2014 11:41 am
by gk108
I used a 3/8" radius on most of my rubrail stuff. On my D15, I used 9 0z. woven tape for the bulk of the rail and cut strips of 10 oz. cloth on the bias for the areas with complex curves. On my rebuild project, I used the bias cut strips for the new toerail. That laid down very well.

Re: Cannonball's FS18
Posted: Mon Jun 02, 2014 12:42 pm
by Cannonball
Still at it. All you FS18 builders are motivating me with all the fresh paint jobs. She went from this...
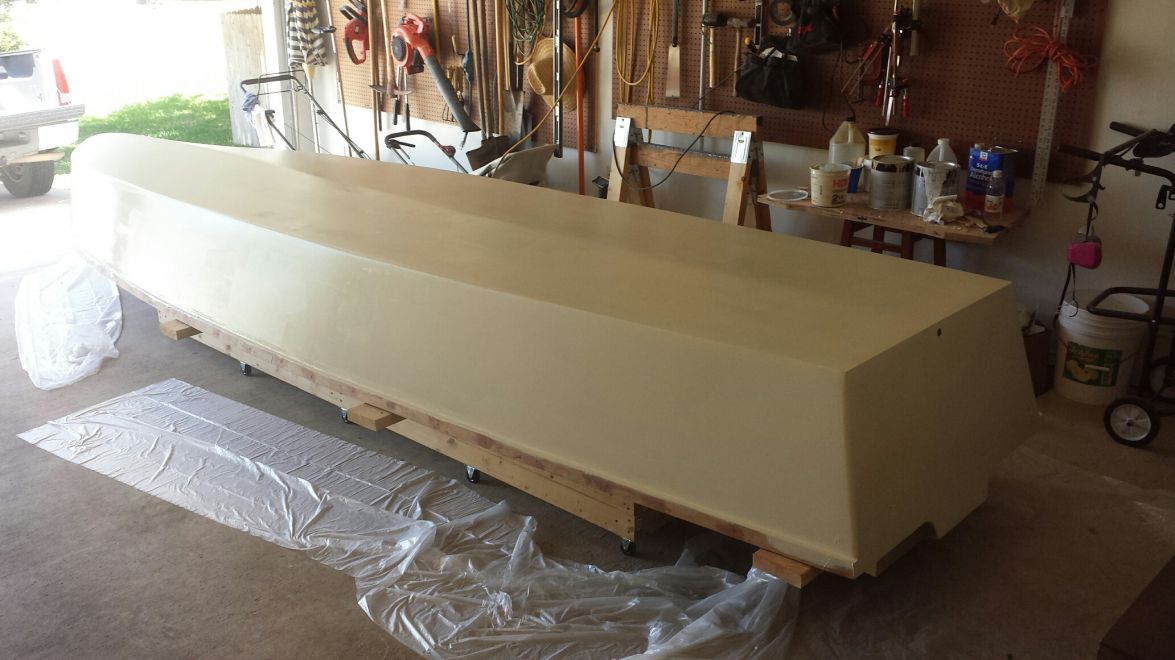
Arg, to this...
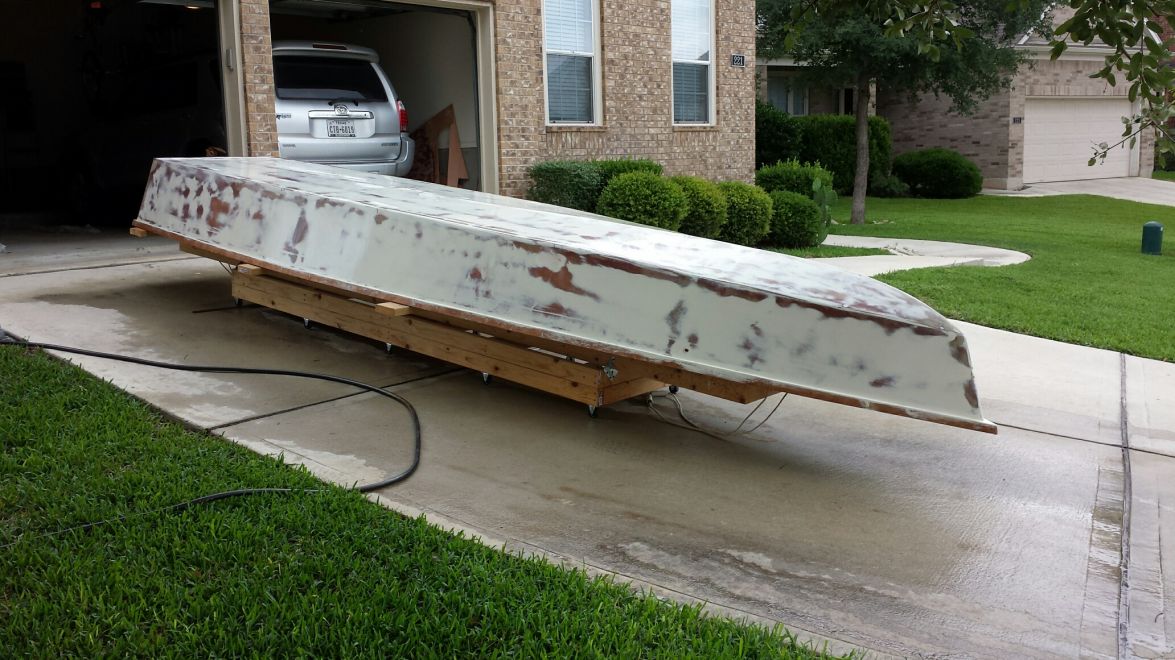
Ughhh, to this...
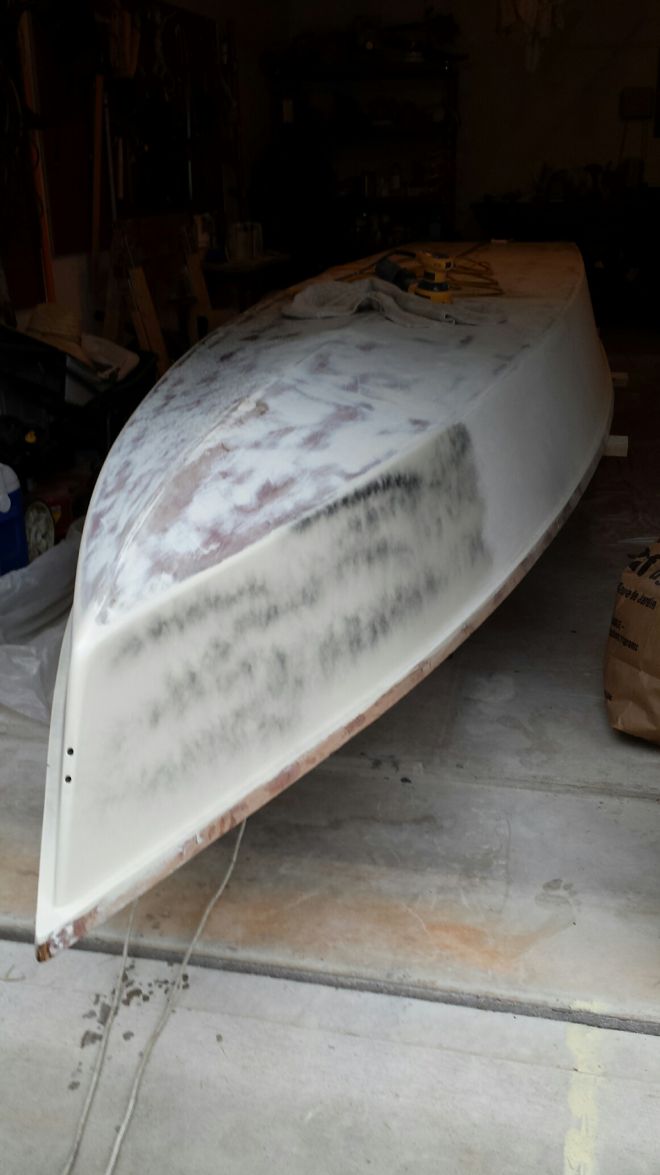
Balls!, to this...
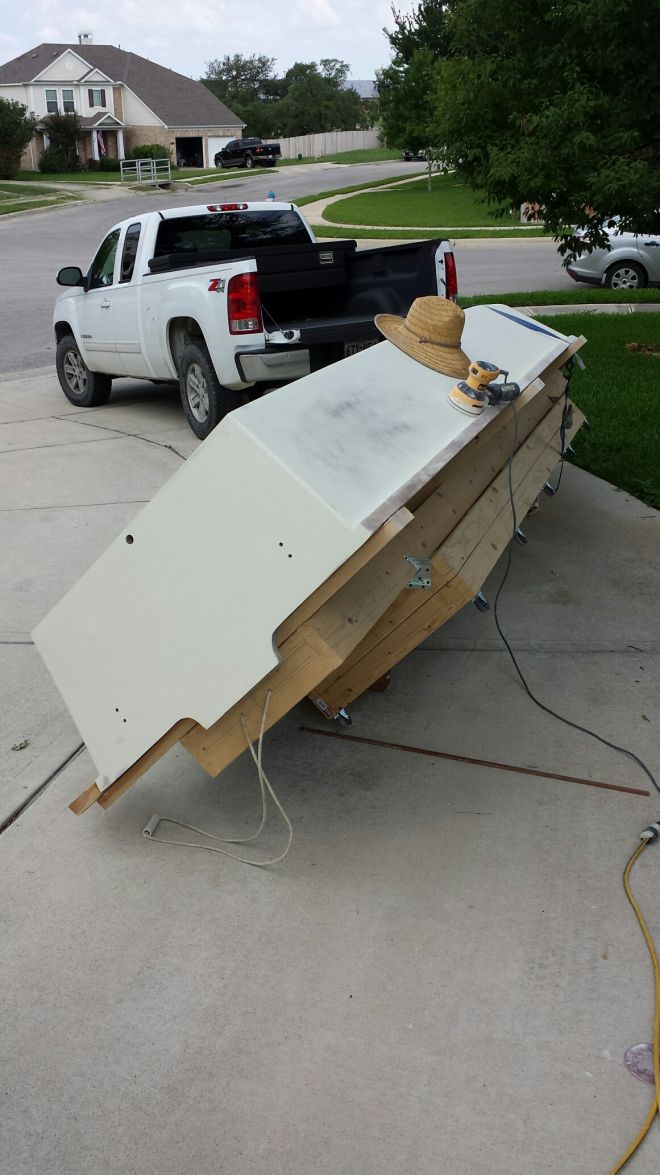
And finally she waits for a bottom job and color...
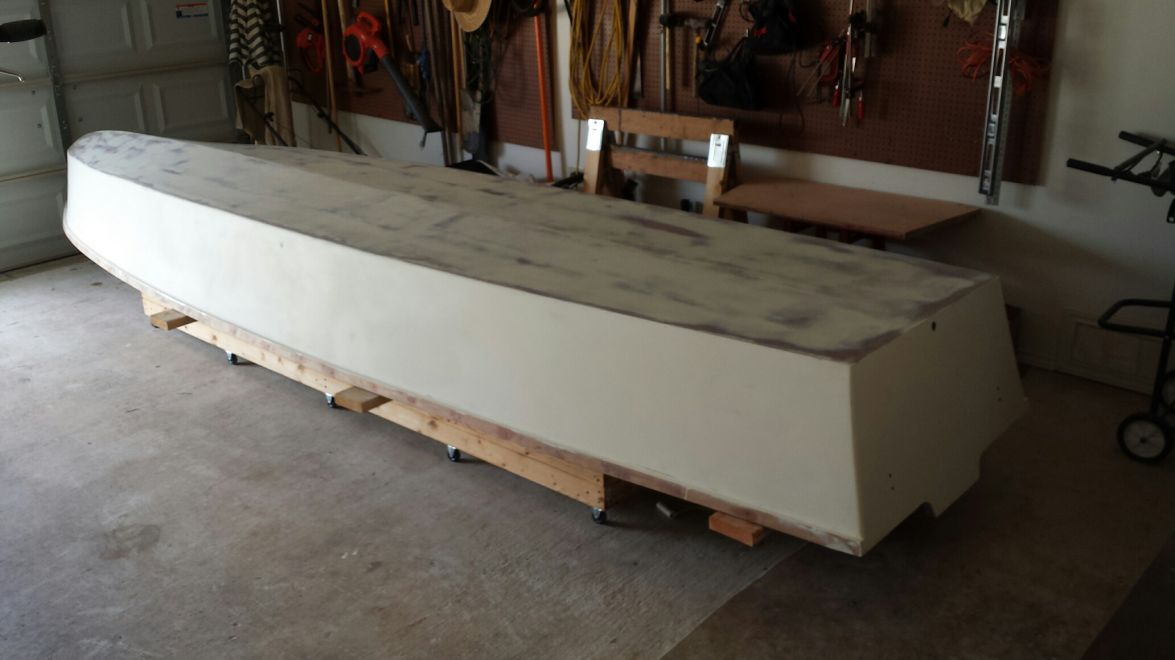
Planning on bottom job this weekend and then final paint the sides the following. I've read the how to's and plan on following Cracker's graphite bottom job instructions, any other pointers? Bring em on. Don't want to screw this part up.
Re: Cannonball's FS18
Posted: Mon Jun 02, 2014 1:10 pm
by garym
If you haven't glassed over the top edge of your transom yet reconsider painting until after you flip.
This is what mine looked like.
Before:
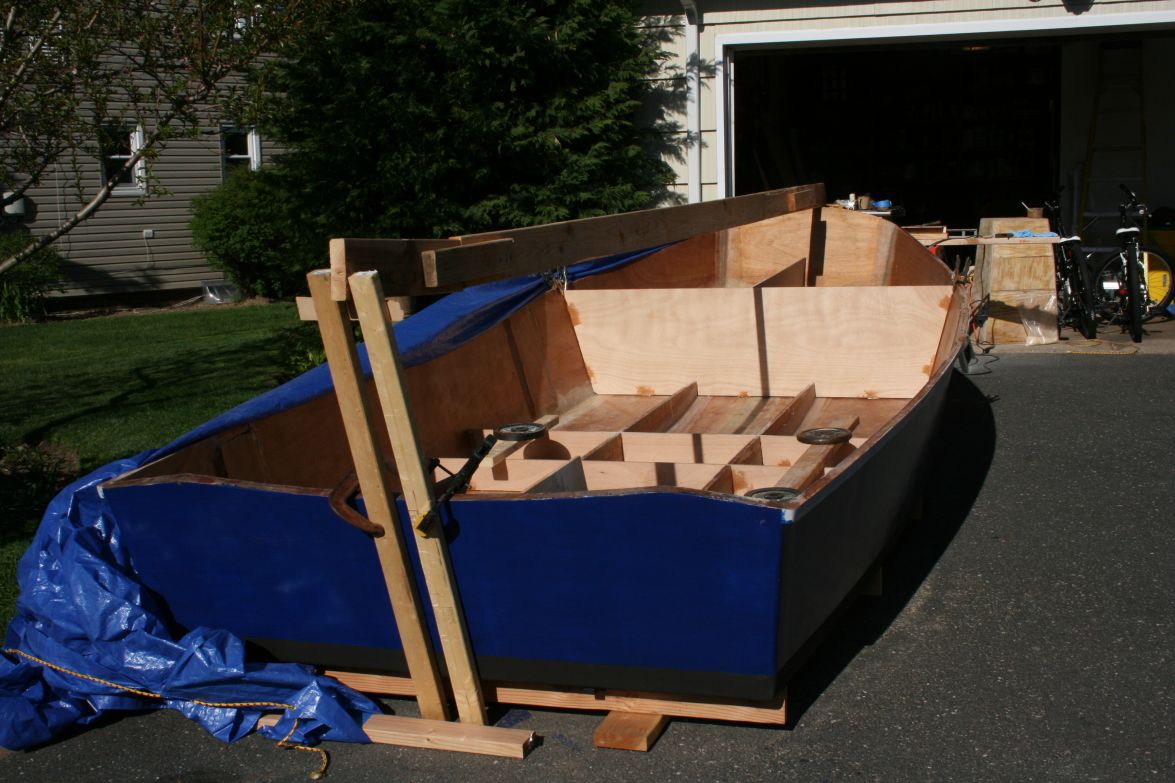
After:

Re: Cannonball's FS18
Posted: Mon Jun 02, 2014 1:31 pm
by AtTheBrink
I agree with waiting. I waited and I'm glad I did. With the bottom covered in graphite you are just painting the sides.
Larry's advice on the graphite is spot on. The hotter the better and it will flow out beautifully. But remember it doesn't start to get real slick til the third coat or so.
Re: Cannonball's FS18
Posted: Mon Jun 02, 2014 2:15 pm
by Cracker Larry
I can relate to all the ughs and args
Graphite is easy, easier than paint to get right.
Re: Cannonball's FS18
Posted: Tue Jun 03, 2014 8:22 am
by Cannonball
I bet you can, been watching you on that console, and whew, better you than me.
We sure are glad that you post all that good stuff for us to learn from though, here is a shot of a buddy building a PH18 and this would be our 3rd big fiberglass lay up. We've got it down now...
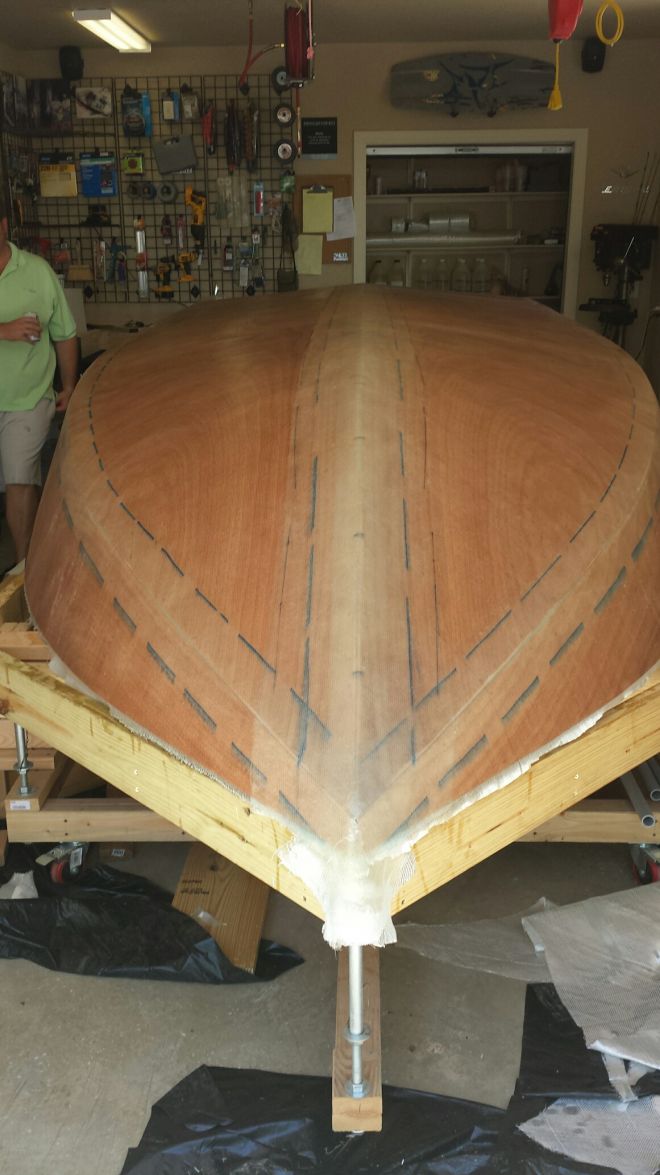
I think I'll take the advice and wait to paint. Thanks!
Re: Cannonball's FS18
Posted: Wed Jun 04, 2014 9:58 pm
by AtTheBrink
Just a small tip on rolling the graphite on the bottom of you boat. I am not sure which rollers Larry used for his boats butthe white foam rollers worked the best for me. I tried the short nap mohair roller and they were very linty. The yellow West system foam rollers fell apart, the when the epoxy gets sticky it pulls them apart. The only other tip I have is do it when it is hot.
Re: Cannonball's FS18
Posted: Thu Jun 05, 2014 1:43 pm
by Cannonball
Mike, I've had pretty good luck with these rollers with most anything besides final finish paints where you need a foam one. The sterling high build primer has seemed to be the harshest I've used so far on rollers, and these held up real good. No hair loss (or very little from the end rubbing agianst the rub rail), stick roller frame, soak up very little epoxy themselves, and cheap too $6.50 gets you 2 of them. Check out your local Shermin Williams store...
Planning on using these on the graphite bottom unless anybody has had a bad experience with them?
Re: Cannonball's FS18
Posted: Thu Jun 05, 2014 1:50 pm
by AtTheBrink
The mohair rollers I used came from Lowes. I am sure the Sherwin rollers are better quality. The painting supplies at Lowes aren't the best...
Re: Cannonball's FS18
Posted: Fri Jun 06, 2014 8:09 am
by Cannonball
The rollers worked ok. Still got some fuzz in there after two coats, but with 30% graphite mixture it would be pretty hard to spread with a foam roller. Here is a pic after the 2nd coat going on this morning...
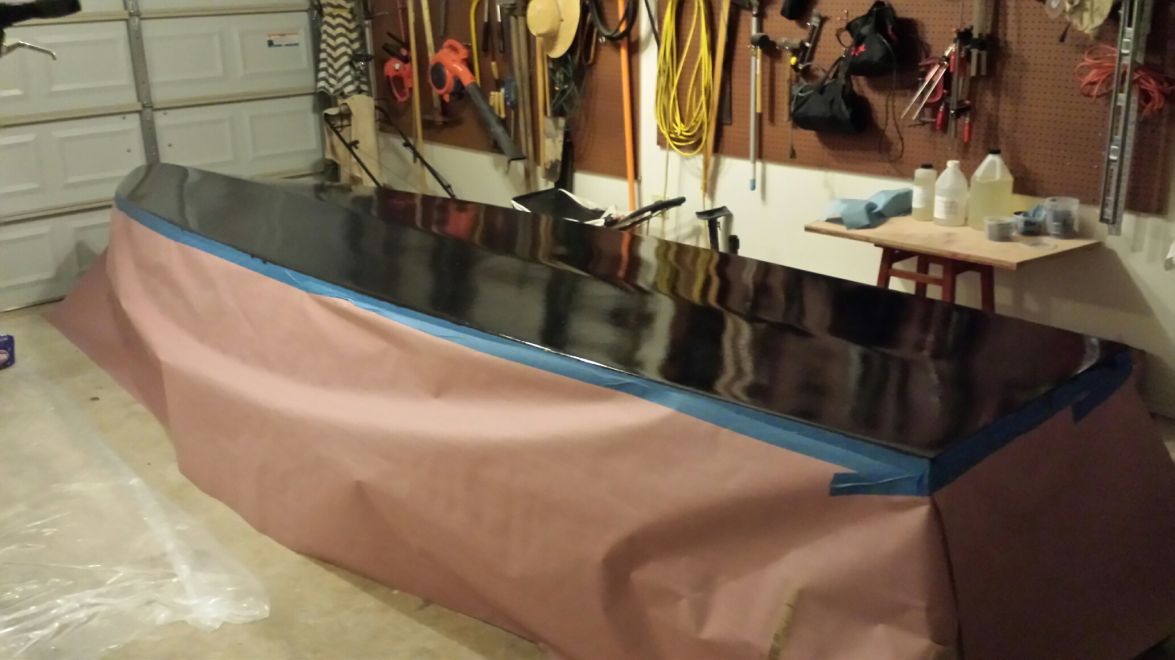
You can see the spots in this one...
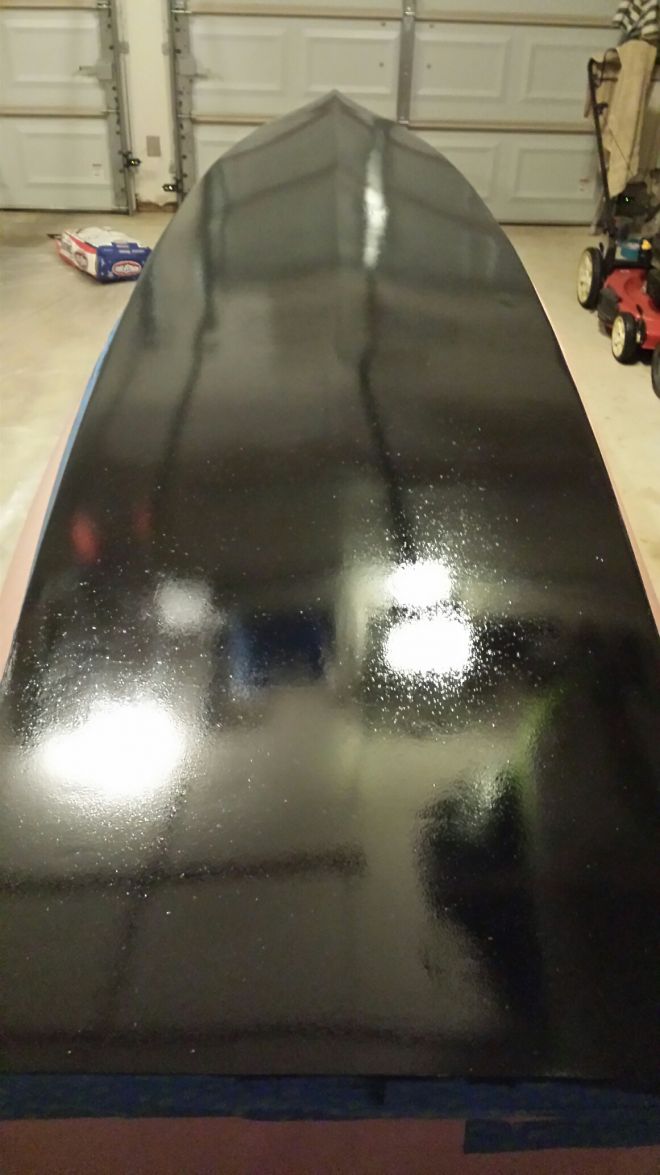
I'm thinking that might be it until Saturday and then I'll give it a wet sand and apply the last coat with a bit less graphite in the mix using a roller. Any better ideas?
Overall I'm pumped to see a finish surface come together. Got me fired up enough to start coating the last of the decks and gunnels so I can flip her this weekend and get the last half dozen pieces glued and glassed...
Re: Cannonball's FS18
Posted: Fri Jun 06, 2014 8:54 am
by AtTheBrink
Looks great! I think I ended up with 5 coats on mine. I went a bit overboard
. It never came out perfectly flat like paint, there was still a little stipple.
I know you are chomping at the bit to get her floating! Keep on keepin' on!
Re: Cannonball's FS18
Posted: Fri Jun 06, 2014 8:56 am
by tech_support
for the graphite. I like the cigar/hotdog style foam rollers, you might have to switch them out if they start to swell too much, but on a bot that size you should be able to get the whole thing done with one roller. looks good to me
Re: Cannonball's FS18
Posted: Fri Jun 06, 2014 9:01 am
by pee wee
If you decide to stick with the mohair rollers, some guys find it helps to roll over the sticky side of masking tape before using it- helps to pull loose fibers out.
Re: Cannonball's FS18
Posted: Sat Jun 07, 2014 8:43 pm
by AtTheBrink
How did that last coat of graphite turn out? I never got mine perfect, it still has some roller stipple but it was close enough for me. I figure as shallow as this boat it going only shrimp and the odd mud minnow will ever see it.
Re: Cannonball's FS18
Posted: Sun Jun 08, 2014 6:53 pm
by Cannonball
Real nice. Thanks for the tip Shine...
Used these rollers and tipped it. Tipping was a must or I would have had a million little bubbles. But the rollers work very well, just be prepared for a very quick very light one time tip...
Then we had some more fun, flipping her in the rain, here's some pics of her on the trailer now. Jet ski trailer is working out good. Much better than I thought.
The crank and the bottom bunks needed a quick adjustment, but that was it. Just barely fits...
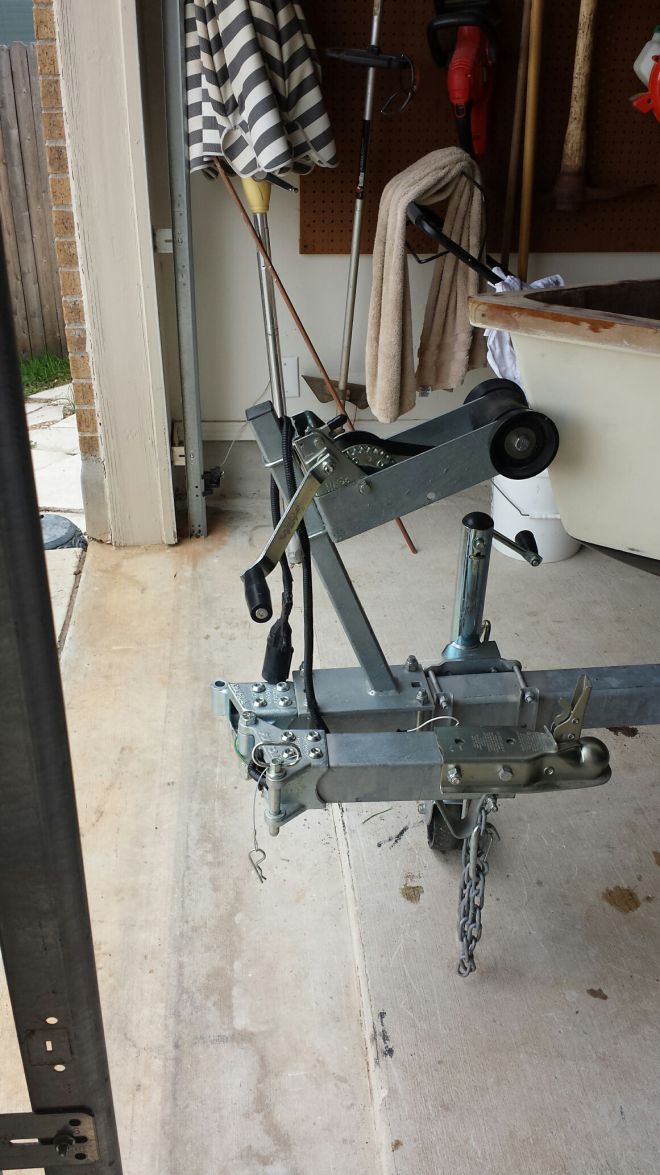
Started whacking away at the decks...
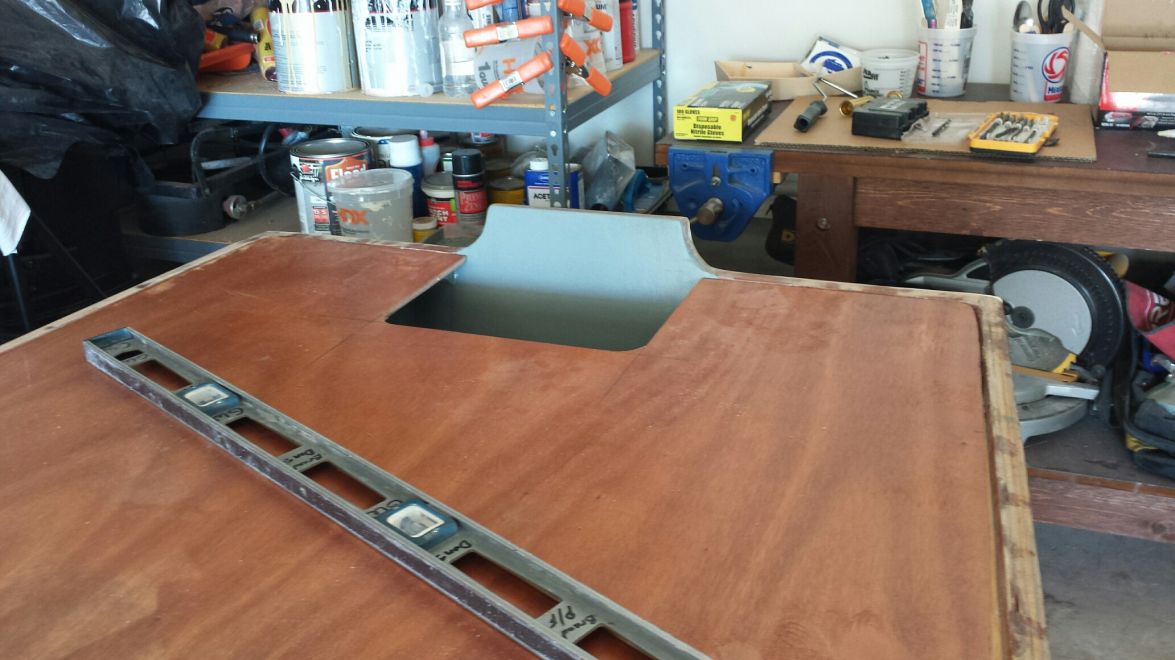
And, got the gunnel rails epoxied in...
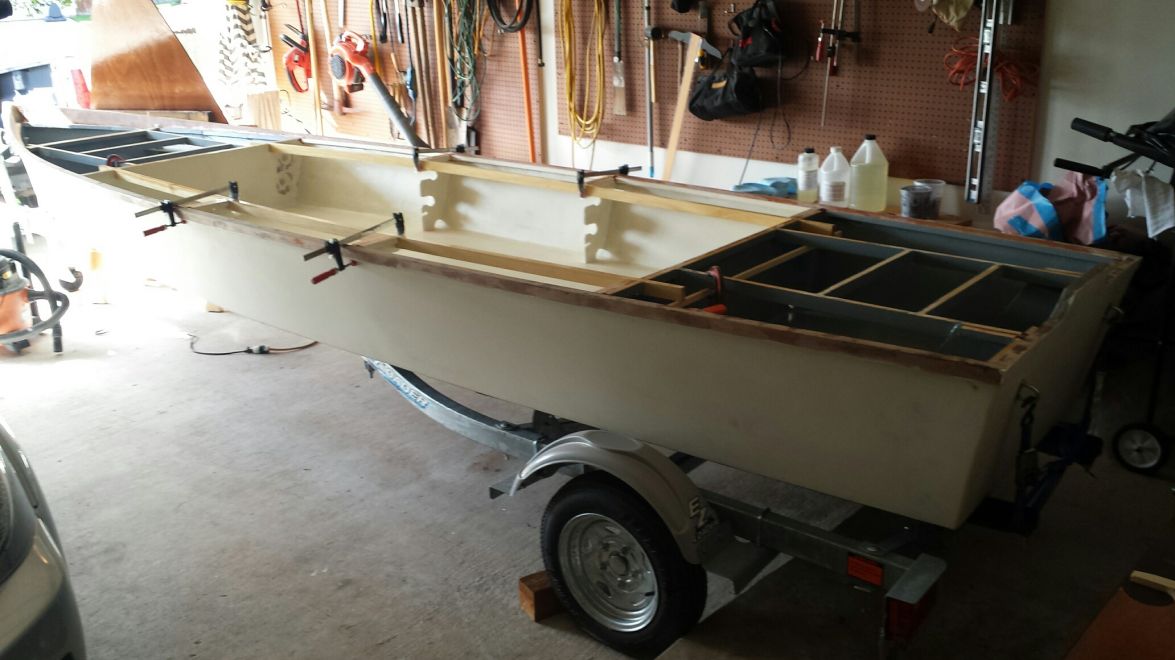
Finally feel like i'm on the home stretch. Now let's just hope I pass my game warden inspection this Friday with it all rat rod style, otherwise I will be bandito fishing come a vacation we have coming up next month. Got my schedule cleared until the forth and hope to be painting then.
Re: Cannonball's FS18
Posted: Sun Jun 08, 2014 8:19 pm
by AtTheBrink
Turned out great! Good luck with the Blame Warden! I have to get one of them out this week to "inspect" my boat too. From what I have heard it is more of a formality than anything. They just want to see that it is not a stolen hull trying to get new hull numbers.
Re: Cannonball's FS18
Posted: Wed Jun 11, 2014 8:25 am
by Cannonball
Here's some pics of it sitting on the trailer outside the garage. Still on a slope, but the little jet ski trailer turned out awesome! I may still need to move the front axels forward a bit because the toungue weight is tremendous. I can get them forward about 4" and then with the motor, she should sit good and level.
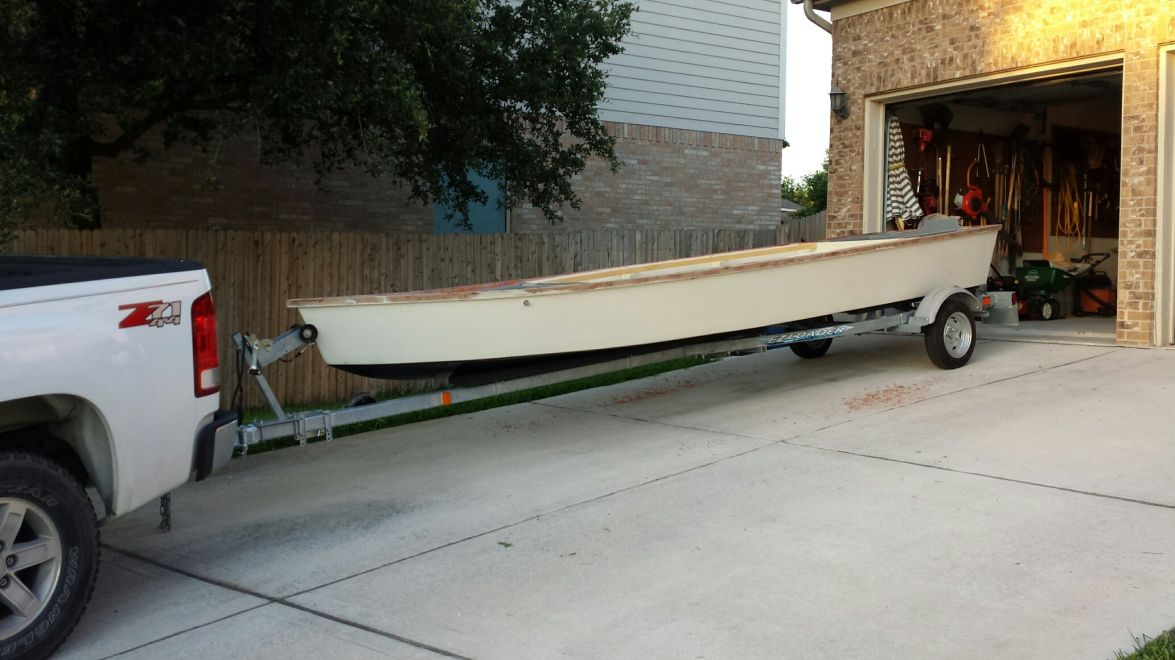
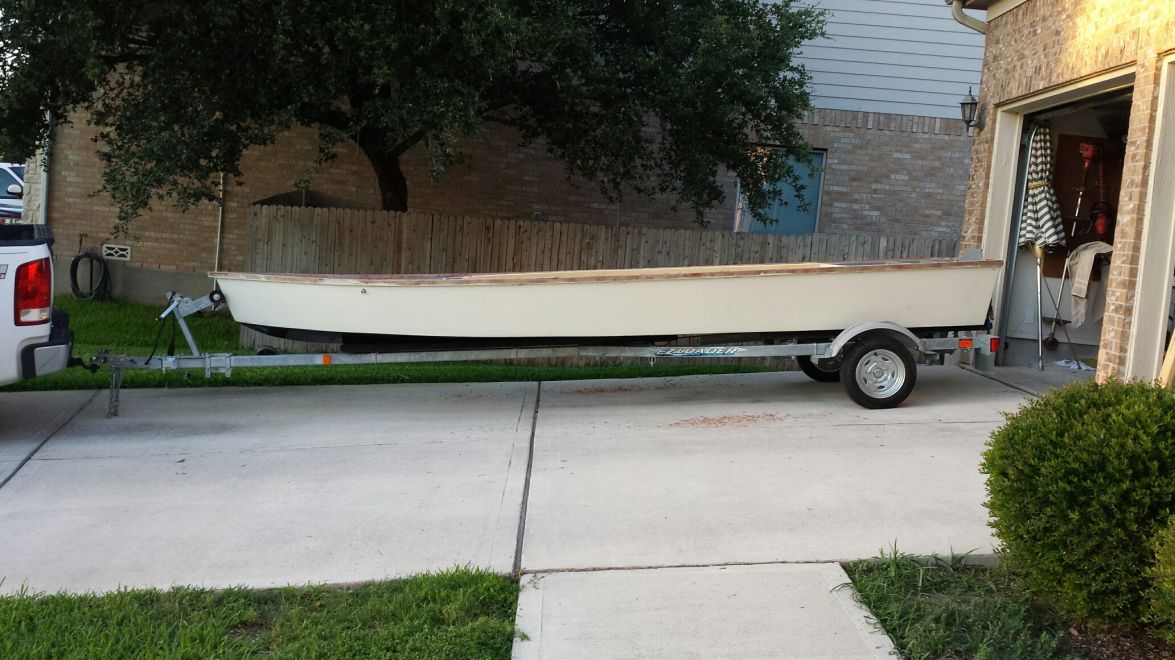
Got the decks trimmed and dry fitted. They are as good as they are going to get.
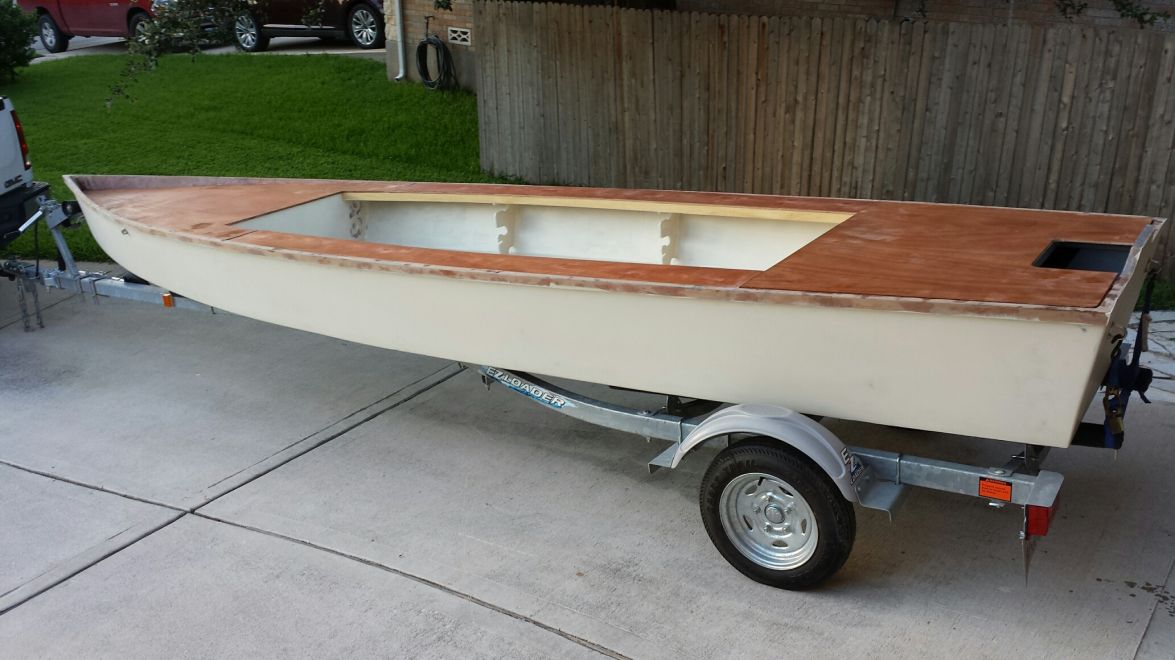
Roughing in below decks...
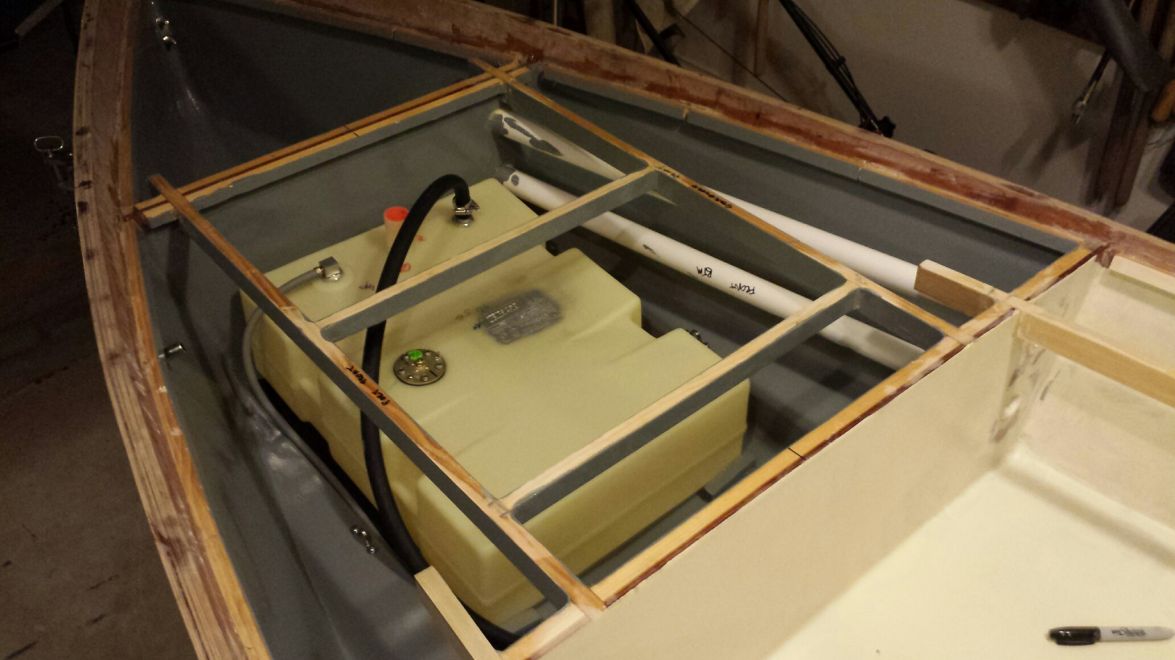
Game warden inspection got pushed to Monday so that'll give me time to get the decks glued down.
Re: Cannonball's FS18
Posted: Wed Jun 11, 2014 11:34 am
by AtTheBrink
For your inspection, is a Game Warden coming out to look at your boat? Or are you having to take your boat into a TPWD office? I am getting the run around down here...
Re: Cannonball's FS18
Posted: Wed Jun 11, 2014 12:30 pm
by Cannonball
I'm taking mine in. They do home inspections also, just depends on what office you go out of and what their protocal is. You're really going to be running around when you find out it take 21 days to process before you get your registration numbers
That's why I'm getting mine done now so hopefully I'll have it by the July 10th. Headed down and will be heading out of Wilson's cut for the sea trials.
Re: Cannonball's FS18
Posted: Wed Jun 11, 2014 6:00 pm
by AtTheBrink
21 days! Well I'll be fishing while I wait for those bumbling bureaucrats to shuffle the papers around and try to justify their existence... I will be able to go where the Blame Warden can't get me
Re: Cannonball's FS18
Posted: Wed Jun 11, 2014 8:20 pm
by Cracker Larry
If Texas is anything like GA, once you apply and keep a copy of the application paperwork, you will be OK on the water. It took about 5-6 weeks to get a DNR officer out to inspect my OD18. I used it while I was waiting.
Re: Cannonball's FS18
Posted: Wed Jun 11, 2014 10:07 pm
by Fishwater
Cannonball wrote:Headed down and will be heading out of Wilson's cut for the sea trials.
If I ever finish mine, that's where I'm planning my first launch as well.
Re: Cannonball's FS18
Posted: Thu Jun 12, 2014 8:50 am
by Cannonball
Hey Fish, you're almost there. Just hustle up and get er done. I'm putting in an hour everyday right now, trying to get wrapped up and ready for paint. Not too much more, I can feel the end coming.
TPWD can be a real stickler, maybe that's just me though. I dont want to invite any stops by not having stickers. It's always something with those guys. I was scarred for life by the game warden though when I got a ticket for inking out the dates on a deer tag instead of cutting them out when I was 12. I'll never forget that one.
Re: Cannonball's FS18
Posted: Thu Jun 12, 2014 10:01 am
by AtTheBrink
12?!? What kind of Monster gives a 12 year old a ticket? You must have been a real serial poacher
!
Re: Cannonball's FS18
Posted: Mon Jun 16, 2014 8:27 am
by Cannonball
Got quite a bit accomplished over the weekend. Here's where we started...
I like rigging...
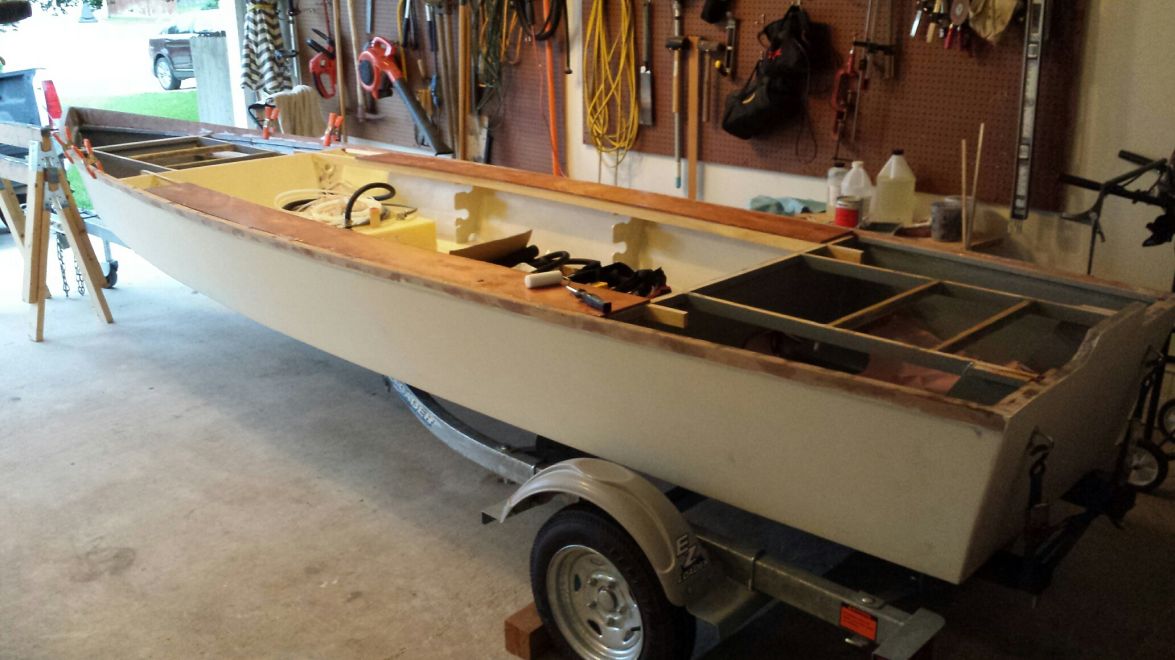
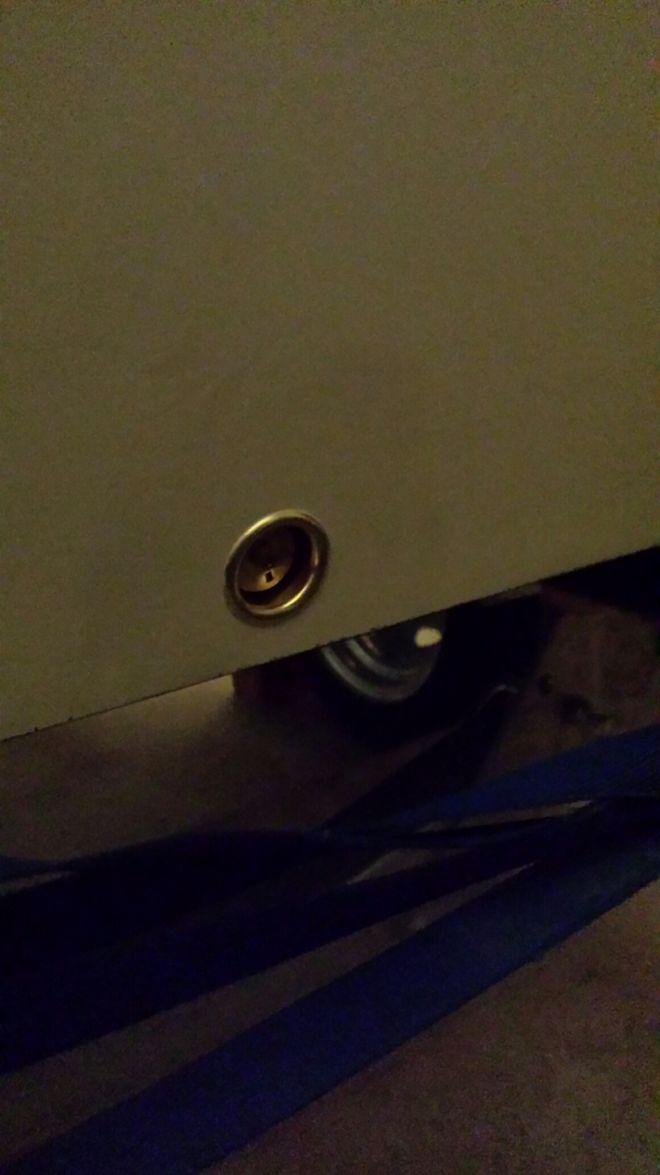
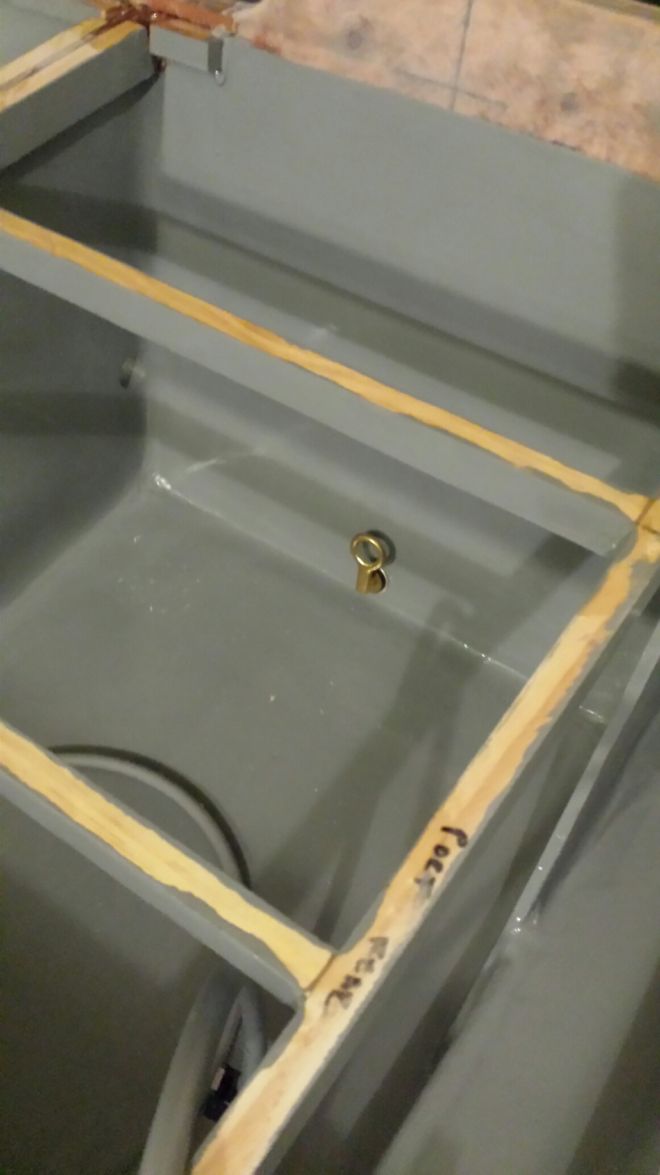
It's fun...
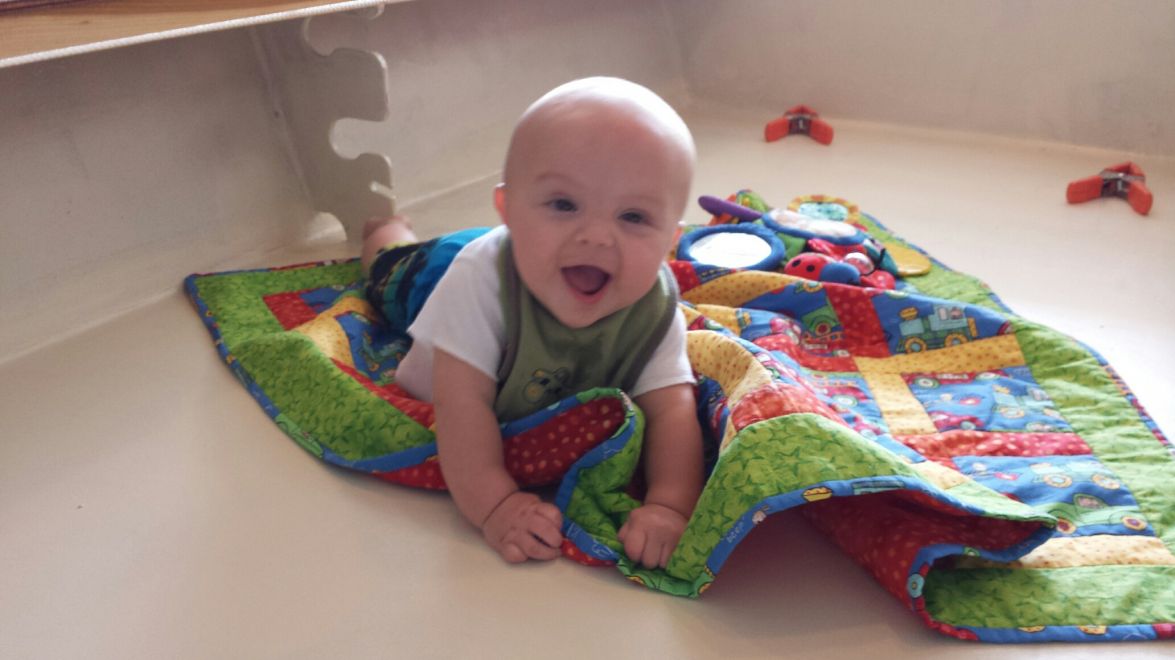
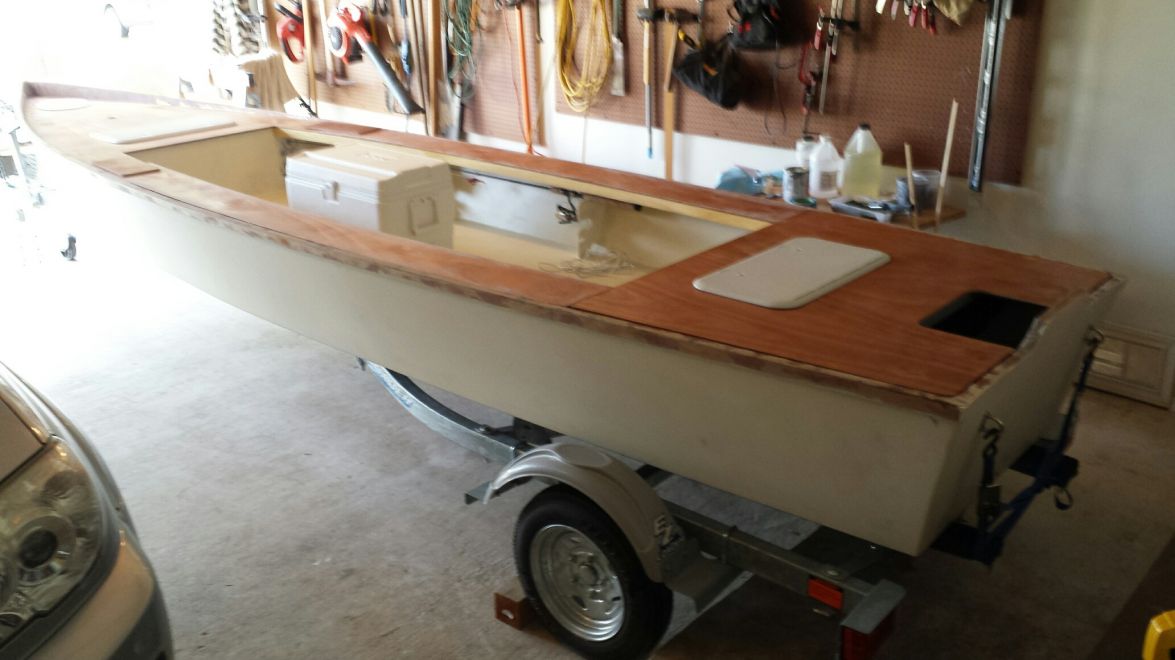
Decks are on. 2 more butt joints to go on the gunwales and then no more wood work. Now if only there was no more fiberglass work or better yet fairing work, or even better yet painting. Ughh, almost there, I want to go fishing already!
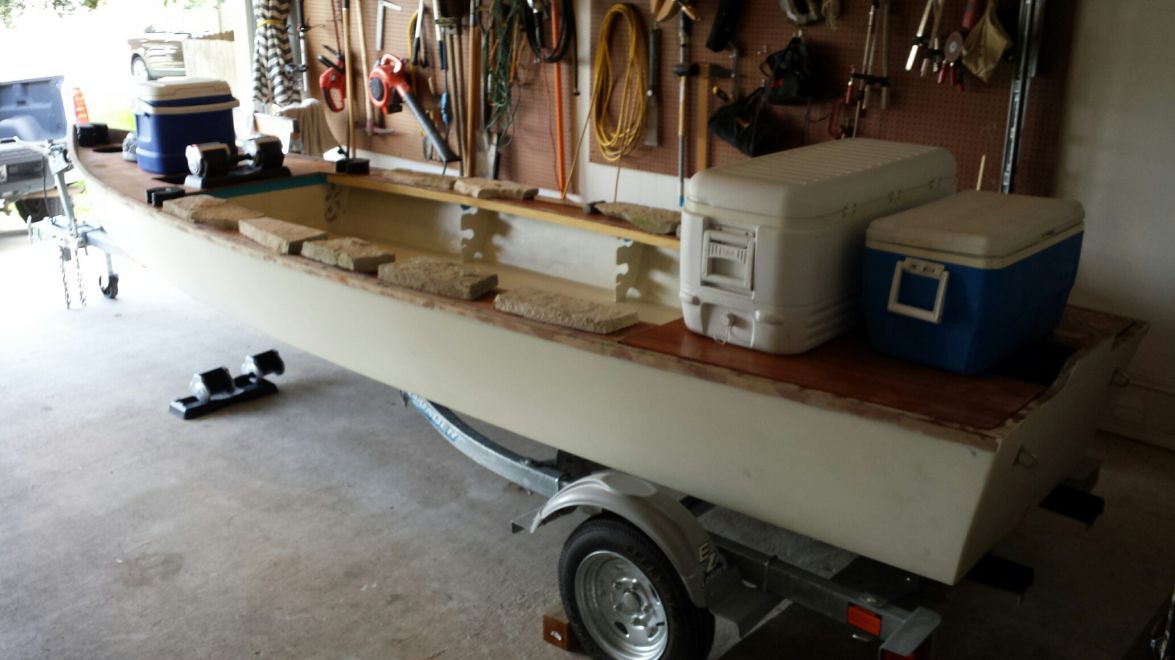
Sitting outside the office. She'll be getting inspected during lunch today. Trailer pulled real nice down 35 right through town. I may leave those axels alone after all.
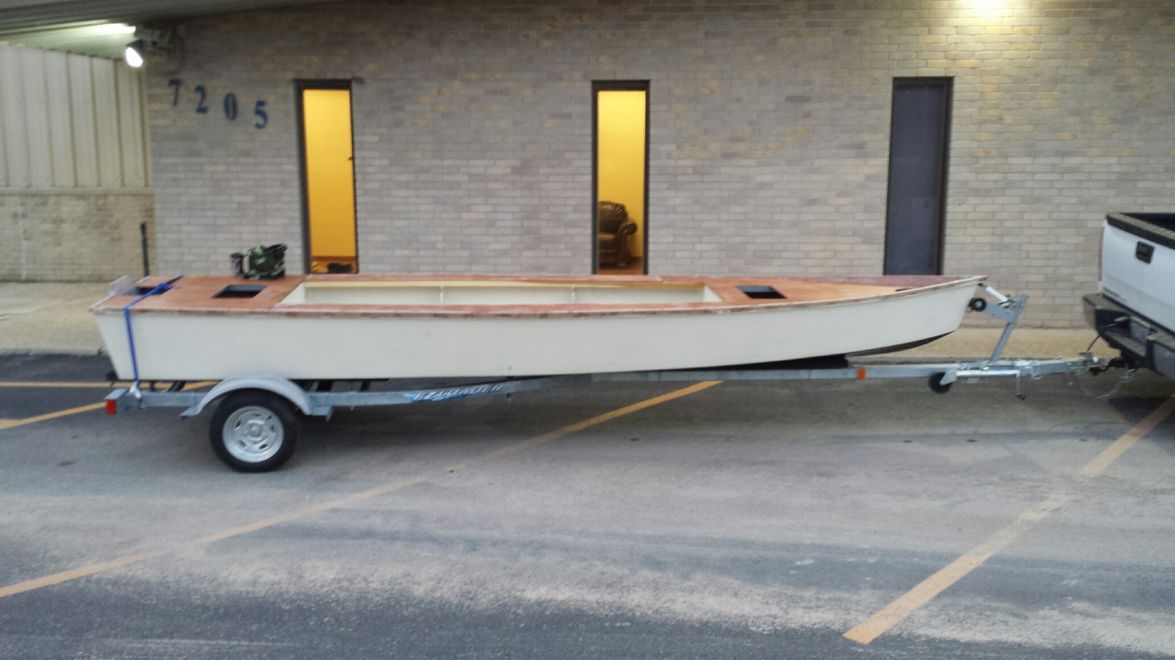
Re: Cannonball's FS18
Posted: Mon Jun 16, 2014 10:23 am
by AtTheBrink
Good work over the weekend! The boat looks great, the blame warden doing the inspection will be impressed! You'll be fishing in no time.
Re: Cannonball's FS18
Posted: Mon Jun 16, 2014 1:08 pm
by Cannonball
Well, that was easier than expected. Got my registration numbers and stickers on the spot. I thought those would have to come in the mail. If I'd of known I could have waited on this, but it's good to have it done.
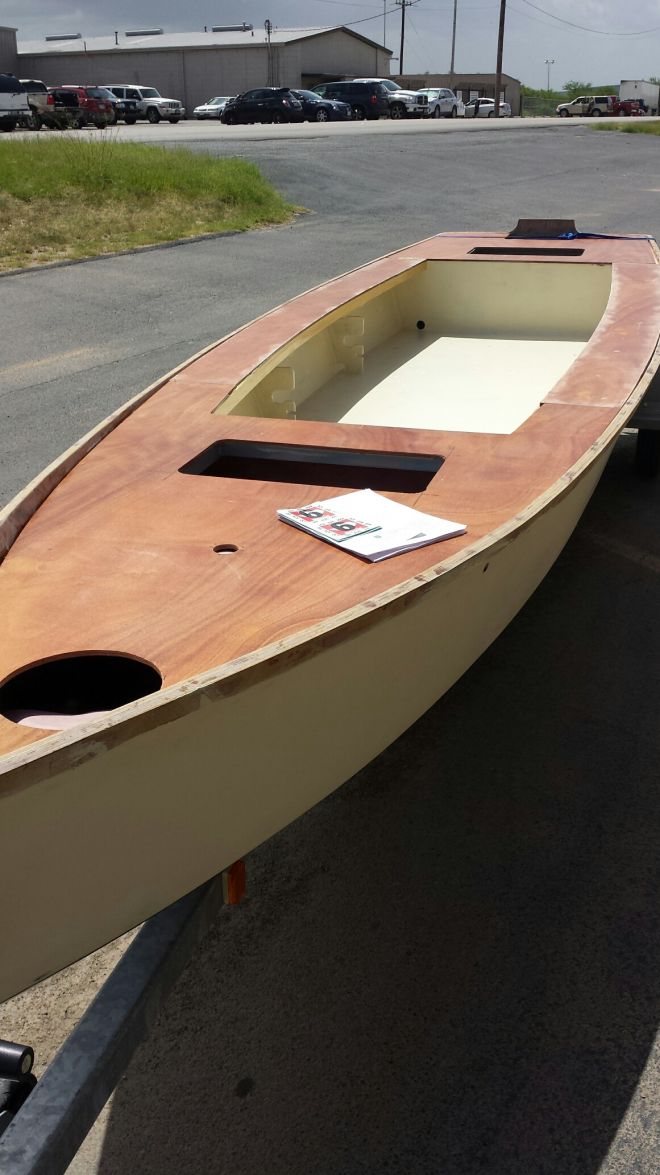
Nothing stopping me now...
Re: Cannonball's FS18
Posted: Mon Jun 16, 2014 3:36 pm
by mindunderwater
Outstanding! It is -officially- a boat
And a nice - looking one at that!
Re: Cannonball's FS18
Posted: Tue Jun 17, 2014 4:13 pm
by AtTheBrink
Glad to hear all went well with Parks & Wildlife. Hope mine goes as easily.
Now get her done! I have about 30 feet of rubrail base that is yours if you are interested. It is black, I bought it here.
Re: Cannonball's FS18
Posted: Tue Jun 17, 2014 7:51 pm
by jorgepease
ditto that!
Re: Cannonball's FS18
Posted: Wed Jun 18, 2014 8:52 am
by Cannonball
Thanks for the comments. She is coming together, I'll be real pumped when she is running 20 mph in 4" of water.
Appreciate the offer for the rub rail Mike, but I'm kindof leaning towards a peel and stick auto body style that I saw a guy use on this site once on a smaller skiff. Here is the post. Rub rail kits seem to add quite a bit of weight, and I'm thinking this will be a good compromise and get me the black rubber rail with less weight. Not to mention less work. Any thoughts?
I used a Chevy pick up body molding (self-stick) on my GV-11. Cheaper.
Been on there 8 years. Assume the boat molded rub rails are as good as those for trucks?
Can get the stuff here...
http://www.autoamenity.com/Body-Molding ... olding.htm
Re: Cannonball's FS18
Posted: Wed Jun 18, 2014 10:48 am
by AtTheBrink
Just my thoughts... The peel and stick stuff will eventually unstick and unpeel. The rubrail I got is the rigid base and rubber insert. It is installed with 6,947 screws
It ain't coming off and will really protect the boat from bumps and bruises. As far as weight goes, it will add maybe 10 pounds. That's a bag of ice...
Re: Cannonball's FS18
Posted: Thu Jun 19, 2014 8:05 am
by Cannonball
Yeah, it's that 6,947 screws I'm trying to avoid. I may still give it a whirl, and if I have to do it right the second time it wouldn't be the first time
Got the decks filleted last night. Looks like a lot of sanding/shaping/routing coming my way this weekend. I think I'll have her glassed on Sunday, but we'll see. I want to get the decks basically faired out so after the 6 oz woven goes down it will be mostly finished besides a final pass.
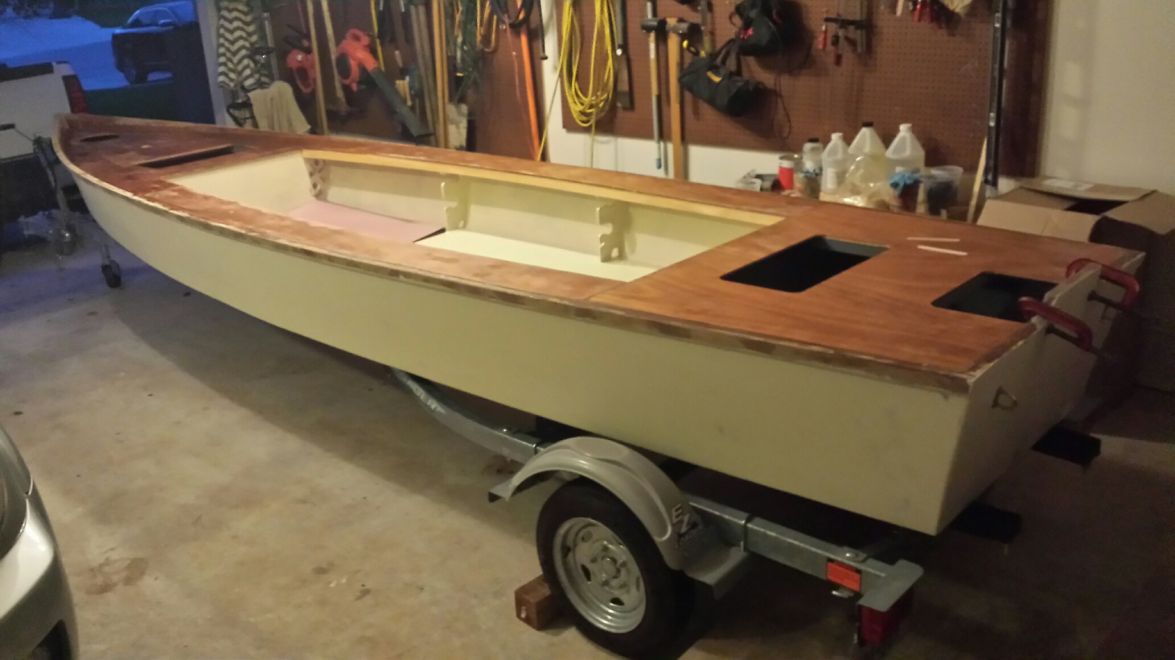
Re: Cannonball's FS18
Posted: Mon Jun 23, 2014 8:05 am
by Cannonball
Ohh yeah, done with the fiberglass!
Got the topsides smoothed up and touched up my fillets before glassing yesterday...
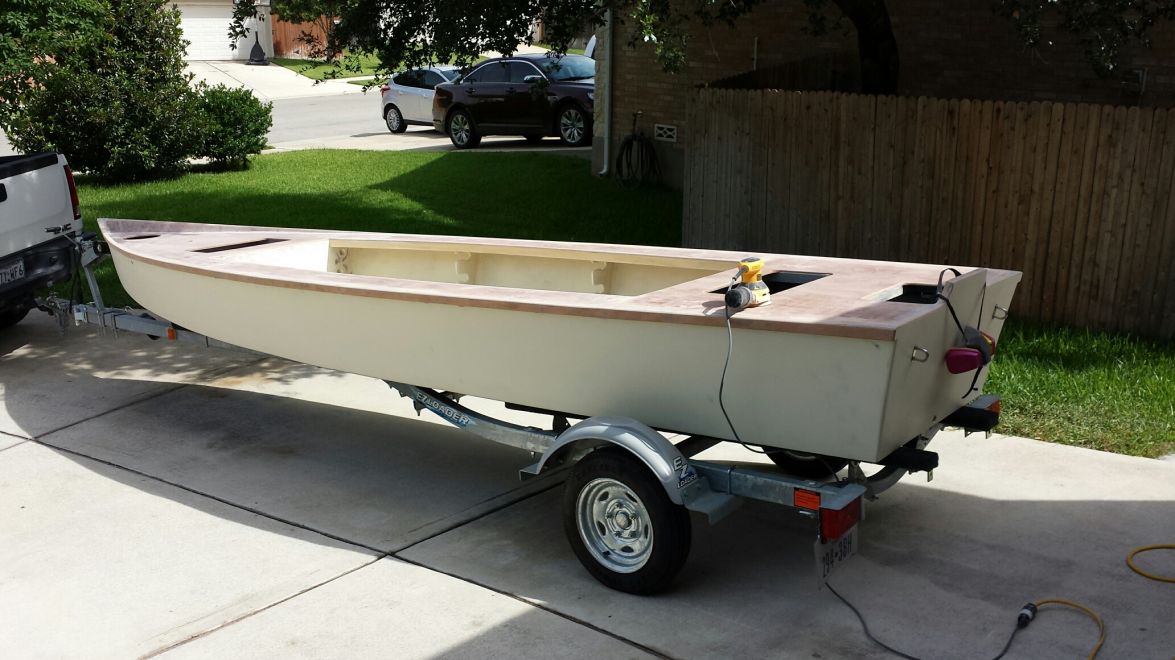
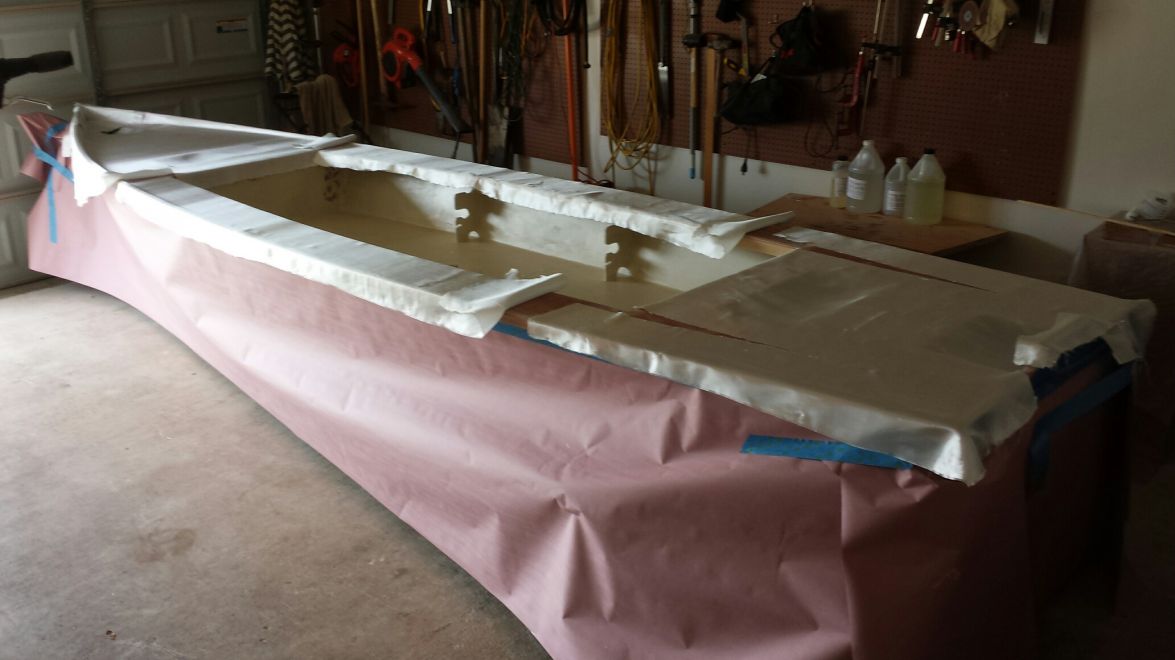
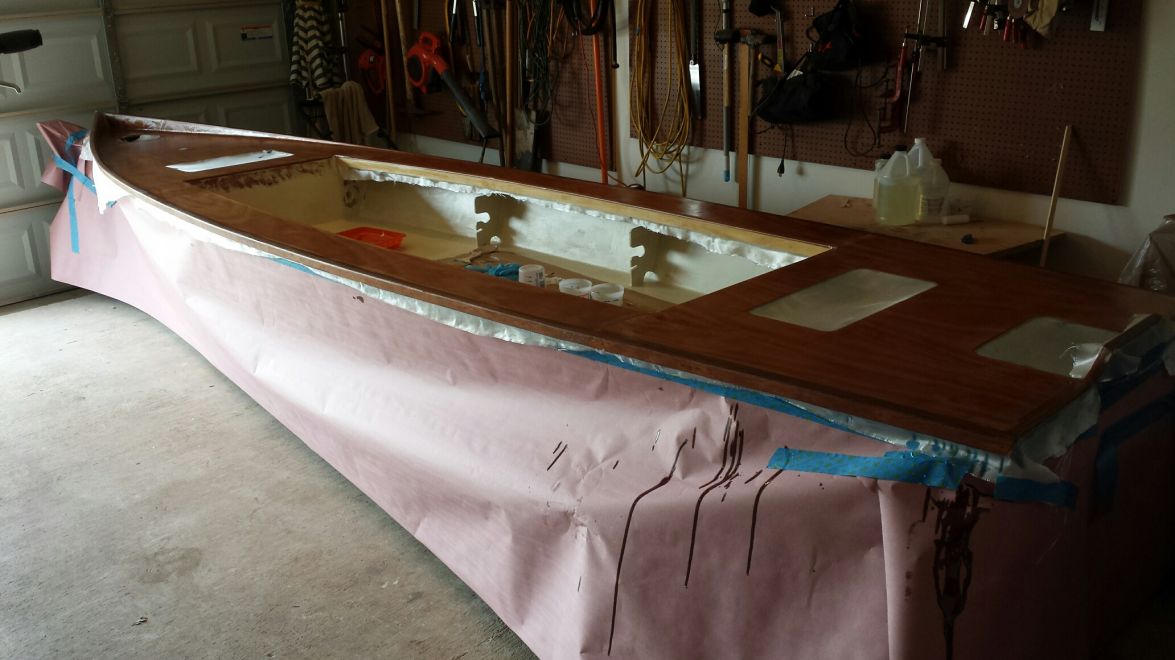
With the 6 oz cloth i think the fairing is going to be pretty minimal on the topsides. I may just wipe it down good to clean up any blush and go ahead and hit it with a coat of primer to make it easier to see the spots. Any downside to doing that?
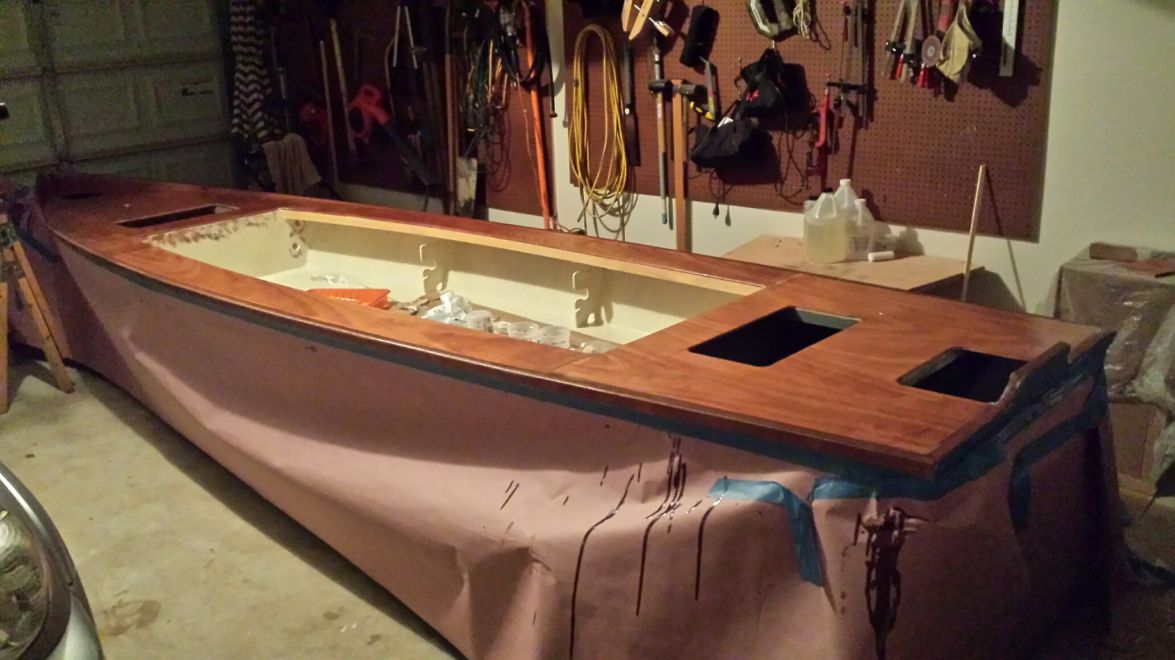
Re: Cannonball's FS18
Posted: Tue Jun 24, 2014 6:59 pm
by AtTheBrink
You're right about the 6oz being easy to fair in. My big tip for laying 6oz, cut it to fit, lay it in dry and wet it out from the middle working to the edges. Doing this will eliminate most all wrinkles. If you start from the edges it can turn into a mess real quick! The woven cloth is not like the biax. Biax is a lot stiffer, the light woven stretches and wrinkles easily. But if you realize all this it is easy to work with.
Re: Cannonball's FS18
Posted: Tue Jun 24, 2014 10:13 pm
by justin_dwyer
Nice work Cannonball, looks great
I agree, the 6oz is great to work with, but you do need to watch the wrinkles (or like you say, be aware from the start and work accordingly).
Re: Cannonball's FS18
Posted: Wed Jun 25, 2014 9:27 am
by tech_support
If you go heavy on the primer, you almost do not need to use fairing with 6 oz. If you hit it (especially the overlap sections) with a slurry of fairing mix it will fill all the weave with minimal material. If you do this while the glass is setting up you can skip a sanding session - sand once, then prime
looking good BTW
Re: Cannonball's FS18
Posted: Thu Jun 26, 2014 9:11 pm
by AtTheBrink
I copied what you did on your trailer. I hope it works!
Re: Cannonball's FS18
Posted: Fri Jun 27, 2014 9:43 am
by Cannonball
I should have thought about putting that fairing compound on while it was still green. I'll remember that next time, if there will ever be a next time. Going to be a dusty cannonball this weekend and double down with the fairing and priming and sanding on the topsides. Got the motor at the shop replacing the water pump and getting her tune up so I'm tracking good for a splash in a couple weeks. Just trying to get the outside painted over the forth so I can get her stickers put on. I'll probably run it with primer on the topsides for a couple weeks and then get back to finishing that part out after tweaking any motor height issues that may arrise. We'll see.
Re: Cannonball's FS18
Posted: Mon Jun 30, 2014 8:31 am
by Cannonball
Well, I'm still itching sitting at my desk. Got a good lick put on her this weekend, but not quite as far as I had hoped. I was hoping that I'd have the rails final primed. I'm going to paint around the fuel fill and my hatches for practice since those are little islands in the what will eventually be surrounded non skid. That will let me permanently mount some accessories and then get read to paint the outside next weekend so I can have it ready enough for our vacation coming up after the forth.
I rough sanded the 6 oz and then hit it with one coat of primer, and 3 coats around the hatch openings. After a single coat I noticed there was quite a few pin holes the would have been iffy to fill, so out came the fairing compound. I think I'll be able to put 2 coats on it now and sand it ready for paint.
Was really searching for shade yesterday...
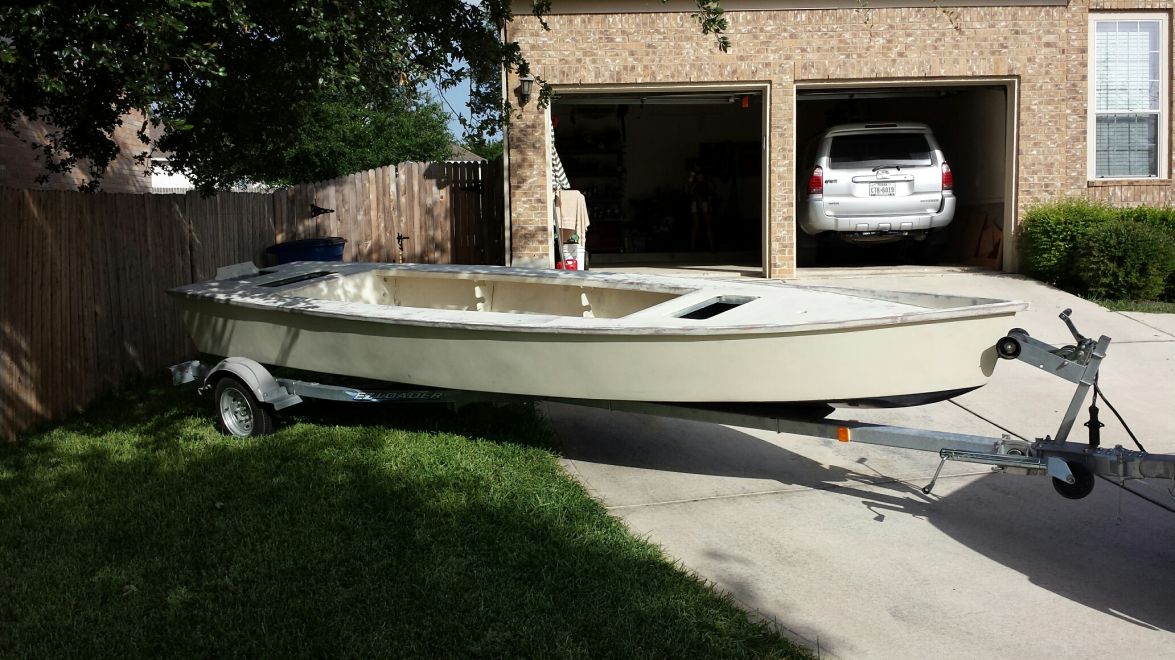
Got a lot of fairing work that needs to be done in the cockpit, so this is about as good as it's going to get for vacation time. Just trying to get her water ready so that I can finish the rest at my own pace. That might take another year. It's starting to get a bit to warm for boat work.
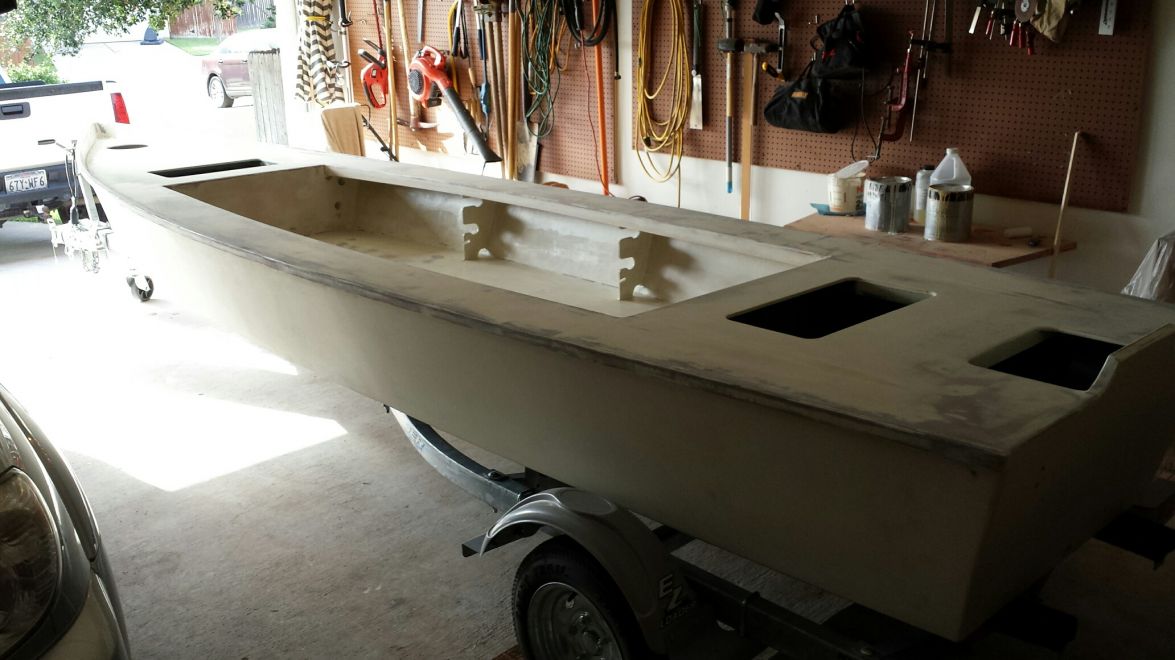
Re: Cannonball's FS18
Posted: Mon Jul 07, 2014 2:54 pm
by Cannonball
Got the outside painted. The sterling really does show every spec of everything. It looks pretty good. Got a couple spots that need some attention, but other than that you step back 10 feet and it looks dang good. The topsides are still rat rod style, but that's going to be it for a bit. They will eventually be ice blue with a black rail. I've got some fairing to do in the cockpit before I open the next can of paint. Pick up the motor tomorrow and then its off to the coast for some sea trials.

Screwed down the hatches for now, will need to redrill and fill them before painting the topsides, but rework is the price you pay for having fun before you're done. I got a white 8" round for now until I can find a light grey one to match. TH Marine has one on their website, but nobody stocks it. Bateau guys, got one sitting around?...
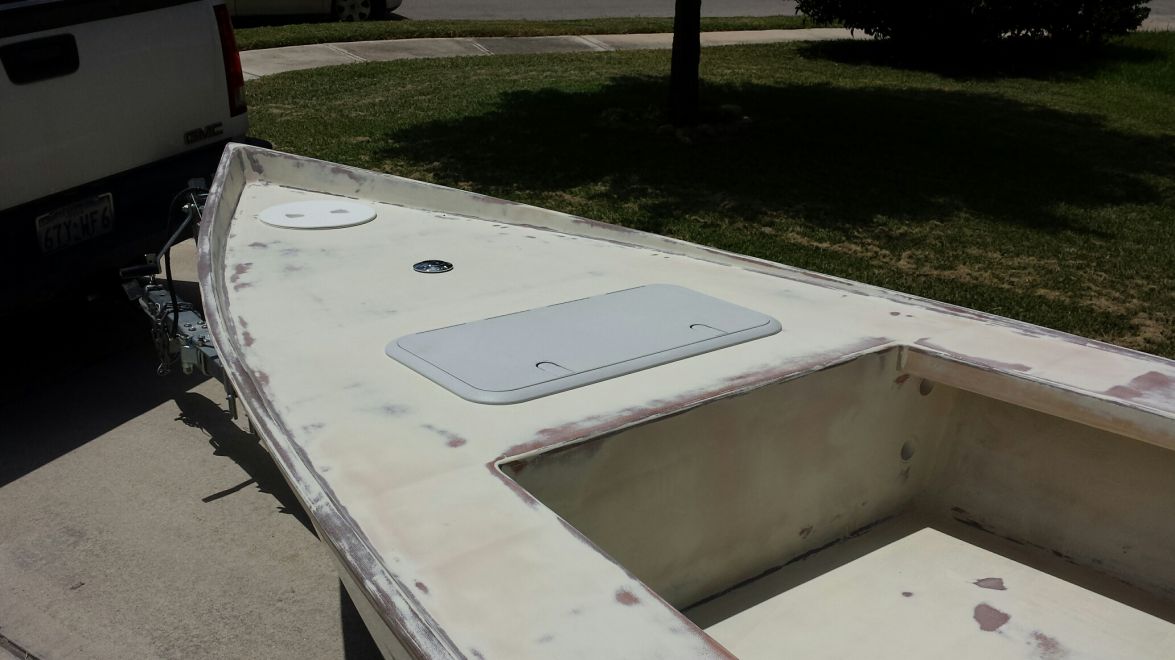
Tank and vent are good to go...
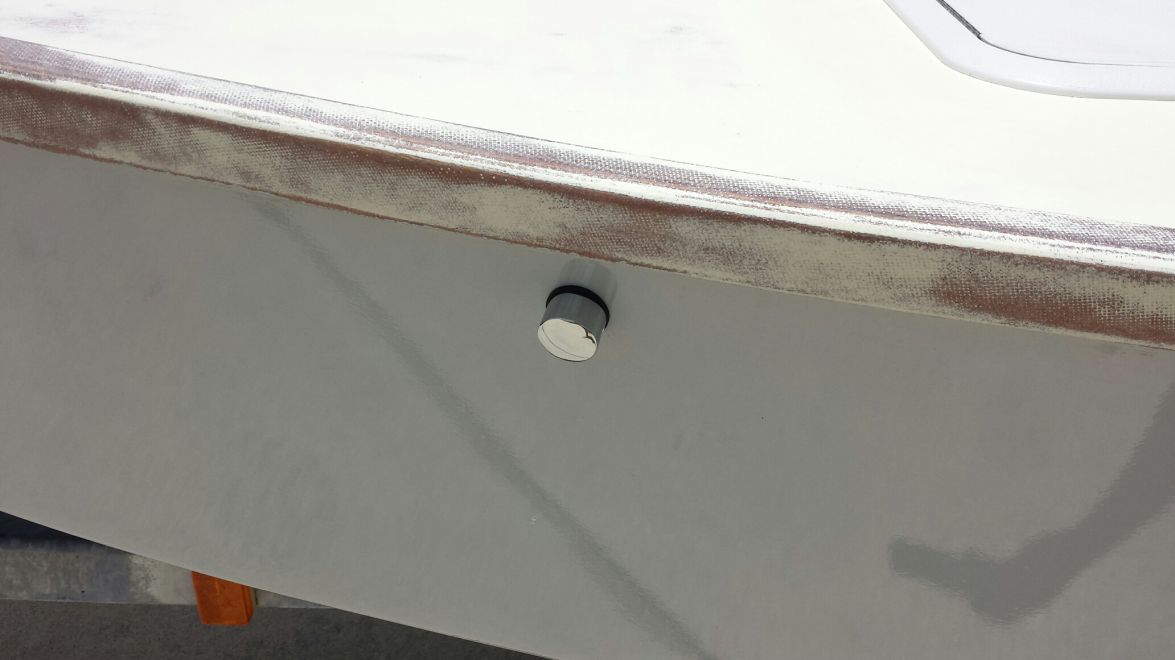
Here is my biggest trouble spot, must have had a wrinkle in the tape that led to some drops on the bow. Im hoping I can srub it off, but we'll see. Any tips? Other than this I have one drip at the fuel vent and just some dust spots overall I"m pretty happy with the paint.
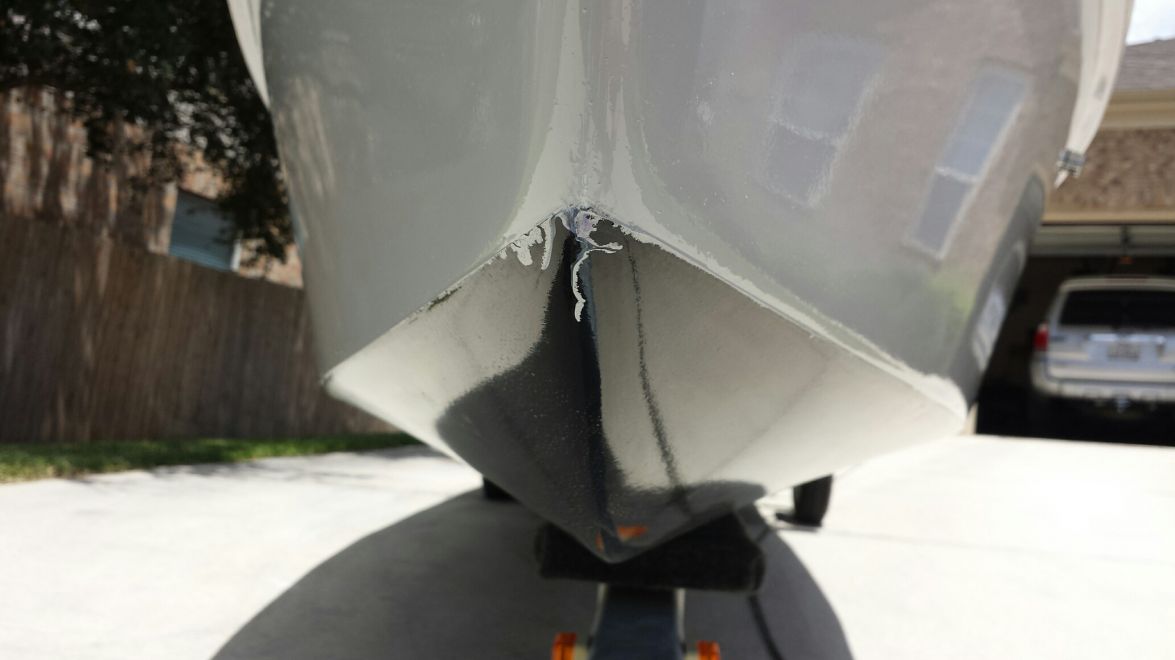
Ready to Go!
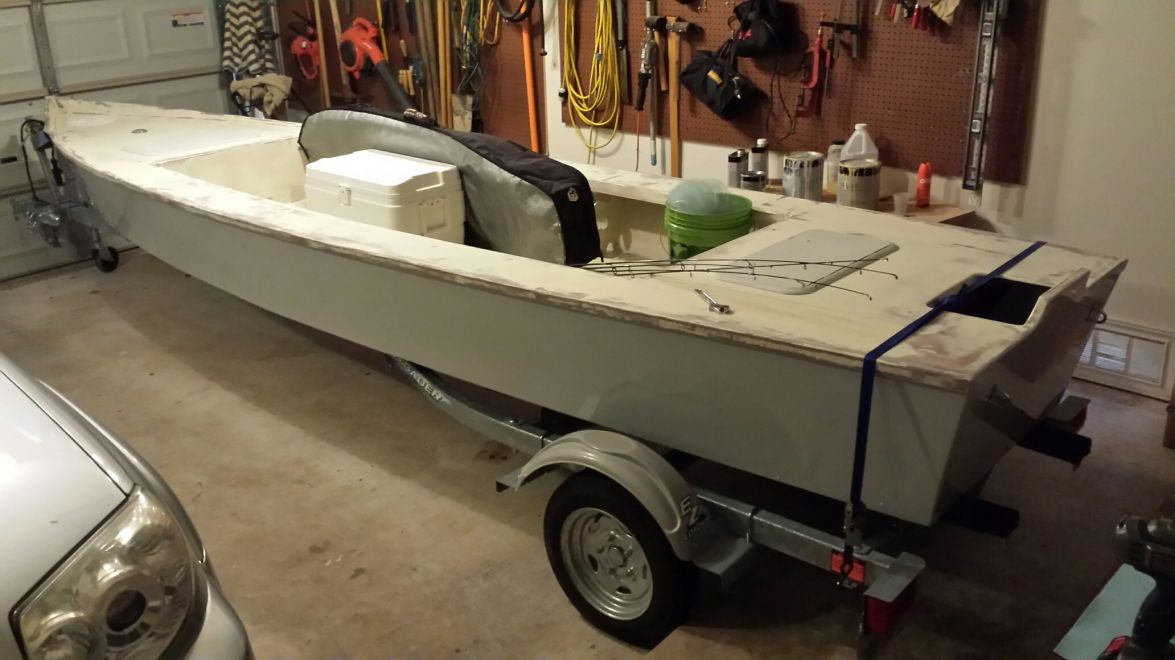
Re: Cannonball's FS18
Posted: Mon Jul 07, 2014 8:45 pm
by Shamrock Kid
Man I like it, looking better ever step of the way. I wish I was closer along with mine, I'd slap on the motor and join you.
I just haven't had a chance to do anything but look at it collecting dust.
Re: Cannonball's FS18
Posted: Mon Jul 14, 2014 9:45 am
by Cannonball
Thanks Samrock. Was cruising your stomping grounds this weekend. Boat ran awesome. With the jet I ran the FS18 into a flat that when I came off plane I sat on the bottom. Drove passed all the fish and right passed the duck blinds
Miss Julie was freaking out
I'd say she'll run in 4" without any grass. The grass clogged me up several times, I still have the fins on the grate and I know guys down there typically remove them and just let the jet foodprocess its way through the grass. Tried to remove them, but they are seized. Still debating how best to deal with that. I need to touch base with Cracker's client to see how he's running that part. She has real nice speed with just me. I ran it down the lake yesterday solo and was surely cruising at 22 -24 mph. With me and Julie was probably around 18 - 20 mph, and with me and father in law, both around 175 probably 16 - 18 mph. Feels plenty fast in such a small boat. Crossed some wake board boat wakes yesterday without an issue. Very happy I kept the original sheer in the front to help out with that. I've got my fuel tank backwards so I"m going to need to extend the pick up line in the tank because once I'm at about a 3rd of a tank its not picking up unless I come off plane and let it catch up. Just typical sea trial stuff. Going to take a bit of a break since the Africa heat just settled into Texas and just enjoy her for a bit before finishing the top sides. I do have a couple stress cracks on the deck where it meets the transom. They are not structural, but just on the surface about 4 " long (probably from trailering), I glassed with 6 oz cloth there and probably need to tape it off with some 12 oz to make that solid before painting. And, let's talk about draft, holy cow! Shei'll pole with me on the deck and the wife in the back through about 4" and can get up in water just a tad over the top of your wading boot. In the pick below waded it through the 2.5" deep water in the background to get to the bay. Nice to have a boat that you can man handle around and very easily get yourself out of a sticky spot. Real stoked!
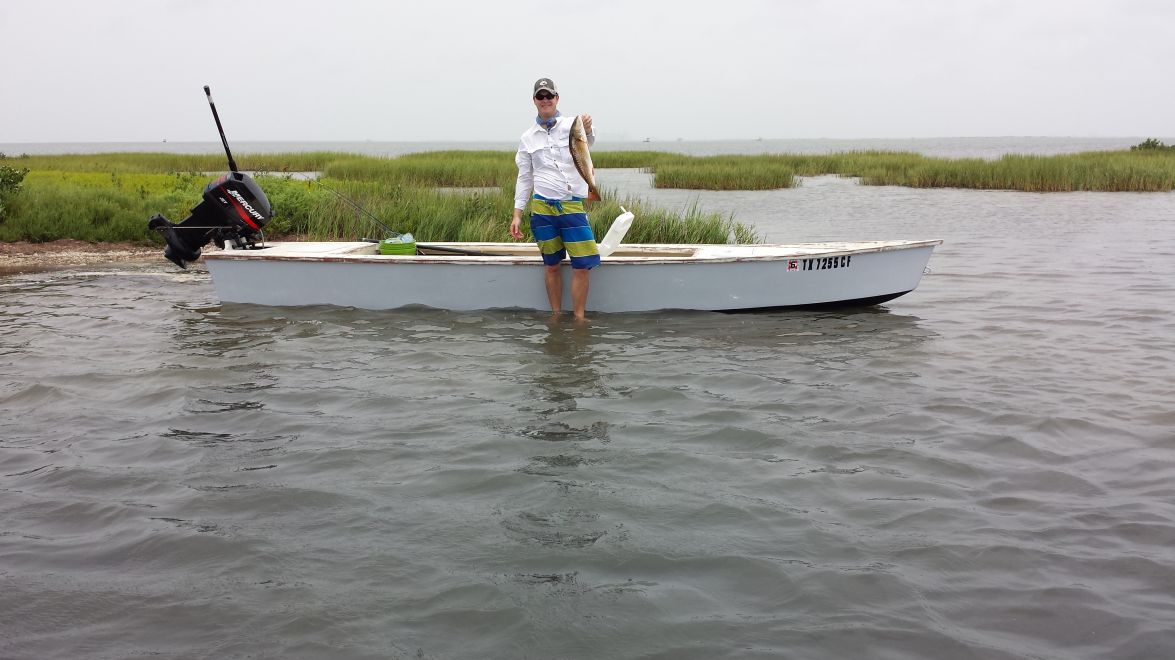
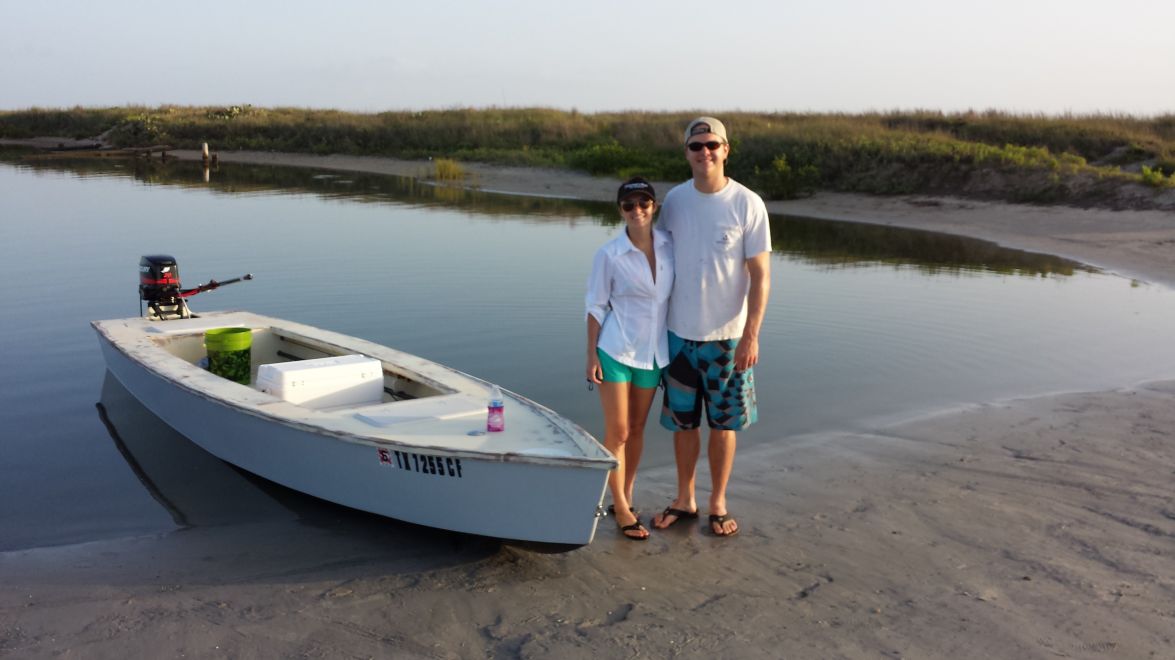
Not sure if anybody will be able to see this. Let me know if you can or not...

Re: Cannonball's FS18
Posted: Mon Jul 14, 2014 9:50 am
by tech_support
NICE!
congrats on the launch and first fish
Re: Cannonball's FS18
Posted: Mon Jul 14, 2014 9:55 am
by Cracker Larry
Very nice
Re: Cannonball's FS18
Posted: Mon Jul 14, 2014 10:07 am
by tech_support
mind if I post the launch pictures to the bateau FB page?
Re: Cannonball's FS18
Posted: Mon Jul 14, 2014 10:14 am
by mindunderwater
I'm going to say that if the boat got you there, catching a fish by wade-fishing next to it officially counts as the skunk chased off
Congrats - couldn't be happier for you!
Re: Cannonball's FS18
Posted: Mon Jul 14, 2014 10:51 am
by Cannonball
Go for it shine. Thanks for the comments!
Re: Cannonball's FS18
Posted: Mon Jul 14, 2014 1:50 pm
by Cannonball
What the heck. Here's a couple more shots of the old girl from the weekend...
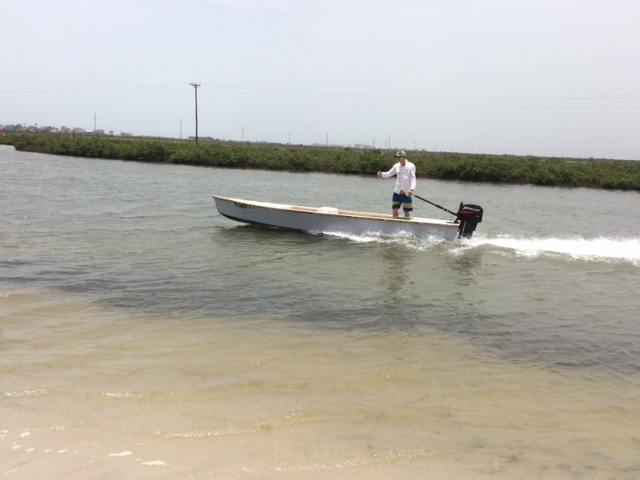
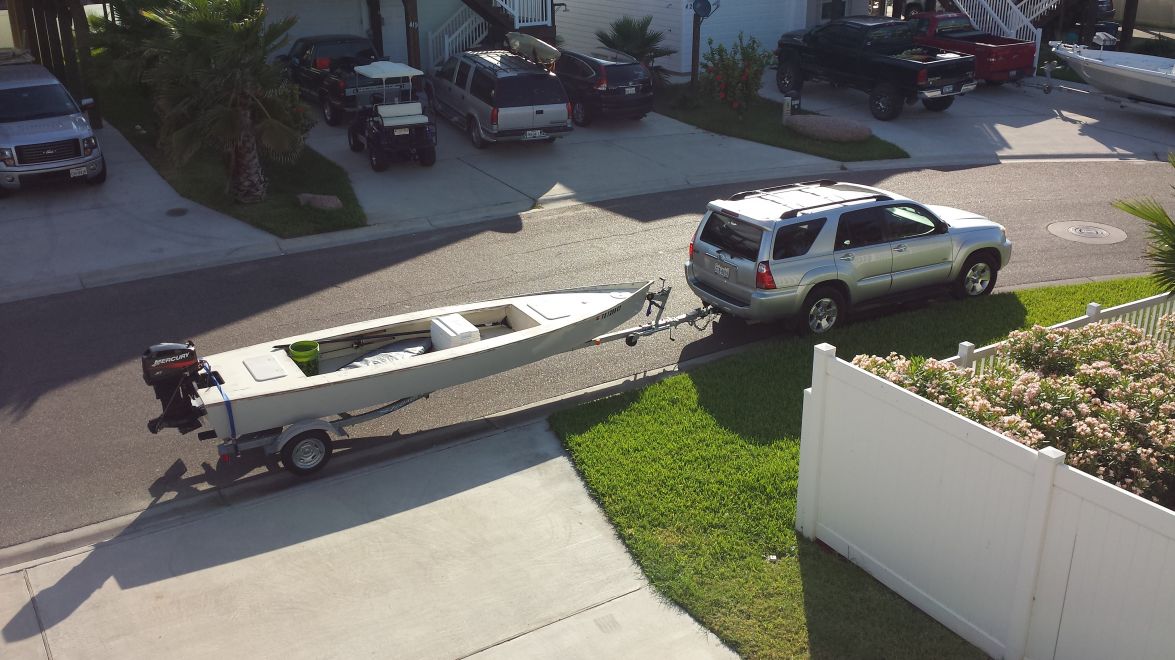
Re: Cannonball's FS18
Posted: Mon Jul 14, 2014 1:57 pm
by Cracker Larry
You look like a Bahamian in that picture
All you need is a line to the bow cleat. They hold the line with one hand for stability and the tiller with the other.
Re: Cannonball's FS18
Posted: Mon Jul 14, 2014 4:05 pm
by Cannonball
Haha, yeah I do. Wish I would have had one there was a couple times I got pretty puckered when I was standing on the rear deck running wide open and caught a clump of grass. That slowed me down in a hurry
Re: Cannonball's FS18
Posted: Mon Jul 14, 2014 4:15 pm
by Cracker Larry
A line to the bow will really help keep you stable standing up like that. Poor man's grab rail
Re: Cannonball's FS18
Posted: Mon Jul 14, 2014 6:00 pm
by AtTheBrink
Hey! Alright! Looks good! Wish I had known you were down I could have seen your boat and helped you find more than one fish!
Re: Cannonball's FS18
Posted: Mon Jul 14, 2014 6:19 pm
by jorgepease
Congratulations, I think I may do the same with mine, have 2 month wait for the metal work!
Re: Cannonball's FS18
Posted: Mon Jul 14, 2014 6:58 pm
by Noles309
Sweetness
Re: Cannonball's FS18
Posted: Tue Jul 15, 2014 7:41 am
by Cannonball
Thanks for the comments. It is definetly worth splashing early. For me I found some things that are an easy fix before final paint, but would have been a total pain if I had waited.
Mike, definetly need to make a trip next time I'm down. I want to get mine finished first so I don't look like a hobo next to that fancy rig of yours. That first fish i"m holding was caught out of a pod of about 10-15 redfish that had the birds working on top of them. Just jammed up into the flat hopped out and caught him. It was totally awesome. Picked up a couple others but that was my only keeper red. Took another black drum and trout home with us in the box. Enough for a family meal at Trout Street. Can't complain.
Re: Cannonball's FS18
Posted: Tue Jul 15, 2014 11:49 am
by AtTheBrink
We were on fish all day and left 'em biting. We caught a couple dozen with only one small one. Most of the fish were 22-24 inches, the biggest was like 26". The flat I was on was about 8 inches deep so we were the only boat on it. It was so nice not be crowded, cut off or screwed by people not paying attention to what is around them or being discourteous. It was a prefect flyfishing situation, constantly surrounded by tailing fish.
Shoot me an email and we can exchange contact info.
Re: Cannonball's FS18
Posted: Mon Aug 25, 2014 8:24 am
by Cannonball
Not much progress since the sea trials here. After trying every moeller fuel fitting known to man I gave up on trying to extend the pick up tube. Ended up chocking up the tank so that I can keep the pick up from starving. That'll have to do until I can upgrade to an aluminum tank. Other than that, I rebunked the back of the trailer on some strut and 2x6s instead of the standard jet ski bunks. Much stouter now, and going to feel a lot safer going down to the coast with it.
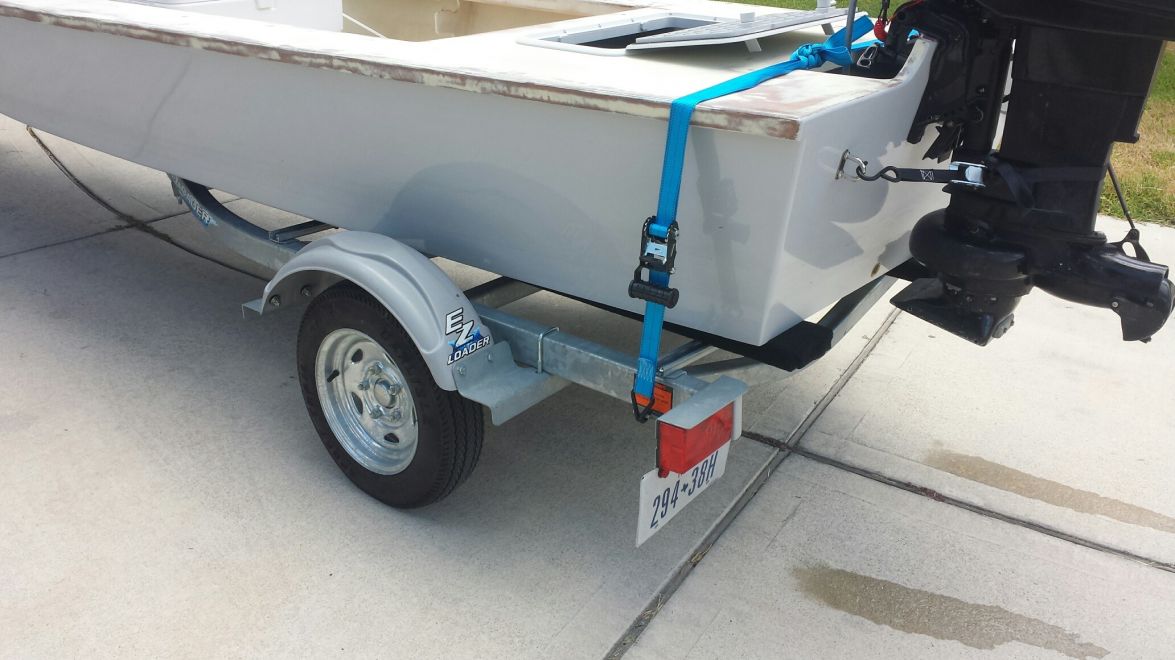
Another item to reduce pucker factor... Spare tire....
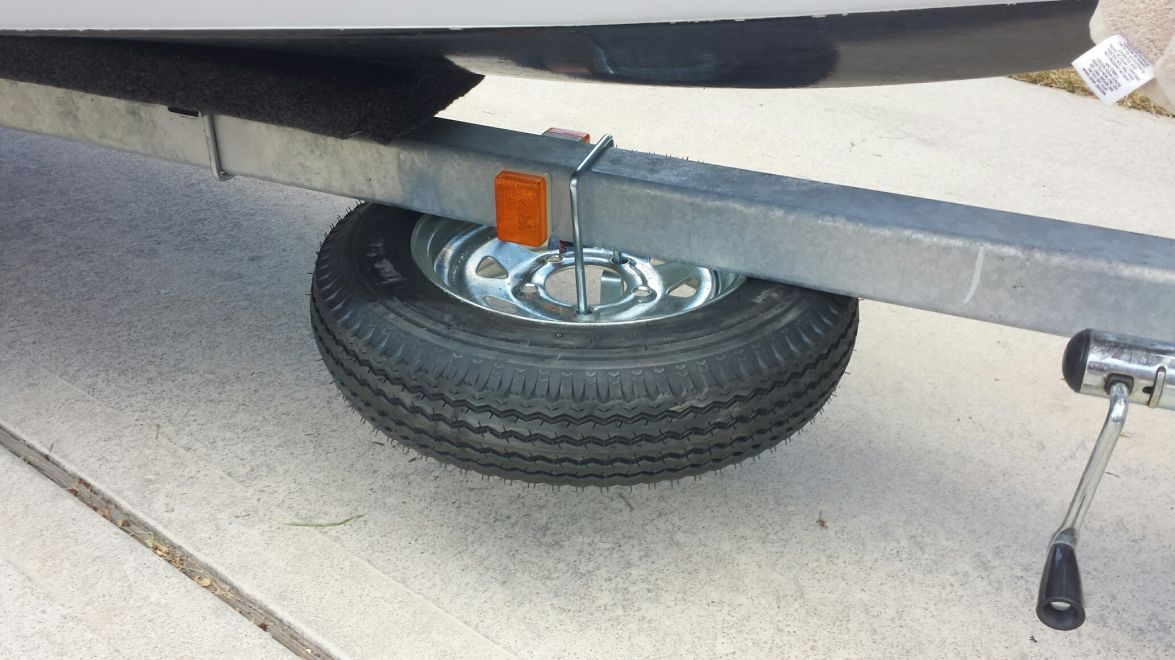
Got some fun in the sun in over the weekend on Dunlap with the family...
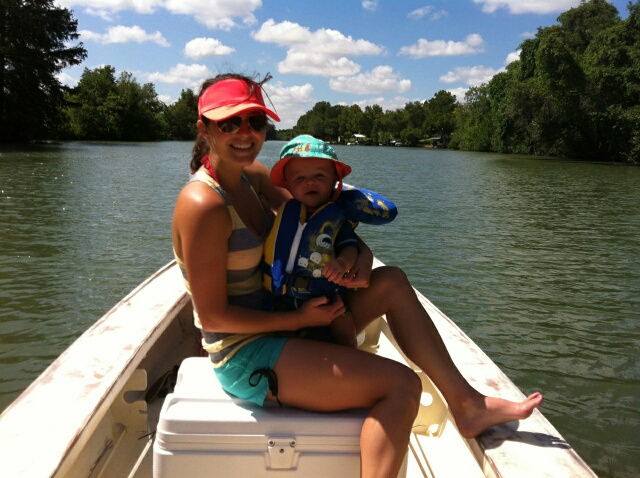
All geared up and ready for labor day weekend in port a. Little Mason is staying with the grandparents so if you run into Julie and I, be prepared to party like its 1999
Re: Cannonball's FS18
Posted: Mon Aug 25, 2014 10:12 am
by tech_support
Finished just in time to enjoy the long weekend - nice
If you use a steep ramp, that spare may hit when you back in
Re: Cannonball's FS18
Posted: Tue Sep 02, 2014 8:12 am
by Cannonball
Yeah man, and a good long weekend it was. Spare tire has made it through most launchings so far. I've got a couple more ramps to try out and after that should be good all around. I did turn my ball/hitch upside down to get the tounge up off the ground a few more inches when I put on the spare.
Another solid trip to the coast. Had some seasonal high tides start showing up and ran all around in the light house lakes no problem. Got a lot of stares from the 21' bay boats when I jammed up in big slew, skitted across the oyester bars and dissapeared into the back lakes. The jet is what makes this thing, even had my first 180 degree wipe out pushing the limits. If you've seen fruitfly's fs18 video you know what I'm talking about.
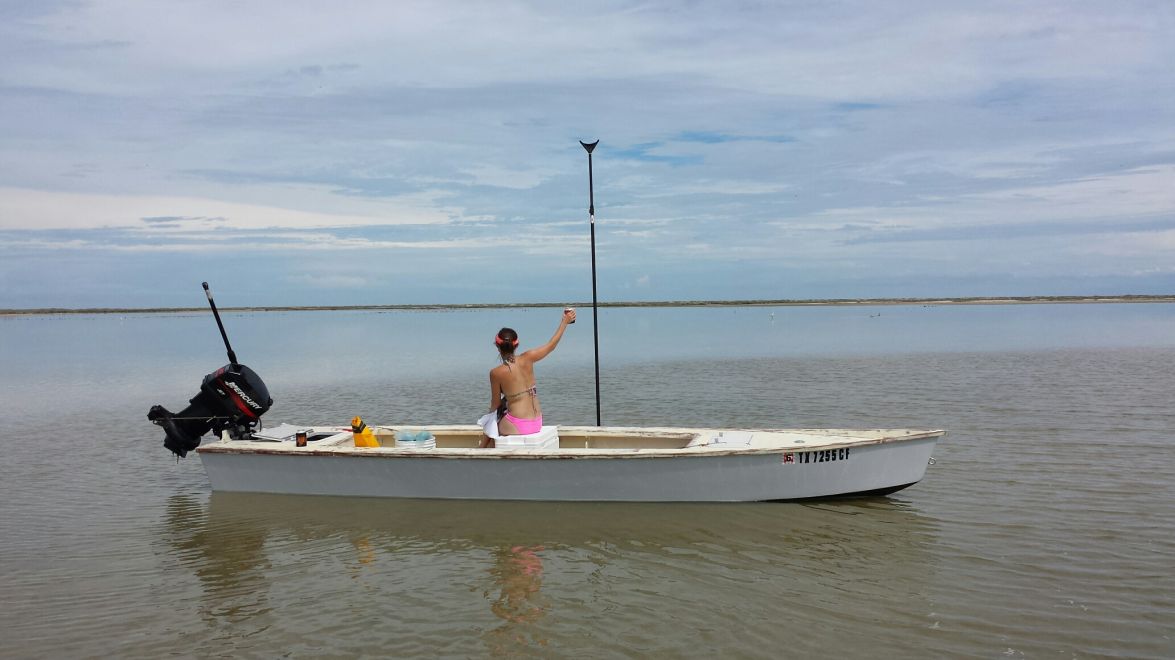
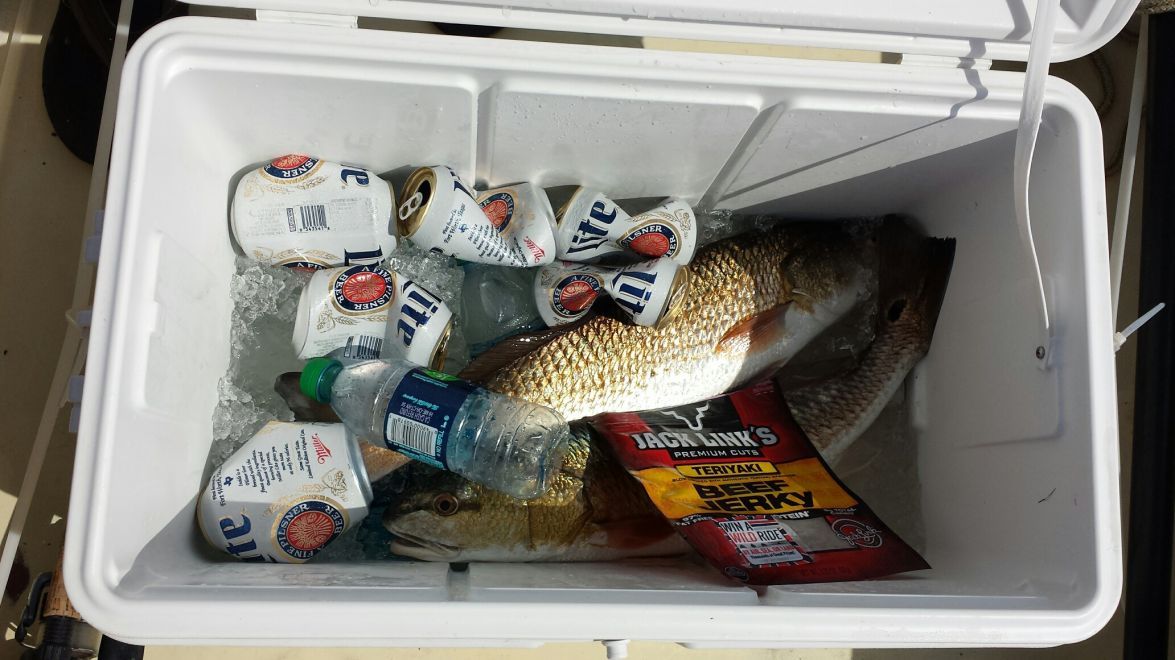
Re: Cannonball's FS18
Posted: Tue Sep 02, 2014 10:11 am
by tech_support
breakfast, lunch, dinner .....
Re: Cannonball's FS18
Posted: Tue Sep 02, 2014 10:51 am
by Marshall Moser
Re: Cannonball's FS18
Posted: Tue Sep 02, 2014 6:08 pm
by toddinbr
Looks like y'all had a great time. I'm ready to get some slime in mine!
Re: Cannonball's FS18
Posted: Thu Sep 04, 2014 7:47 am
by Cannonball
So, after almost being rear ended on the way back from the coast I contacted my insurance agency to see if they would cover the boat and here is what I got back...
Cannon, I do apologize for the delay in getting back with you.
After getting all of the pertinent information from you, I spoke to our Underwriter.
She says they will not insure a homemade boat, unless it has been inspected by either NAMS (National Association of Marine Services, or SAMS (Society of Accredited Marine Surveyors).
The boat has to be deemed structurally sound.
Can you get this for us?
Any thoughts?
Re: Cannonball's FS18
Posted: Thu Sep 04, 2014 10:02 am
by terrulian
Not sure I understand the question. You find a licensed marine surveyor, he inspects your boat and gives you the result for the insurance and you write him a check. They do it all the time for all kinds of boats, self-made or not. The surveyors range from very strict and thorough to, give me a beer and I'll write this up for you. OK, that's a slight exaggeration.
Re: Cannonball's FS18
Posted: Thu Sep 04, 2014 10:06 am
by tech_support
She says they will not insure a homemade boat, unless it has been inspected by either NAMS (National Association of Marine Services, or SAMS (Society of Accredited Marine Surveyors).
that is a high standard than what most production boats would have
I imagine the problem is they have nothing to go on to establish the value. If you have it surveyed then you have a value to use, and also to use when you get insurance on the boat.
Re: Cannonball's FS18
Posted: Thu Sep 04, 2014 10:46 am
by terrulian
Insurance companies don't all have the same rules and underwriters, so if you don't want to pay for survey, and who would, shop around and see if other brokers have the same policy.
Re: Cannonball's FS18
Posted: Thu Sep 04, 2014 10:51 am
by tech_support
I have never needed a survey to get insurance on
the boat, but if Im reading this right its the car insurance company in question.
I recommend to always get an "agreed value" policy for the boat. In some instances they may not give you as much coverage as you want unless you show them (by a survey) that its worth quite a bit more than the materials you built it with.
Re: Cannonball's FS18
Posted: Thu Sep 04, 2014 11:04 am
by terrulian
Also, it seems to be a question of hull insurance, not liability. Marinas, for example, often require that you show proof of liability insurance, but I've never had one care about whether I had my hull insured. So are you requesting hull insurance? Hull insurance is like comprehensive on a car: if your boat catches fire, they will give you the replacement value. But if you're insuring only for liability, the value of the boat shouldn't be an issue for them, since the insurance company is not on the hook for the cost. Many boat owners don't carry hull insurance.
Re: Cannonball's FS18
Posted: Thu Sep 04, 2014 7:18 pm
by BarraMan
The same request is common in Oz for owner-built boats - but there is a BIG difference between having a boat "inspected" and having one surveyed!
Re: Cannonball's FS18
Posted: Fri Sep 05, 2014 8:22 am
by Cannonball
Thanks for the responses. I was shopping for hull insurance for theft or damage in case I got rear ended going down the road. I'm no insurance guy, but I imagined getting insurance similar to my wife's engagement ring. Come to think of it that had to be surveyed as well for it to be covered. I think I'll shop around a bit first.
Re: Cannonball's FS18
Posted: Fri Sep 05, 2014 10:40 am
by Prarie Dog
FWIW, like you I got the runaround on the Insurance thing and from DOW on my first boat. The last one I told both the Insurance people and DOW that it is a GF12 kit sold by Boatbuilder Central and assembled in my garage. It is a Jon Boat worth XX $ for the Insurance guys the insurance card says it is a GF12. For DOW the lady said she couldn't find it in her book but if I would take it by a DOW office they'd look at it and give me a hull ID#. The Colorado registration number says GF yada yada.
In Texas it would probably be a good idea to get the hull inspection first and then tell the Insurance folks it is a FS18 from BBC etc. and when they can't find it in their book tell them it's a kit you assembled and it is worth this much. Safeco jumped all over this about a year ago for me.
Re: Cannonball's FS18
Posted: Tue Dec 02, 2014 1:35 pm
by Formula Red
Cannonball,
How is your fuel consumption? Is that a 12 gallon tank?
Thanks, Kurt
Re: Cannonball's FS18
Posted: Wed Dec 03, 2014 9:28 am
by Cannonball
It is. I'm considering pulling the tank I've got and going to a portable 6 gallon unit. Everytime I've gone out I've burned about 2-3 gallons so the big twelve remains about half full all the time. The problem I have is I put the tank in backwards and on the slope of the bow it leaves a 1/4 tank in the tank that doesn't hit the pick up. Currently I've just got it choked up. The portable would be more serviceable, now if I can just figure out a good quick connect permanent venting system to a portable fuel tank below deck?
Re: Cannonball's FS18
Posted: Wed Dec 03, 2014 11:58 am
by Formula Red
When you burn 2-3 gallons per trip, how many miles would you estimate your trips are?
I would be interested in the 12 gallon tank if you want to sell it.
Re: Cannonball's FS18
Posted: Thu Dec 04, 2014 8:01 am
by Cannonball
Not all that far. Typical trip would be from port a to mud island and all through the light house lakes back to the ramp. Not really sure how many miles. I haven't hauled her to goose island yet to really get a good run in north of cedar bayou, but that is coming once work slows up and I can finish the topsides. Unfortunetly, I'd have to cut the tank to get it out or I'd sell it to you.
Re: Cannonball's FS18
Posted: Thu Dec 04, 2014 9:28 am
by Formula Red
Thanks for the info.
Re: Cannonball's FS18
Posted: Mon Jul 27, 2015 8:17 am
by Cannonball
Well, I'm finally coming out of the pressure cooker on my day job and decided it's about time I wrap this up. No joke ended up being a year later that I finally decided to finish the topsides. I added some additional stiffers under the decks in a couple soft spots and did some additional 12 oz glassing on the transom where I had some surface cracks. Then painted the topsides with Interdeck 2 parts white 1 part squall blue. Got a carbon marine tiller extension that should be arriving today and then some v marine spool style push pole holders that will be going on next. I'm thinking next weekend I can tidy up the punchlist and have this thing ready to go.
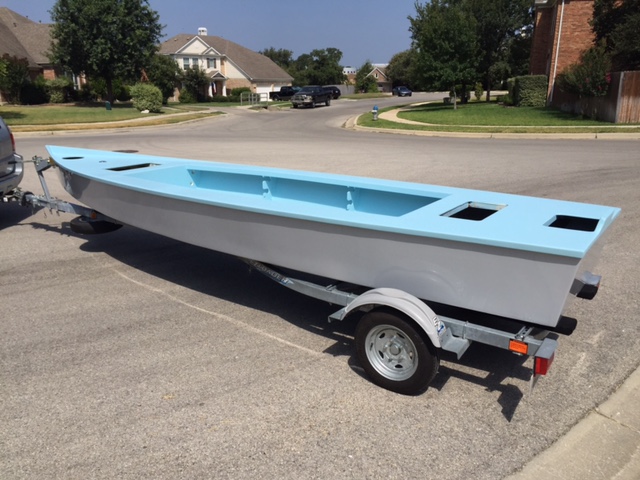
Re: Cannonball's FS18
Posted: Mon Jul 27, 2015 8:56 am
by Dougster
Nice looking paint job, I like the color. I think fish will just jump in the boat. You planning on bringing her to the Oct. boat show in Port A?
Blanco Dougster
Re: Cannonball's FS18
Posted: Sun Aug 02, 2015 4:46 pm
by Cannonball
Como Se Dice... All Finished!!!
Insalled the v marine push pole holders(superstick push pole fits like a champ, can't recomend it enough for the $), 36" carbon marine tillar pillar, screwed/glued down the hatches, bolted on the motor, touched up some areas with the life seal, put on the bungees for the rod holders, put some rubber strips on the cooler bottom so no sliding around or tie downs(except for highway travel), siphoned out the old fuel, cleaned the fuel filter, all greased up, ready for a fresh tank of petrol and the water. Planning on shooting up the guad north of canyon lake next Saturday. Time for a few late summer lounging lake trips to knock the cobwebs out of the jet and then off to the coast for some hard fishing this fall. Feels sooo awesome to be done, very proud owner builder.
Dougster, I'm going to try but I've got a buddies wedding sometime in October I need to check the dates. If it works out great, if not I'll probably be there the weekend before or after. I've got a bunch of vacation racked up after the data center build and I'm ready to burn it all between port a & port o.
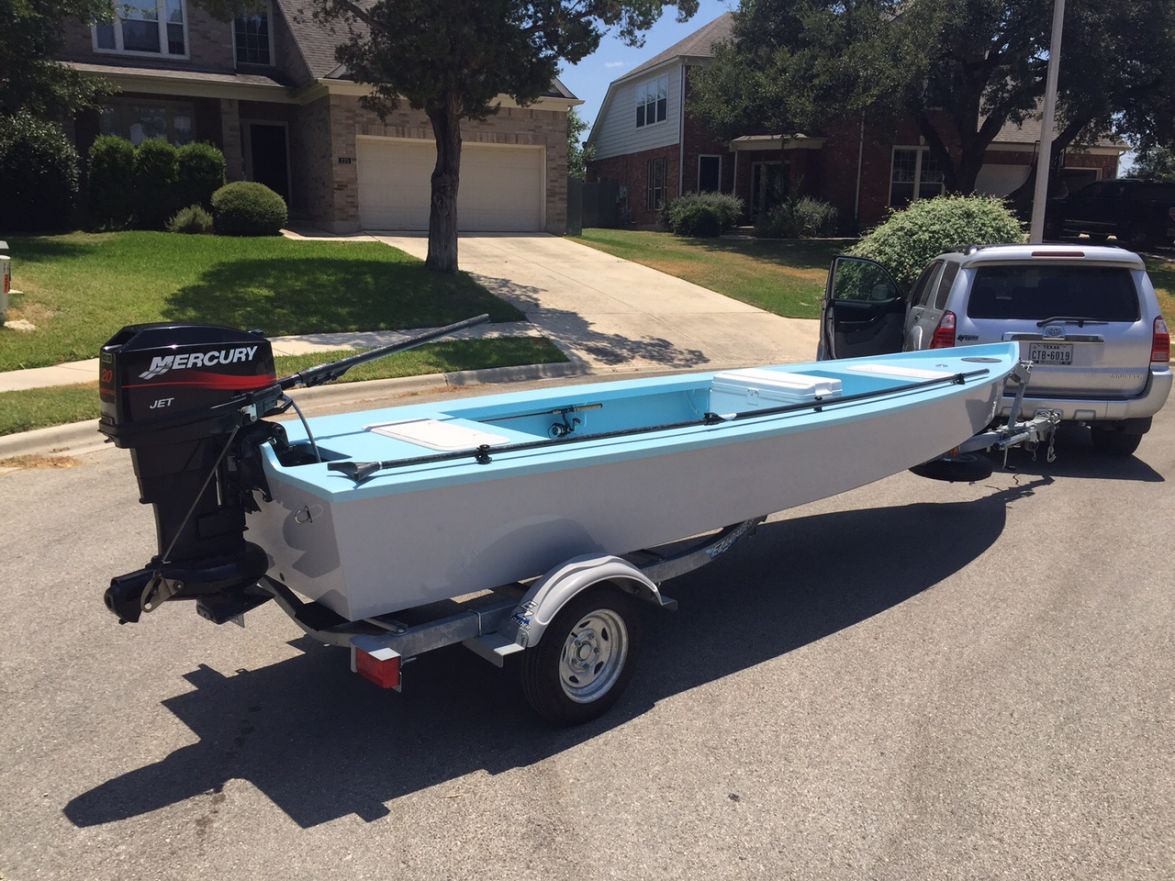
Re: Cannonball's FS18
Posted: Sun Aug 02, 2015 9:07 pm
by Noles309
Very cool. She looks great. Looking forward to some water pics and hearing how the jet does.
Re: Cannonball's FS18
Posted: Mon Aug 03, 2015 9:15 am
by Dustinwg
That is what I'm talking about! Now we can run the motor without filling up a trash can with water!!
C'mon Saturday!
Re: Cannonball's FS18
Posted: Mon Aug 03, 2015 10:29 pm
by Mikem59
Look'in good, I'm envious. Like others, looking forward to some on the water pics too
Re: Cannonball's FS18
Posted: Mon Aug 10, 2015 8:03 am
by Cannonball
Re: Cannonball's FS18
Posted: Mon Aug 10, 2015 8:37 am
by Cracker Larry
Fantastic
Great job and congrats on the completion!
Re: Cannonball's FS18
Posted: Mon Aug 10, 2015 12:40 pm
by Dustinwg
Here is a little video of our river run from Saturday! The water he is running in through the cut is barely over ankle deep!
https://www.youtube.com/watch?v=R8Lo565 ... e=youtu.be
This thing will make you pucker up it runs so shallow! Don't have to worry about crowds though, cause nobody else can get up where we were!
Re: Cannonball's FS18
Posted: Mon Aug 10, 2015 12:59 pm
by terrulian
Holy crap!
Re: Cannonball's FS18
Posted: Mon Aug 10, 2015 6:41 pm
by Mikem59
Wow, that's an impressive, a test run on the Guadalupe, I'll be testing mine on a mud flat on Sabine
But, that's a confidence booster for you knowing it can handle that big rock. And, that's a confidence booster knowing how shallow she'll run.
By the way, I was up in San Marcos for a wedding this past weekend, wish I coulda witnessed or seen your boat first hand.
Great job! Now, I'm off to work on mine after dinner.
Re: Cannonball's FS18
Posted: Mon Aug 10, 2015 10:36 pm
by Noles309
Nice! Very cool!
Re: Cannonball's FS18
Posted: Mon Aug 10, 2015 10:44 pm
by osotexan
That's some Texas cool stuff right there. Great job! The boat looks awesome and I love that permagrin. Hope you bring it down to Port A.
Re: Cannonball's FS18
Posted: Tue Aug 11, 2015 9:28 am
by wegcagle
Awesome
Congrats and great job. She's skinny for sure
Will
Re: Cannonball's FS18
Posted: Tue Aug 11, 2015 12:53 pm
by Cannonball
Thanks All! Especially you you ole Cracker. Couldn't have done it without all that good boat building wisdom you pour out here for us.
She runs good I tell ya. Just got the new intake in for my jet so I can remove the bars from that one and be able to change to wide open at the coast or barred up for the river. I draw a lot of inspiration from the Towee skiff guys and may do a grab bar off the transom, but I think I'm done building for this year. Time to enjoy. I'll post some pics of her once I get it down to the coast, but probably going to be a few weeks. Hopefully I'll be at the boat show, but too soon to tell.