
Hey Marc,
Thanks I can't wait to get back on her. Been away working but should be back at it tomorrow. Filleting and glassing the sole. Can't wait! About the foam I hate to waste anything. Thats why I like this method of building. The nesting on her is close but that was to limit the amount of waste. Genius if you ask me.
Shamrock kid's Fs18
-
Shamrock Kid

- Frequent Poster

- Posts: 127
- Joined: Mon Jun 24, 2013 11:40 am
- Location: Corpus Christi, TX
Re: Shamrock kid's Fs18
John
_______________________________________
Between the Devil and the Deep Blue Sea.......
_______________________________________
Between the Devil and the Deep Blue Sea.......
-
Shamrock Kid
- Frequent Poster
- Posts: 127
- Joined: Mon Jun 24, 2013 11:40 am
- Location: Corpus Christi, TX
Re: Shamrock kid's Fs18
Can't wait for the weekend so I can't get some more done. I love watching others builds move right along. But not why mine is sitting still. 
John
_______________________________________
Between the Devil and the Deep Blue Sea.......
_______________________________________
Between the Devil and the Deep Blue Sea.......
-
Cannonball
- Frequent Poster
- Posts: 180
- Joined: Tue Feb 28, 2012 2:05 pm
- Location: New Braunfels, TX
Re: Shamrock kid's Fs18
I hear that. I'm trying to catchup to you!
-
Shamrock Kid
- Frequent Poster
- Posts: 127
- Joined: Mon Jun 24, 2013 11:40 am
- Location: Corpus Christi, TX
Re: Shamrock kid's Fs18
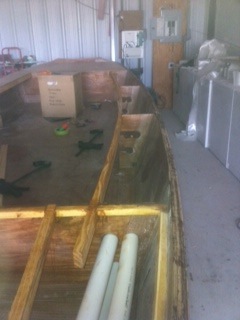
Building on last update I had just glued down the sole. I've been working on the frames / Rod holders.
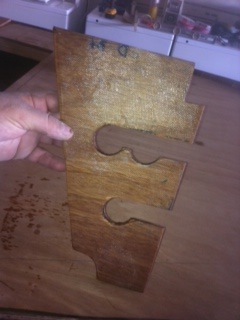
Here is the final design of them. I took CL advise and put some drainage holes on the lower corners. Easier clean up is always smart. The frames were cut out and then covered on both sides with 6oz.
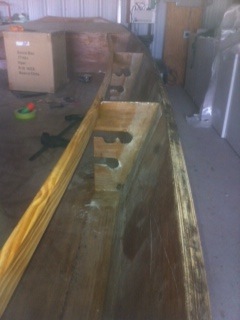
And here they are installed. Filleted and tapped wet on wet. I've also covered the sole in 6oz glass. I need to start fairing the inside. I just don't want to, so I'll move on tho finishing other stuff until I have no choice.
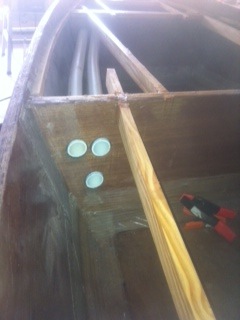
Here is the start of the rod tubes.
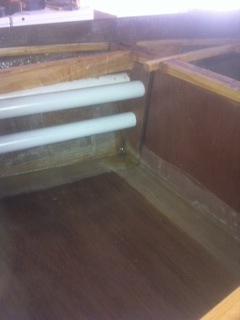
I mounted the block higher so it will always drain any water back out.
A shot down the side.
Here is the final design of them. I took CL advise and put some drainage holes on the lower corners. Easier clean up is always smart.
And here they are installed. Filleted and tapped wet on wet. I've also covered the sole in 6oz glass. I need to start fairing the inside.
Here is the start of the rod tubes.
I mounted the block higher so it will always drain any water back out.
A shot down the side.
John
_______________________________________
Between the Devil and the Deep Blue Sea.......
_______________________________________
Between the Devil and the Deep Blue Sea.......
-
Cannonball
- Frequent Poster
- Posts: 180
- Joined: Tue Feb 28, 2012 2:05 pm
- Location: New Braunfels, TX
Re: Shamrock kid's Fs18
Hoo wee! We are getting there. I'm doing 2 rod tubes forward on the starbord side, and 2 in the rear on the port side. Did you use any couplings or adapters for the tubes, or just epoxy them in flush?
-
Shamrock Kid
- Frequent Poster
- Posts: 127
- Joined: Mon Jun 24, 2013 11:40 am
- Location: Corpus Christi, TX
Re: Shamrock kid's Fs18
No couplings or adapters actually they are just sitting there right now. I'm not sure yet what to use. Epoxy does really bond to plastic. I was thinking about making sure all the wood was sealed up with at least three coats of epoxy. Then glue them in with 5200, that stuff will bond to plastic, wood, epoxy, just about anything. The drain tube in the fuel tank compartment just got epoxy / wood floor (glue) and it seams fine. But it is flush in the deck.Cannonball wrote:Did you use any couplings or adapters for the tubes, or just epoxy them in flush?
John
_______________________________________
Between the Devil and the Deep Blue Sea.......
_______________________________________
Between the Devil and the Deep Blue Sea.......
-
xf20corpus
- Frequent Poster
- Posts: 21
- Joined: Wed Feb 20, 2008 12:18 pm
- Location: Corpus Christ, Tx
- Location: Corpus Christi, Tx
Re: Shamrock kid's Fs18
For rod holders, I like what this guy does.
http://www.microskiff.com/cgi-bin/yabb2 ... 1355017149
I have no clue if that link will work.
http://www.microskiff.com/cgi-bin/yabb2 ... 1355017149
I have no clue if that link will work.
-
Shamrock Kid
- Frequent Poster
- Posts: 127
- Joined: Mon Jun 24, 2013 11:40 am
- Location: Corpus Christi, TX
Re: Shamrock kid's Fs18
The link worked fine, I like that allot. Gives it a great finished look. You could also apply 5200 to the back of the flange, then seat it in place. I might have to look into this idea. Thanks for the link.
John
_______________________________________
Between the Devil and the Deep Blue Sea.......
_______________________________________
Between the Devil and the Deep Blue Sea.......

Re: Shamrock kid's Fs18
That's pretty slick.xf20corpus wrote:For rod holders, I like what this guy does.
http://www.microskiff.com/cgi-bin/yabb2 ... 1355017149
I have no clue if that link will work.
-
Shamrock Kid
- Frequent Poster
- Posts: 127
- Joined: Mon Jun 24, 2013 11:40 am
- Location: Corpus Christi, TX
Re: Shamrock kid's Fs18
Building on.......
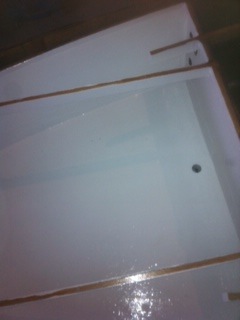
I did a light fairing on the two forward compartments. Then I applied two coats of white tinted epoxy. I didn't really like the way the tinted epoxy turned out so it got sanded and system three yacht primer got put on there. After that dried I covered everything with Brightside white polyurethane top coat.
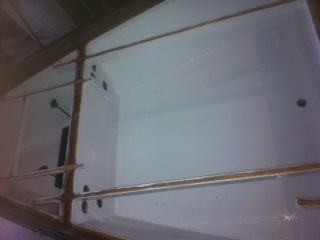
These forward compartment are going to hold a battery and the fuel tank.
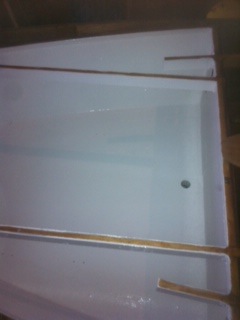
Here is the drain from compartment B, this will also be the fuel hose chase tube.
I got the fuel tank and rod tubes installed. There are three rod tubes on each side.
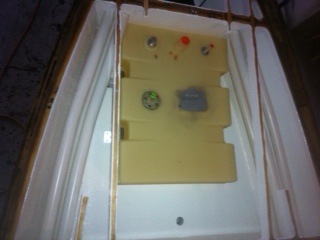
The forward two compartments are mostly complete.
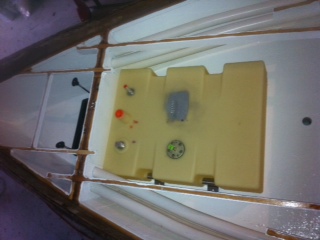
The Brightside turned out nice and smooth and should make clean up allot easier. The fuel tank was mounted using the manufactures kit. Aluminum straps that grab the tank sides and bolt to the deck. I did over size the holes and filled with glue then re-drilled for the screws. It is also sitting on self adhesive rubber strips. So its slightly elevated to help ventilation. I'm not foaming it in as it will expand and contract when filled.
I did a light fairing on the two forward compartments. Then I applied two coats of white tinted epoxy. I didn't really like the way the tinted epoxy turned out so it got sanded and system three yacht primer got put on there. After that dried I covered everything with Brightside white polyurethane top coat.
These forward compartment are going to hold a battery and the fuel tank.
Here is the drain from compartment B, this will also be the fuel hose chase tube.
I got the fuel tank and rod tubes installed. There are three rod tubes on each side.
The forward two compartments are mostly complete.
The Brightside turned out nice and smooth and should make clean up allot easier. The fuel tank was mounted using the manufactures kit. Aluminum straps that grab the tank sides and bolt to the deck. I did over size the holes and filled with glue then re-drilled for the screws. It is also sitting on self adhesive rubber strips. So its slightly elevated to help ventilation. I'm not foaming it in as it will expand and contract when filled.
John
_______________________________________
Between the Devil and the Deep Blue Sea.......
_______________________________________
Between the Devil and the Deep Blue Sea.......
Who is online
Users browsing this forum: Yandex [Bot] and 22 guests