
The V10 was completely easy to build to the point where you could have put in in the water, and all the rest is eyeliner and rouge. I have recently been daydreaming making the same boat again (it really is a disease) and doing the absolute bare minimum just to see how much it weighs. It would not be pretty. But I'd have to get my hands on some okoume rather than meranti, and they don't sell it around here.
Even Larry makes mistakes and some of the best builders are generous enough to show pictures of things gone sideways. You'll find a level of finish that suits you and whatever you decide, my guess is you'll be pretty excited with the result. So don't be reluctant to share stuff with your fellow builders. I never yet have looked at a photo and said, "what an idiot!." More like, "I'm sure glad I saw that cuz that is just what I was going to try."
GV11. And so it begins...

Re: GV11. And so it begins...
One thing I do like is the sense of community on this forum. Thanks for the encouragement. I guess everybody starts somewhere. That being said, here is my first endeavor into epoxy. My first splice...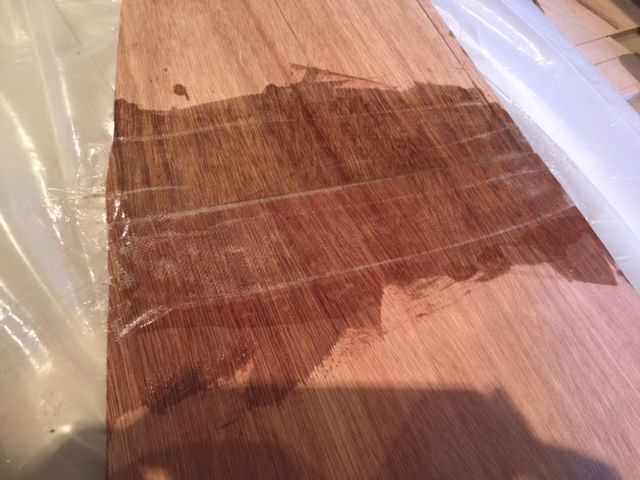

-
terrulian
- * Bateau Builder *

- Posts: 3041
- Joined: Sat Dec 07, 2013 11:29 am
- Location: Marin County, CA
- Contact:
Re: GV11. And so it begins...
You did the splice with glass, which CL and others recommend. As long as the pieces are pretty flush with one another and aligned longitudinally, which it looks like they are from the previous photo, all you need is a bit of fairing and sanding.
I did it with a block for the splice, which is easier for beginners, but still managed to bung it up by making the blocks too wide. This made the splice less flexible and created a flat spot on the hull which I addressed with some annoying fairing later on.
I did it with a block for the splice, which is easier for beginners, but still managed to bung it up by making the blocks too wide. This made the splice less flexible and created a flat spot on the hull which I addressed with some annoying fairing later on.
Tony

Re: GV11. And so it begins...
One the sides I spliced with three inch tape overlapped by about an inch to an inch and a half. I used butt blocks on the bottom pieces. They are much simpler and seem to be very strong! " I like butt blocks and I cannot lie..." Ok. Sorry for that. 

-
gonandkarl
- * Bateau Builder *
- Posts: 1202
- Joined: Sat Mar 16, 2013 10:25 am
- Location: Wels,Austria,Europe
Re: GV11. And so it begins...
Hi,
Your splice looks perfect and I see you have got enough plastic underneath so it cant get glued to anything.
( One of my first small mistakes, one square inch but ages to get it of the workbench )
I made all my splices with biax tape and the last one I made was much better than the first one due to practice.
In the end I put a piece of peelply over it and pushed any bubble away with a plastic squeegy. The result is that one sands once by hand and the splice is perfect. On my oncoming parallel project FS13 I will splice the complete panels so confident made me the splicing practice on my AD14.
Have furtheron lots of fun on Your build and I will read your posts from now on. And dont forget always to upload the newest pictures. This forum lives on pictures where we all can see a lot of detail and therfore learn everyday from from eachother.
Greetings from Karl ( Austria )
-
Steven
- * Bateau Builder - Expert *

- Posts: 3148
- Joined: Thu Aug 22, 2002 1:00 am
- Location: Burleson Texas
Re: GV11. And so it begins...
It's hard to tell from the picture, but it looks white along some of the joint. Ensure they tape is adhered with no air pockets. It should look translucent.
-
terrulian
- * Bateau Builder *
- Posts: 3041
- Joined: Sat Dec 07, 2013 11:29 am
- Location: Marin County, CA
- Contact:
Re: GV11. And so it begins...
Actually, I take back what I said, Steven is right. If there is any air there it would be a structural problem but the fix is pretty easy. Clean the surface with water and a Scotch Guard pad, grind down to a flat surface, sand everything, then apply another layer of glass that overlaps that one by 2-3" on each side. Flip it over; the other side may have the same problem and if so, treat the same way. There will be just a little more fairing but in the grand scheme of things, not very much.It's hard to tell from the picture, but it looks white along some of the joint. Ensure they tape is adhered with no air pockets. It should look translucent.
Tony
-
Cracker Larry

- * Bateau Builder - Expert *
- Posts: 22491
- Joined: Fri Mar 11, 2005 3:39 pm
- Location: Savannah, GA
Re: GV11. And so it begins...
Did you put glue in the joint before taping it? I always smear some glue between the panels before I butt them together.
Completed GF12 X 2, GF16, OD18, FS18, GF5, GF18, CL6
"Ships are the nearest things to dreams that hands have ever made." -Robert N. Rose
-
Fred in Wisc
- * Bateau Builder *
- Posts: 972
- Joined: Tue May 02, 2006 8:54 pm
- Location: SE WI
- Location: Milwaukee WI
Re: GV11. And so it begins...
I've ended up with a little air gap (typically very narrow like 1/16" or less and a couple inches long) between panels at times. It seems like the plywood edge absorbs extra resin. Just drill a couple tiny holes in the void and inject some mixed epoxy resin into the air gap. Quick and easy.
Re: GV11. And so it begins...
I did wet it down with a coat first. And I did paint the seam. I also smoothed it with a layer of Mylar peel and with a squeegee. One problem is that there is a seam on the sides of my tape. That's what the long lines are. Should I snip those seams off next time?
Who is online
Users browsing this forum: Ahrefs [Bot], narfi and 1 guest