Page 1 of 1
Build Progress - Panga 25
Posted: Fri Sep 23, 2016 9:43 am
by subbie95
Started the build on a Panga 25 last weekend. Got the strongback built, leveled and secured and layed out all the frames, the bottom and the stringers during the evening this week. Planning to cut out the frames & stringer pieces tomorrow and glue the bottom panels together prior to cutting them. I do have a few questions before I undertake these next steps that I'm hoping someone can help with (this is my first time building a boat):
1. Do you use thickened epoxy for laminating parts (stringers, transom, etc.) of just straight epoxy?
2. Is there any need to glass the joints on the stringer with the 12oz biax tape?
3. Do I fillet the butt joints of the stringer and transom lamination (middle layer of the transom is cut in 2 pieces) or just glue them together?
4. Ran into an issue laying out the transom, what's the dimension from the baseline to the keel? There's none shown on the frame details, only the dimension from the chine to the baseline is shown...which would make the bottom flat at the transom. Does anyone know what that dimension is, or is the bottom supposed to be flat at the transom?
I plan to post plenty of pictures of progress as I go along, but I figured that everyone has seen enough photos of a strongback, so I won't put those up.
Thanks,
Ryan
Re: Build Progress - Panga 25
Posted: Fri Sep 23, 2016 9:47 am
by subbie95
Just received an answer form Jacques on the transom dimension from another post (question #4), the dimension is 6-1/8" just in case anyone else needs it.
Thanks Jacques.
Re: Build Progress - Panga 25
Posted: Fri Sep 23, 2016 9:54 am
by Marshall Moser
Welcome to the forum!
We love boat porn. Post plenty of pics!
Re: Build Progress - Panga 25
Posted: Fri Sep 23, 2016 9:58 am
by subbie95
I'll be supplying lots of that as the build moves along! Hopefully it will progress quickly, semi-retired dad is helping so we should be able to make steady progress between the two of us.
Re: Build Progress - Panga 25
Posted: Fri Sep 23, 2016 11:18 am
by subbie95
Does anyone know how to post a photo? When I paste the shareable link to my photo using the Img feature I get this error: "reply It was not possible to determine the dimensions of the image. Please verify that the URL you entered is correct"
Any suggestions?
Re: Build Progress - Panga 25
Posted: Fri Sep 23, 2016 11:41 am
by Marshall Moser
subbie95 wrote:Does anyone know how to post a photo? When I paste the shareable link to my photo using the Img feature I get this error: "reply It was not possible to determine the dimensions of the image. Please verify that the URL you entered is correct"
Any suggestions?
jacquesmm wrote:First, your picture must be somehwere on the Internet. If it is not, post it in our gallery.
It is free but you must be a registered user of this message board.
Go to your picture, wherever it is and, in your browser:
- Right click on the picture.
- Select "Properties"
- highlight the complete URL for your picture and "Copy"
- go to your message, click where you want the picture and "Paste"
- highlight the link you just pasted and click on Img (at the top of the message box).
That's all there is to it.
See the Gallery FAQ to learn How To post a picture in your album.
Re: Build Progress - Panga 25
Posted: Thu Sep 29, 2016 9:15 pm
by subbie95
Making progress. Frames are all laid out, transom and stringers are cut and laminated with joints taped. We're ready to start setting the jib up....just as soon as we return from a week of fishing on Lake Superior! I'm going to try to tape the joints on the bottom panels before I leave early Saturday morning so we can cut them out when we return, but there's a strong chance that doesn't get done.
Posting a few pictures here, nothing exciting, just trying to make sure that I have the process figured out.
Re: Build Progress - Panga 25
Posted: Fri Sep 30, 2016 1:06 am
by Eric1
Looking good!
Re: Build Progress - Panga 25
Posted: Fri Sep 30, 2016 1:40 am
by TomW1
[quote="subbie95"]Making progress. Frames are all laid out, transom and stringers are cut and laminated with joints taped. We're ready to start setting the jib up....just as soon as we return from a week of fishing on Lake Superior! I'm going to try to tape the joints on the bottom panels before I leave early Saturday morning so we can cut them out when we return, but there's a strong chance that doesn't get done.{quote}
Where are you located so that you can run up to Superior and still live in MI. I have been in that neck of the woods several times and it is beautiful. I think the PG25 will be a great boat for you in the waters you are fishing in.
Re: Build Progress - Panga 25
Posted: Fri Sep 30, 2016 10:38 am
by subbie95
I'm in southern Michigan, in the Lansing area. It's about a 6 hr drive to the spot on Superior we go to every year. I agree about the boat, I think the Panga is perfect for slicing through the steep chop of the great lakes, and efficient enough to troll for a week without needing to refuel. I'm excited to have it (someday). Now I'm trying to decided what level of finish I want to put on it....there are some beautiful boats on this site, but they took longer to build than I might have patience for.
Re: Build Progress - Panga 25
Posted: Sun Oct 09, 2016 8:45 pm
by PangaRon
Good luck on your build! It does take patience, but I'm enjoying the journey as much as I'm sure I will the "destination". Try to only think of the next step and before you know it, there's progress!
Re: Build Progress - Panga 25
Posted: Tue Oct 11, 2016 9:28 pm
by subbie95
After a WAY too hot week on Lake Superior (with far too few fish), I got back to work on the Panga. So far this week I've completed the initial splice on both bottom panels. I plan to cut them latter this week and splice the other side and build the jig on Saturday morning. Things seems to be moving faster than I thought they would...by the middle of next week it should actually look like a boat!
Re: Build Progress - Panga 25
Posted: Thu Oct 13, 2016 7:37 am
by subbie95
Quick glass question: When the epoxy is fully cured on the 12 oz tape, should there be rough patches where it seems like the tape threads are "exposed"? This is my first time ever wetting out glass, and I guess I assumed (hopefully incorrectly) that the finish product would be smooth throughout. I'm using the "poor man's peel ply", and portions of it are smooth, but sections of it are rough.
Thanks.
Re: Build Progress - Panga 25
Posted: Thu Oct 13, 2016 8:09 am
by peter-curacao
subbie95 wrote:Quick glass question: When the epoxy is fully cured on the 12 oz tape, should there be rough patches where it seems like the tape threads are "exposed"? This is my first time ever wetting out glass, and I guess I assumed (hopefully incorrectly) that the finish product would be smooth throughout. I'm using the "poor man's peel ply", and portions of it are smooth, but sections of it are rough.
Thanks.
This is normal ìt's never smooth as a baby butt, some fairing required

it can be done with vacuum bagging I believe, even then it wouldn't be perfect
Re: Build Progress - Panga 25
Posted: Thu Oct 13, 2016 7:55 pm
by subbie95
Ok thanks, sometimes I just need to check to make sure I'm not doing things wrong!
Re: Build Progress - Panga 25
Posted: Mon Oct 17, 2016 7:19 pm
by subbie95
Moving along! The jig is up (pun intended), took us forever to try and figure out the whole "origin" thing, finally we just gave up and put a line on the jig at the transom where it would work for us. Couldn't tell you if we did "right" or not, but the pieces went together fine...at the right dimensions; so we took that as a good sign. The stringers at frame D do sit an inch above the baseline, which I can't figure out for the life of me

but they sit right at the baseline on all the other frames we did, so I guess it's an anomaly. I plan to continue installing the frames this week and to splice the side panels. By the time my old man returns from the Upper Peninsula, we should be ready to make it look like a boat!
Re: Build Progress - Panga 25
Posted: Tue Oct 18, 2016 8:29 pm
by BB Sig
You're making good progress!
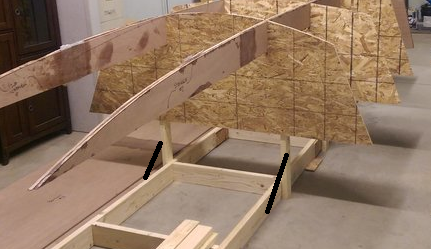
I have not done this before but I have been doing a lot of reading. Most of the time someone recommends putting some braces on your vertical supports. See the black ~45* braces I added in the picture below. It helps keep everything from shifting. You might want to do the same thing horizontally on the ends as well. Just my opinion from reading.
Re: Build Progress - Panga 25
Posted: Thu Oct 20, 2016 7:16 pm
by subbie95
Excellent advice! That's why I love posting progress photos, so people can correct mistake before they actually happen. At his point the frames are just standing and they're just "close" to in place right now. Once they're all up I'll spend a day just tweaking them to get all the diagonals perfect as well as making sure that the baseline is level all the way through....then I'll lock it all in just as you describe. When I'm done...they won't move! If there's one thing I'm known for, it's overkill!
Re: Build Progress - Panga 25
Posted: Thu Oct 20, 2016 9:30 pm
by K2FS18
Wow, that looks like it is half way into your house. You chose a good boat to build, pangas are tough to beat. Like your clean shop as well.
Re: Build Progress - Panga 25
Posted: Fri Oct 21, 2016 9:50 pm
by subbie95
It does look like that, now that I look at the photos

It's actually a detached 40x50 barn that the previous owner had built a paint room in, what you see if the boat (which is huge) passing through the old opening to the paint room. Thanks for noticing the cleanliness...I try to keep it that way...makes working a lot easier. I also love the Panga's, can't wait to get it in the drink!
Re: Build Progress - Panga 25
Posted: Tue Nov 01, 2016 7:51 pm
by subbie95
Well, we have the jig all put together, leveled, plumb and true! Everything appeared to be going great until we attempted to attach the bow mold...turns out the front tip of the boat will be about 5" below my barn floor! So, the next step it to raise the entire jig about 8", should be a ton of fun!
Re: Build Progress - Panga 25
Posted: Wed Nov 02, 2016 2:14 pm
by Fuzz
As long as you are having to raise the jig you might want to think about putting it on casters also. Almost everyone finds the need to move the boat around at some point. You could wait until the hull is glassed and locked in shape or not ever need them, just an idea to think about.
Love the Pangas. Keep posting lots of pictures.
Re: Build Progress - Panga 25
Posted: Sun Nov 06, 2016 8:37 pm
by subbie95
Making progress! We raised the jig about 8" and started to put the bottom panels on...which lead to several questions:
1. Do you bend the bottom panels first OR hang the side panels before starting to bend the bottoms?
2. Is it necessary to zip tie the bottom panels to the frames? When we bend the bottom panels, it lifts the panels away from the frames at the center line.
3. Should the bottom panels essentially be in contact with the frames all the way across the boat?
4. It doesn't seem like bottom panels are going to reach the front edge of the bow mold, is this normal?
Any advice on how to bend these things is greatly appreciated!
Some pics of our current state:
Re: Build Progress - Panga 25
Posted: Mon Nov 07, 2016 12:49 am
by Fuzz
I just looked at the study plans and it seems you are using 1/2 inch for the bottom? If that is correct you may need to kerf it some to get it to make the bends. Take this with a grain of salt as I have not built a panga..........yet

Re: Build Progress - Panga 25
Posted: Mon Nov 07, 2016 12:54 pm
by TomW1
subbie95 wrote:Making progress! We raised the jig about 8" and started to put the bottom panels on...which lead to several questions:
1. Do you bend the bottom panels first OR hang the side panels before starting to bend the bottoms? BOTTOM PANELS FIRST
2. Is it necessary to zip tie the bottom panels to the frames? When we bend the bottom panels, it lifts the panels away from the frames at the center line. NO ZIP TIES TO FRAME JUST BOTTOM PANEL TO BOTTOM PANEL
3. Should the bottom panels essentially be in contact with the frames all the way across the boat? YOUR LOOKING FOR FAIRNESS THE PANELS MAY RAISE UP OFF THE FRAMES SOME
4. It doesn't seem like bottom panels are going to reach the front edge of the bow mold, is this normal? NO. BUT CHECK YOUR BUILDING INSTRUCTIONS ON KERFING AS THE 1/2" WILL NOT BEND AS ENOUGH WITHOUT IT AS WITH IT AND WILL MOST LIKELY ALLOW THE PANEL TO REACH THE EDGE OF THE BOW MOLD.
Any advice on how to bend these things is greatly appreciated!
Some pics of our current state:
Re: Build Progress - Panga 25
Posted: Mon Nov 07, 2016 7:40 pm
by BrianC
What is the height of the hull's centerline at the transom? I hope to have a Panga 25 in my future and knowing this will help me from having the same problem

- Thanks!
Re: Build Progress - Panga 25
Posted: Wed Nov 09, 2016 12:20 pm
by subbie95
I'll take some measurements tonight to give you the height of the transom.
I have the bottom panels bent and zip tied, they look nice and fair and straight.....but they don't touch the frames in many locations. I let them "float" as the build instructions say, and only installed a single screw in each panel at the centerline of the transom, but something seems off about how they interact with the stringers and frames. I've posted the question on the technical board, but wanted to put some progress photos up here as well.
Re: Build Progress - Panga 25
Posted: Fri Nov 11, 2016 6:25 pm
by Fonda@kauai
You need to stitch the sides and bottom all at the same time.
I had to kerf my bottom panels to get them to cooperate. There's a drawing Jacques did somewhere that shows where the straight lines are in the bow, and I kerfed as close to those as I could. I kerfed about half way through the panel and filled the kerfs with thickened epoxy later when I glassed the inside. I believe they were 3/8" ply.
I also temporarily screwed the panels down to the frames for a few days. After a few days I removed the screws and the panels seemed to "relax" more into the desired shape. They floated a little in spots, but we're talking like a 1/4". I also used tie wire instead of zip ties, and found I could tighten them a little more each day as the panels got used to the bend and gave a little more.
Other than that looks good

Re: Build Progress - Panga 25
Posted: Sat Nov 19, 2016 10:18 pm
by PangaRon
Good luck on your Panga build! For info I used 3 inch ratcheting cargo straps, one click at time, but my frame was secured to the ground. You will have to be patient as it takes time for the plywood to "relax". I did not have to kerf my panels, but it took several days to get the plywood to form. I also used bailing wire and not zip ties to pull the panels together. Another trick is to use steak in the middle of a length of bailing wire and then turning it to slowly to pulling down the panel.
Re: Build Progress - Panga 25
Posted: Mon Nov 21, 2016 8:31 pm
by subbie95
Starting the process of hanging the side panels. One of the sides doesn't seem to want to lay right, but I'm sure it will comply after tedious hours of adjusting

I still have the sides held in place with ratchet straps, I'm hoping that when everything is wired together that they'll stay pretty close to the same spot when the straps are released...time will tell. I'm switching to tie wire so I can make adjustments in each direction going forward (tighter and looser).
One question: one side panel lays nicely below the bottom panel edge, while the other seems to want to raise up a little...so that it's along side the edge of the bottom panel.....is that a problem? It's not along the entire edge, just about 12 inches slightly in from of the transom. It might go away as I tweak everything.
Re: Build Progress - Panga 25
Posted: Fri Nov 25, 2016 6:51 pm
by subbie95

I can't get these panels to lay right to safety life!! Ratchet straps didn't prove to be the key, lots of foul language didn't seem to help either....so I'm pretty much settled on kerfs. Can these be cut on the outside of the bottom panels or must they be cut on the inside? I'd like to avoid removing the bottom panels if possible (I already tore the side off).
If there's a kerf plan available can some one tell me where to find it? Any help is appreciated !
Re: Build Progress - Panga 25
Posted: Sat Dec 03, 2016 4:36 pm
by subbie95
Got the Kerf (thanks Fonda!), and managed to wrestle all the panels into place with the Kerfs and straps. Now I'm starting the fillet process and came up with a few questions:
1. Do I need to tool the welds on the inside of the hull as i fillet the outside? They seem to ooze through a little as I install them from the outside, so I crawled under to clean that up on the very few that I did so far.
2. How do I get the nice rounded edge on the outside of the welds? It's it critical that the edges be rounded nicely at this point or can that be accomplished later?
Trying to do the rest of the initial welds tonight so I don't have to heat the barn for weeks through an extended welding process.
Thanks for the help!
Re: Build Progress - Panga 25
Posted: Sat Dec 03, 2016 4:58 pm
by Fonda@kauai
1. You can tool the epoxy that oozes through now, or grind it smooth after the flip. I put packing tape under the seams to hold the epoxy in and grinded and sanded them flush when I flipped.
2. After all the epoxy in the seams cures you will round the edges over with a router or sanding block.
Re: Build Progress - Panga 25
Posted: Wed Dec 07, 2016 9:09 pm
by subbie95
Boat is all spot welded and the stitching has been removed. First test of the epoxy was the release of the ratchet straps, but everything held together. The boat seems to have a little more distance between the frames and the side panel on the starboard side, but everything is straight, true and fair (verified by a thousand measurements), so we went with it. Even with the kerfs and straps, it never pulled all the way down to the frames, but I guess all of these have slightly unique bottoms based on the ply and the atmospheric conditions of that specific build. We let fairness be the first priority.
Hope to have the welding done this week.
Re: Build Progress - Panga 25
Posted: Wed Dec 07, 2016 9:22 pm
by subbie95
I would attach some photos, but it seems that feature is no longer working for me. I just get the exclamation point inside the yellow triangle every time I try. I'll figure that out later.
Re: Build Progress - Panga 25
Posted: Thu Dec 08, 2016 8:03 pm
by subbie95
Boat Progress Pics.
Re: Build Progress - Panga 25
Posted: Thu Dec 08, 2016 8:12 pm
by peter-curacao
Please for the best support keep or start posting pics! US English isn't my first language I think along with me not much estrangeros will respond. post some pics and we understand and we try to help
Re: Build Progress - Panga 25
Posted: Thu Dec 15, 2016 11:01 am
by Threadfin
Excellent read for people like me who starting off on a Panga 22.I guess i maybe one of the handful of Indians to frequent this site.I am sure to get all my problems sorted out with the amount of expertise on this site.
Re: Build Progress - Panga 25
Posted: Thu Dec 15, 2016 11:27 am
by Parkrat
Threadfin wrote:Excellent read for people like me who starting off on a Panga 22.I guess i maybe one of the handful of Indians to frequent this site.I am sure to get all my problems sorted out with the amount of expertise on this site.
I've spent days reading all the threads. Regardless of the boat you are building each boat and thread provides information and ideas that can be used on any build. Overwhelmed with all the ideas!
Yes, probably not too many Indians building boats on this forum.
Re: Build Progress - Panga 25
Posted: Mon Dec 19, 2016 3:05 pm
by subbie95
Sanded all of the fillet's this weekend and plant to start the taping of all joints over the next couple of days. Everything is looking pretty good overall, the sides still don't touch Frames B & C, but the bottom is the right shape, fair and straight....so I'm going with it. I'll modify the frames that aren't wide enough when I flip the hull over. I guess my Panga 25 is going to have a little bit more room than what's shown on the plans.....oh well, I guess that's why they call it a custom made boat!
Starting to think about power, and I'm looking for some feedback on the idea of putting a 90 or 115hp on this thing with the power assisted big tiller that Mercury offers, thoughts? Seems like this would leave the entire boat wide open for fishing or passengers. I'm very curious about whether this would work.
Still can't get pictures to post any longer, not sure what the deal is there...sorry!
Re: Build Progress - Panga 25
Posted: Mon Dec 19, 2016 11:43 pm
by Fuzz
What way are you trying to post pictures? If you need to you can email them to me and I will post them on your thread.
If you do send me a PM and I will give you my email address. I will help as I want to see pictures.
Re: Build Progress - Panga 25
Posted: Tue Dec 20, 2016 8:04 am
by subbie95
I was using the "attachments" tab below to attach the picture files, but that seems to have ceased to function! Now all I get when I try to upload a photo is the yellow exclamation triangle of death. I know that there's another, more complicated way to do attach pictures, so I guess I'll have to learn that way.
Re: Build Progress - Panga 25
Posted: Tue Dec 20, 2016 11:13 am
by bateau-webmaster
subbie95 wrote:I was using the "attachments" tab below to attach the picture files, but that seems to have ceased to function! Now all I get when I try to upload a photo is the yellow exclamation triangle of death. I know that there's another, more complicated way to do attach pictures, so I guess I'll have to learn that way.
You may be over the 50MB limit. I have changed the attachment quota to unlimited, but with a 50mb file size limit. Try posting again.
Re: Build Progress - Panga 25
Posted: Wed Dec 21, 2016 5:00 pm
by subbie95
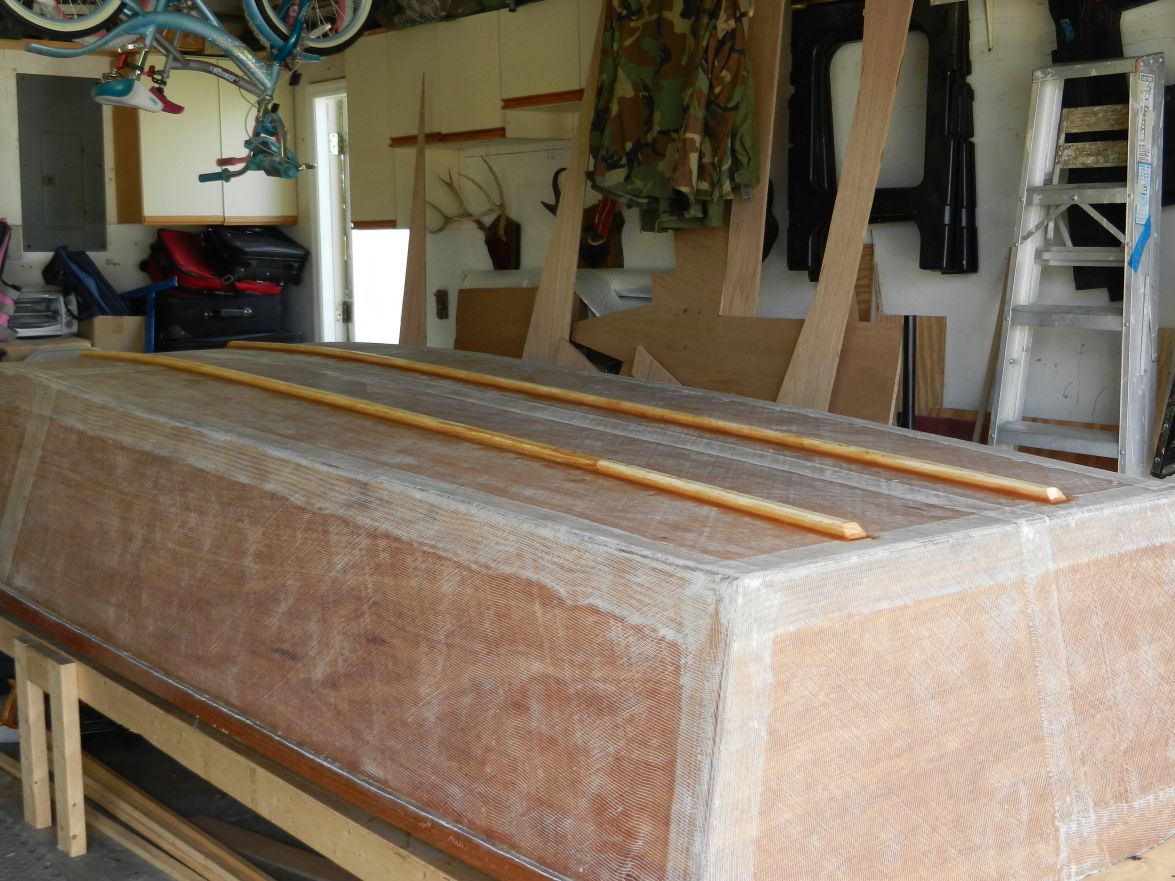
Got all of the exterior seams taped today, everything went pretty well except there appear to be some air bubbles right along the joint that I can't seem to work out for the life of me. Are these a problem? If so, what do I do about them
PS - Thanks to the webmaster for fixing my picture posting issue! I'll keep the pictures coming going forward.
Re: Build Progress - Panga 25
Posted: Wed Dec 21, 2016 6:52 pm
by Jeff
Really nice progress!!! Happy holidays, Jeff
Re: Build Progress - Panga 25
Posted: Thu Dec 22, 2016 8:28 am
by bateau-webmaster
The air bubbles are only a slight problem. What you will want to do, is to "slice" them off with a fresh razor blade, if you can't run the blade nearly parallel, under the surface, then use the tip of the blade to score the edges of the bubble, and peel out the glass on the inside. Then hit it with a sander, just a little bit to knock down any sharp edges, and throw a bit of putty on it. The small area without glass shouldn't make much difference, as you'll be putting wide cloth over it. I would wait to apply the putty until you are ready to put on the wide cloth, so that you can lay the glass on the wet putty, to save yourself effort.
Re: Build Progress - Panga 25
Posted: Thu Dec 22, 2016 9:20 am
by pee wee
Can't be sure just looking at the photo, but it's possible your chine edges were not rounded over enough to allow the tape to take the turn.
The glass work looks good, thoroughly wet out but not drenched with epoxy, nice and clean.
Re: Build Progress - Panga 25
Posted: Thu Dec 22, 2016 12:43 pm
by Fred in Wisc
If those bubble are sealed in under the tape use a syringe (without needle) to inject some epoxy into them. Just drill a small hole on each end of the bubble and inject the epoxy. fast and easy. Might have to stick a little piece of tape over the holes to keep it from running out until cured.
Re: Build Progress - Panga 25
Posted: Fri Dec 23, 2016 11:49 am
by bateau-webmaster
Fred in Wisc wrote:If those bubble are sealed in under the tape use a syringe (without needle) to inject some epoxy into them. Just drill a small hole on each end of the bubble and inject the epoxy. fast and easy. Might have to stick a little piece of tape over the holes to keep it from running out until cured.
This can work, I've thought of doing the same, and been told not to, I would use very slightly thickened epoxy, in case there is open weave in the bubble, and it would be best to use this method immediately after the resin tacks up, before it is fully cured, otherwise you will have a slightly weaker mechanical bond, and it may delaminate over time, with wear.
Re: Build Progress - Panga 25
Posted: Mon Dec 26, 2016 4:36 pm
by subbie95
Now that everything is fully cured, it appears that I have a bunch of bubbles to deal with. I guess I didn't get the corners prepped good enough.....rookie mistake. I tried the razor blade, there's no chance that I'm cutting these out with that!!! This stuff is tough!! Looks like I'm stuck with grinding them out, filling them with a syringe or leaving them and carrying on.
What's the major concern with leaving them? If I drill some small holes in them won't they fill with epoxy during the glassing steps due to epoxy's gap filling nature? Looking for any option that doesn't have me grinding out half of what I've done.
Thanks.
Re: Build Progress - Panga 25
Posted: Mon Dec 26, 2016 5:14 pm
by jacquesmm
I would wait for the resin to cure, grind them down and over it with a new layer of tape.
Grinding is fast, give it a larger radius, 1/2" or more: less risk of air bubbles.
It's a 25's boat, an extra layer of tape is not going to hurt.
Re: Build Progress - Panga 25
Posted: Tue Dec 27, 2016 8:09 am
by subbie95
Just to clarify:
1. Grind down just the areas with the bubbles, putty them and cover those areas with another layer of tape....
OR
2. Grind down all the seams, create the radius and reapply two layers of new tape?
I just don't want to do needless extra work.
Thanks.
Re: Build Progress - Panga 25
Posted: Fri Dec 30, 2016 8:05 am
by subbie95
I'm grinding out the bubbles (the big ones at least), it provided a great excuse to buy a shiny new cordless angle grinder! I love my Makita brushless tool set, and this boat has lead to it's expansion considerably (a nice byproduct). I'm going to fill those areas with putty and apply a third layer of tape over the largest spots. This should be strong enough considering it still gets the wide fabric and the 10oz woven that I plan to finish with, just to get that extra tough hull (and because I bought it by mistake and it was far too expensive to return). I'm also going to cover every surface of the interior in the 10oz woven (except the interior side of the hull, that will get biax as specified).
Looking ahead, any feedback on the following:
1. Thoughts on doing the entire boat in Monstaliner? I'm hard on my stuff, and this product looks shiny and nice from a few feet away but should hold up well to the frequent beaching I do on sand/gravel in the northern Great Lakes.
a. I know from reading ton's of this forum that several guys have done this, I've reached out to some of them via PM to get their feedback as well.
2. Thoughts on installing a 115hp tiller motor? I like the Big Tiller's from Mercury with the hydro steering, I'm just not sure the tiller will be long enough on the Panga 25. This would also greatly cut down on the systems that need to be installed (although I'd still run all the conduits to the Console locations, just in case I change it in the future).
Between these two options I think it would cut numerous hours out of the build. The Monstaliner should cut down on the fairing considerably.
Love to hear the thoughts of those who've forgotten more about building a boat than I'll ever know!
Re: Build Progress - Panga 25
Posted: Tue Jun 13, 2017 12:42 pm
by subbie95
Haven't posted in a while but we've been making progress, slow but sure. The outside is glassed, the keel is on and glassed, the spray rails are spot welded on, just need to finish the filleting after more wood flour arrives today. Then it's on to fairing and painting the bottom....which leads to this post. I'm looking for opinions on paint, since the Stirling isn't currently available.
Awlgrip vs Interlux Perfection....does anyone have direct experience to provide real world pros and cons? I will be rolling and tipping. Easy of use, durability, etc.
PS - I'll get some progress photos up this weekend.
Re: Build Progress - Panga 25
Posted: Fri Jun 16, 2017 10:33 pm
by TomW1
Check the store here(Boat Building Supplies). They carry both Awlgrip and EMC paints. Lots of the guys have gone with the EMC paint. Check it out.
Re: Build Progress - Panga 25
Posted: Sat Jun 17, 2017 12:28 am
by BarraMan
Awlgrip vs Interlux Perfection....does anyone have direct experience to provide real world pros and cons? I will be rolling and tipping. Easy of use, durability, etc.
I can't offer any experience with Awlgrip but as a total novice I rolled and tipped my boat with Interlux Perfection. I am very happy with the finish and many have commented on it. Easy to work with and appears to be quite durable.
Re: Build Progress - Panga 25
Posted: Sat Jun 17, 2017 2:40 pm
by subbie95
Thanks for the feedback BarraMan, that's the kind of info I was looking for. From everything I've read, the Awlgrip appears to be slightly more durable but it's not repairable. I think for the cost, I'll go with the Perfection. It looks like it's a little simpler to mix/apply, and I've read a ton of great reviews on it. I've even read of several folks who've applied it without tipping at all and achieved great results (some of those did back roll it with a fresh roller instead of tipping with a brush). I'm going to use that on the bottom, but I may still use Awlgrip on the sides because I like some of the colors it offers more than what the Perfection comes in. As a note, my plan is to use Monstaliner from the rub rail throughout the interior. It's tough as nails, should save me a bunch of hours fairing the inside, and comes in several "off white" colors that should be pretty close to the Perfection color I'm going to use (Oyster White).
I'm lucky enough to get to spend my whole weekend at work, so the progress photos will have to wait until sometime next week.
Re: Build Progress - Panga 25
Posted: Sat Jun 17, 2017 4:24 pm
by Browndog
This week I am painting the FS 19 that I'm building for my Brother with Awlgrip in their Aquamist color after 4 coats of Silvertip Yacht Primer. I'm using 4 inch foam rollers and 2 inch brushes to tip it off to break the very small bubbles on the surface that the roller leaves behind. The key is to use their Awlcat #3 Brush Converter and then also use their Brush Reducer. The mix is 2 parts color base to 1 part Converter and then reduce by 10-33% with the Brush Reducer. I've been mixing 6 oz. of Color Base, 3 oz. of Converter and 2 oz. of Reducer. That amount allows me to coat both sides and the transom with little to no waste. I bought a Gallon of the color base, but in reality I will use only about 2 Quarts for 5 - 6 coats. Most likely I will use the remainder to paint the inside of the hatches on the boat
Re: Build Progress - Panga 25
Posted: Sun Jun 18, 2017 4:27 pm
by Dutch1
Browndog wrote: ↑Sat Jun 17, 2017 4:24 pm
This week I am painting the FS 19 that I'm building for my Brother with Awlgrip in their Aquamist color after 4 coats of Silvertip Yacht Primer. I'm using 4 inch foam rollers and 2 inch brushes to tip it off to break the very small bubbles on the surface that the roller leaves behind. The key is to use their Awlcat #3 Brush Converter and then also use their Brush Reducer. The mix is 2 parts color base to 1 part Converter and then reduce by 10-33% with the Brush Reducer. I've been mixing 6 oz. of Color Base, 3 oz. of Converter and 2 oz. of Reducer. That amount allows me to coat both sides and the transom with little to no waste. I bought a Gallon of the color base, but in reality I will use only about 2 Quarts for 5 - 6 coats. Most likely I will use the remainder to paint the inside of the hatches on the boat
Thank you for posting this. Good info to have!
Re: Build Progress - Panga 25
Posted: Sun Jun 18, 2017 5:00 pm
by Jeff
Excellent Awlgrip painting information Browndog!! Jeff
Re: Build Progress - Panga 25
Posted: Mon Jun 26, 2017 8:36 am
by subbie95
I'm just about to start fairing the bottom and had a quick question:
- - Do I need to sand off the threads from the biax fabric before starting to fair? It seems like they would provide a good place for the fairing compound to "bite", but I read a lot of posts where they're sanded off before fairing.
Re: Build Progress - Panga 25
Posted: Mon Jun 26, 2017 8:48 am
by Noles309
Yes, sand them off. You want to see the "cross hatch" pattern in the fg like so.
Re: Build Progress - Panga 25
Posted: Mon Jun 26, 2017 9:07 am
by subbie95
Will do, thanks Noles. BTW, how's the Monstaliner holding up on your boat? I'm still leaning towards doing everything from the rub rail through the interior in Monstaliner (most likely going to use Interlux Perfection on the exterior). Also, how much did you use on your boat? Trying to determine what the cost of going that route will be.
Thanks.
Re: Build Progress - Panga 25
Posted: Tue Jun 27, 2017 10:30 am
by Noles309
Its holding up great. I used about 2 1/2 gallons. The monstaliner is covering everything except the deck surfaces and the bottom. Its not cheap by any means and you put it on so thick that a gallon doesn't go far...
I actually think spraying it would work better in a higher temps than rolling. If that becomes an issue for you.
Re: Build Progress - Panga 25
Posted: Wed Jun 28, 2017 1:10 pm
by blueflood
Hi subbie95,
Re Monstaliner....I went that route also after reading Noles309 & Topwater photos and report; see my build Harmony HMD19 for input. I am doing exactly as you are so all you need to know about that stuff.
Something to add if you are buying - tell Magnet Paints to triple check your order. Three times now - yes three - they forgot the white tint for 2 gallons and 2 quarts

That cost me $80 of extra charges getting here
That aside, they are very accommodating and it is a great product. Close to CDN$2000 to shoot inside / outside except the hull and decks. Like Gary says; it takes an awful lot to get good coverage. Also purchase some quarts so you can shoot smaller areas just in case a gallon is too much, it gives more flexibility with less waste. It will likely take 6-7 gallons for all I am doing.
Ask anything for more info. Probably shooting part of the cabin exterior this weekend.
Marc
Re: Build Progress - Panga 25
Posted: Mon Jul 17, 2017 11:00 am
by subbie95
Starting to look ahead at motors, and the pricing for a new Suzuki 115 (my motor of preference) came in higher than I was expecting! I'm wondering what the performance difference would be between a 90hp and a 115hp on this boat?
Re: Build Progress - Panga 25
Posted: Mon Jul 17, 2017 11:32 am
by Jeff
subbie95, I am interested in what the estimate was for the Suzuki 115 and what was the install expense as well? Jeff
Re: Build Progress - Panga 25
Posted: Mon Jul 17, 2017 12:29 pm
by TomW1
Subbie if you can give me an estimate of what the full all in weight you will be running at when you leave the dock I can run the numbers on the difference between the 90 and 115. Be as accurate as you can be. Hull weight will be the same but important as some people build there boats heavy others lighter. Then passenger load, gallons of gas at 6.8lbs, fishing gear, bait tank water at 8.8lbs per gallon, then add 250lbs for miscellaneous gear and wiring and cables, ice and beer.
I have the specs on the 2 Suzuki motors so don't need those. As you can see from above weight is the critical measurement as well as the specs I get from the motor and a couple of other measurements I get elsewhere.
Tom
Re: Build Progress - Panga 25
Posted: Tue Jul 18, 2017 9:25 am
by subbie95
Tom,
That would be awesome! My hull will probably be of average weight construction, I will have everything glassed with fabric, but I won't be doing the 2 layers of biax on the outside. I would figure the following:
- 272 lbs of fuel
- 0 lbs of water for bait (we troll hard baits), but 100lbs for fish cooler and ice
- 200 lbs for fishing gear (downriggers, weights, poles, lures, net, etc.)
- 350 lbs for misc cables, hoses, refreshments, anchor, ropes, fenders, etc.
- 400 lbs for people (typical Salmon trip is two of us)
So, a total of roughly 1,350 lbs of load in addition to the hull and motor.
Jeff,
The quote I received was for a new 115 Zuke with 17' cables, standard binnacle controls...NO installation (I'm doing that) was roughly $11,500. I really like the Suzuki motors and have always had great experiences with them, they may not be the fastest, but they seem bulletproof. BUT, I have requested quotes for other mfrs as well to see how they compare.
Thanks,
Ryan
Re: Build Progress - Panga 25
Posted: Tue Jul 18, 2017 9:44 am
by Jeff
subbie95, I asked about the install cost as with Yamaha on motors probably over 50 HP, if a Yamaha Technician does not install, Yamaha will not warranty the motor--crazy but true!! Are you sure Suzuki will provide warranty with you installing?? Jeff
Re: Build Progress - Panga 25
Posted: Tue Jul 18, 2017 9:54 am
by topwater
That's what i payed for my 115 Mercury installed with controls, harness and a electronic led multifunction gauge.
I had already installed the Baystar steering lines they hooked up the hydraulic ram and bled it.
Re: Build Progress - Panga 25
Posted: Tue Jul 18, 2017 4:17 pm
by TomW1
Subbie95 ran your numbers through the calculator. The top speed for the 115 Suzuki will be in the around 36 mph and the 90 is around 33 mph. For props I would start with a 4 blade with the weather you get on Lake Michigan in a 13 x 17 for the 90 and a 13 x 18 for the 115. If you want I can give you some recommendations on brands and styles of props when your ready.
Tom
Re: Build Progress - Panga 25
Posted: Mon Jul 31, 2017 7:25 am
by subbie95
Does anyone know if the Panga 25 requires a 20" or a 25" shaft on the motor? I can't seem to find it anywhere. I'm assuming that it's a 25", but I'd love to confirm that.
Thanks.
Re: Build Progress - Panga 25
Posted: Mon Jul 31, 2017 9:38 am
by BB Sig
It is typically in the plans but if you can't find them/ aren't near them, check the measurement from where the motor mounts to the transom (motorwell) to the bottom of the transom.

Re: Build Progress - Panga 25
Posted: Thu Aug 10, 2017 8:45 pm
by subbie95
It certainly doesn't take long for the "fairing fun" to wear off! First coat of fairing is on the entire bottom, waiting for it to cure before sanding and applying the second coat. This process is harder than I though it would be, it's darn near impossible to get the first coat on smooth, even with the Flxi-Sander fairing board! But, I applied a second coat in a very small area with it and it looks great...learn as you go. I have the primer in hand and will order the paint soon...so it's fairing, sanding, fairing, sanding, fairing...and so on until I'm fed up with it (or it looks perfect, which is unlikely).
Re: Build Progress - Panga 25
Posted: Mon Sep 18, 2017 3:34 pm
by subbie95
Looking for a little help on the fairing process....
1. How many coats of fairing compound should one typically expect to apply to the bottom of the hull before it's "good enough"?
2. What amount of thickness does the S3 high build primer have? I assume this will cover any trivial imperfections missed in the fairing process.
3. How the heck do you fair the keel? It's already smooth just from the woven glass I used over it, does the entire thing also need to be faired?
Last question, which only a few can probably answer:
1. If I use Monstaliner on the sides, how smooth does the fairing in that area need to be?
Thanks for the help!
Re: Build Progress - Panga 25
Posted: Mon Sep 18, 2017 7:30 pm
by csotelo
Well, it depends on how satisfied with the results you are.
I did about 4, then put the guide coat and sanded to discover it was a crap. I had to fix and sand several parts.

The primer, in my case, covered the scratches, but big details remained.

I´m sure the masters of faring (as the slackers like me) will give you more information.
Regards,
Carlos
Re: Build Progress - Panga 25
Posted: Tue Sep 19, 2017 12:47 am
by TomW1
subbie95 wrote: ↑Mon Sep 18, 2017 3:34 pm
Looking for a little help on the fairing process....
1. How many coats of fairing compound should one typically expect to apply to the bottom of the hull before it's "good enough"?
It is going to depend on you and how fair and smooth you want the bottom. After the first layer is done and you have the second layer applied put on a guide coat of fast drying spray paint like Krylon that you put down in spots not a solid layer, or you can put a dusting of graphite on. Then sand. Then fill in the lows and sand the highs and continue till satisfied.
2. What amount of thickness does the S3 high build primer have? I assume this will cover any trivial imperfections missed in the fairing process.
Not really it will fill small air bubbles and sanding marks but that is about all.
3, How the heck do you fair the keel? It's already smooth just from the woven glass I used over it, does the entire thing also need to be faired?
Yep you just need to get up on it and apply the fairing compound, just like the rest of the bottom. You want the water to run as smooth as possible along the keel.
Last question, which only a few can probably answer:
1. If I use Monstaliner on the sides, how smooth does the fairing in that area need to be?
Like any other covering Monstaliner will show any dips and humps so make it as smooth as you want. Use the guide coat method after the first application to fill in the dips to save yourself some time.
Thanks for the help!
Tom
Re: Build Progress - Panga 25
Posted: Tue Sep 19, 2017 8:33 am
by topwater
Fair as long as you can keep your sanity , then walk away
As far as Monsta liner goes it will not fill dips and big imperfections but will hide all small pinholes and small imperfections
better than high build primer. If you want it smooth then you have to fair. If you put it over unfaired glass you will see
the texture of the cloth.
Re: Build Progress - Panga 25
Posted: Fri Dec 01, 2017 11:55 am
by tcason
update?
Re: Build Progress - Panga 25
Posted: Fri Dec 29, 2017 2:34 pm
by PangaRon
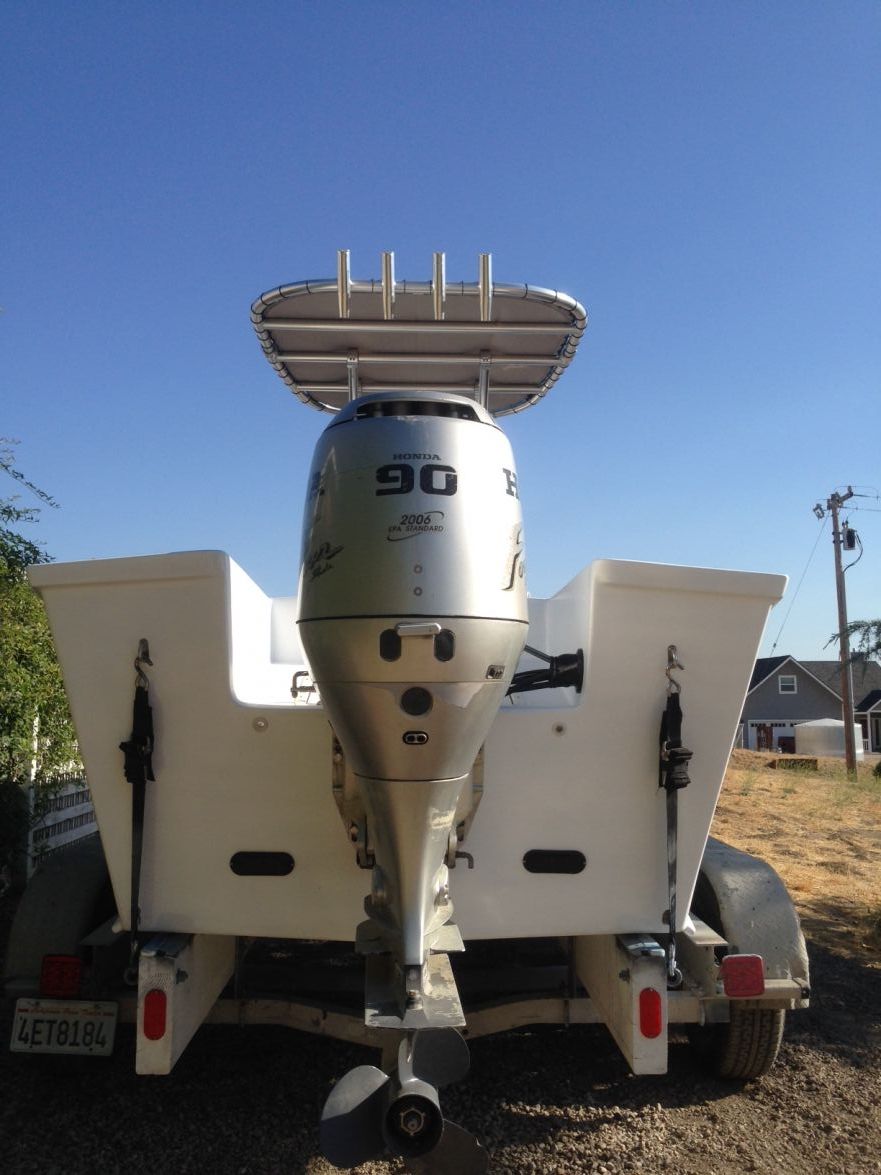
Does anyone know if the Panga 25 requires a 20" or a 25" shaft on the motor? I can't seem to find it anywhere. I'm assuming that it's a 25", but I'd love to confirm that.
I used a 25" shaft Honda 90 but still had to cut 2 inches out of my finished transom to find the proper height as shown on the diagram above. Be sure to measure twice and fair once so you don't have to make backwards progress like me. BTW, I used the center holes on the outboard bracket so I could move it up or down if needed.
Re: Build Progress - Panga 25
Posted: Sat Dec 30, 2017 12:49 am
by TomW1
subbie95 wrote: ↑Mon Sep 18, 2017 3:34 pm
Looking for a little help on the fairing process....
1. How many coats of fairing compound should one typically expect to apply to the bottom of the hull before it's "good enough"?
2. What amount of thickness does the S3 high build primer have? I assume this will cover any trivial imperfections missed in the fairing process.
3. How the heck do you fair the keel? It's already smooth just from the woven glass I used over it, does the entire thing also need to be faired?
Last question, which only a few can probably answer:
1. If I use Monstaliner on the sides, how smooth does the fairing in that area need to be?
Thanks for the help!
How are you doing hope your close to finishing or have finished. PangaRon mentioned that you may be finished. Give us an update either way.
Tom
Re: Build Progress - Panga 25
Posted: Thu Jan 04, 2018 3:17 pm
by subbie95
Man, I wish I was finished/almost finished!!! When I started the process, I wondered why it seemed to take so long to build a boat.....but now I know. It seems life keeps getting in the way of progress.
Currently, the bottom is faired and needs a little more sanding before we prime and paint (with something, maybe Gator Glide to hide out little imperfections), then we'll flip and work on the rest. At this point I'm leaning towards doing the entire topside (maybe with the exception of the floor which would be Kiwi Grip) with Monstaliner. Seems tough as nails and should save some serious fairing time.
I plan to get back at it this winter, but it's been 0 degrees here in Michigan for 2 weeks, and doesn't appear that it's going to get any better in the next couple of weeks...lord knows I'm burning enough wood in the boiler just to keep the house warm, might have to burn the Panga if I try to heat the barn right now. Although, that would solve the "life in the way" problem

I'll try to get some current photos up soon.
Re: Build Progress - Panga 25
Posted: Fri Jan 05, 2018 12:45 am
by TomW1
Well hang in there every little step forward is step towards completion.
Tom
Re: Build Progress - Panga 25
Posted: Thu Apr 19, 2018 11:57 am
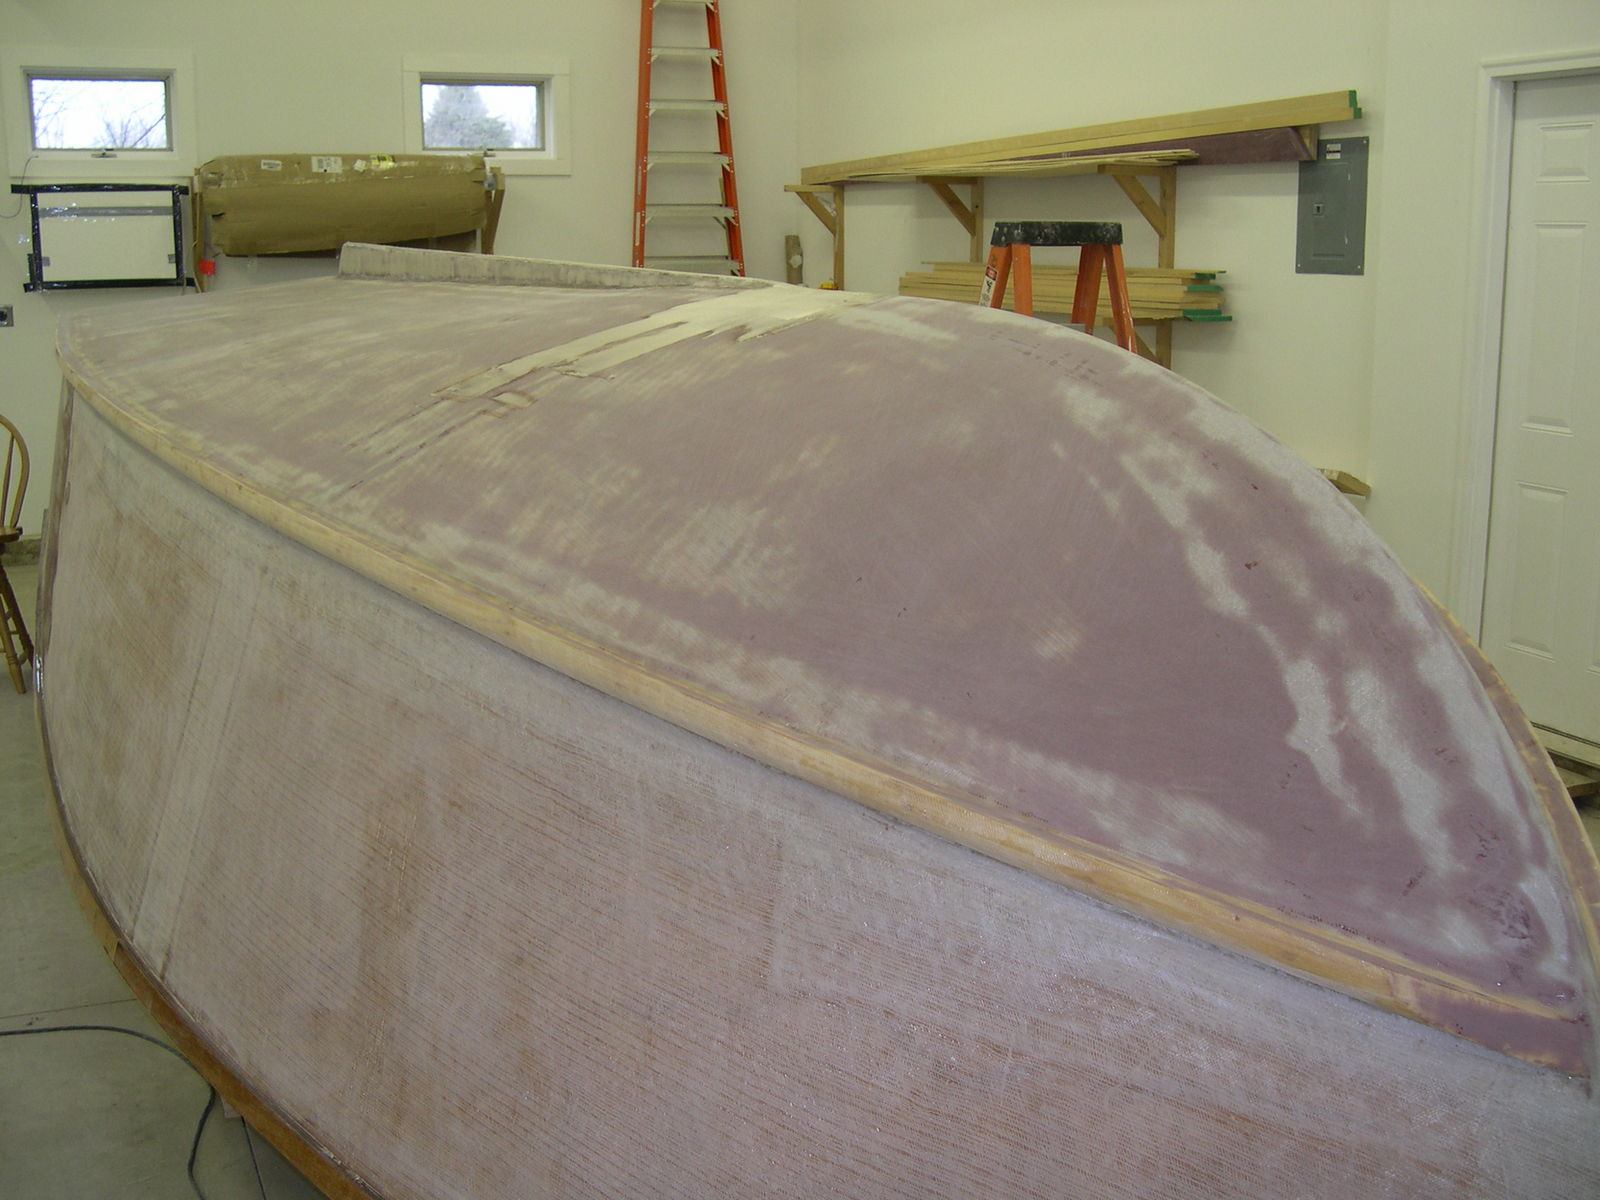
by subbie95
Quick question....do I need to fair the spray rails or just coat them with several coats of clear epoxy? They seem like they're going to be a real pain to fair, and I see loads of photos on the forum where it appears they are not covered in fairing compound.
Re: Build Progress - Panga 25
Posted: Thu Apr 19, 2018 5:00 pm
by TomW1
They are usually faired, rounded over and painted and then covered with a rubber rub rail such as this.
https://boatbuildercentral.com/products ... +Extrusion Most rubrails are structural and provide strength to the upper part of the side panels, they are usually 3/4 by 1 1/2 or 2 inches tall and fiberglassed over though the don't need to be with the rubber rub rail. What ever you do follow the building plans for your Panga 25.
Tom
Re: Build Progress - Panga 25
Posted: Fri Apr 20, 2018 8:41 am
by subbie95
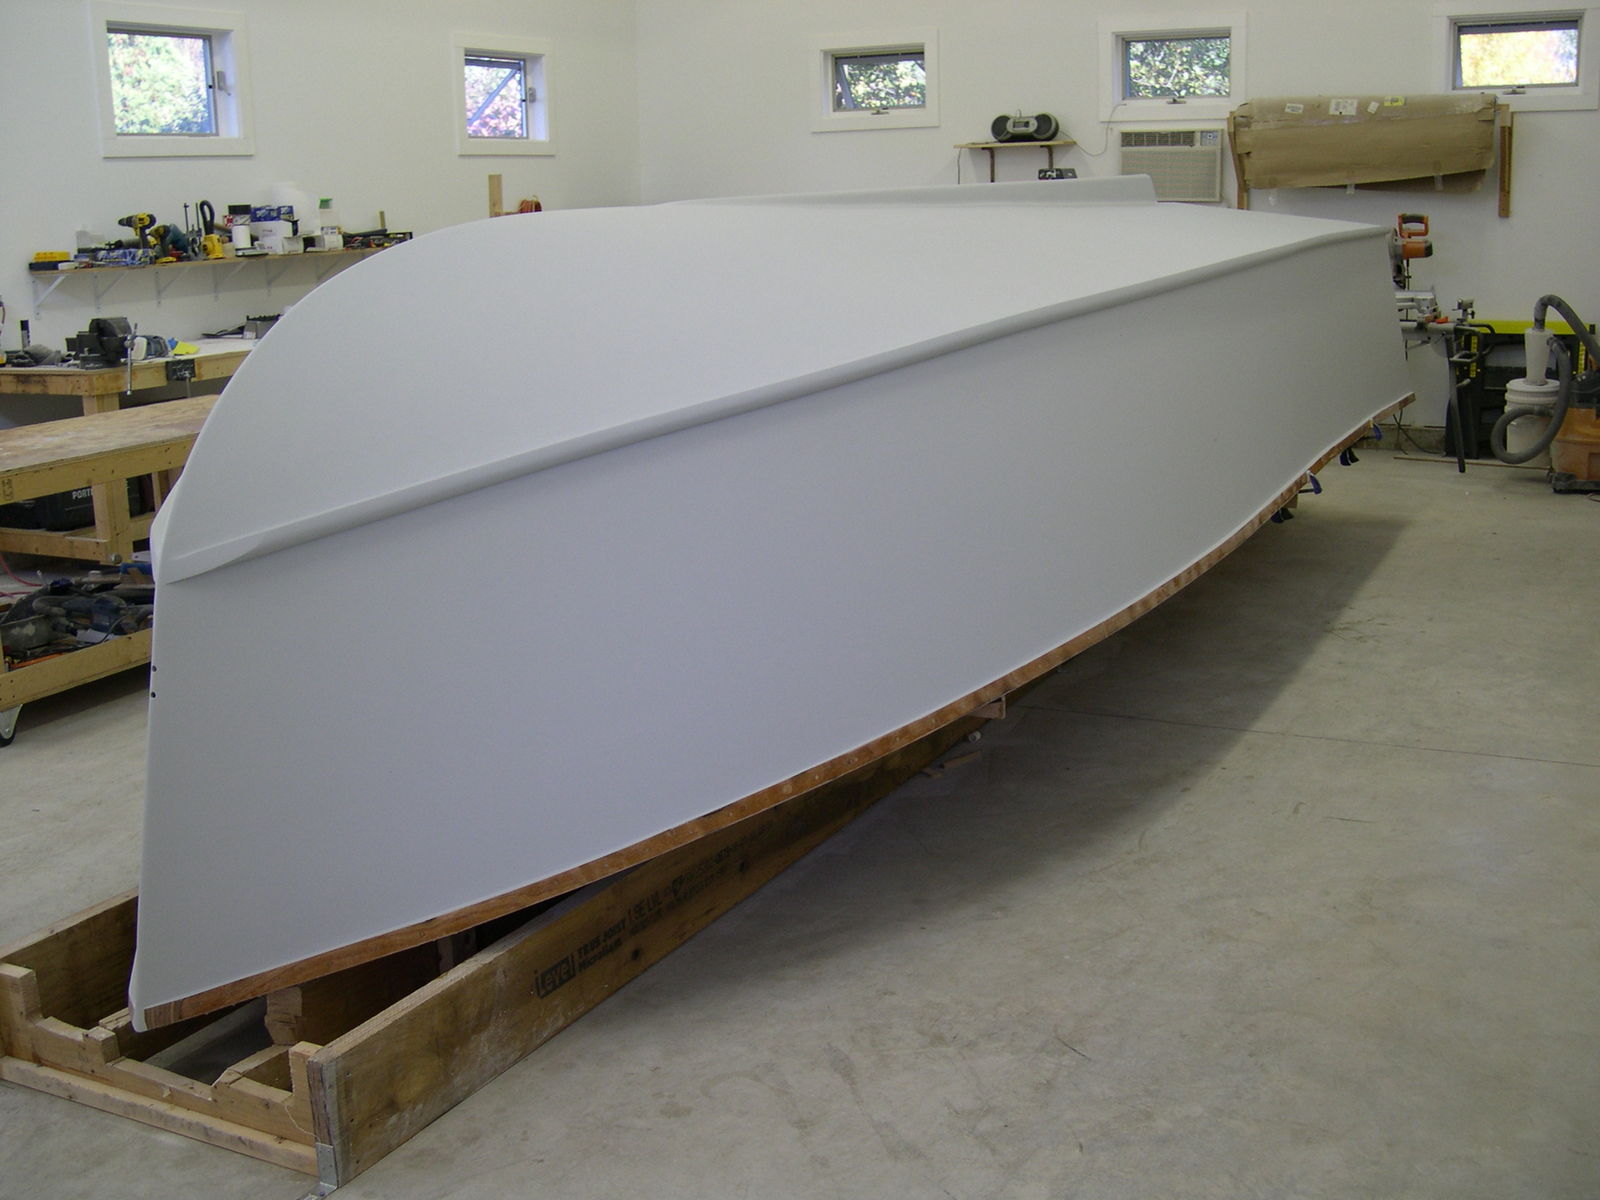
Thanks Tom, but I was actually referencing the spray rails along he chines (See attached photo).
My rub rails will be made from a cloth covered 1x2, covered in Monstliner...should be able to take a beating.
Re: Build Progress - Panga 25
Posted: Fri Apr 20, 2018 1:13 pm
by Fuzz
Stubbie those will be a pain to fair. But you either do that and glass over them or plan on replacing them regularly. That is one of the spots that take the most abuse, well at least they do when I drive
Re: Build Progress - Panga 25
Posted: Fri Apr 20, 2018 3:52 pm
by TomW1
My mistake my mind went cuckoo and read rub rail for spray rail. Go ahead and fiberglass it. Then fair the bottom and sides You can keep the fairing to a minimum along the spray rail. You will of course fill in the fiberglass weave of the fiverglass that you put on the spray rails. Check out PangaRon's build on how he did it.
Tom
Re: Build Progress - Panga 25
Posted: Sat Apr 21, 2018 7:20 am
by topwater
I glassed and faired mine. Yes its a pain but they look nice when done.
Re: Build Progress - Panga 25
Posted: Sat Apr 21, 2018 8:10 am
by Jeff
Guys, we agree, glass and fair!!! Will be happy when completed!! Jeff
Re: Build Progress - Panga 25
Posted: Sat Apr 21, 2018 9:14 pm
by subbie95
I assume that the angles are too sharp for the biax, so I'm going to assume you used a woven glass....at least that's what I'm going to use since it's really for abrasion protection. I want the outside edge, and the top of the spray rail (where the spray rail meets the hull) to be sharp since that's where I plan to change colors.\
I prepped it all today and plan to give the glass on the spray rails a go tomorrow.
Thanks all for the advice!!
Re: Build Progress - Panga 25
Posted: Sat Apr 21, 2018 10:13 pm
by TomW1
subbie95 you round the edges over and use biax on the edges as it is stronger than woven it should be in your fiberglass schedule. You will later square the edges with a mix of epoxy, wood flour, and fiberglass fibers. You do this by building a dam on both the transom and last few feet of the chine. You will leave just enough of a round over say 1/32 to 1/16 for paint to hold on.
Tom
Re: Build Progress - Panga 25
Posted: Sun Apr 22, 2018 9:04 am
by topwater
I used 12 oz biaxe .
Re: Build Progress - Panga 25
Posted: Mon Apr 23, 2018 10:49 am
by subbie95
Thanks again TomW1. I have prepped the spray rails and plan to cover them with 12 oz biax, and then 12 oz woven fabric that I plan to cover the entire hull sides with, including the rub rails (I bought the woven fabric by mistake and plan to use it to create a "heavy duty" hull with two layers of fabric as well as using it to cover the entire interior where the biax isn't specified). It sure seems like a lot of work for a hull feature that Jacques has said is "optional"! Regardless, they're glued on...so they're staying at this point!
On another note/question...you mention squaring off the corner of the transom to hull sides/bottom with thickened epoxy...is this necessary? I rather like the look of the nicely rounded edges there and planned to keep them like that, unless there's a performance reason not to.
I'm also enjoying the fairing process so much
, that I made the final decision to cover the entire boat except the bottom of the hull with Monstaliner, the added cost is worth the reduction in fairing time to me...plus, it will hide any minor imperfections (and there will be some) so they don't bug me for the rest of my life!
Re: Build Progress - Panga 25
Posted: Mon Apr 23, 2018 1:38 pm
by pee wee
subbie95 wrote: ↑Mon Apr 23, 2018 10:49 am
On another note/question...you mention squaring off the corner of the transom to hull sides/bottom with thickened epoxy...is this necessary? I rather like the look of the nicely rounded edges there and planned to keep them like that, unless there's a performance reason not to.
For planing hulls it is a performance issue, the parts of the hull that are in contact with water at planing speeds should have pretty sharp edges or you'll lose some speed and fuel efficiency. If they're extremely sharp they'll damage easily, and paint won't adhere well, so a compromise of maybe a 1/16" radius is good. All the parts you see above the waterline can be as round as you like.
Your build is coming along nicely.
Re: Build Progress - Panga 25
Posted: Mon Apr 23, 2018 1:58 pm
by subbie95
Ahhhhh, good, another step
. I'm going to have to buy a boat if I ever want to go fishing
Re: Build Progress - Panga 25
Posted: Mon Apr 23, 2018 2:11 pm
by Fuzz
It is only a matter of a small amount of efficiency. There are lots of slack bilge boats that plane, think lobster boats. And if you look at glass boats coming out of molds they are not really sharp.
Re: Build Progress - Panga 25
Posted: Mon Apr 23, 2018 9:49 pm
by TomW1
There are two things that comes into play in squaring the chines and transom. For the chines it decreases turning diameter as well as releases the water increases the water increases the speed 1/2 to 1 mph. For the transom the water releases easier and picks up 1/2 to 2 mph.
Tom
Re: Build Progress - Panga 25
Posted: Thu May 23, 2019 6:31 pm
by mchillinsky
subbie95 wrote: ↑Fri Sep 23, 2016 9:47 am
Just received an answer form Jacques on the transom dimension from another post (question #4), the dimension is 6-1/8" just in case anyone else needs it.
Thanks Jacques.
Exactly the number I was looking for.... thanks!!
Mike
Re: Build Progress - Panga 25
Posted: Tue Jul 09, 2019 2:54 pm
by tcason
update??