Well, it's been a while since the last update, and things have been progressing slowly.
I think, though, that I'm over the main epoxy hump, that is covering the hull (I know the inside still has to be done, but at least that doesn't have to be fair!).
Since the last update, the weather has really been playing havoc, as for a couple of weeks it seemed to rain every afternoon so I couldn't work in the evenings, and then a couple of weekends too (not as bad as it seems some of you guys in Florida seem to be experiencing, from what I hear).
Anyway, summer seems to have well and truly arrived, so last weekend I managed to sand all the taped seems in preparation for the final lamination, then during the week I measured out the upper side panels (not cut yet).
Then, this weekend I finally bit the bullet and laid the cloth over the boat.
I eventually decided to go "wet on dry" as people here seem to refer to it. Laid down the cloth on the starboard side, positioned it and got on with mixing. Starting at the transom, I just poured the whole lot on the cloth at the centre-line over a distance of about 0.5m (1.5'). As this started to run down towards the chine, I very lightly and without trying to force the epoxy into the cloth, used a squeegee to spread the epoxy over the first area, then went to mix a second pot of goo.
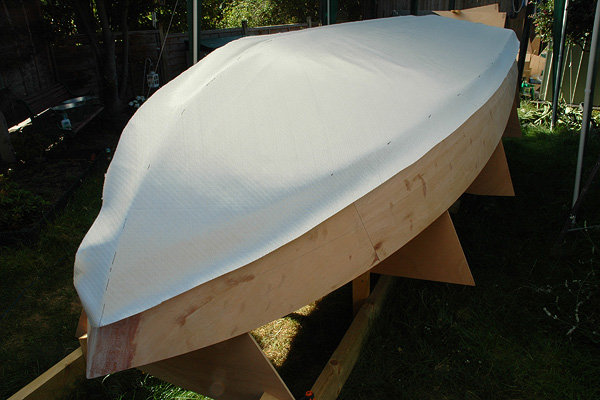
By the time the second mix was ready, I was able to pour on to the cloth again, just below halfway between the centre and the chine, and the first pouring was soaked into the cloth enough to squeeze the air out. After spreading about three areas like this, I had my routine going pretty well.
The port side took about two and a half hours to lay. By now I was on a roll, but it was getting really hot and I was contemplating delaying the second half. But, a half hour break, and nearly two litres of water later, decided it had to go on.
The second (port) side took only one and a half hours to do, working with a nice method:
- Mix one pot, pour at centre and spread towards me (chine) lightly.
- Mix another pot, pour 2/3 of it closer to chine, spread lightly.
- Squeeze first mix to get air out.
- Pour half of remaining mix onto overlap on starboard side and spread lightly.
- Squeeze second batch on the bottom.
- Spread remaining epoxy onto the glass on the side lightly.
- Squeeze starboard side overlap.
- Squeeze side.
- Start again one step closer to the bow.
Measuring and mixing was made easy by having pumps in the resin and hardener that pump proportionally so each pot was four pumps resin, four pumps hardener (about 150ml/5oz). It also helped that the resin had warmed up quite a lot, so was thinner and easier to spread than the first half.
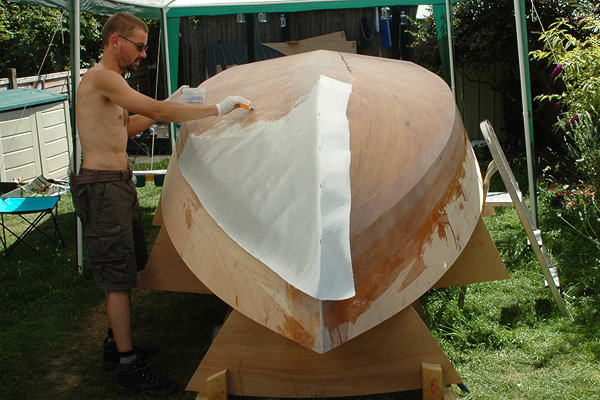
Of course, working in hot conditions did cause a little bit of out-gassing from the wood, but I was able to squeeze almost all of it down again. There are a few very small patches where air got caught under the glass, but looking at it this morning I will be able to grind a small area with a Dremel and squeeze some epoxy into that. Also, having already done the centre and chines, obviously no air could come out there and I have ended up with one very strong looking hull.
It really does look nice now, and as Mrs Wobbly said when looking at the dark wood through the glass, it seems a shame to paint it. I think I have now decided that I am going to try and keep the entire topside natural wood if I can get all the joints neat enough.
Also, I ordered all the wood that I need for the hull trimmings - keel, strakes, spray rail, rub rail laminations - which will be cut to shape (strakes and spray rail) and delivered on Saturday. This week I plan on filling the weave on the bottom in preparation for fairing and hopefully I'll be able to join the keel (skeg?) and spray rails on the weekend.
I shall let you know how I get on (hopefully things will start moving quicker again).
As usual, more pics here:
http://gallery.bateau2.com/thumbnails.p ... 286&page=6
Oh, and I've just noticed that the gallery pics seem a bit out of order, but I'm sure JM will sort that out...
Wobb.
 . Sounds like we are the same stage, I'm building my OB17 outside and did the tape and hull glass last weekend. Question for you - why did you stop taping the corners half way up the transom? That whole joint is highly stressed by the engine weight and stresses. Maybe check your scantlings or with Jacques before applying the skin glass.