
Enjoy that moment with Wyvern.
CV16 Wyvern
-
ks8
- * Bateau Builder *

- Posts: 8403
- Joined: Mon Nov 24, 2003 1:00 am
- Location: NC USA
- Location: Now a much longer sail to Tampa Florida! Back to NC, Youngsville FM05tw
Re: CV16 Wyvern
Hopefully, one template will fit both sides.  On MoF, that was a reassuring moment. But if it had not have been a good fit (on both sides), it would not have stopped me. The thinking chair did that plenty....
Enjoy that moment with Wyvern.
Enjoy that moment with Wyvern.
-
chrisobee
- Very Active Poster
- Posts: 1175
- Joined: Fri May 30, 2003 1:00 am
- Location: Bowling Green, Ohio
Re: CV16 Wyvern
I'm afraid that I already know that she is a little asymetric. (Somewhat like her masterks8 wrote:Hopefully, one template will fit both sides.
Enjoy that moment with Wyvern.
I know what you mean by the thinking chair. It took me years to press beyond the fact that the bottom panels as drawn could not be made to fit. This one problem and the fear and inaction that it generated cost me years of sailing. I am learning to push on and push through problems rather than endlessly puzzling over them.
I fitted knees on the mid frame to support the centerboard case, I fitted and glued in the knees at the transome. I trimmed and glued in cleats at the edge of the fore-deck. I constructed a beam to be glued in to support the fore-deck. It did not have any more 3/4 long enough for this so I laminated a piece out of the 3/8 that I ruined in my first effort with the centerboard.
-
chrisobee
- Very Active Poster
- Posts: 1175
- Joined: Fri May 30, 2003 1:00 am
- Location: Bowling Green, Ohio
Re: CV16 Wyvern
Fabricated and glued in the transome knees.

Created the mast step and added knees to the mid frame to support the centerboard.

Glued in the support structures for the fore deck.

Created the mast step and added knees to the mid frame to support the centerboard.
Glued in the support structures for the fore deck.
-
ks8
- * Bateau Builder *
- Posts: 8403
- Joined: Mon Nov 24, 2003 1:00 am
- Location: NC USA
- Location: Now a much longer sail to Tampa Florida! Back to NC, Youngsville FM05tw
Re: CV16 Wyvern
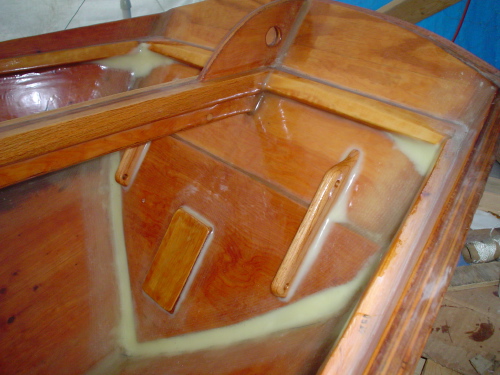
I think you had asked me earlier how much lead I put in the CB. Unfortunately, I didn't weigh the final finished board. I used #4 lead shot mixed in with wood flour and epoxy. You need to be careful to do your best to keep the shot below the fair line of the surface of the foil. You don't want to be grinding lead to shape.... dangerous to put lead particles up in the air and all over the place.
You can see the general size of the area that I filled in these pictures. Istill have the bag of leftover shot. I suppose tomorrow I could weigh what is left in the bag. I screwed a few silicon bronze screw into the wood to give the lead *pour* some more to grip to in the cutout. And of course there is biax on both sides of the board. The rudder has no lead in it, but I can tighten the rudder head cheeks to a tight fit that will still kick up in trauma.
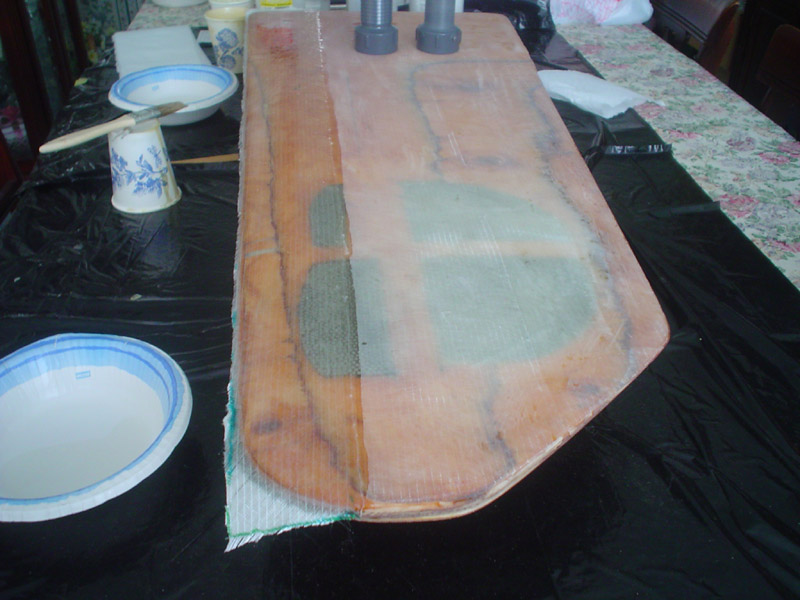
I first taped down some clear wrap, and then laid up several layers of glass over the foil shape, to make a foil female mold for the underside of the CB when I did the pour into the cutouts (hope that made sense). This female mold worked very well, again with clear wrap layer for the pour.
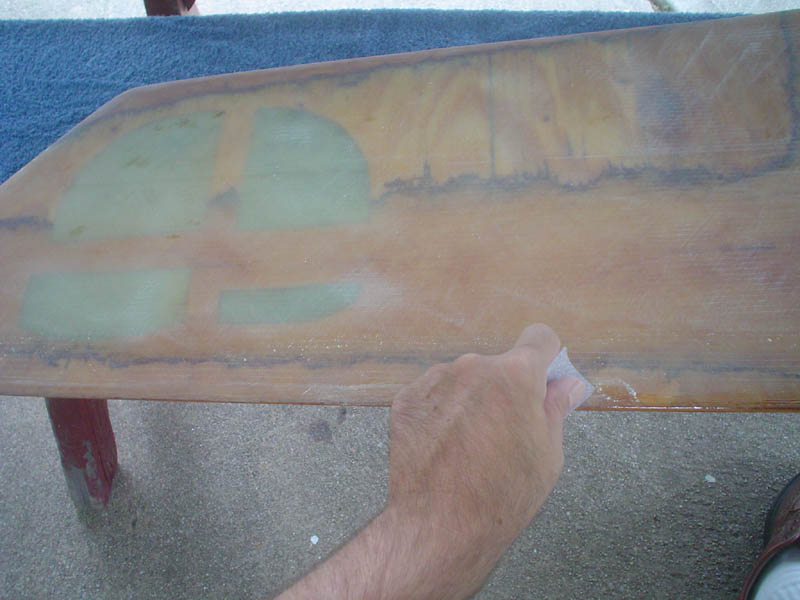
Another view to see how much area is filled...
This is the CB made from cheap wood. Still hasn't broken, but I'm sure it would have if I had not biaxed it with 12 oz, especially on that first very windy day out sailing. I left in the cross pieces because it was an epoxy filler lead shot pour, and it gave a little more support in the center of the mass, even though it forced a larger overall area for an equivalent amount of weight. The board will probably break before that lead ever comes loose, especially with the biax skin.
Both rudder and CB biax was also faired and final epoxy seal before primer. I slightly angled the trailing edges, per Evan's recommendation, to stop humming from vortices that spin off the edge. Neither CB nor rudder hum.
Don't mean to hijack here. Just wanted to answer the question about the weight in the CB. And I thought the answer would be best with a few pictures.
I'll see if I remember to weigh the lead that remains in the bag tomorrow.
You can see the general size of the area that I filled in these pictures. Istill have the bag of leftover shot. I suppose tomorrow I could weigh what is left in the bag. I screwed a few silicon bronze screw into the wood to give the lead *pour* some more to grip to in the cutout. And of course there is biax on both sides of the board. The rudder has no lead in it, but I can tighten the rudder head cheeks to a tight fit that will still kick up in trauma.
I first taped down some clear wrap, and then laid up several layers of glass over the foil shape, to make a foil female mold for the underside of the CB when I did the pour into the cutouts (hope that made sense). This female mold worked very well, again with clear wrap layer for the pour.
Another view to see how much area is filled...
This is the CB made from cheap wood. Still hasn't broken, but I'm sure it would have if I had not biaxed it with 12 oz, especially on that first very windy day out sailing. I left in the cross pieces because it was an epoxy filler lead shot pour, and it gave a little more support in the center of the mass, even though it forced a larger overall area for an equivalent amount of weight. The board will probably break before that lead ever comes loose, especially with the biax skin.
Both rudder and CB biax was also faired and final epoxy seal before primer. I slightly angled the trailing edges, per Evan's recommendation, to stop humming from vortices that spin off the edge. Neither CB nor rudder hum.
Don't mean to hijack here. Just wanted to answer the question about the weight in the CB. And I thought the answer would be best with a few pictures.
I'll see if I remember to weigh the lead that remains in the bag tomorrow.
-
chrisobee
- Very Active Poster
- Posts: 1175
- Joined: Fri May 30, 2003 1:00 am
- Location: Bowling Green, Ohio
Re: CV16 Wyvern
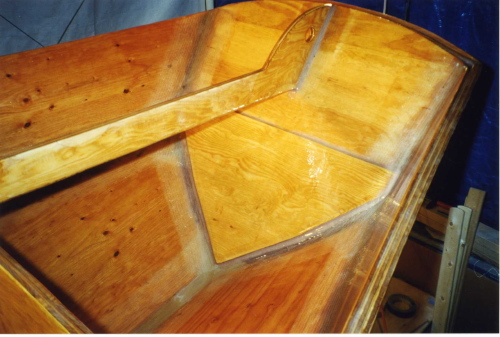
Well, I've wound up my boat building vacation. Tommorow I go back to work. I got the battery shelf installed in the cuddy.

I made patterns for all the seat fronts and the fore deck. I set out to make and attach the fore deck but it occured to me that I should finish the inside before buttoning it up. so I made and installed the battery shelf.

I shaped the centerboard and applied the first bit of biax. Next I will cut a hole in it and melt some lead.

I've got some of the seat cleats installed.

I made patterns for all the seat fronts and the fore deck. I set out to make and attach the fore deck but it occured to me that I should finish the inside before buttoning it up. so I made and installed the battery shelf.
I shaped the centerboard and applied the first bit of biax. Next I will cut a hole in it and melt some lead.
I've got some of the seat cleats installed.
-
ks8
- * Bateau Builder *
- Posts: 8403
- Joined: Mon Nov 24, 2003 1:00 am
- Location: NC USA
- Location: Now a much longer sail to Tampa Florida! Back to NC, Youngsville FM05tw
Re: CV16 Wyvern
Step at a time.
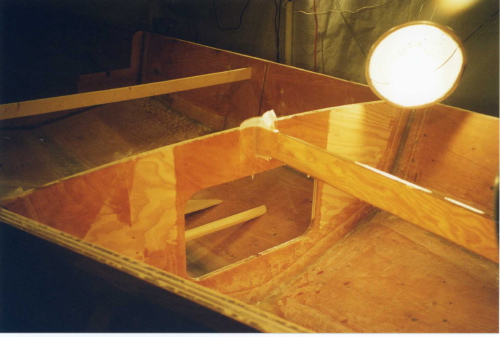
An observation... I see you have the forward chainplate curved stem piece on top of the foredeck template. I'm assuming you are adding that on top of the fore deck?
Here's the thought on that. The plans have that shape as part of the single piece foredeck support piece or *stem piece*. If your plans clearly changed this, ignore the rest of this. I know some builders deviated quite a bit from the plans in this area, but I never really heard how their variations held up long term. I actually managed to stay close to the plans on this one (other than my *flotsam jetsam addition and those small tiedowns in the cuddy).
I had 9oz tape on it there, in that picture, and added biax after the deck was on. No doubts about it being strong enough. Everything ties into each other nicely this way.
After the deck cleats were added, I could stand on it before the deck was even added. Though I don't recommend that, at least not until the deck is on and cured, since the rear attachment of the stem piece to the forward frame is greatly strengthened by the installed deck.
Since you don't have that curved piece as part of the support piece anymore, you might be losing some built in structure *vertical through strength* by simply biaxing it on top. The one piece nature of the stem piece *with* curve gave it lots of strength for the vector of force on it from the forestay. It still may be plenty strong, if I read your intentions right, but I do think that there was an intentional structure in the plans by having it one piece. You can probably gain most of that all back if you biaxed that upper curved piece (where the forestay lashings will go) to the foredeck support and forward transom now, before adding the deck, but you may need to make the curved piece a little deeper to pass through the deck thickness, and still make it up to the top of the bow transom. Then cut a notch in the fordeck for it to pass through, add the deck cleats on that support piece, and then thoroughly biax the front edge of the foredeck to the bow transom and the curved piece. I put extra biax right over the whole surface of that curved section over the predrilled hole so the glass really holds the entire section intact and in form, further preventing splitting. By then, you can probably easily lift the hull by it. But, bottom line, I am not sure how much intended structural strength has been lost by not having that curve piece included on the foredeck support piece from the very beginning on your build.
If Jacques isn't following this thread, I bet one quick email to him, with those pictures you recently posted, would put any questions to rest in less than a minute. If all the question does is show me as a worry wart and overbuilder, well, better that than having your forestay pop loose at the most inconvenient moment imaginable.
Very nice how that battery tray is adding strength to the bow section. I like it. Just make sure your access in the forward frame will be big enough for you to fit through to secure or remove the battery. Do some trial work with the battery (and bow eye fastening) without the deck on yet. I barely make it into my cuddy through the hatch, and it isn't particularly comfortable. I might even be able to contort myself completely in there and shut the hatch, but I'd likely need the jaws of life to get me out again! 
Wishing you opportune times in your schedule to press towards the finish.
An observation... I see you have the forward chainplate curved stem piece on top of the foredeck template. I'm assuming you are adding that on top of the fore deck?
Here's the thought on that. The plans have that shape as part of the single piece foredeck support piece or *stem piece*. If your plans clearly changed this, ignore the rest of this. I know some builders deviated quite a bit from the plans in this area, but I never really heard how their variations held up long term. I actually managed to stay close to the plans on this one (other than my *flotsam jetsam addition and those small tiedowns in the cuddy).
I had 9oz tape on it there, in that picture, and added biax after the deck was on. No doubts about it being strong enough. Everything ties into each other nicely this way.
After the deck cleats were added, I could stand on it before the deck was even added.
Since you don't have that curved piece as part of the support piece anymore, you might be losing some built in structure *vertical through strength* by simply biaxing it on top. The one piece nature of the stem piece *with* curve gave it lots of strength for the vector of force on it from the forestay. It still may be plenty strong, if I read your intentions right, but I do think that there was an intentional structure in the plans by having it one piece. You can probably gain most of that all back if you biaxed that upper curved piece (where the forestay lashings will go) to the foredeck support and forward transom now, before adding the deck, but you may need to make the curved piece a little deeper to pass through the deck thickness, and still make it up to the top of the bow transom. Then cut a notch in the fordeck for it to pass through, add the deck cleats on that support piece, and then thoroughly biax the front edge of the foredeck to the bow transom and the curved piece. I put extra biax right over the whole surface of that curved section over the predrilled hole so the glass really holds the entire section intact and in form, further preventing splitting. By then, you can probably easily lift the hull by it.
If Jacques isn't following this thread, I bet one quick email to him, with those pictures you recently posted, would put any questions to rest in less than a minute. If all the question does is show me as a worry wart and overbuilder, well, better that than having your forestay pop loose at the most inconvenient moment imaginable.
Very nice how that battery tray is adding strength to the bow section. I like it. Just make sure your access in the forward frame will be big enough for you to fit through to secure or remove the battery. Do some trial work with the battery (and bow eye fastening) without the deck on yet.
Wishing you opportune times in your schedule to press towards the finish.
-
chrisobee
- Very Active Poster
- Posts: 1175
- Joined: Fri May 30, 2003 1:00 am
- Location: Bowling Green, Ohio
Re: CV16 Wyvern
You really need to lighten up on your slavish conformance to the plans KS.ks8 wrote:Here's the thought on that. The plans have that shape as part of the single piece foredeck support piece or *stem piece*. If your plans clearly changed this, ignore the rest of this. I know some builders deviated quite a bit from the plans in this area, but I never really heard how their variations held up long term. I actually managed to stay close to the plans on this one (other than my *flotsam jetsam addition and those small tiedowns in the cuddy).
Hmmm.... I was thinking that this was in two pieces. It does make sense that it is one piece. I will glue on the forestay lashing point to my current brace and use biax to tape it all together and to the fore transom. I read in the plans that the brace should also be taped to the cuddy bulkhead as well as the fore transom. I will also add tape to the leading edge of the fore deck. and a bead around the stem piece on top of the fore deck. That should all result in a construction at least as strong as a piece of 3/4 ply.
Regarding the battery I intend on using a battery box and then looping a strap around the box and the shelf to secure the battery. I cleverly did not butt the shelf up against the fore transom for just this purpose.
I don't think anyone on the Bateau staff pays much attention the posts in this section. I think I could advocate all sorts of heresy and not get a single raised eyebrow. Fortunatly I'm quite conventional and apart from some minor details and a wee bit of overbuilding I'm going to be very close to the plans with my final boat. I do plan a scuppered inwale in addition to the rub rail show in the plan. I also plan a rail 1/2" thick by 2" with a rounded over leading edge at the cuddy bulk head. I am inspired by the beauty of the knees that I just recently epoxy coated and by my daughters disappointment that I planned on painting the boat. Therefore I plan that the rubrail, scuppered inwale. cuddy rail, the top edge of the both transoms and the knees all be finished bright. The hull will be bright yellow the interior bainbridge white. I think the fore deck will be yellow. I may leave the stem piece bright as well. After all I must be able to prove to the casual observer that this is a wooden boat.If Jacques isn't following this thread, I bet one quick email to him, with those pictures you recently posted, would put any questions to rest in less than a minute.
-
ks8
- * Bateau Builder *
- Posts: 8403
- Joined: Mon Nov 24, 2003 1:00 am
- Location: NC USA
- Location: Now a much longer sail to Tampa Florida! Back to NC, Youngsville FM05tw
Re: CV16 Wyvern
Yep, tape goes on that stem piece to forward frame bond...
and it is plenty strong once you add the cleats to the stem piece and forward frame, and then bond the deck on.
The bright work will add character, even when it gets scratched.
And I'm thinking your daughter may not object quite so much once she sees that bainbridge white in the interior. t will make things look very clean.
When you plan the dimensions of the scuppered inwale, consider future maintenance and refinishing, some gap that you can make a simple jig to *easily and joyfully* sand prep the inside edges and brush fresh clear. But that is a way down the road. I'm looking forward to seeing your seats added. They really define the interior space.
-
ks8
- * Bateau Builder *
- Posts: 8403
- Joined: Mon Nov 24, 2003 1:00 am
- Location: NC USA
- Location: Now a much longer sail to Tampa Florida! Back to NC, Youngsville FM05tw
Re: CV16 Wyvern
Approximately 5-7 lbs of #4 lead shot was epoxied into the CB. This is based on the weight of an unopened bag, and the weight of the remains of the bag I used. If you melt the lead and do a pour, you can get, I'm guessing, 30-40% more weight in there (but that is an operation that requires proper safety from the fumes and heat. As I said earlier, my board just barely sinks, and is also very difficult to pull up if the boat is not in the water. Perhaps 2 more pounds would have been perfect for a positive and quick board sinking, but then I certainly would need the 2 purchase system to raise it when out of the water. I've got a keel pad under the slot on the trailer to support the board in transit and while on the trailer.
-
chrisobee
- Very Active Poster
- Posts: 1175
- Joined: Fri May 30, 2003 1:00 am
- Location: Bowling Green, Ohio
Re: CV16 Wyvern
Thanks for the info on the lead that's a big help. The next task on the centerboard is to add the lead. I have everything I need. Perhaps this weekend. The weather needs to be nice as I will melt the lead on the patio. It all concrete and has a built in fire pit that I will use for the process.
Who is online
Users browsing this forum: Ahrefs [Bot] and 7 guests