Page 1 of 1
AR15 - Expensive Therapy
Posted: Thu Oct 02, 2003 8:27 am
by richstrat
OK, build time approaches, so I thought I'd start up a thread.
Plywood arrived yesterday - a real mix of sizes, I'm not following the BOM at all!
I'm building the hull skin in 4mm Okoume , decks, seats and soles in 6mm Okoume I managed to source the 10x5's for the cockpit, so less butt joining!
It all looks really good stuff, and I got the whole lot delivered to my door for £312 (7 off 8x4 4mm, 1 off 8x4 & 2 off 10x5 6mm & 4 off 8x4 9mm, all BS1088, Lloyds register Okoume),
I spent most of last night with sheets of ply on the dining room table marking out frames - I had no idea how much leaning over a sheet of plywood marking and measuring would make your hip hurt!!! Still I'm sure it's not the first ache / pain I'm going to get building this boat...
I'll post piccies when I've got something reasonable to post...
Rich
Yes, pls. post AR-15 pictures!
Posted: Thu Oct 02, 2003 11:11 am
by apexchaser
Rich:
It'd be great to hear about your experiences building the AR-15 and see pics of the process.
I'm building a C12 as a first project, and hope to follow it up with an AR-15, R550, or the new sportboat design that is rumored to be in the works by Jacques and crew.
Good luck and have fun!
Felipe.
P.S. Anyone else have construction or completed photos of an AR-15 or R550?
Re: AR15 - Expensive Therapy
Posted: Thu Oct 02, 2003 12:32 pm
by jasonmcintosh
richstrat wrote:I spent most of last night with sheets of ply on the dining room table marking out frames - I had no idea how much leaning over a sheet of plywood marking and measuring would make your hip hurt!!! Still I'm sure it's not the first ache / pain I'm going to get building this boat...
Knee pads.
Knee Pads.
KNEE PADS.
Get some good (very good) KNEE PADS.
Jason
Posted: Fri Oct 17, 2003 5:11 am
by richstrat
It's getting closer - I now have all the materials I need to build - picked up the epoxy from CFS, best price I could find, may be worth a look for all you UK builders (only problem is they don't stock biax tape, so had to get that elsewhere)
Spent last night sorting out my 'boatyard' (garage), so I may even cut my first parts this weekend - piccies to follow when I start building!!!
Rich
Posted: Fri Oct 17, 2003 8:18 am
by fmiles
Hi Rich
http://www.epoxy-resins.co.uk/ can sort your Biax problem if you havn't already fixed that.
Tidying the garage is the worst part, only to muck it up again

Cutting out develops dust you wouldn't believe!
Posted: Fri Oct 17, 2003 8:59 am
by MikeS
Cut outside, build inside!

Posted: Sat Oct 18, 2003 1:59 am
by richstrat
Thanks guys,
Fmiles, yup, I found that epoxy supplies for the biax - CFS were significantly cheaper for everything else though!
I'd love to cut outside, but I live in a very densely packed urban area and the previous owner of the house decided they wanted a garage rather than a garden, so I'm kinda stuck with it. I guess I'll get the old vaccum hooked up the the power tools!!!
Rich
Posted: Fri Oct 24, 2003 3:42 am
by richstrat
OK, I've now finally started properly, just as the weather got cold!
Wednesday night, marked out the bottom panel and one set of side panels - cut and glued last night. I'm sure running 3kW of electric heaters overnight won't do my electricity bill any good, but the epoxy had set like rock in 10hrs...
Boat building week starts tonight! I'll have to dust off the digital camera!!!
Rich
Posted: Fri Oct 24, 2003 12:16 pm
by lstyles
Rich,
Please do post pictures for us novices. Also, if I read your post right you glued the side panels and bottom panel together before putting in the chine panels. I am assuming you attached these to atleast the transom and maybe some other inside frames. Why did you glue before stitching the chine panels in? Please excuse my ignorance but I have made my mind up to build this boat and I like to get different opionions on putting it all together. I have almost completed my D5 and only felt comfortable gluing when I had the whole thing together.
thanks,
Lori
Posted: Sat Oct 25, 2003 9:10 pm
by richstrat
Lori,
No - i had just cut the two halves of the panels and glued them together to make the whole panel. Things have moved on a little from there! Yesterday I cut all the frames, stringers and the two remaining hull panels. Second day in and I'm ready to stitch - 40 hours doesn't seem so unreasonable now! I'll take piccies as soon as it's daylight!!!
Rich
Posted: Sun Oct 26, 2003 12:08 am
by Rick
fmiles wrote:Tidying the garage is the worst part, only to muck it up again
Cutting out develops dust you wouldn't believe!
I think you mispelled "sanding epoxy and fiberglass develops dust you wouldn't believe."
HTH!
Posted: Sun Oct 26, 2003 12:15 pm
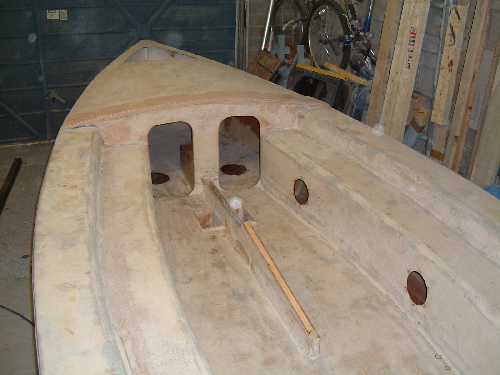
by richstrat
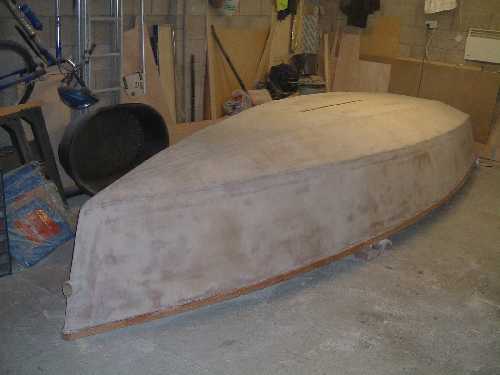
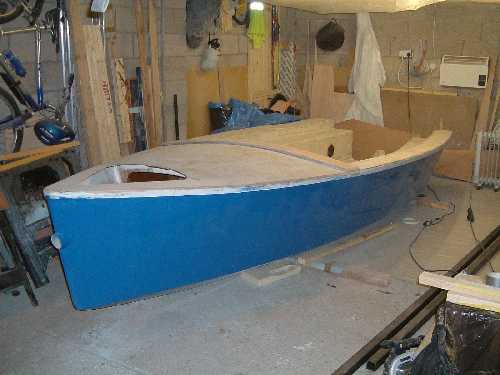
Well, two days into the build and here are the first of the promised photos.
I thought I'd post one of the redesigned transom. There are two layers of 9mm ply reinforcing the bottom (it's like a steel bar now!) I've also reshaped the seats a bit to give a 'split level' seating arrangement...
<img src ="modules/Upload/richstrat/transom 1.jpg ">
A few construction photos...
<img src ="modules/Upload/richstrat/bottom panel.jpg ">
<img src ="modules/Upload/richstrat/stitched up.jpg ">
<img src ="modules/Upload/richstrat/turned over.jpg ">
I'm starting to believe the 64 kgs - I can't believe how light it was to turn over!
Filletting and taping begins tomorrow!!!
Rich
Keep the pictures coming!
Posted: Mon Oct 27, 2003 12:17 am
by apexchaser
Rich:
Thank you for posting, and please keep those construction pictures coming! I'm about to start a c-12 as a first project one of these days, and will then move on to either an AR-15 or R550, so it's awesome to be able to see an AR-15 coming together...
Did you write that you're two days into the construction? and you've already got the hull stitched together? Wow you work fast. Did you start with a pre-cut kit, or cut the ply yourself?
Good luck, and looking good so far!
Cheers,
Felipe.
Posted: Mon Oct 27, 2003 2:09 am
by richstrat
Yup, two days in! And no, I didn't buy the kit!
Alright, that should be two days, plus two evenings cutting and gluing the hull panels, plus several evenings marking out the parts. I found that I could cut and sand the parts much quicker than I could mark them out. I should add that I am ably assisted by my glamourous assistant - my partner Fran. She may appear in a photo or two to come! It's our winter project, although at this rate it may just be our late autumn project
Rich
Looks great, congradulations!
Posted: Mon Oct 27, 2003 10:30 am
by Mike_D
Looks great, congratulations! I'd love to build an AR15 one of these days. My Caravelle is fun, but she's no 'rocket'. I wonder if I could use my Caravelle rig (larger version) on an AR15?
You can get a hull together pretty quickly, but I think you'll find your pace slowing when you get into more of the detailed work. I have a hunch building, painting, rigging and outfitting will keep you busy into the spring.
Best of luck,
-Mike
Posted: Tue Oct 28, 2003 12:18 pm
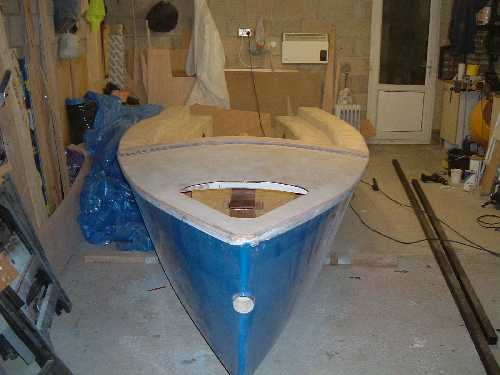
by richstrat
Well, 4 days in and we've got all the inside filleted and taped - tomorrow will be putting the centreboard trunking together and fitting that...
Here are the latest piccies...
The 'hired help' (plus the 'hired hindrance!')
<img src ="modules/Upload/richstrat/hired help.jpg ">
Couple of piccies of it taped up...
<img src ="modules/Upload/richstrat/taped.jpg ">
<img src ="modules/Upload/richstrat/taped bow.jpg ">
Rich
Posted: Tue Oct 28, 2003 12:31 pm
by lstyles
Great job Rich! Your fillets all look so even. How do you make them? How wide are they when they are done?
Lori
Posted: Tue Oct 28, 2003 12:49 pm
by richstrat
Well, they say the camera never lies, but in this case it does!

The fillets aren't really that even, especially the first ones I made towards the back, but here's what I do...
The fillets are actually very short chopped strands of glass - I couldn't find woodflour anywhere handy, so thought they would be pretty strong - posts by Jacques seem to be of the opinion that you can use them if you like - so I did!. Anyway...
I lay the fillet with a toungue depressor, as it's pretty fibrous, it goes on fairly easy. I don't worry about getting it too smooth at this stage. By the time I finish a 'compartment' it's just reaching the 'green' stage so I apply the tape immediately. I consolidate with a finned roller - it's got a diameter of about 20mm, so as you roll into the fillet it compresses it into a lovely round shape.
The two of us working together can fillet and tape a compartment in about 1 hour - we seem to have worked out a reasonable system - did twice as much today as yesterday...
HTH
Rich
Posted: Tue Oct 28, 2003 1:02 pm
by lstyles
Thanks for the info. Your method sounds good to me. I am still experimenting with what works best for me.
What is a "finned roller" by the way? Keep those pictures coming!
Lori
Posted: Tue Oct 28, 2003 2:12 pm
by LarryA
Rich,
That is looking awesome!!!!
Posted: Tue Oct 28, 2003 2:37 pm
by richstrat
Lori,
A finned roller is basically an aluminium tube about 10mm in diameter with fins about 4 - 5 mm long running the length of it - it is for consolidating fibreglass - may also be known as a paddle roller - I don't know if you can get them in the states - here's where I got mine
http://www.cfsnet.co.uk/acatalog/CFS_Ca ... s_121.html
Larry - thanks for the kind words - your advice is paying off now!!!
Rich
Posted: Tue Oct 28, 2003 4:45 pm
by BillyV12
Yes, they can be found here. West Marine, Hamilton's or Jamestown Distributors has them. And I'm sure others do, too.
http://www.hamiltonmarine.com/index.html
http://www.jamestowndistributors.com/cg ... ?E+scstore
Billy
Posted: Sun Nov 02, 2003 11:46 am
by richstrat
Well,
I'm here at the end of my building week and I'm fairly pleased with what I've acheived so far...
The hull is assembled, mast step nearly finished, centreboard trunking is installed, seat sides are in place and I've fitted the cabin floor...
<img src ="modules/Upload/richstrat/cabin.jpg ">
I thought I'd experiment with pigmented epoxy as the final coat in one of the side tanks - I think I can say it was a failure!!!
I've filled as much of the voids under the floor as possible with drink bottles - I will foam around these to give it the rigidity I want
<img src ="modules/Upload/richstrat/bottles.jpg ">
Here is the fitted floor - the holes are there to fill the voids with the foam
<img src ="modules/Upload/richstrat/floor fitted.jpg ">
As you can see, I've moved quite a way from the original design, but it suits my purposes better...
My back hurts now so I'm off for a long soak in the whirlpool!!!
Rich
Posted: Sun Nov 02, 2003 1:15 pm
by lstyles
Rich,
You are making tremendous progress. The plastic bottles are curious. What's up with that?
Lori
Posted: Sun Nov 02, 2003 1:31 pm
by DrBones
The bottles help you save on floatation foam.
Rich, I have a question about the bow area: Is that storage area, or a kind of cuddy cabin? - I can't make it out - looks almost to big for just storage.

If you don't mind, I'd enjoy an 'up close' pic of this area if you have one handy.
Btw, that is some superb work you are doing there. I'm really looking forward to see it finished

Thanks,
Stefan.
Posted: Sun Nov 02, 2003 2:05 pm
by richstrat
The bow area is kinda large, but that seems to be the way it was designed. I must admit I had the same thoughts about a cuddy - when the boat was upside down and I was crawling around threading the zip ties, I got into the bow area and realised that it was not far short of fitting a v berth! I'm 6ft 2" and my legs were very slightly bent to fit in. Perhaps Jacques should consider a stretch of the AR15 for this much promised weekender?
Anyway, it will turn out to be a very generous storage area, plus the spinnaker sock will fit under there somewhere...
Next photo session, I'll take a close up!
Rich
cleats
Posted: Thu Nov 06, 2003 10:22 am
by jlowy
Hi Rich,
Boat looks great...mine is still upside down waiting for me to tape the outer hull.
What size wood did you use for your cleats and what kind of wood is it?
Are you going to use the same type for the rub rail?
Jay
PS. Your pictures are really helping me see what I need to do and how it will look. Thanks
Posted: Thu Nov 06, 2003 12:12 pm
by LarryA
The bow area will be where the chute is stored when retracted.
There is a strong design reason for the fullness as well. If the bow does not contain enough fullness, it will bury going down wind creating quite a spectacular crash (bow goes in, stops, transom goes over the bow, crew goes flying - I will have to find the film loop of it out in internet land, seen a bunch of them). From what I have seen of Rich's pictures, it seems Jacques has taken a more conservative route, selecting a fuller bow to prevent such unfortunate experiences.
It is an interesting tradeoff. You want a fine bow to allow rapid acceleration and hence rapid transition to planing, but you don't want it so fine that downwind crashes are common. The i14 folks have developed a T foil for the rudder which they report greatly reduces the tendancy towards nose diving - don't think you need but an interesting tidbit.
pitchpole videos
Posted: Thu Nov 06, 2003 4:02 pm
by apexchaser
This is a little bit off topic from the AR-15, but to Larry's point about pitchpoling, here's a cool video of a cherub flying along (man, that's FAST sailing) until it hits a wave at just the wrong angle of attack, and then YARD SALE!
http://www.sailingsource.com/cherub/vid ... _jam_1.mov
It doesn't literally go head over heels, but you get the idea. Wild ride, huh?
I remember having come VERY close to pitchpoling on a Nacra 5.2 catamaran. We were flying along on a beam reach, lifting the windward hull in and out of the water, when all of a sudden we buried both bows, lifted the rudders out of the water, and sent both crewmembers flying forward like bait hanging from the trapeze wires...

It was pretty scary the moment it happened, but once we realized we were ok, we just burst into histerical laughter and high-fives. Talk about an adrenaline rush!
Posted: Thu Nov 06, 2003 4:33 pm
by jacquesmm
I never pitchpoled in a dinghy but did some spectacular loopings with a Hobie 16. It must be worse with a Nacra!
Posted: Thu Nov 06, 2003 6:37 pm
by apexchaser
Spectacular is a good word for it... I think we were VERY lucky we didn't go all the way over and nobody was hurt. The deceleration was astounding when we buried the bows!
Posted: Thu Nov 06, 2003 7:08 pm
by LarryA
Nothing like the feeling of going from 20 knots to standstill in a matter of seconds.. Especially when you ain't got no seatbelts

Posted: Fri Nov 07, 2003 3:40 am
by richstrat
To answer Jay's question,
The cleats are a mix of timbers. The simple straight cleats, bonded to the frames and stringers are nominal 1x1 pine (actually 3/4 x 3/4 by the time it's finished). From what I understand, they are just there to increase bonding surface area, so I wasn't that fussy about the timber I used for these.
The vertical seat sides have a double strip of 6mm ply bonded to them to create a ledge. This is because the seat sides are curved and I didn't want to distort that with a solid piece of timber.
I hadn't really thought about the rub rail other than planning on following Jacques recommendations (there's a first!
) - 3 layers of 6mm ply 38mm deep, all bonded together. I'm anticipating that it will be fairly difficult to match the sheer and the varying angles of the hull sides, so thin and flexible seems to be the way to go...
I don't think I would place too much reliance on the photos I've posted to guide you - as you can probably figure, my AR15 is quite significantly different to a 'stock' one (different seats, open transom, shaped cockpit sole - not parrallel as in the stock design, modified centreboard trunking and centreboard, plus I'm planning serious mods under the front deck, to the pole launch system and some changes to facilitate drainage)
Now Jacques, you can't post in my build thread without commenting on my modifications
Rich
Posted: Mon Nov 10, 2003 2:52 pm
by richstrat
Latest update:
I've had my first disaster...
The hull is on blocks at the moment. I was wandering along the sole doing a bit of sanding when I moved a little too far to the side - I capsized in my garage - how embarrasing

The problem was as I fell out of the boat my foot caught the side of the hull and as I'm building in 4mm ply, I ended up with a sizeable chunk of my hull missing! Still, picked up the missing piece, glued it back in and it all looks fine, bit ragged for a scarf, but it's plenty strong enough and under the rubrail anyway...
So, lesson learnt - light boats capsize easily
Anyway, here's what's happened since the last piccies:
Foamed under the cabin sole.
Fitted cleats (timber and foam) for the seat tops.
Fitted seat tops.
Fitted 'hiking level' seat sides.
Fitted rubrail.
I have to say the fitting of the rubrail was just about the most filthy, unpleasant job I've done yet - epoxy oozing everywhere, but it's on now and lookin fine, even if I do say so myself.
<img src ="modules/Upload/richstrat/bow.JPG ">
<img src ="modules/Upload/richstrat/hull.jpg ">
<img src ="modules/Upload/richstrat/transom1.jpg ">
Rich
Posted: Mon Nov 10, 2003 3:24 pm
by lstyles
More great pictures Rich! What are those white things (lines) along the edge of your lower seats. By the way, what is the reasoning behind the two level of seats?
Keep up the great work,
Lori
Posted: Mon Nov 10, 2003 4:22 pm
by richstrat
The white things are basically 2 x 2 strips of foam sheet. It is bonded to the seat top and side - it is a hell of a lot easier to bond a piece of foam in the gap and then shape that to a nice radius than to do it in timber. It will be rounded over and then fibreglassed - hey presto, a lovely rounded seat edge.
The reasoning for the two seating levels is simply personal preference. When just pottering around, I prefer a boat that you can sit in, rather than on. My partner is a novice sailor and we have had many requests already to take novice friends out, so I wanted a boat that felt a little safer, when not really going for it...
Rich
Posted: Tue Nov 11, 2003 2:34 am
by fmiles
Rich, I am very impressed. You are making TREMENDOUS progress, and I certainly am learning oodles from your techniques (Foam mouldings for example!)
Trying to beat the weather before the cold snap sets in by any chance?! I am, its going to get pretty cold in the next 2 weeks

Posted: Tue Nov 11, 2003 3:10 am
by richstrat
I guess I'm in the fortunate position that I have fitted an electric heater in the garage. It easily maintains 18 - 19C with current ambient temperatures, so I'm hoping that even if the weather does turn really cold I can carry on using epoxy...
Actually the reason for the haste is that I've kinda promised to gut and re-build the bathroom in my partners house over christmas and I want the boat finished by then or I'll be really grumpy being drawn away from my pet project!!!
Rich
Posted: Tue Nov 11, 2003 3:30 am
by BrianS
Rich,
When you've finished with the boat and the bathroom, I'll fly you first class over to Florida for a week, and you can finish my boat for me!!!
Great work on the boat, and great pic's too.
Posted: Tue Nov 11, 2003 9:52 am
by LarryA
Rich,
You are doing an awesome job and great photos. One suggestion. Make sure you have worked out your running rigging before you seal everything up. On a performance boat like that, you don't want lines running all over the false floor because you WILL trip over it at some crucial moment and send you and your favorite crew swimming
Many times, control lines are run under the false floor or through the side tanks to keep them out of the way. I only bring this up now because you are doing such a great job, I would hate to see you have to cut things open to run lines....
I could propose a list of control lines to consider if you like.
Posted: Tue Nov 11, 2003 12:35 pm
by lstyles
Larry,
I am going to build an AR15 soon and I would love to hear about your rigging suggestions.
Lori
Posted: Tue Nov 11, 2003 4:20 pm
by richstrat
Larry,
That would be helpful, thanks...
I think I've got most of them figured - I'm planning on using the centreboard trunking sides as a control centre, plus I've got 6 inspection hatches to fit so the side tanks will be totally accessible, but it would be useful to get your views on what should go where!
Cheers,
Rich
Posted: Wed Nov 12, 2003 10:23 am
by LarryA
Wow, I stuck my foot in it this time

(haha)
Will try to get that together today for you....
Posted: Wed Nov 12, 2003 10:45 am
by richstrat
OK, maybe I should try to take the pressure off and explain some of what I plan to do...
Halyards will all exit above deck and be routed / cleated on the main bulkhead at the front of the cabin. I may run the spinnaker halyard along the side of the centerboard trunk as this will be used more frequently than the jib / main halyard.
Jib roller reefing line - probably run under the foredeck and cleat off on main bulkhead, by side seats.
Pole outhaul will run under the fore deck, out through the main bulkhead and be cleated either side on the centreboard trunk (will operate from both sides)
Pole retraction will be automatic - bungee
Spinnaker / jib sheets will run over the decks to the fairleads
Mainsheet will flop around on the deck!
Boom vang - undecided. Will either just operate it from the base of the mast (fine for pottering) or will direct it down the front of the main bulkhead and along the side of the centreboard trunk for easier access.
The spinnaker clew line will run down the tube, out through the main bulkhead and again along the side of the centreboard trunking.
Cunningham and mainsail outhaul will be operated from the mast / boom respectively
Essentially I will be having a stack of lines running along the side of the centreboard case, through fairleads, to a cleating centre towards the middle of the cockpit. I may build a mini console at this point to give a little more space for the cleats - not quite decided yet...
That's how I see it anyway - comments gladly received
Rich
Posted: Wed Nov 12, 2003 10:59 am
by LarryA
The big question is are you planning to race or cruise? Today racing skiffs do not have main and jib halyards, they are rigged laying on their sides (just as an example).
Posted: Wed Nov 12, 2003 11:12 am
by richstrat
Let's face it, the AR15 is very new, I doubt there are any currently on the water in the UK and even if there were and a PY number had been allocated, I've moved so far from the original design that I doubt I would be allowed to race even if I wanted to.
My requirements from the boat are:
Modern looks - AR15 has them
Good performance, without being extreme - I'm led to believe the AR15 has this
Comfort for up to 4 people - the cockpit is certainly big enough for this.
I'm after a boat that I can potter about in, maybe even a bit of dinghy camping, but when I'm in the mood, I can get her to fly. I think the basic design and the mods I've made tick all the right boxes.
Short version: I plan to cruise (albeit quickly
)
I don't think the AR15 is a skiff. Maybe in terms of weight, but as I go through the building process, I'm struck by how much this seems to be an update of my good old Wayfarer - just my view though!!!
Rich
Posted: Wed Nov 12, 2003 12:16 pm
by lstyles
Larry,
Can you explain what you mean by "rigged on their sides"?
Lori
Posted: Wed Nov 12, 2003 12:33 pm
by jacquesmm
lstyles wrote:Larry,
Can you explain what you mean by "rigged on their sides"?
Lori
Flat, on the ground. The boat is rolled on it's side and rigged.
Posted: Wed Nov 12, 2003 12:43 pm
by lstyles
Given the weight of the AR 15 this seems a reasonable approach to rigging even if just cruising. What do you think Jacques?
Lori
Posted: Wed Nov 12, 2003 2:49 pm
by LarryA
richstrat wrote:OK, maybe I should try to take the pressure off and explain some of what I plan to do...
Halyards will all exit above deck and be routed / cleated on the main bulkhead at the front of the cabin. I may run the spinnaker halyard along the side of the centerboard trunk as this will be used more frequently than the jib / main halyard.
I fully expect this to be an evolutionary discussion so .... First crack (and these are just my opinions
).
A "Cruising" configuration it is (I would reconsider halyards because halyards are really long and hence prone to foulng and generally unuseful while under way).... Of course, no halyards makes anchoring out a bit tough.....
I would run the halyards out the bottom of the mast and around blocks to the trunk area where they would be attached to a mechanism that allows some purchase (4:1 minimum) for tensioning, particularly for the jib halyard so you can control headstay sag.
Jib roller reefing line - probably run under the foredeck and cleat off on main bulkhead, by side seats.
You may find you don't use this as often as you think you will. As you raise your chute and bear off, you will discover that your apparent wind will be dominated by the speed you acquire so you will be closer to the wind than you realize and as such the boat will never really be going downwind. This is why assymetricals work better for skiffs but you still see symmetricals used on occasion in IACC type boats that can't generate significant apparent wind (partly untrue but rather complicated they can but not under all conditions). Symmetricals are better deep but skiffs never really go deep downwind (I hope this makes a bit of sense). But if you don't sail it like a skiff, then you may find this arrangement works for better for you (some things are better chosen by the builder
). Also if you intend to stop and anchor much, it may be helpful I will certainly concede (even though it adds some weight).
Pole outhaul will run under the fore deck, out through the main bulkhead and be cleated either side on the centreboard trunk (will operate from both sides)
Pole retraction will be automatic - bungee
that is a reasonable location except I would stop it at the main bulkhead, you are getting a pretty messy trunk right now
. The only suggestion I would make is that the pole launch and spinnaker launch could be the same line at which point you may wish to run it back to the helm. The crew is responsible for keeping your boat on its feet and often, the chute drastically changes the balance when first launched. A crew focused on raising said chute is not focused on balancing the boat and that could lead to a swimming adventure.. The helm is generally just sitting there anyway (ok, I steered the boat, you wanna get that stupid sail up some time today - it's not like it weighs anything for goodness sakes (haha - needed a bit of humor here)) so why not make him do something
Spinnaker / jib sheets will run over the decks to the fairleads
The sheets are a philosphical debate. Obviously jib sheets run over the deck to fairleads and blocks. The blocks (or cars if you prefer) should be adjustable by lines to pull them back and bungee to pull them forward. The hard part is where the jib sheets run from there. Hard?? you ask? Yes. Current idealogy (chose word carefully) is that the crew on the trap holds the main sheet. Why? The main is what generates a majority of the side force, the same force that holds the guy on the trapeze out of the water. So, it seems intuitive to give him complete control over hull trim rather than 1/2 of it and the other 1/2 to the helm. The crew also has more time to look up and down the main than the helm.
For a cruiser, sure, jib sheets to the crew and mainsheet to the helm with appropriately placed cam cleats.
Boom vang - undecided. Will either just operate it from the base of the mast (fine for pottering) or will direct it down the front of the main bulkhead and along the side of the centreboard trunk for easier access.
vang is a good thing to have double ended at immediate reach of whomever is in control of the main. The less reaching one has to do the better. And the vang can be used to help adjust the amount of side force on the sail. I guess it is marginal in that it needs to be there but if the reach is a bit more than immediate, it is not really going to kill you.
The spinnaker clew line will run down the tube, out through the main bulkhead and again along the side of the centreboard trunking.
I would keep that one under the main bulkhead, rarely used and in the way, you may even get rid of it someday for the all-in-one halyard..
Cunningham and mainsail outhaul will be operated from the mast / boom respectively
You may want this to be double ended at the sides as well. You don't want to be moving around alot while tweaking these lines - cunningham more than outhaul.
Essentially I will be having a stack of lines running along the side of the centreboard case, through fairleads, to a cleating centre towards the middle of the cockpit. I may build a mini console at this point to give a little more space for the cleats - not quite decided yet...
That's how I see it anyway - comments gladly received
Rich
A MiniConsole - you should look at the Newport built Flying Dutchmans of the late 60s/early 70s - they had exactly that, a miniconsole just behind the trunk. It was later deemed undesirable and many were removed - they get in the way of people moving around to control boat trim.
Have you considered barberhauls which move the jib in and out? Also jib downhaul which attaches to the clew and tensions it, most useful if you don't have a halyard but alas, it still is good for fine luff adjustment.
I think I have put enough disclaimers in here that it should not offend anyone so I look forward to more discussion.
Maybe I should buy a set of plans and build an all out racer to tote around
I am hopeful that Justin will also jump in here to pose other views, I have developed a healthy respect for his opinions over the years here at the forum as we have not always agreed about such things and he has a lot of experience as well and I think another viewpoint would benefit all.
Posted: Wed Nov 12, 2003 3:10 pm
by richstrat
Wow,
OK lots for me to think about there... Thanks Larry!!!
Posted: Fri Nov 14, 2003 6:34 am
by richstrat
Regarding the centre console, here's where I got the idea...
It's the Laser Stratos (don't know if you have these in the states) - actually it's been the inspiration for quite a lot of my mods...
Anyway, I don't plan on having the console anything like as large as this, just big enough for a couple of through 'deck' fairleads and a selection of cleats...
<img src ="modules/Upload/richstrat/centre20console.jpg ">
<img src ="modules/Upload/richstrat/pup20from20astern.jpg ">
There are a load more rigging piccies of a Stratos on this website - I've found this to be fairly useful to me...
http://www.beveridges.pwp.blueyonder.co.uk/Rigging.htm
Rich
Posted: Fri Nov 14, 2003 8:39 am
by LarryA
Great photos. If you have seen it work, go for it.... There are SOOO many ways one can do these things and none are right.
I remember once Augie Diaz (famous FD sailor) had his boat ready for a race and one of the other FD'ers came by to see how he had some of his rigging done. He looked down and could not figure out what one line did. Grabbed it and as he pulled looked up at Augie and said "what's this one due". Augie could not recall so they kept pulling, about 10 feet of line later, out came the other end, attached to nothing.
So enjoy the process. Given that you are at Plymouth, you may want to see you can find a Cherub to look at for some more ideas, I believe there are a few in that area.
Posted: Fri Nov 14, 2003 8:45 am
by richstrat
I'm finding this discussion really useful - I'm picking ideas from everywhere at the moment...
I'm hoping that by the end of this weekend, I'll be in a position where I can start to dry fit some of the controls and see how they work out for me. It's really difficult to try to figure out where lines will run in your head (well, my head anyway
)
I think it's probably a little too late in the season to spend productive time skulking around dinghy parks, but if this storm blows out (82mph gusts recorded this morning), some brave souls may venture out this weekend, so I may try to have a look...
Rich
Posted: Fri Nov 14, 2003 8:59 am
by LarryA
I just checked the UK Cherub calendar, they have some races scheduled for this weekend and every weekend to mid december. It may be worth while to ring them up and see what they have to say.
Posted: Fri Nov 14, 2003 11:01 am
by jacquesmm
Not just call: go to the races and look at the boats on the parking lot. You can learn a lot from looking at how they rig their boats. And often they like to talk.
Posted: Fri Nov 14, 2003 11:06 am
by LarryA
The UK Cherub folks are about the nicest folks I have ever chatted with. If one were to call them, it would almost certainly end in a "come on by the house" (well probably not because that is an american saying but whatever the equivalent is - meet me at the pub around the corner perhaps
). I really did not mean call them and leave it at that, poor wording on my part.
Posted: Tue Nov 18, 2003 3:50 am
by richstrat
Second disaster...
I fitted the 'hiking level' seat tops - 6mm ply, bonded to the tops of the frames and the gunwale, with a 1 1/2" gap all along the front edge. The plan was to fill the void with foam, leave it expand out through the gap then shape it.
So, I merrily poured the foam into the first three compartments, was about to mix for the last compartment, when Fran pipe's up, 'Is it supposed to be bulging like that?'
The foam had lifted the edge of the seat, next to the gap, by almost 2" - I can't believe how hard this stuff expands. Oh well, out with the circular saw, cut out the offending excess foam, glued back the wood on one compartment and simply shaped the foam for glassing over on the other compartment.
Visually, it's a mess until it's painted, but it's smooth...
It reminded me of a story I read out there in internet land once...
http://www.diyfaq.org.uk/humour.html#foam
Other progress:
The mast step is nearly finished, installed my modified pole launch framing and the front bearing, glued cleats to frame A + B to fit the deck, faired and glassed port side seats.
Photos to follow (I'm too embarrassed about my side deck cock-up at the moment to take any piccies)
Rich
Posted: Tue Nov 18, 2003 5:15 am
by fmiles
Good to read some info on foam. Never having used this stuff before, I will definately benefit from your experience.
My motto: You only learn from mistakes.
Must admit, I though your link was hilarious, almost fell of my chair!
Posted: Tue Nov 18, 2003 8:15 am
by Deltaskipper
Great link! Sounded like something that would happen to my brother-in-law.
Posted: Tue Nov 18, 2003 2:09 pm
by richstrat
OK, latest piccies...
My slight accident - now repaired...
<img src ="modules/Upload/richstrat/glassedrepair.jpg ">
Couple of piccies of the bowsprit arrangement (not yet completed)
<img src ="modules/Upload/richstrat/bowsprit.jpg ">
<img src ="modules/Upload/richstrat/bearings.jpg ">
<img src ="modules/Upload/richstrat/bearings1.jpg ">
Got the other side tank faired and glassed tonight - maybe do the floor later on this week...
Rich
Posted: Tue Nov 18, 2003 2:27 pm
by LarryA
I don't see any stinking accidents
The first Javelin I built, I got a little over zealous with the power sander and had a really nice wobble in on of the chines..... Lesson learned.....
I think I have said in other posts, there is no such thing as a perfect boat. Every boat I have built, at some point I have sat down and said "Eeeek, how to fix that boo-boo" - I defy anyone to show me a perfect boat.
Hobie 16
Posted: Tue Nov 18, 2003 3:17 pm
by JimW
Forward knee straight, aft knee bent.
Jim
Posted: Wed Nov 19, 2003 10:50 am
by richstrat
Sails arrived today - looks like I'll have to get a wiggle on
Rich
Posted: Wed Nov 19, 2003 12:59 pm
by LarryA
richstrat wrote: looks like I'll have to get a wiggle on
Hmm, that sounds painful and possibly dangerous to one's health

.... I recall once making an interesting reply to the I14 list as someone had written a phone number "on the back of a fag pack" and was unable to locate it and hence was looking for the sailor. I naturally had a colorful retort (which is not really repeatable on a family oriented forum like this one).
Posted: Wed Nov 26, 2003 9:57 am
by calidad
Hello richtrat,
I've seen your work and looks impressive. I have the AR-15 drawings in paper and in CAD format. I had some problems on getting the plywood here in spain because the thin boards are very difficult to find. Now I hope to start soon the construction of the AR-15.
I have one question: before I purchased the CAD drawings I played around with a 3D cad system to see If I would be able to have the flat panels from this 3D models and I could not. The problem was in the bow, the chine panel was twisted so much that the surface was not developable. With the purchased CAD files I see that the edge of the bow would be comprised of 639 mm of the upper side panel, and around 40 mm of the chine panel, and this panels would be perfectly aligned.
But in your photographs, it seems that the chine panel bow edges meets one against the other continuing the end of the bottom panel, so the straight edge of the bow is only the one of the upper panel.
Can you confirm it ??
Posted: Wed Nov 26, 2003 10:08 am
by jacquesmm
The developed panels are included in the plans, why do you try to develop them again?
It is not an easy procedure and not two CAD systems are going to use the same algorithm. Some programs are really bad: they will develop things the wrong way and you would not be able to build the boat from it.
Use our developed panels: thousands of boats have been built from my developed panels without problems.
If you try in ACAD from our DXf files, you are in troubles.
Even with a good development program, it takes serious practice.
I develop panels in CAD since 1986 and still encounter problems.
Posted: Wed Nov 26, 2003 10:15 am
by richstrat
I struggled with this one as well (so did Jay, who is building an AR15 in California).
I cut the panels as per the plan, but I couldn't seem to get them to fit - the bow just had too much material, unless the chine panel was twisted almost through 90 degrees to meet the bow.
This was discussed in a previous thread
http://bateau2.com/modules.php?name=For ... f87996498d
Essentially I cheated - I'm sure it was the wrong thing to do, but just couldn't see how I could get the chine panel to twist around to fit, so I trimmed them to size and they seemed to fit OK. The bow looks OK to me, it seems nice and fair, so again, I'm not that bothered by my building stuff ups!!!
Rich
Posted: Wed Nov 26, 2003 10:56 am
by calidad
Hello,
Jaques, the reason for trying to develop the panels was only playing around until I get the materials. It is hard to say that in spain there is no amateur building of no kind (boats, houses, etc ...) and I have tried with around 20 ply suppliers and for 10 mm or more thick I can find a lot of suppliers, but for less than 10 mm it is almost impossible.
Nevertheless, it seems that other people has suffered similar problems in the reality than I had in the 3D model. If ritchstrat has to change the dimensions in the bow, then perhaps there is a problem in the plates.
So ritchstrat, if I cut the panels as in the drawings and I have problems in the bow, Can I use this panels cutting them so they fit as in your photo, or do I have to take into account before I cut the panels ??
Posted: Wed Nov 26, 2003 11:12 am
by richstrat
First things first - I'm not sure my 'trim to fit' approach was correct, and I don't want to recommend that you do this, but as I said, I couldn't make sense of the end of the panel shape. They fitted just fine up until about 4 ft from the bow, then the squared off end of the panel just didn't seem to work. Maybe Jay will jump in here and explain exactly what he did...
I would suggest that you cut the panels as per the plan and see if you can get them to fit. I certainly don't have any dimensions for you to use to cut out the panels as mine have ended up. All I did was fitted them in place, marked out where they were too big and then trimmed them to fit, initially with a circular saw, then with a belt sander, until I was happy with the fit. It took me about 2 hours in total.
When I get a moment, I will post a close up of how the panels come together with the tape removed. If I can, I will sketch on this image how the panels initially went on, to help explain (picture tells 1000 words and all that...) although this will be from memory and so not 100% accurate
Rich
Posted: Wed Nov 26, 2003 11:28 am
by jacquesmm
I went back to the model and everything is correct but there is a very small area at the bow that requires compounding in the chine panel
in theory.
It happens at the last 3 or 4 inches but only IF you try to get a tight fit within let's say 5 mm.
From the previous thread about that, you can see that the problem was solved when the stitches were loosened.
Now, let me explain something important.
<img src ="modules/Upload/jacquesmm/round_bow.jpg ">
The picture above shows the finished surface AND the lines. It is extracted from our original AR15 model. We lofted the surfaces from the blue lines but what we want to build is the green surface.
The dark blue lines are the ones who define the panels but the finished surface will be rounded. Rounded around the bow at least 1/2" (12 mm) and in profile 3" ( 75 mm). Without those radii, you would not be able to fiberglass the outside properly and also, it would look bad.
To create that surface, you start with the panels as designed and build the seams inside. During the panels assembly, you leave some play at the bow.
With the inside fiberglassed, you grind the outside to a nice radius as shown above.
The difference in length is significant: you grind one or two inches off depending on the spot. You can see that on the picture. And doing that, you eliminate the "problem", it becomes wood dust . . .

Richstart probably cut that radius before fiberglassing and that is fine too.
Maybe we should have shown that on the plans but I am afraid it would confuse people. Ideally, each panel should be shorter and builders should leave a nice gap like 1/2" (12 mm) but I am certain that if we show the panels that way, many builders will still go for a tight fit.
Our choice is to show the whole panel and grind it down.
It is one of those things that solves itself during the building.
If you try to get it perfect in theory, within 1 mm, it will not work but that compounded tip will dissapear, it is rounded down.
I will try to find a way to explain that in the building notes.
Just by curiosity, I measured how much to grind off: at the tip, lower edge of chine panel, it is 58 mm, 2"+.
Posted: Wed Nov 26, 2003 11:38 am
by calidad
Thanks a lot, with this explanation I understood the 'real' way of doing this part.
Posted: Wed Nov 26, 2003 11:53 am
by richstrat
Some coincidence there - I found the panel to be 'too long' by about 2"!!!
I still have to round off the bottom corner of the bow , but I've got so much epoxy and filler in there, I'm sure it will all work out!!!
Cheers,
Rich
Posted: Wed Nov 26, 2003 11:57 am
by jacquesmm
Sorry if it took me so long to understand the problem. I am so used to cut those radii that I don't think about it anymore.
If you are using Rhino, you can probably extract a valid panel with those corners cut but I don't know of any other program that can do it.
The lower tip is trimmed with a surf extruded from an arc with a 3" radius, the bow is filleted at 1/2".
I may have done that boat in metric BTW, can't remember.
Posted: Wed Nov 26, 2003 1:50 pm
by lstyles
Okay I am a little dumb! Reading the previous posts about grinding off the lower end of the bow has me confused. Jacques, you say to go ahead and cut it the way it is in the plans and then make seams on the inside but "leave some play" at the bow. I dont understand this...do you mean to say dont epoxy the seams at the end so after you grind you can fill it when you have good shape....Or am I misreading this. It would seem difficult to do the inside seams if the two lower side panels are sticking out the end of the bottom panel. But maybe that is where the play is. I really want to understand this as the AR15 is my next boat.
thanks and I apologize in advance for being dumb,
Lori
Posted: Fri Nov 28, 2003 11:37 am
by calidad
Hello ritchstrat,
I have another question: did you use the dxf files for cutting the ply with laser CNC. I ask you this because I have some problems with the files. The person who is going to cut the ply says that these files can not be used in a laser CNC because something with the scales, or something missing inside the files. Had you any problem??
Posted: Fri Nov 28, 2003 2:47 pm
by richstrat
I cut all the parts by hand - it took me about a day! All part of the fun as far as I'm concerned!!!
Rich
Posted: Sat Nov 29, 2003 12:31 pm
by jlowy
I had the same problem with way too much twist to get it to align properly when tight (I know, it shouldn't be tight:)...and I am now very happy to read Jacques reply with picture. This is one area that has kept me up late at night thinking "what the heck did I do wrong". To make matters worse (or better), I saw Rich's pics and thought that I totally missed it. (Rich, the boat looks great and I love the modifications, I wish I started mine after yours to take some of them into my design). After seeing your progress, I am getting motivated to get out in the garage again (it's been 3 months since I worked on it)
I am now going out to the garage to grind away.
Posted: Sun Nov 30, 2003 12:21 pm
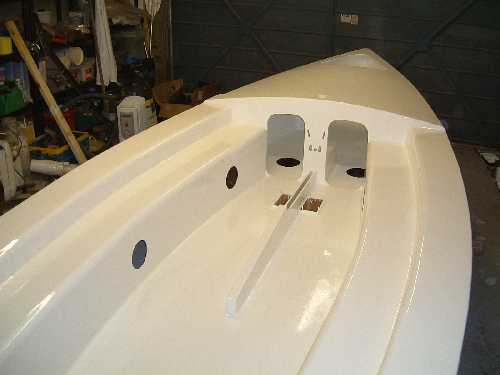
by richstrat
Another weekend over and yet more progress!
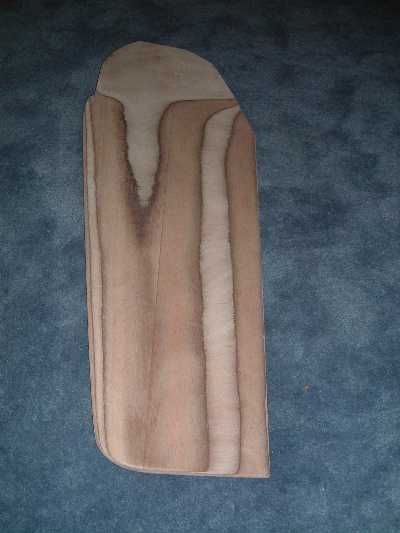
First off, the piccies of the chine panels at the bow - as I said it's not how Jacques intended, but it worked for me...
<img src ="modules/Upload/richstrat/faired chine panel.jpg ">
Here's the same image with an approximation of how the original panels looked - as I said before, it's from memory, so probably not 100% accurate...
<img src ="modules/Upload/richstrat/chinelines.jpg ">
So, the progress over the past week has included, finishing off the spinnaker pole bearings
<img src ="modules/Upload/richstrat/faired bearings.jpg ">
Flooring in the under deck area so any water that gets in through the spinnaker pole or spinnaker storage chute can drain out through the cockpit and the open transom...
<img src ="modules/Upload/richstrat/faired floor.jpg ">
Finished off fibreglassing the cockpit and have just spent the past 2 days filling, fairing and sanding
<img src ="modules/Upload/richstrat/faired cockpit.jpg ">
So here it is as stands!
<img src ="modules/Upload/richstrat/faired bowsprit.JPG ">
Next step is to order my paint - I want to paint under the deck before I fit it - it'll be a pain to paint from inside, having to squeeze through the holes in panel B!!!
Rich
Posted: Wed Dec 10, 2003 3:06 pm
by lstyles
Jacques,
I wanted to repost a question from this thread that didnt get answered:
"Okay I am a little dumb! Reading the previous posts about grinding off the lower end of the bow has me confused. Jacques, you say to go ahead and cut it the way it is in the plans and then make seams on the inside but "leave some play" at the bow. I dont understand this...do you mean to say dont epoxy the seams at the end so after you grind you can fill it when you have good shape....Or am I misreading this. It would seem difficult to do the inside seams if the two lower side panels are sticking out the end of the bottom panel. But maybe that is where the play is. I really want to understand this as the AR15 is my next boat.
thanks and I apologize in advance for being dumb,
Lori"
thanks!
Posted: Wed Dec 10, 2003 10:56 pm
by jlowy
Lori,
This probably won't help much to answer your question but I will give it a shot.
I tried to make it all fit perfect at the bow and it just wasn't going to work. I ended up with a really tight fit and it didn't seem to line up as perfect as I was expecting. I went ahead and taped the inside. I turned the boat over and per Jacques instructions, took the grinder to the bow and formed the radius he illustrated in a previous post. He was right...there was at least three inches of material that ended up being turned to dust. Guess what...that 3 inches happened to be the part of the chine that was all twisted tight and ugly. It came out great.
So, keep it loose with the straps, tape the inside, and grind away on the outside.
I will try to get some pictures up one of these days.
Jay
Posted: Tue Dec 30, 2003 11:43 am
by LarryA
Lori,
Jacques was attempting to explain something that is really hard to explain with out having experienced it once or twice.
Basically, the bow comes to a fairly sharp point. So when you fill it, you get a fairly deep amount of filler in there - it does not require a lot of filler because the volume of the stem is small but it is deeper than most of your fillets. So what Jacques is saying is, assemble it with the plan sizes, fill the bow seam and then grind off the excess and you will have a nice shaped bow.
Sometimes, these things are not really scientific or precise and that is the beauty of stitch-and-glue construction - things don't have to be perfect. I hope that makes more sense. If not, perhaps some photos would help.
Posted: Wed Dec 31, 2003 11:06 pm
by BrianS
Good answer Larry.
Posted: Tue Jan 06, 2004 10:47 am
by richstrat
Just a quick update...
Not much has happened over the past few weeks, as I said in a previous post, I had to renovate my partners bathroom over christmas. It turned into a bit of a monster job, but it's nearly there...
The little progress I have made is as follows:
Turned the hull over with the assistance of my family on boxing day - boy has this boat put on weight!!! (I know it's my fault entirely).
Had a go at grinding some of the seams smooth. I'm finding it a bit difficult to judge how much to sand off the chines - I don't want them to wobble, but i'm finding in places where the epoxy hasn't gone right through the join, the power sander takes the wood back too quickly - it may be a long hand sanding job...
So when's zap file upload coming back!!!
Rich
Posted: Sun Jan 11, 2004 11:02 pm
by Johnmon
Rich,
I noticed that you have your spi pole coming straight out the bow. Is that your mod or an option in the plans?
Posted: Mon Jan 12, 2004 4:45 am
by richstrat
It's my mod.
Reasons behind it....
1. I just couldn't figure out the plans - the retraction system just didn't make sense to me.
2. According to the plans the retracted pole fed into the starboard side tank. If the boat went over to starboard, water could get into the tank with no way of draining it.
3. Gut instinct tells me the bow section is stronger than the side panel.
All the dinghys I looked at to try to figure out the retraction system had bow mounted poles, so I simply took some sketches and copied!
HTH,
Rich
Posted: Mon Jan 12, 2004 11:35 am
by Johnmon
richstrat wrote:It's my mod.
Sounds interesting. I like your seat mods too. I especially like the fact that these plans are so versatile that people feel comfortable making modifications.
Posted: Tue Jan 13, 2004 9:35 am
by richstrat
Latest update:
With bathroom renovations out of the way, I can get back on with the boat. As I said, we turned the hull over christmas, I've now filled and faired the chines and pre coated the entire hull.
Last night I sanded all the filling smooth and went over the hull to roughen up after removing the epoxy blush. I also taped the starboard chines and the bow - tonight I will tape the port chines and the transom. There's not really much to take piccies of at the moment (plus I can't seem to access the board at home - need to jot down the error message and see if anyone here can help!).
If I've got enough time, I'll start fairing the lumpy bottom. Hopefully have fibreglassed the hull by the end of the weekend!
Rich
Posted: Tue Jan 13, 2004 10:45 am
by Johnmon
richstrat wrote:If I've got enough time, I'll start fairing the lumpy bottom.
I'm not sure I quite understand how you got the lumpy bottom. Did it occur between the frames when you poured in the expanding foam? If so, could it be partially because of the bottles or too much foam or not enough vent ports...? Note to Jacques, could this be a problem with other builds or is it something that can be avoided in some way?
Posted: Tue Jan 13, 2004 10:54 am
by fmiles
Lumpy bottoms are talked about a bit here, Rich started a separate topic!
http://forums.bateau2.com/phpBB2/viewtopic.php?t=4087
Posted: Tue Jan 13, 2004 11:41 am
by richstrat
I thought initially I probably didn't have enough expansion holes, but having watched the foam expand several times I became less convinced.
As I tried to explain in the other thread, it seems to be the very last stage of the expansion that causes the problem.
The foam seems to set almost rigid - it certainly stops coming out of the expansion holes, but there is a very slight expansion after this stage, which causes the panels to bow out.
I think the only solution is to foam open voids then trim to fit, but this means you can't use bottles to save on foam and weight, plus it is difficult to accurately shape the foam - not a problem if you only want it for flotation, but if you are relying on the foam to add rigidity to a panel, this could be difficult...
HTH,
Rich
Posted: Tue Jan 13, 2004 12:33 pm
by UncleRalph
On my HM19 I used temporary compartment covers that had expansion holes and the underside of the panel was coverd with plastic. I then removed the temporary panels, filled in any voids with foam and put on the final panel. Because I removed the temporay panel after foaming I could see what was happening to the foam inside the compartment.
I think what happens is that the expanding foam does not really travel horizontally when it contacts the top panel. In other words, if there is too much foam in an area away from the expansion hole the foam does not really want to flow along the underside of the top panel to get to the expansion hole to reeive the pressure - it just pushes up on the top panel. Conversly, if there is a location without enough foam there is usually a void left there, even though there may have been too much foam somewhere else, because again the foam does want to move horizontally from one area to another. I don't know if that is clear or not. I also am not sure what the solution is to get a nice uniformally filled compartment.
Ralph
Posted: Tue Jan 13, 2004 4:11 pm
by Johnmon
I probably should post this on the other thread, but I wonder if pouring in smaller batches, possibly with the boat tipped, would solve it.
Posted: Tue Jan 13, 2004 6:02 pm
by flydangler
Over in the iboats forums (
http://www.iboats.com/cgi-bin/ubb/ultimatebb.cgi ) there are a lot of threads on foam. Just do a search on "Pouring foam".
Them what seem to consistently have the best results with foaming talk about pouring very small amounts only. They like using only 4oz to 6oz of mix at a time, and and really highlight the need for patience.
Those who've tried to figure out the total volume of foam needed and try to pour it in large amounts describe everything from fixable problems to total disasters like explosive destruction of portions of their boats due to pressure generated by expanding foam. Some experiences described on that forum really ain't pretty and a couple might qualify for consideration by the Darwin Awards committee.
Posted: Fri Jan 16, 2004 6:29 am
by richstrat
Sorted out the lumpy bottom - it took 2 evenings, two coats of filler, but I have to admit I was surprised at how little I used. I guess I used less than 1kg of resin and filler to bring the dips up level with the peaks. It needs a final sand, then I'll be ready to fibreglass the bottom...
Won't be doing any work this weekend - going up to Wales for the weekend so it'll have to go on hold again...
Rich
Posted: Sun Jan 25, 2004 3:41 pm
by richstrat
Latest update - got the hull fibreglassed and filled on Saturday, and spent a few hours (and many grip disks!) sanding the hull today.
Got a few little bits of tidying up, then a final fine sand then ready for paint! (Although I've got a bit of cleaning up before I can even consider paint...)
Rich
Posted: Sun Jan 25, 2004 9:36 pm
by BrianS
Looks great. You've come a long way
BrianS
Posted: Mon Jan 26, 2004 2:27 am
by fmiles
Rich, which Primer/Topcoat are you going to use? Single or two pack, and from where? I am at this stage, and Blakes seems to be a good option...
Posted: Mon Jan 26, 2004 3:26 am
by richstrat
I'm going to use a two pack polyurethane made by Jotun - it's a Norwegian company...
I found it on
http://www.boatpaint.co.uk - it's significantly cheaper than the International / Blakes product, so I thought I'd give it a whirl...
Specifically I'm using Jotun Penguin Speed Undercoat (a 2 pack polyurethane) and Jotun Penguin Hard Top (although they seem to be stuggling to get this these days - the range of colours is getting smaller all the time...)
HTH,
Rich
Posted: Mon Jan 26, 2004 11:52 am
by Dipadharo
Bet you can't wait to get sailing! Not long now. Looks very good - can't see any ripples.
good work, Robert
Posted: Mon Feb 02, 2004 5:55 am
by richstrat
Latest update:
I've finished my sanding, cleaned up the garage (with a bit of help from my compressor, blow gun and a gale!), put up tarpaulins around the boat (to help reduce the dust ingress) and given it it's first coat of undercoat.
It has shown up a good few imperfections, especially along the chines, so a bit of sanding tonight (followed by a damn good clean up) and I'll be ready to put on the rest of the paint. In the main though, I'm really pleased with the finish so far... Hopefully I'll have it done (2 more coats of undercoat and three of top coat) by the end of the weekend.
No piccies until it's finished (too many tarpaulins in the way
) - so you'll just have to guess the colour scheme!!!
Rich
Posted: Sat Feb 07, 2004 3:33 am
by richstrat
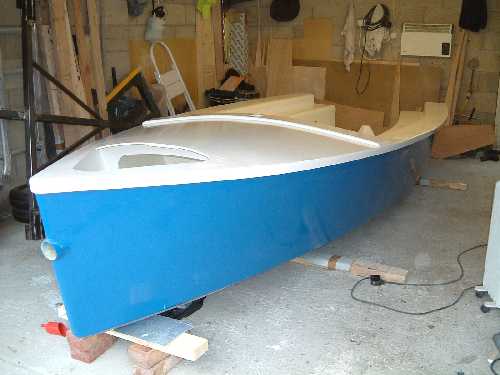
OK here are the piccies of the painted hull...

and another one
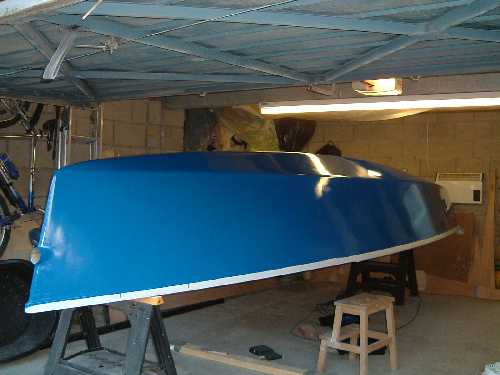
Thanks to the tips on how to finish the top coat, it's lookin fine. There are a few imperfections and bits of dust. I think I'll see how much they bother me before I decide whether to give a really fine sand and then finish with polishing compound or not...
Oh well, nothin' to do now - I'm going to wait at least a week for the paint to cure fully before I turn back over to finish the cockpit / deck. Maybe if I get really bored, I may start on the foils...
Cheers,
Rich
Posted: Sat Feb 07, 2004 10:46 am
by lstyles
Looks very nice Rich! I cant wait to see it when you turn it over and it is all tricked out. Keep those pictures coming...still cant decide on the AR15 vs R550.
Lori
Posted: Sat Feb 07, 2004 12:19 pm
by Johnmon
Rich,
That is looking sweet!
Posted: Sat Feb 07, 2004 1:05 pm
by BrianS
Rich,
That one Heck of a paint job. She looks good. Really good.
Foils
Posted: Sat Feb 07, 2004 2:20 pm
by LarryA
You may just consider buying the foils? The AR15 will be fast enough to make the foil shape important and relevent. The amount of time required to make a good board and rudder for a performance oriented boat is huge. But the UK cherub site has a great section under their boatbuilding pages on making high quality, high performance foils if you want to do it yourself. If it were me, I would contact Alex Vallings in Auckland, his company is
http://www.c-tech.co.nz and I know he ships to the UK regularly. I have done business with him in the past and he is very good to work with. I have built my own NACA foils and it is a pain in the booty. If you get going fast enough and your foil is not right, you can get ventilation of the rudder, bad vibrations etc. You may never hit that point but I would hate for you to spend a lot of time on a foils just to find out they have problems. The reason I say that is, if they start vibrating, it is a huge effort to figure out what is wrong.
Just my 2 cents (or some small fraction of a pound since the US dollars collapse
). Continue the great work...
Posted: Sat Feb 07, 2004 10:52 pm
by ArizonaBuilder
Rich,
You must be really smiling now... nice looking finish..
Posted: Mon Feb 09, 2004 8:03 am
by richstrat
Thanks for the kind words guys. The dust did bother me, so I've had a go at the hull with 600 grit, then 1200 grit wet and dry. I've gone over the hull with Farcela G3 compound - it's come up sooo smooth it's untrue, only thing is the hull is slightly satin finish with some fine swirl mark scratches. Hopefully some G10 finishing compound will sort that out.
Larry, I think I'll have a go at the foils myself - this boat is starting to live up to it's name, especially as I've decided to buy a brand new Proctor rig, rather than refurbish an old Wayfarer rig, so money is a bit tight at the moment... However, I will bear your comments in mind if I ever get the lard arsed thing up to high speeds and experience any untoward vibrations...
Cheers,
Rich
Posted: Tue Feb 10, 2004 11:43 am
by LarryA
Foils...
I think you will enjoy the process - it is tedious work but if it turns out well, it is worth the effort..... You may want to download one of the NACA foil programs to make your templates - there are several free ones for the 4 digit foils.
Posted: Mon Feb 16, 2004 5:34 am
by richstrat
Latest update -
I got a bit obsessed by the finish - but I'm happy (ish) with it now. She's now ready for turning and finishing the inside. That's happening on Friday - got all the family coming over - hopefully we'll have enough bodies, I reckon she's up around 110kgs at the moment! I think I'll build a turning frame to help me protect the paintwork.
I started work on the foils yesterday - the rudder is finished at the moment - it's a pain of a job - I'm dreading the centreboard!!! Oh well - roughing it out with an electric planer and then finishing with the random orbital seemed to work fairly quickly....
Easter Launch!!
Rich
Posted: Wed Feb 18, 2004 3:35 am
by richstrat
Just a quick piccy of the rudder - there is a cool discussion going on over in the Anything else section on foil shapes - still undecided where to go with this one, if / how to reinforce it etc...
The end profile...
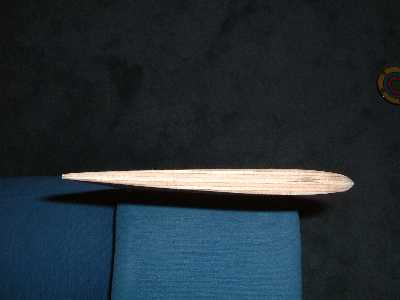
Built my frame to turn it over last night. I was getting paranoid about scratching the paintwork - I have to admit it was not easy turning it the first time, but now with paint on, I don't want to take the chance. I'll try to get a piccy up tonight...
Rich
Posted: Wed Feb 18, 2004 2:04 pm
by ks8
Nice foil! REminds me of the old days of tail sections and wheel strut fairings...
I used a belt sander rather than a planer. How did the planer handle the glue lines and alternating grains of the plies?
Sincerely,
ks
Posted: Thu Feb 19, 2004 4:25 am
by richstrat
The planer wasn't great on the surface as I went across the grain, but having roughed out the shape going up and down the foil, I then planed the trailing edge diagonally which seemed to work really well. Of course, the random orbital sander was the tool for fine tuning... Just keep the blade depth setting as low as possible
I found I just couldn't get on with the belt sander - really difficult to control over the surface, edge of the belt kept digging in etc, still each to his own.
I'm hoping it'll look fab when covered in carbon fibre and varnished!
Rich
Posted: Thu Feb 19, 2004 10:14 am
by ks8
Thanks for the info. I am making several spares of CB and rudder, and it sounds worth investing in a small planer. Would you want to do a short commercial on the one you're using?
One CB/Rudder will be thicker. Others thinner and more for performance without articulation on the rudder. Having fun!
Sincerely,
ks
Posted: Thu Feb 19, 2004 1:35 pm
by TimF
When racing National 12 dinghies in the Thames Valley in the 1980s, I used foils made from laminated strip mahogany sheathed in 'glass. They worked well and looked sharp, especially when finished bright. Has anyone tried a NACA profile on a laminated blank ?
TimF
Posted: Thu Feb 19, 2004 1:55 pm
by Johnmon
Somebody needs to invent a machine that can make a NACA foil. It would be something like a power planer or sander that could be adjusted for height and the width would increase proportionally. You could then just run your blank in to the depth you need (maybe have some sort of auto feed) stop the thing and pull out a perfectly formed foil...just dreaming. It would probably be too expensive to build to be worth it for the number of foils you would create.
Posted: Thu Feb 19, 2004 7:04 pm
by chrisobee
The tools exist to cut virtually any shape out of a solid. Given appropriate dimensions, A CNC mill can produce any shape. I work in a foundry where they use CNC mills to fix tooling. The tooling is used to produce engine blocks, cranks and heads. The tooling produces the molds into which iron is poured to produce parts. I've also seen a laser measurment system which spins around the subject and then feeds the shape of the subject to a CNC mill that produces a lifelike bust of the subject. All you really need to start is a 3d model of the foil. CNC mills are not cheap.
Posted: Fri Feb 20, 2004 3:41 am
by richstrat
KS,
Shortest post yet?
The planer is a BOSCH hobbyist level model - it's not a particularly arduous task, so any electric planer should do the job, the key is having an adjustable planing depth, and keep it shallow...
HTH,
Rich
Posted: Sun Feb 22, 2004 1:51 pm
by Dipadharo
Richard,
How did you attach your seats and decking? Where you cannot use clamps, did you use ties, weights, screws or something else? I am no where near this with my R550 yet but some advice would be useful.
Thanks, Robert
Posted: Mon Feb 23, 2004 3:20 am
by richstrat
Robert,
To attach the sole, seats etc (anything that couldn't use clamps), I just screwed and glued it all in. I clamped on cleats (1x1 pine - nominal) to increase the bonding surface area, left it a day to set, then just covered those with epoxy glue and screwed the piece down, using just enough screws to hold it in place. When set, remove the screws - to minimise the chances of corrosion...
The turning party went just fine, the frame worked an absolute treat. Only problem was I was feeling great about the boat having painted the hull only to realise just how much work there is left to do to get it finished - quite demoralising actually

On the plus side, the cockpit seemed a lot bigger than I remember, so that cheered me up a bit...
I shaped the centreboard on Sunday, following Larry's comments on how FD sailors would shape their boards as close to NACA 0009 profile, but leave the centre section flat so that it would fit into the trunk!
Also joined a sailing club on Sunday, so I've got somewhere to keep it when I finish it - that's given me a bit more motivation to get it done...
Cheers,
Rich
Posted: Mon Feb 23, 2004 10:21 am
by Johnmon
richstrat wrote:Also joined a sailing club on Sunday, so I've got somewhere to keep it when I finish it - that's given me a bit more motivation to get it done...
I'm envious.. We had an excellent sailing club in Michigan while I was there. There are very few sailing people here in Utah and no clubs that I know of.
Posted: Mon Feb 23, 2004 10:34 am
by richstrat
I guess I'm fortunate that there are dozens of clubs to chose from in Plymouth - my biggest problem was finding one that didn't have an 'attitude'. I tried to steer clear of all the clubs that had 'Royal' in the name, then went on recommendation. Torpoint Mosquito SC always seemed to be at the top of lists....
I think I chose well - while filling out the membership application the commodore came over and welcomed us, our form was proposed and seconded by the time we'd finished our beers and annual membership is £23.50 for the two of us!
For those who know UK sailing, Pete Goss is also a member (lead Team Philips for 'The Race' - built the most fantastic looking 120ft wave piercing catamaran, which promptly broke up and sank!
)
Rich
Posted: Mon Mar 01, 2004 11:14 am
by richstrat
Another weekend, another update...
Foils are nearly finished - shaped, leaded, carbon fibre'd and half way to being flow coated. I'm working on these (very carefully) on my dining table (covered with a double layer of polythene) - with the central heating and gas fire on , I can get the temp sky high in there - nice quick cure!
Finished second fill and sand - picked up a few more imperfections, which were filled - sanding tonight...
Spent a bit of time shaping a foam block (cast in an empty WEST C pack resin container) as a mold for the spinnaker launch fitting - basically it's a 10" diameter tube, turning through 90 degrees and changing shape from circular to triangular to follow the bow line. It essentially forms the transition from a fabric spinnaker sock, running fore / aft to a vertical launch through the deck... Sounds complicated! I'll try to get a photo up tonight...
Hopefully start painting this week, then I can fit the foredeck, then finish the painting, rig it and get it in the water!!!
Getting closer!
Rich
Posted: Mon Mar 01, 2004 4:13 pm
by richstrat
Piccies as promised -
The foils after first coat of epoxy. Needs a little black paint on the edges to cover the wood edges...
The spinnaker launch tube - needs a bit of filling and sanding yet!!!
Final fill and sand tonight - cut out the holes for the inspection holes, hopefully will be painting by the weekend...
Rich
Posted: Mon Mar 08, 2004 3:36 pm
by richstrat
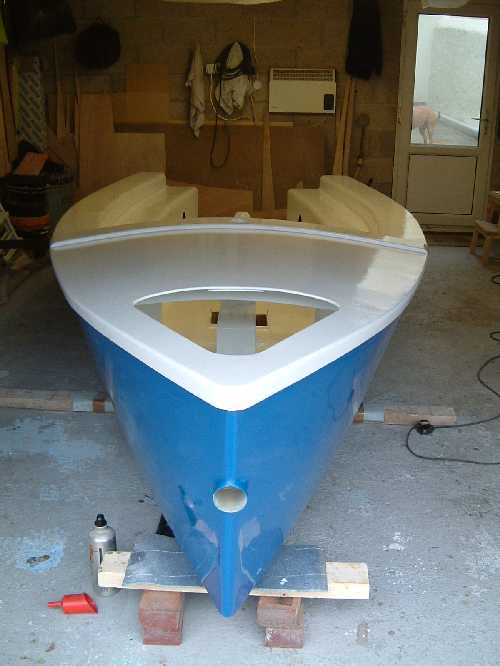
Latest update:
Fitted the foredeck, the mast partner and then glassed and filled the whole lot!
Front view... (if you look closely you may spot a trailer to be!)
And the cockpit (complete with flash backscatter - damn dust
)
It's getting very close to being finished now - I would go for an Easter launch, but I'm off skiing to the Alps, so it may have to wait!!!
Rich
Fillets
Posted: Mon Mar 08, 2004 9:48 pm
by hernangorda
I know you have probably forgotten by now this step which you did in November but if you don't mind sharing with us some of the things you learned while you were making fillets for your boat I would appreciate it! I am now building an AR15 and will have to redo the fillets I have done this weekend since they do not look anything close to fillets! I am using cabosil and woodflour and but in order to keep the mix as a paste, I need to use lots and lots of filler? Would you know how much resin you have used to maker your fillets? Thanks for your help!!!
Posted: Tue Mar 09, 2004 3:19 am
by richstrat
Hmmm...
When you say they look nothing like fillets, what do you mean? Have they run or sagged? Did you put enough filleting material in place?
My fillets were epoxy and chopped strands of fibreglass. I know it's not what is recommended, but they are incredibly strong! I would simply mix up about 1/2 pint of resin, then add handfuls of chopped strands until the mix became almost too thick to stir any more. You are aiming at peanut butter consistency. One good way to test - pull out the mixing stick - it creates a peak. Does it stay there for a while or does it collapse quickly. If it collapses quickly, add more filler.
My process was to mix the filleting material, roughly stuff it in place with a tongue depressor (some use pastry bags - I started with empty, clean sealant tubes!), then immediately cover it with the biax and wet it out. This is pretty universal so far. Then I would get a small laminating roller and roll into the corners. This would squeeze out all air bubbles and form a perfect radius. A lot of people use this method and love it, a lot use a brush or a tongue depressor or a gloved finger. One other thing I've noticed is people are pretty passionate about the method they use.
The biax will hold the fillet in place as it naturally bends to a 1/2" radius anyway. The key, no matter what tools / method you use is to put on the tape whilst the fillet is still workable. I'm with Jacques on this one in that I put on the tape immediately - some prefer to wait for it to stiffen a bit, just don't let it set hard....
There's plenty of discussion on this board about filletting - just do a search for more background...
HTH,
Rich
Posted: Tue Mar 09, 2004 5:13 am
by tobolamr
richstrat wrote:The key, no matter what tools / method you use is to put on the tape whilst the fillet is still workable.
Well stated!
Posted: Tue Mar 09, 2004 7:53 am
by richstrat
By the way Hernangorda, forgot to say when anwering your question -
Welcome to the AR builders club
I assume pictures will be following!!!
Good luck,
Rich
Fillets
Posted: Tue Mar 09, 2004 5:27 pm
by hernangorda
Thanks and yes, I will try to post some pictures. I have not modified plans in any way so it is a "boring" boat compared to your project!
Posted: Sat Mar 20, 2004 2:13 pm
by richstrat
OK, here we go - I've been at the paint again...
6 coats of two pack polyurethane later and...
I've got two little painted bits of ply to cover the ugly holes in the floor - I just couldn't bear sealing up my centreboard bolt under the floor!!!
Rich
Posted: Sat Mar 20, 2004 3:43 pm
by ArizonaBuilder
Rich,
The boat is looking really good.. you should be proud of the excellent job you are doing..
I just couldn't bear sealing up my centreboard bolt under the floor!!!
Excellent point.. i never thought about access to the bolt.. i guess i will need to design a couple of small hatches for access..
I can't wait to see your rigging pictures.. don't forget to get some good closeups of the spi pole mechanism.. and the rudder lifting system, etc.
Posted: Mon Mar 22, 2004 4:45 pm
by richstrat
I've put down the non slip paint, and started the fit out...
Here is the progress so far, but there are more piccies on the pole system here...
http://forums.bateau2.com/phpBB2/viewto ... 1&start=15
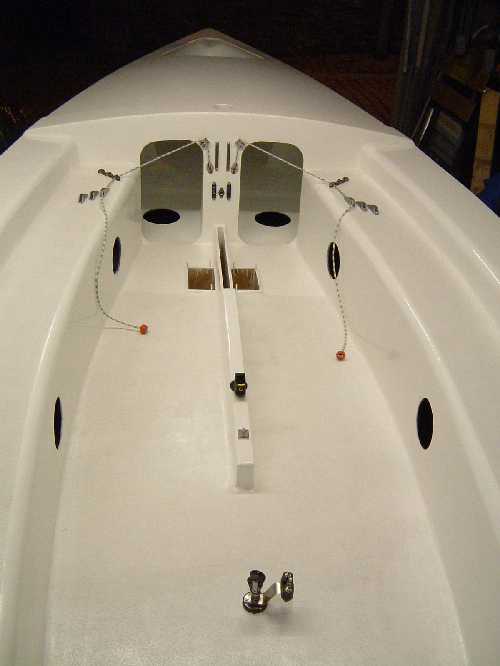
Rich
Pictures
Posted: Tue Mar 23, 2004 1:15 pm
by Johnmon
Rich,
The boat is really looking sweet! That paint job looks professional.
Posted: Wed Mar 24, 2004 3:35 am
by richstrat
Hmm,
Thanks for the kind words... All can say is the camera is deceptive. As I rig the hull, I'm spotting all sorts of little defects... Oh well, at least you guys think it's nice...
Rich
Posted: Wed Mar 24, 2004 9:33 am
by ArizonaBuilder
You see them because you know they are there..
If anyone says anything while you are out sailing, just pull
out the spinnaker and give them the ride of their life or throw
them on the trapeze for a while..
Posted: Wed Mar 24, 2004 4:43 pm
by richstrat
Yeah, but that might encourage them to come back for more and spot more defects!!!
Anyway, I've done just about all I can to the hull until I fit the foils, which need a final sand and a coupla coats of varnish, so here goes!
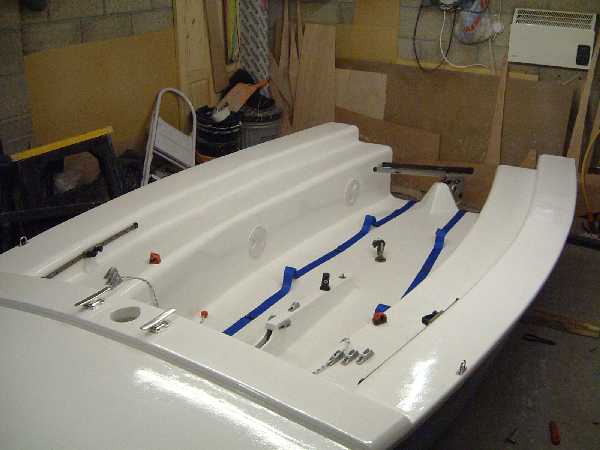
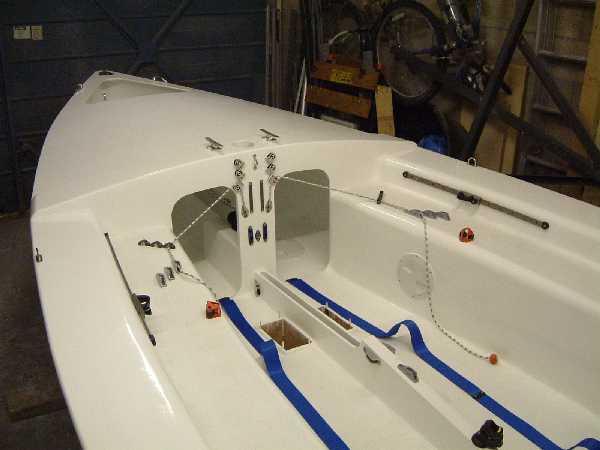
Any close up requests???
Rich
Posted: Wed Mar 24, 2004 5:13 pm
by ArizonaBuilder
okay, i will bite..
can you explain, to us your rigging with pics..
example: what are the two cleats at the bottom of the mast for.
What about the 2 additional cams and blocks on the outside of the pole lines. What are each being used for.
You have the cars and travellers on the sides.
cleats on the CB trunk
blocks on the floor.. etc.
Why do you have the holes on the sides. they look to small for storage compartments..
pics and brief explanations would be a great teaching tool for us rookies out here...
thanks
You did ask for requests.....
Posted: Wed Mar 24, 2004 6:01 pm
by richstrat
OK,
2 cleats on the partner - for anchoring
The 2 leads and jammers outside the poles line - one is for the kicker - double ended, the other for the cunningham. These will run via the 4 blocks on the main bulkhead so can be adjusted from both sides.
The cars / travellers - for the jib.
The cleats on the trunk are all to control the centreboard. a line will run from one side cleat to the other, via the two blocks on the floor and through bushes in the top of the centreboard, to raise the centreboard (given there is about 15lbs of lead in the tip of mine). The cleat on the top is for a retaining line incase it ever turns turtle - so I can pull the board out (upside down) and cleat it to prevent it going back into the case.
Holes in the side - inspection ports and access for though seat bolts. Not interested in storage in the side tanks...
Did that cover it?
Rich
Posted: Thu Mar 25, 2004 2:35 am
by fmiles
Looking VERY fine, you are the proud father of a bouncing baby girl!
If you sail like you build, I'm better off clearing out of the solent! (NOT a detremental comment; fast and focussed is what I am saying)
Posted: Thu Mar 25, 2004 4:30 am
by richstrat
Bouncing? Do you have any idea how heavy I've built this boat
?
I think I'll take that as a compliment
!!
I don't think I'll be sailing too fast initially - every time I mention capsizing or getting wet I get comments from Fran!
Thanks for the nice words!
Rich
Posted: Fri Mar 26, 2004 4:00 am
by richstrat
Dear Rich
You are right the boat is looking great. Well done!
From your chief labourer.
Dad
Posted: Fri Mar 26, 2004 4:09 am
by richstrat
What is it they say about using the same password on the Internet? I knew I shouldn't have told you my snow forecast account details!
Oh well, public thanks to all you watching this thread - my dad has been an absolute trooper and I'd be no-where near the stage I am at without his help!
I'm sure it's only 'cos he wants to go fishing!!!
Thanks Dad,
Rich
Posted: Sun Mar 28, 2004 1:53 pm
by richstrat
OK, latest update - there's not too many of these left to go now!!!
Painted the trailer frame, assembled the trailer and loaded the hull onto it. One things for sure, she's not 64 kg!!!
Fitted the name...
Put the mast together and trial fitted it to measure the shrouds.
So, here we go - apologies for the height of the piccies, but it's a tall mast!!
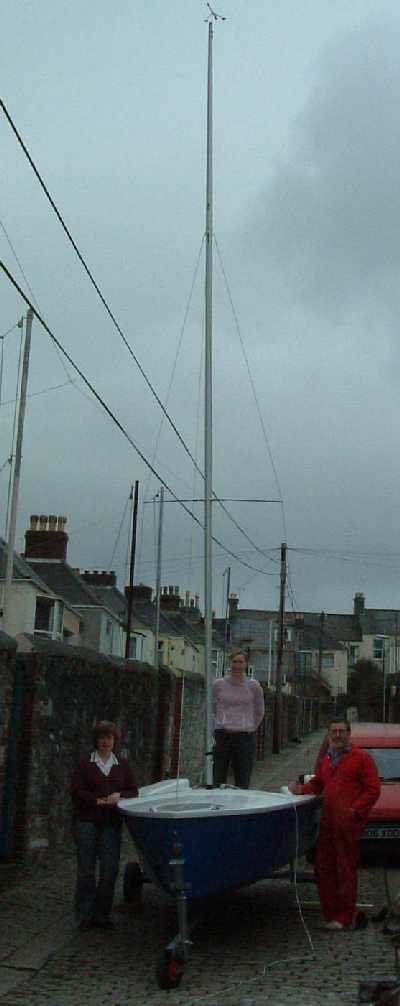
Another view...
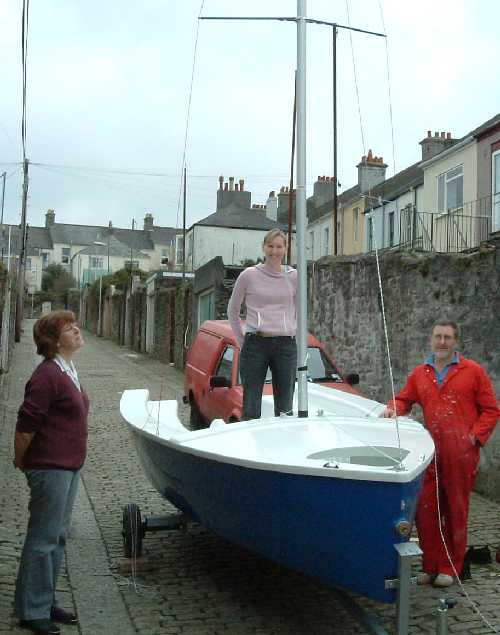
And the name...
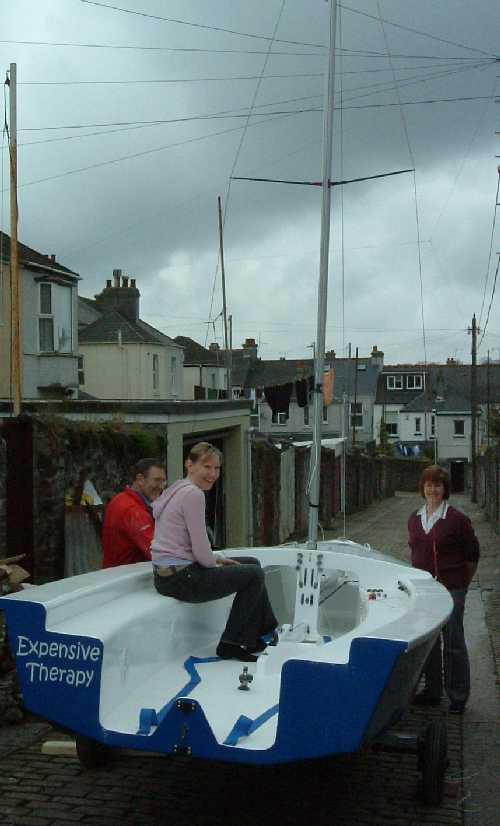
One things for sure, Plymouth on a Sunday doesn't look as nice as these lovely sunny Florida shots we keep getting!!!
Rich
Posted: Sun Mar 28, 2004 2:06 pm
by JohnI
That
is a tall mast! Yee-ha! Can't wait to hear how she sails!
Posted: Sun Mar 28, 2004 2:42 pm
by ArizonaBuilder
Holy cow.. that is one huge mast.
You are going to be flying across the water..
Posted: Sun Mar 28, 2004 2:43 pm
by ArizonaBuilder
Holy cow.. that is one huge mast.
You are going to be flying across the water..
Posted: Sun Mar 28, 2004 4:35 pm
by LarryA
Cool, now go chase Jim Champ and some of those UK Cherubs around - there are supposedly several in the Plymouth area.....
Looks great, congrats. Can't wait to hear how she sails.
Posted: Wed Mar 31, 2004 5:45 am
by Dipadharo
Hi Richard,
Congratulations! So which one is Dad who did all the work??
I would just like to say that one of the great advantages of building a 'Bateau' is the friendship and help that one receives from other builders. None more so than Rich who shares everything with all of us. As another U.K. builder, I can confirm that he has saved me much time and money already. Thanks Rich - may you stay upright and fast!
Robert.
Posted: Thu Apr 01, 2004 7:20 am
by richstrat
Thanks for the kind words guys. I'm giving up on boating for a week - whilst there's still some snow in the Alps, I'm off to do a bit of skiing. When I come back, just a quick couple of coats of varnish on the rudder and centreboard, whip up a cover for her and tow her down to the dinghy park. Should be sailing in two weekends time - boy it's all happening now.
Robert - Fran sure appreciates the upright comment - glad to help on the hints / tips
Larry - I'll chase them cherubs soon enough, need to get used to her and get Fran up to speed first though - it'll probably be a while before we even fly the kite!!!
Terry and John, yeah, it is isn't it! It sure was fun driving it home (all 25ft of it on the roof rack!) I felt like I was inventing a new sport - automotive jousting!!!
Now where are my skis...
Rich
Posted: Mon Apr 19, 2004 3:41 am
by richstrat
OK, latest update...
Sorry to say there are no piccies for this bit as I forgot my camera... There are just so many things to remember when you are taking your boat to the yacht club for pre-launch commissioning! So yes, I finished her as much as I could, trailed her down to the dinghy park and started the final rigging (cutting sheets to length, running control lines etc...)
Had a couple of hiccups, lost the jib halyard up the mast, so had to take that down again and retrieve it, but the biggest problem was the wind. It was really squally so I decided not to put the mainsail up, which meant most of the controls still need setting up (main halyard length, main sheet, kicker, cunningham etc).
I've also taken the decision to sail her without the spinnaker for the time being. There are a few things that need finishing off before I can use the spi, plus I want to get to know the boat under more controlled circumstances.
Hopefully will be able to get down there one evening this week to finish off, then have a shakedown sail on the weekend (oh, and I'll try to remember my camera!!)
Rich
AR 15
Posted: Tue Apr 20, 2004 5:43 am
by Dipadharo
Rich,
Did you build your trailer from a kit? I recall that you mentioned putting it together.
Happy launch and sailing,
Robert.
Posted: Tue Apr 20, 2004 11:38 am
by richstrat
Nah, just taught myself how to weld and knocked one up based on the trailers I'd seen around dinghy parks - reckon I saved myself about £150. It's just a cross made from 50mm box section with triangular braces between the main beam and the axle and the other components bolted on to it -
http://www.towsure.co.uk sell all the bits you need...
Rich
Chainplates
Posted: Sat Apr 24, 2004 5:19 am
by hernangorda
I have tried to figure out from your pictures how you managed to attached the rigging chainplates and have not been able to find anything. Would you mind sharing some of your experiences with us in this area?
By the way, your sketch showing the centerboard on the other thread has been excellent! If you don't mind, I would like to copy what you did!!!
Posted: Sat Apr 24, 2004 8:36 am
by richstrat
Hernangorda,
No problem on the centreboard - it takes some figuring out though! I had to make a couple of full sized templates for the board and case and fine tune the dimensions from this working model.
The chain plates are simple U bolts running through the laminated rubrail...
To all others, here are some piccies.
Did the final rig today, got all the controls sorted ready to launch tomorrow - weather is set fair, gentle breezes, should be ace!
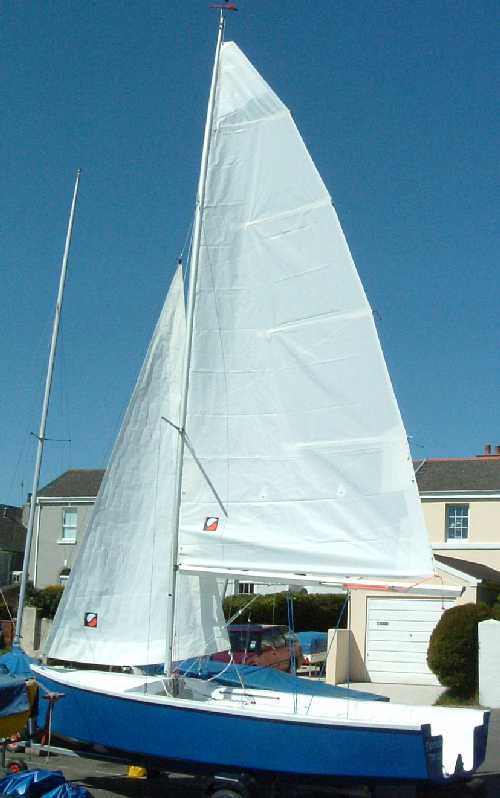
The cockpit is pretty complicated now...
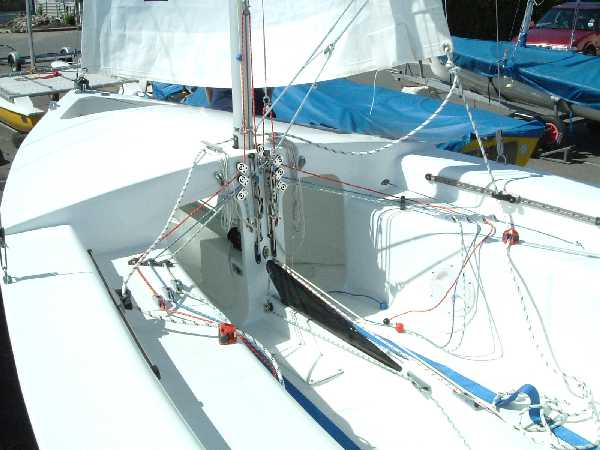
Just a reminder of the name...
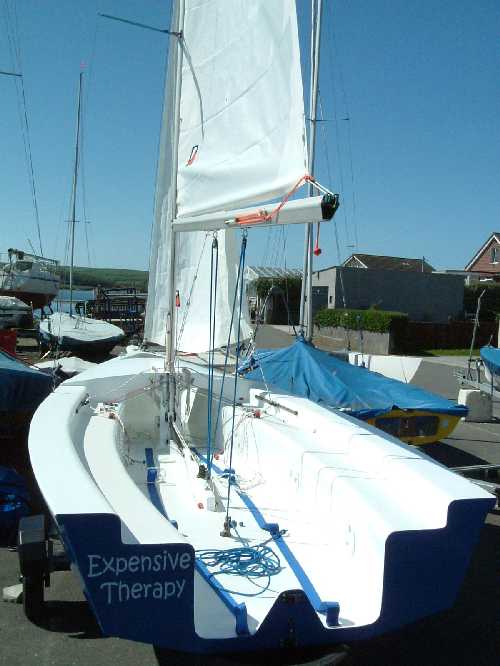
And - after six months - I thought I'd better show my face!
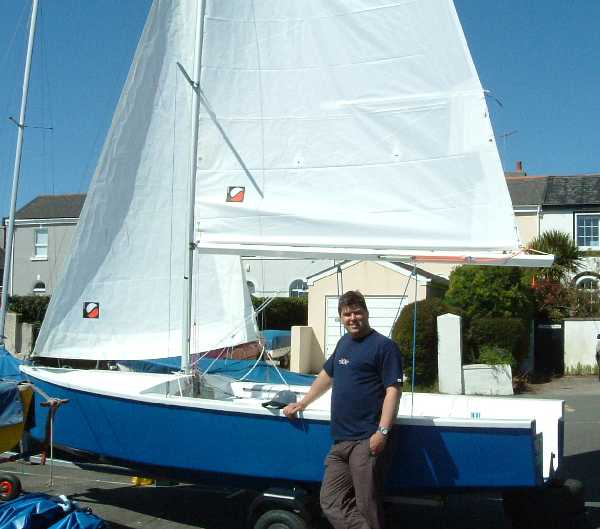
I'll tell you how she goes tomorrow!!!
Rich[/img]
Posted: Sat Apr 24, 2004 11:19 am
by ArizonaBuilder
Rich,
The boat looks great... cant wait to see some action shots
or just hear how she handles.
Posted: Sat Apr 24, 2004 2:22 pm
by Jonnas
Rich,
Congratulations! What a beatifull boat! You should be proud of your work!
And the picture with you standing by her allows for a better appreciation of her real size. It looks bigger then I thought from previous posts.
I'll also be waiting for your comments on her handling.
Happy launching and sailling tomorrow!!
Best regards.
JG
Posted: Sat Apr 24, 2004 2:55 pm
by richstrat
Yeah, and I'm a big bugger!!! (6ft 2")
She is a large boat - went out on a 25 ft yacht last night - the cockpit on that was half the size of my boat...
Rich
Posted: Sat Apr 24, 2004 6:08 pm
by Rick
Really nice boat. All those strings remind me of being a 19-year-old dinghy racer.
Putting the jib sheet tracks on the vertical faces of the sides is a nice touch. I think I have permanent track-shaped indentations in the back of my legs from racing sailboats.
What keeps that little piece of wood where the rudder mounts from breaking off? The pictures don't make the bracing obvious. Or is it magic?
I still don't get transom-less sailboats. If you lose your lunch box out the stern or the boat sinks don't come crying to me.
Is the boom that high in the standard design, or did you do it to clear your 188cm? It looks really high to me, but it's been a *long* time since I raced small boats.
Thanks for sharing the pics. Make sure you get some underway.
Posted: Sun Apr 25, 2004 2:57 am
by richstrat
Hiya Rick,
Yeah, I had the same thoughts on the boom, but it is (give or take tolerance ) the height specified on the plans. It looks odd to me too - I may have to ask Jacques about it, but if you look at the study plans it's about right from these as well - just didn't pick it up until it was there in the flesh.
I may chop another foot or so off the mast - the jib will take it - it'll just need new shrouds and forestay (the spreaders are fully adjustable, so no probs there)
The rudder support is pretty strong. The rear stringer (runs along the centreline) is raised up at the back to form the pyramid - this was biax'd in place and the area filled with sheets of expanded foam, epoxy bonded together, shaped and then glassed. It's going nowhere!!! There are some piccies back on page 2 of this thread...
Rich
Posted: Sun Apr 25, 2004 3:35 pm
by richstrat
First off - I must apologise for no piccies, again, I forgot the camera!
Well, she floats. Took her out on a gorgeous day, not a cloud in the sky, nice breeze - about force 3 (10ish mph) and an ebbing tide...
Got her into the water at about 11am, and had first of my teething troubles - the rudder downhaul line jammed between the blade and the stock - had to pull the rudder off to rectify.
Got her out between the moored boats on main alone - moving very nicely - then unfurled the jib and started sailing down river. We had the tide with us, but she was fairly shifting, overhauling several yachts and holding her own against a 420 (but we had 3 on board - me, Fran and Dad).
Rounded Drakes Island and fell into a hole in the wind - just enough breeze to make way, but we were trapped there for about 20 minutes, then we found some more wind and were off again. I'm guessing she was making about 4 kts, I'll try her with the GPS one day...
Pottered about a bit more in the Sound, then made our way back over the Bridges (reef / WW2 anti submarine 'metalwork') - this was tough - we were on a broad reach - it was wind over tide, over a reef, which lead to difficult sea conditions. The rudder was hellish heavy as I tried to steer her through the waves - the waves were running about 45% to the stern and we were surfing the faces. Hard work... Then we just ran back up river (against the tide) to the club.
2hrs on the water, about 7 miles sailed, with 20 mins practically becalmed.
First impressions:
She's quicker than I expected - as those following this thread will know, I've built an overweight monster, but she's still slippery!
She points exceptionally high. My wind indicator has fixed 'guides' for reference when sailing close hauled, with an angle of about 75 degress between them, she comfortably sails within these indicators, I'm guessing about 25 - 30 degrees to the apparent wind.
She's very stable - the first dinghy I've ever helmed for a period of time whilst standing up!
Heel angle dramatically effects the steering - as the gusts hit, I was using suprising amounts of helm to keep her on course.
The rudder becomes really heavy in certain sea conditions - I can't remember helming a boat that weighted up that way (but then last time I sailed a dinghy was about 15yrs ago and my memory is fuzzy at best!!!)
The stern drags a little when sitting in what I considered logical positions - we had to keep the weight well forward to lift the stern and minimise the drag.
The open transom, hmmm not sure... I think I like it...
Pro's: Really easy (and I do mean REALLY easy) to get into / out of at the slip. Fast draining. Lets you see what the stern is doing (I'm sure I wouldn't have realised the stern was dragging with a full transom).
Con's: Did let in a little bit of water, never more than 1/2" and it didn't get any futher than about 4ft into the cockpit - particularly a problem on a broad reach / run with a following sea.
Bottom line: I got wet feet launching it, so a bit more water when sailing wasn't really a problem. I know I prefer the looks, I think I prefer the practicalities...
BTW Rick, loosing my lunch box is a risk I'll take, but I don't think she'll sink - there is about 25kg of expanded foam in it - giving about 600 kg of positive buoyancy, plus the side tanks and under the bow false floor - which are full of air. I think she'd probably support my car before she sank!!!
So, I have a to do list and a wish list...
1. Sort out the rudder jamming - think that's pretty simple to do
2. Adjust the highfield levers for the halyards, particularly the jib - there was a lot of headstay sag. I already ditched the hook racks as the pre - sail commissioning showed they were no good at all!!! Fortunately I put the levers on tracks, so there is bags of adjustment.
3. Sort out the jib cleating - the cleat is below the track so it is very difficult to cleat the sheet - I think it needs another lead of some sort to change the sheeting angle
4. Sort out the forestay. This gets tangled with the sail when furling / unfurling the jib. As it's only there to hold the mast up when in storage, I think I may unhitch it when the jib is up to solve the problem...
5. May need to adjust the mast step or chock the mast a little as with rig tension on, the mast moves forward in the partner and just touches the front of the partner hole...
6. The jib really could do with a window. Don't know why I didn't order it with one...
So that's my shopping list, but I think my Dad summed it up in the locker room back at the club...
"I have to admit, I was surprised at how well it sailed"
Can't be bad for a first shakedown...
Rich
Posted: Mon Apr 26, 2004 5:10 pm
by Jonnas
Rich,
Again, many congratulations! Looks like she went really well.
It's been very enthusiastic to follow your latest comments on her behaviour (which I think you've been editing throughout the day as sensations were more clear to put into writing
); some questions I wanted to ask this morning you've already answered, as to what main changes/adjustments you think you would do.
Apparently (as Jacques mentions on the other tread you've started) it is a demanding boat for a begginer. You've also stated that, when commenting your being a bit nervous on rigging the spi
. But I must confess that your comments really put me thinking if I could handle her or not. Starting slowly and on protected waters, of course. Also, I'm not sure how it would be like to take young children aboard. Open transom would not be an option then.
If I'm rational about it though, I should start with the Caravelle, get the sufficient amount of sailing/trainning and also wait for my crew (my two kids) to grow up a little bit more
. That's what I'll do, I think
Best regards.
JG
Posted: Mon Apr 26, 2004 6:43 pm
by jacquesmm
Thanks for the report.
It all looks as expected.
This boat must be sailed flat: don't let her heel or she will send you the message through the tiller
Posted: Tue Apr 27, 2004 3:34 am
by richstrat
Jonnas - yes, you're right - lost count of the times I edited that post! I was shattered on Sunday night - didn't stop from 8am to 8pm, plus sea air, warm weather and a celebratory beer didn't do much for me wanting to stay awake!
She is a fast boat and requires attention, but without the spinnaker, she is relatively easily handled. I would describe myself as a competent beginner - I probably don't have much more than 100 hours dinghy sailing under my belt and this was all as a teenager, but I had no trouble controlling her.
What you can't do with her is cleat off the sheets and let her sail herself - she does need constant input on the helm, but other than that she is fine.
When I think back to the Wayfarer I used to sail - similar size - she would sit on course and plod away until you wanted to do something different. The AR15 will largely do the same, but you just can't fall asleep whilst helming. Having said that, the crew had a lovely time
I am nervous about the spinnaker - so much so that I am seriously thinking about ordering a smaller one for cruising / learning (somewhere around 120 sq ft vs 195 sq ft). I feel, however, that I should qualify this statement. The boat is new to me. I want to build experience with her in a variety of conditions before I add more power. I also have never sailed an asymmetric dinghy. Word is this is relatively straightforward, but one step at a time. I feel this course of action is prudent, especially as my crew has even less experience that I do...
I think I would agree about the open transom if you have small kids on board - but bear in mind that it is, under certain circumstances, a safety feature (really fast draining, easier to get back into the boat if you go overboard etc)
I think Jacques was right to describe her as demanding for a beginner, but demanding is not impossible.
Hope this has clarified a little - I'd hate to see my report put others off building one because of a lack of sailing experience - with common sense and delaying the use of the spinnaker, she is a great boat to build experience.
HTH,
Rich
Posted: Wed Apr 28, 2004 12:42 pm
by Jonnas
Rich, thanks again for your comments.
I hope you don’t mind having me using your Builders tread to discuss my “problems” but at this point I must say you really got me thinking.
My option for the Caravelle design had to do with my desire to sail again (I did it 20 years ago, Laser class, and since then only a few times), and to be able to do it with my family (wife and two kids) whom have never tried it before. The CV16-Caravelle seemed the ideal boat for that purpose: large cockpit, stable, forgiving and a good trainer. Also there is a “performance” sail plan available that takes her to around 12m2 sail area, and might give some more thrilling sensations (though she is a displacement hull). I got the plans and immediately started “working” on them: sorted out some mods, went out looking for the materials to build her and have been having great discussions and feedback on these forums.
In the mean time, due to professional changes I had to postpone the construction and since I hadn’t bought any materials, I also felt free to better analyse my choice. Has I said before, I followed your posts on the construction of the “Expensive therapy”, and the AR15 have always been “the boat” I would prefer for myself, family aside. Her lines made me think of the Laser II I crewed with my coach, or, on a more “civilized” approach, the Laser2000 or Stratos (these are comparisons of an inexperienced eye; please give me a little slack here). And the latest two are considered family oriented performance sailing dinghies, aren’t they? Meaning they can be sailed either on a cruising mode or a race mode.
I wouldn’t mind to get wet, capsize, whatever, to build up confidence and expertise. Either alone or with some friends. I still feel up to it and have the perfect place to do it (my small lake, if you read my other treads). The AR15 standard sail area is only 1m2 more than the CV16 performance plan. Sure they are different hulls, but I could start only on Main for instance (forget the spi !). And then I will be able to go with my kids once I get to “know” her. Also, I surely will have the opportunity to sail this summer with friends that are always available with their dinghies.
So, what started to be a second boat to build (AR15), once I got more experienced with the CV16, now I don’t know anymore. It seems I will have difficulties on building time, so why not build the AR15 right away? I wouldn't like to invest time and money on the Caravelle, and although getting a great sail boat, regret the fact I didn’t went for the AR15 when later I might find out that after all I can not build her.
For now I chose to sacrifice my building budget and ordered the AR15 plans. I want to study them while trying to reach a final decision. One way or the other I won’t give up on the building of my own sailboat.
(sorry for the long “speech”; please feel free to add any comments)
Best regards.
JG
Posted: Thu Apr 29, 2004 4:12 am
by richstrat
Funny you should mention the Stratos - that's what Fran did her level one in, and was the inspiration for a lot of the mods I made (split level seating etc).
Have you considered reefing? When I ordered my sails, I got a set of slab reef points installed in the main (added about £40 to the cost of the sail - may get another set installed for the really windy days) and I installed a roller reefing jib (again a slight increase in cost - £50 for the gear and a slightly different sail - no more than £80 in total)
These mods allow a lot more control of the sail area, whilst maintaining balance in the sail plan. Sailing under the main alone would change the centre of effort and could cause more problems than it solves...
As far as I'm concerned, I wouldn't consider the Caravelle, I would just build one boat and build in mods allowing suitable flexibility in the rig to meet the needs of the developing sailors! One other thing to add into the equation - cost! Here's my second dirty little secret - I've spent over £5000 on the boat (including trailer etc)

I know I've overbuilt and over ordered certain things, but I'd struggle to build it again, even with hindsight, for much less than £4,000
HTH,
Rich
Posted: Thu Apr 29, 2004 7:00 am
by Jonnas
My wife's view of the AR15: "I guess you'll have two or three more years to be confortable handling her, until our kids are really willing to go out with you (they are 8 and 5 now); me, I'll just go when they go!"
Looks like I have to find another crew for the AR15, if I will want to sail fast that is

.
Reefing? Yes, but on the main only. I have to confess I am not familiar with reefing/furling jibs for dinghies. Sounds good though. I will investigate that.
About cost . . . yes, I can imagine one spending such an amount of money on building these beauties. Specially 'cause we allways want the best possible. If I choose to build the Caravelle (let the AR15 plans arrive and I'll decide, although . . .
), I don't see myself cutting on materials or layout or whatever, just thinking I'll be building another after a few time.
Stratos. My favorite Laser boat, although I think that the Laser2000 looks more similar to the AR15 (except the sail area and behaviour, maybe). I'll surely also think of some mods to the AR15 based on them. How about the two level seat? Is it confortable? I think that would be a nice feature for the kids ... you know, sit inside not on top?
Thanks again for your comments, and your patience. I'll let you know my decision
.
Cheers.
JG
Posted: Thu Apr 29, 2004 7:10 am
by richstrat
The split level seat is REALLY comfortable. I spent quite a bit of time sitting on stairs, chairs etc, trying to figure out dimensions and I'm really happy with my decision. If you decide to go this way, let me know - I'll measure up and give you dimensions...
Jib roller reefing is pretty simple - just as long as you've got a wire luff in your jib. The top connects to the halyard via a swivel and the tack connects via the furling drum to the boat. The drum simply has a line wound around it, as you pull the line, it rotates the drum, hence the luff of the jib and wraps it around itself... You will however, need a conventional forestay to hold the mast up unless you plan on leaving the jib hoisted permanently
I've used Barton furling gear (76mm drum) - you can see it here...
http://marinestore.co.uk/Merchant2/merc ... bartonfurl
Rich
Posted: Fri Apr 30, 2004 2:43 am
by Jonnas
Rich, thanks for the information.
So that means one can use the Jib partially furled (reefed). Sounds very good. I thought that system was only for "storing" the sail (if you know what I mean; can´t find the english word for it). I'll have that in mind.
I would appreciate if you could give the seats dimensions. No hurry! The plans haven't arrived yet. I intend to play a bit within CAD so I think I will try out chairs, etc. as you did, but it would be nice to have your design too.
Regarding the transom, what do you think of keeping it at lower seat level, "stratos style". I think it would be a good compromise between relative safety feeling inside for the kids (when they get to go) and easy get in from the water after the more then probable several capsizes
. Also it will maintain good support for the rudder.
As you can see, I've been thinking. Hummm!.... Must mean something
Best regards.
JG
Posted: Fri Apr 30, 2004 9:01 am
by chrisobee
Rich...
The Transomless design of "expensive therapy" is your mod of the plans, is it not? Or is that an official option?
Posted: Sun May 02, 2004 1:27 am
by richstrat
Chris,
It's my mod - I discussed it with Jacques and it was something that he thought about whilst designing the boat - there is a thread in sailboats discussing it...
The shape of the cut is not important, but I did reinforce the rudder support and the bottom of the cut - this is 3 layers of laminated 3/8 and is rock solid...
Rich
Posted: Sun May 02, 2004 2:01 pm
by Jonnas
Rich,
Did you went out sailing again this weekend? Managed to sort out some of the things on the to-do list? I would love to read some more of your precious comments.
Cheers.
JG
Posted: Sun May 02, 2004 2:21 pm
by chrisobee
Jonnas wrote:
Regarding the transom, what do you think of keeping it at lower seat level, "stratos style". I think it would be a good compromise between relative safety feeling inside for the kids (when they get to go) and easy get in from the water after the more then probable several capsizes
. Also it will maintain good support for the rudder.
Jonnas
Looks like you could have a sort of Half transom easilly. Rich's boat has no transom and the plans actually show a full transom.
Posted: Sun May 02, 2004 3:43 pm
by Jonnas
Chris,
I think so too. Thanks for the input. I'm waiting for the AR15 plans to arrive so I can sort it out. I like Rich's approach, but I think I would prefer a mid level transom, sort of speak, as I explained before.
BTW, are you building the Caravelle or the AR15?
(EDIT: Sorry, I realized after submiting this post that you had already mentioned you were building the Caravelle. But the AR15 also appeals to you, right?)
My initial option for the Caravelle has changed
, and all of you guys with whom I have been "talking" regarding the Caravelle please forgive me for that (ks8, are you reading this?). The CV16 looks like a great boat to build and sail but I wouldn't forgive myself for not having a go with the AR15, while I have the "stamina" at least to try handle her. But all the comments have been very much appreciated and I will continue counting on them. After all, I'll be building a sailboat, and that's all this is about.
Rich, looks like I decided already. I also manage to have family approval, so . . . . maybe I should start another AR15 builder's thread
Best regards.
JG
PS: Jacques, if you are reading this, please rest assured that every time I capsize and while trying to get her upright again, I will only blame myself, not the designer. I know I've been warned about it.
Posted: Sun May 02, 2004 10:34 pm
by chrisobee
Jonnas wrote:Chris,
BTW, are you building the Caravelle or the AR15?
(EDIT: Sorry, I realized after submiting this post that you had already mentioned you were building the Caravelle. But the AR15 also appeals to you, right?)
Yes I am building a Caravelle. Well at this point accumulating a Caravelle is probably more apt. I have not built anything yet. I do have all the hull panels cut out and I am starting the layout of the frames and transoms. I have purchased sails, spars, running and standing rigging. This week I will do the butt blocks for the hull panels. When I get to stitching the whole thing together I will be starting a build thread, I'm just waiting to have a picture worth showing.
Jonnas wrote:
My initial option for the Caravelle has changed
, and all of you guys with whom I have been "talking" regarding the Caravelle please forgive me for that (ks8, are you reading this?). The CV16 looks like a great boat to build and sail but I wouldn't forgive myself for not having a go with the AR15, while I have the "stamina" at least to try handle her. But all the comments have been very much appreciated and I will continue counting on them. After all, I'll be building a sailboat, and that's all this is about.
I think that everyone that considers Caravelle also considers AR15. I think that AR15 looks harder to build than Caravelle. And as I have no experience sailing, I figure that the Caravelle will be plenty of boat for me for the next 3-4 years.
I have two boats in me, the first will be a Caravelle so that I can learn to sail. The second will be VG20 or similar.
Posted: Tue May 04, 2004 4:14 am
by richstrat
Went sailing again on Sunday...
Wind wasn't as strong, had all sorts of shifts and holes again. Went out of the Tamar against the tide, which proved nearly impossible - thinking we were making progress then spotting a buoy under the jib, which we were about to broadside. Against the tide, it took about 1 1/4 hrs to sail 1 1/2 miles! The worst bit about it was as soon as we hit Plymouth sound, a dense sea fog came in and we had to turn around and head straight back in...
Haven't really sorted out the to do list yet, but I do have more thinking to do. We are seriously thinking about an outboard for our cruising days. The tidal nature of the river is such that you can really only effectively get out into the sound at slack water. If the tide is ebbing or flowing, you get an easy ride one way and a near impossible one the other. A small outboard would mean we could get out into the sound and enjoy ourselves! Ideas are forming about how I would do this...
I also want to fit a rachet block to the mainsheet as the sheet load is quite high and I don't feel comfortable leving it cleated all the time...
That's all for now...
Rich
Posted: Tue May 04, 2004 5:32 am
by Jonnas
Hello Rich,
About the outboard. Would you keep it mounted on its bracket while sailing or take it out and store it in the cuddy area?
For the bracket, check the Randoneur550. From the study plans, it looks like it's also a transomless boat, but there is a reference to an outboard bracket. Perhaps "Dipadharo", whom has started a thread on his built of the R550, may give some input about it.
Also, and you know this better then me, the Laser Stratos (keel version), has an outboard bracket as an option.
Could you please explain "rachet block" ?
Cheers.
JG
Posted: Tue May 04, 2004 11:47 am
by richstrat
I'm thinking (again) along the same lines as the Stratos transom bracket - this is simply a very sturdy block of plywood bolted to the transom, sticking out above the seat - this is what I will do to my AR15 - bolt it to the transom the block sticking up about 3" above the lower seat level on the opposite side from the name of course!!!
I will be storing the outboard under the cuddy - this will also help get some weight forward as she does have a tendancy to drag her stern - it's been fun finding an outboard that will fit the hole! Anyway, sorted now - I've ended up with a 3.5 hp long shaft Tohatsu - she should fly!!!
A rachet block is a block which has a series of V shaped ridges on the sheave to give extra hold to the rope. It has a small switch which engages the ratchet, which only allows the sheave to turn in one direction. I'm using a Harken Carbo ratchet (40mm) if the rope turns 180 degrees around the block, they reckon it gives you up to 5 times more holding power...
I'm also thinking of a removable transom dam for motoring or when I have a lot of crew - just a panel with a seal that I can clip on - just an idea at the mo though!!!
Rich
Posted: Wed May 05, 2004 7:47 am
by Jonnas
Rich, thanks for the ratchet block explainning. I understand now. It's sometimes difficult for me dealing with terminology both in english and portuguese. But I'll get there, I think
Your comments on the removable "dam" make me think I surely won't be cutting my transom all the way down. I haven't started building yet and already have quite a lot of "volunteers" to go for a ride (might be a very wet one though
), so that would also justify a "dam" if I understand you correctly.
Best regards.
JG
Posted: Wed May 05, 2004 10:39 am
by richstrat
The dam is far from ideal as a solution...
Ideally the transom should be completely clear of the water - otherwise this generates turbulence and drag... Obviously, when sailing, this is the last thing I want.
However, with an outboard on the back, even if it only weighs 28lbs, this will increase the tendancy for the stern to drag. this could mean a wet ride - especially if I'm going to cruise with 4 (mum wants to come out next time I sail with dad!). A removeable dam (with conventional transom flaps) may address the wet feet issue when motoring. It would also mean that she could (potentially) be used for a bit of fishing - which should keep Dad happy!
I do like the open transom, but under certain circumstances, especially motoring, I can see it won't work...
Rich
Posted: Thu May 06, 2004 8:23 pm
by Jonnas
Rich,
I got my AR15 plans and, thinking about the transom modification, I realized that it's height is dependant of the height of the rudder cheeks (or the other way around).
How did you solve that? Did you decreased the cheeks height? I believe I read something about an aluminium rudder "head". Was that you? In that case what concerns do we have to have. I think the rudder blade must be as per plans dimensions, correct?
BTW, regarding your "dam" and motor bracket: did you consider combining both? Sort of a small removable transom? Might be possible to sort it out.The only problem I think would be vibration (unless this transom would have a tight fit with some sort of lock) and storing it, together with motor, in the now "small" cuddy. Also, in case of a capsize, you wouldn't want to loose the motor. Have you considered a way of preventing this.
Hope this helps.
Cheers.
JG
PS: I just got the plans today. I'm sure I'll have more questions later on, although your thread and other AR15 posts have been very helpfull so far.
Posted: Fri May 07, 2004 3:29 am
by richstrat
Hi Jonnas,
Yes, I did get an aluminium stock - it's a Seasure simplex stock, part no. 23.88 (silver anodised)
http://www.sea-sure.co.uk/rudder%20equipment.htm
I've built my outboard bracket - it's simply a laminated block of ply, about 40mm thick, that I will bolt to the transom and it will stick out 70mm above the lower level seat to clamp the outboard to...
I'll get some photos of the bracket and the rudder next time...
The transom dam would have to be seriously strong to support the loads imposed by a motor - don't think it's viable.
I'm still toying with how I can do this. We'll see just how much 4 plus motor upsets the trim of the boat - I may not need it...
In terms of securing the motor, I doubt I'd lose it in the event of a capsize, however, 13kgs could sure do some damage in the cuddy... I'm going to lash it down with 2 x 50mm straps to hold it steady...
Rich
Posted: Fri May 07, 2004 8:28 am
by Jonnas
I guess that's what I meant about vibration too: the transom would have to be strongly fited to be viable.
Thanks for the link to Sea-Sure. I think I can find their products here too.
Again, regarding the rudder blade, it seems to me that, if you're going to use such a rudder stock (I think I called it "head" before, sorry
), even if we didn't want to decrease transom height, we would have to. Or, increase rudder blade length, right? Or, make a hole in the transom for the tiller. In your opinion, which one is best? As you know, I would like to have a shorter transom, but I haven't made any calculations yet as what would be the limit considering the rudder stock.
Thanks.
JG
Posted: Sat May 08, 2004 3:37 pm
by richstrat
Hmmm,
That's a tough one...
The sea sure stock (you may also want to check out Cee Vee) will mean the transom is cut down to about 6" above the cockpit sole. If this is too short for you, I really don't know what would be the better option - perhaps you could ask the question in sailboats and see if Jaques answers. Of course you could just modify the wooden stock - then the problem goes away! (it will save you about £130 as well!!!)
Rich
Posted: Mon May 10, 2004 3:42 am
by richstrat
Third sail on Sunday - this time 4 up!
Wind was very light in the river, so having fitted the outboard bracket, it gave me an ideal opportunity to test it. Fired up the stink pot and motored out into the sound - I was just running the engine in on 30 - 40% throttle, but she flew along. Nothing like as nice as with the sails, but I have to say I'm really glad I got the motor - it means I can sail in Plymouth Sound whenever I like - regardless of wind direction or tide...
Anyway, back to the sailing... with 4 on board she sits low in the water, but with 3 forward the stern was clear, even with the outboard on the bracket. So, another lovely gentle sail! It would be nice to try it with a little more wind, but you can't choose the weather!
I've sorted out the cleating for the mainsheet - bent the cleat arm upwards a little, changed the block for a ratchet and swapped the cleat for a PX power cleat - now it's fab... All I've got to do now is change the jib sheets cleats for PX power cleats and I'll be sorted - only problem is finding the £75 to pay for the pair!!!
I removed the forestay this time - so much easier to use the roller furling jib. So its coming together slowly.... Mind you, if the wind continues to be this light, I may have to bring forward fitting the spinnaker!!!
Rich
Posted: Mon May 10, 2004 3:58 pm
by Jonnas
Rich,
It's always nice to read your "reports". You really sound like you're enjoying your new boat. Congratulations again. Seems it was a good investment, both in time and ... well you know what I mean.
If you don't mind, I'd like to ask about a few more details.
1 - Is she stable enough to take the outboard out and put it in the cuddy, with all the moving around it implicates, specially when loaded with four people aboard?
2 - With all 4 aboard, how is it regarding space available/relative confort?
3 - You have been out sailing always with a crew (although I hope you didn't ask your mom to "work" and let her enjoy the scenery
). Have you tried single handling her? How did that feel? Possible? Not recommended?
4 - You gave up on the spi pole layout as per plans and installed another one. Was it because you could not sort out the "mechanics" of it (as I am having some difficulties also), or you just think your way is better, easier?
Again, thanks for your patience. Although I'm not sure when I'll be able to start building her, your comments are a true help to put everything in perspective, and that I'm sure will make things easier when the time comes.
Best regards.
JG
Posted: Mon May 10, 2004 4:19 pm
by richstrat
Finally got some action shots...
A couple sailing...
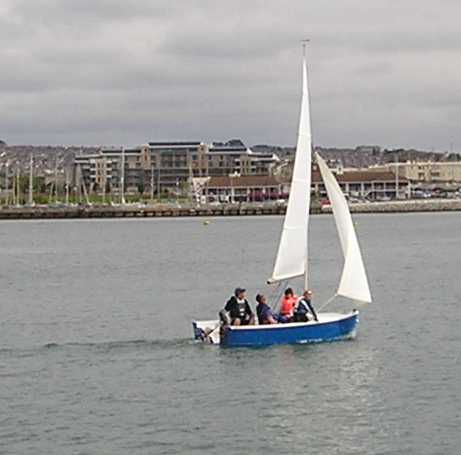
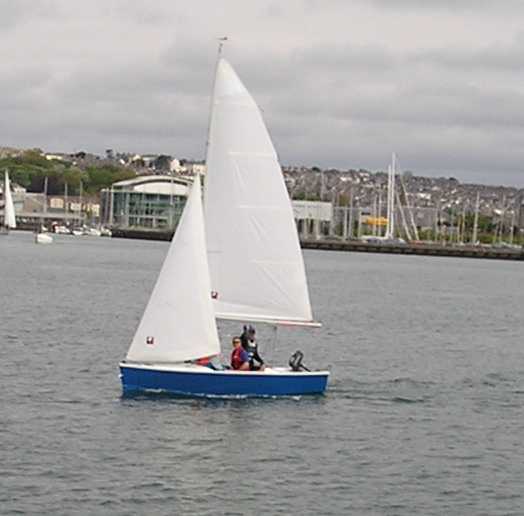
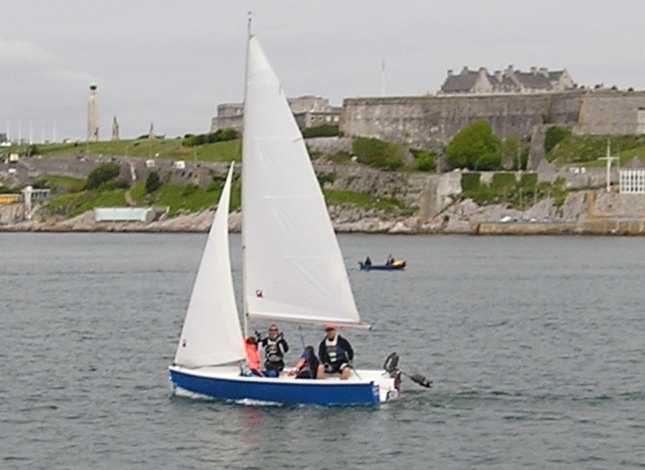
And some of the crew...

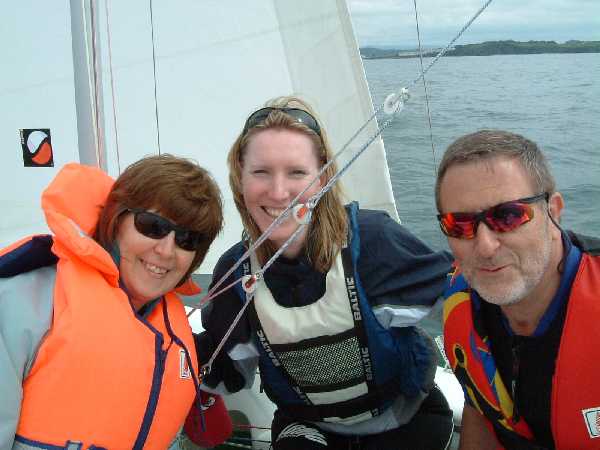
(they all had to squeeze in for this shot!)

Jonnas,
With 4 on board, I didn't feel I had the space to mess around with the outboard - with 3 forward, she was trimmed OK so I didn't bother. That said, after 2 hours sat down, my legs were getting a bit achey, so while Dad was helming for a bit I just stood up for 5 minutes to stretch my legs - she was very stable!!!
As for space, yes there was plenty with 4 aboard. There was a slight issue with comfort as the crew had to sit on the fairleads / cleats to trim the boat - maybe she needs some cushions
I don't think I'd single hand her - she is powerful, even with main and jib - plus I'd never get her up the slip on my own and I enjoy company! I'm not saying it would be impossible, just difficult!!!And no, mum had a lovely time just sitting and watching
Spinnaker pole - if you review the threads, I just didn't get it - it was revived by Arizonabuilder - I think he had the same trouble!!! I looked at a wide range of dinghies and they all had variations of the system I used, so I copied it!!!
Rich
Posted: Mon May 10, 2004 9:31 pm
by Jonnas
Great pictures Rich !!! Nice of you to have posted them. And I'm glad you're mum had a lovely time
, all of you look really happy.
Thanks for the comments (this thread is getting strangely similar to a chat room
) Bottom line, I'm feeling more and more enthusiastic about building the AR15. Can't wait to start!
Best regards. You've been a great help!
JG
Posted: Thu May 13, 2004 11:32 am
by richstrat
Off to the boatyard tonight to try and tick a few more things off my list...
I'm taking the rudder so hopefully (if I remember the camera) I'll get some piccies of how it all works....
Planning a day cruise this weekend - there's a lovely little beach with a pub at the top of it about 6 - 7 miles from the boat yard. Weather looks good, 22C and sunny, so a relaxed morning sail, pub lunch and sail back. Now how do you anchor at a beach on a rising tide so that you can still get on the boat after beer and food without going for a swim... (don't want to scratch my paintwork!)?
Posted: Thu May 13, 2004 12:23 pm
by jacquesmm
Great pictures: I recognized the scenery, that's behind the breakwater isn't it?
I can't help much with anchoring in front of a pub advice since I had my share of mishaps that way. I particularly remember a night when I stayed until pubs closed and forgot that my boat was anchored in a strong tide area in the Blackwater. Pulling the dinghy 100's of yards through the smelly mud is something I will not forget.
Posted: Thu May 13, 2004 2:21 pm
by Jonnas
A friend of mine had the same type of concerns on one of our "excursions" to such pleasantly placed pubs at beaches. The tide was also rising as we had lunch and he managed to solve his troubles, by taking a looooong rope with him to the pub "varanda" where we all were. That way he simply pulled his "boat" up the beach when neccessary, while the remaining of us had to go down to the beach and "rescue" our boats from the tide. It was really funny to watch him with the rope tied to his chair.
Oh, don't now if it makes a difference, but we were kayaking . . .
Just kidding Rich, although the story is true.
JG
Posted: Thu May 13, 2004 3:39 pm
by richstrat
Been to the boatyard, some more things off my to do list - changed jib sheet cleats for nice spinlock powercleats, fitted the spi lead tracks and measured up for the transom washboard. If push came to shove, I could use the spinnaker now, although I would prefer to have it's 'hammock' ready...
My nice (expensive) new cleats...
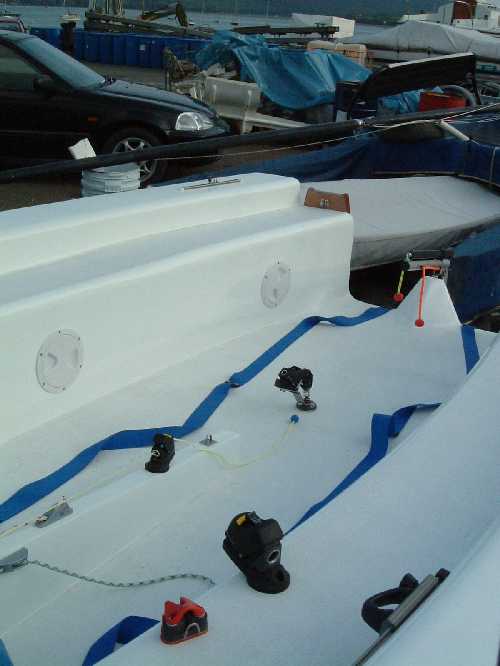
The rudder and stock (as promised)
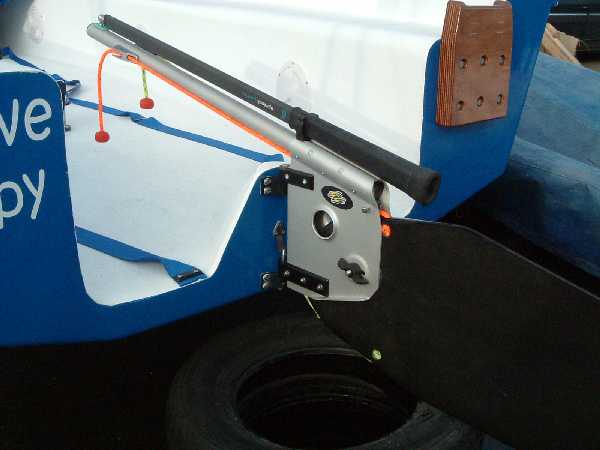
The outboard bracket is also plain to see...
The orange line is the rudder uphaul and the yellow the downhaul. The yellow line has a neato little camcleat that has an adjustable release so it can kick up on grounding...
Jacques, yes, it's all pottering around inside the breakwater - Cawsand (where the pub is ) is due West of the breakwater, so a nice, sheltered area for the first full day of sailing...
Perhaps I should post a small chart so people can see what I'm banging on about when I describe my little adventures...
Rich
Posted: Thu May 13, 2004 4:15 pm
by jacquesmm
Serious investment in hardware. It looks good.
What was that picture you posted and removed in the gallery? It looks interesting. I was checking that new V12 pic when I saw it coming up and then going away.
Posted: Thu May 13, 2004 4:29 pm
by Jonnas
Great layout Rich. It makes us want to get in and . . . sail, sail, sail!
You're making me nervous . . . I got to start mine

.
JG
Posted: Thu May 13, 2004 4:40 pm
by richstrat
The picture is back there now Jacques - It also appears in a couple of the threads about new designs - it was just my musing on the sportboat, but the original resize didn't look good - used different software and it's OK now...
Rich
Posted: Thu May 13, 2004 11:03 pm
by ks8
Great pictures of happy people in the boat, sailing. Great example of how she trims with 4 people. I'm getting tempted, but that must wait until the Caravelle is finished and has two good seasons in her.
thanks Rich! ,
ks
Posted: Thu May 13, 2004 11:25 pm
by Jonnas
KS wrote:
I'm getting tempted, but that must wait until the Caravelle is finished and has two good seasons in her.
By then, surely Jacques has released his new larger models (VG27, VG30 and a 40' that he told us about today) and that will give you (and me) lots to think of besides the AR15
. Also, hopefully mine AR will be sailing by then as well (I will not be able to finish her for this summer as I wished

)
Cheers.
JG
Posted: Thu May 13, 2004 11:43 pm
by ks8
Hello Jonnas,
Tempted yes, but I would really like a bluewater boat. The larger Vagabond sounds even more tempting, but I've got to be on the water more than in a tent building, as much as I enjoy the building. I may, (is it blasphemous?) shop for a used Clorox bottle. I've been eye'ing the Nor'Sea 27 for years, but they're asking quite a bit for them. Now, if I had a year off, I could build a Vagabond. But then I could also be on the water for that year. No such decisions, as I said, until the Caravelle is finished and has had many travels locally and in lakes upstate NY and Vermont and Florida. We'll see... the calendar pages flutter by quickly in proportion to the things you'd like to accomplish. Its one of those laws. I'll give you another that helps red lights turn green faster, but this is one of my most powerful secrets. Careful who you share it with...
Always have something very important you can get done in the car, while waiting at red lights. It is AMAZING how fast they turn green! Of course, there are also people, here in NY, 14 cars back, who feel it their duty to blow their horn the second the light turns green. A friend of mine is an NYC cop. He has a good idea. Require all NYC taxis to have pain threshold horns installed INSIDE the car also. hmmmm....
sincerely,
ks
Posted: Fri May 14, 2004 1:14 am
by Rick
ks8 wrote:The larger Vagabond sounds even more tempting, but I've got to be on the water more than in a tent building, as much as I enjoy the building. I may, (is it blasphemous?) shop for a used Clorox bottle.
KS (what
does that stand for, anyway?), buy a 1972 Newport 27 for $6,000 and sail it while you are working on your VG27.
It is such an easy solution...
Posted: Fri May 14, 2004 5:55 am
by richstrat
I don't know if this will help, but here's a small map of where I sail... The boat is kept in Torpoint and I do most of my sailing in the sound...
Rich
Posted: Mon May 17, 2004 12:37 am
by richstrat
Well, we went out for our sail to Cawsands - beautiful day, 25 degrees, sunny, sea breezes (these are OK, but somewhat unreliable!) As the winds were nice and light, I thought I'd give the spinnaker a go!
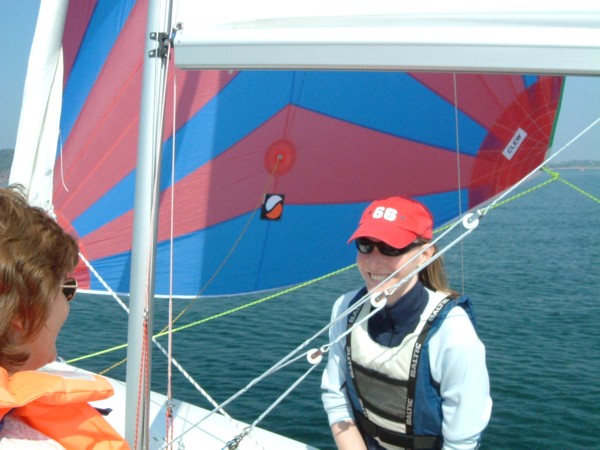
As I suspected, there is a bit of a problem with the spinnaker... As the well is behind the forestay, you can only launch the spi on one tack - this was fine the first time I launched it as we were on the right tack, but coming back, we weren't so there was an awful lot of faffing about, gybing to launch it, then gybing back, then gybing again to recover! The only solution is to hve the well infront of the forestay - major redesign!
Without the 'hammock' the spinnaker got a bit messed up under the foredeck with all the other junk I take for a days sailing, so that's becoming more important...
Anchoring was a trial, but we sorted it eventually!
Oh yes, I had the GPS on... 6.5 mph under power, hit 7.5 at one point under sail...
Rich
AR 15
Posted: Mon May 17, 2004 1:29 am
by Dipadharo
Looks like you are all having so much fun for your efforts, Rich.
I am a little puzzled by your spi problem. Obviously everything needs to be ahead of the forestay. If you can gybe O.K. then the only problem would be with the line that recovers the spi into the storage. This can be doubled round the forestay too - it only needs to be a light line but you would need your gloves recovering it in a blow! Is the problem with the halyard being on one side for the next hoist?
Robert.
Posted: Mon May 17, 2004 4:08 am
by richstrat
I guess a double retraction line would work, so that you can pull the spi in either side of the forestay - I would have to remember to launch the spi on the side it was retracted... One things for sure it requires a bit more thought than if the well were in front of the forestay...
It does gybe OK, takes a bit of co-ordination with the sheets - you need to let the clew fly out far enough to be able to sheet in on the other side without fouling the forestay, but practice will sort that out...
I guess it's as with most things on the boat - you gotta try it out to figure out how to sort it out - one day I'll get there!!!
Rich
AR 15
Posted: Mon May 17, 2004 6:03 am
by Dipadharo
Rich,
Well certainly better than moving the forestay back! Trying everything out in light winds is the answer. By the way, I saw a photo of a javelin going flat out with the crew all aft - quite a bow wave - wow! Your sails look nice. Are you happy with them? Who cut them?
Robert.
Posted: Mon May 17, 2004 7:36 am
by richstrat
I certainly wasn't proposing moving my forestay back, just maybe something future builders may want to consider as a mod...
My sails are Sobstad XVS range - just plain old dacron... The main has a foam panel to help inversion protection and a set of slab reef points. The jib has a uv proof luff so I could leave it on the boat (although I don't think I'll be doing this!!!) and the spinnaker was very cheap for a nice two tone star cut... Most people I asked recommended Sobstad and their prices were fair - £840 delivered. I do wish I'd got a window cut in the jib though!!!
Couple of hints - go to the Southampton boat show - they offer some pretty good discounts, and get lots of quotes, then haggle with the sailmaker you choose - I got £130 off my spinnaker price
Rich
Posted: Mon May 17, 2004 9:01 pm
by Jonnas
Hello Rich,
Great to see you've launched the spi. From the photos I get the impression its size is the original (per plans) and not a smaller one as you were considering. Am I right? Besides the launching/recovering problems you already mentioned, how was it? Great fun, I imagine. I'm so jealous ...
The other day I joked about your anchoring problem and I'm glad you sorted it out (without following my advice, I hope
). But that put me thinking on another issue you might have already thought about: rowing. Let me explain:
I will keep the boat at a camping park located on a lake's margin (the lake I've mentioned on other posts) where I spend most of my summer hollidays and also many weekends throughout the year (I have a caravan stationed there all year). Besides other usual rowing situations, at this lake, it is very common that at the end of the day, during summer, the wind completely disapears. It's a phenomenon I can't really explain but is so common that people overthere call that time of day "lake hour". So, sailors have to row back to the park from whichever beach they are at the lake, or wait until the wind comes again. It's not a very big lake but for ex. coming from the seaside beach to the park, we maybe talking of about 3Km. For me this is the usual thing, since I am either rowing a small dinghy or padling a single or double kayak (at this lake power boats are not alowed). But only now I considered it for the sail boat as well.
So, this long statement is to justify that I have to be able to row the AR15, since an outboard is out of the question (in the lake, that is).
I've been thinking on using small canoe padlles, but don't seem very pratical if you're alone (for ex. taking her for a mooring place, where I will probably left her during summer hollidays, as is usual at my camping park). So, I would prefer to have a pair of oars.
The problems I find are: stowing them (they have to be quite long) and sort out a rowing seat. Regarding the latest, I'm thinking of placing it athwartships on top of the CB trunk, Wayfarer style, maybe fixed, which could also be used for placing some rigging hardware. About stowing, maybe alongside the CB trunk (or seat sides) and into the cuddy, and tied somehow, so they want be moving around. Also, I don't really know yet how to install the oarlock sockets (rubrail, or is it to far out?).
Any thoughts? As allways, I would appreciate your opinion.
Best regards.
JG
Posted: Tue May 18, 2004 3:29 am
by richstrat
Hi Jonnas,
Yes the spinnaker is as on the plans - actually I think it's a little larger than Jacques specified - mine is 18.5m2, I think the plans called for 18...
It was fine whilst sailing - easy to trim, gybing was OK once I figured just how far you need to let the sheets fly to get it around the forestay - I have to say, it was easier than I thought... I was also surprised at how high I could carry the kite - I'm guessing to about 50 - 60 degrees off the apparent wind. Didn't really like going too deep though (as expected)...
I do need to do a bit of work on the retraction / storage issues and a lot of practice, but that's fine tuning.
I'll give my thoughts on rowing in the other thread...
Rich
Posted: Tue May 18, 2004 9:24 am
by Jonnas
Hello Rich,
Thanks for the comments (detailed, as usual, which is very nice).
Several guys I’ve talked to, accustomed to sail asymmetrical spinnakers, mentioned that it is very straight forward, even easier than symmetrical. Reading your comments I’m tented to believe they were right.
I don’t have experience with spinnaker sailing, never sailed one (not even as a crew), so that’s why I’m not going to install it for my first season. Nevertheless I am considering letting the boat prepared for its use (either as plans or as you did it), although it maybe relatively easy to do it at a later date. I haven’t decided yet, but it can wait until the actual building begins.
Continue practicing with yours, and have fun.
Best regards.
JG
Posted: Tue May 18, 2004 9:47 am
by richstrat
Jonnas,
I went through a lot of thinking making the spinnaker decision - initially I was deciding whether to have one or not, then I had to decide could I afford the sail or wait another season - credit card to the rescue! The one decision that wasn't difficult was whether to fit the pole or not.
If you are even remotely considering the spi at a later date, I would encourage you to sort out the pole system while you are building the hull. You don't need to cut the deck just yet, but I'd personally hate to spend a lot of time crawling around under the foredeck, butchering nicely finished panels etc to retro fit a pole. That way, when you feel adequately prepared, you can just cut the deck (if you haven't done that already), rig the spi and go...
Of course if you do this, you'd probably end up like me - not planning on using it for at least a year, then flying it on the 4th sail!!! It really is a simple sail to use once it's up - and the launch / retrieval is simply a matter of practice and a bit of rig refining...
Rich
Posted: Tue May 18, 2004 11:02 am
by Jonnas
Well Rich, you already know me a little
. Started with the Caravelle in mind, a family, very roomy, forgiving, displacement sail boat, perfect for a beginner; and quickly switched for the AR15, a family (as you keep showing us
), roomy (not so much), demanding (hopefully not too much), planning, perfomance sail boat, not so perfect for a beginner
.
From this perspective, trying out the spi doesn't seem such a big jump ...
But the point is exactly what you've said. Doesn't make that much sense retro fitting the spi pole and its accessories if you can do it, easier, during building. Using the spi or not (actually buying it or not), I surely can sort that out later
.
Best regards.
JG
PS: So, do you already understand pole mount as per plans? I kinda like it that way, coming out the hull from the side, and I think I got its mechanics. I'll write another post about it. This one is already veeeeery long
Posted: Wed May 19, 2004 3:30 am
by richstrat
Jonnas,
I still don't see an easy way of rigging the pole as it is on the plans - sure I can see how it works, but the launch tube just looks too trick for me...
It's all been discussed before -
http://forums.bateau2.com/phpBB2/viewto ... 8e3662c7d4
Have a look through here if you've not done so already...
Rich
Posted: Wed May 19, 2004 10:14 am
by LarryA
KS,
Not sure what the used boat market is like in NY, here is GA, it is disgusting. I looked at several 30 foot boats over the weekend where the asking prices were on the order of $10k. My wife and I are working on a deal to pick up a Ranger 23 (a blue water capable small boat) for nothing, just cover outstanding slip fees and part of the brokerage fees. We will have to recore the foredeck and paint her, some other minor things but then we will have a boat that fits the needs you described.
I have noticed over the last 5 years in particular that as boat prices have come down due to the age of some of the fiberglass boats, people buy them who don't really know anything about them. They use them and then something happens and they end up in the boat owner death spiral as we used to call it. The "I can't afford my slip fees, have neglected my boat so I can't sell it so they are going to haul the boat at which point I have to pay the hauling fee and land storage fees - I can't get out from under this thing."
So just go wonder around the Marinas in your area and find an abandoned boat that fits your needs and try to swing a deal with the yard. You will be stunned what you can find laying around. And then you have a boat for while you are building your new one.
Posted: Thu May 20, 2004 7:07 am
by Jonnas
Rich,
I understand what you say regarding rigging the pole. If I got it right, it implicates having lines going alongside the pole inside the tube. I don't like it that much. That's why I thought of cutting the tube open by half along it's lenght. That way I would have acces to lines and it would be easier to rig. It wouldn't be that different form your system, though, except for the side hull placement.
I have some restraints as to install it centrally as you did. I'm afraid it occupies to much space and the spi itself may get caught on the pole lines, unless of course, some sort of sleeve (bag, tube? ... terminology problems again, sorry
) was used and suspended from the cuddy deck, for instance.
I'm still planning but I'll get it right, I'm sure.
JG
PS: Have you read Paul's suggestion on stowing the oars inside PVC tubes? I like the idea and think it may well work.
Posted: Thu May 20, 2004 8:02 am
by richstrat
Well,
The spi did not get caught on the pole / lines with it installed centrally, but that isn't going to stop me from fitting a 'hammock' for the spi to sit in, suspended from the foredeck above the pole, thus separating the spi from the storage area. I'm sure I mentioned this before in the thread - I've got some cat trampoline fabric to make it with...
I would be wary of splitting the tube - I had exactly the same thoughts - but just keep thinking about 18 m2 of sail on the end of your pole. PVC is fairly flexible - are you convinced it's strong enough? I wasn't...
Rich
Posted: Thu May 20, 2004 8:21 am
by Jonnas
I'm sure I mentioned this before in the thread
Yes you did, sorry. Following these forums is not easy sometimes
PVC is fairly flexible - are you convinced it's strong enough?
Nope! Unless I'd use a larger diameter PVC tube, which is not possible, considering pole diameter.
So, back to original plans (without cutting the tube) or your way. Seems you'll win again.
Another question. Do you have installed some way to close the hull spi hole (sort of a lid) for when you don't have the pole there or you have it all the time (or maybe you don't think is necessary)? And also, why did you choose to make your own tube out of FG (the front bearing through the hull). Can that be PVC tube? It's a short lenght, wouldn't be any flex problems, I think. Are there any bonding problems with epoxy (I don't think so)?
Best regards.
JG
Posted: Thu May 20, 2004 8:44 am
by richstrat
No, I've got nothing to close off the hole when the spi is not in use. To be honest, I'd be surprised if I ever got much water in there during normal sailing - any spray generated tends to go up and away with the angle of the hull panels. Plus with the false floor under the foredeck to drain any water, I didn't think it necessary...
I'm not sure how straight forward it would be to close off the hole... The camber on the foredeck, whilst not excessive, would cause problems with a simple ply cover...
Perhaps if you're sure you're not going to use the spi for a period, then install the pole system, but don't cut the foredeck until you are ready... There would be some work to make good, but not too much...
Seems you'll win again.
Ah come on - it's not a competition - I'm only expaining my decision processes - I hope that you (or anyone else for that matter) don't feel that I'm trying to tell you that my way is the only way...
Rich
Posted: Thu May 20, 2004 9:06 am
by Jonnas
Rich, I'm not sure if you're referring to the spi pole hole or the deck hole. Also, you may have missed the second part of my question, regarding using the PVC tube. And that's my fault, because I edited my post. I'm sorry.
Any way, I was referring to the pole hole, and for aesthetic reasons mainly. That's why I'm thinking of using the PVC instead of fabricate a FG one as you did. That way, I could use a standard PVC tube lid painted the same color as the hull, for ex.
Ah come on - it's not a competition - I'm only expaining my decision processes
Yes, I know. I didn't meant it that way. I was kiding really. But the fact is that you have some very good ideas and expertise. and I'm very pleased that you don't mind sharing them.
Best regards.
JG
Posted: Thu May 20, 2004 9:23 am
by richstrat
Oh right, I see....
Why didn't I make my bearings out of PVC? I can't really remember - I think it came down to size... I seem to recall I couldn't get a good fit for the pole diameter I chose. I'm also not convinced that epoxy bonds very well to PVC - I know it doesn't stick at all to polypropylene or polythene - didn't want to risk it with PVC. If you do go down that route, I would rely more on mechanical than chemical bonding, i.e. rough the PVC surface up as much as you possibly can before bonding and use plenty of FG tape over as much of the tube as you can to increase the bonding area...
I did actually have some success bonding plastics into the hull - having said that epoxy doesn't stick to polypropylene, I've used some PP tube for wear resistance on the CB bolt. It does stick if you rely on a mechanical bond - I used a hand saw to cut deep grooves into the outside of the tube before bonding - it's holding so far!!!...
Rich
Posted: Thu May 20, 2004 10:36 am
by Jonnas
Thanks Rich,
I'll post a question on the other forums regarding PVC bonding and check some more opinions. If really there are any serious bonding problems, I'll probably go your way and build the tube from scratch.
Cheers.
JG
Posted: Thu May 20, 2004 11:42 am
by Jonnas
Oh, I forgot to mention. Regarding the hole in the deck, I am considering making sort of a hatch out of it.
The camber is not so difficult to overcome if you measure it on site (actually make a template of it) before cutting out the hole. Then, you'll use that camber template and cut some stringers to glue under the cut out ply (which is now a flush hatch cover) so it will keep the same camber as the rest of the deck.
This is more or less one of the technics used for building kayak ply hatch covers.
This way I can keep the deck closed until I'll start using the spi without the need for retrofiting.
Cheers.
JG
Posted: Tue Jun 01, 2004 9:07 am
by richstrat
Hello again...
Latest update - tried her as a motor boat on Monday. Plymouth was hosting the start of the TRANSAT so I thought I'd pop out to have a look at the big ocean racers starting their little trip across to Boston. I've finished my transom washboard so I thought I'd try her out as a motor boat...
It turned out to be a good decision. The wind was up to 25 knots, blowing straight into the sound. Sea was really messed up - 4 ft swells in places, really steep 3ft chop in others. And this was inside the breakwater!!! It was quite a wild ride. Oh and it was pouring with rain.
She handled the waves with aplomb considering her size, but it was a really hairy ride, especially when she'd take a wave on the quarter. Fran thought we were capsizing. Anyway, after being beat up for 1/2 hour and with the start line 4 miles away, I asked Fran if she wanted to go back. YES was shouted across the boat, so we spun about and headed back in.
Didn't see the start - which was a bummer, but the boat took it all in her stride, even if the crew didn't. Anyway, looking at the pictures of the start, seeing big open 60's tearing away with 3 reefs in and a staysail - I feel vindicated about my choice in not sailing and chickening out after 1 hour...
The funniest things was returning to the slip - I asked Fran to hop over the side to hold the boat as we came into the slip - once she thought the water was shallow enough. I turned to raise the rudder and outboard, only to hear a scream and see her hands holding onto the gunwale. The water wasn't as shallow as she had thought
!!! Bless
The washboard works a treat - I'll take some piccies when it's not pouring with rain... Keeps the boat dry - big plus for heavy crew days or motoring, but for fast sailing, I still think I'd prefer to not have it...
Rich
Posted: Tue Jun 01, 2004 10:19 am
by Jonnas
The water wasn't as shallow as she had thought !!! Bless
Rich, that's no way to treat your crew! You're asking for mutiny one of these days
Sounds like you've had a great ride. I would also love to go out and see the start of the TRANSAT 2004 race. The photos I've seen (probably the same you've mentioned) are really impressive.
Just curious: have you disassembled the mast or took her out only without the sails. I imagine riding that chop with the mast on, would ask also for the centreboard down, for balance?
I would appreciate seeing some photos of the new transom, whenever you can make it.
Cheers.
JG
Posted: Tue Jun 01, 2004 10:47 am
by richstrat
No, I left the mast up. I had the centreboard down a couple of inches just to give me a skeg for directional stability. The centreboard could actually act as a hindrance - the currents and eddies in the narrows are fierce - it's a struggle to hold onto the tiller at times - in circumstances like this, I'm happier without the board.
I had no concerns about the boat actually going over - she's beamy and stable and was riding over the waves with no trouble. If the waves were 6ft + and very steep, she might have gone over - more likely though that the crew would have been 'ejected' first...
As to Fran going over the side, I asked her to jump when she thought the water was shallow enough - for some reason she thought this was 15 ft from the shore!!! Perhaps more detailed instruction next time!!!
Next time I've got the camera down there, I'll take a piccie of the transom washboard. I'm actually really rather pleased with it - it works well, does everything I wanted it to and is easily removeable (it's held on by bungee and hooks).
Worst thing about the start of the TRANSAT was having recovered the boat, we jumped into the car and shot around the coast to watch them from the shore, only to discover the course took them straight out into the mist / fog. Oh well, it was really sunny on Saturday when we spent the morning nosing around the race village - wandering along the pontoons with all that kit on display made me want a bigger boat...
Posted: Tue Jun 01, 2004 9:09 pm
by Jonnas
wandering along the pontoons with all that kit on display made me want a bigger boat...
It seem's like you're finished with Phase III and are ready to start all over again
. I sure can understand that. Be patient and enjoy your AR15, the sportsboat should be released pretty soon (I hope!).
As for me, I have to finish with some major redecoration of my house (you know, spring cleaning, new wall painting, new bedroom for the kids, etc.), before my wife lets me start building the boat
. I don't change my mind easily or very often about decisions made, but if I don't start building the AR15 soon, I'm taking the risk of being somehow impressed by the sportsboat plans as well . . .
. Nah, that would be a major mistake. The AR15 will be enough boat for me for a while.
Cheers.
JG
Posted: Wed Jun 02, 2004 3:20 am
by richstrat
Oh, I'm ready - it's just my finances aren't!!! I think I may go along the lines of designing myself. At least the time I take doing that will stop me from going out and getting started. Of course, I'll probably get the sportsboat plans as well, when they are issued. My biggest problem is size. I reckon I can build up to 20ft in my garage, but will that be big enough? Sure for an accommodation point of view, but having experienced the AR15 in the conditions on Monday, I think larger would be better...
Posted: Wed Jun 02, 2004 8:28 am
by Jonnas
Designing your own boat sure sounds very interesting and . . . challenging.
The sketch you posted a few days ago looks very nice. Are you still considering something with those lines or are you definetely looking for something bigger?
Why not start a thread on designing such boat? I read in these forums that something of that kind was started at AmateurBoatBuilding, although I wasn't able to find it. Surely it would catch everybody's interest and maybe some good ideas might result from it. I definetely would like to contribute with my very minor knowledege.
Best regards.
JG
Posted: Thu Jun 03, 2004 9:24 am
by Jonnas
Rich,
Probably you know this site already:
www.boatdesign.net
If not, IMHO it's worth visiting it.
JG
Posted: Thu Jun 03, 2004 9:40 am
by richstrat
Yep, seen it - that's how I came across the Kralya 630. Check out the Pilgrim 590 as well...
Rich
Posted: Fri Jun 04, 2004 4:59 am
by richstrat
The area in that picture is completely sealed with lots of fibreglass etc. I have high confidence in it not leaking. In addition, the area under the floor is full of expanding foam, so even if cracked / holed, there won't be a lot of water in there...
Topics like this come up from time to time. Jacques normally answers if it is a sealed compartment (these are) then you don't need drainage...
Having said that the false floor under the cockpit and the side tanks do have inspection hatches and any water could be removed from there...
Once you start building using these epoxy / glass seams, you will come to understand why I'm not bothered about water getting under the floor...
Rich
Posted: Fri Jun 04, 2004 6:52 am
by richstrat
If you're really that worried about it (and I wouldn't be) you will need to drill limber holes (technical name - they are just holes drilled in the frames - probably 1/2" - 1" in diameter) in the frames for the water to flow through to a point where you can drain it. I would suggest a couple of 4 or 6" inspection hatches in the sole - one each side of the stringer - so that you can soak up any water with a sponge.
As to location - by the centreboard case would be sensible - that way you can also use them to access the bolt, without having to build an access hole (as I have done).
I really don't think it's necessary - perhaps if you post your question in the main sailboats forum Jacques / others will give their opinions...
Rich
Turning the AR15
Posted: Thu Jul 29, 2004 8:19 pm
by hernangorda
richstrat wrote:Robert,
The turning party went just fine, the frame worked an absolute treat.
Rich
I am not sure if you are still reading the threads or not. Maybe all you are doing is sailing! In any case, can you please share with us how you turned your boat over? Thanks!!!!!
Posted: Fri Jul 30, 2004 5:49 am
by richstrat
Yup,
I still check them!!!
Turning over was a bit of a challenge, but I built a frame for the hull to turn it over.
The procedure:
first turn - i.e. from right way up (following stitching and installation of all interior components) to upside down was just manhandled - there was no high quality finish at this point so I wasn't too concerned about resting the hull halfway on the ground.
Once upside down, the hull rested on 2x4's ( which were padded with a bit of carpet underlay at contact points. I faired, sanded and painted the hull, then built a turning frame.
This was basically two rectangular frames built around the hull - so some 2x4 (or similar) screwed to the two pieces supporting the hull, then braced so they didn't shift fore / aft. I then screwed pieces of timber to each rectangle supporting the hull side panel. All contact points were padded with underlay. Then it was simply a case of taking the hull outside, setting it down and lifting one side of the frame.
The verbal description is probabluy confusing - I'll see if I have any piccies when I get home...
Oh and yes, I am enjoying sailing - took her out in a real blow last weekend - she was a real handful - probably far too much sail - the jib sheave box popped out of the mast under the strain!!! (nearly lost the mast
!!)
Ah it's all good fun!!!
Rich
Frame
Posted: Fri Jul 30, 2004 6:51 am
by hernangorda
As usual nice to read your comments! I am glad you are enjoying the boat!
Pictures or sketches of the frame would be useful but don't let this take time from your sailing!
Thanks!
Posted: Fri Jul 30, 2004 9:04 am
by jacquesmm
If you need a frame to roll the hull, use the dimensions for a frame. It's the same thing but hollow.
I don't think such a frame is needed, it's a small boat.
Posted: Fri Jul 30, 2004 10:03 am
by richstrat
Yeah, I agree, you probably don't need a frame to roll it, especially if you build it light (which I didn't) - I just couldn't bear risking scratching the paint I'd just spent 2 weeks applying, rubbing down and polishing!!!
Rich
Posted: Fri Jul 30, 2004 1:43 pm
by hernangorda
Unfortunately it does not seem my boat is coming too light. I have tried to move it with 2 people and had a VERY hard time doing so. I need to roll it now and I wanted to figure out an easy way of doing it, other than bringing 5-6 people to help!
Granted I have encountered the same issues you did and I most probably overbuilt the boat, but I find it very hard to consider this a "small" boat. Even lifting 12 sheets of plywood is hard!
Thanks for your help!
Posted: Thu Aug 26, 2004 1:37 pm
by jacquesmm
16 pages is enough.
I locked this thread, start another one if you want.