Page 1 of 1
SH14 Starting a new Sharpie called Little Mae
Posted: Wed Mar 20, 2013 6:22 pm
by MWhiting04
Hello All,
I am going to try my hand at building a boat. I have chosen the Sharpie for two reasons.
1) Looks like an easy first boat
2) I have never sailed so this should be a good size to learn on
Any advice as a newbee?
I have built a home and done alot of building projects just never worked with glass before.
Mike
Re: SH14 Starting a new Sharpie
Posted: Thu Mar 21, 2013 9:08 am
by bondo
That's great mwhiting04. Your resume' is more than adequate. You will be fine with the fiberglass and the best part will be the sailing when you are finished. I hope you keep us updated on the project.. Good luck.
Re: SH14 Starting a new Sharpie
Posted: Thu Mar 21, 2013 11:01 pm
by Stuff
Another newbie just like me!!!! So far for me is not that bad and I am building a more complex boat (AD16 Karenina). For me buying the epoxy pumps has being great the best investment. It will guarantee you that you will have the right ratio of epoxy and hardener all the time. Also just like they mention in the How To's page just mix a little at a time. You will be surprise how much you can do with just a little of epoxy. Another thing I learn the hard way is to connect the orbital sander to a wet vac. It is amazing the amount of dust is generated in a short amount of time. My last advise (if you are doing the basket method) put swivel wheels to the basket with hard stops. It will allow you to move the boat anywhere without much effort. So far that is all I have learn in the past 6 months.
Good Luck and ask questions. The people in the forums are great and they will not ignore your questions.
Re: SH14 Starting a new Sharpie
Posted: Fri Mar 22, 2013 9:46 am
by pee wee
If you don't want to buy the pumps, here's a way to accurately measure given volumes of resin and hardener:
http://www.boatdesign.net/forums/fiberg ... 12809.html
If you want to get fancy, you can make several measuring cups and mark each with a different amount.
Pouring the mixed epoxy into a paint roller tray liner will keep it from kicking off too quickly.
Re: SH14 Starting a new Sharpie
Posted: Fri Mar 22, 2013 9:54 pm
by MWhiting04
Well I decided to build a model first to make sure I can follow the plans.
Now I have a cardstock replicate of a sharpie 14, progress.
It took a while to decifer the plans and all the measurements. It really does take some creativity and thought process.
I took the direct measurements from the plans and then determine the arch from the full size plans by measuring every 12" to determine the top and bottom arch. It was fun.
I did convert all measurements from Feet/inches to 1/12 the size in inches for the model.
In place of fiber, I used scotch tape. I will finish the model by completing the seats, CB, and mast partner.
I think I am really going to enjoy this process.
Any words of wisdom would be great.
Mike
Re: SH14 Starting a new Sharpie
Posted: Mon Apr 08, 2013 9:43 pm
by MWhiting04
I decided to start by building a mast. It was a new experience for me.
Planing was a new skill I had to learn. I purchased an electric planer and I really liked it.
I now have a mast round and smooth and ready to be glassed.
I could have done a better job, but for my first one it was a good job.
I had read about sanding, sanding, sanding, and sanding. It is true. Time to get buff.
Re: SH14 Starting a new Sharpie
Posted: Tue Apr 09, 2013 12:27 am
by bondo
I used to think that a power planer was a tool to destroy wood with but now I love the thing. Nice work on the mast. A mast is an advanced boat project.
Re: SH14 Starting a new Sharpie
Posted: Tue Apr 09, 2013 2:51 pm
by MWhiting04
The mast needed some epoxy so it is drying before I do my final sanding. I ran into some technical issues with the spar so I have to start that over. When I say technical that means, I cut it wrong. Taking a break from that part for now.
So I started on the body of the boat. I have all the sides cut out and ready to butt block them.
The plans on nesting were not all that clear on where to cut the butt blocks from. I am going to have to improvise. Also the plans show the center board frame on the 1/4 nesting plan, but the details list 3/8 wood. I am going with the latter because I know I will have extra 3/8.
For others, I used the plan measurements and then backed it up with exact measurements from the full size plans and found some differences. I rounded the difference off. I even double checked each one to make sure I was correct. I dont mind having to adjust but others might be confused and get fustrated.
Re: SH14 Starting a new Sharpie
Posted: Fri Apr 12, 2013 7:55 pm
by MWhiting04
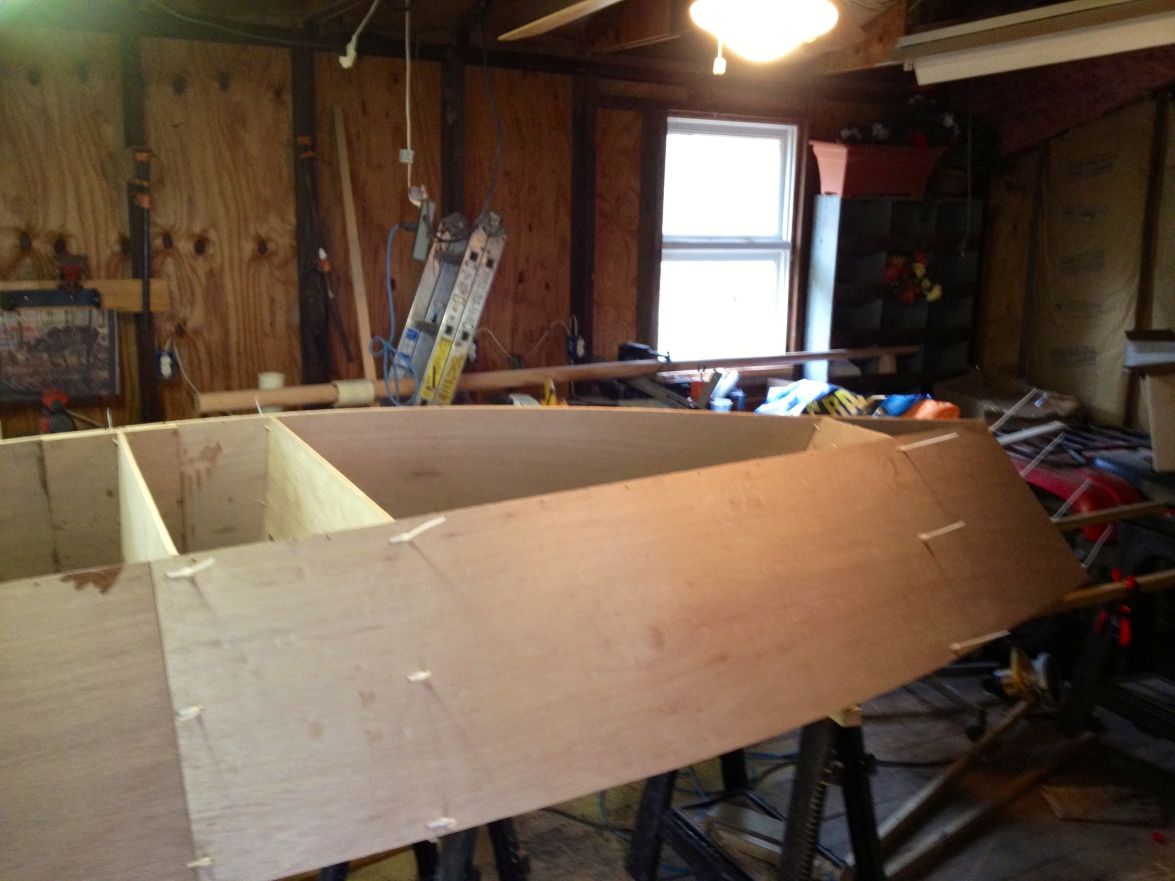
So far so good. I have the frames all traced and cut out. Tomorrow I get to line up the frames and stitch them to the sides. It will look like a boat then.
The frame full size patterns came out exactly as the measurements.
As I am getting closer to marking and cutting out the bottom, is there an easy way to do it. There are not measurements or full size plans for the bottom. The instructions say to lay the boat on the plywood and trace it. I think it will be hard to hold the boat steady while I trace and then rock the boat to do the back. Any suggestions?
Sorry no pictures yet. Flat wood is not much to look at. Once I stitch it together I will post a picture or two.
Re: SH14 Starting a new Sharpie
Posted: Sat Apr 13, 2013 12:42 pm
by MWhiting04
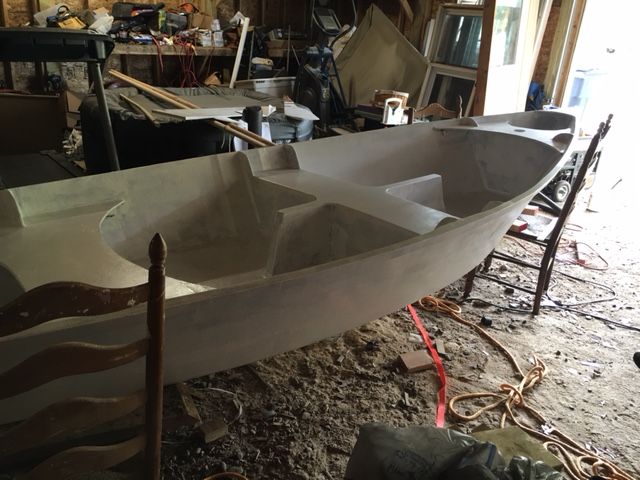
Here is my first pictures of something that looks like a boat.
http://gallery.bateau2.com/displayimage.php?pid=48194
Re: SH14 Starting a new Sharpie
Posted: Sun Apr 14, 2013 10:41 am
by bondo
There you go. That does look like you're building a boat. I can see the mast looking good in the background too. Thanks for the picture. (I encourage you to post lots of pictures)
Re: SH14 Starting a new Sharpie
Posted: Sun Apr 14, 2013 5:56 pm
by pee wee
here you go:
Re: SH14 Starting a new Sharpie
Posted: Sun Apr 14, 2013 7:39 pm
by MWhiting04
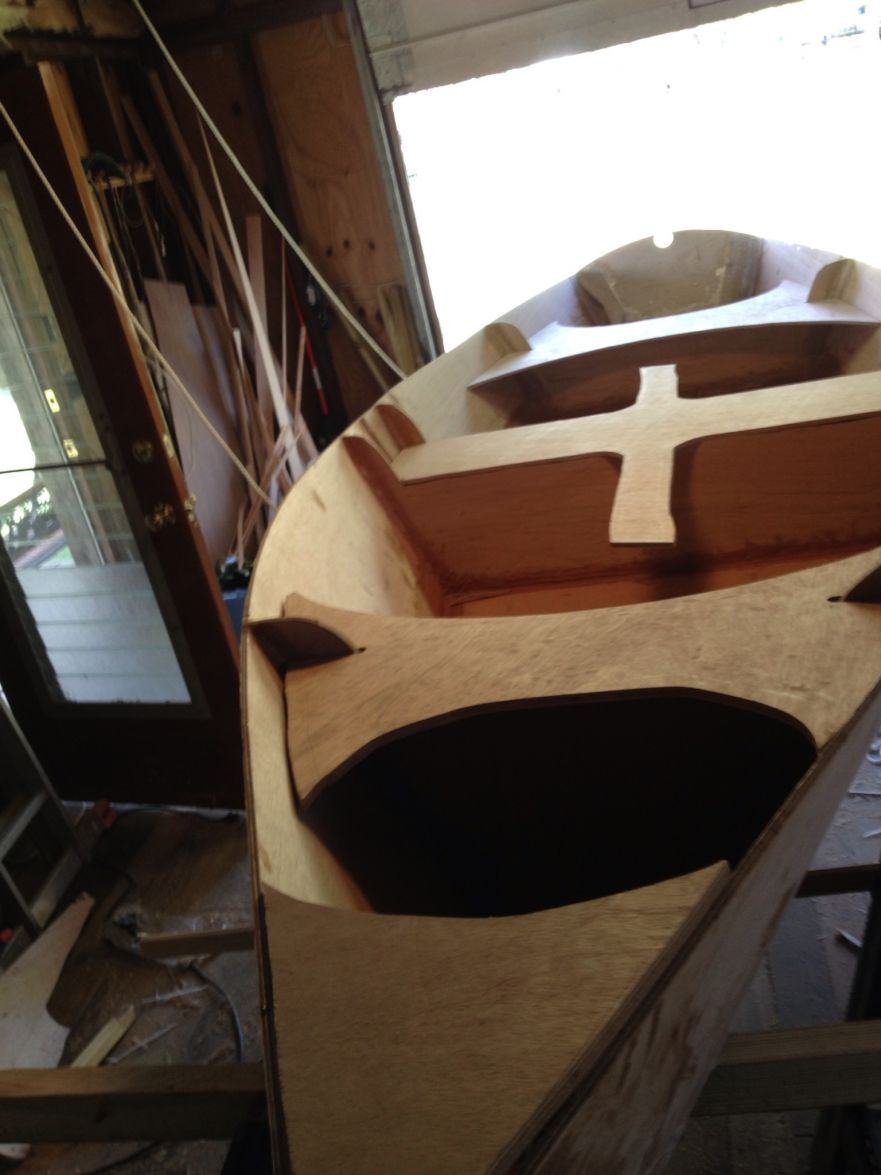
Lots of progress this weekend.
Started filleting after redoing the stitching. Needed to add spaces to avoid wood on wood.
The spot filleting will have to sit till later in the week.
I added a few pics to the builders gallery.
Included one of the mast before final sanding.
http://gallery.bateau2.com/displayimage.php?pid=48230
Re: SH14 Starting a new Sharpie
Posted: Mon Apr 15, 2013 11:23 am
by MWhiting04
Not sure if anyone is reading these but it helps me in my learning process.
I have quickly learned that thicker fillets is better than thin ones.
I was trying to work with a thinner fillet mixture and found I could not shape it to get the 3/4 to 1 inch radius.
I thickened up the putty and it looks and molds much better.
The things you have to learn on your own. I did read about a putty the consistency of peanut butter but it really needs to be thicker than that. My test is if I don't break my wide pop cycle stick when I hold it up high then it is not thick enough.
I hate waiting for the stuff to dry so I can move on.
Now that I am doing the full fillets I can tape it shortly and do not have to wait for a complete dry fillet.
I really need someone mixing while I fillet because I can apply it faster than I can mix more.
I also lowered the boat to make it easier on my back. On a normal size saw horse I was bending over the rail to get to the inside.
Now it is a better height so I don't have to reach over as much.
All for now.
Mike
Re: SH14 Starting a new Sharpie
Posted: Mon Apr 15, 2013 7:19 pm
by MWhiting04
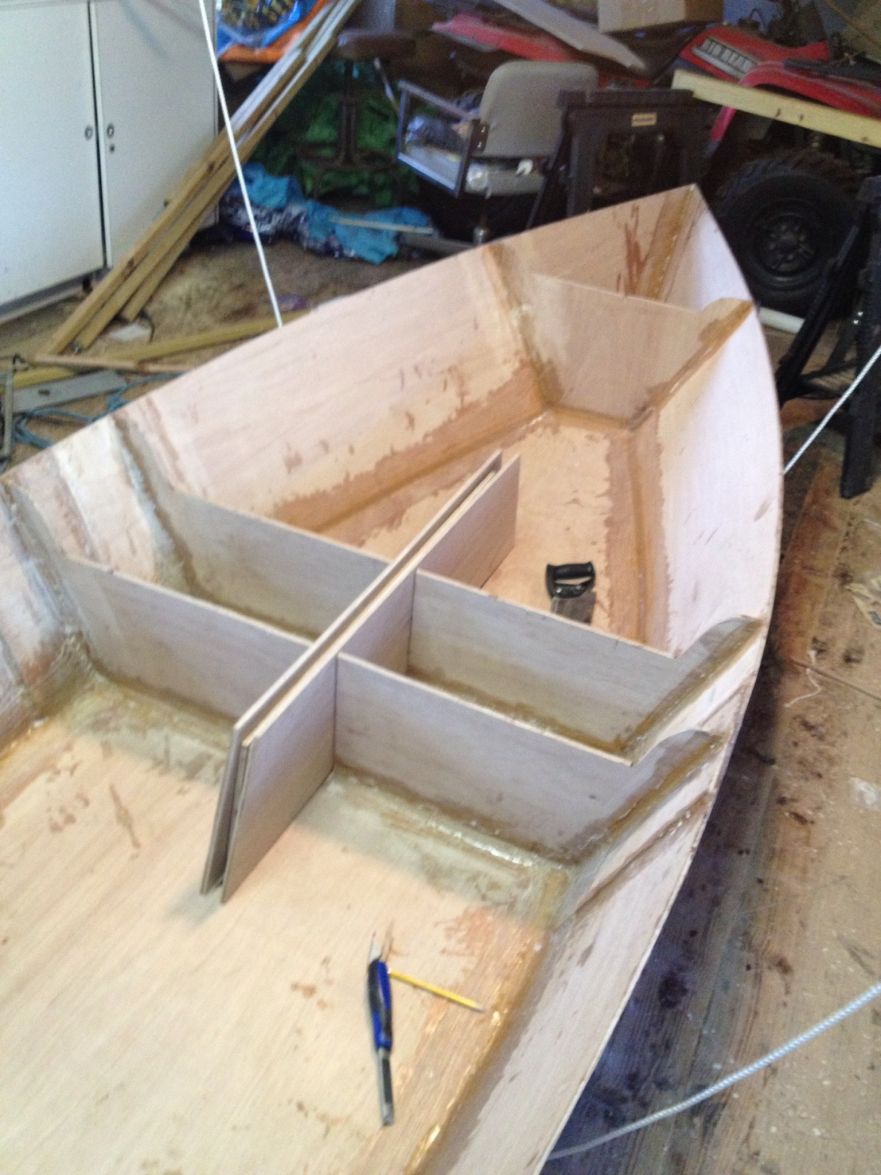
Ok next phase. Finished Fillets and glassed the seams.
Found the best way to wet out the tape was to use my fingers while wearing gloves.
Tried a brush but it was too stiff.
Tooth brush would have taken to long.
http://gallery.bateau2.com/displayimage.php?pid=48253
Mike
Re: SH14 Starting a new Sharpie
Posted: Tue Apr 16, 2013 8:19 am
by Walkers Run
I like to add a little silica to the wood flower for fillets. You want to work wet on wet. Glass right over wet fillets.
Where in the finger lakes are you. I grew up on owasco lake.
Re: SH14 Starting a new Sharpie
Posted: Tue Apr 16, 2013 8:32 am
by topwater
If you want an easier way to wet out tape, pre cut the tape before you lay down the fillet, fillet the seams
and let it set up a little then wet out the tape on a table coverd with plastic , if the tape is short enough
just carry it over to the seam and lay it on. If the tape is long roll it up on a cardboard tube and roll it
out on the seam. I did 23 ft stringers this way works good and is fast. make sure you use a roller or brush
to work out any air bubbles and to press the tape in place.
Re: SH14 Starting a new Sharpie
Posted: Tue Apr 16, 2013 11:31 am
by MWhiting04
We are between Seneca Lake and Canandaigua lake and just north of Keuka lake. So lots of water to learn to sail on.
I am doing wet on wet when I am doing the full fillets. The spot fillets I had to wait so I could remove the ties. Didnt need to but the idea of leaving plastic in the joint did not settle with me. I did leave 4 in at the transom because I just filleted over them.
Why add Silica? Does it make is stronger?
I may try the idea of wetting down on a bench first and then transporting to the boat. My back is aching from leaning over for hours trying to wet it down. I am getting old.
Re: SH14 Starting a new Sharpie
Posted: Wed Apr 17, 2013 9:23 pm
by MWhiting04
Ok decided to get ambitious tonight.
I flipped the boat, planned, sanded, filleted, and glassed all the seams.
Once I started I could not stop until it was done.
I am dreading the next part, seats and CB.
But I just need to take it one step at a time.
I think I am using to much epoxy and wood flour. I am nearly out of wood flour and about 1/3 of the way through my epoxy.
Doesn't matter because I plan to glass the entire bottom and up the sides, so I will need more epoxy.
I picked up some cheap cloth, wont name the store. It has some damaged threads. I did not care because I am going to paint the boat so a clear coat is not what I am looking for. I got 20 yards at 50" wide. That is plenty.
More pics in the builders gallery.
http://gallery.bateau2.com/displayimage.php?pid=48275
Re: SH14 Starting a new Sharpie
Posted: Fri Apr 19, 2013 9:03 pm
by MWhiting04
Really it setting in. I have to do a bunch, and bunch of sanding. For an impatient person that is a nightmare.
I decided that I will rough sand the entire inside before I start on the seats and CB.
I realized something now that I am stepping back a bit. When I filleted the frames in I filleted right to the top of the side. Now I have to remove mch of the fillet to put in the rubrail. Otherswise the rail will stop before each frame and not butt up nicely.
Just more sanding and filing.
No new pics to share, not much to see at this point. Added a second Fiber coat on the Transom and bow inside tonight. Sand tomorrow forever and then maybe sunday second fiber coat on the outside transom and bow.
I seem to have alot of biaxle tape left over. Two rolls with the kit and I have not even gone through one roll.
From the plans I deduced that you dont need to fiber the frames or did I miss read that. I am going to double the fiber on the outside of the butt blocks for more support. Should I double the tape on the outside bottom edges?
Sand is a four letter word, it feels like one.
By the way the electric plane is a great tool. I was able to plane the outside bottom in minutes and to round the chines over for the tape nicely. No elbow brease or broken knuckles needed.
Till later.
Mike
Re: SH14 Starting a new Sharpie
Posted: Sun Apr 21, 2013 10:31 pm
by MWhiting04
Weekend update.
To cold to do any fiber glass work, so I spent most of my time laying out and cutting out the seats, CB, CB case, knee boards.
I started to work on the Rudder but found some confusing things in the plans for the rudder and rudder cheeks.
Post a question in the sail boat builders section for the forum for help.
No new picture, sorry.
Re: SH14 Starting a new Sharpie
Posted: Fri Apr 26, 2013 5:58 pm
by MWhiting04
Ok all,
Some more work done.
I cut out all the parts, Rudder, CB, CB frame, Seats, Knee board.
All the fiber glass is done, 2 coats on all seams on the outside.
Getting the seats to fit was a major chore. Had to keep adjusting until finally they fit.
The Mid seat side pieces has do be cut off because the cut out for the frames was so large it went beyond the side piece.
I will have to put in some for decoration if I dont like the straight look.
The CB portion of the seat is to long on purpose. I did not want to cut it until I knew the size and where the CB frame goes in.
So in the pics it looks long and uneven, that is just a work in process.
CB frame is next, need to cut the frames and the bottom.
It is coming together. Ran out of wood flour so I need to hold up gluing the CB, and rudder together.
I ordered some more along with some fairing compound.
Before I put in the seats and CB case I want to clean up all the edges while it is easy to get to them.
Pics in the galley, link below.
http://gallery.bateau2.com/displayimage.php?pid=48336
Re: SH14 Starting a new Sharpie
Posted: Sat Apr 27, 2013 2:18 pm
by gstanfield
Looking good, you'll have her on water in no time!
Re: SH14 Starting a new Sharpie
Posted: Sat Apr 27, 2013 5:17 pm
by bondo
Nice work MWhiting04. You sure are getting after it. Looking good too.
Re: SH14 Starting a new Sharpie
Posted: Sat Apr 27, 2013 7:08 pm
by MWhiting04
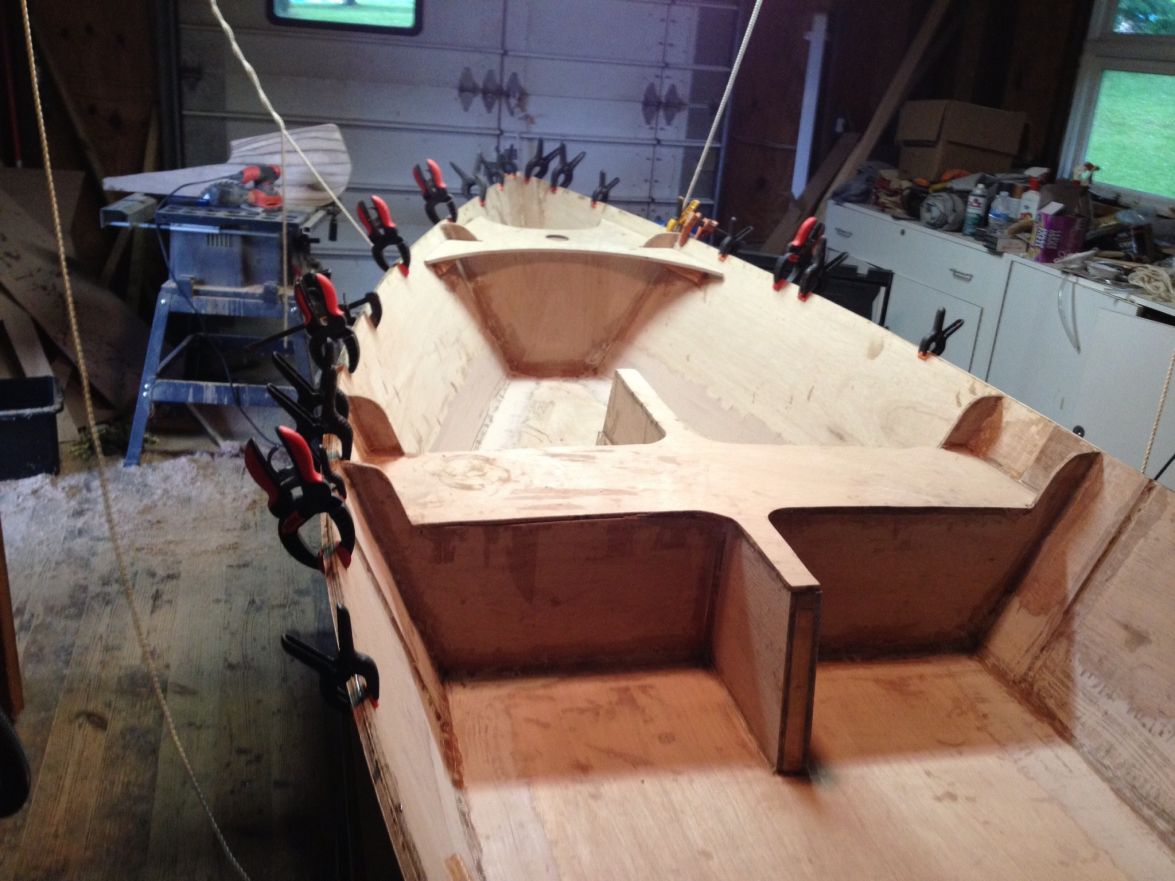
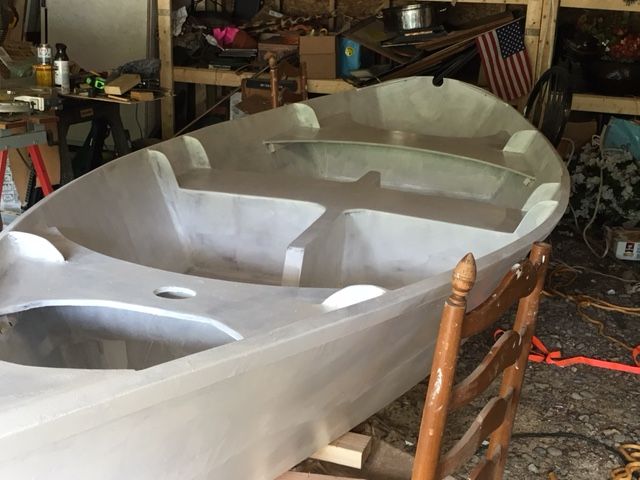
Some more work this weekend.
I measured and cut out he CB slot in the bottom of the boat.
I then placed the CB case and CB in place to see how it looks.
I have some planning to do on the frames and CB case to get a better fit, but it look nice.
This is all that I can do this week. I am out of town this week.
http://gallery.bateau2.com/displayimage.php?pid=48366
Re: SH14 Starting a new Sharpie
Posted: Sun Apr 28, 2013 10:47 am
by Stuff
Î am impressed with your work. You are moving really fast. At that pace you will be done by the summer.

It's looking great. You are ready for the AD16!

Re: SH14 Starting a new Sharpie
Posted: Sun Apr 28, 2013 3:12 pm
by MWhiting04
Let me get this one in the water and learn to sail before I think about AD16.
That is a bigger, longer project.
Love looking at others progress on theirs.
Re: SH14 Starting a new Sharpie
Posted: Wed May 08, 2013 9:18 pm
by MWhiting04
No updates in a while. Been away and wife has a new project for me.
I was able to glue the CB halfs together and started on the CB case.
I got over anxious and almost made a big mistake. I cut and started to glue 1" spaces all the way around the frame.
Got them epoxied up and glued. Went back out about 30 minutes later and realized that I put a 1" space on the bottom section.
So I made a 1" box with not gap for the CB....
The glue had not set yet and I was able to remove the bottom one. Whew....
Going to put the CB together after I epoxy the inside and out of both sides, maybe two coats on the inside because it will be a wet area.
No new pics, sorry. Maybe over the weekend I will have CB case in and have a new pic or two.
Re: SH14 Starting a new Sharpie
Posted: Fri May 10, 2013 8:35 pm
by MWhiting04
A little more progress.
CB Case was coated with two coats of epoxy on the inside and glued together.
Glued the Sleg together.
Maybe tomorrow dry fit and trim the CB case to size.
I did pick up a trailer. Found a trailer that fits our need.
It is a lightweight trailer for a 14' boat. It has a flat deck on the rear so we can carry lumber also.
I need to build two bunks on the deck that are removable.
I will post a picture when the sun comes up.
I did have to rewire the entire trailer but that was not too bad.
All for $400.
Mike
Re: SH14 Starting a new Sharpie
Posted: Fri May 17, 2013 10:38 pm
by MWhiting04
Ok back at it again.
CB case was put in place tonight.
Tomorrow I will flip it over and clean up the inside and epoxy the seams.
I am making some small changes to the middle seat now that I have had a chance to look at it.
I plan on making the center case the total width of the center section, no over lay or need for cleats there.
I am dreading all the sanding that I have to do. Isn't there a spay on smooth finish that covers all the bumps and valleys...lol
Oh well, it wont do it by it's self.
Mike
Re: SH14 Starting a new Sharpie
Posted: Wed May 22, 2013 11:25 pm
by scoperk11
That's looking good! I'm also a new builder, learning a lot as I go and making plenty of mistakes

When are you planning to have her out on the water? I'm almost at the fairing/painting stage, and every time I see a boat go down the road on a trailer I wish it was mine. Can't get finished soon enough! Good luck to you
Re: SH14 Starting a new Sharpie
Posted: Sat May 25, 2013 1:06 am
by bondo
Looks good. Can you get your pictures to show up here? I use photobucket but I'm not a tech guy.
Re: SH14 Starting a new Sharpie
Posted: Sat May 25, 2013 8:36 am
by MWhiting04
I have all my pics in the gallery here on this site.
Tried post in the message and could not do it.
Re: SH14 Starting a new Sharpie
Posted: Sat May 25, 2013 9:09 am
by Cracker Larry
Looking good!
Re: SH14 Starting a new Sharpie
Posted: Mon May 27, 2013 10:15 am
by scoperk11
MWhiting04 it took me a little reading to figure out how to post pictures too. When you have a picture up in your gallery, you cannot just copy and paste the link to that picture into your message. You have to right click your image and select something like "view image" or "open image in a new tab," something along those lines - I'm not sure what pops up for the bateau galleries. Once your image opens in a new tab, the URL up at the top of the screen should end with .jpg (meaning that now it is in picture format). Now, you can copy and paste the link into your message, and once you do so, highlight it, and press the "Img" button.
It sounds like a lot of work and a lot of steps but it goes faster than you think. If you're not sure you did it right, then just press "Preview" to see if the image will actually show up before you submit your final message.
Re: SH14 Starting a new Sharpie
Posted: Mon May 27, 2013 7:21 pm
by ks8
another dream (good one) taking shape in the world.

Re: SH14 Starting a new Sharpie
Posted: Fri Jun 07, 2013 9:35 pm
by MWhiting04
All right some progress.
Started putting the rail on, 1st layer. 2nd layer tomorrow.
I decided to do the layer one at a time. I cut the piece just slightly to wide and adjusted as I dry fit them.
The second layer I have cut a little wider than the first and will line up the bottoms and then plane the top even.
While the rail was drying I decided to shape the rudder.
It turned out really good.
So I decided to try the CB. It turned out good too.
I was avoiding shaping them because I thought it was going to be hard.
I just took my electric plane and started with the portion that was the thickest and worked out from there.
Planing 1 inch strips at a time. Then sanded to smooth out the lines and it is done.
For the CB, I decided to drill the hole for the painter rope because I started shaping. Glad I did.
Then shaped it and I am very please of how it came out.
I have pictures of the Rudder and rail going on but did not get one of the CB.
Will post one tomorrow.
http://gallery.bateau2.com/displayimage.php?pid=48817
Re: SH14 Starting a new Sharpie
Posted: Sat Jun 08, 2013 2:17 pm
by ks8
nice
Re: SH14 Starting a new Sharpie
Posted: Mon Jun 10, 2013 1:31 am
by bondo
Ooooh, pretty.
Re: SH14 Starting a new Sharpie
Posted: Wed Jun 12, 2013 1:14 pm
by MWhiting04
I got tired of working on the inside and decided to work on the outside for a while.
The rail is on, both layers. I planned the top and need to fill a few low areas. For the bottom of the rail I am going to wait till I glass the bottom and sides then fillet in the uneven areas and fair the cloth on the sides all at one time.
So my next steps are to sand entire bottom and sides, add a second coat of epoxy on the seams and fair a little before glassing the entire bottom and sides.
I picked up some 6oz cloth real cheap and have plenty to cover the boat.
Then I will add the Sleg and start working on the inside again.
Pictures to follow.
Mike
Re: SH14 Starting a new Sharpie
Posted: Sun Jun 16, 2013 5:30 pm
by MWhiting04
Ok really busy weekend but I was able to get the cloth done.
It was not really that hard.
I decided to do it without a precoat so that I could preplace the cloth and work out the weave.
While I was at it I did the first coat on the rudder and CB.
The whole process was not bad. The only problem is that the weave had to be darted a few times. I did not get it adjusted correctly when I smoothed it out.
Here are some pics in the gallery.
Included is a picture of the trailer I picked up.
I need to still build the bunks on the back.
http://gallery.bateau2.com/displayimage.php?pid=48952
Re: SH14 Starting a new Sharpie
Posted: Tue Jun 18, 2013 7:54 am
by MWhiting04
Well had a little scare.
The second coat of epoxy on the cloth for most of the boat was good.
One area, about 1/2 of one side never dryed. I was worried that I had an issue.
But I put another coat of epoxy on and it was dry this morning.
I did find one bubble in the cloth, so I cut it open and will fill with epoxy shorting.
Now I can sand the epoxy rough areas, a little filleting and I am ready for the stag, then primer, then paint.
I ran out of flour so I can't round out the bottom of the rail. It is nice to see it coming together.
I still have lots to do on the inside of the boat but progress is progress.
I will submit a new picture tonight of the fully cured, fully sanded outside hull.
I am now thinking about primer and paint, any suggestions.
I want the bottom and lower sides to be white, sides to be maroon or red, the inside floor to be maroon or red, and the inside sides and seats to be white.
Re: SH14 Starting a new Sharpie
Posted: Fri Jun 21, 2013 2:36 am
by bondo
I looked at the pictures. The layup looks nice. Good looking work. You will be set with that trailer. As for the paint I don't know a thing about it. I am using a one part polyurethane. Roll and tip. Oh, and two-part epoxy bottom paint and cockpit floor.
Re: SH14 Starting a new Sharpie
Posted: Sat Jul 06, 2013 10:19 am
by MWhiting04
Some more progress.
A while back I got tired of working on the inside and decided to flip the boat and work on the outside.
Now the outside is completely done.
I had fairingitis for a while. I keep fairing and sanding and fairing. Finally I had to say enough is good enough.
The bottom is ready for first coat of primer and then paint.
Now I am going to work on the inside and get that finished. But it needs alot of sanding.
I put the epoxy fillets on and did not clean up before it dryed, so now I have to sand so much more.
Also my first experience with fairing did not go well on the inside. I was treating fairing kind of like dry wall putty.
and learned that you dont need so much. So now I have to sand off alot of fairing.
The things you learn by trail and error.
On the bottom I used just what fairing was needed and it turned out nice.
My check list of things to do is getting smaller and smaller. I am down to smoothing the inside out, installing the remaining seats, covers, and knee boards. Then its on to fairing a little and primer and paint.
I still have to finish the mast. It is shaped and sanded but needs a coat of epoxy and I might Fiber glass over it.
Question to those who know. Will a fiber glass cover over a wooden mast make the mast to rigid?
I was hoping to have it done before August by looks like it will be End of August before it sees the water.
See my gallery for pictures.
I have learned that with an ipad you can imbed pictures in the forum. So I will post a link to the last uploads and you can browser the rest if you want.
http://gallery.bateau2.com/displayimage.php?pid=49207
Re: SH14 Starting a new Sharpie
Posted: Sat Jul 06, 2013 7:53 pm
by Stuff
Looking pretty good. A few more months and you will be sailing
Re: SH14 Starting a new Sharpie called Little Mae
Posted: Tue Jul 09, 2013 9:26 pm
by MWhiting04
Had a good day today.
The inside rear of the boat is now done.
Once the epoxy drys i will check for any areas that need attention.
The rear seat is now sealed in place.
The mid seat forward needs a little sanding then a few coats of epoxy.
The bow needs some rough sanding.
Getting closer.
If all goes well this weekend may put me at the first coat of primer. Still need to decide what to use.
Question for all the experts, what kind of hardware should I add in?
I have the front tow ring for to connect the trailer, but do I need cleats, tie downs, etc....
Latest picture.
http://gallery.bateau2.com/displayimage.php?pid=49242
Re: SH14 Starting a new Sharpie called Little Mae
Posted: Tue Jul 09, 2013 9:32 pm
by MWhiting04
I forgot to add,
I learned a lesson first hand why you do not reuse epoxy containers.
I did some filleting and started a second batch. I figured I would use the same cup, it was nearly empty.
I mixed the new epoxy and added wood flour, mixed it up and applied it to the bow by that mast holder.
Came back 10-15 minutes later and it had ballooned up like a cake rising.
I had read that you never use the same cup twice and now I see why.
I was able to quickly get the balloon area removed and redid the area with a clean cup and it was fine.
Never reuse the same cup, they are cheap and you can avoid problems. I was lucky that I saw it, once it hardened it would have been mess to clean up.
Re: SH14 Starting a new Sharpie called Little Mae
Posted: Sun May 01, 2016 9:54 pm
by ChapLen
Any pictures of the finished product? I'm getting ready to start mine soon...really enjoyed following your progress.
Re: SH14 Starting a new Sharpie called Little Mae
Posted: Fri Jul 15, 2016 4:49 pm
by MWhiting04
ChapLen wrote:Any pictures of the finished product? I'm getting ready to start mine soon...really enjoyed following your progress.
I am just getting back to finishing it. I need to sand alittle, then apply primer and paint, then rig all the hardware.
I have more time now to finish. How is yours going?.
Re: SH14 Starting a new Sharpie called Little Mae
Posted: Fri Jul 15, 2016 4:50 pm
by MWhiting04
OK time to get this baby finished.
I plan to get it done in the next few months.
I will try to post some more pics as I can.
Re: SH14 Starting a new Sharpie called Little Mae
Posted: Sat Jul 16, 2016 5:52 pm
by MWhiting04
Ok finally some progress after a few year break.
I was able to cut out the tiller today. Need to sand and round it some more.
Also got the Sprit cut and formed. Need to sand it and seal it.
Ordered the pintles and grungeons for the rudder.
I am going to try the suggestion of a traveler at the transom for the sheet.
Next need to mount the rudder cheeks and attach the tiller.
I also installed the bolt for the center board with a spacer inside the center board case.
Still not sure how it will stay in place.
Seems like it can easily come out when the board is lowered into place.
Re: SH14 Starting a new Sharpie called Little Mae
Posted: Sun Jul 24, 2016 9:03 pm
by MWhiting04
Some more progress.
Primed the bottom of the boat with Epoxy Primer and the Top Side with Top Side Primer.
I need one more coat of the top side primer. I have installed the rudder and tiller. Also put the center board in with the tie off cleats.
Two pics of a primed boats.
Need to sand a little and then finished paint. Planning on bottom and water line in white and top side Navy Blue, and the inside all white.
Getting closer.
http://gallery.bateau2.com/albums/userp ... G_0130.JPG
http://gallery.bateau2.com/albums/userp ... G_0129.JPG
Re: SH14 Starting a new Sharpie called Little Mae
Posted: Sun Jul 24, 2016 9:34 pm
by pee wee
Looking good, nice work.
Once you've pasted the photo's address into your post, highlight it and click on the "Img" button and you'll get this:
Re: SH14 Starting a new Sharpie called Little Mae
Posted: Thu Aug 04, 2016 4:31 pm
by MWhiting04
Latest update.
I decided to build my own sail. So I saw an option to use Polytarp and did not like that. So I took another approach.
I used a butel drop cloth and glued the patches on all four corners. I also lined the edges with gorilla tape.
Not a perfect solution but for the first sail it should work out.
I ordered the grommets for the leach and the corners. Once they come I will finish up the sail.
I will try to get a picture but I don't have a place to layout that large of sail.
Today my lead came for the weight for the center board. I was 3 lbs. I had to melt it down and pour it into my form.
I am now epoxying it into the center board. I was worried about melting lead but it was easy.
Used a cast iron pan on our burner on our outdoor grill. Took about 20 mins.
The next sail will be Dacron but I am sure this one will get some abuse as I learn.
Re: SH14 Starting a new Sharpie called Little Mae
Posted: Thu Aug 04, 2016 4:48 pm
by jacquesmm
Nothing wrong with building your 1st sail from cheap material. You will learn a lot and be better at choosing a Dacron sail later.
Check the local sailmakers: they sometimes have deals by recutting old racing sails that are not perfect for racing but great for cruising.
Re: SH14 Starting a new Sharpie called Little Mae
Posted: Thu Aug 04, 2016 4:54 pm
by MWhiting04
i kind of wanted to make the sailboat 100% homemade. This way it will at least start that way.
Re: SH14 Starting a new Sharpie called Little Mae
Posted: Sat Aug 06, 2016 8:16 am
by wegcagle
Beautiful build
Will
Re: SH14 Starting a new Sharpie called Little Mae
Posted: Tue Aug 09, 2016 11:45 am
by MWhiting04
Next update.
The sail is now done.
I spent an hour today rigging it and seeing the best way to tension the sprit.
I think I got it on dry land, now to try eventually on the water.
Need to paint it and I am ready to go.
Re: SH14 Starting a new Sharpie called Little Mae
Posted: Tue Aug 09, 2016 3:35 pm
by Jaysen
MWhiting04 wrote:

Re: SH14 Starting a new Sharpie called Little Mae
Posted: Tue Aug 09, 2016 3:47 pm
by Jeff
Very nice!! Jeff
Re: SH14 Starting a new Sharpie called Little Mae
Posted: Tue Aug 09, 2016 5:01 pm
by jacquesmm
Yes, are close. Still some wrinkles but you"ll adjust all that on the water.
Re: SH14 Starting a new Sharpie called Little Mae
Posted: Sun Aug 21, 2016 5:29 pm
by waytootall
What did you use for that mast and sprit? It looks good. I am also considering making my own sail so I look forward to hearing how yours works.
Re: SH14 Starting a new Sharpie called Little Mae
Posted: Tue Oct 01, 2019 12:27 pm
by MWhiting04
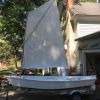
After a few years I finally finished the Sharpie and got it in the water.
Not a good result but will try again.
Center board came detached and 20 ft from dock on my first turn into wind it flipped.
I have since put a metal strap over the connection point on the center board so it can’t fall off.
Question. Beside the weight which seemed ok. How does the center board stay straight down and not retract some because of the flow of water? Do I need to lock it in place somehow?
 Viewed 12124 times")
- After flip. Lol
 Viewed 12124 times")
- Before painting
Re: SH14 Starting a new Sharpie called Little Mae
Posted: Tue Oct 01, 2019 1:24 pm
by Jaysen
I’ve seen a shock cord used to hold the board down. That allows the board to “bounce up” on impact. There are some examples online if you search google.
Re: SH14 Starting a new Sharpie called Little Mae
Posted: Tue Oct 01, 2019 2:45 pm
by jacquesmm
MWhiting04 wrote: ↑Tue Oct 01, 2019 12:27 pm
Center board came detached and 20 ft from dock on my first turn into wind it flipped.
What do you mean by detached and flipped? The CB pivots around a bolt. The plans show the bolt going through the CB case and the CB. How can it become detached? Did the bolt get loose? Can you take picture of the pivot bolt?
I have since put a metal strap over the connection point on the center board so it can’t fall off.
The bolt is secured by nuts, why a strap? A picture will help.
Question. Beside the weight which seemed ok. How does the center board stay straight down and not retract some because of the flow of water? Do I need to lock it in place somehow?
The plans show a lead insert in the CB, it seems that is right, it is sufficient for the CB to go down. Once the boat has some speed, sailing, the side pressure on the CB is sufficient to keep it from moving.
You only drop the CB when sailing upwind.
Post a picture of that pivot please, I wonder why it should become loose.
Re: SH14 Starting a new Sharpie called Little Mae
Posted: Tue Oct 01, 2019 4:43 pm
by MWhiting04
This is picture of entire center board.
The bolt does go through the boat and the center board hooks on it.
I put a metal strap where the green shows.
So sounds like while underway the board stay down because of side pressure. The board is tapered like a wing as well.

- normal_image_25.jpg (78.32 KiB) Viewed 12091 times
Post a picture of that pivot please, I wonder why it should become loose.
[/quote]
Re: SH14 Starting a new Sharpie called Little Mae
Posted: Tue Oct 08, 2019 9:56 am
by MWhiting04
jacquesmm wrote: ↑Tue Oct 01, 2019 2:45 pm
MWhiting04 wrote: ↑Tue Oct 01, 2019 12:27 pm
Center board came detached and 20 ft from dock on my first turn into wind it flipped.
What do you mean by detached and flipped? The CB pivots around a bolt. The plans show the bolt going through the CB case and the CB. How can it become detached? Did the bolt get loose? Can you take picture of the pivot bolt?
I have since put a metal strap over the connection point on the center board so it can’t fall off.
The bolt is secured by nuts, why a strap? A picture will help.
Question. Beside the weight which seemed ok. How does the center board stay straight down and not retract some because of the flow of water? Do I need to lock it in place somehow?
The plans show a lead insert in the CB, it seems that is right, it is sufficient for the CB to go down. Once the boat has some speed, sailing, the side pressure on the CB is sufficient to keep it from moving.
You only drop the CB when sailing upwind.
Post a picture of that pivot please, I wonder why it should become loose.
I was not able to get a picture of the bolt but that does not seem to be an issue, never came loose. It is a bolt through the center board housing with a Bolt Sleeve about 1" wide so the center board does not roll on the bolt it rolls on the sleeve.
See example picture

- Bolt Sleeve
- Bolt Sleeve.PNG (163.09 KiB) Viewed 11571 times
I did include a picture of the center board with the U shape notch.
I wont get a chance to try again this year unless the weather does a major turn around. Seems like the strap covering the U notch should keep it from falling off again.
It felt so good for about 10 secs when I turned the rudder to get into a close reach and the front of boat started coming around. I have never sailed and going against the wind always seemed odd. But it worked, I started moving upwind but then I think the center board hit the bottom and then fell off. But those 10 secs were cool that I was doing it.
Re: SH14 Starting a new Sharpie called Little Mae
Posted: Tue Oct 08, 2019 11:52 am
by jacquesmm
I see it now and I understand your questions.
Look at the plans, profile section, like below:
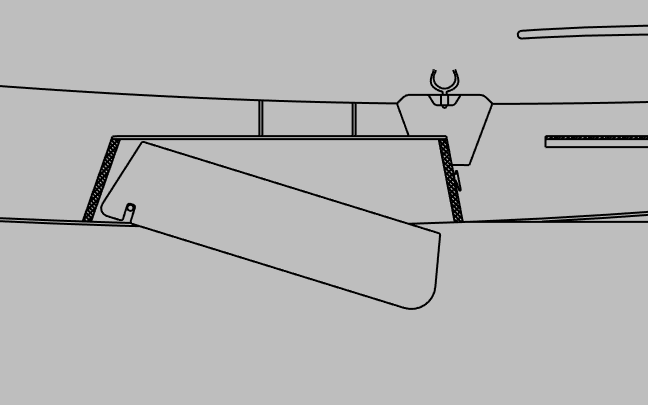
That is how the CB should look when it is down.
Positioned at that angle, it can not jump out.
Tie a knot in your painter to keep it from going deeper.
There is a description of the painter and slot here:
http://bateau2.com/howto/centreboard.php
The painter is the line that you use to raise and lower the CB.
The advantage of that system is easy maintenance and cleaning: let the board go lower and you can remove the board for cleaning or transport.
I had that same system on a large ocean going boat and the board never jumped out but if you let it go lower, it will jump out as you describe.
If you look up "sharpie" you will find this:
https://en.wikipedia.org/wiki/Sharpie_(boat)
showing a traditional sharpie CB arrangement;

that is how the SH14 should sail.
In my design, I use a slot instead of a hole.
If you don't like that system, fill the slot and drill a hole for the pivot. To clean or repair, you will have to remove the pivot bolt.