
I originally used duct tape on my keel, but the combination of my slow build, high humidity, and the stress of "opening" the hull with the batons, my duct tape just isn't holding anymore. I am starting to re-stitch the keel, but seems every time I start working on the boat, the wife comes out and wants to talk. Somehow this is supposed to involve me stopping work on the boat...Flat Fish wrote:I was able to stitch the CC with just duct tape. I didn't do a great job of lining everything up, though. They say that with zip ties you can put them all in loose and slowly tighten down until everything is perfect.
CH14 by a rookie - starting year 3
-
Jerry-rigged
- Very Active Poster

- Posts: 634
- Joined: Tue Oct 04, 2005 3:22 pm
- Location: Hopefully fishing Christmas Bay
Fishing from a paddle boat...
-
Jerry-rigged
- Very Active Poster
- Posts: 634
- Joined: Tue Oct 04, 2005 3:22 pm
- Location: Hopefully fishing Christmas Bay
First Seam Glassed!
Over the weekend I got my first lesson in fillet and tape. Got the keel glued and taped. About 90% of the seam looks good, but the ends look like ^%$#@. This is where the keel bends up to an extreme 'V', there was not a lot of room to work, plus being my first seam, I didn't realize I was screwing it up. the last 3" or so on both ends will need to be ground out and re-done. Oh well, no biggy. I am thinking I will go head and glass the chine seams before I worry about grinding out the screwed up glass. Depends on if the new glass will cover the bad spots or not.
Lesson #2 - I only have about 10-15 minutes working time with the goo before it gets hot - I had one pot too hot to handle, had to set it outside. it took about two batches going off in my hand before I learned to stop using the stuff when it got too hot. In the same vein, I am glad I went head and got a dozen of the mixing cups - when the pot kicked - I could set it aside, grab a new one, mix a new batch, and keep going. Somehow at the beginning of all this I actually thought I would empty every cup goo and reuse the cup.
No new pics, My camera phone doesn't have the resolution to show bad glass from good glass. LOL
Jerry
Fishing from a paddle boat...
-
chrisobee
- Very Active Poster
- Posts: 1175
- Joined: Fri May 30, 2003 1:00 am
- Location: Bowling Green, Ohio
If you find yourself with a batch that is getting too hot to handle, pour it out onto a flat surface, preferably a cool one and it will slow down the reaction. Basically the reaction feeds on its own heat and speeds up as it heats up which produces more heat. So cooling your mixture can drag out your time to cure. If you find you are constantly battling this problem try cooling your epoxy and hardener before you mix it, or work in smaller batches. As a last resort buy some slower hardener. Hope that helps with Lesson #2.
-
Jerry-rigged
- Very Active Poster
- Posts: 634
- Joined: Tue Oct 04, 2005 3:22 pm
- Location: Hopefully fishing Christmas Bay
-
gk108

- * Bateau Builder - Expert *

- Posts: 3356
- Joined: Thu Jul 28, 2005 6:53 pm
- Location: The Peach State
You might try storing your epoxy jugs inside an A/C room. Bring them out to mix up your batches. I have even left the jugs inside and mixed the resin there, but the doorknob got too messy. The lower the resin temp is when mixed the longer you get to work with it. Too cold will make it hard to spread or mix fillers.Jerry-rigged wrote: Maybe I will try to ice down the eopxy next batch.
Jerry
CC, D15, V10
-
ArizonaBuilder
- Very Active Poster
- Posts: 1192
- Joined: Wed Dec 31, 1969 7:00 pm
- Location: Phoenix, Arizona
Tips:
Start with resin and hardener at room temp. If it is too cold the viscosity is too thick.
Use a slow hardener.
Mix small batches - 6oz
Get the epoxy spread out as quick as possible.
Once it is spread out you will have lots more working time.
You will get a feel for it, hopefully you don't waste too much epoxy.
Beer is living proof that God loves us and wants us to be happy.
-- Benjamin Franklin
-- Benjamin Franklin
-
Jerry-rigged
- Very Active Poster
- Posts: 634
- Joined: Tue Oct 04, 2005 3:22 pm
- Location: Hopefully fishing Christmas Bay
Slow progress, but progress. Got the chines tabbed, and all stitches removed! (except for 2-3 at the bow).
Tabs have been sanded smooth, ready to tape the chine, but yesterday was laundry day - garage was somewhere around 110^ with the dryer running - no epoxy work possible.

Jerry
Tabs have been sanded smooth, ready to tape the chine, but yesterday was laundry day - garage was somewhere around 110^ with the dryer running - no epoxy work possible.
Jerry
Fishing from a paddle boat...
-
Jerry-rigged
- Very Active Poster
- Posts: 634
- Joined: Tue Oct 04, 2005 3:22 pm
- Location: Hopefully fishing Christmas Bay
A few more pics, a little more progress. Chines are taped inside, and about 80% of the inside has a seal coat of epoxy. Finally, I dragged it out into the yard, so I could get a nice profile shot and look at the bottom.
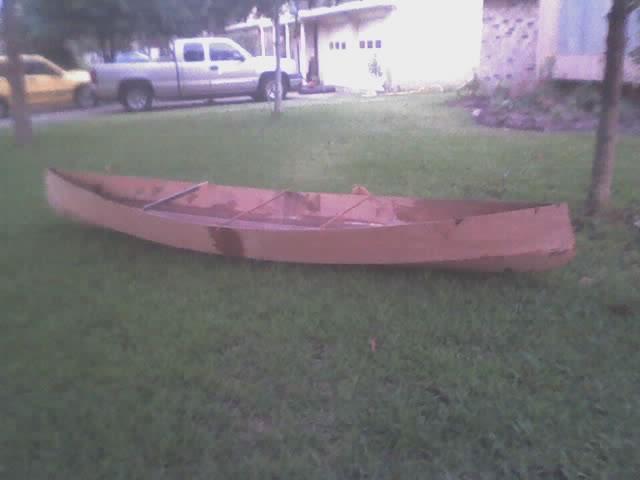
(sorry for the crappy-er than usual pics, I forgot to clean the pocket lint off of the camera phone lens )
)
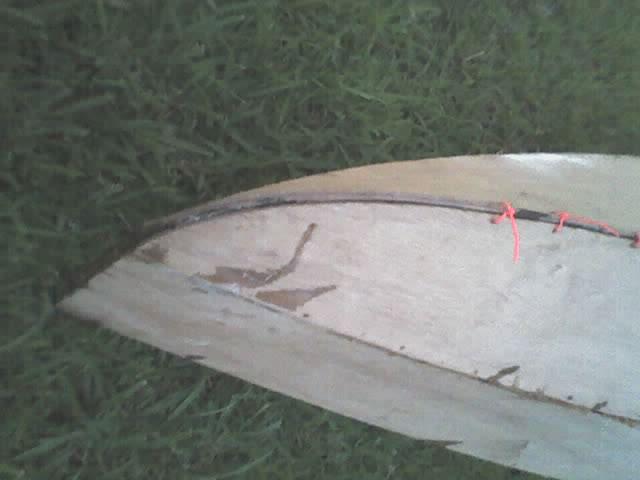
Also I flipped the boat over to look at the bottom. Overall, it looks good, I really like the shape the panels took at the bows. Only screw up is at one of the bows, the panels at the keel overlapped where I had them stitched with duct tape. With the tape, there was no way to check the overlap, and it got screwed up. Oh well, too late now. I guess that is way I had such a tough time getting that end of the boat to stitch up straight...
(Again a bad pic, but you can see the near side panel is inside of the far-side panel)
Jerry
(sorry for the crappy-er than usual pics, I forgot to clean the pocket lint off of the camera phone lens
Also I flipped the boat over to look at the bottom. Overall, it looks good, I really like the shape the panels took at the bows. Only screw up is at one of the bows, the panels at the keel overlapped where I had them stitched with duct tape. With the tape, there was no way to check the overlap, and it got screwed up.
(Again a bad pic, but you can see the near side panel is inside of the far-side panel)
Jerry
Fishing from a paddle boat...
-
Jerry-rigged
- Very Active Poster
- Posts: 634
- Joined: Tue Oct 04, 2005 3:22 pm
- Location: Hopefully fishing Christmas Bay
Finally, a little more progress. Actually, I've been kinda "Tinkering" with it, about an hour every other week or so, but today, finally a good work day. The past few weeks, I have been trying to figure out what to do with the "odd" end, Finally I decided to do a "False Stem" to hide the screw-up. the f-stems were laminated with 3/64 strips of ash, to about 1/4" thick. doesn't sound like muck, but they took a few evenings, and look nice. Then today, I got the outside seams taped. They went a lot smoother than the inside seams, and look nicer too.
Now on to fairing the outside...
Jerry
Now on to fairing the outside...
Jerry
Fishing from a paddle boat...
Who is online
Users browsing this forum: No registered users and 6 guests