Page 1 of 1
FL14 (in Texas) - FINISHED!
Posted: Thu Mar 09, 2006 1:32 am
by bredstein
Today I received plans and an epoxy kit. A good start...

Also got myself a 140 tooth disk for my circular saw.
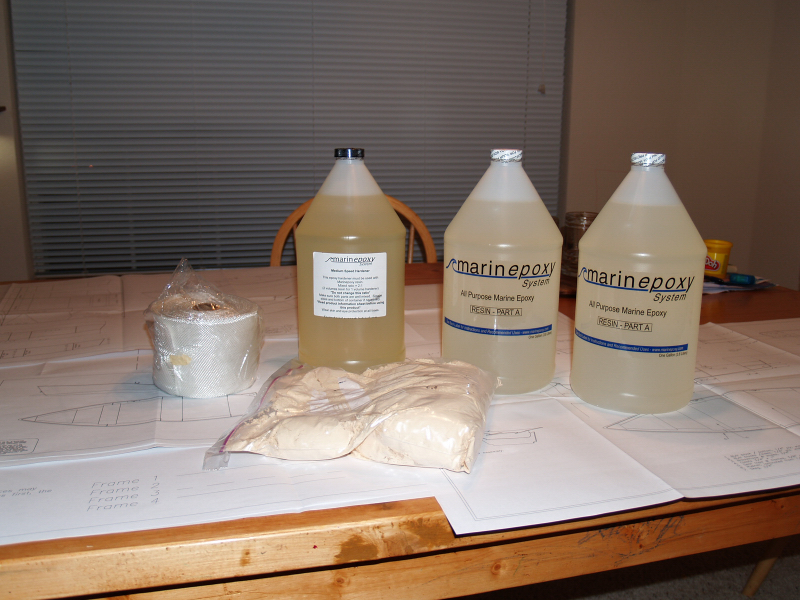
Also I realised that these 3 gallons should be used with caution. Which made me think about using a much cheaper wood glue for those parts that will be covered with epoxy/tape. Did anybody has any experience? From my side I can say that wood glue (such as Titebond) provides a bond superior to the strength of wood itself.
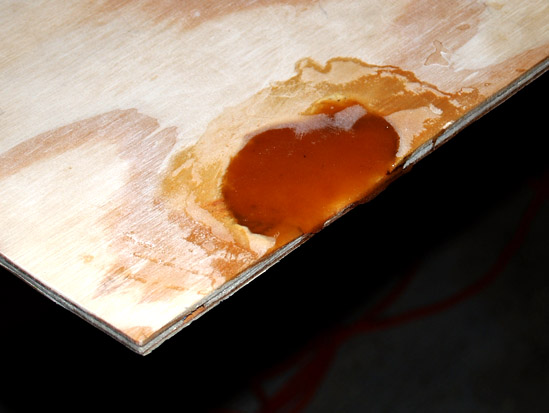
...And it is also nice to work with epoxy here in Texas - before I read Baba's post I was thinking: do I need to cool the resin in the fridge for a while to give me more time? We are in the stable 80ies already
Posted: Thu Mar 09, 2006 8:49 am
by rjezuit
If you got medium hardener, yes. In the 80's it'll kick pretty fast. Also USE THE EPOXY TO GLUE. The amount you use for gluing on an FL14 is inconsequential, and it works. The stuff is easy to use, low smell, waterproof, all the things you need. You will have fun with the FL14, it's a fun build. Not too complex, but challenging enough to be fun if you have never done it before. Rick
Posted: Thu Mar 09, 2006 1:45 pm
by baba101
Bredstein,
A warm welcome to the club....I will be learning a lot from you...
I started this project mainly for learning the build process....will be making lots of mistakes...but you soon get a sense that there is an Army of experienced builders ready to help you along the way....
Enjoy...and keep as posted....

Posted: Thu Mar 09, 2006 5:46 pm
by Mike Adams
Hi Bredstein,
Welcome to the forum and the FL14 group!
IMHO you should NOT try to use a wood glue for the build. Most wood glues are not good space fillers and require a fairly close fit to the wood pieces being joined to ensure a good bond. Epoxy glue can fill any minor gaps, so it doesn't matter if your wood pieces don't fit exactly. As Jacques often says, these are not wooden boats - they are epoxy/fibreglass boats with plywood cores. Even though you may not cover the entire FL14 with fibreglass as I did, this principle still holds true for the seams. You will not have any problem with epoxy glue, but personally I would not be so confident about using ordinary wood glues. As Rick says, the amount of epoxy you use for gluing is inconsequential - most of it will be used on the fillets and fairing.
Best of luck with the build.
Mike
Posted: Thu Mar 09, 2006 5:59 pm
by bredstein
Thanks everybody for the warm welcome! Even before getting the plans I have been browsing this forum in a reading mode and noticed how friendly and helpful its members are.
Now to the glue question, that is epoxy vs wood glue. Usually the same rule applies to the wood glue - two surfaces shouldn't be pressed too hard together, it is more than enough to use a car battery (as I saw on a few builders' pictures) for a good pressure.
Mike Adams wrote:As Jacques often says, these are not wooden boats - they are epoxy/fibreglass boats with plywood cores.
That is exactly the point! What is important is a good core. And how one achieves it is less important. I'll try to use it for joining the side and bottom panels, blocks for oarlocks and motor, and maybe rubrailes. The only concern is water, but I'll epoxy it 2-3 times, and hopefully it will work...
Andrey
Posted: Thu Mar 09, 2006 9:27 pm
by rjezuit
How much do you think you will save using the wood glue? My thought is maybe 6 ounces. That seems a little cost for peace of mind. You could do all of the butt blocks with what is in the sample kit. Rick
OK, forget about wood glue for now
Posted: Sat Mar 11, 2006 2:09 am
by bredstein
I am not completely convinced yet, and some of my friends who make kayaks say that wood glue is great under fiberglass. Anyway, I started with what I have. The coming week is a Spring break, and so I need to be fast
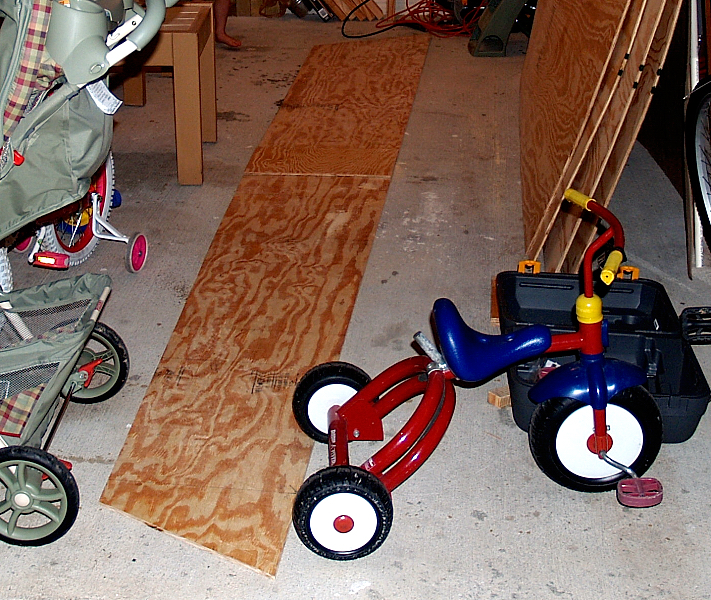
After two hours one side was ready to be glued. Without two kids riding their bikes over my playwood with the plans it could have taken less time...
I finished with the glue; let's see how it works tomorrow. I have no experience with this epoxy-flour mix, hard to believe that it's bond is superiour to the wood glue.
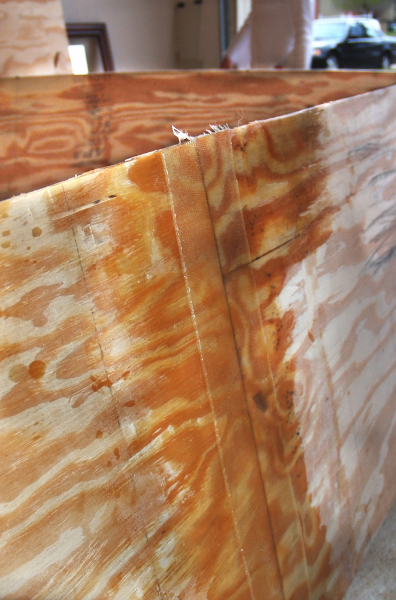
Two things that surprised me at this point: the plastic cup with glue leftover melted because ot got real hot, and I realized too late that the block has to be twice as narrow - for some reason I made it 12'' wide.
Posted: Sat Mar 11, 2006 3:27 am
by bermudian
Bredstien I have made a woodstrip canoe with wood glue coved with 4oz glass , I also just finished a OD16 . But this is stich and glue(wood flour epoxy mix )boat building . Like you I wasn't experienced with wood flour mix and didn't think it wouldn't be as strong. Trust me wood flour mix is strong, and you will get used to mixing for the right aplication. Besides the day you tell everyone that you will be building a boat is the day when you find out that 50% of them are expert shipbuilders. Enjoy the build and trust me it wont be your last.
Posted: Sat Mar 11, 2006 12:49 pm
by rjezuit
If the epoxy kicks too fast, spread it out in an old (or new) teflon frying pan. The exothermic (heat producing) reaction slows down with more surface area. Rick
Posted: Sun Mar 12, 2006 12:29 pm
by ArizonaBuilder
rjezuit wrote:If the epoxy kicks too fast, spread it out in an old (or new) teflon frying pan. The exothermic (heat producing) reaction slows down with more surface area. Rick
Rick is correct, the sooner you can get the mixed epoxy spread out the more working time you will have.
For glue and fillets I like to put the mixed glue/fillet in a sandwich bag. I will cut of the corner of the bag and twist the open end of the baggy. Now I can use all the material quickly spreading it out as glue or for my fillets. Once the material is down on the boat, I have a lot more time to play with it building my fillets or spreading out the glue.
The same applies for the straight epoxy, the sooner you can get it out of the cup the more working time you have.
Posted: Mon Mar 13, 2006 1:31 am
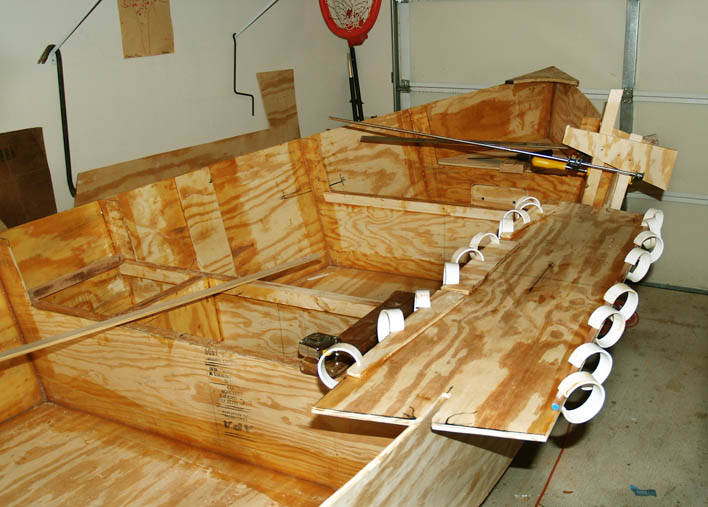
by bredstein
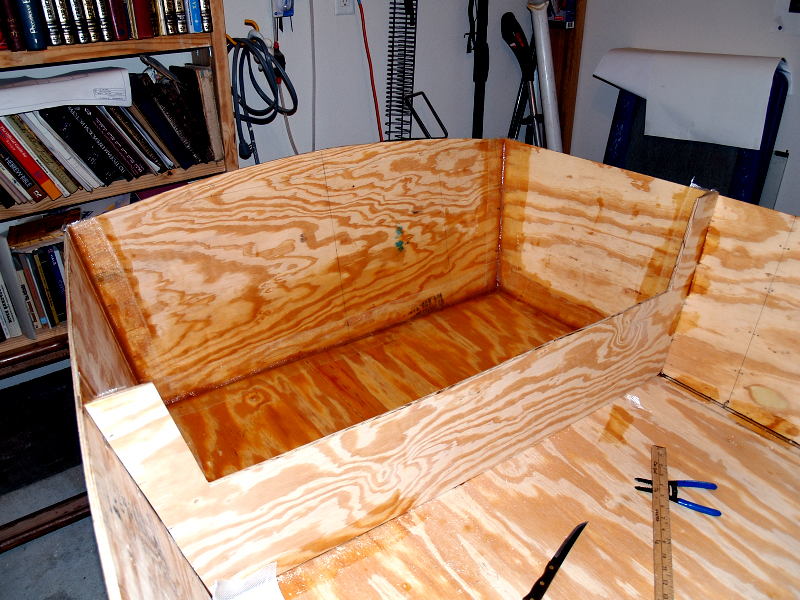
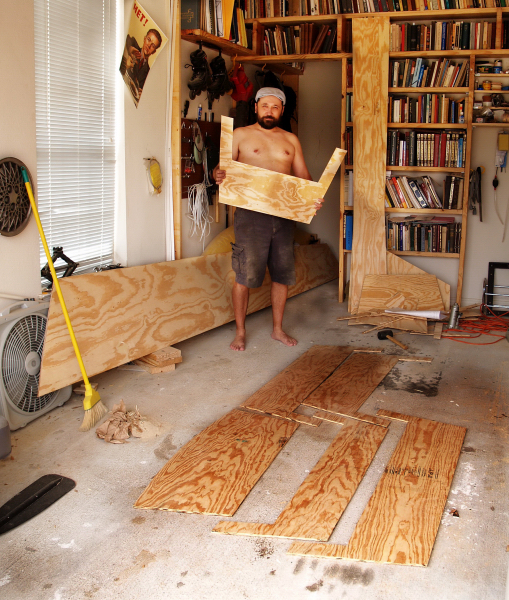
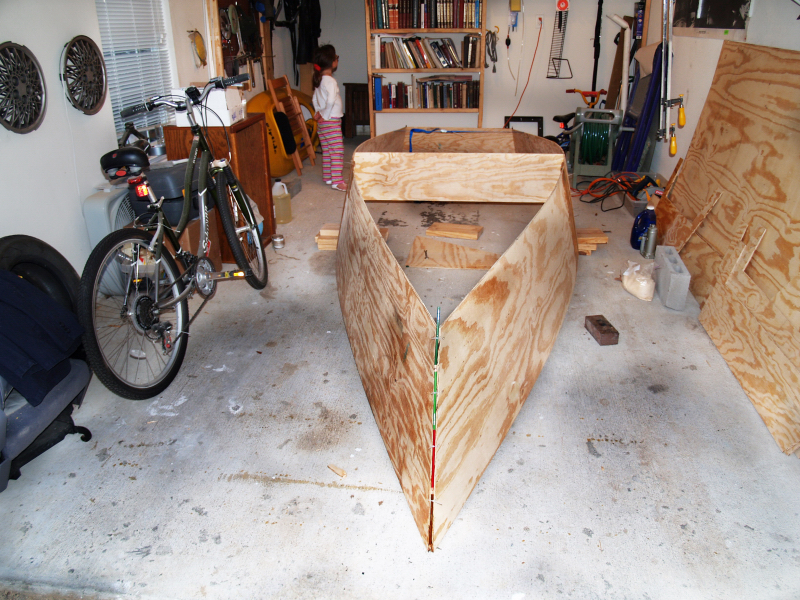
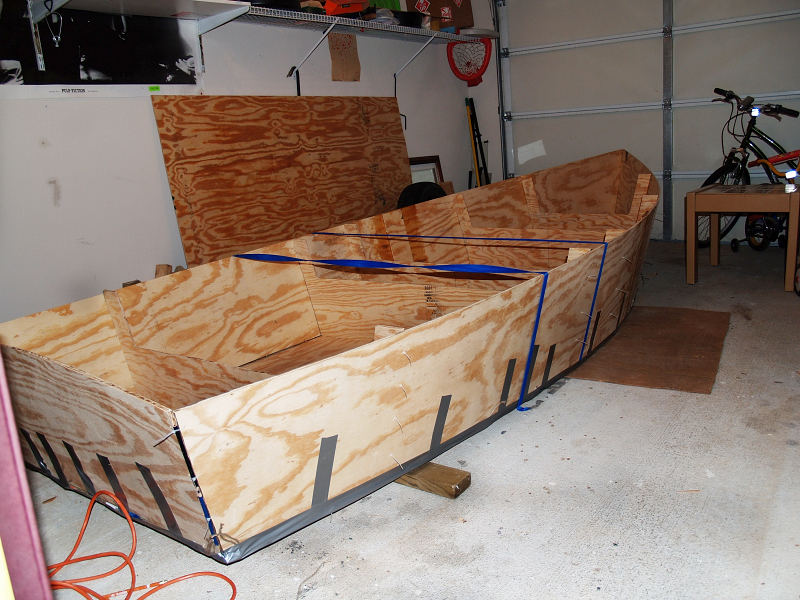
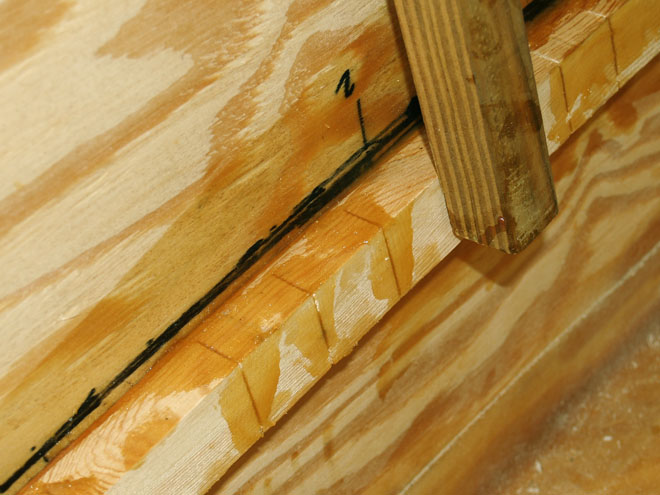
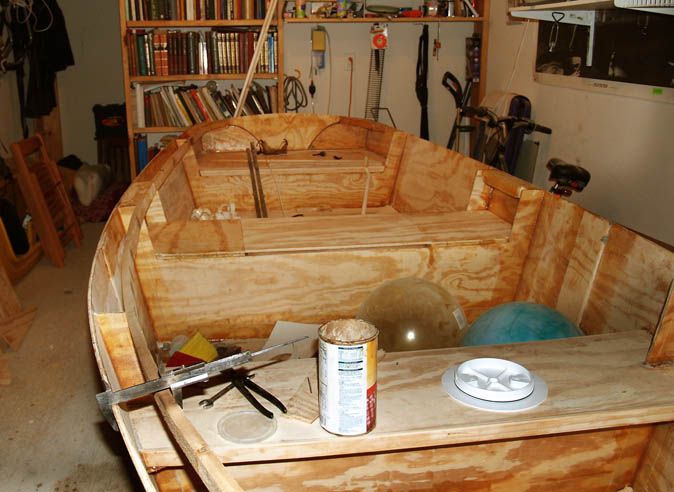
Finally I am done with the frames:
Thge next step was going to assemble it and call everybody and say: "Look, it's almost a boat!" Then I realized that there is no limit to my stupidity - one of the blocks was glued on the wrong side

So I added another block, this time on the right side, and now I have to get rid of the old one. Who needs two blocks per side?
Posted: Mon Mar 13, 2006 5:17 pm
by baba101
Hey Andrey,
How hard was it to get the butt block unglued....did you have to cut it...?
Posted: Mon Mar 13, 2006 5:43 pm
by ks8
Please say you're going to either move that library, or seal it off with tarp and tape, before starting to grind and sand!


Don't forget a good respirator...
Posted: Mon Mar 13, 2006 10:25 pm
by bredstein
OK, this is how I removed the block: I set my circular saw to slighly less than 3/8'' (that's my block) and made parallel cuts every inch or so. Then I used chisel and removed most of the plywood. The next device was a heat gun - it works miracles on the epoxy! Just in seconds I was able to completely get rid of the epoxy. Sanded with 60 grit and nobody tells that there was anything on top!
But my problems don't end with it. When I started finally assembling with just two mid frames and a transon, the block cracked
I assume that it has to do with my change (out of ignorance) in the plans: instead of 6'' as written, I made it 12", simply was to lazy to cut another time...
Now I'll remove both blocks (I know how to do it now) and reglue them with 6'' blocks.
Posted: Tue Mar 14, 2006 12:11 am
by baba101
bredstein wrote:.... When I started finally assembling with just two mid frames and a transon, the block cracked
I assume that it has to do with my change (out of ignorance) in the plans: instead of 6'' as written, I made it 12", simply was to lazy to cut another time...

Thats weird because I used 11" butt blocks on my bow, and they look strong...I have turned the hull a few times..but no sign of weekness.
What ply are you using.....? did the glue come off...?
Posted: Tue Mar 14, 2006 8:54 am
by rjezuit
I used 12" blocks by mistake last year with no problem. Rick
Posted: Tue Mar 14, 2006 9:58 am
by bredstein
rjezuit wrote:I used 12" blocks by mistake last year with no problem. Rick
Did you use 1/4 plywood? Mine is 3/8, maybe that's why it became sort of too hard?
Posted: Tue Mar 14, 2006 10:44 am
by baba101
bredstein wrote:rjezuit wrote:I used 12" blocks by mistake last year with no problem. Rick
Did you use 1/4 plywood? Mine is 3/8, maybe that's why it became sort of too hard?
I used 3/8" because the nesting used the bottom panel for all the butt blocks. Plus I figured I am going to need all the scrap I can find of the 1/4" for the Rub rails. I am planning to make a wider rub rail than the plans...
How are you making out with the removal of your butt block...please try to figure out why they cracked before attaching new one's...
Shine/Jac can you help us please ..?

Posted: Tue Mar 14, 2006 10:55 am
by rjezuit
I used 3/8 meranti for the butt blocks. The only problem was a slight flat section where it was doubled up. This could/would be avoided by using the skinnier butt blocks. Rick
Posted: Tue Mar 14, 2006 10:55 am
by tech_support
baba101 wrote:bredstein wrote:rjezuit wrote:
Shine/Jac can you help us please ..?
Cheap plywood cracks sometimes - it has voids. This is a repeating issue. There was another post this morning from the builder in the Philippines who cracked his hull panel made from cheap wood. If there was a void running throught the butt block - it would crack when bent.
For all that will use cheap plywood, be aware that this is a potential outcome It is possible to build these boat from good quality exterior – BUT IT MUST NOT HAVE VOIDS, or at least very tiny and short ones.
At least it cracked now and not out on the water.
Posted: Tue Mar 14, 2006 11:59 am
by ks8
Less expensive exterior ply has only 3 plies. I would suspect that it would be more likely to crack than marine grade with four or five plies. I thickened the ply of a few structures because of this when I built with exterior grade. Just a thought. If you go a little thicker on the butt block it may slightly affect the fairness of the panel bend.
Maybe if you glass the outside of the butt joint, it would help take the strain of the bend instead of it all being taken by the butt right along the seam?
My butt joints slightly opened after a week, hairline cracks in the filler. I was very concerned of the *hardspot* of strain on the butt block right along that seam, because I used exterior grade, and on my boat, the main frame that also supports the standing rigging, sit right in the middle of the butt block. If that were to crack... I don't want to think about it! I ground a little 1/16 inch channel, put in fresh filler and put biax tape over the outside of the seams and have had no problems since. If you think about it, the butt seam, if the filler cracks, has no *outer* skin strength at all without some glass over it. Marine ply may be plenty strong as a butt, but the cheap exterior these days can be scary if not compensated for a little at some critical points, imho, as an amateur. If you are using exterior, I recommend the biax tape on the outside, based on my own experience and nervousness with the same situation, only because the exterior grade these days can be so *cheap*, especially in that middle ply, and no matter how hard you try to get good panels with few or no voids, it is just hard to know what is *inside*, and the butt block seam if fairly important structurally. The butt will be a little stiffer as a result of the glass, but I don't think it will significantly alter the fairness of the panel bend.
Actually, I laminated on the biax tape while the panel was bent to shape, with the hull stitched up so the extra stiffness was fair to the intended curve.
Just some thoughts for whatever they may be worth...
ks
Posted: Tue Mar 14, 2006 12:21 pm
by MadRus
Meranti 1088 marine ply... two boats, no voids, no cracks, no checking, no problems.
Posted: Tue Mar 14, 2006 12:36 pm
by bredstein
ks8 wrote:Maybe if you glass the outside of the butt joint, it would help take the strain of the bend instead of it all being taken by the butt right along the seam?
Do you mean glass before assembling? Or stitch and then glass?
Posted: Tue Mar 14, 2006 1:20 pm
by ks8
First, if good wood is used, and the plans do not specify glass on the outside, then you don't need it, because the plans and designs and wood are good.
Problem is, when using exterior grade these days, you have little control over what is *good* when it comes to the wood, unless you are going to xray the panels. So glass on the outside is very cheap insurance for the diminishing quality of interior plies in exterior grade these days.
That being said, on an FL14 I don't think it would matter if you biax the outer seam of the butt before or after assembly. But if the glass does stiffen the panel enough to cause a slight flat spot at the butt seam, and you want to avoid that minor hardly noticable condition that might not even happen, then glass the outer butt seam after the hull is stitched up (at which point you will have a slight bump from the tape!). I did it to mine after the seams were taped inside (I assembled rightside up, CV16, not FL14), and after flipping it over to upside down, but I was very careful handling it before the inside seams were taped and while flipping it, and still those butt seams developed the hairline crack from that handling, both side and bottom panels, because the butts themselves flexed more than marine grade would have.
With amateur building, the plans and assembly method and materials should compensate for professional lack of skill, and these good plans do that well. But, like I said, with an FL14, if you are concerned from the past crack experience, it is safest to biax that seam before assembly and then not worry about it! But you may get a slight flat spot which fairing compound can fill quickly when you get to that stage.
It's really not a big deal at all, but that glassing is very cheap insurance when the quality of exterior grade plywood is an unknown (it may be very good wood!).
If you ordered a kit for the build, the extra biax tape to do this was probably not in the box, so if you use what is on hand, then down the road you will come up short and need to order a bit more to finish, as I did. I have no regrets. This hull is strong now. You may want to biax the bottom butt seam also, though again, with good wood, it is not necessary if the plans do not call for it. The side panels also get strengthened when you add the rubrail, but you've already seen that unexpected things with an odd piece of bad wood can go wrong before the rubrail stage.
If I remeber right, Paul snapped a Centerboard on his CK17 that was made of good wood! A real headscratcher, unless it was a giant squid he didn't notice? But that CB may have had some unforseen weakness that made itself known quite unexpectedly.
http://gallery.bateau2.com/thumbnails.php?album=24
But that CB was not structural to the hull either. Don't worry! These are great plans. Where the wood is exterior grade, biaxing the butt seam is such cheap insurance and will add hardly any weight. Remember, enjoy the build! Smile... whistle... but not after eating crackers and working over a batch of filler ...
Sincerely,
ks
Posted: Tue Mar 14, 2006 1:35 pm
by rjezuit
I put woven tape along the outside of the butt joints so there was a tension member on the outside wher the stress is concentrated. It worked fine and as pointed out lessened the flatness of the butt area. Rick
Posted: Tue Mar 14, 2006 1:45 pm
by ks8
rjezuit wrote:I put woven tape along the outside of the butt joints so there was a tension member on the outside wher the stress is concentrated. It worked fine and as pointed out lessened the flatness of the butt area. Rick
I don't recall Rick... did you use exterior? Got a picture of the taped seam you can link for Bredstein?
Real simple. No worries. Cheap insurance. But the kit may run short if you do it without ordering extra.
ks
Posted: Tue Mar 14, 2006 1:54 pm
by rjezuit
I'll look for pictures, but I used BS1088 Meranti. I felt it was false economy compared to the effort, time and money I had invested in the boat/trailer/motor. The price difference wasn't that much and I had read alot of horror stories about marine fir and exterior. Rick
Posted: Tue Mar 14, 2006 2:12 pm
by ks8
rjezuit wrote:I'll look for pictures, but I used BS1088 Meranti. I felt it was false economy compared to the effort, time and money I had invested in the boat/trailer/motor. The price difference wasn't that much and I had read alot of horror stories about marine fir and exterior. Rick
Next boat intended to endure will surely be BS1088, but I hope this one to last a good long while, and its given me plenty experience *sheathing* in glass! You can still find good exterior, but it is labor intensive to find it, unless you get lucky the first time out shopping. But I do think there are some fine small boat made from it and being made from it. It certainly has a more involved learning curve, potentially. But I am all for promoting the BS1088 after my five year adventure!! My CV16 I hope to be another of those fine exterior grade boats, whether it secretly dreams it were meranti or not...
Posted: Tue Mar 14, 2006 2:51 pm
by baba101
I used Meranti BS6566...with 3/8" 11" butt block on the bow...the joints look rock solid after nearly a week of being stretched.
I did notice the flat spots on the bow due to the wider butt block..(same as Rick) ..and plan to add 9oz woven tape to it to make it more fair..followed by fibre glass for the entire hull.
Posted: Tue Mar 14, 2006 2:59 pm
by ks8
baba101 wrote:I used Meranti BS6566...with 3/8" 11" butt block on the bow...the joints look rock solid after nearly a week of being stretched.
I did notice the flat spots on the bow due to the wider butt block..(same as Rick) ..and plan to add 9oz woven tape to it to make it more fair..followed by fibre glass for the entire hull.
Baba,
You're slipping out of character! Shouldn't you have said...
Baba used Meranti BS6566... and...
Baba did notice the flat spots on the bow... and...
Baba plans to add 9oz woven tape to it...
ks thinks Baba's Meranti BS6566 looks great too... btw...
really...
Posted: Tue Mar 14, 2006 4:05 pm
by rjezuit
Rick says Baba's overwhelmed with obsessive boat building and is no longer a third person, but one with his craft. Rick
Posted: Tue Mar 14, 2006 4:23 pm
by ks8
truth be told...
boat building helps you find, and lose your third person!
Posted: Tue Mar 14, 2006 6:28 pm
by baba101
Just trying to keep my post interesting...so the experts continue to read and comment...
Baba is back....!
Posted: Tue Mar 14, 2006 10:17 pm
by rjezuit
Baba you are doing a great job. I look forward to your posts and progress. Rick
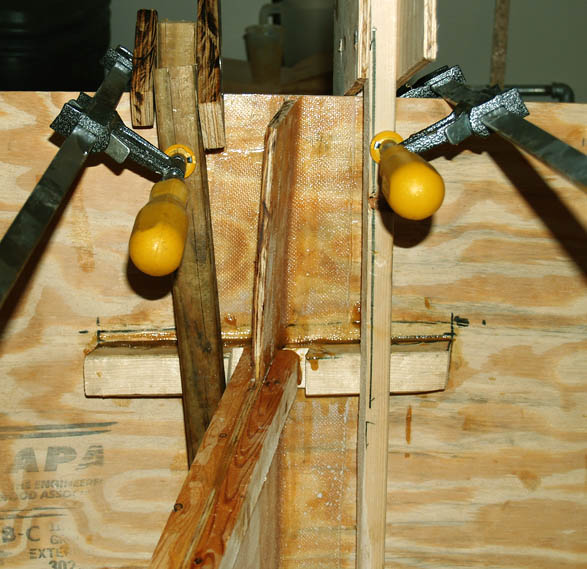
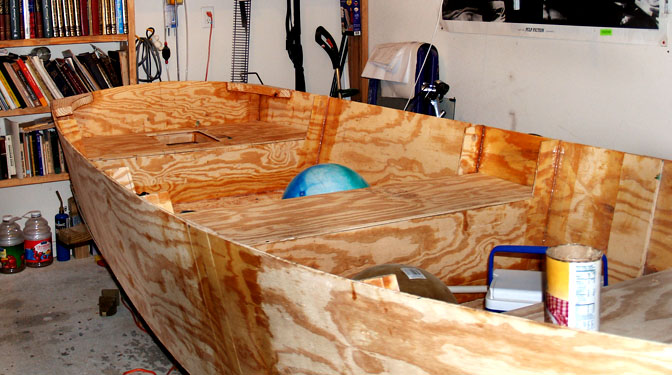
Assembly - second attempt
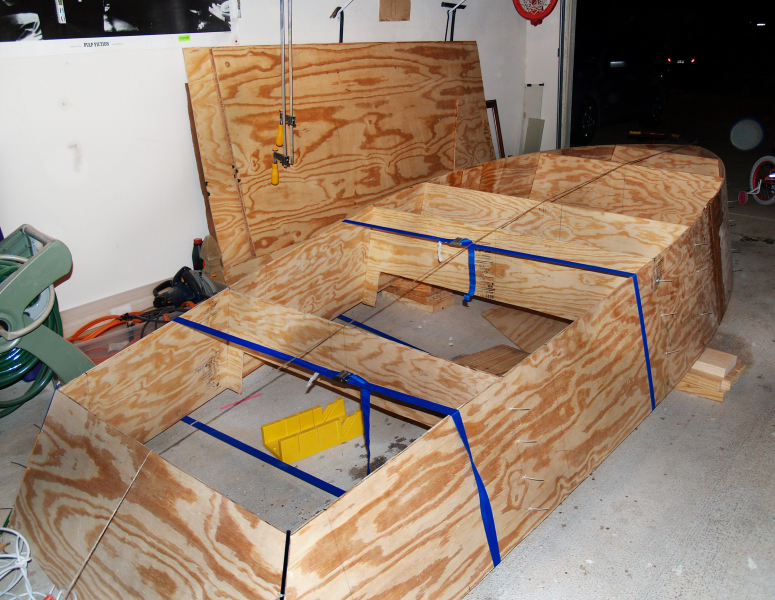
Posted: Wed Mar 15, 2006 11:58 pm
by bredstein
OK, my speculations were correct. I glued new blocks, this time 6'', and put a tape from the other side:
And it worked - my great-super-home-depot-plywood didn't crack this time! So I installed the frame and the transom.
Drilled more holes and stitched the rest of the frames. I read somewhere online that it is better to connect sides and bottom/transom in such a way that they just slightly touch each other on the edges. So I used pencils and could reserve room for fillets outside.
Posted: Thu Mar 16, 2006 12:28 am
by baba101
Looking good buddy....
Posted: Thu Mar 16, 2006 1:26 am
by ks8
Bredstein, (and Baba -edited (thanks Mike- oops)), you're both bringing back fond memories as the hull(s) takes shape. Enjoy these days of quick progress and shaping up.
So Bredstein, do you think you'll 6 oz the entire hull to help it last longer? It will be easier and quicker than it was on my CV16, and it will certainly stop any checking with big box exterior fir plywood, but it will also add some weight from the extra $$ cha-ching epoxy. ks is glad he did. All checking stopped in its tracks, everywhere. But I need another person to lift the boat around on its cradle now, where earlier it was a one man one arm job, even with the outer sheathing.
http://gallery.bateau2.comdisplayimage. ... =25&pos=22
Posted: Thu Mar 16, 2006 2:25 am
by Mike Adams
Guys, maybe I'm having a senior moment, but I'm confused as to just whose thread this is!

Both Rick and KS seem to be directing their comments to Baba - I thought it was Bredstein's (Austin, TX), not Baba's (Toronto, Canada) but maybe I'm getting mixed up here.
Anyway, whichever of you it is, you're doing a good job and as KS says, it brings back memories!
Mike
Posted: Thu Mar 16, 2006 5:17 am
by lncc63
Read about the cracked butt blocks, seemed strange since it looks like Berdstein is using very nice plywood and the curve is not that drastic. Could it have been because there was no glue between the joined panels themselves?
Posted: Thu Mar 16, 2006 5:18 am
by lncc63
Read about the cracked butt blocks, seemed strange since it looks like Berdstein is using very nice plywood and the curve is not that drastic. Could it have been because there was no glue between the joined panels themselves?
Posted: Thu Mar 16, 2006 8:49 am
by rjezuit
Mike, Simultaneous builds, and the threads are getting blended. This is the southern boat, not the northern one. Rick
Posted: Thu Mar 16, 2006 12:15 pm
by bredstein
Mike Adams wrote:I'm confused as to just whose thread this is!
Mike, we are building the same boat, Baba and me, and we read (at least truly yours) both threads. So it is not so important where you post your comments - which are so valuable for us!
Andrey - from Texas - NOT from Canada
Posted: Thu Mar 16, 2006 12:20 pm
by bredstein
lncc63 wrote:Read about the cracked butt blocks, seemed strange since it looks like Berdstein is using very nice plywood and the curve is not that drastic. Could it have been because there was no glue between the joined panels themselves?
You are kidding! This "very nice plywood" can be had at your HD store for under $18 per 3/8x4x8 sheet! As for the glue between the panels (if I understand you correctly) there was not too much of it - the surface is insignificant. The strength comes from the block/side part.
Posted: Thu Mar 16, 2006 1:46 pm
by rjezuit
The plywood looks nice at least the figuring of it. This doesn't speak of the strength. It looks like you are doing well. Improvise and correct if problems occur. That's the magic of making your own boat. Okay guys, here's the deal, it's north versus south again, on your mark, get set,go. Who finishes first gets the coveted epoxy trophy. Rick
Posted: Thu Mar 16, 2006 1:50 pm
by baba101
Its the Turtle (North) and the Rabbit (South) race...Can't rush Baba he is a very slow worker.
Plus my current hobby is building boats...wouldn't really know what to do with it when its done....

Posted: Thu Mar 16, 2006 2:00 pm
by rjezuit
Baba, They are never really "done". Mine has been "done" since last June, but looking at these threads makes me want to do"upgrades" when the weather gets nicer. I was thinking of turning it into a planing hull, but decided against it. Now probably just the floor drain, and a swim ladder for the transom. The kids love jumping off the back seat, but it's a pain getting back in. Especially for those of us whom aren't kids anymore. Rick
Posted: Thu Mar 16, 2006 2:06 pm
by baba101
I thought about using the drain after reading your posts...but now don't feel like it any more...I will just store it upside down and close all seat compartments with foam. Like the idea of a low maintenence Giant tube. Drain by tilting it to one side.

And now I think a swim ladder is an excellent idea...WOW...are you thinking a real ladder or just a platform...?
Posted: Thu Mar 16, 2006 2:19 pm
by ks8
Rick,
Why not start a new thread with ideas for a swim ladder? I'll post some of my sketches as well...
ks
Posted: Thu Mar 16, 2006 5:37 pm
by Mike Adams
bredstein wrote:Mike Adams wrote:I'm confused as to just whose thread this is!
Mike, we are building the same boat, Baba and me, and we read (at least truly yours) both threads. So it is not so important where you post your comments - which are so valuable for us!
Andrey - from Texas - NOT from Canada
rjesuit wrote:Mike, Simultaneous builds, and the threads are getting blended. This is the southern boat, not the northern one. Rick
Glad to know I'm not actually going senile after all.....
Both boats are looking real good.
Mike
Posted: Thu Mar 16, 2006 5:54 pm
by bredstein
rjezuit wrote:Who finishes first gets the coveted epoxy trophy.
Well, the problem here is that Baba has lots of time, and I need to finish it before summer - I have no AC in my garage... As the joke here, there are only two seasons in Texas: summer and hell
FL15?
Posted: Sat Mar 18, 2006 1:52 am
by bredstein
The boat probably has to change her name from FL14 to FL15
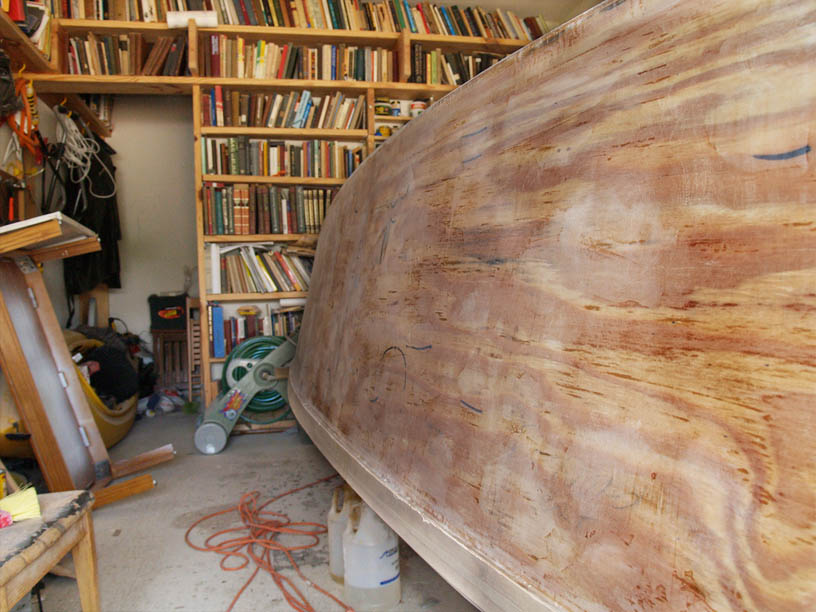
I measured, and measured, and measured, and then measured again, and still after everything has been cut and stitched, I realized that my sides are almost 1 foot longer! Also the angle of the transom was a wrong one. And this brought me to a choice: make it according to the plans, or make it bigger. I went the second way. Without taking apart the sides, I draw new lines to make the angle closer to the plans, and cut with a circular saw on the spot. It worked just fine. Now I am ready to cut the bottom.
Posted: Sat Mar 18, 2006 2:22 am
by baba101
There is a typical Texan for you...Want to do everything bigger and more powerful.....
You are lucky this is not a planning hull...I better measure my boat tommorow morning, just to make sure...
What makes you think the Transorm angle was wrong...? I would not have known if Madmax's transorm was a few degrees off...!
Posted: Sat Mar 18, 2006 2:31 am
by bredstein
baba101 wrote:What makes you think the Transorm angle was wrong...? I would not have known if Madmax's transorm was a few degrees off...!
Well, a few degrees don't count, but in my case the difference was some 10-15 degrees I assume. I first noticed that something is wrong when I saw that the transom is shorter than it should be, although I double checked it and didn't find any mistake. Still, the upper ends of the sides were about 1'' above the transom. Not a big deal, was my first thought, I'll grind it off. But then I asked myself: why did it happen? This is how I came to the angle question. And good that I did it, because otherwise it could have been more problematic to attach a trolling motor...
Posted: Sat Mar 18, 2006 11:30 am
by rjezuit
Thes boats are very forgiving of mistakes. The extra foot may make a difference, but I doubt ot. There is some guy out there making an FL18 if I recall correctly. Rick
Posted: Sat Mar 18, 2006 11:23 pm
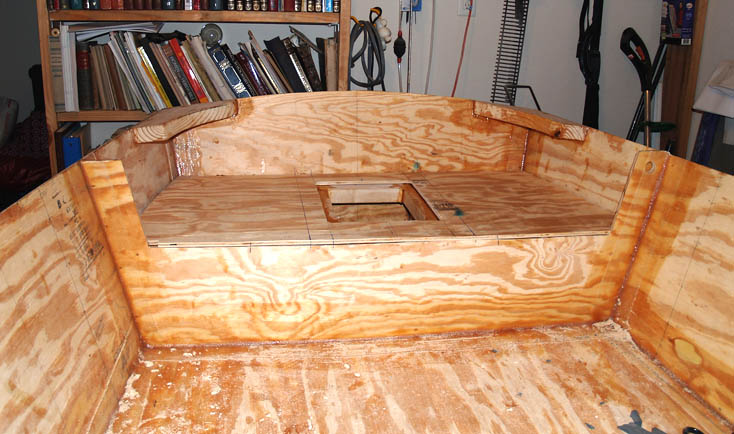
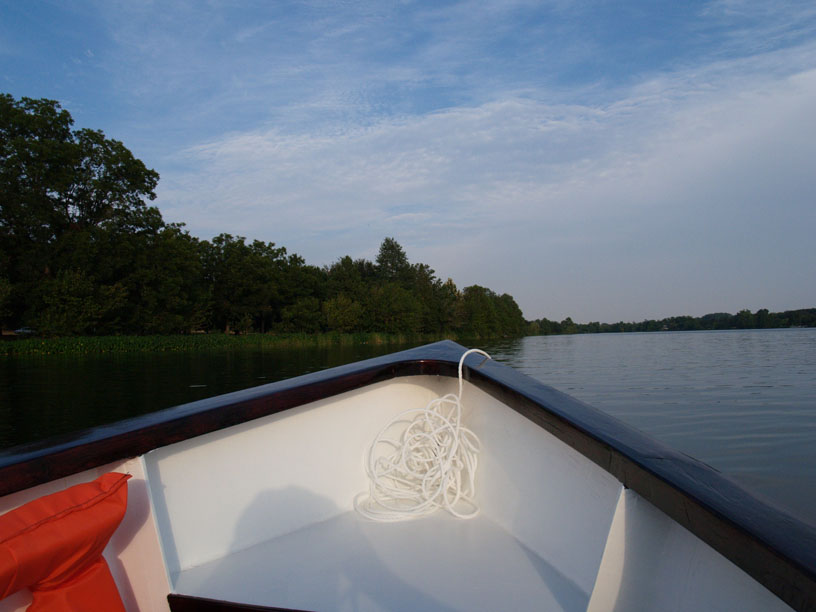
by bredstein
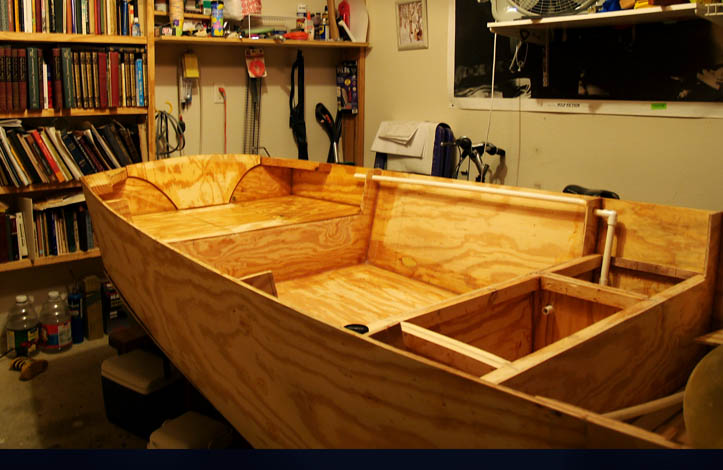
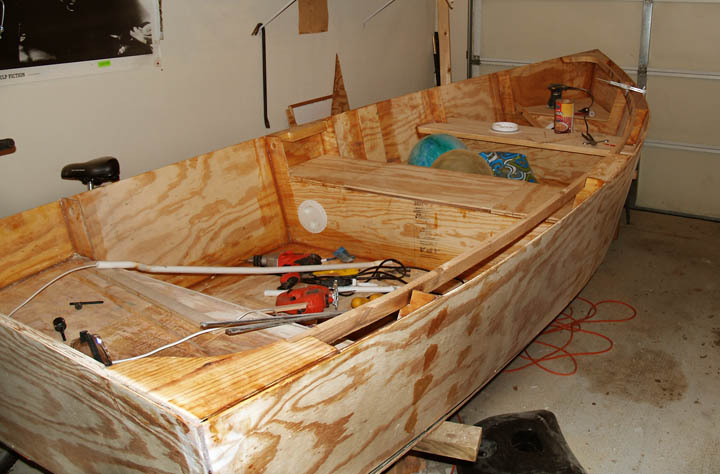
Almost done with the bottom - ready to turn the boat over.
Posted: Sat Mar 18, 2006 11:24 pm
by bredstein
Almost done with the bottom - ready to turn the boat over.
Posted: Sun Mar 19, 2006 12:48 am
by baba101
Feels pretty good doesn't it....your' FL15 kinda looks nicer than the usual FL14s... More slender...and straighter...
Do you have a raised Bow and transorm...? Mine is and I think thats how it should be...
Posted: Sun Mar 19, 2006 2:31 am
by bredstein
baba101 wrote:Do you have a raised Bow and transorm...? Mine is and I think thats how it should be...
Exactly! I wish I were not so ignorant in geometry, then I'd probably be able to understand WHY it is so
Posted: Sun Mar 19, 2006 2:34 am
by bredstein
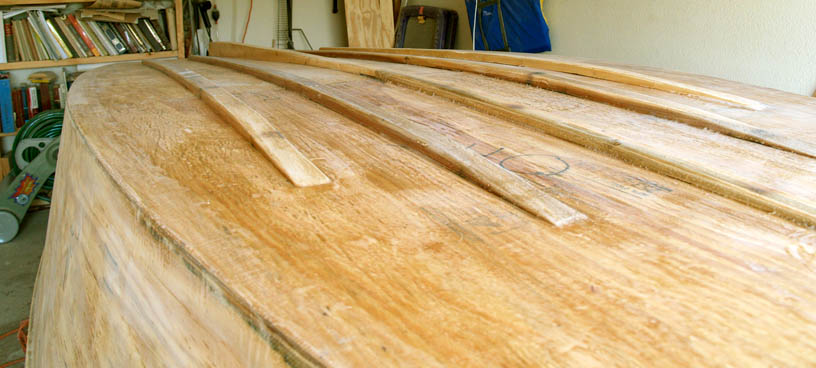
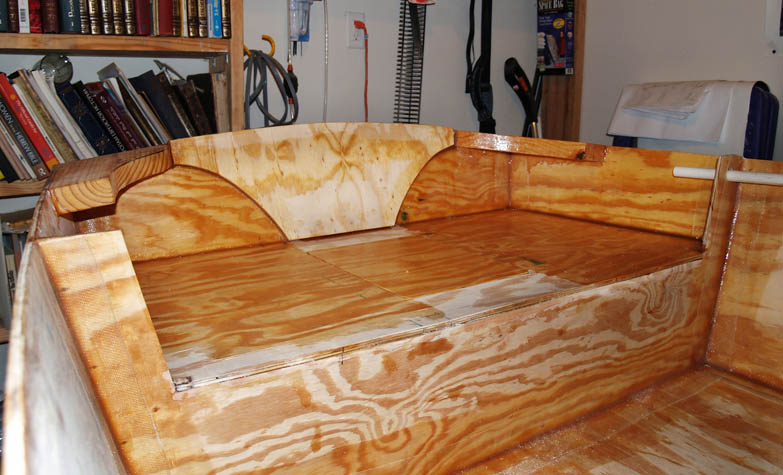
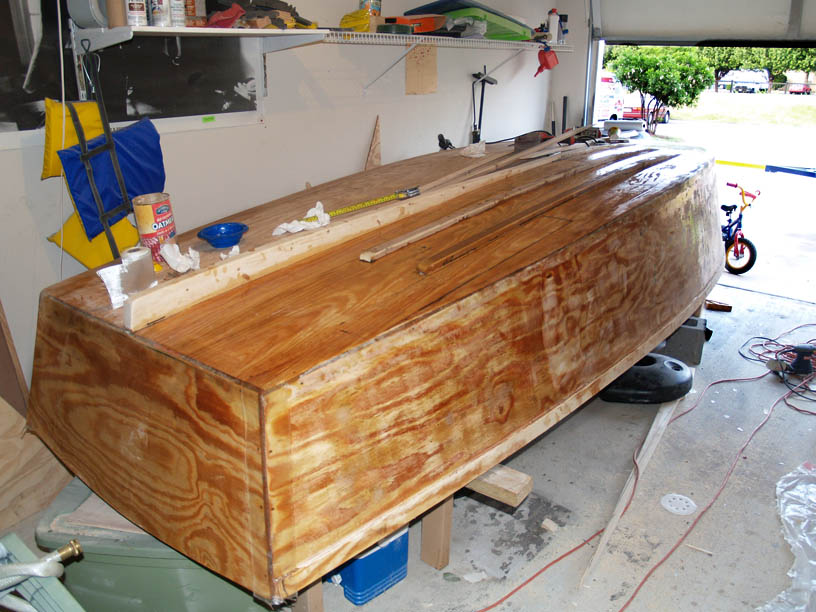
Finally turned the boat over:

Posted: Sun Mar 19, 2006 4:08 am
by Mike Adams
You're making great progress! I see that you have left the frame tops squared off - are you planning on adding a narrow gunwale deck as I did? If so, I would recommend adding an extra support for the deck between the mid seat frames and the rear seat frame.
Posted: Sun Mar 19, 2006 1:36 pm
by rjezuit
With the raised bow and transom, you may be thinking of the built in rocker. This makes rowing easier, but also makes it into a displacement hull and not a planing hull. For a planing hull the back would not curve (rocker) up, but be flat like the GF series. Rick
Posted: Sun Mar 19, 2006 2:26 pm
by baba101
So Andrey is building a Planning Hull and mine is a displacement hull..!
When I lay Madmax on a level floor, the boat rests on the middle with the bow and transorm in the air.
Posted: Sun Mar 19, 2006 5:32 pm
by rjezuit
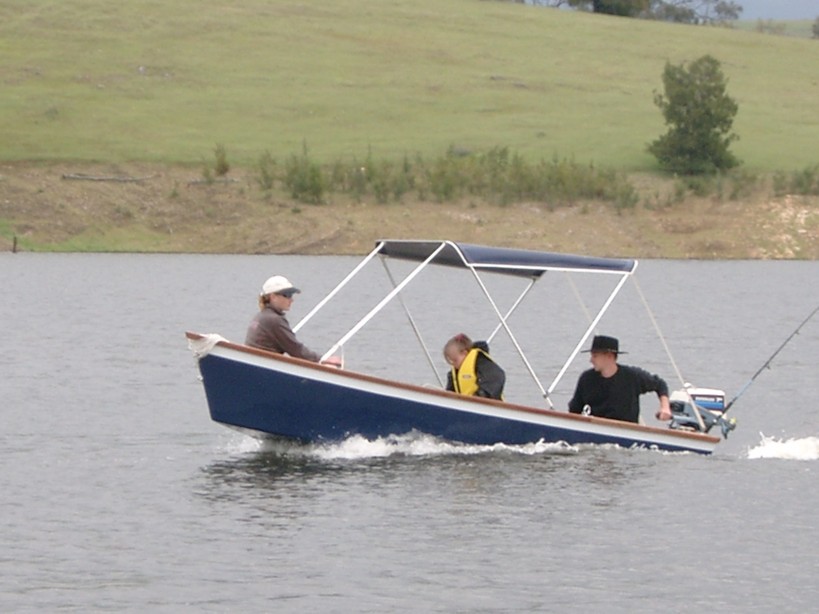
Baba, That is correct. If you look at the study plans that is what it shows. If you look at Mike's boat underway, you see what happens when you try and push a displacement hull with rocker through the water with extra power. Mine does the same thing, but it is of little consequence since most of the time I am in a trolling motor only lake or on the Erie canal going slow. It actually performs better with less throttle. Rick
Posted: Sun Mar 19, 2006 6:00 pm
by bredstein
rjezuit wrote:With the raised bow and transom, you may be thinking of the built in rocker. This makes rowing easier, but also makes it into a displacement hull and not a planing hull. For a planing hull the back would not curve (rocker) up, but be flat like the GF series. Rick
I feel ashamed to demonstrate my ignorance, but could you please tell me more on this: what is a rocker? what is a displacement hull? planing? For me it's just a boat - all I want is to get on water with my family
But now I see that there is a whole science here... As for what I have now, it has raised bow and transom, so what kind of a hull it is?
Posted: Sun Mar 19, 2006 6:17 pm
by chrisobee
A displacement hull pushes its way through the water. A planing hull rises up out of the water and kind of skips along on the surface. Rocker in the hull of the boat lifts the bow and stern up so that the middle of the boat is deeper. This makes for a boat the moves through the water nicely. very important for sailboats and rowing boats as these do not typically plane. They just don't go fast enough for that sort of thing. To get on plane a boat must have a very flat surface at the stern that does not have rocker, nor a hook. A hook is depression in the planing surface, rocker is a bulge. neither is good for a planeing boat. The rate that a displacement boat can go through the water is determined by its length and a coefficient relating the hull shape. A long thin hull travels better through the water than a short fat hull. A 20 ' boat is typically limited to 6-8 knots. A planing boat can go much faster as it is not trying to push the water out the way but rather skips over the surface.
There, that's everyting I know about boats in one paragraph.
Posted: Sun Mar 19, 2006 7:11 pm
by baba101
Thats one hell of a summary Chris...I gotta write this down.....
Thanks
Posted: Sun Mar 19, 2006 7:27 pm
by Mike Adams
rjezuit wrote:If you look at Mike's boat underway, you see what happens when you try and push a displacement hull with rocker through the water with extra power. Mine does the same thing... It actually performs better with less throttle. Rick
Rick is right - but my son seems to like belting around at "full throttle"...


The boat is actually trying to climb out of the hole. If it was flat at the back instead of having the rocker, I reckon it would plane easily. (But then it would be a different design!).
Mike
taping
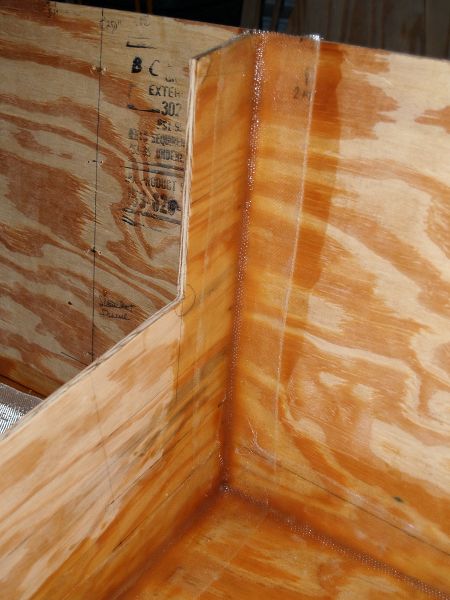
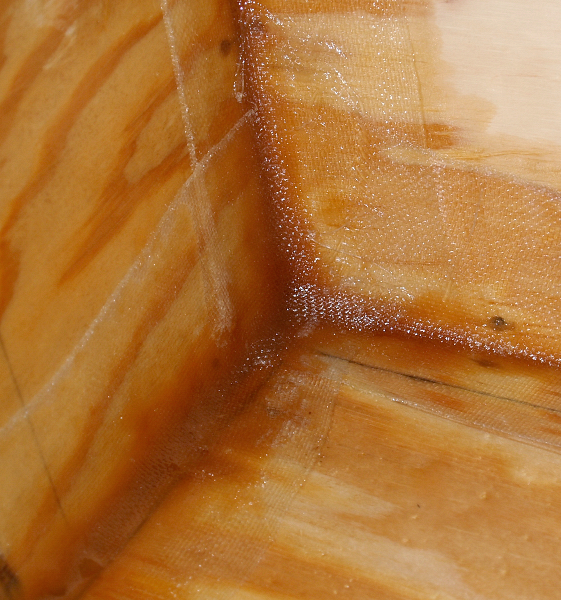
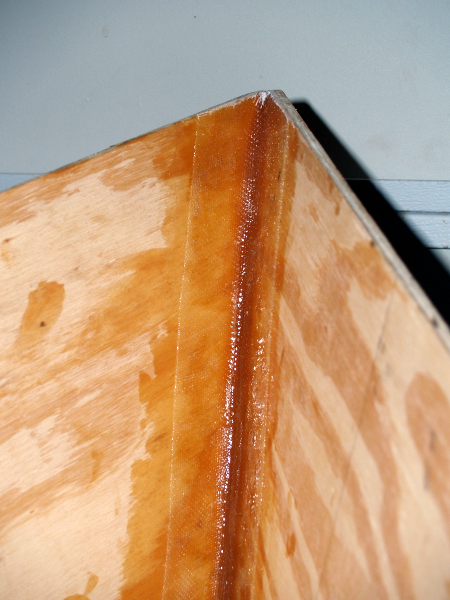
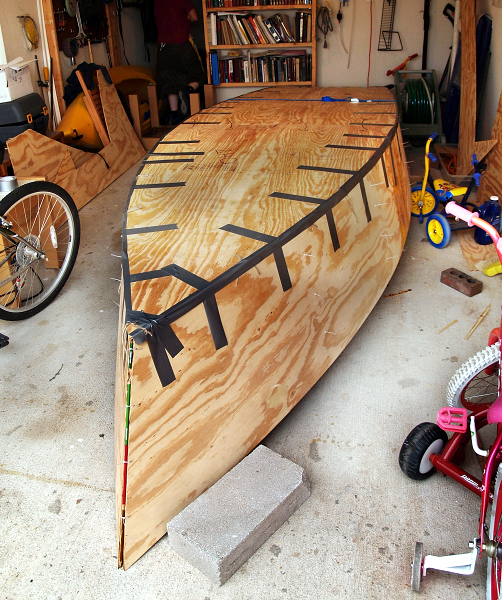
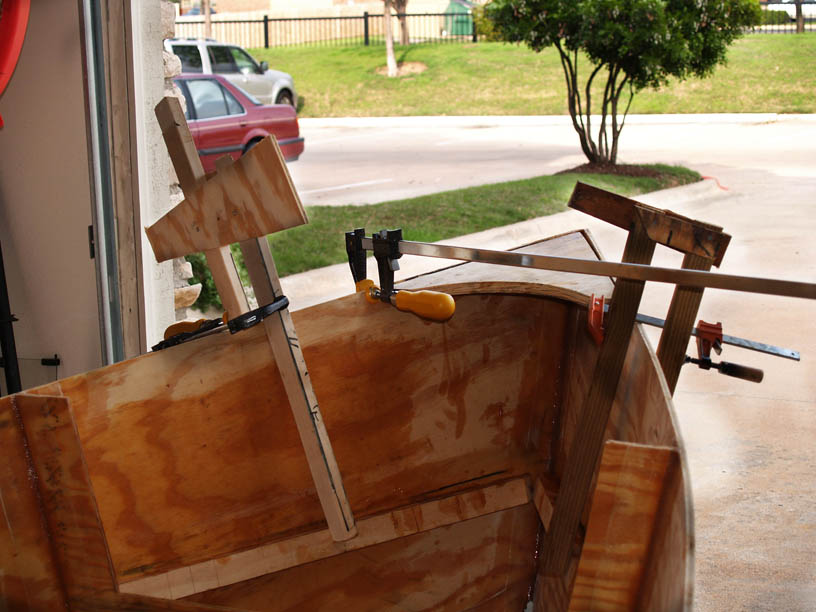
Posted: Wed Mar 22, 2006 1:02 am
by bredstein
Posted: Wed Mar 22, 2006 1:28 am
by Mike Adams
Nice fillets from both you and Baba - keep going, you're doing great!
Posted: Wed Mar 22, 2006 1:45 am
by ks8
Yes, it will be interesting to see the final character all of you put into an FL14. Are there 3 or 4 currently being built in the forum? The 2006 batch!
... and you will all be done before me ...
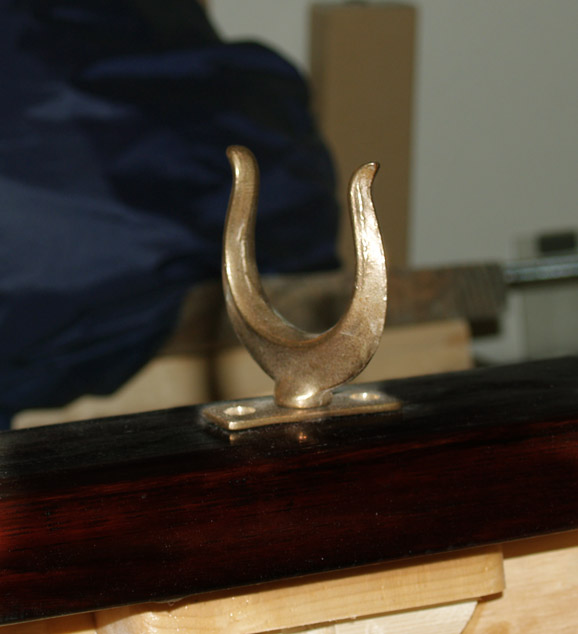
U-bolt at the bow
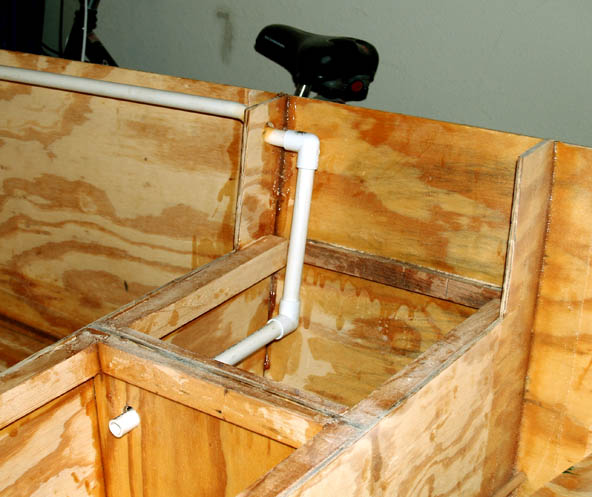
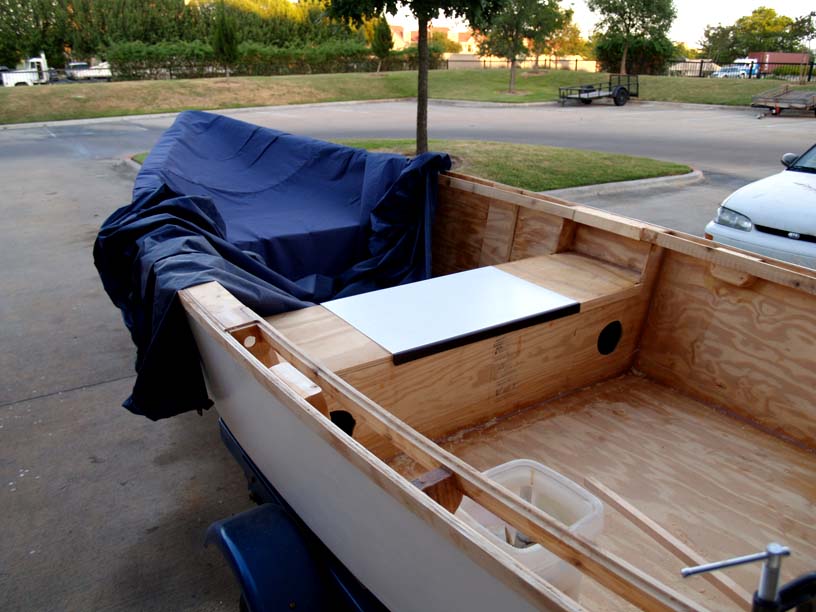
Posted: Tue Mar 28, 2006 11:23 am
by bredstein
I came to the point when the bow box is taped and glassed inside, and the seat is cut and ready to be installed. Now I need to drill two holes and insert a u-bolt. Once it is there, the space is filled with a foam (or its equivalent), and I guess there is no access to the nuts from inside. My questions to the gurus are: is it important to have such access? I remember a picture on this forum - somebody even made a tunnel through the foam! Is this bolt a must? How about attaching the rope to the breasthook?
Thanks,
Andrey
Posted: Tue Mar 28, 2006 11:39 am
by ks8
Boats generally tow better from an attachment point closer to the waterline rather than up on the bow *deck* level, and the ubolt is convenient for winching up the boat on a trailer.
I don't recall how buried that ubolt access will be on your boat.
Personally, I'd probably either build a sufficiently large , yet narrow plywood box *channel to the bolts* (that you can comfortable get your hand/arm in to get to the bolts), or a cosmetic frame 5 inches aft (taping it in would be wise) to restrain the foam (and then a minimal access hatch would be needed to get to the nuts), or dig a foam tunnel (messy) afterwards (access hatch still needed). There are ubolts that you snug up by hand inside, then tighten with another nut on the outside, but you still need to get to the inside nut for maintenance, even if you don't need to get a wrench on it. If you foam it in, maybe it won't need attention for 10 years?! Then, a minor repair would be necessary with some sawdust flying, but you know how to do that!
The ubolt helps secure the boat on the trailer, if you travel far over the road with it.
Have fun deciding...
Posted: Tue Mar 28, 2006 12:19 pm
by baba101
Andrey,
Keep youre camera handy...while you are instaling the Ubolt. I really have no idea how it should be done....thanks in advance...
Ditto
Posted: Tue Mar 28, 2006 2:47 pm
by msujmccorm
Boy am I glad I waited until after you guys to start!
Any charge for the lessons??
Jeff
u-bolt
Posted: Tue Mar 28, 2006 4:42 pm
by bredstein
Good news! After looking at the plans - yes, that's all one needs sometimes! - I realized that the bolt is ABOVE the seat, so we can relax and forget about tunnels or additional frames...
Now what I am thinking about is the angle of the bolt. Should it be 90 degrees to the waterline or to the bow line? The boat is not so heavy that it could really make any big difference, but still it may be better for the alignment of powers IMHO.
FL14 on the blogspot
Posted: Tue Mar 28, 2006 4:44 pm
by bredstein
Those boat builders who are blessed with the knowledge of Russian language, are most welcome at my new blog at
http://fl14.blogspot.com. The page is in Russian ONLY.
Re: u-bolt
Posted: Tue Mar 28, 2006 9:16 pm
by Mike Adams
bredstein wrote:Now what I am thinking about is the angle of the bolt. Should it be 90 degrees to the waterline or to the bow line? The boat is not so heavy that it could really make any big difference, but still it may be better for the alignment of powers IMHO.
Why not buy a proper bow eye? It doesn't cost much, looks good and is set at the correct angle:
Mike
Re: u-bolt
Posted: Sat Apr 01, 2006 12:31 am
by bredstein
Mike Adams wrote:
Why not buy a proper bow eye? It doesn't cost much, looks good and is set at the correct angle
I simply believe that they are overpriced. In terms of design, I prefer U-bolt rather, although your bow eye looks nice, maybe it is too massive for my eyes. Now, the stainless U-bolt from Home Depot sells for $3, and a very similar Perko U-bolt is sold for $15-20. The only difference I could see is an extra nut (add 7 cents more and get it at HD!). Today I looked at the boats parked in front of my building, and understood how simpple they are installed - parallel to the bow. Very simple to do the same...
Posted: Sat Apr 01, 2006 12:38 am
by bredstein
After almost a week pause, I am back. Installed bow cleats today.

I had to make a handmade device (two pieces of wood connected at one end to a third piece with nails) to keep them in place.
I found very useful Mike's advice to make cuts in the cleats - wrked great, thank you so much, Mike!
And finally, I installed two longer cleats for the seat:
I still have to decide which design of the seat is better...
Posted: Sat Apr 01, 2006 4:44 am
by Mike Adams
It's looking good, Andrey! You're making fast progress.
Foam
Posted: Mon Apr 03, 2006 1:19 pm
by bredstein
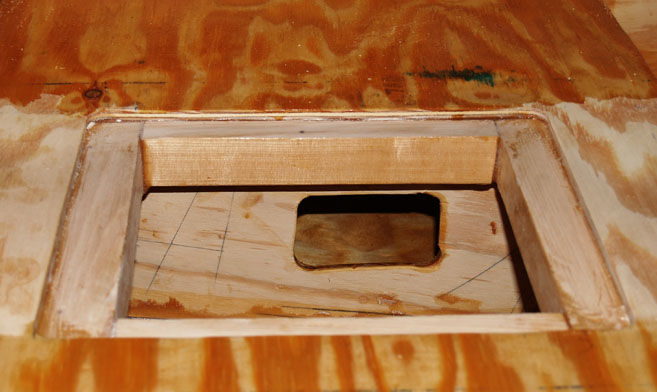
After long considerations I decided NOT to use foam in my boat. I am going to make hatches in the bow and transom frames, and also hatches on the main seat. I'll put airtight containers in these places. When not needed, they could be removed. If moisture accumulates, it could be dried...
Posted: Thu Apr 06, 2006 2:31 pm
by baba101
Andrey/Mike, what are the cuts in the cleats for...?
Posted: Thu Apr 06, 2006 5:26 pm
by bredstein
baba101 wrote:Andrey/Mike, what are the cuts in the cleats for...?
These cuts allow the cleat to take the shape of the side. You won't need it for a 1/4'' stripes, of course, but since the cleats are 1'', without these cuts you may end with the straight sides - they are weaker than the cleat, so they will take the new shape
Seats
Posted: Sat Apr 08, 2006 3:38 am
by bredstein
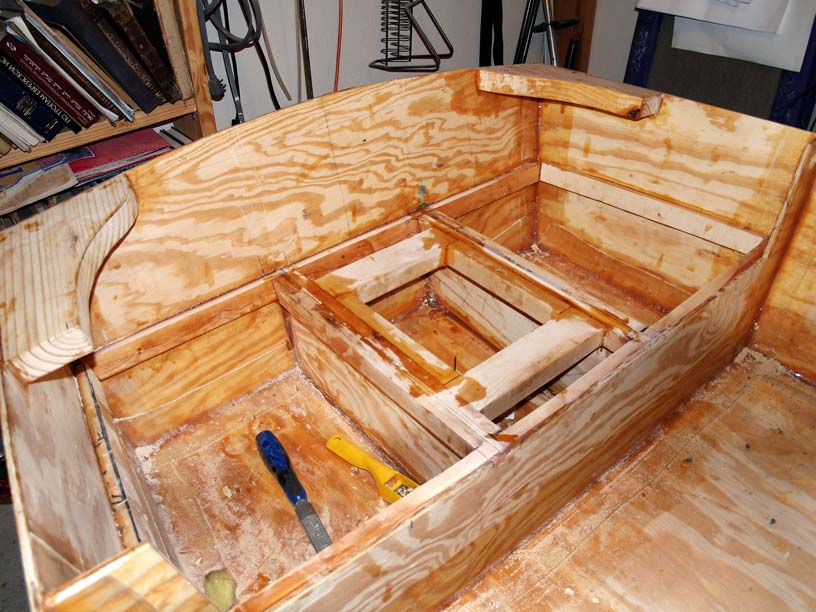
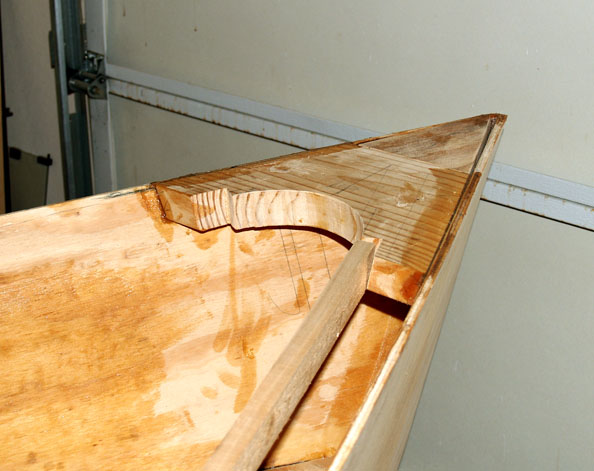
So I decided to finish with the seats, and only then flip the boat on work on her outside. Today I made and installed knees - maybe too thick, but I had a few pieces of a 1 1/2'' board (for some reason marked as a 2'') and they fitted perfectly:

Also made cleats for the back and front seats.
As for the front seat itself, I want it to have a stripe on the long side. Since 3/8'' doesn't look like a solid base, I glued some plywood (took it out from the trash) on the edges. Tomorrow I will hopefully finish this seat.
Posted: Mon Apr 10, 2006 3:09 pm
by baba101
Hey Andrey,
Are you going to build a drain in your boat....nice for hosing it ...?
Or will you just tip it to get the water out...?
Posted: Mon Apr 17, 2006 12:56 am
by bredstein
baba101 wrote:Hey Andrey,
Are you going to build a drain in your boat....nice for hosing it ...?
Or will you just tip it to get the water out...?
To tell the truth, I don't see the point of these drains for an FL14 used according to my style, that is, no extreme, just a couple hours on a weekend, never left in rain, etc. If some water gets under my seats, I have hatches to wipe it off. So for now, no drains!
Weekend progress
Posted: Mon Apr 17, 2006 1:16 am
by bredstein
Glued all the cleats finally (there are some to be added under the mid seat, but I haven't decided how to make the hatch yet).
I like to have a solid foundation under my... well, where I sit
So I made these cleats from 2x4 board. Still have to cut out a matching lid.
Found one spot on my HD plywood filled with something white. Got rid of it, sanded and fixed with a thick epoxy glue.
Some people write how boring it is to sand and fair. I am still behind this stage, but I am really fed up with this epoxy glue! Would like to do some sanding for the change...
Posted: Mon Apr 17, 2006 5:20 am
by Mike Adams
Looking good, Andrey - it reminds me of "Lake Dreamer" at that stage!
I see you've left the frame tops squared off and also have the knees squared off - are you planning to add a narrow gunwale deck, as I did? If so, I suggest some extra supports under the deck between the mid seat and rear seat frames. You will also need to consider where/how you are going to fit rowlocks. I cut slots in my deck to accommodate these - details are shown in my building thread.
Mike
Posted: Tue Apr 18, 2006 12:35 am
by bredstein
Mike Adams wrote:I see you've left the frame tops squared off and also have the knees squared off - are you planning to add a narrow gunwale deck, as I did?
Yes, Mike, once I saw your gunwale (gunnel?), I thought that it is a very clever and useful thing. The only difference will be the width - I'll make it a little bit (3/8'') more narrow, and also the shape because my knees and breasthook are more rounded.
Mike Adams wrote:I suggest some extra supports under the deck between the mid seat and rear seat frames. You will also need to consider where/how you are going to fit rowlocks. I cut slots in my deck to accommodate these - details are shown in my building thread. Mike
Thanks for advice! I'll add such support. As for the oarlocks, I'll probably install a piece of my favorite 2x4 board at 10'' from the seat, and then cut out the corresponding section of the deck accordingly.
By the way, I got my U-bolt in the HD today - with decorative brass caps for $2.15 before taxes... I'll post a picture sometime.
Good luck,
Andrey
Re: Weekend progress
Posted: Tue Apr 18, 2006 8:33 am
by MadRus
bredstein wrote: Would like to do some sanding for the change...
Wha,wha,what! Oh, you'll sand, you'll do lots of sanding, a-ha-ha-ha!
Looking real good.
Posted: Mon Apr 24, 2006 1:07 am
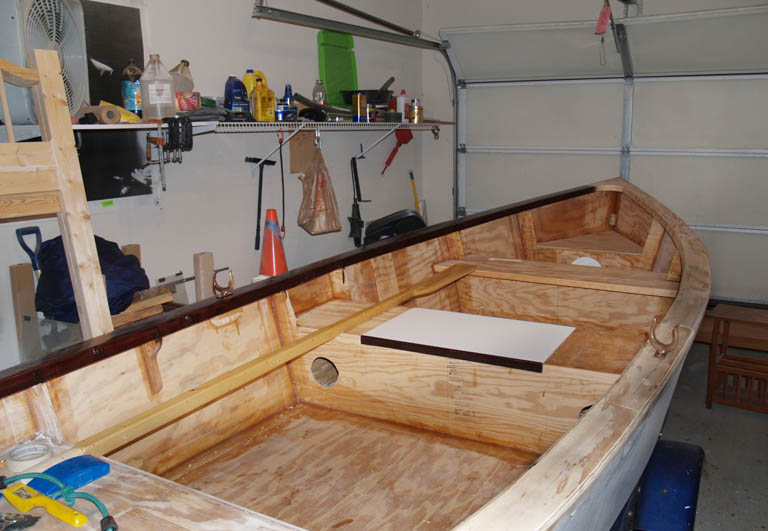
by bredstein
Made a little progress with the backseat. Now it is finished in terms of constuction, and it only waits to be nicely sanded and primed.
I wanted to make the backplate with a curve - this is how it looks:
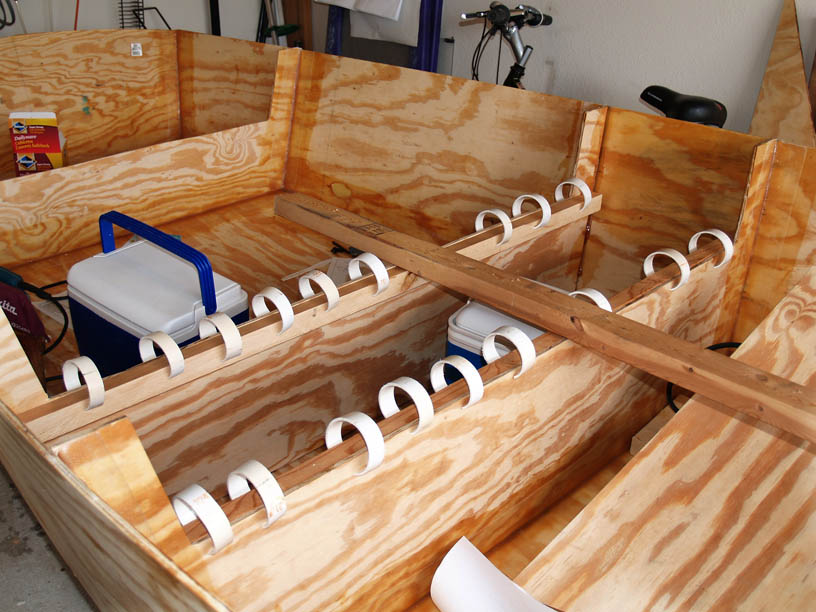
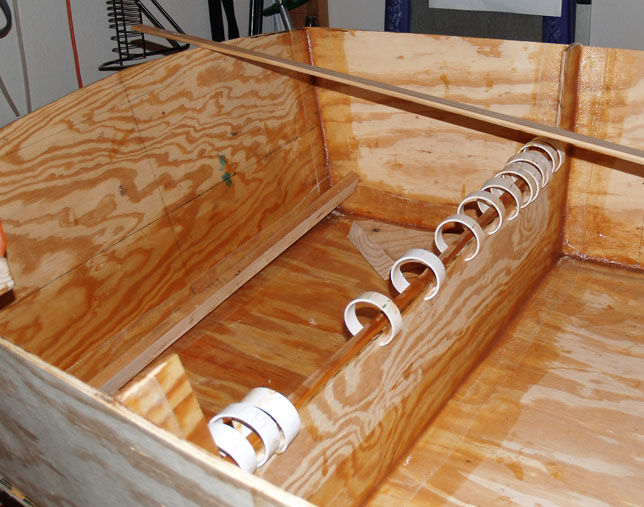
In the midsection under the hatch I ended up with two holes on each side. It is wide enough to let my hand in, so I can have access to these chambers. I'll put there 20''-25'' inflatable balls.
Also I drilled holes and bended with a heatgun a pipe, the one that I used to draw curves on my side. I had some connectors, so decided that the material should be used. Of course, there is a more simple way to get those wires from the midseat to the transom (where I want to install an outlet), but I like how it looks! More and more like a real boat...
Posted: Mon Apr 24, 2006 1:33 am
by baba101
Andrey,
I love the backplate...hope you don't mind if I copy your design....?
Boat looks good....got a name for her yet...?
Can you give me an idea of the number of hours you've put in doing the seats so far...?
Posted: Mon Apr 24, 2006 10:48 am
by ks8
Nice Backplate!
Before you finalize that PVC as wiring conduit, do a test pull of the wires you intend to run. Getting wires through tight 90 degree elbows of that thin stuff is next to impossible.

Use 45 degrees, or a stretch of clear flexible hose on the turns so that it makes a gentle curve, and, you can remove the hose (if it is accessible) to help nudge a wire through the bend. You want to figure this sort of thing out now before the seat tops are on forever.
Are you going to thoroughly soak and seal the seat chambers with epoxy before closing them in?
Looks good!
ks
Posted: Mon Apr 24, 2006 10:58 am
by bredstein
baba101 wrote:I love the backplate...hope you don't mind if I copy your design....?
Of course, Baba, you are most welcome! Feel free to copy it - just don't forget to engrave with the bold
letters my copyright!
baba101 wrote:Boat looks good....got a name for her yet...?
I don't have a name so far, because I am not sure it is OK according to our traditions. I need first to consult with people. If yes, it is going to be something in Russian or Yiddish.
baba101 wrote:Can you give me an idea of the number of hours you've put in doing the seats so far...?
I am afraid no. I work really irregular. It seems to be a simple job: you cut the cleats (3 minutes), make glue (2 minutes), glue the cleats (3 minutes), but how does it turn into days (weeks), I have absolutely no idea
But very approximately, I would talk about few hours per seat (not to count time of epoxy/glue curing and sitting on the thinking chair).
I am still trying to decide between FGlassing the bottom/sides and installing good rails.
Posted: Mon Apr 24, 2006 11:13 am
by bredstein
ks8 wrote:Before you finalize that PVC as wiring conduit, do a test pull of the wires you intend to run. Getting wires through tight 90 degree elbows of that thin stuff is next to impossible.
Use 45 degrees, or a stretch of clear flexible hose on the turns so that it makes a gentle curve, and, you can remove the hose (if it is accessible) to help nudge a wire through the bend.
KS, thanks a lot. What do you mean by 45 degrees? Sorry for the ignorance, I didn't get it. My degrees are all 90, and when cooled down, the pipe is hard again. But what I usually do in such cases - prior to banding I insert a very thin rope, more like a string. It is inside from the beginning, before final installation. When installed, I tie my wires to this rope and pull. Voila!
ks8 wrote:Are you going to thoroughly soak and seal the seat chambers with epoxy before closing them in?
Yes, sure thing. No waste of paint inside
Also, none of them are completely closed - I left holes in the inner walls for the backdeat, and will do the same with two chambers under meadseat. Just have to decide where to make them.
Posted: Mon Apr 24, 2006 12:23 pm
by ks8
I thought you used 90 degree elbow fittings. If you bent it after heating, that should help the wires through (smooth plastic path). The manufactured plumbing 90 degree elbows have a very sharp edge in them that is no good for pulling or running wires. Whereas the manufactured 45 degree elbows have a much smoother interior edge. But since you heated and bent the pipe, this should not be an issue.
But I see at least two 90 degree elbows in your path to down under the seat. You may still want to try a test pull before finalizing. I've pulled lots of wire through all sorts of passages.

How large is the inside diameter of the pipe? How many wires do you intend to fit through it? What gauge wires? Pull them all at once or singlely? Loose wires or twisted pairs (minimize affecting compass)? Twisted pairs need more room than the two single straight runs. You may have it all planned fine. I'm just trying to spare you some grief if the fit is a bit too tight for what you have planned, before you build up around what can easily be changed now.
Once you glue those elbows on, the only way to correct the path, if wires are being stubborn, is to cut them off and reconstruct the path another way. And remember, even if you get the wires through, those elbows, depending on the manufacturer, may have a very sharp edge inside at the 90 degree bend. THose fittings are meant for fluid, not electrical cabling, so they do not smooth interior edges during manufacture. Right now I'm holding a 1 inch elbow. I could probably cut my finger open if a slid it across the interior 90 degree edge fast and hard. Large diameter elbows are not as bad inside, but small diameter elbows can have nasty edges inside, with fluid PVC sched 40 cheap pipe fittings. If it is a sharp edge, some almost razor sharp, it would not be good for your wires to be rubbing against that from engine vibration or while pulling them through.
Double check the inside of those (2) elbows.
Posted: Tue Apr 25, 2006 12:00 am
by bredstein
ks8 wrote:I thought you used 90 degree elbow fittings. [...] The manufactured plumbing 90 degree elbows have a very sharp edge in them that is no good for pulling or running wires.
Got it! Yes, I do have 90 degree fittings - I just didn't know the right word for these... these things
under the seat and above as well. But between the frames I wanted the pipe to be as close to the gunnel as possible, so I had to bend it. The angle is about 65 degrees.
ks8 wrote: I could probably cut my finger open if a slid it across the interior 90 degree edge fast and hard.
I came home and tested my fittings. They are probable of some other make than yours, because I wouldn't call their inside edge sharp. It is not as round as the outside, but also sort of rounded, so nothing to worry about - such edge cannot damage wires.
ks8 wrote:How large is the inside diameter of the pipe? How many wires do you intend to fit through it? What gauge wires? Pull them all at once or singlely? Loose wires or twisted pairs (minimize affecting compass)? Twisted pairs need more room than the two single straight runs. You may have it all planned fine.
KS, many thanks for all these questions. I never thought about it that serious. Could you please tell more about the wires? All I know is that (1) my pipe is 1'' inside; (2) I need at least two wires (plus and minus); (3) the gauge should be 10. So what is it about twisted pairs vs loose wires? How does it effect compass? I don't have one at this point, but I may have it one day...
What are dis/advantages of each type? Oh yes, and I need wires just for a simple trolling motor. So the battery is not a huge one. There is a guy who parks his trailer with a boat close to my cars, and he showed me his six (!) batteries. But he has both a trolling and a gas motor...
Posted: Tue Apr 25, 2006 12:28 am
by Cracker Larry
Andrey, any wires that carry DC voltage near a compass should be twisted. About 1 twist per inch. DC wires that are run side by side, non-twisted, will create a magnetic field which will affect mag compasses. The magnetic field of the wires will be stronger than the magnetic field of the earth, causing fauly compass readings. Always twist DC wires to cancel out their magnetic field when run anywhere on a boat.
Posted: Tue Apr 25, 2006 1:28 am
by ks8
Before we go any further, what do you plan to do with the boat? A refresher for considering the simplest electrical that could prove handy and need little effort to install.
What time of day or night for boating?
What sort of waters? Lakes? Large or small? Salt water bays or inlets?
You may only need a flashlight and hand bearing compass and your trolling motor power (and oars?). GPS is very handy if fog is possible in your area.
What were your plans for this project, in usage on the water?
I'm having fun installing options of practical value to me, but for all I know, you will fish or row during the day in a small lake. Refresh my memory of your plans and we'll see how empty that tube can be kept.
Do you know the amps drawn by your motor at full throttle?
Posted: Tue Apr 25, 2006 4:11 pm
by bredstein
ks8 wrote:Before we go any further, what do you plan to do with the boat? What time of day or night for boating? What sort of waters? What were your plans for this project, in usage on the water? Do you know the amps drawn by your motor at full throttle?
Well, I was thinking first of all of a boat roomy enough for a family with three kids, including one under 1 year. We would like to be on the water only at the daytime, for couple of hours maximum, using oars when following the flow of the river, and using an electric trolling motor when tired and coming back. We have only fresh water here, be it our river, or Lake Austin, or any other Texas lakes. Most of them are artificial. As for the amps, I have no idea - I have no motor yet
I will probably buy a new battery somewhere like Academy, and would be happy with a used ebay motor about 30 lbs. I noticed that there are two types of batteries: deep cycle and universal. I assume I need the first type, is it correct?
Trolling motor
Posted: Tue Apr 25, 2006 4:37 pm
by msujmccorm
I saw a 30lb freshwater trolling motor at my Academy yesterday for $80.00.
Posted: Tue Apr 25, 2006 4:46 pm
by Jerry-rigged
A quick look at the Minn Kota website tells me that the amps a motor will draw (at 12vdc - one battery) is about equal to the rated Lb. thrust. So a 40 lb thrust 12vdc motor will draw 42 amps.
NEC 310.16 tells me that you need a #8 AWG wire for 42 amps (#8 good for about 50 amps - #10 only good to 35 amps) NEC Table 9C tells me that in 1"PCV, you can put a max of 4 - 1/Conductor #8 wires or 3 - 1/C #6's. However, the NEC thinks you are using an electrical elbow (LB) not a water 90deg fitting.
#8 wire is a bare to pull thru a bend - it does not bend real easy that tight - even for stranded conductors. I had the plesure of pulling a 4/c #10 thru a 1 1/2" conduit last fall - I would not try a #8 in a 1". If nothing else, go to HD and buy a 1" "LB" style elbow - it has a removable back plate and you can make the pull as 2 straight runs - it will be much easer.
Good luck what ever you do.
Posted: Tue Apr 25, 2006 6:27 pm
by Lon
"deep cycle and universal. I assume I need the first type, is it correct?"
Yes.
If you run up river to start with you'll quickly learn how far and fast you can go.
Posted: Sat Apr 29, 2006 3:44 am
by sharpwit
Andrey,
As a former Austinite, let me make some suggesions. I had a similar sized boat with a 24 lb. minnkota that was just fine. Lake Austin is beautiful, clear water with a good fish population. If you like to fish, then put in at the Loop 360 Bridge and take a left, the hydrilla beds all along the left side of the lake hold a very healthy population of Largemouth Bass and Bluegills. The only problem with Lake Austin is the abundance of wakeboarders and large powerboats. Read huge wakes. But if you pick your times it's absolutly breathtaking. Try Town Lake, it's electric only, and the fishing can be just as good. It's really nice to get out there on a spring morning with the fog rising over the lake as the UT Rowing team gets out to practice. It is impressive to see those sculls moving along at such a good clip. Just hearing about your progress makes me long to be out under the 360 Bridge at sunset, especially this time of year! Your doing well, keep it up!
Josh
Posted: Mon May 01, 2006 1:21 am
by bredstein
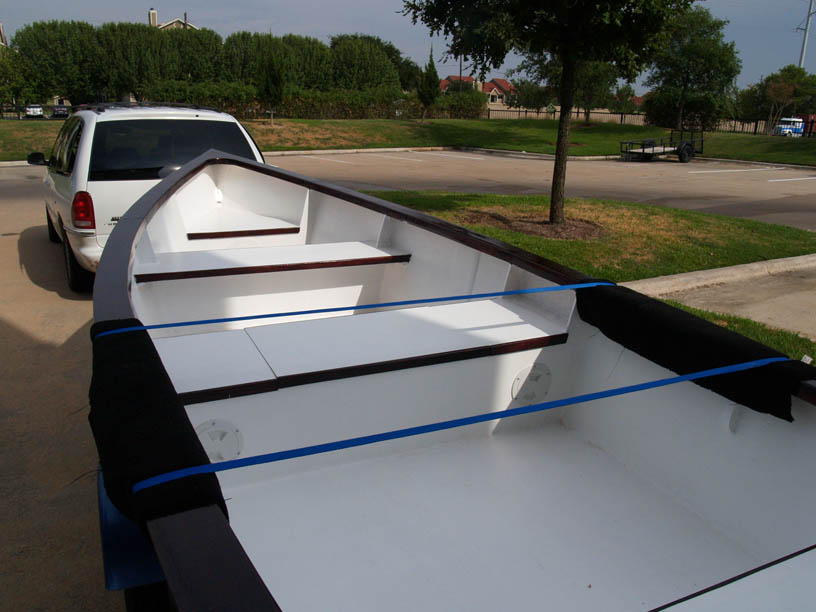
A little bit of a weekend progress. I glued seats on the side chambers, and made a perimeter of anti-water walls.
Cut and installed breasthook:
Inner rail on a starboard is formed with a heatgun and installed:
Posted: Mon May 01, 2006 1:24 am
by bredstein
sharpwit wrote:As a former Austinite, let me make some suggesions. [...] Try Town Lake, it's electric only, and the fishing can be just as good. It's really nice to get out there on a spring morning with the fog rising over the lake as the UT Rowing team gets out to practice.
Thank you, Josh, for these suggestion. I'll looking forward to follow them, the only thing I need for it is a boat!
And, yes, I can imagine how impressing may look the rowing team in the fog - saw it once in the afternoon sitting with a kid in kayak, looked terrific!
Posted: Mon May 01, 2006 9:19 am
by ks8
Hello Andrey,
Sorry about the delay...
So with your intended boating, daytime, freshwater, small lakes, sounds like the only electric you need is the trolling motor. I think you said another pair of wires in that tube. What were they going to be used for?
I see you had some replies about the wire gauge for the motor, and the potential problem pulling it around a one inch 90 degree. Have you come up with a plan to tackle that situation yet? Also remember that you will need some sort of electrical connector to the motor, one which can handle the load that the motor is drawing and the wires are carrying.
ks
Posted: Mon May 01, 2006 10:44 am
by bredstein
ks8 wrote:I think you said another pair of wires in that tube. What were they going to be used for?
Hm, don't remember anything about a second pair... was it a typo? As for now, I have two wires of size 8, long enough to go from the midseat to the back seat. There is no need to install any lights, so it looks like these two wires are enough. And yes, they are NOT solid.
ks8 wrote:I see you had some replies about the wire gauge for the motor, and the potential problem pulling it around a one inch 90 degree. Have you come up with a plan to tackle that situation yet? Also remember that you will need some sort of electrical connector to the motor [...]ks
I decided to pull the wires through separate sections first, including elbows, then connect these parts to each other. My elbows are not that sharp inside, don't think any vibration can damage them. As for connector, I got a plug and receptacle by Attwood ($10 both) at Academy. It also has * gauge wires. Now I need to find exact place for this outlet. Trying to imagine how I am going to sit when using motor, and where it is easier to reach with a hand...
Good luck!
Posted: Mon May 01, 2006 10:57 am
by baba101
Hey Andrey,
The Gunnel looks sweet (nice curves on the Breathook too)....you have obviously done this before...!
Due to the gunel you will find it hard to drain the boat..if you ever want to hose it down or leave it out in the rain.. (i.e. you will not be able to tip it to one side...).
You might want to plan for a drain or having holes in the gunel...
I was reading some earliar posts from you when you were still deciding on which boat to build...you mentioned you liked the FL14 but wanted it bigger...
Did you secretely change the dimentions and pretended it must have been a mistake (so Jac doesn't get upset)...
I guess what I am trying to say is "was the FL15 an act of God or did you do it on Purpose...

".
Posted: Mon May 01, 2006 3:34 pm
by bredstein
baba101 wrote:[...]you have obviously done this before...!
My experience with wood is limited to a couple of shelves and a dining table. I could not find anything I liked in the furniture stores, so I decided to build it myself. And what I like, is that it should NEVER move when I touch it, or push it, or whatever. That's why it has 4"x4" legs made out of some fence posts
Also it fits exactly into my dining room - another huge plus. And needles to say it is big enough to sit 10 people...
baba101 wrote:Due to the gunel you will find it hard to drain the boat..if you ever want to hose it down or leave it out in the rain.. (i.e. you will not be able to tip it to one side...).
This is something that requires extra time in a thinking chair. I never had boats before, so I may not know some obvious things. But from what I understand, rain is not a factor once you've got a cover? And I am not going to the water in a rainy day. Actually, we don't have much rain here in South anyway
So I am thinking more of a light roof against sun... How about letting water dry
baba101 wrote:Did you secretely change the dimentions and pretended it must have been a mistake (so Jac doesn't get upset)... I guess what I am trying to say is "was the FL15 an act of God or did you do it on Purpose...
".
Not at all! I do recall that discussion. Jaques convinced me that it is too complicated to just make it longer - it involves a whole lot of other changes, and I am not an AutoCad person
Also I thought that making the space between seats too long means loosing strength. So I decided to follow the plans. But! as we see now, G-d heard my wish, and made it come true by simply letting me make this mistake... Which means that it was indeed an act of G-d!
Posted: Mon May 01, 2006 4:14 pm
by gk108
If you have a good rain proof cover for storage a bailing sponge may be all you need to get water out of the boat from normal use. Rinsing the salt off after a day of playing at the beach could leave a puddle, but a sponge will take care of that, too.
Posted: Mon May 01, 2006 9:40 pm
by ks8
How about putting some sort of panel under the gun'l for the motor power receptacle? It will be out of sight and out of spray, but you will know where it is and be able to reach it easily enough. You could run that PVC into a plastic junction box and mount the receptacle on the removeable plate of the box, protecting the back of the connector a bit more with the box. And you could wire in an appropriate rated circuit breaker, just in case. The circuit breaker could mount near the battery itself.
Posted: Mon May 01, 2006 11:24 pm
by Mike Adams
baba101 wrote:Due to the gunel you will find it hard to drain the boat..if you ever want to hose it down or leave it out in the rain.. (i.e. you will not be able to tip it to one side...).
You might want to plan for a drain or having holes in the gunel...
A month or two back we had a storm in Canberra - The cover on "Lake Dreamer" was not tied down properly and blew off. About two inches of water accumulated in the bottom of the boat, but it's a small boat and it took only ten minutes minutes of bailing with an ice cream container and a sponge to dry it up. Drain holes wouldn't have helped me much. I wouldn't bother.
Mike
Posted: Fri May 26, 2006 11:32 am
by baba101
I guess the advantage of a drain would be for a place like Seattle...
If you leave your boat open all winter....and it rains every week...you would not get a pool inside for 6 months...
I am not going to have a drain for Madmax...and will store it upside down in winter to keep the snow out....so no worries...!
Thanks Mike for the inspiration ...your tutorial was the only reason I chose the FL14...it was very detailed...and the final pictures were stunning…and you claimed to be a first time builder..
I did not know what a displacement hull was...or flat bottom meant....I just wanted to build a boat that I could finish without being humiliated...
Posted: Fri May 26, 2006 5:52 pm
by Mike Adams
Thanks for the compliment, Baba - I'm sure your FL14 will turn out just as good! And yes, I had never ever built a boat before, or anything like it. In fact this was my very first experience with F/G and epoxy. But, as you have already discovered, the combination of Jaques' designs and the advice on this forum is all you need to be succesful!
Cheers,
Mike
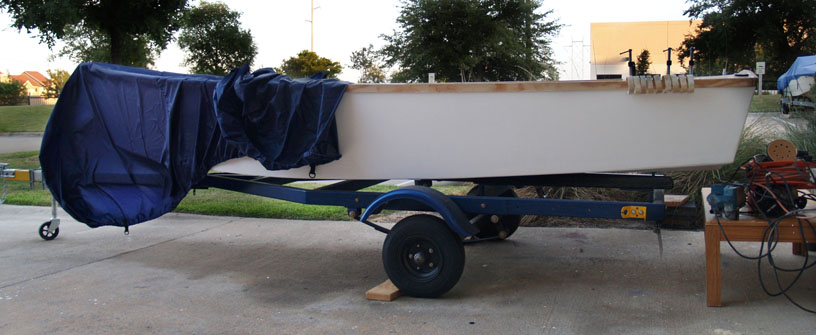
Posted: Fri Jun 16, 2006 12:56 am
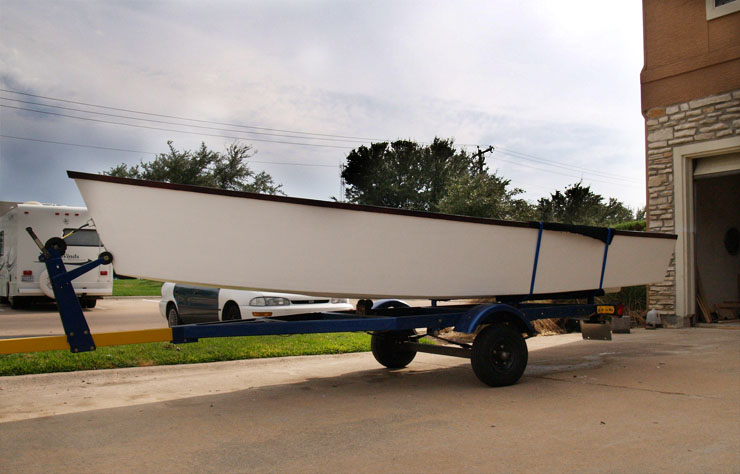
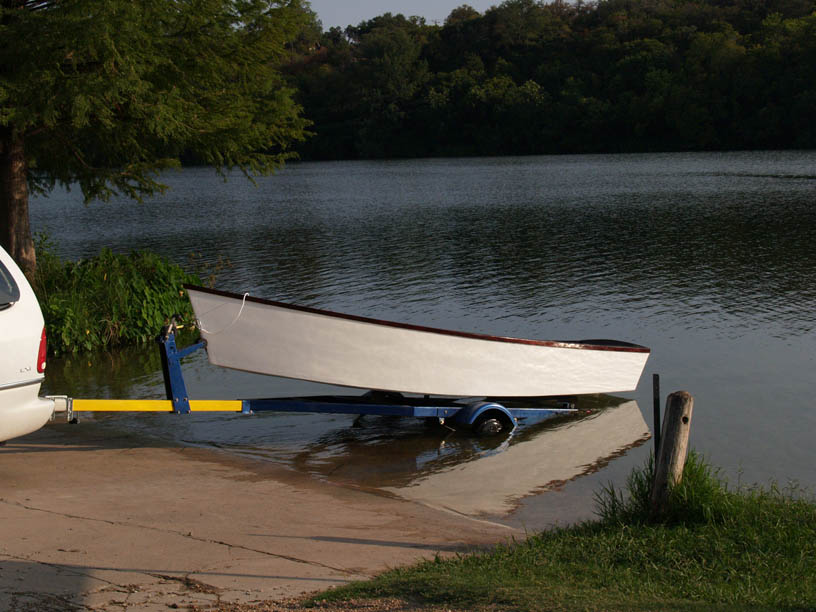
by bredstein
After a break I am back to the boat. Got myself an old trailer which has been sitting in somebody's backyard in Round Rock from early 80s... Now it is ready for the FL14:
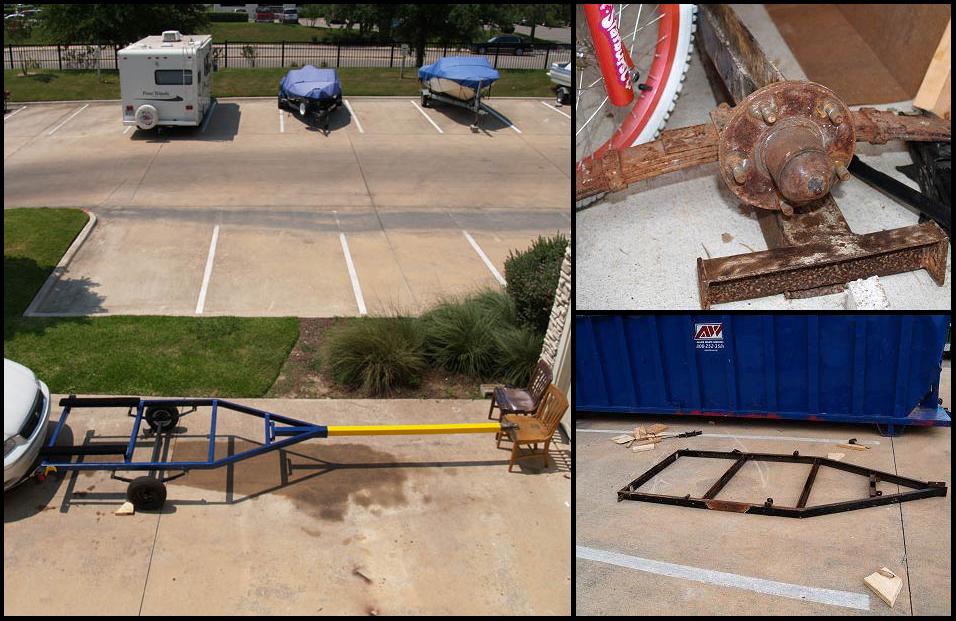
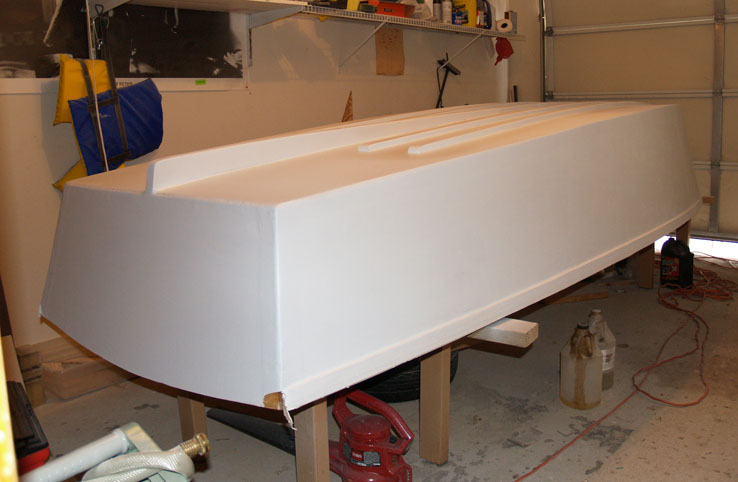
Installed the modified skeg - it goes much farther on my boat, added two runners on one side (thinking of adding the third one, just about 2' long). The hull is taped completely and is ready to take three coats of epoxy:
Hope to finish exterior this weekend, then flip her over and put on the trailer.
Posted: Fri Jun 16, 2006 11:15 am
by baba101
Thats a lot of drag Man...! you could go sailing now...
What was the reason for such a huge skeg..? are you plannnig on sanding it....? I wonder if its going to make it hard for you row this thing...
Looks good though...
Posted: Fri Jun 16, 2006 12:12 pm
by bredstein
baba101 wrote:Thats a lot of drag Man...! you could go sailing now...
Give me two more weeks
baba101 wrote:What was the reason for such a huge skeg..? are you plannnig on sanding it....? I wonder if its going to make it hard for you row this thing...
I made it out of a long 2x4 because I already had it, that's all. But I would probably look for a 2x4 anyways, in my opinion it is just what I need. It differs mainly in length, starting from the middle it becomes only 1'' and then goes to zero, serving as a runner. It is sanded with 60 grit and epoxied. As for rowing, nothing on the bottom can make it harder, I assume, at such turtle speeds as I will have with my two Russian oars
Posted: Sun Jun 18, 2006 10:39 pm
by baba101
Andrey,
Are you concernde about your plywood checking (without the fiberglass). I so you should consider a 4oz cloth...
Posted: Mon Jun 19, 2006 12:27 am
by bredstein
baba101 wrote:Are you concerned about your plywood checking (without the fiberglass). I so you should consider a 4oz cloth...
I thought a lot about it. This FL14 is my first boat, and I would like to push limits as far as I can. As you see, I am using wood filler, I do not glass, I do not prime with S3, etc. There are some positive results, for example, I found that corn starch with epoxy works better for me than QuickFair, it just spreads better
As for the cheking problem, I assume that the plywood cracks from its expansion and contraction when moisture content changes. And paints are not waterproof. But epoxy is, so theoretically three layers of epoxy (as a water barrier) should work as good as fiberglass, be it 4 oz or 12 oz, doesn't matter. What glass does, it adds strength. But it doesn't seal better than epoxy. What do you think?
Posted: Mon Jun 19, 2006 1:06 am
by baba101
bredstein wrote: ...As you see, I am using wood filler, I do not glass, I do not prime with S3, etc....I found that corn starch with epoxy works better for me than QuickFair, it just spreads better
..... What do you think?
I think you and I have taken different paths to experimenting on our first boats....I have wasted money by over building ...and I hope you have NOT wasted your money by these little savings...
Either way I might have spent about $600 dollars more on my boat then needed...and it may be that this is all you spent on yours...so in worst case scenarios we would be at par.
Goodluck
Posted: Mon Jun 19, 2006 1:13 am
by ks8
Of course, we should consider that Andrey hasn't considered going over Niagara Falls either...
We know Baba is building Mad Max. Who is Andrey building? Got a name yet?
Posted: Mon Jun 19, 2006 2:36 am
by bredstein
ks8 wrote:Of course, we should consider that Andrey hasn't considered going over Niagara Falls either...
We know Baba is building Mad Max. Who is Andrey building? Got a name yet?
Oh, yes, no falls, for sure - one of the kids is still under 1 year
It is true, our waters here in Austin, TX, are very protected, maybe even overprotected. ...Of course, it sounds nice to unload the boat from the trailer, and then sail to a remote island, dragging the boat over the sand mixed with sharp stones, you got it. But do we have such islands and shores here? And if yes, do I need to land? Most likely the boat will never touch anything but my trailer bunks...
Got a name yet?
First I have to convince myself that she needs a name. Otherwise I may keep the boat anonymous
Posted: Mon Jun 19, 2006 2:47 am
by bredstein
baba101 wrote:I hope you have NOT wasted your money by these little savings...
It is early to calculate total, but as for now, I spent about $420.
- plans: $35
- epoxy kit: $200
- plywood (6 sheets 3/8'' exterior, each one $18.75): $112.50
- sanding disks (10): $5.20
- oarlocks and sockets: $27
- wires: $6
- outlet and connector: $11
- hatches (2 small, 1 large from Academy): $17
I will soon buy 1 gallon of primer ($17), 1 gallon of paint ($20), 1 quart of another paint ($7), and non-skid additive ($4); total about $50.
So there is a good chance to stop investing before I hit $500...
Posted: Mon Jun 19, 2006 11:35 am
by baba101
bredstein wrote:....First I have to convince myself that she needs a name. Otherwise I may keep the boat anonymous
Yeah man...treat her mean and keep her keen....!
Recently I have questioned the need for Graphite bottom...12oz Biax ..super packed foam in seat buckets, S3 primer and Paint...and soon to be 12oz Biax for rubrails...
My reason is that I expect to use all of this stuff on my OB19...and I suspect Madmax will be treated mean and ruff...and I'd like it to be a low maintenance machine....Also I want it to float in water...even if it is flooded and kids want to stay on board...and in a few years if my son takes Madmax out I want to feel reassured that the boat will hold up to any emergencies...
My cost of this boat is fast approaching $2000 Canadian…which is about as much as I was prepared to pay for a new 14 Foot Aluminum (with a cheap paint job). I am hoping Madmax will be stronger, will row better and be easier to accessorize..
Posted: Tue Jul 04, 2006 10:26 am
by baba101
Hey Andrey...lets see some pictures of your progress ....... I know you are pianting quitely in your Garage....
Posted: Tue Jul 04, 2006 11:32 am
by bredstein
baba101 wrote:Hey Andrey...lets see some pictures of your progress ....... I know you are pianting quitely in your Garage....
Nothing interesting so far. In a few hours of free time that I have in a week I finished fairing - yes, with a corn starch mix
and I am quite satisfied with the result. Then I tried to paint one of the top seats. I'll post some pictures when it is completely dry.
Posted: Tue Jul 04, 2006 8:54 pm
by bredstein
Posted: Wed Jul 05, 2006 2:13 am
by Mike Adams
That's looking real nice, Andrey! What colour are you planning to finish her?
Posted: Wed Jul 05, 2006 8:21 am
by bredstein
Mike Adams wrote:That's looking real nice, Andrey! What colour are you planning to finish her?
Thank you, Mike. I am going to make her mostly white with very dark trimming on the seats, knees, breasthook and gunnel (this dark color is a "bombay mahogany" polyurethane stain from Minwax).
Posted: Wed Jul 05, 2006 9:02 am
by baba101
bredstein wrote:Mike Adams wrote:That's looking real nice, Andrey! What colour are you planning to finish her?
Thank you, Mike. I am going to make her mostly white with very dark trimming on the seats, knees, breasthook and gunnel (this dark color is a "bombay mahogany" polyurethane stain from Minwax).
Nice...I have the "bombay mahogany" polyurethane stain from miniwax on my kitchen Cabnets...it blocks water good (atleat in my kitchen) and shows the grains real nice.....
You have made good progress...I am still struggling with the SKEG which is far from being Fair...will post the problem and attempted resolutions so far...
Posted: Wed Jul 05, 2006 9:27 am
by msujmccorm
Looks good.
I should finish sanding today and hopefully prime the bottom tomorrow. I hope mine turns out as good. I'm going to try the roll and tip?!?
Jeff
Posted: Sat Jul 08, 2006 8:02 pm
by bredstein
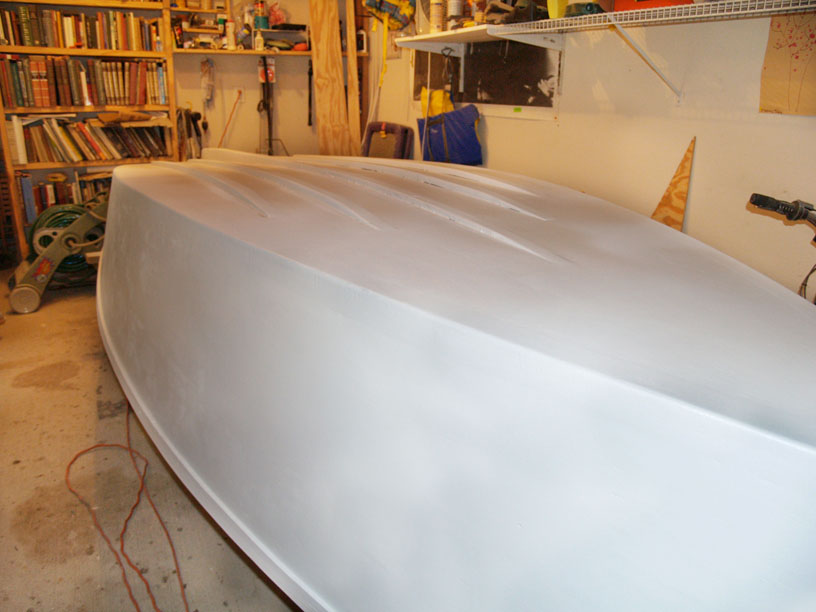
Today I put on the first coat of paint. I used roller on the bottom and one side, and spray on the other. Interesting to compare the results. Anyway there will be some 220 grit sanding... Also put the third coat on the seat top; so now it has two coats of BEHR latex primer, three coats of BEHR porch and floor latex paint. The sides were precoated with MINWAX wood conditioner and have two coats of MINWAX polyurethane finish of Bombay mahogany color:

Posted: Mon Aug 07, 2006 11:43 pm
by bredstein
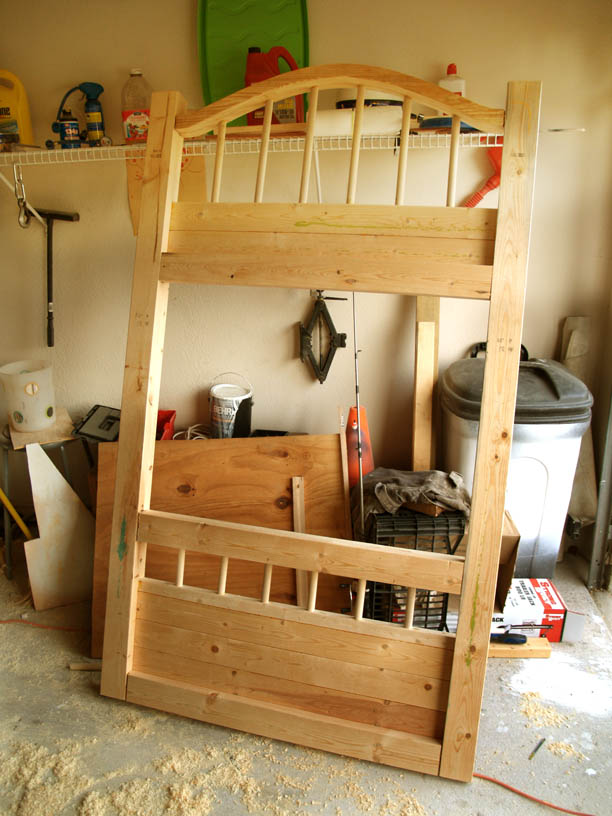
I sure could have made a better progress on the boat, but had to spend some time on another project
Here it is - no epoxy, no glass, no paint. Not done yet, only one frame is ready so far, but once I have it in my head, the rest is just a matter of a few evenings:
As for the boat, it sits on a trailer already. Exterior work is mostly done. I have to add a U-bolt on the bow, and two U-bolts on the transom. No cleats. I'll go with simple holes and a knot.
Here is what I started doing with the gunnel. After sitting in a thinking chair for quite a long time I came up with an idea to notch both sides and support rails with a router set at depth slightly less then 3/8''. It can be seen in the picture how I played with different depths. Then I am cutting pieces (first of paper) of plywood and glue it in with a regular wooden glue. Last thing to do is fill the gaps with a wood filler, and cover with two coats of Minwax Polyshade.
Posted: Tue Aug 08, 2006 12:35 am
by Mike Adams
TWO FL14s with gunwales! Maybe I've started a trend?!
It's looking good, Andrey. I like the contrast of the "bombay mahagony" trim against the white - very nice.
Mike
Posted: Tue Aug 08, 2006 5:50 pm
by bredstein
Mike Adams wrote:TWO FL14s with gunwales! Maybe I've started a trend?!
Mike, even if you were not the first boatbuilder to make a flat 14' skiff with a gunnel, you were certainly my source of ideas regarding this add-on. So why not officially start calling it a "Mike's gunnel"?
Posted: Tue Aug 08, 2006 10:00 pm
by ks8
MiGun'l.
Of course the term only applies to FL14's.
Posted: Tue Aug 08, 2006 10:44 pm
by bredstein
ks8 wrote:MiGun'l.
Of course the term only applies to FL14's.
FL14 rules! I don't have any statistics, but it surely looks as one of the most commonly built boats - easy for a beginner, fun to use, etc., etc. Maybe it is time to create a separate subsection in our forum for FL14 (now together with its FS clone)?
Posted: Tue Aug 08, 2006 10:58 pm
by Mike Adams
ks8 wrote:MiGun'l.
Of course the term only applies to FL14's.
Gee, a new naughty-cal term! Wot next - a 'ksavelle' perhaps (meaning any boat that deserves to be on display in the Smithsonian...
).
spackling
Posted: Fri Aug 18, 2006 3:35 pm
by bredstein
I am almost done with a gunnel. Originally the idea was to use longer sections of plywood, that is three or even two per side, but I soon ran out of wide leftovers, and so at the end used 12'' long pieces
Glued them with a wooden glue - the strength is comparable with epoxy, and in this particular place epoxy has no advantage over Titebond II. On the contrary, it is way more expensive, and more messy.
Next step was filling the gaps, from 1/32 to 1/8. I tried few different makes of wood fillers, and the result was not bad. Of course, it is not that hard as epoxy with flour (or my favorite starch), you can easily leave a mark with your finger nail. On the other hand I am still using it, because it is fast, simple and cheap. And yesterday I tried another solution, which turned out to be absolutely superior to enything I had before! Got a pint of it for $2 in the local supermarket. It is called a "lightweight spackling," and has limestone, soda, etc. as ingredients. It is a pleasure to work with it, dries very fast, I wish I knew about it earlier.
Important note: I think it is a VERY BAD idea to use either wood filler of spackling in the places where strenght is crucial. This is a pure cosmetic stuff, designed to improve minor imperfection at a fraction of cost and labor if compared with epoxy.
Posted: Fri Aug 18, 2006 11:51 pm
by bredstein
Here are a few pictures. Earlier I put two layers of Minwax semi-gloss Polyshade Bombay Mahogany; today the gunnel was completed.
The rubrail on the bow has only one coat on this picture - the difference is very clear. And I want to make three coats, so it's going to be real dark finish!

Oarlocks (bought them online for $23 with sockets) are installed and ready to accept oars. Have made only one so far
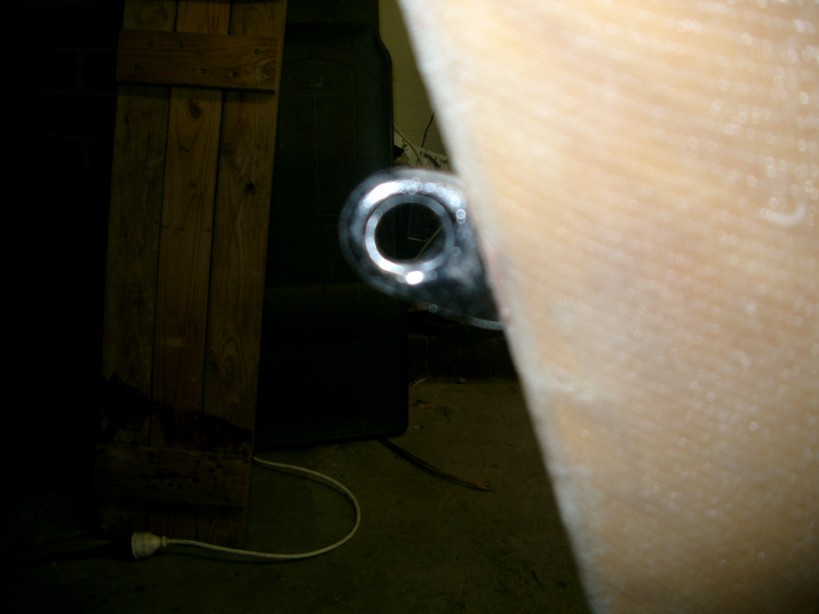
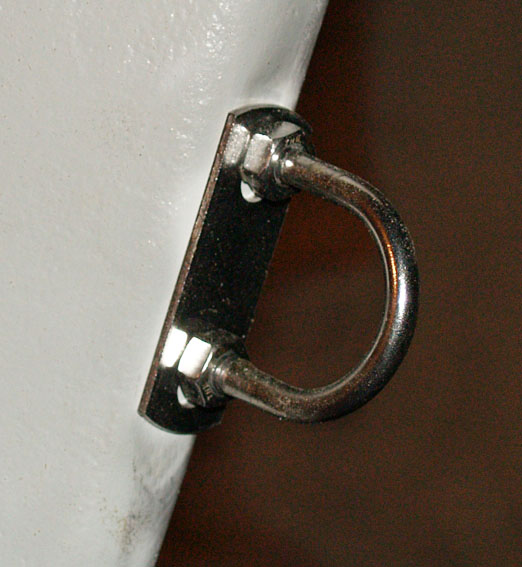
And finally a closeup of my beloved U-Bolt from the Orange box for $2.65.
Boat is finished
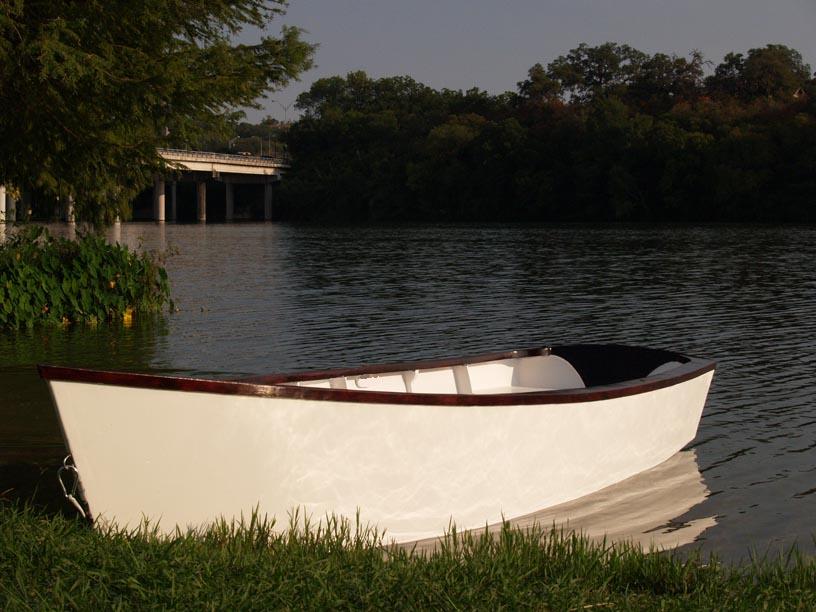
Posted: Tue Sep 05, 2006 11:20 pm
by bredstein
Today I took the boat to the river (Lake Austin - a funny name for a river, no?). It was also a test for the trailer, completely renewed. Some guys told me that such small wheels can burn the bearings if I drive the trailer at a highway speed. Not true! After 30 minutes of driving at 65, the hub was a just a little bit warm.
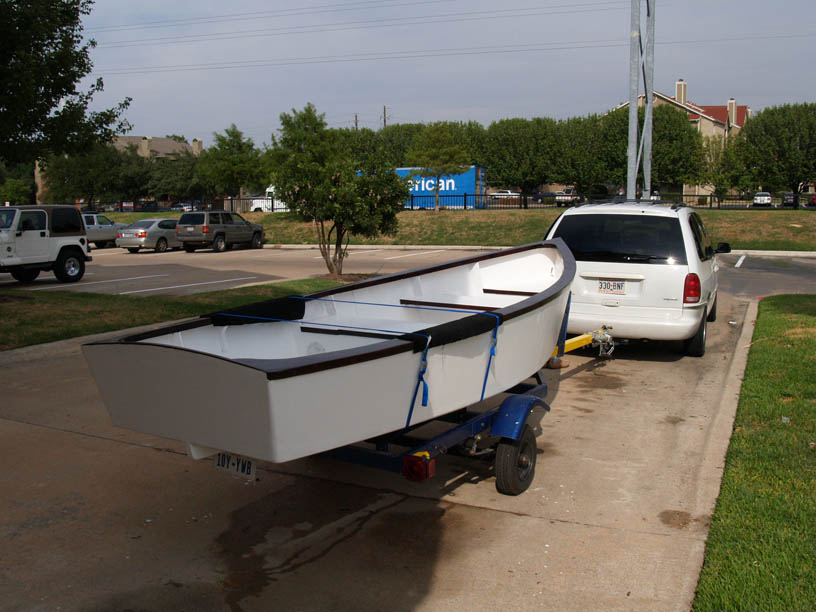
It is always nice to have a free ramp not so far from home!
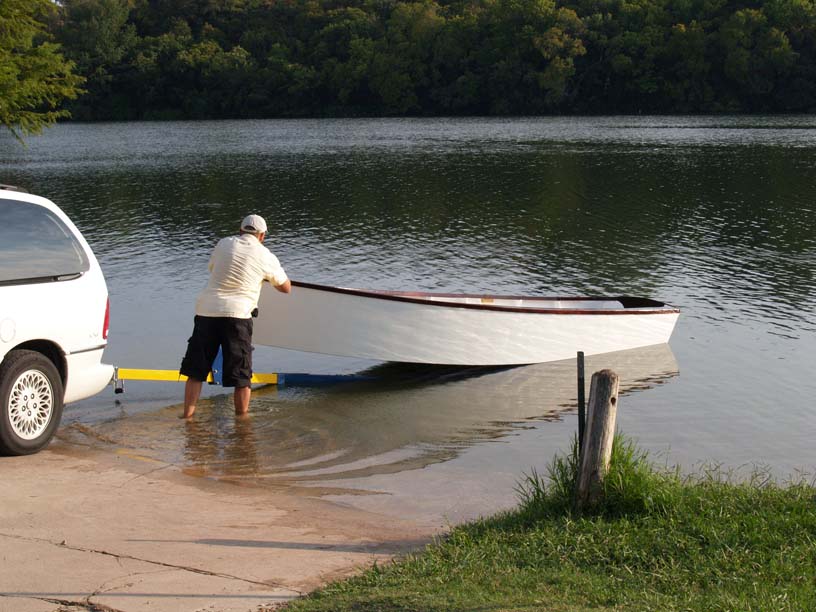
Could be better, but good enough for me...
She rows well, the only two things I need to decide are the locks - both oars kept jumping out of them, and the width of the blades, they may be too narrow, I don't know. Maybe I just need more experience in rowing!

Now some ideas. First of all, my many thanks to Jaques for a VERY simple and easy to work with set of plans. Also the boat turned out to look quite nice - due to his design.
In the process of building I realised that for my purposes some materials can be substituted, making the boat cheaper, that is - more afordarble. This particular FL 14 is about $600 total. For example, the seats can be glued with Titebond, the holes can be filled with the wood filler, the hull can be painted with porch-and-floor latex, etc. Of course, it will not make the boat look like a show room beauty, but it can put you in the water faster and easier. Again, this is a free choice.
As for the future plans, I would like to make a super-small sail boat, so that I could learn how to sail, and also learn more about other ways of building. I am especially interested in row boats from the pre-plywood era. After all, people have been rowing for centuries before plywood and epoxy were invented...
Posted: Wed Sep 06, 2006 1:20 am
by gk108
Looks good Andrey. Don't worry too much about the small tire thing. With a lightweight Bateau design the loads aren't as bad as an overweight production boat. Just make sure the bearings are greased, maybe get some bearing buddies for the axle.
For a small sailboat the V10/V12 is a cool little boat. Only 4 sheets of plywood and wooden spars that I know you would like to make. You can learn about all the basics except what to do with a headsail.
Posted: Wed Sep 06, 2006 7:48 am
by msujmccorm
Congratulations... Looks great.
Sure feels god to put it in the water the first time doesn't it?
Posted: Wed Sep 06, 2006 8:19 am
by Mike Adams
Congratulations Andrey - nice job! I like the contrasting dark gunwales/rubrails with the white hull - very sharp.
If you are having trouble with the oars jumping out of the oarlocks, you could try the type that I have fitted on "Lake Dreamer". (I got these from Jacques):
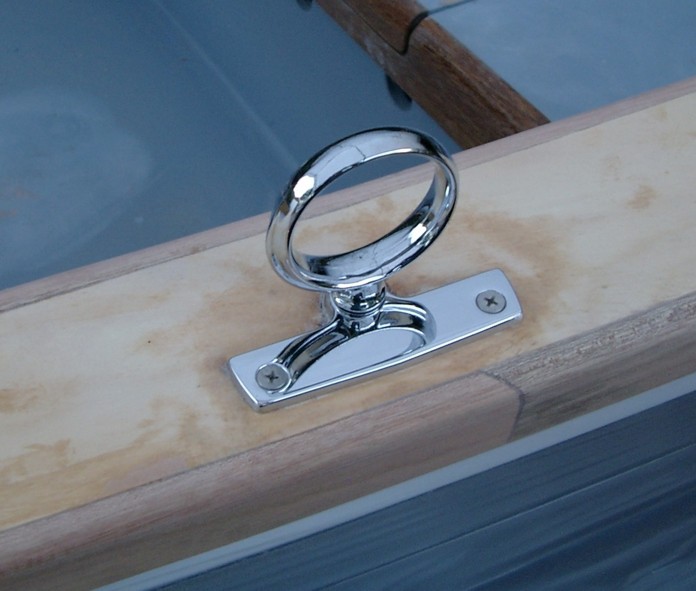
I found this type of oarlock compensated well for my very inexpert rowing..
BTW, do you have a name for your boat yet?
Mike
Absolutely beautiful
Posted: Wed Sep 06, 2006 8:20 am
by kakupper
I'm building my FL14 in Atlanta and just learning to use this forum. I saw Mike's Gunnels and was tempted. I now see yours and am convinced. Unfortunately I've already cut curves in my frame tops. I'll have to find a work around. What were the challenges you faced in building these gunnels? Mike if you read this, please post your advice.
Re: Absolutely beautiful
Posted: Wed Sep 06, 2006 8:53 am
by bredstein
kakupper wrote:Unfortunately I've already cut curves in my frame tops. I'll have to find a work around. What were the challenges you faced in building these gunnels?
If you like the gunnel on FL14, and really want to have it, then curves are IMO not a big deal. The stress vector is vertical, so you can cut these tops even more: cut out the upper part completely. Then make corresponding pieces of plywood and glue them with small butt blocks or FG tape. Or in some other way. Because after all, these tops are nothing but supports, and you'll have to add at least one such support anyway - between midseat and back seat. Now you have to make more of them, so two or six is not a big difference
Good luck!
Posted: Wed Sep 06, 2006 9:01 am
by bredstein
Thanks everybody for good words about my boat. It really feels good to be on the water in your own boat. She doesn't have a name, and I am not going to keep her long. What, am I going to start a boat collection?
Another few trips to the lake, and she is ready for a Craigslist. Room is needed for something else. V10 is maybe too big for sail learning purposes, I am looking at a 6 or 8 footer.
BTW, after posting yesterday about non-plywood boats, I found this project:
http://209.193.28.16/Boats/Klondike/Klondike.htm
Looks very close to what I have in my mind right now!
Posted: Wed Sep 06, 2006 9:32 am
by ks8
Splash at last! Hadn't heard from you in awhile. Looks like you were busy. Happy rowing... until Craig's list anyway...
You may need longer oars. The angle to the water looks too steep. I still don't know what I'm doing there either. Long oars can get pricey.
Enjoy!
Posted: Wed Sep 06, 2006 9:48 am
by bredstein
ks8 wrote:You may need longer oars. The angle to the water looks too steep.
You are reading my mind! I was reading this forum about the length, and found a post by Jaques saying that 7' is ok... used the formula and also got 7' plus a few inches. So I made the oars 7' 6'', and as tried them even before splashing, I got a feeling that they are too short. At least anothe foot! I'll keep experimenting and then report to the forum...
ks8 wrote:Long oars can get pricey.
Not for me! I made my oars out of 2x2 ($2.14) and the spruce blades are also about $2 each, plus a can of spar urethane, which is still 3/4 full after four coats... so I would say my oars are about $16 for both.
Re: Absolutely beautiful
Posted: Wed Sep 06, 2006 6:39 pm
by Mike Adams
Hi Kakupper,
Andrey is correct, it's no big deal to add supportsfor the gunwale deck. I would not bother cutting your frames, though - just glue some supports made from scrap ply to either side of the curved frame tops to square them off. These extra pieces will be hardly noticeable under the deck.
To cut the deck to shape, I simply laid the plywood on top of the frames and scribed the shape of the hull at the rub rail on the plywood with a pencil. I then turned the plywood over and drew a parallel line the desired width of the deck. I didn't worry too much about accuracy when cutting the deck out - I just cut it slightly oversize and then sanded the edges back to the lines after gluing it in place, which made it a neat fit.
Cheers,
Mike
Posted: Fri Sep 08, 2006 11:52 am
by baba101
Great Job Andrey....Your Boat looks big...and beautiful...
This Young Taxan has now proven that a
first time builder can indeed get his boat in the water
fast and cheap...
You can get about three of your boats for the cost of one incomplete Madmax...
By suddenly wanting to sell this thing and building the next.... you have also demonstrated that you are now an addict...looking for the next high.....
Posted: Fri Sep 08, 2006 9:19 pm
by bredstein
baba101 wrote:Great Job Andrey....Your Boat looks big...and beautiful...
Thank you, Baba... you know what, most of her beauty comes from the art of photography
If you could cast a closer glance, you would see many imperfections.
baba101 wrote:By suddenly wanting to sell this thing and building the next.... you have also demonstrated that you are now an addict...looking for the next high.....
Yes... there is something here... when I was done with this FL14, I decided that no more boats (in the near future at least) are going to be built. But just two days later I started thinking over - in the head for now - the next boat.
There are a few ideas that I have now. First, no more plywood. I want to try boards. You just have to hammer between them something like a thin rope, and then pour hot pitch on this seam. And it will do fine without any paint. Can be pretty heavy; I am talking about a 20' boat with an optional mast...
Yes, good luck with Madmax. BTW, you haven't posted anything for quite a while, ha?
Posted: Sun Sep 10, 2006 10:46 pm
by kakupper
Has anyone put a drain in their boat. I previously built an Fl14 and had no luck keeping water out of it with a cover. It will stay trailered most of the time and I'd like to keep from having to flip it everytime I take it out. With the rocker, it doesn't seem to make since to put in in the transom either. Would it be a fatal mistake to put one in the floor? What are your thoughts.
Posted: Sun Sep 10, 2006 11:44 pm
by jayb01
Even with the rocker, I'd put it in the transom. I'm assuming there is a way for the water to get to the back of the boat to get out at the transom.
While on the trailer, keep the front of the trailer elevated enough that the rocker does not prevent water from going to the back.
Depending on the trailer setup you may be able to adjust it so that the boat sits a little bow high even when level.
Posted: Mon Sep 11, 2006 12:17 pm
by rjezuit
I put in a brass flange with a plug in(garboard drain plug) the bottom of my FL14. It drains well, but with the rocker leaves a little to sponge out. I put it along the one side on the bottom behind the center seat. If I did it over again I would have put it in front of the middle seat. That is the lowest point when it is on the trailer. Rick
Posted: Tue Sep 12, 2006 1:17 am
by bredstein
kakupper wrote:Has anyone put a drain in their boat.
I did't mess with any drains. The seats devide the boat in three sections, and to use a plug you need first to let the water flow thru some holes under the seats and gather in one place. IMO, it is better to design a better cover, because most of water comes from rain, not from taking her to the lake. I noticed that my cover (waterproof, said the box) works well only when the water doesn't accumulate on it. So when it is covered, I simply raise it with things like orange cone, plastic pipes, etc., and the water doesn't get inside.
Posted: Thu Sep 14, 2006 6:01 pm
by kakupper
Thanks for the advice. I guess it helps to not buy the cheapest cover also.
Posted: Mon Nov 13, 2006 2:57 am
by bredstein
Here is some update. After long discussions about plywood, glue, paint, etc. (I was sort of on the cheapo side of it), we came to conclusion that there can be no better judge but time. And as more than two months have now passed, I am ready with some observations.
1) The HD exterior plywood turned out to be even a bigger drek than I expected
I left the boat covered with a waterproof cover from Academy (that was my last shopping for covers in that store!) for about two weeks of nice Texas rains, and got about 5 gallons of water inside the boat. The top of the rear seat was left completely unfinished - no epoxy, no paint, no nothing. And it checked REAL bad. All the layers literally detached from each other. This is the bad side of it. The good one, however, is that everything that had two coats of primer and three coats of a porch paint (both by BEHR) was just perfect, and we are talking about two weeks soaked in the water! I could see no difference between plywood treated with epoxy and plywood treated with paint. At least as for now.
2) Minwax finish looked great on the gunnel, but unlike porch paint, it didn't save the plywood from checking. So I had to sand it clean with a 120 grit. Then I filled all the cracks with a wood filler, and let it stand for a week. No more checking so far. I gave it two coats of the same Minwax, hope it will help. But if I had to make another gunnel, I'd go now with a simple 1x4, it is affordable and safe from checking.
3) My general impression is that plywood is good, but not for the type of boats I am interested in. My next one will be most likely of boards (planks?), no plywood.
Posted: Mon Nov 13, 2006 3:35 am
by jacquesmm
. . . My general impression is that plywood is good, but not for the type of boats I am interested in. My next one will be most likely of boards (planks?), no plywood.
Quality plywood doesn't check.
The problem is with the type of plywood.
Posted: Mon Nov 13, 2006 8:33 am
by tech_support
The parts coated with epoxy will not ever get wet (unless its compromised), but that does not necessarily mean they will not check. Let the sun beat on it and over time the exterior plywood will check unless there is glass over top - then the glass will stop the grain coming up.
Epoxy coating alone will not keep fir ply or exterior from eventually checking.
Joel
Posted: Thu Feb 15, 2007 9:05 pm
by ks8
Epoxy and glass does wonders to seal things up. Let us know how things progress Andrey, and maybe a few pictures of the next planked project? It will be nice to hear from you again. If you post to Amateur boat building instead, put a link to your posting here so we can find you again easily.
I suspect you replaced the rear seat top if it delaminated?