Page 1 of 1
MICKS FL12 BUILD
Posted: Wed Mar 04, 2009 5:02 am
by mickmac
Hi all,
Thought i might document the build of my first boat project, the fl12, i'm gonna skip to where i'm at now, rather than right from the beginning, all went pretty good apart from the cold weather affecting the epoxy, but got over that with heat lamps.... (advice from this forum). anyway, i'll post a few trial pics in here to show where i'm at now, then as i progress i'll update, maybe my mistakes / lesson's learned will help others.....
so far though no major problems, plans are excellent, easy to work with for a novice.... and with the back up of this forum i would advise anyone who is teetering on the sidelines, wondering if they can do it themselves, GO FOR IT!, it is definately manageable to anyone who wants to do it!
and really good fun!!


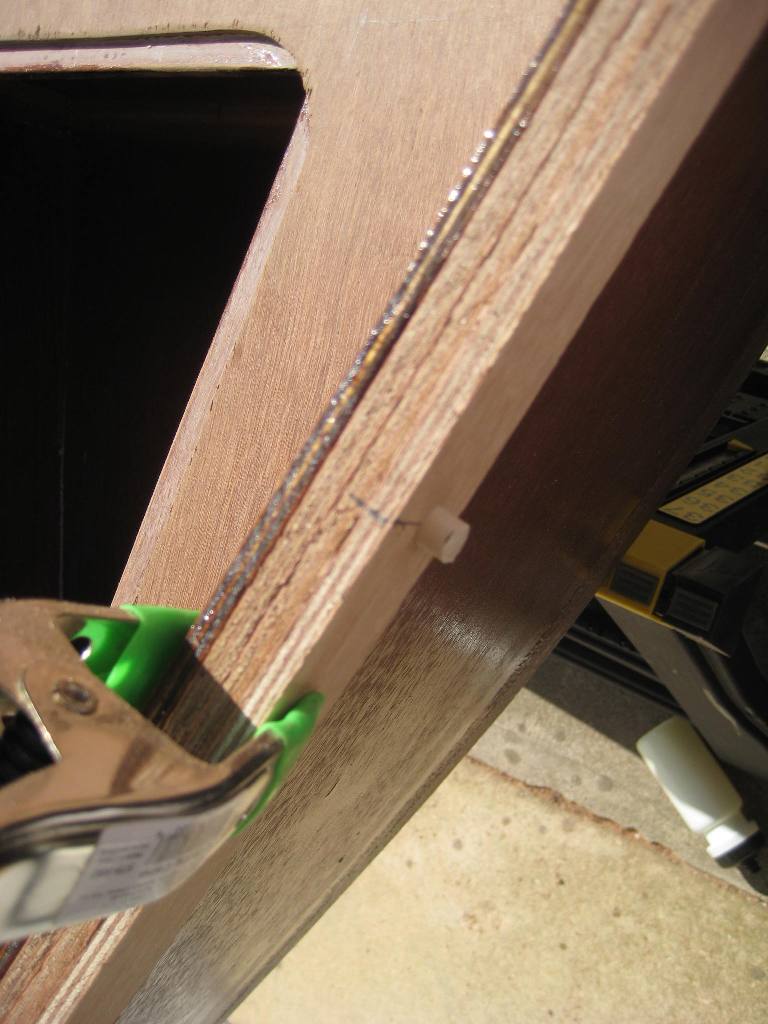
so, it's all cut out, and stitched / taped together, this is the stage that i sat there for an hour just looking with a stupid grin on my face!!
i'd like to point out that although i'm a carpenter by trade, you definately don't have to be, this is all totally achievable with basic d.i.y tools and a bit of determination..... i've never got the same satisfaction from anything i've built in the past!

i only get a few hours here and there between jobs to work on it, but find myself thinking about it all the time! although this boat is far from completion i'm browsing the plans section for the next one! is this normal? is it taking over my life?

so, next stage is fillets and glass taping, waiting on woodflour to be delivered and hoping to get back on it at the weekend......
so, i'll keep you posted....... till next time........

Re: MICKS FL12 BUILD
Posted: Wed Mar 04, 2009 8:53 am
by Doc_Dyer
mickmac wrote:
i only get a few hours here and there between jobs to work on it, but find myself thinking about it all the time! although this boat is far from completion i'm browsing the plans section for the next one! is this normal? is it taking over my life?
this condition is known as BBV
or Boat Building Virus
and it is uncurable

so just enjoy it
Bradley
Posted: Wed Mar 04, 2009 5:51 pm
by chicagoross
this is the stage that i sat there for an hour just looking with a stupid grin on my face!!
My favorite part of the build - probably so for most of us!
i've never got the same satisfaction from anything i've built in the past!
Yup, boats are big, fun, and sexy. A good design is a work of art as well as a functional item. I've built jeeps in the past, competitive shooting, etc., nothing takes hold like this.
i only get a few hours here and there between jobs to work on it, but find myself thinking about it all the time! although this boat is far from completion i'm browsing the plans section for the next one! is this normal?
It's only normal for boatbuilders...the rest of the world may not quite understand this problem. Don't worry about thinking about it during non-boatbuilding hours (we call this "pondering"); it is the best stress reliever you will ever find.
is it taking over my life?
By the time you get to this point, by the time you ask this question, it already has!
Posted: Wed Mar 04, 2009 8:39 pm
by mechdave
You might be infected with BBV if you drive home from work at lunch time so you can sand on your pride and joy for 30 minutes instead of eating lunch. You might also stand there for hours in the late evening after finishing wetting out a layer of glass watching the epoxy cure. At least most of our wives are glad we're home and not spending boat building funds at the local pub.
Posted: Thu Mar 05, 2009 3:06 am
by mickmac
thanks for the reassurance guys, i was getting worried!
looking forward to getting back to it now, hoping to actually get a full day at the weekend!
woodfibres arrived yesterday, so all set for my first attempt at fillets and glass taping..... should be interesting....
thanks again for the replies, Mick
Posted: Thu Mar 05, 2009 6:16 am
by wegcagle
i only get a few hours here and there between jobs to work on it, but find myself thinking about it all the time! although this boat is far from completion i'm browsing the plans section for the next one! is this normal? is it taking over my life?
If it makes you feel better I'm currently on call at the hospital, I've been up all night in the ICU, but I found 10minutes to down a cup of coffee, check the website, and even do a little replying

The short answer is yes...it's already infected you. I am currently building the GV15 for a duck hunting boat, but I've already planned out my next build, LB26
It's bad when you realize that you check this website more often than your email, voicemail, answering machine, and the mail added together

I tell my wife daily that a bad boat habit beats a bad drug habit any day
Will
Posted: Thu Mar 05, 2009 9:07 pm
by Biker B.O.B.
chicagoross wrote:this is the stage that i sat there for an hour just looking with a stupid grin on my face!!
My favorite part of the build - probably so for most of us!
You said it, Ross.
Welcome, Mick - I think that this is one of the great things about stitch-n-glue construction. You really get to see the basic shape early one. From here on out, you are simply perfecting what you already know is a fine looking boat. Enjoy!
Oh! BBV is incurrable, so just get used to the idea.
I'm buiding my second and debating which one will be next.
Posted: Fri Mar 06, 2009 1:34 pm
by mickmac
Hi all,
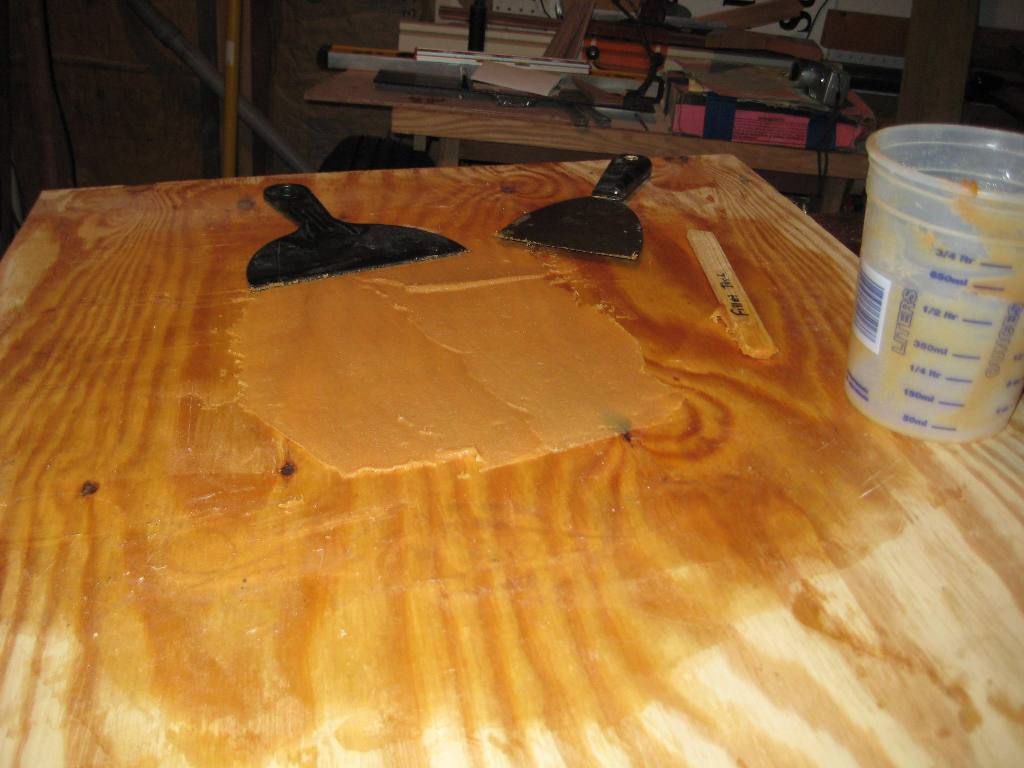
well, had my first attempt at fillets and taping today, i thought it went ok (well, unless someone tells me different of course!)
is there anything else to use for cleaning after epoxy (brushes, containers, etc) other than the manufacturers own thinner? it's really expensive, and i seem to be using a lot of it!!
also, was wondering, if anyone else has used anything other than ply laminate (as per plans) for the rubrail? i have lots of 2" x 1/4" mahogany strips left over from a job, was thinking about laminating with these?

my first ever fillet!

and taped!
hoping to get all inside taping done this weekend, then rubrails, then flip it over!!!
till next time..... Mick
Posted: Fri Mar 06, 2009 1:55 pm
by Cracker Larry
Looks good Mick

White vinegar will clean uncured epoxy, as will acetone or MEK. I use white vinegar. Brushes, most of us use disposable and trash them after each use. If you mix in plastic containers, one the epoxy cures you can just flex the container and the epoxy will pop loose. Hope this helps.
I meant to add, your mahogany strips will be fine for laminating the rubrail.
Posted: Fri Mar 06, 2009 2:22 pm
by mickmac
Thanks Larry,
white vinegar, as in normal household vinegar?
i'm pleased about the mahogany, although this is only a small first effort boat, i would like to make it as nice as i can..... thanks for the comment, it means a lot when someone say's you're doing something ok! this project will hopefully help me to learn the skills required to tackle a bigger one next time....
"NEXT TIME"! listen to me.... hardly started and already talking next time!
many thanks, Mick
Posted: Fri Mar 06, 2009 2:29 pm
by Cracker Larry
It's incurable. I'm about to start boat 4, once I decide what she'll be
Yes, normal household vinegar.
Posted: Fri Mar 06, 2009 2:30 pm
by mickmac
Nearly forgot... an old guy calls into my workshop every couple of days, walking his dog, just to chat..... he's a retired fisherman, has been expressing his concerns about "no strength in a varnished plywood boat son", today showed him a piece of ply i'd been using for epoxy (well cured) and a piece of "un-epoxied" ply.... he looked at them both, flexed them both, thought long and hard, then said, oh, so this epoxy stuff is like plywood viagra!" "keep building son!"
i had to laugh!!!!
Posted: Fri Mar 06, 2009 6:14 pm
by Dog Fish
The old guy was probably just walking the dog waiting for his viagra to kick in and than home to mama............ hopefully

Your boat is looking good Mick.
Gunnels
Posted: Fri Mar 06, 2009 9:16 pm
by aubreii
Good on ya brother! Your posts & replies are inspiring. I'm about to fillet & tape my fl12 this weekend. I've agonized about the rub rail question myself
& found a local (Peabody MA) surplus yard that had awesome 2x4 mahogany lumber for cheaper than the extra ply I'd have to buy. I ripped it to 3/8" & it bent sweetly with minimal clamping. I plan for 2 laminations for the rub rail & maybe an in-wale with scooped scupper blocks (Bridgeport access helps). If I get that far, I'll try to post pics.
Thanks, Pete G
Posted: Fri Mar 06, 2009 11:48 pm
by Evan_Gatehouse
Yes, you can use your 2x1/4 mahogany for rubrails. If I had nice wood like that I would leave them clear coated with epoxy and then varnish them, even if I painted the rest of the boat.
The taping looks nice and tidy. Good work.
Posted: Sat Mar 07, 2009 5:37 pm
by mickmac
Hi all,
done a bit more filleting and taping today, only got a couple of hours due to the arrival of my second grandchild, baby girl, sasha, 8lb 9oz, she's a beauty!! will hopefully have all inside work completed tomorrow after hospital visits, etc..... working away next week , so not expecting to get much done.......


getting nearer though!
by the way, thanks for the white vinegar tip, it works a treat!
till next time, Mick
Posted: Sat Mar 07, 2009 6:44 pm
by Dog Fish
8lbs- 9oz now that's a real keeper, congrats grampa and to her mom & dad. Sasha, that's a pretty name.
Posted: Sat Mar 07, 2009 11:43 pm
by Lon
Congratulations, Grandpa.
I've got six now - you'll find they're so much fun
you will wish you had them first.
Has Grandma's feet touched the ground yet?
Posted: Sun Mar 08, 2009 11:57 am
by mickmac
Hi all,
Thanks to all for replies and congratulations.... i would be totally lost without the help and advice from you good people....
managed to get all the inside taping finished this morning.....

so by time i get back on wednesday or thursday should all be well cured... then hoping to laminate rubrails, give the inside a coat of epoxy, then flip her over, can't wait for all that sanding!
wish i could start this boat again, now i'm getting more used to the epoxy! think it could have been a bit neater, still, the next one.........

won't do much work on the boat this week sadly, but i'll have internet access, so i'll read threads and learn stuff!
till next time..... mick
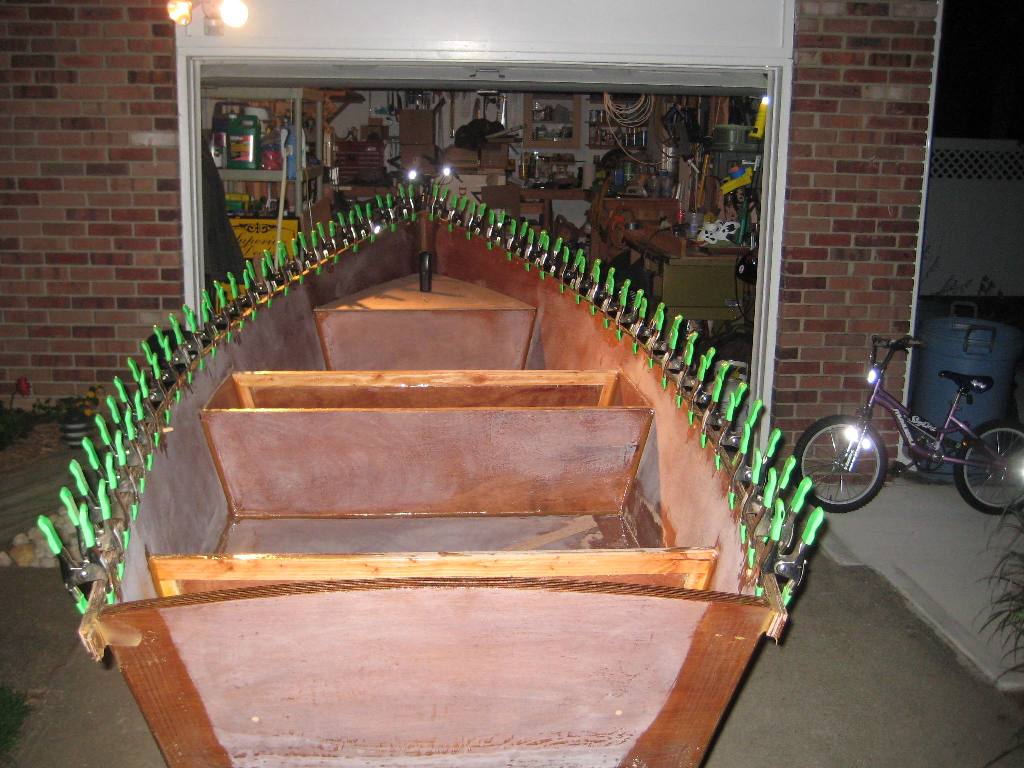
Posted: Sat Mar 14, 2009 2:54 pm
by mickmac
Hi all
well, i'm back, so got straight to the garage today, weather is warming up thankfully!
starting to cut and fit rubrails, and little jobs, inner support for bow eye, knees etc, so hopefully this week will see some real progress....
and have decided that all my family members will be told that any occasions, birthdays, christmas, etc.... get me clamps! man we use a lot of them, i had to beg, borrow and steal today!!

so this is where i'm at, been looking forward to getting back to it all week!
till next time, Mick
Posted: Sun Mar 15, 2009 9:40 am
by Dog Fish
Looks like ya got a boat there Mick, looks good. You have a lot of the high dollar clamps there.
Posted: Sun Mar 15, 2009 10:39 am
by Cracker Larry
That looks great Mick
You can never have too many clamps

Posted: Sun Mar 15, 2009 10:40 am
by mickmac
thanks dogfish, it's nice to walk in to the garage and see something that looks like a boat, instead of a stack of cut up plywood, people are starting to take me a little more seriously now!
part of me wants to slow down and not finish this one too quick and part of me is itching to get to the next one!
thanks for the reply, Mick
Posted: Sun Mar 15, 2009 10:45 am
by mickmac
woh larry, that is a lot of clamps!!! i'm kicking myself because just before deciding to build the boat i saw similar clamps to those for 1.50 euro a piece.... went back recently.... all gone... typical!
Posted: Sun Mar 15, 2009 4:29 pm
by Hope2float
Steve
I used clamps to hold three layers of rubrail for both sides to be glued at the same time. I used dowels about every 28 inches to take care of the positioning during assembly. I do understand the clamp issue because of this site. You can never have to many.
Dave
Posted: Sun Mar 15, 2009 5:46 pm
by mickmac
cheers dave, i was actually thinking about how to keep all the laminates in alignment, the dowel idea seems good, i think i'll use that one!
thanks again, Mick
Posted: Mon Mar 16, 2009 2:38 am
by chicagoross
If you just do a layer at a time, you'll never need the dowels; an occasional temporary sheet-rock screw will keep the clamped layers from slipping.
Posted: Mon Mar 16, 2009 10:00 am
by Dog Fish
I think Larry has been out clamped by Hope2float. All one color and perfectly positioned.
Were talking 60 + clamps here.

Posted: Mon Mar 16, 2009 10:14 am
by tech_support
you can also use drywall screws while the epoxy glue cures. Fill the holes later with epoxy.
I did not use any clamps on the two layers of my FS17 rubrail ...
Just be careful to not over tighten, or you will be left with flat spots - same applies for clamps
Posted: Mon Mar 16, 2009 10:28 am
by Dog Fish
shine wrote:you can also use drywall screws while the epoxy glue cures. Fill the holes later with epoxy.
I did not use any clamps on the two layers of my FS17 rub rail ...
Just be careful to not over tighten, or you will be left with flat spots - same applies for clamps
Joel, I am assuming that you drill the holes in the rub rail slightly larger than the screw so the rail can float on the screw so you don't squeeze out to much glue

Posted: Mon Mar 16, 2009 11:50 am
by mickmac
Hi all,
It's making me feel totally inadequate on the clamp front! hope to float shows remarkable accuracy and colour coding, while i like larry's setup equally...... i hope this won't start a "clamp war"!!!
as i would like to leave the mahogany "bright" i went out and got a contrasting dowel this morning.... won't get to do any work till tomorrow now as still fighting the flu.... so i'll ponder for the evening...... the simplicity of shine's drywall screw setup appeals as i could fill screw holes with epoxy and mahogany woodflour after..... almost invisible.... i collected the shavings from my planer, put them through the food processor.... works a treat, just as fine particles as my brought stuff!!!
sshhhhhh.... though, she wouldn't approve me thinks
Posted: Mon Mar 16, 2009 12:05 pm
by Dog Fish
Posted: Mon Mar 16, 2009 12:17 pm
by mickmac
Hey dogfish,
thanks for the reply, should be good to go tomorrow, best weather we've had for months too! and i'm stuck indoors..... still, could always be worse! thanks again, Mick
Posted: Mon Mar 16, 2009 4:16 pm
by Hope2float
This pic shows the dowel nicely and it adds to the rubrails appearence. If you epoxy the surfaces of your rubrail first, then mix up some woodflour and spread it out thin on scrap plywood. It will give you enough time to complete each side. Don't try for both sides at the same time. You will easily be able to laminate three strips and position one side. after you sand and epoxy coat it is finished and you don't have to waste time filling holes and dealing with the wood dimples at the screw hole. Remember to spead the glue mix out thin on scrap and it will provide enough working time. Out of the sun . Also, use a foresner bit to cut holes for the dowel and back it up on the exit side. This will eliminate any tear out that would damage bright finish.
Dave
Posted: Mon Mar 16, 2009 5:37 pm
by Dog Fish
Hope2float your rub rail looks good, nice job. I grew up in your neck of the woods. I went to grade school and high school at J.P.Stevens. I lived in Edison and had some friends from Jackson but that was 35 + years ago. There was a lot of people that got bad sick that lived near Glidden Paint Co. They had chemical retention ponds that leaked into the ground water and contaminated lots of peoples wells in the area. Very bad deal with lots of law suites. There was a movie made about it using diffrent names and places.
Posted: Mon Mar 16, 2009 6:33 pm
by ks8
Doing one side at a time, when it comes to installing rub rails, works for some, but there is the danger that the hull will be distorted on that one side first, and the distortion locked in with the cure, more so when the other rail is put on and cured. It is usually safer to install both at the same time, one layer at a time if necessary, to keep the forces equal on both sides of the hull. You can still use dowels to do this, keeping in mind that only the final layer, if finished bright, will show the final dowel(s) used. The first layer or two can be more sloppy with those dowels ground flush, (after that layer cures), for the next layer with new dowels. I like to use dowels that are just large enough for the job, since a *larger* hole for an overly large dowel is going to weaken the grain strength of the rail somewhat. I also keep them all in line if using multiple layers, so that all the dowel holes are in the same line that is already weakened by the first dowels.
Those lighter dowels on that rail sure look purty...
Posted: Mon Mar 16, 2009 8:26 pm
by Hope2float
Ks8
I agree with you on letting one side to cure at a time, that is not good. Work one side in then do the other side before cure. If you look a my photos you will see both sides curing at the same time. If prepared for the task both sides can be done in an hour and a half.
Dog
That stretch of water you are talking about near the Driscol bridge is the only turquoise bahama colored retention ponds in the state to this day. Ciba Giegy had poluted the wells of some folks in Toms River. Many children developed crazy rare cancers that were way over the normal ratios. they linked the source to a contaminated well that supplied water to thousands.
Posted: Mon Mar 16, 2009 10:15 pm
by Dog Fish
I got ya there Hope2float, my parents had a shore house in Cherry Quay in Bricktown. I knew this guy that use to tend bar at the Red Lion in Brick and sold and installed flag poles on the side. He lived out there, and ended up with some kind of cancer that was proved to be a direct result from the well water. It killed him before he even got any compensation. I think his wife ended up with something too.
Posted: Tue Mar 17, 2009 3:55 pm
by mickmac
Hi all,
rubrails are now done, decided on using dowels, made more work for myself really using the mahogany, but hoping it'll pay off on the looks front..... here's a couple of pics....

looks kinda wide in this shot, but one strip is inside the hull and one dummy strip covers the ply edge of the hull...... (inwalls? !) dunno if that's what they're called?


this shot of the transom shows the dummy filler covering the ply edge, hopefully when its all planed and coated it should look nice
have to wait and see i guess
forgot to get a pic when leaving, but it's all glued up....
till next time, Mick
Posted: Tue Mar 17, 2009 8:13 pm
by Dog Fish
Nice Mick, I know that rail will look like a piece of furniture when your done.

Posted: Fri Mar 20, 2009 5:43 am
by mickmac
Thanks dogfish,
work has kinda got in the way again this week, shouldn't complain though, the work situation isn't great here at the moment, i'll update as soon as i make some progress,
thanks again for the reply, mick
Posted: Fri Mar 20, 2009 6:16 am
by hwsiii
It looks reallyyyy good Mick. I think bright work on a boat looks so good. It just seems the right thing to do to finish it off right. I intend on finishing my rub rail bright. I also want to do the foredeck with a faux inlay pattern and the gunwales bright as well. In my opinion there is nothing like some bright work on a boat.
H
Posted: Fri Mar 20, 2009 11:36 am
by ks8
Those rails will look nice! If they get too hot on top in the summer, you could paint the tops white and they will still look beautiful, if you work hard to get a good clean line on the paint. Being rubrails, don't worry when they get scratched, but make sure they stay sealed. Mahogany can rot with exposure to water, faster than you imagine. Salt water not so bad, but fresh, like rain or dew, or wash down from the hose, and it may start. A very easy and quick inspection each time she gets back home.
What sort of wood flour did you use for the lamination?
I made my own from mahog belt sanding, and had to slightly lighten it in places with other blends. Mahog wood flour is almost black in an epoxy blend.
Posted: Fri Mar 20, 2009 12:35 pm
by mickmac
hi ks8,
i made woodflour by putting shavings through the blender
, didn't really work out too well,was still too course, even though it looked as fine as the bought stuff... lesson learnt....so went with the white in the end, i still think (hope!) that it'll look ok once sealed and varnished......
i radiused the glue line under the rail quite small, so it should be easier to mask off for a clean paint line... we shall see i guess
and as far as the heat aspect in the summer goes, shouldn't be a problem.... this is ireland!!! cheers, Mick
Posted: Sat Mar 21, 2009 2:20 pm
by mickmac
Hi all
at last got to the garage for a couple of hours today, made these for the transom.....

they should tie in with the rubrails nicely.... maybe

i'll sand it all on monday and sort out the bow, then i'll pay some attention to the seat tops, knees and breasthook.....
will post some better pics when it's all cleaned up and sanded...
till next time, mick

Posted: Mon Mar 23, 2009 2:16 pm
by mickmac
Hi all
a little more progress today, pesky work keeps getting in the way though
a little sanding today (alot!) and i think the rubrails are starting to look pretty good?

i'm really enjoying this bit of the build, it's a bit more what i'm used to......


just got to glue in the small transom top sections, then that's all done... will have a go at breasthook and elbows.. (knees?) tomorrow....
till next time, Mick
Posted: Mon Mar 23, 2009 2:34 pm
by TomW
Looking very nice Mick, more like a cabinet than a boat.
Proud of ya man!
Tom
Posted: Mon Mar 23, 2009 5:16 pm
by mickmac
cheers tom,
well i was thinking if it don't float, i'll fill it up with soil and use it as a planter!!
Posted: Mon Mar 23, 2009 5:23 pm
by TomW
Naw put glass on top and make a large coffee table
Posted: Mon Mar 23, 2009 5:30 pm
by peter-curacao
Or put barstools next to it and make it a happy hour bar, hmmm wonder what name to give this bar
Posted: Mon Mar 23, 2009 6:38 pm
by Dog Fish
You can do the hole house, tables, bar, hot tub, and one with a high sole for a bed.
Lookin good Mick.
Posted: Mon Mar 23, 2009 7:24 pm
by peter-curacao
Dog Fish wrote:You can do the hole house, tables, bar, hot tub, and one with a high sole for a bed.

Posted: Mon Mar 23, 2009 8:20 pm
by chicagoross
Looks nice, Mick! You're certainly having fun with this build! Wet out that corner and give us a preview of what all that nice mahogany is going to look like!
I laminated three layers of 1/2" mahogany on my HMD for rails, and was in awe of how they looked...then I laid the deck over them, chickened out, covered them with glass and painted them. Good thing, my 8' boat has to go through a 8 1/2' gate, which I managed to graze this weekend...

The glass stayed tough and I just need a touch of paint to fix it though, so I made the right choice for my needs...but sure loved working with and seeing that beautiful mahogany!
Re: MICKS FL12 BUILD
Posted: Wed Mar 25, 2009 9:50 am
by mickmac
chicagoross,
thanks for the response
.... i love mahogany! there's something about it, i've been collecting bits and pieces of it for years with the intention of "one day", just experimenting with this build really to get used to working with epoxy etc..... my real ambition has always been a mahogany runabout, just need to see if i have the patience and skill required, but i am really enjoying this one, unfortunately i seem to be busy with so many other things at the moment i can't seem to get as much time as i'd like to work on it
......i'll take a "wet snap" next time i'm there! thanks again for your reply,
Re: MICKS FL12 BUILD
Posted: Fri Mar 27, 2009 12:09 pm
by mickmac
Hi all
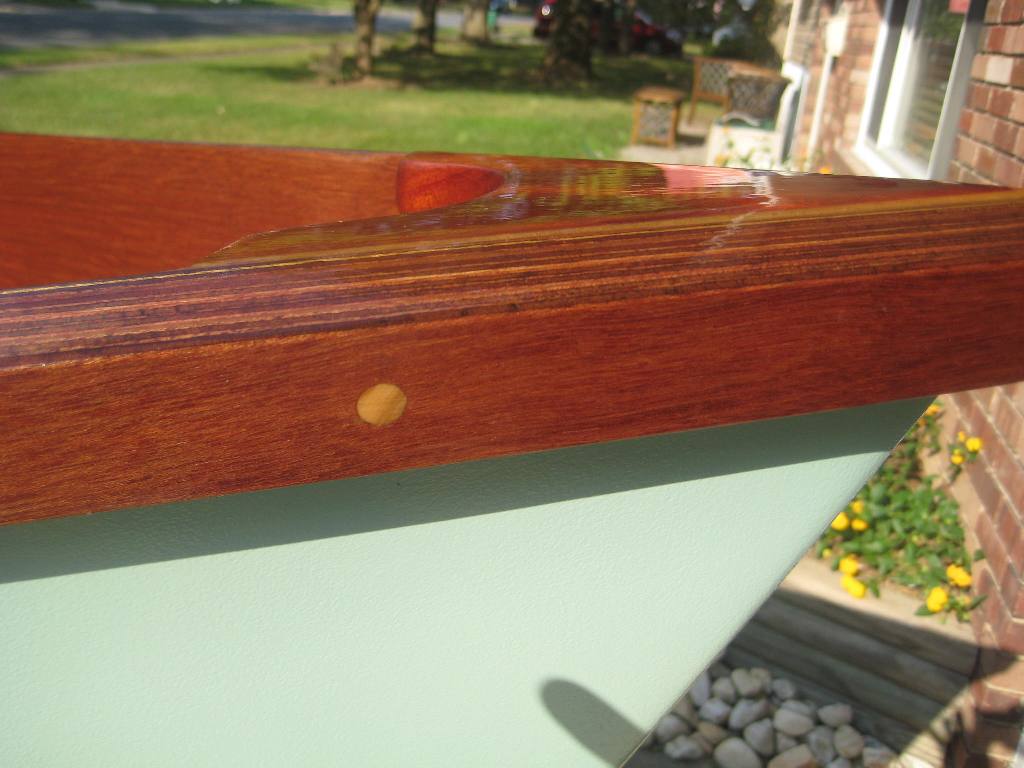
managed to grab a couple of hours at the shed today, thought i'd start on the breasthook/foredeck, been thinking of various ways to do it, but decided on this,

made a cover trim from mahogany to hide the end grain and the ply edge,

will inlay all the joints with white or black epoxy (can't make my mind up till i see the timber with a couple coats of epoxy), hoping it will look good when glued, epoxied and varvished

gonna use similar treatment on the knees, and seat tops, if this ends up looking ok....

i think it looks kinda sexy, but i would i suppose
till next time, Mick
Re: MICKS FL12 BUILD
Posted: Fri Mar 27, 2009 12:20 pm
by peter-curacao
Now that looks beautiful! I vote for white if I may, I think it will look good with the white …. (forgot name in English) in the rubrails
Edit:I should had read back I meant dowels white dowels
Re: MICKS FL12 BUILD
Posted: Fri Mar 27, 2009 12:23 pm
by AD16 The Opportunist
Re: MICKS FL12 BUILD
Posted: Fri Mar 27, 2009 1:55 pm
by Dog Fish
Super nice Mick, you really are building a piece of furniture. You are not going to want to put this boat in the water. You have some great ideas. Keep up the masterful job.
Re: MICKS FL12 BUILD
Posted: Fri Mar 27, 2009 5:06 pm
by Hope2float
Mick
That is some nice looking work. It has a funny way of getting you carried away with it doesn,t it. It is the beginning of a brand new disease. Don't bother to call the doctor because there is no cure.
Dave
Re: MICKS FL12 BUILD
Posted: Fri Mar 27, 2009 5:23 pm
by mickmac
Thanks for all the replies
it's good to get opinions from more experienced builders, this is all new to me
Hope2float wrote:Mick
It has a funny way of getting you carried away with it doesn,t it.
Dave
dave, you're right.... my daughter stopped by today, she said, "but it's only a little row boat, why go to all that trouble?" and i could only answer, "because i want to!"....... i think i got it bad..... but hey, i'm really enjoying myself.... all comments / critisism appreciated........
thanks again, Mick
Re: MICKS FL12 BUILD
Posted: Sat Mar 28, 2009 3:16 am
by chicagoross
Beautiful breast hook! How did you bend that trim?
Re: MICKS FL12 BUILD
Posted: Sat Mar 28, 2009 4:20 am
by mickmac
Hi Ross, thanks for the comments
, i couldn't bend a piece as the radius is very tight, and the trim is 1/2" thick, so i just cut it out of an offcut board with the trusty old jigsaw, then sanded it up...... took a while
cheers, Mick
Re: MICKS FL12 BUILD
Posted: Sun Mar 29, 2009 5:55 am
by hwsiii
Mick, that is an absolutely BEAUTIFUL breast hook and trim. I love it when it is made in a Faux finish like individual boards all joined together like a teak deck. Some older Chris Crafts did that on the bow, and they were so pretty. It looks like you have put a lot of thought into your build and it surely shows it. Good luck
H
Re: MICKS FL12 BUILD
Posted: Sun Mar 29, 2009 10:36 am
by mickmac
Thanks H
as i said before, this is my first attempt so i'm kinda making it up as i go, but i think i'm hooked, having great fun with it.... and looking forward to the next one
i'm pleased with the breasthook so decided to carry it through to the knees.....

it looked a little plain, so decided to put rod holes in....

made a mahogany insert to finish off the inside of the openings.... still have to cut trims for the outer edges....

lots of sanding to do next time, then a couple coats of epoxy,i've decided on white for the "caulking" between the boards, then i'll varnish it all once the hull is painted, etc....

so this is the state of play so far.....
thanks again for all the comments, i really missed the forum while it was down....i've been reading through lots of builders threads, trying to educate myself....
till next time, Mick
Re: MICKS FL12 BUILD
Posted: Sun Mar 29, 2009 10:43 am
by peter-curacao
mickmac wrote:i've decided on white for the "caulking" between the boards
Good choice
again your doing a good job

Re: MICKS FL12 BUILD
Posted: Sun Mar 29, 2009 10:50 am
by mickmac
cheers peter, i took your advice on the white
, i wet out a couple of samples of the two timbers and laid a thin white plastic strip between, just to see...... it looked sweet
, thanks again, Mick
Re: MICKS FL12 BUILD
Posted: Sun Mar 29, 2009 11:22 am
by Dog Fish
I agree with you guys the white will make it rich looking, very very nice.
Re: MICKS FL12 BUILD
Posted: Wed Apr 01, 2009 10:17 am
by jrussellx
Wow, your FL12 looks great. I just got my FL12 plans and I'm getting ready to start.
I hope mine looks as good as yours in the taped together stage.
Re: MICKS FL12 BUILD
Posted: Fri Apr 24, 2009 9:35 am
by mickmac
Hi all, haven't been able to post for a while, but sorted now
progress has been slow as work has had to take priority
but, hey, we have to pay the bills right!
i have added a couple of recent pics, and will post more as soon as i do something worth showing! it's good to be back though

i have finished the centre seat box....

and cleaned up the elbows, still need to fit trims....

all inside is epoxy coated....

so this is the state of play so far...have ordered primer and top coat, so hopefully it'll be looking more like a boat for the summer! got my hands on a honda four stoke 2.5 hp outboard, not sure it will be enough, but we'll see.... till next time, Mick
Re: MICKS FL12 BUILD
Posted: Fri Apr 24, 2009 11:24 am
by Dog Fish
Hay Mick. Yea long time no type
That is going to be such a great looking FL12, you will get lots of compliments when shes done. I really like it.
Brian
Re: MICKS FL12 BUILD
Posted: Fri Apr 24, 2009 11:34 am
by mickmac
hey brian
i've been off for weeks, kept deleting cookies on the forum as i couldn't sign in, webmaster told me i had to delete them from the browser....it worked!
doh!
Re: MICKS FL12 BUILD
Posted: Fri Apr 24, 2009 1:27 pm
by ks8
Looking very nice! Haven't stopped by this thread in awhile, but I glad I just did..
Welcome to the world of displacement hulls. The 3.5 - 4.0 knot speed out to new cruising or fishing grounds is suiting me just fine and makes for easy casual talk or silence with others on the boat... no shouting over engine or wind noise. I like to go fast too, but this boat (CV16) was meant for relaxing, and for chat, with a line in the water now and then. The hull here is about 12 foot WL so probably very close to what you will get. I'm also looking forward to the first electric cruise with near total silence, except for the sound of the water. Hope you enjoy getting to know the FL12 as much as I am enjoying this.
Can't wait to see the color of paint on which you decide, and where you put it. I always thought the FL12 is a boat that is clean and pleasing to the eye. Conservative brightwork does wonders.
Re: MICKS FL12 BUILD
Posted: Mon May 04, 2009 11:26 am
by mickmac
Hi all
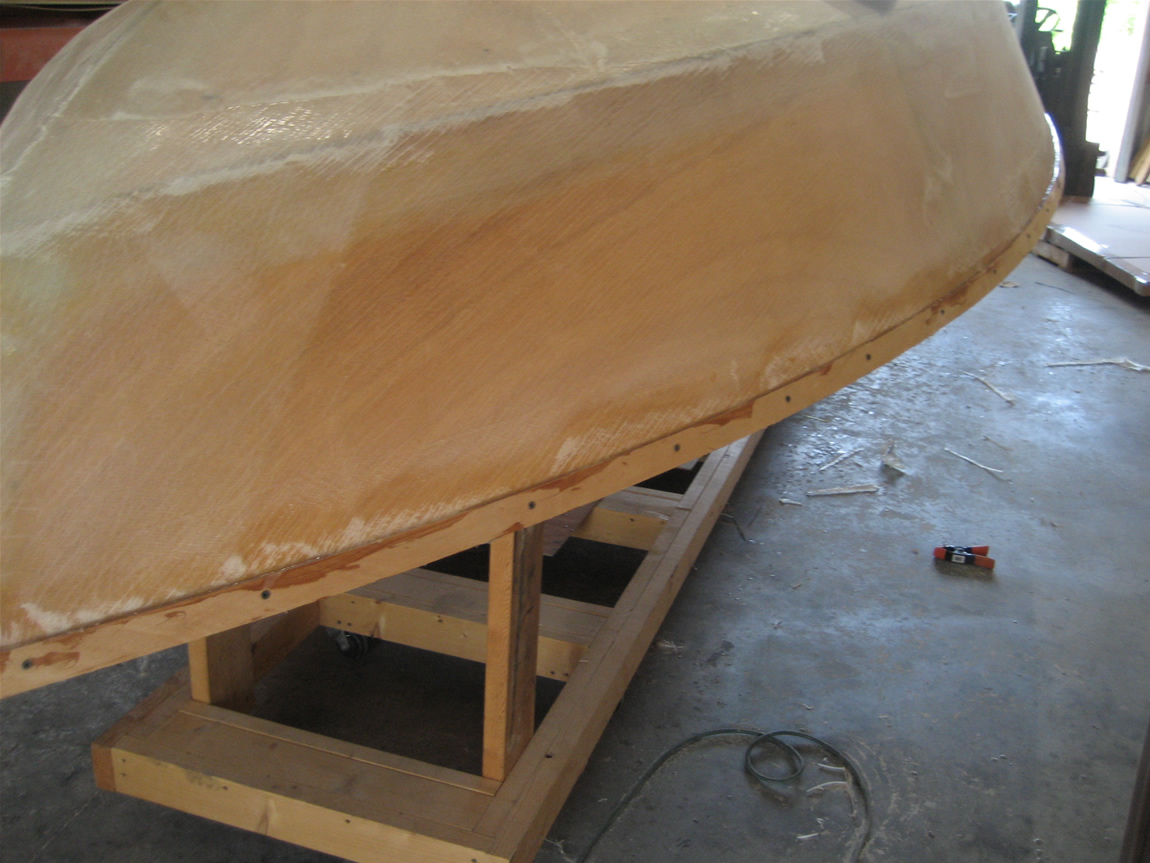
thought i'd post a little update, my little fl12 has now been flipped and i'm working on radiusing the edges and taping, ordered paint, but received the wrong colour

this boat seems to be taking forever! but i haven't been getting enough time away from work lately, i'm really enjoying the whole process, but find myself wanting it done so i can start on the next one.....

but as far as my inexperienced eye can tell, it all seems pretty straight....and i'm really quite proud of myself!!
oh before i forget, i promised my faithfull sidekick "brandy" a picture, so here she is!

she's not really much help around the shop, but great company, and i find myself asking her advice a lot!!! the madness begins
till next time, Mick
Re: MICKS FL12 BUILD
Posted: Mon May 04, 2009 12:45 pm
by Dog Fish
Hi Mick, I started to post in your thread last night to see how you were doing but got sidetracked. I think your doing just fine, Its only been two months since you started this thread plus the time it took to get to that stage. After you get the bottom done, painted and flipped back over you will be unstoppable to the finish line. Your doing great and that's going to be a bad ass FL12 for sure.
You should be proud
Brian
Re: MICKS FL12 BUILD
Posted: Mon May 04, 2009 1:09 pm
by mickmac
thanks a lot brian, it's the encouragement from the good folks on here that keeps me going! i don't know a lot about boats but i want to get going on another one straight away, something a bit bigger that i can go out a bit further in... just can't decide! i lack confidence in my boat building skills a bit though.... i've got a few months to figure it out
thanks again, Mick
Re: MICKS FL12 BUILD
Posted: Tue May 05, 2009 12:12 pm
by topwater
You have to have a shop dog or everybody thinks you are crazy and talking to youre self
Re: MICKS FL12 BUILD
Posted: Tue Feb 23, 2010 6:16 am
by mickmac
Hi all, well, it's been over six months since my last post and i am ashamed to say i have done nothing on my boat! have been in and out of hospital trying to get sorted, and moved house, but, thankfully am feeling much better now, so it'll soon be time to get back at it.... i was afraid that my little fl12 would never get done, so.... watch this space ! cheers, Mick
Re: MICKS FL12 BUILD
Posted: Tue Feb 23, 2010 9:04 am
by Larry B
Mick, welcome back and glad your feeling better.
I know first hand about not working on a boat. My FL14 probably stood up against the wall in my shop for close to a year. Just had other things come up. But be careful now that you are back to building. While finishing my FL14 and fairing the inside I kept telling myself that I wasn't going to build another boat. Well didn't have the FL launched very long and along came some OD18 plans. It's too big to stand up against the wall so got to finish it
I seem to do something on it each day.
So be careful because when it's finished more plans will show up
and more than likely plans for a much bigger boat
Your FL is looking great btw
Re: MICKS FL12 BUILD
Posted: Tue Mar 30, 2010 2:11 am
by quadradomus
Mick,
Any chance that you have some more current/recent pics. of your FL 12 build?
Re: MICKS FL12 BUILD
Posted: Wed Jun 09, 2010 2:15 pm
by mickmac
Re: MICKS FL12 BUILD
Posted: Sun Jun 13, 2010 2:42 am
by quadradomus
Thanks for the update Mick. Yours is one of the F-12's that I keep eyes on while slowly building my own. I admire your work. You will have a great time now that you are building your own shop.


