Page 1 of 1
PY12 Build - NC
Posted: Tue Jan 08, 2013 12:48 pm
by Dienster
Hi,
I'm building this as a test of my boat building skills before I start on a 19-20' center console hopefully later this year. Or a 2-seater kayak if my wife decides to steal this one..
I got my fiberglass and epoxy kit in yesterday and will be picking up the wood in a few days so am ready to get started. I want to outfit this as a fishing kayak so will gladly take any advice on rigging. I want to get this finished up in a month or three so I can take it out this spring.
I've got a few questions:
Is cypress a good wood for the cleats? I've got a lot of that laying around, it's light and rot resistant so I figure its a good wood.
I'm thinking of using a pair of these for the drains and having a channel between them behind the seat to drain the water as needed instead of the open holes in the side. I assume the plug is on the outside with these?
http://www.basspro.com/Replacement-Kaya ... /10225363/
For the stitches, I have some bulk twist tie material that's used for tying up tomatoes, I figure it should work on this little boat but may not be strong enough for a larger one. Anything wrong with that thinking?
I've seen some partially finished threads of the PY12 but nothing completely rigged out, did I miss someone's build?
I'll post some pictures once I get started.
Thanks,
Steve
Re: PY12 Build - NC
Posted: Tue Jan 08, 2013 11:36 pm
by Bowmovement
Looking forward to see one of these get built. Its on my list.
Matt
Re: PY12 Build - NC
Posted: Wed Jan 09, 2013 8:01 am
by topwater
I use cypress for all my cleats , nice to work with and I get it cheaper than doug fir.
Re: PY12 Build - NC
Posted: Fri Jan 11, 2013 1:54 pm
by Dienster
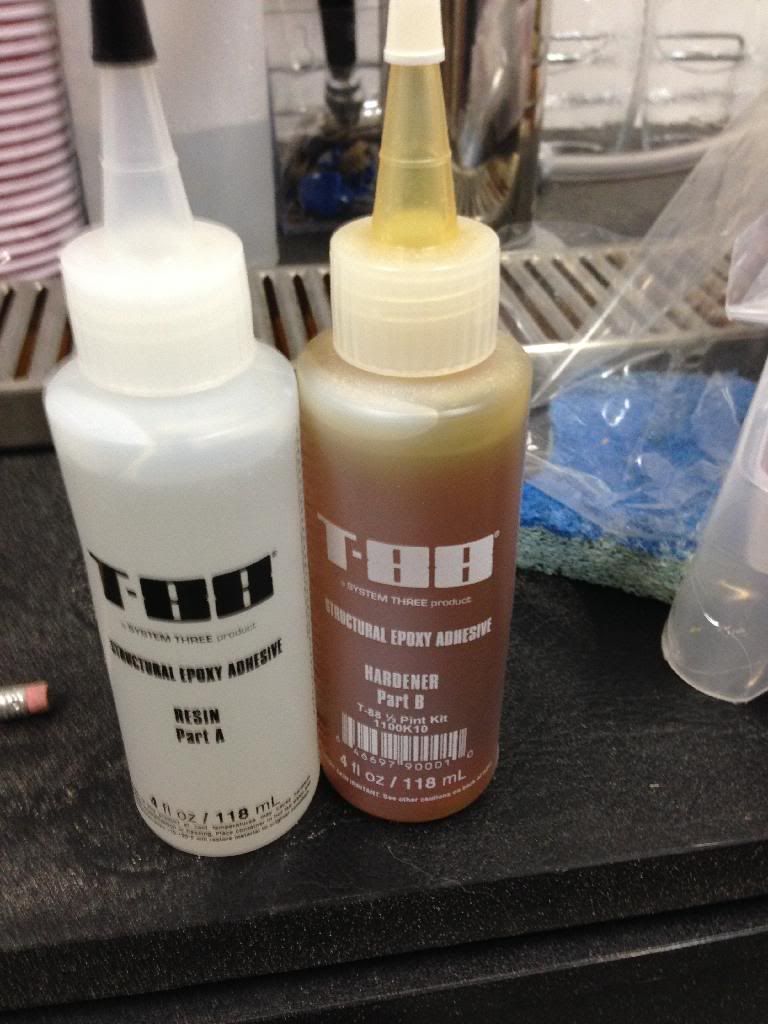
Here's the baby stack of plywood. 3 - 3mm Okume and 1- 6mm meranti
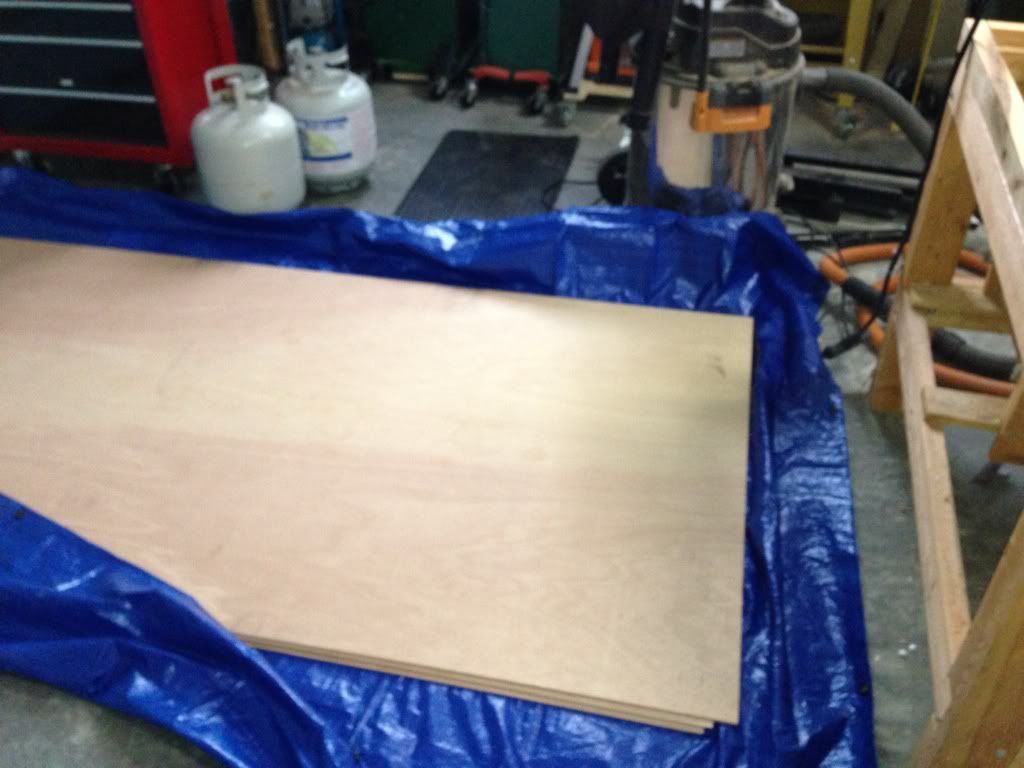
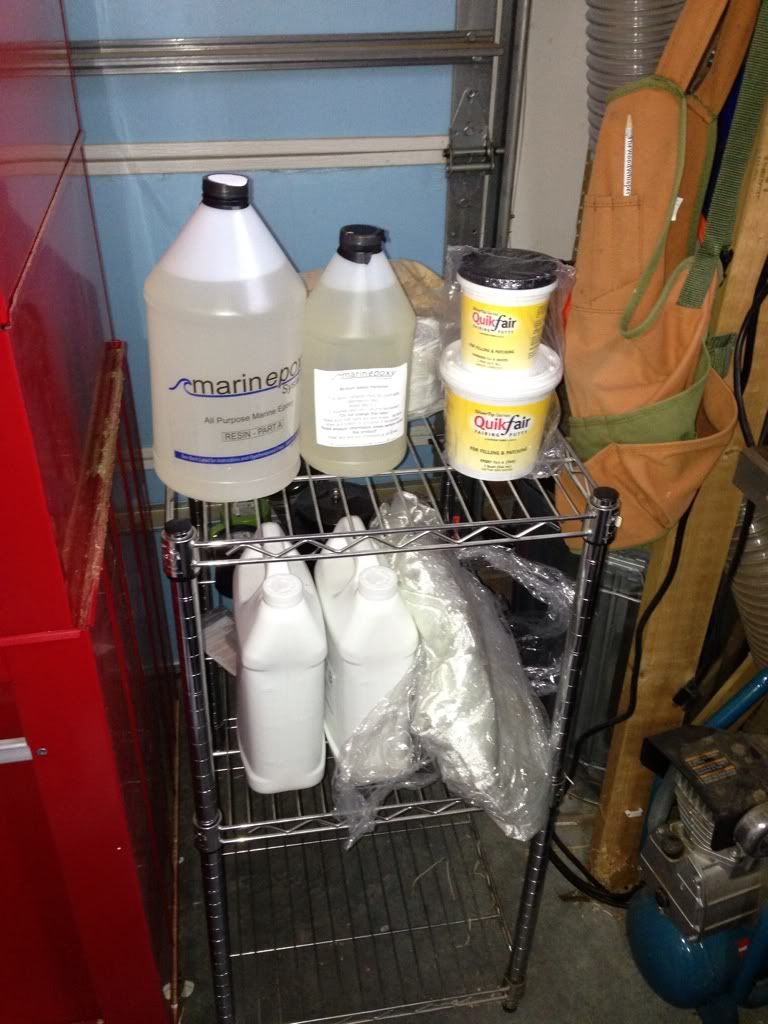
Here's the glass/epoxy kit from BBC
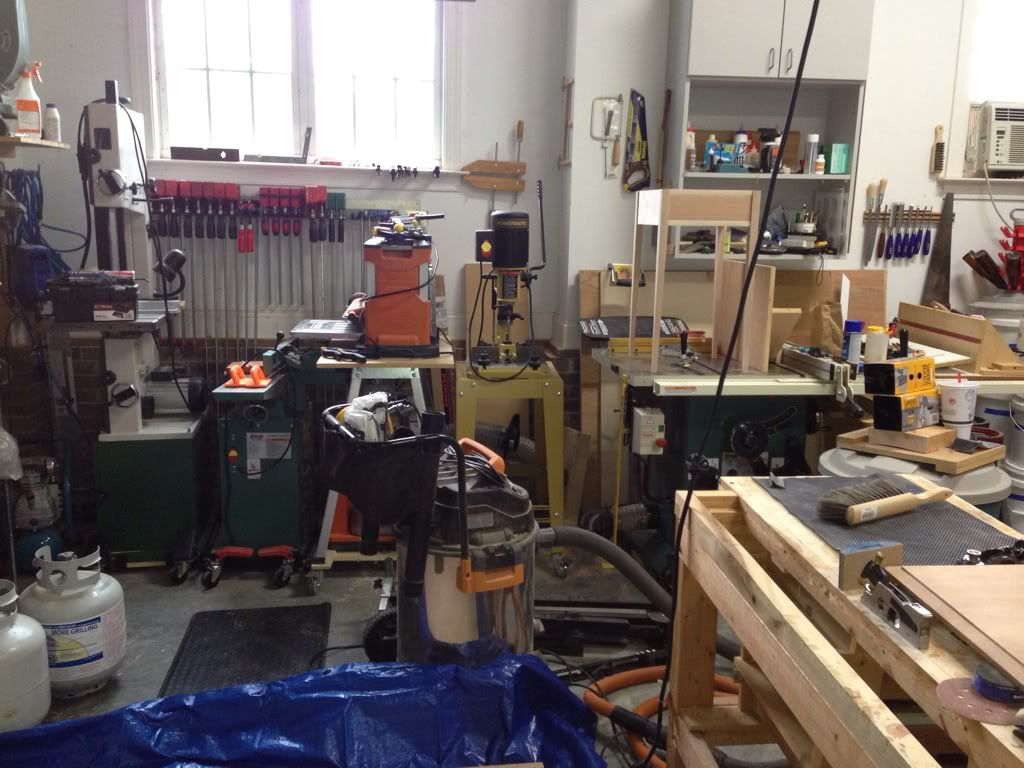
Here's the garage that will soon be covered with dust again.
I'm going to try to get started laying out and cutting this weekend.
When you guys lay out the nesting and pieces cross multiple sheets, do you
1) lay them out together un-glued, cut, and then glue the smaller pieces together
or
2) do you glue the 4x8s together, lay out, then cut
or
3) something else?
Do you trim the factory edges of the ply to ensure that you have 90 degree angles to work from when parts cross multiple pieces of plywood or is this too picky?
Thanks
Re: PY12 Build - NC
Posted: Fri Jan 11, 2013 2:52 pm
by Dougster
I did number one and stayed with the factory edges.
But that's just Dougster

Re: PY12 Build - NC
Posted: Fri Jan 11, 2013 4:09 pm
by AMC
I did #1 (but I'm all better now)
I don't know about the PY12 planes, but some small boat plans have symmetry across the seem, which lets you cut both pieces at the same time, reducing the time, tear out from the saw, and guaranteeing symmetry. I have heard of people gluing them together first, but don't know what the advantage is, and the difficulty of handling a 4 X 16 foot piece of wood makes it hard to justify.
I generally assume that the factory edges are closer to 90 degrees then I could get them.
Where you at in NC?
Re: PY12 Build - NC
Posted: Fri Jan 11, 2013 6:18 pm
by Dienster
Thanks guys.
AMC, I checked the plans and I can rip all of the 3mm ply down the middle, stack two together w/ doublestick tape, lay out once and cut pairs. I might even be able to make most of the cuts on the bandsaw since they will only be 24" wide.
I'll check them for square and if they are really wonky, crosscut the ripped pieces to a good square edge. I'm just worried that if I index off the edge and the pieces of ply are canted because of a non-right angle joining them, the boat will sink.

Well... not really, but it might make assembly more complicated.
I'm a few miles south of Raleigh.
- Steve
Re: PY12 Build - NC
Posted: Sat Jan 12, 2013 1:48 pm
by MulletChoker
Steve,
We just started the Orca 16 Kayak, I was nervous about butting the 2 cutout pieces together and have them be fair since the width at the splice would be 7 and 9 inches respectively for the sides and bottom panels. (Joel told me the factory edges aren't as exact as we might like to think.) So I spliced the 2 4x8 sheets together first, did the layout, cut the first panel slightly oversize then stacked and cut out both panels at the same time. So far this has worked really well with the 4mm, I've stitched the sides and bottom and everything is coming together nicely. (note: this threw off the nesting plan somewhat but not to where I will need another sheet)
This is the 4th boat we've built from the Bateau guys, not only are they fun to build but without exception perform better than anticipated when wet!
Best of luck!
Re: PY12 Build - NC
Posted: Sun Jan 13, 2013 6:14 pm
by Dienster
Decided I want to start with good straight square edges to index off of so I ordered one of these.
http://www.rockler.com/product.cfm?page ... te=ROCKLER Full 8.5 ft straight edge plus a t-square.
Should get cutting this week.
Re: PY12 Build - NC
Posted: Sun Jan 13, 2013 9:51 pm
by Dougster
Cool looking tool Dienster, let us know how it works. I've looked at some of those type things, never saw that one. I just use any old semi straight piece and clamp it with marginal results.
Still on board Dougster
Re: PY12 Build - NC
Posted: Sat Jan 19, 2013 9:02 pm
by Dienster
The straightedge confirmed that the factory edges were good enough for me. There's a little more slop in the rail to tool sled attachment than I would like but I can fix that with a little hdpe tape. Pretty good little tool. The t-square was great for laying out.
I laid out and cut the top, bottom and side pieces this afternoon and will get the frames and sole cut tomorrow. I'll need to stack matching pieces together and fair out the edges after I glue them.
So how cold can it be and epoxy still set?
Re: PY12 Build - NC
Posted: Sun Jan 20, 2013 9:25 am
by Dougster
Sounds like a nice tool for those straight cuts on big sheets of ply. I think you need temps at least in the 50's to set up. It just goes slower the colder it is. Heat lamps work well too. If the temp falls too low things just stop, but will start setting up again when things warm up.
Got a warm January day in Texas Dougster
Re: PY12 Build - NC
Posted: Mon Jan 21, 2013 8:33 pm
by robbiro
D--On the toolbar above, click on how to's. then Materials and how to use . Then number three under Composite Materials and their use. It is a table that gives cure times with selected hardeners and temps.
This is my next project. Have the plans, but waiting to get a few more pennies saved for the materials.
Keep on Buildin'
Robbie
Re: PY12 Build - NC
Posted: Tue Jan 22, 2013 11:56 am
by AMC
As warm as the temps have been around here lately, you should have no problem. The slower it goes, the longer working time you have, and that can make things much easier when you are both learning, and during the awkward initial glue ups. Some folks on here have gone with the faster epoxy when the temps are cold, but for me, I would rather go a little slower and not have to rush.
I guess the ideal set up would be to have a cold room to work in, then move it to a warm "curing room" after.
looking forward to seeing your progress.
Re: PY12 Build - NC
Posted: Tue Jan 22, 2013 9:26 pm
by Dougster
Cool table Robbie, I never noticed it. I always use slow hardener so the numbers make some sense to me there. I like the slow because of the increased working time, but this winter my over drilled and then filled with thickened epoxy holes were still a bit soft the next morning (maybe my mix was a bit off?). They took like 36 hours to set up really hard, but were fine. Guess it would be handy for me to have a bit of fast hardener on hand for cold days. 'Course there's not so many of those down here in S. Texas

I'll enjoy following this build.
Still at it Dougster
Re: PY12 Build - NC
Posted: Tue Jan 22, 2013 9:50 pm
by Dienster
I saw that table but wasn't sure if temps below those listed on the table wouldn't cure or if its just so long it doesn't really need to be on there for working time issues. I've got med hardener.
Re: PY12 Build - NC
Posted: Wed Jan 23, 2013 11:43 am
by AMC
My experience with the slow hardener last summer in a semi-climate controlled environment (75-80) was that after 12 -15 hours, it was still soft, would not take a finger print, but could be easily cut with a razor blade. After about 24 - 36 hours it was fully hard. In other words, it was about 24 hours before you could sand it. But even for this first time builder, I always seemed to have enough work time.
Re: PY12 Build - NC
Posted: Wed Jan 23, 2013 7:57 pm
by Dienster
So assuming it gets a little warmer around here, I'll glue up the pieces this week and start stitching.
When glueing up the pieces is this the right process? Lay plastic below the pieces, prewet the ply area where the tape will go, then lay the tape, wet out the tape, roll/squeegee out any bubbles, then cover with plastic and some weight distributed by a piece of plywood. Let it set then flip and repeat. Or do I just need glass tape on one side?
The joints are pretty tight so I'm thinking I don't need to mix up any thickened epoxy for this. ??
Thanks
Steve
Re: PY12 Build - NC
Posted: Wed Jan 23, 2013 10:56 pm
by pee wee
The joints will be a bit stronger if you put some thickened epoxy between the ends of the panels that butt together, even if they fit tightly.
Re: PY12 Build - NC
Posted: Thu Jan 24, 2013 8:45 am
by AMC
Also, many people on here have suggested that you sand or plane the area where the tape will go. By thinning it out, you can reduce the amount of fairing required later (prob only necessary on the side that will show). If you are covering the outside with cloth, I don't know if you would need the tape on the outside, sounds like a good question for JM.
Although with possible snow tomorrow, and highs in the mid 40s, sounds like better weather to go crappie fishing on Harris!
When you get this boat done, I would love to meet up and look at her.
Re: PY12 Build - NC
Posted: Thu Jan 24, 2013 10:06 am
by Dienster
AMC wrote:Also, many people on here have suggested that you sand or plane the area where the tape will go. By thinning it out, you can reduce the amount of fairing required later (prob only necessary on the side that will show).
I was considering that but with the ply being only 3mm, I was a little worried about structural integrity by thinning that out any more. If I only did the show side and went down .75-1mm, I think it would be ok but I would worry about the strength of having a 1-1.5mm thick wood "tenon" if both sides were rebated (at least until the rest of the glass went on). Anyone have an opinion on this?
When you get this boat done, I would love to meet up and look at her.
Sure thing, what area do you live in?
Re: PY12 Build - NC
Posted: Thu Jan 24, 2013 10:46 am
by jacquesmm
Keep that sanding very shallow. As you say, there isn't much wood in 3mm.
If you reduce the wood thickness, make certain that the inside tape generously overlap that part.
Re: PY12 Build - NC
Posted: Thu Jan 24, 2013 2:34 pm
by AMC
Dienster wrote:
Sure thing, what area do you live in?
Creedmoor.
JM, do you need to tape the outside if you are covering the whole thing with glass? If not, then I don't know that I would bother with the thinning if it's only on the inside.
Re: PY12 Build - NC
Posted: Thu Jan 24, 2013 3:07 pm
by jacquesmm
See the notes.
I list a standard version = wide fabric only, no tape except inside bow and stern and a heavy duty version: tape all outside seams before applying the wide fabric.
If you are building the standard version, the discussion about grinding the plywood down for the tape becomes irrelevant.
The heavy duty version is overkill but it may make sense for rough use: white water with rocks or a club/rental boat.
Re: PY12 Build - NC
Posted: Thu Jan 24, 2013 3:16 pm
by Dienster
jacquesmm wrote:See the notes.
I list a standard version = wide fabric only, no tape except inside bow and stern and a heavy duty version: tape all outside seams before applying the wide fabric.
If you are building the standard version, the discussion about grinding the plywood down for the tape becomes irrelevant.
The heavy duty version is overkill but it may make sense for rough use: white water with rocks or a club/rental boat.
To splice the smaller pieces from the different pieces of plywood together, you use tape right? How many layers, any offsetting of multiple layers? Forgive me if I missed this in the notes, I looked for it twice.
Re: PY12 Build - NC
Posted: Thu Jan 24, 2013 4:15 pm
by jacquesmm
OK, the splices . . . I don't know why I was thinking about the seams, probably because I was busy drawing a seam for a new boat.
For the splices you use tape and I would grind them down a little bit on the outside face for the tape. Outside only and remember that panels are mirror image, not copies.
Re: PY12 Build - NC
Posted: Thu Jan 24, 2013 10:13 pm
by swampboy
Dienster - I am building the Wave Kayak 13 and using 3mm plywood, same as your PY12 build. I initially attempted to get super particular about removing material for the fiberglass splice on the external side of the panel - even going so far as to layout staightedges offset from the seam just beyond where the 6" tape would go, and routing out a mil or so of material. I glassed it up and when I went to flip it, it was pretty flimsy and felt weak at the joint, even though the glass job appeared solid. IMO the effort is not worth it, the 3 mm ply is just too thin. I ended up lopping off the ends and re-splicing the panels together without removing material. The difference in joint strength is noticible.
I bought 6" wide 6oz cloth tape for this build, and used the full 6" width for the splicing job. The thickness of the lightweight splice when glassed up is minimal (~1 mil), and fairing should not be an issue. When I get to fillet and taping, I plan to cut the 6" tape in half to make 3" taping strips. I also plan to glass the entire outside of the yak - including the deck - and the inside just above the waterline or so with 6oz cloth. I'm thinking that should make it plently strong.
Re: PY12 Build - NC
Posted: Thu Jan 31, 2013 9:52 pm
by Dienster
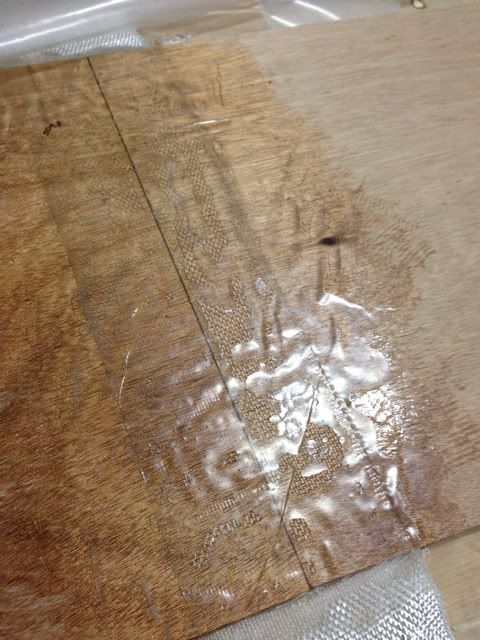
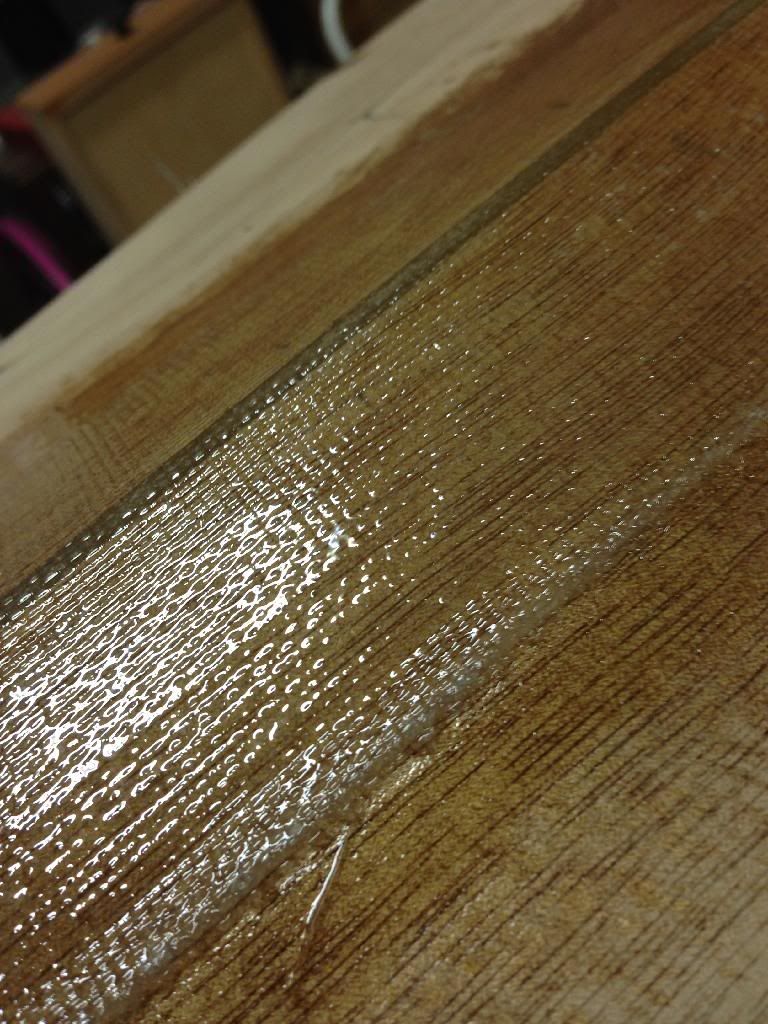
So I'm wondering if this was too much, too little or just the right amount of epoxy?
Thanks
Steve
Re: PY12 Build - NC
Posted: Fri Feb 01, 2013 2:53 am
by dbcrx
Too much. You only need enough to make the glass go clear. You don't want glossy pools of it sitting on top.
Re: PY12 Build - NC
Posted: Fri Feb 01, 2013 8:35 am
by Dienster
Thanks,
I thought it might be. So, the mesh shouldn't necessarily be completely filled with epoxy but just wet out enough to make it translucent. (End product should look like the drier spots in the picture where you can see the mesh?)
I was shooting for just filling the mesh and making it translucent but I may not have given it enough time to spread out before dabbing on more.
Does epoxy expand when curing? Seems like there is a lot more on there after curing than what I thought I put on.
Guess I should get sanding?
- Steve
Re: PY12 Build - NC
Posted: Fri Feb 01, 2013 10:33 am
by swampboy
I suggest using a lamination roller to mitigate the epoxy pooling effect during lamination. They are sold at any boatbuilding supply store, including this site. I prefer this tool for laying up tape, a squeegee tends to move the tape around to much in my experience. I tend to use the squeegee for larger fiberglass cloth vs. tape laminations. Hope this helps for your future laminations. I wouldn't worry too much about what you show in the picture. Just sand it flat with an orbital until you hit glass, then stop.
Re: PY12 Build - NC
Posted: Fri Feb 01, 2013 12:40 pm
by Dienster
I did use a roller but I think the plastic I laid over pulled it up into the puddles you see because it was level and not puddled before it cured.
Re: PY12 Build - NC
Posted: Fri Jul 12, 2013 2:51 pm
by BB Sig
Any updates on this boat? Bitten by the kayak bug and a comparable one to this is over $3,000.
Re: PY12 Build - NC
Posted: Mon Jul 15, 2013 8:33 pm
by robbiro
Barry I have had the same thought on what happened to this build. I have the plans and will start fairly shortly. Had a great discussion with Jacques at the Central Gulf Boat Builders meet over this past weekend and I am ready to get after another build. I have had several folks tell me that they liked the idea of a fishing kayak in some of the small ponds, lakes and streams here in central Mississippi. Seems to be a good idea to use in place of a car-topper type dingy.
Hey Steve where are you in your build!!
Keep on Buildin'
'
Robbie
Re: PY12 Build - NC
Posted: Thu Nov 21, 2013 1:54 pm
by Dienster
This has been sidelined for too long. Going to get back on it soon.
Re: PY12 Build - NC
Posted: Sun Dec 01, 2013 7:02 am
by BB Sig
Good to hear. Welcome back!
Re: PY12 Build - NC
Posted: Wed Dec 04, 2013 7:45 pm
by Dienster
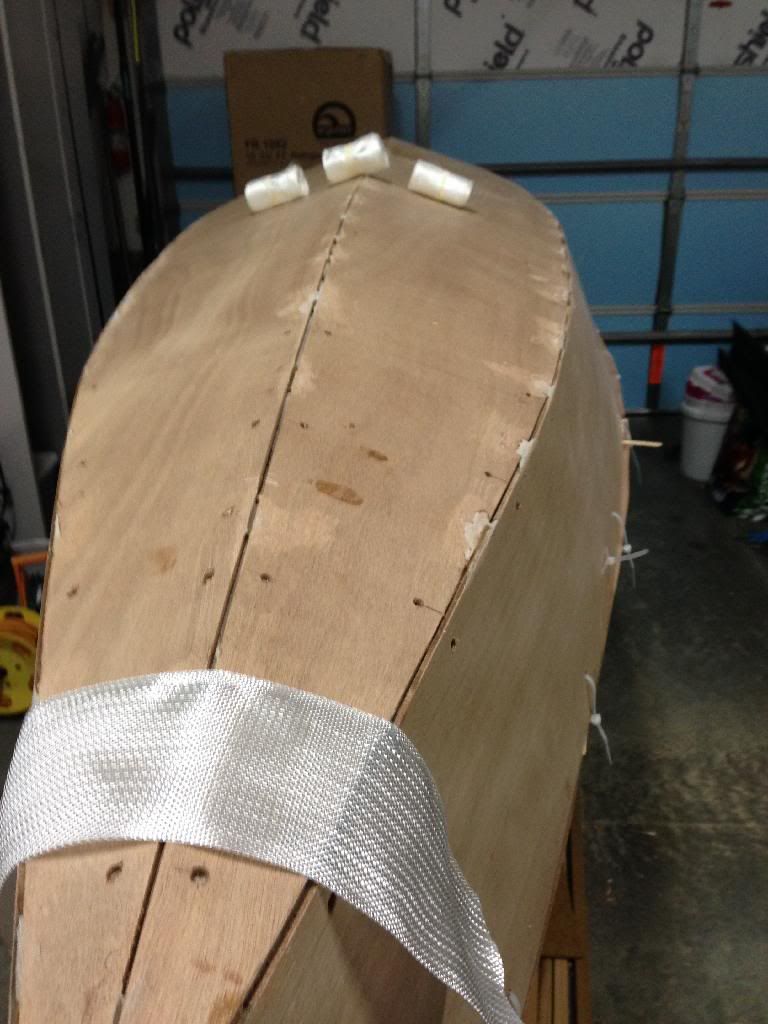
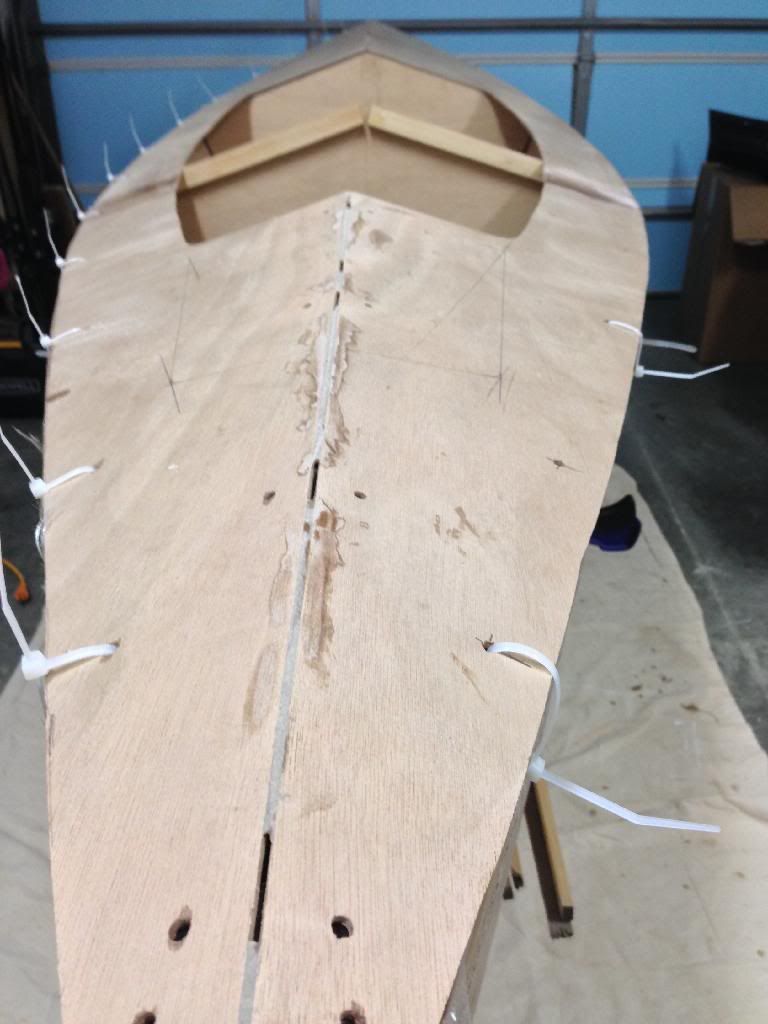
So I have it stitched up but it needs a bit of adjusting. I'll cut the stitches and trim a few areas this weekend and hopefully be able to fillet and tape the hull this weekend.
I've been looking at toys and plan to add a bassyak trolling motor to this. I figure I'll have a battery compartment up front and run a chase under the foam for power. Also planned is a gps fishfinder. I'm considering adding a removable 360 nav light as well as a power port for a live well in the rear all controlled by a panel up front. This should be able to hold a large battery so I might as well make use of it. I'll try to get some pics up later
Re: PY12 Build - NC
Posted: Sun Dec 08, 2013 9:02 pm
by Dienster
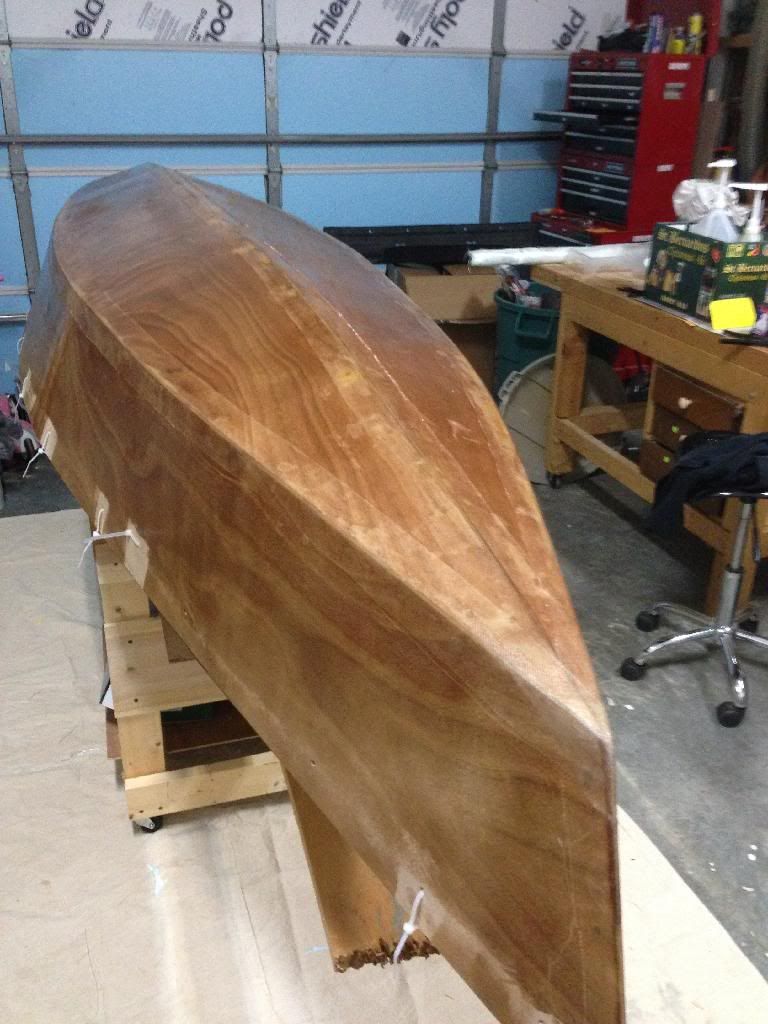
So I cut it apart and hit some areas with the block plane to clean them up. Then I started putting it back together.
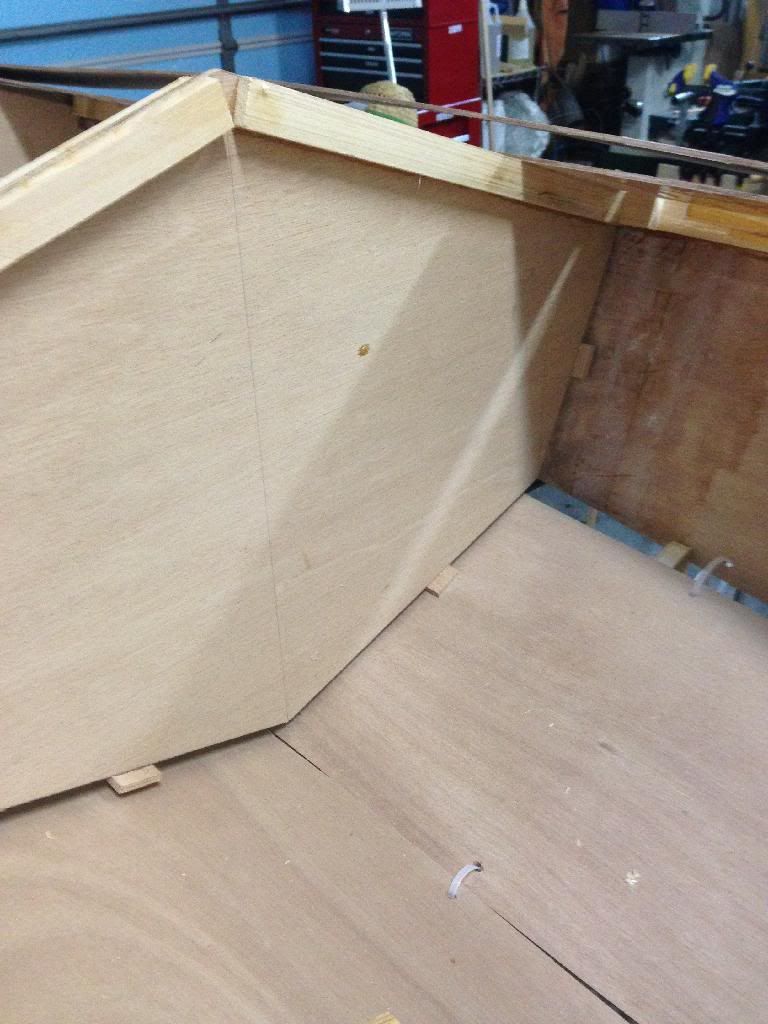
Hot glued some spacers on the frames to keep them off the plywood sides so there will be room for a good bond later.
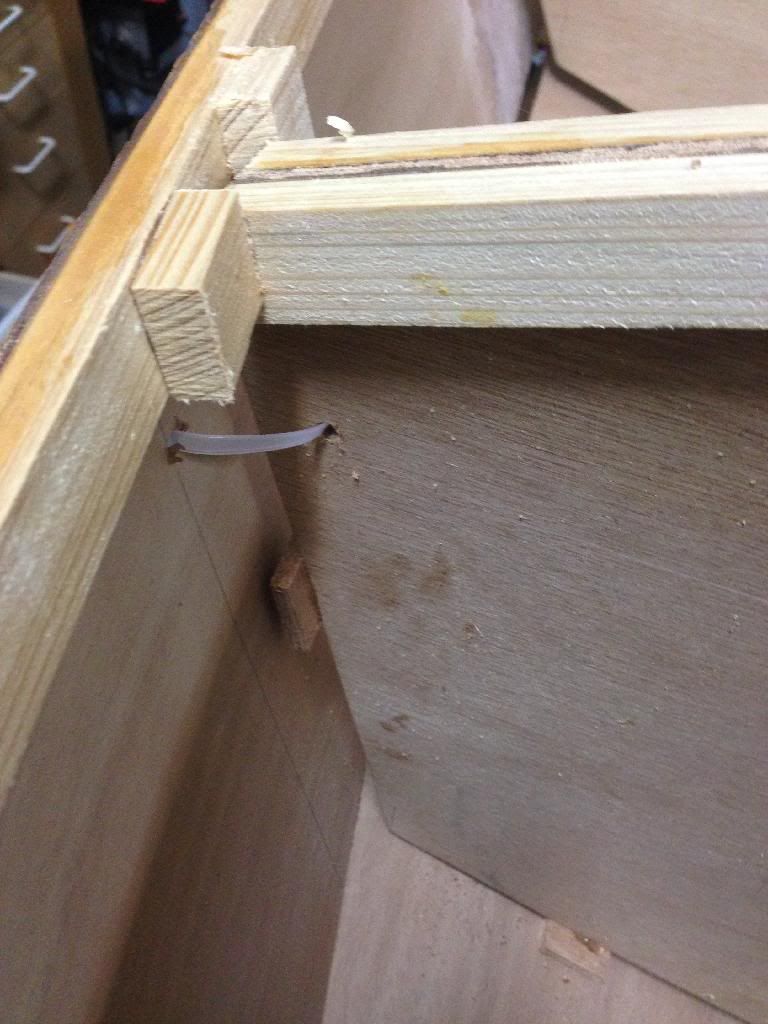
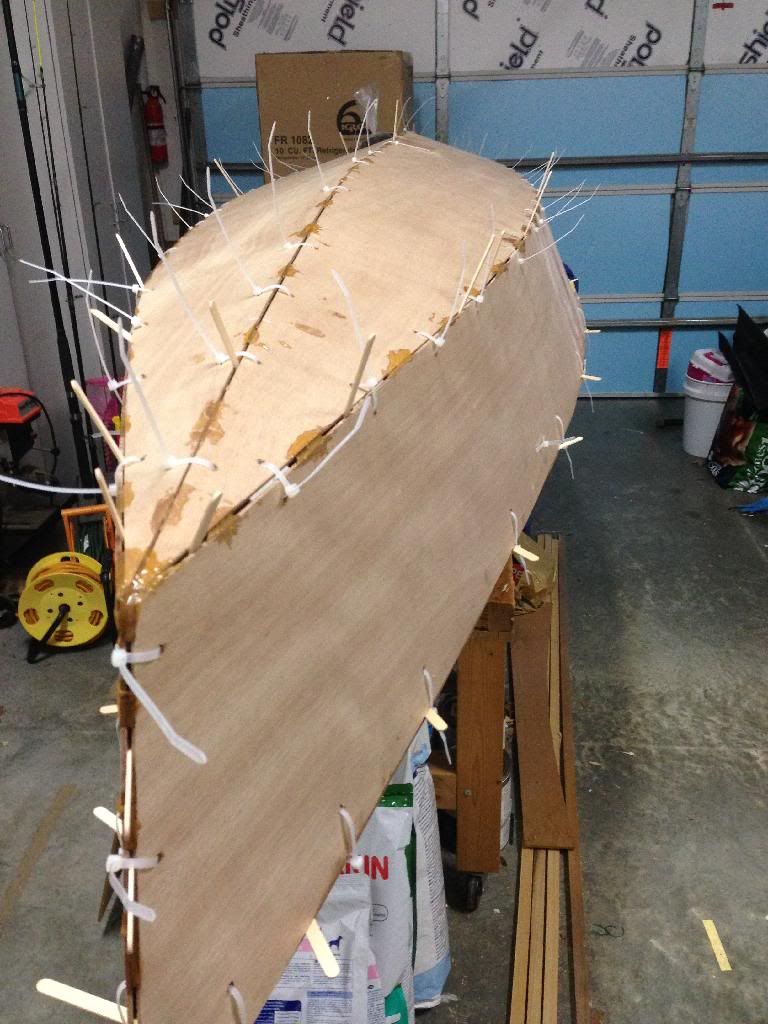
Had trouble with the smaller frames moving around too much to stitched them in with a zip tie on each side and blocked them in with some scrap.
Zipped it in loose and tightened slowly. Did the top and bottom center lines first and then the sides.
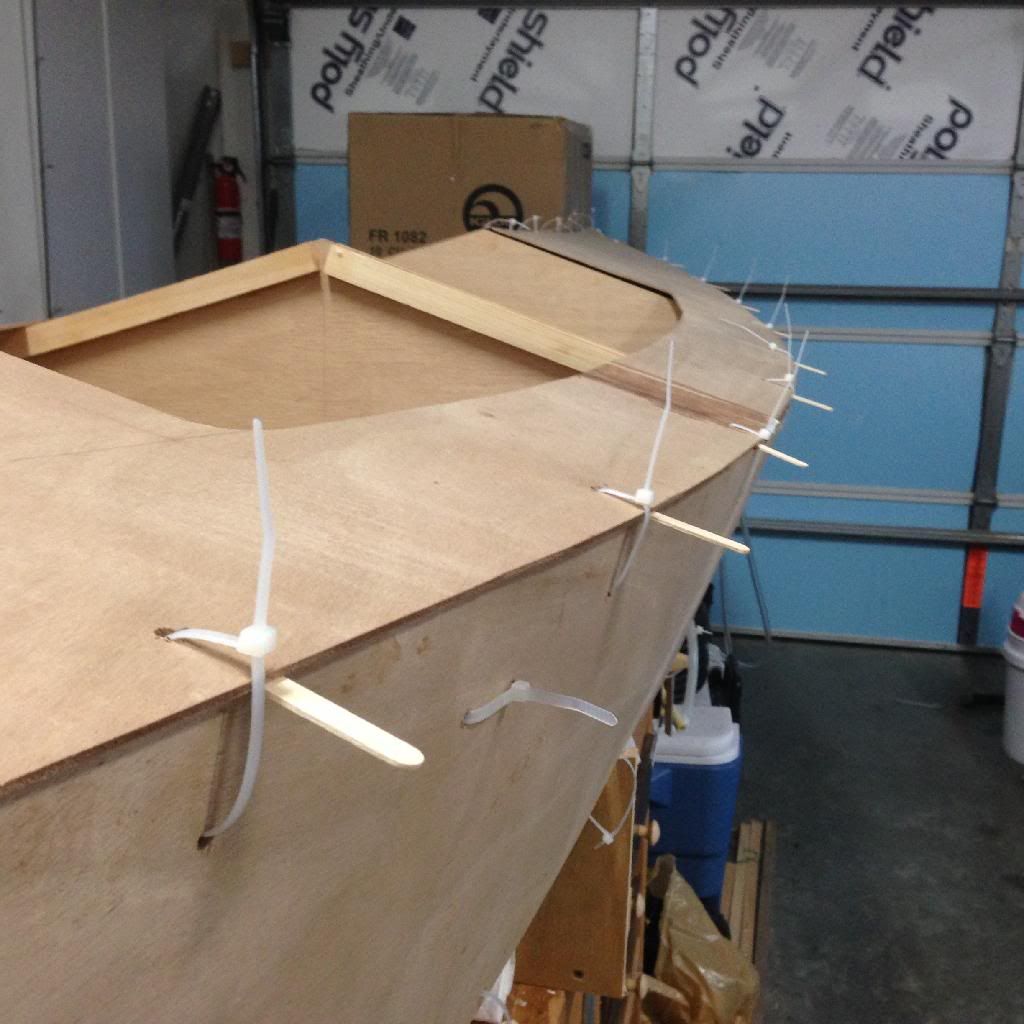
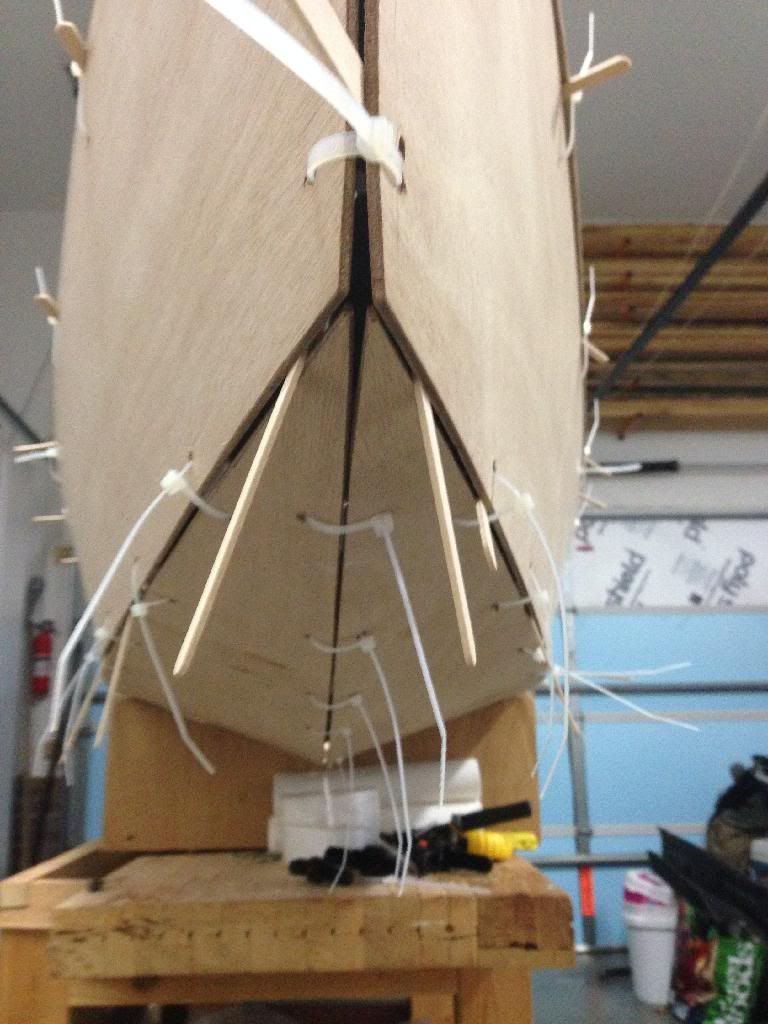
Used some Popsicle sticks to help space things.
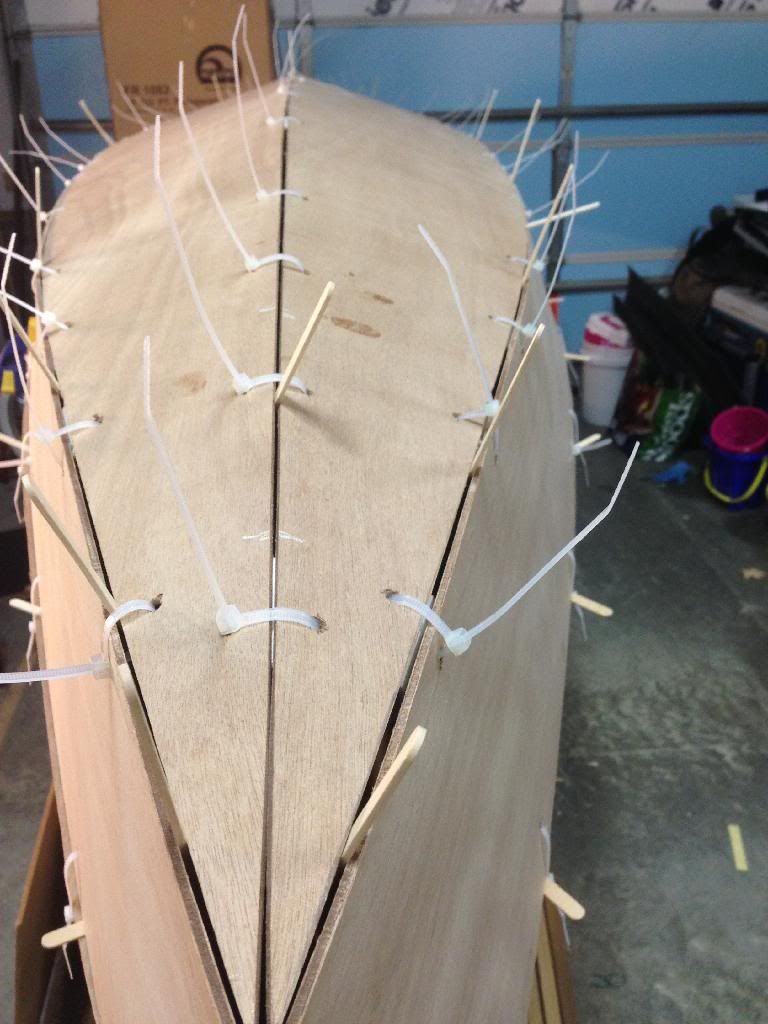
Tacked the bottom. Forgot to tape the seams from the insides. Some areas were tough to tack weld. After the tacks cure, I'll flip it, remove the stitches where I tacked and cut the top off so I can tape it up.
Re: PY12 Build - NC
Posted: Mon Dec 09, 2013 11:38 am
by tech_support
that looks really good. I use the same method for keeping a consistent gap on the seams

Re: PY12 Build - NC
Posted: Tue Dec 10, 2013 9:38 am
by Dienster
Question time:
1) I'm planning for a shoot-through transducer mount and I don't have it yet. How big of a hole do I need to cut and glass? Where would the best place be for it on the kayak; front, center, rear?
2) wet on wet?
Does it even make sense to do this on the outside or is it better to let the welds cure, shape them with the sander and then do wet on wet with the tape and cloth?
After I clean up the tacks, what is the timing for doing wet on wet on wet?
0) precut tape and remove edge stitching, label, pre-cut cloth and label
1) lay down nice glue bead on all joints
2)Let the glue start to firm up
3) pre-coat the tape area
4) lay tape and wet out
5) let tape start to firm up
6) precoat whole area
7) lay out cloth and wet out
clean tools and beer
Is that right?
3) I'm thinking of running 2 "stringers" between the front frame and large seatback frame about 6-8" apart to support the sole and give me some storage area between the stringers that I can access through a hatch. It will reduce the area for foam. What volume of foam do I need to make it unsinkable with an extra 80lbs or so for trolling motor and battery, ~2 cubic feet?
THANKS
Re: PY12 Build - NC
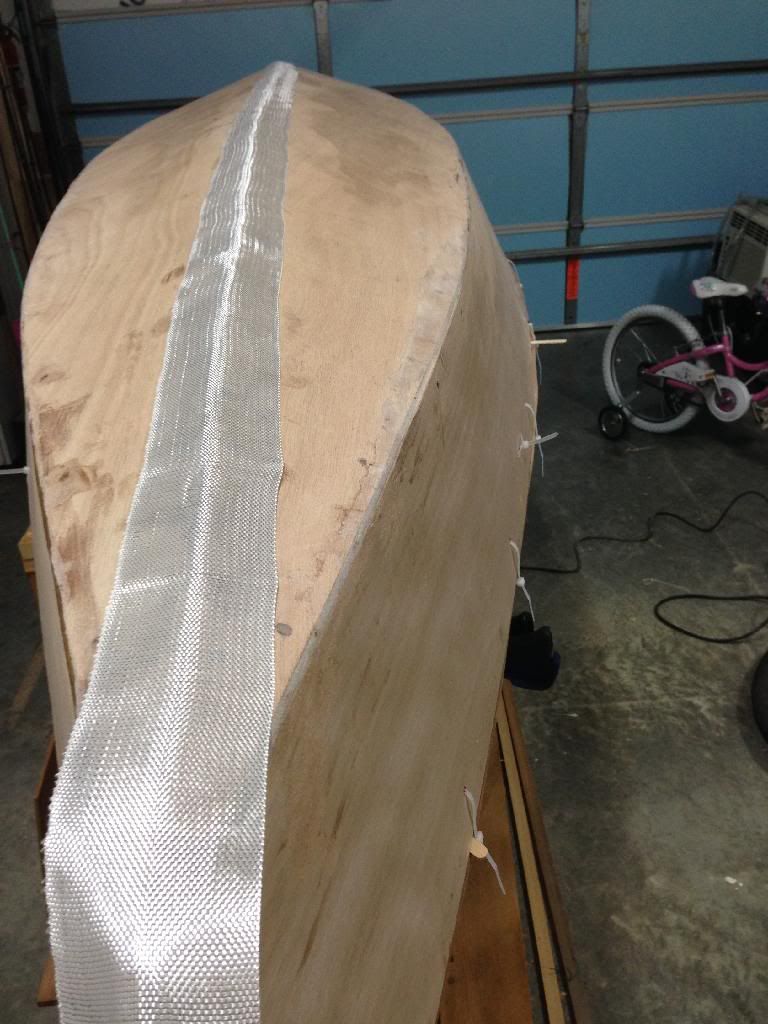
Posted: Tue Dec 10, 2013 11:41 pm
by Dienster
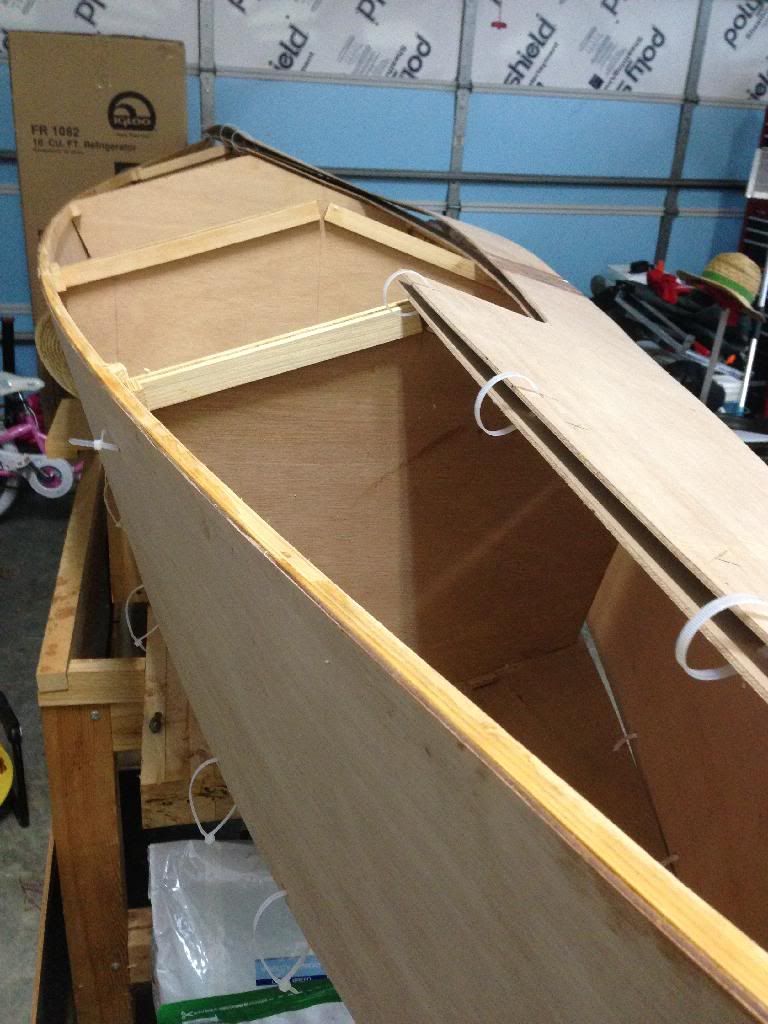
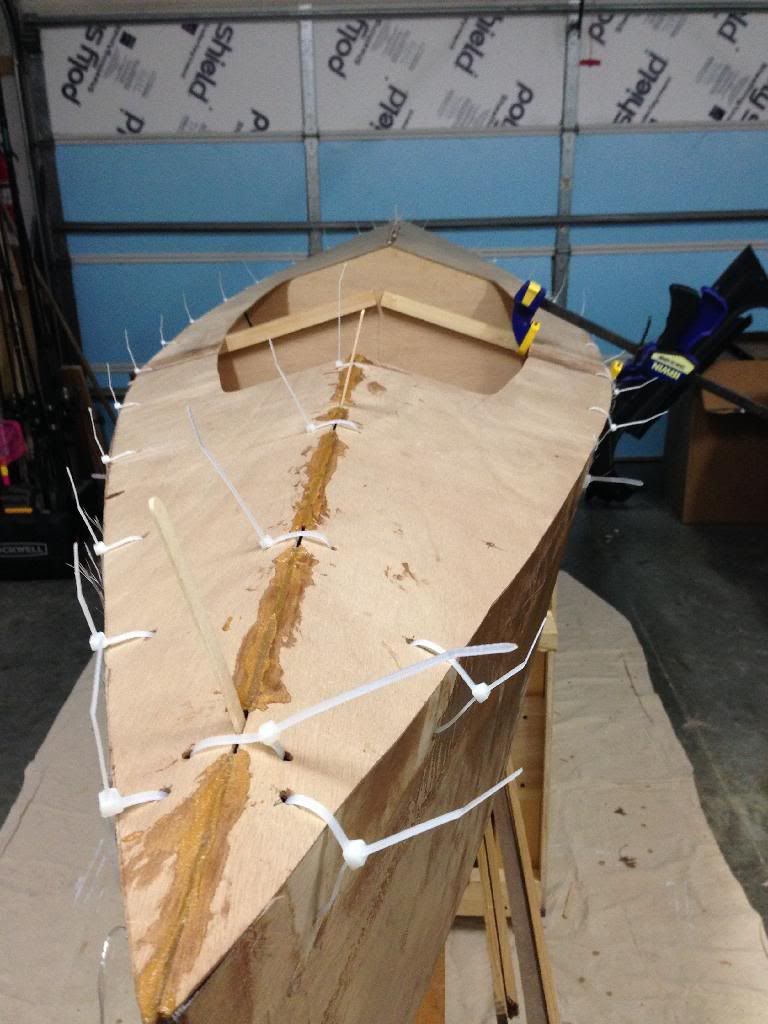
Had to cut a few welds at the stern where the 4 panels came together and re-tack them. One of my strategically placed sticks that needed a little more persuasion to get things lined up popped out and let one of the bottom panels slip over the side panel.
After that set, I flipped it, cut half the top off, cut all the stitches that were welded and taped the joints covering the stitch holes. Stitched the top back on and flipped it again.
Sanded down the welds and cut the tape to length.
Guess I'll decide on whether to go wet on wet with this once I see how well the seams look after laying down the bead of glue.
Re: PY12 Build - NC
Posted: Mon Dec 16, 2013 7:26 pm
by Dienster
Got the bead down though it was not uneventful. Had a bag explode on me while I was piping the seam so I finished 2/3 of the joints by spreading epoxyglue using a Popsicle stick.
Went back several times while it was curing to smooth out the joints.
When it cured, got on it with the sander to get rid of clumps
Was getting ready to pre-wet the area around the tape joints when I noticed this on the stern.
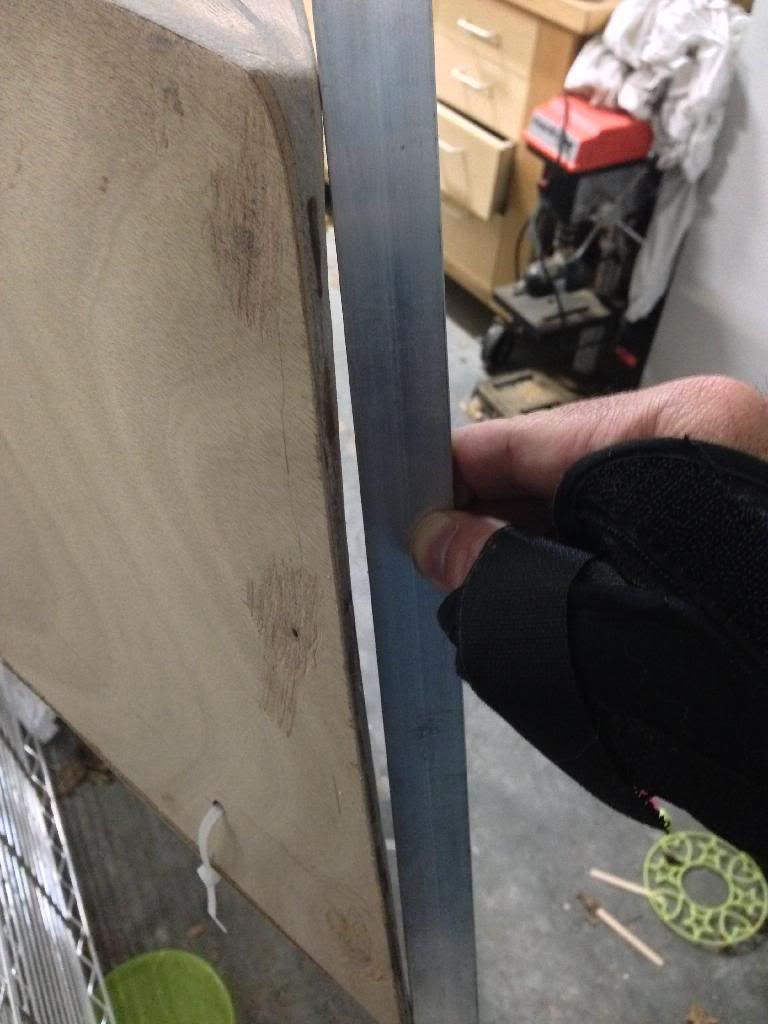
So I cut the glue with my oscillating tool and strapped up against a straight edge.
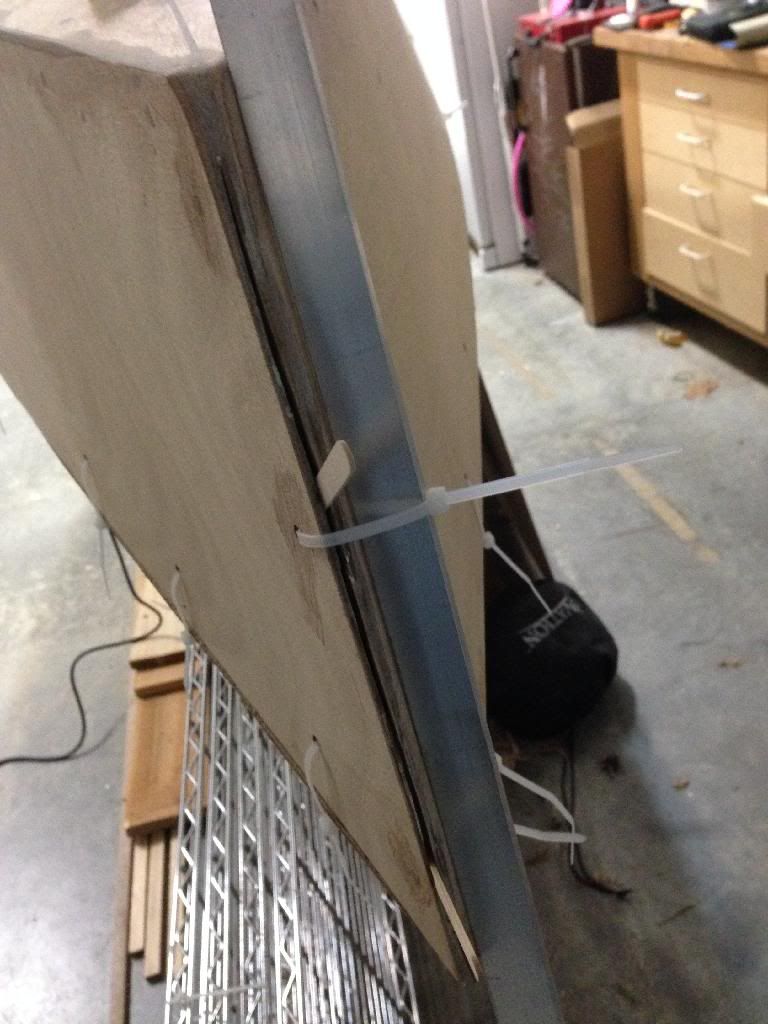
I had some of this laying around so mixed up a few ml and glued it together. I hope there aren't any compatibility issues with different epoxies.
Re: PY12 Build - NC
Posted: Sat Dec 21, 2013 11:12 pm
by Dienster
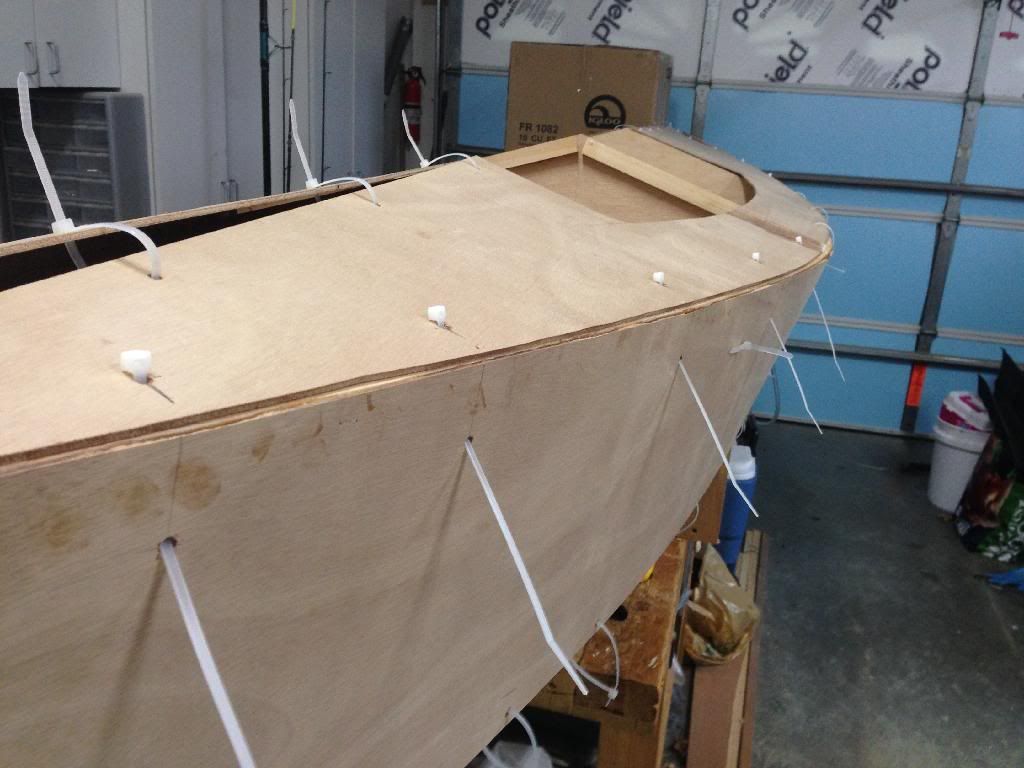
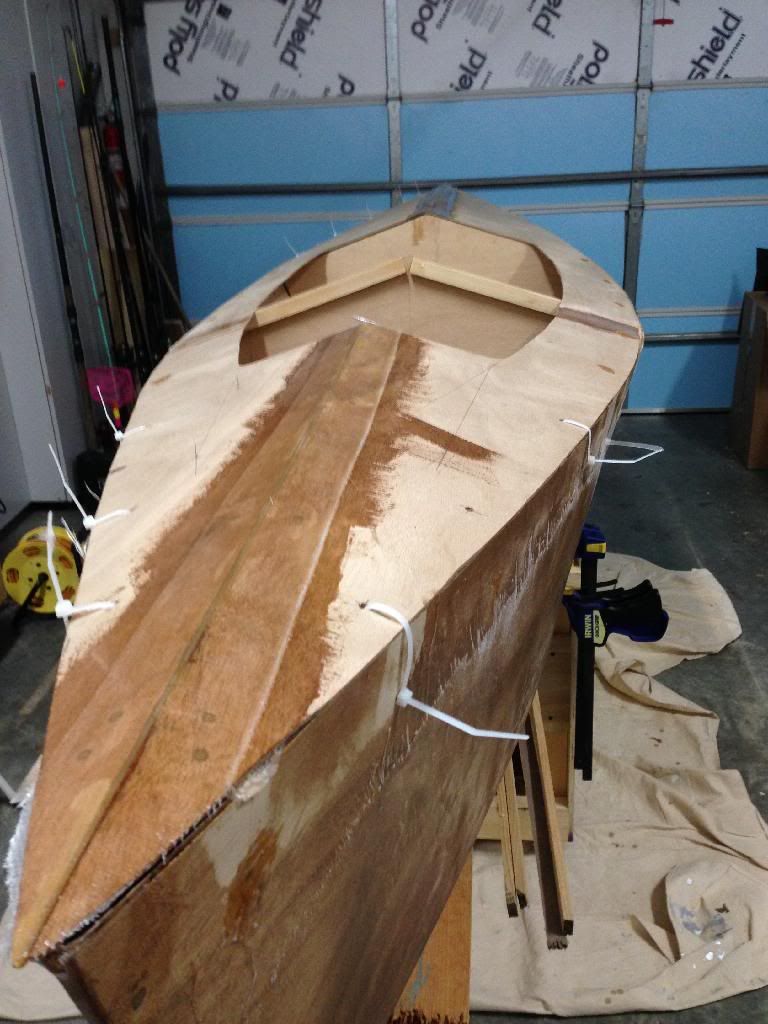
Built a cart that puts the kayak at an easier height to work with and can roll around easier.
Sealed the hull, taped and glassed last night. Shouldn't have started glassing at 11:30pm.

Wet

Taped
Glassed. I used too much epoxy for the 3.5 yards of 4 oz glass. Should have been 16 oz but used 21. Maybe if I heat the epoxy up it will wet out better next time.

Flipped and tack welded the center joint on the deck today
Hopefully can get it taped tomorrow.
Re: PY12 Build - NC
Posted: Sun Dec 22, 2013 9:30 am
by gk108
That looks pretty good. Your epoxy consumption is within the ballpark, so don't stress on it too much. Lots of variables at work including just how thirsty that particular piece of plywood is today. Had you rolled on a seal coat, then sanded and applied the glass, your resin content probably would have been right on the money. 50/50 resin content doesn't include the resin that soaked into the plywood.

Re: PY12 Build - NC
Posted: Sun Dec 22, 2013 10:41 am
by Cracker Larry
50/50 resin content doesn't include the resin that soaked into the plywood.
Very good point, GK.
That looks real good from here
The resin does wet out the cloth more efficiently when it's warm. Cold resin is hard to spread evenly.
Re: PY12 Build - NC
Posted: Sun Dec 22, 2013 2:24 pm
by Dienster
Thanks guys. I did seal the whole hull with about 6 oz of epoxy rolled on 10 hours before glassing. Maybe it was still thirsty because >95% of the glass, I can feel the texture so I didn't overdo it too badly. I'll heat up the epoxy next time to see if I can get closer to 50/50.
Somehow the seat back form shifted while I was stitching and now when set even with the top, it leaves a 5/8" gap below the form. Luckily, it shifted symmetrically and the boat isn't cockeyed. I'm planning to add a 3/8" shim glued to the bottom of the form to help fill in the gap. I just don't think filling a 5/8" gap with putty makes sense.

There are a few small air bubbles under the glass. 1-3 mm diameter. Should I do anything about those?
Re: PY12 Build - NC
Posted: Mon Dec 23, 2013 7:42 pm
by Dienster
Sanded, cut the stitches, finished the seam and filled some holes.
Cleaned things up and taped
Re: PY12 Build - NC
Posted: Tue Dec 24, 2013 8:36 am
by tcason
The resin does wet out the cloth more efficiently when it's warm. Cold resin is hard to spread evenly.[/quote]
I like the resin above 70 degrees to work into the cloth - just get it out of the pot and you will have time to work it into the cloth.
Re: PY12 Build - NC
Posted: Tue Dec 24, 2013 9:24 am
by ks8
Looking good.
Re: PY12 Build - NC
Posted: Sun Jan 05, 2014 1:37 am
by Vanagod
Does this boat not have taped seams on the inside of the hull?
I should have read your build over as I have been progressing on mine, I may have saved some effort. I think I would have been well served flipping my canoe after initial stitching and tack-welding. There is alot of shaping sanding I will have to do now instead where boards did not line up exactly where I wanted them to.
I also have a colder work area. Typically my garage is about 40*F in the morning. What I will do is keep the epoxy jugs indoors so they stay warm and fluid and then light up the propane heater to bring the shop up to 55 or so. (I am using fast hardener.) Once I am ready for stuff to cure, I move the heater closer to the boat and let the garage warm up and things seem to cure up in 24 hours. Of course today, I let the garage get up to 70+, and that fast epoxy lit off twice before I was ready for it to. Good reason to keep the batches small.
Please keep up the posts. By when do you think you will have her splashed?
Re: PY12 Build - NC
Posted: Sun Jan 05, 2014 8:52 am
by Dienster
Vanagod wrote:Does this boat not have taped seams on the inside of the hull?
It does, you just tape the center seam of the top and then remove it to take care of the inside.


I should have read your build over as I have been progressing on mine, I may have saved some effort. I think I would have been well served flipping my canoe after initial stitching and tack-welding. There is alot of shaping sanding I will have to do now instead where boards did not line up exactly where I wanted them to.
I think this calls for flipping because the kayak parts completely enclose the frames and mold, I'm not sure how well that would work with a canoe.
I also have a colder work area. Typically my garage is about 40*F in the morning. What I will do is keep the epoxy jugs indoors so they stay warm and fluid and then light up the propane heater to bring the shop up to 55 or so. (I am using fast hardener.) Once I am ready for stuff to cure, I move the heater closer to the boat and let the garage warm up and things seem to cure up in 24 hours. Of course today, I let the garage get up to 70+, and that fast epoxy lit off twice before I was ready for it to. Good reason to keep the batches small.
I want to get a heat lamp or something to get the epoxy up to ~80 degrees for the big layups. I can deal with a few extra ounces for taping but doing the broadcloth can suck up some epoxy if I can't get it to flow well.
Please keep up the posts. By when do you think you will have her splashed?
I was shooting for last May. This May would be nice.
Re: PY12 Build - NC
Posted: Sun Jan 05, 2014 12:35 pm
by Vanagod
How did you transfer the epoxy putty from the mixing pot to the baggie for filling in the fillets? I am thinking of doing that for my bows, but with how thick the epoxy is, all I can think of doing is scraping it out and scraping it to the side of the bag. I wonder too if I am mixing my putty too thick. My first batch sagged through gaps, so I made it a bit thicker for my second batch. If I mix that thick, I imagine that the baggie might just blow out instead of extruding putty.
Re: PY12 Build - NC
Posted: Sun Jan 05, 2014 1:49 pm
by Dienster
Vanagod wrote:How did you transfer the epoxy putty from the mixing pot to the baggie for filling in the fillets? I am thinking of doing that for my bows, but with how thick the epoxy is, all I can think of doing is scraping it out and scraping it to the side of the bag. I wonder too if I am mixing my putty too thick. My first batch sagged through gaps, so I made it a bit thicker for my second batch. If I mix that thick, I imagine that the baggie might just blow out instead of extruding putty.
I put the bag in a Guinness pint glass and folded over the excess bag. Then just scraped it into the corner of the bag as best I could.
Make sure to tape the opposite side with masking tape if you don't want to deal with sagging.
Re: PY12 Build - NC
Posted: Mon Jul 20, 2015 2:46 pm
by sds
Looking good so far Dienster
Are you still around? How are things going with the build?
cheers,
scott
Re: PY12 Build - NC
Posted: Mon Jul 20, 2015 6:11 pm
by ks8
Yes. How's the progress?
Re: PY12 Build - NC
Posted: Mon Jul 20, 2015 7:51 pm
by Dienster
Progress has stalled for a while. We moved last November and I need the other house to sell or rent before I can build my shop and get productive. All my tools are packed into half of the 2 car garage and basically unusable since my wife claimed half for her new car.
Re: PY12 Build - NC
Posted: Mon Jul 20, 2015 11:12 pm
by ks8
When the dust settles, jump back in.
Looking forward to seeing the completed boat.


