Wade's GV10

To help other builders, please list the boat you are building in the Thread Subject -- and to conserve space, please limit your posting to one thread per boat.

Please feel free to use the gallery to display multiple images of your progress.
wadestep
* Bateau Builder *
* Bateau Builder *
Posts: 1407
Joined: Fri May 09, 2008 9:40 am
Location: SW Florida

Re: Wade's GV10

Post by wadestep »

Building has been a little slow around here over the past 2 weekends. I've been fairly busy at work, and actually got to do a bunch of boating last weekend. Anyways, we haven't done the final fairing that I got peer-pressured into :wink: yet. However, the two of us had some time yesterday afternoon, so we flipped the boat right-side up and went to town on the taping/glassing.
Early in the AM I ground/sanded the inside of the boat smooth. There were epoxy drips and stuff from taping the outside. Then we put down some neat epoxy with a brush into the seams, and a roller on the larger areas. Then we filleted all seams, pre-wet out the tape (all of which was pre-cut and labled), and laid the tape down. Then immediately we put the 6oz cloth down and wet it out in place. The way this boat is set up with the frames, there are 3 distinct 'compartments'. due to this, all the above steps were carried out sequentially in each compartment, before moving to the next. This allowed the whole deal to be done wet-on-wet. Today I'm going to fair while it's still chemically active. Basically I'm going to go from bare wood to 1 layer of fairing without even touching the boat with sandpaper. Major time saver!
Image
Completed : OB19, CC14, GV10.

wadestep
* Bateau Builder *
* Bateau Builder *
Posts: 1407
Joined: Fri May 09, 2008 9:40 am
Location: SW Florida

Re: Wade's GV10

Post by wadestep »

Couple of things I've noticed
1) I no longer bother to create a nice concave, round fillet. I basically just put the bead of epoxy down with a icing bag, and then lay down the wet-out tape. this eliminates a step I've been doing - using a tongue depressor or something to smooth out the fillet. By the time you've pressed the tape into the seam, the fillet is the perfect shape anyways.
2) the 6 oz, 4" tape I'm using (from Bateau) has one edge with a very prominent thread seam. This makes working wet-on-wet imperfect. The second layer doesn't make perfect contact - gets a little line of air where the seam from the first is. This only happens on one edge of the tape and not the other, where the edge seam is different. The manufacturer really should be able to improve on this. In order to have a perfect lamination, you'd have to stop, let it dry, and sand off the seam. I'm going to sand it off after all the layers are cured, and just fill with epoxy with milled fiberglass thickener.
3) getting the 6oz woven cloth to lay down perfectly is a pain. I've got it about figured out for flat and convex surfaces, but on concave surfaces still end up with a few small ripples. I'l just have to fair them out in the future. Others have had the same problem, and I also encountered it on the OB19. The best I've come up with is to pre-wet out the surface, then lay down the edge of the cloth and squeegee it into place while keeping the other edge up off the surface. Don't use any extra epoxy here, the wet surface is enough to stick the cloth, yet allows you to squeegee out the ripples. Then just keep progressing down towards the other end, squeegeeing the cloth on a little at a time. Then, when it's all in place and flat, then come back and wet it out.
Hope this description helps someone else.
wade
Completed : OB19, CC14, GV10.

User avatar
topwater
* Bateau Builder - Expert *
Posts: 3131
Joined: Tue Oct 30, 2007 6:27 pm
Location: Port Charlotte
Location: Florida

Re: Wade's GV10

Post by topwater »

Wade have you tried cutting the sewn edge off before using the tape :?: I have some 9 oz
woven cloth tape that came with the kit that I haven't used yet, but I was thinking when I do
I will cut the edges off first. Build looks good 8)
Novi 23 finally launched !

wadestep
* Bateau Builder *
* Bateau Builder *
Posts: 1407
Joined: Fri May 09, 2008 9:40 am
Location: SW Florida

Re: Wade's GV10

Post by wadestep »

I haven't tried doing that. It would probably fix the problem, but it might be a mess also - lots of unraveling strings? I'll keep an eye out and see whether you find it to be worth it or not. I do know that the cut edge of the 6-oz fabric tends to fray/unravel and create a mess of things at times. sticky strings all over your squeegee, gloves, legs, ... :lol: The tape may act differently, though?
wade
Completed : OB19, CC14, GV10.

Spcmnspff
Frequent Poster
Frequent Poster
Posts: 26
Joined: Fri Apr 19, 2013 8:55 pm
Location: Salt lake city
Location: Salt Lake City UT

Re: Wade's GV10

Post by Spcmnspff »

That's good info, Wade. It would definitely have helped had I not done the inside first. Your method starting with your filleting and taping the outside first, seems to have been optimally efficient - something that obviously comes with experience. For me starting with the inside seams first made more sense. I had some hard joints that were better accessed from the inside, where there was still a gap, and sanded down from the outside to where I could get more putty in from the outside. Also taking more time on the fillets with a radius tool was necessary for me as I had to push the putty into the gap. You had already done this from the outside.

So I'm happy with the outcome although I didn't get full wet on wet as I took too long with the filleting. I did get all the tape down on top of wet fillets but by the time I wet it out all the way, the fillet had already set up. The fillet was enough to hold the tape but the majority of it wasn't wet until going over it with epoxy. Also my work is very sloppy being my fist boat. I imagine yours is very clean. There will be much sanding ...
Sean

wadestep
* Bateau Builder *
* Bateau Builder *
Posts: 1407
Joined: Fri May 09, 2008 9:40 am
Location: SW Florida

Re: Wade's GV10

Post by wadestep »

Got the first coat of fairing done on the inside. It is harder to get it to spread just so on the inside, but I'm fairly happy with the application. My plan is to do one coat of fairing, sand it down, and then stop and attatch everything else. I don't want to be taping stuff in over fairing compound, so I'll be sanding some of it off anyways to get to glass to bond to. However, just seems easier so get 80% of the fairing done now before more stuff gets in the way. This is also how others advised me to go on the last build, and I was happy with the order of operations.
Image
Image
In the 2nd picture, you can also see where I've been getting ready to install the bow eye. That's 1/2" ply cut to size, edges ground to a radius, then glued up. I'll be putting whatever else fiberglass scrap over it as I go, at least 18-24oz thick in total, maybe some left over biax tape if I can find any.
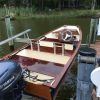
I'm re-thinking the stiffness of the hull, and kinda worried about it, based on some comments Evan has made. I'm going to re-think whether I can add any reinforcement, I'd really like the hull sides not to flex, and I'm going to put a 10HP motor on it. The boat already has 6oz cloth on each side, which is in addition to the bare-bones plans. However, Evan has been advising up to 12 oz biax. At this point, I'm not going to add any sheathing, so I'm thinking about other ways of reinforcing the hull. I still need this boat to be light enough to get into the truck, which will include 2 people carying it up to 100 yards or so.
In order to do this much thinking, I'll need a homebrew (or 2). :wink:
wade

PS - I've also added 1.5" to the sheer. Not sure if I stated that in a previous post.
Completed : OB19, CC14, GV10.

tcason
Active Poster
Active Poster
Posts: 371
Joined: Mon Mar 04, 2013 11:33 am
Location: Maryland - US

Re: Wade's GV10

Post by tcason »

How did you determine location of bow eye?

I am looking to put mine higher on Garvey 13.

Are you going to put "drain" holes under the frames to allow water to rear?

Looks awesome!

wadestep
* Bateau Builder *
* Bateau Builder *
Posts: 1407
Joined: Fri May 09, 2008 9:40 am
Location: SW Florida

Re: Wade's GV10

Post by wadestep »

I put the bow eye lower than normal because I hope this boat will be tow-able at a slow speed behind a larger boat. When towing like that, an upward pull is preferable. Therefore, I put it low. Hopefully it will be fully out of the water at rest. I'll be able to still reach it while inside the boat, which was my only other main concern. I'll probably put another cleat higher up for docking. Maybe inside, maybe outside the hull??
Yes, I'm definatly going to put in limber holes for water drainage. Still figuring out what size, and how they will work with the seat/foam flotation. I'll probably use a small hole saw and then sand them to the final shape. Kicking around laying a half-round of PVC pipe under the foam flotation and glassing that in water-tight.
wade
Completed : OB19, CC14, GV10.

User avatar
topwater
* Bateau Builder - Expert *
Posts: 3131
Joined: Tue Oct 30, 2007 6:27 pm
Location: Port Charlotte
Location: Florida

Re: Wade's GV10

Post by topwater »

Wade what about running some half round pvc pipe along each side to stiffen them up.
Like they do on the P 21. Check out Joes or hope2floats build you can see them along the sides of the cockpit.
Novi 23 finally launched !

wadestep
* Bateau Builder *
* Bateau Builder *
Posts: 1407
Joined: Fri May 09, 2008 9:40 am
Location: SW Florida

Re: Wade's GV10

Post by wadestep »

Thanks for the idea - I'll check them out.
Completed : OB19, CC14, GV10.

Post Reply

Who is online

Users browsing this forum: No registered users and 3 guests