First let me say that this is NOT a Bateau design. If it works well, y'all are certainly welcome to use whatever ideas you can from it. And it's made out of products from Boatbuilder Central and my wood scrap pile. Webmaster, if it should be in another category, feel free to move it.
A few years ago, I started bowfishing some, and my flatback canoe wasn't quite stable enough to feel comfortable standing up and shooting a compound bow, at night, at carp moving rapidly through a small area lit up by a battery and 6 automotive flood lights. I started to build some pontoons to stabilize the canoe, but abandoned that when I only bowfished a few times. So the pontoons hung in my basement for a few years. Then I gave the canoe to my friend Mark, who cut it up and modified it(see thread "Widening an Existing Boat").
Earlier this summer we went on a family vacation and the resort we stayed at had pedal boats that we could borrow. My kids LOVED them. Well, a few weeks later, I'm working in the shop downstairs, saw those pontoons, and everything clicked. We need to have a pedal boat.
A little math first to see if it's got a chance of working. The 2 pontoons are 6 feet long, 9" wide at the bottom and about 11" at the top. About 10" tall. Pretty much rectangular boxes. A little math shows about 9 square feet of wetted area, so .75 cubic feet of displacement per inch of immersion. So around 45 pounds per inch of draft. Structure weight probably 60 pounds, plus 100 pounds of kid would require about 4" of draft. That's reasonable. My 185 pound carcass would need another 2 inches of draft leaving very little freeboard. Better deck over the tops so they don't get flooded. If this had been intended to be a paddle boat from the beginning, I'd have gone 8 feet long and an inch or 2 wider.
Pardon my slacking on early construction photos, this just sort of happened as I figured it out.......
Upside down view:
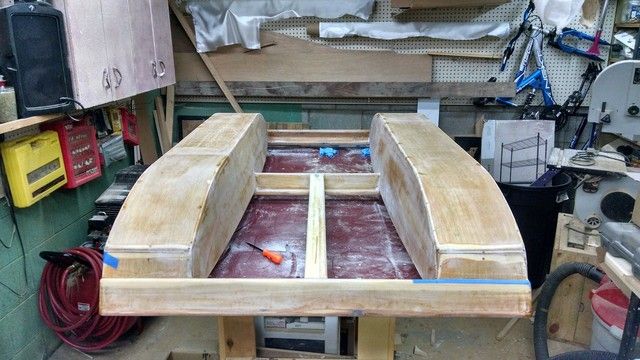
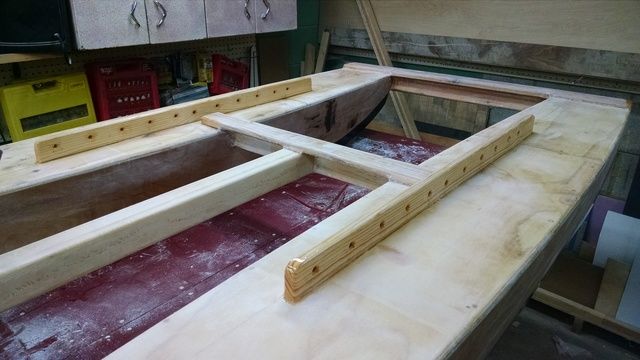
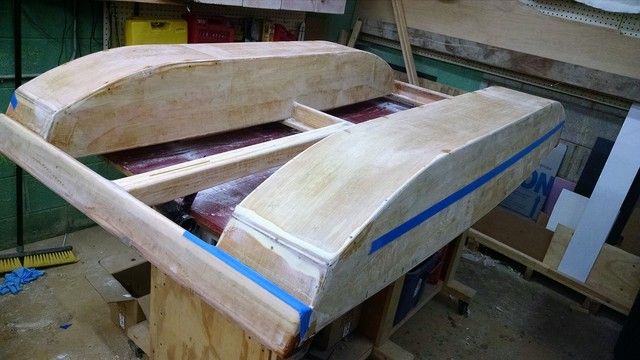
Pontoons are 1/4 plywood, flat bottomed. I experimented a little with how much camber was needed in the bottom of the side panels to make it fit up, I think it was about 3/8" or so. A few spacers to spread out the top center areas a bit and get some curve in the panels, zip tied, spot welded with putty. Once they dried, I taped the seams and used scrap cloth to cover the insides. glued a 1/2"x1 or so rail around the top and ends, then sanded it flat so I could glue the tops on. Glued in a couple substantial (2x4) crossmembers where the cross arms will be. then topped it off with another piece of 1/4".
Width is just under 48 so it's easy to toss in the back of most vehicles.
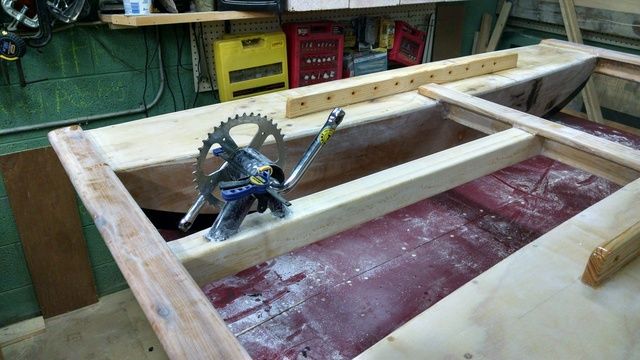
Monkeyed around a bit with seat locations, pedals, paddle wheel location, etc to keep the front to rear balance reasonable and get a lot of seat adjustment range so it can be used by little kids or adults. then glued up some cross pieces from pine and cedar, added a longitudinal member for mounting the pedals, and glue it together. Wrapped it all in light fiberglass (10oz on the hull bottoms, 4-6oz on the rest according to what I had left over from previous projects.
I got ideas for the bike parts design from http://www.atomiczombie.com - a website for low $ home made custom bike building. The pedals and crankset came from a 20" kids bike that I got for $10 on Craigslist. I cut out the part of the frame I needed, welded up a couple little holes in it from where extra tubes joined, and then epoxied it into the front longitudinal beam. that beam is made of 3 pieces of 3/4" lumber, so I cut out the middle piece with a jigsaw to fit the frame ends, then notched the outer wood with a chisel and grinder, clamped it up straight, and glued it all together. Filled the gaps around the bike tubes with some epoxy later on. I'll get better pics of that soon.
Graphite coated the bottoms. Let my daughter pick out the topsides color (BRIGHT red). Will update with pics of the seating arrangement and mechanicals as I build them.
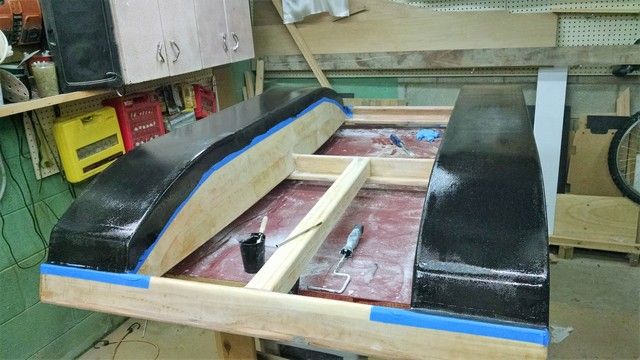
2 coats of graphite a few hours apart looks pretty good. Still some areas where the weave isn't filled in real well, but it's a solid coating. I'm leaving it. This is a "git 'er done" kind of deal.
Stitch and Glue Pedal Boat
-
- * Bateau Builder *
- Posts: 972
- Joined: Tue May 02, 2006 8:54 pm
- Location: SE WI
- Location: Milwaukee WI
Stitch and Glue Pedal Boat
Last edited by Fred in Wisc on Tue Jul 26, 2016 11:18 am, edited 1 time in total.
Re: Stitch and Glue Pedal Boat
That is very cool, please post pics as you go along. It's great to figure out ways to use left over scrap ply and cloth. I can't visualize the pedal system yet and look forward to seeing it.
Dougster
Dougster
Re: Stitch and Glue Pedal Boat
That's awesome! I want one.
Maybe you and Jacques can corroborate and get it on the site as plans one day.
Keep the updates coming, very intrigued.
Cam.
Maybe you and Jacques can corroborate and get it on the site as plans one day.
Keep the updates coming, very intrigued.
Cam.
Completed:
CC14 Canoe
V12 Sailing Dinghy
In Progress:
D5 dinghy
CC14 Canoe
V12 Sailing Dinghy
In Progress:
D5 dinghy
-
- * Bateau Builder *
- Posts: 972
- Joined: Tue May 02, 2006 8:54 pm
- Location: SE WI
- Location: Milwaukee WI
Re: Stitch and Glue Pedal Boat
More pics and info.
Here is the boat hull right side up. You can see the mount for the pedals bedded into the frame, and the seat adjusting track.
Here you can see the hull is pontoon style rather than the typical pedal boat being a big rectangular barge. Less weight carrying capacity, but it should go a lot faster due to less water resistance.
With the pedal crank temporarily installed. That part was just cut out of a whole 20" kids bike.
This was carefully aligned so the sprocket and chain runs parallel to the frame that it's mounted in. It's up high to keep the user's heels out of the water, and water out of the bearings. The pedal will have about an inch and a half of clearance to the front frame at its closest point.
Seat adjustment: after much thought and tinkering I decided it would be easiest to keep the pedal assembly and paddlewheel in fixed positions rather than making them adjustable. Having to adjust the chain length for different users would not be practical at all. Thus the seat had to be movable. This would have worked a LOT better if I'd drilled the holes in the track before mounting them, they would be straighter and more consistently spaced. Since I had already glued the rails on the boat I had to drill them in place. Since there is some slop there, I drilled them all oversize, chamfered them a bit with a countersink, and epoxy coated the inside of all the holes from both sides. There are corresponding holes in the front and rear of the seat frame, they will be bolted together, probably using some kind of plastic knobs so they can be adjusted without tools.
Seat- I decided to go with recumbent seating for comfort. The bottom seat is angled up slightly, pointed at the center of the pedals. The back is angled approx. 118 degrees from the bottom. This was the recommended seating setup for recumbent bikes from the bicycle expert folks at http://www.atomiczombie.com.
The seat is adjustable back and forth over a very wide range. I figured there might be a problem with weight shift, so I figured out the approx. center of gravity with a person on that reclined seat (about 9" ahead of the seat/back junction) and set it so that's about in the middle of the boat for a larger person. I figured the pedal vs paddlewheel thing will about cancel out weight wise, and that smaller kids can have a little pitch imbalance - they are lighter so they won't affect it very much, they are not too far off center and even with some unbalance they will still have plenty of freeboard. We'll see how that works later on.
For small people
for tall people
Now I have to figure out the paddle wheel for propulsion and the steering mechanism.
Re: Stitch and Glue Pedal Boat
Your pedal boat is looking very good!! Please keep the pictures coming!! Jeff
Re: Stitch and Glue Pedal Boat
I'm watching. Interesting project, well done and I am waiting to see how the pedal to paddle wheel will work.WouldWork wrote:That's awesome! I want one.
Maybe you and Jacques can corroborate and get it on the site as plans one day.
Keep the updates coming, very intrigued.
Cam.
I assume it will be a paddle wheel but ti could also be a prop drive by a flex cable like in a weed wacker.
Jacques Mertens - Designer
http://boatbuildercentral.com
-
- Active Poster
- Posts: 216
- Joined: Mon Oct 12, 2015 5:40 pm
- Location: United States
- Location: Wilmington, N.C.
Re: Stitch and Glue Pedal Boat
Did anyone ever find out more info on this system?
http://forums.bateau2.com/viewtopic.php?f=6&t=60741
Re: Stitch and Glue Pedal Boat
No. They were going to send us a prototype of a new model but we are still waiting.
Jacques Mertens - Designer
http://boatbuildercentral.com
-
- * Bateau Builder *
- Posts: 972
- Joined: Tue May 02, 2006 8:54 pm
- Location: SE WI
- Location: Milwaukee WI
Re: Stitch and Glue Pedal Boat
It'll be a paddle wheel. That's going to be a "design optimization through experimentation" thing and it'll be pretty easy to change paddle wheel diameters, area of paddles, gear ratio, etc, plus it's made out of cheap used bike parts.
that flex drive is clever though, and it could eliminate a lot of the problems I foresee with chain routing. Changing the pedal motion 90 degrees into turning a flex shaft won't happen with cheap and readily available junk parts, though. And I certainly don't have skills and equipment to machine precision type parts.
I'm planning on a long chain driving the paddlewheel with the rear sprocket from the bike wheel. A few little wheels / guides/ bearings to route the chain downward so it clears the structure. I think the paddlewheel will be a round steel shaft (I'd rather use aluminum, but I can't weld that steel sprocket to it) running inside a piece of square steel tube. the sprocket will be about in the middle of the shaft, so there will be a set of paddles on each side. The paddles will be plywood or Dibond (an aluminum / plastic sandwich product- I can get scrap free at work), 4 on each side bolted through the square tube. That way they should be easy to replace if they get damaged.
I'm pondering how high to mount the centerline of this- I don't want the paddle too big in diameter since it will already be geared up some. But I don't want it too low- my goal is for the paddles to not extend below the hull when they are turned to 45 degrees from vertical/horizontal so the boat can sit down flat for transport. But when they are turning, they'll extend below the hull at the vertical position for more thrust. I figure I can adjust the width and length of them a bit to get a good balance between pedal effort and speed.
Bearings will be something super simple- this is a low speed application and not high stress, so probably mount the shaft into some replaceable plastic bushings that are pretty easy to change. That might even turn out to be PVC pipe caps or something similar, and then fill the ends of the steel shaft with graphite/epoxy or weld a washer over it so they don't wear out the ends of the pipe caps too fast with the thin steel outer tube. I think a plastic on steel thing should be OK for this given the performance required. trying to keep it cheap and simple.
Last edited by Fred in Wisc on Tue Jul 26, 2016 5:49 pm, edited 2 times in total.
- cape man
- * Bateau Builder - Expert *
- Posts: 8278
- Joined: Sun Jan 20, 2008 12:02 pm
- Location: Lithia, Florida
Re: Stitch and Glue Pedal Boat
Between this and widening the boat there's some cool stuff going on out there...
The world always seems brighter when you've just made something that wasn't there before - Neil Gaiman
Who is online
Users browsing this forum: No registered users and 12 guests