
Stitch and Glue Pedal Boat
-
Cracker Larry

- * Bateau Builder - Expert *

- Posts: 22491
- Joined: Fri Mar 11, 2005 3:39 pm
- Location: Savannah, GA
Re: Stitch and Glue Pedal Boat
Very cool project, Fred  Looks like fun!
Completed GF12 X 2, GF16, OD18, FS18, GF5, GF18, CL6
"Ships are the nearest things to dreams that hands have ever made." -Robert N. Rose
-
narfi
- * Bateau Builder *

- Posts: 2434
- Joined: Tue Jun 07, 2016 6:55 pm
- Location: Bush Alaska
- Location: Bush Alaska
Re: Stitch and Glue Pedal Boat
How will you tension the chain?
Could you plqce tensioners under the crossmember nd then you wouldnt need to pass through it? (Two birds with one stone?)
Could you plqce tensioners under the crossmember nd then you wouldnt need to pass through it? (Two birds with one stone?)
-
Fred in Wisc
- * Bateau Builder *
- Posts: 972
- Joined: Tue May 02, 2006 8:54 pm
- Location: SE WI
- Location: Milwaukee WI
Re: Stitch and Glue Pedal Boat
The chain will be shortened to about the right length, and then the guide pulleys will be located to take out any remaining slack. Can't use a conventional derailleur type tensioner like a bike since this will have to operate in reverse under load as well.
The chain links are only 1/2" long so I can get it pretty close by shortening the chain. Then fine tune with the guide pulleys. I might end u using the little "sprockets" from a derailleur for some of those.
The chain shouldn't really need to be tensioned, just the slack removed so it doesn't jump off the sprockets.
-
narfi
- * Bateau Builder *
- Posts: 2434
- Joined: Tue Jun 07, 2016 6:55 pm
- Location: Bush Alaska
- Location: Bush Alaska
Re: Stitch and Glue Pedal Boat
Right.
I wasnt thinking of a spring loaded bycicle type but sprockets on slides you can manually adjust up/down over time as stuff settles in and the chain stretches. Maybe overkill though.
I wasnt thinking of a spring loaded bycicle type but sprockets on slides you can manually adjust up/down over time as stuff settles in and the chain stretches. Maybe overkill though.
-
Fred in Wisc
- * Bateau Builder *
- Posts: 972
- Joined: Tue May 02, 2006 8:54 pm
- Location: SE WI
- Location: Milwaukee WI
Re: Stitch and Glue Pedal Boat
The chain return will be under the crossmember. I didn't want to run them both underneath, the bottom one would be pretty far below the crossmember and I'm trying to keep the chain out of the water.
Good idea on an adjustable guide for tensioning, I'll see if I can incorporate that without too much complication.
Good idea on an adjustable guide for tensioning, I'll see if I can incorporate that without too much complication.
-
Fred in Wisc
- * Bateau Builder *
- Posts: 972
- Joined: Tue May 02, 2006 8:54 pm
- Location: SE WI
- Location: Milwaukee WI
Re: Stitch and Glue Pedal Boat
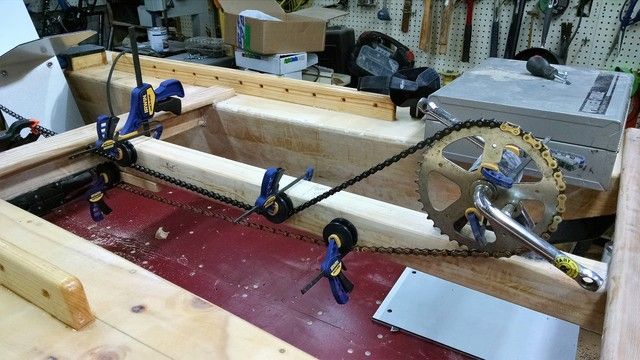
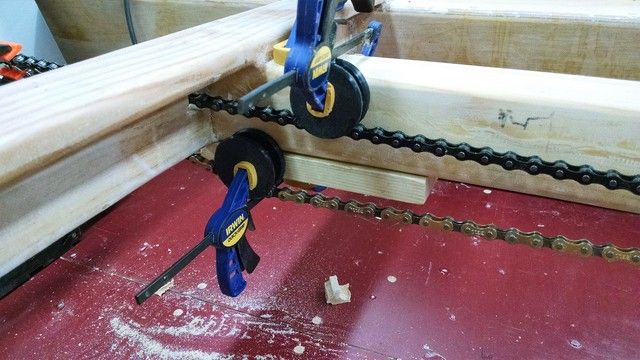
Made a lot of progress on the drive mechanism.
First, I needed some guide pulleys to route the chain, since it couldn't be just a straight run between the front sprocket and the rear one. I looked around a bit locally and didn't find anything that looked like it would work real well (small V belt pulleys were close, but they have a big center hole and are usually steel, so I thought the chain running around them would be loud and they'd be prone to rusting.
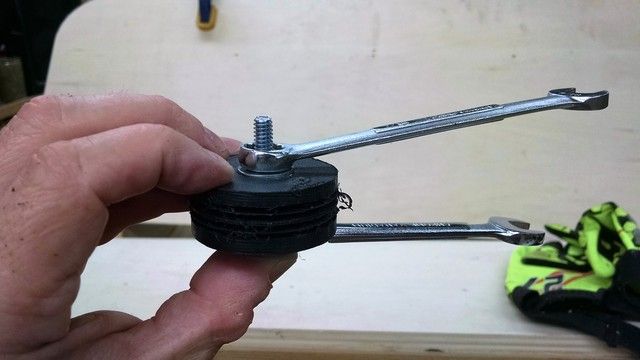
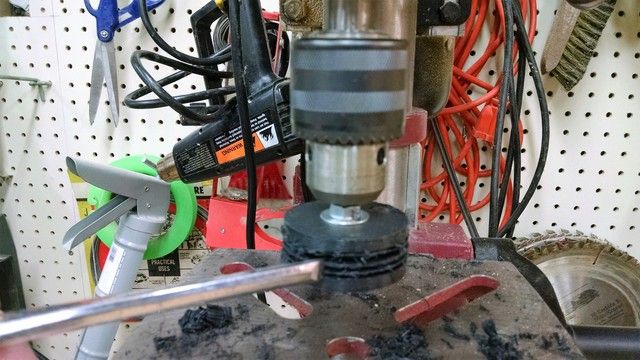
So I ended up making them. Had some scrap 3/4" Starboard. Used a hole saw (the one from cutting out doorknob recesses when I put in some new doors) to make some rounds with 1/4" center holes. The rounds are about 2" in diameter. I then ran a 1/4" bolt through the center hole, tightened it down and chucked them in the drill press. Fired it up at a low speed and a little work on my "redneck mini lathe" with a sharp wood chisel and a file made them nice and round with smooth surfaces.
I figured the chain would need a groove to ride in and keep things aligned, so I used a table saw (note the dowel in the center hole to improve grip) to start roughing one out. that was a little scary and dangerous, but ZI figured trying to run it through the router table would be WAY scarier and more dangerous.
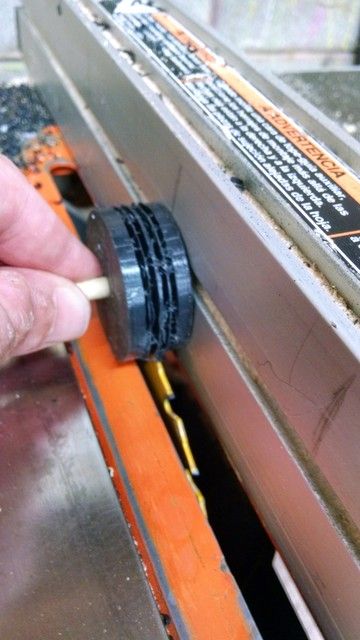
Then put the center bolt back in to cut out the groove. Found the trick was to use a rest (not shown in pic) clamped to the table and to use light pressure and take material off just a little at a time.

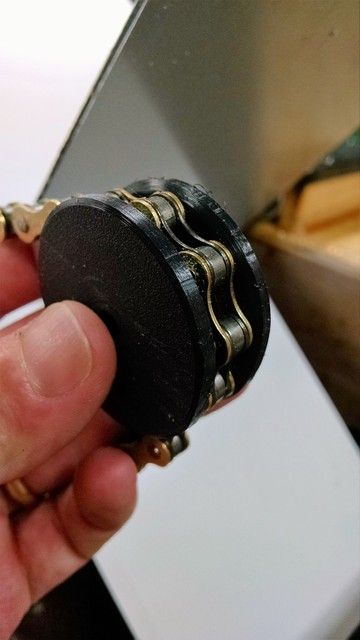
After the chisel, I used a file to smooth things out, and to put little corner chamfers on the guide pulley. Test fitted to make sure the chin fit in the groove nicely. It was a tad tight at first so I cut them a little bigger and tried again. Success.
So now I had 4 pulleys. Time to figure out the chain routing. Had to work it around the crossmember, seat, try to keep it out of the water, minimize the angle of change needed to keep the strain on the pulleys low, and keep it all aligned. Turned out I could almost do that by mounting the pulleys on the pedal support stringer, but the rearmost one needed to go a little lower, so I added a block under the stringer.
The only thing I don't like is the front top pulley changes the angle of the chain more than I'd like, but if it's any farther back, it will limit the seat travel forward for small kids. I could cut a notch out of the front seat frame, but I'd rather keep that strong and keep the chain low to minimize people getting body parts stuck in it.
I had initially drilled a hole in the crossmember to run the chain through. It was almost in the right place, and it gave me a starting point for routering a proper hole. The routered hole was cut with a long flush cut bearing bit that ran up against the top cap board and the center pedal stringer. On the other 2 sides, I clamped some boards to the forward side of the crossmember and used them for a cutting guide. After cutting it out, I ran a roundover bit on the edge, and hand filed/sanded the forward edges, no room to get the trim router in there. the chain runs through it nicely, about centered, looks like it won't touch any of the edges in use.
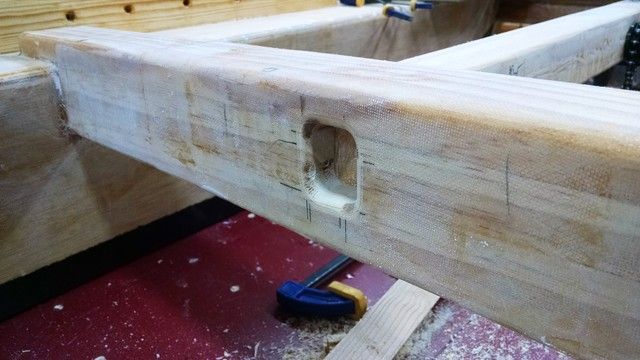
Then applied a bunch of small pieces of 4 or 6 oz cloth scraps to cover all the edges where I had cut or added pieces. Also added a layer or 2 to the narrow wood piece under the hole just to make sure it's not a weak point.
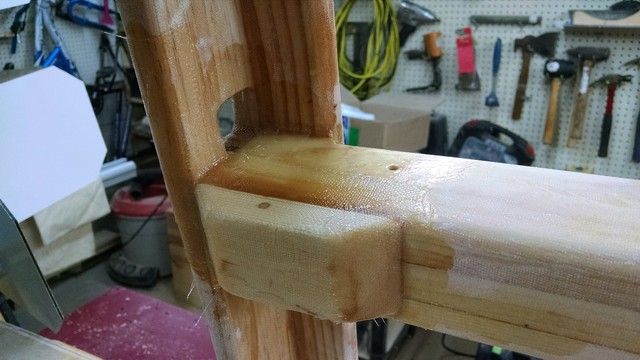
This looks like a smooth and easy process from the pics, but it took several hours of assembling, disassembling, trying stuff, pondering, trying different stuff, reassembling, and experimenting. I sure hope it works. We'll see shortly, the epoxy should be cured tonight, I can rough sand it and do a test assemble!
First, I needed some guide pulleys to route the chain, since it couldn't be just a straight run between the front sprocket and the rear one. I looked around a bit locally and didn't find anything that looked like it would work real well (small V belt pulleys were close, but they have a big center hole and are usually steel, so I thought the chain running around them would be loud and they'd be prone to rusting.
So I ended up making them. Had some scrap 3/4" Starboard. Used a hole saw (the one from cutting out doorknob recesses when I put in some new doors) to make some rounds with 1/4" center holes. The rounds are about 2" in diameter. I then ran a 1/4" bolt through the center hole, tightened it down and chucked them in the drill press. Fired it up at a low speed and a little work on my "redneck mini lathe" with a sharp wood chisel and a file made them nice and round with smooth surfaces.
I figured the chain would need a groove to ride in and keep things aligned, so I used a table saw (note the dowel in the center hole to improve grip) to start roughing one out. that was a little scary and dangerous, but ZI figured trying to run it through the router table would be WAY scarier and more dangerous.
Then put the center bolt back in to cut out the groove. Found the trick was to use a rest (not shown in pic) clamped to the table and to use light pressure and take material off just a little at a time.
After the chisel, I used a file to smooth things out, and to put little corner chamfers on the guide pulley. Test fitted to make sure the chin fit in the groove nicely. It was a tad tight at first so I cut them a little bigger and tried again. Success.
So now I had 4 pulleys. Time to figure out the chain routing. Had to work it around the crossmember, seat, try to keep it out of the water, minimize the angle of change needed to keep the strain on the pulleys low, and keep it all aligned. Turned out I could almost do that by mounting the pulleys on the pedal support stringer, but the rearmost one needed to go a little lower, so I added a block under the stringer.
The only thing I don't like is the front top pulley changes the angle of the chain more than I'd like, but if it's any farther back, it will limit the seat travel forward for small kids. I could cut a notch out of the front seat frame, but I'd rather keep that strong and keep the chain low to minimize people getting body parts stuck in it.
I had initially drilled a hole in the crossmember to run the chain through. It was almost in the right place, and it gave me a starting point for routering a proper hole. The routered hole was cut with a long flush cut bearing bit that ran up against the top cap board and the center pedal stringer. On the other 2 sides, I clamped some boards to the forward side of the crossmember and used them for a cutting guide. After cutting it out, I ran a roundover bit on the edge, and hand filed/sanded the forward edges, no room to get the trim router in there. the chain runs through it nicely, about centered, looks like it won't touch any of the edges in use.
Then applied a bunch of small pieces of 4 or 6 oz cloth scraps to cover all the edges where I had cut or added pieces. Also added a layer or 2 to the narrow wood piece under the hole just to make sure it's not a weak point.
This looks like a smooth and easy process from the pics, but it took several hours of assembling, disassembling, trying stuff, pondering, trying different stuff, reassembling, and experimenting. I sure hope it works. We'll see shortly, the epoxy should be cured tonight, I can rough sand it and do a test assemble!
-
terrulian
- * Bateau Builder *
- Posts: 3041
- Joined: Sat Dec 07, 2013 11:29 am
- Location: Marin County, CA
- Contact:
Re: Stitch and Glue Pedal Boat
Nothing about that looks easy, especially the table saw bit, which I would have been too chicken to try.
How are you determining the gear ratio/sprocket size?
How are you determining the gear ratio/sprocket size?
Tony

-
Fred in Wisc
- * Bateau Builder *
- Posts: 972
- Joined: Tue May 02, 2006 8:54 pm
- Location: SE WI
- Location: Milwaukee WI
Re: Stitch and Glue Pedal Boat
You'd better believe I was careful- the dowel supplied most of the control and force, I put a finger on top of the pulley to keep it against the fence and stop it from spinning. the blade was only up about 3/8 of an inch. I was still mighty careful, I'm a big wussy about emergency medical care.
The gear ratio is determined by the parts I had. Here's the math from page 2 of this thread:
The gear ratio is determined by the parts I had. Here's the math from page 2 of this thread:
It would probably benefit from some optimization, but should be close enough for a testing and initial use.Ballparking math again, just to see if this makes sense: Leisurely pedaling is about 40-60 rpm on a bike, lets figure 40 since this will probably have more resistance than biking unless you're going up a real steep hill. The front sprocket has 40 teeth, and the rear has 18, so about a 2 1/4 to 1 ratio, figure about 90 RPM for the paddle wheel speed. I can get a 24" paddle wheel to fit, and it'll be easy to mount since the shaft can go on top of the hulls and the blades will extend about 1.5 inches below the hull when vertical. Circumference of the 2' dia wheel is a little over 6', so around 540 feet per minute of paddle speed at the tips (actual effective dia will be a little less than tip dia, but we're approximating here).
That converts to about 32400 feet per hour, or a little over 6 miles per hour. Of course, there will be some "prop slip", effective diameter is a little smaller, friction, water resistance on the hulls, etc. So let's say a 25-50% loss- that leaves us with a projected speed of about 3- 4.5 mph. That seems reasonable for a paddle boat. Maybe a little high, actually. If it's too hard to pedal, I can make the paddles narrower for more slip. Of find a bike with a "dirt bike" 30 tooth or so front sprocket, that would reduce speed and effort by about 25%.
Commercial pedal boats use a direct drive paddle with 2 blades approx. 12" across and 6" high each. They are painfully slow and require almost no effort to pedal. I found a youtube video where a guy paddling moderately hard got just over 2mph in one on gps. Mine has more paddle area, and it will have less speed differential between the top and tip of the paddles since the paddle has a larger radius (so less loss from the paddle fighting itself with different water speeds) as well as less hull area. It should move pretty well for what it is. Anyway, I think this is good enough for a starting point.
-
terrulian
- * Bateau Builder *
- Posts: 3041
- Joined: Sat Dec 07, 2013 11:29 am
- Location: Marin County, CA
- Contact:
Re: Stitch and Glue Pedal Boat
I should have gone back and looked at that. Allowing some room for adjustment by narrowing the paddles and/or changing sprocket size was wise. Quite an experiment.
Tony
-
Fred in Wisc
- * Bateau Builder *
- Posts: 972
- Joined: Tue May 02, 2006 8:54 pm
- Location: SE WI
- Location: Milwaukee WI
Re: Stitch and Glue Pedal Boat
Actually building the little pulleys wasn't such a big deal. I have a pretty average shop and the whole process used just the table saw, drill press, hole saw, wood chisel, file and a couple of clamps. It was one of those things that was harder to figure out and get started than it actually was to do.
Last edited by Fred in Wisc on Wed Aug 17, 2016 9:38 am, edited 1 time in total.
Who is online
Users browsing this forum: Ahrefs [Bot], Google [Bot] and 12 guests