Page 1 of 1
FL14 "Robjack" update
Posted: Wed Jan 05, 2005 9:44 am
by Steve_MA
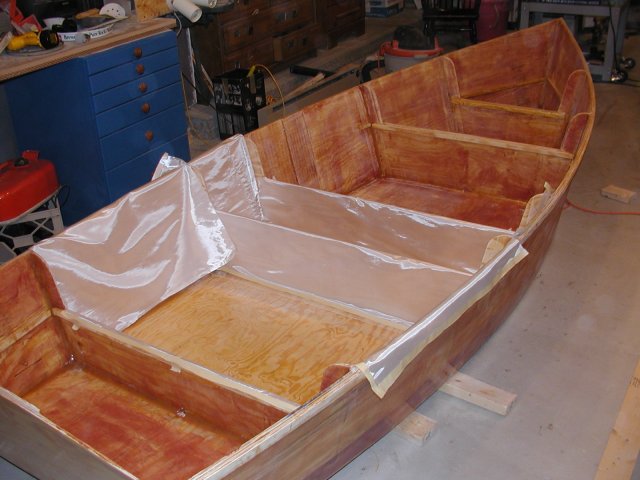
I figured I would start a running post here on my progress. After all your help, I finally got my head straight and committed to glass the whole boat so as to minimize any chance of water getting to the bcx plywood.
I got my E-poxy Monday and mixed up 3oz of the gooey stuff do to the butt blocks on the sides. They have had 36 hrs to cure now so today I going to stitch the sides together, cut the bottom and do its butt block. Then Friday I will stitch the bottom in place, duct tape the chines, flip it over and start the fillets.
I have been using the Devlin book as a resource. He says to keep your stitch holes the thickness of the ply + 1/8 from the edges....seems reasonable. I dont know if I am going to use cable ties or drywall screws for the frames yet. 3/8 is a small target to hit plus I dont want to split the wood. If I predrill some guide holes, I think it might work OK. Others seem to have done it. I was also thinking of using a cable tie as a spacer between the wood sections to keep a gap. This way I will have no "wood on wood" which I understand is the objective for a composite boat. For the F14 probably doesnt matter much though.
On the fillets, Devlin says make them about thickness of the ply and about 2X up the sides. I was planning to shoot for 3/8 thickness and 3/4 to 1" up the sides. I think I can get my plastic spoons to do these nicely. The FL14 plans show 1/2 thickness in one place and 3/4 thickness in another, but I think those are just generic references, not specific to the FL14. Are my planned fillets big enough?
I also want to maintain wet-on-wet as much as possible to minimize sanding. When does wet become "dry"? They only guages I have been able to figure out are (a) the epoxy form some kind of amine blush (?) after about 48 hrs that should be sanded off before the next coat and (b) wet epoxy has more "teeth" for the next layer to bond to....but I will be the epoxy is pretty firm about about 6hrs (in my space which is about 60 deg F). If I do my fillets and then come back with the 4" tape about a couple hrs (ie. before it gets real firm), is that still wet-on-wet?
OK - off to build!
Posted: Wed Jan 05, 2005 10:02 am
by jacquesmm
A note about the Devlin book: it is excellent but does not always apply exactly to our boats.
Remember that we were specifying biaxial and filleting techniques before the Devlin book was published.
We recommend the Devlin book but clearly say in our building notes that, if there is a conflict between his recommendations and ours, you must follow our specifications.
His specs work for his designs, not for ours.
The radius of the fillet has nothing to do with the plywood thickness. It is a function of the fiberglass type and weight.
In general, an amateur will not able able to properly laminate light fiberglass around any corner sharper than 1/2".
Some experienced builders will shape 6 oz. around a 3/8" radius but that's the max.
Use as few screws as possible on the frames. On a FL14, you should not need any screws in the frames.
If you do, you will have an unfair hull.
Blush depends on the resin. West System blushes a lot, our MarinEpoxy slow and our Silver Tip do not blush.
Wet on wet means wet. Wet enough for the resin to wet the next layer but there is very little of that in the FL14.
What you are thinking about is secondary bond: one to two days is fine depending on the temperature. That is for our resins, not for West or Mas. With those ones, you must wait for complete cure and remove the amine.
FL14
Posted: Wed Jan 05, 2005 11:22 am
by mpacek
Steve,
I am builiding a FL14 in Woburn. Had similar plywood concerns and I am ready to glass the bottom. Between cold weather and kids have not had the time. Some progress pictures are in the gallery under MikesFL14
Posted: Wed Jan 05, 2005 2:25 pm
by fishingdan
Steve,
We have all been at the same stage. Once you get started, you'll quickly get the feel of these things.
- Fillets just need to be large enough to allow the fiberglass tape to transition from one panel to another without any air gaps.
- Wet-on-wet for simply means that you will lay the tape on the seam before the fillet cures. Apply a light coat of epoxy on the joint, apply/shape the fillet, clean up any excess, apply another thin layer of unthickened epoxy over the fillet and then lay down the fiberglass tape. Once the tape is down and push it into place with a disposable brush or glove coated hand. Let the glass absorb the available excess resin. Then complete the saturation of the tape (no white tape visible) by applying a little more unthickened epoxy.
- This time of year in New England, keep your epoxy at room temps and you can work through the winter without any problem.
Overall, take your time and pick a small area for your first attempt. When you are done, you will look back and say "what was I worried about, that was easy". I said that after every step of building my first boat.
Good luck and enjoy the build.
Dan
Posted: Wed Jan 05, 2005 2:25 pm
by Steve_MA
Thanks Jacques....I guess I will keep posting my planned method ahead of time to make sure I dont screw up too bad. I didnt think of the impact of trying to bend the cloth around a small radius.
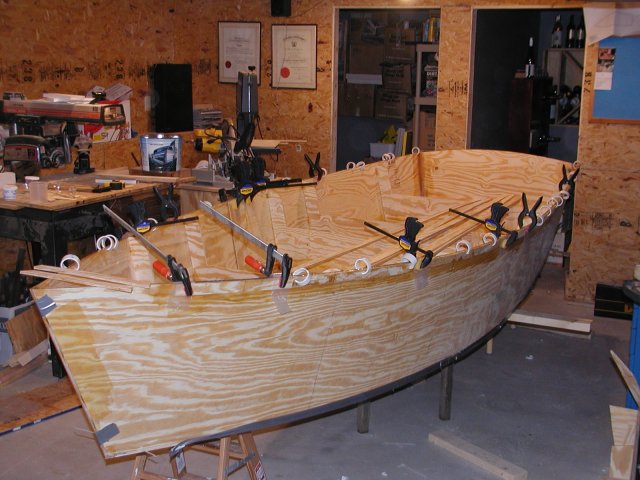
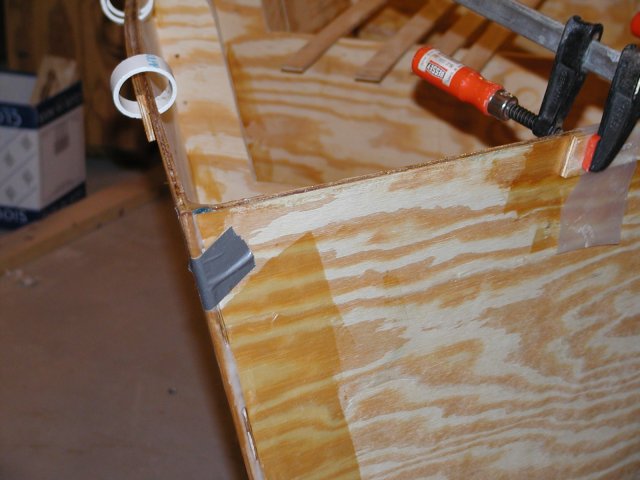
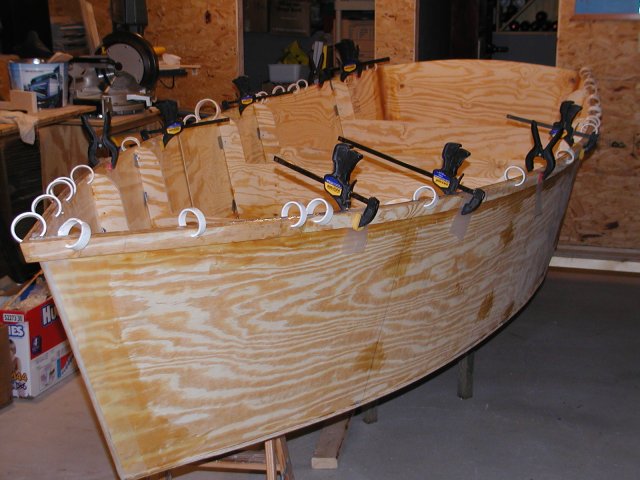
I got the hull "framed". I used cable ties and its suprisingly tight. It would have been a nightmare using screws I can see now.
As far as getting this thing square.....hmm......the transom corner to the bow measures 153.5" from both corners of the transom. To frame 1, I can get the measurements to be 129.75". However, if I measure to frame 3 or frame 5 for example, I can be 1/2 or maybe even 1" different. .... Well I just went to check it looks good now! Maybe only 1/2" different at most.
I have the hull supported on a 2x4 at the bow and the same on each side by the transom. If I pick it up by the sides at the transom, wiggle it around, and set it down, I can get things to come out differently....get it out of square.
Now that I have it square. I will put the bottom ply on, mark it, cut and glue it...then Friday, stitch it together.
updated pics at:
http://photos.yahoo.com/eabsjw
(I would use the bateau gallery, but first time I had a filesize problem, now I have a resolution problem, arghh..)
Posted: Wed Jan 05, 2005 6:14 pm
by Steve_MA
Wet-on-wet for simply means that you will lay the tape on the seam before the fillet cures. Apply a light coat of epoxy on the joint, apply/shape the fillet, clean up any excess, apply another thin layer of unthickened epoxy over the fillet and then lay down the fiberglass tape. Once the tape is down and push it into place with a disposable brush or glove coated hand. Let the glass absorb the available excess resin. Then complete the saturation of the tape (no white tape visible) by applying a little more unthickened epoxy.
This is pretty much what I was going to do. Should I try to serve the fillet mixture out of a ziplock bag like a cake decorator? I was thinking doing that then smoothing it with a spoon would be a good way to do it. I am not so sure the bag thing will work though.
I assume I am going to do corner to corner and not corner the tape at 90 degrees. I suppose it could be done but a couple scissor snips would be required to make it lay flat. Any guidelines on how much epoxy to mix at a time? How many pieces of tape can you lay with it? I only mixing 3oz batches now and it seems to firm up by the time to get to the end of it - may 5-10 minutes. This is with med hardner at 65 deg. Seems pretty fast. I think I should be able to get 15-30 minutes shouldn't I? Do I just need to mix more?
I am sure I will figure out a technique after a few trys, but I like hearing other peoples experience.
Lastly I was going to cover the fillets with some 4mil plastic after the tape is saturated and then roll it lightly with a clean roller. This I am hoping will give me a nice smooth fillet.
Posted: Wed Jan 05, 2005 6:25 pm
by Steve_MA
Blush depends on the resin. West System blushes a lot, our MarinEpoxy slow and our Silver Tip do not blush.
Wet on wet means wet. Wet enough for the resin to wet the next layer but there is very little of that in the FL14.
What you are thinking about is secondary bond: one to two days is fine depending on the temperature. That is for our resins, not for West or Mas. With those ones, you must wait for complete cure and remove the amine
So - if I epoxy seal the plywood, then come back a week later to apply a cloth covering to the plywood, can work right over the cured epoxy without sanding? (Using E-poxy)
I was going to do all the fillets first, then come back and cloth the large areas later (like several days later). I want to miniimize any epoxy I need to sand. If I dont have to sand it, I can just expoxy coat the large areas and not worry where the epoxy goes. If I *do* have to sand, I will confiine the expoy to the filllets.
Thanks for the help
Posted: Wed Jan 05, 2005 7:59 pm
by ks8
Personally, I wanted the glass to be bonded to the wood with the same batch of epoxy. I wetout the cloth on the dry wood hull panels. Of course I had first taped the seams, let them cure, and sand prepped them all, without cutting too deep and avoiding cutting cloth.
If you epoxy all surfaces first, I would think it wise, if it cures, to first wash any potential blush off, then sand rough it up for a sheathing of glass and epoxy. After sand prep of such surfaces, I usually wipe it down with a couple of clean damp cloths after a light wash with a *damper* cloth, to get any fine dust out of the roughed up surface, since the next epoxy layer is relying on a mechanical bond instead of chemical. And I let it dry overnight and up to about noon the next day, in case I had sanded through the first cured coat and got the wood a little damp in those areas.
There will be, no doubt, several good opinions on the matter. Just remember that any epoxy coats after a preliminary coat has cured, will no longer be a total chemical continuous bond, but will rely on mechanical bond properties between the layers, which means it will, I believe, always help to rough it up a bit, even if a resin type boasts No blush at all.
sincerely,
ks
Posted: Wed Jan 05, 2005 10:25 pm
by Steve_MA
Thanks, ks....sounds like a prudent way to do it. I had forgot about dry time, especially for the wood. Your comment about the epoxy making a chemical bond with the wood got me thinking too.....I didn't realize that....it caused me to go do a bunch of reading on the forum and other places...
I picked up some tips on related items:
- let fillets cure up 30 min or so before applying tape
- dont mix more than about 15oz epoxy at once and try to apply to 15sq ft (Sys 3 epoxy book)
- you can wipe amine blush off with water
- "sanding" - if only for mechanical purposes - can be done with something like a damp scotchbrite pad - this will keep dust down immensely. Sounds like it might be worth a try
- if you cant get to a surface and want to avoid sanding - you can slip in a "skim" coat to give you an extra couple days
I am probably way over analyzing this, but heh....it beats work!
Posted: Thu Jan 06, 2005 8:25 am
by Mike Adams
jacquesmm wrote:Use as few screws as possible on the frames. On a FL14, you should not need any screws in the frames.
If you do, you will have an unfair hull.
Jacques,
I've just started my FL14 (see separate post). I'm a bit confused by your comment on the use of screws. On page 2 of the building notes, under 'Assembly', it says: "Fasten the frame to the side panels. Fastening can be done with screws or staples. Stitching or taping are other acceptable methods."
I bought some bronze screws especially to do this job, and a special countersinking bit to ensure a straight and true pilot hole for the screws. Why will the use of screws result in an unfair hull? Should I forget about using them?

Posted: Thu Jan 06, 2005 9:15 am
by fishingdan
Mike Adams wrote:I'm a bit confused by your comment on the use of screws. On page 2 of the building notes, under 'Assembly', it says: "Fasten the frame to the side panels. Fastening can be done with screws or staples. Stitching or taping are other acceptable methods."
I bought some bronze screws especially to do this job, and a special countersinking bit to ensure a straight and true pilot hole for the screws. Why will the use of screws result in an unfair hull? Should I forget about using them?
Screwing a panel to a frame can result in a distortion of the side panel if you are not careful. You will get the best results by loosely stitching the hull together with nylon cable ties or wire. The resulting natural bend in the panel is what the designer is counting on to provide the nice hull shape. When screws are used, the result is often that the panels are too tightly attached to the frames and, as a result, the side panels will be distorted.
It also sounds like you were planning on leaving the screws in. That is not necessary and not recommended. As you glass the seams, it is best to remove any screws and stitches.
Dan
Posted: Thu Jan 06, 2005 9:32 am
by fishingdan
Steve_MA wrote:
This is pretty much what I was going to do. Should I try to serve the fillet mixture out of a ziplock bag like a cake decorator? I was thinking doing that then smoothing it with a spoon would be a good way to do it. I am not so sure the bag thing will work though.
I assume I am going to do corner to corner and not corner the tape at 90 degrees.
Steve,
Applying the fillet material with a bag works well. Once it is layed down, then you go back with a spoon (or whatever you plan to use) to shape the fillet.
Yes, you should lay the tape corner to corner.
Regarding how much epoxy to mix. Be careful. Mixing larger batches will not increase the working time. In fact, it will do the opposite. Larger batches generate more heat. You will have less working time. This can result in a batch of epoxy "going off".
I worked through last winter (Norfolk, MA) with slow and medium hardeners. The benefit of working in cooler weather is that you get longer working times. The downside, is you develop "cold weather" epoxy habits. When it warms up, you can get caught off guard with the smaller working times.
Early last summer, I was getting in a hurry to finish my boat and started working on the console. I mixed up a batch of epoxy thinking I was going to coat the entire console with one mixture of epoxy. I didn't make it. The larger batch went off after about 8 minutes and because it was a larger batch it went off fast. Within a moment of time it went from a liguid to a thick glob and became smoking hot (literally).

I am probably not a good candidate for boat building in FL.
Posted: Thu Jan 06, 2005 4:41 pm
by Steve_MA
I bought some bronze screws especially to do this job, and a special countersinking bit to ensure a straight and true pilot hole for the screws. Why will the use of screws result in an unfair hull? Should I forget about using them? Confused
Mike, I started looking to use the screws first - before I saw Jacques post. I was going to drill pilot holes so (a) the screw did not bite the side panel and (b) center the screw into the 3/8" frame. After drilling a couple pilots in the frame by hand and trying both course thread and fine thread drywall screws I had, it was pretty clear that either (a) I would not be able to get it centered without some kind of jig and/or drill press and (b) even if I did get it centered, the screw might easily pop out the side if stressed.
I switched with cable ties and it worked great. The hull came out pretty square and was quite and easy to put it all together.
I havent really decided whether or not the stitches will stay or go....probably some of both. I dont think it matters to leave them - or parts of them in since they will be totally covered by epoxy anyway. I kept my holes within about 1/2 of the joint so the fillets will cover the stitch.
One thing that did have me wondering for a while (during the stitch process) was with frame 3 I think it is. When I install all the frames (upside down) I tried to line up the bottom of the frame with the bottom of the side panel. All the frames and hull curves seemed to look pretty good except frame 3 which didnt seem to fit quite as well as the others. I chalked up to being a bit off on a cut, but I think its actually because frame 3 is sized to accomodate the butt block - I bet when I move it 3/8" down it will look better.
The other thing immesley useful, something to keep the transom area together when you stitch the box. I had a couple of 50lb weights - you probably need something equivalent to about 5 gallons of water for each side. I just rested the structure on the ground with a couple 2x4s underneath and that was all I needed.
The only other tricky part was getting it square. I initially had a support under the transom but that was no good. I found one support under each side panel at the transom end and 1 piece under the bow a nice 3 point support for the assembly. I would pick it up at the transom end, jiggle it around and set it down carefully, check for square, tighten up all the stitches. Frankly if it was really out of square - not sure what I would have done.
Good luck!
Posted: Thu Jan 06, 2005 4:55 pm
by Lon
"I'm a bit confused by your comment on the use of screws. On page 2 of the building notes, under 'Assembly', it says: "Fasten the frame to the side panels. Fastening can be done with screws or staples. Stitching or taping are other acceptable methods."
Mike, all you're trying to do is hold the frames TEMPORARILY in the correct position in relation to the side panels so that they may be PERMANENTLY fused with fillet and tape.
Read here:
http://bateau2.com/content/view/46/28/
Posted: Thu Jan 06, 2005 5:02 pm
by Mike Adams
Steve, Dan
Thanks very much for the tips, guys. I will take your advice and go with the cable ties for attaching the frames to the sides.
I note that the plans state that the midseat frame (bowside) is dimensioned to allow for the butt block. Since the frames are installed with the hull upside down and the tops of the frames level with the tops of the sides, I presume that the correct alignment for that frame should happen automatically.
Boy, I'm glad I sat up late last night and read the forum posts before I got stuck into assembly today! This has to be the best boating site on the internet!

It's a glorious summer morning here in Canberra - gotta go now and build me a boat!

Posted: Thu Jan 06, 2005 5:10 pm
by jacquesmm
There are many ways to keep the frames in place while assembling the hull but remember that the goal is to shape the hull by letting the panels take their natural shape.
You can use screws but don't drive them all the way down, do not create a flat.
I like duct tape, it is often sufficient on a boat like a FL14 or FL11.
If you use screws, they will not bite in the 3/8 frame. You can add little temporary blocks where you put the screws.
Cable ties are OK too but I stick to my duct tape.
One last method we used was to cut 2x4" of the exact spacing between the frames and drive a nail through the spacers. Works but heavy.
One last thing, you can build the boat upside down or right side up but in all cases you will have to help those panels with some blocks. They are thin and tend to wobble. The hull looks scary at that stage, really flimsy but with all the fiberglass, seats and rubrail it will become very solid.
Posted: Thu Jan 06, 2005 5:14 pm
by Mike Adams
Lon wrote:Mike, all you're trying to do is hold the frames TEMPORARILY in the correct position in relation to the side panels so that they may be PERMANENTLY fused with fillet and tape.Read here:
http://bateau2.com/content/view/46/28/
Lon
Thanks- yes, I understand the technique, but I was a bit confused because whereas the DE23 is assembled as a hull 'shell' with the frames and stringers permanently installed only after flipping, the assembly of the FL14 starts off by positioning the frames and attaching them to the sides. I thought the assembly instructions were telling me to screw or staple the frames permanently in place before fusing with the fillet and tape. I'll go with the cable ties.
Posted: Thu Jan 06, 2005 5:19 pm
by Mike Adams
jacquesmm wrote:One last thing, you can build the boat upside down or right side up but in all cases you will have to help those panels with some blocks. They are thin and tend to wobble. The hull looks scary at that stage, really flimsy but with all the fiberglass, seats and rubrail it will become very solid.
Thanks, Jacques. Boy, I'm glad you told me that before I got started with the assembly - I'm scared enough as it is!

update on progress
Posted: Fri Jan 07, 2005 8:18 pm
by Steve_MA
Today I stitched the bottom, flipped the hull and admired how good it looked. Then I started setting up some supports to make it stable for epoxy, tape etc and realized it wasnt so easy. Then I took out my tape measure and found out I went from 1/2 out of square betore the bottom went on to 1" out of square now. 6 hours later, after taking out and reistalling all the frames, and finally getting a good support in place, I got my 1/2 back and I am ready to move on. But tomorrow I think.
Update photos
http://photos.yahoo.com/eabsjw
And I was just telling my wife how everything was going pretty close to plan; I must have jinxed myself
fillets
Posted: Sat Jan 08, 2005 10:52 am
by Steve_MA
And so here are the fillets from my first crack at it

I used a 1 qt plastic bag to bead the stuff out. It was had to get into the bag and the batch only lasted for about 15" before I had to start fussing with it at which point, things broke down fast.....ie got real messy. Its amazing how much wood flour it takes...and i think I could have even made it thicker.
Shaped with 2 1/2 PVC which worked great. Wetted out with 3" roller which worked well. Got the bubbles out and wetted out final areas with plastic fiberglass thingy (squeege?). That all worked pretty well.
I dont think I need to touch these again until I come back and cover the whole inside with cloth, except to sand down the edges and clean out the messy bits.
Do I need to fill the weave before I put down the covering cloth? I dont think so....
Posted: Sat Jan 08, 2005 10:59 am
by Steve_MA

[img]http://gallery.bateau2.com%20displayimage.php?album=238&pos=1[/img]
Lets try these images again....they dont show in the preview, but maybe they dont ....
Posted: Sat Jan 08, 2005 11:04 am
by Steve_MA
Oh well, one more time...

this link works
http://photos.yahoo.com/eabsjw
01/11 status
Posted: Wed Jan 12, 2005 12:00 am
by Steve_MA
Build status...
I ran out of wood flour so I didnt get all the inside seams taped. Learned as i went of course. No huge mistakes yet. Help has been great. This thing is getting solid as a rock. Is going to be a great boat; its bigger than I expected. Used my last wood flour and some silica on the last seams. It was definitely smoother paste, but under the tape, I dont know if it makes a diff. Using plastic minifibers to paste the rubrail, since I have some. That seems to have worked nicely; mixed about 3oz epoxy with 3oz by volume of filler (loosely packed).
Should I bring the rubrail all the way around the bow (as I see the KentXX galllery picture? Looks like the design shows it that way. I was going to leave it short an inch or so and feather it to meet the bow. Is this a builders choice or is there a "right" way to do it?
I duct taped and tabbed a 1/4" dowel to the bow to give me something to round the tape over. This will go on tomorrow then I will put the last strip of the first layer of rubrail.
I am going to have a big breasthook, so we can jump off it into the water. I could put a couple screws in and cover them with the last strip of rubrail or just epoxy and fillet underneath. Epoxy is probably strong enough....haven't decided.
Seems like I am putting lots of hours in now....up to about 50 total. Cant wait to get it flipped and see what the hull looks like.
Process: flip, prep the hull, tape the chine, 9oz cloth on the bottom, 4oz cloth on the sides. I am thinking to bring the 9oz cloth over the chine and up the side about 4 inches, then bring the cloth down from the rubrail to about where the tape starts. This will give me a step from 4oz cloth, to 4oz + 9oz, then to 9oz cloth + tape. Seems like a smooth transition.
If any with experience have comments, warnings, recomendations, I am all ears!
(Still thinking about drainage and seats/storage). Shipment of supplies on tthe way.....
Posted: Wed Jan 12, 2005 6:56 am
by Mike Adams
Lookin' good, Steve!

We seem to be at a very similar stage (see tonight's post on my FL14 thread). I'm glad I took your advice about using cable ties instead of screws - it made things a lot easier than they would otherwise have been.
I reckon I've spent about 13 or 14 hours on building so far - plus several more hours cleaning up, etc.

Keep on building!
Posted: Wed Jan 12, 2005 9:19 am
by PJPiercey
If you are going to be standing on the breasthook I would recomend 6 oz tape around the fillet seam on top.
Progress looks great

Keep the pictures coming.
Paul Piercey
FL14 in Woburn
Posted: Wed Jan 12, 2005 9:50 am
by mpacek
It must be nice to have a heated space to work in. I am at the point you are
at and have been for about a month but am waiting for a little wamer day to glass the hull. I am using 6 oz on sides and bottom. I am planning to add rub rail, skeg and runners after glass. Looks great Steve
Posted: Wed Jan 12, 2005 10:11 am
by Steve_MA
Hmm... I wasnt thinking about a fillet on top of the breasthook. its going to be flush with the rubrail so its smooth on top. I will fillet underneath with 9oz tape assuming I have a few inches left. The top will be covered with 4oz cloth. I think that ought to do it.
Posted: Thu Jan 13, 2005 12:36 am
by Steve_MA
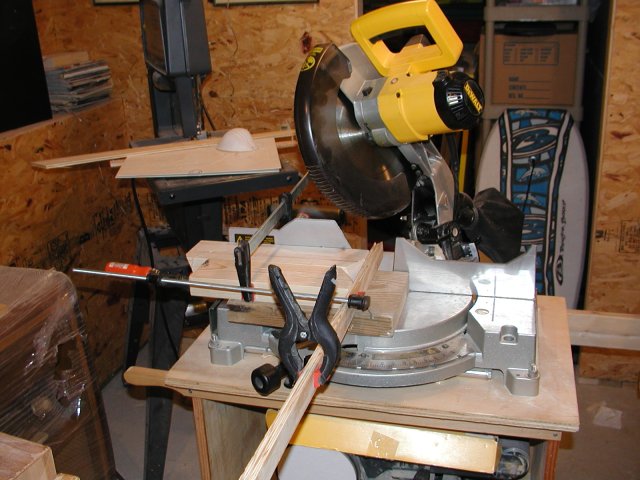
Put in another couple hours. Decided "to get on with it" and just do the rubrail around the bow with 1/4 ply. What cinched it was that I has a compound mitre saw that I have never used and after puzzling for quite a while I was able to make the right cuts.
Here are some pics of the dry fit
There must be an easier way, but I dont know what it is......it was a complicated setup on the saw.
The other thing I did was work on the bow. With the dowel installed, I need to fill in around it and put tape on. I wasnt able to do that all at once because I kept getting alot of air bubbles around the dowel.
All this needs to be filled in *first*. So I wasted my first piece of tape. I filled in around the dowel with putty. Once that dries, I shouldnt have to worry about air bubbles. I will just apply some thick glue and make sure its shaped nicely before putting on the tape.
Posted: Thu Jan 13, 2005 9:42 am
by JeffS
You could glue the rub rail on to one side and leave them long. Once the glue sets use a hand saw to trim them flush. Then glue on the other side and once set trim with a hand saw. You get a lap at the point when you do that. Not important if it is going to be painted You will never see it. If you are going wit the varnished wood look you might not want to do it this way.
Jeff
Posted: Thu Jan 13, 2005 3:46 pm
by Mike Adams
It may not be a good idea to glue rubrails in place only on one side at a time - this could cause some hull distortion. Somewhere else on this forum (can't remember where) Jacques recommends glueing rubrails to both sides simultaneously to avoid this problem.
Posted: Thu Jan 13, 2005 4:18 pm
by BilltheCat
I did just that on my N7 - port rail held in place and cut flush - then starboard rail left long - glue both and let dry, then trim flush with port rail. Then for the next layer - starboard cut flush and port goes long - and so on for three layers. Any gaps filled with the magic woodflour & epoxy putty.
Neat way if your joinery skills are rusty.
Posted: Sat Jan 15, 2005 12:17 am
by JeffS
As far as gluing rub rails on one at a time goes, I do not see too much of a problem here unless it is done very early in the building process before the major seams or fillets are built. Once the frames are in place, in my experience not much bad can happen that has not already happened. The rub rails will help fair our long streaches of the sheerline between frame. But I do not think this will add any twist to the hull once the frames are glued inplace (sides and bottom). Unless you are working in teams it is hard to put them on at the same time. Even if you are putting on one ten minutes before the other, you will have clamped it in place, then can hand saw flush and install the other side. Might take one extra minute. Easy to do. When you are going for the nice wood joinery for the exposed varnised wood look then things have to be done well. On the other hand the angle of the symetrical joint could be marked easy enough by clamping in place and putting pencil marks on the top and bottom following the centerline. Cut with a handsaw, and reclamp to make sure it is good. If it is a little off, either try again 1/4 inch in from the old cut or fix the first cut with a belt sander or sanding block to get spot on. Just keep the back side a little long in case you have to nibble back a couple of times to get it where you want it.
JeffS
Posted: Sun Jan 16, 2005 10:23 am
by Steve_MA
Status: second row of rubrail installed. Starting assembling and glueing bits a pieces for breasthook, skeg, cleats, etc. Resolved buy another sheet of 3/8 if I need to instead of trying to utilize every scrap most efficiently. I can just cut it half glue it, and rip as many cleats as I need.
Now the boat is flipped and I went thru my procedure for the next week; up through fully fiberglassing the exterior.
Posted: Wed Jan 19, 2005 7:28 pm
by Steve_MA
Well, I have been trimming and sanding, boring and filling voids. Boat was flipped over the weekend. I wasnt quite sure how to go about getting the 1/2" roundover on the edges. I used a router with a roundover bit and bearing, but all that did was serve to get me started...effectively working somewhat as a trim bit since the panels arent at 90 deg. Then I tried my random orbit (Porter Cable 333 since some are interested - with broken dust collector), but I didnt think my roundover was enough and it was slow going. I had been hesitant to try the belt sander, but finally did. It worked alot faster, but you have to be careful with it of course. Then the belt broke. It was medium grit and I replaced it with a course grit. Now, I had to be more careful! Probably should have stuck with medium. In any case, now I have a nice roundover all around the hull and on the transom. I also have some heavy scratch marks in the plywood that I am hoping the cloth and fill will help feather out.
I have also sanded the whole exterior and filled all the holes, knots, etc. That has been about 4-6 hrs of work I guess. I exposed a few voids rounding over the hull. I used a "Rotozip" to open it up and fill it with epoxy (there were 4). One turned out to be a knot and ended up being about the size of 2 quarters!
I have been covering these patched areas with 4mil plastic and it just peels right off 12 hrs later leaving a nice smooth surface!
It will be interesting to see what the hull looks like after its covered and had a coat or 2 of epoxy+microballoons. There are alot of minor imperfections in either due to epoxy or ply and I wonder if the cloth + fairing mix will make them disappear or be more pronounced.
Maybe tomorrow I will get to taping. Steps
1. tape seams, knock down edges next day
2. transom cloth, bottom cloth (this will cover all the tape)
3. next day, hull cloth
4. next, 1st coat of epoxy+balloons
5. another coat of epoxy + ballooons?
Posted: Thu Jan 20, 2005 12:58 am
by Mike Adams
Hey, Steve - looks like you're on a roll!
Please post more pics. We are really learning off each other, I think!
Posted: Thu Jan 20, 2005 11:26 am
by Steve_MA
OK - I uploaded more pictures.
http://gallery.bateau2.com/thumbnails.php?album=238
I have a bunch more, but I dont know how to organize them and it takes a while to do. It isnt the most intuitive interface I have ever seen.....but the rest of the "company and community" more than compensates.
Is there a way to upload more than 1 picture at a time does anyone know?
Posted: Thu Jan 20, 2005 2:04 pm
by ks8
Must be nice to have a heated garage!
Looks like you will be in the water while I'm still sanding.. but that's alright.
go go go...
Posted: Thu Jan 20, 2005 2:20 pm
by Steve_MA
well....its a basement and there is no heat, but its been holding at 58-62 lately, but in past few days its come down a few degrees. Its taking the epoxy longer to set.... I have forced hot air ducts running across the cieling to heat the 1st floor and my builder implied I could cut them open to put some heat in the basement if I wanted to, but I dont know if it will cause any problems so I havent done it.
Posted: Thu Jan 20, 2005 3:11 pm
by fishingdan
Steve_MA wrote:well.... I have forced hot air ducts running across the cieling to heat the 1st floor and my builder implied I could cut them open to put some heat in the basement if I wanted to, but I dont know if it will cause any problems so I havent done it.
Steve,
You don't want to do that. In my previous home, the builder did exactly that and it was useless. Unless the system is designed to heat that level, it will be ineffective. Get a gel filled electric heater. They work great. I had a 5' long free standing floor model.
The boat is looking good.
Dan
Posted: Thu Jan 20, 2005 6:58 pm
by ks8
I've got one of those electrics also. They work fairly well, but electricity is expen$ive.
A forced air system in a basement may tend to have all the heat rise to the ceiling as the cooler air near the floor and walls is heavier (good enough term), and displaces where the warmer air might have otherwise drifted to (sort of). One or two strategically placed fans, on the floor, pointing straight up, will get the warmer air up there to circulate more in the living regions above the floor, by using the cooler denser air to move that hotter air around more. But when altering a home heating system (cutting a hole in a duct), you always have to make sure that the system can still push warm air to all the spaces where it is needed. You don't want to start, say, getting minimial heat to a second floor, and risk any pipes freezing that may be in outside walls.
In college, I lived in an old huge house with cathedral ceilings. When I was moved to one of the LARGE rooms, I found out what a cold room is like. Someone left a beer on a nightstand one night. I woke the next morning to find it froze solid. I got up on a chair and raised my hand. It was toasty up there, but there were no people typically spending anytime up there! I put in just one small space fan (18") in a strategic corner, on the floor, and aimed it straight up. I partially regret, since it made that room the warmest in the house, and everyone used to stay and chat in there til the wee hours, which doesn't help when sleep tugs at your eyelids.
Try the fan, as it may do the trick without having a skyrocketing electric bill. Even putting the fan four feet off the ground and aiming it up should help. It doesn't need to create a gale, just move the air by the ceiling.
Of course, if you are sanding, that fan will blow and circulate the dust everywhere, and if there isn't positive pressure coming out the hole you cut, all the time, the dust and fumes may spread through the whole house, via the duct system! Maybe the electric is the way to go...
Have fun being Professor wizard...
ks
Posted: Thu Jan 20, 2005 10:07 pm
by Steve_MA
Turns out I have a 5' oil filled elec heater. It seems to doing a good job, my work area is about 60 deg now.....
Taped the exterior tonite.
Posted: Thu Jan 20, 2005 10:52 pm
by ks8
If you try to push it up much higher in temp in this cold snap, if you get bored you can go outside and watch the meter spin! Bring a chair in case you get dizzy...
You're inspiring me. I may laminate up the port additional chainplate partial frame this saturday, in the basement, so in the spring it will be ready to fit to the boat. And I suppose I could finish the rudder head laminations too. Gee, there aren't many parts left! Feels good!
ks
Posted: Thu Jan 20, 2005 11:44 pm
by Steve_MA
What are you building? Do you have any pics posted? Whoops....OB19; I see now.
Heck... I have a fan doing nothing too.... my wife will think I am nucking futs! Running a fan and heater in the basement in the middle of winter.....
Posted: Fri Jan 21, 2005 3:52 am
by ks8
Remember, my room had a cathedral ceiling with a LOT of hot air trapped up there doing nothing. If you don't feel warmer air at the ceiling, the fan will only average (likely) out the temp of the room air at different heights, all of it being cool, and then your wife will know you're nuts!
Posted: Sat Jan 22, 2005 11:49 pm
by Steve_MA
Well, I had my first experience putting on fiberglass cloth; I can't wait to do more
 http://share.shutterfly.com/action/shar ... &sm=1&sl=0
That link should get you gory details.
First, taping the seams wasnt too bad. I wet out the surface applied the tape then thoroughly wet it out. Since I was planning to knock down the edges, I thought it might help to cover with plastic. Well, I didnt lay the plastic on perfectly smoothly and most lines in the plastic showed up in the epoxy. The tape has a hard edge so it really didnt help; I just ended up looking messy. Anyway, I sanded the edges and sanded away any drips.
One thing about the F14, the hull is so small, sanding isnt really that big a deal. I seems I am forever sanding the thing to clean up the surface. So I sanded the bottom and sides competely and wiped off all the dust until my rag picked up nothing visible.
Then I did the cloth on the transom (4oz). I wanted to finished the transom bright, but next day I noticed a whole bunch of air bubbles I didnt see. SHould have had better light. This cloth wet out easily. There are pics of the bubbles, so much for bright finish I think.....
Then I went to do the first piece of bottom cloth. This was a real pain because the hull was tacky. Even though I had precut all my pieces I had a heck of time getting the cloth on without massive wrinkles. Some help might have made it better, but I decided to leave the rest until the hull dried. As it turns out, I think the only real problem with this piece was some parts that didnt get enough epoxy....no major bubbles.
Next day, the next piece of cloth went on much better. I taped the edges with masking tape to keep the stringy bits down (see pics). However, the 3rd (final) piece was still a bit tough to start because it was tacky where I overlapped it, plus about another 4 inches due to brushing epoxy off. I think next time I might use plastic covering to keep epoxy from getting places I want dry. But, the real problem with the last piece is that my epoxy was going off when I applied it. I think some of it hardened a bit and stopped new epoxy from penetrating (see pics). There are quite a few white spots (along with a couple air bubbles).
I was really surprised how much epoxy it took to wet out this cloth and how much pressure was required to move the air bubbles out. I think I ought to try a wider squeegy too.....maybe a 9" or 12" one. It takes a while to wet out with the littlle (6"?) one and it seems hard to get a uniform coat.
Well, the whole idea with the FL14 was to get some experience with building a boat betore trying a bigger one. Now that I am in the thick of it, I am glad I did. Although some if it looks a little sketchy, I have only seen one air bubble big enough to pop and fill. I think the ones on the transom are too small.
If anyone has any tips, comments, pls let me have it. I am going to glass the rest of the hull sides with 4oz. And the inside, arghh... ; at least thats the plan.
I may take a breather tommorow. Dig out from the blizzard. Watch the Patriots pummel the Steelers .... figure out how to do a better job on the hull.
---------------
PS> Rest of my pics from the beginning of plywood. I havent quite finished labeling them all though
http://share.shutterfly.com/action/shar ... &sm=1&sl=0
Posted: Sun Jan 23, 2005 3:06 am
by Deltaskipper
Great post and set of pictures. They were very informative about the problems that can be encountered. The boat looks like its going to finish out very well.
Posted: Sun Jan 23, 2005 5:04 am
by Mike Adams
Steve,
Looking good! I got my hull taped today, but your tapes look a lot neater than mine. I'm using 12oz biax tape 6" wide, and I found it difficult to get neat foldovers at the bow and transom (pics in my FL14 thread).
Next job for me is covering the hull with biax cloth. You say that the first piece of cloth you put on was difficult because the hull was tacky - did you coat the entire hull before starting to apply the cloth? I was thinking of coating the hull in stages and unrolling the cloth as I go to make sure the epoxy is wet as the cloth is laid down, then rolling over it with a 12" roller before applying more epoxy on top of the cloth as necessary to finish wetting it out.
Posted: Mon Jan 24, 2005 8:54 am
by Steve_MA
Deltaskipper wrote:Great post and set of pictures. They were very informative about the problems that can be encountered. The boat looks like its going to finish out very well.
Well thanks....never having done this, I wonder how its going to come out in the end.
Posted: Mon Jan 24, 2005 8:40 pm
by ks8
Hello Steve,
I originally was going to post this in Terry's AD16 thread, but didn't. I don't have time to edit it now so I'll just post it here, copy n paste. Now you know why The AD16 is mentioned instead of your FL14.. Hope this helps...
--------------------------------------------
Some builders wetout the cloth off the boat, then lay it on the boat, the cloth being already soaked with epoxy (uncured

), but I did not do that. Too much stress to get it right before it sets up. I don't think I ever explained what I did on the Caravelle sheathing. (pictures I hope within the month... got to find them yet!) I laid the cloth on the dry hull (FG tape areas of keel and chine were already cured and sandprepped with 80 grit), smoothed the dry cloth nicely, then began pouring 4 oz mixed batches one at a time on the cloth in sections, starting along the keel seam first, and working it evenly in the cloth out to the chines (not overworking and making tiny bubbles though). I did not over squeege the excess out, because the dry wood was soaking up lots of epoxy. I did not rush to do any huge areas at one time. I worked slowly with small batches and let it wetout well, again because the wood was also soaking up quite a bit that went through the cloth. The result was that the epoxy bond to the cloth is the same cured batch that penetrated the wood fibers. I don't know how critical this is, but it sure made it very easy and clean to lay on the dry cloth on a dry boat and line things up before the goo was even mixed. After 30 minutes, in areas where epoxy was no longer soaking into the wood beneath the cloth, and pooling slightly, I squeeged the excess to redistribute it more evenly so the glass would not float in what were the pooling areas. Because they were small batches, they did not generate too much heat in the cup and *go off* too soon. I would go back to previous sections before I finished wetting out the whole thing. I wanted to finish squeegeing any area that needed it before it began tacking up. I had time to go back and finish the rest of the dry cloth, but kept going back to previous sections to see if it soaked up or pooled and needed a final spread. Some areas soaked up so much, they needed a touch more epoxy as the cloth was really starting to starve. Small batches helped ensure that they wouldn't fire off before they did the wet-out thing. Wetting out is difficult once the epoxy begins to setup, or impossible.. Fresh batches are important. One batch on the inside floor was flashing and not fixable, so I cut it out and redid before things got too hardened, but I was using biax tape there and it was easy to cut out a section of flashed tape. This would be awkward with a wide piece of cloth, but I suppose sharp scissors could help there. Small fresh batches really help make the job easier and minimize the problems associated with a batch going off too soon. imho.
For my first sheathing of a hull, I give myself a passing grade, but after one hull, I already know I could do better. I am not trying to build a museum piece though. Your D5 experience should help much. I sheathed in cool weather, so I had time to squeege after 30 minutes to minimize floating the glass (except for one small section, but we won't talk about that
). You're gonna do fine with the D5 experience behind you.
The cloth I used was 6 oz weave. I don't know what kind of cloth you're using, but the one who knows what he is talking about does! Jacques did a great job on the design, and it looks like your boat will be the first full size pictures we see. Feeling famous yet???
If you've precoated and washed and sanded, you won't have to watch for where epoxy is getting soaked up by dry wood like I had to.
But know this, it was much easier than I thought it would be.
I've worked with resins and other plastics and glass in the past, with all sorts of substrates, but never with epoxy on a boat project. It was almost pleasant.
And it was very clean until I got to the sides and excess dripped all around the boat. Lay down cardboard or plastic drop cloths, if you haven't already. I didn't care at first, but changing my mind in the middle of sheathing is a bit too late. Also, wear your epoxy shoes and epoxy hat. If they are not when you start, they will be when you are done. Trying to be too neat while sheathing such large areas can become a distraction to getting the job done well and timely. imo. If its cool enough, I suggest a cheap disposable Tyvek overall. I used one, and again, was not in a panic about accidentally leaning on goo.
Happy mixing, etc...... can't wait to see the pictures...
But you've got a bit of building and picture taking before you get to sheathing!
I'm jumping out of the thread again. Just wanted to encourage you that it will be much easier than you might imagine. It went mostly smoothly for me, I think, because I planned it out and used smaller batches to minimize disasters that might arise out of my inexperience with sheathing such a large area (like that one area we won't mention, though it was a small area, because it was a small batch). I had lots of spare measured and marked cups ready in case I started dropping them! I can usually use one cup for a dozen batches, before wanting a fresh one. I didn't drop any cups, but two batches went off before the cup was empty, but I said I wasn't going to talk about that.
Measure well.... its a lot of epoxy!
Sincerely,
ks
Posted: Mon Jan 24, 2005 9:15 pm
by Steve_MA
KS...Thanks alot for the info. I just did my sides and I will post that next. I did cut down on the pot size and focused more on making sure the cloth was wet out (1st) then laying it down with no air bubbles (2nd) - but I was doing veritical surfaces here.
I do try to work neatly, otherwise glue and fiberglass strands and stuff is stuck to everything! And, agreed, I have "epoxy clothes"! Sacraficed to the boat. My wife has been trying to get me to toss these pants I have....well they are now epoxy pants and she will finally get her wish.
Posted: Mon Jan 24, 2005 10:35 pm
by Steve_MA
I got the side panels fiberglassed today, spent yesterday setting it up AND watching the Patriots get their revenge against the Steelers AND digging out of this Nor'Easter. Just a little snow here
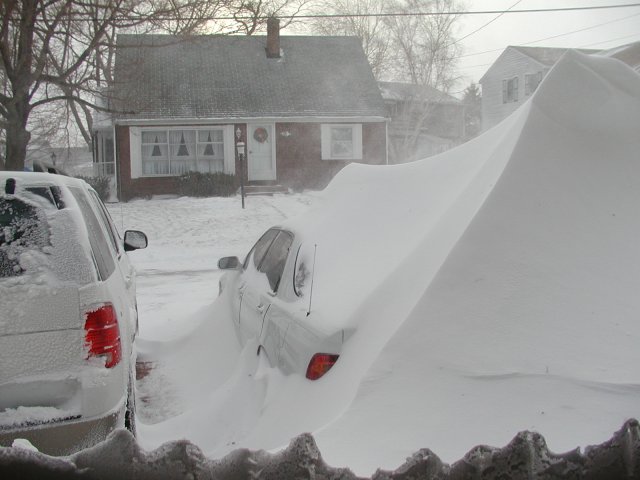
One side of the drive is clear, the other is piled high!
A neighbors dingy
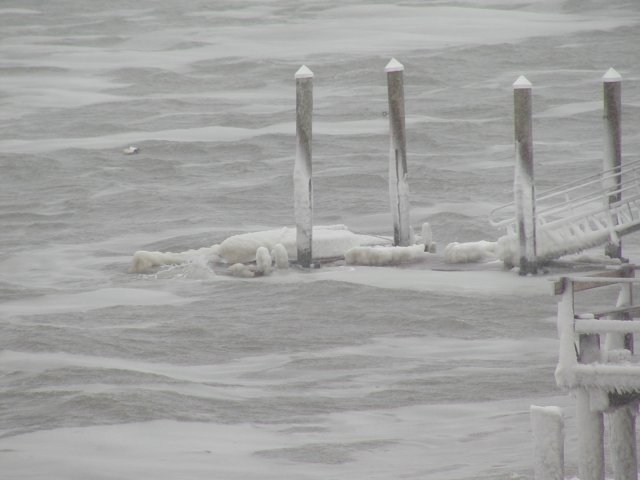
looks like a "frozen donut" as we used to say....although I dont know why....
Anyway, I was determined to improve my methods. I set up the cloth ahead of time. The 50" wide cloth I have fit nicely on both sides when slit down the middle. I was concerned it would be hard to get to lay flat but it was no problem. This is 4oz cloth, easy to work with. I spread the epoxy with a 3" roller starting at the middle of the hull and working towards each end. After it was all wet out and laid flat, I used a razor cut the cloth against the rubrail below and the tape on the top and sides.

Here it is done, plus there is 1 coat of epoxy+microballoons on the bottom
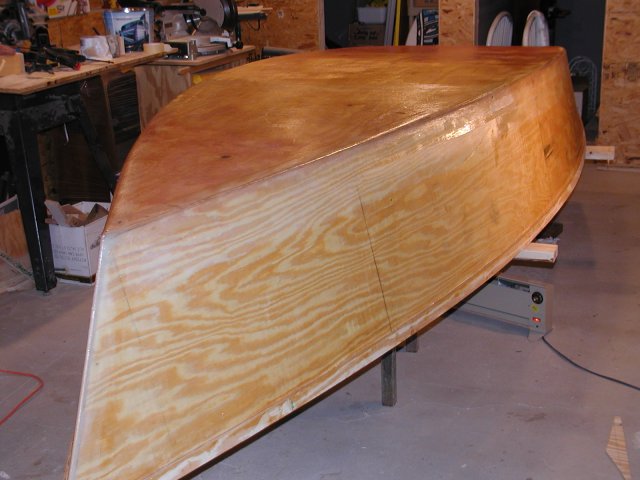
I have to figure out how much filler to use; this seems a bit thin to me. I have seen other pics where the hull is essentially purple from the microballoons. The pattern on the hull shows where I poured the mixture from the tub onto the hull before rolling it out.
Working on a dry hull, this was much better.
Finally, some ugliness, here is a chunk of cloth that lifted because it wasnt wet out enough.
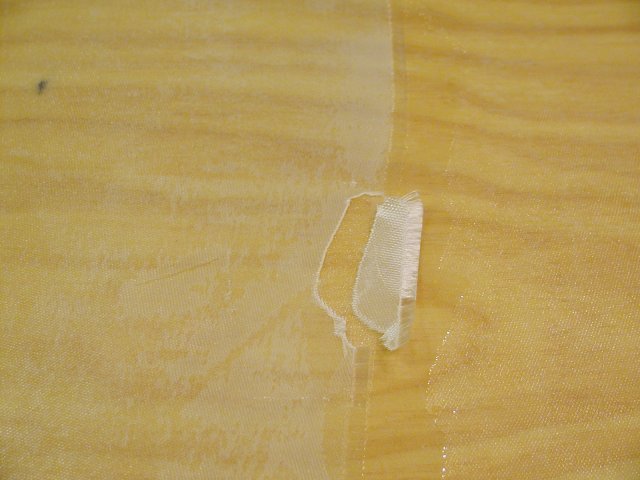
I have alway been a believer that EXPERIENCE is the best teacher. No worries.....I am not planning to cross the Atlantic....yet
I think I am ready to flip this thing back over and look at the other side for a while!
Posted: Tue Jan 25, 2005 12:20 pm
by chrisobee
Steve_MA wrote:I got the side panels fiberglassed today, spent yesterday setting it up AND watching the Patriots get their revenge against the Steelers AND digging out of this Nor'Easter. Just a little snow here
One side of the drive is clear, the other is piled high!
We can see that car under that snow pile! Shame on you for trying to exagerate your snow fall by hiding a car under it.

Posted: Tue Jan 25, 2005 12:38 pm
by Rick
Steve_MA wrote:I got the side panels fiberglassed today, spent yesterday setting it up AND watching the Patriots get their revenge against the Steelers AND digging out of this Nor'Easter. Just a little snow here
Heh. You'll note that his cars are outside and his boat project is inside.
Good man.
Posted: Tue Jan 25, 2005 12:50 pm
by fishingdan
Steve,
The weave of 4 oz cloth is easily filled with a couple of thin coats of unthickened epoxy. I have had good luck "rolling and tipping" these coats. You should not need much fairing mixing other than were your cloth overlaps any tape.
Many of the boats that look all purple have been boats covered with biaxial cloth. In the case of biaxial, the weave is more prominent and usually needs to be filled with something.
Dan
Posted: Tue Jan 25, 2005 1:12 pm
by Steve_MA
fishingdan wrote:Steve,
The weave of 4 oz cloth is easily filled with a couple of thin coats of unthickened epoxy. I have had good luck "rolling and tipping" these coats. You should not need much fairing mixing other than were your cloth overlaps any tape.
Many of the boats that look all purple have been boats covered with biaxial cloth. In the case of biaxial, the weave is more prominent and usually needs to be filled with something.
Dan
Thanks....I noticed that on my transom (also 4oz), that it was smooth after just 1 coat of epoxy. I think I mentioned I was going to finish this bright, but the air bubbles look terrible. Do people generally just epoxy something thats to be finished bright?
I did alot better on the side panels, but there are still some bubbles I couldnt get out. I dont know why.....seemed like i could squeeze the air/epoxy out and it would be flat, then the bubbles would just start forming again.
I read people using about 3:1 filler:epoxy for fairing; I didnt use that much filller first time around. Lets see if this fairing mix has more "filling" properties.
Posted: Tue Jan 25, 2005 9:53 pm
by ks8
Do people generally just epoxy something thats to be finished bright?
4 oz, even 6 oz cloth can be used over surfaces that will be bright finished. The 6 oz is visible if you look closely. The 4 oz is effectively invisible, but you still need a good final seal coat of Epoxy over the 4 oz, then you can LPU or varnish, but I would not want too thin a layer of epoxy between the fibers of the cloth and anything that could damage it. Of course, More epoxy, more weight.
I put 6 oz cloth on the caprails of the Caravelle... barely visible, but the sheer is certainly stiff now and well protected. This certainly was not necessary, but I expect abuse... and currently, I've flip flopped back to bright finishing the caprails. The 6 oz cloth is really not noticeable, when properly wetted out of course. And I will be filling the weave with another light coat or two of epoxy next sprummer.
Not the best pictures but this may help...
This is 4 oz on port, starboard and bow caprails. 6 oz on cuddytop (which will not be bright). Where two or more layers of cloth overlap, it begins to get noticeable, so if you are bright finishing large compound areas, plan your overlaps for the finish (providing they do not have to be large overlaps for structural reasons). These areas have not yet had their final fairing sand and seal yet. The cockpit area caprails have 6 oz on them (not pictured here).
ks
Posted: Tue Jan 25, 2005 10:09 pm
by JohnI
seemed like i could squeeze the air/epoxy out and it would be flat, then the bubbles would just start forming again.
If you wait until the epoxy starts to set up, then go back and push those last few bubbles down with a (gloved) finger, you can often eliminate them. When the epoxy has start to set it will be tacky and the fiberglass will stick down and wont' pop back up.
Posted: Tue Jan 25, 2005 10:34 pm
by ks8
Good point. Depending on the temperature and hardener used, you may want to walk around a few times, a minute apart, and make sure they haven't lifted/bubbled again, until it setsup well enough to leave to itself (which I call *walk away time*).
In some areas that I glassed, I had friends who thought I was done with that section, but I told them that now I have to babysit. I'd stay out in the tent another hour watching for such things and dealing with them while I could. The time was not wasted as I used the time to plan the next tasks, or any further changes I might want to make. Its also a good time to listen to an audio book (get some reading done while babysitting the goo). It can be very relaxing, but of course can get awkward when the family also needs attention, or wants to give you some attention.
At times, if the bubbling or outgassing was bad enough, I'd use properly ratio measured syringes (one for resin, one for hardener) to mix very small batches of epoxy and blop (I think that's a word) it on the troublesome spot. The syringes have been very handy as I can mix an ounce or less accurately for those fine touchups with no waste, though it can make you feel like a mad scientist!
Sometimes the hiddeous deep resonating laugh is all you need to fix some of these problems...
ks
Posted: Wed Jan 26, 2005 4:51 pm
by Steve_MA
Thanks for the tips guys. I will have to try some of those things when I start to glass the inside. KS - that work on the Caravelle looks awesome...what kind of wood did you use? there were even more bubbles that I thought on my sides, I definiitely need more practice and new techniques....
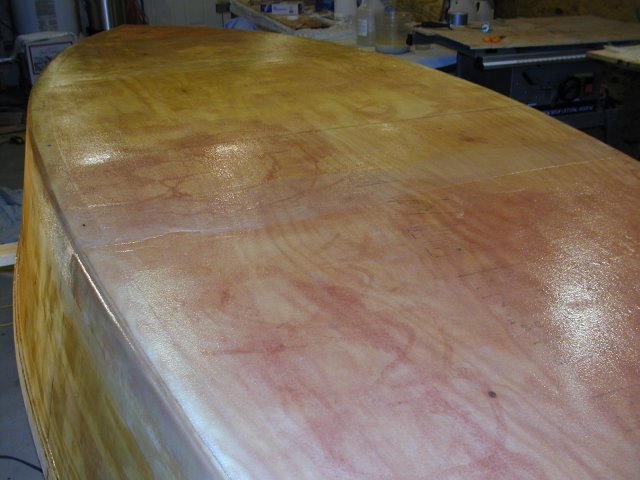
I put another coat of epoxy+balloons/silica today. I made thicker mix to try and cover some of the seams and thinner mix to fill in the weave. The 9oz cloth on the bottom is still not covered after 2 coats. Its starting to take shape. I bought some QuickFair so i might try some of that before I flip it. i am going to flip it back to finish the inside seams, do the seats, interior epoxy and cloth before I go back to finishing the hull.
Feeling the need to cut some wood
Posted: Wed Jan 26, 2005 9:15 pm
by ks8
Steve_MA wrote:
...what kind of wood did you use?
Select panels of Doug Fir plywood, ACX, from a big box store. Dimensional wood is from Doug Fir 2x4's, selected from the bin for minimal knots, then ripped and cut to utilize the best grain patterns and knot free areas for the needed structures.
The attention to some of this detail work was inspired from some of the superb work in the user galleries. My boat will never look like some of those beauties, but I'm enjoying the build nonetheless.
Your hull is shaping up nicely. Are you going to wait for warmer weather to paint the outside, or crank the heater? Paul did a phenomenal job with roll and tip on his V12. Hard to believe it wasn't sprayed.
Hope you find good wood for cutting, for boat or fireplace!
ks
Posted: Wed Jan 26, 2005 11:16 pm
by Steve_MA
I am getting back to the inside before I get back to the hull. The hull still needs more fairing. I doubt if I will get to painting until March. I am thinking of using the System 3 paints.
There are a couple reasons I dont finish now, but one for sure is that I would like to do something else besides work on the hull for a while. Its easy enough to flip.....
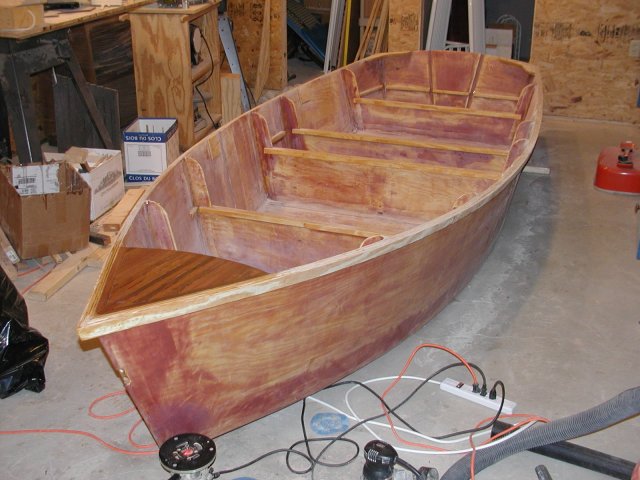
progress update
Posted: Sun Feb 27, 2005 10:29 pm
by Steve_MA
Well, I havent posted an update here for a while....looks like a month, wow...
Doesnt seem that long. Anyway, I have been working on the interior. I had to finish the seams around the frames, cover the bcx ply with 4oz cloth, then add seat cleats, fair, etc.
Today I finally finished the last section of cloth. This is what the boat looked like before I started today.
I like have a few hours uninterrupted to do fiberglassing and its been hard to get lately. You can see I am further along in other areas. The seat cleats are in the bow, midseat, and transom area. I have been practicing my fairing on the bow seat area. This is a tough area because the corners are tight.
Before fiberglassing the interior, I sand down the edges of the tape pretty well. Sometimes you can barely feel the edge. In these cases, when I put the cloth on, the fairing is pretty easy simple. I have been pretty pleased with these results although I didnt do it everywhere.
When I fiberglassed the bow area, I tried to wrap the cloth through the corners to fully overlap the tape and have the cloth overlap. This was very difficult with the tight corners and I didnt have a small enough roller to get in there and smooth it out. I decided I didnt need all that overlap anyway, since the glass is not for strength, but to protect ply and keep it from checking. That made it a bit easier.
But then still, I was going mad from dealing with the fraying edges. Although the gunk sands off easily, it makes a mess of everything. Today, I taped the edges. To apply, I wet out to the taped edges and then use a razor blade to cut the cloth. I cut right over the tape and end up with overlap of 1 or 2" depending. This method seems to work pretty well.
Today, finally, all the big fiberglassing jobs are done.
So now its sanding and fairing full time, plus a few other bits and pieces. I have actually found hand sanding with a 3M sanding block and 60 grit norton 3X paper works really well to knock down quickly knock down edges and clean up a surface. Then I come in with Mr. Random Orbital and 60 grit. If I havent made too much of a mess with my fairing mix, this can be a quick step too.
Too often, however I find my fairing mix dripped on me. I am mixing silica and microballoons. I think I am just putting on too much of a thin mix sometimes......need more practice.
I guess, for the most part, I have this fairing under control for now. I am not quite sure how to do the corners. I tried just working the fairing mix as it dries (with some epoxy on my finger) and that works OK. I havent tried putting any plastic (poor mans peel ply) down yet, but I will probably try that where it makes sense.
Also, I need to finish the edges of the butt blocks somehow. I made a bit of a mess out of the transom pad with wood flour/glue. On the floor butt block, I have a small wedge of "fillet" there and it looks alot better. I at least ought to use something easier to sand than wood flour!
Well...I am rambling on, just like the Oscars. I have posted a few other pictures here.
http://share.shutterfly.com/action/shar ... &sm=1&sl=0
Posted: Mon Feb 28, 2005 5:02 am
by Mike Adams
Looking real good, Steve!
As you said in the other post (on my FL14) we are using quite different building techniques. It certainly gives each boat a special character of its own and although we are both building the FL14, I have a feeling that they will not look much like each other when we're done!
Your boat will probably be lighter than mine - I have not worried too much about building 'light' - just building strong and functional and incorporating my own ideas as a learning experience. Are you wetting out the cloth before laying it on? I laid mine on dry and then wet it out in place. In any case, we both seem to have had problems with frayed cloth edges - but I like your solution of taping the edge then cutting through the tape.
Keep on building, my friend - I am looking forward to seeing your boat in the water
almost as much as I am to seeing mine splashed!
Posted: Mon Feb 28, 2005 10:32 am
by Steve_MA
Mike - I tried to wet it the cloth out ahead of time, but it was too hard to apply without creating lots of air pockets so I do it dry now. For fillet and tape, I wet the tape out first and that seems to work well.
Posted: Tue Mar 01, 2005 7:26 pm
by ks8
Mike wrote:
I have not worried too much about building 'light' - just building strong and functional and incorporating my own ideas as a learning experience.
See, I knew it was contagious...
Take comfort in that you will all be done before me
I've got to go back to fitting the mounts for the MR. Fusion unit...
Looking good!
ks
Posted: Mon Mar 14, 2005 4:39 pm
by Dane_Ger
Steve,
I'm wondering if you have finalized a plan for drainage/limber holes for your FL14? I saw in another thread where you mentioned this, but haven't seen anything since as far as more finalized plans.
Thanks,
Dane
Posted: Mon Mar 14, 2005 7:21 pm
by Steve_MA
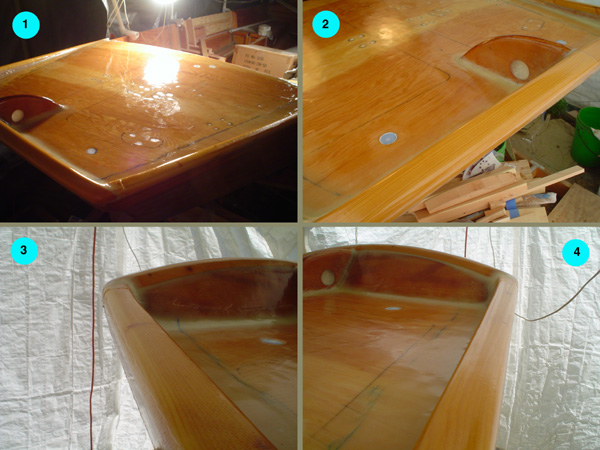
Drainage: I did finally decide to just cut holes in the middle of the frames so the water can seek the lowest level. In hindsight, I would have cut the holes before the fillets so I could finish them nicely. As it is, I cut the holes with a "zip tool" and also use it to clear out all the epoxy from teh epoxy. If you hit the www button and look at "Album 3" at the bottom of my web page, there are a couple pics in there. I am tentatively planning to install a manual pump *and* pump a drain in the transom so I can dump water that way. This boat will sit weeks at a time on the beach and could have many gallons of water to get out. So much, you cant lift it.
Posted: Mon Mar 14, 2005 11:17 pm
by ks8
This boat will sit weeks at a time on the beach and could have many gallons of water to get out. So much, you cant lift it.
Put some 6 or 9 oz cloth up and over the sheer, and you won't be so nervous to flip it upside down for long periods of being a tourist background photo-op. Of course, with a gas tank in there with gas, this could become a more primitive night display if flipped.
If the hull is basically empty, I think an FL14 would look just as at home on a beach inverted as upright (that's a compliment). But I'd like to see pictures of the pump when you get to that part of the build. Sounds interesting.
ks
Posted: Tue Apr 05, 2005 4:55 pm
by Dane_Ger
Steve, I hadn't seen any updates from you in a bit . . . hope your build is progressing well!
I figure as close as you were getting in your last post . . . you may be waiting to surprise us with your 'splash'!
Posted: Wed Apr 06, 2005 9:12 pm
by Steve_MA
Well, I have been getting lazy not posting anything. I have been obsessing about fairing the inside so there hasnt been much to show. I havent tried the QuickFair yet....my fiberglass job was so crappy I would have probably needed a 55 gallon drum to get a smooth finish. The corners are the hardest to get smooth, but I think i have been able to get them pretty well with the combination of a wire wheel to knock off the glops of epoxy and a detail sander followed by a little hand work. I am happy enough that i can do it - so I am not obsessing about getting every corner perfect. I have been cutting back on the time too so its been going slower.
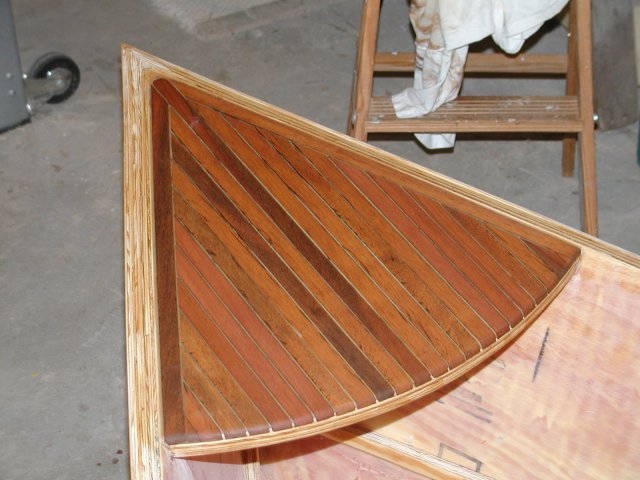
I have everything on the inside except the seats. I spent some time adding something traditional to the breasthook. I used some wood from some old lawn furniture - it might be cedar, I'm not sure. It came out pretty good.....
I am getting ready to flip it over and take it out the garage where I can paint it. i put a couple coats of fairing mix on the bottom and sides, but didnt do any sanding yet. So, I have to finish the outside. Add the skeg and runners (those are assembled and epoxy coated), paint it. Flip it back, add the seats and hatches, the finish the inside.
I am going to make a fairing board....we'll see how it goes. I will probably focus on the sides more than the bottom.
Posted: Wed Apr 06, 2005 9:29 pm
by tnewman
that breasthook came out great! how did you do that?
Posted: Thu Apr 07, 2005 8:26 am
by Dane_Ger
WOW! Steve, that breasthook is way cool! And what a clever use of materials at hand! D
Posted: Thu Apr 07, 2005 10:03 am
by Steve_MA
I was going to take a pic of building it, but its simple......start with 3 strips, one on each side and one down the middle. Make sure the middle strip is centered. Set up your mitre saw to get the correct angle cut on the next pieces. Lay them in spaced from the other pieces with 4d nails.
The wood wasnt all quite square so the nails serve to give uniform spacing AND keep the edges square to each other. I did about half the strips then stopped to glue it down. Then I came back the next day and glued the rest of the strips in place. The little piece at the end is just butted up to the one next to it...no space. Gave me more glueing surface and kind of served as a wedge. It was too small to space it with the nails.
One it was all glued down and sanding it with the belt sander to get to clean wood. Filled gaps with epoxy/wood flour/silica mix - adding silica really lightens up the putty mixture. Then trimmed off the ends around the curve - got it close with a power saw, then sanding the middle to the edge with the belt sanding, then came thru with the round over bit on the router.
The router fit pretty well into the corners surprisingly enough. I was able to just trim the final bit with a small hand saw and sand it over to match.
There seem to be 3 pieces that dont quite match.....should have been a bit more careful about that.
Posted: Thu Apr 07, 2005 11:34 am
by tnewman
it looks great, i wish i hadnt chucked those old 'teakwood' chairs the kids put their feet through
Posted: Thu Apr 07, 2005 12:47 pm
by Dane_Ger
Steve_MA wrote:There seem to be 3 pieces that dont quite match.....should have been a bit more careful about that.
Only the builder would know!
BTW, approximately how much epoxy did it take to glass the exterior of your hull? I'm essentiall finished with the inside and have over 1gal left . . . just wondering if I need to order more yet?
Posted: Thu Apr 07, 2005 1:20 pm
by Steve_MA
I got what came with the kit (3 gal kit?) then bought the same again. I used 9oz cloth on bottom and 4oz everywhere else inside and out. I still have a gallon left and I should be just about done with it. I recall your fillets are much smaller than mine...thats where I used alot.... and on the bottom cloth too.
if you arent putting down cloth on the exterior 1 gal is probably oK. if you put down cloth you need to fill it and fair it which may take more.
Posted: Thu Apr 07, 2005 1:31 pm
by Dane_Ger
Steve, thanks for the info!
Posted: Fri May 06, 2005 9:01 am
by Mike Adams
Hey, Steve - haven't seen any posts from you for a month now! How is your boat coming along? Love that breasthook, by the way - beautiful job.
Posted: Fri May 06, 2005 9:53 am
by Steve_MA
Well, boat is moved from basement to garage so I can paint. Got so far as to buy paint. Still need to fair bottom and sides. Added runners and skeg. Started sanding bottom and sides, need to add fill, sand... the usual drill. Then I still need to flip back and complete the inside.
But first, I need to get a job.....so most of my time has been spent in that effort! I have been on R&R for too long now....
I am keeping my eyes on whats going on here, but my posting has dropped, yes. Plus how many pictures can you really take of fairing
I am particularly watching WobblyLegs because I want to build a C17 sometime too.....
Posted: Thu May 19, 2005 8:34 am
by Steve_MA
Well, I finally got back to it last nite. Sure enough, my 1.5hr planned turned into 3hrs but it is theraputic I think. I dont remember how many coats of epoxy I had on the outside, maybe only 1 coat on the hull. My 4oz cloth still didnt feel completely smooth. I have almost got 6 gal of epoxy on this so I was a bit dismayed I needed another coat to start.
I sanded out all the little bubbles in the cloth and put another coat of the balloon/silica slurry on the hull; about 12oz to cover it. I put some peel ply on the bow and stearn areas where there are alot of tape seams coming together. I put extra filler in here previously, so its in decent shape already.
I wasnt sure if I should use the peel ply or not. I have used it before with mixed results....its always the air bubbles that kill you. I just took a piece off and I think it looks worse than it did before.... its been said before, I am going to sand off 75% of what I put on. My hope is that I can touch up with QuickFair after this coat for the most part.
Assuming the trailer works and the boat fits, I wanted to finish fairing the hull before bringing it up to the MA/NH get together. We'll see
Posted: Sat May 21, 2005 11:31 pm
by Steve_MA
Well the hull is fairing out nicely with the QuickFair.....its sure a pleasure to work with after the epoxy/balloon mixture. I have it down to 150 grit and the touch up spots are getting fewer and fewer
Its especially nice that it doesn't sag like epoxy can. Its nice to get back to it again....
Posted: Thu Aug 25, 2005 11:00 pm
by Mike Adams
Hi, Steve
Along with Dane, you are another one who has been very quiet lately - have you finished/launched your FL14 yet?
Posted: Fri Aug 26, 2005 9:50 pm
by Steve_MA
Well, you know, its sitting in my garage and I see it every day! The last work I did was to cut the seats and hatches. I stained them. 2 coats of epoxy. The inside fairing is complete. I am basically ready to start painting. I ought to get going before the season ends here!
Posted: Sat Jun 17, 2006 11:36 pm
by Steve_MA
Lets dust the cobwebs off this thread and see if I can get this boat finished!
The boat sat upside down and covered in the winter (off the ground). When I uncovered it I found some the epoxy had started to peel off the rubrail which I had stained. I am guessing it didnt stick very well and it wasnt the another application goof or sun exposure. The only place its coming off is where the stain is.
You can see it at robjack.shutterfly.com
Anyway, so I built a little dolly for it so I could move it in and out of the garage and sanded everything off the rubrail for the most part; its getting paint now. I didnt have the boat in the water at the end of last season. It lives moored in a tidal area; the sacrifical strips on the bottom gave up their epoxy pretty quickly. The keel also looked like it had been thru the grinder. I have learned before.....beach=sandpaper. A couple years down the road, everything comes off the bottom and some oak strips go on.
Now its got 2 coats of Interlux 2 part primer on it. It isnt too bad to work with, but it does smell. The finish is nice and hard. I am rolling and brushing, trying to see what kind of finish I can get. Using 1/4 nap roller works OK, but it wont do for a finish coat. Any fuzz isnt acceptable....then again, I may not have much choice if I want to get done!
I have been sanding between coats with 150 as the directions say. It goes pretty quick, then I just wash it down with water and dry. Its been hot so it dries fast. That method isn't going to work so well on the inside....
I am going to finish with Brightside. I would like to try spraying, but I will will have to rig something in my garage to handle the overspray. Haven't figured that out yet.
Posted: Mon Jun 19, 2006 9:31 am
by Mike Adams
Hey, Steve - good to see you back on the job! Your boat looks very nice with the primer coats on. Looking forward to seeing her finished!
Mike
Posted: Mon Jun 19, 2006 10:23 am
by ks8
Be careful spraying the interlux or any solvent finish system. It has nasty solvents in it that are also combustible when atomized. For instance, if your compressor is in the garage and kicks in, we won't get to see pictures of the completed boat. Forced air, excellent cartridge respirator, all those sorts of issues need to be considered when spraying a solvent finish system, if not for possible explosion, then to guard your central nervous system.
I don't mean to be a dark cloud, but we do want to keep hearing from you.
I will be spraying their Epoxy with Teflon bottom coat but small sections, with the compressor far away, using a long hose. I may also duct forced air in to blow into the work area and force out the vapors, and of course a good respirator.
Posted: Sun Jun 25, 2006 11:32 pm
by Steve_MA
Thanks for the pointer - have never sprayed before. I am off that idea now anyway. I switched to a different roller and it seems to work better. Also with about 4 coats of primer on the bottom now - and getting a little better finishing it off with the brush - it doesnt look too bad.
I should get some color on this week, rain permitting....
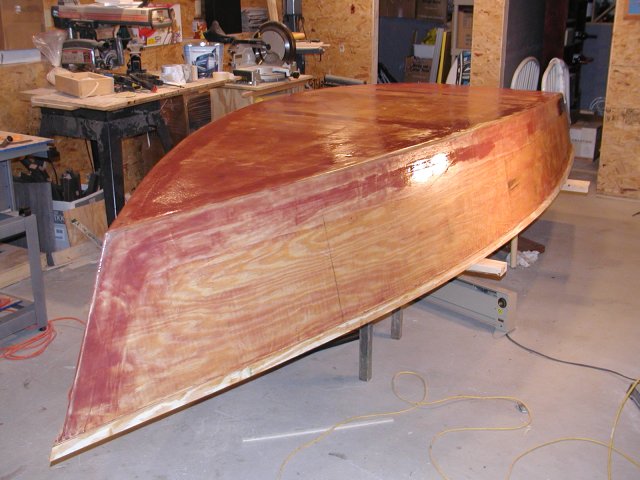
hull painted
Posted: Wed Jul 05, 2006 4:53 pm
by Steve_MA
several coats of Barrier Kote primer. This stuff dries hard as a rock.
3 coats of Yellow Brightsides, brushed on, wet sanded to 600.
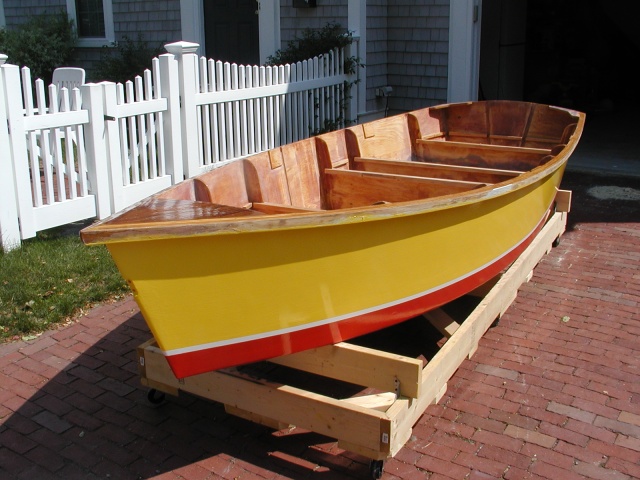
As I said before, over the winter, the epoxy peeled off the rubrail. I thought it was due to the stain I had put on the wood, but I think now thats not true. Other areas that where stained (and hidden from the sun) show no problem. I checked the tarp I used to cover it and it didnt indicate it provided any kind of UV protecttion. I didnt see any problems on the bottom or hull, though...
That was a big "whoops".... luckily I am not afraid to use my belt sander on the rub rail and it wasnt too hard to get the epoxy off.
more pictures here
http://robjack.shutterfly.com/action/?a=8AcuWrVq2cN2Hp
Posted: Thu Jul 06, 2006 12:52 am
by Mike Adams
That's looking real nice, Steve. You'll enjoy finishing the inside much more than sanding the hull, I think!
Posted: Fri Jul 07, 2006 11:43 am
by ks8
Mike Adams wrote:That's looking real nice, Steve. You'll enjoy finishing the inside much more than sanding the hull, I think!
Yes! There's the spirit! Even if it is a lot of sanding and planning on the inside as well, the interior is *home*, while the exterior is more *necessary details to make it an efficient floating boat*. Sanding the inside comes in smaller sections with tighter inside corners, but again, you are shaping your living space on the water. Enjoy it.
The outside of the hull looks fantastic! Enjoy making it a temporary home on the water.
Posted: Mon Jul 10, 2006 3:41 pm
by Steve_MA
Ahemmm....I am not planning to do alot of sanding on the inside!
Doing the outside wasnt hard; its a small boat and surfaces are flat. Its just time consuming. I have the inside primed and I skipped the 'tween coat sanding. The seats got epoxied in yesterday. The rub rail got a coat of varnish. I spilled a tub of varnish in the boat.....

(At least it wasn't epoxy).
Tonite, more epoxy around the seat and more varish.
Posted: Mon Jul 10, 2006 4:37 pm
by ks8
Steve_MA wrote:Ahemmm....I am not planning to do alot of sanding on the inside!
Doing the outside wasnt hard; its a small boat and surfaces are flat. Its just time consuming. I have the inside primed and I skipped the 'tween coat sanding. The seats got epoxied in yesterday. The rub rail got a coat of varnish. I spilled a tub of varnish in the boat.....
(At least it wasn't epoxy).
Tonite, more epoxy around the seat and more varish.
You're inspiring me to lean in the same direction.
The trim I added dresses things up enough. I've got to finish this.
I was going to fair areas in the interior this weekend, but hmmmm... maybe I'll just prime. SHall I put up a vote to see how many think I'll prime or fair?
Please, feel free to launch before me! BUt do be so kind as to harass me to finish every now and then.
Posted: Mon Jul 10, 2006 8:11 pm
by Mike Adams
Posted: Tue Jul 11, 2006 10:39 am
by Steve_MA
My dad had a saying "your eyes are bigger than your stomach". I think the same thing applies to building boats. I have changed my paint/varnish scheme so many times, I swear the next one I build (and I will deny I ever contemplate such a thing to my wife) will be white and only white.
Yes, so I will be sanding the inside. I just cant help myself.... but I swear its just going to be one color.
I have to get this one done because I have another boat in the driveway that has to get in the water too
It needs work done on the bottom.....
Posted: Tue Jul 11, 2006 10:49 am
by gk108
Steve_MA wrote:I have changed my paint/varnish scheme so many times, I swear the next one I build (and I will deny I ever contemplate such a thing to my wife) will be white and only white.
I'm having that same problem. Every time someone else paints their boat and posts pictures I want to paint my boat like theirs.
Touchdown!
Posted: Tue Aug 15, 2006 11:08 pm
by Steve_MA
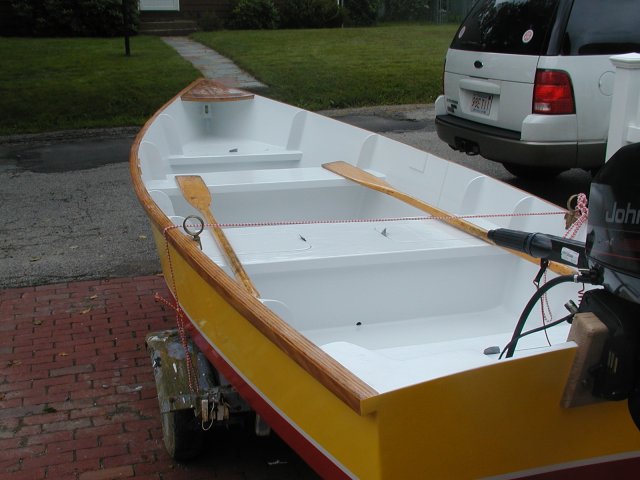

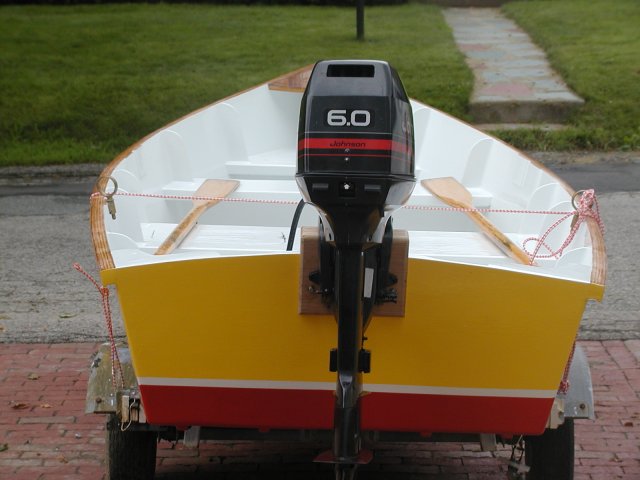
Well, its been in the water for a couple weeks now and getting lots of use. The local harbormaster gave me a little visit one Sunday afternoon and gently reminder me I MUST have it registered if I want to use an engine. At least he clarified the procedure and it didnt cost me anything.
Brightsides is slippery....need to add some nonskid.
Didnt put an hatch hardware on yet - winter project.
Got a 6hp Johnson for $450, its a Sailmaster so although they call it a long shaft - its really more like 22" - a bit long. I added a motor clamp of white oak and pushed it up a couple inches. The length isnt really a problem. Still more engine than it needs though. After about 2/3 throttle all it does is push the bow up. Even with about 600lbs load.
My 6 yr old drives it more than me now. Amazingly, he is quite circumspect with the throttle.
Get lots of complements. Everyone loves the design and asks about it. A couple people even knew of bateau.com! Word is spreading!
Already trying to figure out where to carve out space to build a bigger one.....
(I guess I should change the "in progress")
Posted: Wed Aug 16, 2006 4:47 am
by Mike Adams
Nice job, Steve - congratulations! She looks sweet in the water.
Posted: Wed Aug 16, 2006 8:37 am
by tech_support
Very nice colors, I like it
Rubrail looks good too
Posted: Wed Aug 16, 2006 1:51 pm
by kakupper
I tried to make my fillets match the those included with the plans and ran out of wood flour half way through. I'm making another boat and used the plastic spoon you mentioned and made them much smaller (1/2 inch). This is much more reasonable.