Page 1 of 1
Another FL14 started!
Posted: Thu Jan 06, 2005 8:16 am
by Mike Adams
Well, it’s finally happening - I’m building a boat! I had hoped to spend all of today on the FL14, but most of the time was spent clearing up the yard and reclaiming half of my garage from my son, Sean, who is renovating yet another old car…..!

However, I finally got everything set up to go!

I taped builder’s polythene to the floor to keep the area clean and free from epoxy spills. I've started a new album and posted some pics in my gallery - see
http://gallery.bateau2.com/displayimage.php?pos=-2797 The table at the far end of the garage is also covered with polythene to protect both the table and the FL14 plans beneath.
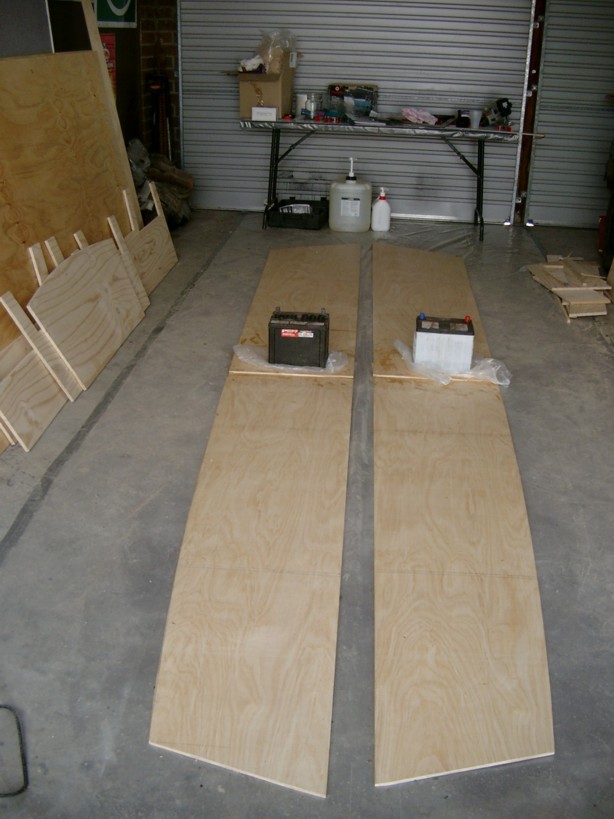
I was unable to get marine plywood in Canberra, so since I plan to completely cover the hull with biax fabric, I decided to go with external structural ply. I picked through the pile to find the best sheets I could and they seem to be reasonably free of any defects. Couldn’t get 6mm and 10mm though - these sheets are 7mm and 12mm. The 7mm will be used for the bottom and sides and the 12mm for the frames.
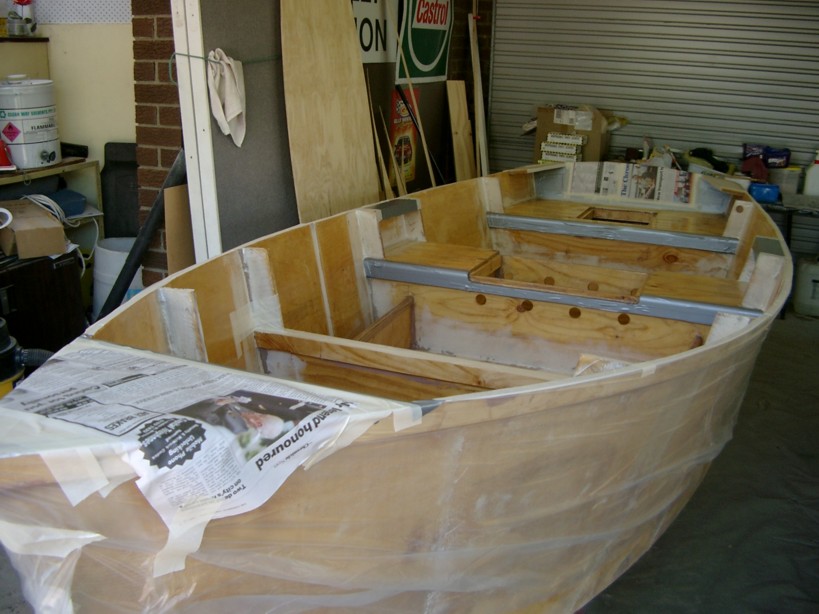
I drew the sides and frames on the plywood tonight and I found this quite a tiring job - it took me about 4 hours of carefully checking and rechecking measurements against the plans. I also had to experiment with the nesting of the frames on the plywood to avoid one or two knots and faults in the exterior ply. Got a bit tight, but I managed to squeeze it all in!
While on holiday last week, my wife picked up a very useful gardener’s kneeling frame, which I’ve now ‘borrowed’ to make things easier on my old knees! Turn it over and it becomes a comfortable stool for the jobs that can be done sitting down. (Pics in the gallery).
BTW, I got my wife interested in boats while we were on holiday - she came with me to a training course for a Recreational Shipmaster’s Licence (that’s what they call a power boat driver’s licence in Queensland). She enjoyed the classroom work and passed the written exams without any problem, but was a bit worried about doing the practical training and driving test (it was done in a fast planing hull boat on the Noosa River), but in the end she did just fine. So now I’ve got a ‘first mate’ (or maybe a back-seat driver, we’ll have to wait and see…!).

I am planning to spend at least the next two days full time on the FL14 and I’m ready to start cutting tomorrow! Should have some real progress pics to post by this weekend.
Posted: Fri Jan 07, 2005 5:10 am
by Mike Adams
Well, the end of a fun-filled day - and now I've got aches on my aches!
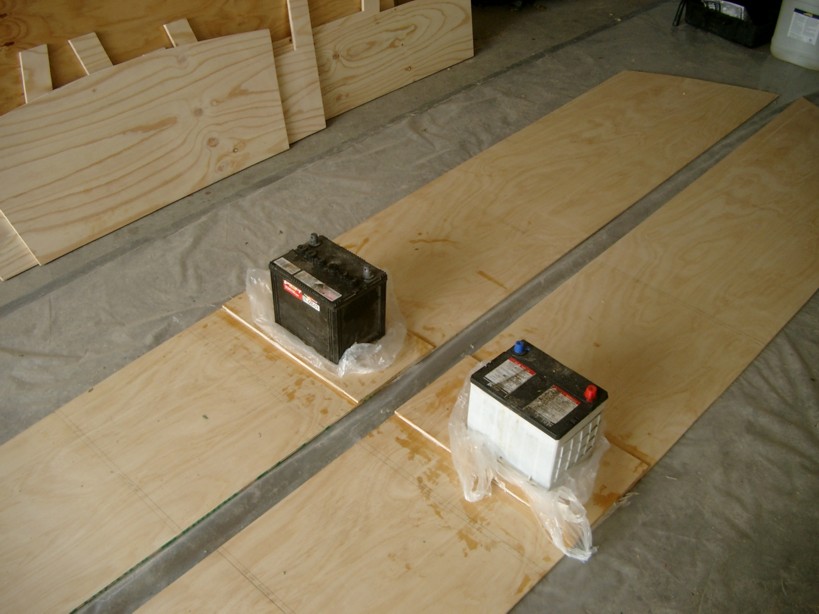
Took a big deep breath and started cutting plywood this morning - it took me about three hours to cut out all the frames and the side panels. I remeasured everything before cutting and again after everything had been cut out, and was very pleased to find that my measurements and cutting were accurate to the plans - only a few dimensions were out by 1mm and just one or two out by 2mm - nothing larger than that.

With this major hurdle out of the way, I relaxed and joined the side panels with butt blocks - I chose to cut out both sides at once, which made it easier to get accurate mirror sides and eliminated the need to mark each side separately with the frame positions, as I had drawn these in right across the ply sheet to cover both sides before cutting.
I'm using West System Epoxy - I gave the panel joint area and inside face of the butt block a coat first, then mixed in some filler to get a good consistency of epoxy glue paste. A couple of old batteries my son had lying around in the garage are providing the necessary pressure to the joint while the epoxy cures. It took me about an hour all together to get this done and clean up.
I have to wait a day or so now for the epoxy to cure properly before I can start assembly.

However, I did a little more work on the DE23 model (see separate post).
More pics to come soon.
Posted: Sun Jan 09, 2005 5:12 am
by Mike Adams
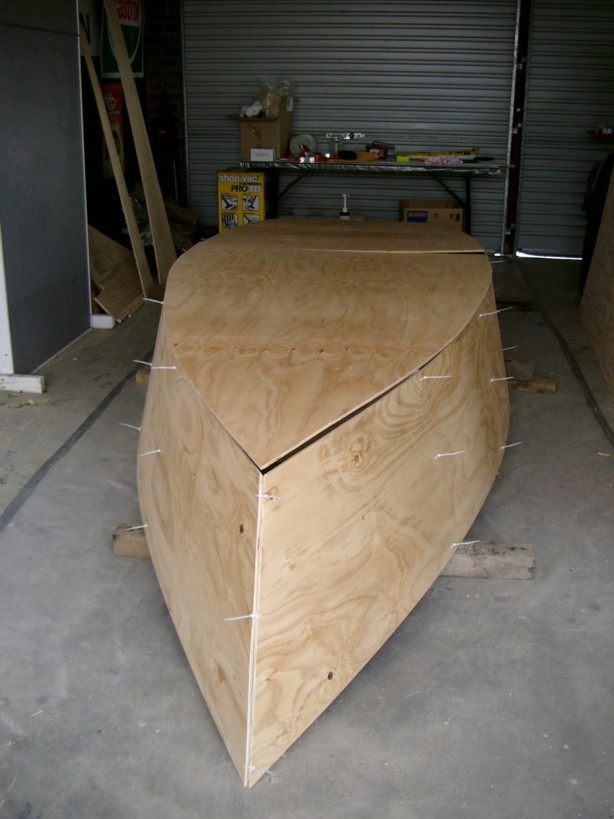
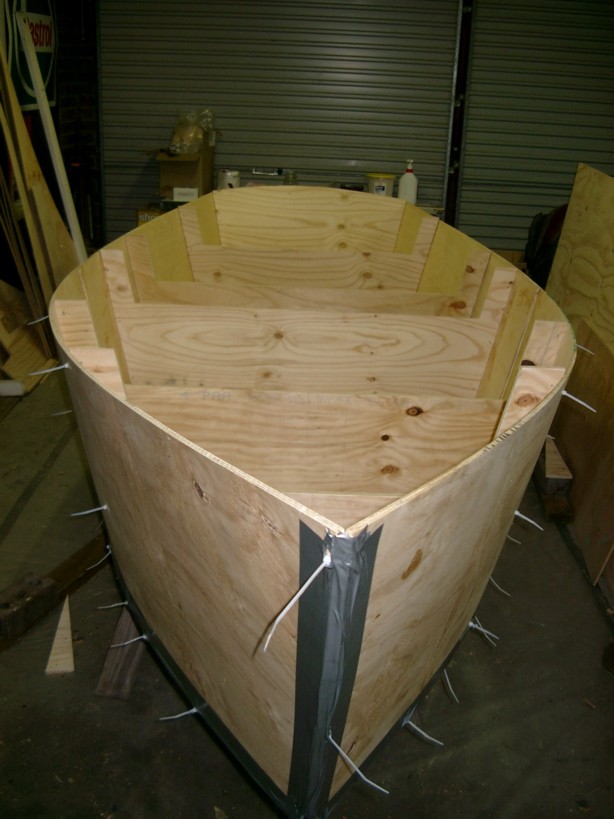
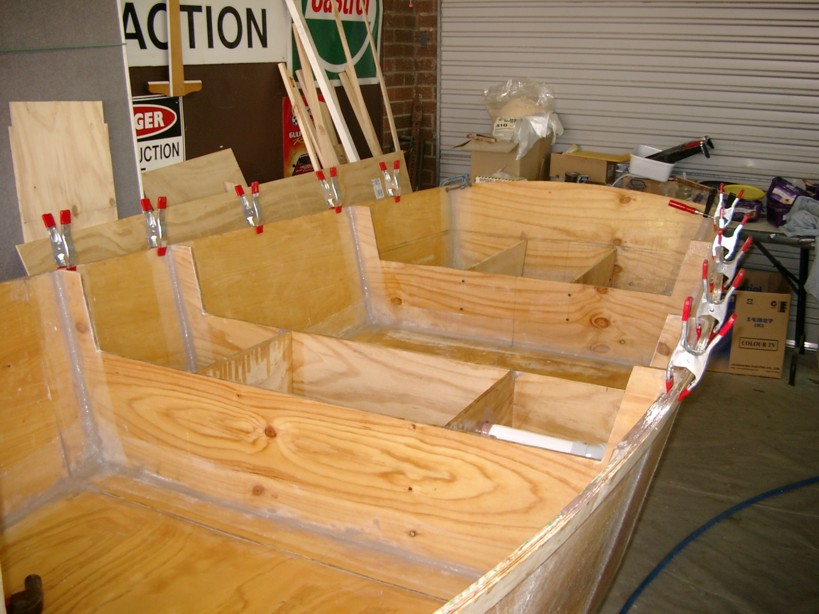
She's starting to take shape!
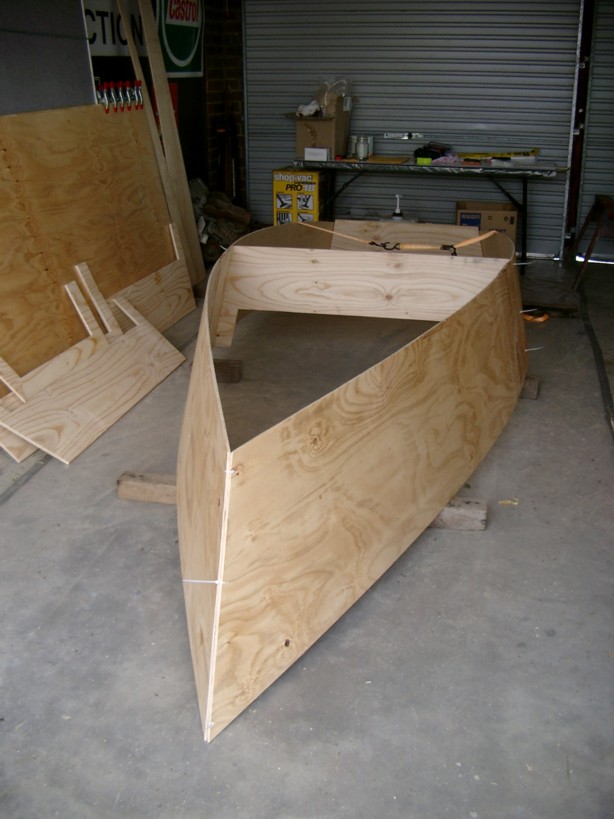
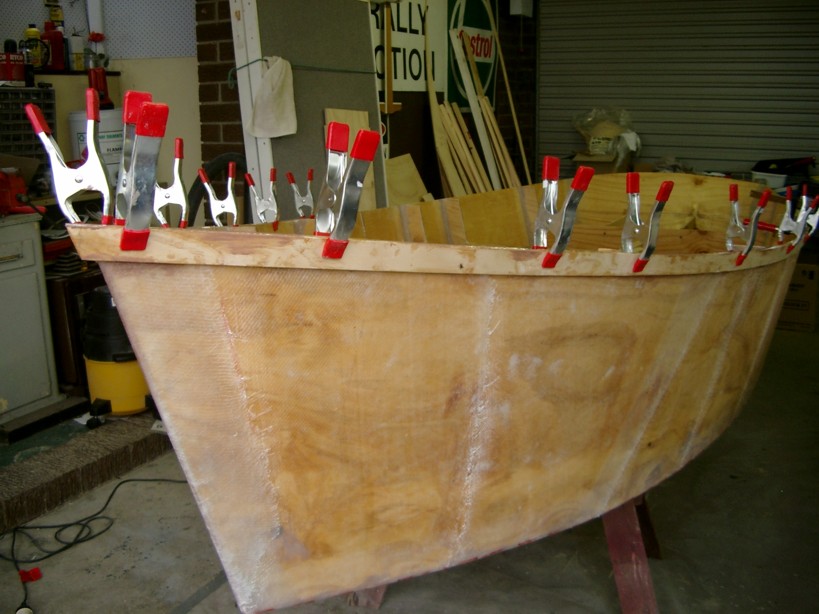
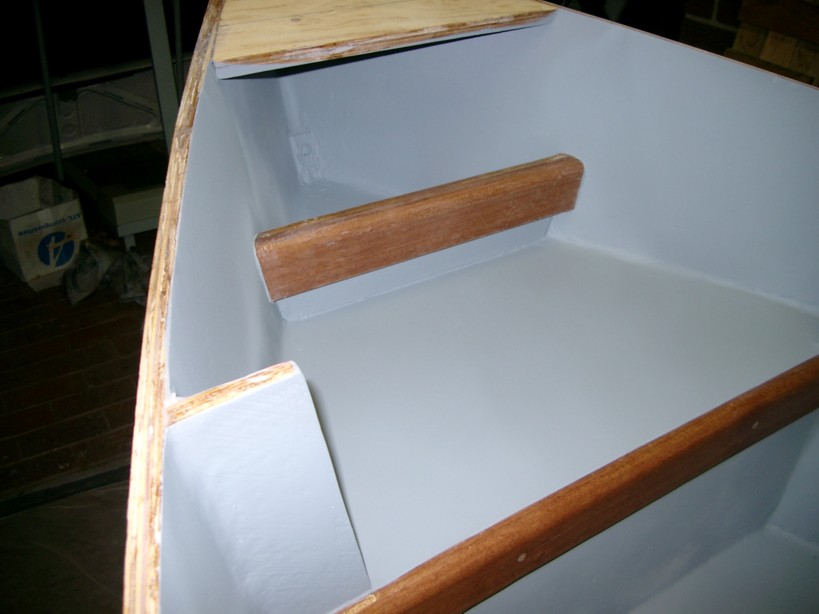
Bow stitched, mid-seat frame and transom installed. I used a ratchet cargo tie-down strap to help hold the side panels in place while I stitched the transom.
All frames installed and diagonals checked - all within 5mm or less.
It is great to watch the sheerline appear - just as Jacques said it would!


Cutting the bottom panels - my son Sean (pictured here with me) and his girlfriend stuck this 'Captain's cap' on my head as a joke and insisted on taking a photo...!

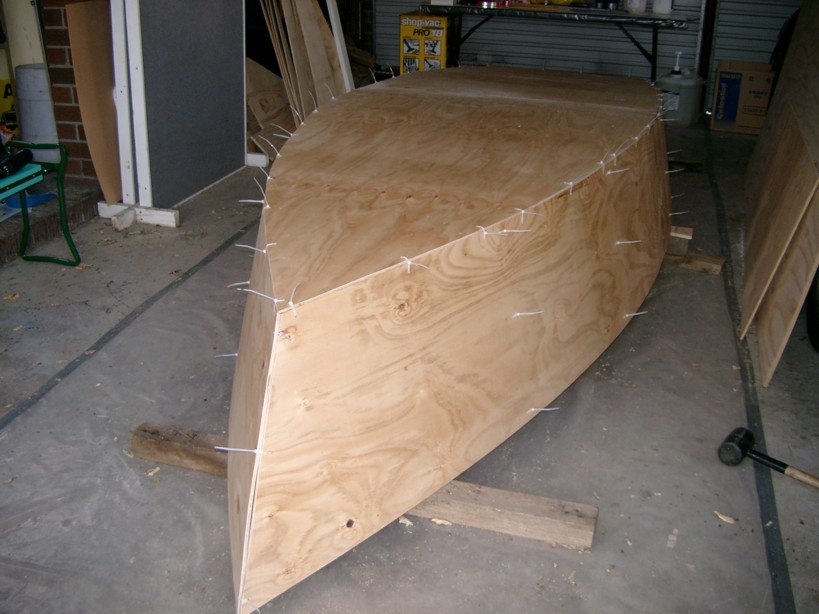
Bottom panels cut and laid loosely in position.
Unfortunately, my holidays have come to an end and I have to go back to work tomorrow!
I hope to get the bottom panels joined and stitched before next weekend, so I can start the fillets then.
FL14 Build update
Posted: Wed Jan 12, 2005 6:49 am
by Mike Adams
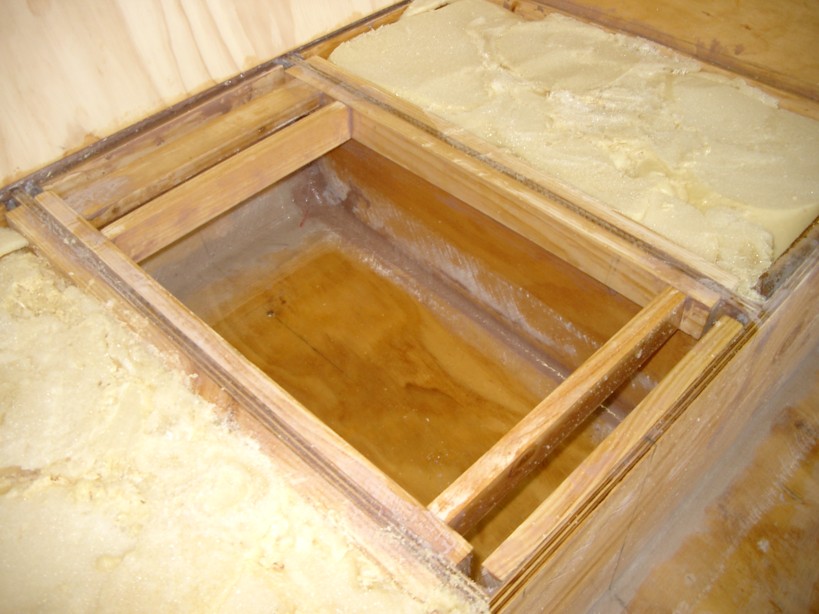
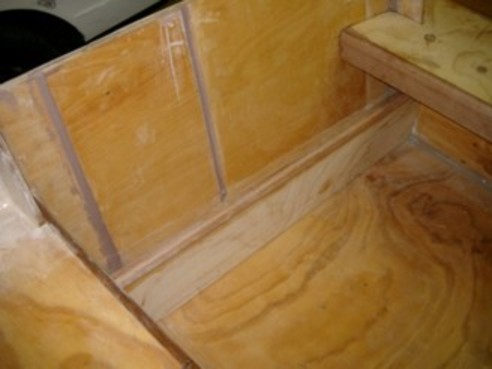
Bottom panel stitched:
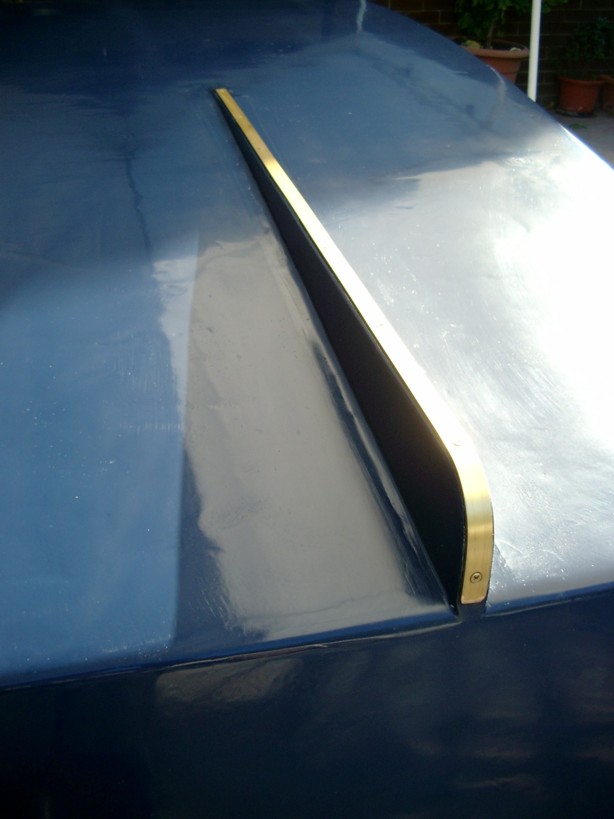
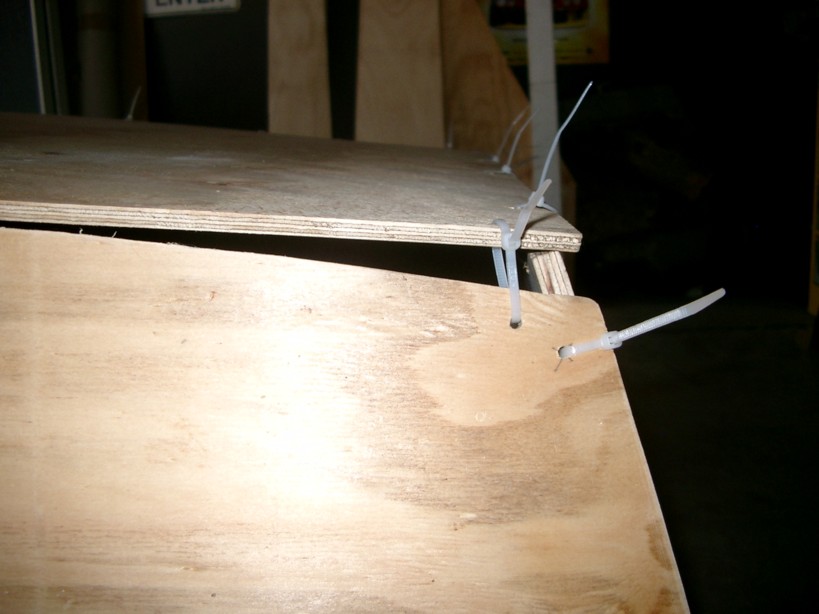
This is the 30mm error I made at the transom edge when measuring the side panels

- but it's not as bad as I feared it would be and should fill easily with scrap ply and epoxy fillet:
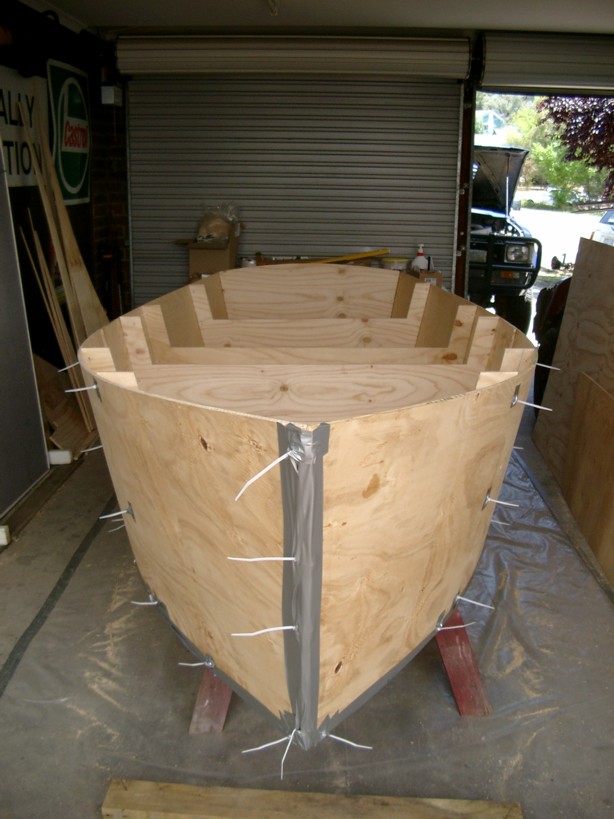
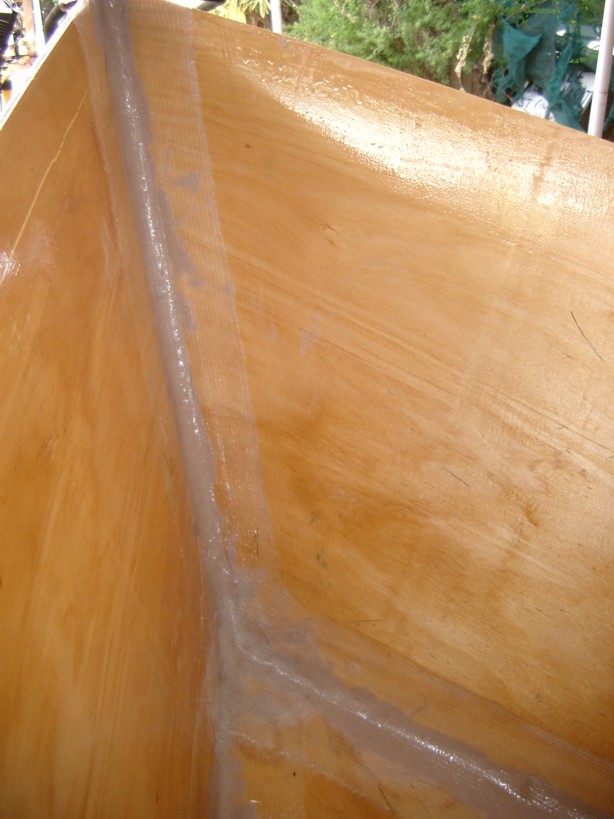
Seams taped:
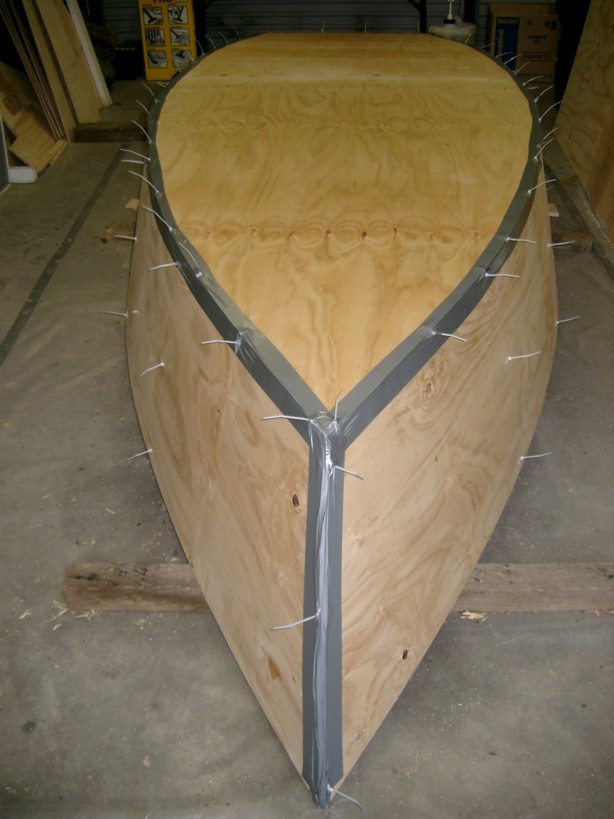
Hull flipped:
Before turning the boat over, the diagonal measurements were accurate within 5mm. After flipping, the upper measurements showed a consistent 15mm error in the diagonals between frames. However, the diagonals from transom to bow are spot on, so I think the problem might be that the frames are not quite straight across. Too tired to think about it any more tonight - I'll recheck tomorrow and try to reduce the diagonal error before filleting (scheduled for Saturday).
Posted: Wed Jan 12, 2005 8:50 am
by Steve_MA
Mike - Looking good! You boat looks just like mine did at that time. After measuring, my bow to transom to msmt was right on as well. I measured diags from transom to frame 5, to frame 4, etc....all down one side; the did the same for the other. I did this for 6 hours

You are closer than I was to start; I think having 3 ties in your frames helps keep them square to the hull side; or at least keeps them in place better than 2. Now that I think about it, I should have used 3 as well.
Good luck....
Posted: Wed Jan 12, 2005 9:20 am
by Deltaskipper
Are you covering your ties with the filet material?
Please keep posting as you build. This is a good tutorial on bulding the FL-14.
Posted: Wed Jan 12, 2005 10:06 am
by Steve_MA
I did initially, but sometimes they get in the way. So I started tabbing the joints with left over epoxy. Once its hard, you can take out the ties. This is what I do now. Its hard enough to get the fillets to look good without those ties being in the way.
I think Mike is just getting to this point as he just flipped the hull.
Also, from what I have gleened, the size of the fillet only needs to be big enough to transition the tape smoothly from one surface to another. You can do this easily with a plastic teaspoon. I used 1 1/2 PVC initially. I got nice smooth fillets, but they were bigger than necessary I think and the pipe isnt as flexible as a spoon for getting in corners. Plus, as the fillet firms up, you can shape it with your fingers. Dont "set it" and "forget it".....
Posted: Wed Jan 12, 2005 5:54 pm
by Mike Adams
Deltaskipper wrote:Are you covering your ties with the filet material?
Please keep posting as you build. This is a good tutorial on bulding the FL-14.
I have yet to start the fillets, but I have positioned the ties as close to the edges as I thought practical, so the inside fillets should in most cases easily cover the ties. If not, I will tab the joints like Steve did. I also decided to use wider tape than specified (6" biax) so that what is left over from the roll can be used on the DE23.
When the inside fillets are complete, the remainder of the ties projecting outside will be cut off before completing the outside seams.
Happy to keep posting progress reports. I read every new post on this forum and I am really impressed with the way not only individual builders but also Jacques and his team are willing to take the time to answer questions and help out with their expertise.
Incidentally, you might have noticed that I have not rounded off the top corners of my frames yet. I have done this deliberately as I have some ideas for fitting a folding canvas top and some rod holders in the sides. Not quite sure yet if or how I will do this, but I decided to leave the tops of the frames square for the time being in case I need them as supports for a narrow gunwale. If I change my mind, I can always round the tops of the frames off later.
Posted: Fri Jan 14, 2005 6:28 am
by Mike Adams
Steve_MA wrote:Mike - Looking good! You boat looks just like mine did at that time. After measuring, my bow to transom to msmt was right on as well. I measured diags from transom to frame 5, to frame 4, etc....all down one side; the did the same for the other. I did this for 6 hours
You are closer than I was to start; I think having 3 ties in your frames helps keep them square to the hull side; or at least keeps them in place better than 2. Now that I think about it, I should have used 3 as well.
Good luck....
Well, Steve, I'm sure not closer than you were now!
I spent a couple of hours tonight trying to correct the diagonals errors, but only succeeded in making things a whole lot worse.
Using three ties certainly keeps the frames in the right place and I think it was the right thing to do - but I made a major mistake when I assembled the frames and sides by tightening up all of the ties before ensuring that everything was perfectly square. The whole thing was so rigid I couldn't alter the structure enough to achieve a change to any of the diagonal measurements.
I eventually figured out what was wrong by running a string line from the centre of the transom to the bow, and laying a draftsman's T square against the transom and the string line to check that they were at right angles to each other.... they weren't, even though the diagonals from transom to bow were almost spot on!
This clearly indicated that the structure was assymetric, so I then checked the measurement from the string line in the centre to either side at the forward midseat frame and found the boat had an error of over an inch wider to port than to starboard.....

After thinking about it some more, I realised that since the side panels follow the line of the bottom panel, we must have scribed the bottom panels to an off-square frame before cutting it out. (This shows a potential flaw in the method used for the FL14 of scribing the bottom panel to suit the frames and sides you have stitched together instead of drawing the bottom panel out on the ply sheets from dimensions given on the plans. This method will only work if your frames are nice and square before you mark out the bottom panel).
[
Jacques - may I suggest that the dimensions of the bottom panels be inserted in the plans, so that builders have a choice of either transferring these dimensions to the plywood, or scribing the outlines of the bottom panels using their frames, if they are satisfied that everything is squared up.]
Another error I think I made was to tighten the stitches all along one side then the other - I think it would be better to do this like tightening the nuts on a car wheel - diagonally across each time, to avoid distortion.
I'm now going to have to cut the bottom panel loose, reassemble the frames and sides, adjust the fit of the bottom panel and square everything up before I can start the fillets.
Two major lessons I have learned from this experience that I will pass on to others are -
1) Make absolutely sure your frames and sides are square before you scribe the outline of the bottom panels. Better still, draw the panels out using the dimensions (if given) on the plans.
2) Don't tighten the stitches too much, and keep them loose until you are sure everything is square and in the right place.
I'm learning - I guess that's why Jacques tells us to build a small boat first....
Posted: Fri Jan 14, 2005 8:03 am
by Steve_MA
Mike, Sounds like your knee deep into it. I was puzzled too about what portions of the design, frame, bottom, etc have the primary impact on how square it is. One that seems obvious is that if the sides arent exactly the same, it will never be square. I I think this is why they have you cut one side based on the other. I did it in a slight different order than specified hoping to improve my results.....instead of cutting both sides and then doing the butt blocks; I cut one side, did both butt blocks, then traced out the second side and cut it. What might be even better is to cut the 1/4 lengthways in half, butt block it, then cut both sides together.
I dont know how much the bottom has to do with it because the bottom floats underneath the sides. Now, *if* the bottom is not true and you tighten up the sides to it, thats a problem, agreed. I also left my ties somewhat loose, and I every once in a while the bottom would shift so much one side would fall over the edge.
THe other concern I had was whether or not my frames where square to the sides and how much effect that would have on the outcome. Even more specifically, *which* frames where key.
In the end, I took out all the frames, but left the bottom in. I tried to make sure the bottom was positioned the same way as when I cut it. With no frames you can check for square at the pencil marks on the full where the frames go.
Shouldnt it be square with no frames installed? Seems to me it should.
Then I added frame 3 and checked for square. Then frame 1, check for sqaure. And so on. I even started using duct tape to hold the frames since I was running low on cable ties. The duct tape is OK for temp fastening, but one I had it positioned, a tie is more secure.
PS> The other thing that could make you out of square is the transom. If the side angle on the transom is off, and you tighten the side to it, you will be out of square. This is one thing I did *not* adjust which maybe I should have. I had the sides tight to the transom and never moved them. That may be why I go never get better than 1/2".
PSS> Finally, I found my support system could have an impact on my measurements of square. I dont recall the details, but I changed it several times before I was satisfied.
Again, I dont fully understand *exactly what* effects how square it comes out. Probably everything....
Take your time and have fun with it. Hope this was of some use....
Posted: Fri Jan 14, 2005 2:51 pm
by Mike Adams
Steve_MA wrote:Mike, Sounds like your knee deep into it. I was puzzled too about what portions of the design, frame, bottom, etc have the primary impact on how square it is. One that seems obvious is that if the sides arent exactly the same, it will never be square. I think this is why they have you cut one side based on the other.
I double/triple checked my frame and side measurements - all were accurate within a couple of millimetres and the sides were an exact mirror, so this wasn't my problem.
I dont know how much the bottom has to do with it because the bottom floats underneath the sides. Now, *if* the bottom is not true and you tighten up the sides to it, thats a problem, agreed.
I've done a lot of thinking about this overnight! I am pretty sure that this was the reason for the error. My son and I had a little difficulty lining up the sides with the edges of the panel bottom after it was cut out. The plywood I used is exterior and although it is of good quality with no voids, it is designed for building construction and is exactly 1200mm wide (not 1220 as specified in the BoM). This meant a small gap occured on each side at the butt block area - not a problem in itself, because it will fill with epoxy, but it gave extra room for some movement of the sheet when positioning. In addition, we could not quite align the panel with the sides at both transom and bow ends simultaneously - if one end was exactly positioned, the other would be out by about 5mm. I didn't worry about this at the time as the slightly overhanging edge can be trimmed later after filleting, but I now realise that when I pulled the stitches up too tight, I must have forced the hull sides to follow the slightly assymetric bottom panel.
However, I'm fairly confident now that I can restitch the bottom(loosely!

) and correct the out of square error.
It's 6:45a.m. Saturday here, and I'm just about to go out and get this job done, so I can still do some fillets today. We're in for another hot one today - 32degreesC, although not as bad as yesterday, which got to 38C.
Gotta go build me a boat!
Sucess at last!
Posted: Sat Jan 15, 2005 4:30 am
by Mike Adams
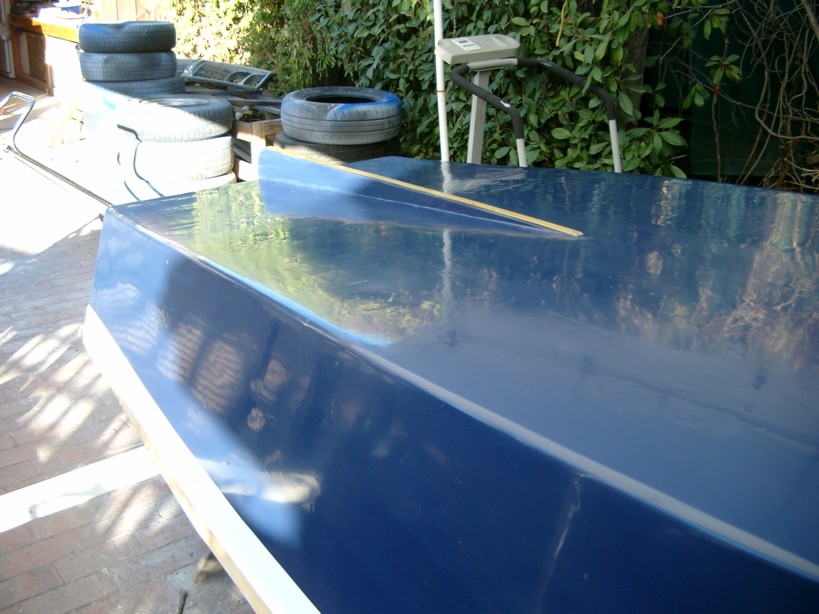
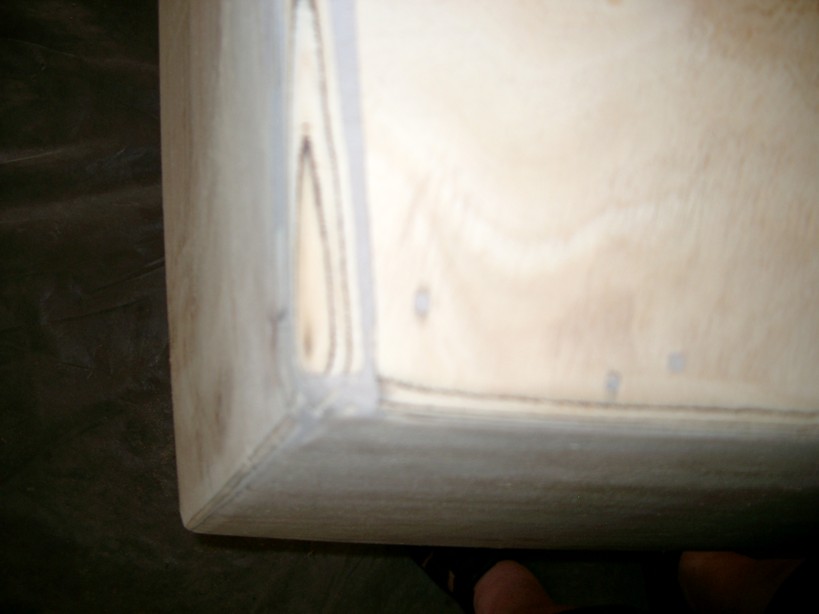
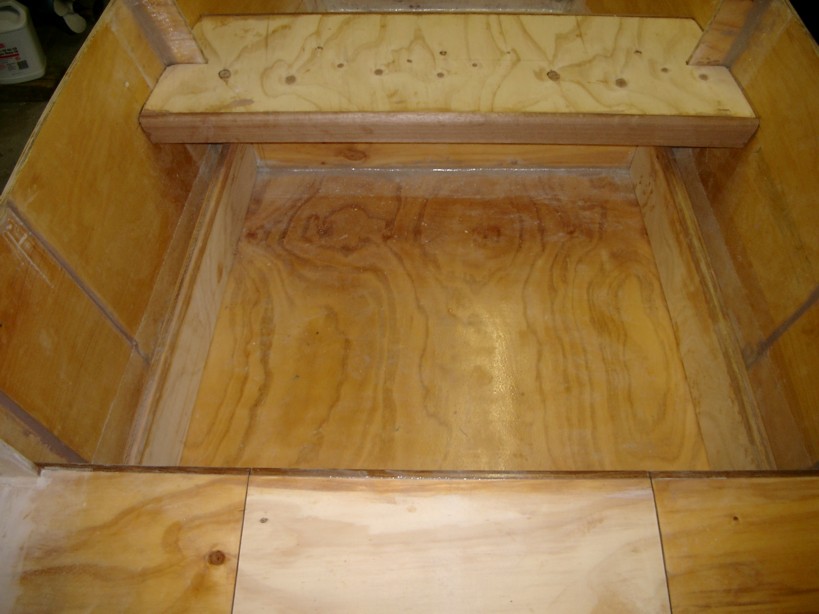
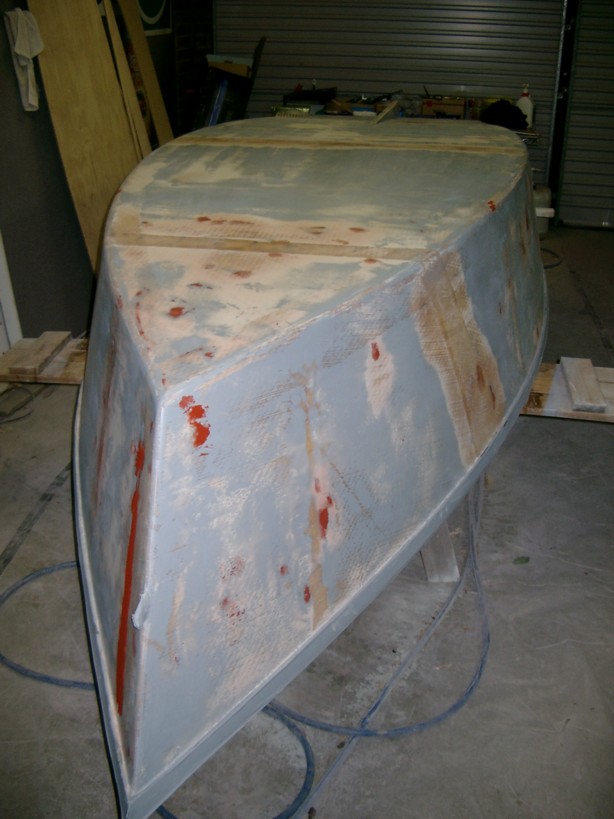
Well, my assessment was correct - it was an inaccurately scribed and cut bottom panel that was causing all the trouble. I spent 5 hours today reassembling the hull - turned it upside down again and removed the bottom panel, then trued everything up on the frames and sides and laid the bottom panel back on. The lateral error at the transom was immediately apparent - see pic below. (The same amount of error extends out beyond the opposite side).

You can see the holes I drilled to take the original ties. When I tightened these up, the sides were drawn to follow the bottom panel error, thus throwing everything out of alignment. After a lot of work and the use of 4 drywall screws to hold the the transom in the correct place, I managed to get everything aligned properly, with the maximum error anywhere now only 4mm and most measurements within 2 - 3mm.
/
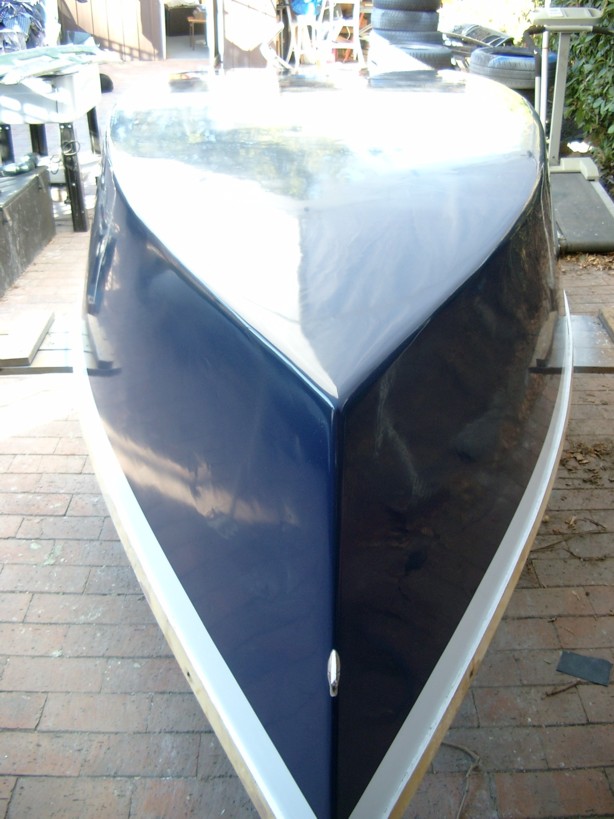
Correctly aligned and dead straight - at last!
At last I was able to start the fillets, assisted by a friend who is also considering buying the DE23 plans. Our first attempt - filling the hole left by the incorrectly cut bottom panel - was a bit messy; we mixed too much fillet material and took too long doing it, with the result that it started to go off very quickly (I'm using slow hardener, but the temp got up to about 35C today.
). We managed to complete the job, but it doesn't look very pretty. Still, it is in an area that will be filled with flotation foam, so I guess it doesn't matter too much. I've used biax tape as well, so there should be plenty of strength in the join.
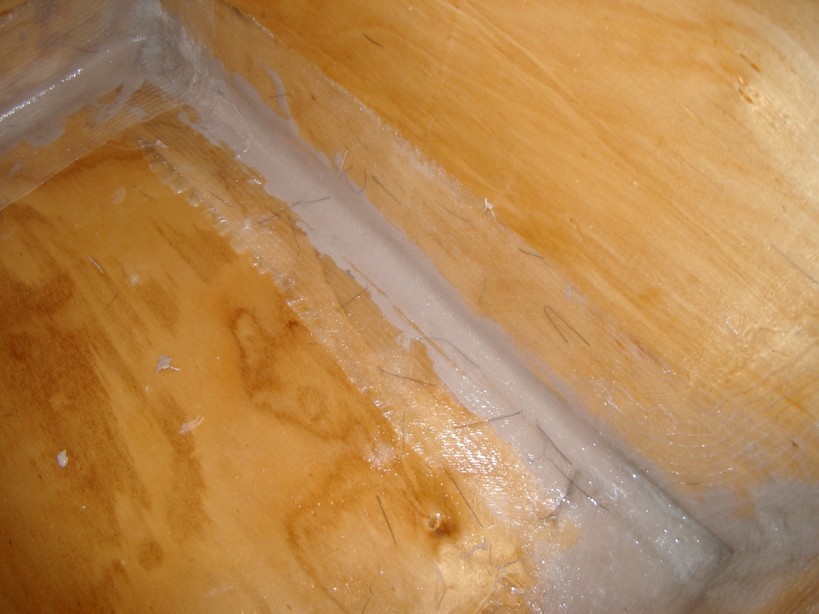
But we're getting better with practice! Here is the bow fillet:
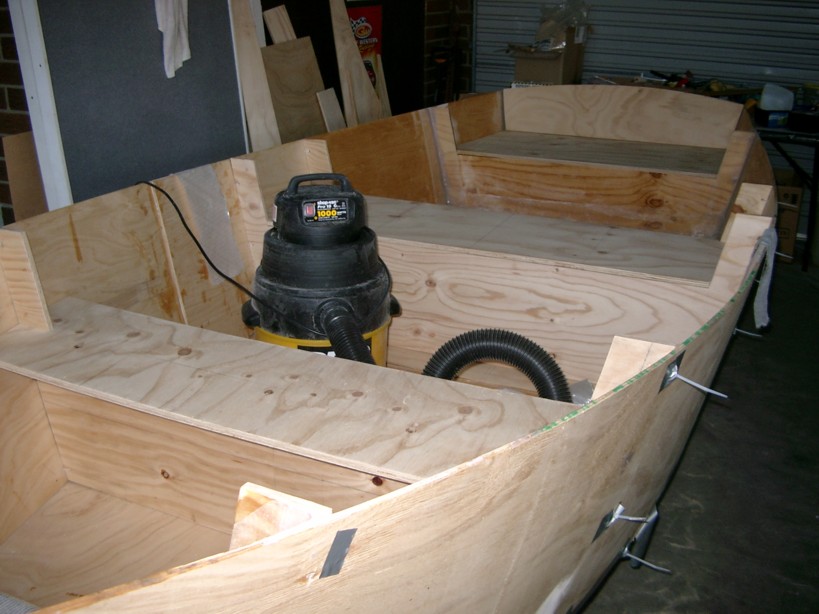
Knocked off after nearly 10 hours working on the boat today - having reassembled the hull, and finished the transom box, bow box, and mid-seat bottom side fillets.
Hopefully I won't make any more stupid mistakes......
Posted: Sat Jan 15, 2005 5:09 pm
by rjezuit
That's what I like to see. Even with errors and setbacks, you have gone forward and learned. And with your learning, I am learning also. I will be starting an FL14 when the weather gets a little nicer and am collecting knowledge now. Great job fixing the mistakes, hope the rest goes better. Rick
Posted: Sat Jan 15, 2005 6:14 pm
by Mike Adams
rjezuit wrote:That's what I like to see. Even with errors and setbacks, you have gone forward and learned. And with your learning, I am learning also. I will be starting an FL14 when the weather gets a little nicer and am collecting knowledge now. Great job fixing the mistakes, hope the rest goes better. Rick
Thanks, Rick. I took a bit of convincing to do a small boat first (before the DE23), but I am very glad now that I did as there is just no substitute for experience. On another thread,
GrampaB wrote:Most people have the skill to do something they desire to do but only practice develops the craftsmanship that builds a really great project. Anything you do is a learning experience and I've learned very little or nothing by doing it correctly. A starter project makes a lot of sense when contemplating a big or expensive project.
Ain't it the truth! You don't learn anything much by doing things right first time.
Good luck with building your own FL14.
Posted: Sat Jan 15, 2005 6:35 pm
by ks8
Fillets are looking good. Have fun! It is rewarding when it finally takes shape, eh?
ks
Posted: Sat Jan 15, 2005 8:05 pm
by Deltaskipper
When you cut the bottom does it rest on the sides or did you leave a gap between the bottom and sides?
Posted: Sun Jan 16, 2005 12:05 am
by Mike Adams
Deltaskipper wrote:When you cut the bottom does it rest on the sides or did you leave a gap between the bottom and sides?
Now that's an interesting question! As Jacques would say, "Gaps are good!" (Provided they're not the size of the ones I had..
). From other posts on this forum I have since realised that ideally there should be a small gap between the edges of the sides and bottom, that can be filled with epoxy (although the FL14 plans and building instructions do not make this clear), but I just scribed the bottom panels to the outside edges of the sides.

Cutting out the bottom to sit inside the edge of the sides and leave a gap would probably require a bit more attention to accuracy in order to make it fit without ending up with oversize gaps. As it turned out, if I had cut the bottom to fit inside the sides, my bottom panel error would have been a lot bigger than it was!
As I understand it, the main reason for leaving a gap to fill with epoxy is to avoid hard spots, where wood meets wood and exerts excessive pressure. However, my bottom panel sits fairly evenly on the edges of the sides, so that's the way I left it. Because I had to correct my original error, the bottom/side panel edges didn't quite meet in several places anyway, so I ended up with some gaps for the epoxy to fill after all!
Got a few more fillets done today - it is several degrees cooler here in Canberra than it was yesterday and the mix stayed active a lot longer, which made the job a lot easier. I think my fillets are improving!
Posted: Wed Jan 19, 2005 5:48 am
by Mike Adams
ks8 wrote:Fillets are looking good. Have fun! It is rewarding when it finally takes shape, eh?
ks
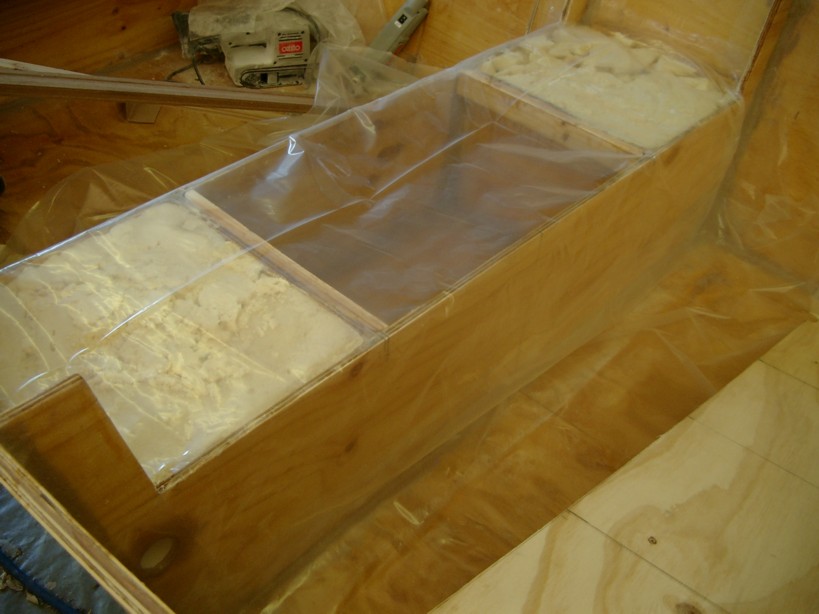
Sure is! Very happy with today's progress - I made a storage frame for the outboard and cut out all seat tops and outboard pad panels for the transom area.
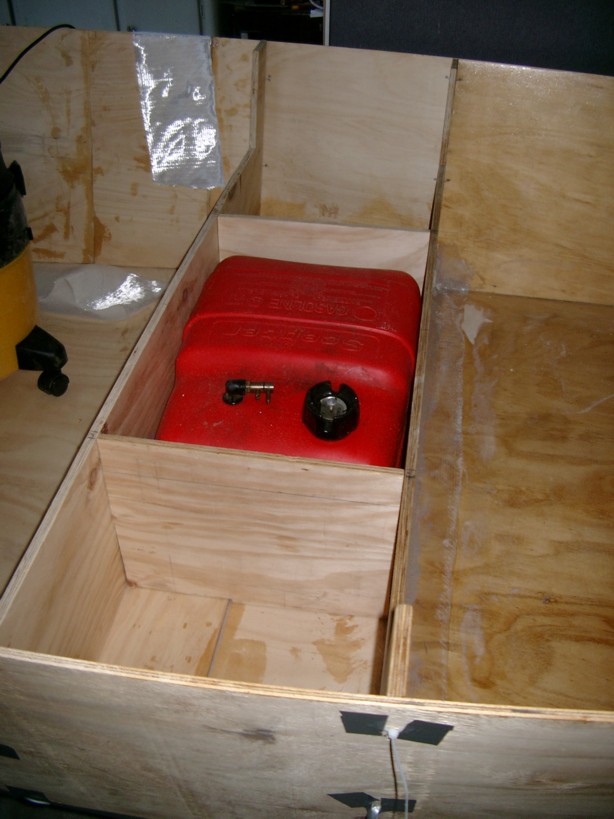
This is where the fuel tank will go:
I was very unhappy with the messy first attempt fillets at the transom, so the other thing I did today was to cut out the worst areas and prepared them for re-filleting/glassing. I also lightly sanded the other areas already filleted to 'feather' the edges of the biax tape, and smoothed off the piece of dowel glued in the join of the panels at the bow) Bow is now ready for biax tape.
I'm on leave again for a few days, so hope to get the remainder of the inside fillets done by the weekend and be ready to flip the hull.
Posted: Wed Jan 19, 2005 9:13 am
by Steve_MA
Hi Mike.....Looks good....my first attempt at fillets was way too messy as well.
I didn't cut my seat tops yet. Did you make templates to fit the curves in the hull or did you just do it by eye or other measurements?
The other question I had was how are you going to run the gas line from mid-seat to the transom? What do you have in mind for that.
It neat to see you designing yours to fit a motor so well. I am just doing a rowing version and not thinking much about accommodating an engine.
Posted: Wed Jan 19, 2005 1:28 pm
by ks8
It neat to see you designing yours to fit a motor so well. I am just doing a rowing version and not thinking much about accommodating an engine.
You're the boatyard. You can always make the mods later if you want an engine on there. but the transom you have now may support an electric with a big battery under a seat. Battery compartments also need some ventilation. Even sealed batteries can gas out a little when charging, unless they have a proper safety rating in this regard.
When I saw the first pictures of the FL14's with people in them, it was amazing to see how roomy they are for 14 foot boats.
You'll probably both be finished before me!

ks
Posted: Wed Jan 19, 2005 3:45 pm
by Mike Adams
Steve_MA wrote:
I didn't cut my seat tops yet. Did you make templates to fit the curves in the hull or did you just do it by eye or other measurements?
The other question I had was how are you going to run the gas line from mid-seat to the transom? What do you have in mind for that.
G'day Steve.
I decided to cut out my seat tops mainly because I was fed up with falling over the remaining sheet of 12mm ply standing up alongside my boat.
Also, I wanted to see how much I had left over to make division walls in the midseat compartment. No, I didn't bother with templates - just measured as accurately as I could and eyeballed the curves using the curve at the top edge of the sides as a rough guide. I figured that since the seat tops will be permanently fixed in place, good ol' epoxy filler will fix any gaps. However, I was surprise at how much curve there actually is in the bow box - it doesn't look a lot when eyeballing it, but I undercut the bow seat by about 10mm - that is definitely a candidate for epoxy filler!
WRT the gas line, I intend to run a short chase tube through the portside midseat bouyancy foam box, then take the line up along the narrow gunwale I am going to install with the rubrails. Should keep it all neat and tidy and (importantly) in the open and easily accessible. I decided to use a short chase tube in the foam box after my son (a motor mechanic) reminded me that fuel lines do perish over time and will need to be regularly checked and replaced if necessary. Using a chase tube in that area wil make it easy to do this.
Hope your boat is going well - looks good from the pics!
Cheers
FL14 Progress Update
Posted: Sat Jan 22, 2005 5:05 am
by Mike Adams
Here's an update of my progress on my FL14:
I've finished all the fillets now, except for the mid-seat fuel bay area - this will be easier to reach when I can get into the boat after fibreglassing the outside of the hull.
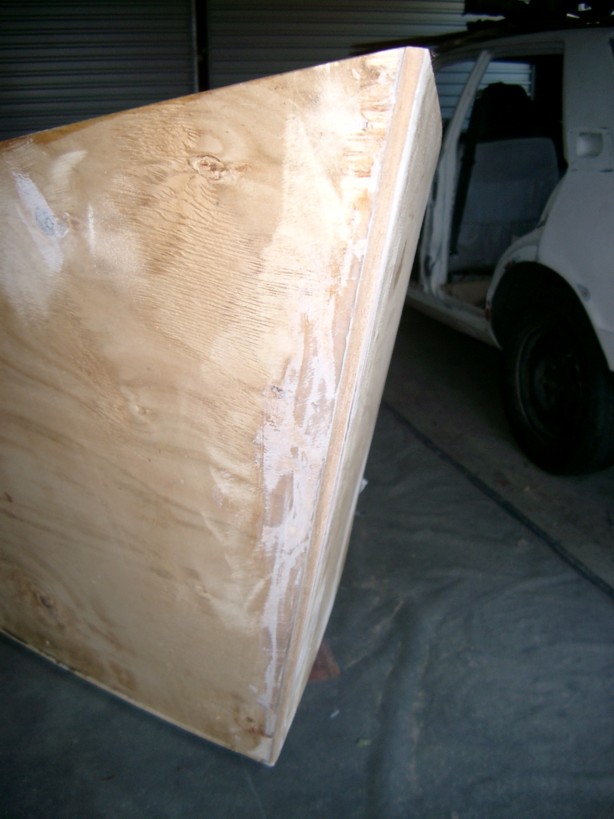
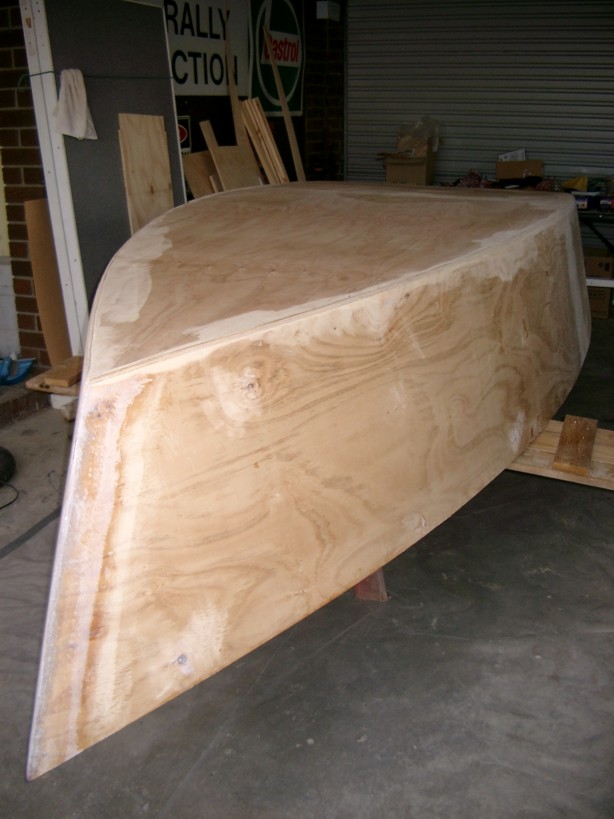
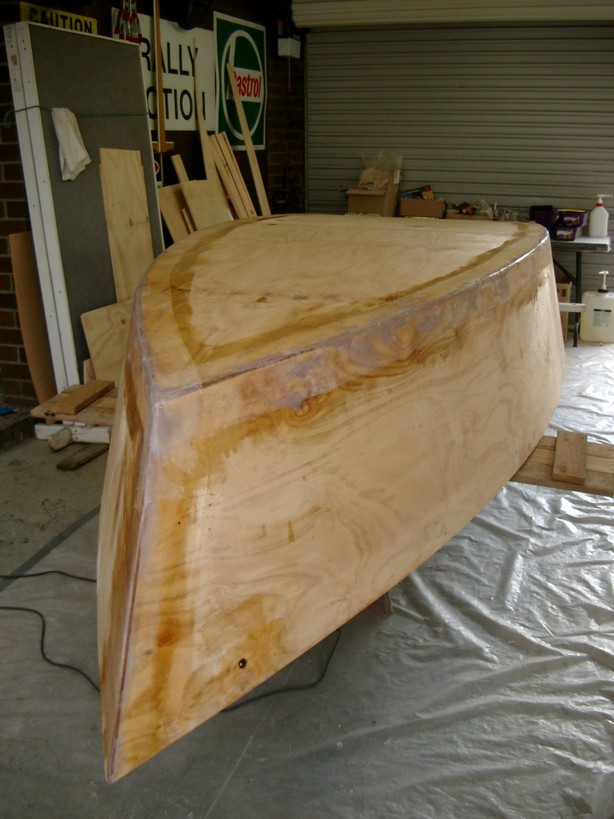
Flipped the hull and rounded the edges of the chines - ready for taping.
Unfortunately, my belt sander gave up the ghost halfway down the second side....
(Another expense coming up).
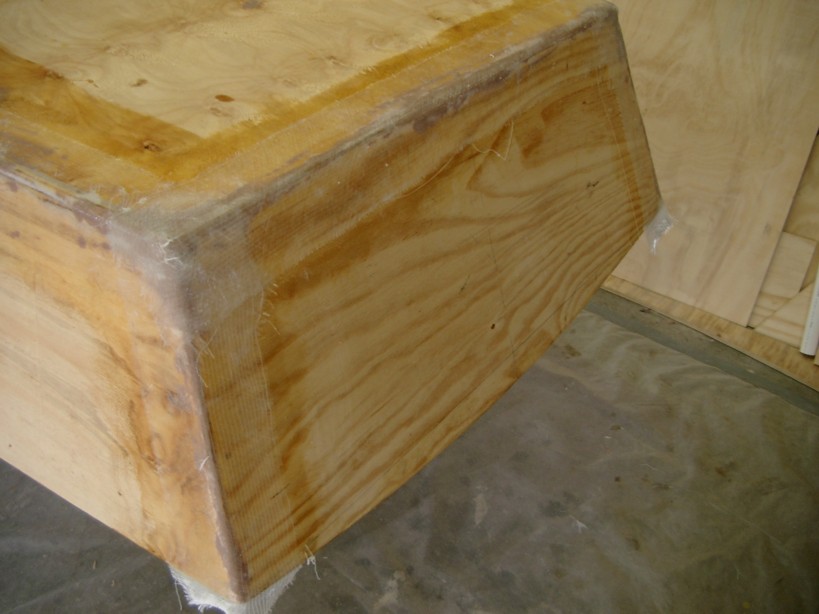
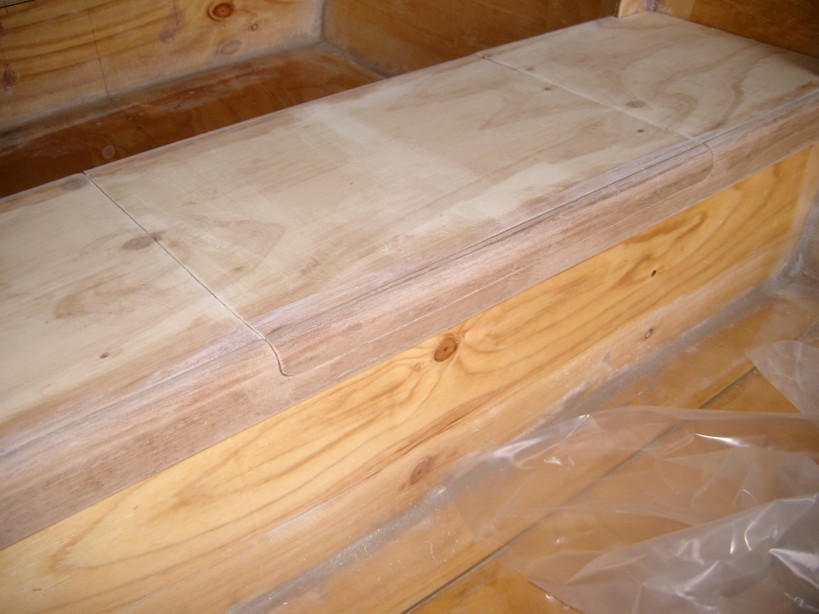
This is where I made a bad mistake cutting out the bottom panel and transom edge of the side panels.
It has filled nicely with scrap ply and epoxy glue/fillet and seems very strong. With biax tape on the seams and then biax cloth over the whole hull, nobody will ever know...!
Posted: Sat Jan 22, 2005 11:15 am
by fishingdan
Looking great Mike!
FL14 down under
Posted: Sat Jan 22, 2005 5:59 pm
by mpacek
Wow. Mike that looks great. I had sized my center compartment the exact same way. I still have not had the weather to glass the bottom 4F today with 1 - 2 feet of snow on the way. I did buy a propane heater for the garage for when it warms up to somthing like 20F. Maybe next week.
Posted: Sun Jan 23, 2005 5:12 am
by Mike Adams
Thanks, guys.
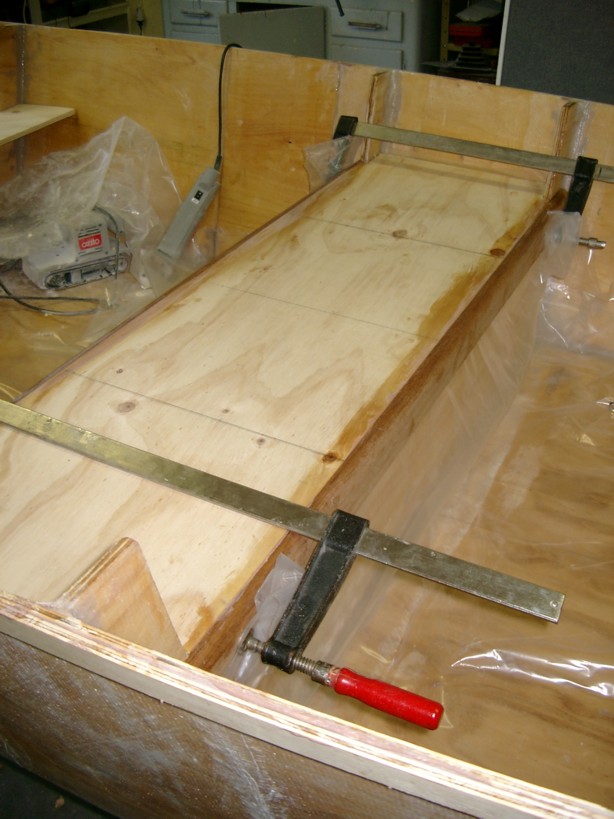
Got the seams taped today, but I'm using heavy (12oz) 6" biax tape and found it a bit difficult to get nice neat foldovers at the bow and transom.
Next job is to cover the hull with biax cloth, then let the fairing and sanding commence..
Posted: Sun Jan 23, 2005 7:23 am
by Steve_MA
Mike, You are making fast progress....looks pretty good. I used the tape with the kit, 4" I think, and it went on fine. I spent alot of time putting a good roundover on the hull.
I did precoat the entire hull and let it sit for an hour before starting the bottom cloth, 9oz woven. It was tacky and this was a mistake because it is impossible to lay down without getting wrinkles....well not impossible since I did it, but definately not way to do it, IMHO.
I was just reading the System 3 book. I says to put the cloth over a tack-free coast of epoxy and suggests taping the edges to keep the fiber strands down. This is what I did the second time and how I will continue.
I had a bit of trouble with this clothing step. Practice will fix that I hope. I hope you fair better than I did! Keep it up....
Posted: Sat Jan 29, 2005 5:18 am
by Mike Adams
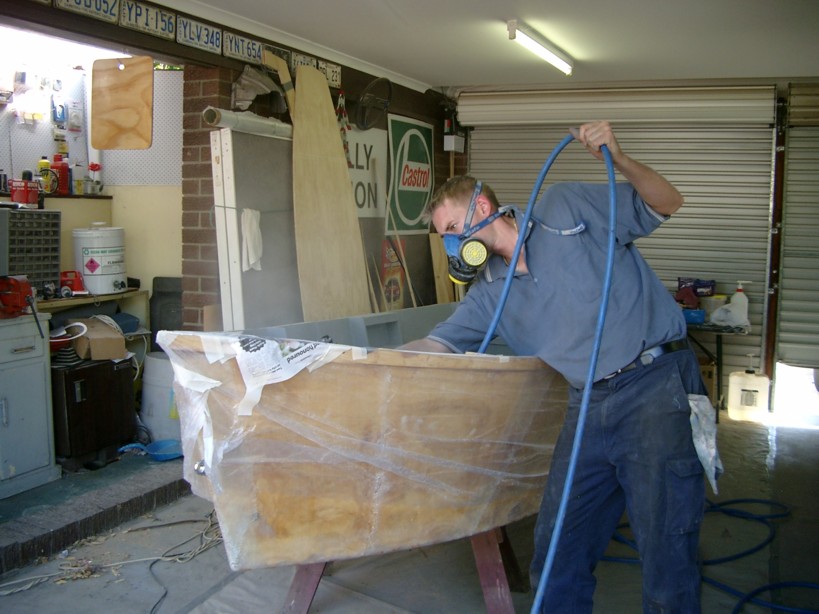
I got my hull glassed this week without too much difficulty - helped by my wife, who mixed and spread epoxy while I came behind with a rubber squeegee to spread it and remove any excess. Definitely easier with two pairs of hands!
I used 12oz biax cloth. First, I laid it out dry and cut the sections to shape, slit where the cloth folded down the sides, etc.
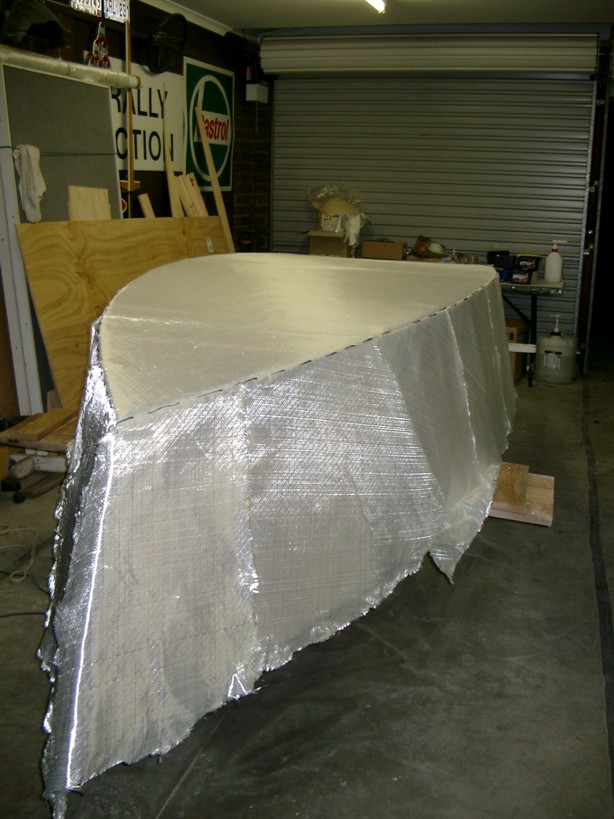
I laid the cloth across the hull rather than along it, so that for each section the hull and sides would be covered with one piece - this made for a very smooth and even transition over the chines. To make it easy to align the cloth over the wet pre-coat, I marked the position of the chines on the cloth while still dry:
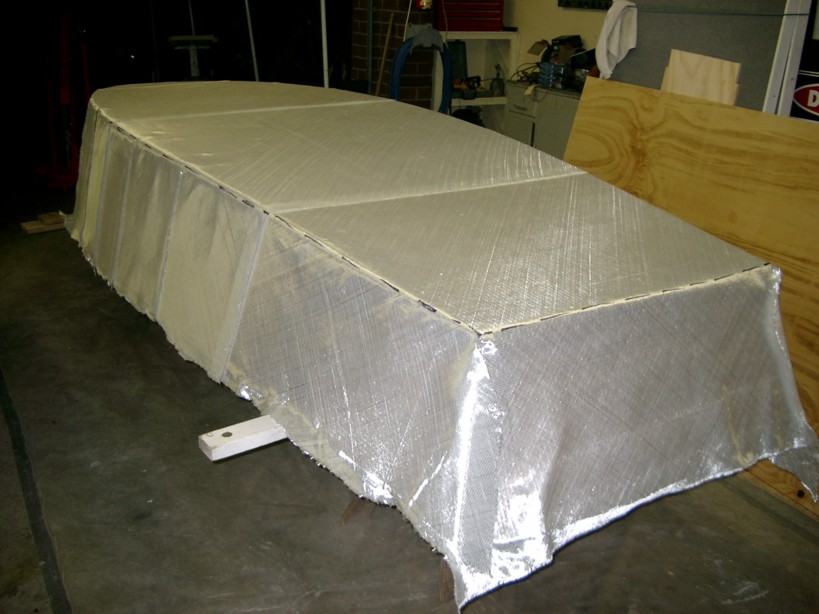
We worked one section at a time, starting from the transom, applying a precoat to the plywood, then laying on the dry cloth. I then used the rubber squeegee to smooth out the cloth and help it begin to absorb epoxy from the precoat, while my wife mixed epoxy for the wet-out. She then spread it on, initially using a roller; however, we found that the roller tended to lift the cloth as it got wetter, so she reverted to putting it on with a brush. I then followed along a second time with the squeegee, making sure the cloth was completely wetted out and squeezing out excess epoxy. After less than 4 hours work, this was the result:
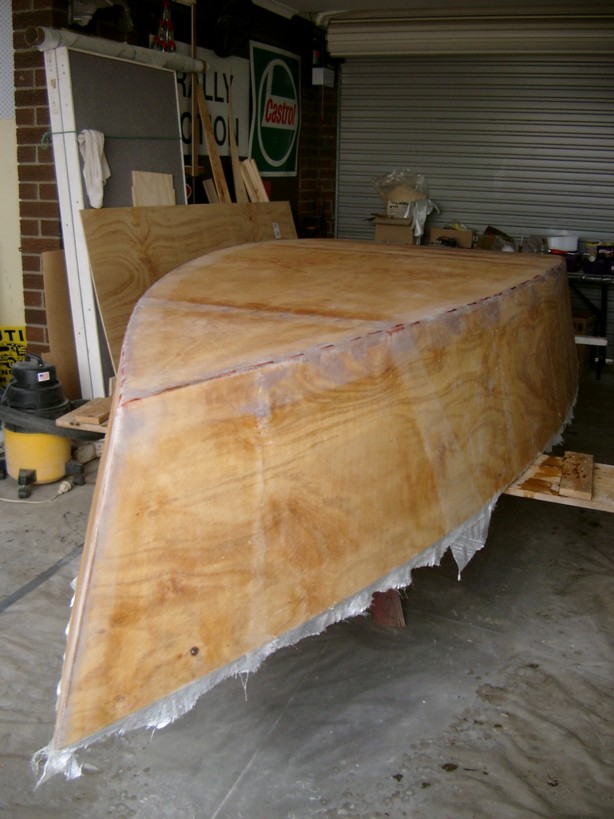
I was going to start fairing next, but decided to turn the boat over and install the first layer of rubrail first:
I also lightly sanded the cloth joins to feather the edges in preparation for fairing the hull.
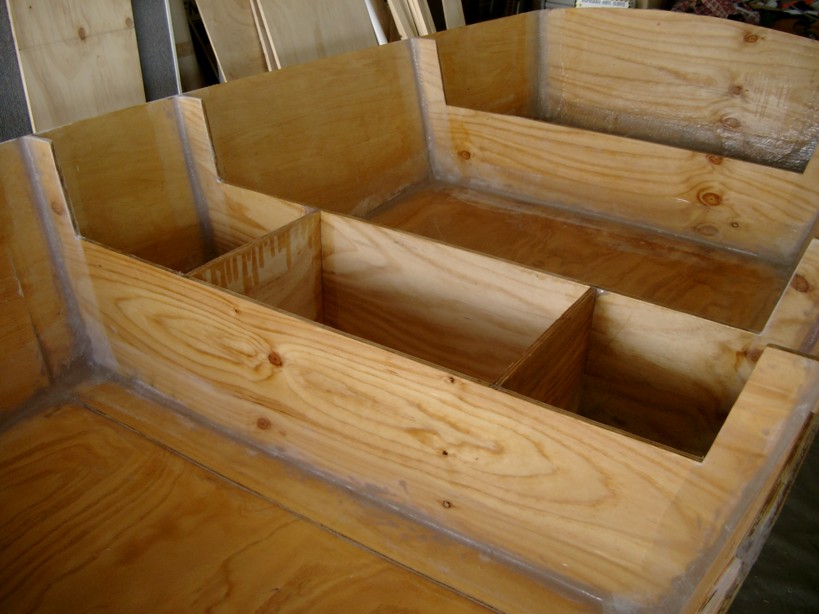
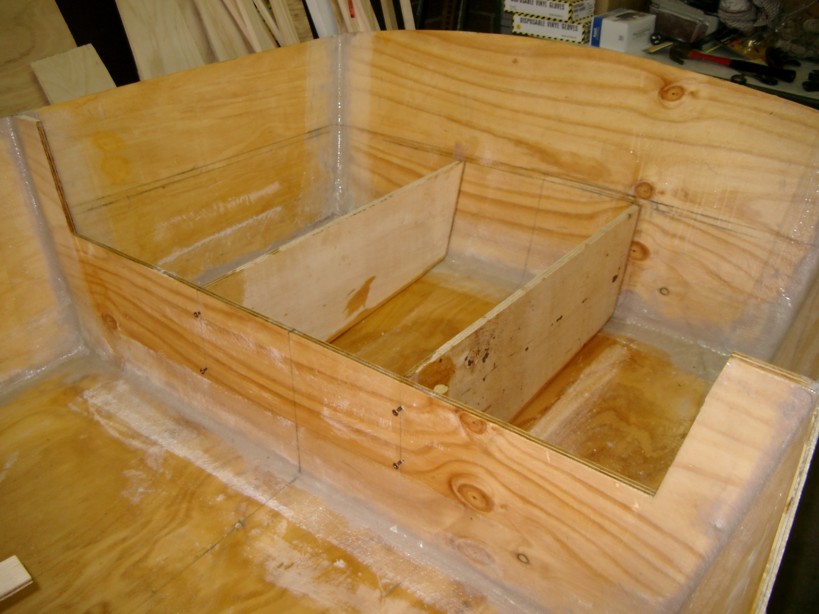
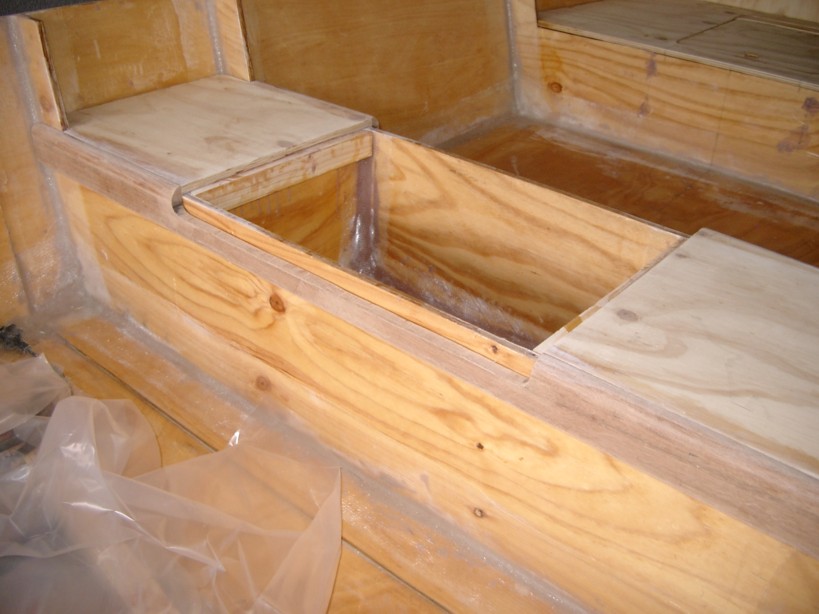
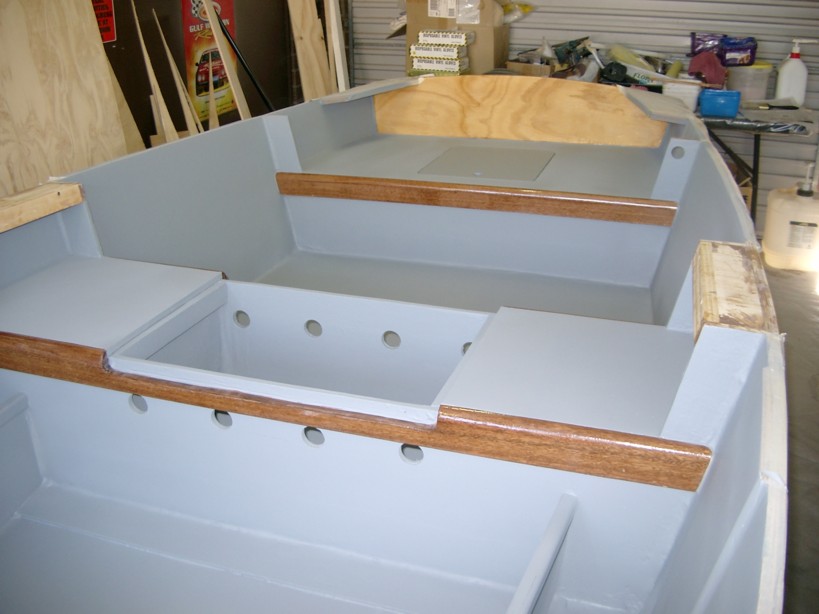
Since the boat was now right way up, I decided to do a few other things while waiting for the rubrail epoxy/glue to dry. This is the rear seat storage box - sides held in with drywall screws while the tab weld set, then I will remove the screws and complete the fillets. (The compartments either side will be filled with bouyancy foam).
I also installed the chase tube for the fuel line through the portside mid-seat bouyancy foam box:
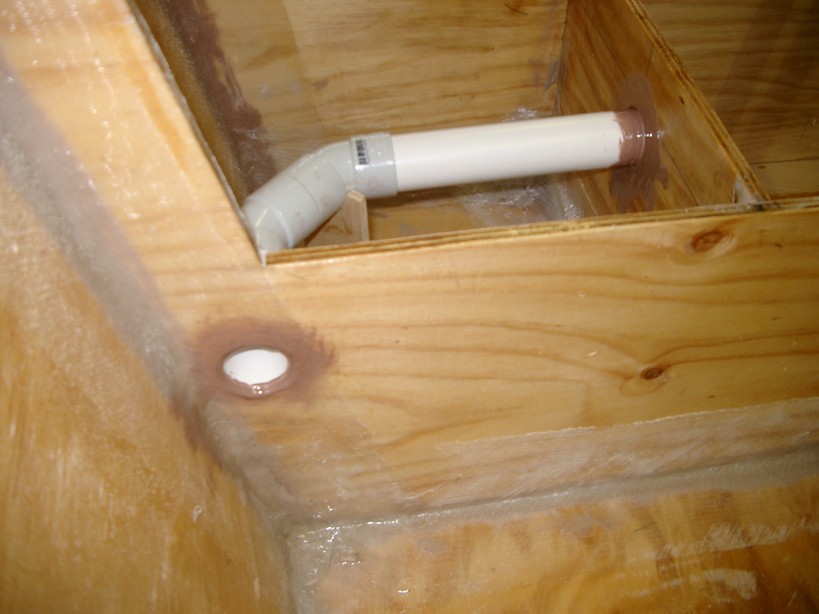
The fuel line will run from the chase tube up under the narrow gunwale I am going to install, and around to the transom and the engine.
Next jobs will be to glue the rear sections of the rubrails (I couldn't do them all at once - not enough clamps!
) and fillet the rear seat storage box sides before turning the hull over again to start the fairing. In between I am still pottering with the DE23 model - more pics on that soon. (Damn nuisance having to go to work from Monday to Friday, though - cuts right down on important boat-building time!)
Fortunately, we are in our summer period and on daylight saving, so I can usually get an hour or so in on the boat after work, other things permitting.
More to come later.....
Posted: Sat Jan 29, 2005 5:32 am
by Mike Adams
I forgot to tell you about one trap I almost fell into - some time after we had finished glassing the hull, I went out to have another look and admire our handiwork
and while standing there looking at it, I suddenly realised that a small layer of cloth and epoxy run-off had welded my boat to the two timber cross supports it was standing on!
I very quickly took a sharp knife and cut the boat free! Glad I noticed it before the epoxy had totally cured....!

In future, I will remember to put a layer of plastic down over the support timbers to prevent this.
Posted: Sat Jan 29, 2005 8:40 am
by Steve_MA
Its really coming along ... I have mine flipped as well. I need to finish the inside fillets, but first I am deciding on how I am going to drain it since it will be outside and open mostly. I think I have settled on a system with help from others (in a different thread). I am also still working on my seats/hatch covers. There wont be any foam in mine. I will probably leave the compantments open too. I am curious to see how your going to the gunwale. That will be a nice addition. Maybe I will copy it !
I may end up double up the 3/8 ply for the seats and hatches. I have noticed that it doesnt always like to stay flat. Plus 3/8 doesnt give you much to screw into. I might get away with backing plates where needed and some cross supports. Working on that now.....
Build on!
Posted: Sat Jan 29, 2005 2:57 pm
by ks8
That's what I mean Steve. See how Mike put those verticals in the rear chamber so that foam would go on either side? That's what I meant in your other thread regarding hatches and foam locations.
ks
Nice work Mike! Decades ago, I worked with plastics and leather, using SuperGlue for some plastics work. A coworker (really, it wasn't me), while kneeling by some work, accidentally knocked over the industrial superglue. It ran along the floor, soaked his pants and glued his knee to the concrete floor. We laugh today, but not back then! Glad you caught the epoxy drip while wet, but it can still be cut free easily once cured, or ground.
Posted: Sun Jan 30, 2005 6:38 am
by Mike Adams
I decided to install the cleats for the bow seat today, so that I can fill the area with foam and install the seat before installing the breasthook and anchor storage area above.
Now here's an interesting problem - at most positions on the boat, the seat cleats will glue to a fairly straight part of the side panels. However, the side panels in the bow seat area have a pronounced curve - so how do you glue a stiff, straight timber cleat to a curved side panel and clamp it in place when it is located halfway down the side (where normal clamps won't reach)?

Well, after a lot of thought, here's what I did
- I used two pieces of timber to extend the reach of my sash clamps, and then cut slots across the cleats almost right through, so that they would bend easily to the shape of the side panel when pressure was applied through the clamps (the vertical lines across the cleats are the slots closed up after the cleat has bent to the correct shape):
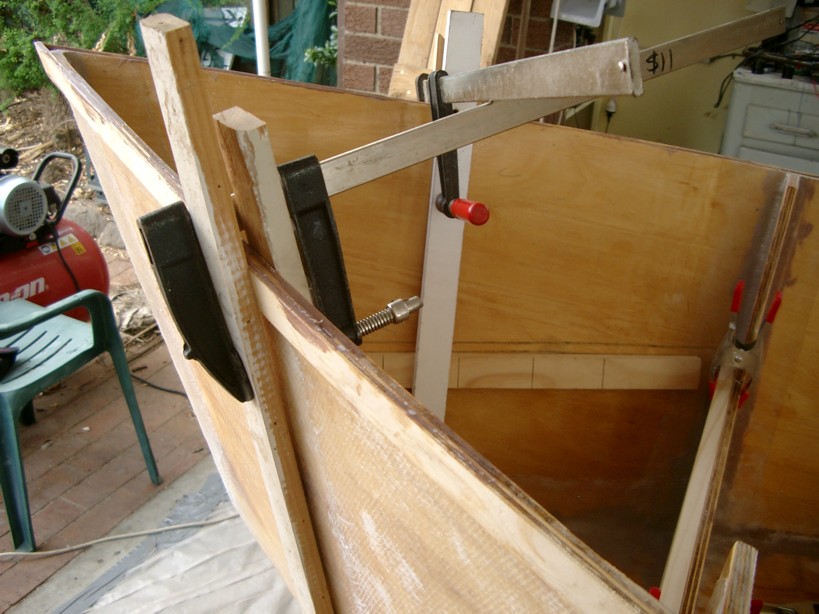
It looks complicated, but once I worked out what to do, it was quite easy. Hope the tip helps someone else.
I also cut the pieces for the breasthook and glued them together, and got the rear sections of the rub rails (first layer) glued in place:
It was a hot and humid day today. Didn't get much more done, but every little bit is progress!
Posted: Sun Jan 30, 2005 1:07 pm
by rjezuit
Just got my FL14 plans the other day. I can't wait to get started but it has been near or below 0 F here lately, and have to wait for warmer weather to work in the garage. I think you are doing a great job, and am learning along with you. Hopefully saving me some trials and tribulations. Rick
Posted: Mon Jan 31, 2005 4:56 am
by Mike Adams
Thanks, Rick - that's what this forum is all about, learning from each other. I'm certainly learning heaps from other builders!
Well, I had my first experience with bouyancy foam today - UGH!! What terrible stuff! You have to work very quickly, mixing the two parts to a consistent creamy yellow colour within ten or twenty seconds, then pour the liquid into place, stand back and watch it rise before your eyes! (While you are fascinated with this, you of course forget about your mixing container, which is taking on its own load of rising foam from the mix residue left..... )
I had no real idea how much I needed to mix to fill the bow seat area, and consequently I overdid it:

I used a serated edge breadknife to cut away the excess - this seemed to work well:
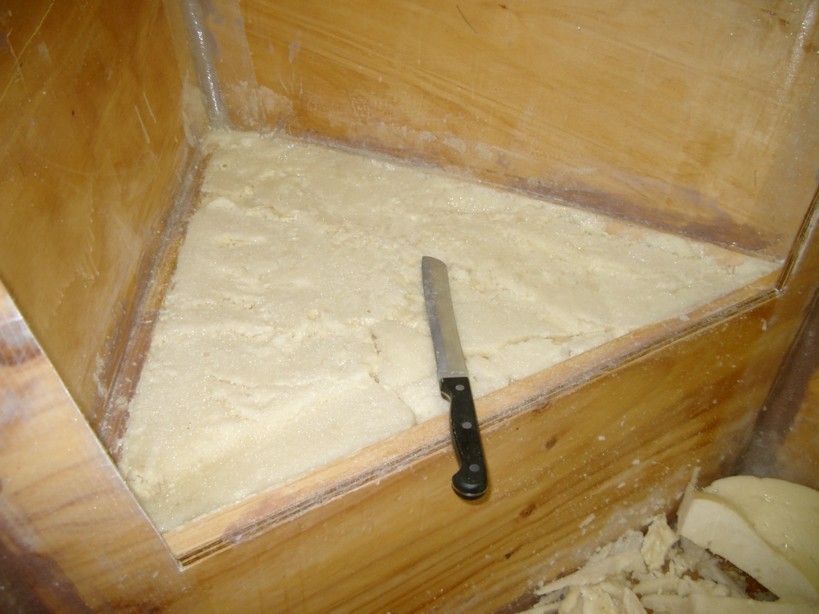
There seemed to be a great deal of foam left over!

At the price this stuff is, I have no intention of wasting it and I will put it into the bottom of another bouyancy compartment before I pour fresh foam.
Probably won't be able to get to the boat for a few days now, due to other priorities
Hope the weather warms up for you soon, so you can get started. Be sure to start a thread when you do, so we can all follow your progress.
Posted: Mon Jan 31, 2005 9:09 am
by Steve_MA
Hey Mike - You made nice work of that foam....
I have been thinking about how to clamp those hard to reach pieces, but I hadn't though about cutting some "kerf" marks - I think thats what they are called - you probably had to make those go at least 1/2 way or more through the cleat...that would be my guess assuming you had two 3/8 pieces glued up.
I gave alot of thought to my seat plan yesterday and consequently didnt get much new stuff done. I am closing in though....
Posted: Mon Jan 31, 2005 9:43 am
by Mike Adams
Steve_MA wrote:I have been thinking about how to clamp those hard to reach pieces, but I hadn't though about cutting some "kerf" marks - I think thats what they are called - you probably had to make those go at least 1/2 way or more through the cleat...that would be my guess assuming you had two 3/8 pieces glued up.
I didn't use 2 x 3/8 pieces - I used 1.5" x 3/4" dressed pine and yes, I cut the kerfs (I think you are correct, that's what they are called) about 3/4 of the way through. When the cleats bent to the shape of the hull, the kerfs closed up tightly and when the cleats were epoxy glued in place they became nice and firm while maintaining the correct shape.
Posted: Mon Jan 31, 2005 12:33 pm
by ks8
Steve wrote:
I gave alot of thought to my seat plan yesterday and consequently didnt get much new stuff done.
Wow! Does that sound familiar! Did you dedicate a *thinking chair* for the purpose yet?
ks
Posted: Mon Feb 14, 2005 5:29 am
by Mike Adams
Here's an update on my progress with the FL14:
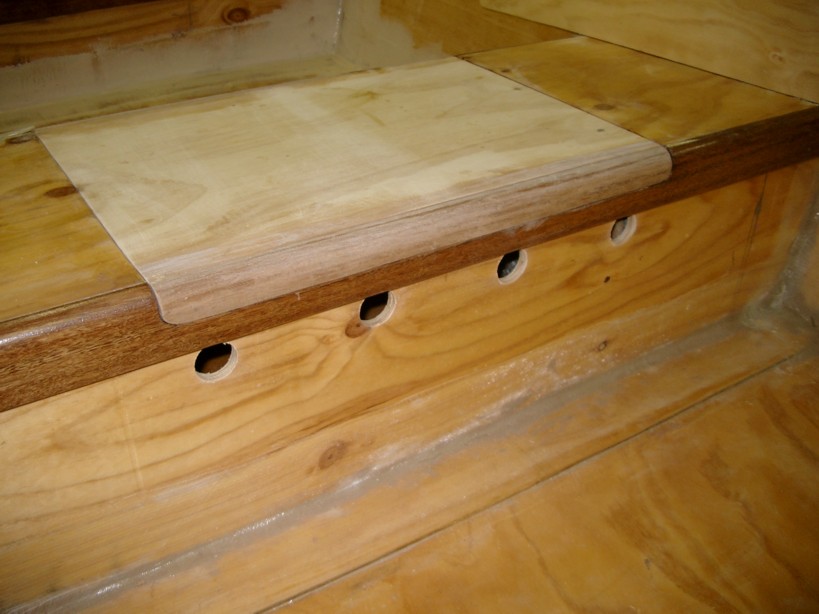
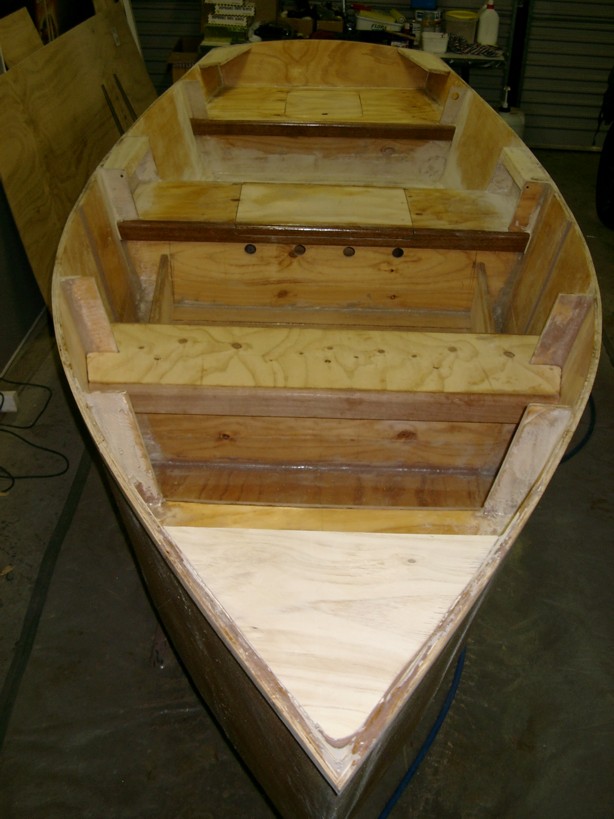
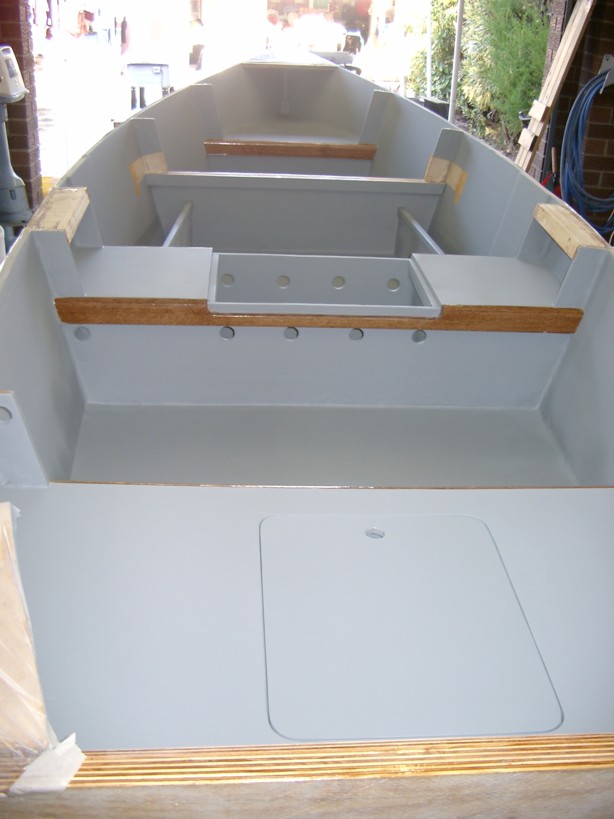
Bow seat finished and ready for final fairing and paint, and rear seat cleats installed.
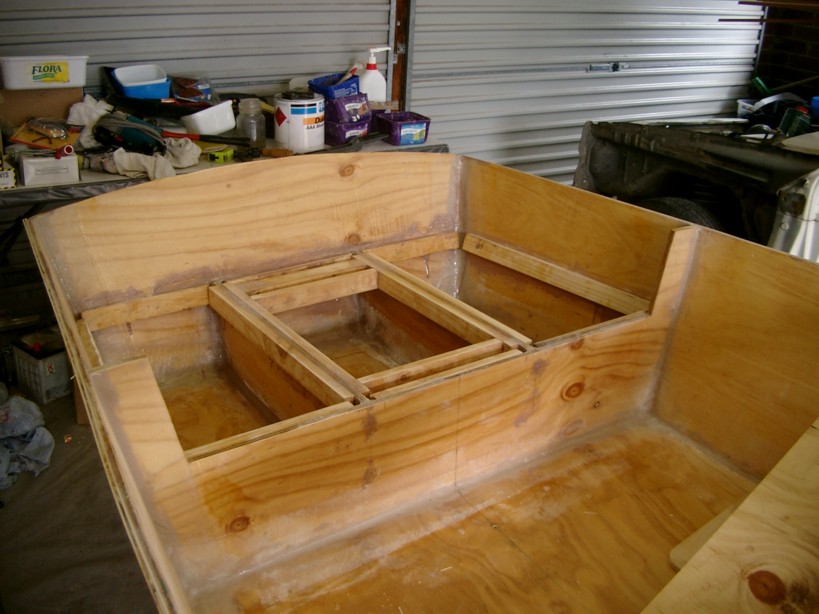
Buoyancy foam installed in midseat and rear seat compartments and first layer of the transom reinforcing board glued in place:
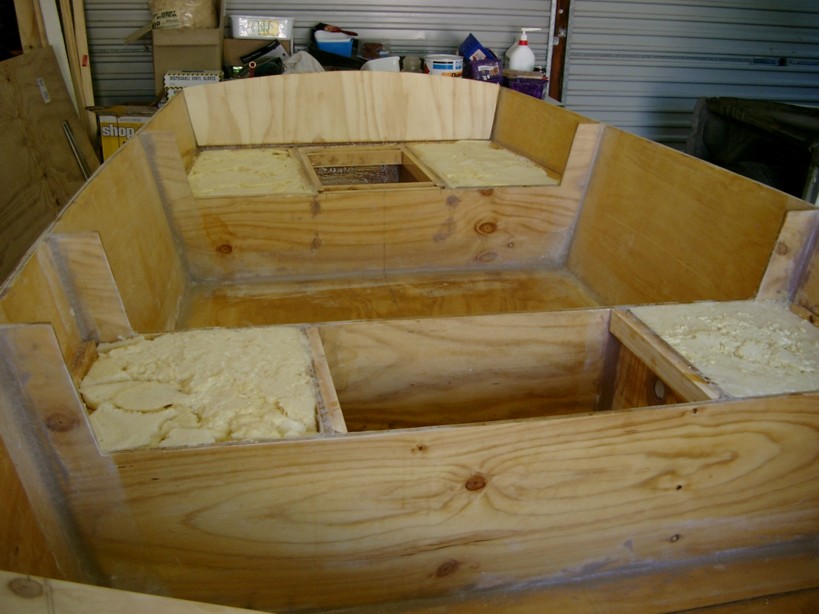
By my calculations I have enough foam in these four compartments and the bow seat compartment to provide 205kg of additional flotation.
I have made the rear seat storage box nice and water tight, so it could be used for ice/beer/fish if desired!
The middle section of the midseat will lift off to provide acces to the fuel tank. To ensure that the trims across the side sections and midsection will align properly, I decided I needed to glue the trims to the seat edges before cutting the middle section free, but I didn't want to stick the seat to the frames as I need to lift the seat off to cut out the middle. After a bit of thought, I decided to cover the seat frames and foam compartments with polythene, then glue the trims to the edges with the seat in position:
This method made accurate alignment of the seat edges with the trim strips easy:
Once the epoxy has set hard, I will be able to lift the seat off the frames to cut the middle section out. Since it was all assembled in one piece, both sides and the middle should then sit nicely aligned when finally installed.
I'm off to NZ tomorrow for three days (a conference with Boeing on B777 ETOPS, EvilD), so won't be able to do any more until next weekend.
Posted: Mon Feb 14, 2005 11:50 am
by ks8
Nice work! You should be prepping for paint soon!
If you plan to put food or fish in those storage areas, you may want to put some sort of liner in them that is approved for contact with foodstuffs. I don't know if food right next to, or, in an expoxy coated box is a good health thing. I don't know, one way or the other, but a liner sounds like a good idea.
Now, I've got to finish a few jobs so I can sand tonight. It's in the 30's F, now, but tomorrow is supposed to be in the 50's. That means 70's under the lights in the boat building cathedral. Time to break out the goo again!
Sincerely,
ks
Posted: Mon Feb 14, 2005 12:49 pm
by rjezuit
Mike, How much floatation foam did you end up using? I was thinking the stern compartment, bow seat and part of middle seat, and wanted a rough estimate of quantity. Thanks, Rick
Posted: Thu Feb 17, 2005 2:39 am
by Mike Adams
rjezuit wrote:Mike, How much floatation foam did you end up using? I was thinking the stern compartment, bow seat and part of middle seat, and wanted a rough estimate of quantity. Thanks, Rick
Rick
I used two four-litre packs (2 litres of Part A and 2 of Part B to a pack). I only purchased a four litre pack initially because the marine supplies guy told me that should be plenty for a 14ft boat. He said that each four-litre pack would make up about 4 cubic ft of foam, and this is probably about right, because by my reckoning there are about 7.5cubic feet of foam now in my boat, plus a small amount of waste left over. This stuff is expensive here in Canberra - I could only find one supplier and he charged A$75 for each four litre pack, so it cost me A$150 to put the buoyancy foam in my boat, but if I had bought the single 8 litre pack (4+4) at A$125 in the first place, I would have saved $25!
Oh well, this is another lesson learned by building a small boat first!
Posted: Thu Feb 17, 2005 3:17 pm
by rjezuit
Thanks, Mike. It looks to me like you should never sink. At 7.5 ft^3, you should have about 450 pounds of floatation.
Posted: Thu Feb 17, 2005 5:56 pm
by Charlie
rj
How much floatation would there be if those foam filled boxes where air tight and empty?
Charlie
Posted: Thu Feb 17, 2005 6:12 pm
by Lon
Given 7.5 cu ft of foam and 450 lbs flotation, zero foam would provide an additional 2 lbs/cu ft (foam weight) x 7.5 cu ft = 15 lbs additional flotation. BUT all flotation would be lost with a loss in hull integrity.
What assurance do you, the builder, require is the question.
Posted: Thu Feb 17, 2005 8:32 pm
by rjezuit
For this size boat, in sheltered water, it is probably not much of an issue. But, it is a relatively minor cost of the boat (at least in the USA) for the peace of mind it gives.
Posted: Thu Feb 17, 2005 9:44 pm
by Mike Adams
rjezuit wrote:For this size boat, in sheltered water, it is probably not much of an issue. But, it is a relatively minor cost of the boat (at least in the USA) for the peace of mind it gives.
My thoughts exactly! Also, although it might seem to be overkill for the FL14, I decided right from the outset that I wanted to learn as much as I could from building this boat in preparation for building the DE23 - hence the biax cloth over the whole hull, additions to the basic design (in this case the narrow gunwales), the extra storage areas, fuel tank bay, chase tube, and foam, etc. - all things that I want to be able to do well when I get to the DE23.
Posted: Fri Feb 18, 2005 8:39 am
by Mike Adams
Now back in Oz after my trip to NZ, and straight on to the boat after work today!
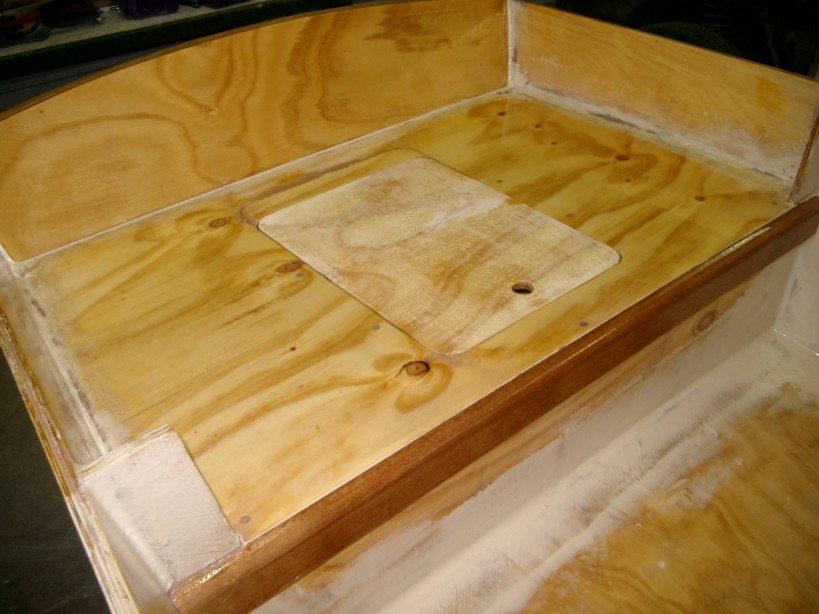
I lifted off the midseat with the trim/reinforcing mouldings now firmly attached, and cut out the middle section, then glued the side sections permanently back in place:
As I hoped, the middle (lift-off) section now fits neatly in position:
I will glue some cleats to the underside of the middle section that will fit inside the fuel box to hold the seat firmly while still allowing it to be lifted off for access to the fuel tank. The seat and frames will be painted, but the meranti trim will be finished bright to match the meranti rubrail and inside trim of the planned gunwale. Next job will be to cut the ventilation holes for the fuel tank bay in the frames below the trim strips.
I also got the rear seat glued in place and will complete the fillets for that tomorrow.
Posted: Fri Feb 25, 2005 11:12 am
by Dane_Ger
Mike,
That is one of the sweetest bench/hatch set-ups I've seen!!
How did you make that cut on the benches? Or should I ask what kind of saw or tool did you used to make the cut.
Posted: Fri Feb 25, 2005 4:25 pm
by Mike Adams
Dane_Ger wrote:Mike,
That is one of the sweetest bench/hatch set-ups I've seen!!
How did you make that cut on the benches? Or should I ask what kind of saw or tool did you used to make the cut.
Thanks for the compliment, Dane! It really wasn't difficult. Because I had glued the trim strip mouldings to the edge of the seat top before I made the cut, all I had to do was to run my portable circular saw straight across the seat top, set to cut just below the thickness of the ply. I then turned the whole seat on its side, inserted the blade of my jigsaw into the cut already made, and cut round the curved corners of the moulding, then straight down the middle of the moulding to separate the two halves. A light clean up with sandpaper, and everything fitted nicely back in place. The lower half of the mouldings on each side are now glued to the seat frames to provide reinforcement and tie the two outside sections together, and the upper half is left attached to the middle (lift-off) section.
Posted: Fri Feb 25, 2005 8:05 pm
by ks8
*matter of fact* explanation or not, nice job. Looks good!
Drilling those vent holes will be an interesting experience. You put all that work into making it just so, just to go and drill some big holes in it!
Remember that the epoxy seal coat(s) and finish system will take up some space, especially if you build up the mils of primer and paint that System Three recommends. Make sure you've got enough gap to accomodate the finish. I ran into this with the inner layer of the cuddy hatch on my boat. It was made from the scrap of cutting out the hole for the hatch, but the blade width gap was not enough once the epoxy and finish was added. I needed to grind it down further to fit in the *finished* hole.
Can't wait to see it finished, but I'm sure not as much as you.
ks
Posted: Fri Feb 25, 2005 9:39 pm
by Mike Adams
ks8 wrote:Drilling those vent holes will be an interesting experience. You put all that work into making it just so, just to go and drill some big holes in it!
Can't wait to see it finished, but I'm sure not as much as you.
The vent holes are already cut and actually they don't look too bad at all - more pics soon.
Yes, I'm a little impatient to see it finished, but I'm also enjoying the ride along the way!
I keep thinking of new things - for example, because the centre seat storage area is going to be taken up with the fuel tank, I decided I need some extra storage for safety equipment, etc., so I've come up with what I think is a real good solution for that - I'm going to build in some 'side pockets' between the middle and forward seats. A little difficult to explain here, but you'll see what I mean in a week or two, when I've finished them.
Of course, all these extra ideas take time to think about and then to implement, so I think it's unlikely now that I will finish the boat until after I return from Florida in April. New splash date target is the end of April.
Posted: Sun Feb 27, 2005 6:00 am
by Mike Adams
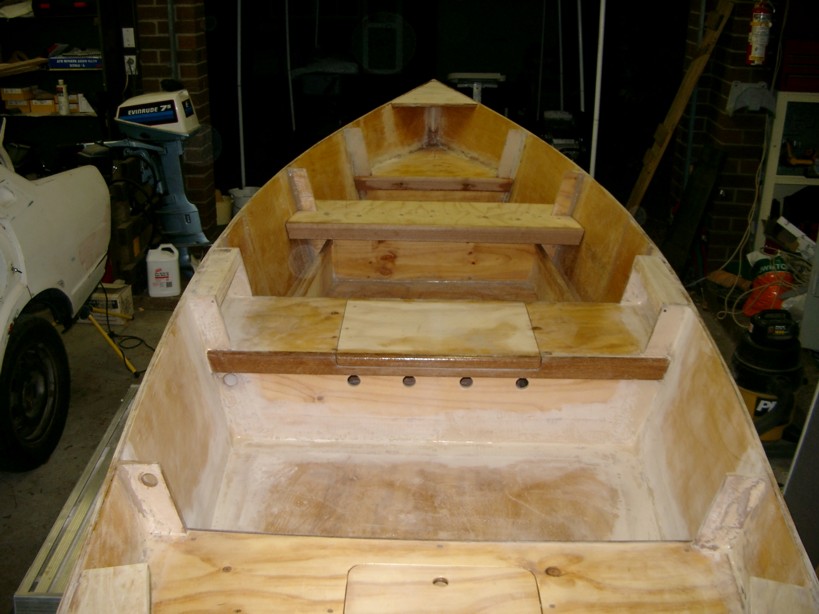
Made some more progress this weekend. The fuel tank bay ventilation holes have been cut and with the midseat section not yet coated with epoxy, it is easy to see how the hatch fits -
The rear seat is now complete, faired and ready for first coat of primer paint (the transom board face will be left bright) -
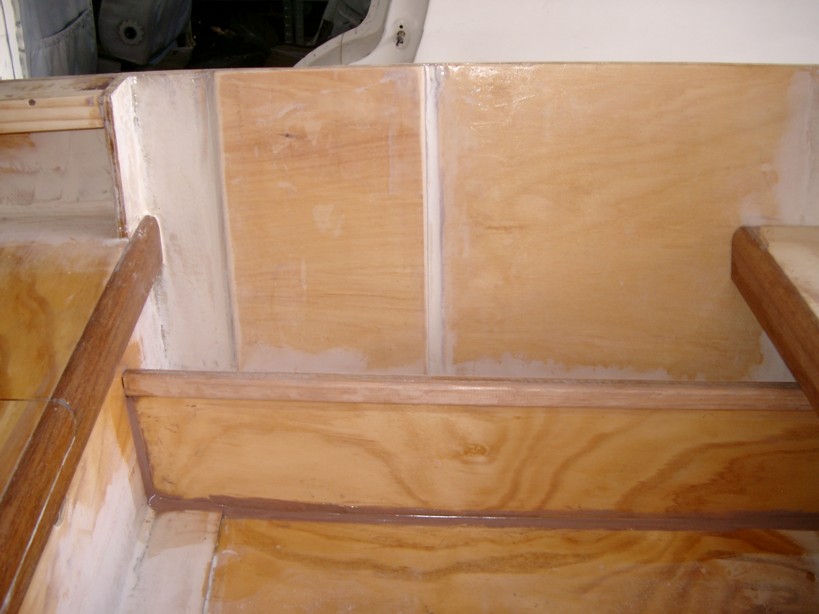
The transom board has been reinforced right across the width of the boat - there are two layers of 12mm ply plus one layer of 7mm ply, with biax fabric on the outside and fillets in the corners on the outer and middle layers of 12mm ply:
You can also see the stupid mistake I made when cutting out the rear seat hatch - I carefully measured 5" from the transom edge and 3" from the front edge, as per the building instructions - at least I thought I had! Somehow I had put the seat top on the workbench the wrong way round, so I ended up with 5" from the front edge and 3" from the transom edge!
To avoid wasting the large piece of ply used for the seat, I carefully cut out the seat hatch hole at the front edge and epoxy glued the cut out piece at the back to restore the 5" minimum at the transom edge. Thank heavens for epoxy glue!
As the seat is to be painted, the error will not be seen.
Fairing filler has been applied further forward (still to be sanded) and front seat cleats glued in position -

(The pieces glued up at each side are loose panels that I am making to create side pocket storage between the midseat and front seat).
The knees and breasthook have been cut and are ready to install after fairing and initial primer coat is completed. My plan now is to finish the interior up to the first or second primer coat before turning the hull over to fair and paint the outside. When the outside is finished and the hull flipped right way up again, I will then have only the outer rubrail, the gunwale deck, and the inside trim to the gunwale deck to install, then final inside painting and finishing. Still a fair amount of work left in this!
New splash target date is the end of April.
Posted: Sun Feb 27, 2005 7:18 am
by attownsend
Looking good my man,looking good.Lets party.
Evild.
Posted: Sun Feb 27, 2005 7:30 am
by Mike Adams
attownsend wrote:Looking good my man,looking good.Lets party.
Evild.
We will, my man, we will!
- lookin' forward to March 28 in St Lucie, but you still haven't told me what your favourite poison is so I know what to bring with me from duty free!
Posted: Sun Feb 27, 2005 7:40 am
by attownsend
Mike Adams wrote:attownsend wrote:Looking good my man,looking good.Lets party.
Evild.
We will, my man, we will!
- lookin' forward to March 28 in St Lucie, but you still haven't told me what your favourite poison is so I know what to bring with me from duty free!
Bring me some Ausie beer.Love that stuff.Spent a lot of time in Austrialia when I was in Vietman.That's where we did our uplifts for the troops.God I think I've lived too long .Just joking,my family lives too long.I think it's time someone else takes over..I designate you.You do good work man!!!
Evild.Bring me some poison,I could use it right now.
Posted: Sun Feb 27, 2005 9:27 am
by Steve_MA
Hi Mike, Those seat hatches are looking nice. I have been spending my time glassing the inside of the boat and fairing everything. I was thinking that a secondary benefit of foam was that you didnt have to fair everything! I havent posted any pics in a while, but I might soon.
We used used different building methods: I used 9oz woven fabric on the bottom and 4oz everywhere (inside and outside) else. No foam. I have gone thru about 4 gal of epoxy and 2lbs of wood flour and some fairing balloons.
From what I recall, you used biax on the bottom (and sides?), but didnt glass the hull interior. I was wondering what the cloth weights were and how much epoxy and wood flour you have gone thru.
What are you planning to do for paint?
Posted: Mon Feb 28, 2005 5:39 am
by Mike Adams
Steve_MA wrote:We used used different building methods: I used 9oz woven fabric on the bottom and 4oz everywhere (inside and outside) else. No foam. I have gone thru about 4 gal of epoxy and 2lbs of wood flour and some fairing balloons.
From what I recall, you used biax on the bottom (and sides?), but didnt glass the hull interior. I was wondering what the cloth weights were and how much epoxy and wood flour you have gone thru.
What are you planning to do for paint?
Steve,
I used 12oz biax cloth all over the hull outside. The chines and all the fillets were done with 12oz x 6" biax tape. I used up an entire 50 metre roll of biax tape and had to cut a few pieces out of left over biax cloth. Total biax cloth used was about 9 metres, including the bits cut for tape. So far I've used about 20 litres of epoxy mix and I reckon I will probably use another 3 or 4 litres before I'm finished. I used 'Boatcote' glue and fillet filler - about 10 litres used so far and a little more will be needed, but I don't know what it weighs -not much, though, it's very light. Fairing filler is West System 410 - I got a 20 litre pack and that weighs virtually nothing! So far I've only used about 1 litre of this, but I haven't done a lot of fairing yet - only on the inside.
The interior has had two coats of epoxy and I will give it a third coat when the fairing is complete and before the first primer coat goes on.
Paint will be high-quality automotive paint - my son is a motor mechanic and does his own spray painting. He has all the necessary gear and can get the paint reasonably cheaply, so that's why I've gone down that path. The hull will be a 'royal' blue (the same paint and colour used on my DE23 model hull) and today I bought a lighter "squall blue" non-slip deck paint for the floor. I have not quite decided on the main colour for the interior - probably an off white or very light sky blue to set off the bright meranti trims and lighter ply gunwale deck and transom board. Got a few other ideas also, but I'll keep those under my hat for the moment!
Posted: Tue Mar 01, 2005 7:37 pm
by ks8
Yes, I'm a little impatient to see it finished, but I'm also enjoying the ride along the way!
Now don't go desktop calendar happy on us!
I keep thinking of new things - Of course, all these extra ideas take time to think about and then to implement, so I think it's unlikely now that I will finish the boat until after I return from Florida in April. New splash date target is the end of April.
Ha! I think I said that 3 aprils ago!
I must be an april fool?
Update
Posted: Wed Mar 02, 2005 6:05 am
by Mike Adams
Some more progress made today. These are the 'side pockets' that I am installing between the mid and forward seats to provide some open storage space:
The breasthook and knees are now installed - the knees have been shaped to provide support for the gunwale deck at the transom:
The inside is faired and ready for primer paint from the transom up to the midseat. I have also installed some small supports between the midseat frames, where the rear and forward gunwale deck pieces and inside trim strips will be joined:
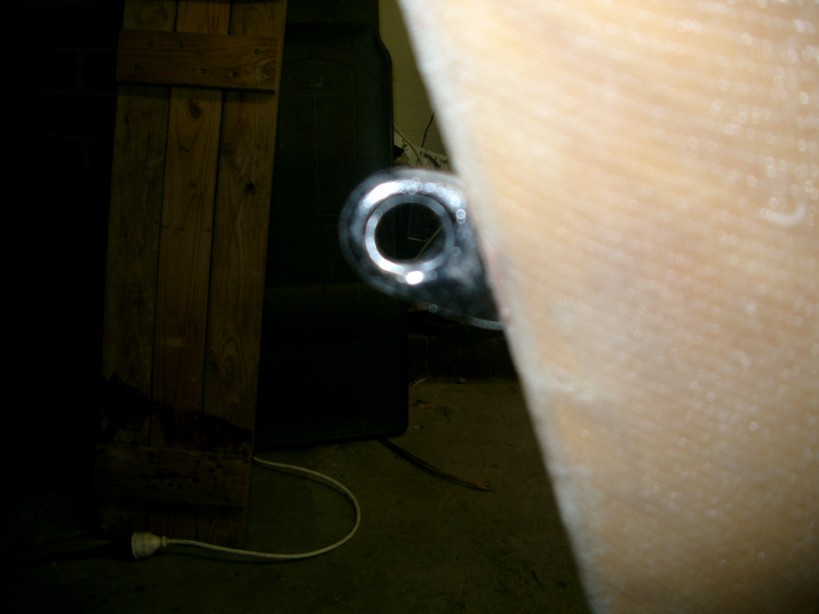
I also installed the bow hook - it has a ply backing plate and epoxy plug securing it inside the bow:
Posted: Wed Mar 02, 2005 2:20 pm
by Steve_MA
Wow! Your moving right along....looks good with the seats on. I am doing all my fairing first; its about 1/2 done maybe. It sure is a learning process.
Keep it coming!
Posted: Thu Mar 10, 2005 1:40 am
by Mike Adams
This pic will give a better idea of the side storage pockets I have installed on each side between the mid seat and the front seat. A bit more sanding/filling to do before I can apply the first primer coat to the interior!
More progress!
Posted: Sat Mar 12, 2005 3:47 am
by Mike Adams
A beautiful late summer/early autumn day in Canberra today - ideal for painting!
Here, all the preparation is complete and the boat is ready for the interior primer coats:
I did all the preparation work, but left the spray painting to the expert - my son, Sean:
It's amazing what three coats of primer/filler will do to the whole look of the boat!
Note that this is not the finish colour - the interior will be "Ford Dynamic White" (white with a slight blue tinge) with 'squall blue' non-slip deck paint on the bottom and possibly (haven't quite decided yet) on the seat tops as well.
The front seat has not yet been set in place. To make it easier to spray the paint, this will not be done until the interior finish coats are applied to the areas underneath the front seat. The front seat will then be epoxy glued/filleted in place (you can see where we masked off the areas where the fillets will go to keep the paint off those places), then the entire interior will be finished up to (but not including) the gunwales. BTW, in this shot, the side storage pockets I have installed are clearly visible:
The plan is that after finishing the interior as described above, the hull will then be turned over and fairing and painting of the outside will be done. Finally, the hull will be flipped again, gunwales installed and finishing touches added to complete the project.
Posted: Sat Mar 12, 2005 8:27 am
by Steve_MA
Mike - Congrats getting to the paint.....it lookes AWESEOME

Must feel good..... I spent 3 hrs sanding again yesterday

Posted: Sat Mar 12, 2005 8:39 am
by MadRus
Looks great! Nice job, I'm spraying if I ever get to a big boat.
Posted: Sat Mar 12, 2005 10:40 am
by Dane_Ger
Wow, Mike . . . you aren't kidding when you talk about how much different the 3 coats of primer make! Great job; she looks fantastic!!
Posted: Tue Mar 15, 2005 4:51 am
by Mike Adams
Thanks, guys - I'm very happy with the way it's turning out. Not so happy with the fact I have been stuck in Melbourne this week on business - no chance to do any more to the boat! But I only have this week at work, then I'm on days off for a week before I leave for Florida on 27th, and I'm hoping to get a lot more done before I go. Still on target for end of April splash.
I have one question re paint and epoxy if anyone can help - I plan to have my son spray a clear coat over the whole boat when the painting is finished. We are using high quality acrylic auto paint and the clear coat will be a two-part mix that is designed as a final high gloss coat over auto paint . The brightwork will not be painted but has been given several coats of epoxy. I don't want to mask it off if I can avoid it, and we would prefer to apply the clear coat over the whole boat, including the brightwork. My son does his own auto spraying but has not had any previous experience with epoxy. He is not sure if spraying the clear coat on to the epoxied brightwork will be OK, or whether there might be some adverse reaction between the clear coat and the epoxy that might spoil the brightwork. Reading other posts on painting, I get the impression that there should be no problem, but I would like to be sure. Does anyone have any advice, please?
Thanks again.
Posted: Tue Mar 15, 2005 9:40 am
by jacquesmm
I prefer rounded corners but must say that you are doing a great job.Very clean.
Congratulations.
Posted: Tue Mar 15, 2005 9:44 am
by MadRus
Mike,
I doubt there would be a problem, you want to coat the epoxy in any case and you want it to be coated with a UV protectant clear coat. UV will break down unprotected epoxy.
Uncle Ralph is right, below, when in doubt, ask the mfg.
-Dave
Posted: Tue Mar 15, 2005 9:51 am
by UncleRalph
Mike Adams wrote: He is not sure if spraying the clear coat on to the epoxied brightwork will be OK, or whether there might be some adverse reaction between the clear coat and the epoxy that might spoil the brightwork.
All epoxy needs to be coated with something for UV protection. The normal way to do this for brightwork is with varnish that includes UV inhibitors (any external or marine varnish). I don't know if the clear coat you are applying has UV protection or not. If it doesn't, I don't think I would want to apply varnish over top the clear coat. If the clear coat does have UV protection, your question is whether or not it can applied directly over epoxy. That probably is a question best answered by the manufacdturer of the clear coat.
Ralph
Posted: Tue Mar 15, 2005 4:32 pm
by Mike Adams
Dave, Ralph - thanks. I had not thought to ask if the clear coat is UV protected - I think it probably would be, given that it is intended as a final finish coat on autos, but will I check that out. I'm not sure who the manufacturers actually are, as we get our paint supplies from a local auto paint shop that can mix any of the standard paint colours used on any make of vehicle, but I'll ask them. Thanks for the advice.
Jacques - thank you. I am really enjoying building this boat! The frame sides have been left square because I am adding a narrow gunwale deck and the frame sides will act as supports for that. The gunwale will only be about 4"wide including the meranti trim on the inside and the outer rub rail, but it will make my FL14 just a little bit unique. (My wife complains I always want to do things differently to everyone else.....!
).
FL14 build update
Posted: Wed Mar 23, 2005 6:52 am
by Mike Adams
Very little progress this past week, due mainly to a spell of bad weather in Canberra.
However, the weather improved today and we were able to completely finish the interior with a final coat of primer. Only the finish paint and gunwales to be done now.
BTW, I've made another small addition to the interior design! I put a small 'wall' across the bow seat to form an anchor well and stop the anchor and chain sliding back on the seat when stowed. (In this shot you can also see the plywood and epoxy backing plate to the bow hook).
Tomorrow we will flip the hull, install the skeg, and start on fairing and painting of the outside. If possible I want to finish fairing the hull before I leave for Florida on Sunday, so that my son can spray paint the outside while I am away. Still hoping to splash by the end of April, although this last 'lost' week may put that schedule back a little.
Posted: Fri Mar 25, 2005 9:12 pm
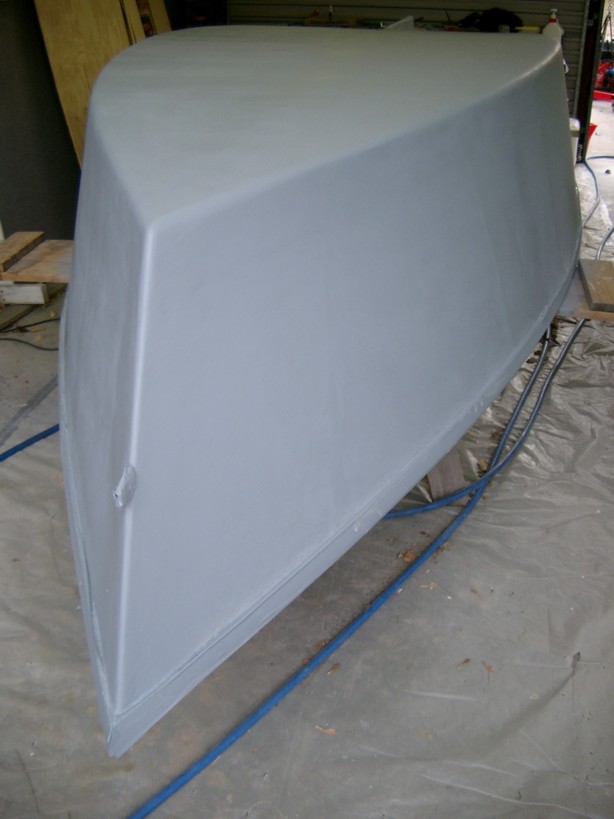
by Mike Adams
Hull flipped and skeg installed:
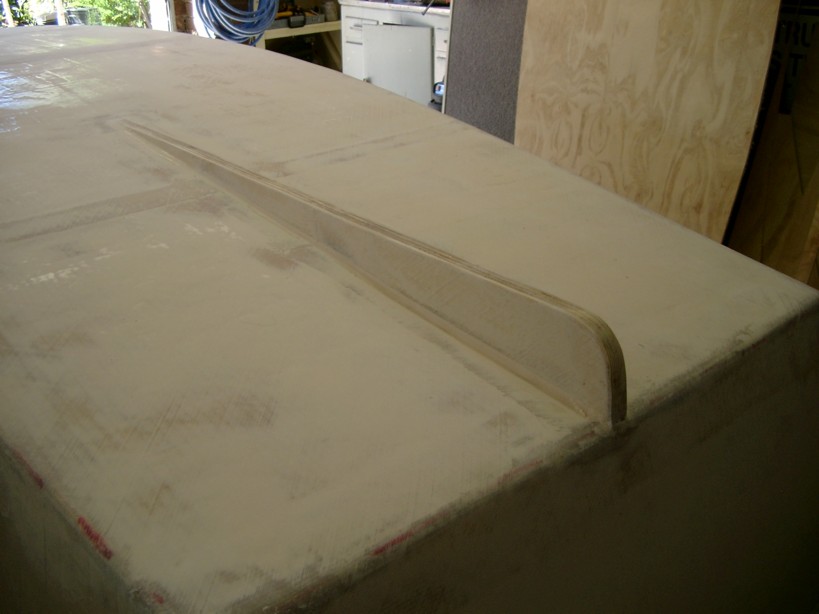
Initial fairing completed and sanded with 40 grit to remove runs, bumps and ridges (the biax took a LOT of fairing filler to fill the weave!):
The hull is now ready for finishing sanding before the primer/filler coats are applied, but as I will be leaving for Florida tomorrow (Sunday), this will have to wait until I return home in mid-April.
Posted: Sat Mar 26, 2005 7:42 pm
by tnewman
i like these side storage bins. i wonder about drainage though. i am going to add somethign like this on my fl 11. how far did you space these away from the hull and what angle did you place em at?
boats looking good, i cant wait to see the finished paint job
t
Posted: Sun Mar 27, 2005 9:06 pm
by Mike Adams
tnewman wrote:i like these side storage bins. i wonder about drainage though. i am going to add somethign like this on my fl 11. how far did you space these away from the hull and what angle did you place em at?
boats looking good, i cant wait to see the finished paint job
t
I thought about drainage and maybe cutting a couple of slots in the bottom of the panels to allow any water to drain, but then I decided it wasn't really necessary - the bins are open and easy to bale out or mop out with a sponge if necessary. Also, since I am adding a 4"gunwale above, it is unlikely that I will get a lot of water coming aboard and into that area.
As to size - because the boat obviously narrows towards the front seat, the bins are also narrower at the front than at the back. I can't remember the precise measurements - I just set the panels vertically at what looked about the right distance and parallel to the centre line of the boat - it worked out about 5" at the front and about 7" at the back, I think. Because the sides also slope, the bins are a few inches wider than this at the top. The vertical panels are quite light - just some 6mm ply FG'd in place, with a couple of half-round mouldings set along either side at the top edge to add strength where it's needed.
Posted: Sun Apr 17, 2005 7:11 am
by Mike Adams
I managed to get back to work on the boat this weekend.
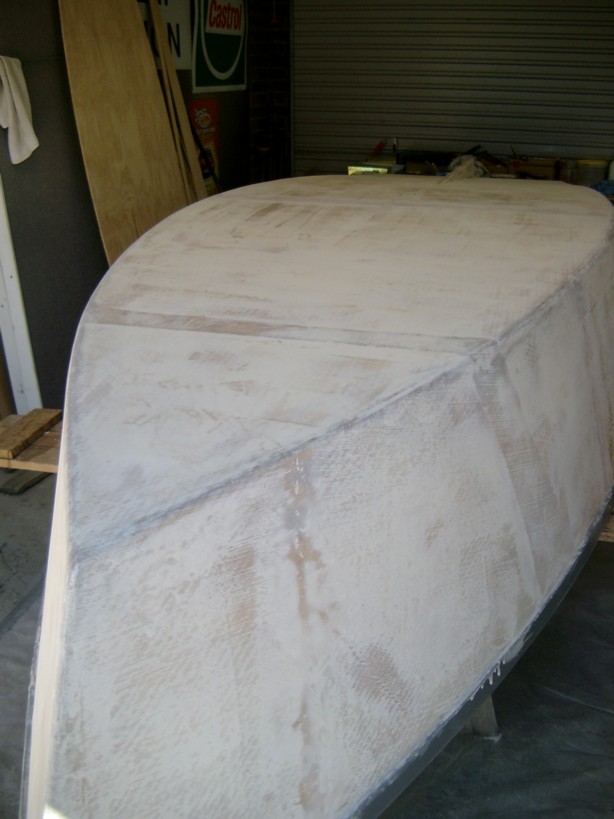
After a lot of sanding of the hull, I thought it was pretty smooth, and decided to spray a thin primer coat over the hull to make it easier to see if/where it still needed any sanding or fairing:
It soon became very obvious that I had a lot more sanding ahead of me!
In this closeup of the side panel the biax cloth seams are clearly visible. Not so obvious (but still there) are a lot of tiny indentations, pinholes, bumps, etc in the epoxy fairing.
After several hours of sanding, spot filling, and resanding I
think the hull is now completely smooth.

Next step will be two coats of primer/filler and a recheck for any irregularities before applying the finish coats.
Posted: Sun Apr 17, 2005 9:33 pm
by UncleRalph
You're doing a real nice job.
Ralph
Posted: Mon Apr 18, 2005 12:13 am
by Mike Adams
Thanks, Ralph - coming from someone like you who has built such a beautiful HM19, I take that as a real compliment!
I'll be glad when I can get the painting finished. Having access to the air-driven professional orbital sander that my son uses for his car bodywork has certainly made things a bit easier for me, but I'm getting really tired of sanding!
Posted: Tue Apr 19, 2005 5:54 am
by Mike Adams
I sure wasted a few hours this afternoon. My son convinced me that I need to put another thin epoxy fairing layer over the whole boat to fill some remaining uneven areas on the surface. (I couldn't see any, but he insisted he could feel them with his fingers and that the blue gloss finish paint would show these uneven areas up........
).
Well, he's the painting expert, so I gritted my teeth, put on my old epoxy gear, and went out to do as I was told. Unfortunately, I discovered that not having used the resin pump for a few weeks while I've been away in Florida had resulted in it becoming unusable - it had lost its prime and when I tried to get it working again, it broke.
Then I couldn't find any measuring cups (I was sure I had some around somewhere - I'll probably find them tomorrow...). Anyway, I jumped in the car and went to the local store, but they didn't have any. I had to drive a few km to a large builder's supply and home store before I found some. By the time I got back home, it was dark and too late to start again today.
Oh well, tomorrow's another day. I am not looking forward to all the extra sanding before my son will be satisfied, but I'm sure the result will be worth the extra effort!
Needs a TV
Posted: Fri Apr 22, 2005 3:44 pm
by JollyLolly
Splash date looks imminent. Your boat is an inspiration to this newbie.
I guess you've planned the position for the satelite dish on the boat, so you can watch the Brumbies win the Super 12... again. Sorry, just being facetious. (Sour grapes, because I'm a Stormers supporter, and ACT are ahead of us on the log).
Building boats beats watching your team get beat, anyhow !!!
Posted: Sat Apr 23, 2005 1:14 am
by Mike Adams
Hardly seems worth the expense of a satellite dish when I KNOW the Brumbies are going to win anyway...!
I hope to have her splashed before the end of May - If I can make it, I might take her to Queensland the last week of May and first week of June (it starts to get a bit cold in Canberra by then!).
However, there still seems to be heaps to do. I completely covered the hull with a thin epoxy fairing layer as per my son's advice. After it had cured, he informed me that to get he finish HE wanted (
!!) I would have to forgo the air-driven orbital sander and use a long board on the entire hull.
So far I've hand-sanded about half of the hull. I can see the difference it's making to the surface, but boy, do I feel tired right now! I't's Saturday here and I've just finished lunch, so no more excuses - out I go again to sand, sand and sand some more.........
If I survive, I'll post some more pictures soon...
Posted: Sat Apr 23, 2005 10:20 am
by Dane_Ger
Mike, just sand/rub her into the shape you want her . . . just don't forget to tell your fine young significant other that you luv her too!
Posted: Sat Apr 23, 2005 10:47 am
by rjezuit
Mike, Perhaps you should use ther old trick " I don't understand what you are talking about, please show me" Then when your son is fairing to his liking, quietly slip away. He might just " forget" and keep on going. That will sure save on the arms. Rick
Posted: Sat Apr 23, 2005 7:52 pm
by Mike Adams
I have to admit, my son has been real good to me! He was very busy this weekend rebuilding an engine (a back yard pocket money job), but after several more hours of me sanding yesterday afternoon, he left what he was doing and told me to stop work for the day while he finished the job. My muscles were really beginning to cramp up and hurt by then, and he's nearly 23 while I'm 63 years old, so I didn't argue!
He spent another three hours getting it to where I now only have to give it a light sanding with 240 grit this morning (Sunday) to produce what looks to me to be an almost perfect surface! My son will give it three coats of primer this afternoon, and since tomorrow is a public holiday here, we're hoping to do the top coat of the white stripe (below the gunwale) then. After a day or two of curing in the sun, I will mask off that stripe and we can put on the finish coats of blue over the rest of the hull, followed by a couple of clear coats over the whole boat a day or two later. My son then wants me to leave it for about a week baking in the sun before we cut and polish it. By that time I hope the trailer I ordered will be delivered, so that I can turn her over straight on to the trailer to finish the topside.
There's light at the end of the tunnel! (Hope it's not a train coming the other way.....
).
Posted: Sun Apr 24, 2005 8:52 am
by Dane_Ger
Sounds great, Mike . . . Look forward to seeing your recent progress!!
Posted: Mon Apr 25, 2005 11:30 am
by JollyLolly
Hi Mike,
No, sounds to me like the light will be the glare coming off the paintwork on your boat. Can't wait to see the finished product.
PS When you're finished, your son is welcome to spend a weekend or two "holidaying" in Canada. I'm not at the finishing stage yet, but could sure use an asset like him.
Laurence
Posted: Wed Apr 27, 2005 6:06 am
by Mike Adams
Well guys, unfortunately it looks like I am going to have to ease off working on the boat for a while. My wife has recently become very sick, and she and my family will need most of my attention for the next week or two. I may still be able to spend a little time on the boat now and then, but we are scheduled to leave for Queensland in three weeks' time, so it now seems unlikely that I will get it finished and in the water before we go.
Bottom line: It will be well into June and winter here before I can hope to get my FL14 splashed...
I'll still be checking the forum regularly, though, so I look forward to watching all of your progress.
Good luck!
Posted: Wed Apr 27, 2005 10:11 am
by rjezuit
Good luck to you and your wife Mike. I lalways look forward to see your progress on the FL14. I am building one now also. But I must admit, not to the level you are working at. Best of luck, and take care. Rick
Posted: Wed Apr 27, 2005 10:36 am
by Dane_Ger
Mike, sure am sorry to hear of your wife's illness and my thoughts are definitely with your entire family. Taking care of her is absolutely the priority here. For now, the boat can wait.
You can live vicariously through the other builders here, so we'll try to all keep you updated with our progress.
Dane
Posted: Wed Apr 27, 2005 11:00 am
by JollyLolly
Hi Mike,
Sorry to hear of your wife's illness.
A few extra weeks on the build is a small price to pay for being a support to her and the family. Our thoughts and prayers are with you all.
Laurence
Posted: Sat May 14, 2005 7:38 pm
by Mike Adams
Glad to report that things are returning to normal in the Adams' household - my wife is a lot better now; thanks to all for your thoughts and, especially, prayers.
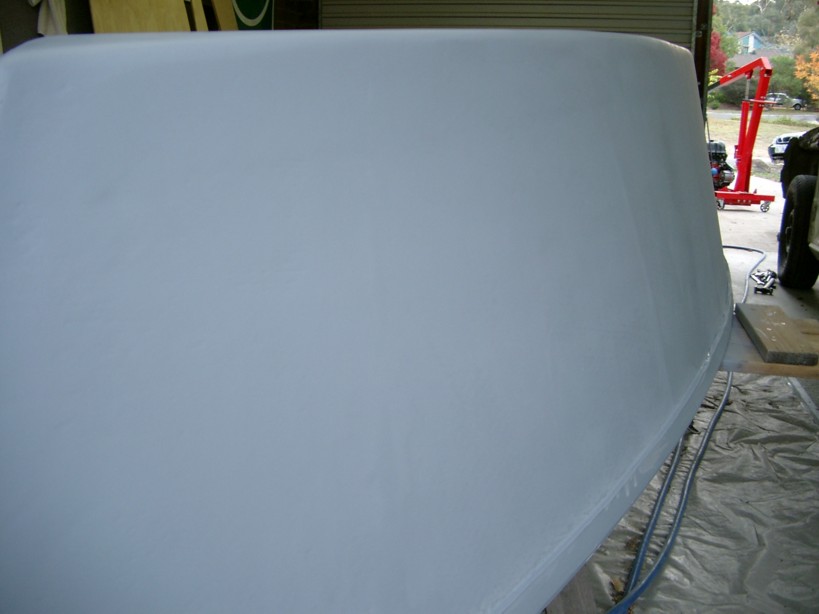
We've made some slow progress on the boat - my son sprayed the colour on the hull a few days ago and then two coats of clear yesterday. The paint now has to cure for about a week in the sun before cutting and polishing for the final finish, but as we are going to Queensland for a two week break next Thursday, it will be June before I can get back to doing any more. Anyway, here is a shot of the bow in it's present (unpolished) state:
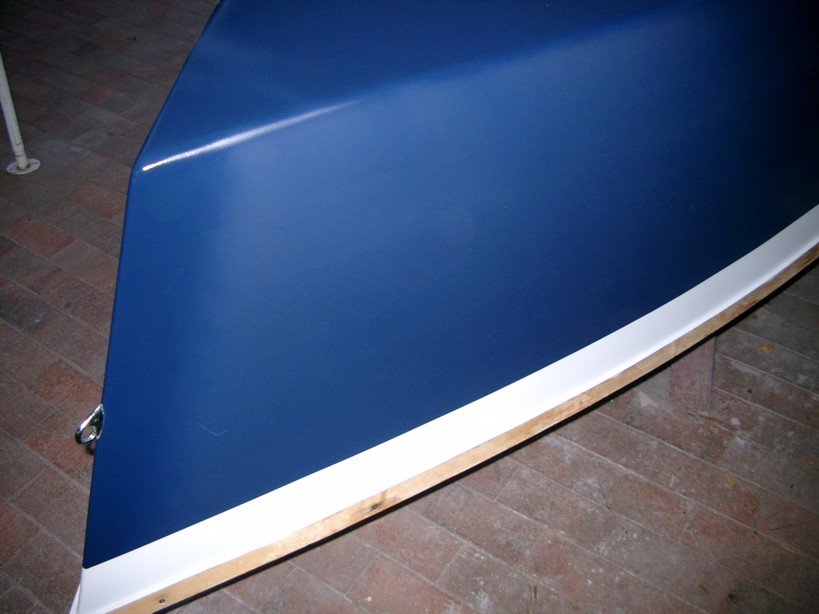
The finish is not quite as perfect as I had hoped for.
One lesson I have learned is that in future I will use a bit more epoxy fairing filler - even if it means extra sanding! Where the fairing filler was applied a little more thickly, the surface is super-smooth, but where it was applied very thinly there are still a few spots where some tiny pinholes in the epoxy fairing just didn't quite fill completely with the primer/filler, and there are also one or two sanding marks that I missed during the prep stage. A slightly thicker layer of fairing filler would have eliminated all those spots. Fortunately, these spots are mainly on the bottom, where they won't be seen!
I also expect to take delivery of a new trailer for the boat next week, so when I can get back to working on it I will be able to turn the hull over on to the trailer to finish the inside.
Posted: Sat May 14, 2005 7:41 pm
by tnewman
that looks darn good to me.
Whats your plan for finishing the rub rails?
t
Posted: Sat May 14, 2005 7:45 pm
by Mike Adams
Thanks, t. The outer layer of rubrail will be meranti finished bright - same colour as the trim strips on the seats. There will also be a narrow (4") ply deck finished bright (to match the inside face of the transom) and then another finishing rail of meranti on the inner side.
Posted: Sat May 14, 2005 8:22 pm
by Dane_Ger
Very Nice, Mike . . . also very glad to hear that things are returning to your sense of normalicy at home . . . and that the wife is well on the mend!
I love the color of blue (is it a stock color?) and the white trim! Sweet!
Dane
BTW: I definitely understand what you are saying about having enough fairing compound in some places . . . I tried to be as sparing as possible to save sanding and materials and I can now see where this may prevent me from having the finish I was hoping for. We'll have to wait and see.
Posted: Sat May 14, 2005 11:07 pm
by Mike Adams
Dane_Ger wrote:
I love the color of blue (is it a stock color?) and the white trim! Sweet!
Thanks, Dane - your boat is also looking real good! Maybe we'll splash around the same time?
The blue is a stock automotive colour - "Toyota Blue". It is the same colour that my son had on a Toyota Hilux 4WD that he owned a short while back. I liked it when I saw it on the 4WD and happened to mention to him that I would like the same colour on my boat, so he and his young lady bought me the paint for my birthday in February. The white is "Ford Dynamic White" - I chose it for the interior because it has a very slight blue tinge that reduces the dazzle of a pure white. I also have a lighter blue anti-skid deck paint that should fit in well with both the hull blue and the white.
Have you decided on a colour scheme for your boat yet?
Posted: Mon May 16, 2005 10:49 am
by Dane_Ger
Thanks Mike! Again, I really like the shade of blue you have chosen and the complimentary colors sound like they will be a great match!
I have decided on my colors. I plan to do the outside in a pale yellow, something near what is called "Fighting Lady Yellow," from awlgrip. I'm going to mix some whidbey white with some sinclair yellow both from S3 and hope for something close. I saw in another thread where the ratio is 8:1 and I may also experiment with some very small batches of 7:1 and 6:1 too!?
The interior will be whidbey white (off white) with a few 'bright' accent pieces.
You'll splash well before me I believe as I have lots to do on the interior where I've yet to do any fairing and sanding, plus chase tubes for fuel and for a future 12v system, seats to measure and cut, bow deck to build, etc., etc.
I don't know if its possible, but I'm still thinking a late June launch will be about right! We'll see!?
Dane
Posted: Wed May 18, 2005 8:33 am
by HokieBoatbuilder
Mike,
Somehow I missed the pictures of your painted boat until now. She looks beyond great. I love the blue and white. It appears that you have a perfect finish.
Posted: Thu May 19, 2005 8:58 am
by Steve_MA
Mike, I'm jealous! I wish I had such a good helper over here. Your paint job looks great, and with some varnished trim its going to look really sharp. I cant wait to see the pictures....
Posted: Thu May 19, 2005 9:08 am
by tnewman
I havent made much progess on my FL11, but I am watchign you guys , looks great.
I am wonderign about how you you finish bright work like you are plannign with that rub rail. Would you forgo the epoxy and just sand and varnish? Any special considerations?
Tt
Posted: Mon May 23, 2005 4:14 am
by Mike Adams
Thanks for the kind words, guys, but really, the finish isn't perfect - it's nice,but not perfect.
t, sorry for the delay in responding - I'm on combined holiday/business in Queensland and have had problems with my computer and internet connections. I will finish the rubrails and the gunwale decks the same way as the seat trims and transom - first with several coats epoxy to thoroughly seal the wood, then a final coat of clear automotive paint (that has also been applied over the blue and white) which can then be cut and polished.
Posted: Mon Jun 06, 2005 5:54 am
by Mike Adams
Posted: Mon Jun 06, 2005 11:06 am
by Dane_Ger
Sweeeeet! Fine work, Mike!
Posted: Mon Jun 06, 2005 12:54 pm
by JollyLolly
Hi Mike,
Welcome back. How was the vacation. I trust all is well with Lorraine.
Your boat is looking sooo good. All the hours spent sanding and priming are certainly paying off.
I launched on Saturday, had a ball...
Posted: Mon Jun 06, 2005 1:06 pm
by nort
That is one fine paint job. You and your son do good work. Just remember if you use it, it will get scratched. Don't worry about that and just enjoy it.
Posted: Mon Jun 06, 2005 1:10 pm
by HokieBoatbuilder
Looking great Mike, very glossy. All you have left is to paint the inside correct?
Posted: Mon Jun 06, 2005 11:14 pm
by Mike Adams
Thanks for the nice compliments, guys. I am happy with the way it's turning out, but especially glad for the lessons building this boat has taught me.
Nort - there are several minor flaws on the bottom (these don't show up in the pictures) but I guess it will get scratched soon enough, so they won't matter!
Laurence - I posted a response to your thread - you've done a great job on your boat. The combined vacation/business trip was real nice and we enjoyed the Queensland weather - but coming back to winter in Canberra was not so good! Lorraine is almost back to normal now, thanks, but her vision in the left eye is still a little blurred (the shingles may have resulted in some permanent damage to her left eye, but we won't know for a while yet).
Hokie - in addition to the inside painting, I still have to complete the gunwale deck and rub rail, install the oarlocks, rod holders, cleats, etc. It being our winter, it gets dark by the time I get home from work now, so I will only have weekends to work on the boat (and do all the other household/garden chores), so I'm not sure now when I will actually get finished. Meantime, I'll just enjoy building it!
Posted: Tue Jun 07, 2005 6:34 am
by Mike Adams
A couple more pics - taken tonight after dark!
Here, the hull has been waxed and is ready for flip:
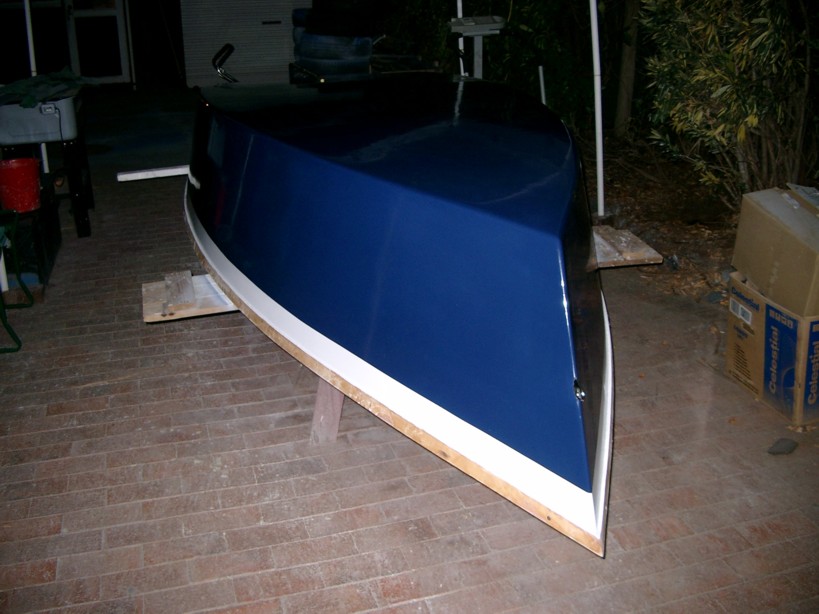
And at last she is right way up on the trailer, ready for finishing inside:
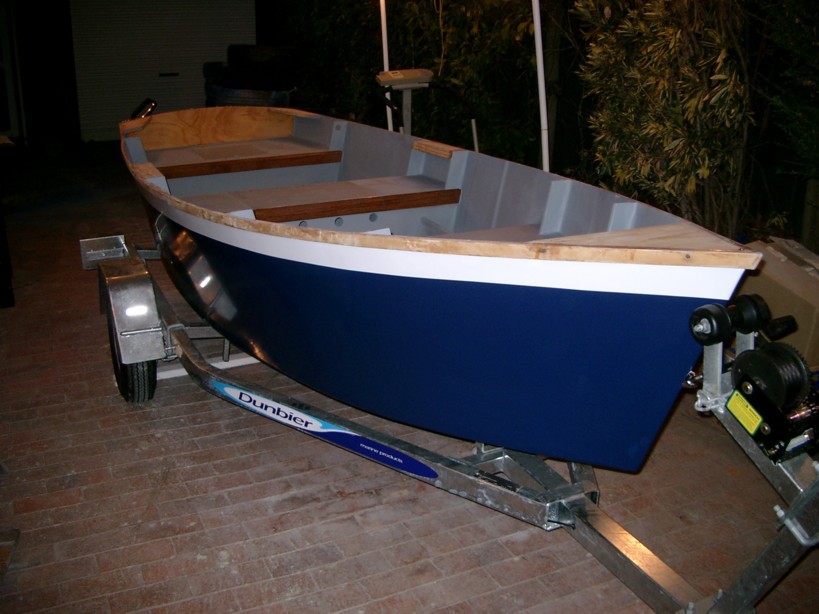
FL 14
Posted: Tue Jun 07, 2005 6:42 am
by cottontop
Mike, I did not realize how close to completion you were. What beautiful craftsmanship. The paint is outstanding. She sure is one fine looking boat. When do you plan to splash her? On a side note, I hope your wife is doing better. Shella and I did not realize she was so ill.
Posted: Tue Jun 07, 2005 11:29 am
by Dane_Ger
Looks super, Mike!!
Re: FL 14
Posted: Mon Jun 13, 2005 8:58 am
by Mike Adams
Thanks, I'm happy with it!
Cottontop wrote:I did not realize how close to completion you were. When do you plan to splash her?
I've given up predicting when I will splash her!
I originally thought I would launch at the end of April, then May, then June, but various circumstances have worked against those schedules. Now Winter has set in here in Canberra; the temperature was down to minus 1°C last night and only got to 15°C today, with widespread rain over the last few days. (Not that I'm complaining about the rain - Australia is currently experiencing one of the worst droughts in our history). However, these factors will work against a speedy finish to the project. I still have quite a bit of finishing work to do, including installation of the narrow gunwale deck. With the days now much shorter, I really only have weekends available to me to work on the boat as well as do all the other things needed around the house. Add to all this the fact that the water in the Snowy Mountain lakes where I intend to launch will be
VERY cold from now on (
) and I doubt if I will launch before the beginning of Spring (that's September here).
BTW, Lorraine is very much better now, thanks - and we are particularly relieved that there does not appear to be any permanent damage to the optic nerve.
Re: FL 14
Posted: Mon Jun 13, 2005 11:46 am
by JollyLolly
Mike Adams wrote:(1)Thanks, I'm happy with it!
.........
(2)BTW, Lorraine is very much better now, thanks - and we are particularly relieved that there does not appear to be any permanent damage to the optic nerve.
1. And so you should be.
Don't fret too much about the rain... drought leads to dried up lakes and rivers... can't have that now can we? You're doing such a great job on the boat that to have it run aground in the middle of the lake would be a real pity (although the Brass on the skeg will help [nice touch]). September is going to be here before you can say, "I think I see something else that needs sanding !"
2. Great news about Lorraine's sight. Just make sure she wears her sunshades when she gets close to the boat, the glare won't do her much good
Posted: Sat Jun 25, 2005 3:14 am
by Mike Adams
Rain and cold weather for the past couple of weeks have stopped progress on my FL14. However, today (Saturday) was dry and not too cold (13C) so I managed to get the plywood oarlock pads and the meranti inside rails to the gunwale deck fitted:
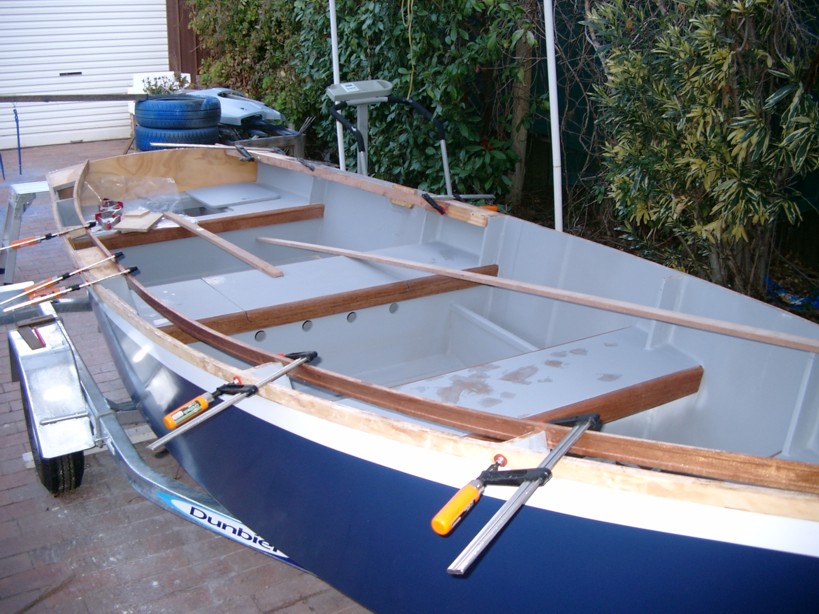
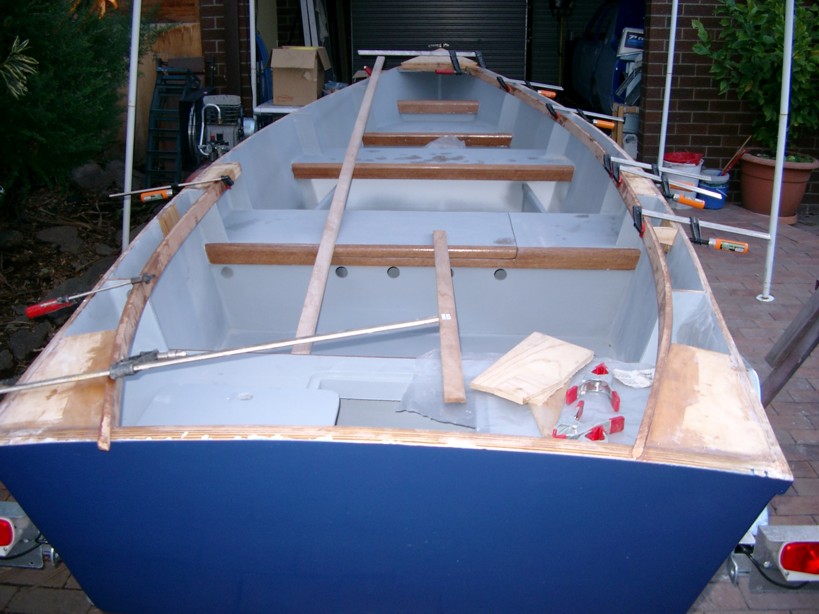
Next step will be to fit the 6mm deck, then the outside rub rail (also meranti), and sand and finish (bright). After that I will do the inside final paint coat and deck paint, and add the finishing touches (cleats, rod holders, etc). Should be OK for an early Spring launch....
Posted: Sun Jun 26, 2005 9:34 am
by swamppainter
Nice looking work Mike. What is the reason for the spaced inside rubrail, just out of curiosity? Are those trim pieces on the seats added or just left bright through the process? Thanks for listening.
Another question...how do you post images inline? I can't find it in the FAQ's. Thanks.
Posted: Sun Jun 26, 2005 11:55 pm
by Mike Adams
swamppainter wrote:Nice looking work Mike.
Thank you.
What is the reason for the spaced inside rubrail, just out of curiosity? Are those trim pieces on the seats added or just left bright through the process?
The rail forms the inside trim of the small gunwale deck I am fitting, with the outer rubrail forming the trim on the other side. I decided to fit a small gunwale deck for a couple of reasons - 1) I just like doing things a bit differently to everyone else (:lol:); 2) I wanted some practice at making small alterations so that I had some experience when I get around to customising the DE23 I want to build next; and 3) I will be fitting some flush-mounted rod holders in the gunwale deck at the knees and a lightweight detachable bimini top mounted at the middle seat area.
The meranti trim pieces on the seats were added partly because I think they look good and partly to ensure a nice smooth rounded edge to the seats.
With all my additions, plus the fact that I have fibreglassed the outside of the hull, I fully expect my boat to weigh about double the design weight! However, as Jacques has pointed out on another post, the PPI is about 217lbs, so you would need a ton of weight to sink this boat! I have a 7.5HP outboard engine, so will have plenty of power available to overcome the effect of any extra water displacement - as a displacement hull, it will only putter along at 5 or 6 kts (max), anyway.
Another question...how do you post images inline? I can't find it in the FAQ's. Thanks.
To show pictures in your thread, you simply have to paste in the URL of the pictures in your picture gallery. Open the required picture in your gallery and right click on it to call up "properties", then highlight and copy the complete URL (make sure you include the .jpg extension - sometimes the URL is so long that this gets missed, and then it won't work). Back in your thread, you click on [img],%20then%20paste%20the%20URL,%20then%20click%20on%20[*img]%20again.%20Alternatively,%20you%20can%20type%20[img]%20and[/img] before and after your URL. (Make sure there are no spaces between these tags and the URL).
I'll be following your progress, too - good luck!
Posted: Mon Jun 27, 2005 3:50 am
by Mike Adams
What is the reason for the spaced inside rubrail, just out of curiosity?
These pictures of the forward gunwale deck epoxy glued in place may help to explain what I am doing:
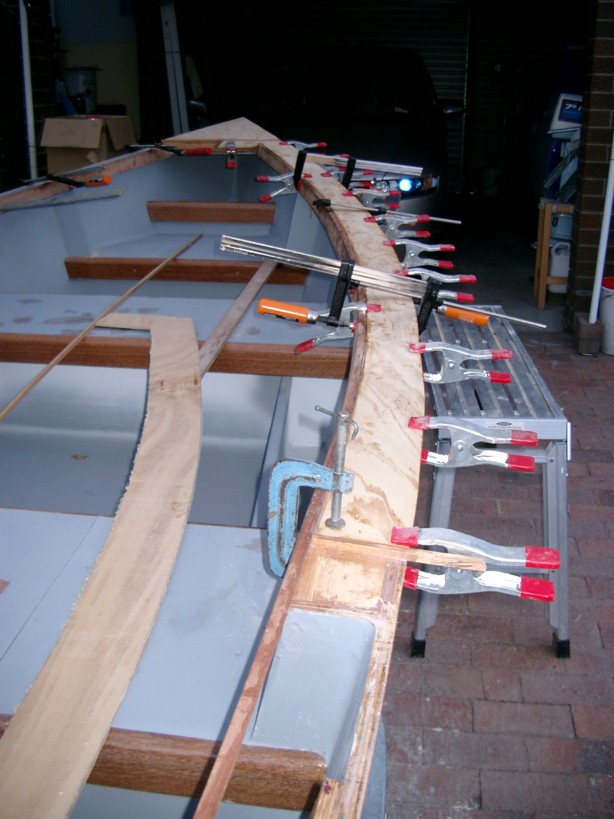
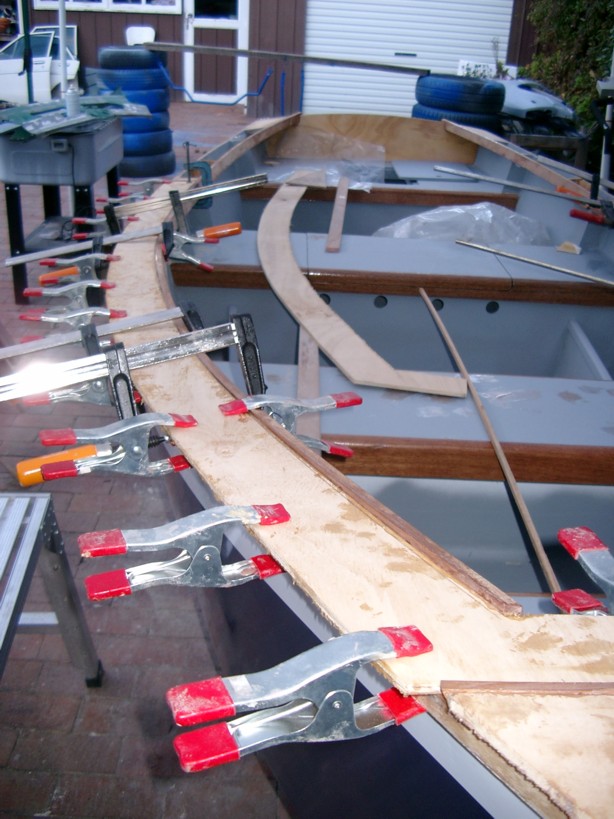
The step by step building procedure I am using is -
1) deck pieces roughly cut to shape, slightly oversize;
2) inside rails glued in place;
3) deck scribed to match inside rail to ensure a snug fit and trimmed;
4) deck epoxied in place;
5) outside edge of deck cut/sanded flush to the first layer of rubrail (already installed);
6) top layer of rub rail (meranti) glued in place; and
7) deck, rubrail, and inside trim sanded to final smooth shape and coated with epoxy for a clear (bright) finish.
Due to the low temperatures we are currently experiencing, this is a slow process, as I have to leave everything clamped in place for a few days to ensure the epoxy has cured completely, and I've used up all my clamps on this one piece and the opposite inside rail!
Posted: Mon Jun 27, 2005 10:48 pm
by Barney
Nice work Mike. I notice that the width of your deck looks suspiciously well sized to cope with a can of VB. Coincidence? I think not.
Posted: Tue Jun 28, 2005 12:07 am
by Mike Adams
Barney wrote:Nice work Mike. I notice that the width of your deck looks suspiciously well sized to cope with a can of VB. Coincidence? I think not.
Now Barney, you are not suggesting that I would drink AND drive, are you?!
On the other hand, if my significant other proves she can handle the boat, maybe I'll let her drive while I put your suggestion to the test....
Posted: Tue Jun 28, 2005 2:27 am
by kiwi
Looks like you are building a masterpiece there! Great job Mike
Tony
Posted: Tue Jun 28, 2005 12:01 pm
by Dane_Ger
Mike,
My compliments on the gunwale deck. I've known you were going to do this, but I couldn't quite get a 'picture' of how it would look on this boat? Alas, it looks absolutely great!
Keep up the good work!
Posted: Tue Jun 28, 2005 12:14 pm
by tech_support
My last "VB" disappeared from the fridge - thanks again for the beer Mike. Your boat is going to look great with that bright finished meranti
Posted: Wed Jun 29, 2005 4:35 am
by Mike Adams
Thanks, guys.
Joel, if I ever get the chance to visit again, I'll bring you some more VB!
The rain has set in again today, but yesterday was fine, and I managed to get a bit more done on the gunwale decks:
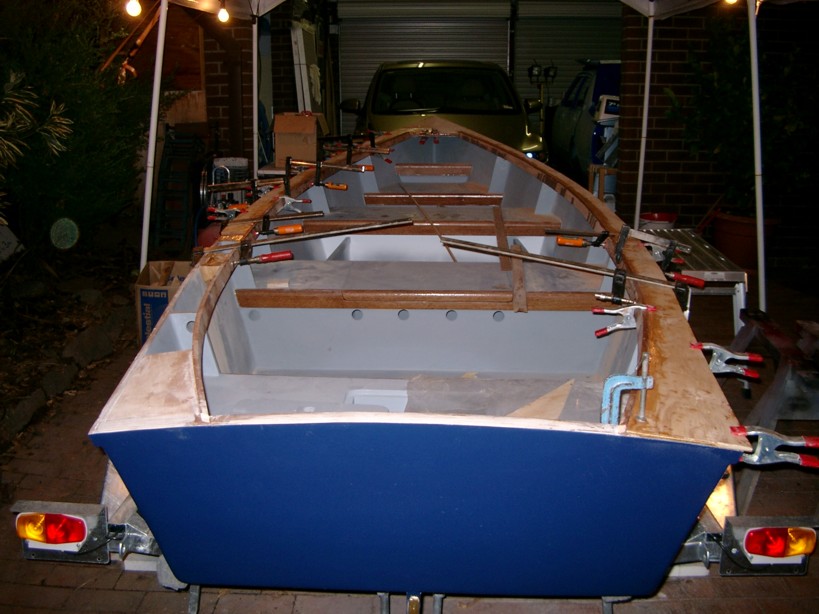
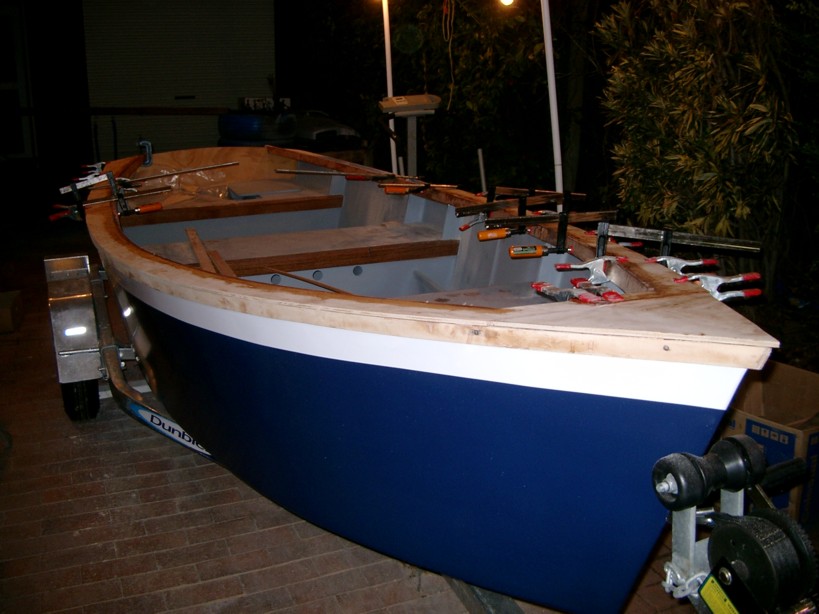
I think maybe the end is in sight, if we can only get a spell of good weather! Just the port rear deck and the rubrails to install, then finishing paint on the inside and fit the hardware.
Posted: Wed Jun 29, 2005 2:45 pm
by tech_support
Nice colors
Posted: Wed Jun 29, 2005 2:52 pm
by kiwi
Shine wrote:Nice colors
You drank his beer, the guy has taste
Tony
Posted: Sun Jul 17, 2005 11:33 pm
by Mike Adams
Well, guys, the construction phase is finally over!
I got the last section of rubrail epoxied into place yesterday. All I have to do now is finish sanding the gunwale decks and rubrails and give them a couple of coats of epoxy, then finish the interior paint and add the hardware. I will need to leave the rubrails clamped for a few days, though, to ensure a proper cure for the epoxy - yesterday wasn't too bad while I was working (sunny and about 10 deg C), but it plummeted down to -4 deg C overnight and was still only 1 degree when I came to work (had to scrape ice off the car windows..
). Sun's out now though, and the forecast is for 12 degrees C today.
I would post some more pics but I still can't log into the gallery from my home computer, even though I can get automatic login to the gallery from my work computer.....
Posted: Wed Jul 20, 2005 11:24 pm
by Barney
Looking forward to seeing your latest photos Mike. I've just posted a months backlog of photos, so you should be able to get on now and post them!
Posted: Thu Jul 21, 2005 3:51 am
by Mike Adams
Now the gallery is back up, here are some more pics of my progress.
The hardware has been temporarily positioned prior to coating the finished gunwale decks with epoxy:
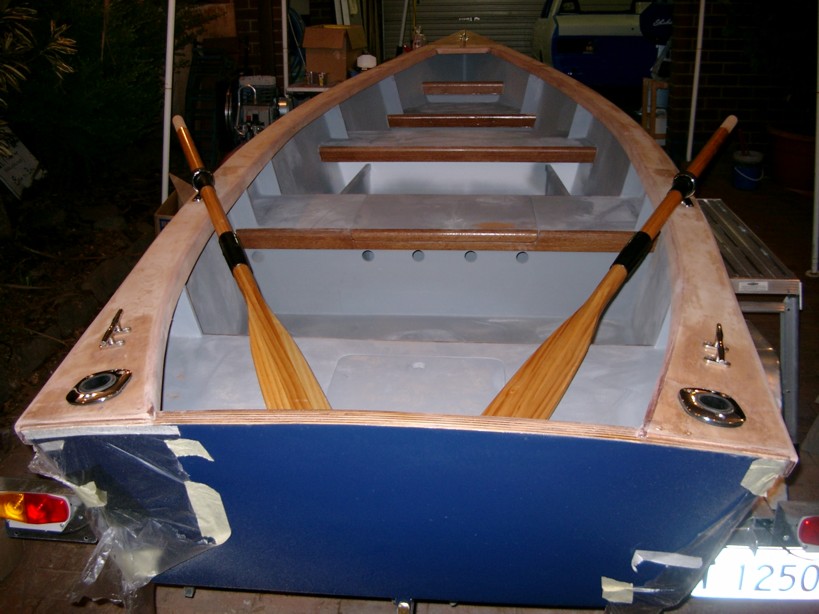
The oars are made in two sections that snap together - makes in-boat storage when not in use a lot easier!
I got the rowlocks courtesy of Bateau when I visited Jacques and Joel in Vero Beach earlier this year. Because of the gunwale deck, I could only use the top screws, so I set the oarlocks into slots in the deck and epoxied them tightly in place in the slots:
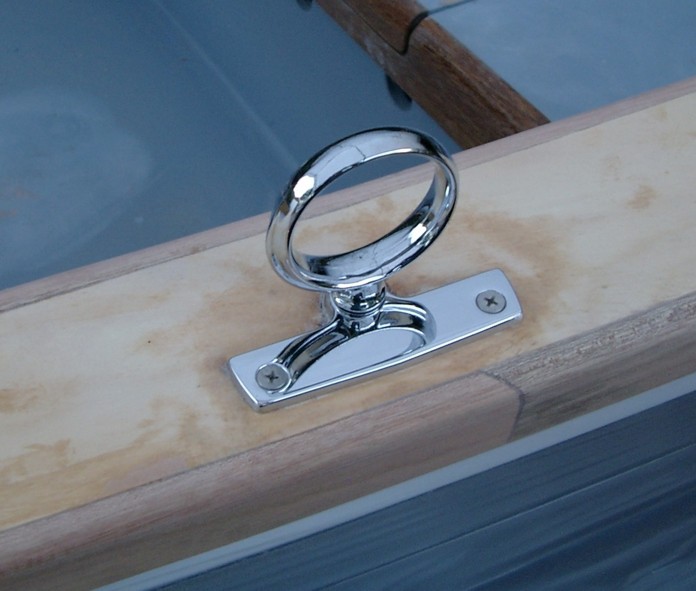
S/S through-deck rodholder, cleat and bimini top fastener temporarily positioned in the aft portion of the gunwale deck:
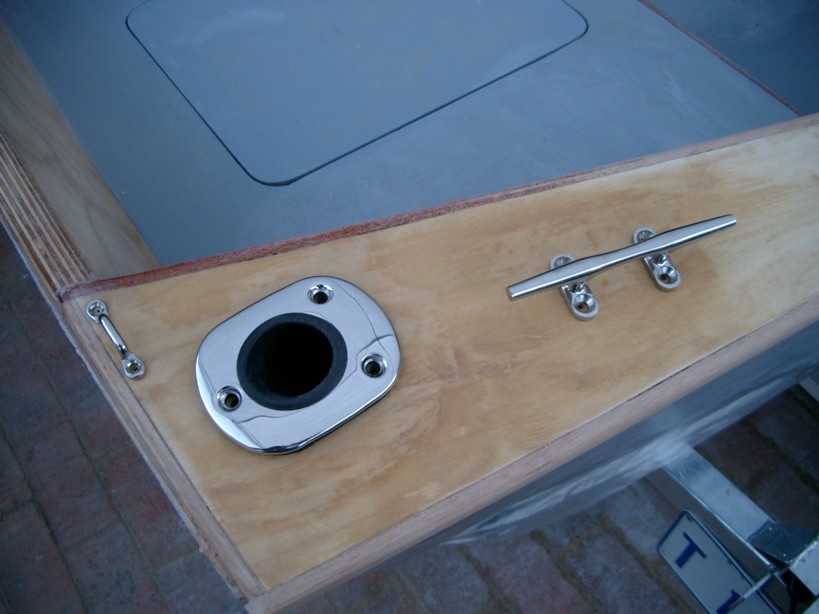
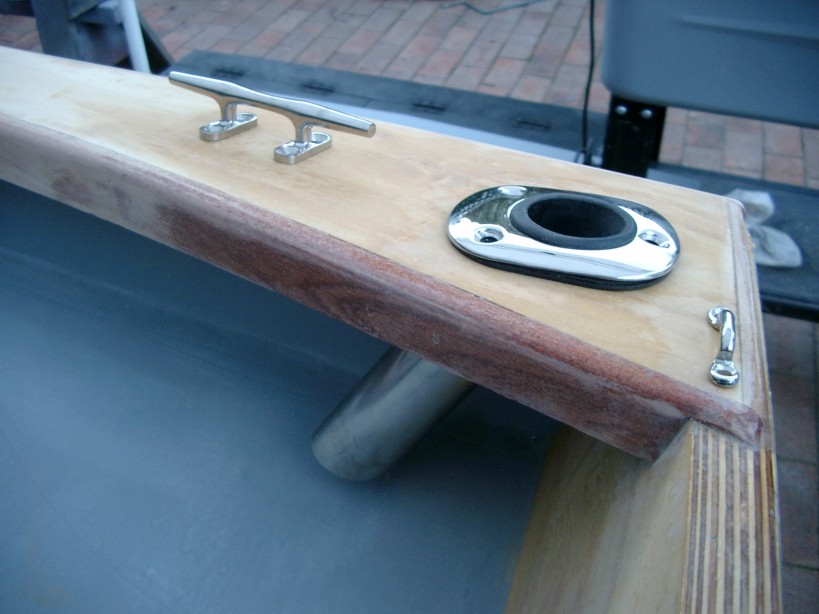
I'm on the last lap! All I need now is some good weather for a change...
Posted: Thu Jul 21, 2005 12:32 pm
by ArizonaBuilder
Mike,
The boat looks great. nice job, you must be very proud..
Posted: Thu Jul 21, 2005 8:40 pm
by Mike Adams
Thanks, Terry - I must confess to feeling pretty good about the way it has turned out, especially since this is the first time I have ever tried to build a boat! Progress will be a bit slow from now on - although I don't have much left to do, the weather is still very cold for applying epoxy and paint and definitely too cold to launch in the Snowy Mountains lakes! I'll be in NZ next week and have to have a minor medical procedure the week after, so I'm still looking at September for the launch.
Posted: Thu Jul 21, 2005 11:01 pm
by ks8
Love what you did with it Mike!
Another mod maniac eh?
They look worth the effort. Let me guess... you plan to fish?
Hope the surgery goes well and heals quickly.
Beautiful boat...
ks
Posted: Thu Jul 21, 2005 11:36 pm
by Steve_MA
Mike - Awesome looking work..... adding the gunwale gives it so much character. I really like it.
Actually, I have a question for you - I recall you put a piece of brass or something on your skeg..... what did you use exactly. I think I am going to need something like that.
Steve
Posted: Fri Jul 22, 2005 1:44 am
by Mike Adams
Let me guess... you plan to fish?
After spending all my money on the boat, I think I'll have to catch my own dinner!
I've enjoyed building it, but I could do with a rest for a while, and fishing will provide some welcome relaxation in the Spring and Summer and time to think about building the DE23......
Thanks for the compliments, guys.
Steve - I bought a length of 3mm x 19mm brass strip from the local builder's supplies store and bent and cut it to shape for the skeg. I secured it with countersunk brass screws and put epoxy in the screw holes before final installation.
Posted: Fri Jul 22, 2005 5:43 am
by JohnH
G'day Mike,
Where do you fish? Down the coast? Not much in Lake B-G. Plenty of trout nearby but not for your boat.
I lived down there for a few years while at Uni- wind off the snow covered Brindabellas definitely no good for epoxy (or anything else).
Good job mate.
Cheers
John
Posted: Fri Jul 22, 2005 4:12 pm
by Mike Adams
Thanks, John.
I haven't had a lot of time to fish as yet, but I'm sure planning to this Spring/Summer! I'll launch in Lake Jindabyne and will probably fish there or in Eucumbene most of the time, although the Clyde River around Nelligen is also pretty good for small boats. The Wyangala Dam out past Yass is also a good fishing area.
What part of Brisbane are you from? We're Queenslanders - my wife's family live in Gympie and we have a house there that we intend to retire to in about 18 months. We lived in Brisbane and in the Caboolture area (Beachmere) for many years - we used to own and operate two flying schools, one in Redcliffe and one in Caboolture before moving to Tamworth for 3 years and then to Canberra 10 years ago. The older I get, the more I look forward to getting back to Queensland weather and away from the bloody cold in Canberra! (It's minus 2C this morning.....).
I want to build the DE23 next, but I don't think I'm going to be able to do much on it before we retire, due to lack of space here in Canberra.
Cheers
Mike
Posted: Sun Jul 31, 2005 6:35 am
by Mike Adams
The sun has shone this weekend, so we managed to get the inside of the boat painted white. The meranti rub rail and inside trim with a contrasting lighter gunwale deck has turned out quite nicely. The deck over the breasthook was to have been finished bright as well, but I got a bit too enthusiastic with the orbital sander and put some rather ugly marks in it.
There were also a couple of sanding marks at the edge of the deck where it meets the meranti trim across the back of the breasthook, so I decided to paint the breasthook deck white, with a couple of narrow white trim stripes to cover the edge marks. Although this was actually done to cover a mistake, I am rather pleased with the final effect!
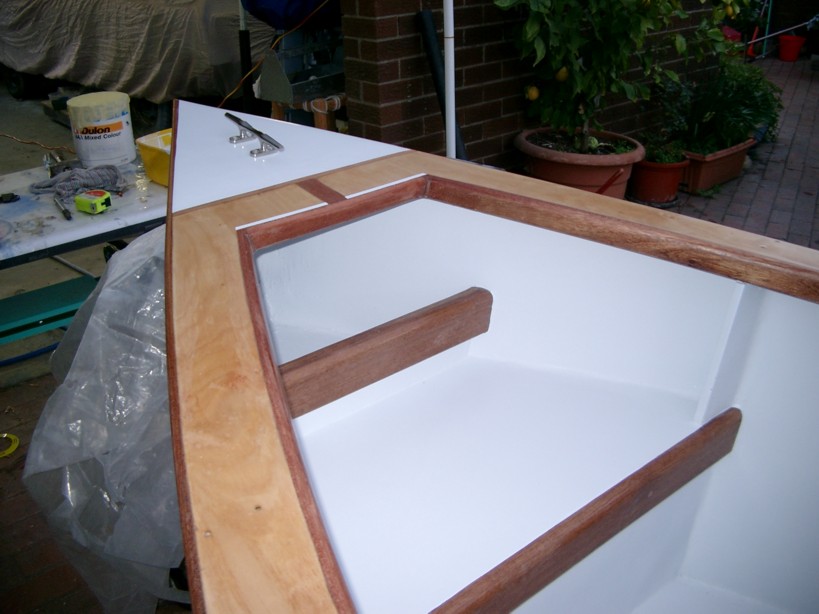
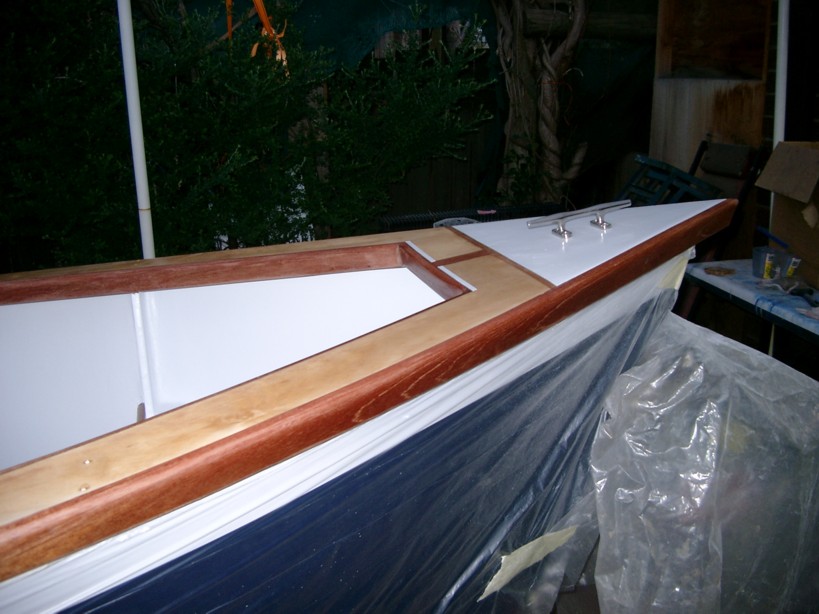
The rub rail on this side was covered with masking tape that was exposed to the sun for the last week. As a result, it was very difficult to remove the masking tape after painting, and there was a lot of glue residue remaining after the tape was finally peeled off. I used a little acetone on soft cloth, together with a lot of elbow grease (!) and it has cleaned up nicely with no adverse effect on the epoxy surface.
The bright finished transom matches the gunwale deck:
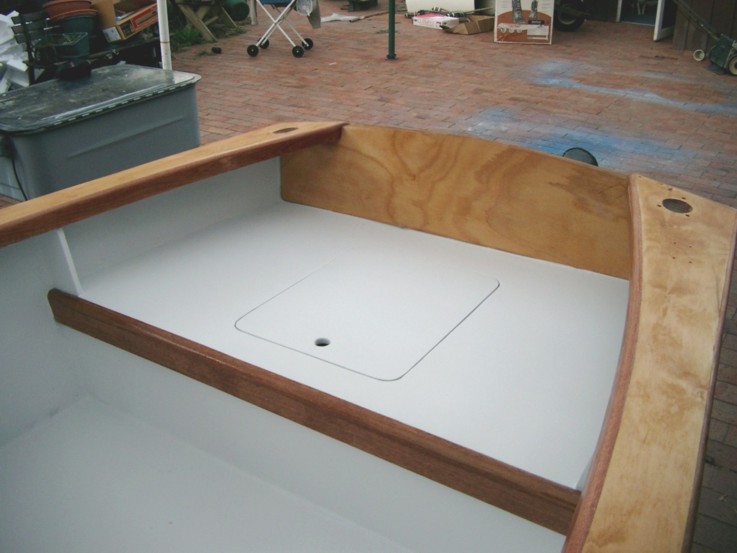
The finishing clear coats still have to be applied over the interior and brightwork, the non-slip paint applied to floor and seat tops, and the hardware fitted. I hope to be able to get that done over the next couple of weekends, provided I feel OK after a medical procedure I have to undergo next Wednesday. The final task will be to put her name on the boat - I have called her "Lake Dreamer", to match the DE23 ("Sea Dreamer") that I want to build next.
Launch is being tentatively planned for 17 September (weather permitting).
Posted: Sun Jul 31, 2005 1:54 pm
by cimmaronjim
Man, that is nice!
What an inspiration to us future builders!
Posted: Mon Aug 01, 2005 9:39 am
by Dane_Ger
Gorgeous Mike . . . . absolutely gorgeous!
Posted: Mon Aug 01, 2005 10:36 am
by Rich_L
Wow!!
Outstanding job Mike.
Rich
Posted: Wed Aug 03, 2005 9:59 pm
by Mike Adams
Thanks for all the kind words and encouragement, guys! I really enjoy this forum and only wish I was geographically closer and able to meet more of you.
BTW, I'm happy to report that the (not-very-pleasant-but-necessary) medical procedure I had to have yesterday went successfully and after a few days rest I should be OK to get back to finishing the boat.
Posted: Fri Aug 05, 2005 1:58 pm
by Dane_Ger
Mike, glad everything went well as can be expected and wishing you a speedy recovery!
Posted: Fri Aug 05, 2005 9:13 pm
by Mike Adams
Thanks, Dane. I'm feeling fine now - the next step for the boat is to apply the final clear coat, but unfortunately my son has decided to take this weekend off to go 4WD/camping, so I won't be able to get back to finishing it until next weekend. Oh well, I guess I've run out of excuses not to do all the other things that need doing around here...!
Actually, I took a big deep breath and cut two more holes in my boat yesterday...
!
I had previously decided I needed a couple of rod holders up for'ard in addition to the two in the aft gunwale deck, but I was having difficulty finding space for them because of the way the gunwale deck narrows towards the bow and the sides slope inwards. Anyway, it suddenly occurred to me that the front seat had a lot of spare space underneath, so I very carefully positioned the two rod holders in the seat top, facing outwards.
This is how they look:
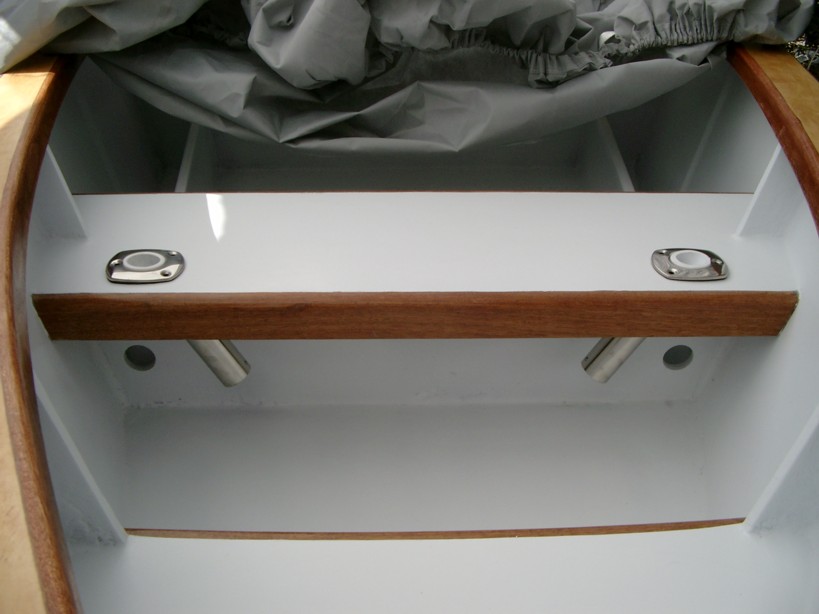
BTW, the other two holes you can see are to accommodate the oar handles when they are stowed in the side bins.
Posted: Mon Aug 22, 2005 5:49 pm
by Dukydo
Mike,
I think Joel is right when he says yours is the "MOTHER" of all FL 14s.
I am going to start my FL 14 next spring. My wifes health is on the front burner till then.
I hope you would entertain a question about your boat. My main question is this; When you cut the frames did you square off the tops instead of useing a radius on the inboard side? If yes I presume it was to help support the gunwale deck? My monitor is not the best and the photos are not real clear due to that.
BTW Have you named her?
Posted: Mon Aug 22, 2005 9:13 pm
by Mike Adams
Hi Duke,
Yes, I deliberately left the tops of the frames square to support the gunwale deck. I also added a couple of extra plywood supports under the gunwale deck between the rear mid seat frame and the transom seat frame, at the position of the oarlock pads. I put another small support between the two mid seat frames so that I could join the gunwale deck pieces at that point, and to provide a fixing point for the bimini top. I'm at work right now, but I may have some pics on my home computer that show these details in close up. I'll have a look tonight and see if I can find anything useful.
It's now completely finished except for tidying up a small area of paint that got damaged and putting on the name. I have a few things to do over the next week or so, but hope to post full pics of the finished boat soon.
As for the name, when I first started out with the idea of building a DE23, my family thought I was dreaming, so I decided in advance that she would be called "Sea Dreamer" (hence my signature). When I decided to build the FL14 first, it therefore seemed logical to call her "Lake Dreamer"! So that's her name.
Now that I have decided to build the LB22 Nina next, I will call that one "Sea Dreamer", and if when I retire I manage to build a bigger boat (it may be the TW28 instead of the DE23) that one would become "Ocean Dreamer". A bit corny, I know, but I rather like the idea of building a "Dreamer" series just to rub it in to those who thought I was dreaming when I first said I was going to build a boat!
Although I won't launch "Lake Dreamer" for another few weeks yet, I think it's time to change my signature below....!
Posted: Tue Aug 23, 2005 4:12 am
by Mike Adams
Duke,
Here is a close up pic of the supports I put in for the gunwale deck, as described in my previous post. Hope this helps to explain.
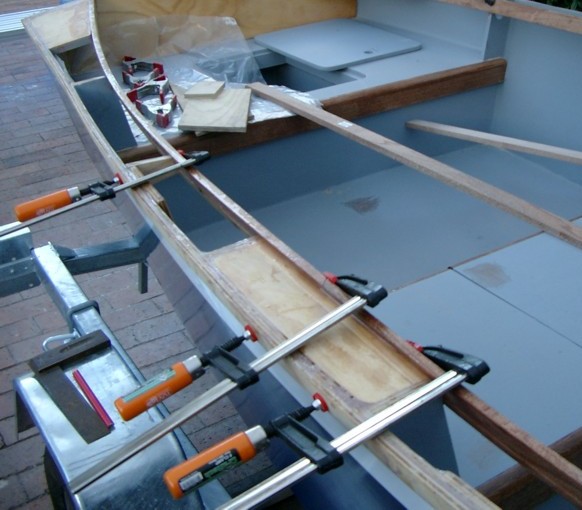
Posted: Wed Aug 24, 2005 11:48 am
by Dukydo
Thanks Mike
The additional photo helps alot. I will surely be consulting your thread here when I finally get started. Obviously I like the idea of a gunwale deck. I had tossed the idea around before but now I'm convinced it is a practical addition. It not only adds a place to mount hardware but must surely add structural strength to the boat. Not to mention it looks real nice also. Great going Mike.
Even with all the added work it makes (I'll be working alone) I'm still adding the feature.
Posted: Sat Aug 27, 2005 3:26 am
by Mike Adams
As flagged on a separate thread, "Lake Dreamer" is now finished. Here are a few more pics for those who are interested. This one is with the detachable Bimini off -
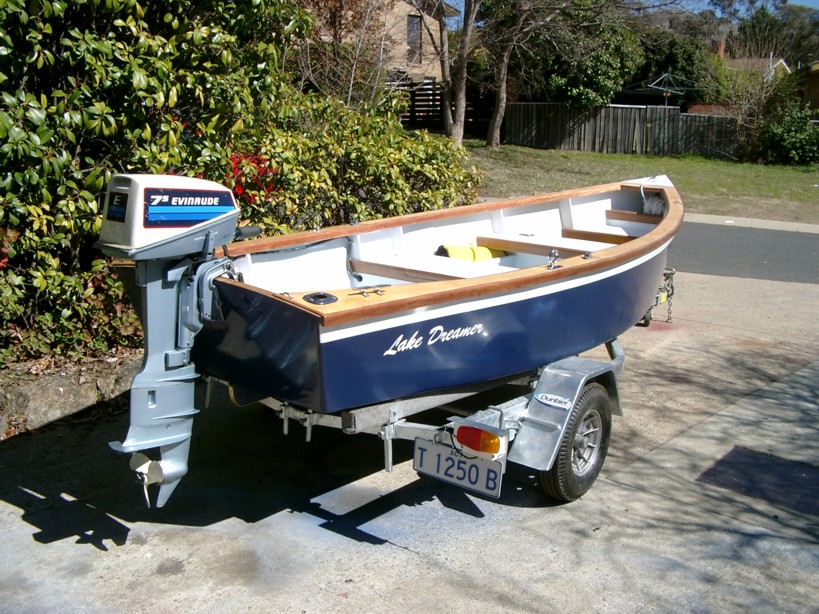
Here the bimini is fitted but is folded down -
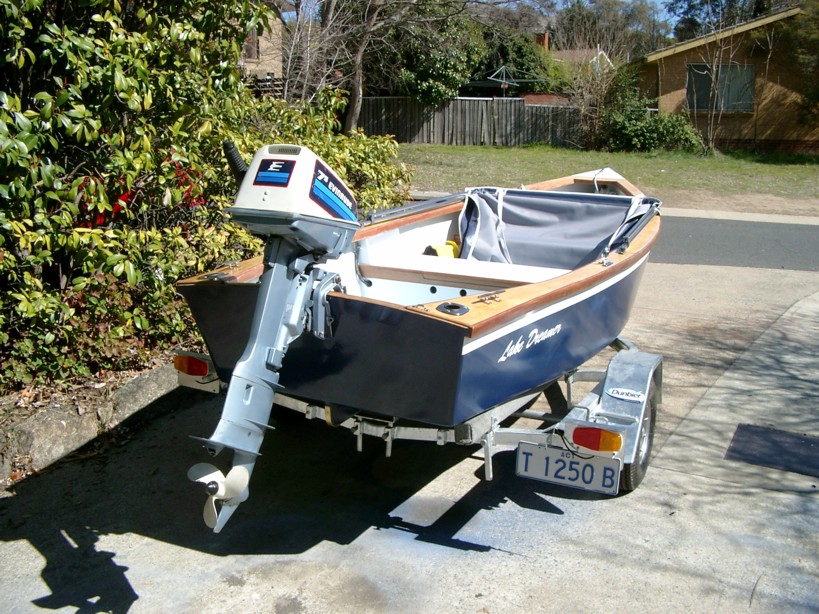
And here the bimini is up for those hot summer days!
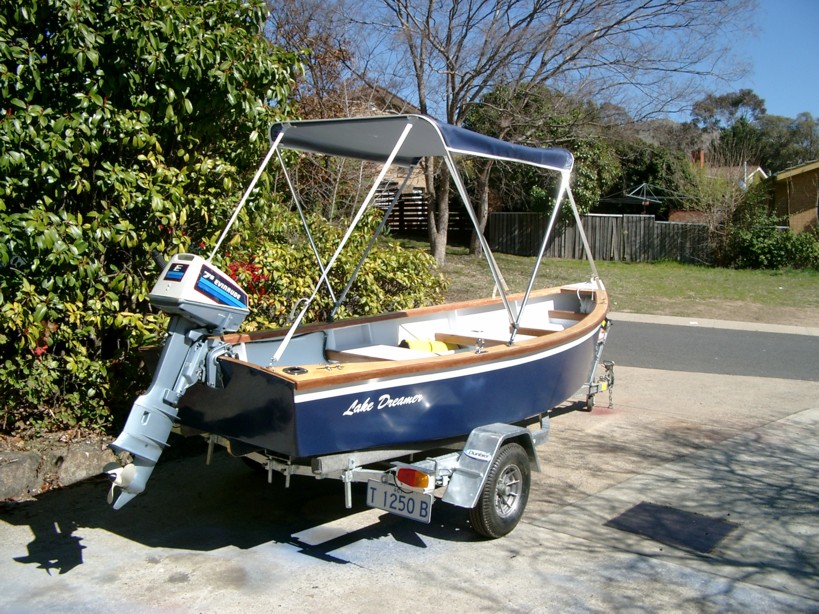
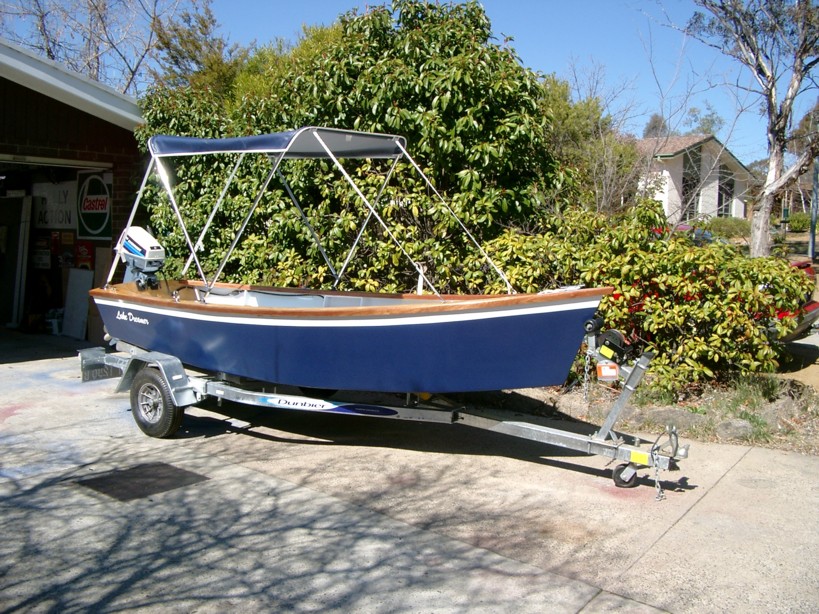
The floor has been painted with 'squall blue' non-slip deck paint -
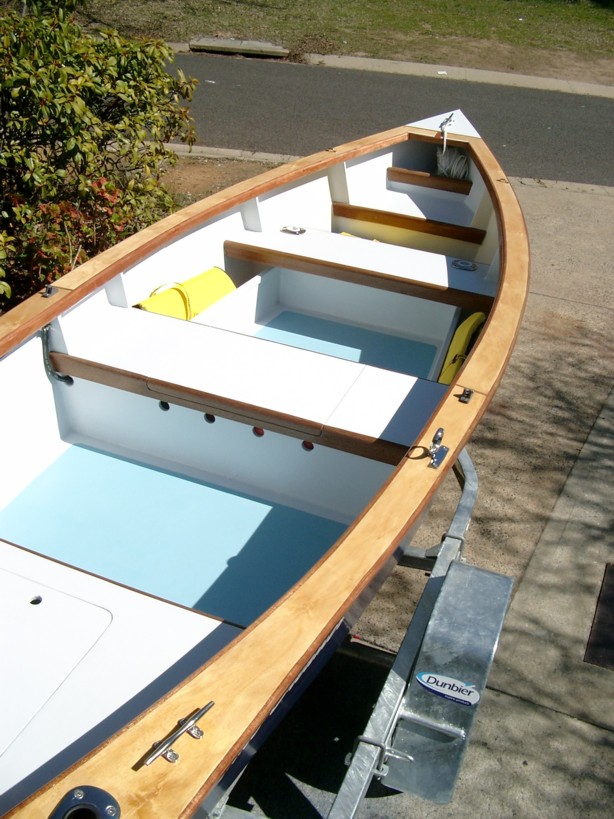
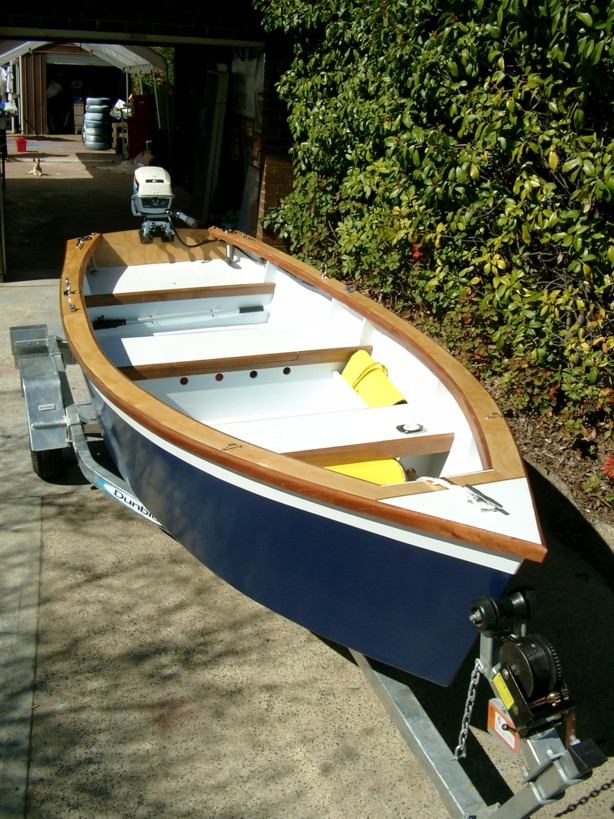
The tiller extension is stored across the rear seat frame. This is neat and out of the way, but I think I will have to put a small piece of rubber on the clips to avoid leg scratches!
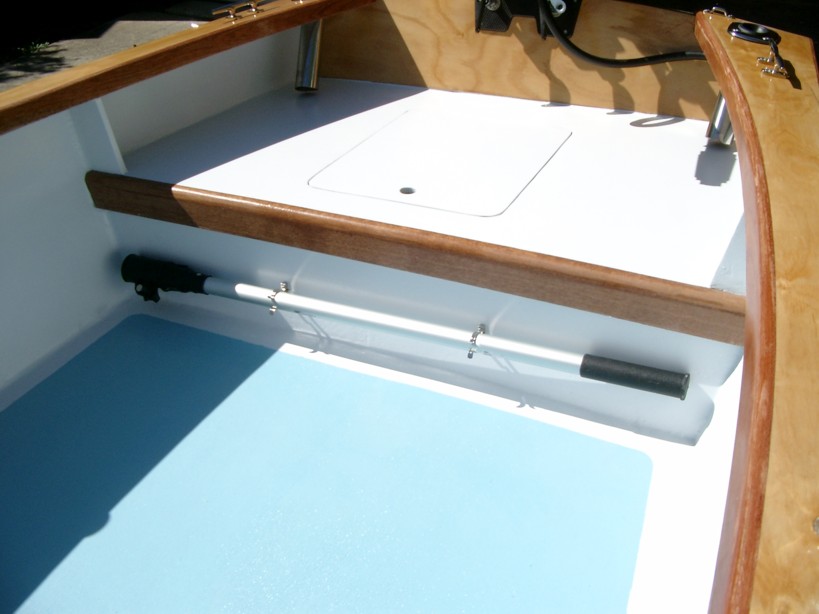
This is how the tiller extension fits when in use -

The two-piece oars are stored in the side bins when not in use -
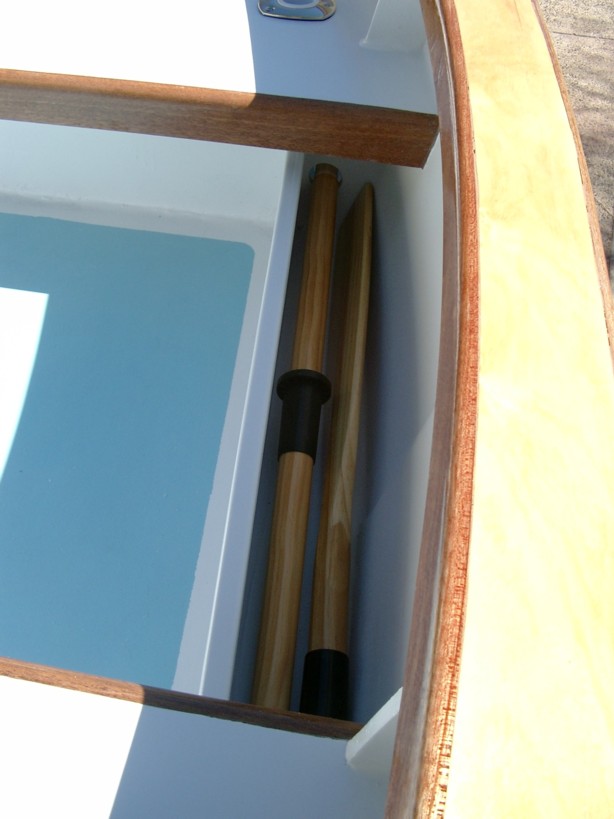
And the anchor and rope is stored in the forward seat well -
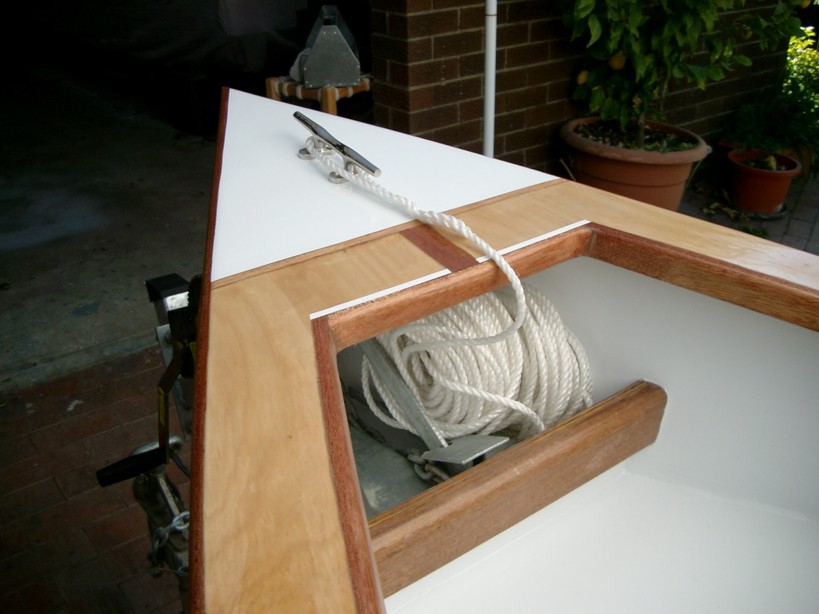
The fuel tank is located under the mid seat and the fuel line is routed through the chase tube in the foam bouyancy compartment, up under the gunwale and round the rear rod holder to the engine -
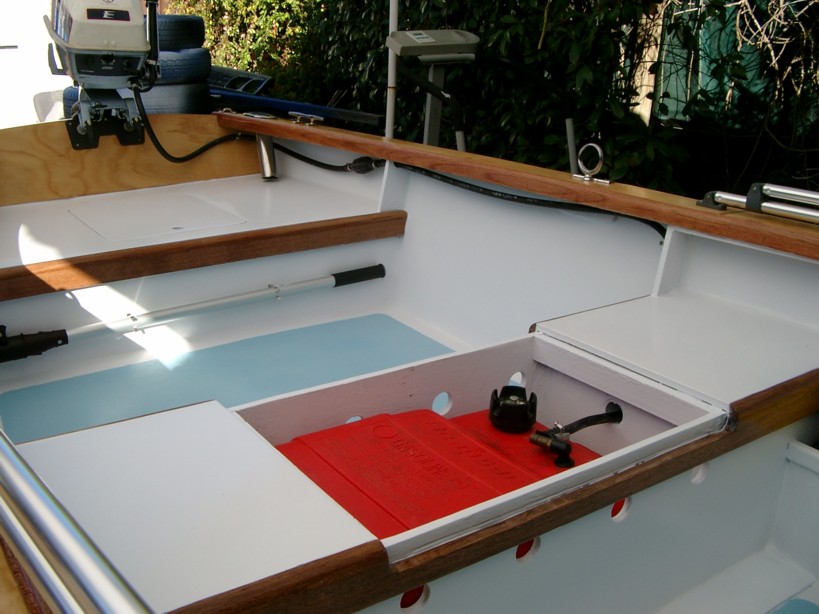
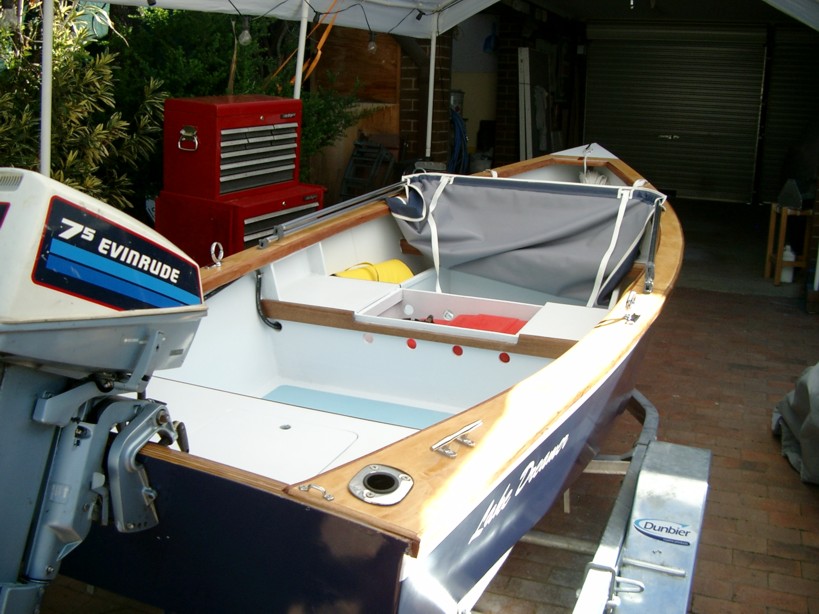
So there she is - "Lake Dreamer":
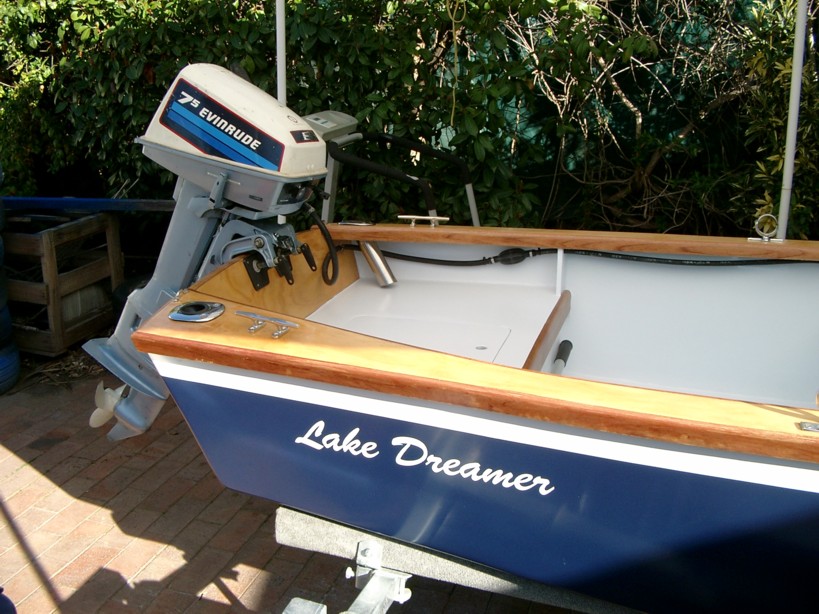
I'll post photos when she's launched. Thanks again to everyone for the help and encouragement.
Mike
Posted: Sat Aug 27, 2005 7:51 am
by alball
Fantastic Mike. You have thought of everything! I particulalry like the gunwhale deck and the fuel tank and anchor storage. She is a real beauty!
al
Posted: Sun Aug 28, 2005 3:01 pm
by Dukydo
Hi Mike,
I have been spending so much time gazing at the photos of your boat the wife has jokingly asked what I have in the den besides a computer!? So I better ask my questions and get out of here.
I have done an internet search and have not been able to locate anything that looks like the type of oars you have in the "Lake Dreamer." Where would I find them and how long are they assembled?
Also where would I find those type of "Rod Holders? The same with the fuel tank? I cannot find these things here locally and no telling how far I'd have to go to locate them. Can you help me out?
I'm trying to get my materials together before I start my build. Its something I can do without exposing my wife to chemicals and sawdust.
A BIG THANK YOU
Posted: Mon Aug 29, 2005 12:06 am
by Mike Adams
Thanks for the compliments, guys. It sure is nice when everything works out the way you hoped it would!
Duke,
The oars are made in two pieces and snap together to become just over 6' in length - a shade short for serious rowing in the FL14, but ideal just for back up in case of engine trouble. I found these on the shelf when visiting a large boat supplies store in Queensland. I'm sure that there would be similar items available in the US. Try searching for "two-piece oars" or in the catalogues of on-line "marine/boat supplies" and you should be able to find something similar.
The rod holders are thru-deck (flush mounted) stamped stainless steel. There are a number of places in your part of the world that have them advertised. If you don't have a marine supply store nearby, try the on-line stores. Here are a just a few of the links I found that might help:
http://www.everythingforboats.com/
http://www.gotrolling.com/
http://www.lake-link.com/businesses/bus ... nessID=293
http://www.jbeezwatercraft.com/store/in ... ath/31_477
http://www.sea-dog.com/catalog/R-9.html
http://www.boatingstore.com/boatingstor ... E8CECBEDD0
The last link in particular will show a good range of flush-mounted rod holders - just type "rod holders" in the Keyword Search box and click "Go". If you type "fuel tank" you will find they also have a tank fairly similar to the one I have. I'm sure you'll find many more if you do a search - these are very common portable fuel tanks for boats. The one I have is way bigger than needed for the FL14, but it came with the used outboard that I got for a good price (about US$400).
Cheers
Mike
Posted: Mon Aug 29, 2005 2:49 am
by kiwi
Mike
That is my definition of "masterpiece" - you are an artist. Now get out there and scratch that paint!
Tony
Posted: Mon Aug 29, 2005 11:08 am
by pirate
Damn!!
Posted: Mon Jul 31, 2006 10:33 am
by John D Wiilimann
Wow ! Your boat is a beauty !
I'd be scared to use it...
Seriously, that is an awesome job.
Right, back to my battered before it's time boat...
Posted: Mon Jul 31, 2006 6:35 pm
by Mike Adams
Thanks for the kind words, John. It's almost a year since I completed Lake Dreamer and - you guys are not going to believe this, but it's true - she's not been back in the water since the launch..
There have been many reasons for this. The runup to Christmas and the New Year was an extremely busy time for us; then my daughter got married in January; my wife had to have major surgery in March and I was away overseas on a business trip for four weeks in April and May. After that our winter started to set in, so the Lakes in the mountains got pretty cold. We did try one trip to Lake Eucumbene in the high country before it got too cold, but by the time we got there (almost a 2 hour drive) the wind had picked up and I judged the conditions on the lake were too dangerous for someone with my limited boating experience, so we did not float her.
The winter here in Canberra has been particularly cold this year (at least, by our standards!), but my son and I are hoping to take Lake Dreamer to the coast this week and do some fishing in the river estuary. This will be the only opportunity I will have to put her in the water now for the remainder of the year, as I will lose my job soon because of 'reorganisation' and consequent redundancy. We will be moving back to Queensland at the end of the year and in late September we will be travelling up to the Gold Coast in Queensland where my daughter will be participating in the Special Olympics National Games swimming events. We are planning to take 'Lake Dreamer' with us and leave her stored in my brother-in-law's shed until we move ourselves and the rest of our gear in December. Once we get settled in I hope I will have some more time available to actually use her!
Another result of my being made redundant is that I doubt if my finances are going to allow me to start another build for a while yet. All our efforts (and cash) for the next year or so will be going into building our new home (I plan to build this myself, with a kit home). I've been waiting for Jacques to release the LB26 plans, and I will probably still buy them when they are available, but when I will be able to get started on that boat is anybody's guess. I may have to try to sell Lake Dreamer to pay for the next project...
Meanwhile, I'll still be checking this forum and enjoying watching the efforts of other builders.
Mike
Posted: Mon Jul 31, 2006 11:21 pm
by Dukydo
Mike,
I know what you mean about not having time for the boat. In my case it sits in my basement still in pieces. My wife underwent a bone marrow transplant and her recovery ate up the winter months. Insurance did not cover everything so I had to work longer to keep up. This summer has been hectic and I am threatening to sell all of the materials but my wife (bless her) won't let me.
I hope all goes good for you on your move and the building of your new home. If Lake Dreamer is any indication I,m sure it will be a beauty.
Better build a shop large enough for the new Bateau project.
Duke
Posted: Tue Aug 01, 2006 1:17 am
by Mike Adams
Duke,
Good to hear from you. I have been wondering where your boat was at.
I trust your wife is on the road to full recovery now. My wife is also very supportive and has accepted that we will be looking for a large block of land for our new home, with a shed on it big enough for me to play in....!!
Cheers,
Mike
Re: Another FL14 started!
Posted: Wed Nov 10, 2010 10:09 am
by JohnC
Thread for FL14 "Lake Dreamer"
John
Re: Another FL14 started!
Posted: Mon Dec 06, 2010 10:03 pm
by jlintvet
I am so inspired by this build! Can someone point me in the right direction ...
"The sun has shone this weekend, so we managed to get the inside of the boat painted white. The meranti rub rail and inside trim with a contrasting lighter gunwale deck has turned out quite nicely."
So I take it I can find solid meranti somewhere to fashion the rub rail ... is there another name for meranti? I've been getting some confused looks. What was used/should I use for the lighter contrasting gunwale deck, exterior fir?
Thanks!
Re: Another FL14 started!
Posted: Mon Dec 06, 2010 11:11 pm
by wej
Get used to confused looks when you tell others what you want materials for...."You're gonna build a what!?" is what I get a lot. My local lumber yard did some "research" and came up with "Okume siding" they said, " That'll work for you plywood won't it?"
Re: Another FL14 started!
Posted: Tue Dec 07, 2010 10:42 am
by jlintvet
Funny.