18' Skiff Repairs

Questions about boat repairs with our resins and fiberglass: hull patches, transoms and stringers, foam, rot etc.
Matt Gent
Very Active Poster
Very Active Poster
Posts: 602
Joined: Sat Jan 05, 2008 7:54 am
Location: Treasure Coast, FL

18' Skiff Repairs

Post by Matt Gent »

We use this boat for river cruising, sandbar days, waterskiing, occasional offshore lobster & spearfishing trips, camping, and just about anything else you can imagine. My father-in-law bought it new in the early 90s, and it was handed down through my brothers-in-law until my wife brought it to me when we got married. Since then I've replaced most of the rigging, put on a new motor, rebuilt a trailer for it, and generally put in way more money than its worth. Its a cheapo Hialeah boat, chopper and roving, with lots of exposed plywood that is rotting away. I'd prefer to restore a 20' SeaCraft, or buy a new 21-22 bay boat, but my wife is emotionally attached as she grew up with it. It is very low maintenance (ie no cleanup), dog friendly, and versatile. Plus it sits paid for in the driveway, so for now I'm going to do a few small jobs to fix its major problems. When the transom goes (its on its way) that is probably the end of the line.

Image

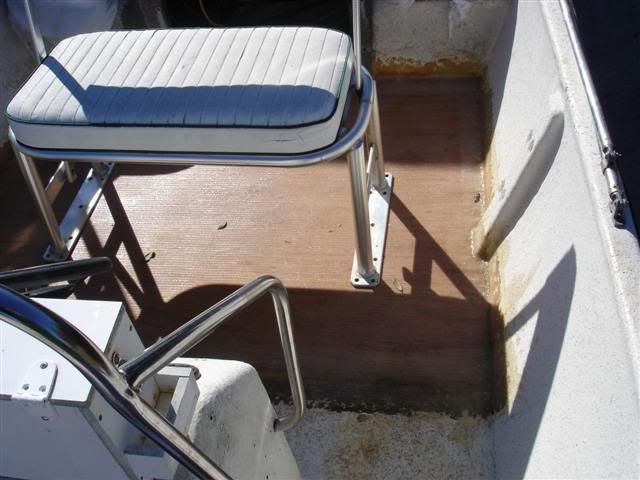
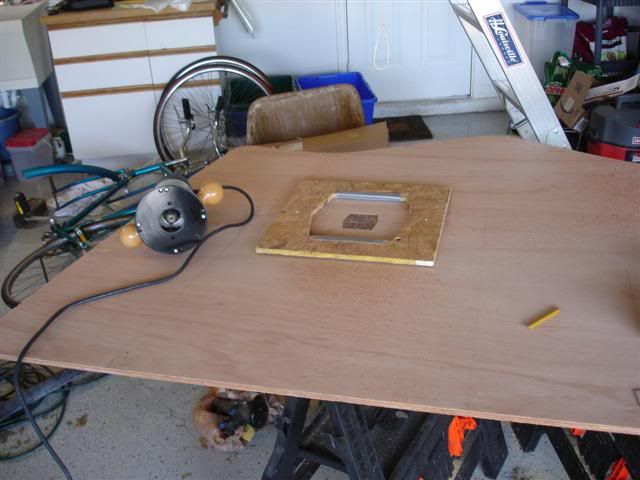
First job is to rebuild the casting deck. The aft bulkhead is rotting away, and the deck itself is starting to get pretty soft. I also don't like the storage arrangement, as getting the anchor in and out of the hole is pretty tough, and everything else needs to come out to get to it. I think originally there was a piece of canvas that covered up the hole, but that is long gone.

Image

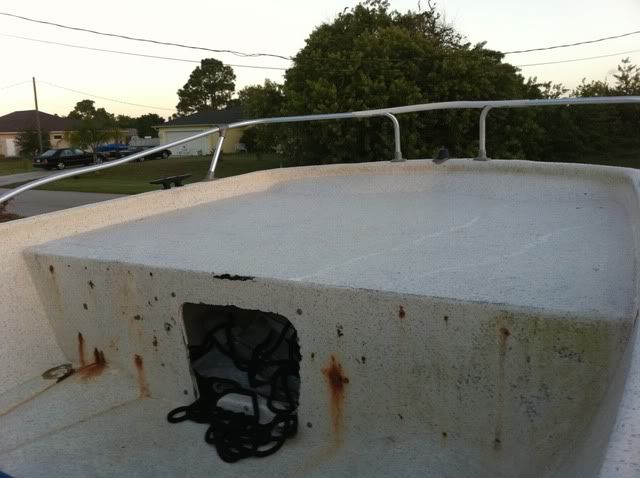
The plan is to rebuild it in generally the same layout, but with a hinged hatch on the top deck. I'll divide the compartment left and right into a dry-ish area on one side and a wet side for the anchor and lines. I originally bought a Bomar hatch to use for this, but I've seen a few that don't weather well when exposed to the sun all day, and they look a little cheap, plus I think I can make something nice and it will be a fun project. This is the part I think I need a little help with.

The current deck also holds two floatation chambers, one on each side. I will be eliminating these. We really need the storage space, and this boat has had significant amounts of water in it a few times but never this far forward. The entire sub-floor is filled with foam as well as two large volumes on the stern.

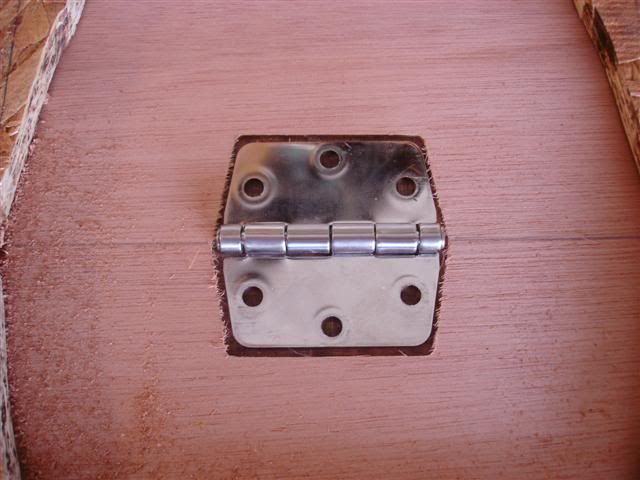
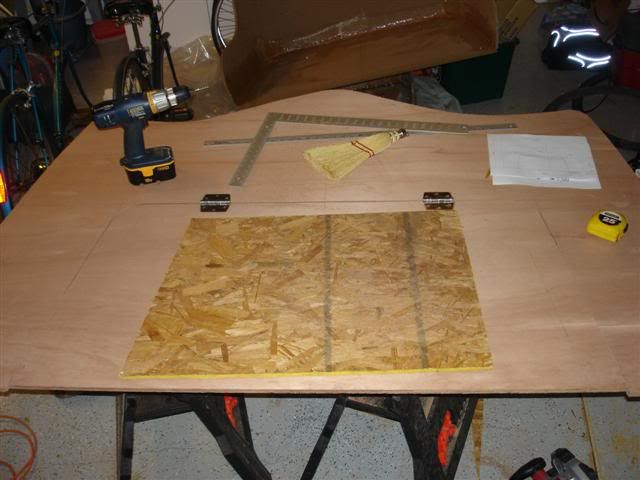
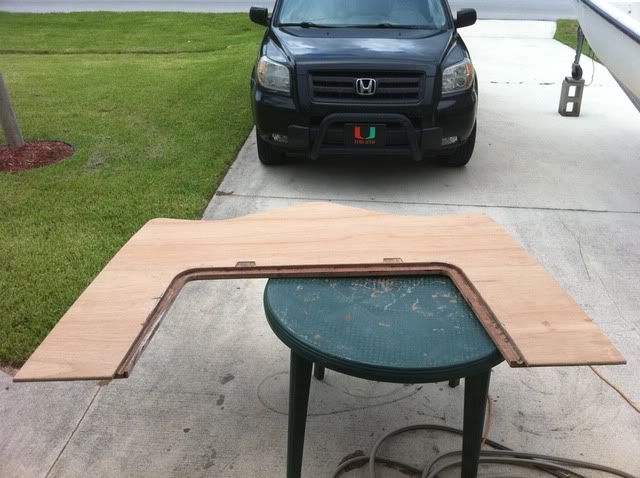
Hit up Marine Connection last weekend and picked up two 3x3" flush hinges and a 2" diameter spring-loaded latch. Here's a layout of what I plan to do:

Image


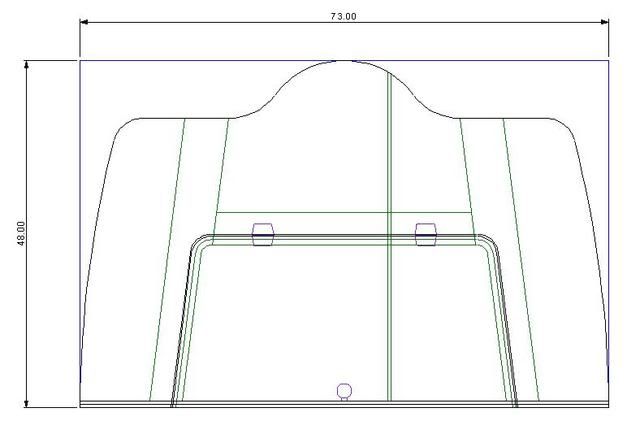
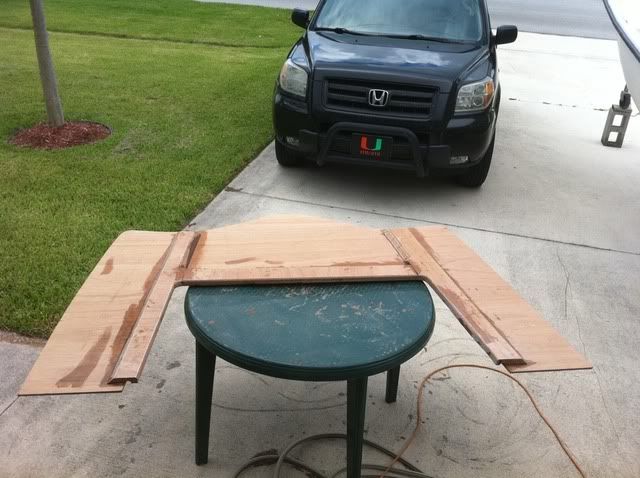
The colors got lost a bit in upload. Blue is the outline of raw material (48 x 73), 1/2" Meranti that I've already bought at BBC. This is exactly the same size/shape as existing. The bulkhead is a solid version of what is there today, plus a full-width cleat across the back side. I'll make a pattern to route the hatch out of the deck, leaving a 1/4" gap. The hinges and latch locations are shown in purple. The green outline is a frame I'll build up from strips of 1/2" ply and bond to the under side of the deck, which will also form the drip rail. There is also a longitudinal bulkhead to divide the sections and reduce the span of the deck and hatch. This one will be a little tricky to get the contour just right to match the hull. I need a couple of drain areas through the bulkhead too.

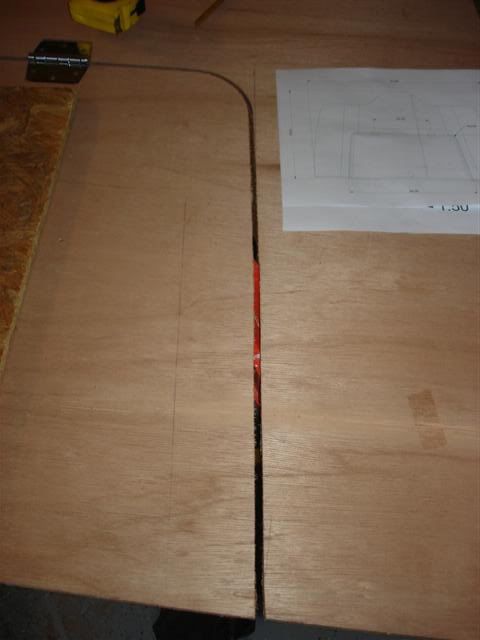
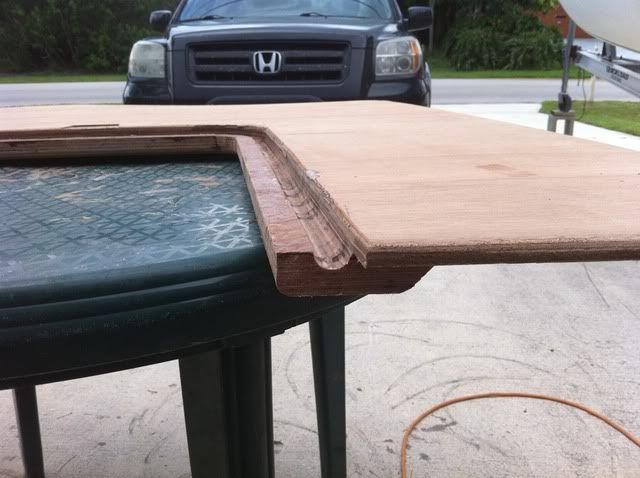
Here is a section through the deck, hatch, hinge, and frame/drip rail:

Image

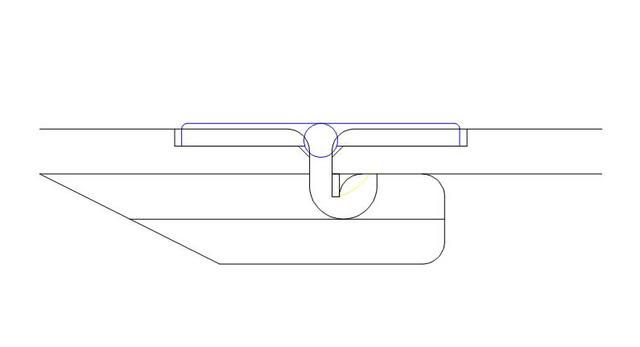
My plan is to build the frame onto the deck (after cutting out the hatch) and then use a core box router bit with an upper bearing to make the drip trough. This way the trough follows the outline of the hatch hole all the way around and drains out aft at the bulkhead. The drip edge will be formed on the hatch with fiberglass (found an explanation of this elsewhere on this site). The recesses for the cleat will be routed out of the deck prior to cutting the hatch out using a template that I'll have to make.

I'm open to any comments or suggestions on how to do this better. A few things that are in question:
-Will the deck be stiff enough with that span plus the frames?
-Where to fiberglass? Definitely on the top of deck, hatch, back of bulkhead, and anchor locker. If I glass the bottom of hatch or the lip it sits on I'll need to account for that thickness. What about glassing in the routed out area for the hinges?
-Are the frames & bond strong enough to support someone standing on the hatch?
-Should I add a gasket all around the lip (need to account for its thickness too). What material?

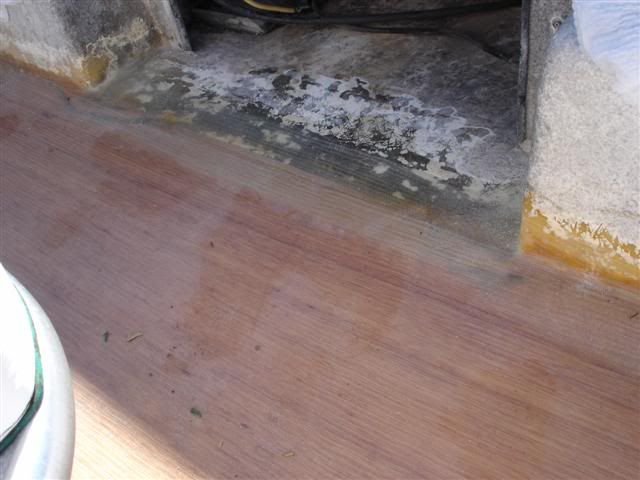
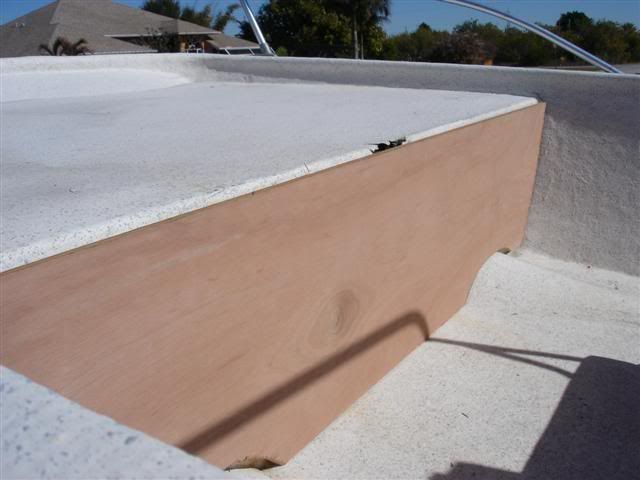
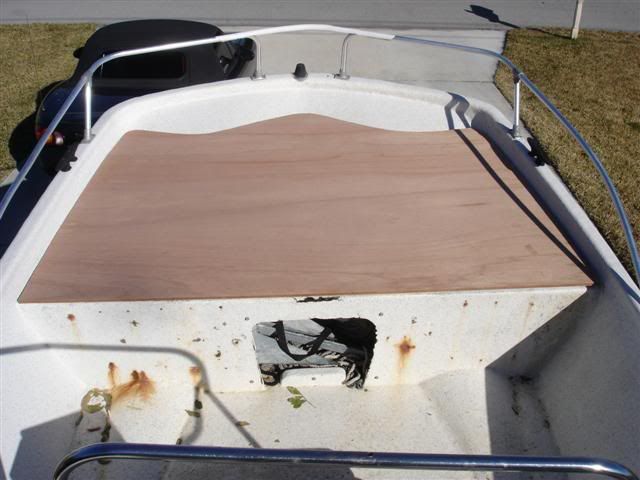
Next job is to patch the floors in the back end of the cockpit (and clean up the mildew!). I really should do the whole thing but I don't want the boat to be down for too long at a time.

Image

Matt Gent
Very Active Poster
Very Active Poster
Posts: 602
Joined: Sat Jan 05, 2008 7:54 am
Location: Treasure Coast, FL

Re: 18' Skiff Repairs

Post by Matt Gent »

My brother-in-law had a free day so he came up and we attacked the rear floors first. In one day we had it gutted, cleaned, floor cut to fit & primed w/epoxy, and added a layer of 1708 to the outer hull. It was real thin, and almost all chopper gun material. The next morning we glued the floor down (needed some 1/4" ply shims to get it level). The existing floor is very far from flat, so it needed some grinding and filler to get a good transition to the new section. My wife helped me tape it in and cover with one layer of biax. We tried adding some 2-part foam that my brother had left over from an old project but it didn't react right. Not sure what the shelf-life is on that stuff.

Material is 1/2" Meranti and MarinEpoxy.

As it sits it needs some clean-up grinding, filling, and painting. The boat already has splatter paint so I'm not too worried about finish.

Image

Image

Image

TRC886
Very Active Poster
Very Active Poster
Posts: 1103
Joined: Sun Oct 03, 2010 11:18 am
Location: eastern NC

Re: 18' Skiff Repairs

Post by TRC886 »

Matt Gent wrote:My brother-in-law had a free day so he came up and we attacked the rear floors first. In one day we had it gutted, cleaned, floor cut to fit & primed w/epoxy, and added a layer of 1708 to the outer hull. It was real thin, and almost all chopper gun material. The next morning we glued the floor down (needed some 1/4" ply shims to get it level). The existing floor is very far from flat, so it needed some grinding and filler to get a good transition to the new section. My wife helped me tape it in and cover with one layer of biax. We tried adding some 2-part foam that my brother had left over from an old project but it didn't react right. Not sure what the shelf-life is on that stuff.

Material is 1/2" Meranti and MarinEpoxy.

Y'all work FAST :!: :!: :D

It looks good :!:

Matt Gent
Very Active Poster
Very Active Poster
Posts: 602
Joined: Sat Jan 05, 2008 7:54 am
Location: Treasure Coast, FL

Re: 18' Skiff Repairs

Post by Matt Gent »

I've also gotten a start on the front deck, but I think my vacation will run out before I get to it in earnest.

Cut out the bulkhead and deck pieces. I used large plotter paper taped to the existing parts to transfer the shape.

Image

Image

Then I traced out the shape of the hatch and where the hinges will be. I cut a template for the router out of chip-board. It took a few trial and error cuts on scrap to get the fit right.

Image

Image

Next I'll make the template for routing out the hatch itself. The cut line runs right through the center of the hinges.

Matt Gent
Very Active Poster
Very Active Poster
Posts: 602
Joined: Sat Jan 05, 2008 7:54 am
Location: Treasure Coast, FL

Re: 18' Skiff Repairs

Post by Matt Gent »

TRC886 wrote: Y'all work FAST :!:
Well....sometimes

http://forums.bateau2.com/viewtopic.php?f=10&t=15515

Trying to clear out all the little projects so I can get back to my big restoration.

Matt Gent
Very Active Poster
Very Active Poster
Posts: 602
Joined: Sat Jan 05, 2008 7:54 am
Location: Treasure Coast, FL

Re: 18' Skiff Repairs

Post by Matt Gent »

Made a template for the hatch and cut it out with the router. I'm having fun playing with the router, should have bought one a long time ago. Also used it to counter-sink the bunk bolts on the trailer for the pontoon.

Image

Image

Matt Gent
Very Active Poster
Very Active Poster
Posts: 602
Joined: Sat Jan 05, 2008 7:54 am
Location: Treasure Coast, FL

Re: 18' Skiff Repairs

Post by Matt Gent »

Between trips, getting sick, and work the repairs have been sitting for a bit. I need to wait for a full clear weekend to commit before I rip out the fwd deck.

In the mean time the floors have been sitting. I have a tarp over it but I want to get it covered before I get any UV damage.

How much QuickFair do I need for the whole job? Its rougly 2 full sheets of area installed for both repairs. Mainly just want to fill the weave in the 12oz cloth, it will get splatter paint finish.

I'm open to suggestions on paint also. Again, work boat finish with white base and a grey splatter.

User avatar
Mad Dog
Very Active Poster
Very Active Poster
Posts: 1945
Joined: Sun Aug 05, 2007 1:49 pm
Location: San Antonio, Texas

Re: 18' Skiff Repairs

Post by Mad Dog »

Matt Gent wrote:How much QuickFair do I need for the whole job? Its rougly 2 full sheets of area installed for both repairs. Mainly just want to fill the weave in the 12oz cloth, it will get splatter paint finish.
The recommendation to me for filling weave was to use resin and micro balloon filler. Mix it to a consistency of honey and spread it with a broad blade scapper (I used dry wall tools). Scrape the slurry off the top of the weave and let it fill in. Worked great, went on quickly, takes very little materials, and is more structurally sound than Quick Fair.

MD :wink:
Ergo piscor, ergo sum

Matt Gent
Very Active Poster
Very Active Poster
Posts: 602
Joined: Sat Jan 05, 2008 7:54 am
Location: Treasure Coast, FL

Re: 18' Skiff Repairs

Post by Matt Gent »

Its amazing how fast time goes by. We've been using the boat with the floor finished structurally but in primer. I also built some little foot blocks for the seat to space it up 2" so we could fit a standard 70qt cooler underneath it.

I've made a few rookie mistakes but I'm nearly ready to rip out the casting deck and replace it. I've been working on getting the new deck ready so it can go in over one weekend.

I bought a 1/2" core box router bit which worked great to make a gutter for the hatch surround, but I think it is smoked after just one piece. By the end of the cut, done in about 10 segments, the sawdust was catching fire. I couldn't do it in multiple passes of depth since there wouldn't be anything for the bearing to ride against.

If I had to do this again I would make a mold for the gutter. This is way too much manual labor, multiple steps in sequence that really add up.

Image

Image

Image

User avatar
Phantom_22
Frequent Poster
Frequent Poster
Posts: 121
Joined: Thu Jan 23, 2003 1:00 am
Location: San Antonio, TX

Re: 18' Skiff Repairs

Post by Phantom_22 »

Any updates?

I am planning to add a deck and hatches to an older boat as well. Your pics help me with gutter ideas.

Thanks!
Shawn

Post Reply

Who is online

Users browsing this forum: No registered users and 20 guests