

Update: Its cold. Winter... Still burning off the Xmas turkey... Cant seem to get the backside outside and into the garage as often!
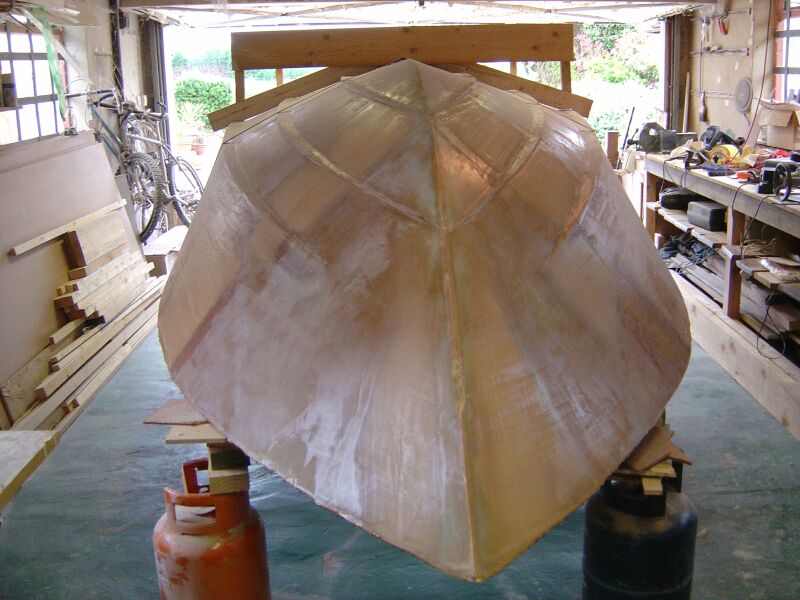
Nevertheless, managed to get the sprayrails and some strakes sorted.
<img src ="albums/userpics/11578/View1.jpg">
<img src ="albums/userpics/11578/View2.jpg">
<img src ="albums/userpics/11578/View3.jpg">
Is it me, or are sprayrails a REAL pain in the backside? It took me FOREVER to get them just right, no waver or dip, and perfectly faired. I ended up with profiled Durian glued onto chine, and because this had a tendancy to want to work its way up the boat, the profile looked wrong. Fixed this by cutting a massive ply overlay, and glueing that on.
Mangusta Progress

Nice job on those strakes. Yes, those small things are time consuming but the result is worth it.
Jacques Mertens - Designer
http://boatbuildercentral.com
http://boatbuildercentral.com


DrBones, I still need to bond the top deck, and side panels. When all the stitching is complete, and all the overlapping tape bonding topdeck is in place, the side panels will inevitably need refairing in parts, to take into account the extra tape thickness.
I suspected the turning would do a bit of damage, and I was correct. We had a few scratches etc on the bottom. I just feel more comfortable getting the boat all rigid, and semi complete, turn, finish the bottom, turn, and that is that. Finished! Or, lift the boat, and complete the underside upside down. Jurys out on that...
Recon I will need 6 guys to help me next time! Anyone volunteer?!
Next steps:
1 - Fillets 'n' tape -Yeehaa
2 - Glass internally - LOTS
3 - Fix and tape bulkheads/stations.
4 - Fix on top fore deck, aft deck, wind shield, and side panels.
5 - Complete bottom/Side fairing (turning or lifting I guess)
6 - Fit out internally
7 - Paint insides
8 - Get Outboard/Trailer. Hmm, gotta get this one past the wife Methinks project may extend to next year...
I suspected the turning would do a bit of damage, and I was correct. We had a few scratches etc on the bottom. I just feel more comfortable getting the boat all rigid, and semi complete, turn, finish the bottom, turn, and that is that. Finished! Or, lift the boat, and complete the underside upside down. Jurys out on that...
Recon I will need 6 guys to help me next time! Anyone volunteer?!
Next steps:
1 - Fillets 'n' tape -Yeehaa
2 - Glass internally - LOTS
3 - Fix and tape bulkheads/stations.
4 - Fix on top fore deck, aft deck, wind shield, and side panels.
5 - Complete bottom/Side fairing (turning or lifting I guess)
6 - Fit out internally
7 - Paint insides
8 - Get Outboard/Trailer. Hmm, gotta get this one past the wife
Will put URLS now instead, I dialled up from home, and my page took minutes to load!
The interior is now completely Fibreglassed. For some reason, this took WAY more epoxy than the exterior. I guess as it wasnt easy to scrape excess off, this was inevitable. The bow section is now like steel. Its so thick with FG nothing'll get through that!
http://gallery.bateau2.com/albums/userp ... 0bands.jpg
http://gallery.bateau2.com/albums/userp ... 20view.jpg
Station Test Fit before filleting and taping
http://gallery.bateau2.com/albums/userp ... 20view.jpg
Front View of strakes
http://gallery.bateau2.com/albums/userp ... trakes.jpg
Update:
Progress slowing now, but can see the light at the end of the tunnel.
I have completed all stringer and bulkhead fibreglassing. I have only one comment to make on filleting, it gets easier with practice! Actually, the PERFECT tool for filleting is a kitchen bowl scraper. These work incredibly well, and you end up with PERFECT fillets.
View from back of stringers and bulkheads
http://gallery.bateau2.com/albums/userp ... kheads.jpg
View of Front bulkheads
http://gallery.bateau2.com/albums/userp ... kheads.jpg
Got to bond the sole mounting cleats shortly, place my control routing pipes, and foam
Who is online
Users browsing this forum: No registered users and 21 guests