Page 1 of 1
Another 18 Privateer rebuild
Posted: Tue Jul 16, 2013 5:51 pm
by greymare89
In a recent post on this forum I saw a gentleman who rebuilt an 18 Privateer Retriever which included the stringers, transom, deck and misc. holes. I'm looking to do the same thing on the exact same boat with the exception to the complicated stinger layout, anchor locker and chase piping. Currently I'm about 75% done with taking apart the existing rotten wood and fiberglass and I will be looking to set the boat up with a tiller motor with an open hull (basically as simple as I can make it). Is there by any chance an old supply write up, invoice or something along those lines containing the amount of material the guy used to rebuild his Privateer? I'm taking the advice of members of this forum who posted on his thread and am looking to use the 12 oz tape for tabbing, 1708 to cover the transom/deck, wood flour and silica for the fillets and the marine epoxy resin the only question is how much of each to order. I can posts some pics for anyone who is interested although I'm not gonna lie, THE BOAT IS ROUGH!!!! This is my first rebuild so any help I can get with he much appreciated. Thanks
Re: Another 18 Privateer rebuild
Posted: Tue Jul 16, 2013 8:31 pm
by FitzFisher
POST SOME PIX! wE LOVE PICTURES~!
Re: Another 18 Privateer rebuild
Posted: Tue Jul 16, 2013 9:38 pm
by NOTHING ELSE MATTERS
Post some pictures and welcome aboard.
6 gallon kit epoxy, 2-50 yard rolls of 12 oz tape, 10 yards of 1708, 2-bags of wood flour, 3 bags of silica and some tools of course.
Where in the Island?
Re: Another 18 Privateer rebuild
Posted: Tue Jul 16, 2013 9:40 pm
by greymare89
Trying to post pics but can't seem to figure out how to do it. Is there a tutorial page for it or can someone give me direction? I know in the past on other sites I've had the option of entering an image into the post or copy and pasting it from my desk top but here I'm not able to. As soon as I can figure it out I'll post the pics up
**** BTW after looking at the pics I have I realized I have more work ahead of me then I originally thought... In my first post I said I was about 75% done with tearing the boat down but I think I was just being overly optimistic lol.
Re: Another 18 Privateer rebuild
Posted: Tue Jul 16, 2013 9:50 pm
by greymare89
Post some pictures and welcome aboard.
6 gallon kit epoxy, 2-50 yard rolls of 12 oz tape, 10 yards of 1708, 2-bags of wood flour, 3 bags of silica and some tools of course.
Where in the Island?
Thanks for the reply. I'm out in East Hampton. It's taken me a while to find the boat for a good price, out here Privateers are hard to come by since they are all pretty much owned by the comm. fisherman who don't want to part with them. I actually bought an '88 Retriever hull from a friend of my then located the boat I'm tearing apart about 2 weeks later for $250 which I though was a steal. Eventually I'm going to put the '88 hull up for sale since I don't need two if anyone is interested.....
Anyway back to the list of materials... Do you think 6 gal of epoxy is enough? I planned on ordering 12 gallons and about 15-20 yards of the 1708 (enough to do 2 layers on the transom and deck) Just don't want to run out and have to order more and waste money on shipping
Re: Another 18 Privateer rebuild
Posted: Wed Jul 17, 2013 9:30 am
by tech_support
greymare89 wrote:
Anyway back to the list of materials... Do you think 6 gal of epoxy is enough? I planned on ordering 12 gallons and about 15-20 yards of the 1708 (enough to do 2 layers on the transom and deck) Just don't want to run out and have to order more and waste money on shipping
6 gallons might be enough if there is very little waste and you don't have a lot of putty/gap filling to do. I would say start with the 6 and see what you need if/when you run out of it. The 1708 you should get all at once, or it will increase shipping cost (cost about the same to send a 10 yard roll as a 15 yard roll). You will need at least on roll of the 12 oz,. biax tape. For fillers, 5 lbs of wood flour and a bag or two of silica.
Re: Another 18 Privateer rebuild
Posted: Wed Jul 17, 2013 8:48 pm
by greymare89
Not very attentive I guess, just found the directions to uploading pics under the thread READ FIRST!!!!! Woops, anyway pics to follow
Re: Another 18 Privateer rebuild
Posted: Wed Jul 17, 2013 9:36 pm
by greymare89
Re: Another 18 Privateer rebuild
Posted: Thu Jul 18, 2013 1:51 am
by NOTHING ELSE MATTERS
How big is the one you want to sell? Can you post some pictures?
Re: Another 18 Privateer rebuild
Posted: Thu Jul 18, 2013 6:19 pm
by greymare89
Code: Select all
How big is the one you want to sell? Can you post some pictures?
The boat I will have for sale is the same exact boat as the one I am rebuilding, '18 Privateer Retriever. Its a 1988 hull and in better shape the my project boat, if you click on the link about it will bring you to the site with my pictures. The first 5 pics are of the boat for sale (it has no reg #'s and it is still fully intact)
Re: Another 18 Privateer rebuild
Posted: Thu Jul 18, 2013 11:20 pm
by NOTHING ELSE MATTERS
I am interested on the other boat. How can i get in touch with you?
Re: Another 18 Privateer rebuild
Posted: Fri Jul 19, 2013 7:44 am
by greymare89
This entire week/weekend I have a weird schedule at work so I probably won't answer the phone... The best way might be to email me (
greymare89@aol.com) and I will give you all the details, location, etc
Re: Another 18 Privateer rebuild
Posted: Fri Jul 19, 2013 10:51 am
by greymare89
Sorry guys still trying to iron out these pictures, for some reason I can cut and paste or add individual pics into my message so logging onto the shutterfly acct. for now is going to have to do.
I have about a 10 day vacation coming up in a week and a half so I'm looking to make a material purchase within the next few days so I have it available. I've been reading all the threads I can from people who have done what I'm looking to do but there are a few things I need clarification on
- I understand you are suppose to use the 12 0z 45/45 for tabbing but the roll only comes 6" wide, How do you overlay the tabbing if the two layers are the same width? I was under the impressing the first layer would be 6" then the second would be about 10".... Do I just offset the two layers of tape if there are both the same width at 6"?
- Is it more beneficial to buy the pre-made "fillets" in the caulking tubes or will that just be more money and a lot $ as opposed to mixing the epoxy glue myself with wood flour and silica?
-When the stringers are in place and encased in fiberglass do I screw the deck to them or just glue with marine adhesive? I was planning on gluing in with 3M's 5200 adhesive.
- Is there a benefit to using slow hardener vs the medium? This is my first glass project so I figured I was be cautious and go with the slow to afford myself plenty of time
- I have multiple holes in the transom from the previous owner(s) of the boat as you can see in the pics. When it comes time to lay the new transom in do I just lay the wood over the inside skin, epoxy glue in and then go back and epoxy the holes? The epoxy glue that comes in the caulking tubes, is that the same stuff I will use for fillets, gluing the transom sole to the outer skin and filling in pre-existing holes?
SORRY FOR THE QUESTIONS, I had being the clueless new Guy!!!
Re: Another 18 Privateer rebuild
Posted: Fri Jul 19, 2013 12:27 pm
by tech_support
Do I just offset the two layers of tape if there are both the same width at 6"?
yes, you offset the two layers
- Is it more beneficial to buy the pre-made "fillets" in the caulking tubes or will that just be more money and a lot $ as opposed to mixing the epoxy glue myself with wood flour and silica?
you fill the caulk tubes with fillets putty, the fillet putty can either be somethign you mix yourself or use the pre-made putty
-When the stringers are in place and encased in fiberglass do I screw the deck to them or just glue with marine adhesive? I was planning on gluing in with 3M's 5200 adhesive.
You epoxy glue/putty to bed down the sole/deck to the supports. no screws
- Is there a benefit to using slow hardener vs the medium? This is my first glass project so I figured I was be cautious and go with the slow to afford myself plenty of time
You cant really go wrong with SLOW

- I have multiple holes in the transom from the previous owner(s) of the boat as you can see in the pics. When it comes time to lay the new transom in do I just lay the wood over the inside skin, epoxy glue in and then go back and epoxy the holes?
Yes
The epoxy glue that comes in the caulking tubes, is that the same stuff I will use for fillets, gluing the transom sole to the outer skin and filling in pre-existing holes?
No, you will use the epoxy to wet out glass to patch the holes (if they are big). Smaller holes you just fill in with an epoxy putty - same mix as for fillets
Re: Another 18 Privateer rebuild
Posted: Fri Jul 19, 2013 8:17 pm
by greymare89
Shine
I see you get these questions all the time so thank you for taking the time to answer them, I really appreciate it.
Re: Another 18 Privateer rebuild
Posted: Mon Jul 22, 2013 12:01 pm
by greymare89
OK Guys I'm about to order the materials, I have the plywood coming this week. Just had a question about the two part foam. When all the stringers are in and everything is buttoned up is when the foam is applied... Is the foam necessary and how much will I need? I was thinking of ordering (2) of the two gallon kits but I have no idea how far this stuff will go.
Also what is the difference of thickened epoxy and epoxy glue/fillets?
Re: Another 18 Privateer rebuild
Posted: Mon Jul 22, 2013 9:57 pm
by NOTHING ELSE MATTERS
Where did you get your plywood? If marine meranti i hope from Roberts plywood.
As far as the foam, the more the better. I have in mine 5280 lbs worth of buoyancy, i feel safer that way.
I applied my foam right before i installed the floor, any excess that went above the stringers i saw it down and used it at the bottom of the next compartment. The warmer the weather the bigger it will grow and the more buoyancy you'll get. When you pour make sure you have gloves on and clothes that planning on throwing away. I under estimate mine by 5- 2 gallon kits. I had bought six kits and wasn't enough then i bought another 6 kits and i ended with 1 kit left. I used total of 11 2-gallon kits. Have you check out my restoration yet? There is a lot of info in that thread.
http://forums.bateau2.com/viewtopic.php?f=10&t=24201
Any questions you have you can call me and talk.
Re: Another 18 Privateer rebuild
Posted: Tue Jul 23, 2013 12:27 am
by greymare89
George
Thanks for the link to your build, I'll def. have to read it over a few times to take it all in, you were right there is alot of info on there that pertains to my questions. As far as the plywood I stopped in at our local lumber yard (Riverhead Building supply) and confirmed they stock marine plywood, they have okume, and marine grade fir. Since the boat is going to be used mainly in the bay and not as a primary fishing boat I will be trying to keep the costs down as much as possible so I'm going with the fir. Don't get me wrong I want the boat to be solid and last for years to come but it I have to be real, its going to be a glorified work boat and just isn't that valuable.... I guess I'm just going to place the following order and see how far it gets me
2- rolls of 8oz 6'x50 yard tape
15 yards of 1708
9 gallons of resin/hardener
5lbs wood flour
8 oz silica
2 foam kits
misc other odds and ends..... Any thoughts, I don't mean to be a pain with the questions.
Re: Another 18 Privateer rebuild
Posted: Fri Aug 09, 2013 10:50 am
by greymare89
Making some headway after gluing in the transom the other day now i just need to figure out how to get my pictures off of photobucket and onto this thread so you guys can better help me along. Again this is my first ever fiberglass project and need ALOT of guidance. Anyway just a few questions/concerns:
I noticed after the epoxy glue set up that there are a few spots with a bit of a gap between the skin and the wood transom, like around the old scupper holes.... If I can see a gap there, maybe less than a 1/8 of an inch, who knows how many gaps are under the new wood transom that i can't see! everything seems to be rock solid just don't know if I have royally screwed up.
After the 6" tabbing set up on the bottom and sides of the transom I noticed the resin pooled up and hardened on top of the 12oz tape causing it to look like "ice" in a few areas. I have read too much resin is no good, should I grind away or is it something I can leave.
Lastly I left the top of the transom without the 12oz tape for tabbing, just used some of the thickened epoxy to that squeezed out to kind of mold it to the outside skin. I have read the transom tutorial on the homepage multiple times and can't see how the glass is layered over and tied into the outside skin. When I use the 1708 to glass over the entire transom and overlap the 2 layers by 4" and 8" do I do the same on the top or just the sides and bottom? If i overlay over the top and down the outside skin I will cover up the HID # and most likely cause a large noticeable "seam" from the layers of glass.
Again I will work on getting the pictures on the thread so you guys can better see what I'm talking about, in the meantime any advice is GREATLY appreciated!!
Re: Another 18 Privateer rebuild
Posted: Fri Aug 09, 2013 1:02 pm
by tech_support
I noticed after the epoxy glue set up that there are a few spots with a bit of a gap between the skin and the wood transom, like around the old scupper holes.... If I can see a gap there, maybe less than a 1/8 of an inch, who knows how many gaps are under the new wood transom that i can't see! everything seems to be rock solid just don't know if I have royally screwed up
might not be anything abnormal, need to see a picture.
After the 6" tabbing set up on the bottom and sides of the transom I noticed the resin pooled up and hardened on top of the 12oz tape causing it to look like "ice" in a few areas. I have read too much resin is no good, should I grind away or is it something I can leave
no problem with epoxy, but with poly it would be a place where cracks could start, then propagate to the laminate. Epoxy will not crack until it is stretch A LOT. It is true that its not a strong as id you used the perfect amount, but its not a big deal.
When wetting out the tape, paint it on and move on, don't keep applying it until its wet out, you will end up using too much. Its takes a minute or two for the epoxy to saturate the tape
Lastly I left the top of the transom without the 12oz tape for tabbing, just used some of the thickened epoxy to that squeezed out to kind of mold it to the outside skin. I have read the transom tutorial on the homepage multiple times and can't see how the glass is layered over and tied into the outside skin. When I use the 1708 to glass over the entire transom and overlap the 2 layers by 4" and 8" do I do the same on the top or just the sides and bottom? If i overlay over the top and down the outside skin I will cover up the HID # and most likely cause a large noticeable "seam" from the layers of glass.
You dont have to do that, just cover it with a layer or two of cloth, then sand it flush, no need to overlap.
Re: Another 18 Privateer rebuild
Posted: Fri Aug 09, 2013 3:02 pm
by greymare89
Ok so I will trace out the transom on the 1708 roll using my original transom template and then just add 4" to the sides and bottom for the first layer then 8" to the sides and bottom on the second layer, the top on both layers will be cut out conforming exactly to the template. Then the layer(s) of the 12oz tape will "cap" off the transom instead of overlaying the 1708 mat up and over the top. Should the 1708 be glassed on first followed by the tape or tape first then apply the 1708? All of the regardless of the order will be applied in one shot wet on wet correct?
Sorry for the ignorance but I went through all 50 pages on the forum and couldn't find any pictures of the glass being applied to the top of the transom, I only found the finished product.
Re: Another 18 Privateer rebuild
Posted: Fri Aug 09, 2013 5:09 pm
by greymare89
Re: Another 18 Privateer rebuild
Posted: Sat Sep 07, 2013 9:05 pm
by greymare89


Hey guys its been a while since my last post but its been slow going due to time constraints. Anyway the transom is in but I have some concerns I want to bring attention to. In the first pic it shows my attempt to cap of the transom with two layers of the 12 oz tape. Needless to say it came out like complete crap so I sanded it all off and replaced it with two layers of 1708. Due to the multiple curves and contours near the motor well and top edge I found in a few spots the glass bubbled up and didn't adhere well. While sanding all the seams to get as close of a smooth finish as I could I sanded the raised up area caused by trying to bend the mat and by the time I was done I noticed I was down to either the thickened epoxy I used for a fillet or completely through the two layers of material I used to cap it all off.
My question is do I go back over the "thin spots" with patches of 1708 or 12oz tape or leave it be since I didn't make it down to the bare plywood? I feel like I'm playing with spackle, I put it on and and take it right back off..... If I don't sand it will show through the paint at the end and look like garbage. Here is a bit of a close up of one of the areas I'm talking about, the white area near the curve to the motor well. I didn't sand it down to the plywood but I def. went through the layers two layers of cap and down to the face layer(of the transom)

The entire transom was put in as recommended:
2 layers of 12 oz tape for tabbing
2 layers of 1708 over face of transom overlapping by 4 and 8 inches
2 layers of 1708 for the cap (first layer 5 inches wide second layer 8 inches wide)
Should I go with more layers over the face and, more layers on the cap or do I leave it? Thanks
Re: Another 18 Privateer rebuild
Posted: Sun Sep 08, 2013 10:52 am
by TRC886
I had the same trouble in the same places. After several attempts, I decided that it was "good enough".
OTOH: My project was simple enough that I'd have been time and money ahead by buying cheap ply, gluing it together with Elmer's glue, and painting it...then repeating every few years
 http://forums.bateau2.com/viewtopic.php ... 8&start=10
When I get to this point on my SilverLine, I don't know if it'll be "good enough" or not. I hope that some of the more experienced guys will chime in with what/how they did it.
Re: Another 18 Privateer rebuild
Posted: Sun Sep 08, 2013 6:16 pm
by greymare89
A few more close up pics of the areas of concern I'm talking about. Its a lot easier to show it than to describe it.....


**** Also wanted to point out that the smooth woven side of the 1708 is the area that was sanded and the chopped strand mat side is facing inward. Is there a particular side of the 1708 that either facing in or out to make it easier to get that finished look? ****
Re: Another 18 Privateer rebuild
Posted: Sun Sep 08, 2013 6:45 pm
by NOTHING ELSE MATTERS
Yes, mat side goes inwards, to finish the front of the 1708 you can use CSM or 6oz finished cloth.
Re: Another 18 Privateer rebuild
Posted: Mon Sep 09, 2013 10:36 am
by tech_support
probably not going tobe an isssue at all.
It the glass going up the sides and the transom that are transferring loads to the hull (that plus the stringers) . the glass over lapping the top is not doing much
Re: Another 18 Privateer rebuild
Posted: Fri Sep 13, 2013 10:30 pm
by greymare89
Stringers are almost all done and ready to be put in( though the pictures only show two). just a few questions:
-Do I completely seal off the spaces between each stringer or do I leave a small cut out at the back where the stringers will be tabbed to the transom to allow water to drain into the bilge? One of the pictures show a center bulkhead with an oval cut out near the keel to allow water through, should I seal this off?
- Before I set the stringers in I was thinking about "tack welding" them in thickened epoxy every 24 inches or so, letting it set up and then going back and filleting and tabbing the entire stringer at once. OR I was going to set the entire stringer grid in place by tacking it together with temporary 2x4's and screws to keep the spacing, lifting the entire grid in one shot up off the skin of the boat and lay a bed of thickened epoxy under each stringer before lowering it back into place. OR option thee laying each stringer one at a time which will be extremely time consuming..... thoughts?


Re: Another 18 Privateer rebuild
Posted: Fri Sep 13, 2013 10:37 pm
by greymare89
Oh and one more question I forgot to ask
I was thinking about purchasing a 10 yard roll of CSM to finish off the visible seams from the 1708 on the transom and up the sides of the boat once I lay the deck in. Can I use the epoxy resin I've been using all along or is the CSM not compatible with it? I've read polyester is the preferred resin to work with CSM since it dissolves the binders and makes it pliable. Will the epoxy and CSM be a waste of time and money to create a seamless look or should I sand everything down like I've been doing then cover with paint?
Re: Another 18 Privateer rebuild
Posted: Sat Sep 14, 2013 10:16 am
by Cracker Larry
Before I set the stringers in I was thinking about "tack welding" them in thickened epoxy every 24 inches or so, letting it set up and then going back and filleting and tabbing the entire stringer at once. OR I was going to set the entire stringer grid in place by tacking it together with temporary 2x4's and screws to keep the spacing, lifting the entire grid in one shot up off the skin of the boat and lay a bed of thickened epoxy under each stringer before lowering it back into place.
I would use a combination of option 1 and 2. I set both stringers in place with a few 2X4 spacers to maintain the alignment and keep everything square. Prop it up off the hull about 1/8" or so with some shims, then tack glue it in place every couple of feet. Once the glue dries remove the shims and spacers, then fillet and tape.
Re: Another 18 Privateer rebuild
Posted: Sat Sep 14, 2013 9:12 pm
by greymare89


The stringers are cut and dry fit, just have to take the plunge and start bedding them in thickened epoxy.....
Re: Another 18 Privateer rebuild
Posted: Sun Sep 15, 2013 12:47 pm
by pee wee
Very neat looking work, but a question- it looks like you have got the stringers made with full thickness material and laid out with butt joints, and those joints line up across the hull- am I seeing that right? I'm used to seeing stringers laminated from thinner plywood stock using offset seams to create a stronger, full length piece. The way it looks in the photo you would have an area with less strength that could spell trouble. I haven't been following your thread, maybe this is a special circumstance, but I had to ask.
Re: Another 18 Privateer rebuild
Posted: Sun Sep 15, 2013 8:38 pm
by greymare89
Pee wee, you are right about the seams. They are all in the same place and until you brought that to my attention I hadn't even noticed. I had made a mental note to offset the seams but I must have completely forgotten about it one I got underway . Is this a major problem? If so its a major set back and an expensive one at that!!!! I would have to by another piece if $80 marine plywood and re-cut the stringers... Also I should note the blocks holding the stringers together in the photos are only temporary , when it comes time to glass them in I plan on cutting butt blocks to match the width of the stringers with the edges cut on angles to help with laying the glass in...
Re: Another 18 Privateer rebuild
Posted: Sun Sep 15, 2013 10:39 pm
by NOTHING ELSE MATTERS
You don't have to worry, all you ave to do is use a 4 foot piece of plywood the full height of the stringer and glue it to the join, this way you going to have a two foot support on each side of the join. If you do it on both sides of the stringer is even better.
Re: Another 18 Privateer rebuild
Posted: Mon Sep 16, 2013 9:30 am
by tech_support
You don't have to worry, all you ave to do is use a 4 foot piece of plywood the full height of the stringer and glue it to the join, this way you going to have a two foot support on each side of the join. If you do it on both sides of the stringer is even better.
A big butt block, that will work. But you need to do something


Re: Another 18 Privateer rebuild
Posted: Mon Sep 16, 2013 7:26 pm
by greymare89
Thanks for the replies. I'm set to cut the butt block probably later this week, just one more question about bedding the stringers. The grid is laid in nice in sturdy and it would make life so easy to apply the fillet as they sit in the pictures rather than picking them up, laying the thickened epoxy under the stringer, and lowering them back down. Is it a waste of time to try and push the thickened epoxy under the stringers as they sit now or should I try to lift each one individually up and lay the fillet under so its "bedded in"???
Also I cut the scuppers holes into the transom and the fiberglass seems awfully thin (2 layers of 1708). Before I go ahead and tab the stringers in should I lay 2 more layers of 1708 or is what I have now enough? I'll be hanging a Honda 50 4 stroke on the back.
Also my in my previous post I asked about using CSM to cover my seams from the 1708, will this be compatible with my epoxy resin? I want to crate a seamless look on the gunwales once I tab the floor in as well as cap the transom off with a few layers to compensate for the areas I sanded too thin.
Re: Another 18 Privateer rebuild
Posted: Mon Sep 16, 2013 8:45 pm
by Cracker Larry
Is it a waste of time to try and push the thickened epoxy under the stringers as they sit now or
No. That's exactly how I do it. In the picture I showed you earlier, this one, I'll post it again, I have the stringers spaced 1/8 higher than the hull bottom...
With the spacers in place I tack glue it with spots of glue every couple of feet. When it cures, remove the spacers and build the fillets. I work one side at a time using my fillet tool and force the epoxy under the stringers/frames/ whatever/ it's all the same, use your fillet tool of choice to force the glue underneath until it comes out the other side. Then work the other side the same way.
Re: Another 18 Privateer rebuild
Posted: Mon Sep 16, 2013 8:54 pm
by Cracker Larry
It's best to work it wet on wet. I do one side of one stringer at a time. After it's tack glued and cured in place I brush on some neat epoxy, then lay the fillet, forcing it tight into the joint. Then I let that sit for a half hour or so to firm up a little bit, then brush it again with neat epoxy to smooth it out, and immediately lay on the tape and wet it out. Then move to the other side. No sanding required. Tack it all in first, then work in small sections that you can fillet and tape in one session.
Re: Another 18 Privateer rebuild
Posted: Mon Sep 16, 2013 9:20 pm
by FitzFisher
I did a little trick using packing tape on the opposite side so you can put the putty in without it just going all over the place. If you lay the tape right it can form a nice radius on that side. Once it sets you can pull it right off. That way it doesn't sag out while you are moving down the line.
Re: Another 18 Privateer rebuild
Posted: Tue Sep 17, 2013 9:25 am
by tech_support
Also I cut the scuppers holes into the transom and the fiberglass seems awfully thin (2 layers of 1708). Before I go ahead and tab the stringers in should I lay 2 more layers of 1708 or is what I have now enough? I'll be hanging a Honda 50 4 stroke on the back.
You should replace with the same thickness that was there before.
Thanks for the replies. I'm set to cut the butt block probably later this week, just one more question about bedding the stringers. The grid is laid in nice in sturdy and it would make life so easy to apply the fillet as they sit in the pictures rather than picking them up, laying the thickened epoxy under the stringer, and lowering them back down. Is it a waste of time to try and push the thickened epoxy under the stringers as they sit now or should I try to lift each one individually up and lay the fillet under so its "bedded in"???
The glass is what you want transferring loads from the bottom up to the stringers. If you dont squeeze the epoxy under it, then the next best thing (text book actually) is to keep a tiny space under the stringers - the stringers do not actually touch the bottom. That is ideal and probably never happens even in the better production boats. Glassing the stringer sto the bottom while they sit on the bottom is not recommended
Also my in my previous post I asked about using CSM to cover my seams from the 1708, will this be compatible with my epoxy resin? I want to crate a seamless look on the gunwales once I tab the floor in as well as cap the transom off with a few layers to compensate for the areas I sanded too thin.
Yes, but depending on what brand of CSM you get it might turn into a big milky glob. CSM that are designed for epoxy (more stitching less binder) will wet out just fine, CSM with a lot of binder (powdery glue) will make a mess with epoxy. For filling in a depression though it really does not matter
Re: Another 18 Privateer rebuild
Posted: Mon Sep 23, 2013 1:59 pm
by greymare89
Stringers have been tacked in and allowed to cure for about 4 days now. Tomorrow I plan on filleting and taping them in (pics to follow). Before I begin taping in with the 12oz tape, should I dry fit the 1708 and set that in at the same time or apply it in a different session?
When applying the 1708 is it correct to apply it to each side of the stringer separately then tab onto the floor leaving the top exposed? I can just foresee issues with trying to go up and over the top and down the other side so I was planning on capping the top of the stringer with 12 oz and plastic wrap to force the air out once the 1708 was set up and dry....
Also do the areas of thickened epoxy that are currently "tacking" the stringers in place have to be sanded or can the fillet and 12oz be applied right over it as is?
Re: Another 18 Privateer rebuild
Posted: Tue Sep 24, 2013 10:11 am
by tech_support
I can just foresee issues with trying to go up and over the top and down the other side so I was planning on capping the top of the stringer with 12 oz and plastic wrap to force the air out once the 1708 was set up and dry....
If the stringers are wide enough, you can wrap the 1708, but judging by the pictures earlier int he post that does not seem to be the case. So you will probably need to apply 1708 to each side then cap it later
Also do the areas of thickened epoxy that are currently "tacking" the stringers in place have to be sanded or can the fillet and 12oz be applied right over it as is?
I like to make the "tacks" or "spot welds" a slightly smaller radius than what my fillet will be, then you can just run your fillet tool and putty right over top - no sanding
Re: Another 18 Privateer rebuild
Posted: Tue Sep 24, 2013 4:22 pm
by greymare89
Shine, thank you for your response. Never got around to the stringers since something came up so tomorrow looks like the day . One question before I go for it. *****hopefully you see question/post before I start in the morning and potentially screw something up lol****
Can I fillet/tape the stringers in place without the butt blocks in place then epoxy glue the butt blocks over top or should the butt blocks be set first before and tabbing with the 12 oz tape? The reason I ask is because I have the whole day tomorrow and would like to get as much done as possible. If I have to set the butt blocks in first then wait for them to set up before laying in the tape I will most likely waste half the day. If the butt blocks can be set after the fact then tabbed in separately with the 12 oz it would be a home run for me !!! As always I appreciate any input and am sorry if I'm a nuisance, just want to make sure it's done correctly and I'm not wasting my time.
Re: Another 18 Privateer rebuild
Posted: Tue Sep 24, 2013 4:26 pm
by tech_support
no, you need butt blocks before glass. Glue them up with beveled edges, if you use medium or fast hardener you can get the butt blocks tacked up before tabbing
Re: Another 18 Privateer rebuild
Posted: Tue Sep 24, 2013 5:41 pm
by greymare89
Thank you! I would have taped first then done the butt blocks....
Re: Another 18 Privateer rebuild
Posted: Fri Sep 27, 2013 4:18 pm
by greymare89
Re: Another 18 Privateer rebuild
Posted: Sat Sep 28, 2013 8:25 pm
by FitzFisher
Those stringers are going to be tough to cover with the different thicknesses (3 wide and 1 wide). YOu could have done a double thickness all the way down with staggered joints and had a uniform piece to work with. I know you are fired up about your project, but it might pay off to take a little more time to plan it out and get some input. I'm not saying this won't work, but you created a lot of work for yourself. Can you take some more close up photos of the problem areas and let us see what you have done a little better. It's tough to tell from that distance, but a lot of white is not good.
hang in there, you'll get it figured out.
Re: Another 18 Privateer rebuild
Posted: Sat Sep 28, 2013 9:15 pm
by greymare89
Fitz
I thought about making the staggered joints and double the thickness but I'm trying to cut as much weight out of the boat as I can. Its only going to be powered by a 50hp. I went with the 4 foot butt blocks to cover my joints after it was mentioned by members of this site. Also as far as thinking ahead and planning, I'm trying to think out the build as best as I can but this is the first time I have ever done anything like this and rely solely on advice given by members of this forum. I really appreciate the input you all give and I'm very grateful for the guidance given. I tried to crop the pictures to give more of a close up but I can't get it to work. Like I said before this boat is going to be a beat around bay boat not my primary ride, so having said that I'm definitely not going to grind out what I've done and start over, haha. I'm just going to take it ALOT slower for the next stringers and make sure all the glass is worked in well. I should also mention the white areas are a lot more noticeable where the 1708 is over top of the 12 oz tape and both are very solid when I push and pry on them if that makes any difference.
Also I wanted to ask for advice on the center stringer in the keel. There is quite a large void between where the keel tapers out and the face of the stringer which would lead to a lot of thickened epoxy to fill in. Is there another way to fill the void and glass over top? I thought about ripping down a piece of PVC, filleting it in then covering with the 12oz and 1708. Thoughts?
Re: Another 18 Privateer rebuild
Posted: Tue Oct 01, 2013 9:00 pm
by greymare89
Went ahead and filled the void in the keel with a fillet instead of using PVC like I had considered, it came out a lot nicer since I took my time only working one side of the stringer at a time....
I've run out of materials though, the fillets have taken a lot of it. I have two and a half stringers left, (half of the center that I did today and the two others) they are about 12 feet long by 8 inches high. I was going to order 5 lbs of wood flour, 1 oz bag of silica and another 3 gallon kit of epoxy.I have to also keep in mind that I have to glass the deck..... My original purchase was 9 gallons of epoxy ( a six and a three gallon kit) 5 lbs of wood flour and 8 oz of silica and I've done the transom so far and a good portion of the stringers
The wood flour and silica is cheap enough so I'm not worried about waste if I buy too much.. Will 3 more gallons be enough to do the rest of the project? I have two gallons of epoxy and 1 gallon of hardener left over from my original purchase as I sits right now.
I've read on several posts that people have used 10 oz / 50" fabric to glass the deck, is this correct? My original plan was to use 1708 but I've found it eats the epoxy up like crazy and will probably be over kill for a deck... How many layers of glass will suffice for the deck, 1 or 2?
The shipping isn't cheap to get everything here to the northeast so I want to try and place one more order and be done. Any suggestions? If I haven't provided enough info please let me know and I'll try to be a little more detailed, Just want to make the most educated guess that I possibly can for this next order.
Re: Another 18 Privateer rebuild
Posted: Tue Oct 01, 2013 10:19 pm
by NOTHING ELSE MATTERS
For the deck, when i was doing mine, every one recommended one layer of 10oz cloth, i doubled it and i am happier now.
Re: Another 18 Privateer rebuild
Posted: Wed Oct 02, 2013 8:08 am
by greymare89
Nothing Else Matters
Thanks, I think I'm going to do the same. How many gallons of epoxy did you use to do the deck? Also if I recall correct you used 1708 for your transom, how many layers did you use for that? I have two on there now and it seems a but thin to me. I was trying to figure out if I should add a layer or two just to be safe.
Re: Another 18 Privateer rebuild
Posted: Wed Oct 02, 2013 10:04 pm
by NOTHING ELSE MATTERS
Hoe many gallons? I really don't remember, but it was more than 15 for the whole boat.
For the transom i installed i think 3 or 4 layers, it is almost 1/4" thick.
Re: Another 18 Privateer rebuild
Posted: Mon Oct 07, 2013 4:39 pm
by greymare89

Here is the center stringer bedded in A LOT of epoxy with 2 layers of 12 oz and one layer of 1708 on each side. Once my shipment of supplies comes on Tuesday I'll move onto the last two stringers. I tried to take my time on this stringer only doing one side at a time and I think it came out good, any thoughts or concerns from anyone?
Also I'm a little concerned the 2 layers of 1708 on the transom will not be enough. I didn't have an original thickness of glass to compare to since the previous owner did a little modification of his own on top of the original rotting transom. I've tabbed the two outside stingers into the transom already, is it possible to complete my stringer work as planned then cover the transom with two additional layers of 1708? If so I would have to tab the additional transom layers over top of my stringer layers. Am I thinking into this too much or will the two layers I have already be sufficient enough for the 215 lb outboard I'm putting on the back?
Re: Another 18 Privateer rebuild
Posted: Mon Oct 07, 2013 4:48 pm
by greymare89

Little more of a close up. Also should mention the stringer is bedded in thickened epoxy not just epoxy like I mentioned in the original pic above.
Re: Another 18 Privateer rebuild
Posted: Wed Oct 16, 2013 7:16 pm
by greymare89
stringers are all glassed in finally!!! Took a little more epoxy than I expected because I had to make some extra large fillets in certain places to compensate for extra large gaps. Anyway I have a few questions for Shine or anyone one else interested in helping before I move on
- I tied into my pre-existing stringers near the bow with 4' long 1/2" plywood butt blocks on either side. The majority of the 4' butt block is adhered to the new stringer with only about 6" epoxy glued to the old stringer. This is def. a weak point I'm sure since all the joints are in a straight line..... I cut back to solid stringer, hence the reason for the joints all in a line. Is there any way to make this joint stronger with something like a bulkhead or cat joint?
- I know I have to buy more epoxy, I have about a gallon and a half left. Any guess on how much I would need to cover the deck with 2 layers of the 10 oz mat? The area is approx 14 ft long by 6 ft wide roughly
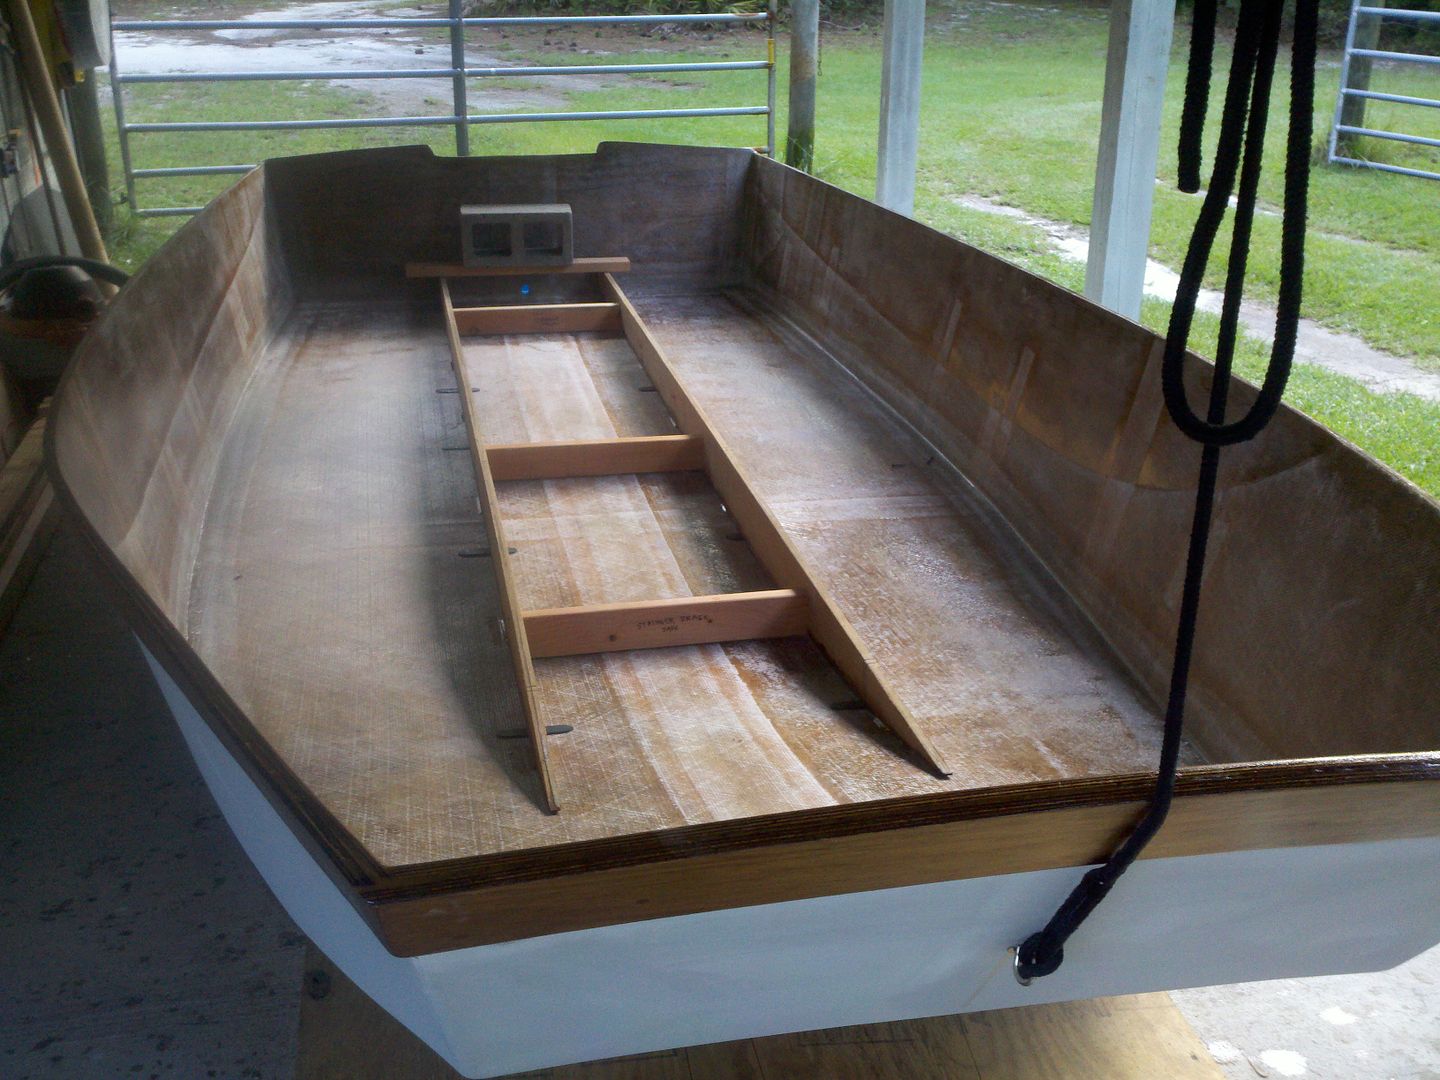
Re: Another 18 Privateer rebuild
Posted: Sun Nov 24, 2013 8:33 am
by greymare89
Some updates since I haven't posted in a while. Its getting cold here in the northeast so my days of glassing are really limited. The deck is finally in and now I'm just playing the waiting game for it to set up. I ordered two quarts of Kiwigrip Gray to cover the floor. Does anyone know if this will be enough? Also should I put primer down first before painting the floor and gunwales?
My plan is to finish the interior of the boat so I can duck hunt out of it for the remainder of the season then sand and finish the outside in the spring. I plan on painting the boat gray and have to paint the inside gunwales first before I tape off and apply the non skid. Does anyone know which Interlux Brightside gray matches closest to the Kiwigrip gray? When looking at Interlux's color chart there looks to be about 5 different choices and was hoping someone had first hand experience before I play the guessing game. Thanks

Two Kits of foam totaling 4 gallons under the floor. The two outer most stringers were left without it as I ran out. Hopefully this isn't a big deal.

Painted the bilge with two coats of Interlux bilgekote.I might try to put one more coat down by reaching through the inspection hatch I put in once the floor sets up.

The sole (1/2"marine ply) was coated with two heavy coats of epoxy then glued down with thickened epoxy.

Finally the floor was tabbed in with two layers of 12oz tape then covered with two layers of 10oz woven. Pretty happy with the way it turned out seeing how this is my first ever fiberglass project.


Re: Another 18 Privateer rebuild
Posted: Mon Nov 25, 2013 9:00 am
by tcason
I asked the same question about priming under KIWI Grip and was advised on this Forum to prime under it to avoid "bleed through".
I proceeded with this advice (to prime floor under KIWI) and would advise you to do the same.
Looks great what you have done!
Re: Another 18 Privateer rebuild
Posted: Mon Nov 25, 2013 9:30 am
by Cracker Larry
That does look great for first time work

Yes, I would prime under the Kiwi Grip for a more uniform color. 2 quarts will be plenty for that deck. Don't know about which Interlux paint to get, but the gray KG is a very light gray color.
Re: Another 18 Privateer rebuild
Posted: Fri Nov 29, 2013 10:01 pm
by greymare89
Thanks for the positive comments, I know it doesn't look like much compared to most of the projects on this forum but I have to say I have a new found respect for those who work with fiberglass. I will most likely try again on another project but for now this one has been enough (both on my wallet and patience)!!!
This might be a stupid question but here it goes....
The project has taken a lot longer than anticipated as a result of lack of spare time and weather conditions. Duck season is currently underway here in NY and I would really like to get out there and utilize the boat. Is it a bad idea to hunt the boat over bare fiberglass (including the exterior of the transom where I did a few repairs) or should I apply paint on all the exposed surfaces? I know it will look ridiculous using a boat half finished but the reality is by the time I find a free minute where the weather is cooperating to prep and apply the paint, duck season will be over! What do u think?
Re: Another 18 Privateer rebuild
Posted: Sat Nov 30, 2013 9:11 am
by gk108
Do duck hunters get points for style?

You're just as likely to hear someone say they need to do that to their boat.
Re: Another 18 Privateer rebuild
Posted: Sat Nov 30, 2013 9:20 am
by Cracker Larry
It won't hurt a thing, go duck hunting, you won't have to worry about messing up the paint
Re: Another 18 Privateer rebuild
Posted: Wed Jul 02, 2014 10:24 pm
by greymare89
Been a while since my last post since I've had real limited time to work on the boat and just wanted to to ask a few final questions before I apply the paint. Since my last post in November I've sanded everything down with 80 grit paper including the original gel coat and the seams of the new fiberglass I put down on the deck and transom. Since I put down 12 oz mat for the deck do I have to sand the entire surface to prep for paint or can I just use fiberglass prep solvent to dissolve the amine blush so the paint will adhere? I ask this because sanding will only effect the "high spots" on the fiberglass mat and not the "valleys" unless I sand it down completely smooth which will compromise the thickness.
Also a while ago I asked about the 1708 I used for the transom which I wrapped over the top. There were some air bubbles due to the tight radius which I have since ground away. After sanding I found I sanded completely through the fiberglass on the top in some places so it isn't one continuous piece of glass anymore, now it's essentially two separate pieces. The glass seems to be adhered well but I want to avoid it lifting over time after I paint over it. Am I over thinking this or should I cover the transome cap with another piece of fiberglass? Maybe a piece of 12 oz mat?
I'll try and get a picture so I can better explain what I'm talking about if this makes no sense.
Re: Another 18 Privateer rebuild
Posted: Thu Jul 03, 2014 9:30 am
by tech_support
Since I put down 12 oz mat for the deck do I have to sand the entire surface to prep for paint or can I just use fiberglass prep solvent to dissolve the amine blush so the paint will adhere? I ask this because sanding will only effect the "high spots" on the fiberglass mat and not the "valleys" unless I sand it down completely smooth which will compromise the thickness.
so your just going to paint over the weave? If so, what you describe will work. Sand the top, wipe down best you can.
Also a while ago I asked about the 1708 I used for the transom which I wrapped over the top. There were some air bubbles due to the tight radius which I have since ground away. After sanding I found I sanded completely through the fiberglass on the top in some places so it isn't one continuous piece of glass anymore, now it's essentially two separate pieces. The glass seems to be adhered well but I want to avoid it lifting over time after I paint over it. Am I over thinking this or should I cover the transom cap with another piece of fiberglass? Maybe a piece of 12 oz mat?
you need to fill the gap with epoxy putty.
If there were gaps along the sides or bottom, you would have to re-tab the two pieces together, but along the topside its more or less just for covering the wood
Re: Another 18 Privateer rebuild
Posted: Sun Jul 06, 2014 9:41 am
by Guest
Shine
Thanks for the reply, I realize it's kinda hard to get what I'm asking but I think you get the gist of it. Instead of sanding the 12oz mat to prep for primer/paint, will going over it with a wire wheel to rough it up work instead of sanding and potentially thinning the thickness of the glass on the deck? Also does anyone know what soap is best to use to wash the deck prior to painting and using the fiberglass prep. To remove the amine blush?
Re: Another 18 Privateer rebuild
Posted: Thu Jul 10, 2014 11:43 pm
by greymare89
Shine
Thanks for the reply, I realize what I'm trying to ask isn't that easy to understand but I think you get the gist of it. Since I only put two layers of 12oz down on the deck I'm trying to avoid sanding whenever possible so I can maintain the thickness of the glass. Instead of sanding is it better to go over the deck with a wire wheel or something similar to scratch the surface or is sanding the only way? And if I must sand do I have to create a flat surface or can I just go over lightly and leave the 12 oz mat's texture? I plan on covering with prime kote then kiwi grip so I think weave texture won't be able to be seen anyway. The most important thing is the getting the paint to stick so I never have to do it again.
Re: Another 18 Privateer rebuild
Posted: Fri Jul 11, 2014 9:22 am
by tech_support
Since I only put two layers of 12oz down on the deck I'm trying to avoid sanding whenever possible so I can maintain the thickness of the glass. Instead of sanding is it better to go over the deck with a wire wheel or something similar to scratch the surface or is sanding the only way?
your overthinking this
you should sand the top of the 12 oz glass, you just go over it lightly with 60 grit. You are not going to remove much (if any) glass, you are just going to remove the stitching that is sticking up proud. This will leave you with only small dimples of weave to fill. You can then go right ot kiwigrip if you dont mind seeing the weave through the KG, or you can spread a thin mix of fairing compound (take very very little) over the deck, filling the weave. You only fill the weave, not build a layer. The whole deck of 19' should take maybe 2 pints of this faring "slurry".
Re: Another 18 Privateer rebuild
Posted: Fri Jul 11, 2014 6:49 pm
by greymare89
Ok thank you


