
Oh I forgot, got my long batten out and played with sheer lines. Have it close but not quite perfect yet, so that will come in a day or 2 or 3. It looks WAY cooler with the transom cut down and the sheer prettied up.
Fred in Wisc
Little Hickman Sea Sled
-
Fred in Wisc
- * Bateau Builder *

- Posts: 972
- Joined: Tue May 02, 2006 8:54 pm
- Location: SE WI
- Location: Milwaukee WI
-
Fred in Wisc
- * Bateau Builder *
- Posts: 972
- Joined: Tue May 02, 2006 8:54 pm
- Location: SE WI
- Location: Milwaukee WI
Had a little time to work on the boat while baby was napping today.
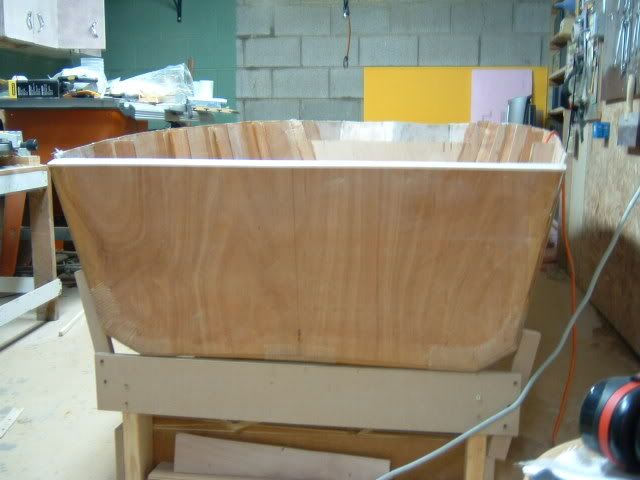
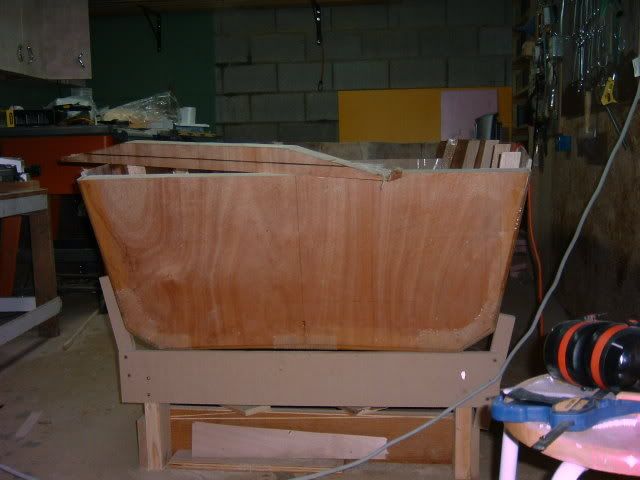
After trying many options, I decided on the sheerline that looks best, traced and cut it. Just laid it out with the long batten, clamped it where it should be, traced the line. Then cut a little big with the cordless circular saw and planed down to the line. Actually cutting it only took about 40 minutes including moments of hesitation based on fear of screwing something up. The second side should only take 20-30 minutes.
Here you can see the left side is cut but the right is not. Hard to see in the pic but easy in person. The trim was about 3/8" at the transom, 1 1/2" in the center, and tapered to a point at the bow. Now instead of looking tall and fat, the boat looks lean and purposeful. A really big improvement.
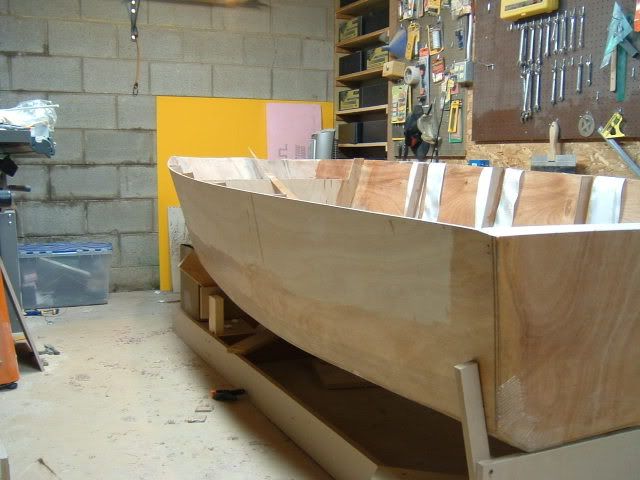
You can also see the transom trim from yesterday. I set it up so the motor plate is about an inch under the bottom of the hull. Here is the transom from the inside, I will need to make the clamping board wider in the motorwell area.
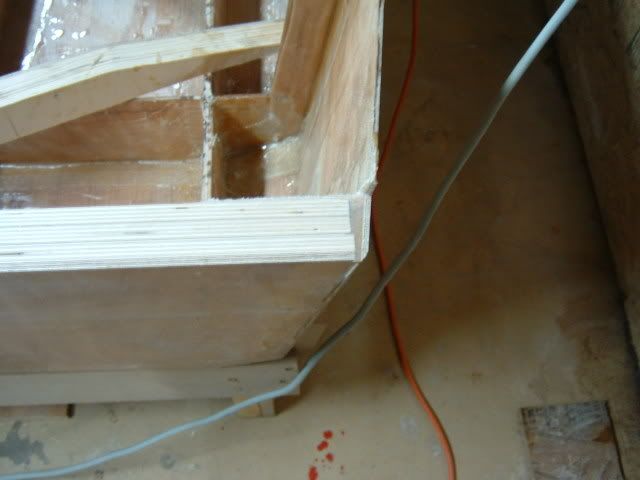
It was interesting to take a look at the section of the transom to hull joint after cutting it. This one looks great, the other side had one little pinhole. So I'll post the pic of the perfect looking one.....
The red spots on the floor aren't blood this time. Just paint drips. There has been blood and sweat shed over the boat but no tears yet.
Here's how much I ended up trimming off, extra portion is sitting on the hull.
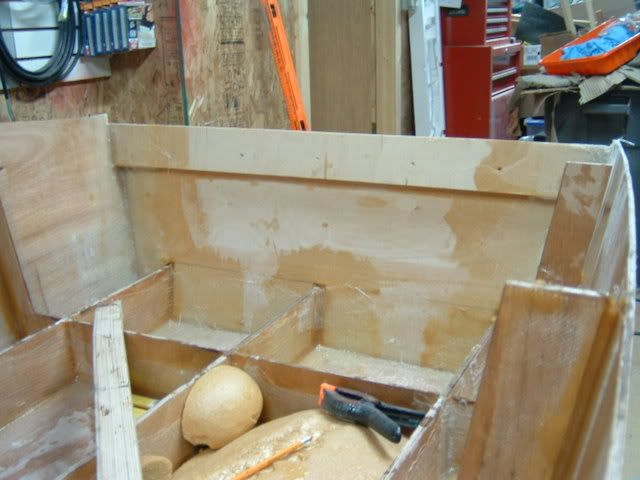
I also have a pic of the front frame trimmed to the height where the front casting deck will be installed. You can also see the fillet and tape job on the seft side frames, much neater than my first ones on the stringers. I'm not working any harder on them, just getting better at it as I do more of them. I think the lesson here is not to wait too long between boats, your technique suffers.

I am beginning to have some hope of actually using this boat before the end of this boating season. It may not be painted, but I think it's getting launched this year. (I ended up using my canoe for nearly 2 years in primer).
Fred in Wisc
After trying many options, I decided on the sheerline that looks best, traced and cut it. Just laid it out with the long batten, clamped it where it should be, traced the line. Then cut a little big with the cordless circular saw and planed down to the line. Actually cutting it only took about 40 minutes including moments of hesitation based on fear of screwing something up. The second side should only take 20-30 minutes.
Here you can see the left side is cut but the right is not. Hard to see in the pic but easy in person. The trim was about 3/8" at the transom, 1 1/2" in the center, and tapered to a point at the bow. Now instead of looking tall and fat, the boat looks lean and purposeful. A really big improvement.
You can also see the transom trim from yesterday. I set it up so the motor plate is about an inch under the bottom of the hull. Here is the transom from the inside, I will need to make the clamping board wider in the motorwell area.
It was interesting to take a look at the section of the transom to hull joint after cutting it. This one looks great, the other side had one little pinhole. So I'll post the pic of the perfect looking one.....
The red spots on the floor aren't blood this time. Just paint drips. There has been blood and sweat shed over the boat but no tears yet.
Here's how much I ended up trimming off, extra portion is sitting on the hull.
I also have a pic of the front frame trimmed to the height where the front casting deck will be installed. You can also see the fillet and tape job on the seft side frames, much neater than my first ones on the stringers. I'm not working any harder on them, just getting better at it as I do more of them. I think the lesson here is not to wait too long between boats, your technique suffers.
I am beginning to have some hope of actually using this boat before the end of this boating season. It may not be painted, but I think it's getting launched this year. (I ended up using my canoe for nearly 2 years in primer).
Fred in Wisc
-
Fred in Wisc
- * Bateau Builder *
- Posts: 972
- Joined: Tue May 02, 2006 8:54 pm
- Location: SE WI
- Location: Milwaukee WI
Well momma and baby went to sleep kinda early, so I got the rest of the frames filleted and taped.
Once it's set up, I'll take the level and transfer points for the sheer over to the right side, connect the dots and cut it. I'm pretty excited about that, really wanted to do it tonight, but it would be less accurate with the frames hanging loose. And the saw is pretty loud.
I think I am all done taping frames and stringers. Yeah! Oh, wait, except for the sones I have to add for deck support.
Next up, installing cleats on all the under sole stuff. Extending the clamping board and laying a couple layers of biax on the transom. Then foam. Then cutting out and installing the sole. Then.....Well I guess there's a lot more before the going fishing part.
Fred in Wisc
-
Fred in Wisc
- * Bateau Builder *
- Posts: 972
- Joined: Tue May 02, 2006 8:54 pm
- Location: SE WI
- Location: Milwaukee WI
Wow, it is WAY too late to be posting here, but I'm kinda wired from working on the boat tonight so this is a good way to wind down. Got a good amount done the last 2 days. My wife and daughter are visiting relatives out of town, so I get some extra boat time. Off work tomorrow, so time to git 'er done. Would have got more done today, but my wife's mother and father called, their freezer died, so I took them to get a new one, delievered it to the house, and horsed it down the basement steps. Not nearly as much fun as building a boat.
Thought about fishing tomorrow, but with all the rain we have had, the lakes are about 2' above normal, so the launches are really hard to get at. Lots of lakefront properties under water. One of my coworkers is planning on bowfishing for carp in a flooded section of town, you can actually see them swimming down the street. My guess is local law enforcement won't be too enthusistic about that.
Yesterday I finished gluing in all the cleats for the sole. That took a lot longer than expected. Leveling the outside cleats that glue to the hull was a bit challenging, especially in the bow. I only had enough clamps to do about half at a time, plus I was careful leveling everything so the sole is flat and square to the boat. The frames and stringers were pretty close, I only had about 1/8" of variation to even out.
I found it expedient to epoxy coat the bottoms and sides of the cleats before installing them, the access is so much easier than after. Sanded the drips and such off the tops. Tomorrow they will get a second coat, plus a coat on the top sanded surfaces.
Made a little piece to extend the clamping board down in the center, planning a little motor well, just to make it easier to tighten the motor down (clearance was pretty tight there) and to have a little more clearance when the motor is tilted up.
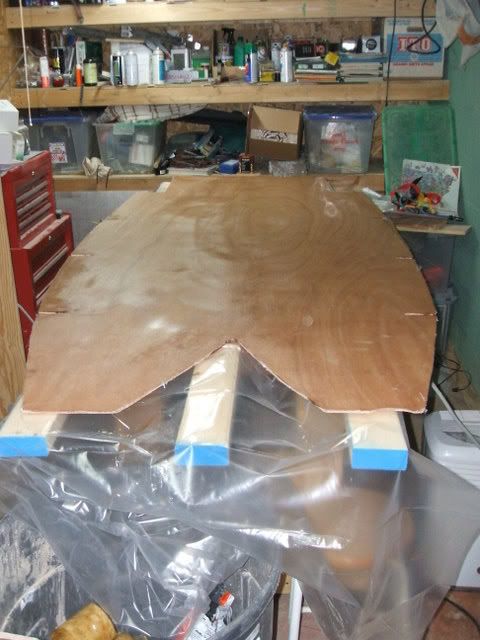
I measured and cut out the sole, then spent a bunch of time with the jigsaw and plane getting it to actually fit nicely. Definite disadvantage of not using the complete plans, you spend a lot of time measuring and figuring out stuff. And of course, I made an error transferring measurements, so I got to glue in a little patch where I cut one area too small. Working too late at night. Shoulda caught that. Since the sole used my last sheet of 6mm ply, I had to fix it. All I have left is a couple partial sheets of 6mm and almost 2 sheets of 4mm.
The sole is pretty thin, so it will be glassed both sides with 9oz woven fabric for strength and rigidity. For a 10' boat, the floor area is pretty impressive. About 7'7" long and 41" across at the widest point. Not that much taper either, it's 35" wide at the transom.
Tomorrow I will add the coast guard foam as well. It looks like I will have about 7 cubic feet with under the sole, in the bow (beneath a couple small storage compartments) and a pair of small transom boxes under the rear deck.
I better get to sleep, lots to do tomorrow. I promise I'll try to get some new pics up too.
Fred in Wisc
Thought about fishing tomorrow, but with all the rain we have had, the lakes are about 2' above normal, so the launches are really hard to get at. Lots of lakefront properties under water. One of my coworkers is planning on bowfishing for carp in a flooded section of town, you can actually see them swimming down the street. My guess is local law enforcement won't be too enthusistic about that.
Yesterday I finished gluing in all the cleats for the sole. That took a lot longer than expected. Leveling the outside cleats that glue to the hull was a bit challenging, especially in the bow. I only had enough clamps to do about half at a time, plus I was careful leveling everything so the sole is flat and square to the boat. The frames and stringers were pretty close, I only had about 1/8" of variation to even out.
I found it expedient to epoxy coat the bottoms and sides of the cleats before installing them, the access is so much easier than after. Sanded the drips and such off the tops. Tomorrow they will get a second coat, plus a coat on the top sanded surfaces.
Made a little piece to extend the clamping board down in the center, planning a little motor well, just to make it easier to tighten the motor down (clearance was pretty tight there) and to have a little more clearance when the motor is tilted up.
I measured and cut out the sole, then spent a bunch of time with the jigsaw and plane getting it to actually fit nicely. Definite disadvantage of not using the complete plans, you spend a lot of time measuring and figuring out stuff. And of course, I made an error transferring measurements, so I got to glue in a little patch where I cut one area too small. Working too late at night. Shoulda caught that. Since the sole used my last sheet of 6mm ply, I had to fix it. All I have left is a couple partial sheets of 6mm and almost 2 sheets of 4mm.
The sole is pretty thin, so it will be glassed both sides with 9oz woven fabric for strength and rigidity. For a 10' boat, the floor area is pretty impressive. About 7'7" long and 41" across at the widest point. Not that much taper either, it's 35" wide at the transom.
Tomorrow I will add the coast guard foam as well. It looks like I will have about 7 cubic feet with under the sole, in the bow (beneath a couple small storage compartments) and a pair of small transom boxes under the rear deck.
I better get to sleep, lots to do tomorrow. I promise I'll try to get some new pics up too.
Fred in Wisc
-
Fred in Wisc
- * Bateau Builder *
- Posts: 972
- Joined: Tue May 02, 2006 8:54 pm
- Location: SE WI
- Location: Milwaukee WI
After I got all the cleats glued to the stringers and frames, I let them set up for a day or 2, then sanded off the epoxy drips and stray wood flour putty on the tops of them so the sole can sit flat. Then I went back through and gave them another coat of epoxy to cover the areas I sanded through or missed previously.
Then I did a little calculating on the foam, had a little left over from my last 2qt kit, and a brand new 2 gallon kit. It looked like it would come out real colse, so I took some pink styrofoam scraps and put them down in the bigger compartments to take up some space. Then I mixed an poured lots of foam.
If's dang near impossible to estimate how much you need to put in a compartment to fill it. I ended up with several that needed a second dose of foam, and sometimes a third. Then I got impatient on the next ones and had a whole lot of extra up over the top. Best practice here is to do one or 2 compartments at a time, so you can trim the excess off and toss it in the next compartment.
Foam is so much fun. It's such an interesting reaction to watch. I left mine outside in 80 degree weather for couple days before bringing it into the basement, it certainly reacted faster than the stuff stored downstairs where it's about 65. Seems to yield more foam, feel fluffier, not as dense and hard.
Best tool for trimming was a flush cutting trim saw with a reversible handle so I could set it up to cut either direction. I tried to trim the foam just slightly high, going over it with the 36 grit on the longboard next so it's dead flush with the stringers. That will provide better support for the sole, so it does not flex. Got a few scratches in the stringers and cleats, so those will get a recdoat before sealing it up.
Ran out of foam before running out of empty spaces, so I have to get some more. Also need to build a divider in one bottom compartment to put my transducer and a drain plug. I also forgot to glue cleats to the transom to hold up the sole edge, so that will be among the next tasks.
Speaking of the sole, I laminated one side with the 9oz woven fabric. It's way easier to laminate flat panels. Looks like a pro did that one.
Only a couple days until the sole is installed, then I can move on to the decks.
Sorry, still having some camera issues. I'll get some new pics up here eventually.
Fred in Wisc
-
Fred in Wisc
- * Bateau Builder *
- Posts: 972
- Joined: Tue May 02, 2006 8:54 pm
- Location: SE WI
- Location: Milwaukee WI
Finally took a few pics.
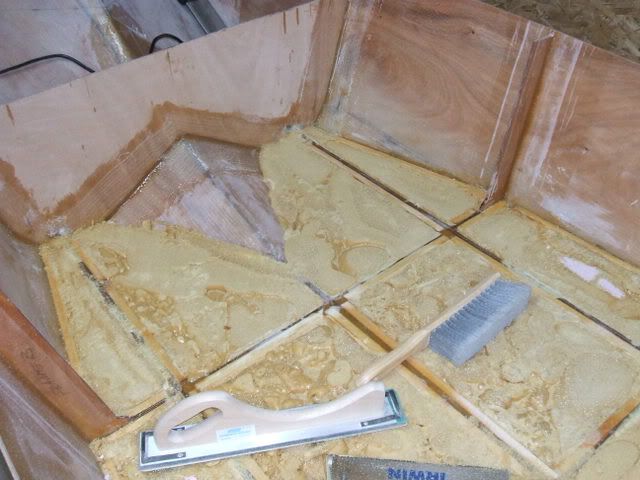
Here is the sole, cut out and glassed on one side with 9oz woven cloth. It still needs minor trimming of the cloth and a little more clearance around a few frames. I want to make sure I have a large enough gap to get putty into it so it's completely filled in between the hull, frames, and sole where the frames come up through the sole.
Here is the hull with foam floatation mostly installed. The foam really stiffened up the hull. I still have to build some boxes for foam against the transom. Kind of a double duty thing, they will tie into the outer stringers, give support for the rear deck, stiffen up the transom a bit, and provide more volume for floatation.
I actually used a whole 2 gallon kit, plus some pink styrofoam, plus some leftover coast guard foam (about a quart) from my last boat to fill this. My wife is a little scared of small boats, so I know it's overkill, but it gives her peace of mind when I have kids in the boat. This thing should have about 550 or 600 pounds of flotation when it's done.
I still need to fill the 2 center compartments by the transom also, but there are a few bits to get glued in first.
One thing I learned: If you are using sheet styrofoam or something to fill in, make sure the expanding foam does not get under it, it will get pushed right out the top of the compartment.
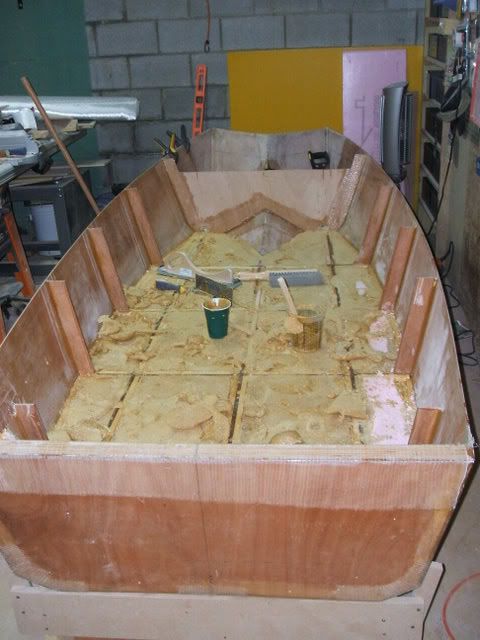
Here is some detail of the bow area, with the foam trimmed nearly flush. I'm taking some time to trim carefully, even using the longboard and some 36 grit, to make sure I don't have any high areas that make the sole bumpy. In the bow, the angle required for cleats is really extreme, so I'm just going to level the foam carefully, cut it back about 3/4" from the edge of the sole, and put a fat bead of putty there to hold the front edge of the sole.
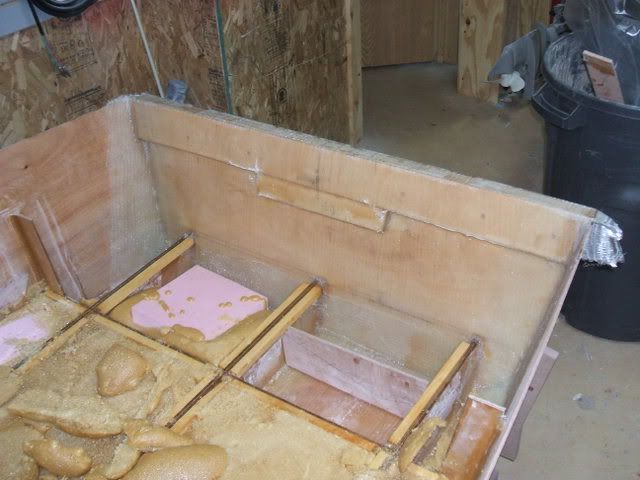
Here is the transom with the clamping board extension. I am planning to have a small area of the rear deck lower here to give some clearance for clamping the motoro on and tilting it up.
The glass work here is less than ideal, I actually wrapped one piece of biax from the inner hull bottom, up the transom, over the clamping board and onto the outside of the transom. I used some plastic sheeting and a lot of blocks and clamps to get it nice and neat around the 90 degree corners. Worked ok, but I have a few areas to fix. Mostly some air spaces in the corners, I'll shoot some epoxy in with a glue syringe and it will be fine. There are 2 areas where the fabric pulled farther away from the corners that I will trim out and reglass. You can see one at the top of the right side of the transom if you look closely. The other is at the left end under the clamping board extension.
I'm going to divide the right middle compartment so I can mount a through hull transducer like Cracker Larry did (that was slick), and a drain plug. Still need to glue in the divider and lay a couple layers of light cloth in it to make sure that area is well sealed. Then install a cleat on top of the divider and on the left side transom, pour and trim a little foam and it's time to install the sole. Exciting stuff.
Time to go to sleep now. Tomorrow is Daddy day (I have baby, my wife goes to work to actually talk with adults) so I had better get some rest.
Fred in Wisc
Here is the sole, cut out and glassed on one side with 9oz woven cloth. It still needs minor trimming of the cloth and a little more clearance around a few frames. I want to make sure I have a large enough gap to get putty into it so it's completely filled in between the hull, frames, and sole where the frames come up through the sole.
Here is the hull with foam floatation mostly installed. The foam really stiffened up the hull. I still have to build some boxes for foam against the transom. Kind of a double duty thing, they will tie into the outer stringers, give support for the rear deck, stiffen up the transom a bit, and provide more volume for floatation.
I actually used a whole 2 gallon kit, plus some pink styrofoam, plus some leftover coast guard foam (about a quart) from my last boat to fill this. My wife is a little scared of small boats, so I know it's overkill, but it gives her peace of mind when I have kids in the boat. This thing should have about 550 or 600 pounds of flotation when it's done.
I still need to fill the 2 center compartments by the transom also, but there are a few bits to get glued in first.
One thing I learned: If you are using sheet styrofoam or something to fill in, make sure the expanding foam does not get under it, it will get pushed right out the top of the compartment.
Here is some detail of the bow area, with the foam trimmed nearly flush. I'm taking some time to trim carefully, even using the longboard and some 36 grit, to make sure I don't have any high areas that make the sole bumpy. In the bow, the angle required for cleats is really extreme, so I'm just going to level the foam carefully, cut it back about 3/4" from the edge of the sole, and put a fat bead of putty there to hold the front edge of the sole.
Here is the transom with the clamping board extension. I am planning to have a small area of the rear deck lower here to give some clearance for clamping the motoro on and tilting it up.
The glass work here is less than ideal, I actually wrapped one piece of biax from the inner hull bottom, up the transom, over the clamping board and onto the outside of the transom. I used some plastic sheeting and a lot of blocks and clamps to get it nice and neat around the 90 degree corners. Worked ok, but I have a few areas to fix. Mostly some air spaces in the corners, I'll shoot some epoxy in with a glue syringe and it will be fine. There are 2 areas where the fabric pulled farther away from the corners that I will trim out and reglass. You can see one at the top of the right side of the transom if you look closely. The other is at the left end under the clamping board extension.
I'm going to divide the right middle compartment so I can mount a through hull transducer like Cracker Larry did (that was slick), and a drain plug. Still need to glue in the divider and lay a couple layers of light cloth in it to make sure that area is well sealed. Then install a cleat on top of the divider and on the left side transom, pour and trim a little foam and it's time to install the sole. Exciting stuff.
Time to go to sleep now. Tomorrow is Daddy day (I have baby, my wife goes to work to actually talk with adults) so I had better get some rest.
Fred in Wisc

-
Fred in Wisc
- * Bateau Builder *
- Posts: 972
- Joined: Tue May 02, 2006 8:54 pm
- Location: SE WI
- Location: Milwaukee WI
-
Daniel Huckleberry
- Very Active Poster
- Posts: 862
- Joined: Mon Jun 19, 2006 12:40 pm
- Location: Fairhope, Alabama
Who is online
Users browsing this forum: Ahrefs [Bot] and 0 guests