Page 1 of 1
FS17 low sheer
Posted: Thu Jun 12, 2008 3:57 pm
by tech_support
A new project.
FS17 with lowered sheer and larger casting decks. I will keep the same sheer line, just lowered by about 4". Casting decks will be large, sole length will be 6'. No console, but a box a small box in the middle for gas and storage (also seat). Motor will be mounted on a hydraulic jack plate directly to the transom, no motor well. I will probably build a poling platform and a "hand rail" out of carbon fiber tubes.
Boat will be used 90% in the Indian River
The molds are cut, next week we will have the panels ready and maybe even have the strongback finished (all cut on the CNC) - this will be a quick one

Joel
Posted: Thu Jun 12, 2008 4:03 pm
by steve292
Sounds nice...........come down here to show us all how it's done,have you

I look foward to it,should teach me a few things
Steve
Posted: Thu Jun 12, 2008 4:12 pm
by mecreature
We want pic and videos like the FS14..
Posted: Thu Jun 12, 2008 4:33 pm
by tech_support
We want pic and videos like the FS14..
Thats the idea. We will show things that keep coming up in the forum, and test new products.
Things to show:
mixing quick fair with scale
more fairing tips/tricks
stitching/taping
glassing the whole bottom at once; wet on wet
we may build a gas tank from epoxy/glass/wood
any other suggestions?
Things to test:
Epoxies, new formulations and new products
making carbon fiber parts
new epoxy for gas tanks
new filler combinations
Joel
[/i]
Posted: Thu Jun 12, 2008 4:43 pm
by Tagged
Great project!
So why the lower sides? And how did you decide that 4" was the right reduction?
Tag
Posted: Thu Jun 12, 2008 5:50 pm
by dpurcell
Shine,
Looks like the race is on on this one, although I think it will be a bit of turtle and the hare scenario,probably with the expected outcome rather than the unexpected outcome of the old fable. Probably a good thing though, I can just shadow your build and hopefully minimize mistakes!

Especially when it comes to the fairing, looking forward to seeing those tips! I'm getting started on the strongback soon, but my schedule takes the build to next June.
On another note, Joel, did you ever get in touch with Mickey?
Donny
Posted: Thu Jun 12, 2008 7:57 pm
by Spokaloo
Sure must be nice in that river, no chop, all these low-freeboarded boats with big monster casting decks.....
Looking forward to some photos, SPECIFICALLY how you are going to build this transom and no motorwell.
E
Posted: Thu Jun 12, 2008 11:06 pm
by jayb01
What about a small side console somewhat like this:

Posted: Thu Jun 12, 2008 11:18 pm
by Cracka
That will be a nice build Joel, can't wait to see the progress and piccies, good luck mate.
Have you decided on power yet?
Mick
Posted: Fri Jun 13, 2008 8:59 am
by tech_support
So why the lower sides? And how did you decide that 4" was the right reduction?
Tag - Jacques cut it in 3D for me and it looked right at 4", plus the casting decks get too low if we cut it down more.
Donny - I am going to build the hull as designed, after drawing out some of those mods we spoke about at the meeting, I think it would just complicate things too much, with only a slight benefit. I have not called Mickey, but I will soon - I need another board

Sure must be nice in that river, no chop, all these low-freeboarded boats with big monster casting decks.....
Looking forward to some photos, SPECIFICALLY how you are going to build this transom and no motorwell.
E
Eric, your right the river is nice and calm most of the time. Its does whip up in the afternoons and in the spring - so the added sheer towards the bow will be nice. The water is warm, so a little spray is a price Im willing to pay for less windage (slower drift) and ease of getting in and out (we wade fish a lot). I think the transom will just have nice uninterrupted camber, and there will be a hatch through the rear casting deck to access the jackplate mounting bolts
What about a small side console somewhat like this:
Jay - I thought about the side console, but if I want a cooler/seat/tank box in the center - there is not enough room. The remote steering and throttle mean more work and less room. For the indian river, a console it really not needed. If I were using the boat in more open water where standing with a tiller is too rough (crossing sounds or in the ocean) i would absolutely have a console
Have you decided on power yet?
Mick - For power Im thinking F40 Yamaha, but i will switch if i can get a deal another motor
Posted: Fri Jun 13, 2008 11:23 am
by jgroves
I'm looking forward to your build. I like your FS12 pics... I check them often. I think the FS17 will be perfect cut down with the big deck! I really like the shape of the boat. I can see lots of variations with this boat.
On a side note... the Aquasport rebuild pics are great. I check them often as well!
Posted: Fri Jun 13, 2008 11:57 am
by Spokaloo
Oh Joel....
Building overpowered........
I bet Jacques was thrilled to hear that.....
E
Posted: Fri Jun 13, 2008 12:24 pm
by tech_support
Spokaloo wrote:Oh Joel....
Building overpowered........
I bet Jacques was thrilled to hear that.....
E

A 40 will be OK, the problem is there is not a F30.
Who knows, I may go with a 2 stroke 25; they are available with electric start . They are also about half the cost.
Posted: Fri Jun 13, 2008 1:22 pm
by TomW
What's wrong with a Merc 30?

Tom
Posted: Tue Jun 17, 2008 3:47 pm
by Tagged
Hey Shine,
If JMM rendered the low shear for you already, can you post those pics? I'm curious what goal you're aiming toward.
Tag
Posted: Wed Jun 18, 2008 11:22 am
by tech_support
maybe soon, Jacques has been working on some network issues the last day
Posted: Sun Jun 22, 2008 12:17 am
by Steven
Excellent. I'm very interested in seeing this build. I"ve considered exactly that mod. Maybe not making the casting decks quite as large.
Posted: Tue Jun 24, 2008 5:31 pm
by dpurcell
Maybe a stupid question, but if you extend the decks the sole only needs to be the length of the cockpit, not the full length from E to A as in the plans? I was planning on running it from E all the way to A.
Posted: Tue Jun 24, 2008 8:23 pm
by TomW
Exactly Donny. The casting decks make up for the sole. I believe the only other place you will need a peice of sole is in the rear for the transom. May be wrong there. Just build up the last frames to the height of the casting decks. Don't get me wrong you can put soles in if you want for storage, and to cover the foam if you use it, but you don't need to. And I might use a lighter plywood for them.
Tom
Posted: Tue Jun 24, 2008 8:35 pm
by peter-curacao
Why casting decks???
Posted: Tue Jul 08, 2008 4:26 pm
by Tagged
Shine,
Are you going to follow the sheer line of the FS, or flatten the sheer to look like a phantom, or do something in between?
Tag
Posted: Mon Jul 28, 2008 2:47 pm
by tech_support
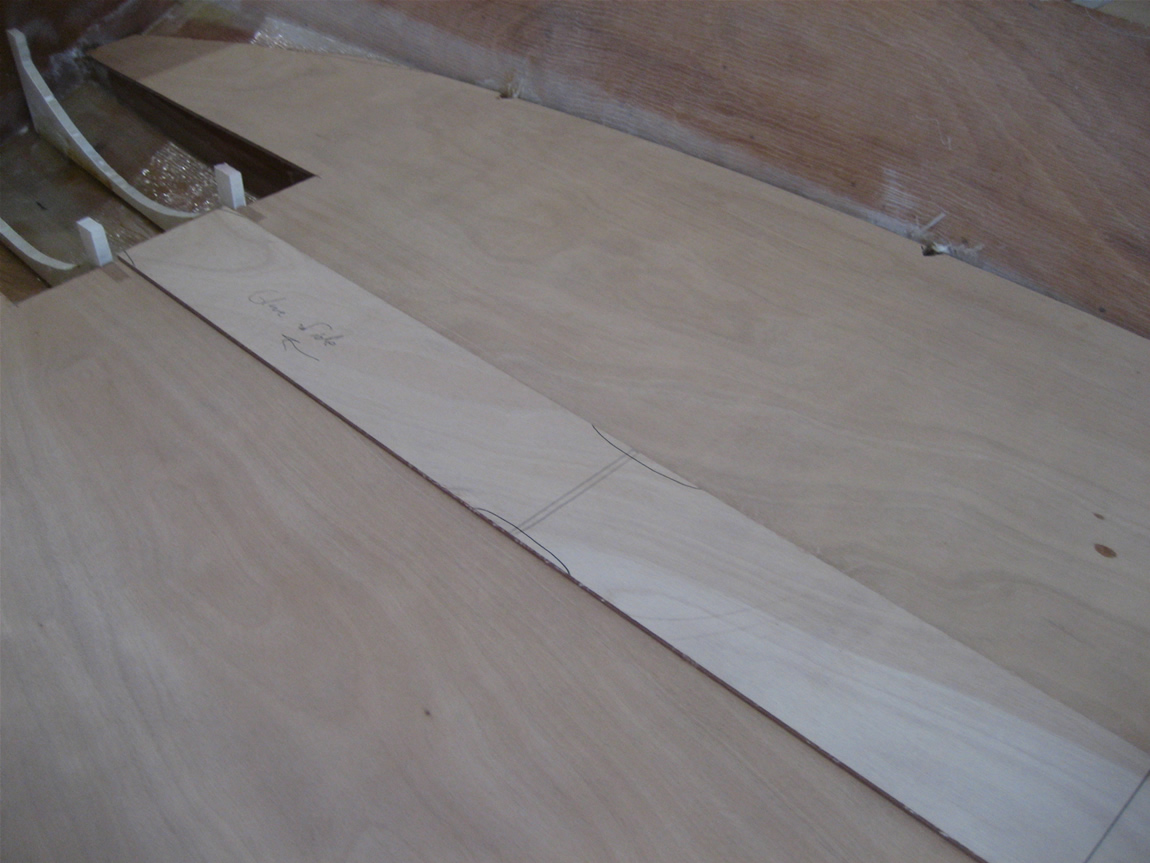
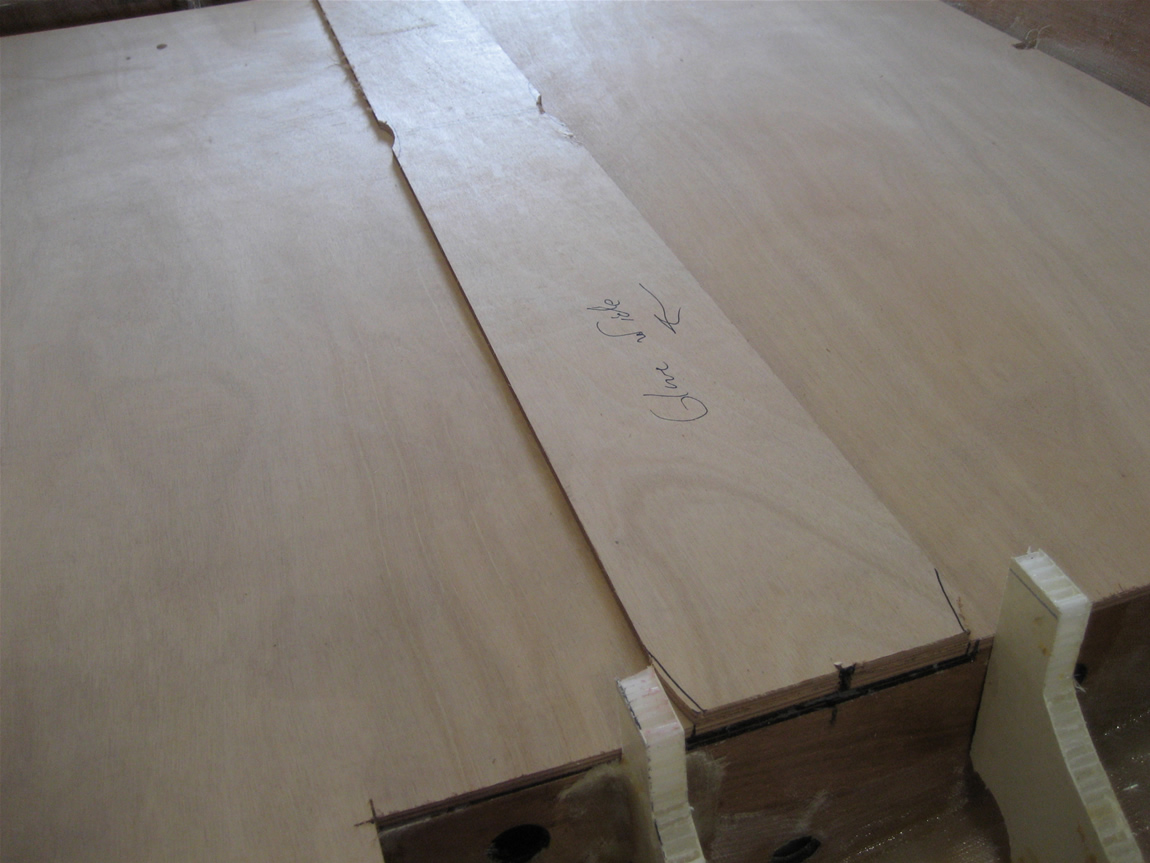
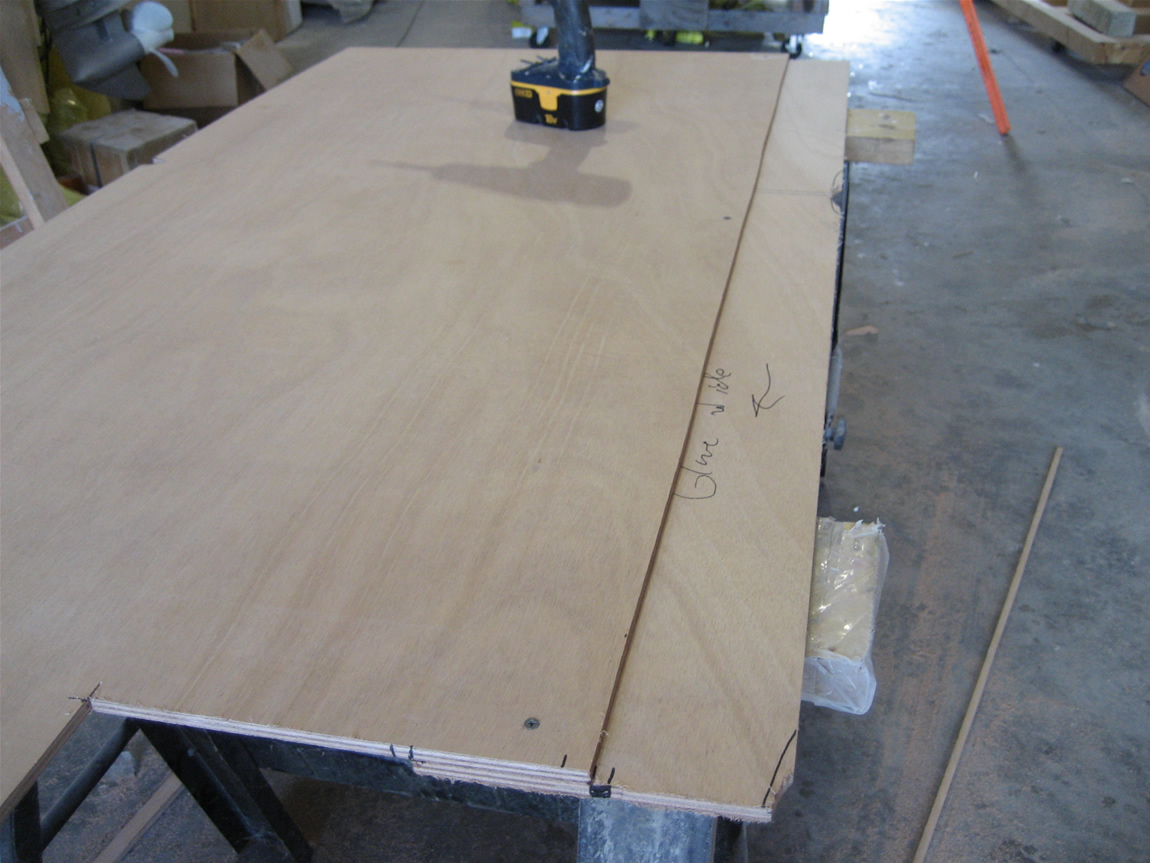
FS17 update:
8 pages of pictures in the gallery...
 http://gallery.bateau2.com/thumbnails.php?album=867
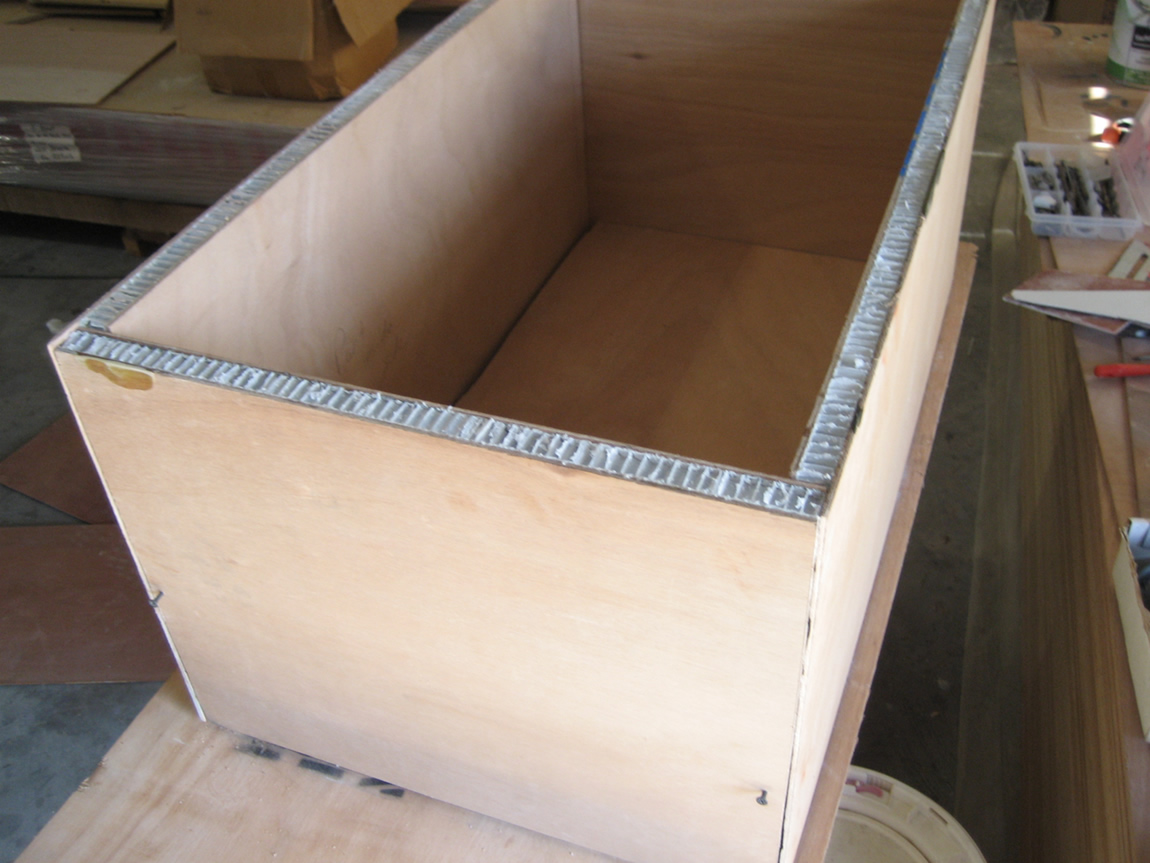
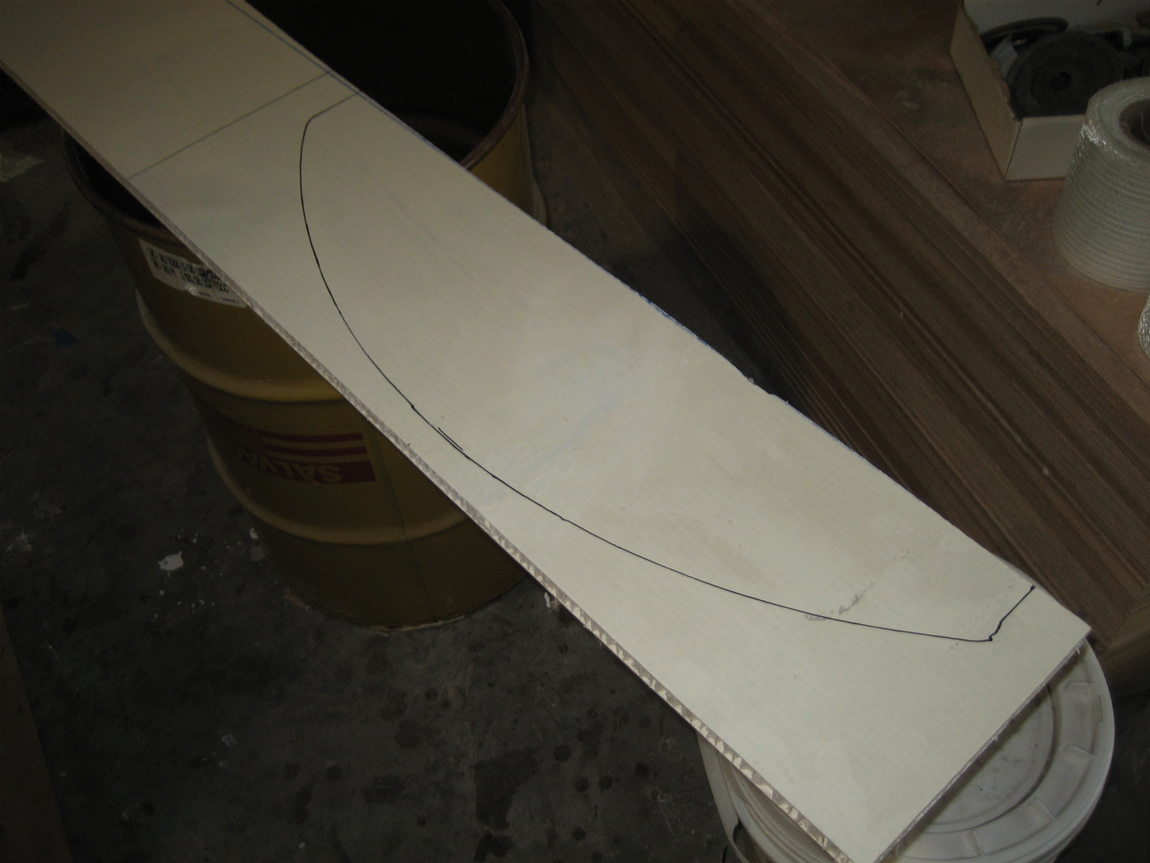
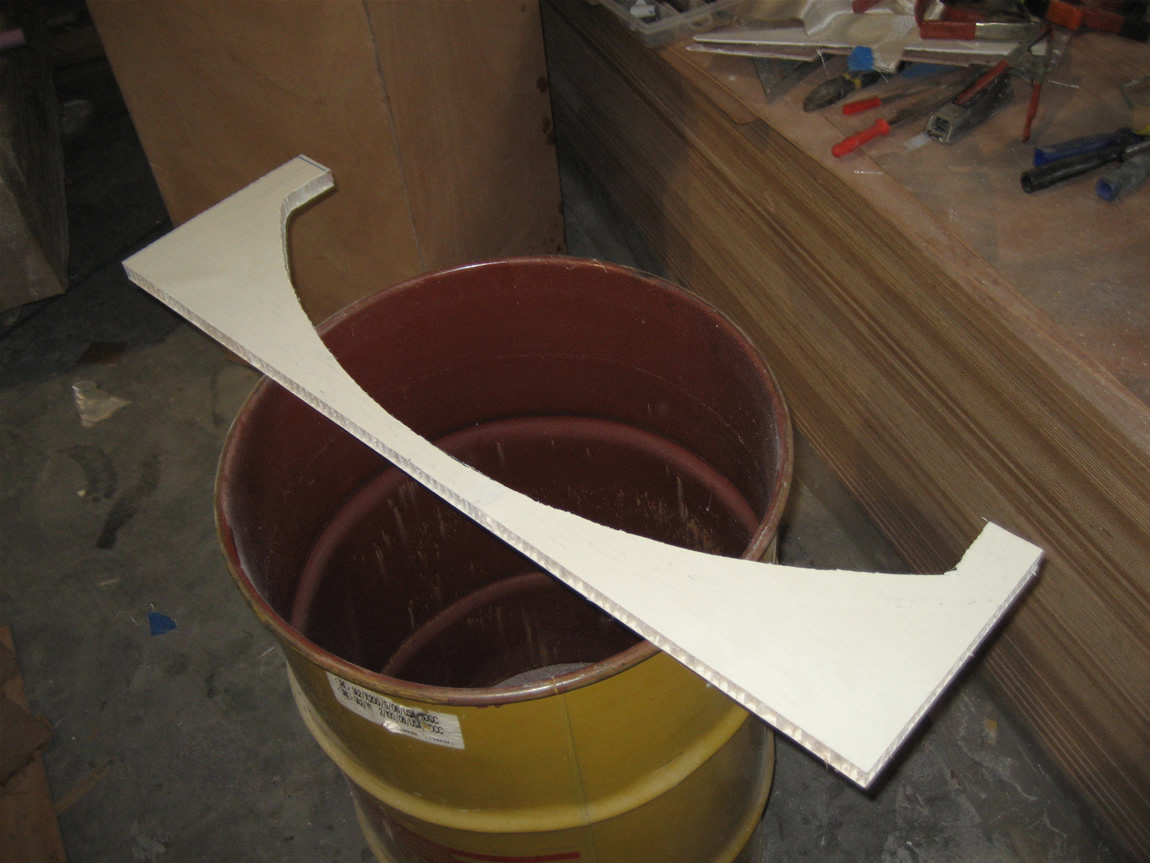
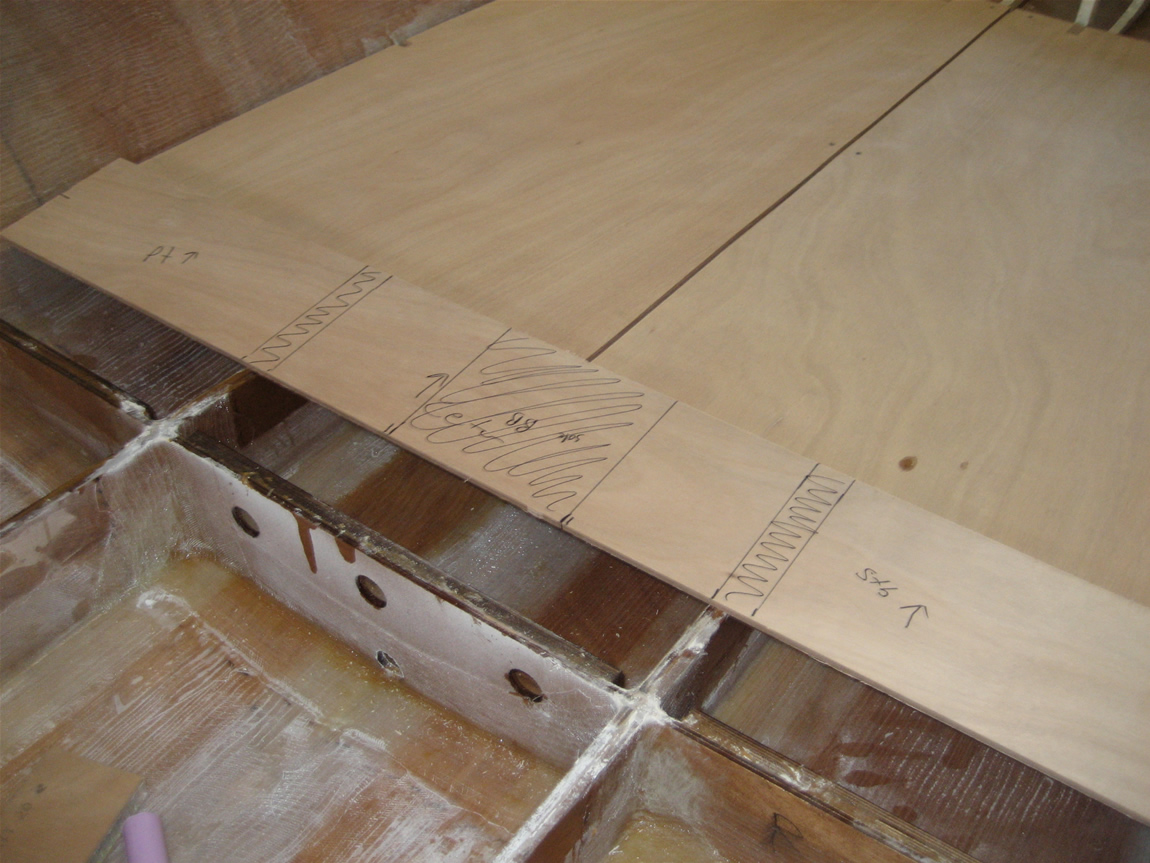
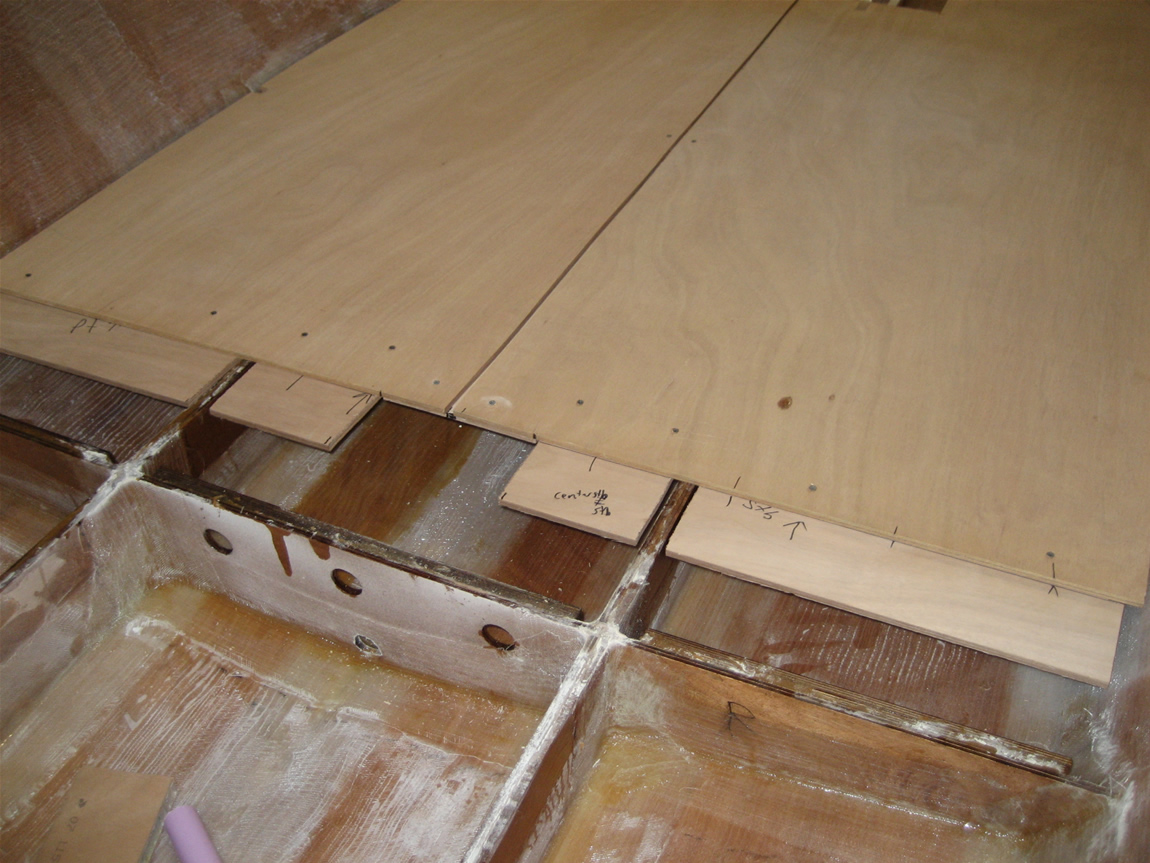
Last week we finished cutting the side panels, transom, and stringer. The MDF mold were already cut. The MDF molds are all disposable.
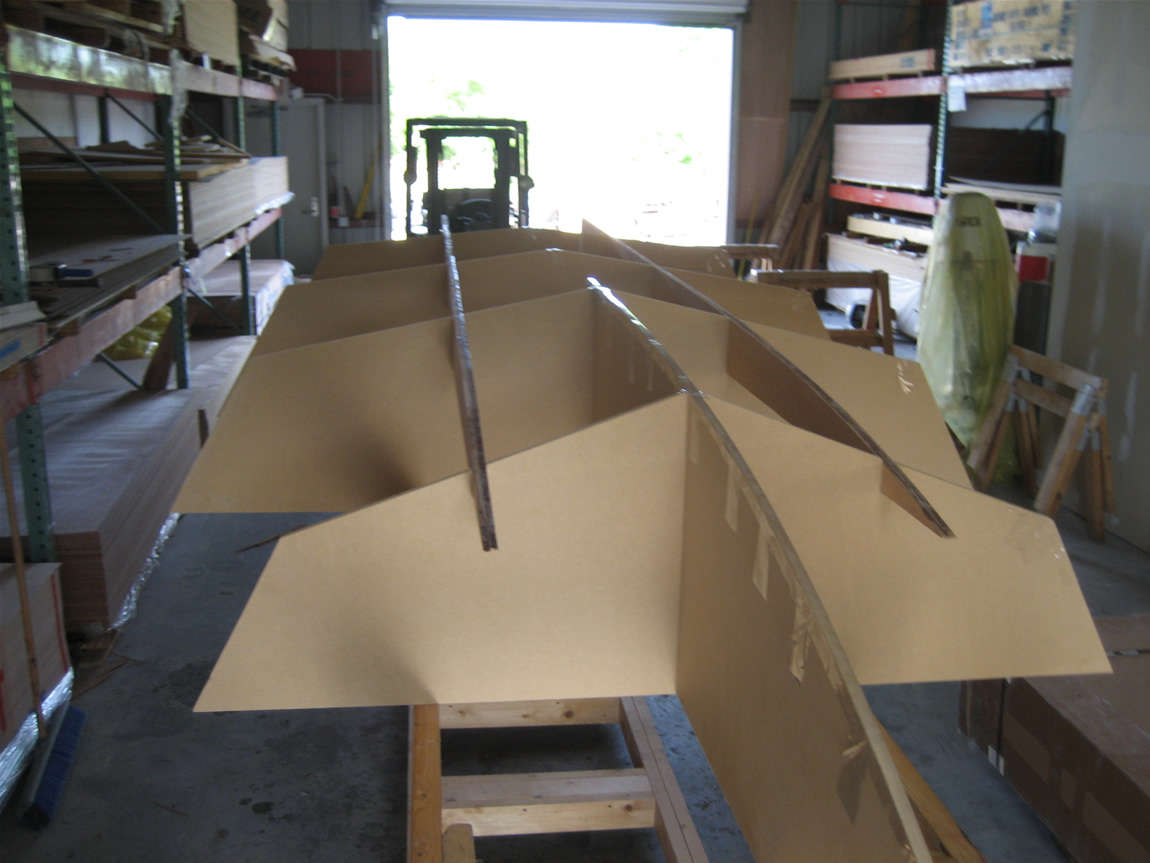
In our CNC kits, we are now supplying these MDF molds and bow mold. Note our new notched “snap togetherâ€
Posted: Mon Jul 28, 2008 3:32 pm
by jgroves
By next week we will see you in it
Very quick! Lookin' good!
Posted: Mon Jul 28, 2008 3:46 pm
by mecreature
Show off...
very nice.. You make it look like I could even do it..
I bet that pre-cut kit helps.. Looks like it lines up perfectly..
Posted: Mon Jul 28, 2008 3:47 pm
by Spokaloo
Hey Joel, can you pack a white t-shirted kid to be an assistant with each kit? He sure would come in handy getting those cardboard rolls in place for us build-alone guys.....
Looks good!
E
Posted: Mon Jul 28, 2008 6:27 pm
by TomW
Very nice Joel!
Tom
Posted: Tue Jul 29, 2008 12:21 am
by Daniel Huckleberry
Great Tutorial, Joel.
I hope I can afford a pre-cut kit for my next build. I think it will be much more fair not to mention less frustrating.
Thanks for all the pics
Huck
Posted: Tue Jul 29, 2008 8:14 am
by tech_support
mecreature wrote:
I bet that pre-cut kit helps.. Looks like it lines up perfectly..
Thats the only reason it all went together so quickly. I do not have the skill or patience to cut panels that accurately
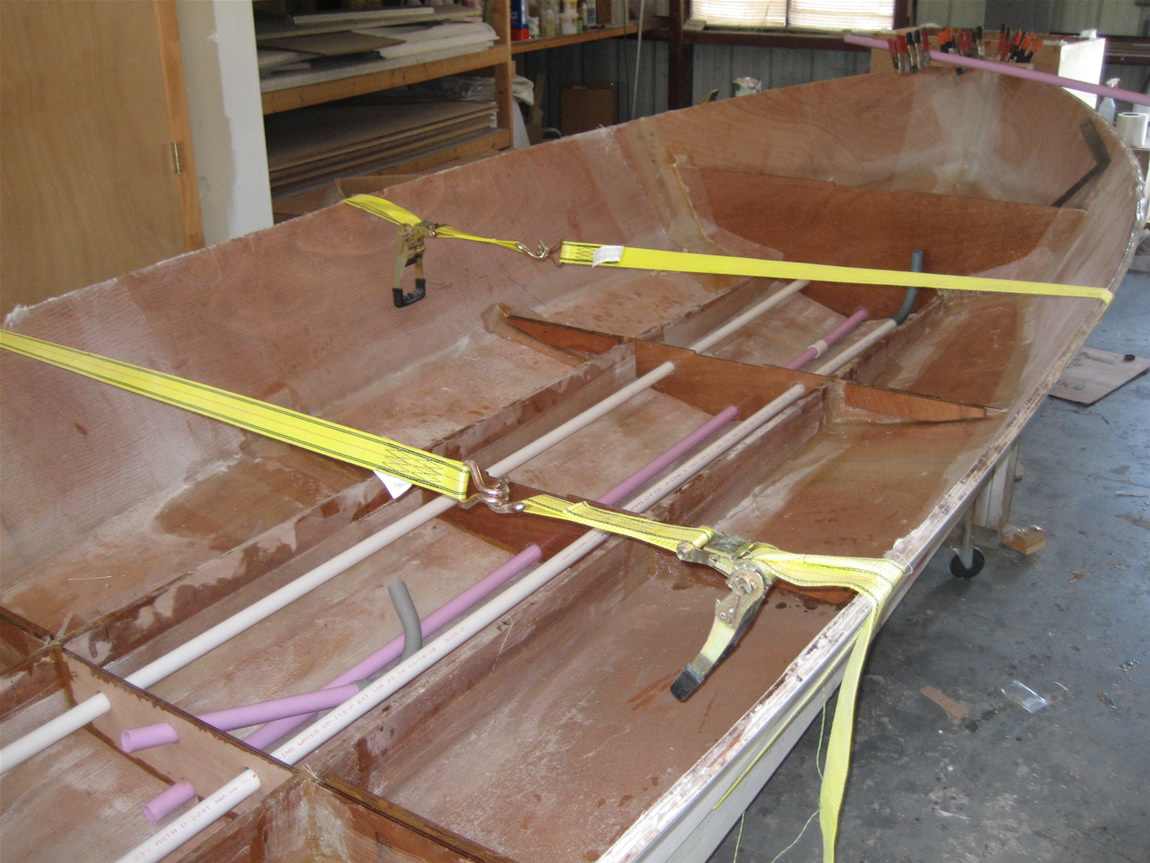
The molds/jig was huge time saver. The mold all rest on the same plane, so there are no upright supports to mess with - just two 2x6 for the molds to rest on, then snap in the stringers.
One thing I forgot to mention is the bow mold hooks into the first two mold stations - this aligns the bow mold perfectly and hold the first two molds at 90 degrees. Then the stringer go into their notches in the mold and everything is square
Hey Joel, can you pack a white t-shirted kid to be an assistant with each kit? He sure would come in handy getting those cardboard rolls in place for us build-alone guys....
That is Joseph, he does all our packaging and shipping of materials. He did a much of the finish work on the Aquasport, and he will help me some on this boat. We build a few surfboards together and he is getting very good with epoxy/glass.
Having a hand for the zip tie was nice

Posted: Tue Jul 29, 2008 11:43 am
by dpurcell
Looking Good Joel, goin' together very quickly!
With this modification what are the necessary structures for the motor well/aft end of the boat? I noticed you made the stringers with "knees", will there still be a motorwell bulkhead? One other question, is the MDF 1/2" or 3/8" and do you sell that to the non kit guys? It always seems to be stored with a big bend in it at the big box stores, not to mention it seems a little pricey at 20 some bucks a sheet.
On another note, is it alright if I have Mickey call you about the surfboard stuff? I feel like the middle man on this and I think I need to be eliminated in order to for this to start moving!
Posted: Tue Jul 29, 2008 12:01 pm
by jacquesmm
About the braces.
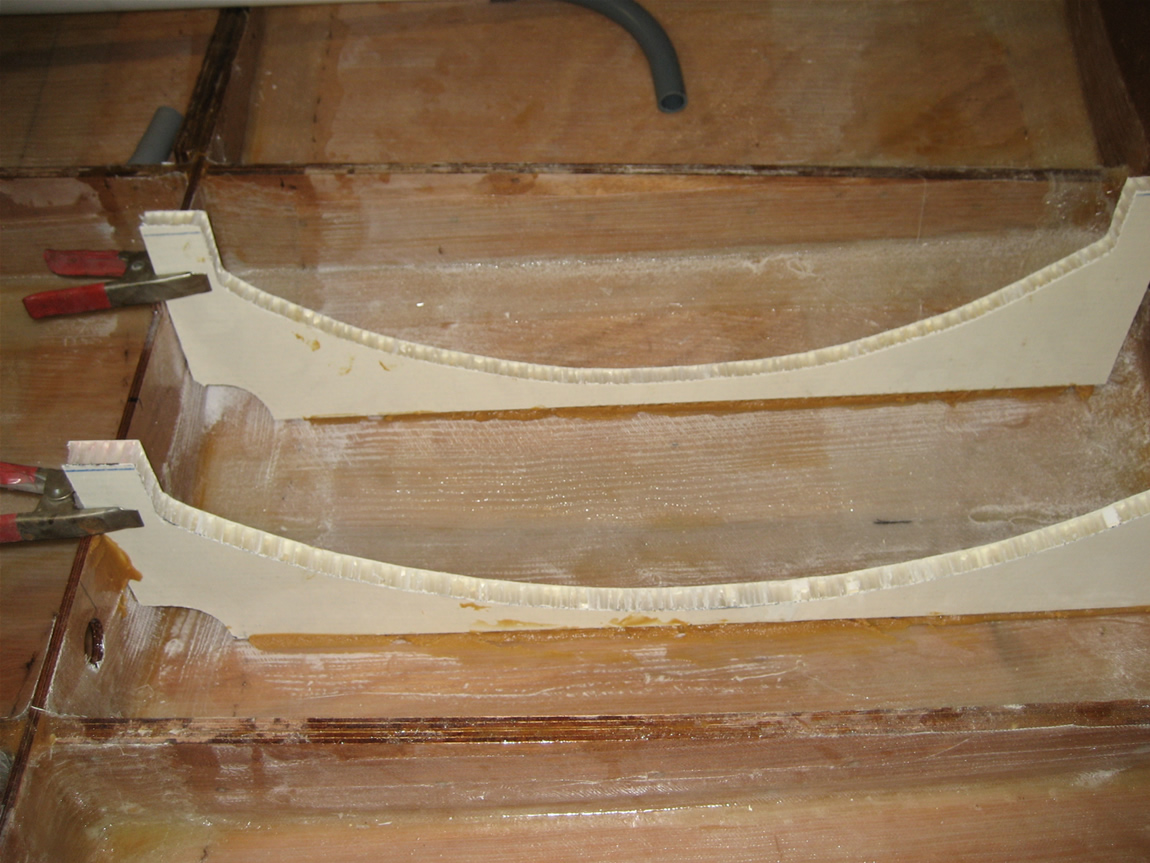
Since there is no motorwell and no motorwell sides to act as braces, I had to incorporate the bracing in the stringers.
In the standard version, the motorwell sides do the job.
If we have to design a kit for the standard version, I may very well incorporate those same braces in the stringers just to make the assembly easier. We'll see when somebody orders that kit.
Posted: Tue Jul 29, 2008 12:04 pm
by steve292
Now your making me feel ashamed of how long it has taken me to build mine
Posted: Tue Jul 29, 2008 12:42 pm
by kiwi
Rule number 3:
Never be ashamed. You have built a boat. Millions of human beings haven't and most never will.
You really meant to say "I'm proud I have built a boat. Next time I'll build one better and faster than I have built this one."
Cheers
Tony
Posted: Tue Jul 29, 2008 1:19 pm
by Lung Boy
I'm with you, Steve. I feel inadequate.
Tony, it may take awhile to embrace Rule number 3.
Nice work, Joel.
Mike
Posted: Tue Jul 29, 2008 2:01 pm
by tech_support
Posted: Tue Jul 29, 2008 2:52 pm
by jgroves
Posted: Tue Jul 29, 2008 2:55 pm
by dborecky
Great build.
Why is the fill for the transom plug green? I see you used fiber glass strands but that should not make the epoxy green...
Posted: Tue Jul 29, 2008 3:40 pm
by tech_support
dborecky wrote:Great build.
Why is the fill for the transom plug green? I see you used fiber glass strands but that should not make the epoxy green...
I put in a bit of pigment so it would be easier for be to locate the epoxy plug through all the glass that going on soon
The fillers in the plug are milled fibers, chopped glass, and a little wood flour
Posted: Tue Jul 29, 2008 4:00 pm
by Cracker Larry
That's a neat idea

Posted: Tue Jul 29, 2008 4:14 pm
by tech_support
Posted: Tue Jul 29, 2008 4:49 pm
by mecreature
I tried that ziplock bag thing... that stuff heats up way to quick for me to be any good with it...
Posted: Tue Jul 29, 2008 4:59 pm
by tech_support
You have to go real fast, maybe 4 inches a second.
Posted: Tue Jul 29, 2008 5:00 pm
by dpurcell
All I can say is Good God Man! Joel you didn't give me enough of a head start, jeez I haven't even started yet!:lol: Jacques thanks for the reply on the bracing! SWMBO is tyin' me up with the honey do list.
Posted: Tue Jul 29, 2008 5:19 pm
by martin_
shine wrote:You have to go real fast, maybe 4 inches a second.
would it help to use a real slow hardener? I have one here wich can be used for 7 hours @ 22°C.
Another one with 5 hours. I used this on several speaker cabinet projects and you could mix 1kg in a bottle and it gets only handwarm (the you only have about 45minutes).
Could this be a solution?
thanks
martin
Posted: Tue Jul 29, 2008 6:03 pm
by rcihard
Joel - Do you fill the zip tie holes with epoxy or epoxy glue before glassing???
Cheers
Richard
Posted: Tue Jul 29, 2008 6:49 pm
by Dougster
Nobody's slower than old Dougster, and slow hardener Silvertip worked just fine for me with the ziplock deal. Never lost a batch, and if you're slower than me, well......nah. Re speed of build, I don't guess it matters much. I figure the longer it takes the more fun for the money. Again, well...
Have yall ever heard the backpackers prayer? "You pick 'em up Lord, and I'll put 'em down".
Puttin' 'em down Dougster
Posted: Tue Jul 29, 2008 6:52 pm
by Spokaloo
martin, they are regularly working in 28-32C temps there, might be a bit warmer than your beautiful weather.
Joel, you ever use real icing bags (the disposable kind)? Price is actually less than a zippered bag, and the batch sizes are a hair smaller.
E
Posted: Tue Jul 29, 2008 8:40 pm
by jbo_c
Is there any thought of making this a stock option? I have the plans for this boat, but had just about ruled it out in favor of another design. the low sheer makes it more appealing for me.
jbo
Posted: Wed Jul 30, 2008 8:49 am
by tech_support
rcihard wrote:Joel - Do you fill the zip tie holes with epoxy or epoxy glue before glassing???
Cheers
Richard
Yes, right before taping the seams we fill them with putty. While that putty is still malleable we glass the seams - this saves the step of letting it harden, the sanding/shaping the joints again.
We will show this when we do all the glassing - hopefully we will have some time to set aside today or tomorrow to glass the entire outside
Posted: Wed Jul 30, 2008 1:57 pm
by Old E.
mecreature wrote:I tried that ziplock bag thing... that stuff heats up way to quick for me to be any good with it...
Keep your epoxy in the fridge.
It helps.
Posted: Thu Jul 31, 2008 3:37 pm
by tech_support
Spokaloo wrote:
Joel, you ever use real icing bags (the disposable kind)? Price is actually less than a zippered bag, and the batch sizes are a hair smaller.
E
I will look into getting some of those for the inside - thanks
Posted: Thu Jul 31, 2008 4:01 pm
by tech_support
Posted: Thu Jul 31, 2008 4:57 pm
by Gramps
Wow, it is looking great Joel! I can not wait to see more. It is amazing what you can do with some plywood and glue.
Posted: Thu Jul 31, 2008 5:31 pm
by Dougster
I'd be afraid, especially working alone, to wet the hull then try and roll on big pieces of glass like that, but it sure looks like a good way if you can do it. I'd make a mess and be alone with it struggling to get the wrinkles out.
Has his limitations Dougster
Posted: Thu Jul 31, 2008 7:25 pm
by steve292
I'm not sure I could do the wide cloth thing on my own either,but it sure saves time.If I do this boatbuilding thing again
,I will have to enlist/bribe with beer a helper.
What are you going to use for a skeg,if you are going to use one at all?
Steve
Posted: Thu Jul 31, 2008 8:49 pm
by Spokaloo
Just wait a few hours and its cake. You can get to a period where the epoxy is still really green but not nearly as tacky. Just takes some patience.
Tighter than a frog's ass Joel.
E
Posted: Fri Aug 01, 2008 1:21 am
by Cracka
Nice job Joel. You blokes make it look so easy.......Is that the power plant I see under plastic, 50 Honda.
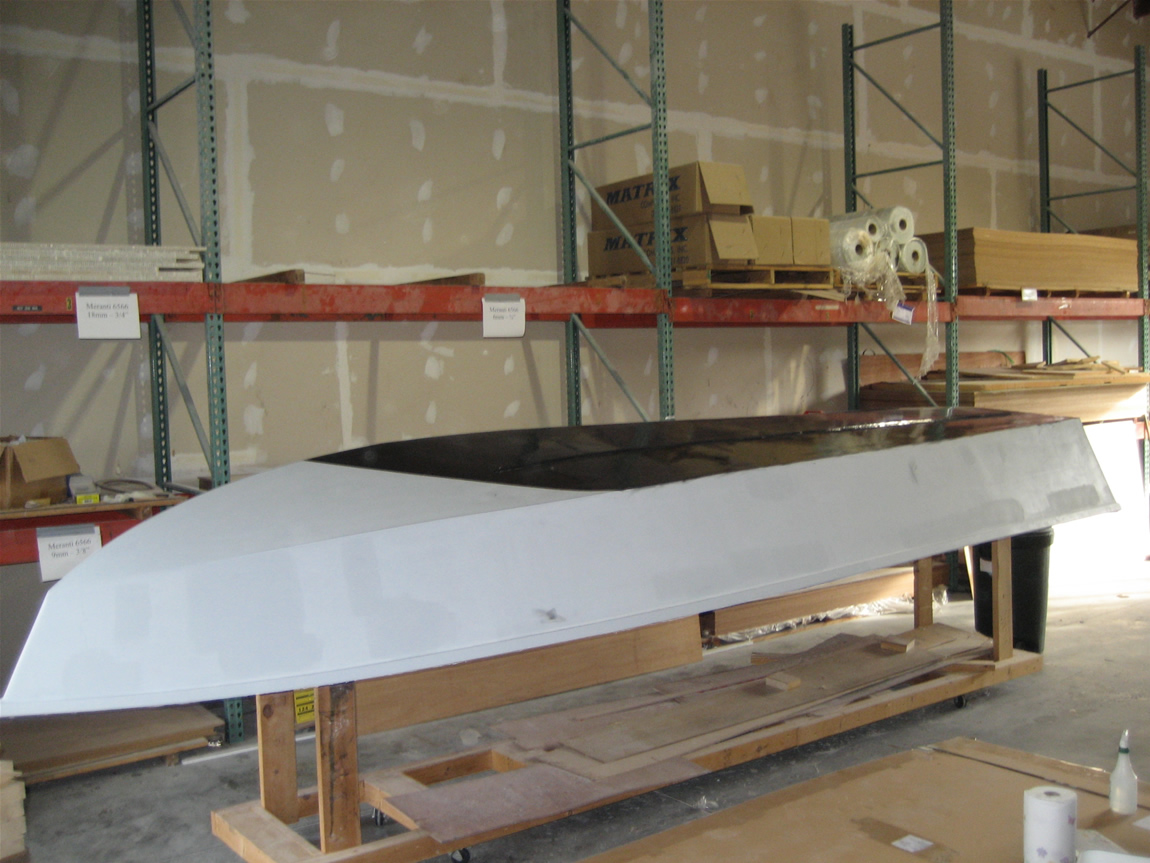
Can't wait to see the sheer when she is flipped, it looks great upside down!
Mick.
Posted: Fri Aug 01, 2008 1:54 am
by TomW
Very nice job Joel. Can't wait to see this complete instructional series.\n
Tom
Posted: Fri Aug 01, 2008 10:06 am
by dborecky
Joel,....
to build with such speed and precision..... you suck....

Posted: Fri Aug 01, 2008 11:19 am
by tech_support
Thanks guys.
Its the CNC machine that makes it fast and accurate - not us
There was two of us working, one person mixing most of the 24 ox batches and the other spreading. Working this way, you will move fast. In the tim it takes to mix a 24 ox batch, the second person has used the previous 24 oz.. When you get to a spot were you need more time, split the batch into 2 pots and both people work.
Joel
Posted: Fri Aug 01, 2008 11:57 am
by Spokaloo
Wow, that cuts time out heavily compared to my one-guy, one-cup method at 9 oz at a time.....
E
Posted: Fri Aug 01, 2008 2:08 pm
by peter-curacao
Spokaloo wrote:compared to my one-guy, one-cup method at 9 oz at a time.....
E
wat's wrong with that ? I did it the same way
And Joel really nice job is that you in the pic's?
Posted: Fri Aug 01, 2008 2:22 pm
by tech_support
That is Joseph in the pictures. I am the one behind the camera
Even the largest lamintions can be done by one man, with the right prep work. But having an extra set of hands for those big laminations cuts the time by at least 2/3.
I will be doing most of the rest of the work myself; rubrail gluing, fairing, etc..
Posted: Mon Aug 04, 2008 9:44 am
by mecreature
It does look easy.. I am with the others no way I would try that whole mess at once..
Not bad shine.
Posted: Mon Aug 04, 2008 8:35 pm
by bushmaster
Joel, you are sooo good.
I see Joseph is becoming an expert like you.
Say hello
Bushmaster
Posted: Thu Aug 07, 2008 4:22 pm
by tech_support
Posted: Thu Aug 07, 2008 5:45 pm
by gk108
shine wrote:Using the gelmagic cartridges was nice, but making your own glue is not much more work.
It looks like it would be just the thing for gluing up birdsmouth masts and other such assemblies. Good control with the gun applicator, but you don't have to worry about the batch kicking while you make adjustments like you would with a regular caulking tube.
Posted: Fri Aug 08, 2008 12:10 pm
by tech_support
The cartridges would be perfect for those type applications
Posted: Fri Aug 08, 2008 12:26 pm
by tech_support
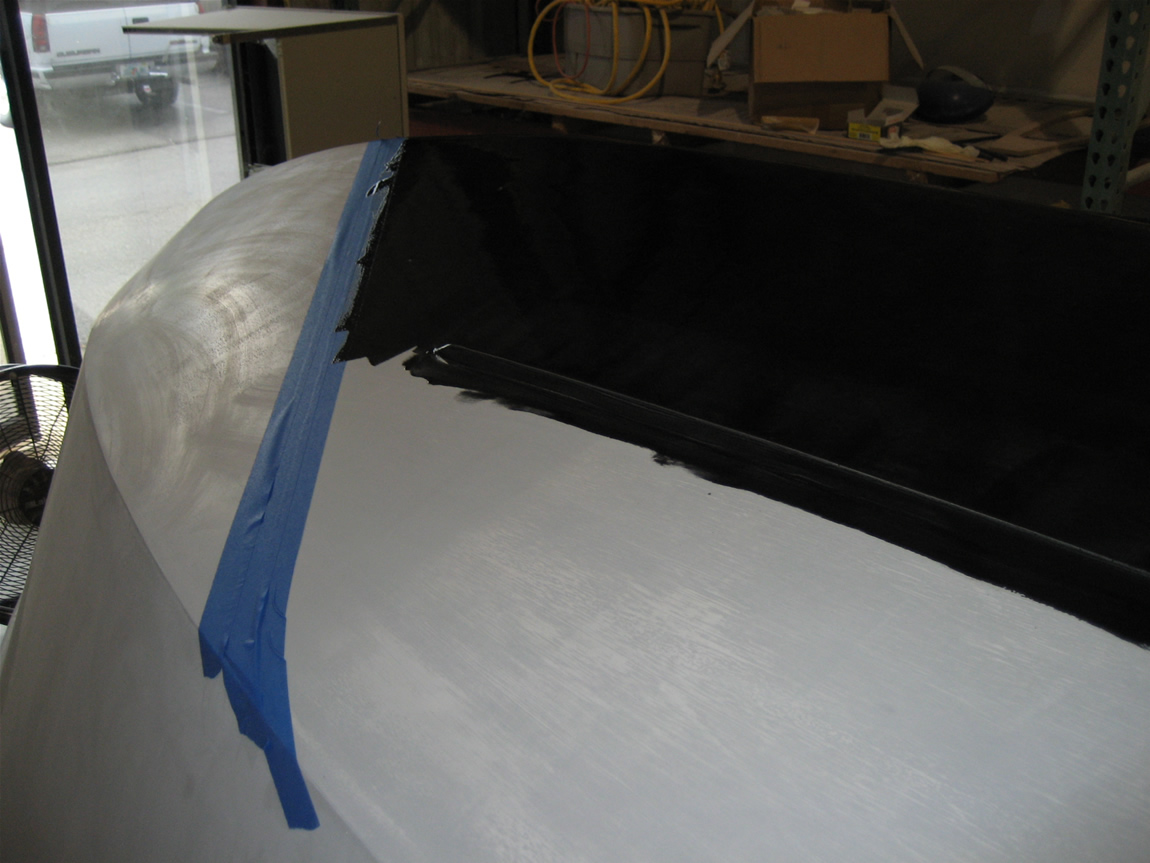
Put on the second layer of rubrail today. We will probably stop with 2 layers on the inside and then add 2 more layers to the inside (shear clamp).

Took a few shots of the fairing to be done..... no much
Before putting on the rube rail, we put a extra layer of 9 oz cloth on the bottom. I plan on running her up on the spoil islands quite a bit, so I wanted some added protection. We trimmed that extra layer of glass so it fit in between the tape seams/overlaps. This has the effect of fairing the humps of glass on the joints from all the over laps. You can see it in the pictures.
After wetting out the extra layer of glass, we made a couple batches of epoxy/silica/woodflour slurry ans filled the weave of the biax all over
[before all of this we used the sander with 60 grit to knock down the stitching of the biax and any proud glass spots]
Later today, I hope to start fairing
Posted: Fri Aug 08, 2008 1:06 pm
by jeremy
You filled the weave with woodflour? I would have expected an epoxy/silica/microballoons mix. Won't the woodflour be very difficult to sand?
Posted: Fri Aug 08, 2008 1:32 pm
by tech_support
I do not intended to sand it
I only filled the weave with it, you can see it in this picture....
If the slurry is loose or thin enough, you can spread it all around with a plastic squeegee. When you apply enough pressure, it only fills the weave holes in the biax. Sort of like filling the depressions in a waffle with butter
I suppose I will have to sand it a little in any spots where I did not clean up, but that will only take a few minutes.
The filler I used is 2 part woof flour to 1 part silica by weight, the silica makes it smooth
Posted: Fri Aug 08, 2008 5:01 pm
by tech_support
Posted: Fri Aug 08, 2008 11:23 pm
by wegcagle
You're doing an incredible job Joel. How tall will the low shear version sit off of the water line? Also do you expect the draft to be the expected 7" or will it sit a little higher on the water? By the way, I'm getting ready to see how the poling platform will come together.
Oh well patience is a virtue (or so I keep getting told)
Posted: Sat Aug 09, 2008 9:04 am
by Chalk
Awesome build and some really nice tips spread through out your post.
Can't wait to see this one finished in record time.
Very nice Joel
Posted: Mon Aug 11, 2008 9:39 am
by tech_support
The boat should be about 400 pounds less engine/gear/fluids. This will bring the daft down to 6" from the DWL. Adding 2 men, gear, and fluids should make it about 300-400 pounds under the the designed displacement. With a PPI of around 350" the boat will float 1" higher.
In such a small boat, you can see the place to save weight is in the engine/gear/and choice of fishing partner
The hull weight becomes a smaller percentage of the entire displacement
Posted: Tue Aug 12, 2008 10:07 am
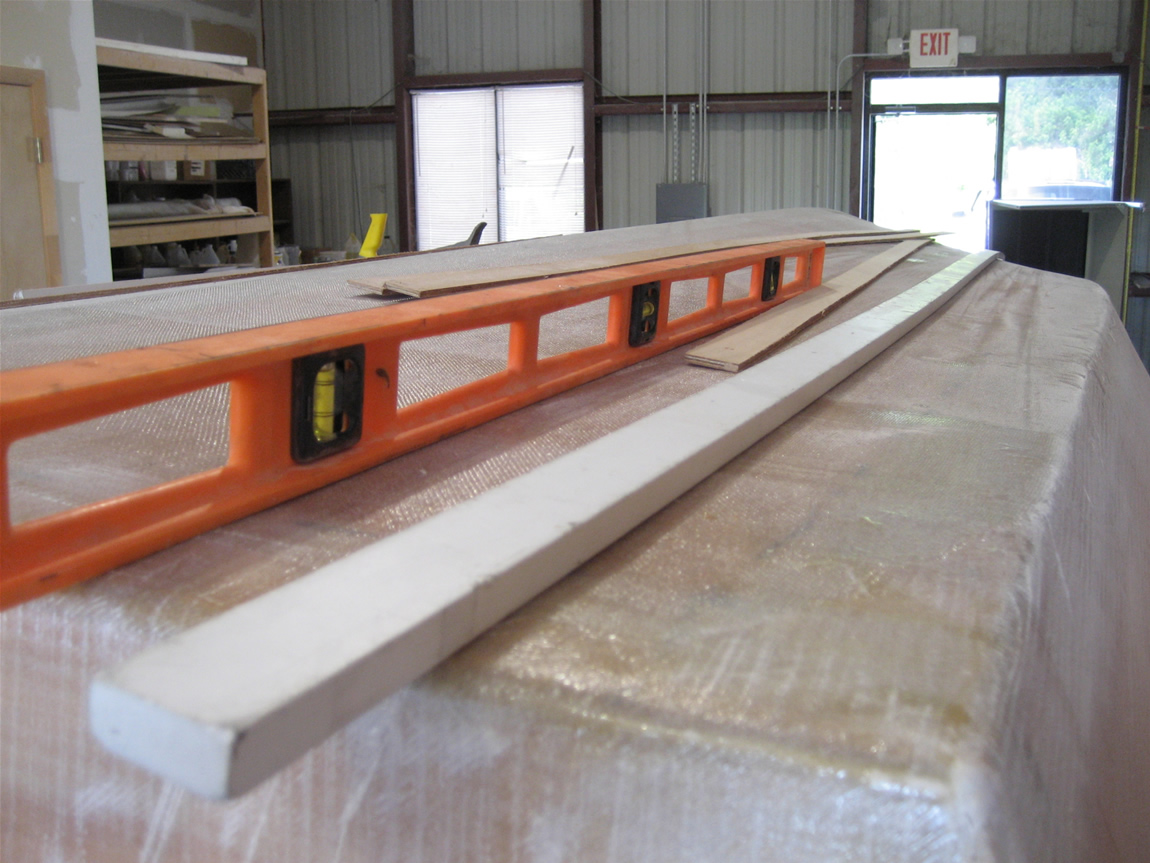
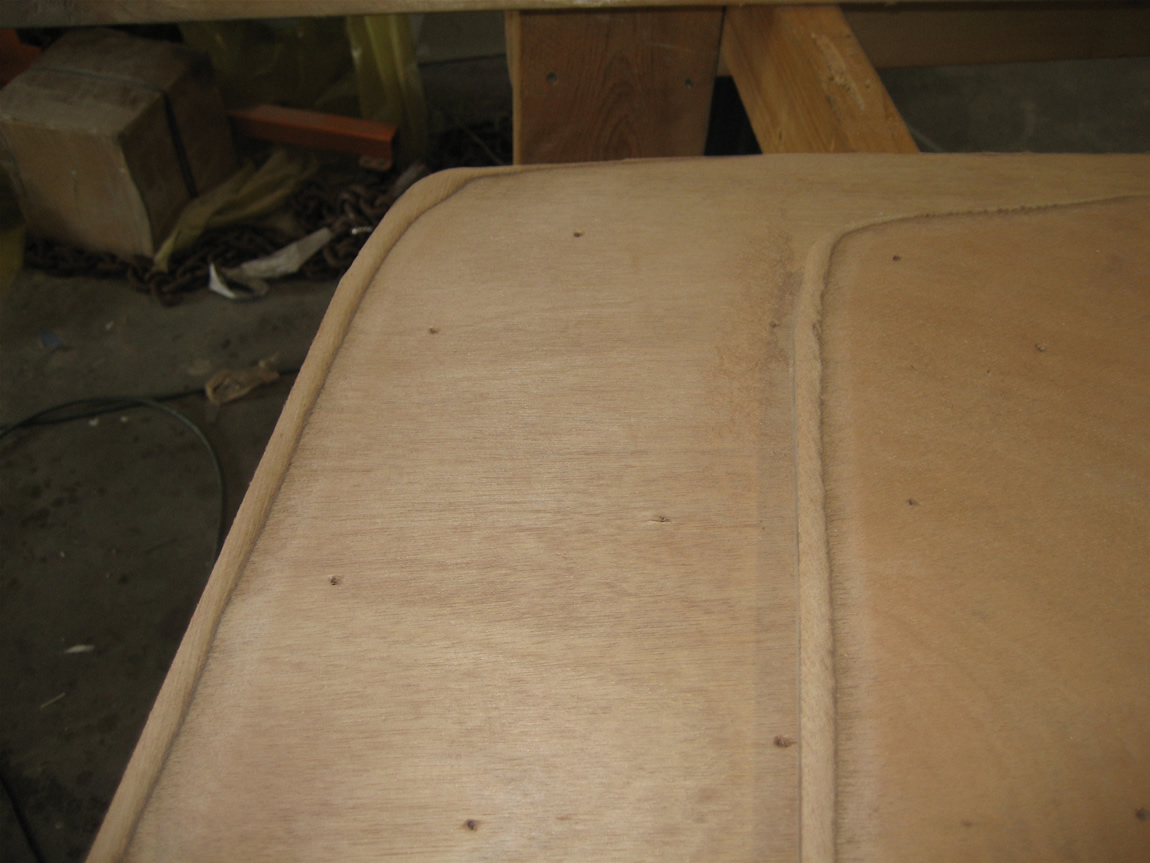
by tech_support
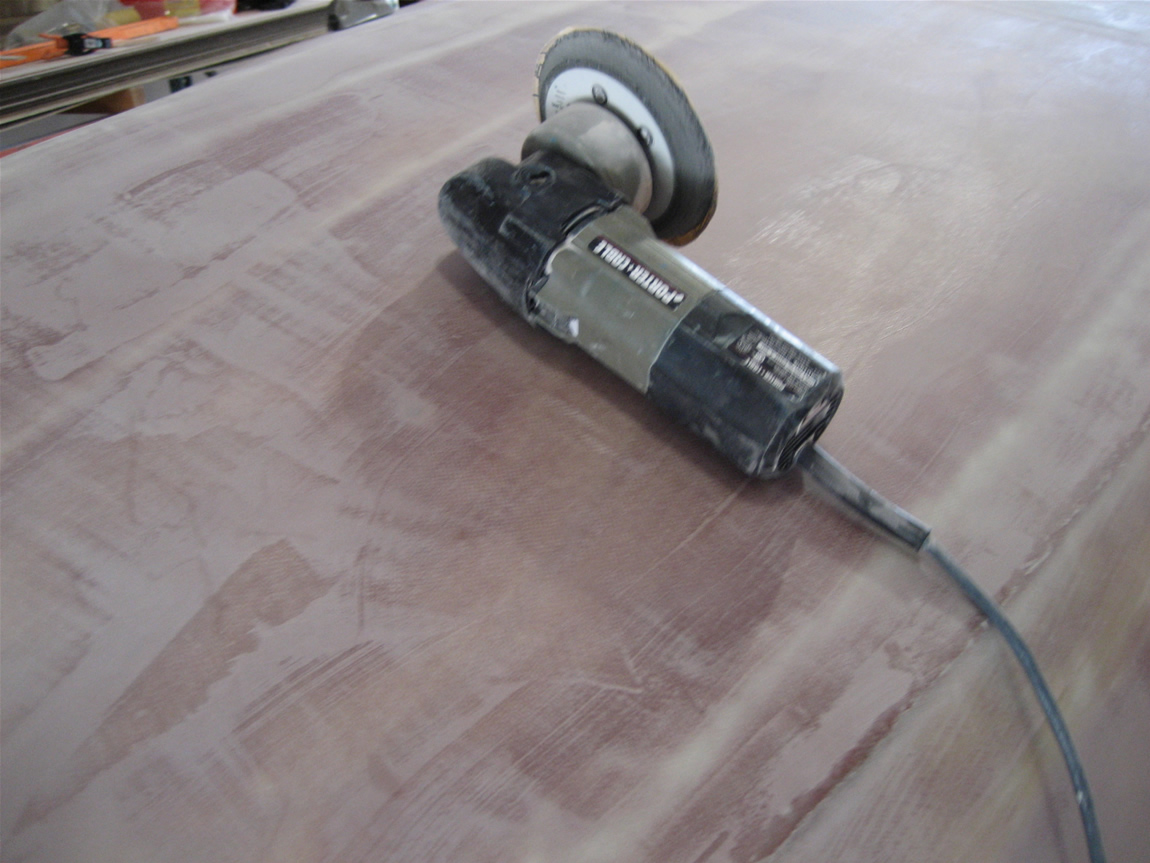
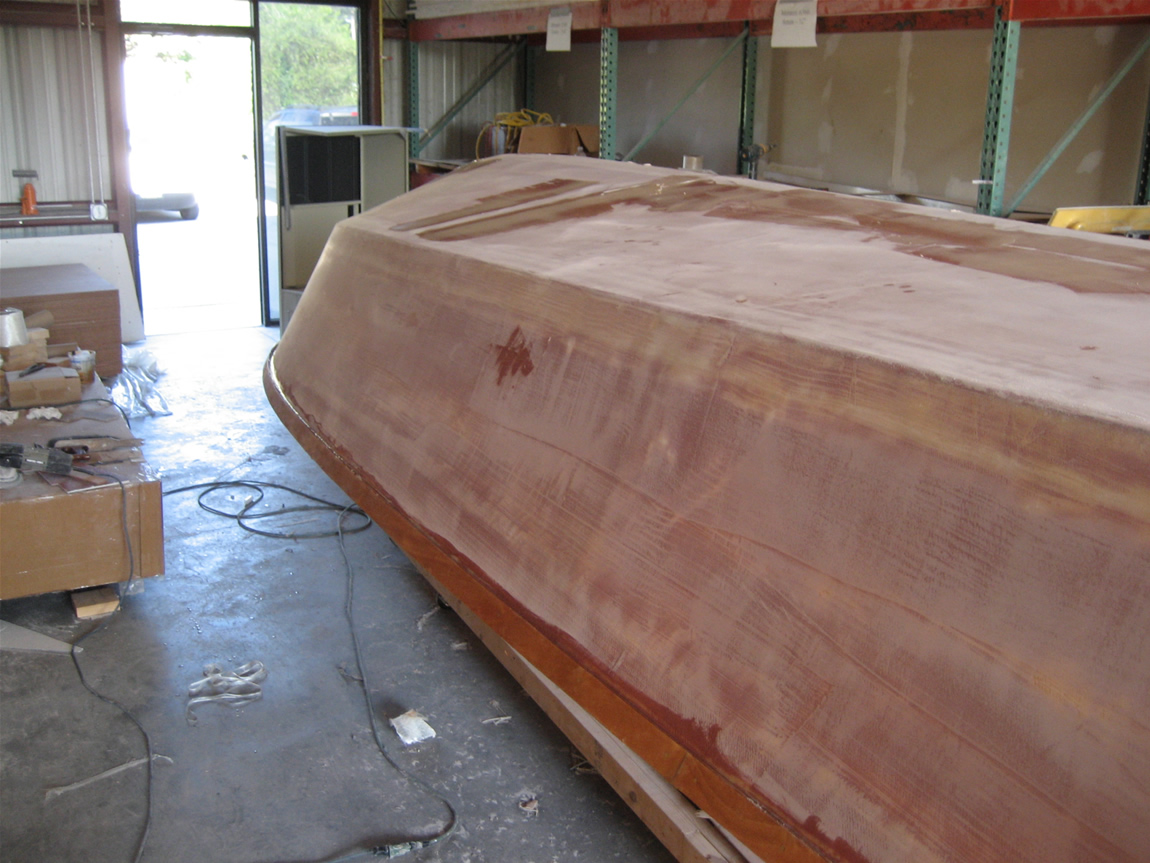
Yesterday afternoon I was able to start the fairing. The blended filler fairing we applied Friday afternoon was VERY hard by now

I used three tools:
A Stanley Sureform
A large flexible fairing board (with 60 grit paper)
6" DA sander with 80 grit (I would have used 60 if I had it handy)
The sureform makes quick work of removing blobs of putty and taking down very high spots
Then I move to the fairing board. The board is long enough to span low spots - you only hit the highs. This shows were you need to fill in more later. In the pictures you see were the faring board removed the blended filler from the highs and left it in the lows. Move the board at 45 degree angles.
After removing highs with the board, I smooth everything out with the DA. The lows are still easy to differentiate.
This is what she look like after the first sanding of fairing...
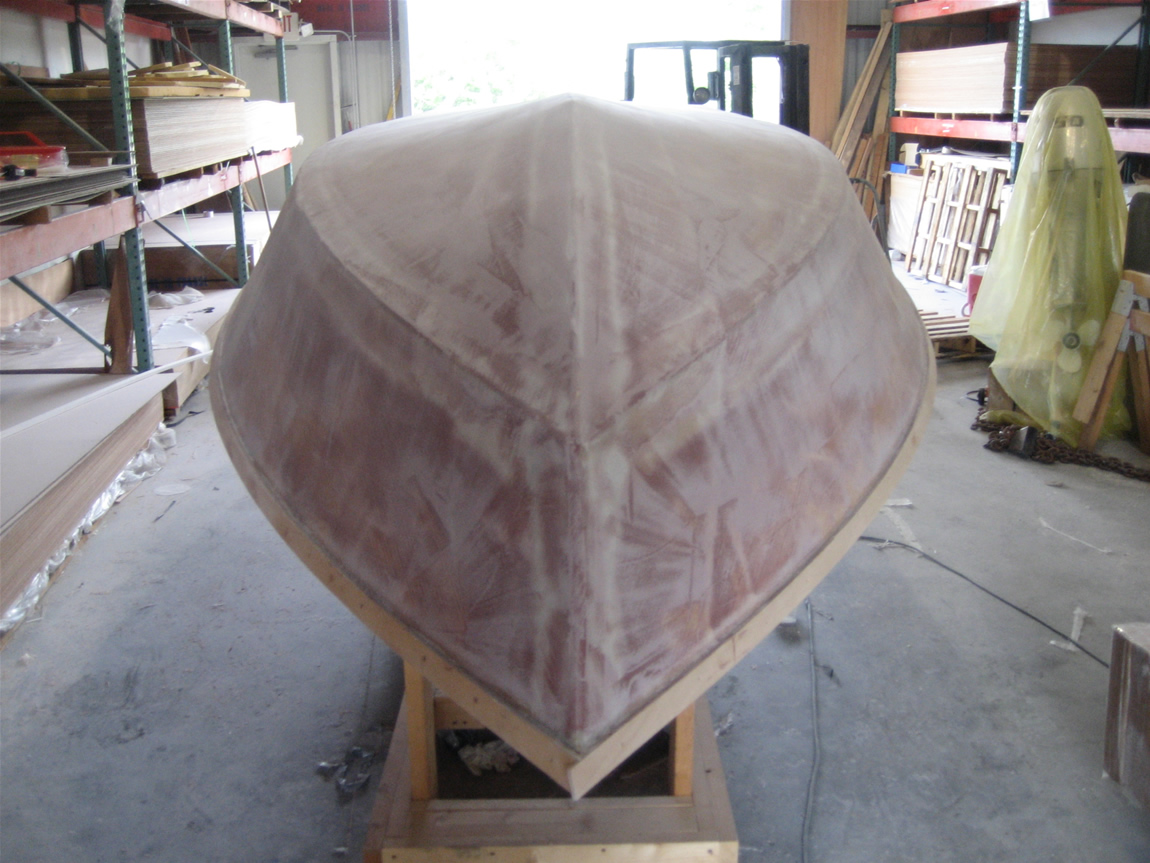
Notice how the fairing board exposed the fiberglass splices in this picture - they get quick fair

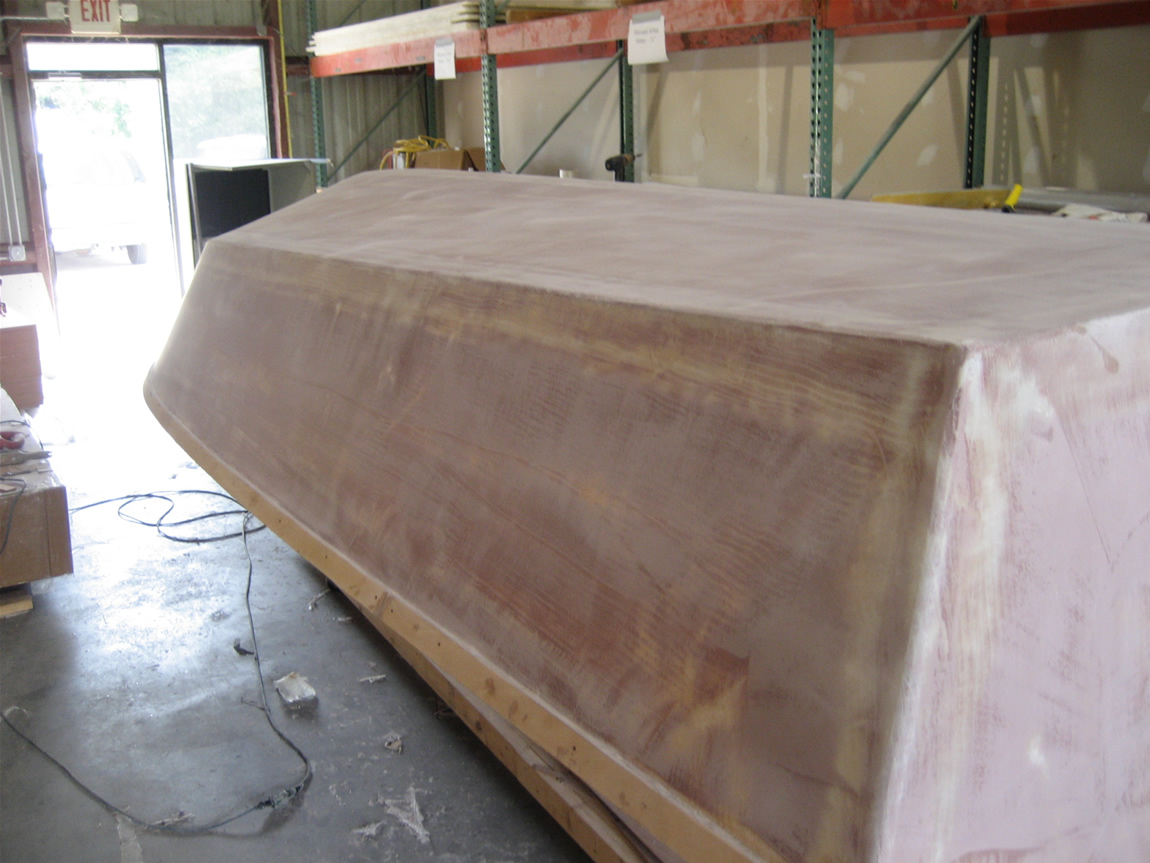
You can really see the lows spots that we missed in the initial fairing pass...
This area was pretty good...
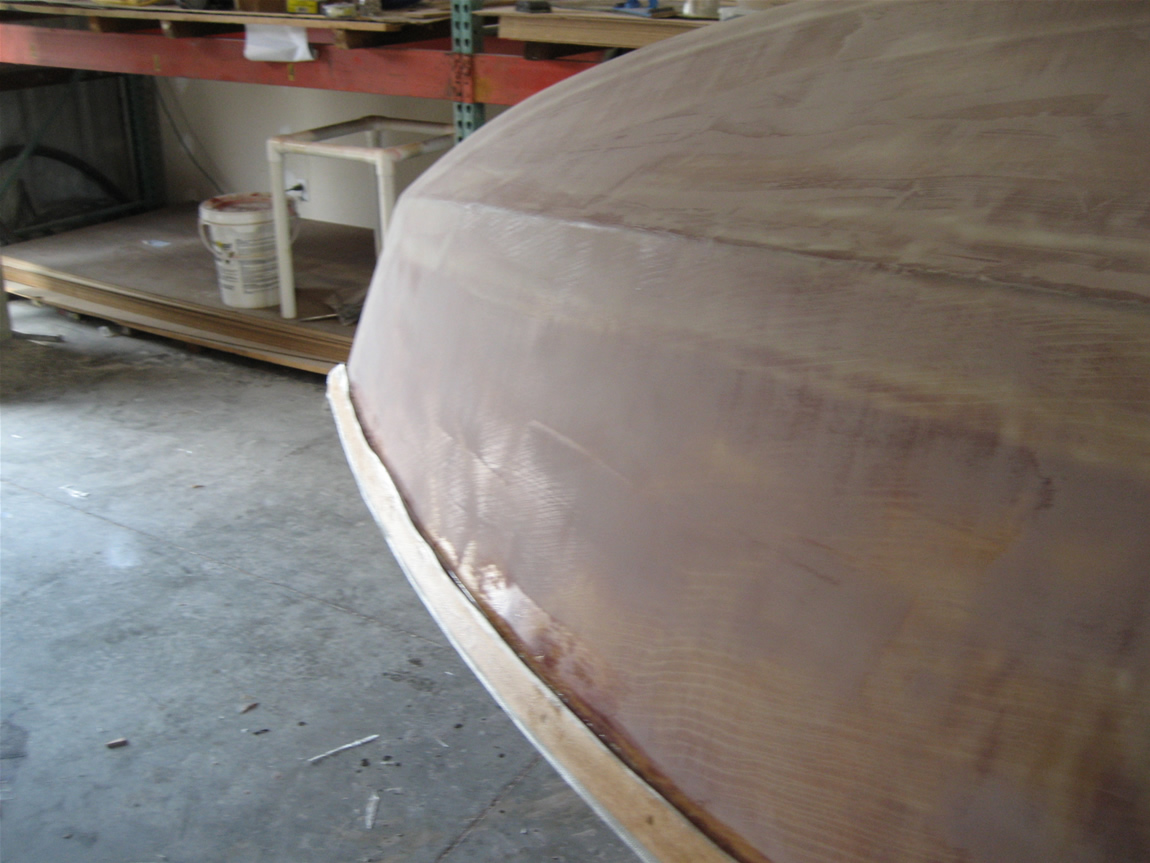
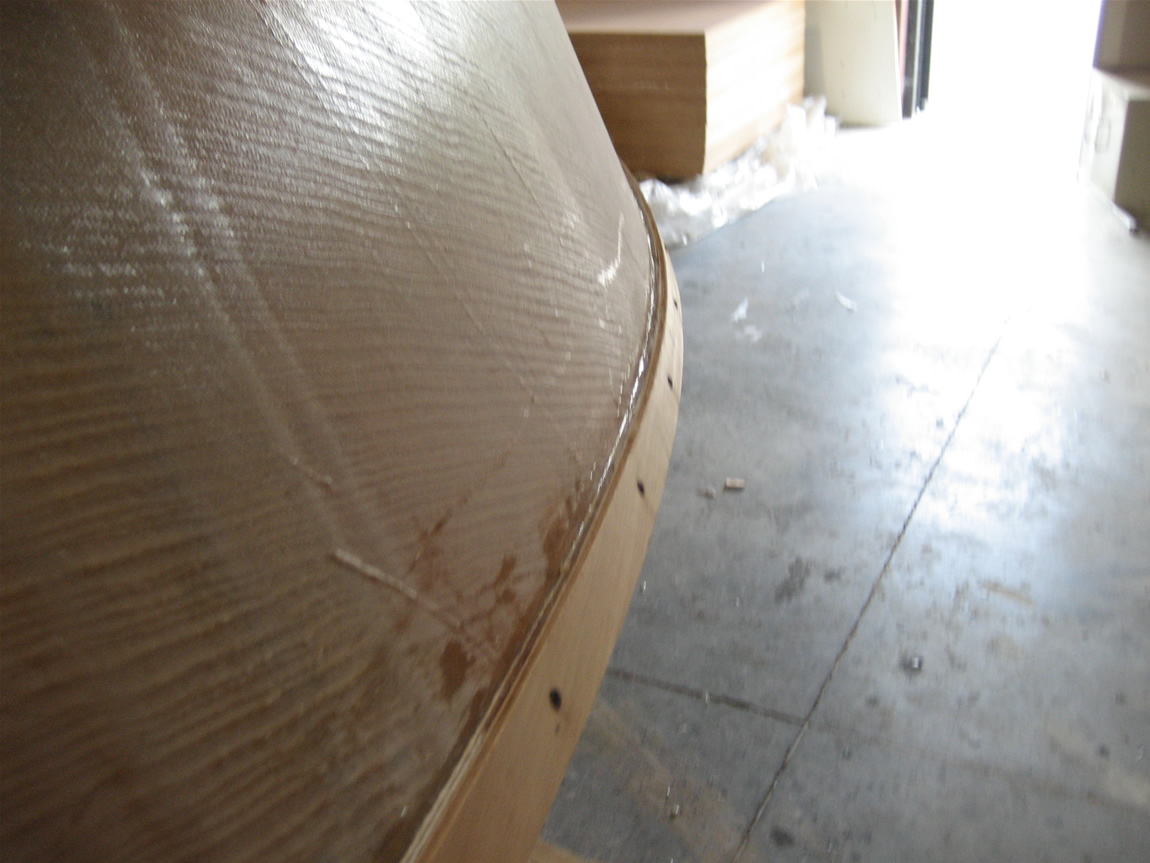
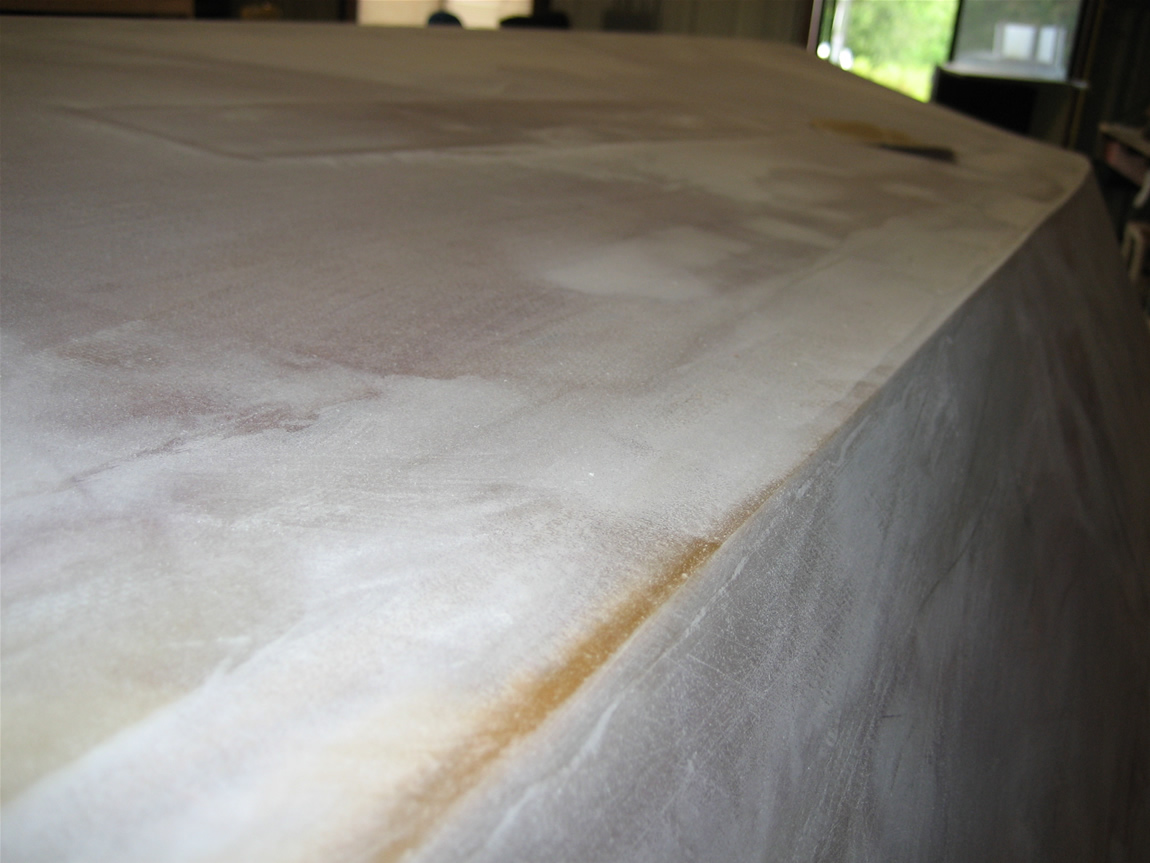
You can also see that I put some 6 oz tape of the rubrails. I did not wrap the tape, just trimmed it flush. When the boat is flipped, i will round over th rails with a router, then put some biax tape of the rubrail and inwale. The boat will only have a rubrail/inwhale
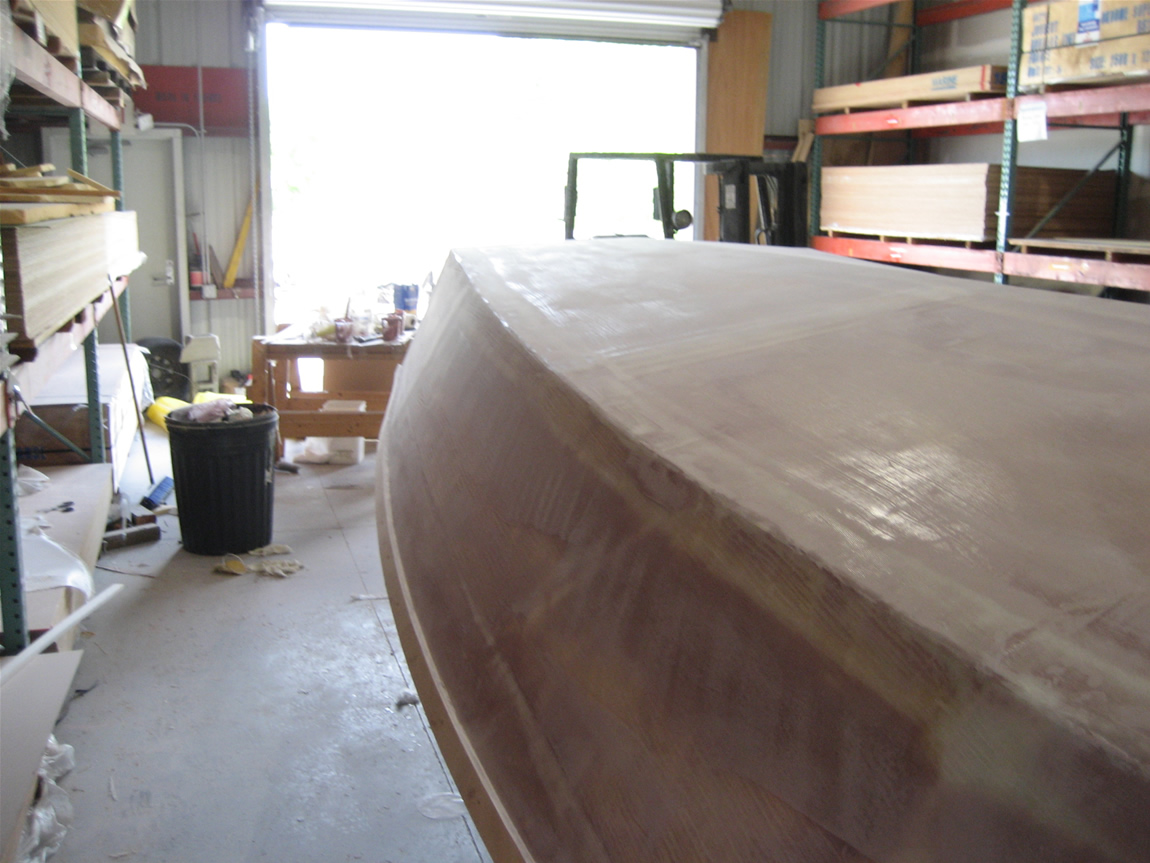
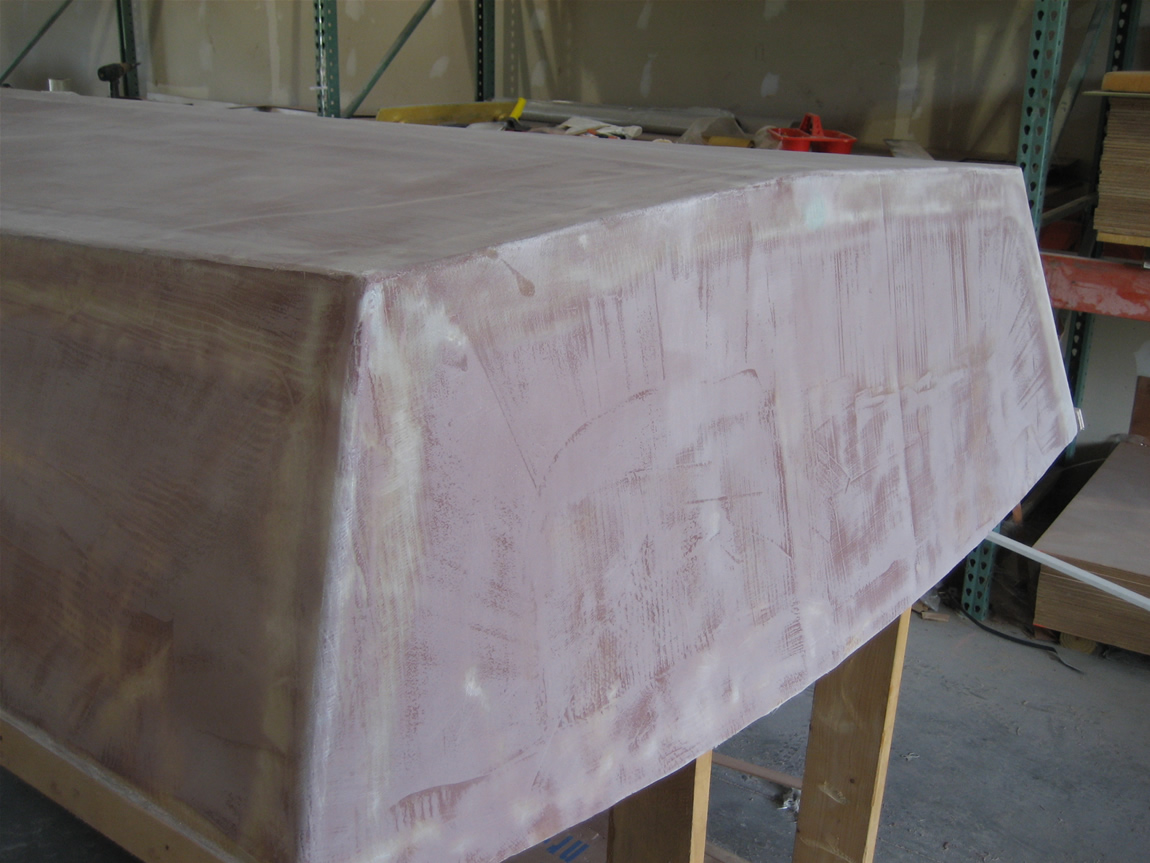
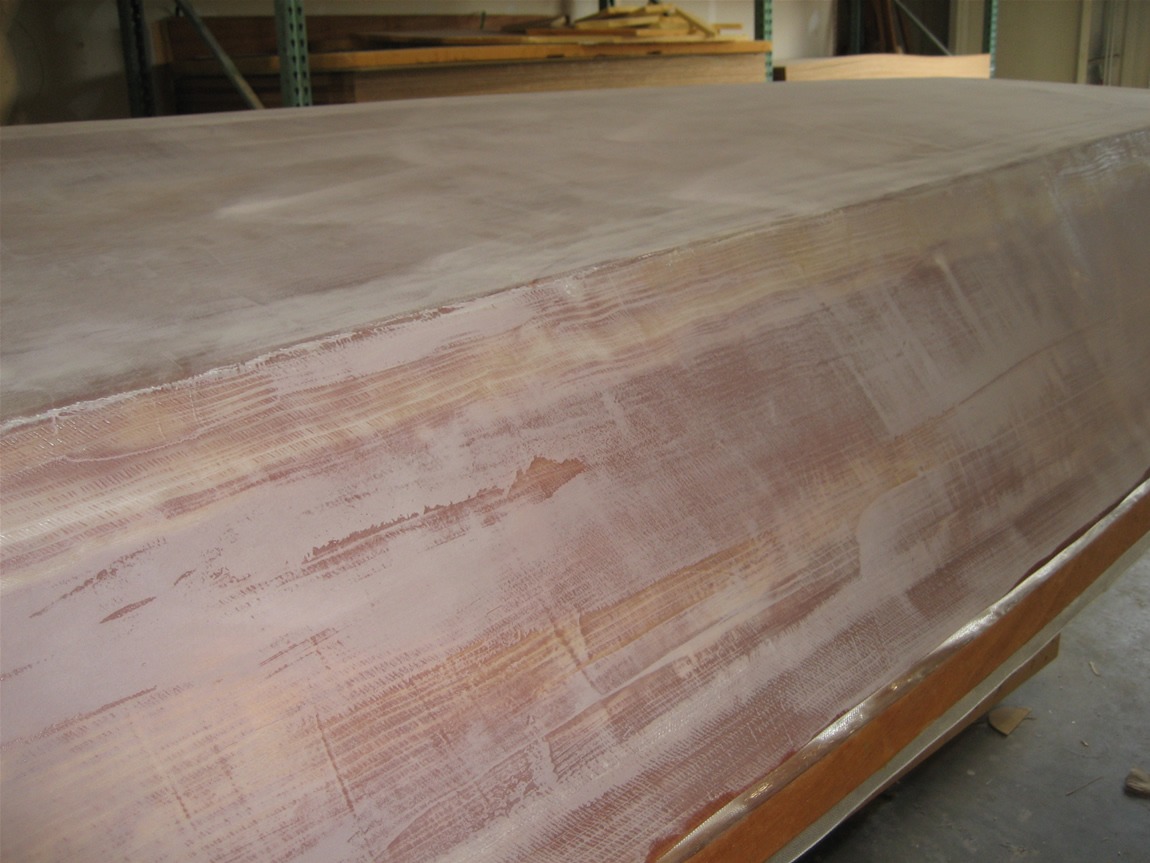
After the sanding, I had enough time to get a couple batch of Quickfair on the bottom and transom.
Quickfair spreads much more smooth, so you can really feather in the putty. Here we are filling in the lows towards the bow (in the previous shots you can see where these lows used to be)
(BELOW) Fairing either side of the fiberglass splice (high spot). Notice that there is no reason to put faring on the high spot, thats a waste. We put one edge of the spreader on the edge of the high and drug the putty down. You will not get it perfect the first pull, take any excess from the first pull and reposition it so that on the second pull it fills in spots you missed in the first attempt. It make take a few pull until you get it just right
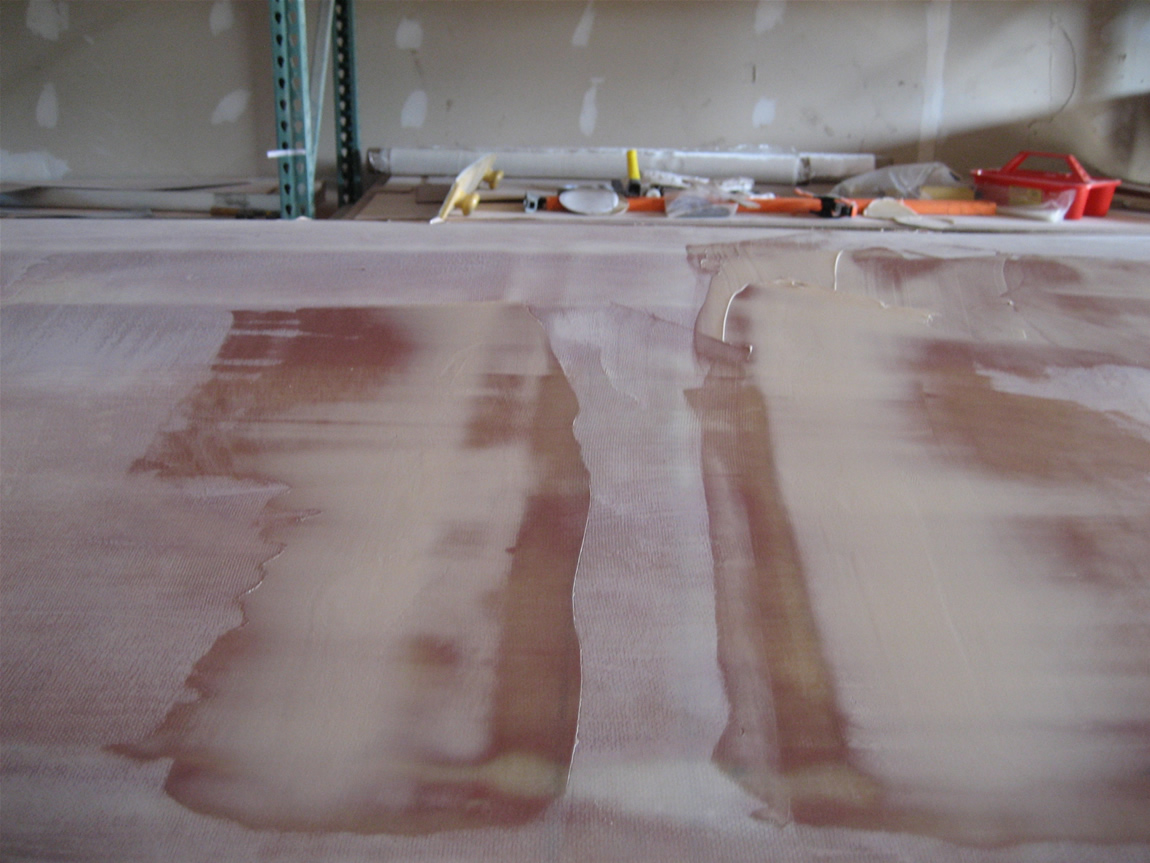
Transom was pretty good, just needed to fill in a little...
This area bottom/transom was a really very close to fair, just a pass to fill in spot missed by the first fairing...
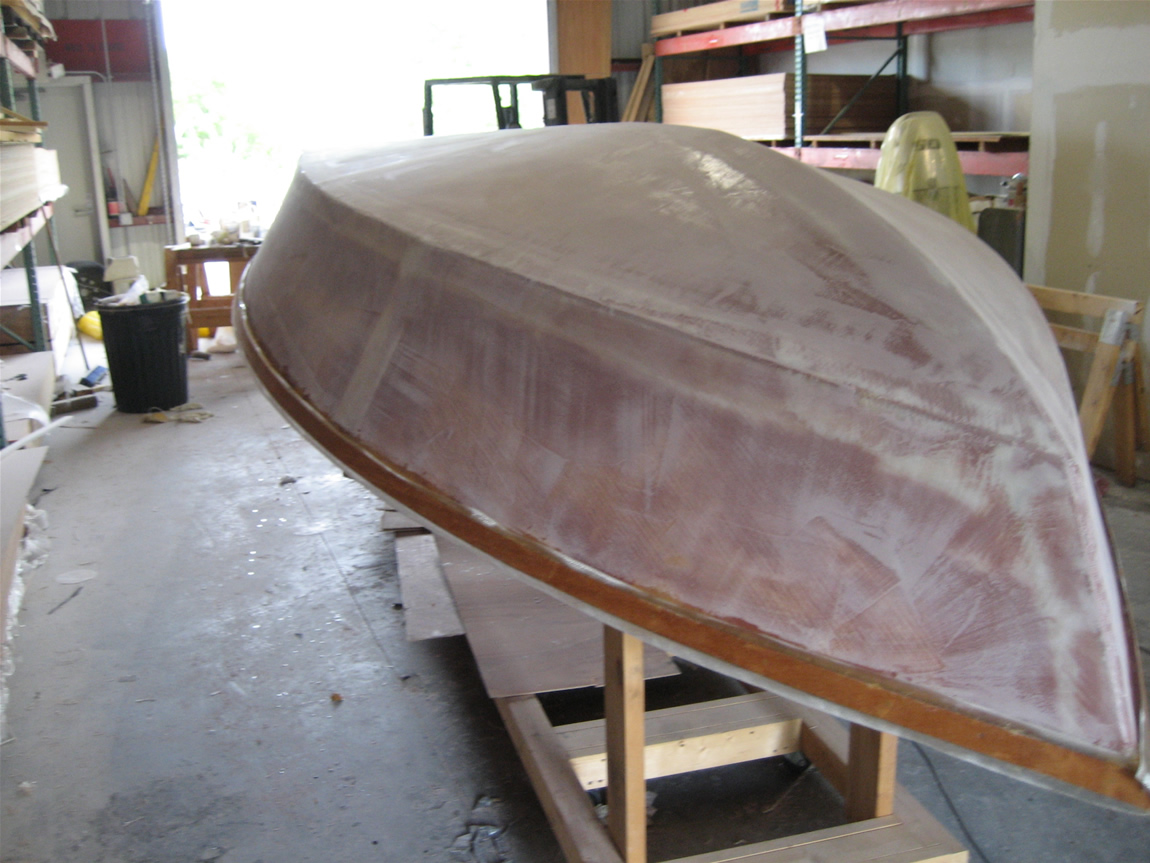
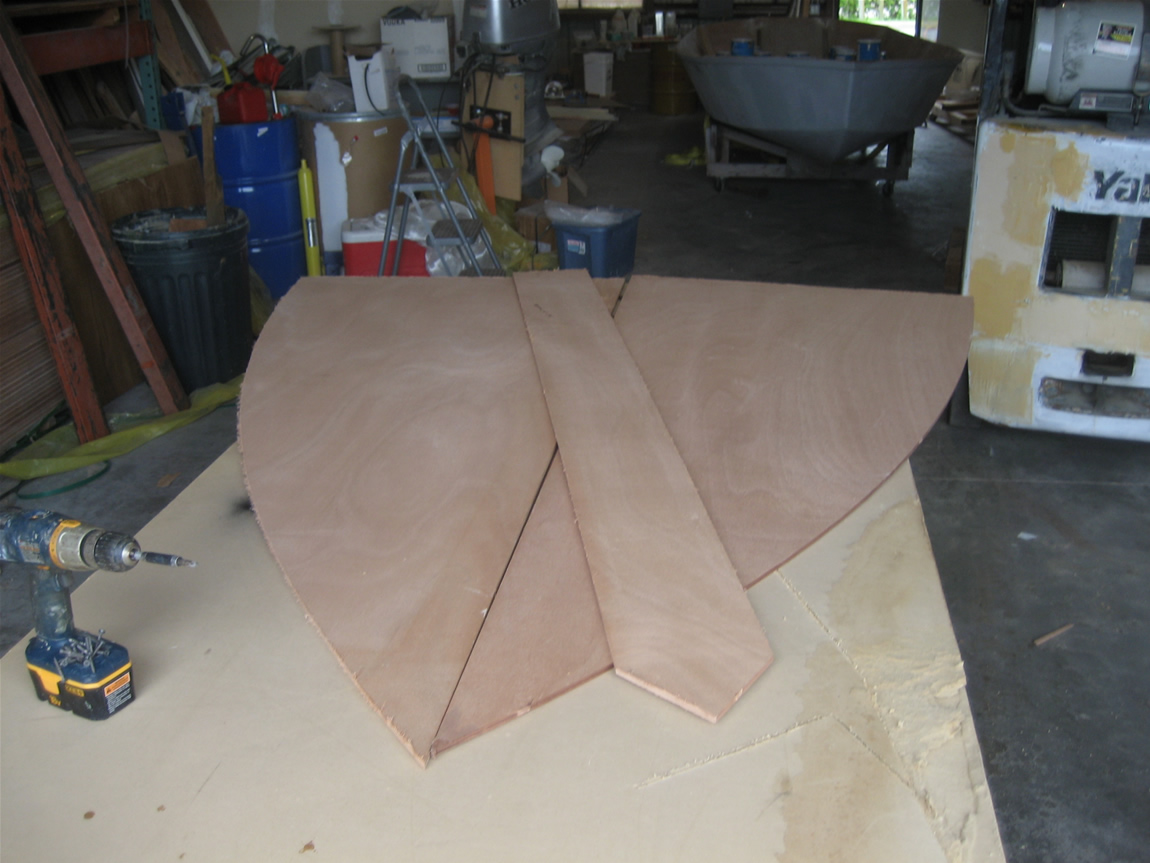
Next I will make runners/strakes/sprayrails - I have to find a good mold at the home store for this. After gluing down the runners, I will create a sharp edge on the chine and bottom.
At that point, Im going to apply my new barrier coat epoxy product and flip her. I will wait until the inside is finished to do the final fairing/primer on the sides.
Joel
Posted: Thu Aug 14, 2008 4:49 pm
by tech_support
Posted: Thu Aug 14, 2008 7:07 pm
by Cracker Larry
That's a neat idea with the runners
Posted: Thu Aug 14, 2008 7:19 pm
by jgroves
I like the runners! Great idea! Quick you are, quick
Posted: Thu Aug 14, 2008 7:35 pm
by TomW
Shine great minds seem to think alike
, that's what I bought all that milled fiber for on this order. Hope I got enough. It is a super idea glad you showed me how to do it. I was going to use wood and plastic wrap, your aluminum and mold release looks easier and I'll add the chopped glass, I was going to use sawdust and silica.
Tom
Posted: Tue Aug 19, 2008 12:47 pm
by Chalk
I like the runner molds, Joel
Posted: Tue Aug 19, 2008 1:34 pm
by Oceola
Good Idea Joel.
I'm sure you've thought of it but for others...make sure you clean off ALL the mold release from the runners.
Frank
Posted: Thu Aug 21, 2008 12:45 pm
by tech_support
Posted: Thu Aug 21, 2008 1:40 pm
by Rick
Looks nice, Joel. I miss the purple Quick Fair though...
Posted: Thu Aug 21, 2008 1:48 pm
by tech_support
Rick wrote:Looks nice, Joel. I miss the purple Quick Fair though...
We have some dark blue pigment
The new QF hides much better, the old stuff would made a very dark background even through a couple coats of primer. But I know what you mean about contrast helping to show highs/lows
Posted: Thu Aug 21, 2008 1:57 pm
by Cracker Larry
That is a very neat trick with the chines
Posted: Thu Aug 21, 2008 2:54 pm
by mecreature
see the low spots that need one more Quickfair pass:)[/quote]
Just one more uh..
I would be 2 months before I got to priming..

Posted: Thu Aug 21, 2008 3:55 pm
by michaelk
Cracker Larry wrote:That is a very neat trick with the chines
I did this on my transom where it meets the bottom of the hull. I used a few pieces of foamcore (from a craft store) and used a few drops of superglue to attach it to the transom. When I was done, most of it pulled right off and the paper residue came off easily with sandpaper. Very fast, and makes a nice sharp line.
-Mike
Posted: Thu Aug 21, 2008 4:50 pm
by tech_support
made a video of how we like to measure quickfair....
http://www.youtube.com/watch?v=2nKmjFozTAE
Posted: Fri Aug 22, 2008 10:31 am
by topwater
Shine you make it look easy
Posted: Fri Aug 22, 2008 11:57 am
by jgroves
Good video.
I can tell it's warm there by the viscosity of the putty
.
Posted: Tue Aug 26, 2008 12:49 pm
by tech_support
Posted: Wed Aug 27, 2008 9:06 am
by jgroves
I really like the idea of he gelmagic stuff! Does it cure hard? Is is basically epoxy? I guess it does, but how well does it hold in comparison to mixed (jug) epoxy?
Posted: Wed Aug 27, 2008 9:12 am
by mecreature
jgroves wrote:I really like the idea of he gelmagic stuff! Does it cure hard? Is is basically epoxy? I guess it does, but how well does it hold in comparison to mixed (jug) epoxy?
I have wondered the same thing..
I will also ask
How does it compare in cost?
Posted: Wed Aug 27, 2008 9:13 am
by tech_support
jgroves wrote:I really like the idea of he gelmagic stuff! Does it cure hard? Is is basically epoxy? I guess it does, but how well does it hold in comparison to mixed (jug) epoxy?
Its the same gelmagic epoxy glue that System Three puts in the jugs. Its extremely good glue if you look at the technical properties.
The cartridges are expensive if you compare them to the cost of the volume of the same epoxy in a jug. BUT I can tell you they not only save A TON of time and make for clean work - there is virtually zero waste.
I used the same cartridges when I laminated the rubrails.
On big glue jobs (transoms, stringers, butt blocks, etc) its much easier to mix bigger batches from the jugs. For small jobs the cartridges a very nice
Posted: Wed Aug 27, 2008 9:58 am
by jgroves
Gelmagic sounds like a great product. The cartridge would probably end up saving me money as the waste factor is nearly eliminated. With small jobs on my boat I would end up over mixing nearly every time. I wish I had all the epoxy I wasted. I could probably have a nice start on another boat.
Posted: Wed Aug 27, 2008 10:03 am
by peter-curacao
It is a great product, very very strong and if I understand correctly it stays a little bit flexible to
Posted: Wed Aug 27, 2008 10:06 am
by jgroves
Shine,
Does the gelmagic you sell come with the tip?
Posted: Wed Aug 27, 2008 10:56 am
by tech_support
each cartridge comes with a mixing and dispensing tip.
Posted: Wed Aug 27, 2008 11:06 am
by Gramps
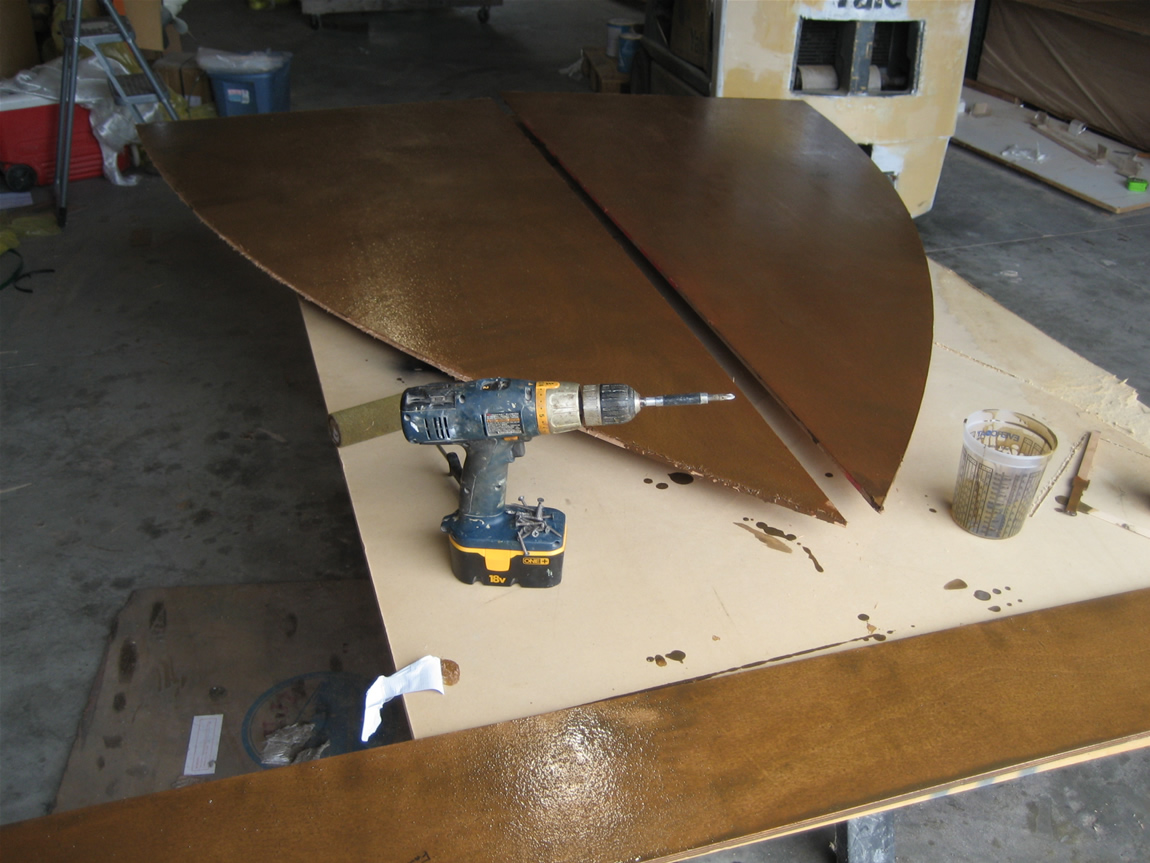
Uh oh, is it now a carbon composite boat Joel? Guess I mean, is that CF tape on the strake/runner? If it is, would you suggest using cf tape on these types of runners where the brunt any ground/log/shell impact would occur?
Posted: Wed Aug 27, 2008 11:09 am
by jgroves
That's a great price! Locally I can get it, but it's without tip and retail is 24 bucks. Great price man! I need to find something else to build.
Posted: Wed Aug 27, 2008 11:18 am
by tech_support
Gramps wrote:Uh oh, is it now a carbon composite boat Joel? Guess I mean, is that CF tape on the strake/runner? If it is, would you suggest using cf tape on these types of runners where the brunt any ground/log/shell impact would occur?
no, no thats just black pigment
I would never use carbon fiber in the strakes for the reason you suggest
Joseph made the last strake in the mold, and i guess he wanted to try some black pigment for fun.
the strakes are made of epoxy, milled fibers, chopped glass, and some scrap woven tape (and pigment in one of them
)
Joel
That's a great price! Locally I can get it, but it's without tip and retail is 24 bucks. Great price man! I need to find something else to build.
Posted: Thu Aug 28, 2008 12:52 pm
by saltponder
Joel,
Great info; thanks for sharing. Photos are worth thousands of words.
Didn't see the gelmagic on your site. I'd like to order some.
In mixing wood flour, silica and resin for the sharp transom and chine edges, what proportions of wf and silica did you use?
Tnx.
Gil
Posted: Thu Aug 28, 2008 1:00 pm
by tech_support
saltponder wrote:
In mixing wood flour, silica and resin for the sharp transom and chine edges, what proportions of wf and silica did you use?
Gil,
I did not measure them, sorry. The woodflour/silica is mixed at 4/1 by weight - to that I added a handfull of milled fibers. Milled fibers do not thicken up the epoxy very much. You cant really get it wrong unless you mix it so thick so that you cannot force the mix between the mold and the hull
here is the link to the cartridges...
http://boatbuildercentral.com/proddetai ... _cartridge
Posted: Thu Aug 28, 2008 2:29 pm
by tech_support
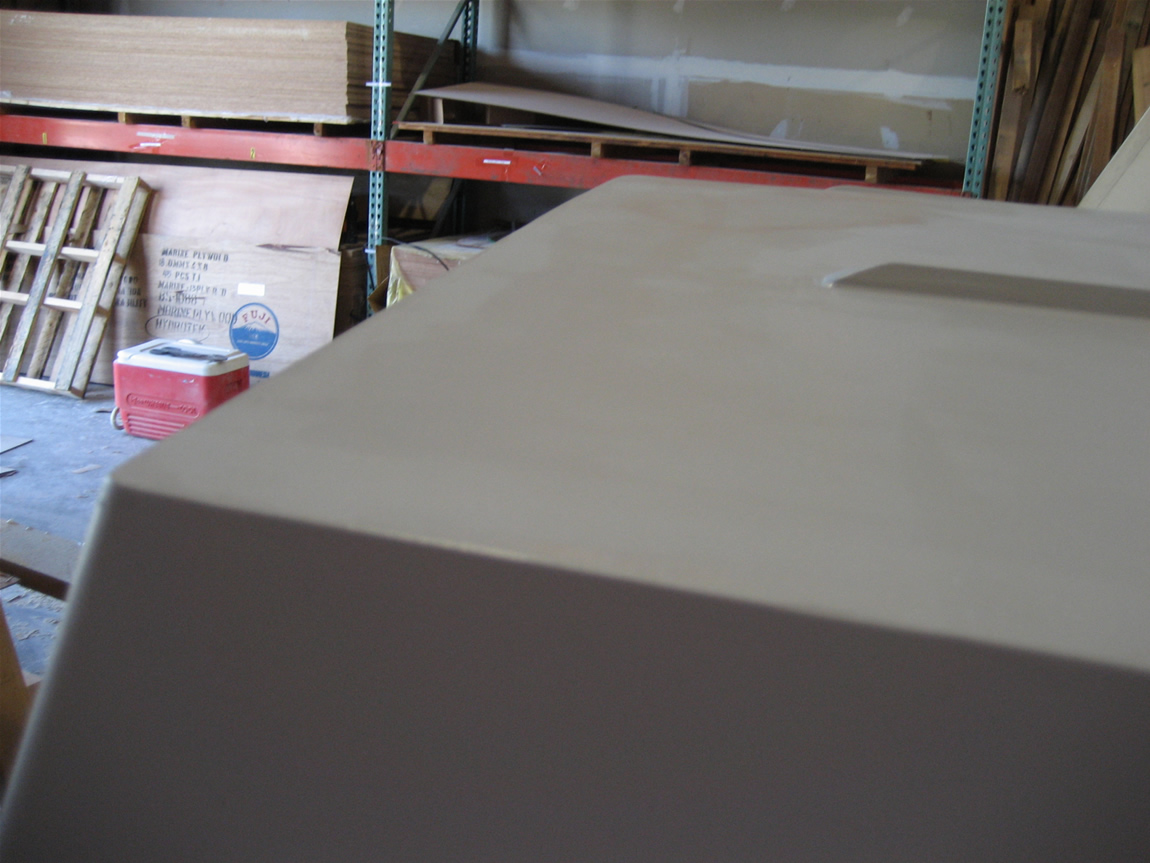
rolled on a little System Three primer
Two coats on port side and transom, only 1 so for on starboard. Have used a total of 1 quart so far.
I need to change the setting on the camera, these shots are fuzzy.
Overall, Im very pleased. I kept looking for dips or wiggles, but could not see anything but minor fills.
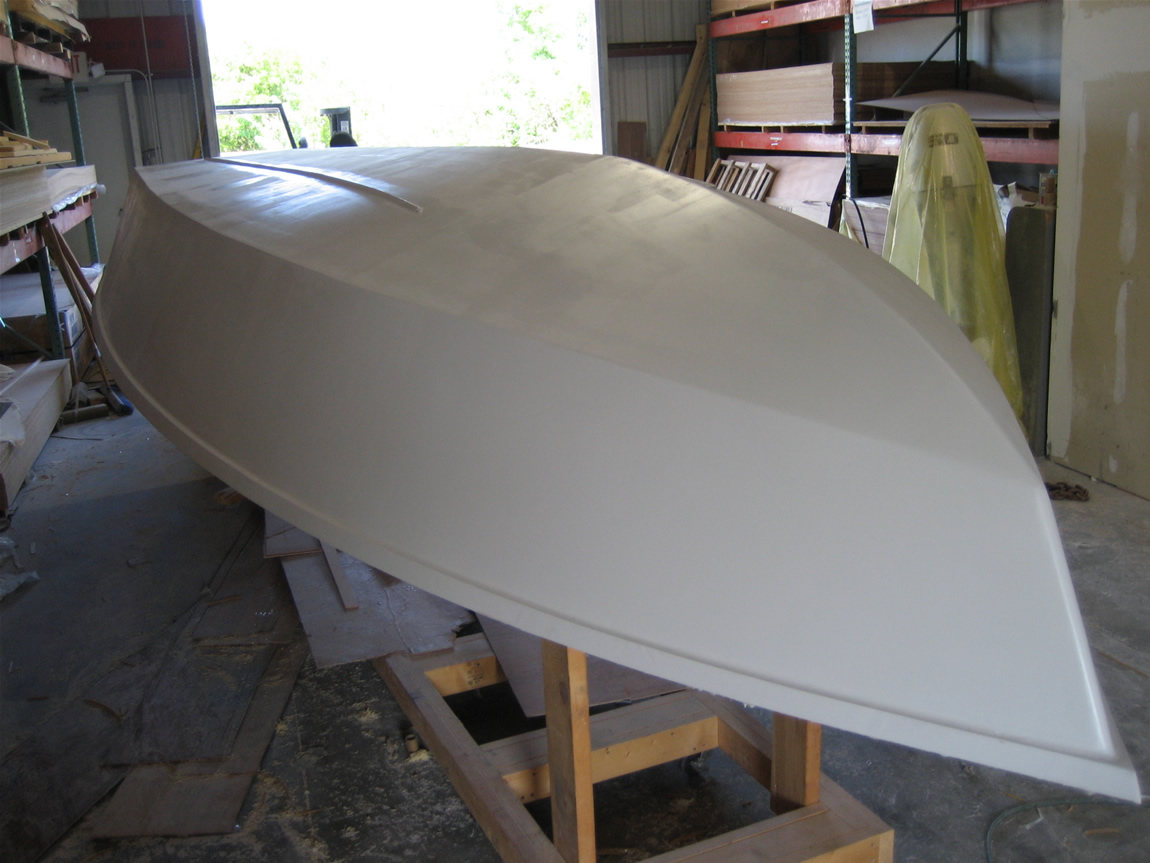
port side/transom corner
in this shot you can see the transition from hard chine, to the more rounded bow. I ended the sharp portion of the chine 24" back from the bow and just blended it in to the round portion with fairing. This is the "sculpting" part
Next comes the bottom barrier coating. We have a new product to test here below the waterline
Hopefully that goes on next week, then we flip her.
Posted: Thu Aug 28, 2008 2:58 pm
by jgroves
I keep saying how fast your building the boat! However I should probably mention the great job your doing first! Great work! Are you keeping the boat when you finish?
Posted: Thu Aug 28, 2008 3:28 pm
by tech_support
thanks for the complimet.
Yes, she stays with me
Posted: Thu Aug 28, 2008 3:55 pm
by TomW
Shine what a nice job your doing. I have forgotten how hard it is to properly fair a boat especially a 40 year old rebuild. You are really doing a nice job and I know you will enjoy her when you are done.
Tom
Posted: Thu Aug 28, 2008 7:49 pm
by Cracker Larry
Sweet.
What are you going to paint her with?
Posted: Thu Aug 28, 2008 9:54 pm
by Dougster
I notice you round the transom edge where it meets the side panels. Should I do that? I have that edge very sharp now, as, of course, is the corner where the transom meets the bottom and side panels. It does seem pretty sharp to hold paint.
Still walking the fair road Dougster
Posted: Fri Aug 29, 2008 6:58 am
by saltponder
Joel,
The 4" you chopped off of the sheer should help minimize "hull sail" effect when poling. Did you consider rounding off the chine at the bow to minimize slap when poling? That would have been an awful lot of extra work considering what the guys have reported in doing the same on the Flats Stalker 18s--whether or not it would have been worth it is another matter. I suspect that those Indian River Reds have heard and seen it all and know the words to every Jimmy Buffet song.
Looking forward to seeing your "box" design on the sole. Glad to see another project that dispenses with a center console. Beautiful work.
Gil
Posted: Fri Aug 29, 2008 8:57 am
by tech_support
Sweet. Cool What are you going to paint her with?
Larry, she is going to get sterling paint, with kiwigrip non-skid. I have not given much thought to colors though

Im not going to paint her until the end. the are still plenty of hole to drill and fill (cockpit drains, drain holes on rear casting deck, jack plate, maybe a baitwell pump, etc..)
I notice you round the transom edge where it meets the side panels. Should I do that?
Dougster, it doesnt really matter for the sides. I like them rounded for aesthetics, but the hull bottom edges are sharp so that the water separates cleanly when running on plane = more efficient. When re rebuilt the 22 Aquasport, we sharpened them.
The 4" you chopped off of the sheer should help minimize "hull sail" effect when poling
reducing windage was the main reason for lowering the sheer
Did you consider rounding off the chine at the bow to minimize slap when poling?
not really, there will be hardly any slap as is. I did not have rounded chines on my last PH16 and it was very quiet. We have large schools of redfish here, but they do not get hardly any pressure compared to the one on TV up in Titusville (mosquito lagoon).
I am going back and forth on a couple different ways to make the box. But Im pretty settled on the box being half cooler and half dry storage with some rod holders on the side.
Before the box, I need to finalize how Im going to make the Carbon fiber poling platform - its going to be integrated into the hull
Posted: Fri Aug 29, 2008 9:40 am
by mecreature
No way a quart could cover all that. At least with me painting it.
Posted: Fri Aug 29, 2008 9:53 am
by tech_support
I mixed another 12 oz batch at the end of yesterday to get more coverage on the starboard side. The new S3 Primer covers very well. So it took a little over quart to get enough coverage that the primer is opaque
Posted: Fri Aug 29, 2008 10:15 am
by saltponder
Joel,
The built in cooler sounds like a good plan. Are think more in line with a box to drop in a removable cooler, or are you planning to build to one from scratch, foam-lined?
For tiller operation, are going to have a bench seat, or box seat in addition to the box at center?
Gil
Posted: Fri Aug 29, 2008 10:27 am
by tech_support
saltponder wrote: Are think more in line with a box to drop in a removable cooler, or are you planning to build to one from scratch, foam-lined?
Will build from plywood and line it with foam for insulation.
saltponder wrote:
For tiller operation, are going to have a bench seat, or box seat in addition to the box at center?
On the rear of the set/cooler box, there will be a vertical carbon fiber pipe that will come up to about stomach level - its grab handle/leaning bar. May also run the jack plate switch to it, so you can adjust the trim while standing/running
Posted: Fri Aug 29, 2008 12:24 pm
by saltponder
I like your idea of a "reverse" leaning post/grab bar for stand-up tiller control. One fabricated out of anodized aluminum in an "I", "T" or even an inverted "U" shape sitting in a socket for removal when fishing might be appealing--one less item for a fly line to snag.
Gil
Posted: Fri Aug 29, 2008 3:40 pm
by cape man
Joel,
I am missing something...what are you talking about for "the box". Where was this in the thread?
By the way...boat is looking sharp. Very sharp.
Posted: Fri Aug 29, 2008 3:55 pm
by tech_support
cape man wrote:
I am missing something...what are you talking about for "the box". Where was this in the thread?.
first post
I want a tiller boat, no need for a console and the extra 75 pounds or so that comes with all the controls/rigging of a remote motor. The boat will probably never see the ocean - just the lagoon
Posted: Fri Aug 29, 2008 6:49 pm
by cape man
Sorry. Didn't go all the way back.
I think I have issues.
Posted: Mon Sep 08, 2008 10:21 pm
by Jpatburke
I check this post 25 times a week for updates.........

Does anyone else feel like a crackhead?
All kidding aside, great lookin boat Shine!
-JimmyB
Re: I think I have issues.
Posted: Tue Sep 09, 2008 7:59 am
by Gramps
Jpatburke wrote:Does anyone else feel like a crackhead?
-JimmyB
Ha! Been thinking that myself for the last few days. I need my fix Joel!!
Re: I think I have issues.
Posted: Tue Sep 09, 2008 8:16 am
by flatpicker
Gramps wrote:Jpatburke wrote:Does anyone else feel like a crackhead?
-JimmyB
Ha! Been thinking that myself for the last few days. I need my fix Joel!!
I was afraid it was just me!!!
Posted: Tue Sep 09, 2008 9:05 am
by tech_support
Sorry, but its been slow. Last week we finished the bottom. We experimented with a new bottom coating product that did not turn out so well, so we went back to the graphite/epoxy
I plan to flip the boat today if we have time
We sanded the bottom with 180 before applying the graphite/epoxy. I did not make a water line for the graphite because I want it to be out of the sun. We took it just to the chine and forward to where it will provide some protection when I run into a sandbar
from the transom facing forward
First coat going on. We used 20% to 25% graphite to silvertip epoxy. It took two 12 oz batches (not counting graphite) to give a single coat on the bottom. It only took two coat, but a third would not have hurt.

Hopefully we get her flipped today and back to glassing.
Posted: Tue Sep 09, 2008 10:26 am
by Gramps
I am uber jealous! This may just trump the FS18.... Really looking forward to the interior layout and the high HP tiller
Looking great!
Posted: Tue Sep 09, 2008 1:08 pm
by dborecky
Joel,
What went wrong with the super duper fighter jet wing edge epoxy??... Say that four times fast..
Posted: Tue Sep 09, 2008 1:10 pm
by tech_support
Posted: Tue Sep 09, 2008 1:13 pm
by tech_support
dborecky wrote:Joel,
What went wrong with the super duper fighter jet wing edge epoxy??... Say that four times fast..
Its covered up with graphite. Its incredible stuff, but it must be sprayed. I tried to roll and tip it, but it made a big mess. We may still sell it, but I need toe experiment with it more.
Posted: Tue Sep 09, 2008 3:41 pm
by Lower
Boat looks awesome Joel! You do make it look way to easy! Can't wait to see how the inside comes together.
Posted: Tue Sep 09, 2008 5:06 pm
by Steve_MA
Great thread. Beside building more boats, I have a new objective - being able to lay fiberglass like that! Gonna have to find a helper, my 8 yr old isnt going to be up to that...takes longer than 5 minutes....
Question Joel - There was another thread where "white graphite" was discussed. Was that the "super duper edge fighter wing epoxy"? Do you guys know anything about this hBN white graphite? I have graphite on 2 boats and black is OK. But it would be nice to have choice
Posted: Tue Sep 09, 2008 9:57 pm
by jbridges
Hey Joel, just wondering why you chose strakes only instead of a skeg ? You have me pondering the whole skeg thing again. Will the strakes still alow you to bank in turns? I'm building the ph16. I know that was one of your builds also. I will be fishing the flats and crossing the open bays, what would you suggest?
Posted: Wed Sep 10, 2008 7:52 am
by jbo_c
Enjoying the build. Wish I could devote that much time to it.
Is this to become a plan option? - or to do it would one just drop all the panel measurements by 4" and be on their own?
Jbo
Posted: Wed Sep 10, 2008 2:38 pm
by tech_support
We have not devoted much time to the boat, maybe 6 hours a week.
having the everything line up perfectly (using the CNC kit) the first time saved many, many hours of labor. Also saves money in sandpaper and epoxy by having all fairing surfaces and joints.
Check out how the stringers meet the hull all around, and how uniform the panel joins are. This is definably not a testament to anything we did - its because we had all the parts cut perfectly by the machine (or within a few 1/100" of perfect anyway
)
The notches in the first two layers of transom will be a big help keeping the stringers straight when we glass them in later.
With any luck, we will have some time next week to glass the inside
Posted: Wed Sep 10, 2008 2:59 pm
by jacquesmm
About this becoming a new version: yes, it will be.
I did cut the new sheer in CAD to Joel's requirements.
We looked at different sheer cuts and this one looked as the best compromise.
That means the hull model and all the framing exist. The CNC hull kit for what you see in the pictures exist, you can order today.
Joel wanted to create the decks and gunnels after flipping the hull. This gives him a good feel for the ergonomics.
Once he is decided about the final layout, we will enter them in CAD and cut the parts.
After that, the whole CNC kit will be available but it will take a little more time to produce the 2D plans, web page, BOM etc.
Posted: Wed Sep 10, 2008 3:38 pm
by ks8
I like the new sheer, and the self aligning slots for the stringer. Can you tell?
http://gallery.bateau2.com/displayimage ... 627&pos=12
http://gallery.bateau2.com/displayimage ... 244&pos=87
I guess it comes of assembling all those Lunar Modules cut from the back of cereal boxes when I was a bit younger... tab A in slot A.
But now a question... that I suppose is partly answered by the fact that you approved of it on the transom/stringer design. Is there no issue with a hard spot in that slot, or, do you need to float the stringer in putty when bonding it in the slot?
Seems like flaoting it in putty would be a little more involved than just slopping it in there. How much play is between the slot and the stringer?
The slots I used had hardly any play... just enough for about 1/32 to 1/16 room for excess putty... in other words, work the part in and it likely centers itself. But with a stringer to transom, do you need to make sure the stringer centers in any play in that slot?
Great pictures!
Posted: Wed Sep 10, 2008 4:02 pm
by jacquesmm
The hard spot to avoid are the ones created by the framing pushing on the thinner hull panels.
That is not a problem where the stringers and transom meet.
Even for the stringers, we are less concerned about hard spots with a CNC kit because they push evenly all along their length thanks to the precision of the assembly.
Posted: Wed Sep 10, 2008 4:06 pm
by topwater
Jacques will all of the kits have the same slot set up in the
transome

Posted: Wed Sep 10, 2008 6:35 pm
by jacquesmm
topwater wrote:Jacques will all of the kits have the same slot set up in the
transome
When it makes sense. It is not always the best solution especially for larger boats.
What do you have in mind? Which boat? And is it something you want?
Posted: Wed Sep 10, 2008 7:25 pm
by ks8
Topwater,
Some thoughts on tab and slot, which I think back up the reason J asked for more specifics. I like the tab and slot concept, but if you look at my two examples a few posts back (by clicking on the links), you'll see that I only did that in a few spots, where it really helped assembly with the putty. But it had a cost in developing the part structure for a situation, and creating the part to match the fit very closely. In some boats, you want to be able to shift things around a little to get things fair with the main panels. Can't happen if there is tab and slot implemented, and parts were not cut a positioned very precisely. When working alone, it was convenient for me to have one end of the skeg taken care of and secure, while I fidgetted with alignment and strap clamping at the transom end. And even those secondary knees I did, primarily were done that way to make the final assembly and alignment very, very easy, in a tight spot otherwise. Important to note though, the hull shape was already built and its shape finalized. When it comes to parts that affect the final shape, before putty is laid in and cured, it may not be the best idea, unless there is either very good accuracy in forming the part to fit, or, (same thing), it is CNC formed.
When I did the seat risers/stringers on the CV16, I divided them into smaller pices for easier handling (back was real bad then), and made them fit very well, so they would not distort the hull bottom by a forced fit and clamp. But I had to modify the cleats and bonding surfaces somewhat so they would have lots of surface to contact for alignment, where as the original lamination schedule had them simply filleted and glassed in, lighter, and easier, IF you had the health to move around that fast while epoxy is setting up. The way I did it, there was no alignment issue at all anymore, and there was virtually no force on the clamps to install them because they were very accurately beveled and fitted. But this is not the usual in many stitch and glue builds. Of course, there is some liberty to implement this wherever you find it will make the build easier. Probably just ask first, depending on how it might effect final hull shape or load bearing. It is very convenient when doable, but takes time and so can actually add a little complication *to make it simpler*.
But I can't tell you enough what a stress relief it was on me, at the time being apprehensive about any sudden moves with my back. The complicated shaping was done outside the boat while standing comfortably, and not twisted in a pretzel.
That forward seat riser squished into perfect position on a nice even bedding of putty. I could slowly turn around, get clamps, and calmly and barely tighten them into perfect position, because of the way the part was made and fitted against cleats. It did not slip or slide out of alignment while my back was turned, or give me high blood pressure. But I am hard pressed to see how this can be done with less rather than more material, and less rather than more weight, and in less rather than more time.
For me, on those knees, on the seat risers, on the skeg front, it was well worth it, easing the stress on me, the builder, while the goop was curing. I also used it on the turtle heads on the transom, again, for me, just to make a final install and alignment of a part in a tight work area, easier, for me.
And if you want to engineer in planned catastrophic break away, don't tab and slot, or use strong fasteners.
Posted: Fri Sep 12, 2008 1:34 pm
by topwater
no particular boat Jacques. I just tought it was a pretty
slick set up. Ks8 thanks for the explanation " i think"
Ks8 dont feel bad about youre build time the boat is
buetiful. I have been building a 14by 28 work shop for
over a year now and it still isnt done
Posted: Fri Sep 12, 2008 2:28 pm
by ks8
A sufficiently large workshop with heat and AC is a beautiful thing. And large double doors. No internal columns. Room for A frame lifts or similar. Oh yeah!
Posted: Mon Sep 15, 2008 4:04 pm
by mecreature
Just checking..
Posted: Thu Sep 18, 2008 10:47 am
by tech_support
Posted: Thu Sep 18, 2008 10:57 am
by jgroves
Glassing the inside took about 2.5 hours (5 man hours).
We know your working at super human speeds but no sense rubbing our faces in it
There seems to be a lot of question out there about the uses and limits of the FS17. For the record I think your use of the design will be perfect! The lower sheer will help stability for standing on the edge.
Posted: Thu Sep 18, 2008 2:41 pm
by bernd1
Shine,
one question : do you have as much arms as a octopus
Is this a special kind of high-speed boat building?
I'm very impressed !
By the way, nice pictures and interesting describtion of your building.
Bye
Bernd
Posted: Thu Sep 18, 2008 2:47 pm
by mecreature
are these inside laminations per plans?
2 layers of tape... one layer overall.
Posted: Thu Sep 18, 2008 3:23 pm
by tech_support
mecreature wrote:are these inside laminations per plans?
2 layers of tape... one layer overall.
Im not sure, I have not looked at stock FS17 plans. There are a few things that are different in this boat - if you see something different that I do in this build vs. the regular FS17 plans, follow the plans
The idea in working quickly is not to break any records or show off, but rather to show how planning the work, working wet on wet as much as possible, and using the kit you can eliminate a lot of unnecessary work (sanding, fitting, measuring, etc). I am by no means a professional boat builder, i build one or two things a year. Joseph, who is helping me, has only done a little of the finishing work on the Aquasport project - this is his first experience in boat building.
Working by myself this afternoon, it took me at least an hour to wet out two layers of biax on the transom. having an extra set of hands more than doubles the amount of work you can accomplish in a set period of time.
Tomorrow (time allowing) we will tab in the stringers.
Posted: Fri Sep 19, 2008 1:42 pm
by Lower
Your killin me! Nice build for sure!
Posted: Fri Sep 19, 2008 3:12 pm
by jacquesmm
It's the same lamination schedule than the standard FS17.
Posted: Sat Sep 20, 2008 1:19 pm
by Lung Boy
jacquesmm wrote:It's the same lamination schedule than the standard FS17.
It is not the same as the plans that I have. My plans call for one layer of biaxial tape on the chine seams. Two layers on the keel, bow and transom seams. Also, one layer of wide biaxial fabric on the outside of the transom only. Has there been a change in the plans?
Posted: Mon Sep 22, 2008 10:07 am
by Lower
Joel...Your inspiring me! Had a question about the last order I placed. Shot you an email last week, not sure if you got it. Re-sent today. Thanks.
Posted: Mon Sep 22, 2008 11:06 am
by jacquesmm
No change in the plans, just follow the plans please.
Posted: Mon Sep 22, 2008 11:20 am
by tech_support
Lower wrote:JHad a question about the last order I placed. Shot you an email last week, not sure if you got it. Re-sent today. Thanks.
I will start a new thread to address your chine question.
here it is, hope that helps...
http://forums.bateau2.com/viewtopic.php?p=150915#150915
Posted: Mon Sep 22, 2008 5:23 pm
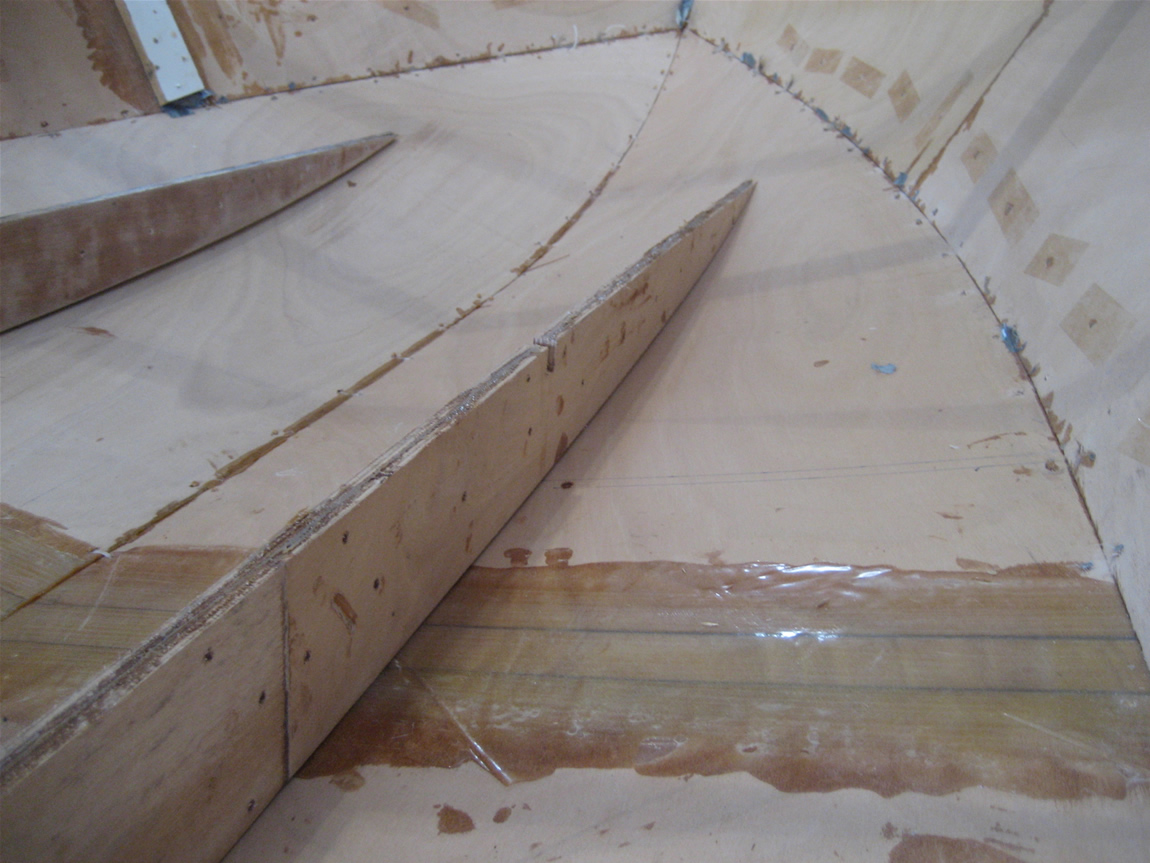
by tech_support
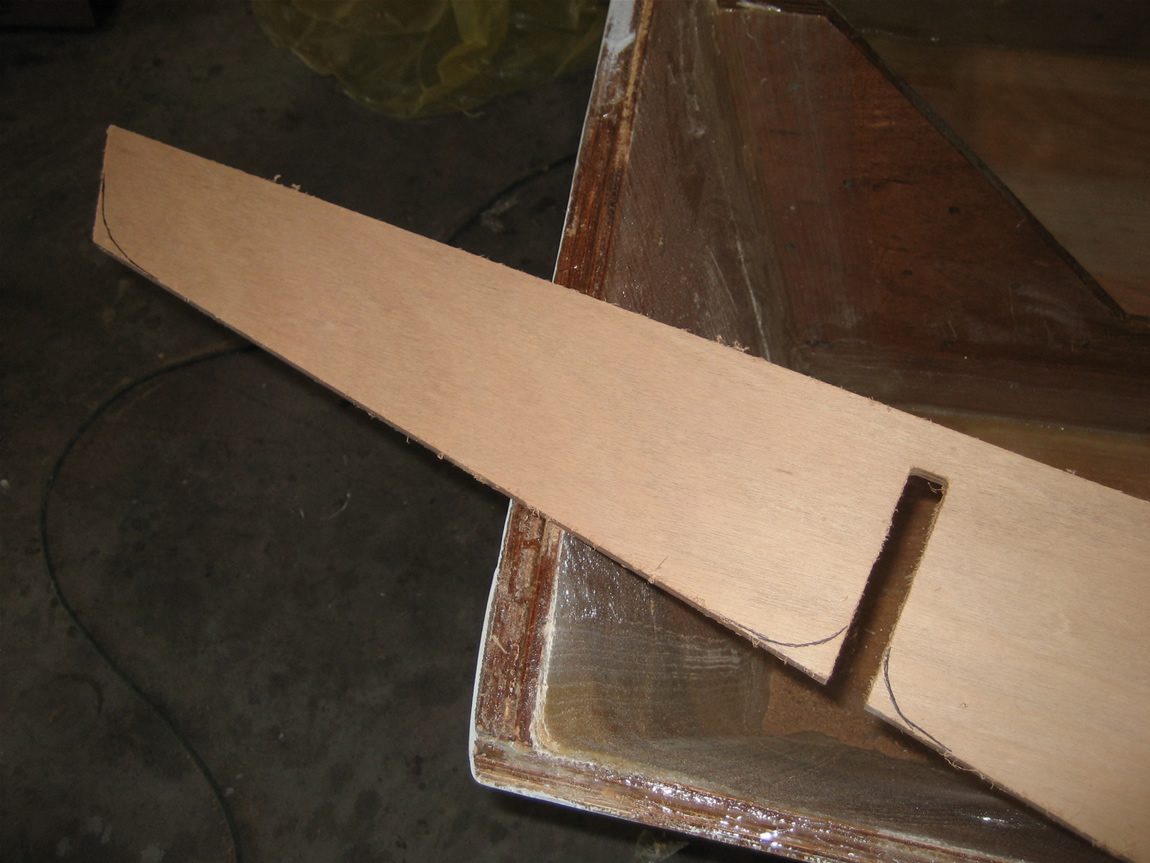
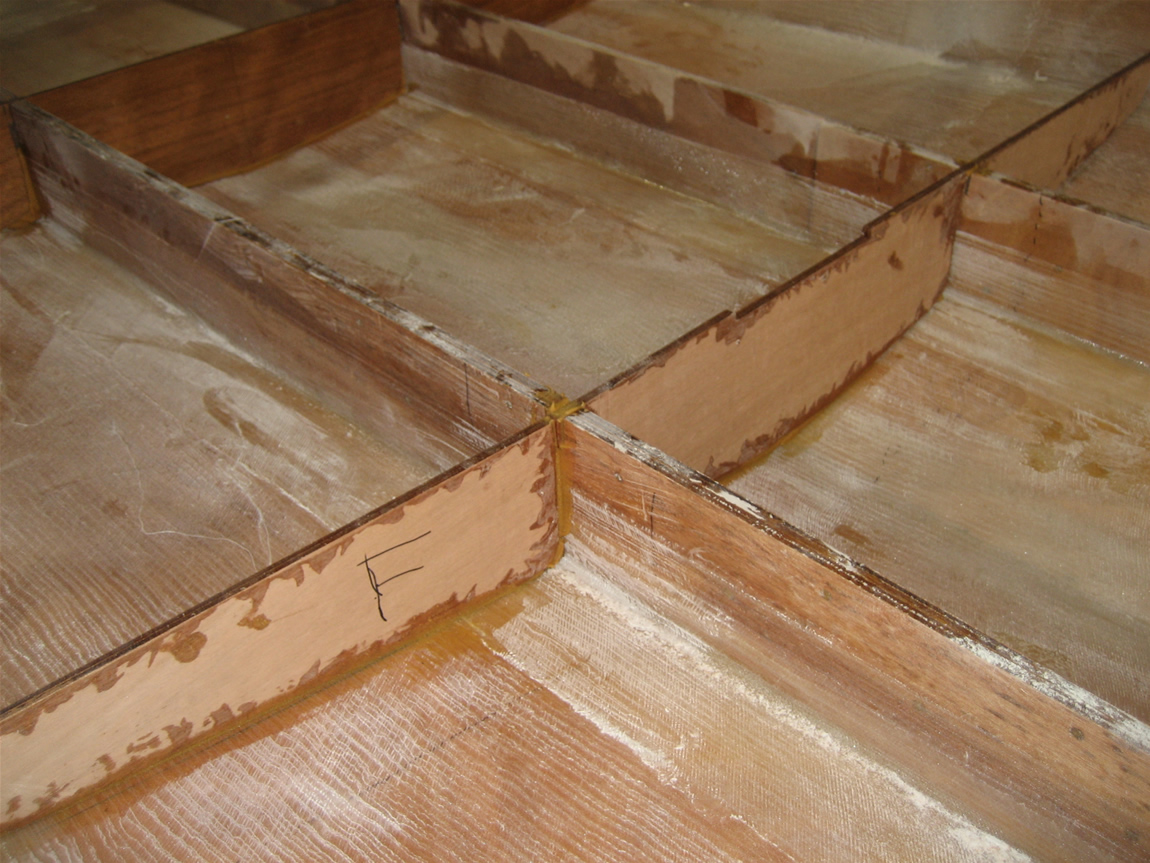
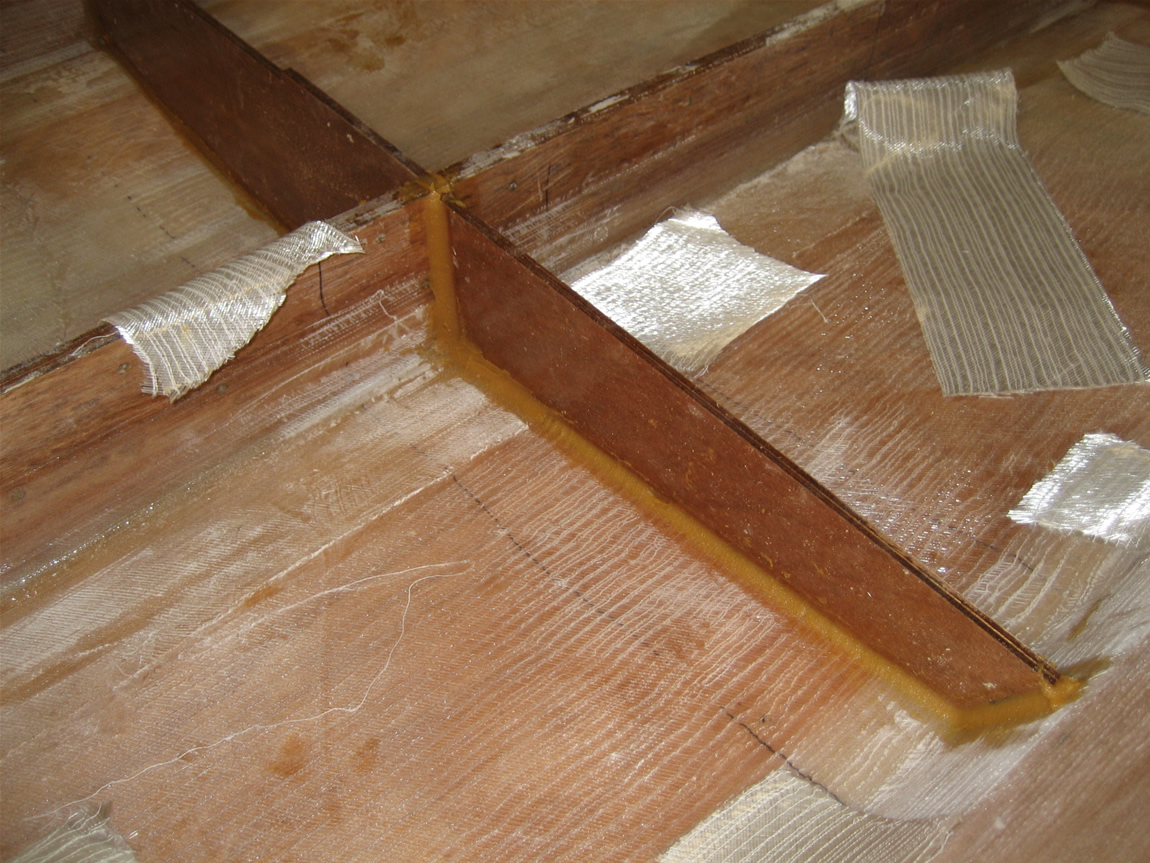
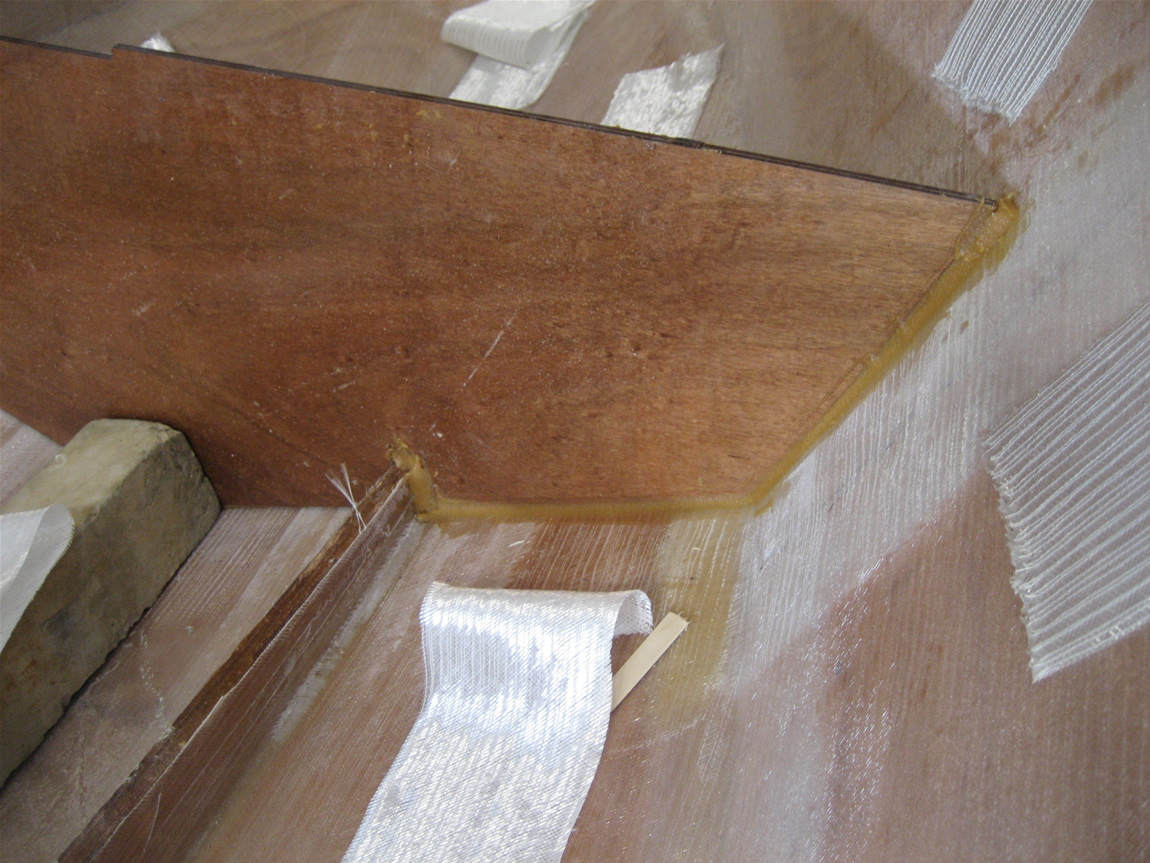
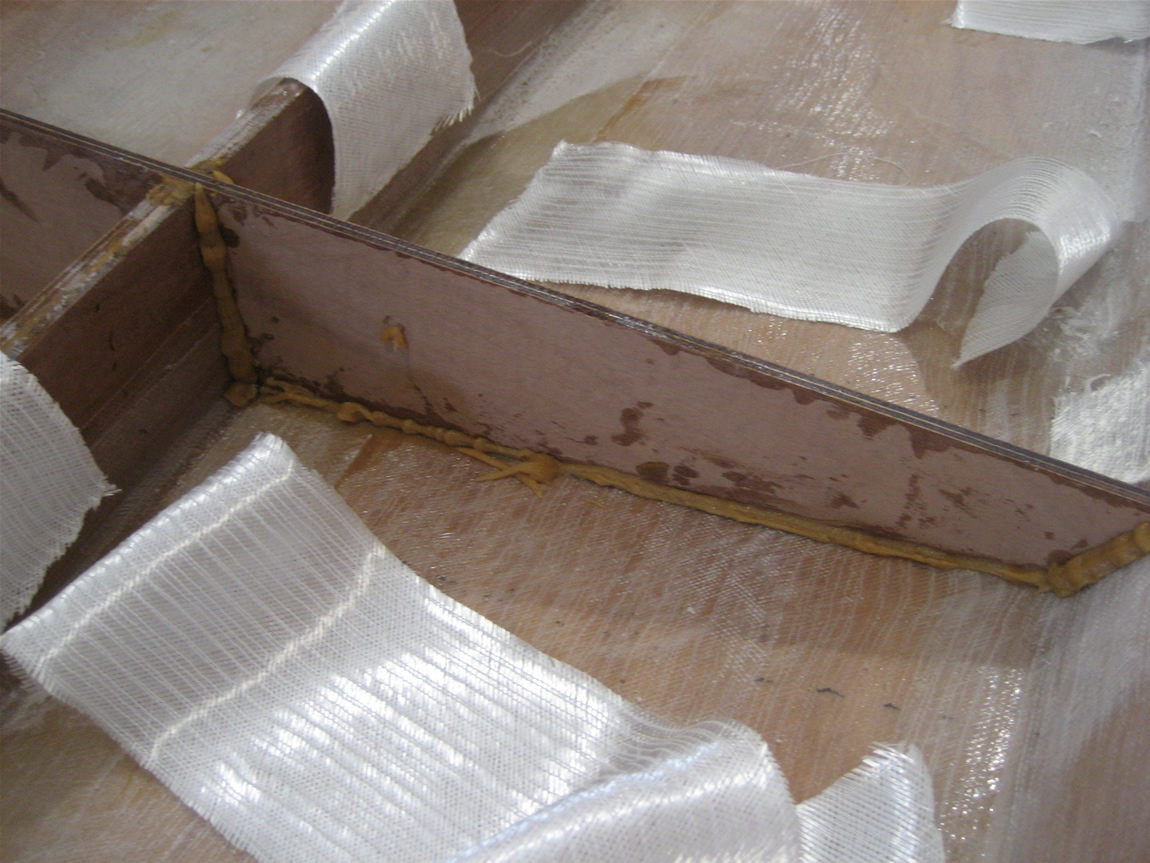
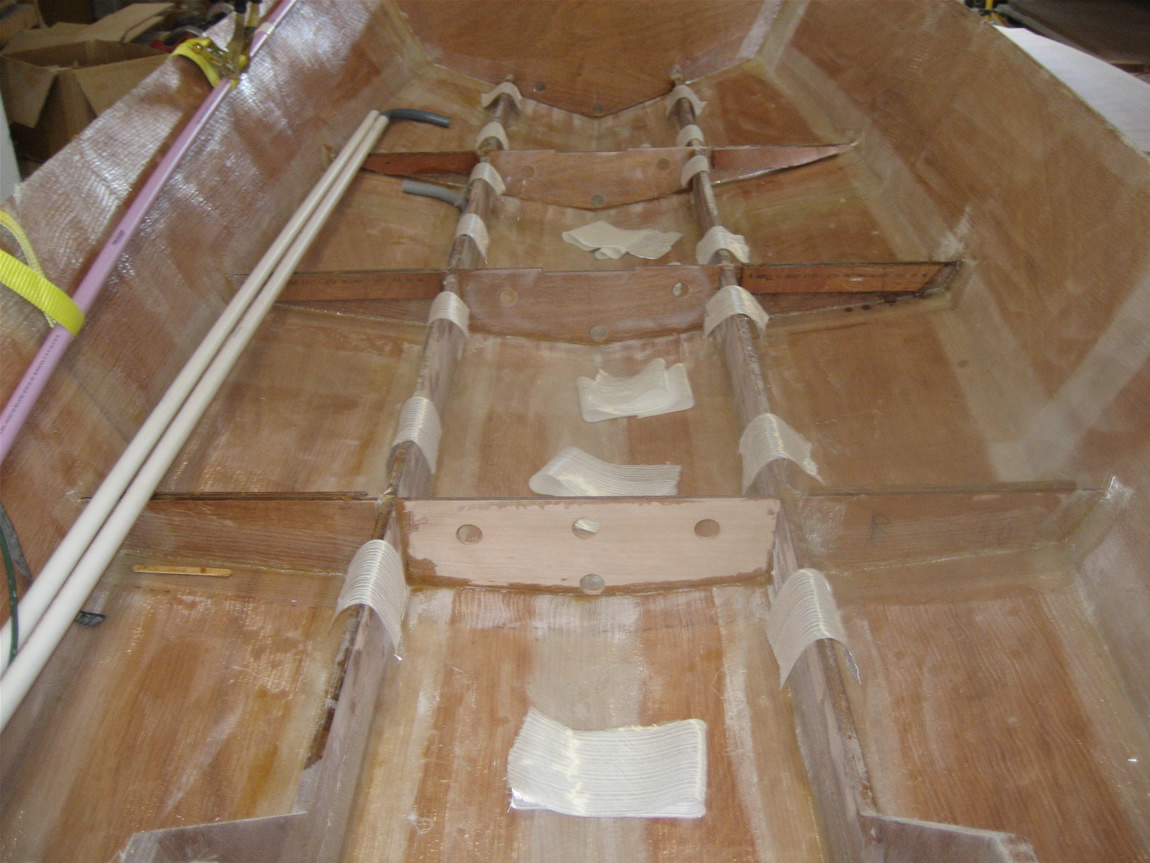
On friday we tabbed the stringers int the hull.
Started by shaving the end of the stringers down a little with the sander and 40 grit so they would fit easy into the slots in the transom.
We dry fir everything and used the molds again to line things up. The molds are only there to keep the stringers parallel and at 90 degrees. We traced the stringers with a sharpie pen, so we would know exactly where to put down our bead of epoxy glue.
We used some water bottle tops to hold the stringer up while we put down the bead of glue. We used on of these empty caulk tubes to dispense the glue.

pictures of the stringer being held up by caps, note the sharpie trace line so we know where to put the glue....
We had just enough time to fillet and tape the rear of the stringer to the transom - 2 layers
We did not have time to go any further, so we cleansed up excess glue so it would not be in the way when we made fillets later.
Today (Monday) we glassed in the stringers. We started by sanding the area where we would be glassing to knock down anything that might cause trouble in laying down the tape. We used the caulk tubes again to lay down a bead of epoxy/wood flour, then smoothed it over with a mixing stick to make the fillet radius. For reference, one full tube of epoxy glue will make tow lengths of fillet - pretty convenient
cut 8 lengths of biaxial tape ahead of time
stringers are in...
Posted: Tue Sep 23, 2008 3:29 pm
by tech_support
I started a separate thread to show the carbon fiber poling platform being built...
http://forums.bateau2.com/viewtopic.php?p=151013#151013
We are cutting out all the frames, sole, and casting deck this afternoon on the CNC machine
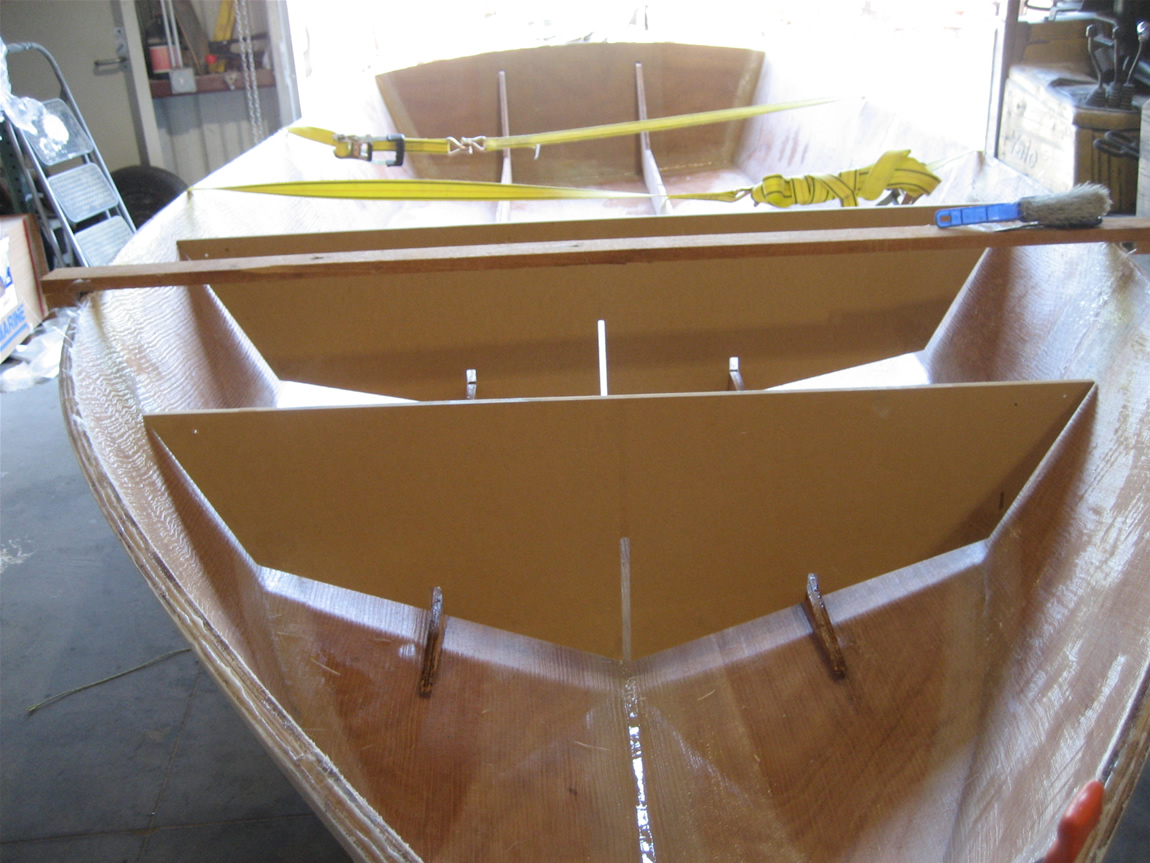
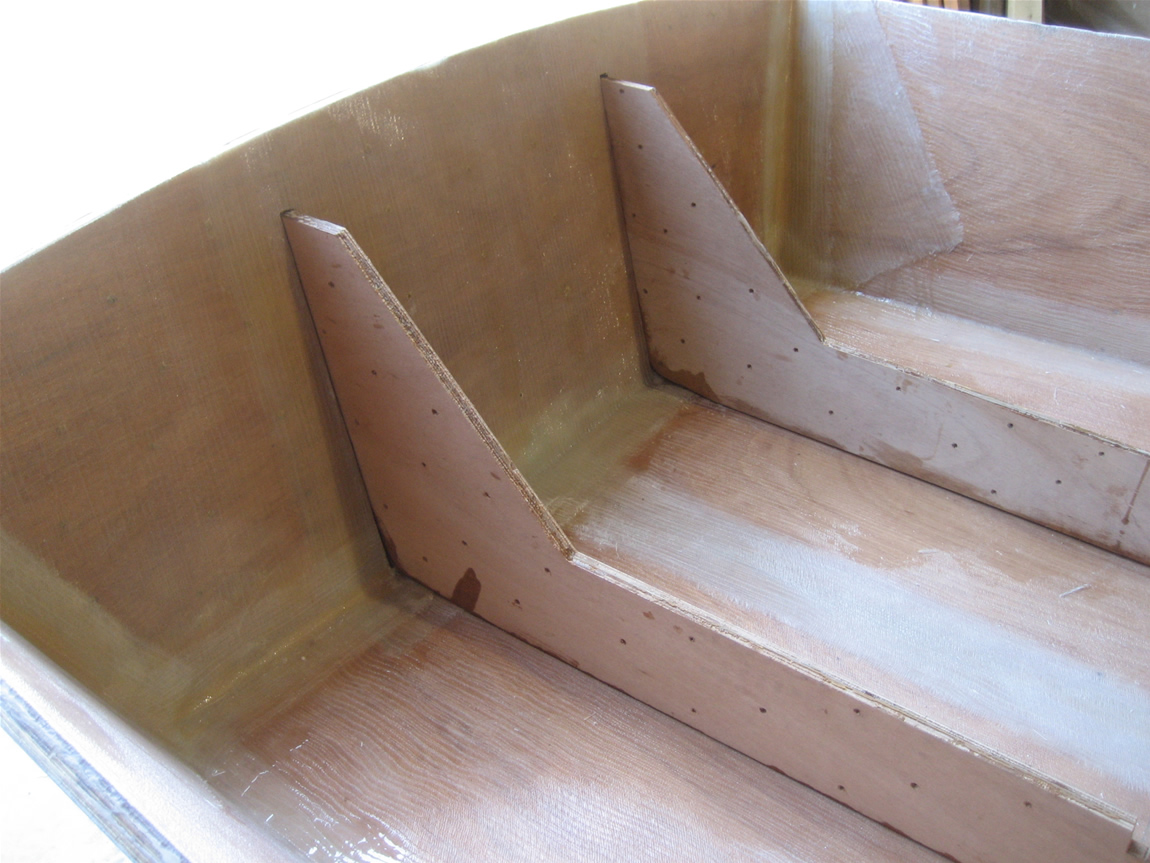
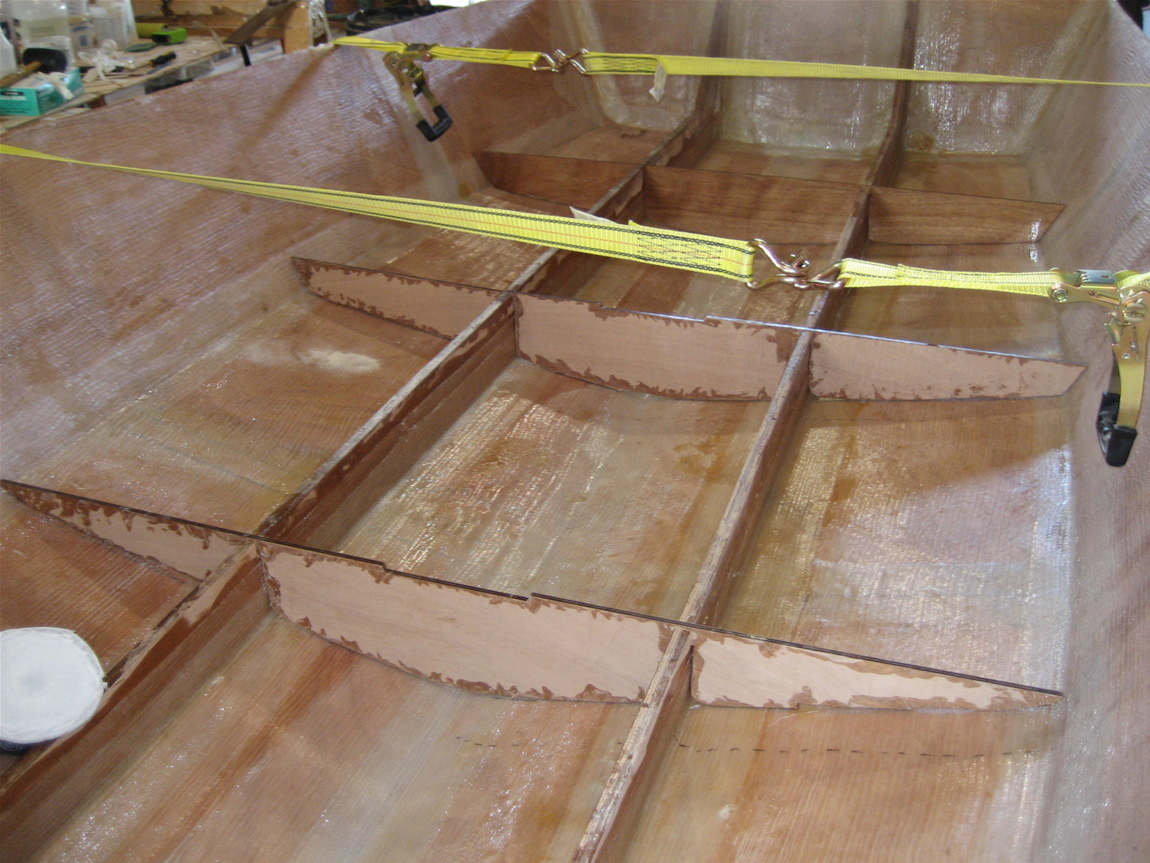
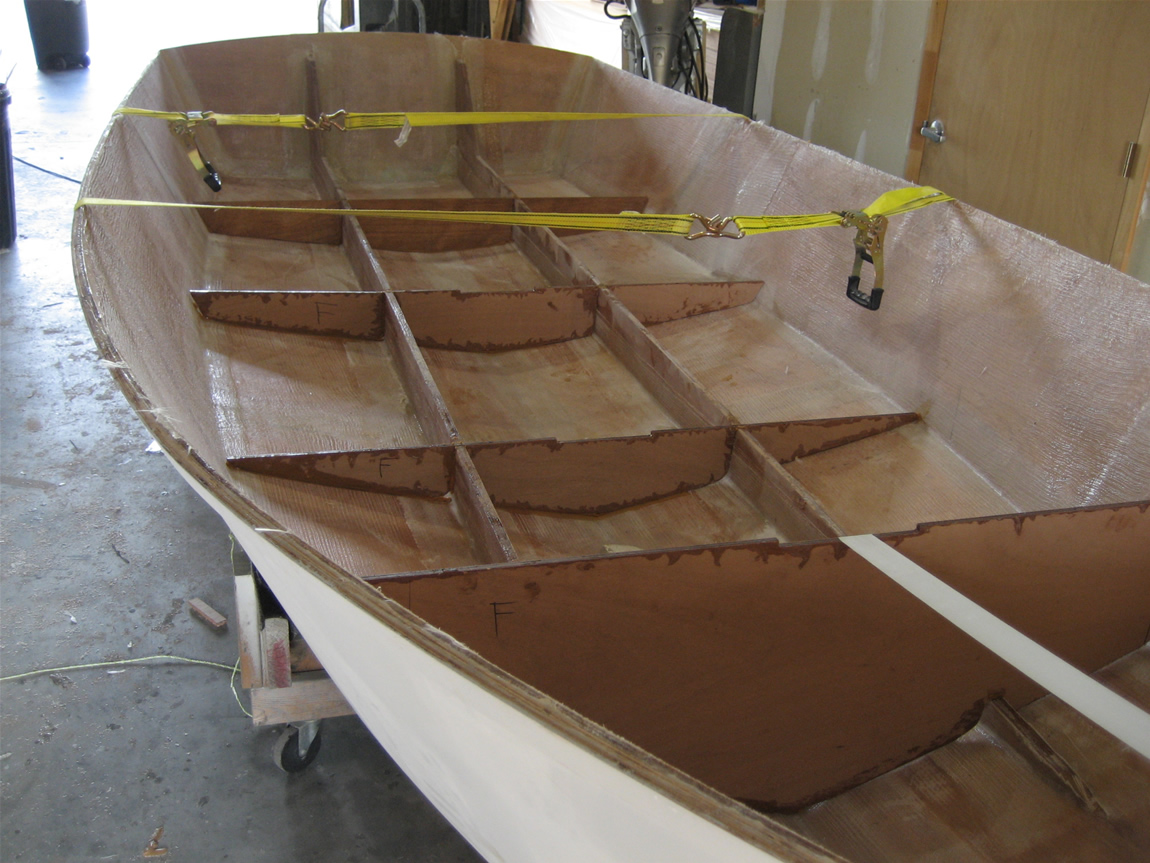
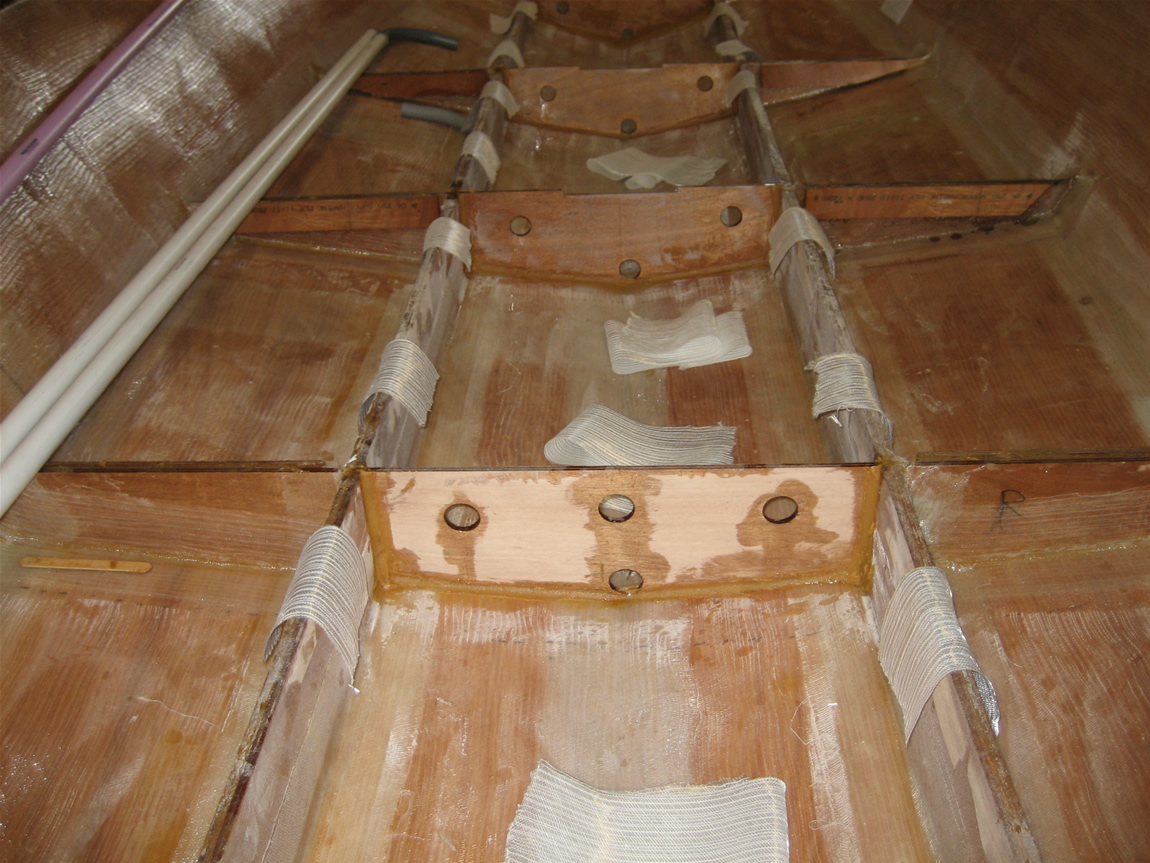
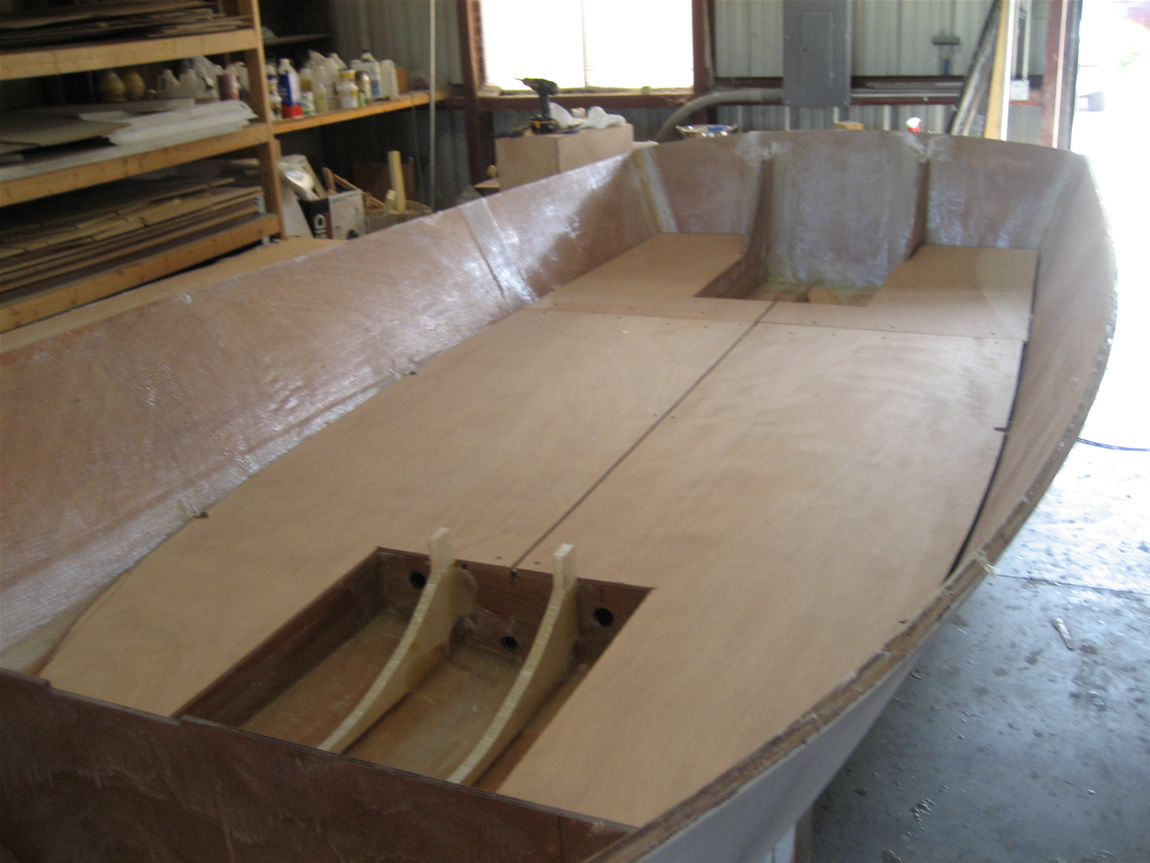
Posted: Fri Sep 26, 2008 4:29 pm
by tech_support
frames are mostly installed, cleats for sole are glued up. I have not glassed the center the center portions of the frames because i want to have the holes cut for chase tubes first, then I can glass all around them and give the holes a good coating of epoxy.
dry fitting frames. They need to be trimmed to account for all the fiberglass now on the inside of the hull
We traced out where we would trim. Allowing room for the glass/fillets...
Now they fit better (I took too much off on a couple, which only means we have to use more fillet putty than I want)
Again, we used calk tubes to apply a nice even bead of epoxy/wood flour glue under the gaps of the frames. We cleaned this up so there was no excess. Let it cure overnight.
you can see the glue under the frame
Marked out 3" on either side of the frames and sanded in preparation for the fillet/glass tape.
Cut up the tape for outside portions of the frames.
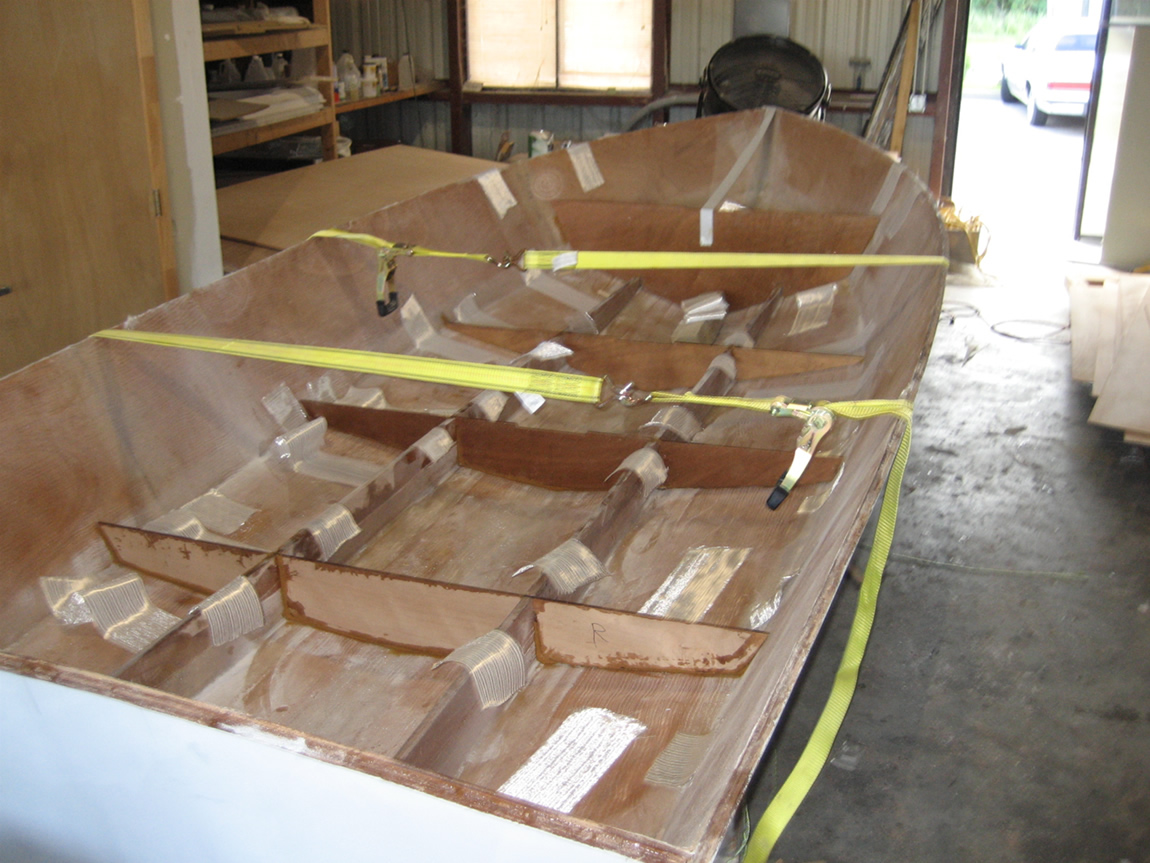
made fillets all around
This is what the fillet putty looks like before we go over it with the fillet tools to make it smooth. We used the caulk tube to dispense the bead of fillet putty. Ech tube holds 10 oz of putty. They are a HUGE time saver. I think we did all the fillets in 20 minutes or so.
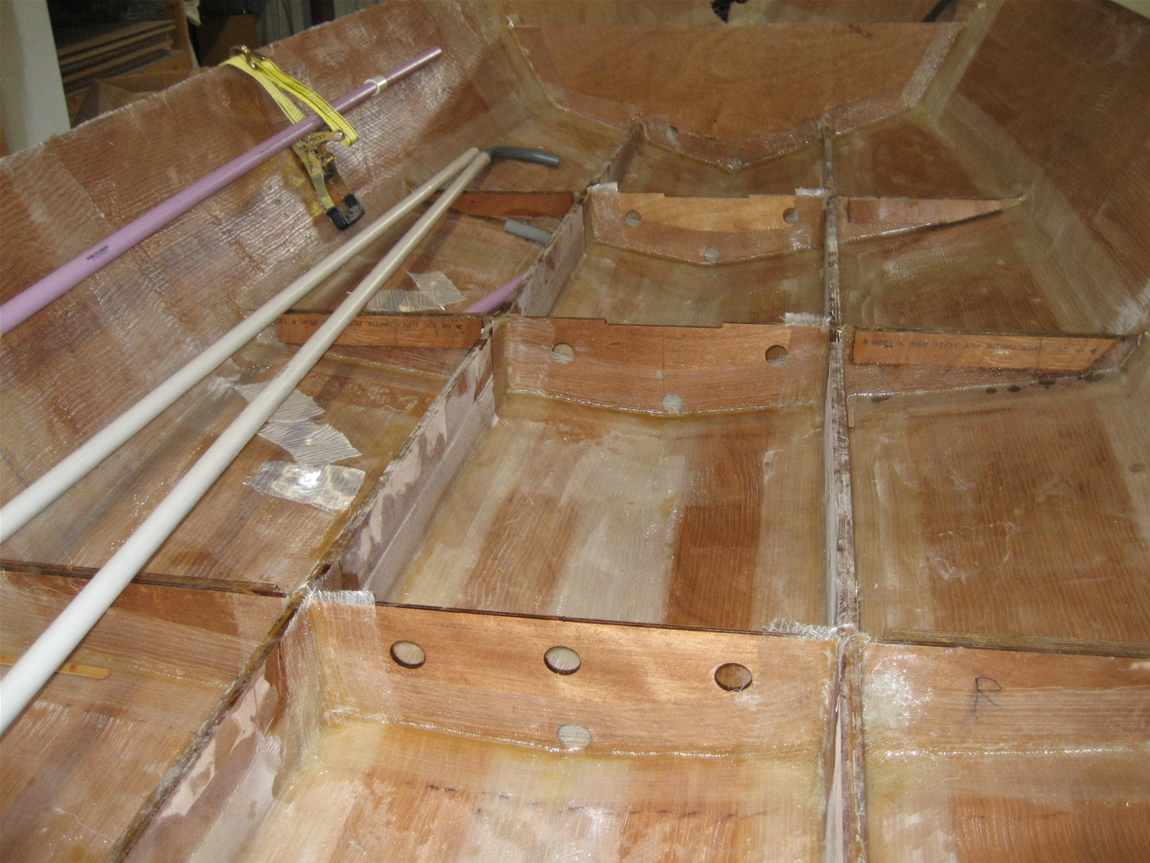
We let the fillets set up for about 30 minutes, then came back and wet out the tape. We will do the center spans after I run chase tubes
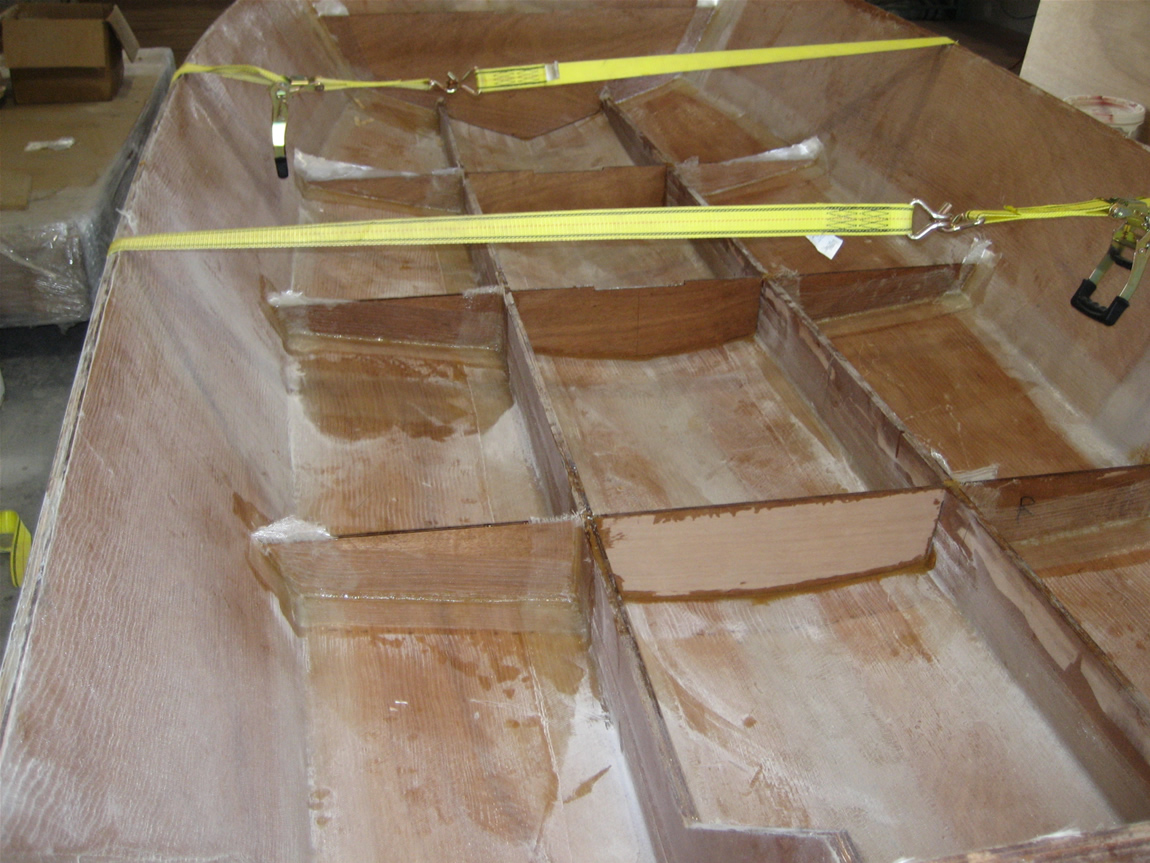
today I glued up the cleats. The cleats are little pieces of wood which are epoxy glued to the sides of the frames and stringers. These give more glue/bonding area when we epoxy down the sole and casting decks. I just used scrap 3/8" okoume for the cleats, doubled up. Normally they do not have to be as tall as when you see here, 3/4" is fine - but these scraps were already cut, so i used them
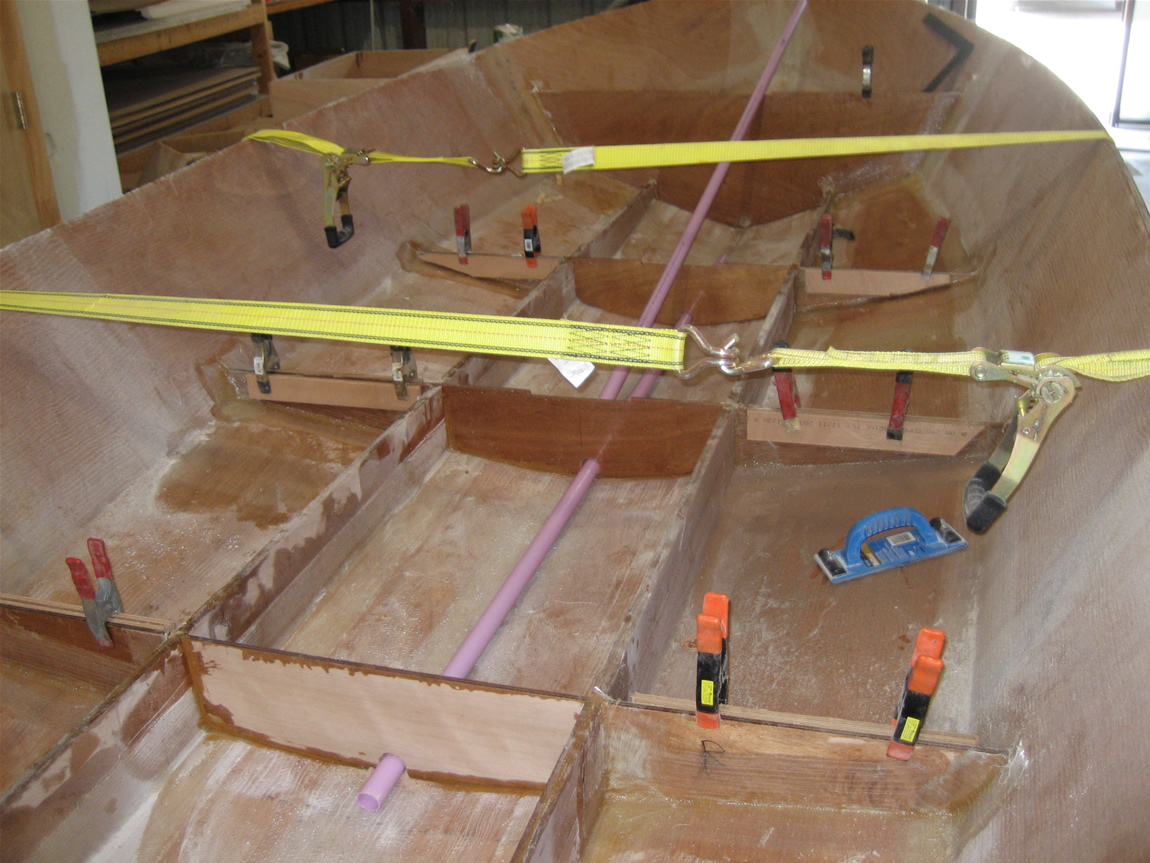
Also, i started the insulated box that will be in the center of the sole. I had to figure out the size and placement of this right now because i am going to run a chase to tube to it from under the sole. the box will served double duty as either a cooler or baitwell - drain out the side. The first 6 inches will be a compartment for an electrical box. Dimensions are big enough to hold a upper limit snook (length wise)
Which is about the biggest fish i would take home. I will start another thread to show how Im building it
Posted: Fri Sep 26, 2008 11:30 pm
by Lon
Shine, do you clean and reuse caulk tubes?
Posted: Sat Sep 27, 2008 9:57 am
by Steve_MA
Yes, those tubes look like a real time saver. I never really liked the plastic bag approach. This looks alot easier to make it clean.
- where can you get those tubes? Seems they would be hard to reuse...
- do they work with a regular caulk gun?
- how much epoxy do they hold and how much time do you have to work? I would think you have to be pretty well prepared
Also, one last question: when you taped the rear of the stringer to the transom, you left the glass proud of the stringer. Did you clean that up before it set or after? If after, how did you do it? Thanks
Posted: Sat Sep 27, 2008 12:51 pm
by tech_support
The tubes can be re-used. After the epoxy inside cures, you can pop out the cap.
When we mix the epoxy glue to fill the tube, we use a 9 oz batch of epoxy and add filler until we get to peanut butter consistency - then fill it. That seams to fill the tube all the way up with a littel putty left over.
Its actually quite easy to get it all out before you have any issues with the epoxy kicking or exotherm. From the time you finish mixing to the time your finished dispensing is less than 5 minutes.
We stock the tubes..
http://boatbuildercentral.com/products.php?cat=7
The glass over the stringer was trimmed when the epoxy was green, we will clean it up more with the grinders before we glue the rear casting deck down. The rear casting deck is at the level of the top of those stringers.
Joel
Posted: Mon Sep 29, 2008 9:37 am
by jgroves
Those cartridges are a great idea! Nothing worse than having a ziplock bag pop open while squeezing. The worse is when your finger goes through the side and it starts to squirt out the new hole more freely than the "precision" cut tip.
I remember my first "run in" with the ziplock method. I had mixed a rather large batch assuming that I would be quick filleting for the first time. Because I was going to be so good at this I used fast hardner. After about 30 seconds of squeezing till my face turned blue the two pounds of mix began to kick and get hot. Conveniently, to free the hot goo my finger had slipped through the side of the baggie. Since it was really hot (smoking) I decided I should work faster. I wasn't about to waste this much epoxy my first try. So I coverd the hole with the same finger that created it and continued to squeeze for all I had. About ten seconds later the smoking goo had squirted out the hole half hard already. Conveniently saving my garage floor it landed on my forearm. Since it was really hot and still smoking my plans of the perfect fillet were shot. My new goal was get this pile of westsystem excrement off my arm. I ran out the garage past my wife, new baby, and what seemed like the entire neighborhood screaming and yelling all the while beating at this pile of smoking goo. Luckily the grass made a great goo remover. It was even a little damp which was a nice touch.
I had some explaining to do, some touch up work ahead of me, and a little experience under my belt
Yeah cartridges would be nice.
Posted: Mon Sep 29, 2008 12:45 pm
by saltponder
Joel,
After applying the "glue", did you use any permanent spacers after you removed the bottle caps to guard against "hard spots" when you laid out frames, stringers, etc.?
Tnx. Gil
Posted: Mon Sep 29, 2008 2:25 pm
by tech_support
saltponder wrote:Joel,
After applying the "glue", did you use any permanent spacers after you removed the bottle caps to guard against "hard spots" when you laid out frames, stringers, etc.?
Tnx. Gil
No hard spots with the glue bead - the forces are uniform for the length of the stringer
Posted: Mon Sep 29, 2008 4:39 pm
by dpurcell
Jeremy, you got any video of that story, you'd win $$$ on Americas Funniest Home Videos if ya do. That's a great story
Posted: Mon Sep 29, 2008 5:03 pm
by mecreature
sounds like my first experience with a ziplock too jgroves...... LMAO reading that... might give the tubes a try next time..
Posted: Mon Sep 29, 2008 5:06 pm
by Daddy
I favor the heavy duty plastic pastry bags. They dont break or puncture, are cheap and then you throw them away and use another one. Any kitchen store sells them.
Daddy
Posted: Mon Sep 29, 2008 8:16 pm
by jbo_c
I had the same Zip-Loc experience and was going to go with a real pastry bag too. I may have to try a caulk tube. I was a little worried about it cooking off in the tube.
Jbo
Posted: Tue Sep 30, 2008 1:53 pm
by dpurcell
Joel, what/how many floor frames are you using? I am only counting four, or is that B, and A is hiding in front of that? Will your front deck extend to B or just A? Also what are the notches in the top of the floor frames for(B or C and C or D)? One more question, did you raise the stringers with the bottle caps for the glue bead along their entire length or just in back, logic tells me the entire length but I can't tell from the pics? One more (off topic) Surfed lately? That's it I swear?
Posted: Tue Sep 30, 2008 5:08 pm
by tech_support
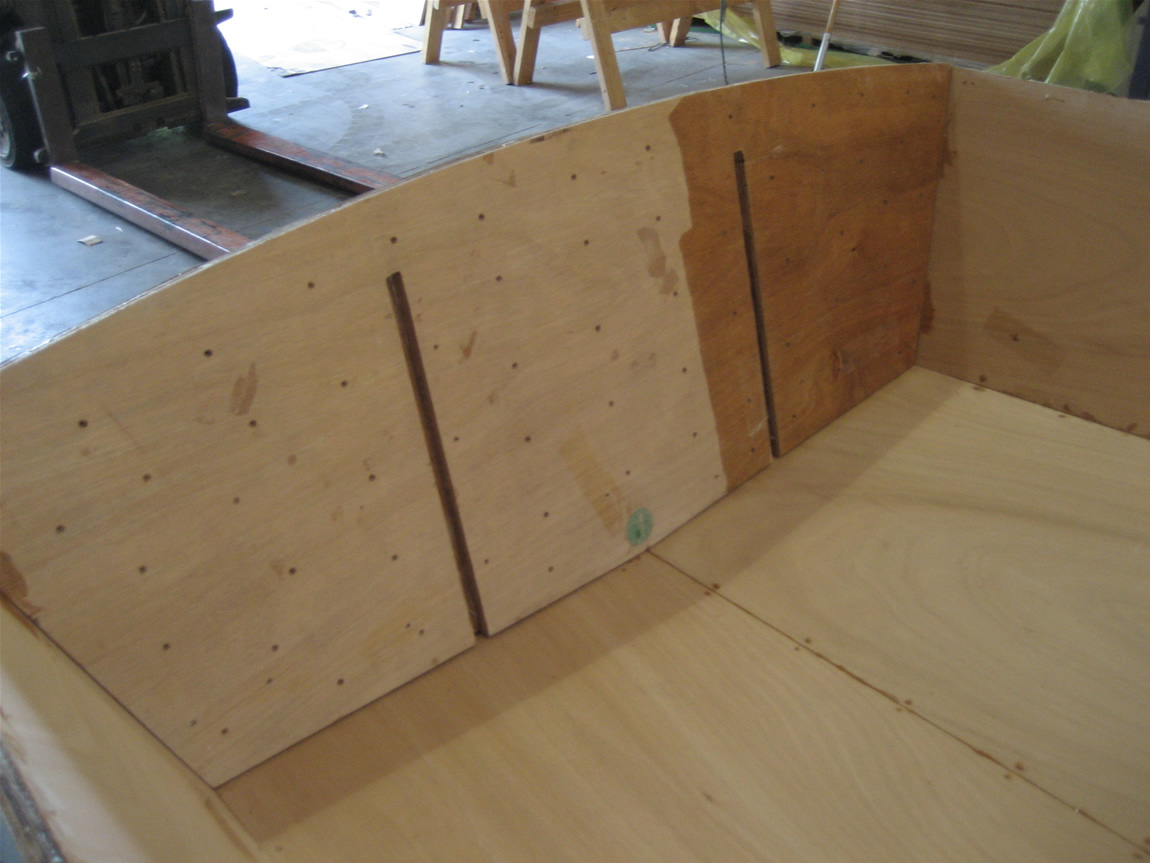
what/how many floor frames are you using?
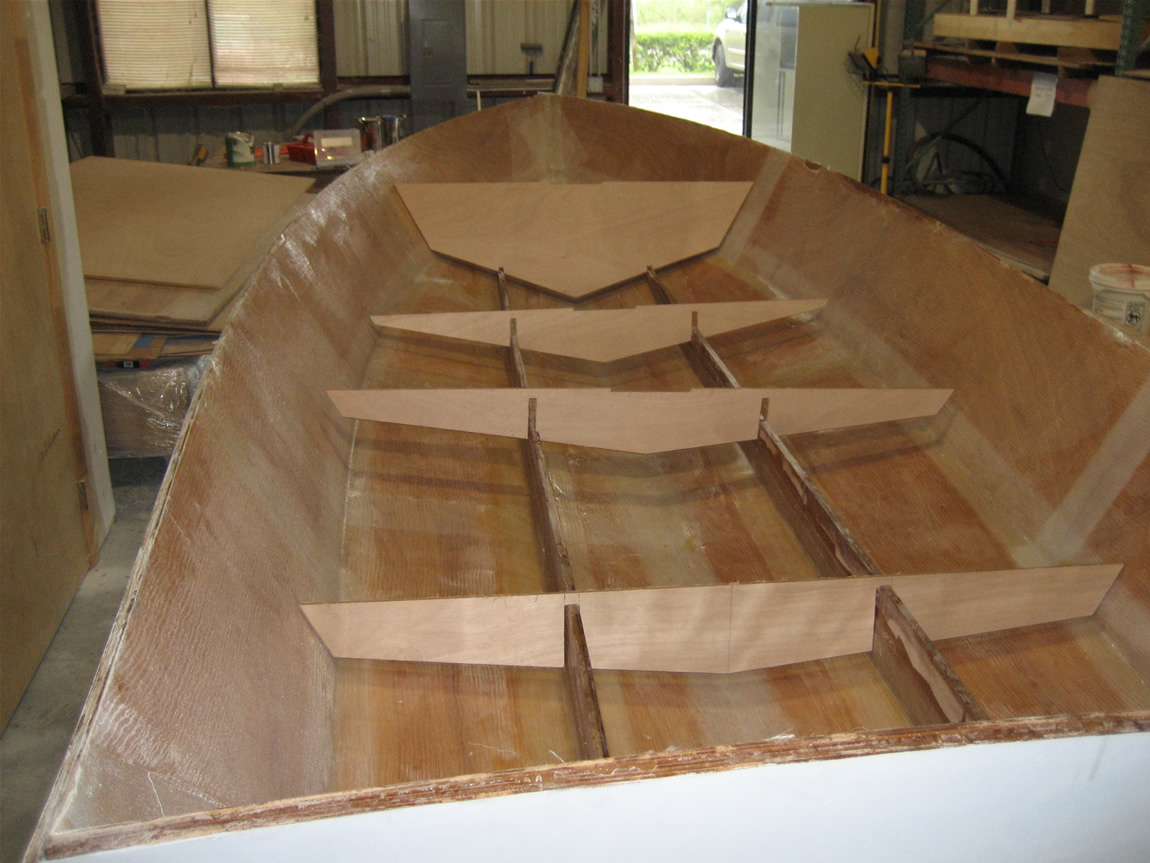
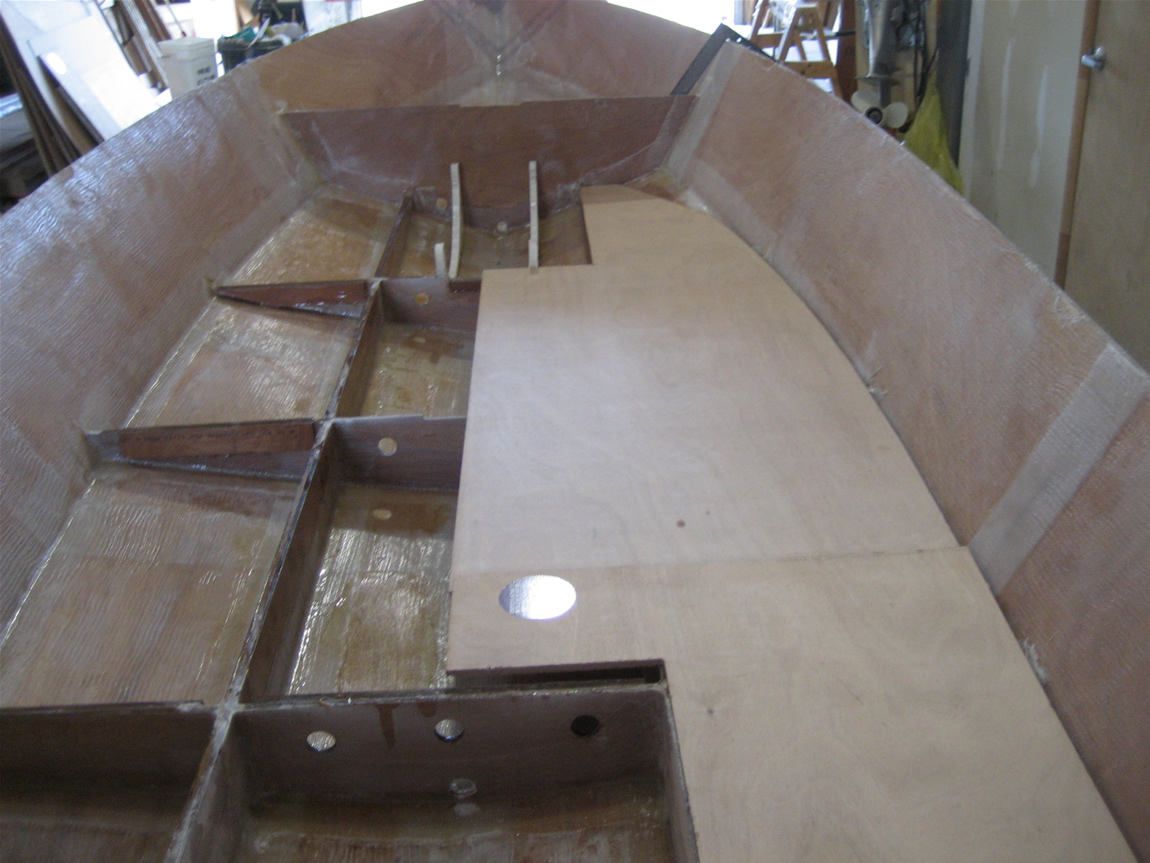
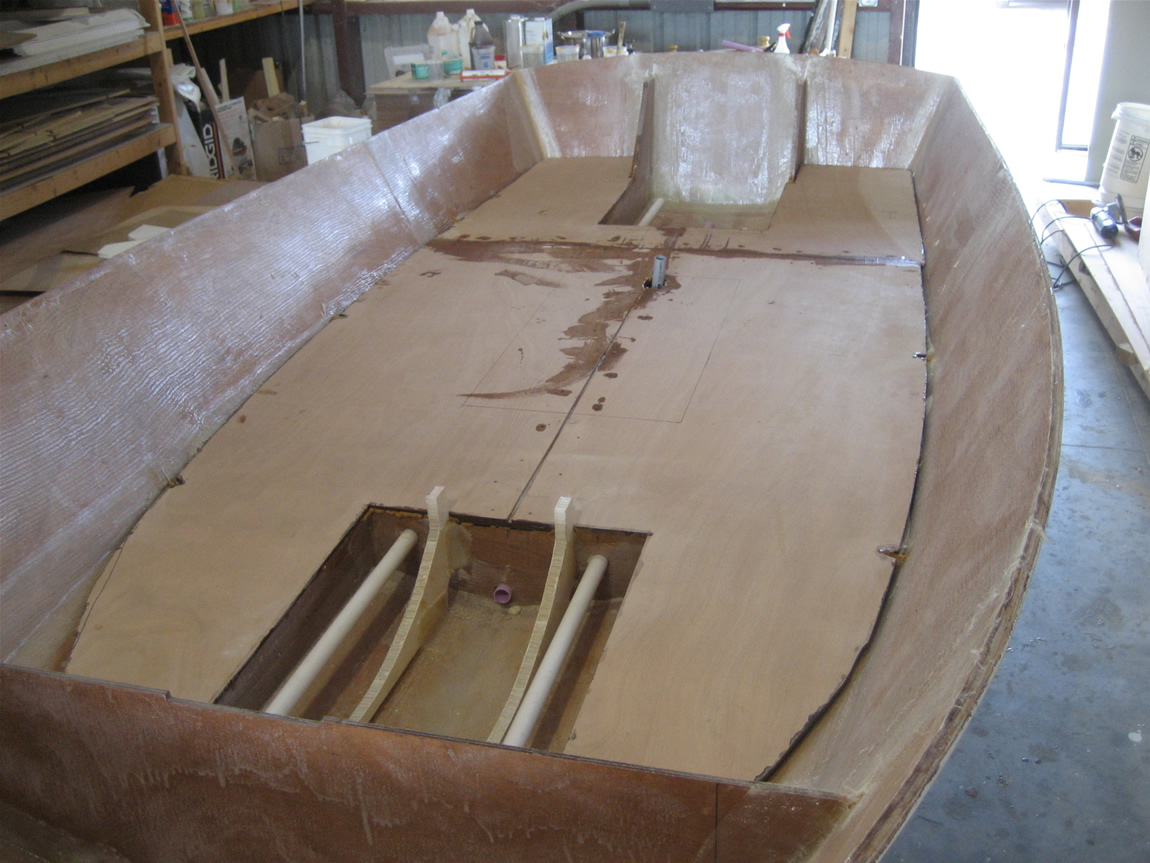
There are 4 frames. A is the height of the casting deck. The sole extends over B and there is a second part of B that is the height of the casting deck also. That where you step up. Between B and D there is a 6' long sole, then the rear casting deck
Also what are the notches in the top of the floor frames for(B or C and C or D)?
Thats where the but block rests
Jacques put the notches in to the cut file. the sole is cut in half length wise.
One more question, did you raise the stringers with the bottle caps for the glue bead along their entire length
I had a bottle cap at the rear and front of the stringer while we put down the bead of glue, then we just pulled the caps out and shoved the stringer back into the pre-cut slot in the transom (which was full of putty also)
Surfed lately?
Yes
Ive been going about once a week, and Im getting better (relative statement). I desperately need a shorter board though. This past Saturday dropping in on some overhead steep ones with my 10' board was scary. I want something about 8' with a lot of volume but still hard rails - maybe a big fish
So whats the status of your boat?
[/quote]
Posted: Tue Sep 30, 2008 6:22 pm
by dpurcell
Still in a holding pattern until the little man sleeps through the night since Colleen can't get much sleep. I watch him in the mornings and evenings so she can get some Z's. Weekends have been hectic lately as well, with some unfinished projects that need to be completed before I get the thumbs up. Chomping at the bit though, ready to head to the big box and get some melamine to at least get the molds cut and build a strongback. Got good news from my accountant about my taxes so I have a few extra bucks. Hopefully cooler weather =boat building weather. I'm having to live vicariously through all my friends for this past swell since Liam was sick I had no chance to hit it. I need to talk to Mickey about getting that 8 footer for ya!
Posted: Wed Oct 01, 2008 9:33 am
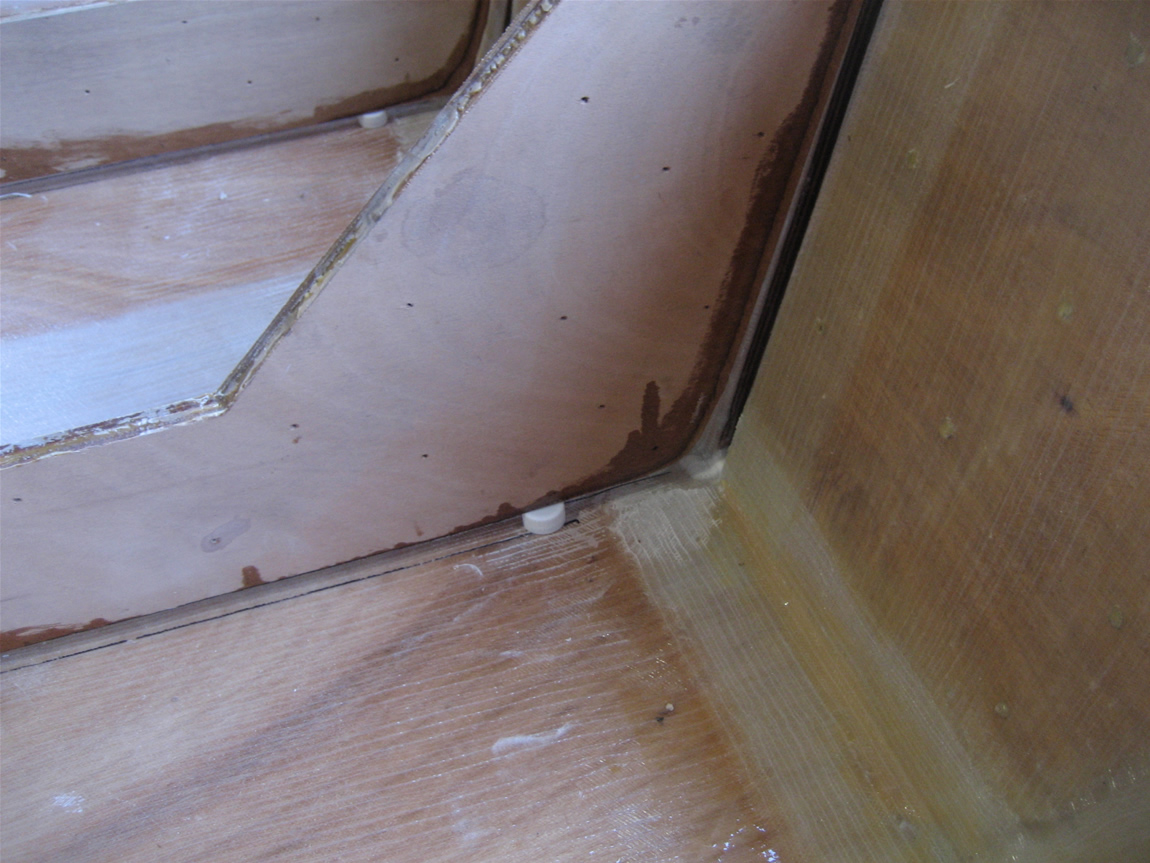
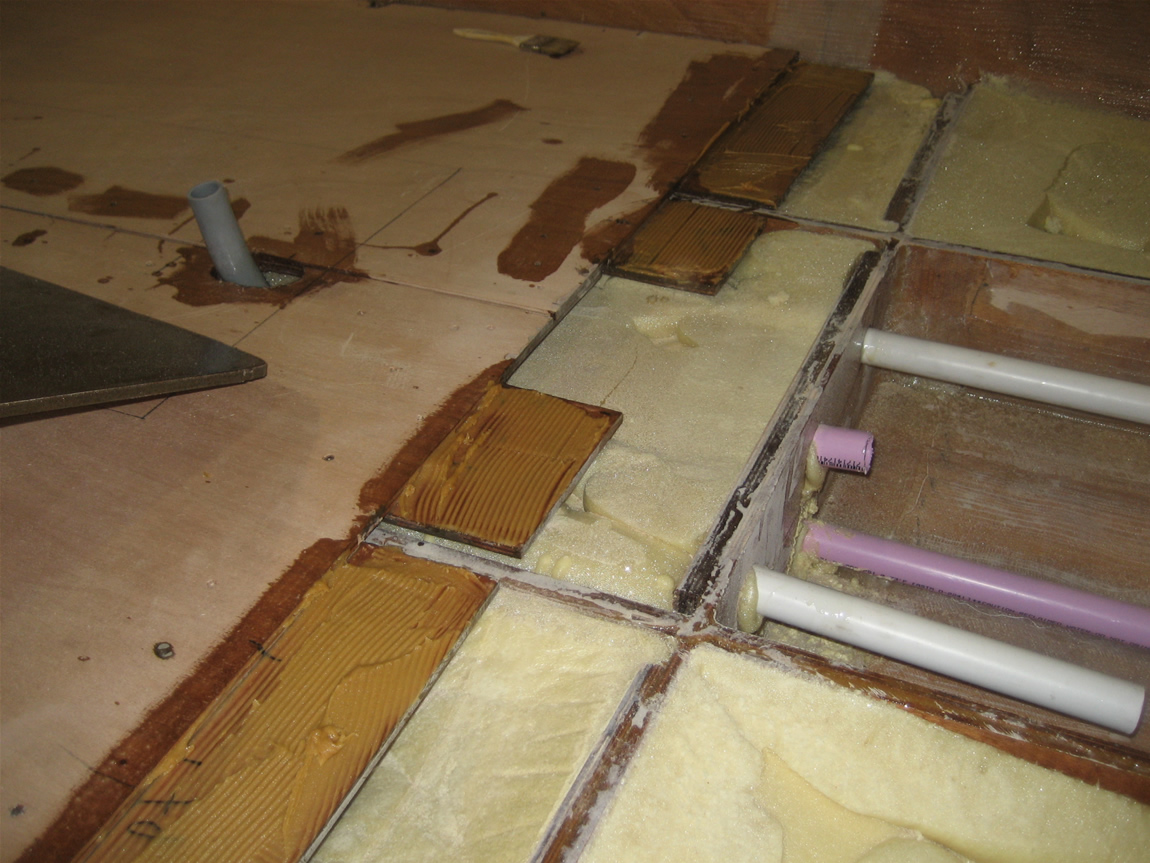
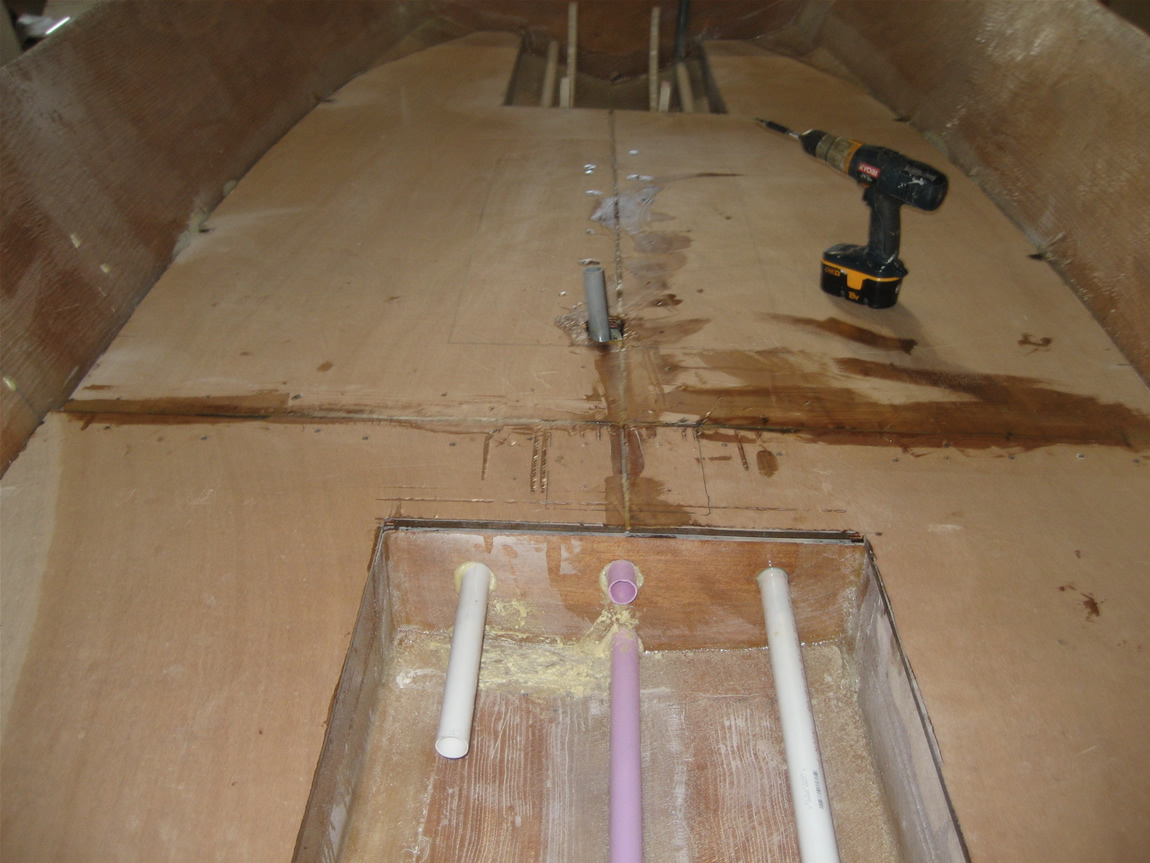
by tech_support
decided on locations for chase tubes. I wanted to cut these hole before glassing the center portions of the frames, that way I could gives the holes a good coating of epoxy as I wet out the tape.
There is one tube for draining the front compartments (runs down the keel), there is another for fuel line (ends between frames A and B with 90 degree elbow), a third goes all the way through frame A - this one will be for running lights or anything else I might need.
There is also a short chase running towards the middle of the sole with a 90 degree elbow. This one will come up just inside the center box. The center box will have a compartment towards the rear. Compartment will be mainly so i can run a switch for the jackplate.
Holes cut, tape pre-cut and ready.
fillets made, holes coated with epoxy
Tape wet out over the still tacky fillet - this is working "wet on wet"
________________________
Found a fuel tank
The boat is getting to the point where we need to figure out how to fit a tank. I gave thought to having a portable tank located under the front casting deck, but I want to use smaller pre-made hatches, so I would not be able to remove the tank anyway. Found this 17 gallon tank from the local marine surplus. The shape is not perfect and it more capacity than I need, but it fits better than anything else I could find and the price was very good.
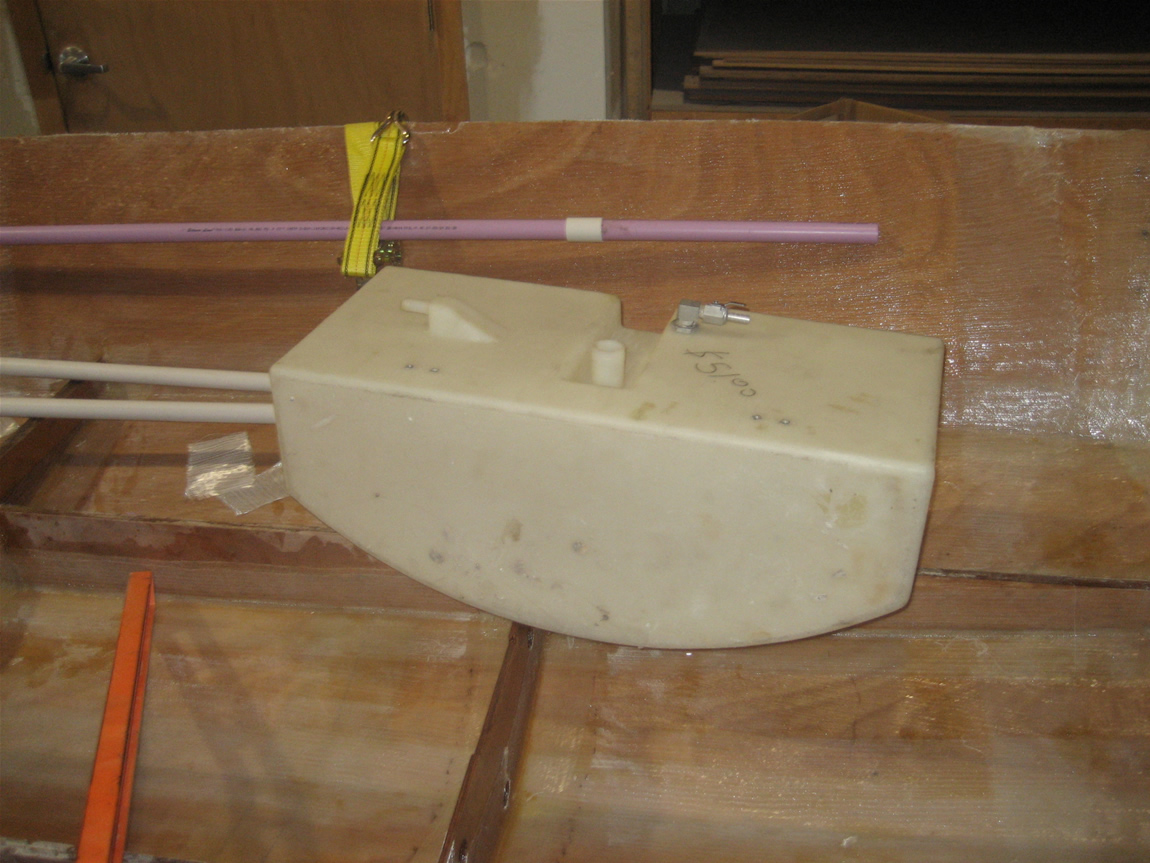
the sole will extend under the front casting deck on either side of the stringers. mounting the tank the way you see in the picture is the only way to allow for room for the chase tubes to not interfere with the tank. The front anchor compartments will drain to this compartment, which runs back to the bilge.
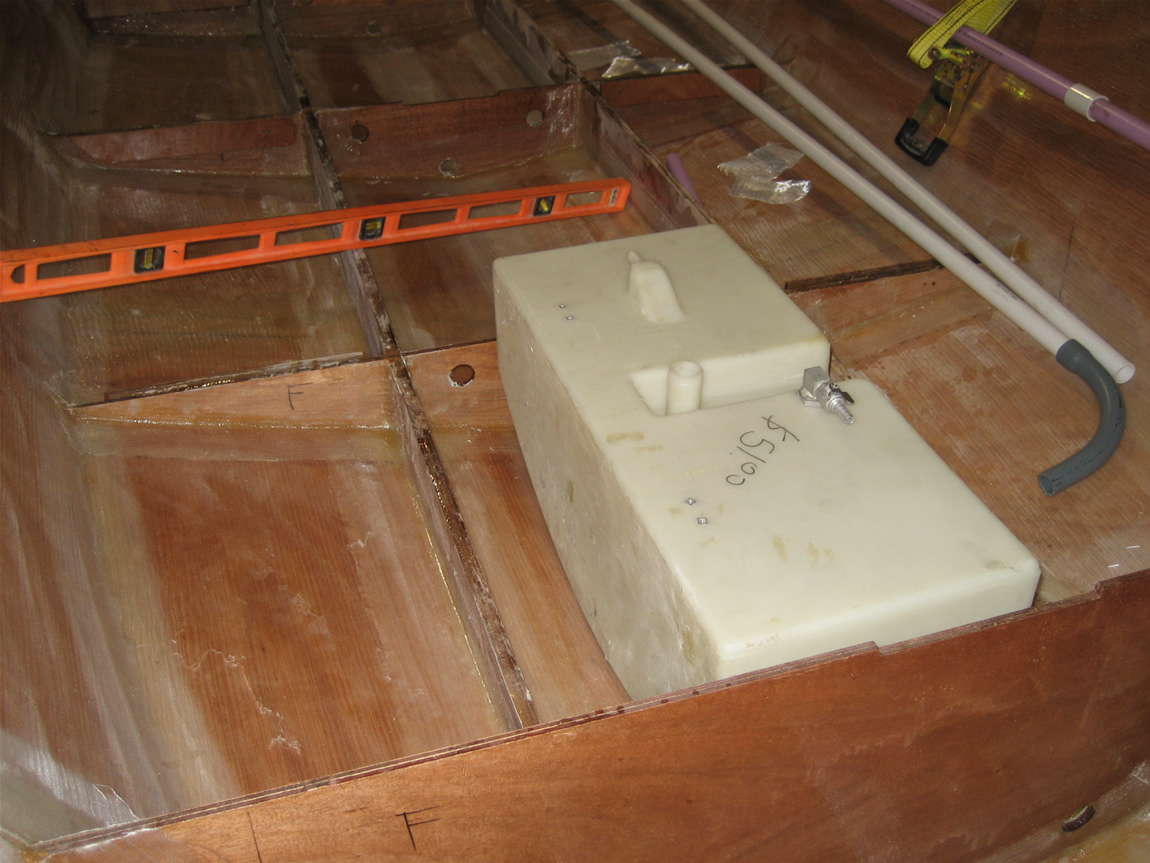
Fuel tanks should not sit directly on the hull bottom. the tank should be suspended by brackets or resting on a neoprene strip. When the boat slams you do not want point loads from all the fuel weight directly on one spot of the hull (similar to hard spots on stringers). This tank is a funny shape, so i made a couple brackets to evenly support it.
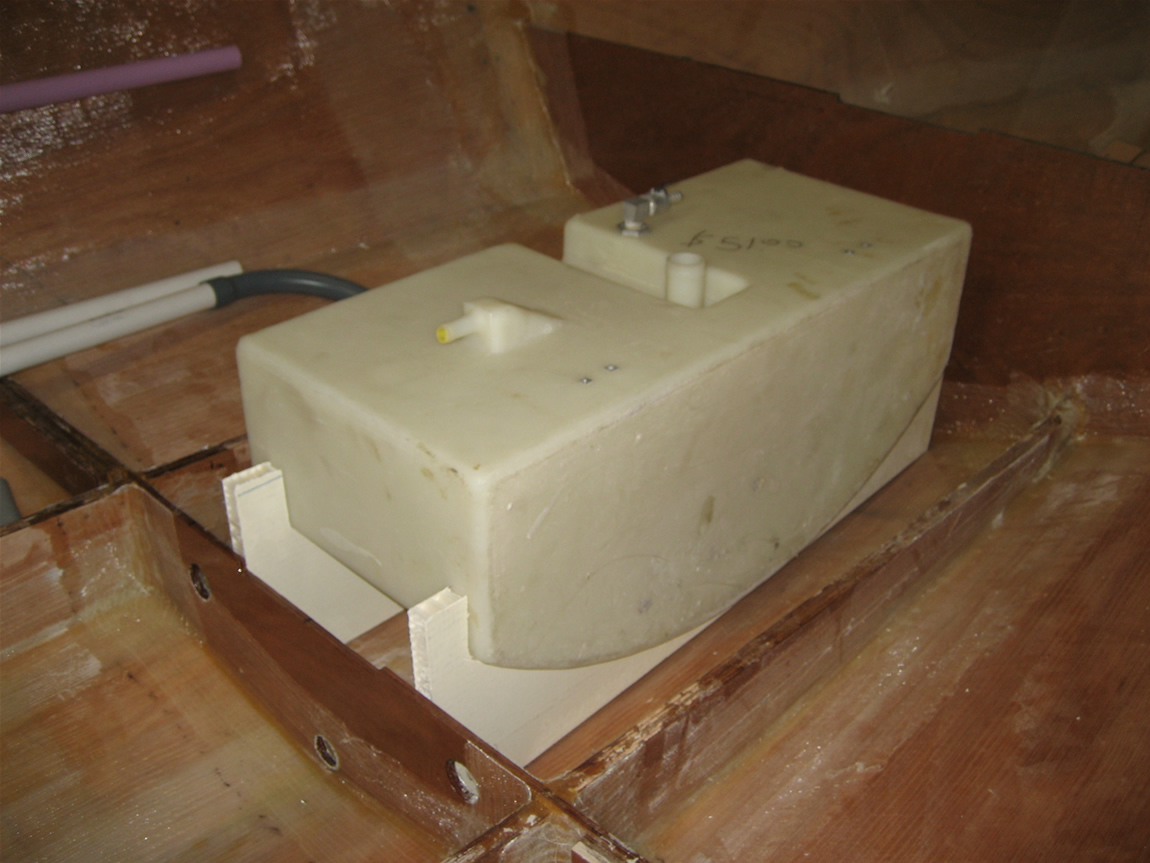
The brackets are just some scrap honey comb panel we have, I could just as easily used some scrap plywood. I traced the outline of the tank and cut them out. then they tabbed to the hull with epoxy putty. Later they will get a couple pieces of biax tape to hold them down.

Today, we will glue on the last couple cleats for the sole, the give the compartments one last coating of epoxy (where needed) and start fitting the sole.
Posted: Wed Oct 01, 2008 10:09 am
by tech_support
Here is a separate thread for documenting the building of the center box...
http://forums.bateau2.com/viewtopic.php?p=151639#151639
Posted: Wed Oct 01, 2008 10:22 am
by dpurcell
Joel, what is the spacing between D and the transom is it the full 54" (along the bottom) as in the plans or did you adjust the spacing since there is no E? Just wondering how many transverse members are needed and the spacing since my plans are nearly the same as yours.
Posted: Wed Oct 01, 2008 6:41 pm
by tech_support
the frames are spaced at 36". From the transom to the nearest frame is 36"
Posted: Fri Oct 03, 2008 9:59 am
by tech_support
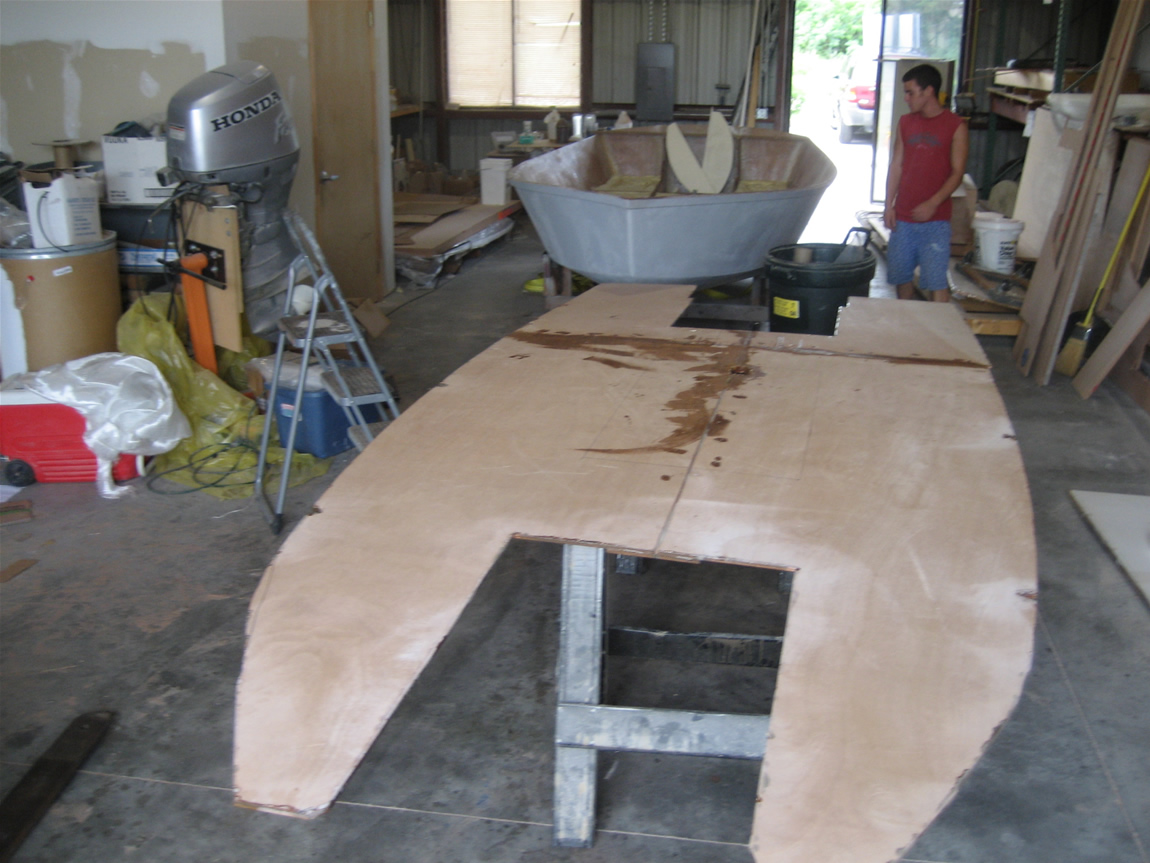
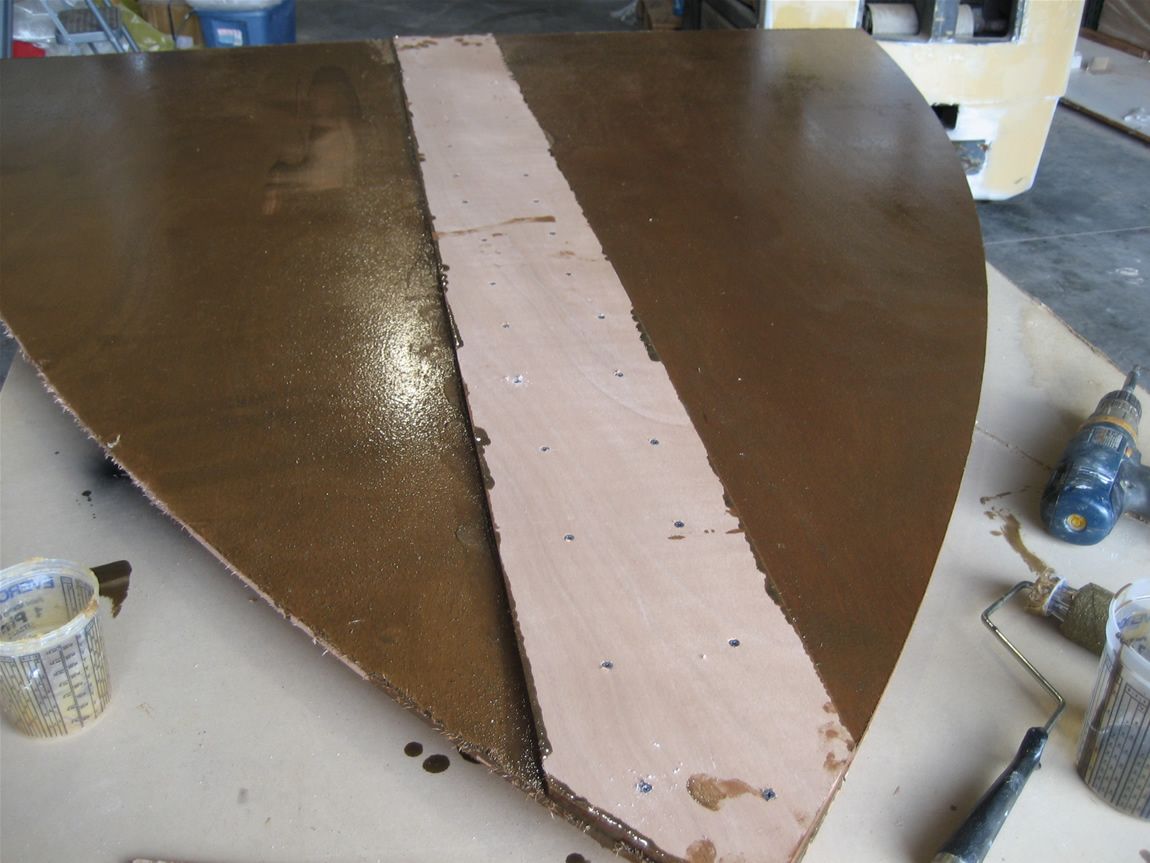
Yesterday I dry fit the sole. Had to trim some places for good fit. Originally I had planned to have the sole go all the way to the front frame, but because my fuel tank rests below the sole in between the stringers, i had to notch the sole so it fit around that compartment.
This shows the the forward pieces of the sole and the butt block that will be glued underneath. I line it up on the top and make some marks so I know where to line it up when we glue it underneath
Take one side out of the boat and screw the butt block underneath using those marks to line it up where I want
Screw it to the other side, again aligning with my marks, making sure I have a good flush fit all around on the stringers and frames.
Now I do the same thing for the butt blocks that combine the front sole with the rear sole. You can see the marks for where we have to cut out space for the stringers and the butt block thats already on the two front sole pieces. (you can see I made a cutting mistake here. I should have left the butt block from the two front pieces extend 4" out the rear, that way the rear sole pieces would be glued to it. The way I have it now i will have to have another but block under those pieces - no big deal)
Here they are cut out and marked
This is the rear portion of the sole. The sole extends under the rear casting deck on either side of the stringers. Between the stringers is left open for a bilge/sump.
So the sole is dry fit. Later in the day, I epoxy glued the butt blocks in place. Today we will install the chase tubes and begin foaming in the compartments. Also we will be coating the under side of the sole pieces and filling in all those dry wall screw holes with epoxy.
Its a good idea to do all of this fitting/gluing/sealing before you start with the foam - other wise it will be more diffucult.
Joel
Posted: Fri Oct 03, 2008 1:31 pm
by flatpicker
Joel, will you gas tank be exposed??
Looking awesome by the way!!
Marty
Posted: Fri Oct 03, 2008 1:35 pm
by tech_support
flatpicker wrote:Joel, will you gas tank be exposed??
Looking awesome by the way!!
Marty
there will be a hatch on either side, but yes you will able to see it from the sides - which is how I will know how much fuel I have
No need for gauge. Its 17 gallons, which is probably 10 more than I will ever burn in one day. but it cant hurt to have the capacity in case on day I take the boat to the everglades or run it up and down the beach in the summer
Posted: Wed Oct 08, 2008 5:23 pm
by tech_support
filled under the sole with foam. Used 2 2 gallon kits. Trim the tops off the first couple compartments, then toss the left over into the next one - this saves a lot of waste.

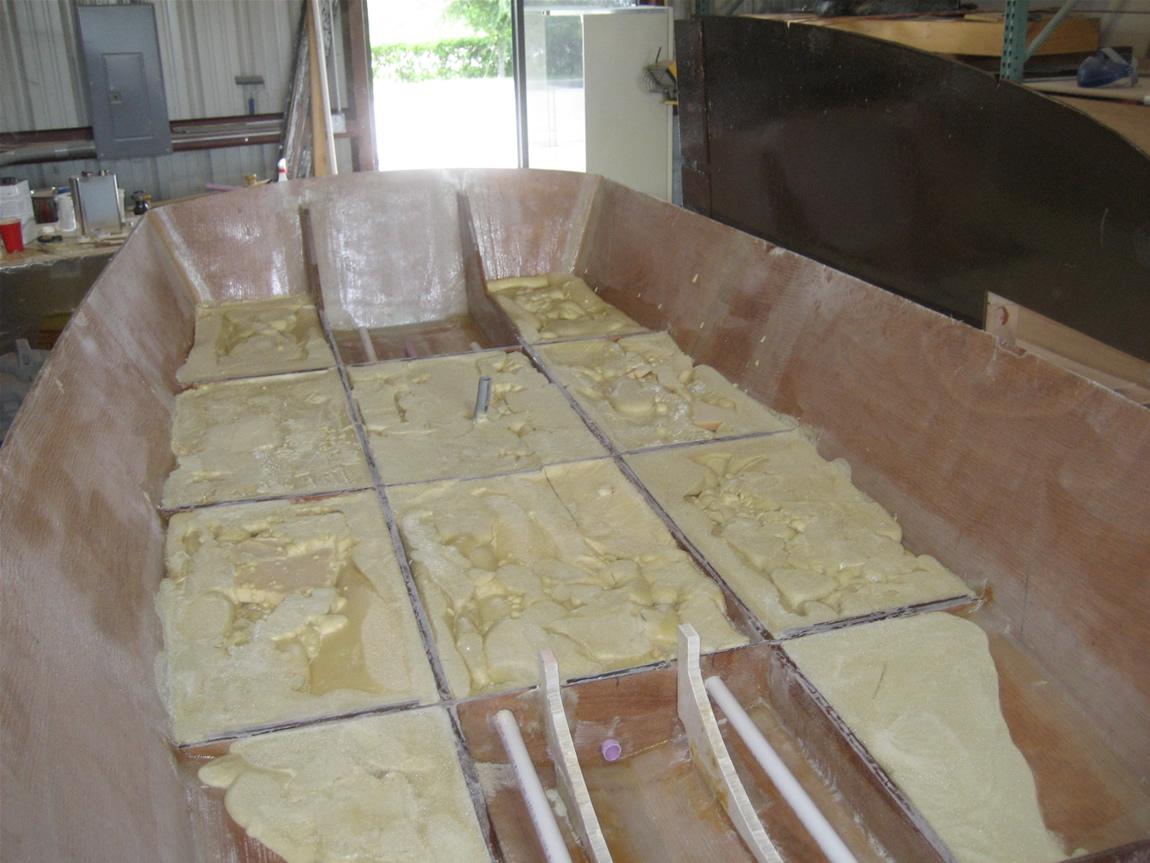
Coating the under side of the sole pieces. Rolled on two heavy coats of epoxy. the last coat was pigmented (brown) so I could see I was getting even coverage/encapsulation.

Gluing the two sole pieces together:
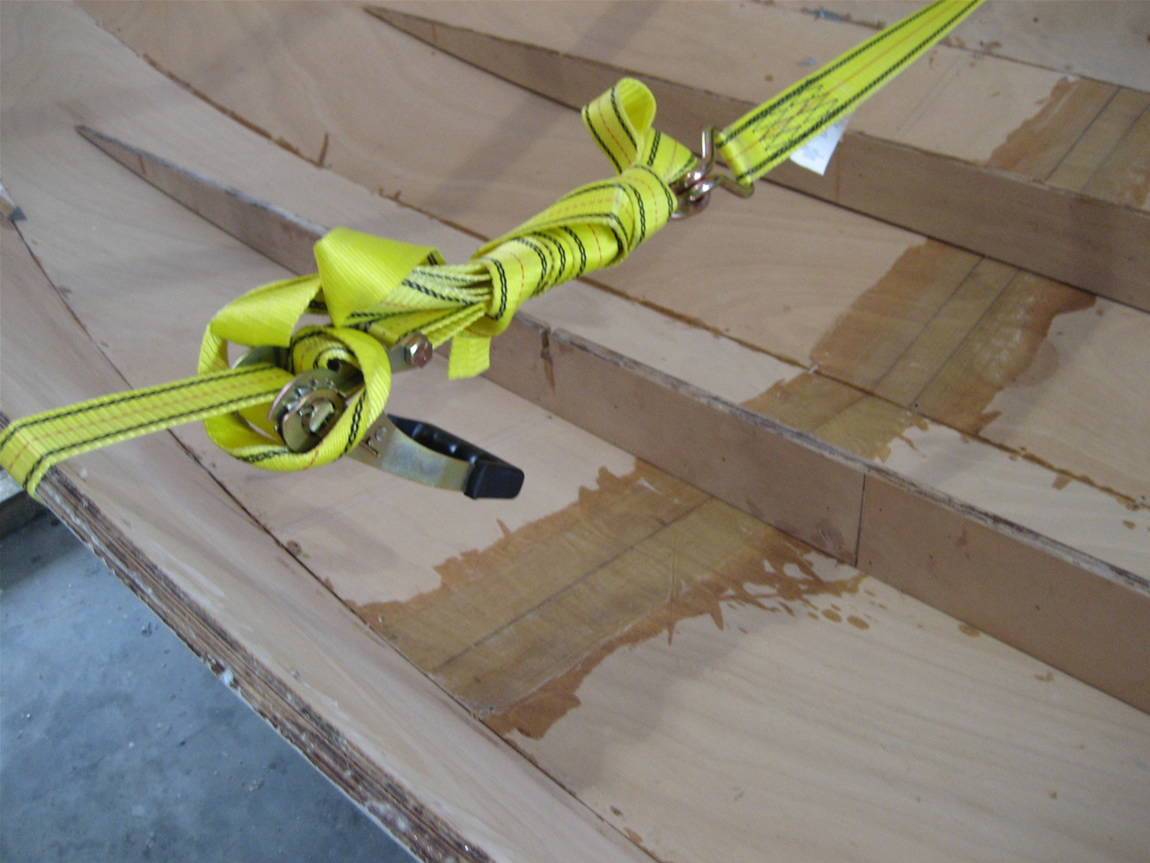
Roughed up the underside of the rear sole piece, then applied epoxy glue to the butt blocks which are already glued up to the forward sole piece.
Used screws to pull the two together until the pieces were flush. Its good to do this sort of thing in the boat so that everything is lined up. After this cures, we will take the sole out and drill/fill where the screw are now.

Tomorrow we will probably glass the sole down and also the tops of the frames that support the casting decks (they are already cut out and trimmed to fit)
Posted: Thu Oct 09, 2008 7:12 am
by Murry
Thanks for all details Joel.
Did you epoxy glue the sole to the tops of the stringers as well,
or will the glass be enough. I feel like I know the answer to this question
but since I didn't see any glue on the stringers I wanted to make sure that
I'm understanding as many building processes as I can.
Thanks,
Daniel
Posted: Thu Oct 09, 2008 7:56 am
by tech_support
Murry wrote:
Did you epoxy glue the sole to the tops of the stringers as well,
or will the glass be enough. l
Not yet, Im waiting for the glue to cure on the butt blocks that attach the two parts of the sole. Then I remove the sole, drill out the holes where the screws are, then re-fill with epoxy. Then, I will glue the sole down to the stringers/frames.
Posted: Thu Oct 09, 2008 8:25 am
by Murry
Thanks Joel,
I must of had a slight case of "impatient reader syndrome".
Posted: Thu Oct 09, 2008 9:28 am
by mecreature
interesting how it lines up so well... weird... takes close enough out of it.. how fun could that be.
Posted: Thu Oct 09, 2008 5:17 pm
by tech_support
glued down the sole today. Also pieced together the forward casting deck.
Started by removing the sole from the boat. Yesterday we glued the forward and rear section together while its was in the boat - this insures it will fit correctly later.
pulled out of boat and resting on saw horses
With 1/4" bit I drilled out the screw holes left from gluing the two pieces together. We then roughed up the underside of the sole with some 80 grit paper in the palaces where it will rest on the stringers and frames. Mixed up some epoxy and painted the tops of the frames/stringers and the underside of the sole (also filled those holes with epoxy). Let this set up for several hours before gluing down the sole.
For gluing down the sole, I had help mixing glue and filling caulking tubes with the epoxy glue. We used 3 tubes total, and there was not any waste to speak of. Each tube will hold about 12 oz of glue. We start with 9 oz of epoxy and add wood flour/silica until we get to a very thick consistency (we can go really thick because we first painted the surfaces with regular unthickend epoxy)
you can see what size bead glue we laid down

here it is before adding weight
here it is after weight
We could see excess squeezing out all around, so we know the contact and bond is good
With a little time left I put together the forward casting deck. Forward casting deck is in two pieces held together with abut block. The two frames the deck sits on are already notched for the but block.
coated the pieces first with epoxy (a little brown pigment mixed in to help discern even coverage). Then mix up some glue and dry wall screwed the parts together. The screws are removed a day later, then the holes are drilled out over sized and filled with epoxy. ZERO screws stay in the boat
Posted: Thu Oct 09, 2008 6:04 pm
by Murry
Joel,
I read earlier that you plan drill out the screws and then fill the holes.
Do you simply drill off the heads or do try and get all the metal out
and if option one are you concerned about rust. Probably not since they will never see moisture. How do you avoid squeezing out to much glue when using screws? I'm concerned about using screws when I evertually start to glue, because of creating hard spots and squeezing out two much glue. I know your experience can shed some light on my questions
and thank you for the response earlier.
I'll be honest I've read so much about hard spots that I'm trying to completely avoid wood contact where I can when I build my gf16. I'm planning to dry fit all transoms and frames to the sides using screws with two spacers on either side of the of the screws to avoid low spots and contact and then tack weld in between them. After everything dries I will remove the screws and then fill the gaps when I fillet and tape. Does this method seem like it would work? I thought this would also keep me from squeezing the glue out of each of the joints. (I understand that to be a no no.)
I'm certaintly not trying to draw attention away from your very nice build
,but I thought it would be a good opportunity to get this quick question answered concerning the use of screws.
Thank You Joel.
Daniel
If this question is out of place here please let me know.
Posted: Thu Oct 09, 2008 6:25 pm
by Cracker Larry
Daniel, you misunderstand.
First you remove the screws with a screwdriver, then you drill out the screw holes, so that you can fill them completely with epoxy. Unscrew the screws as soon as the glue sets so they don't get too stuck. If they get too stuck you can heat them to unscrew. I usually use coated deck screws, the coating keeps the glue from sticking to the screws.
How do you avoid squeezing out to much glue when using screws?
By not screwing the screws in too tight
Posted: Thu Oct 09, 2008 6:29 pm
by jacquesmm
If you are worried about screws, just use weights to glue parts together.
But if you use screws, don't over analyze the process: you screw the parts, you remove the screws and fill the holes with epoxy and that's it. Don't worry about hard spots there.
Posted: Thu Oct 09, 2008 7:46 pm
by tech_support
I updated the post to be more clear....
The screws are removed a day later, then the holes are drilled out over sized and filled with epoxy. ZERO screws stay in the boat
Posted: Thu Oct 09, 2008 8:15 pm
by TomW
Daniel you also don't really need to worry about hard spots except on the hull bottom, the stringers and the bulkheads, frames, etc. This is where the flexing of the hull can cause problems. In other places as long as you have glue between the wood no problem with hard spots. Remember gaps are good. Of course in the case of gluing the sole there will only be glue between the peices and this is fine.
Tom
Posted: Sun Oct 12, 2008 9:05 pm
by Murry
Thank You everyone, each one of your replies helped me to understand.
I know it will all come together when I start building.
Thanks again,
Daniel
Posted: Mon Oct 13, 2008 10:07 am
by tech_support
Posted: Tue Oct 14, 2008 9:46 am
by jacquesmm
Parenthesis:
I another thread, we were discussing the ideal outboard for this boat and I posted some figures. Here is a copy of that post:
----------------
Here are some figures that I ran for Joel's FS17_custom_low_sheer.
The first one is hydrostatics values.
Those are very conservative, big safety margins. I estimated a displacement of 1,050 lbs with a 25 HP 2 stroke, 2 persons (400 lbs), gas, battery, baitwell filled, lots of gear. Somebody who watch the weight can go much lower, like 850 lbs with 2 persons.
At 1,050 lbs, the hull draft is 5.5". Download or view the PDF below:
http://www.bateau.com/studyplans/FS17_H ... Report.pdf
Based on that weight, I ran a planing analysis and estimated that this was a well tuned but used engine with 70% shaft output and a little bit of drag from dirt.
This gave us a top speed of 29 mph, easy cruise at 26 mph with a trim of less than 2 degrees.
View or download the file here:
http://www.bateau.com/studyplans/FS17_P ... Report.pdf
If you look at the speed/power rows, you'll see that the boat planes with around 15 HP at the shaft, that means a 20 HP nominal.
A 25 HP well tuned with the right prop is ideal for that boat.
The balance is critical: those values were calculated for 2 men standing close to the middle of the boat, just behind Joel's box or behind the console if any.
Posted: Thu Oct 16, 2008 1:33 pm
by tech_support
We have glued up cleats and installed the framing to support the casting decks. Also glassed the sole with 6 oz cloth for abrasion resistance. Finished the fisrt of the two poling platform supports. More work on the cooler box.
glassing the sole with 6 oz cloth
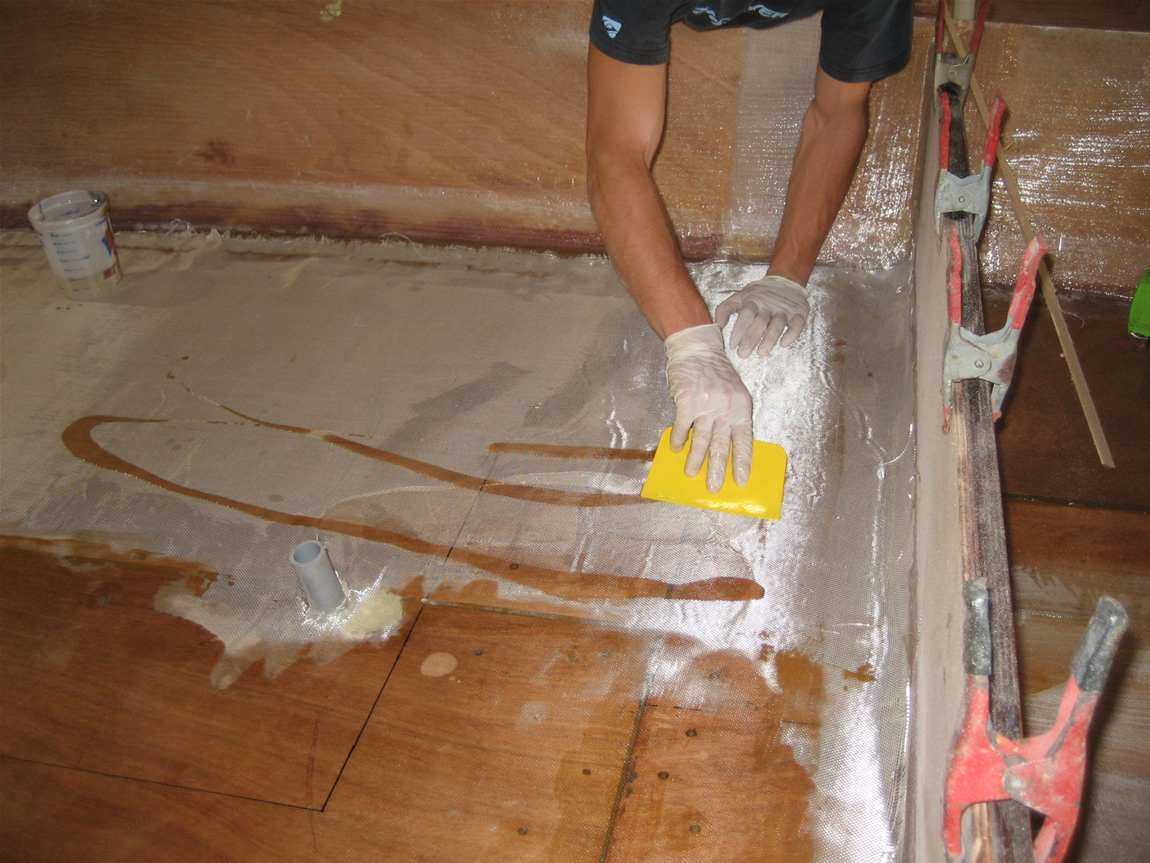
cleats glued to transom and deck frame:
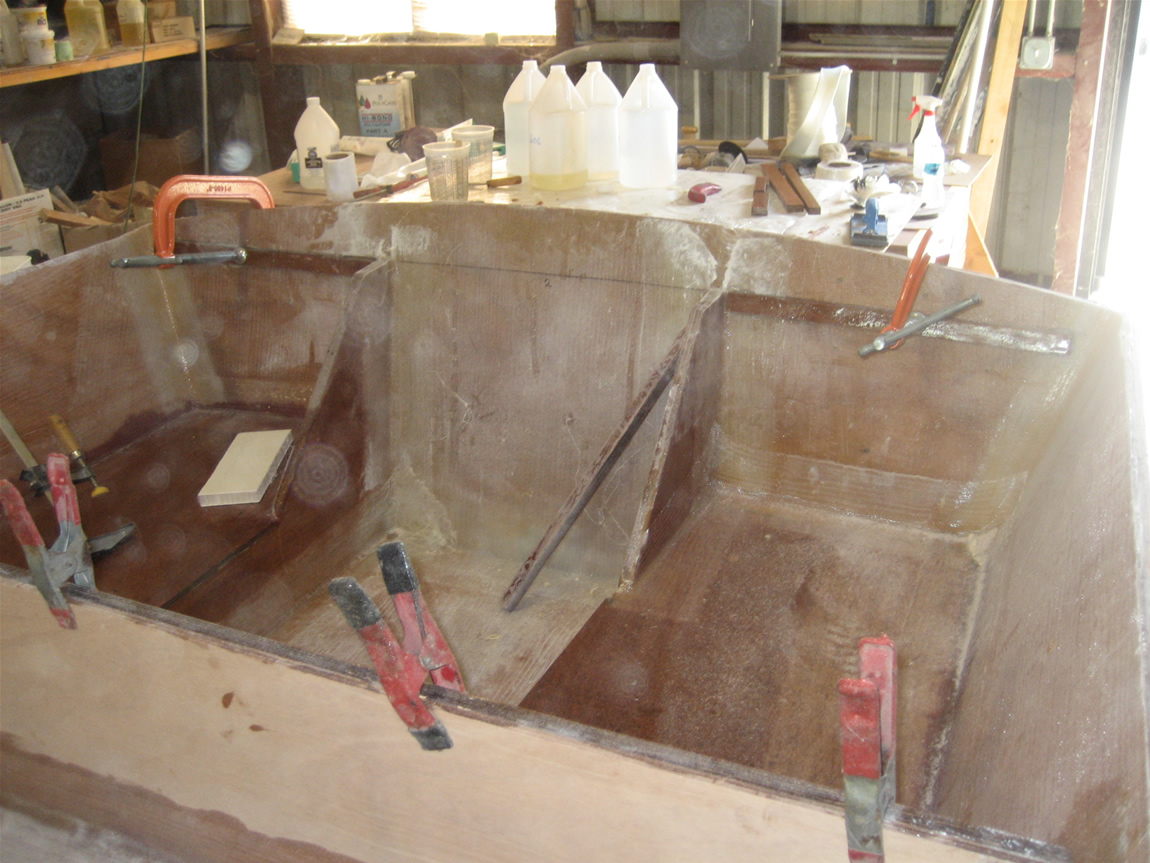
more cleats
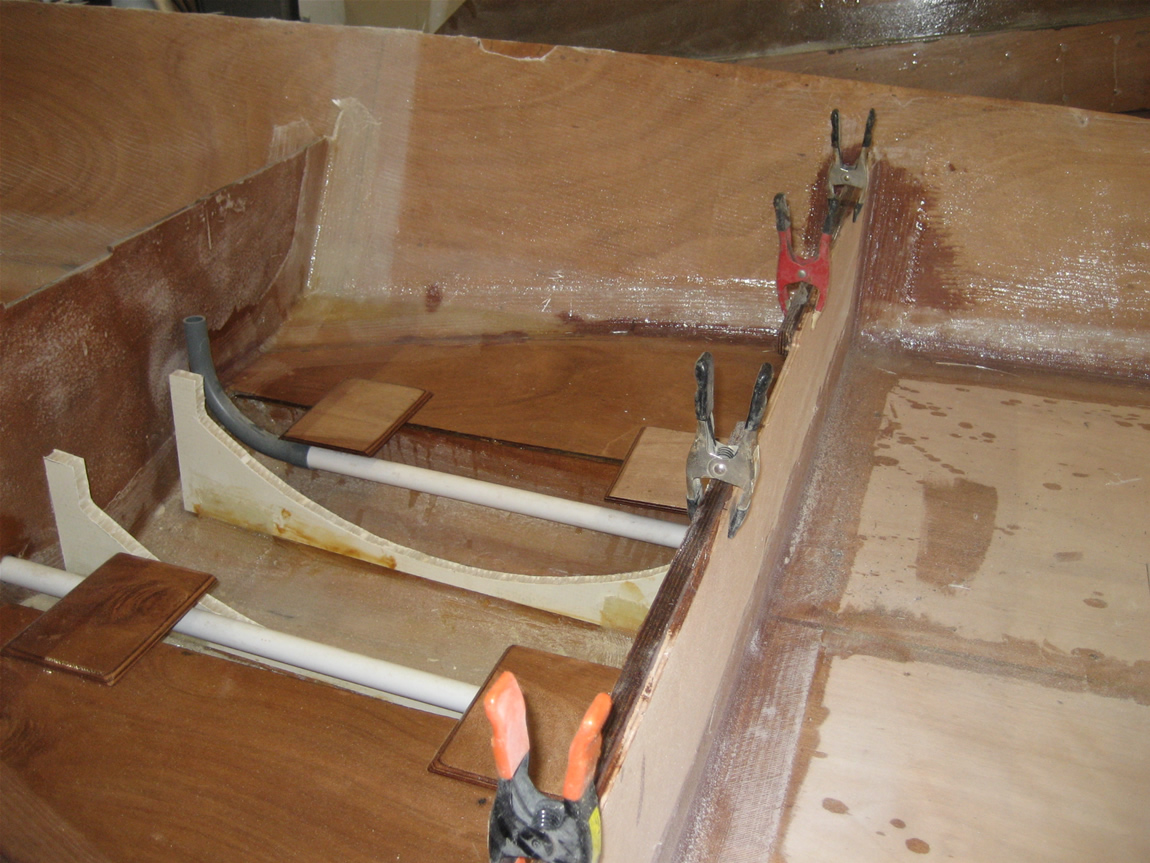
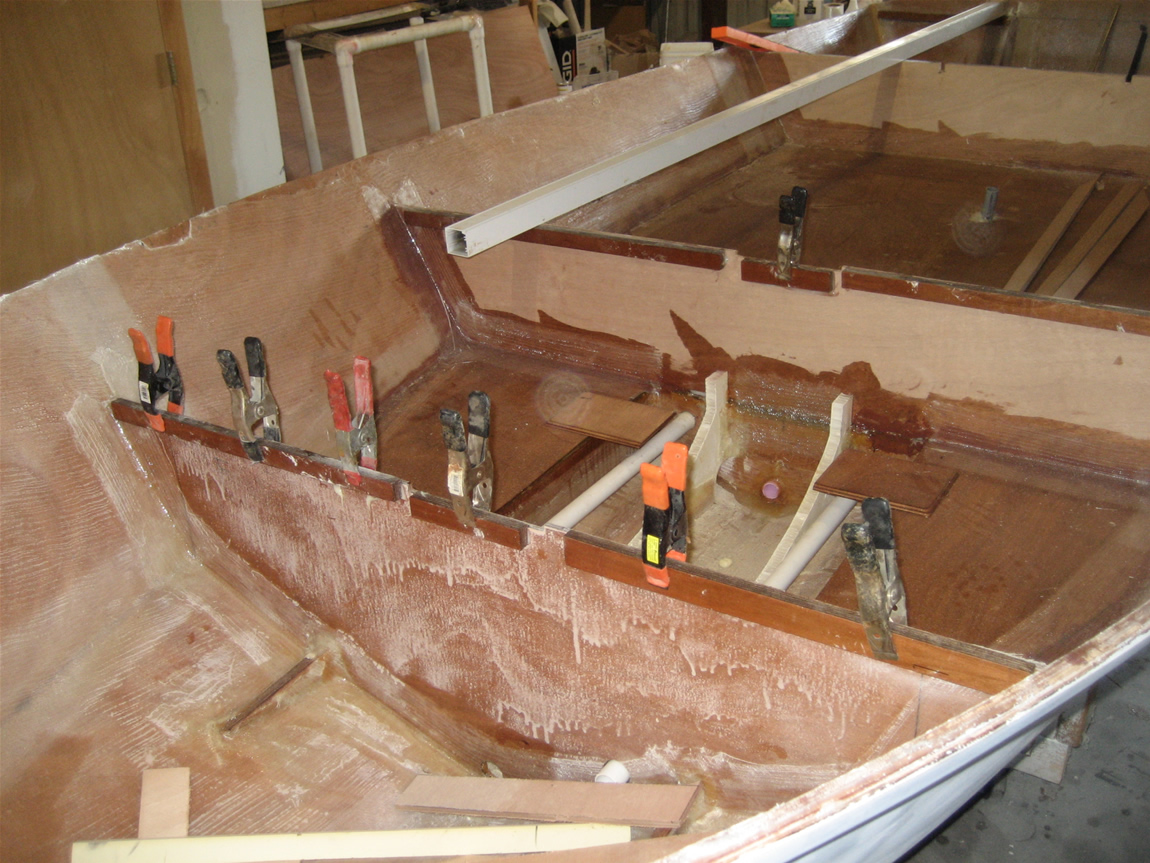
Supports for rear deck, these are notched into the frame and glassed to the top of the stringer
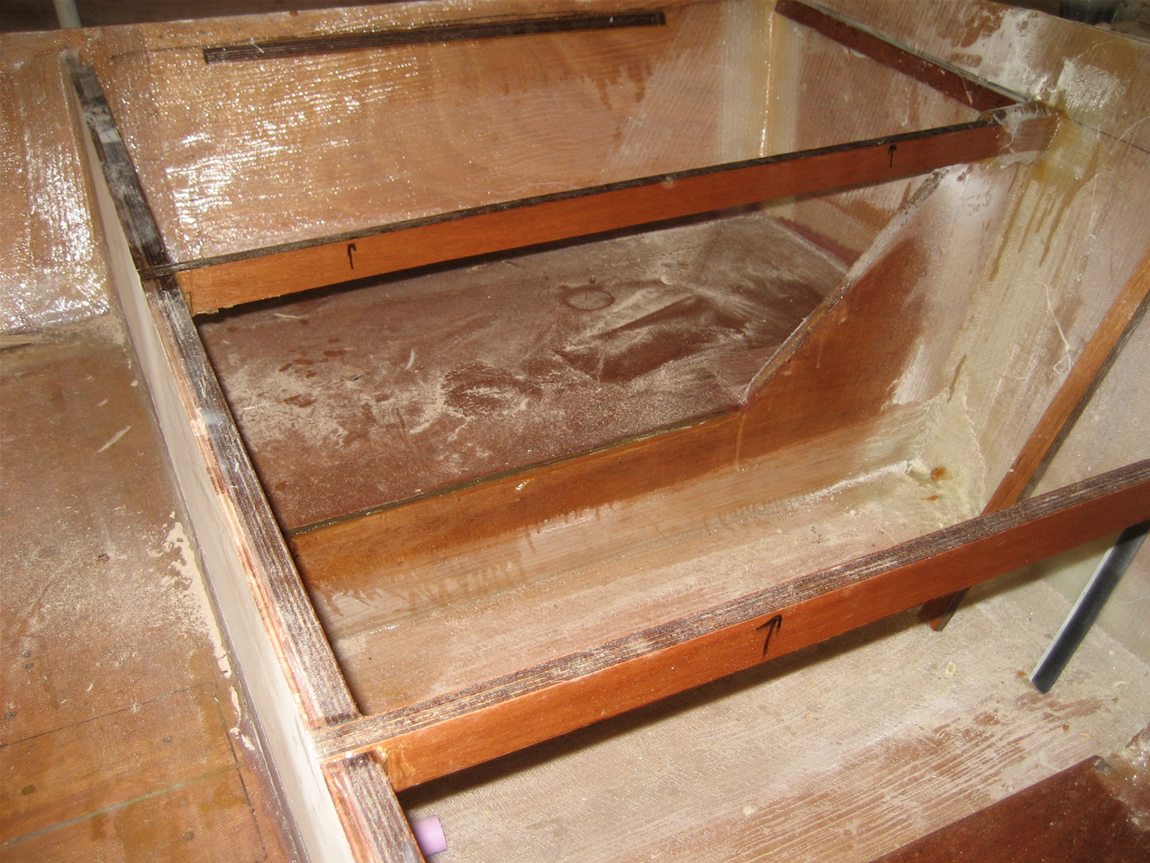
These are the two supports for the forward deck. these supports are two layers of 9mm glued together (2.25" tall"). these are all made from left over Okoume from the kit
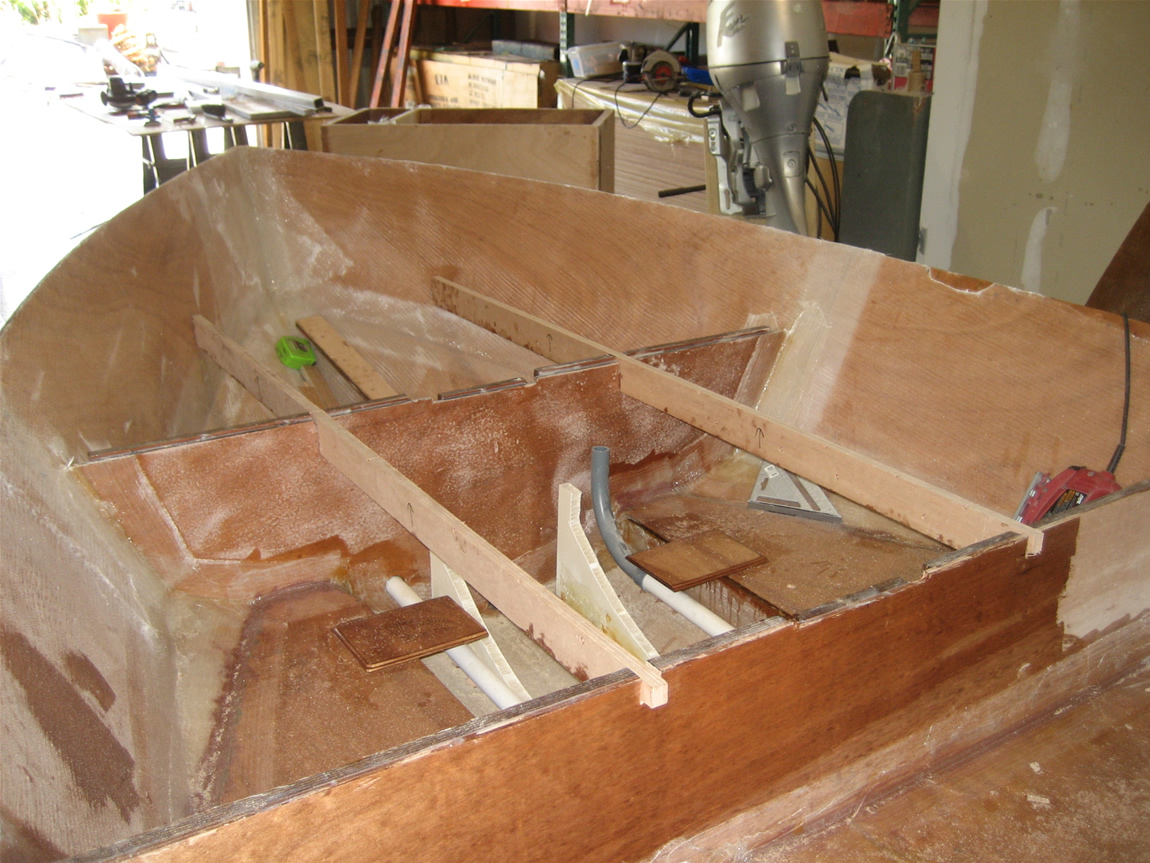
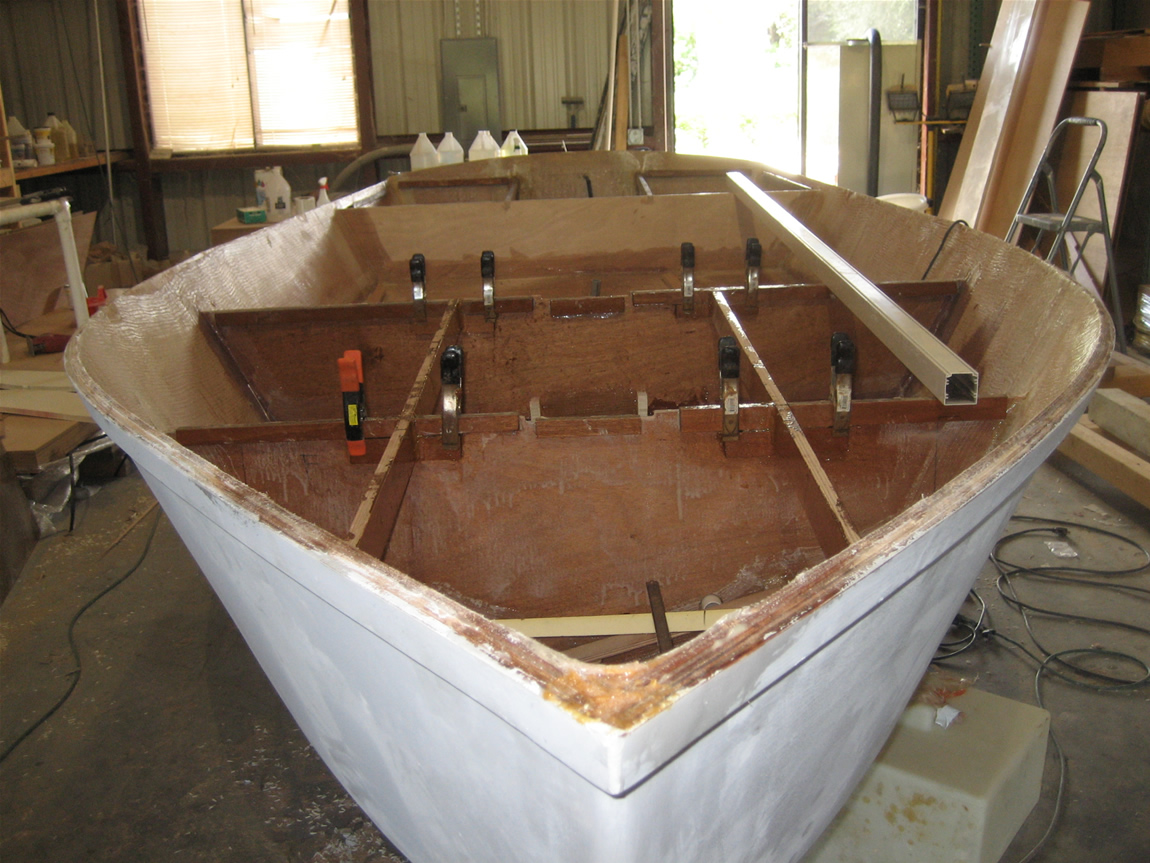
Here is the CF poling platform support, post curing in the sun. It weights less than 3.5 lbs. I post more on building the CF parts in the other thread in this section
Also making the cooler box
Posted: Tue Oct 21, 2008 1:57 pm
by tech_support
Making a few small extra parts:
Small pieces of 9mm for where we will drill cockpit drains. This is how i have drained my last few boats and I prefer it to drains out the transom, even through the later looks better (as we did the Aquasport recess drains to scuppers though the transom)
The sides needed some extra stiffness after all, so a small frame goes in
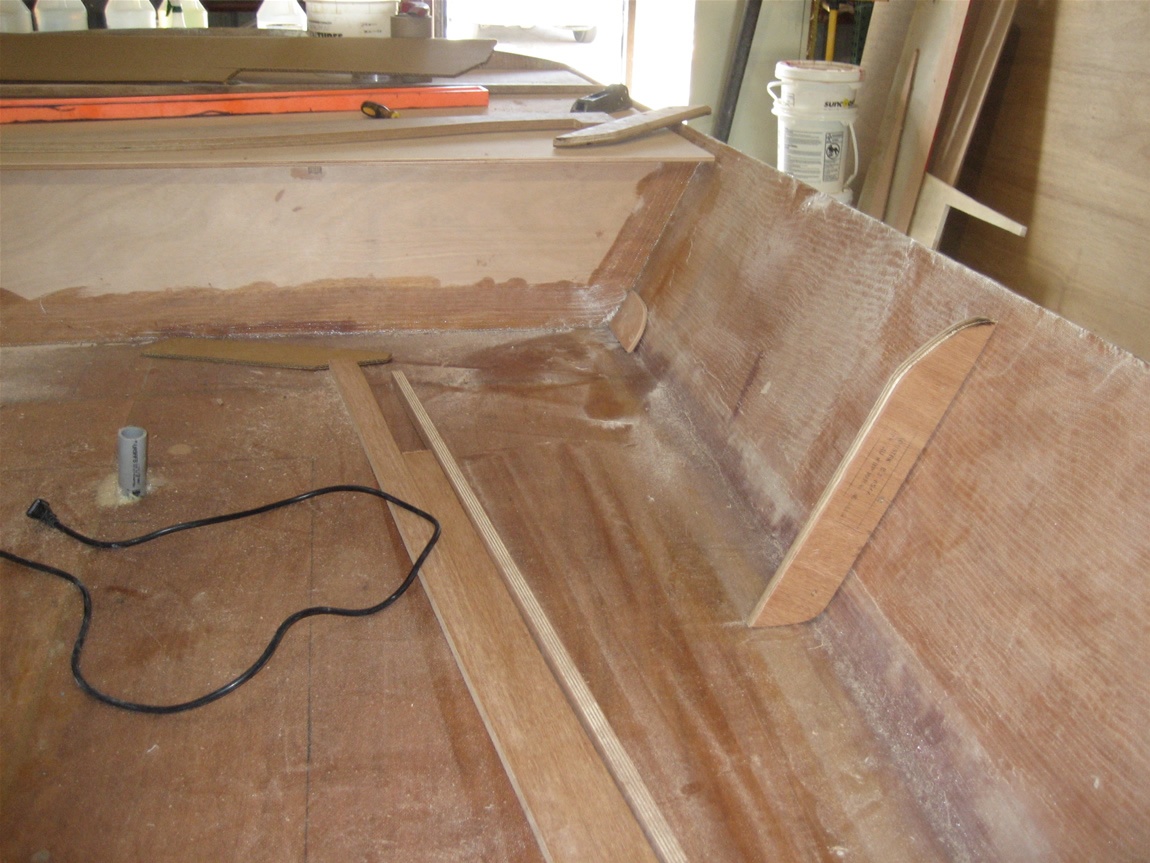
frame gets glassed in with biaxial tape, as does the drain piece
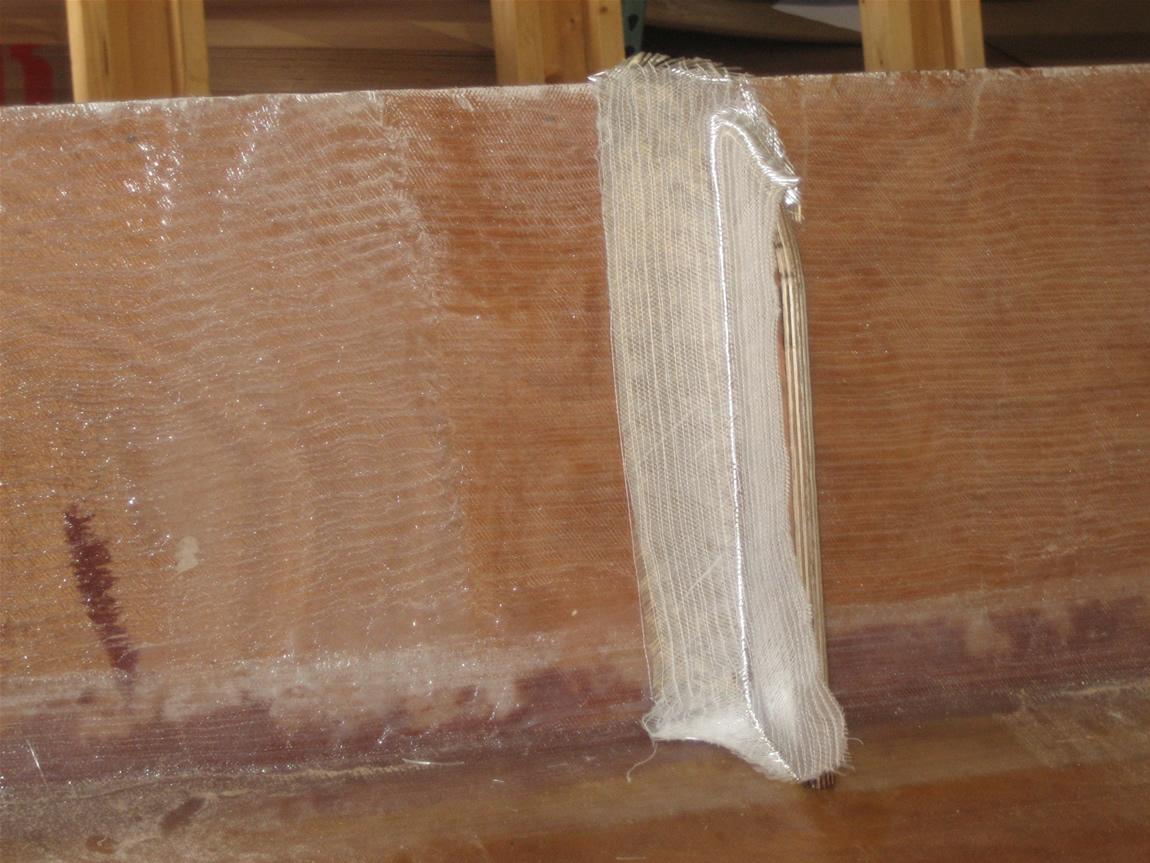
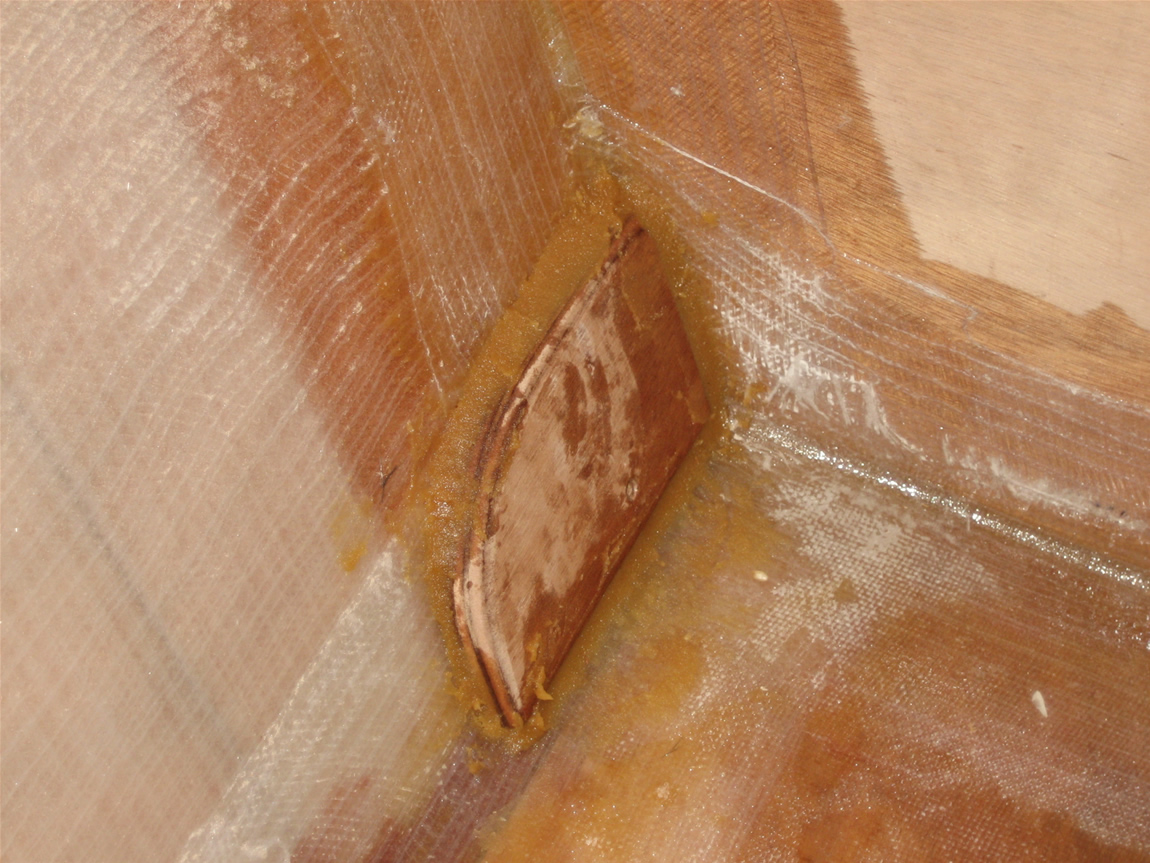
more progress also on the box and the poling platform
Posted: Tue Oct 21, 2008 1:59 pm
by Spokaloo
Joel, couldn't you have gotten away with either side decks or a slotted gunnel for side strength? Or possibly even a chair rail?
E
Posted: Tue Oct 21, 2008 2:27 pm
by tech_support
Spokaloo wrote:Joel, couldn't you have gotten away with either side decks or a slotted gunnel for side strength? Or possibly even a chair rail?
E
yes, there were lots of options.
I considered a gunnel: more weight than needed, takes up space. If I had to do it over, I would cut them on the cnc to be one piece with the front/rear casting deck and nice radius corners
I considered inwhale: not enough room above rear casting deck (its almost at the sheer level already)
I considered a half a 2" PVC pipe with glass over it: too much weight
I went with the frame because it was the most efficient way of getting the stiffness, and I may notch it for use as a rod/pole holder
Posted: Tue Oct 21, 2008 2:39 pm
by Cracker Larry
This is how i have drained my last few boats and I prefer it to drains out the transom
I'm glad to see someone besides me draining the cockpit like that
I prefer it that way too.
Looking good Joel. That's going to be a nice boat
Posted: Tue Oct 21, 2008 3:17 pm
by dpurcell
Posted: Tue Oct 21, 2008 3:18 pm
by TomW
Nice Joel, she is rapidly becoming a true lady. I still prefer the scuppers out the transom, but not the little things they normally sell. Everyone to there own. May make my own. Good idea on the small frames. Definately less weight than other options.
For some reason I think you have been doing this a while.
Tom
Posted: Tue Oct 21, 2008 3:48 pm
by tech_support
TomW wrote:NI still prefer the scuppers out the transom, but not the little things they normally sell.
i agree, large oval type scuppers out the transom are very different than the little tubes with flappers.
Posted: Fri Oct 24, 2008 11:02 am
by Gramps
How close is the BOM for the standard FS17 to your lowered sheer version?
I keep wavering on what I want but keep coming back to your boat Joel. Just can't wait to see it complete!
-Scott
Posted: Fri Oct 24, 2008 11:25 am
by tech_support
Its close to the base BOM, sides are lower, but I used a bit more ply for the casting decks.
Posted: Fri Oct 24, 2008 3:48 pm
by tech_support
Coating the insides with pigmented epoxy. This took about 1 quart of epoxy and 4 oz of pigment for 2 coats. Also coated the underside of the rear casting deck
Epoxy is more resistant to fuel and chemicals than paints, so this is a very good alternative to painting. But only for area out of the sun, pigments are not enough barrier to protect the epoxy from UV long term.
Under forward casting deck...
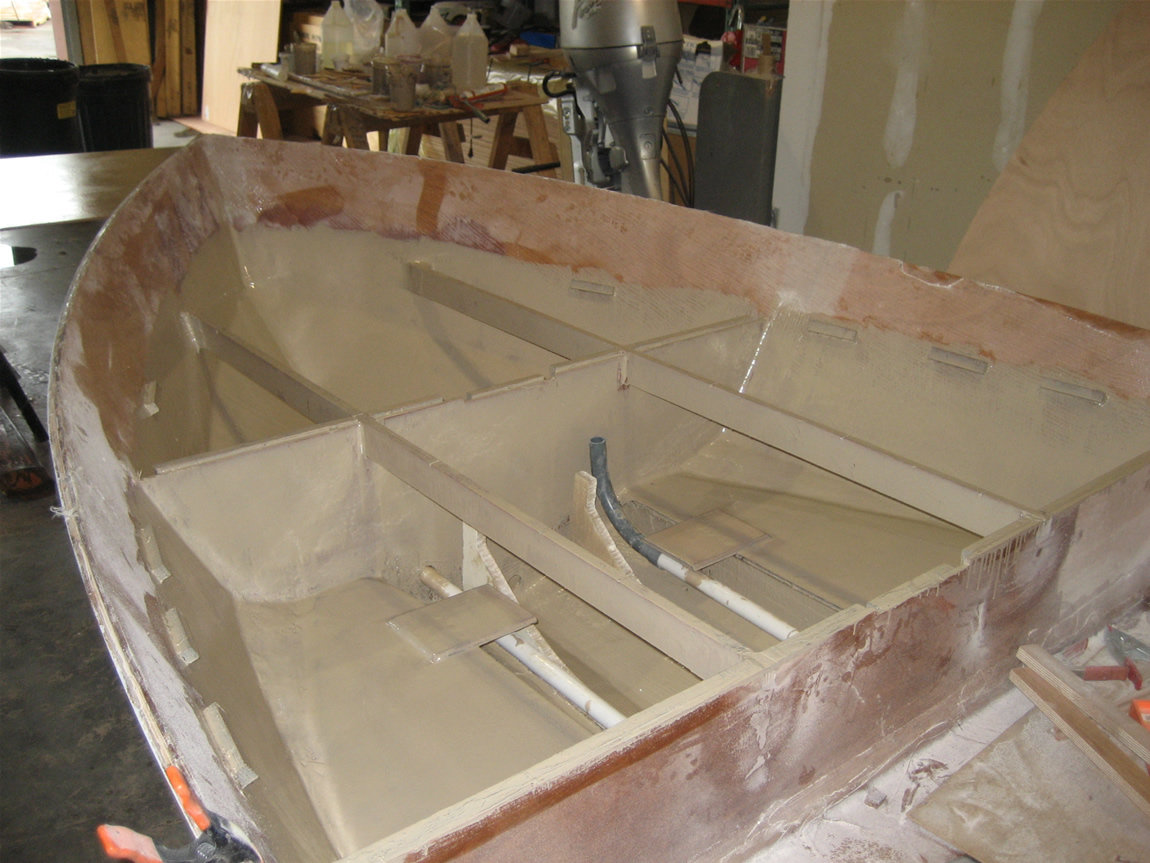
under rear casting deck
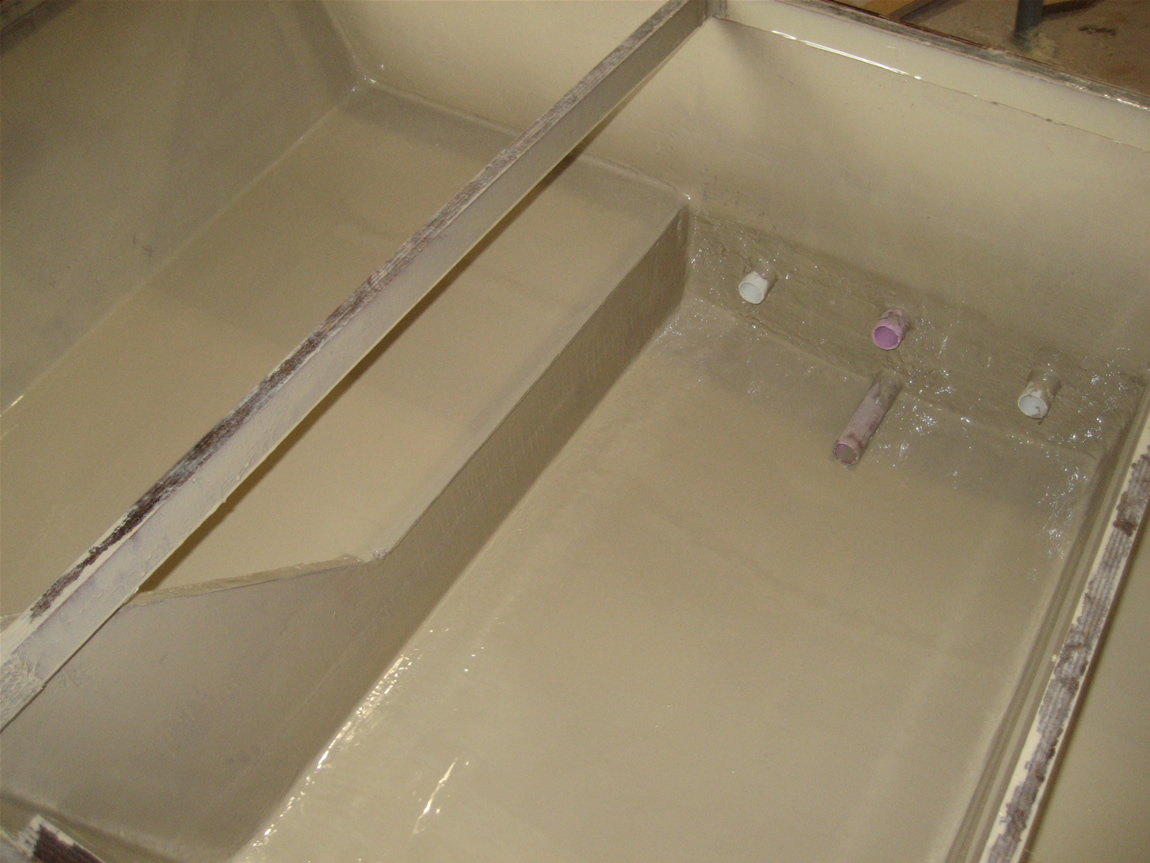

this is the underside of the rear casting deck...
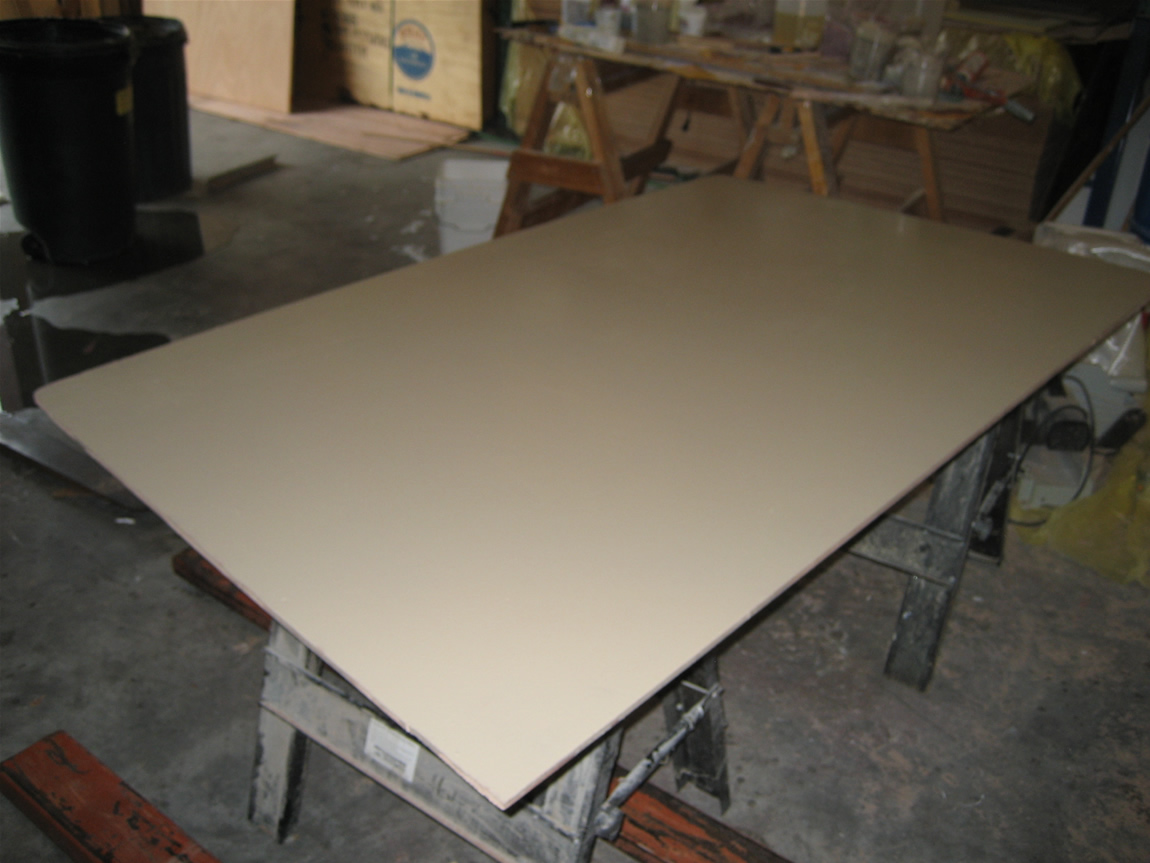
Also made a little progress on the box and the second poling platform support. Ordered hatches today, so next week we glue down cating decks and install hatches.
Posted: Fri Oct 24, 2008 4:52 pm
by chicagoross
Looking great, Joel! The pigmented epoxy in the compartments is on my list of changes for the next build. It not only looks great and is more durable, it costs less than paint and saves you several days of painting. After all, you needed a few coats of epoxy anyway! Just like the graphite bottom - tougher coating and no painting! That's the way to go!
Posted: Fri Oct 24, 2008 5:07 pm
by TomW
Cool Joel
The 4 oz of pigment per qt of epoxy really covered well. Just like you told me in my question in the paints forum. Real good example. Using the pigmented epoxy on the bottom of the deck also makes makes sense to me. It will glue down just fine like epoxy on epoxy.
Is that the beige or tan?
Tom
Posted: Fri Oct 24, 2008 5:08 pm
by mecreature
Looking very good...
I am onboard with the pigmented epoxy too...
Posted: Wed Oct 29, 2008 4:56 pm
by tech_support
cutting out holes for hatches in rear and forward casting decks
I like to make a template of the cut out hole. Always cut your hatches to be lined up with the closest visible frame or bulkhead, and wait to cut them until you have the decks lined up and marked out.
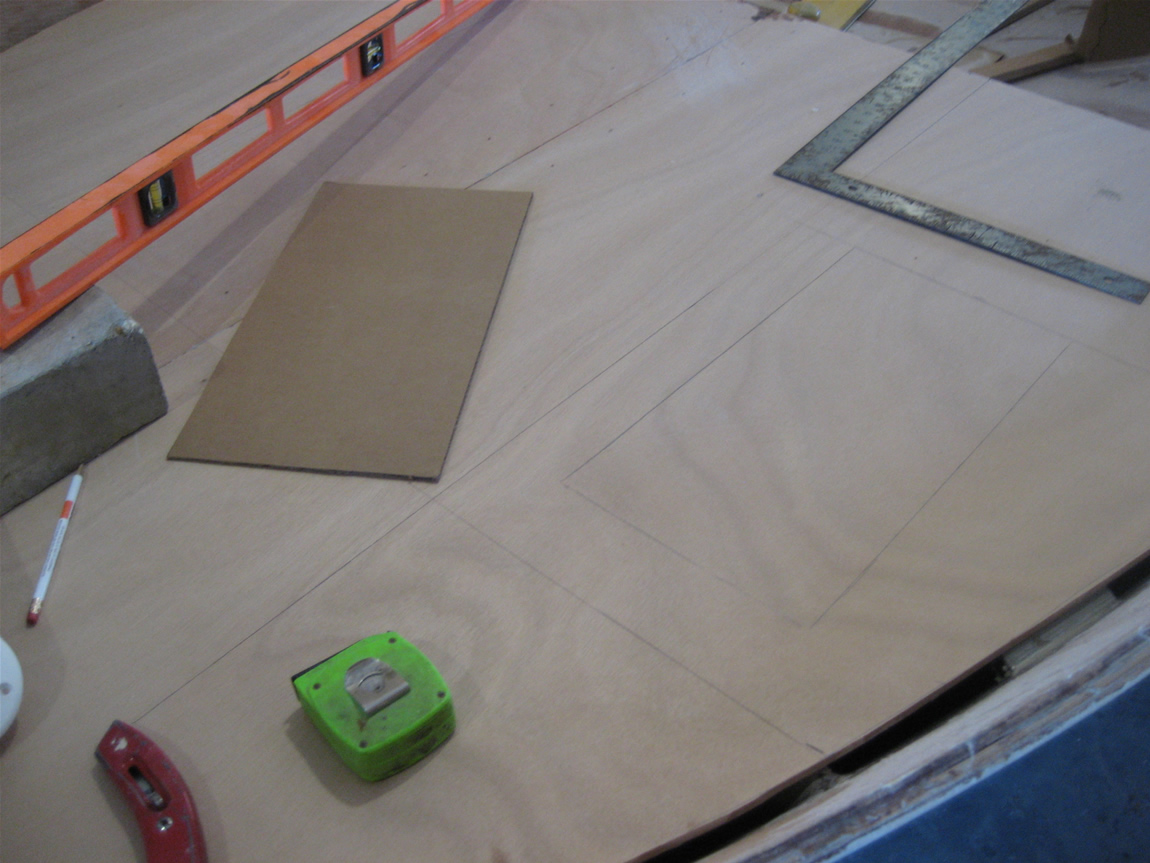
rear deck, fits snug. when drawing out the holes, make little marks on the side and deck so you can line everything back to the same spot later
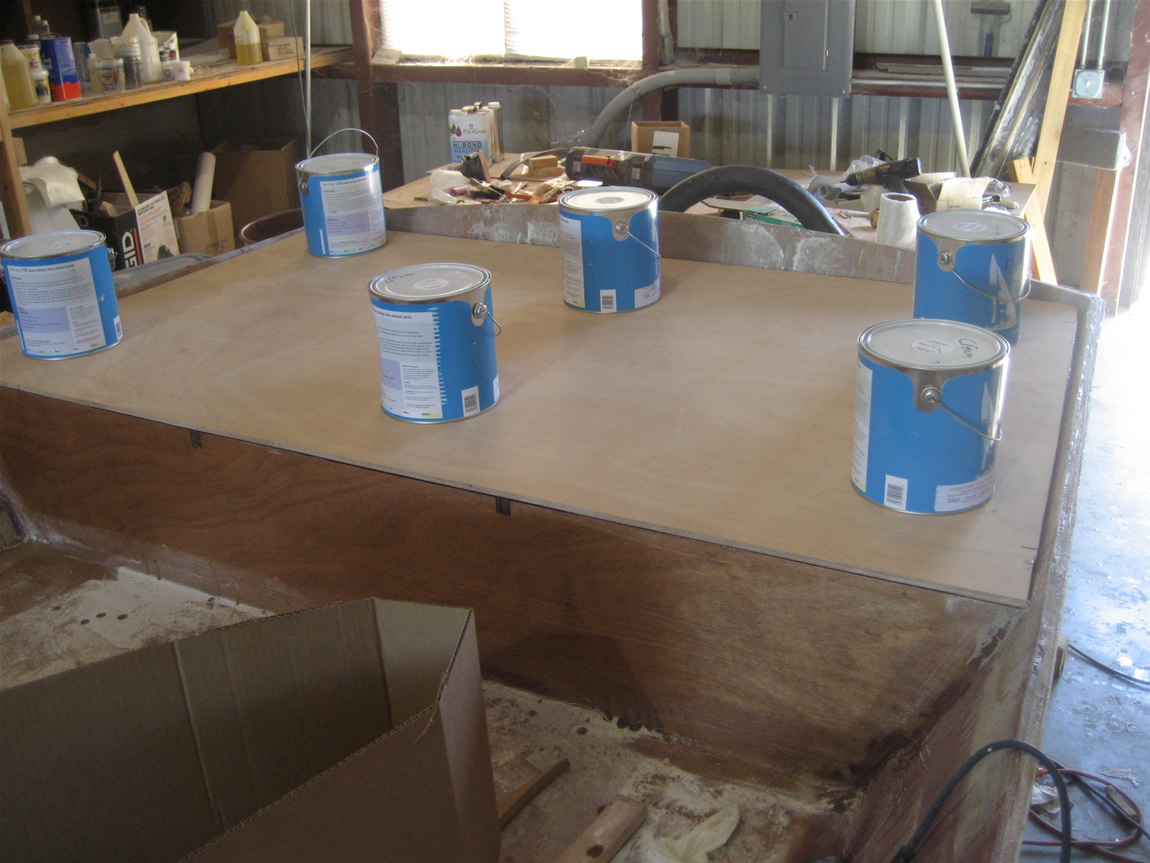
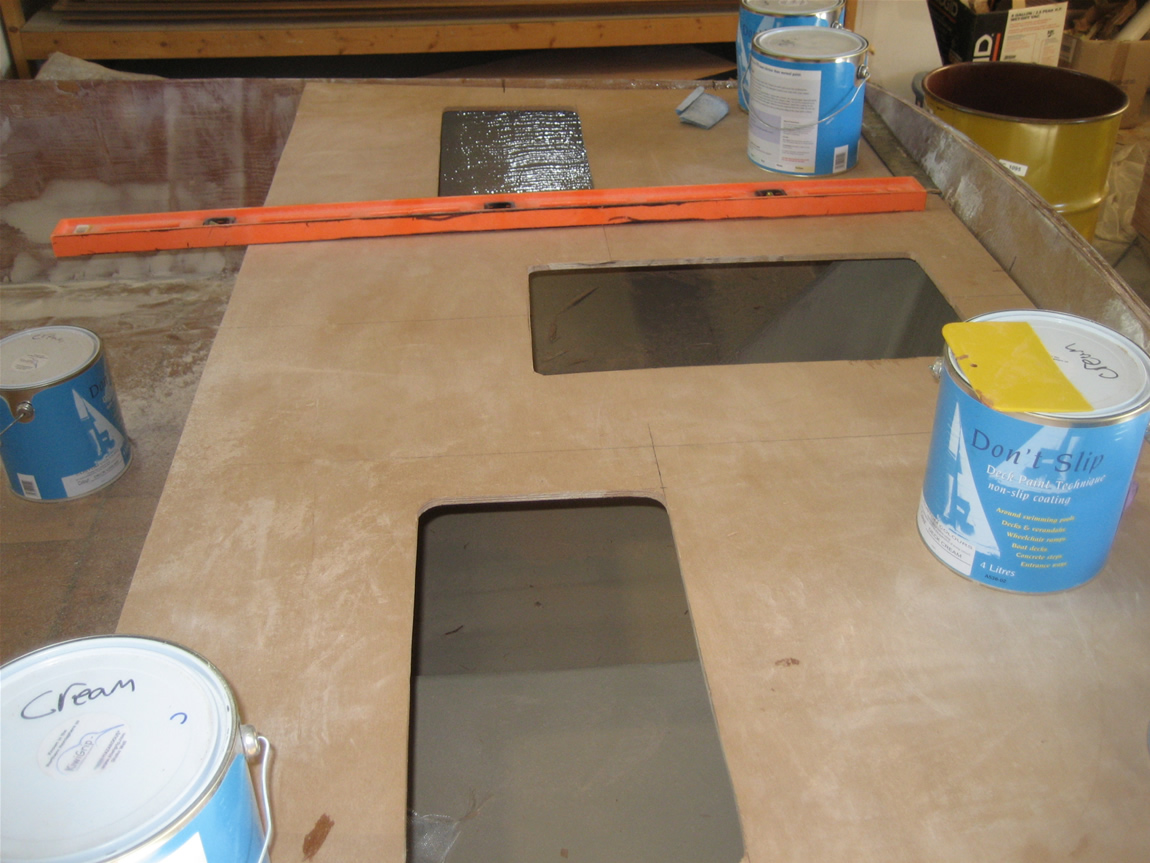
When a hatch hole is in the middle of a span that will hold weight, you can stiffen it back up by gluing some stiffeners (pieces of scrap wood). In these shots we are gluing up those stiffeners to the underside of the deck. Earlier, while the deck was lined up (right after cutting holes), we marked the location of the framing members on the underside of the deck, so we know where to end these stiffeners.
underside of rear casting deck, you can see where we marked where the deck hits the framing members (black sharpie lines).
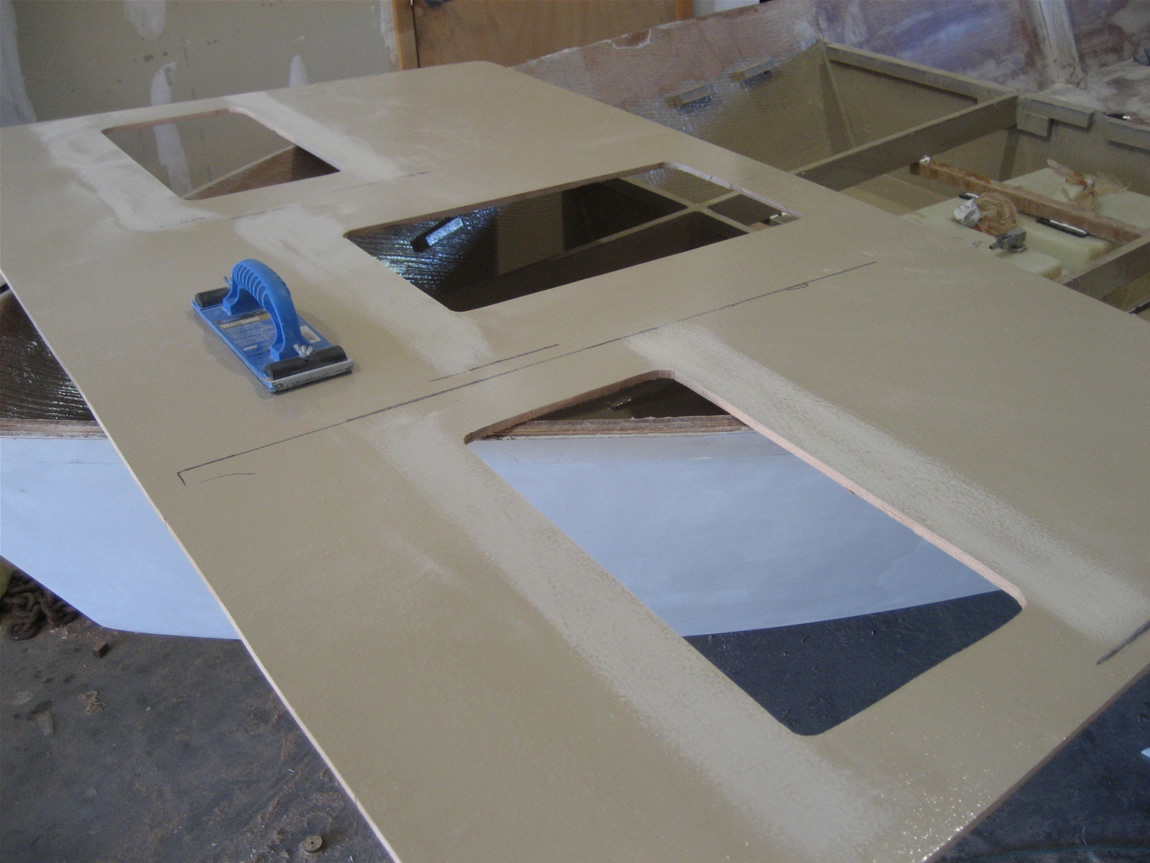
hatch hole stiffeners glued up on underside of rear casting deck.
Rear casting deck is upside down in this picture
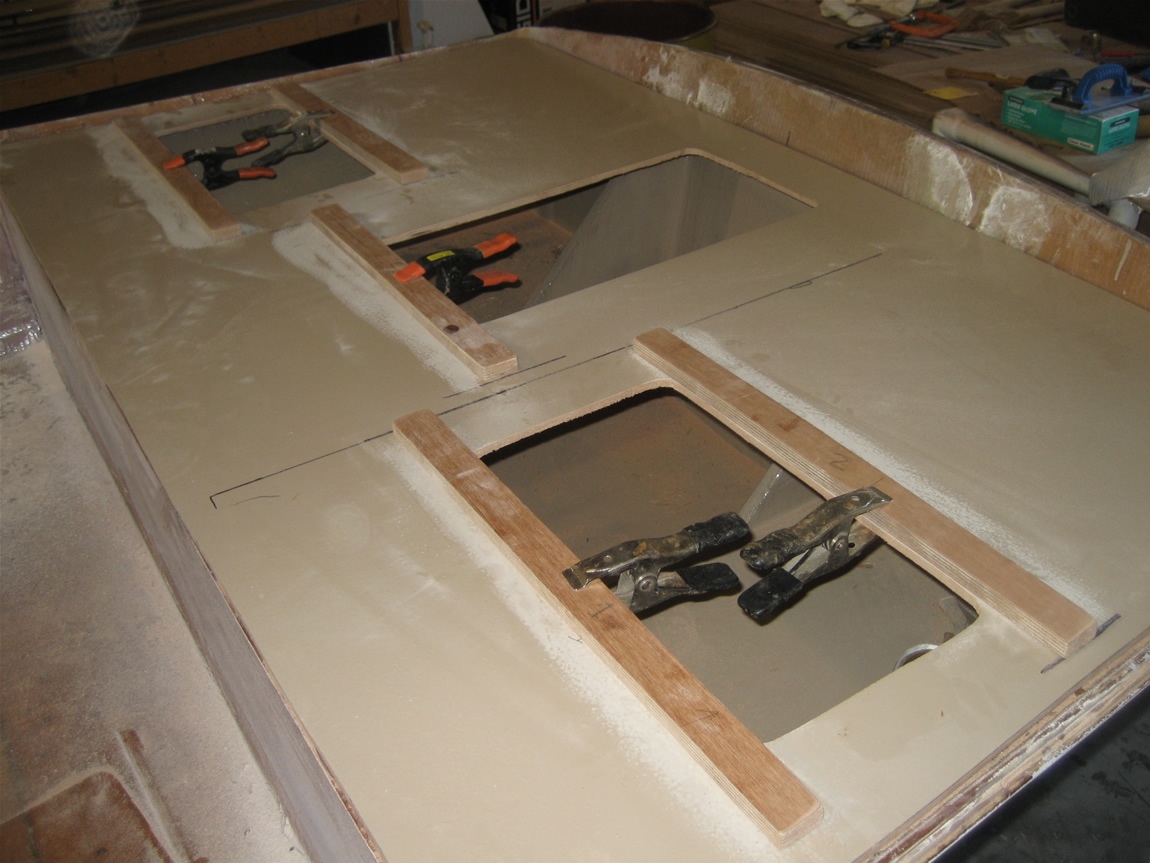
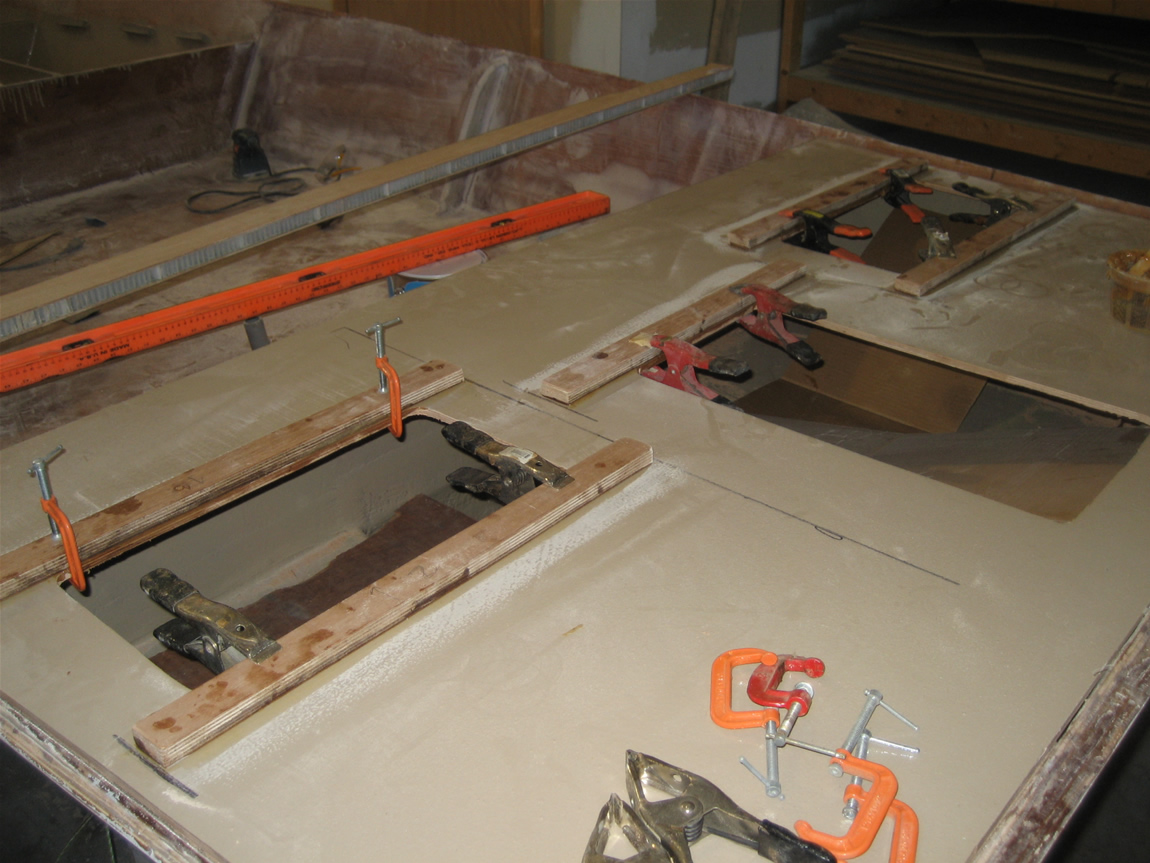
front hatch hole stiffeners glued up... Only need them on the rear side of the hole in this case because the forward side of the hole is within a couple inches of the large deck frame
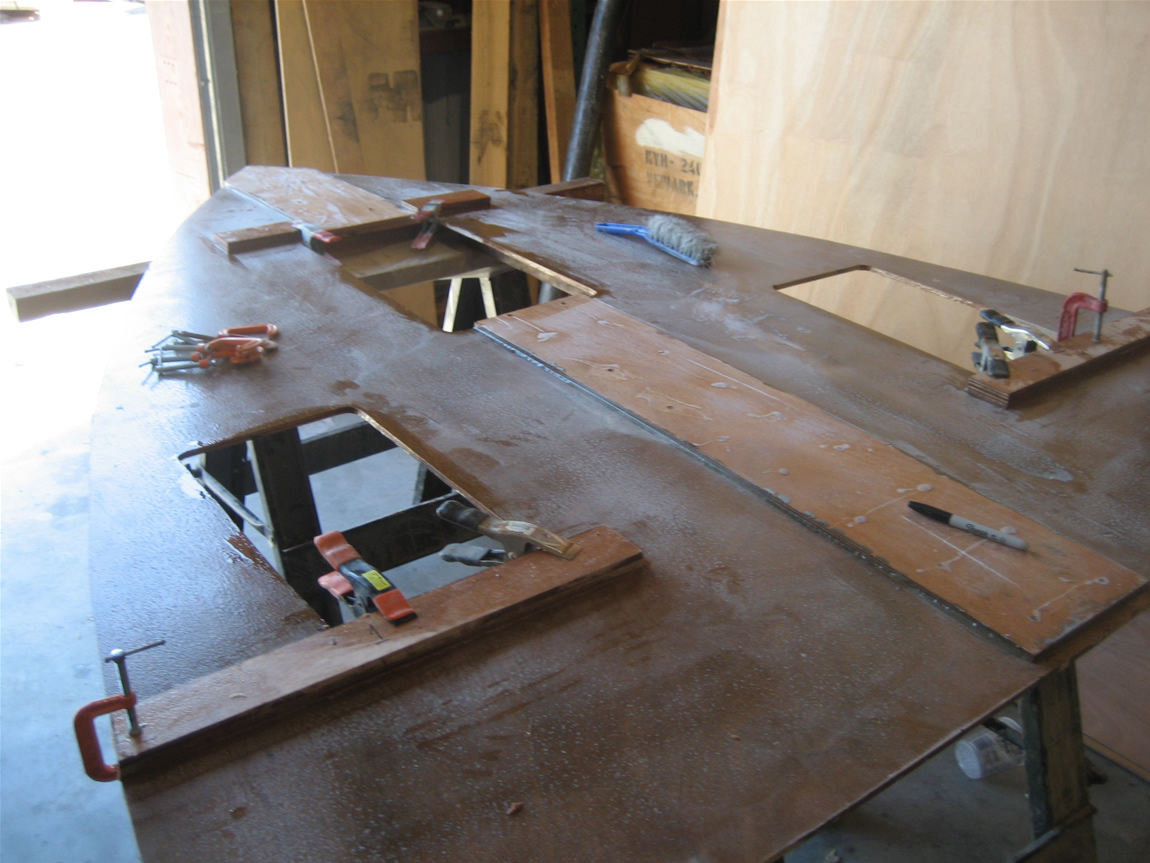
making a breast hook, of sorts. Im making it big enough for a trolling motor in case I ever want to put one up there (will not have one now, its just extra weight and expense)
Cut out a piece to fit the contour of the hull, then using a few radius pieces drew out the inside shapes
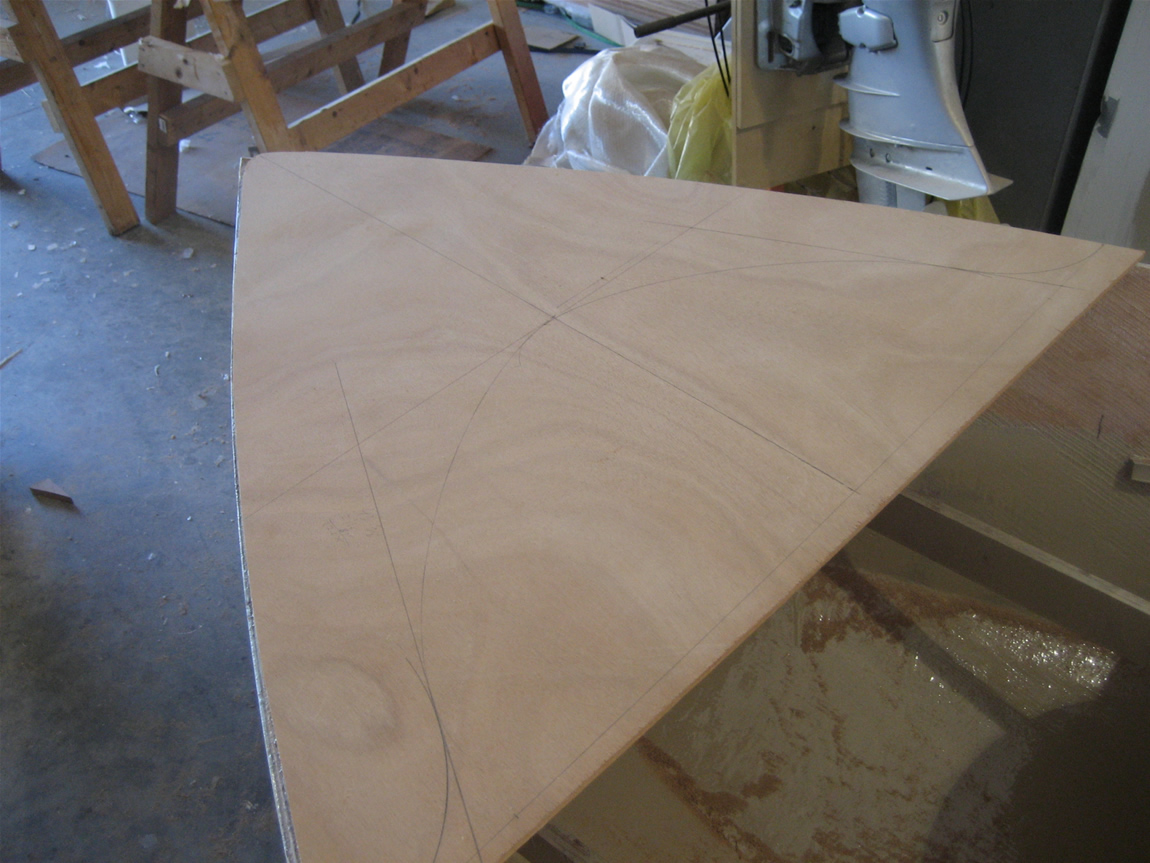
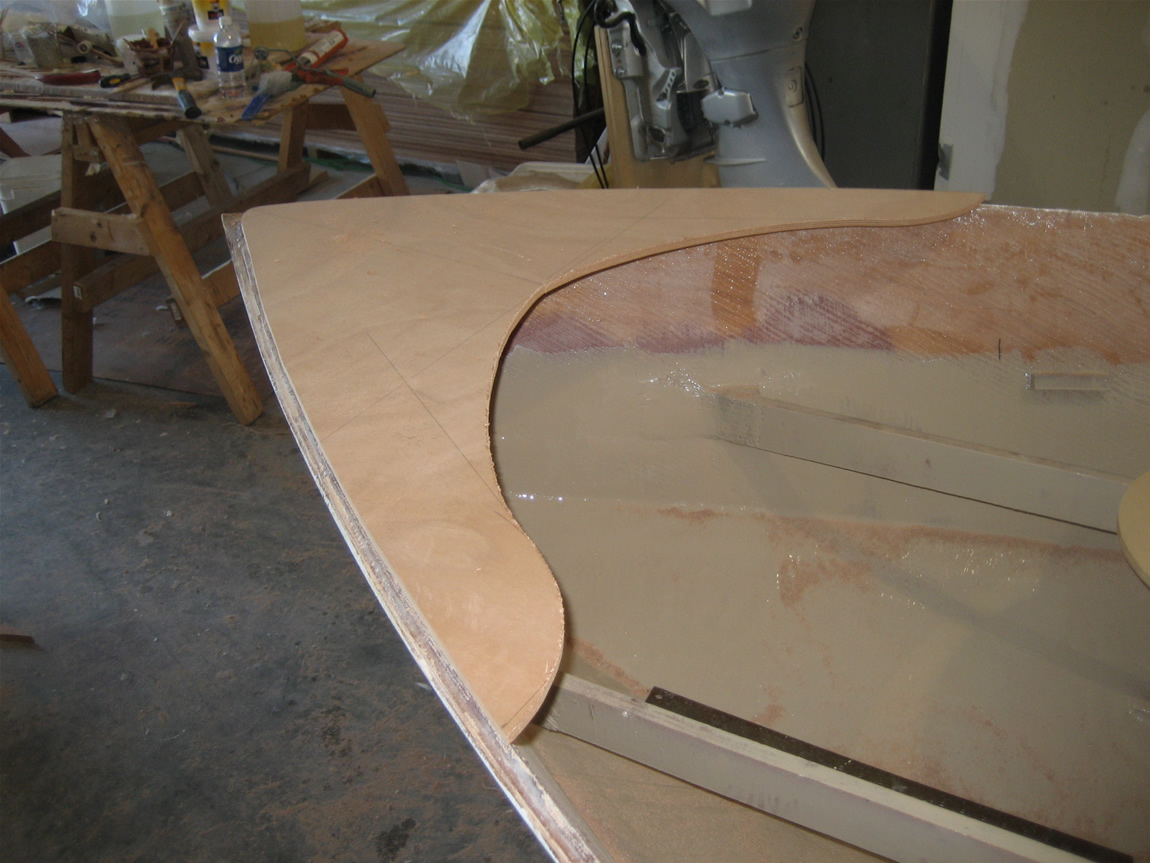
Gluing up a double layer around the edge
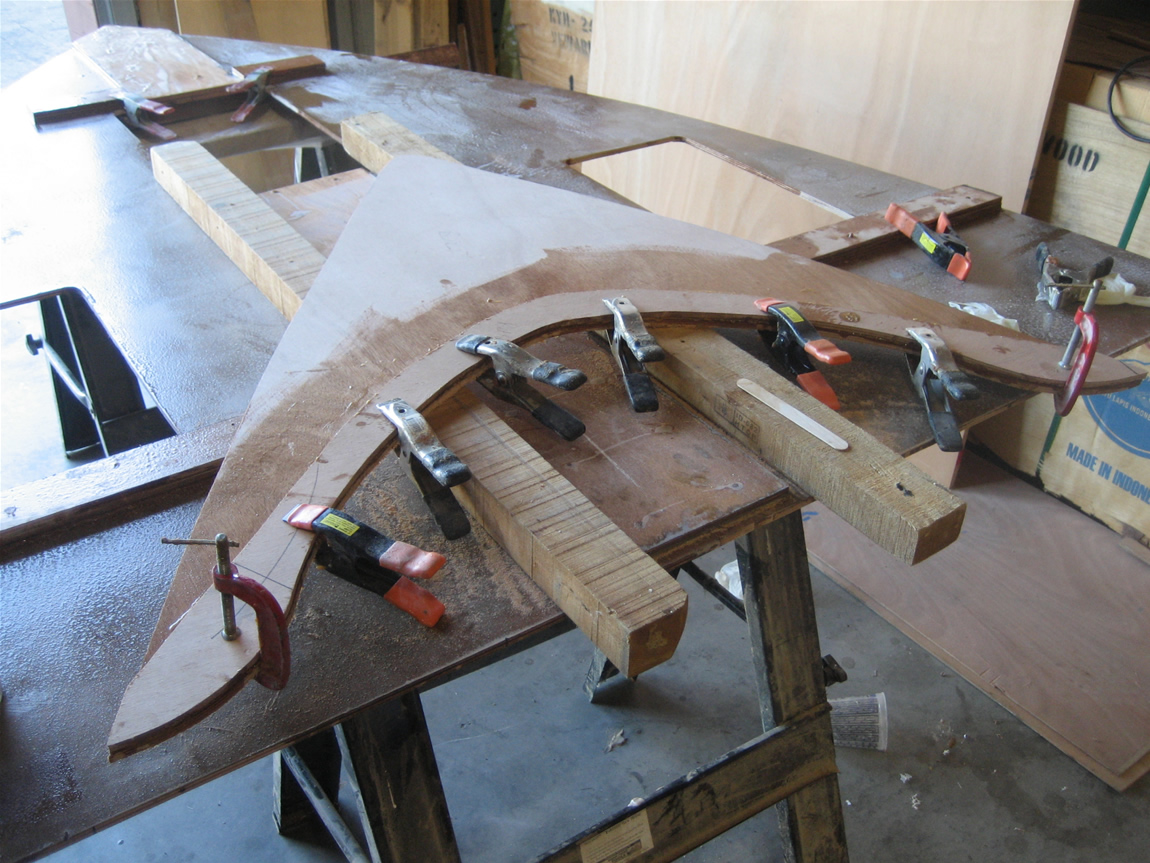
Posted: Thu Oct 30, 2008 1:46 pm
by Lower
Hey Joel. Finally had a chance to really sit and go through your build. Looks very nice! It's really helpful as well. Thanks for posting the pics and detailed info. Will surely be helpful when I get there.
Question...I noticed on the floor frames you did not use cleats on the frames, stringers or side wall. Are they necessary? Does the foam aid in support?
Posted: Thu Oct 30, 2008 1:50 pm
by jacquesmm
They may not be very visible but he used cleats and you need them.
Posted: Thu Oct 30, 2008 2:07 pm
by tech_support
they are there, just hard to see. In this shot you can barley see them on the left side floor frame. They are made of two layer of 3/8" Okoume, so they blend in with the frame.
in this picture you see the cleats on the front side of the casting deck, but not on the back side which is under the casting deck
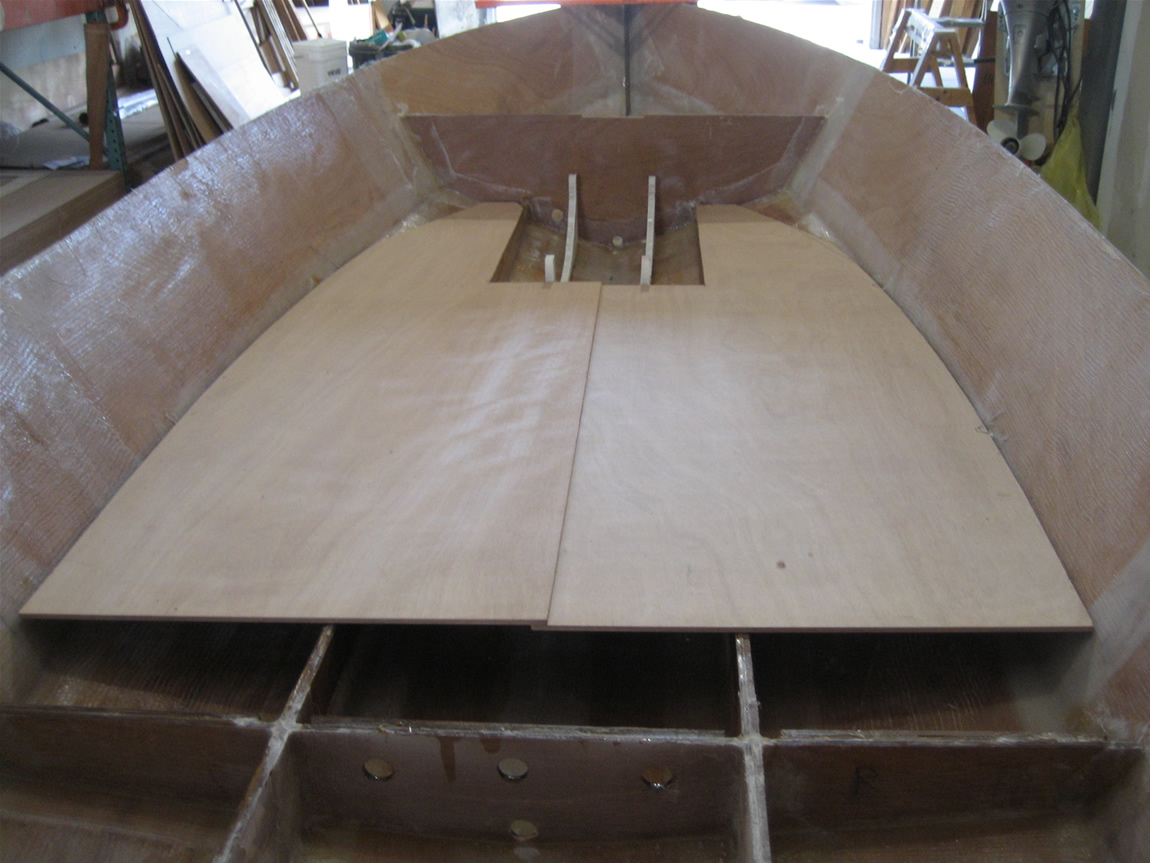
Also no cleats on the center portion of the floor frame that is under the center seat box. Anywhere someone might stand, there are cleats underneath
Posted: Thu Oct 30, 2008 2:40 pm
by Lower
Yeah, I see them now. You have to give me credit, they do blend in. I don't stray from the plans, just an observation I was curiuos about.
Posted: Thu Oct 30, 2008 3:24 pm
by tech_support
it just shows I need to get closer on some shots
Posted: Thu Oct 30, 2008 4:30 pm
by tech_support
cut drain holes for cockpit, wrapped the plug in packing tape and shoved it back in the hole with epoxy putty all around, coated the wood inside the hole with neat epoxy first. Will knock out the plug and hopefully leave me a nice 1" ID hole. If it doesn't turn out well, we will just redrill with a 1.25" and start over
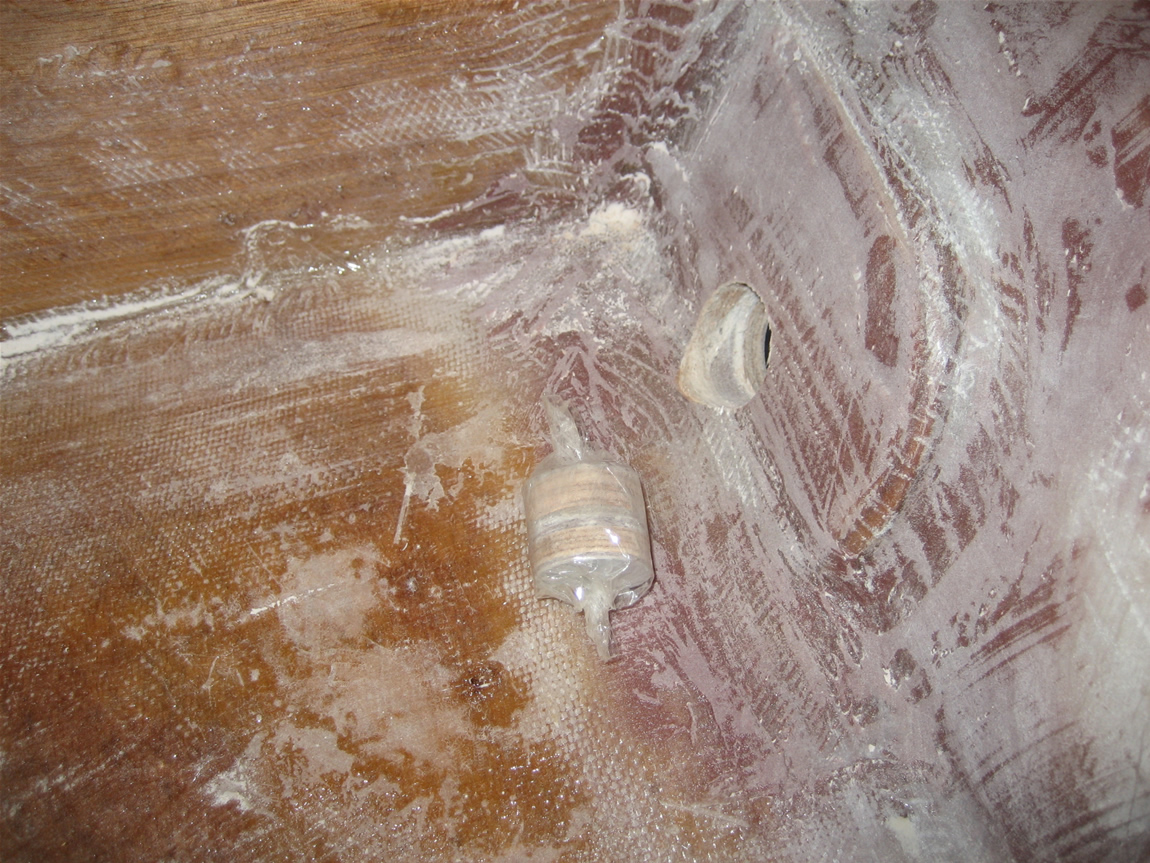
the cooler box is coming along, it gets glassed to the sole very soon

breast hook rounded over with 3/8" bit
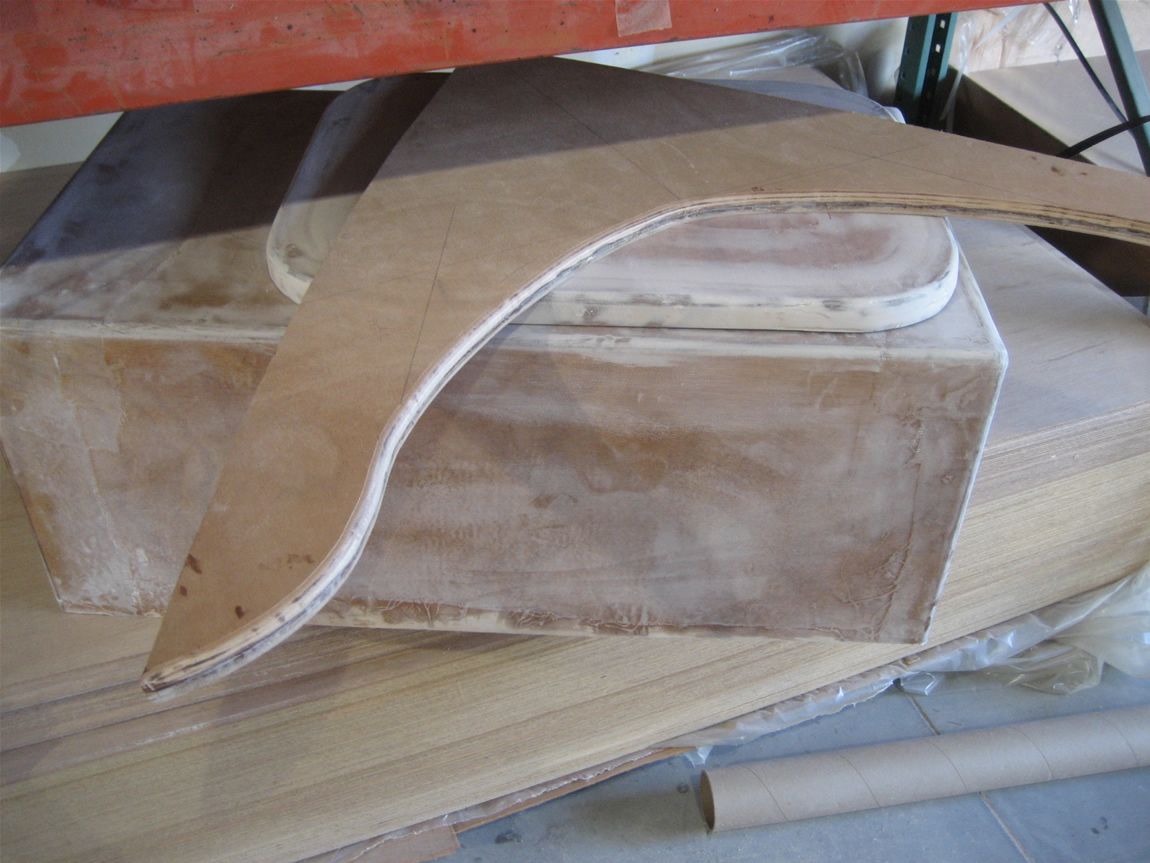
Under side of the rear casting deck. Stiffeners get second/last coat of epoxy - with pigment this time

These are cleats for the breast hook to sit flush with the sheer.
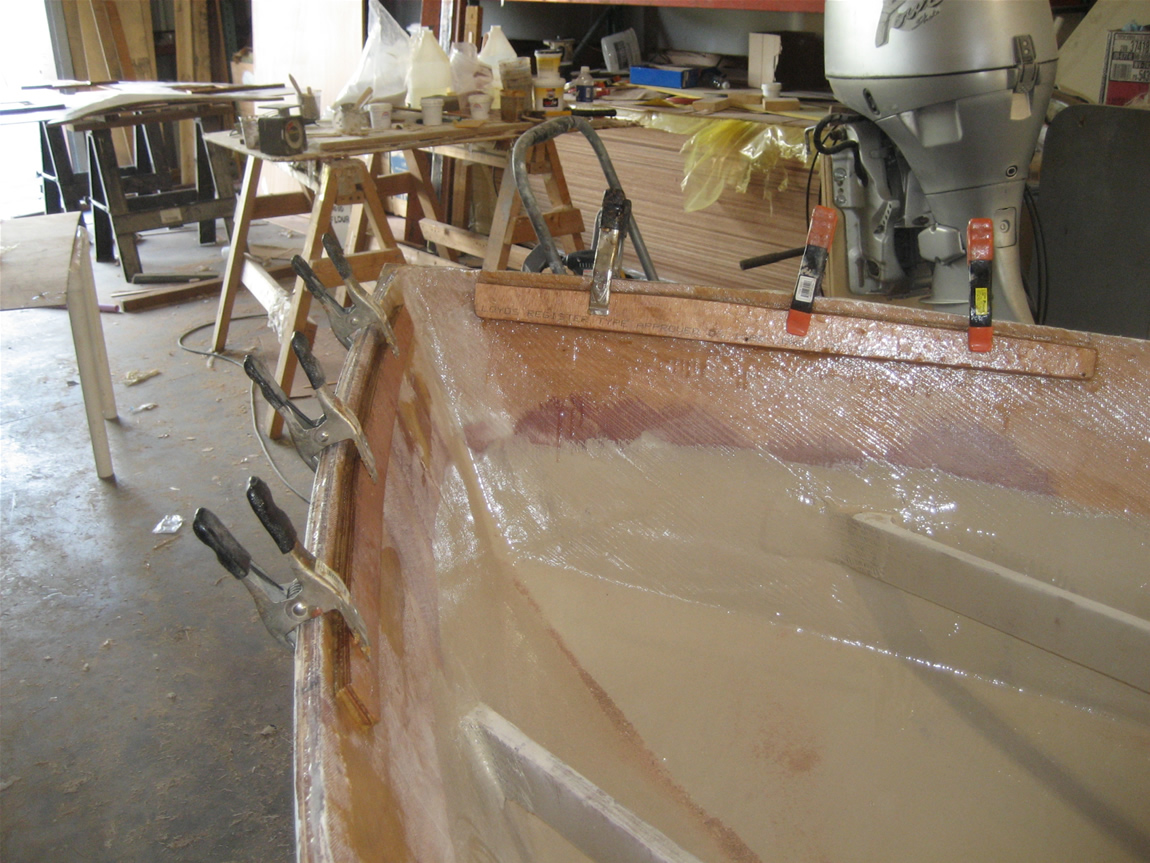
A craigs list trailer for $500
I will be modifying the trailer a bit, but its a close fit. Im thinking about making custom bunks that fit the bottom like a shoe - I just have to make them the same shape as the stringer, follows the same form.
Posted: Fri Oct 31, 2008 4:43 pm
by tech_support
fitting the fuel line and vent before gluing down casting deck.
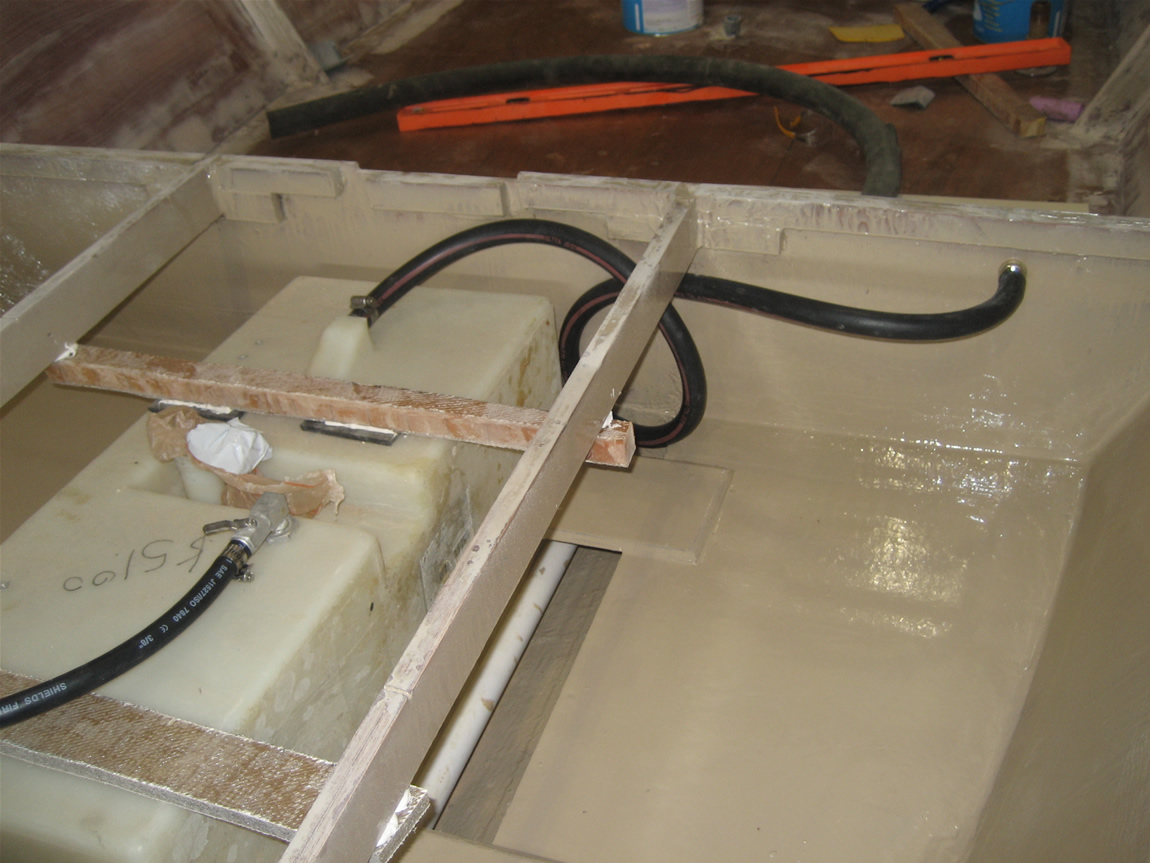
dry fitting the breast hook on the cleats we glued up yesterday. Will be glass to the side/rub rail later
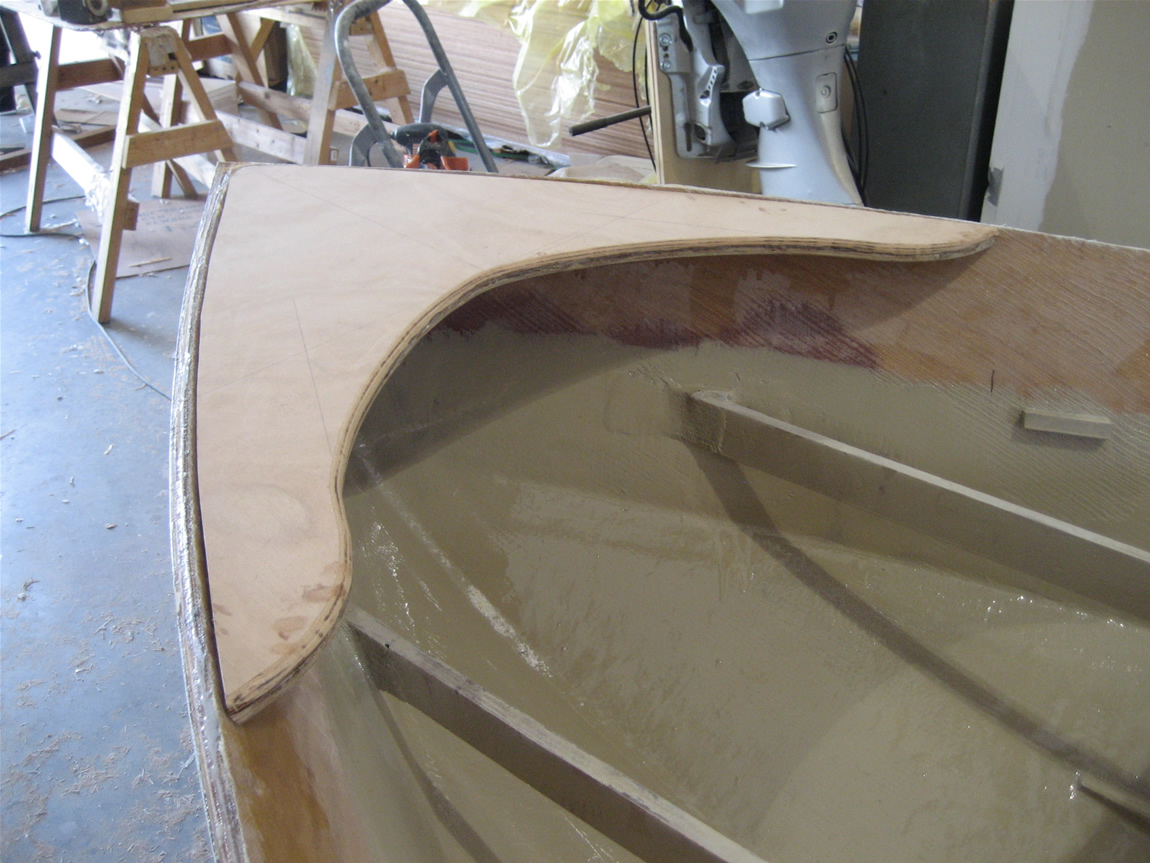
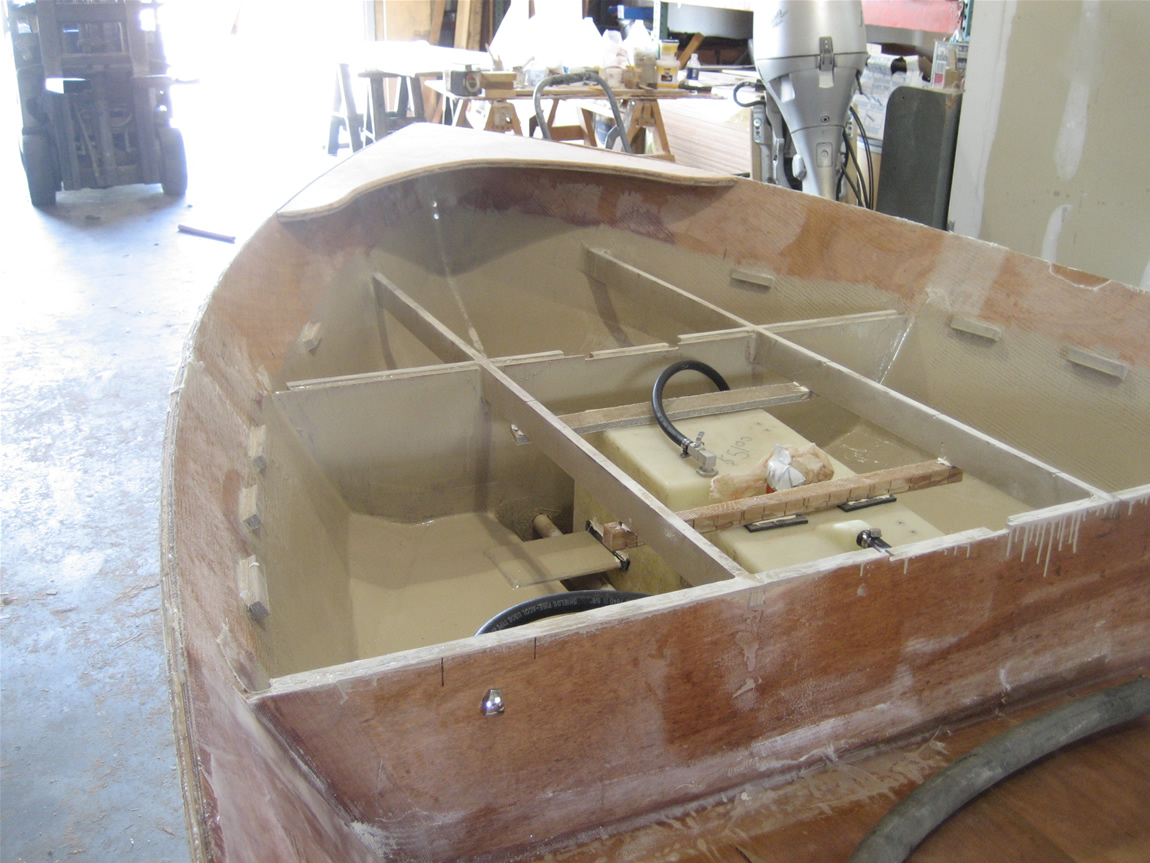
Gluing down the forward casting deck. firs step was to put some paper down so we do not make a mess in our nice compartments. Then we sand/ rough up the tops of the frames/cleats and also the underside of the deck where the glue will be. Then we give both a very light brushed coat of epoxy.
this is the underside of the forward casting deck, before gluing it down, we marked hole locations for where the screws for the hatches will be. We drilled them out to about double the diameter of the screws and then we filled them epoxy after we glue down the deck - the white tape is to hod the epoxy in the hole while it cures.
It took two caulking tubes of woodflour/epoxy glue to make the glue bead. hind site, my bead did not need to be that big.
A little weight
A she sits down everywhere, contact made evenly everywhere.
We fill the screw holes with epoxy (tape is underneath keeping it from running out)
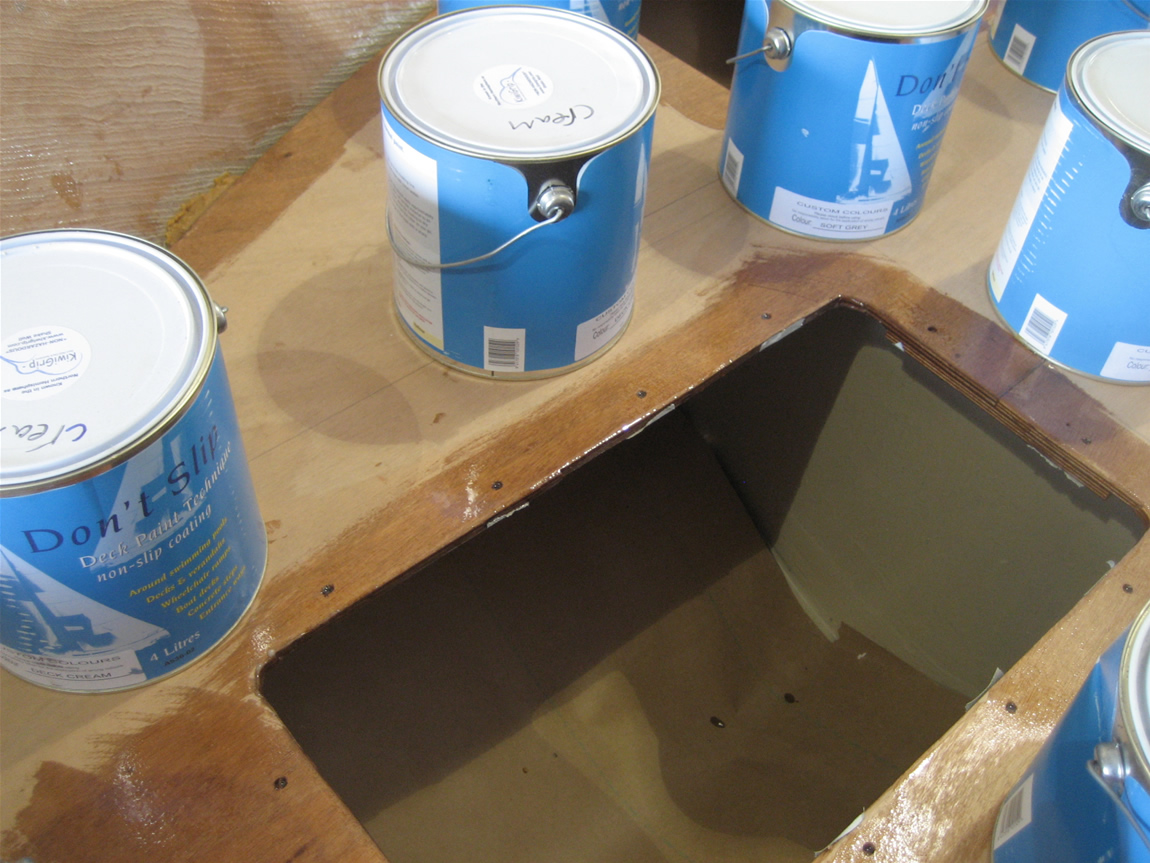
This is where the gas fill will be located. The circular piece of 9mm will have a fillet around it and glassed over - so the fill will sit 9mm above deck. Will do the same for the running light receptacles.
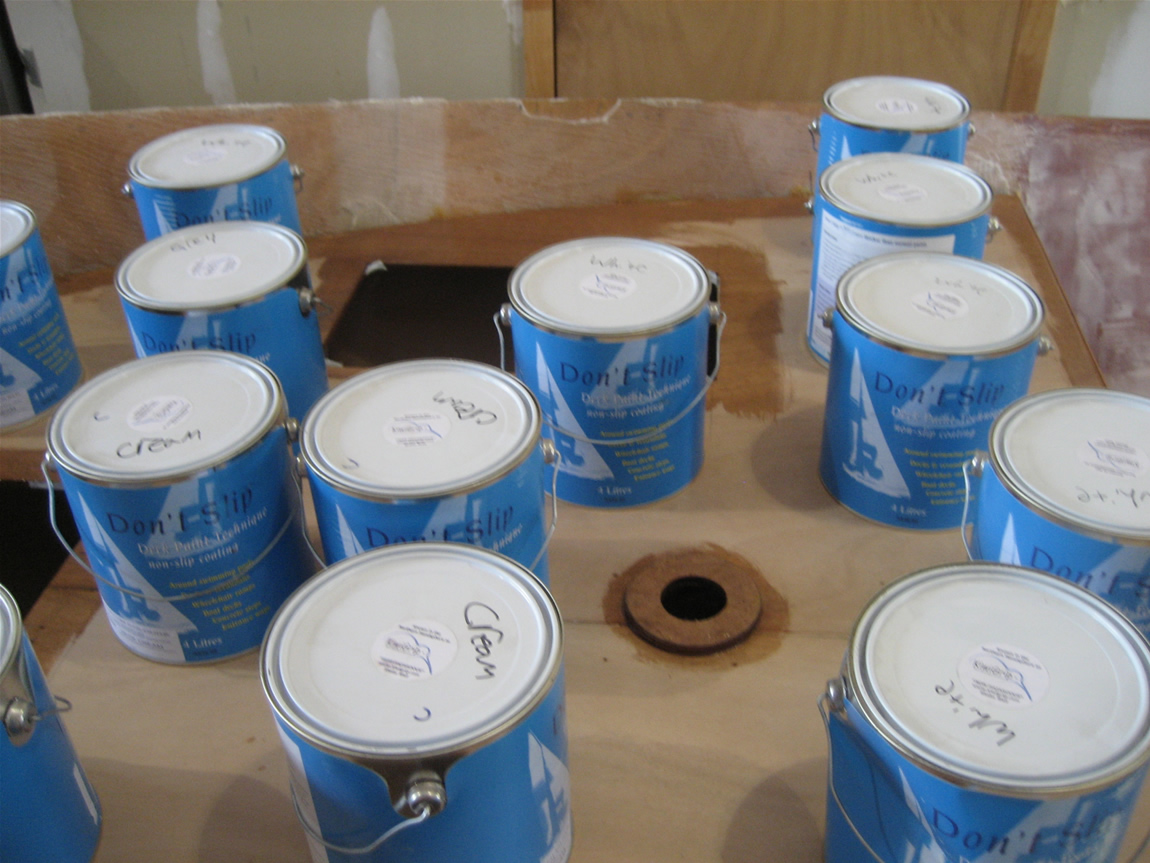
Posted: Sat Nov 01, 2008 8:26 pm
by Murry
Joel,
It's looking so nice.
I have a question concerning the epoxy filled screw holes for your hatches.
Are you planning to use wood srcews in the epoxy or something else? I haven't worked with epoxy other that taping a couple of seems and I'm still trying to learn the correct methods of use.
Thanks,
Daniel
Posted: Mon Nov 03, 2008 8:47 am
by tech_support
Murry wrote:Joel,
Are you planning to use wood srcews in the epoxy or something else? I haven't worked with epoxy other that taping a couple of seems and I'm still trying to learn the correct methods of use.
Thanks,
Daniel
the screws to hold in the hatches are always going to be stainless steel. The reason for over drilling and filling those holes with epoxy is so that the screws will be in a ring of epoxy, not wood. So there is no path for moisture to ever get to the wood.
Posted: Mon Nov 03, 2008 9:42 am
by Murry
Thanks,
"wood screws" was a poor choice of words on my part. sorry.
I was refering to a tapered course threaded stainless screw, but anyways. I understand that you will be drilling the epoxy leaving an outer ring of epoxy and then you will use a machine threaded stainless fastener with locknuts on the back side.
Is the epoxy to strong to use tapered course threaded stainless fasteners if predrilled. For example. Areas that to you couldn't access to install lock nuts.
Thanks again you for all the help Joel,
Daniel
Posted: Mon Nov 03, 2008 10:14 am
by Cracker Larry
Murray, I drilled and filled all the hatch screw holes just like Joel, but I attached mine with SS self tapping panhead screws. I re-drilled a pilot hole and sealed the threads with 5200.
I don't really think bolts and locknuts are necessary for hatches. Mine took 144 screws. Have you priced those SS locknuts

Posted: Mon Nov 03, 2008 10:31 am
by tech_support
Murry,
sorry I misunderstood, yes I will use a course thread SS (pan head) self tapping screw. The threads are plenty - there is not any appreciable forces pulling the hatches up. Also, the adhesive used could probably alone hold it in.
We will drill pilot holes through the center of the epoxy plugs so the self tapping screws will find their correct path
joel
Posted: Mon Nov 03, 2008 10:53 am
by Murry
Excellent Guys.
That answers my question and it sure makes it alot easier.
Daniel
I'll try to be more specific with my questions in the future.
It's hard to resist just picking up the telephone, but that wouldn't anyone
else.
Posted: Fri Nov 07, 2008 11:47 am
by tech_support
drilling out over size holes for hardware, filling with thickened epoxy, then re-drilling mounting holes through the epoxy plug. This ensures no moisture will ever get to the wood
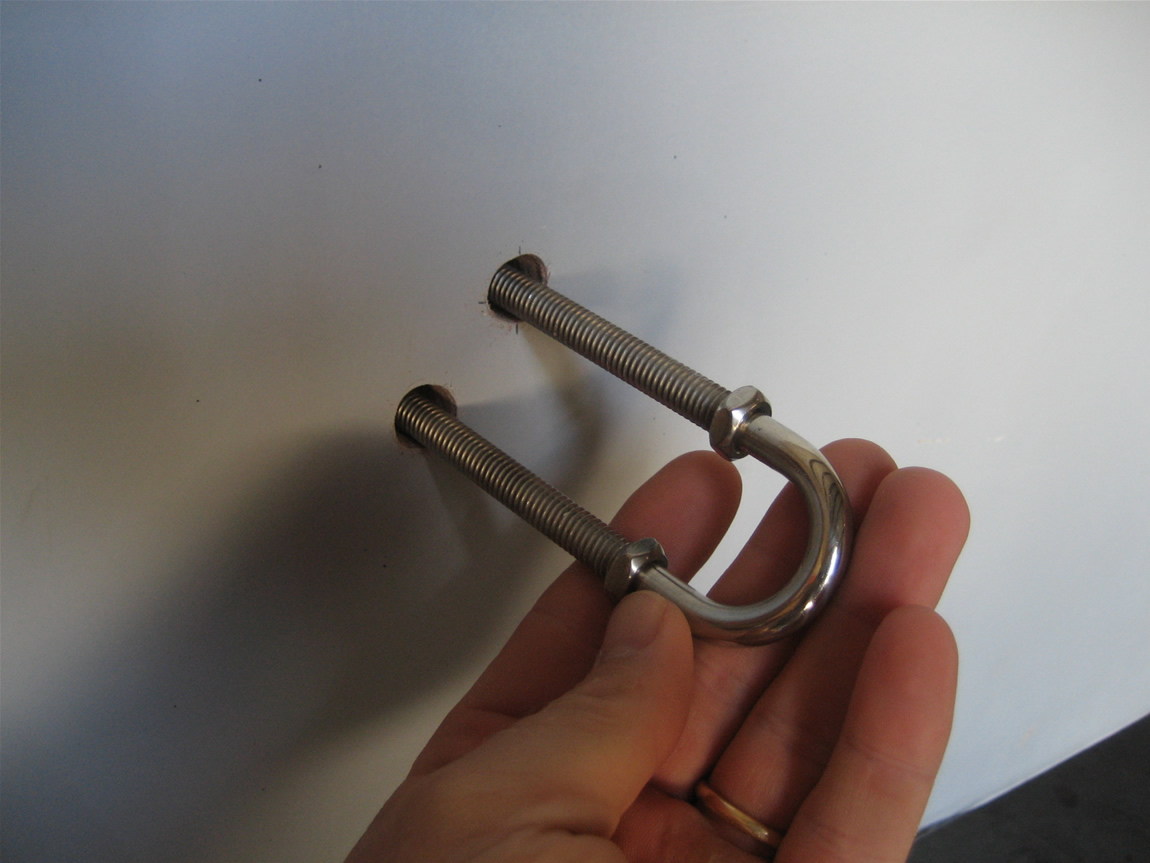
We put clear packing tape on the outside surface then push the epoxy into the hole
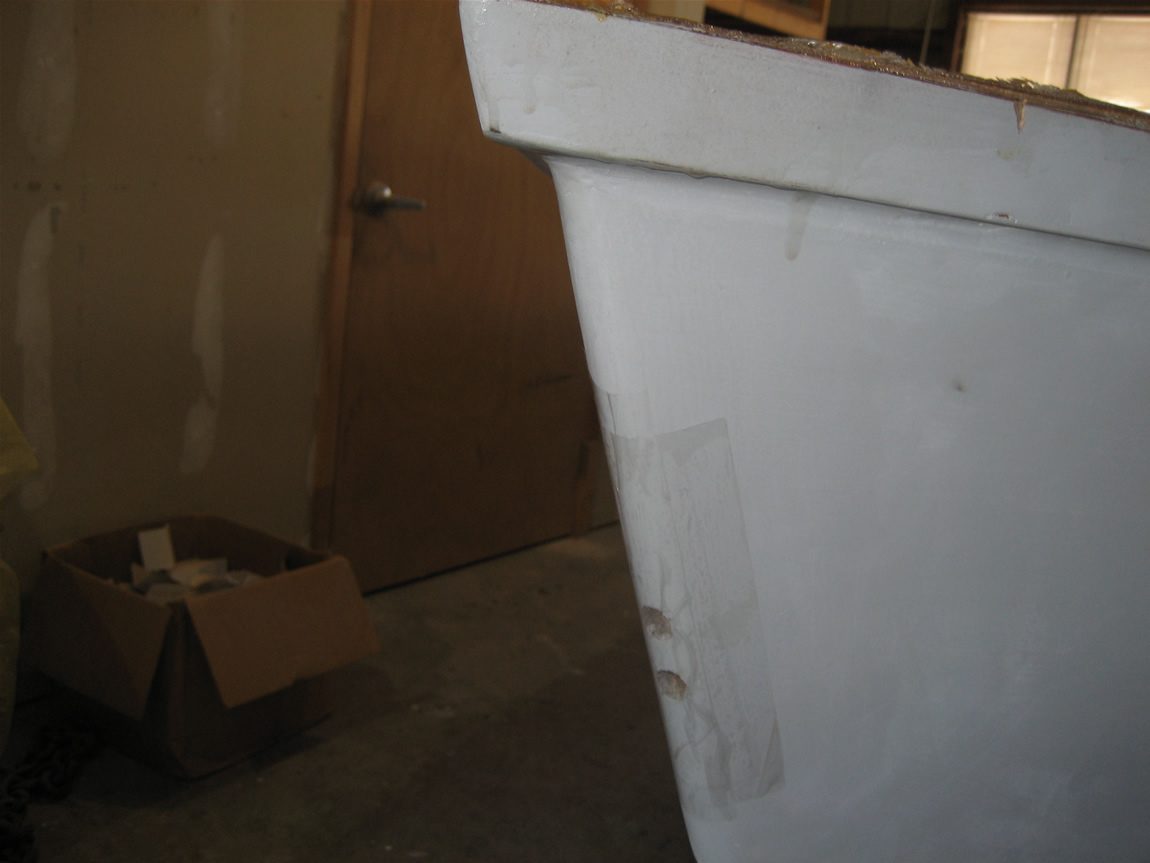
when we take off the tape, we have a nice surface to drill out the final holes
Posted: Fri Nov 07, 2008 11:59 am
by tech_support
Posted: Fri Nov 07, 2008 12:03 pm
by tech_support
glassing in the Carbon fiber poling platform supports:
I will write more on this in the thread dedicated to the poling platform.
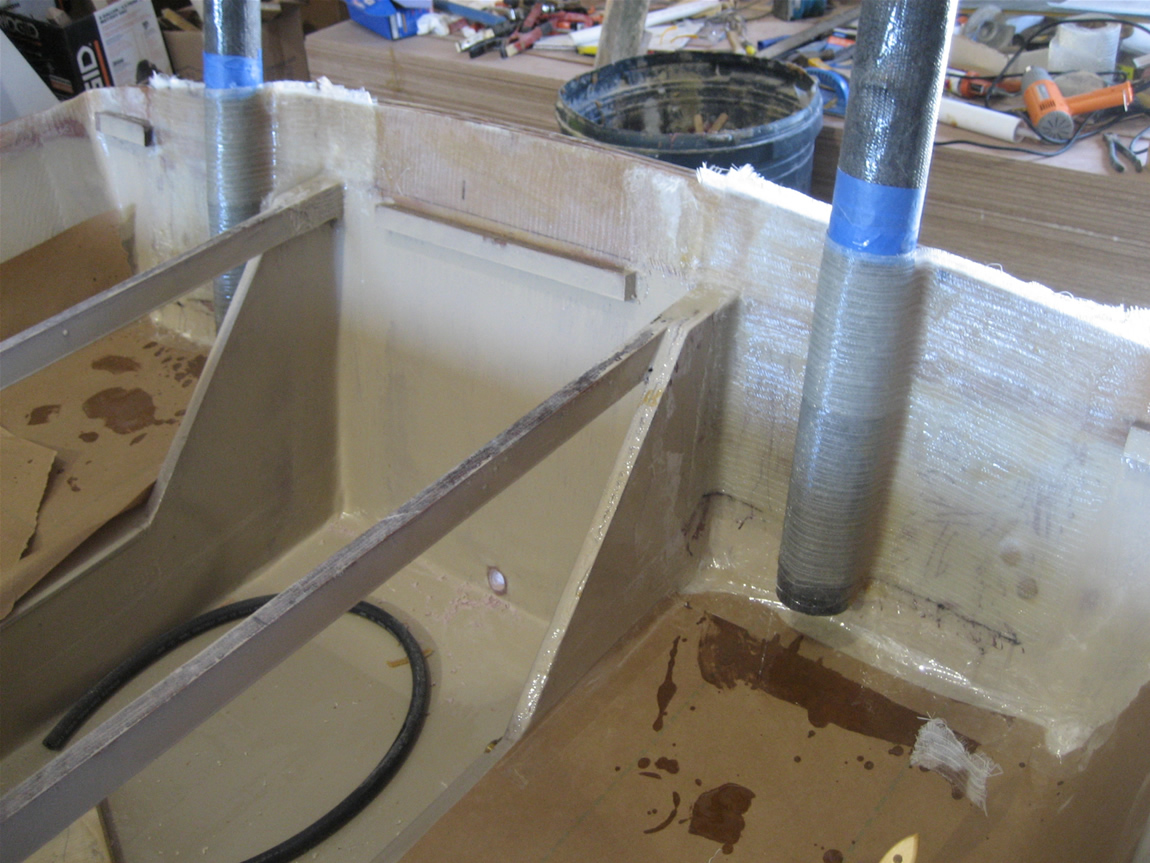
The seat/cooler box is glassed in and the front deck is in fairing stage , will post more this afternoon
Posted: Fri Nov 07, 2008 12:36 pm
by tech_support
glass in the seat/cooler box:
Started with a nice 1" radius fillet
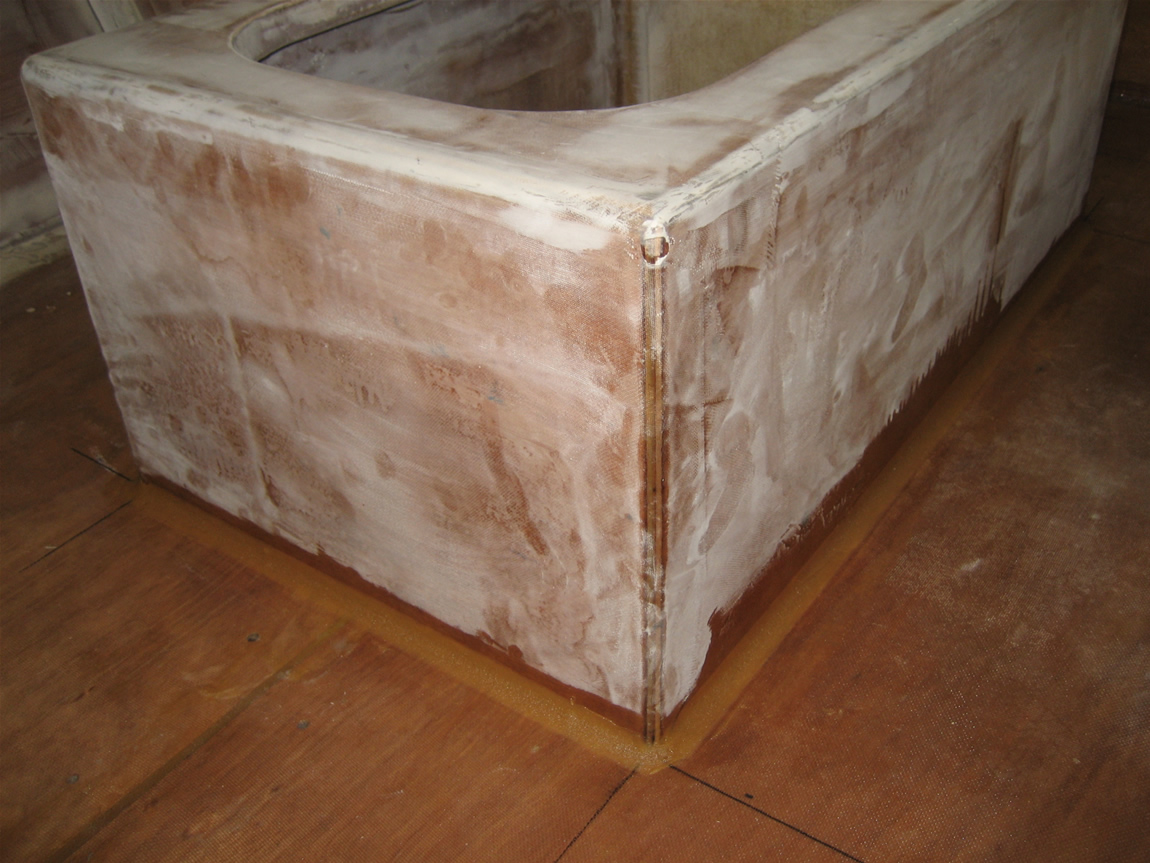
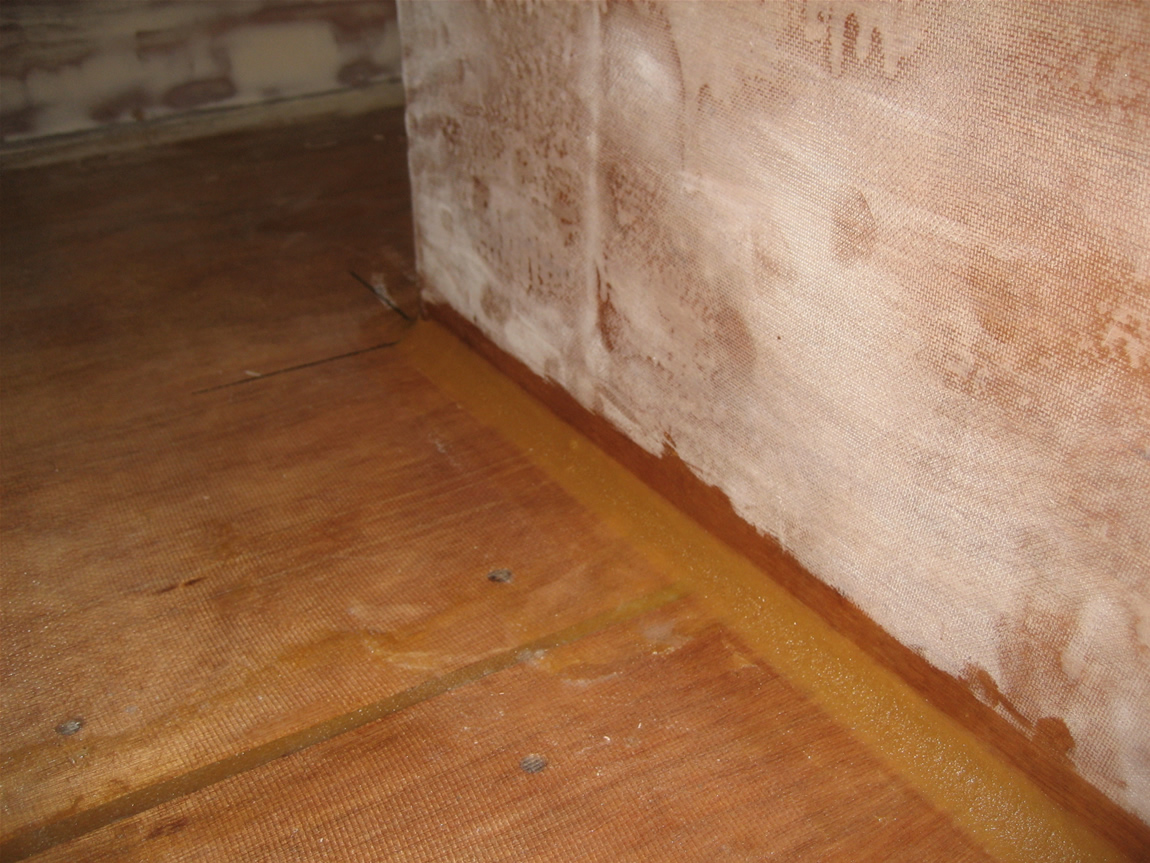
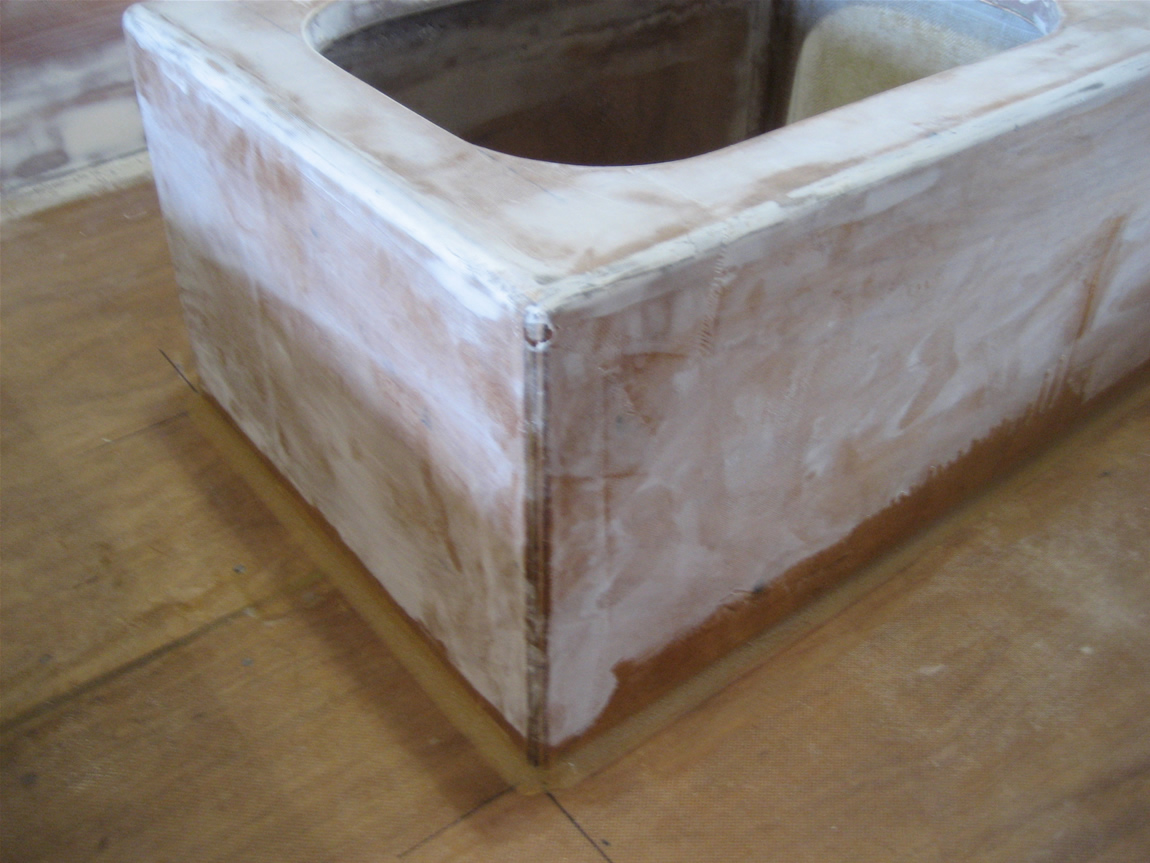
After letting fillet firm up for about 30 minutes, we wet out the tape
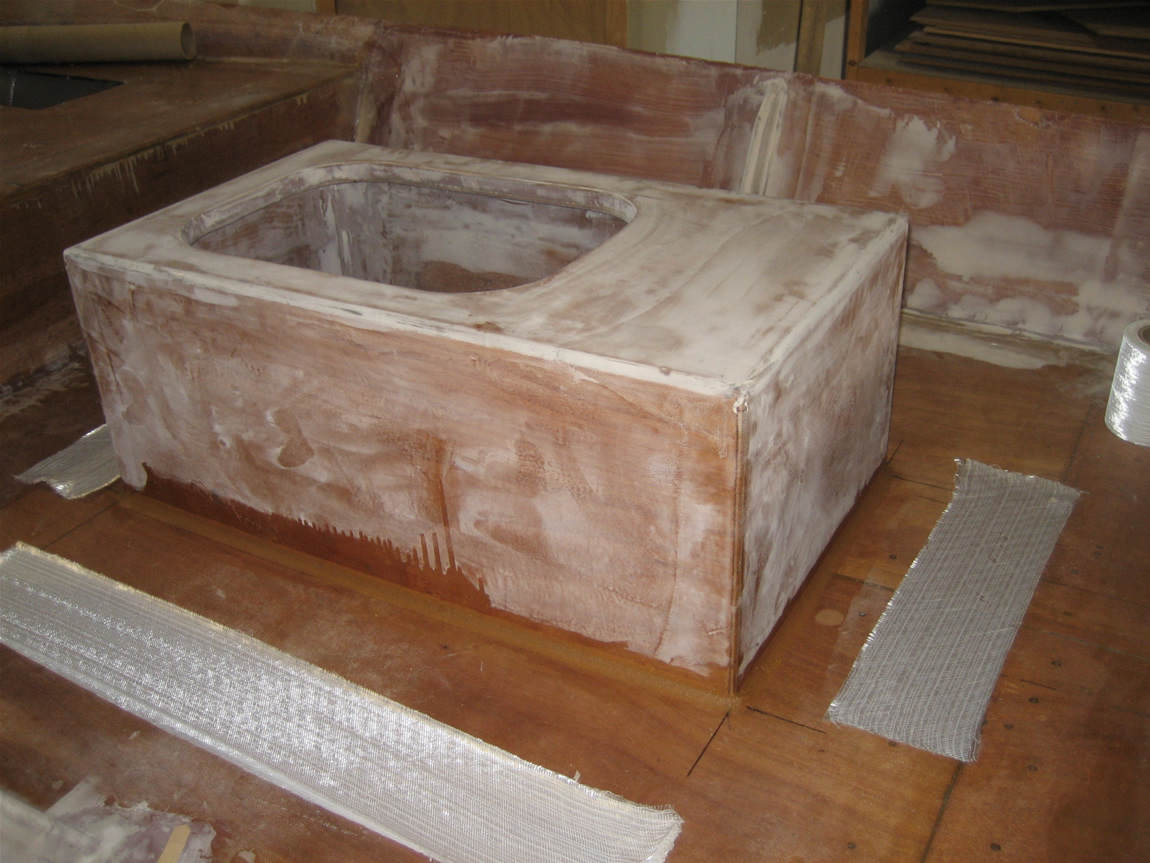

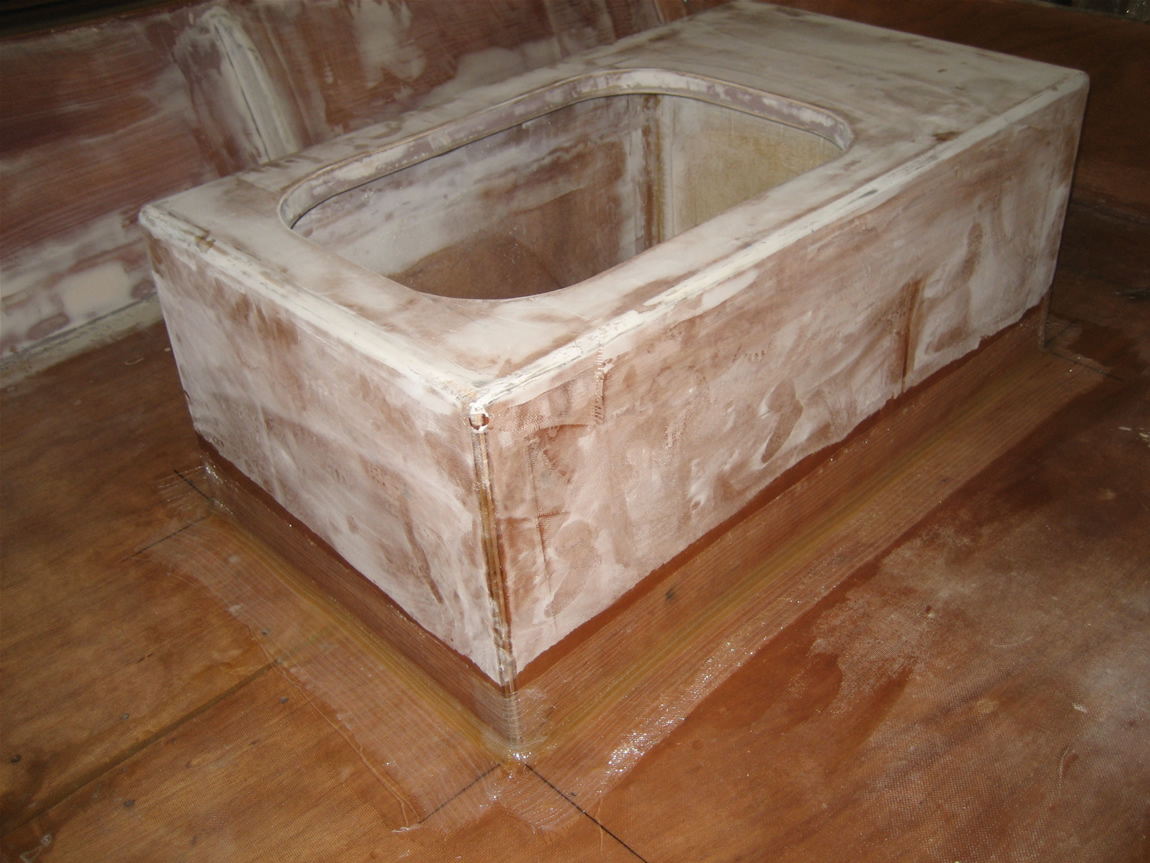
Putting in a pieces of nida-core for the floor of the cooler box. We need the floor of the box to be a little higher then the sole so it will drain well
Fairing the front casting deck:
We used blended filler and epoxy for the initial faring of the front casting deck area. The final fairing will be completed with Quickfair putty
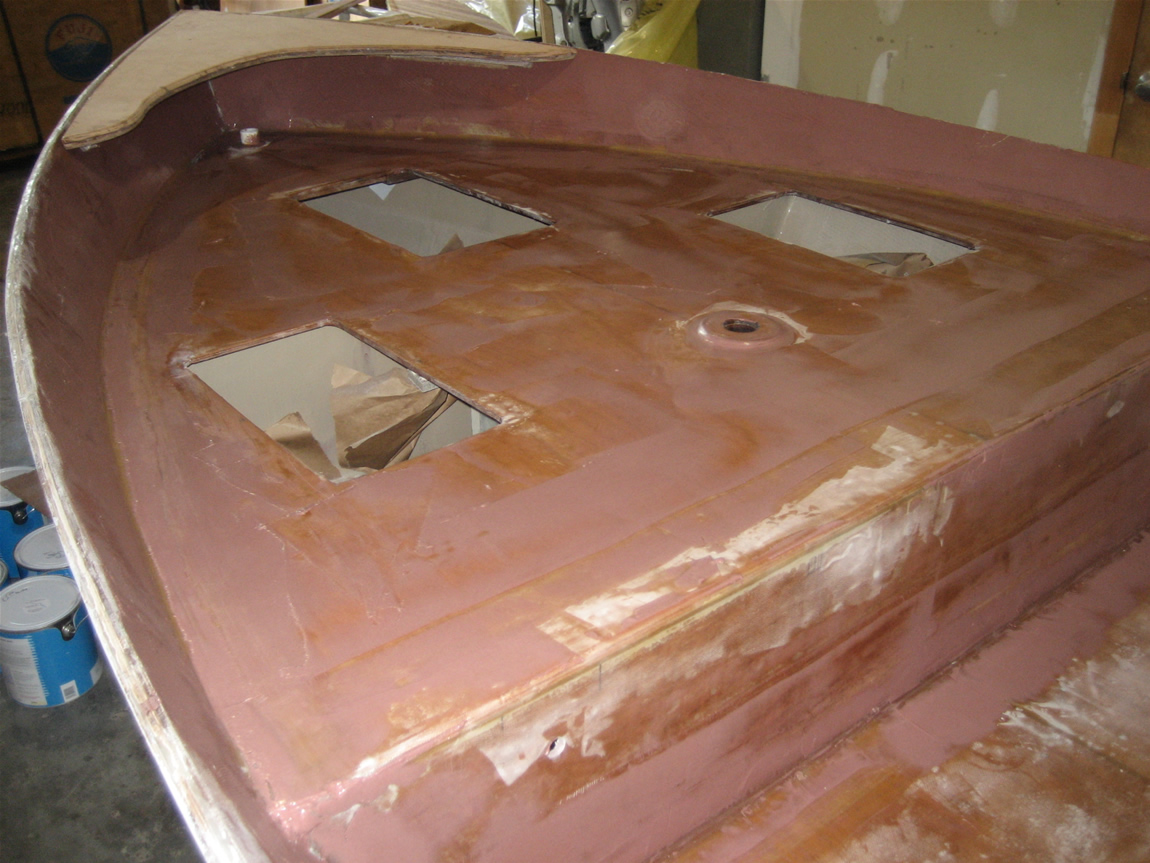
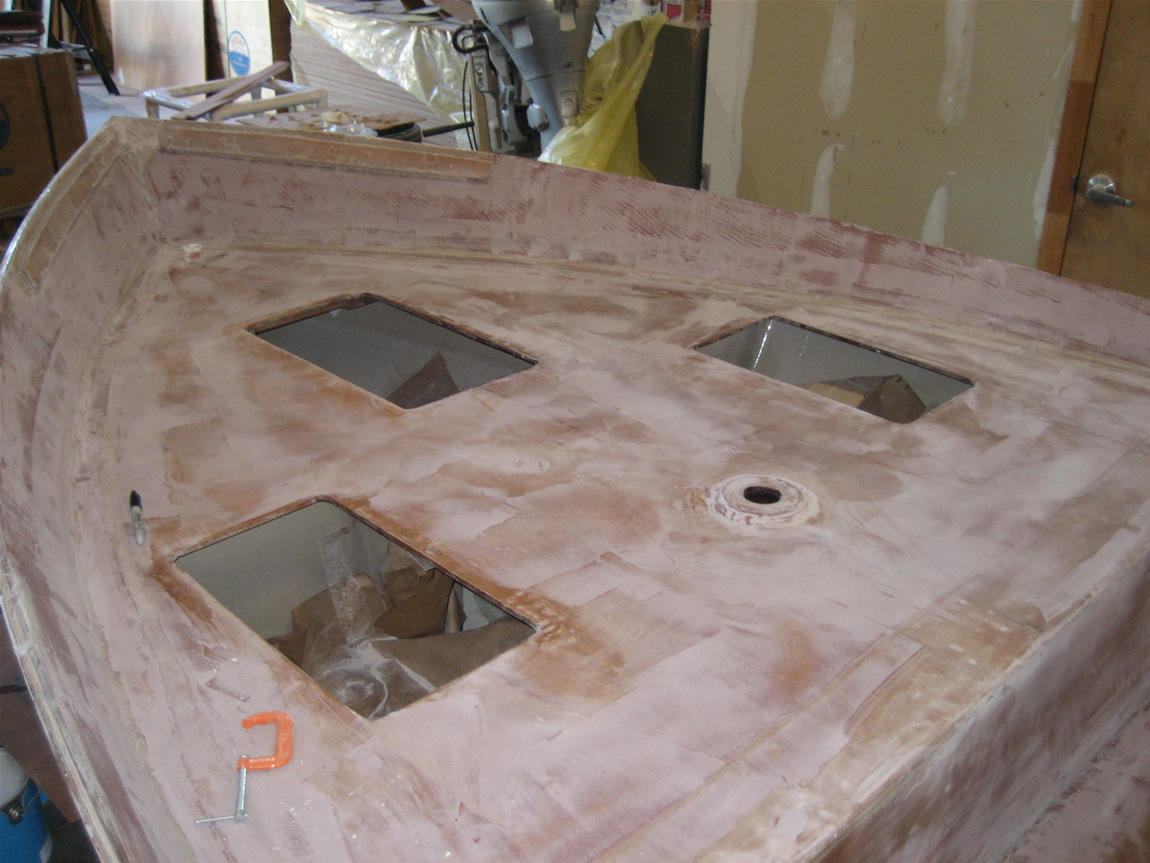
So here we are....
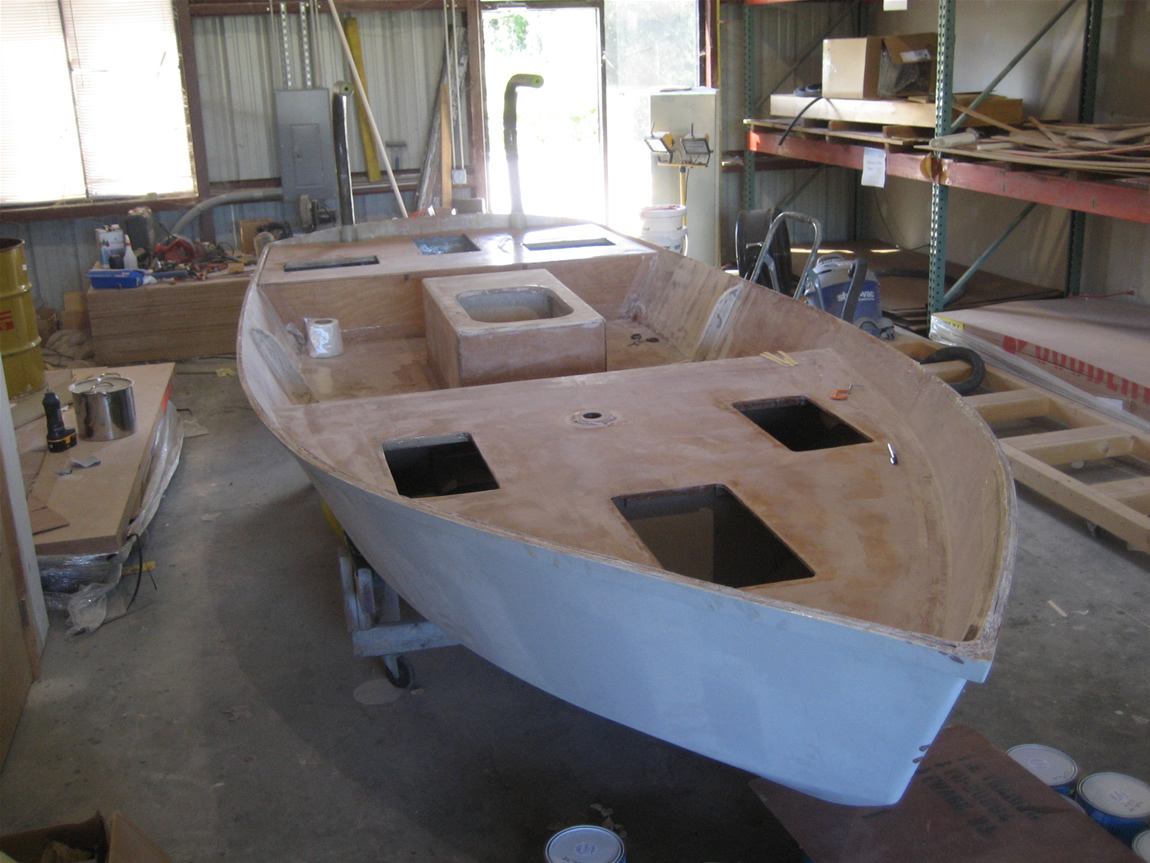
Posted: Fri Nov 07, 2008 1:27 pm
by dborecky
Joel,
Your an animal!!!!!!!!!!! The speed that your are throwing this thing together is amazing!!!!
Posted: Fri Nov 07, 2008 2:28 pm
by OysterBreath
WOW man, super nice job! I am really liking the way the coffine is turning out. This is one tutorial I'll be printing out and putting in my building notes binder! I can't wait to see more progress on the poling platform too. You've given us a wealth of supurb information!
Posted: Fri Nov 07, 2008 4:11 pm
by chicagoross
Beautiful work, Joel, and nicely thought out details!
A number of builders have recently commented that after adding extras (hatches, extra fabric, etc.) we have ended up using double the amount of epoxy listed in the BOM. But I've also read a few times "maybe Joel can build it with the amount shown of the BOM"...
So what's the reality? You're putting every goody you can on this boat, what's you epoxy consumption looking like?
Posted: Fri Nov 07, 2008 4:53 pm
by tech_support
I have not kept track of the epoxy since doing the large laminations ont he hull and we were right on track after putting in the wide cloth on the inside.
We used a lot of damaged returns and samples from different manufacturers so there are a lot of half bottles. Take away the extras; pigment epoxy coating the insides, poling platform, extra glass on decks, cooler box, and I bet we are very close to 7 gallons.
I have also used 4 or 5 of the little gelmagic tubes, and half of a 3 quart Quick fair kit
I have to be honest in that I am not the one doing most of the laminating now, Joseph is gettting pretty good and he does most of the taping and wetting out
Posted: Sat Nov 08, 2008 2:31 pm
by Steven
Looking good. Seems like the fuel fill in the middle of the casting deck is going to be a trip hazard. Any reason in particular you didn't put it closer to the side? I'd love to see a picture like the last one with someone in it. It's hard to picture the scale.
Posted: Sat Nov 08, 2008 4:39 pm
by tobolamr
This thread is GOLD! Awesome work, guys!
You've sure dispelled a lot of my questions about the build process. I can hardly wait to get started! Is it spring yet!?
Posted: Sat Nov 08, 2008 6:10 pm
by stickystuff
The more you balance out your craft the more level it will run. You don't want the hull to be leaning to one side or the other. That is why you center the fuel tank to keep the weight equal.
Posted: Sat Nov 08, 2008 9:17 pm
by jbo_c
I think he was referring to the fill being in the center, not the tank. I have the same question/thought.
Jbo
Posted: Mon Nov 10, 2008 8:25 am
by jgroves
I have to be honest in that I am not the one doing most of the laminating now, Joseph is gettting pretty good and he does most of the taping and wetting out
If I had a helper thats what he would get good at too.
"Son your doing a fine job. Your promoted to taping and wetting out. You do a good job with this and you will be fairing in no time."
The boat looks great! Both of you are doing an amazing job! I really like the layout.
Posted: Mon Nov 10, 2008 9:23 am
by tech_support
the fill it right over the tank fill opening. I put it there to keep it simple, less fill pipe and takes up less room, lighter. Fill pipe is heavy, and I am taking every easy opportunity to saver weight.
The little 9mm base piece offers relief off the deck level so water will never sit around the base of the fill. Its tapered in the the level of the deck with a fillet and glass - its not enough to trip over, although i supposes I could have used 6mm and achieved the same thing.
I will do the same thing for the running light pole mount and the rigging tube hole - both on the rear casting deck. Im finished with the rear all around lights not work because water sits in it and corrodes the connections
Posted: Mon Nov 10, 2008 4:56 pm
by tech_support
opinions and suggestions please....................
Im considering colors now.
Thinking about cream/white/stainless as the scheme
Cream hull, cooler box, non-skid
Pure white hatches, hull inside paint, poling platform, and rubrail (white with white insert)
Stainless rodholders on sides of box, pop up cleats, and rubbing trim pieces
Posted: Mon Nov 10, 2008 5:56 pm
by Cracker Larry
opinions and suggestions please....................
Since you asked, pure white is going to be real hard on the eyes in the FL sunshine. It actually hurts to look at my matterhorn white in the sun. I would not want it on the inside.
Of course opinions are like elbows, everybody's got a couple and you know the FL sun as good as anyone, but I'd reverse the colors were it mine
Posted: Mon Nov 10, 2008 6:38 pm
by gk108
The white on my D15 is actually closer to a cream color, but you wouldn't know it in the full sun. It looks more like bright white. I sort of wish I had gone for a shade just a little more towards tan.
Posted: Mon Nov 10, 2008 8:56 pm
by Aripeka Angler
Pure white hatches, hull inside paint, poling platform, and rubrail (white with white insert)
I would go off white on the paint and hatches. My deck and hatches blind me big time done in stark white.
Stainless rodholders on sides of box, pop up cleats
I used pop up cleats. I think they are stronger than the flip up ones but if I did it again I would use the flip up models. They don't drain into the bilge.
Paint the hull in something other than white. My boat is boring in white. Put some color on the boat
I wish I had lived a little large and painted my boat red like I planned to originally. Just my opinion for what it's worth.
I have picked up a bunch of great ideas from your build. Thanks for taking time to share it with us. It is also nice that you value our opinion. Continued good luck on your build....
Richard
Posted: Mon Nov 10, 2008 9:24 pm
by TomW
Shine thanks for asking and valueing our opinions. I'd stay away from anything white inside, just to much glare, never again for me.
The cream outside sounds nice.
Tom
Posted: Mon Nov 10, 2008 11:24 pm
by jayb01
Cream


Empress blue
or
Cream

fighting lady yellow
or
Cream

Sea foam
or
Cream

sky blue
or
Cream

midnight blue
Posted: Tue Nov 11, 2008 7:11 am
by saltponder
I agree that the boat's deck's should not be white, glare is awful. As an old waterman told me about boat hulls being any color other than white, a white hull shows up better on the horizon than any other color. For safety's sake, white hull is best.
Gil
Posted: Tue Nov 11, 2008 8:44 am
by tech_support
thanks everyone for the feedback. Good food for thought.
I had planned the decks to be 90% non-skid (cream). Thats how I have done the last few boats and I like it a lot, no glare at all. The only thing that would be white would have been the sides and the vertical faces of the casting decks, also the poling platform.
the phantom (thats S3 San Juan Tan for the non-skid)
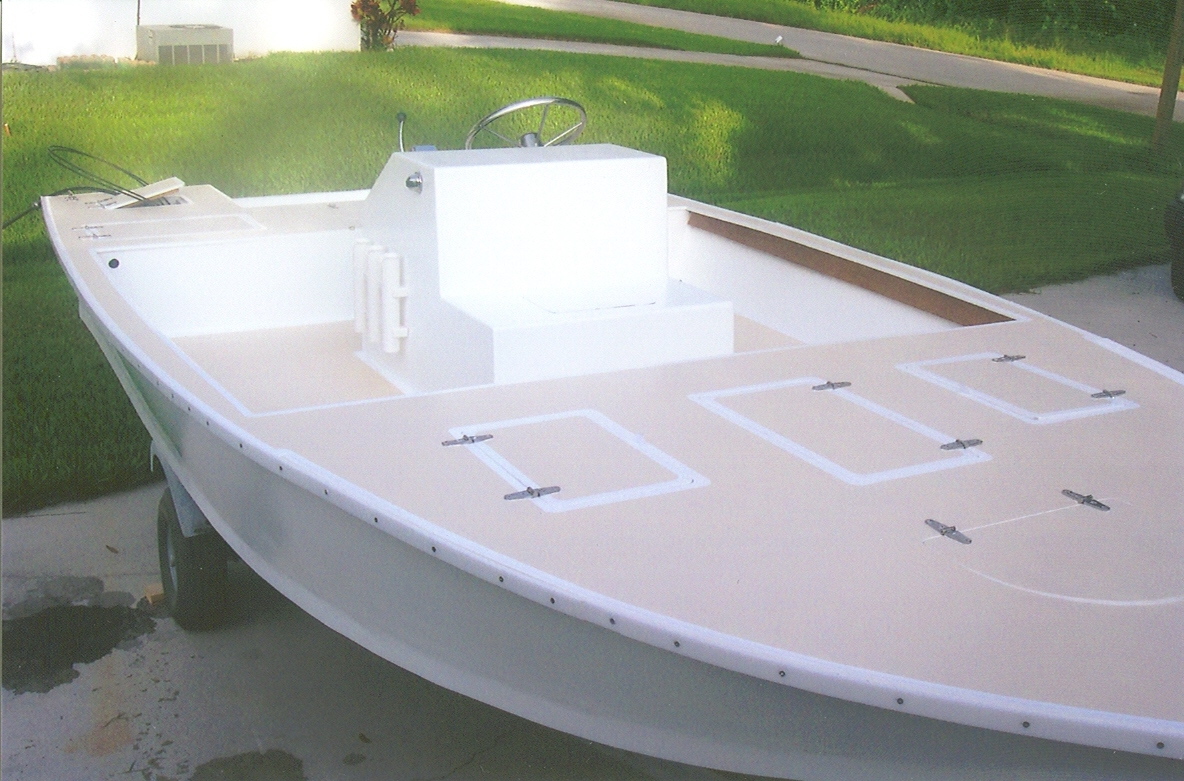
the aquasport
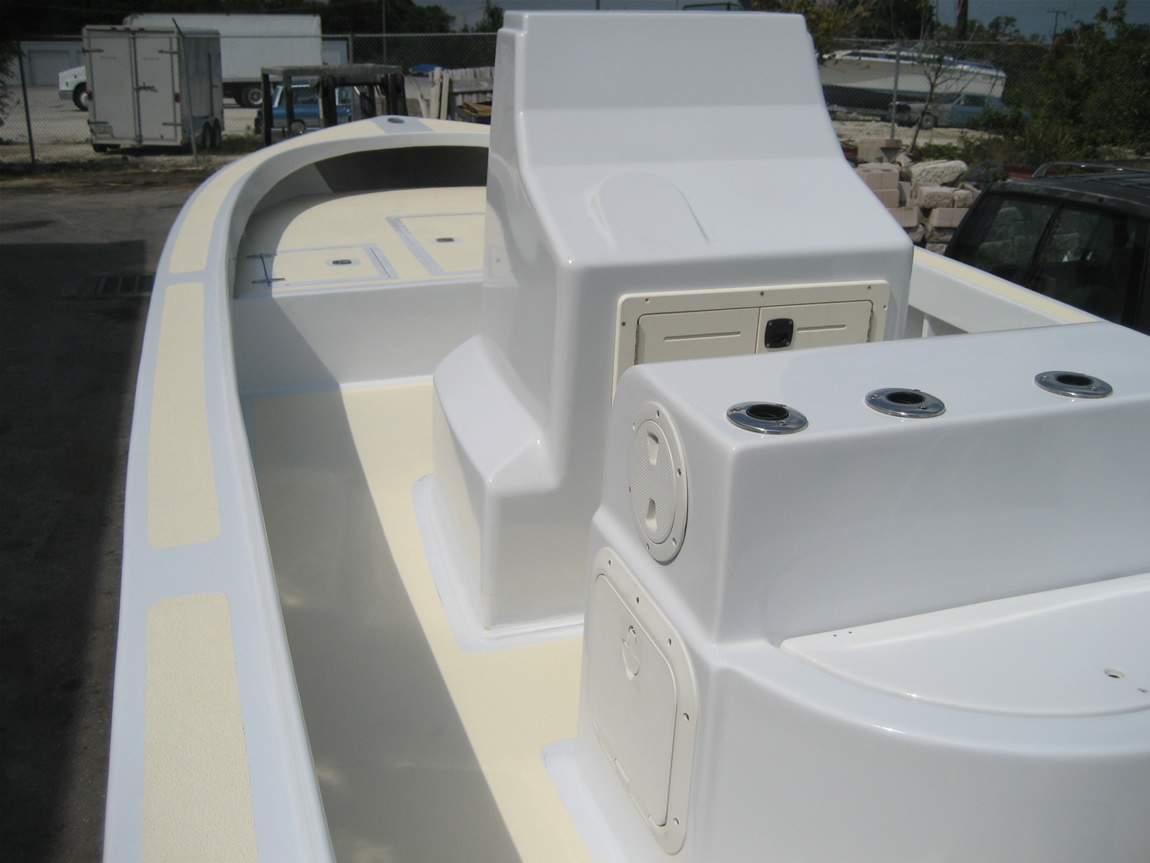
the fs12
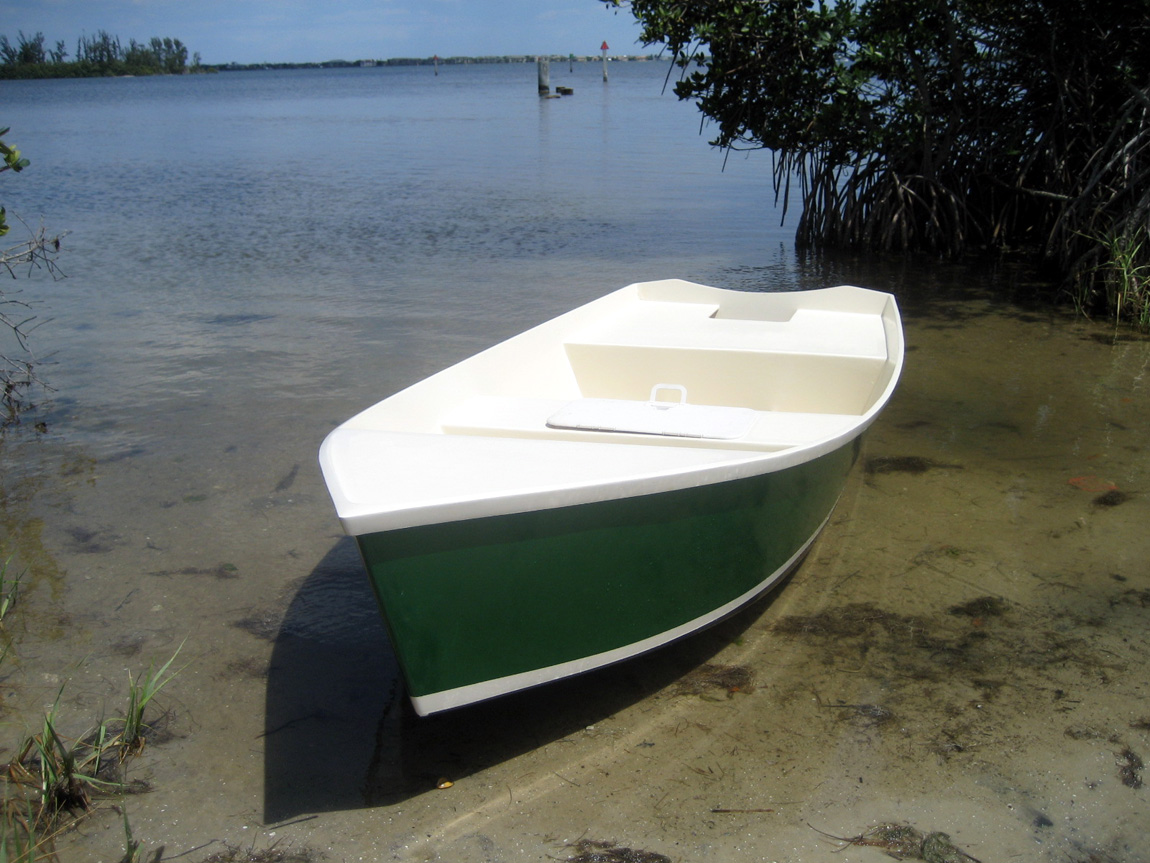
But now Im remembering the sides of this boat do not have gunnels, so the sun is going to be reflecting off of them much more so then with my past boats. So you all are correct that the inside sides need to be less prone to glare, so white insides are out
My constraints on colors:
I have already bought the hatches, they are white white - so I need something to match them, probably the rubrail.
The carbon fiber platform MUST be very light in color, it cannot get too hot
My other preferences:
light colors, not pure white. Cant show dirt super well either.
Hmm, Richard says red
A Georgia red/black boat would be really nice, but way too hot
Red sides might work if I kept the boat mostly out of the sun when stored. My father will be fishing with me a lot and he is a UF grad, so there is another plus for red/black
Posted: Tue Nov 11, 2008 8:47 am
by EricY
Will there really be enough white that it will cause that much of an issue with glare, since the coffin box and non-skid will all be cream colored?
I'm asking because I was thinking of using Matterhorn white, with blue Kiwi grip on my interior.
** oops, guess you answered my question while I was asking it.
Posted: Tue Nov 11, 2008 9:18 am
by mecreature
I mixed a equal parts 50/50 of whidbey and bainbridge S3.. Not to warm and pretty gray.
It KOs the glare pretty good. and is grey enough to go with stainless well..
Posted: Tue Nov 11, 2008 11:25 am
by Steven
If white on the bulk heads never bothered you, I don't think white on the sides will bother you. i think that only horizontal surfaces are going to cause you glare problems.
Posted: Tue Nov 11, 2008 2:55 pm
by Biker B.O.B.
shine wrote: My father will be fishing with me a lot and he is a UF grad, so there is another plus for red/black
In support of a fellow Gator...
You should show your father a little respect and paint it Orange & Blue.
And tell him I said "Go Gators!"
Posted: Tue Nov 11, 2008 3:02 pm
by TomW
Joel not to get off the paint subject found these scuppers
http://store.hamiltonmarine.com/browse.cfm/4,11209.html and they also have a 3x9 size. Both will handle plenty of water either off the side or out the rear.
These are the cutout sizes the fitting sizes are bigger.
Why don't you do cream outside and Offwhite inside with the inside getting the reduced gloss treatment that is offered by Sterling.
Tom
Posted: Thu Nov 13, 2008 1:49 pm
by tech_support
Tom, those are the style I would have for an off shore boat.
glued up the breast hook

filling in the gaps with epoxy/woodflour putty
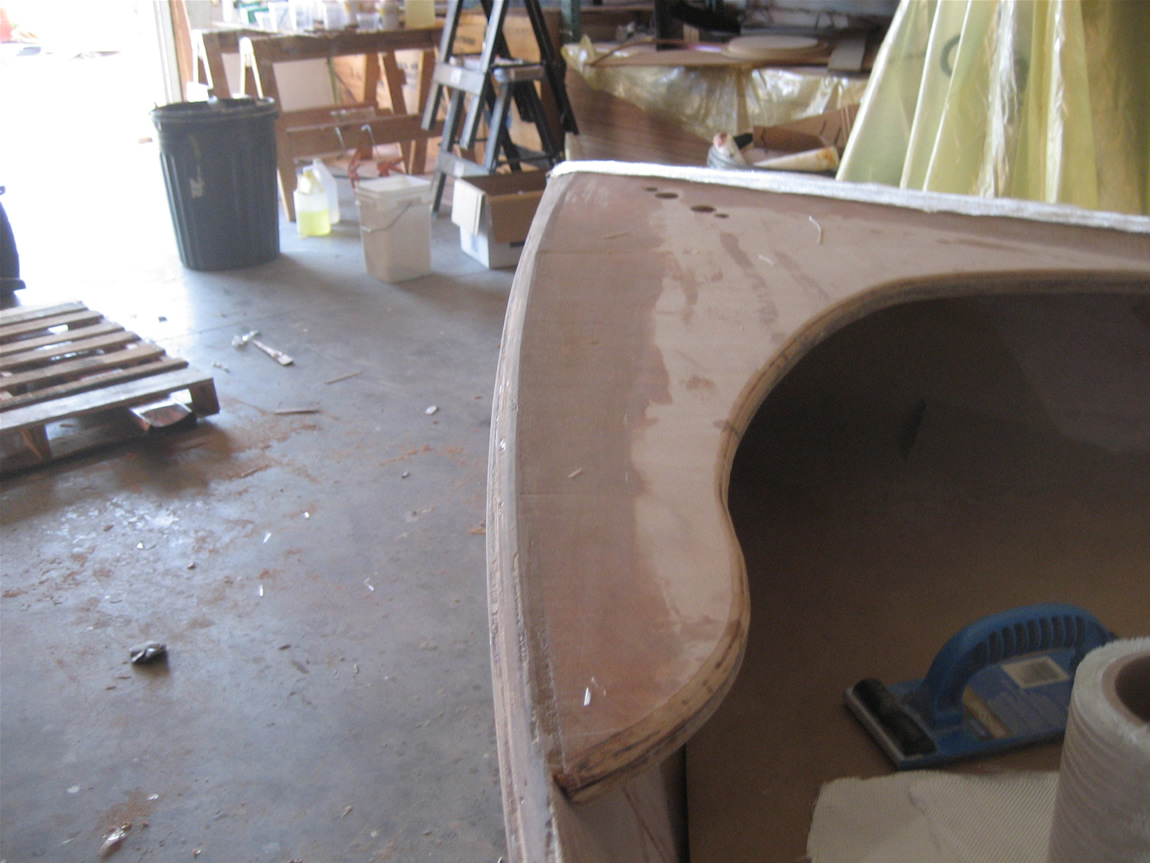
glued down the rear casting deck. before gluing down, I rounded over the front edge with a 3/8" round over bit
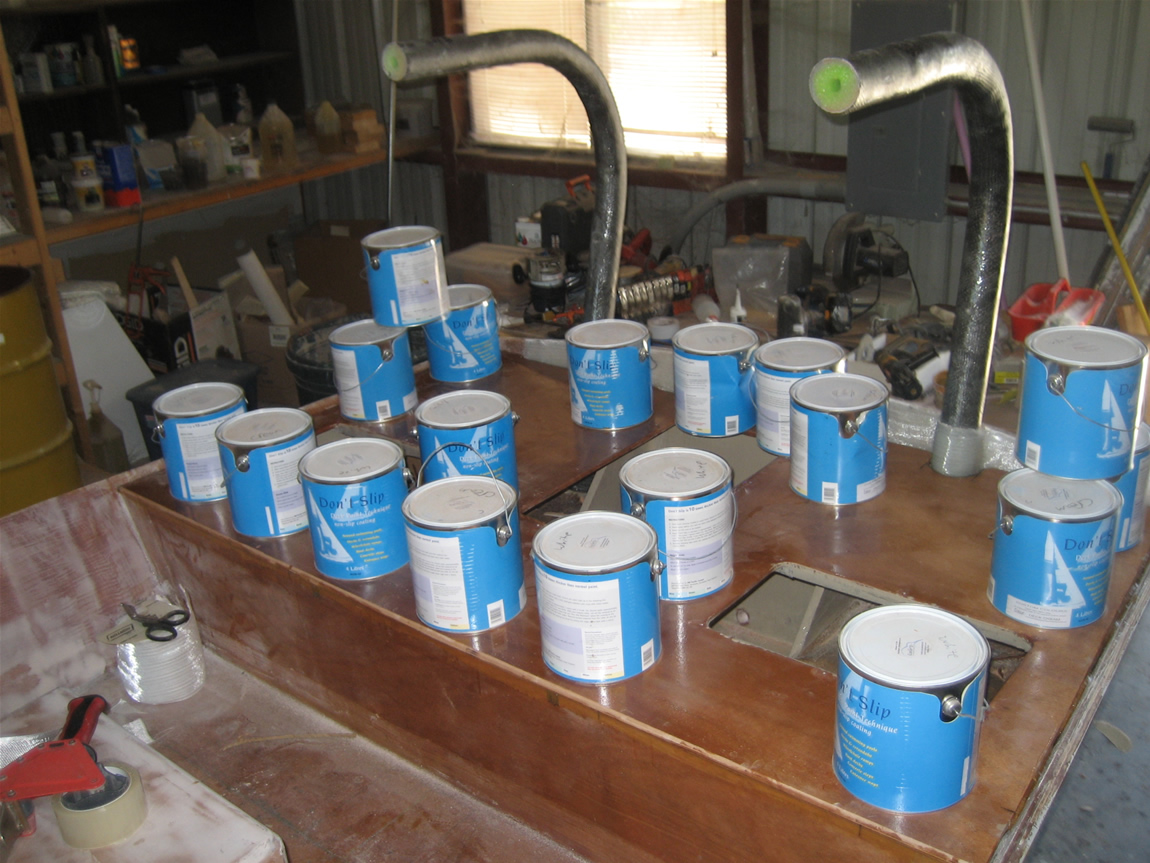
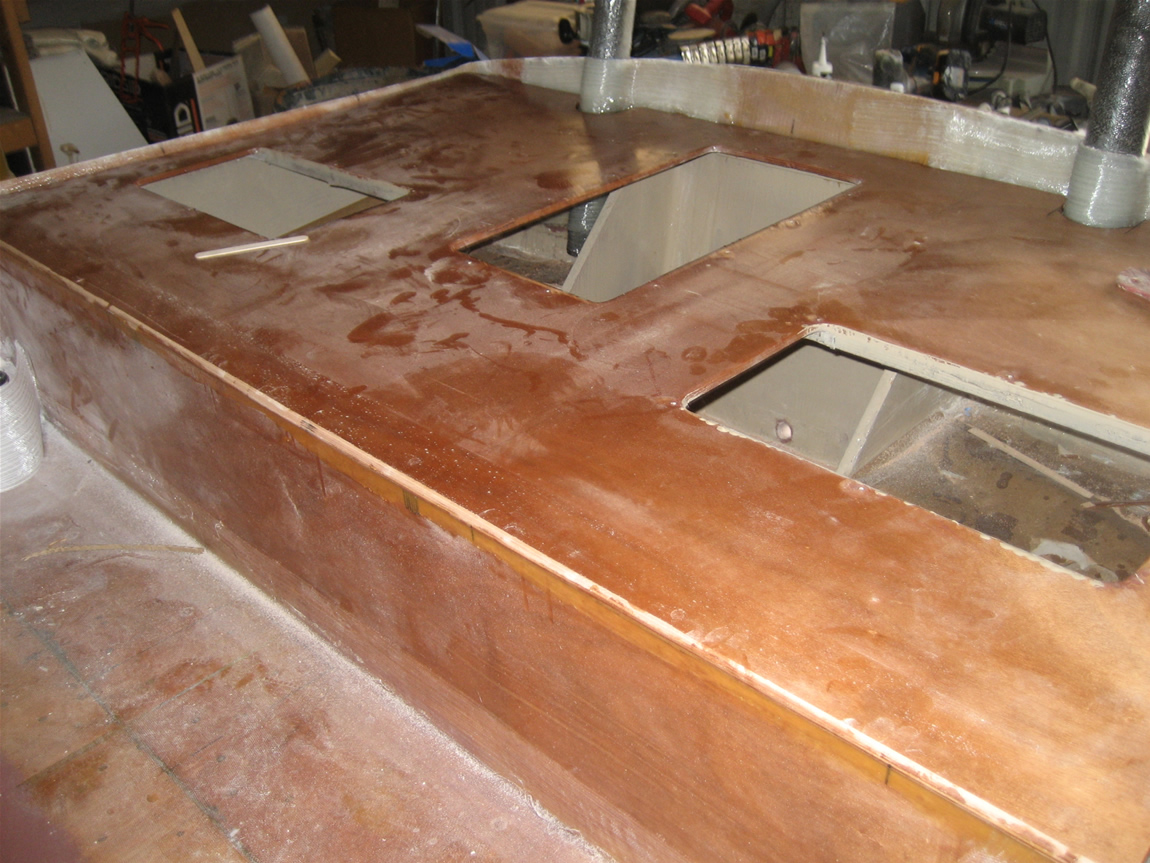
Taping and covering the breast hook with glass
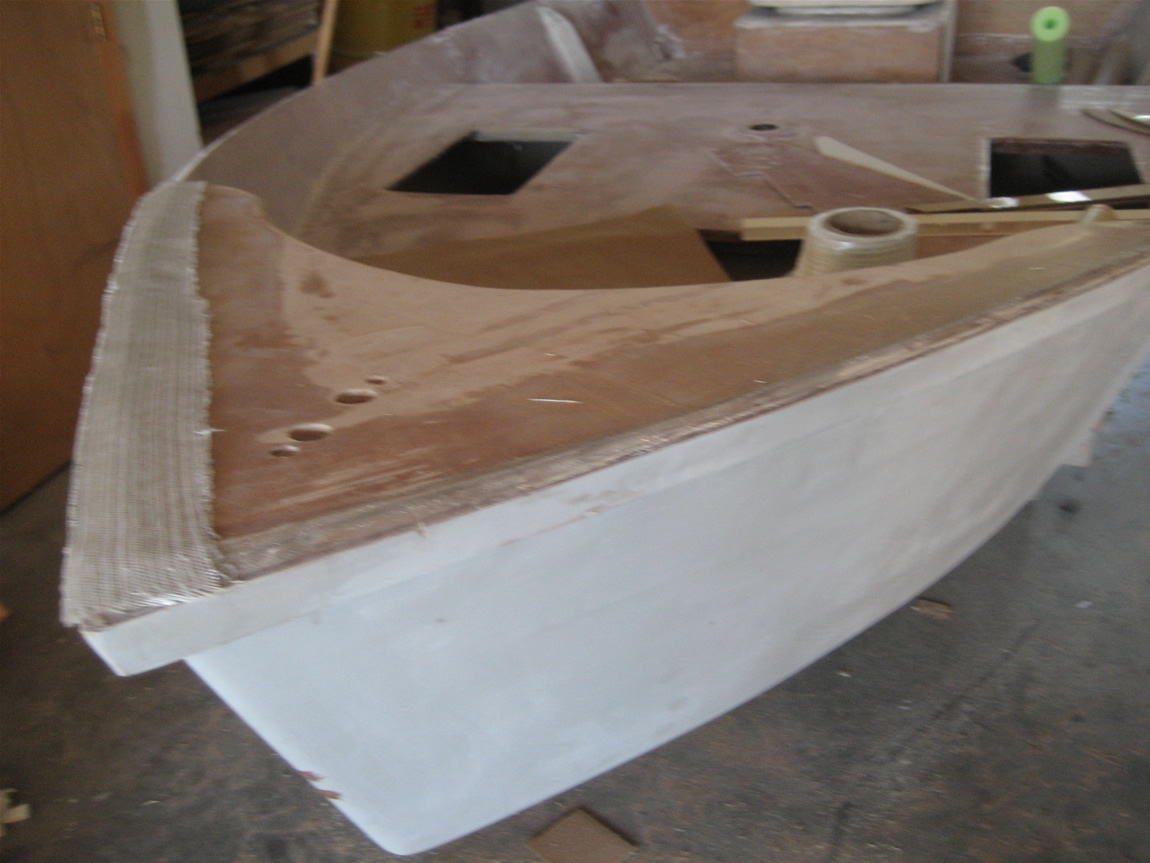
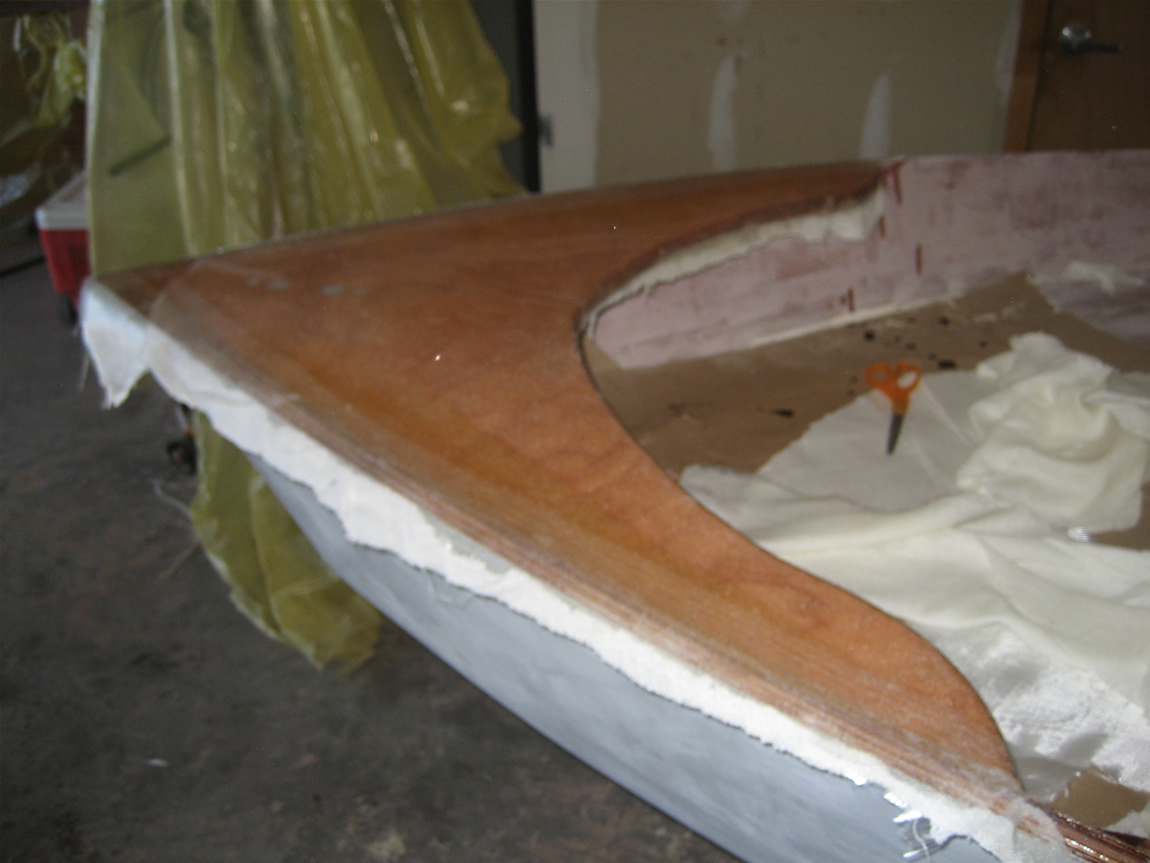
trimmed up
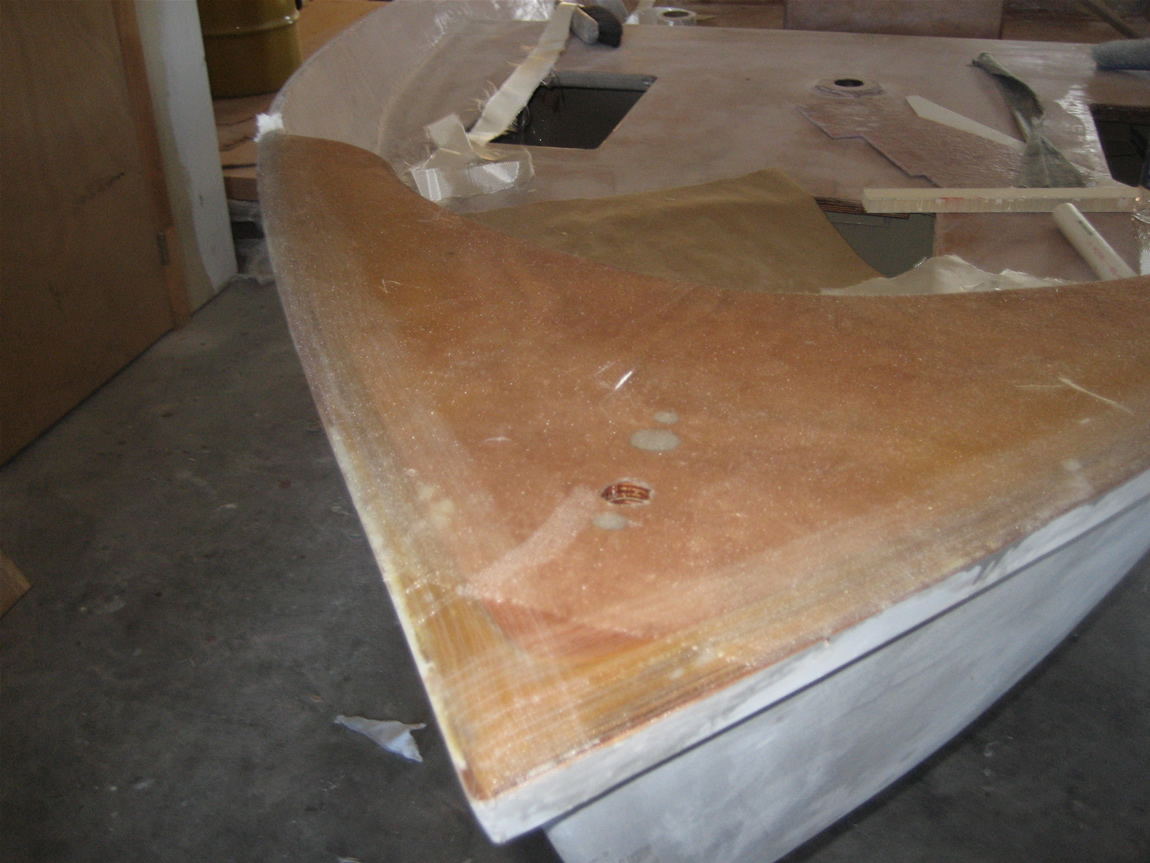
Rear casting deck gets glassed down. 12 oz biax around the perimeter, scrap 6 oz woven cloth covering the top
cut hole for inspection plate for rear compartment of cooler/seat box
Also made the carbon fiber poles that will be part of the grab rail. The grab rail comes out from the rear of the of the cooler box and just give the driver something to lean into when driving the boat from a standing position. I have an idea on hiding 2 stainless 0 degress rod holders inside the top o the CF supports
These are the supports, i will post details on their construction in the poling platform thread
Posted: Thu Nov 13, 2008 3:32 pm
by Lower
Thanks again Joel! Really love watching this build. It truly helps no matter what your building. Going to have to bite the bullet and pick colors pretty soon
Posted: Thu Nov 13, 2008 4:29 pm
by tech_support
here is where Im leaning ...
light blue sterling topcoat for the outside hull, inside vertical parts, cooler box, and the push pole platform
white rubrail, white hatches, white carbon fiber push pole uprights
light gray Kiwi grip non skid, may do a few patches of the Kiwigrip with a very light profile (not aggressive) on the sides of the inside to help kill glare
minimal visible hardware, all stainless
Should have the motor tomorrow
found a lightly used 40 hp tohatsu 2stroke. Its more than what I need but it has all the features I want (trim/tilt, electric start, 20"), and it does not weigh too much.
The last thing major I have to buy is a jackplate. Since the motor has trim/tilt, I do not need a hydraulic plate anymore. So im looking for a 4" to 5" set back manually adjustable jackplate. I have to order it soon, because the holes have to be drilled/filled before we paint the outside
Posted: Thu Nov 13, 2008 5:27 pm
by Cracker Larry
Yeah, that all sounds good
I wish I had drilled the motor mounting holes a long time ago also. Good thinking. When I picked up my trailer today the Yamaha dealer gave me a drilling template. Should have asked for it about 3 months ago.
light gray Kiwi grip non skid, may do a few patches of the Kiwigrip
Are you sure you have enough
Posted: Thu Nov 13, 2008 6:14 pm
by gk108
He's got the rear deck covered, anyway.
Posted: Thu Nov 13, 2008 7:20 pm
by TomW
Ya think!
Posted: Fri Nov 14, 2008 4:06 pm
by tech_support
Posted: Fri Nov 14, 2008 4:25 pm
by tech_support
almost forgot, the motor is bought
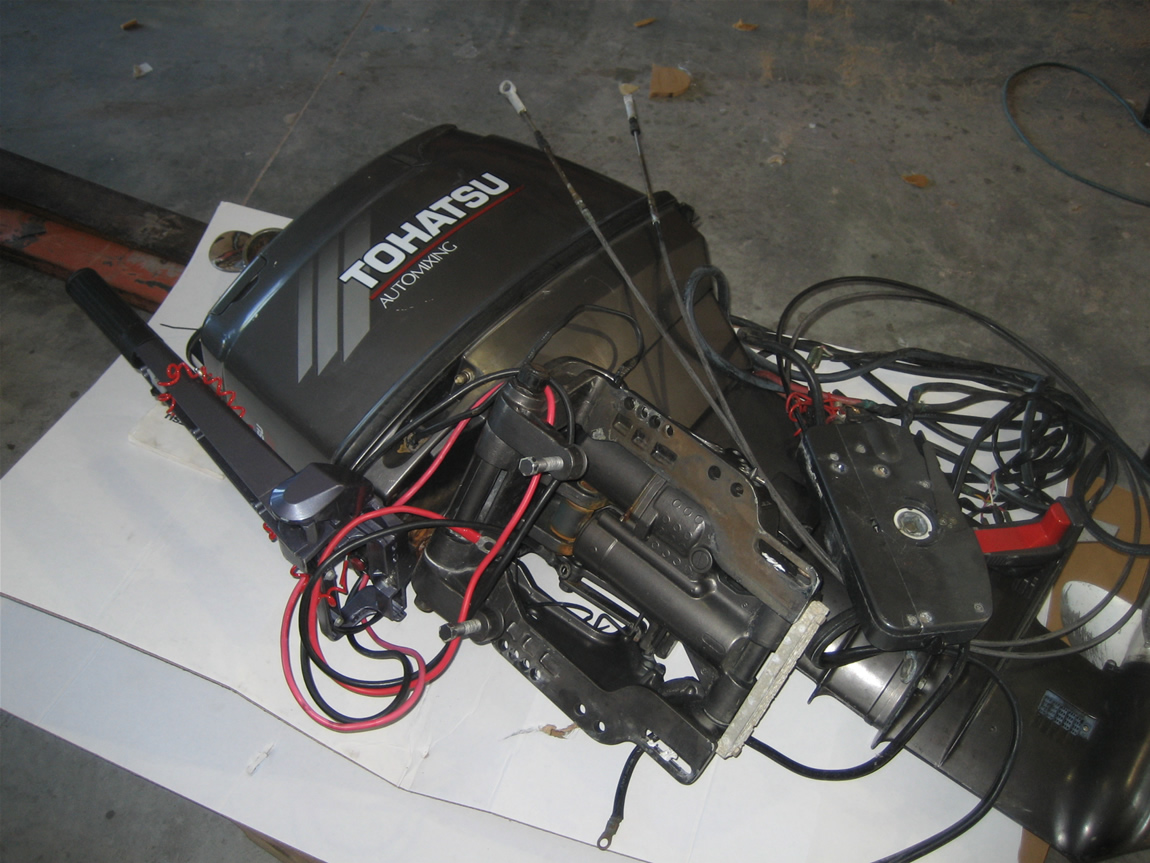
Its 40 hp, 3 cylinder Tohatsu. Its a bit heavy for the boat, but it was pretty good deal. I will take it off and get a 25 if its too much
Posted: Fri Nov 14, 2008 10:04 pm
by Dougster
Well you slipped that in. Slow hardener Quickfair! That makes a great product even better. And as a plus, I get to wait another hour or two before I have to sand
Might just buy some to keep it near-bye.
Loves that slow lane Dougster
Posted: Sat Nov 15, 2008 12:05 pm
by Steven
Dougster wrote:Well you slipped that in. Slow hardener Quickfair! That makes a great product even better. And as a plus, I get to wait another hour or two before I have to sand
Might just buy some to keep it near-bye.
Loves that slow lane Dougster
Second this. My biggest pain in fairing was getting the Quick Fair down before it set. Working in the summer when the temps stay above 85 at night and over 100 during the day makes Quick Fair quick. Even in small batches spread out. Wasted a lot sanding off ridges I couldn't smooth down before it set too much and began to drag. Excellent improvement. Can't wait to try.
Getting the itch and have decided on the FS17. Not as big as I'd like to go, but it's about max sized for my current garage. I can make due another season with the GV11, but the dang kids keep getting heavier. :)Gonna buy the wood and expoxy kit soon after Christmas so I can get the hull assembled and the bottom faired before the summer heat sets in.
Posted: Mon Nov 17, 2008 10:53 am
by Lower
Hey Joel, you mention possibly adding a trolling motor in the future. I'm definitly intersted in one as well. If you were to add one would you go 12 volt or 24 volt? I think 12 is plenty enough to move the boat, I just get concerened with how long the battery will last. 24 volt is ideal, but now I'm looking at another 100 lbs in batteries
. I realize your boat will be lighter with the lower sides and much better laminations, but just curious your thoughts.
Posted: Mon Nov 17, 2008 2:13 pm
by tobolamr
Lower, regarding the trolling motor:
I have a 12V Minn Kota PowerDrive 40lb Thrust unit for my 15' aluminum V-hull. I've got a single Group 31 AGM Deep Cycle battery, and I can fish that sucker HARD for something like 36-48 hours before it even starts to dip in power output. Last 4th of July I spent the weekend in a high-current river in heavy winds, fishing about 12 - 16 hours a day, and didn't have to recharge it from Friday until after I got home on Monday.
Anyways, for what it's worth!
Posted: Mon Nov 17, 2008 2:18 pm
by tech_support
I agree, 12V is plenty for a small/light boat.
Posted: Mon Nov 17, 2008 2:20 pm
by tobolamr
Oh yeah! I forgot to mention: The MinnKota guys will provide you with amp draw information on request, too.
Posted: Mon Nov 17, 2008 4:11 pm
by Lower
tobolamr...thanks a lot for the information. That's exactly what I was wondering! I've never owned a boat. I have a lot of friends with boats with trolling motors, but can't really compare as it's not apples to apples with these designs.
Oh and by the way Joel, boats looking really good...coming to an end quickly. Nice motor too. I hear nothing but great things about those.
Posted: Wed Nov 19, 2008 8:02 pm
by FLYonWALL9
Joel,
The Great White transom 54/12v is what I
had. That thing is POWERFUL! I did have it
reshafted longer and controls remounted
so that it would work on a bow vs a transom.
That Birdsall mount is a great thing unless
you have figured on something else.
Cheers, oh and the project is looking great!
SCOTT
Posted: Wed Nov 19, 2008 10:51 pm
by tobolamr
Lower, feel free to e-mail me via the button below regarding those trolling motors. I can share more there. I don't want to hijack Shine's awesome FS17 Low Sheer Build thread!
Shine, Keep up the awesome work!
Posted: Thu Nov 20, 2008 5:05 pm
by tech_support
Posted: Thu Nov 20, 2008 5:37 pm
by Dog Fish
Looking good
Posted: Thu Nov 20, 2008 7:01 pm
by TomW
Looks great Joel.
Tom
Posted: Fri Nov 21, 2008 1:38 pm
by tech_support
Posted: Fri Nov 21, 2008 3:52 pm
by Cracker Larry
He didn't even mention who sanded all that fairing, I'm betting on Joseph
Posted: Fri Nov 21, 2008 4:35 pm
by Steven
Hey Shine,
How did you fair the inside? Fill and sand with RO or did you actually long board?
Posted: Fri Nov 21, 2008 6:51 pm
by gk108
Cracker Larry wrote:He didn't even mention who sanded all that fairing, I'm betting on Joseph
They need to figure out how to put a Joseph in the kits.
Posted: Fri Nov 21, 2008 9:18 pm
by ks8
gk108 wrote:Cracker Larry wrote:He didn't even mention who sanded all that fairing, I'm betting on Joseph
They need to figure out how to put a Joseph in the kits.
Just add water? How's he going to fit? The shipping might be a bit of a hit.
Posted: Sat Nov 22, 2008 9:47 am
by tobolamr
What about one of thos robots from Honda?
Posted: Fri Dec 05, 2008 4:19 pm
by tech_support
Posted: Fri Dec 05, 2008 4:34 pm
by TomW
Very nice Shine, looks ready to me.
Tom
Posted: Fri Dec 05, 2008 9:05 pm
by nort
Is this a replacement for the Phoam Phantom? Or does it have another purpose?
Posted: Sat Dec 06, 2008 8:21 am
by jgroves
You will be on the water in no time! Heck you already have an engine... you could go now.
Posted: Sun Dec 07, 2008 12:17 pm
by Lower
Movin right along. Can't wait to see some paint
Posted: Mon Dec 08, 2008 8:14 am
by JimW
shine wrote:
The poling platform is another story, there is still work to do.
[/img]
Just trim work or is there any big problems with it? I like that design and am watching quietly.
Posted: Mon Dec 08, 2008 10:08 am
by tech_support
this is the replacement for the phoam phantom. The motor was getting to the point where it needed replacement and I wanted a new boat for a new motor, so i sold her.
Jim, the CF platform just needs fairing for the platform part.
Posted: Mon Dec 08, 2008 11:27 am
by Murry
Joel,
At wich point in your fairing process do you put down the fairing board and pick up the RO?
Thanks
Daniel
The shot of the complete boat really does look nice. That's one tough looking fishing machine.
Posted: Mon Dec 08, 2008 12:36 pm
by gk108
Jim, the CF platform just needs fairing for the platform part.
Distinctive styling has its cost, doesn't it? It looks like it will be well worth the effort.
Posted: Mon Dec 08, 2008 1:49 pm
by TomW
Murry you use the RO first to knock down the fiberglass threads and any ridges on your firs fairing pass, after that it is all fairing board unless you find a real high spot and then you can take the RO lightly to it. After the first fairing pass you are basically filling in the low spots and fiaring with the boards.
Tom
Posted: Mon Dec 08, 2008 2:19 pm
by tech_support
yes at this point we are only using the DA sander, sanding blocks, and hand sanding.
Today we are sanding with 220, and it looks like we will have one more application of primer.
Posted: Mon Dec 08, 2008 3:49 pm
by Murry
Thanks Joel and Tom,
You both helped me to visualize things a bit' more.
Daniel
Posted: Mon Dec 08, 2008 10:08 pm
by macfiveo
Joel, are you spraying on the primer? roll and tip?
Sure is looking good!
Ron
Posted: Tue Dec 09, 2008 9:04 am
by tech_support
macfiveo wrote:Joel, are you spraying on the primer? roll and tip?
Ron
Just rolled on. We do not spray the primer or paint, the paint will be rolled and tipped.
Posted: Sat Dec 13, 2008 11:40 pm
by sealevel
this is killing me; went soooo fast, now...
Posted: Sun Dec 14, 2008 12:37 am
by tobolamr
sealevel;
There's a builder who journaled his Phantom 18 build, and he started to track his building hours versus his finishing/rigging hours. The latter won out in the end! A lot of time goes into these ending portions of the builds in fairing, fitting, etc.
Posted: Sun Dec 14, 2008 3:56 am
by sealevel
Oh, I know...just seemed like he & his crew had this one "robotized" to the point that it would beat everything. I built a 16' skiff once; it took a couple of days for the hull & bottom & I am STILL working the fiddly bits.
Posted: Sun Dec 14, 2008 9:49 am
by Cracker Larry
this is killing me; went soooo fast,
It seems fast, it is for most of us, but they've been working on this boat over 6 months, in an enclosed shop, with all materials at hand, with extra labor, and with a lot of knowledge that saves much pondering time.
Boat building is slow work, even for the professionals
Posted: Sun Dec 14, 2008 10:10 am
by steve292
Cracker Larry wrote:this is killing me; went soooo fast,
It seems fast, it is for most of us, but they've been working on this boat over 6 months, in an enclosed shop, with all materials at hand, with extra labor, and with a lot of knowledge that saves much pondering time.
Boat building is slow work, even for the professionals
& I think he is doing it as part of his(Shine's) day job with the aim of creating a tutorial, but correct me if i'm wrong (again
)
Steve
Posted: Sun Dec 14, 2008 12:18 pm
by tobolamr
Oh, and don't forget they're building in Florida, where the temps are typically nice for working with epoxy. We had -18F earlier in the week here in central wisconsin!
That's okay! I've already got a wood stove for heating the garage.
and access to over 100 acres of woodland for harvesting wood
Posted: Sun Dec 14, 2008 5:54 pm
by sealevel
Just bought a Big Buddy heater for the shop after I read about it on the forum; it's definitely all that & a free bowl of grits.
Posted: Mon Dec 15, 2008 9:12 am
by tech_support
OK, ok, guys
We may have some advantages, but remember we do not work on the boat after 5:00 pm or on the weekends. (I think I came in one weekend for couple hours to make a minor gluing). There have been several weeks where we only put in a few hours. For hardware, tanks, jackplates, etc, I have to measure and order them also. Our warehouse is not climate controlled and in the summer it was about as hot a you imagine a metal building in south florida would be. Right now our temps are perfect.
Joseph has done most of the sanding/fairing work. About a year ago, Joseph did not know what epoxy was and had never done any of this. he is still learning, but he in no more experienced than someone who has build one of our smaller boats.
having all materials handy, and having the correct tools, and more importantly knowing the techniques to use the tools are the most important things if you want to make quick/good progress. Having an extra set of hands is also wonderful for big jobs.
I am going for close to yacht level of finish on this boat, so that adds many hours of finish work. Working full time, with the CNC kits, I believe with one helper I could build an FS17 to yacht level standards in less than 1 month, or 2 fs17's in 5 weeks
If you have a second boat in the close to the same stage of construction, there are large saving in time. All the tanks, hardware, etc would have to be already on hand. So much time is spent on non-hull building things like his
If anyone wants to see if this is possible, place and order for two finished boats and we will see
Posted: Mon Dec 15, 2008 9:33 am
by steve292
I wasn't trying to sharpshoot you.
I was just pointing out that you had perhaps a little more time than most. I agree if I was to work a 35 hour week on mine, 6-8 weeks is perfectly acheivable
if you have all the materials including paint & hardware to hand.
Butif you are doing 2 or 3 hours a time like I am,which is a hideously ineffecient way to do it,it will take you 2 years
Regards,
Steve
Posted: Mon Dec 15, 2008 2:06 pm
by tech_support
I built my ph16 (in foam core) in my garage on night and weekends - took 1.5 years -
It was closer to "work boat" finish though
Put the first coat of sterling ice blue on the boat today. with 18 total oz of paint (12 oz paint, 6 oz catalyst) we got a very good coat on almost every surface that will get sterling paint. We leave off areas that are non-skid or get S3 paint - no need to waste the paint there.
Joseph rolled and I tipped. Took 2 hours from the time we mixed the paint to the time we cleaned the brush.
I am going to try to get at least three coats before sanding the paint. i took some pictures and also got a little video or rolling/tipping. Seeing that paint layout and tighten up to that extreme gloss is a lot of fun.
Last week we finished the priming. Used guide coat, sanded it down with 180 or 220 (cant remember which).
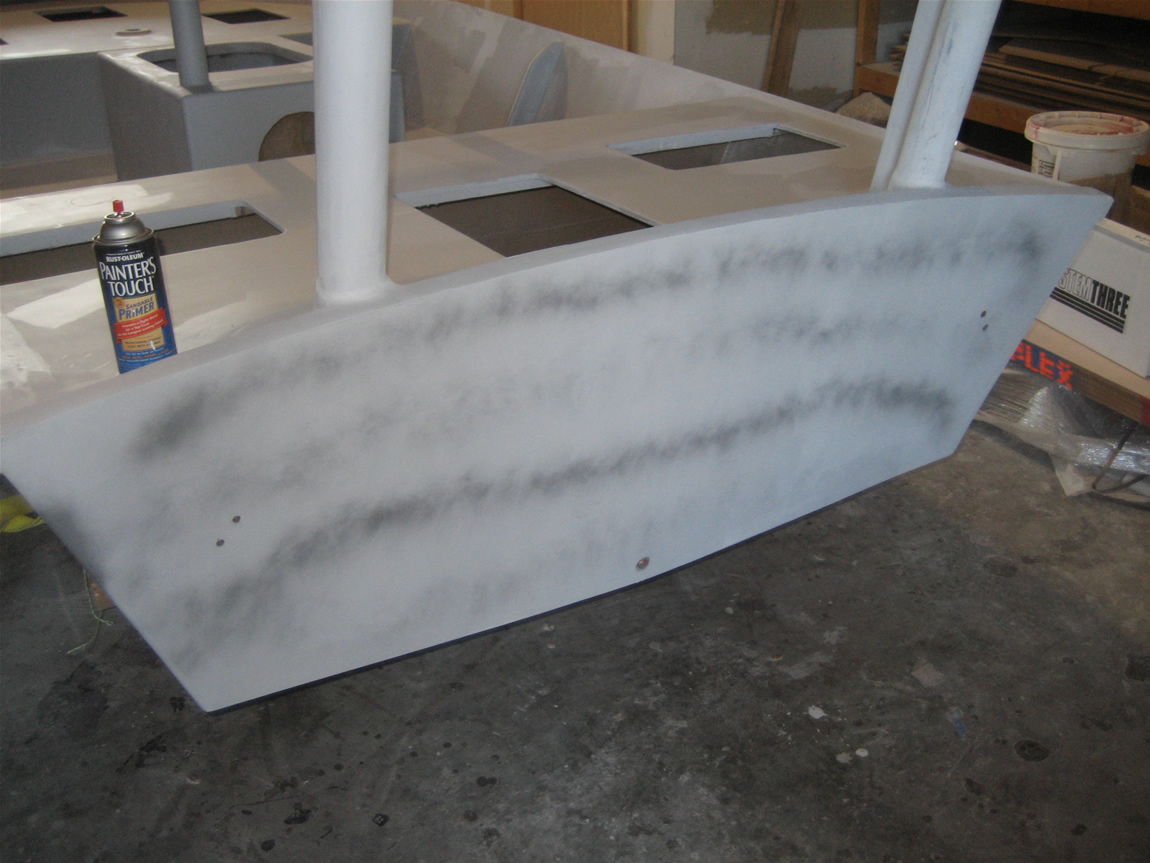
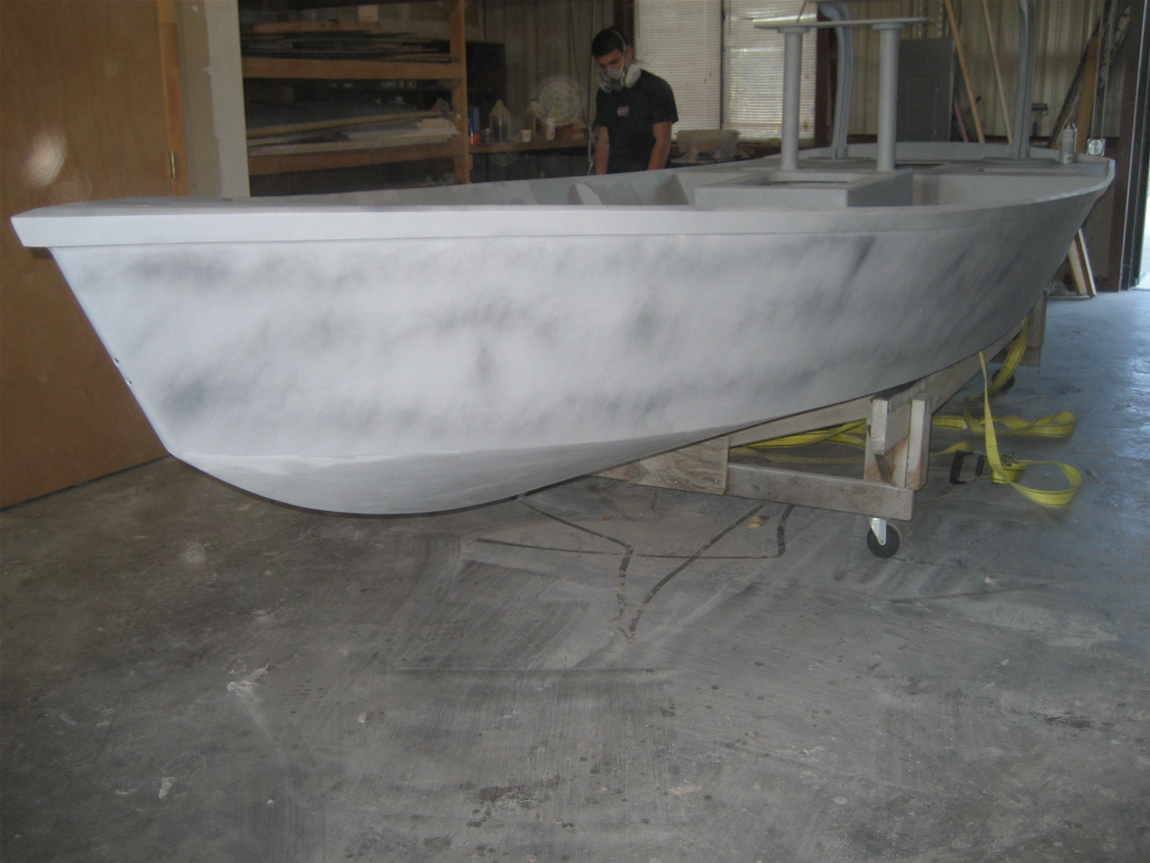
There were still a could spots that had pin holes, so we put on two more coats of primer (which we thinned to about 25% with water), then sanded the next day with 320 grit. Here is the surface sanded with 320
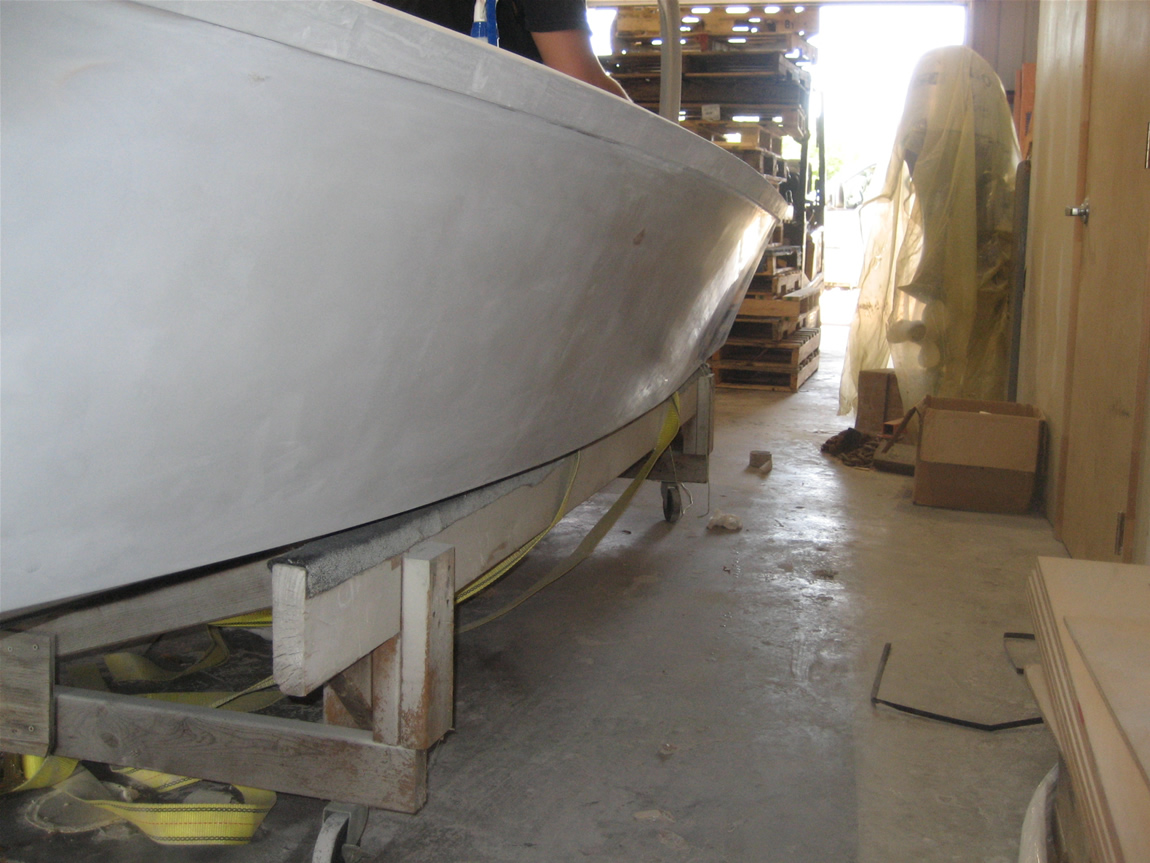
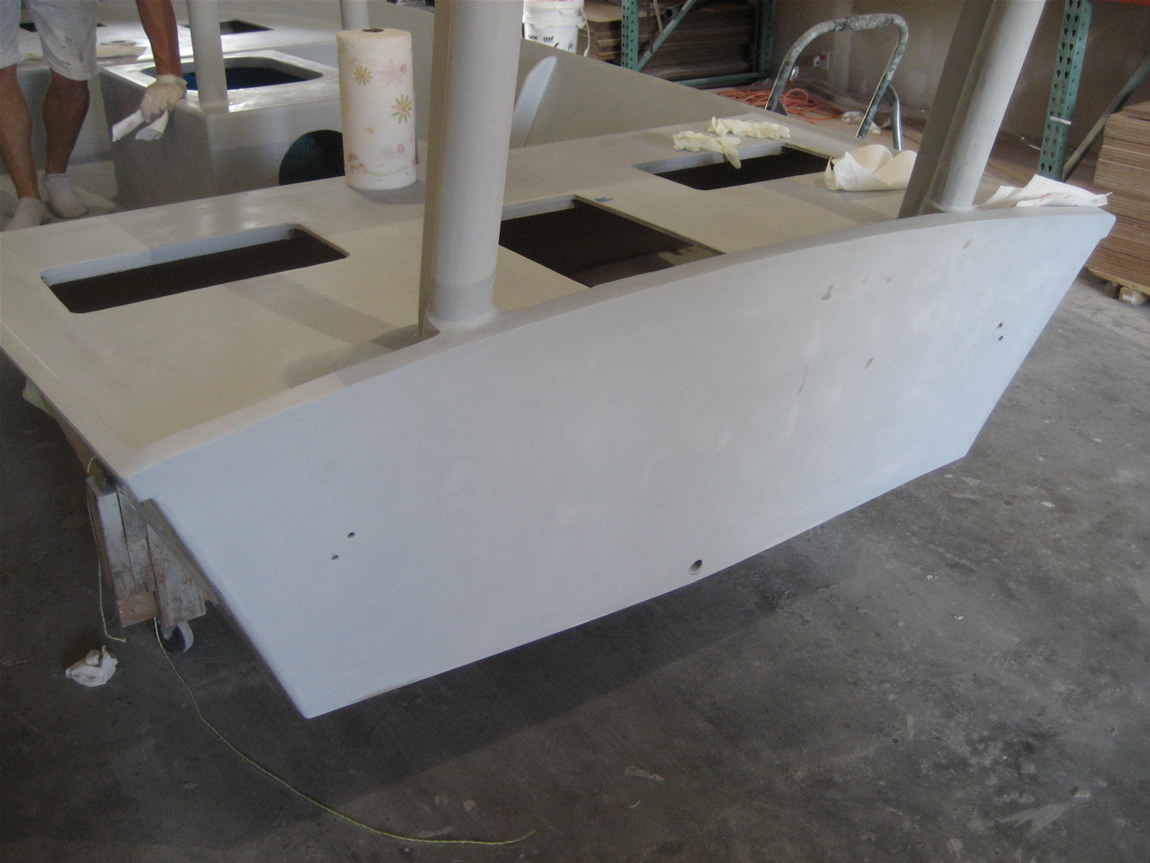
then we vacuumed up the warehouse and let the dust settle over the weekend. This morning Joseph gave the boat a wipe down with denatured alcohol and we painted.

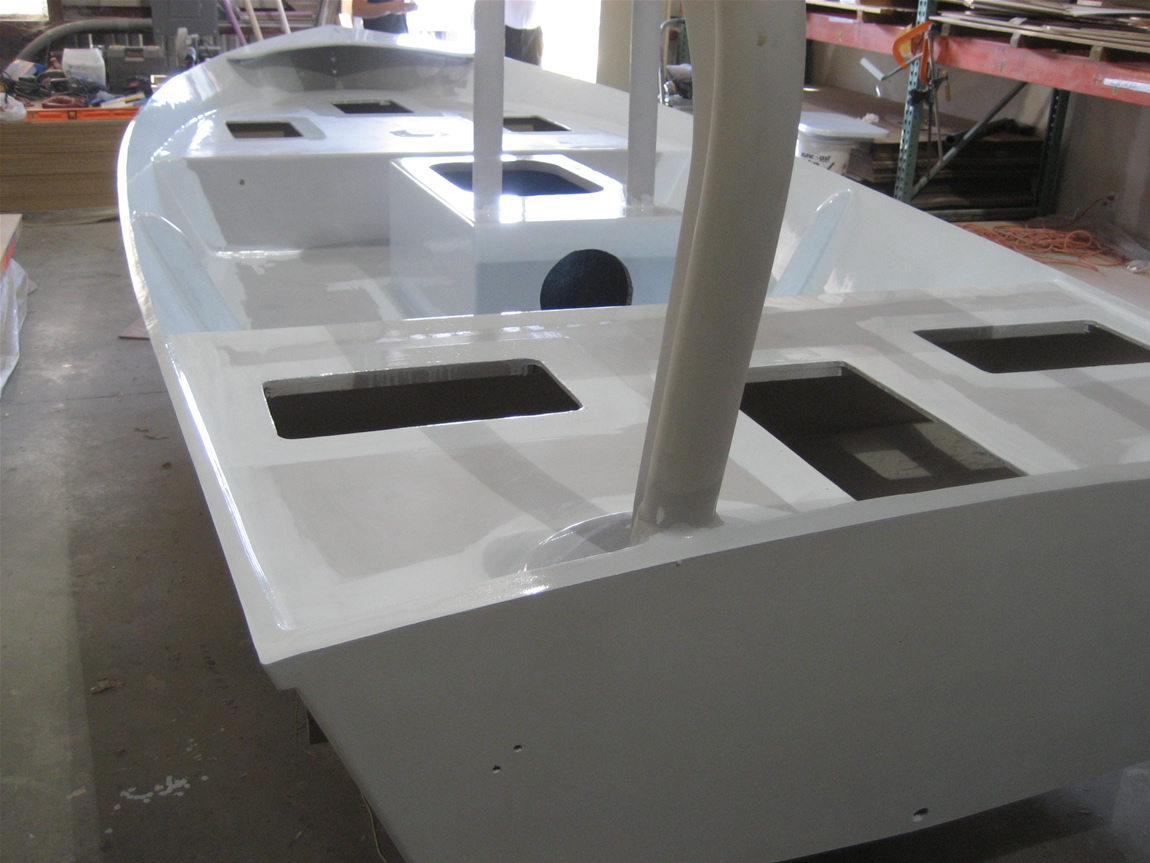
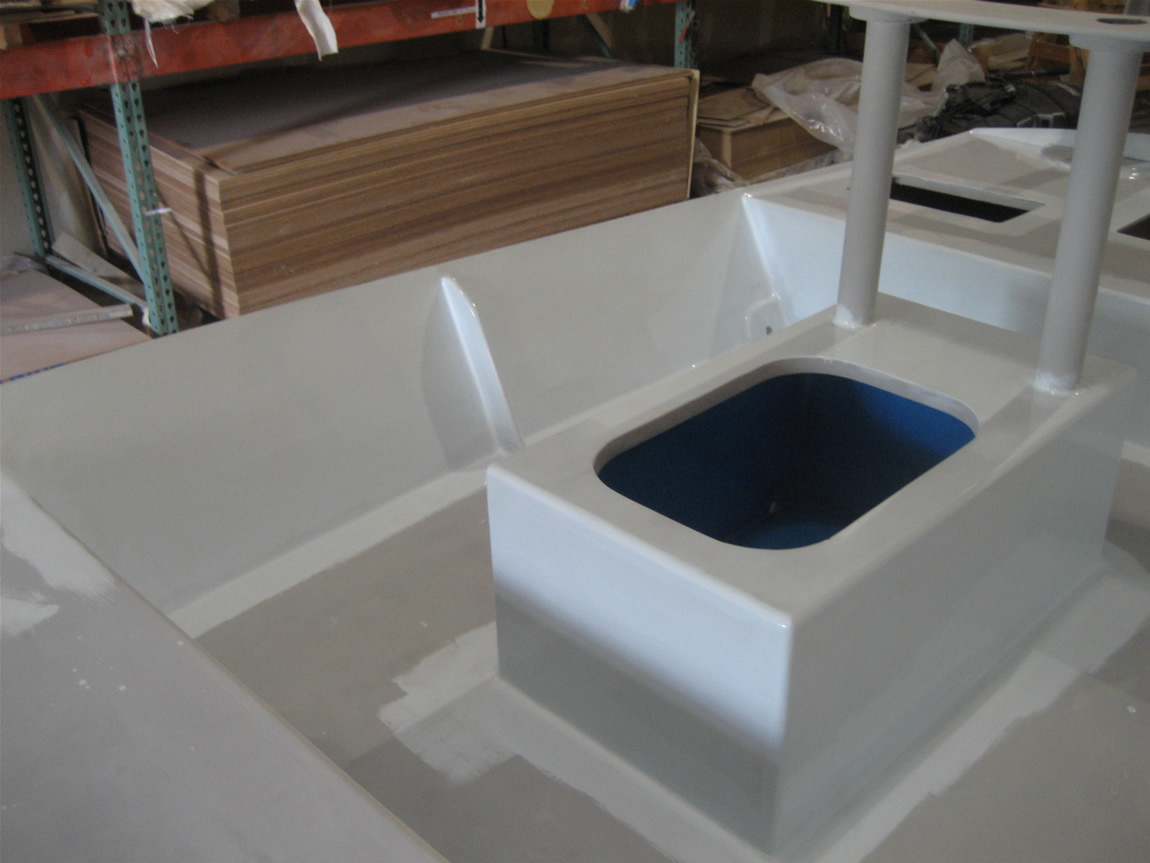
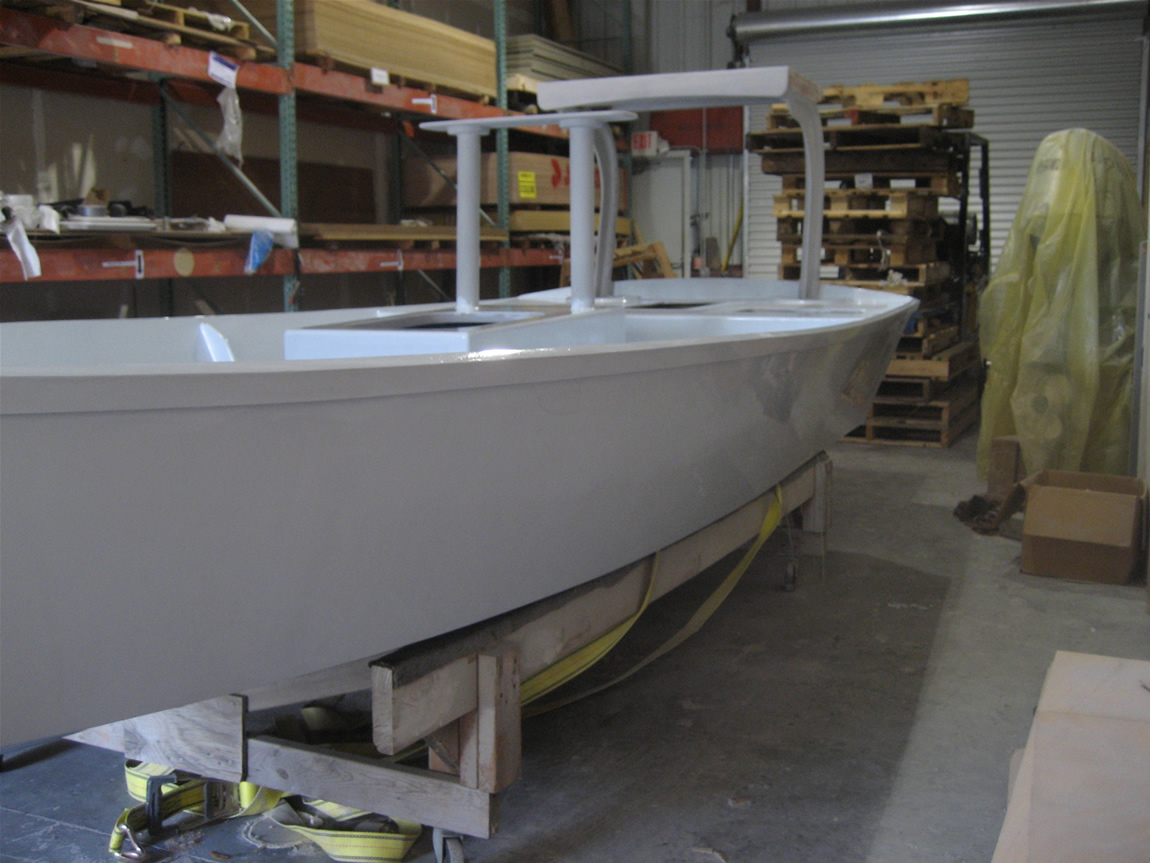
Posted: Mon Dec 15, 2008 5:19 pm
by Jaap
Wow, she starts Shining
Posted: Mon Dec 15, 2008 5:24 pm
by steve292
Nice.............
. What colour is that?
Posted: Mon Dec 15, 2008 6:25 pm
by colonialc19
Lookin' good Joel, is that the outboard for the FS in the background?? looks like a Hooooda
.
Posted: Mon Dec 15, 2008 7:00 pm
by Cracker Larry
What colour is that?
Put the first coat of sterling ice blue on the boat today.
Beautiful
Love that Sterling paint
The color looks the same as Matterhorn white I used.
Posted: Mon Dec 15, 2008 7:37 pm
by TomW
Looking good Joel, the Ice Blue doesn't quite show in the photo like the color chart.
Tom
Posted: Mon Dec 15, 2008 8:11 pm
by tech_support
Thanks for the complement, all that sanding really is paying off.
yes, its ice blue
but one thin layer of ice blue over gray primer looks just like matterhorn white
When Jacques saw the boat he thought I had changed my mind on the color and gone with white. The color in the pot looks just like the color chart. Tomorrow morning we will get another coat on and the color will look better.
The honda 50 in the background belongs to Jacques, its for a future project
. My 40hp Tohatsu is under plastic on the other side
Posted: Mon Dec 15, 2008 8:44 pm
by Cracker Larry
Something catches my eye and I just have to ask. In this picture and others your poling platform supports are round with a gusset...
But in this picture it looks like you have squared them off...
I like that
Did I miss something or is it trick photography
Posted: Tue Dec 16, 2008 8:31 am
by tech_support
they are round, looks like a shadow is playing games.
The poling platform is not finished yet, still needs to be faired. The poling platform and the leaning post/grab rail will be painted a flat color that will be the same as the non-skid on the decks and sole (right now I have in mind light gray).
I just know that every redfish within 30 yards would see the glare off a poling platform painted with sterling, bad enough that the hull is going to shine like a mirror.
Posted: Tue Dec 16, 2008 9:08 am
by Cracker Larry
Thanks Joel, I thought it must be a trick of light and shadow.
Your boat looks great, if it's too shiny I've got some left over Krylon in flat camo you can have
I've been meaning to ask if you want this Sterling accelerator back. I only used a teaspoon, no need to waste it.
Posted: Tue Dec 16, 2008 9:57 am
by mecreature
Looking pretty sweet.. looks gray from here...
small gunnel might have looked pretty sweet on that sheer..
Posted: Tue Dec 16, 2008 10:38 am
by jgroves
Once you get it in the sunlight the color will look more true. Also the setting on the camera make a big difference on color.
Posted: Tue Dec 16, 2008 12:50 pm
by OysterBreath
shine wrote:The poling platform and the leaning post/grab rail will be painted a flat color that will be the same as the non-skid on the decks and sole (right now I have in mind light gray).
When you first proposed building a carbon platform I thought you were going to have the carbon exposed. I thought that was an amazing idea. Then I realized that was not your intent. I was a little disapointed but as you progressed I started to think that what you are currently doing might in fact be more attractive than the exposded carbon. It's funny how an observers opinion can differ from the designer...then in the end change and agree with the designer. I think your poling platform is going to be VERY nice indeed! Watching you develop your idea has been a really fun ride! I can't wait until you edit a video of your work. That will be pure unfiltered inspiration! When your boat gets done, be sure to take plenty of high res pictures. This one might become my new desktop!
Posted: Tue Dec 16, 2008 1:01 pm
by tech_support
thanks for the complement.
There is no benefit to having carbon fiber clear coated, quite the opposite only negatives.
If I were to build this very same boat again I would only change a few things. One is to add small gunnels to connect the casting decks (below the sheer line). I was worried about having plenty of open space, but there is enough room for a small gunnel of maybe 5 or 6 inches.
Posted: Tue Dec 16, 2008 1:28 pm
by tech_support
Posted: Tue Dec 16, 2008 3:31 pm
by jgroves
Wow ok thats lookin' blue now. I like that color. Very cool.
Posted: Tue Dec 16, 2008 3:45 pm
by TomW
Now she's looking blue, I like it. Colors always look different under warehouse lights.
Tom
Posted: Tue Dec 16, 2008 4:58 pm
by Larry B
Shine, Very nice looking boat. Been following this as I'm thinking I would like to build it.
Could You let me know how much paint did this boat take to get the finish you are getting? Including primer. Just trying to put together a cost for the paint?
Larry B
Posted: Tue Dec 16, 2008 5:37 pm
by slump67
Shine, you have built a Beautiful boat. I agree with you on small gunnels. I have the same situation with my 18' Maritime Skiff. The next time it needs a paint job, I plan on putting them in.
Al
Posted: Tue Dec 16, 2008 6:44 pm
by OysterBreath
shine wrote:
I just know that every redfish within 30 yards would see the glare off a poling platform painted with sterling, bad enough that the hull is going to shine like a mirror.
That's the delima of a custom boat...
Boats that make other humans say ,"wow!"; makes fish swim away!
Boats that make people say, "gee that's ugly!", make fish assume it's just natural floating debris. Where do we find the comprimise. When I get started, I first considered a light colored camo paint job on the hull but I'm a little appriensive because people have warned against using certain colors in our Florida sun. So I'm rethinking that and might go with a price safe off white without any gloss.
shine wrote:
thanks for the complement.
It is a well deserved complement!
shine wrote:If I were to build this very same boat again I would only change a few things. One is to add small gunnels to connect the casting decks (below the sheer line). I was worried about having plenty of open space, but there is enough room for a small gunnel of maybe 5 or 6 inches.
Why would you want a gunnel?
I know it's a customary thing to have but what function does it serve? If you ask me your design works very well without it so I'm curious why you'd want one. They do offer some top protection for side stored rods but what other function does it serve?
P.S. your boat would have been cool with side rod lockers like the Beavertail BXT. That would have been a cool reason for side gunnels...
Posted: Tue Dec 16, 2008 6:46 pm
by jbo_c
How many times are you planning to stumble over that center frame before you get mad enough to throw something overboard?
Not picking. Just hadn't noticed it before. Did you taper it flush at the sole?
Jbo
Posted: Tue Dec 16, 2008 7:49 pm
by Daddy
Gunnels add stiffness to the sheer, keep people back from the side of the boat for safety, sometimes just look good, more finished looking, someplace to mount a cleat or rod holder, probably more, but I'm hungry and supper is ready.
Daddy
Posted: Tue Dec 16, 2008 8:26 pm
by cape man
Joel,
First, awesome build. I'm really impressed. Not only can you get us great stuff at great prices, extremely fast, but looks like you can also build a gorgeous boat at a pace that's inspiring. I agree that I would put gunwales on her. Not too late.... Easier now than later... You're going to wish you had...
Without them it is still a wonderful boat. I'll trade you a fishing trip. My OD over this side, your FS over there.
Posted: Wed Dec 17, 2008 12:17 am
by OysterBreath
Daddy wrote:Gunnels add stiffness to the sheer, keep people back from the side of the boat for safety, sometimes just look good, more finished looking, someplace to mount a cleat or rod holder, probably more, but I'm hungry and supper is ready.
Daddy
I agree with the stiffness but around here we walk the gunnels so I doubt they'll do any "keeping people safe" around these "hur" parts! lol
Posted: Wed Dec 17, 2008 6:32 am
by tech_support
the original idea for the boat was a super simple skiff, as light as possible, and easy/quick to build. Gunnles, side/console steering, custom hatches, etc, would have all added cost/time/weight to the build. The little frames are not mush in the way, there is plenty of room to get by.
I do not want anyone walking the gunnles of this boat. If I had installed them I would have made then narrow enough so no one would walk them. I did this on my ph16 and was very happy. The cockpit depth is so low, there is no reason to stand on the gunnel.
If I were to build the boat again right now, I would probably make a 4" or 5" wide piece that is on the same plane as the two casting decks. The added weight and fairing time would not have been too bad.
Posted: Wed Dec 17, 2008 10:51 am
by macfiveo
OysterBreath wrote:Daddy wrote:Gunnels add stiffness to the sheer, keep people back from the side of the boat for safety, sometimes just look good, more finished looking, someplace to mount a cleat or rod holder, probably more, but I'm hungry and supper is ready.
Daddy
I agree with the stiffness but around here we walk the gunnels so I doubt they'll do any "keeping people safe" around these "hur" parts! lol
Don't forget the European safety margin that gunnels provide.
They help keep you from toppling over the side when European.
5-0
Posted: Wed Dec 17, 2008 2:04 pm
by mecreature
shine wrote:
If I were to build the boat again right now, I would probably make a 4" or 5" wide piece that is on the same plane as the two casting decks. The added weight and fairing time would not have been too bad.
I am not sure what you mean by the "same plane as the two casting decks."?
Posted: Wed Dec 17, 2008 2:40 pm
by tech_support
European is a good one, i will save it and use it someday
The casting decks are flat and one the same plane or level. The sheer of the boat is not straight, it moves upward towards the bow.
The rear casting deck is very close to level with the shear line towards the transom. So for a gunnel I could have made one that followed the shear line, but it would have been 6" or so above the level of the forward casting deck
Posted: Wed Dec 17, 2008 4:56 pm
by OysterBreath
European safety margin…LOL, good one!
However, My Somalian sea fairing friends of nefarious intention refer to gunnels as “pirate welcoming mats!â€
Posted: Thu Dec 18, 2008 9:05 am
by tech_support
Maybe this will help with the visual.
In this picture you cane see the front deck , rear deck, and the sole. All three are parallel to one another and also to the water line. the two casting decks are one the same plane

Here is a picture of an aluminum extrusion sitting level across the two forward casting deck supports/frames - it was also parallel to the transom cleat supports .
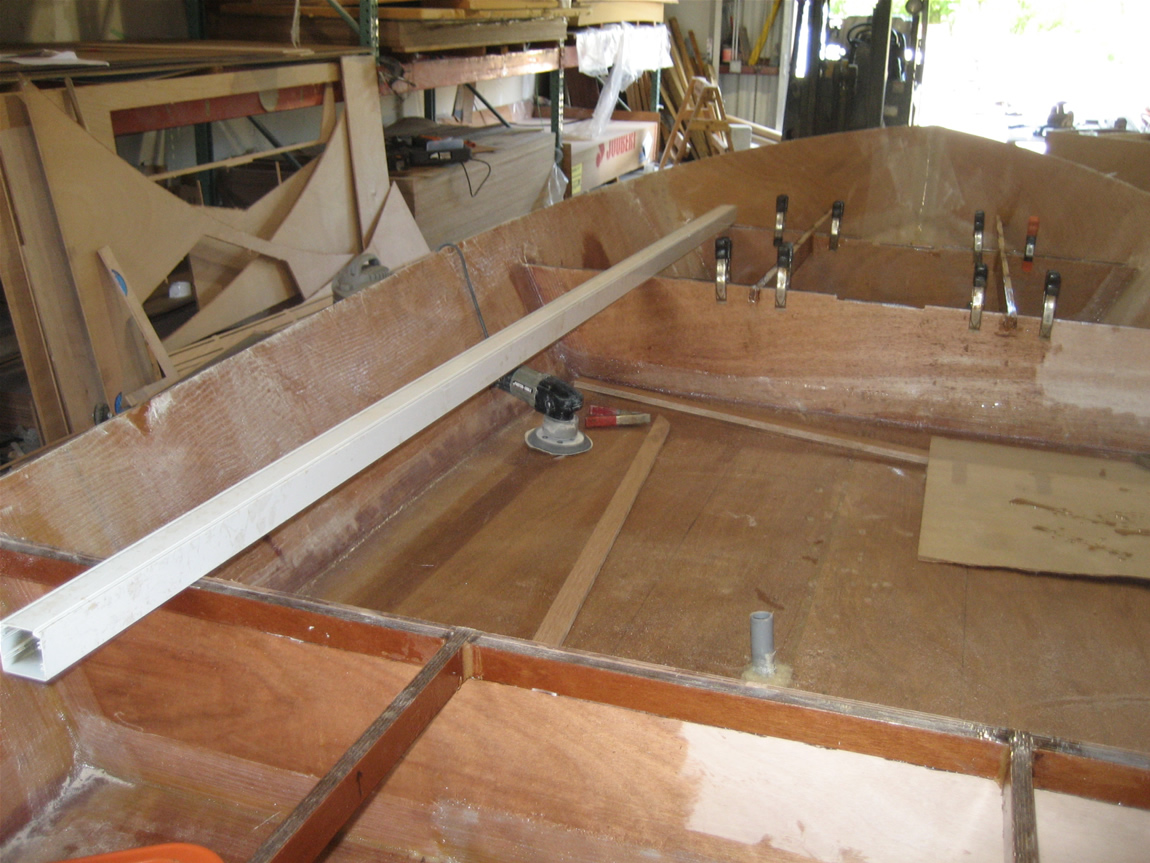
I knwo its strange to visualize, i could not really "see" it until Jacques played with various deck levels in his design software, we moved them up and down until there was enough room for things underneath
Posted: Thu Dec 18, 2008 9:18 am
by gk108
I can see how a little "shelf" along the sides would be handy. That is positioned about the same as the level of the cockpit version of the D15. Even if I had built the thwart seat version, I think I would have added something like that. There's about a thousand things that you could do with a little extra flat space there.
Posted: Thu Dec 18, 2008 9:35 am
by tech_support
Posted: Thu Dec 18, 2008 10:51 am
by dpurcell
Joel, looking sooo sweet, a bit like an HPX Micro with more V in the bow (I hope MHP doesn't have a problem with me mentioning them like that other company, you can delete this if you think they will). Quick question, what is the sheer height of the boat at A or the bow from level hull bottom? It looks just about right for what I want. I cant wait to really get rolling, last night the baby slept for 6 straight hours....FINALLY! So maybe things will start coming together. Man, that boat is awesome, I can't stop looking at it, I'm pumped for you and pumped to get started.
Posted: Thu Dec 18, 2008 11:52 am
by macfiveo
Really looking awesome, Joel. When the redfish comes up to whistle at the purty boat, just shove a Borski crab in his little mouth and hang on.
Did you do any engineering studies on the carbon fiber supports for the poling platform, or just guestimate? I'm not even sure how one would project what the stresses would be. I've been considering a plywood support for the platform for the OB, and will be watching with interest the stiffness/performance of your poling perch.
Love the ice-ice-baby blue.
5-0
Posted: Thu Dec 18, 2008 11:53 am
by dborecky
Awesome looking rig you got going there. I can't wait to see it in the water and for you to post some performance data...
Posted: Thu Dec 18, 2008 1:08 pm
by jgroves
I'm diggin' that color. Are you going to put a non-skid surface?
Posted: Fri Dec 19, 2008 8:46 am
by Chalk
Looks good Joel
Posted: Mon Jan 05, 2009 9:43 am
by tech_support
Posted: Mon Jan 05, 2009 10:13 am
by jgroves
Heck yeah that looks great! I like your rubrails your using. What type of insert are you going to use? Black, white, stainless?
Posted: Mon Jan 05, 2009 11:34 am
by dborecky
Joel,
I need to put a rub rail on the FS14 and was wondering the brand you were used. It looks like it would work for mine. Do you guys carry it? I was also wondering what insert you will use.???...
Posted: Mon Jan 05, 2009 1:30 pm
by Fonda@kauai
Lookin premium Joel
Are you using kiwi grip or a non skid additive to the paint?
Posted: Mon Jan 05, 2009 3:22 pm
by tech_support
the rubrail is from the surplus place up the road, sorry I do not know who makes it, I do not see any markings on it.
The insert will be white (yes, I know it will get dirty). I didnt want black even though it may be more practical.
Non skid will most likely be Kiwigrip in the cream color. I tested the cream kiwigrip next to the System Three Whidbey White and they are virtually identical. So the leaning post and poling platform will match the non-skid.
I also found some very small aluminum angle trim that I will run along the inside of the rubrail and around the top edge of the poling platform. This will cover a very hard/sharp edge and also give it some flash.
The rest of the hadware came in today, so maybe this week I can make a push to get her ready for power.
Posted: Mon Jan 05, 2009 3:36 pm
by jgroves
White will be good! Honestly I think black shows scratches worse. I troll along a bridge and ocassionally "bump" into it with stainless and boy does it kill me. It scratches easily and makes a heck of a grinding noise.... white rubber would be my new fist choice.
Posted: Mon Jan 12, 2009 12:36 pm
by tech_support
poling platform and leaning post are painted.
The edge was pretty sharp along the top of the inside sides, so I wanted something to protect. I picked up some small aluminum angel trim at the surplus shop it was only $.75 per foot, and it really finished off the inside of the boat.
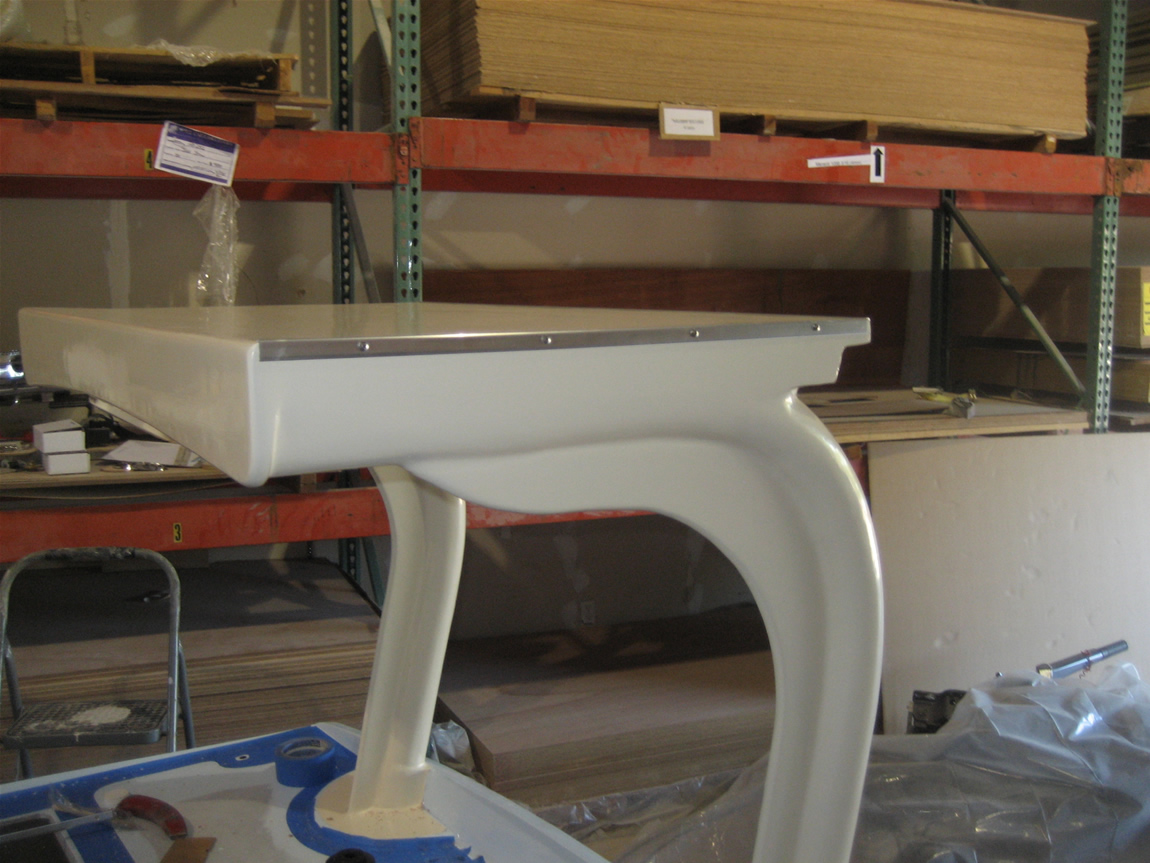
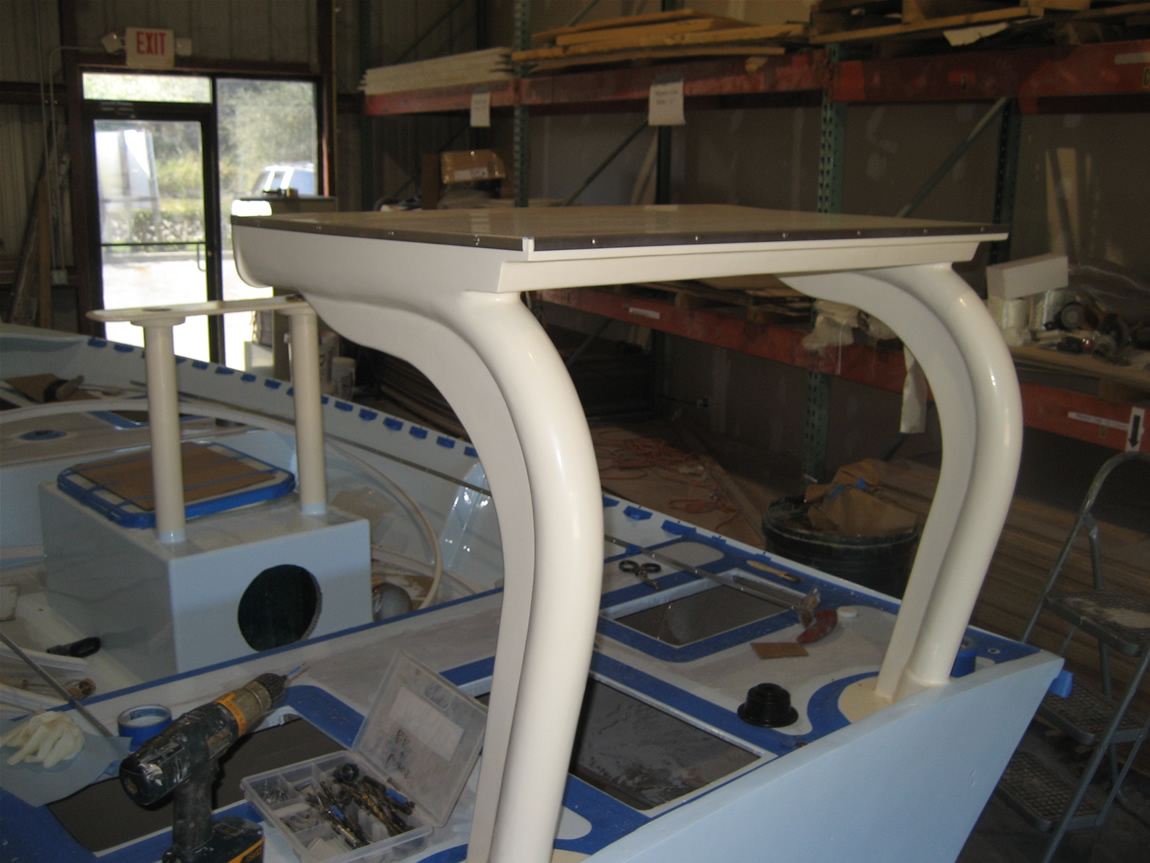
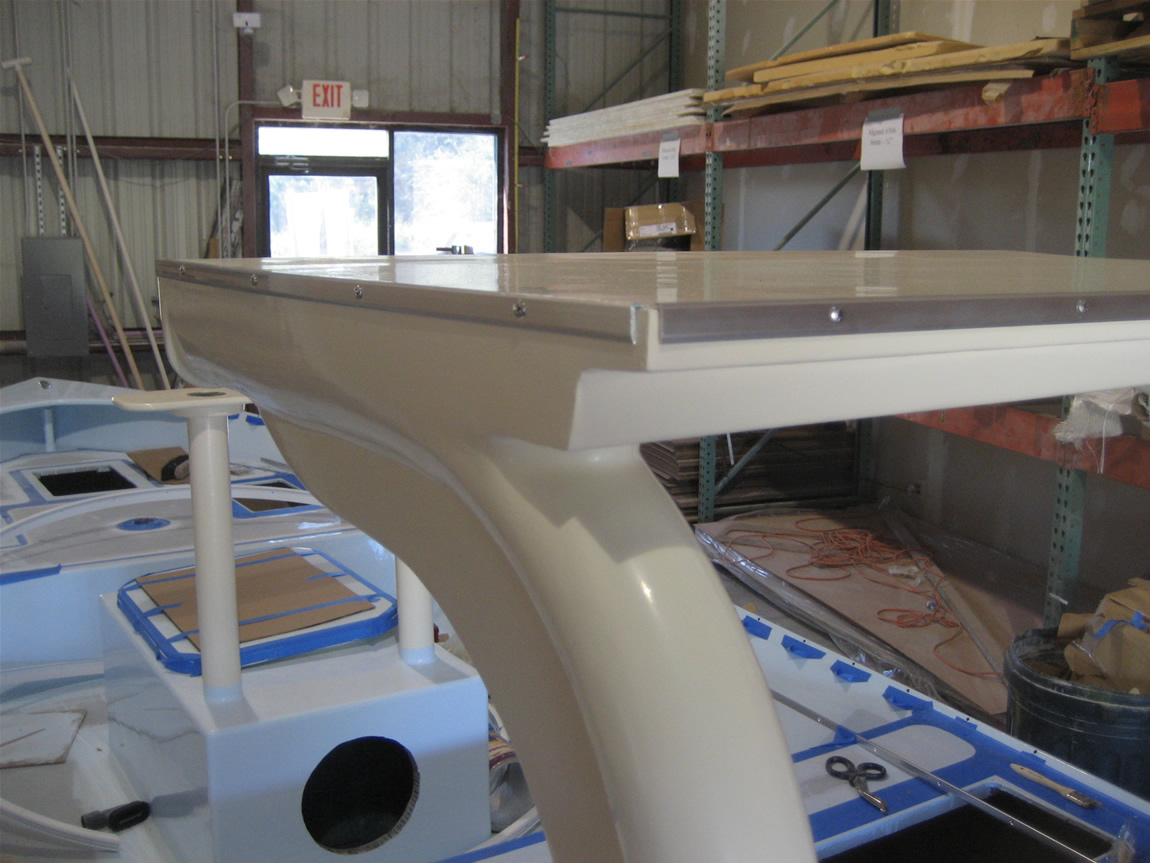
Here is the trim along the inside of the sides. Its difficult to see in the overhead light.
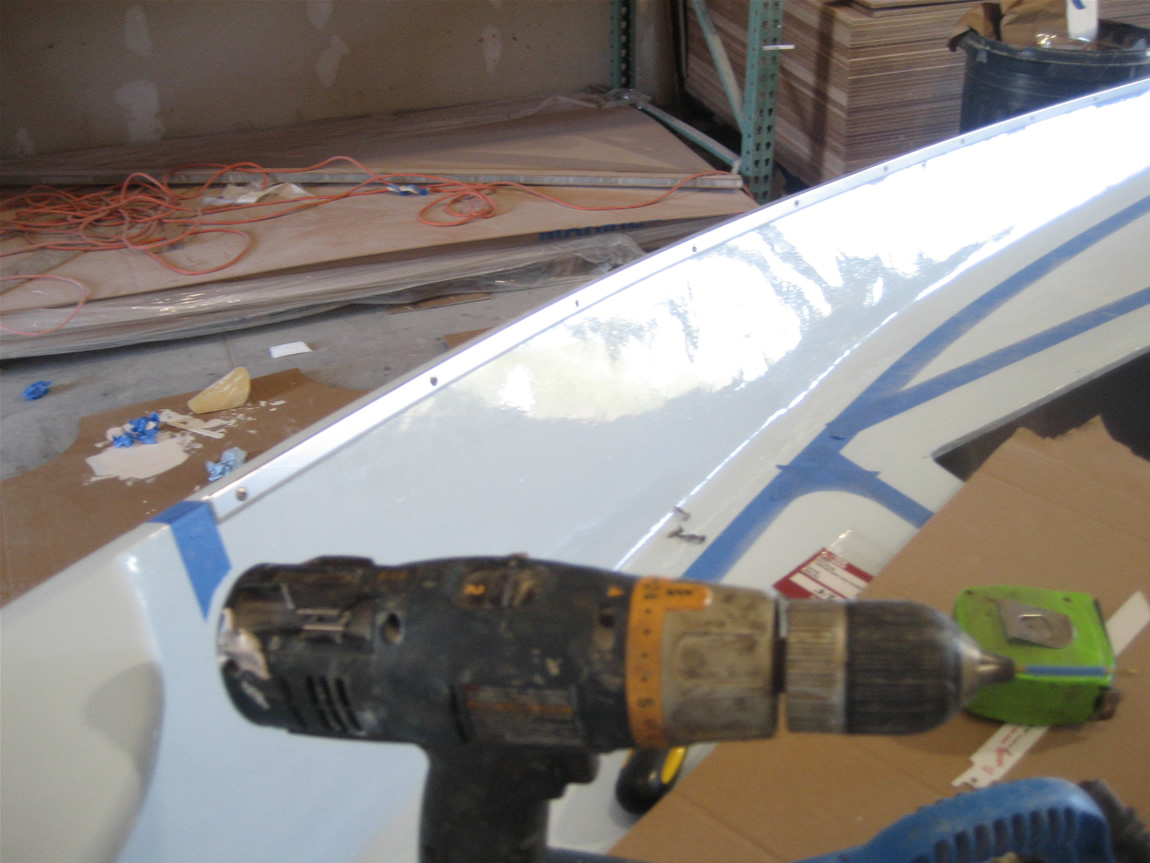
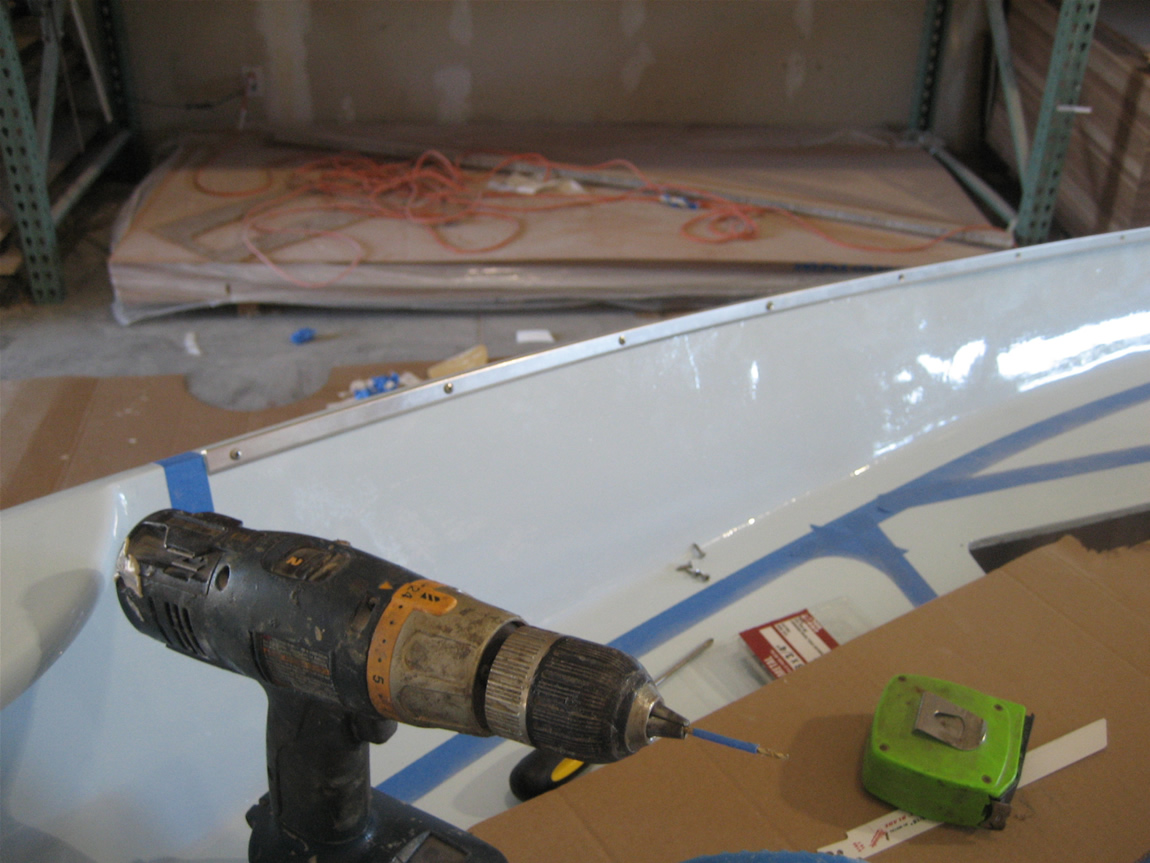
Also cut out holes for the fold out cleats. These get filled with epoxy, then re-drilled for bolts.
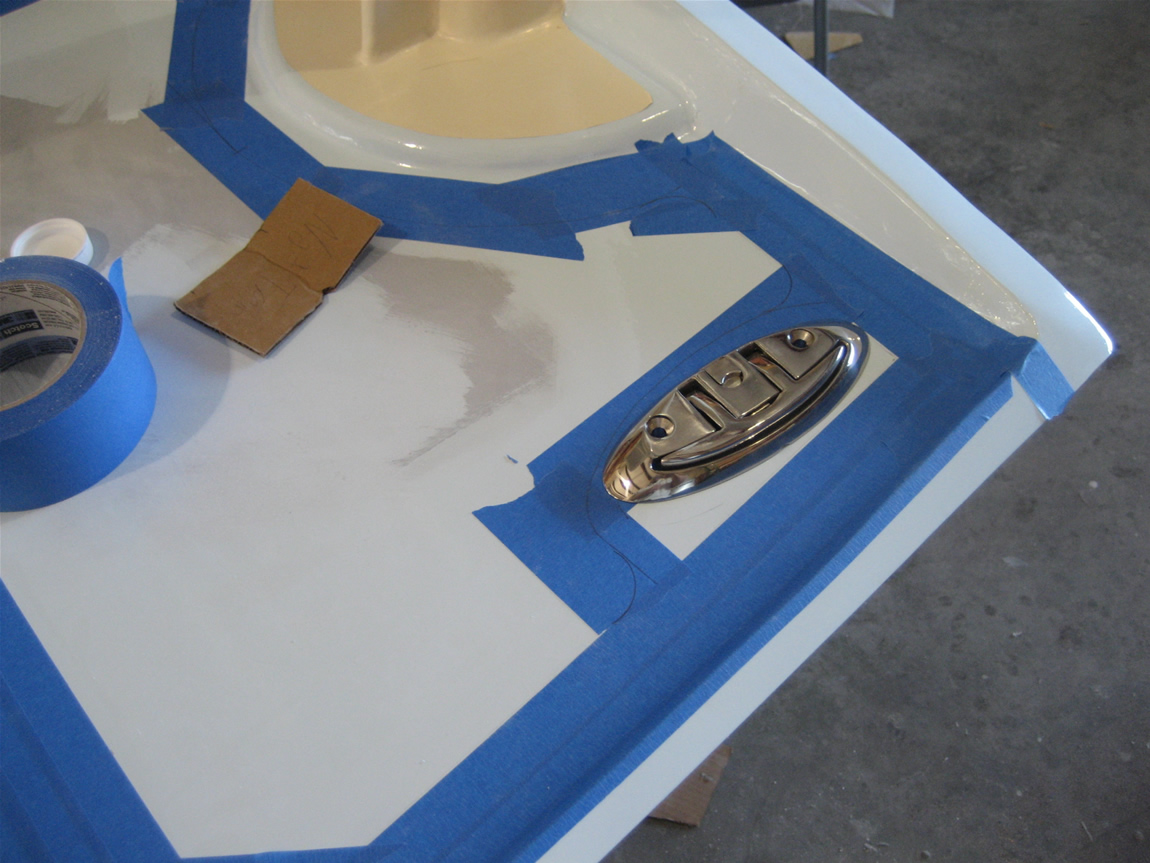
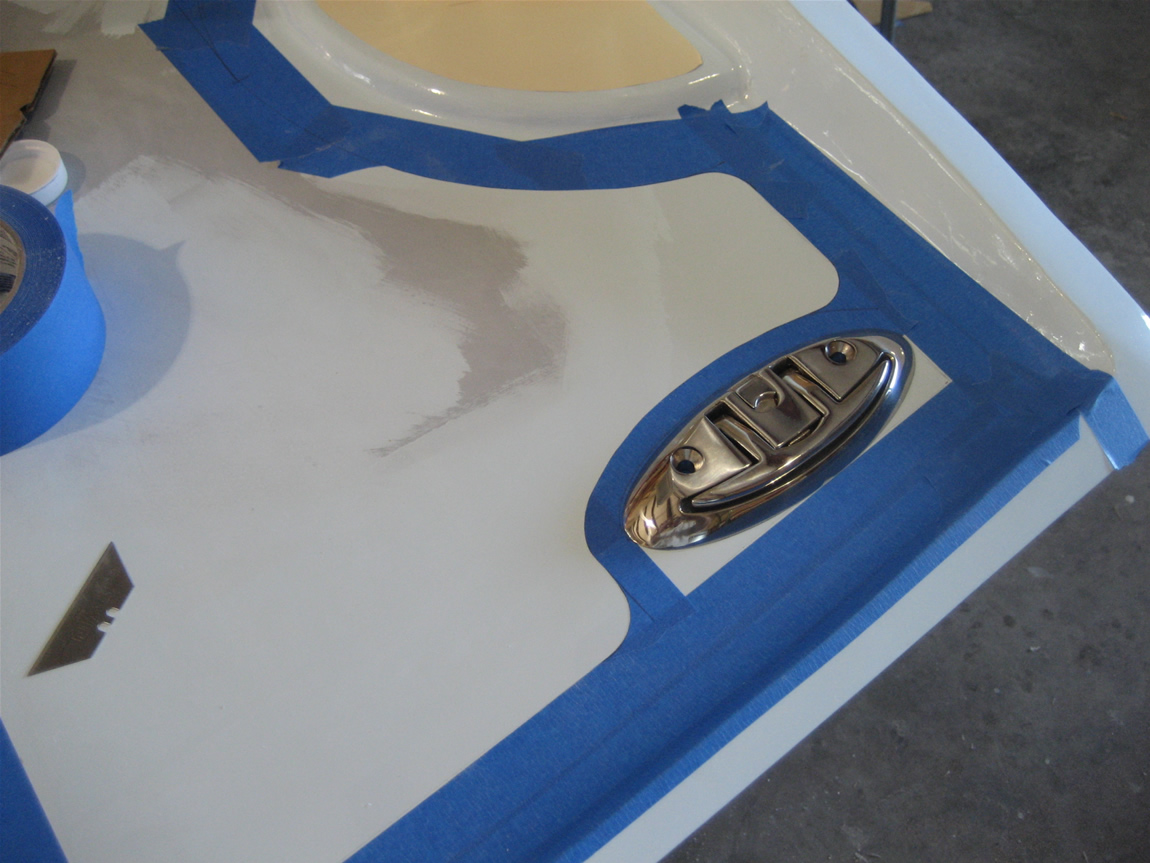
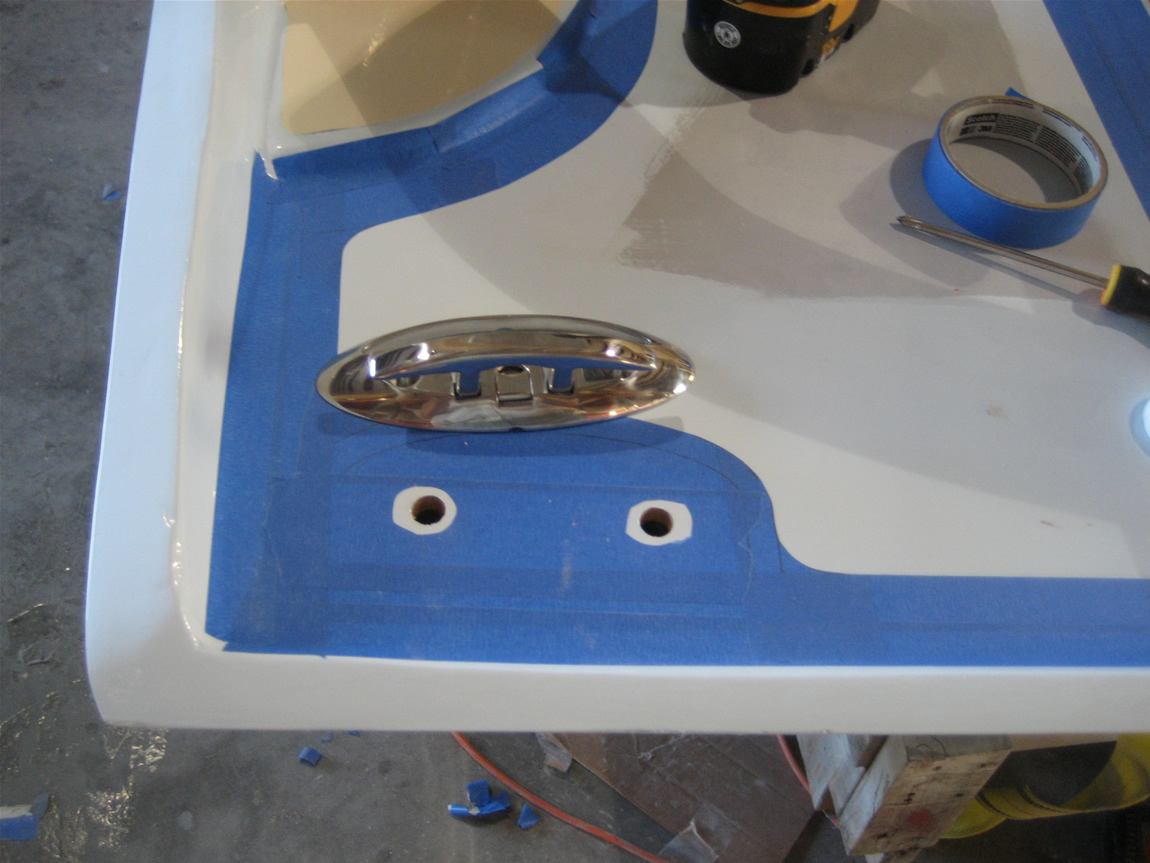
This is the boot which will cover the cables and fuel line hole. Again, holes drilled, then filled with epoxy
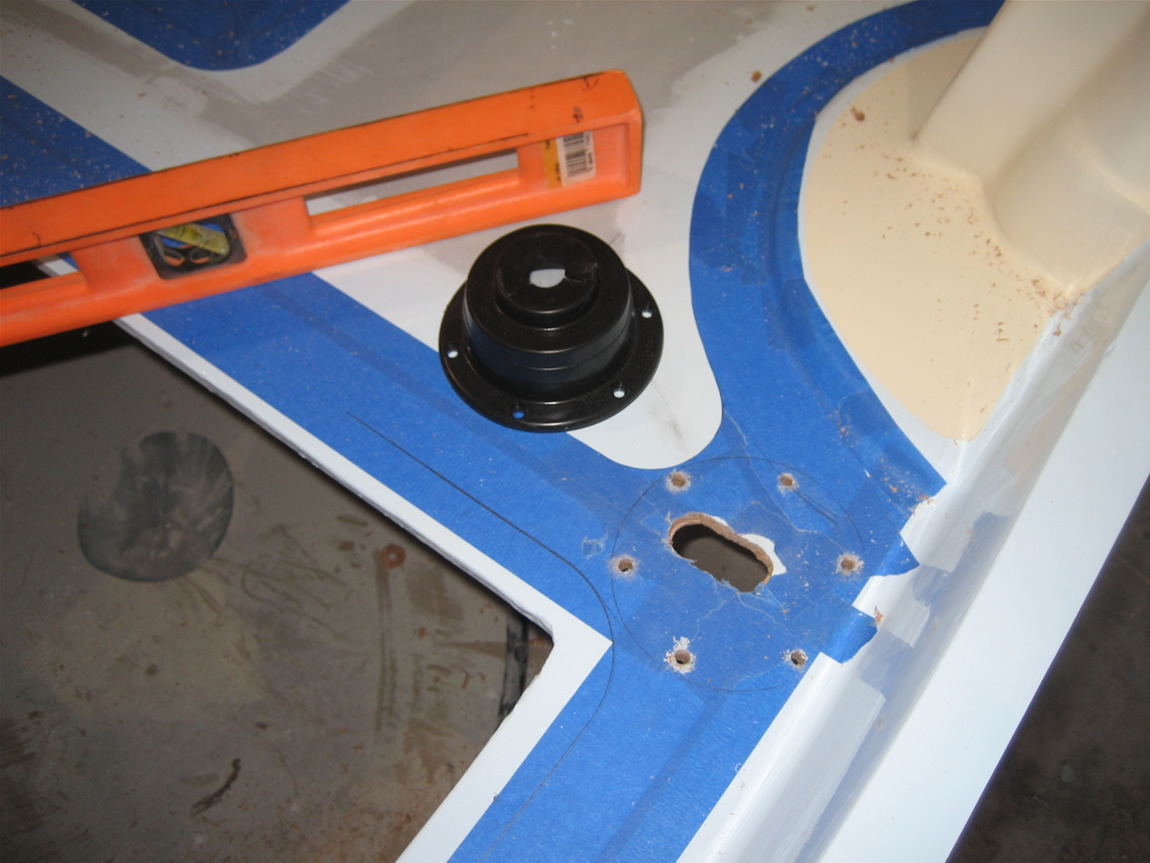
I am now drilling out the holes for the trim and rubrail, so that they can be filled with epoxy. For the rub rail, I am making the epoxy plug quite large (about 1/2"). For the inside trim the plug will be about 2 times the width of the screw.
As I hate cleaning up epoxy, I went to pretty elaborate taping job to keep the epoxy off the sterling paint job - its worked well.
here are the holes for the rub rail

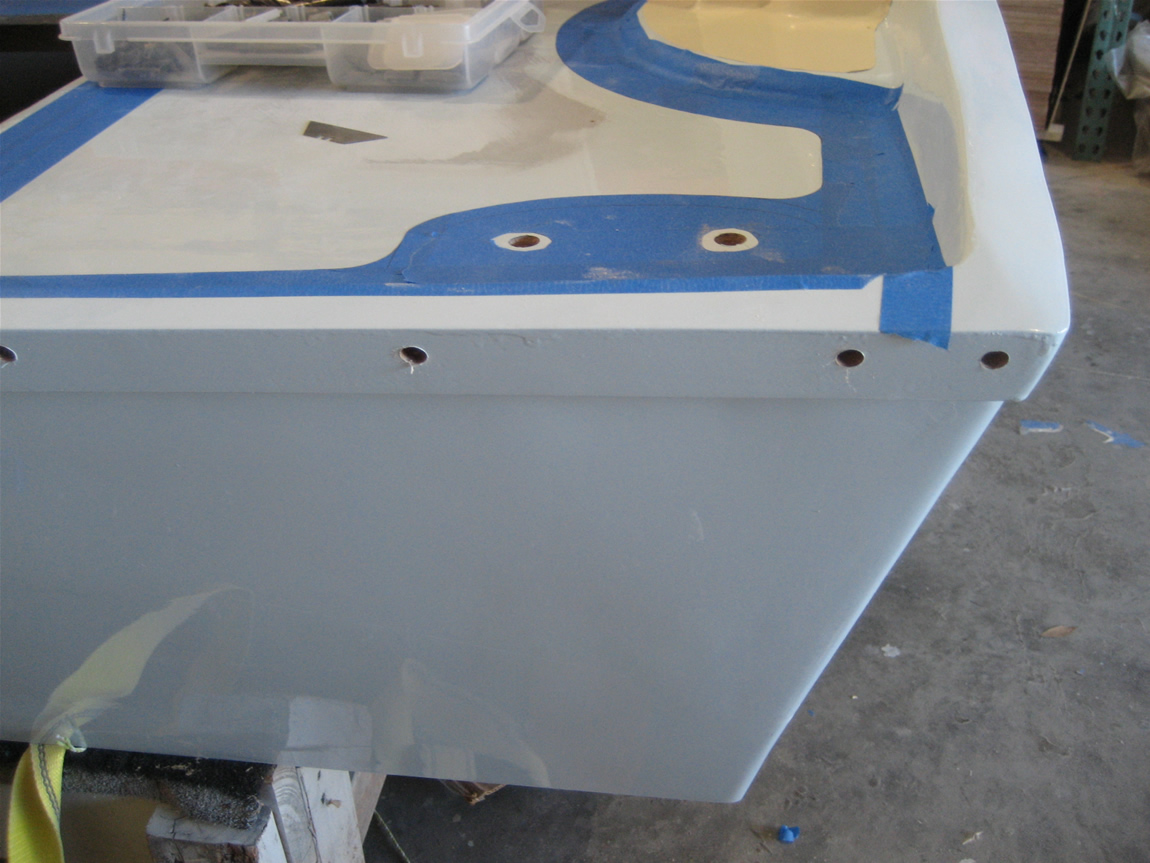
holes re-drilled for trim pieces
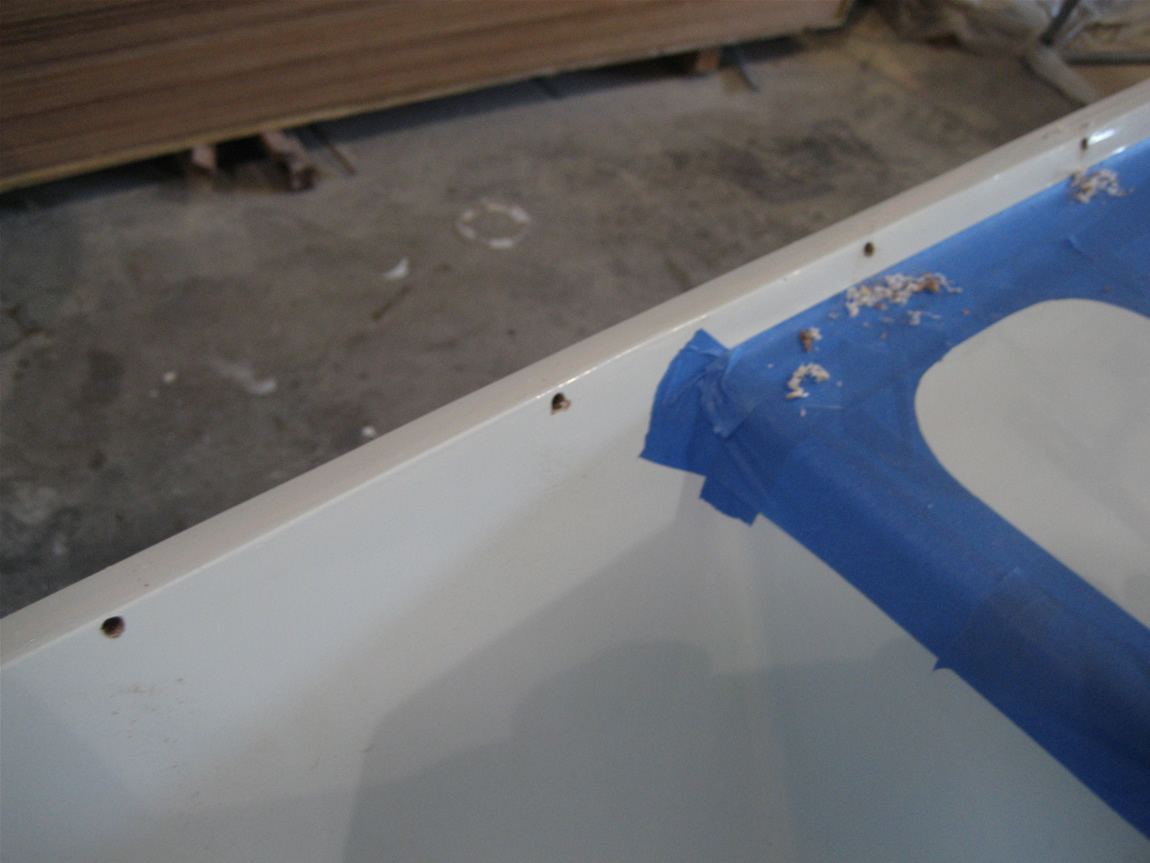
Putting tape under the hole to catch epoxy drips
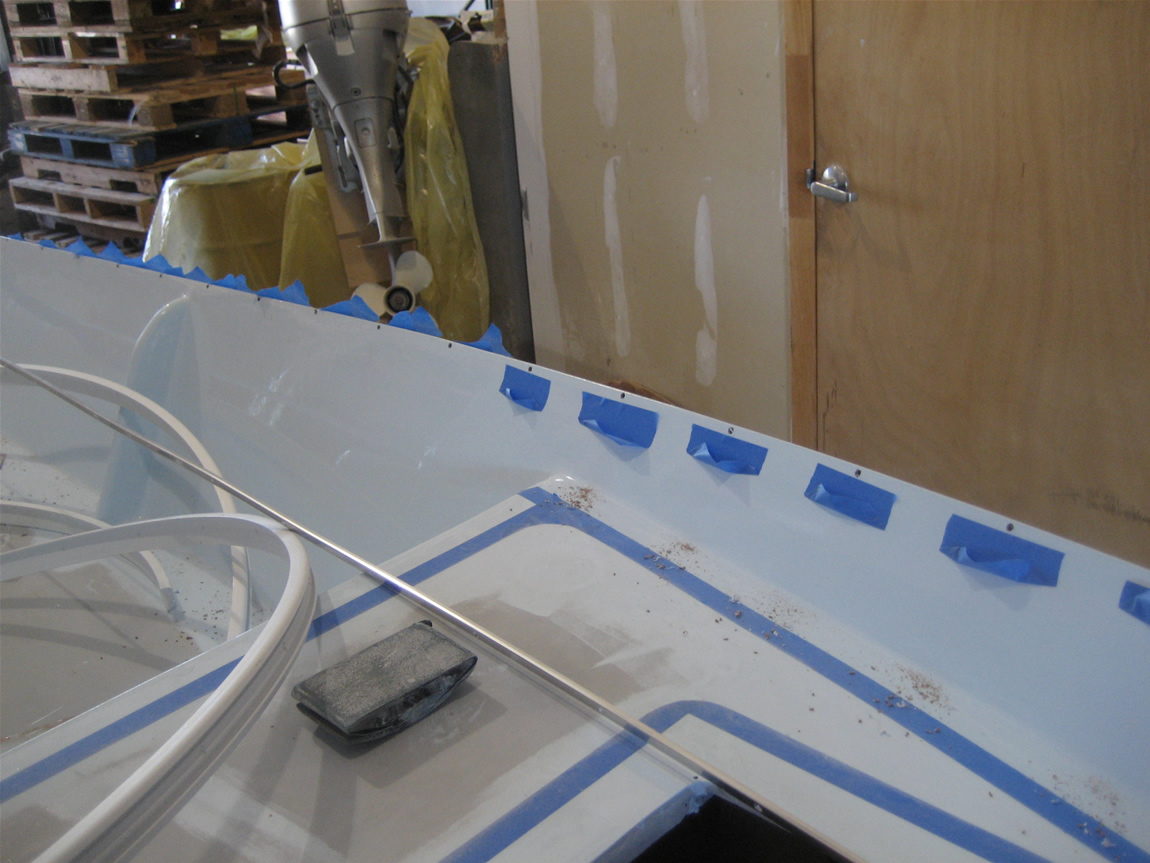
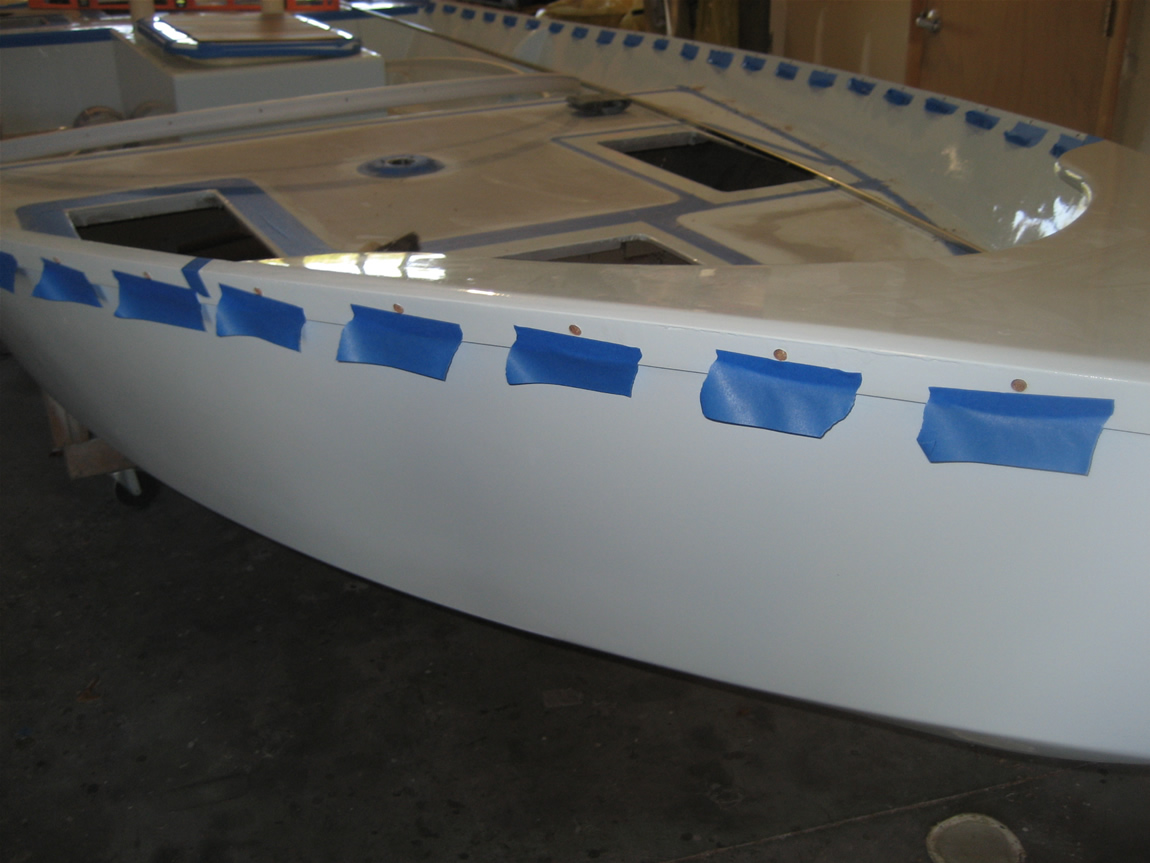
I used a syringe to squirt un-thickened epoxy into the holes
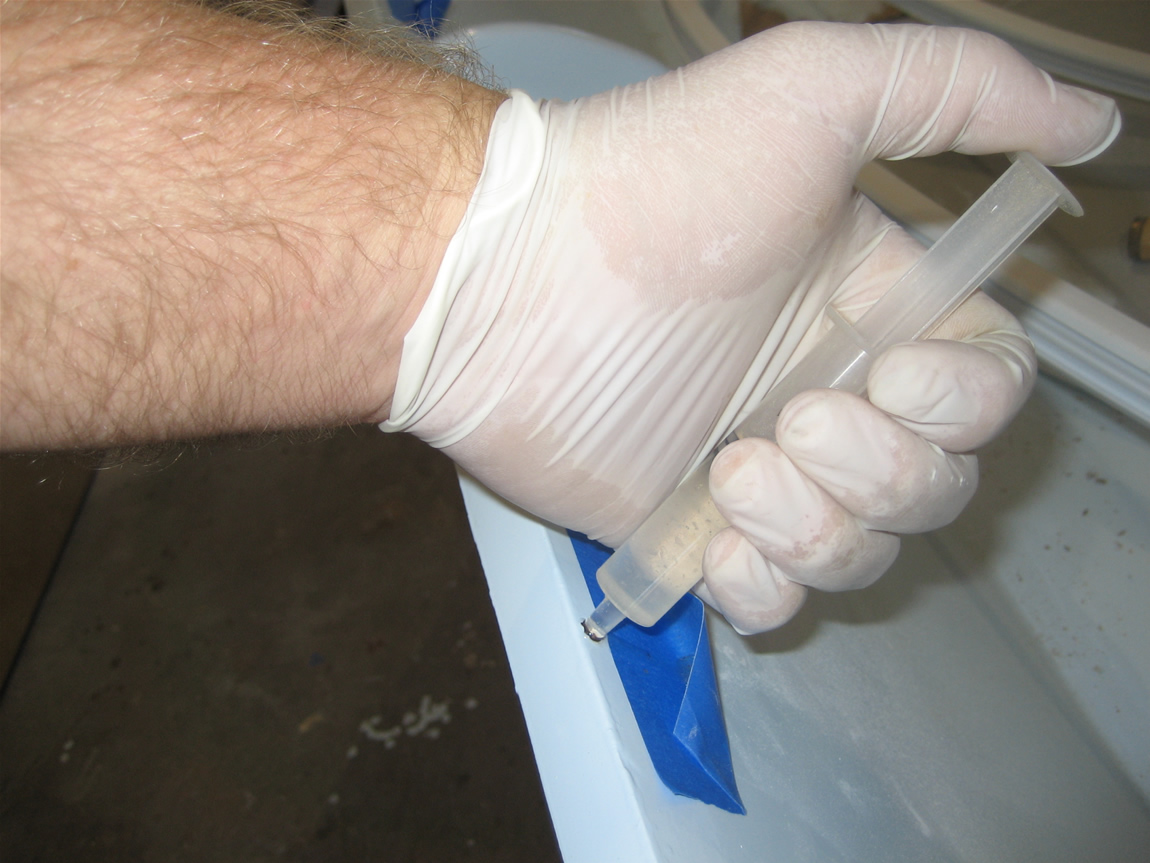
drips not hitting the paint
....
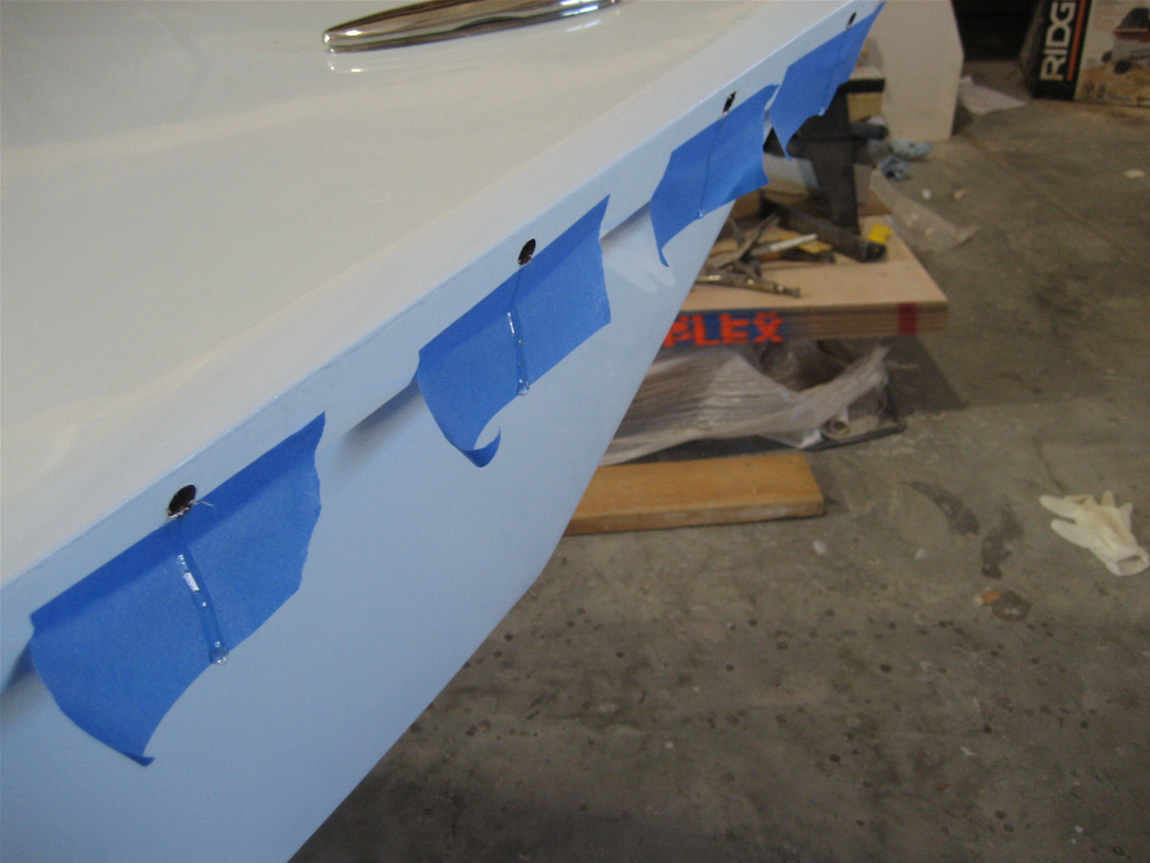
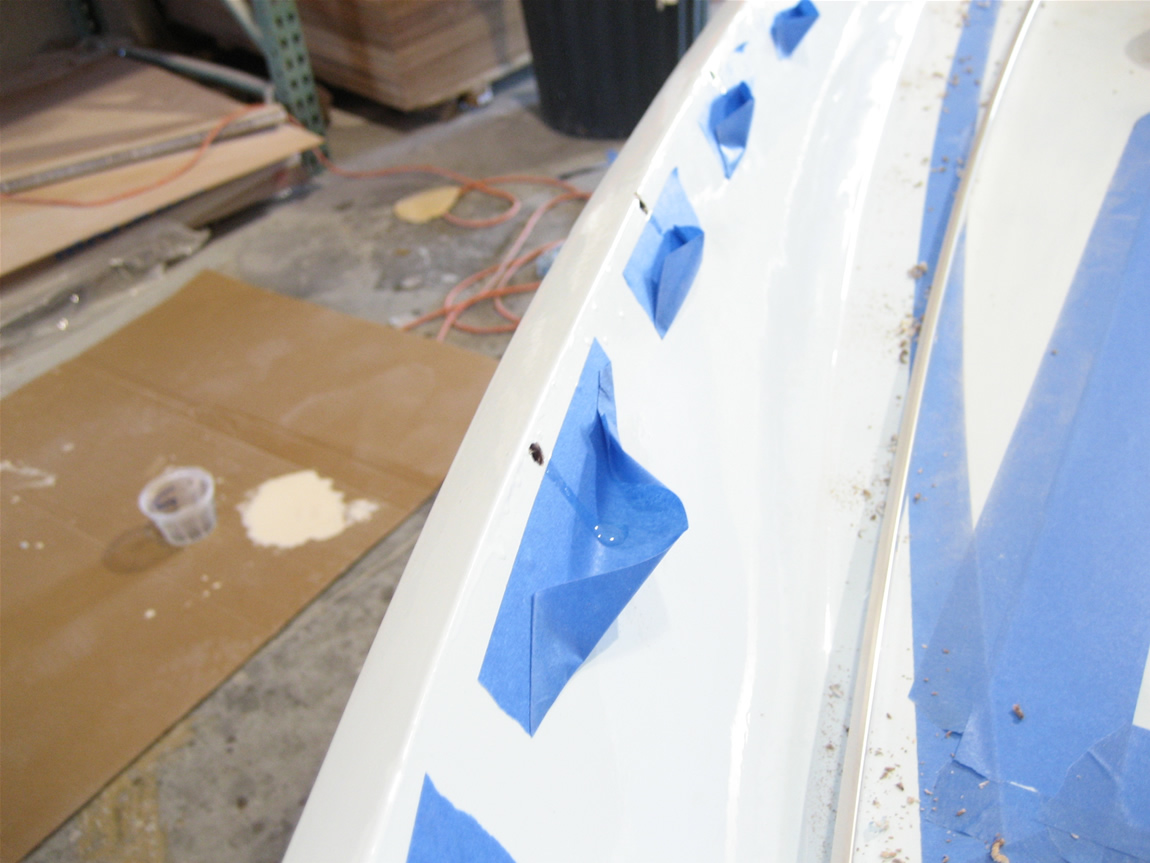
Today, I plan to fill all the holes with epoxy putty.
Posted: Mon Jan 12, 2009 12:38 pm
by tech_support
poling platform and leaning post are painted.
The edge was pretty sharp along the top of the inside sides, so I wanted something to protect. I picked up some small aluminum angel trim at the surplus shop it was only $.75 per foot, and it really finished off the inside of the boat.
Here is the trim along the inside of the sides. Its difficult to see in the overhead light.
Also cut out holes for the fold out cleats. These get filled with epoxy, then re-drilled for bolts.
This is the boot which will cover the cables and fuel line hole. Again, holes drilled, then filled with epoxy
I am now drilling out the holes for the trim and rubrail, so that they can be filled with epoxy. For the rub rail, I am making the epoxy plug quite large (about 1/2"). For the inside trim the plug will be about 2 times the width of the screw.
As I hate cleaning up epoxy, I went to pretty elaborate taping job to keep the epoxy off the sterling paint job - its worked well.
here are the holes for the rub rail
holes re-drilled for trim pieces
Putting tape under the hole to catch epoxy drips
I used a syringe to squirt un-thickened epoxy into the holes
drips not hitting the paint
....
Today, I plan to fill all the holes with epoxy putty.
Posted: Mon Jan 12, 2009 12:52 pm
by Fonda@kauai
Oh, daddy like
Posted: Mon Jan 12, 2009 1:15 pm
by flatpicker
WoW!!! My patience would be running thin with all that taping. Looking good none the less
Posted: Mon Jan 12, 2009 1:30 pm
by tech_support
flatpicker wrote: My patience would be running thin with all that taping. Looking good none the less
try cleaning epoxy off your paint
makes taping feel like therapy
Posted: Mon Jan 12, 2009 3:41 pm
by Murry
I love that boat. The poling platform turned out very nice.
I like how you drilled the trim fasteners in line with the rubrail fasteners,
that makes for less work and less epoxy use and the alluminum trim does look nice.
Daniel
Quick question about this build early on.
Did you glass those fabricated strakes to the hull? I went back to check but I didn't see where it was discussed. Thanks
Posted: Mon Jan 12, 2009 4:03 pm
by tech_support
no glass, just epoxied with gel magic.
Ideally, I would have a layer of tape on them; but I did not decide to put them on until the bottom was fair.
Posted: Mon Jan 12, 2009 4:05 pm
by Steven
Looking good. Can't wait to see some pics of it on the water.
I use pipe cleaners to apply straight epoxy to holes before filling with a blended mix. Bend one in half, dip it in neat epoxy and run it in and out the hole a couple of times. Works well.
Posted: Mon Jan 12, 2009 4:14 pm
by Murry
no glass, just epoxied with gel magic.
Thank You Sir, I used the Gelmagic on my rubrail and I love the stuff.
Posted: Mon Jan 12, 2009 4:20 pm
by BassMunn
Joel the boat is looking really nice, love the poling platform
Posted: Thu Jan 15, 2009 9:47 pm
by OysterBreath
WOW! I can't believe how beautiful this boat is turning out.
You REALLY spent some time sanding that joint between the platform down tube and the standing deck support tube.
FS 17
Posted: Fri Jan 16, 2009 7:15 am
by cottontop
Joel, You do great work. cottontop
Posted: Mon Jan 19, 2009 11:16 am
by tech_support
thanks guys, more progress to show....
After sealing the over sized holes (for rub rail and inside trim), i used the same syringe to fill the holes with thickened epoxy (woodflour and silica mix). Here is what the holes looked like after filling...
rub rail holes
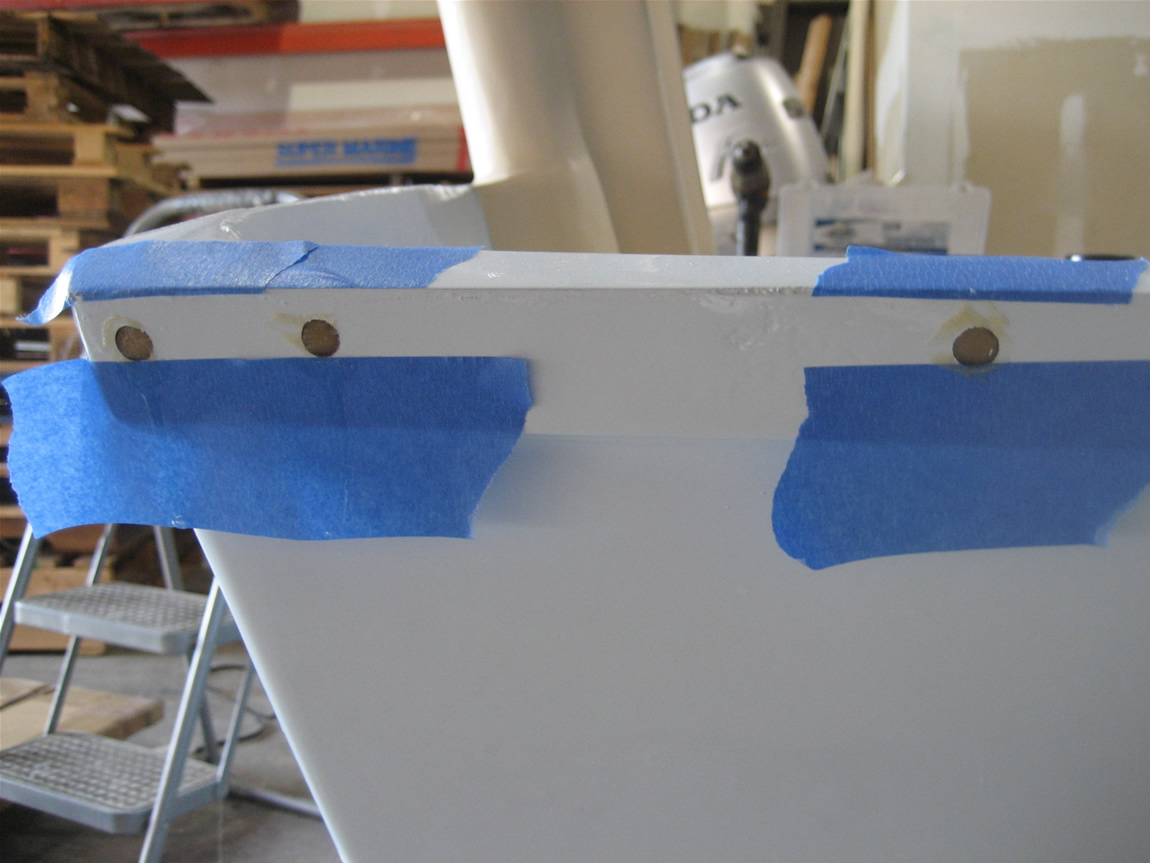
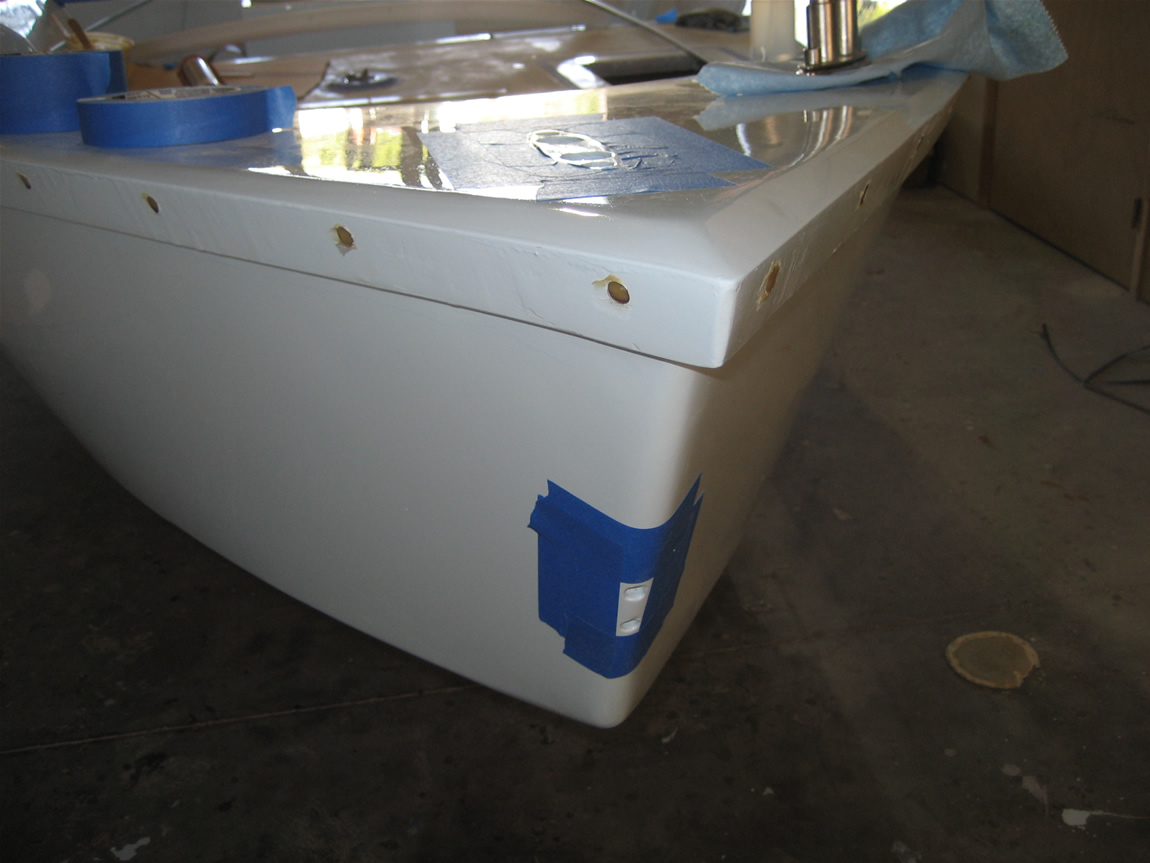
Holes for rigging boot
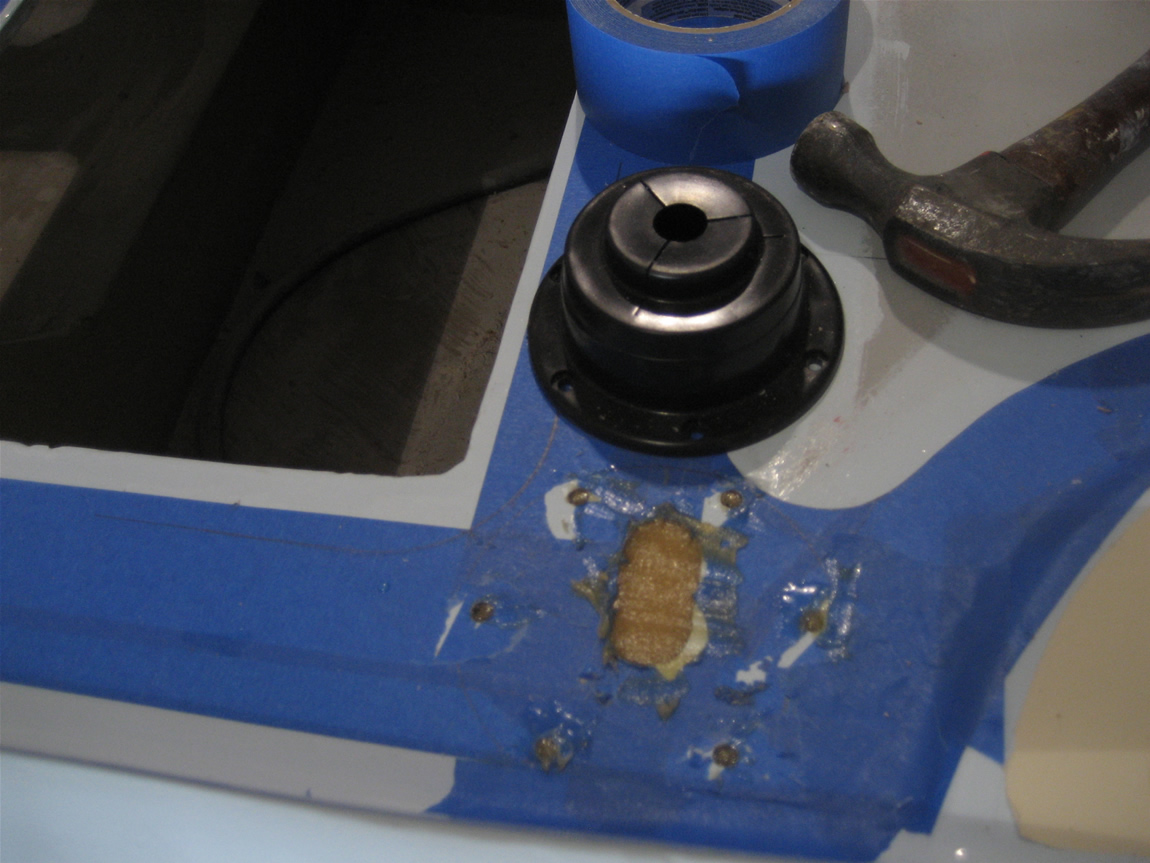
holes for stern cleats
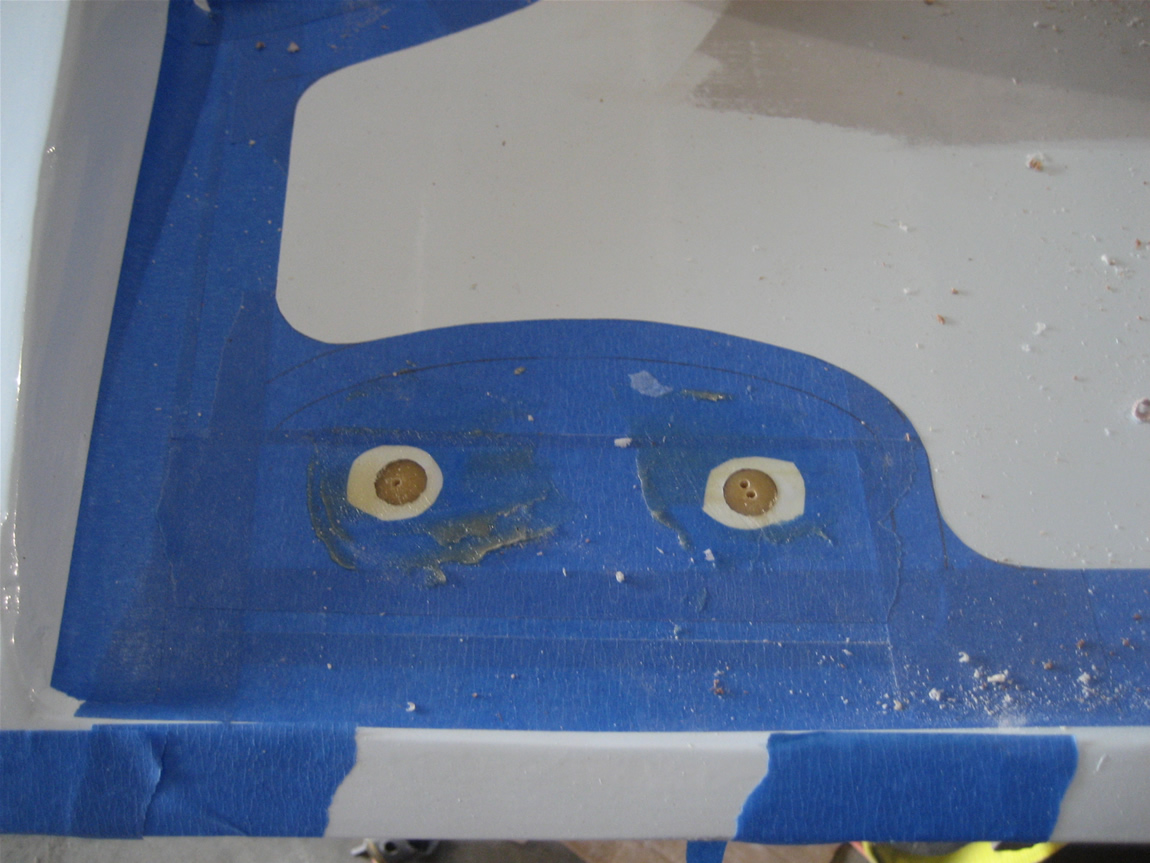
once the epoxy was firm, i trimmed them off flush with a razor
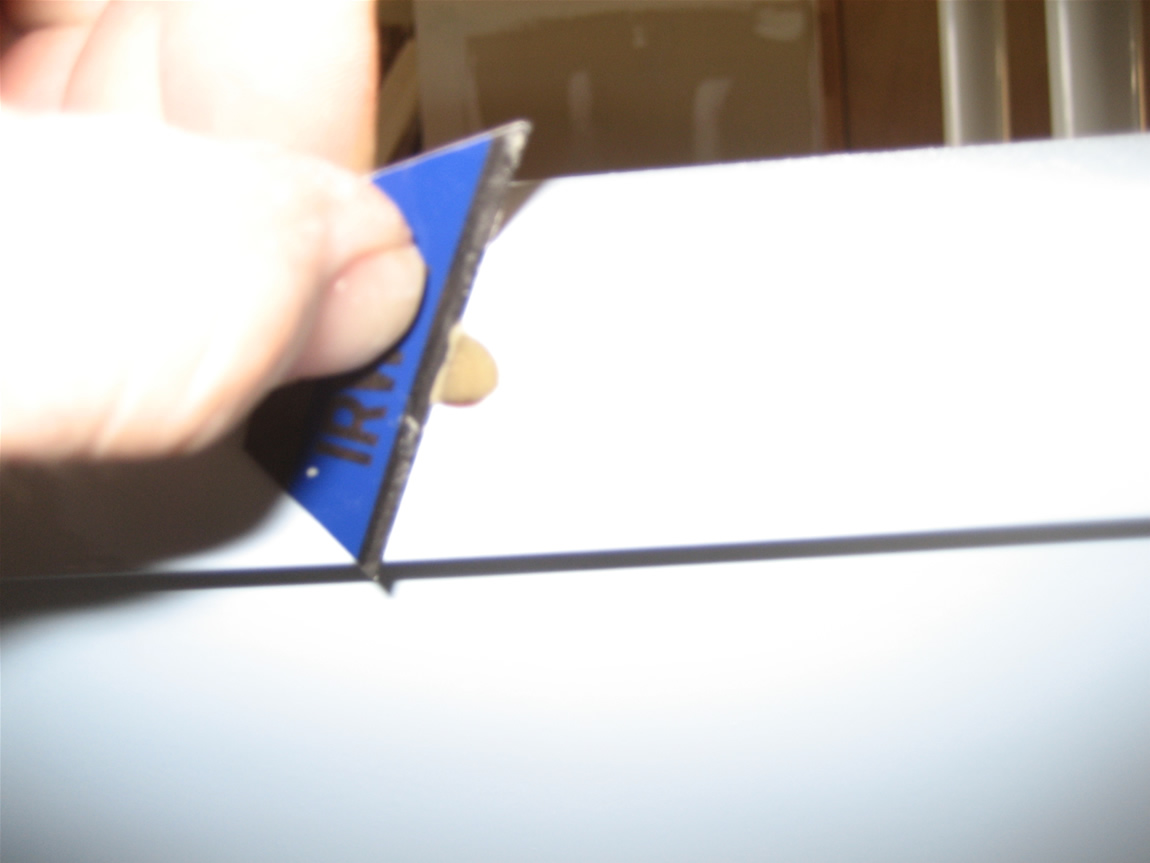
Next it was time to permanently affix the rub rail. Drilled pilot holes into the epoxy plugs and dry fit the rail, making certain to hit the epoxy plugs and not the wood. The backing off a section at a time, I put a generous bead of Lifeseal adhesive underneath before tightening the screws. Cleanup was done with denatured alcohol.
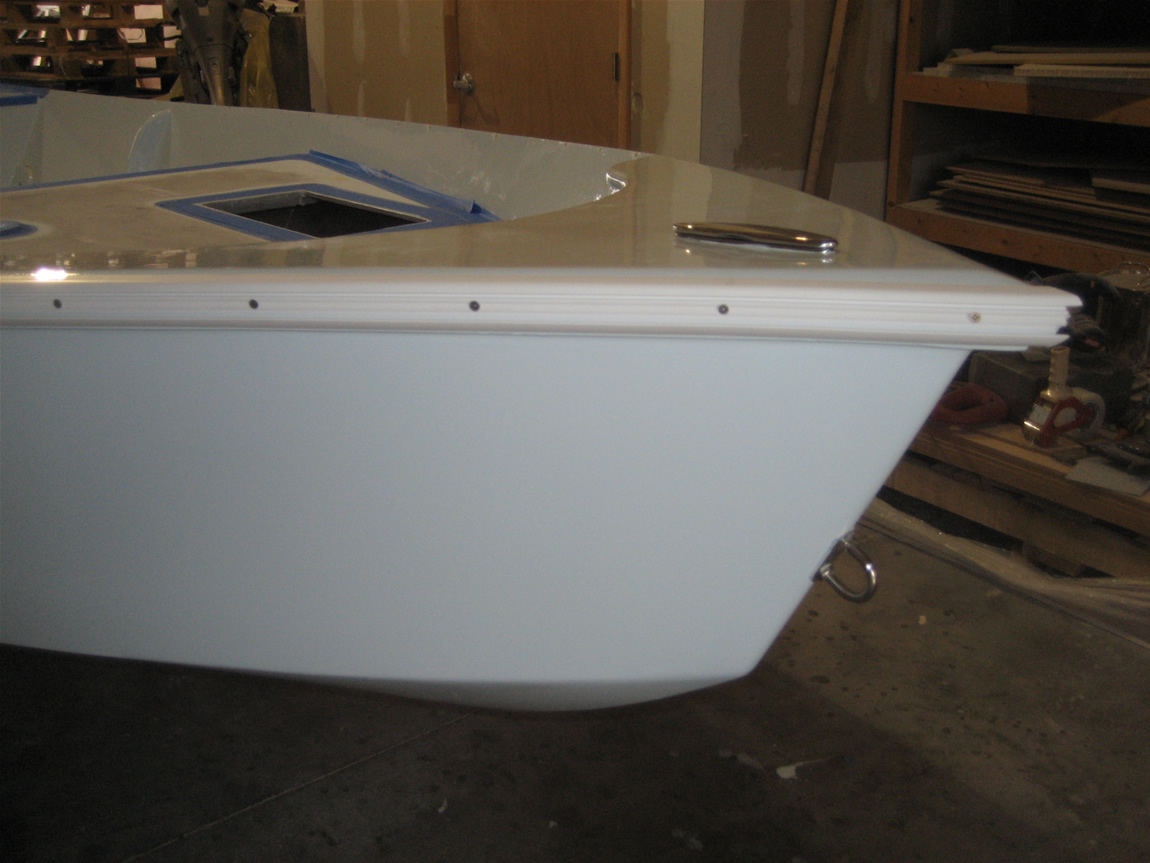
one side done
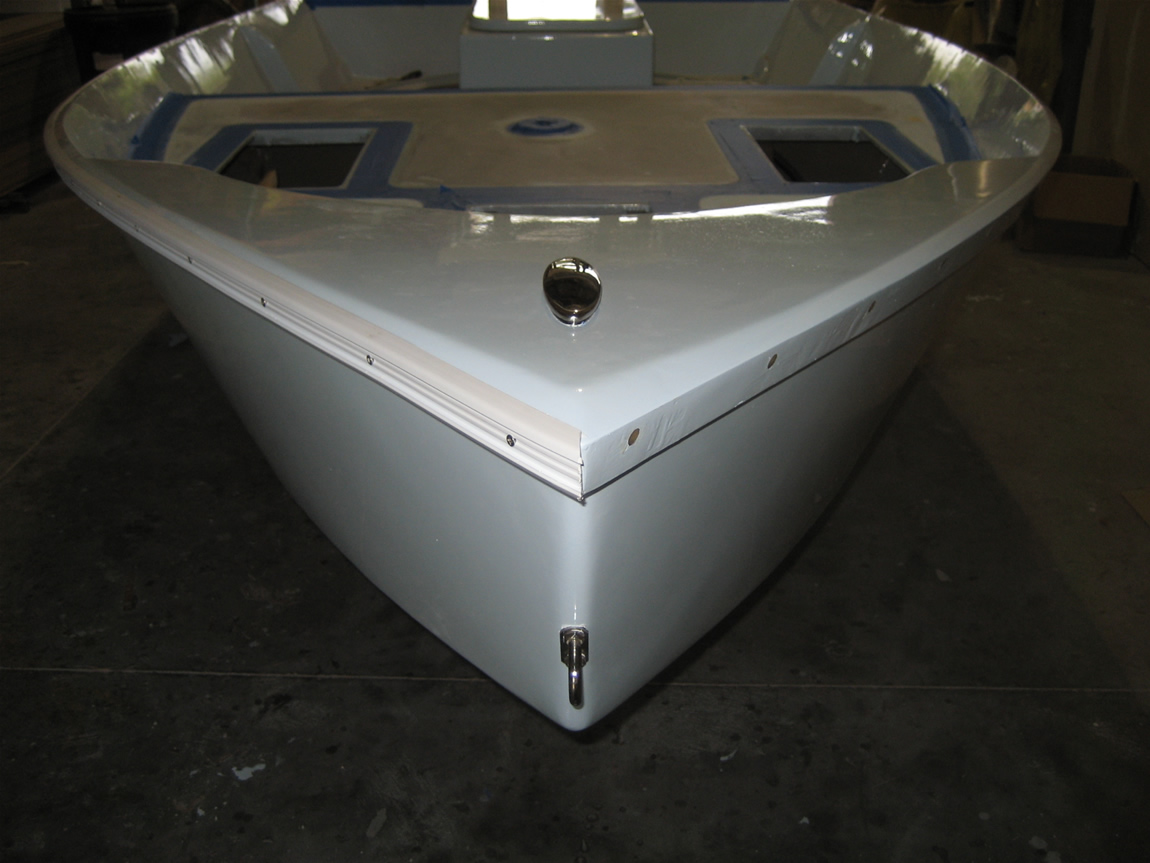
port side going on
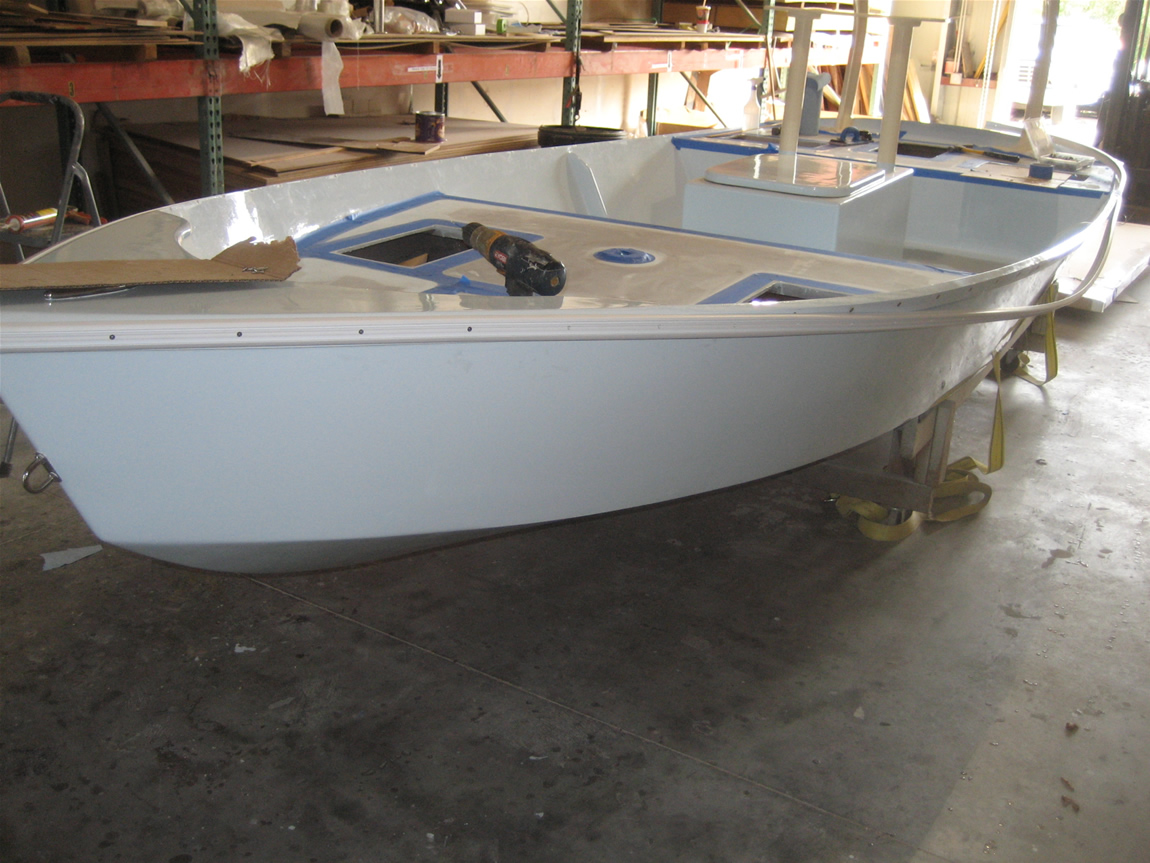
started mounting hardware. Bow cleat, bow eye, transom eyes
http://gallery.bateau2.com/albums/userp ... %20008.jpg
with backing plate; goes under breast hook
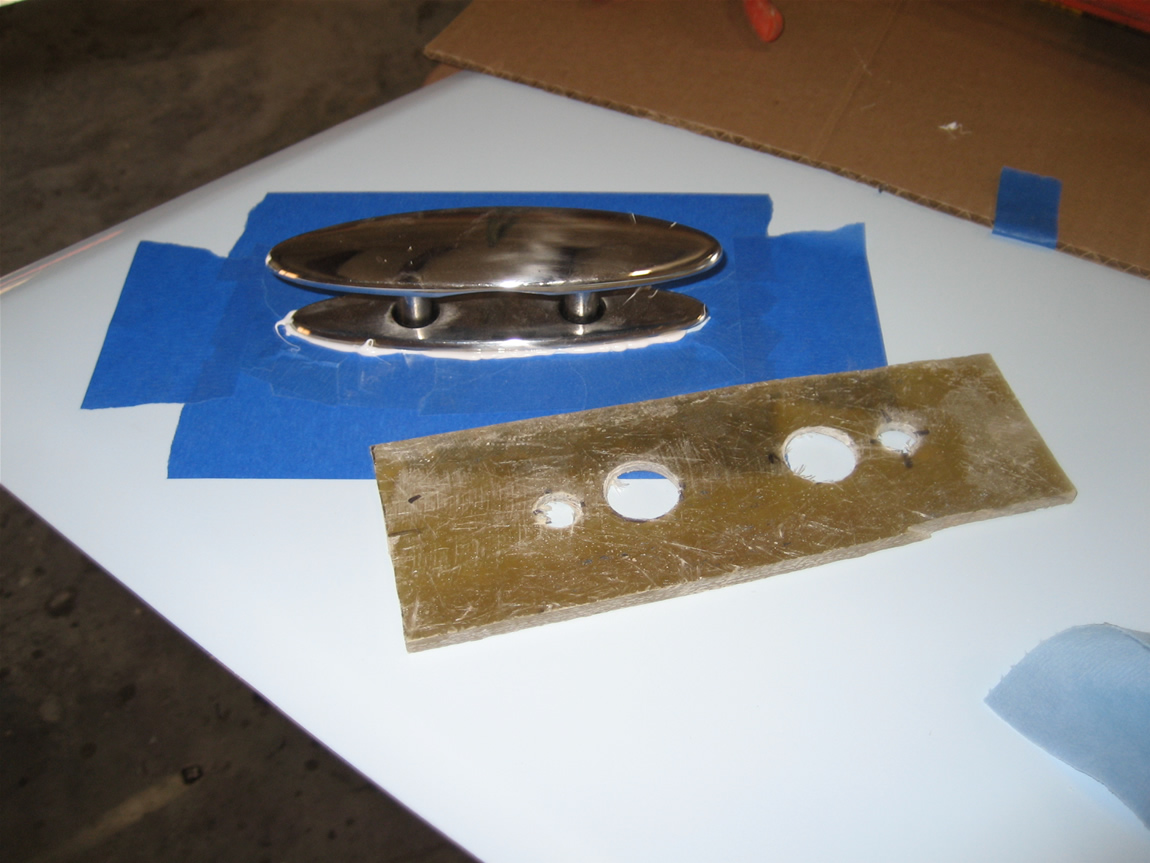
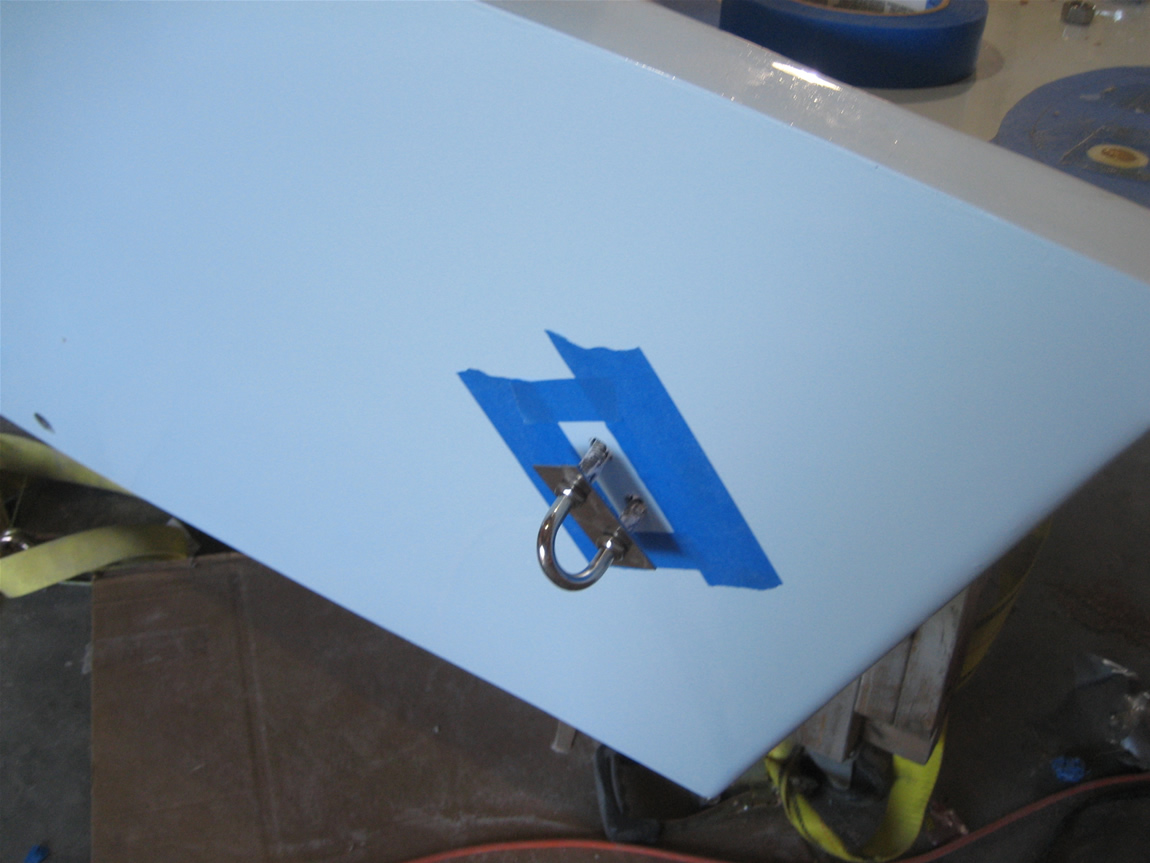
Posted: Mon Jan 19, 2009 11:27 am
by tech_support
On Sunday morning I applied the Kiwigrip non-skid to the front and rear casting decks. Here are the pictures. I also made a video of the application, which I will turn into a shop clip for the help file.
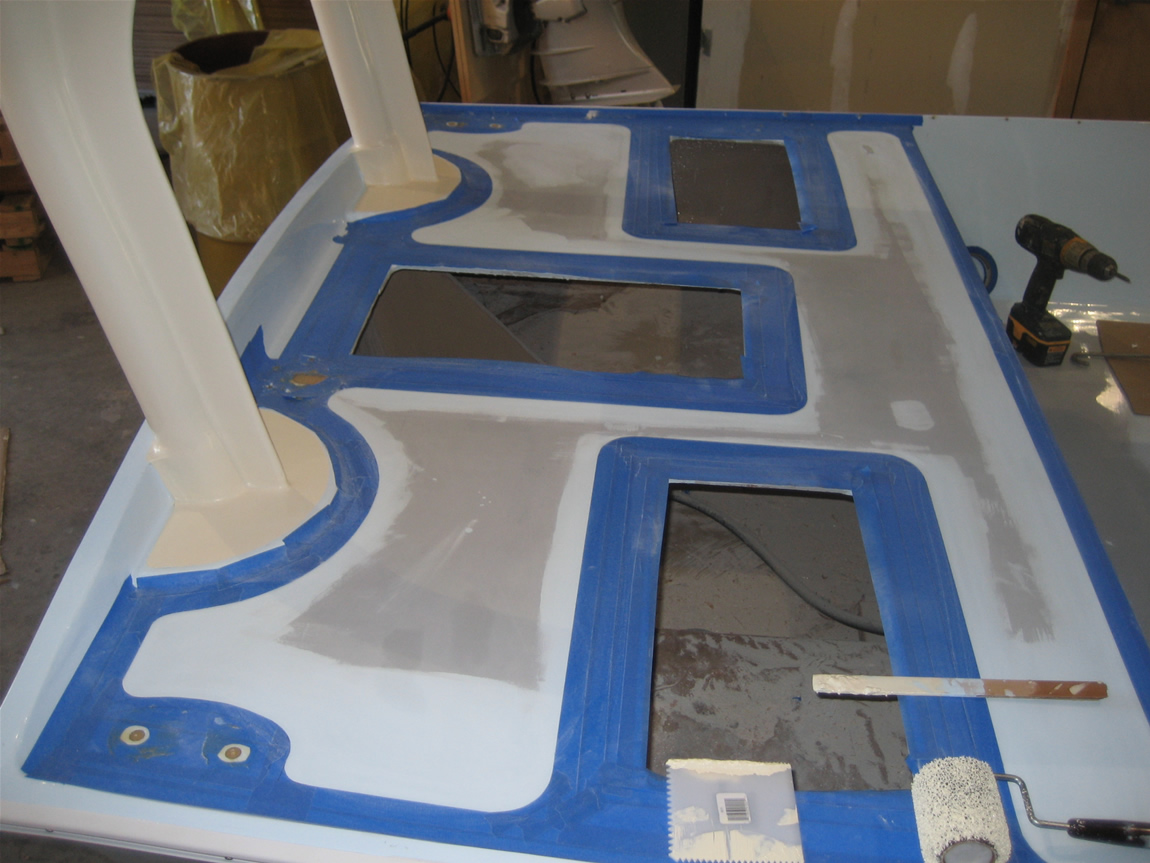
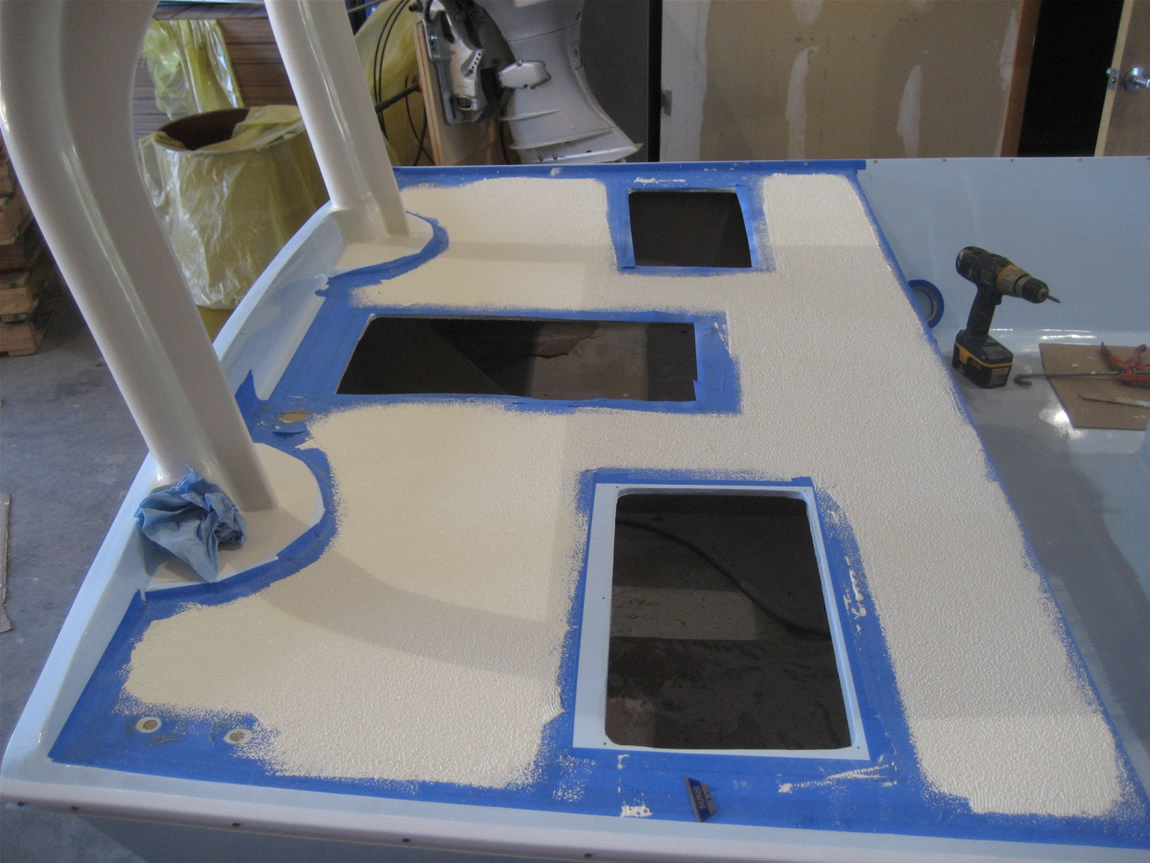
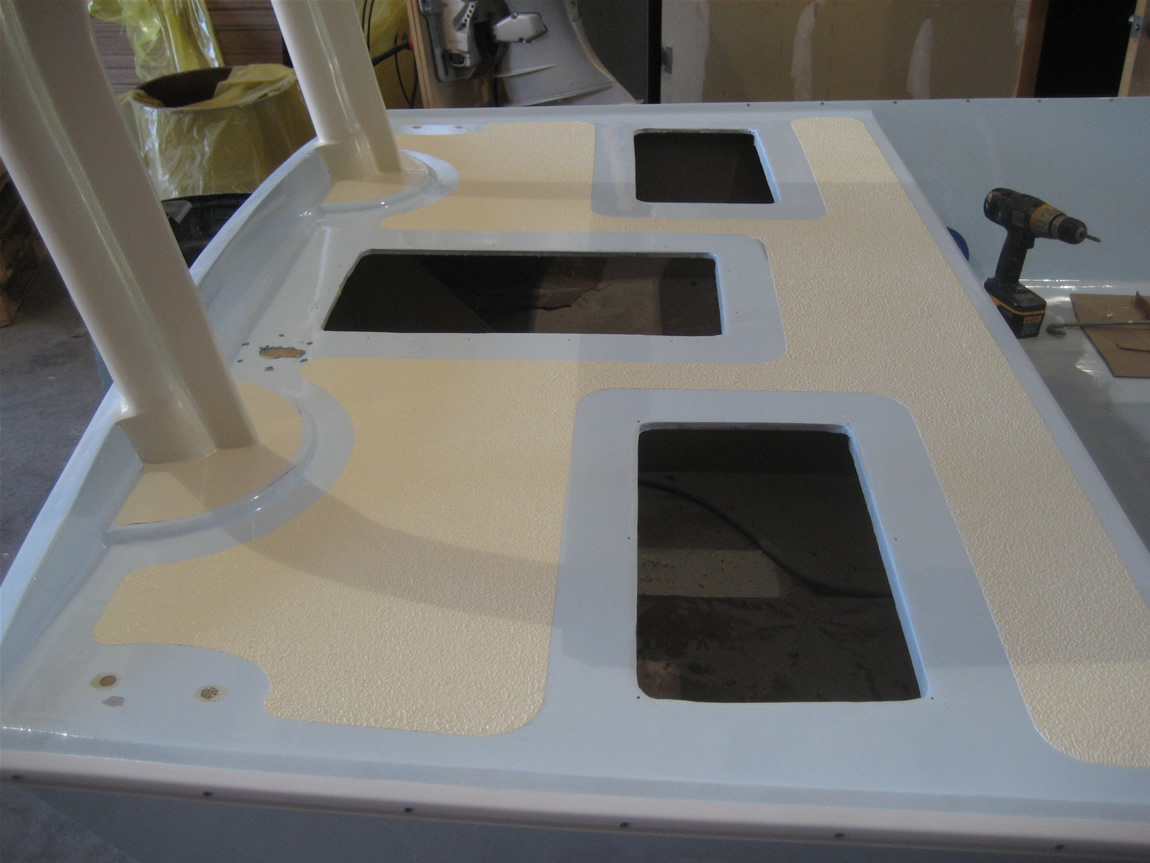
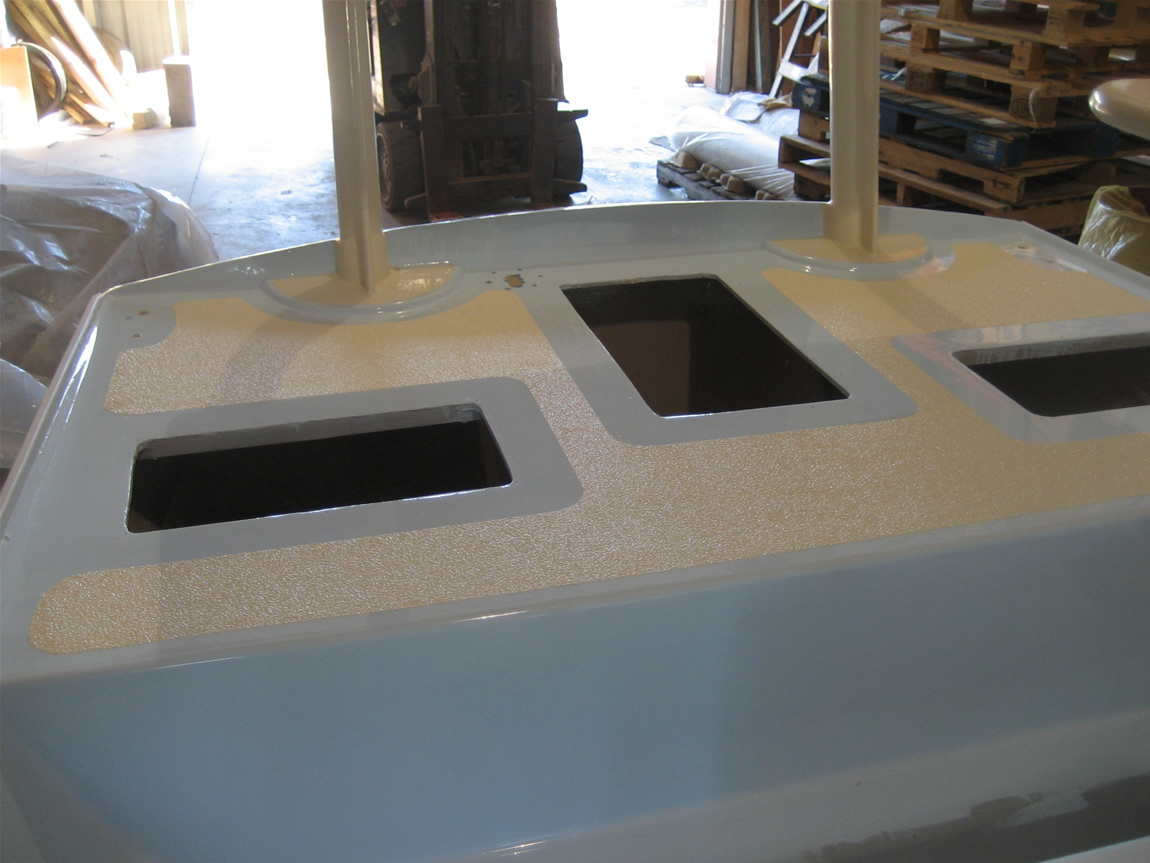
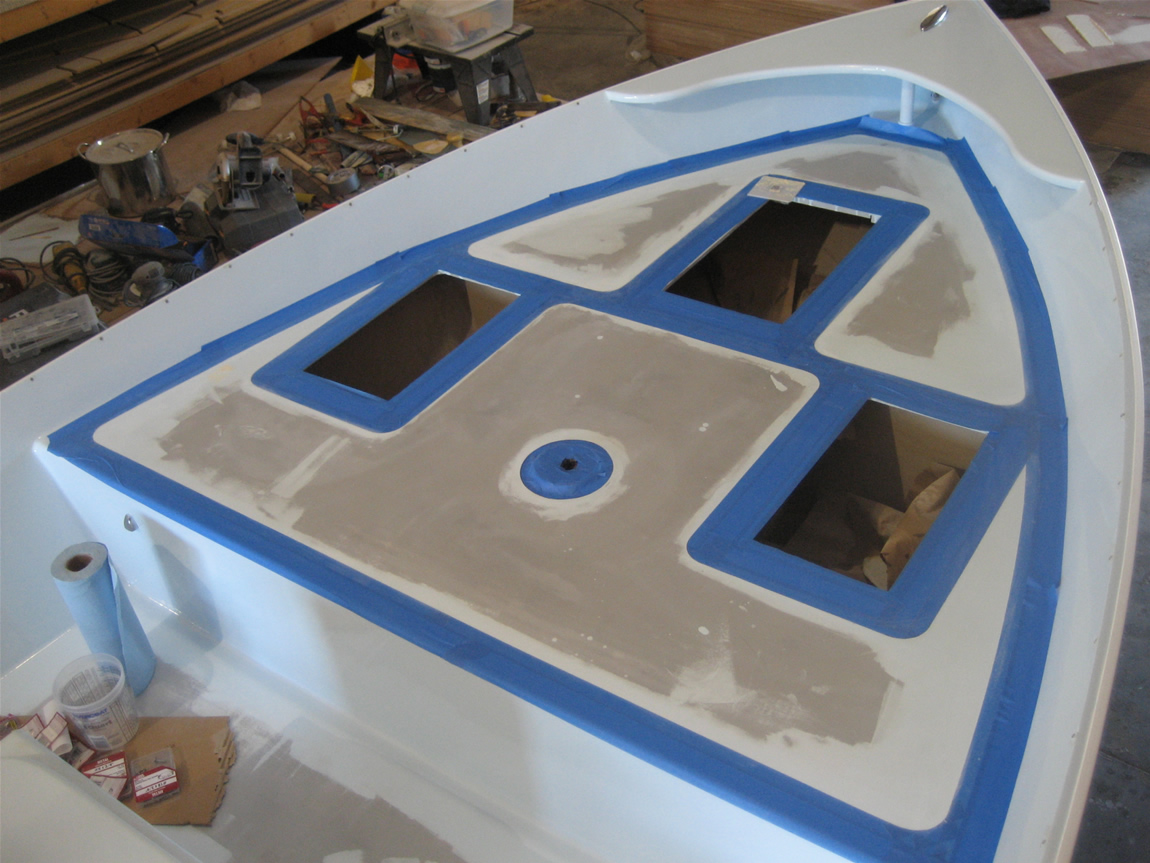
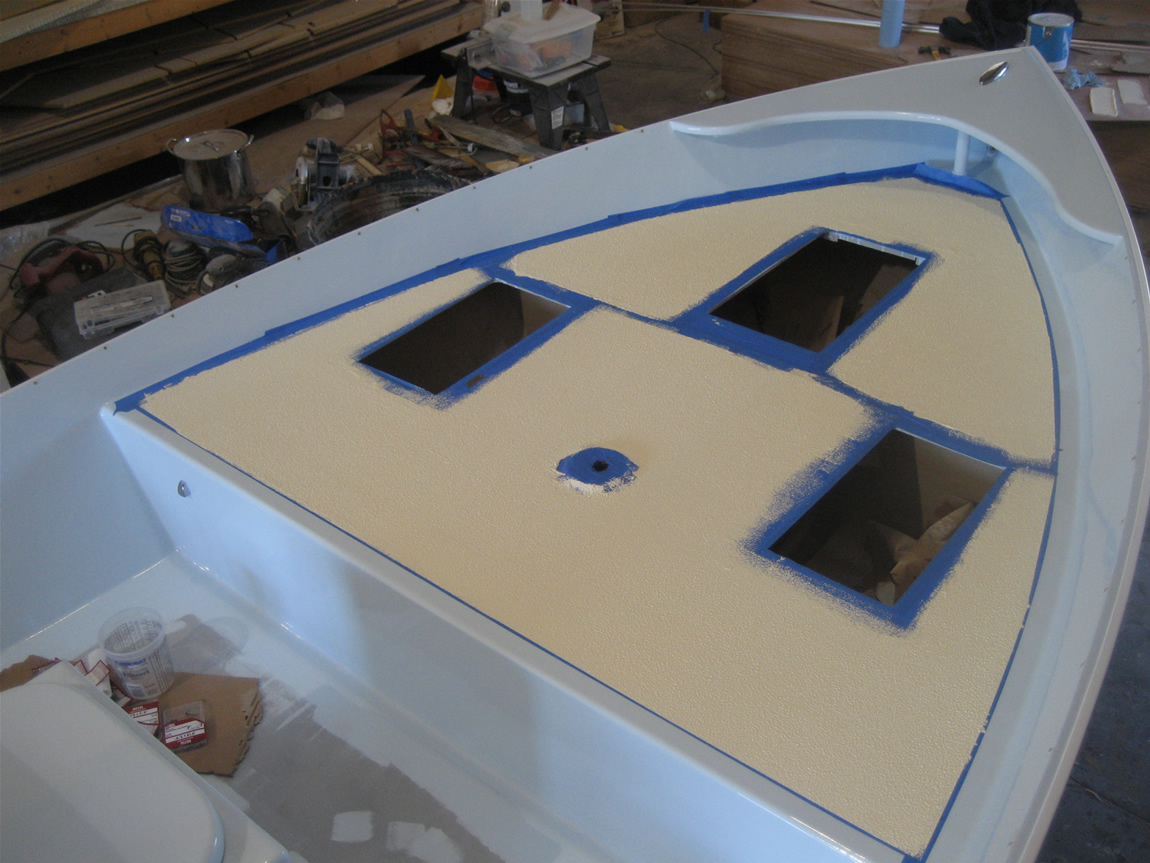
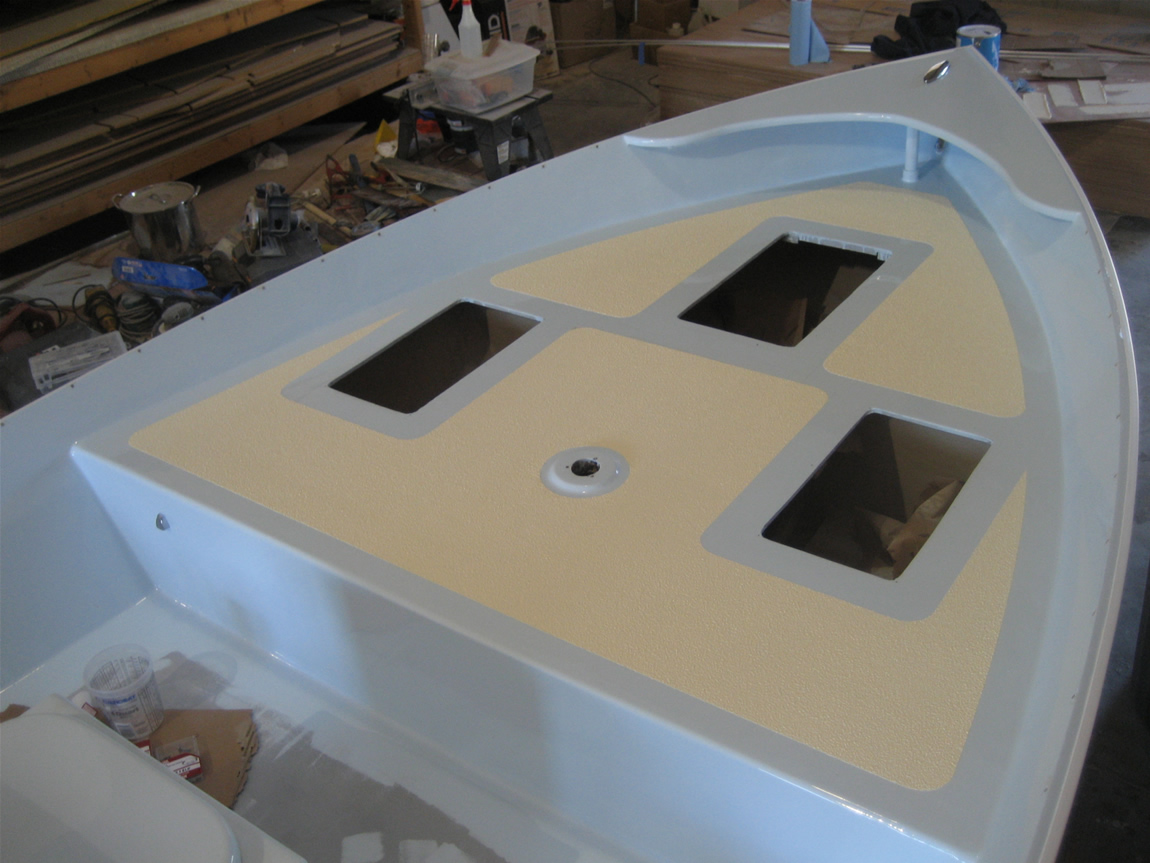

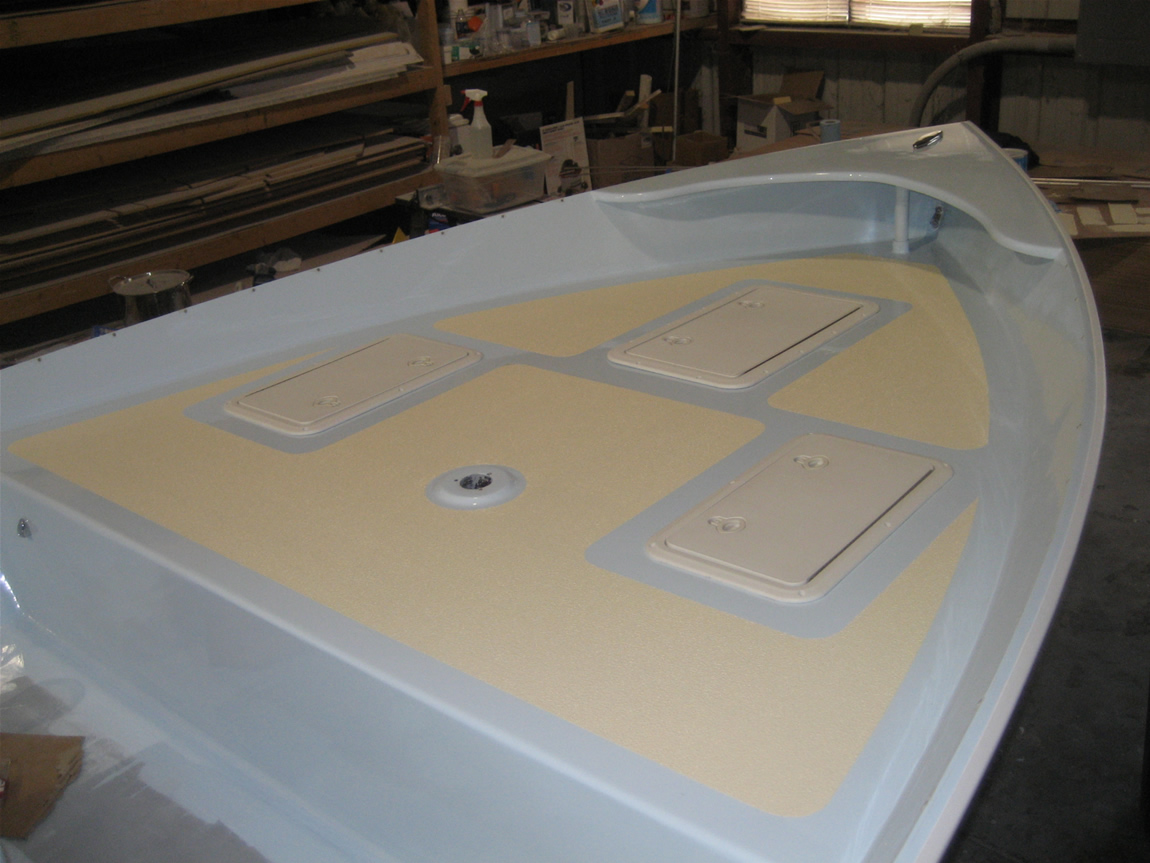
some tips: ( I will put these in the video also)
Use a notched spreader to make sure you have the same amount of material everywhere
Practice on a scrap piece of wood to make sure you know how to get the level of grip your after (more material = more texture). I used the smallest notches on the spreader
Roll all over the material at least 4 times, then lighter pressure on the roller towards the end
remove tape immediately after rolling
wipe up any splatters with a wet rag (water)
its very easy to apply, it takes longer to remove the tape than it does to apply the Kiwigrip
Posted: Mon Jan 19, 2009 11:44 am
by steve292
Beautiful work Shine
It will almost be a shame to cover it with fish blood
Posted: Mon Jan 19, 2009 2:09 pm
by Fonda@kauai
That looks really good
I'm sold on kiwi grip for the panga.
Posted: Mon Jan 19, 2009 3:36 pm
by dpurcell
Joel, really lookin' sharp! When I get to that stage I suppose I might let you come up and do another tape job if it is so therapeutic for you.
I read the post you made on surfing, I'm a bit envious of the water temps down there.
I agree with Fonda, Kiwi is a definite.
Posted: Mon Jan 19, 2009 4:22 pm
by tech_support
dpurcell wrote: I'm a bit envious of the water temps down there.
yesterday afternoon the wind shifted around from the West and I had a couple hours of fairly clean chest high surf - perfect size for me. Every 10 min or so there was a head high wave to keep it extra fun.
Posted: Mon Jan 19, 2009 11:18 pm
by Murry
The cream really looks good over the ice blue.
I really like that boat
Posted: Tue Jan 20, 2009 2:17 pm
by dpurcell
I'm a bit envious of the waves too! That swell must have, for the most part, just blown right by us. It wasn't that big up here.
Posted: Mon Jan 26, 2009 11:14 am
by tech_support
Posted: Mon Jan 26, 2009 11:18 am
by Cracker Larry
Very nice Joel
Posted: Mon Jan 26, 2009 11:23 am
by Murry
Joel
It looks amazing, I wish I could see it in person.
Daniel
Posted: Mon Jan 26, 2009 11:24 am
by RR
Fantastic! What a beautiful Boat. Congratulations
Posted: Mon Jan 26, 2009 12:05 pm
by TomW
Georgeous Joel! Good luck on the motor.
Tom
Posted: Mon Jan 26, 2009 12:16 pm
by jacquesmm
Murry wrote:Joel
It looks amazing, I wish I could see it in person.
Daniel
It looks much better than in the pictures.
Posted: Mon Jan 26, 2009 1:12 pm
by dborecky
Very nice!!
I can't wait for the numbers with that motor.
Posted: Mon Jan 26, 2009 3:14 pm
by flatpicker
Nice!!
Posted: Mon Jan 26, 2009 5:14 pm
by dpurcell
Ditto that
Posted: Wed Jan 28, 2009 12:55 pm
by tech_support
yesterday we put the boat on the trailer, still needs some adjustments (need to be lowered). Also put on the jack plate and made holes (re-filled with epoxy) for the rodholders.
Putting her on the trailer was pretty simple. Kept a thin piece of ply on the bunks so when we moved the roller up to the keel they will take some of the weight of the hull (after the thin ply is removed). the boat is narrow enough that it will mostly fir between the wheel wells, so i will probably lower the bunks by 5" or so.
The bunks will extend past the transom by a few inches, and the tongue weight is about 100 pounds - so its looking good
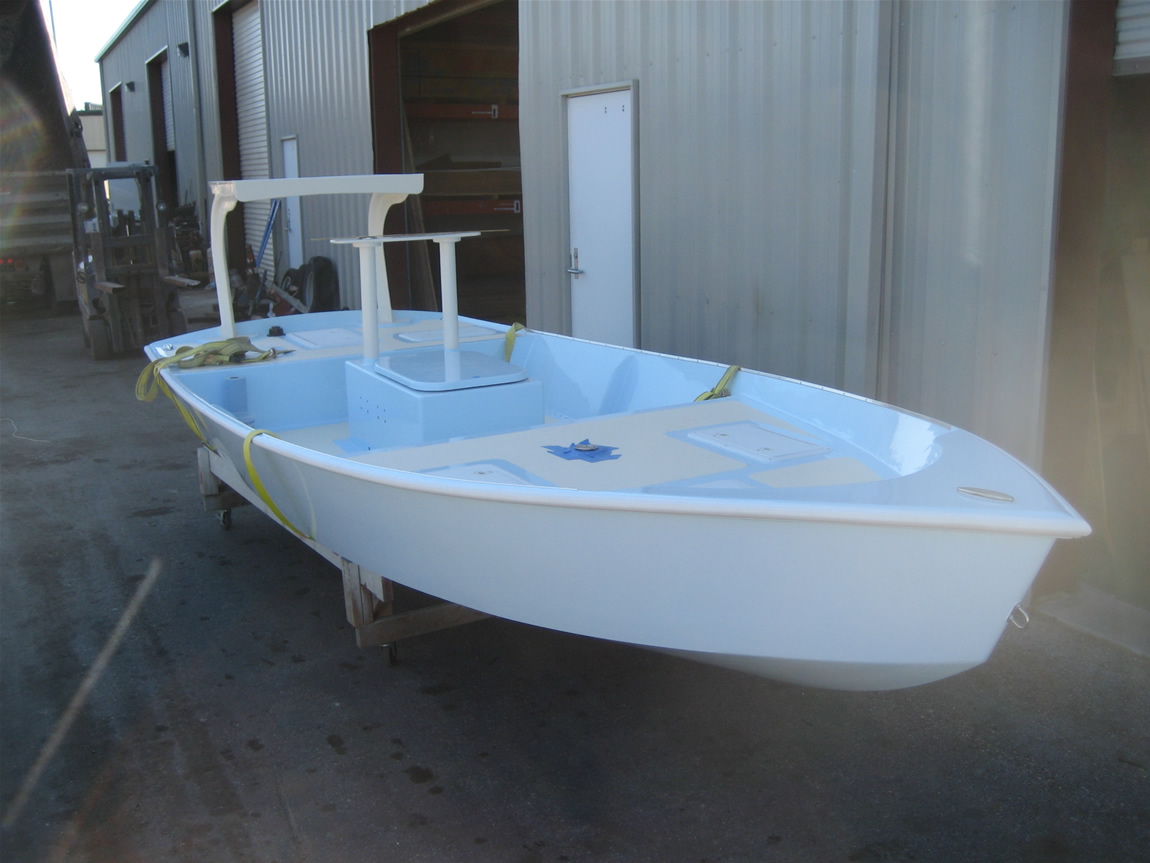
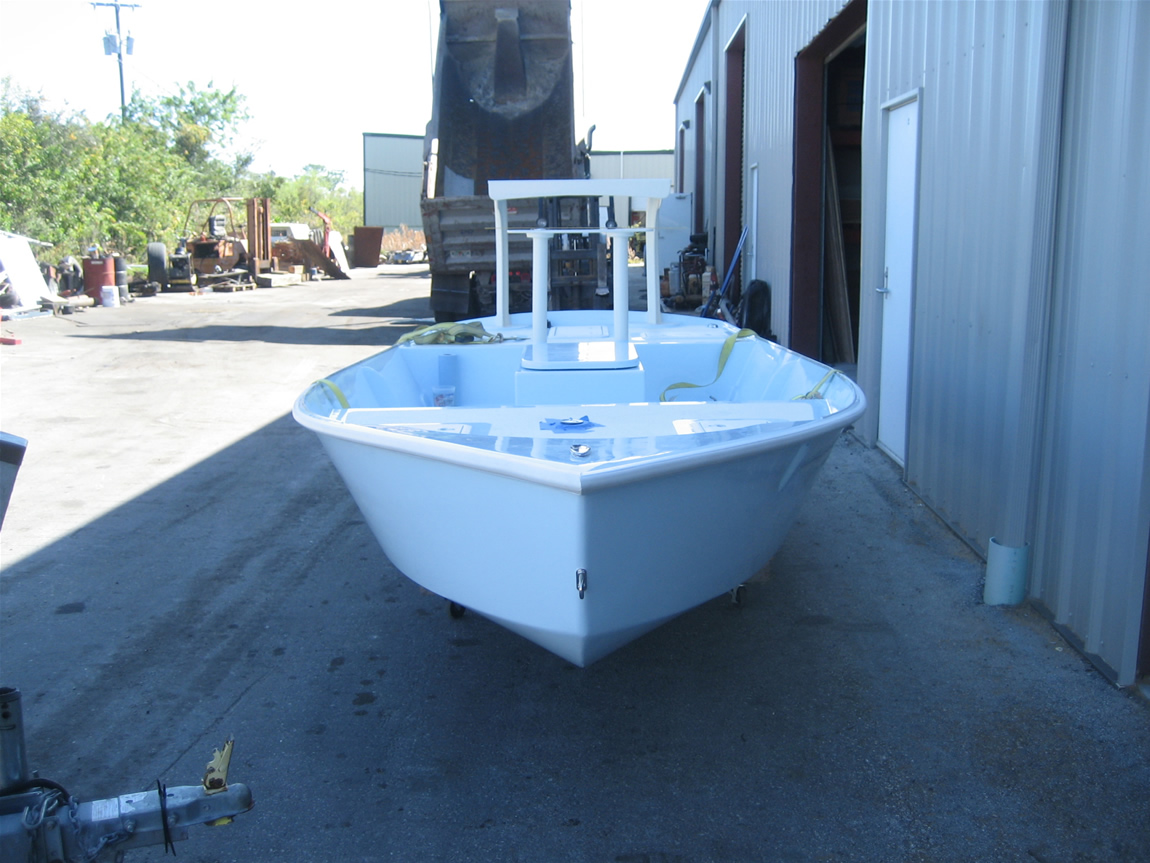
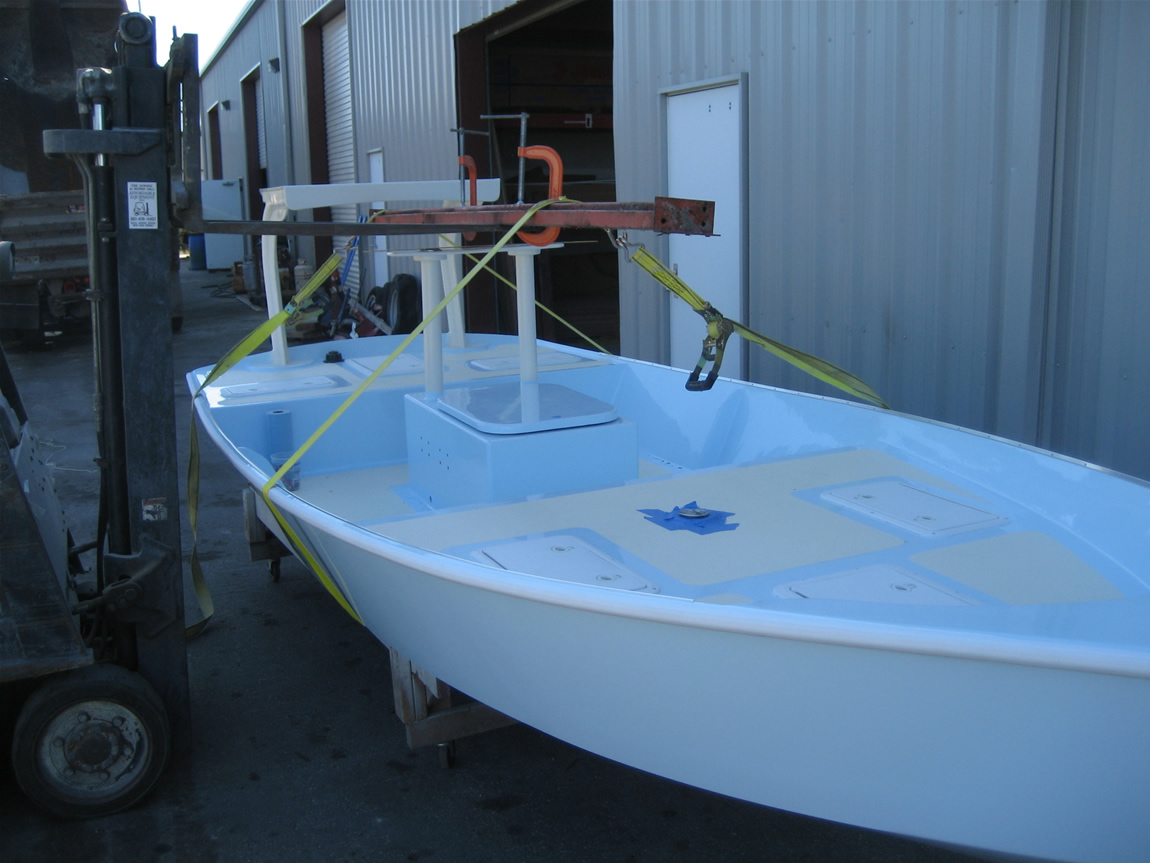
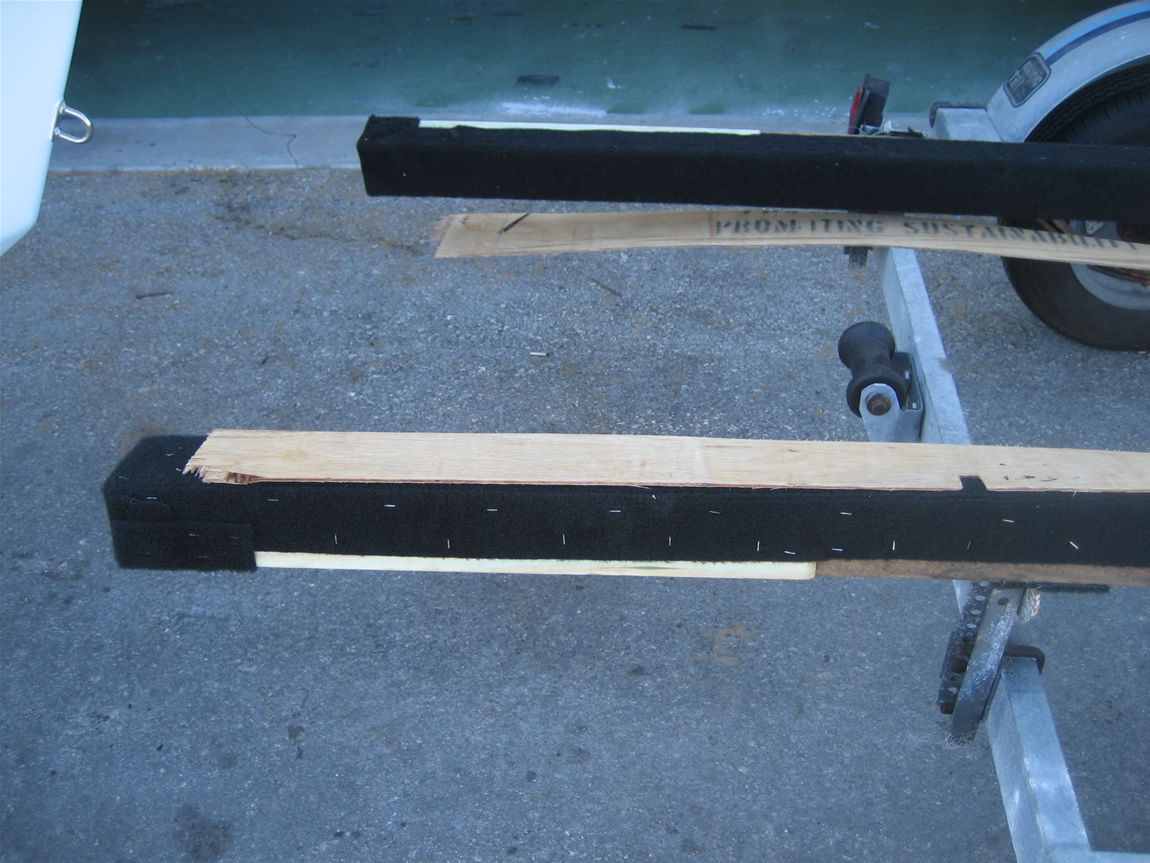
I drill out out the holes for the jackplate. I started by using a smaller bit to make sure I was on target to go through the epoxy plugs. You can see this in the picture below. The plugs are 1" diameter, which gave plenty of room for error in drilling out the 1/2" bolt holes.
pilot holes drilled
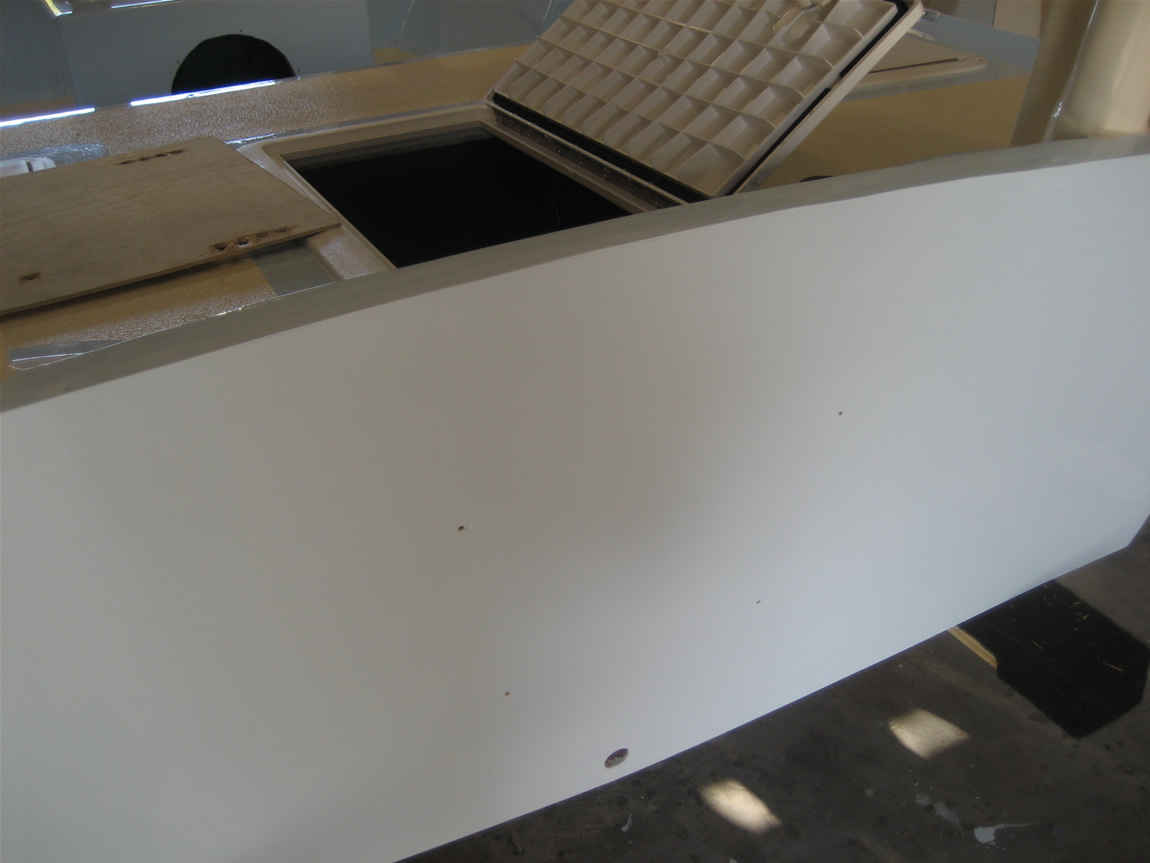
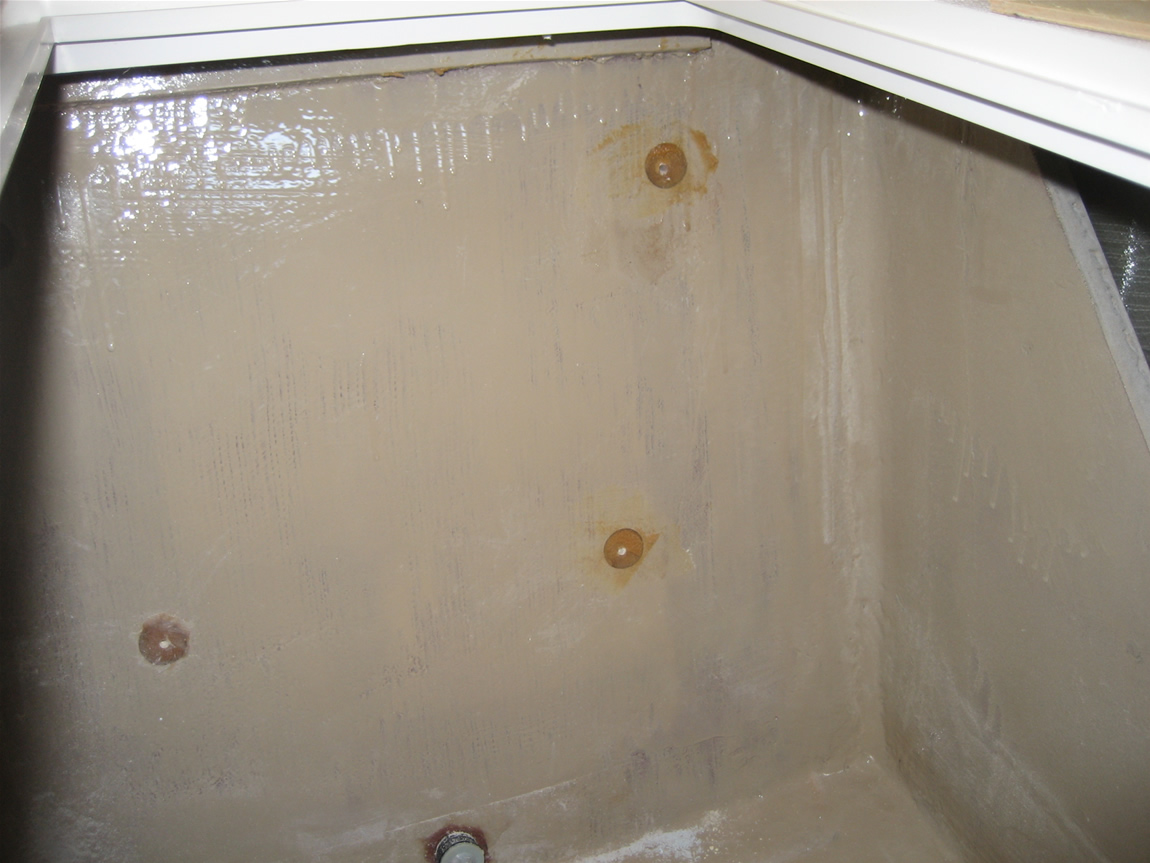
1/2" holes drilled
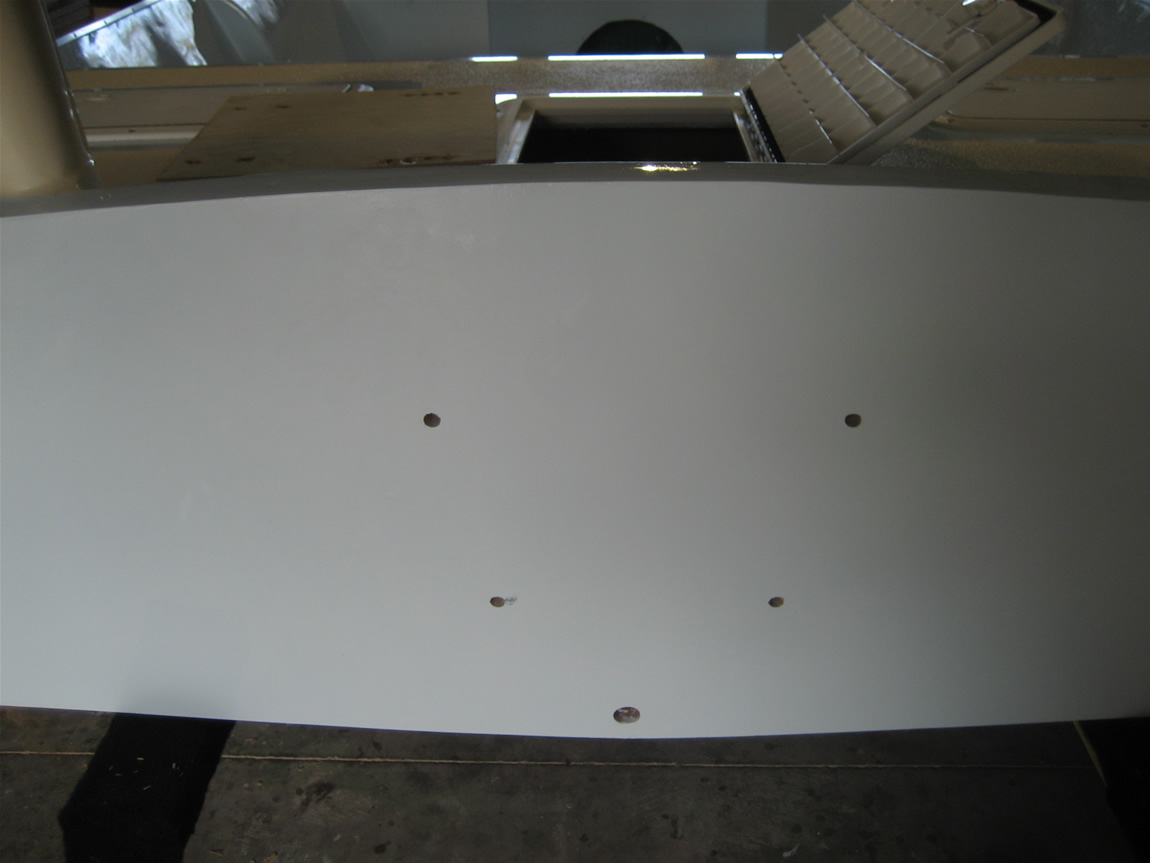
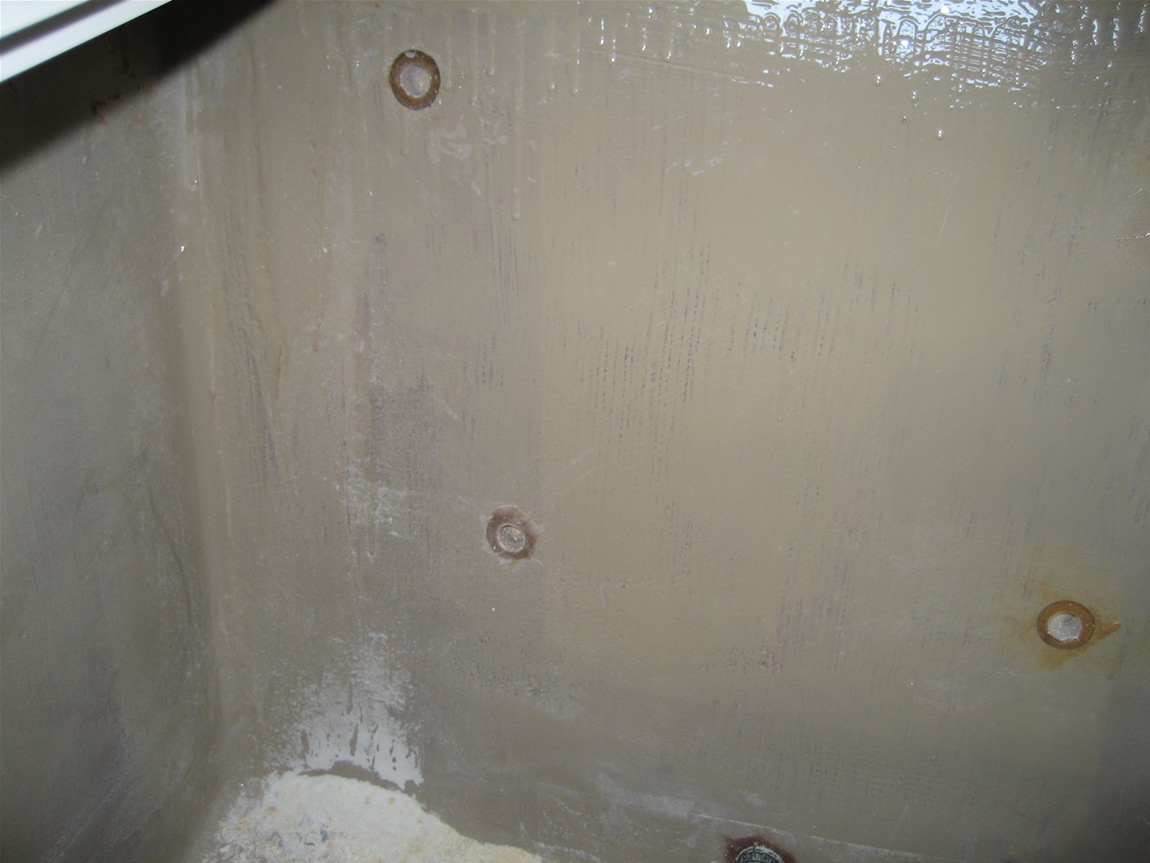
jack plate on
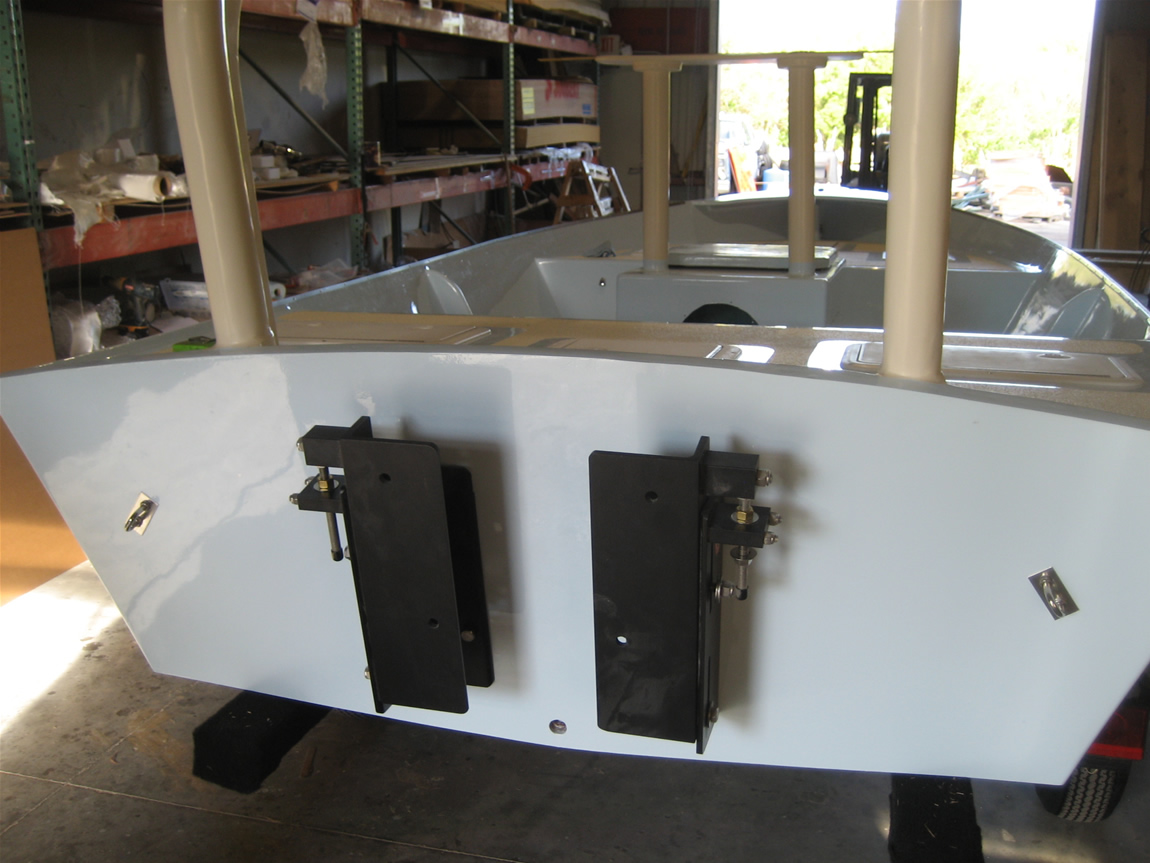
The cooler/bait box is made of 20mm plastic honey comb core and 4mm Okoume plywood skins. A screw under any forces would pull out of just the 4mm Okoume skin, so we drilled out holes and filled with epoxy/woodflour to make an insert. These will hold the rod holder screws.
If i had 3/8" plywood or greater I would not have bothered, but those side rod holders can have some torque put on them when some grabs a rod for balance; not taking chances.
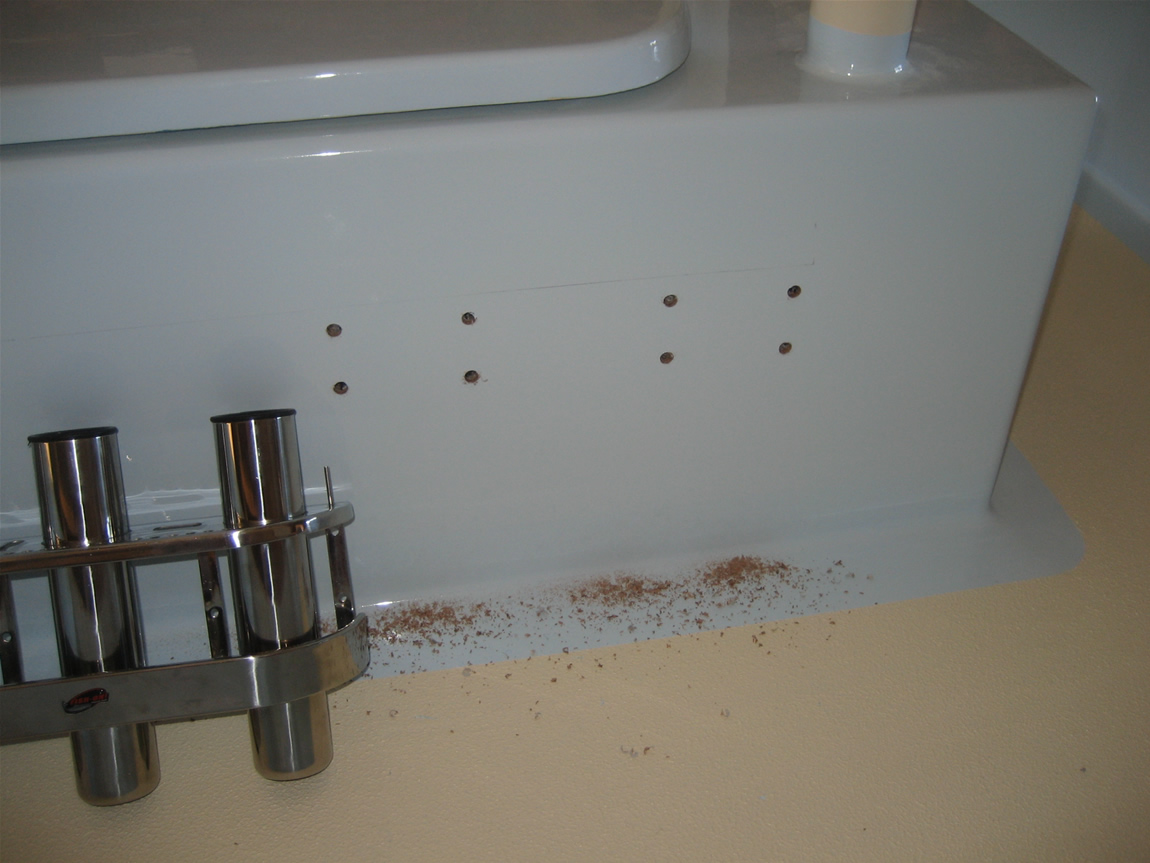
Posted: Wed Jan 28, 2009 2:05 pm
by mecreature
Man shine that is one sweet set up...
I will be close to getting going on another boat when I get some personal things wrapped up.. this one is hard to overlook. (with a few mods of course).
Were you trying to keep the tongue weight at 100lbs or is that by chance?
How much do you thing she weighs?
Posted: Wed Jan 28, 2009 2:37 pm
by tech_support
mecreature wrote:Were you trying to keep the tongue weight at 100lbs or is that by chance?
How much do you thing she weighs?
Its a little heavy for such a small boat, but I have still to hang the motor
so we will see.
She should be around 400 +/- pounds before engine
thanks for the complements
Posted: Wed Jan 28, 2009 3:06 pm
by jacquesmm
mecreature wrote: (with a few mods of course).
What?
I have the lines and the panels drawings. We'll show it as a plan soon.
Posted: Thu Jan 29, 2009 9:41 am
by mecreature
More cup holders.
Posted: Thu Jan 29, 2009 2:22 pm
by jgroves
You have built a cool boat! I check out all your pics when you post but there is not much more I can say than WOW. Also your pigmented epoxy is a great idea for your closed spaces. I have just got around to "finishing" all my compartments and I'm using white pigmented epoxy. It looks good. I would have never thought of that. Keep doing cool things like that
Posted: Thu Jan 29, 2009 11:01 pm
by Cracka
Joel, the boat looks fantastic I can't wait to see you get it in the water for some pics and perf data. I am thinking this one might be a bit more versatile for me than the FS18, hmmm, wouldn't it be nice to have both.....
Mick
Posted: Mon Feb 02, 2009 2:17 pm
by tech_support
Posted: Mon Feb 02, 2009 2:36 pm
by TomW
Nice Joel she really looks great. You have that motor planned just right. couldn't have squeezed it any closer.
Tom
Posted: Mon Feb 02, 2009 4:09 pm
by BassMunn
Hey Joel if I can get my boat anywhere the finish you have on yours I'll be a very proud owner. Real quality workmanship.
The boats gonna be a rocket with that motor on it.
Posted: Mon Feb 02, 2009 4:34 pm
by Tagged
Umm Joel,
I hate to be the one to break it to you, especially this far into the build. But looking at the second picture of your last post, I'm pretty sure the boat won't fit through that door.
Minor oversight.
Tag
Posted: Mon Feb 02, 2009 5:39 pm
by gk108
Sure he can. Just open the cape man hatch.
Posted: Mon Feb 02, 2009 6:04 pm
by TomW
Yea, yea Capeman hatch. Works every time!
Tom
Posted: Mon Feb 02, 2009 9:09 pm
by chicagoross
Joel. beautiful build (as always!) I know Tohatsu makes a bunch of motors for Mercury, didn't know about that one, but it sure looks like the new (japanese made) 3-cyl 2 stroke 40 tiller Merc I have waiting at my place in the philipines for my next PI build (have been thinking about a FS17 for there). Except mines black. Will be really interested in your performance figures!
Posted: Tue Feb 03, 2009 2:22 am
by ks8
Very nice Joel, but I'm afraid it is too light. You need more mods. Maybe not that many if you weld together some 1/4 inch steel plate cup holders (just mount them low).
Looking forward to the fly-by pictures! Try to keep part of the hull touching the water. You know all the vain fish will be kissing themselves in that finish, and ignore the lures.
Posted: Tue Feb 03, 2009 4:46 pm
by dborecky
Joel,
That is sweet. I can't believe you were able to get the tiller that tight!!!! That is either luck or very good calculations.
When is the splash date??? Don't forget to bring your camera and video camera for the event!!!
Posted: Tue Feb 03, 2009 7:30 pm
by tech_support
KS,
Yes she is super light and very simple. The Indian river really does not require anything more than this boat. The average depth is less than 4', there is no reason to speed (most areas are limited to 30 mph outside channel), there is basically no tide or current, and Im never further than 7 miles from the ramp I launch. If I were building a fishing boat for a more traditional coastal zone, she would have more gear and capacity.
CR,
I have never owned one of these tohatsu motors, but everything I hear from those who have say they are bullet proof. My only worry is taht this is going to be too much motor for a light tiller boat. If that is the case, I will try to trade it for a 25
Derek,
It was luck that it was that close, but the measurements and calcs helped to get close.
Started the motor for the first time today, ran great even after sitting for months. I should get my vinyl letters and numbers this week. I have someone coming to rig a new trim/tilt switch for me tomorrow. The trailer has tags. Fuel system is hooked up. Weather this weekend is supposed to be 70's - so it looks like I have no excuse not to launch this weekend
Posted: Wed Feb 04, 2009 8:00 am
by jgroves
Posted: Wed Feb 04, 2009 10:15 am
by TomW
Watch them fish run and hide now.
Best on the launch Joel.
Tom
Shine
Posted: Wed Feb 04, 2009 12:42 pm
by cottontop
Posted: Thu Feb 05, 2009 7:42 pm
by bushmaster
Congrats Joel
You have done a marvelous job of building and painting. She looks beautiful.
Now that you have done yours, may be you can come down to Homestead and help me finish mine...Ha, Ha...
Bushmaster
Posted: Thu Feb 05, 2009 9:17 pm
by hwsiii
Your boat is beautiful and I am sure it is perfect for what you intend on using it for Joel. I just wish we had a place like that to fish here. I need to move back to Florida, I used to live on Perdido Key and had a beautiful condo on the water in the bay about 1 1/2 miles from the Gulf by my boat. I sure wish I hadn't moved, but you have to follow business where it leads you. What a shame.
HWS
Posted: Thu Feb 05, 2009 11:55 pm
by ks8
shine wrote:KS,
.... Weather this weekend is supposed to be 70's - so it looks like I have no excuse not to launch this weekend
Oh yes, I am well aware of that situation ....
I've just got to finish final rigging and haul this boat and dolly up on the utility trailer. A dual splash weekend would be great... but as Hooper said, *Don't wait for me!* ... and I'm sure you won't.
Posted: Fri Feb 06, 2009 6:40 am
by cape man
Joel,
What a perfect machine for where you are. Can't wait to see how she performs. She's going to be a lot of fun and easy to fish out of. Love the simplicity of design you employed.
Posted: Sat Feb 07, 2009 4:56 pm
by tech_support
Posted: Sat Feb 07, 2009 5:19 pm
by BassMunn
Very Nice Joel
Now it's time to get some fish blood on that deck
Posted: Sat Feb 07, 2009 5:23 pm
by Dog Fish
Looks great, you guys should be very proud
The poling platform is really cool, I bet it wont be long before you whack your head on it. Super job and best of luck with it .
Posted: Sun Feb 08, 2009 5:33 am
by stickystuff
Got to be an awsome feeling. The first time we put the PH15 in the water and how it performed was awsome also. The only problem we had was running straight out the motor would lose its bite. (4 blade power tech prop) Made a call to power tech and they sent me a diff prop and solved all the problems with prop ventilation.
I kick myself in the arse for getting involved with the Flatstalker dealershop. I will def. build the FS 17. Great job. You better bring it with you to Crystal River in the spring. Thumbs up to you . Great job.
Posted: Sun Feb 08, 2009 8:18 am
by cape man
She squats more that I would like while at rest.
When you say more than you would like, is it really a problem (transom so low a wave can come over, scuppers below the waterline)? I weigh about 165, so maybe if you just put me forward it will fix the issue?
Very nice. Cannot believe you finished as quickly as you did. I also like the color scheme inside. Very unique and surprisingly pleasing to the eye.
Posted: Sun Feb 08, 2009 11:06 am
by bernd1
Nice boat
Any movies there the FS17 is in action?
Bye
Bernd
Posted: Sun Feb 08, 2009 11:21 am
by topwater
Impressive.......
Posted: Sun Feb 08, 2009 1:21 pm
by jgroves
Woohoo! Looks great. I like the colors you chose... you can really see them out in the sun. Next you will have to show us some of the fish you catch down there
Posted: Sun Feb 08, 2009 1:52 pm
by ks8
Very nice!
For the weight distribution issue, after moving the batteries, you could also stow a 90 pound fisherman's anchor on the casting deck. Never know when you might need that. Are you thinking you'll try the 25 HP, or, wait for someone else to finish and launch with a 25?
Now fill her up with everything she was built to be filled with!
Congrats!
Posted: Sun Feb 08, 2009 2:18 pm
by peter-curacao

Jaw dropping boat very nice
Posted: Sun Feb 08, 2009 5:35 pm
by tech_support
Thanks everyone.
Ken, the prop is an old aluminum one that came with the motor, I have to admit I have not even looked at the pitch
So I know I can get better all around performance with the proper prop
Because I just have holes in the side as apposed to scuppers with floats or flaps, water will come in if we both stand on the same side. This is something I was ready for, but I may install a scupper out the transom with a flapper, maybe not.
The only reason not to move the battery forward is that I do not want it in the same compartment as the fuel tank. Of course, if I put a trolling motor up front, that battery will be in the anchor locker area (plenty of room up there)
I need to get a new water pump installed, the motor was only peeing at high idle and above.
Im really happy with the color scheme
Cape man and KS, I did not even have an anchor on board, so there will be another 40 pounds or so all the way forward. When I put my fishing buddy on board sitting on the cooler box the boat was much more level. With the 2 of us on board the water line was around 2" inches below the sole. With 225 of skipper, 200 pound of motor, and no other weights, she she squats more than she will with another person forward, more gear, and more fuel. I doubt I can loose much weight, so I may look for someone who would like to to swap for a 25, in the mean time I going to have some fun with the FAST skiff 17
Posted: Sun Feb 08, 2009 7:17 pm
by TomW
I guess we'll just call you Speedy Jose' from now on.
Nice pictures Joel. Pretty day for the launch also.
Tom
Posted: Mon Feb 09, 2009 5:37 am
by cape man
This is something I was ready for, but I may install a scupper out the transom with a flapper, maybe not.
Is there a reason you can't install a flapper type scupper out the sides? That was my plan so if there's a reason it won't work let me know. I was going to install drains out the sides that I can plug when she's overloaded with camp gear, and have them open when fishing and anchored. The drain to the bilge and thus bilge pump would be my way to get water out if and when the scuppers went below the water line.
Posted: Mon Feb 09, 2009 8:43 am
by carolinaboatbuilder
Looks really nice Shine. is that Interlux blue? I just painted my FS17 the same color. How did you flip your hull, with overhead chain hoist and support frame or just manhandle and roll over?
Again, lloks great!
Posted: Mon Feb 09, 2009 8:54 am
by tech_support
cape man wrote:Is there a reason you can't install a flapper type scupper out the sides? That was my plan so if there's a reason it won't work let me know.
Those would work but I would prefer to to leave the side clean looking and route them out the transom.
Looks really nice Shine. is that Interlux blue? I just painted my FS17 the same color. How did you flip your hull, with overhead chain hoist and support frame or just manhandle and roll over?
Its Sterling topcoat, the color is Ice Blue. Its rolled and tipped
We rolled her in straps. Takes very little effort that way.
Posted: Mon Feb 09, 2009 11:30 pm
by Murry
Just beautiful Joel. I can only imagine how good you boat looks in person.
How do you think the "ice blue" would look on my gf
Posted: Sat Mar 14, 2009 11:57 am
by msujmccorm
Beautiful job Joel. It's amazin how versatile these plans are!
Re: FS17 low sheer
Posted: Thu Apr 02, 2009 9:24 am
by little jimmy cook
The boat looks awesome. I love the color and the sheer lines of this boat.
Great job. I am inspired even more.
Jimmy
Re: FS17 low sheer
Posted: Wed Jul 15, 2009 3:47 pm
by Cefoam
awesome boat, you guys are artists with these boats.
i couldnt find the thread on the poling platform. i would love some info on it, to maybe come up something similiar for my boat.
im building a ob15 with an identical layout, sheer lowered almost 5", decks in front and back, very simple.
thanks tommy
Re: FS17 low sheer
Posted: Wed Jul 15, 2009 4:05 pm
by FLYonWALL9
NOT meant to derail Joel's thread but....
"im building a ob15 with an identical layout, sheer lowered almost 5",
Having built the OB15, one of the first to put decks on front and rear
and one of the first to lower the sheer. I would not lower the sheer of
the ob15 almost 5 inches.....
The sheer on the boat isn't all that high to start with, doing so will also
make your boat more narrow. Most of the people that lower the sheer
on that boat simply make the boat more level front to rear cutting the
camber out of the bow.
Re: FS17 low sheer
Posted: Sun Jul 19, 2009 10:20 am
by tech_support
lets start a new thread on the OB15. I agree, there is no need to lower the OB15 sheer that much. I did not lower my FS17 that much and the FS17 has even higher sheer.
Re: FS17 low sheer
Posted: Sun Sep 27, 2009 5:38 am
by Cracka
G'day Joel,
I keep coming back to this boat as a possible build and now that you have been running it for just over 7 months, I am wondering what your impressions of the boat are.
Did you end up keeping the 40 or did you change for the 25. If you kept the 40, have you had a chance to do a speed check.
Did you end up putting an electric on the bow.
How did you go with your balance of weight for and aft, did you re-adjust or not.
If you can offer any other pros and cons feel free.
Thanks mate.
Mick.
Re: FS17 low sheer
Posted: Mon Sep 28, 2009 9:45 am
by tech_support
Hi Mick,
here you go.....
Cracka wrote:G'day Joel,
I keep coming back to this boat as a possible build and now that you have been running it for just over 7 months, I am wondering what your impressions of the boat are.
Mick.
I really like the boat, its perfect for my use. I use her almost every weekend (twice this weekend
). For two guys fishing she isplenty boat without having things you do not need. I kept the 40 and I like having the option to go fast. I now use a launch ramp that is further away from the fishing area but has far less traffic, I can get there in 10 minutes running full throttle.
Cracka wrote:G'day Joel,
Did you end up keeping the 40 or did you change for the 25. If you kept the 40, have you had a chance to do a speed check.
Mick.
No speed check, I dont have a GPS. I am guess top speed with 2 men, full tank of gas and fishing gear is a little over 35 mph. The downside is the weight (200+ pounds of motor) while I stand on the back (220+ pounds of Joel). With a man on the bow casting, its balances out perfect though.
Cracka wrote:
Did you end up putting an electric on the bow.
Mick.
Not yet, but Im still thinking about it. there are few times (fishing around docks especially) when the trolling motor is better than poling. I just do not do much of that fishing.
Cracka wrote:G'day Joel,
How did you go with your balance of weight for and aft, did you re-adjust or not.
If you can offer any other pros and cons feel free.
Mick.
I could use a little more weight forward, but not by much, I did not take the heavy motor in consideration when planning the seating. If I move myself and passenger a foot forward, its perfect. And really no one but me knows, its not obvious.
The hull shape is very pleasant running in a chop, she handles is very smooth. I do not need to come off of plane to cross large boat wakes, she cuts right through at 30 mph. I love the simplicity of the boat, nothing to break of maintain. I do not have any instruments, no bilge pump, no trim tabs, no gas gauge, nothing like that; just turn the key and go fishing. Granted the place where I use the boat is extremely forgiving (sheltered, very shallow, and never far from help), if I lived somewhere else i may have included some of the other items
If your use for the low sheer FS17 is similar to mine, you will not be disappointed
Re: FS17 low sheer
Posted: Tue Sep 29, 2009 3:34 am
by Cracka
G'day Joel,
Thank you very much for the reply, I'm glad to hear you're happy with the boat and getting to use it, it is a great looking boat.
My intended uses for the boat are mainly estuary and river systems (shallow water) with the occasional freshwater lake foray. But where I live I do have the option of bay and inshore fishing out the front of the estuary.
I was originally going to build the FS18 but I am now thnking I would be silly to, when I could build the FS17 low and fish most of my options. I only venture into the bay on good days anyhow, as there is a bar crossing.
I mainly only fish 2 up maximum, and I would have a bow mount electric and battery (66lb) up front (same as my last 2 boats) so the balance would be fine I guess when alone, I'm only about 165lb.
Also, what did the length/beam end up at after lowering the sheer, and what is the stability like at rest, I assume it would be pretty good, just need to ask before I make any decisions?
Thanks mate.
Mick
Re: FS17 low sheer
Posted: Tue Sep 29, 2009 9:27 am
by tech_support
From what you describe, my boat sounds like a good fit, but you probably do not need a poling platform. maybe a very small side console or center console.
The FS17 is much more stable than the FS18. Its still a small boat for 17', and that is why it is so easily driven and efficient. Its plenty stable for two guys to walk around the boat and not cause uncomfortable movement. I can stnad on the poling platform while my fishing partner walks around. The loss of length may be 6", loss of beam maybe 3" the loss of length/beam Has zero effect on the performance, the running surface and volumes are the same (unless your pushing the bow through waves)
One change I would make in my boat is to make the seat box/cooler box smaller (narrow). I have not needed to use it but once for large fish, and walking around it with rod holders on the side is not super easy because my rods have plugs with treble hooks on them
Re: FS17 low sheer
Posted: Wed Sep 30, 2009 1:47 am
by Cracka
G'day Joel,
You're dead right mate, I wouldn't be putting the poling platform on, we just don't have the vast area of shallows that you guys over there have that I need to pole, it is something that you just don't see here.
Most of my estuary/river fishing is off snags, using the bow mount to keep position and cast to them, and also on what flats we do have, I normally use the leccy or just drift them using the leccy to keep the bow in position.
It's funny you mention the console, when I was replying to you on my last entry I was going to mention it but thought I had already bombarded you too much. A good idea I think, a small centre console. My last boat was a 4.5 metre ally boat with a side console, the problem with it I found when 1 up fishing the boat always listed to the console (starboard) side, I realise this can be fixed with trim tabs but its just another expense.
Mick
Re:
Posted: Tue Aug 10, 2010 5:28 pm
by kcinnick
shine wrote:
Thats the only reason it all went together so quickly. I do not have the skill or patience to cut panels that accurately
The molds/jig was huge time saver.
The mold all rest on the same plane, so there are no upright supports to mess with - just two 2x6 for the molds to rest on, then snap in the stringers.
)
How far above baseline should you cut the molds to have them all rest on the same plane and still have enough mold to properly hold the shape? Does it really matter, would going with the distance on the shortest mold and cutting them all to that height above baseline work?
Re: FS17 low sheer
Posted: Wed Aug 11, 2010 9:30 am
by tech_support
I do not remember, the molds were draw in CAD and cut on a machine. Besides, each boat would be different the measuremetn for my custom version of the FS17 would not help you.
If you need help with a particular measurement for the boat your building, please start new thread and we can help.
Re: FS17 low sheer
Posted: Thu Jan 20, 2011 6:58 pm
by stickystuff
If you have never met Joel you will understand why tiller steering is in order. A hull this light and his 230 some odd pounds would not be feasable for a side consol. You would have to add concrete blocks on the other side just to balance it out. He ain't no midget. Not fat either. Just a good ol healthy southern boy.
Re: FS17 low sheer
Posted: Sun May 13, 2012 11:50 am
by jabcd
Thank you for this group of pictures and instruction notes. I have not started yet, but have some questions I will be getting to as soon as I get them formulated in my mind. They will be on the Garvey-18, but the technique used will be the same as in this instruction group.
James Doubravsly
Re: FS17 low sheer
Posted: Sun May 13, 2012 2:51 pm
by jacquesmm
jabcd wrote:Thank you for this group of pictures and instruction notes. I have not started yet, but have some questions I will be getting to as soon as I get them formulated in my mind. They will be on the Garvey-18, but the technique used will be the same as in this instruction group.
James Doubravsly
If questions come up, please start a new thread.
All our boats are built the same way but boat specific or subject specific threads are easier to search.
Re: FS17 low sheer
Posted: Thu Aug 30, 2012 7:26 pm
by jerms
Shine,
I am getting ready to take the plunge and begin my first build. I am thinking that a low sheer FS17 would suit my needs, but wanted to know a few specifics if you don't mind. I've read through this thread a ton of times, my apologies if the following questions have already been answered somewhere and I didn't catch it.
I'll be primarily using this hull to pole high and low tide flats in Charleston, SC. I am mostly concerned with three things: actual draft numbers (light load and two people), how badly the wind catches the freeboard and affects poling, and how well it tracks when poling (irrespective of the wind).
I would appreciate any information you would like to share. Really love what you did with yours.
Cheers,
Jeremy
Re: FS17 low sheer
Posted: Tue Sep 04, 2012 9:37 am
by tech_support
A lot of this is subjective, but here you go
.....
actual draft numbers (light load and two people)
mine is about 5" with two guys, trolling motor and a 40 hp (heavy). For a poling skiff, i would have recommend a lighter motor. A guy standing on a platform plus a motor will weight more than rest of the boat.
how badly the wind catches the freeboard and affects poling
not bad, its relative to the draft of the boat and how low you cut down the sheer.
how well it tracks when poling (irrespective of the wind)
better than my PH16, all thing being equal a boat with a more narrow water line will track better. But tracking well is in almost direct conflict with poling draft. A boat with more V or a skeg (profile) will track better, but it will increase draft.
I have some small runners on my hull that help with turning and do not protrude far enough to effect draft - You can make them bigger (more profile) than mine and they would help with poling direction
In real life fishing, there are not many places I cant go with that boat. For a pure poling skiff the FS18 is better, but I would compromise with the FS17 so I could still cross sounds rivers safely and be able to use the boat in other applications. FS17 low sheer would be a great boat for low country tidal marsh fishing. I am considering taking my FS17 up to Hilton head and leaving it there for my dad to use, I have not been able to use it enough myself lately.
Re: FS17 low sheer
Posted: Tue Sep 04, 2012 5:12 pm
by Rapchizzle
Jerms, give me a call before you start the build and order stuff. I still have some 12 oz biax and 6 oz tape as well as abotu 2- 2 1/2 gal of epoxy.
I haven't even gotten a motor for the Creek Rat yet and I'm already looking at the low sheer FS17 with a tiller!
Re: FS17 low sheer
Posted: Wed Sep 26, 2012 2:26 pm
by tech_support
Re: FS17 low sheer
Posted: Wed Sep 26, 2012 3:32 pm
by Cracker Larry
That's a good buy!
If you sell both of your boats, what's next
Re: FS17 low sheer
Posted: Wed Sep 26, 2012 3:49 pm
by tech_support
If you sell both of your boats, what's next
I dont know, but if I sell the skiff I have enough (with insurance claim) to get a new 300 4 stroke for SC.
I have a good offer already on the SC hull.
if I sell both, I could build a bigger boat (GS28 or other), might re-build another SC, or might partner with someone on a big boat. I'm not really sure, but I would not mind having options (cash) come November.
Re: FS17 low sheer
Posted: Wed Sep 26, 2012 4:00 pm
by Aripeka Angler
That is a GREAT price for the FS17!!! It sure would be cool if one of the guys on here would buy the boat instead of a stranger. I don't know why I think that way, it's just the way I think
Re: FS17 low sheer
Posted: Wed Sep 26, 2012 5:22 pm
by Cracker Larry
I would not mind having options (cash) come November.
Me and you both. Just call us crazy. I'm thinking Krugerrands
Re: FS17 low sheer
Posted: Wed Sep 26, 2012 8:05 pm
by jacquesmm
Re: FS17 low sheer
Posted: Fri Nov 13, 2020 3:02 am
by AlScal
tech_support wrote: ↑Thu Jun 12, 2008 3:57 pm
A new project.
FS17 with lowered sheer and larger casting decks. I will keep the same sheer line, just lowered by about 4". Casting decks will be large, sole length will be 6'. No console, but a box a small box in the middle for gas and storage (also seat). Motor will be mounted on a hydraulic jack plate directly to the transom, no motor well. I will probably build a poling platform and a "hand rail" out of carbon fiber tubes.
Boat will be used 90% in the Indian River
The molds are cut, next week we will have the panels ready and maybe even have the strongback finished (all cut on the CNC) - this will be a quick one
Joel
Indian River Fla? I moved a J30 down the Intracoastal many years ago. There were oranges and grapefruit hanging over the banks of the Indian River.
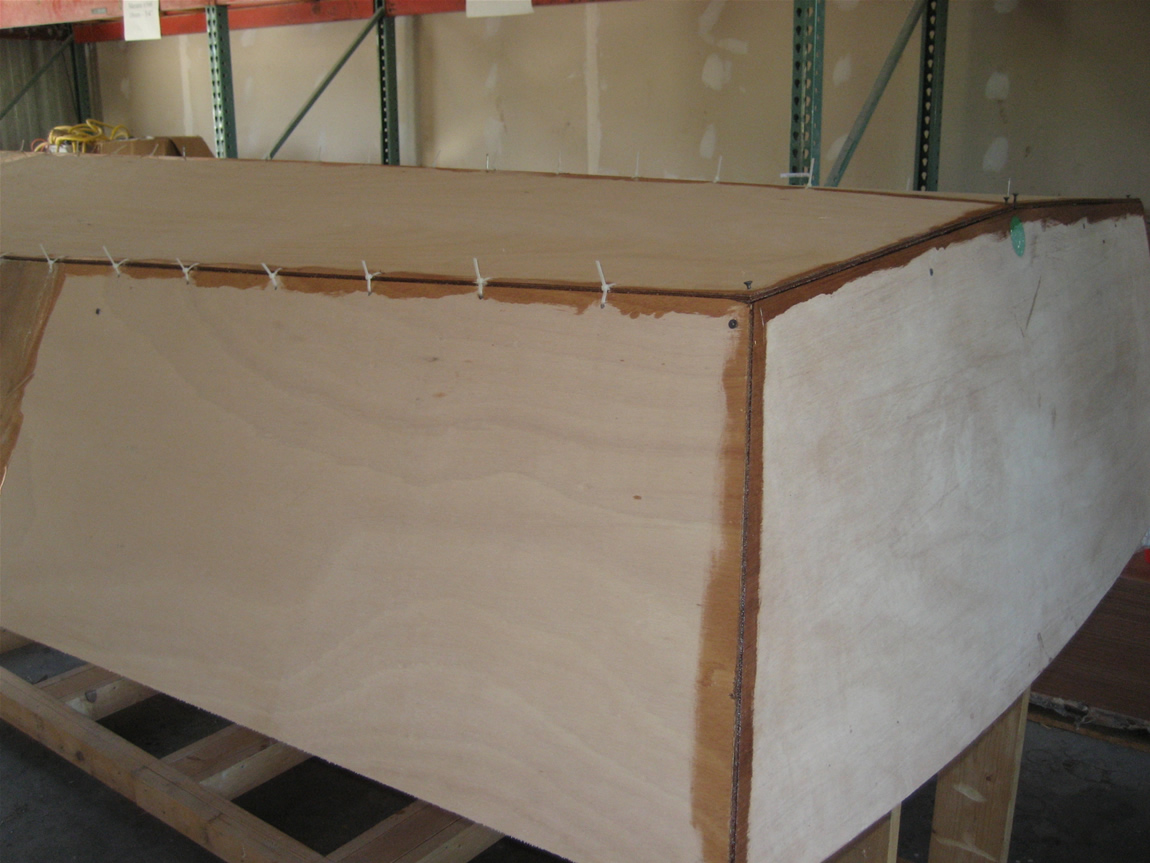
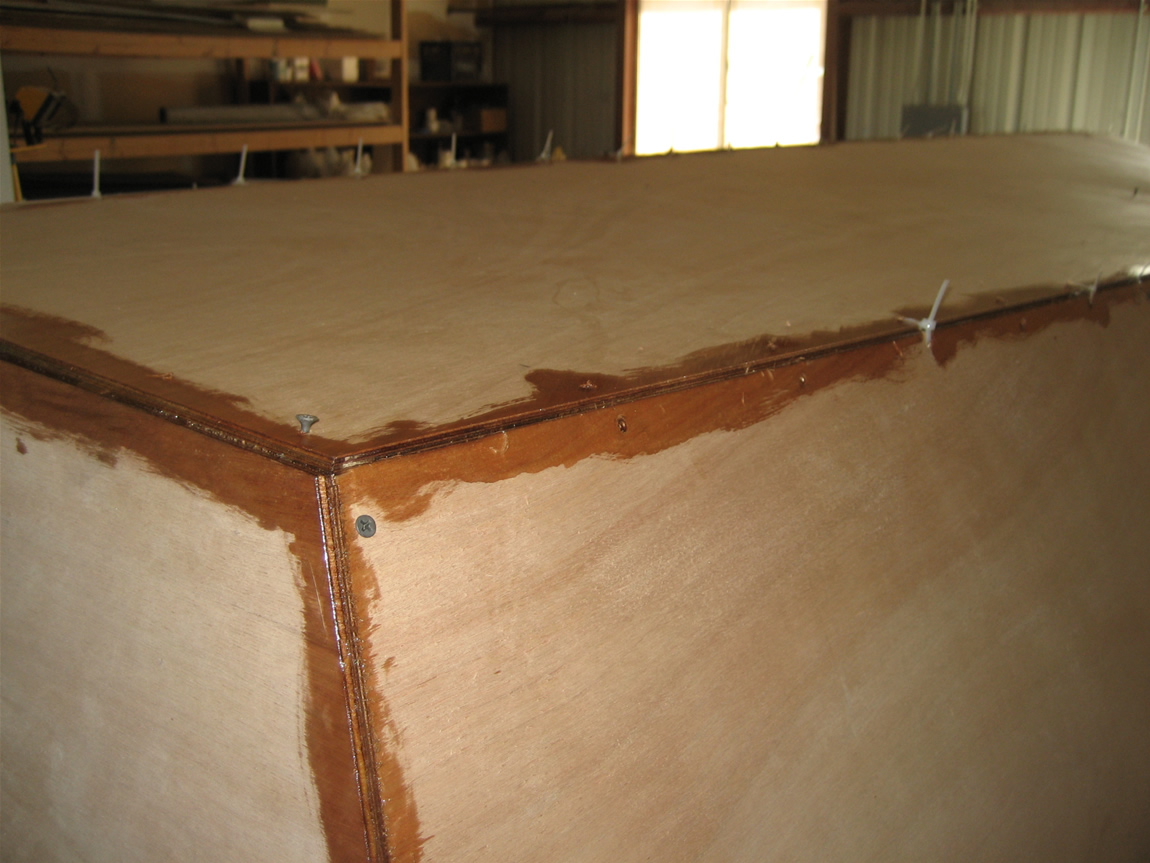
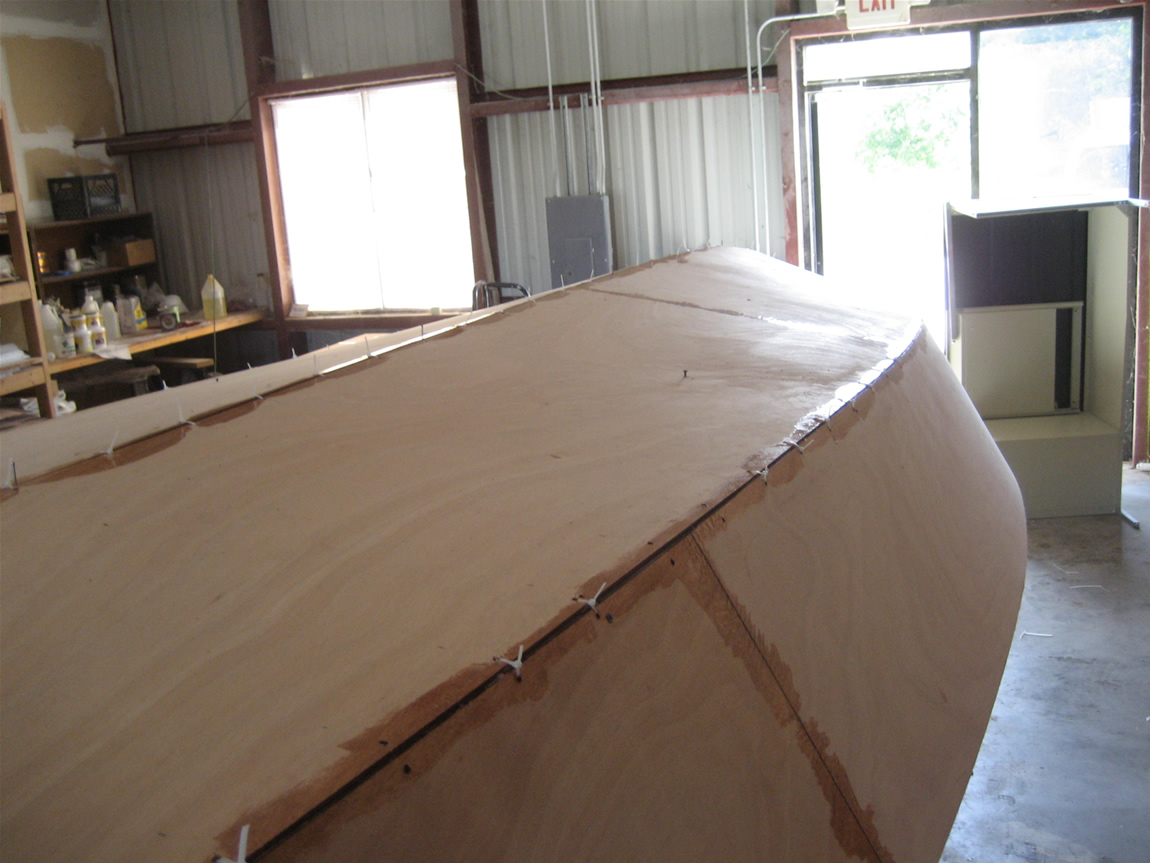
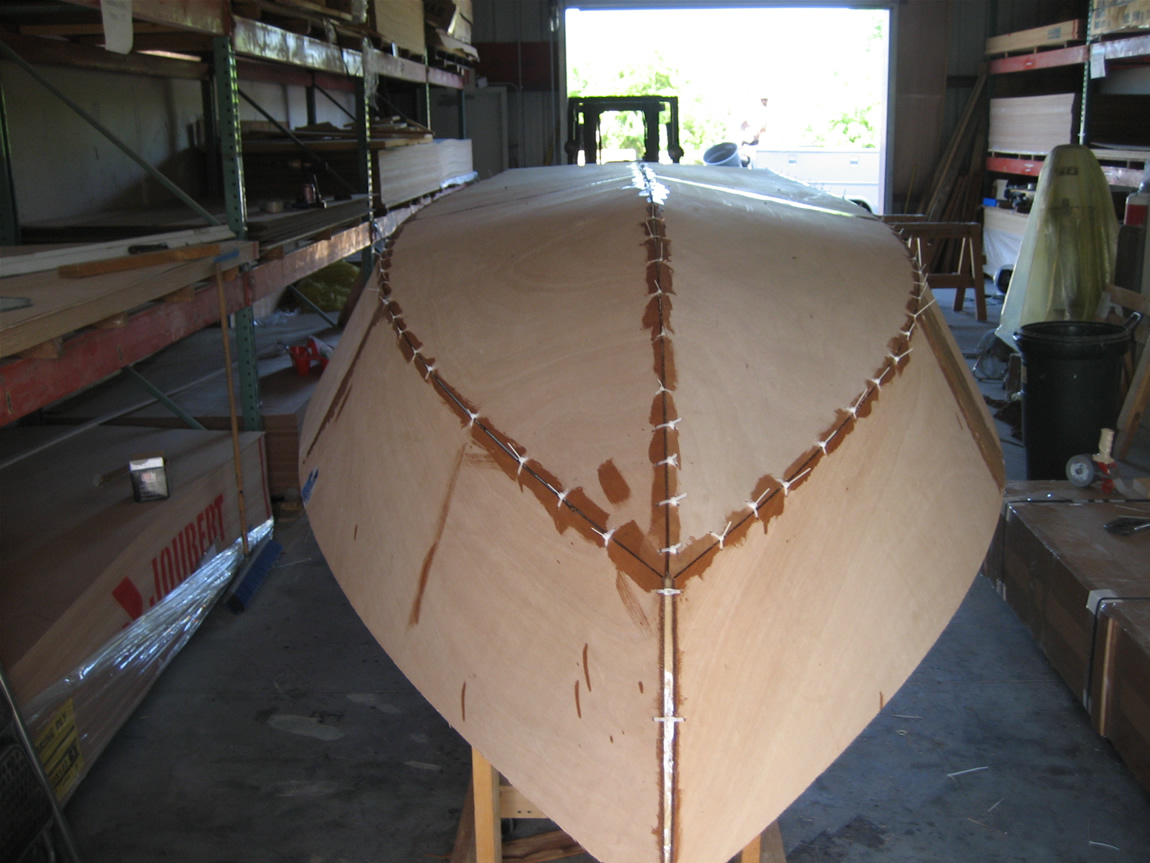
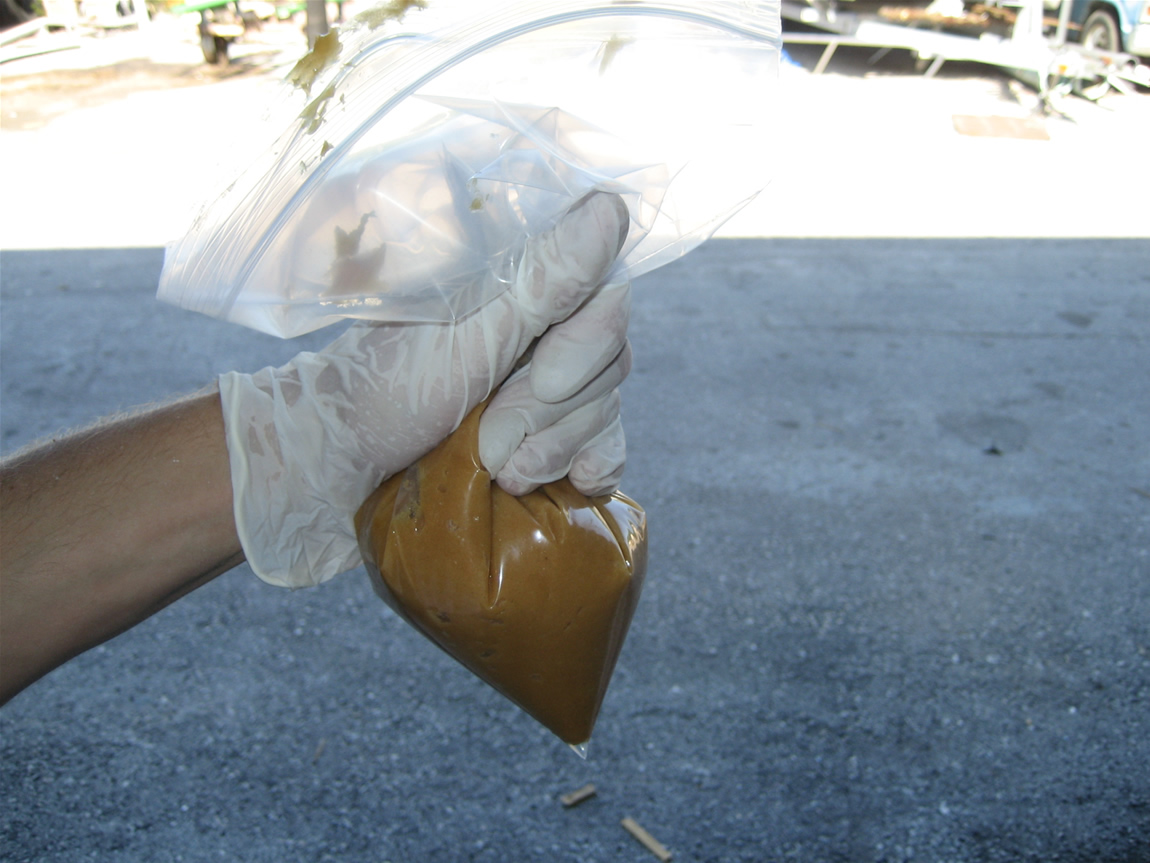
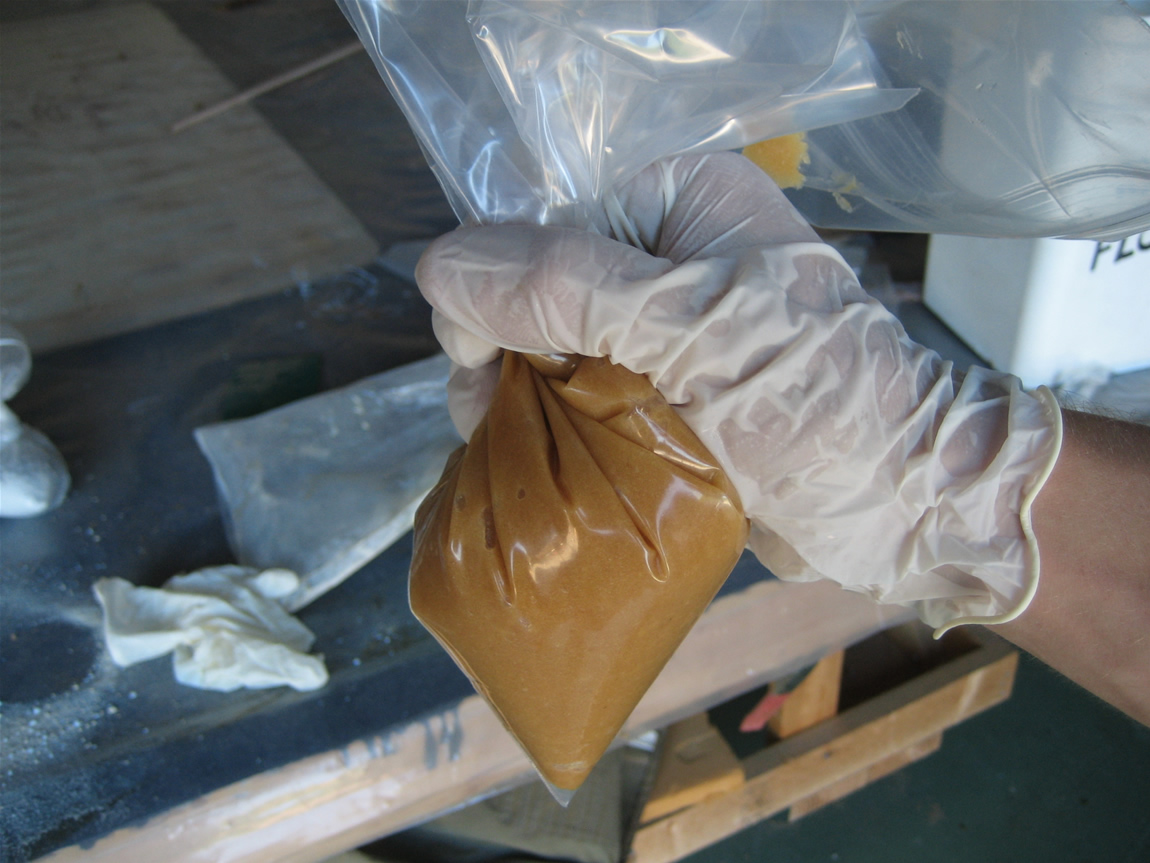
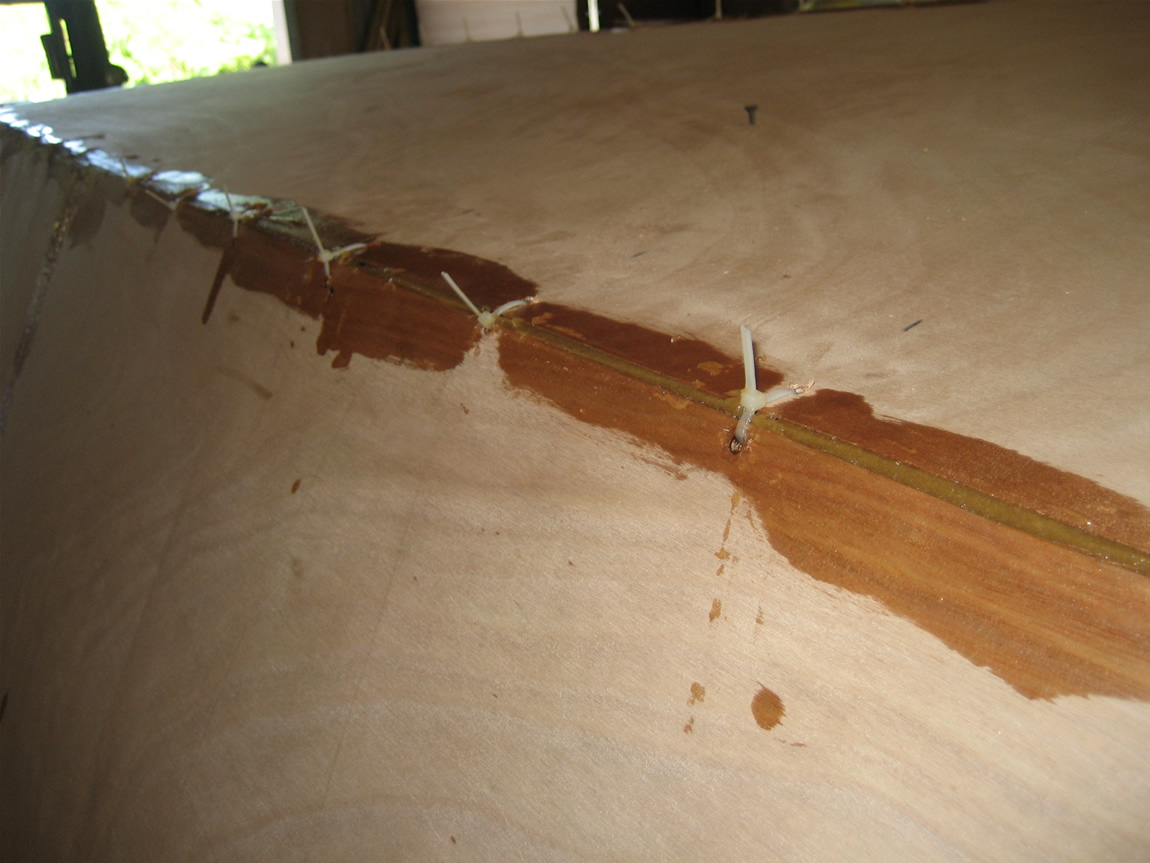
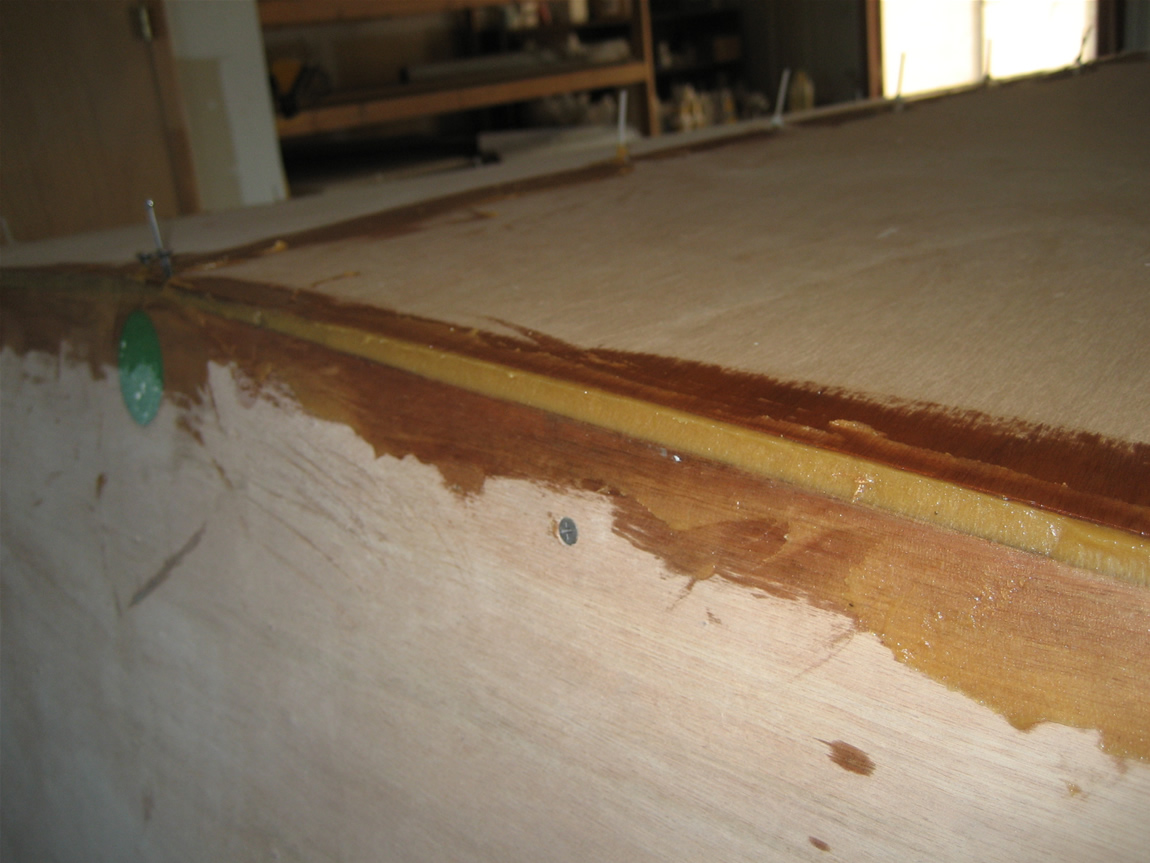
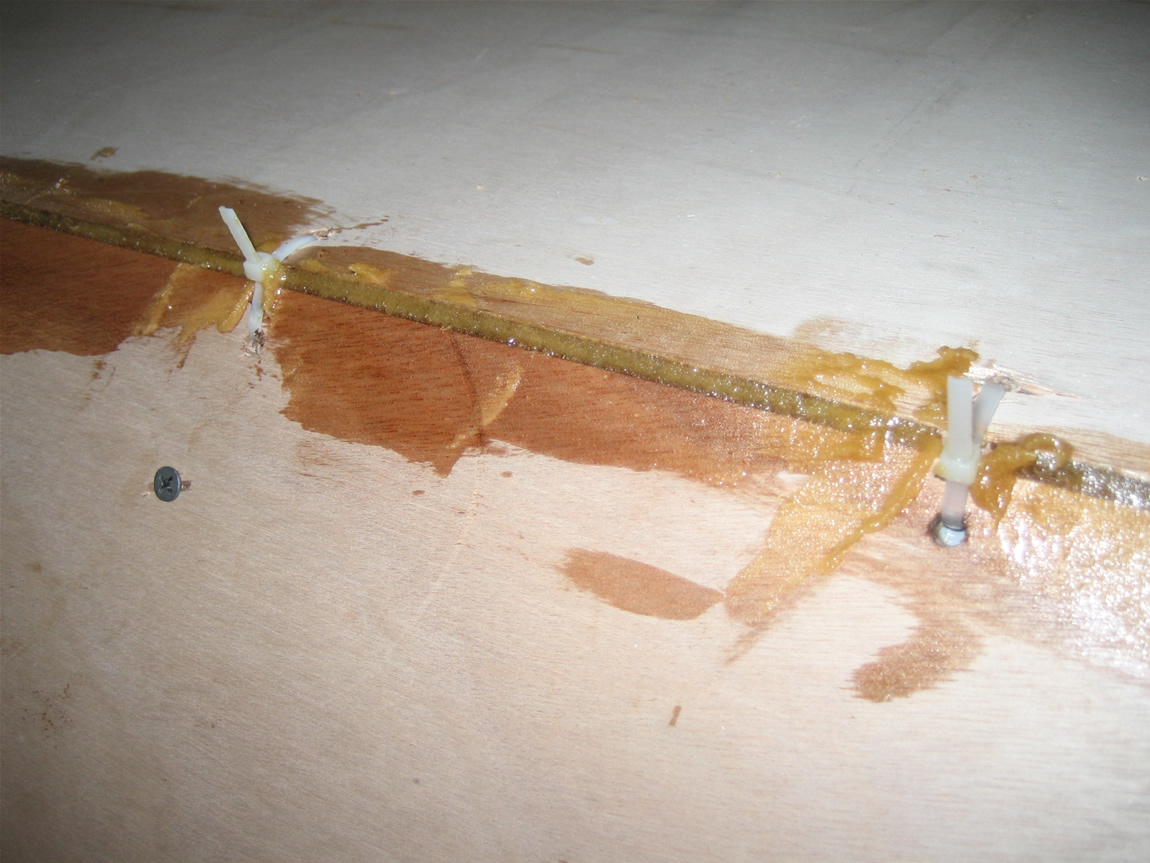
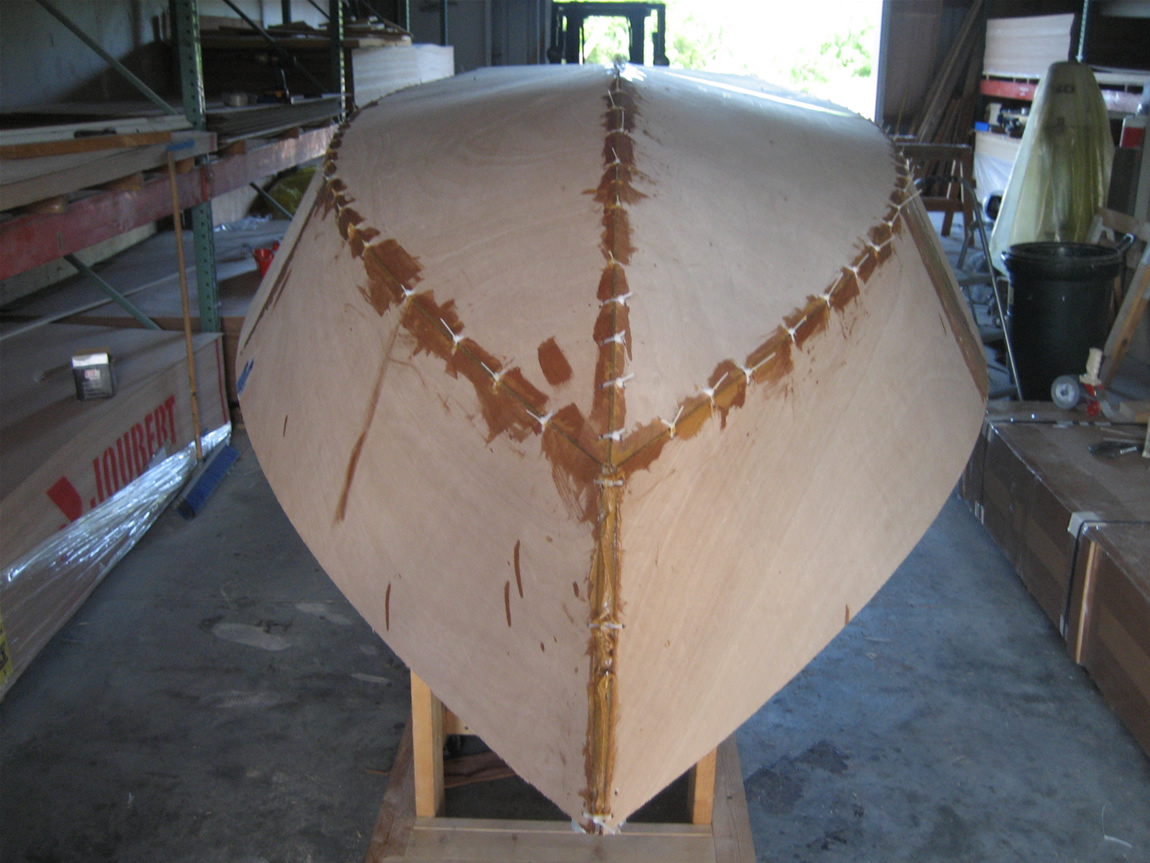
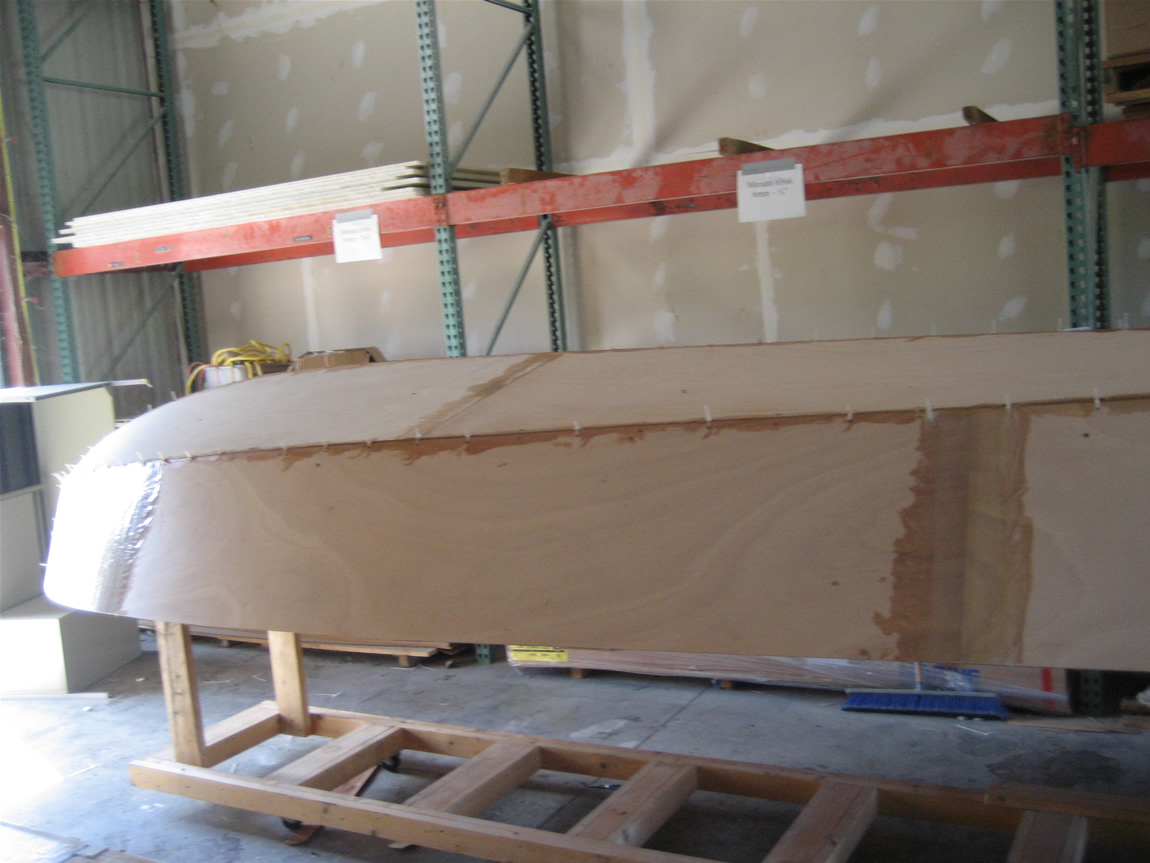

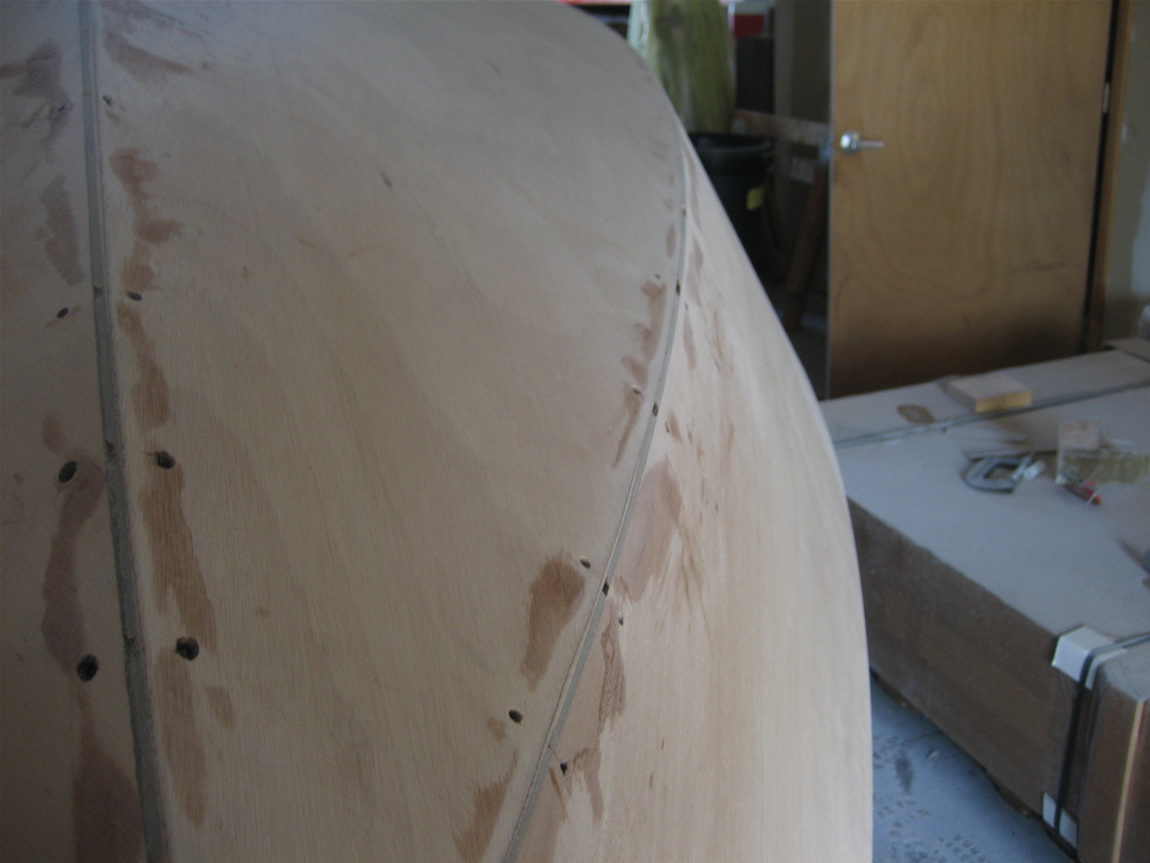
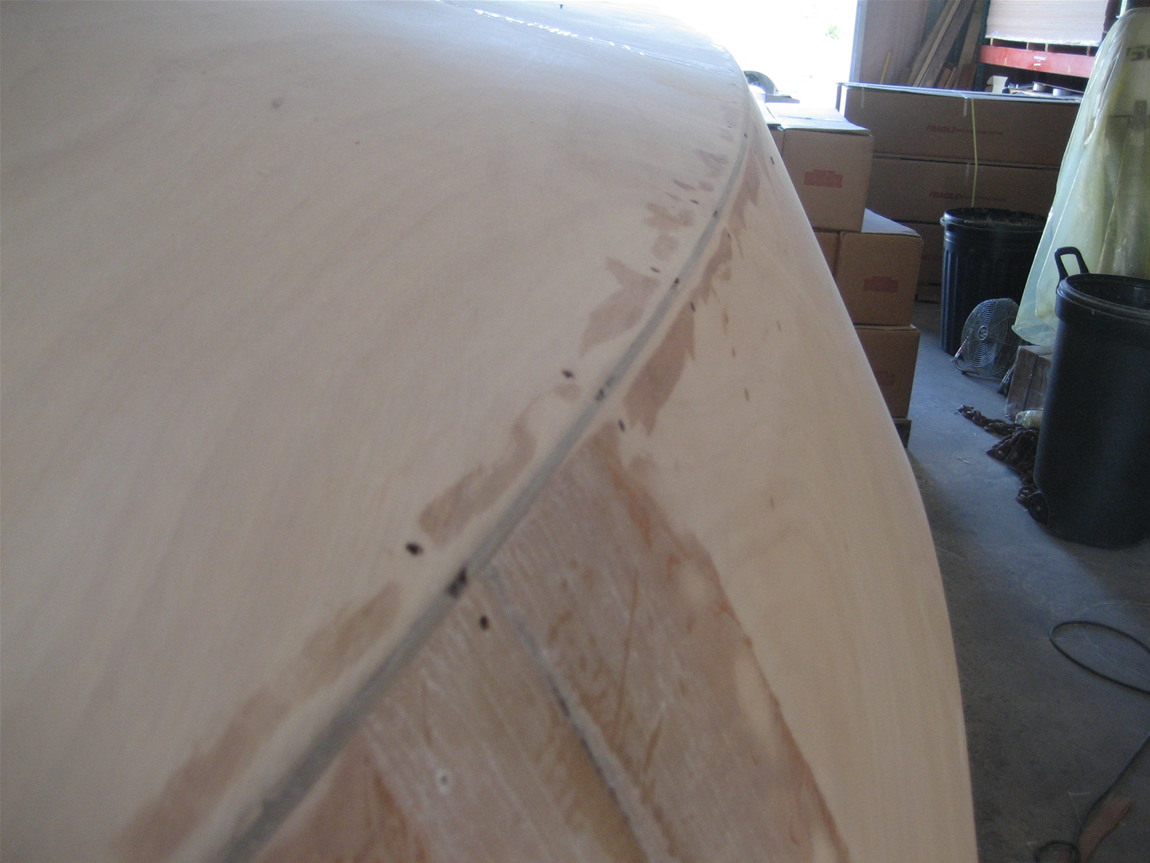
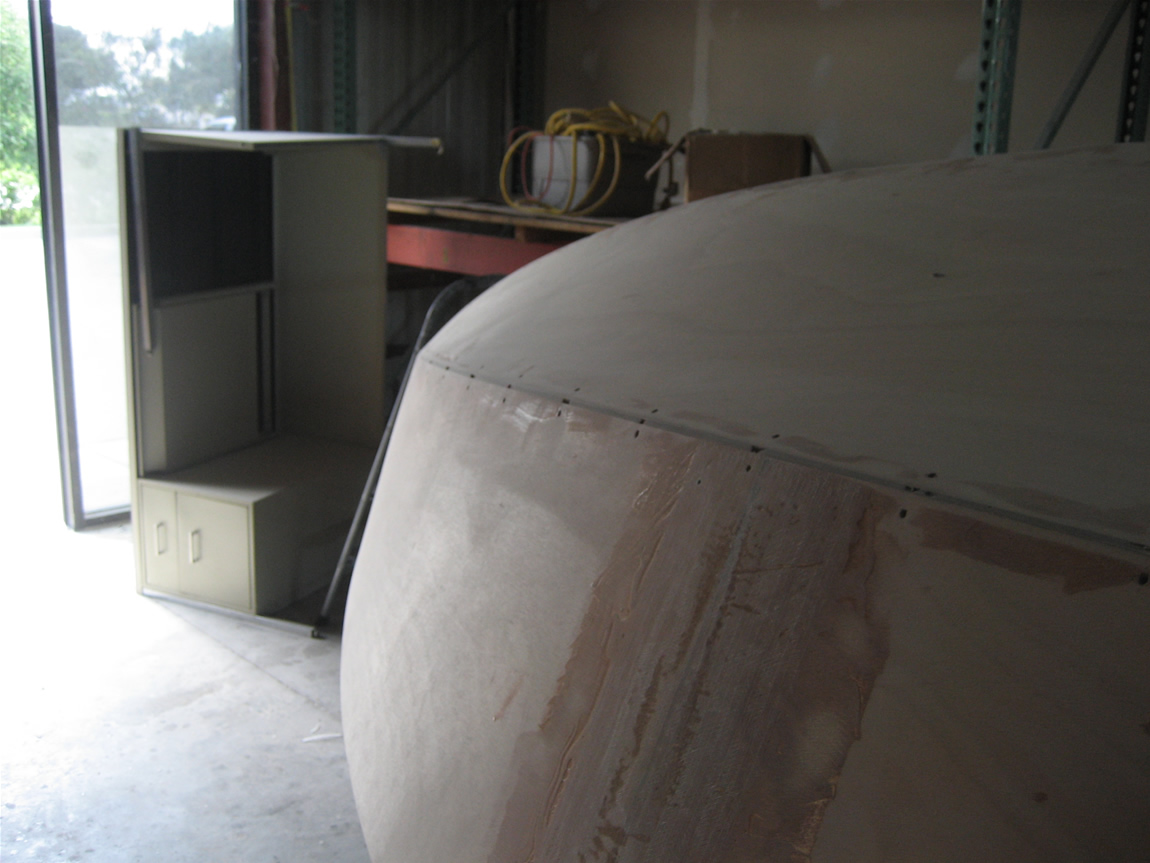
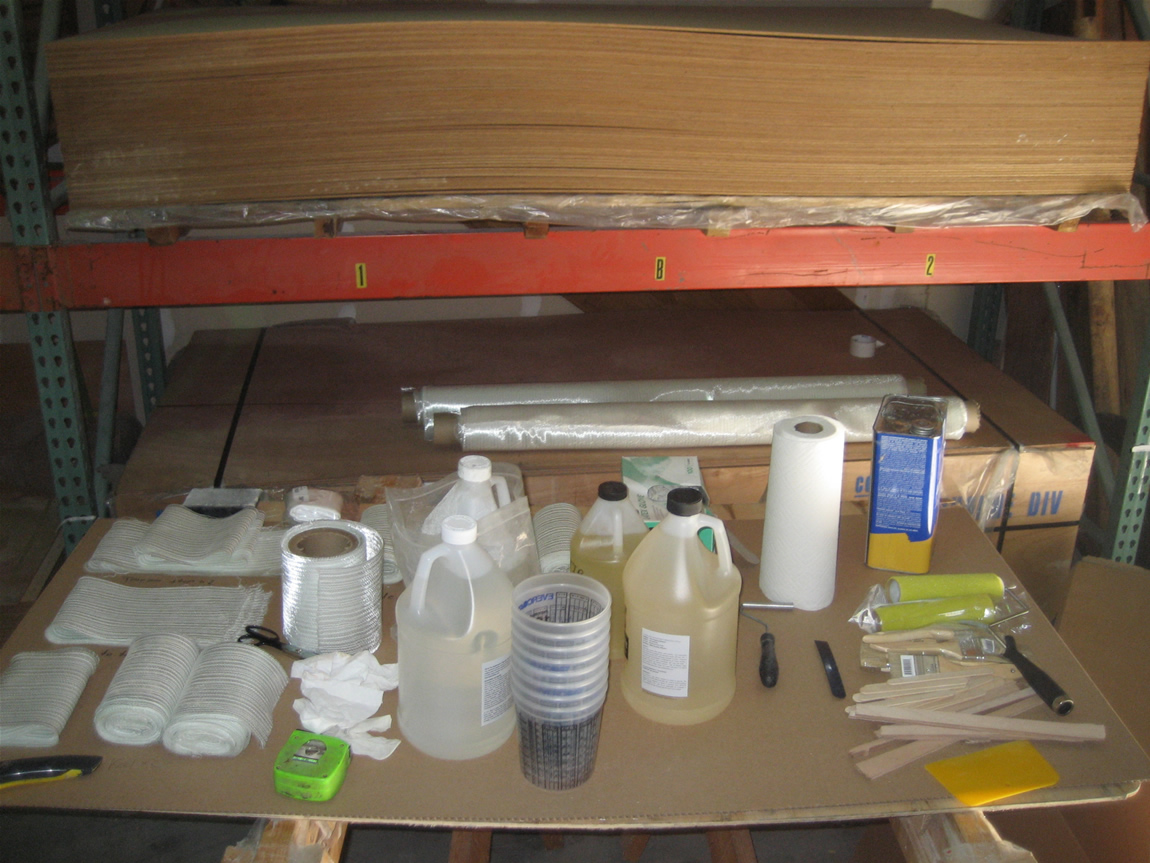
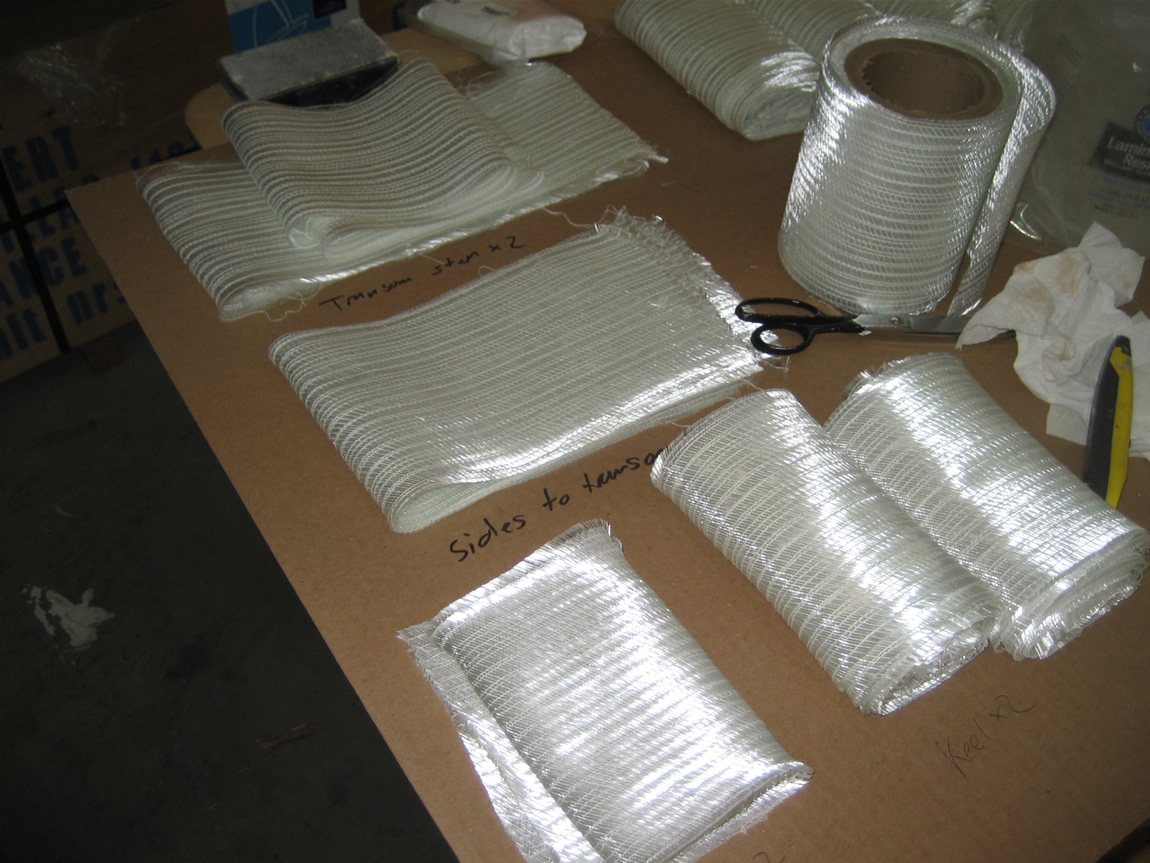


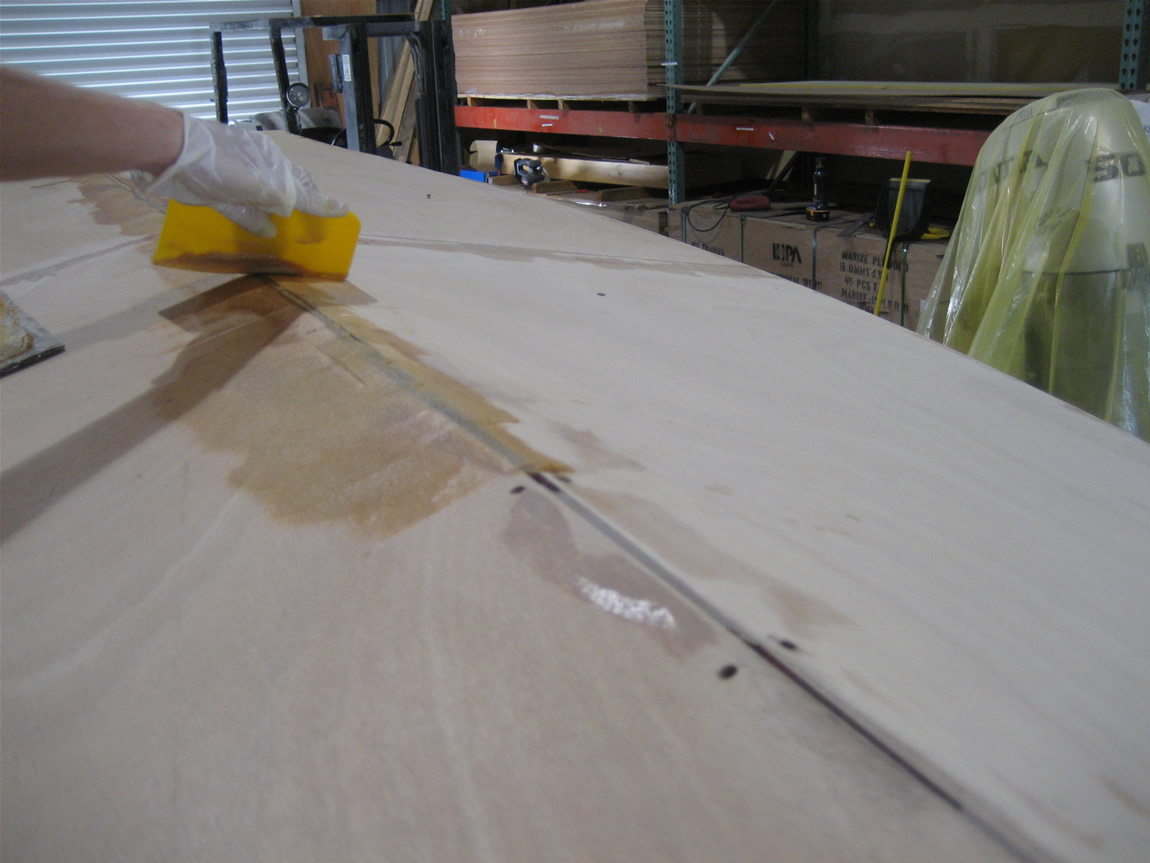
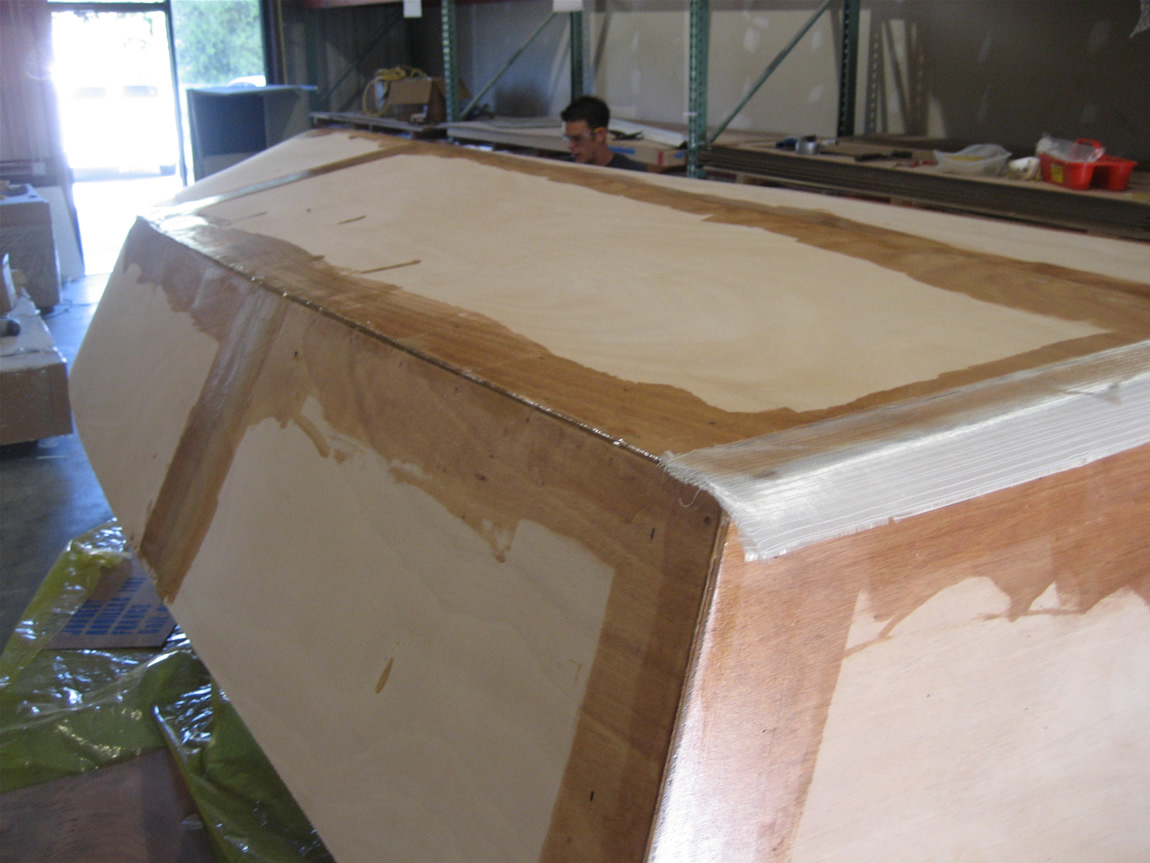
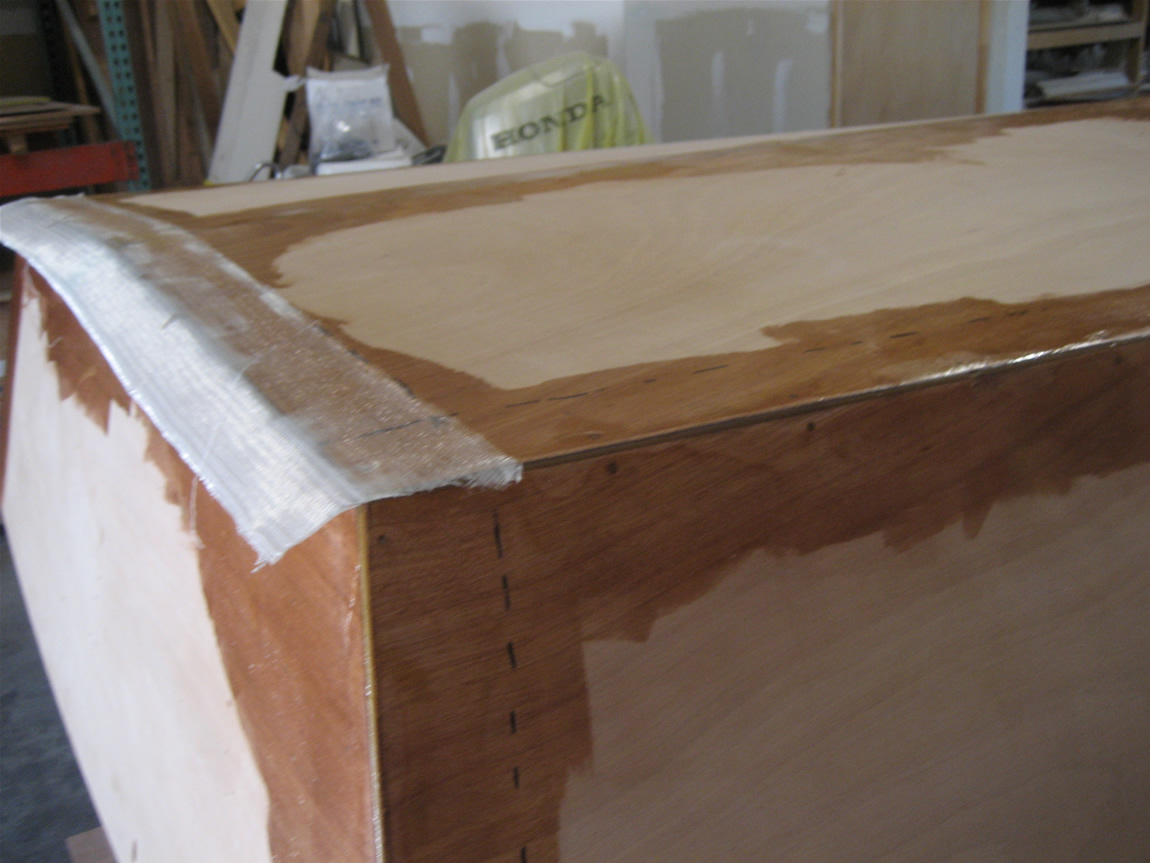
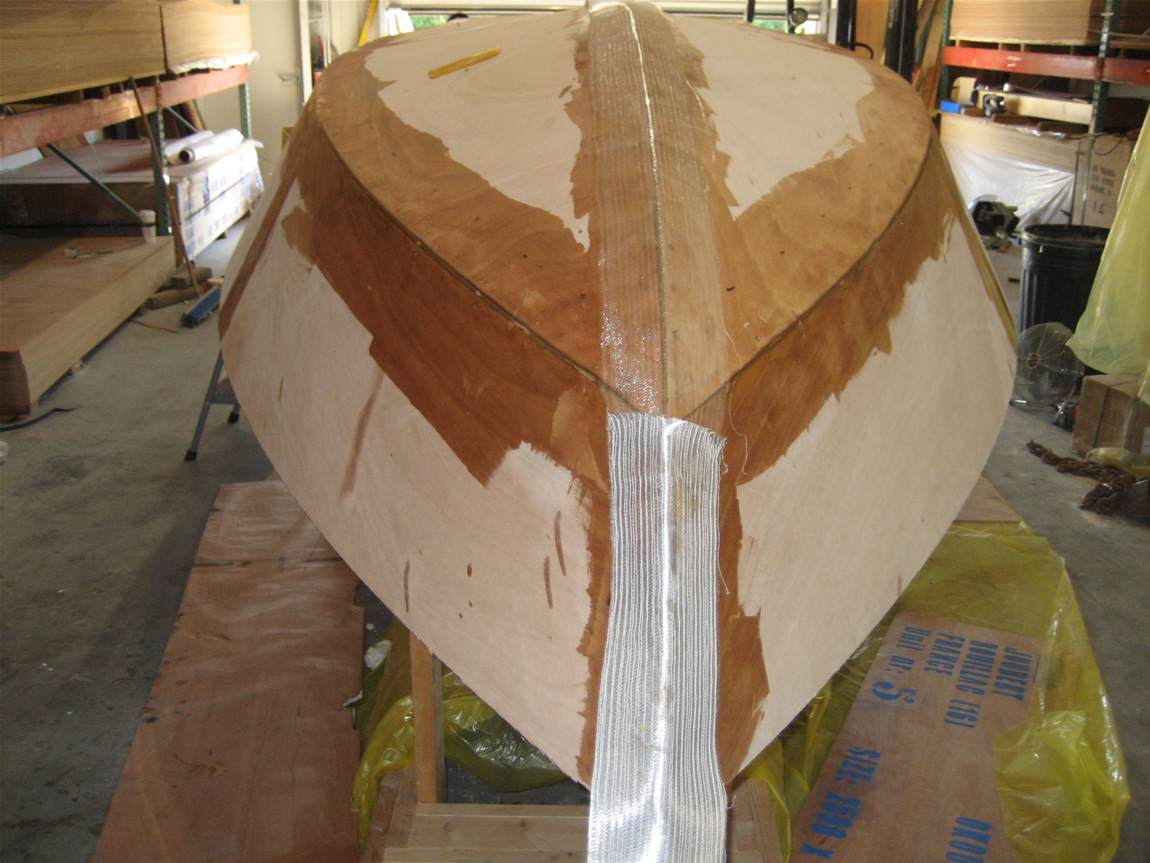
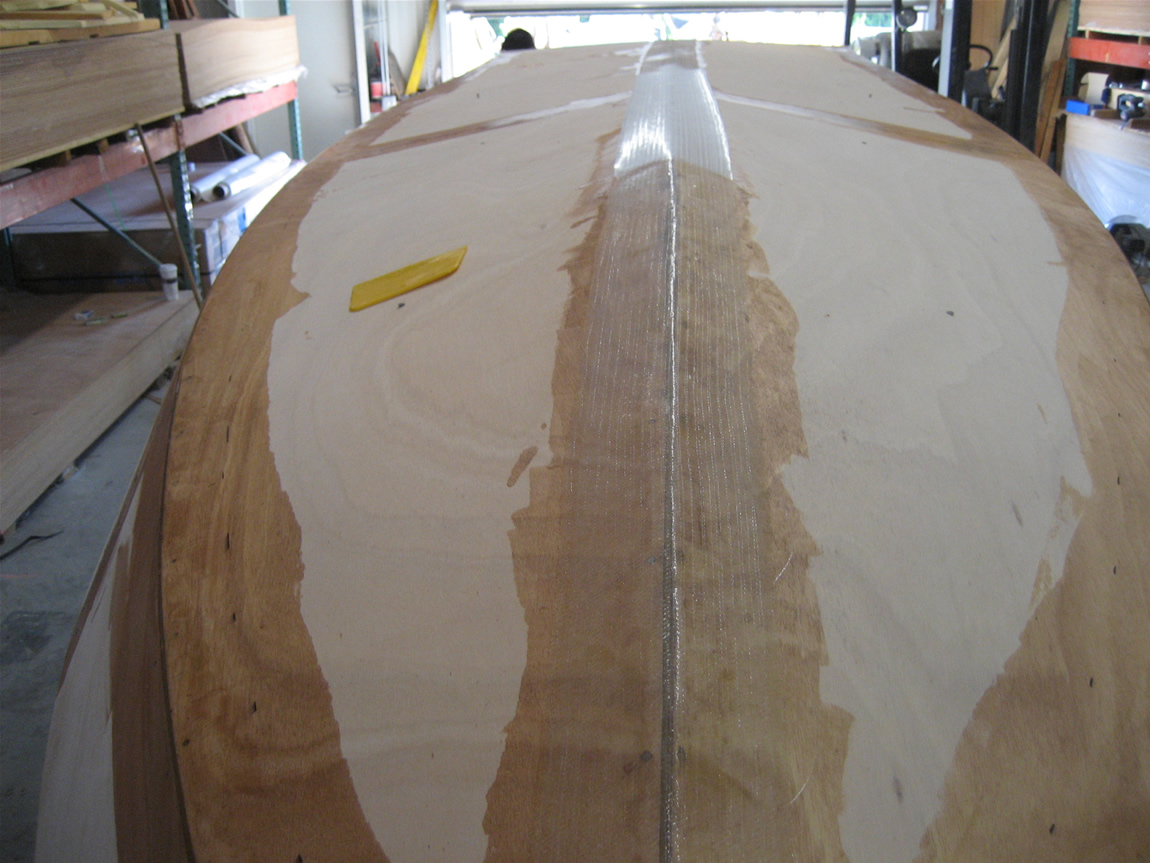
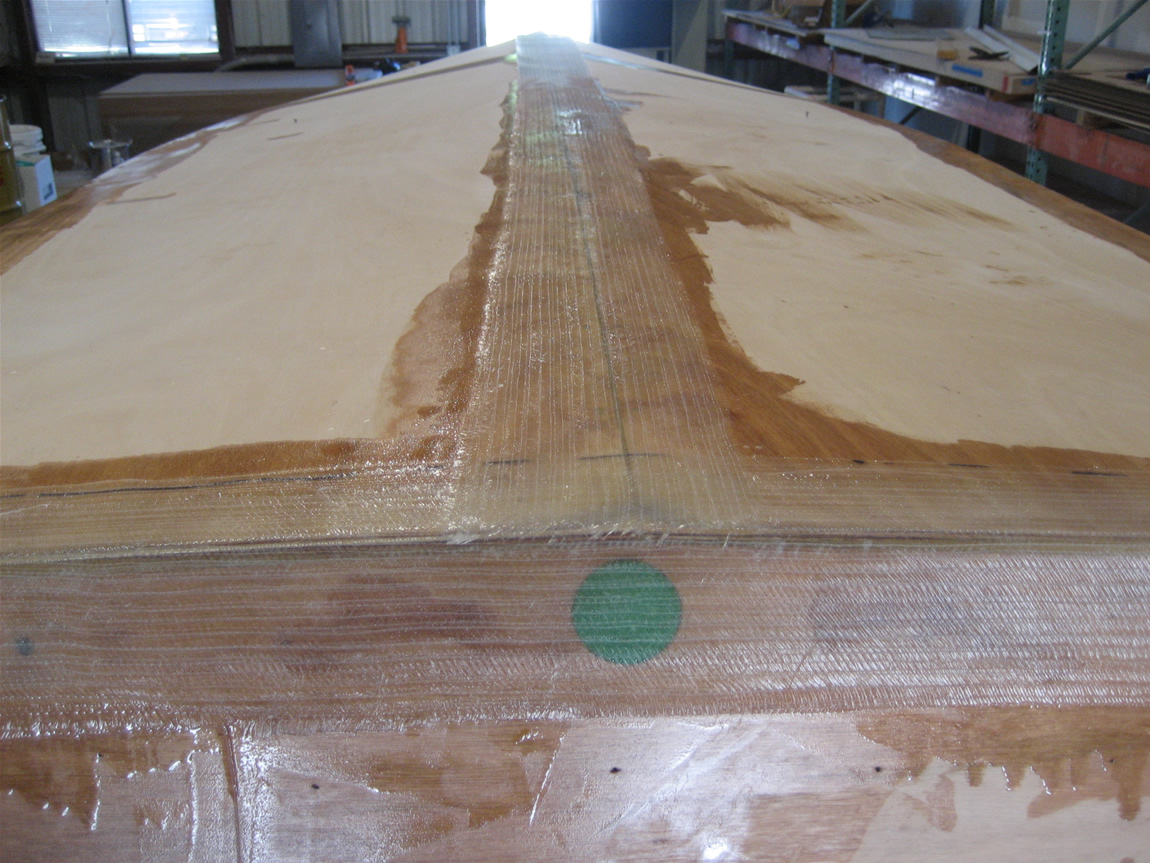
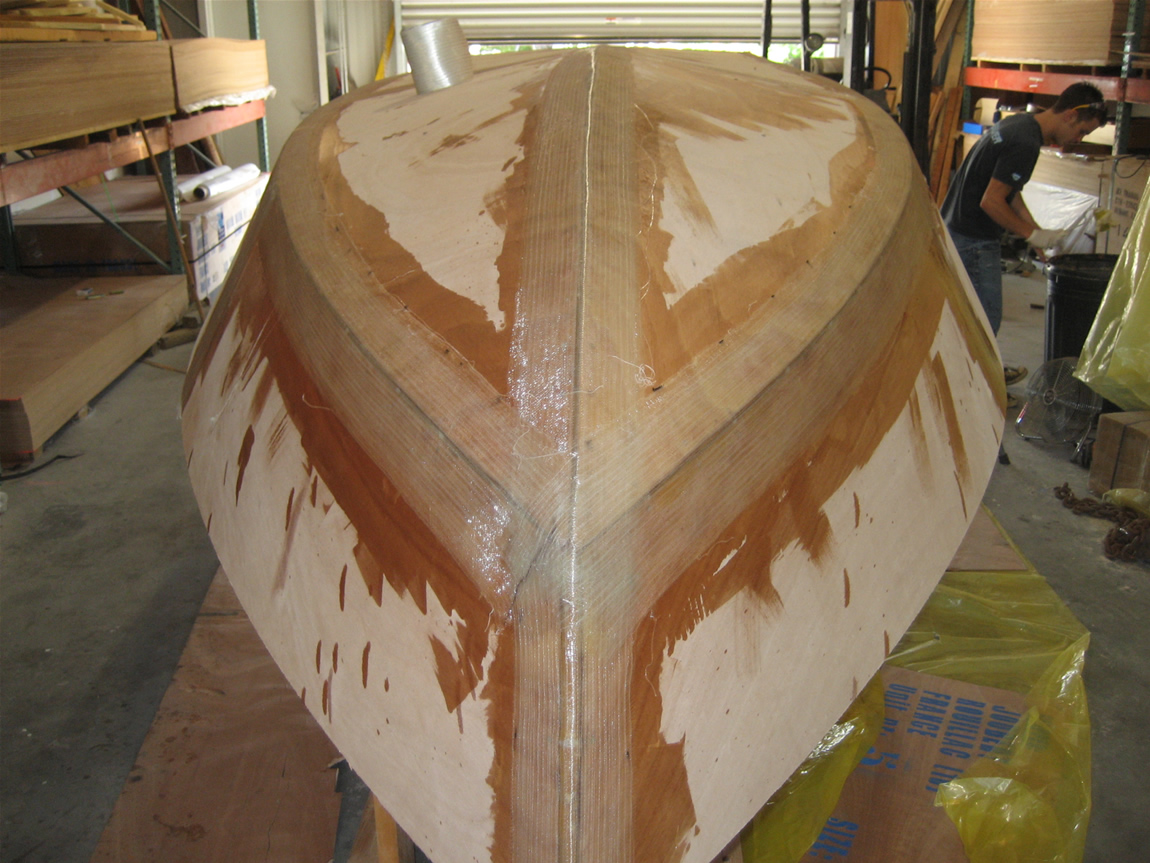
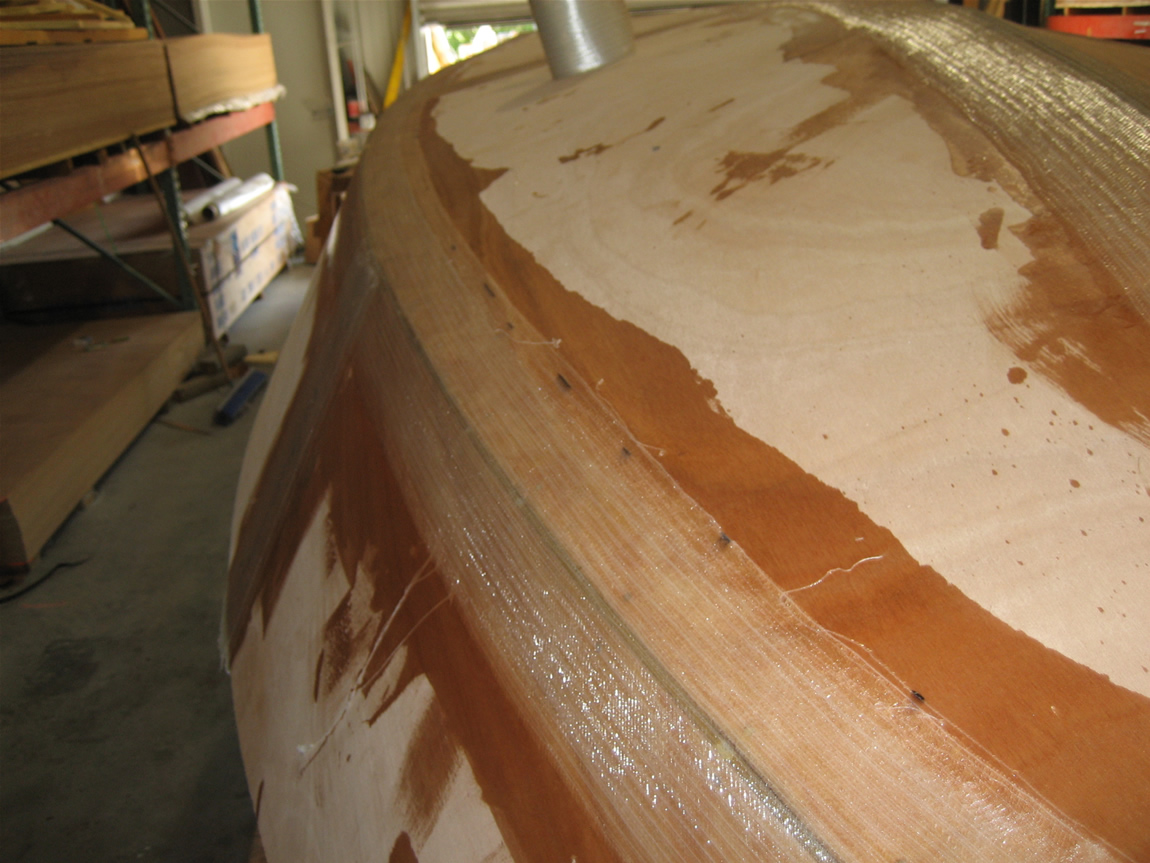
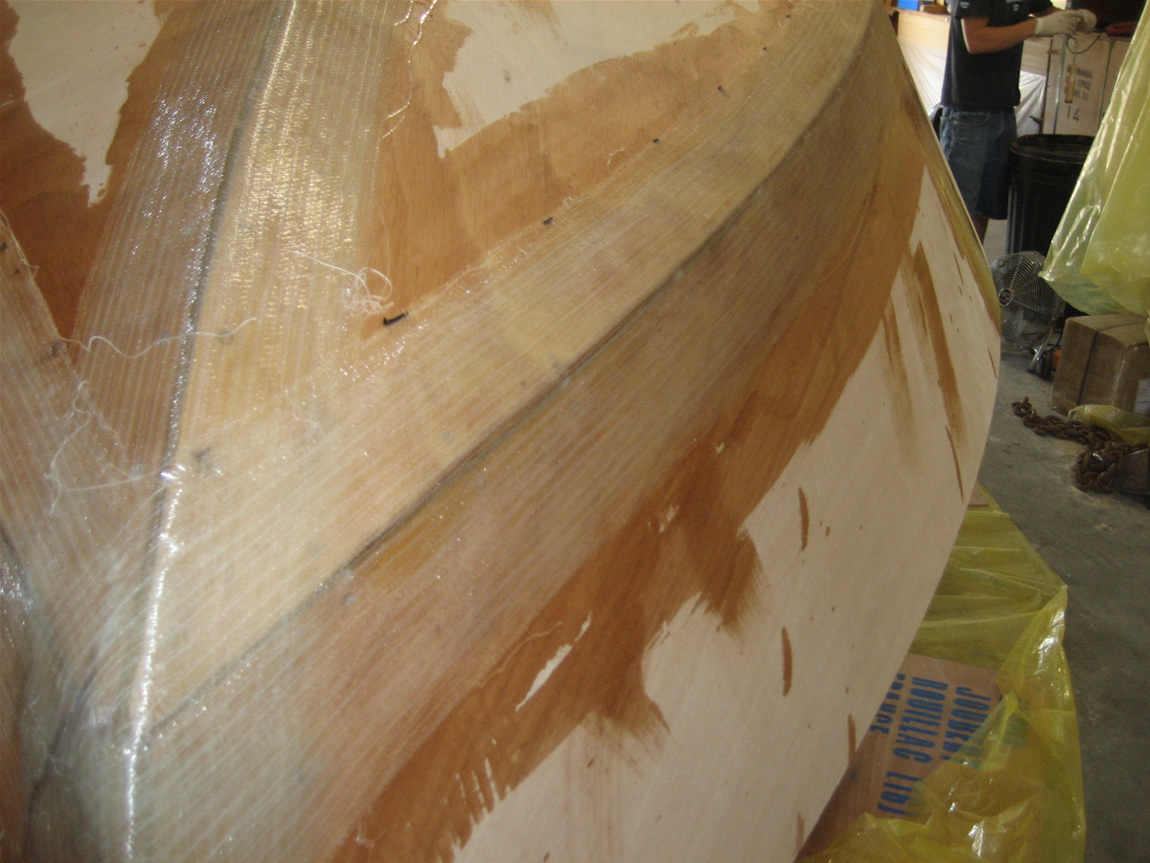
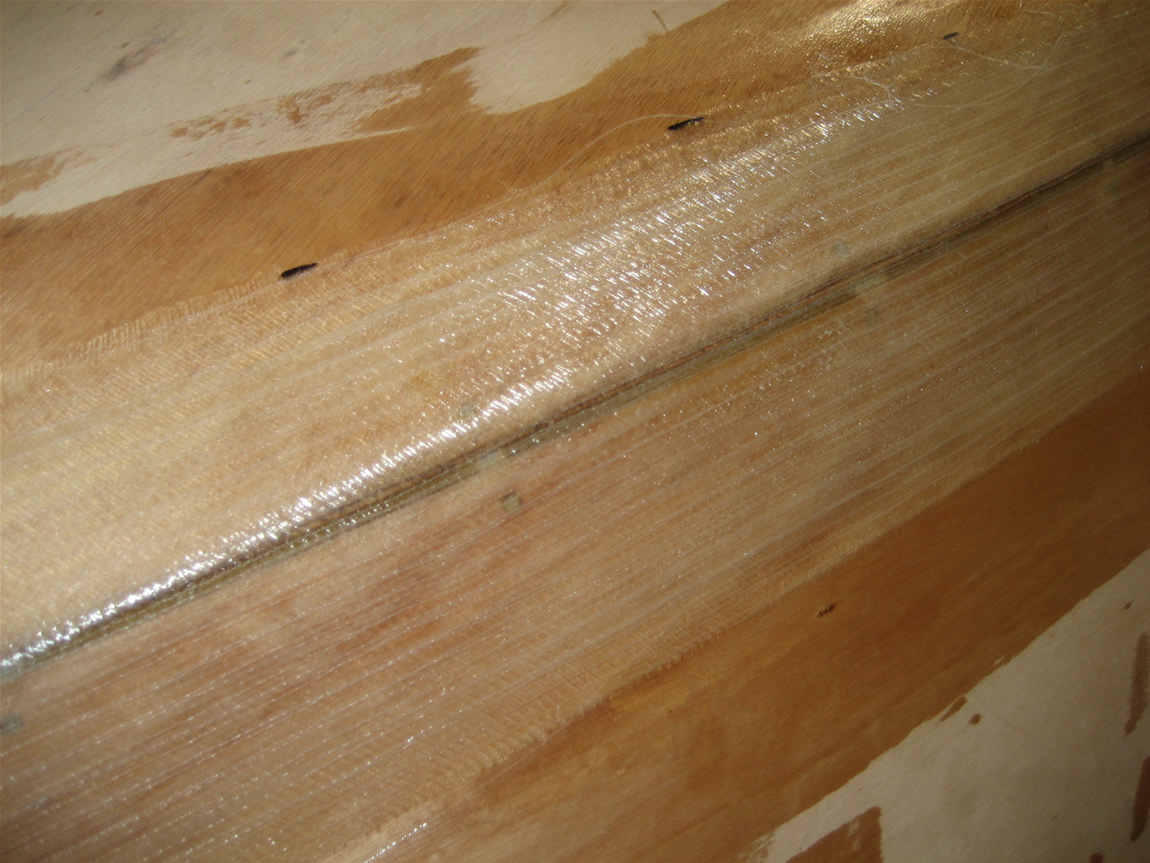
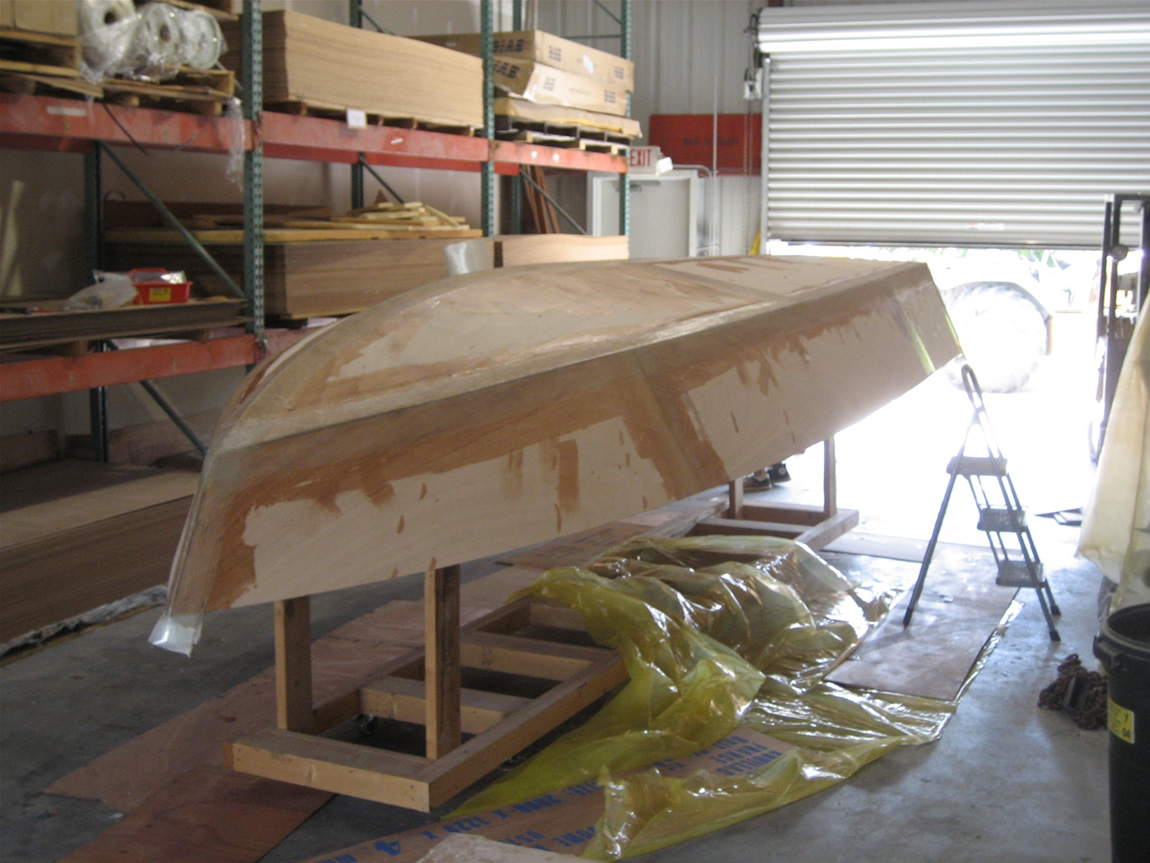
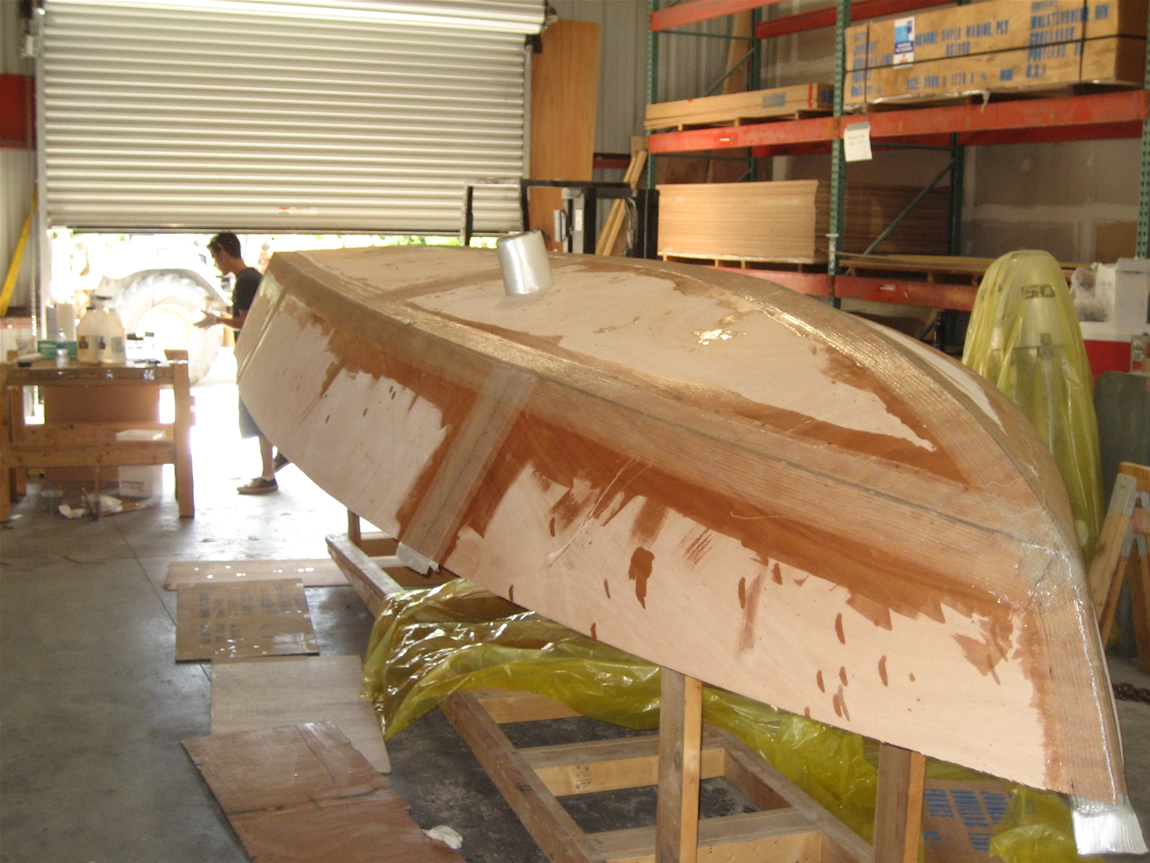

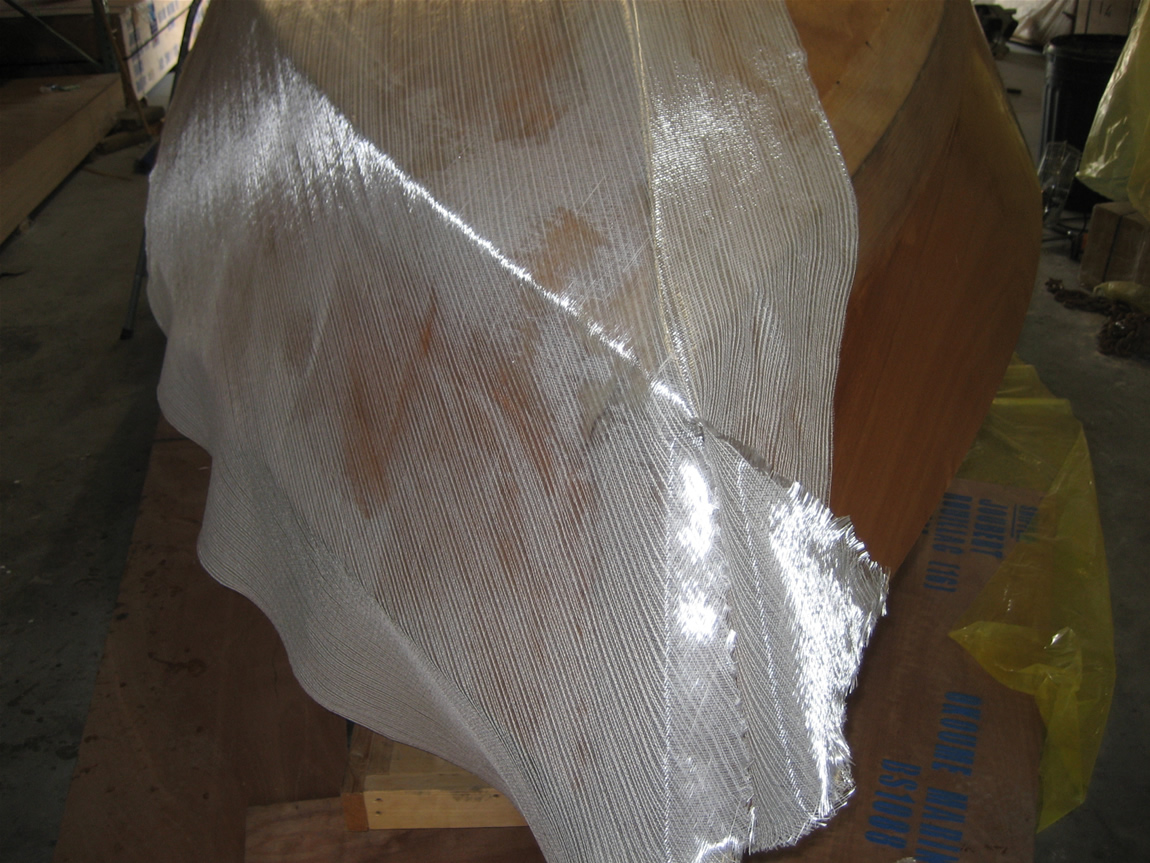
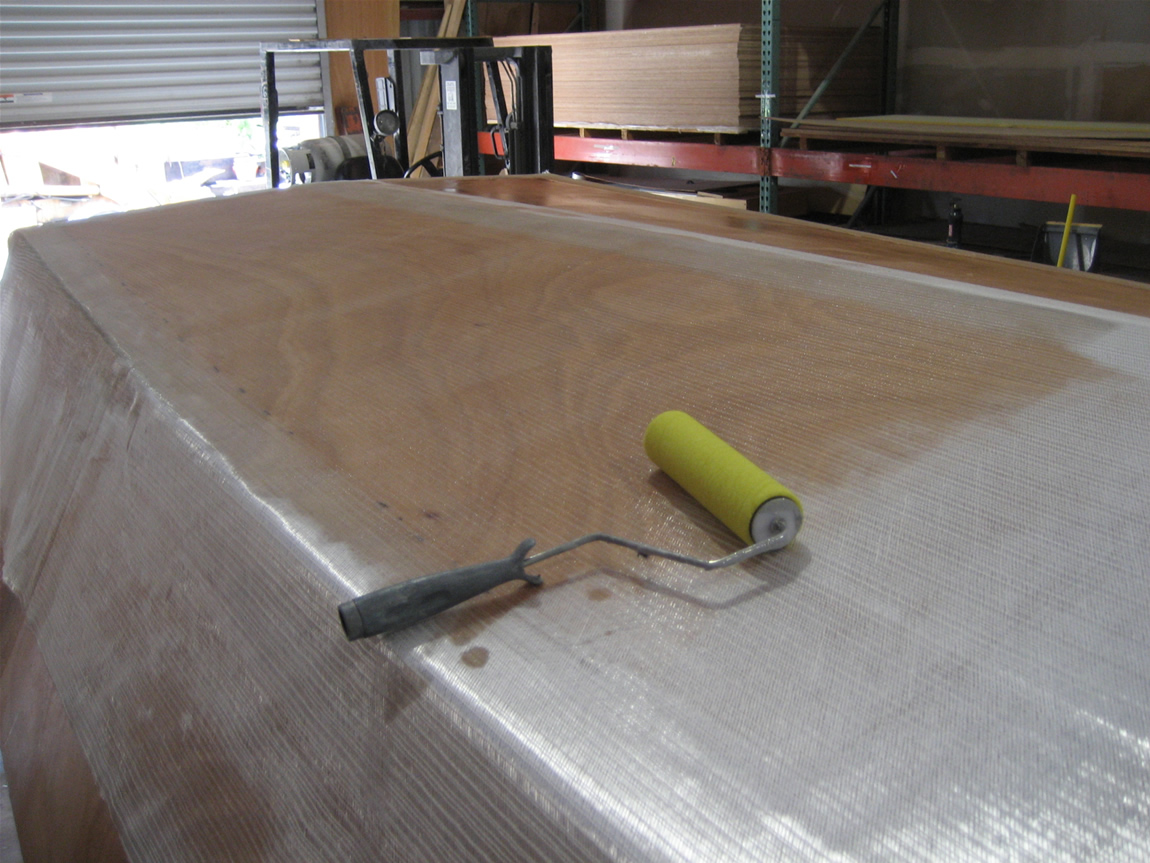
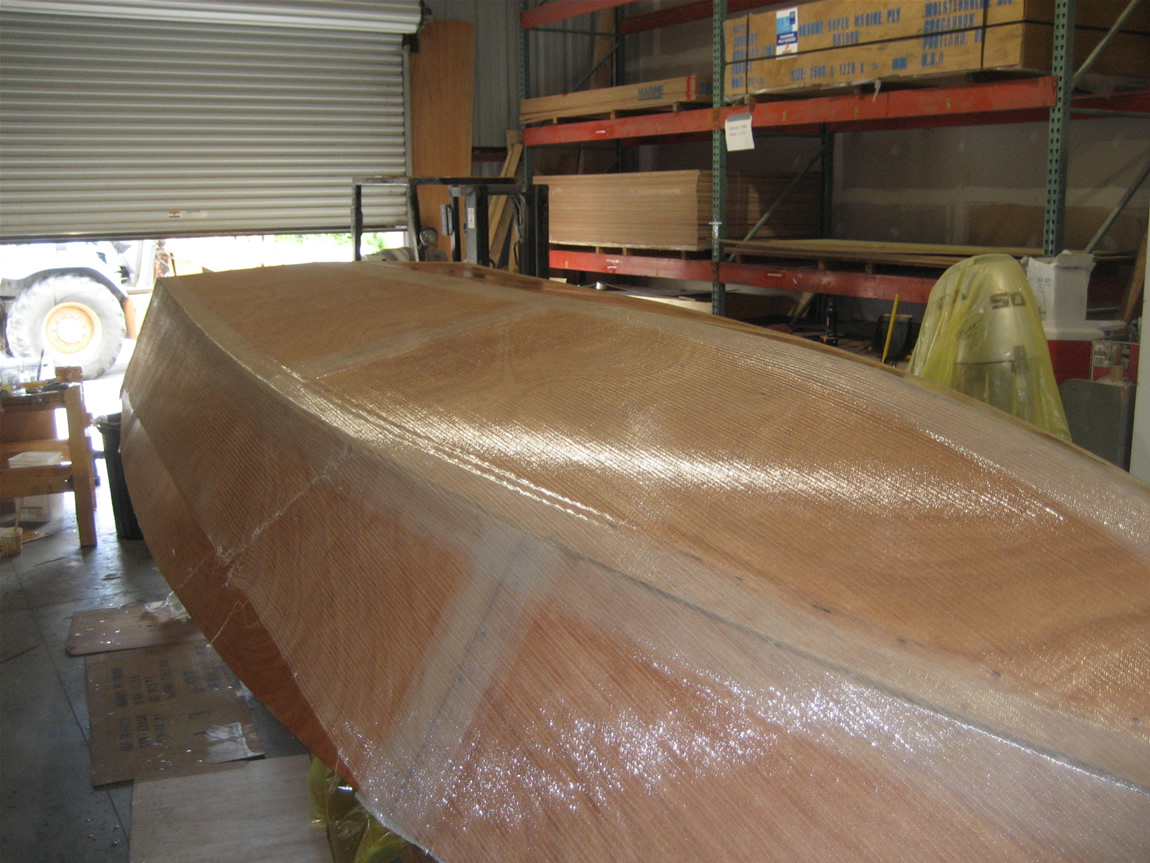
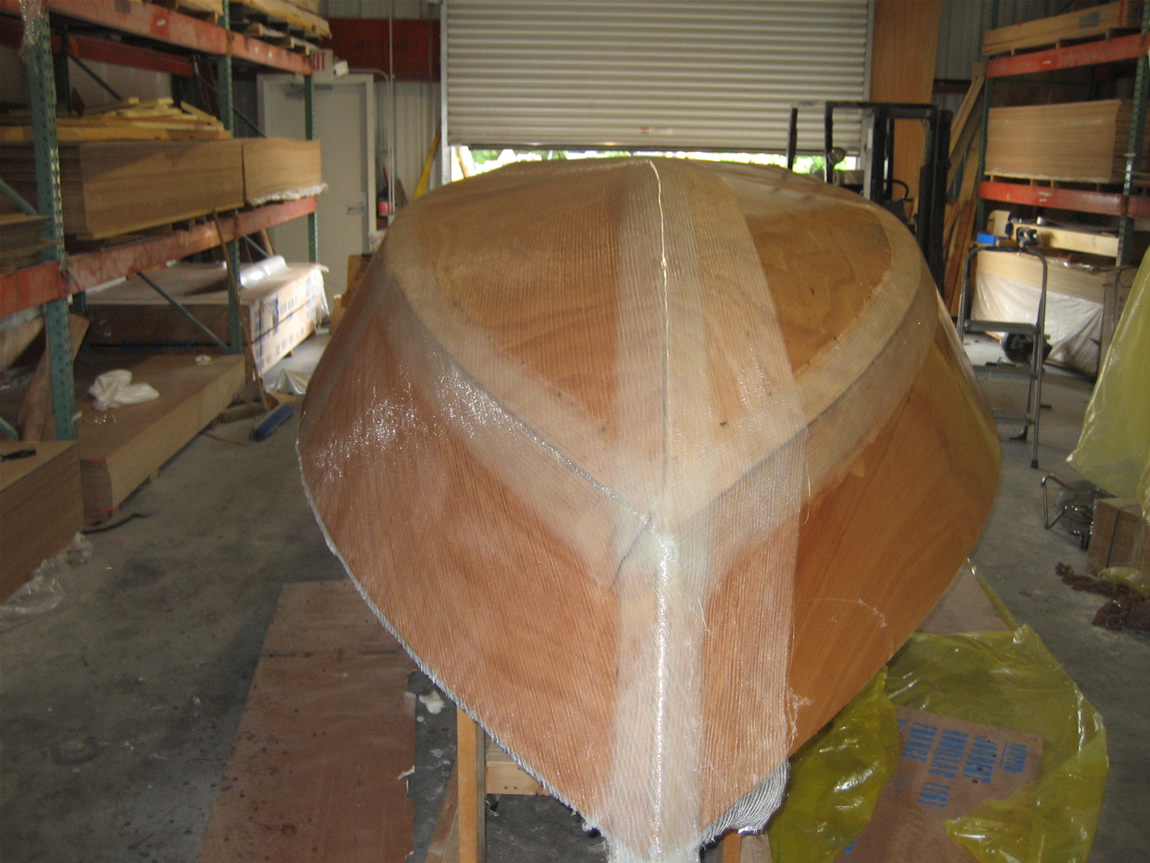
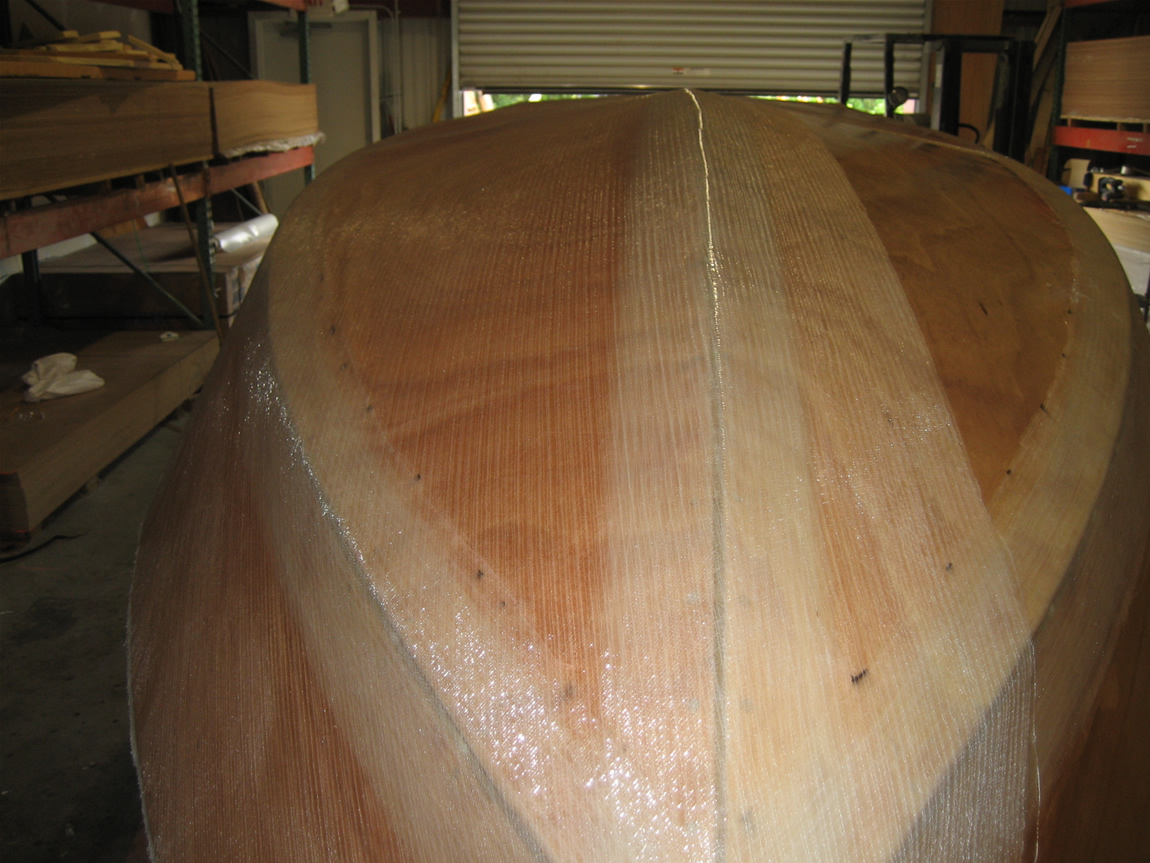
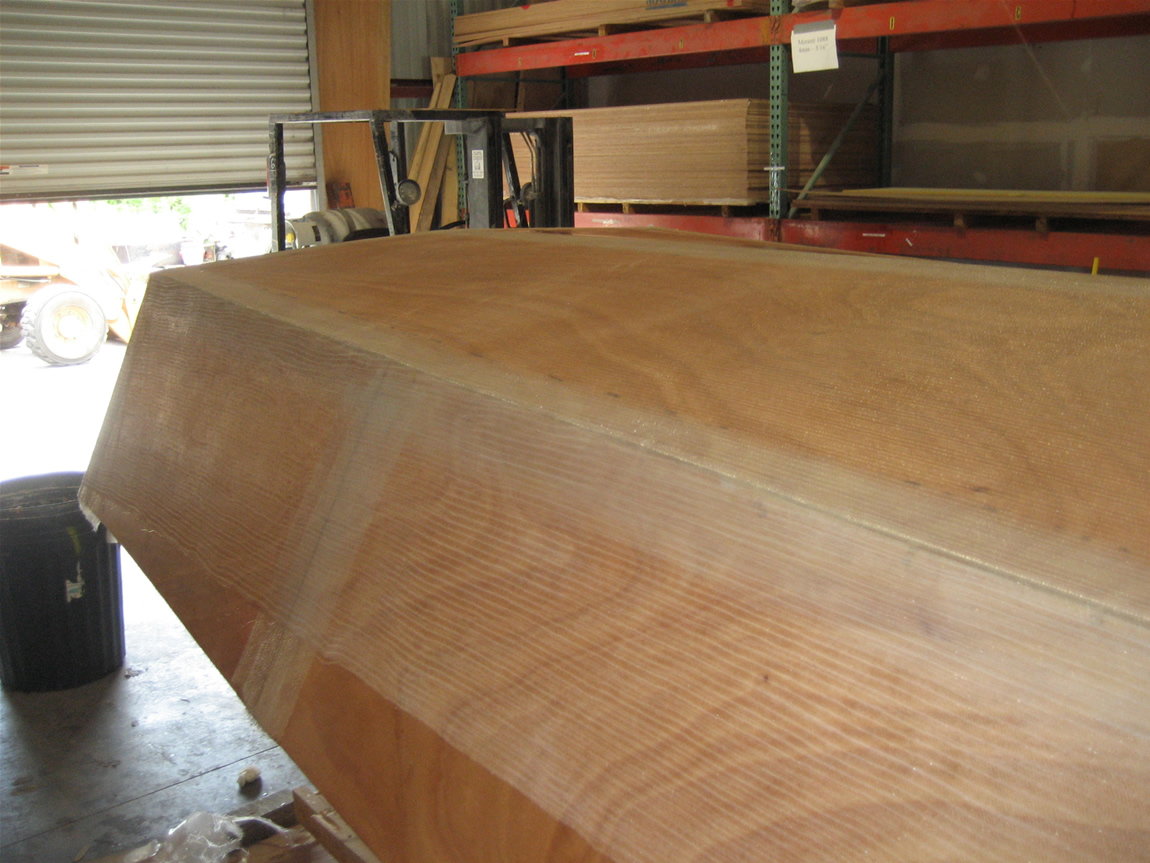
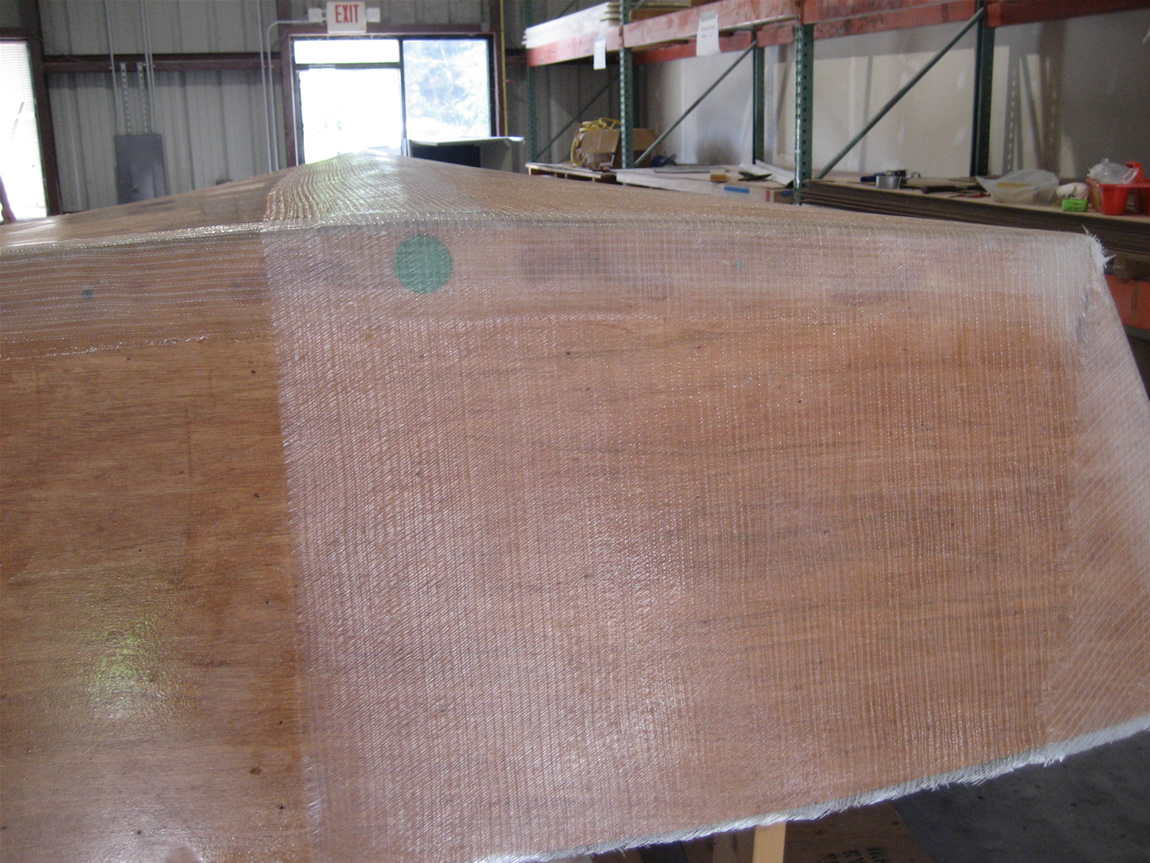
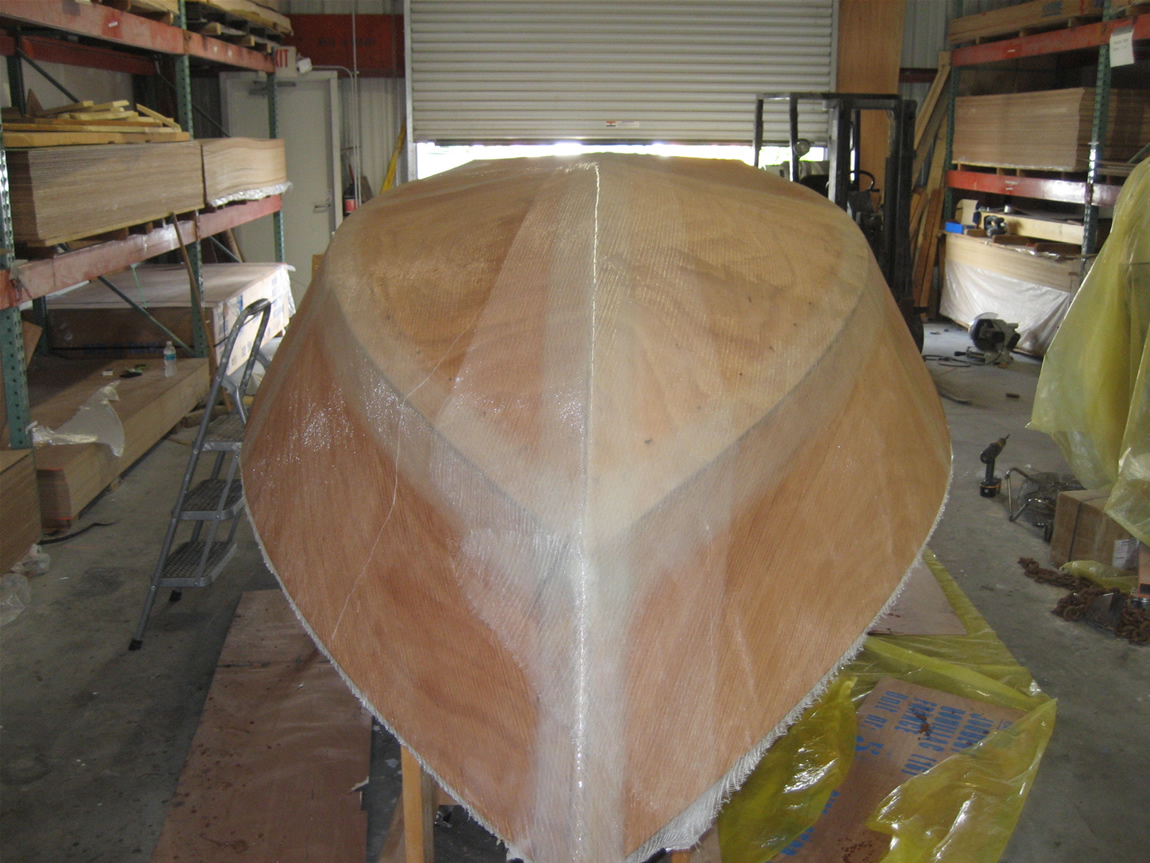
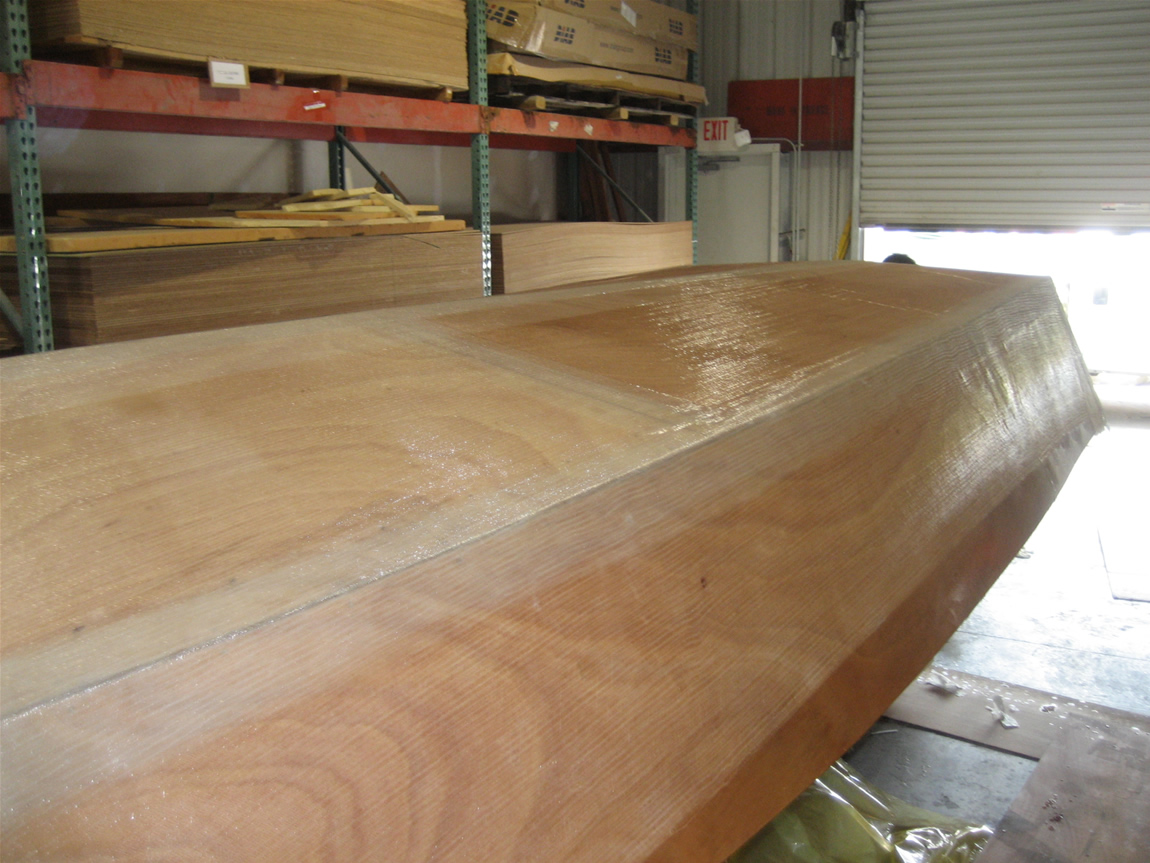
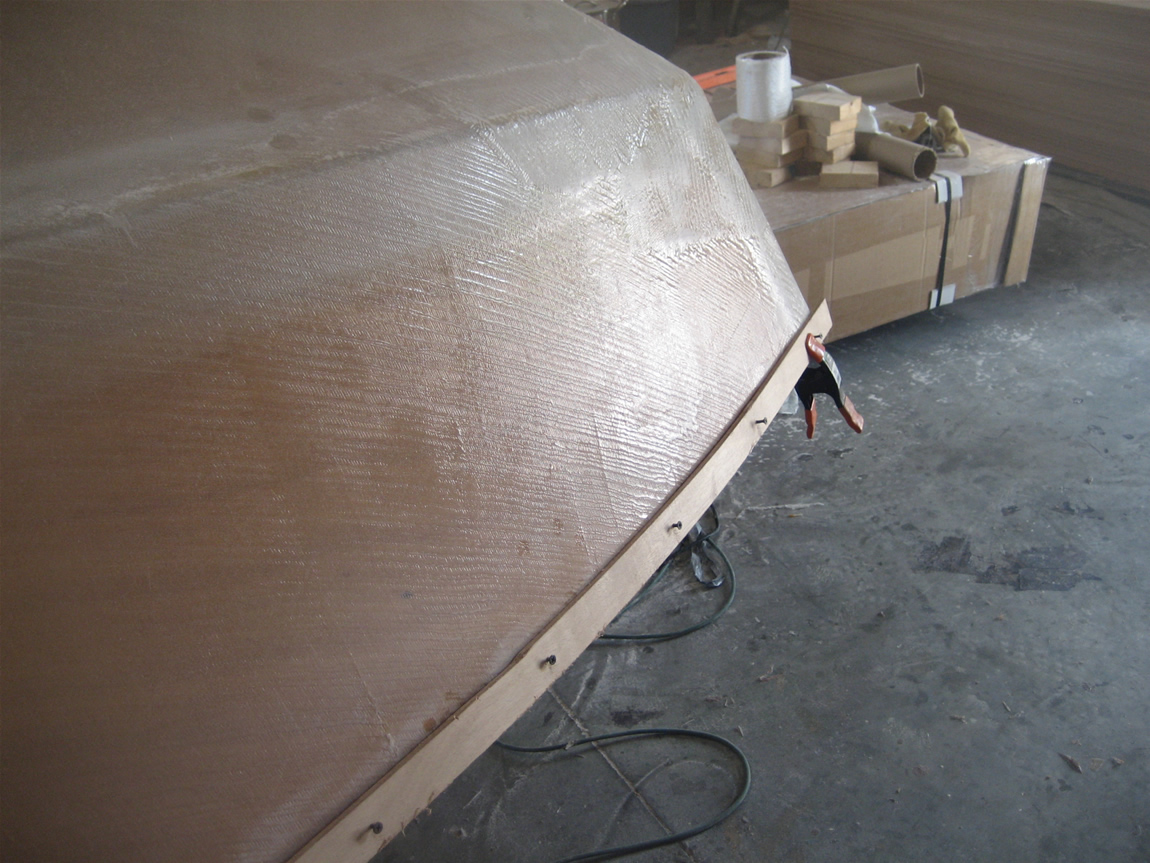

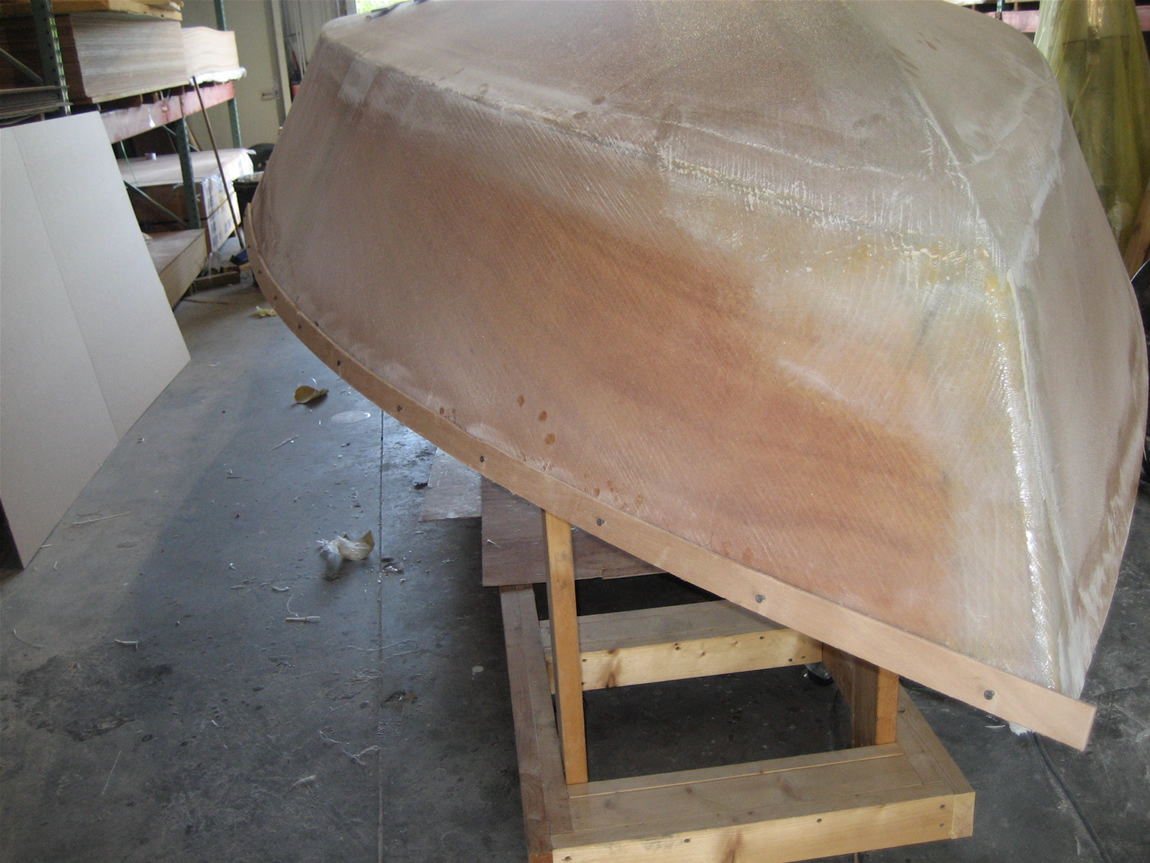
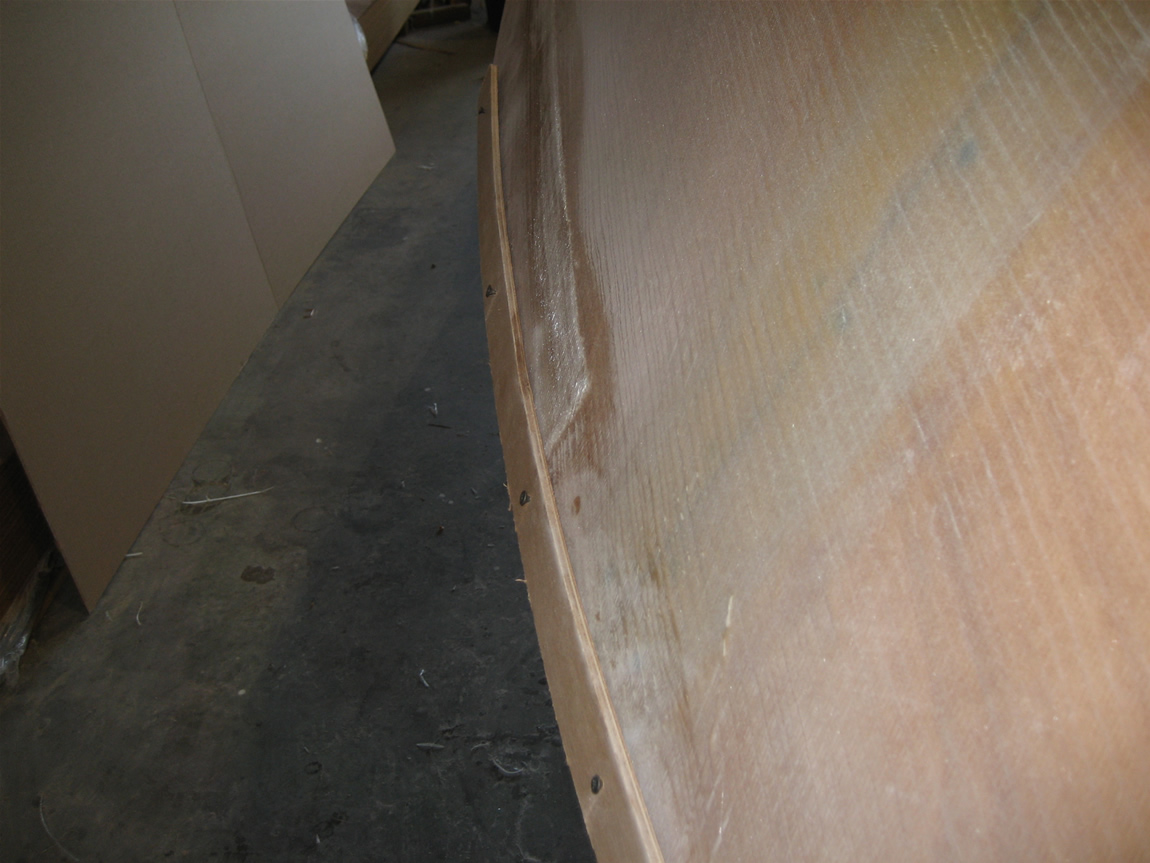
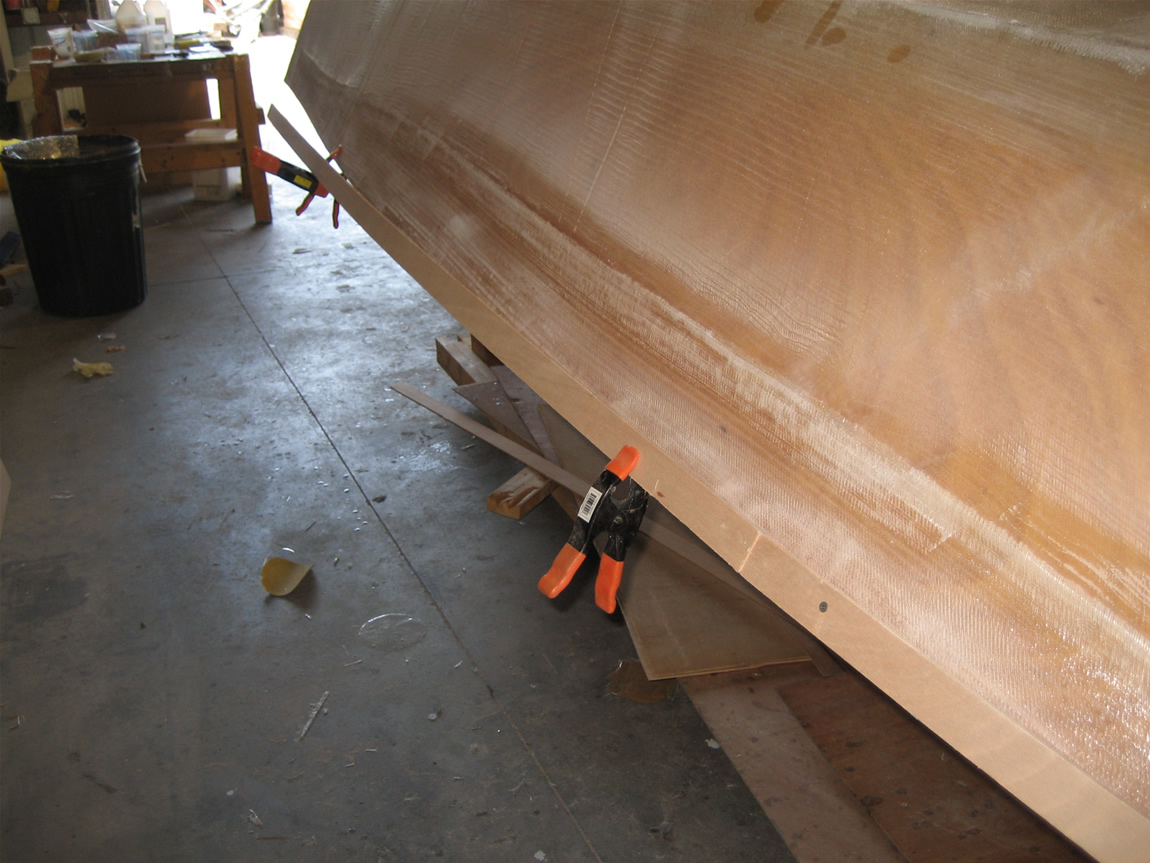
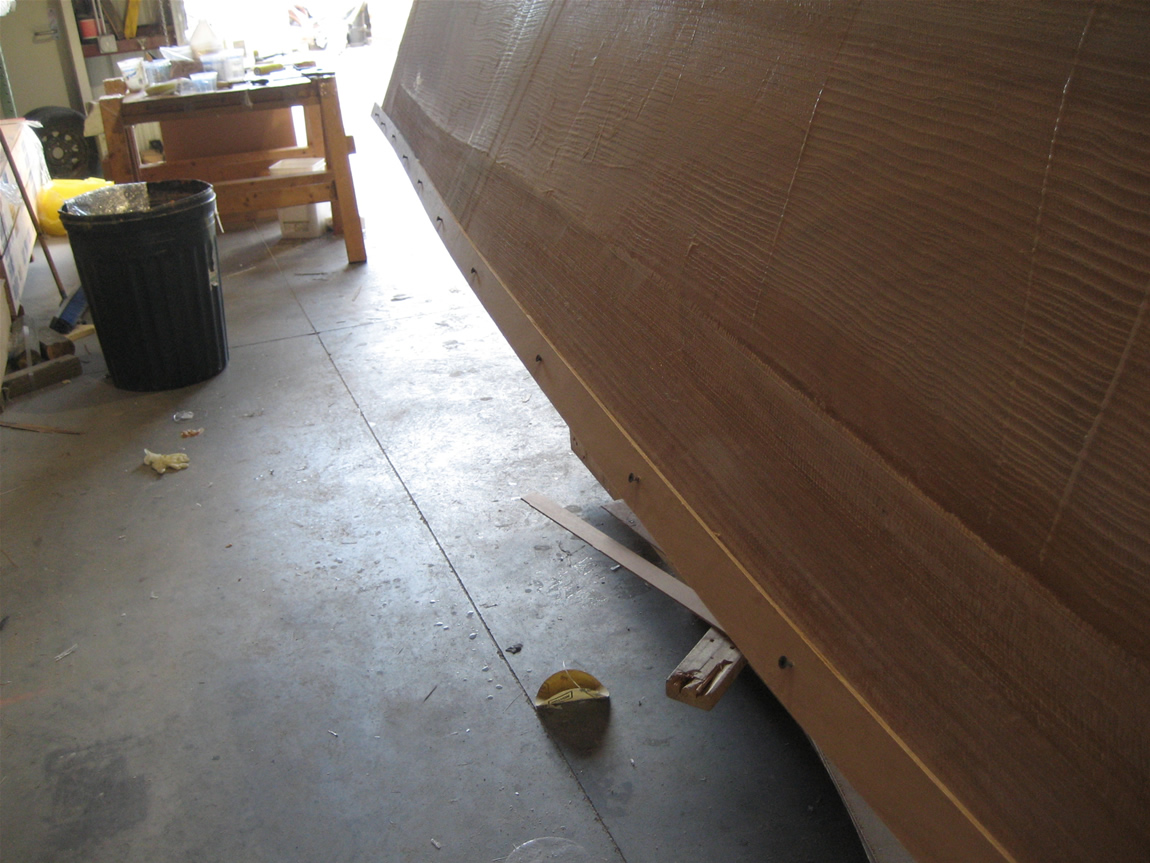
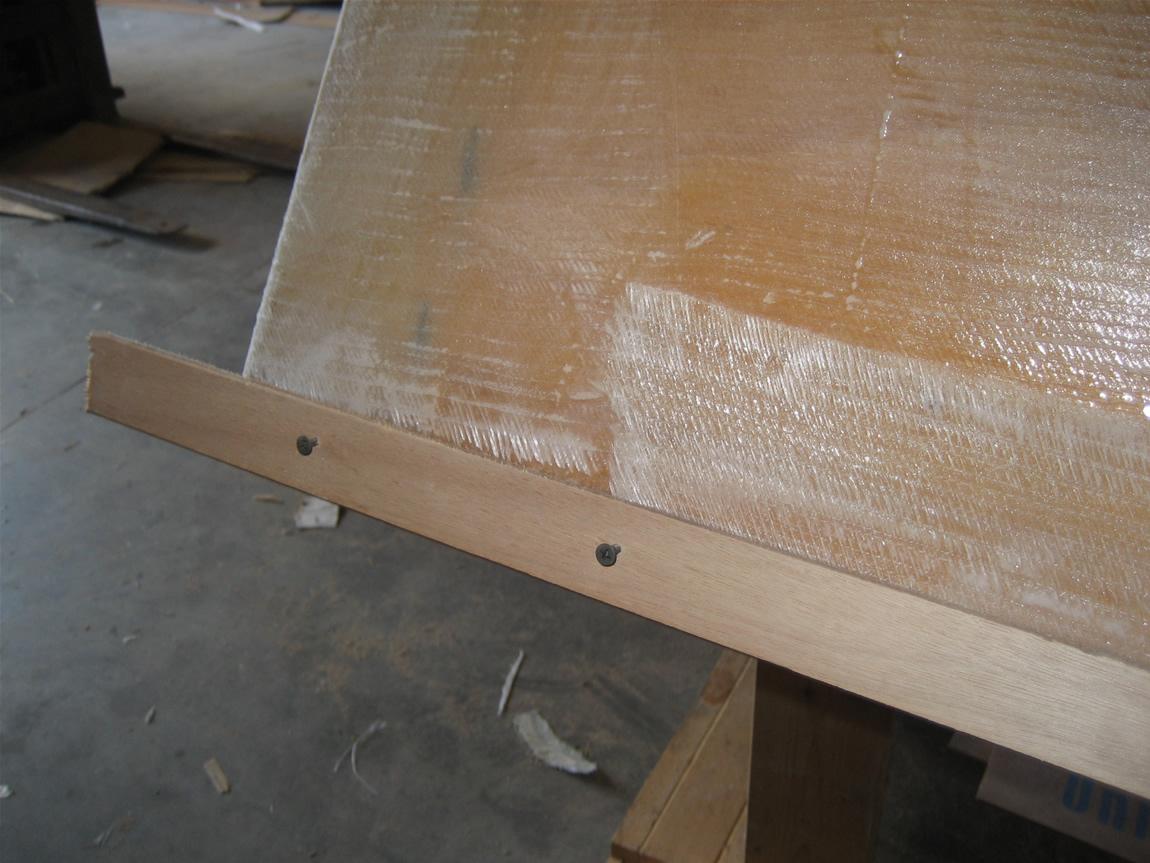
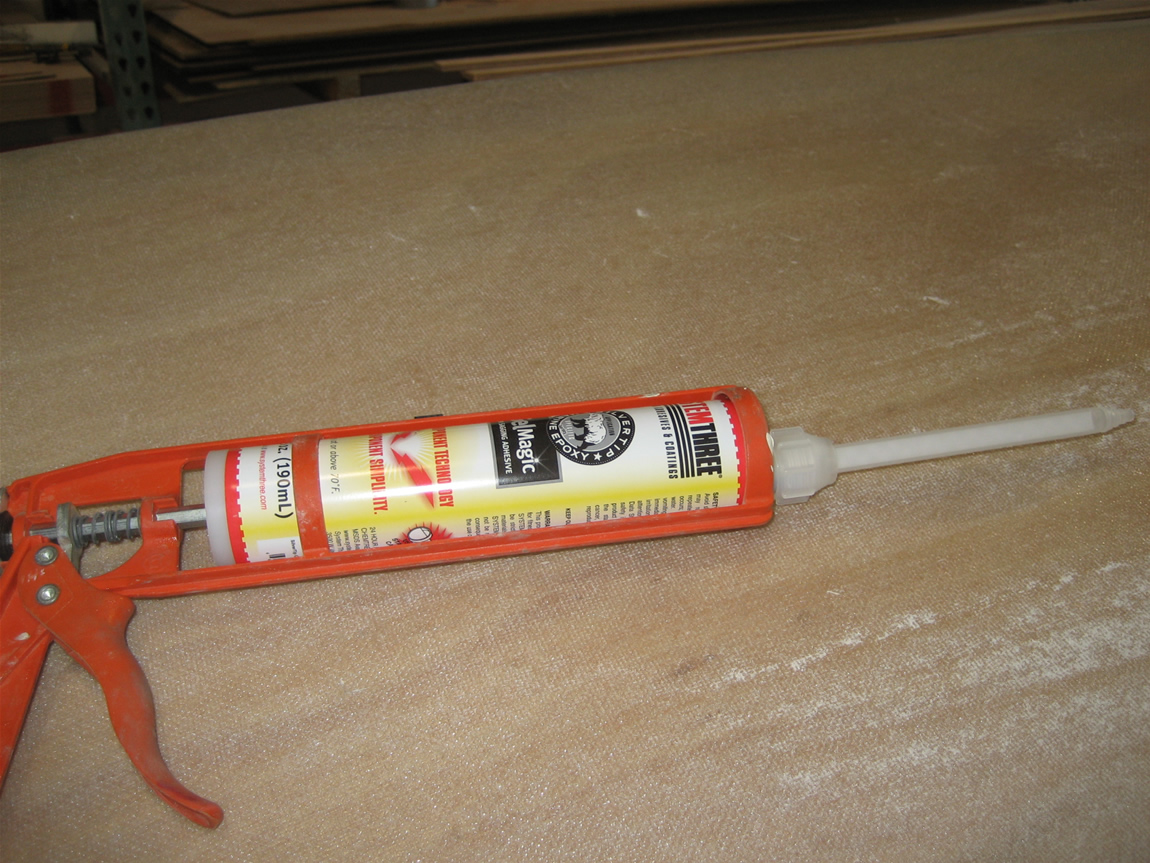
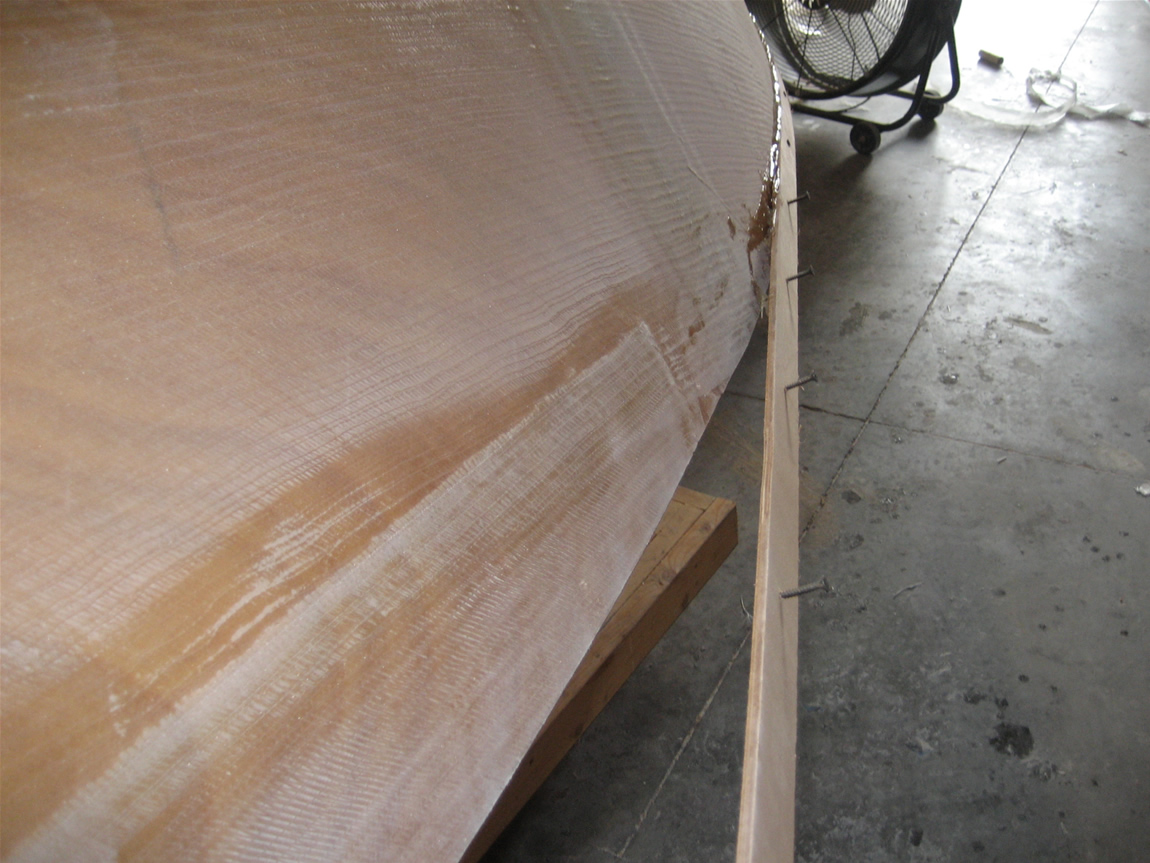
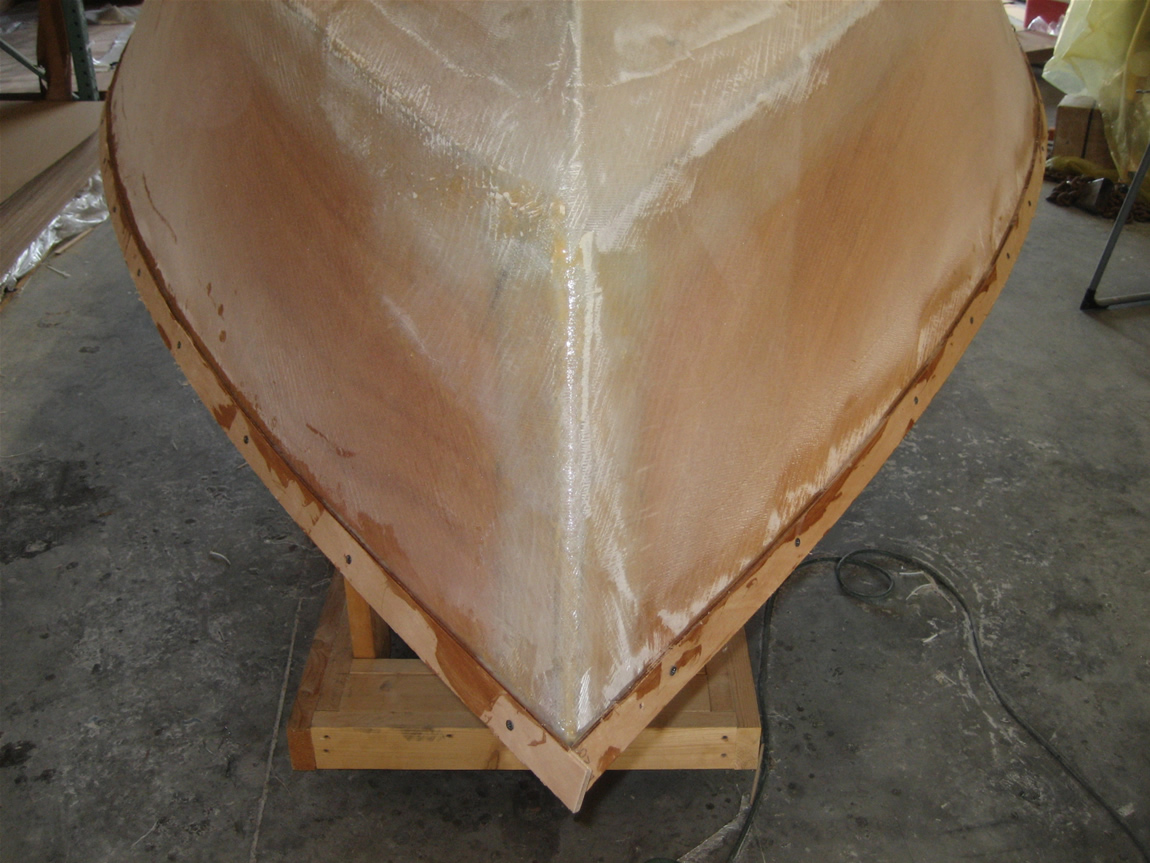
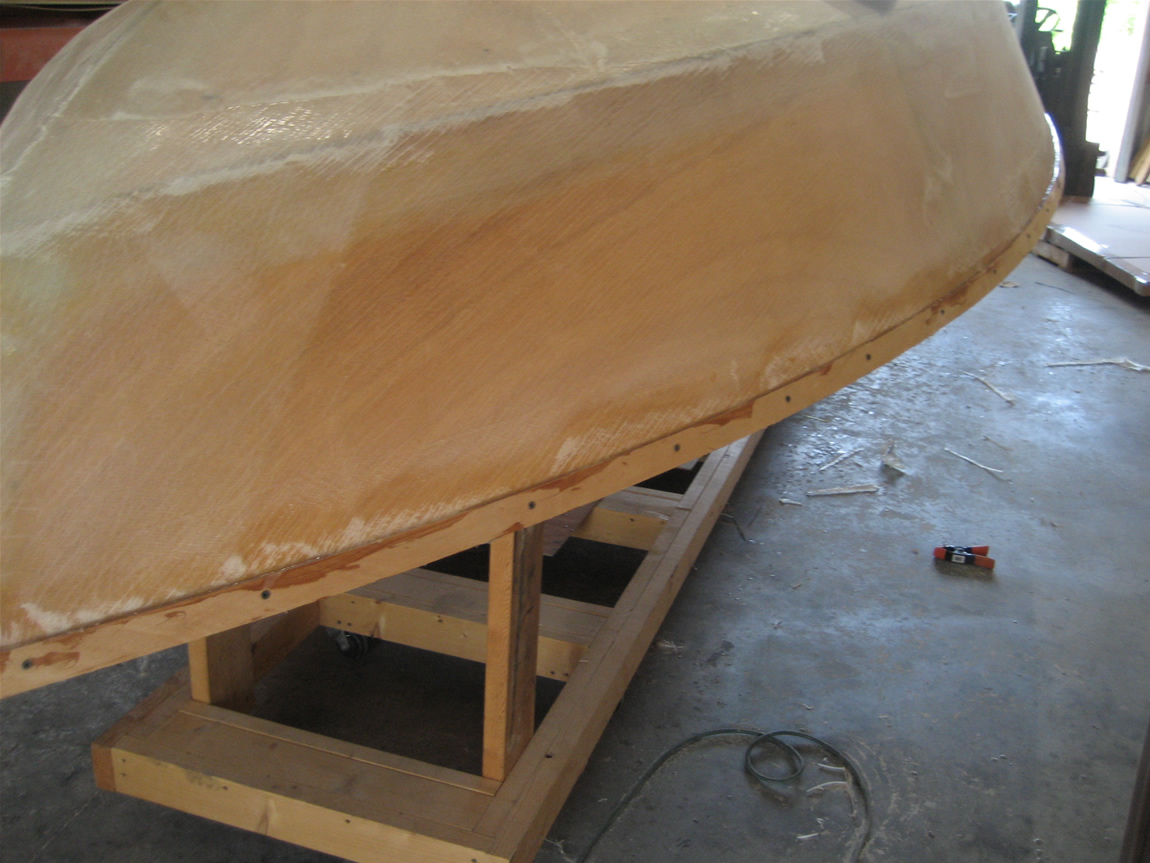
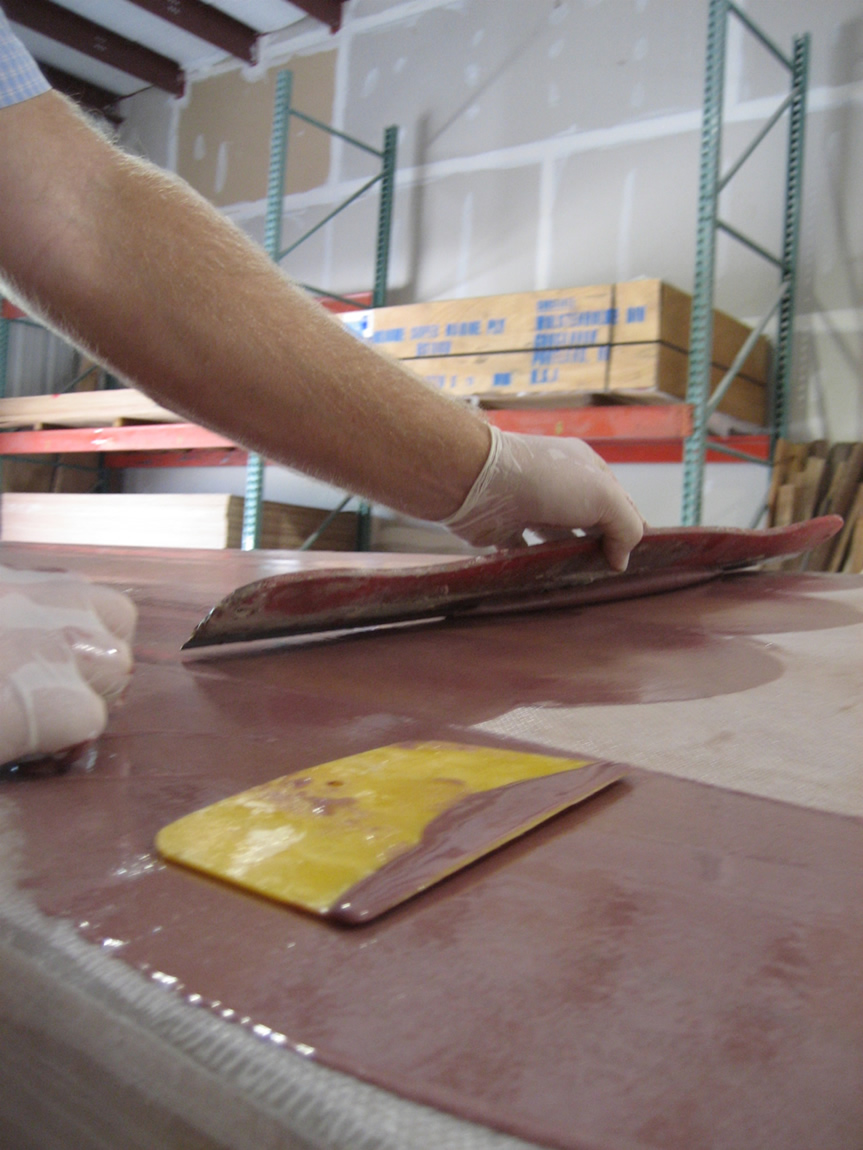
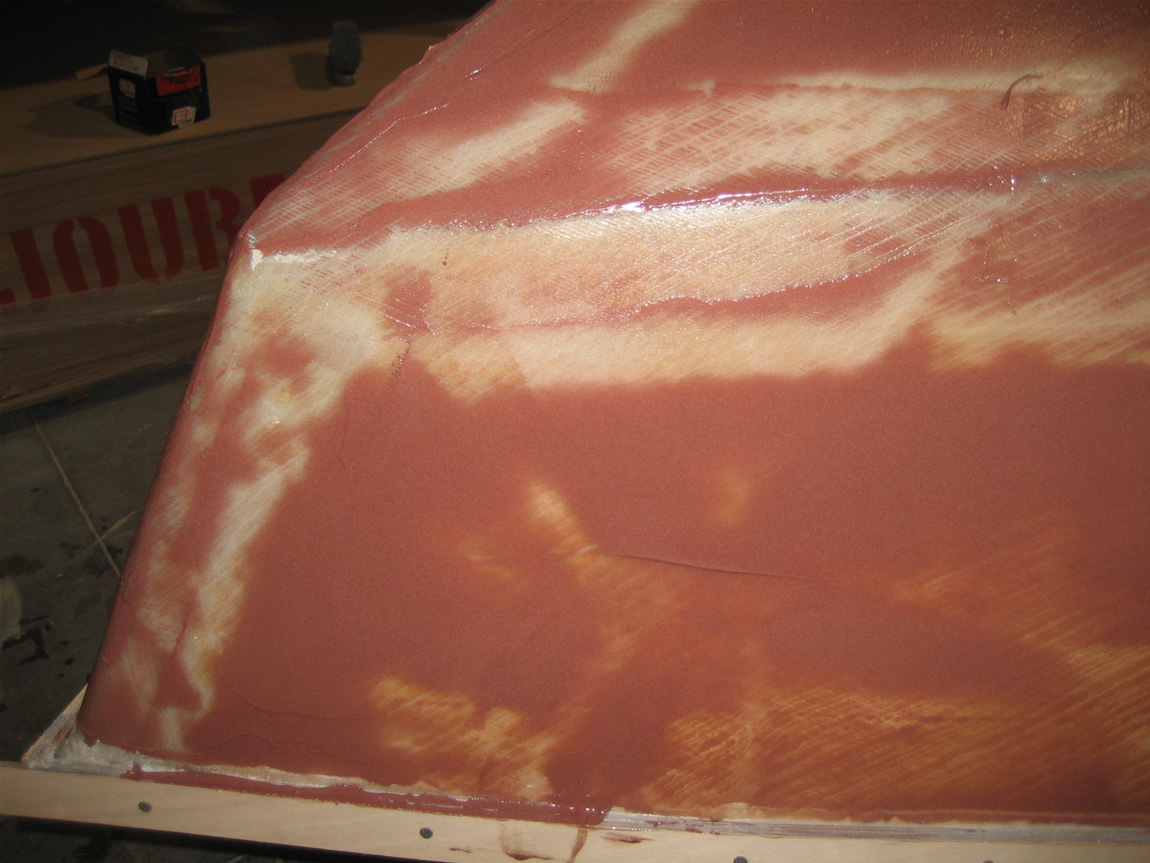
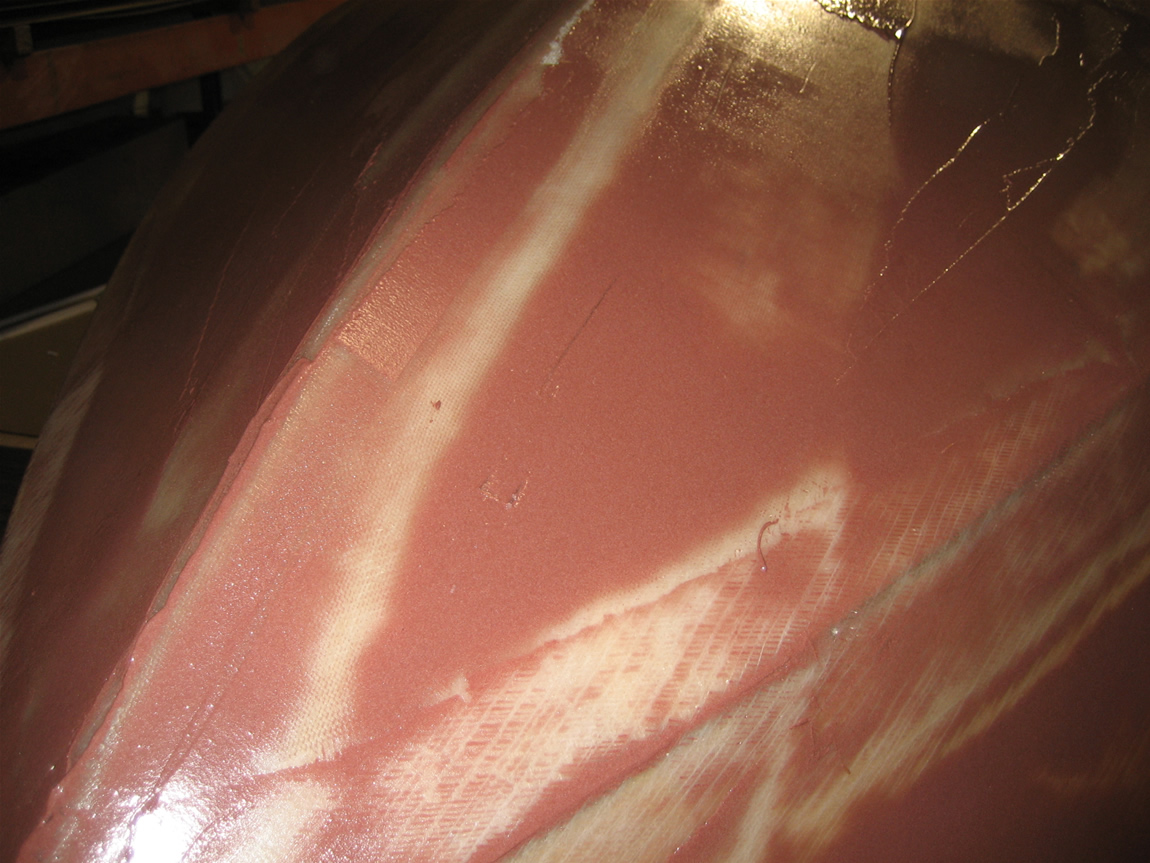
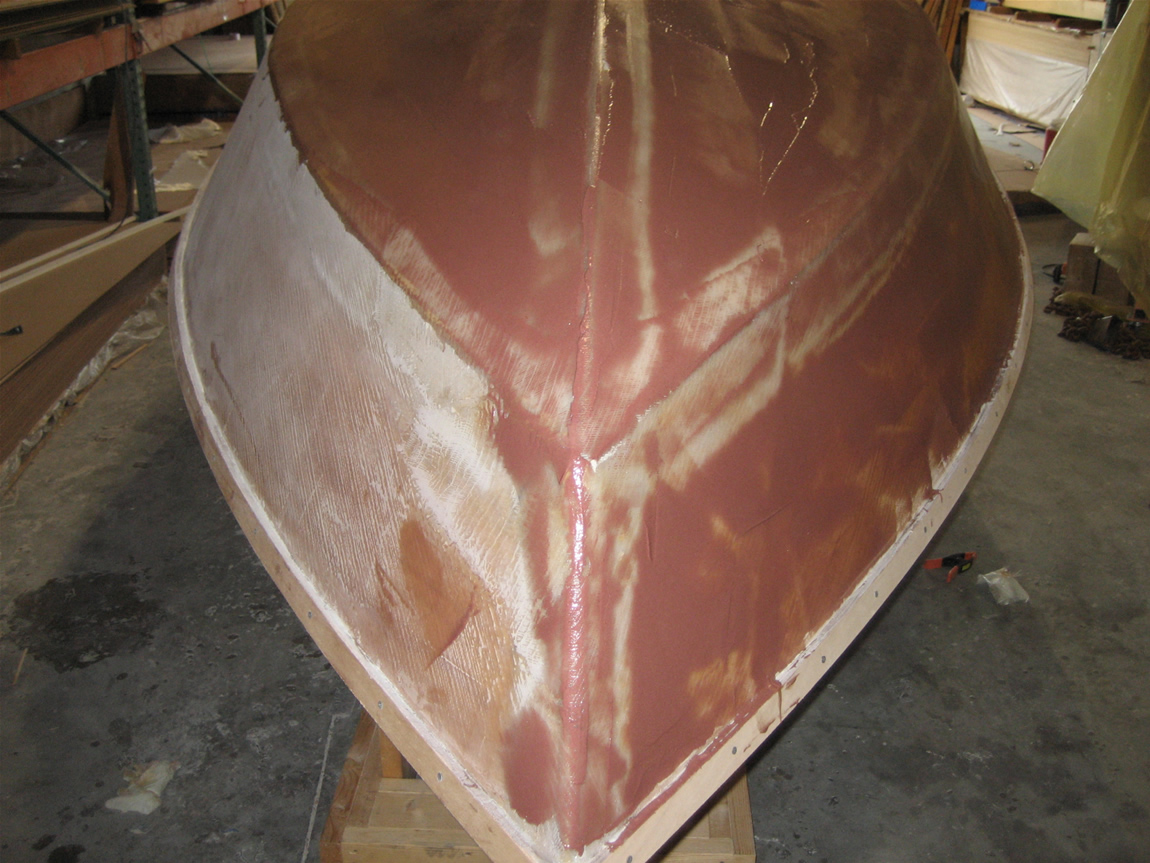
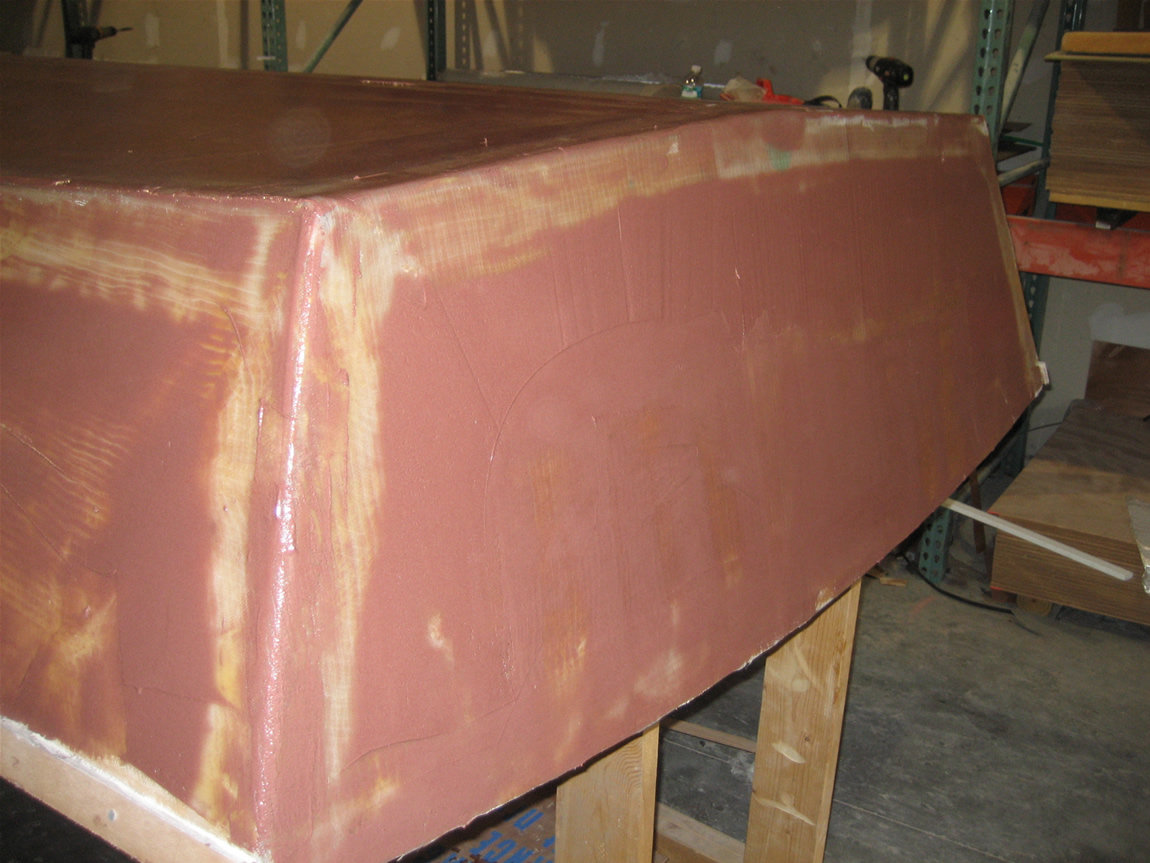
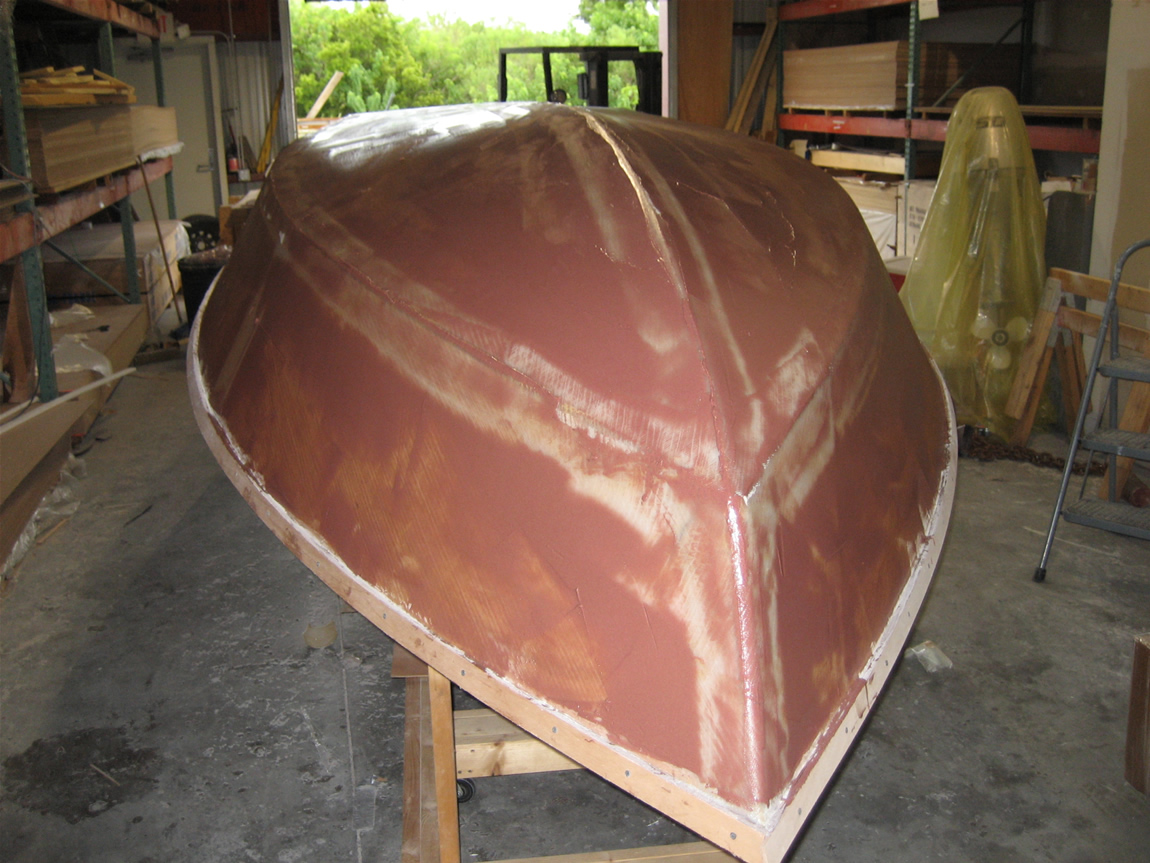
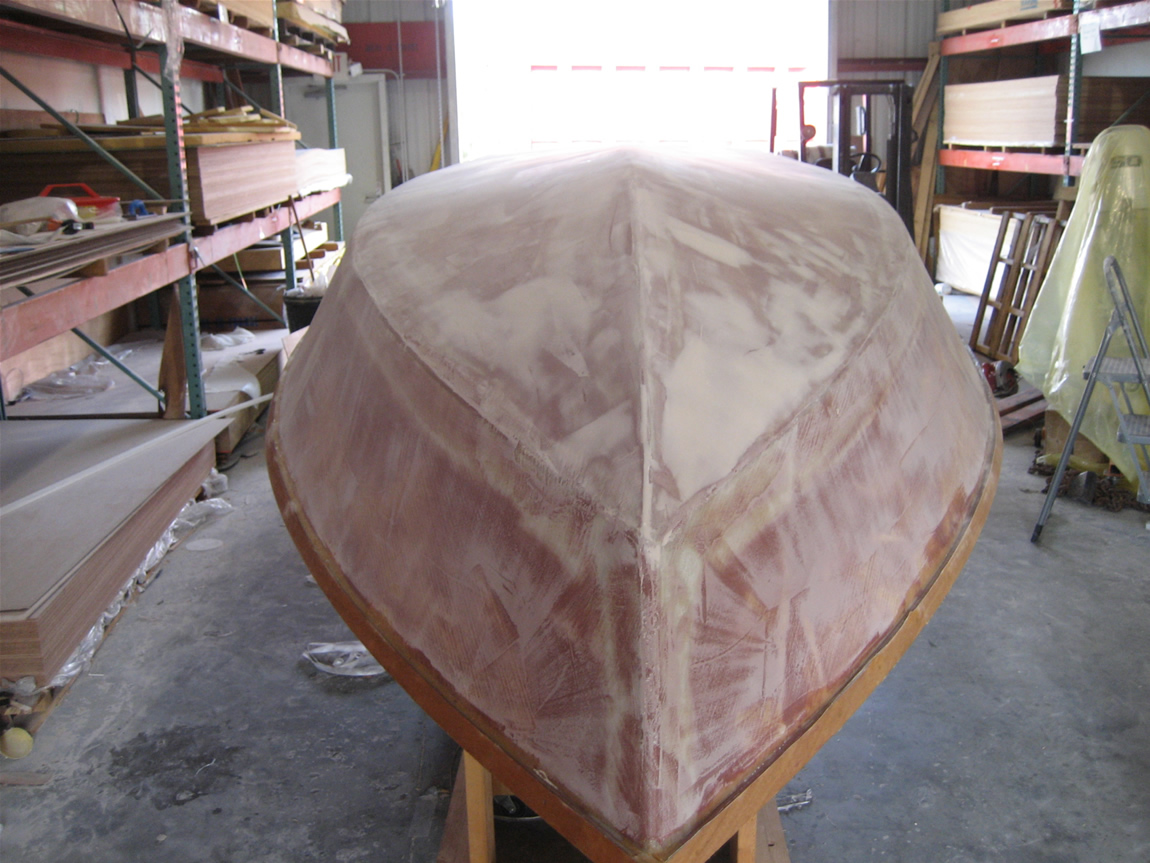
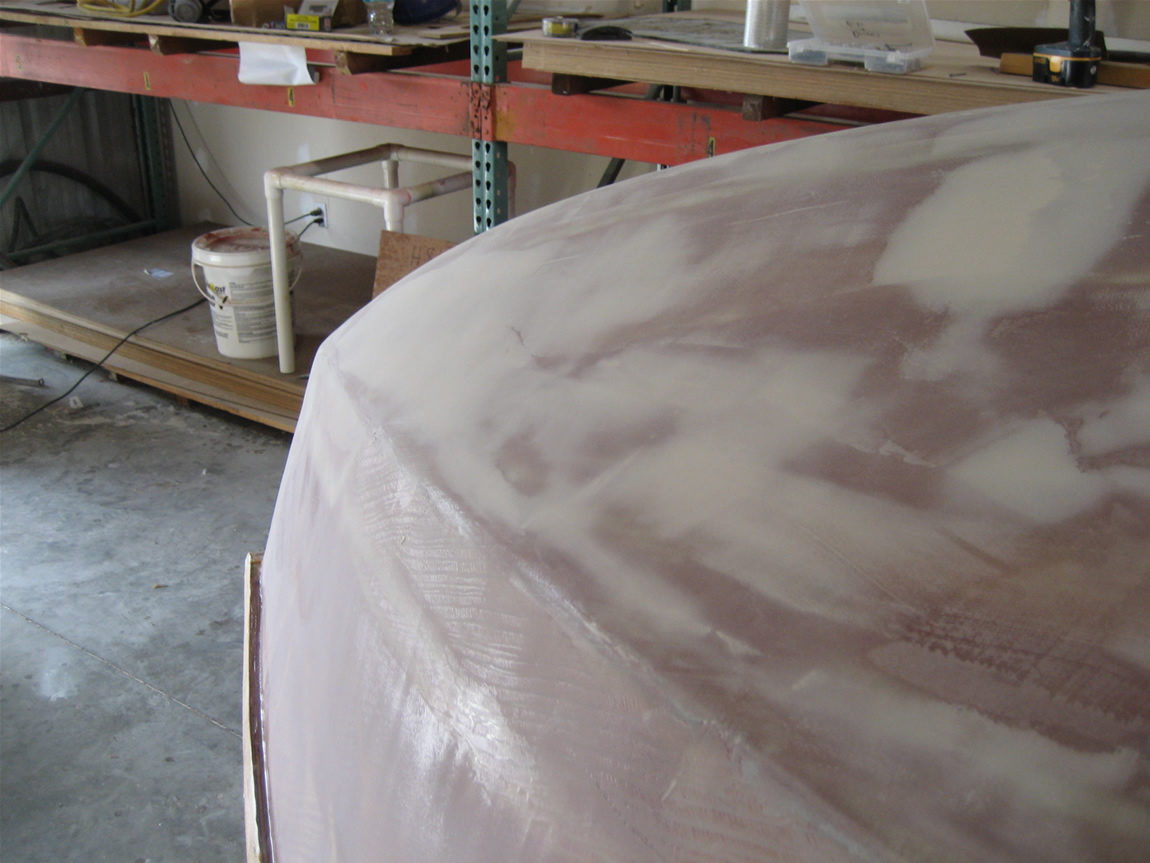
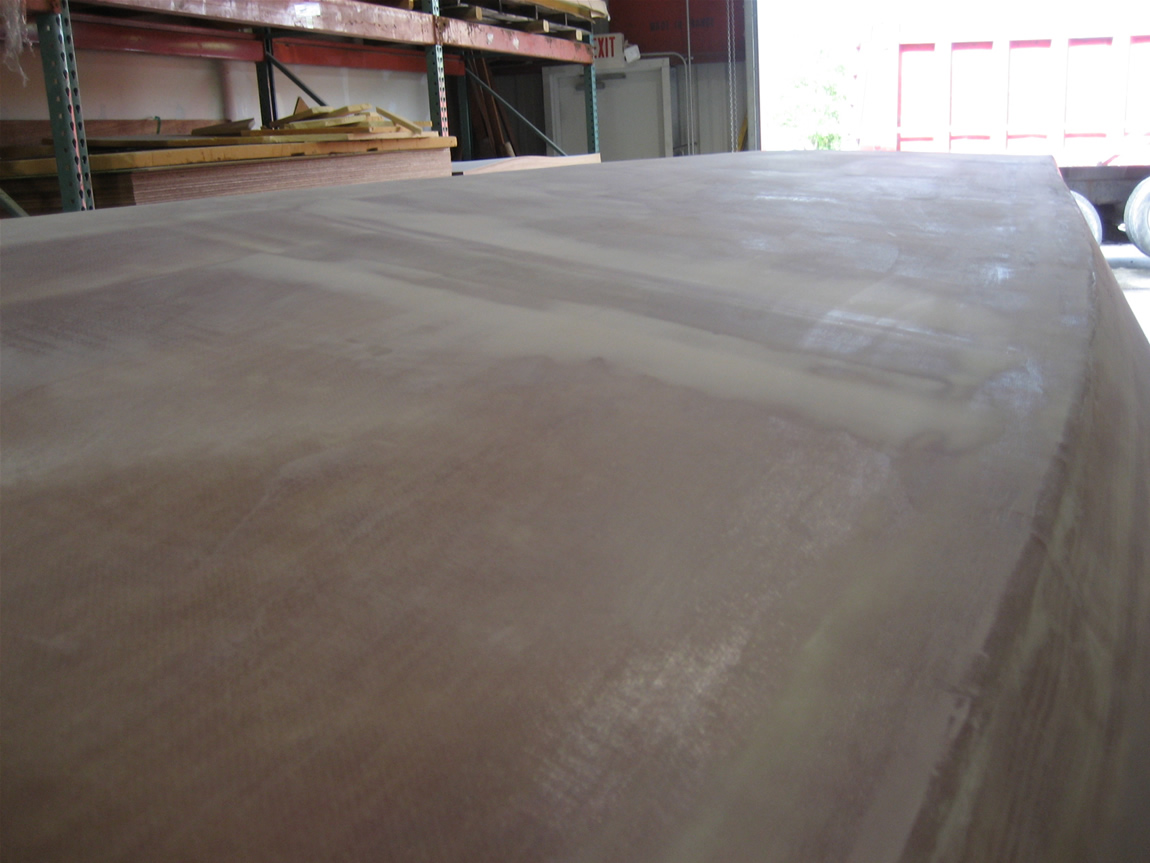

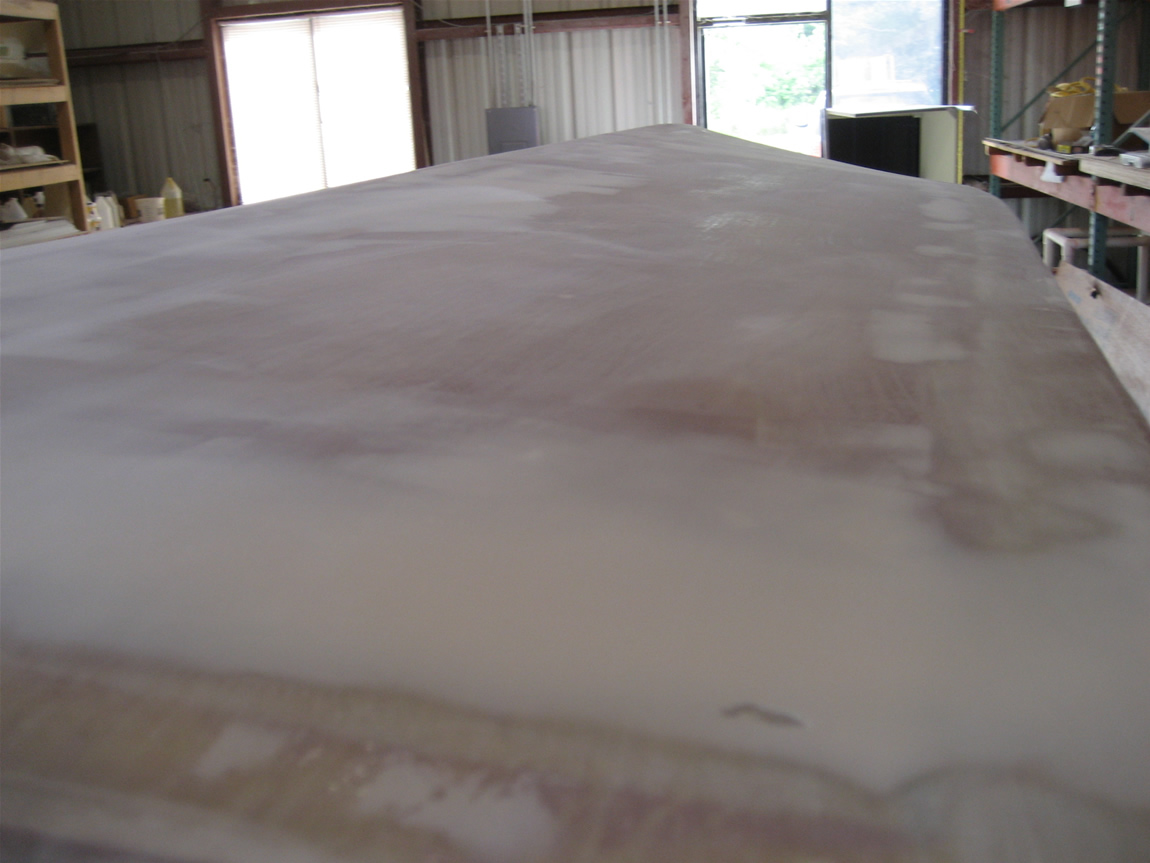
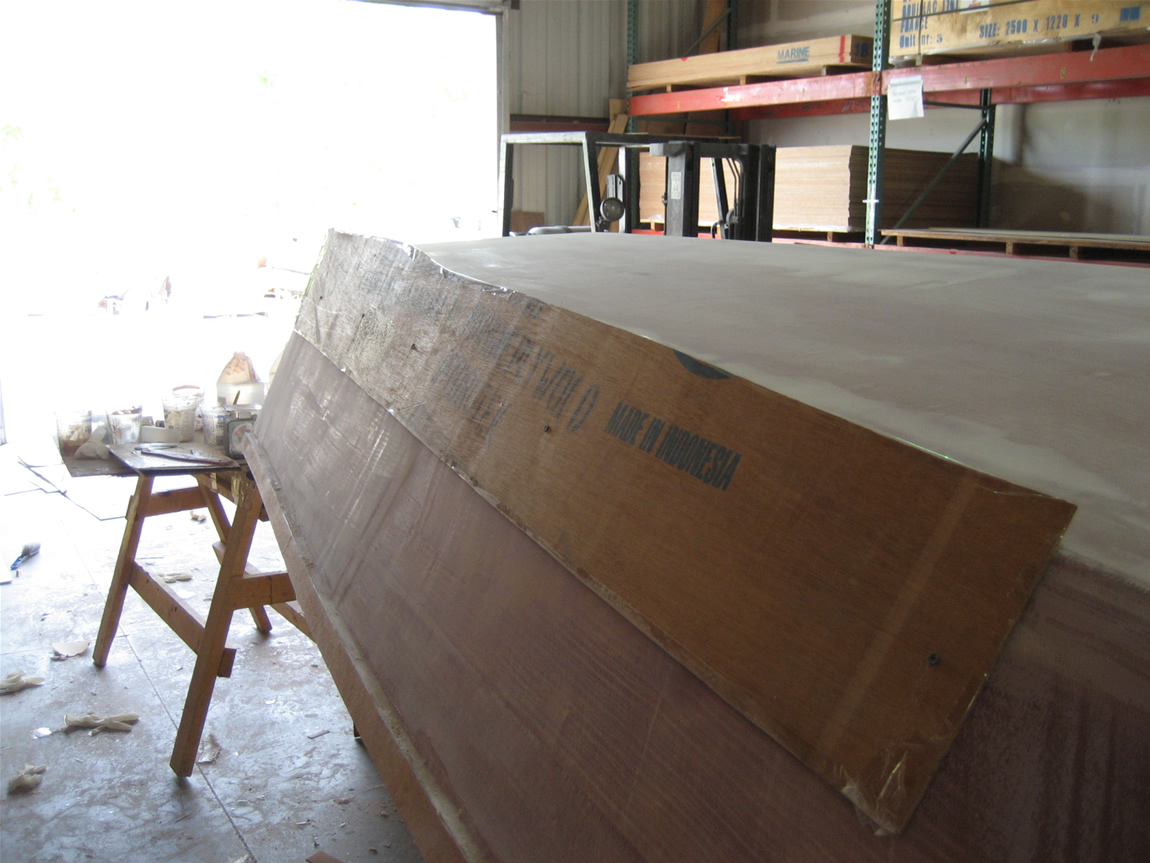
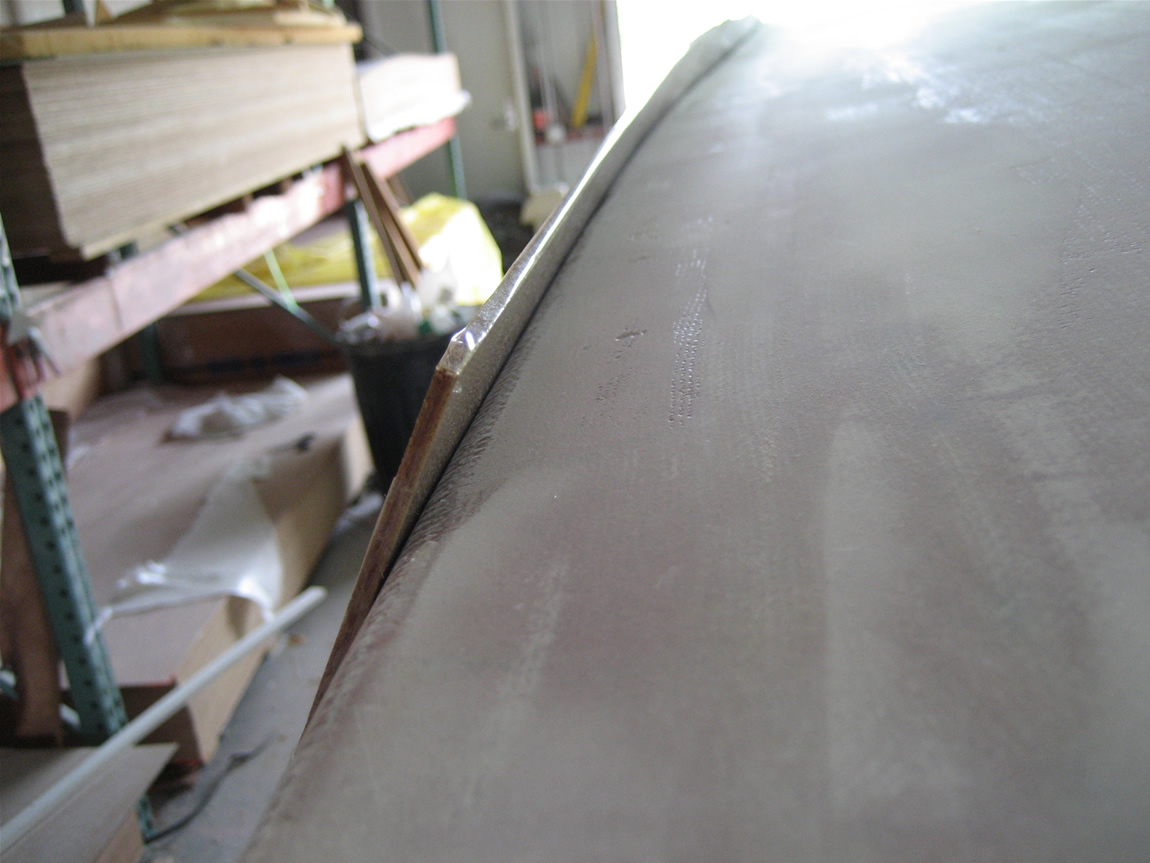
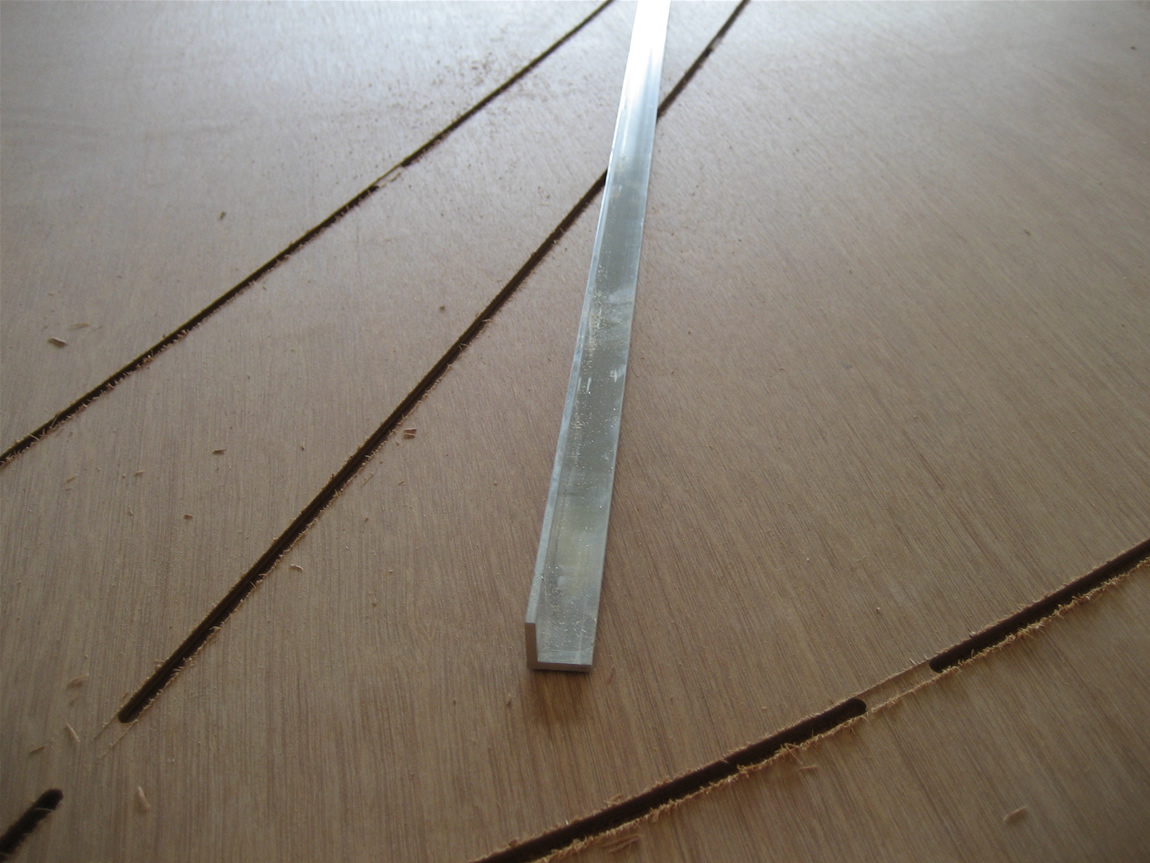
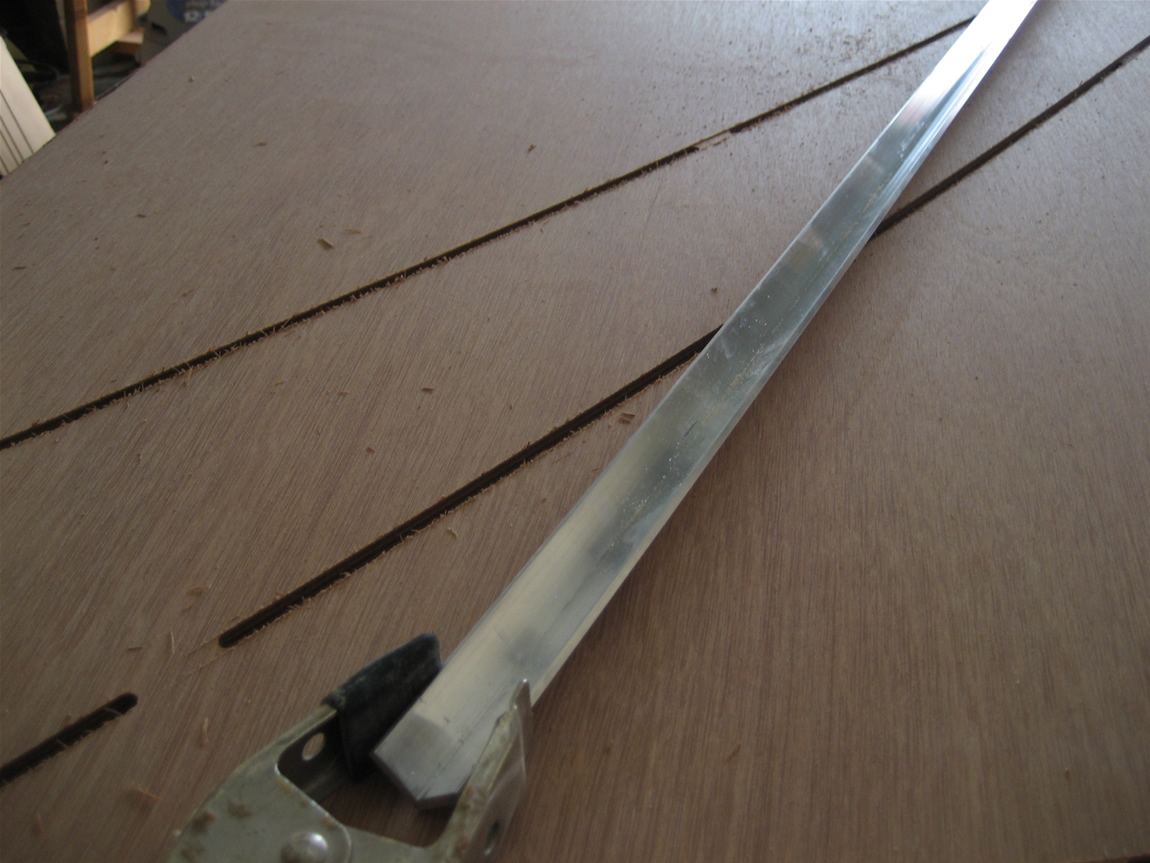
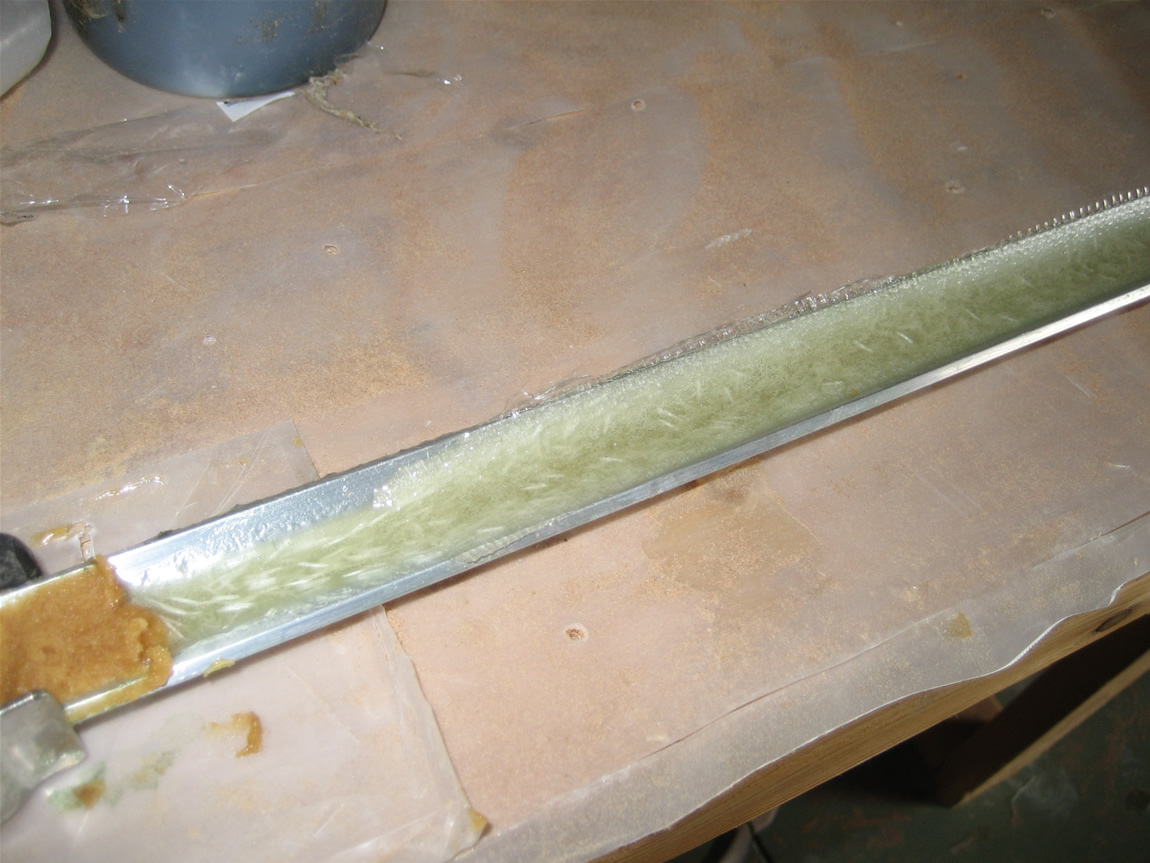
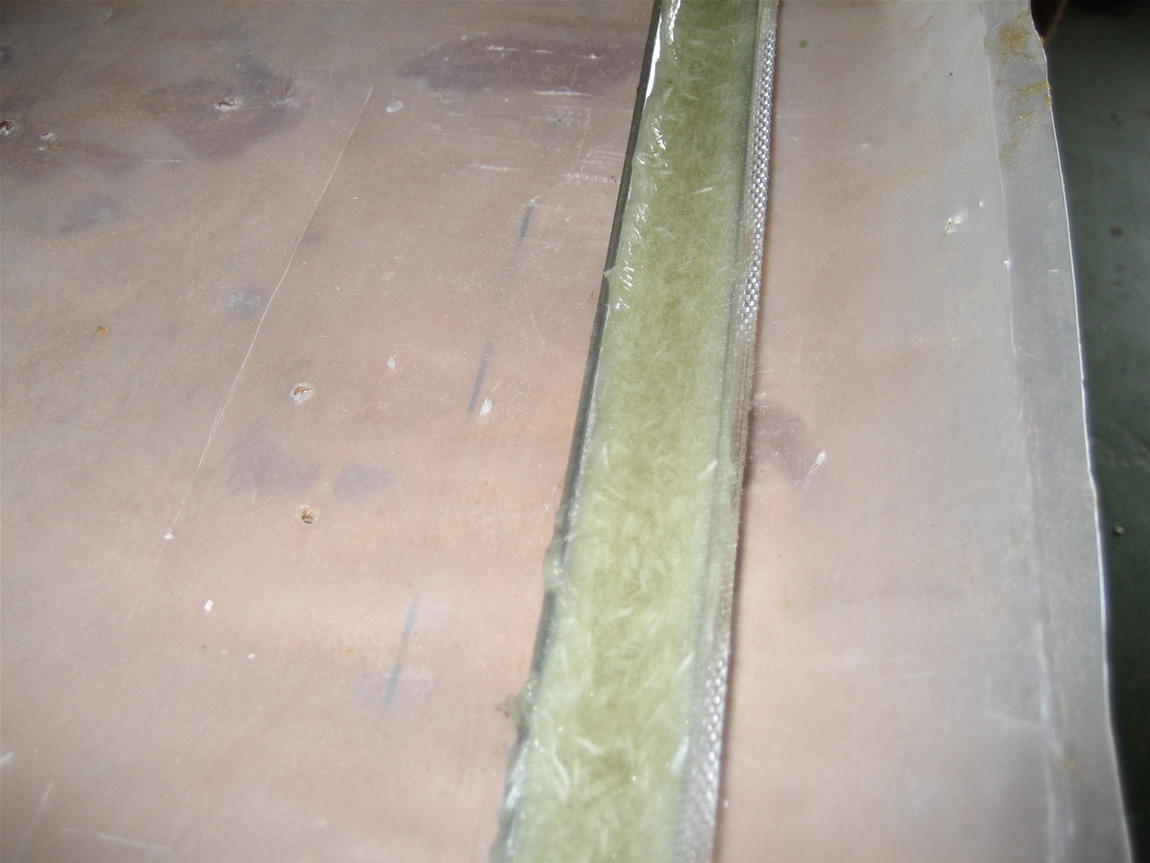
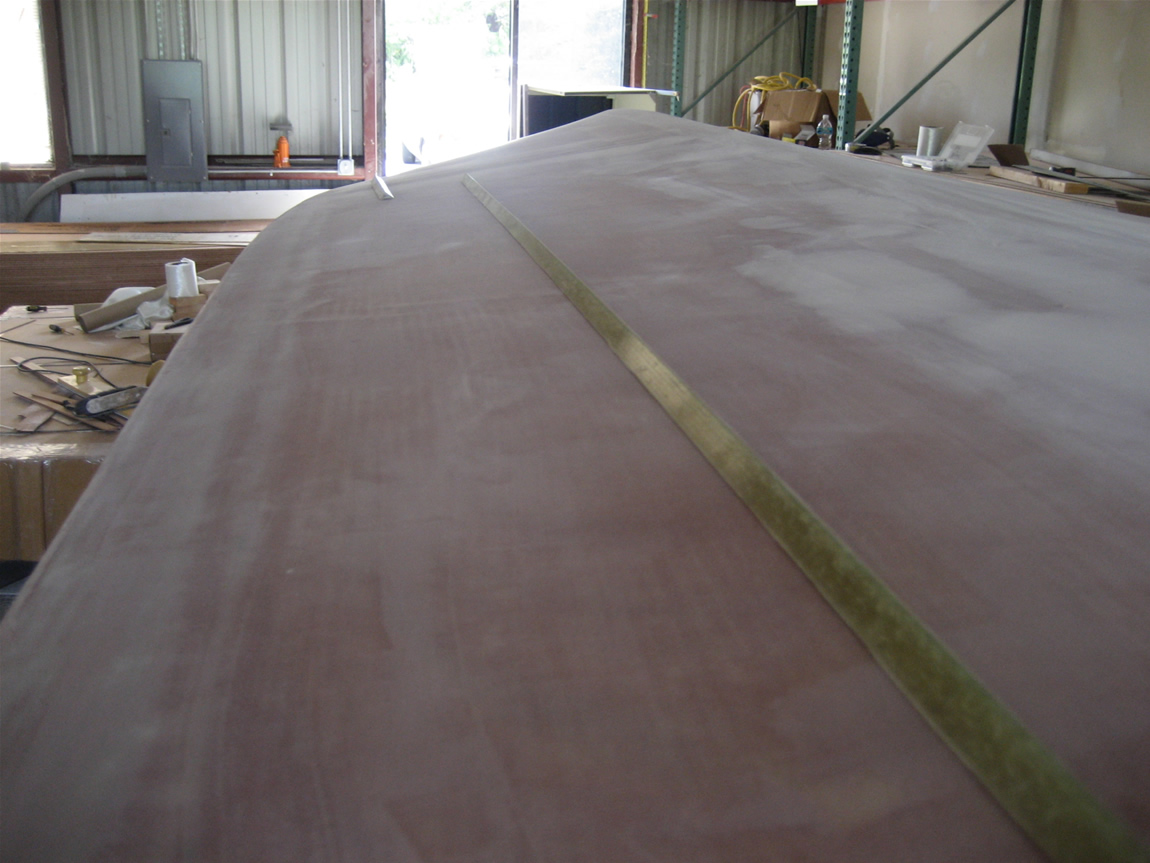
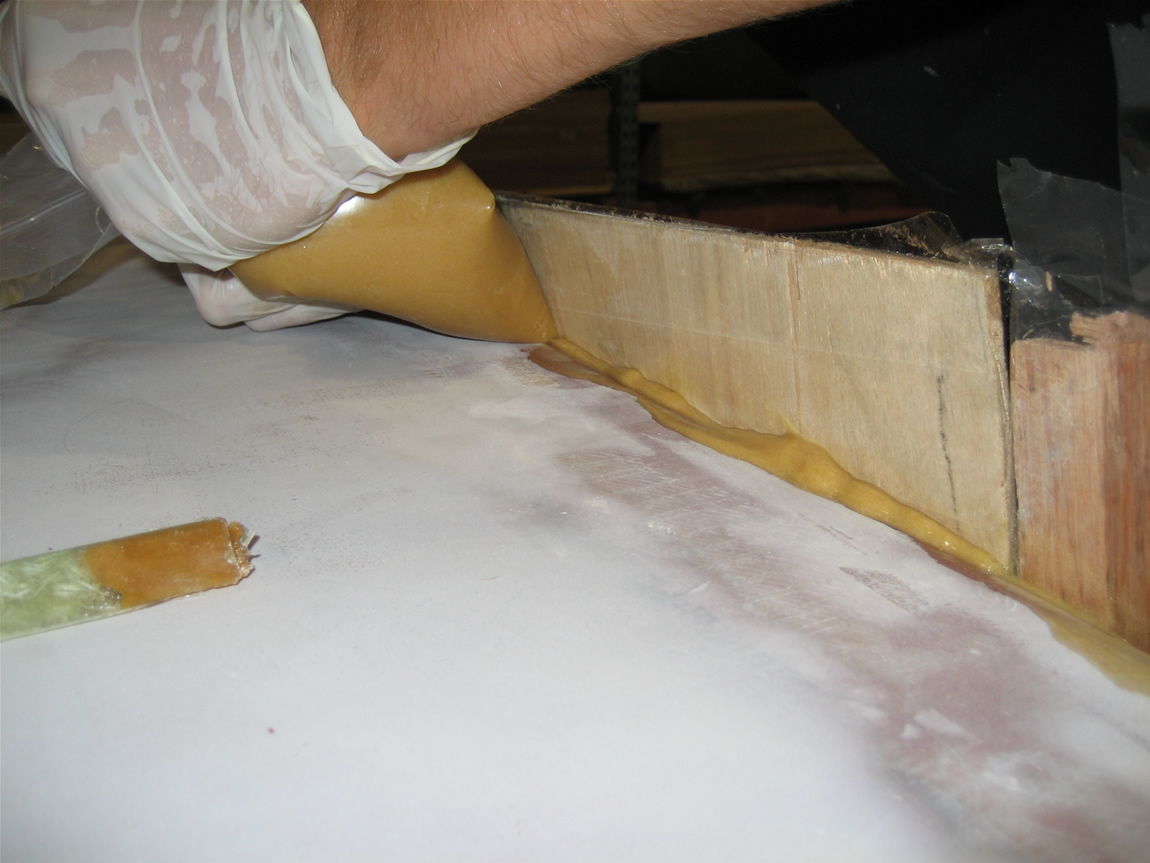
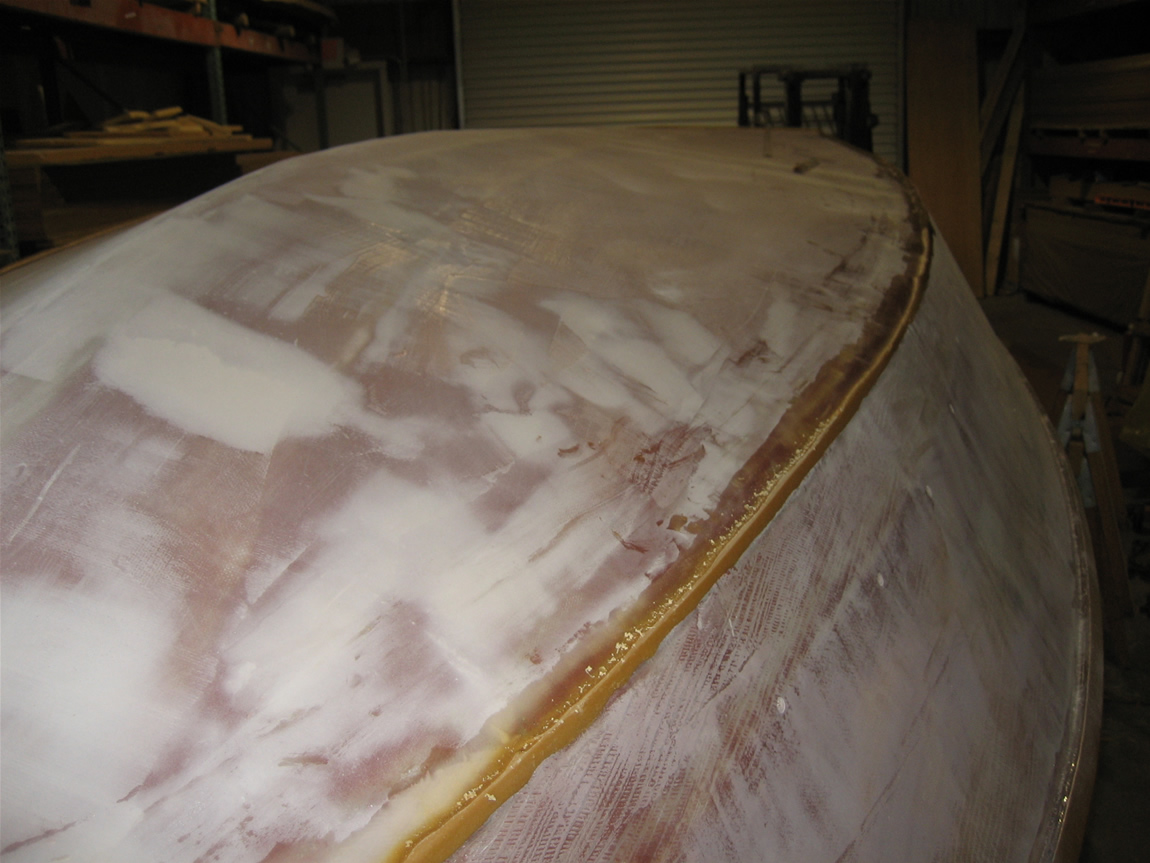
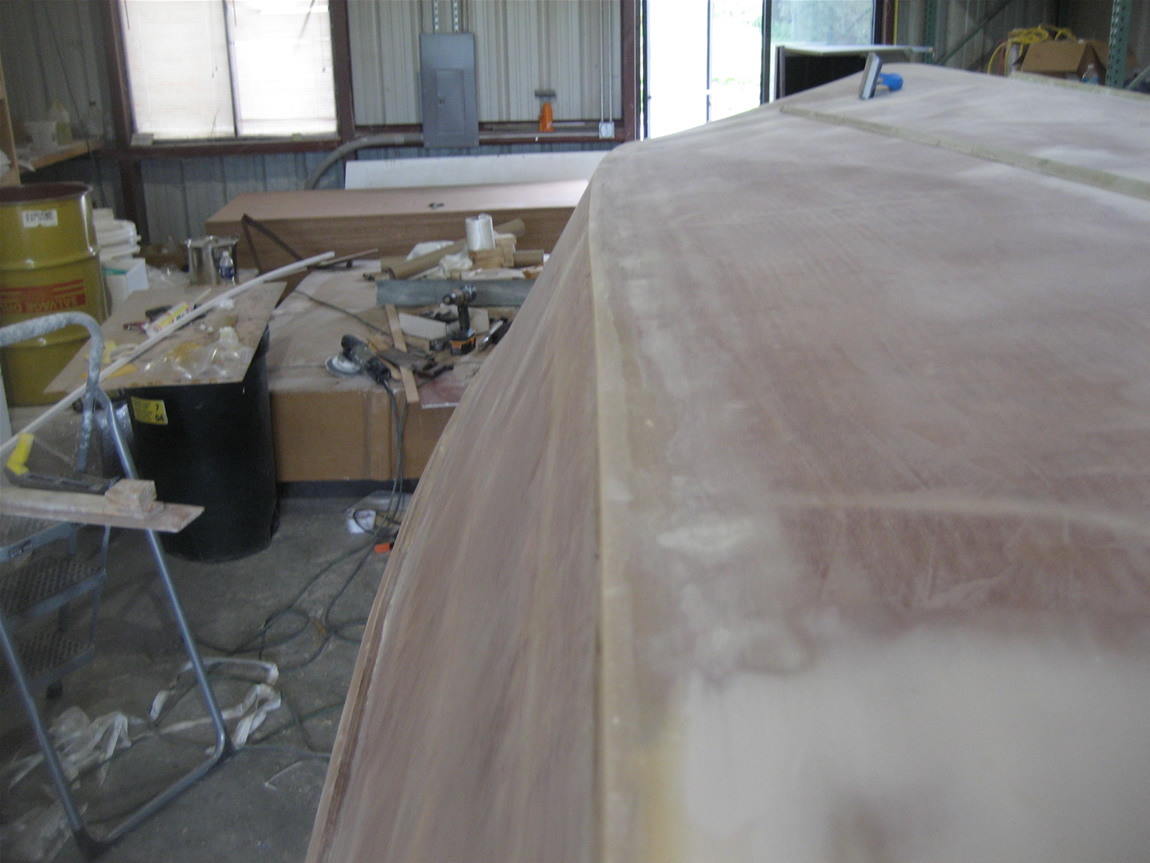
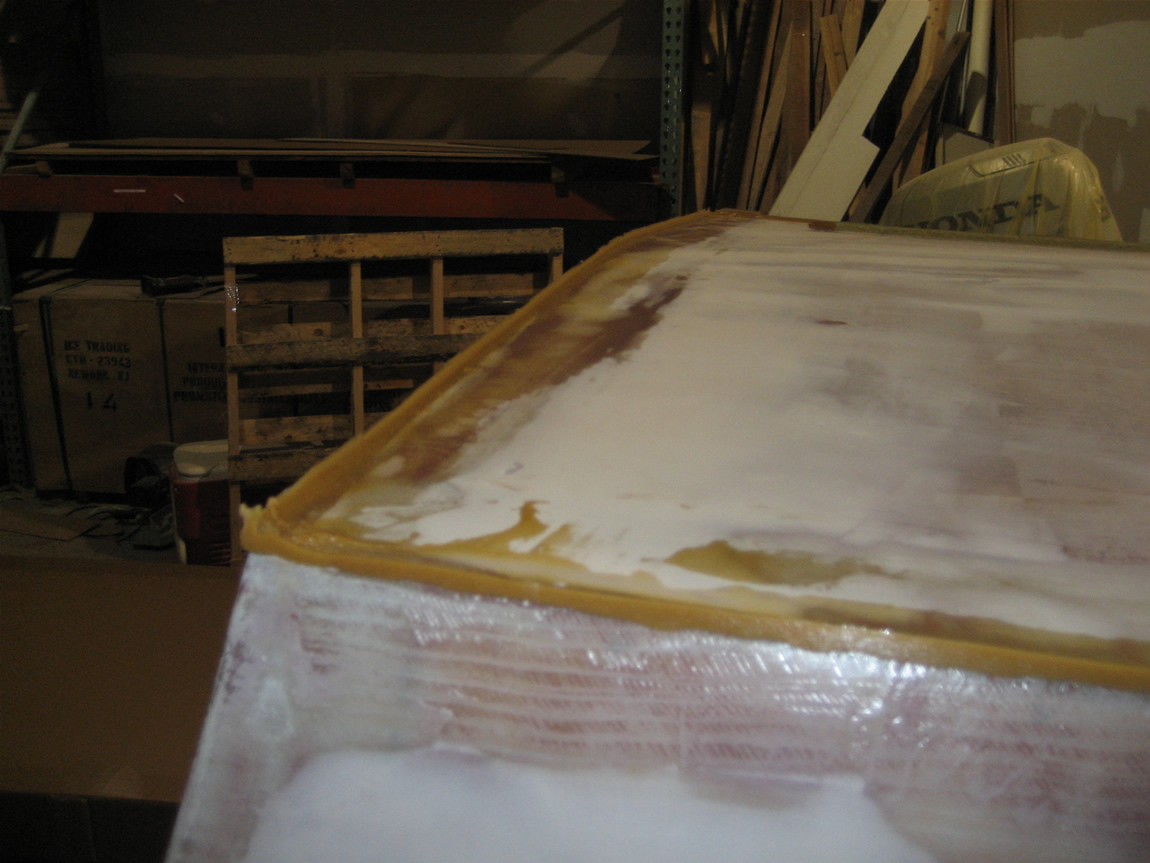
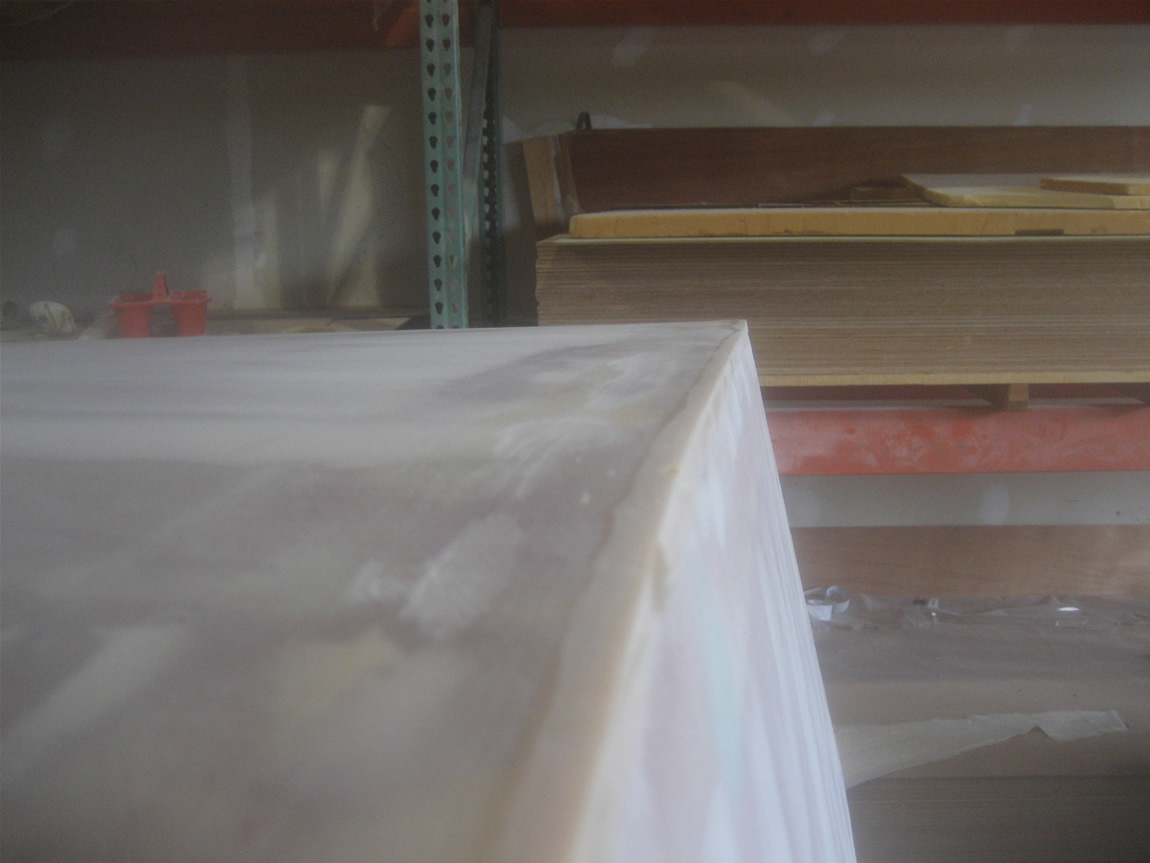
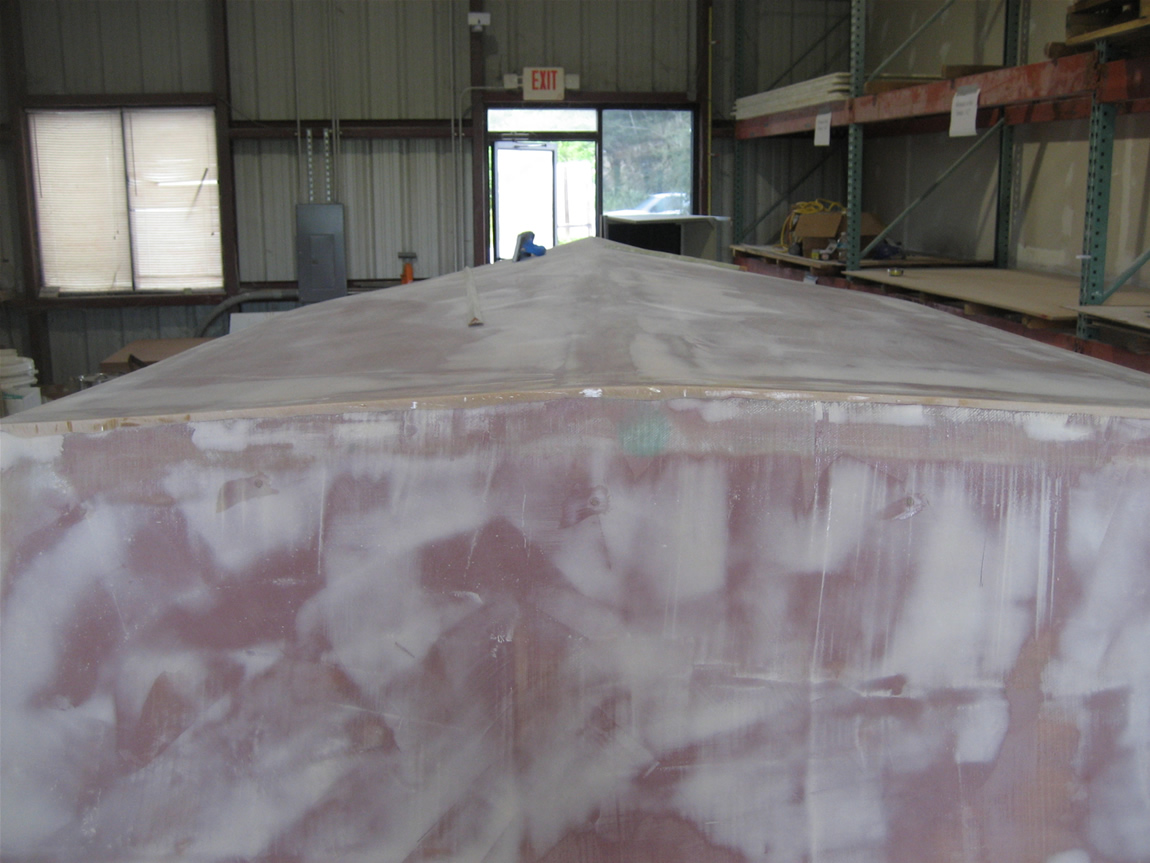

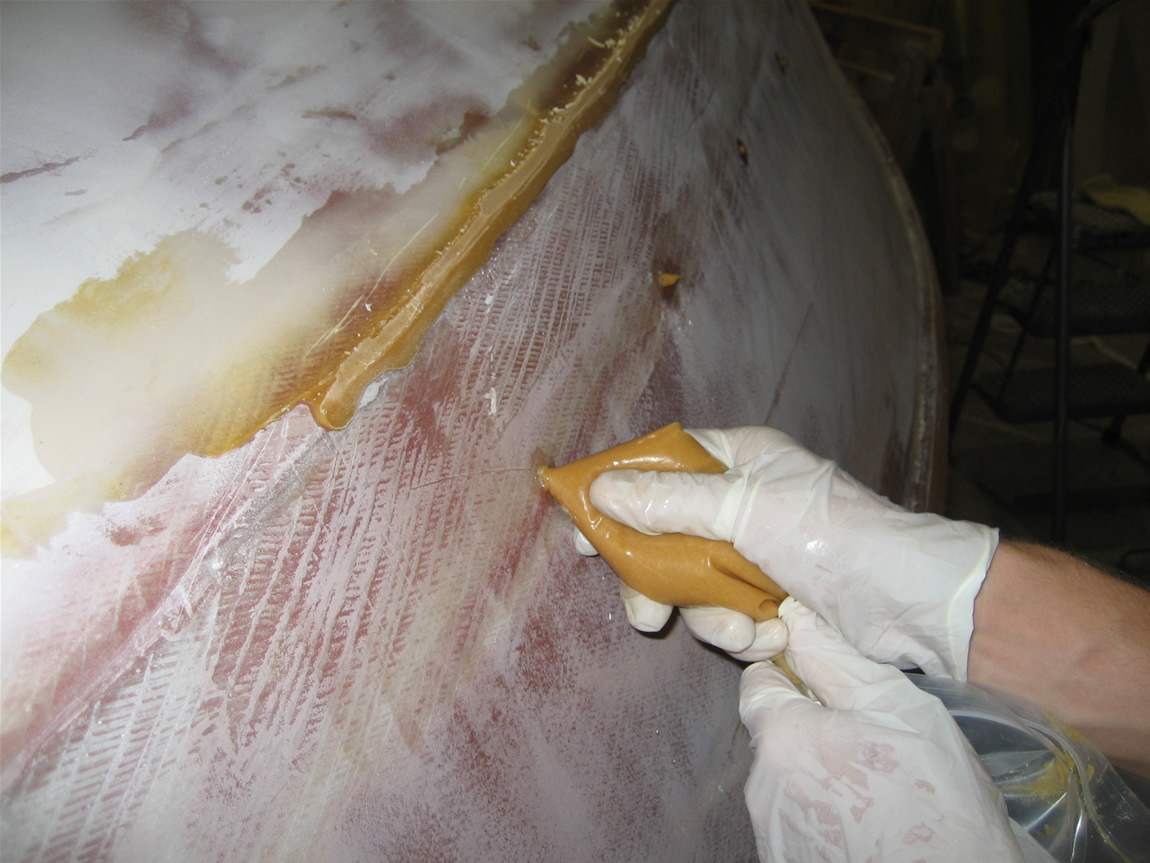
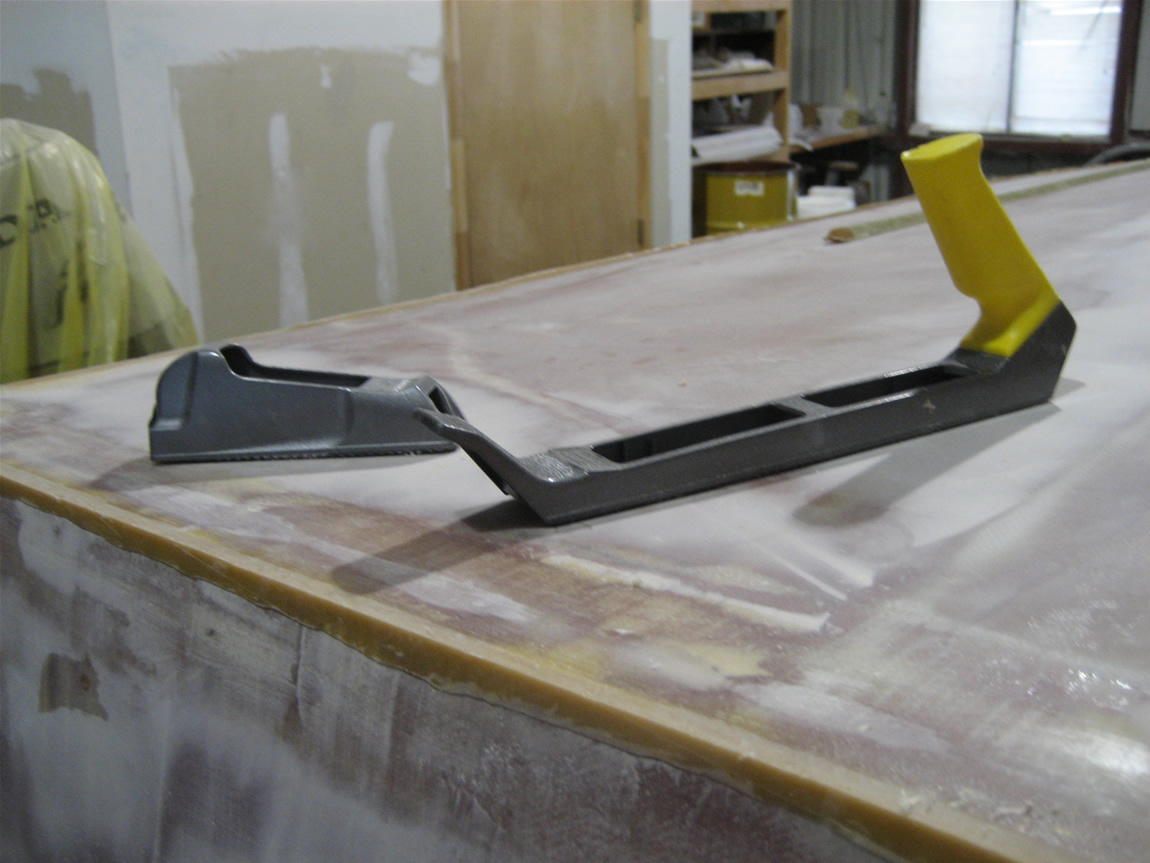
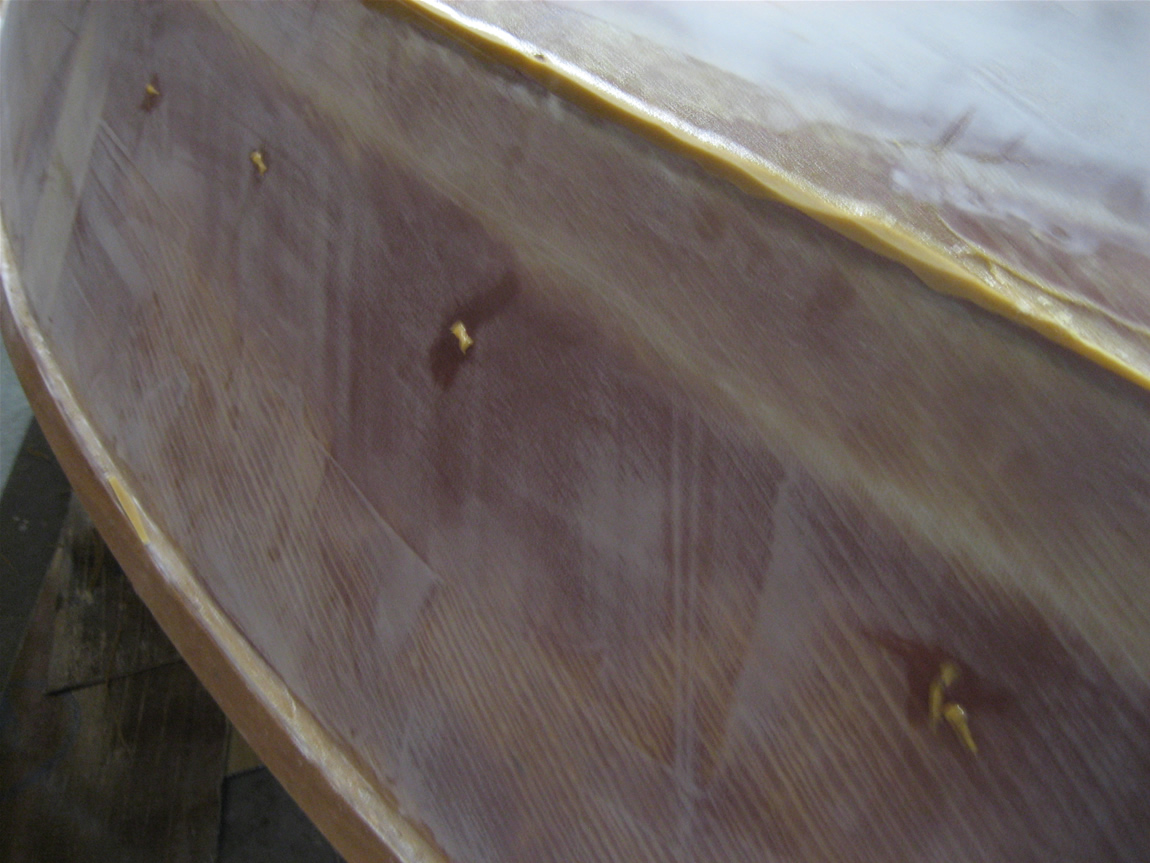
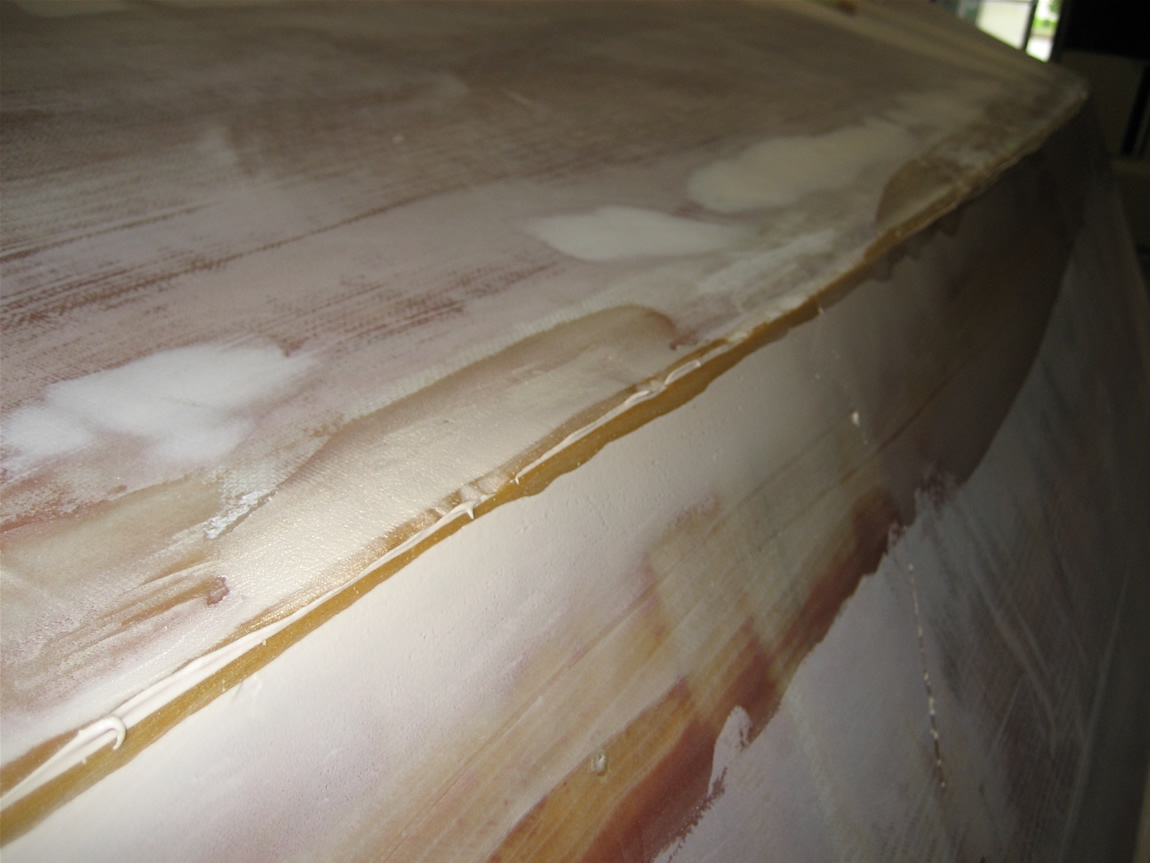
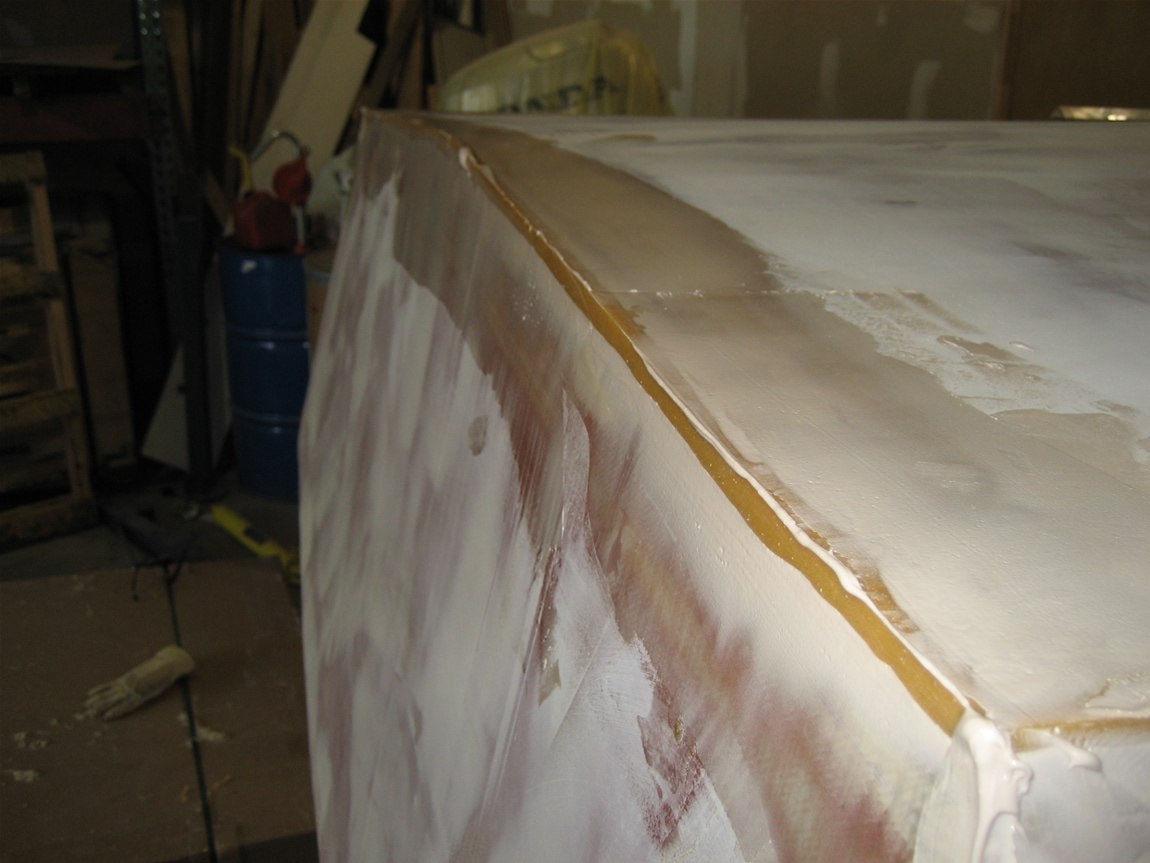
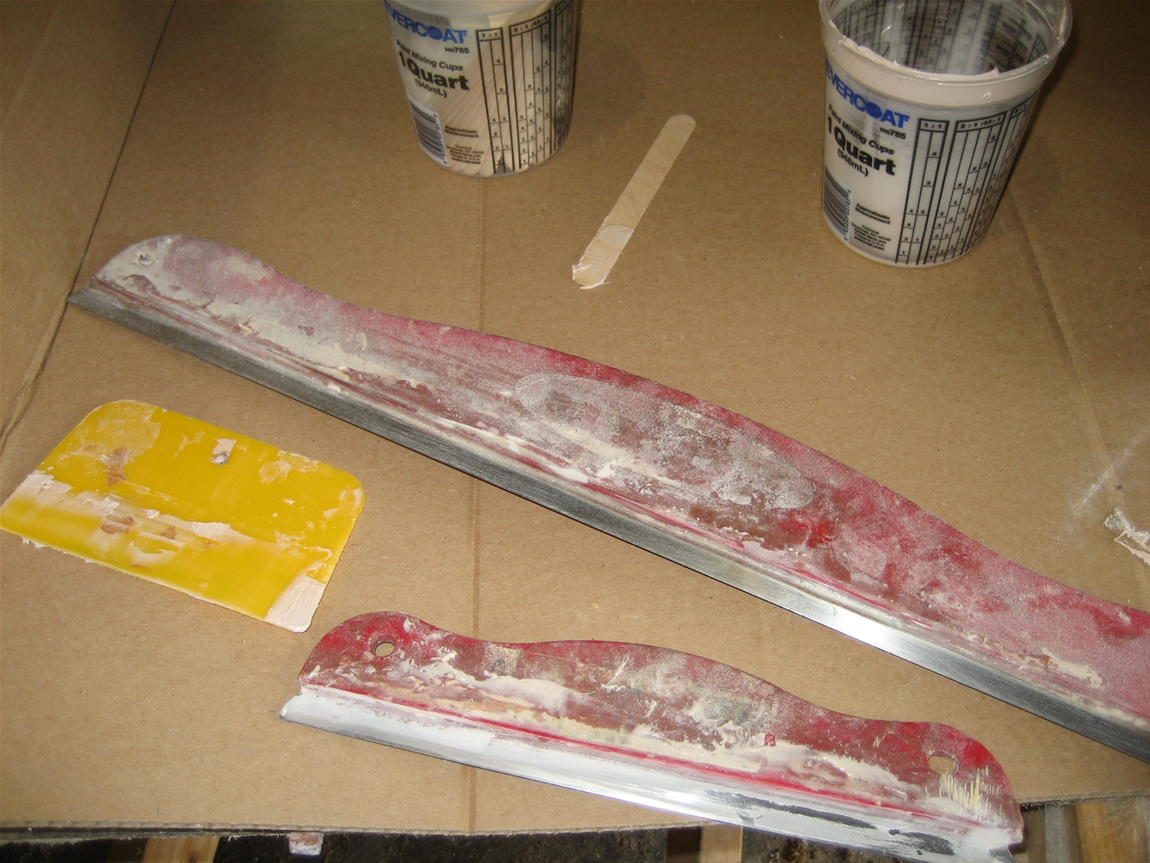

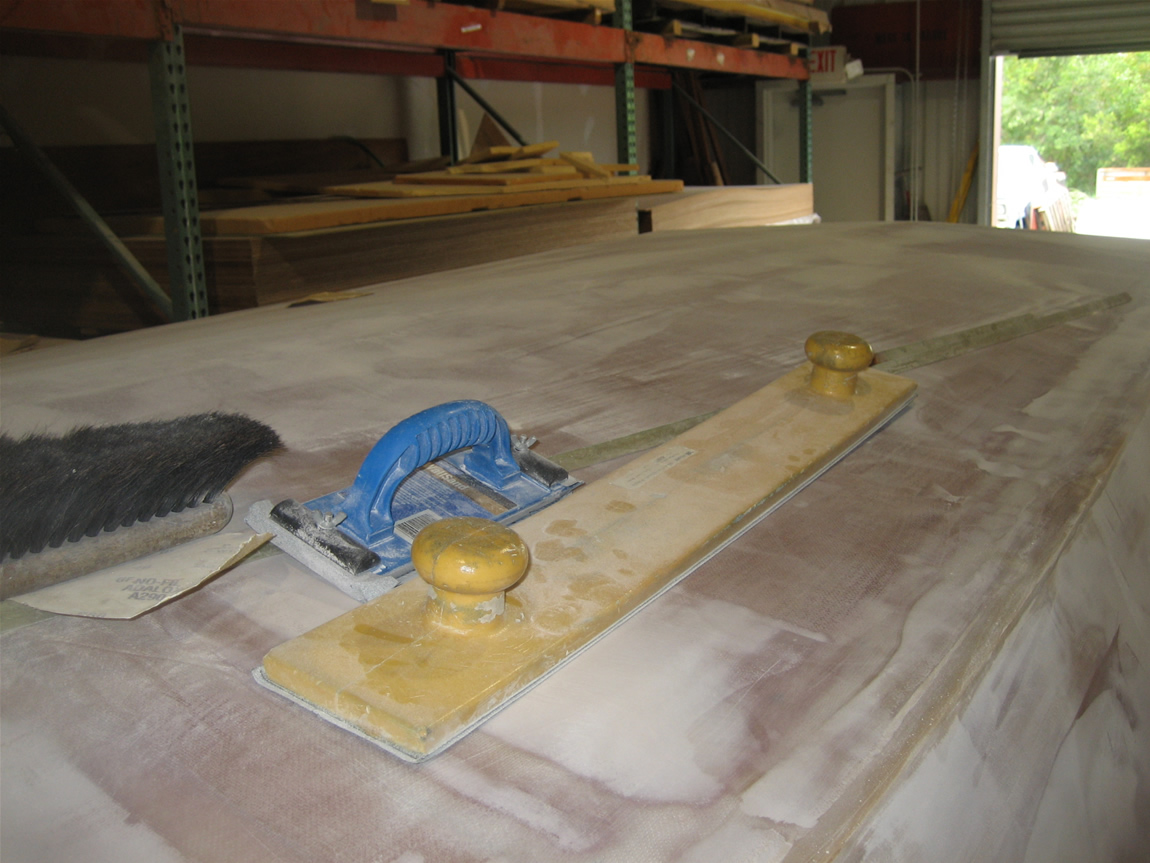
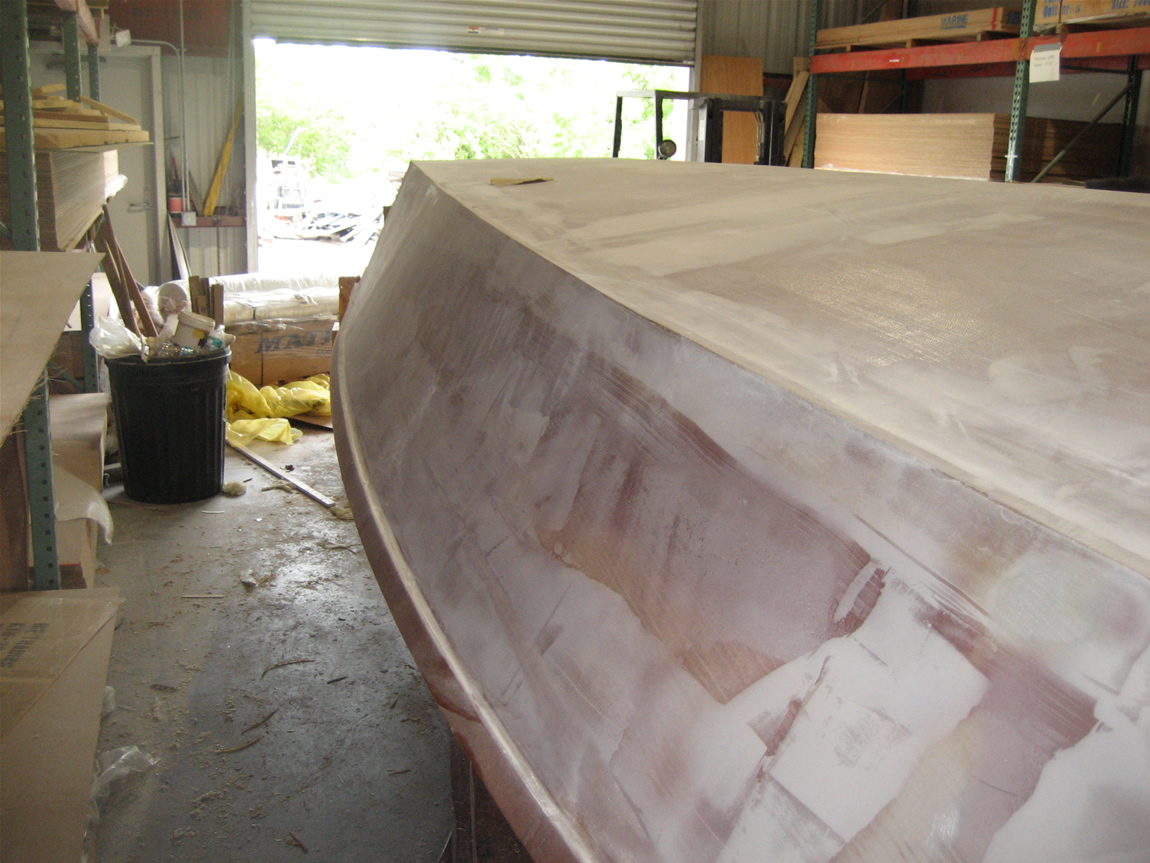
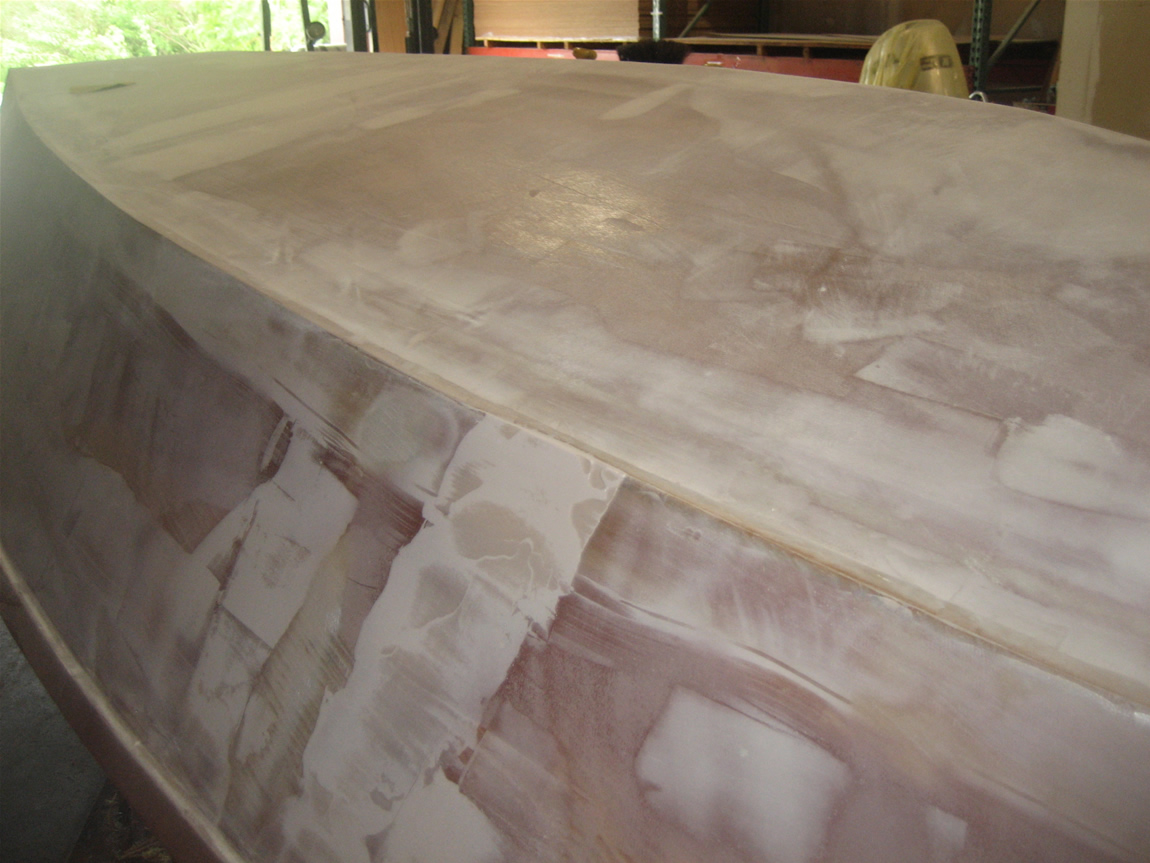
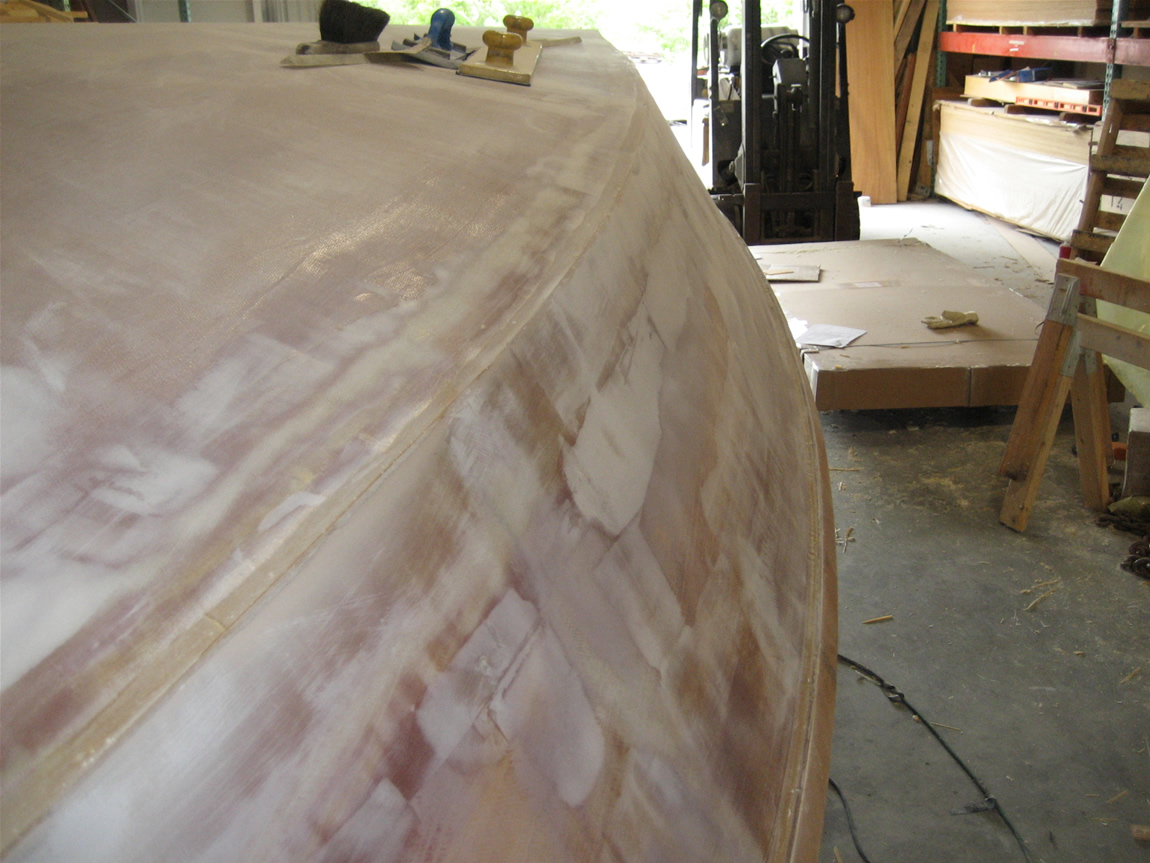
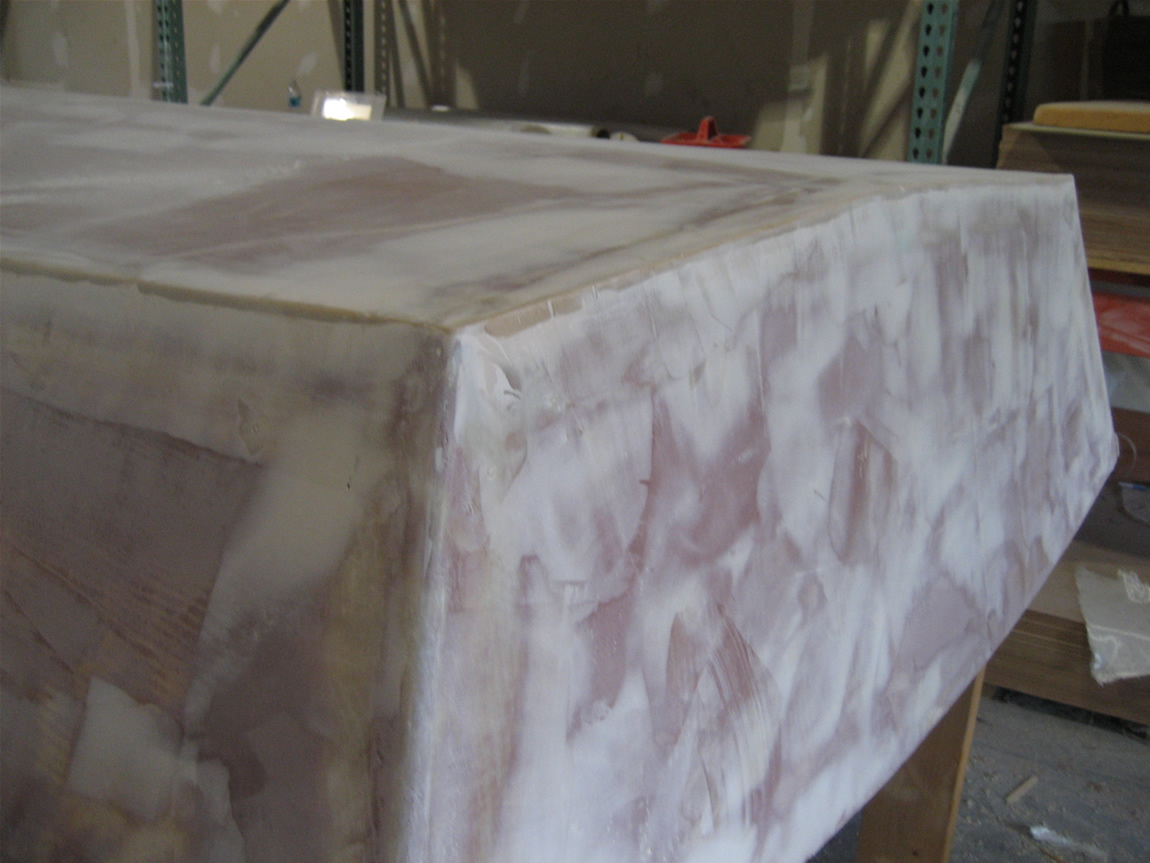
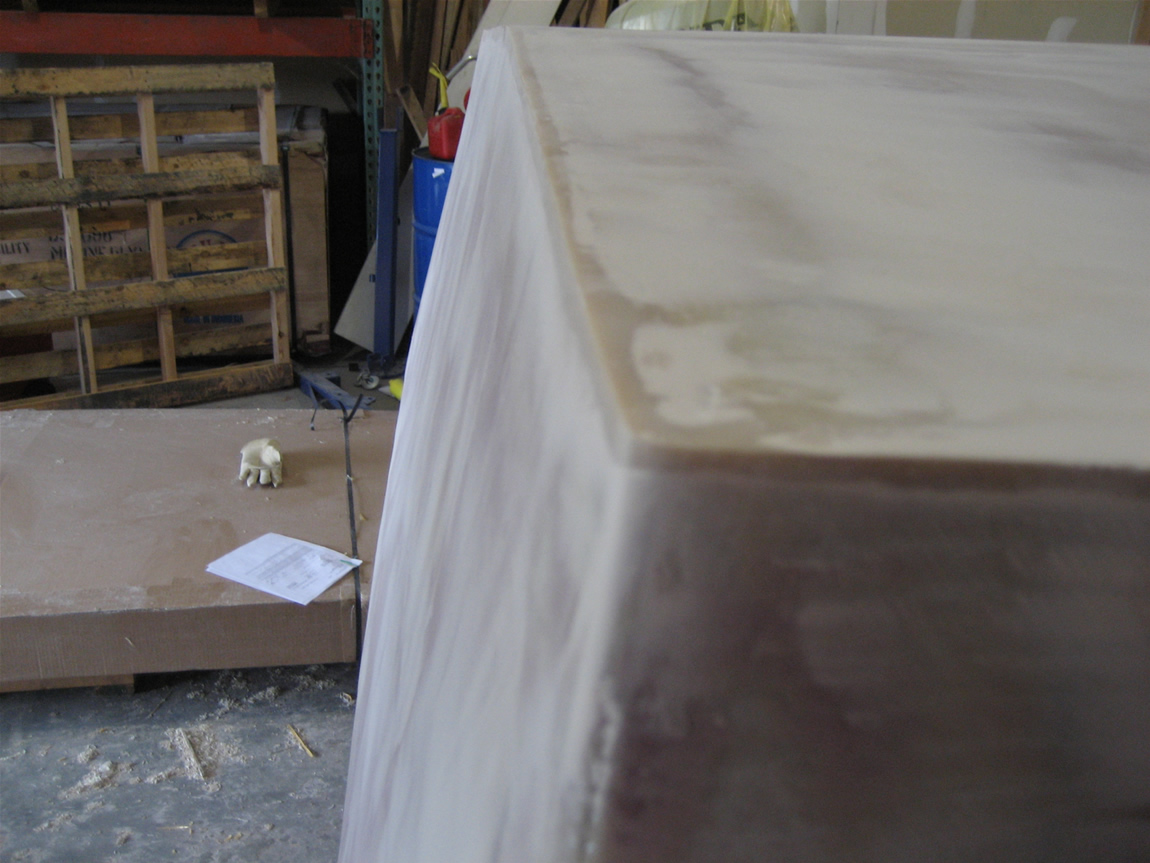
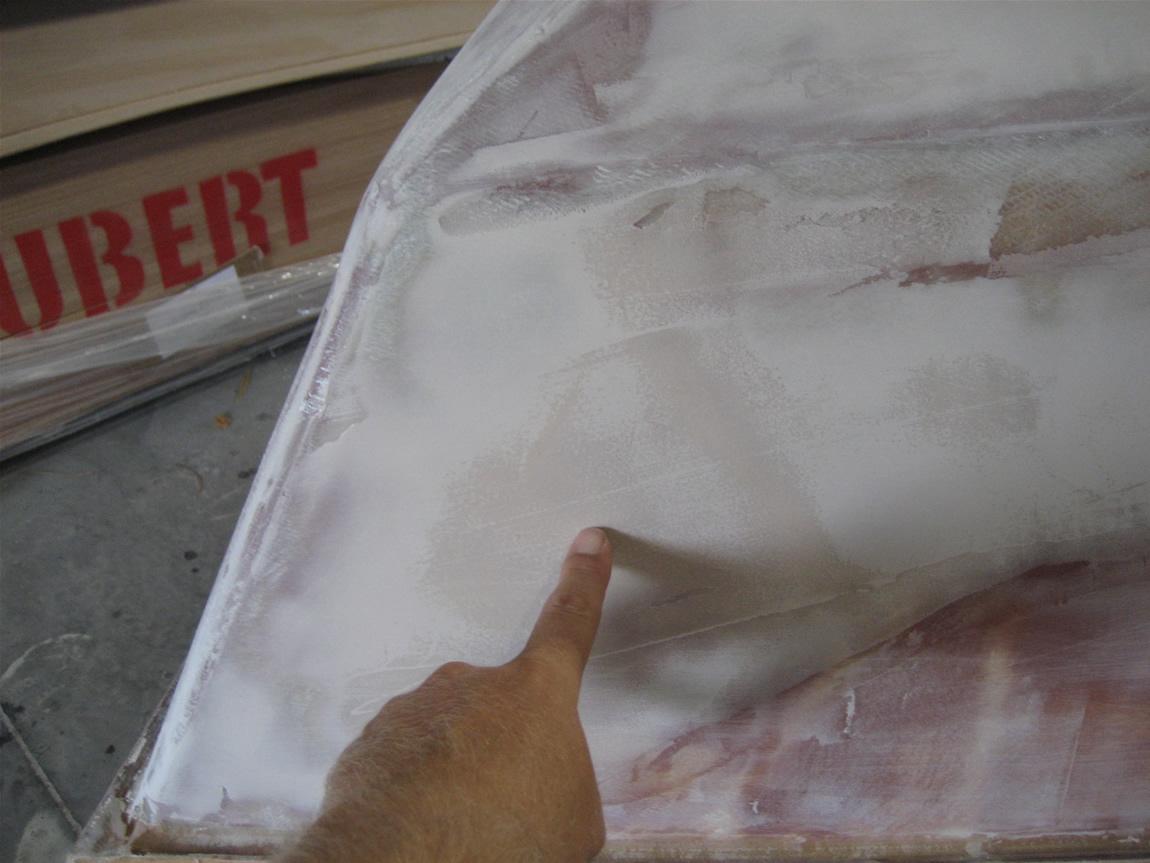
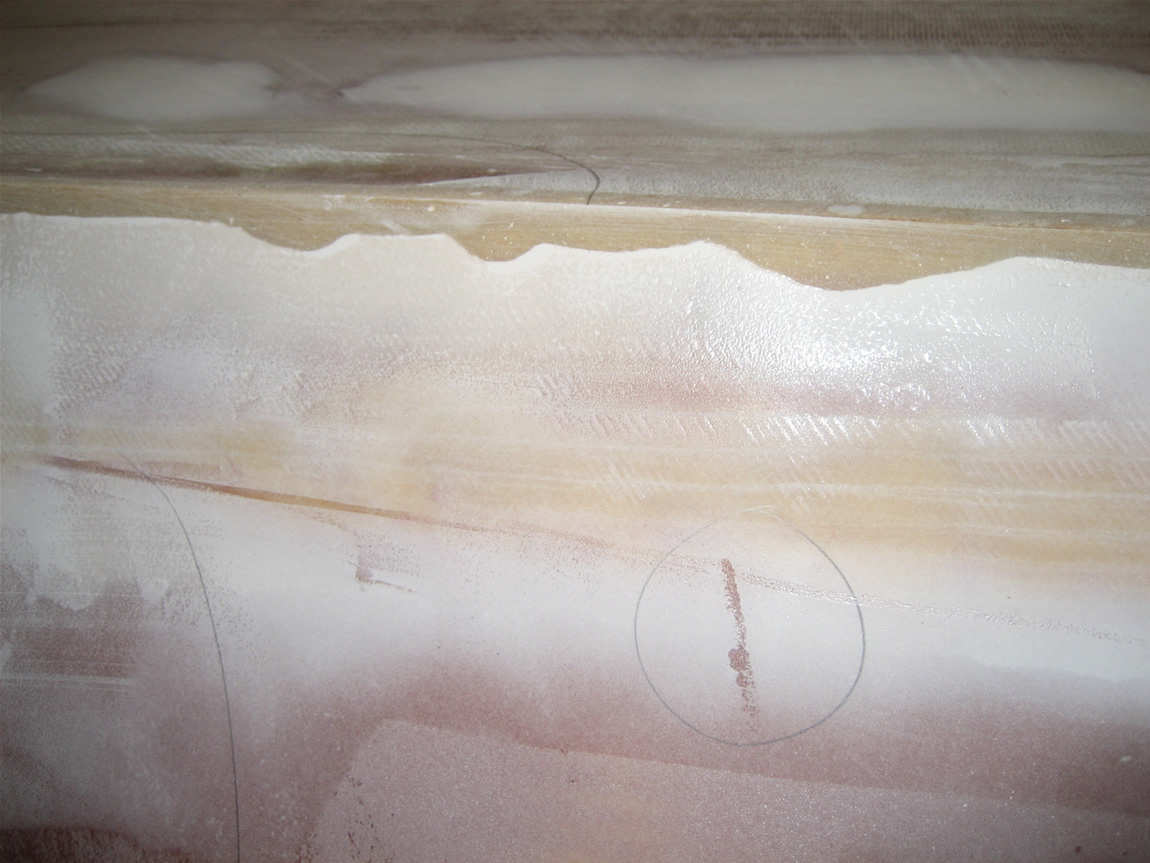
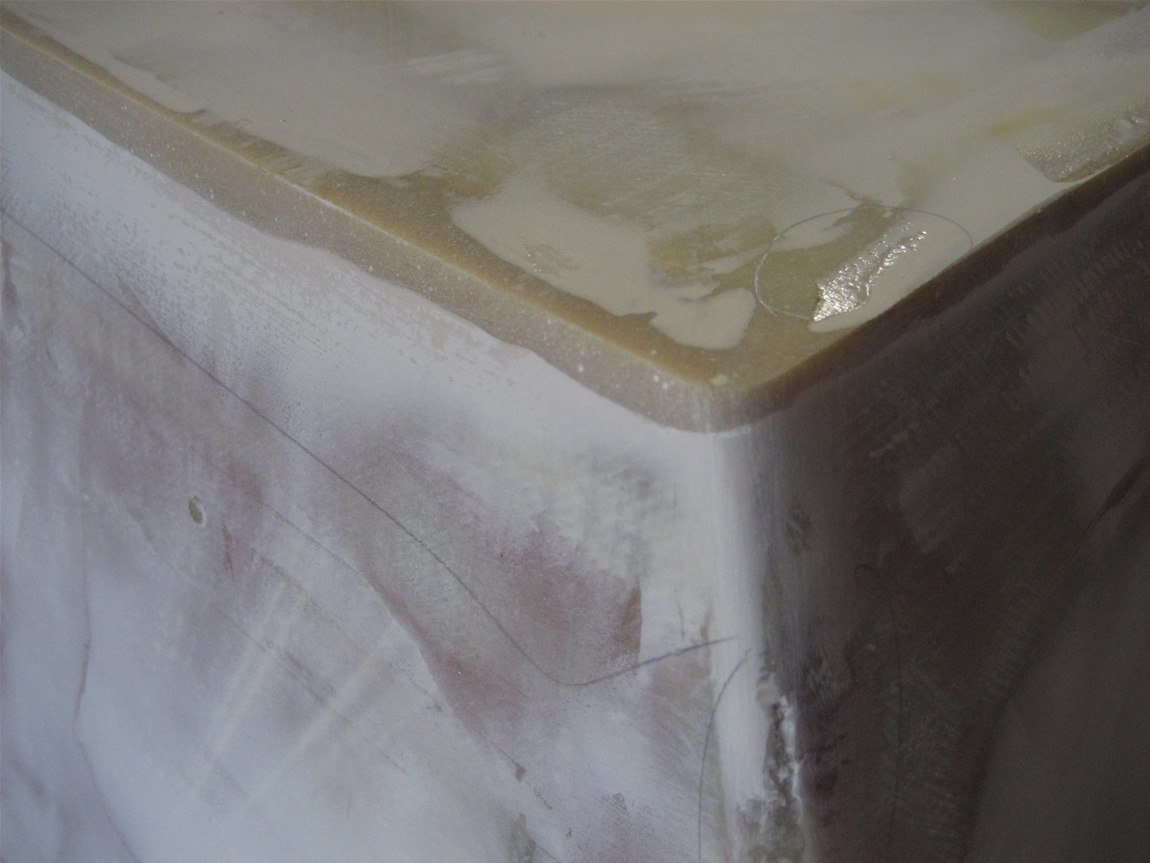
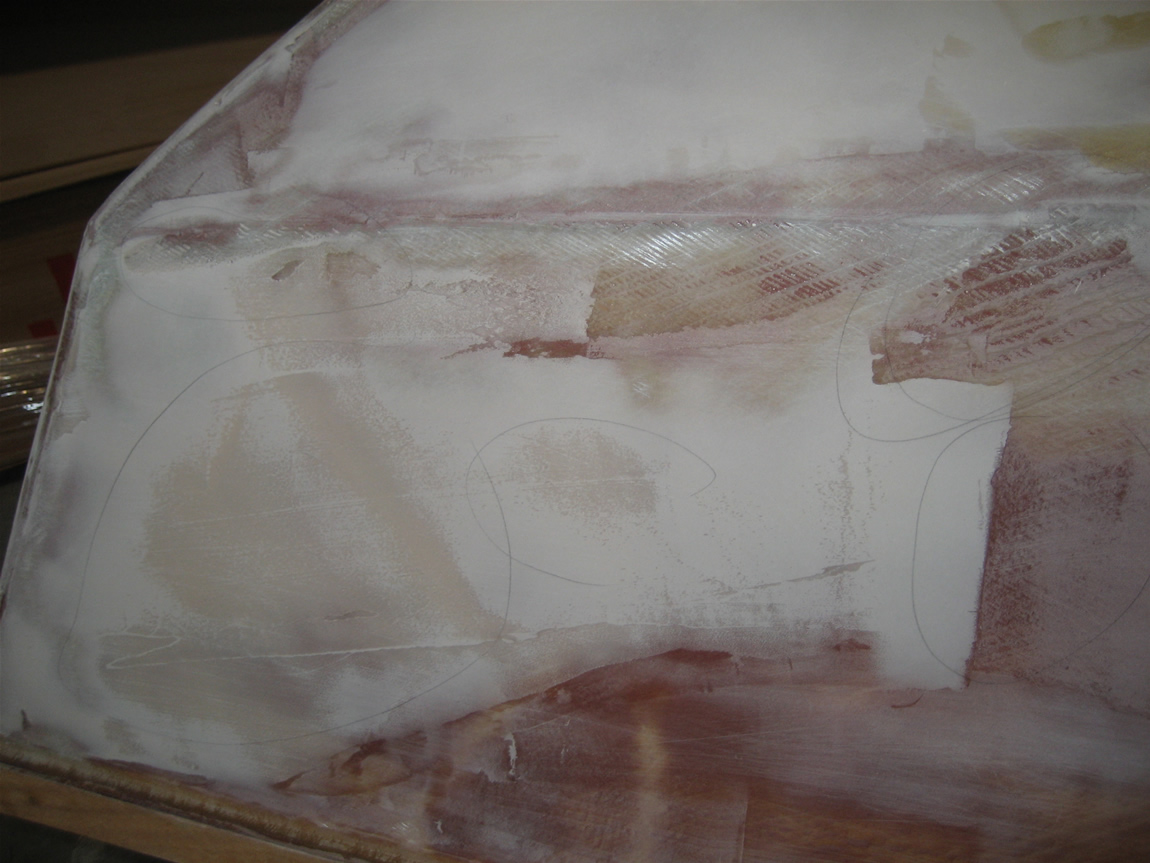
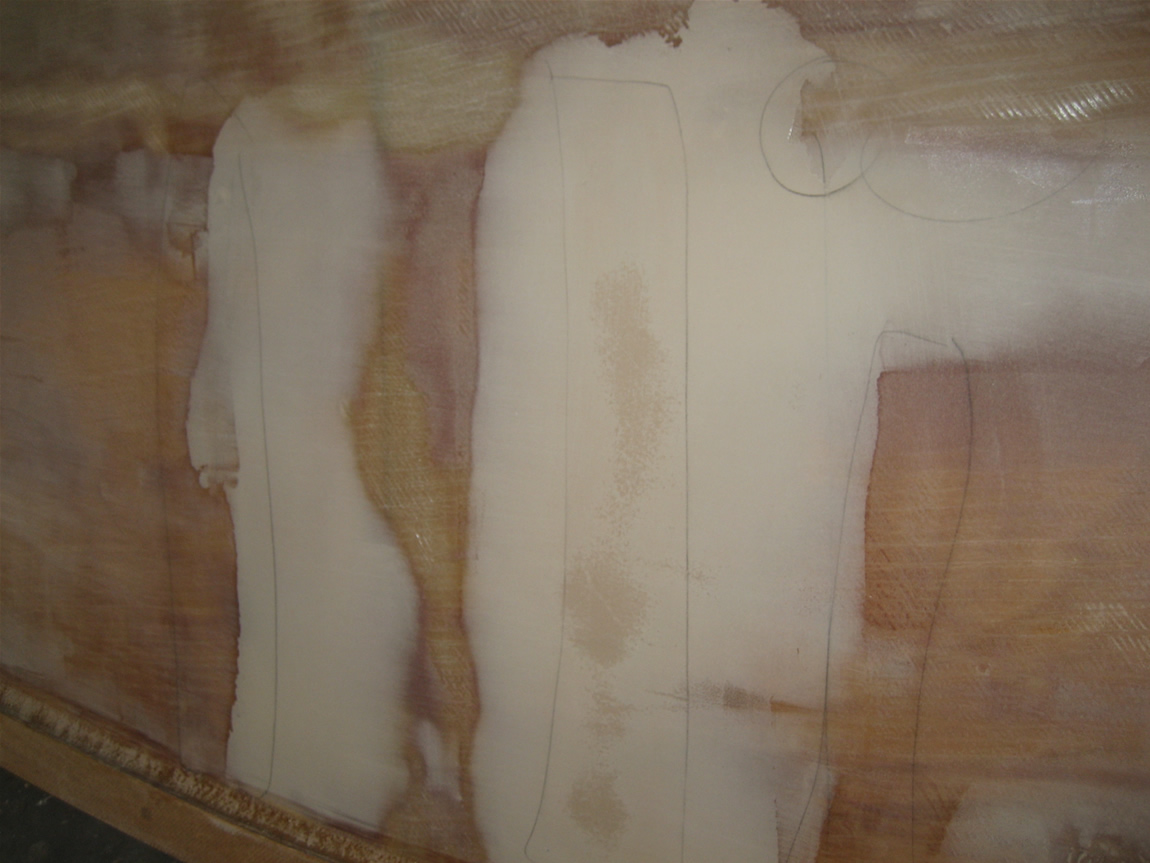
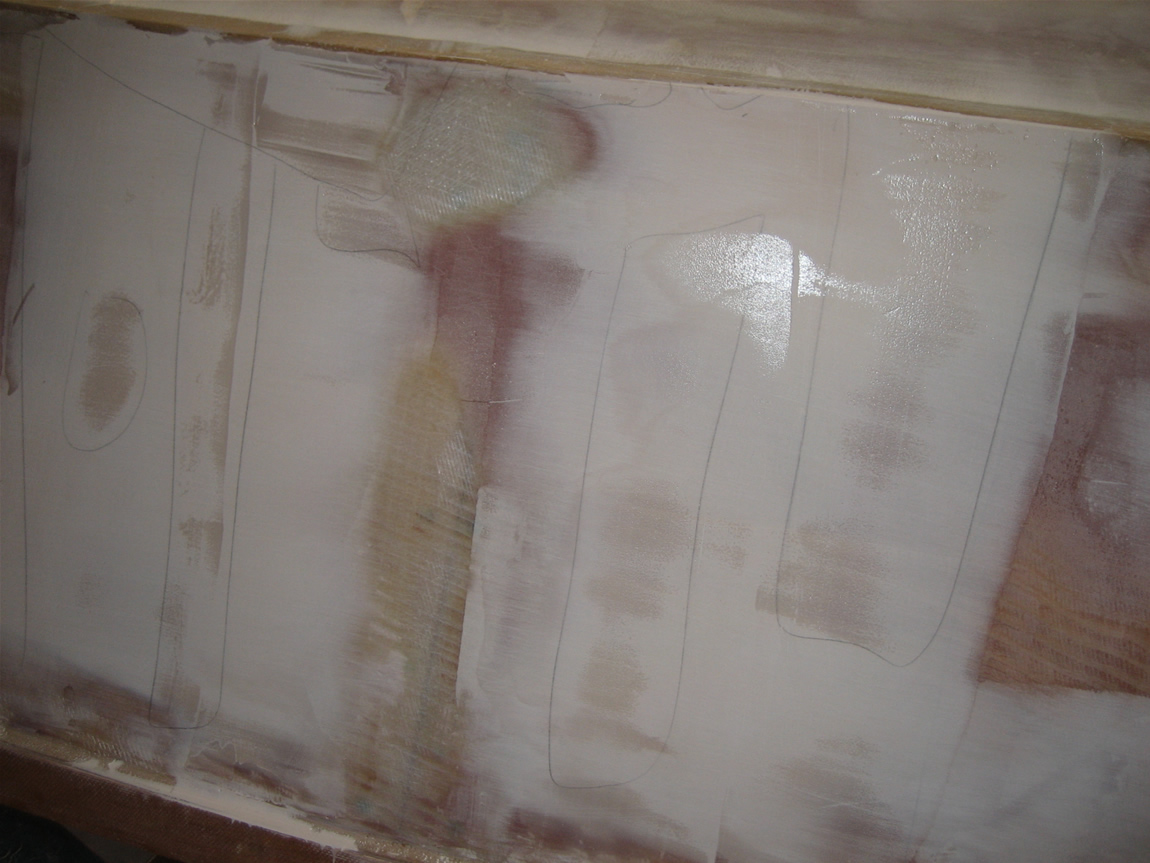
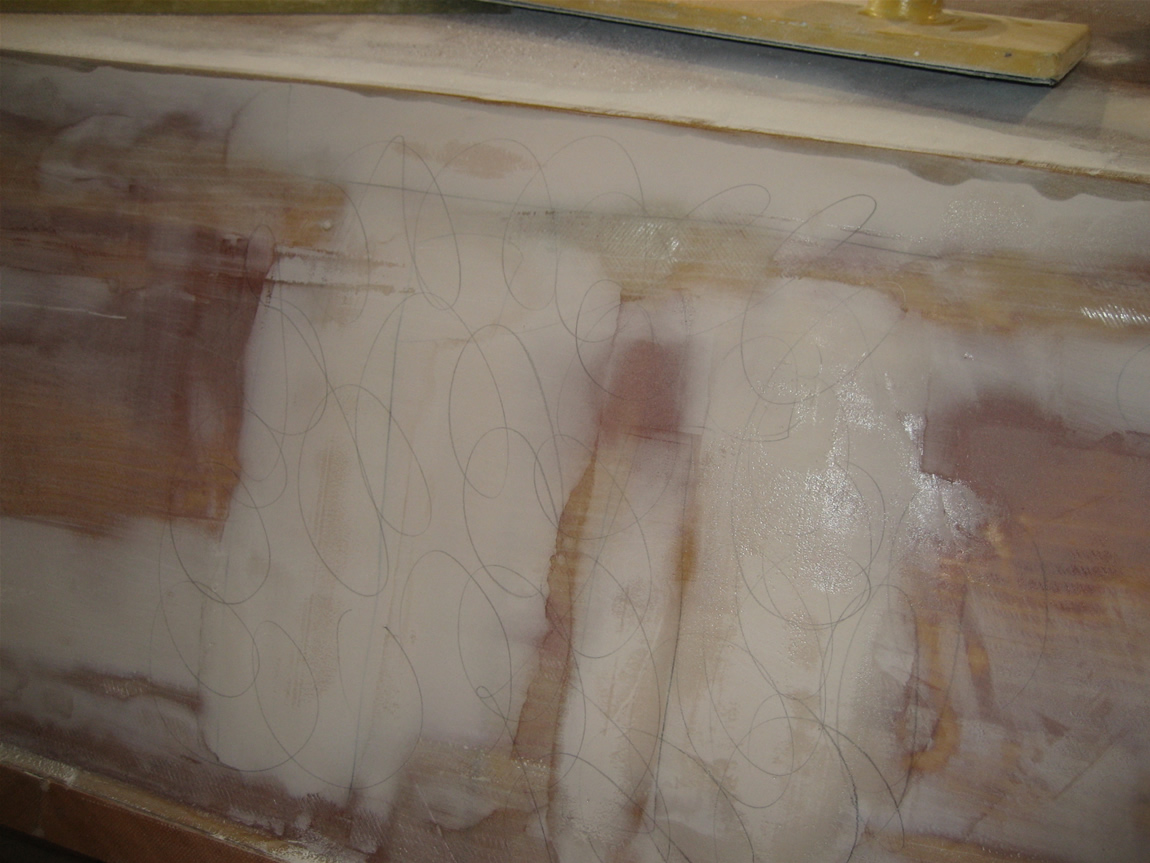
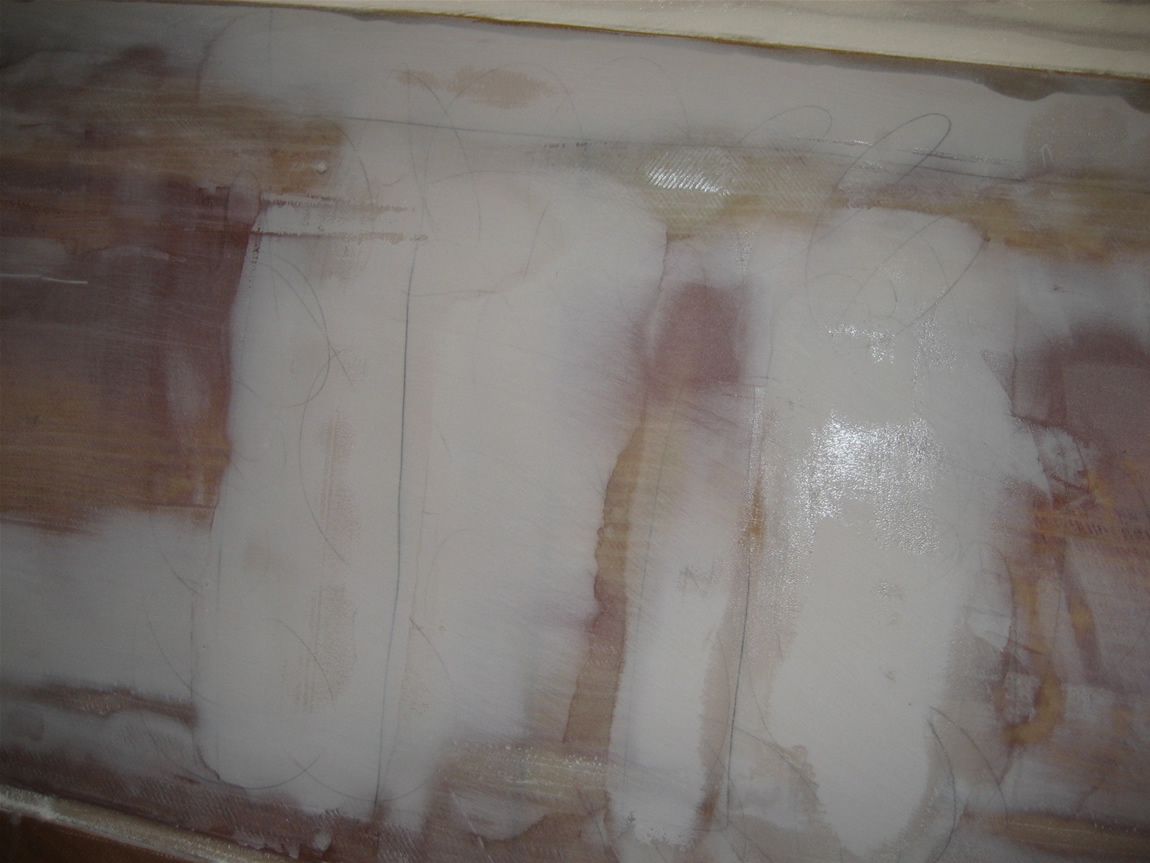
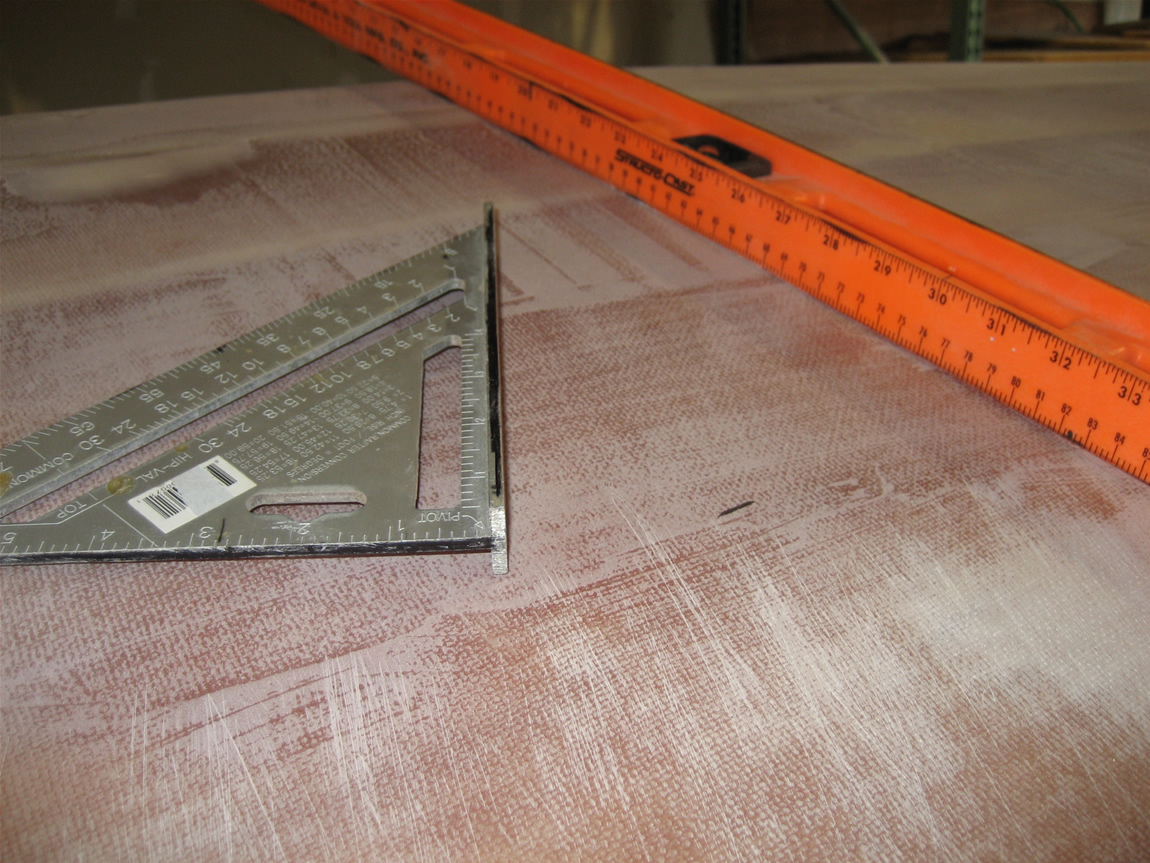
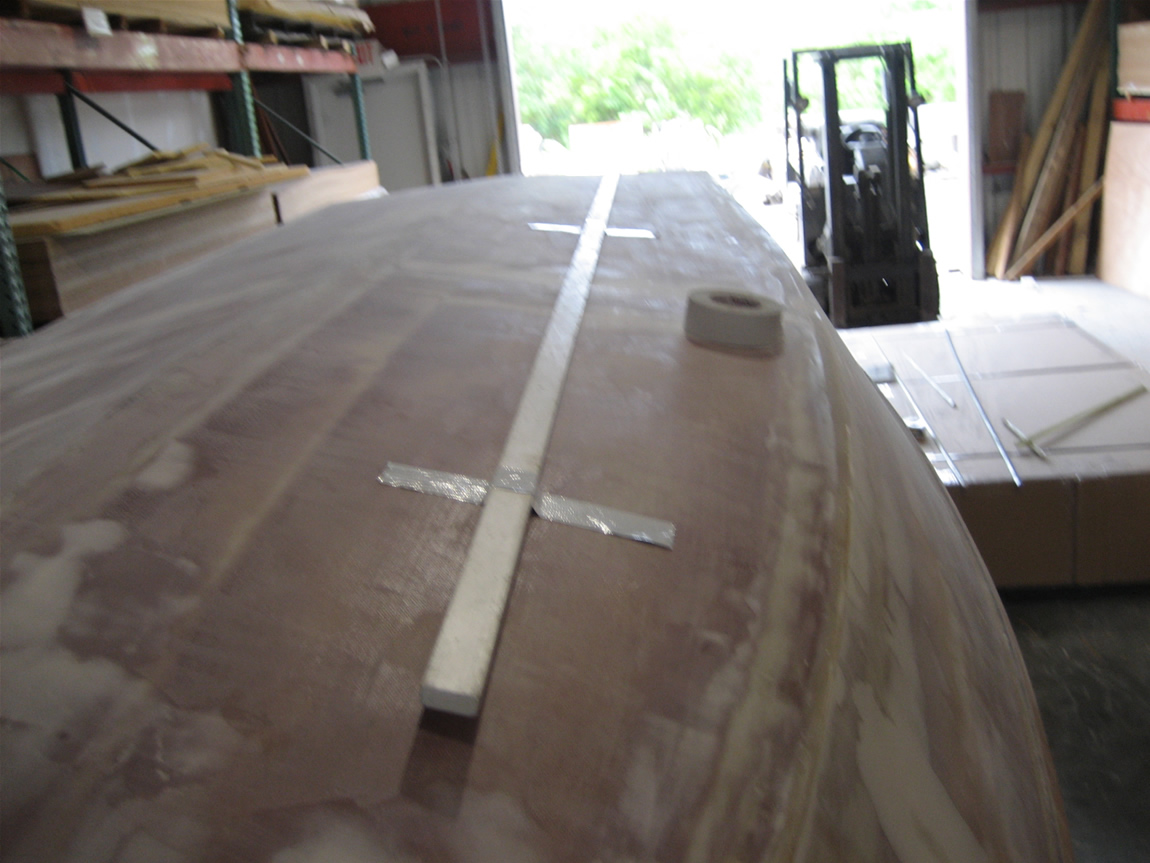
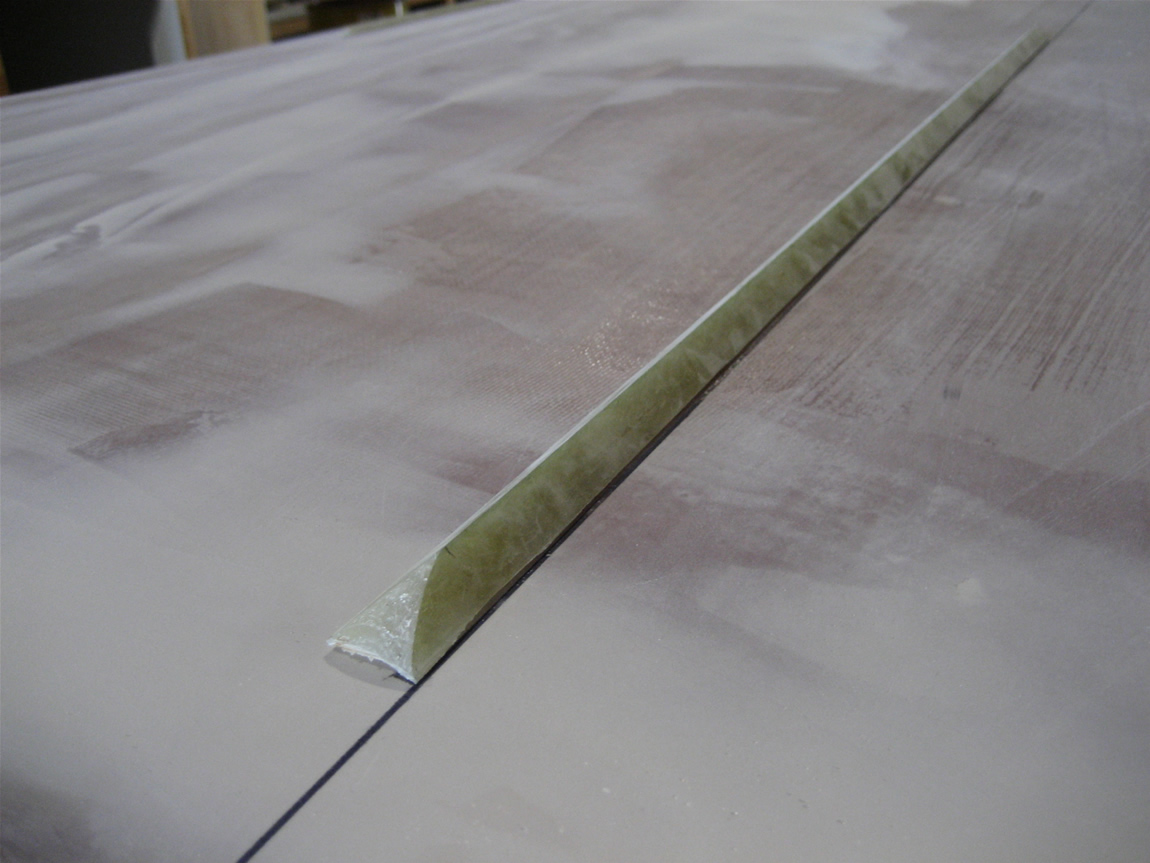
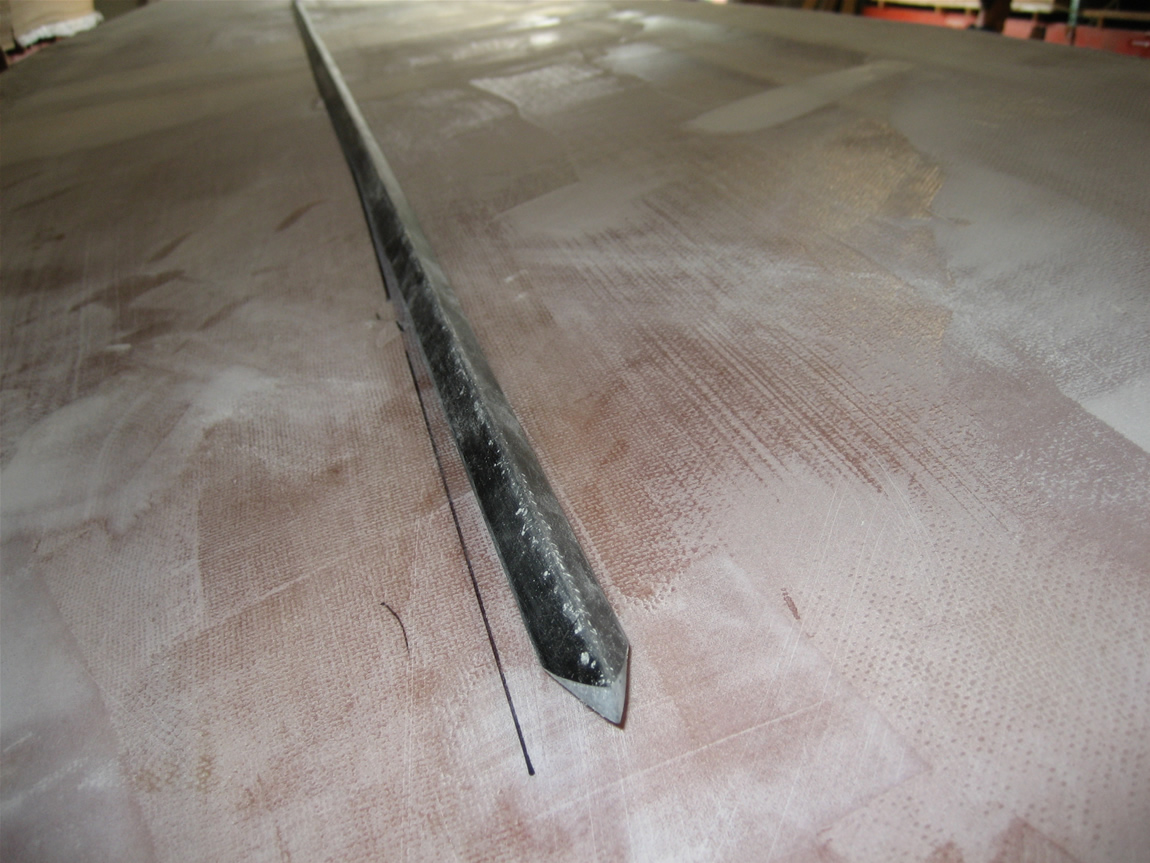
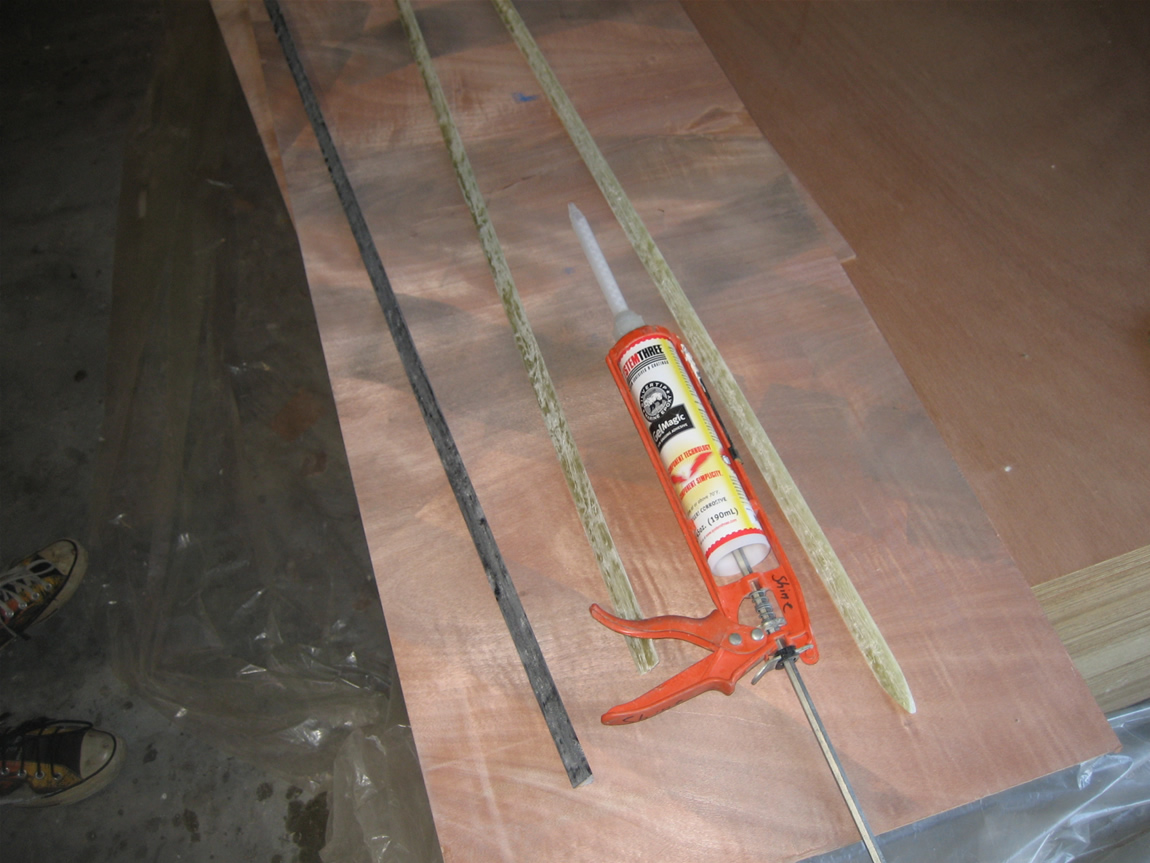
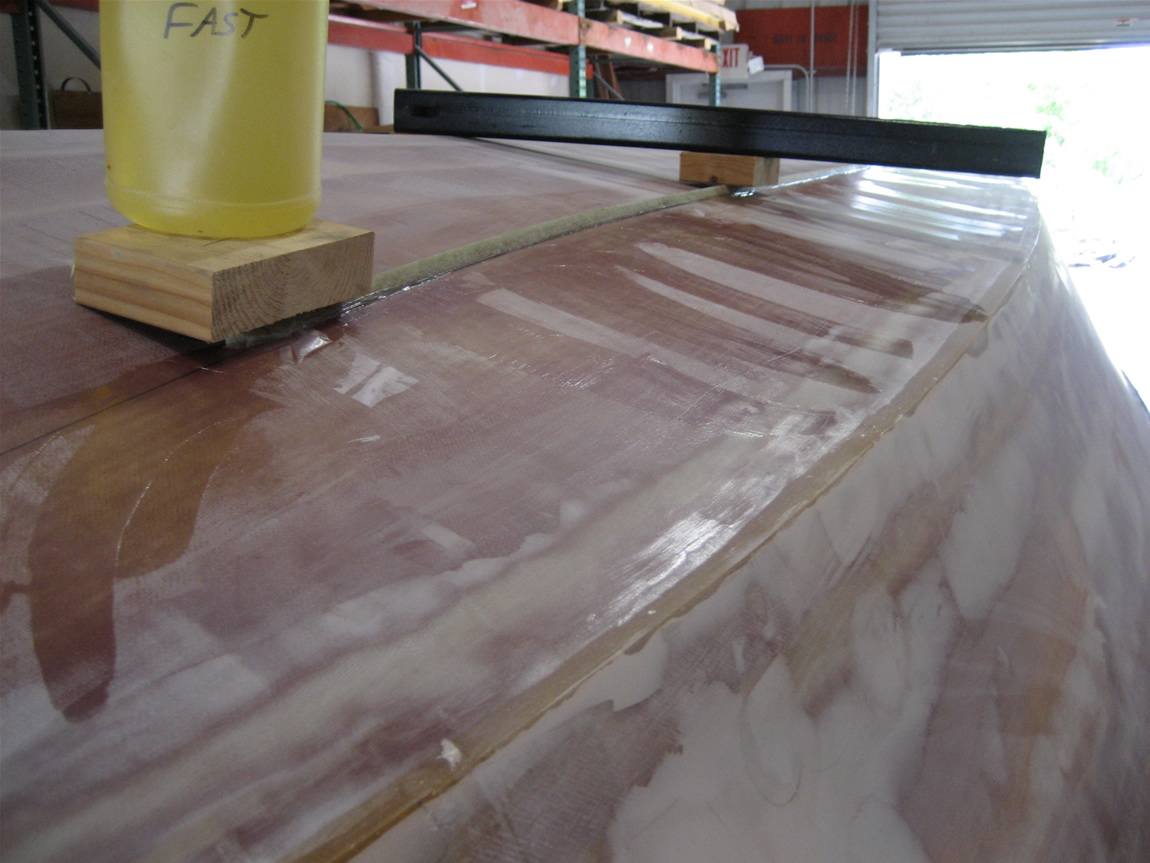

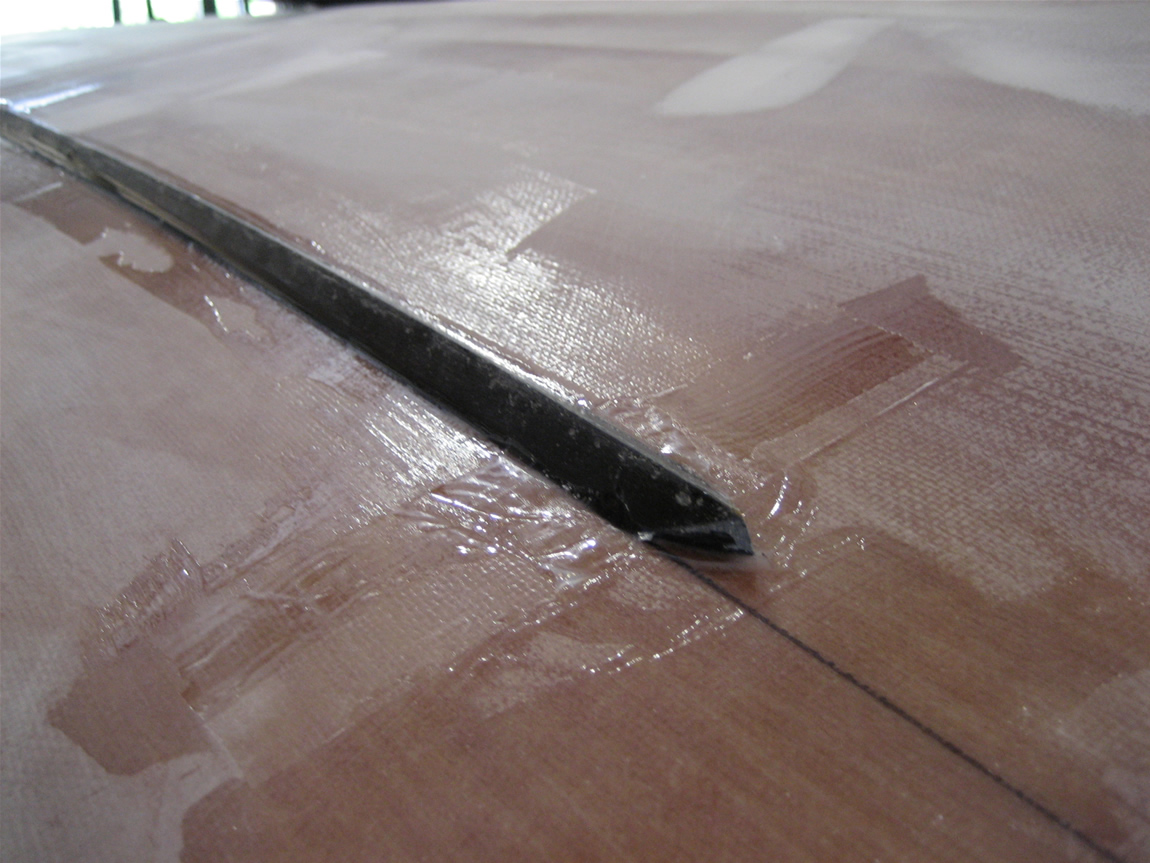
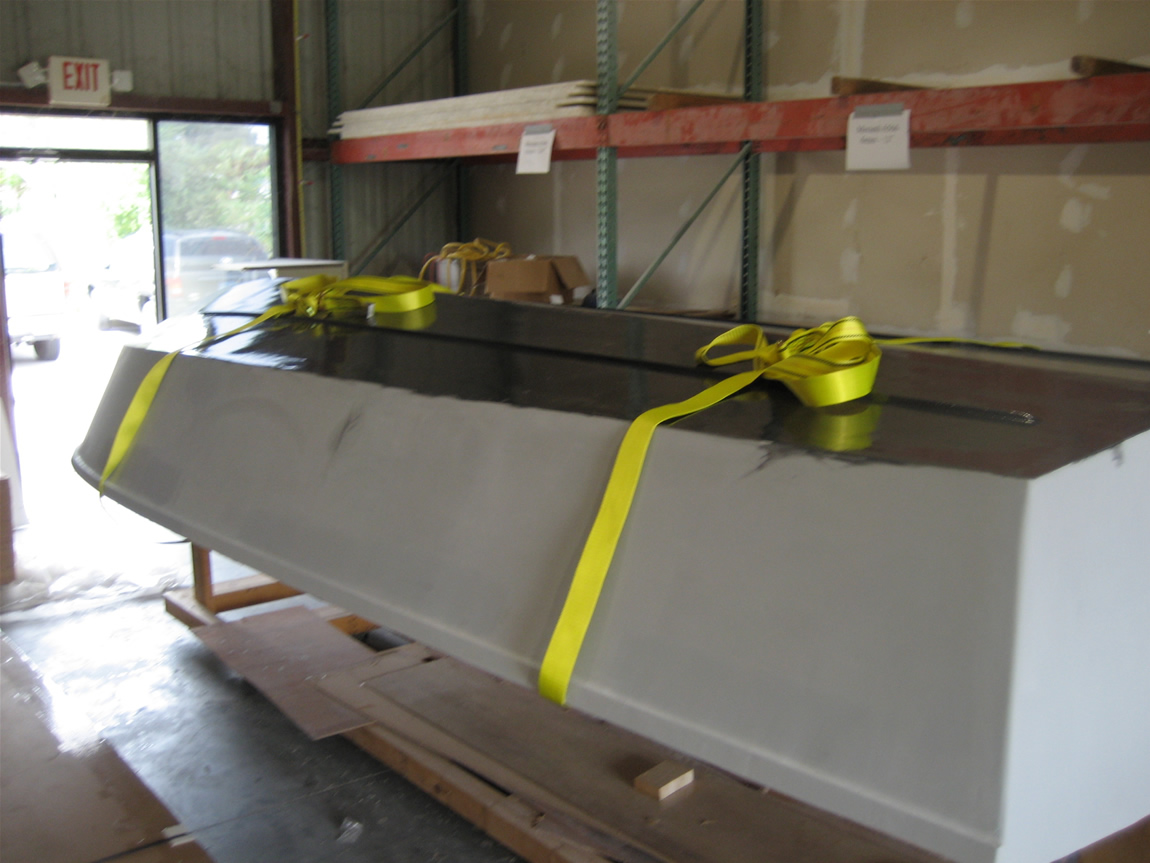

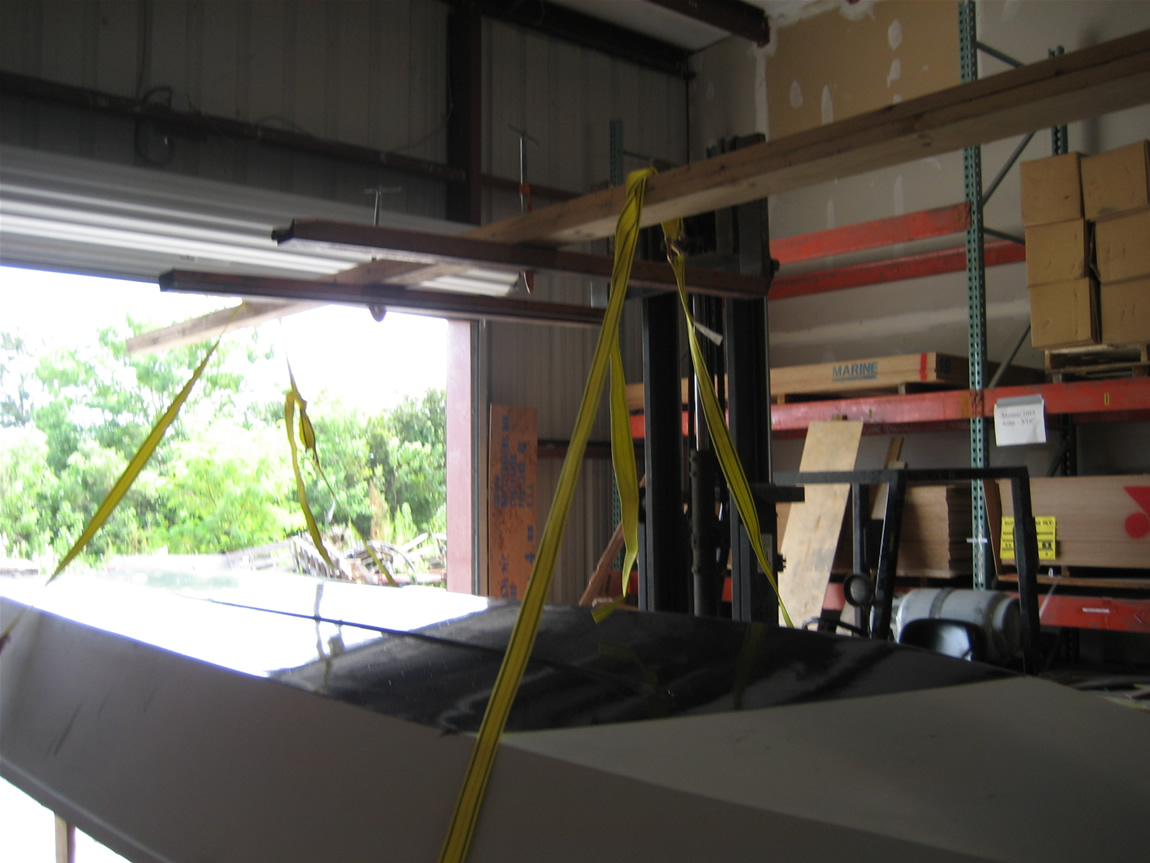
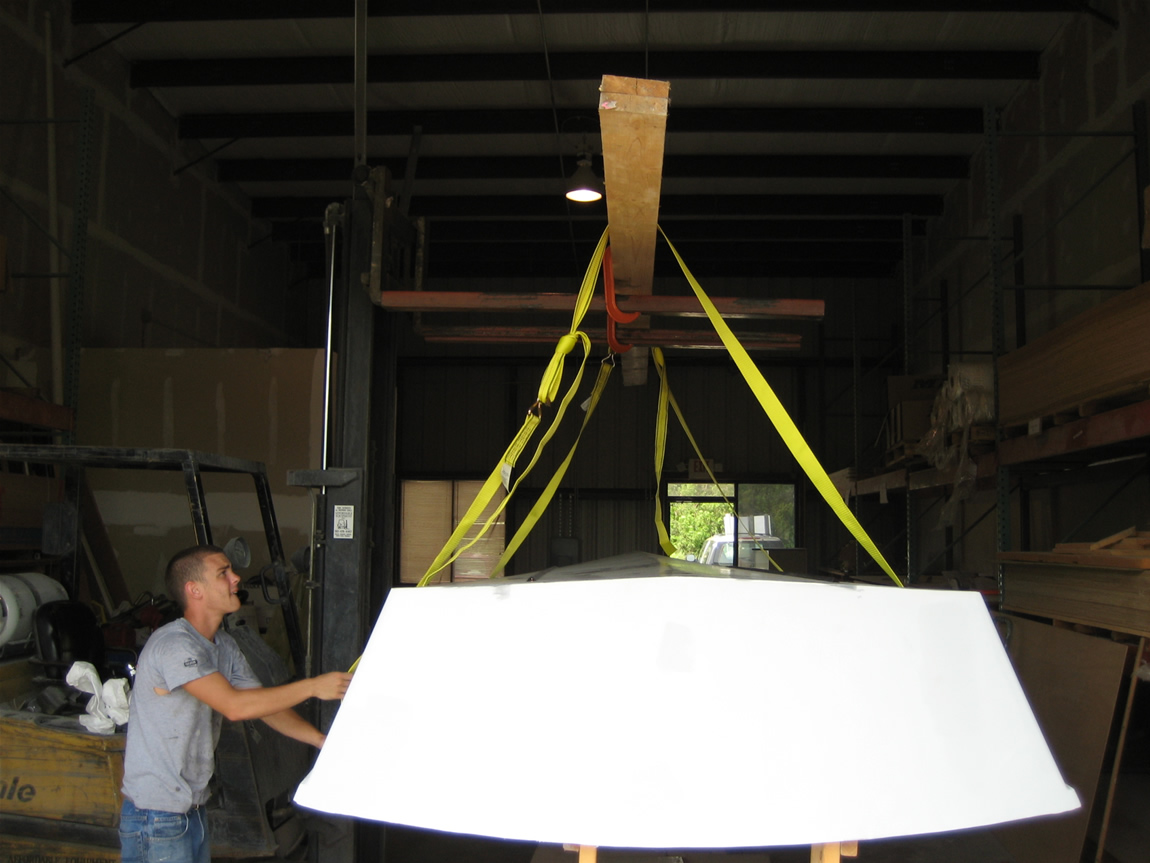
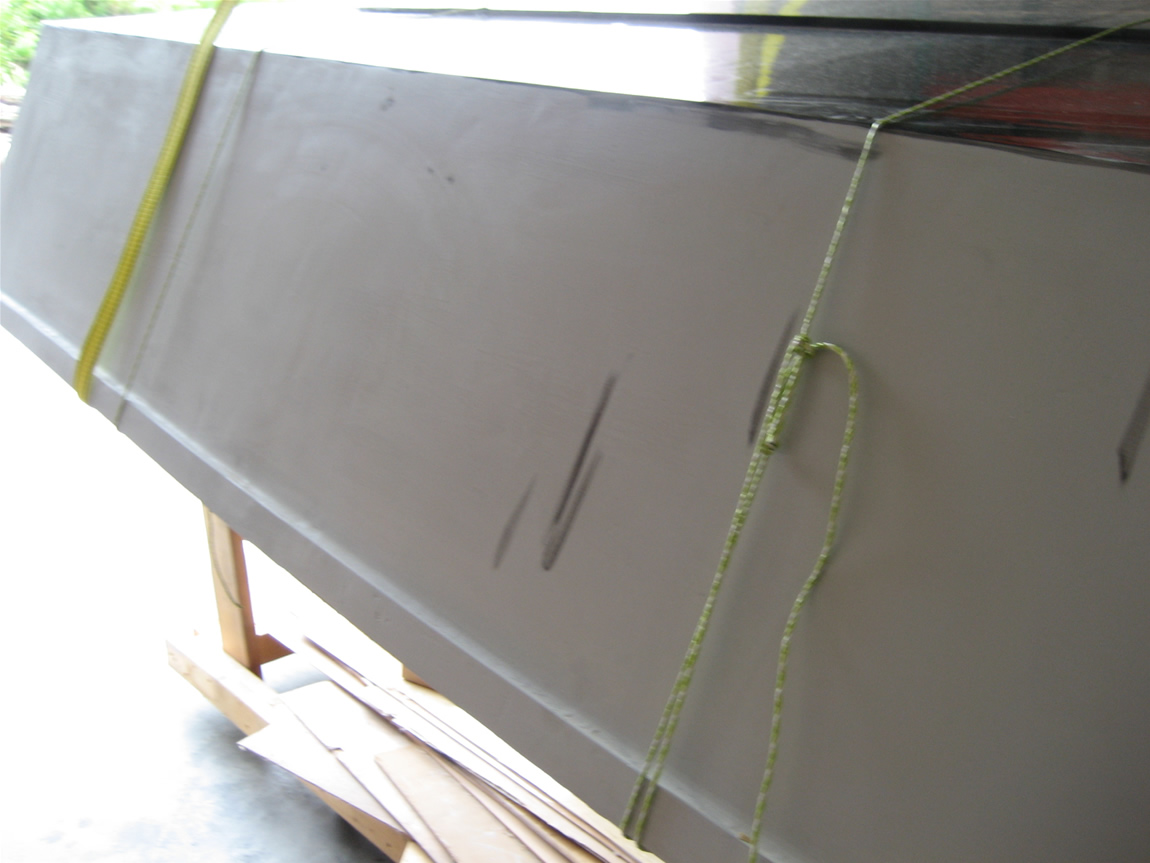
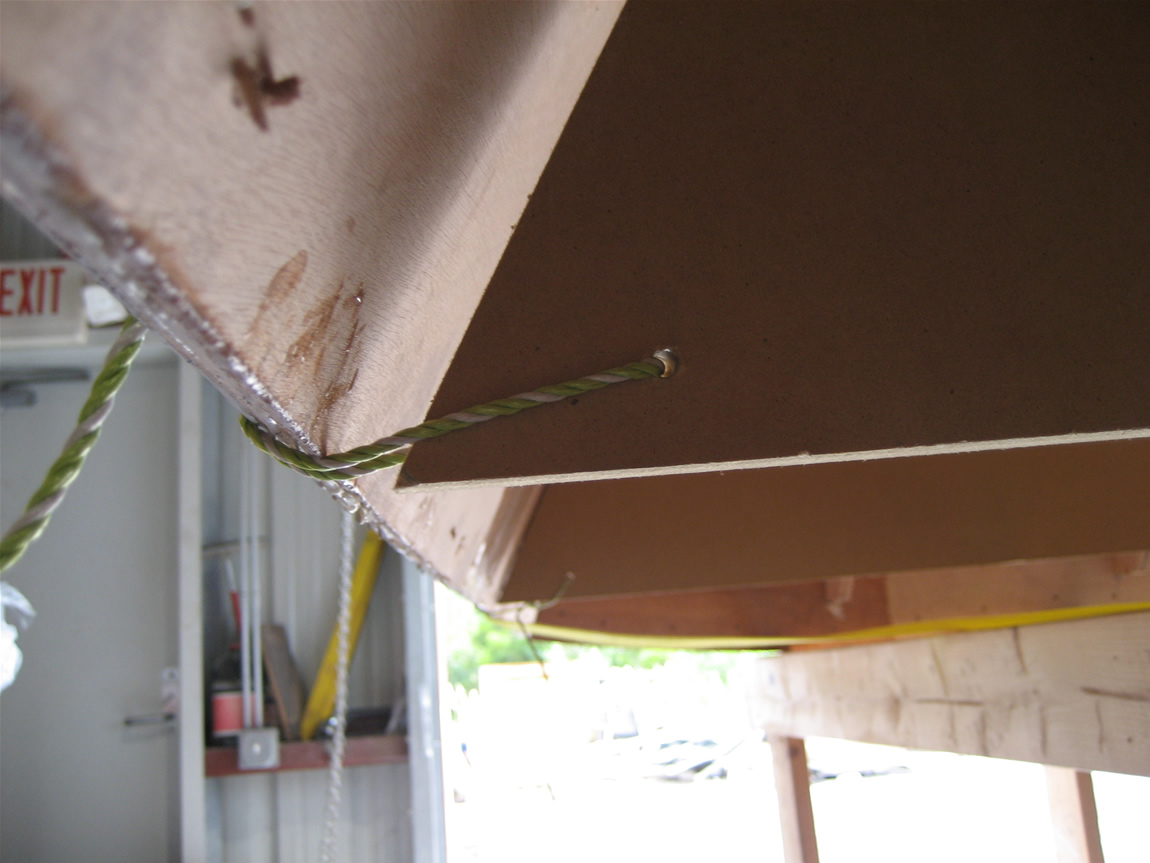

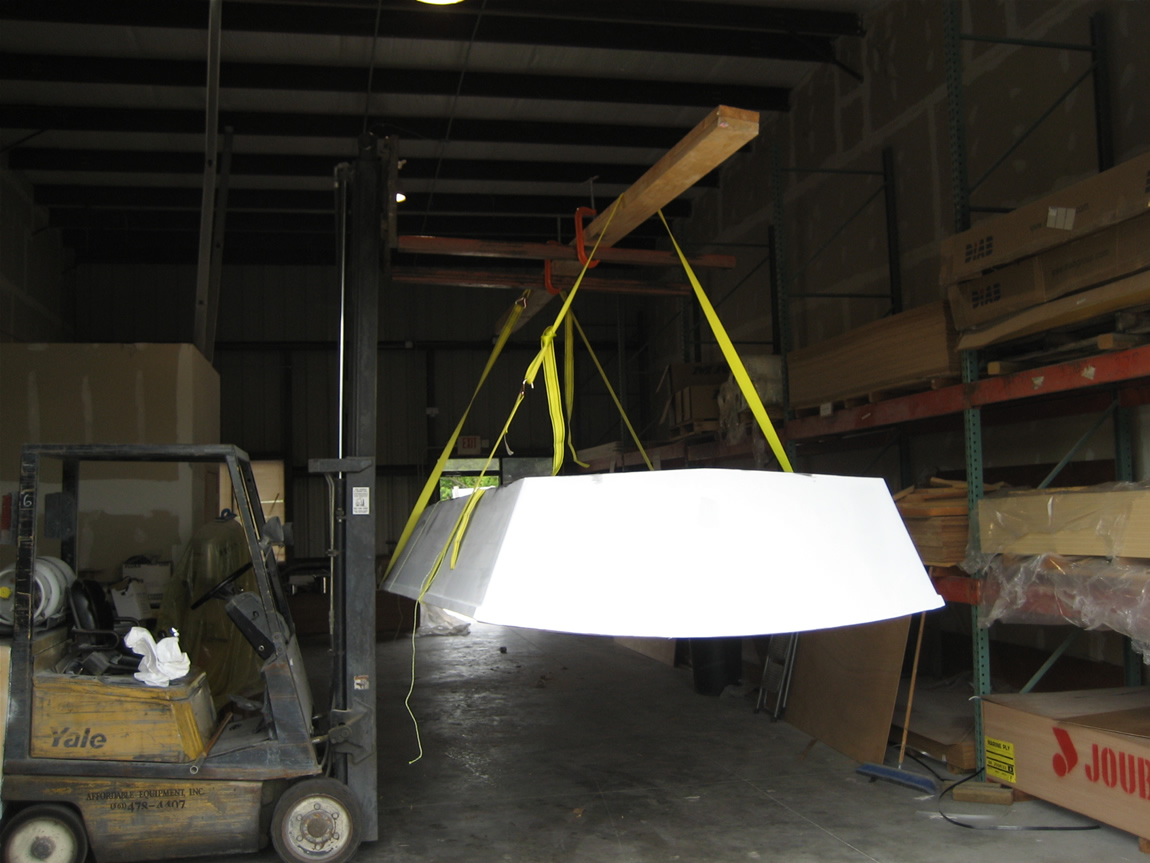
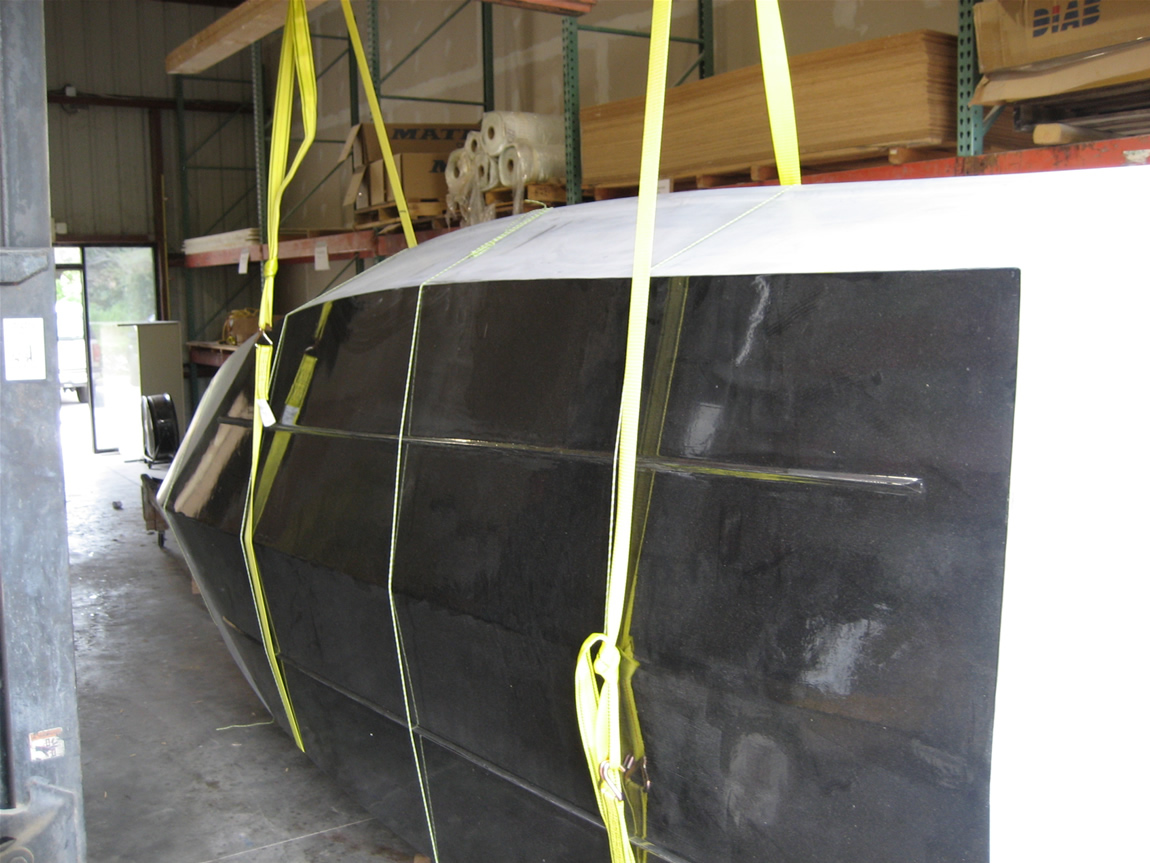
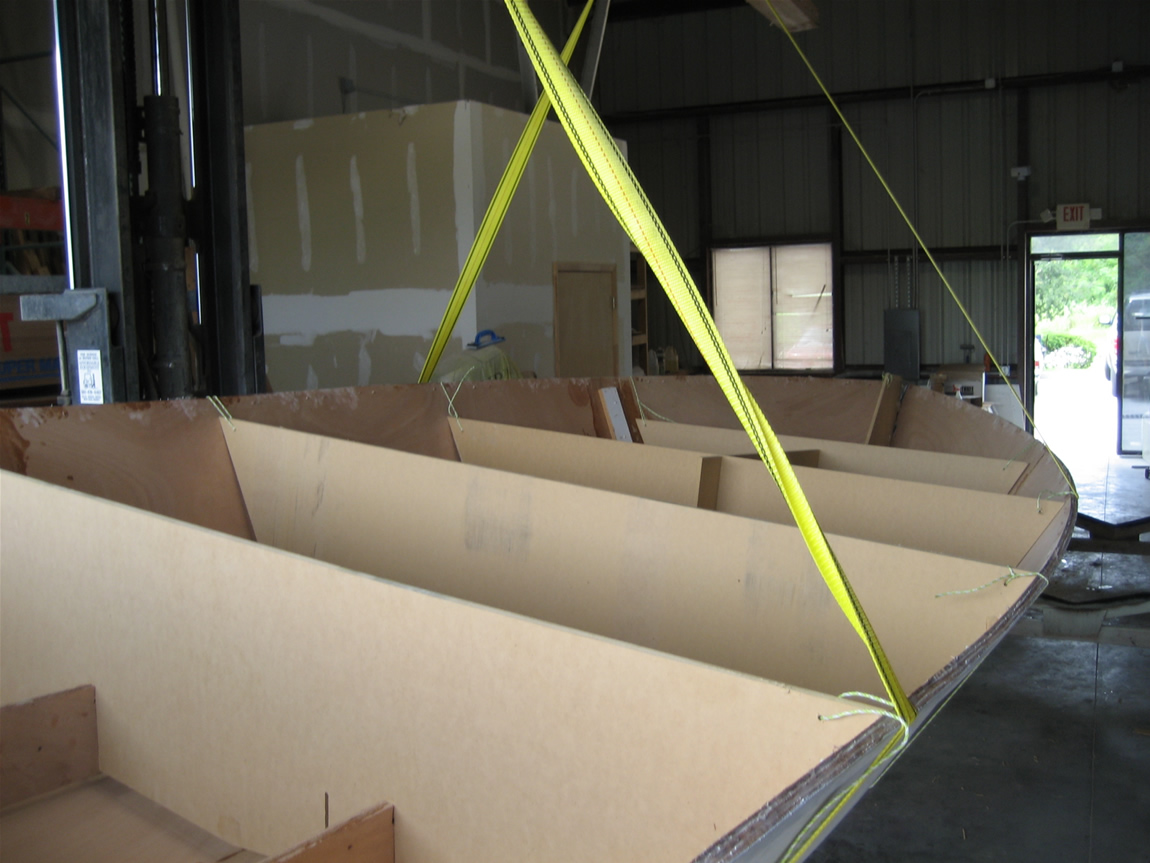
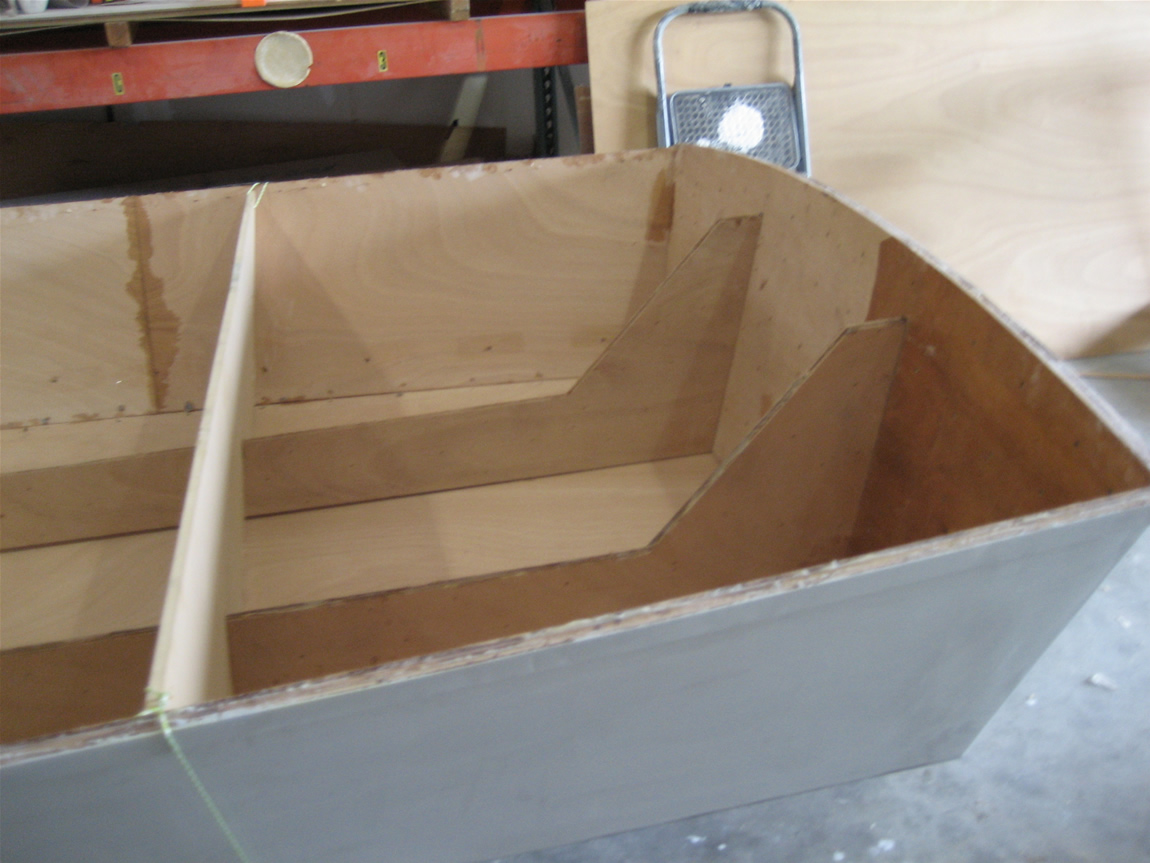
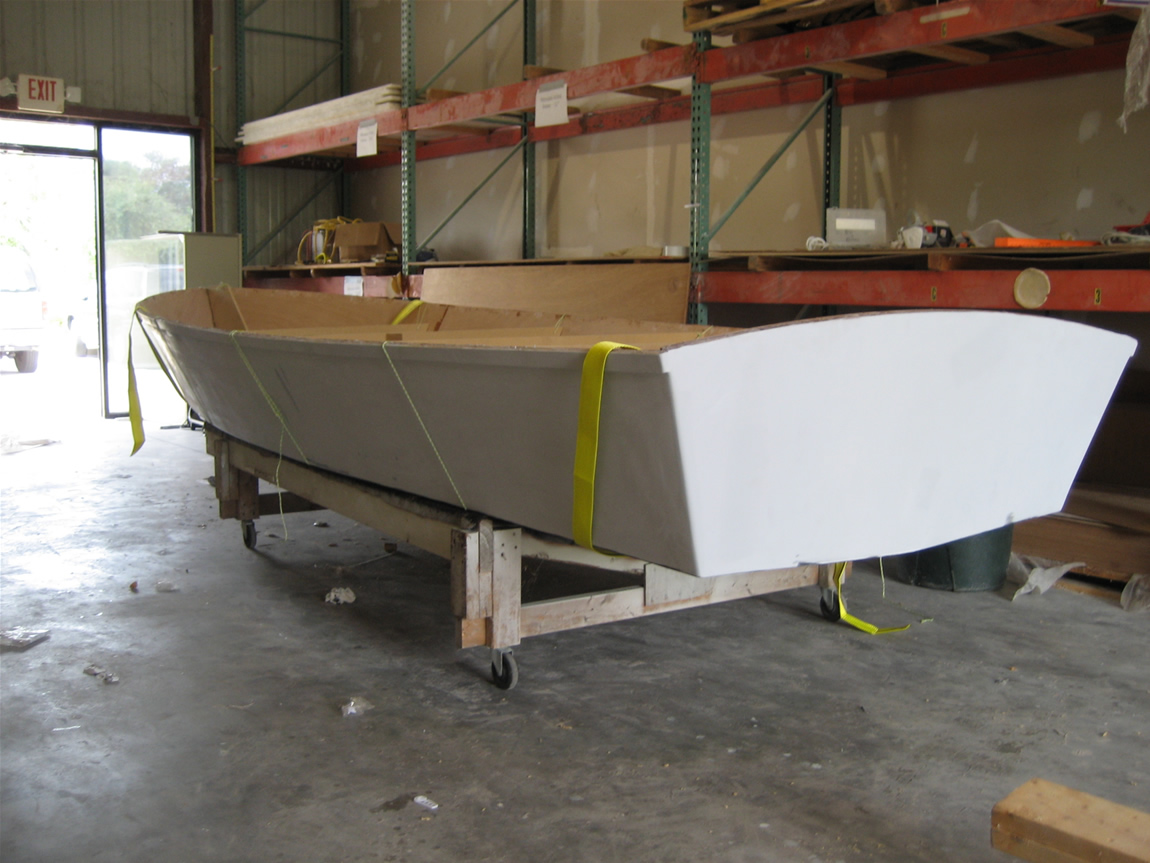
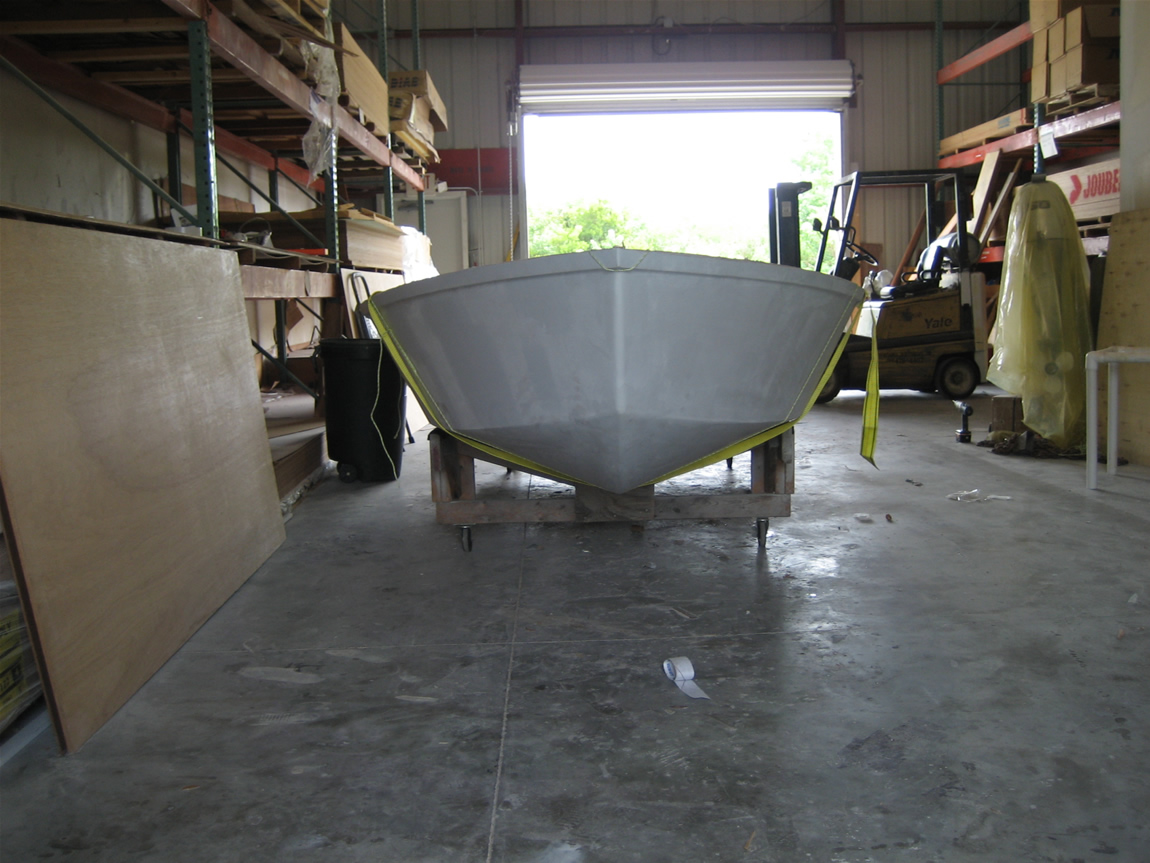
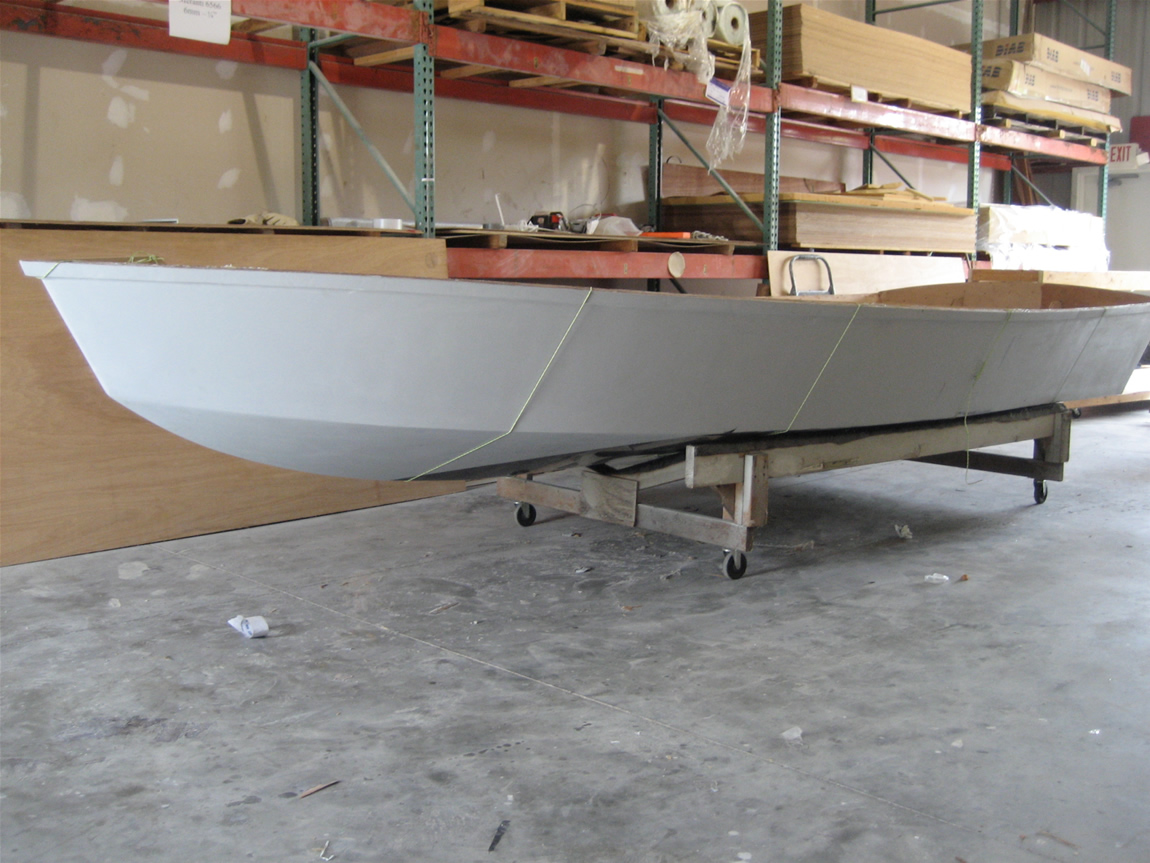
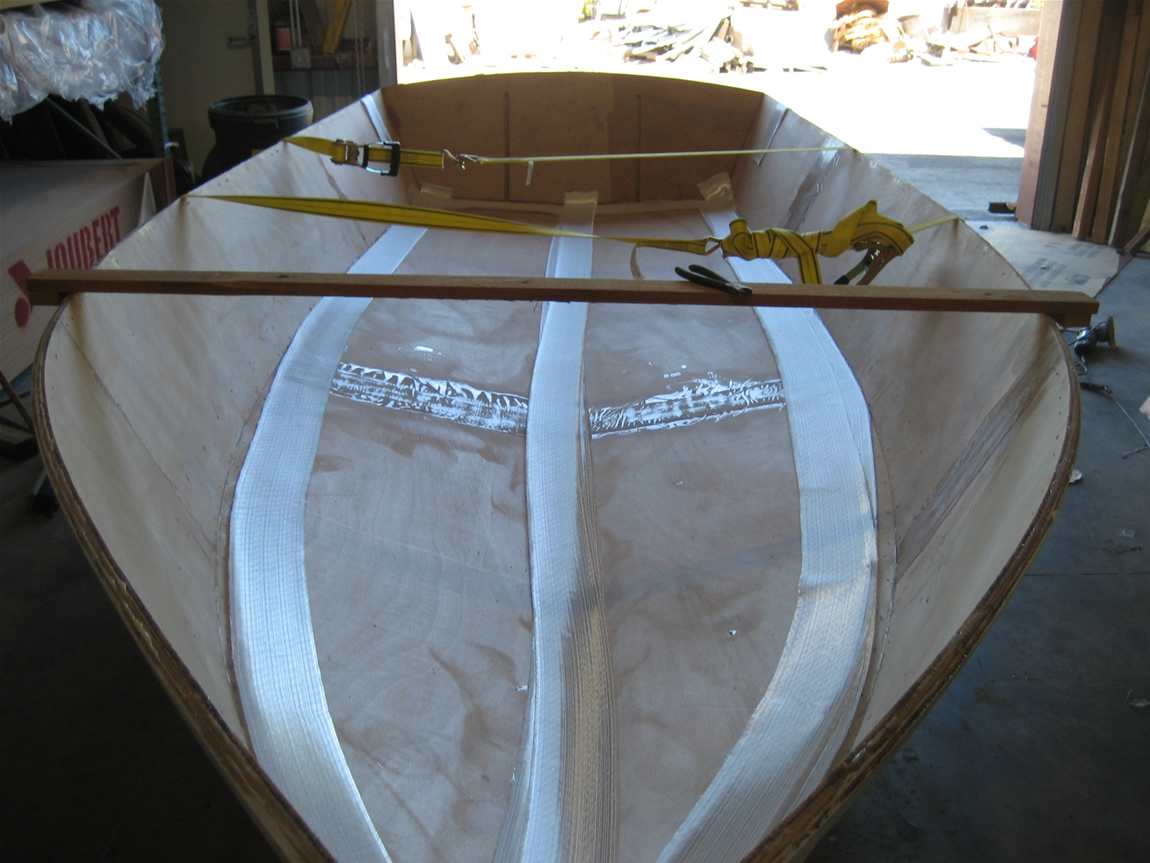
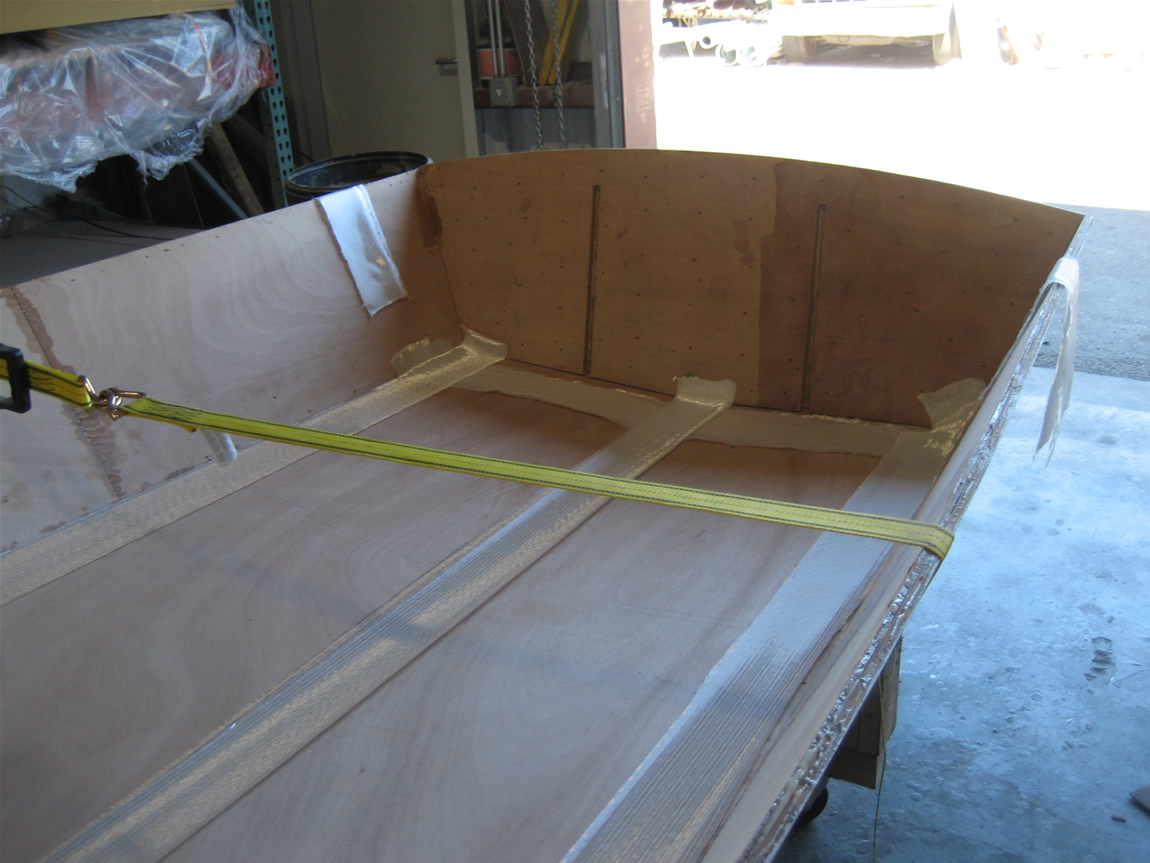
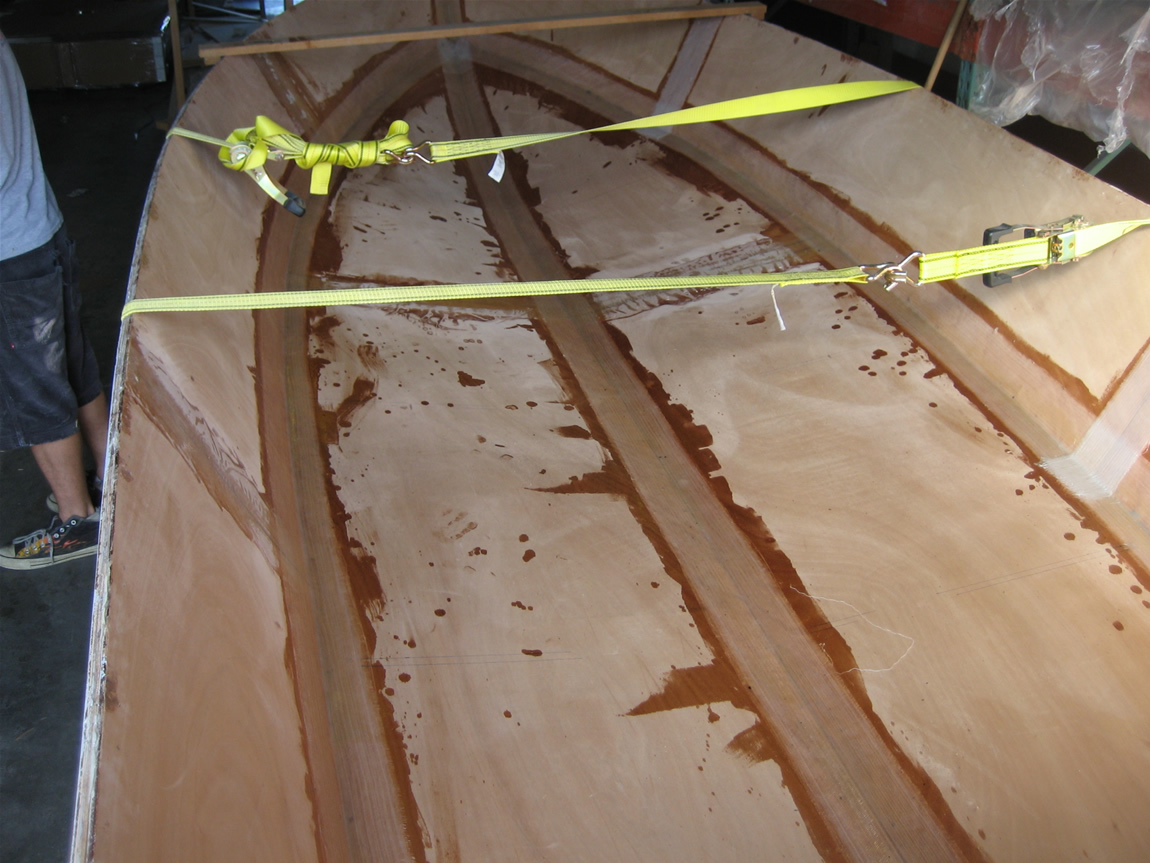
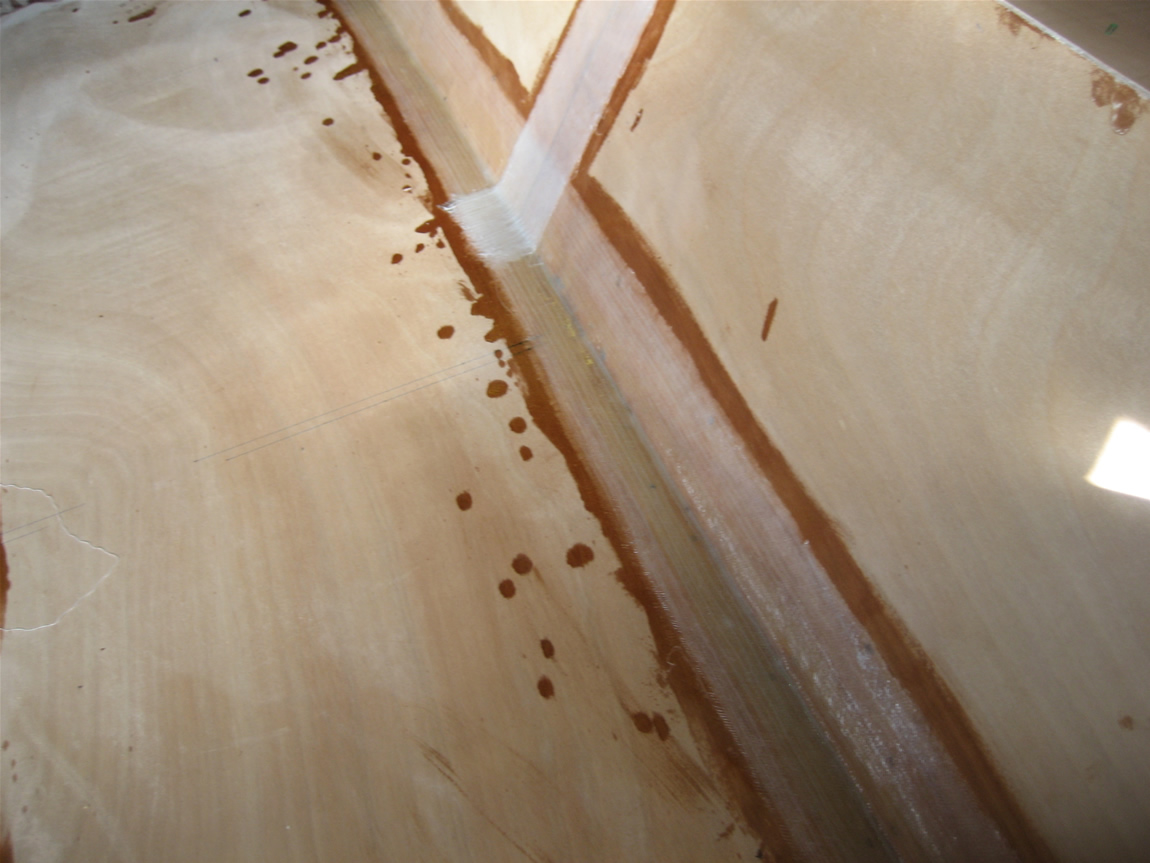
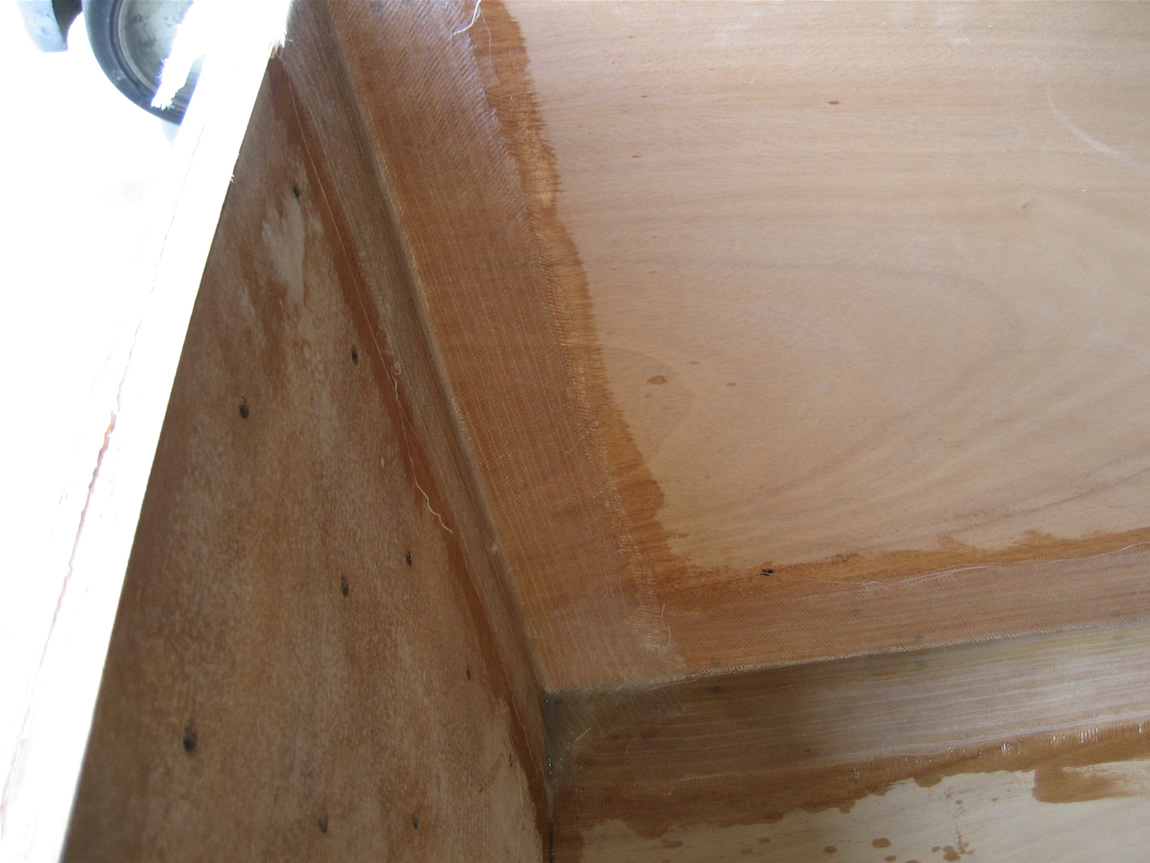
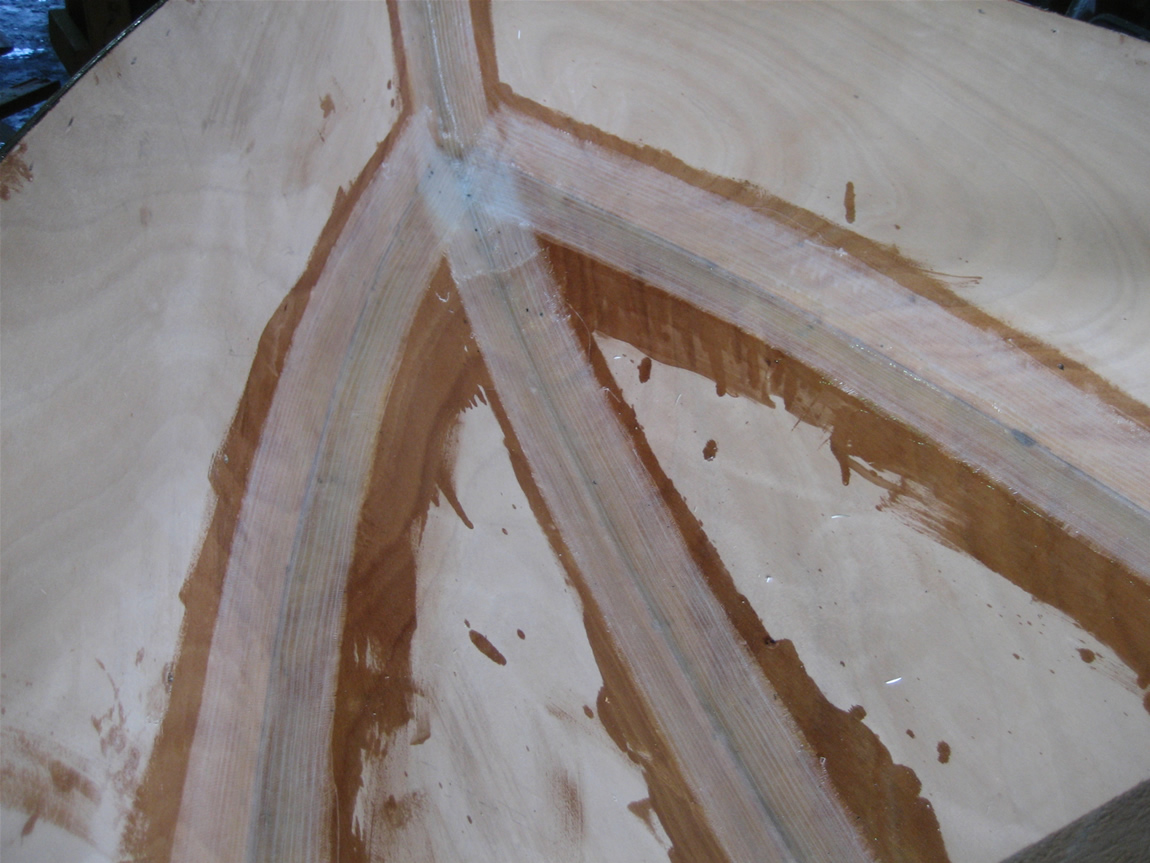
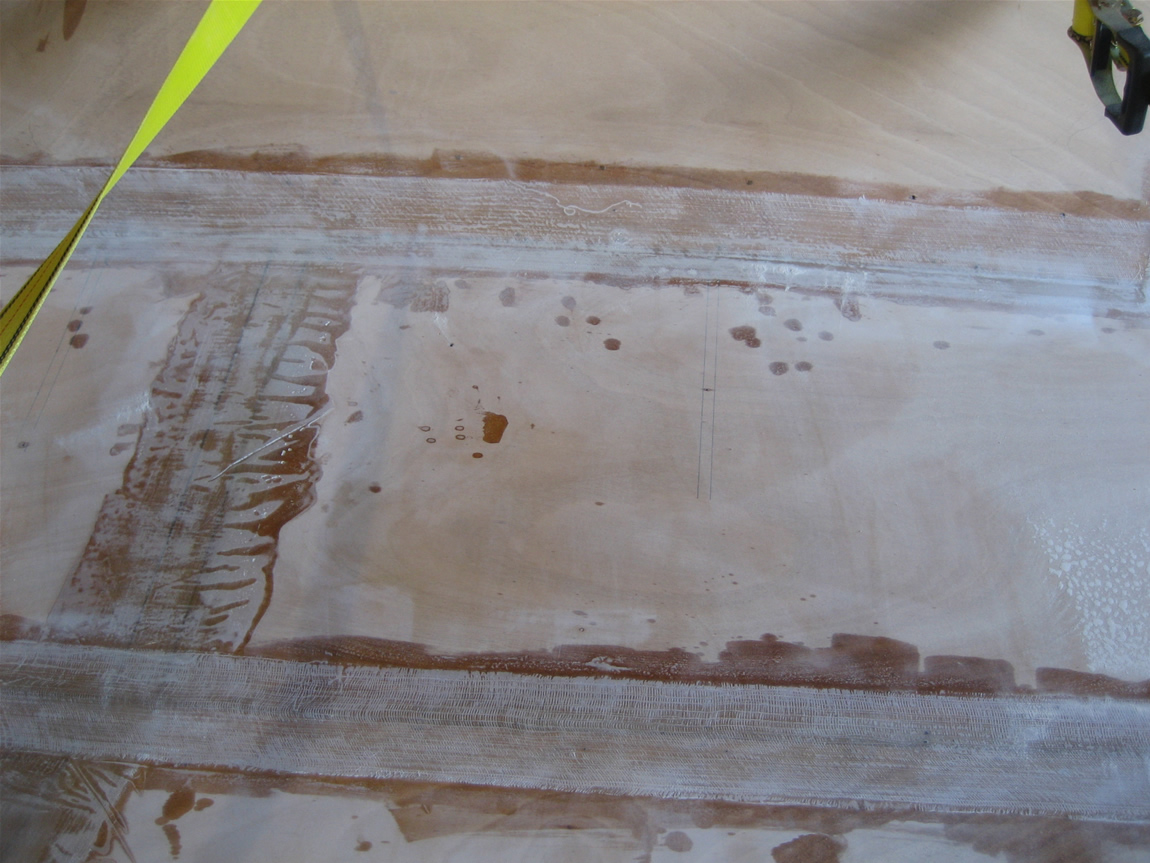
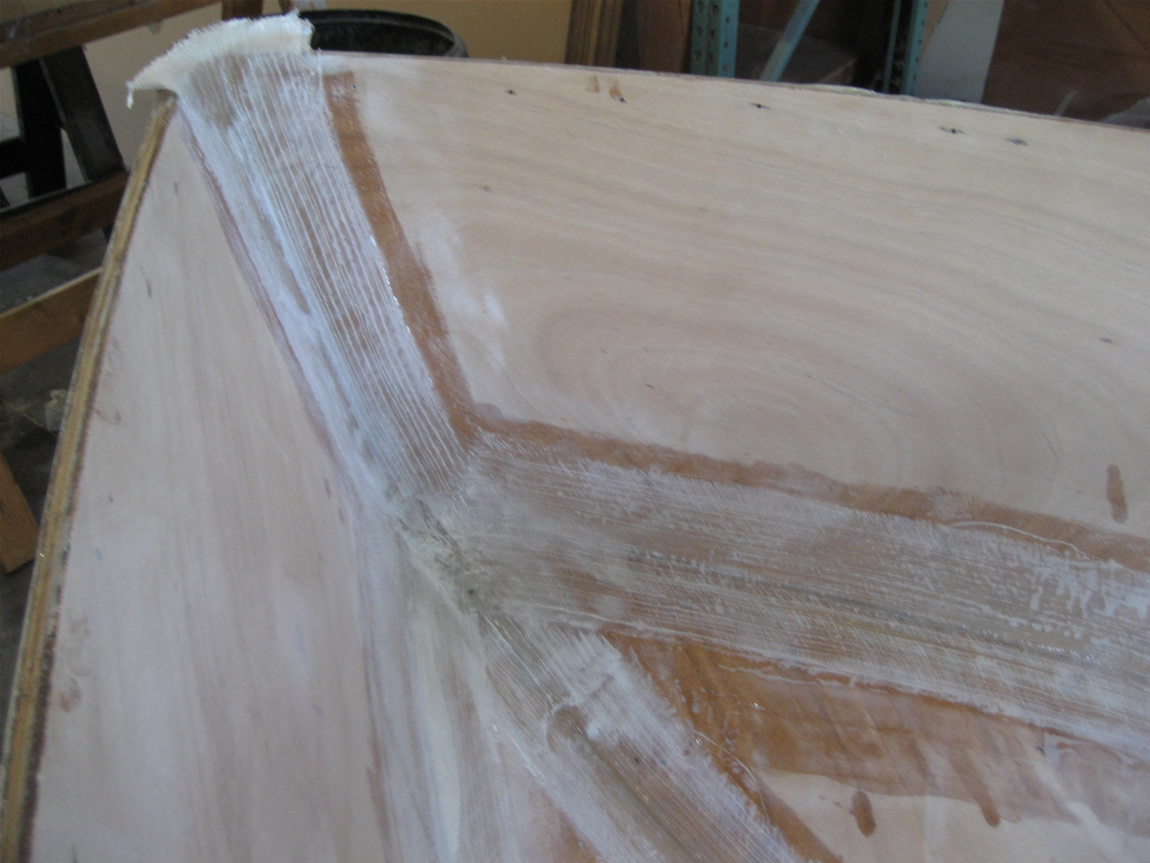
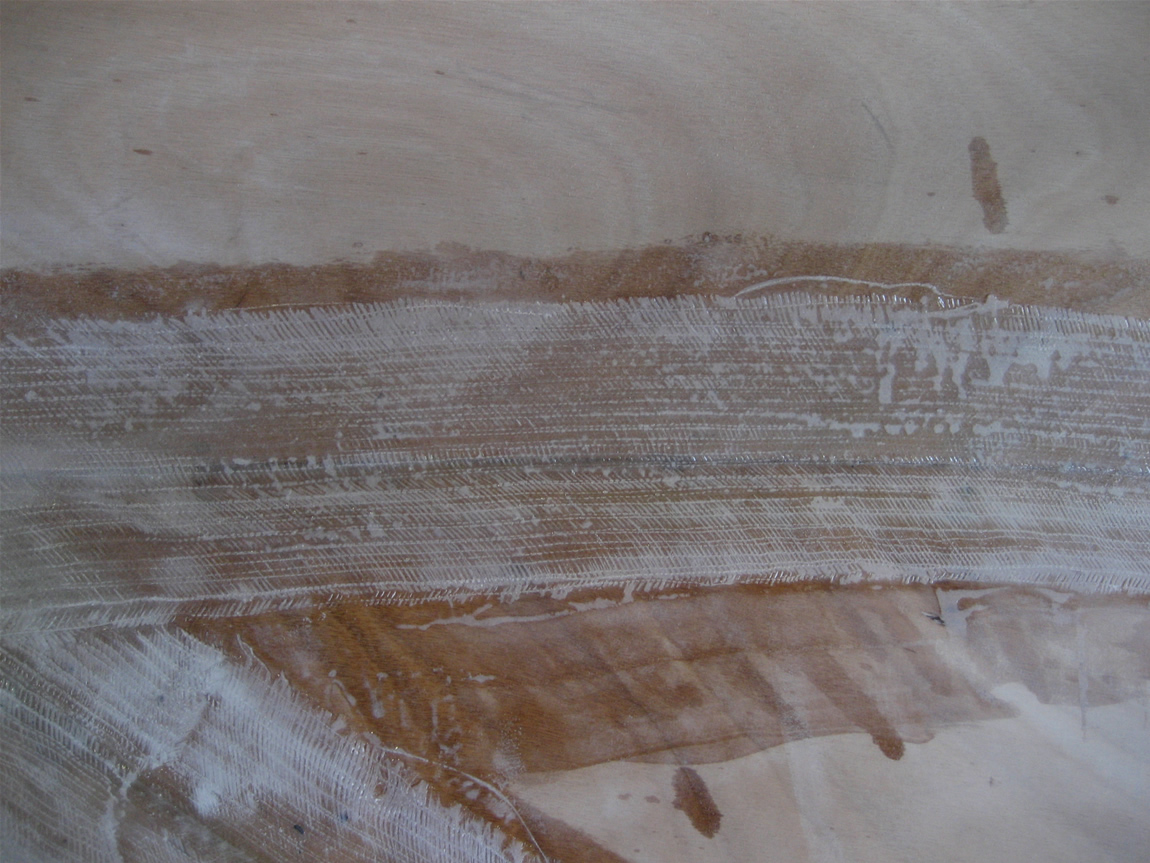
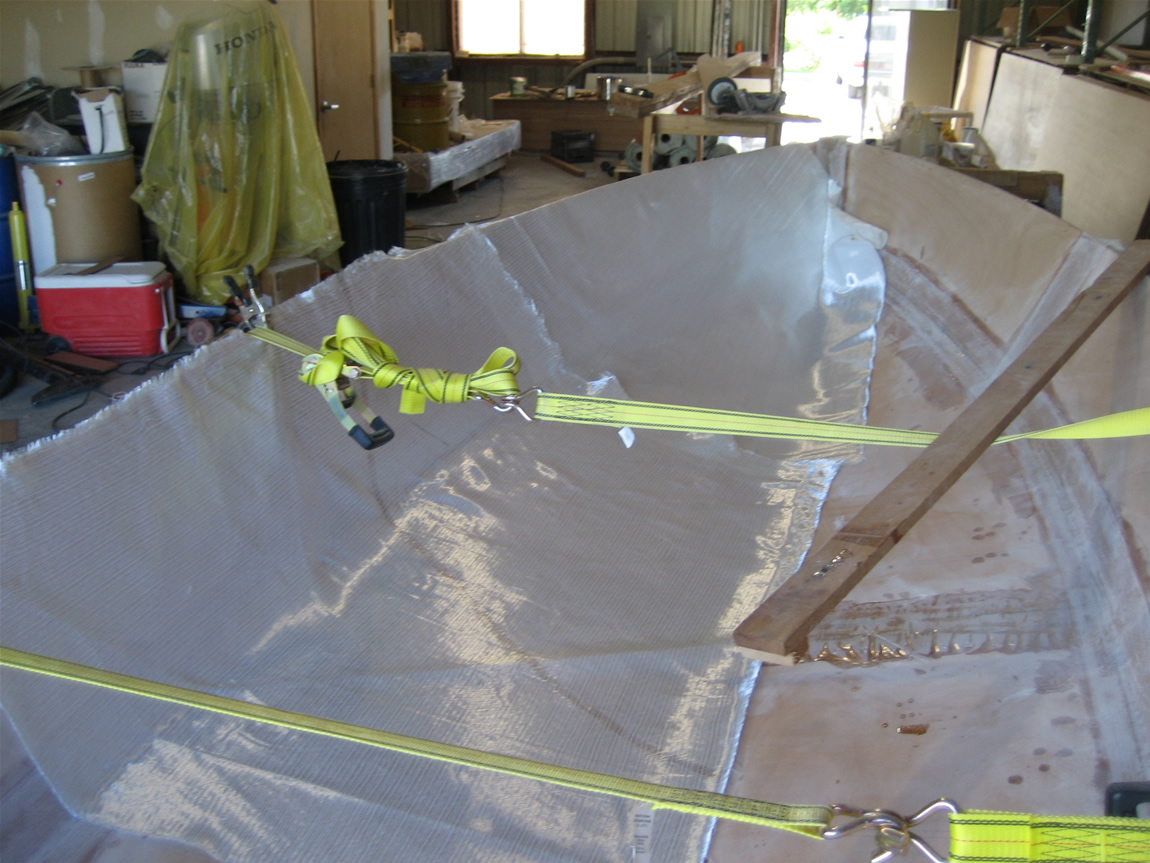
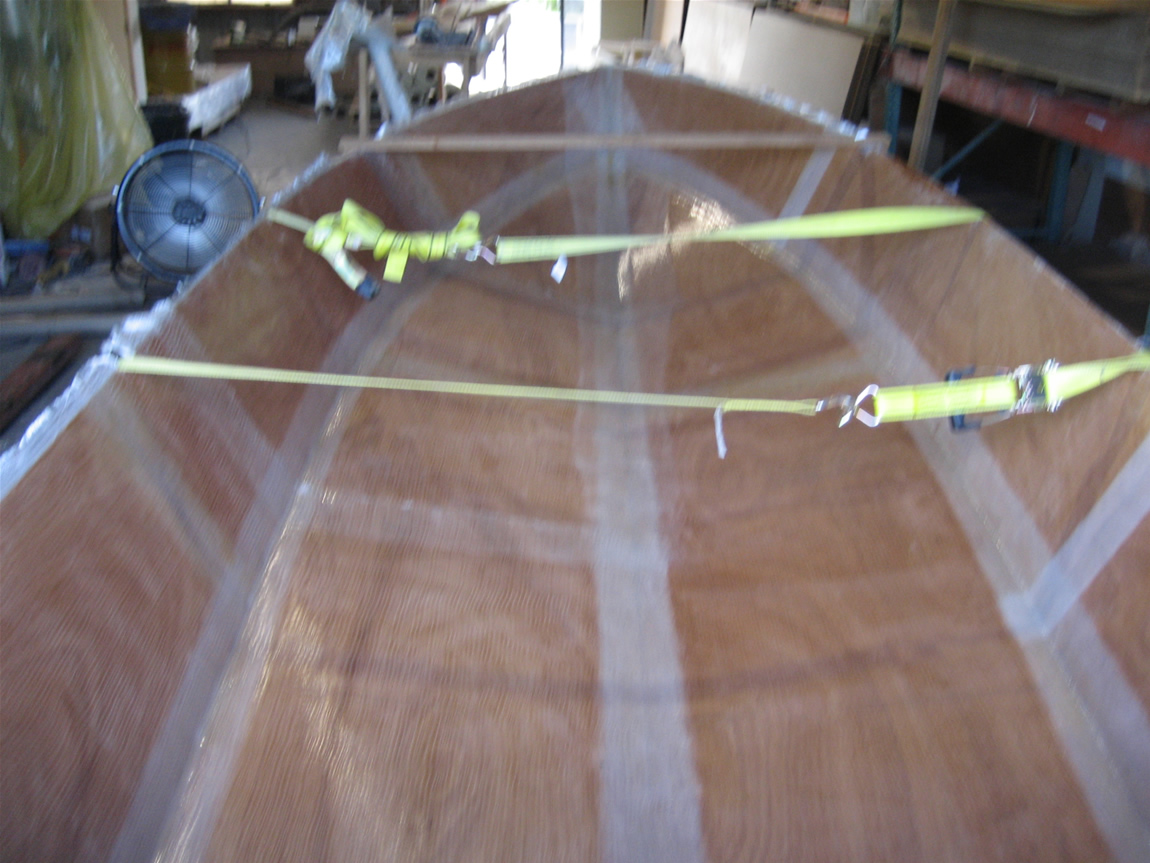
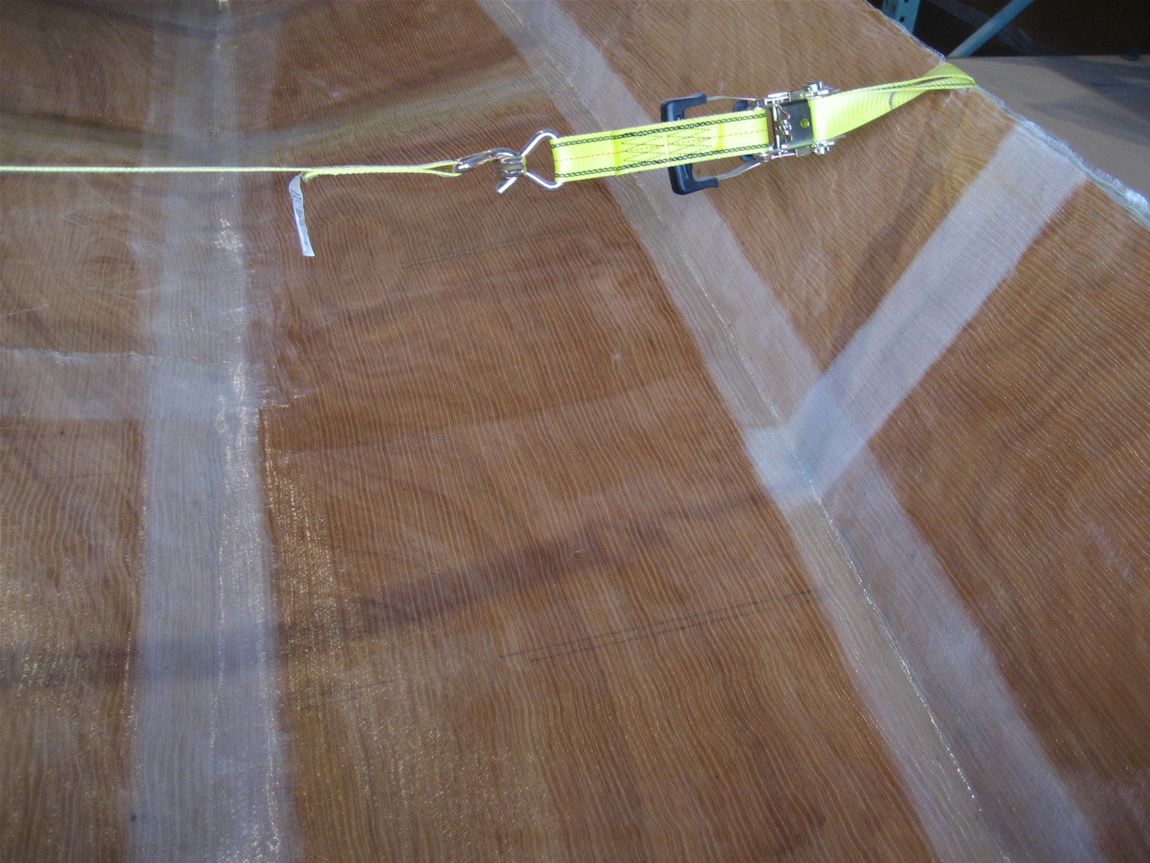
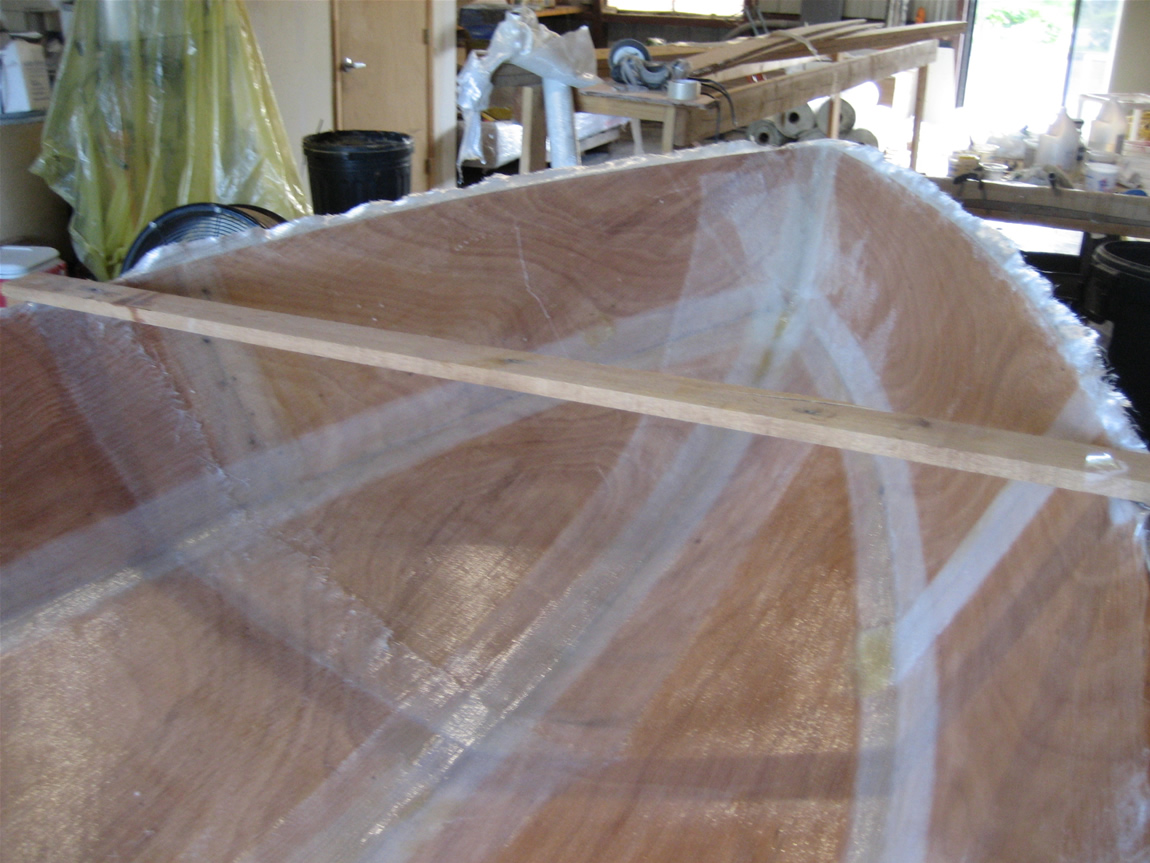
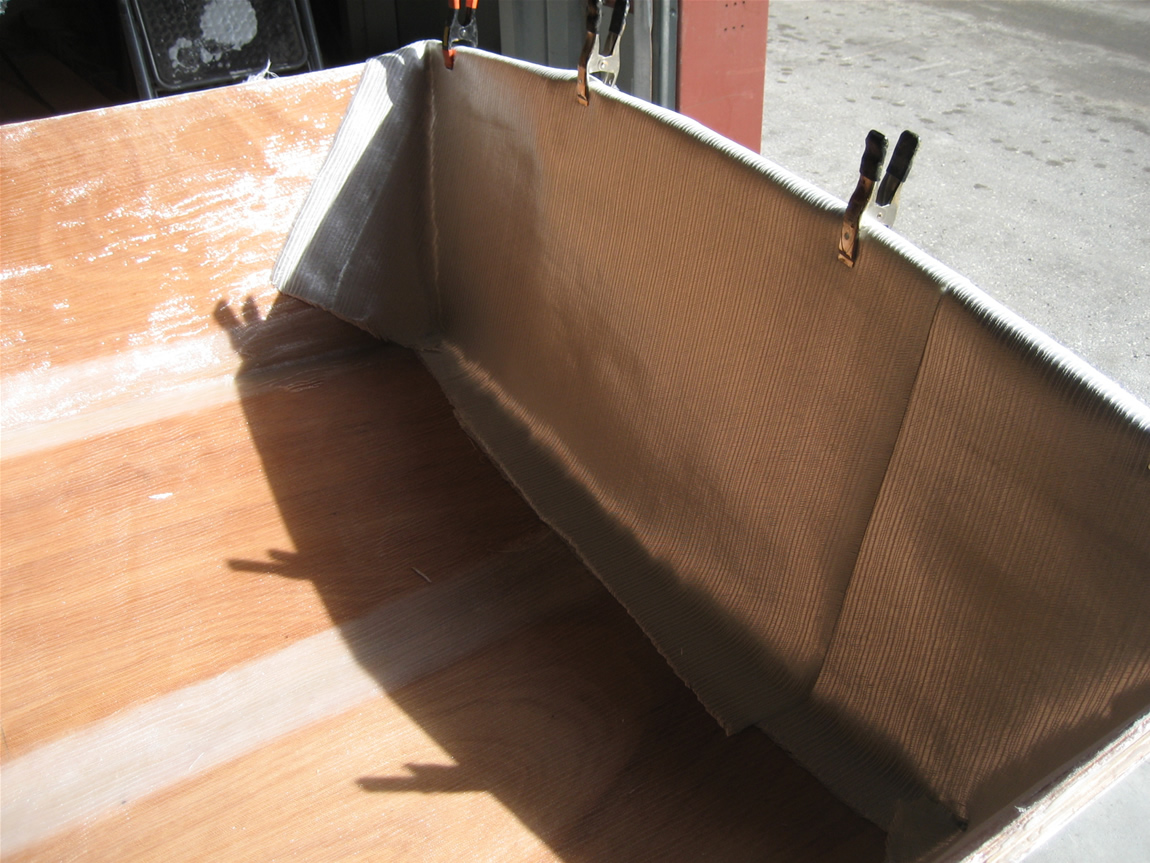
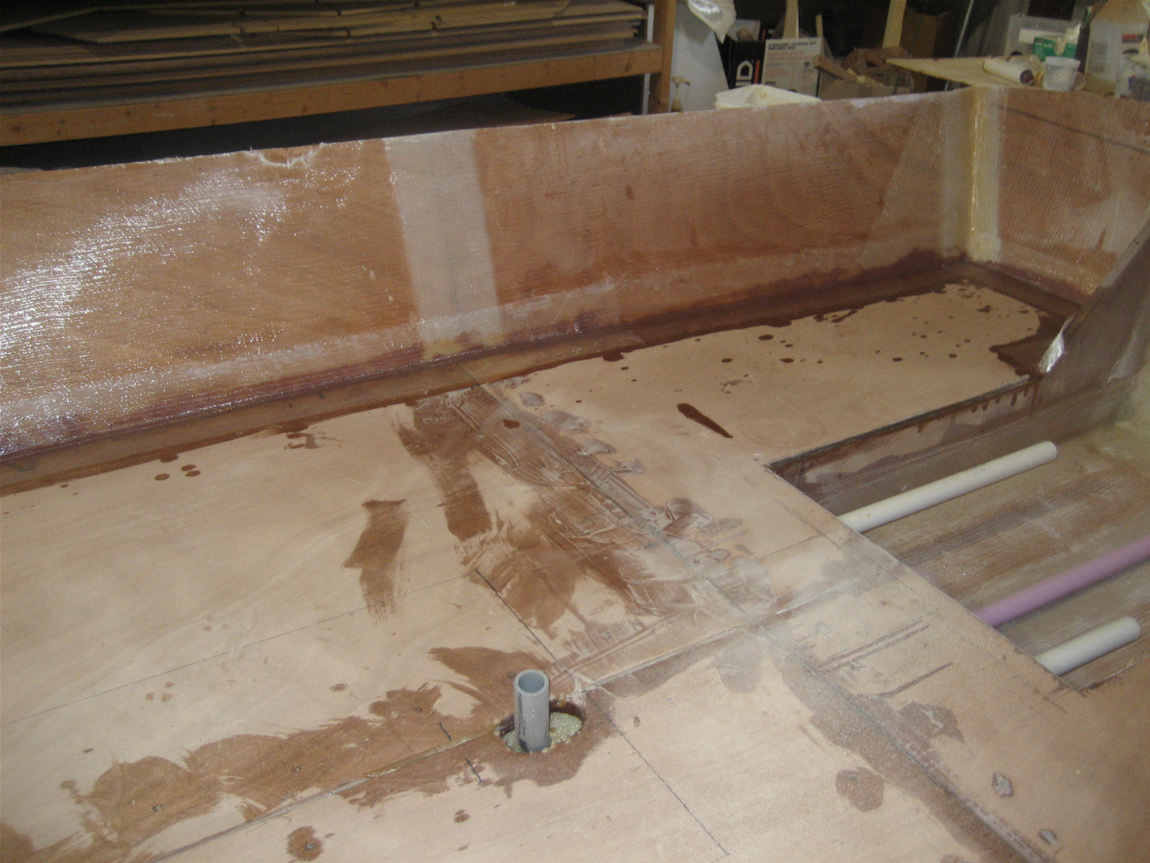

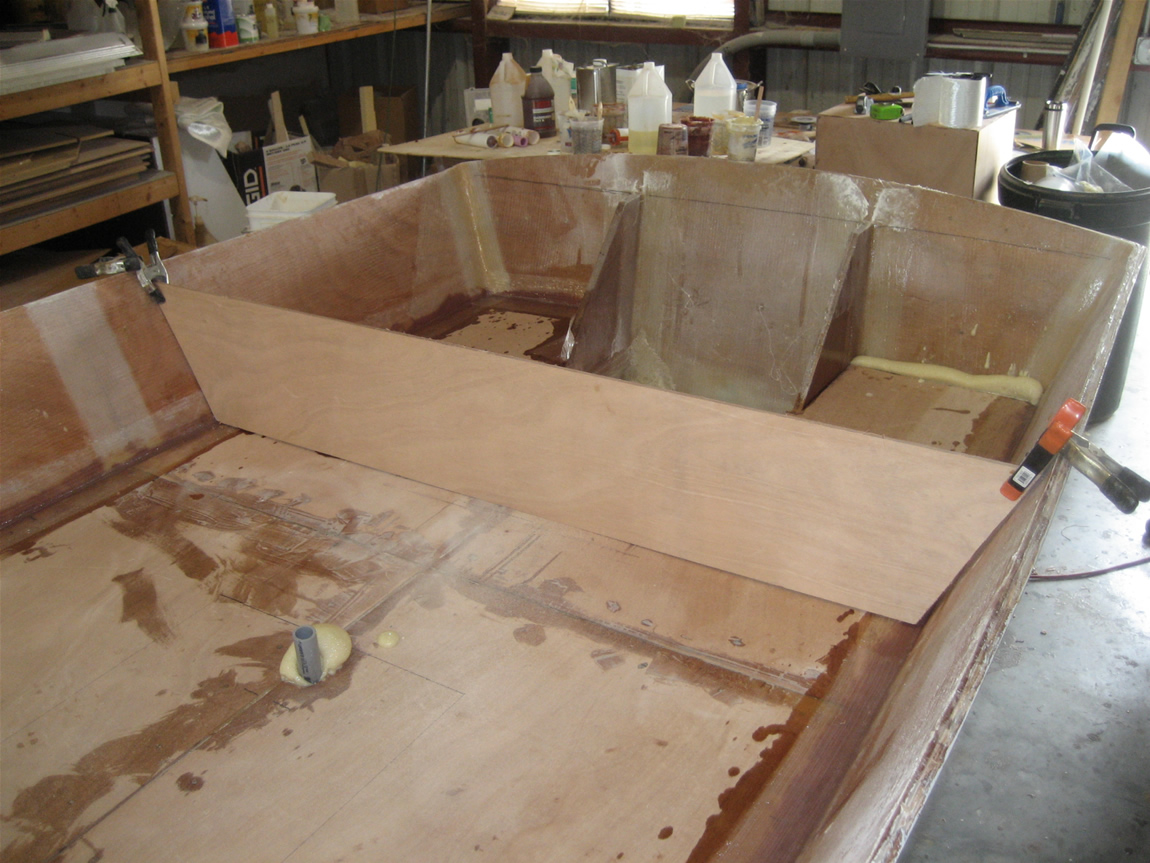
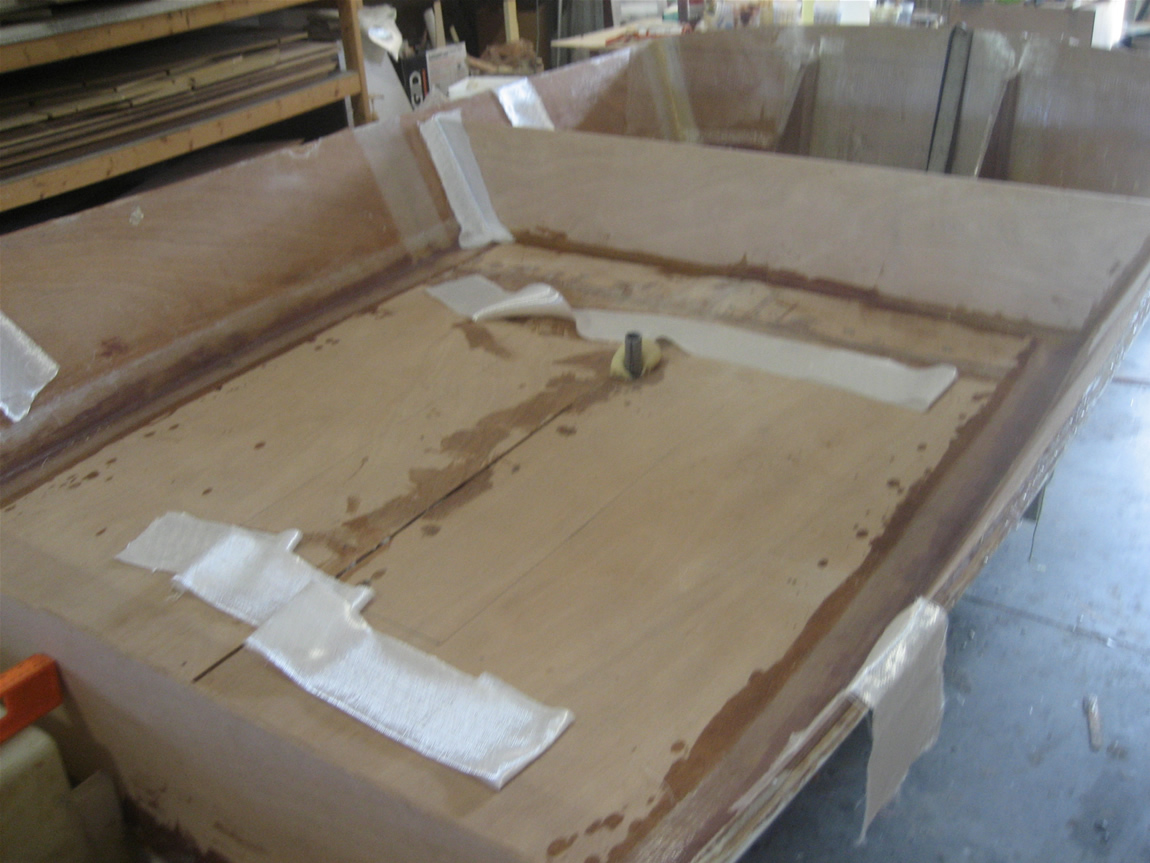
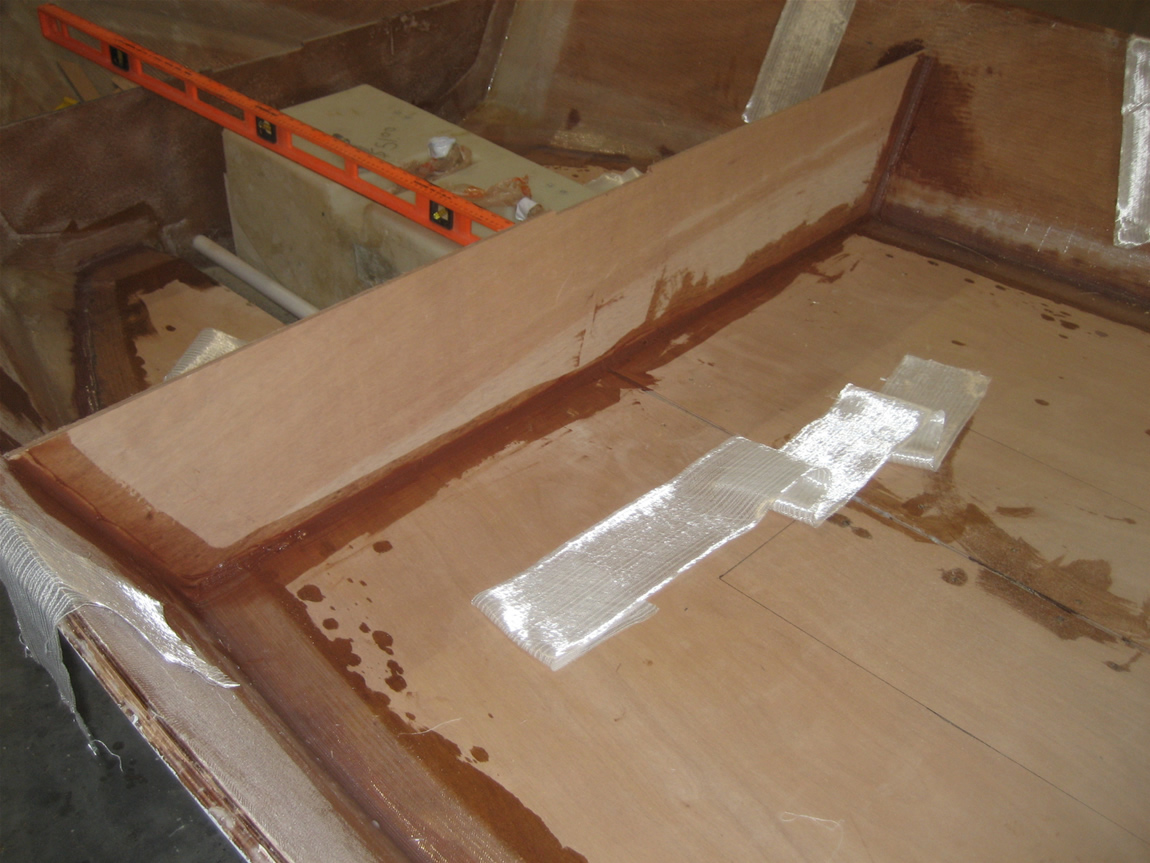
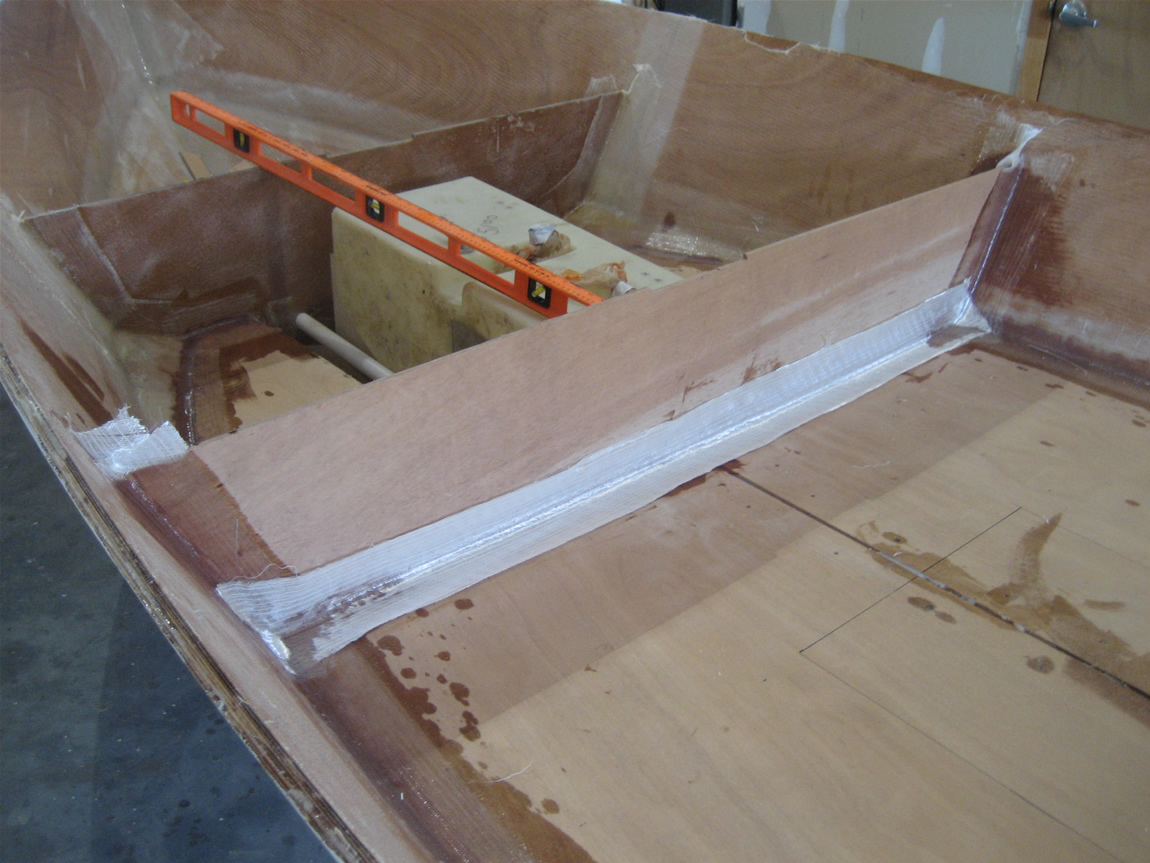
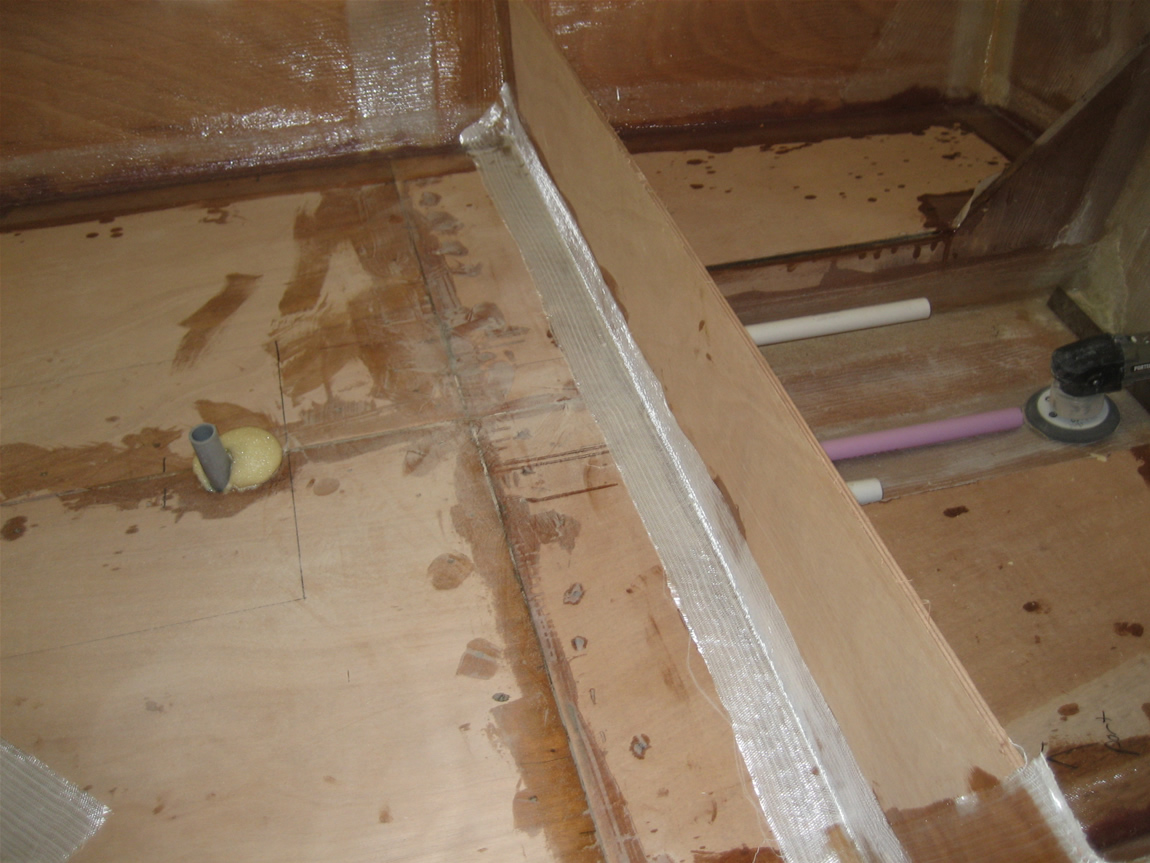
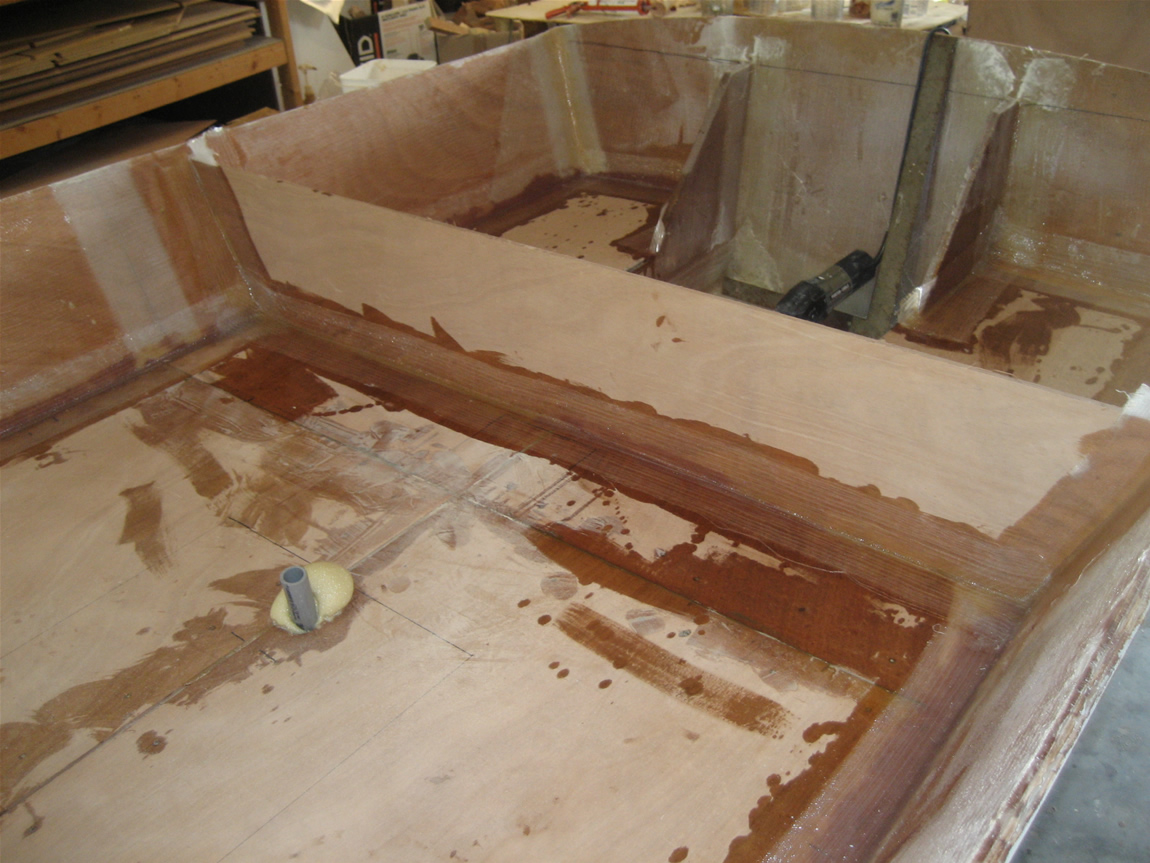
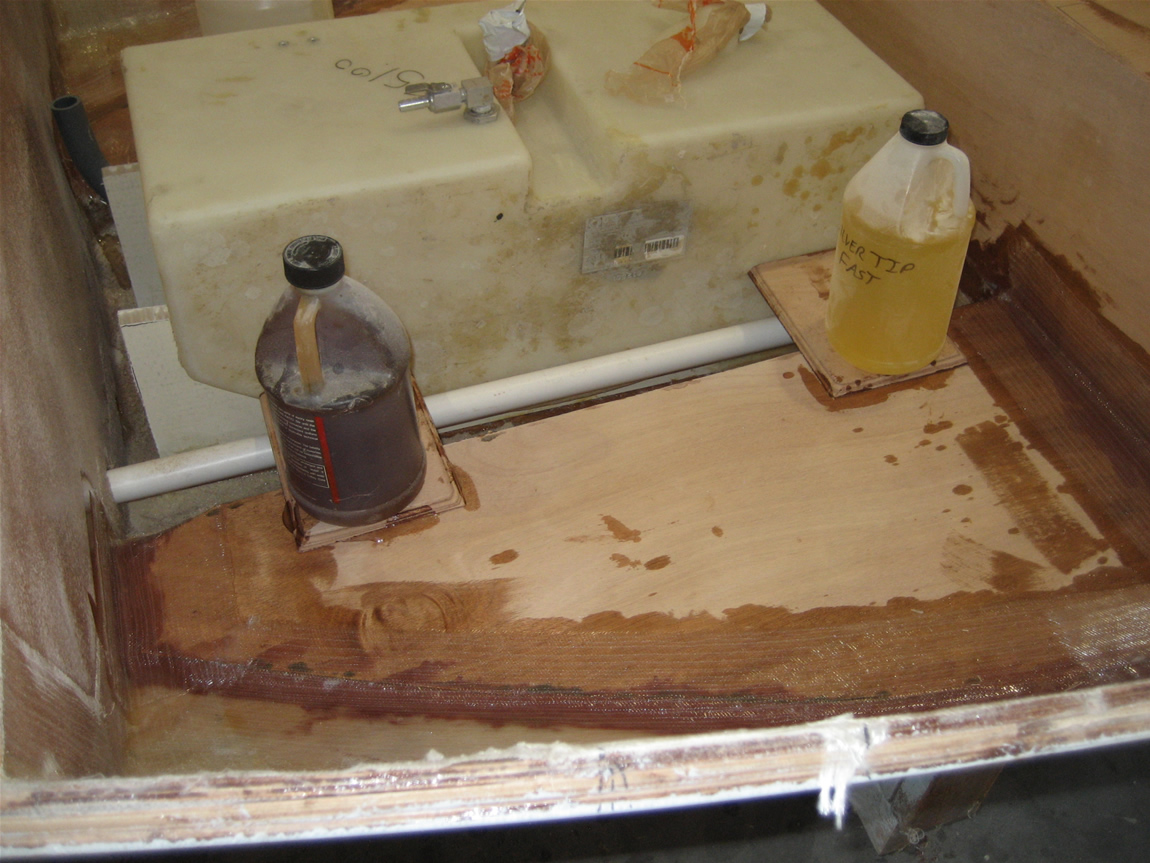
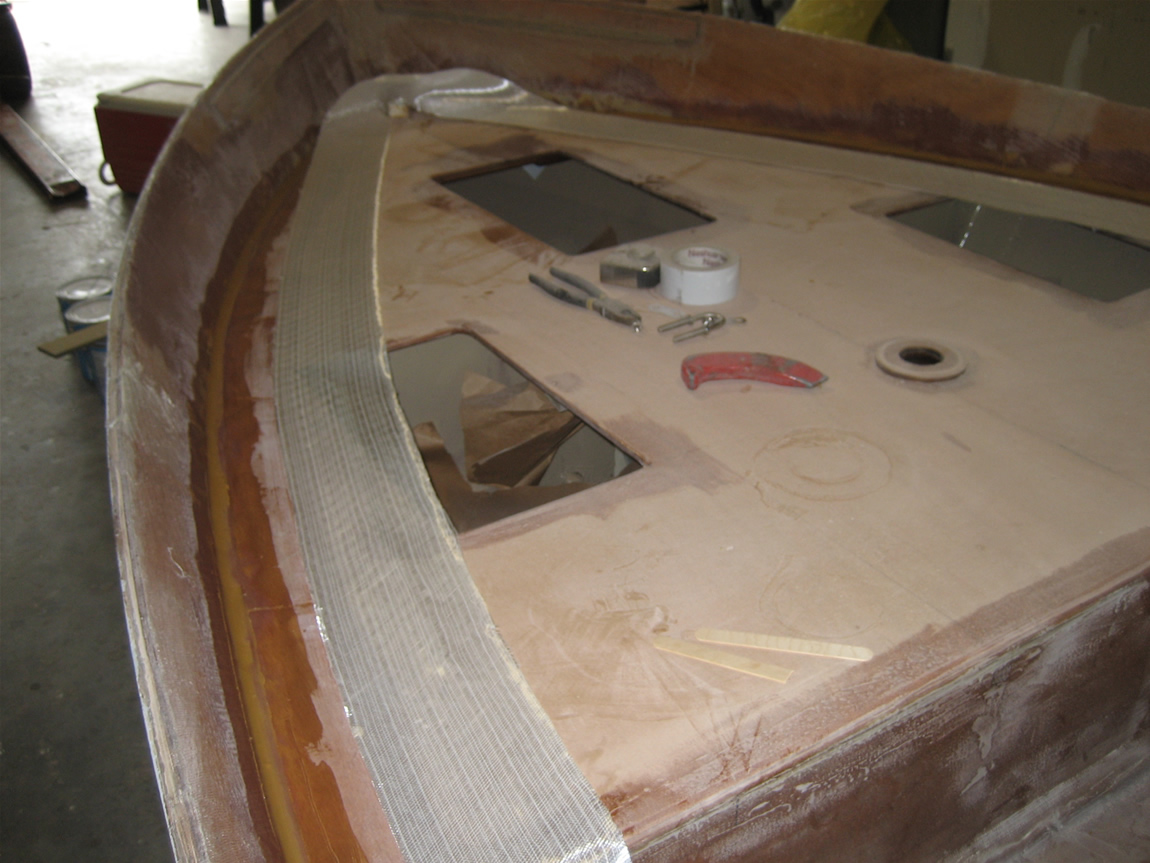
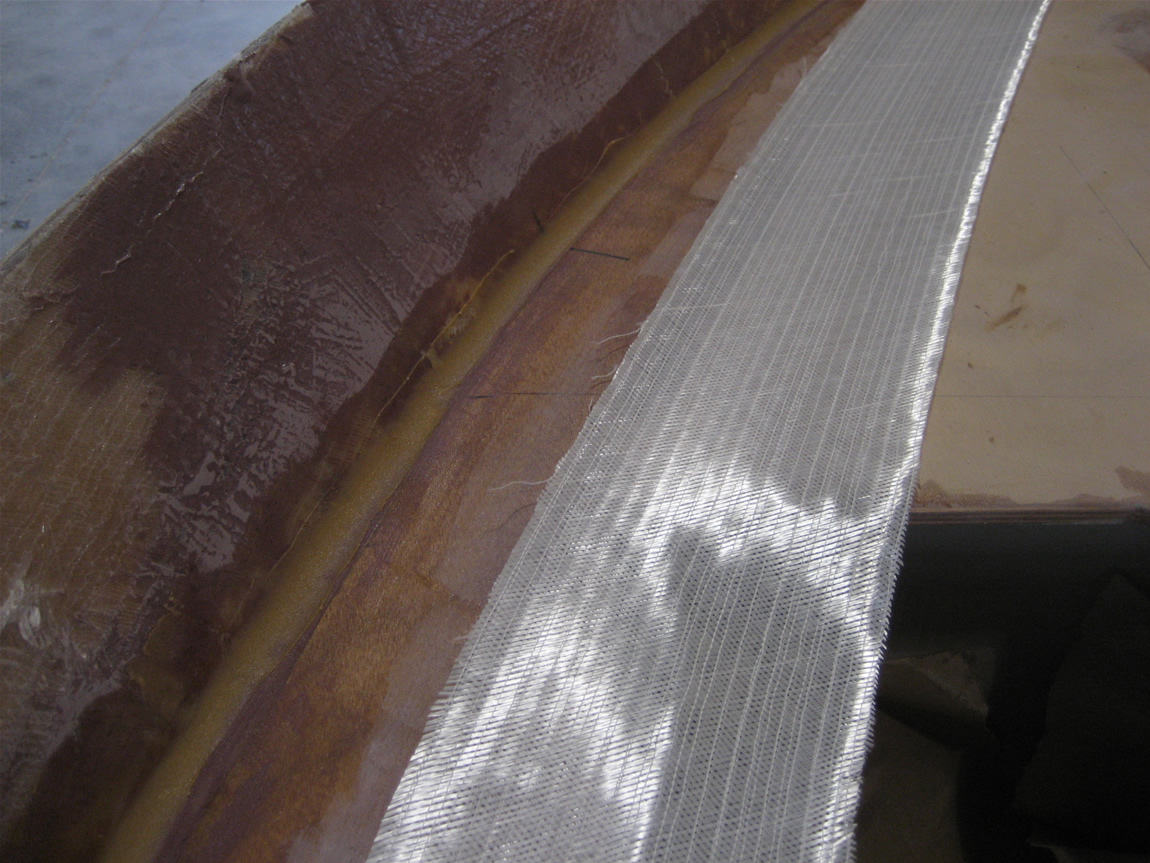
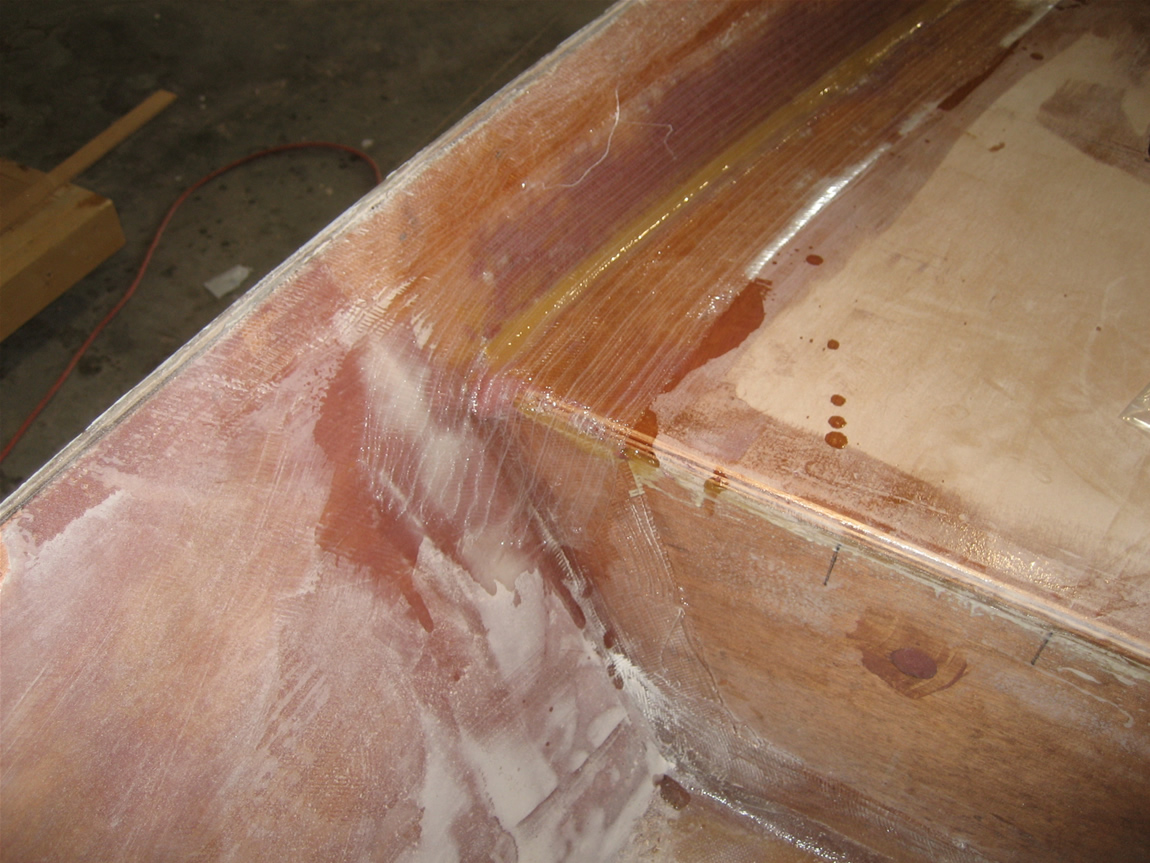

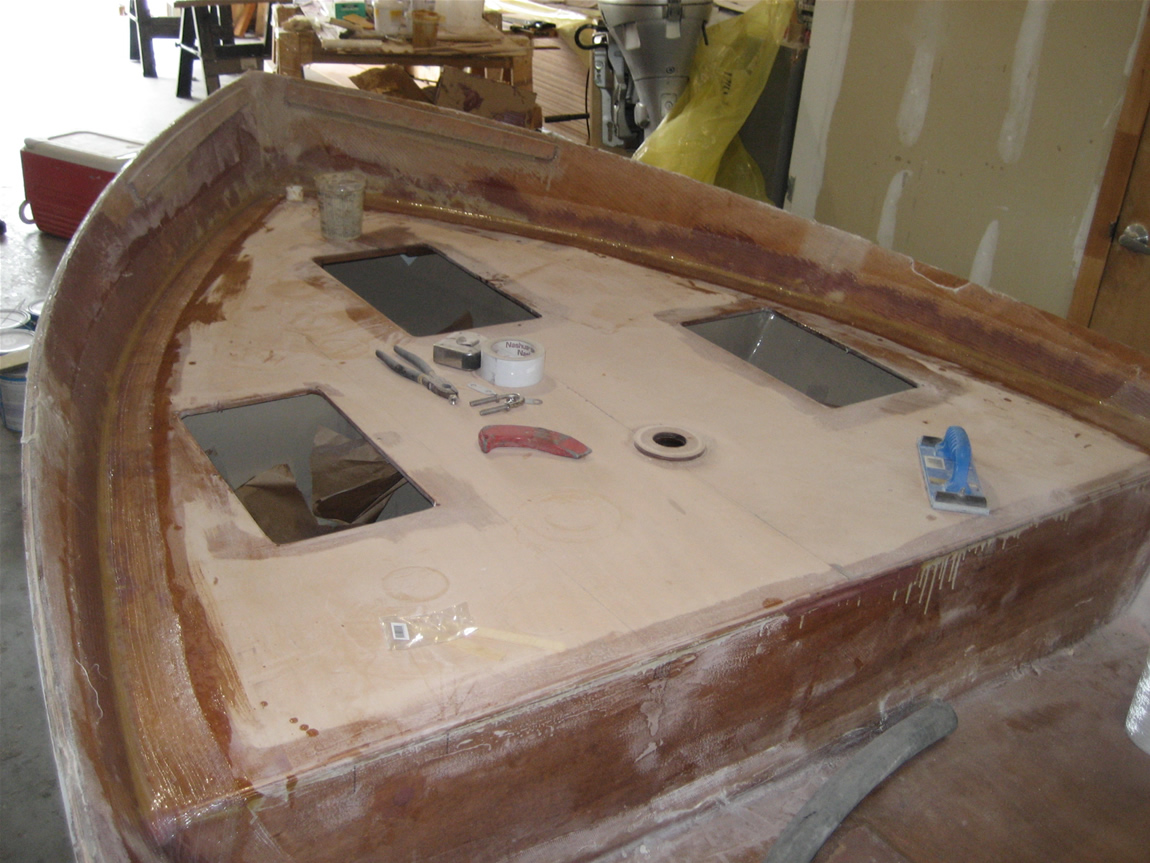
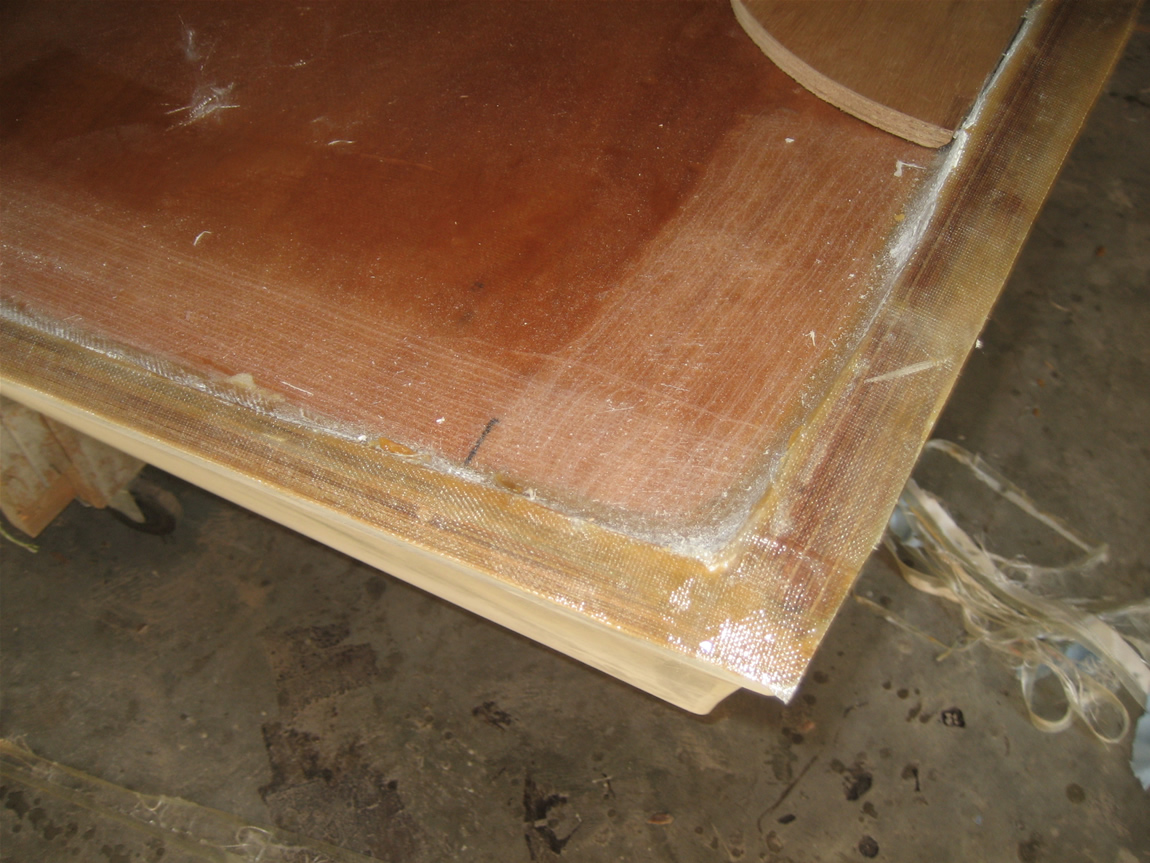
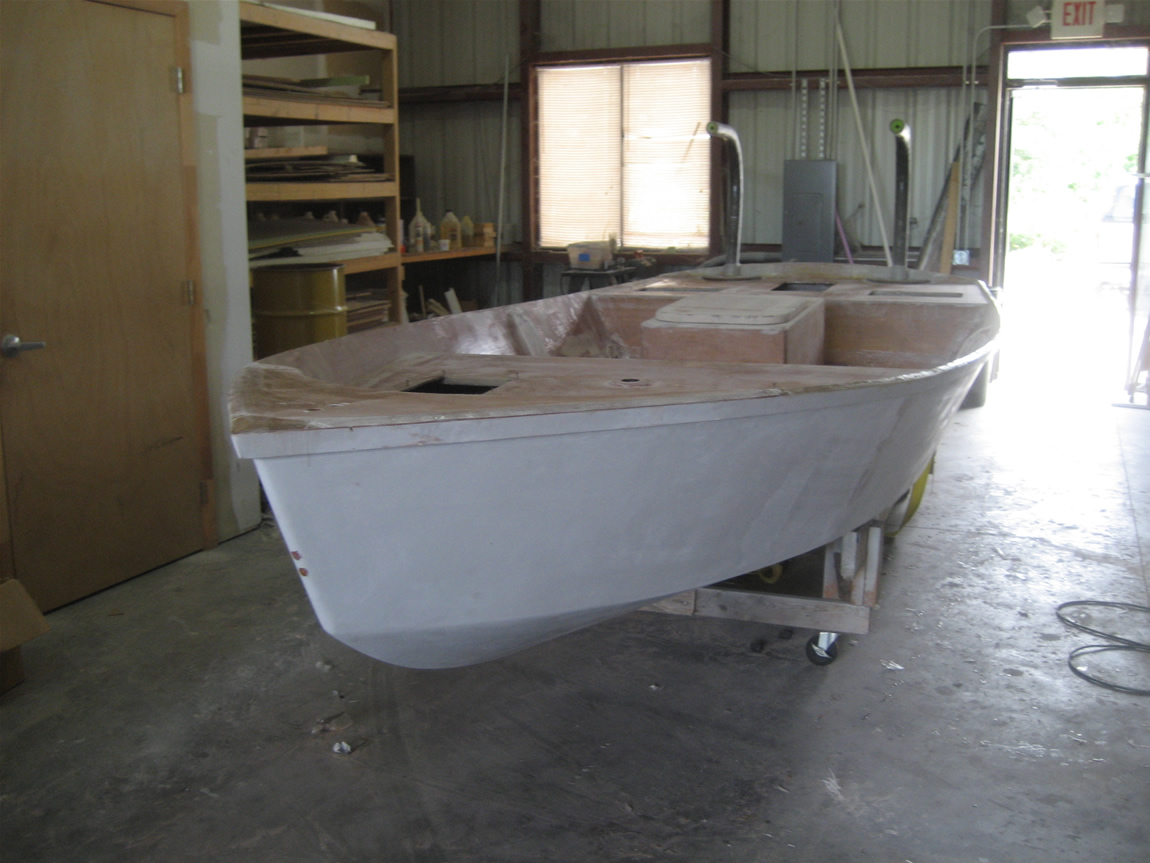
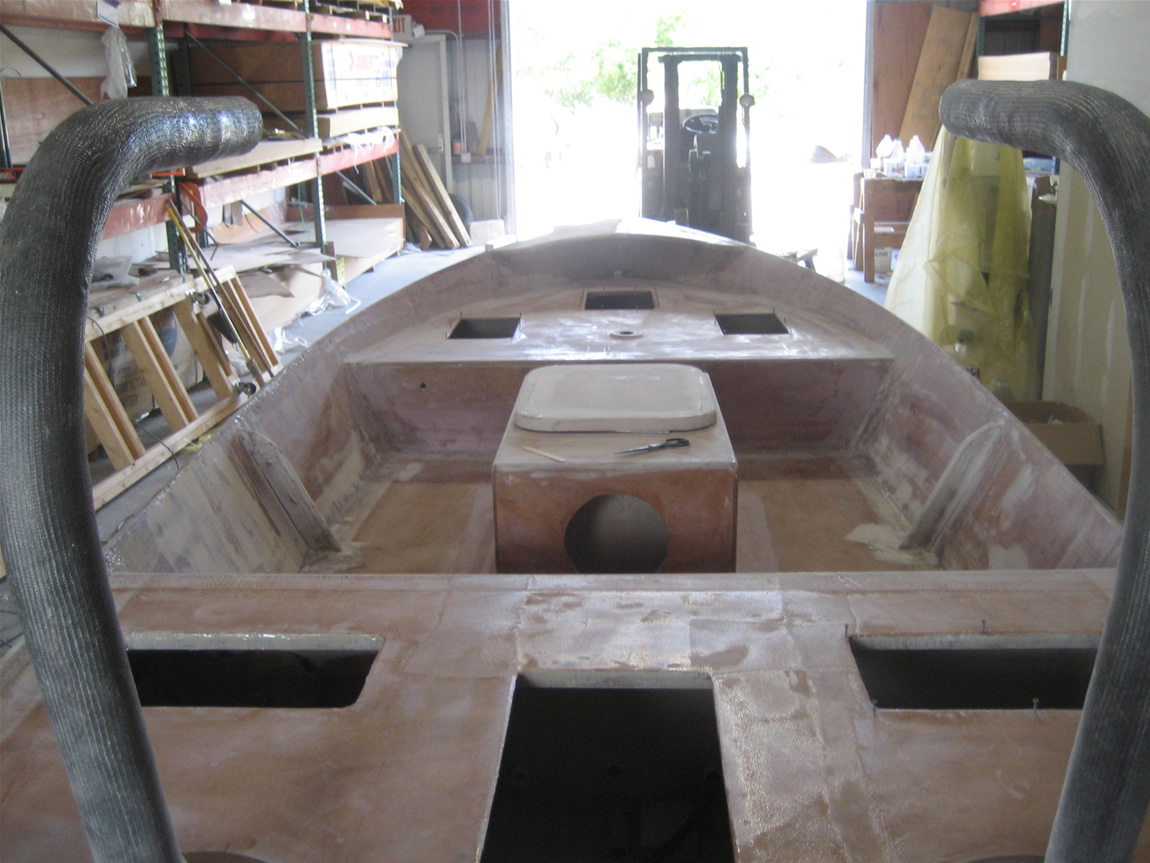
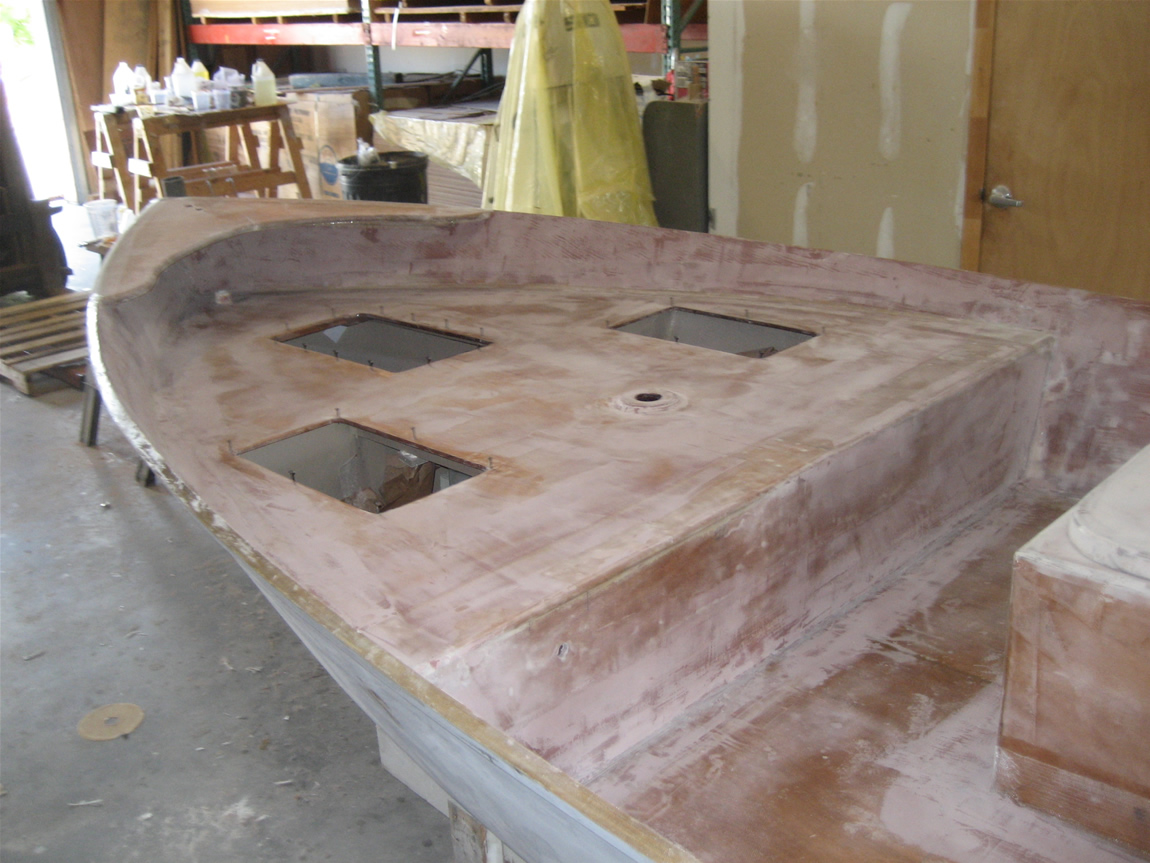

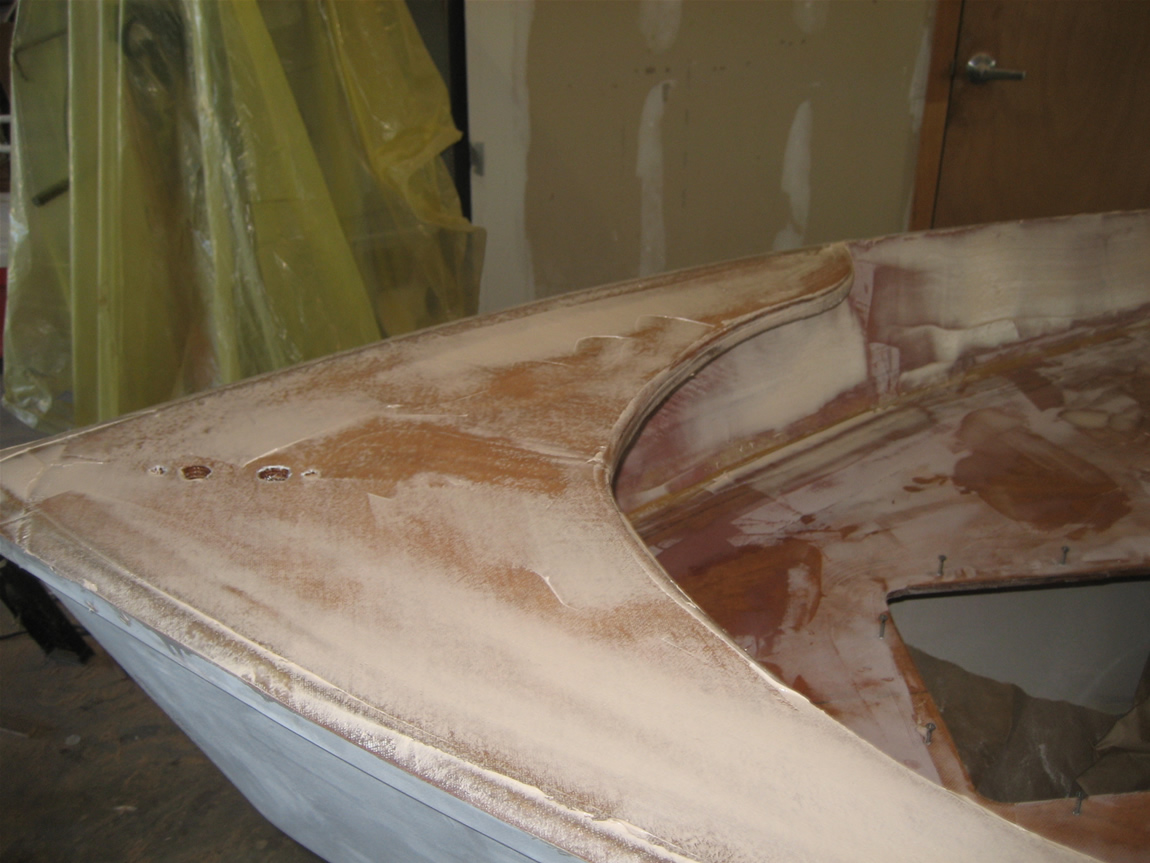
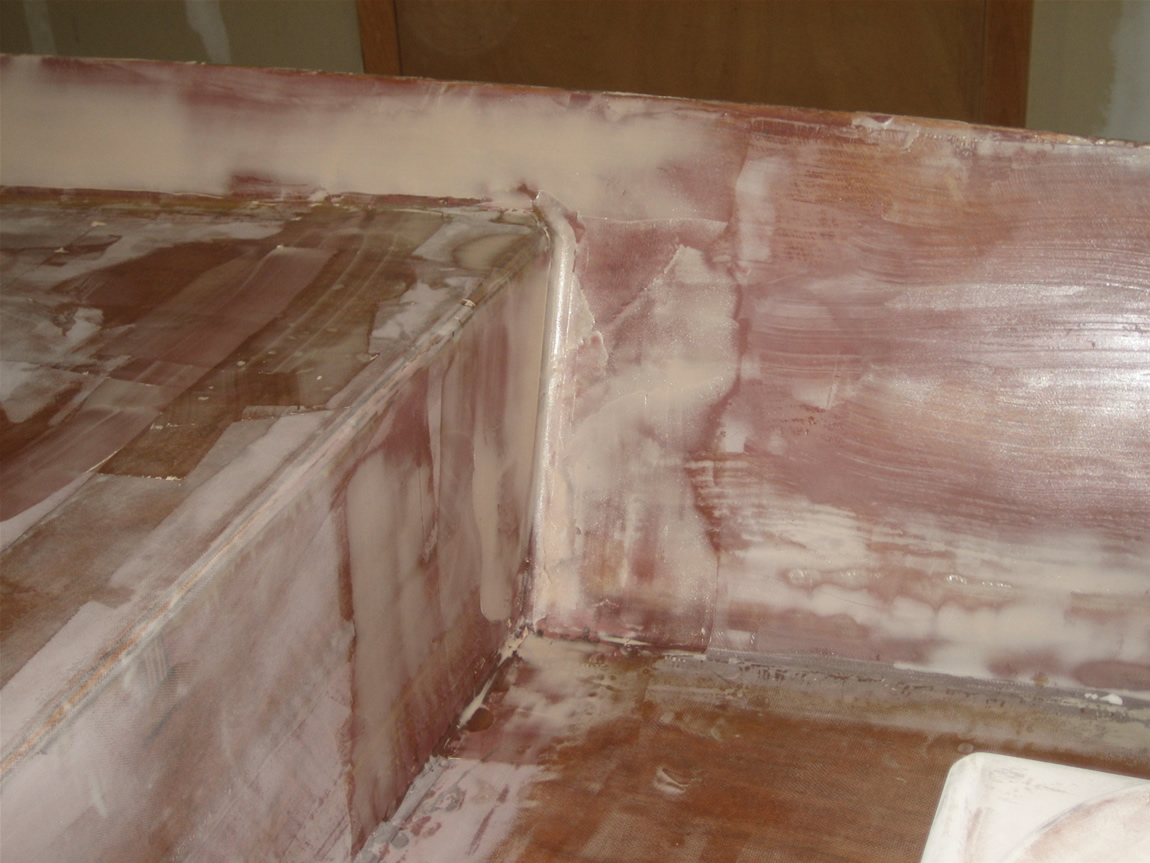
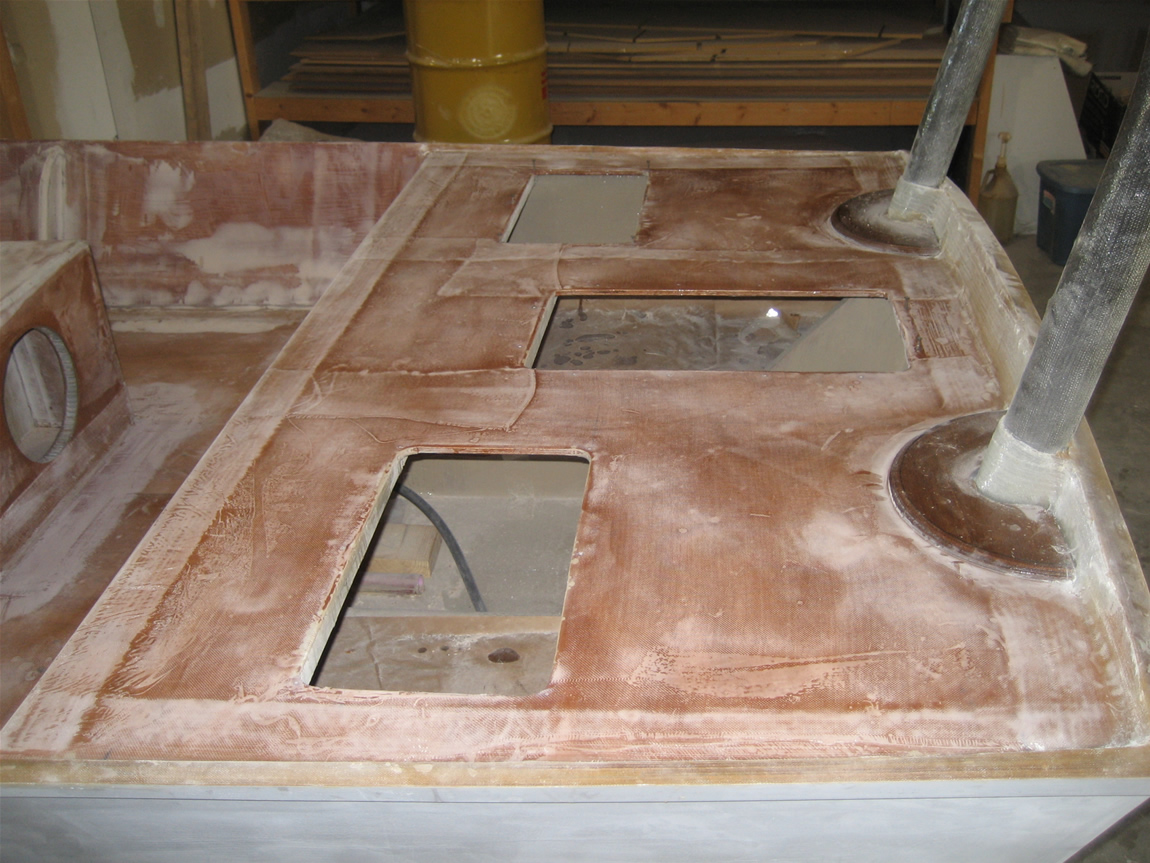
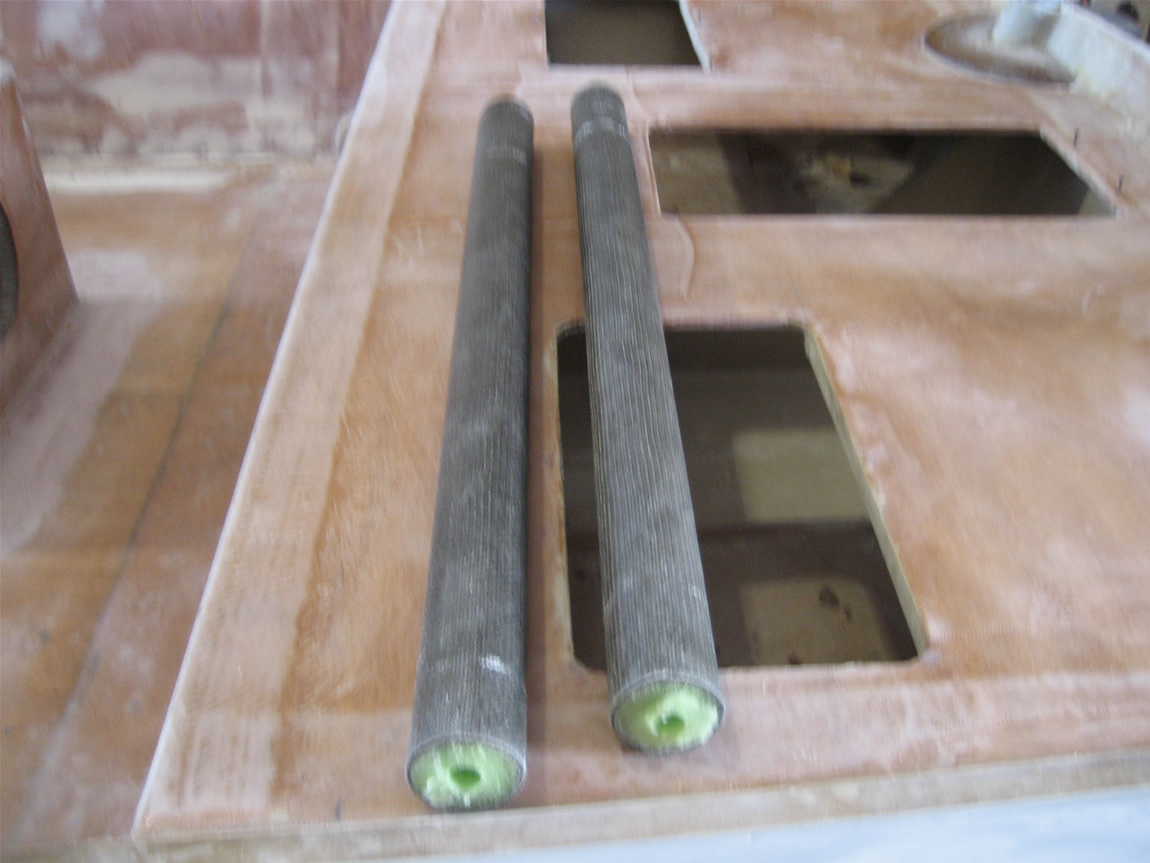
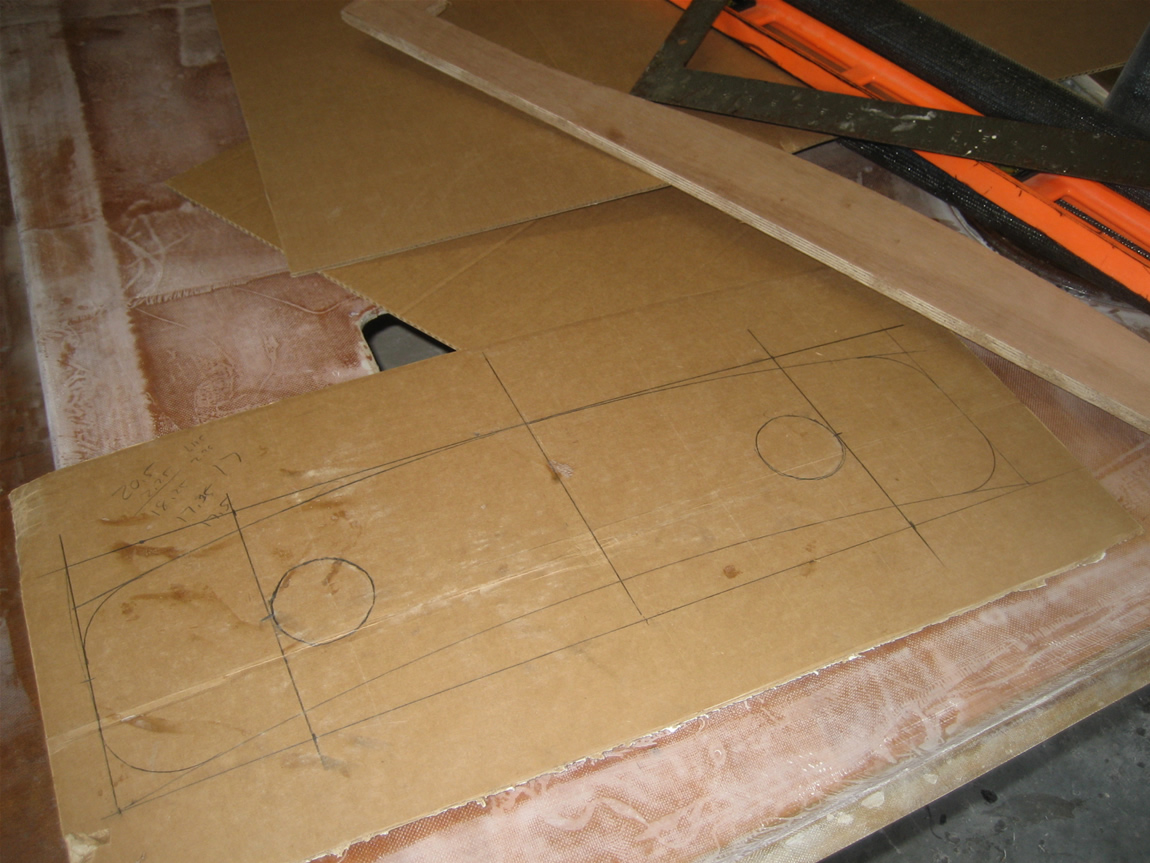
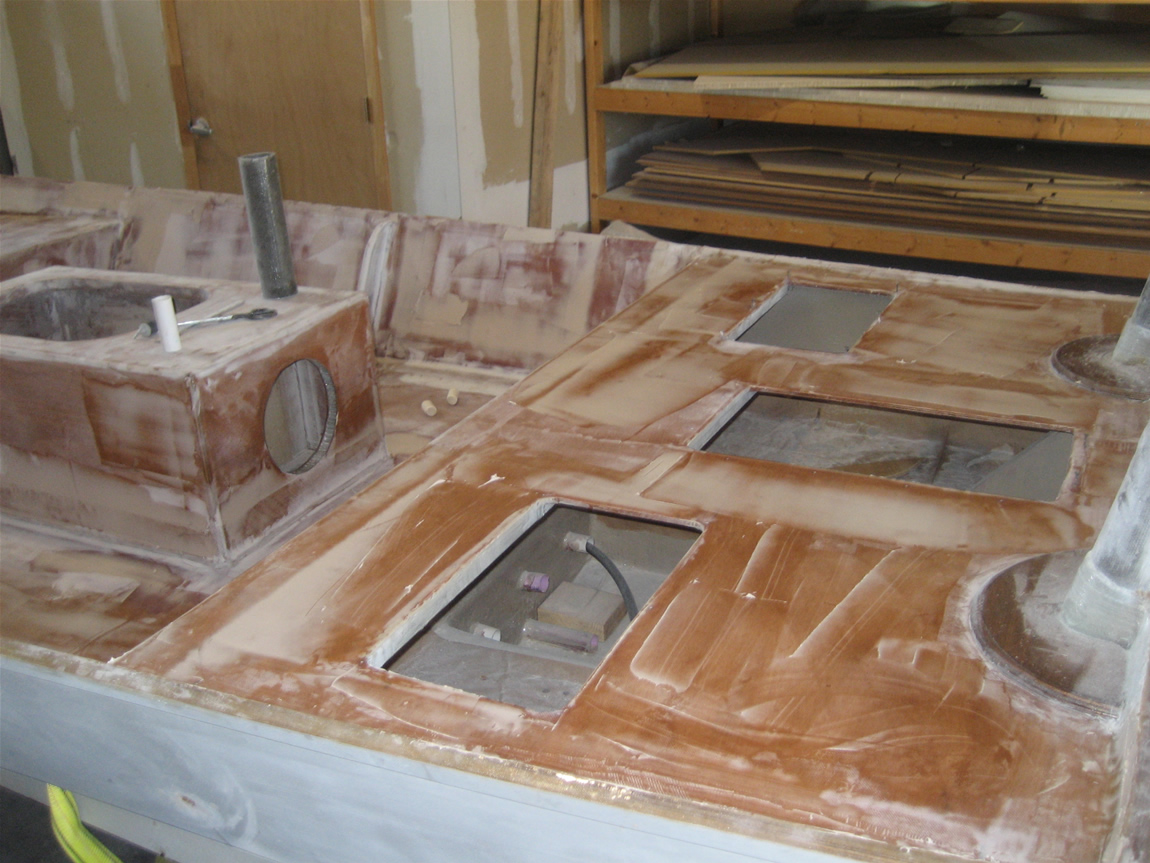
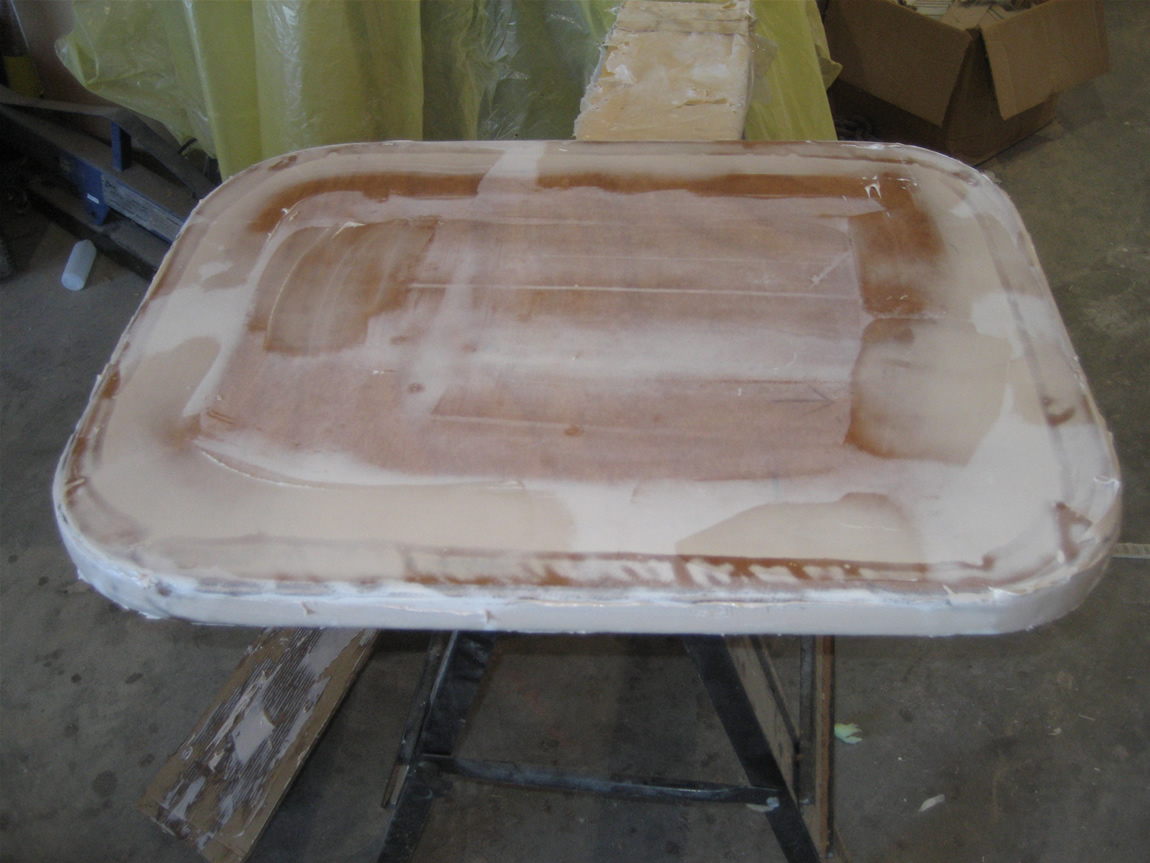
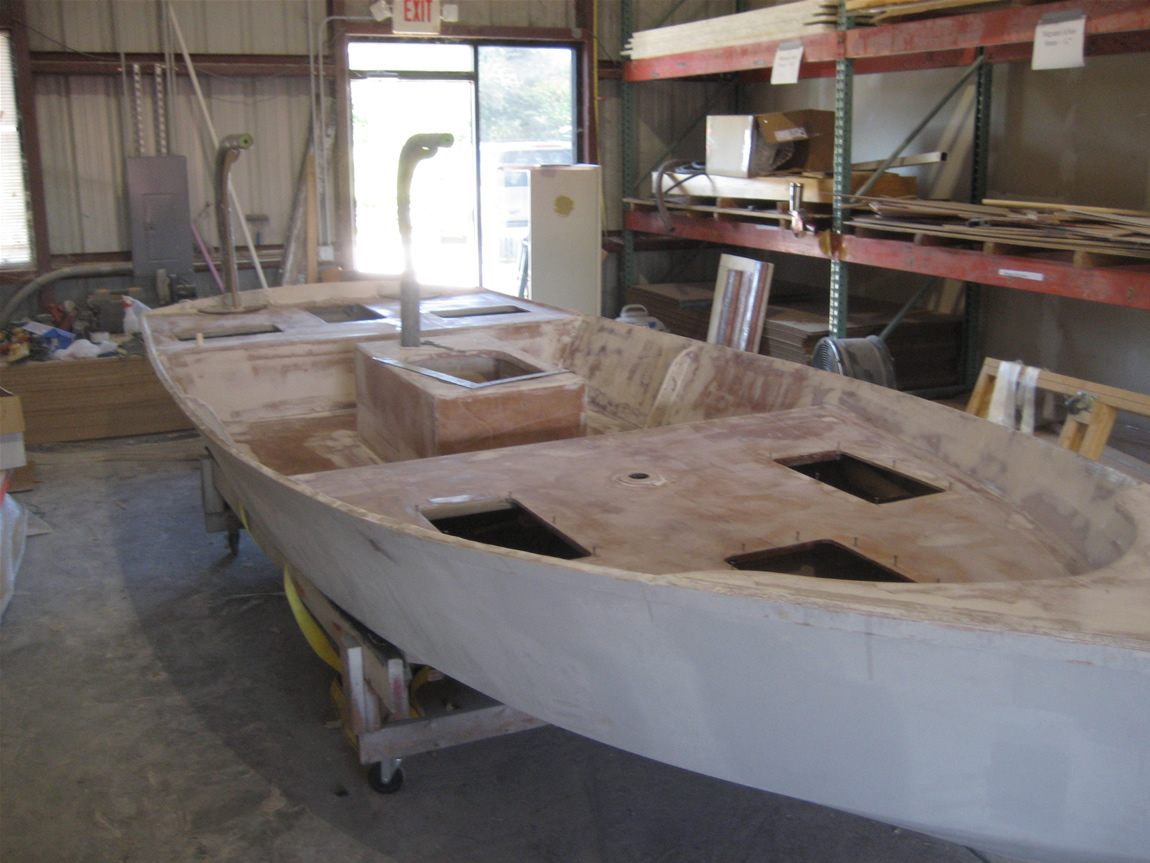
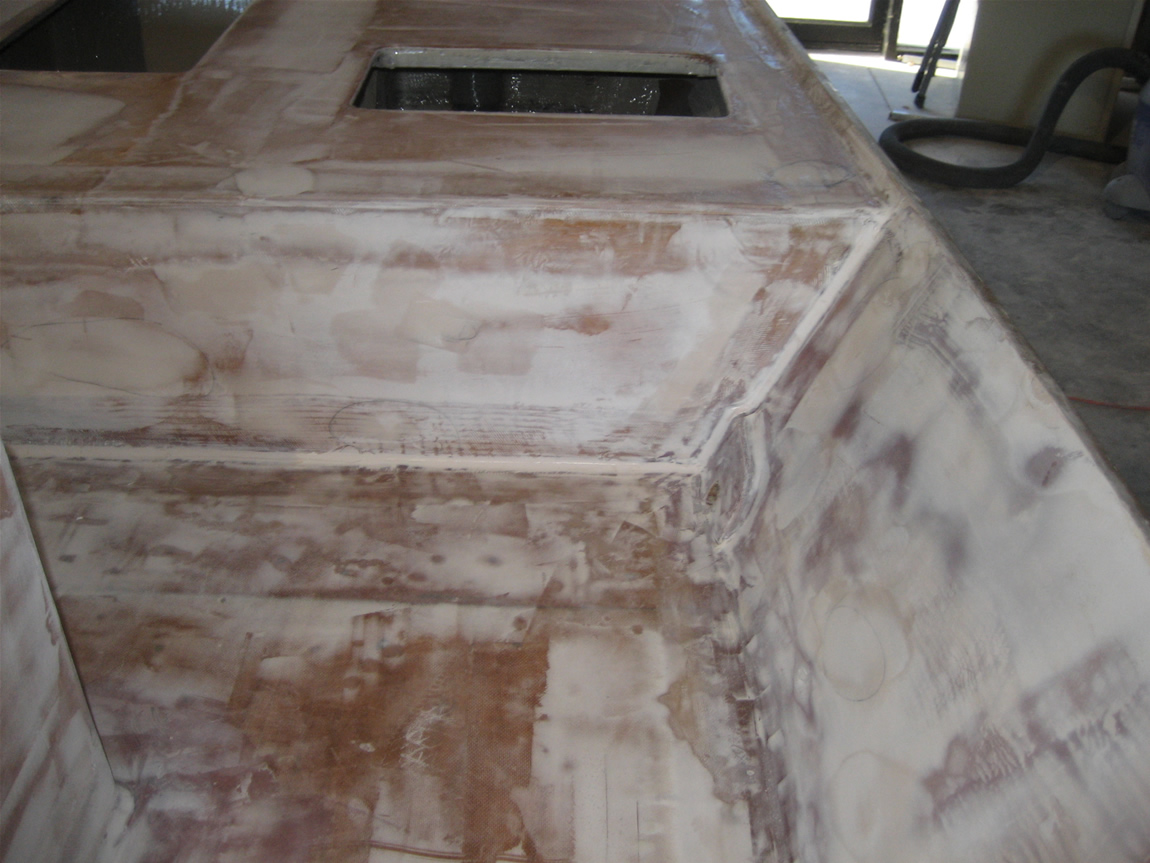
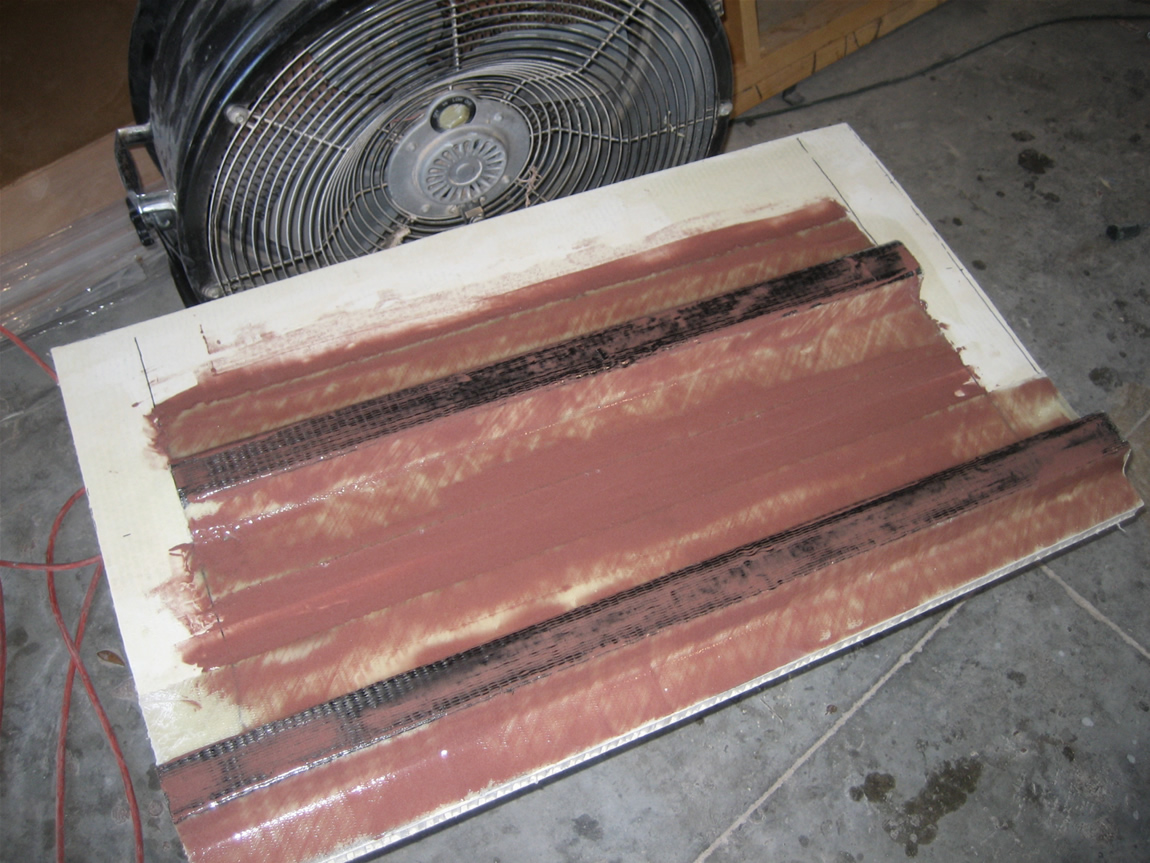
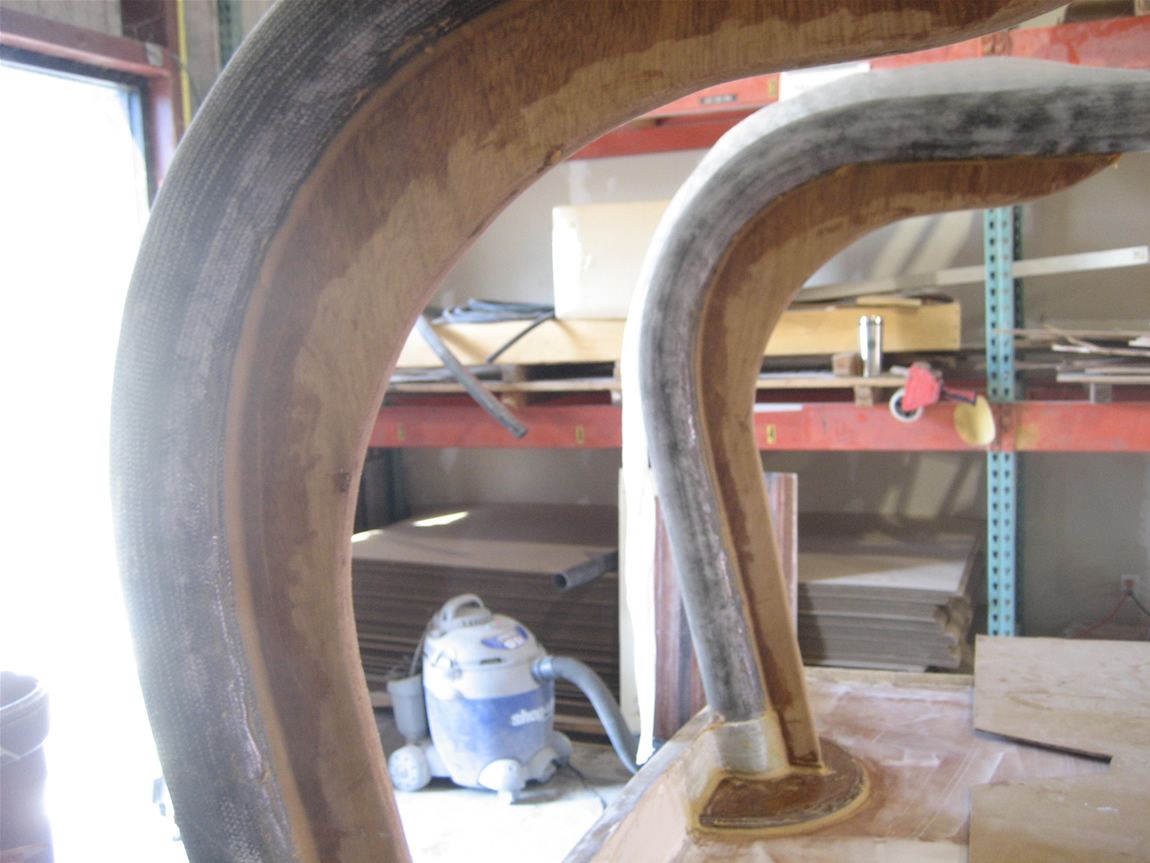
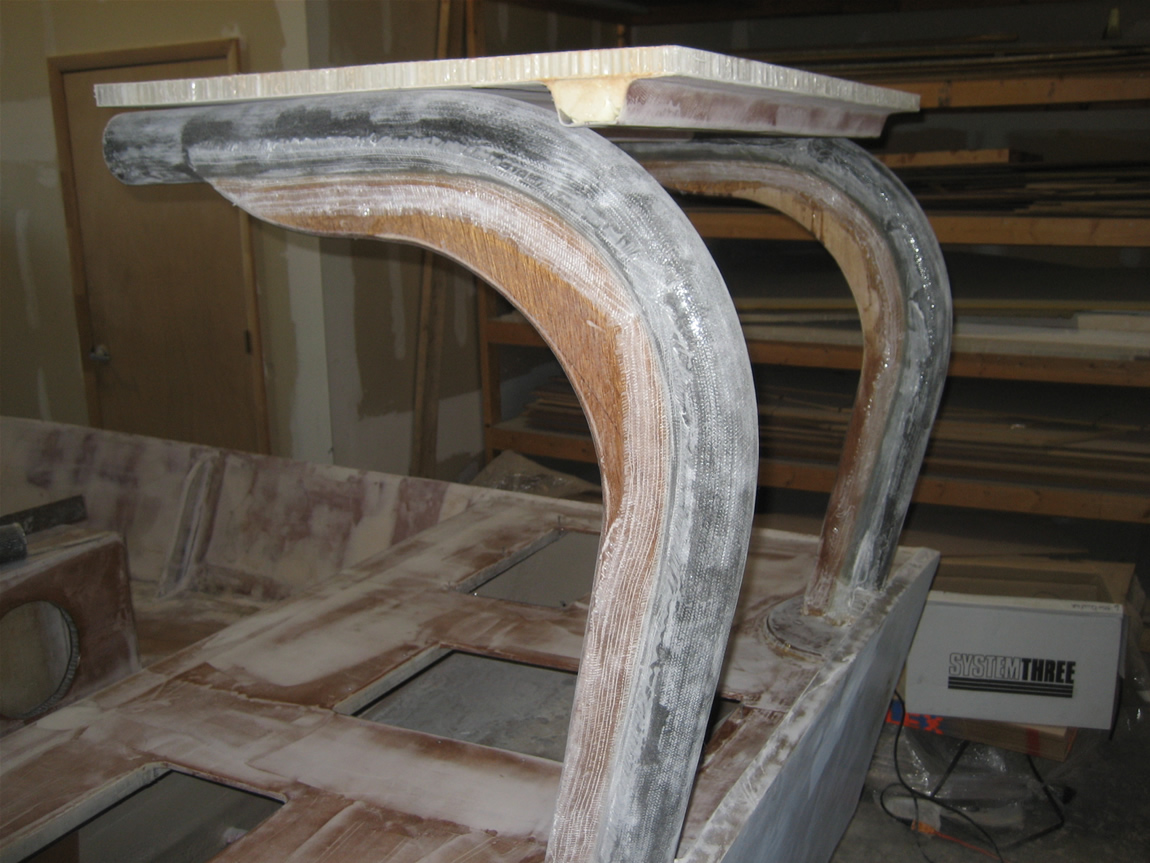
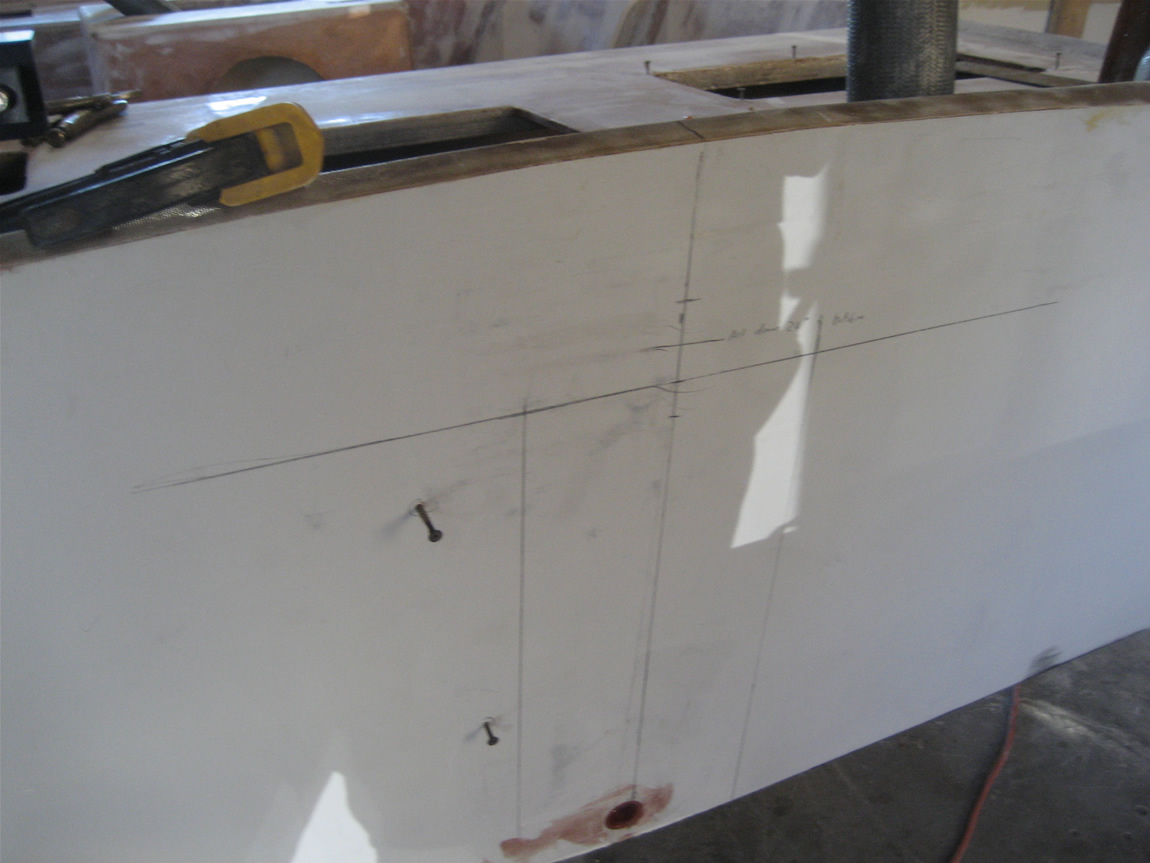
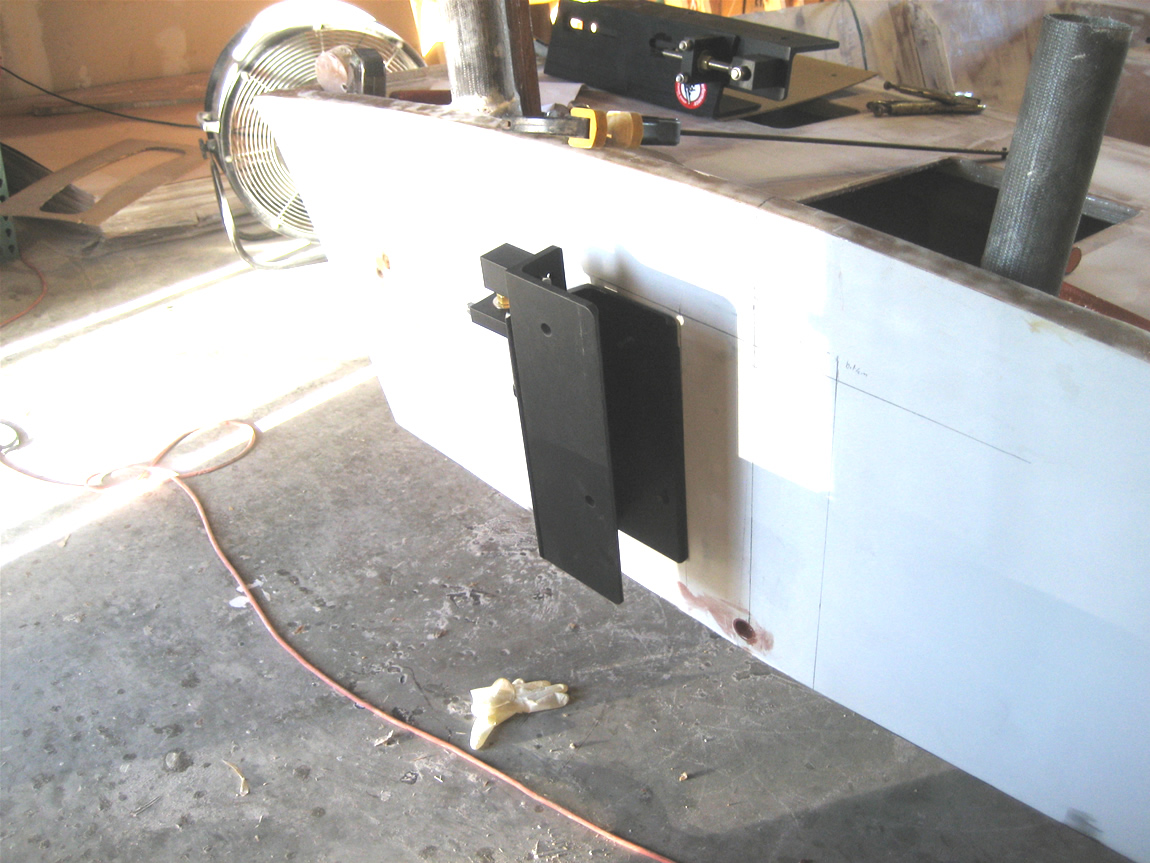
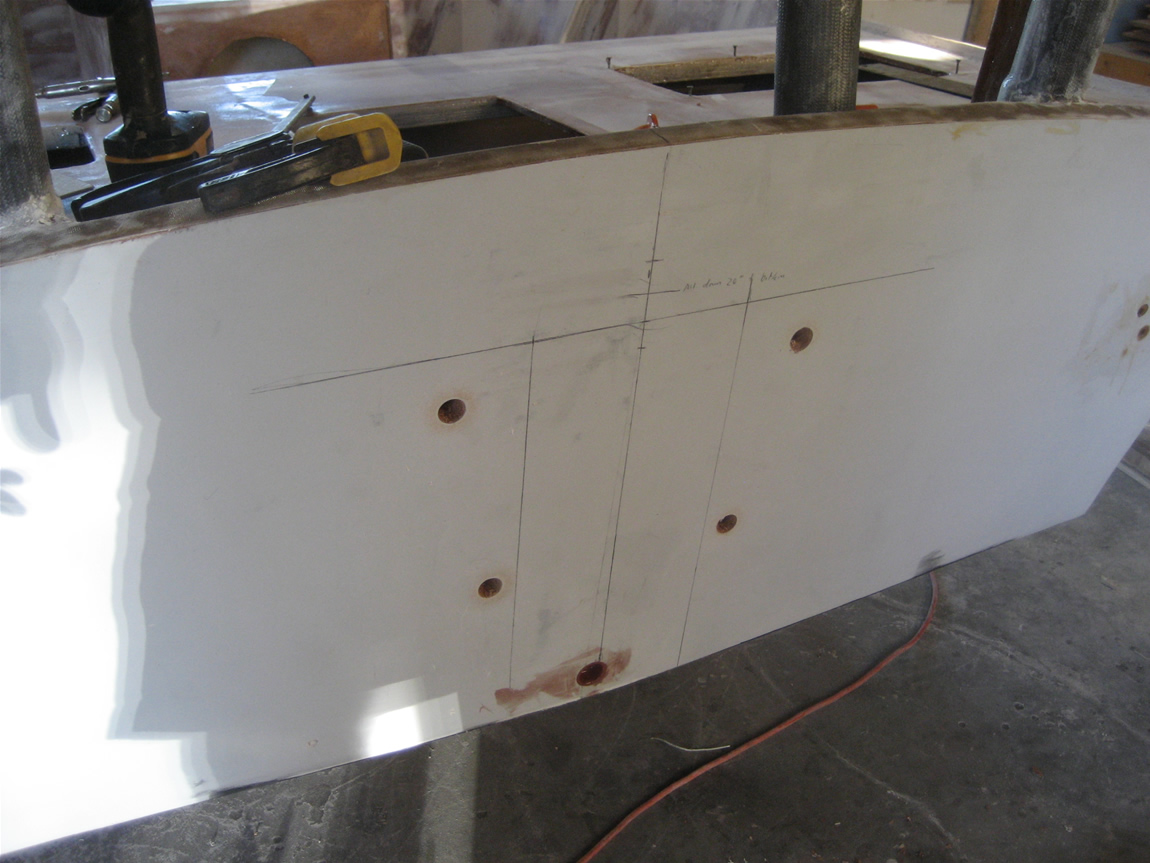
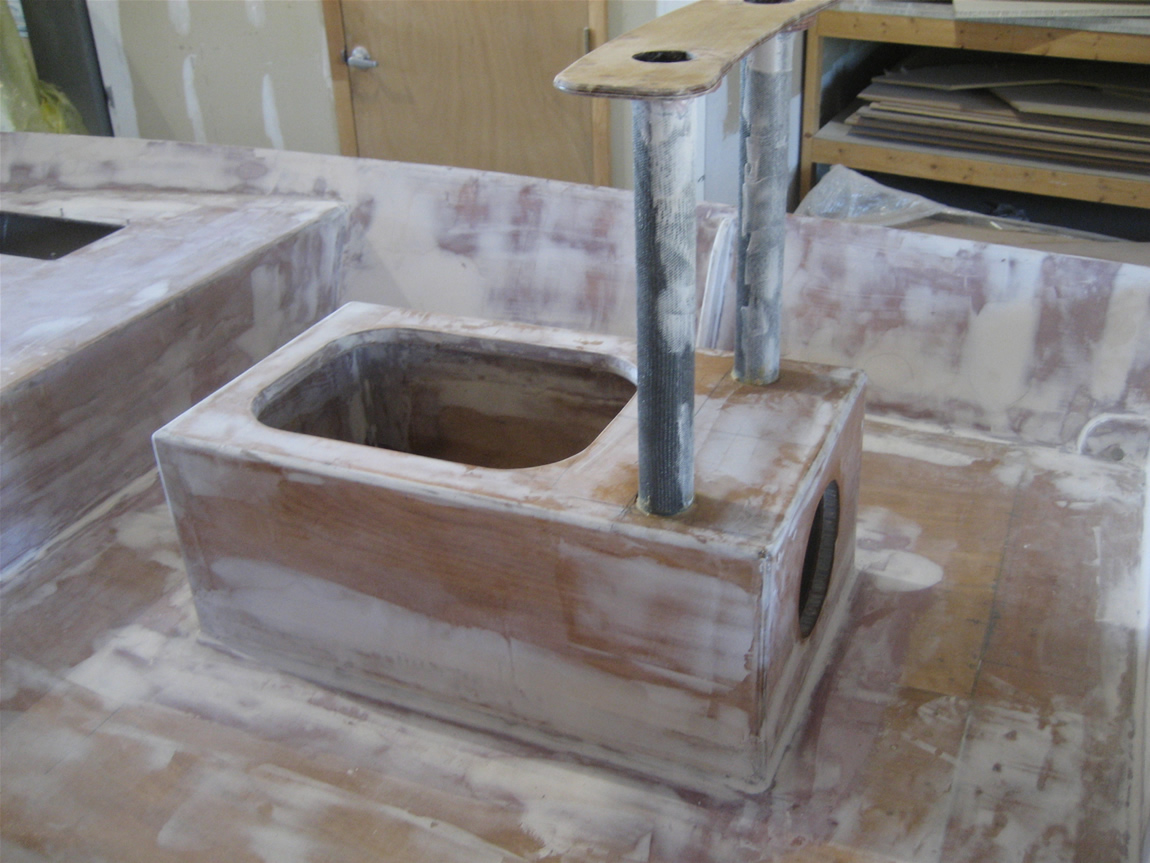
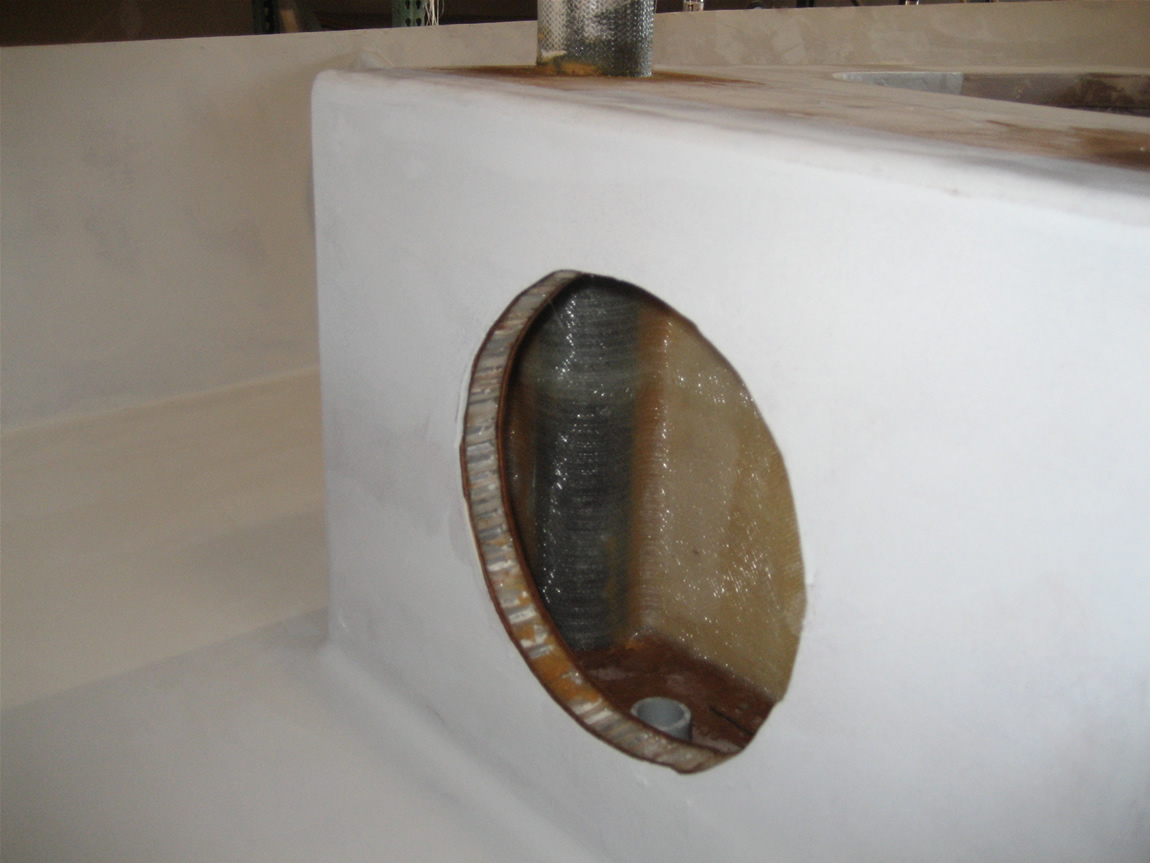
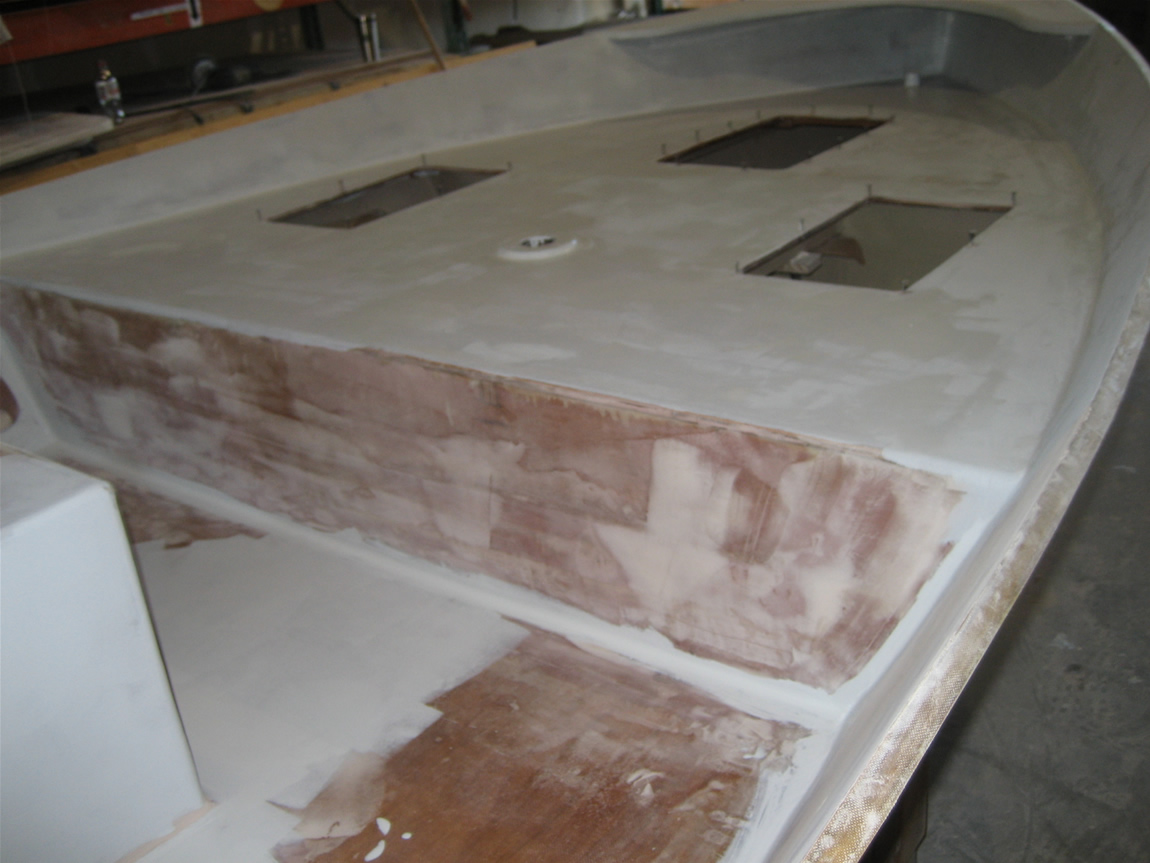
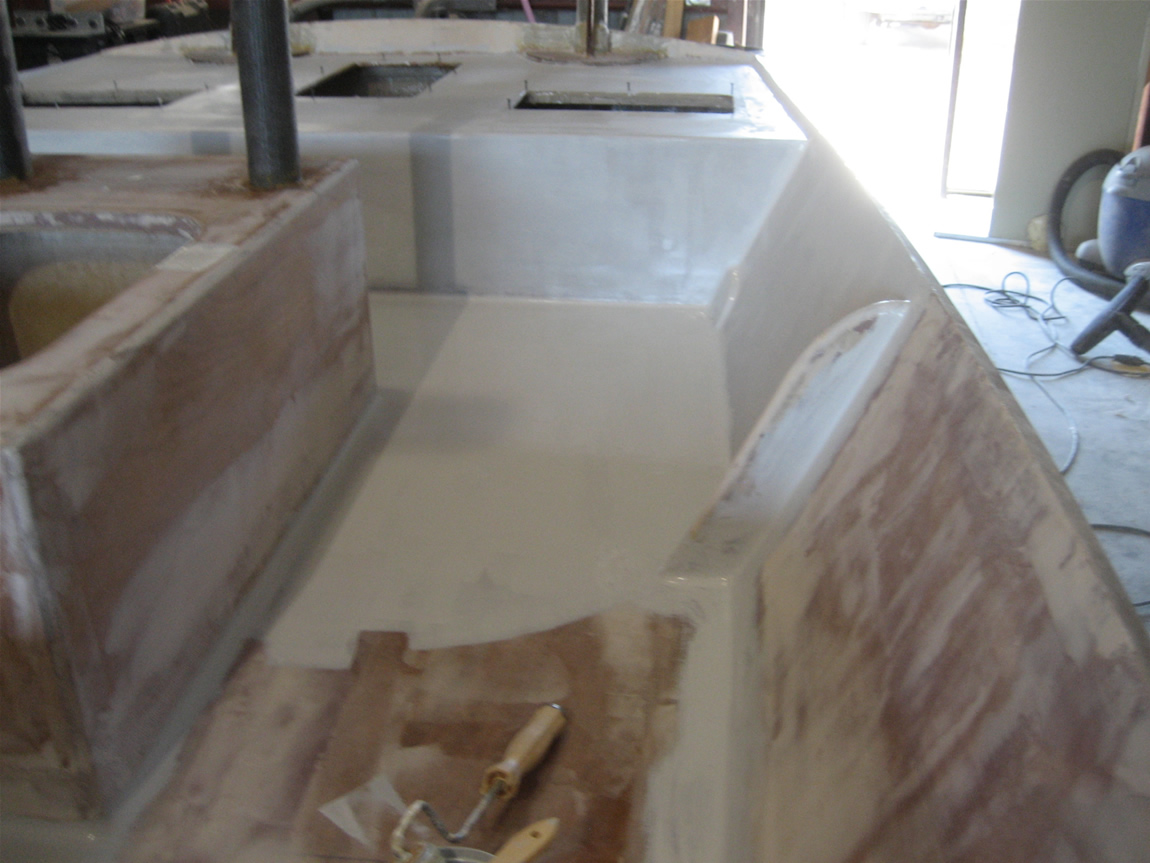
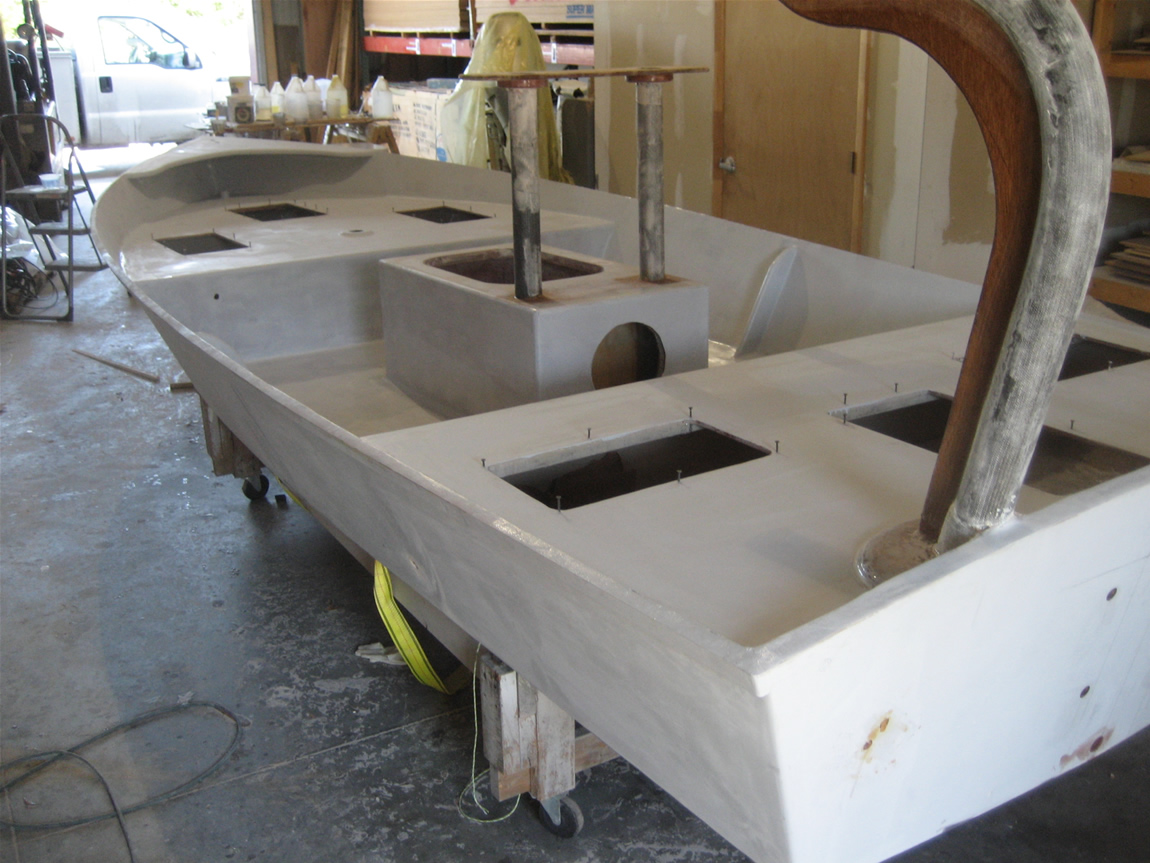
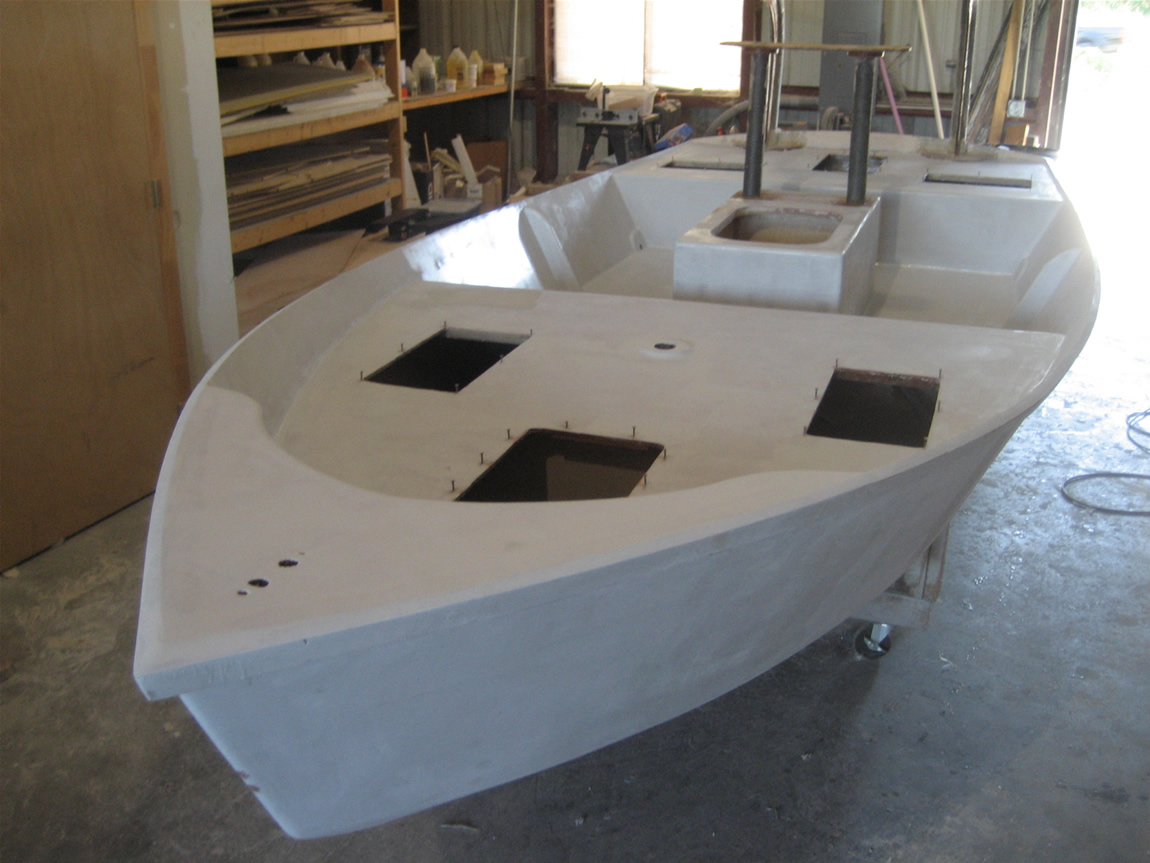
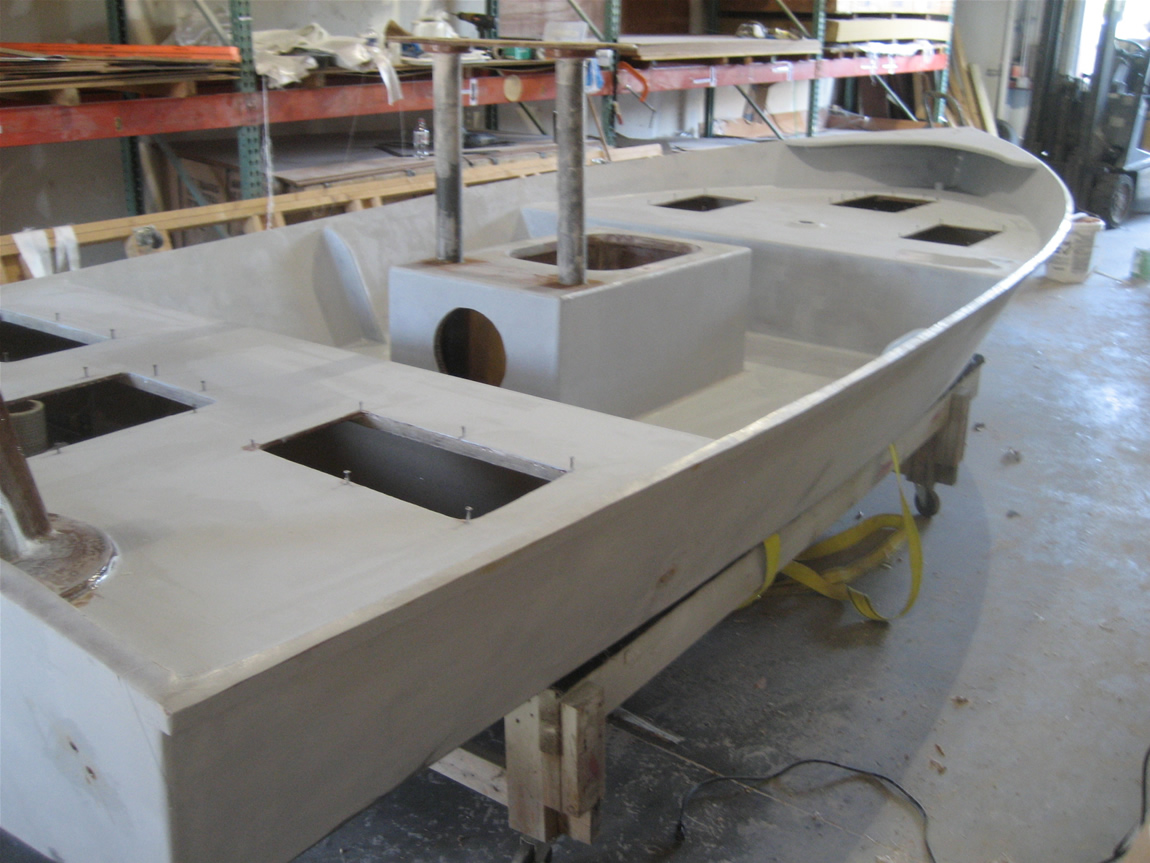
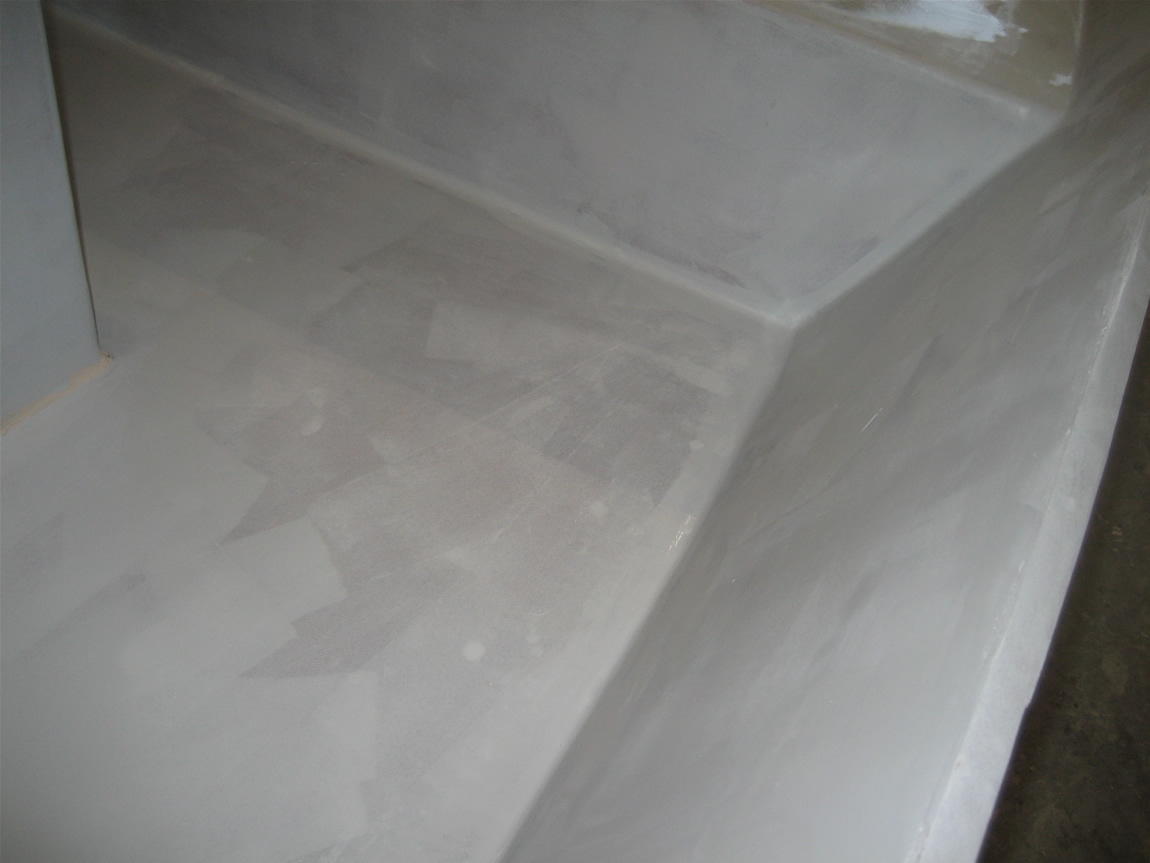
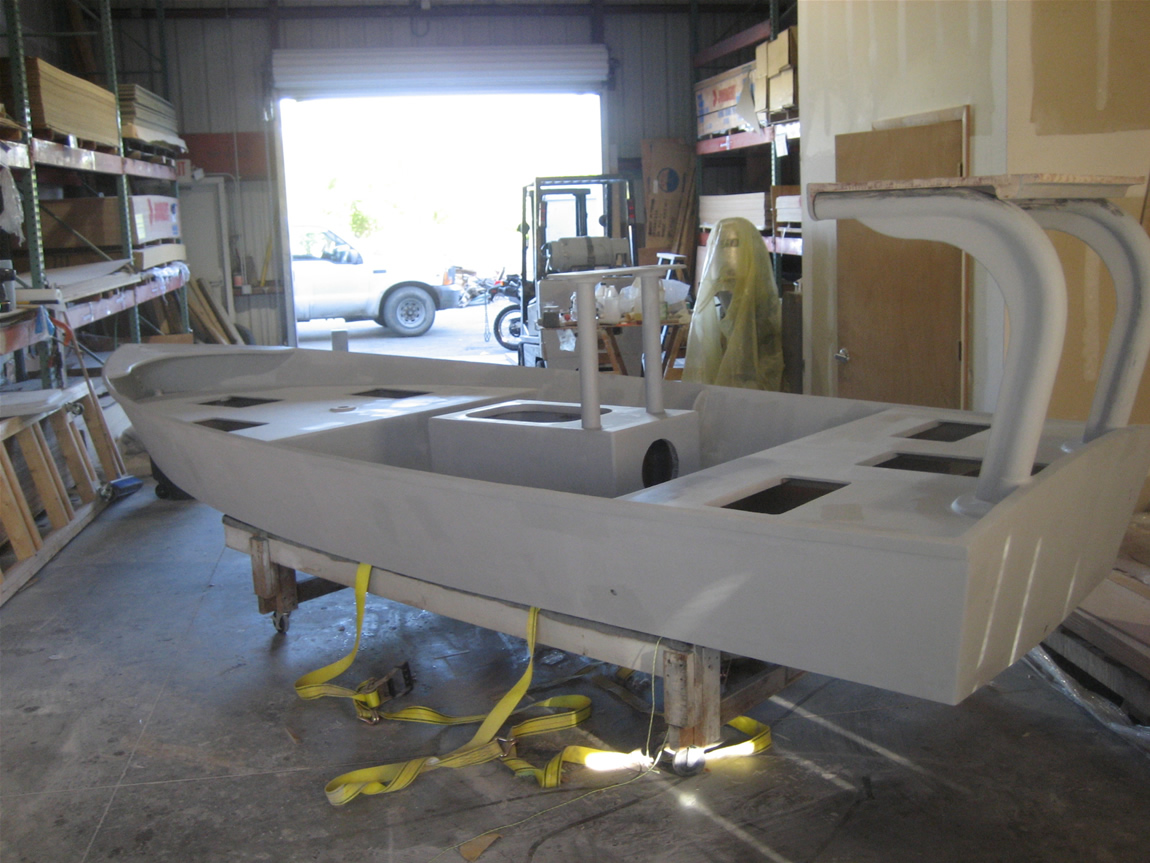
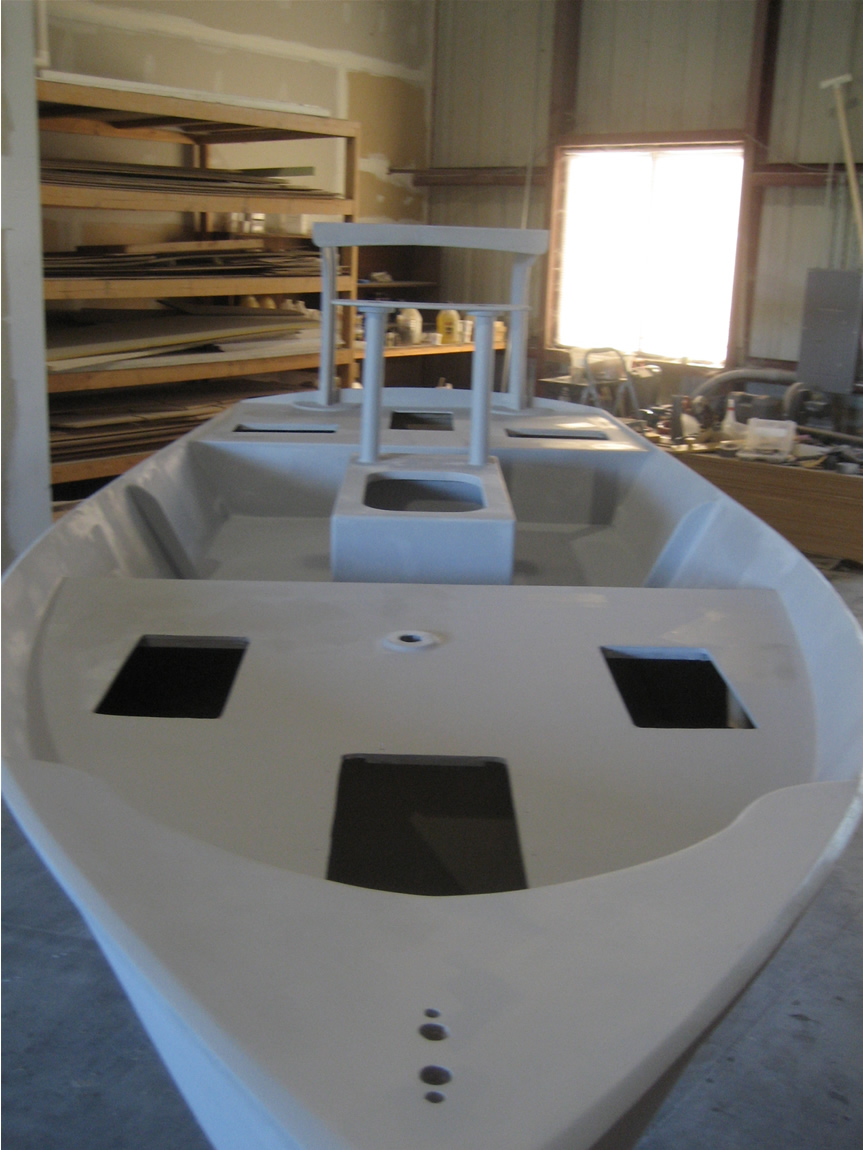
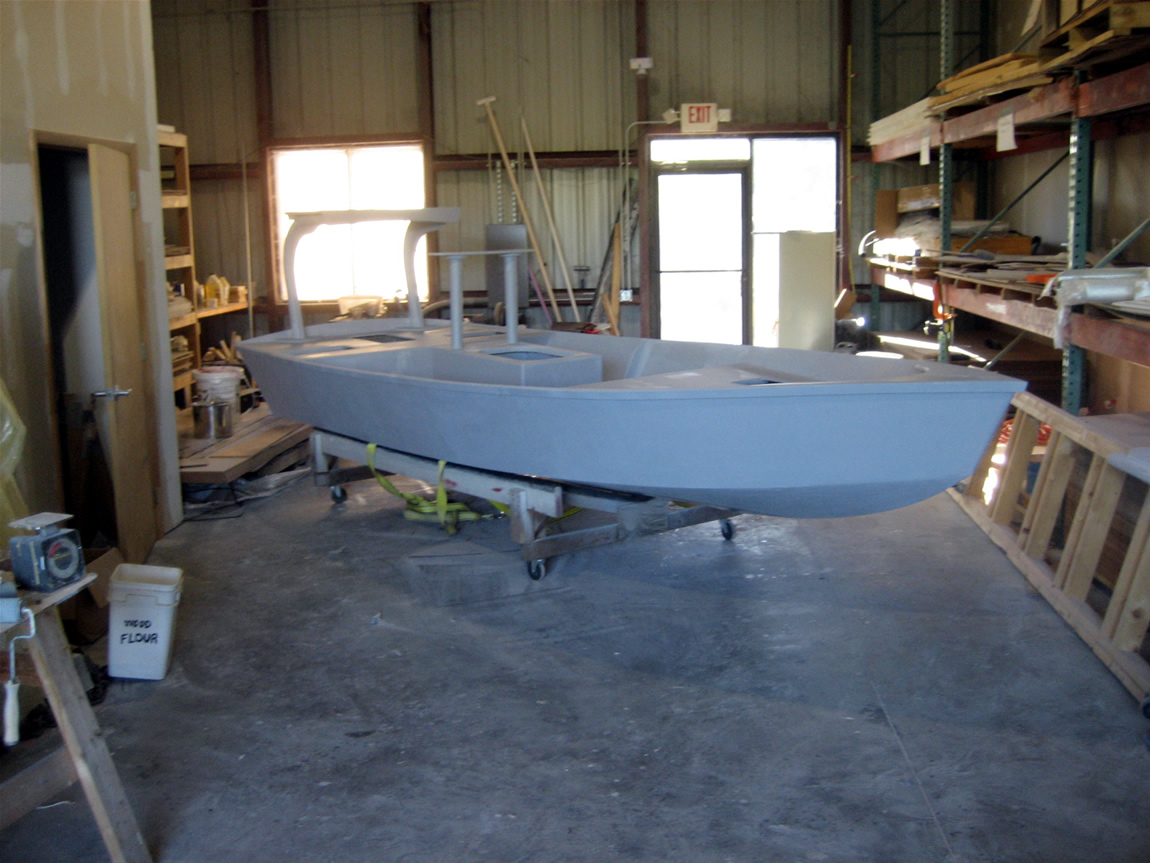
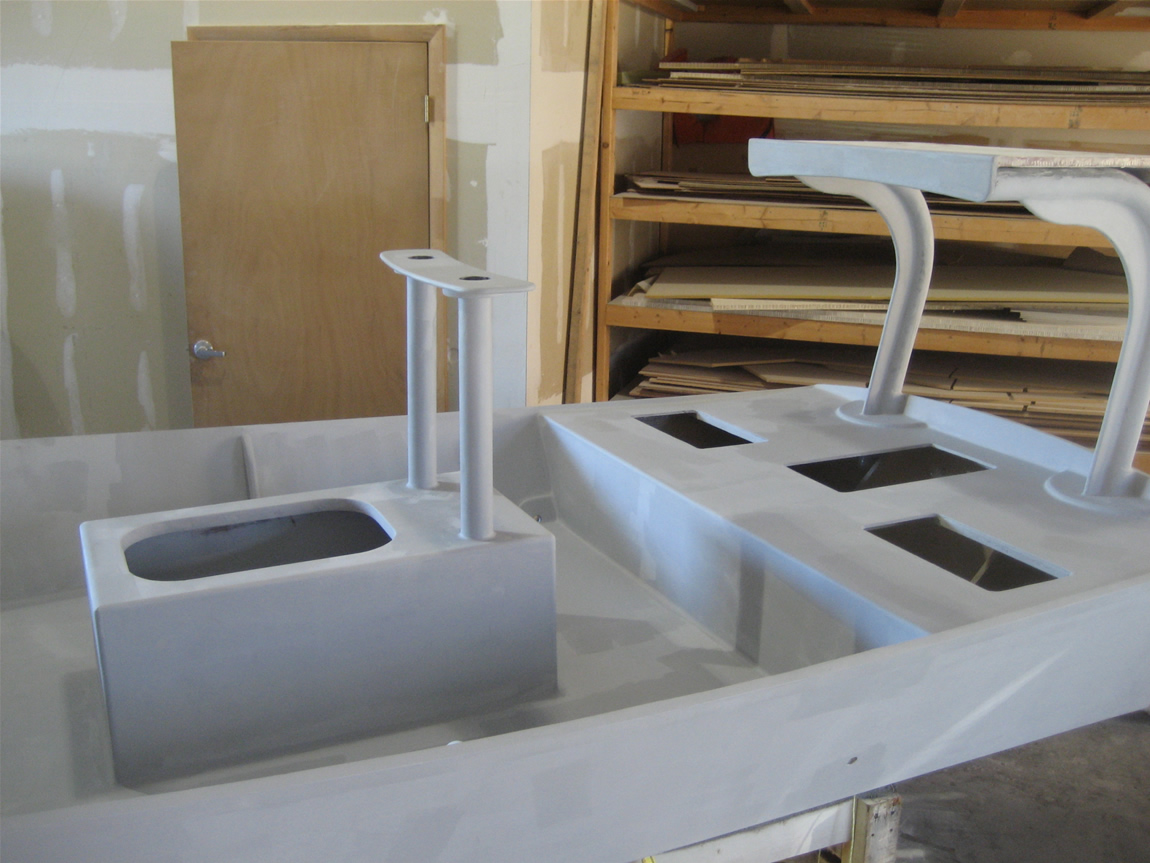
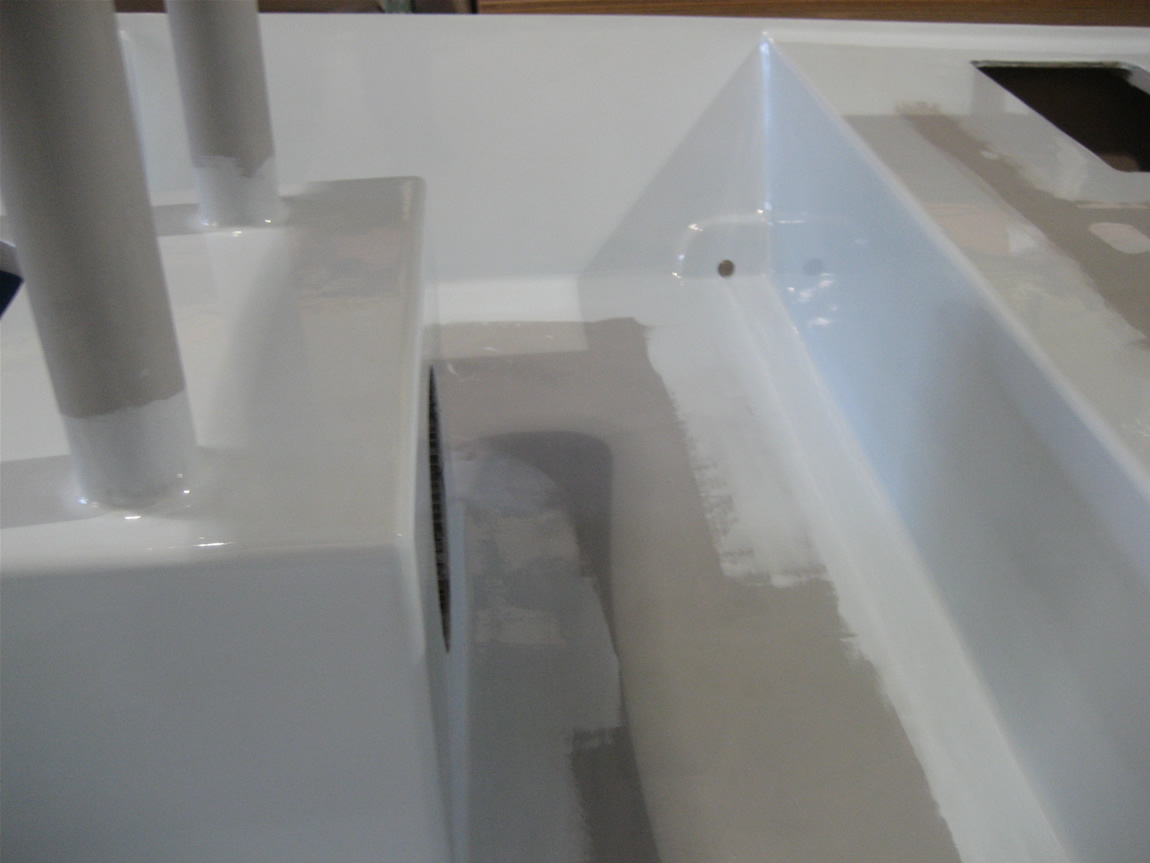
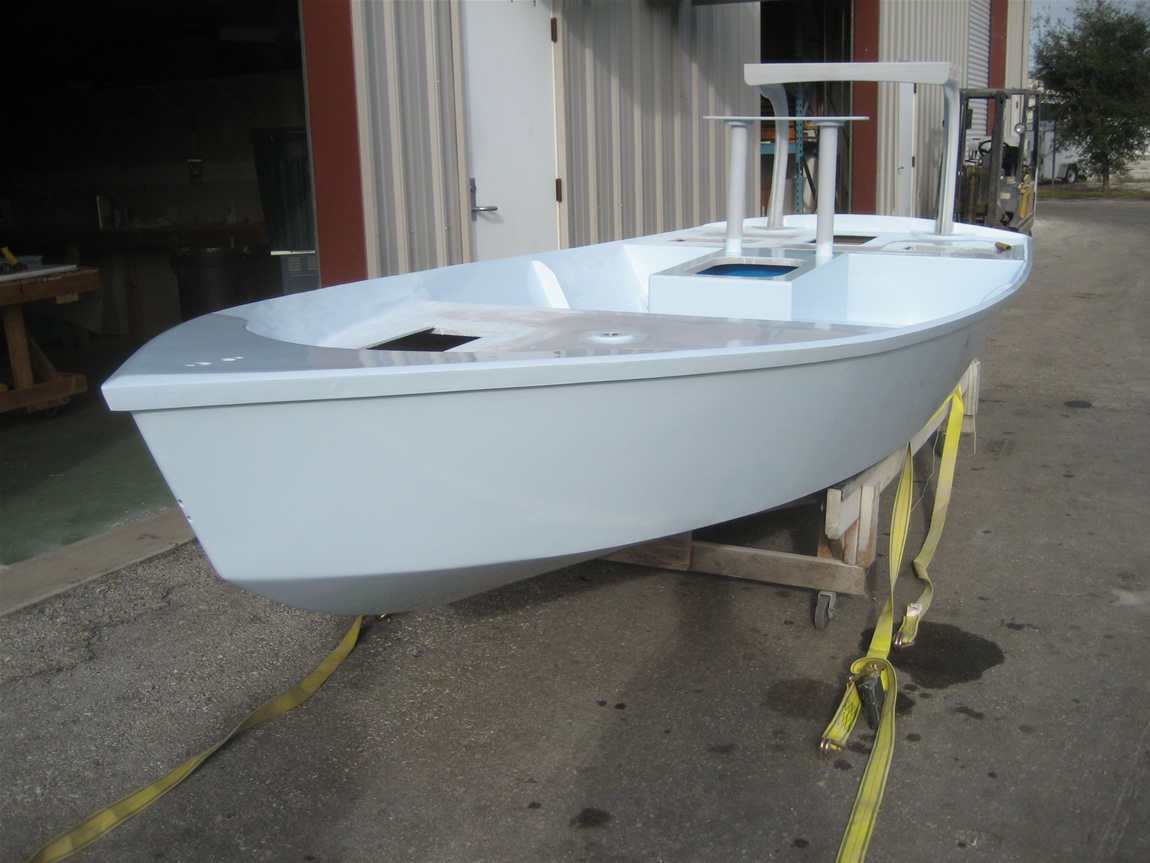
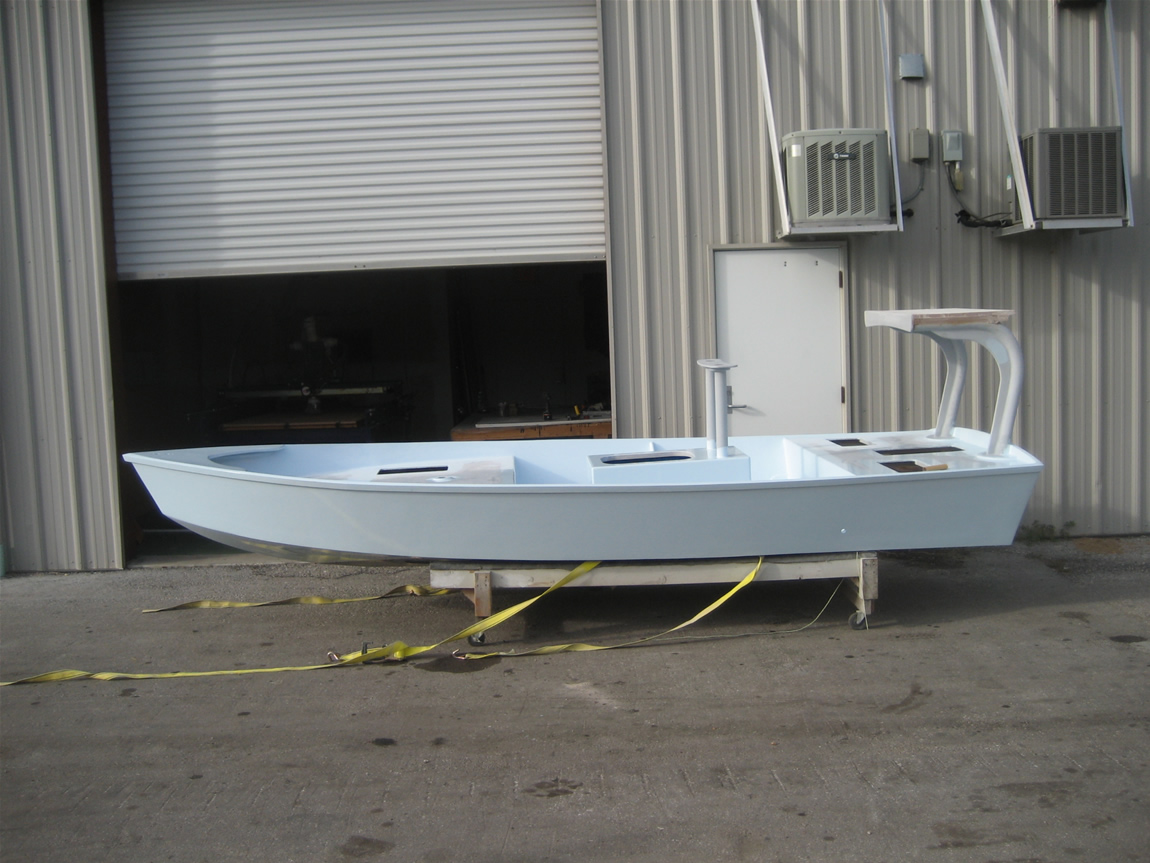
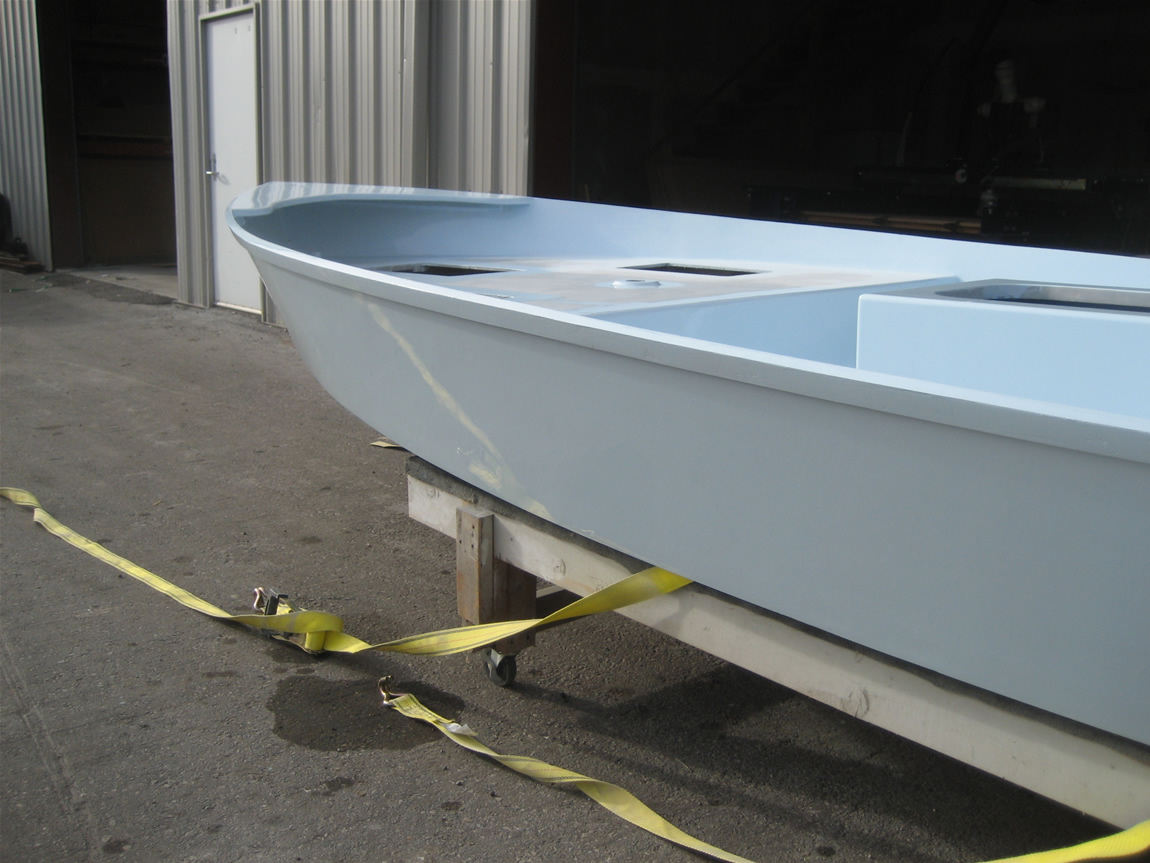
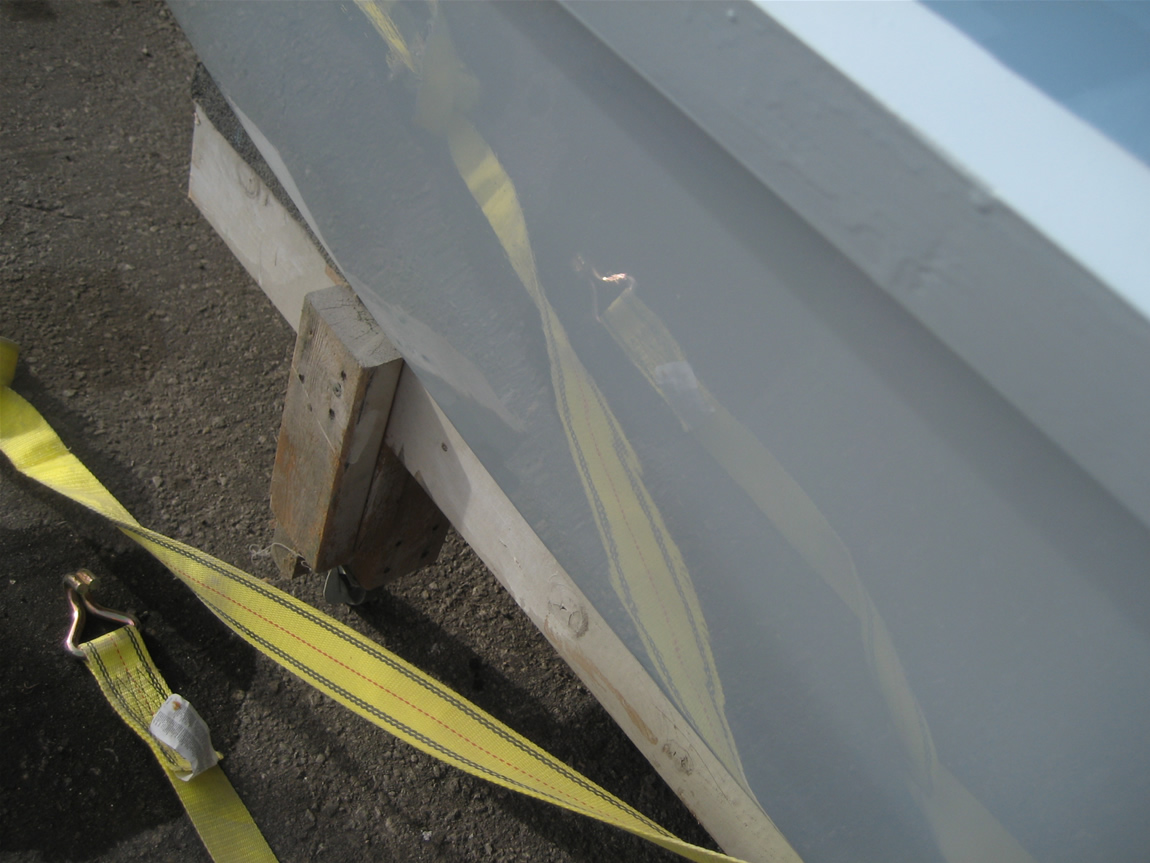

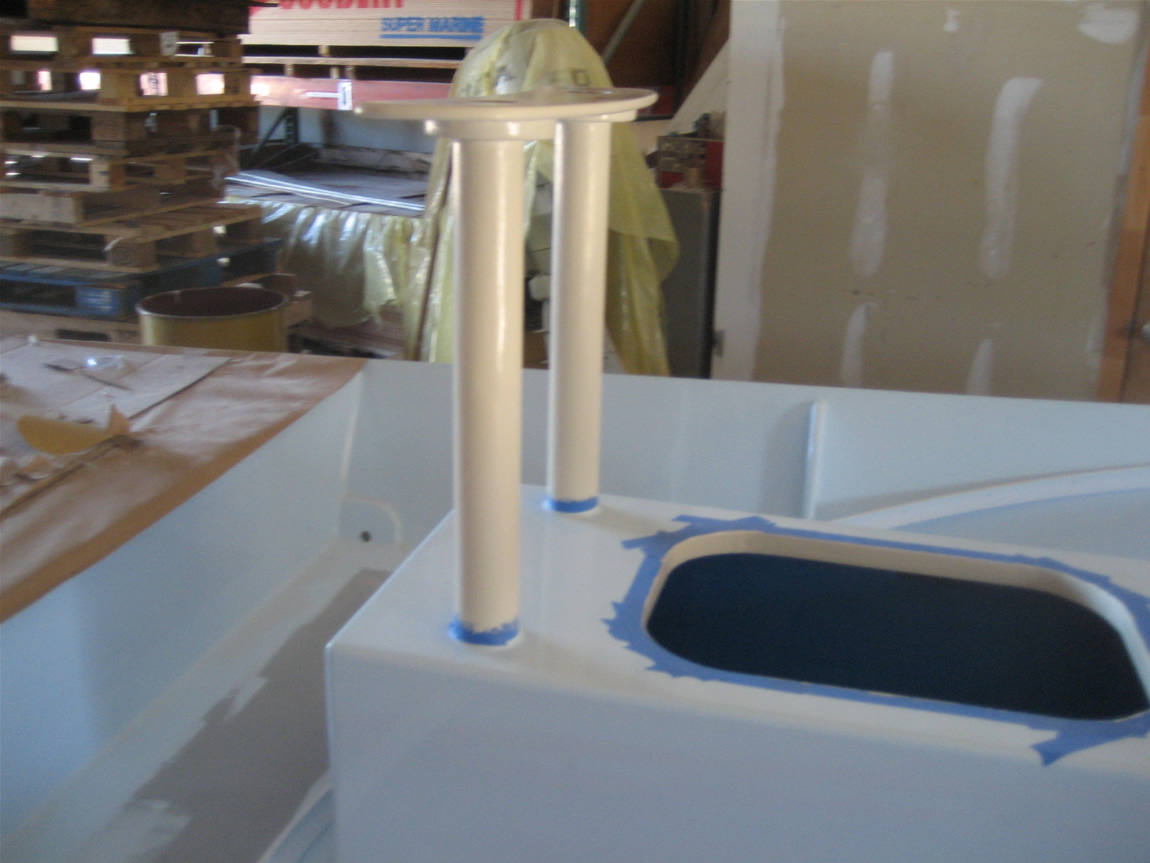
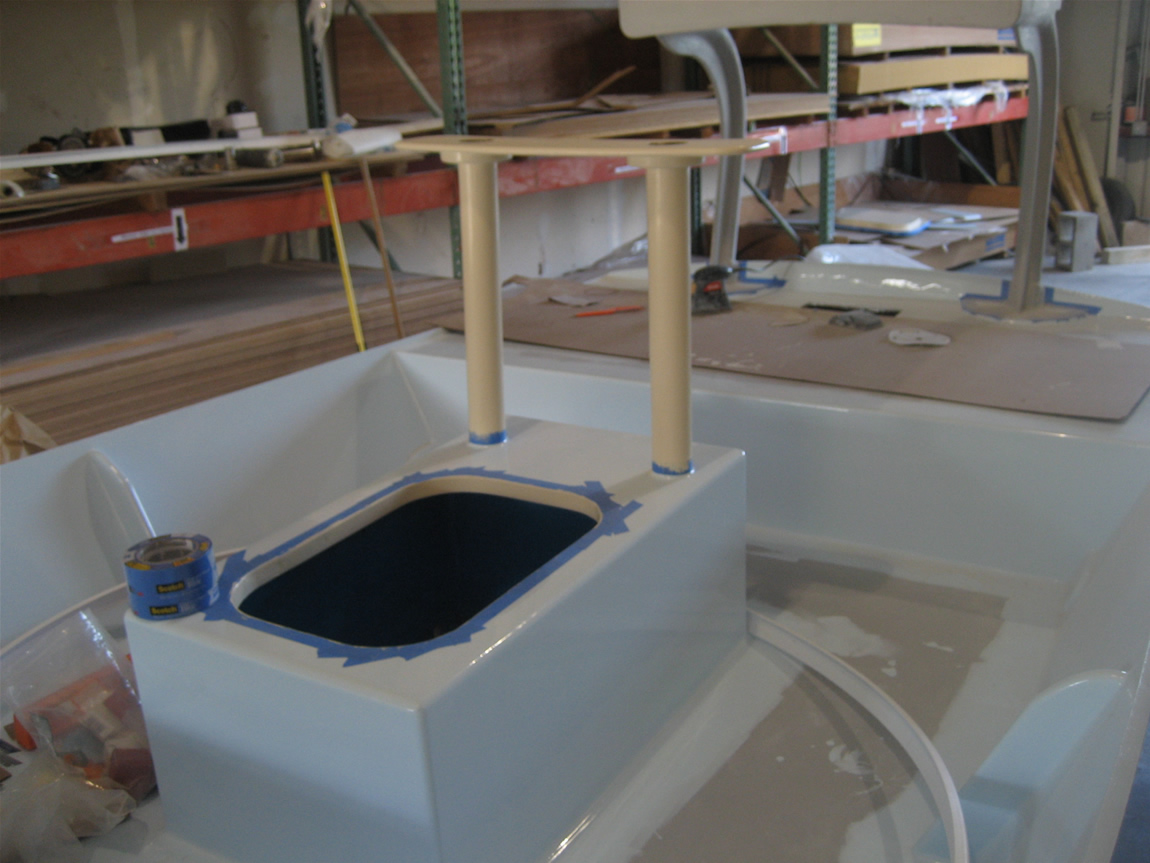
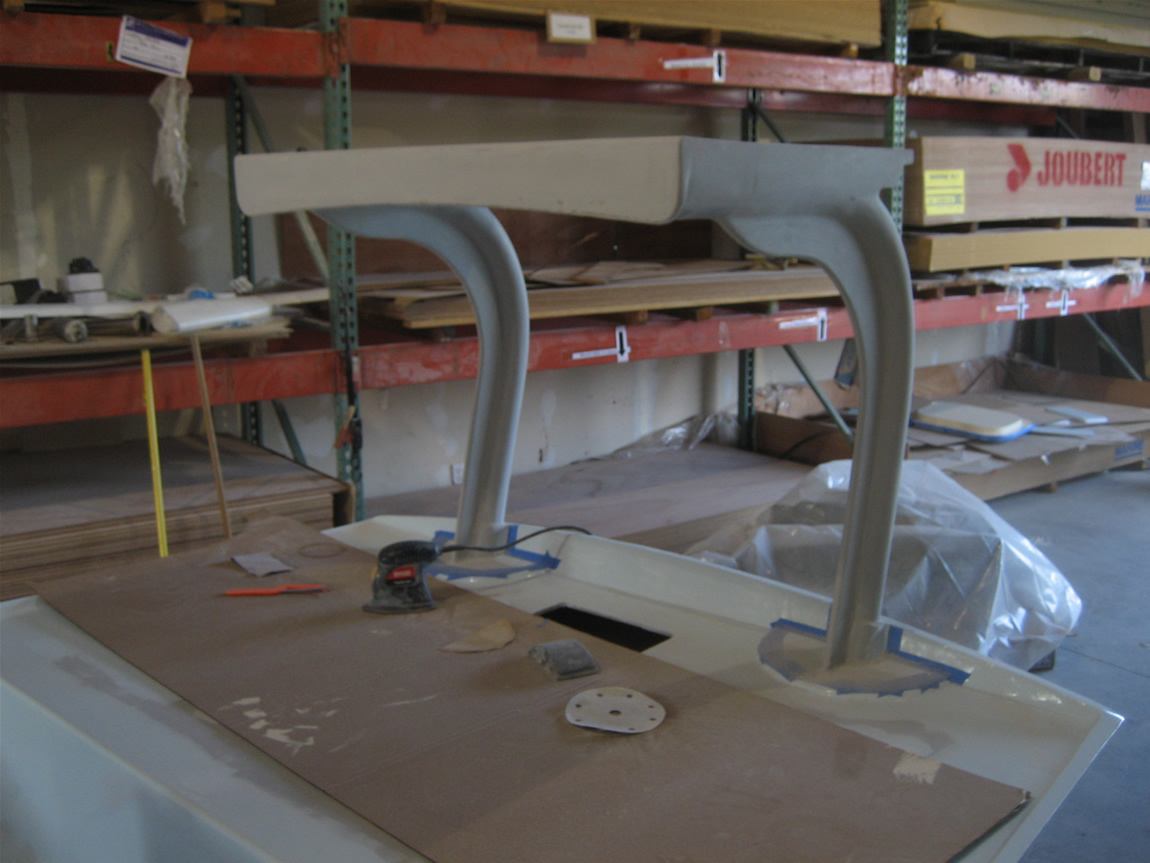
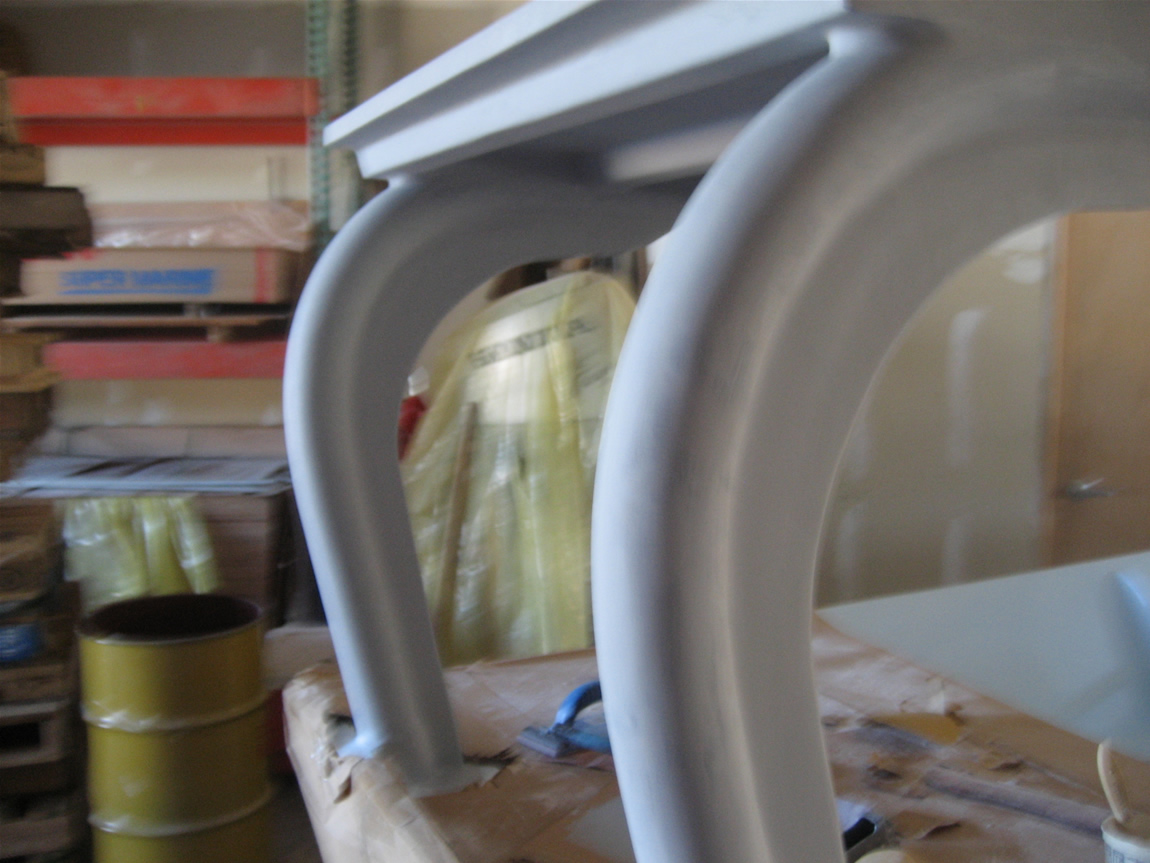
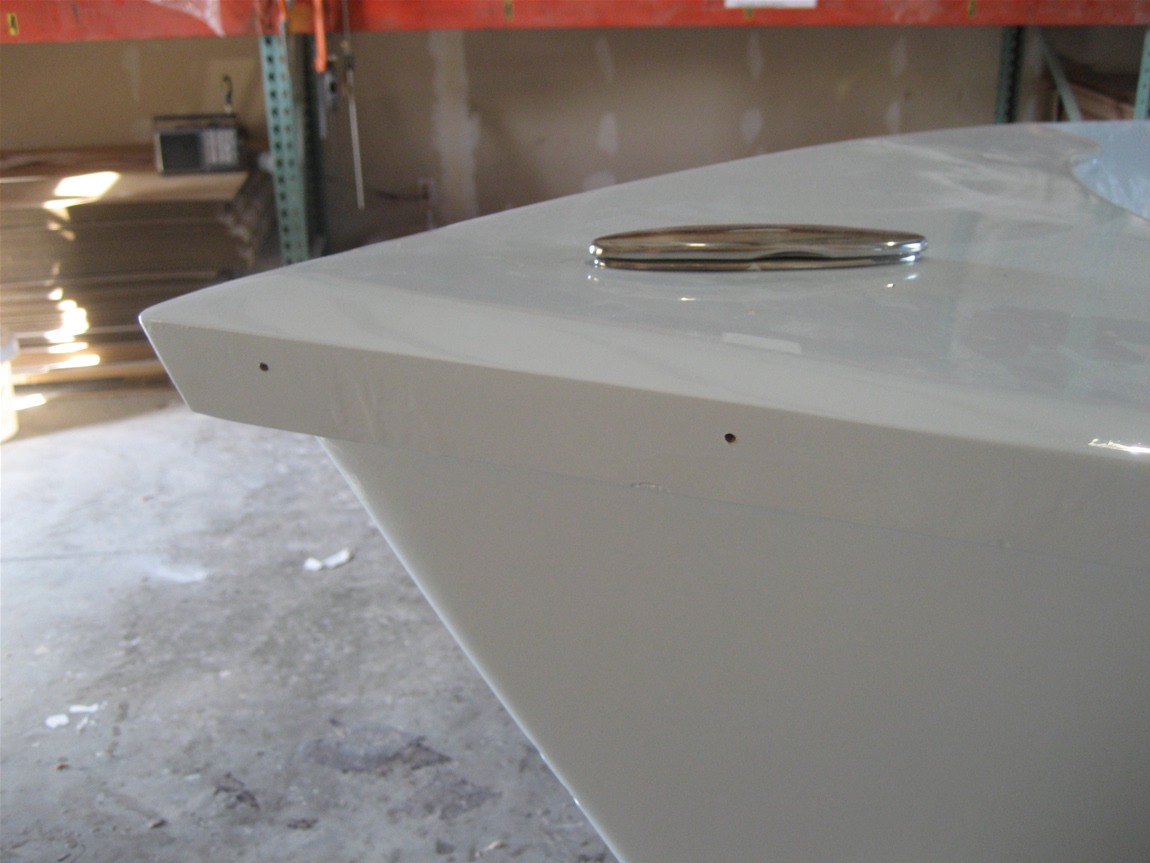
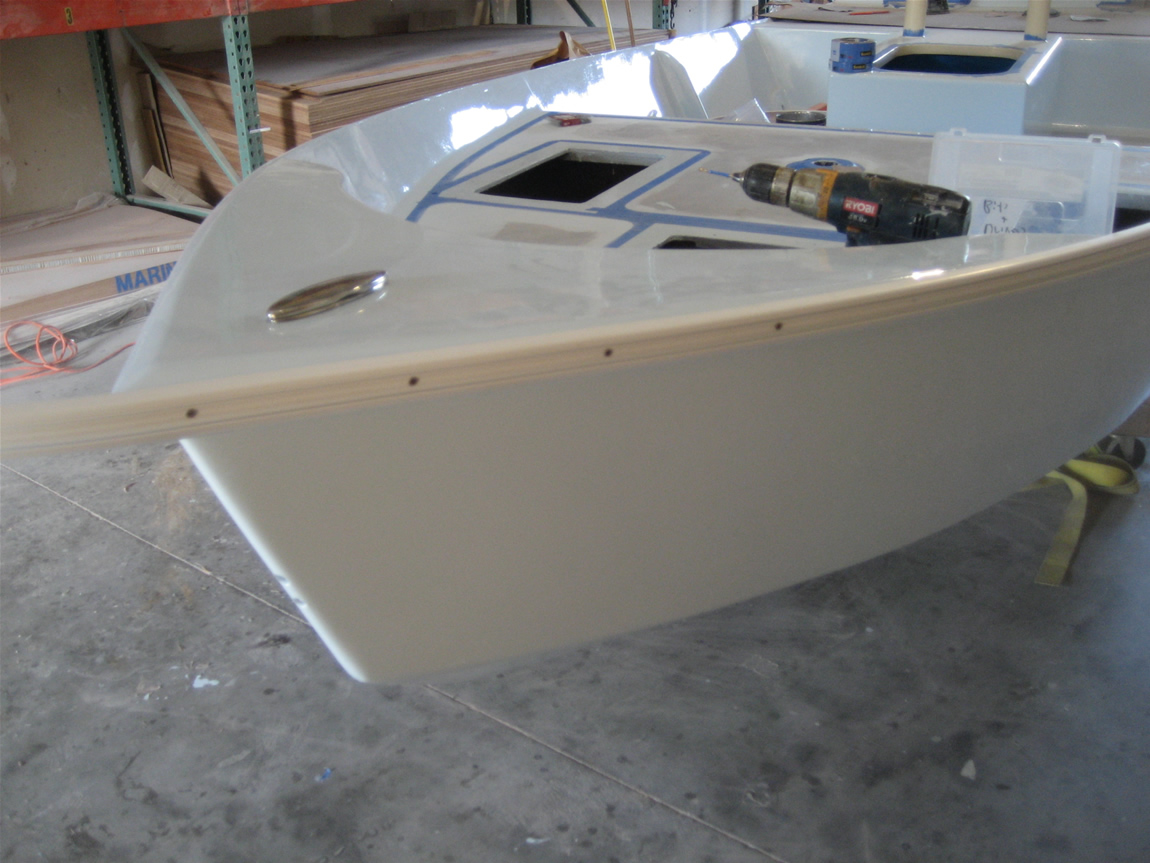
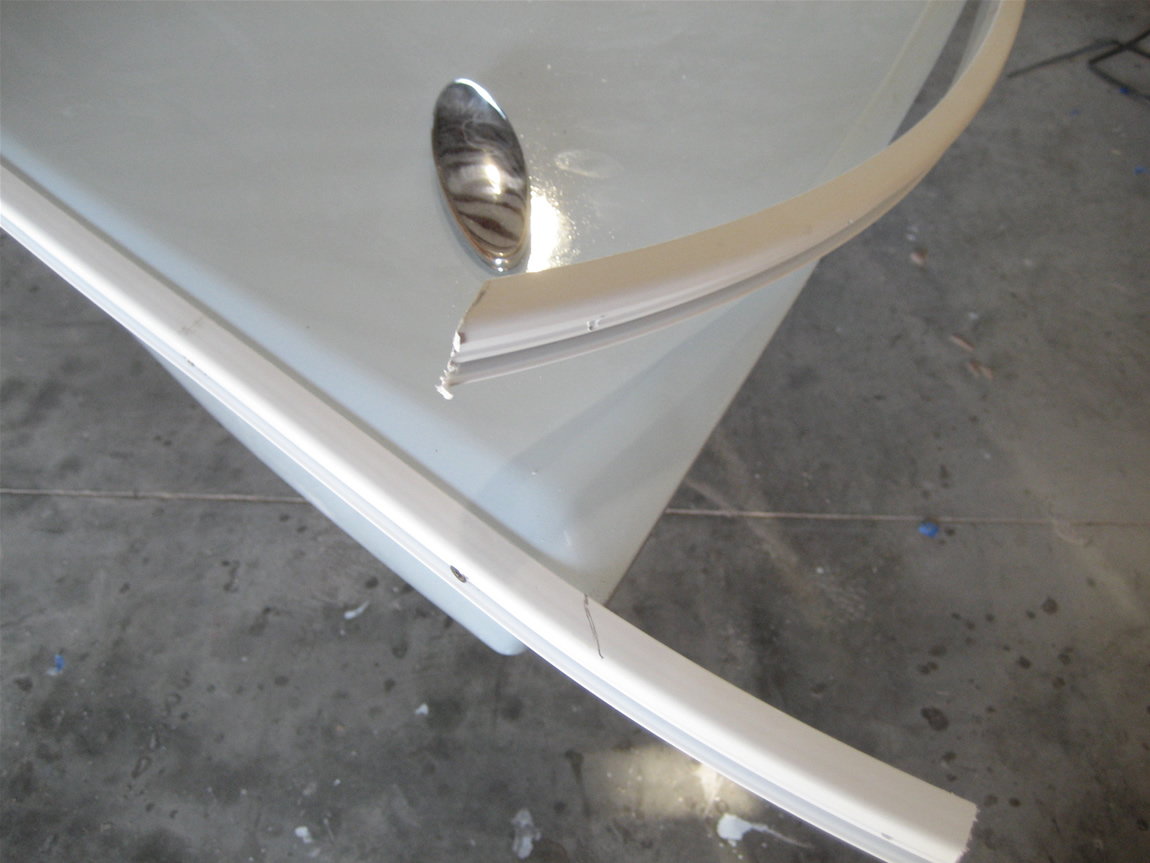
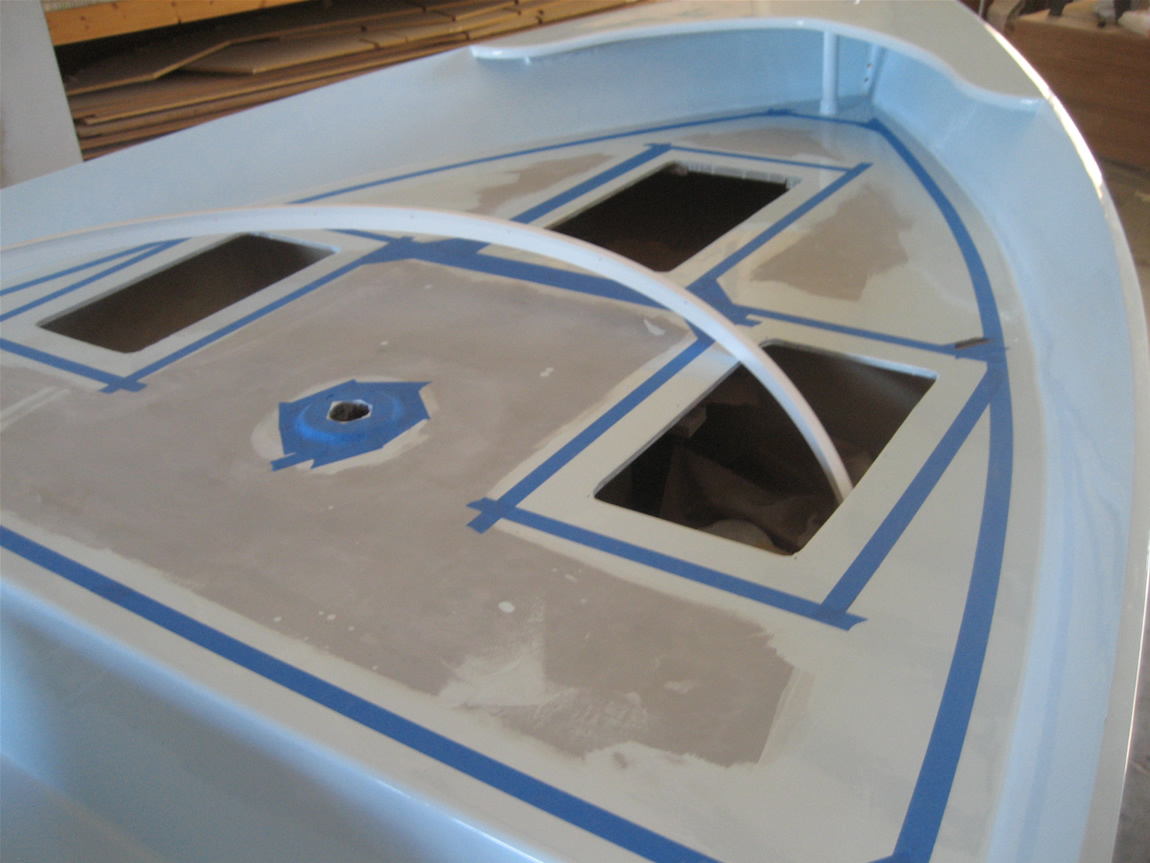
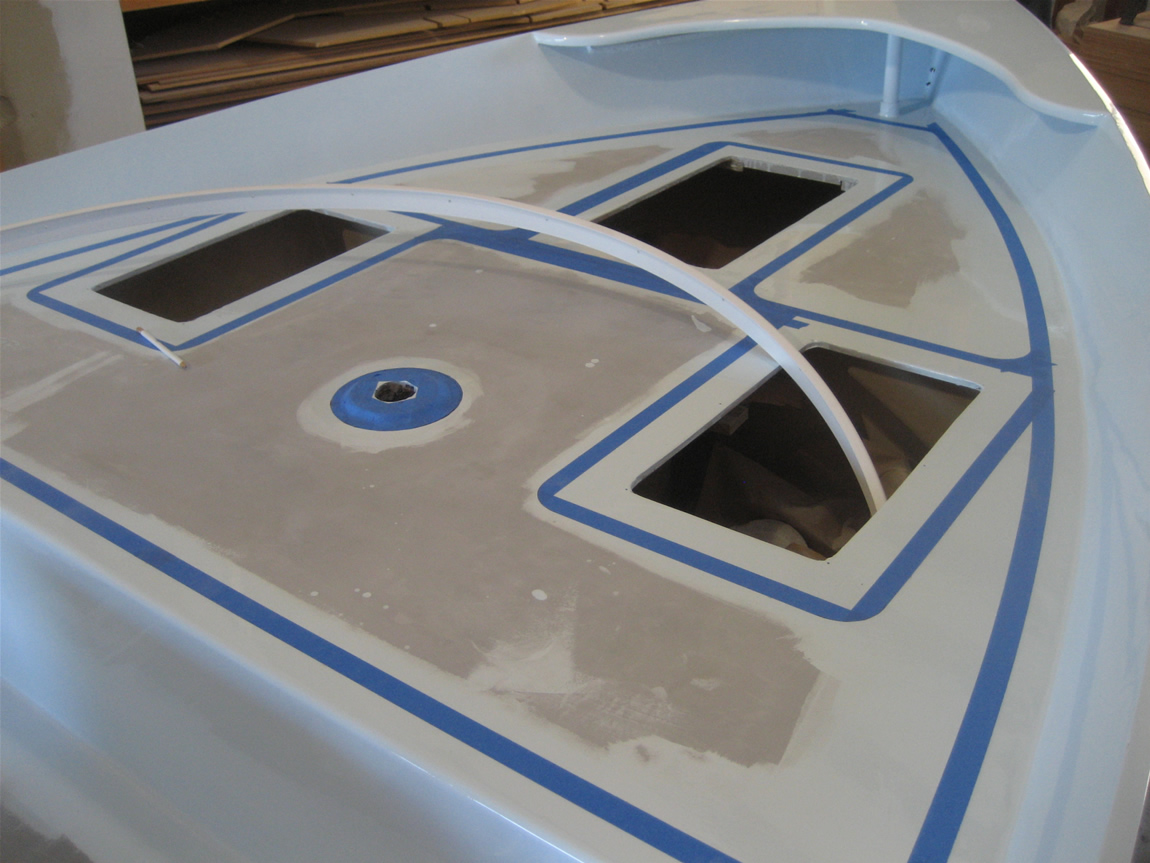

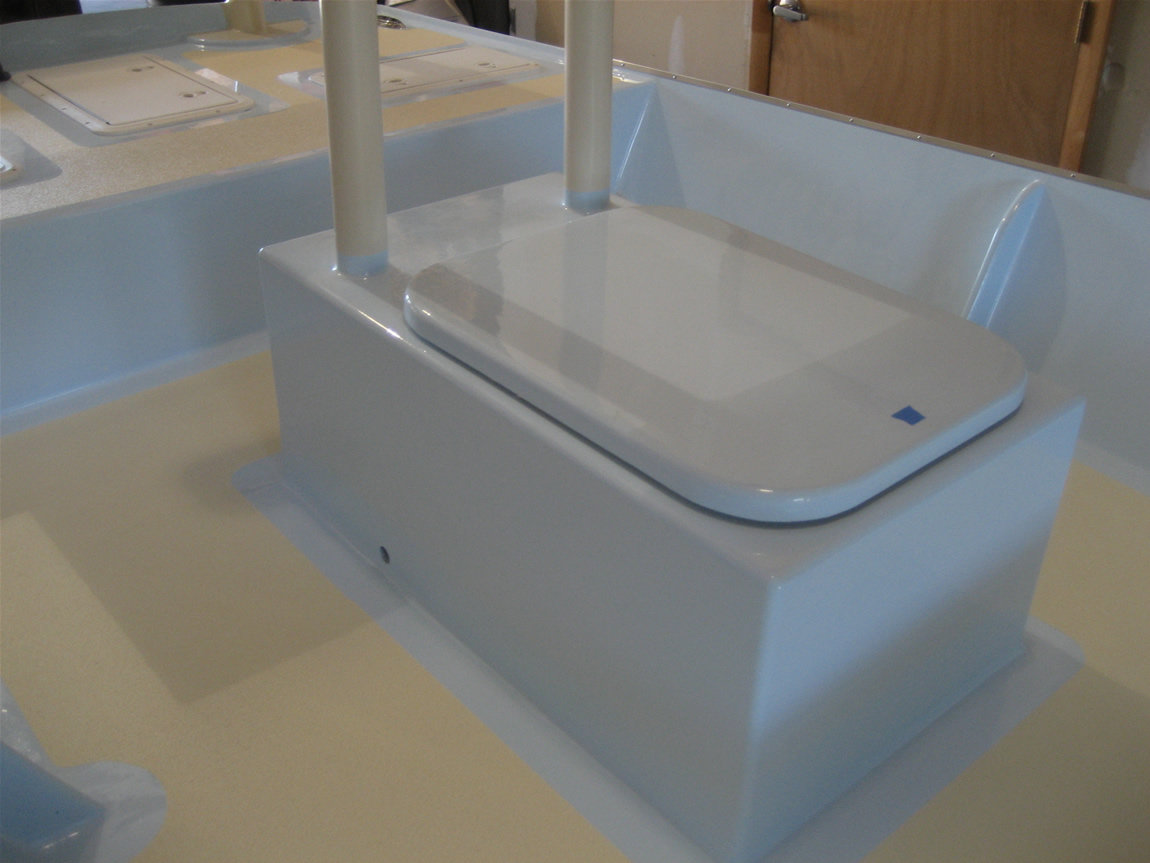
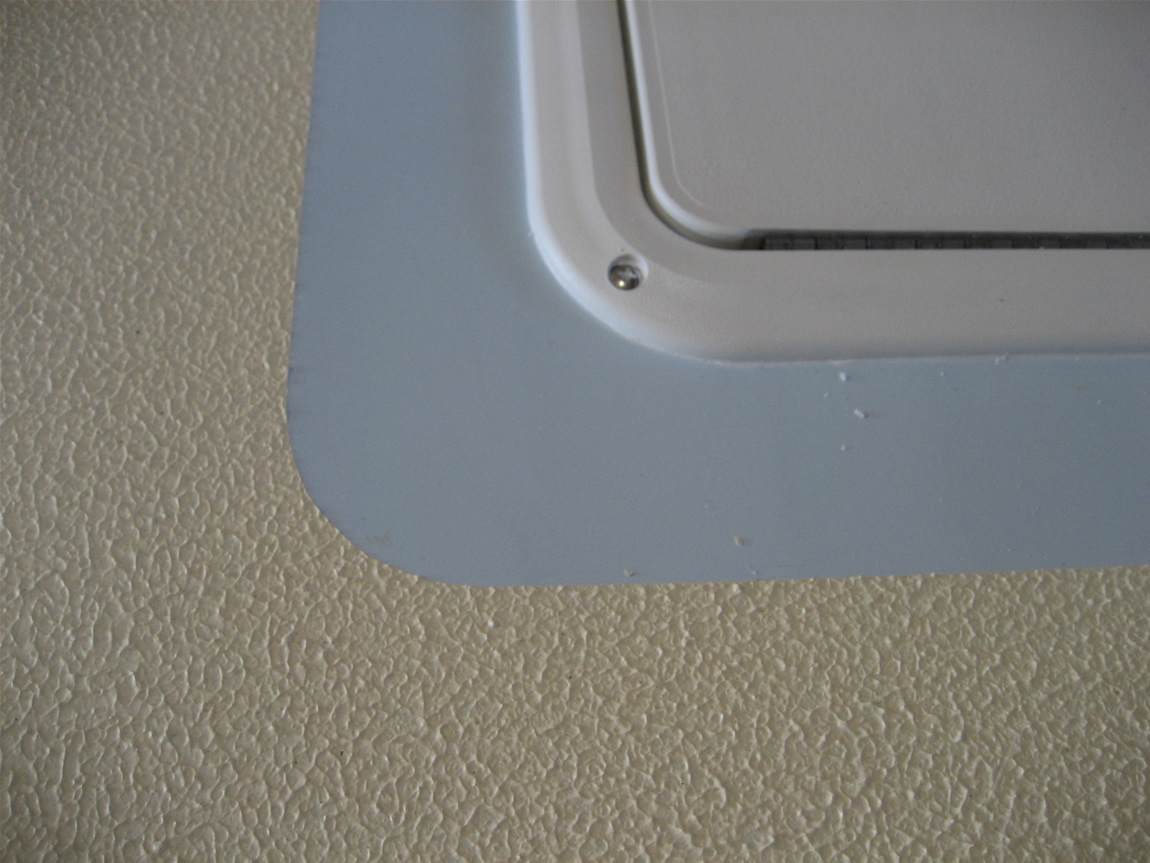
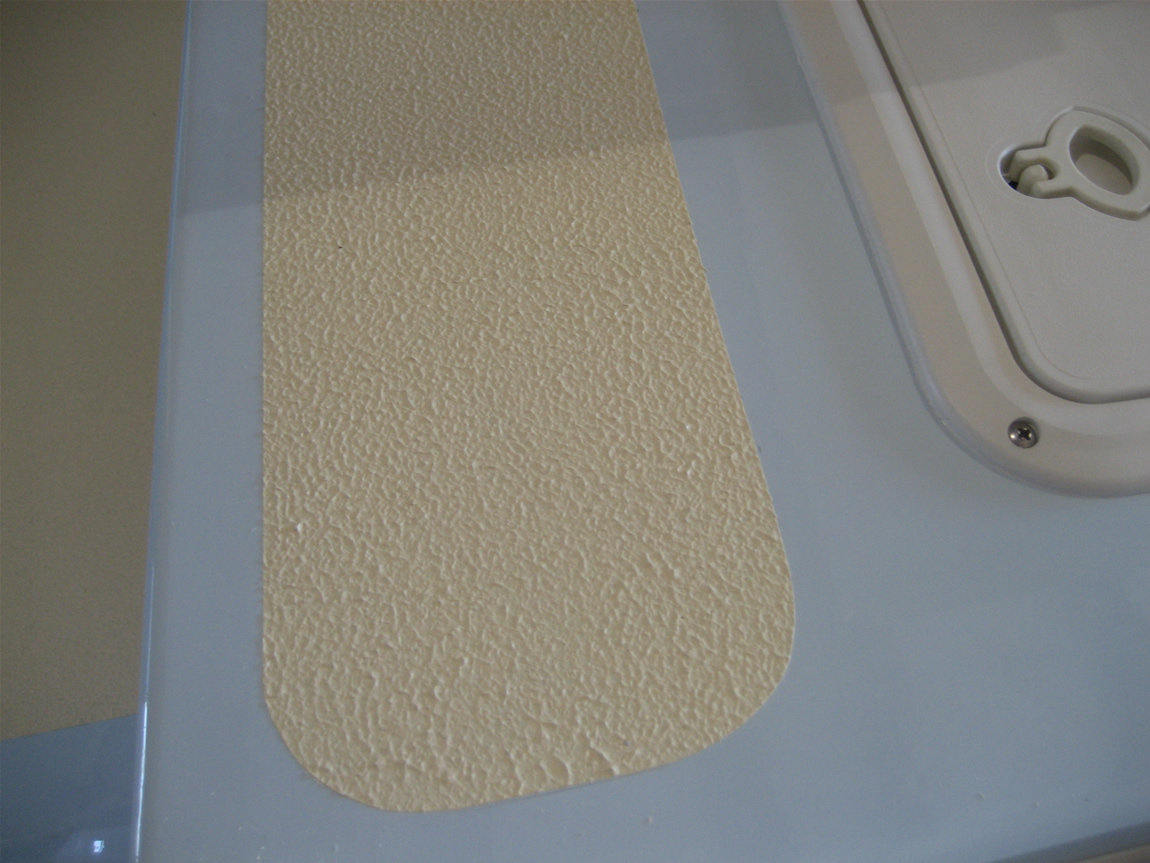
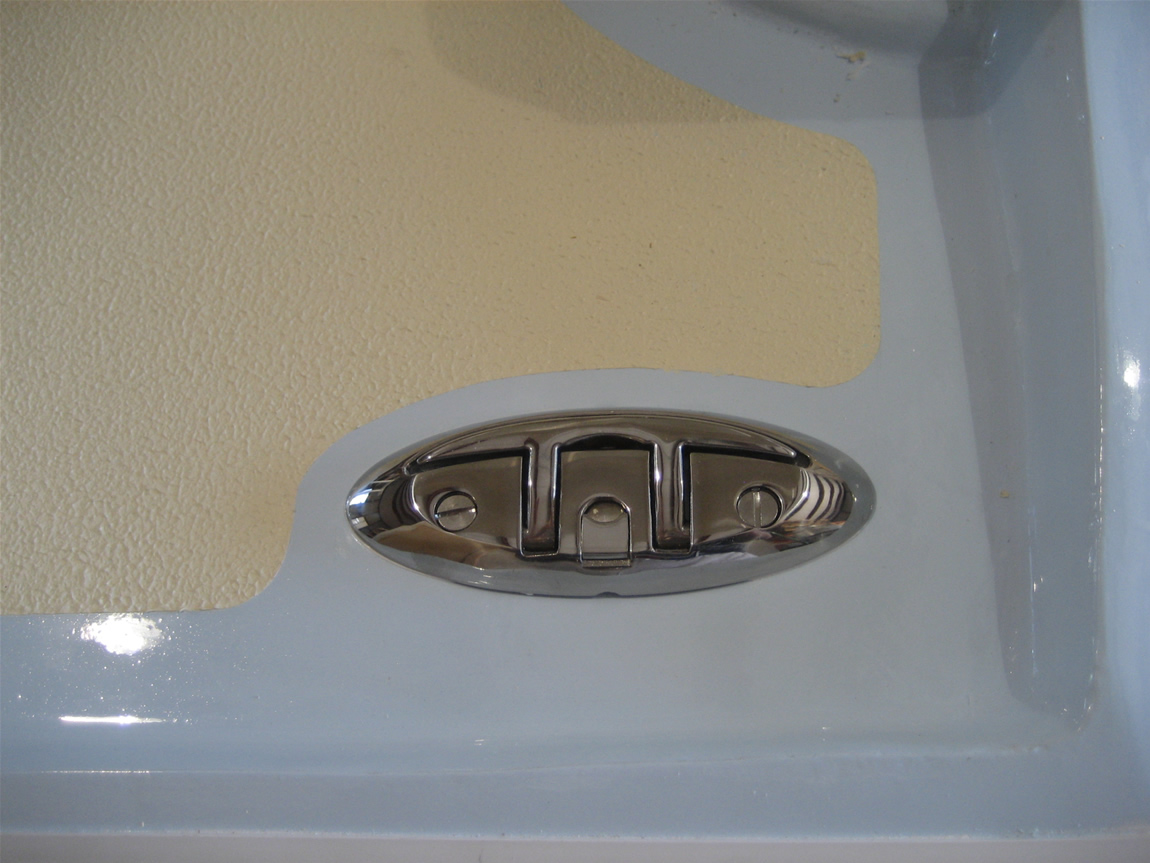
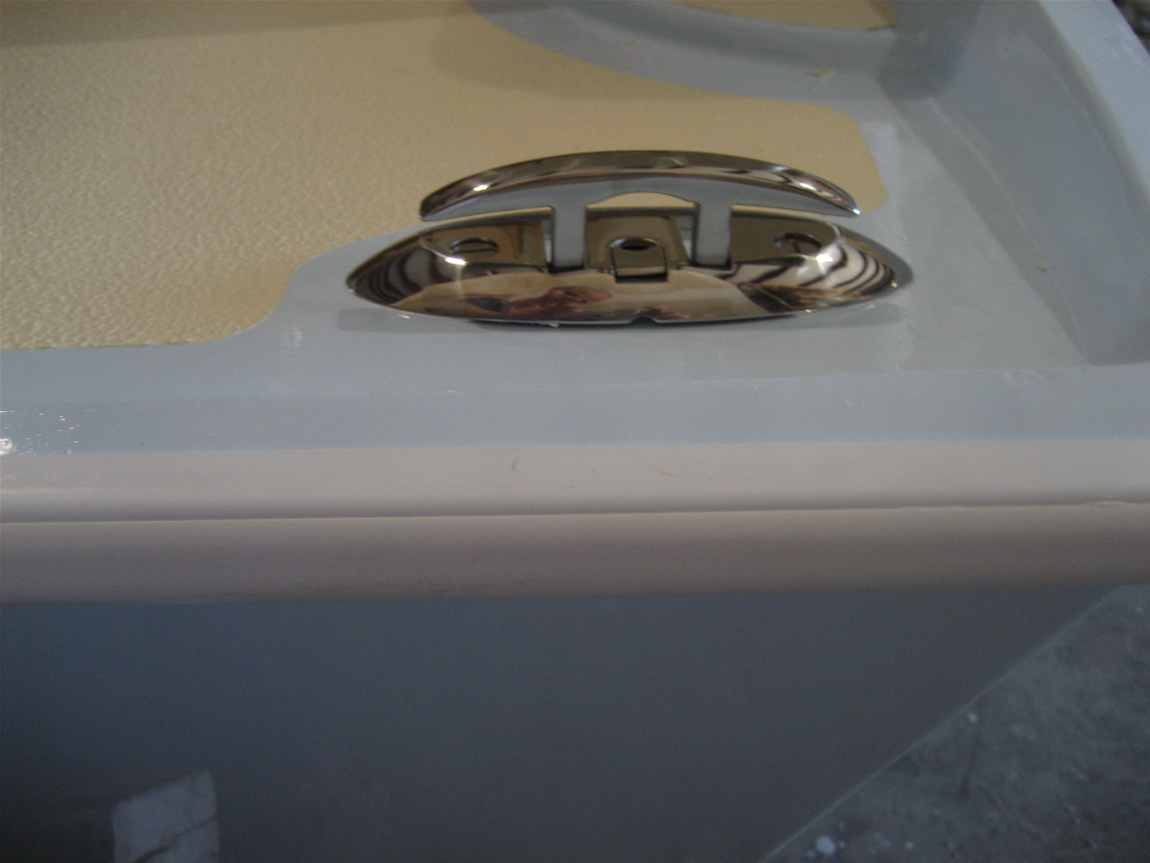
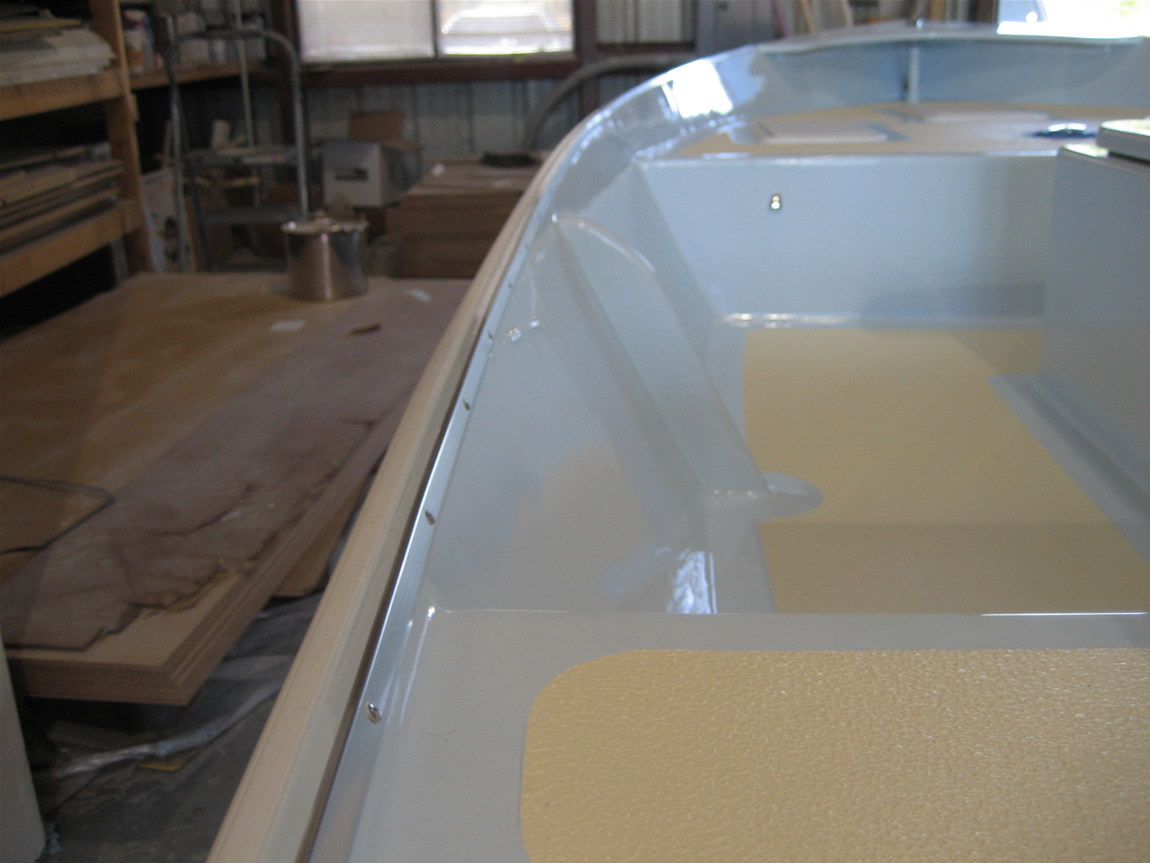
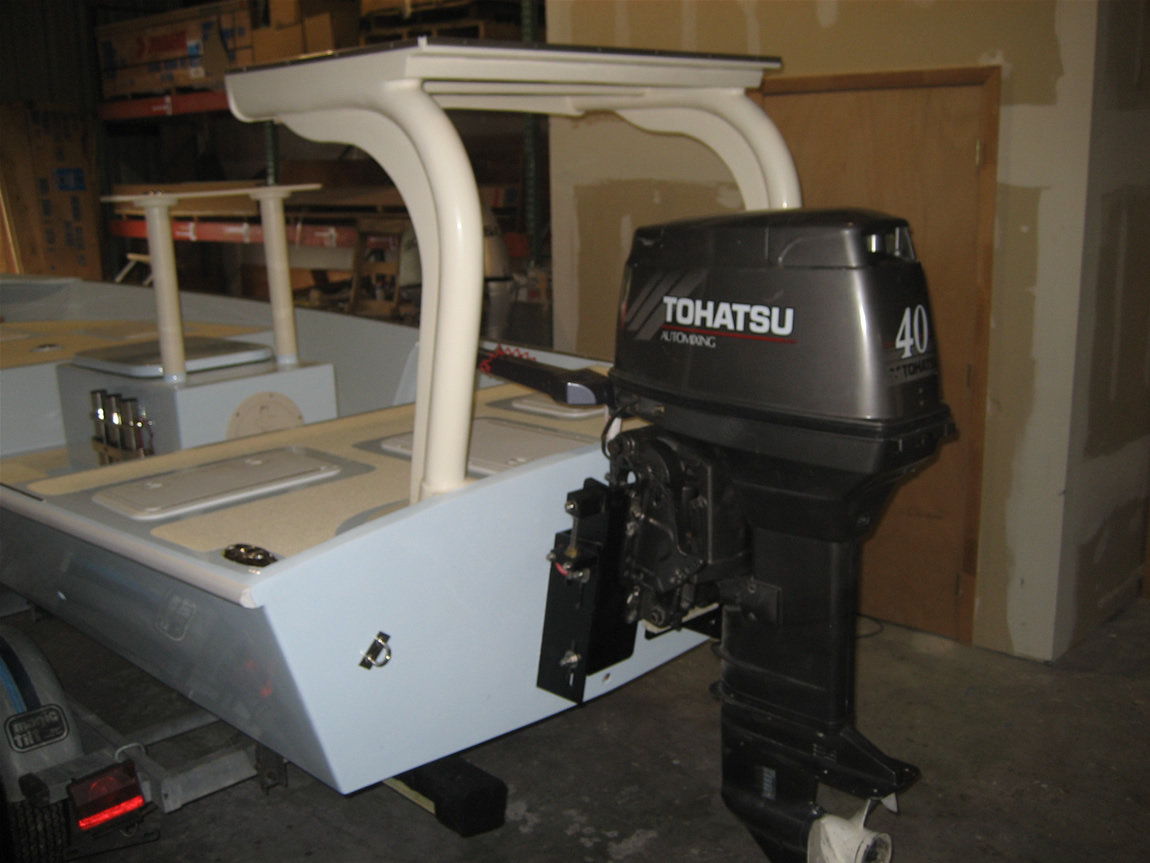
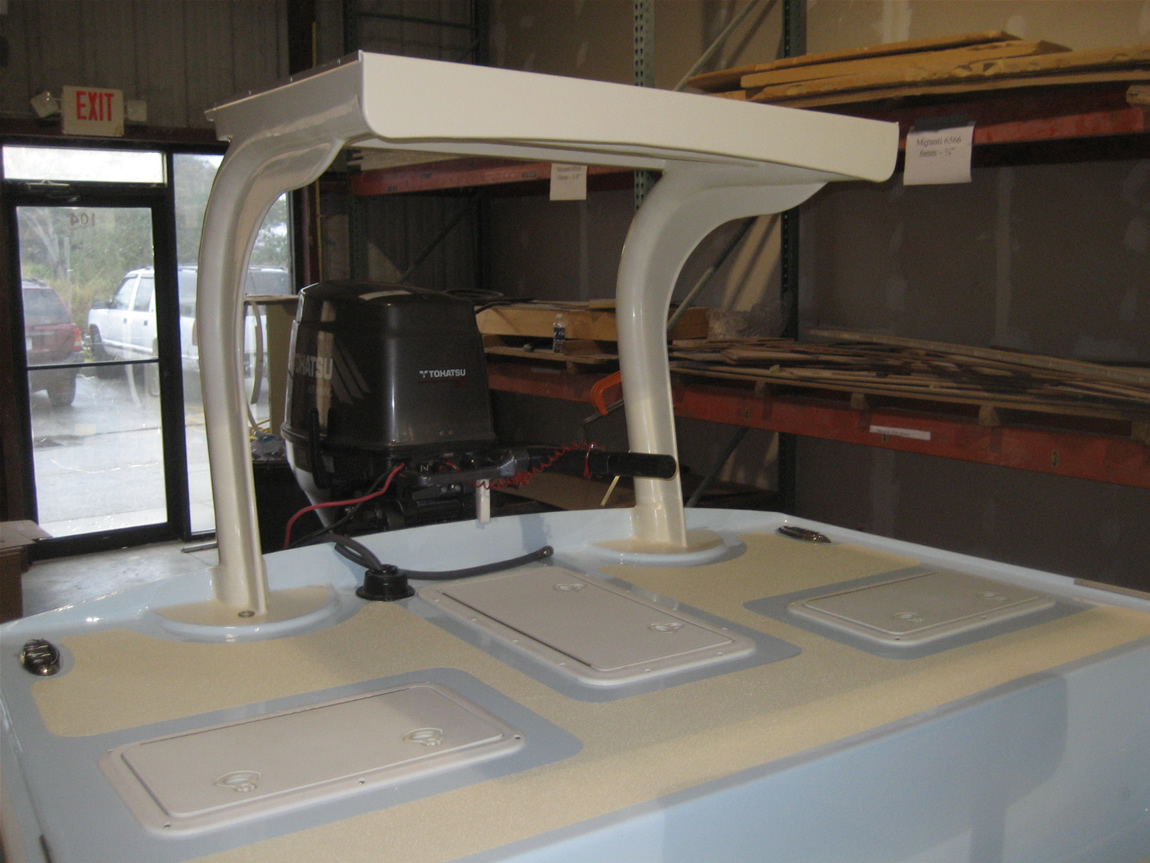
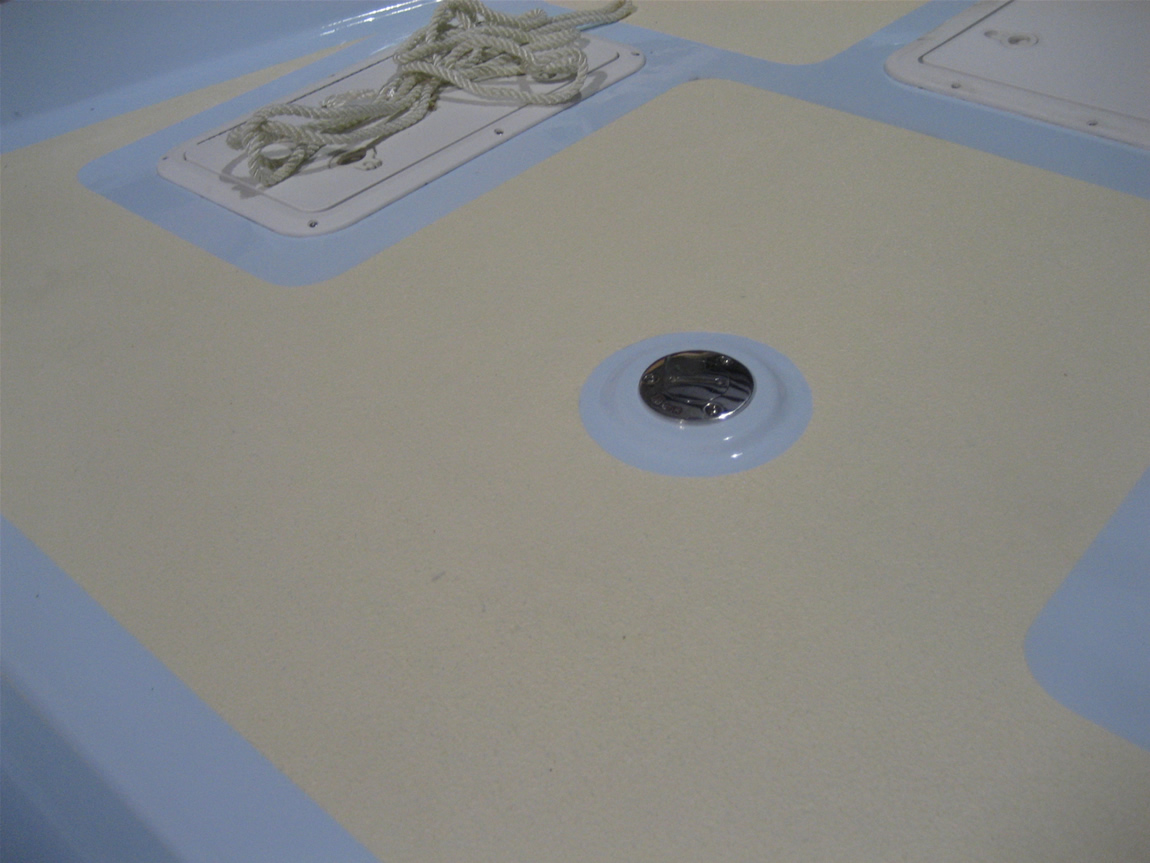
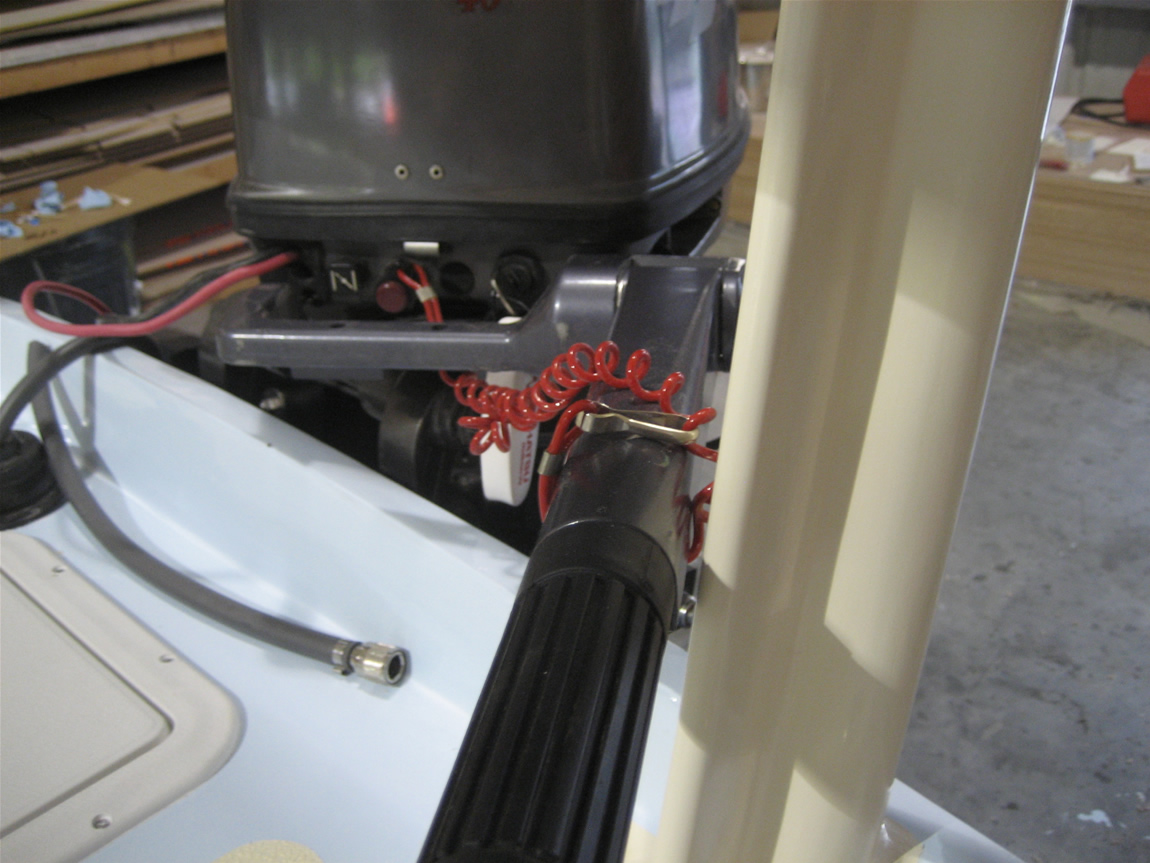
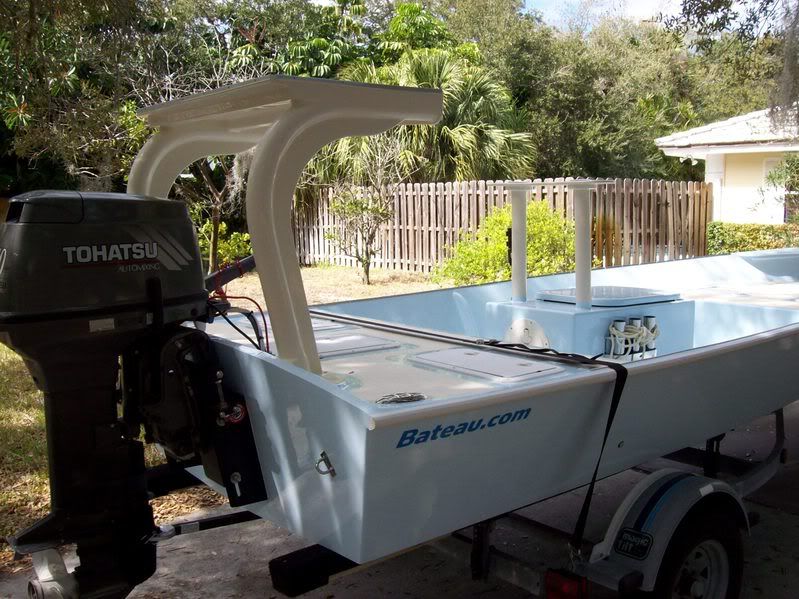
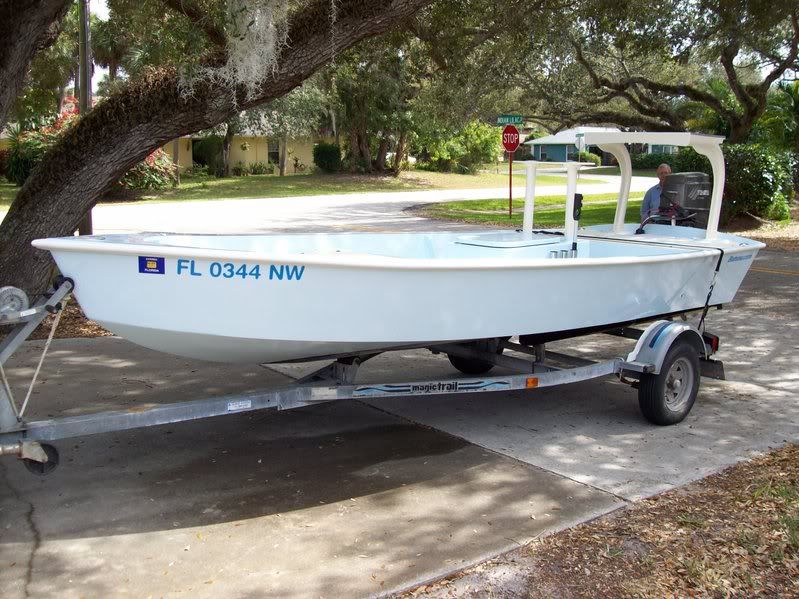
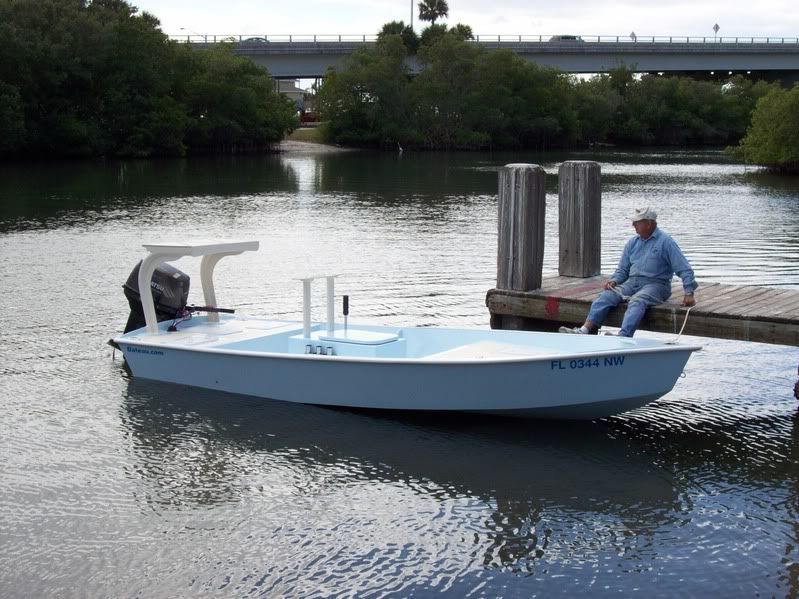
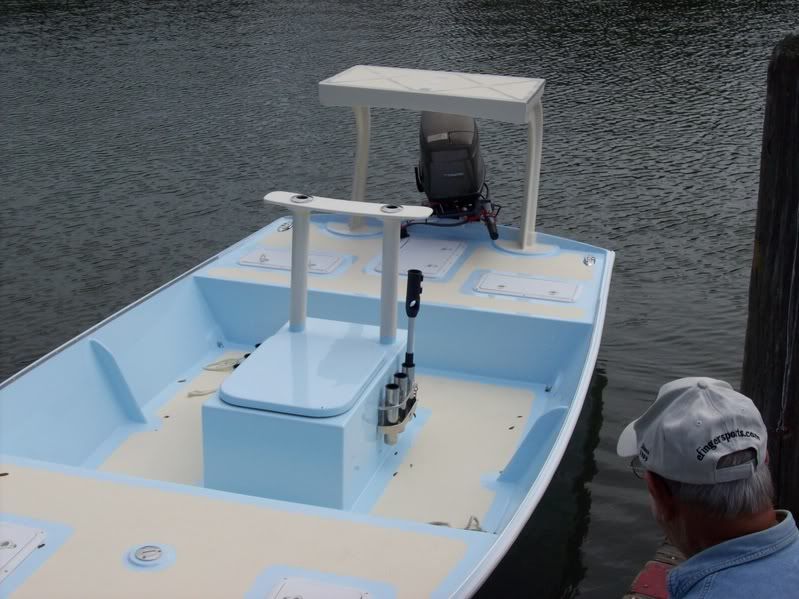
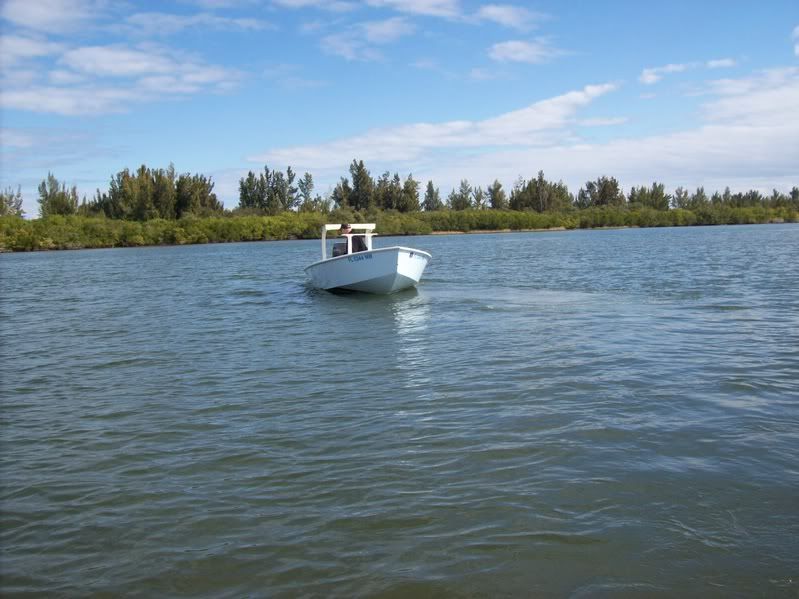
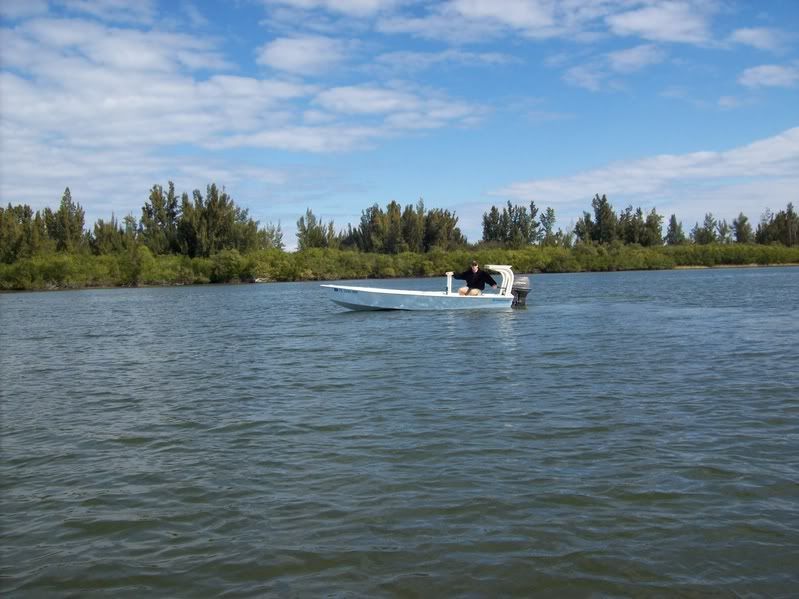
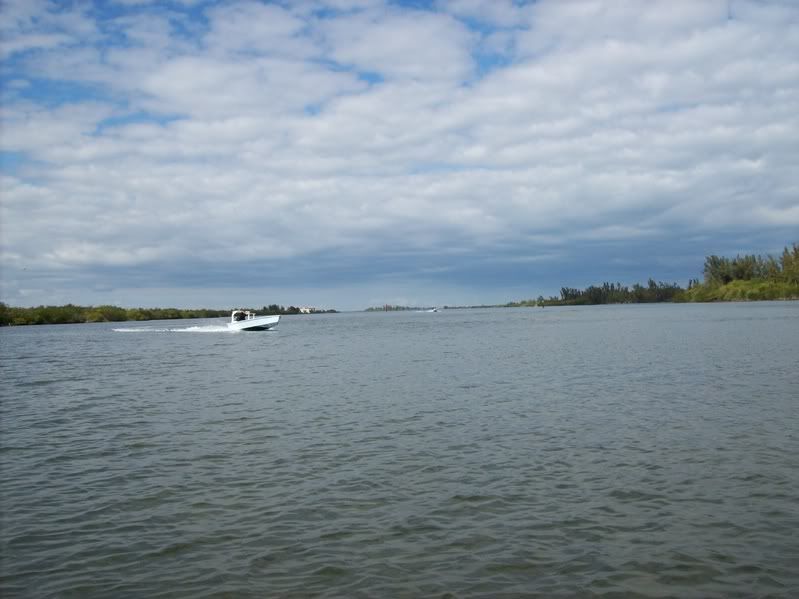
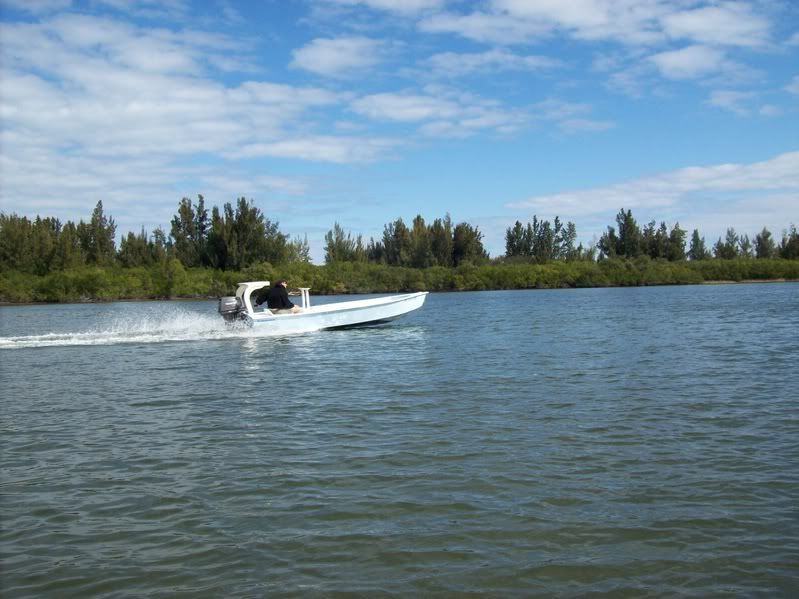
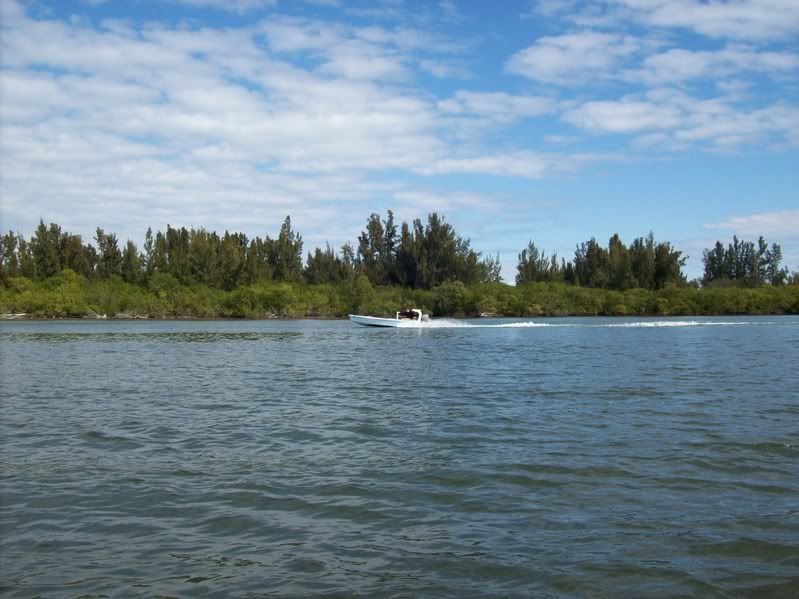
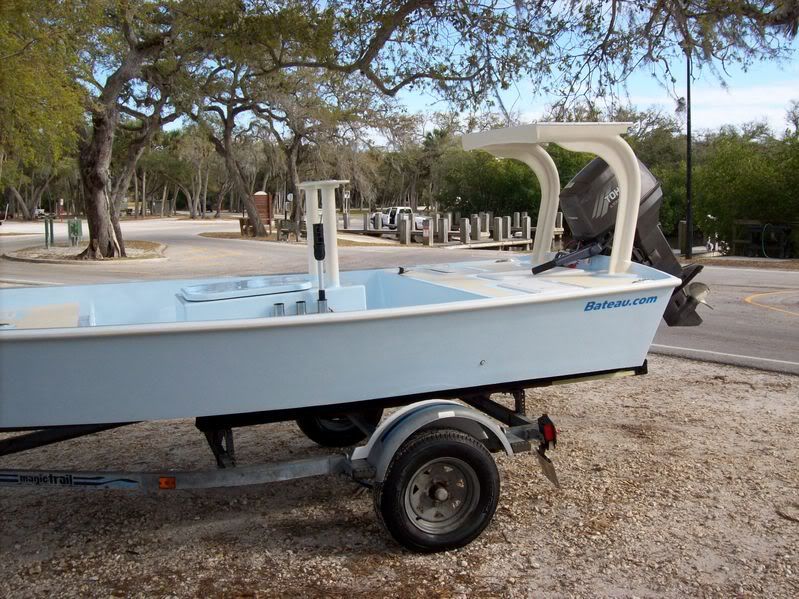

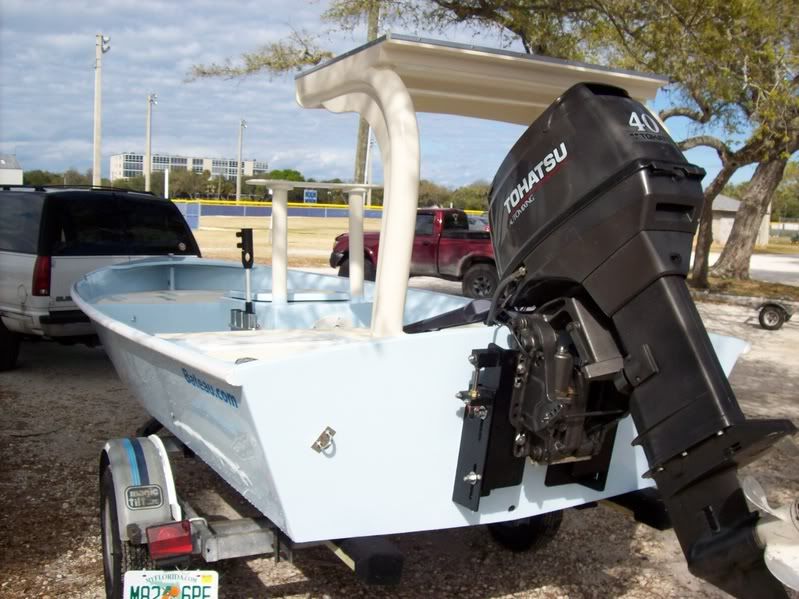
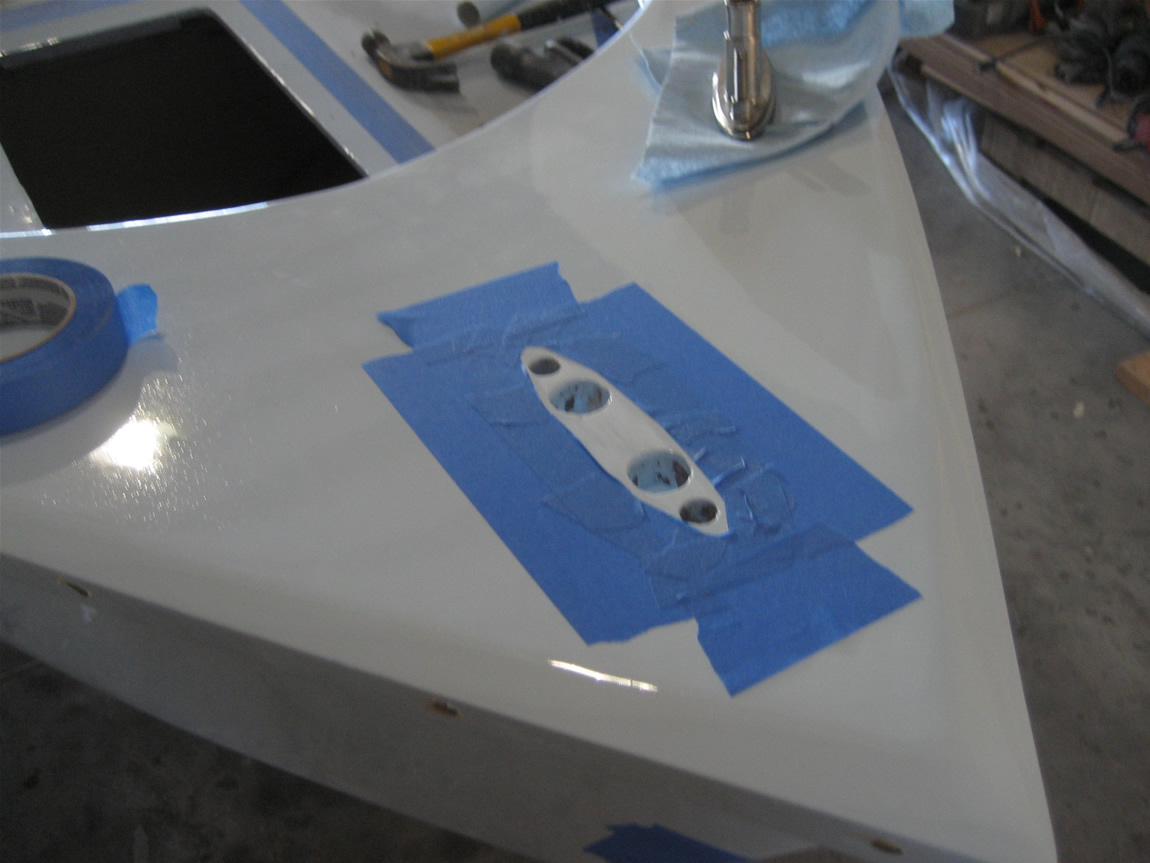