Page 1 of 1
"La Flaca" FS18
Posted: Wed Jun 09, 2010 1:39 pm
by doubleup
Here we go!
Re: New FS18 Build
Posted: Wed Jun 09, 2010 1:46 pm
by tech_support
how about sharing the pictures in this thread, so we can comment and share

Re: New FS18 Build
Posted: Sun Feb 13, 2011 11:35 am
by Zack Attack
Cool I have been running mine for 3 or 4 years now you will love it
Jeff
Re: New FS18 Build
Posted: Mon Feb 14, 2011 4:17 pm
by Uncle D
Noticed the last entry was about 8 months ago. Done anything since???
Re: New FS18 Build
Posted: Tue Feb 22, 2011 2:36 pm
by doubleup
Re: New FS18 Build
Posted: Wed Feb 23, 2011 10:15 am
by Uncle D
Nice work. I'd guess your going with a console instead of a tiller.
Re: New FS18 Build
Posted: Wed Feb 23, 2011 11:28 am
by doubleup
No console. I will be doin a tiller 25 two stroke.
Re: New FS18 Build
Posted: Thu Feb 24, 2011 11:49 am
by Uncle D
Sorry, thought with length of the rear deck...pic deceived me.

Re: New FS18 Build
Posted: Thu Feb 24, 2011 3:59 pm
by Zack Attack
Looks great
Re: New FS18 Build
Posted: Thu Feb 24, 2011 8:20 pm
by hooter
looks good.
I like the lowered sheer!
hOOt
Re: New FS18 Build
Posted: Thu Feb 24, 2011 9:20 pm
by brianincc
The lowered sheer looks great I wish I would have done that with mine.
Re: New FS18 Build
Posted: Mon Feb 28, 2011 9:20 pm
by doubleup
Messing around with some platform ideas with photoshop and paint. I want to get one custom made that sits pretty far forward but still able to control the tiller ok. Also don't want a tall one either.

I like this one
Re: New FS18 Build
Posted: Mon Feb 28, 2011 10:22 pm
by sitandfish
doubleup wrote:...I want to get one custom made that sits pretty far forward but still able to control the tiller ok. Also don't want a tall one either.
I like your thinking on both accounts. Your drawing looks really good. Shine came very close with his tiller on his low shear FS17. He said 3/16".

Edited to add:
Butt high always seems the best hight. You get enough height to steer while you are scouting tailing fish and well... there is that butt thing. It hits you right.
Too low and the tiller might hit if you stand and steer.

Re: New FS18 Build
Posted: Tue Sep 06, 2011 10:37 pm
by doubleup
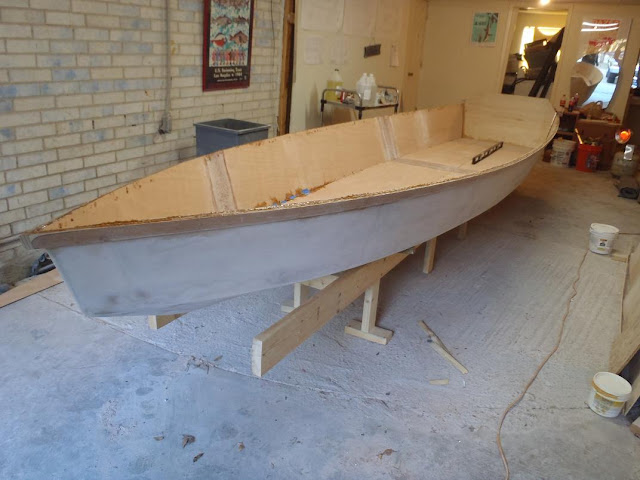
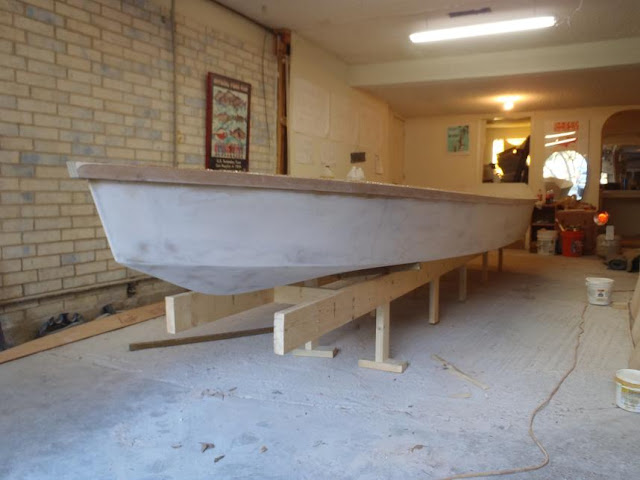
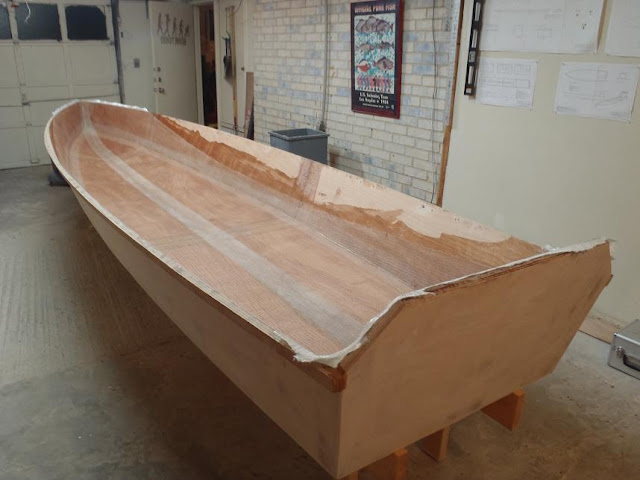
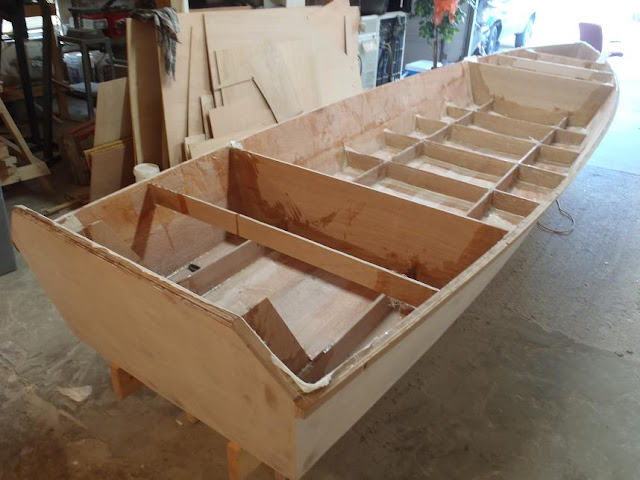
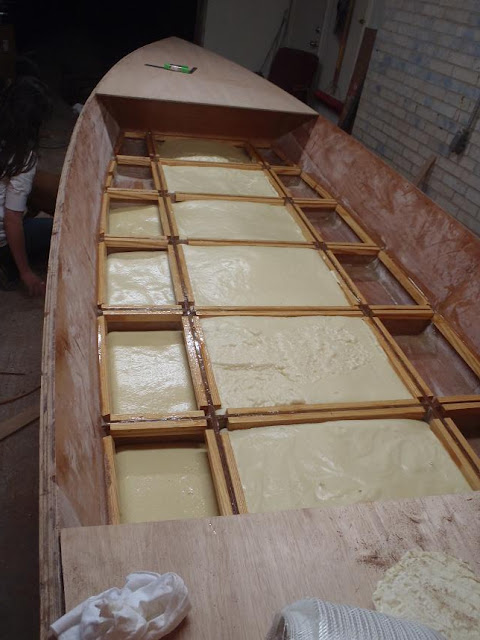
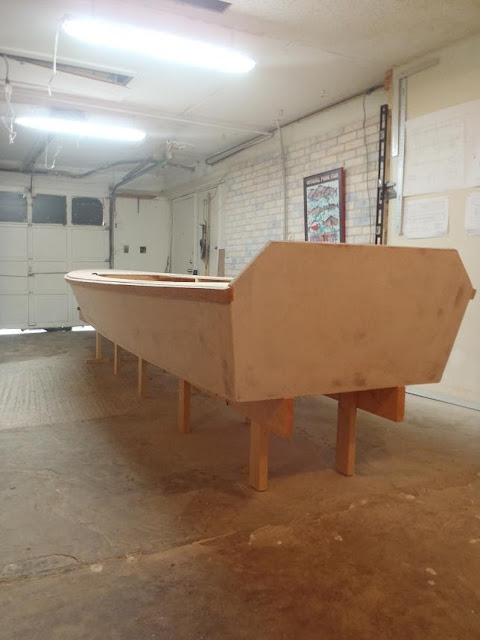
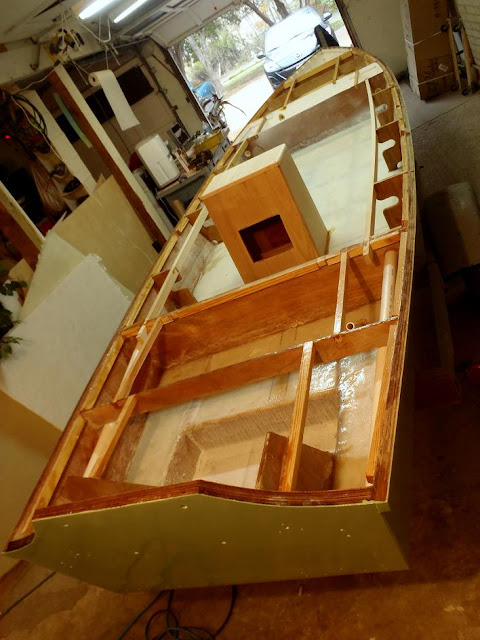
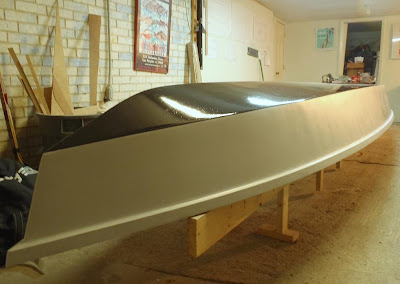
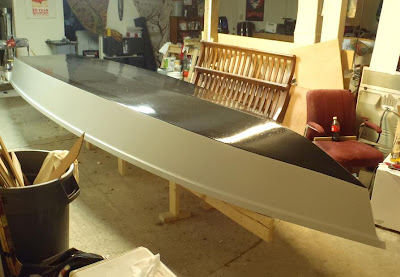
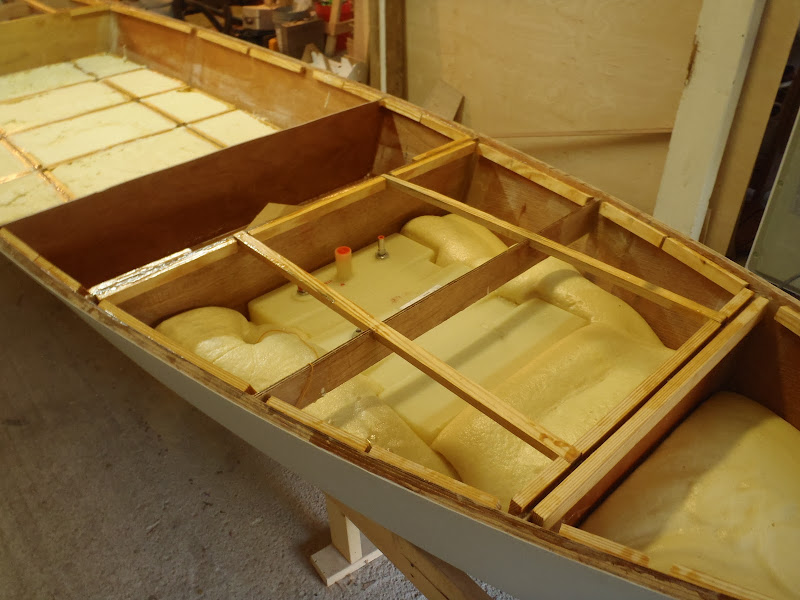
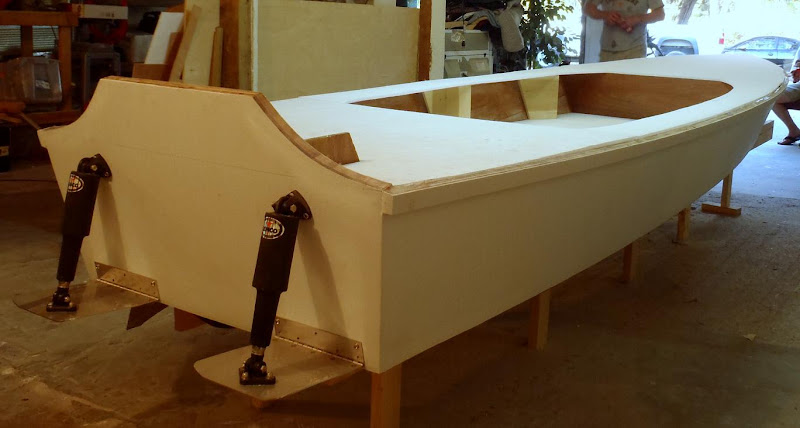
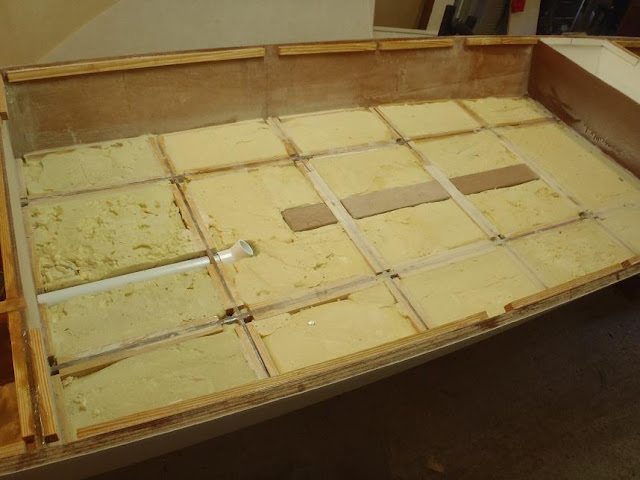
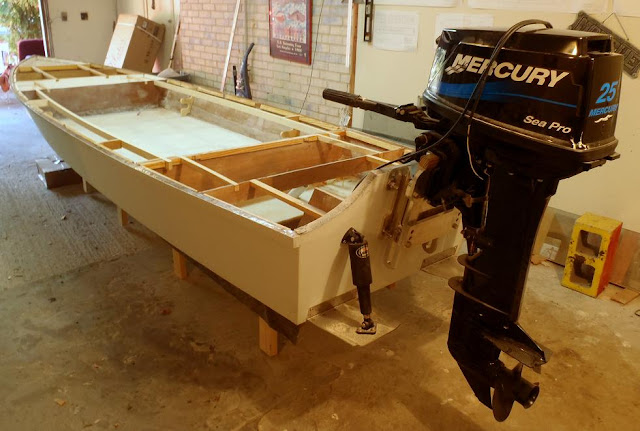
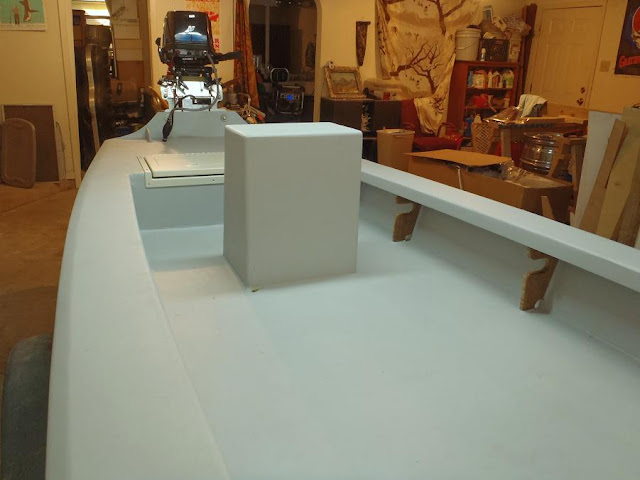
Got back to Texas for a weekend and pushed ahead with some of the build. I had the boat deck side up but decided to flip and try and finish the outside hull part of the boat. I applied 3 coats of graphite/epoxy mix to the bottom of the hull. It applied a little weird and there are some tiny little bumps in some spots but its characteristics of being scratch resistant makes up for it. Not a fan of black but I'm going to keep it black on the bottom because of the scratch issue. Also put 4 coats of high build epoxy primer on the sides and have a few colors in mind for the topcoat. Lenco trim tabs arrived as well as a moeller in deck 12 gallon gas tank that will mount in the front. I also finished puting the bouyancy foam in the sole and put extra in the back corners and bow to really cork her. I've realized that storage space is going to be minimal but I pack light and 99% fly rod only (Life jackets, tiny anchor, fly boxes, fly rods, maps, rain jacket, hand held radio, and wading boots) plus I'm mounting a small yeti cooler in the center.
I was going to glue the sole and decks down but am interested in some composite materials for decking like that plascore material. Is it really strong and light? Would it be a smart idea for all of my decking? Can I glue and glass it and is it easy to cut to shape? What thickness compared to okume plywood?


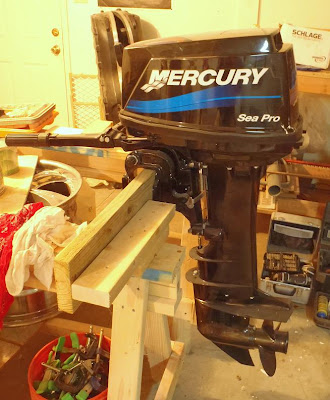
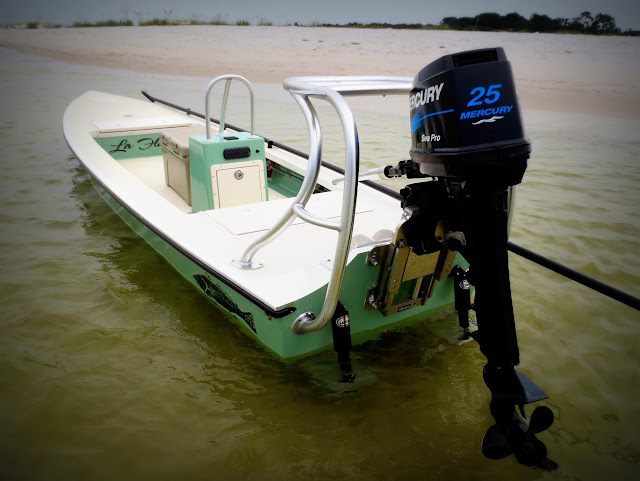
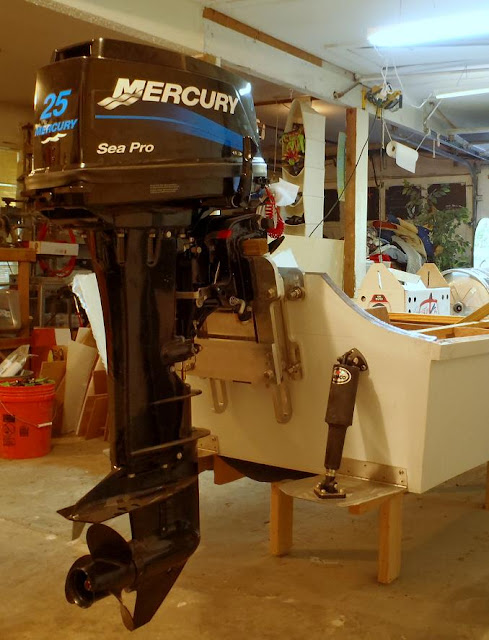
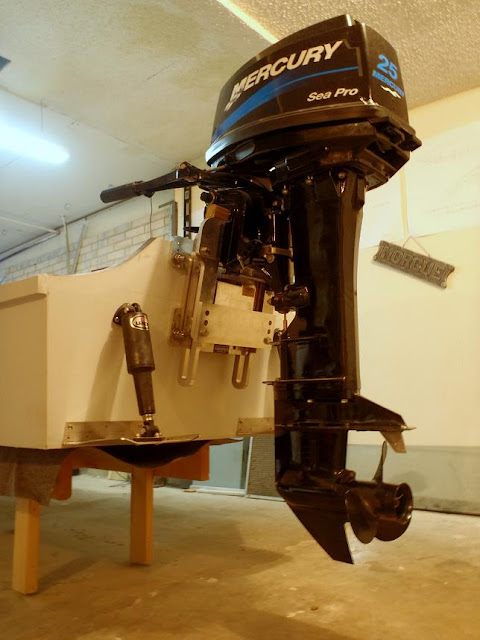
Another big jump is my new motor that I recently purchased! I bought a bran new 25hp Mercury Sea Pro 20" shaft tiller outboard. Super stoked about it. One bummer is that it recieved shipping damage and the cauling, engine cover, was cracked pretty bad on arrival. Also on inspection I noticed what looks like small water intakes on the bottom of the cone of the lower unit that isn't on other non sea pro mercs.
The transom is 21" right now and I will cut it into a better shape once I decide on what I want to do...So here is my next big question? I don't have trim and tilt but I have trim tabs. And I plan on buying a 4 blade cupped stainless prop. What would make this boat perform skinny and logical, a jack plate(manual or electrical) or a trim and tilt unit. Both have set back which is good but to much will sink my skinny width in the back more. I will primarily be fishing lots of skinny water in Texas.
Re: New FS18 Build
Posted: Tue Sep 27, 2011 10:29 pm
by doubleup
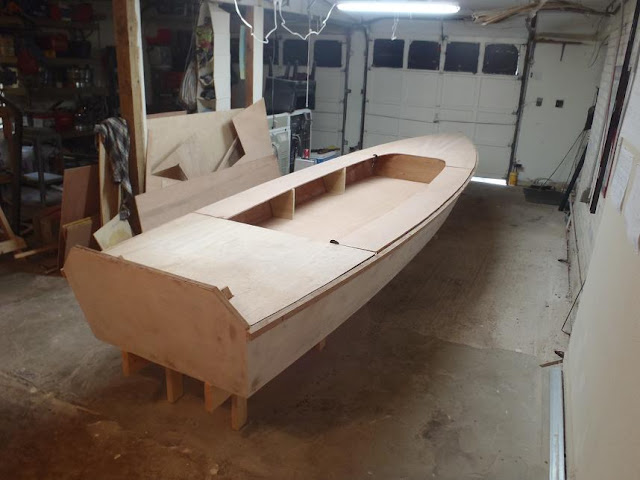
Getting closer, flipped hull, dry fitted trim tabs, cut transom to shape, installed fuel tank, cut out plascore, glassed one side of plascore, and made front deck bigger by adding another frame to make a decent size storage.
Here's the instalation of the fuel tank. I custom made some aluminum brackets that bolt to the stringers
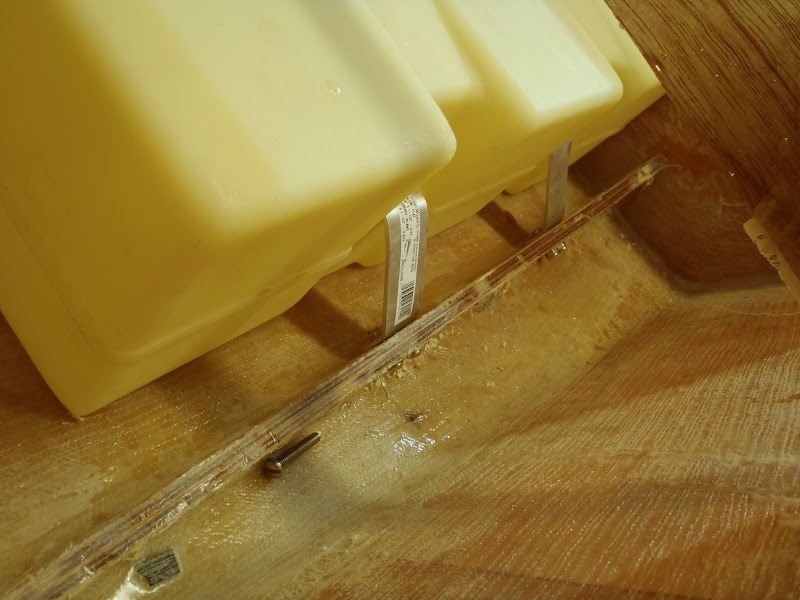
Poured bouyancy foam around the tank, it feels super solid, and will be a pain to get out if I ever have to.
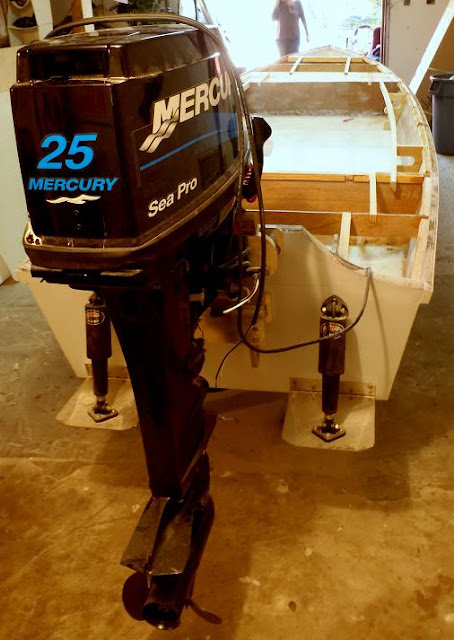
Dry fitted the 9X9 standard Lenco trim tabs. I found them new on ebay and was afraid that I might need the edge mount version instead but they fit good.
A cut the transom to a nice curve. You can see the plascor deck cut out and dry fitted. The sides are just primered.
I'm going to put bouyancy foam under the white plascore below the rear deck and have a little bilge area right behind it. I've decided that I will groove out a little area in the rear of the sole for the water to drain through a tube in the foam under the plascore and drain into the bilge. No self bailing deck, will have bilge pump.
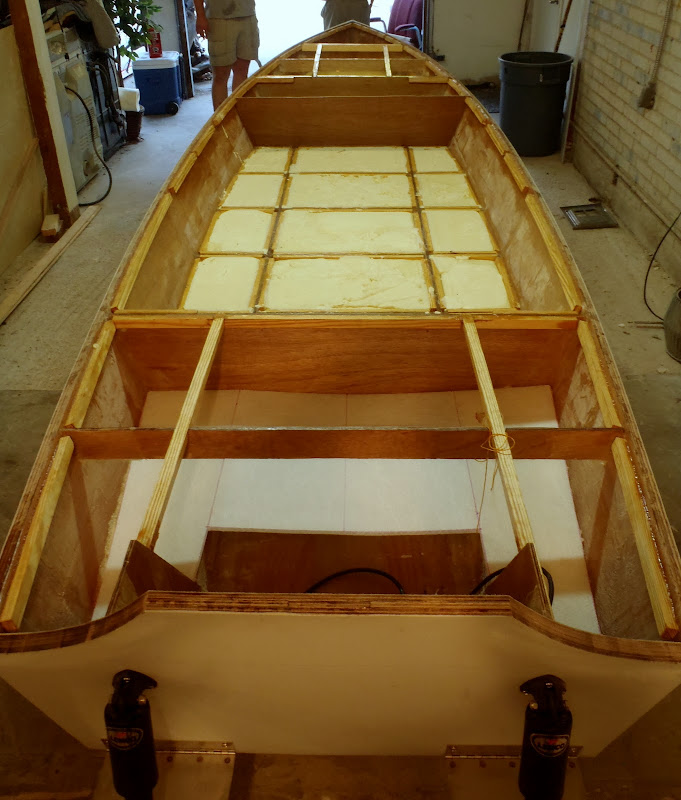
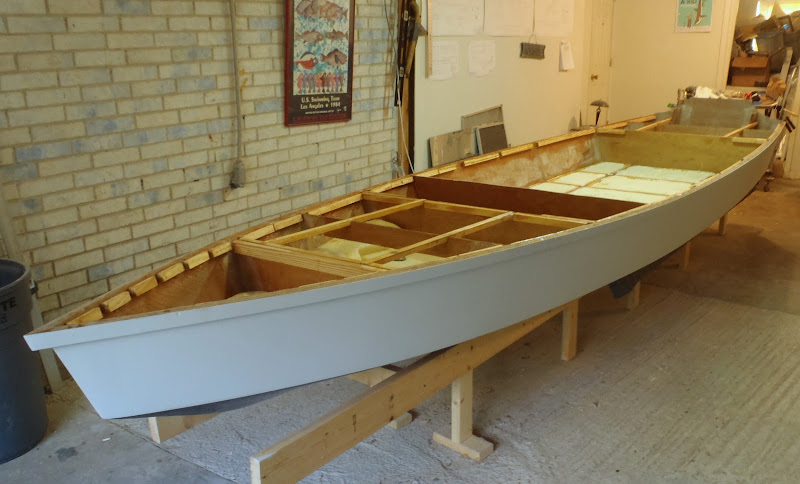
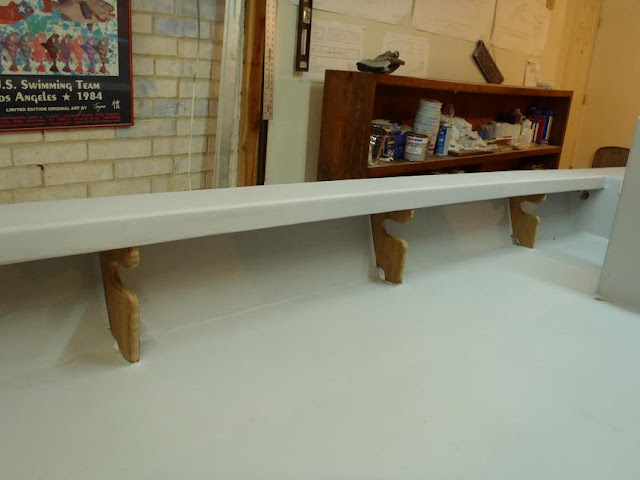
Dry fitted plascore decks. Made gunnels skinnier, still not sure how I want them.

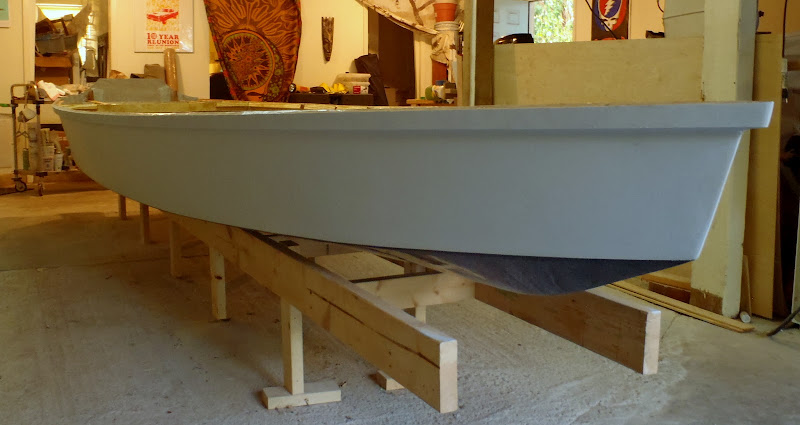
High build primer and graphite bottom. Really digging the lowered sheer.
Ordered 4 blade cupped stainless powerteck prop to compliment the jack plate.
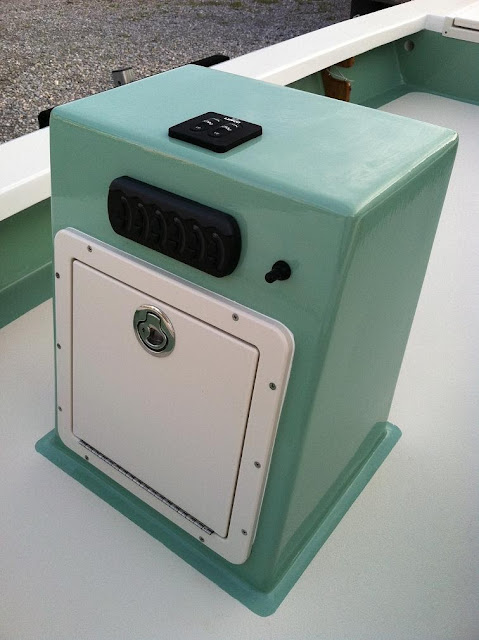
Also planning on putting a small tiller console like Ankona's in the center to mount trim tab, jack plate, nav light switches and also have a grab rail on it. I'd also like to put my battery in that little console. I didn't make a chase tube for the console but I can shave the foam and still put one in. And a small yeti mounted in front of that.
Re: New FS18 Build
Posted: Wed Sep 28, 2011 9:49 am
by Cracker Larry
Your build is looking great, except for this, which also looks good, but isn't
Poured bouyancy foam around the tank, it feels super solid, and will be a pain to get out if I ever have to.
A plastic fuel tank should never be completely foamed in place. They expand significantly when filled with fuel and you have to leave room for expansion in length and width, or something is going to break. Doing it like that is a violation of USCG requirements and will void the tank warranty.
This is from Moeller..
IMPORTANT: Do not use foam to secure tank in place. Resin fuel tanks require a multidimensional expansion area of 2-3% at all times; foaming a tank in place removes the chance for hydrocarbon expansion and will void tank warranty.
Re: New FS18 Build
Posted: Wed Sep 28, 2011 10:32 am
by Uncle D
I read in one of the earlier post that you didn't like the black color of the hull. I did the same on mine. I think if you want to go with color, just add high build primmer and paint right over the graphite.
Re: New FS18 Build
Posted: Wed Sep 28, 2011 12:54 pm
by doubleup
Cracker Larry wrote:A plastic fuel tank should never be completely foamed in place
Knowing that the warranty would still be void, would it be o.k. to shave the foam down half way or more of the tank and still leave some foam around the bottom to help secure it?
Re: New FS18 Build
Posted: Wed Sep 28, 2011 1:02 pm
by johna
Boat is looking good. I'm a couple months behind you with my FS18. Thanks for the posts. Very helpful to see what is coming up next.
Re: New FS18 Build
Posted: Wed Sep 28, 2011 3:52 pm
by Cracker Larry
would it be o.k. to shave the foam down half way or more of the tank and still leave some foam around the bottom to help secure it?
Yes, I would remove it more than halfway down, close to the bottom. Just trim back about 1 1/2" all around. Some foam left around the corners and end seams will be fine to secure it, most of the expansion will occur in the center of the tank sides in a bulging manner.
It's somewhat of a conundrum in that the USCG requires that the tank be secured so that it cannot move more than 1/4" in any direction including up, but it must also have 5% expansion space all around it

Your aluminum straps look very secure and meet that requirement, but a little foam around the edges won't hurt a thing

I'll mention also in case you don't know, that compartment will need to be vented with 2 vents, one as high as possible, one as low as possible. See this for reference...
http://www.uscgboating.org/regulations/ ... partg.aspx
FEDERAL LAW
183.620 - Natural ventilation system
(a) Except for compartments open to the atmosphere, a natural ventilation system that meets the requirements of Sec. 183.630 must be provided for each compartment in a boat that:
(5) Contains a non-metallic fuel tank:
(i) With an aggregate permeability rate exceeding 1.2 grams of fuel loss in 24 hours per cubic foot of net compartment volume, or
(ii) If the net compartment volume is less than one cubic foot, having a permeability rate exceeding 1.2 grams of fuel loss in 24 hours.
NOTE: Reference Fuel "C" at 40 degrees Celsius plus or minus 2 degrees Celsius from ASTM standard D 471 (incorporated by reference, See Sec.183.5) is to be used to determine the permeability rate.
OPEN TO THE ATMOSPHERE
Compartments that are open to the atmosphere do not require additional ventilation.
All plastics and fiberglass will permit gasoline and its vapors to pass through them. This capability of the material is termed permeability. The permeability rate is the quantity of gasoline that passes through the material in a specific length of time or per unit of net compartment volume. See 183.605 of this guideline for a discussion of how to determine net compartment volume.
The permeability rate of a material is affected by the thickness and density of the material. The temperature at which the test is conducted may also have an effect on the permeability rate. The conditions and standard procedures of the test must be controlled when conducting the test.
Re: New FS18 Build
Posted: Wed Nov 16, 2011 10:30 pm
by doubleup
Ran a chase tube for the tiller console I'm installing that will house a battery, etc. Also laid down some 3/8in wood down the center for the ice chest mounts
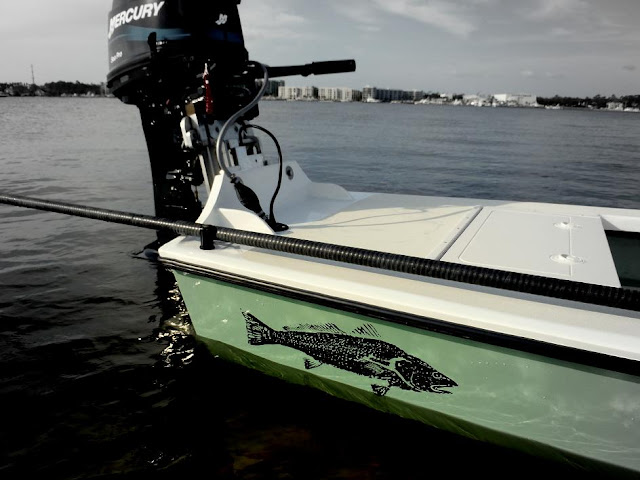
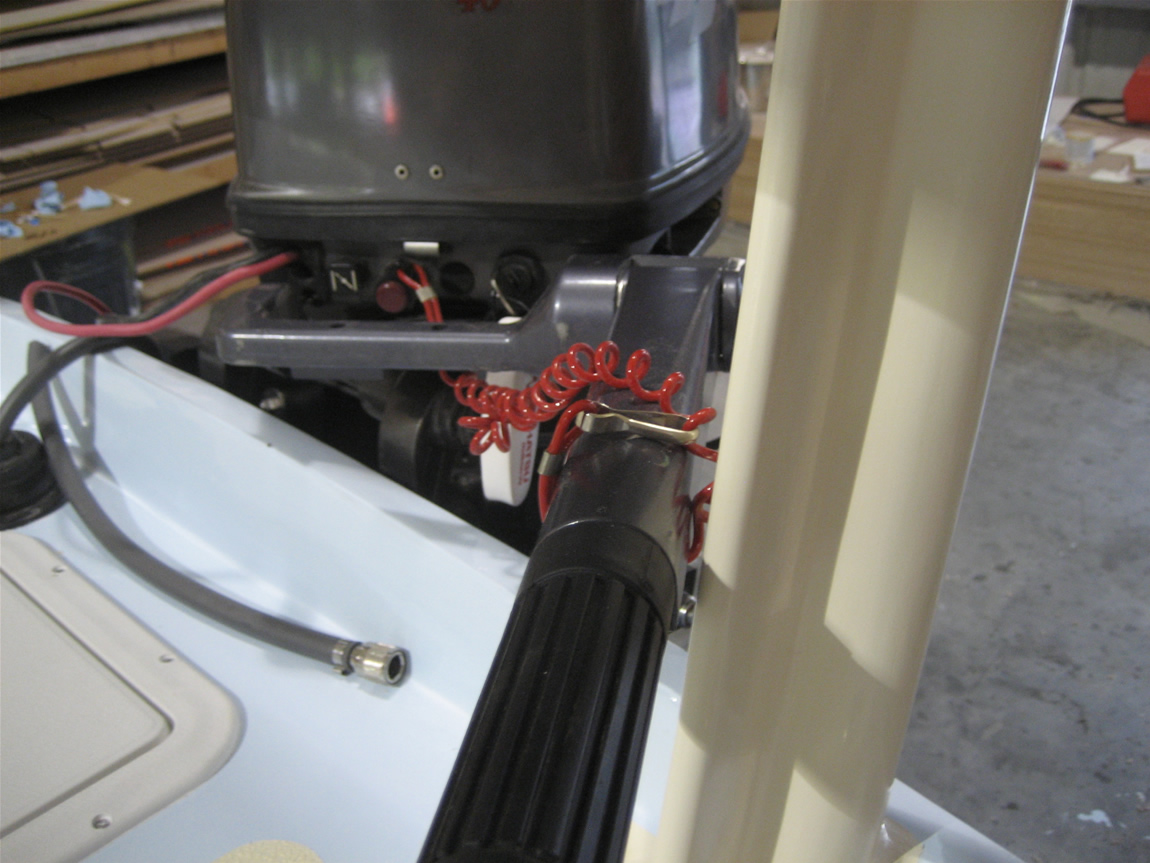
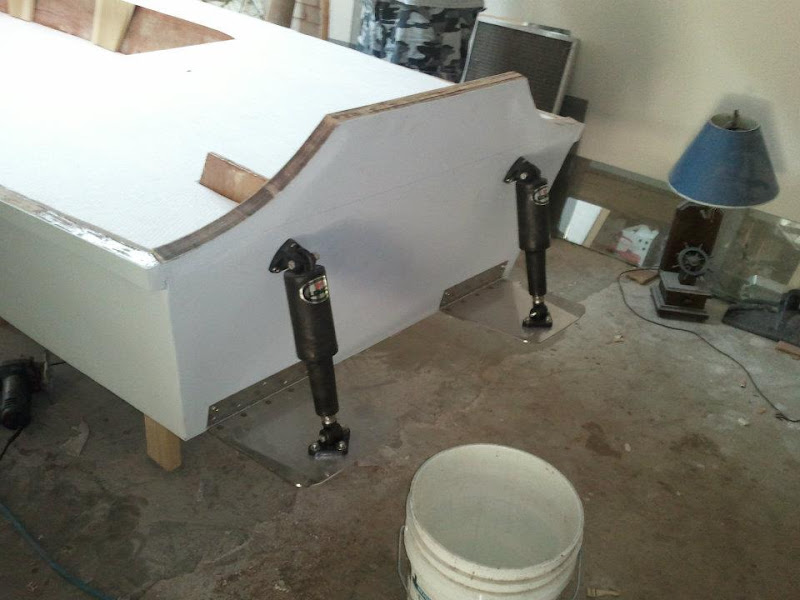
Dry fitted the jack plate and motor. It looks really tall and kind of wish that I would of found a 15inch motor rather than this 20inch, which actually looks more than 20. The transom seems really strong with it all together. I heard that for every inch of set back on the jack plate the cav plate of the motor can go above the transom a half an inch. So with 4inches of set back on the plate I could mount the motor with the cav plate 2inches above the bottom. I ended up mounting it with the cav plate an inch above the bottom but I'll have the 5inches of lift with the jack plate to find a sweet spot and be able to run a little shallower. The atlas micro jacker that a bought has a clamp on motor adapt plate that I bought and It fits wierd and wasn't able to clamp the motor. Had to add a piece of wood too. I'll take some better pictures next time I go back.
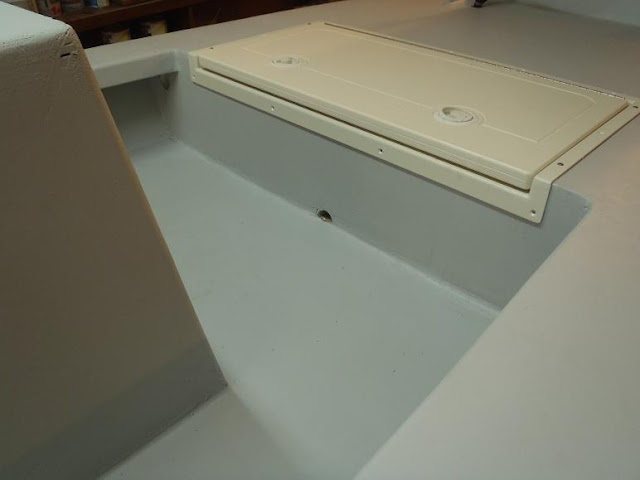
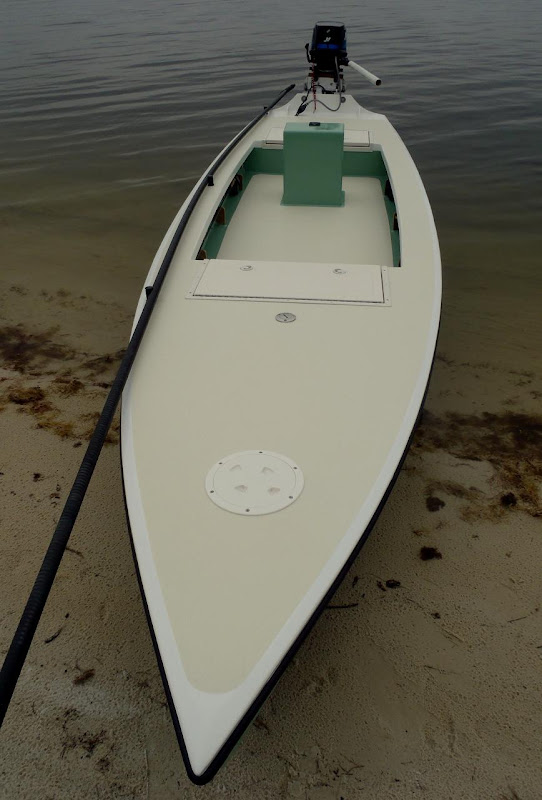
Glued down and glassed the plascore sole, no soft spots at all. The plascore gets really strong once both sides are glassed. Cut out some rod holders and sort of framed up the walkaround gunnels. Not pictured but I'm going to have three rod holder frame supports on each side to help strengthen the gunnels, now 6in wide. Also not picturet, I bought two aftermarket super flush aluminum framed hatches from Greatlakesskipper.com that were made for Mako Boats. I had to rearrange some of the deck supports to help fit and support those hatches that are 30in x 15in
Dry fitted the Livorsi navigation lights

Didn't get as much done as I planned but was only back in Texas for a few days. I should of took a lot more pictures but forgot along the way. Also not pictured that I did was finish the aft bilge area.
Re: New FS18 Build
Posted: Thu Nov 17, 2011 7:50 am
by Cracker Larry
She is really looking good. I like that flush deck, might have to re-think mine and build it like that
Re: New FS18 Build
Posted: Sun Dec 04, 2011 11:36 am
by doubleup
I'm moving along on my build and have been looking at rub rails on the internet. I don't know a lot about them and was wondering the pro/cons of semi rigid, flexible, stainless, etc. The only sharp turn i have to do is the bow. Also heard that the flexible one's sometimes turn out a little wavy after installation. I'm leaning toward a rub rail with insert. Seen some uniflex rub rail kits with rope insert that looked pretty cool. The Uniflex is a semi-rigid/flexible combo to help keep a staighter look.
Any info helps.
Re: New FS18 Build
Posted: Sun Dec 04, 2011 11:47 am
by peter-curacao
I'm nut sure but a rubrail over a rubrail?
If it was me I only put some ss trim on it
Re: New FS18 Build
Posted: Mon Dec 05, 2011 12:49 pm
by Bayport_Bob
I used Taco #809 Flexible Rubrail kit. Includes SS crews & insert. I heated the roll up in hot water and used a heat gun for wrapping around the bow on mine.

Re: New FS18 Build
Posted: Mon Dec 05, 2011 2:15 pm
by Cracker Larry
I plan on using that same rail on mine. I used a larger version on my OD with the same technique Bob mentioned. If it's cool out you have to warm it up good to stretch it.
I'm nut sure but a rubrail over a rubrail?
If it was me I only put some ss trim on it
The wood rub rail is structural and necessary to the boat, but you don't want to beat it up anytime you bump against something. The heavy rubber rail absorbs impact and protects the boat, as well as any other boat you happen to pull alongside of. Think about this Peter. Would you want him to pull his boat alongside of your new, shiny CX25, with a stainless rubrail that would meet your hull about a foot above it's waterline and scratch an 18' gouge in it?

Re: New FS18 Build
Posted: Mon Dec 05, 2011 3:03 pm
by peter-curacao
Cracker Larry wrote:The wood rub rail is structural and necessary to the boat, but you don't want to beat it up anytime you bump against something. The heavy rubber rail absorbs impact and protects the boat, as well as any other boat you happen to pull alongside of. Think about this Peter. Would you want him to pull his boat alongside of your new, shiny CX25, with a stainless rubrail that would meet your hull about a foot above it's waterline and scratch an 18' gouge in it?
There's you saying something, But doesn't it get very bulky that way? I mean the wooden rubrail is already very thick, at that rubber rail over it wouldn't that look strange? I mean as far as I know most production boats what use those rubber rubrails don't have much but a deck hull seam under there not an extra rubrail.
I always thought of doing it
this way, thought it looks classy but as I understand now not recommended if you wanna make friends on the water?

Re: New FS18 Build
Posted: Mon Dec 05, 2011 3:43 pm
by Cracker Larry
There's you saying something, But doesn't it get very bulky that way? I mean the wooden rubrail is already very thick, at that rubber rail over it wouldn't that look strange?
The wood part of the rail is only 3/4" thick, and the rubber rail less than that. To my eye, no, I like them bulky. Your styling preference is more European sleek. Just a matter of taste I reckon. But I usually go with function over style. This is at least better than a half dozen old tires, that's how we used to do it
The stainless rails look good on that Carolina hull, and it's fine if you like that, and you rig a few fenders before you pull up next to me. It won't take long for the metal to get dents all over it though.
Re: New FS18 Build
Posted: Sat Dec 24, 2011 9:42 pm
by doubleup
Re: New FS18 Build
Posted: Tue Jan 03, 2012 1:57 am
by doubleup
Re: "La Flaca" FS18 Spashed!!
Posted: Tue Jan 03, 2012 7:18 am
by cottontop
That is one cool looking boat. She sure is pretty the way she is. Congratulations. John
Re: "La Flaca" FS18 Spashed!!
Posted: Tue Jan 03, 2012 7:25 am
by Cracker Larry
Very nice

Re: "La Flaca" FS18 Spashed!!
Posted: Tue Jan 03, 2012 9:49 am
by tech_support
very nice
I like that box and cooler set up.
Re: "La Flaca" FS18 Spashed!!
Posted: Tue Jan 03, 2012 9:53 am
by Pro Wader
Excellent!
I hope I get a chance to meet you on the water. I just finished cutting out all of my wood for my FS18. If you are ever around the Galveston/Freeport/Matagorda area, give me a buzz. I would sure like to see her on the water.
Congrats.
Re: "La Flaca" FS18 Spashed!!
Posted: Tue Jan 03, 2012 3:38 pm
by sitandfish
She is a bad looking boat. Especially with her bottom wet.

Re: "La Flaca" FS18 Spashed!!
Posted: Tue Jan 03, 2012 8:16 pm
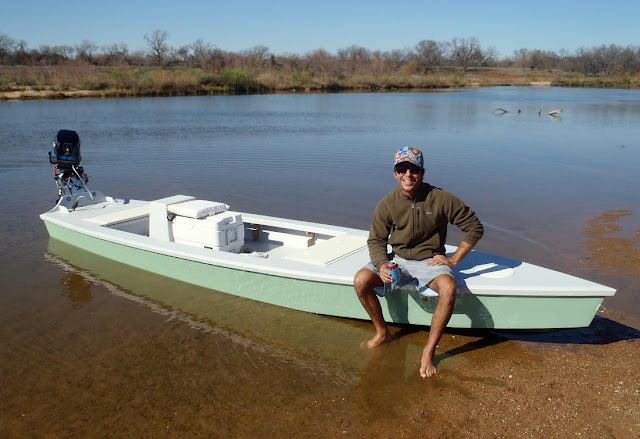
by doubleup
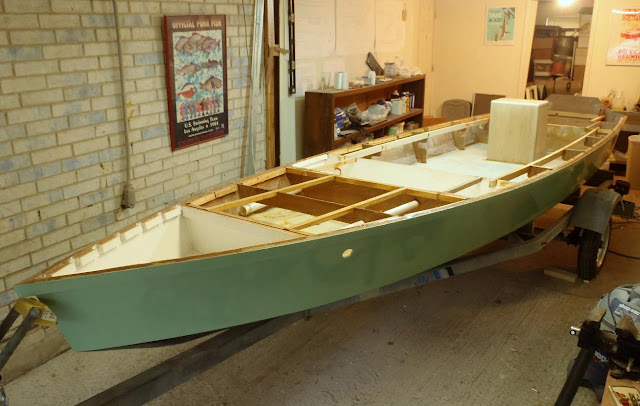
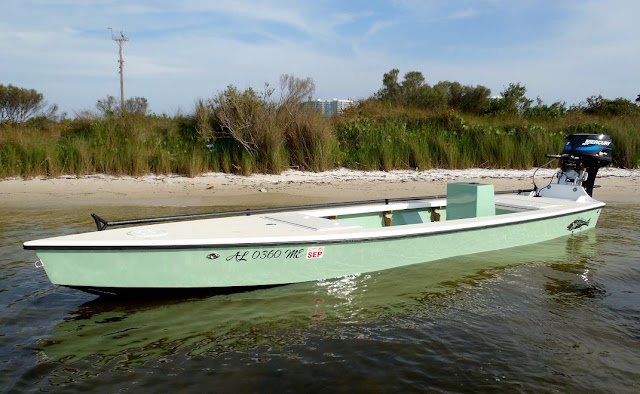
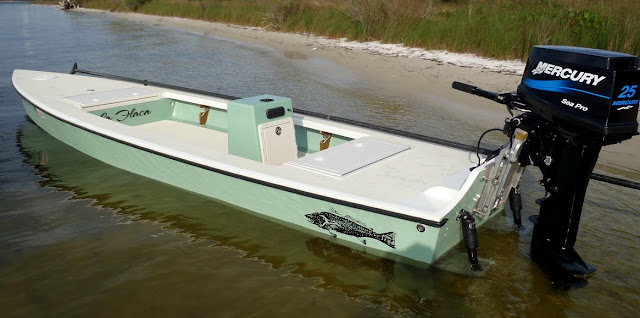
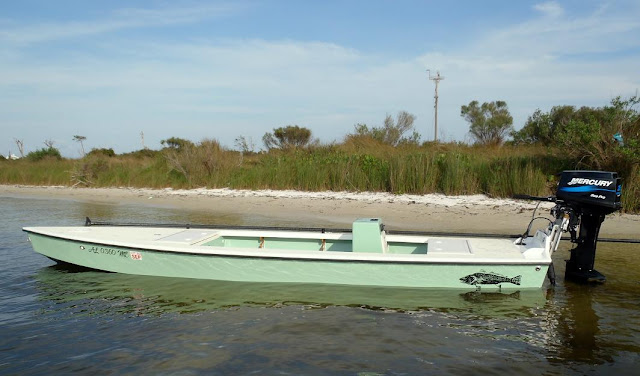
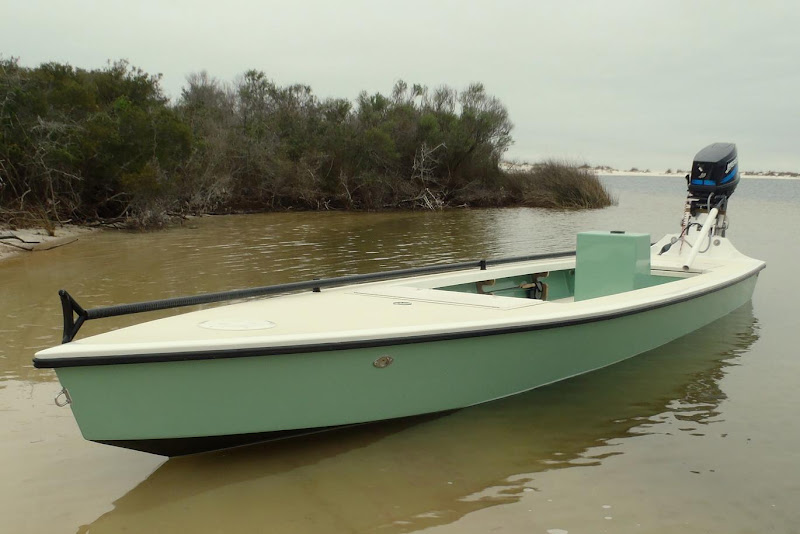
Ok, I'm sure I'm going to forget a bunch on info but I'll try to summarize what happen over the holidays.
When I first got back to Texas I went to a friend of mines house who had trailer that would work. Luckily he had air tools and torches, so we stripped everything off the trailer and put new hubs, bearings, rims, tires, and tongue on. The next day I got it legal at department on trans. Then brought it to Austin and my build buddy, Dave, and I put bunkers on it and fitted for "La Flaca". Still need a few mods and rollers.
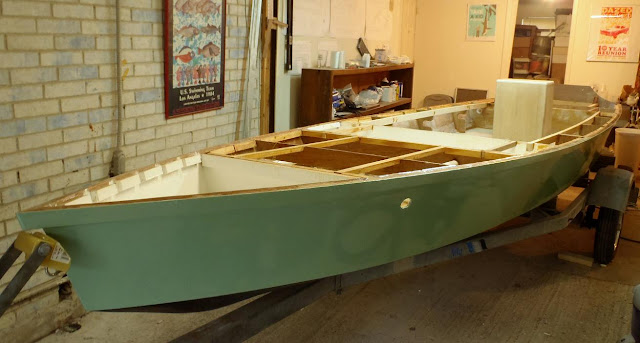
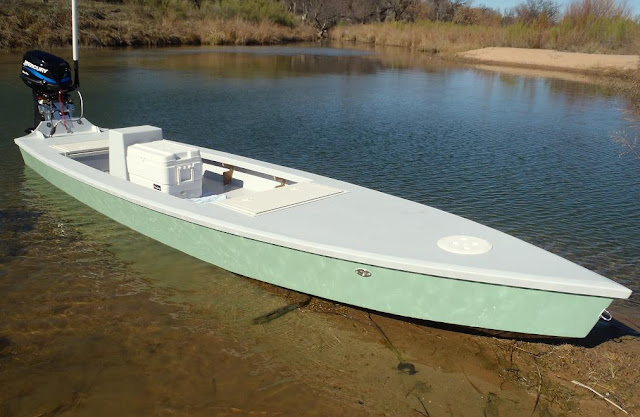
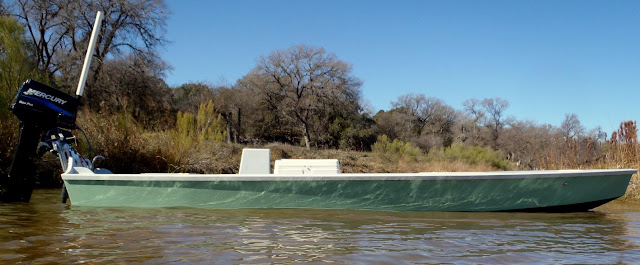
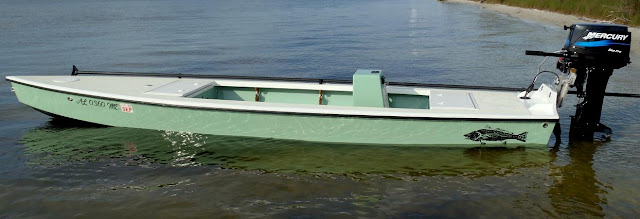
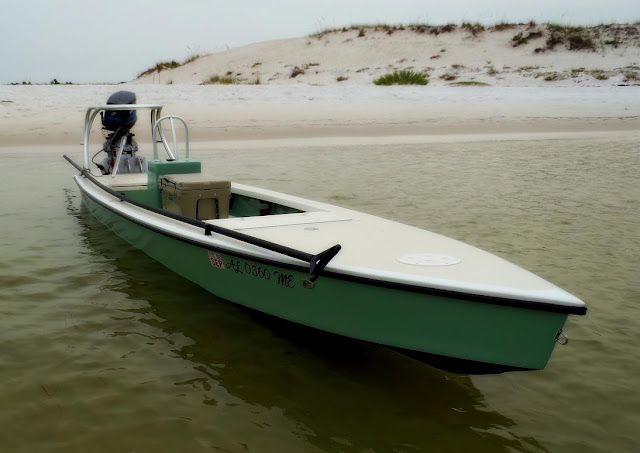
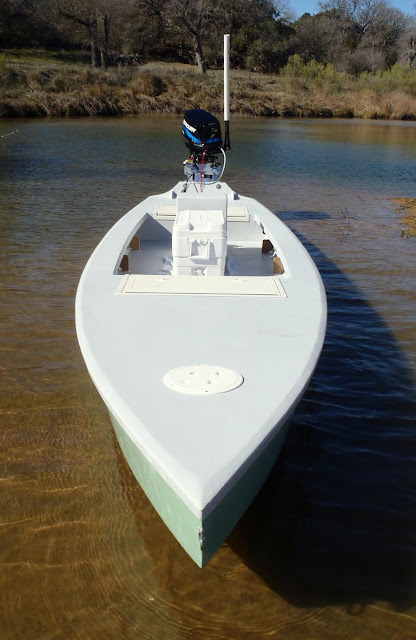
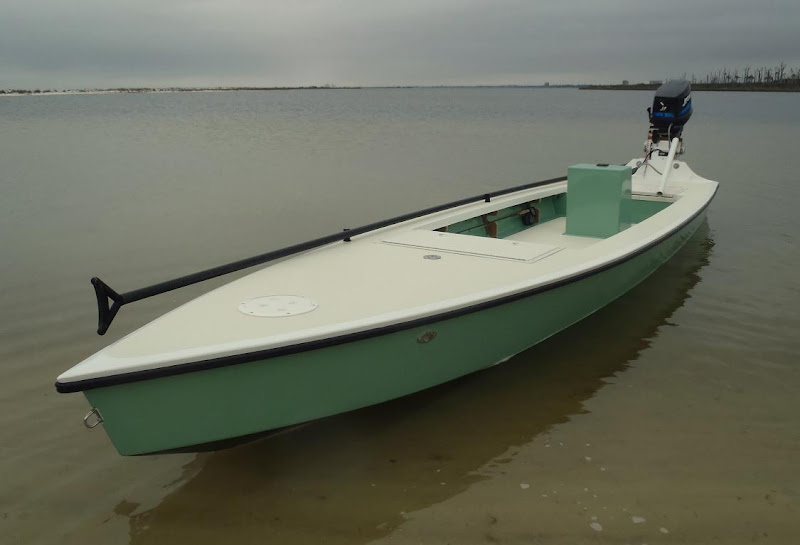
I flipped the hull and painted the sides Sea Mist Green Sterling roll and tip style. Did 3 coats and well, it could use some help but looks good to me for now. I think my rollers were falling apart cus I've got tons of tiny bumps all over it and some brush marks didn't flood out. Step back 5 feet and she looks gorgeous. What I do like is that the Sterling seems like a very strong paint for the outside.
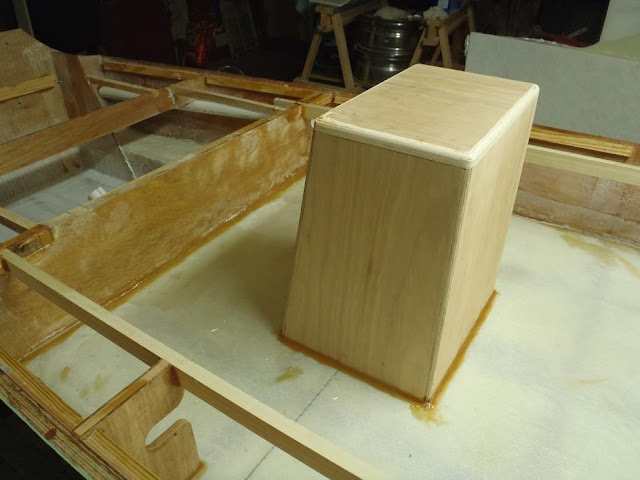
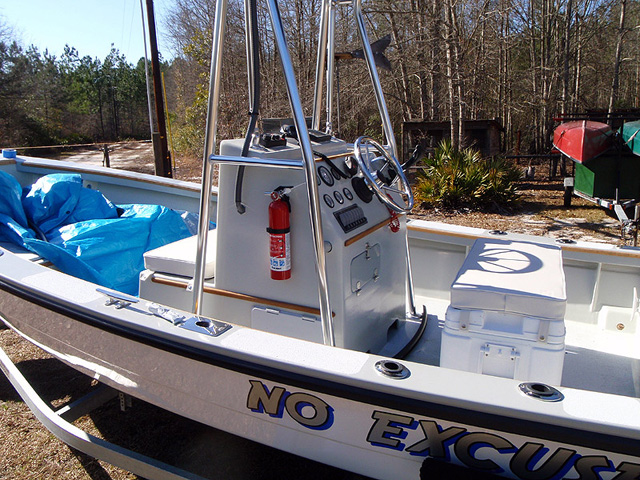
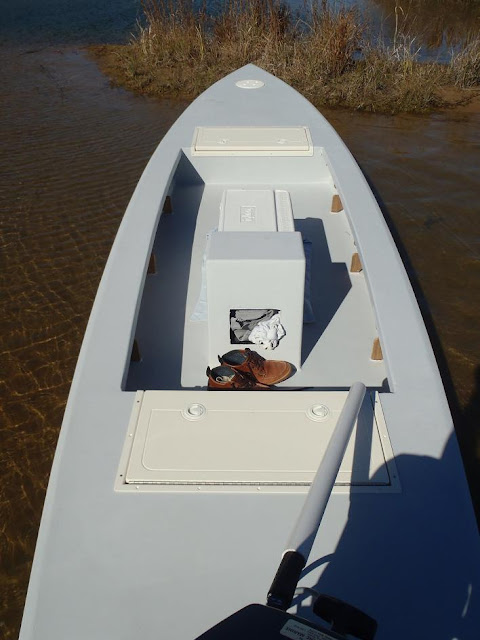
Flipped her back over after she dried and went to Dave's cabinet shop to make a little tiller console out of okume and make new rod holders out of Bamboo that he has been making all his cabinets out of. They look super cool and they're super strong. Plan on accenting the bamboo on the tiller console and poling platform as well. Then glassed the inside of the console. To attach the console I glued and glassed two 1x 2s to the sole that would fit snuggly inside the console. Then glued console to sole and glassed outside of console and glassed to the sole. Seems super stout. Shown in previous post. Just made a small cutout for now. I'm going to have a hatch where the cutout is and have switches above that.
Installed pvc rod tubes going forward and back. Also figured out how I wanted to drain the sole. I cut a piece of pvc down the middle and glued it onto my raised bilge area under the aft deck. Water will run through it and fall into the square bilge area that you can see in previous pix. Also ran fuel line and wiring to the bow. Installed livorsi led nav lights. Hooked up fuel vent and fuel line, but did not use it on the splash. I cut out a stuff hatch in the bow hatch that will allow me access to the build in fuel tank and also allow for hooking up and back up fuel supply if needed.
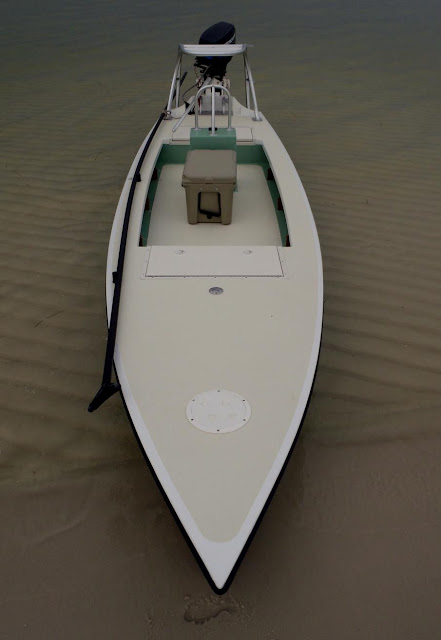
Next I glued down the plascore decks. I put two layers of glass on the bottoms of the plascore previously. My decks weren't very flush so instead of shaving everything, I went with where it lied. I would have to create a beveled edge with filler. The next day I made some strong filler and filled the edge. I really liked how it turned out. Little different look. Routered the inside edges of the walk around gunnels and sanded a little turn over on the rubrails and then glassed the top decks to the rubrail. The plascore got super strong once glassed on both sides. ended up doubling the glass on the front deck. Dave who is big dude can jump up and down on it! Next cut out the spots for hatchs.
Faired the decks, sole, and console the next day and started sanding.........more sanding......I new that I only had a few more days in town so I just sanded my first layer of fairing which turned out pretty good and then put a primer coat on her.
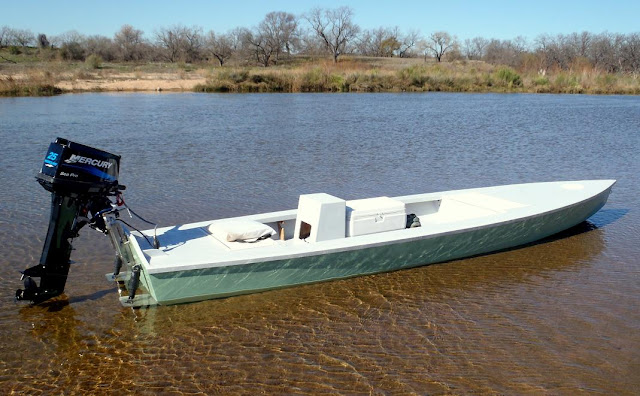
The primer dried and we started installing trim tabs, jack plate, then motor. Went and bought a small cheap 12v battery to run the tabs and plate for test run.
Strapped her down and took her away from her Austin home for the first time. I've got a some good friends that I grew up with that have lake houses on Lake LBJ in Kingland, Tx and were having a New Year's party. Plus we could take her up the Llano river that flows into the lake and is mostly a sand bottom in most spots and see how she floats in the skinny.
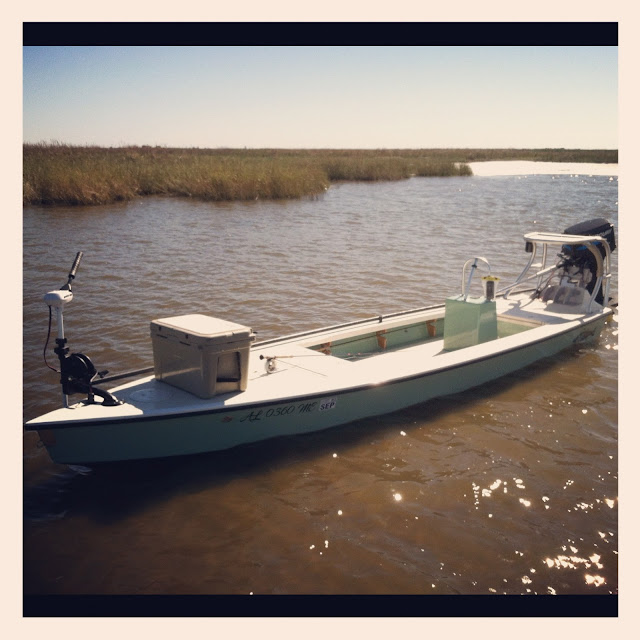
I didn't hook up the main 12 gallon tank thats under the deck and just put a portable 6 gallon tank up in the forward hatch that was hooked up to our main fuel line. That means I can have the 12 gal full and bring a 6 gal along and not have and fuel cans on deck. For those super long camp trips!
OK, the launch. So with what was said and still needing to do some more fairing, non skid the decks and paint decks, install rubrail, pushpole holders, removable trolling motor mount, yeti cooler, and getting a poling platform made, "La Flaca" was ready to go!
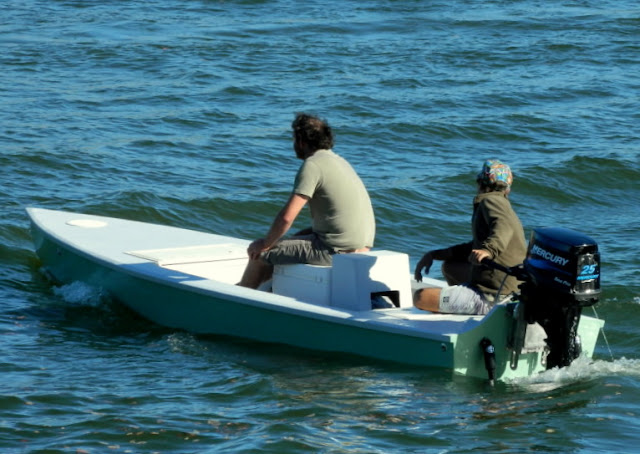
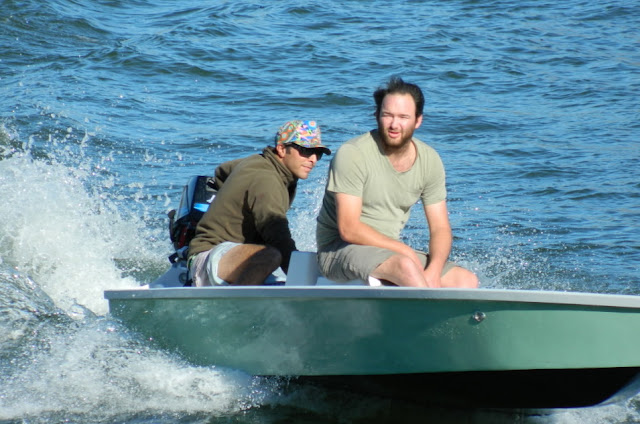
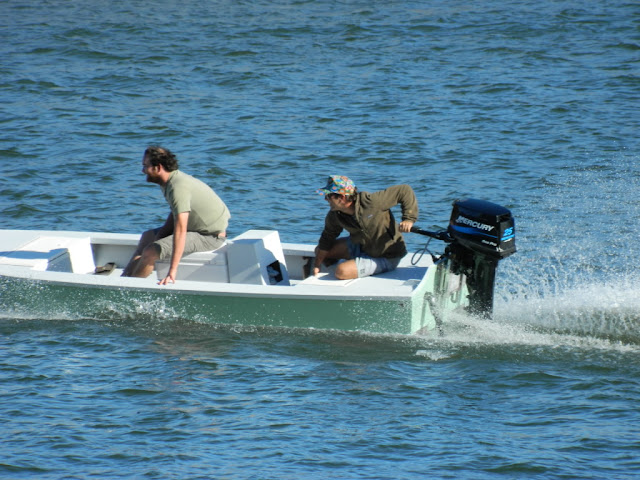
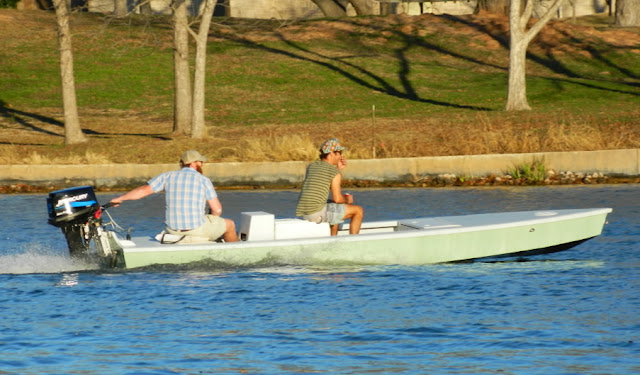
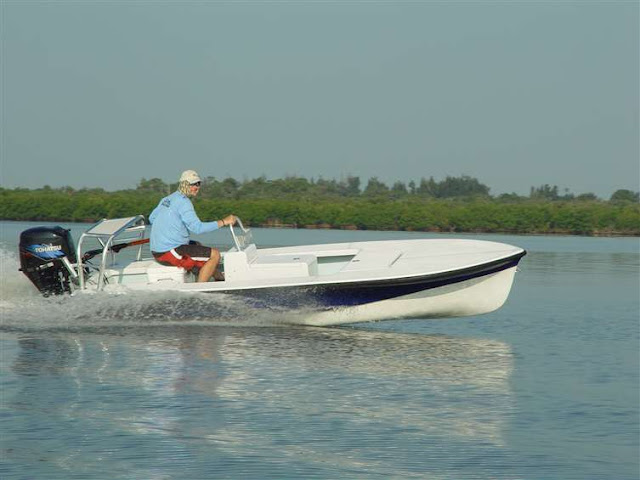
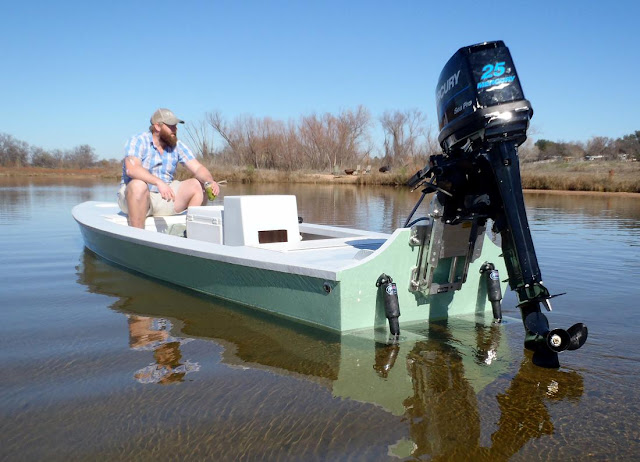
Brand new motor fired up. Running her super rich for the first 6 gal and break in period. The sea pro isn't very loud and seem perfect for my rig. We did the breack in and didn't mess with any taps or plate positions. I also don't have a stainless cupped 4 blade yet. Just ran the aluminum 3 blade that came with the motor.
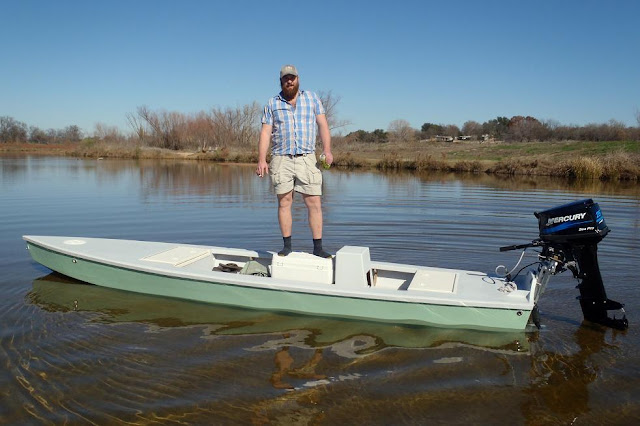
She is solid as can be, quiet, takes chop nice, tracks well (I didn't do a skeg on the bottom on the hull, like the plans call for) and performed awesome with tabs up and plate down. And with the motor in a little tilted position, since i don't have trim and tilt, did not bight at all. Might change with the cupped 4 blade. I could let go of the the tiller, stand up and surf the damn thing!! Just lean to one side and she would start tracking that way!
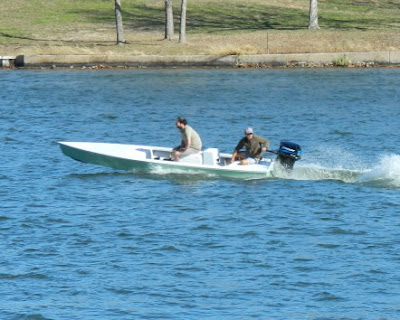
Now for the fun part. With the trim tabs all the way down, she pops right up and planes at a ridiculous slow speed and the tabs start throwing water up like a tunnel hull. I was then able to come up with the jack plate about 2-3inches before blowing out and she was running skinny and pissing plenty of water. Once i get a better prop and maybe a custom cav plate, I think she will perform like a tunnel hull skiff. I know i splurged on the tabs and plate and thought that they would not be worth it but now I'm convinced that they make this hull do some amazing things. The only down fall is that I have to be very careful how much weight is forward when I throw the tabs all the way down. With Dave and full fuel way forward, the bow digs way down with the tabs all the way down. But when your by yourself they're perfect. And when some boat wakes came, I pulled the tabs up and went over some good size wakboard wakes with ease and little manuevering.
In the skinny water at idle speed I can jack the motor all the way up on the jack plate and put around in a foot of water without having to manually tilt the motor up. I wasn't able to get precise drafts but She floats plenty skinny. With Dave and I and 6 gal of fuel and a cooler full of beer she was drafting 5in. The skinnest she floated was with one person in the boat standing on the front hatch. She floated across nothing. Blew my mind. Can't wait to pole her. You can push her around with a pinky finger.
All in all I am one proud and stoked boat owner/builder!! I've been in a bunch of productions skiffs and this thing can don what they do plus more! Thanks Bateau for the help and inspiration!


Re: "La Flaca" FS18 Spashed!!
Posted: Tue Jan 03, 2012 8:38 pm
by TRC886
Looks great
Re: "La Flaca" FS18 Spashed!!
Posted: Tue Jan 03, 2012 8:42 pm
by hooter
Looks great!
Makes me want to go fishing!!
hOOt
Re: "La Flaca" FS18 Spashed!!
Posted: Tue Jan 03, 2012 8:49 pm
by doubleup
Re: "La Flaca" FS18 Spashed!!
Posted: Tue Jan 03, 2012 10:16 pm
by doubleup
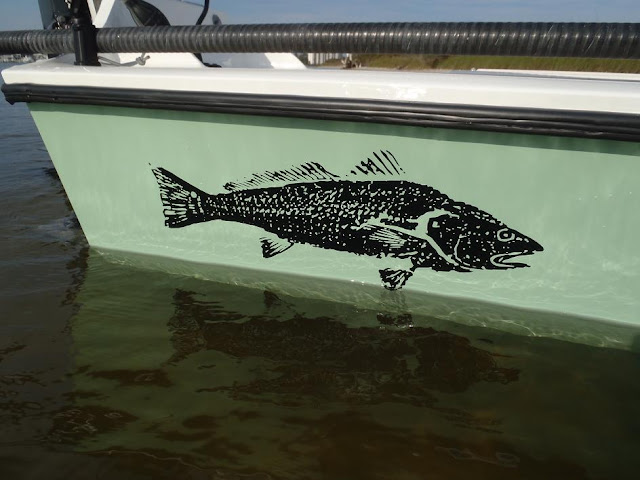
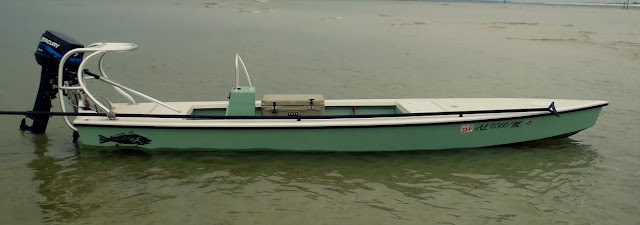
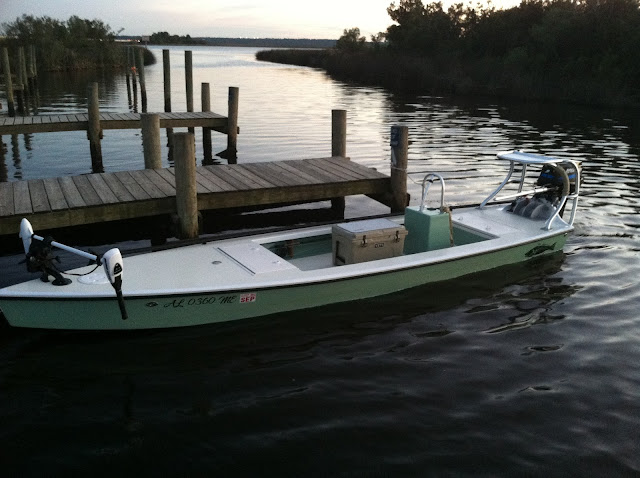
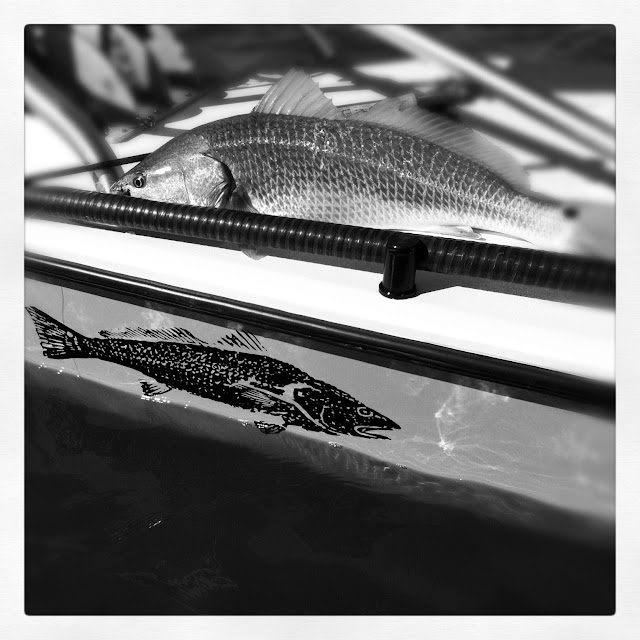
I've been doing fish prints for while and decided to get one made into a decal for the back corners of the boat and then have "La Flaca" across the forward bulkhead under the hatch lip.

Re: "La Flaca" FS18 Spashed!!
Posted: Tue Jan 03, 2012 11:09 pm
by Prarie Dog
She looks really nice, great job Doubleup.

Re: "La Flaca" FS18 Spashed!!
Posted: Wed Jan 04, 2012 7:31 am
by Cracker Larry
Great report and pictures, thanks
I hope mine looks that good!
One question, where did you get those hatches that mount at the lip of the decks? I like them..
Re: "La Flaca" FS18 Spashed!!
Posted: Wed Jan 04, 2012 8:07 am
by LeeFitz
doubleup wrote:I've been doing fish prints for while and decided to get one made into a decal for the back corners of the boat and then have "La Flaca" across the forward bulkhead under the hatch lip.
How do you do that? I would LOVE a "fishprint" of a Barramundi (see below) to put on the sides of my new BIG Barra boat?

Cheers
Lee
Re: "La Flaca" FS18 Spashed!!
Posted: Wed Jan 04, 2012 9:15 am
by doubleup
Larry, I got those hatchs at
www.greatlakesskipper.com They were originally hatchs for mako boats.
Lee to do these prints first I do it different than most people. When I've got a fish I like, I take them and make sure they are dead then try and get as much of the slime off as possible then I take a piece of cardboard and some wire and pins and pin out there fins where you want them, otherwise the fins will fold down and they'll look dead in the print. Next place them in a deep freezer and let them freeze. Pull em out let em defrost a little and take the pins out of the fins. Apply paint, i use fabric acrylics, with little rollers. I use thin sheets from fabric stores to do all my prints on, because when you put it on the painted fish you can see where the ink has saturated and not saturated. When you lay the fabric down on the fish be careful, then take a dry roller and roll the fabric all over the painted fish. Then pull away and bam!
Re: "La Flaca" FS18 Spashed!!
Posted: Wed Jan 04, 2012 9:58 am
by hockey52
Nice!!
Re: "La Flaca" FS18 Spashed!!
Posted: Wed Jan 04, 2012 11:54 am
by Doc_Dyer
doubleup wrote:Larry, I got those hatchs at
http://www.greatlakesskipper.com They were originally hatchs for mako boats.
Lee to do these prints first I do it different than most people. When I've got a fish I like, I take them and make sure they are dead then try and get as much of the slime off as possible then I take a piece of cardboard and some wire and pins and pin out there fins where you want them, otherwise the fins will fold down and they'll look dead in the print. Next place them in a deep freezer and let them freeze. Pull em out let em defrost a little and take the pins out of the fins. Apply paint, i use fabric acrylics, with little rollers. I use thin sheets from fabric stores to do all my prints on, because when you put it on the painted fish you can see where the ink has saturated and not saturated. When you lay the fabric down on the fish be careful, then take a dry roller and roll the fabric all over the painted fish. Then pull away and bam!
http://greatlakesskipper.com/product/31 ... hatch.html
Re: "La Flaca" FS18 Spashed!!
Posted: Wed Jan 04, 2012 12:53 pm
by Cracker Larry
Thank yall both
That's where I usually buy hatches, but hadn't seen those before.
Re: "La Flaca" FS18 Spashed!!
Posted: Wed Jan 04, 2012 12:54 pm
by Uncle D
I also like that hatch. Will they support a BFG?? (big fat guy)
Can't tell you how many hatches I've cracked/broken.
Don
Re: "La Flaca" FS18 Spashed!!
Posted: Wed Jan 04, 2012 9:22 pm
by Steven
Great looking boat. Cool hatches. Some 15" wide ones like that would sure have simplified my life.
Re: "La Flaca" FS18 Spashed!!
Posted: Thu Jan 05, 2012 5:18 pm
by Jerry-rigged
Doubleup-
Very nice looking boat! You make me want to build one.
I like that small console. Are you planning a grab-bar on it for stand up driving?
Re: "La Flaca" FS18 Spashed!!
Posted: Thu Jan 05, 2012 5:34 pm
by doubleup
Yeah I'm going to get a grab bar made and a custom poling platform.
Re: "La Flaca" FS18 Spashed!!
Posted: Tue Jan 10, 2012 10:33 pm
by johna
Nice build Doubleup.
I'm wondering about your sheer line. It looks great. Earlier in your thread you said that you cut the freeboard down 3" at the stern and 0 at the straight sheer foredeck. It looks like it was cut down more than that at the stern- maybe 4 or 5" less than the 19" of the standard sheer version. Can you tell me how you tapered that from stern to zero at the foredeck? Are you happy with the performance now that you have had the chance to ride in the boat? I'm about ready to make that decision myself when I get my workshop back on line. Thanks.
John A
Re: "La Flaca" FS18 Spashed!!
Posted: Wed Jan 11, 2012 9:59 am
by doubleup
Johna, I cut out the plywood to the straight sheer version, thinking that was the look I wanted. After glassing and fairing the hull on the jig, I decided to shave her down from the straight sheer look. I shaved 3" on the back half of the boat then figured out an amount to decrease every foot to the nose of the bow, where I cut nothing from the straight sheer. I forgot how much I did per foot, but it was easy to figure out. I like the look but next time might go with the original sheer then shave 4-5" in the back half going to nothing cut at the nose. It would give a little more kicked up nose.
Re: "La Flaca" FS18 Spashed!!
Posted: Wed Jan 11, 2012 4:30 pm
by johna
Ok, that's what I had in mind to do as well. I'm thinking 3" aft up to zero " fwd. I have temporarily lost access to my workspace. I'm letting a friend use the house where I'm building. I hope to get back to work in a couple weeks. Thanks for the feedback . I'm very impressed w the shallow draft of your build and hope mine turns out about the same.
Re: "La Flaca" FS18 Spashed!!
Posted: Wed Jan 11, 2012 6:24 pm
by doubleup
Here is an edited view of what she'll look like when I can afford it.

Re: "La Flaca" FS18 Spashed!!
Posted: Mon Feb 27, 2012 9:13 pm
by doubleup
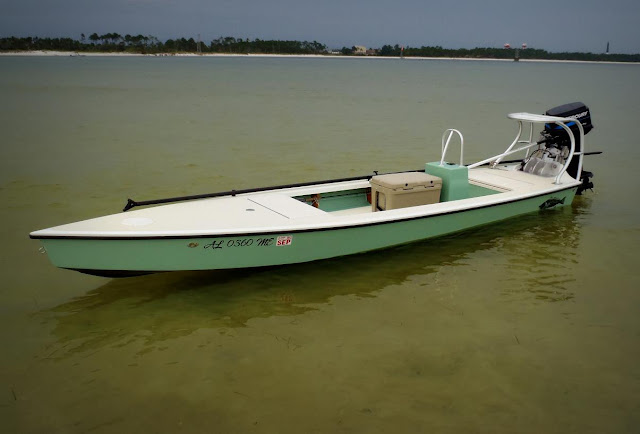
She's almost complete!!!! This Last month was sanding and fairing the decks, top coat paint, non-skid, wiring, rub-rail.....etc finishing details. Still have to get a poling platform, grab bar, and tiller extension made, varnish the bamboo rod holders, paint rear storage/ bilge area, finish wiring, mount bilge pump, get stickers of a redfish print and "La Flaca" made, do a few mods to the trailer, and get her registered. Stoked!


Re: "La Flaca" FS18 Spashed!!
Posted: Mon Feb 27, 2012 9:31 pm
by Cracker Larry
Dangit man, she sure is pretty
Real pretty
Re: "La Flaca" FS18 Spashed!!
Posted: Tue Feb 28, 2012 12:04 am
by chicagoross
That's a skinny boat! Good name!
Re: "La Flaca" FS18 Spashed!!
Posted: Tue Feb 28, 2012 10:43 am
by tech_support
Awesome !
You mind if we use a couple of those pictures?
Re: "La Flaca" FS18 Spashed!!
Posted: Wed Feb 29, 2012 9:29 am
by doubleup
Shine, your more than welcome to use some pictures of "La Flaca". Let me know if I need to email some in larger format.
Re: "La Flaca" FS18 Spashed!!
Posted: Wed Feb 29, 2012 9:38 am
by gk108
Excellent
It looks like one of those boats that all the fish will be dying to ride.
Re: "La Flaca" FS18 Spashed!!
Posted: Sat Mar 03, 2012 2:23 pm
by mjxlange
Looks like those hatches will become popular. I think I will order some for my build. Thanks for sharing the boat looks great.
Re: "La Flaca" FS18 Spashed!!
Posted: Mon Mar 19, 2012 8:47 pm
by doubleup
Re: "La Flaca" FS18 Spashed!!
Posted: Mon Mar 19, 2012 8:55 pm
by Boater45
Very cool!!!
Beautiful boat....love the color!!!
Will
Re: "La Flaca" FS18 Spashed!!
Posted: Tue Mar 20, 2012 8:12 am
by topwater
Very nice
Love the fish on the side of the hull . How did you do that

Re: "La Flaca" FS18 Spashed!!
Posted: Tue Mar 20, 2012 8:54 am
by Cracker Larry
Fantastic! Beautiful job
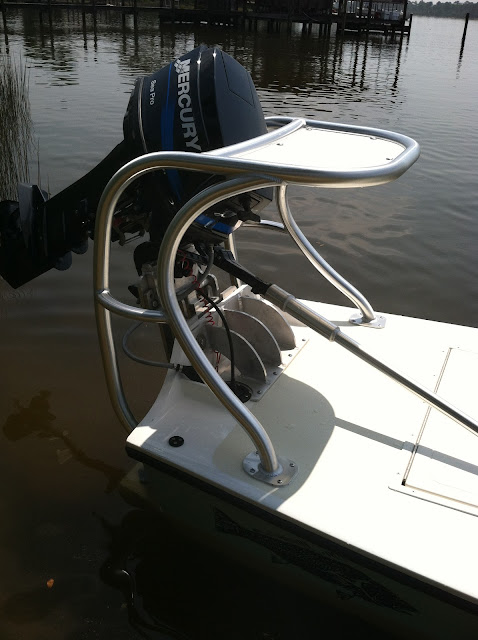
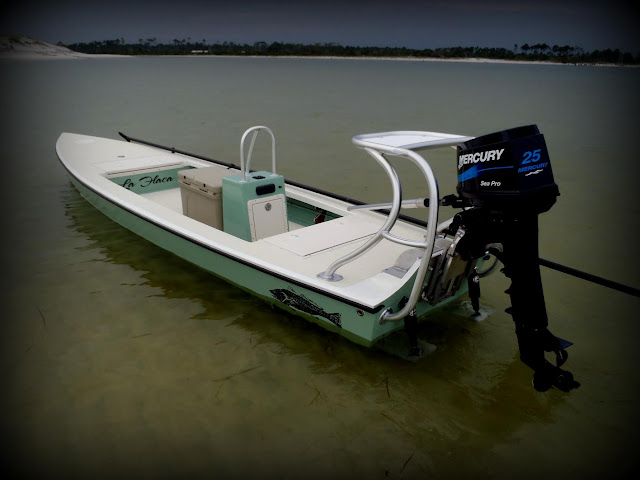
Re: "La Flaca" aluminum added!!!
Posted: Mon Jul 02, 2012 11:40 pm
by doubleup
Re: "La Flaca" aluminum added!!!
Posted: Mon Jul 02, 2012 11:58 pm
by Pro Wader
JUST AWESOME PAUL!!
I hope mine turns out half as nice.
Re: "La Flaca" aluminum added!!!
Posted: Tue Jul 03, 2012 7:49 am
by Cracker Larry
Fantastic
Re: "La Flaca" aluminum added!!!
Posted: Tue Jul 03, 2012 10:06 am
by Joe H
SWEET! That looks like a fun ride!!!!!!!!!!
Joe H
Re: "La Flaca" aluminum added!!!
Posted: Tue Jul 03, 2012 10:12 am
by tech_support
really cool boat, i love it
Custom pipework its awesome, you can jack the motor up, trim it up, move it side to side and never hit your platform
Re: "La Flaca" aluminum added!!!
Posted: Sun Sep 23, 2012 3:15 am
by johna
I hadn't seen your most recent upgrades for La Flaca. It looks fantastic! Cool platform. It looks like you are using V marine pushpole holders (I think they are using a photo of your boat on their website). How do you like them?
I'm at the point with my FS18 where I'm drilling for jackplate, tabs, etc. I'm wondering how the position of the jackplate has worked out for you. You said you placed the cav plate 1" above the bottom at the lowest setting? maybe I got that wrong? I'm also using a 20" shaft but a Yamaha instead of a Merc. Would you use that same placement if you doing it over?
Thanks.
John A
Re: "La Flaca" aluminum added!!!
Posted: Sun Sep 23, 2012 11:29 am
by ks8
Re: "La Flaca" aluminum added!!!
Posted: Tue Sep 25, 2012 12:20 pm
by doubleup
Johna, I'm enjoying my v marine push pole holders. The only problem I had was that my decks are plascore honeycomb type sheets that are glassed on both sides. I had to use a syringe to fill the cells with epoxy then mount the holders. I've got a decent amount of bend in the push pole which tweeks the holders but they have been solid since.
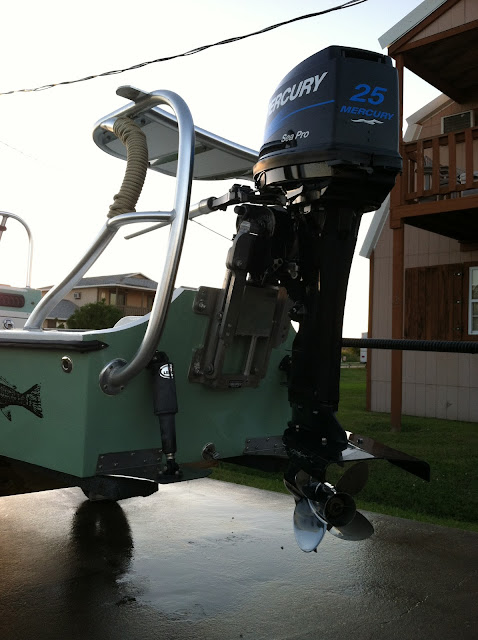
As for the jackplate. My Merc has i think a 22" shaft stated as a 20". When I mounted mine I had two friends come over to help hold the motor and I eyeballed it. At the lowest setting on the jackplate the cav plate is 1" above the bottom. As a rule for every inch of set back you go up as half an inch. So I could of put it 2" above, but the fact that I just press a button, it wasn't an issue. As the trim tabs go down, I'm able to jack the motor up a little more. She rides the best with a little tab down and the jack plate up about 2" which would put the cav plate 3" above the bottom
Re: "La Flaca" aluminum added!!!
Posted: Tue Sep 25, 2012 9:58 pm
by johna
Cool. Thanks for the response. So if I am brave I could put it at it's lowest setting with the cav plate 2" above the bottom. I will let you know if I am. I have spoken with a well respected Yamaha mechanic and he tells me he can convert my '20"' into a '15"' for a pretty hefty fee. I have an old Suzuki 200 which I may try to trade for service and parts to do that. It's where I'd like it to be now so I either bite the bullet or I sell my new Yamaha and buy a way too heavy 4 stroke. Still scratching my head on that one.
Re: "La Flaca" aluminum added!!!
Posted: Wed Dec 05, 2012 12:22 am
by doubleup
Re: "La Flaca" FS18
Posted: Wed Dec 05, 2012 7:36 am
by wegcagle
You have a great boat for sure
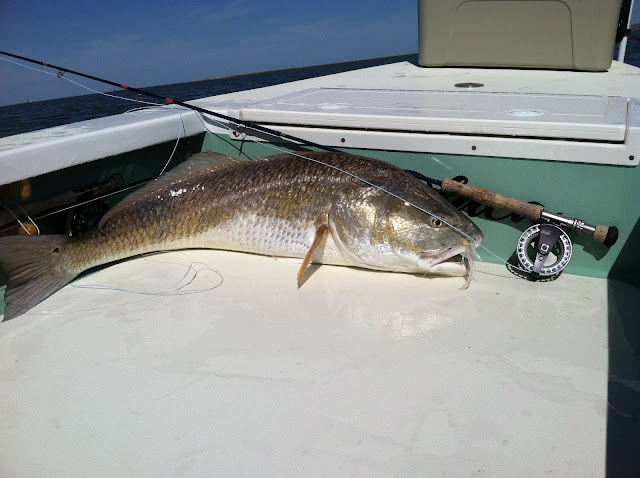
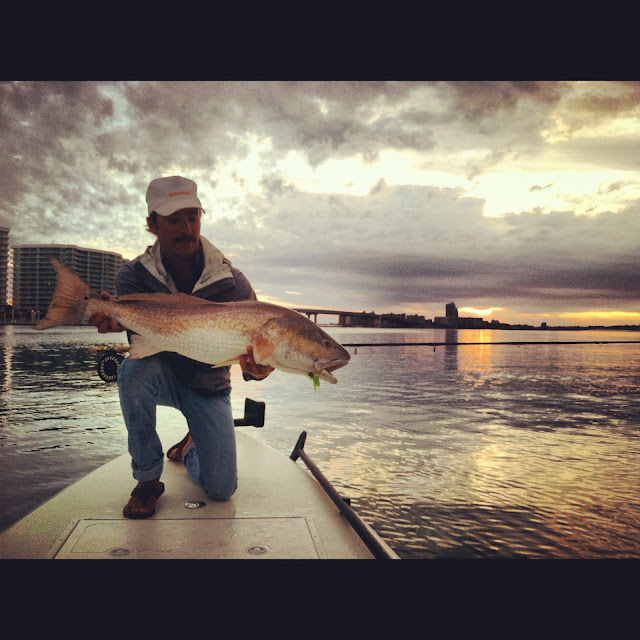
. I really like the last picture. You should blow that one up, make it black/white, and frame that bad boy.
Will
Re: "La Flaca" FS18
Posted: Wed Dec 05, 2012 8:23 am
by Cracker Larry
That's a fine looking boat and great pictures
Nice fish too! Thanks for the update.
Re: "La Flaca" FS18
Posted: Wed Dec 05, 2012 9:09 am
by AtTheBrink
This makes me what to go to work and finish mine! I really like your boat, and thanks for the performance stats.
Re: "La Flaca" FS18
Posted: Wed Dec 05, 2012 9:19 am
by jacquesmm
Nice boat, great report and I love the pictures.
Re: "La Flaca" FS18
Posted: Wed Dec 05, 2012 2:23 pm
by ks8
Re: "La Flaca" FS18
Posted: Wed Dec 05, 2012 5:57 pm
by jorgepease
Love the boat and pictures!
Re: "La Flaca" FS18
Posted: Sun Apr 07, 2013 5:39 pm
by Cannonball
Paul,
Great work! I'm going to start building an outboard jet skiff similar to the port a boys, and running a thread on here. When are you going to bring that boat to Texas and take me fishing!
Cannon
Re: "La Flaca" FS18
Posted: Mon Apr 08, 2013 2:26 pm
by tobolamr
VERY nice!
Re: "La Flaca" FS18
Posted: Thu Jul 10, 2014 3:03 pm
by Super Spook
Doubleup,
I'm working on a fuel tank arrangement almost identical to yours. How did you vent the compartment in a way that satisfied the inspectors? Thanks.
Re: "La Flaca" FS18
Posted: Fri Jul 11, 2014 9:56 am
by crackedconch
Very Nice!!!!

Re: "La Flaca" FS18
Posted: Fri Jul 11, 2014 2:21 pm
by jorgepease
What a beauty!
Re: "La Flaca" FS18
Posted: Mon Oct 05, 2015 3:22 pm
by August_D'Angelo
Don't know if you are still active, but if you are, what are the dimensions of your console? I want to make one like it. Also, what switch panel did you use? Great looking boat too.