Page 1 of 1
Mikem59 FS18 Build
Posted: Fri Apr 19, 2013 8:48 pm
by Mikem59
Well fellow boat builders, and I use that term loosely since I don't qualify as a boat builder just yet, but I finally pushed the checkout button today to order the FS18 kit. I've probably built this boat in my mind several times since I started reading this forum a few years ago. I finally got the courage and the $$, to make the move.
My progress will probably be pretty slow at first and proceed in fits and starts. But, after reading about others just like me, I'm confident I'll be able to build me a fine flats boat. And, based on what I've seen and read on this forum, you guys aren't afraid to chime in and offer invaluable help and suggestions, I'll just need to be sure not to be afraid to ask for help and offer up my pics and help.
While I await the delivery of the goods, I'll start on the strongback. Bought materials for that today.
Hopefully, more to come soon!
Re: Mikem59 FS18 Build
Posted: Fri Apr 19, 2013 8:58 pm
by mjxlange
Good luck on your build. It will make things a lot easier with the kit for sure. Try not to lose momentum and set a dead line. I have taken so many breaks from my build that i'm not sure i will ever finish.
Re: Mikem59 FS18 Build
Posted: Fri Apr 19, 2013 10:20 pm
by Mikem59
Thanks, and yes I do have a deadline, September 1 of this year. I know that without a deadline it will be too easy to let opportune work time slip by. Besides, I'm having to pull my bay boat out of storage to provide me a good workspace.
Re: Mikem59 FS18 Build
Posted: Sat Apr 20, 2013 8:57 am
by Cracker Larry
Welcome Mike

Just take it one step at a time and If you have any questions, ask.
Sept. 1 would be very quick, especially for a first build. You will need to work on it almost full time. Everything seems to take twice as long as you think it will.
Re: Mikem59 FS18 Build
Posted: Sat Apr 20, 2013 4:56 pm
by Pro Wader
It took 17 months for mine to be fishable (I'm still not truly finished)
Re: Mikem59 FS18 Build
Posted: Mon Apr 22, 2013 9:47 pm
by Mikem59
Haven't even started my build and getting good feedback. I figured Sept 1 was ambitious. Maybe I should target having the hull glassed and flipped by that date. Regardless I'll have to take advantage of any available time to work on the build. I'm sure, like most of you all on this forum, you have other jobs to do and you also want to find the time to chase your other passion - fishing.
Got the email today from Mr. Shine confirming my order and a delivery location. Won't be long now.
Re: Mikem59 FS18 Build
Posted: Mon Jun 03, 2013 10:06 pm
by Mikem59
Well, I haven't posted in awhile, but wanted to say I have made some progress. I've built my strongback. At this rate, no doubt a September 1 completion date was very optimistic. Working full time, a good thing, gets in the way of getting long chunks of time to work. I'll be putting in some hours after work during the week to begin making some more progress. And, I must be crazy, but I got a great opportunity to get in on a deer lease, something I've never done in all my years living in Texas. So, work, trips to the deer lease, and build a boat, and fish, Hmmm, I'll be happy to complete by March 1 2014.
I've taken some pics of the materials as delivered along with pics of the strongback, hope to get those uploaded soon.
Re: Mikem59 FS18 Build
Posted: Tue Jun 04, 2013 10:42 pm
by AtTheBrink
Just keep plugging away at it and it will be finished when its finished. I had dreams of splashing mine in 6 months, that came and went 2 months ago...
Re: Mikem59 FS18 Build
Posted: Wed Jun 05, 2013 9:00 am
by wadestep
Mikem59 wrote:And, I must be crazy, but I got a great opportunity to get in on a deer lease
Plan on the boat work being very slow from about Oct through Dec... but you'll be having lots of other fun!
wade
Re: Mikem59 FS18 Build
Posted: Thu Jun 06, 2013 9:38 am
by AtTheBrink
Where is your lease?
Re: Mikem59 FS18 Build
Posted: Sun Jun 09, 2013 9:56 pm
by Mikem59
The lease is just north of Lometa, Tx, which in turn is north of Lampasas. I've been out to the lease 3 times, beautiful out there. Although my passion is fishing, I can see right now, I'm going to enjoy this deer lease.
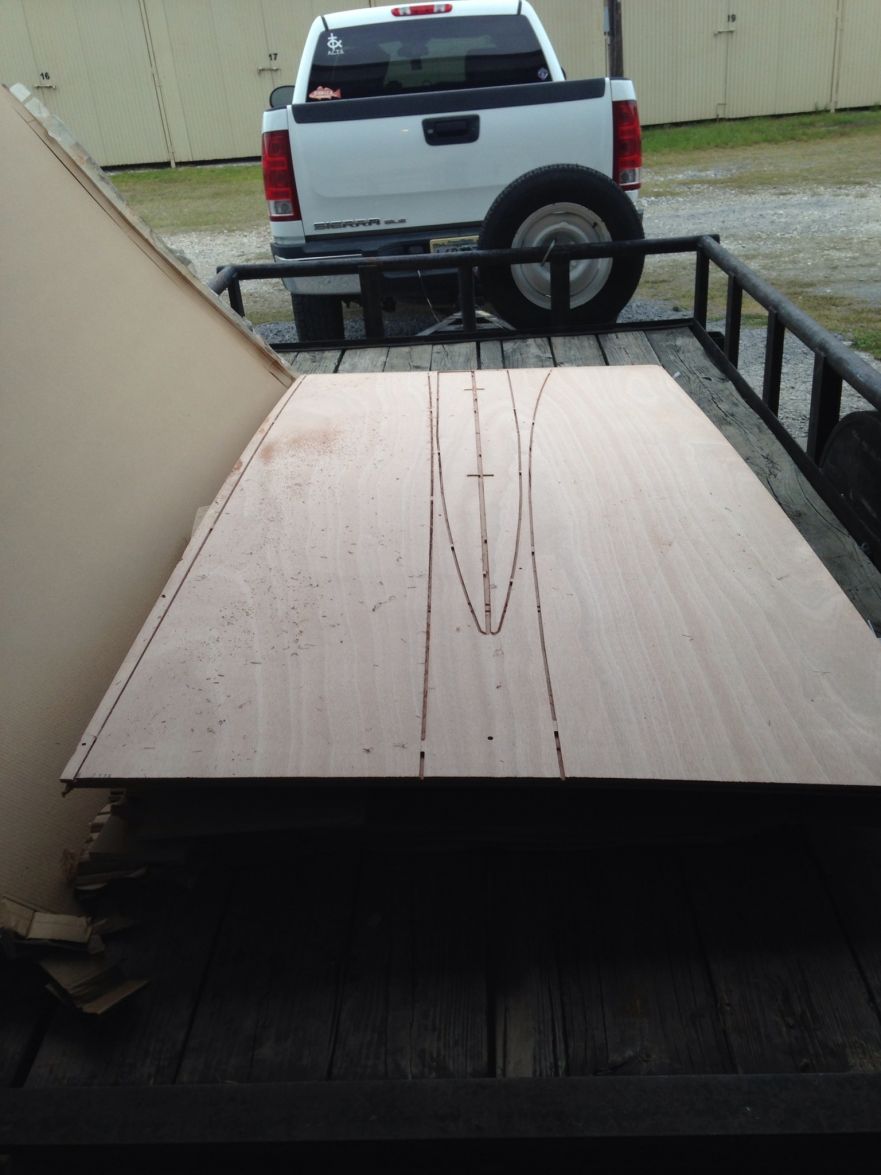
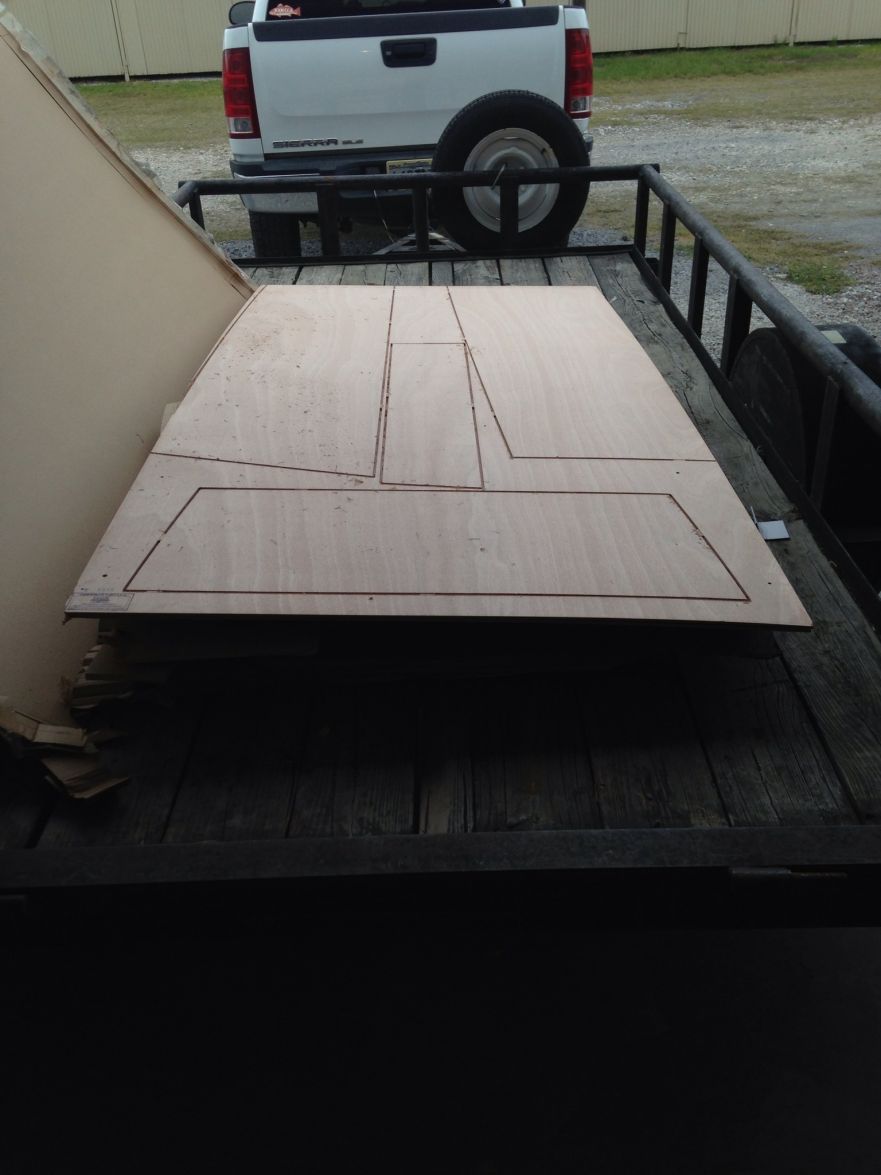
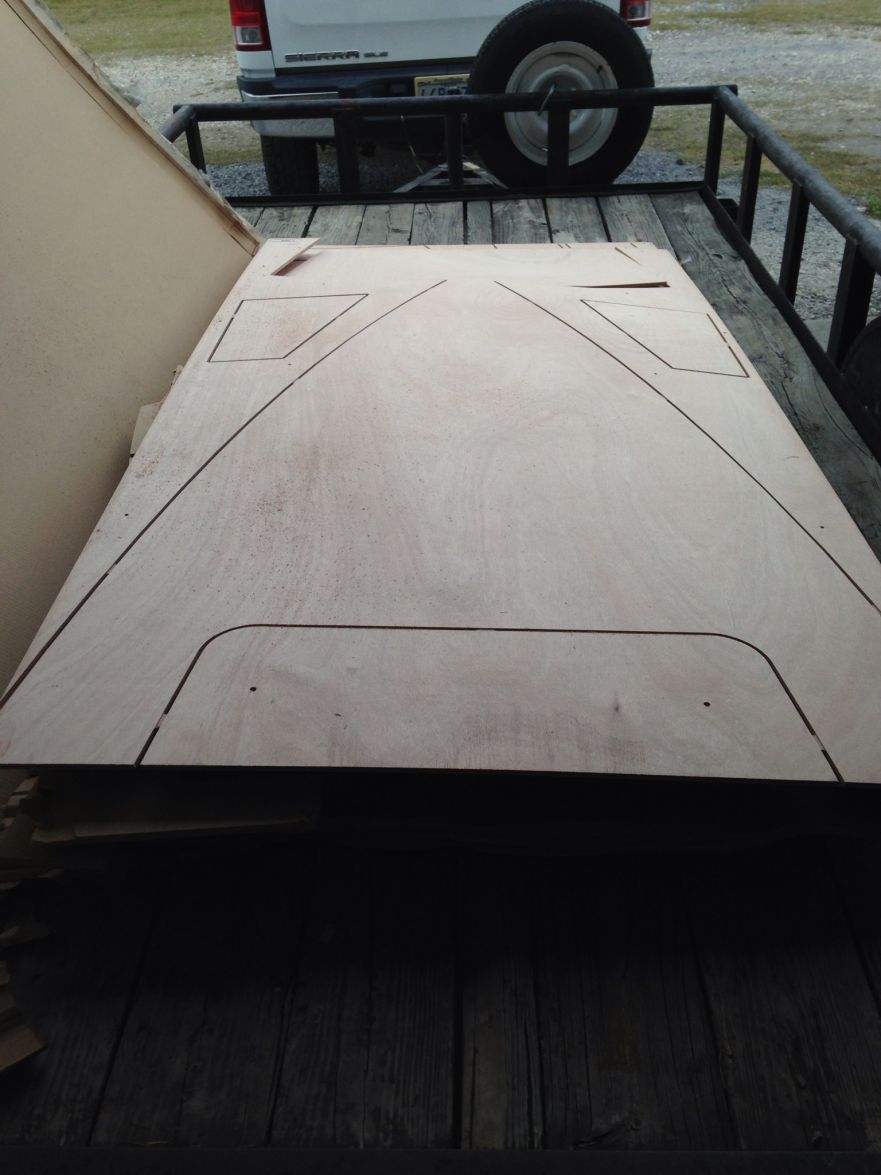
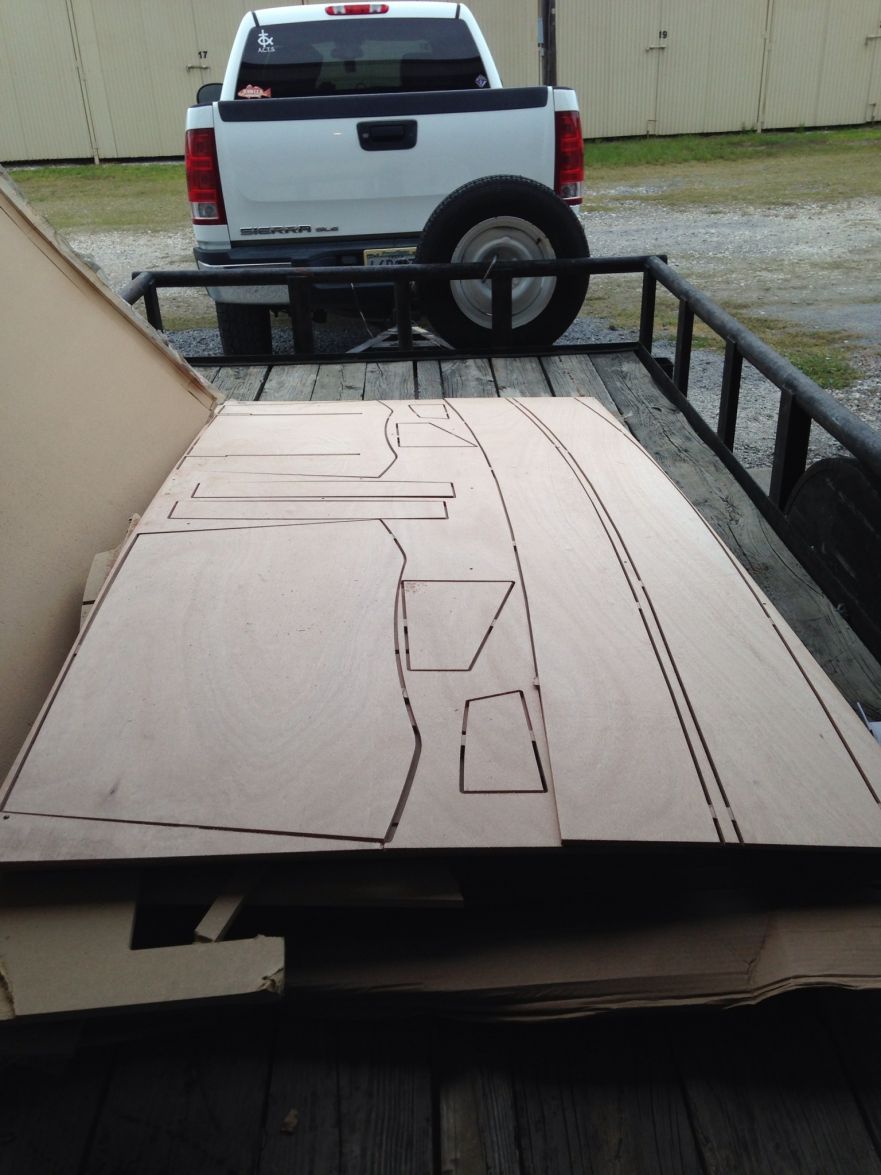
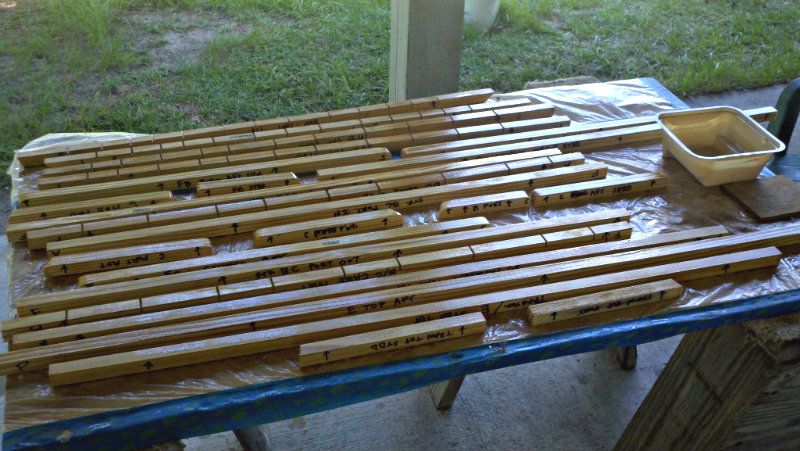
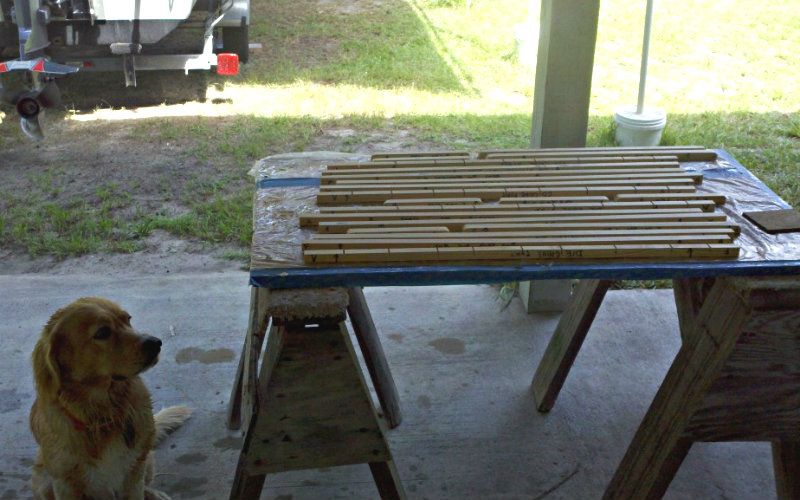
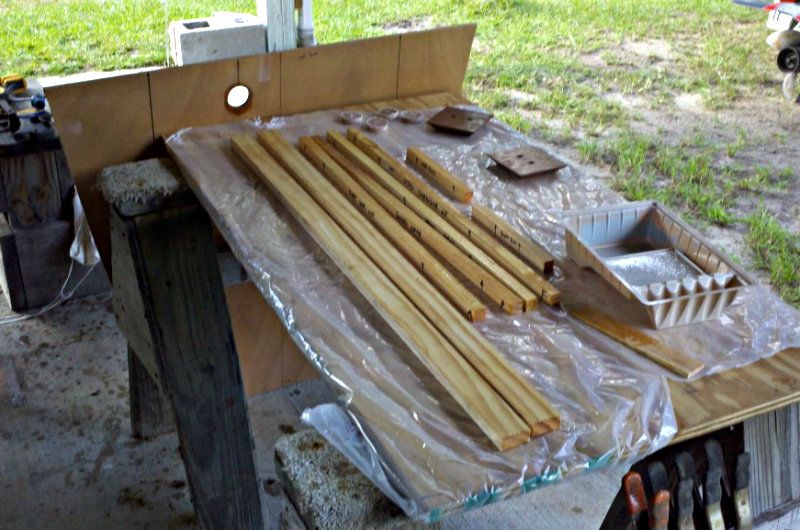
And, making just a little more progress on the build. I bought the CNC standard sheer,rounded chine kit. Glad I bought the CNC kit for my first build, I'd be a long way from getting ready to glue the stringers and transom pieces.
I got all the pieces separated from the "puzzle" and cleaned up the edges. I do have a question, for the stringer laminations, isn't one side supposed to be slightly shorter to account for the hull shape?
Also, got to trim the middle transom sheet, it for some reason is slightly larger on all sides. I'll get that trimmed this week and I'll get it glued together. I'll probably use the dowel method to make sure the pieces align. I can see right now trying align without them could be difficult.
Re: Mikem59 FS18 Build
Posted: Sun Jun 09, 2013 10:45 pm
by AtTheBrink
The stringers are supposed to be square on the bottom. There isn't much V in this hull and all gaps are filled with the fillet, same thing on the transom.
Dowels are a good idea when glueing up just about every lamination. The epoxy glue you are going to make is slicker than owl snot!
Re: Mikem59 FS18 Build
Posted: Sun Jun 09, 2013 11:58 pm
by Mikem59
Thanks for the input, I feel better about the stringers now. I'm at that stage where I want to be sure before I take that step to start gluing stuff together. And, I'm glad I bought a trial epoxy kit, That gave me a chance to make some glue. Amazing stuff.
Re: Mikem59 FS18 Build
Posted: Mon Jun 10, 2013 7:09 am
by Cannonball
How about some pics... I'd like to see that cnc kit come together. For me schedule was another reason, besides $, to cut the panels out my self. It only took 1 day, but I did have some issues, transom redux and couple gaps here and there. I'm using bayport bobs baseline of 160 hours to get the boat ready for paint, and feel like I'm tracking pretty close. I also am shooting to be done by sept 1. My buddy Paul, aka double up, said it was doable by planning your tasks where you knock out the small items that hold you up for curing time during the week, and put in power sessions on the weekends. That said, listen to these more experienced and trust what they say. I'm also on my first build and they are keeping me lined out.
Good luck, Being from Nederland, sounds like you'll be fishing the other Port A.
Re: Mikem59 FS18 Build
Posted: Mon Jun 10, 2013 1:26 pm
by Mikem59
Yes I need to get some pics uploaded. Not a whole lot for me to show, but I did take lots of pics of the CNC kit as received. Itis nested differently than the standard nesting drawing. I'll make time in the next 2 days to get the pictures uploaded to the builders gallery and then attached to my posts.
And yes, I'll be fishing the other Port A. There's some really great marsh around here to fish as well as Calcasieu.
Re: Mikem59 FS18 Build
Posted: Tue Jun 11, 2013 3:07 pm
by Mikem59
I'm probably getting worked up over nothing since this is a "stitch and glue" but when measuring and marking for center lines on the molds some molds widths are off by as much as a 1/2". Could be the difference between the CNC kit versus the original plans or that this kit was for rounded chine standard sheer. Also the middle transom section is 1/4" wider and 3/8" taller. Tell me I'm worried about nothing and just move on.
Re: Mikem59 FS18 Build
Posted: Tue Jun 11, 2013 3:20 pm
by AtTheBrink
Not sure what to tell ya. Hopefully Jacques or Shine will see this. I would say say post a question in PowerBoats but I kinda got my hand slapped for suggesting cross posting...
Re: Mikem59 FS18 Build
Posted: Tue Jun 11, 2013 3:21 pm
by Cracker Larry
I have never used a CNC kit so not sure about that. With your transom, put the widest piece in the front, narrowest in the rear. The boat is tapered so the transom is widest forward. 1/2 error isn't much for S&G. I'd split the difference and move on, it isn't critical.
Re: Mikem59 FS18 Build
Posted: Tue Jun 11, 2013 3:44 pm
by Mikem59
The widest piece happens to be the one that has a notch in it due to the nesting for the front deck. The plans call for filling that in with a scrap piece and sandwiching this between the other pieces. Also the inner transom piece is notched to receive the transom knees and stringer. But what you say about the width is certainly right, I'll need to double check the measurements on the other pieces and see if I can factor that in. Thanks
Re: Mikem59 FS18 Build
Posted: Tue Jun 11, 2013 4:26 pm
by Mikem59
Going to take a crack at posting a pic. This is of the strong back. Modeled somewhat after Cracker Larry's. if this pic post works. I'll begin posting more.
[img]
http://gallery.bateau2.com/displayimage ... fullsize=1[/img
Re: Mikem59 FS18 Build
Posted: Tue Jun 11, 2013 4:47 pm
by Mikem59
Trying again i think i see what happened. This is of the strong back. Modeled somewhat after Cracker Larry's. if this pic post works. I'll begin posting more.
http://gallery.bateau2.com/displayimage ... fullsize=1
Re: Mikem59 FS18 Build
Posted: Tue Jun 11, 2013 5:27 pm
by pee wee
before you hit "submit", hit preview. If you did it right the photo should show, if not you get to try it again. Right click on the photo you want (at full size), select "copy image url", then past that into your message, highlight what you just pasted in and push the Img button up top. That should do it.
Re: Mikem59 FS18 Build
Posted: Tue Jun 11, 2013 6:46 pm
by Mikem59
Thanks. My biggest problem is trying to do from my iPhone. I don't think it can be done. Thanks again
Re: Mikem59 FS18 Build
Posted: Tue Jun 11, 2013 6:50 pm
by AtTheBrink
On comment on your strongback, and I think Larry will back me up on this, make it shorter. Easy to do now that you don't have a boat on it. 12" is all you need. I started at 18", that was too high so I cut 6" off.
Re: Mikem59 FS18 Build
Posted: Tue Jun 11, 2013 10:24 pm
by Mikem59
I had read about the height and making it too high. I just couldn't convince myself to go lower. I was laying out the molds this evening in preparation for setting up them up on the strongback.
One thing's for sure, I bet I've stared at the plans, read and reread the materials, and stared at the materials for a 1000 hours and done actual work for 1 hour. With all that, plus the few years of lurking I still have lots to learn and lots of questions
Now, here are my next questions, does the transom basically "hang" off the end of the strongback? The reason I say that is that the baseline for the transom is taller than the molds.
And, if that is the case, does the origin need to be offset, say several inches to allow for this? I've gone through a number of pics of some other builds and that appears to be the case. With that said, I think I will offset by 6", meaning my measurements to the face of each mold will be the measurement on the drawing minus 6", for instance, mold "E" on the drawing is spec'ed for 36", now I'll set it at 30".
Hope I don't wear you all out with these questions! I know one thing, I look forward to this build, on one hand, I'm sort of frustrated by the slow progress, but I am enjoying and learning alot.
Re: Mikem59 FS18 Build
Posted: Tue Jun 11, 2013 10:43 pm
by AtTheBrink
Your origen can still be at the end of your strongback, the transom angle will let it clear. Hope that helps, and hope I understood your question.
I remember the excitement when I first started, now I am about to wrap it up and I am really stoked! Feel free to ask all the questions you have, I will try to help in any way I can and lots of other guys are extremely helpful. Good luck on your build. Take your time now and get it right, it will save you tons of headaches and backaches late on.
Re: Mikem59 FS18 Build
Posted: Tue Jun 11, 2013 11:02 pm
by Mikem59
Yes, you understood my question, and yes, that makes sense. I was toying around with that on the strongback this evening, and wasn't sure if it would clear. That's good since I had already struck my lines on the strongback for the mold locations, not that it would have been difficult to change.
More pictures coming, trying to synch my iphone photos to my pc via the "Cloud" to simplify the process of uploading and posting. Right now, that ain't work'in so good. Maybe I need to go out onto a "Cloud" forum to figure that one out.

Re: Mikem59 FS18 Build
Posted: Tue Jun 11, 2013 11:19 pm
by Mikem59
Re: Mikem59 FS18 Build
Posted: Wed Jun 12, 2013 8:22 am
by AtTheBrink
I've never seen a CNC kit before, pretty cool stuff. That bow mold they sent you is going to really help you with the round chine. I really wish I had cut one for my build. This boat isn't immune to the Droopy Bow but it isnt as bad as some.
Re: Mikem59 FS18 Build
Posted: Wed Jun 12, 2013 12:50 pm
by Uncle D
Mikem59 wrote:The lease is just north of Lometa, Tx, which in turn is north of Lampasas. I've been out to the lease 3 times, beautiful out there. Although my passion is fishing, I can see right now, I'm going to enjoy this deer lease.
As a kid we hunted at my great uncle's ranch out of Lometa. The Hood Ranch. And that is beautiful country.
I pass by Nederland all the time.

Don
Re: Mikem59 FS18 Build
Posted: Wed Jun 12, 2013 10:24 pm
by Mikem59
Don, we're on a lease called the Bear Creek Ranch. Looking forward to squeezing in time to go out there. The good news, lots of dove, hogs, turkey, and deer. My hunting buddies are pretty fired up as the lease they were last on did not have dove nor much in the way of hogs or turkey.
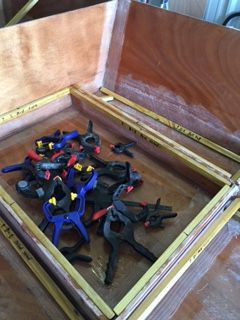
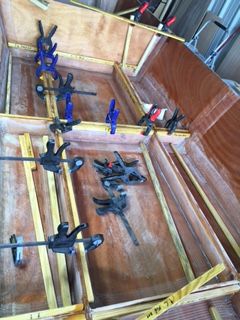
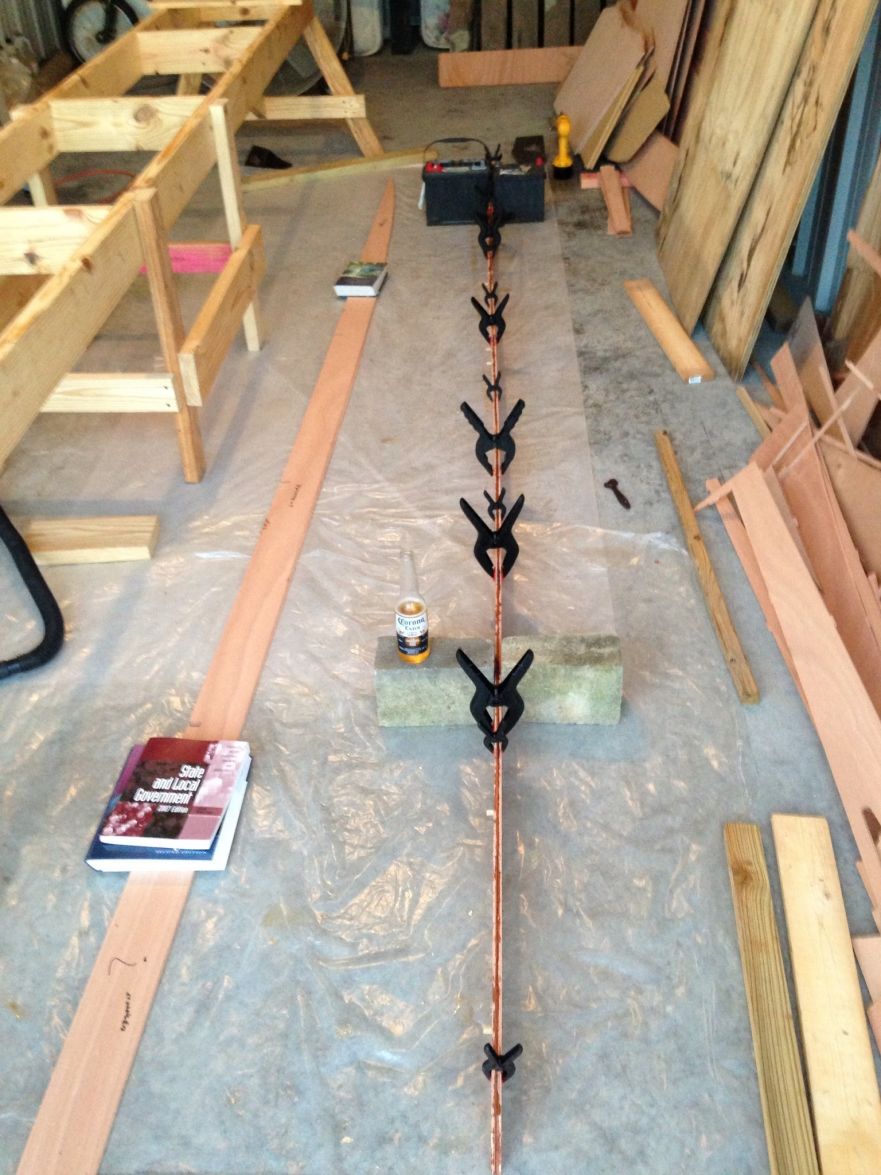
Now onto an update. Achieved a milestone this evening, got one set of stringers glued together. And, as expected the things that went well were due to all the tips and tricks posted by others. In particular, using 3/8" dowels to keep everything aligned. Without those I would have fought keeping things aligned while trying to clamp everything together. I bought some clamps at Lowes, based on tonight's experience, I need more!
As for a key learning and something I'll probably struggle with for awhile is batch size. I wetted out each of the pieces first using a total batch volume of 150 ml. That was pretty darn close to what was needed. As for the epoxy glue batch I should have stuck with the same volume. Instead I went with 300 ml. I thought the wood flour would require more volume. After completing, I probably had 75 ml leftover and didn't have anything else prepped to glue.
And the cure times I found in the help somewhere are probably pretty good. It called for a cure time of 49 min at 85 deg for the slow hardner. This small batch kicked in about 35 min. So that's probably about right. With that cure time, and working by myself, I would not have had enough time to glue anything else anyway.
I'll post some pics shortly.
Re: Mikem59 FS18 Build
Posted: Wed Jun 12, 2013 10:39 pm
by Mikem59
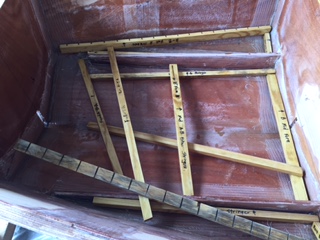
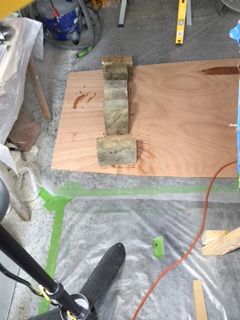
Here's that bow mold from the CNC kit. As you can see, I had to scab it together as it had broken during shipment.
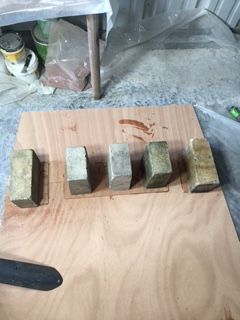
Clamps, and now I know, not really enough of'em:
Wetted out stringer sections:
Aligned, glued, and clamped together, as you can see, I celebrated my accomplishment:
Re: Mikem59 FS18 Build
Posted: Wed Jun 12, 2013 10:42 pm
by AtTheBrink
When you mix up batches of epoxy, epoxy glue, or fairing compound you can stretch your working time a bit by getting it out of your mixing pot and spreading it out on something like a piece of cardboard covered in packing tape. It slows down the cure by not allowing the heat to build up. When are you planning to start stitching her together?
Lookin' great so far!
Re: Mikem59 FS18 Build
Posted: Thu Jun 13, 2013 7:37 am
by Mikem59
I recall seeing that tip to use cardboard or a paint pan. And I'll give that a try when I decide to tackle more pieces with one batch or in one session. I'm glad I just did the one piece. As for a date for starting the stitching I'm thinking I can get to that stage by late this month. Have a couple of trips to take that are going to slow me down a little
Re: Mikem59 FS18 Build
Posted: Thu Jun 13, 2013 2:33 pm
by Uncle D
you can never have enough clamps...
Re: Mikem59 FS18 Build
Posted: Thu Jun 13, 2013 5:43 pm
by Mikem59
Ha, I've seen that pic and you are right.
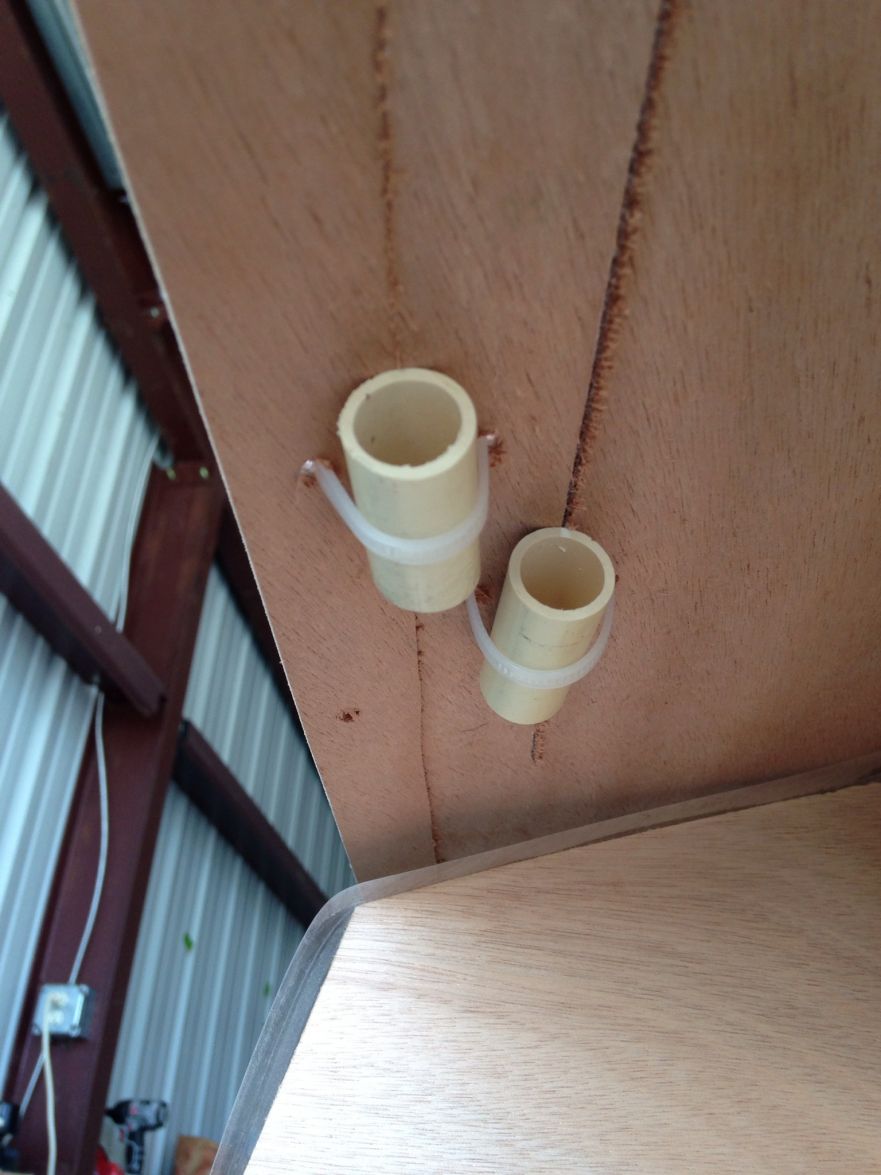
I've seen a few of the guys use PVC as clamps for the rub rail, unless someone feels that's more trouble than its worth I'm going that route. Regardless, I still need more clamps.
The first set of stringers went good. They are no doubt glued together. Got some cleanup on the top and bottom edges for all the epoxy glue that squeezed out.
Second set just completed gluing.
Now off to Pennsylvania to visit family for the Fathers Day weekend. I'll have some completed stringers waiting for me when I return next week.
And Happy Fathers Day to all you dads out there. Hope you all get out in your boats and get on some fish!
Re: Mikem59 FS18 Build
Posted: Thu Jun 20, 2013 8:40 pm
by Mikem59
Stringers glued, cured, and I've begun cleaning them up. And I had purchased a Stanley sure form plane and can see why it was recommended. Thanks to Cracker Larry as I believe it was on his build thread I picked that tip up.
As for tonight, siphoning gas out of my current boat. I guess after nearly four years the tank managed to accumulate some water and ruined my last attempt to head out fishing. Fuel rail and injectors cleared and cleaned. Big thanks goes out to the boat Ramp in Port Neches for the quick turnaround.
Why I didn't have a fuel water filter separator on this boat I don't know, but its installed now as well.
Hope to get in some boat work over the weekend. I'm ready to glue the transom as I've got those pieces cleaned up and have installed some 3/8" alignment holes. Pressing forward !
Re: Mikem59 FS18 Build
Posted: Thu Jun 20, 2013 9:12 pm
by AtTheBrink
PVC clamps- I used them on my boat and they work good. I used 3" pipe and cut them 1 1/2" wide. I used a 10" miter saw to cut them. Be careful and go slow, that pvc can get ugly quick!
Re: Mikem59 FS18 Build
Posted: Mon Jul 08, 2013 9:37 pm
by Mikem59
Not a whole lot of progress on my build of late. I've only managed to do some cleanup of the glued stringers and the transom. That leads me to a question regarding my transom.
I plan on mounting an Atlas Micro Jack Plate along with a 20 hp Suzuki 4 stroke. I'd like to put on the short, 15" shaft model. I don't have the exact measurements, but assuming it is 15" shaft, do I cut down the transom to match? Or, just stay with the plans and match up with a 20"?
And, I've noticed on some builds that the transom is thickened/reinforced. Is that necessary given my jack plate and motor plans?
Re: Mikem59 FS18 Build
Posted: Tue Jul 09, 2013 12:30 am
by Shamrock Kid
Mikem59 wrote: I've noticed on some builds that the transom is thickened/reinforced. Is that necessary given my jack plate and motor plans?
The plan calls for the transom to be three layers laminated together. I think as long as you follow the plans you will be fine. Im not and expert and am on my very first build myself. But I'm sure the more experienced builders will agree to follow the plans and you cant go wrong.
Re: Mikem59 FS18 Build
Posted: Tue Jul 09, 2013 7:02 am
by Cracker Larry
The transom is plenty strong enough as designed. I would leave it at 20" and use the jack plate to adjust the engine height.
Re: Mikem59 FS18 Build
Posted: Tue Jul 09, 2013 10:27 pm
by Mikem59
Thanks and yeah I agree I will leave the transom at 20". I looked at a boat today with a jack plate and a 40 hp and see that it should be a relatively simple and the transom should be plenty strong as mentioned. As much as I would like a short shaft motor, I'm not really sacrificing much in the way of added weight.
Sure wish I had started this build months ago so I'd have another boat to fall back on. My Blue Wave is out of commission, due to a little incident with some rocks resulting in a bent prop shaft, and minor hull damage. Glad I still have boat insurance.
Re: Mikem59 FS18 Build
Posted: Wed Jul 10, 2013 11:07 pm
by Mikem59
Got an opportunity to get in some work tonight and I must say it felt good to make this step. Got the frames and molds loosely fitted on the strongback. Had to do some minor trimming of the slots to get the stringers and molds "married" up, but all in all no issues there. The only question I have is with the transom knees. When I dry fitted/clamped the knees to the stringers, they don't rest flush on the strongback, they are 1" below the strongback. Obviously, the stringers can be raised up so that they will be flush, but they won't be resting on the molds - is that ok? I suspect it is as I believe the stringers should be flush with the top frames and molds as they sit on the strongback. But before I square everything up and secure everything to begin the planking, I want to be sure that is correct.
I'll post pics when I get to my pc.
Re: Mikem59 FS18 Build
Posted: Thu Jul 11, 2013 8:45 am
by Cannonball
I built the FS18 with the deck upside down on the strong back and when I clamped on the knees, the tops of the knees rested on top of the deck and lined up without any issues. This would be best for Shine to answer since it's a CNC package.
Re: Mikem59 FS18 Build
Posted: Thu Jul 11, 2013 10:06 pm
by Mikem59
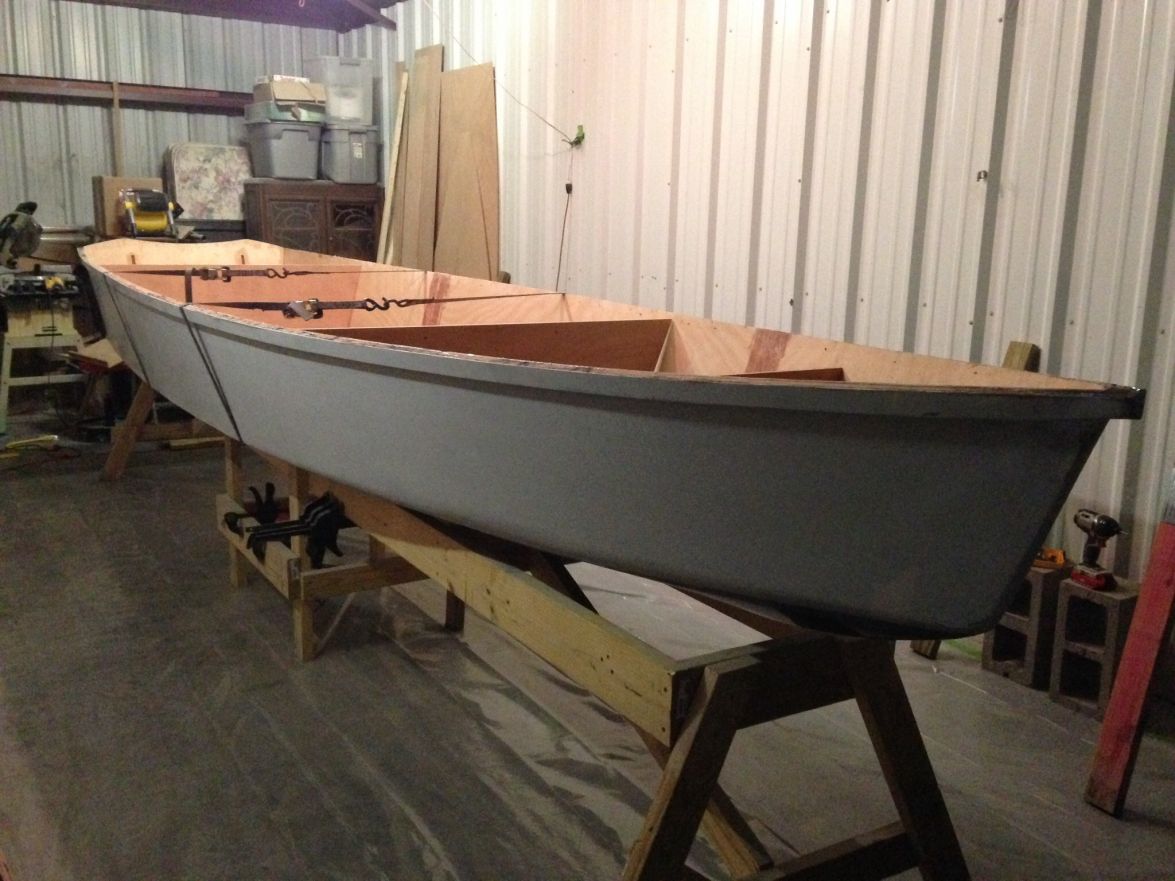
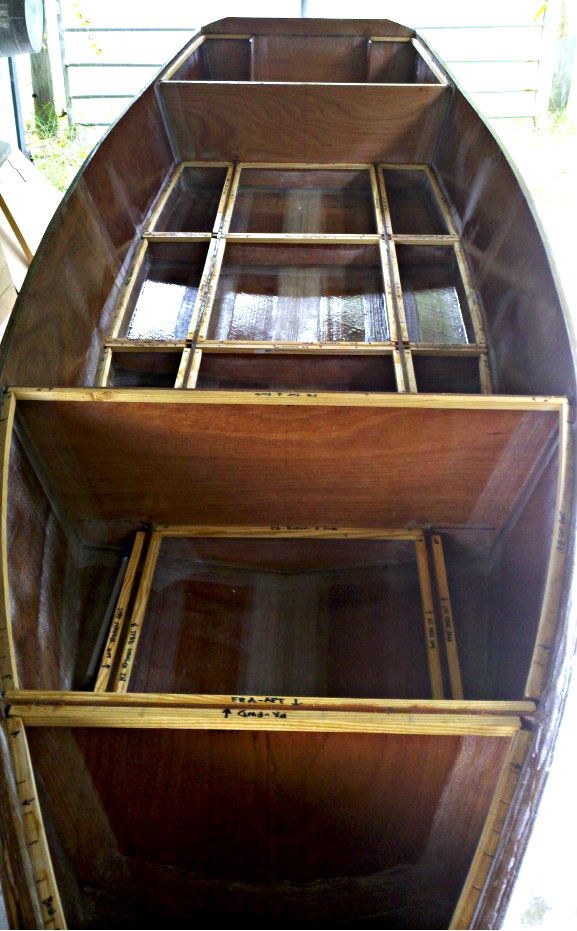
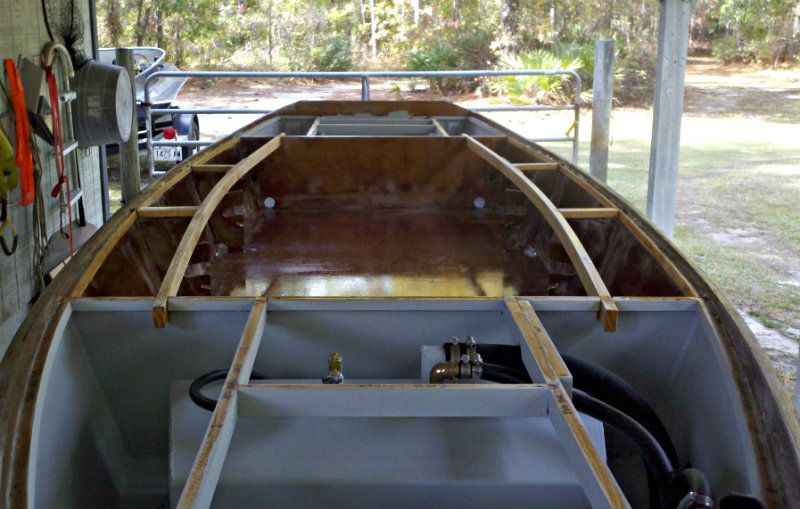
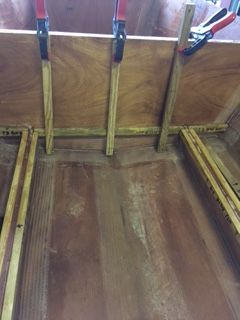
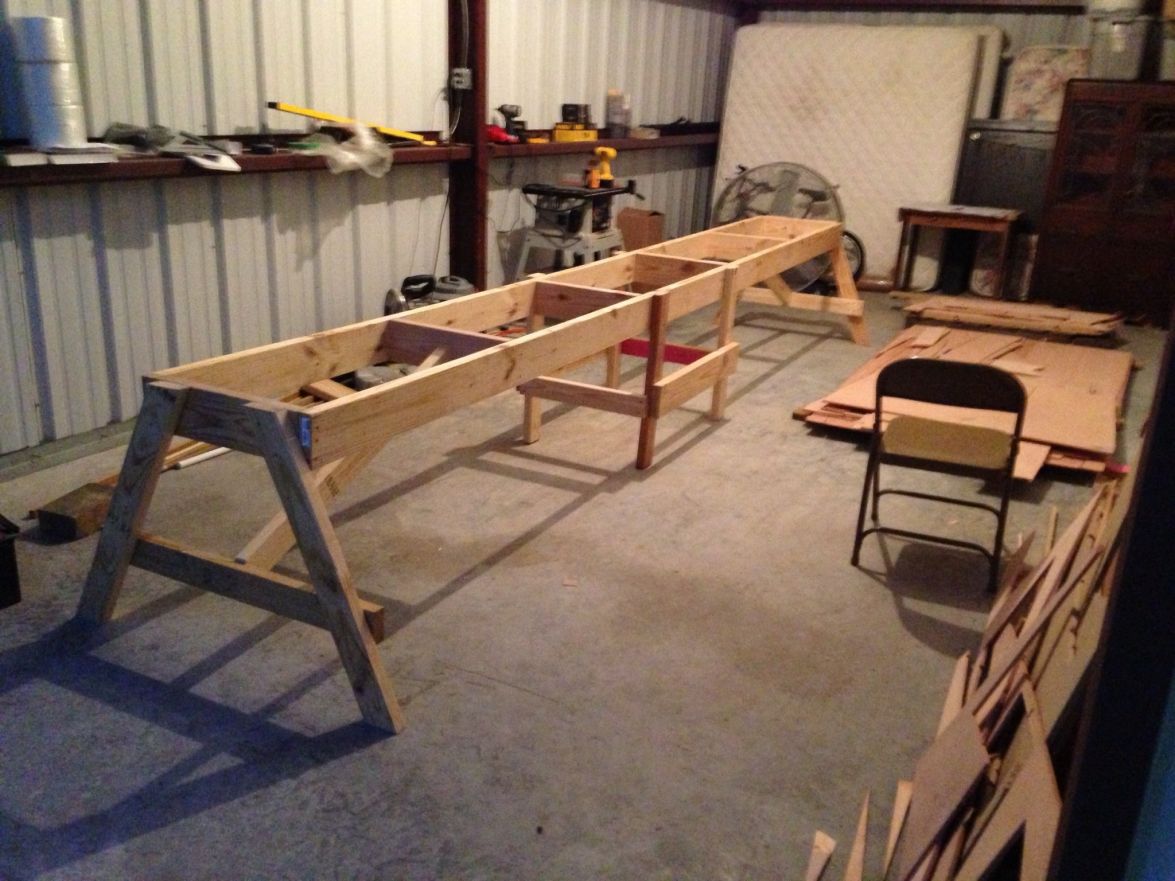
Here are some photos of my latest progress, loose fitting of frames/molds on the strongback. I've stayed with my original height of the strongback. Hopefully, I won't regret that decision. Once I flip the hull, I'll look at lowering to accommodate the interior work.
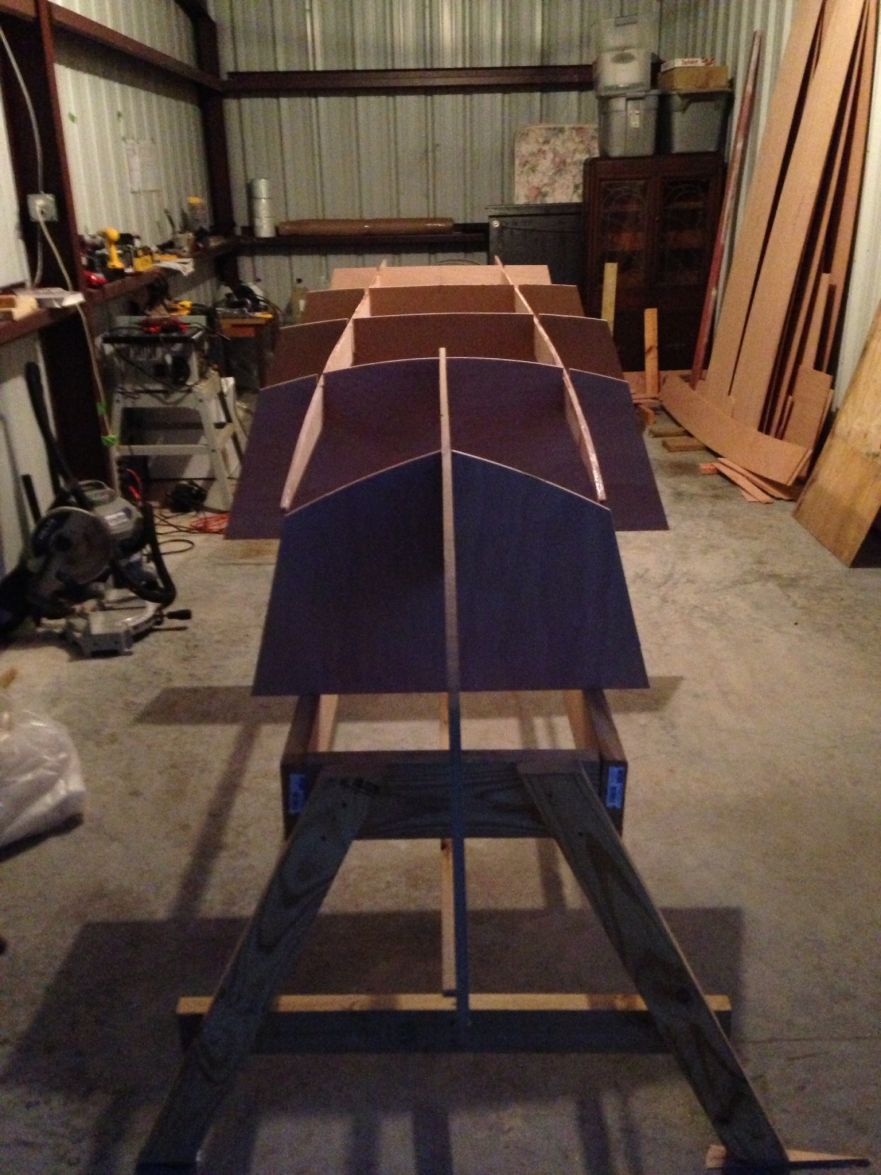
Here's a view from the transom end. I suspect you experienced builders will see some issues with my strongback.
Yep, the support legs need to be on the inside to allow for the transom to sit properly to fir up the stringers and knees; and, with my strongback narrower than the builder notes, the knees will not rest on the strongback. Both will be easy fixes.
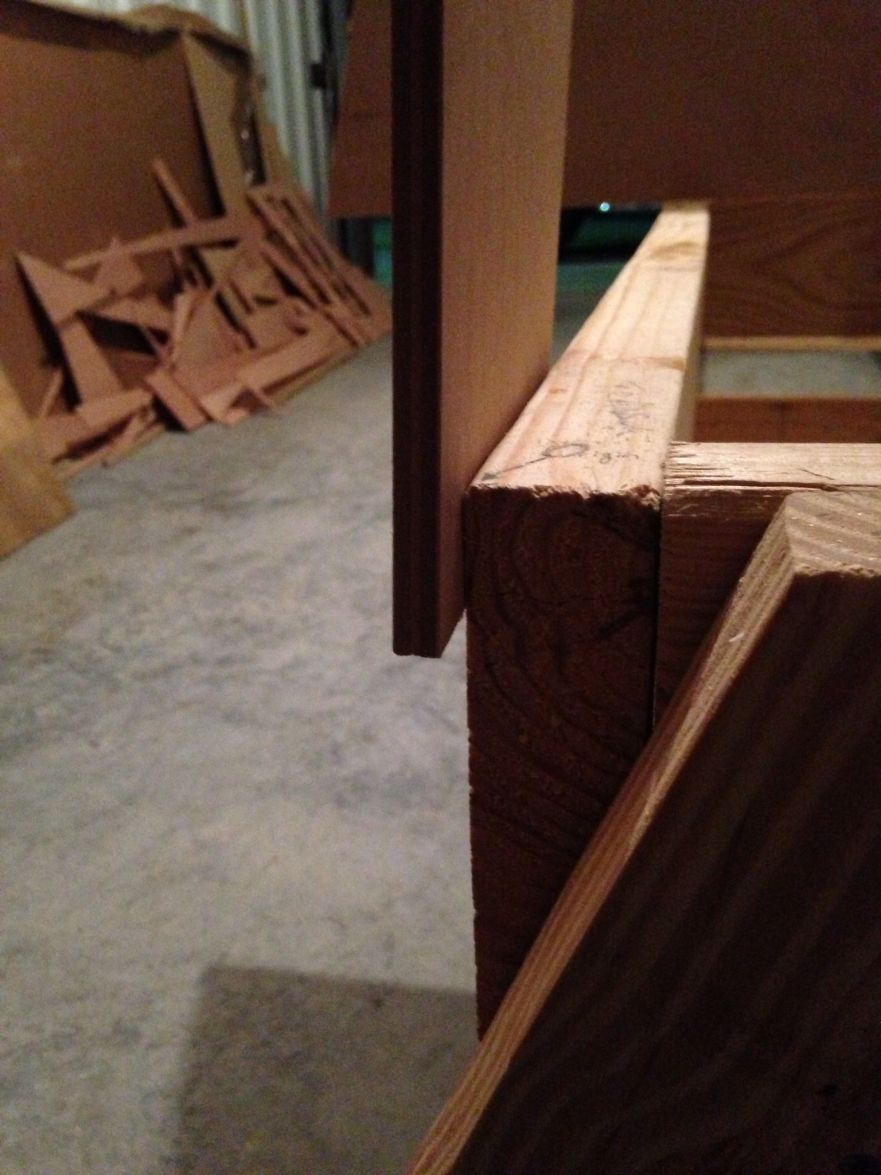
And, as you can see, the knees are sitting 1" below the strongback. It appears that if I lift the stingers to have the knees rest flush, the stringers will be flush with the frames/molds as well.
Once I finish up with a mini-church retreat Saturday afternoon, I plan on getting in some time over the rest of the weekend. Hope to center/square up everything to secure and prep for the hull planking.
I know one thing, I'm enjoying the heck out of this.
Re: Mikem59 FS18 Build
Posted: Thu Jul 11, 2013 11:47 pm
by AtTheBrink
It is fun ain't it!?!
I can see in you pictures that the notches are deeper than they need to be. Just shim them up to flush with the frames and you will be good to go. Everything looks good. Get it all square, level, flush and plumb and there aint much that can go wrong!
Wish I had had a bow mold...
Re: Mikem59 FS18 Build
Posted: Fri Jul 12, 2013 4:41 pm
by Mikem59
Thanks Mike for the confirmation that all I need to do is shim up to get the stringers flush with the frames.
As for the bow mold, I would suspect that it will be very helpful. Looking forward to getting everything squared up and moving on to the next step.
Re: Mikem59 FS18 Build
Posted: Wed Jul 17, 2013 10:58 am
by Mikem59
Guys, I have what may be a dumb question, when joining the hull panels, do you do one side at a time? If not what's the trick to doing both sides in one session? Ive gone through some of the other builds and its not clear to me how this is done. Thanks Mike
Will post some pics soon but have finally got everything square, plumb, and secured on the strongback and ready for hull planking.
Re: Mikem59 FS18 Build
Posted: Wed Jul 17, 2013 11:13 am
by Cracker Larry
Lay the bottom panels on the jig first with them loosely stitched down the middle. Then loosely stitch one side panel onto the bottom, then the other one. With all panels hanging loose, start tightening the stitches a little at a time, working evenly around the boat.
Re: Mikem59 FS18 Build
Posted: Wed Jul 17, 2013 12:42 pm
by Mikem59
CL. Thanks for your reply. And, I realized after I posted my question I had poorly phrased it. My question revolves around joining, gluing, and glassing together the individual hull panels. Maybe i should say splice together the hull panels. I have not yet joined/spliced the individual hull bottom or side panels as yet. Hope that is more clear. Thanks
Re: Mikem59 FS18 Build
Posted: Wed Jul 17, 2013 12:49 pm
by Cracker Larry
Sorry, I misunderstood the question

I splice one side at a time. I've tried doing both and it always comes out sloppy on one side.
Re: Mikem59 FS18 Build
Posted: Wed Jul 17, 2013 12:56 pm
by AtTheBrink
Are you talking about splicing the pieces together to make the panels? If so, you do one side at a time. Make sure you have a flat clean surface to work on and back up the joint with something that epoxy wont stick too. I used plastic packing tape, that helped contain any seap thru and minimized sanding on the other side when I flipped it, but you can just put a piece of sheet plastic under the joint. Prep the joint with neat epoxy, fill the joint with epoxy/woodflour glue(you want the glue fairly stiff so it doesn't run out or sag leaving an air pocket) and then tape it. Let it cure, flip it and do the other side.
Just a tip, sand or plane down the ends you are joining enough to make a flat finished joint. It will save you a lot of fairing. You can just do the outside of the panel.
Re: Mikem59 FS18 Build
Posted: Wed Jul 17, 2013 1:17 pm
by Mikem59
CL and Mike, once again thanks for the replies and yes you have both answered my question. And will just plain plastic be sufficient for backing to prevent the epoxy from sticking?
Re: Mikem59 FS18 Build
Posted: Wed Jul 17, 2013 1:45 pm
by Cracker Larry
Yes, about any kind of plastic. I buy a big roll of cheap drop cloth plastic and cut off pieces as I need them.
Re: Mikem59 FS18 Build
Posted: Wed Jul 17, 2013 9:42 pm
by Mikem59
Yeah, I've got plenty of plastic, I bought a couple of the drop cloth plastic rolls. And, as you can see, I've already covered the floor of the work area.
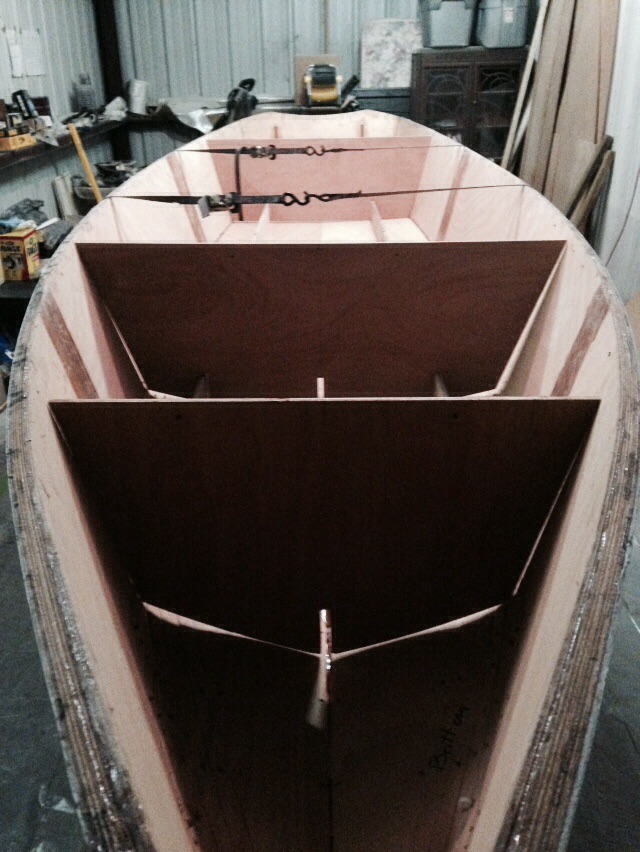
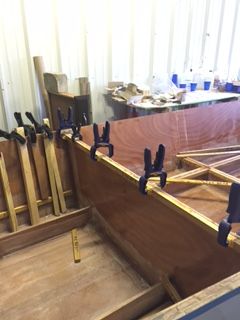
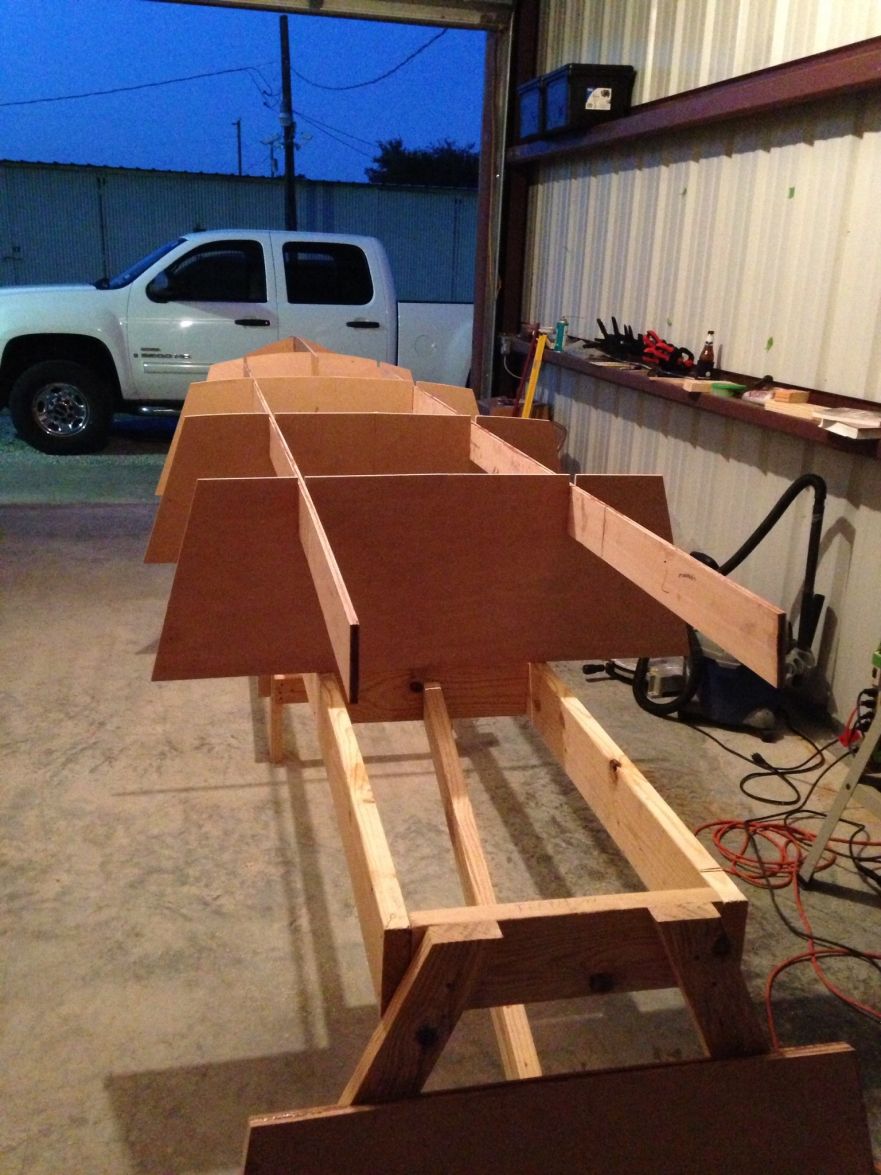
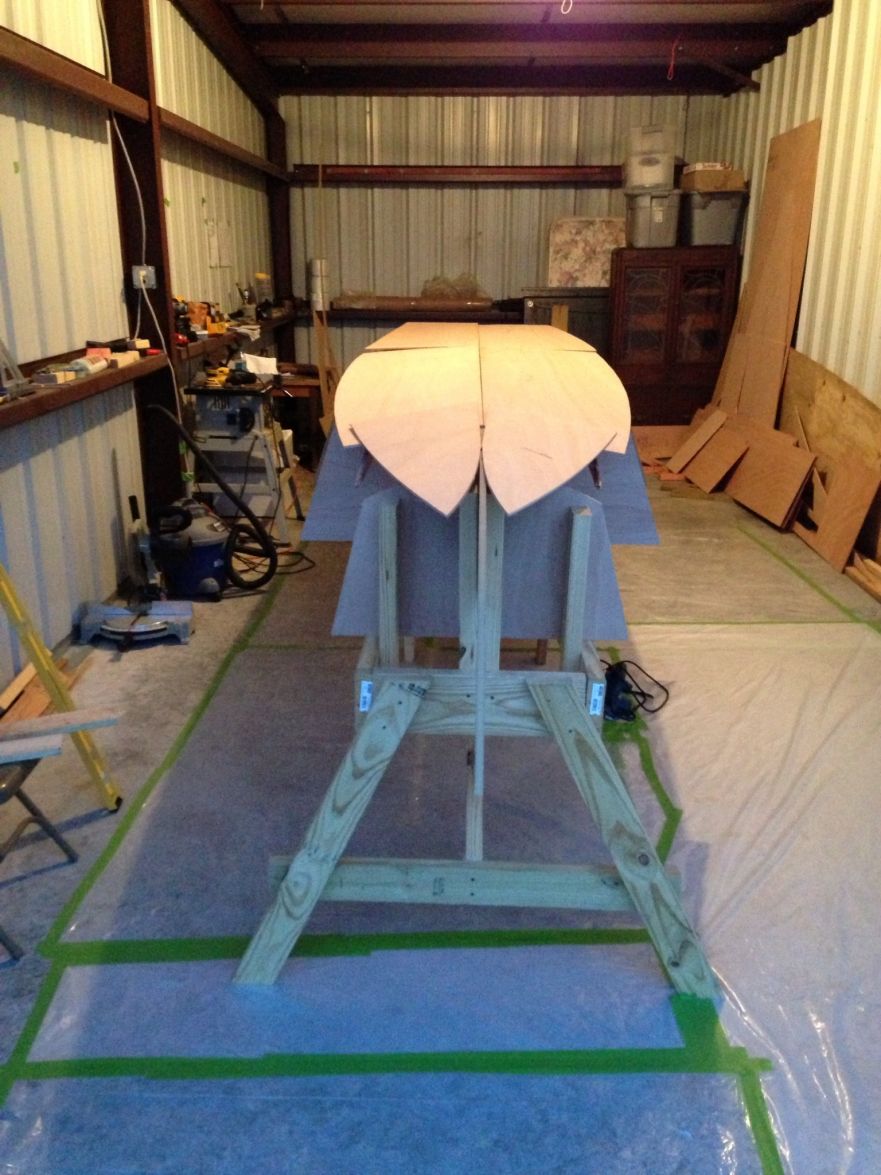
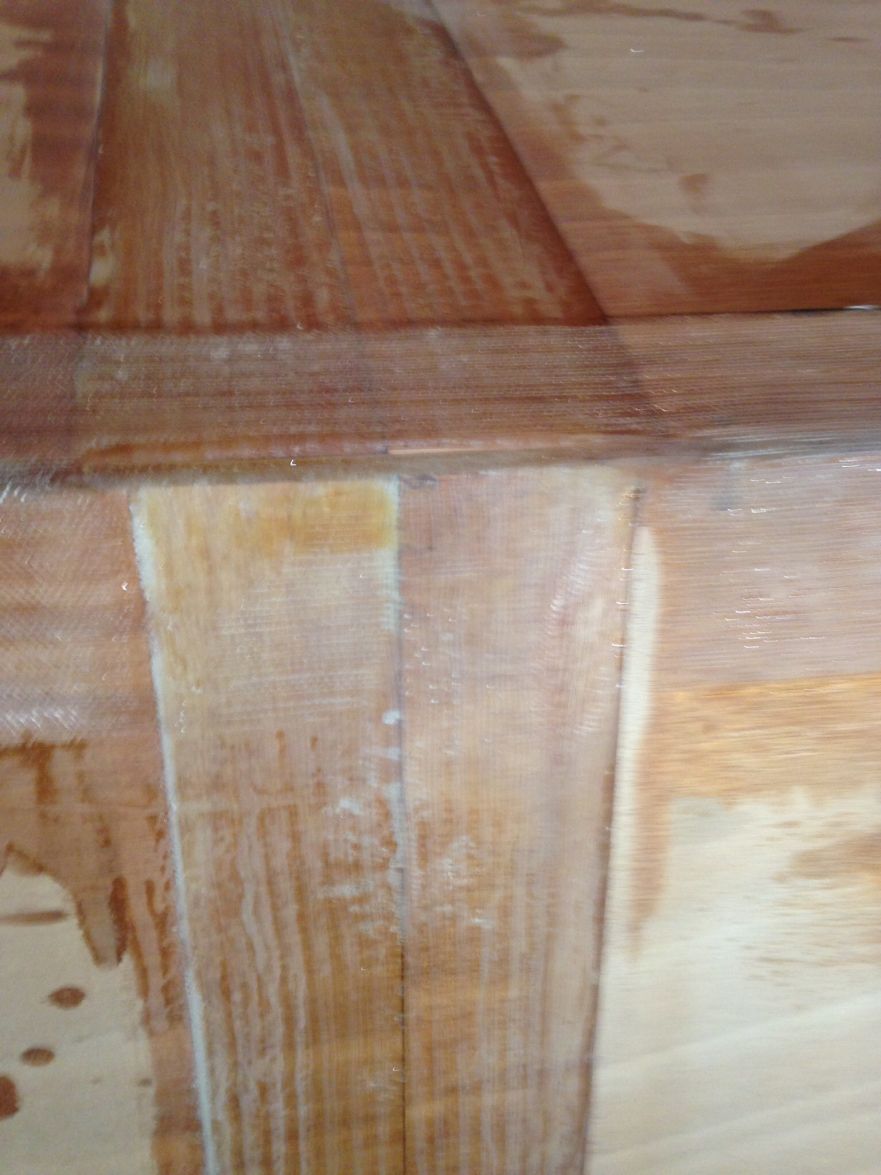
In this pic, you can see the floor covered up beneath and to the side of the strongback. And, I was so excited to have the molds/frames squared up, plumb, and secure that I just had to lay the hull bottom panels to get a rough idea how they will fit.
While I'm finally at my computer instead of an iphone or ipad, I'll post a few pics. Not terribly exciting for most of you, but I'm real pleased with my progress,and completing each step is such a confidence builder. I've seen it said a lot on the other builder posts, but, yes, "just follow the plans" and things do come together. But yes, questions do come up, but the help out here is just phenomenal.
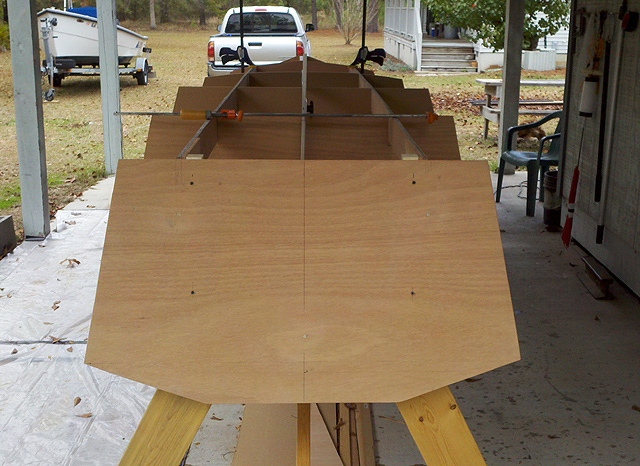
This threw me off for awhile, the transom not looking as though it was flush with the top of the knees and stringers. But photos on CL's posts seemed to confirm that was how it is supposed to be. And, yes, once I put the panels on top, it was like, of course, the panels sit flush on the back of the transom due to the angle, duh. Once again, just follow the plans and don't overthink it.
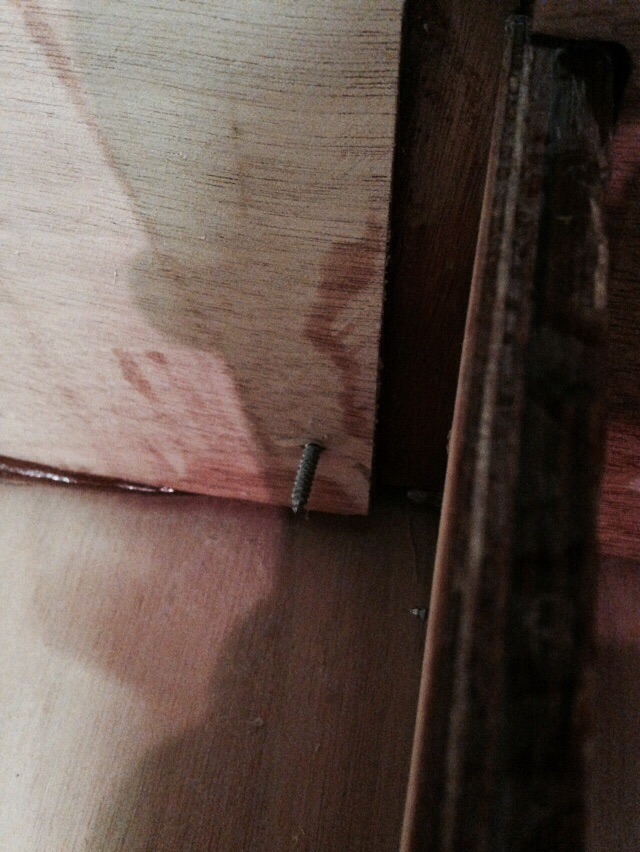
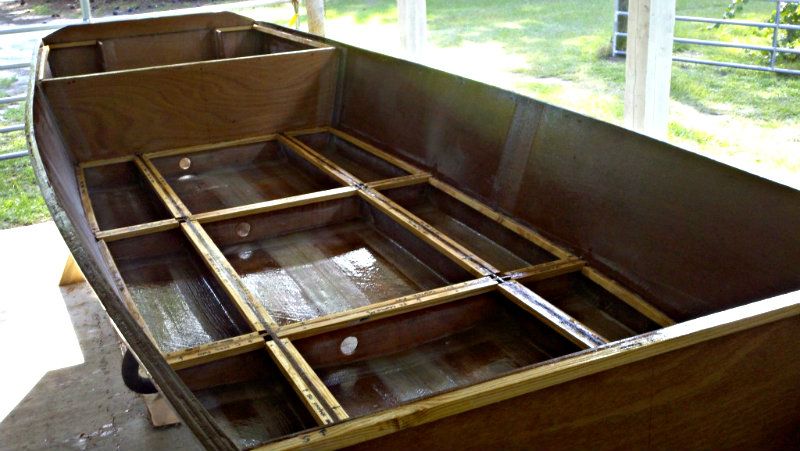
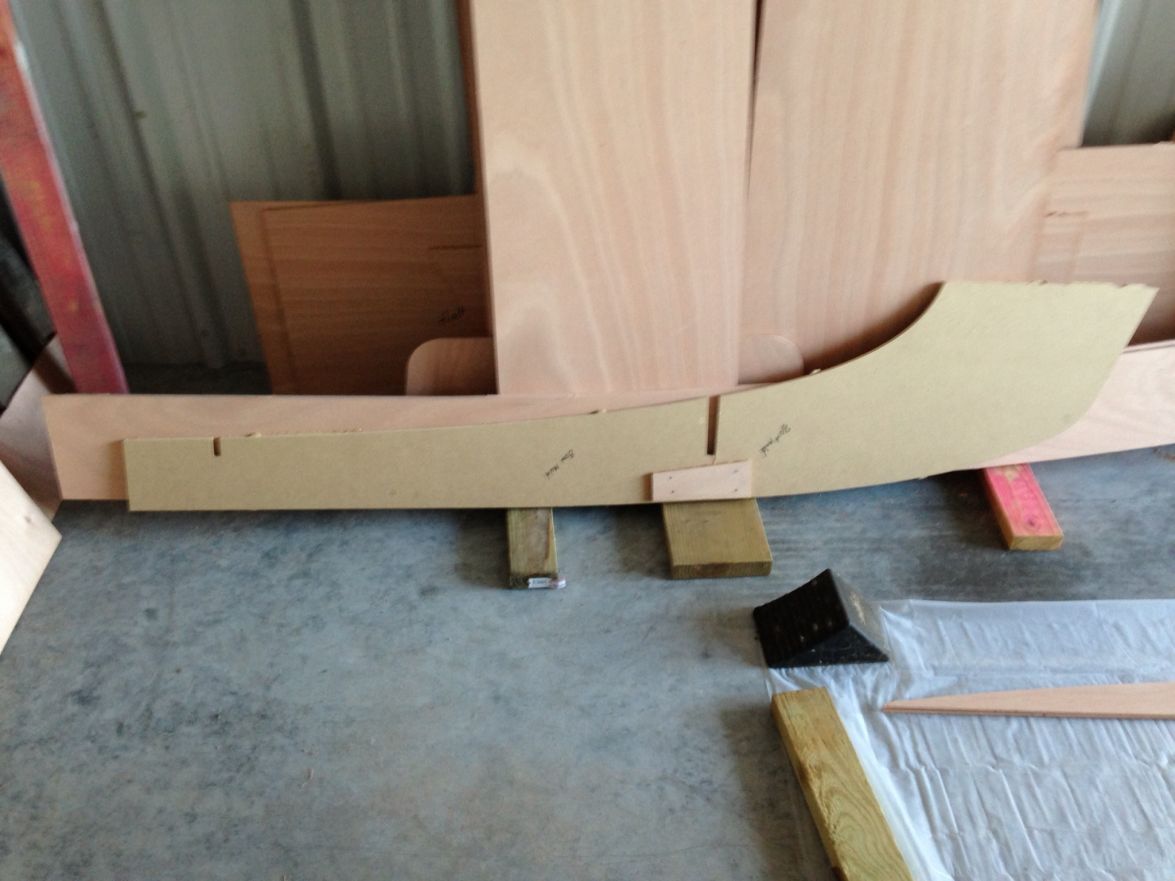
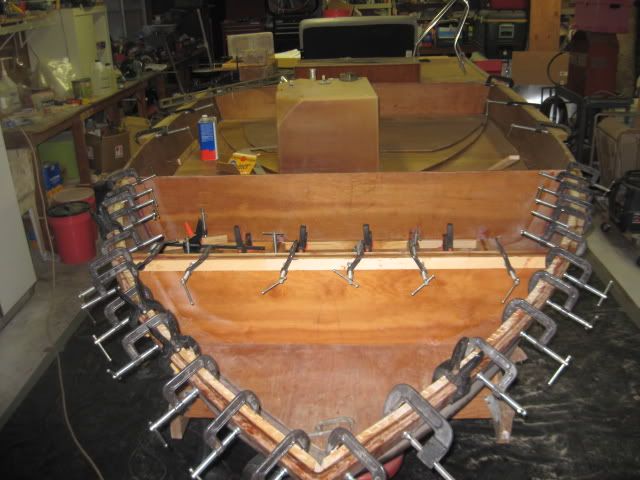
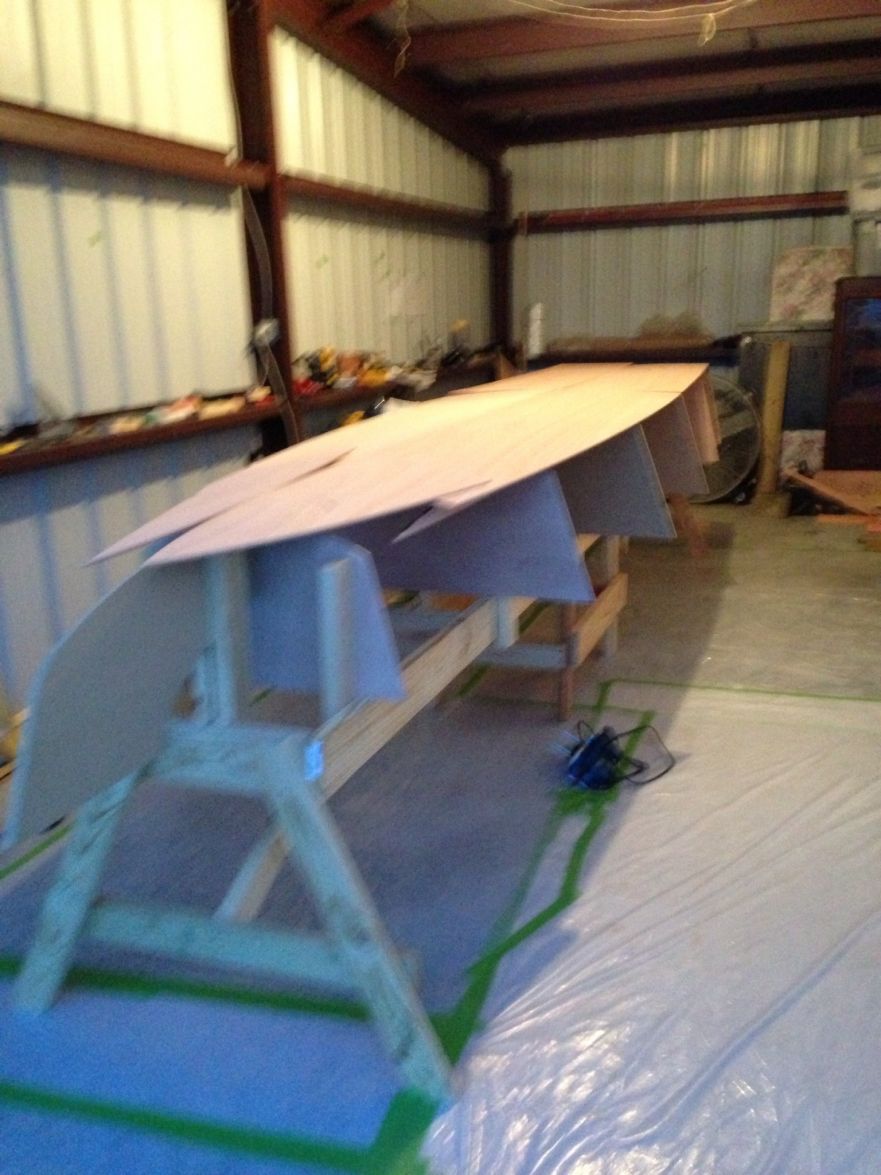
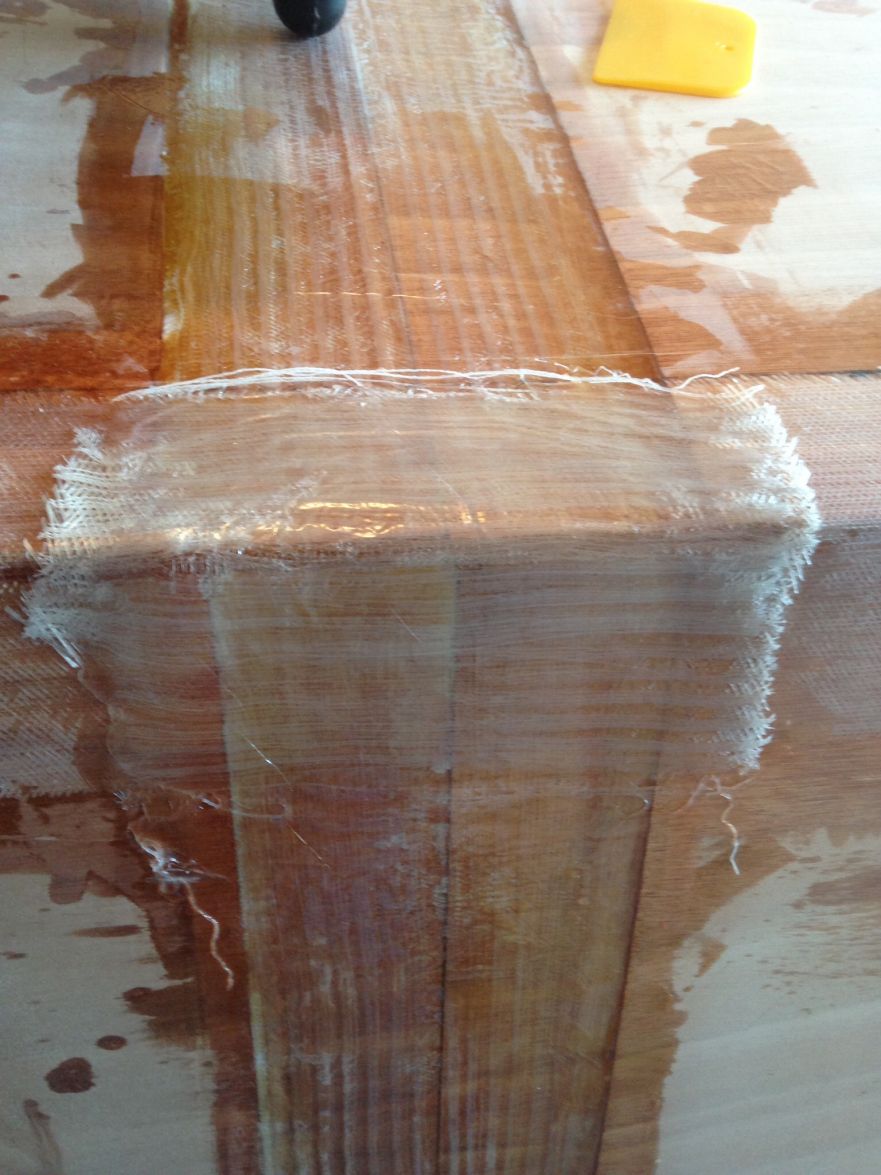
But here is a photo of an issue I'm not sure about. The stringers, remember from the CNC kit, when glued up are flush on both edges for most of the length, but there is a section whereby they are only flush on one edge. If this is going to be a problem down the road, let me know, otherwise, I may do some minor trimming just to ensure the stringers remain level for when I begin the hull planking. Also, you can see the dowel plug used for aligning and keeping them aligned during gluing. Worked like a charm for the stringers as well as the transom.
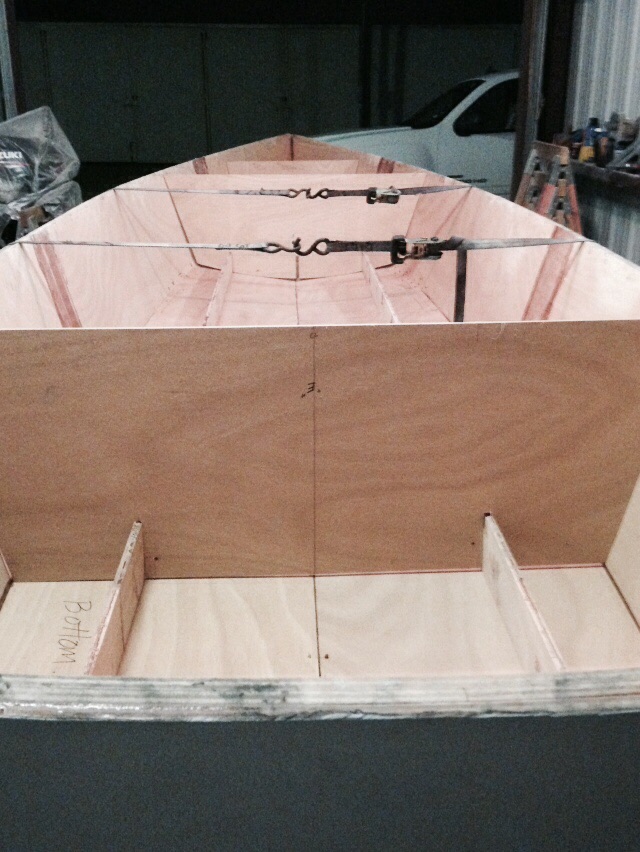
Lastly, here's another photo looking straight on the completed "jig". You may recall the bow mold had broken during shipment. I had finally epoxy glued it back together. But once I completed everything, had some concerns about the strength of that bond once I begin planking. So, I braced it as well.
Re: Mikem59 FS18 Build
Posted: Thu Jul 18, 2013 6:11 am
by Cannonball
Coming along nicely. The uneven stringer lamination shouldn't be a problem as long as the stringers are straight and will allow the hull panels to rest on them without creating any hook or rocker. Later the topsides will get cleats and the underside will get an epoxy fillet that will make that go away. One piece of advicc, Take Your Time Stiching! I wish I would have spent a little more time making sure everything was straight and true befor gluing up. All in all it only takes a half a day to really get everything hung drill holes and stitched. Take an extra couple hours to pull some string lines over the bottom to check for hook (fs18 seems to be prone to a slight hook I've seen everybody have to push out), do that and you'll save some time later.
Re: Mikem59 FS18 Build
Posted: Thu Jul 18, 2013 8:46 am
by Mikem59
Cannonball, thanks for the input and advice. One thing I did make sure of was that everything was square, plumb, and level. Like you say, I figured that what is now the top edge of the stringer will become the bottom and will then be glued to the hull. And I recall reading that the stringers shouldn't be in direct contact with the bottom, the epoxy resin fillet provides the bond to the hull. Given that understanding and your confirmation I feel good about the stringers. As for the advice on the stitching, thanks for the heads up, getting the hull "fair" is a big deal from what I've gathered. I'll make special note of this advice.
Thanks
Re: Mikem59 FS18 Build
Posted: Thu Jul 18, 2013 11:00 am
by AtTheBrink
What's up with your bow bottom panel? It looks like there is some trimming that needs to be done. That is an exciting part of building a boat! Seeing the hull come together is always cool!
Re: Mikem59 FS18 Build
Posted: Thu Jul 18, 2013 11:11 am
by Cannonball
You bet. Just a note: The stringers should be in contact while your at this stage to keep the bottom level, and your correct they will sit up off of it a bit when you fillet them in after the hull flip. Hoping to flip this weekend myself.
Re: Mikem59 FS18 Build
Posted: Thu Jul 18, 2013 11:17 am
by jacquesmm
1. Transom: why does it not line up at the bottom? It should. What reference did you use to set the height of the transom?
With the kit, you don't have to measure anything, simply put the transom on the jig lined up with the stringers and that's it.
BTW, you line up the outside edge with the stringers, not the inside. After planking, there will be gap that you fill with putty. Maybe that is what we see in your picture, it may be correct.
2. Stringers: Why does layer one not line up at the bottom? Did ti shift while you were gluing? The two layers are perfectly identical, they should match.
Do the port and starboard stringers match? How much is the difference?
It looks very small and as you write, it should be easy to shave that 1/4" off but I wonder why there is a difference.
The stringers must be perfectly straight for the stern half of the hull. Make them straight by shaving that little bit off or if there is a gap, no problem, it is small and will be filled with putty.
All together, I see no real problem but I wonder about the two points above.
The kit is cut from the CAD file. In the CAD file, I do not draw 4 layers of stringers. I draw one and copy it. It is mathematically 100% identical, same control points. Those points are used by the machine to cut, there should not be any difference unless a piece moved a little bit during the cutting.
Re: Mikem59 FS18 Build
Posted: Thu Jul 18, 2013 5:30 pm
by Mikem59
Wow, once again, a lot of support out there. I'm responding not only to address the questions but, apparently for my own good.
Mike - nothing wrong with the bottom panel, at least I hope not. They were just layed up on top of the molds, but I didn't lay the bow panels flush with the middle panels. I've certainly not modified them in any way from the CNC kit. So, I expect they are perfectly fine.
Cannonball - no doubt, yes, those stringers will be in contact during the hull planking.
Jacques - I'm certainly hopeful there aren't any issues with my transom. I lined it up as you state, with the knees and stringers lining up in the cut out in the transom. I did have to make a slight adjustment post picture as the one side didn't get seated in quite right. That has since been corrected. And, once the panels are laid down, they do rest flush with the back edge of the transom. After doing that, it made sense to me. Again, hope that is correct. It was a simple geometry lesson for me. I don't recall the angle of the transom, but due to its angle the back edge "kicks up" just a little such that it makes up for the apparent difference at the part that is mounted to the transom knees and stringers. And, the following picture from Cracker Larry's FS18 build helped me decide I was alright.
As for the stringers, I would most certainly agree, one would think the CNC cut stringers should be identical, but they weren't. At first, I though perhaps one was supposed to be taller than the other due to the hull shape, but once I put them in the frames/molds, the edge you might expect to be longer/shorter to accomodate for the slight difference in hull shape didn't make sense regardless of which set of stringers went where. Also, prior to gluing them, I lined them up and no matter how I did it, one edge was slightly taller than the other. So, when I glued them, I used 3/8" dowels to align them and keep them from "slipping" while gluing. And, knowing the bottom of the stringers, upon flipping, would be glued/filleted to the bottom, I made sure that was the portion that stood taller so I could trim if needed.
I realize that doesn't answer the question as to why they aren't exactly the same size along the entire length, but I don't see it as a showstopper. I will make the minor adjustments to ensure the panels lay flush with the stringers, frames, and molds as well as remain level. And, the height difference is maybe a 1/4". Very fixable with time, and, well patience.
I'm hoping to get the bottom panels joined/spliced this evening. Out of town over the weekend, so I won't finish the side panels till next week. Factor in the rub rail construction, I don't see flipping for at least a few more weeks for me.
Thanks again to you all!
Re: Mikem59 FS18 Build
Posted: Mon Aug 05, 2013 7:36 am
by Mikem59
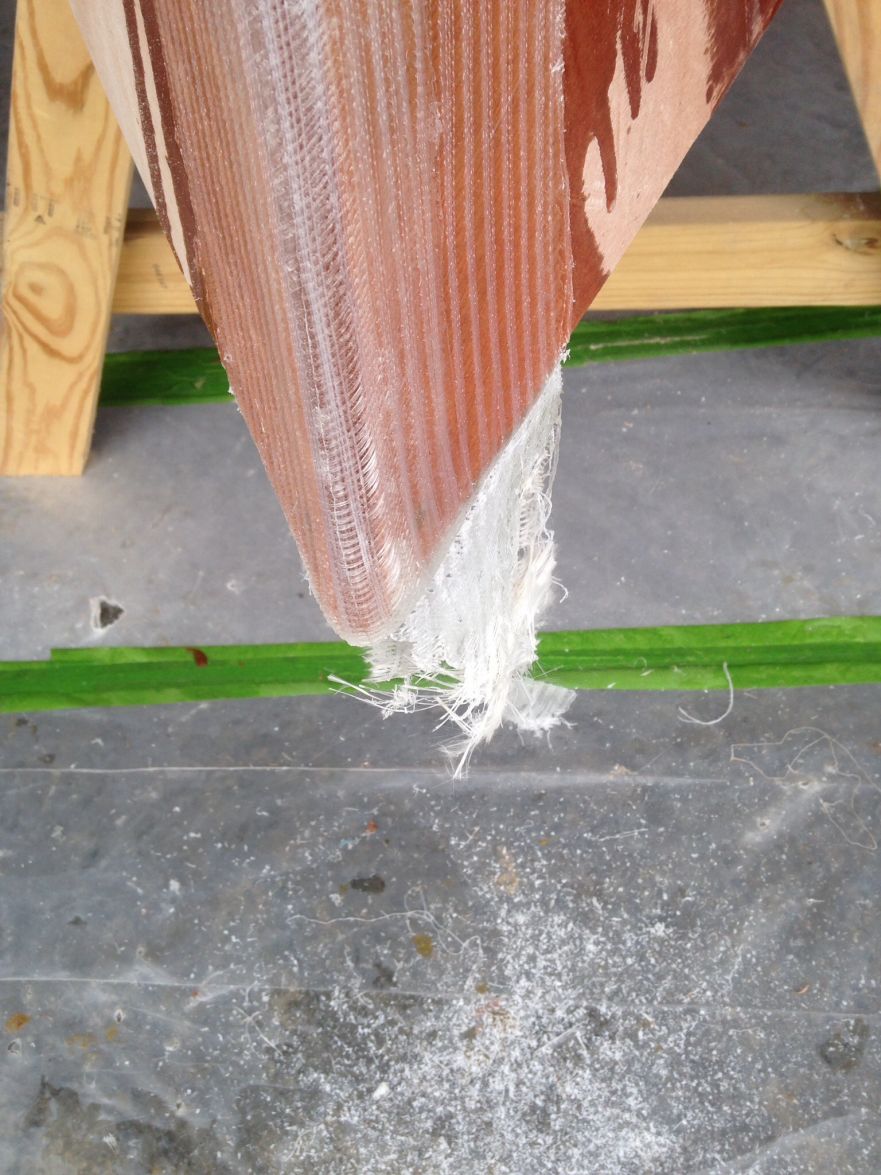
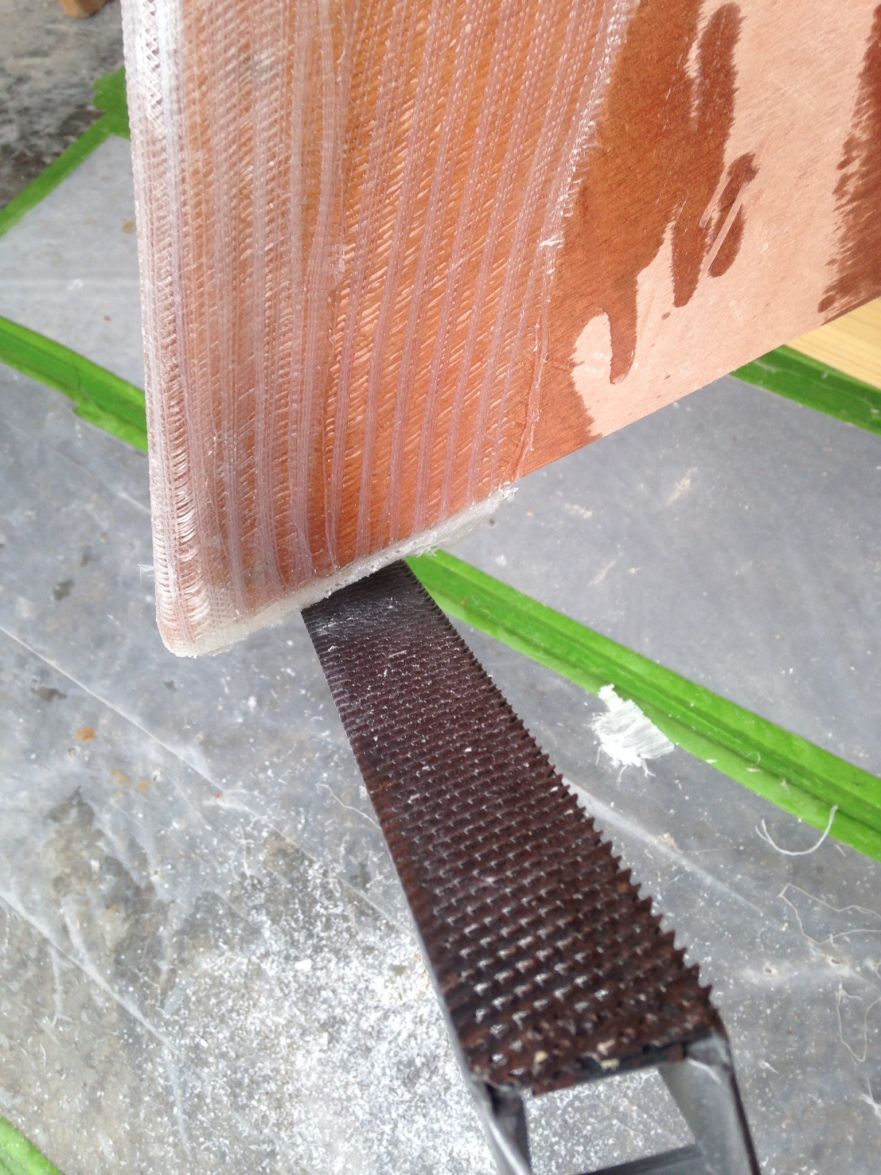
Finally completed joining the bottom hull panels, but I'm a bit disappointed

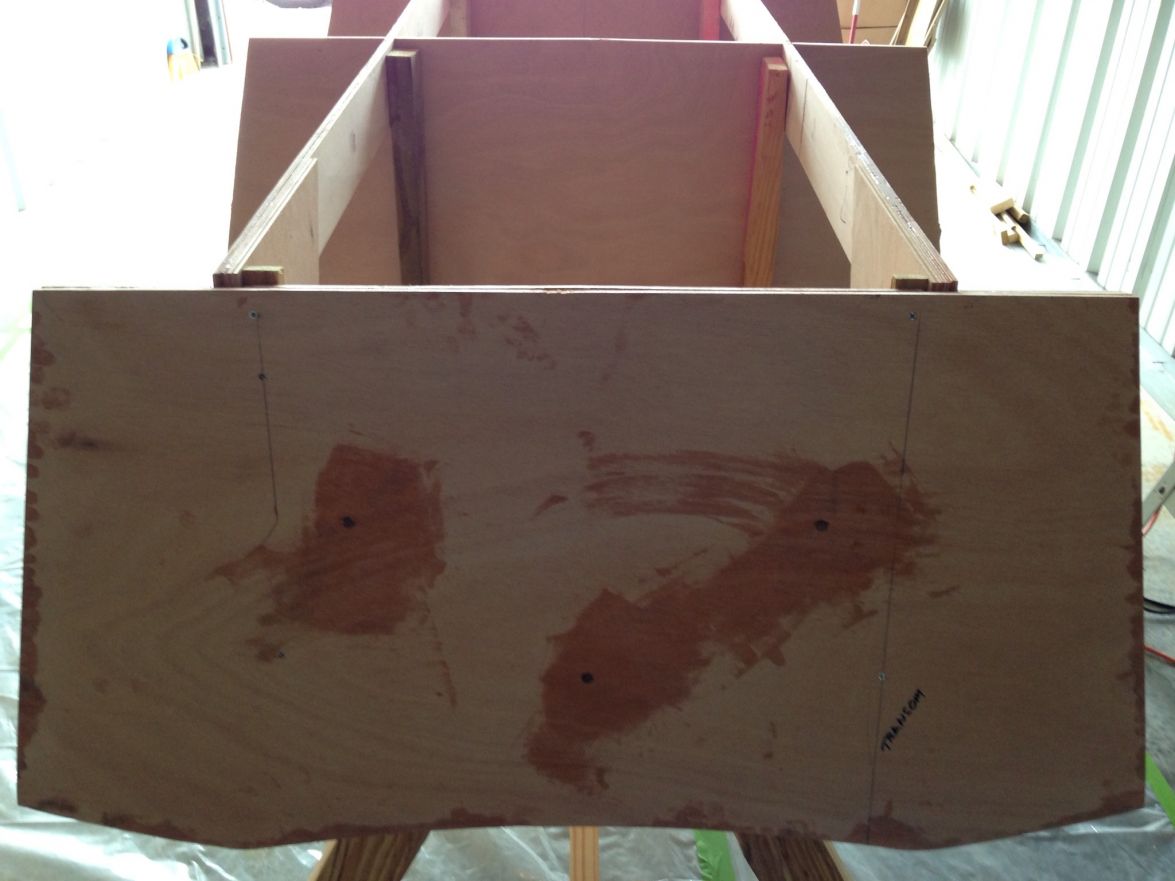
in my effort and need some insight on whether I need to make some fixes now, not at all, or wait till I get'er stitched and glued and ready for glass. Below are a couple of photos of the joints.
In this pic, there are some gaps where the resin didn't fill all the way in and the fiber glass was not quite as wide as the section I had planed out for the joint.
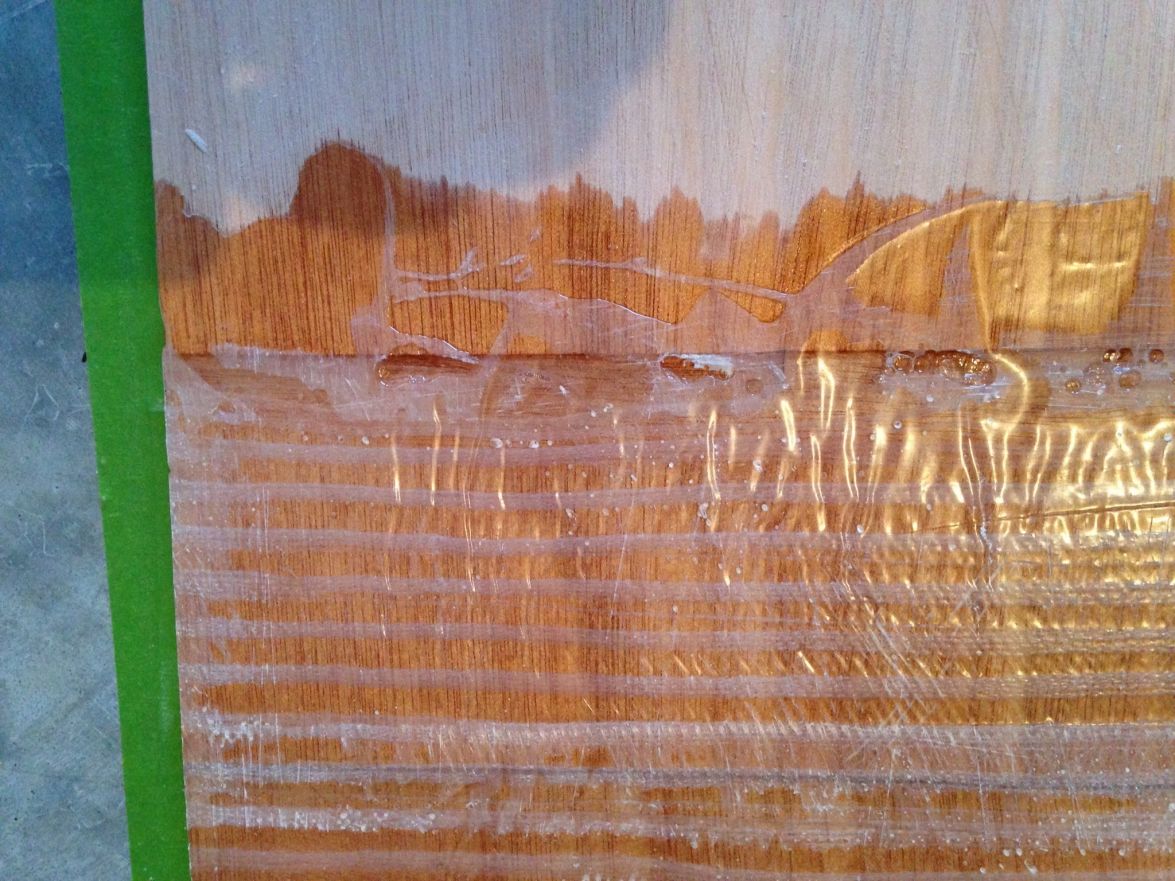
Similar in this pic, but more pronounced.
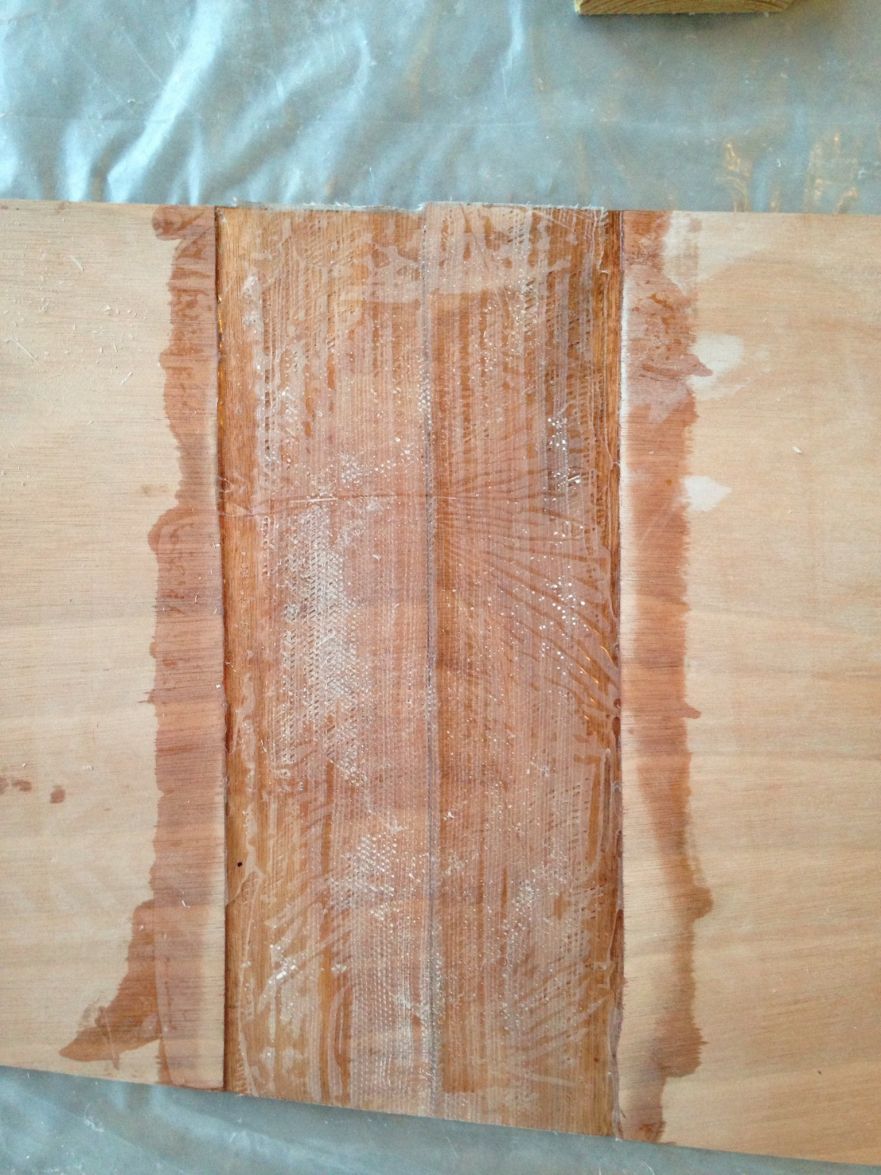
My mistakes were making the planed out portion of the joints to wide for the fiberglass; and, upon completing the glassing, I did not apply even pressure over the joints while curing.
I don't want to get ahead of myself here and regret making a bad decision this early in the build. Looking for the right step to take here.

Thanks.
Re: Mikem59 FS18 Build
Posted: Mon Aug 05, 2013 9:47 am
by AtTheBrink
I am not sure what you are talking about. What gaps? It looks pretty good to me. Remember it is easier to fill and fair a low spot than sand and fair in a high spot. The only thing I see is you used a bit too much epoxy.
Do you have pictures of the back side of your joints?
Re: Mikem59 FS18 Build
Posted: Mon Aug 05, 2013 12:48 pm
by Mikem59
Mike, thanks for the comments. The joints have some gaps near the edges that are hard to see. But, as you say, better to fill and cair than to have to deal with a high spot. And, yes too much epoxy. I guess I'll chalk that up to beginner mistake. I think I'll do some filling with a fairing mix now rather than after I stitch and glue the panels.
Thanks!
Re: Mikem59 FS18 Build
Posted: Mon Aug 05, 2013 1:15 pm
by Cannonball
Take a look at Cracker's FS18 when he's glassing in the middle of his thread somewhere, I think page 40-50 somewhere there's a Cracker tutorial. Use 1 oz of epoxy per 1' of 12 oz tape. I've used this as a general rule after using too much on my panel joining and it has served me well since.
Re: Mikem59 FS18 Build
Posted: Mon Aug 05, 2013 2:42 pm
by Mikem59
Cannonball - yes I remember seeing a go by for resin to glass somewhere. And I tried to use that basis. I just need more practice. Thanks!
Re: Mikem59 FS18 Build
Posted: Mon Aug 05, 2013 6:46 pm
by AtTheBrink
No worries, my first joints looked just like that. You learn as you go. You will be an expert in no time.
Re: Mikem59 FS18 Build
Posted: Tue Aug 06, 2013 9:12 am
by tech_support
its fine. The glass is wet out, thats what matters. Dont bother with the plastic peel ply unless you can put enough weight on it to make it FLAT.
When I mix epoxy I plan on 1 oz. per foot of 6 in tape, but it goes almost double that if you doing two layers wet on wet.
Re: Mikem59 FS18 Build
Posted: Tue Aug 06, 2013 9:35 am
by gk108
Yep, what Joel said. On these splice joints where you have planed the plywood, it's just as easy to leave out the plastic and sand down the binder threads before applying filler to fair the joint.
On areas where you use the plastic, dry squeegee or dry roller on top of the plastic to force excess resin out of the tape. Even if you end up with little resin pools away from the tape and joint, that's still easier to clean up than pools on the tape itself.
Re: Mikem59 FS18 Build
Posted: Tue Aug 06, 2013 5:18 pm
by Mikem59
Based on what I'm reading, seems that I could just move ahead to stitch the panels then do the filling and fairing when that step comes into play. My main thing was ensuring I don't move forward with a problem that can't be fixed later. Thanks for the input!
Re: Mikem59 FS18 Build
Posted: Tue Aug 06, 2013 5:51 pm
by gk108
do the filling and fairing when that step comes into play
That's about the way it is. There may be a few places where you want to fair first because of ease of access, but not many. You definitely don't want any lightweight filler between the splice tape and the chine tape, etc.
Re: Mikem59 FS18 Build
Posted: Tue Aug 06, 2013 5:54 pm
by Cracker Larry
Yep, what GK said. Just carry on

Re: Mikem59 FS18 Build
Posted: Thu Sep 05, 2013 9:24 pm
by Mikem59
Wish I could say that my long absence from the board meant that I've been working feverishly on my build. Work, a family vacation, other committments have kept me from getting alot done. But, I have stitched the bottom hull panels, made the round chine cuts, and have the panels on the jig. Overall, I'm pretty pleased with what I see.
I'm pretty sure I've read in the "How To's" and/or on some of the other posts that there should be a gap, say 1/4" between the panels. Right now, I've got the stitches as tight as they'll go and have the panels pretty much butted up against each other. The fit is pretty good, the panels do raise up off the C & D frames a little. I think that going back and restitching a little more loosely will help that as well as be the correct way to do this anyway. Am I on track with that thought process?

Re: Mikem59 FS18 Build
Posted: Thu Sep 05, 2013 9:45 pm
by Fishwater
You seem to have it down. Take your time at this point...believe me. Make sure everything is as you want it before you start "tacking it" and certainly before you start glassing. I think the key is to have everything stitched loosely and then slowly make adjustments. The PVC trick works too. Take some small diameter pvc, cut it into short lengths (you won't need them more than 3") and place it on the underside where you're going to stitch. Feed the ziptie through one hole, around the pvc, and then back through the other hole and cinch the ziptie. Not sure if that makes sense. One of the first guys to build the FS18 figured it out. It's on his thread...maybe Bayport Bob?
Re: Mikem59 FS18 Build
Posted: Thu Sep 05, 2013 10:51 pm
by Mikem59
Thanks for the input. I have the PVC technique posts already bookmarked for quick reference. When you mention tacking, how do you recommend doing that?
Re: Mikem59 FS18 Build
Posted: Fri Sep 06, 2013 8:01 am
by Cannonball
If I could go back and do it again I would use west systems six 10 for tacking. Little pricey, but you can get it for $18 a tube on amazon and it will save you loads of time with clean up. I went way heavy on the tacking and regretted it.
Re: Mikem59 FS18 Build
Posted: Fri Sep 06, 2013 9:10 am
by AtTheBrink
You are doing great! Loosening (is that a word?) the stitches along the keel will let the panels relax and you should be good to go. You want a small gap there. The PVC trick will really help you with the round chines. Take your time! Lastly, Cannonball is right on about using something like West 610, it is the caulk tube that makes it easier and cleaner with less wwaste. You can get empty ones and use your own mix and save some $$$. Putting packing tape on the back side of all the joints will save epoxy, time, and headaches!
Re: Mikem59 FS18 Build
Posted: Mon Sep 09, 2013 7:02 pm
by Mikem59
Was out of pocket for a few days, just now saw the follow up replies. Once again thanks for the help. As usual I have some follow up questions. For tacking with the West Systems material, would I use that to tack the panels to the frames? And, does it release easily? And yes I used the packing tape.
Re: Mikem59 FS18 Build
Posted: Mon Sep 09, 2013 7:46 pm
by Cracker Larry
The fit is pretty good, the panels do raise up off the C & D frames a little.
Just put some weight on them to hold them down. This is the one I built, stitched and tacked, with weights holding the hull down on the frames.
For tacking with the West Systems material, would I use that to tack the panels to the frames?
At this stage of your build you don't want to attach the frames to the panels at all. Just let the panels float on the frames while you tack the hull panels together.

Marinepoxy and wood flour works fine for me
Re: Mikem59 FS18 Build
Posted: Mon Sep 09, 2013 9:28 pm
by Mikem59
Gotcha, I let myself get confused on "Tacking". So, I think by loosening my stitches, that should "relax" the panels, suspect I'll still need to weight them to get them to rest on the panels. As for the tacking, is the the West System 610 an alternative to epoxy and wood flour?
Wanting to get straight on all this as I'm planning on getting all the panels stitched and glued over the next two weeks.
Thanks All!
Re: Mikem59 FS18 Build
Posted: Mon Sep 09, 2013 10:21 pm
by Shamrock Kid
Mikem59 wrote:As for the tacking, is the the West System 610 an alternative to epoxy and wood flour?
It is a thickened epoxy that can be used for structural adhesion. So yes you can use it in place of epoxy/wood flour. It would get mighty expensive to use it verses epoxy / wood flour for the entire boat. I think for tacking it would be fine. I like the epoxy would flour myself I ordered the kit and had plenty of wood flour on hand. Mixes easy, and spreads easy as well. But I didn't do the modified chine so your going to do allot more tacking then I did. Might be better to use the Six10 that was suggested, Idk.
Re: Mikem59 FS18 Build
Posted: Mon Sep 23, 2013 9:43 pm
by Mikem59
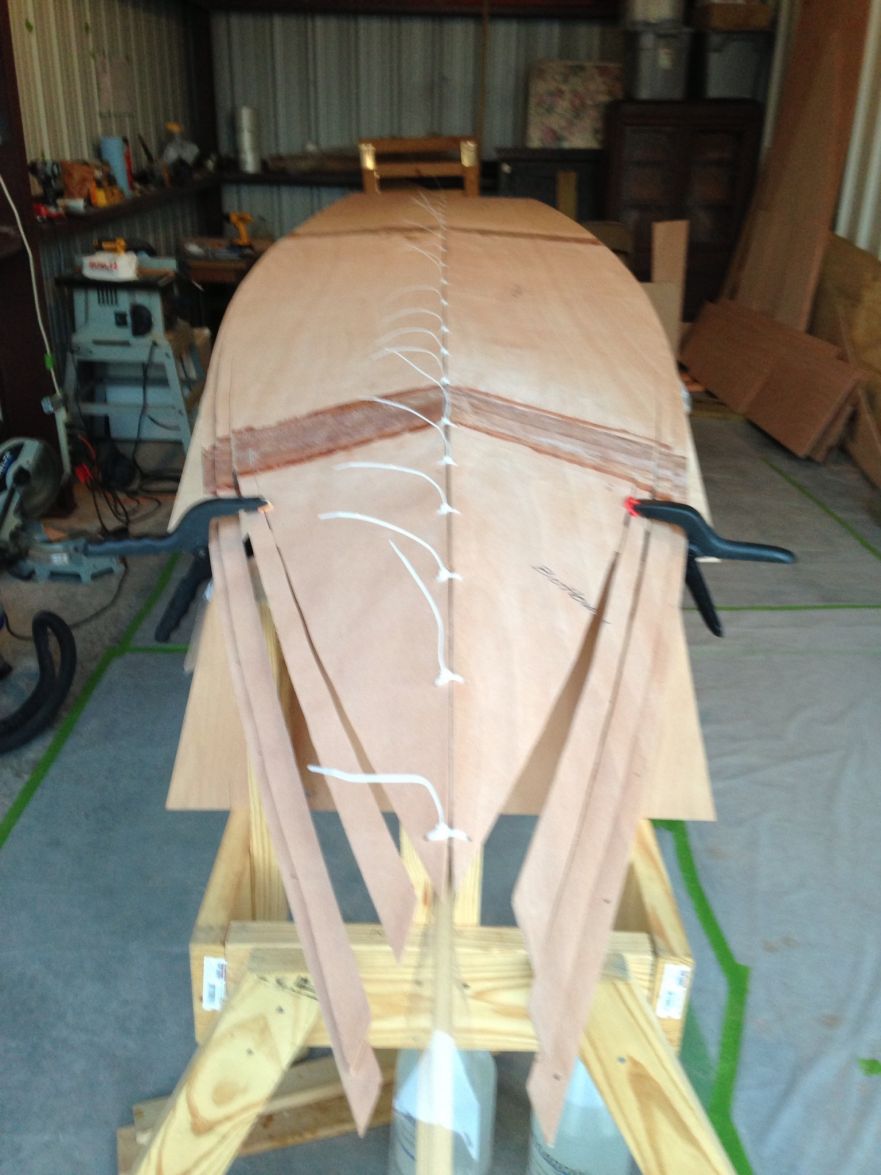
Well, over the past few weeks, I've made some progress. Finished stitching the boat together and tack/glued everything. Here are some pics along and with some comments.
The beginning process of zip tying for the rounded chine

I didn't see the whole process explained, but figured the easiest way was to do the bottom panels first before attaching the side hull panels. The bottom hull panels has a nice gap until I got close to bow end. Here, they butted up against each other. I hope I don't regret breaking it down and sanding or planing to get a consistent gap.
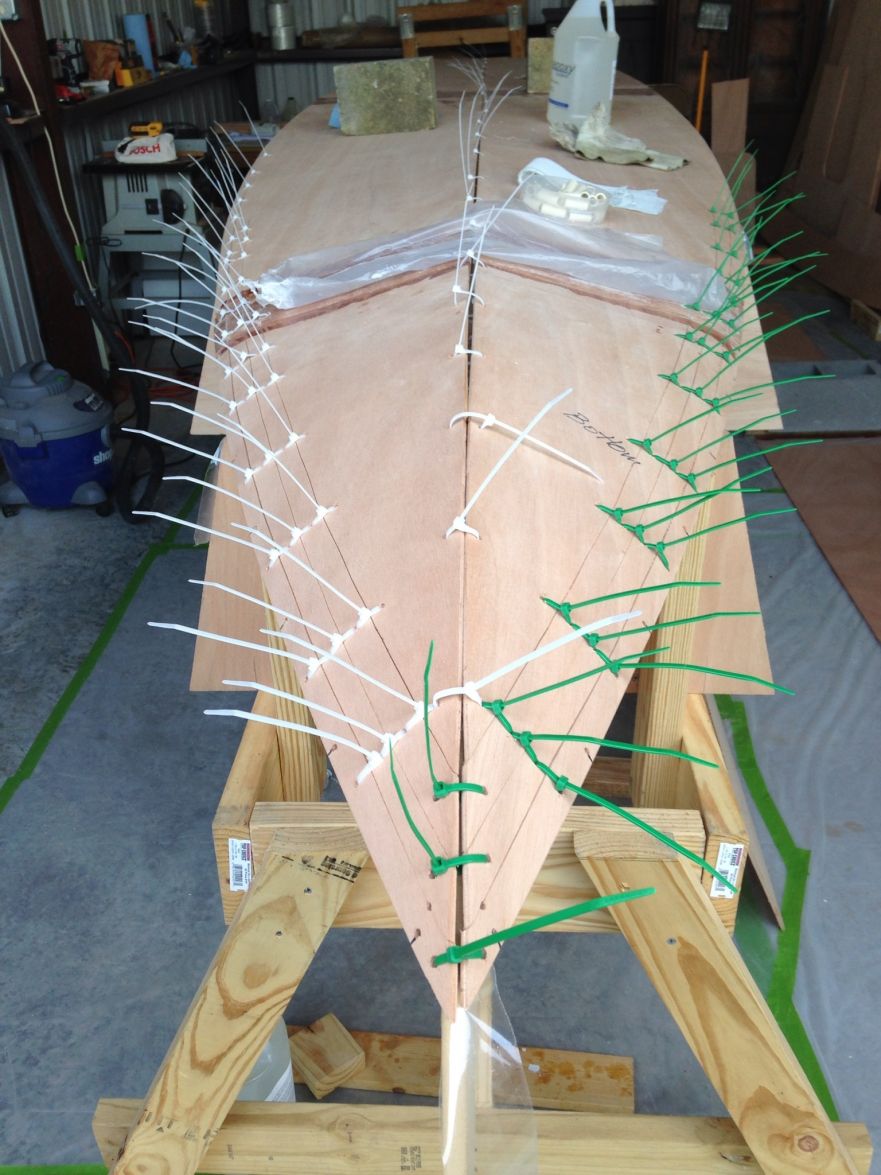
Attaching the side hull panels is a bit challenging by yourself, but managed with the help of some horses, saw horses that is. And, decided to loosely stitch the rounded chine cuts at the end to keep those strips from going wild on me.
Re: Mikem59 FS18 Build
Posted: Mon Sep 23, 2013 9:56 pm
by Mikem59
Here she is, stitched and glued.
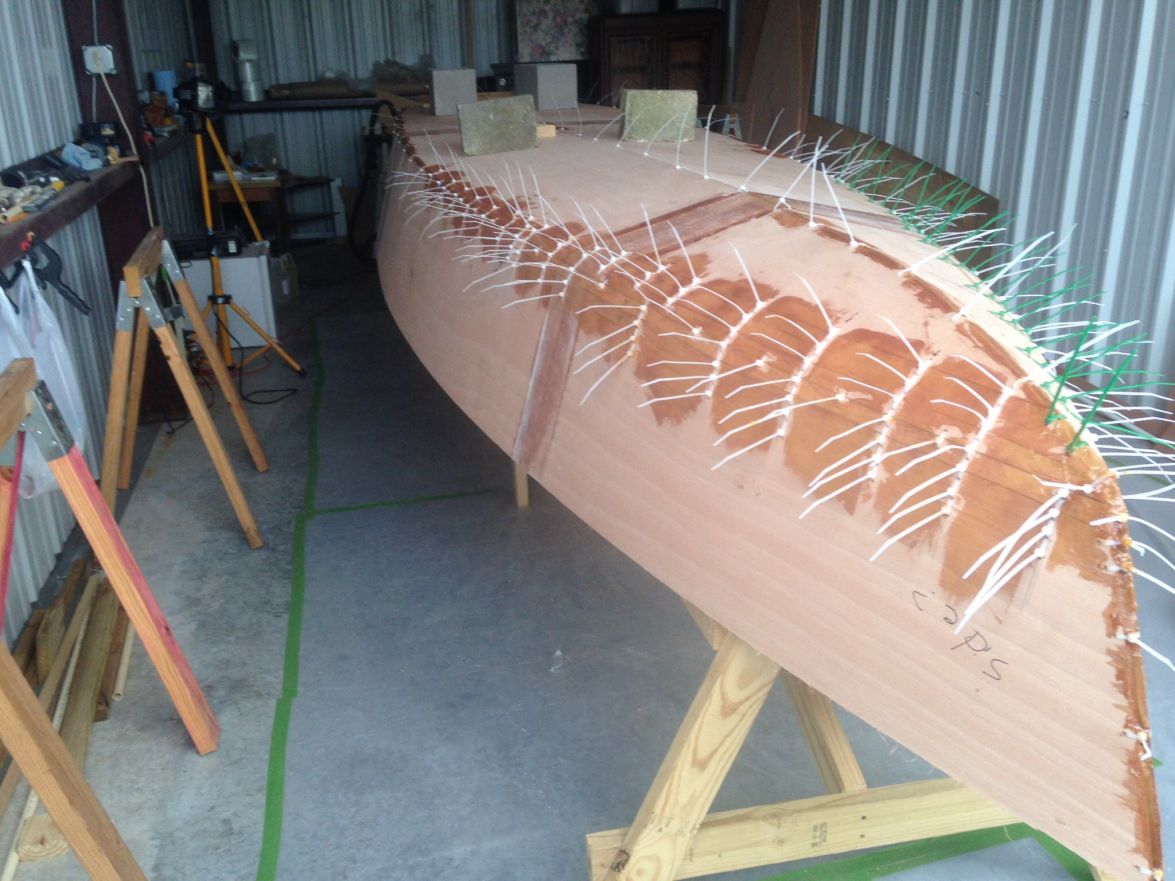
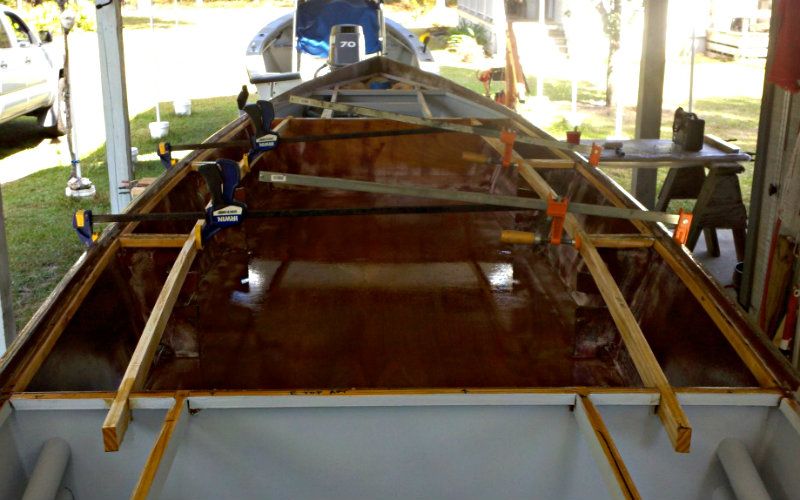
I'm a little concerned with the fillets here to get the 1/2" radius. Can I build these up with more epoxy/wood flour glue? Or, are they workable as is?
Lastly, here's the bow all "gorilla snotted" together. The mix was just a tad to thin when I applied. I may have some difficulty getting those zip ties out and I guess I'll be doing some sanding. From what I've gathered, I'll be doing alot of that no matter what.
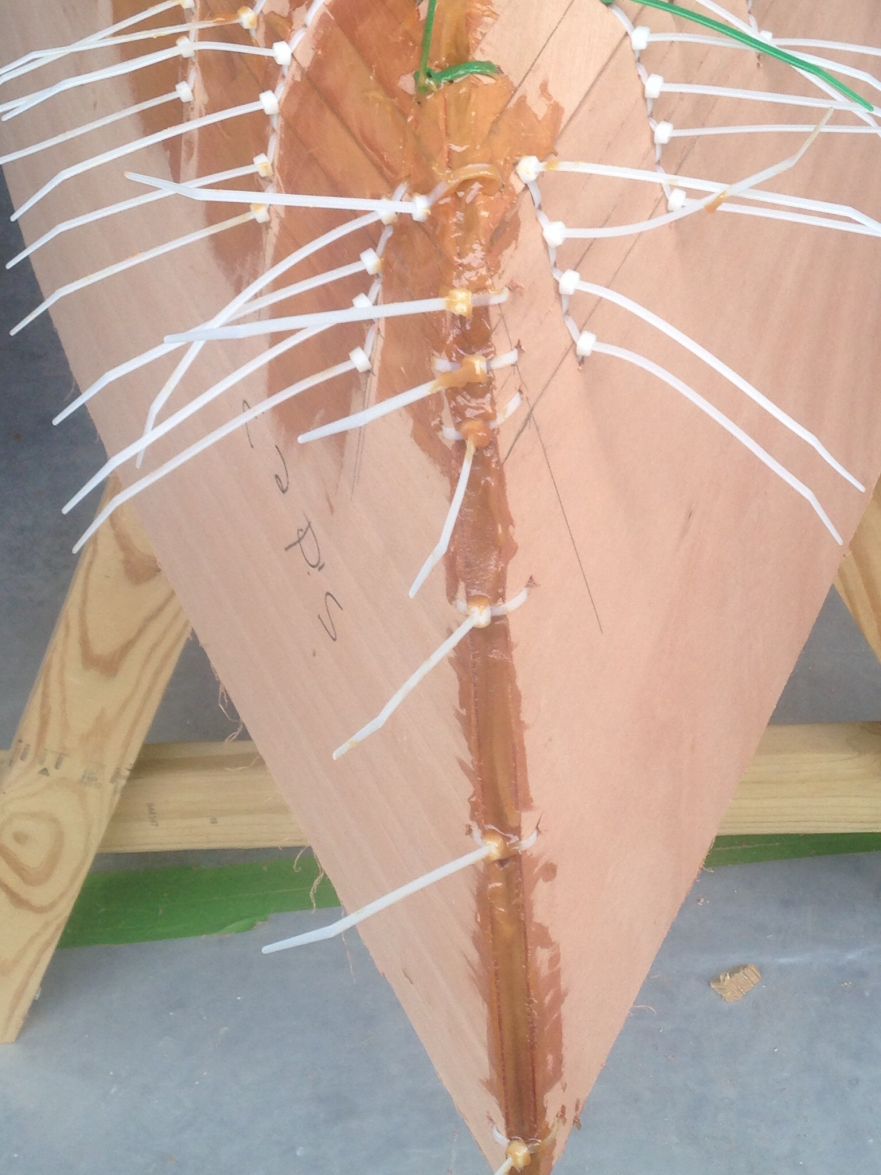
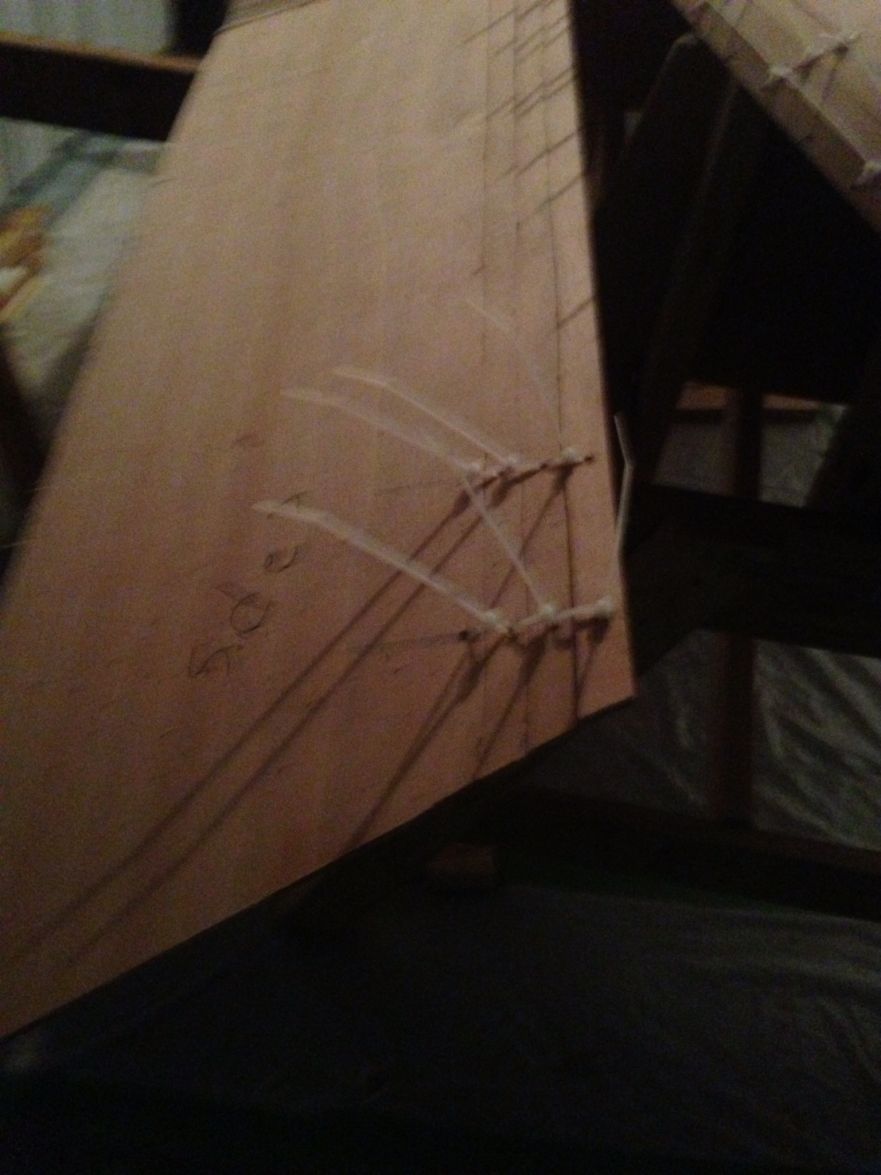
And, I may have gotten carried away with the zip ties for the rounded chine option. My spacing was pretty tight and made for some difficulty tacking between zip ties.
Overall, I'm super excited to be at this point. Look forward to cutting the zip ties and filling in the remaining gaps. Again, my biggest concern is making sure I get that 1/2" radius.
Re: Mikem59 FS18 Build
Posted: Tue Sep 24, 2013 9:58 am
by tech_support
from here is looks very good.
Dont worry about the zip ties, they grind right off.
I would build up the chine putty a little more, then sand/grind it flush from top and bottom, then round it over.
You can put some "blobs" of putty on the underside in key places to keep anything from popping loose when you grind off the stitches from the outside
Re: Mikem59 FS18 Build
Posted: Tue Sep 24, 2013 5:33 pm
by Mikem59
Thanks for the advice. I figured I'd would have to build up the chines. And, I believe I will tack from the underside in some key spots. I'd hate to see everything start popping loose. I'm particularly concerned with the rounded chine area staying together. Thanks again!
Re: Mikem59 FS18 Build
Posted: Tue Sep 24, 2013 7:29 pm
by Cracker Larry
That epoxy is a lot stronger than you think it is. It won't pop loose, not as much as you have on there. Looking good
Re: Mikem59 FS18 Build
Posted: Tue Sep 24, 2013 10:38 pm
by Mikem59
the first time builder in me is showing through. No doubt after seeing resin set up in a mixing cup demonstrates how strong it is. And, yes thinking back to gluing the transom and stringers shows the bonding strength to wood as well. At least I won't be too nervous when removing the zip ties.
Re: Mikem59 FS18 Build
Posted: Tue Sep 24, 2013 11:54 pm
by Cracker Larry
The glue is 100 times stronger than the plastic zip ties, cut them
Re: Mikem59 FS18 Build
Posted: Wed Sep 25, 2013 12:50 pm
by Mikem59
you got it I'm going to cut'em. Thanks
Re: Mikem59 FS18 Build
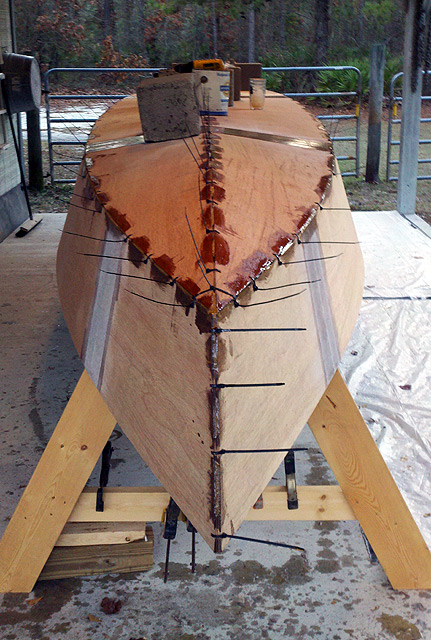
Posted: Mon Sep 30, 2013 9:51 pm
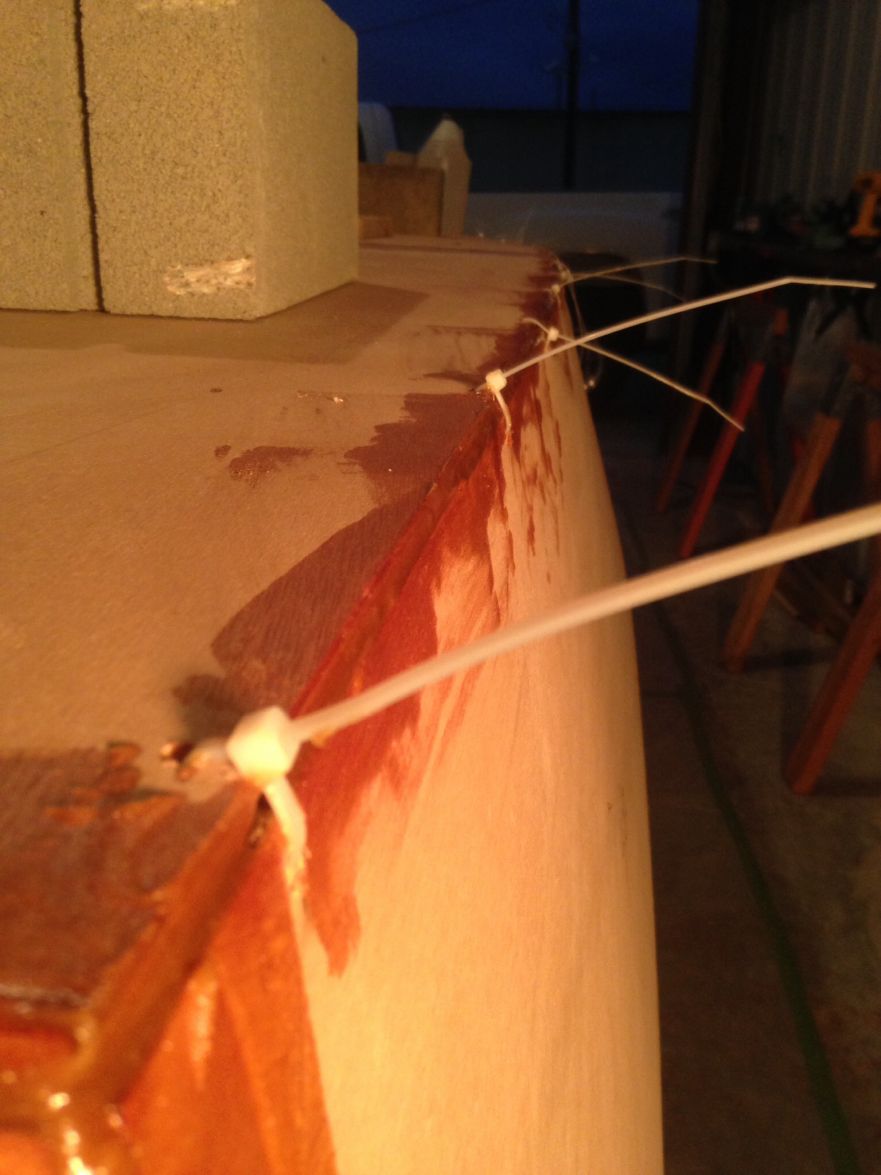
by Mikem59
Cut those zip ties last Wednesday, no problems. Looks good without'em. And, the boat didn't explode
.
Looking forward to filling in the gaps in the glue and building up the chine to make sure I get that 1/2" radius. Unfortunately, work/travel will keep me away for a few days, and then, off to the deer lease this weekend, not a bad problem to have.
Here are a few photos after the zip tie cutting.

She may not have exploded, but there are alot of pieces of pvc on the floor. I used 237 zip ties and 172 pvc pieces.

Re: Mikem59 FS18 Build
Posted: Tue Oct 08, 2013 6:14 pm
by Shamrock Kid
Is it still holding up Mike?
J/K of course it is that epoxy is some strong stuff. Any updates?
Re: Mikem59 FS18 Build
Posted: Fri Oct 11, 2013 6:12 pm
by Mikem59
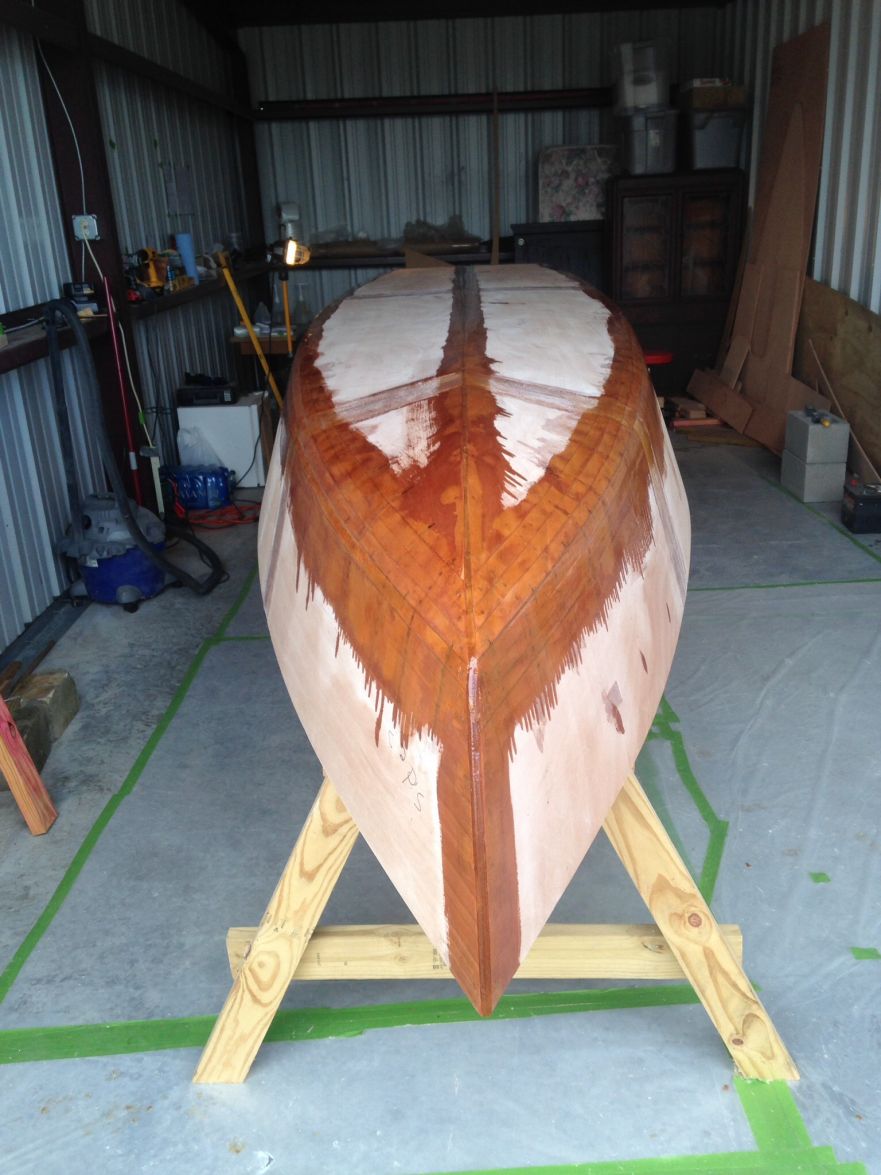
yessiree. Holding together just fine. That resin is amazing stuff.
I've managed to fill in all the zip tie holes, glue the gaps where I had the zip ties, lay down a coat of resin and glue over the seams, and plane the excess glue off. I'm ready to sand to get a more fair surface and lay down the glass on the seams. I'm planning on completing that over the next week.
I'm getting anxious as I know I'm getting close to the point when I'll be able to flip the hull. Well maybe, in reading all of the various builds, glassing the hull and getting it fair will be a timely and crucial phase of the build. And, although this is my first build, I really want a great looking, smooth, and fair hull. I'd like to think I can get it to look as good as a production boat hull. And from what I've seen on this forum, I know it can be done.
Re: Mikem59 FS18 Build
Posted: Mon Oct 14, 2013 1:30 pm
by Cannonball
If your going to lay down the glass tape, go ahead and plan on doing it all wet on wet. Pay attention to the lamination schedule, there are a couple different ways to do it. I would get a table ready with everything pre measured the night before and recruit a couple hands. Before I started I didn't fully understand the big push to do everything wet on wet, but it will save you a lot of time. Just think with a little preplanning 6 hours one day. Or, 4 hours taping one day, 2 hours sanding/cleaning the next day, and then 4 hours cloth lay up on the 3rd day. That is what the wet on wet decision is all about.
Re: Mikem59 FS18 Build
Posted: Wed Oct 16, 2013 11:32 pm
by Mikem59
Cannonball, thanks for the info. With what little experience I've had so far and certainly from your advice and what I've read throughout the forum, wet on wet will be the way to go. And, yes, I'll be recruiting some help as well. I've seen that you and others get ready with premeasured amounts of resin and hardener to keep things going when you are ready for another batch. And, with the weather finally beginning to cool down, I think I'll still use the slow hardener to give me some more time to work wet on wet.
As far as my progress, I've completed the gluing step. And, I believe I may have overdone the glue. I used the heck out of the Stanley Sureform Planer, as Cracker Larry stated, great tool. Then, I've sanded for three hours. Seemed like an awful lot of sanding for what I think Cracker Larry called light sanding before the seam glassing step.
Here's the post gluing outcome, which was achieved by the tabbing between the zip ties, pulling the ties, patching up the zip tie areas, then going over with a coat of resin then a epoxy glue coat (wet on wet).
And, here's the appearance after the sanding.
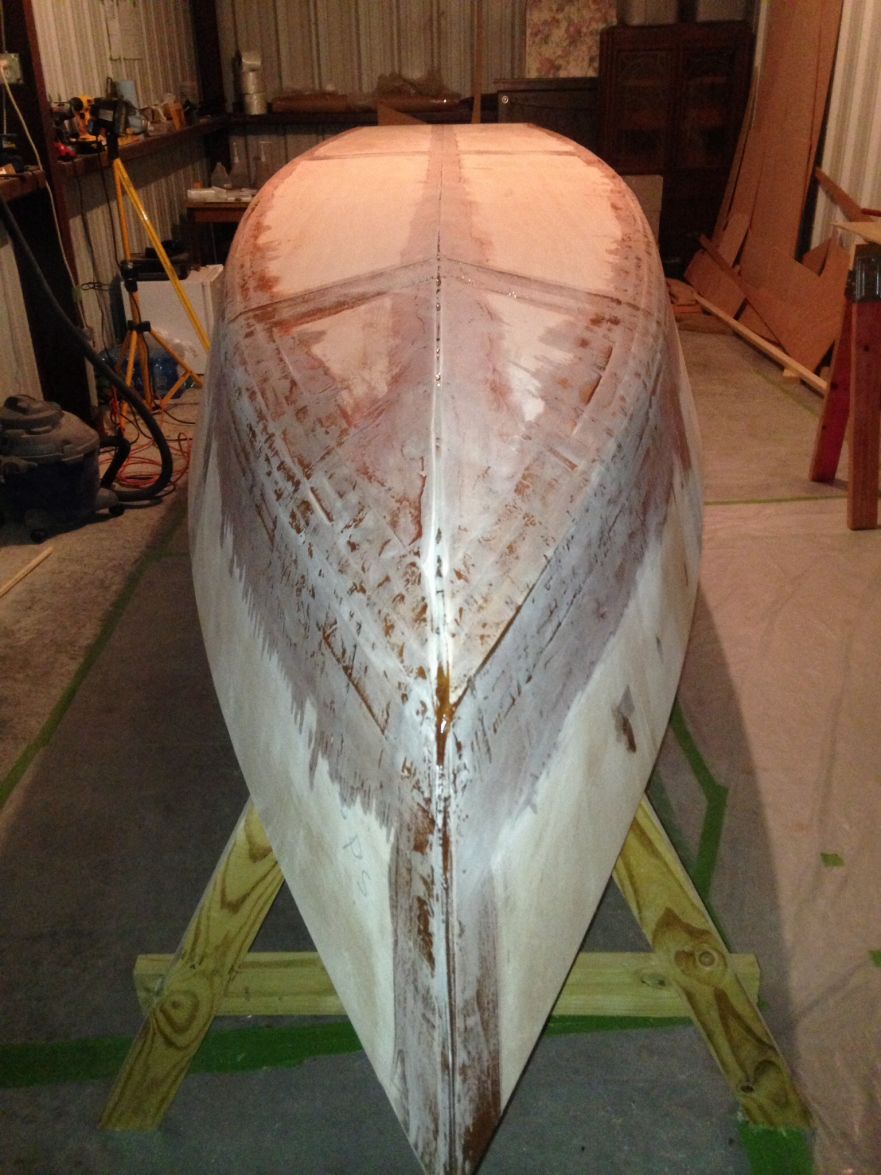
I know it's difficult to see the "quality" of the surface from the sanding. I hoping that at this phase, having a "fair" and extremely smooth surface isn't necessary. I'm probably a bit paranoid, but I do think I can move onto the seam taping/glassing step. But, I'm concerned that instead of the taping/glassing of the seams taking care of any slight imperfections in the surface, it may magnify them. Any thoughts?
Re: Mikem59 FS18 Build
Posted: Thu Oct 17, 2013 9:10 am
by Shamrock Kid
Looks good from where I'm sitting, but I do know anything you take care of now will make it easier later. If there are spot of raised glue you definitely want to sand down smooth. If not the cloth will not lay flat, and will trap air under the lamination. No good at all, if you have small voids on the seams were the glue has settled you might want to fill them. The cloth will not droop down in those areas but you most likely will trap air bubbles there too. Making a weak lamination. When CL says light sanding don't forget he has built a few and his work is allot better then most. I tend to work very messy and spend allot of time sanding because of it.
But getting it fair now will pay off after you glass it. Fairing sucks
Better to minimize it as much as possible imo. Im no expert though, I'm sure others will chime in. But from what I see your doing a great job so far. Keep it up and keeps the pics coming as it motivates me to press on.
Re: Mikem59 FS18 Build
Posted: Thu Oct 17, 2013 5:56 pm
by Mikem59
John, thanks for the feeback and support. The good news is that the glue is pretty smooth throughout. I'm glad you raised the issue of voids, gaps in the glue. I do have some of those. I was mistakenly thinking that by going wet on wet that the resin would fill those voids. Sounds like the best insurance is fill them now and not count on that. That will be a relatively easy task to complete.
Now, it's about getting the time, going to the deer lease this weekend. I've never been on a deer lease till this year. I was always one of those guys that loved hunting season cause that was less fishing pressure during a prime time of year. Oh well, I'm loving this deer lease thing anyway and wondering now why it has taken me 35 years to ever get on a lease.
So, updates may be a a week or so away.
Re: Mikem59 FS18 Build
Posted: Sat Nov 09, 2013 9:53 pm
by Mikem59
Very little progress over the past couple of weeks. Traveling for work and opening weekend for deer season have slowed me down. More travel next week as well.
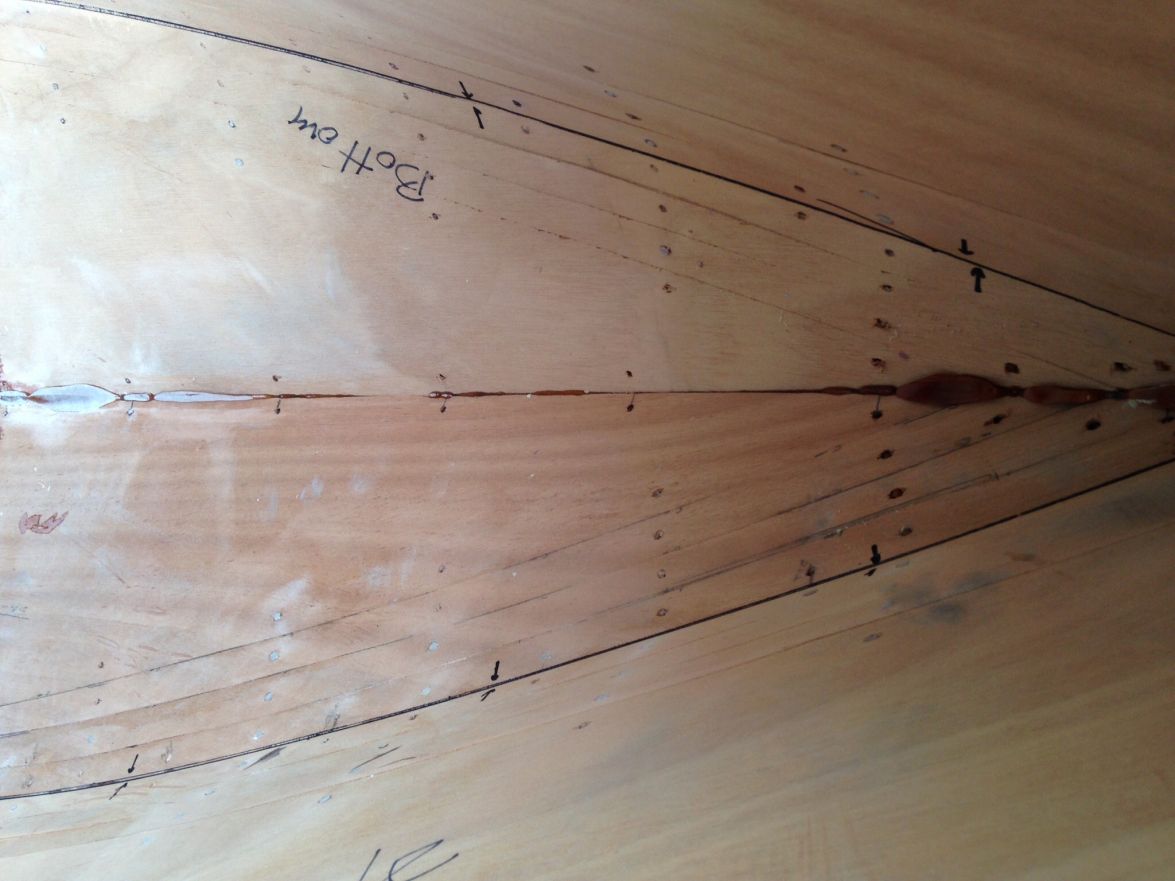
My biggest hang up right now is whether or not I can move onto taping the seams. I've done some touch up to fill voids and sanded high spots as well. I've still got some voids that I'm concerned with. The are small, less than a 1/16" deep. Will the resin fill those voids or will they just create an air bubble. My gut tells me to keep at filling these till I get a good smooth surface.
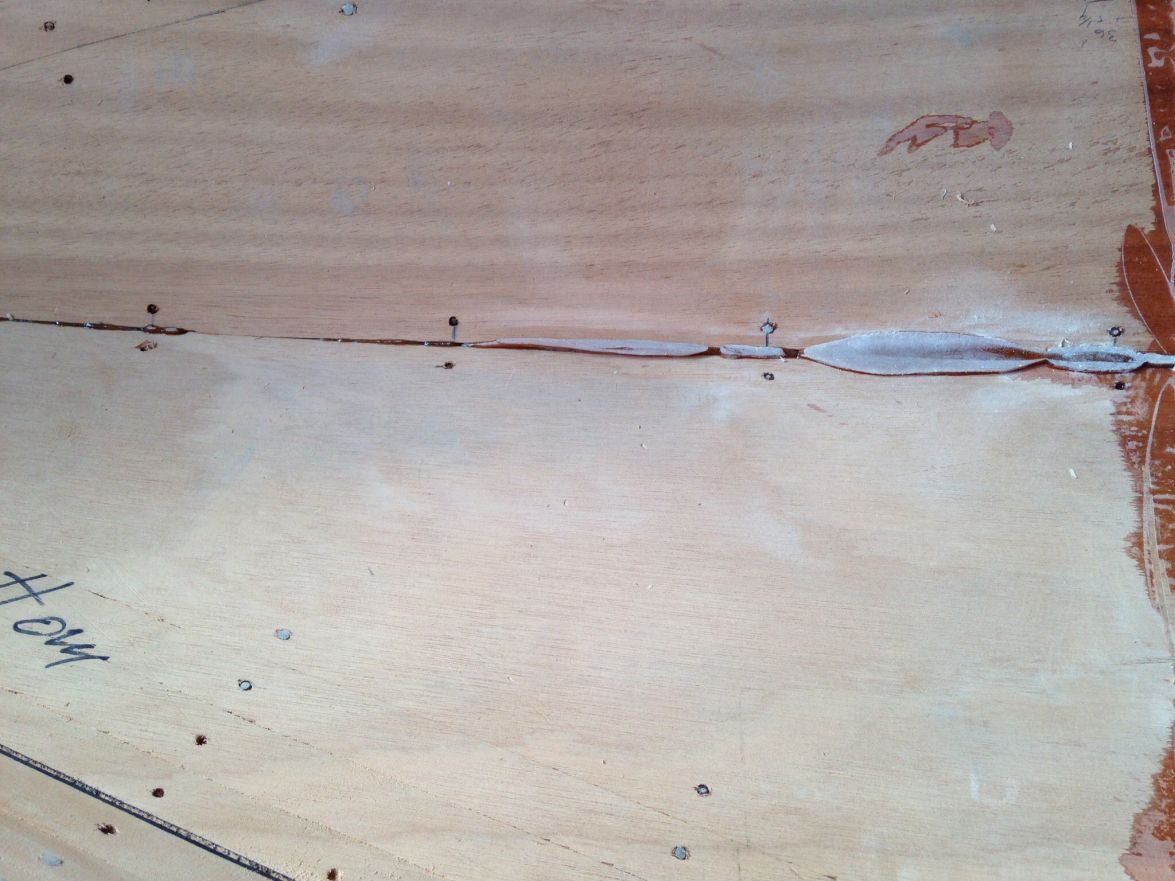
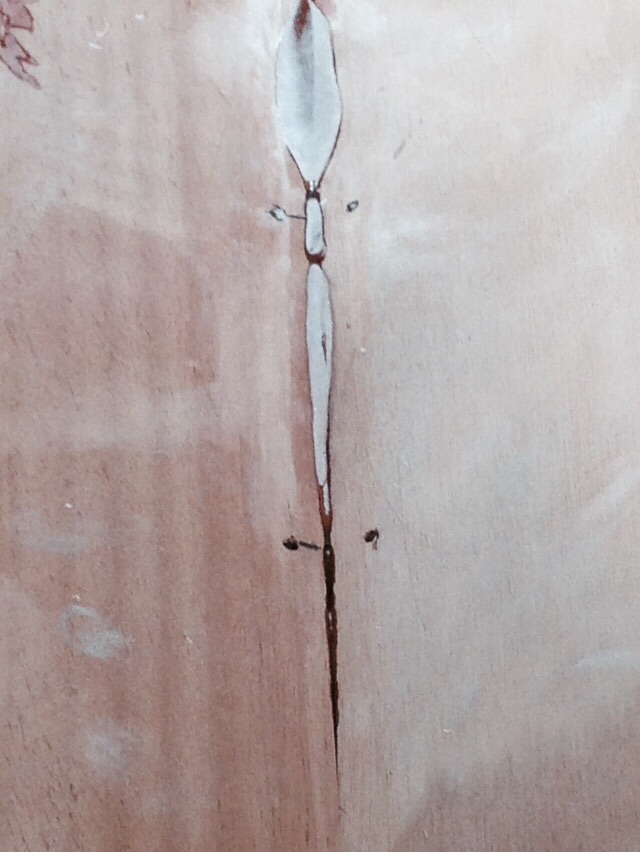
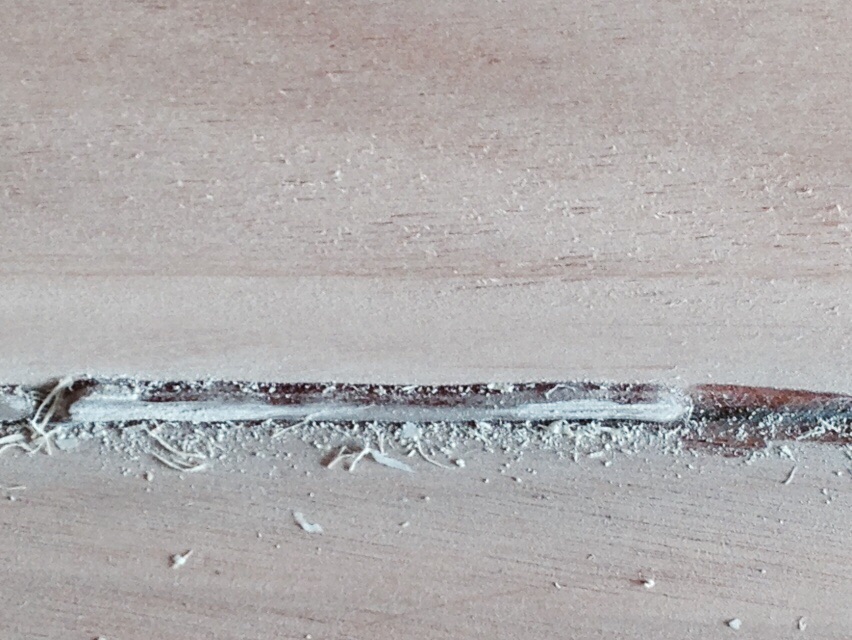
The first pic is a slight void along the chine.
This pic is on one of the panel joints.
I'm getting anxious to move to the next step, but need that shove in the right direction.
Mike
Re: Mikem59 FS18 Build
Posted: Sun Nov 10, 2013 6:34 am
by Walkers Run
I would fill those voids with thickened epoxy, not to stiff. Then glass over it wet on wet.
Re: Mikem59 FS18 Build
Posted: Sun Nov 10, 2013 6:37 am
by Cracker Larry
Yes, you need to fill those with thickened epoxy, resin alone won't do it and you will have air bubbles.
Re: Mikem59 FS18 Build
Posted: Sun Nov 10, 2013 8:34 am
by AtTheBrink
Do what Walker and Larry said! Fixing air pockets sucks, get the surface as smooth and fair as you can now. It make taping and glassing easier and fairing after you glass with be easier and faster. One thing I learned from Cracker Larry, work clean! Clean up drips and runs as they happen, don't use more epoxy than you need, same goes for glue and fairing compounds. It's a lot easier to take fairing compound off with squeegee when it's still wet than to sand it fair after it cures.
Passing on the Cracker Lesson
Re: Mikem59 FS18 Build
Posted: Sun Nov 10, 2013 9:18 am
by Cracker Larry
Lessons learned the hard way
Re: Mikem59 FS18 Build
Posted: Mon Nov 11, 2013 10:25 am
by pee wee
It's the same practice when doing drywall work- watch the pros do it and they leave a surface that looks like it's ready to paint once it dries. Of course epoxy is a lot harder to sand, but it's the same concept.
Re: Mikem59 FS18 Build
Posted: Mon Nov 11, 2013 4:35 pm
by Mikem59
I'll keep listening to my gut and you guys. That's what the forum is all about, helping rookies like me ultimately get it right and avoid as many mistakes as we can.
With the advice I went back over all the little voids and filled. I'll check the results of that effort this evening. I'll just say There is a lot to be said for controlling the amount of epoxy used, the thickness of the glue, runs, drips, etc. it's a learning process for sure.
I'm not so quickly learning
that each step may require some recipe tweaking to get the desired results.
Thanks and more to come!
Mike
Re: Mikem59 FS18 Build
Posted: Tue Nov 26, 2013 2:53 pm
by Mikem59
Finally getting back to doing some work on the boat. Did a little more filling of voids and sanding. Now, I believe I'm finally ready to begin glassing the keel, transom, and bow seams. However, I do have a question.

For the keel, do I run a continuous strip of fiberglass all the way down to the top of the bow, or do I do the bow section separately? I've reviewed some of the other builds and it's difficult to see just how this is done.
Re: Mikem59 FS18 Build
Posted: Tue Nov 26, 2013 5:20 pm
by Cracker Larry
Yes, at least that's how I did it. Down the keel requires 2 overlapping pieces of tape and I ran them from the transom to the tip of the bow. The tape will conform to the bend, if it wants to pucker cut a slit in it so it lays flat. Same with laying the cloth, run it full length and cut slits where it puckers.
Re: Mikem59 FS18 Build
Posted: Tue Nov 26, 2013 5:58 pm
by Mikem59
Thanks Cracker Larry. Once again some reassurance on how to move forward. Now, just need some warmer weather.
Mike
Re: Mikem59 FS18 Build
Posted: Tue Nov 26, 2013 6:26 pm
by Cracker Larry
Me too!!
Re: Mikem59 FS18 Build
Posted: Thu Nov 28, 2013 11:41 pm
by justin_dwyer
I just learnt a heap from this post about doing my boat, I am epoxy gluing the seams and then will tape.
Great tips.
Your boat is coming along great Mike, watching with interest.

Cheers
Justin
Re: Mikem59 FS18 Build
Posted: Wed Dec 04, 2013 9:30 pm
by Mikem59
Justin - thanks. At the rate I'm going, a guy starting his build now will pass me up. This work thing sure makes it difficult to get some quality chunks of time in, but it does pay the bills and for the build.
I've managed to get quite satisfied with the touch up work and sanding to start prepping for taping the seams. I've measured out the required glass for the keel (2 strips to be overlapped), the chines and the transom. And, I've marked the hull where the edges of the glass should line up to. And, I've set up a larger resin mixing table that is also easier to get to than where I was set up before.
I've got a small Stanley space heater, hoping that can warm up my work area enough to work since this weekend weather forecast is calling for some cold weather. I found out a couple of weeks ago that although the resin will still cure, albeit over a long time, the plungers to measure out my mix isn't the best way; that cold resin and hardener don't pump out very easily.
However, the colder weather may be good for these next steps as it will certainly give me plenty of time to lay it up without it kicking on me. At least I think that is a good thing.
Also, as for calculating the amount of resin, I've reviewed the forum and confirmed that it should be a 50:50 mix of resin to glass on a weight (ounces of resin to ounces of glass). Based on that for example, the keel will be approximately 2 strips of glass tape approximately 18' long and 6" wide. That's 9 sq. ft. or 1 sq. yd. per strip. At 12oz. per yard of glass, it will thus take 12 oz. of resin per strip. The chines going from the bow all the way to the top of the transom is roughly 21', so a little more resin than 12 oz. I guess I'm putting this out here for confirmation. I'll add in maybe a 10% fudge factor, then get everything pre measured and ready to mix so I can move from one strip to the next.
Lastly, here are just a few pics of the prep for the seams.
Re: Mikem59 FS18 Build
Posted: Thu Dec 05, 2013 8:08 am
by tcason
I warm up the epoxy to + - 70 to 80 degrees in the plastic bottle before mixing. It will pump and flow much better.
If you pour out the epoxy after mixing on the colder surface that should give you ample working time.
Your results may vary and maybe the experts will chime in.
FROM WEST SYSTEM
http://www.westsystem.com/ss/cold-temperature-bonding/
.
Warm resin and hardener before using. As mentioned, the warmer the resin and hardener, the lower the viscosity. Thinner resin and hardener will flow through pumps better, cling less to containers and mixing equipment, and mix more thoroughly. The initial chemical reaction will get off to a better start and result in more cross-linking even if the mixture cools after it is applied to a cooler surface. The thinner mixture will initially flow out smoother and wet-out porous surfaces better.
Warm the resin and hardener with heat lamps or keep it in a warm area until you are ready to use it. You can build a small portable hot box out of rigid sheets of foil-backed insulation, with a regular light bulb or an electric heating pad inside to maintain a temperature of 70°F–90°F. This method allows you to keep the warm resin and hardener close to your work and allows less time to cool off between dispensing and application.
Re: Mikem59 FS18 Build
Posted: Thu Dec 05, 2013 8:30 am
by Cracker Larry
Good looking prep work. Planning ahead makes it all go smoother. For the 6" tape I've learned that it needs about 1 ounce of epoxy per foot of tape. That usually works out perfect. After you mix it, pour it out immediately on the tape. If I'm going to lay a piece of tape 18' long, I mix 18 ounces of epoxy and pour it out evenly along the entire length of tape, then roll it in. Once it is out of the cup you will have plenty of working time even if it's hot.
If the epoxy is under 65 degrees it is very difficult to work with and it takes a lot more of it to wet out the cloth. The warmer it is, the easier it is to spread and you get better coverage.
Re: Mikem59 FS18 Build
Posted: Thu Dec 05, 2013 7:09 pm
by Mikem59
Tcason, thanks for the input. It's good to know that the warmer resin not only improves the pump ability, but improves the cross linking.
CL, Thanks as well. The ounce per foot of 6" cloth is an easy go by. I do have a question though, I was planning on laying down a thin coat of resin, then lay the cloth, then follow with the resin on top to wet it out, would I need to eliminate the initial coat? And, do you use the aluminum laminating roller or a cloth, tight nap roller to wet it out? I have both, and when I say tight nap, I found some 1/4" nap rollers at Lowes.
By the way, the cold front is moving through as I speak here. Calling for a low of 37 and only a high of 42 for Saturday.

Hope the heater works.
Re: Mikem59 FS18 Build
Posted: Thu Dec 05, 2013 8:08 pm
by justin_dwyer
Looking very organised Mike
I am interested in that last post too, prime the strip first or just lay the tape out, clamp it and pour the epoxy onto it and let the wood soak it from the cloth?
Good luck on the weekend Mike, keen to see how it goes, I'll be there probably next weekend
Cheers
Justin.
Re: Mikem59 FS18 Build
Posted: Thu Dec 05, 2013 9:41 pm
by Mikem59
Thanks Justin. I'm thinking since I've finally have a full weekend, I've got to find a way to make some progress regardless of the cold. I may take the suggestions to heat the resin.
Later,
Mike
Re: Mikem59 FS18 Build
Posted: Thu Dec 05, 2013 9:44 pm
by Cracker Larry
When it's on a mostly horizontal surface I usually just lay out the tape dry, then pour and roll the epoxy over it. Where it goes on vertical surfaces I put a little epoxy on the wood first, let it tack up a bit, then put on the tape and finish wetting it out. I use high density 4" foam rollers, also from Lowes. Marked Whizz Door and Cabinet rollers
http://www.lowes.com/pd_119118-11591-94 ... Info=WHIZZ
Re: Mikem59 FS18 Build
Posted: Thu Dec 05, 2013 9:49 pm
by justin_dwyer
Sucks when you finally get some time away from work, family commitments, etc and the weather is no good

I am basically building mine outside, I have a roof, but no sides and at this time of the year the temps are fine (30 - 35C), but we get rain nearly everyday, and the tropical storms come in pretty quick so I get reluctant to do too many big jobs, like glassing the bottom with cloth will be interesting
...still haven't work out how I'll do that yet, other waight for 6 months til the dry season, which is too long for me.
Yeah, heat up the resin and get one or two of the gas outdoor heaters, we can hire them here in Australia for parties, etc. Not sure if you can there. They kick out some good heat, and you have a good enclosed are there that will trap it.
Good luck!!
Justin.
Re: Mikem59 FS18 Build
Posted: Sat Dec 21, 2013 11:21 am
by Mikem59
I finally got a break in the weather and my schedule earlier this past week and got the seams completed. Once again, a milestone accomplished. Up to this point, it's been a solo project, but got some help on the seams. Having an extra hand certainly makes things easier.
Here are some pics:
Layed out dry to verify the length, then cut a slit at the bow to aid in getting it to fold/lay. (Thanks CL)

A thin coat of resin before rolling out the cloth. This certainly helped keep the cloth in place when wetting it out. My help hadn't shown up yet either at this point.
Close up at the bow once I started laying the cloth. The slit sure helped.

No intermediate pics prior to getting to this point, I've already got some resin on my life proof screen for the phone.
Transom shot.
After the cure. I'm pleased, but the next two pics show some potential problems.
Some cloth along the joint that did not appear to wet out completely.
Same thing on the chine.
Regarding the "white" spots that did not appear to wet out, I've read through the forums and found that it may be possible to go over these with some more resin to wet out. I think that'll work, but I'm going to take a closer look today before I take any rash actions. Raining here today, so I'm going to start going through the scraps to see how much of the rub rails pieces I can rip.
Re: Mikem59 FS18 Build
Posted: Sat Dec 21, 2013 12:22 pm
by Mikem59
By the way, any suggestions on a minimum length for salvaging pieces for a rub rail that will be easy to work with? I'm looking at my scrap right now and don't think I'll 1) be able to have a piece much longer than 4 or 5 foot, 2) won't have near enough to assemble 3 layers 18'+ long. As much as I hate to admit it may need another sheet of marine ply. I'll need more anyway for my console.
Re: Mikem59 FS18 Build
Posted: Sat Dec 21, 2013 3:21 pm
by Shamrock Kid
Looks good Mike your still moving forward. I think you have the right idea of wetting out the edge's that didn't wet out to well. I cut my rub rail strips from an extra sheet of ply. The scraps can be used and probably is the most efficient use of the wood. But I took the easier route and ripped them out on the table saw. Just remember to stager the joints. I accomplished this by cutting some of them down to 4' sections. So I had 8' and 4' sections this way you don't end up with aligned seams and a weak spot in the rub rail. But your build is looking good. Seeing the pics reminds me of when I was there it feels like yesterday. Keep plugging away and updating us, I love watching these boats come together. I'm fixing to order a set of OD18 plans.
Re: Mikem59 FS18 Build
Posted: Sat Dec 21, 2013 3:29 pm
by Mikem59
John,
Thanks for the encouragement and suggestions, I just finished wetting out those edges and I think it's going to work.
As for the rub rail, totally agree on the stagger for the joints. I'm killing time now cutting some scrap to make fairing boards for now.
Later,
Mike
Re: Mikem59 FS18 Build
Posted: Sun Dec 22, 2013 12:56 pm
by Mikem59
Not much work done yesterday, basically, attempted to wet out the "white spots", cut some scrap to make some fairing boards, and knocked off the excess cloth.
Just a couple of pics, one to show the Stanley Sureform planer, one heck of a useful tool.
Re: Mikem59 FS18 Build
Posted: Mon Dec 23, 2013 7:38 pm
by justin_dwyer
Looking great Mike.
Those planers are definitely a handy bit of gear, I have used mine so much that the blades have gone flat, time for some new ones.
Keep up the great progress.
Cheers
Justin
Re: Mikem59 FS18 Build
Posted: Mon Dec 23, 2013 8:02 pm
by peter-curacao
howbout a grinder with a 60 or 80 grit flapper disk?
Re: Mikem59 FS18 Build
Posted: Tue Dec 24, 2013 10:43 am
by Mikem59
peter-curacao wrote:howbout a grinder with a 60 or 80 grit flapper disk?
Ha, don't have one of those, but hey, This boat build has led to some new tools, and besides its Christmas
I'm sure that grinder could knock out that work in short order.
As for progress on the boat, I spent about 3 1/2 hours sanding the seams. While doing that the one "White spot" near the chine and on the hull panel joint blew out. I was afraid of this on this particular spot as I could never get it to wet out.
I put the Stanley Sureform planer to work as well as my RO sander to clean up this spot and reglass it. Just checked it out and it looks much better. I'll post pics later.
I'll be ready to glass the hull soon, but the weather is too cold right now to attempt. Probably won't get a shot at this till after New Years.
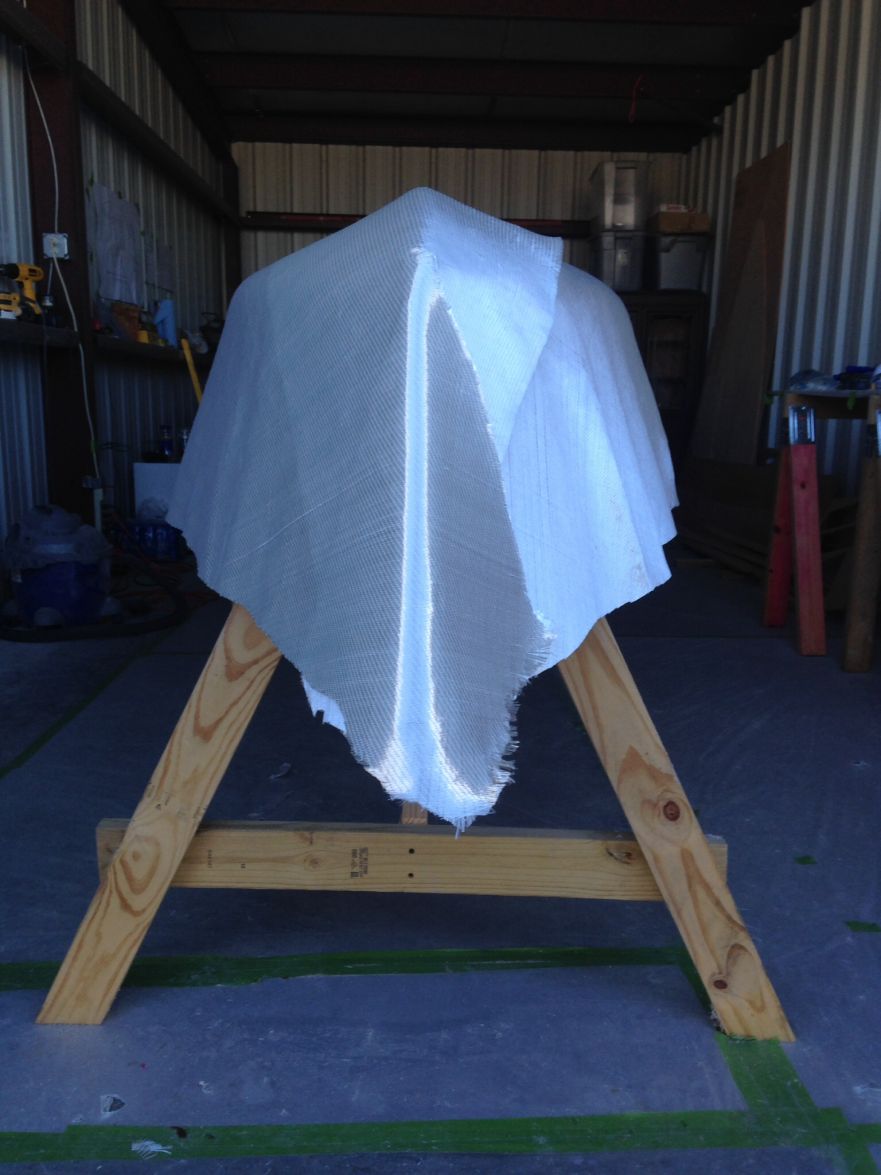
Regarding glassing the hull, the BOM for the kit states 13 yds of 50" cloth. I calculated that to amount to a total length of 28' of cloth. My intentions are to apply glass to cover the entire hull sides as well. But, 28' of cloth won't be enough. I should have known that since the plans don't call for doing it that way. Looks like I'll order some more cloth soon.
Merry Christmas to All You Boat Builders!
Re: Mikem59 FS18 Build
Posted: Tue Dec 24, 2013 11:12 am
by Mikem59
Pics of the latest fix.
Sanded to remove the glass and resin along and below the chine and along the full width of the joint
Here's the after pic. It's not pretty. In an effort to make sure I had wetted it out real good and to not mess up the weave, I used a piece of plastic over top while wetting out.
Just need to clean this up, do some touch up sanding and get ready for that next big step!
Re: Mikem59 FS18 Build
Posted: Tue Dec 24, 2013 9:38 pm
by Shamrock Kid
Mikem59 wrote:Regarding glassing the hull, the BOM for the kit states 13 yds of 50" cloth. I calculated that to amount to a total length of 28' of cloth. My intentions are to apply glass to cover the entire hull sides as well. But, 28' of cloth won't be enough. I should have known that since the plans don't call for doing it that way. Looks like I'll order some more cloth soon.
Merry Christmas to All You Boat Builders!
Mike, yup the BOM is correct because by design the cloth only needs to go past the chine 6". But the way your going to do it is in my option correct too. I'm covering all exposed wood with cloth. The sole has already been covered in 10oz, the deck will also get covered but I think I'm going to go 12oz biaxial on it.
You build is looking good, Merry Chrstmas to you too!
Re: Mikem59 FS18 Build
Posted: Sun Jan 05, 2014 9:06 pm
by Mikem59
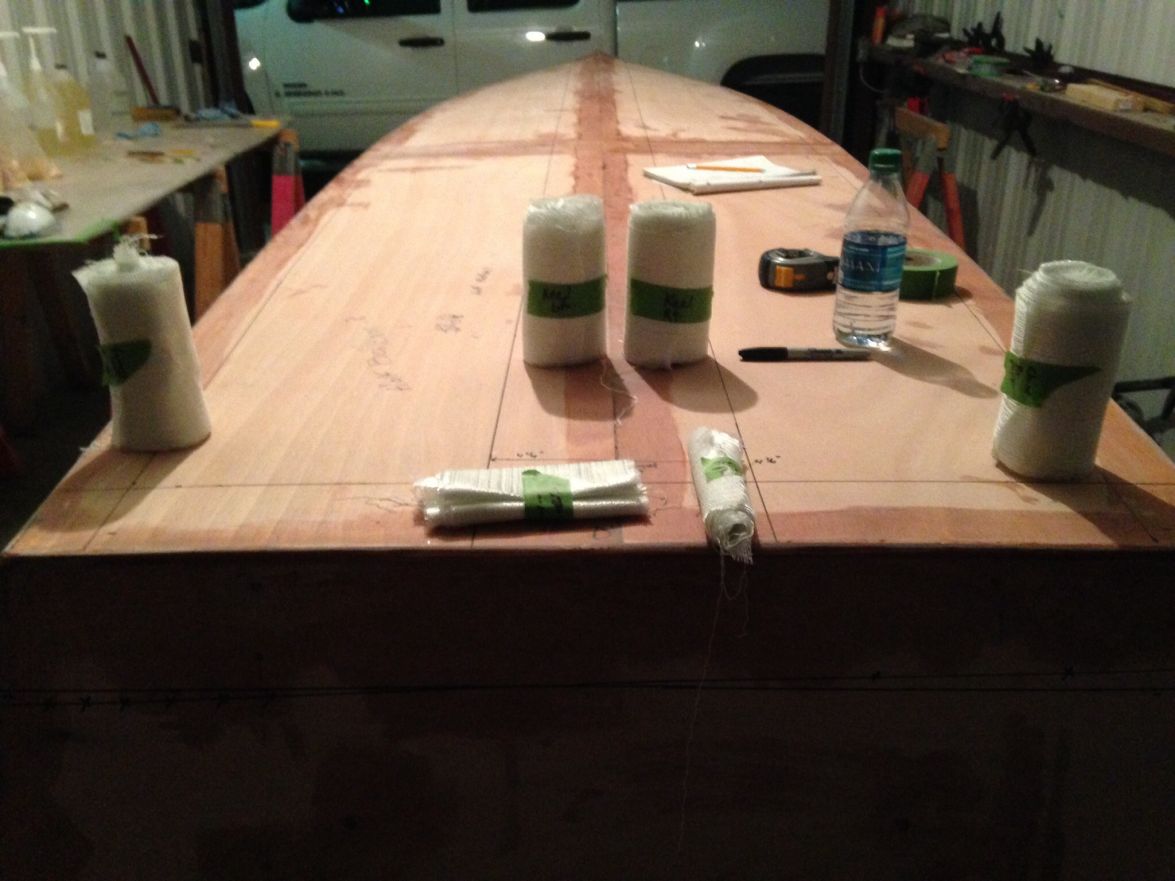
Well placed an order for 10 yds of 12 oz biax cloth so I can do the entire hull. Waiting won't be so bad, cold weather has kept me from doing much anyway, and it's going to be cold most of the week here.
And, while I'm on my way to the deer lease next weekend, I'll make a stop at Houston Hardwoods to pick up a sheet of 6mm 1088. I'll use that to rip the rub rails and also for my console.
Re: Mikem59 FS18 Build
Posted: Sun Jan 19, 2014 11:02 pm
by Mikem59
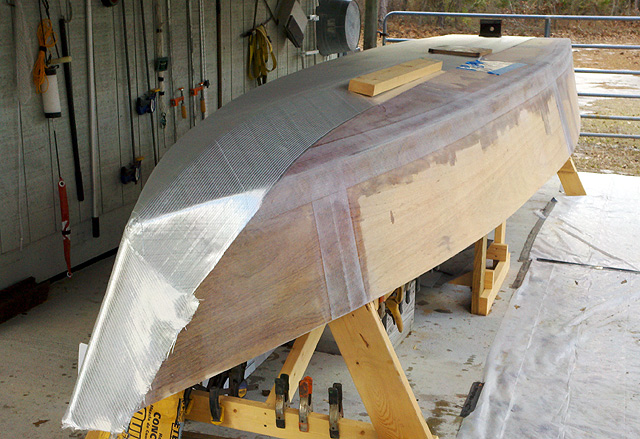
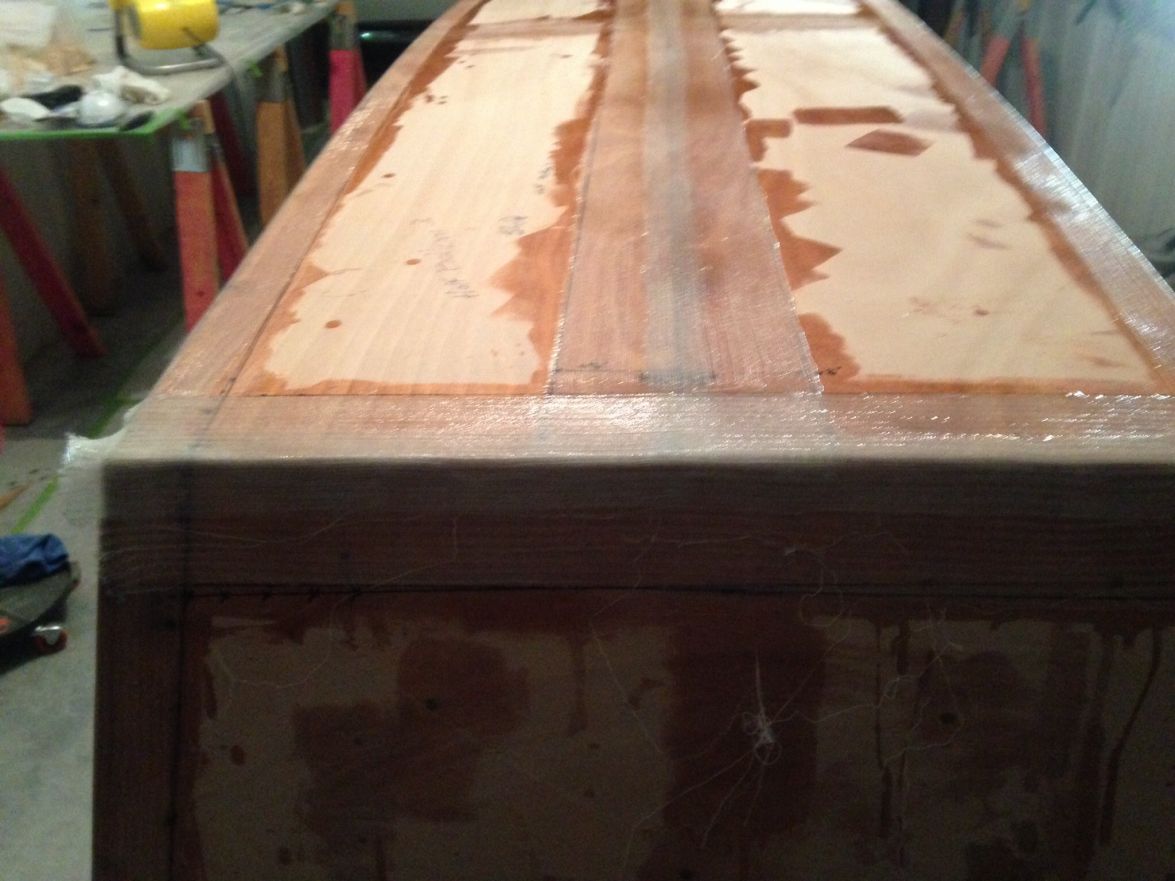
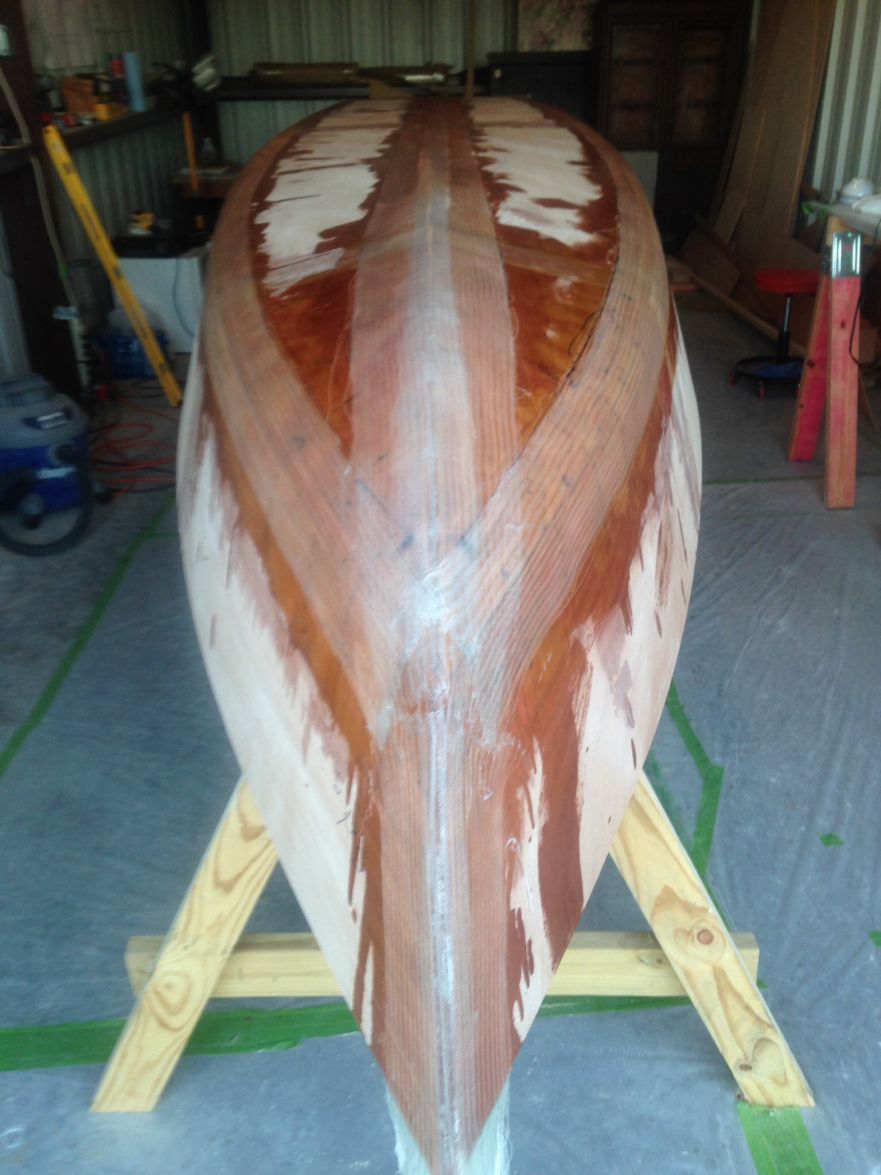
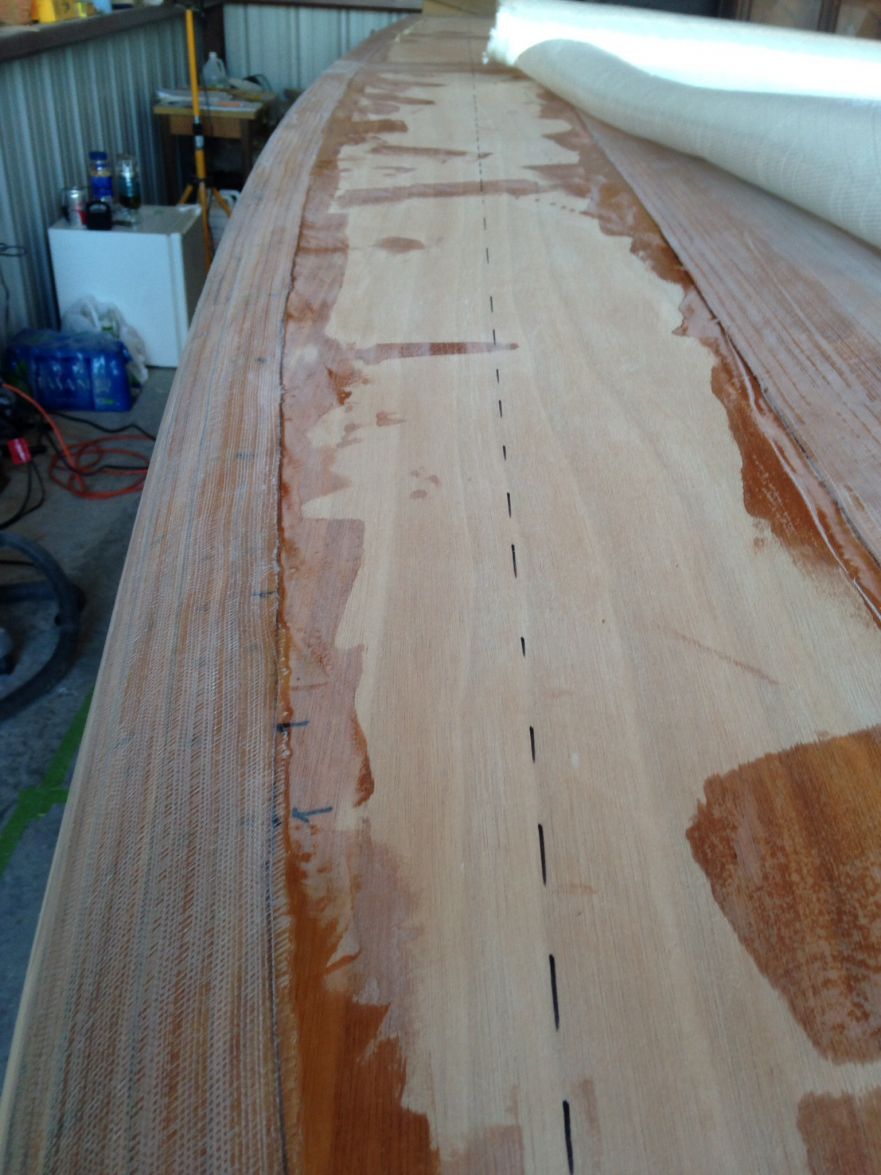
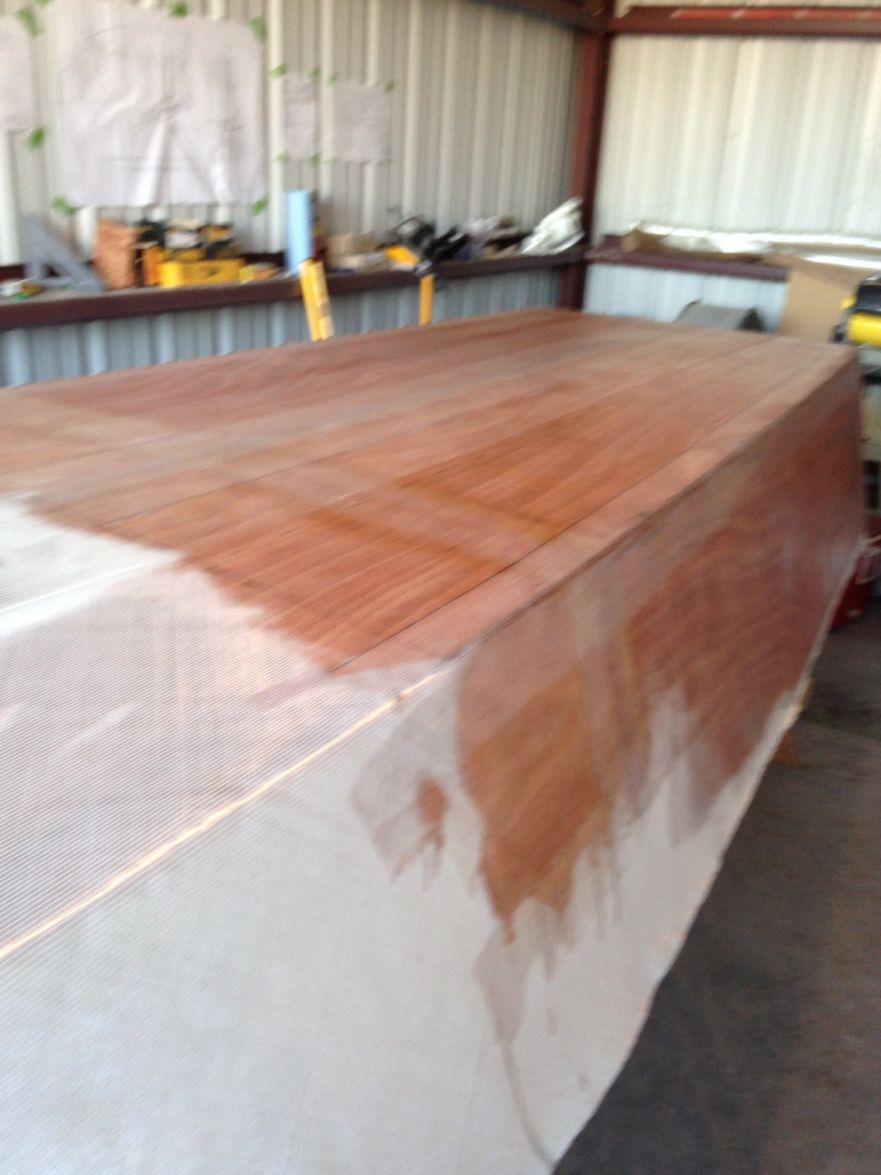
Finally took the plunge and got the hull glassed. Feeling good about the accomplishment, but always worry with anticipation to see the outcome. That was alot of work. Reading about all the other boat builds and the time it takes doesn't sink in until you're doing it for your first time.
Did the glassing over three days, day one, with some help, rolled out the glass, and cut to length. Also, cut the rub rail strips since I had help. Day two, finished trimming the fiberglass on the hull.
Day three, glassed the hull. This step alone, with help at about the half way point still took six hours. I had no idea how difficult it would be to wet out the fiberglass. Not sure if that was a function of temperature or not. Or, that's just the way it it. When I started, it was about 70 deg. By the time we finished, it was 53 deg outside. I did have a space heater going in the shop. Also, I used the medium speed hardener. Didn't have any issues with it kicking on me too quick. But, it didn't seem to take long to tack up.
And, wetting out the keel section where there was a 10" overlap on each side sure was difficult. Just voiceing all the fun I had in case I may have missed a few tips and tricks along the way.
Nonetheless, I'm quite happy to have completed this step, but I'm going to have alot of sanding, I'm guessing I went pretty heavy on the resin. I haven't tallied up how much I used just yet.
Here are some pics:


Re: Mikem59 FS18 Build
Posted: Sun Jan 19, 2014 11:34 pm
by justin_dwyer
Great job Mike
I bet it feels good to have that out the way, even if there is a bit of sanding to do.
Just waiting for the weather to ease here so I can glass mine. Just had a monsoon, so it has been raining for about 2 weeks here, everything has grown mold....so I am hoping my wood hasn't sucked up too much
Weather should ease here next week hopefully.
Cheers
Justin.
Re: Mikem59 FS18 Build
Posted: Mon Jan 20, 2014 8:10 am
by Mikem59
Justin,
Thanks! Wow, I feel for ya, two weeks worth of rain. I live on the TX Gulf Coast and we've had our bouts with extended rainfall. I can't recall two weeks worth in quite awhile. Eventhough I have a an enclosed storage building to work in, it isn't climate controlled, so I am still at the mercy of the temperatures and humidity. I'm just hoping my space heater kept things warm enough overnight for a good cure of the resin.
Sure hope that rain doesn't mess you up for much longer. Hang in there.
Re: Mikem59 FS18 Build
Posted: Mon Jan 20, 2014 8:46 am
by Cracker Larry
The glass looks great, Mike. It is much harder to wet out the cloth in cool temps and it takes more epoxy, but that looks excellent
Re: Mikem59 FS18 Build
Posted: Mon Jan 20, 2014 10:41 am
by Mikem59
Thanks CL. I suspected the cool temps were part of the culprit. I guess there's a bance between that and having time to wet out in warmer temps. This proves out that having help is key.
Re: Mikem59 FS18 Build
Posted: Tue Jan 21, 2014 9:52 pm
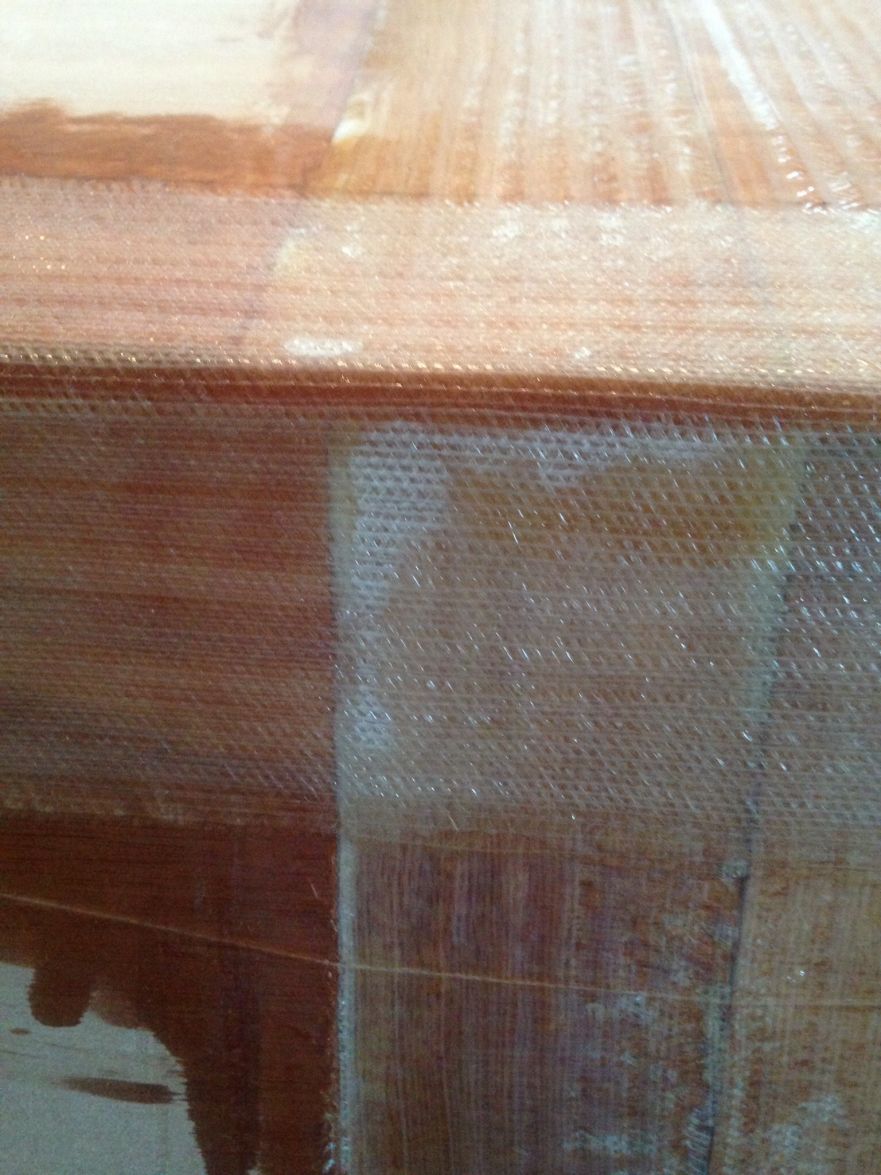
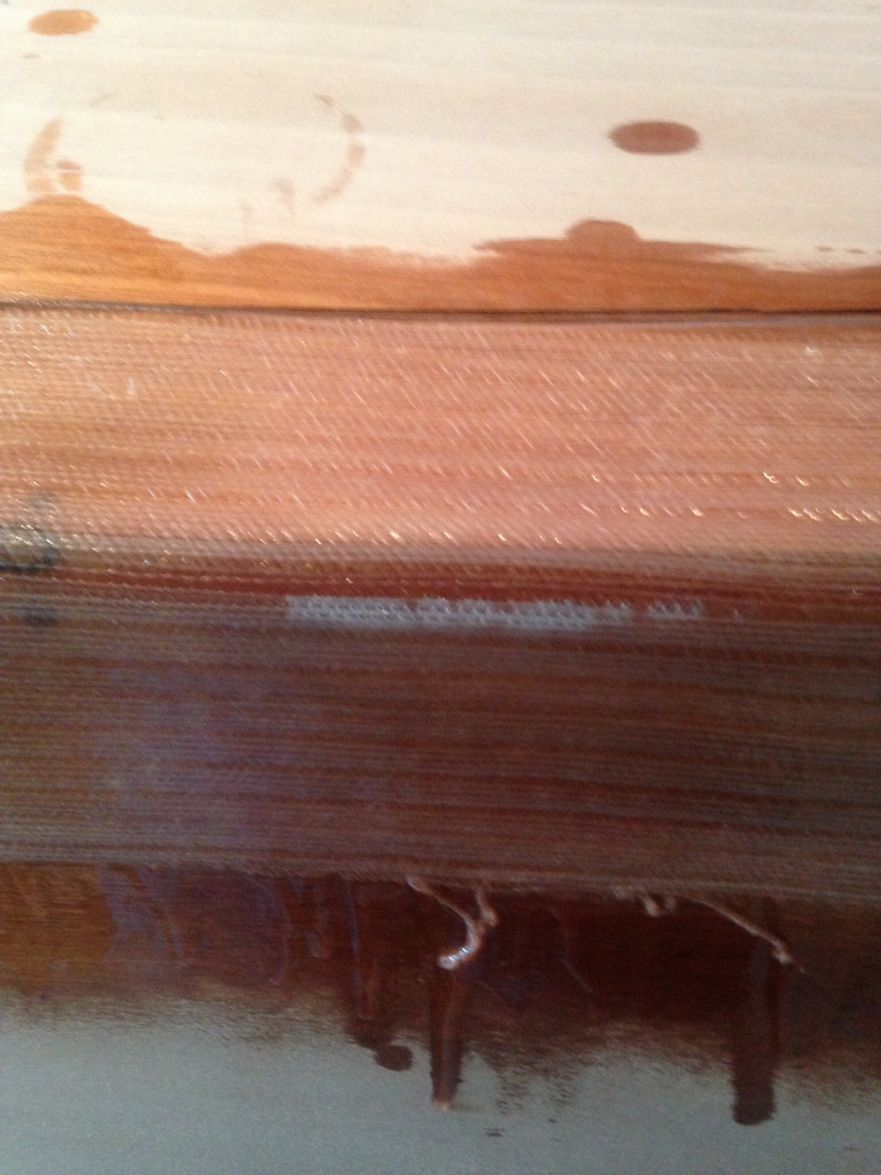
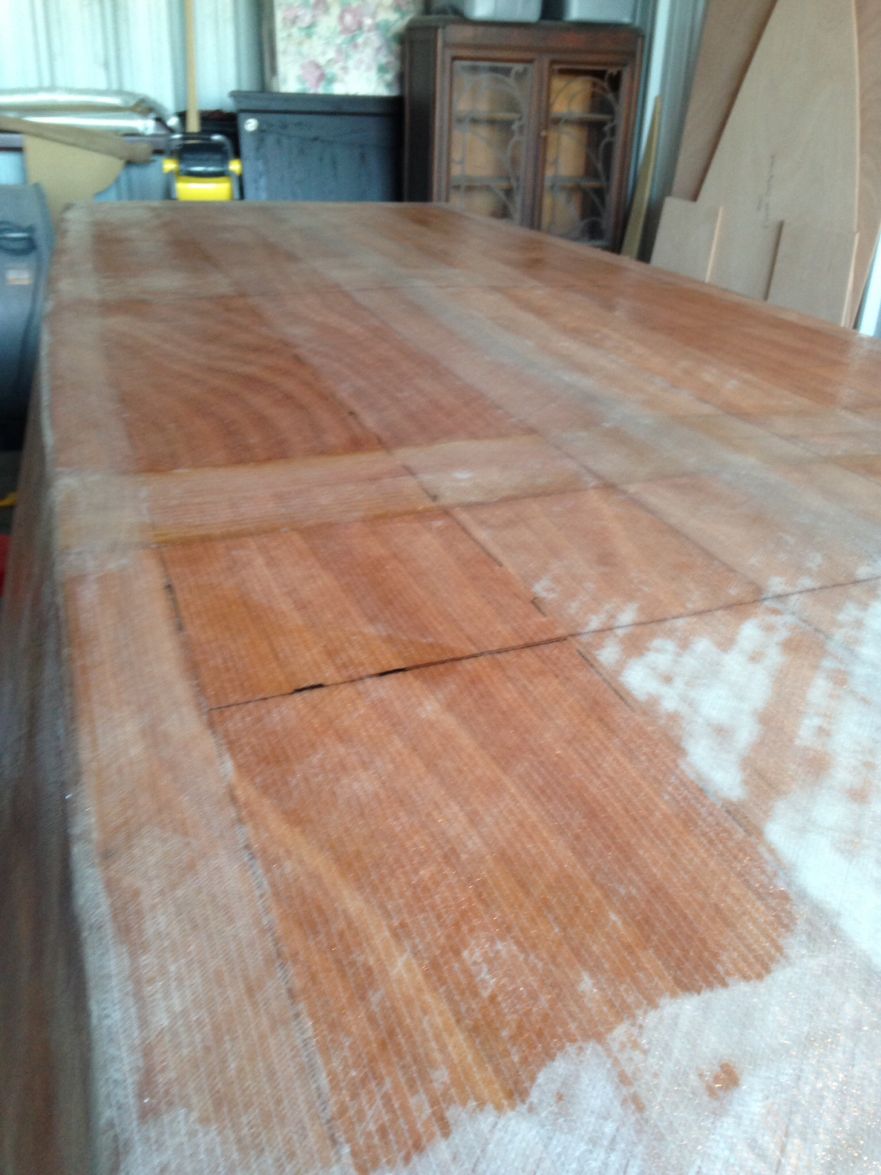
by Mikem59
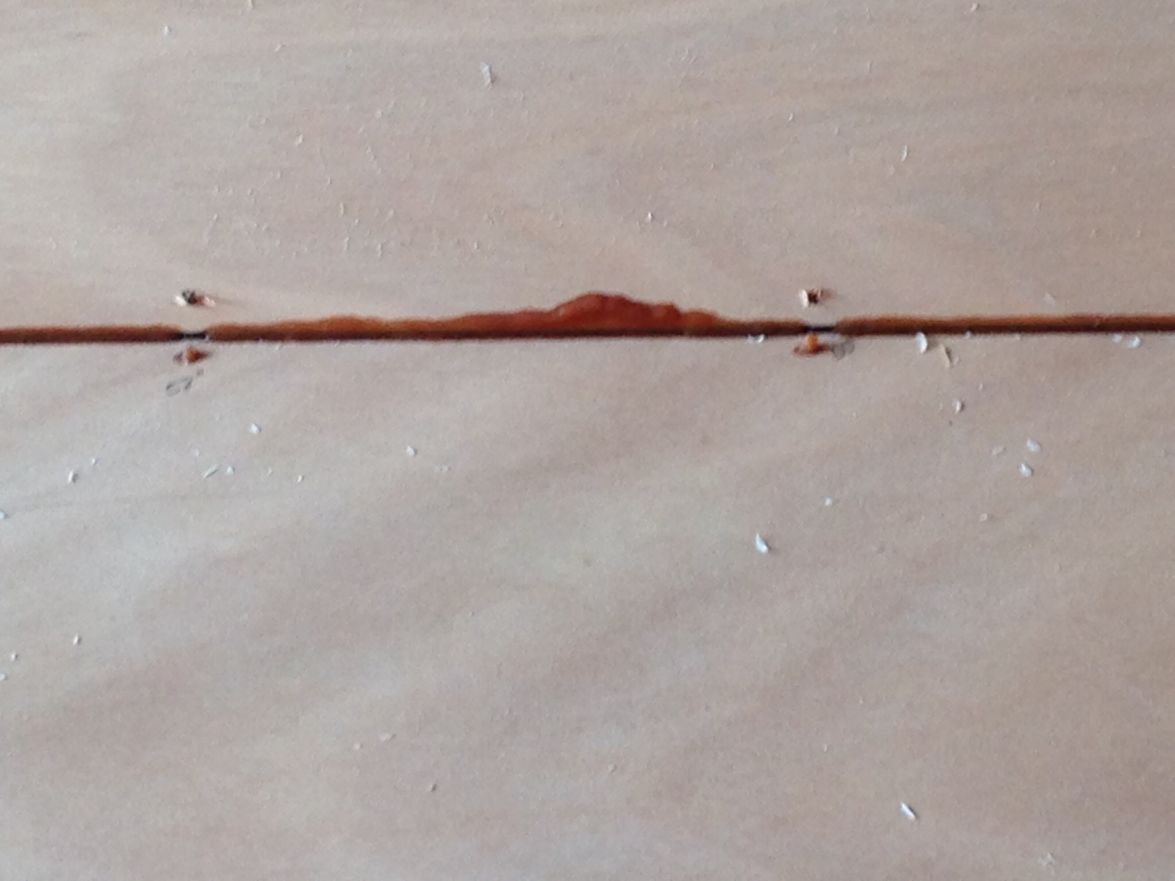
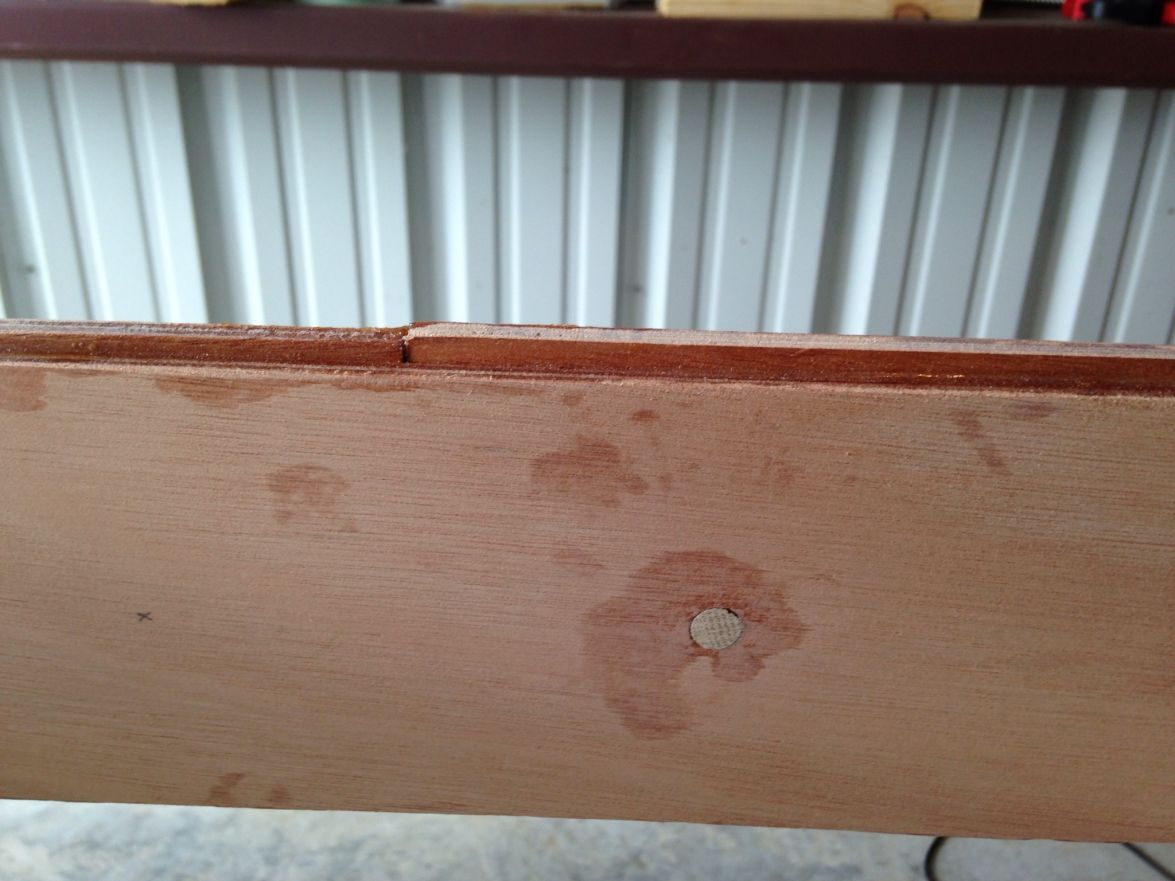
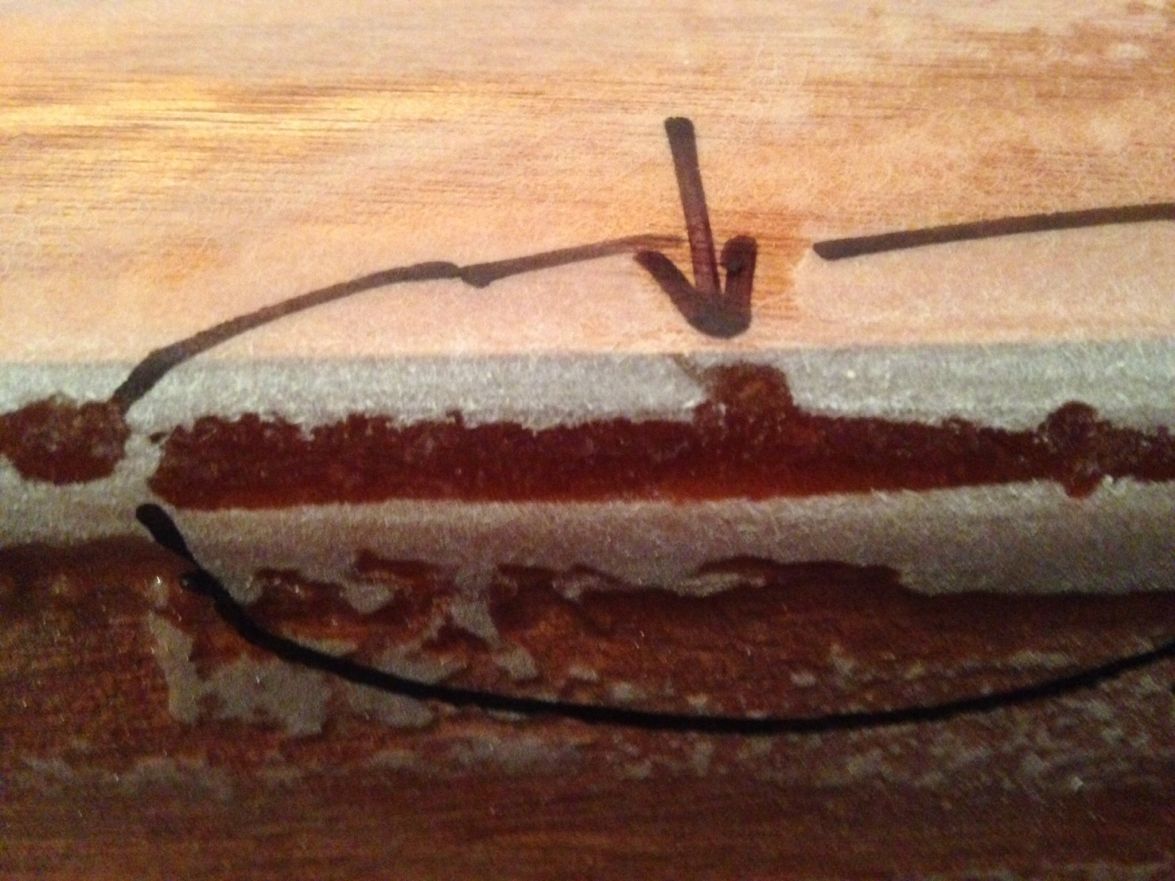
Had a chance this evening to inspect the results of my hull glassing effort, and well, overall I am pleased with the outcome, epecially in light of this being a first time build. Here's what I observed, a sizable bubble about 2 inches in length and about 1/4 to 1/2 inches wide, dead center on the keel about 3 or 4 ft from the bow. Other than that, I found just a handful of other bubbles that were more than a 1/2 inch in length. And, then there are a number of bubbles no bigger than a pinhead. I found no soft or mushy spots anywhere. And, the chines, which I was most concerned with, looked real good with no unwetted resin or bubbles to speak of. Some of the bubbles I'm finding are predominantly along the the edges where the cloth overlapped the edge of the joint tape, particularly on the bottom where I'm guessing resin wanted to do its natural thing - follow gravity.
I'm going to consider the resin injection with the hypodermic needle before I take any drastic steps to start grinding away anything. As for the pinhead sized bubbles, do they have to be addressed?
I am glad I completed this step when I did because I would have surely lost another weekend due to polar vortex 2. Now, I've got the "repair" work to do, then lots of sanding.
My last comment, glad I completed this step, it was a huge learning experience, and one that I won't have hesitation to do the next time.
Re: Mikem59 FS18 Build
Posted: Tue Jan 21, 2014 9:59 pm
by justin_dwyer
Sounds like you've done really well Mike
Could you post some pics of the problem areas, as I haven't glassed mine yet (and I am a first time builder), I'd be keen to see what to look out for.
Great job again.
Cheers
Justin.
Re: Mikem59 FS18 Build
Posted: Tue Jan 21, 2014 10:09 pm
by Mikem59
Justin,
Yes, I meant to say I would post some pics. Just gotta get them uploaded to the gallery and then included in a follow up post. I'm hoping the pics will reveal the bubbles, glare and well, it's an iPhone, will,limit the quality. It'll probably be tomorrow before I get them posted.
Mike
Re: Mikem59 FS18 Build
Posted: Tue Jan 21, 2014 10:14 pm
by justin_dwyer
No worries, thanks Mike
Re: Mikem59 FS18 Build
Posted: Wed Jan 22, 2014 8:15 am
by wegcagle
Great job Mike
I also had a few air bubbles on my GV15 when I did my first layup. Mine were mostly over one chine where I got in a hurry with a batch of epoxy that was going to kick faster than I wanted
I tried the epoxy/hypodermic needle and was unsuccessful. My guess is that my needle was too small for the viscous epoxy to go through. I ended up grinding out the area, filling with thickened epoxy and putting two overlapping layers of fiberglass tape over it. Should be plenty strong, but it did take some extra fairing to the get area right later.
Will
Re: Mikem59 FS18 Build
Posted: Wed Jan 22, 2014 8:59 pm
by Mikem59
Justin,
I took some photos, but only one was worth a darn, the bubble in the keel. I am including that pic here, and, I'll try to get some photos when I'm back working on the boat with better light.
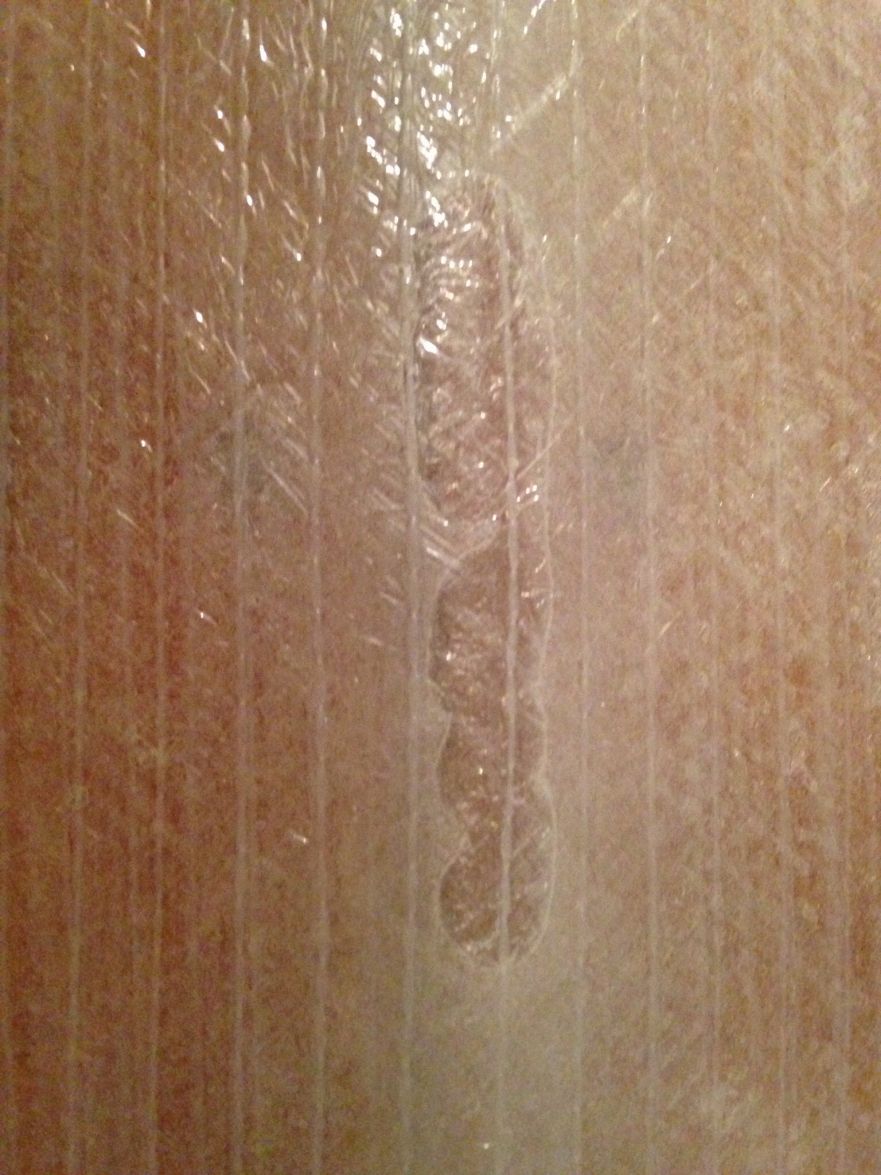
Will,
Thanks for the kudos. I certainly didn't have any issues with worrying about the resin kicking, although, when I first started when the temp was about 70 deg. I did have that first batch start to get warm as I had got too wrapped up in trying to work a small section of the hull with too much still in the pot.
As for the hypodermic needle technique, do you happen to know what guage needle you used? Tractor Supply has syringes and needles, with the largest diameter needle they stock being a 16 guage which amounts to just over a 1 mm inside diameter. Another option might be one of those Cajun Flavor injectors, but I haven't found any info on the needle diameter. May just have to buy one and try it out on a brisket or pork shoulder first then fill'er up with resin for the boat touch ups.
Re: Mikem59 FS18 Build
Posted: Wed Jan 22, 2014 9:18 pm
by wegcagle
I'm pretty sure it was a 20, but may have been an 18 ga. I would try a 14ga if I had to do it again, but I bet a 16ga would work just fine. Just mix a sample size of epoxy for starters, 10-30mLs max, to see how it works so you dont waste a lot of epoxy. You can always make more, but once you've commited it's either on the boat or in the trash.
Will
Re: Mikem59 FS18 Build
Posted: Wed Jan 22, 2014 9:30 pm
by Mikem59
Will,
Thanks for the quick reply. And, yep, I'll do a small test first. Believe me I've wasted my share of epoxy, don't need to waste more. I'm also going to either wait for a warm day or convert an old cooler over to a warmer to heat of the epoxy and resin. Hoping that will thin it out enough for the syringe.
Thanks again,
Mike
Re: Mikem59 FS18 Build
Posted: Thu Jan 23, 2014 8:03 am
by pee wee
I had success with a syringe body without a needle, just a plastic stub- don't know what size it was, though. Another tip is to drill two holes, one at each end of the bubble- resin goes in one end and air comes out the other, ideally until resin has filled it all.
Re: Mikem59 FS18 Build
Posted: Thu Jan 23, 2014 10:42 am
by tcason
Re: Mikem59 FS18 Build
Posted: Thu Jan 23, 2014 8:28 pm
by Mikem59
Hank & TCASON,
Thanks for the additional tips and suggestions. I like the idea of drilling of some small pilot holes for the addition of the resin and a way for the air to exit. I had thought of drilling a hole to avoid the concern with the needle tip not being able to penetrate the cured resin. And with a drilled hole, you're right may not need to have a needle at all and just use the stub end of the syringe.
May make the trip to tractor supply tomorrow on my day off, besides, it's going to be sub freezing tomorrow. May even get to see some snow, but doubt it.
I certainly don't plan on working on the boat.
I'll update once I decide to give this a go and the results. Sure seems that this will be easier than grinding and reglassing.
Re: Mikem59 FS18 Build
Posted: Sat Jan 25, 2014 4:53 pm
by Mikem59
Well, the good news, the syringe will work. Bought a cheap marinade injector from Academy for $0.99. It came with a plastic needle with the outlets on the sides. I ended up using without the needle and just used the stub end. Then I drilled pilot holes to inject and one for air to be forced out. This worked well on most that I tried it on. I think I'll order some syringes off Amazon with a 16 gauge needle, I think that will work much better than injecting through the stub end that has a relatively large diameter.
Now the bad news
. Now that I had more light to work with today, noticed a lot more trouble spots. Still not too bad, but I've got my work cut out for me. The main issues are a couple of spots along the chine that did not wet out completely, a spot on the lower portion of the bow where the cloth had overlaps, and a number of other white spots on the hull along the keel where the cloth was double layered due to the overlap.
I did manage to also cut off the overhanging glass and planed the edges. It definitely looks like a boat, albeit upside down
.
Re: Mikem59 FS18 Build
Posted: Sun Jan 26, 2014 9:09 pm
by Mikem59
Catching up on posting some pics.
Pic after trimming the overhang off. Used a grinder with a cutting disc.
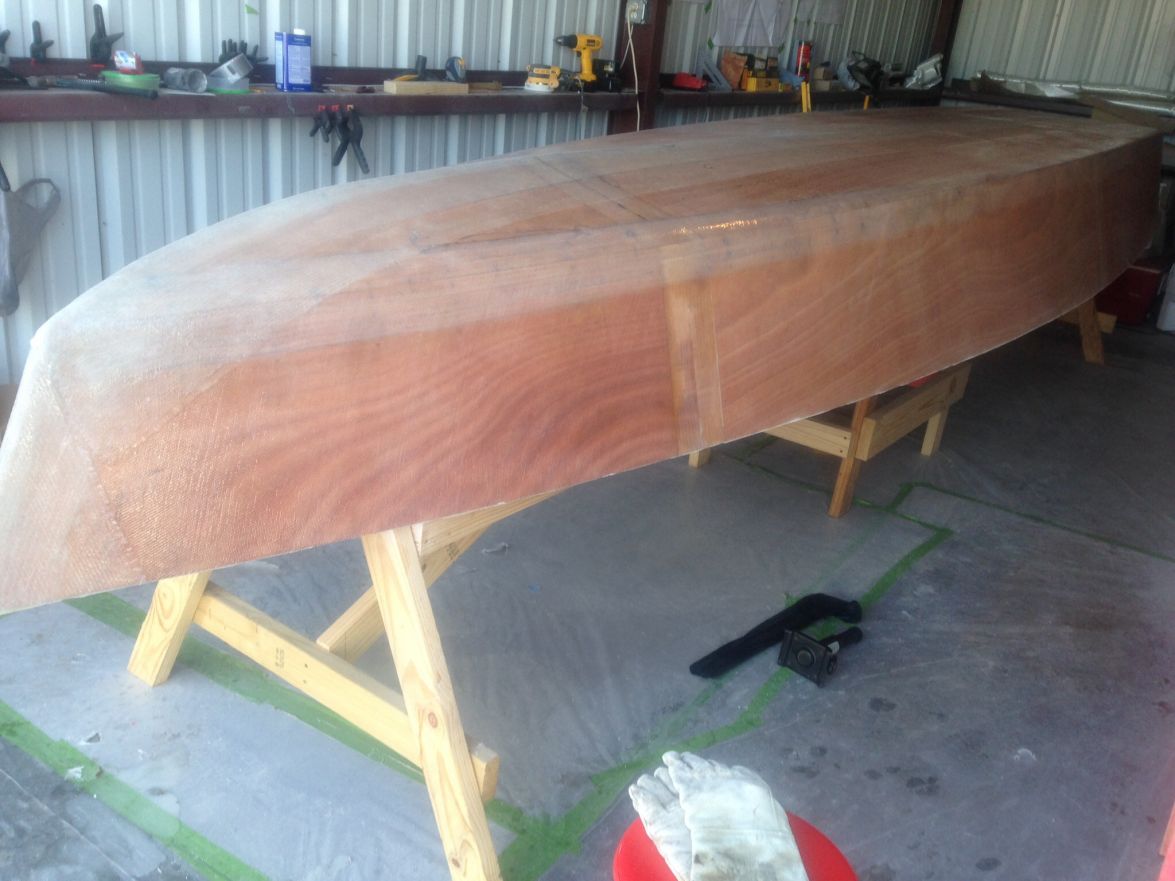
The other side trimmed.
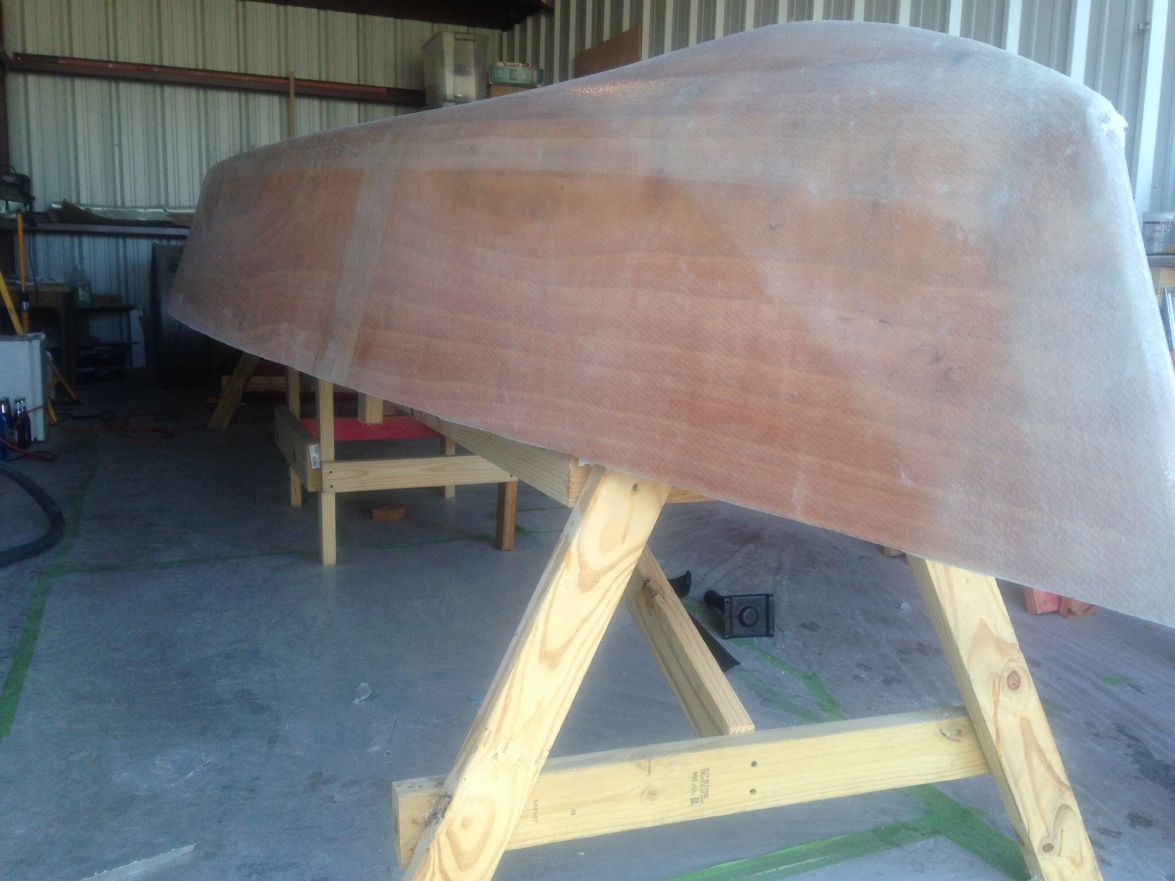
The trimmings and trash from the whole glassing effort.
Yikes, bubbles. None bigger than a dime.
Here's the marinade injector I bought at Academy for $0.99 that I used on some of the bubbles. Just used the syringe and stub end. Worked ok. Like Hank suggested, I had drilled two holes, one to inject into, the other to bleed out the air. Again, that worked ok on the few bigger bubbles.
Once I got some better light to work with in the storage building I'm working in, I could see that the chine just didn't look good, some bubbles and white areas. After all that work glassing the hull, it's not easy telling yourself to grind it away. But, after I began grinding (used the Stanley Sureform Planer), it became obvious doing so was the right decision, that glass had not wetted out along the chine in this area. The tell tale sign was that some of the cloth was not adhered to the underlying layer.
Another shot looking down the chine.
Here's Sir Stanley.
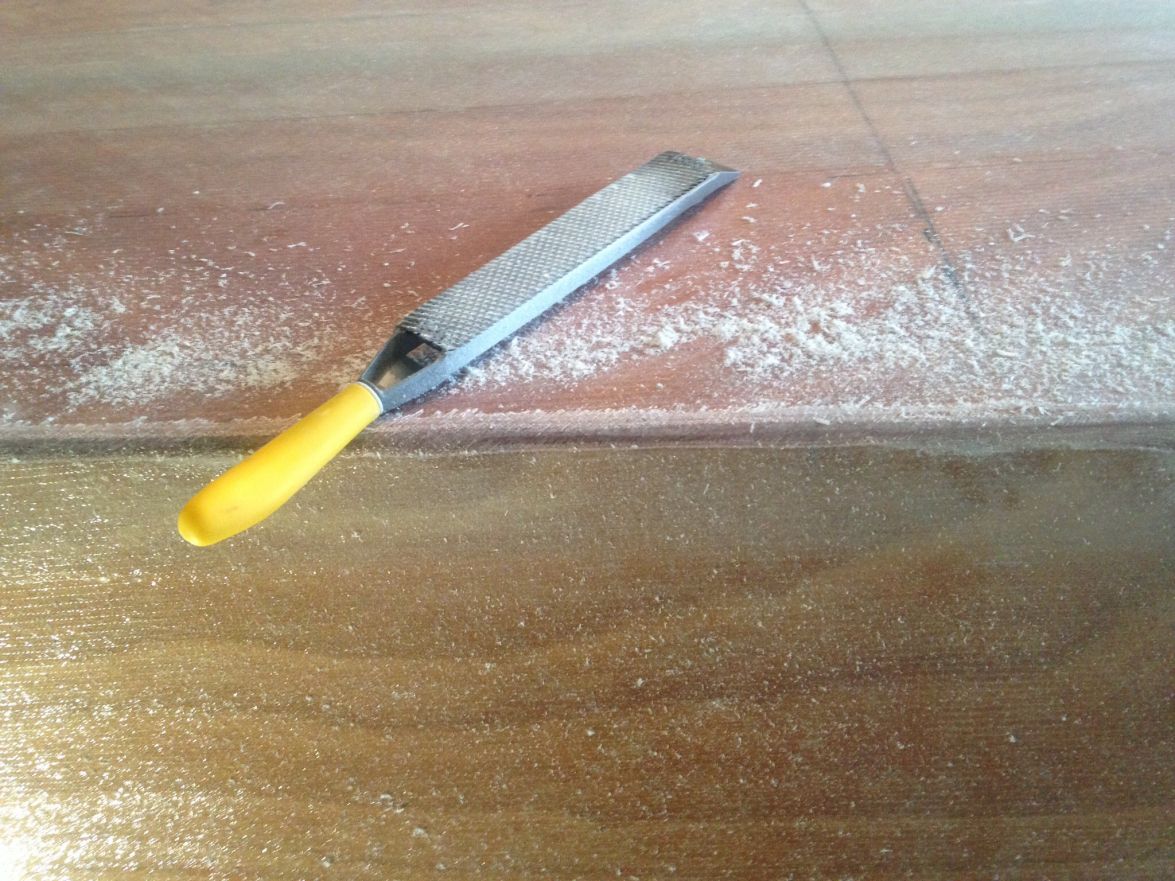
I reglassed the lower portion of the bow as well. All those layers of glass that overlapped here just didn't wet quite right, figured I'd better redo it.
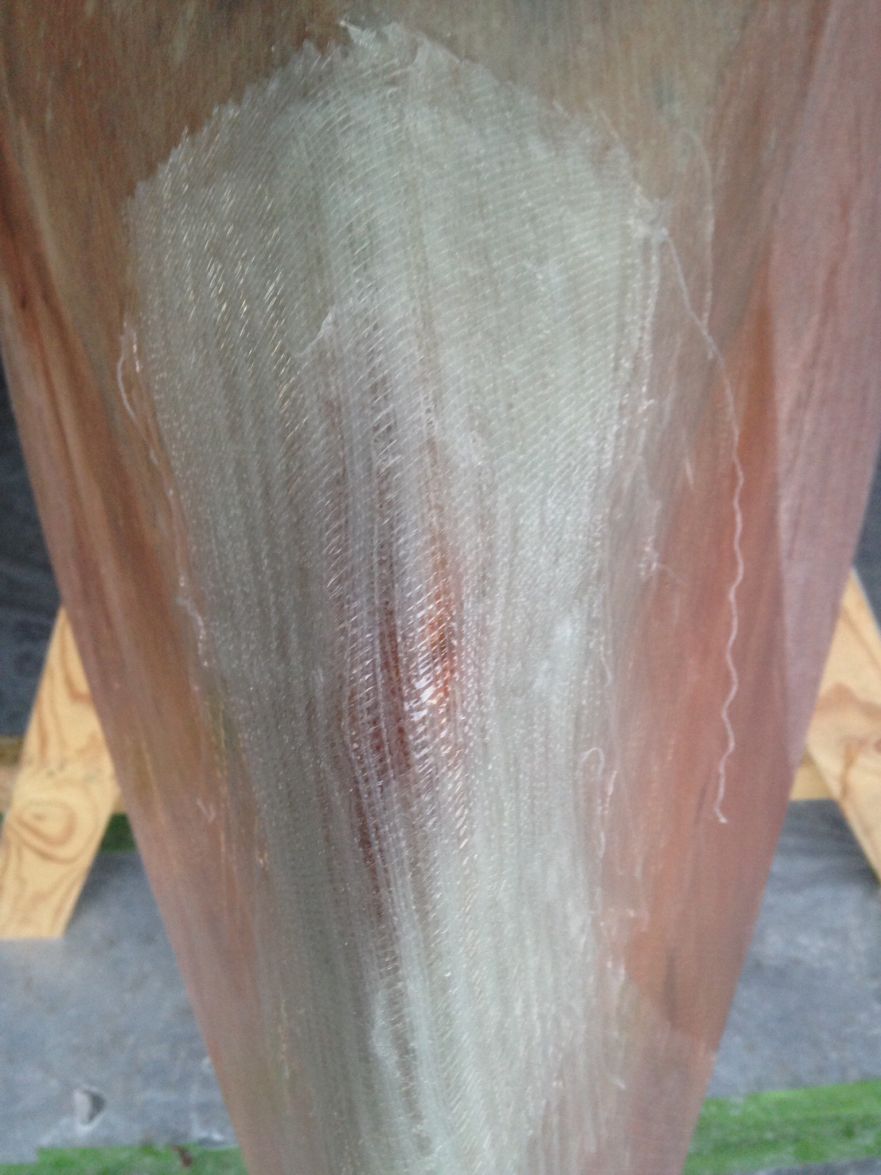
Re: Mikem59 FS18 Build
Posted: Mon Jan 27, 2014 7:39 am
by justin_dwyer
Mike, thanks for posting such good pics.
Do you have to fill all those little bubble holes?
Also, to fix that chine, do you just grind away the loose glass and run some biaxial tape along it to fix that up? Do you know why the chine didn't laminate ( hoping to avoid as many problems with mine as I can).
I am just waiting for the weather to break here so I can glass mine.
It is looking great.
Cheers
Justin
Re: Mikem59 FS18 Build
Posted: Mon Jan 27, 2014 8:54 am
by Hope2float
Hey Mike, couple of things for you to consider. Is the round over on the chine enough to allow the glass to lay flat. Are you using some kind of fiberglass roller to remove the air trapped under the glass. Is the epoxy warm enough to wet out what you are glassing. Are you working the glass after wet out to pull against your radius. Glass has a funny way of relaxing after wet out. Just bringing these points to your attention to help you move forward and not have to go back and repair these. Send a shout out to Larry, he probably has some pointers for you as well.
BUILD-ON!
Dave
Re: Mikem59 FS18 Build
Posted: Mon Jan 27, 2014 9:34 am
by Mikem59
Justin,
I don't plan on going after all those bubbles, unless someone feels I'm making a huge mistake. They are all pretty small. As for the chine I will be reglassing with tape. As Dave noted in his follow up, the chine may not have been rounded to the proper radius, but I'm more inclined to believe it was due to the glass "relaxing" after wet out. And, I really wish now that I had wetted out the resin with warmer temps or heated the resin. The day I glassed the hull, it started out at 70 deg. But by the time I finished it was 50 or so. Like some have stated on he forum, the resin was difficult to work with when it got cool.
I'll be making sure I get a good radius and wait for a warmer day. Calling for 73 deg this coming Saturday after this 3rd round of the Polar Vortex.

And, Dave, CL and others like yourself on the forum have been good enough to comment on some of my posts throughout my build. It is very welcome info. I just need to pull it all together and remain patient and persistent.
Re: Mikem59 FS18 Build
Posted: Sun Feb 02, 2014 7:34 pm
by Mikem59
Some decent weather this weekend, so got to do the chine repair work, then started sanding.
Here's the chine repair. Dave - as you stated, the cloth definitely wants to relax. Between trying to keep it from relaxing and making sure I didn't have any bubbles, I decided to use a piece of plastic over the chine. Here are a couple of photos. I think this worked pretty well.
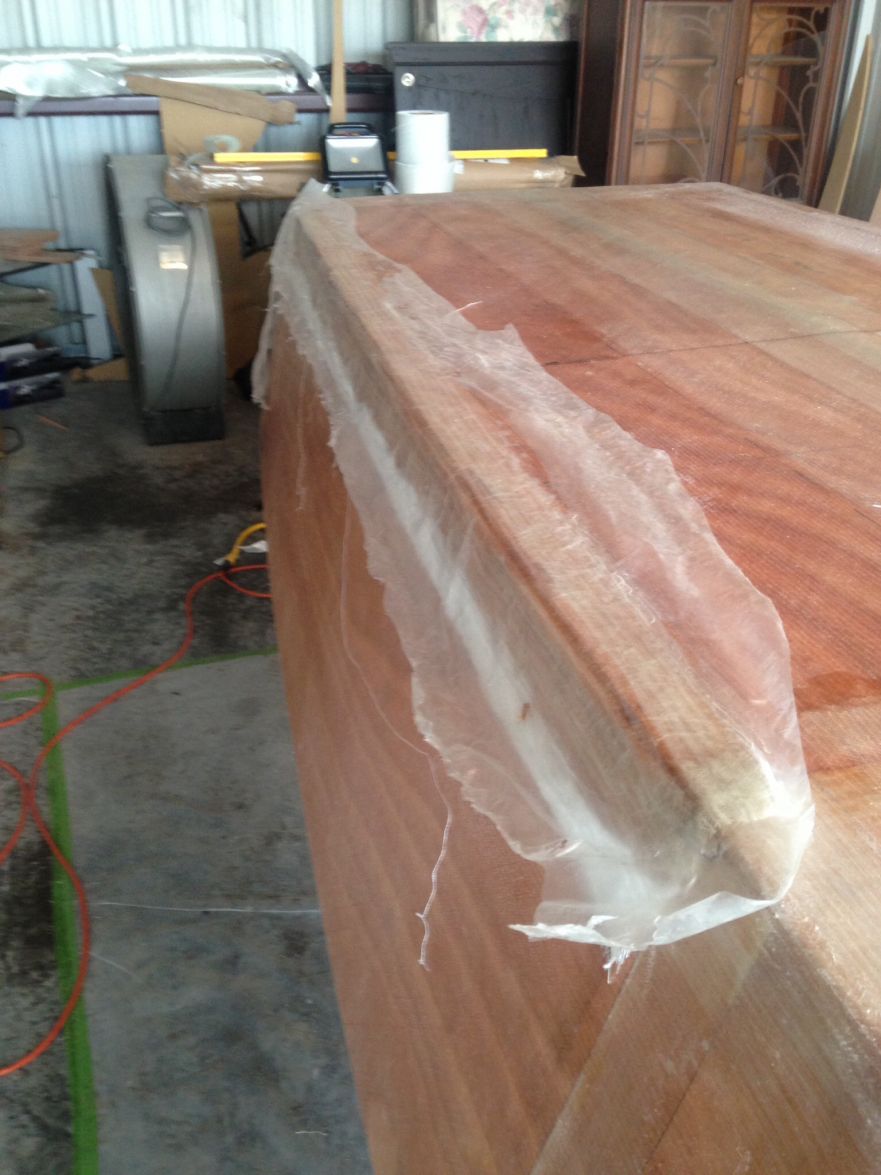
Another shot with the plastic over the chine.
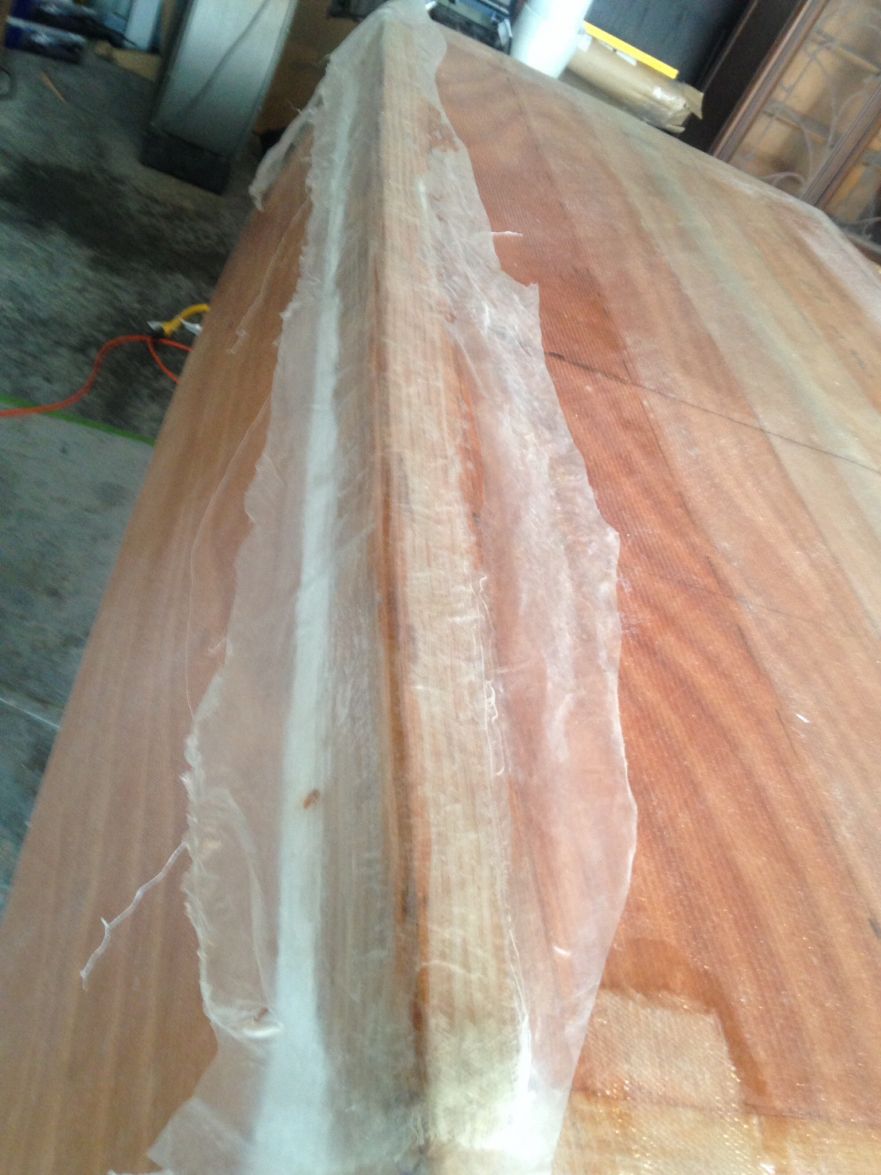
Here's a pic after I peeled the plastic off. I was pleased as there were no bubbles. It was a little wavy below the chine, and notice I have some dry cloth at the bottom. I didn't wet it all out as the repair was truly only limited to about an 1 1/2" area on either side of the chine.
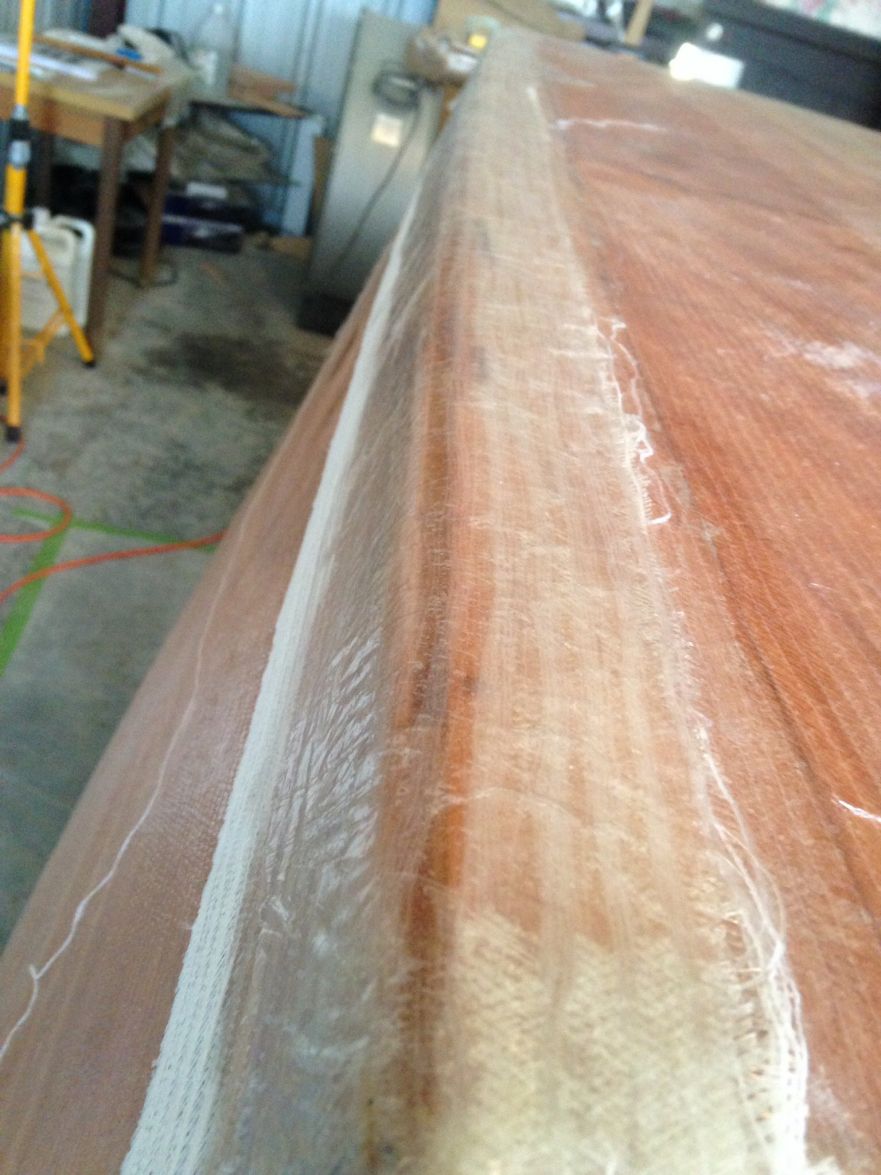
Now, sanding, I want to be sure I take off the correct amount of resin, here are a series of photos at different stages of sanding.
This is the transom area whereby there are two layers of seam tape, then the 50" cloth on top as well. Here, you can see where I knocked off the top layer of resin. The portion nearest the edges is sanded to where you can jsut barely see threads. I'm guessing I need to do more sanding as the binder threads should be virtually sanded away exposing the biax, right
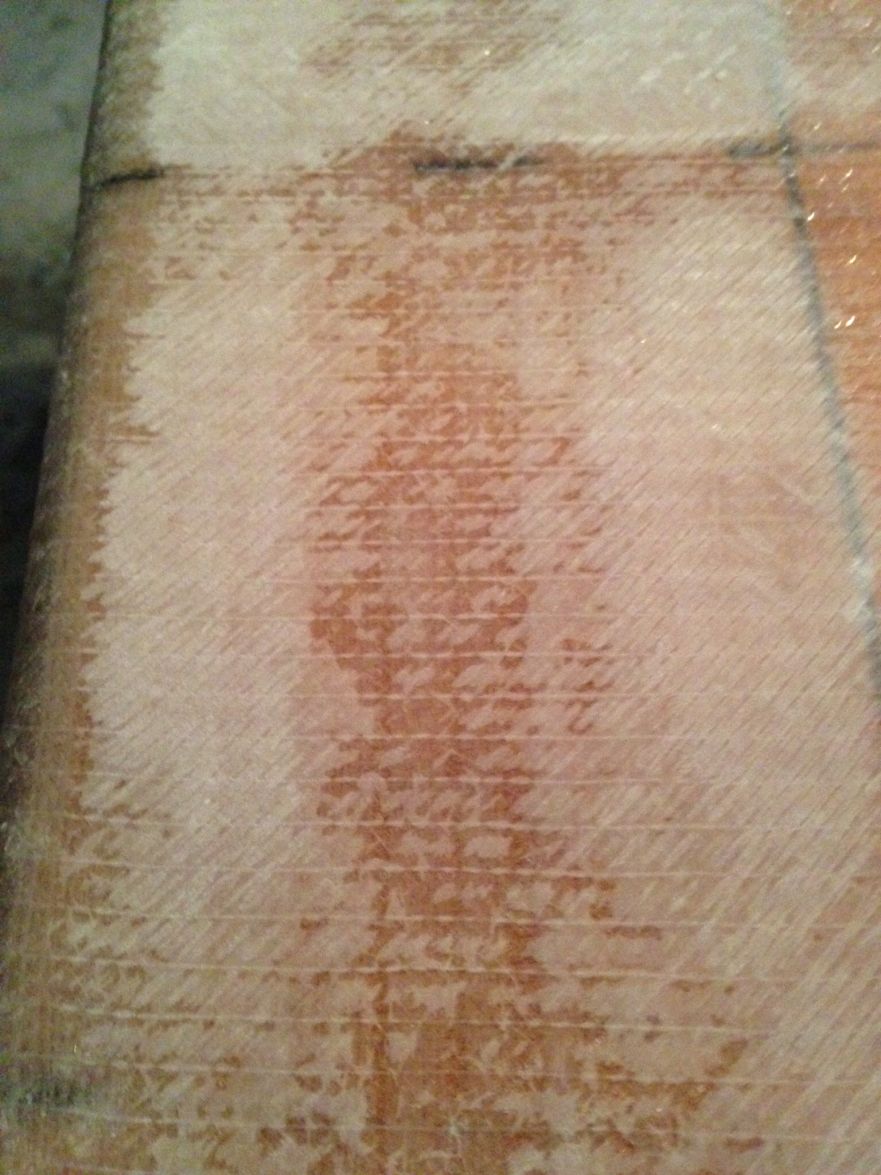
This has been sanded further, seems to be getting close to where I should be
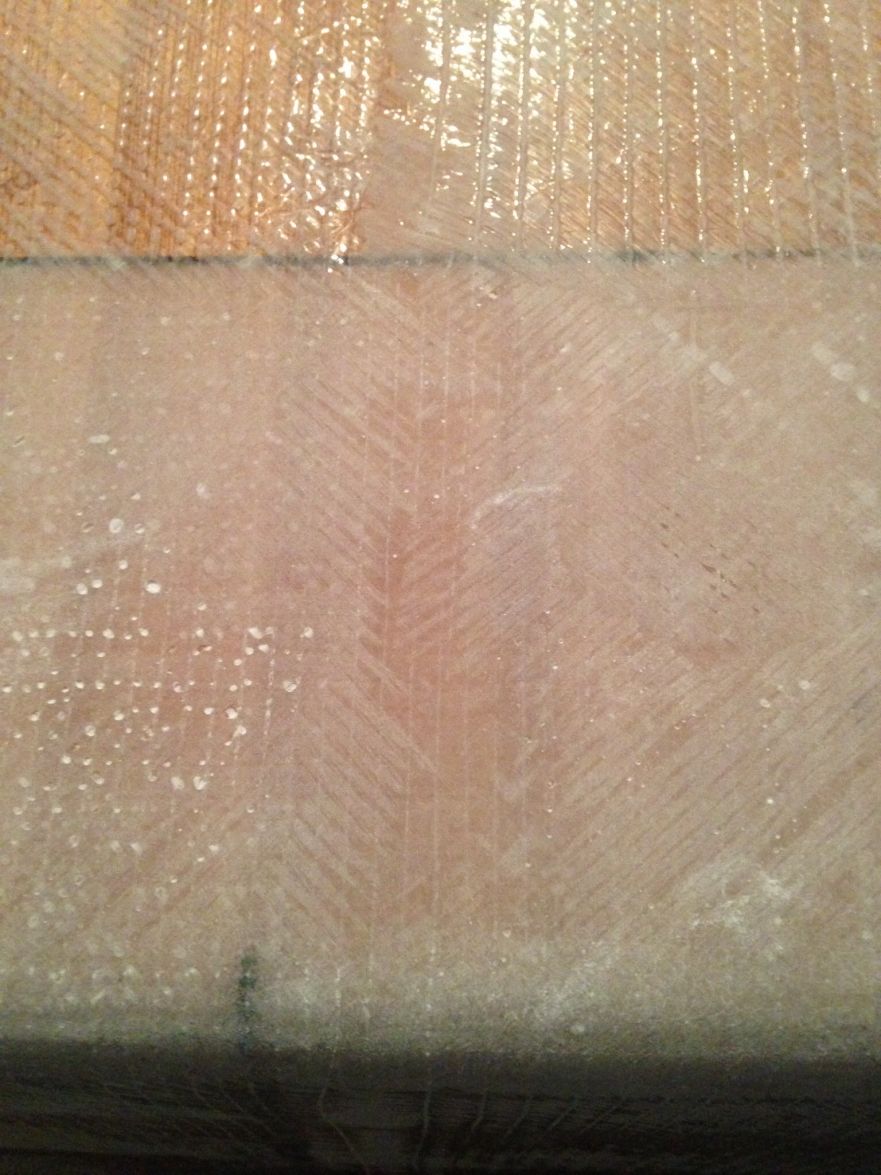
Or, do I just get it like this
I'm guessing no, if this were the case, I could have knocked out sanding the whole hull in no time.
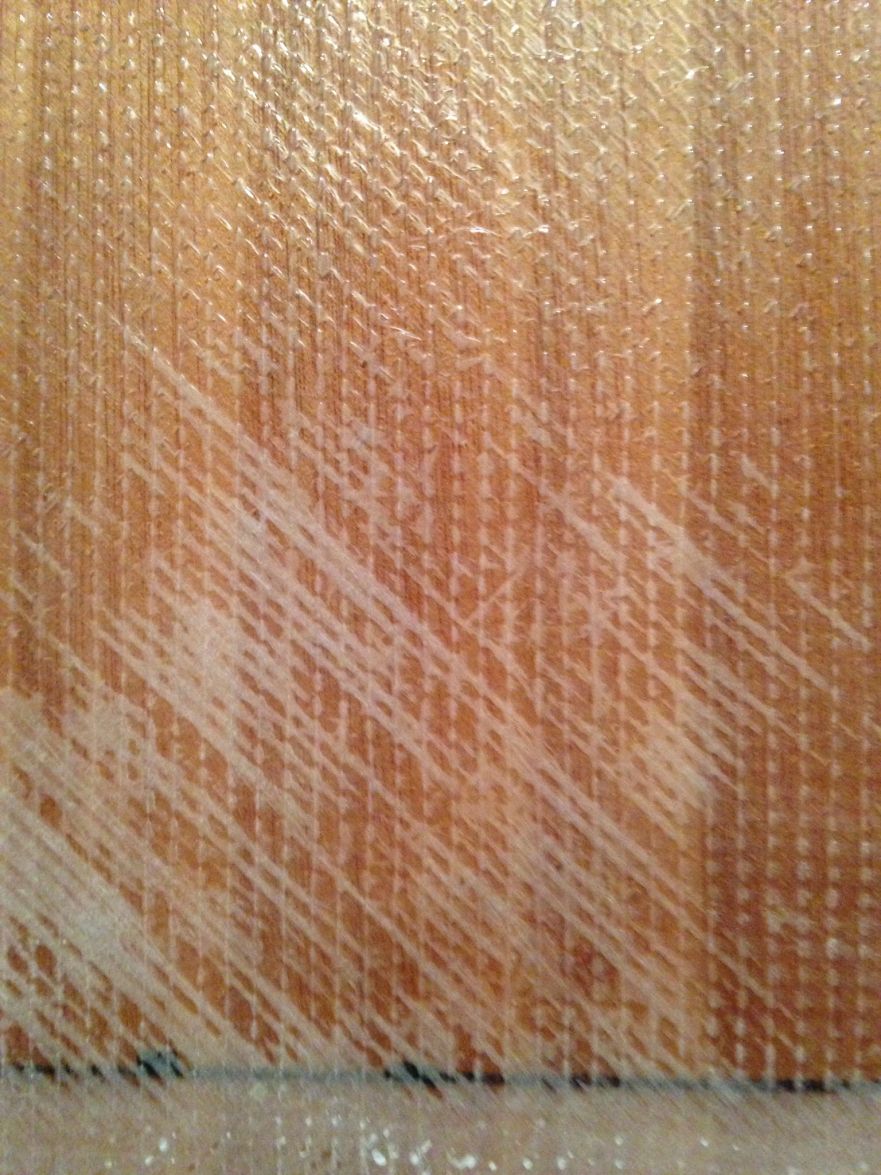
And, here's shot of the chine I had redone where I've sanded for nearly 2 hours. It appears as though I'm down to the binder threads. Is this where I need to get to?
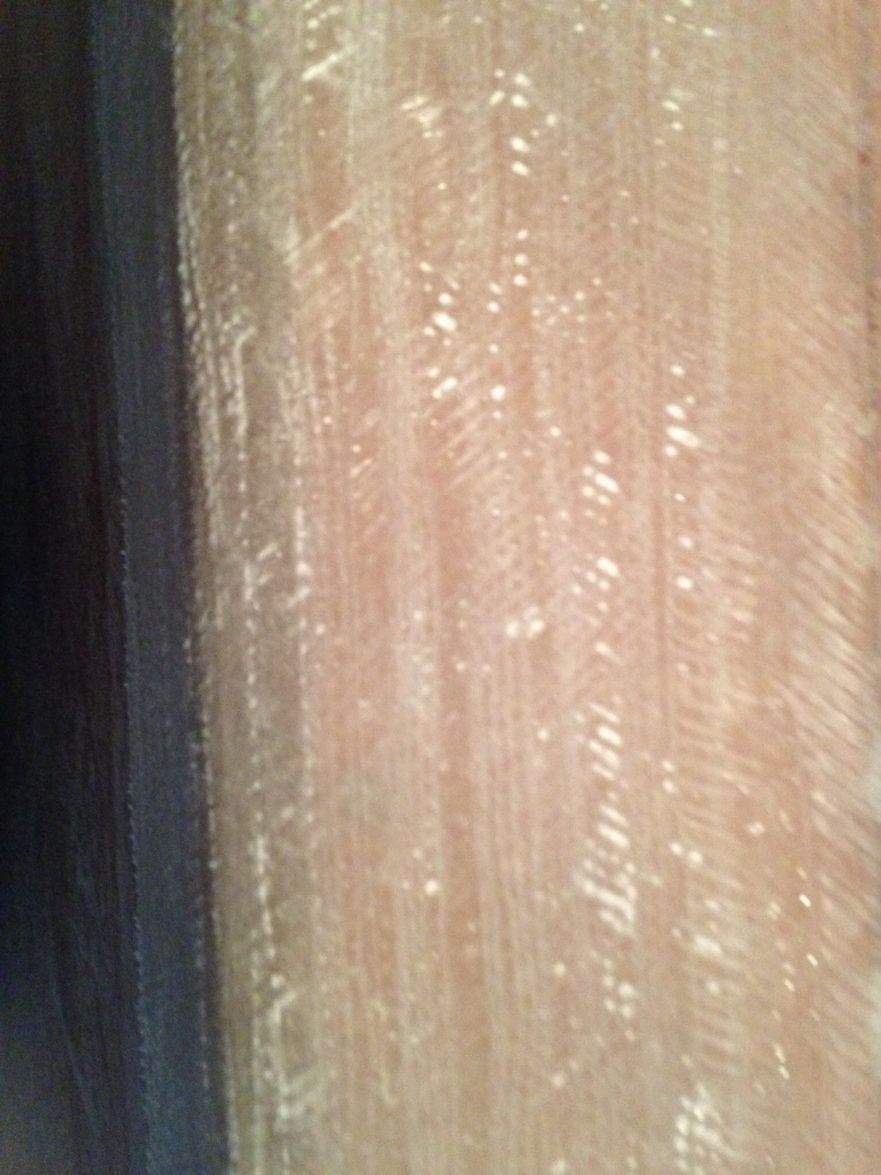
Admittedly, this is going to take some time, no a lot of time!
But, I look forward to this step, it means I'm just a few steps away from the hull flip. I sure hope, once I complete the sanding, that the hull fairing will go much better.
Re: Mikem59 FS18 Build
Posted: Mon Feb 03, 2014 9:07 am
by tech_support
I prefer to take it down a little less than this amount...
You just getting into the biax, but the idea is to have nice overlaps there so its not the end of the world of you go through a bit.
JOel Shine
Re: Mikem59 FS18 Build
Posted: Mon Feb 03, 2014 6:53 pm
by Mikem59
Joel,
Thanks for the reply. That is somewhat of a relief, I was thinking I might have to virtually expose the biax threads. Your advice as well as that of others is thankfully consistent and what I had done when I sanded the seams prior to this step.
Mike
Re: Mikem59 FS18 Build
Posted: Wed Feb 19, 2014 9:05 pm
by Mikem59
Well the boat doesn't look much different today than it did a couple of weeks ago. It's not due to not doing anything. After completing the sanding and doing some close inspection, I just became real uncomfortable with 3 other spots, 1 along the chine, and the other two on the joint between the hull and transom. I sanded, planed off the "bad" sections and reglassed.
After completing that, the one transom-hull intersection still has a spot that just wouldn't hold resin. Realized that there was a slight depression that made it difficult for the cloth to lay properly and take and hold the resin.
So planed, sanded this small section out and mixed up some resin and wood flour to fill that small void. Will go back tomorrow and cover with a glass patch.
Once that is completed, will finish up the sanding of the repaired spots. Before I begin the fairing process, what works best to clean up the hull after sanding
Will vacuuming the dust off be sufficient? Wipe down with acetone? Or just scrub it down with soap and water?
Re: Mikem59 FS18 Build
Posted: Thu Feb 20, 2014 10:25 am
by tech_support
I start with a brush, then wipe down. Most of the time you can just use a brush to clean it off and its ready, but if your going over some old glass that might have some wax on it then your safer to wipe it down. Acetone works, so does mineral spirits, so does denatured alcohol. If you going over previous layer of epoxy, then you just need to make sure there is no blush before the next application
Re: Mikem59 FS18 Build
Posted: Thu Feb 20, 2014 10:08 pm
by Mikem59
Shine,
Thanks. I've been using a horse hair brush and wiping down. I ought to be good to go soon on the fairing process, but will need to order the quick fair soon to get started.
Mike
Re: Mikem59 FS18 Build
Posted: Fri Jun 13, 2014 12:02 pm
by Mikem59
Wow, saw that my last post was back in February. It's not that I haven't done anything, but I haven't made awhole lot of progress either. And, it's great to see the progress on Atthe Brinks, Cannonballs, and others builds too, more motivation for me.
So, here's what I've done since last post.
Built the "mold dams" to do the hard chine and made up the mix of wood flour, milled glass, and resin. I don't have the photos of how I built the mold dams to hold the mix, but I sure learned pretty quickly what I did wrong.
Once I applied the packing tape and double sided tape to attach the plywood for the dams, I should have recognized from Cracker Larry's photo of this step that another piece of tape should have been applied to seal the bottom edge. I quickly did while trying to collect runs of resin mix down the hill sides.
Next, I believe if put the double sided tape too far down from the chine edge. Unless I missed something else, that gorilla double sided tape is probably a 1/16" thick. Once you pour that resin, it is going to build up on the top edge. Since I taped down too far from the edge, this led to a layer of epoxy that would have to be ground and sanded off.
Another issue I had was that some resin had run over the packing tape making it along with the double-side tape difficult to remove. Basically, what I could pull off got sanded off. Needless to say, with all the grinding and sanding, it looked like a light snowfall in my building.
Overall, I was really disappointed in the end result of this effort.
It has led to a lot of grinding and sanding. This has been another of those learning experiences. It takes extra effort, but knowing you can always recover from big or little mistakes helps to ease my mind.
Below are the pics I have of this effort. You may be able to see some of my issues with the uneveness of the chine. I'd like some suggestions on how to progress, ie. should I do the "mold dam" to correct some of the uneveness, or move onto the fairing step to resolve.
Here are the pics:
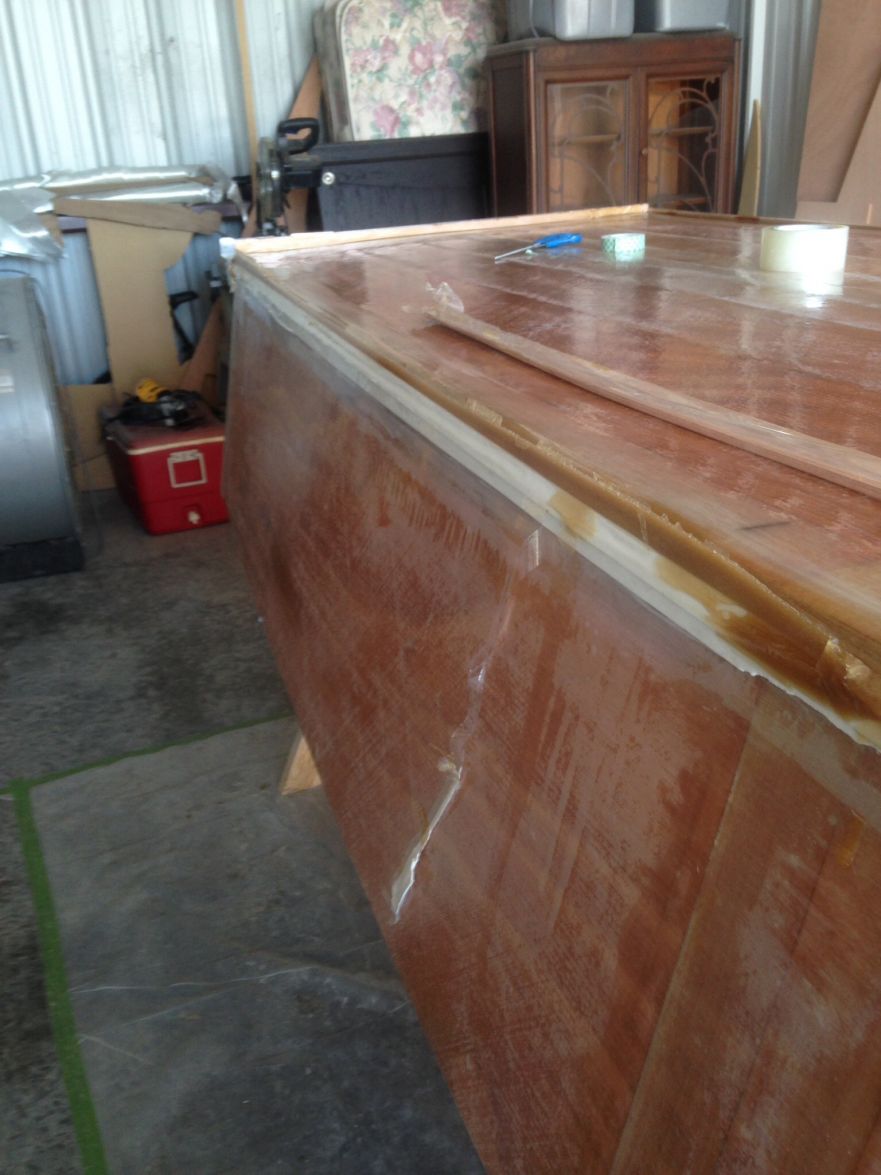
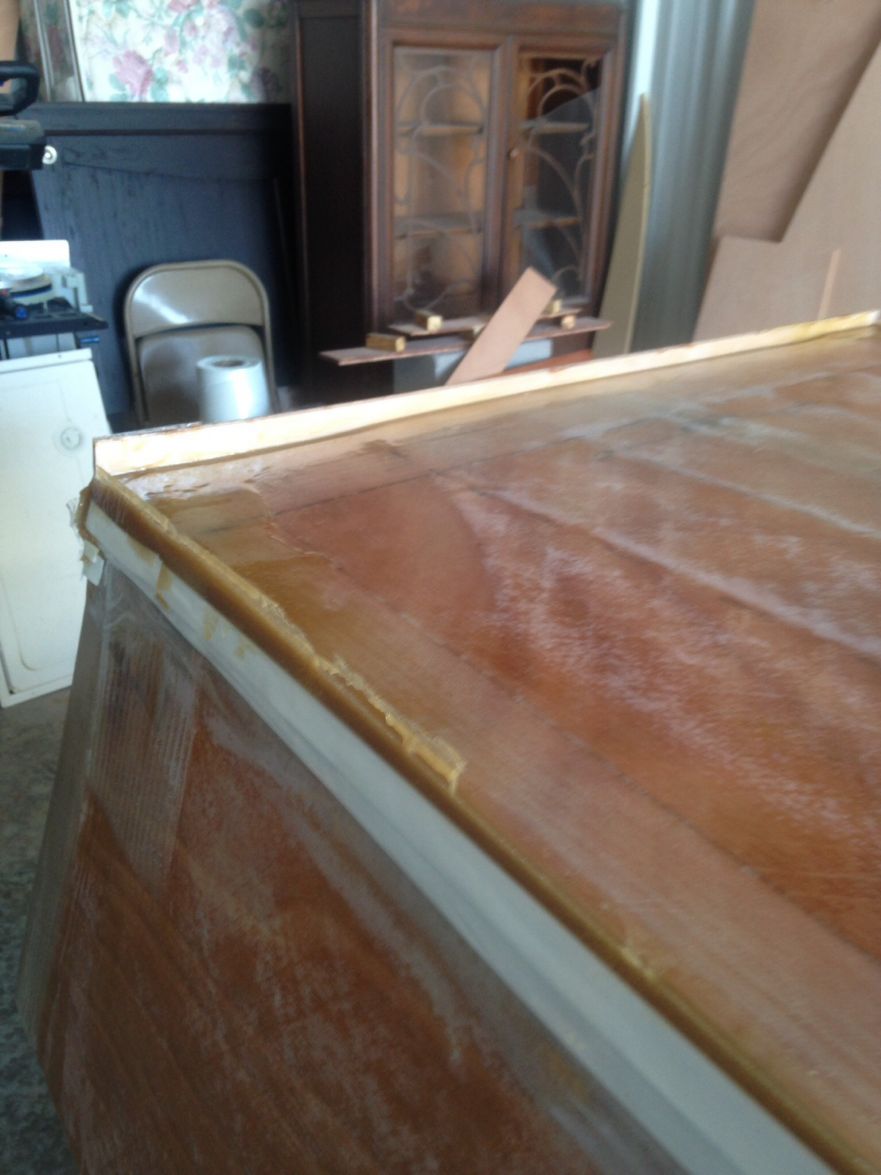
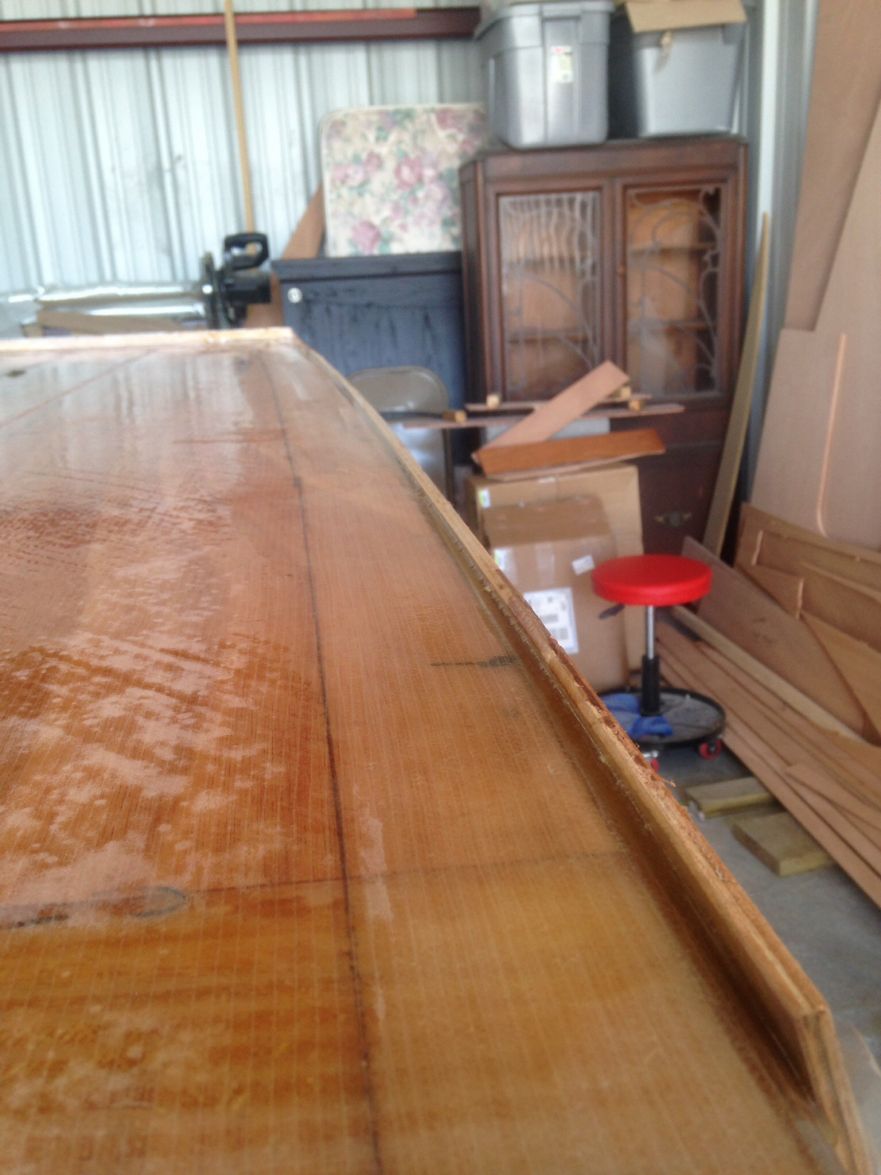
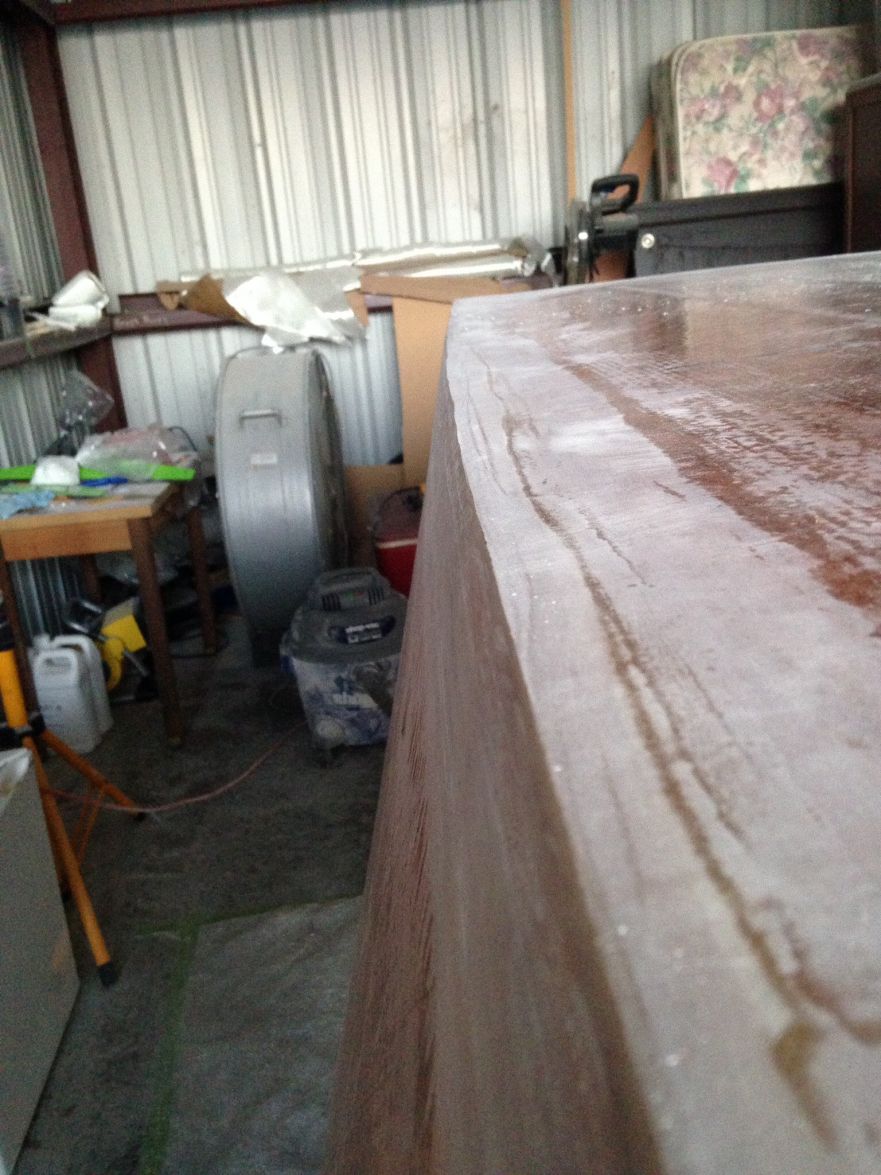
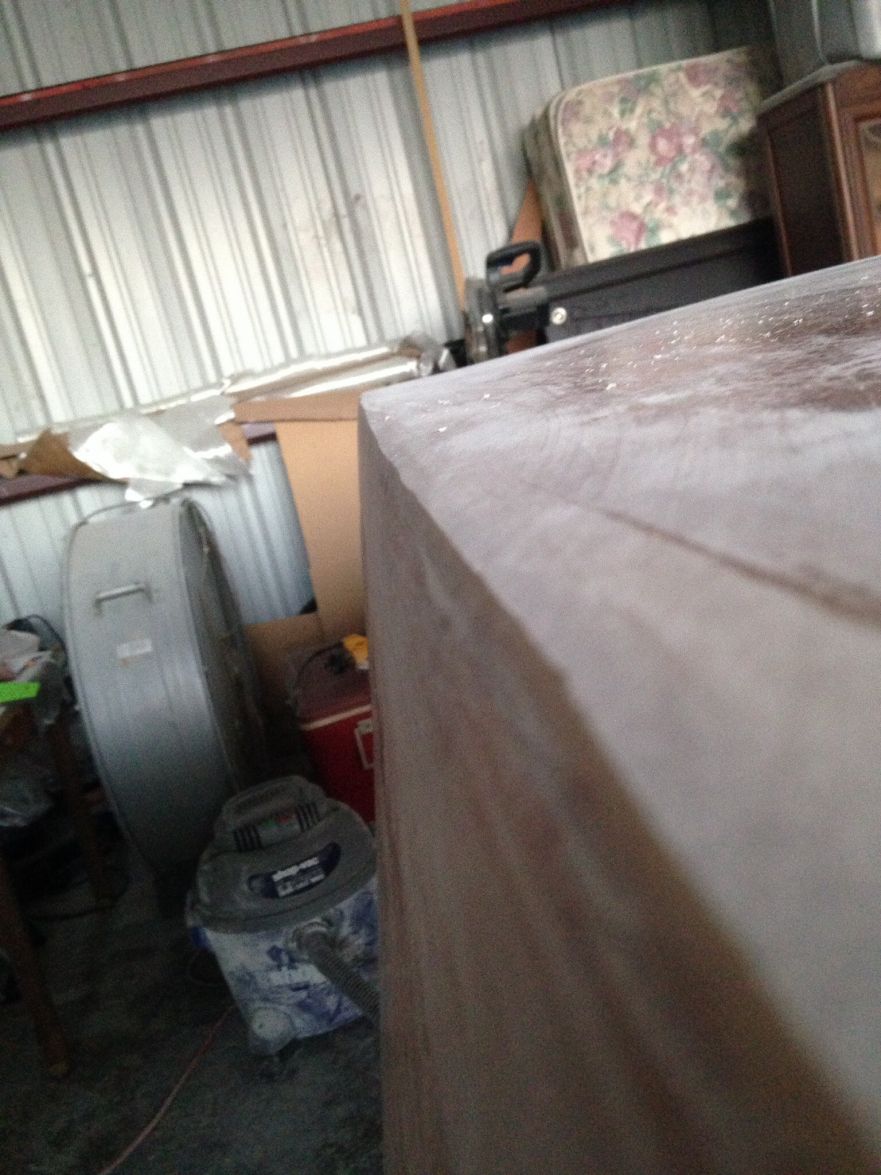
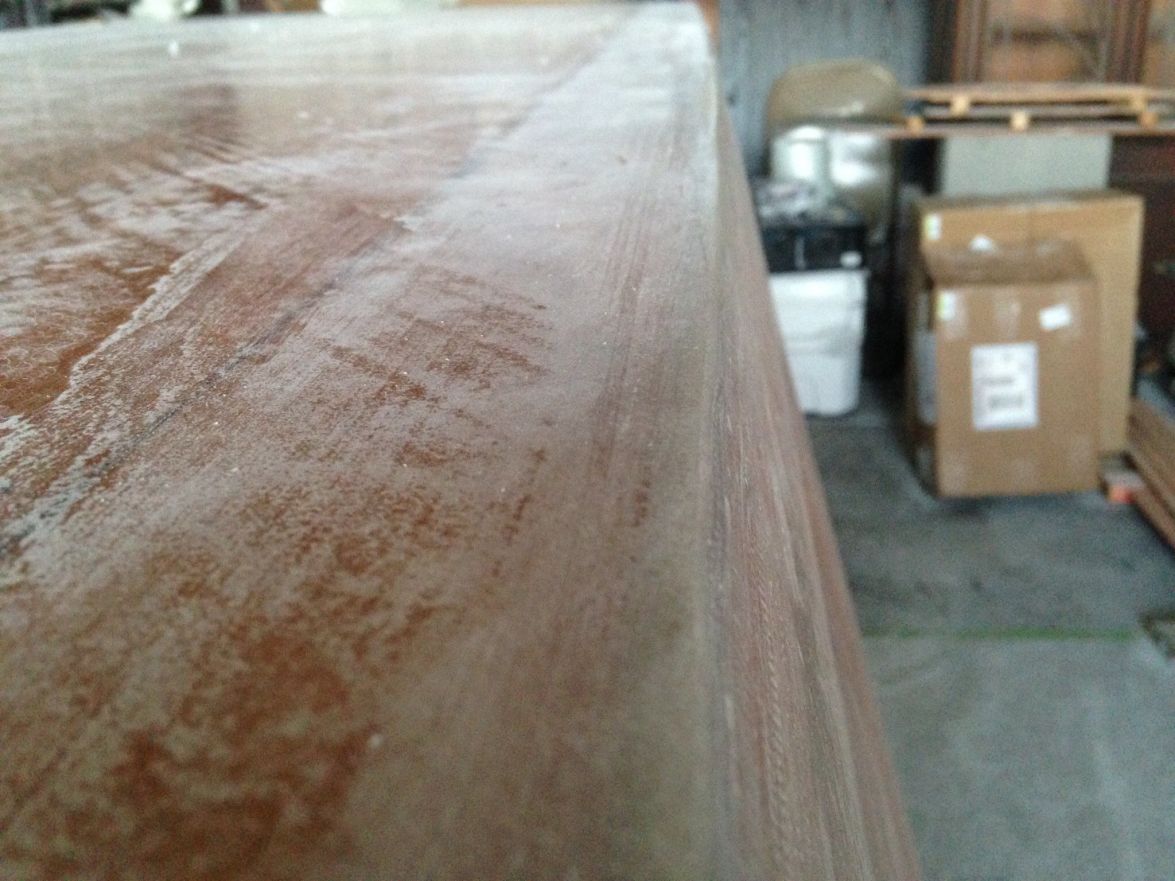
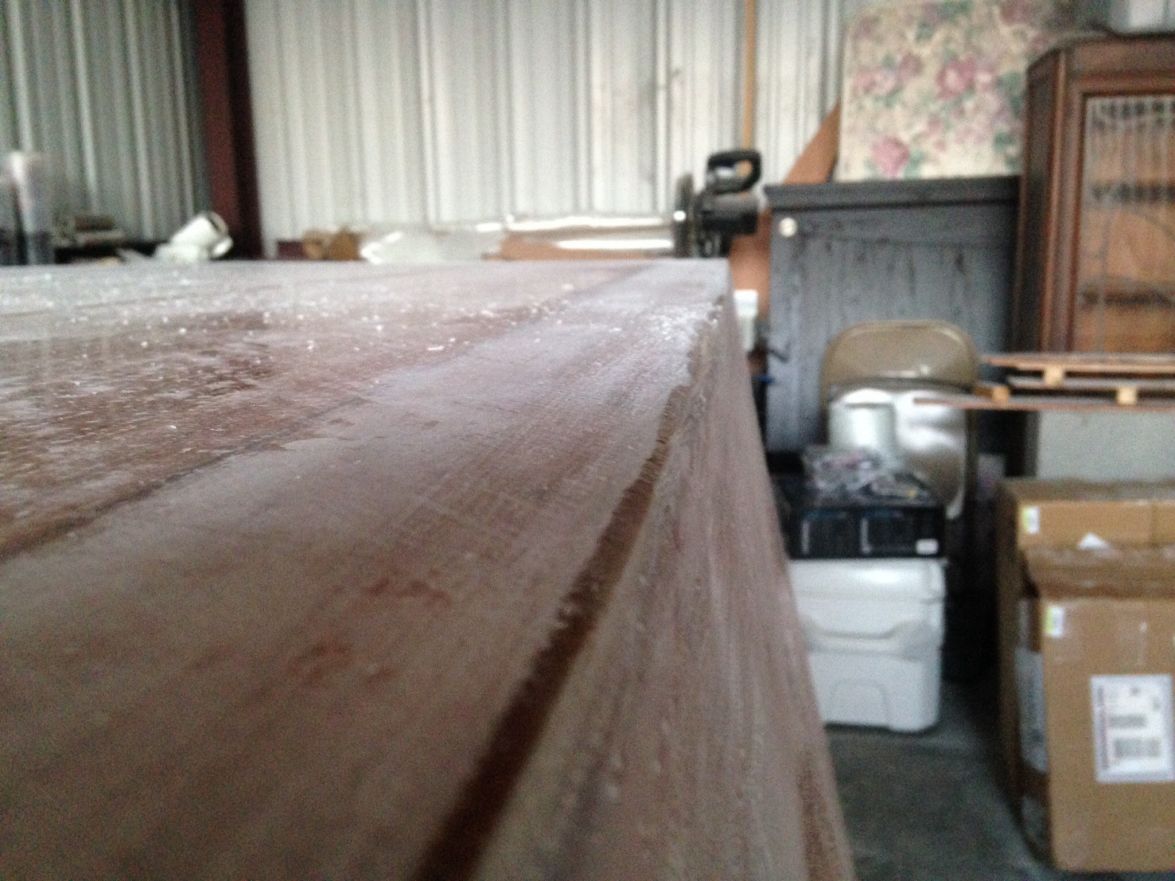
Re: Mikem59 FS18 Build
Posted: Fri Jun 13, 2014 1:57 pm
by Cracker Larry
Good to see you back at work
I would make another mold and do it again. Don't use double sided tape, just single sided. Guess you learned that

Do most of the trimming with a SurForm sander and block plane, much easier than sanding and doesn't make dust. Finish the edge with your long board to keep them level and flat.
Re: Mikem59 FS18 Build
Posted: Fri Jun 13, 2014 3:28 pm
by Mikem59
Cracker Larry,
Thanks for the quick reply. That was my inclination, do the mold and redo again. I can just pour in, let it self-level.
One question though regarding the comment to not use the double-sided tape. So, I'll just need to put down a layer of packing tape up to where the edge of the hard chine will be, then tape the plywood dam to that, correct?
And, yes, makes sense to use the "longboards" I've got those made and ready to go for the fairing work, like to give them a try.
Thanks again,
Mike
Re: Mikem59 FS18 Build
Posted: Fri Jun 13, 2014 6:45 pm
by Cracker Larry
So, I'll just need to put down a layer of packing tape up to where the edge of the hard chine will be, then tape the plywood dam to that, correct?
Correct.
Re: Mikem59 FS18 Build
Posted: Sat Jun 14, 2014 12:09 am
by justin_dwyer
Great to see you back at it Mike. Any progress is good progress.
Mikem59 wrote: It has led to a lot of grinding and sanding. This has been another of those learning experiences. It takes extra effort, but knowing you can always recover from big or little mistakes helps to ease my mind.
I can sympathise with you here, sometimes feels like 2 steps forward and 1 step back
Keep it up, looks great.
Cheers
Justin
Re: Mikem59 FS18 Build
Posted: Tue Jun 17, 2014 10:22 pm
by Mikem59
Justin - thanks for the words of encouragement.

I'm still very excited about this first time build, and anxious to get completed. Time has been hard to come by, and when it has, I've tried too hard to make the most of it and, perhaps, make some mistakes. I'm starting to take some time in the evenings after work and put in a few hours. And, in so doing, not bite off more than I can handle in these small sessions.
As for tonight, after a few minor glass repairs last night, I've redone the dam mold for the hard chine. I was tempted to add an "n" to the dam, but redoing it was the right recommendation from Cracker Larry.
As for redoing the dam mold, here are the photos. Cracker Larry, take a look too please. I'll preface by saying I reread and looked at your photos of this step and your response to my recent post and here's what I did:
Put packing tape on the side of the marine plywood mold that will face the hull. At first, I thought I should also apply packing tape to the hull so that the resin won't adhere to the side of the hull. But, I don't believe that is how you had done it, and I don't believe it is necessary, or is it?
I then used duct tape to tape the molds to the hull and transom and sealed the bottom edge. And, don't laugh please, but I applied tape from the bottom edge of the hull mold across the hull to the bottom of the mold on the other side of the hull. I did this to "cinch up" these molds to minimize the gap between the mold and the hull side to prevent too much resin running down the side. The tape running across from one mold to the other rides above the hull bottom by an inch or so giving plenty of clearance for when I pour the resin, so I don't believe it will hamper that effort at all.
With that said, here are the photos, and I look forward to comments or suggestions. If all is well, I'll mix up the resin, wood flour, and milled glass mixture and pour tomorrow evening. WooHoo


Re: Mikem59 FS18 Build
Posted: Wed Jun 18, 2014 12:03 am
by AtTheBrink
Looks OK to me. Just check to make sure that duct tape running across the boat isn't pull your dams out of fair, looks like it might be.
Re: Mikem59 FS18 Build
Posted: Wed Jun 18, 2014 12:49 am
by justin_dwyer
Looking great Mike, we are at similar stages so I am always checking where you are up to. I am putting a spray rail on mine (P19) so I won't be using this hard chine that you are.
Keep up the great work, and good luck finding more time
Cheers
Justin
Re: Mikem59 FS18 Build
Posted: Wed Jun 18, 2014 7:59 am
by Cracker Larry
Looks good to me, Mike
Re: Mikem59 FS18 Build
Posted: Wed Jun 18, 2014 2:45 pm
by Mikem59
Thanks guys. And, yes Mike I saw the potential issue on the mold on the photo of the right side dam
Re: Mikem59 FS18 Build
Posted: Thu Jun 19, 2014 8:08 am
by Cannonball
Mike, I saw you somewhere on the forum talking about using clamps for the rub rail strips. I would go with deck screws if I was you. Also, I had very good luck using west systems six 10 for that, it is expensive stuff, but makes floppy sloppy glue up jobs as clean as you can get them.
Re: Mikem59 FS18 Build
Posted: Fri Jun 20, 2014 10:47 pm
by Mikem59
Thanks Cannonball, I bought some glue awhile back for the rub rails, I'll go back and review your build to see how you did that. As for the progress, last two days at the office late then yard work to do. Gett'in enough rain, sun, and heat that the grass needs cutt''in twice a week I'm going to get this hard chine knocked out this weekend. Then, onto fairing. You all have scared the bejeezies outta me regarding all the "fairing sucks" comments all over the forum
actually I'm looking forward to it
Re: Mikem59 FS18 Build
Posted: Sat Jun 21, 2014 8:08 am
by justin_dwyer
Mikem59 wrote:You all have scared the bejeezies outta me regarding all the "fairing sucks" comments all over the forum actually I'm looking forward to it
I hope it isn't that bad Mike, I'll have a heap to do
Re: Mikem59 FS18 Build
Posted: Sun Jun 22, 2014 10:12 am
by AtTheBrink
Fairing ain't too bad. Get out your long board and put up the RO sander, things will go faster.
Re: Mikem59 FS18 Build
Posted: Wed Jun 25, 2014 10:36 pm
by Mikem59
Well, completed round 2 of the hard chine effort. I'll first say I'm satisfied with the outcome, but, I'm not convinced I did it quite right.
I still had issues with resin wanting to find a way to get through the tape seal on the bottom of the mold. Made for an interesting exercise trying to pour resin and scrape up what was leaking through. Made for a sloppy effort.
After it cured, had some voids that had to be filled once again, but that went better. The good news, I've got a pretty good "hard chine", just a lot of grinding and planing away of the excess and to get it all fair. I can see that I may have a few spots that may require some spot patching, but that'll be much easier.
Pics are in my gallery, i'll post here in a few days.
Re: Mikem59 FS18 Build
Posted: Thu Jun 26, 2014 10:00 am
by AtTheBrink
Lookin' good! Keep on plugging' away!
Re: Mikem59 FS18 Build
Posted: Fri Jun 27, 2014 9:49 am
by Cannonball
I had several rounds of dealing with that shaping on the chines myself. Just got to keep plugging away.
Fairing is kind of fun to start, but it's more difficut than you think to make that boat look like the picture in your mind. Just follow the how to's and read the Cracker's threads they are a help. I would definetly get it to final prime and have the bottom finished before flipping it. I didn't and although it kept my momentum up at the time probably took longer over all. Not to big a deal either way though with this size boat though. I flipped mine with everything in it but the decks with just one other person so it's not like the big boats.
Re: Mikem59 FS18 Build
Posted: Tue Jul 01, 2014 6:28 pm
by Mikem59
Canonball,
Thanks for sharing your experiences with the hard chine as well. And, in a way, I do look forward to the fairing. Given what I've learned and, yes, reading the threads, fairing is something I'm confident in tackling, just takes time. And, yes, I plan to one, graphite coat the bottom, prime, install the rub rail, then flip.
Mike,
Thanks for telling me to put up the RO and get out the "long board". That thing can sure remove some resin. I gave it a go last night to pick up where I left off on removing the excess resin and getting the hard chine finished up. It's alot of work, but makes for a cleaner finished surface than continuing to "grate away" with the Stanley Sureform and risk taking too much material off. Got some more to do, but think I'll get this hard chine work completed this weekend and finally move onto fairing.
And, here are the pics I promised:

The resin that adhered to the packing tape created a thin little piece that knocked off easily.
The corner is going to require a little "patch work" but no biggie. And, there are a few bubbles along the transom edge that will be filled as well.


Things got a little sloppy, so I've got some excess resin to plane, sand down, but overall, I'm quite satisfied with the outcome and really impressed with how sharp and clean an edge this creates for the chine. I can see how this will aid in better water flow, less drag on the hull.
Thanks all for the input,
Mike
Re: Mikem59 FS18 Build
Posted: Tue Jul 01, 2014 8:12 pm
by AtTheBrink
How much of the chine did you sharpen? I think I sharpened 5 feet forward of the transom. After that it is rounded and transitions into the round chine at the bow. Your is hard chined or round? I forget.
Re: Mikem59 FS18 Build
Posted: Tue Jul 01, 2014 10:04 pm
by Mikem59
I did the round chine version. And, I sharpened to right at 6' forward of the transom.
Re: Mikem59 FS18 Build
Posted: Fri Jul 04, 2014 12:33 am
by AtTheBrink
When you get yours done we'll have to round up all the other guys here in Texas that have built this boat and have a little FS18 fest and fish off.
Re: Mikem59 FS18 Build
Posted: Fri Jul 04, 2014 10:51 am
by Mikem59
yeah we sure do. I didn't run a count of FS18's in Texas, but I know there's certainly enough for quite a gathering! And, wow, more pressure, I mean, incentive to get mine finished!
Re: Mikem59 FS18 Build
Posted: Mon Jul 28, 2014 9:09 pm
by Mikem59
Ive only had a few work session since I did the hard chine work, but I've sanded till my arms want to fall off, gave the Stanley Sureform a workout, and the RO sander has been tested to its limits.
As I had mentioned in an earlier post, the hard chine effort got a little sloppy and created some high spots. But, I believe I'm ready to begin the fairing as I feel that I've managed to sand down those high spots to the point where they appear to be approximately the same level as the adjacent areas. I don't feel I gain much more than a set of Popeye arms by continuing to sand. But, a little validation by the experts would be helpful; and, I can handle it if you all say, sand some more, ugh!

I'm anxious to get onto the fairing, and, yes, more sanding.
Here's a pic, showing the sanding effort on the one side. Hope it helps give you all an idea of where I'm at.
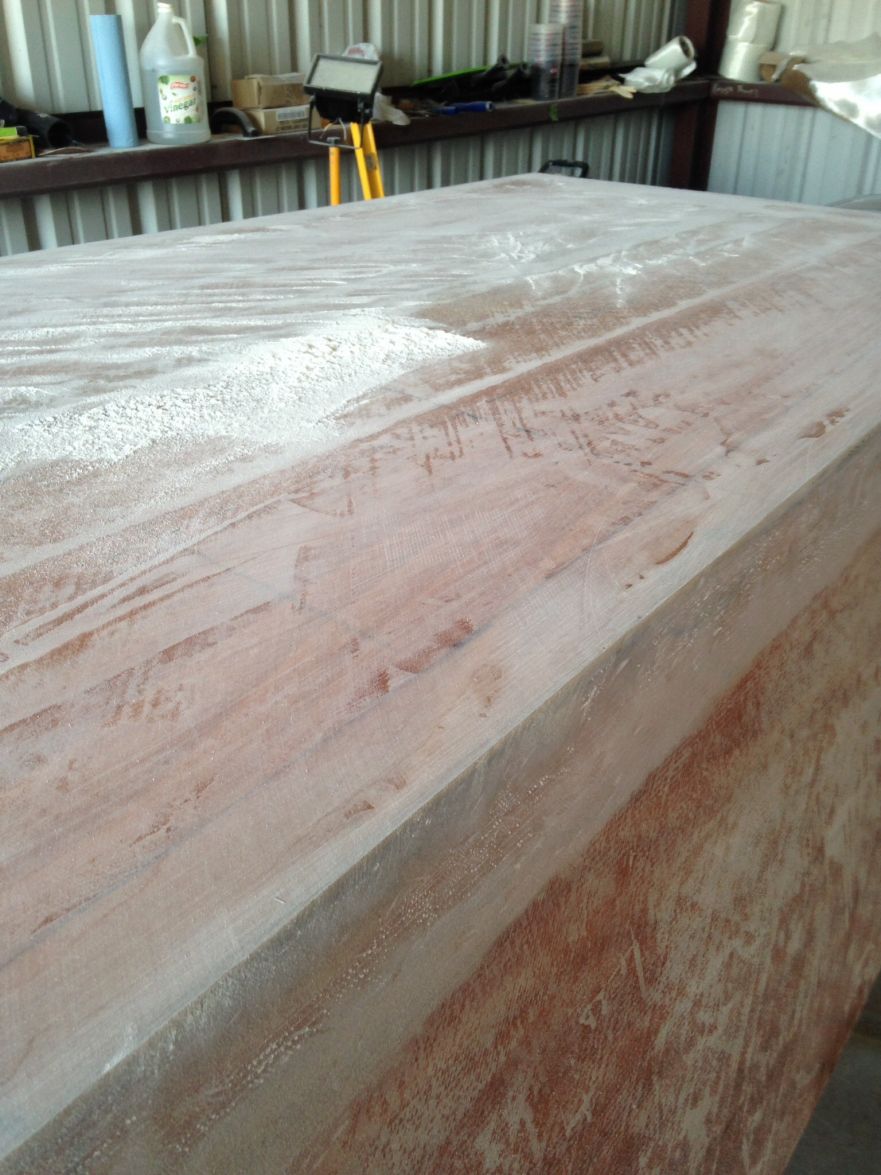
Re: Mikem59 FS18 Build
Posted: Tue Sep 09, 2014 10:12 pm
by Mikem59
Been awhile since my last post, needless to say, I've had a great summer doing things other than working on the boat. But, I've finally been getting in a few sessions here lately; and, I've started the fairing process. And, wow, another big learning curve to get around. I don't know if this was a mistake or not, but I started the fairing process using the Quick Fair instead of mixing up my own.
Nonetheless, I didn't have near enough Quick Fair to do the entire boat. I attempted to negotiate the lows along the seams, but I tended to get a little sloppy and put more Quick Fair along the high side of the seam along with trying to make to many "pulls" with the dry wall spreader . But, with the sanding, and ohhhh the sanding
, does begin to show you the postive outcome of the effort and where the mistakes, lows/valleys and highs are.
I'm going to do some more sanding of my recent efforts, get the rub rail glued on, and then order some more epoxy, Quick Fair, etc. By the way, seem to see in some posts by others, screws are the way to go for the rub rails. What size, 1 1/4"?
Here are a few pics of the fairing effort so far.
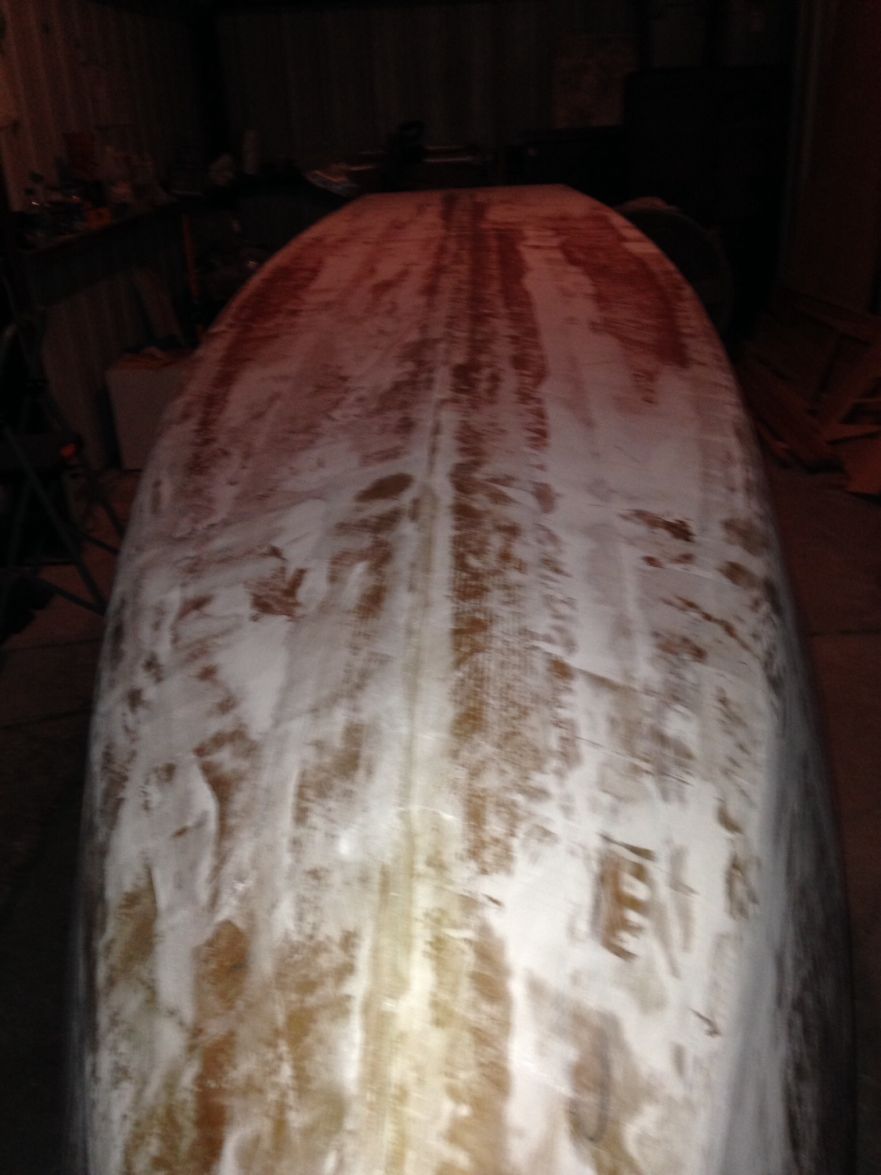
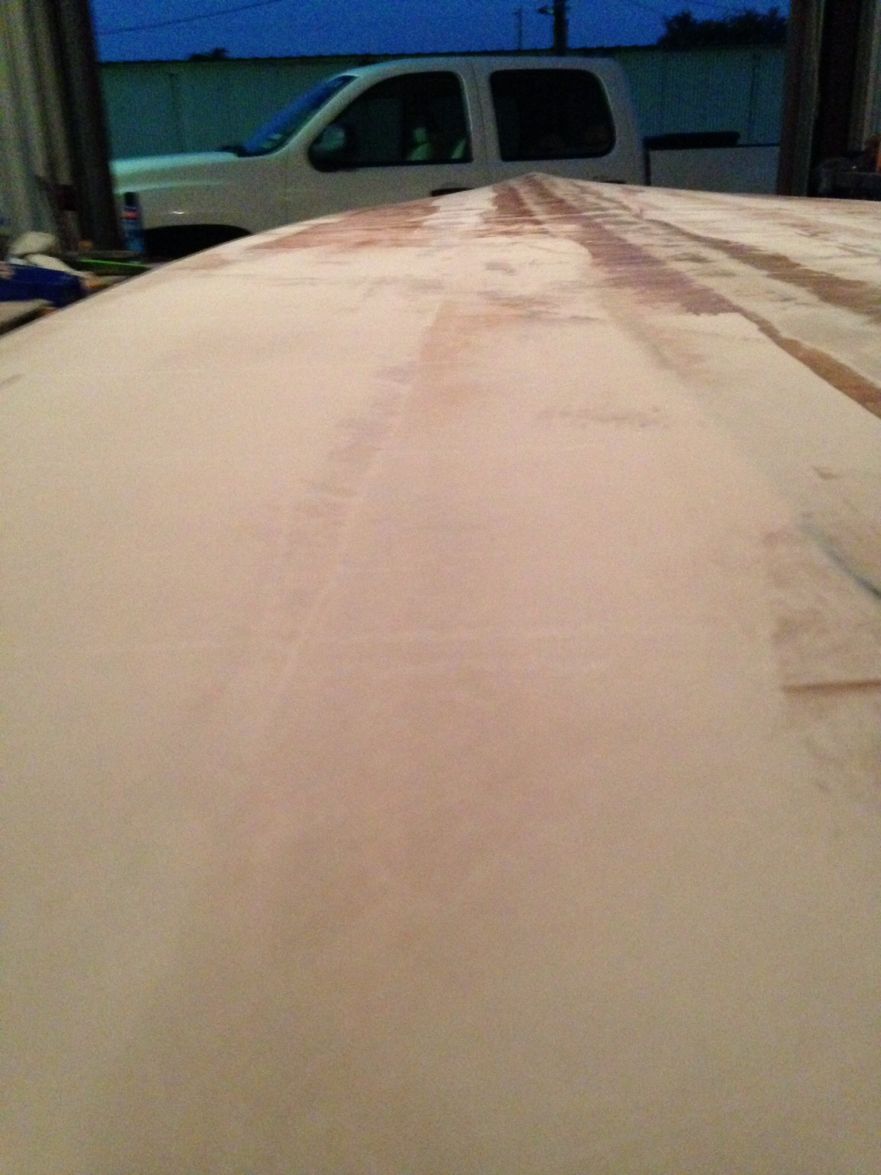
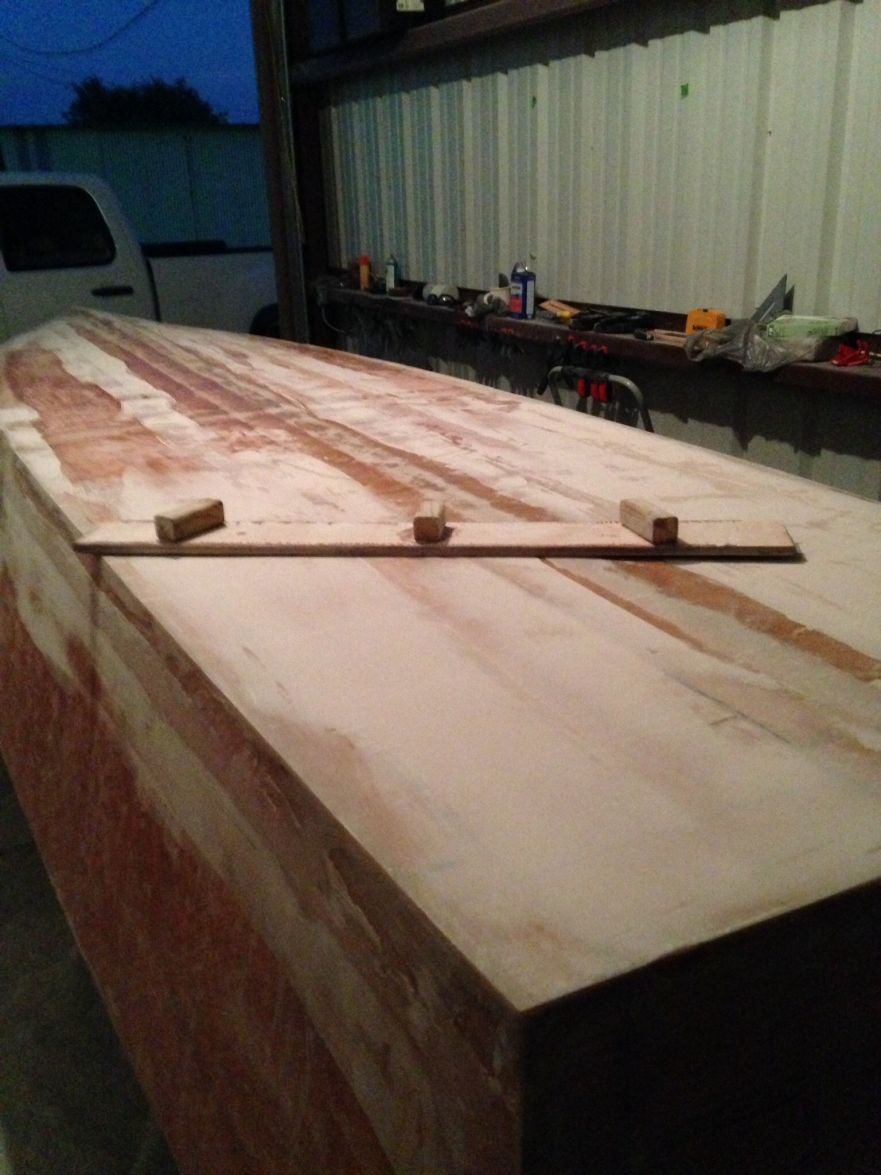
Re: Mikem59 FS18 Build
Posted: Fri Dec 19, 2014 5:06 pm
by Mikem59
Well, I'm off from work today, and it's raining here in SE Texas. Thought it would be a good time to provide a small update on the build. I have spent some time on her of late, but most of it has been sanding the fairing work thus far. Between my first go at round one of fairing and round two, I'm guessing I've got well over 16 hours of sanding in. It's worth repeating what everyone says, Fairing Sucks! But, with what limited progress I've made here, I can see how this is where you can really make the boat look so so or look great.
Here are some pics:
This first pic was my first go at applying fairing compound. I thought it would be a good start by using Quick Fair. It's good stuff, but I didn't have near enough to do the entire hull. And, it's probably not the best way to start out the fairing process. But, I got off the snide and finally got the process going.
The following pics show the second round fairing effort after using a fairing slurry comprised of equal portions, by volume, of blended filler and phenolic balloons which was then added to an equal amount, on a weight basis, of resin. This provided a pretty good fairing slurry. As recommended by others, this slurry was like ketchup. I probably could have made it somewhat thicker as it did sag some along the hull sides at the chine. I've got 12 hours of sanding just on this round of fairing, but it is beginning to look good, I can now see what it is I'm trying to accomplish. Once the weather warms up a little, I'll move to round three of fairing. I found out earlier this year that working with resin at temps below 60 isn't easy. I'm hopeful this next round of fairing will get me close to only having to do a touch up round of fairing using some Quick Fair. Then, I will move onto marking a water line and then applying a graphite/resin to the bottom.
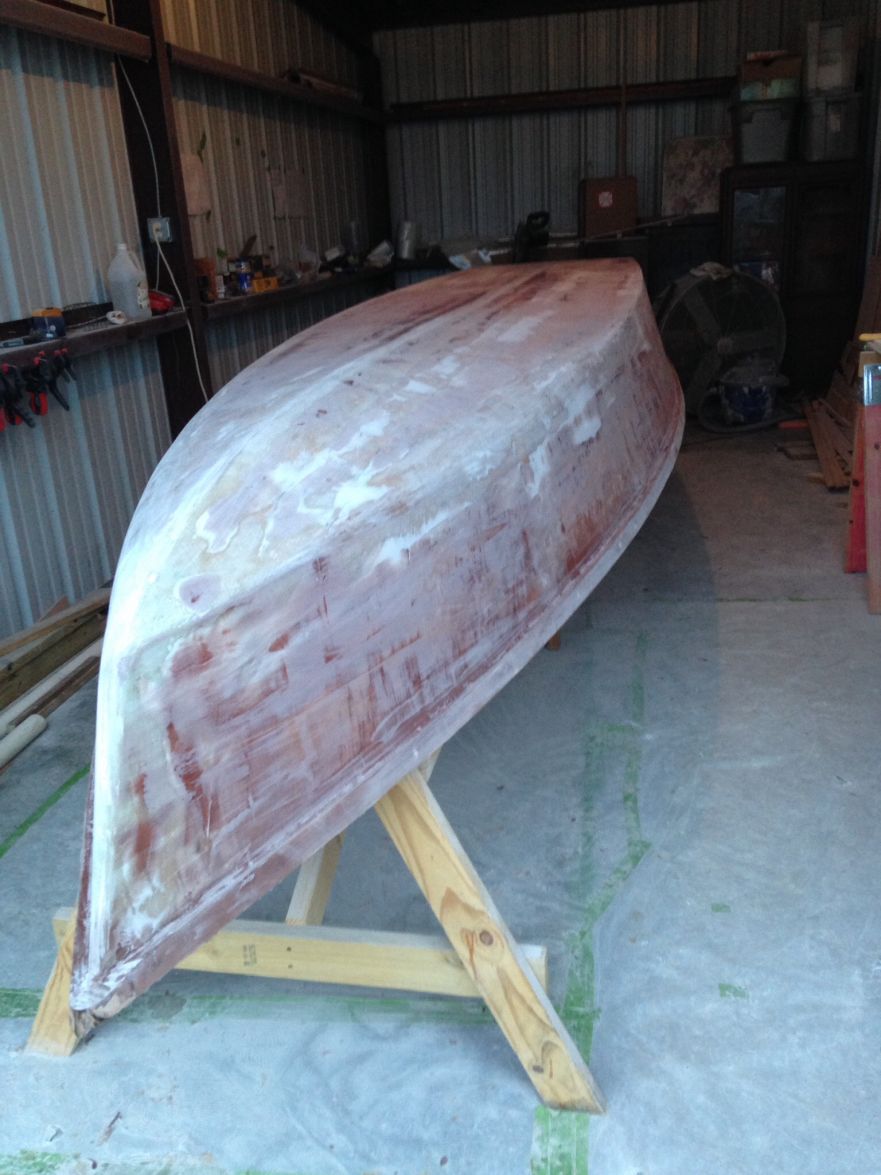
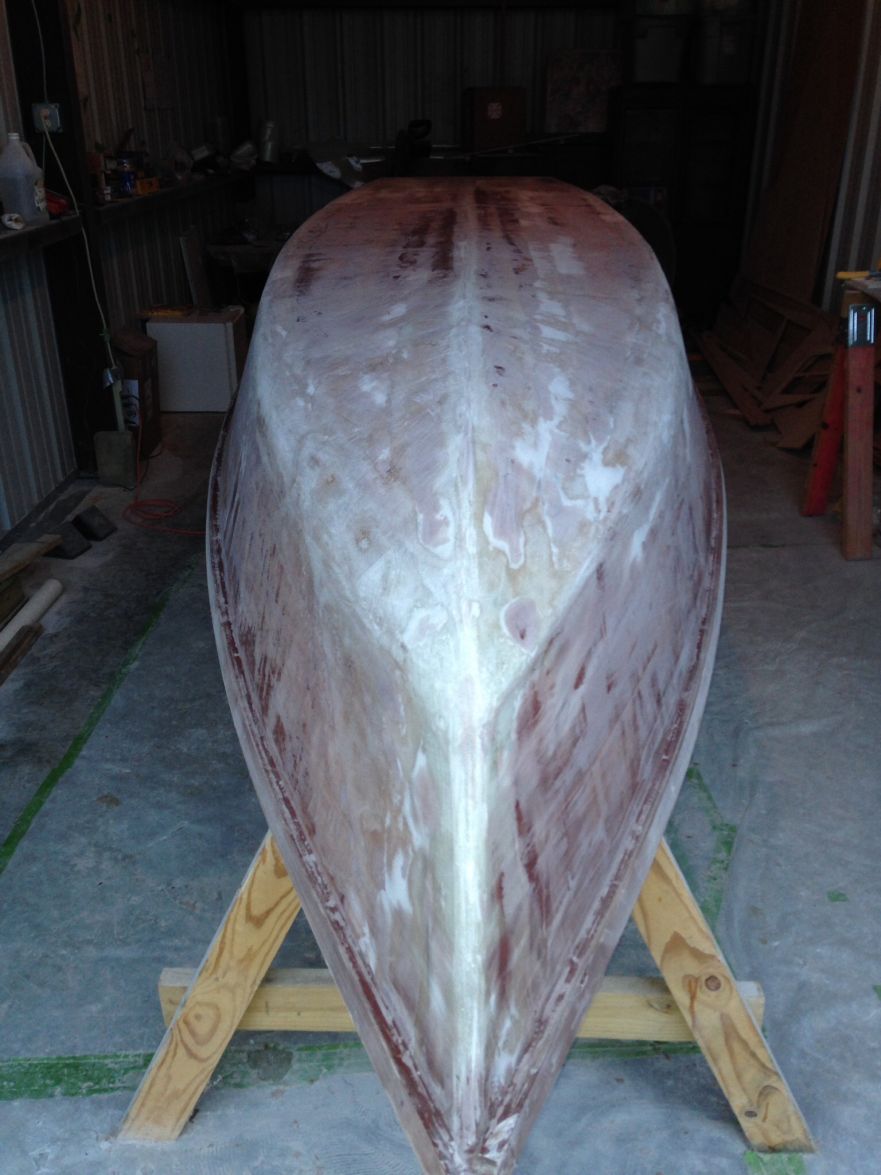
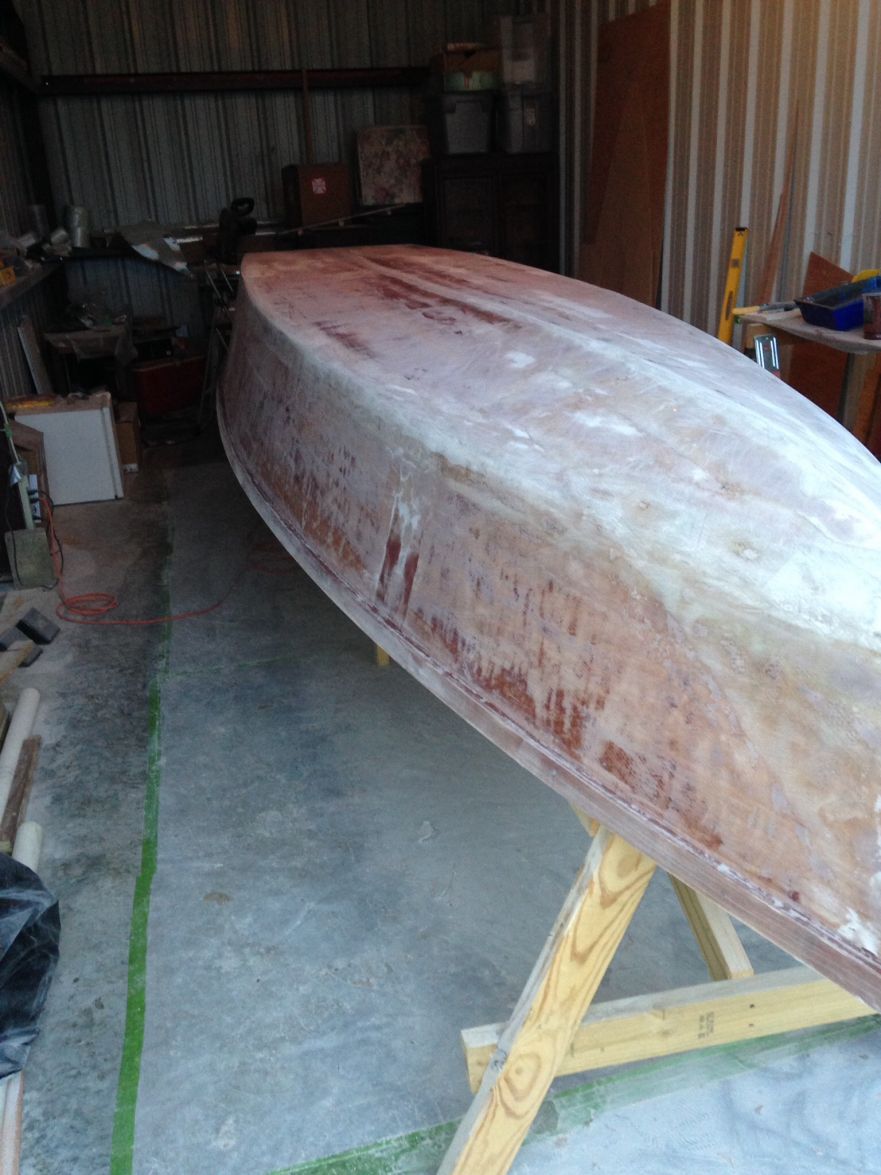
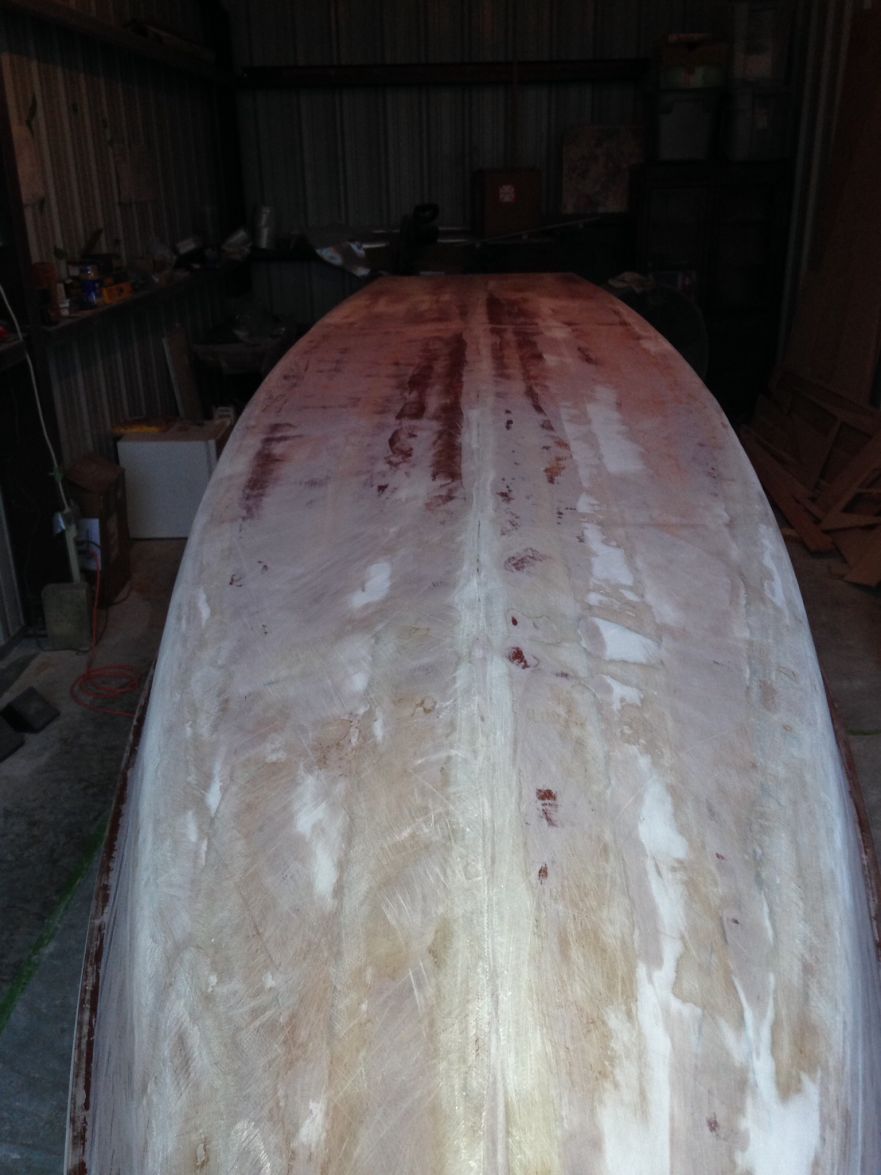
Re: Mikem59 FS18 Build
Posted: Sat Dec 20, 2014 9:41 am
by Dougster
Looks like you're getting there. I used mostly Quickfair on my LB22, and lots of it
Still, it worked well for me. The ketchup thing tended to sag too much except on the sole and such. The long board did it. I made two, one stiff and one springy. Set myself on a schedule on days off: 2 hours in the morning, 2 in the afternoon. I got better at using smaller, thinner layers of Quickfair, as it gets tiresome to put a cup on and then sand it nearly all off
Felt like I was going nowhere. The first round of primer feels great to put on, so keep going
Remembers Dougster
Re: Mikem59 FS18 Build
Posted: Sat Dec 20, 2014 11:39 am
by Mikem59
Thanks Dougster. I'm at the point that I want to keep at it. So, I'm taking advantage of evenings and days off as able. Still have to take care of those honeydoos around the house
And,The cool weather makes me nervous, but probably isn't as big an issue when working with the fairing compound. I have a small heater that can help in the building I am working in. I am considering making a warming box to keep the resin above 70 deg.
I'll consider using the Quick Fair for my next Round since I bought the 3 qt. kit, that may get me through this next round. I have some confidence though in making the next batch of slurry, I think I have an over abundance of blended filler and phenolic balloons.
I'll keep plodding along, the excitement of completing this build is still there
And, Merry Christmas to all out there on the forum!
Re: Mikem59 FS18 Build
Posted: Fri Dec 26, 2014 7:48 pm
by Mikem59
Not that anyone is relying on my expertise but when mixing up some fairing slurry this afternoon I realized I made an error in one of my previous posts. The fairing slurry I mixed was equal portions by weight of blended filler and phenolic balloons then add resin equal by volume.
And, this afternoon, I found that the consistency to prevent sagging was more like 5 parts resin to 2 or 3 parts filler/balloons. Looking forward a few more hours of sanding now
Re: Mikem59 FS18 Build
Posted: Sun Mar 01, 2015 5:53 pm
by Mikem59
I must really like fairing as I'm still doing it
But, once I sand this round of fairing, I will finally move on. Before I do however, should I prime the hull sides first before I apply the epoxy/graphite to the hull bottom? My concern is if I do the epoxy/graphite first, then prime the sides, the fairing board work may affect the graphite finish of the bottom. Thanks!
Re: Mikem59 FS18 Build
Posted: Mon Mar 02, 2015 9:32 am
by Dougster
I don't quite understand why you'd be using the fairing board on the sides after the graphite. Are the sides not faired yet? I faired the entire outside hull first, then put S3 primer on the whole thing. The primer is not really needed on the bottom, but it does help to show areas that need a bit more fairing. That might not necessarily be a good thing
Anyway, that was my approach: prime it all then epoxy/graphite mix on the bottom up to the waterline.
Still watchin' Dougster
Re: Mikem59 FS18 Build
Posted: Mon Mar 02, 2015 11:52 am
by Mikem59
Hey Dougster, thanks for the quick reply. I am nearly complete with the fairing. And, yeah you're right, I need to complete the fairing and the priming before I graphite the bottom. That makes the most sense. I'll have to think about priming the bottom or not since it will get the graphite. Anything that screams of more fairing makes me hesitate, but it's probably a good idea.
Thanks again, pics to come later.
Mike
Re: Mikem59 FS18 Build
Posted: Tue Mar 03, 2015 9:00 pm
by Mikem59
Well, primer and a few other supplies ordered and already shipped out. You Bateau guys are awesome. Now I just need to finish up the last bit of sanding. I'm sure the primer will arrive with the next cold front. No biggie, got some work to do helping prep for the CCA Sabine Neches Chapter annual banquet on Thursday. Looking forward to some mud bugs,beverages,great fundraising auctions and raffles, and lastly lots of fishing stories among friends.
Re: Mikem59 FS18 Build
Posted: Tue Mar 03, 2015 10:07 pm
by osotexan
Sand, sand, and sand. Then think "Should I sand again?" That's how my build has gone.
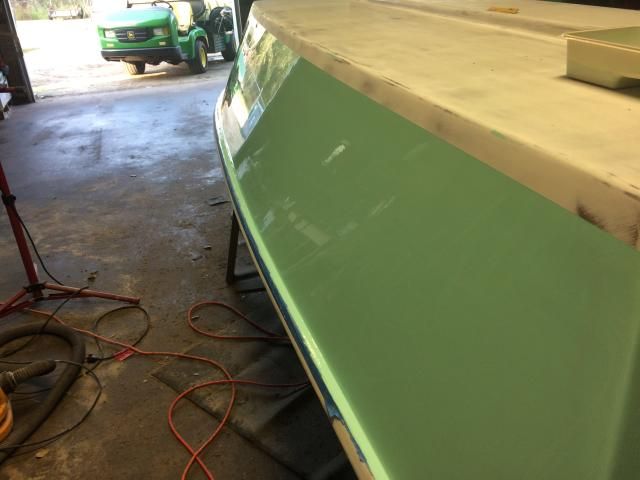
This is where I am currently. This is after one round of microballons, three rounds of quikfair, four rounds of primer and three rounds of paint. All with mucho sanding between. I'm ready for the graphite epoxy on the sole now.
What I've learned about marine finishes is "put it on and sand it off, then............do it again"
Its all worth it to me.
Re: Mikem59 FS18 Build
Posted: Wed Mar 04, 2015 9:02 am
by jacquesmm
Very pretty.
Re: Mikem59 FS18 Build
Posted: Wed Mar 04, 2015 11:10 am
by Walkers Run
Your getting there! By the time your almost done you'll have learned how not to sand most of what you put on off. That's just how it works
Your boat looks great
Re: Mikem59 FS18 Build
Posted: Wed Mar 04, 2015 2:56 pm
by Mikem59
Osotexan, your boat looks great! And, yes, sand, sand, and sand some more. Hoping mine will look that good once I get the primer on.
Re: Mikem59 FS18 Build
Posted: Wed Mar 25, 2015 1:56 pm
by Mikem59
Finally decided to move on and apply the first coat of graphite on the hull bottom

. Yeehaw! After a long period passing with fairing and sanding, this was a huge step for me and very uplifting. So looking forward to finishing the graphite and then priming the hull sides to finally flip.
Although CL, and others have chronicled this step quite well, I'll add some comments that merely emphasizes what has already been stated.
Taping wasn't terribly difficult once I decided on how far below the chine I wanted to go. I skipped the whole laser thing as that seemed to be debunked by others. I thought I'd try to mimic a level line based on a set height to match a set distance off the water line, but when taped off, it didn't look right at all, and I didn't need an eye test to figure that out.
I then taped trying the eyeball method, but once again wasn't satisfied. The third time was a charm.
As for mixing the graphite, I used CL's recipe, 3 oz. of twice-sifted graphite, mixed with 9 oz. of prepared resin. I allowed it to sit for at least a minute, then applied using a tight nap roller from Lowe's. Application went well, but I could do a better job of pouring out more evenly the next time. I was concerned that it may not have been hot enough as it was about 75 deg when I mixed the graphite and resin, but it appeared to mix and apply well with no clumps. So, I'm quite pleased.
Next will be the wet sanding, and here is where I have a question
What type of backer do you all use when wet sanding? A rubber backer or just a backer pad?
With that I'll post one of the pics I have downloaded thus far, more to come later:
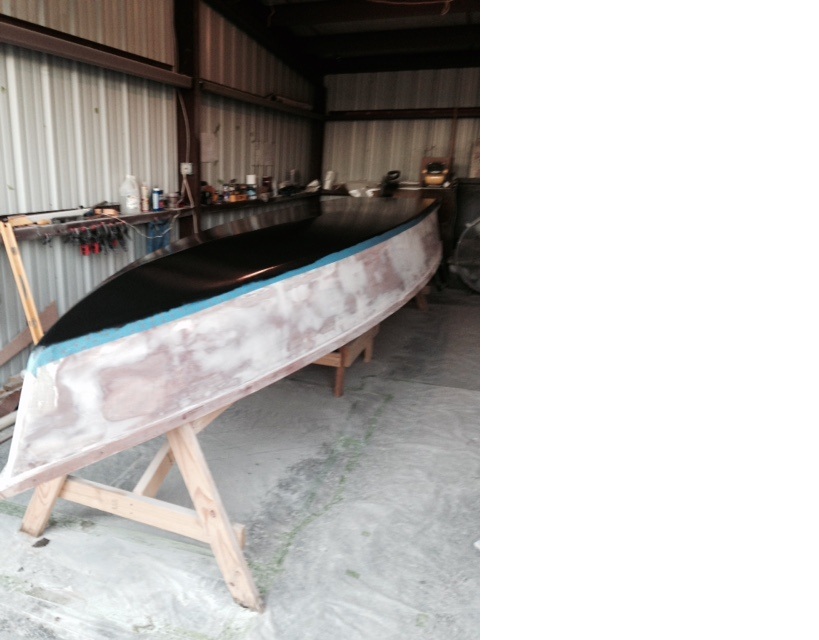
Re: Mikem59 FS18 Build
Posted: Mon Apr 06, 2015 9:12 pm
by Mikem59
After some encouragement by a couple of friends, decided to move on and put some graphite on the bottom. Here are some pics of the effort.
Starting with the masking, well, the first attempt at doing something that would mimic the waterline just plain didn't look right. Abandoned that.
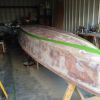
After one other attempt, this is what I went with. Basically, at the origin point, started masking 1" below the chine and let the tape take a natural line.
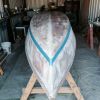
First coat of graphite. Overall, pleased with how this went and looked. Used Cracker Larry's recipe.
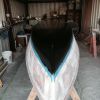
Well, thought it was early enough in the year to avoid bugs, but, low and behold, a moth took a dive.
Wet sanded.
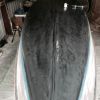
2nd coat of graphite. Didn't turn out as good as the first. One, got some roller hair and poured too much and got some of the uglies. Wet sanding helped to elimated.
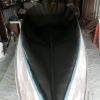
3rd coat of graphite.

Another view ofthe 3rd coat. Now, I need to decide on whether to put on a fourth or move onto priming the hull sides, I'm anxious to get her flipped.
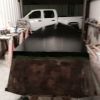
Re: Mikem59 FS18 Build
Posted: Tue Apr 07, 2015 6:07 am
by cottontop
Looking goooooood! You will be done before you know it. John
Re: Mikem59 FS18 Build
Posted: Tue Apr 07, 2015 8:39 am
by Mikem59
Thanks John, I've got some momentum now and have been able to get more time to work as well.
Re: Mikem59 FS18 Build
Posted: Tue Apr 07, 2015 8:59 am
by justin_dwyer
Looking good alright!!
Mikem59 wrote:I've got some momentum now and have been able to get more time to work as well.
They sound like pretty good ingredients for progress
Keep it up.
Re: Mikem59 FS18 Build
Posted: Tue Apr 07, 2015 1:41 pm
by Marshall Moser
Mikem59 wrote:After some encouragement by a couple of friends, decided to move on and put some graphite on the bottom. Here are some pics of the effort.
Starting with the masking, well, the first attempt at doing something that would mimic the waterline just plain didn't look right. Abandoned that.
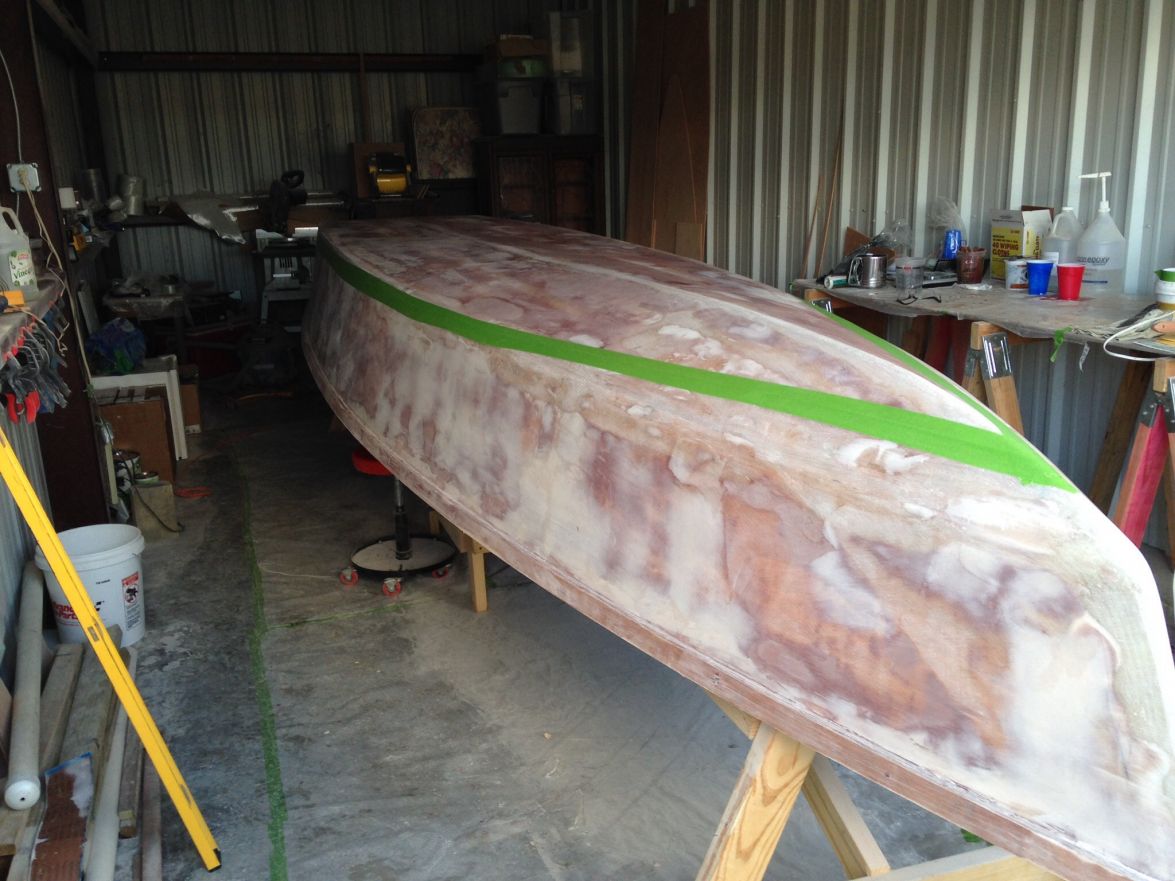
After one other attempt, this is what I went with. Basically, at the origin point, started masking 1" below the chine and let the tape take a natural line.
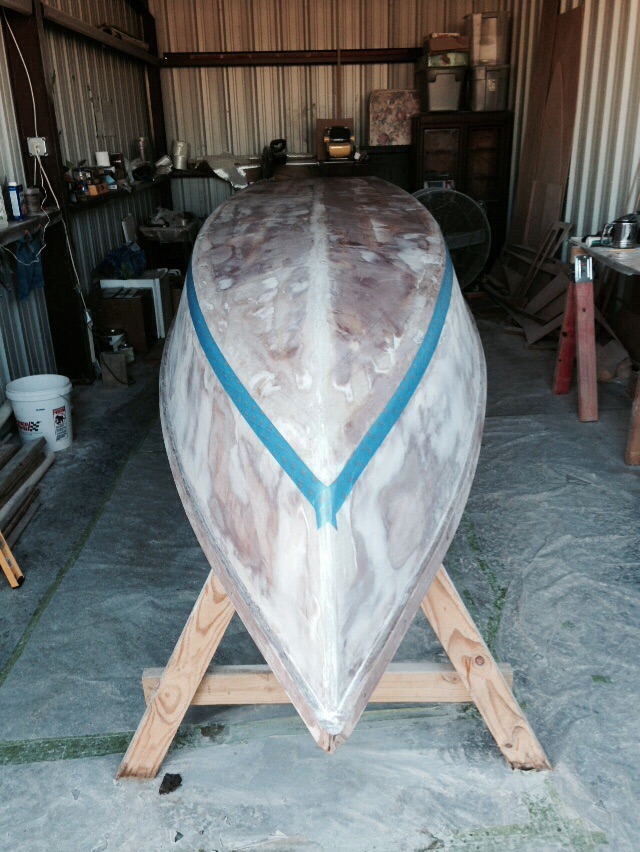
First coat of graphite. Overall, pleased with how this went and looked. Used Cracker Larry's recipe.
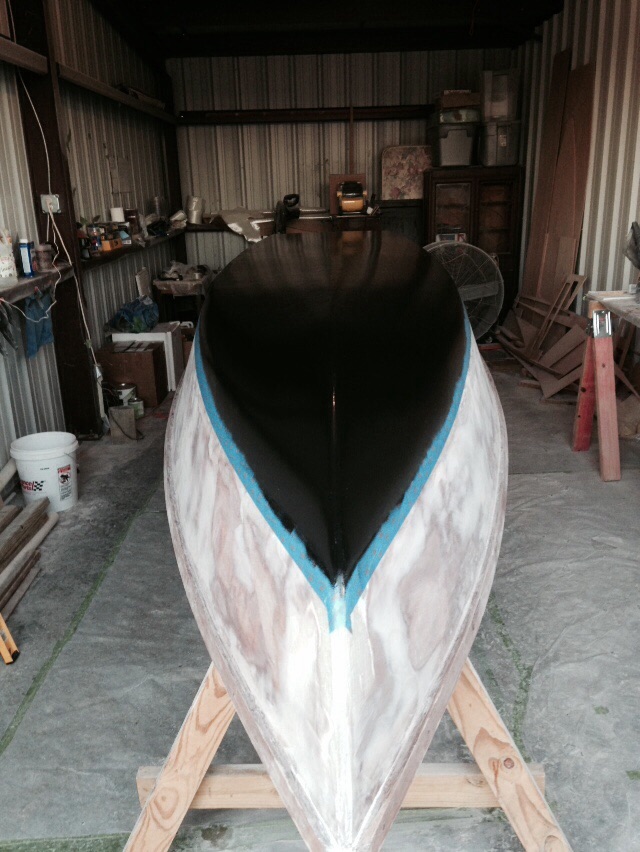
Well, thought it was early enough in the year to avoid bugs, but, low and behold, a moth took a dive.
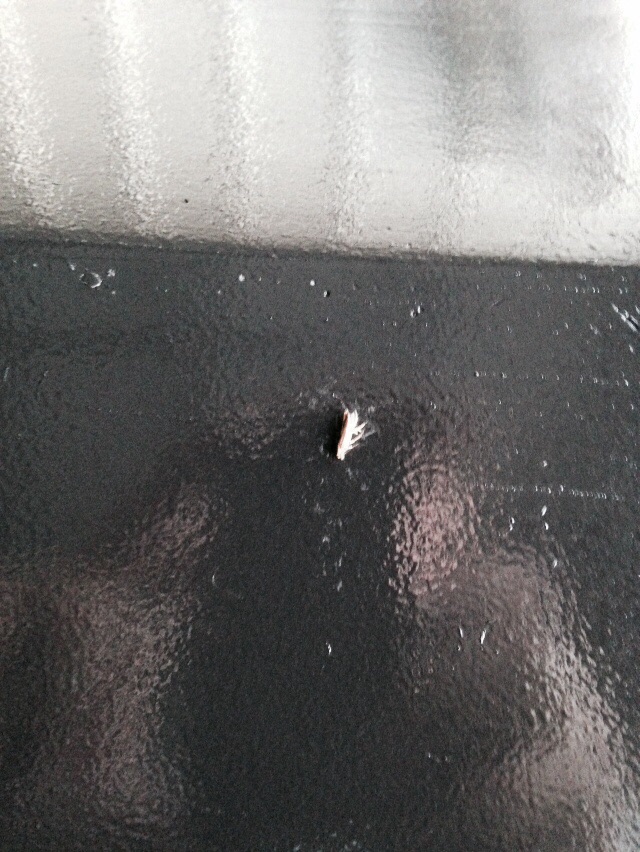
Wet sanded.
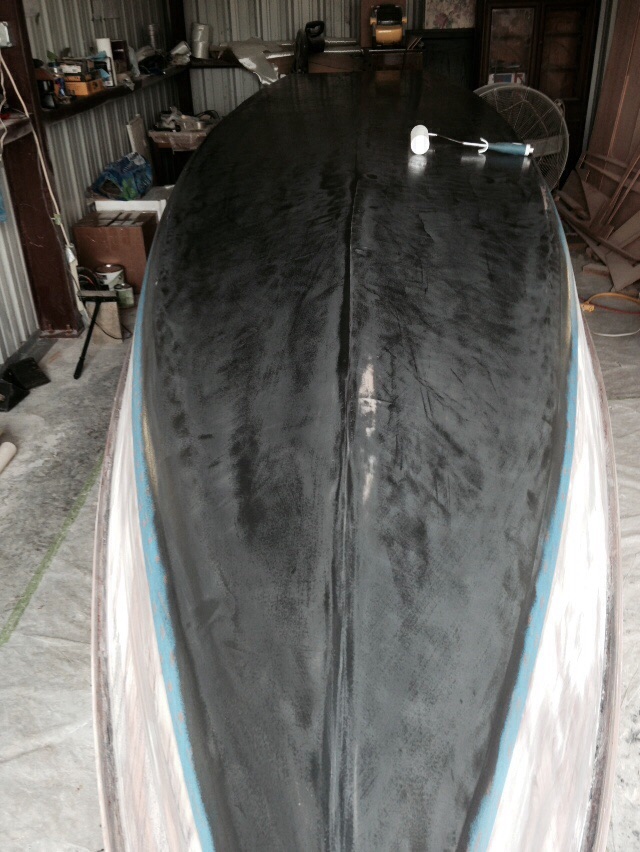
2nd coat of graphite. Didn't turn out as good as the first. One, got some roller hair and poured too much and got some of the uglies. Wet sanding helped to elimated.
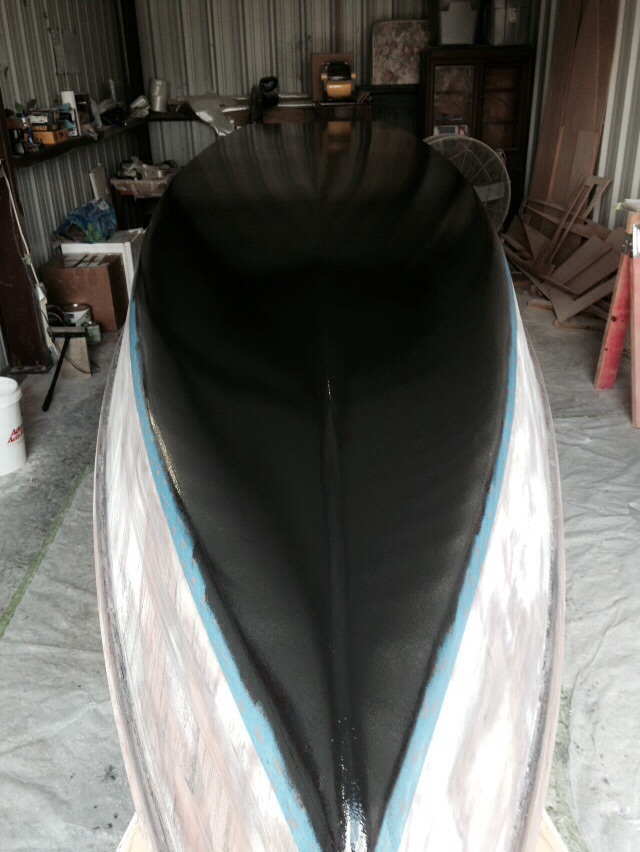
3rd coat of graphite.

Another view ofthe 3rd coat. Now, I need to decide on whether to put on a fourth or move onto priming the hull sides, I'm anxious to get her flipped.
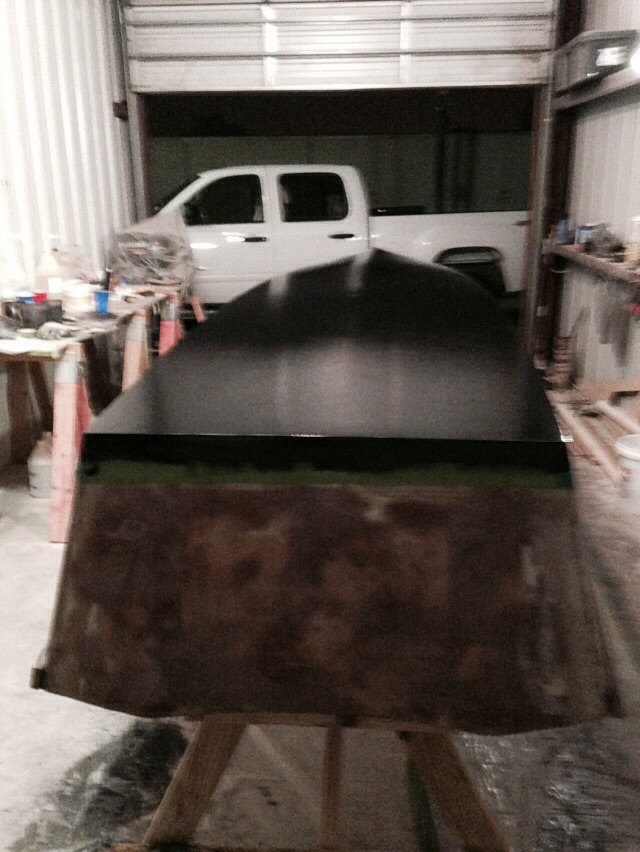
Re: Mikem59 FS18 Build
Posted: Tue Apr 07, 2015 9:18 pm
by Mikem59
Thanks for reposting with the bigger photos. I got in a hurry and didn't pay attention to how I copied the image file info over.
Re: Mikem59 FS18 Build
Posted: Tue Apr 07, 2015 9:22 pm
by osotexan
Looks great! You're moving along at a great pace.
Re: Mikem59 FS18 Build
Posted: Thu Apr 09, 2015 1:34 pm
by Mikem59
Well, I had every intention to pull the tape, and re-mask it to do the primer on the hull sides. But upon looking at the bottom I could still see some minor low spots that I couldn't live with. Amazing what some color and contrast will do for you to see the imperfections. I may need to begin working blindfolded
Wet sanded and mixed up a small batch of quick fair. This ought to do it.
With this I suspect I'll need to go with two more coats of graphite. Will just have to see, or not.
Re: Mikem59 FS18 Build
Posted: Mon May 11, 2015 7:48 pm
by Mikem59
Since my last post, I did lay down two more coats of graphite, and I had finally decided to move on to priming. Pulled the tape and remasked for the primer to go on the hull sides. I went with the System 3 Primer. And, I used a a 9" tight nap (1/4" nap) roller to apply. For the first coat of primer, I mixed up a 20 oz. batch, this was way too much. The System 3 primer is mixed at a 4:1 ratio, so I was trying to go with easy ratios to mix. So, dropped to a 10 oz. batch (8 oz to 2 oz) for the second coat, I had to begin spreading thin and didn't get quite the coverage I would have liked, so moved to a 12 oz batch. This was just right. Gee, this is starting to sound like the Three Bears
Based on what I've read, three coats is about what is needed to get good coverage to then do the guidecoat and sanding for highs and lows. I'll note I didn't have any issues with applying the primer, I did wait at least 15 minutes after mixing the two parts as the directions called for. And, you really have to mix well, the Part A doesn't want to readily mix with the Part B.
Here are some photos of the primer coats:
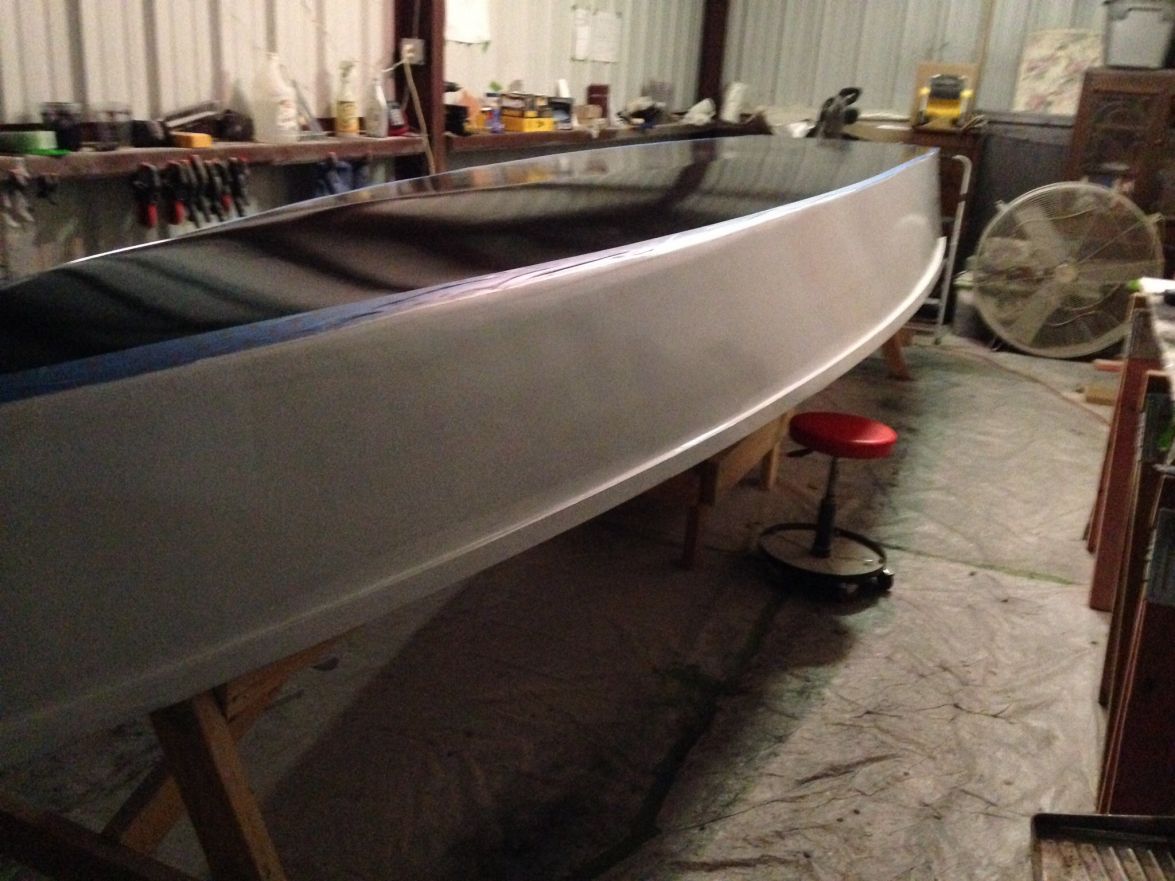
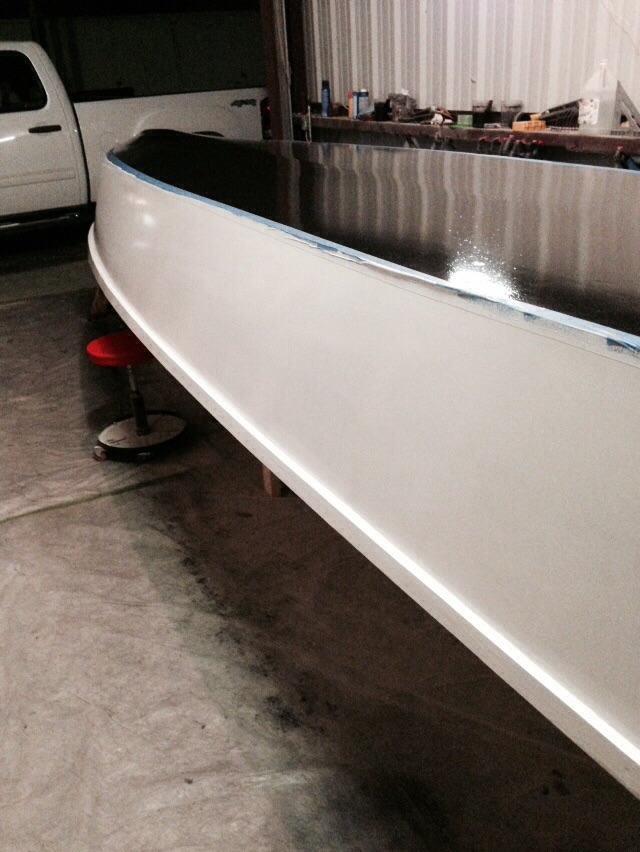
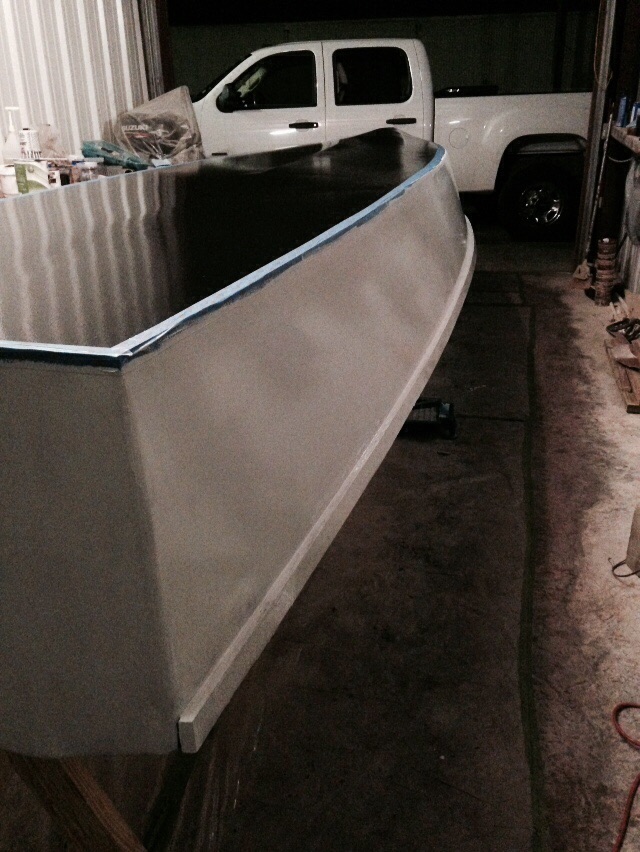
I'll also note, after the first coat, I had every intention of applying the 2nd and 3rd coats on successive days, but work managed to screw that up. It ended up being several days later. Per the System 3 Instructions, I needed to sand before applying the next coat. I believe it said to sand if you go more than 48 hours between coats.
Re: Mikem59 FS18 Build
Posted: Mon May 11, 2015 7:52 pm
by Mikem59
After the primer, applied unused graphite with a cloth rag as a guidecoat. And, yes, that's all it took after some inquiries I had made on the forum. Not sure why I was so skeptical or concerned with the ease of applying, it's just like taking a powdered No. 2 pencil to your hull. Here are some pics:
You can see some of the spots I had applied some Quick Fair.
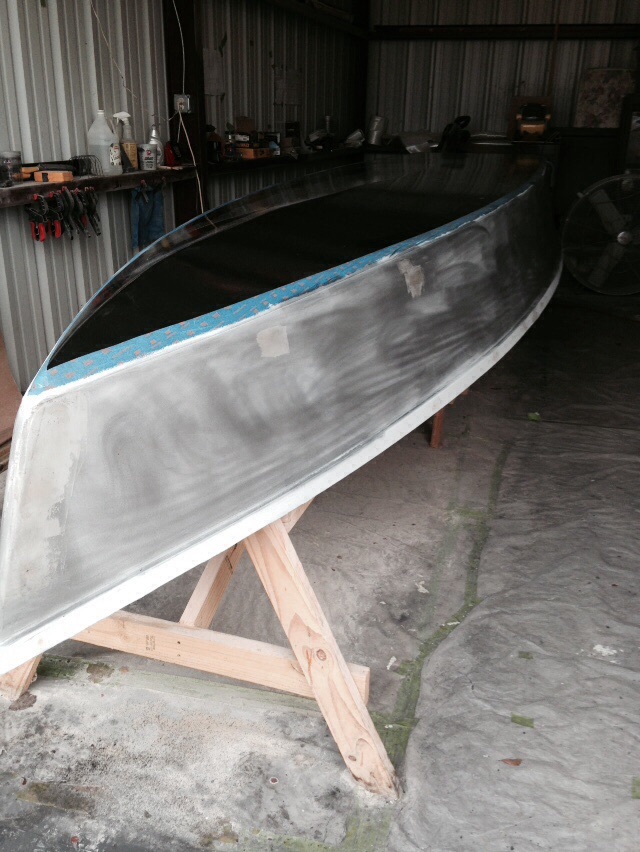
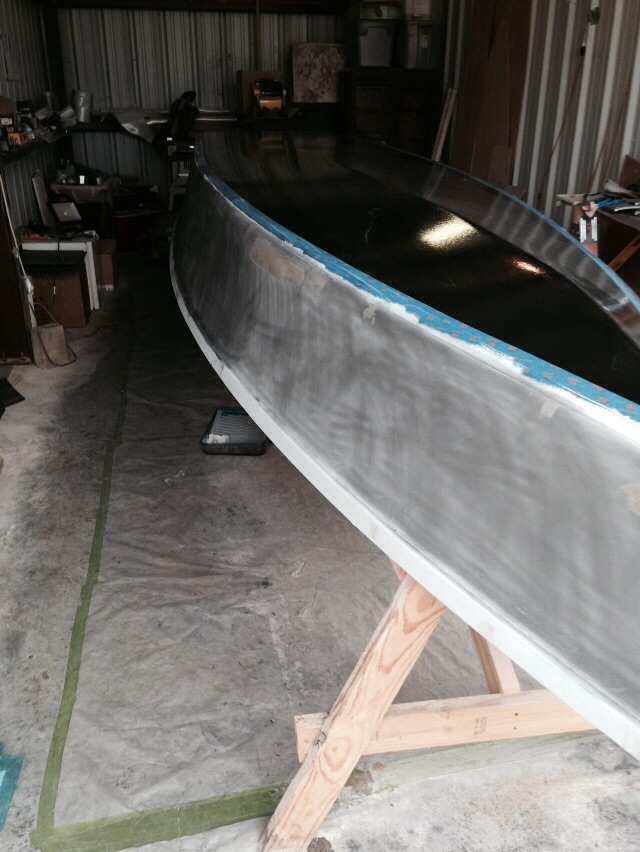
Re: Mikem59 FS18 Build
Posted: Mon May 11, 2015 9:54 pm
by justin_dwyer
Looking good Mike
Re: Mikem59 FS18 Build
Posted: Mon May 11, 2015 10:35 pm
by Cracker Larry
Real good
Re: Mikem59 FS18 Build
Posted: Mon May 11, 2015 10:37 pm
by Mikem59
Aftern to graphite guide coat, I then sanded with my fairing board. I used the same 80 grit I had been using. I think I should have used something different, say a 220. As the 80 grit "scratches" the primer pretty deeply. Nonetheless, the highs and lows stood out. I applied Quick Fair at the obvious lows, the spots I had marked. I did some additional spots since I didn't want to waste the Quick Fair I had mixed. I targeted the obvious lows, basically spots where the fairing board hardly touched the primer.
Overall, I'm pretty pleased with how it turned out. I could probably gone back over a few more spots, but the hand and eye test passed. So, I applied two more coats of primer and called it good. Here are some shots of the sanding to reveal the highs and lows. I didn't post any pics after the two additional coats of primer, not much to see that's different. I'll say this, once you sand the primer with some 220, she's smooth as a baby's butt.
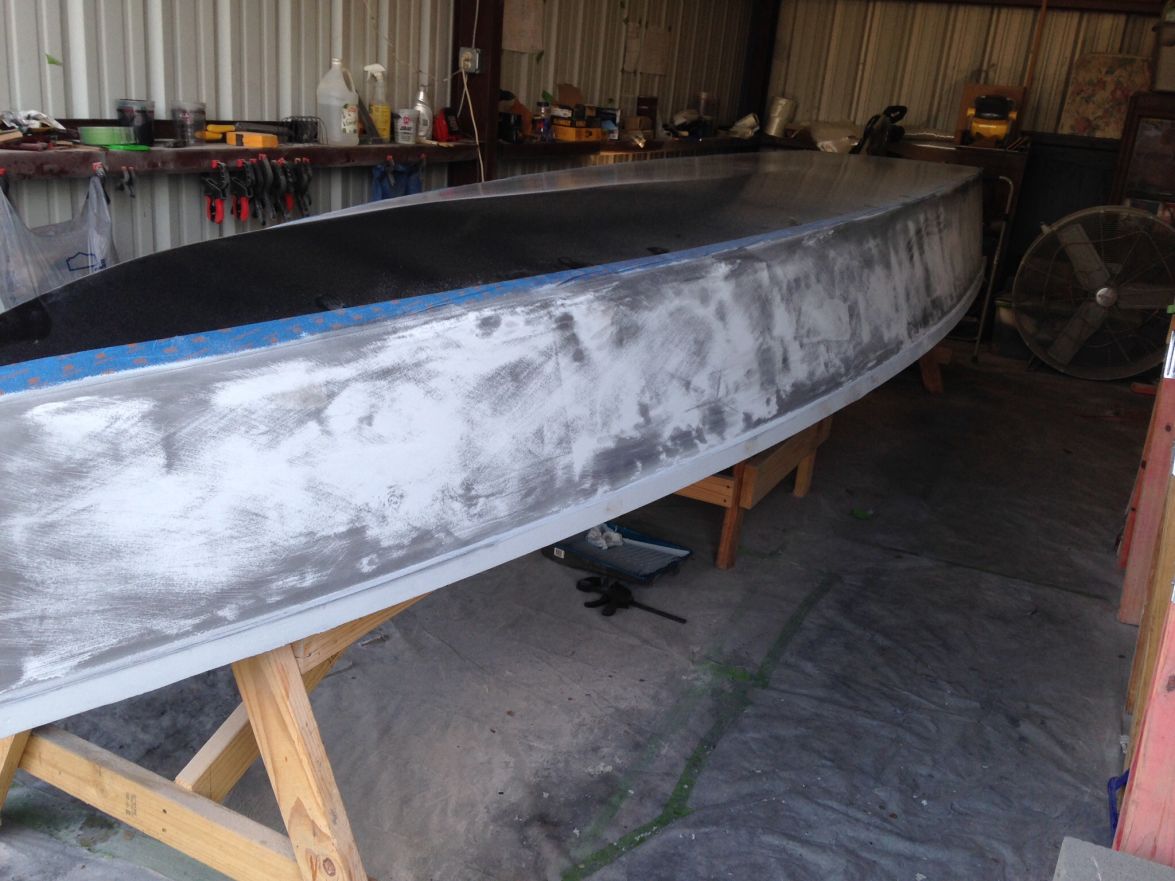
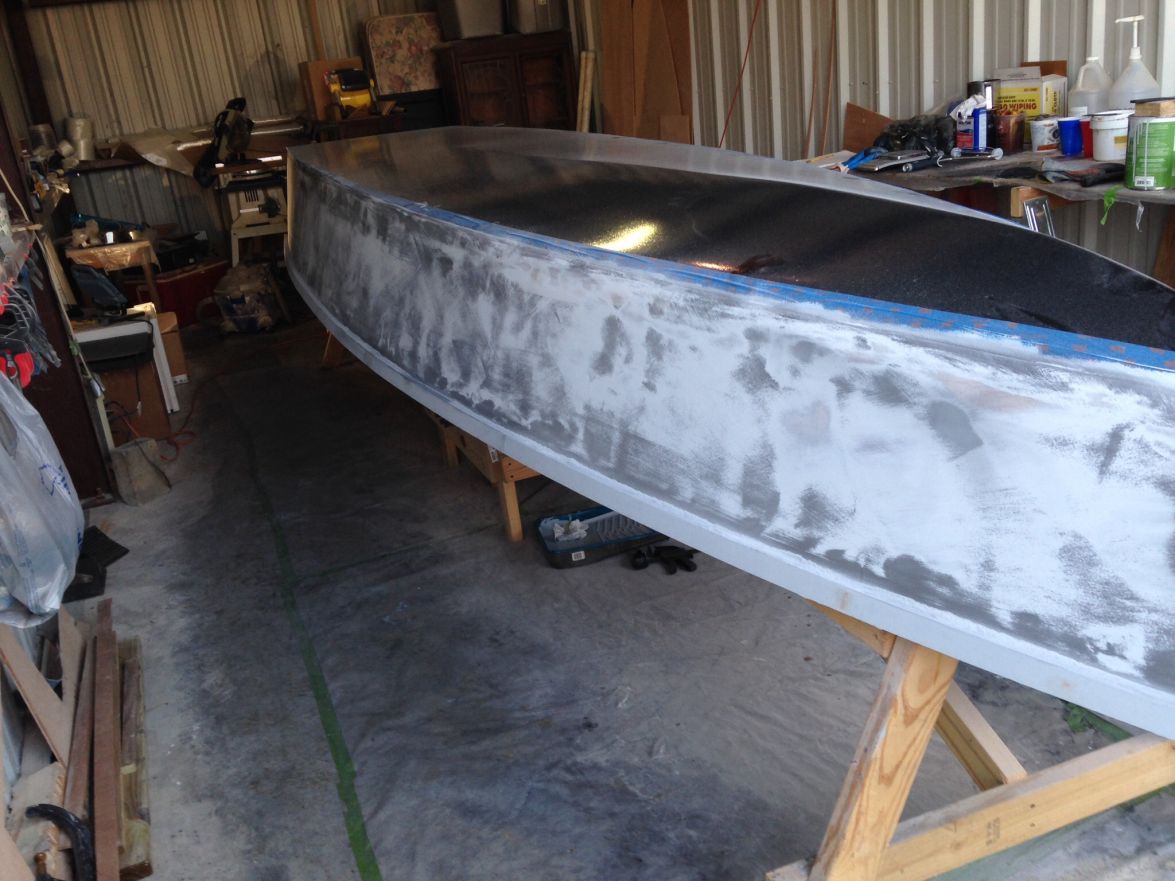
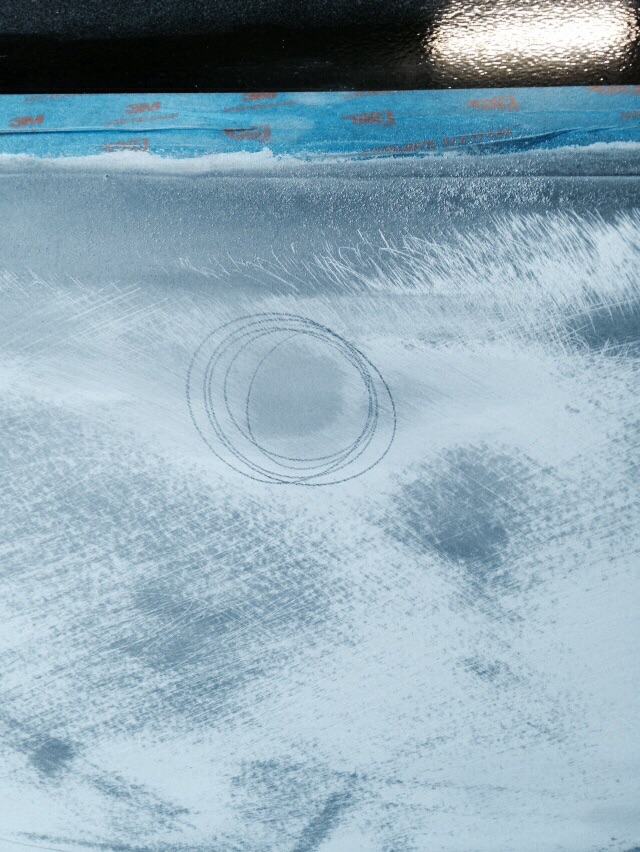
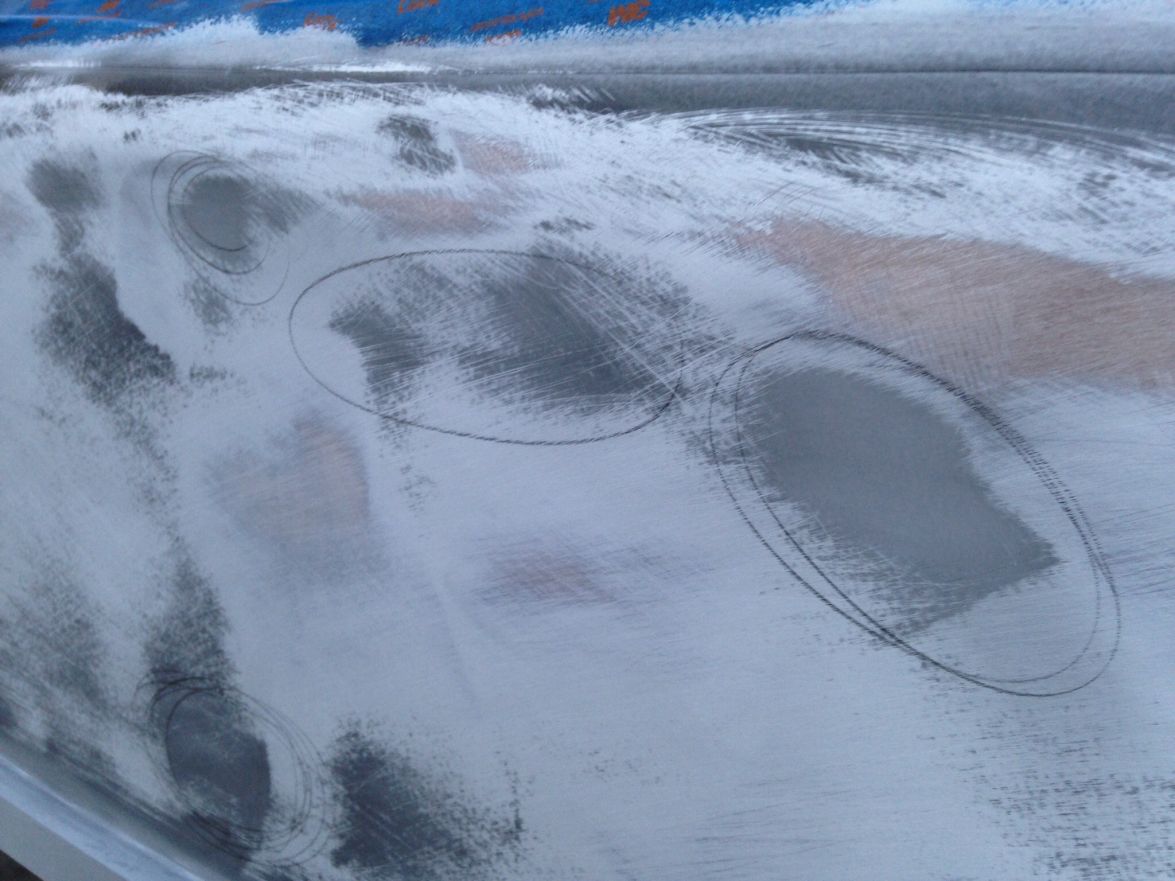
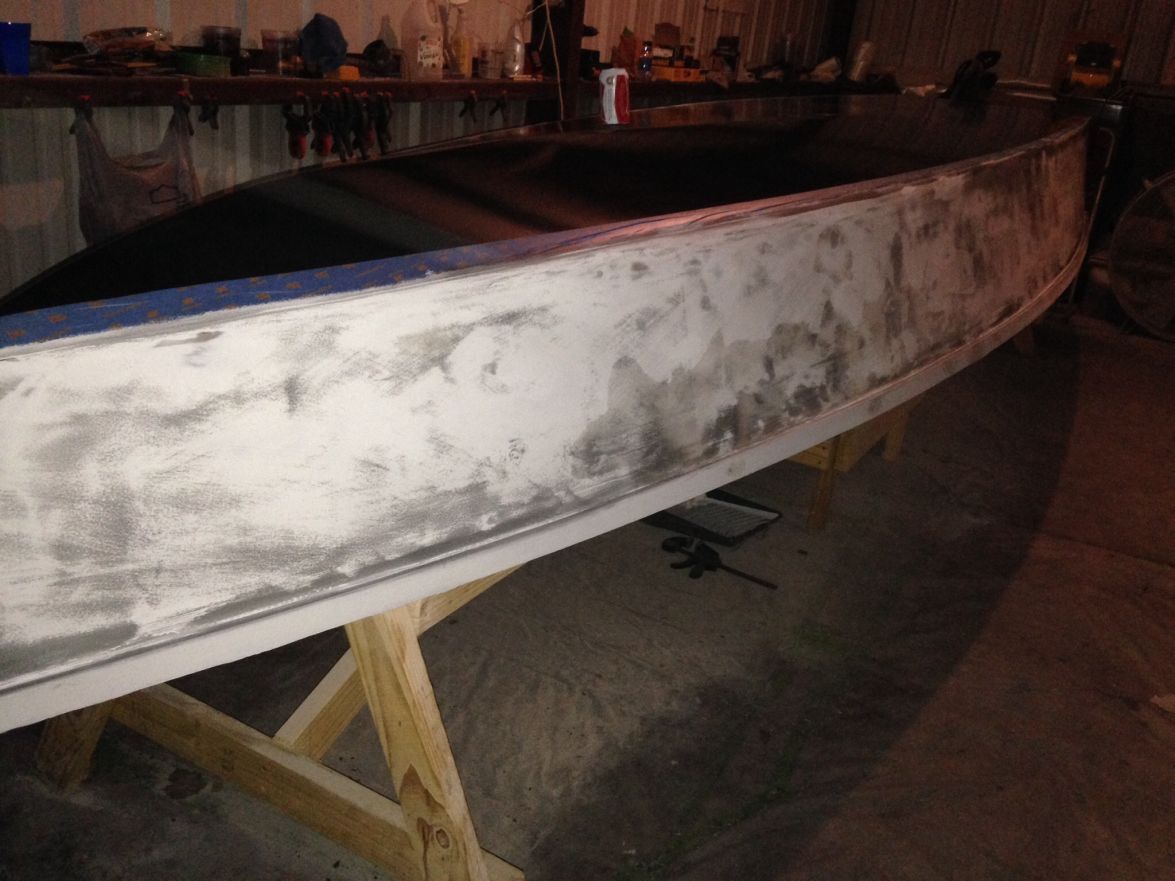
Now, I'm ready to flip her!
Re: Mikem59 FS18 Build
Posted: Mon May 11, 2015 11:01 pm
by Mikem59
Re: Mikem59 FS18 Build
Posted: Mon May 11, 2015 11:04 pm
by Mikem59
Justin and CL,
I've been so busy posting my updates, I just saw you both had commented, THANKS!
Justin - I'll have to get over to your build forum hope your build is going well.
And, CL, you've splashed another boat while I've been doing mine, enjoy watching your builds come together.
Mike
Re: Mikem59 FS18 Build
Posted: Mon May 11, 2015 11:10 pm
by justin_dwyer
You are doing a great job Mike.
I am currently working on glassing the inside of mine, I have to say I enjoyed glassing the outside more. Crouching around on the inside isn't much fun!!
Re: Mikem59 FS18 Build
Posted: Tue May 12, 2015 6:47 am
by Cracker Larry
One thing you might want to consider now that it's upright is to cut the legs on the strong back shorter. This will make it much easier to work on the inside. I completely removed the legs on mine at that stage.
Re: Mikem59 FS18 Build
Posted: Tue May 12, 2015 8:06 am
by Noles309
Looking real good Mike
Re: Mikem59 FS18 Build
Posted: Tue May 12, 2015 5:03 pm
by Mikem59
CL,
Yes, I've struggled with cutting the legs or not based on others posts. I"m 6' tall, and last night I checked my reach into the middle of the boat, and it' doable but may create some difficulties. I'm assuming that, in the upright position, I need to ensure everything is still plumb/level. So, If I cut the legs, I'll just be sure to keep everything plumb/level.
Gary,
Thanks for the kudos, much appreciated
Thanks,
Mike
Re: Mikem59 FS18 Build
Posted: Thu May 14, 2015 7:52 am
by blueflood
Sweet fairing job Mike
Re: Mikem59 FS18 Build
Posted: Thu May 14, 2015 9:20 am
by jacquesmm
Thank you for the pictures of the fairing procedures.
It is a good demonstration of the use of graphite as guide coat.
Re: Mikem59 FS18 Build
Posted: Thu May 14, 2015 10:51 pm
by Mikem59
Thanks guys!
Jacques, although this was my first time at this whole process, this graphite method was extremely easy. It's bound to be a lot easier than say spraying on a guide coat that may go on uneven and not provide the contrast that the graphite did.
Re: Mikem59 FS18 Build
Posted: Fri May 15, 2015 9:31 am
by jacquesmm
I agree. I used graphite, plug maker dye (Dikkum) and spray paint.
I prefer the graphite.
Re: Mikem59 FS18 Build
Posted: Sun May 17, 2015 4:47 pm
by Mikem59
Re: Mikem59 FS18 Build
Posted: Sun May 17, 2015 5:40 pm
by Cracker Larry
Next time I bet you'll crawl under there and put some masking tape on those seams before filling them
Much easier than sanding them.
Re: Mikem59 FS18 Build
Posted: Mon May 18, 2015 12:03 am
by Fuzz
Mikem59 wrote:After getting the boat flipped could see where I've been wasting all that resin
Had what I'll call alot of epoxy snot that had found it's way through the seams as well as where I had filled the holes for the zip ties.
If you call that a lot of drip through I must be a real pig! I was thinking how clean that looked compared to what I found when I flipped my boat. Nice looking build.
Fuzz
Re: Mikem59 FS18 Build
Posted: Mon May 18, 2015 7:56 pm
by Mikem59
Funny CL, I'm glad I read your post to be sure to tape over the frames, that would have been disastrous to glue the bottom to the frames. But sounds to me like you're holding out on a few builder secrets
I'll remember to mask those seams the next time, but I still have this boat to finish.
Fuzz, well I took those pics after I had knocked down some of the bleed through. Thankfully, it didn't take me too long to cleanup enough to do my fillets and taping. And, Thanks!
Re: Mikem59 FS18 Build
Posted: Tue Jul 28, 2015 10:28 pm
by Mikem59
First of all, glad to hear Jacques will be returning to Florida. Continued prayers for a speedy recovery!
And, once again, behind on posting pics and, well, I've got some questions to boot.
Well, I'll start off with a little fun, my first ever bonefish. Made a trip to Belize back in mid-May. I hadn't picked up a fly rod since I was probably 20 years old hitting cold water streams in north central Pennsylvania for trout. I'm rehooked on the fly fishing and now looking forward to my first redfish on the fly rod.
Ok, I do work on the boat now and then, here are some pics of my progress. The next several pics are of the seam taping. Had some issues with the fillets but, everything still came out ok. I used a tablespoon for most, tried a plastic spoon with no success. The fillet material wanted to stick to the spoons, but working wet on wet and with a stainless steel tablespoon was the best option.
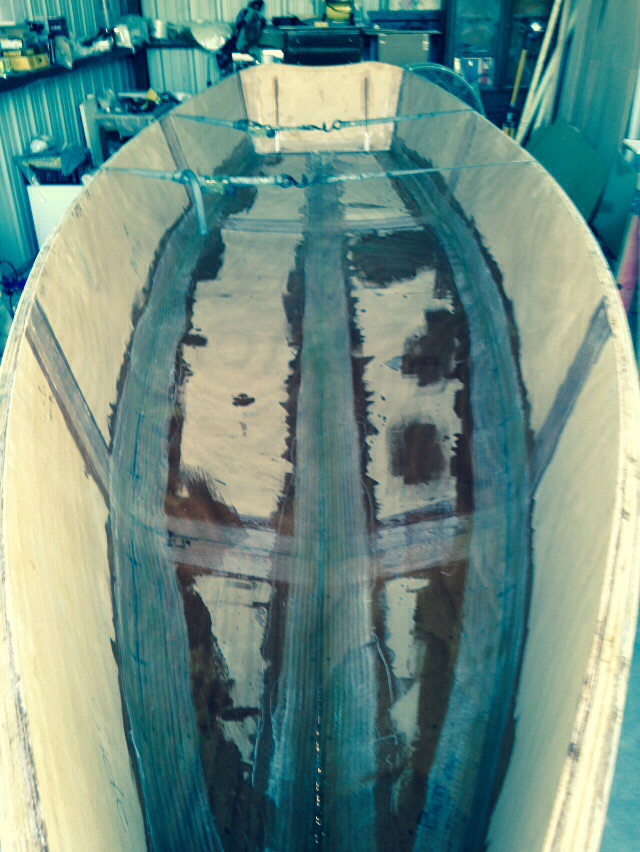
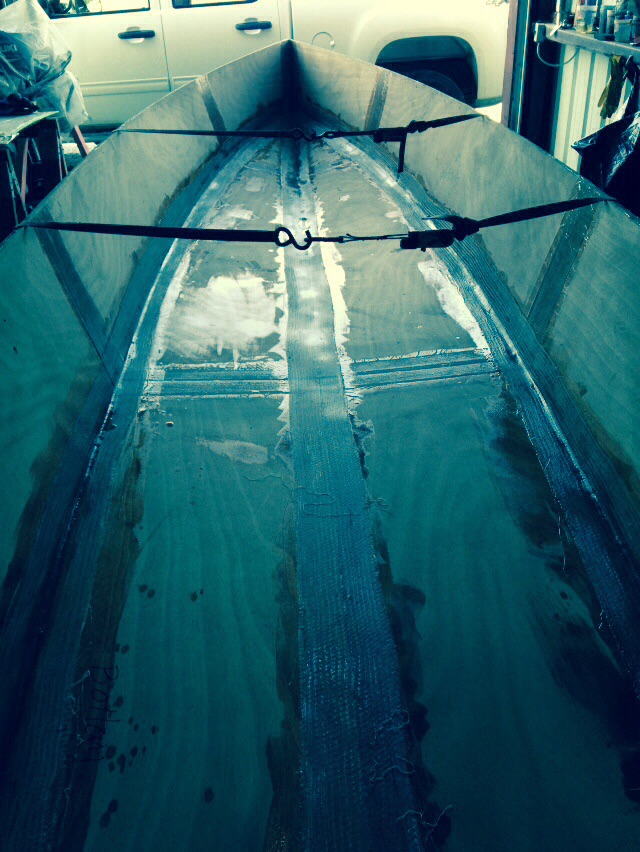
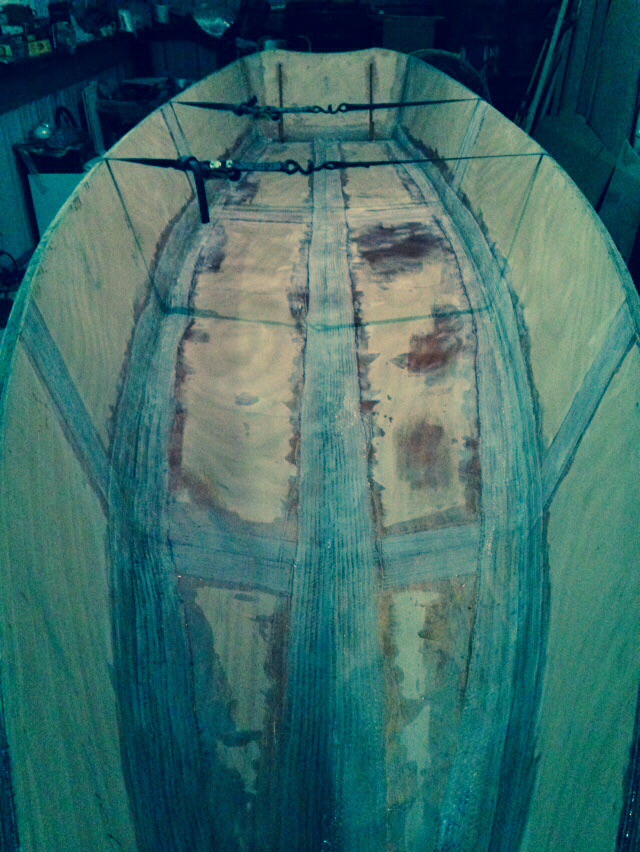
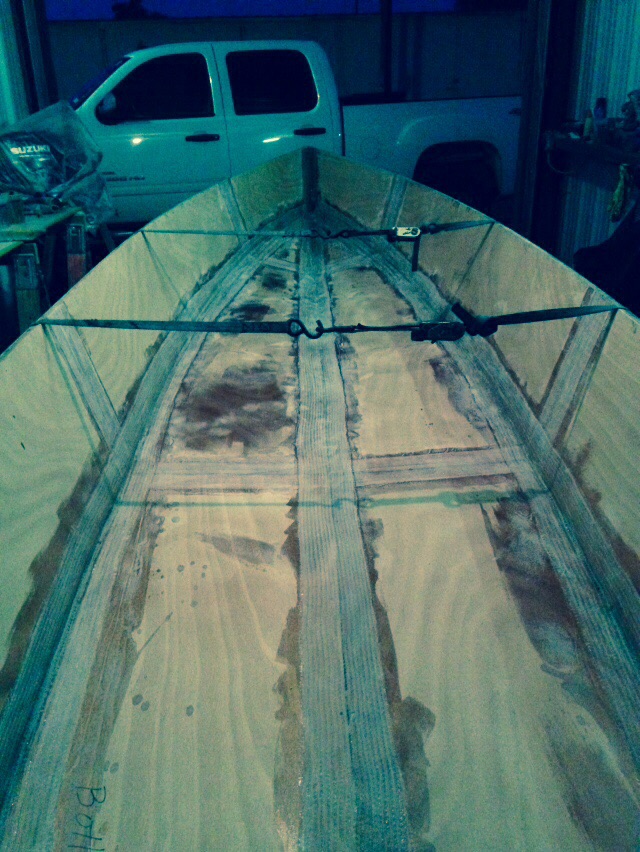
Some shots of interior glassing. Needless to say, when you are working by yourself in 90+ deg heat, a certain amount of apprehension sets in regarding how much time you have to work with the resin, and, with that apprehension comes some forgetfulness, ie. a case of the dumbass
on basic rules...working wet on wet. As I began applying resin and trying to work it into the cloth it hit me. It was a bit difficult, but managed to wet out the cloth and where I hadn't already began wetting out from the top side, I pulled back and rolled in some resin on the bottom side. The end result was still good.
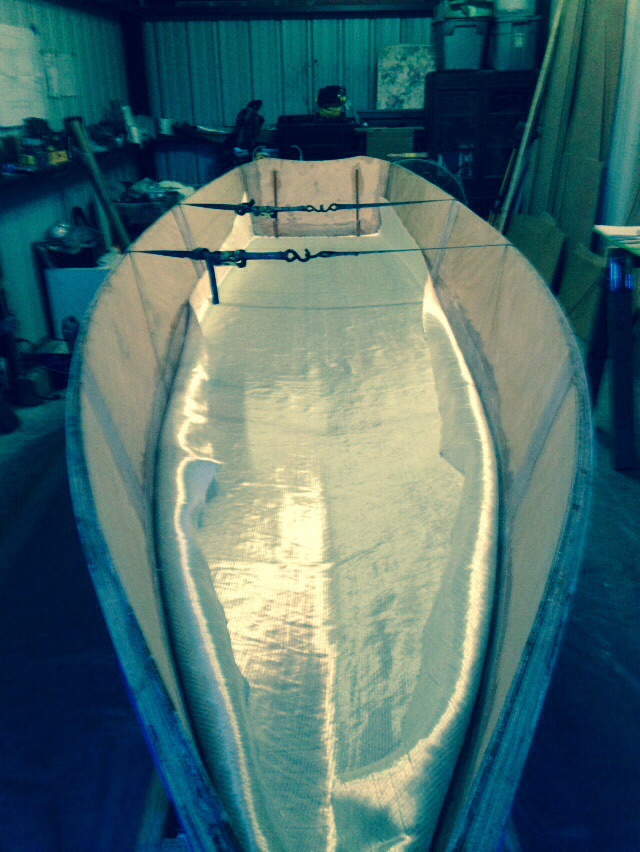
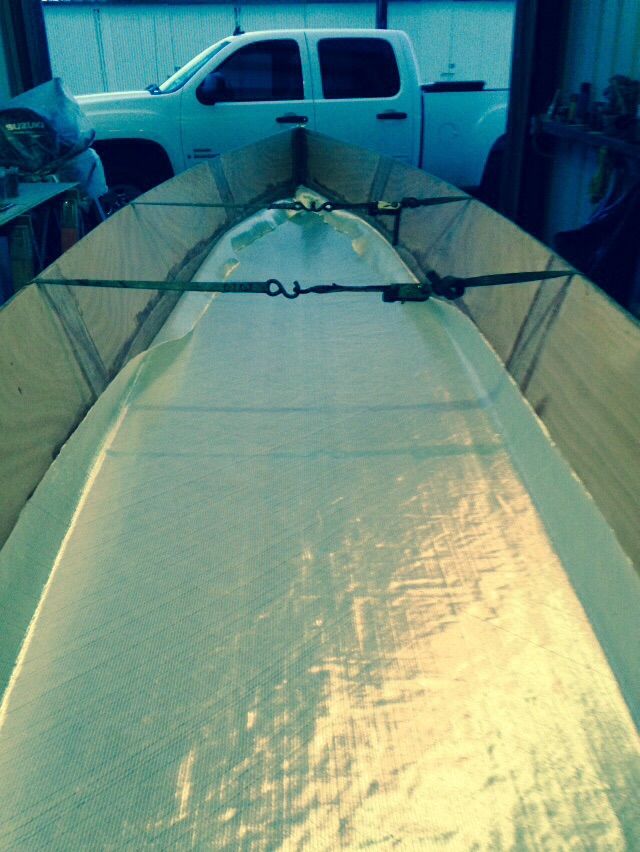
Uh, you probably noticed, the transom isn't glassed. Well, how after pre-laying and cutting it to fit, to the time I laid it in to glass, I was a bit short
I ended up cutting piece to fit and glassed in later.
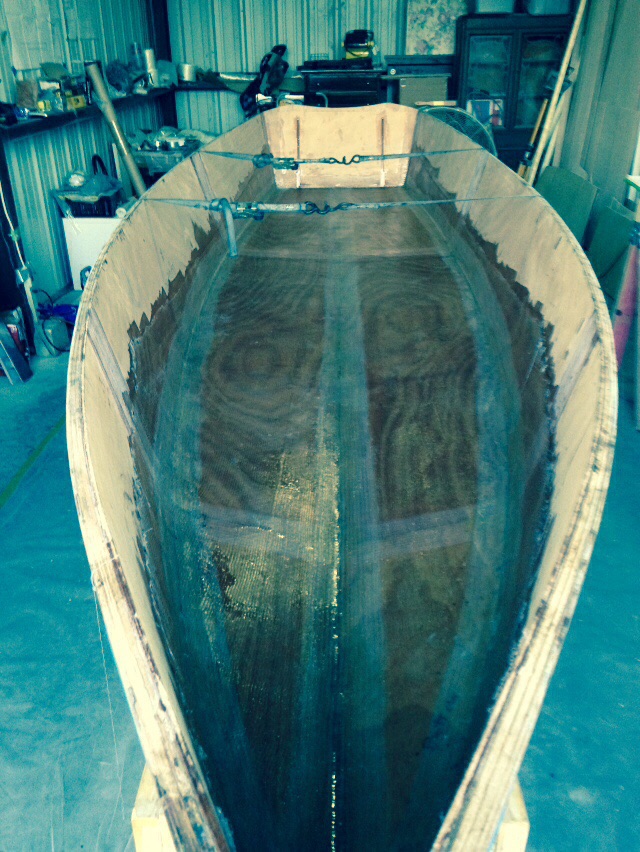
The aftermath
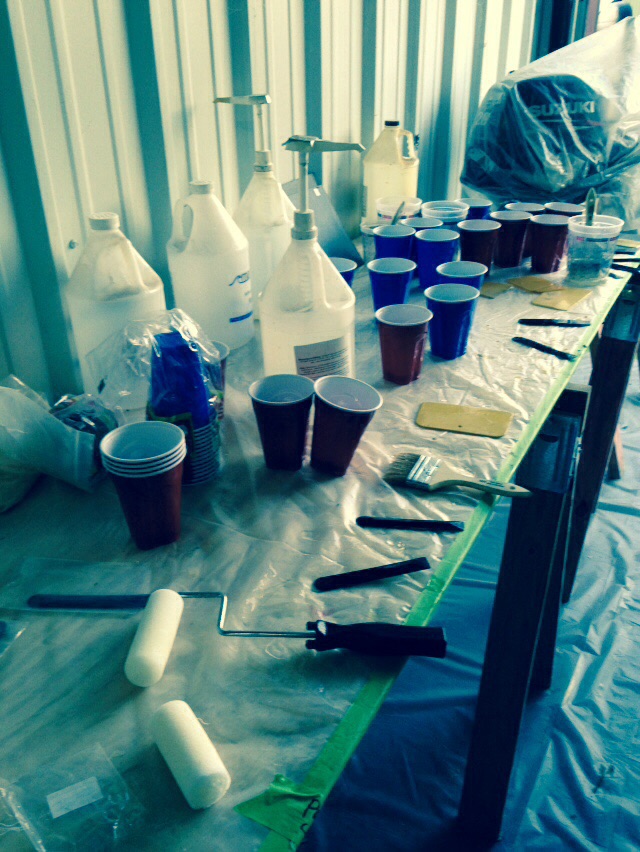
Like most, I dry fit everything to get the real feel for what the end product will look like. While I'm excited with what I see
, it raised some questions.
Here's the fit:
And, here's my issue, the gap between the front deck and the bow. How do I address this
? I don't recall seeing anything on this but sure it's been covered.
And, lastly, the very front of the stringers where they curve upwards, I have as much as a 5/8" gap. Can that be filleted in, or will I need to add in some scrap to get a smaller gap
And, after all this work, I'm pretty dang sure I didn't mix any bad batches of resin, so I must have misplaced a bottle of hardner because I have one gallon of resin and no more hardner
. So, need to place an order so I can get busy with taping the stringers, frames, etc. One way or the other, I'll keep plugging away.
Thanks all for the help!
Mike
Re: Mikem59 FS18 Build
Posted: Tue Jul 28, 2015 10:48 pm
by justin_dwyer
Looks great Mike, good to have that inside all glassed up.
Re: Mikem59 FS18 Build
Posted: Wed Jul 29, 2015 9:16 am
by Topwater.2
I had the same issue with my deck . I guled on enough ply along the edges to over hang the gunnels , glued the
deck on then used a flush trim bit in a router to clean it all up. Worked great.
Re: Mikem59 FS18 Build
Posted: Wed Jul 29, 2015 9:32 am
by Cracker Larry
Only way to fix that gap on the deck is to cut another piece of wood to fill it with. I had the same issue with the stringers on mine and glued on some filler strips to bridge the gap. 5/8 is more than I would try to fill with epoxy.
Re: Mikem59 FS18 Build
Posted: Wed Jul 29, 2015 7:48 pm
by Mikem59
TW2 and CL,
Thanks for the info that's what I figured. Heading over to the boat build location and cut out some pieces to fill those gaps.
And, Justin thanks for the props. And yes great to get the inside glassed. I'm feeling like I can knock out big chunks of work and get this build done before November as long as work doesn't mess me up schedule wise.
Re: Mikem59 FS18 Build
Posted: Wed Sep 02, 2015 10:48 pm
by Mikem59
Been awhile since I've posted any updates, but believe it or not I have made some more progress.
My fillets are still a work in progress. I tried using a tablespoon, but I couldn't seem to get the hang of it. So, I made this little gadget below with a small piece of 1/2" pvc and a 45 elbow. I'm a bit more successful with it than the tablespoon. While reviewing other builds, ran across a post by AttheBrink where he was just using the large radius of the spreaders. I may give that a try. The biggest issue I have with the spoon and the little tool I made is the need to continually go back and pick up the excess that moves out to the sides. Seems that a spreader may help to pick up the excess onto the spreader itself and to smooth out the fillet more easily.
Stringers glued in.
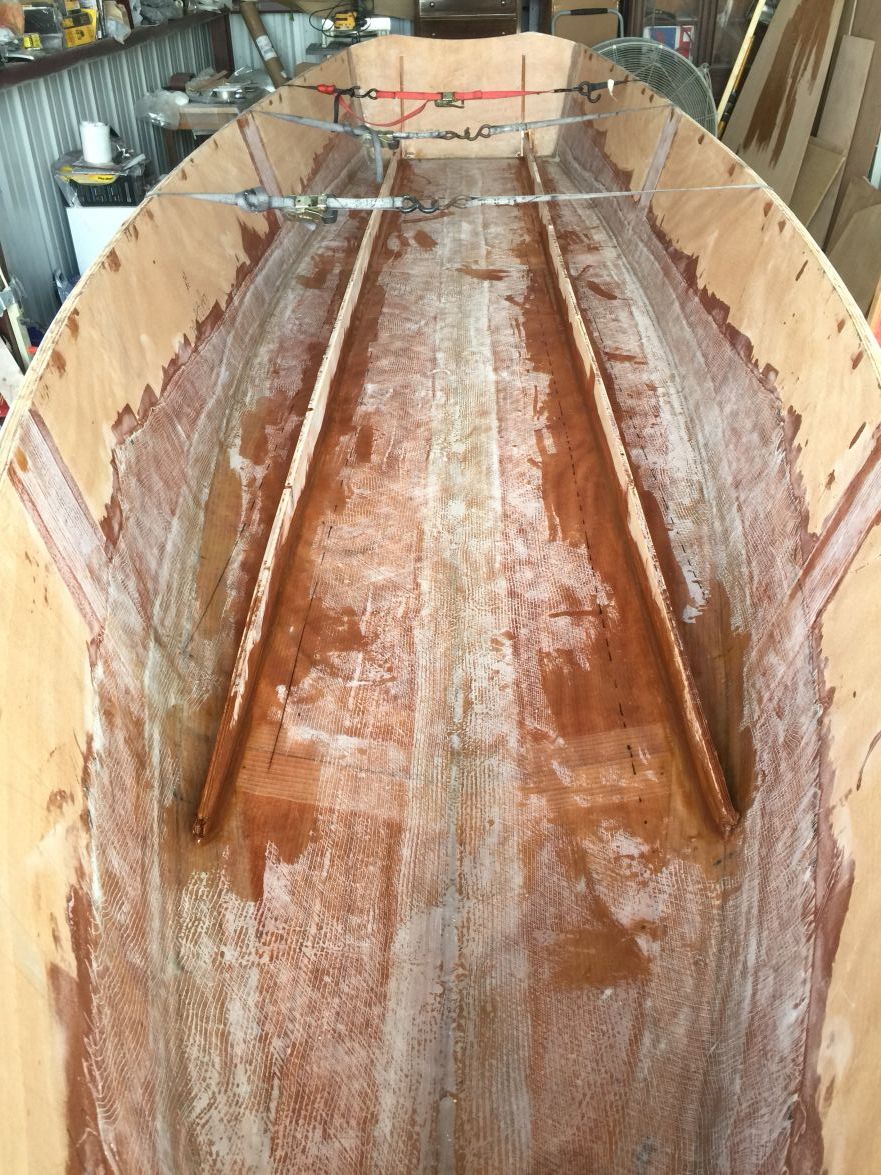
Front portion of stringer glued in. I had to scab in some marine plywood to reduce the gap I had between the curved section of the stringer and the hull. Worked out pretty well.

Stringers taped with the exception of the inside of the port side stringer. Don't know if this was before or after my first mishap with mixing a batch or resin. Always figured, I may not be the best at glassing, filleting, etc. but I'll never mix a bad batch or resin, oh well. I found out when you are working in 90 deg heat and panicking to be able to get the tape in wet on wet and have to open up a new bottle of hardner, you might just forget to do something. I'm thinking I never added the hardner.
Read through numerous posts to see how best to remove that tacky mess. I found lacquer thinner to work best.
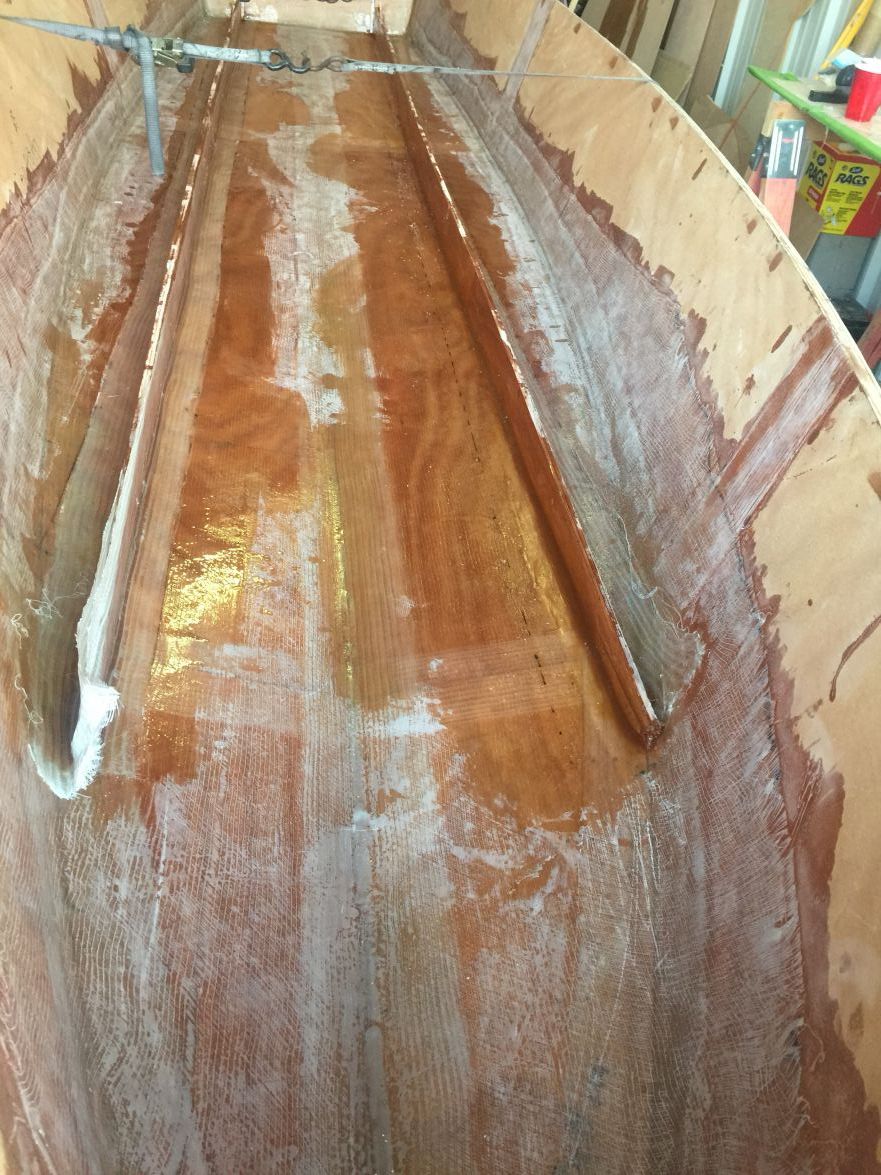
Frames tacked in. Leveling and making sure the frames were plumb and to keep a gap was a bit challenging with limited tools, but still managed. Frame A was the most stubborn of the bunch. Should have taken a photo, but I cut a 36" long 2X4 to maintain that distance between Frame A and Frame B along the bottom. This prevented Frame A from shifting on the bottom while trying to level and plumb. Used some plastic shims to aid in getting the gaps and to wedge tightly enough to prevent it all from moving once I got it right.
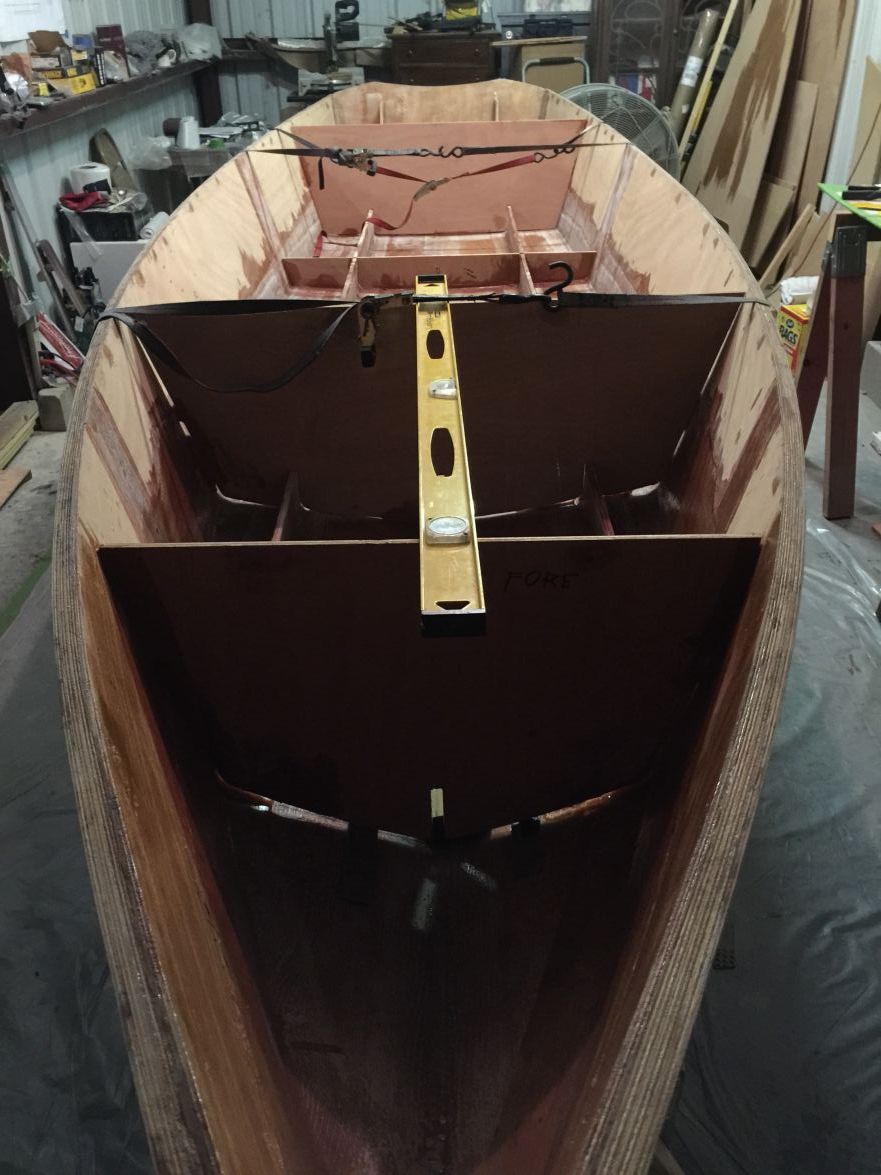
Another shot of the frames tacked in. I'll add that the frame corners and bottoms had to be trimmed to accommodate for the radius and to account for the thicker sections where the fiberglass tape was run for the stringers.
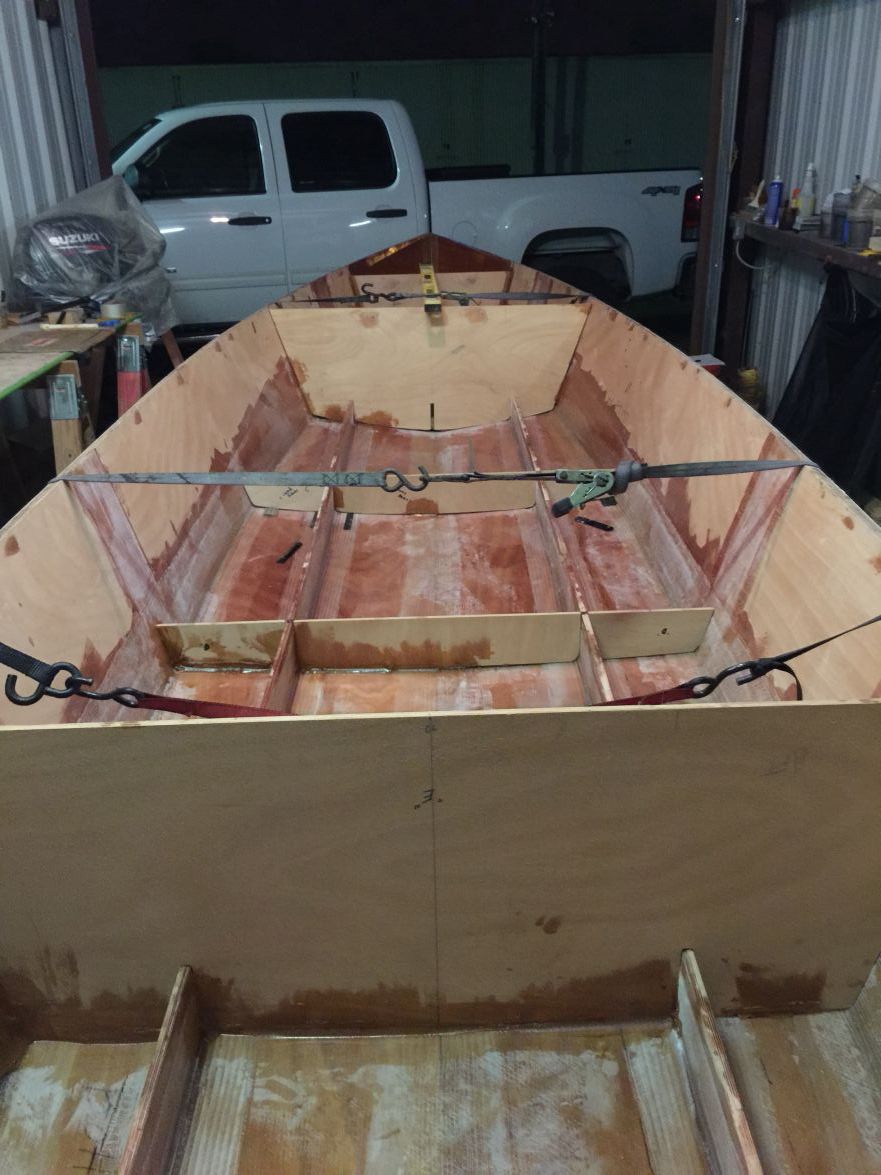
Next, I'll have to finish the fillets for the frames. Hoping I can settle in on a "best" tool to do those. And, I'll be ripping some 1X4's for my cleats as well. I starting to feel really close to finishing, but recognize there is still so much work to do. I'll add that I received another shipment of resin and hardner along with some more wood flour from Bateau today. Just in time to keep me going. My beginner skills, or lack thereof, are showing in my use of hardner and resin. And, somehow I got out of synch and am about a quart short on hardner. So, I had ordered 2 quarts of each. Sure hope that will be enough to finish out this build.
Re: Mikem59 FS18 Build
Posted: Wed Sep 02, 2015 11:59 pm
by justin_dwyer
Looking like some good progress there Mike.
I am at the same stage, and working at the same frantic speed in the heat by the sound of it. I got up at 5.00am this morning to finish 2 of my 4 stringers. I started them yesterday at about 2pm (right in the heat of the day) and the resin was starting to thicken by the time I got it mixed. I was working at a fairly stressful pace.
This morning was very less stressed, I even stopped halfway when my wife bought me down a coffee
I just use a piece of 1 inch PVC for my fillets and then clean up the bits that squidgy out the side with a tongue depressor. I find the mixture of the glue is a big factor. Too dry and you just pull it all out as it sticks, too wet and it doesn't hold its form. My mix is 300ml of mixed resin to 11 heaped teaspoons (plastic disposable type). Works well for me.
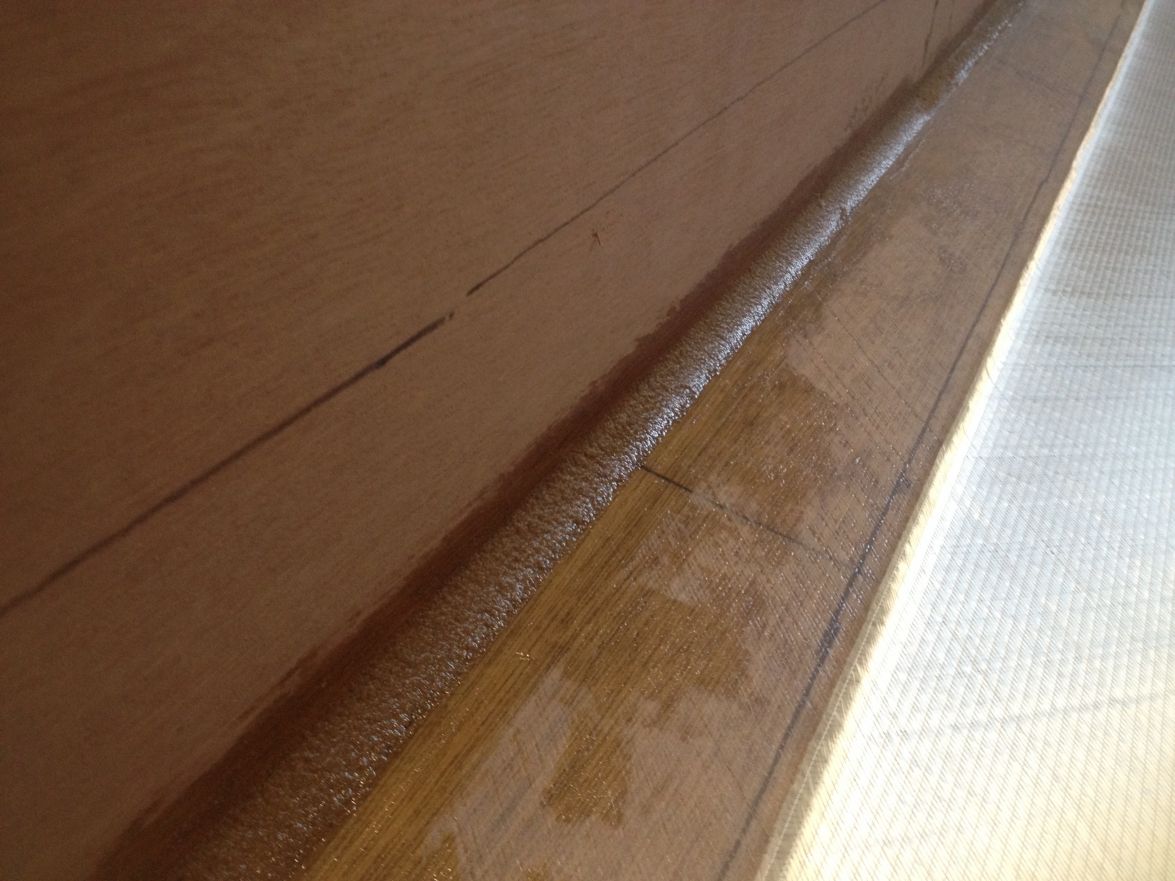
Keep up the good work, looks great.
Justin
Re: Mikem59 FS18 Build
Posted: Thu Sep 03, 2015 2:22 pm
by Mikem59
Hey Justin, thanks for the input. You're right about the mix to much filler it sticks too little and it just sags. Are you using wood flour filler? That's what I've been using but have toyed with the idea of using silica or phenolic balloons to see if they spread any easier. That is a good looking fillet there. One day we'll finish
Re: Mikem59 FS18 Build
Posted: Thu Sep 03, 2015 2:36 pm
by Mikem59
Also. Impressed the wife brought you coffee
my wife would too, but my build location is at a boat storage not at my house. And, I think my wife is getting as anxious as me to see this boat finished, she's been coming by more frequently to check on it.
Re: Mikem59 FS18 Build
Posted: Thu Sep 03, 2015 7:38 pm
by justin_dwyer
justin_dwyer wrote:Are you using wood flour filler?
Yes, sorry Mike, I should have added that. I am using wood flour.
I bought a 20L bag of milled wood flour years ago for about $30 for a small boat I built and after building that boat and this one, I think I have used about 1/10th of the bag...so works out really cheaply
There is light at the end of the tunnel, plug on!
Re: Mikem59 FS18 Build
Posted: Sat Sep 05, 2015 12:09 pm
by Mikem59
Ha, no problem on the wood flour question. I had assumed you were using wood flour. I had asked just to see if by chance you were using another filler. And yep I'd sure be using wood flour too given how much you have. I actually ordered 2 more pounds I feel like I might come up short with all the more fillets I have left to do. But I do have some phenolic balloons and silica on hand I may need to give them a try.
And you're right there is a light at the end of the tunnel. Between a wife that loves to fish (and that's a good thing) and work still struggle to get big chunks of time to work on the build. I'm at it now for nearly 2 1/2 years no point in getting in too much of a hurry.
Re: Mikem59 FS18 Build
Posted: Sat Sep 05, 2015 1:12 pm
by Cracker Larry
Phenolic balloons are for fairing, not structural glue fillets. Silica is mostly used as an anti-sagging agent in fairing compounds but it is brittle as a glue also.
Re: Mikem59 FS18 Build
Posted: Sat Sep 05, 2015 10:15 pm
by Steven
For applying fillets I find the following mixing sticks from West Marine perfect. Shape the filet with one, and then use the chisel end of another to clean along the sides. I use a couple bags of these a boat.
They will get wore with use over time.
http://www.westmarine.com/buy/west-syst ... 23_004_507

Re: Mikem59 FS18 Build
Posted: Tue Sep 08, 2015 4:29 pm
by Mikem59
CL, thanks for the heads up on the phenolic balloons and silica. I thought I had read that they could be used for fillets. Makes sense though that they wouldn't provide the structural integrity. And from why I recall when using for fairing it would take an awful lot to make into a glue.
Steven, thanks as well regarding the mixing sticks. I do use them to help with the cleanup as I spread the fillets. I may need to try to use for the fillet as well.
Between holding a flat with the glue, the fillet tool, and a spreader or stick you realize you need three hands.
Re: Mikem59 FS18 Build
Posted: Thu Sep 10, 2015 10:30 pm
by Mikem59
Filleted and taped in Frame E. Used the rounded end of the mixing stick for the fillets. So far, I like this method best. I seemed to have better control and was able to clean up the "squish out" pretty quickly. Guessed wrong on the amount of fillet material I could work with before it got to thick to work with. I had made a 12 oz batch looks like I would have been able to do Frame E with a 9 oz batch. Thankfully I didn't waste too much.
Have all the fiberglass cloth cut to fit for the rest of the frames. Won't get back to work till next week. And I'll post pics when I get a little further along on the frames.
Re: Mikem59 FS18 Build
Posted: Thu Sep 10, 2015 10:33 pm
by justin_dwyer
That is what I use most of the time for fillets too, the round end of the mixing stick. Pot in one hand, stick in the other and it all goes pretty smoothly.
Keep it up, can't wait to see pics
Cheers
Justin
Re: Mikem59 FS18 Build
Posted: Mon Sep 14, 2015 1:30 pm
by August_D'Angelo
Hey y'all, I just joined this forum because I am interested in building the FS18 as well. In the past hour or so I have read through your 2 and a half years of hard work. Your boat is looking great! Prior to this did you have an experience in the craft? I have exactly 0 experience and am wondering if taking on such a project would be too difficult. Justin, correct me if I am wrong, but you're completing your build outdoors correct? Have you faced any issues with this? My garage is only 15' so for my build to take place at home, it would have to be located within my screened in porch that has a solid roof and I just want to make sure this would be okay. Sorry for these questions, but as mentioned earlier in this reply, I have 0 knowledge on this topic except for what I have been reading up on for the past month or so.
Re: Mikem59 FS18 Build
Posted: Tue Sep 15, 2015 12:05 am
by Mikem59
August,
When I began my build I was just like you - ZERO experience
I did have some basic woodworking experience but that was about it. Never worked with fiberglass cloth or resin. So a huge learning curve. But the great thing with this forum is that it's been a huge resource with some great people who are extremely willing to take the time to share their wealth of knowledge.
As for location, I'll let Justin and others answer since I've had the luxury of an enclosed storage building to work in. And, certainly having an enclosed workspace is a huge benefit.
And thanks for the kudos on my build this far. I'd just say there are dozens of well documented FS18 builds on the Builders Power Boats forum. AttheBrink, Cracker Larry, Shamrock Kid, Canonball, and several more but I can't remember them all. Each one lends a different view into the build and well worth reading and bookmarking for reference.
I hope this helps. I'll say again there are a lot of resources here to help you but most of all it takes commitment, time (and don't I know it
, and patience. Good luck to ya!
Re: Mikem59 FS18 Build
Posted: Wed Sep 16, 2015 6:14 am
by justin_dwyer
August_D'Angelo wrote: Justin, correct me if I am wrong, but you're completing your build outdoors correct? Have you faced any issues with this?
Hi August_D'Angelo, yes that is correct. Here are some images of my setup.
It has it challenges, but is doable. Living in the tropics, weather being the biggest challenge, keeping the wood dry if you haven't put epoxy on it yet, but a few plastic covers can avoid that (a bit annoying when you only have a short period of time to work and you have to spend time covering and uncovering). Another is having more "dirt and dust" in your build than there would be otherwise. My major issues will be when it comes to painting, but I'll figure that out when I get there.
It is definitely doable though, just takes some more planning.
Like Mike said, it is definitely a commitment, in time and money (it will cost twice what you budget), so take your time and get the boat you want at the end of it.
Sorry for the thread hi-jack Mike, can't wait to see your progress
Cheers
Justin.
Re: Mikem59 FS18 Build
Posted: Wed Sep 16, 2015 3:42 pm
by August_D'Angelo
Hey everyone thanks for the replies. And Mike, sorry for the hijack.
Mike, thanks for that confidence boost. I will have a fair bit of time to work on it as I go to school from 6:30-2 and I only work 5-15 hours a week due to restrictions due to age. The rest of my life would be committed to my boat build.
Justin, thank you for sharing pictures of your build site. I too had fears about moisture and dirt. My plan is to purchase a walled in 10x20 carport. I will have plywood floors. The model I am purchasing has some great reviews and it has apparently been up for some for a few years, and as long as I have it screwed into the plywood it shouldn't blow away. I'm estimating that it'll cost me about $225.
For anyone who is interested my timeline is as follows. For the next year garner extra hours during snowbird season at work to acquire the money needed for this build and get a second job during the off season (summer). Then, if I have enough money I will hopefully start my build September 2016. My estimated build time is 9 months, finishing in June 2017, just in time for summer break. That means I won't even look at the plans for the next year, so my posting here will be minimal. I will closely follow other builds and maybe chime in from time to time. Once again, sorry for the hijack.
Re: Mikem59 FS18 Build
Posted: Wed Sep 16, 2015 10:00 pm
by Mikem59
No apologies necessary gentlemen. August, sounds like your timeline to do a build in 9 months would be doable if you are indeed able to dedicate big chunks of time.
I've learned that it's really nice to have 4+ hour chunks of time to work. Not saying you can't do anything with less time, but when you start working with resin and the cloth it sure helps to have big chunks of time. That's been my biggest problem. I work 55 a 60 hrs a week. My other good problem is I have a wife that loves to fish
. So I make time for that which robs time to work on the boat.
Justin. Pics will be awhile. Haven't been able to work on the boat at all this week then my job will take me out of the country for a week. Not going to complain too much, going to Amsterdam and Rotterdam. Maybe I can learn aittle about boat building over there
Re: Mikem59 FS18 Build
Posted: Tue Sep 22, 2015 5:27 pm
by August_D'Angelo
Mike, this may have been mentioned earlier, but how do you plan on doing fuel? I sort like the idea that CL had with the permanent tank up front, but that renders the bow otherwise useless for storage. I have thought about just sticking two 6 gallon portable tanks on either side of the transom, leaving the middle open. But I wanted to hear your thoughts and plans on what you're doing? Also, are you putting on navigation lights? I am trying to decide whether I want to do flush mount lights, or just the portable clip on ones from West Marine. I am thinking I will do the WM ones, just for weight and clutter purposes. Once again, just wanting to hear your thoughts. Hope to see some updates soon. Until I get around to building mine, I am getting my fix by looking at others.
Re: Mikem59 FS18 Build
Posted: Sat Sep 26, 2015 9:25 pm
by Mikem59
August, Sorry for the delay in replying. But here are my plans. I'm putting in a permanent 12-gal Moeller fuel tank up in the bow. I've opted for this to get more weigh in the bow. As for the navigation lights, I plan on putting in a small center console and mounting them on the sides of the console. I also plan on putting the battery in the console as well. I'm trying to keep from putting to much weight in the stern. You might ask why the concern for the weight in the stern. Well I also plan to install a jack plate, an Atlas Micro Jacker) and trim tabs (Lenco). I was concerned is have too much weight to the stern if I also put the battery and fuel in the rear as we'll.
Hope to get back to work on the boat soon. Work as had me out of town for a week as well as having to take care of some work around the home. But more to come.
Re: Mikem59 FS18 Build
Posted: Mon Sep 28, 2015 10:00 pm
by August_D'Angelo
I like the idea and like that model of fuel tank, probably the one I will end up with. Did you opt for the extended foredeck option? If so, how long is it? If not, how long is it? I want to put my gas tank up front, but I don't want to sacrifice all my bow storage, if at all possible, and my battery(s) will likely be in my stern storage. I don't plan to put in a console for my build. Switches and gauges will likely be placed on the outside of stern storage.
Sorry for the hi-jack. I'm just trying to visualize how I'm gonna turn wood and glue into a boat with electricity and it helps me to write it out and run it by someone else
Re: Mikem59 FS18 Build
Posted: Thu Oct 01, 2015 6:18 pm
by Mikem59
August,
My boat plans are the standard plans, not extended deck, bow or stern. No matter where you put the fuel tank, you sacrafice storage space, just becomes a function of where the sacrafices are made. Like I said, I really wanted to have some weight forward, so that's where I placed the fuel tank. I will admit, the 12-gallon Moeller tank is probably overkill for a boat that I will power with a 20 hp Suzuki 4 stroke motor. A smaller 6- gal. portable would be more than adequate, obviously smaller and thus will not take up too much storage space.
I've still got a lot of thinking to do, but I have the basic concept in my mind of my layout. The small center console is something I really want to have, but I know it will take up some floor space. But, with that console being home for the battery and electronics, I saved some storage space in the stern and/or bow area.
I need to stop writing about it here and get to work, but time continues to be an issue.
Keep at it and get it down on paper, I did lay my out to scale on paper, I'll see if I can scan or take an image of it and post for you.
Re: Mikem59 FS18 Build
Posted: Thu Oct 01, 2015 6:35 pm
by Mikem59
Since I'm on my pc and not an ipad, thought I'd post a couple pics of my progress from a few weeks ago, one side of the transom frame taped in.
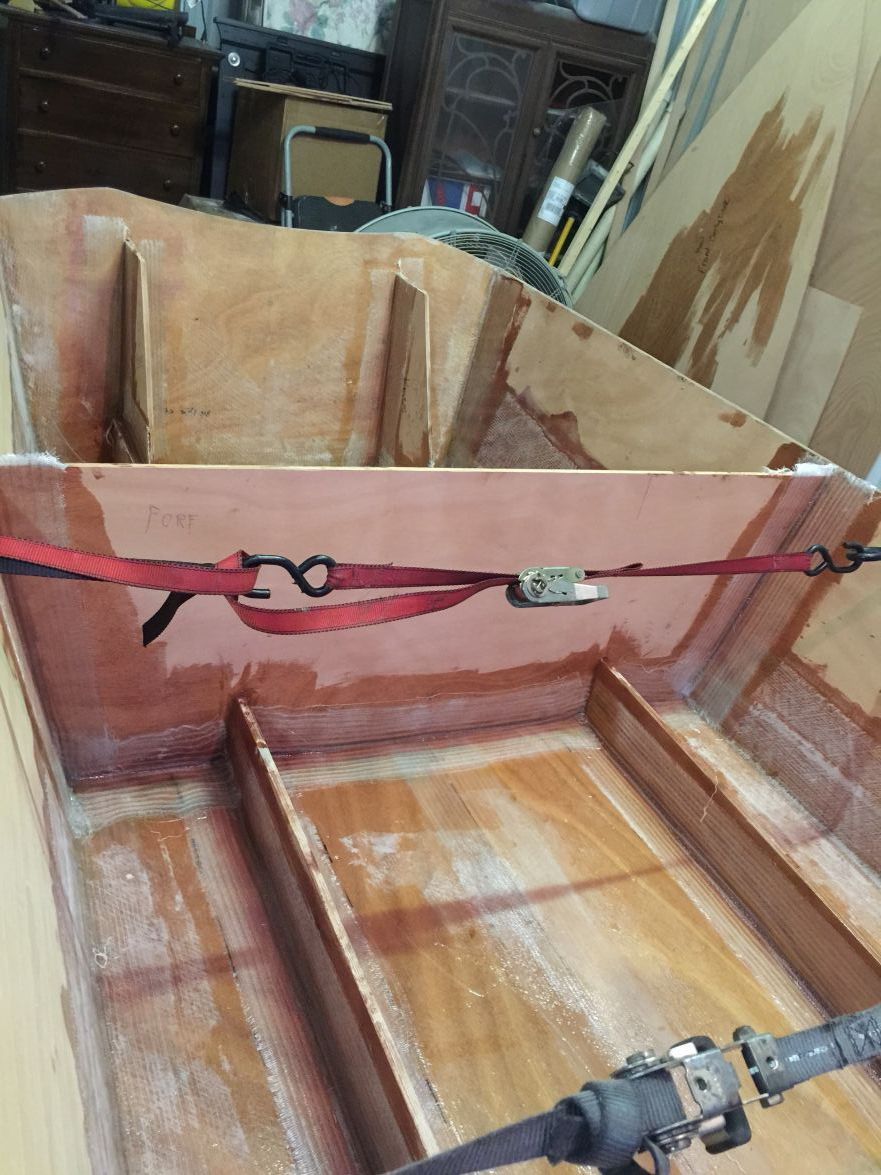
Layout of fiberglass for the remaining taping. Still have a lot of fillets to do.
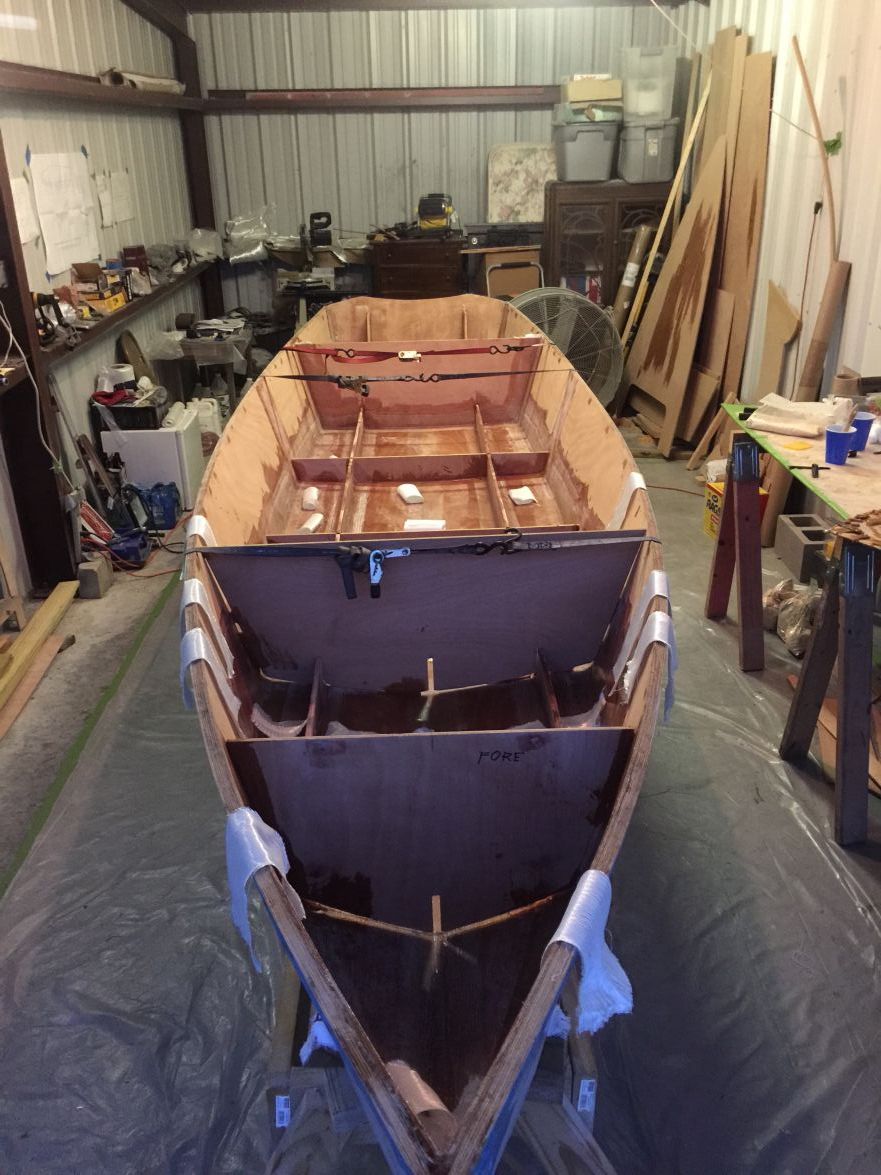
Re: Mikem59 FS18 Build
Posted: Sun Oct 04, 2015 6:22 pm
by August_D'Angelo
Hey Mike. Do you know what dimensions your console will be? I wanna put a grab bar with storage and I don't really know what dimensions it should be. Just reading through threads and getting an idea from everyone.
Re: Mikem59 FS18 Build
Posted: Mon Oct 05, 2015 8:51 pm
by Mikem59
August_D'Angelo wrote:Hey Mike. Do you know what dimensions your console will be? I wanna put a grab bar with storage and I don't really know what dimensions it should be. Just reading through threads and getting an idea from everyone.
August, here's the plan view of the layout I have in mind. These plans show my center console but I haven't yet settled on the exact dimensions. Right now, I want to be sure it is wide enough to house the battery. So, I plan on it being 16" wide by 12" deep, and 30" tall. And, I had a friend donate a CarbonMarine grab bar that will be installed in the console as well.
I also show the fuel tank being forward of a storage area below the casting deck. I don't think that is going to work, just not sure yet.
Without rambling on too much more, here's the layout.
Re: Mikem59 FS18 Build
Posted: Mon Oct 05, 2015 9:09 pm
by Mikem59
Well, another milestone achieved. All the frames are glued and taped. Not the prettiest of work you'll see on the forum, but I have improved laying down the fillets. Using the West plastic stirrers has worked the best. Thanks Steven for sharing that tip to use these earlier.
The one thing that I still seem to lack the confidence and experience is the level of effort and the amount of resin I'm using for the fiberglass tape to fully wet out, even working wet on wet. But, not doubt, wet on wet when working with anything in a vertical position is the only way to go to keep the tape in place. I may have enough experience by the time I finish this build
Now on to a few pics:

Nice to see the boat without the straps, self supporting, and it didn't explode into pieces. Putting the extra resin to use, but as you can see, ran out coating "B" frame. I certainly can't waste anymore resin. Hoping I have enough to finish the build.
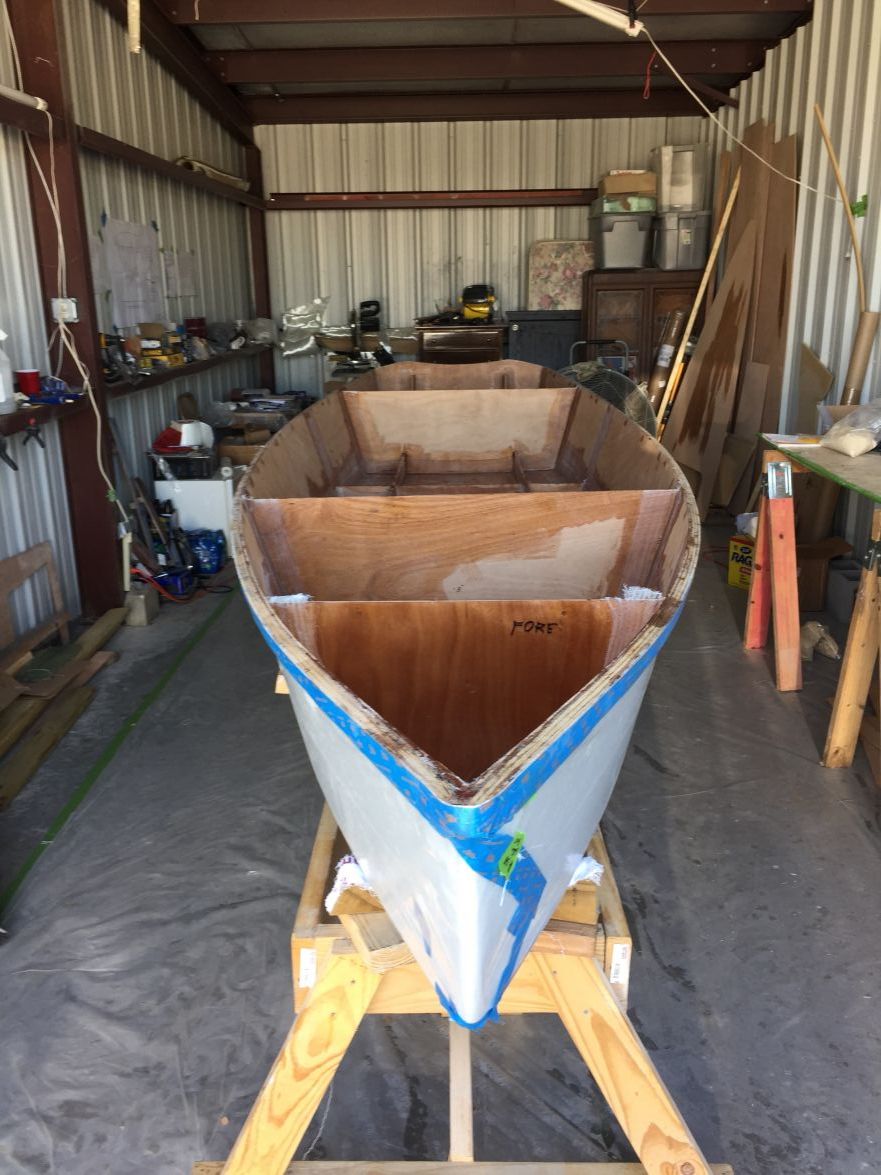
Hey, when the wife says, let's go fishing, I don't say no, here she is with a nice redfish. And she says I never let her do what she wants to do.
Next up, cleats. WooHoo! I think.
Re: Mikem59 FS18 Build
Posted: Tue Oct 06, 2015 8:20 am
by topwater
Here's a tip i got from Cracker Larry , use 1 oz of epoxy per foot of 12 oz biax tape .
If you are using Silver tip epoxy use a little less .
Re: Mikem59 FS18 Build
Posted: Tue Oct 06, 2015 9:38 pm
by Mikem59
Thanks Topwater, and yes, I have used CL's method, as well as doing the calculation based on the actual amount of 12 oz cloth and a 1:1 ratio of resin to cloth. In reality, I'm using perhaps 10% more than I need to, not a big deal for a beginner like me. And, that is certainly improvement from my first rounds of applying resin to cloth. I think I let my paranoia get the best of me when I am applying the resin and that it just takes time an effort to penetrate the cloth.
Re: Mikem59 FS18 Build
Posted: Wed Oct 07, 2015 7:18 am
by justin_dwyer
Great progress Mike, looking good
I've struggled to find traction lately
Re: Mikem59 FS18 Build
Posted: Sat Oct 10, 2015 8:42 pm
by Mikem59
Justin,
I know the feeling when it comes to getting some traction. The long road traveled will be well worth it.
CL,
Hope all is well on your end, didn't know if your area was hit hard with rain or not. Hoping you can answer a question based on what I've quoted from one of your FS18 posts below.
Still working on the cleats, in fact I've about reached cleat burnout

You wouldn't think a little boat like this would have so many, but there are roughly 110 individual pieces that have to be cut to size, fitted, rounded over where they meet fillets, angled to match the sides, kerfed to make the bends, sanded, labeled, pre-coated with epoxy and glued in place. My back and my patience both are about to give out. Sure will be glad when this is finished, if it ever is
I ripped some 1x4's to make 1x1's for the cleats. You mention 110 individual pieces, I've made up a drawing and labeling system for when I start cutting these out, but I've come up with just 64 pieces; and, I've estimated 197 linear feet for cleats. I'll probably figure out somewhere down the line that I missed something
And, you say you cut to size and round to meet the fillets, since the cleats are beneath the decking to provide support and more surface area for gluing down the decking, is it necessary to fit the cleats such that they match up with the fillets in the corners:?: And, does the entire cleat need to be pre-coated? Or, can just the side that will be glued to the hull, stringers, or frames be pre-coated and sanded before attaching, then finish coating the remainder of the cleat? I'm thinking that may be easier and I'm concerned once pre-coated, they'll be harder to flex into position.
Appreciate your comments.
Mike
Re: Mikem59 FS18 Build
Posted: Sun Oct 11, 2015 8:38 am
by topwater
I precoated all sides of my cleats except the side i was going to glue before hand and had no problems installing .
When ready to install just hit the uncoated side with neat epoxy and glue and install.
Re: Mikem59 FS18 Build
Posted: Sun Oct 11, 2015 9:07 am
by Dougster
I do mine like Topwater. I have only rarely had to kerf them but do bevel the sides to fit better. I take the angel with a T Bevel and transfer it to the table saw blade, then rip them to that angle. The LB22 took about a hundred miles of cleats
Even the little PY12 I just finished took a bunch. I use SYP 1" by 2" ripped in half.
Remembers the cleats Dougster
Re: Mikem59 FS18 Build
Posted: Sun Oct 11, 2015 9:27 am
by BarraMan
I have followed the CL method and made sure that every piece of wood going into my boat has at least 3 x coats of epoxy on it!
Boy can this boat gobble up some wood!
I haven't bothered to count them but as I have 7 x separate sole panels, I just deal with them one at a time (working on #5 - 1 to 4 completed!).
I use an angle grinder with a 40 grit flapper disc on it to "sculpt" the ends to fit the fillets. Doesn't have to be perfect as I use lots of glue (epoxy/woodflour) to glue them in and I push glue into any gaps. My cleats aren't going anywhere!
My cleats are A-grade (fine?) hoop pine stock. Probably not the cheapest option, but then nothing in my boat is!
My cleats do not flex - but nor do they need to do so!
Re: Mikem59 FS18 Build
Posted: Sun Oct 11, 2015 10:54 am
by Mikem59
Thanks guys! I should never doubt the wisdom on the forum. No point in attempting perceived shortcuts at this juncture anyway. I'll begin cutting and fitting pieces, hopefully soon. Have a house move to make though that will slow me down.
Re: Mikem59 FS18 Build
Posted: Sun Oct 11, 2015 12:35 pm
by Cracker Larry
Re: Mikem59 FS18 Build
Posted: Sun Oct 11, 2015 7:01 pm
by Mikem59
Hello CL, glad to hear you aren't flooded at least. Looks like your wife picks vacation like I do
Appreciate your follow-up to my questions and reposting the pics. I'll study them over once again and hopefully get in some cleat making soon.
Re: Mikem59 FS18 Build
Posted: Tue Jan 26, 2016 1:05 pm
by Mikem59
Been pretty quiet, but I've managed to put in some time lately. I've cut and trimmed to fit all the cleats for the decking, and have actually begun to apply a coat of resin. I've only coated about 25 pieces so far. The ones I've coated thus far were on a 60 degree day with medium speed hardener. Kind of panicked since the resin didn't kick for awhile. But, on the other hand, that was a good thing in that the batch lasted as long as it took to coat those 25 pieces.
Now, for a couple of questions, do you do any light sanding between coats?
And, unrelated to the cleats, I was doing some preliminary fitting of the decking and, is there supposed to be a piece to fit between frames A and B? I swear I had a piece, but alas, I don't have one laying around.
I'll need to double check the plans with the layout of the plywood cuts, but thought I'd put this question out there.

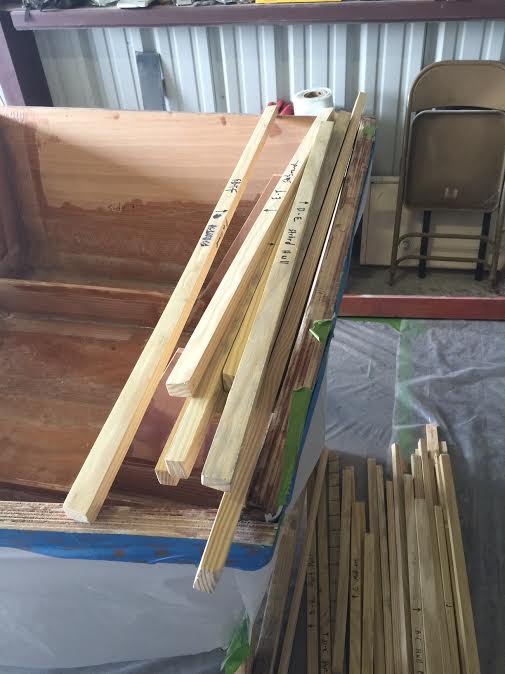
Re: Mikem59 FS18 Build
Posted: Tue Jan 26, 2016 9:31 pm
by justin_dwyer
Hi Mike, looking good.
I think if you add a coat every 8-12 hours you will be right to just apply it straight over the previous layer, but after that you will need to clean them down, give a light sand and then go again. Someone else might chime in here to the contrary, I am certainly no expert
I have just primed all my frame pieces and I was within 12 hours for each recoat, but I gave them a light sanding anyway, just to be sure.
Life has seriously got in the way of my build, but I am slowly getting a few things done.
Re: Mikem59 FS18 Build
Posted: Wed Jan 27, 2016 7:31 am
by Mikem59
Thanks for the input Justin. Although I won't be able to subsequent coats 12 hours or less apart, a light sanding between coats is probably the wise thing to do.
And, yes, life gets in the way. But, I steal away chunks of time here an there. And, I now have a wager with a co-worker, so I've got some motivation. I have to finish my build before he finishes his home build.
I think I've got till about July 1 to beat him out.
Re: Mikem59 FS18 Build
Posted: Wed Feb 24, 2016 10:26 pm
by Mikem59
I've been able to get in some work on the boat lately after completing our house move. I've completed all the cleats - 3 coats of resin, sanded between each coat, and after the last coat light sanded the surfaces that will be glued to the hull or receive decking. The first two coats of resin were applied with a 1" chip brush. The last with a foam roller. Wish I had done the foam roller for all the coats of resin as that method makes for a much more consistent and thinner coat. Sanding between coats was about a 2 1/2 hour process each time, but I feel good about doing that, especially since the 2nd and third coats were laid down more than 24 hours apart. And sanding just the surfaces to be glued obviously took less time at just under 2 hours. I"ll begin gluing in the cleats soon.
In addition to the gluing, I need to do some prep work for the bow eye installation as well as the transom eyes. I've done some searches of the forum and haven't found anything descriptive enough or any pics of how to go about the install for the backing for the bow eye u bolts and backing plat to mount to. I'm guessing I should do something similar to how the transom eyes are done, stacking pieces of 3/8" ply and beveling at a 45 deg angle. But I'm wondering what size the backing should be? And, should the backing be mounted such that it fits snugly into the inside "V" of the bow? I'm thinking the backing support can probably be 2" by 3 1/2" such that it will fit in pretty closely?
I'm rambling here, but as you can see, I'm struggling with how to do this and ensure I have sufficient support. The good news is, I'm motivated in numerous ways to get this build done, got a nice little wager going with a co-worker (bottle of scotch riding on this), my son will be getting married in November (it better not take me that long to finish), and I'm just plain ready and excited to get this boat floated.
Looking forward to hearing from you all!
Re: Mikem59 FS18 Build
Posted: Tue Apr 26, 2016 10:55 pm
by Mikem59
Re: Mikem59 FS18 Build
Posted: Thu May 05, 2016 11:00 pm
by Mikem59
Finally finished up Round 1 of the cleat installation. This took me, I believe, 10 days to complete as I was only able to do about 7 cleats per session due to the limited number of clamps I had. And, I was mixing up 3 oz batches of resin/wood flour for each session, seemed to work out pretty well.
Have done a little cleanup of these installed cleats to get them ready for laying down the decking. But a lot of work before I get to that phase as I still have to install the bow eye and the tow eyes on the transom and drill the holes and run conduit for the fuel line and a separate conduit for my electrical as well as for the drain plug in the transom.
Here we go with the pics.
Attempted to use some 2 X 2's cut to a length to wedge between the already glued interior cleat and the to be glued in hull side cleat. It wasn't the time saving, brilliant idea I had expected
. As I wedged in the 2 X 2, the pressure would cause the cleat to "walk" up the side of the hull. Had to be careful or clamp another 1 X 1 to hold in place.
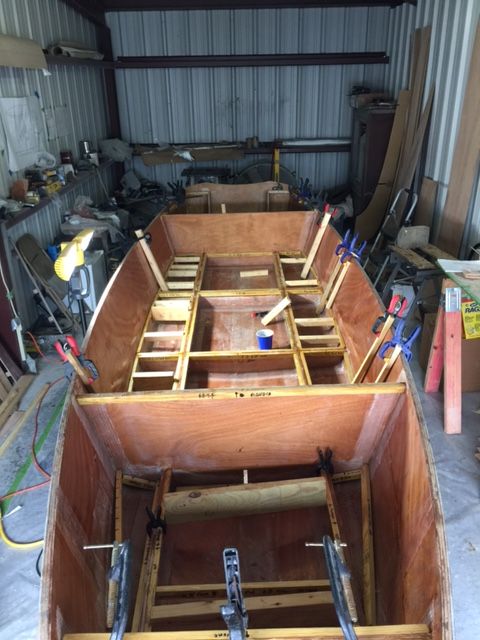
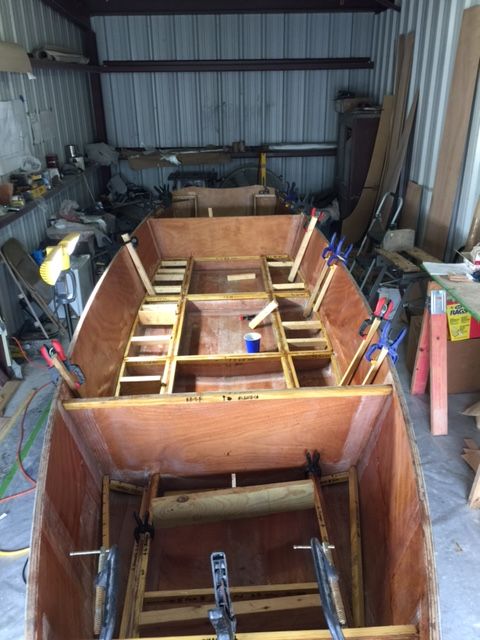
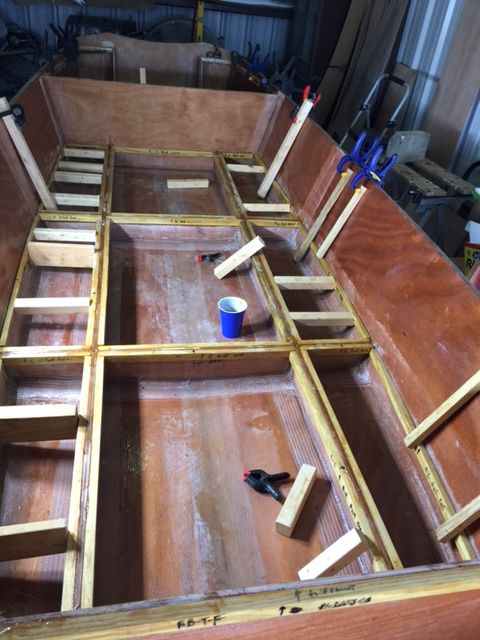
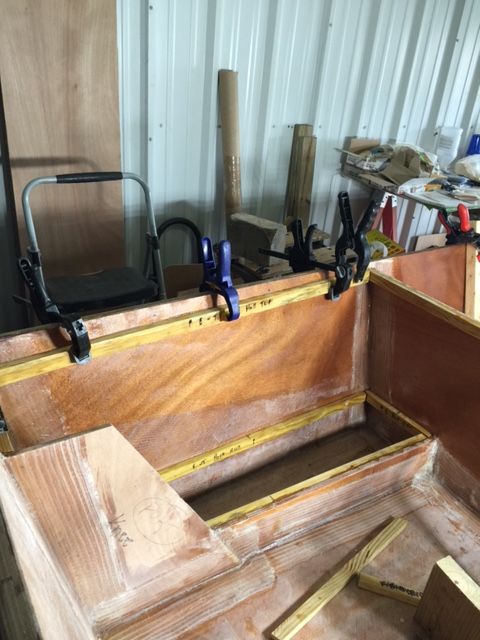
Bow section cleat gluing. Needed just a few clamps here


Bow section completed.
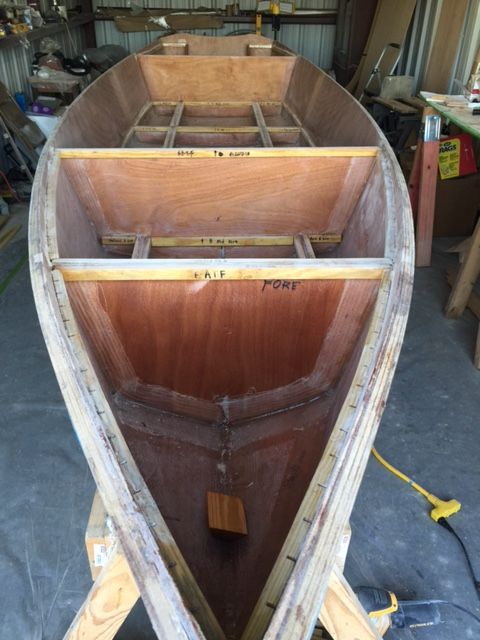
A view of the whole interior completed.
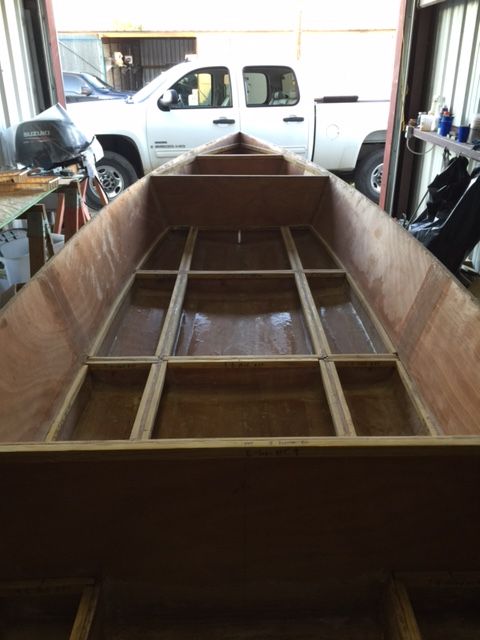
Another view of the whole interior completed.
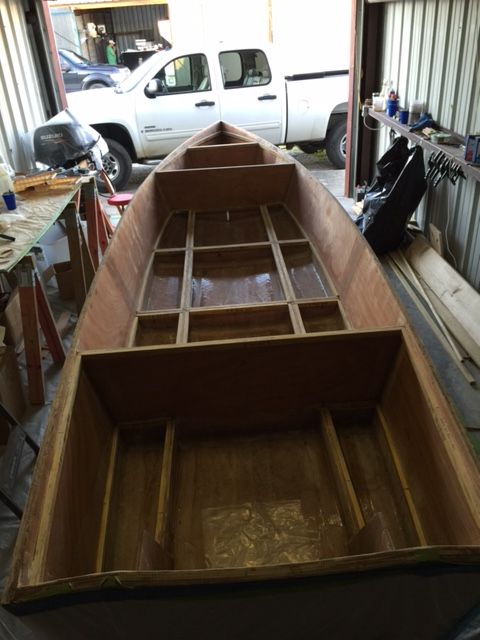
Re: Mikem59 FS18 Build
Posted: Thu May 05, 2016 11:18 pm
by Fonda@kauai
Nice clean work
Getting the cleats done is a big milestone! The real satisfaction comes when you glue down the sole and can finally walk around on something flat for a change
Re: Mikem59 FS18 Build
Posted: Fri May 06, 2016 10:18 am
by jacquesmm
Yes, very clean work.
Re: Mikem59 FS18 Build
Posted: Sun May 08, 2016 9:51 pm
by Mikem59
Guys, thanks for the compliments
. Now, I'm looking forward to putting some holes in my boat,
. Will start drilling some holes for bow and transom eyes, drain plug, and to run conduit for fuel lines and electrical.
But, yes, definitely looking forward that next milestone, gluing down the sole.
Re: Mikem59 FS18 Build
Posted: Wed May 11, 2016 1:48 pm
by Mikem59
CL,
I have a question based on one of your posts
Still moving forward, slow but certain. I mounted the fuel fill before gluing on the forward deck, because it's easier to do it right side up than it is upside down under the deck., Especially the ground wire. It's a hard reach under there. Better to do it where you can reach it.
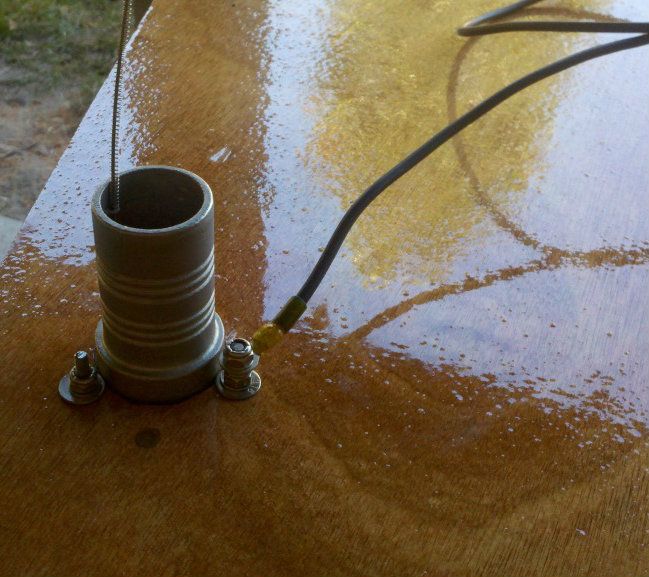
Where did you run/attaché the ground wire?
Thanks,
Mike
Re: Mikem59 FS18 Build
Posted: Wed May 11, 2016 2:24 pm
by Cracker Larry
To the ground lug on the fuel tank, which is grounded to the - ground buss like everything else.
Re: Mikem59 FS18 Build
Posted: Wed May 11, 2016 8:40 pm
by Mikem59
CL, Thanks for the reply. I was thinking too far ahead and my brain clearly couldn't catch up.
But while I'm replying and embarrassed, can the grounding wire run through the same conduit as the fuel hose to connect to the ground buss? Note, I don't plan on running a separate conduit for any electrical components on the bow area. I'm guessing no but want to be sure and to determine if I need to run another smaller conduit below the decking anyway.
Thanks,
Mike
Re: Mikem59 FS18 Build
Posted: Wed May 11, 2016 9:17 pm
by Cracker Larry
can the grounding wire run through the same conduit as the fuel hose to connect to the ground buss?
Technically and correctly, no. Electrical wires are never run through the same chase a fuel lines. Doesn't your fuel tank have a sending unit? Run it though there. Do you not have any running lights in the bow? That's a ground too.
Re: Mikem59 FS18 Build
Posted: Wed May 11, 2016 9:39 pm
by Mikem59
I was planning on my running lights being mounted on the sides of a small center console that's why I wasn't planning on running electrical all the way to the bow section, but you're right, the tank will have a sending unit. Makes sense to go ahead and run an additional smaller conduit all the way to the fuel tank section.
Re: Mikem59 FS18 Build
Posted: Wed May 11, 2016 10:00 pm
by Cracker Larry
Run the wire in the same conduit as the sending unit. The sending unit has to have a ground too. Doesn't matter where you get it.
Re: Mikem59 FS18 Build
Posted: Thu Jun 30, 2016 11:43 pm
by Mikem59
I've been slowly plodding along and making some progress, sorry though, haven't got pics to post just yet.
I've started pouring the foam and, like I've read in a few of the other builds, the 2 gallon kit just isn't enough. And, temperature sure shouldn't have been a problem as it was 90 deg+, in other words, downright hot
.
I ordered another 2 gallons and have used almost all of that two gallons and, based on what I see, once I trim off all the mushroom tops and use as filler, I shouldn't need anymore.
I've also installed an additional frame between frame E and the transom to create a dry storage space that will accommodate a hatch lid someone donated to my project. They also gave me a Carbon Marine grab rail that I plan to use in the center console I will put in.
I've also fitted and trimmed the decking to go between frames B & C as well as the main sole decking and transom decking.
I've also installed the chase tubes as well as drilled all the mounting holes for the Lenco Trim tabs. And, a drain tube hole has been drilled too. All the holes were overdrilled by 1/8" filled and redrilled to proper fit. See, I've been studying the other builds
.
Now, as usual, I have a question. I have head scratched
and searched and read trying to find some guidance on installation of the Atlas Micro Jacker Jack Plate and Clamp on Adapter. My main question is,
how much clearance between the top of the transom and the top mounting holes do I need?
I'd like to mount the Jack Plate as high as possible since the transom is only 20". With the clamp on Adaptor, it appears I'll have the motor approximately 22" from the keel. And, that will be with it mounted on the top hole still giving me two more mounting holes if I need to move it up higher, I believe that will provide an additional 1 1/2" if needed. However, with 5" of travel, I don't believe that will be necessary.
So, if I mount the jack plate with the very top even with the top of the transom, that will mean I only have about 3/4" to the top dead center of the top bolt holes. That concerns me. So, how much clearance will I need to be safe and not create any undue stress on the top of the transom?
Thanks for all the support throughout the build!
And, I hope to post some pics soon.
Re: Mikem59 FS18 Build
Posted: Fri Jul 01, 2016 7:16 am
by Cracker Larry
Industry standard is the top holes 2" below the transom lip.
Re: Mikem59 FS18 Build
Posted: Fri Jul 01, 2016 12:27 pm
by BB Sig
Larry,
Is that a good idea for anything near an edge or just when it will support a good amount of weight?
Re: Mikem59 FS18 Build
Posted: Fri Jul 01, 2016 12:44 pm
by TomW1
BB Sig wrote:Larry,
Is that a good idea for anything near an edge or just when it will support a good amount of weight?
It is for everything including frames and stringers for conduit holes.
Re: Mikem59 FS18 Build
Posted: Fri Jul 01, 2016 3:44 pm
by Cracker Larry
Larry,
Is that a good idea for anything near an edge or just when it will support a good amount of weight?
Probably, but I'm saying that is the correct location by industry standards to mount an engine or jack plate. That's the height both are designed to be mounted.
Re: Mikem59 FS18 Build
Posted: Fri Jul 01, 2016 5:12 pm
by Mikem59
Thanks for the replies. 2" seems reasonable and won't be a bad compromise to still give me plenty of room to work with getting a reasonable location for the cavitation plate. I'll add that I'll be mounting a 20 hp suzuki outboard to that jack plate. The outboard weight is 107 lbs. and the jack plate, I believe, is 22 lbs. And I will be using the backing plates TSP-1 and 2 from TH-Marine.
Re: Mikem59 FS18 Build
Posted: Wed Jul 06, 2016 1:36 pm
by Mikem59
Here are some pics to catch you all up on my build.
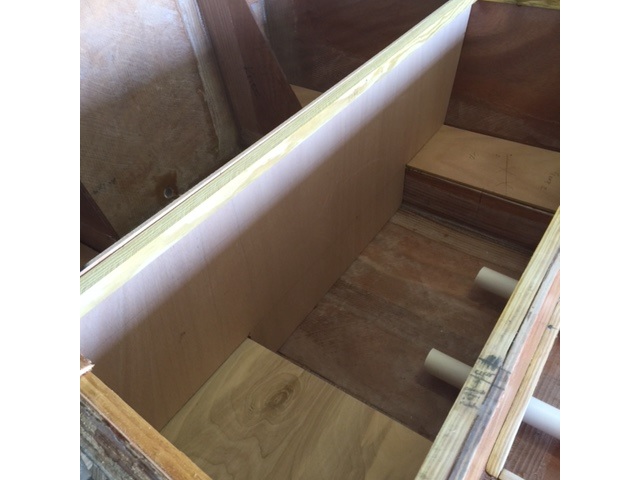
This is what I call Frame Ea that is located between frame E and the transom. You can also see the chase tubes as they pass through frame E. I'll be adding a coupler to extend through frame Ea. I will most likely close that section off as well.
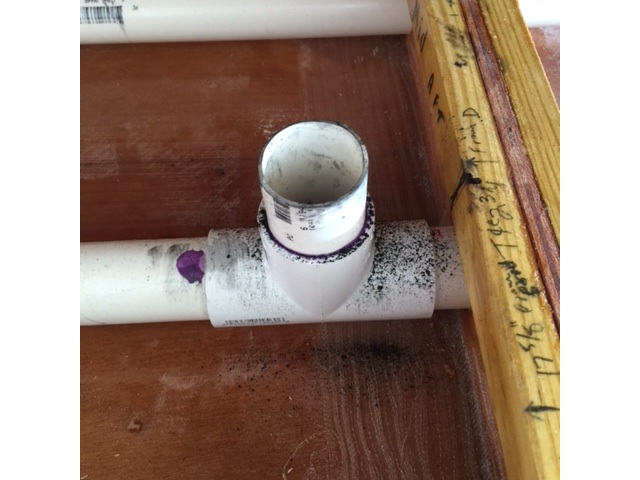
The T for the electrical chase where it rises up into the planned console. Used graphite to aid in marking the location to drill the sole. Worked pretty well.
Yep, worked, hole lined up nicely.
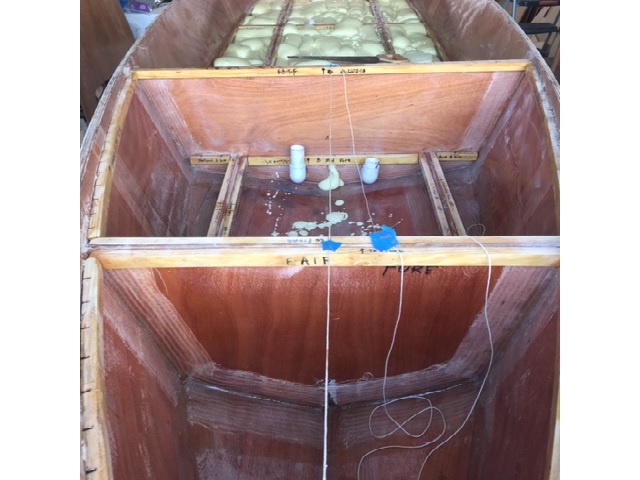
Here's what my 4 gallons of foam looked like once poured and cured. I say 4 gallons, I may have a pint remaining.
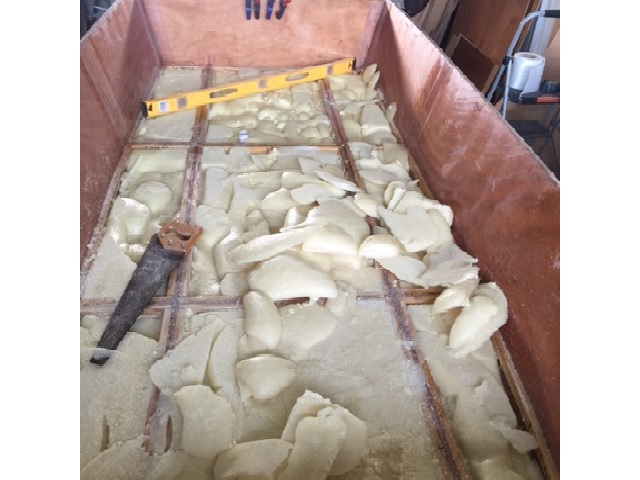
And, after trimming the tops.
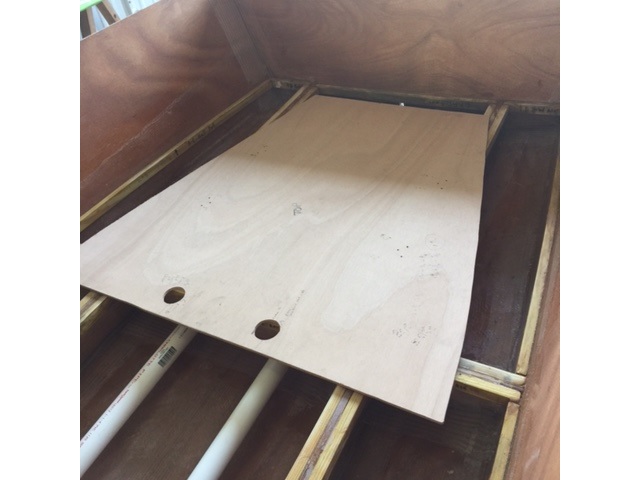
Sole/deck for fuel tank compartment between frames A and B
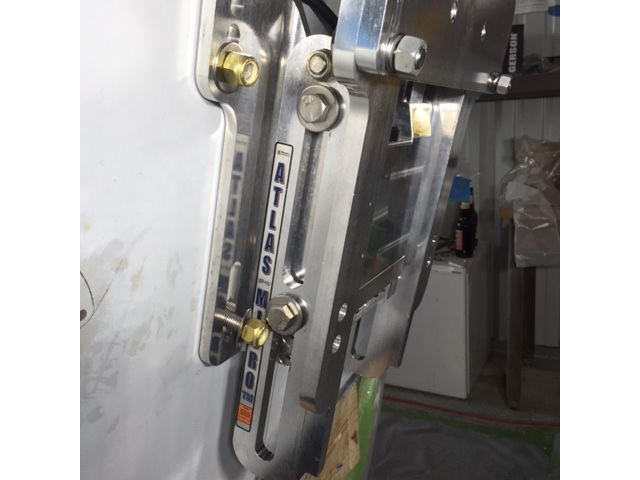
Doing some preliminary Jack Plate fit. Getting excited to know I could soon mount the engine and take her for a test spin.
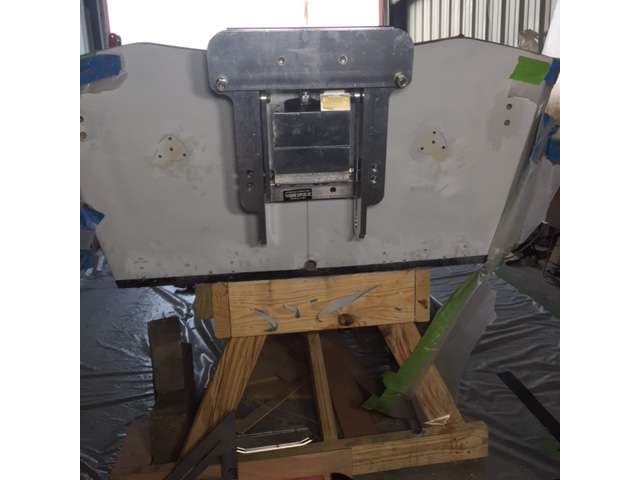
Another view of the jack plate. I mounted such that the top dead center of the mounting bolts are 2" below top of transom. I feel confident in this location. Thanks Cracker Larry for the guidance.
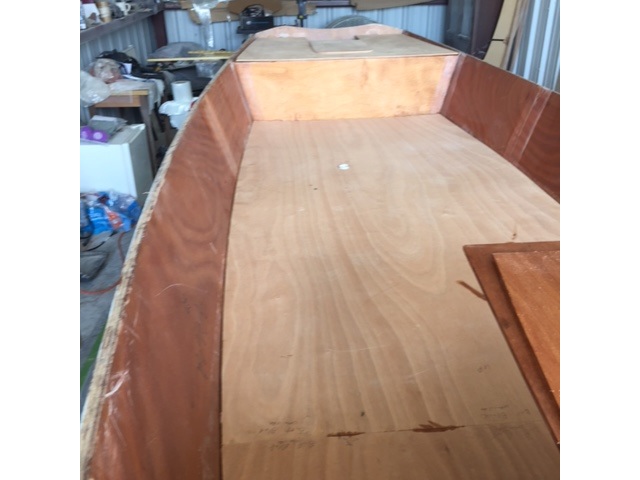
Getting an idea of the fit for the sole and transom decking. Had to do some trimming for good fit. After it was all said and done to this point, I'm probably 1/8" out of square. Not sure where along the way that happened, but I'll be ok.
Just hope she runs straight when done
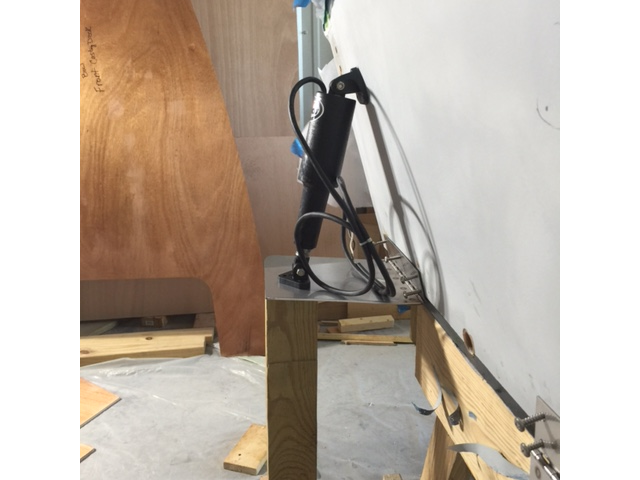
Close out this round with the fitting for the trim tabs.
After I get some backing support for the battery box glued onto the underside of the sole, I'll glue that down as well as get the sole down for the fuel tank compartment.
Trying to decide on whether or not to install backing for a casting platform on the front deck. And, I'll need to figure out just where I'll need backing for the poling platform I plan to add as well.
Getting confident in an end of summer completion!
Again, thanks for all the help from the forum!
Re: Mikem59 FS18 Build
Posted: Wed Jul 06, 2016 1:50 pm
by terrulian
Looking great.
Re: Mikem59 FS18 Build
Posted: Wed Jul 06, 2016 2:19 pm
by Jeff
Really looks good!! Jeff
Re: Mikem59 FS18 Build
Posted: Thu Jul 07, 2016 1:34 pm
by Mikem59
Put in a couple of hours yesterday evening.
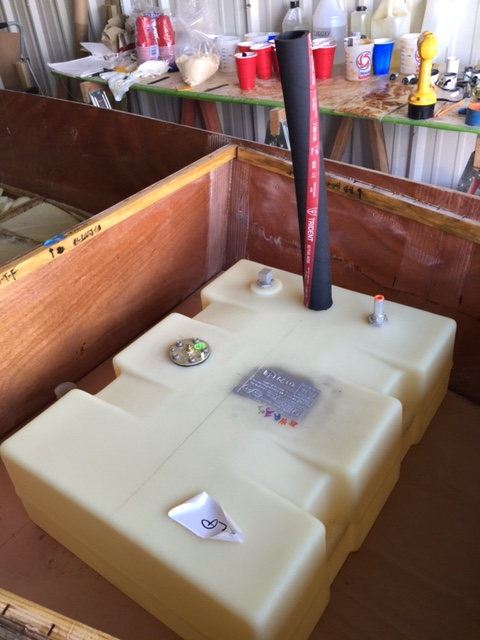
Just checking the fill hose fit and where I'll need to trim it factoring in the deck width as well as the fill cap connection.
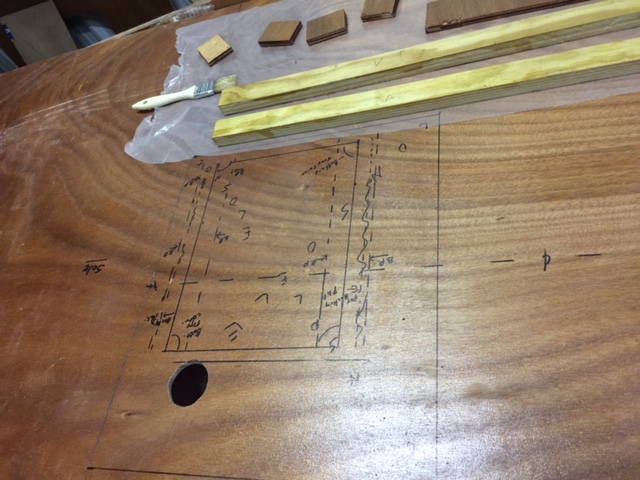
Layout of the console and battery tray from the underside of the sole to ensure I have sufficient space for a Group 24 battery and tray as well as where I'll place some backing. I'll most likely use a TH Marine Narrow battery tray.
I gotta ask, any chance this is a good idea to use the spray in foam insulation to fill the small voids. I'm guessing it's not a good idea, but just checking.
Re: Mikem59 FS18 Build
Posted: Thu Jul 07, 2016 3:04 pm
by Cracker Larry
NO! don't do it.
Re: Mikem59 FS18 Build
Posted: Thu Jul 07, 2016 11:34 pm
by Mikem59
Ha, Thanks Cracker Larry. Never, ever saw any mention of using this stuff anywhere on the forum; and, with it saying "water resistant", I figured all that would do is ask for trouble if any moisture ever got into the foam beneath the decks.
I am just trimming tops and filling in large gaps with those. Plan to get the deck glued down over the weekend. At some point, going to need some more supplies, fuel line for one as well as the electrical, and paint. And, since I have a donated hatch that will be installed on the transom deck, I'm going to buy additional hatches rather than build my own for the casting deck area and for my console.
Re: Mikem59 FS18 Build
Posted: Sun Jul 10, 2016 10:56 pm
by Mikem59
Got the deck glued down. A little panic set in when mixing up the glue and putting in bags to squeeze out the beads of glue. First bag a cut the corner and made too large of a bead. And, boy, that bag gets hot. Thought that glue was going to kick and set up too hard too soon. Had to make three batches of glue to get all the glue beads down that I needed. And, as you can see in the first pic below I nabbed anything with some weight to put on top.
The pic below with all the bricks, blocks, batteries and spare tire removed and the 6" biax cut to fit and rolled up till I'm ready to tape them in. Hopefully later this week.

Re: Mikem59 FS18 Build
Posted: Mon Jul 11, 2016 9:43 am
by Jeff
Mikem59, Nice start, please keep the pictures coming!! Jeff
Re: Mikem59 FS18 Build
Posted: Tue Jul 12, 2016 10:24 pm
by Mikem59
Got the deck seams filleted and taped this evening. Managed to knock this session out in a little more than 2 hours. I've managed to get pretty confident in laying out the fillets. Applied the 6 oz. biax for the seams wet on wet, but wetting out the cloth is something I'm not all the confident in. But, this session went well.
The motivation to complete this build, well, builds on itself more and more at this stage. Getting pretty excited and confident I can get this done by the end of September. Ironically, when I started this build over three years ago, I thought I'd be done by September...of 2013.
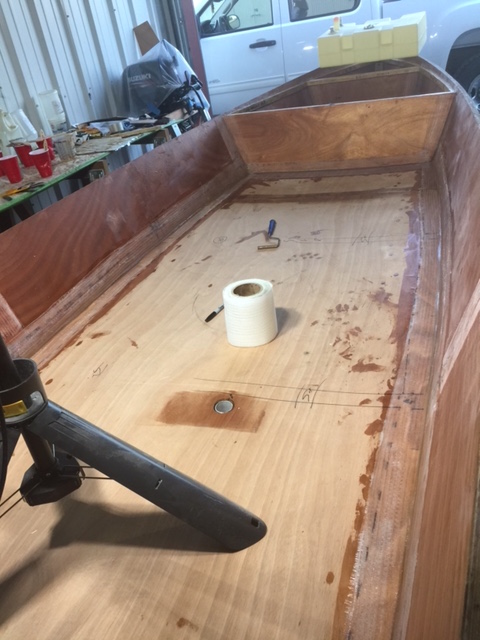
Re: Mikem59 FS18 Build
Posted: Wed Jul 13, 2016 10:47 pm
by willg
Nice job there. Feels good to walk on the installed sole, don't it?
Re: Mikem59 FS18 Build
Posted: Thu Jul 14, 2016 11:02 am
by Mikem59
Yes, indeed nice to work on the inside. Much easier on the back as well.
Thanks!
Re: Mikem59 FS18 Build
Posted: Thu Jul 14, 2016 11:04 am
by Jeff
Mikem59, really nice and clean work!! Jeff
Re: Mikem59 FS18 Build
Posted: Thu Jul 14, 2016 4:29 pm
by Mikem59
Thanks Jeff and Will. I had a chance to see how the seam taping looked yesterday evening and I finally pleased myself. All the FB cloth had wetted out nicely, not on sloppy, and I feel like I didn't get too carried away on how much resin I used to wet it ou this time.
Working on finishing up the storages compartment between frame E and Ea as well as the mods I need to make to accommodate the hatch. And, started reviewing everyone's different takes on the rod holders and rod tubes. I want to run my tubes forward into the bow.
Lots to think about!
Re: Mikem59 FS18 Build
Posted: Wed Aug 03, 2016 7:46 pm
by Mikem59
Continuing to press on. It's been brutal working when I have time as it's been during the heat of the day. As many of you know, Texas Gulf Coast heat and humidity is miserable. Nonetheless, making progress.
Used what was left of the foam to fill the void that will be beneath the decking between frame E and Ea. Didn't fill it all the way to the top, but not a problem as this won't be a heavy load bearing area, it will be a storage compartment.
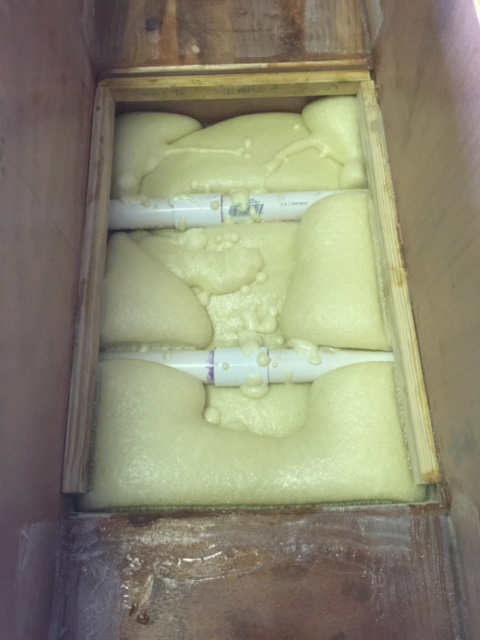
Glued down the decking between frames B&C. This compartment will contain a Moeller 12 gal fuel tank. Haven't yet decided on how I'll set up access from the deck. Considering a T-H Marine 11/15 hatch but may be too large.
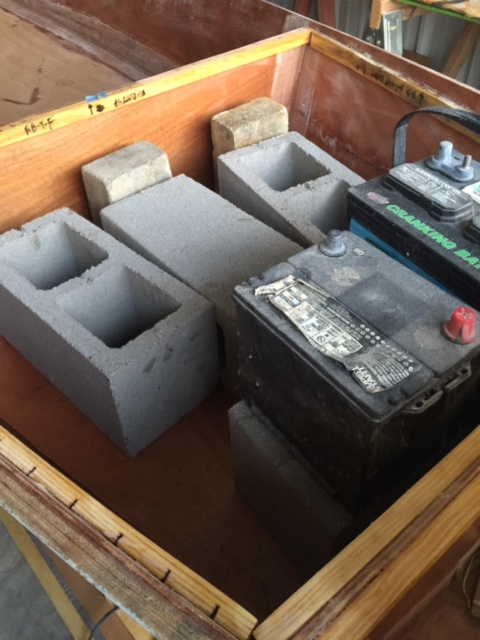
I decided to lay down some 12 oz cloth on the main deck. Went pretty well. I'm getting better at wetting out the fiberglass with regard to not using too much. The photo doesn't show it, but did have a few air bubbles.
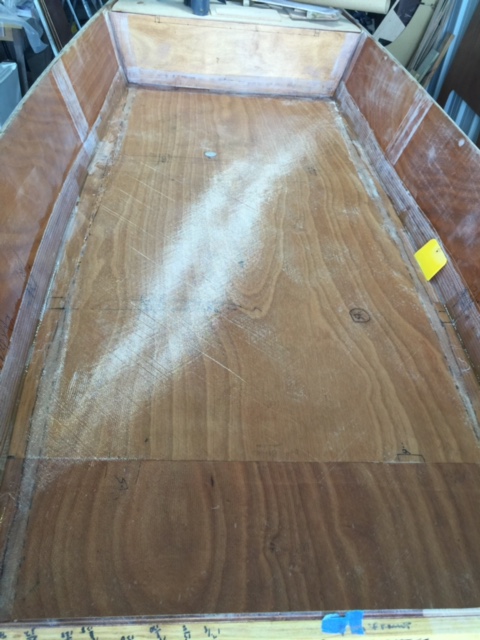
Image showing the fit for the donated hatch on the transom deck.
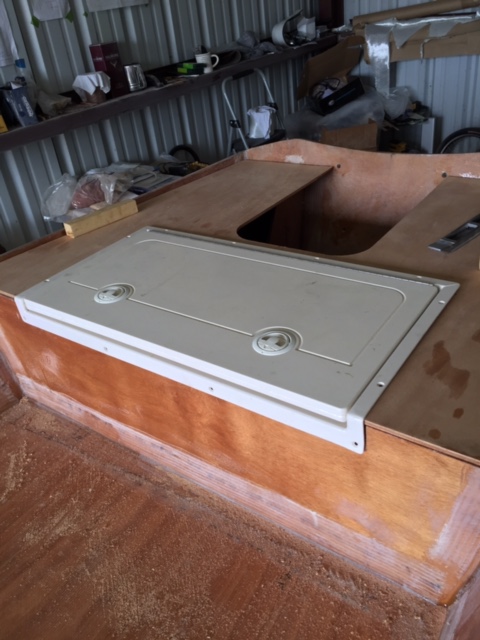
More to come soon!
Re: Mikem59 FS18 Build
Posted: Wed Aug 03, 2016 9:04 pm
by pee wee
Looks good! Nice progress.
Re: Mikem59 FS18 Build
Posted: Wed Aug 03, 2016 9:31 pm
by Jeff
I agree, looks really good!!!! Jeff
Re: Mikem59 FS18 Build
Posted: Wed Aug 03, 2016 10:16 pm
by Mikem59
Thanks guys. Appreciate the kudos.
Next steps will be to finish the storage compartment. I made a little mistake when I glued in the cleats to support the decking for the gap between E and Ea. I glued the cleats level with the already covered compartments between the stringer and the hull. Caught it in time to fix 2 out of 4 cleats before the glue had cured. One of the other cleats I completely removed and re glued. The removal of that one cleat wasn't a pretty process, but it got done. The initial effort was an attempt had using a router to remove the needed amount of depth. But, the router collet became loose and before I could respond to that issue, removed too much wood and it also threw the router bit. Thankfully, that didn't result in any injury. Regardless, wearing eye protection and gloves for just such possibilities. Hopefully I won't need Kevlar armor.
However, the cleat glued to the aft side of frame E is still attached. Trying to determine a better path forward such using a simple wood plane to do the work of getting it to the proper height. It's just a tight space to work in.
Also began trying to determine just how the gunwales will fit. Before I start asking too many questions, I need to do a good mock up and take some pics to see what I'm dealing with there.
I know I can count on the forum to bring me to the finish line, thanks for all the help
Re: Mikem59 FS18 Build
Posted: Thu Aug 04, 2016 5:48 am
by Eric1
Glad there was no injury! Your boat is looking good Mike!!
Re: Mikem59 FS18 Build
Posted: Thu Aug 04, 2016 8:04 am
by Walkers Run
I just got caught up on your build. Looks great! You'll be glade you put the 12 oz glass on the sole.
Re: Mikem59 FS18 Build
Posted: Thu Aug 04, 2016 8:07 am
by Cracker Larry
Looking real good Mike! I've learned to be very cautious with routers too. Those things can hurt you! So can band saws
Re: Mikem59 FS18 Build
Posted: Tue Sep 13, 2016 10:49 pm
by Mikem59
Making some more progress. Have made cleats for the transom decking as well as testing the fit of the gunwales, transom deck, and bow. Have some fit issues, but nothing that can't be overcome. I've also made rod holders and tack welded three of them in with a glue gun. The fourth, for whatever reason didn't fit right
, any effort to trim to get proper fit and get the gunwale to sit level would have ruined it, so totally scrapped it and cut out a new one. I made my rod holders by sandwiching 2 pieces of the 3/8" marine plywood.
I'll post pics as soon as I figure out why I can't get the photos I uploaded to my gallery to rotate.
Still a long ways to go, and I need more supplies. My guess is I'll come up just short on having enough biax tape and I'll need more resin to be sure I have enough to tape the rod holders, gunwales, and to make fairing slurry.
And, I've made a paint decision, going with the Vashon Gray on the hull exterior and Bainbridge White on the interior. I'll have figure out just how/where I'll apply the Kiwi grip as well.
I also have to buy a few more hatches, one for the bow to access the fuel tank compartment, a door/hatch for the console, and deck access plate to access the compartment formed by frame A in the bow.
And, I'm fitting the pieces together for my console as well.
Sorry kind of rambled here, but wanted to provide a partial update. Hope to get the pictures fixed in the gallery to then upload here.
Re: Mikem59 FS18 Build
Posted: Wed Sep 14, 2016 12:22 am
by MrPaul
Your boat is looking great!
That 12 gallon fuel tank is going to take you a long way in that boat. I have a 15 ft john boat with a 25 hp 4 stroke Yamaha with a 6 gallon tank. I frequently have to dump old gas into my truck's gas tank before it goes bad. I've made some long runs with that tank and never used it all.
Keep up the good work. Looking forward to seeing this one splash.
Re: Mikem59 FS18 Build
Posted: Wed Sep 14, 2016 2:16 pm
by Mikem59
You're right about that 12 gallon tank. After I purchased it, realized it was probably overkill. By the time I finish this boat, I hope to have a lot of time to get out and do some fishing and burn some fuel.
Re: Mikem59 FS18 Build
Posted: Wed Sep 14, 2016 3:48 pm
by RCC-SKIFFS
Looking great so far. And unless you plan on running cross country trips a 6 or 9 gallon is efficient imo.
Mikem59 wrote:I also have to buy a few more hatches, one for the bow to access the fuel tank compartment, a door/hatch for the console, and deck access plate to access the compartment.
I believe Bateau is fixing to offer some really nice hatches in the next few weeks. Keep an eye out for them. Jeff might have more info on them if he is watching this thread Maby he can chime in.
Re: Mikem59 FS18 Build
Posted: Wed Sep 14, 2016 4:12 pm
by Jeff
Mikem59, Yes, RCC-Skiffs is correct. We have been able to source some new, really well built hatches. We will initially have three different sizes/types. It will be a few weeks though as the local Florida builder needs time to get started. We have already agreed and I know he is working on them!! Jeff
Re: Mikem59 FS18 Build
Posted: Thu Sep 15, 2016 9:29 am
by topwater
Thats great because good hatches are hard to find.
Re: Mikem59 FS18 Build
Posted: Sun Sep 18, 2016 9:17 pm
by Mikem59
Jeff,
I was considering a TH Marine hatch for the fuel tank compartment access, and possibly their hatch door for my console. I'm just going to put in a screw in deck access plate for the bow compartment. But, sounds like I ought to wait a little while longer. I'm getting close to needing the hatches so I can finalize the cleats, but I still have to tape in the rod holders and complete the fairing. At my pace I can wait to see what you'll have to offer.
Thanks for the heads up!
Mike
Re: Mikem59 FS18 Build
Posted: Wed Oct 05, 2016 10:04 pm
by Mikem59
Have begun fairing the interior. One round completed in the transom area,aft storage compartment, and the compartments in the bow. In the main deck area, I've applied a fairing slurry along the interior tape along the chine areas. Like I've read on many posts on other builds, fairing sucks, and I suck at it
I think I just have to accept, especially along the seams that it'll be two applications minimum, one to, fill the weave, and the second to fill the gap along the edge of the tape and the main deck.
At least it's started, and like the exterior of the hull, I'm sure it'll be fine after some cussing, sweat, and a beer or two.
Now, I have a question
I had cut out the pieces I need for the console I plan to install. I'm not exactly sure how to assemble. What I've done to this point is basically cut out some 1x1 cleats to "frame" it and provide a gluing surface. Here's a pic/mock up of what I mean. Is this the best way to do this?
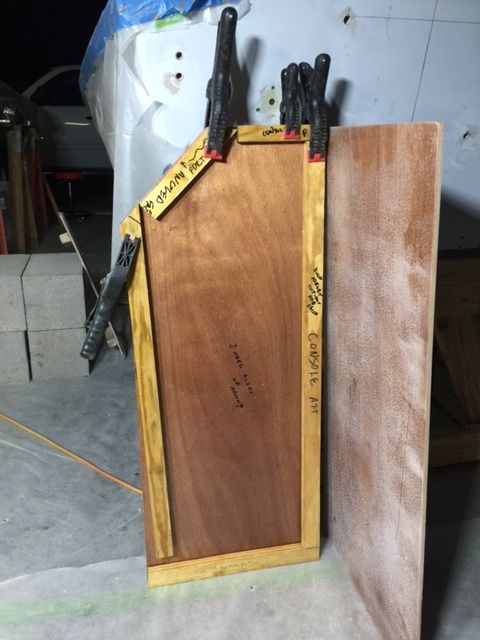
The panel with the cleats clamped is the port side panel with the rear panel that would then be glued to the cleats. I would have to do some shaping on the exterior corners to get the 1/2" radius to glass. Anyway, looking for some suggestions on the best path forward.
Thanks,
Mike
Re: Mikem59 FS18 Build
Posted: Wed Oct 05, 2016 10:55 pm
by willg
I made my console using similar steps as the hull assembly. I drilled holes for zip ties then tightened the ties up with nails in the joints to create uniform gaps. Once everything was nice and square I tacked it together with putty welds, then pulled the ties and put fillets and biax tape on all inside joints. Outside joints were rounded over for biax tape. Then the whole outside was covered with biax cloth. That might be overkill but it is very sturdy.
Re: Mikem59 FS18 Build
Posted: Wed Oct 05, 2016 11:20 pm
by Mikem59
Thanks for the quick reply. That certainly makes sense and would be a heckuva lot easier than the path I was about to take. Sometimes I make things too complicated
.I've got enough speed squares to aid in getting it squared up.
I'll give this a go when I get tired of fairing which probably won't take too long
Re: Mikem59 FS18 Build
Posted: Thu Oct 06, 2016 12:45 am
by BarraMan
Yep - me too. Stitch and glue, fillet and tape inside and out - all external surfaces covered with 6 oz biax cloth.
Re: Mikem59 FS18 Build
Posted: Thu Oct 06, 2016 3:58 am
by seaslug
To make squaring it up while stitching it together just cut 2 pieces of ply to the inside dimension, 1 for the top and 1 piece at the bottom and stitch it up tight to the ply, using nails or whatever for spacers. Tack it all together, pull the ply and stiches, and you should be perfectly square. Once you fill everywhere, block sand off the square outside corners and use a 1/2" or larger radius round over bit in a router to get perfect outside radius corners. Make sure to use 2" masking tape on the inside of the box pressed tightly into the corners to prevent excess epoxy creating a mess on the inside. Than make a nice fillet on the inside corners and you're ready to glass. I like to lay the cloth while the fillets are still soft, using a small metal roller to press the cloth into the inside corners, and it squeezes right into the soft fillet and makes a great bubble free bond. Personally, I would only use cloth on the outside, than epoxy coat the inside really good and paint. Good luck. Mike
Re: Mikem59 FS18 Build
Posted: Thu Oct 06, 2016 8:10 am
by Mikem59
Thanks again for all the input. Stitch and glue it is
Re: Mikem59 FS18 Build
Posted: Mon Nov 14, 2016 12:40 pm
by tcason
Re: Mikem59 FS18 Build
Posted: Tue Nov 15, 2016 9:45 pm
by Mikem59
Have been managing some more boat work in the evenings. Since last update have finished fairing the interior, meaning I finally gave up and moved on
The fairing actually went pretty well in the main cockpit area which is what will obviously be the most visible area.
I've also completed applying 2 coats of primer to the main cockpit and just 1 coat in the bow and transom sections. I plan on one more coat in the bow and transom sections. After applying the primer, it really helps to display some of the flaws that need additional fairing work. To move forward on that, will need more quick fair. Sure like that over trying to mix up a fairing slurry with epoxy, balloons, and filler. I'll add that I probably won't get too crazy with additional fairing as I plan to apply the kiwi grip to the interior decking.
I'm also getting ready to install the last of the cleats for the gunwales, bow and transom decking. Just waiting on the hatches to finish out how I'll do the cleats for the bow deck. I also will need a hatch door for my console.
And, I've begun stitching together my little center console to get it glued together as well. Thanks guys for the input, stitching along with the pvc and some nails for spacers is going to work out great.
Only have a pic of the primer effort right now. By the way, frame A from the CNC kit had a notch in the bottom, you can make it out in the photo. I'm guessing that should be filled
How should the bow compartment be drained
Pressing forward! This boat will float soon, don't believe it will be before the end of the year, but it will be early next year!
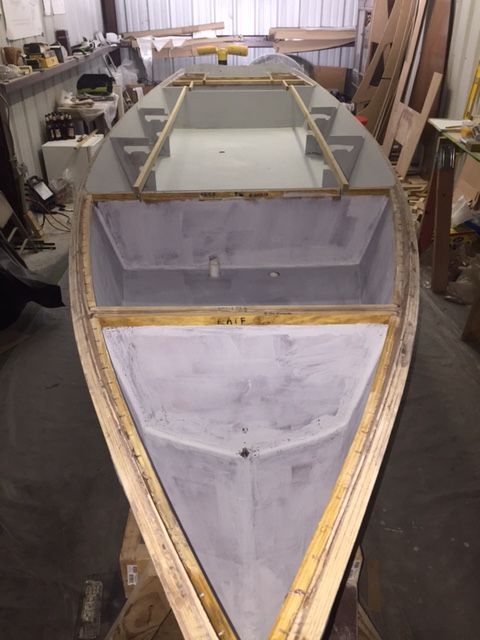
Re: Mikem59 FS18 Build
Posted: Sat Nov 19, 2016 9:51 pm
by Dutch1
Looking good. I've got a ways to go before I get where you are in your build. Please keep posting the finish. Previous builders posts didn't provide much detail towards the end of the builds.
Re: Mikem59 FS18 Build
Posted: Mon Nov 21, 2016 7:23 pm
by Mikem59
Thanks Dutch. I'll try my best to post pics as I continue to approach the "finish line". I had some problems awhile back posting pics, but the latest post went fine. Going to enjoy the Thanksgiving Holiday before I get back to the build. All I've managed to complete since last post was to cut to length the inboard cleats for the gunwales. And, gave them a coat of neat epoxy.
And, I filled in the "hole" in frame "A" as I know darn well that isn't supposed to be there.
Lastly, needing to make a decision on the hatches to really nail down some final fit issues.
Happy Thanksgiving All!
Re: Mikem59 FS18 Build
Posted: Thu Dec 29, 2016 11:31 pm
by Mikem59
A lack of posting thankfully hasn't meant I've not been making progress. Although slow, I feel I have come a long way lately. I've installed the cleats for the gunwales and the transom decking, drilled holes for the rod tubes, and applied 2 coats of topside paint.
Gluing in these cleats required more clamps than I had, so piecemealed my way through. Also, since I've already faired and primed the interior, put in some plastic as a drip cloth. Definitely needed those in place.
This first pic shows Frame E with the notch for the gunwale cleat, then a small section before the wide cutout and cleats for the storage locker hatch.
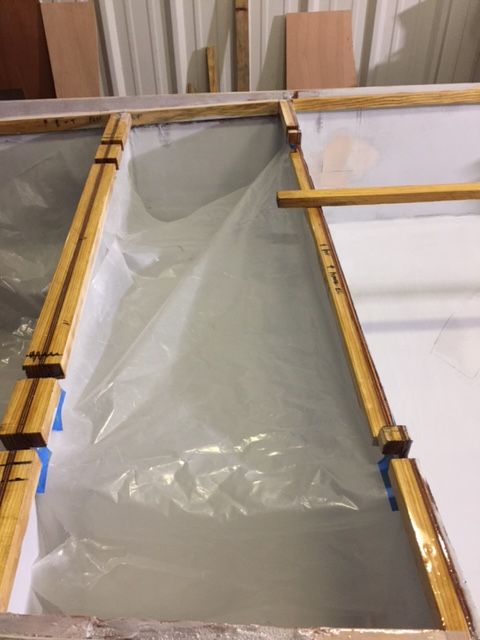
Frame B notches, one set of notches for the gunwale cleats, the other set for cleats between Frame A and B for bow deck support. The notches in Frame A are somewhat obscured by my light stand.
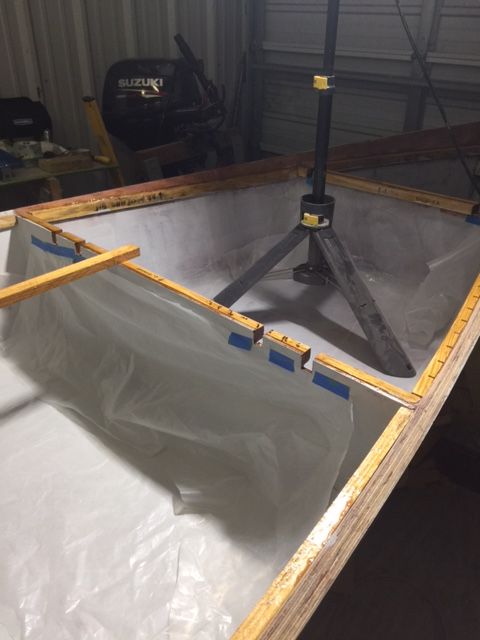
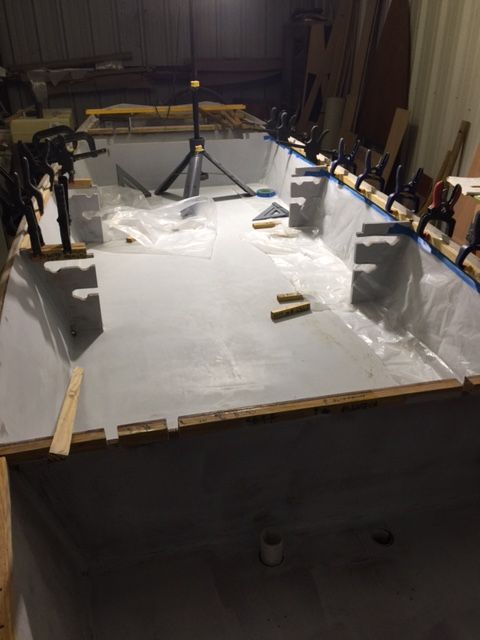
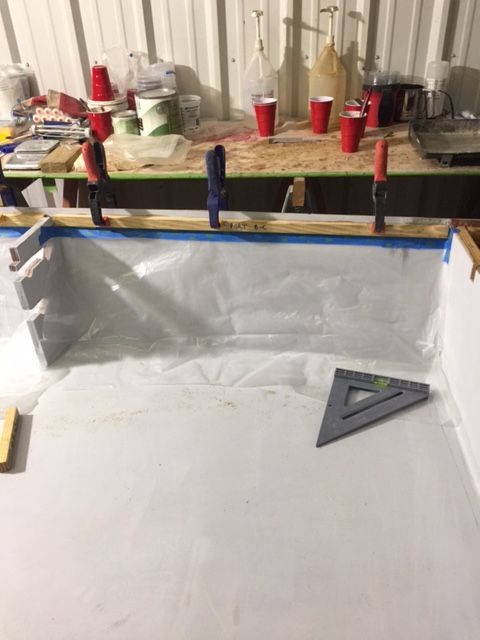
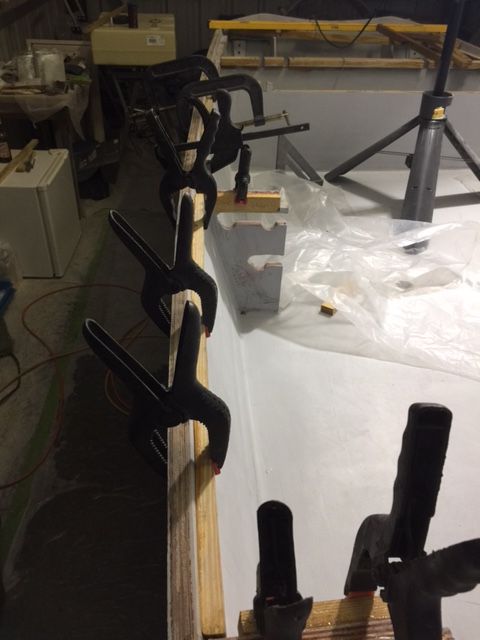
Glued in the inner gunwale cleat. If anyone was wondering, I purchase 1"X4"x10' boards and ripped them to make the 1"X1" s for my cleats. As such, I was able to have the inner clear run the full length between frame B and frame E. And, had to borrow some bigger clamps to span between the hull exterior to the inside of the gunwale cleat. Thanks to my friend Gerald who is an avid car and truck restorer.

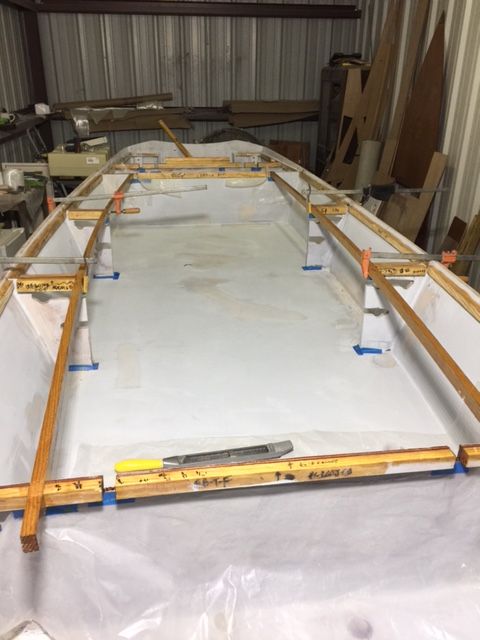
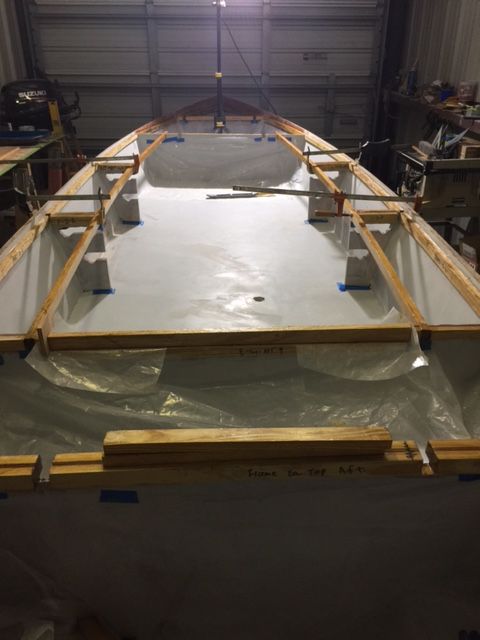
Cleats for the transom decking.
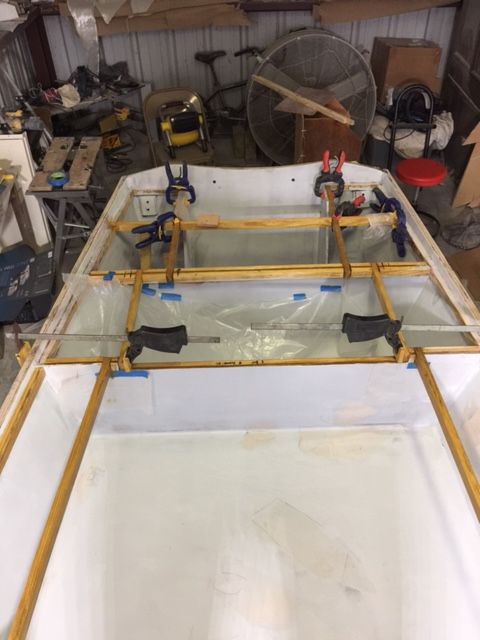
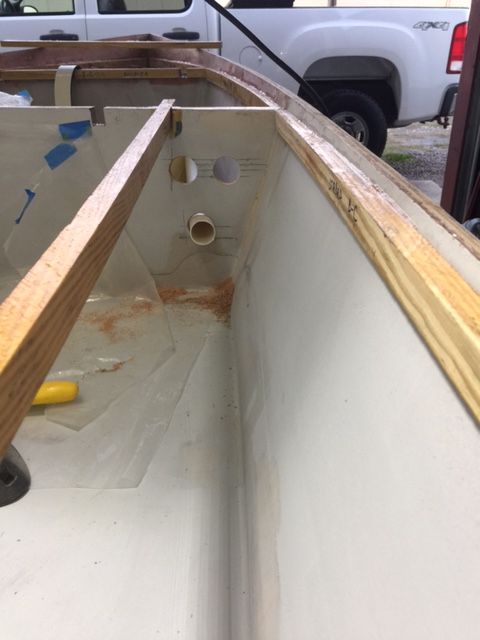
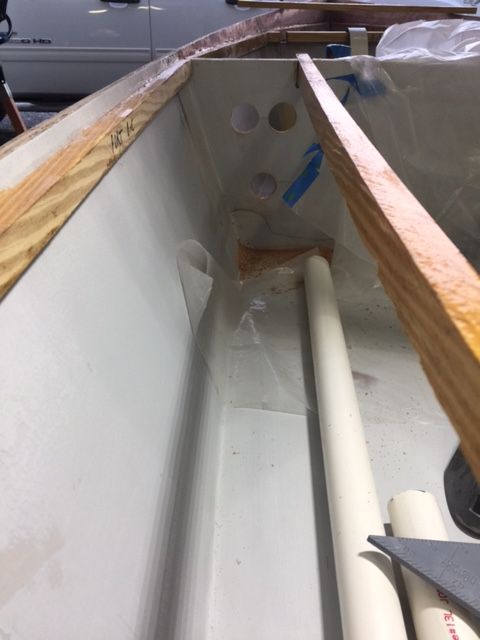
And, the last 3 pics are of the first coat of topside paint. I went with the Pettit Easypoxy, Platinum color. It's "medium gray". I rolled it on with a 3/16" nap roller and then tipped with a brush. I was very pleased with the outcome of the 1st coat. No doubt, the roller does leave a stipple that the tipping with the brush took out. And, the paint is self leveling, so the brush marks all but disappeared. After the 1st coat, there was a slight "orange peel" look, but not bad at all, and very glossy. Again, I'm quite pleased
, just hope subsequent coats will only improve the appearance. They recommend a minimum of 2 coats, I plan on at least 3. I bought a gallon of this paint, and it appears that it will be more than enough to do 3 coats as well as do 2 coats in my below deck storage lockers and the open area beneath the transom decking.
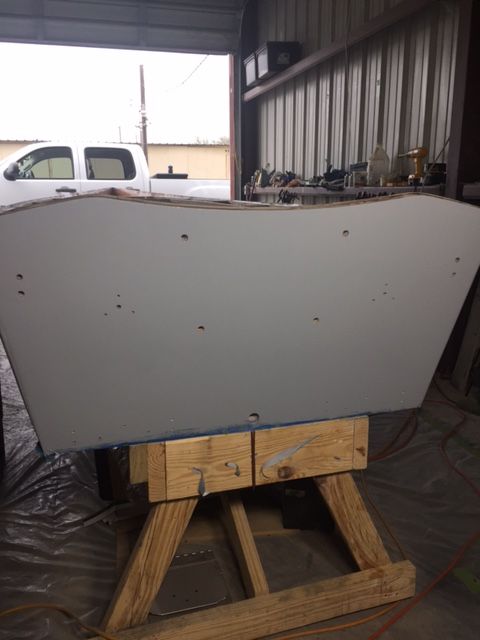
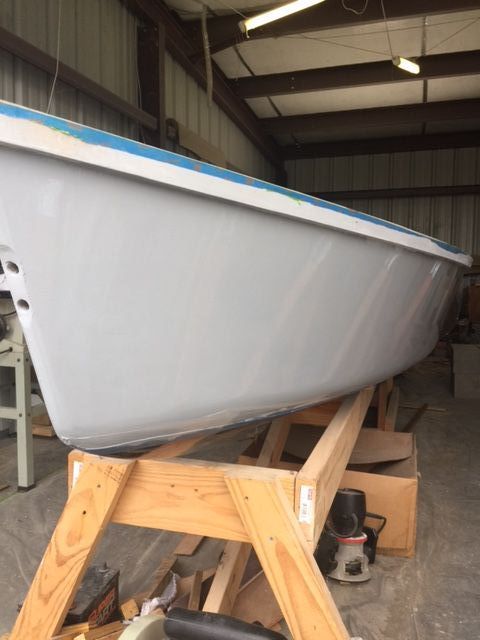
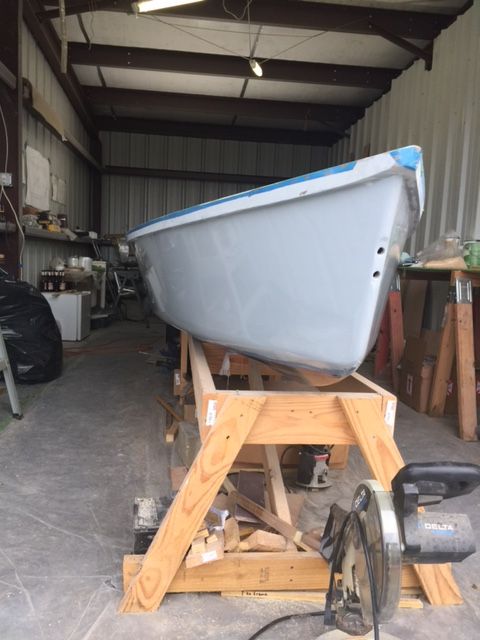
Looking promising to get this build finished soon. After I get the 3rd coat on the hull, I'll finish up some touch up work in the cockpit area and then apply some non-skid paint. I went with the Kiwi Grip in white, but will get it tinted to be a very light gray or off-white. I'll apply that before I install the gunwales and the transom and bow decking as it will be easier than with the gunwales already installed. I'll also install the Lenco trim tabs, the Atlas Micro Jacker, and mount the engine to prep for doing the electrical. Have a friend that rigs boats to assist on the electrical. Rather someone with experience do that to make this a clean and sensible install. Still have the bow eye, transom eyes, the fuel tank to install as well as my small console. Still a long list of things to do, other than the electrical, I don't see anything to prevent me from completing soon.
But, my last need is a boat trailer. Priced an aluminum trailer through McLain, $1850, ouch
. But, there is a local boat trailer builder in Beaumont that should be able to beat that price, I've been a good customer of his in the past, so hope that will count for a nice discount
And, I may go to the Houston Boat Show as Coastline and others are typically there, maybe I can get a better deal.
More to come!
Re: Mikem59 FS18 Build
Posted: Fri Dec 30, 2016 6:31 am
by Jeff
MikeM59, nice progress!!! Jeff
Re: Mikem59 FS18 Build
Posted: Fri Dec 30, 2016 9:47 am
by Dutch1
Thanks for the update and the pics! Do you plan on any kind of standing platform?
Re: Mikem59 FS18 Build
Posted: Fri Dec 30, 2016 5:26 pm
by Mikem59
Thanks Jeff!
And, Dutch, yes I do plan to install a poling platform as well but will splash'er first and see how she does, how she responds to standing on the back of the boat, and then decide just how I want to install the platform. As for up on the bow, probably just stand on a cooler.
Re: Mikem59 FS18 Build
Posted: Sat Dec 31, 2016 4:57 pm
by Dutch1
Mikem59 wrote:
And, Dutch, yes I do plan to install a poling platform as well but will splash'er first and see how she does, how she responds to standing on the back of the boat, and then decide just how I want to install the platform. As for up on the bow, probably just stand on a cooler.
That's what I was thinking too. Go ahead and get a feel for how she will shift around with my 270lbs on her. I'm going to build up (under the deck) where I plan to bolt the platform down though.
Re: Mikem59 FS18 Build
Posted: Sat Jan 07, 2017 10:37 pm
by K2FS18
Mike, any m,ore info on your trailer? I had aluminum trailers priced out in Sea Drift and POC. About 3k for torsion axles, dry lunch and welded. Looking for better deal or I will make this as well. Found parts on web, would be a bolt together.
K2
Re: Mikem59 FS18 Build
Posted: Sun Jan 08, 2017 8:41 pm
by Mikem59
K2,
No, I haven't made a decision on a trailer just yet. I'm going to try to make it over to the Houston Boat Show to see if anyone there is making any deals. $3k seems high. McLain quoted $1850 but I don't remember if that was with a torsion spring axle or regular leaf springs.
I did look at a used trailer, but it was 20+ years old and a little wider than I needed. Felt like all I would have done is bought a $400 headache.
I also need to get an official quote from Long's in Beaumont.
In the meantime, making progress on the build, going to put on a 4th and final coat of paint tomorrow. Would have stopped at 3 but had some runs that were too visible.
Although the last coat had some runs, this paint does look good though, very pleased.
Mike
Re: Mikem59 FS18 Build
Posted: Wed Mar 01, 2017 9:40 pm
by Mikem59
Long overdue for an update. Managing just a couple of hours after work 2 - 3 days a week. Progress is slow, but it all is coming together.
First photo is of the wire chase in the cockpit where I had planned to install my console. But after mocking up my console and setting it in the cockpit to see about fit and room, I decided not to do the console.
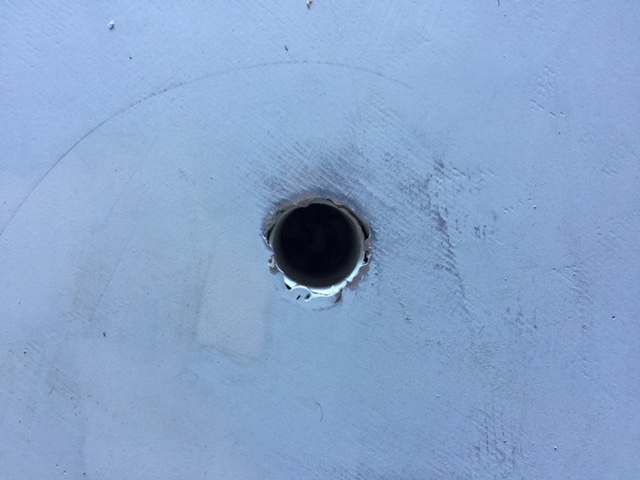
So, now you see it now you don't. Plugged, sealed, glassed over, faired, and primed. I'm glad I opted to forego the console, I like to have the room and a nice clean look inside, no clutter.
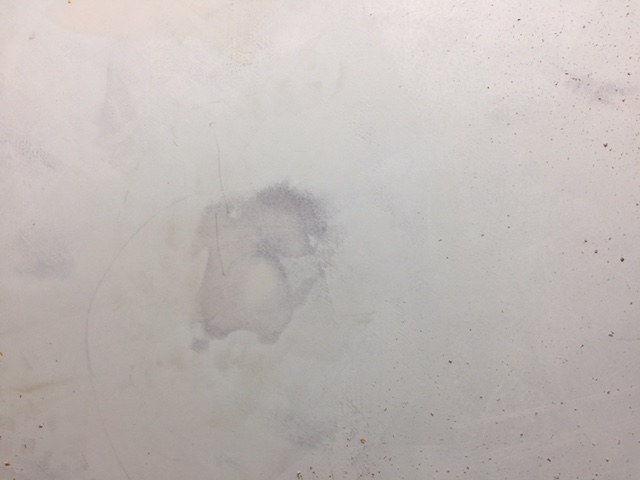
Dry fitted the jack plate, and engine, the trim tabs are installed just don't have the piston connected, don't need a meat slicer on the back while I'm working on her still.
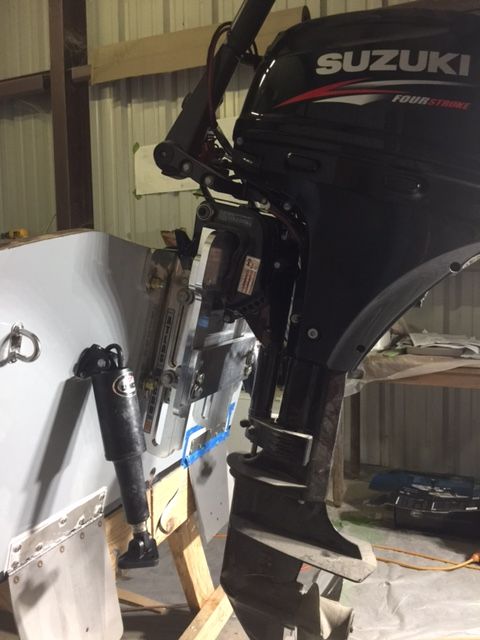
Fuel tank is in along with termination points for the rod tubes.
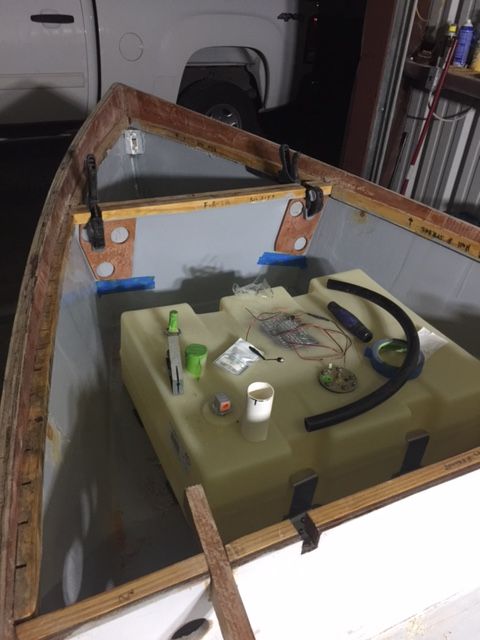
Dry fit the switch panel, jack plate switch, and trim tab switch panel. The Trim tab switch panel will be a little higher than it shows in the pic to center up more with the main switch panel.
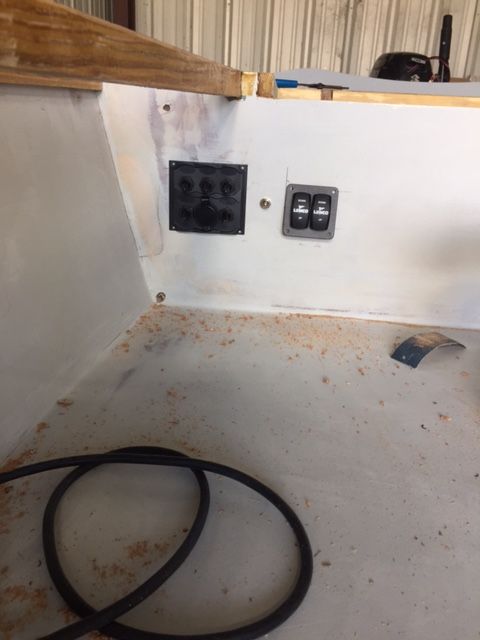
And, here's a pic of the first coat of Kiwi Grip in the cockpit area. I bought the white and had tinted to the Sherwin Williams Olympus White. I didn't want the pure, bright white, wanted something easy on the eyes and hopefully won't show the blood and guts as much. I also feel it's a good contract to the platinum color of the hull. I'll add that the Kiwi grip application is different due to it's thickness. Don't know if there is an expectation for it to cover in just one coat. I applied with a paint brush then used the supplied "Loopy Goopy" roller to get the texture. I think I laid it on too thin, requiring me to apply a decent amount of pressure to get the texture and not see the brush stroke marks. Nonetheless, I am pleased with the nonskid texture I got with the first coat. The second coat went on nicely and covered well. I'll get pics posted soon.
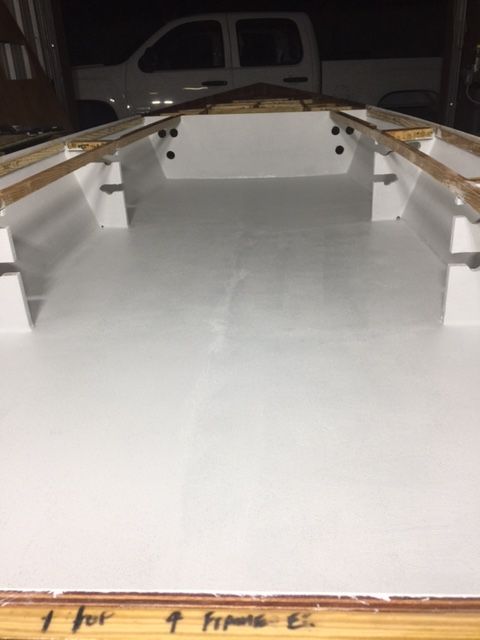
I dont' have the pics as yet, but I've installed cleats at the bow section and between A and B frames (above the fuel tank). Since I'm not doing a console, I had a hatch door for it that will now be used as an access hatch for the bow. I've also installed the nav lights, just using the small led's amazingly bright. Have pulled the fuel hose through it's chase as well as the nav lights wire and the fuel sending unit wires. Installed a battery tray in the transom section port side. Have a Perko switch, negative and positive buss bars, and inline fuse as well as the wire ready for install. Once I get all the electrical sorted out and installed, the decking and gunwales will go down to button 'er up. So close.
And, will order a boat trailer soon as well as contact TPWD to inspect and allow me to get it registered.
Re: Mikem59 FS18 Build
Posted: Wed Mar 01, 2017 10:40 pm
by Dutch1
Great progress Mike. I'm interested to hear how the zuke pushes her. I've heard great things about those. What size did you go with? And, why did you decide not to have a console? Time? I'm trying to decide if I want to do anything for a console too. I look forward to your .02.
Steve
Re: Mikem59 FS18 Build
Posted: Wed Mar 01, 2017 10:55 pm
by Mikem59
Dutch,
I went with the 20 hp Suzuki. Considered the 25 hp, but a bigger powerhead added more weight. Given I wanted the jack plate and trim tabs, I wanted to go with the lighter motor. And, at time I purchased, the 20 hp suzuki was the lightest 4 stroke out there and I've had better luck with suzuki in the past than with another manufacturer.
As for the console I had planned, it was going to be 16" wide. I literally had all the panels cut out and stitched together, that's how I knew exactly what I was working with as I placed it in the cockpit for the mock up. I should have taken a picture. The console along with a cooler in front to sit on, in my opinion, was just going to take up more space than I was willing to give up. And, I didn't like the amount of walking space between the console and the gunwale. Don't get me wrong, there was room to do so, I was just uncomfortable for my sake as well as whoever may be along for the ride. I'm not a big guy, but I'm not a spring chicken either, so I'm not going to rely on ageless balance and dexterity to maneuver around it.
I will add that I believe Shamrock's build has a pic of his console, or maybe he posted it in a reply in my build. My console was going to be very similar.
Hope that helps.
Re: Mikem59 FS18 Build
Posted: Wed Mar 01, 2017 11:07 pm
by Dutch1
Mike,
Thanks for taking a few minutes to reply. That definitely helps.
Steve
Re: Mikem59 FS18 Build
Posted: Wed Mar 01, 2017 11:23 pm
by seaslug
One of the best decisions I made when finishing my FS18 was ruling out the small console I had mocked up. It didn't look bad, could be somewhat functional for storage, and mounting a GPS etc. but as a pure flats fishing machine, the open cockpit works so well I would never change it. That being said, I do not usually stand while driving the boat, opting instead to sit very comfortably on my poling platform, which is at a comfortable 27" off the deck. If I stand, I rest my butt on the platform and it's extremely stable. For a boat like this, a cooler that can be moved around as a seat, and to adjust weight as needed works best. Mike
Re: Mikem59 FS18 Build
Posted: Tue Mar 07, 2017 10:06 pm
by Mikem59
Mike - thanks for helping me feel even better about my decision to forego the console. Now that I had made that decision, I've thought about some of the other things I've done with this build that, well, I don't regret, but were probably unnecessary, such as a 12-gallon permanent fuel tank as opposed to just sticking with a simpler design. But hey, those decisions have been made and that work is done.
I promised a pic of the bow section with the cleats I've added. The additions between Frames A and B are the ones running parallel to the frames tying cleats to the hull cleat and the long cleat running between A and B on both the port and starboard sides. I also added cleats running down the center between a new fore cleat and the existing aft cleat. I added these cleats as I had the bow section laying on the initial cleats I had installed and it felt like it lacked some support. May not have needed once I install the hatch that will reside behind frame B and the mid cleat. I hope you all understand all that, I wrote it and I don't think I have a clue what I just said.
As for the bow section, I added cleats there as I decided I didn't want to waste or send back the hatch I had purchased for the console I had foregone. Luckily, that hatch will be a perfect fit and will be a lot better than the 8" round screw in hatch I was originally planning.
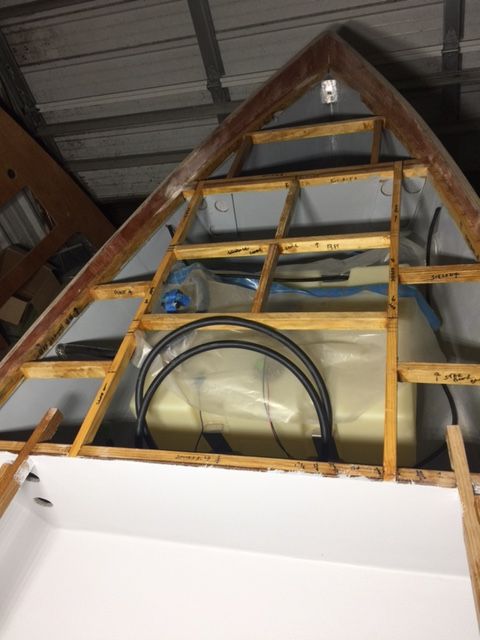
In addition to the above, tonight I went along the rub rail and, with a small batch of resin and wood flour filled in some minor gaps where the glue had not completely filled when I installed the rub rails originally. I am not exactly sure what I'm going to do about the tops of the rub rails to finish them out. Can't decide if I will just extend the fiberglass up and over when I install the gunwales, or just fair the tops, prime and paint. I am concerned that if I glass over the tops I'll need to do something with the interior edge of the rub rails. Right now, they are squared off, but may need to round off with a router. Unless someone has some immediate thoughts, I'll peruse the forum for some ideas from other builds, I pretty sure I've seen something on this before.
Thanks all,
Mike
Re: Mikem59 FS18 Build
Posted: Sun Mar 19, 2017 10:40 pm
by Mikem59
Looking for some help/guidance on how to finish the rub rails. Do you round off the interior hull edge to then enable the cloth go over the top of the rub rail? Or, just take the cloth up what little interior hull there is to cover and just epoxy, fair, and paint the top of the rub rail?
As for next steps, the gunwales are not a perfect fit, gonna have to scab in some pieces to fill a gaps that are pronounced the first few feet for and then again aft.
Made some progress with the electrical. Have installed a Perko battery switch, a positive bus and a negative bus, and run and connected the wires for the Atlas Micro Jacker and the trim tabs.
Mike
Re: Mikem59 FS18 Build
Posted: Mon Mar 20, 2017 10:53 am
by K2FS18
Mike, looks like you put in high gear!
I don't believe you need glass on the decks. But if you decide to install, any of the above should work. I used 4oz on mine and wrapped up and over the rub rail and trimmed flush with the bottom eased edge of the rub rail.
Re: Mikem59 FS18 Build
Posted: Tue Mar 21, 2017 11:03 pm
by Mikem59
K2, thanks for the suggestions. And, I'm in high gear when I get to work on the boat. Spring break took me away for several days, then some travel for work. But, I am making progress.
Here are some pics of the gunwale issues I mentioned.
This is the port side gunwale. As you can see, as it approaches to the aft, a gap widens between the gunwale and the hull.
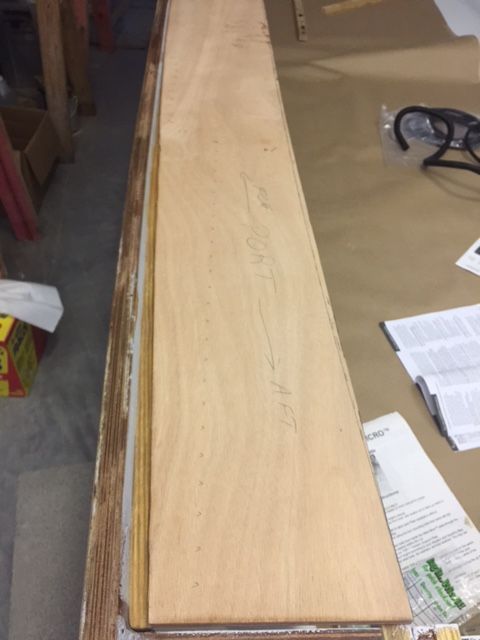
Similarly, on the fore side, a gap forms and widens. I've already added an additional support cleat along the inner support cleat, and I'll do the same along the hull cleat to make sure there is plenty of gluing surface and support for the gunwale.

And, here the bow decking leaves sizable gap between the gunwale as well as not quite wide enough to extend to the edge of the cleat. I'm not thrilled about another trip to Houston Hardwoods and another $90 for another sheet of Okume. So, I feel pretty comfortable using what I have left to scab in and fill the gaps.
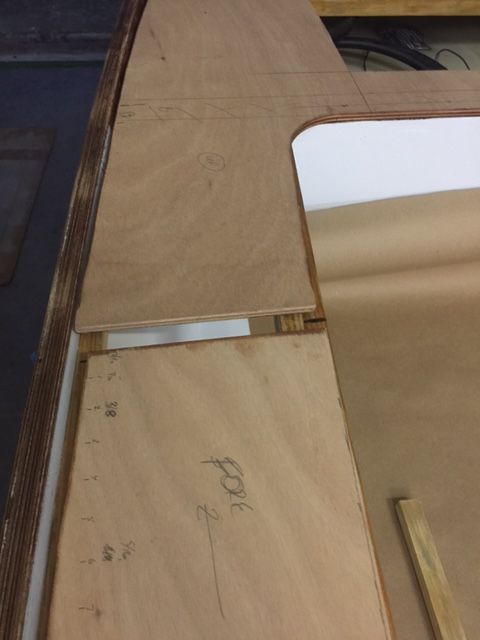
Here's the fuel tank compartment with all the cleats along with the nav lights wiring
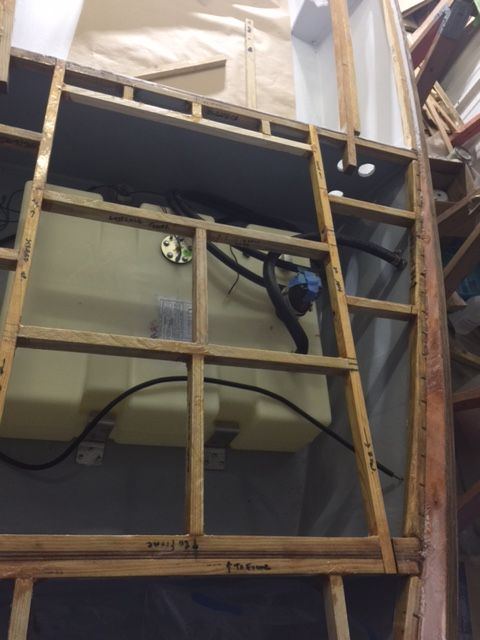
And, a shot of the storage compartment beneath the transom decking. Right now it's a snake pit. Have the negative and positive buss bars in, a battery switch along with the jack plate and trim tab wiring. A lot to sort out, but it's coming along.
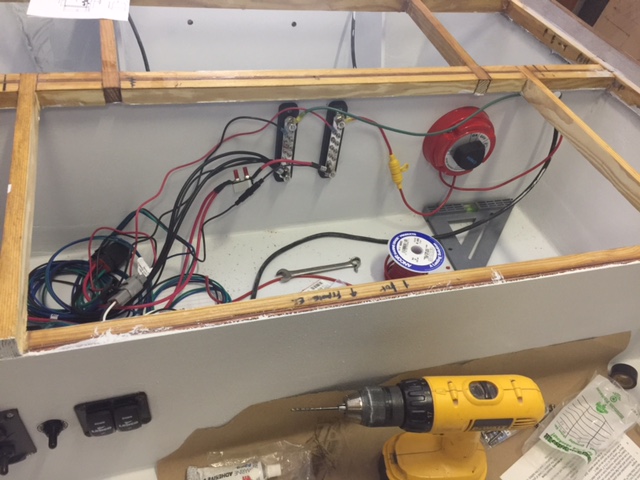
Although I am making progress, I had to do some TLC for my Blue Wave as it's feeling pretty ignored. Oil/filter change along with some chine repair work with some Marinetex. Doing all the work on the build has given me the confidence to do minor repair work on my Blue Wave.
Re: Mikem59 FS18 Build
Posted: Mon Apr 03, 2017 11:15 pm
by Mikem59
Have pretty much finished up running and cleaning up the wiring "pit". I've also glued in some additional cleats as needed to support my gunwales. And, I've masked off and put down some plastic to prevent glue from leaking/spilling onto my painted cockpit and below deck areas. But, I still need to also finish up the rod tubes.
A few pics:
The wiring is pretty well cleaned up, will need to tidy up just a little more, still have some wiring work to finish up, I have some under gunwale wiring to pulled for installing some LED's under the gunwales.
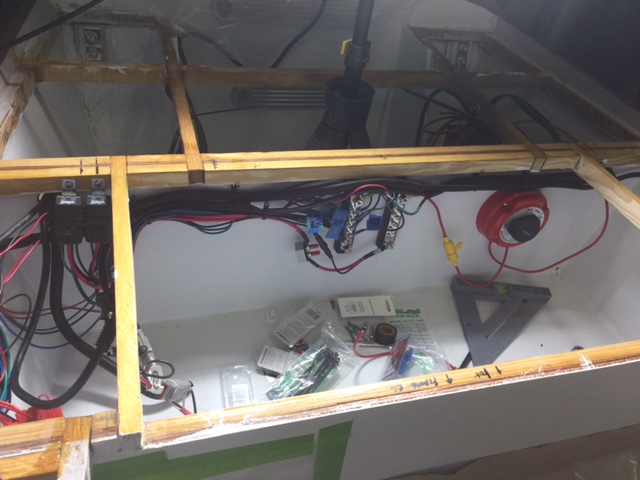
Another view of the wiring.
And, hey, the navigation lights work, as did the jack plate, bilge pump, and trim tabs. The nav lights are under the plastic skirting, so, not the best of views.
Re: Mikem59 FS18 Build
Posted: Thu Apr 06, 2017 9:09 pm
by K2FS18
Looking good. I see you got the good wire as well. Its crazy how a simple wire job can become complexed pretty quickly.
Re: Mikem59 FS18 Build
Posted: Tue Apr 11, 2017 10:14 pm
by Mikem59
K2 - Yep, I always looked under the console of my bay boat and past boats and always wondered what the heck all that wire was for. Surely a little ole FS18 wouldn't require nearly that much wiring. I certainly figured the wiring for this little boat build would be quite simple. I wracked my brain
quite a bit over the wiring. But, it wasn't too bad even though it is still quite a bit of wire.
Re: Mikem59 FS18 Build
Posted: Tue Apr 11, 2017 10:55 pm
by Mikem59
Made some more progress, I glued down the bow decking tonight. A big step and, well commitment as well. Looking at this as the first really big step to getting this boat finally finished.
Pics of the latest progress:
Saw somewhere about how to flange the PVC for the rod tubes. Used an 1 1/4" shower flange.
Then used a heat gun to heat the end enough to then apply pressure to begin to flatten out the end. I learned you have to apply the pressure evenly and slowly. If you don't the PVC will split at the edge.
This is a pic of the rod tubes after install. I'm not 100% satisfied with them. And, this pic is an improvement over the initial pics. I had to heat the ends again and use a piece of wood as a flat surface to get the tubes to be more flush with the face of the bulkhead. Still not perfect, but will silicone in to seal up real good. OOOPs, this picture isn't rotated 90 deg. clockwise.
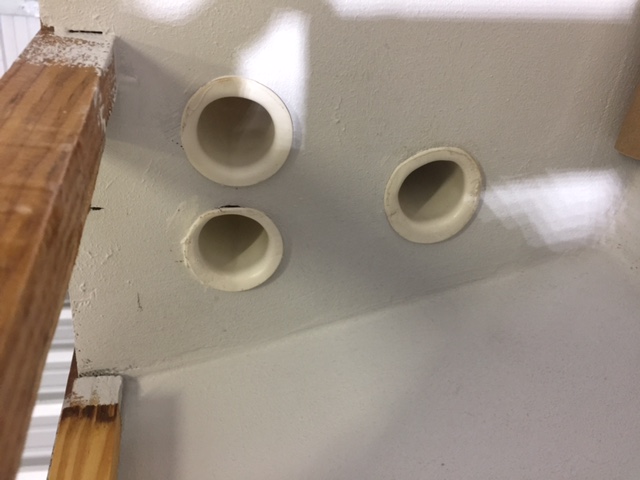
Starboard side rod tubes
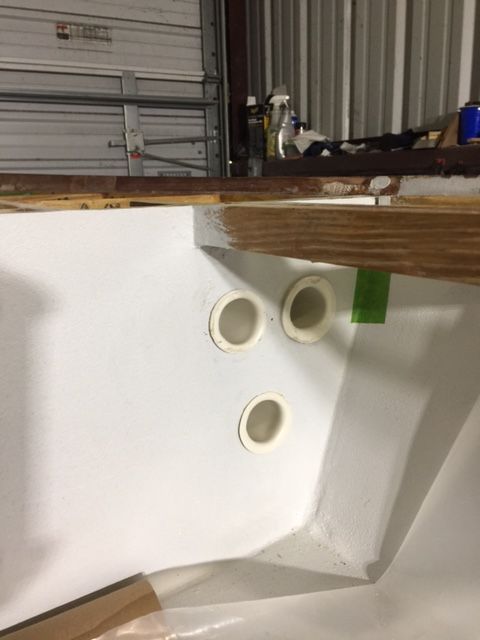
Plastic laid down and masked in to make sure I don't get glue all over the place.
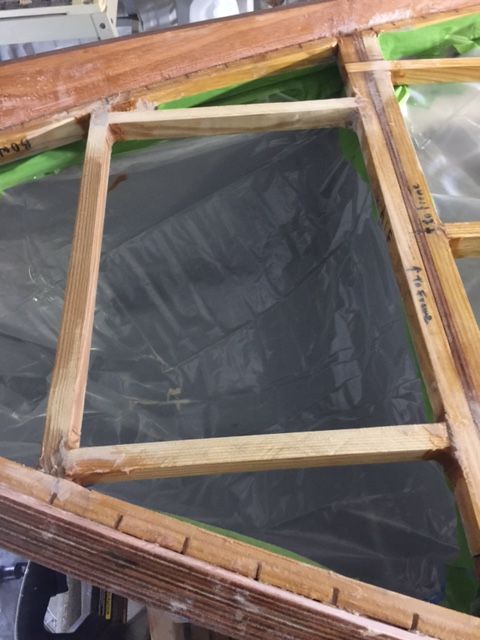
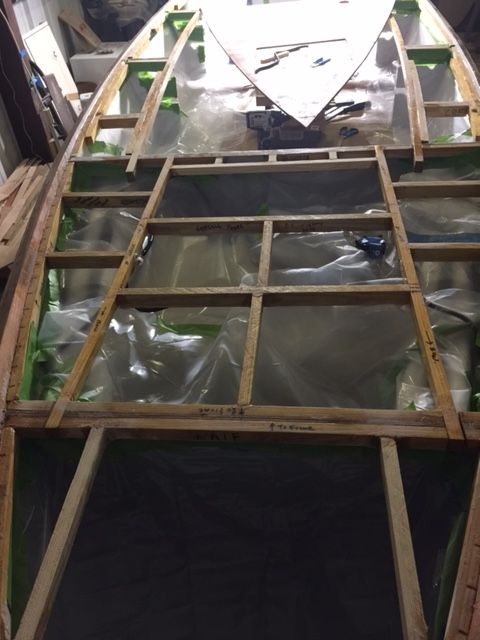
And, now, the deck is glued down
By the way, here's the surface mount LED's from Oznium that I will install under the gunwales. Came highly recommended from a friend of mine that rigs boats for a local dealer. I bought 8 of them for a total of $32.12 including the shipping. I'll be installing one on the underside of each section of the gunwales, and one in the transom deck storage compartment. The other, possibly in the storage in the bow compartment, not sure just yet.
Lastly, put a coat of paint on the underside of the gunwales so I won't have to paint after installed.
I also made a trip to TPWD in Beaumont, needed to file for a lost title for the motor i bought 3 years ago. Couldn't find the title, or maybe the dealer never mailed, I don't remember. I'll be making a trip to TPWD in Beaumont soon for the inspection!
Re: Mikem59 FS18 Build
Posted: Wed Apr 12, 2017 6:25 am
by Jeff
Really nice progress!!! Jeff
Re: Mikem59 FS18 Build
Posted: Wed Apr 12, 2017 2:55 pm
by Mikem59
Jeff, Thanks. Gotta call from McClain Trailers in Houston, to their credit they got my trailer built in 3 weeks. My progress plan was counting on them taking 5 weeks. Just more motivation to finish. I just have to find a higher gear to git'er done.
Re: Mikem59 FS18 Build
Posted: Wed Apr 12, 2017 8:26 pm
by Dutch1
Looks great Mike! What kind of hatches are you going to use?
Re: Mikem59 FS18 Build
Posted: Wed Apr 12, 2017 9:37 pm
by Jeff
Mikem59, nice turn around time on your trailer!! Jeff
Re: Mikem59 FS18 Build
Posted: Wed Apr 12, 2017 11:04 pm
by Mikem59
Dutch1, For the bow compartments I went with TH Marine hatches. I'll have to dig up the order to see which model and I can post some pics. The hatch for the transom deck compartment was donated, I'll take a pic of it as well. Would liked to have built my own, but as long as this build has taken me I didn't want something else to drag it out any longer. Sure have seen some nice hatch builds on the forum.
Jeff, Yes great turnaround on the boat trailer. Perhaps I should have ordered it much sooner as it has certainly kicked me in high gear. I've glued down the bow deck and the transom deck. Will do the funwales tomorrow or Friday.
Re: Mikem59 FS18 Build
Posted: Sun Apr 16, 2017 8:07 pm
by Mikem59
Making some more progress, here are some photos of the gunwales glued in. Used every heavy object I had as well as clamps.
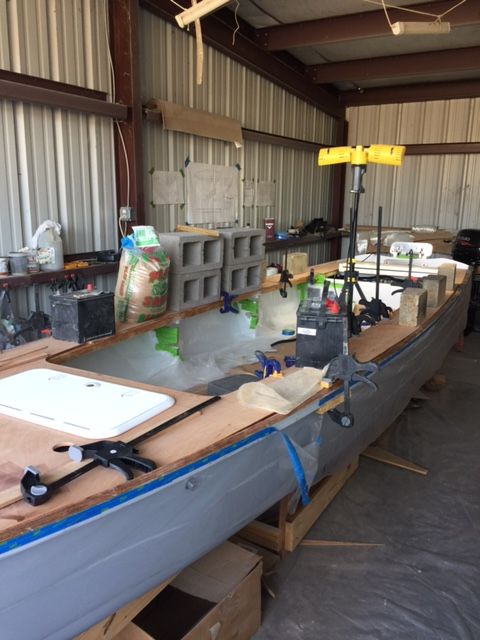
Dutch1, Here are the hatches. Both bow deck hatches are TH Marine. The larger one is the Designer Series. I had intended to do a small round screw in hatch in the front compartment, but when I decided to forego the console, that smaller hatch to repurposed to the bow.
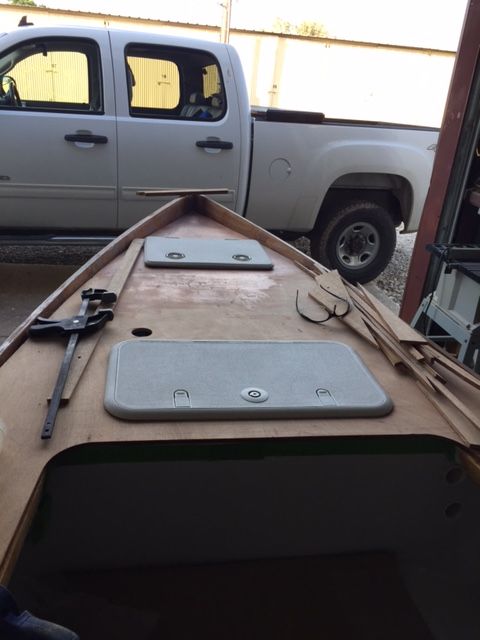
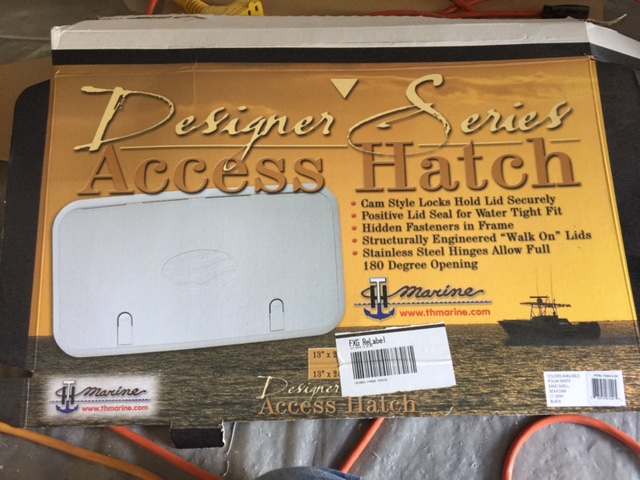
Here's the transom deck hatch, don't know the brand on this one, this was the donated hatch.
I've also scabbed in some pieces and glued them in to fill gaps. Next will be shaping, trimming and glassing in.
Re: Mikem59 FS18 Build
Posted: Sun Apr 16, 2017 10:13 pm
by K2FS18
Coming along real nice.
Re: Mikem59 FS18 Build
Posted: Sun Apr 16, 2017 10:34 pm
by Dutch1
Thanks for the hatch info Mike! I really like that rear hatch but have been unable to find one. A buddy of mine told me what boat it came from (OEM) but I don't recall right now. Still searching for one. . . I may end up going with just one large hatch.
The boat looks great!
Re: Mikem59 FS18 Build
Posted: Sun Apr 16, 2017 11:06 pm
by Mikem59
Dutch1, I've perused all the FS18 builds, and the La Flaca Build by Doubleup used the same hatch, but didn't see where the brand was mentioned. Here's the link
https://forums.bateau2.com/viewtopic.ph ... 4&start=40.
I want to say these are OEM in Mako's, but can't say for sure.
K2, thanks, I'm starting to feel it, the build completion is getting close!
Picking up my trailer in the morning.
Re: Mikem59 FS18 Build
Posted: Mon Apr 17, 2017 6:38 am
by topwater
Check greatlakeskiper.com They sell surplus from the manufacturer and i have seen those hatches there before .
They might be Grady White .
Re: Mikem59 FS18 Build
Posted: Mon Apr 17, 2017 7:45 pm
by Dutch1
Sorry for the hijack Mike. Yes, my buddy told me it was a Mako. Couldn't remember last night.
I've looked at every hatch greatlakes skipper has and I just searched for the last two hours for OEM Grady white parts and can't find it. Greatgrady didn't have it either. I've put in enough time trying to find that hatch. Oh well but thanks!!
Re: Mikem59 FS18 Build
Posted: Tue Apr 18, 2017 8:35 pm
by Mikem59
The boat is starting to smell water, I'm getting close now. Since the last post, routed with a 1/2" round over bit the inwale as I could, and also the outside edge of the rub rail. I was real nervous about this as I've never used a round over bit, let alone use my router much, but it as a piece of cake.
As for the inwale, where I had to stop the router, I shaped with the Sureform planer and then with the multi-tool with 40 grit paper. Then, back over it all with 80 grit on the RO sander. All in all, pretty pleased. And, it looks so much better rounded than with the sharp edge.
Lastly, filleted in the edges of the bow, gunwales, and transom decking. I'll clean those up then move on to glassing those. I'm hopeful to get her completed by the weekend.
Re: Mikem59 FS18 Build
Posted: Tue Apr 18, 2017 8:39 pm
by Mikem59
Dutch1 wrote: ↑Mon Apr 17, 2017 7:45 pm
Sorry for the hijack Mike. Yes, my buddy told me it was a Mako. Couldn't remember last night.
I've looked at every hatch greatlakes skipper has and I just searched for the last two hours for OEM Grady white parts and can't find it. Greatgrady didn't have it either. I've put in enough time trying to find that hatch. Oh well but thanks!!
Dutch1, no problem. I had looked on Great Lakes Skipper awhile back thinking I wanted the same hatch up on the bow deck, but didn't look real hard. Looked again like you had, no luck locating it either.
Re: Mikem59 FS18 Build
Posted: Fri Apr 21, 2017 10:12 pm
by Mikem59
Another milestone, Decks glued down and filleted in. Inwales rounded and the rub rail rounded as well. And, prepping for the glass.
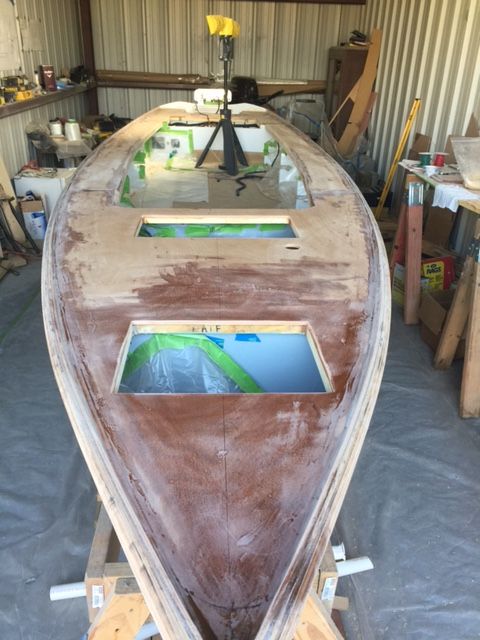

Looking at a long day Saturday glassing the bow, gunwales, and transom decks. Can't wait. Hoping that will cure fast enough to sand by the evening so I can get in hopefully just one round of fairing. Nonetheless, I don't want to get impatient now.
Also, purchased a few other needs to truly finish the boat, bought the bilge pump hose, the through hull fitting, and a 10 micron fuel filter. The fuel filter also needed a 3/8" barb fitting for the fuel hose incoming to the filter and a 5/16" for the hose to the outboard connector. Suzuki's provided fuel hose is 5/16". Not something I even looked at when I purchased the fuel hose for the run from the tank to the rear of the boat. No biggie, the fuel filter and fittings will make joint these a breeze.
Re: Mikem59 FS18 Build
Posted: Sat Apr 22, 2017 7:36 am
by cape_fisherman
Many boats of this style have the majority of the topside decks finished with non-skid...keeping fairing to a minimum.
Re: Mikem59 FS18 Build
Posted: Sat Apr 22, 2017 12:23 pm
by Mikem59
Yes, I need to keep that in mind as I am using a non-skid. Thanks
Re: Mikem59 FS18 Build
Posted: Mon Apr 24, 2017 10:30 pm
by Mikem59
Glassed the top side decks Saturday, have sanded, and done some fairing and fill work.
When I wetted out the glass, I was pretty pleased. But, upon curing and sanding, found a number of small "dry holes" where the cloth didn't wet out well enough. All were on the 1/2" round off on the rub rail or the inside radius. Used fairing compound to fill as well as fair some other spots. Will sand, then probably go over with a coat of resin, then sand once again before top side non-skid goes on.
Closing in on the finish line!
Re: Mikem59 FS18 Build
Posted: Tue Apr 25, 2017 9:20 pm
by Mikem59
Here are some pics from Topside Glassing
Calculated 26 oz of resin/hardener to glass the all the topside decking. Prepared 5 - 6 oz batches for 30 oz. total. And, yep, it was too much. Will be the last time for awhile that I'll have to deal with mixing resin/hardener. And, luckily, I had enough to finish the boat with a little to spare.
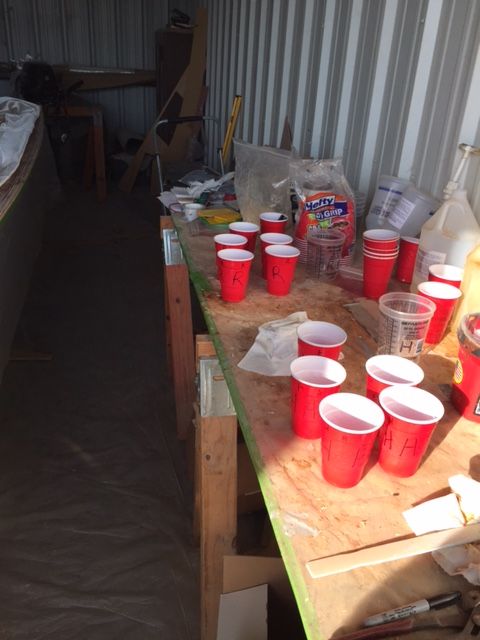
Pic of just prior to rolling on some resin to aid in wetting out the bow deck. But wasn't able to do that for the remainder of the topside.
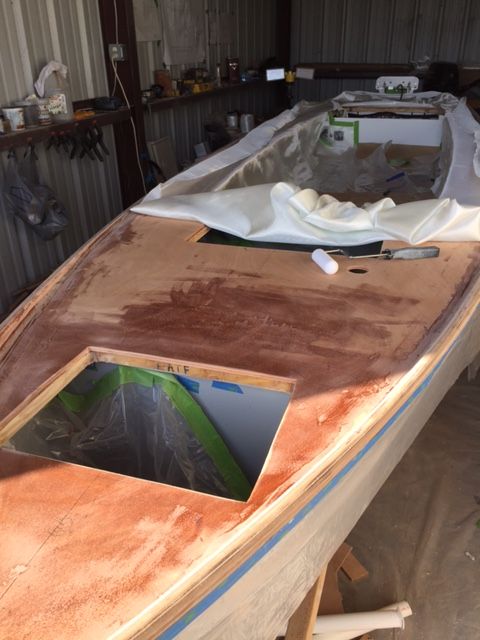
All glassed. Like I mentioned in the previous post, it looked as though everything wetted out just fine. I didn't get pics of the spots that didn't fully wet out.
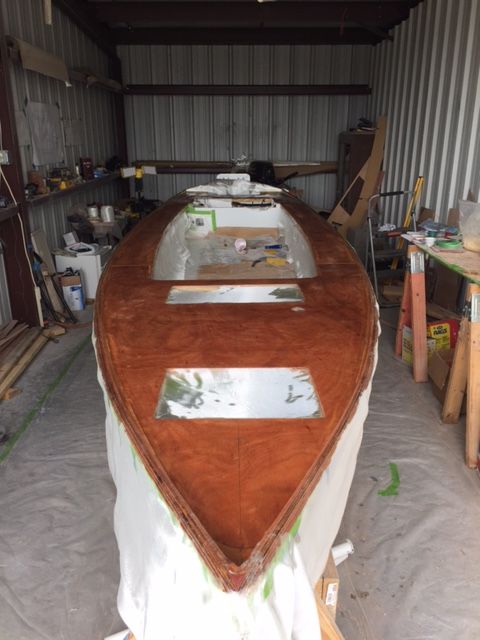
Re: Mikem59 FS18 Build
Posted: Wed Apr 26, 2017 4:16 am
by Eric1
Looks Great!
Re: Mikem59 FS18 Build
Posted: Wed Apr 26, 2017 6:29 am
by Jeff
Nice MikeM59!!!! Jeff
Re: Mikem59 FS18 Build
Posted: Wed Apr 26, 2017 9:10 pm
by Mikem59
Thanks Eric and Jeff, I'm closing in on the finish line.
Tonight put on a coat of non-skid on the top side decks. I used Kiwi Grip and went with a little more aggressive pressure to get a more aggressive non-skid surface. I was pretty pleased with it when I applied it to the cockpit decking. And, as noted by Cape Fisherman, I didn't do any fairing of the decking. I did some spot checks of the top side decking and didn't see any lows that the Kiwi grip non-skid couldn't hide well; it goes on pretty thick when you use a more aggressive texture. I used a 1/8" notched trowel to aid in spreading the Kiwi Grip before rolling out with their "Loopy Goopy" roller.
Here are the before and after pics, you'll notice the inside of the hulls and the topside of the rub rails aren't finished. Due to the roller and proximity to the decking, it's difficult to spread without messing up what's already applied to the topside decks. I'll go back and finish those out after this coat dries and do some touch up as well.
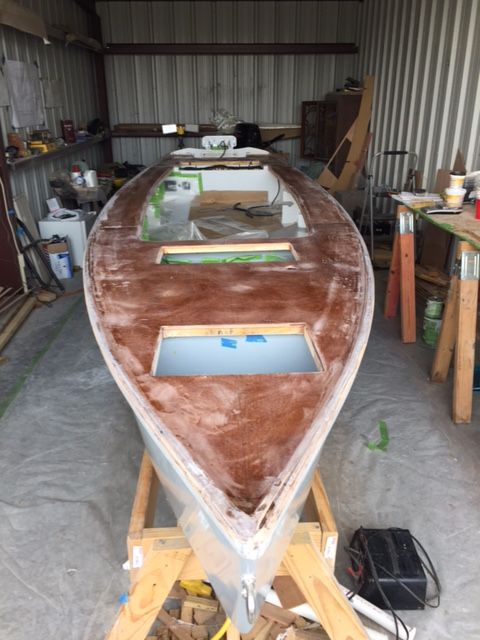
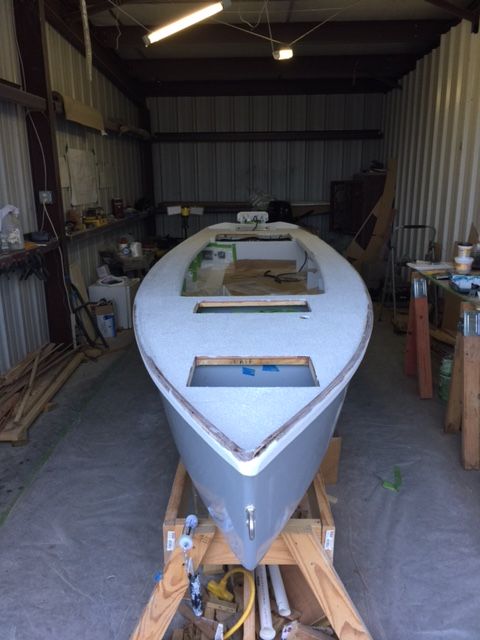
Once if finish the touch up work, I'll install the hatches, the fuel fill with grounding wire, get the motor on, finish the trim tabs, and the bilge pump hose.
TPWD does the boat inspections at their Beaumont, TX location on Thursday's between 9 and 11. I plan to make that trip next Thursday!
Mike
Re: Mikem59 FS18 Build
Posted: Wed Apr 26, 2017 9:33 pm
by MrPaul
Looks great! Let us know how everything goes with TPWD. I hope to be taking mine out for inspection sometime later this year.
Re: Mikem59 FS18 Build
Posted: Sun Apr 30, 2017 9:55 pm
by Mikem59
Closing in on it. Non-skid, and hatches fit check.
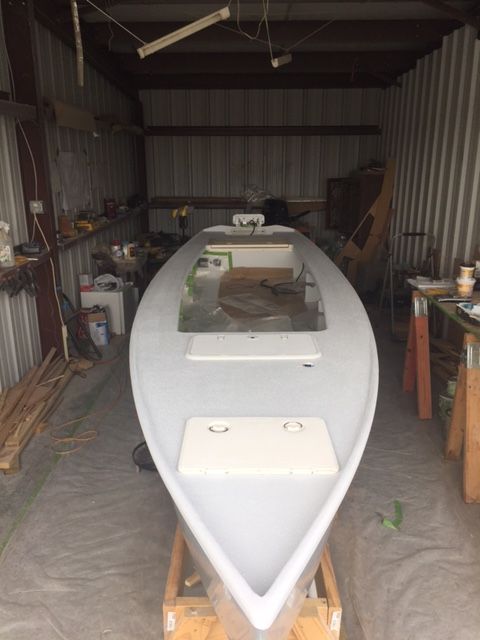

Since these pics, have secured the hatches, installed the under gunwale led's, the bilge pump hose, the fuel fill, and the fuel filter.
Look'in like I'm on target to complete this week.
Re: Mikem59 FS18 Build
Posted: Mon May 01, 2017 6:36 am
by Eric1
Very Nice!!
Re: Mikem59 FS18 Build
Posted: Mon May 01, 2017 6:39 am
by glossieblack
Fast work and nice work!
Re: Mikem59 FS18 Build
Posted: Sat May 06, 2017 9:43 am
by Mikem59
On May 6, 2011, this was one of the pics, the day I received and delivered the materials to my build location. Hard to believe, well not really
, that it's 4 years to the day to get that pile of wood to look like it does today. I'm not splashed yet, all I gotta do is get'er on the trailer.
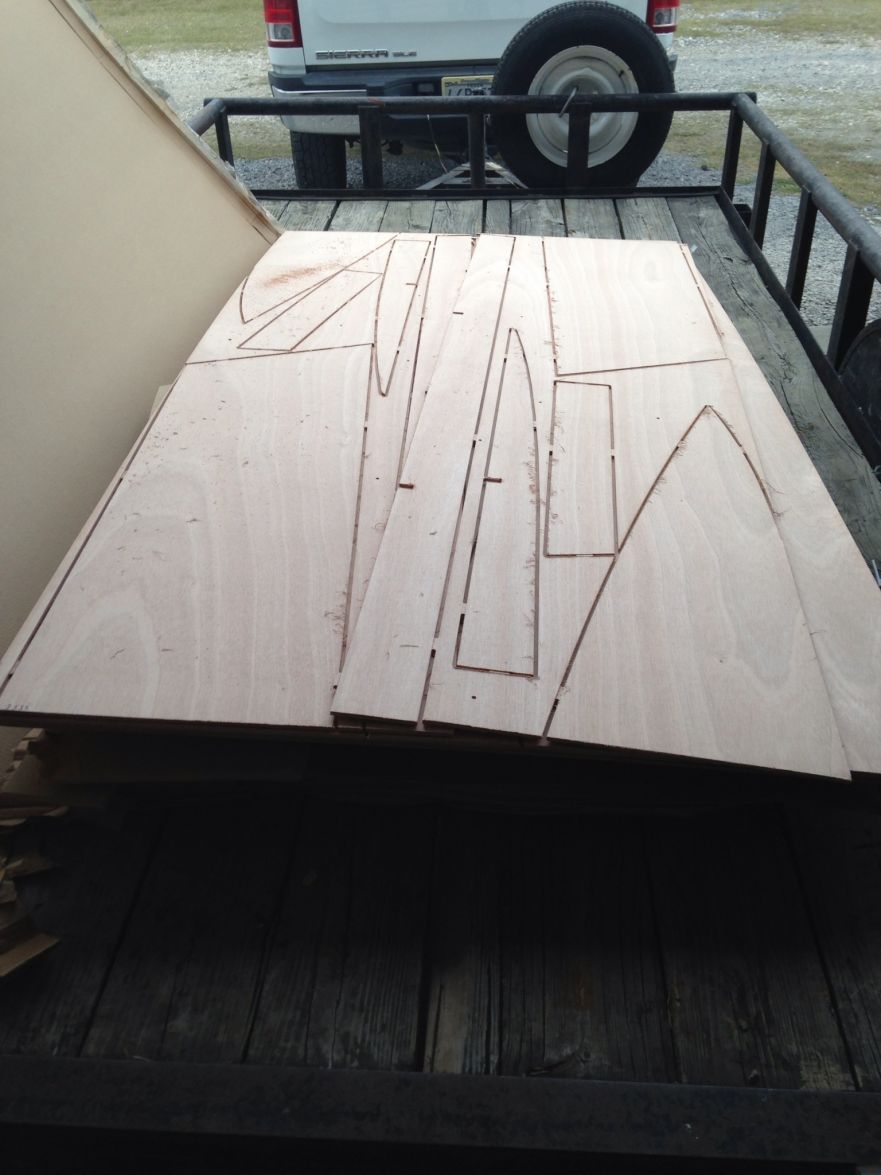
Here's the nearly completed boat, completion will be a few touch ups and getting the boat on the trailer.
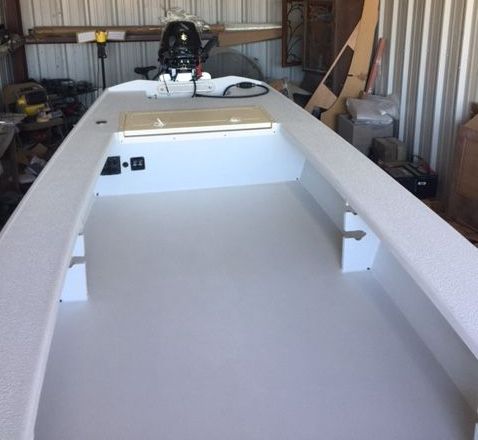
One last fit check with the motor, no issues with the clamps and clearance with the Atlas Micro Jacker.
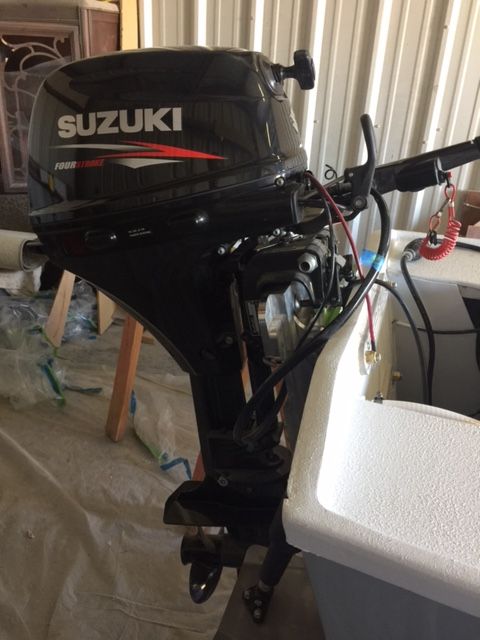
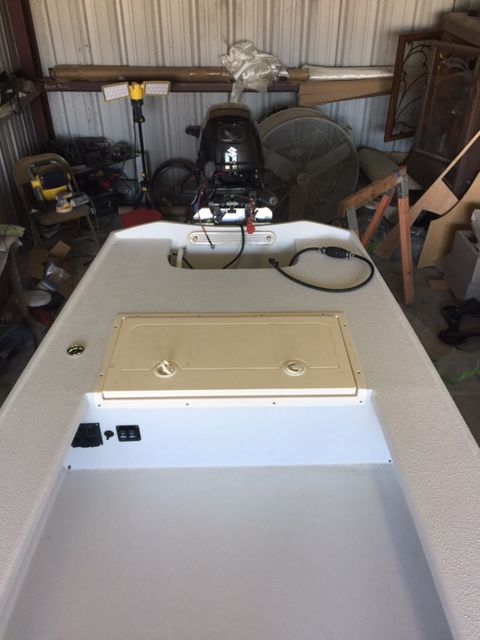

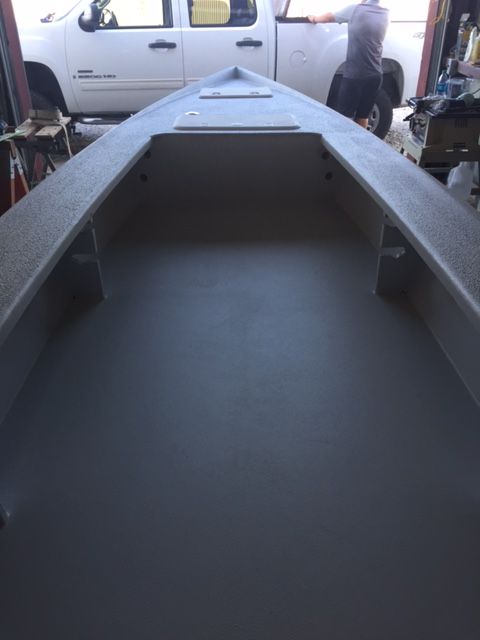
Here's a pic with the under gunwale UV LED's. The picture is a bit misleading, they aren't as bright as I may have liked, but may be fine in complete darkness. And, I mounted them differently on the port side than the starboard side. Still pleased with the overall look.
You'll probably notice the light on the transom deck starboard side, that's the fuel gauge.
Now, I'm off to do the final touch ups. Possibly a splash later today or tomorrow, trip to TPWD on Thursday, and a definite splash next weekend.
Re: Mikem59 FS18 Build
Posted: Sat May 06, 2017 7:50 pm
by K2FS18
Excited for you!
Re: Mikem59 FS18 Build
Posted: Sun May 07, 2017 12:39 am
by Jeff
Mikem59, very nice!! Let's us know when you splash her!!! Jeff
Re: Mikem59 FS18 Build
Posted: Sun May 07, 2017 4:06 am
by glossieblack
K2FS18 wrote: ↑Sat May 06, 2017 7:50 pm
Excited for you!
I second that.
Re: Mikem59 FS18 Build
Posted: Sun May 07, 2017 8:19 pm
by Mikem59
Thanks guys, the excitement just builds as it won't be till late this week of the weekend before I splash her. Hoping the wife will want to celebrate Mother's Day fishing from the new boat
In the meantime, continue to do some touch up work, polished/buffed the exterior hull, and did some contemplating over the motor/jack plate set up and the planned poling platform.
Before I go into the pics and some questions, I'll just say it's already quite gratifying to have finished the boat, especially today while buffing it out, I had 3 people stop by to admire the boat and and the question, did you build that? When you get to answer "YES", that was pretty dang cool, even for an ole man like me.
With that, let me throw out some things to ponder.
The motor will travel about 98% of the way down before it hits the clamps. I swear I've seen this discussed on this forum and I've seen some discussion on some other forums and don't see anything that provides a good clear solution. I can remove the little handles the clamps. But, considering that this is intended to be a shallow water boat, I have some angst over running with only the motor clamped onto the adaptor of the jack plate. Maybe its unfounded paranoia, but would much rather have it bolted on.
In this pic, the clamp is just barely into the top of the jack plate, the transom itself isn't an issue. And, this is with the jack plate almost completely down. I have maybe another 1/2" of travel available.
Considering taking the bottom plate, drilling it out and making a recess on the back side to mount through the 3/8" holes. Not sure what that bottom plate is for anyway.
Here's the bottom plate I'm referring to.
Now, my next major add on will be a poling platform. Here are some overhead pics of the 20hp Suzuki showing stop to stop on the tiller steering. Makes for an interesting fabrication on the port side. I've seen a number of photos of poling platforms on FS18's; and it appears this can be overcome. Again, maybe some paranoia, but I don't want to mount any of the metal onto the transom, I'd rather it be bolted direct to the transom decking. Luckily, I have a few folks to lean on for help here.
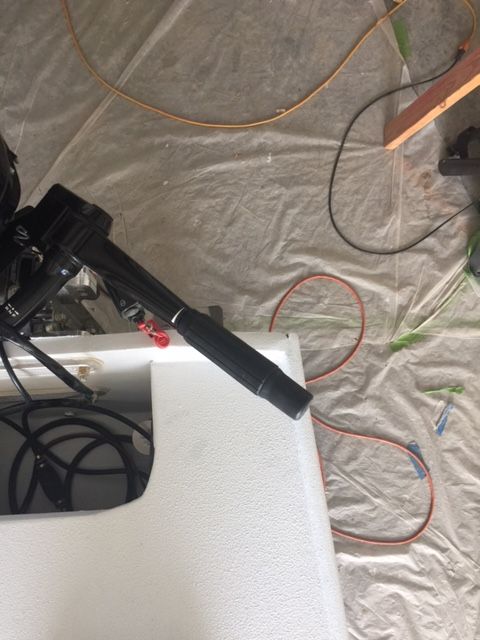
Hope to have some on the water pics next weekend!
Re: Mikem59 FS18 Build
Posted: Sun May 07, 2017 9:25 pm
by K2FS18
Got the same questions you do about the poling platform. Ponding that one currently myself.
Re: Mikem59 FS18 Build
Posted: Sun May 07, 2017 11:30 pm
by seaslug
I modeled my poling platform off of the FS18 "La Flaca" on this forum. My main criteria were; Low enough to sit on comfortably and drive the boat, at 27" off the deck, plus easier to climb on and off, than a lot of absurdly tall platforms I see on lots of boats. Room for the tiller to travel fully both port and starboard, set far enough back to pole easily without bashing the motor constantly, and because it is built low, the back side cut away so the motor can tilt all the way up without banging into it. I wouldn't change anything on my platform, I feel I got it right. I think the most important thing of all though, is don't go crazy and make it so tall you need a ladder, and I think steps on the sides are almost useless on a platform, especially on such a narrow boat. Mike
Re: Mikem59 FS18 Build
Posted: Mon May 08, 2017 11:33 am
by Mikem59
Mike,
Thanks for the advice on the poling platform. I've certainly seen the La Flaca build and agree that's a good one to model off of. And I don't want anything absurdly elevated. At 57 I don't need anything difficult to climb up on and down from.
Basically want to meet the same criteria you noted.
Thanks,
Mike
Re: Mikem59 FS18 Build
Posted: Mon May 08, 2017 9:33 pm
by Fishwater
I have the same jack plate and had the same issues. Drill and through bolt that outboard. The second or third time I had mine out, I was just pulling out of the no wake zone in the harbor and got up in plane. I turned around because I'd forgotten to put on the kill switch chord. The outboard was rotating out of the water. I was seconds away from catastrophe. The vibration of trailering it and running it will certainly be a problem for you too. Someone on here pointed it
out to me and I didn't heed the advice. Don't make that mistake too.
Re: Mikem59 FS18 Build
Posted: Mon May 08, 2017 10:08 pm
by Mikem59
Fishwater,
Thanks for reassuring me that I'm not paranoid. You hit exactly what my fear is, trailering it alone will cause vibration and loosening that won't be apparent till it's too late. So, after quite a bit of looking it over along with some quasi engineers, looks like I should be able to through bolt it or get it tapped/treaded to take a 3/8" bolt. Looking into what will be the best viable option.
Mike
Re: Mikem59 FS18 Build
Posted: Tue May 09, 2017 9:57 pm
by Mikem59
Got her on the trailer.
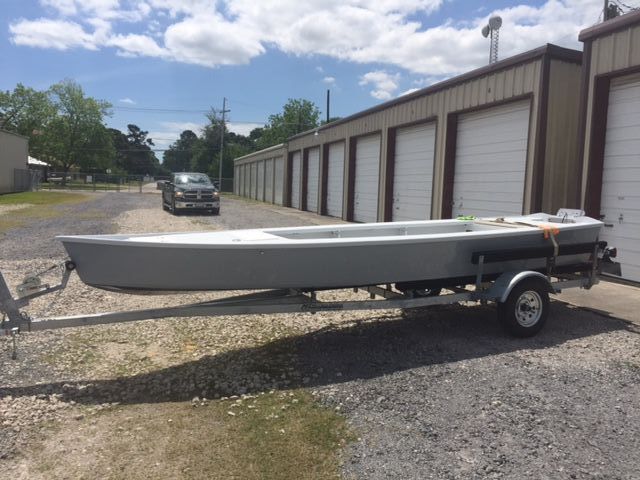
What, no more boat to work on? Made room to put her in storage, but lot's of cleanup to do.
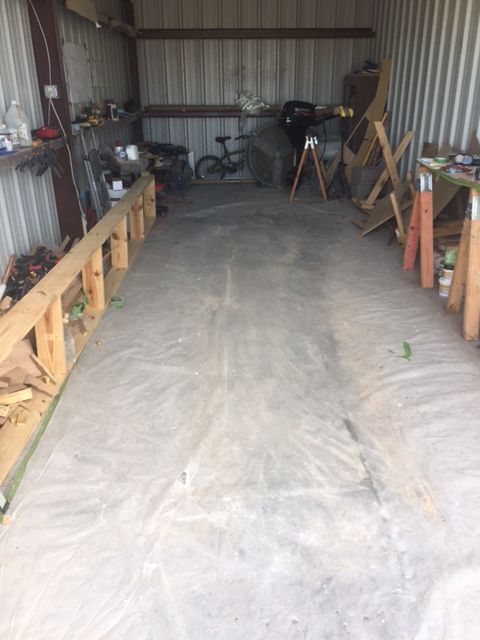
Her home for now.
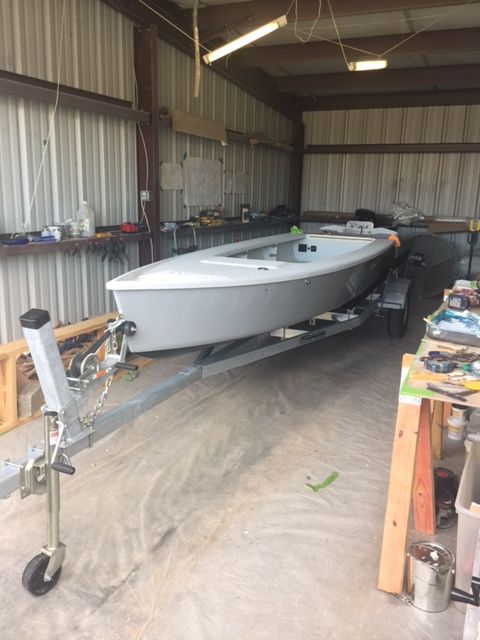
Photo in the driveway.
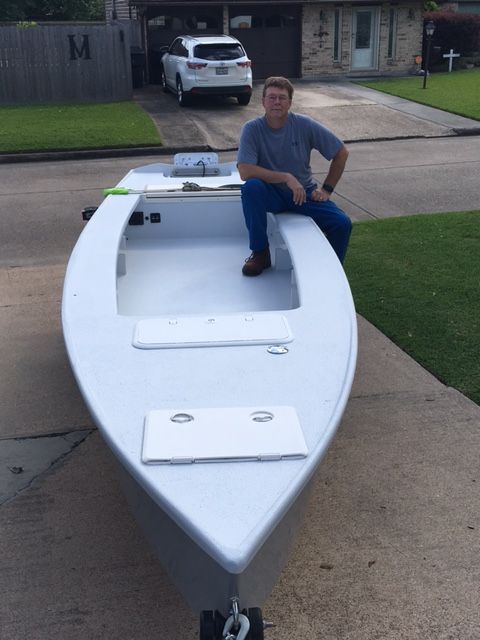
And, hopefully, my impatience didn't get the best of me, but the only way I see to address the mounting of the Suzuki 20hp to the jack plate securely along with the clamps is to drill and tap. The holes on the outboard mount will take a 5/16" bolt, so, I'm drilling and tapping for a 5/16" hex bolt. Will finish that up tomorrow evening.
Re: Mikem59 FS18 Build
Posted: Wed May 10, 2017 6:28 am
by Jeff
Mikem59, well done and your FS18 looks great!! All you need now is water!! Jeff
Re: Mikem59 FS18 Build
Posted: Wed May 10, 2017 9:29 pm
by Mikem59
Thanks Jeff! Water will be added to the pics as early as tomorrow. Trip to TPWD in the a.m. Then, put on the motor and head out, weather permitting, and that forecast looks promising.
Tapped the threads this evening, so I'll be a lot less stressed about the motor coming off the jack plate.
Re: Mikem59 FS18 Build
Posted: Wed May 10, 2017 11:16 pm
by fitzclf
Inspiration, thanks for posting the photos. Wish I was closer to your neck of the woods to observe the splash. Looking forward to your impressions of the performance. Enjoy the water!
Re: Mikem59 FS18 Build
Posted: Thu May 11, 2017 10:46 pm
by Mikem59
Splashed! What an awesome, awesome day to finally splash my boat for the first time today. The day started with the trip to TPWD. That was a painless experience, expect for the $105 they want for getting a hull id and registration. Took all the receipts along with me and they never even asked to see them. But, I do know some of the folks that work there.
After registration, headed back to put the motor on and then pick up a few last minute things, then off to Keith Lake. My favorite place to fish, and I needed some protected water, wasn't the best of days for the initial splash, wind was blowing 20 - 25 mph out of the SSE. But, this area provides plenty of protected shoreline to cruise with a SSE wind.
Brought my son along with me to enjoy the first outing. Began a nice slow cruise to break in the motor. Wasn't long before we found some working birds. Fishing wasn't are primary goal today, but hey, nothing like getting some fish slime in her for the first time.
Decided to keep pressing on and made a run quite quite a ways back into the back lakes and then into Salt Bayou. Once we had trekked for about 1 1/2 hours, decided to find out what WOT would get me. I was quite impressed, managed 24 mph. And, that's with the stock prop on the Suzuki 20 hp along with 8 gallons of fuel, and then myself and my son, let's just say, with the two of us in there we added over 400 lbs. to the payload.
I'll add that it takes no time for the boat to get up on plane, runs great, and certainly runs plenty shallow. I didn't measure how much I was drafting, but I'm pretty sure less than 5". I was impressed with how well the boat maneuvered turns. Wasn't running WOT, but didn't notice and slide in the turns, turned pretty true. My son fished off the bow, and, he said it is a bit tippy, but was easy to get used to. Nobody fell out of the boat.
From the back on the transom deck, it was quite stable standing and fishing from there. I don't see any issues with putting in a poling platform.
Now that the initial splash is done, need to install some cleats and push pole holders. And, I'll need to do something with the rub rail, was as careful as I could be, but managed to brush up against one of the posts at the launch, it don't take much to scuff the paint.
Well, that's enough jabbering, here are some pics:
Here's that wind. We launched at 3:00 p.m. and returned to the launch at 5:45 p.m.:
Hull ID
Registration sticker, I know, boring pic, but, a milestone!
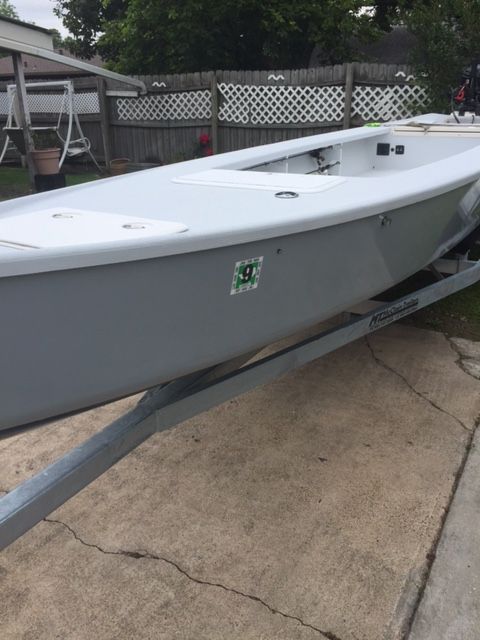
Getting ready for her first sip of water.
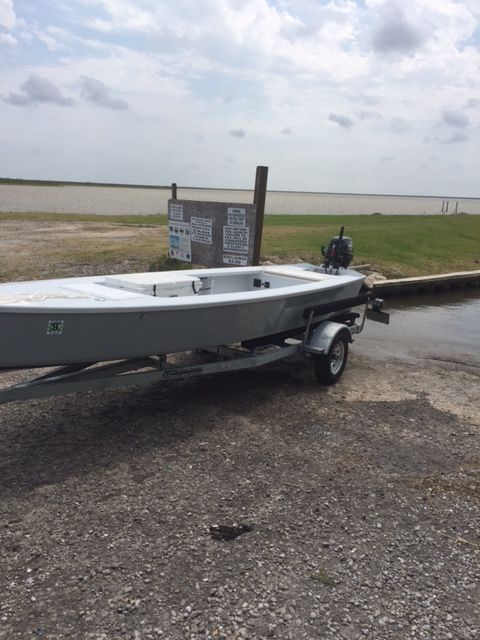
Her first fish slime, not a bigg'in but hey, fishing wasn't the primary goal today. And, there's nothing like sliming the boat on the first outing.
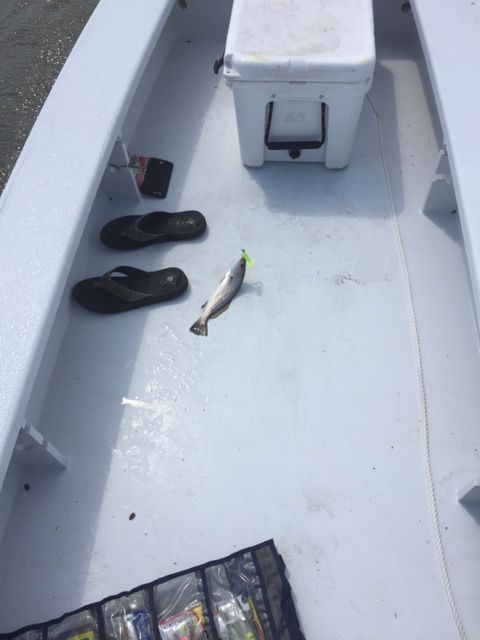
My son on the bow deck,
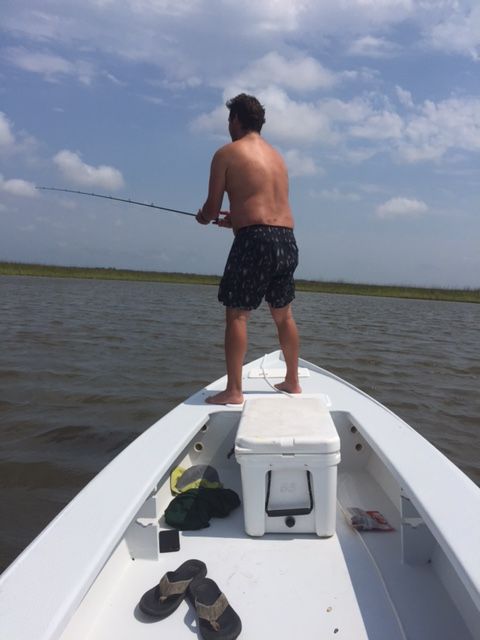
And, me cruising the bayou!
Let me close by saying, Thank you, Thank you, Thank you
To all of you here on the Builders Forum, I would not and could not have done it without everyones posts and inspiration; and I will certainly look to the heavens, tip my hat, and a cold one, and thank Cracker Larry as his FS18 Build was a constant reference and he was quite willing to share advice. But most of all, I know my Dad was looking down on me and his grandson with pride, wish he could have been with us today!
Re: Mikem59 FS18 Build
Posted: Thu May 11, 2017 11:24 pm
by K2FS18
Glad to see you you got her wet! Plus you stayed dry!
Re: Mikem59 FS18 Build
Posted: Fri May 12, 2017 2:09 am
by TomW1
Congratulations!!! And even a fish.
Re: Mikem59 FS18 Build
Posted: Fri May 12, 2017 2:14 am
by Fuzz
Congratulations
Boat looks great and it seems you had a great day in more than one way. First splash with your new hand built boat, good weather, and fishing with your son. It just don't get any better than that
Re: Mikem59 FS18 Build
Posted: Fri May 12, 2017 8:16 am
by Jeff
Congratulations!!! She looks great on the water!! Also a proven fishing machine!! Jeff
Re: Mikem59 FS18 Build
Posted: Fri May 12, 2017 8:51 am
by 94'325is
That's awesome, the boat looks great and the fact that you were comfortable enough on it to fish and cruise around in high winds the first time out says a lot. Thanks for the detailed report, it's always interesting to hear impressions on the boats on this site. Good choice on engine too, I first started mine 6 weeks ago and it already has 41 hours on it and keeps getting better.
Re: Mikem59 FS18 Build
Posted: Fri May 12, 2017 9:04 am
by pee wee
Very nice, congratulations! It sounds like you picked just the right boat for your situation, hope you have lots of great adventures in her.
Re: Mikem59 FS18 Build
Posted: Fri May 12, 2017 8:44 pm
by Dutch1
Outstanding! Congrats Mike! She looks great and thanks for the details!
Steve
Re: Mikem59 FS18 Build
Posted: Fri May 12, 2017 9:35 pm
by Mikem59
Thanks all! Hope to get her back out over the weekend and do a little more testing her performance.
Re: Mikem59 FS18 Build
Posted: Fri May 12, 2017 11:00 pm
by TomW1
Well just checked the weather and it looked like you have a nice week end with the temps in the mid 80's. Go catch some fish.
And have a great week end.
Re: Mikem59 FS18 Build
Posted: Sun May 14, 2017 6:07 am
by glossieblack
Re: Mikem59 FS18 Build
Posted: Sun May 14, 2017 4:07 pm
by Mikem59
My son and I want back out yesterday to do some more exploring and testing. TomW1 - as you noted, had great weather. However, as can be expected, the wind was blowing harder than the marine forecast called for, but much better than Thursday's inaugural trip.
I don't have any pics, but wanted to report out on some other handling aspects of my FS18. Got a chance to pole her around while standing on a Yeti. The boat poles super easily. I haven't poled a boat in over 6 years and that was when I had a Caronlina Skiff J16 and then a 17" Express aluminum boat. This experience was far better as I was able to control and steer much easier. However, I have an old fiberglass 18' Stiffy Push Pole. I think I'd like to upgrade in length and the lighter graphite sometime soon as it would be nice to have a few extra feet of pole to move the boat, and the lighter weight would be nice too.
We poled around on a very shallow flat and got up into easily 6" of water with no issues. It looks like I'm drafting about 5 to 5 1/2". I'll add that my son was a bit nervous with Dad poling from atop a Yeti cooler, and, I'll admit it is not the most stable platform as it does want to start to rock when you try to make a hard push. But, today was just an opportunity to test her out anyway.
Also, when running the boat, I have the motor on the 3rd hole for the trim. At this hole and with the jack plate all the way down, the cavitation plate is about 1" below the hull. Hole shot is no problem whatsoever. I may try the 4th hole to see what difference that may make on the holeshot and boat speed. All I can say is, the boat pops up on plane almost instantly. Makes me wonder if the trim tabs were necessary. But, on the 4th hole the bow may raise up more on holeshot and give them an opportunity to be useful. I lowered them a little and that quickly pushed the nose down. No doubt they'll do the job. I also had them down for a hole shot, and had the tiller turned, not a good idea
More to learn on how to use these, but certainly for holeshot, need to be pointed straight ahead.
Another thing I've identified from my build would be the drain holes, I always thought, looking at other builds that the holes at the bottom of the bulkheads looked awfully big. I believe I drilled mine to a 3/8", they need to be bigger. Luckily, I have some room to ream them out bigger. Thankfully, I'm learning this while washing it, it certainly holds water too long.
Lastly, the trip out didn't yield any fish, didn't even spot a redfish, but plenty of bait. There's always next time!
Re: Mikem59 FS18 Build
Posted: Sun May 14, 2017 9:44 pm
by seaslug
As you're aware, I've followed your build from the beginning and it's great to see the boat successfully launched. Your boat came out fantastic, and if you think it poled well standing on a cooler, you'll be blown away when you get your poling platform installed. I pole mine for hours on end and you will not find another boat that poles as well. Congratulations on your launch, now go sight fish some Reds.
Re: Mikem59 FS18 Build
Posted: Sun May 14, 2017 10:02 pm
by Newt
Mikem59 wrote: ↑Sun May 14, 2017 4:07 pm
My son and I want back out yesterday to do some more exploring and testing. TomW1 - as you noted, had great weather. However, as can be expected, the wind was blowing harder than the marine forecast called for, but much better than Thursday's inaugural trip.
I don't have any pics, but wanted to report out on some other handling aspects of my FS18. Got a chance to pole her around while standing on a Yeti. The boat poles super easily. I haven't poled a boat in over 6 years and that was when I had a Caronlina Skiff J16 and then a 17" Express aluminum boat. This experience was far better as I was able to control and steer much easier. However, I have an old fiberglass 18' Stiffy Push Pole. I think I'd like to upgrade in length and the lighter graphite sometime soon as it would be nice to have a few extra feet of pole to move the boat, and the lighter weight would be nice too.
We poled around on a very shallow flat and got up into easily 6" of water with no issues. It looks like I'm drafting about 5 to 5 1/2". I'll add that my son was a bit nervous with Dad poling from atop a Yeti cooler, and, I'll admit it is not the most stable platform as it does want to start to rock when you try to make a hard push. But, today was just an opportunity to test her out anyway.
Also, when running the boat, I have the motor on the 3rd hole for the trim. At this hole and with the jack plate all the way down, the cavitation plate is about 1" below the hull. Hole shot is no problem whatsoever. I may try the 4th hole to see what difference that may make on the holeshot and boat speed. All I can say is, the boat pops up on plane almost instantly. Makes me wonder if the trim tabs were necessary. But, on the 4th hole the bow may raise up more on holeshot and give them an opportunity to be useful. I lowered them a little and that quickly pushed the nose down. No doubt they'll do the job. I also had them down for a hole shot, and
had the tiller turned, not a good idea More to learn on how to use these, but certainly for holeshot, need to be pointed straight ahead.
Another thing I've identified from my build would be the drain holes, I always thought, looking at other builds that the holes at the bottom of the bulkheads looked awfully big. I believe I drilled mine to a 3/8", they need to be bigger. Luckily, I have some room to ream them out bigger. Thankfully, I'm learning this while washing it, it certainly holds water too long.
Lastly, the trip out didn't yield any fish, didn't even spot a redfish, but plenty of bait. There's always next time!
If you're in real shallow water and can't get up, you can sometimes make a hard turn and ride your wake up. The boat leaning raises the prop enough to get some water.
Newt
Re: Mikem59 FS18 Build
Posted: Mon May 15, 2017 9:24 pm
by Mikem59
Seaslug - Thanks for the compliment and the comment on how well she'll pole once I get a platform installed. Makes me excited all over again to hit that milestone. What length push pole are you using, and yes, can't wait to sight fish for those reds!
Newt - yes, I'm familiar with that to get up on plane in shallow water. But that certainly wasn't my intent at that moment
Thanks
I'll add that with my son sitting in the center of the boat, that blocked my immediate visibility in front, and I'll be darned if I didn't center punch a crab trap buoy. Needless to say, the stock aluminum prop with just two trips out is already looking like hammered crap.
I've read mixed reviews on other forums about putting a stainless prop on the 20hp, but down here in this mix of mud and shell, I don't think I have much choice. Would like to get a little more time with this prop before I decide on what pitch to go to when I purchase another prop.
More to come.
Re: Mikem59 FS18 Build
Posted: Mon May 15, 2017 9:34 pm
by Aripeka Angler
Great report on the launch! I was especially interested in your take on trim tabs and cockpit drains.
Very nice work!
Re: Mikem59 FS18 Build
Posted: Mon May 15, 2017 9:43 pm
by MrPaul
Congrats! She sure came out pretty
. and with that gas tank you can probably get to Cancun and back.
Re: Mikem59 FS18 Build
Posted: Mon May 15, 2017 11:10 pm
by seaslug
Mikem, I have a 3 piece 17' pole I found on craigslist cheap. The length has worked out fine for me because 90% of my local fishing is in 16" or less, in fact we've had such low tides the past few months, I'm usually in 4"-6", and since it's mostly soft mud bottom, I'm actually pushing the boat through the mud sometimes. If I ever find a deal on a longer pole I would want one 19' for my local waters, and possibly longer if I were to go to the keys or someplace that I could be poling in 3' or more.
Re: Mikem59 FS18 Build
Posted: Mon May 15, 2017 11:29 pm
by Mikem59
Thanks Seaslug for the quick reply. I'm leaning towards a 3 piece graphite Stiffy that will measure 21'. I may be poling in 1' or less but in soft mud. The pole will usually penetrate up to 2'. Ask, would like to make up for that lost 2' and with the effort to retrieve it will want a lighter pole.
Ha Mr. Paul, I may not go to Cancun, but maybe I'll make a trip down intercoastal to say Chockaloskee in the Everglades
Aripeka, I'll keep you posted as I experiment on the trim tabs.
Re: Mikem59 FS18 Build
Posted: Tue May 16, 2017 1:37 am
by TomW1
Mike let me know what motor and prop you have on now and I'll run it through my calculators to come up with a SS prop for you. I'm working with someone else right now on his 20HP motor. Also do you have a jack plate and what is the weight of your boat when it leaves the dock, that means people, fuel, motor, gear(cooler, beer and tackle) and the boat its self with trim tabs etc.
Re: Mikem59 FS18 Build
Posted: Tue May 16, 2017 7:18 pm
by Mikem59
TomW1, I don't have an exact weight, so here's my guesstimate based on the following assumptions
Hull est. = 275 lbs.
engine = 108
Jack plate = 23
Trim tabs = 14
fuel tank/hose = 12
fuel (8 gallons) = 49
battery = 53
2 persons = 425 (my son and I need to lose weight
)
+ cooler, drinks, ice, gear = 70
Total est. weight = 1029 lbs.
The stock prop is a 3 X 9.25 X 10. I believe the max pitch for this motor is 11, but haven't confirmed. Using my Navionics GPS app on my iPhone, WOT was 24 mph. Don't know if changing the trim will get much more or not.
Hope this is a good start. If something looks off here let me know, and Thanks for your help!
Re: Mikem59 FS18 Build
Posted: Thu May 18, 2017 12:43 am
by TomW1
Mike I need one more thing. The brand of your motor and is it a four stroke or two stroke. This will let me look up it's gearbox ratio. It looks like you have a Suzuki 20 4-stroke with a max rpm of 6300 rpm's and a 2.08 gear ratio. Let me know if I'm wrong.
Thanks Tom
Re: Mikem59 FS18 Build
Posted: Thu May 18, 2017 9:10 am
by Noles309
The boat came out great! That is an awesome feeling for sure!
I would jack the motor up so the cav plate is at least 1" above the hull as a starting point. You have too much motor in the water. Most flats boats jack it up more than that. Power Tech ss props are awesome and really woke my boat up.
I'm going to build a jackplate to play with motor height on my GF16. Right now my motor is 1" above the bottom and I'm more looking for a little more speed but I know you Texas boys really need to run shallow.
Tie that yeti down and you will be golden for poling
Re: Mikem59 FS18 Build
Posted: Thu May 18, 2017 3:05 pm
by Mikem59
TomW1 wrote: ↑Thu May 18, 2017 12:43 am
Mike I need one more thing. The brand of your motor and is it a four stroke or two stroke. This will let me look up it's gearbox ratio. It looks like you have a Suzuki 20 4-stroke with a max rpm of 6300 rpm's and a 2.08 gear ratio. Let me know if I'm wrong.
Thanks Tom
Tom - you are correct.
Thanks,
Mike
Re: Mikem59 FS18 Build
Posted: Thu May 18, 2017 3:19 pm
by Mikem59
Gary,
Thanks for the input. I had a power tech SS prop on my Carolina Skiff years ago, and yes a great prop.
As for the cavitation plate height with all the travel I have with the Atlas Micro Jacker there is plenty of room to move the plate well above the keel, I haven't measured but it probably moves it 4" above. I'll need to check the actual height above and test it as well to see at what height it will cavitate.
And, yes if I get out again I'll tie that Yeti down. But with the dang wind down here lately I probably won't be getting out before I decide to run her in and get a poling platform installed. I really want a platform with an Oh Shit bar.
Thanks all!
Re: Mikem59 FS18 Build
Posted: Thu May 18, 2017 11:00 pm
by TomW1
Hi Mike here is the prop I would suggest for you to try. It is the Powertech SRA3 10" diameter by 10" pitch. It has 20 degrees rake and some cup. This will allow you to raise the motor higher. The caveat is that make sure your motor can take the 10" diameter prop. I never know from motor to motor how much distance the manufacturers allow between the shaft and the cavitation plate. It looks at sources I have that your Suzuki can take up to a 10 1/4" prop, but double check. You can contact Powertech at 318-688-1970 Prop is here
http://www.ptprop.com/index.php?page=sh ... &Itemid=46
Re: Mikem59 FS18 Build
Posted: Fri May 19, 2017 7:43 am
by Mikem59
Tom, Thanks for the follow-up info for the prop. I'll check the clearance for the prop this weekend, but I believe you are correct, I should be able to go up to as high as a 10 1/4".
By the way, other than having the durability of a stainless steel prop, what will this prop do performance wise? Speed increase? Better hole shot? WOT rpm's?
I'm not worried about speed, the 24 WOT I am currently getting is fine for what I will be doing with this boat, but am curious.
Thanks,
Mike
Re: Mikem59 FS18 Build
Posted: Fri May 19, 2017 8:29 pm
by Mikem59
TomW1,
Just to follow-up, from the shaft center to bottom of cavitation plate is 5 1/4". Assume with a 10" dia. Prop and a 1/2" clearance is plenty.
Thanks,
Mike
Re: Mikem59 FS18 Build
Posted: Sat May 20, 2017 12:44 am
by TomW1
HI Mike it will let you raise the motor higher. This is a bigger prop from what you have so whole shot may be lower but not by much, top end will probably be higher but again not by much. By raising the motor you may not see much difference at all except allowing you to get into shallower water.
Re: Mikem59 FS18 Build
Posted: Sun May 28, 2017 5:54 pm
by K2FS18
TomW1 wrote: ↑Thu May 18, 2017 11:00 pm
Hi Mike here is the prop I would suggest for you to try. It is the Powertech SRA3 10" diameter by 10" pitch. It has 20 degrees rake and some cup. This will allow you to raise the motor higher. The caveat is that make sure your motor can take the 10" diameter prop. I never know from motor to motor how much distance the manufacturers allow between the shaft and the cavitation plate. It looks at sources I have that your Suzuki can take up to a 10 1/4" prop, but double check. You can contact Powertech at 318-688-1970 Prop is here
http://www.ptprop.com/index.php?page=sh ... &Itemid=46
Just curious, how does this let you raise the motor higher?
Re: Mikem59 FS18 Build
Posted: Mon May 29, 2017 12:18 am
by Newt
The cup holds the water better. A good reason to get a SS prop and use the OEM aluminum one for a spare.
Newt
Re: Mikem59 FS18 Build
Posted: Mon May 29, 2017 1:59 pm
by TomW1
Newt is correct by adding cup to a propeller the water holds on to the prop longer. This reduces the chance of ventilation as you raise the prop. So raise the motor until you do not get ventilation on normal turns at speed, if you ventilate on emergency turns no big deal. If you want lower it a 1/4" if it does ventilate on emergency turns.
Tom
Re: Mikem59 FS18 Build
Posted: Thu Jun 01, 2017 8:50 pm
by Mikem59
TomW1,
Just to update you, after talking with PowerTech folks I opted for the SRT3 11 pitch prop. Got it installed but haven't had a chance to test yet. Will update when I get some time on it.
Also, hope to take her in to get the poling platform installed next week. More to come on that as well.
Hope everyone is either enjoying their builds or making great progress.
Mike
Re: Mikem59 FS18 Build
Posted: Wed Aug 09, 2017 11:23 pm
by Mikem59
Wow, don't post any updates in awhile and my build thread was already back to page 3. I have been back to check in on some of the other builds and there sure has been a lot of activity by some builders. Seeing some really nice looking builds. I'm already envious of Aripeka Angler's FS18 Build. Some really awesome stuff.
It's taken me awhile to load up my latest photos and updates. So, here are some few while up on Lake Sam Rayburn. Finally got the wife to venture out. She was nervous due to the size and narrow beam, but as you'll see, she quickly overcame her fears and got pretty comfortable.
Since those pics, I've also mounted my platforms. Had a local gentleman build my platforms, all aluminum and then I applied some Seadek. Overall, very pleased, haven't been out in her as yet with the platforms, but may be able to do that this upcoming weekend. Need the rain to stop!
On to the pics:

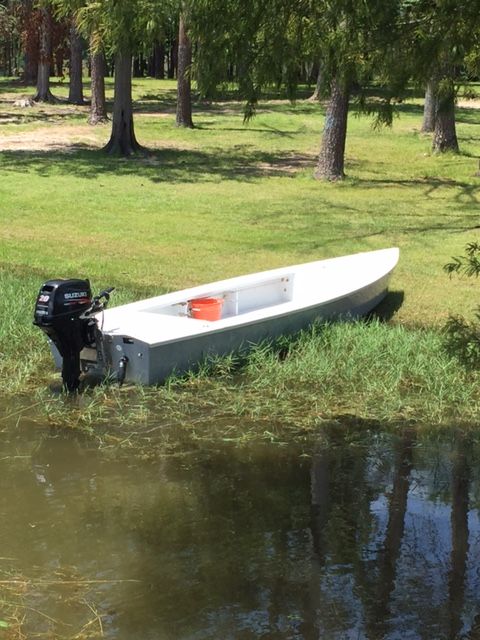
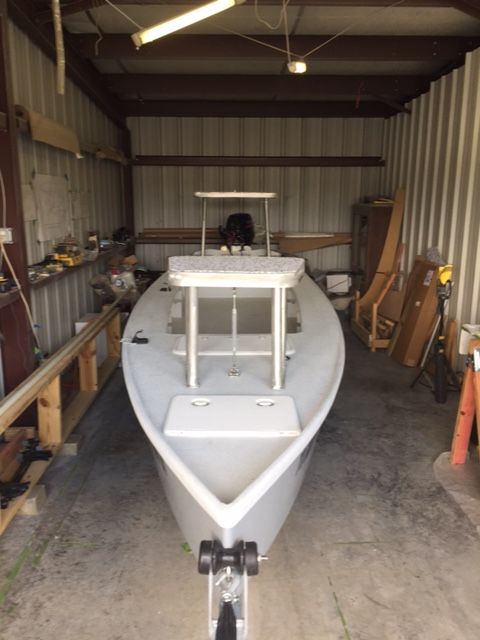
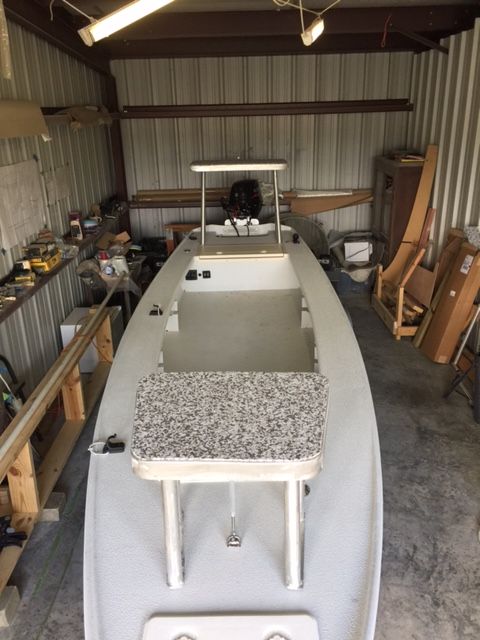
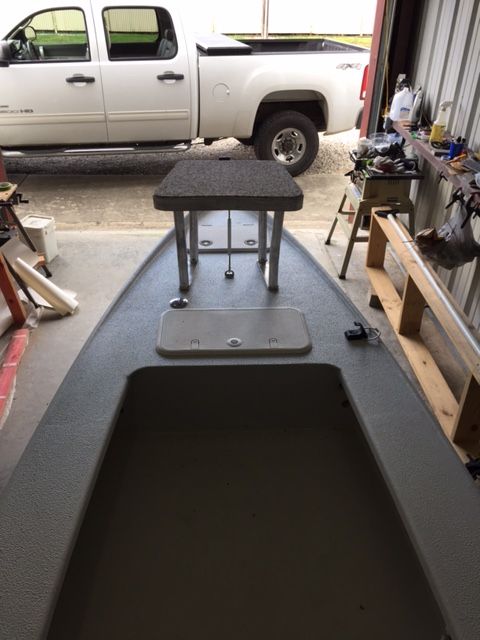
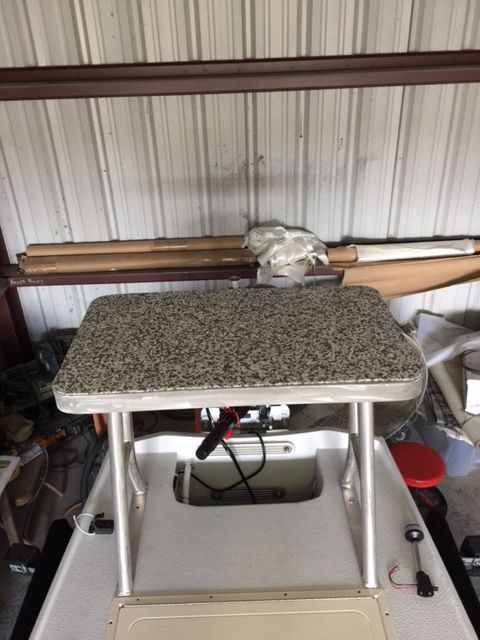
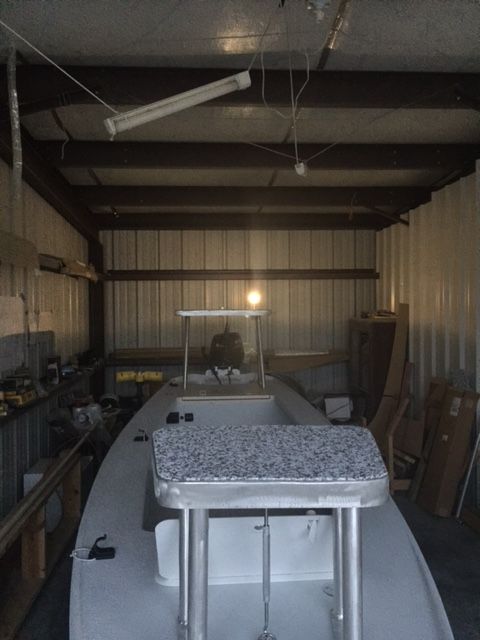
I'll close with saying I'll be making a few more tweaks, but don't we all. I'll need to add some straps to hold rods in place and I'm going to do another coat of the Kiwi Grip in the cockpit area as my son and wife both agree it needs the more aggressive texture that I had done on the casting deck, gunwales, and transom deck. And, not sure if it was a build on this site or on microskiff, but want to do a paranoid braid on the main posts for the rear poling platform.
Re: Mikem59 FS18 Build
Posted: Thu Aug 10, 2017 7:53 am
by Jeff
Mikem59, Nice FS18!! Well done and she is already catching fish!! Jeff
Re: Mikem59 FS18 Build
Posted: Thu Aug 10, 2017 7:53 am
by Jeff
Mikem59, Nice FS18!! Well done and she is already catching fish!! Jeff
Re: Mikem59 FS18 Build
Posted: Thu Aug 10, 2017 3:09 pm
by TomW1
Do you have some prop numbers I would like to know how the SRT3 11 pitch is doing for you. Top rpm's, etc. At 9.5 inch diameter you can go to the 11 pitch. How high have you been able to raise it up with your jack plate. How is your ventilation on turns. This is why I don't always go with the techs at PowerTech, our boats are much lighter than most and we can be more aggressive with our propellers. Thus my 10 x 10 was based on the weight of your FS18. I have talked to some of Techs at PowerTech and we always come up with the same props or alternatives when we take into account the weight factor, after a little bantering back and forth.
There props are top notch.
Tom
Re: Mikem59 FS18 Build
Posted: Thu Aug 10, 2017 3:26 pm
by Rollbar
Just a FYI~IMHO. Get extra cup and it will really help. I use a 4blade no cup which is about the same for me, but a 3 blade extra cup is sweet.
Re: Mikem59 FS18 Build
Posted: Thu Aug 10, 2017 8:59 pm
by MrPaul
Always good luck when the wife catches fish on the first trip
Re: Mikem59 FS18 Build
Posted: Thu Aug 10, 2017 9:23 pm
by Mikem59
TomW1,
The SRT3 performed quite well. The hole shot is not as pronounced, but this FS18 hull gets on plane so quick I'm not worried at all. Already had to make a couple shallow water starts.
I'm definitely not hitting the rev limiter with the SRT3, but it seems to be in the proper operating range, I'm guessing I'm around 5900 to 6000 rpm. And, I did gain 3 mph. At WOT, I'm hitting 27 now. I'm pleased with the performance but have a couple of really good local folks that do prop work, may want to squeeze a little more out of her.
As for the Jack Plate, I've had her dang near all the way up with no cavitation issues. I'll need to take note of performance in the turns. And, get you more details on just how high the cavitation plate is when it's jacked all the way up.
As some of you here state as well as some others, adding some cup may be the ticket to really get the performance I'd like.
And, TomW1, thanks for the help, and the Powertech folks were very helpful but like you state, perhaps a bit conservative when the bumped me down to the SRT3.
Mike
Re: Mikem59 FS18 Build
Posted: Thu Aug 10, 2017 10:15 pm
by Newt
I've never had a SS prop with out cup.
Newt
Re: Mikem59 FS18 Build
Posted: Wed Jul 25, 2018 1:03 pm
by Mikem59
Hope you all don't mind posting a couple of pics showing the rub rail installed. I meant to post awhile back and had issues. And, currently, laid up recovering from knee surgery, so have some time on my hands. I installed a Taco rub rail. Picking a hot day and laying the rub rail on the concrete driveway made the install quite easy. Easy enough my wife was able to help with the install. Rub rail sure makes a nice addition and protects the underlying marine ply.
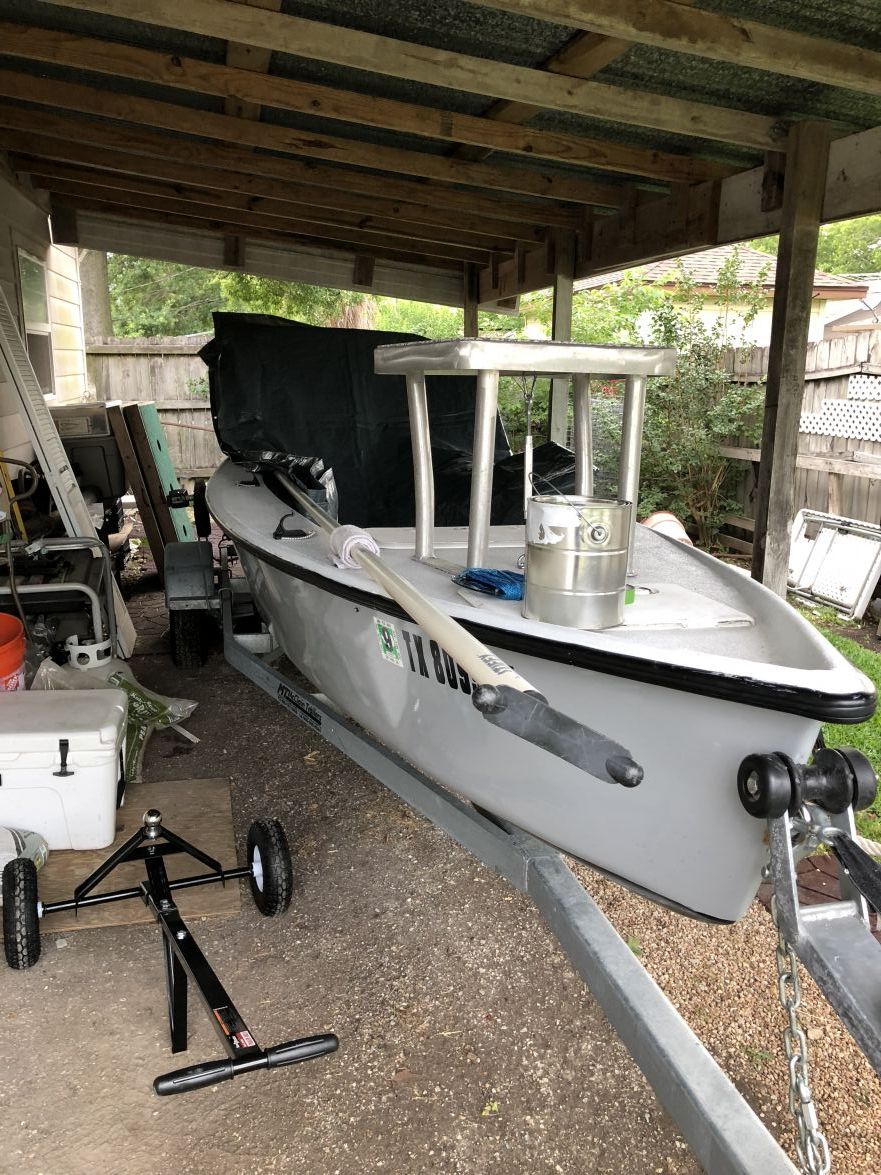
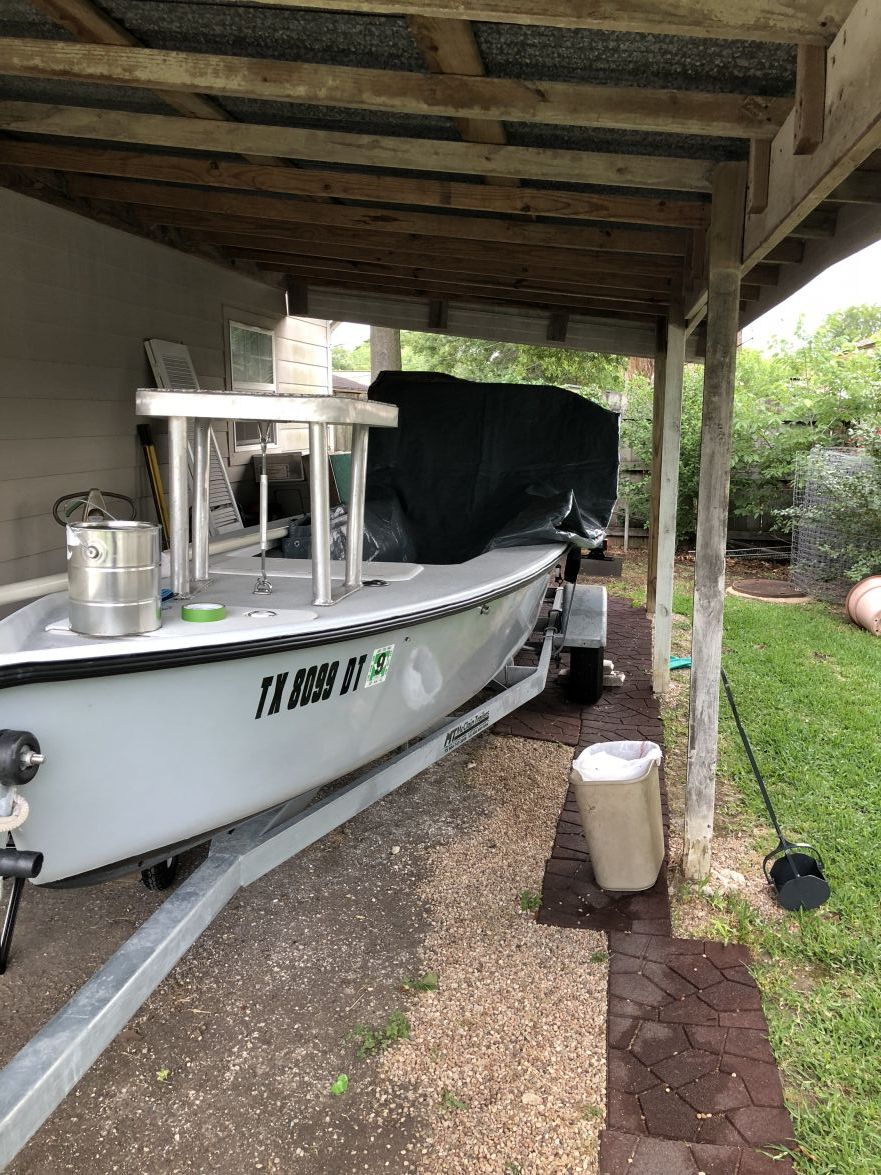
Re: Mikem59 FS18 Build
Posted: Wed Jul 25, 2018 3:46 pm
by Eric1
That looks good!
Re: Mikem59 FS18 Build
Posted: Wed Jul 25, 2018 9:45 pm
by Mikem59
Thanks Eric. I was pleased with how it looked once on. Certainly gave it more of the look of the production boats.