
AD 14 KIELGE

Re: AD 14 KIELGE
Happy Birthday Karl!!!! Jeff
Re: AD 14 KIELGE
Happy birthday, Karl!
-
Fuzz
- * Bateau Builder - Expert *

- Posts: 8939
- Joined: Tue Aug 02, 2011 4:23 am
- Location: Kasilof, Alaska
Re: AD 14 KIELGE
Karl the weather here is still not too cold, around 0c or 32f but most of the inshore fish have moved out to deeper water for the winter. Running very far offshore in our winter months can expose you to some pretty nasty weather so I will wait for spring. I am pulling the batteries and covering up the boats for winter.
Re: AD 14 KIELGE
Happy Belated Birthday Karl!!!
-
gonandkarl
- * Bateau Builder *

- Posts: 1202
- Joined: Sat Mar 16, 2013 10:25 am
- Location: Wels,Austria,Europe
Re: AD 14 KIELGE
Hi,
At last I can post again about my sailboat. I was busy this whole summer making 2 beds and 2 carry cots for my new grandchildren Rosa and Joseph who are 5 weeks today already and now it is time for me to turn to my sailboat again. I built a 3 metre long extension bar for the trailer for slipping in the shallow slip and I have practised pushing the trailer around a big shopping centre s parking lot after hours and I am confident that I can do it at the slip without any problem as well. This extension bar hides in the trailers tow bar while travelling from home to the lake where I just have to pull it out and lock it with 2 stainless steel bolts for slipping the boat app. 5 metres into the water. Today I also made an important update to my rudder hardware. I have 3 Gudgeons on my rudder and the matching Pintles at the transom. Whenever I go sailing I have to fit the rudder to the transom about 10 metres from the shore because at the shore it is to shallow and the rudder would touch the ground. Now hanging the rudder on the water was a permanent battle to get the 3 Gudgeons onto the Pintles . I attached now the middle and top Pintle 10 mm and 12 mm lower than they were until now. It is now easy to push the bottom Gudgeon a bit onto the pintle and then the middle and top ones as well. Most probably I am the only Adelie sailboat builder that did not fit Gudeons and pintles right at the begin a bit offset for easy hanging of the rudder. The difference between top Pintle ( 12 mm lower ) and the middle ( 10 mm lower ) enables me to hang the rudder already on the shore in the top 2 positions and then out on the lake lift it up again and lower it down so the rudder is held in all 3 attachment pints. All I have still to do is fill the old 8 holes in the transom with epoxy and give the transom a new coat of paint on both sides.
Greetings from Karl
-
Fuzz
- * Bateau Builder - Expert *
- Posts: 8939
- Joined: Tue Aug 02, 2011 4:23 am
- Location: Kasilof, Alaska
Re: AD 14 KIELGE
Sounds like a well thought out mod to the boat. The big thing is it is good to see you posting again. Congratulations with the new grandchildren.
-
glossieblack

- * Bateau Builder *
- Posts: 4107
- Joined: Wed Jan 02, 2013 1:28 pm
- Location: Australia
Re: AD 14 KIELGE
Thanks for the update Karl. Nice to know life's good for you. 
Currently building Jacques Mertens ST21 "Skinnydip". Boating adventures: Splash testing and using 'Skinnydip, as a basis of further building refinement; Adams 44’ sailing sloop "Great Sandy" (cruising and maintaining); Iain Oughtred Feather Pram "Mini Dip" (building); Jacques Mertens R13 "Wood Duck" (built and due for maintenance).
Re: AD 14 KIELGE
Nice Karl!! Great to hear from you!!! Jeff
-
gonandkarl
- * Bateau Builder *
- Posts: 1202
- Joined: Sat Mar 16, 2013 10:25 am
- Location: Wels,Austria,Europe
Re: AD 14 KIELGE
Hi,
Today I installed my outboard motor bracket which I bought 4 months ago. It had to swallow my pride to drill 4 holes into my lily white transom which I never wanted to have any holes. But this stainless steel bracket is a big improvement on my self made concoction which was just tied with lines to the pushpit doing its job but I could not get properly to the starboard transom cleat and there fore this new bracket. Thank God I have inspection holes near the transom through which I could tighten the 4 nuts lying on my stomak on the sole while the screws outside where held by pinch pliers.
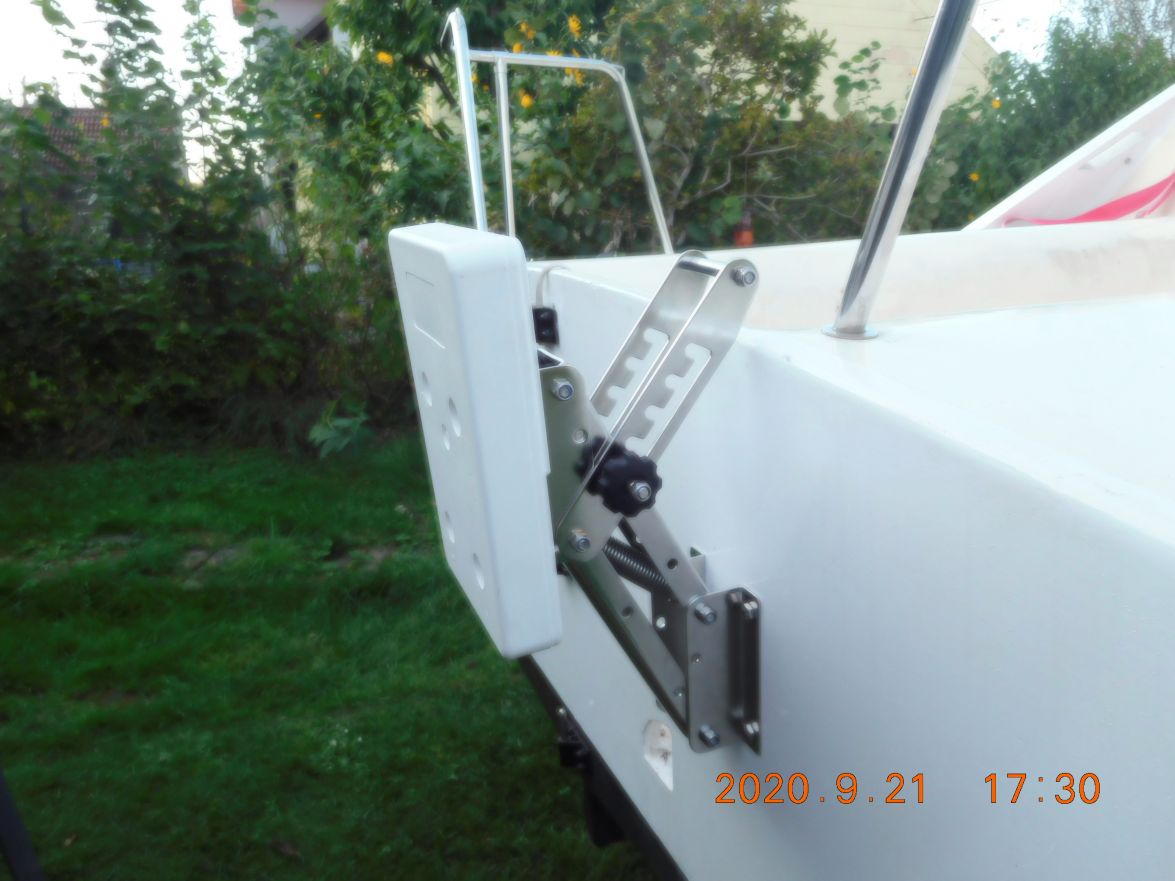
Next sail will be a bit easier as I only have to put the electric outboard motor to it and off I go.
Greetings from Karl
Today I installed my outboard motor bracket which I bought 4 months ago. It had to swallow my pride to drill 4 holes into my lily white transom which I never wanted to have any holes. But this stainless steel bracket is a big improvement on my self made concoction which was just tied with lines to the pushpit doing its job but I could not get properly to the starboard transom cleat and there fore this new bracket. Thank God I have inspection holes near the transom through which I could tighten the 4 nuts lying on my stomak on the sole while the screws outside where held by pinch pliers.
Next sail will be a bit easier as I only have to put the electric outboard motor to it and off I go.
Greetings from Karl
Who is online
Users browsing this forum: No registered users and 7 guests