Fred In Wisc CC14 Cheap Canoe at 80% Scale

To help other builders, please list the boat you are building in the Thread Subject -- and to conserve space, please limit your posting to one thread per boat.

Please feel free to use the gallery to display multiple images of your progress.
Fred in Wisc
* Bateau Builder *
* Bateau Builder *
Posts: 972
Joined: Tue May 02, 2006 8:54 pm
Location: SE WI
Location: Milwaukee WI

Re: Fred In Wisc CC14 Cheap Canoe at 80% Scale

Post by Fred in Wisc »

Got the exterior sanded down, and the extra cloth removed. It needs a little fairing. I think it's gonna get one go-over on that and then call it good. Our camping trip is on the 28th so I need to get this wrapped up.

Used a laser to mark a center line for a keel. Then marked reference points on the laser line and connected them to get a center line. I'm planning a full length or near full length one in the center and then a pair of 4' long ones about 6" outboard of that. That should not only aid in tracking, but also protect the bottom outer edges in beaching and parking lots, and should add some stiffness to the bottom. It seems real strong, but it's got some flex since the core is only 2.5mm thick.

Image

Image

Bottom will be graphite coated, exterior painted, interior, gunwales and decks bright finished.

Drilled the bow and stern for some painter lines. Didn't want exposed hardware, and there wasn't an easy way to attach it anyway with the front and rear areas sealed and foamed. Measured twice, predrilled with a small bit, eyeballed up for symmetry, then drilled with a big step drill.

Image

Image
Last edited by Fred in Wisc on Fri Feb 12, 2016 5:11 pm, edited 1 time in total.

User avatar
Cracker Larry
* Bateau Builder - Expert *
Posts: 22491
Joined: Fri Mar 11, 2005 3:39 pm
Location: Savannah, GA

Re: Fred In Wisc CC14 Cheap Canoe at 80% Scale

Post by Cracker Larry »

8)
Completed GF12 X 2, GF16, OD18, FS18, GF5, GF18, CL6
"Ships are the nearest things to dreams that hands have ever made." -Robert N. Rose

Fred in Wisc
* Bateau Builder *
* Bateau Builder *
Posts: 972
Joined: Tue May 02, 2006 8:54 pm
Location: SE WI
Location: Milwaukee WI

Re: Fred In Wisc CC14 Cheap Canoe at 80% Scale

Post by Fred in Wisc »

Some triple keel runner action with a creative clamping arrangement. The bottom is supported from beneath at 4 points along the centerline to keep it from deforming from the downward pressure of the clamps.

Drew a line 3/4" to each side of the center line for centering the keel, then a pair of them 5" off to each side for the side runners. Double checked them for parallellness (yeah, that ain't really a word). Marked each runner for front to rear alignment, they are all centered.

The runners are clear cedar 7/8 tall and 3/4 wide, cut with a 20 degree taper on each side to approx. a 5/16 wide tip, then sanded lightly to round them off. Ends were trimmed with a jig on the table saw and then sanded round. The little flats on the ends will be faired into the bottom with a dab of wood flour putty. A denser pine would have probably been a better choice for these, but I had some nice cedar in stock and only a small amount of nice long clear pine, which is going to form the inner rub rails.

Precoated the glue side with neat epoxy, then mixed wood flour into the rest until it was like stiff frosting, spread a layer on the runners and set them in place. Clamped it down lightly. Had some spots where there were little gaps between the hull and runners, filled in what I could without pushing them out of place. Will put a little fillet on the edges when taping, so that should fill in anything I missed. I want those operations to be wet on wet so I don't have to sand in between.

I was careful to scrape off the excess glue that squeezed out so I won't have to sand it off tonight when I glass tape over them. Hopefully I can tape them and lay down the first coat or 2 of bottom graphite wet on wet. No fairing on that, I'll just work as neat as I can and then the rocks in the river will wear off all the high spots eventually.............

Image

Image

Fred in Wisc
* Bateau Builder *
* Bateau Builder *
Posts: 972
Joined: Tue May 02, 2006 8:54 pm
Location: SE WI
Location: Milwaukee WI

Re: Fred In Wisc CC14 Cheap Canoe at 80% Scale

Post by Fred in Wisc »

Taped the runners last night. It took a lot longer than I had anticipated. Pretty tired this morning, was up til 2 finishing it up.

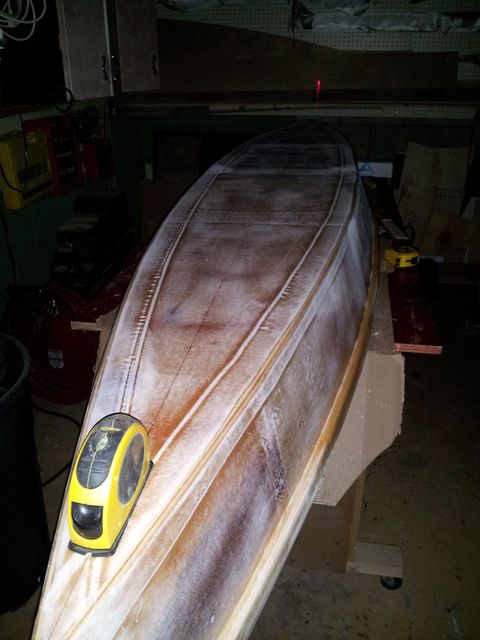
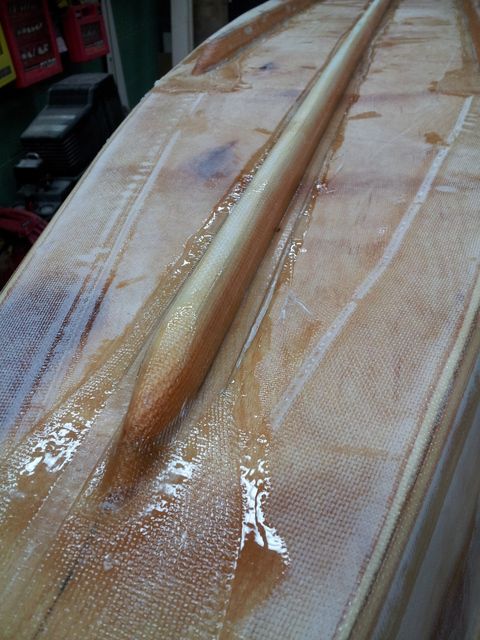
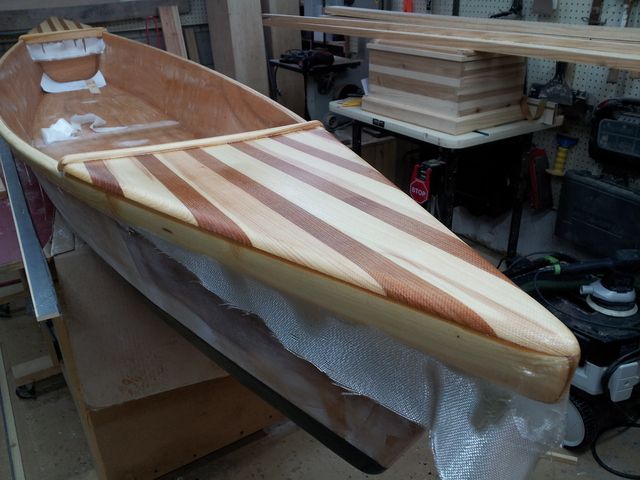
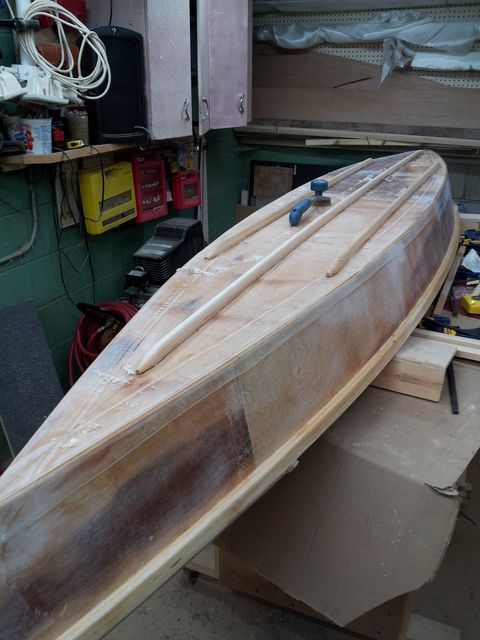
Used the scraper to clean up some small bits of glue sticking out from under the runners. The bottom of the boat is tremendously stiffer with the runners glued on. Precoated the runners since cedar seems to suck up a fair amount of epoxy. Added little blobs of wood flour putty to the runner ends since they have a little flat on then that will need to blend in to the bottom.

Image

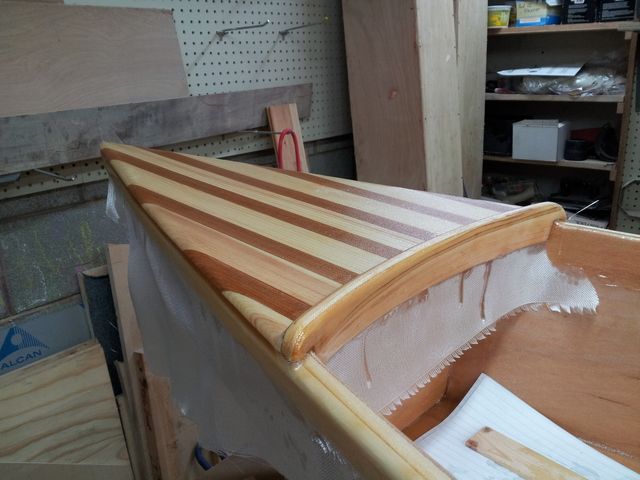
I had some 6" woven tape left over from another project, so I cut that down the center into 3" tape.

Image

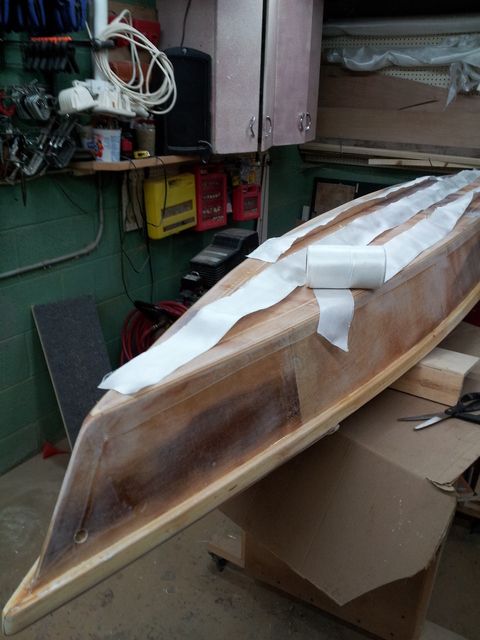
Foolishly, I thought that tape would wet out and drop pretty nicely into that square corner with a little prodding, so I didn't fillet the runners. That was not the case. The tape only overlapped about 3/8" onto the bottom of the boat and with the slipperiness of the epoxy and the springiness of the tape, it kept pulling away and forming an air gap. So I had to keep going back and stick it back down. That worked pretty well as the epoxy started to set up, but it required a fair amount of time.

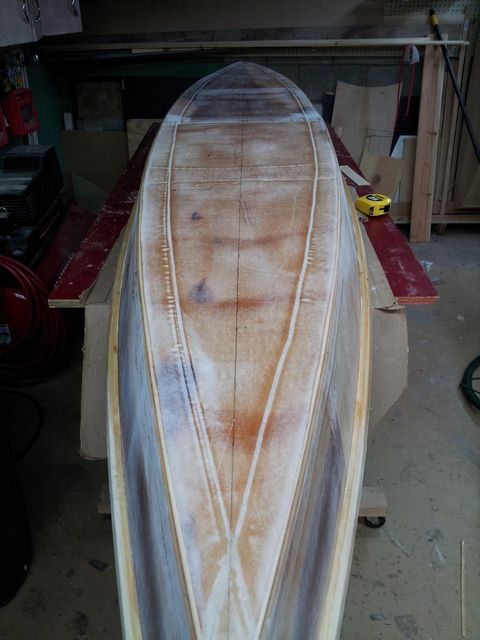
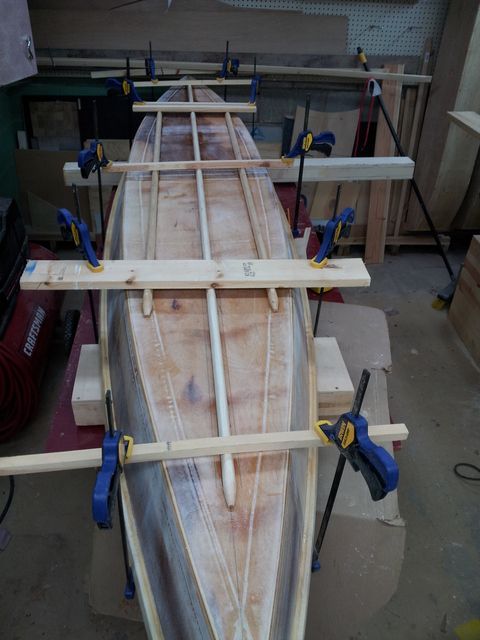
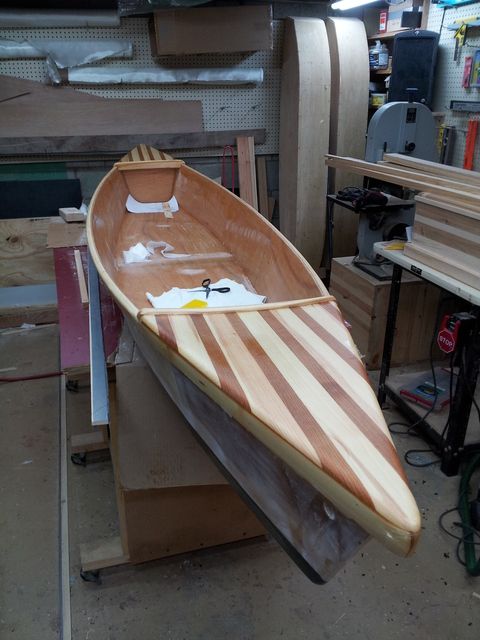
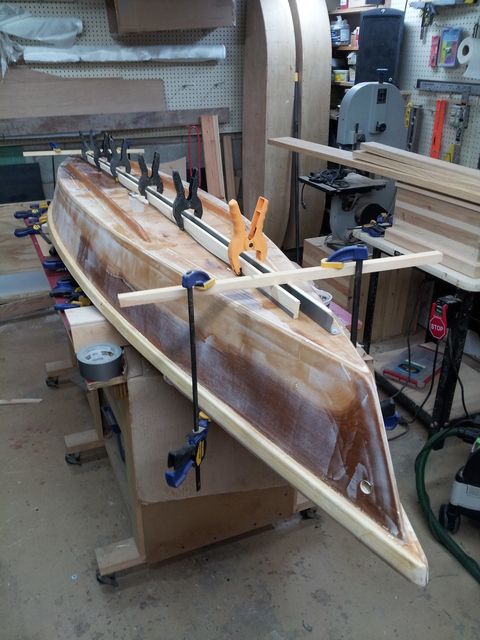
I clamped the long center one down. Took a couple narrow boards, covered in duct tape, slid them down the sides of the runner to pull it tight, then clamped them every 16" or so, and downward at the ends. I used a similar method on the rub rails and it worked real well. We'll see how this works once I pull the clamps off.

Image

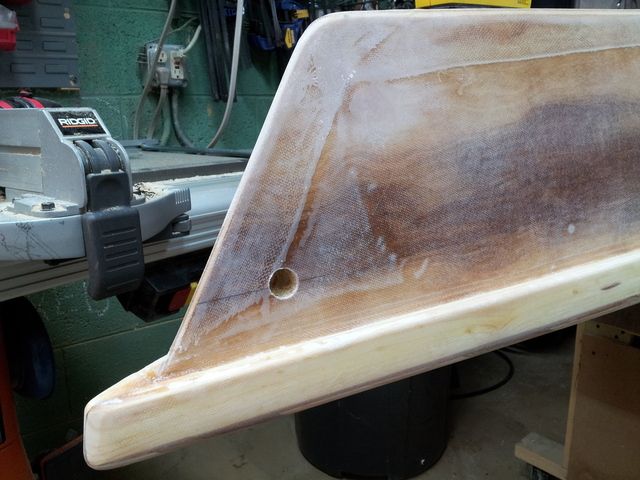
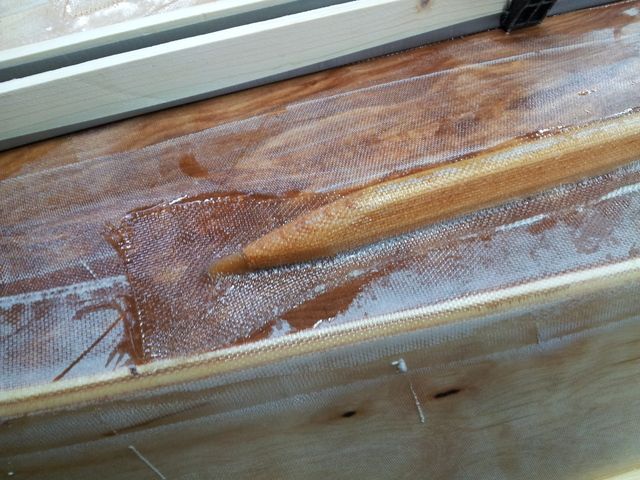
In retrospect, I should have used some little fillets, and I should have used 2 layers of 4oz cloth cut on a bias. With that I could have brushed epoxy on the runners, let it soak in a little, and just stuck the cloth down. Press down, add a little epoxy where needed, and press on the second layer. that would have conformed a lot better and been a bunch faster to do. Either that or I should have vacuum bagged it, but I didn't want to run the pump so late at night (I don't have a vacuum reservoir so I have to run the pump constantly and bleed air in after the bag connection to control the amount of vacuum.) Live and learn.

Also mixed a little microballoon mix for fairing and filled in the worst of the stuff on the sides. I tried to really use a minimum of material, usually I end up putting on too much and then spending way too much time sanding it back off.

Checked on it this morning, the 2 side runners look pretty good, just a few small bubbles here and there. Especially right at the tip of the runner, it seems to have lifted just a touch there. Looks like I left a flat at the top, should have rounded it off completely. That tape was stiffer than I remember. Left the center runner clamped, I don't want to pull off the tape since it's not completely cured yet.

Image

In other news, I had to let a boat go yesterday. I had build a Swift Canoe about 9-10 years ago. It's scaled down, 12' long. Been a great little boat for rowing and fishing, but with 2 new boats this summer my wife is reaching the BSAT (Boat Saturation Anger Threshold). It's made from exterior plywood, all cloth and epoxy encapsulated, and has been stored outside. Still in pretty remarkable shape structurally - needs paint badly and a bunch of nicks and scratches fixed but solid as a rock. Anyway, I have a LOT of hours tied up in it, so it didn't feel right selling it. I gave it to a good friend. He's the one that just build the CC14 for his son (See pics a page or 2 ago on this thread- the boy sure gets a lot of compliments and inquiries on where he got it out on the river). He also spends a chunk of time reloading all my ammo (thanks Mark!). He's going to use it as is for the now, but is planning to cut it lengthwise and widen it a foot or so and refinish it next year. That should make a dandy duck hunting/ fishing rig, and I think it's a real cool project.

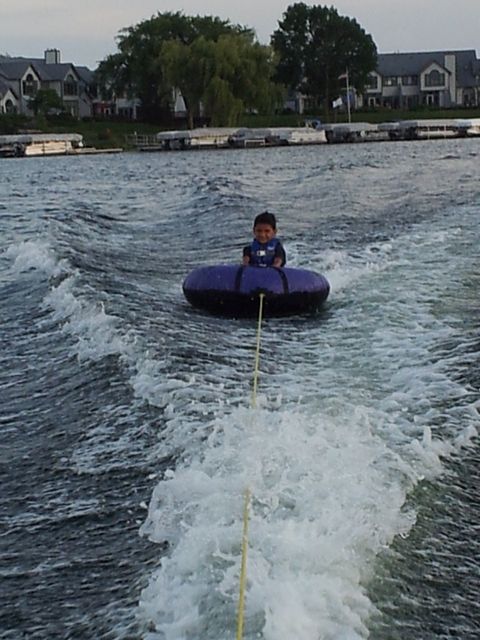
Took the family and a couple of neighbor kids tubing in my old 16' aluminum V that I built a new interior in earlier this summer. Worked out great and they had a blast. Great fun, but kept me from starting the boat work until late. totally worth it.

Image
Last edited by Fred in Wisc on Fri Aug 14, 2015 2:48 pm, edited 1 time in total.

Fred in Wisc
* Bateau Builder *
* Bateau Builder *
Posts: 972
Joined: Tue May 02, 2006 8:54 pm
Location: SE WI
Location: Milwaukee WI

Re: Fred In Wisc CC14 Cheap Canoe at 80% Scale

Post by Fred in Wisc »

Image

Stopped home at lunch and pulled the battens off the center runner. Turned out pretty well, just a few small areas that will need epoxy injected with a syringe (long thin bubbles along the flat spot on the tip of the runner). Duct tape is an excellent release agent.

terrulian
* Bateau Builder *
* Bateau Builder *
Posts: 3041
Joined: Sat Dec 07, 2013 11:29 am
Location: Marin County, CA
Contact:

Re: Fred In Wisc CC14 Cheap Canoe at 80% Scale

Post by terrulian »

Great pictures. Admirably precise work.
Just to be clear, you are using duct tape and not packing tape? I would not have thought duct tape would work so well.
Tony
Image

Fred in Wisc
* Bateau Builder *
* Bateau Builder *
Posts: 972
Joined: Tue May 02, 2006 8:54 pm
Location: SE WI
Location: Milwaukee WI

Re: Fred In Wisc CC14 Cheap Canoe at 80% Scale

Post by Fred in Wisc »

Yep, duct tape. This was "duck" brand. It's got a smooth shiny finish on the back. Better quality duct tape with the fabric back probably would stick like crazy. Go for the cheap stuff in this case.

jacquesmm
Site Admin
Site Admin
Posts: 28215
Joined: Wed Aug 14, 2002 1:00 am
Location: Florida USA
Contact:

Re: Fred In Wisc CC14 Cheap Canoe at 80% Scale

Post by jacquesmm »

Duct tape with brand name Duck tape: that solves all the spelling mistakes, duck or duct, it's always correct.
Jacques Mertens - Designer
http://boatbuildercentral.com

Fred in Wisc
* Bateau Builder *
* Bateau Builder *
Posts: 972
Joined: Tue May 02, 2006 8:54 pm
Location: SE WI
Location: Milwaukee WI

Re: Fred In Wisc CC14 Cheap Canoe at 80% Scale

Post by Fred in Wisc »

Drilled little holes in the air bubbles and injected epoxy slightly thickened with silica. Put another coat of epoxy on the runners to fill in the weave a bit. Let that set up for a couple hours.

Then rolled on a coat of graphite. Mixed it stiff- 3oz epoxy and about 1.5 oz graphite plus a little silica. The silica seems to keep stuff from running and dripping. Looks nice. No roller bits in it like my Hickman Sled had.

Image

These rollers work great, no shedding and gives good coverage. Leaves the finish a little orange peel like, but the epoxy flows out to pretty smooth after a few minutes if you don't roll it too thin. Much better than the ones I used last time that left little bits in the finish.

Image

Fred in Wisc
* Bateau Builder *
* Bateau Builder *
Posts: 972
Joined: Tue May 02, 2006 8:54 pm
Location: SE WI
Location: Milwaukee WI

Re: Fred In Wisc CC14 Cheap Canoe at 80% Scale

Post by Fred in Wisc »

Feels like I'm coming into the home stretch with this build now. Hoping to launch it at a family gathering on Saturday (without paint- that will happen next week before our camping trip).

Rolled on a second coat of graphite a few days ago. Pulled the tape and had a pretty nice sharp line. Forgot to take pics of that.

Rounded over the inner edges of the rubrails with a 1/4" bit. Did the curved trims at the ends of the cockpit with a 1/4" router on the inner sides and a plane and sandpaper on the outer sides. Sanded the strip plank decks smooth and rounded the edges with sandpaper (I had introduced some waves into them sanding off the previous glassing edges). All hand sanding, at this stage I didn't want to overdo it with the electric sander.

Then precut 4oz (I think, maybe it's 6) fabric for the rubrails and decks. Wet it out, the whole thing only took 7oz of epoxy. With cloth that light I found it worked best to brush the resin on to the area I was going to apply cloth, then lay the cloth into that thin layer. In most places it was enough to saturate the cloth, I went through with a small brush to saturate the spots that were still a little dry and to move the excess around so it wasn't too much in any one area. On the decks I used a scraper rather than a brush, it gives a more consistent finish and removes a bit more resin. Couldn't effectively scrape the rubrails, with the narrow strip of cloth, stuff wanted to move all over.

Image

Image

That epoxy coating really makes the grain in the strip planked decks wood pop. I'm very pleased with it. :D

Then this morning I trimmed off the excess cloth. The epoxy was still a little soft so it trimmed nicely with a utility knife blade. Tonight I'll have to sand the edges and corners, and fill a few small bubbles at the corners of the decks. Then probably a second coat of epoxy to fill the weave and get it ready for varnishing.

Image

Then a slotted inwale to give a place to tie down gear, seatback, and footrests. I'm planning to space it down a little from the top, just to keep the sheer pretty. I'm thinking something like this, but a little less blocky. I think this one looks a little bit too thick for my boat. (Photo from Sandy Point Boatworks)

Image
Last edited by Fred in Wisc on Tue Aug 18, 2015 3:01 pm, edited 1 time in total.

Post Reply

Who is online

Users browsing this forum: No registered users and 3 guests