
You are making good progress. Keep it up and post lots of pictures. Lots of boat porn is needed at this time
SOBX Little Big Boat GV15
-
Fuzz
- * Bateau Builder - Expert *

- Posts: 8938
- Joined: Tue Aug 02, 2011 4:23 am
- Location: Kasilof, Alaska
Re: SOBX Little Big Boat GV15
For I found you either need a lot of compressor or a large volume tank to run an air sander. I do not think that one will do the job. That said someone like AA would be able to give you the best answer.
You are making good progress. Keep it up and post lots of pictures. Lots of boat porn is needed at this time
You are making good progress. Keep it up and post lots of pictures. Lots of boat porn is needed at this time
Re: SOBX Little Big Boat GV15
That compressor will work with quite a few air sanders such as this one https://www.homedepot.com/p/Husky-6-in- ... /204671962
Requires 3 cfm at 90 psi. Since that's a 2 stage compressor you'll be fine running a lot of different air tools.
Requires 3 cfm at 90 psi. Since that's a 2 stage compressor you'll be fine running a lot of different air tools.
Eric (aka, piperdown)
"Give an Irishman lager for a month and he's a dead man. An Irishman's stomach is lined with copper, and the beer corrodes it. But whiskey polishes the copper and is the saving of him." --> Mark Twain
"Give an Irishman lager for a month and he's a dead man. An Irishman's stomach is lined with copper, and the beer corrodes it. But whiskey polishes the copper and is the saving of him." --> Mark Twain
-
Dan_Smullen
- * Bateau Builder *

- Posts: 912
- Joined: Tue Aug 13, 2019 3:02 pm
- Location: VA
Re: SOBX Little Big Boat GV15
My limited experience with a similar sized compressor is that it will work, but your compressor will run most of the time.
I started off with an inline sander, but quickly gave it up for a Dura Block. I pull the big boy sander out when I have larger clumps to get down quickly, but the dura block yields a much better result.
Harder on the shoulders obviously, but not near as obnoxious as the noise and the dust generated by the pneumatic sander.
-
Evan_Gatehouse

- Very Active Poster
- Posts: 3210
- Joined: Tue Aug 27, 2002 1:00 am
- Location: Vancouver, BC, Canada
Re: SOBX Little Big Boat GV15
Hi,
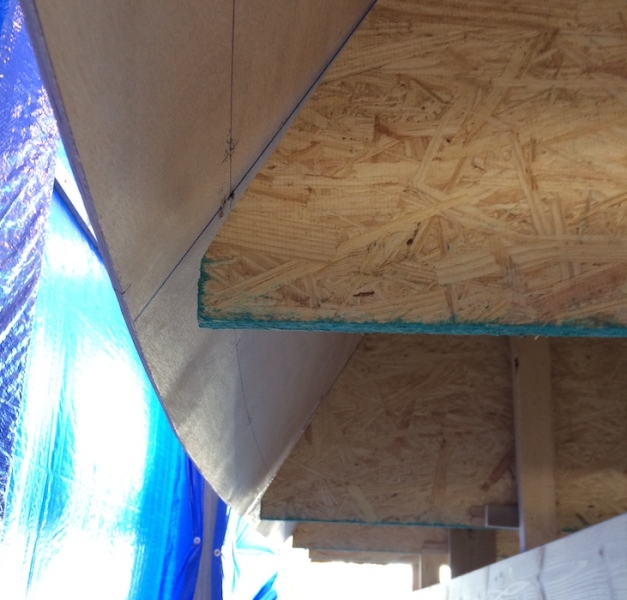
I think you've done the right thing relieving the tightness of the seam to eliminate any hook. Just look at in side view and see what it looks like. Is it a nice smooth curve? If so all good. If the curve looks lumpy then you should adjust a bit.
I think you've done the right thing relieving the tightness of the seam to eliminate any hook. Just look at in side view and see what it looks like. Is it a nice smooth curve? If so all good. If the curve looks lumpy then you should adjust a bit.
designer: FB11/GV10,11,13/ HMD18/
SK17,MM21/MT24
SK17,MM21/MT24
-
BrianC

- * Bateau Builder *
- Posts: 376
- Joined: Tue Dec 01, 2015 11:10 am
- Location: Cedar Point, NC
- Contact:
Re: SOBX Little Big Boat GV15
Before I describe today’s efforts, I want to discuss how the panels are fixed to one another. The plans don’t call for the use of any epoxy+wood flour glue to be applied to the outsides of the seams. Rather, it calls for the application of small squares of fiberglass at intervals along the seams followed by zip tie removal and application of the first fiberglass tape layer over the un-filled and un-sanded panel seams. This is in contrast to recent builds on this forum that use epoxy+wood flour glue applied to all seams between the zip ties, followed by a second application of glue after the zip ties are removed. Then, only after the seams are smoothed and rounded, the first tape layer applied.
My guess it that methods have evolved since since the plans for the GV15 were drafted back in 2001 so I’ve decided to follow the method more commonly used on builds seen in this forum.
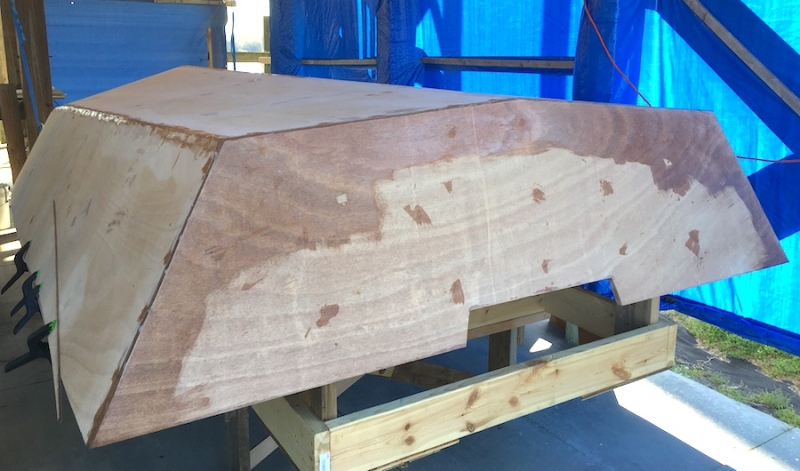
I finished stitching up the hull panels today. After tightening up all the zip ties, there was a decided wobble at the shear line in the region of frames 2-4.

Also, there were big gaps between the side panels and the molds, particularly at mold #1 where the gap was about 3-4”.
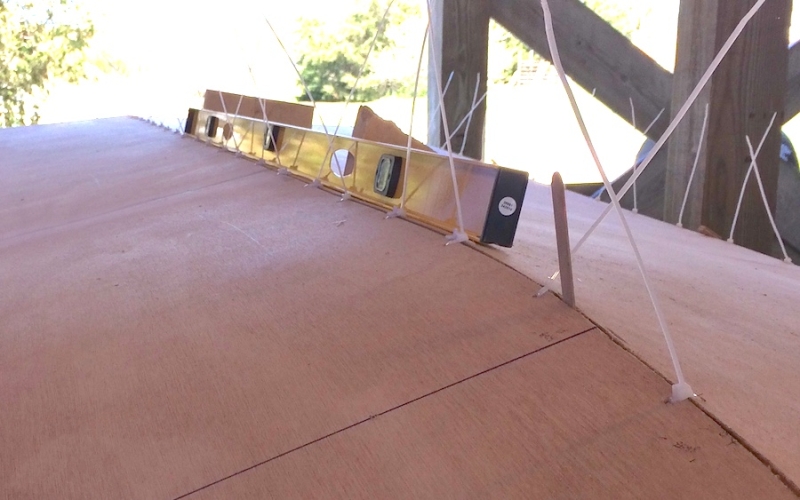
I tried a few things like clamping battens along the shear line. Nothing seemed to work until I tried lifting the corners of the bow (the points where the hull bottom and side panels come together at the shear). Lifting these points brought the side panels in against the molds. I added two ~2’ sections of 2”x2” underneath the bow corners, and running back along the chine seam, to distribute the lifting force over more area and rigged several ratchet straps to the ends of the 2”x2”s. I then used the laser level to ensure that the bow support straps were lifting symmetrically. You can see the strap hooks on the end of the 2”x2”s and the red laser line in this photo:
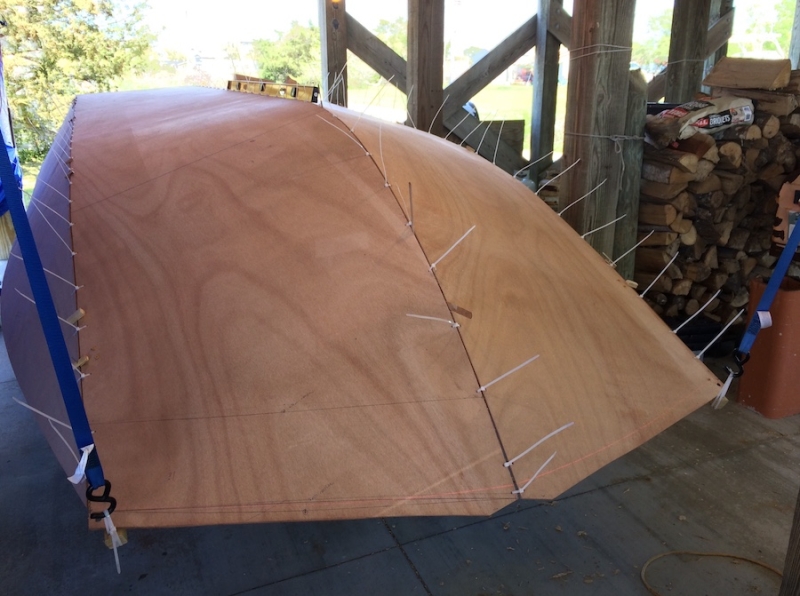
After adjustment of the bow support straps, the gaps between the side panels and molds was greatly reduced and the shear wobble was almost fully eliminated. Clamping a batten of scrap plywood to the shear line took care of the rest of it.
I taped the undersides of the keel and chine seams with painter’s tape so that the epoxy glue wouldn’t squeeze through and create a mess requiring lots of grinding and sanding. In this photo, you can also see the spring clamps holding the shear batten in place.
I did a last check for any hook before applying glue - no gaps under a 5’ beam level placed on the forward part of the flat section of the keel (frames 2-4).
Here is the hull all stitched and with the first application of glue between the zip ties.
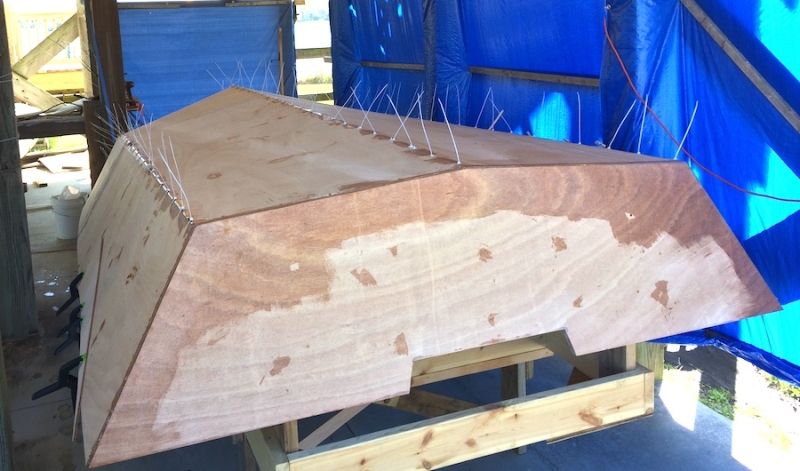
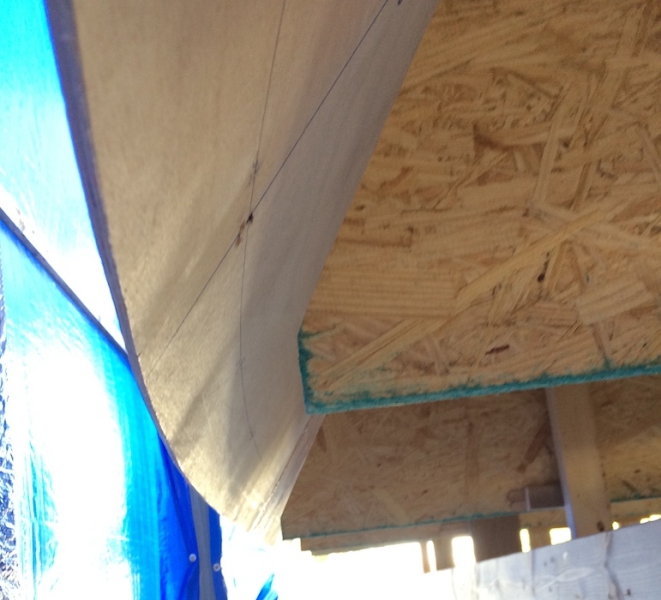
The keel seam is flat and level relative to the sole baseline.
One concern I have is the strength of the seams near the bow. The panel have quite a bit of bend in this area and I'm a bit worried the seam might 'pop' when I remove the zip ties. Should I add some fiberglass tabbing to this area before I remove the zip ties or am I worrying needlessly?
My guess it that methods have evolved since since the plans for the GV15 were drafted back in 2001 so I’ve decided to follow the method more commonly used on builds seen in this forum.
I finished stitching up the hull panels today. After tightening up all the zip ties, there was a decided wobble at the shear line in the region of frames 2-4.
Also, there were big gaps between the side panels and the molds, particularly at mold #1 where the gap was about 3-4”.
I tried a few things like clamping battens along the shear line. Nothing seemed to work until I tried lifting the corners of the bow (the points where the hull bottom and side panels come together at the shear). Lifting these points brought the side panels in against the molds. I added two ~2’ sections of 2”x2” underneath the bow corners, and running back along the chine seam, to distribute the lifting force over more area and rigged several ratchet straps to the ends of the 2”x2”s. I then used the laser level to ensure that the bow support straps were lifting symmetrically. You can see the strap hooks on the end of the 2”x2”s and the red laser line in this photo:
After adjustment of the bow support straps, the gaps between the side panels and molds was greatly reduced and the shear wobble was almost fully eliminated. Clamping a batten of scrap plywood to the shear line took care of the rest of it.
I taped the undersides of the keel and chine seams with painter’s tape so that the epoxy glue wouldn’t squeeze through and create a mess requiring lots of grinding and sanding. In this photo, you can also see the spring clamps holding the shear batten in place.
I did a last check for any hook before applying glue - no gaps under a 5’ beam level placed on the forward part of the flat section of the keel (frames 2-4).
Here is the hull all stitched and with the first application of glue between the zip ties.
The keel seam is flat and level relative to the sole baseline.
One concern I have is the strength of the seams near the bow. The panel have quite a bit of bend in this area and I'm a bit worried the seam might 'pop' when I remove the zip ties. Should I add some fiberglass tabbing to this area before I remove the zip ties or am I worrying needlessly?
SK14 completed ——— GV15 under construction
"...there is nothing - absolutely nothing - half so much worth doing as simply messing about in boats.”
— The Wind in the Willows — Kenneth Grahame
— The Wind in the Willows — Kenneth Grahame
-
BrianC
- * Bateau Builder *
- Posts: 376
- Joined: Tue Dec 01, 2015 11:10 am
- Location: Cedar Point, NC
- Contact:
Re: SOBX Little Big Boat GV15
Fuzz, Piperdown, & Dan_smullen - Thanks for sharing your experience with air tools. I have a (120VAC) 6” RO sander now but it is good to know I have options. Given the cost of inline sanders, my fairing will be human-powered! I’ll look into the Dura Block - any suggestions on the length?
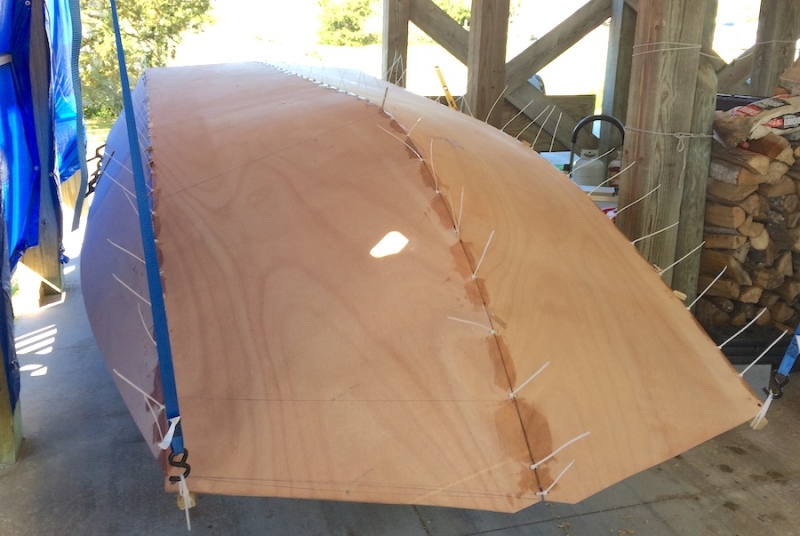
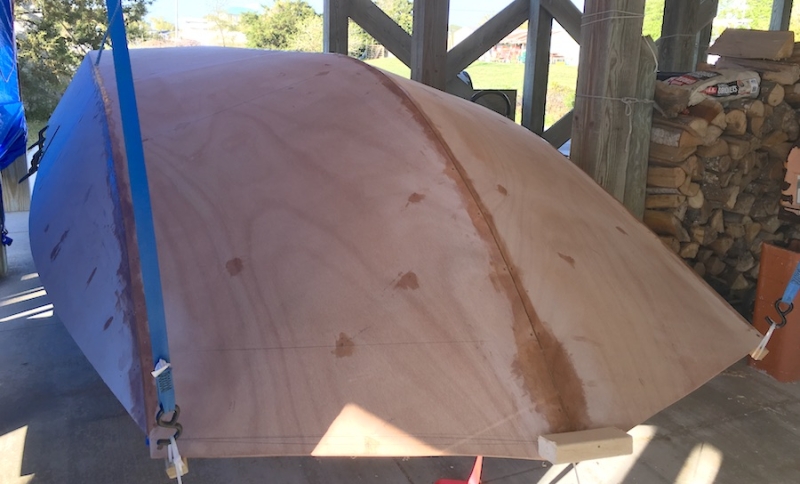
Evan - Thanks for the confirmation that I was doing the right thing. As you can see, I got it all sorted out and hook free. Is this your design?
Evan - Thanks for the confirmation that I was doing the right thing. As you can see, I got it all sorted out and hook free. Is this your design?
SK14 completed ——— GV15 under construction
"...there is nothing - absolutely nothing - half so much worth doing as simply messing about in boats.”
— The Wind in the Willows — Kenneth Grahame
— The Wind in the Willows — Kenneth Grahame

Re: SOBX Little Big Boat GV15
BrianC, yes, this is a Evan Gatehouse Design!!! Glad you got everything sorted!!! Also, nice progress, Jeff
-
Netpackrat

- Very Active Poster
- Posts: 1031
- Joined: Thu Sep 14, 2017 1:35 am
- Location: Anchorage, AK
Re: SOBX Little Big Boat GV15
I prefer an electric sander because you don't have to worry about it contaminating the surface with oil or moisture from your air supply.BrianC wrote: ↑Fri Apr 03, 2020 11:26 pm Fuzz, Piperdown, & Dan_smullen - Thanks for sharing your experience with air tools. I have a (120VAC) 6” RO sander now but it is good to know I have options. Given the cost of inline sanders, my fairing will be human-powered! I’ll look into the Dura Block - any suggestions on the length?
-
BrianC
- * Bateau Builder *
- Posts: 376
- Joined: Tue Dec 01, 2015 11:10 am
- Location: Cedar Point, NC
- Contact:
Re: SOBX Little Big Boat GV15
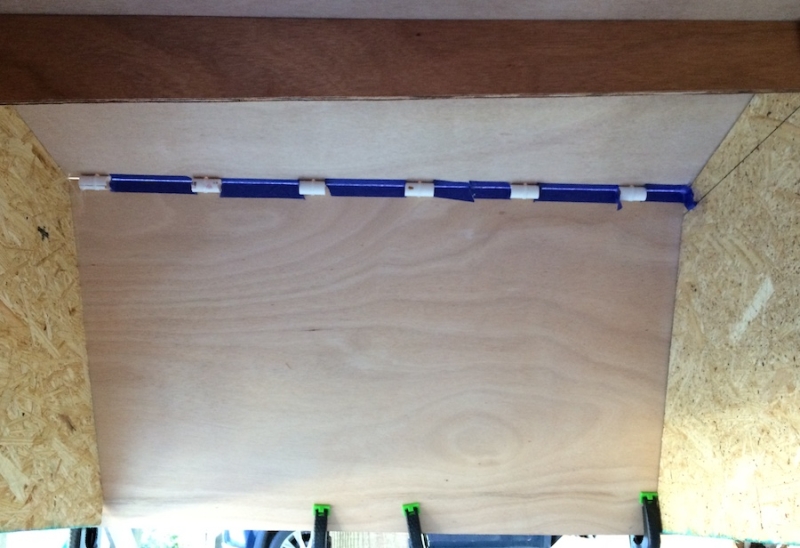
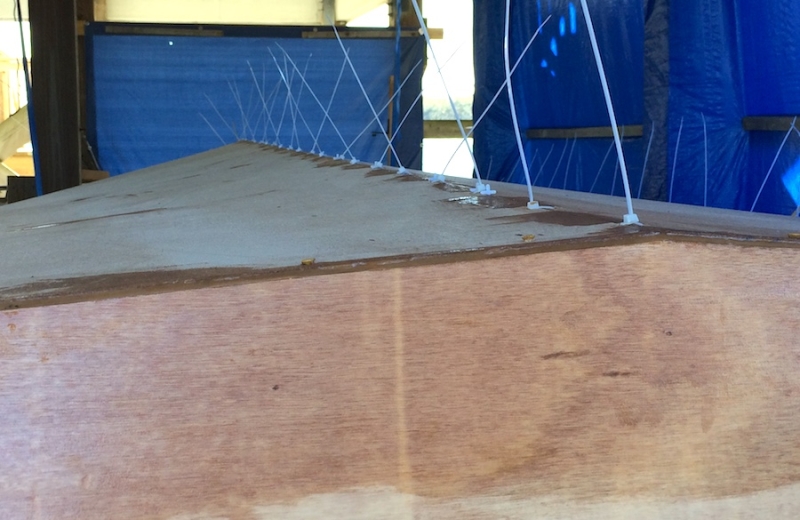
It now looks less like a hedgehog, more like a boat…
Yesterday, I applied a second round of glue to the bow-area seams to ensure that it wouldn’t come apart when unstitched. Today I removed the zip tie stitches and filled all the remaining gaps with epoxy+wood flour glue.
Tomorrow I’ll round the edges of the seams in preparation for tapping and do any final filling.
SK14 completed ——— GV15 under construction
"...there is nothing - absolutely nothing - half so much worth doing as simply messing about in boats.”
— The Wind in the Willows — Kenneth Grahame
— The Wind in the Willows — Kenneth Grahame
-
Fuzz
- * Bateau Builder - Expert *
- Posts: 8938
- Joined: Tue Aug 02, 2011 4:23 am
- Location: Kasilof, Alaska
Re: SOBX Little Big Boat GV15
I think all of use worry it will fly apart when we cut the tie wraps but so fat I have never seen it happen. That epoxy glue is some tough stuff.
Who is online
Users browsing this forum: Bing [Bot], rick berrey, Yandex [Bot] and 9 guests