Page 1 of 1
SOBX Little Big Boat GV15
Posted: Wed Mar 11, 2020 7:17 pm
by BrianC
I just started my GV15 build. I need a boat for back bay fishing (1-2 people), ferrying small groups (5-7) for beach days and sight seeing (protected back bay waters only), and claiming and oystering in shallow areas (~1.5’). The GV15 will live on an existing 2000 lb. capacity side lift on my dock. Given all that, the GV15 seems to be the ideal choice.
The boat will be used in Bogue sound, the area inside of Bogue inlet, estuaries behind barrier islands, brackish creeks and rivers, and the Intracoastal Waterway. While the main channels in these area are 4-15’ in depth, most area outside the channels are 3’ or less. One creek that I frequent has a ~1 mile section that about one foot deep at lowish tide if you pick the optimum route. Many areas that I fish are about that same depth at low tide. While distances aren’t that great most of the time, some days I might be traveling 20-30 miles. Again, the GV15 fits the bill.
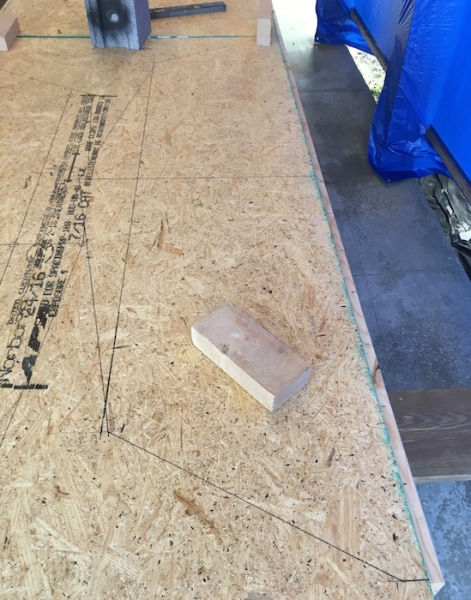
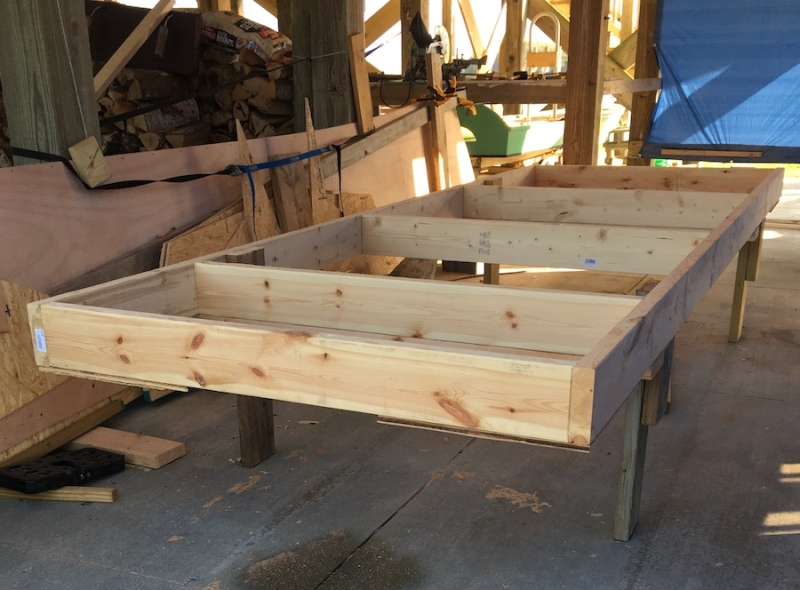
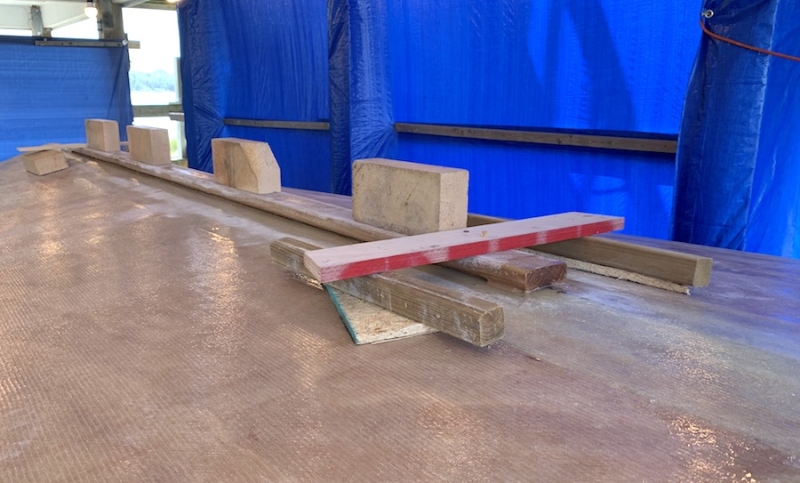
Just one picture for today - here is the strongback up on saw horses. I'll leave it at that height and use it as a cutting table for the molds and hull panels. It will then get fixed legs for the first part of the hull build and then get castors after the flip.
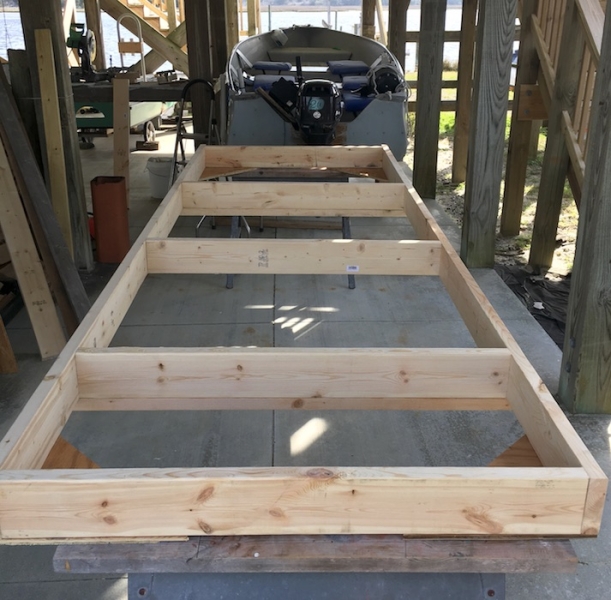
I'm hoping to get the hull completed & flipped before hurricane season hits so that I can tow it to safety should we get (another) one headed our way!
Re: SOBX Little Big Boat GV15
Posted: Wed Mar 11, 2020 8:50 pm
by Dan_Smullen
Best of luck on the new endeavor!
Re: SOBX Little Big Boat GV15
Posted: Thu Mar 12, 2020 8:07 am
by Jeff
Look forward to watching your build!!! Jeff
Re: SOBX Little Big Boat GV15
Posted: Sat Mar 14, 2020 11:06 pm
by BrianC
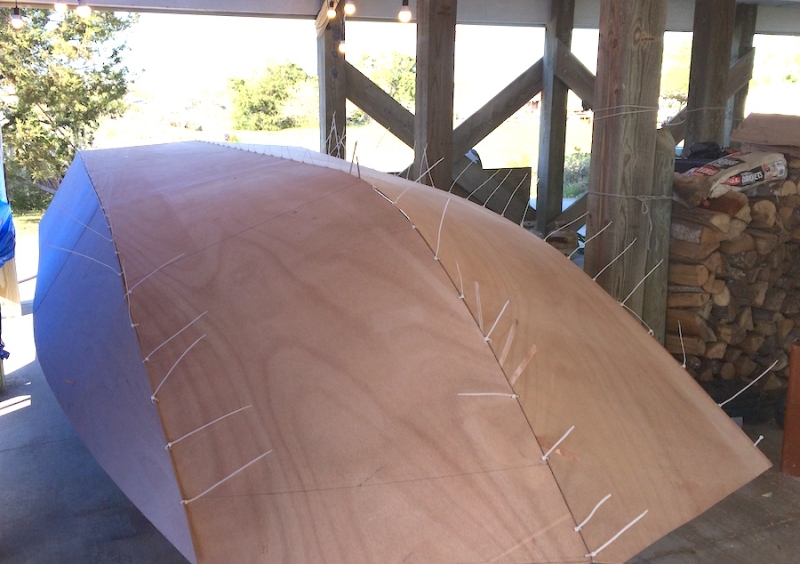
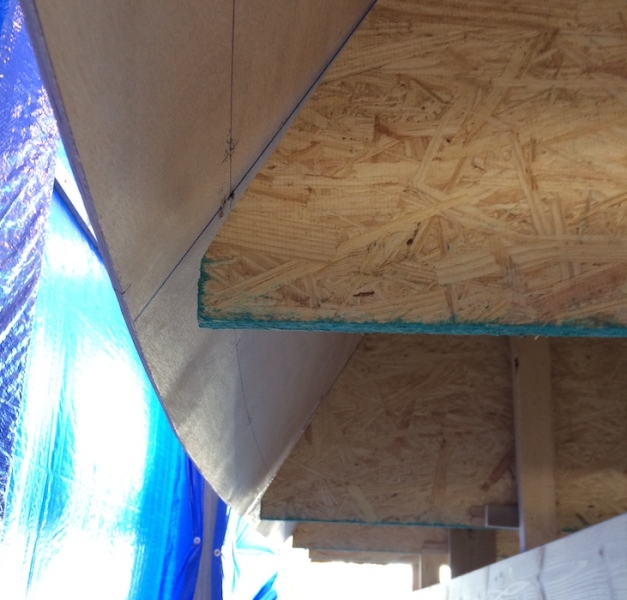
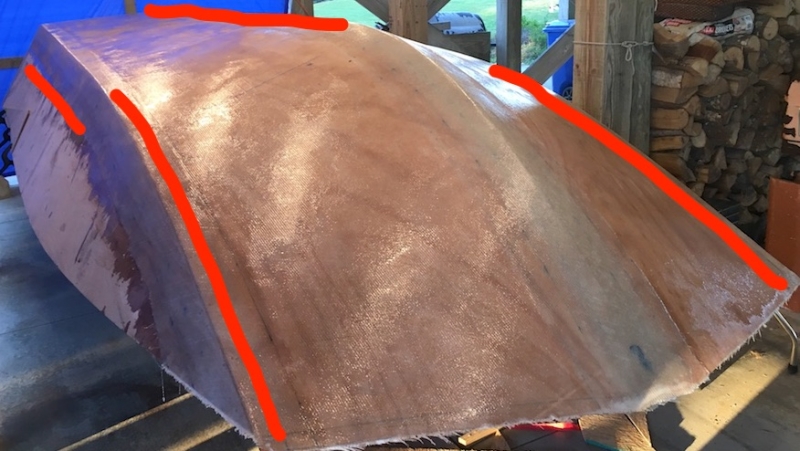
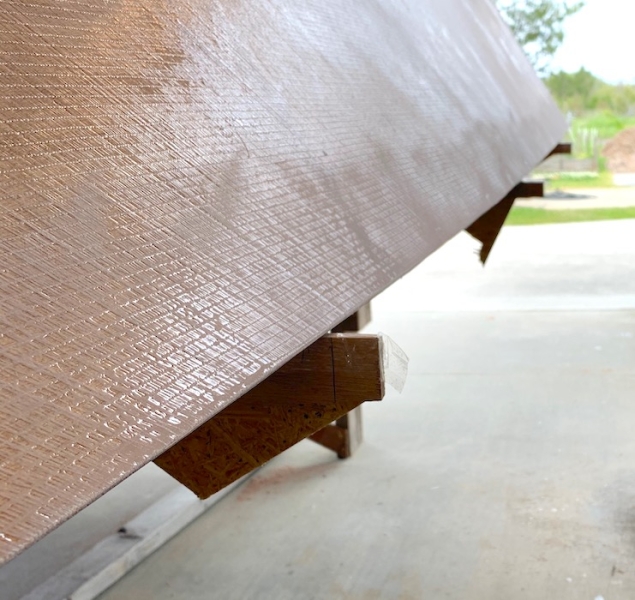
It always seems slow at the start. I installed tarps along the exposed side of the under-the-house build area. Hopefully, this will help keep exposed wood dry and will cut down a bit on the wind. I also installed some LED lights-on-a-string to make up for loss of ambient sunlight:
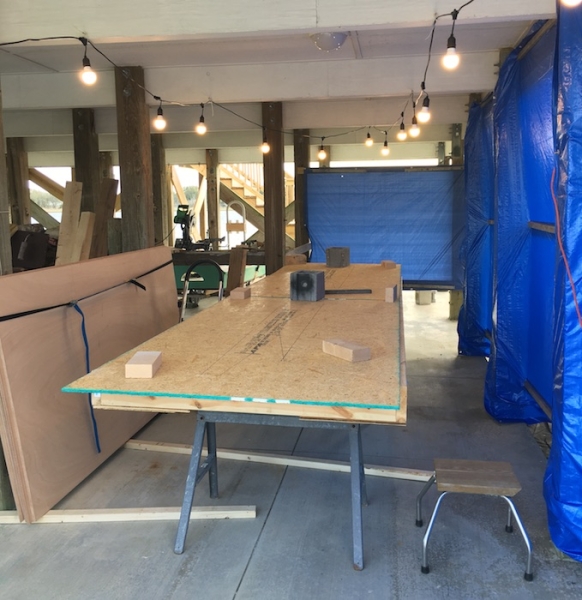
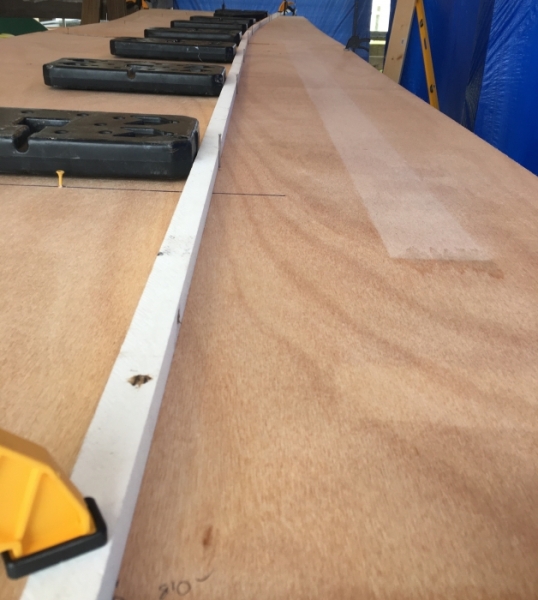
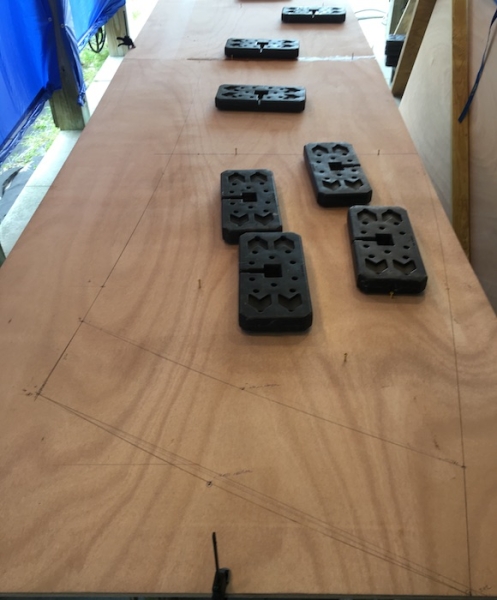
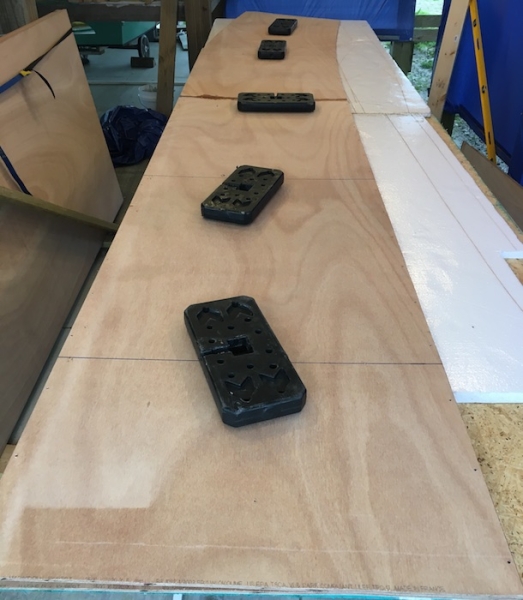
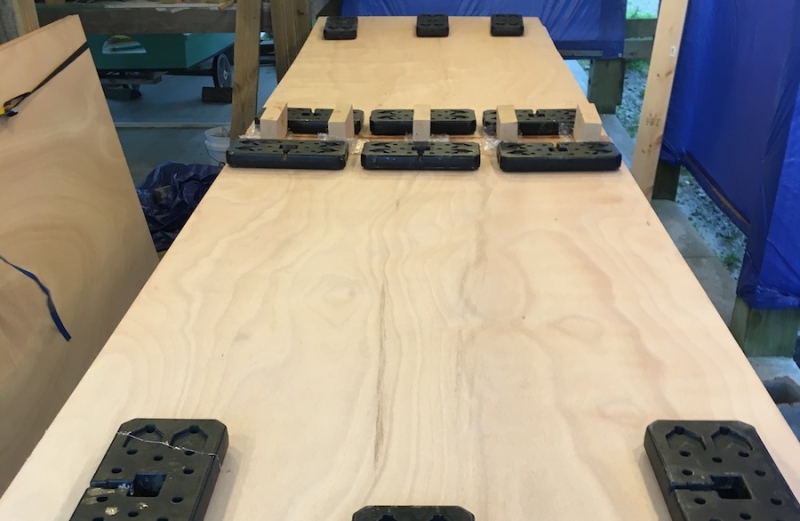
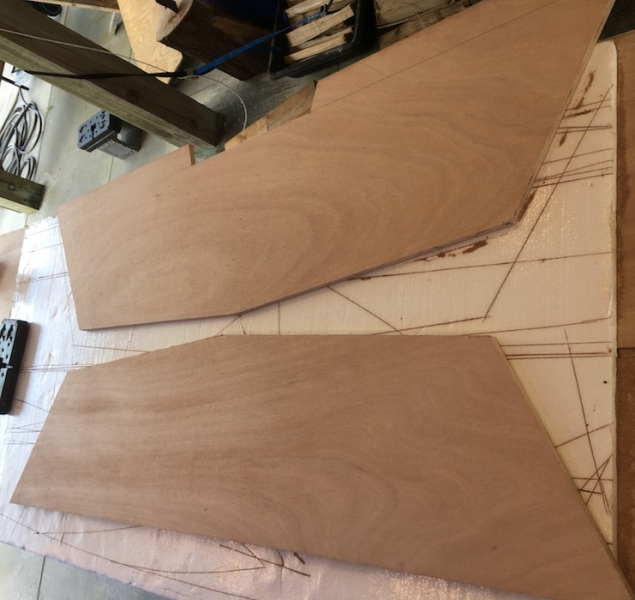
I've drawn out all the molds onto 1/2" OSB but won't make any cuts until the hull panels and stringers are cut since those panel serve as the cutting table:
I have the BS1088 Okoume plywood for the hull panels and stringers and will be laying those out next. I'm thinking that I will edge glue and tape the pairs of plywood sheets that are needed for the four hull panels then do the cutting afterwards. It would seem that this would minimize alignment errors that might creep in if I cut first and glued after.
Re: SOBX Little Big Boat GV15
Posted: Fri Mar 20, 2020 10:42 pm
by BrianC
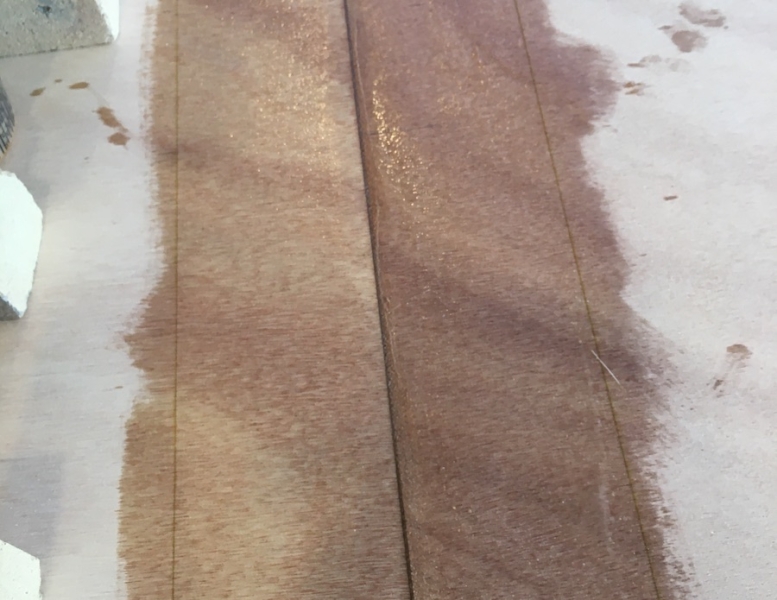
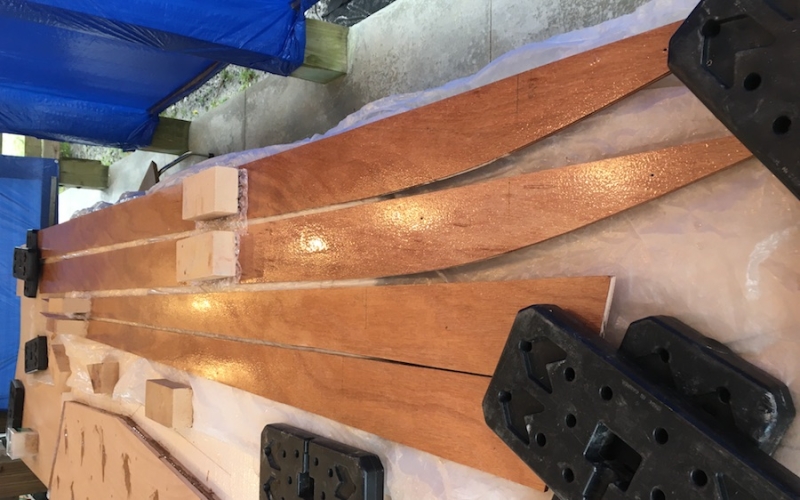
After spending the last few days cleaning up my work area, I've finally started to make some more progress on the GV15. Today, I spliced two pairs of 6 mm Okoume sheets for the hull's two bottom panels.
First, I marked the area to be taped:
Next, I pre-wet both the area to be taped as well as the plywood edges with neat epoxy. I mixed about 2 oz. of epoxy which was enough for the pre-wet and left enough for the 'glue' (epoxy + wood flour to peanut butter consistency):
After mixing the epoxy + wood flour glue, I applied some to the edge of each panel:
Next, the panels were pushed together and the excess 'glue' scrapped off:
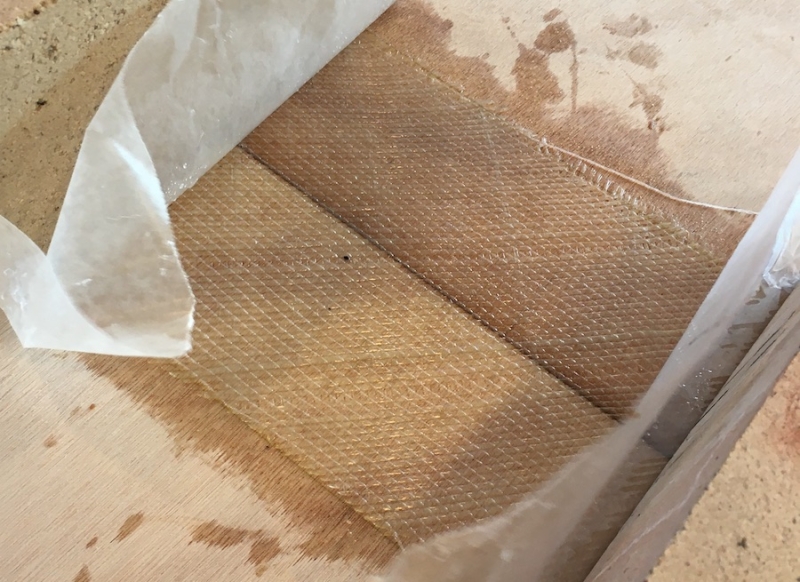
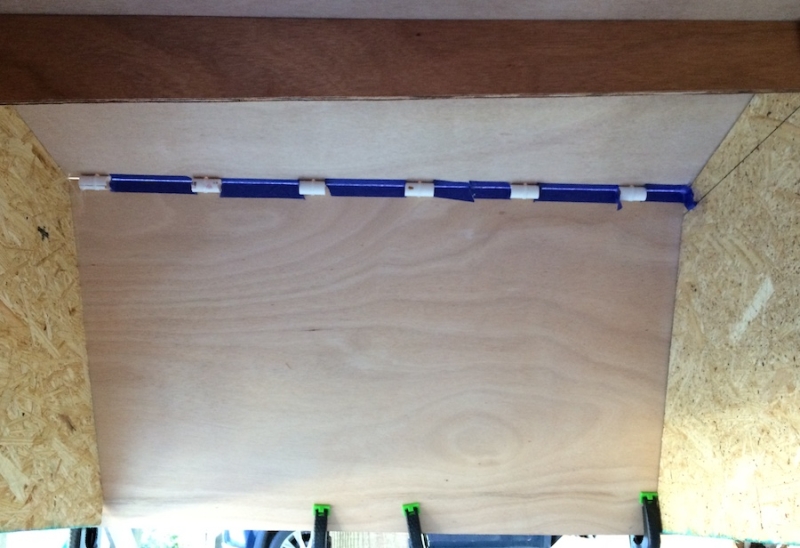
Next, I tapped with 12 oz. 6” wide biax tape which was first weighted so that I could mix the right amount of epoxy (110% of tape weight works for me):
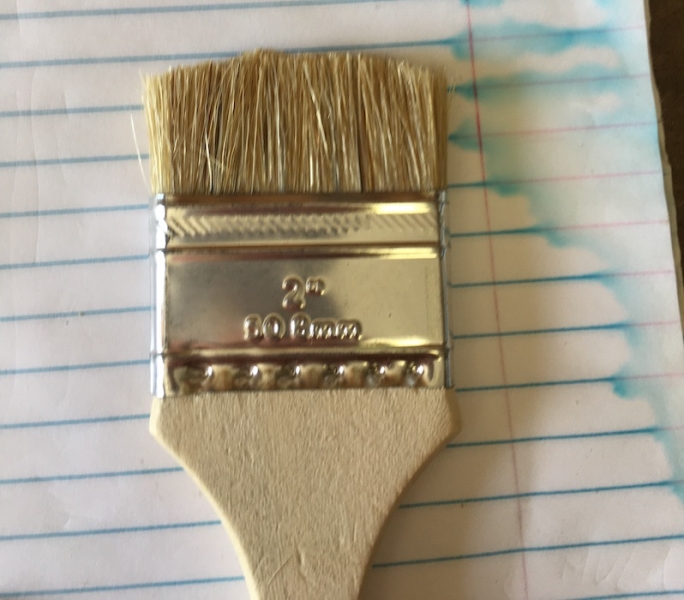
All the epoxy work was done using a 2” chip brush cut down a bit:
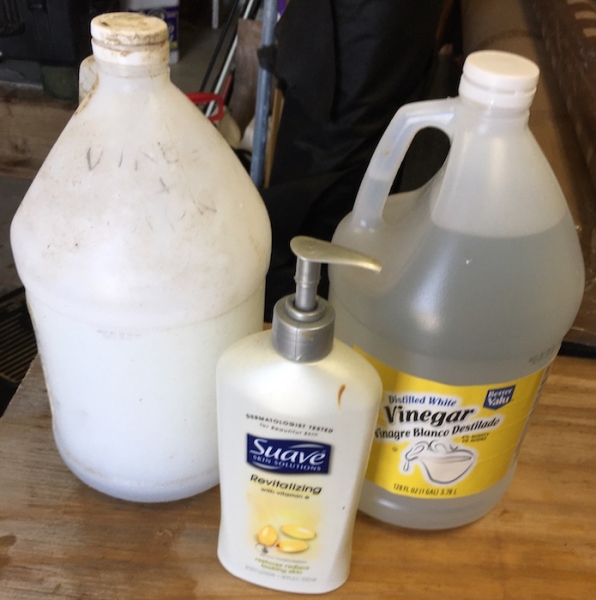
Lastly, I used vinegar to clean the brush & cups, followed by a water rinse. For the few spots on me that always seem to get around the gloves, I used the same white vinegar pre-mixed with cheap hand lotion.
Re: SOBX Little Big Boat GV15
Posted: Sat Mar 21, 2020 11:51 am
by piperdown
Nice work!
Re: SOBX Little Big Boat GV15
Posted: Sat Mar 21, 2020 11:59 am
by Jeff
Great start!!!! Jeff
Re: SOBX Little Big Boat GV15
Posted: Mon Mar 23, 2020 10:19 am
by BrianC
The glue up of the two pairs of 6 mm Okoume ply sheets went well except that I found out that I shouldn’t use wax paper to keep my weight bricks from sticking to the glued seam. Good thing I checked before the epoxy was fully cured or I might have had to grind them off! Going forward, I will use plastic sheeting or packing tape.
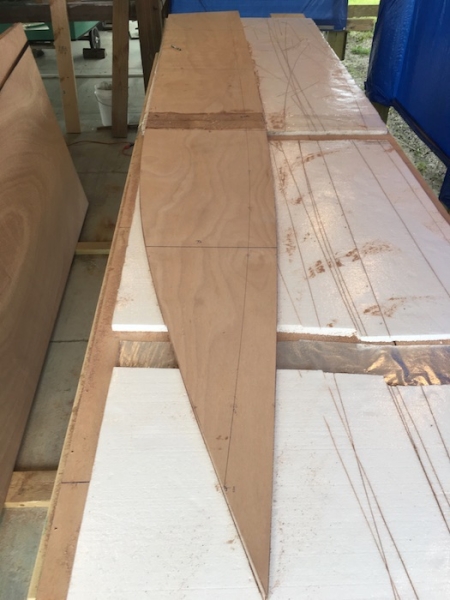
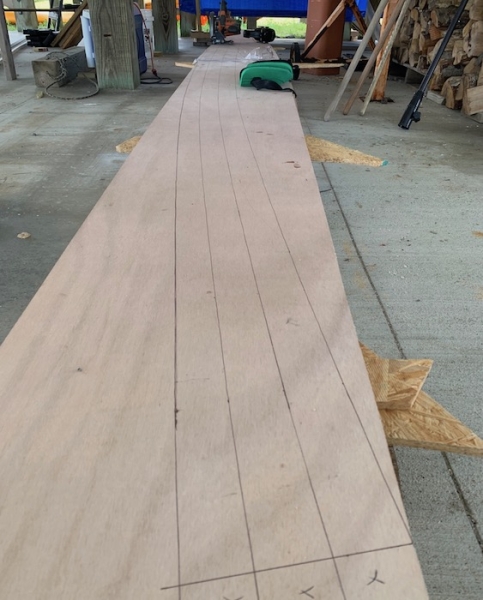
The first step was to double and triple check all my measurements. BS1088 ply wood is pricy so measure three times, cut once.
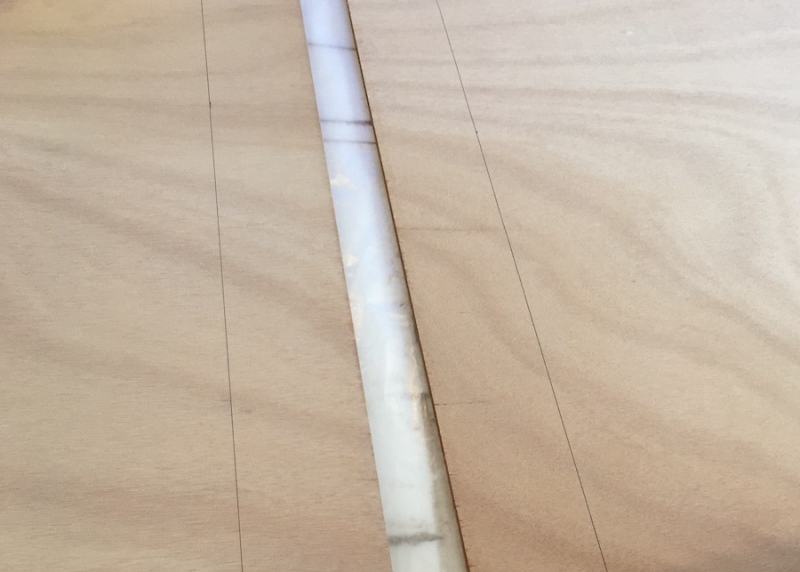
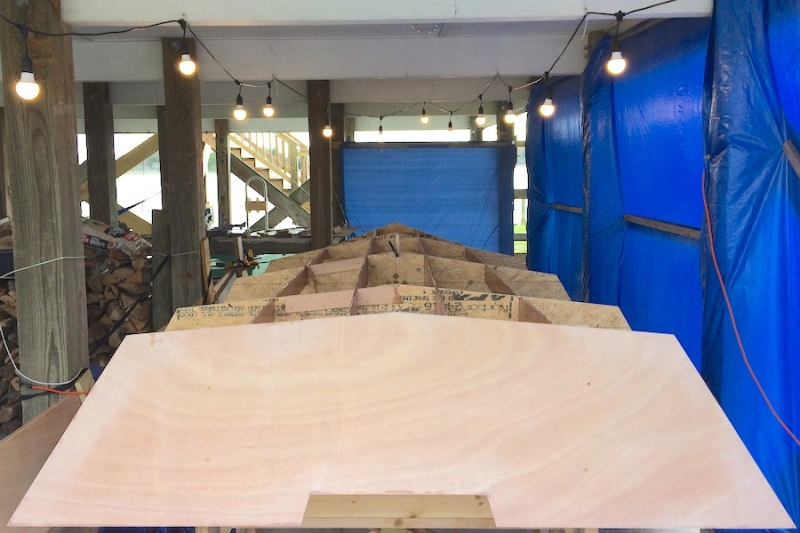
After that I stacked the glued up pairs on top of the other, aligned the edge that won’t be cut, and screwed them together. I placed the screws on the frame lines so the screw holes well serve to make the frame positions on the second panel. Next, I hammered in a finishing nail offset a bit from each marked point so that the drawn line goes through the marked points. I had a 18’ long slice that was trimmed from a PVC foam corner-board that makes an ideal batten for tracing the cut lines between the nails:
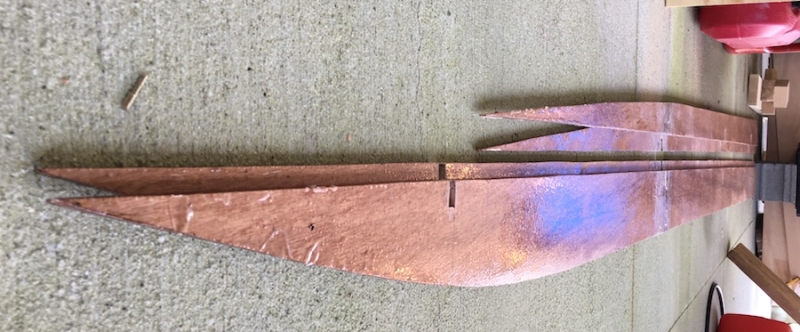
Here is the hull bottom panel all marked out:
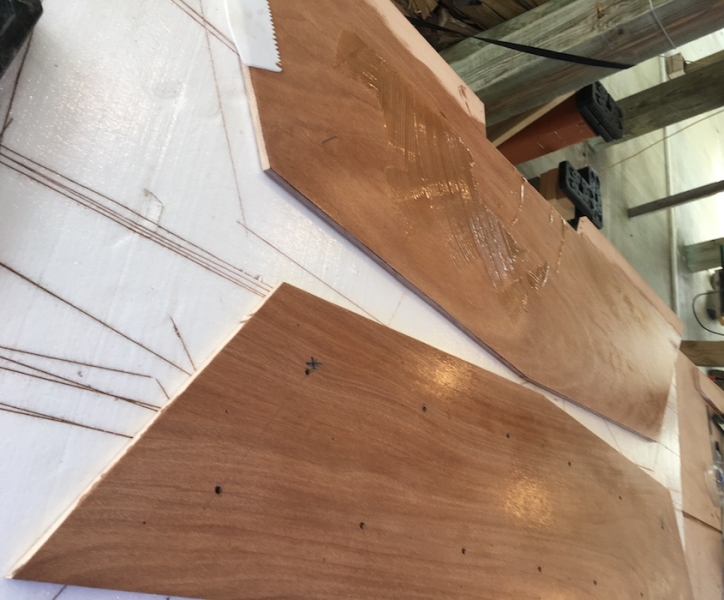
I used the stitch hole marking tool I made for the SK14 to add stitch holes after cutting. It is just a strip of ply with two finishing nails hammer through just enough to mark the ply. You just place the first nail in the last marked point, align the edge of the ply strip near the second nail with the panel, and then press to mark the next hole. The second hull bottom section is underneath so the holes along the keel will match perfectly:

Here are the finished pair of bottom hull panels:
after sliding the finished panels underneath the cutting board foam sheets, I covered the glued splice area with packing taping - this should work much better than wax paper:
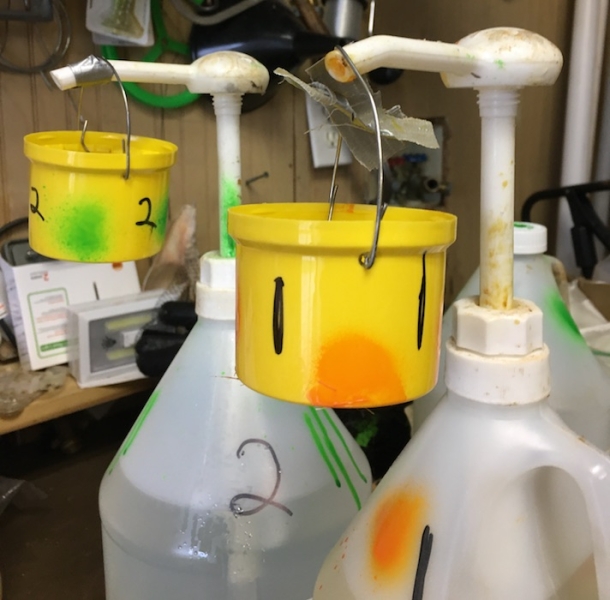
I also made up a couple of drip cups for my epoxy jugs:
Lastly, I placed another pair of panels on the cutting table. Here they are all glued up:
Next up, cutting the hull side panels and gluing up the last pair of ply sheets for the stringers.
Re: SOBX Little Big Boat GV15
Posted: Mon Mar 23, 2020 10:17 pm
by BrianC
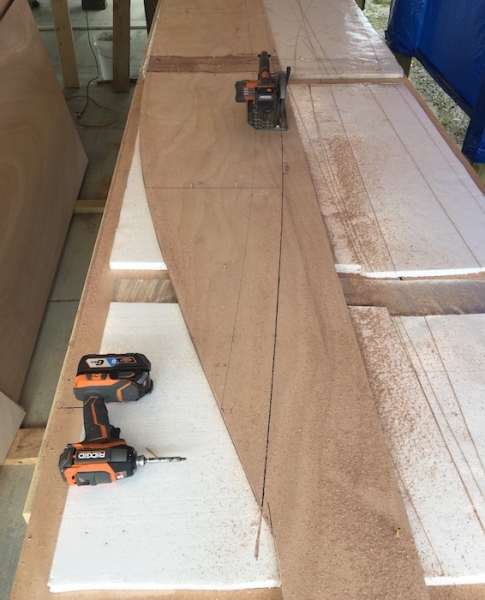
Today I cut the pair of hull side panels. Since these are cut from the same pair of glued up sheets of 6 mm plywood, I first cut them in half lengthwise and then stacked the two pieces. The stacked pieces were held together with screws while I did the cut:
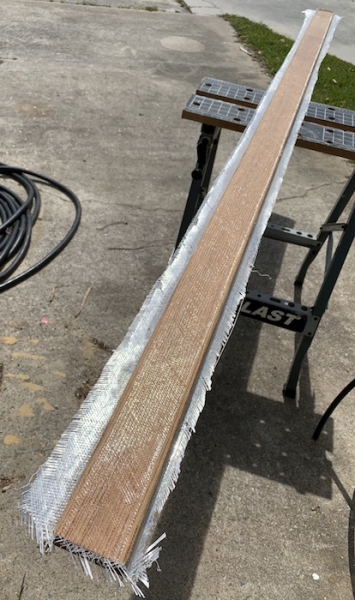
Next, I glued up the two 12 mm sheets that will be marked up and cut for stringers tomorrow:
I’m now down to one sheet: the 18 mm for the transom:
A few more days of this & I'll be ready to start stitching!
Re: SOBX Little Big Boat GV15
Posted: Tue Mar 24, 2020 11:10 pm
by BrianC
Today I marked out and cut the four stringers (2 inside, 2 outside) out of 9 mm Okoume. As with the hull panels, I first stacked two pre-glued panels so that I would get identical pairs.

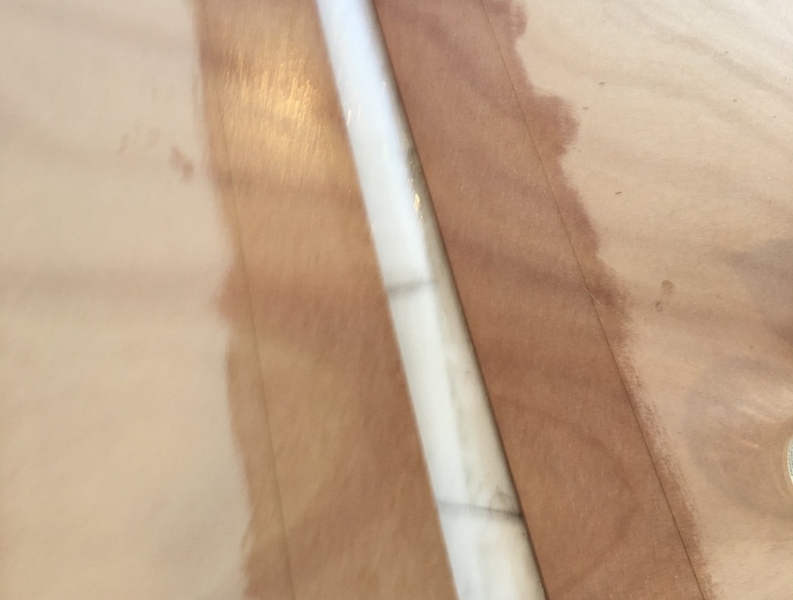
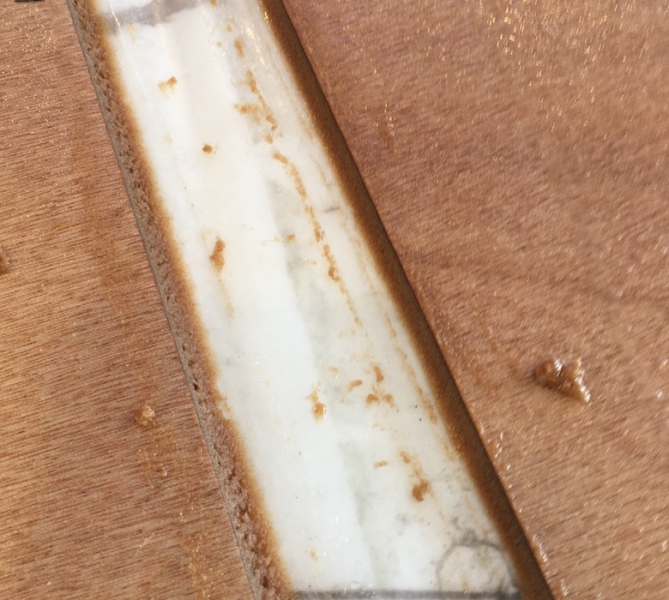
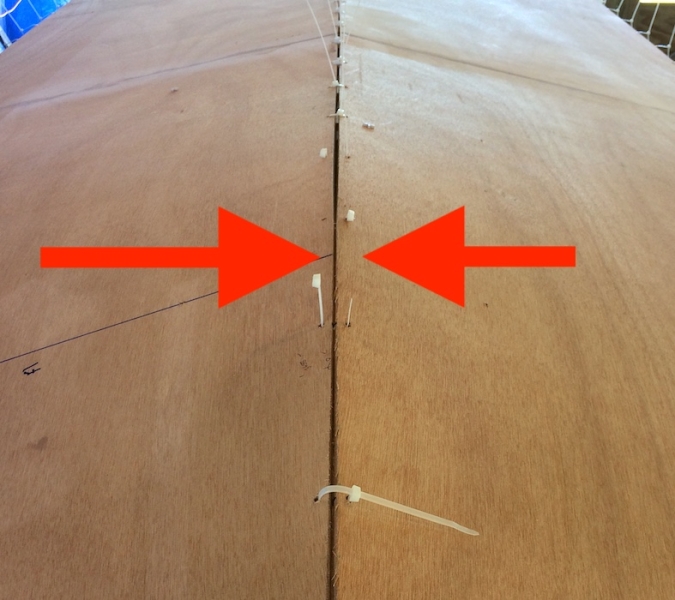
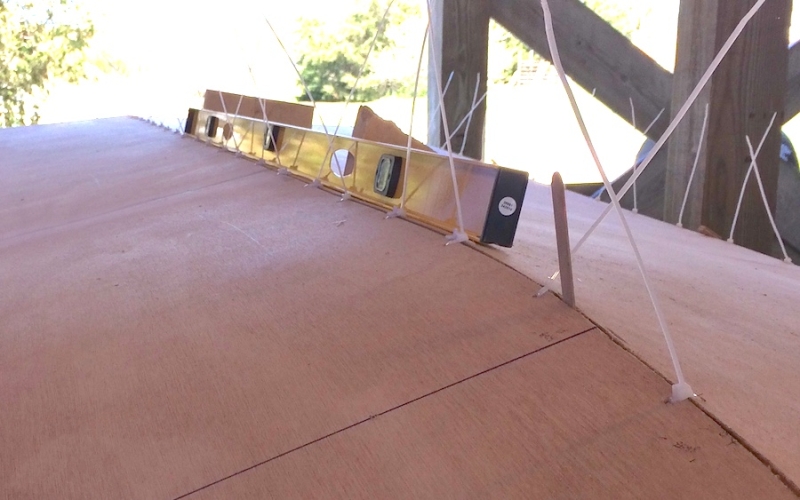
One issue that I ran into was that some of the lines traced by the batten didn’t result in fair curves. Pressing the batten down against all the finish nail reference points resulted in unexpected 'wiggle' in the traced line. In these photos, the arrows point to ‘correct' line:
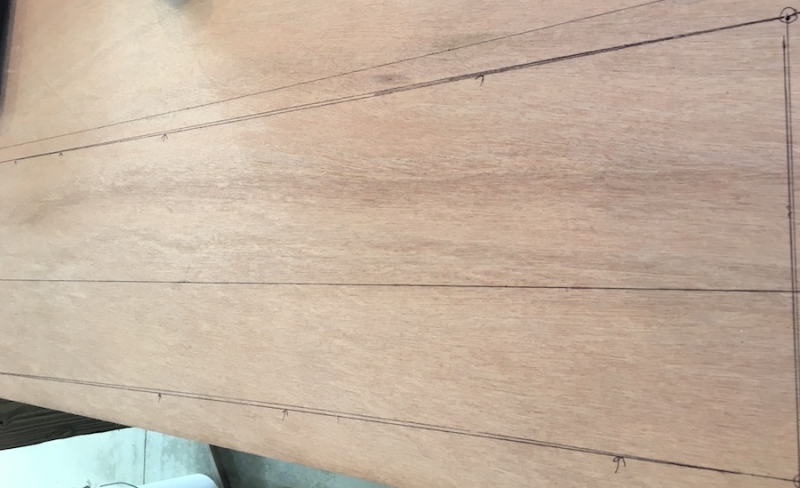

I think I fixed the issue by using the batten to trace between just 3-4 points at at time and always having a straight line between the points as a reference. I recall that several other builders of the GV15 had issues with hook of the hull bottom panels — I wonder if this could be part of the problem?
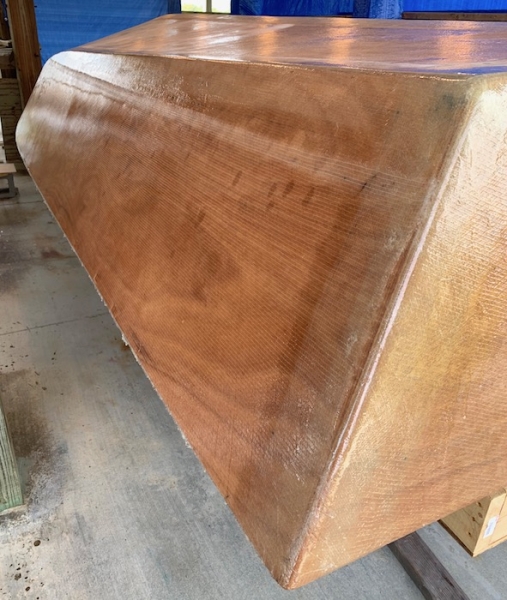
The stringers aren't doubled as they are in many other designs, and they seem a bit flimsy. I'm going to tape the second side and give them a coat of neat epoxy to strengthen them a bit.
Re: SOBX Little Big Boat GV15
Posted: Wed Mar 25, 2020 10:34 pm
by BrianC
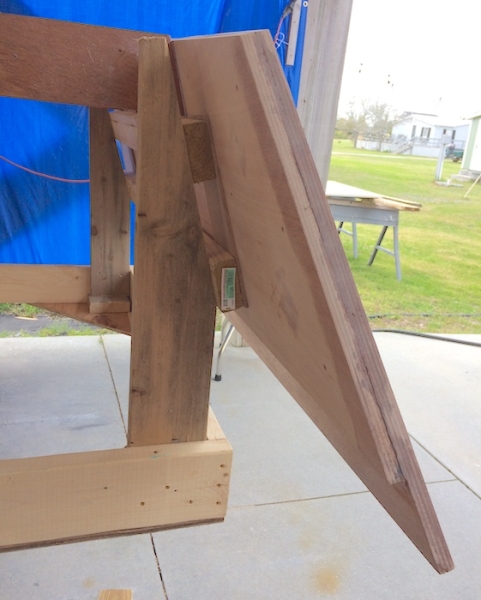
Today I assembled the transom from two layers of 18 mm ply. Here they are cut out and ready to go:
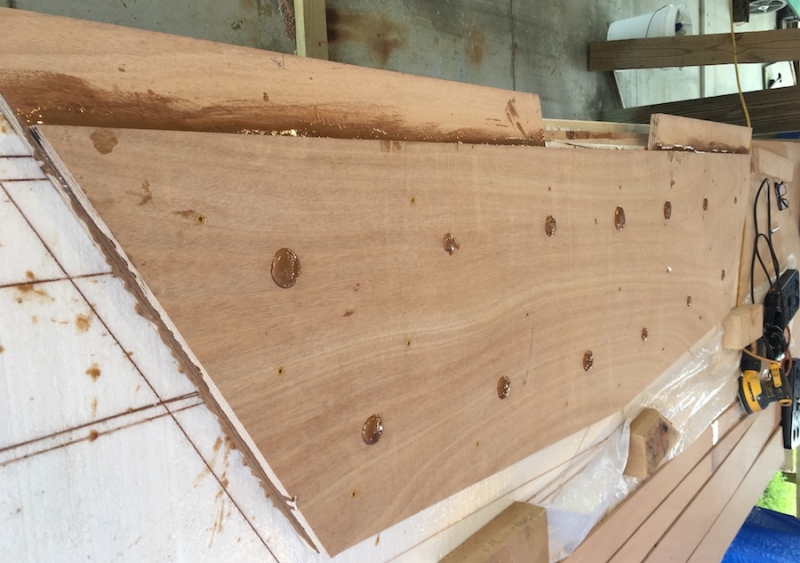
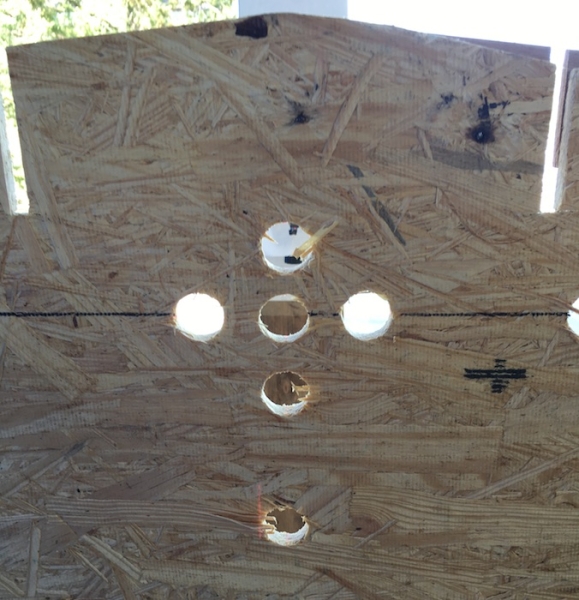
After aligning the two panels, I drilled a pair of small (~1/8”) through holes. After separating the panels, I hammered finishing nails into the two drilled holes in lower panel and over-drilled the holes in the top panel so the nails would easily pass through. I also drilled some 1/4” relief holes in the top panel so that excess epoxy and trapped air had a place to squeeze out. A handful of smaller holes were also drilled in the top panel that will be used to temporarily screw the two panels together while the ‘glue’ sets. I then applied neat epoxy to both sides to be glued. I added wood flour to the remaining epoxy and dumped that out on the bottom panel:
Here it is after all the glue was applied to the bottom panel:
I then dropped the second layer onto the first, using the finishing nail pins to ensure proper alignment. Next, I screwed the two together making sure to not over torque the screws. You can see the excess 'glue' squeezing out the 1/4" relief holes:
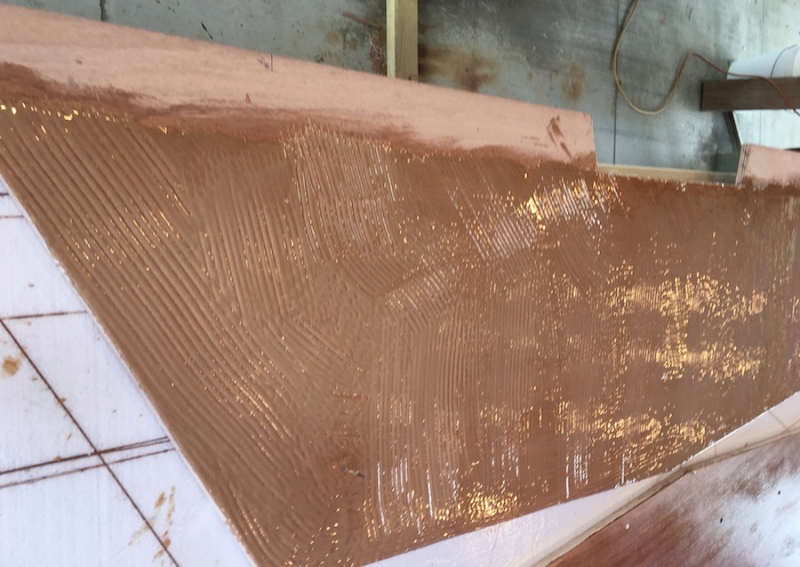
After completing the transom glue-up, I added tape to the other side of the splice on the four stringers and gave the entire surface a coat of neat epoxy:
Re: SOBX Little Big Boat GV15
Posted: Mon Mar 30, 2020 1:23 pm
by BrianC
Friday's post (a few days late):
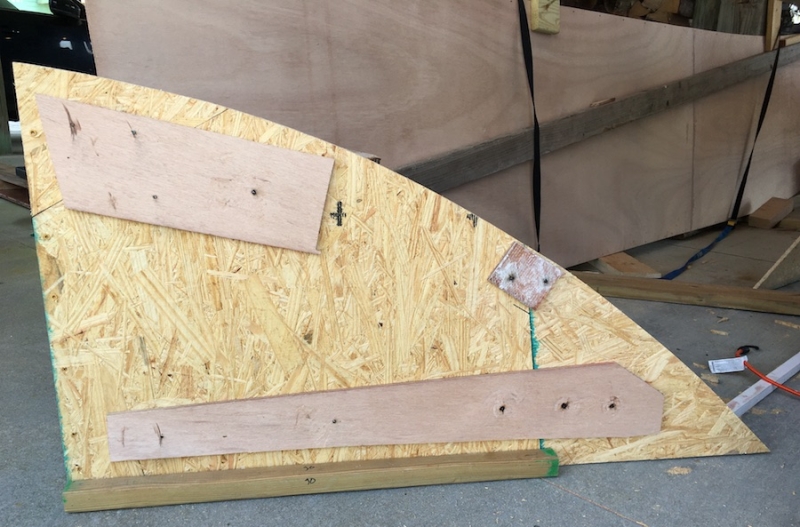
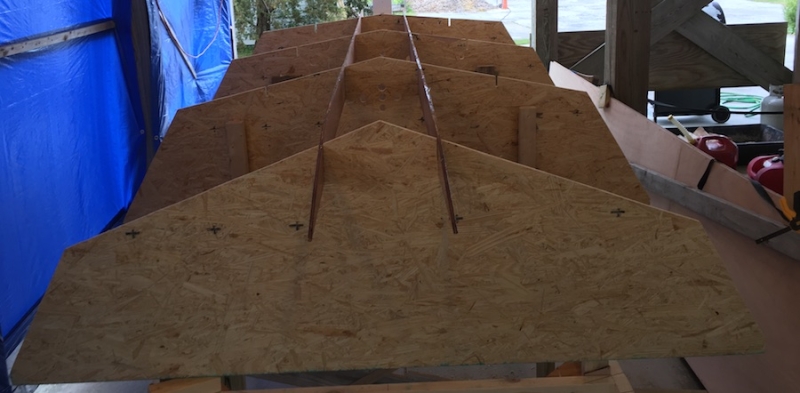
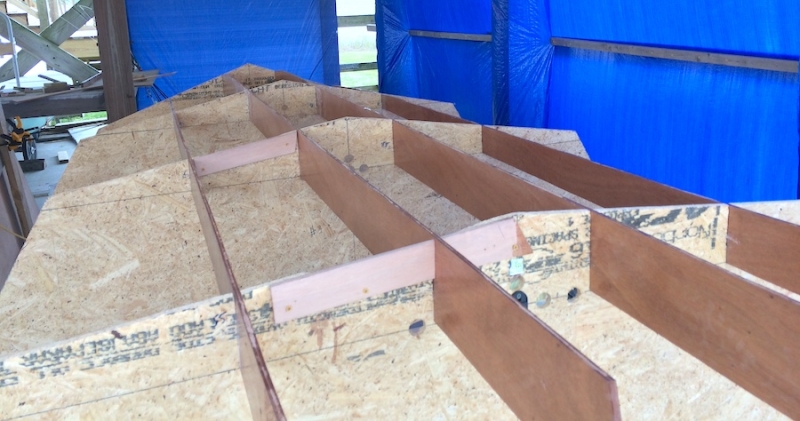
I reached a big milestone today: all hull panels cut, stringers cut, transom parts cut & glued up, all stitch holes drilled, molds all cut, stringers and molds all notched.
Rather than brave the crowds at the local home store, I spliced together a Frankin-bow mold from scraps left over from the other molds:
Lastly, I put legs on the strongback taking care to get it pretty level. I also marked the floor so that I can keep it in the same place while stitching.
I think I might wait until Monday to start stitching up the hull panels on the strongback. We are expecting 15-20 mph winds this weekend and I don’t want to be wrestling 15-16’ long hull panels under those conditions.

Re: SOBX Little Big Boat GV15
Posted: Mon Mar 30, 2020 10:40 pm
by BrianC
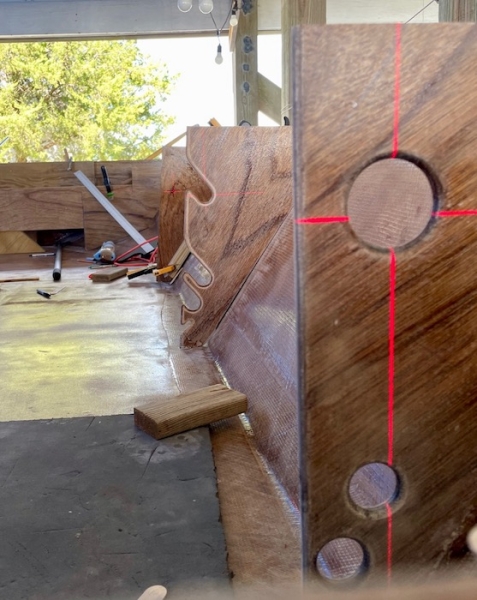
The weather cooperated today (not too much wind) so I got all four molds along with the two inner stringers mounted on the strongback. The laser level (one of those that projects both vertical and horizontal reference lines) used to ensure alignment is mounted on the transom end of the strongback.
After getting each mold aligned with the laser's vertical and horizontal references, I used mirrors hot glued on the mold to ensure that the plane of the mold was close to perpendicular to the laser level beams. I could tell when the mold was perpendicular by looking at the position of the back reflection of the laser - when close to perpendicular, the laser comes close to reflecting back on itself. Adjustment were made by shimming between the mold and the vertical supports previously attached to the strongback. Only when I was happy with the alignment did I screw the mold in place. You can just see the red glow of the laser line on top of the black lines on the mold:

I taped some white paper over the laser level so that I could better see the position of the back reflection. This picture shows the laser reflected back onto that paper from the mirrors on the mold closest to the transom:
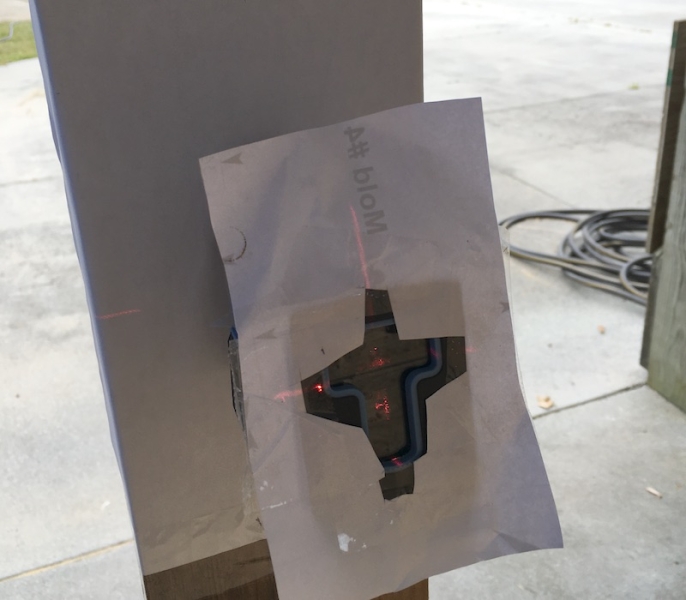
Once I finished mounting the mold closest to the transom, I removed the mirrors and drilled holes so that the laser level would project through to provide references for the next mold.
After placing the first two molds, I added the innermost pair of stringers to make sure that the mold spacing matched the spacing of the notches in the stringers. I continued using the same methods to align and mount the last two molds.
Besides the laser, I also used more traditional methods to ensure alignment: verifying that diagonal dimensions are equal, and that the top of the rearmost three molds are all level with one another.
Next up: mounting the bow mold, fine tuning the notches in the molds so that the stringers sit “just so,” and adding the transom supports and the transom itself. Then I’ll be ready to drop on the hull panels and begin the stitching process.
Re: SOBX Little Big Boat GV15
Posted: Tue Mar 31, 2020 10:32 am
by Dougster
Great and clever idea with the mirrors on the laser. Wish I'd known that on my other builds!
Dougster
Re: SOBX Little Big Boat GV15
Posted: Tue Mar 31, 2020 10:57 am
by BrianC
Dougster wrote: ↑Tue Mar 31, 2020 10:32 am
Great and clever idea with the mirrors on the laser. Wish I'd known that on my other builds!
Thanks, it works 'reasonably' well and comes for almost free if you are already using a laser level (the
mirrors were $3.49 on Amazon). Since the mirrors don't mount perfectly flat on the molds (I used cheap OSB) using a dot of hot melt glue, I used a pattern of five. Three reflect the horizontal laser line, and three the vertical. Since they aren't perfectly flat, I just adjusted the tilt of the panel to the average. It seem to work well since the diagonals matched within a few mm. When it came time to remove them, a bit of heat applied to the mirror to soften the hot melt did the trick.
Adding the stringers when placing all molds after the first like is described in the plans also helps since it insures that the mold spacing is correct (assuming you cut the stringer notches correctly!).
Re: SOBX Little Big Boat GV15
Posted: Wed Apr 01, 2020 7:58 am
by VT_Jeff
You are a machine, nice work!
Re: SOBX Little Big Boat GV15
Posted: Wed Apr 01, 2020 9:05 am
by Jeff
Nice work!! Jeff
Re: SOBX Little Big Boat GV15
Posted: Wed Apr 01, 2020 12:53 pm
by CpnCrunch
Hi Brian,
Have not built anything yet, but I have seen dozens of build thread. I'll just say that besides boatbuilding, I'm particularly commending your threadbuilding skills, you have a clean and thorough way of reporting your progress and with very neat pictures to boot. Keep up the good work, I'll be following your thread with interest.
Cheers!
Sébastien
Re: SOBX Little Big Boat GV15
Posted: Thu Apr 02, 2020 12:53 am
by BrianC
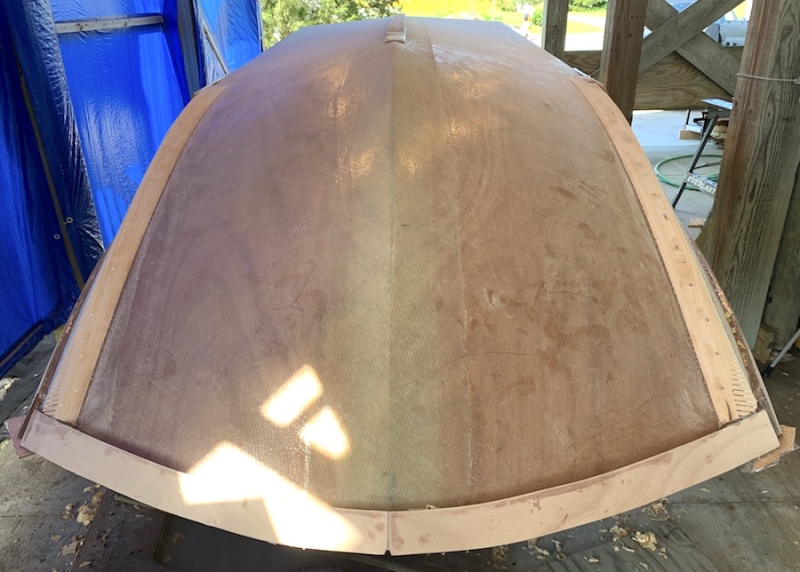
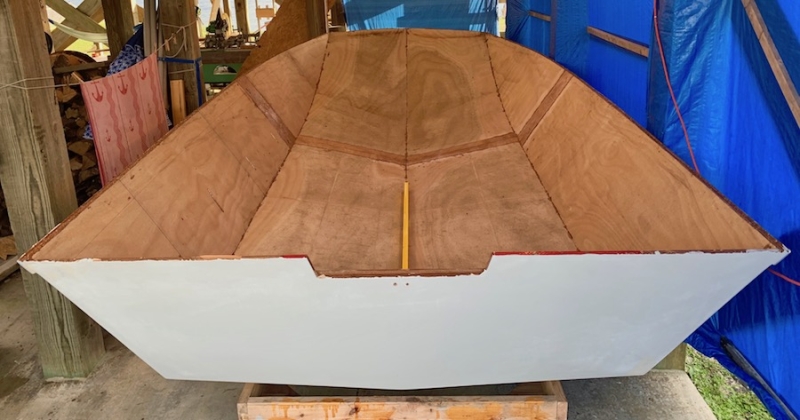
It’s nice when it all comes together correctly. With all four stringers placed in the molds, it was great to see that they all lined up at the transom end:
This really is a big boat compared to my previous build, a SK14. It is really starting to sink in how huge a project some of the other builders are tackling with their 25 foot plus hulls!
Today’s big accomplishment was building and installing the transom support jig, then aligning and mounting the transom.
Here it is with the transom in place:
Re: SOBX Little Big Boat GV15
Posted: Thu Apr 02, 2020 10:47 pm
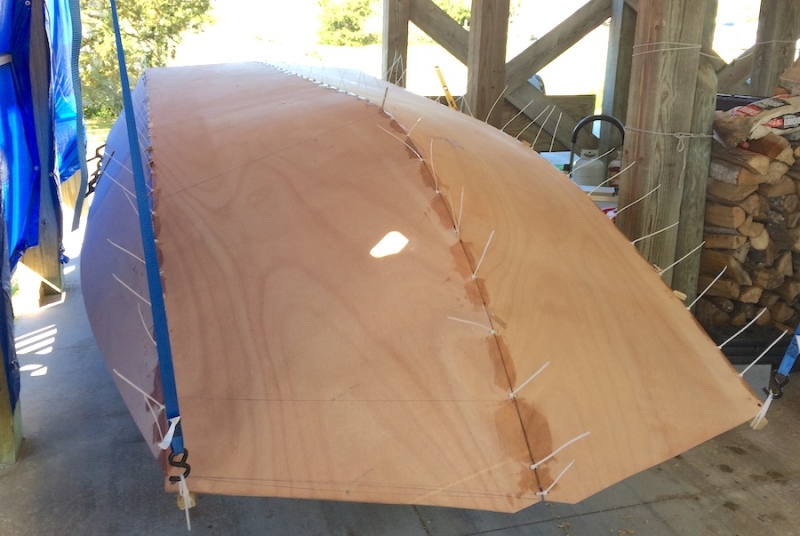
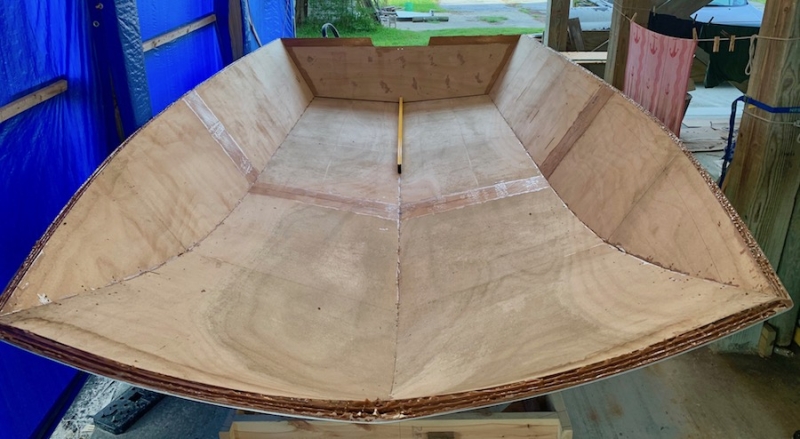
by BrianC
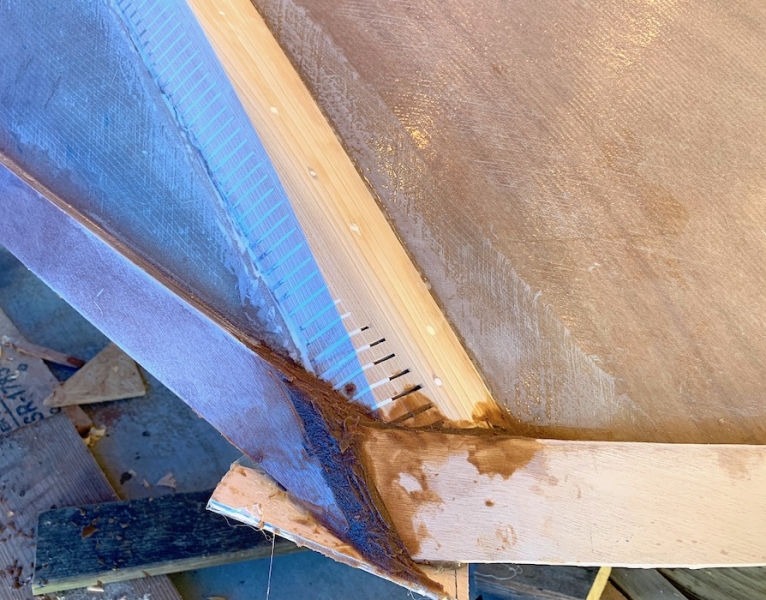
I finished installing the bow mold this morning and proceeded to place and stitch the hull panels. I stitched up the stern section of the keel seam first, using PVC pipe segments and tile shims to ensure proper spacing. Since the keel from frame 2 to 4 plus the transom is perfectly flat and horizontal relative to the sole baseline, I could stitch this up tight to ensure the panels were aligned properly. I left the bow portion of the keel seam and both chine seams loosely stitched to start.
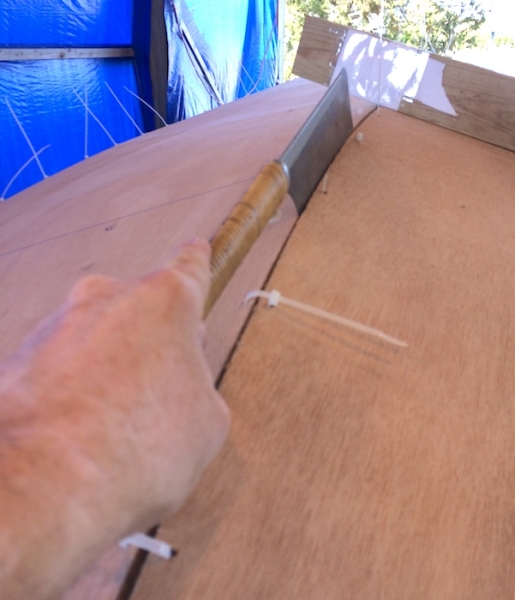
I discovered a tight spot on the keel seam in the area where the keel begins to curve up to the bow. Could this be the source of the ‘hook’ that some have discovered in other GV15 builds?
To ensure that the keel line was nice and fair as it sweeps up to the bow and to eliminate any potential hook, I used a saw to cut to open up the tight spot. I ended up removing about 3/16” along a 12” section of the keel seam.
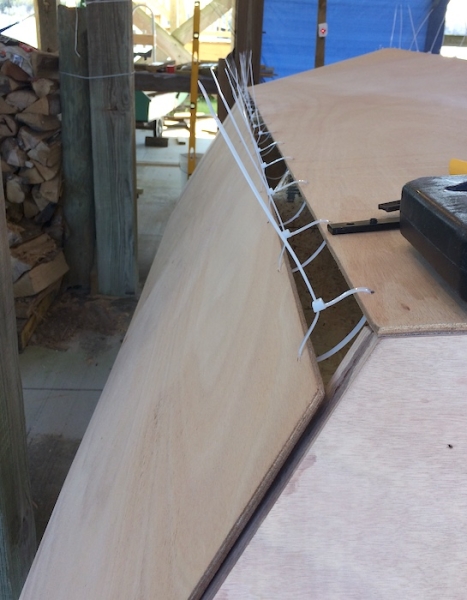
That done, I added PVC sections to each of the chine seam zip ties.
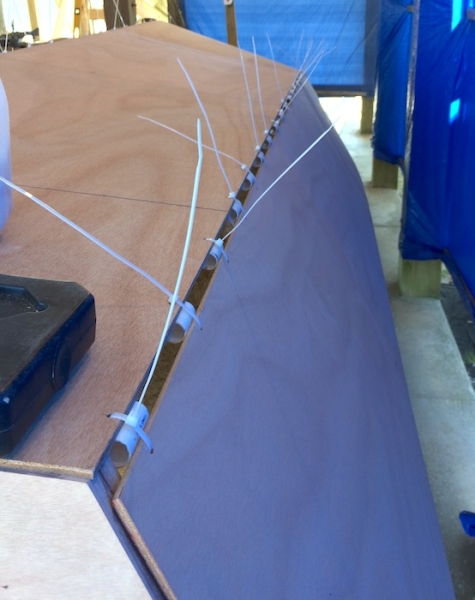
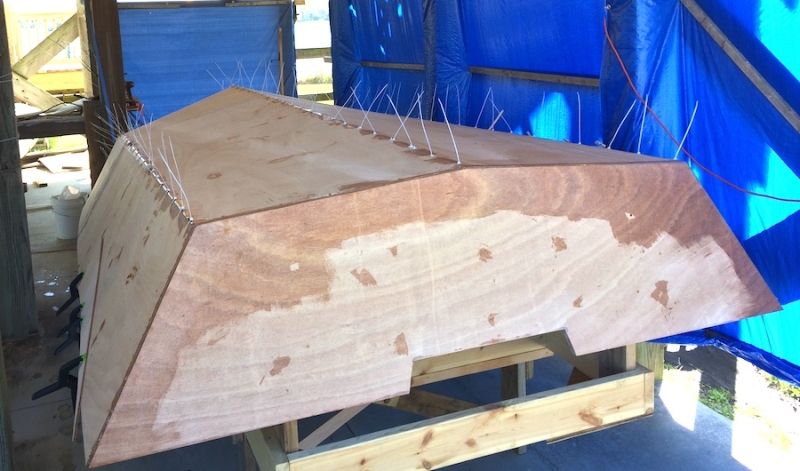
Here is the hull mostly stitched up. I have adjustments to do tomorrow (especially on the bow end of the chine seams) and then comes taping seam undersides and glueing.
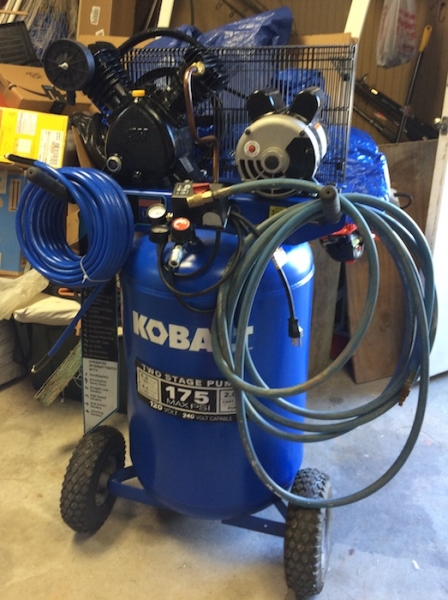
My neighbor had an extra compressor left over from a work-related project and so donated it to me. I’ve never used air tools before (like sanders) so I’ll have to do a bit of research to see if it has the needed capacity. What do you guys think, will this power a sander?

Re: SOBX Little Big Boat GV15
Posted: Thu Apr 02, 2020 11:01 pm
by Fuzz
For I found you either need a lot of compressor or a large volume tank to run an air sander. I do not think that one will do the job. That said someone like AA would be able to give you the best answer.
You are making good progress. Keep it up and post lots of pictures. Lots of boat porn is needed at this time

Re: SOBX Little Big Boat GV15
Posted: Fri Apr 03, 2020 5:10 pm
by piperdown
That compressor will work with quite a few air sanders such as this one
https://www.homedepot.com/p/Husky-6-in- ... /204671962
Requires 3 cfm at 90 psi. Since that's a 2 stage compressor you'll be fine running a lot of different air tools.
Re: SOBX Little Big Boat GV15
Posted: Fri Apr 03, 2020 5:33 pm
by Dan_Smullen
My limited experience with a similar sized compressor is that it will work, but your compressor will run most of the time.
I started off with an inline sander, but quickly gave it up for a Dura Block. I pull the big boy sander out when I have larger clumps to get down quickly, but the dura block yields a much better result.
Harder on the shoulders obviously, but not near as obnoxious as the noise and the dust generated by the pneumatic sander.
Re: SOBX Little Big Boat GV15
Posted: Fri Apr 03, 2020 6:43 pm
by Evan_Gatehouse
Hi,
I think you've done the right thing relieving the tightness of the seam to eliminate any hook. Just look at in side view and see what it looks like. Is it a nice smooth curve? If so all good. If the curve looks lumpy then you should adjust a bit.
Re: SOBX Little Big Boat GV15
Posted: Fri Apr 03, 2020 11:14 pm
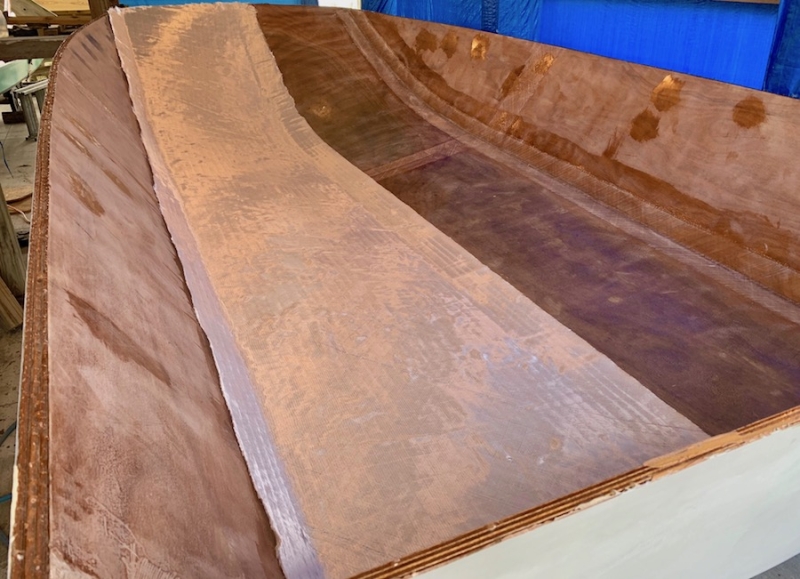
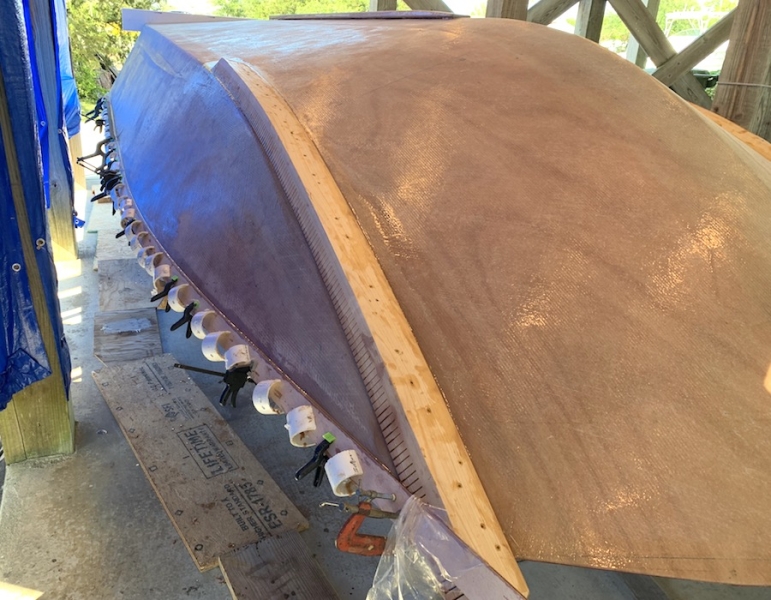
by BrianC
Before I describe today’s efforts, I want to discuss how the panels are fixed to one another. The plans don’t call for the use of any epoxy+wood flour glue to be applied to the outsides of the seams. Rather, it calls for the application of small squares of fiberglass at intervals along the seams followed by zip tie removal and application of the first fiberglass tape layer over the un-filled and un-sanded panel seams. This is in contrast to recent builds on this forum that use epoxy+wood flour glue applied to all seams between the zip ties, followed by a second application of glue after the zip ties are removed. Then, only after the seams are smoothed and rounded, the first tape layer applied.
My guess it that methods have evolved since since the plans for the GV15 were drafted back in 2001 so I’ve decided to follow the method more commonly used on builds seen in this forum.
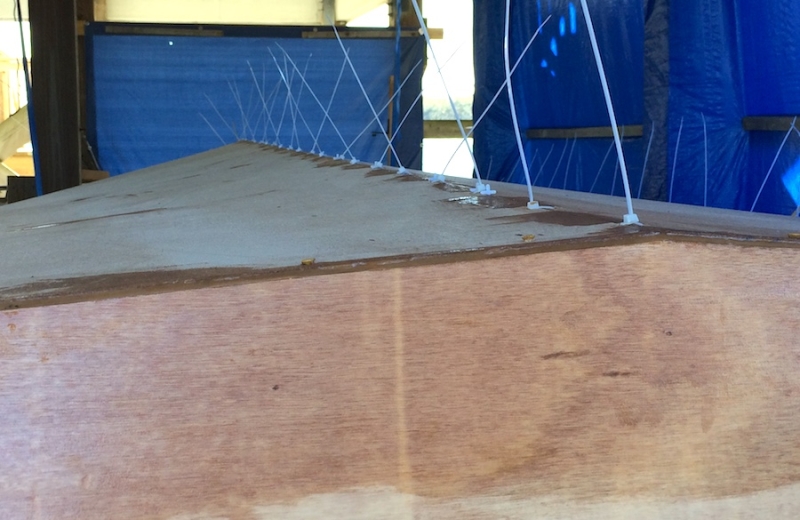
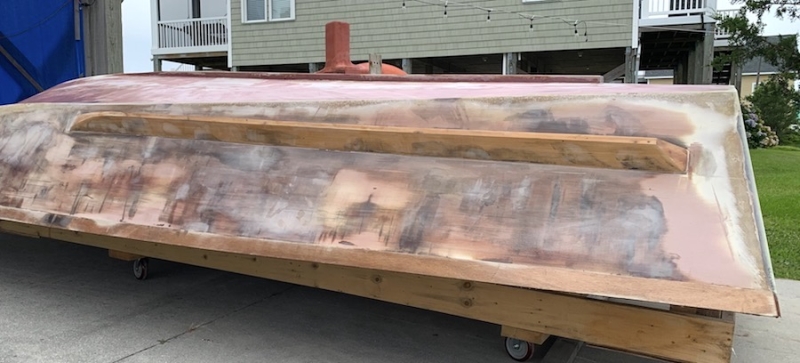
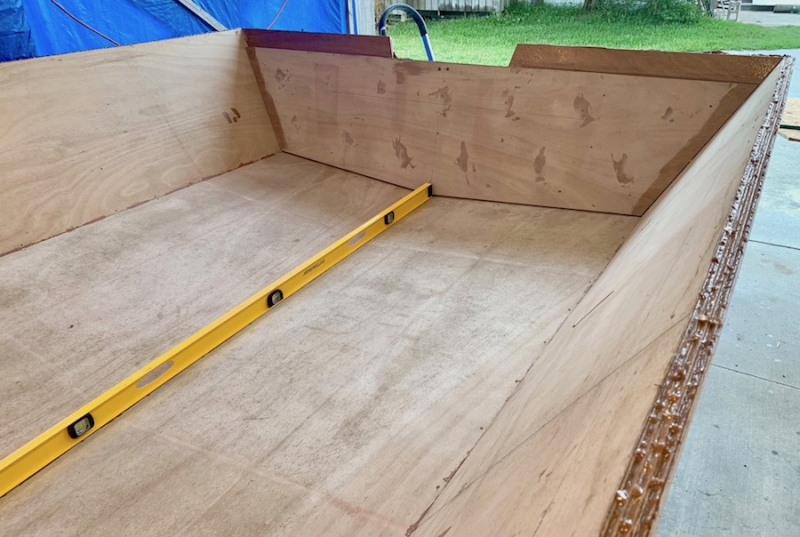
I finished stitching up the hull panels today. After tightening up all the zip ties, there was a decided wobble at the shear line in the region of frames 2-4.

Also, there were big gaps between the side panels and the molds, particularly at mold #1 where the gap was about 3-4”.
I tried a few things like clamping battens along the shear line. Nothing seemed to work until I tried lifting the corners of the bow (the points where the hull bottom and side panels come together at the shear). Lifting these points brought the side panels in against the molds. I added two ~2’ sections of 2”x2” underneath the bow corners, and running back along the chine seam, to distribute the lifting force over more area and rigged several ratchet straps to the ends of the 2”x2”s. I then used the laser level to ensure that the bow support straps were lifting symmetrically. You can see the strap hooks on the end of the 2”x2”s and the red laser line in this photo:
After adjustment of the bow support straps, the gaps between the side panels and molds was greatly reduced and the shear wobble was almost fully eliminated. Clamping a batten of scrap plywood to the shear line took care of the rest of it.
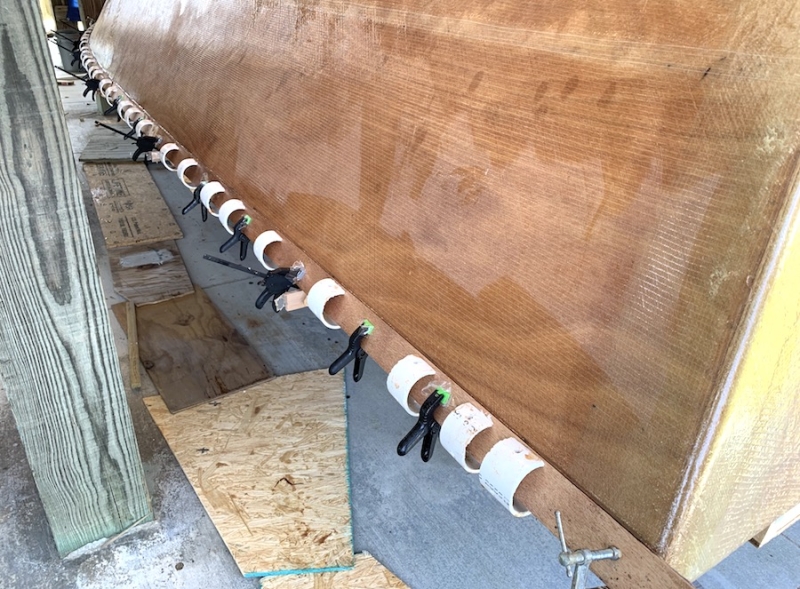
I taped the undersides of the keel and chine seams with painter’s tape so that the epoxy glue wouldn’t squeeze through and create a mess requiring lots of grinding and sanding. In this photo, you can also see the spring clamps holding the shear batten in place.
I did a last check for any hook before applying glue - no gaps under a 5’ beam level placed on the forward part of the flat section of the keel (frames 2-4).
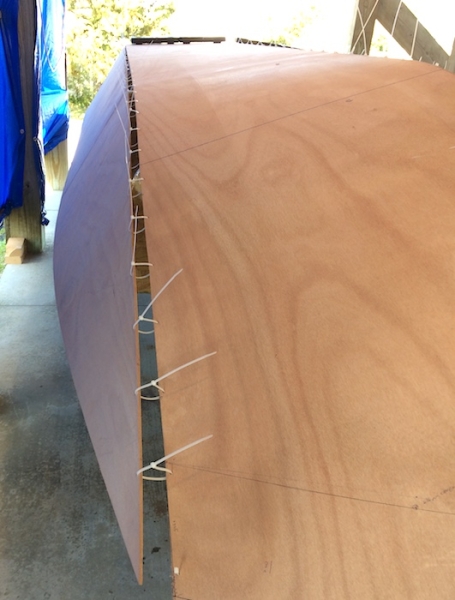
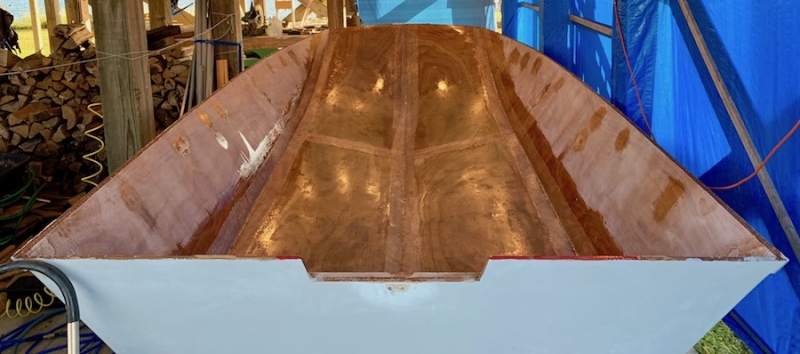
Here is the hull all stitched and with the first application of glue between the zip ties.
The keel seam is flat and level relative to the sole baseline.
One concern I have is the strength of the seams near the bow. The panel have quite a bit of bend in this area and I'm a bit worried the seam might 'pop' when I remove the zip ties. Should I add some fiberglass tabbing to this area before I remove the zip ties or am I worrying needlessly?
Re: SOBX Little Big Boat GV15
Posted: Fri Apr 03, 2020 11:26 pm
by BrianC
Fuzz, Piperdown, & Dan_smullen - Thanks for sharing your experience with air tools. I have a (120VAC) 6” RO sander now but it is good to know I have options. Given the cost of inline sanders, my fairing will be human-powered! I’ll look into the Dura Block - any suggestions on the length?
Evan - Thanks for the confirmation that I was doing the right thing. As you can see, I got it all sorted out and hook free. Is this your design?
Re: SOBX Little Big Boat GV15
Posted: Sat Apr 04, 2020 7:10 am
by Jeff
BrianC, yes, this is a Evan Gatehouse Design!!! Glad you got everything sorted!!! Also, nice progress, Jeff
Re: SOBX Little Big Boat GV15
Posted: Sat Apr 04, 2020 8:20 am
by Netpackrat
BrianC wrote: ↑Fri Apr 03, 2020 11:26 pm
Fuzz,
Piperdown, &
Dan_smullen - Thanks for sharing your experience with air tools. I have a (120VAC) 6” RO sander now but it is good to know I have options. Given the cost of inline sanders, my fairing will be human-powered! I’ll look into the Dura Block - any suggestions on the length?
I prefer an electric sander because you don't have to worry about it contaminating the surface with oil or moisture from your air supply.
Re: SOBX Little Big Boat GV15
Posted: Sun Apr 05, 2020 10:42 pm
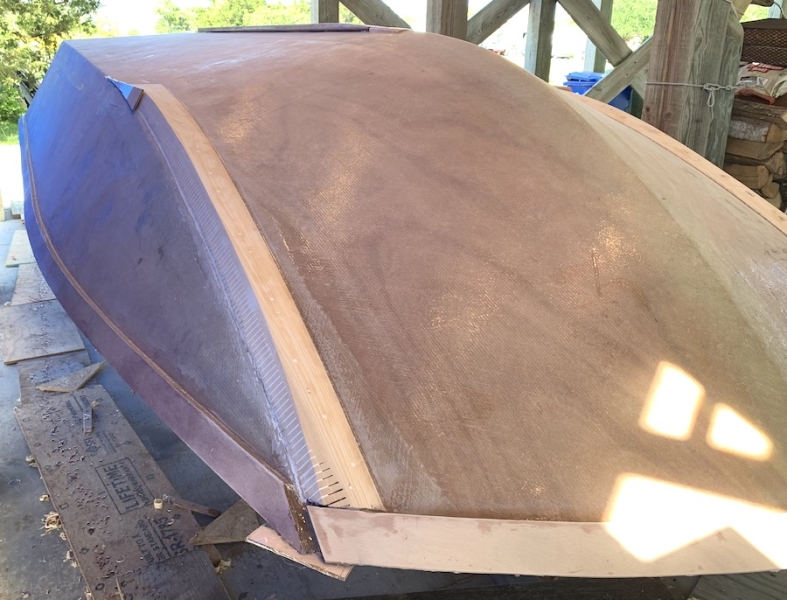
by BrianC
It now looks less like a hedgehog, more like a boat…
Yesterday, I applied a second round of glue to the bow-area seams to ensure that it wouldn’t come apart when unstitched. Today I removed the zip tie stitches and filled all the remaining gaps with epoxy+wood flour glue.
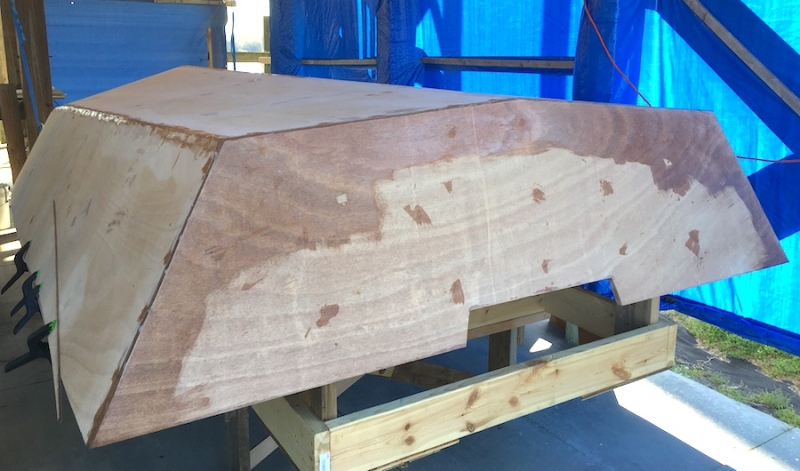
Tomorrow I’ll round the edges of the seams in preparation for tapping and do any final filling.
Re: SOBX Little Big Boat GV15
Posted: Sun Apr 05, 2020 11:36 pm
by Fuzz
I think all of use worry it will fly apart when we cut the tie wraps but so fat I have never seen it happen. That epoxy glue is some tough stuff.
Re: SOBX Little Big Boat GV15
Posted: Mon Apr 06, 2020 8:51 am
by Jeff
Nice progress!! Jeff
Re: SOBX Little Big Boat GV15
Posted: Mon Apr 06, 2020 4:44 pm
by piperdown
Looking good! That epoxy glue is really strong stuff but it's nice to have a bit extra just in case.
Re: SOBX Little Big Boat GV15
Posted: Wed Apr 08, 2020 12:03 am
by BrianC
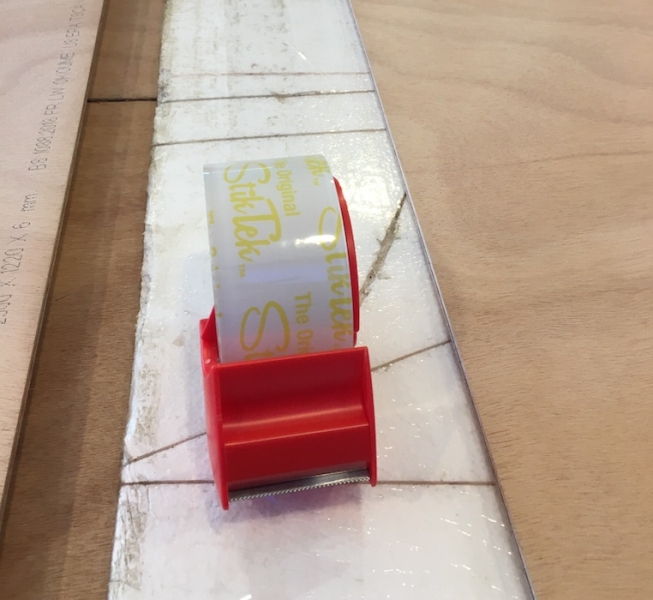
I don’t have a space where I can safely unroll and measure the 50” wide fiberglass biax cloth (just too windy outside) so I cut a piece of string to the length of fiberglass cloth desired and used that to measure the cloth as I rolled it off the supply bolt.

I placed the string on the edge of the cloth and rolled it in as I rolled the cloth onto a batten. By keeping the string taut, the length of the cloth should match the length of the string:
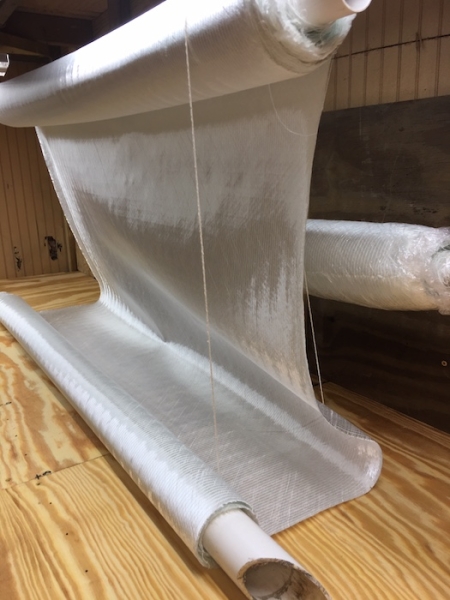
Here is all the cloth and tape for laminating the outside of the hull. I weighed the tape, and, from the expected widths used, calculated the weights of the cloth panels - I'll wait to trim the cloth to the desired width once I roll it out on the hull.
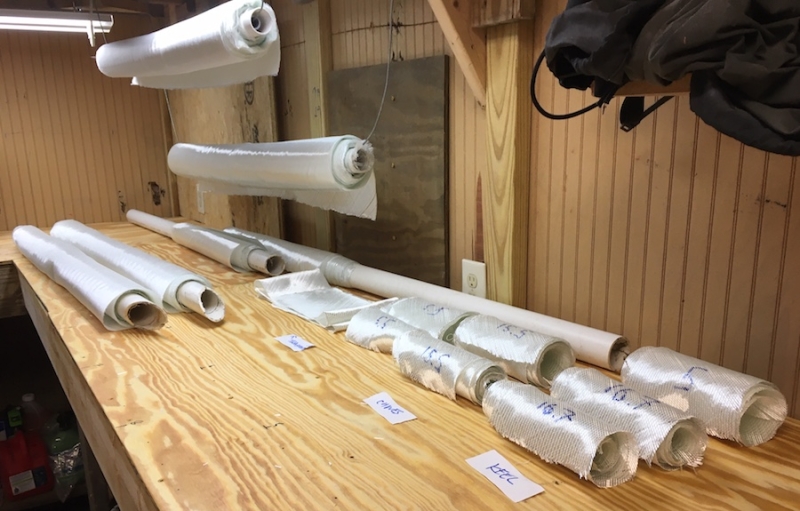
I sanded the seams for the last time and marked the hull at 2”, 4” & 6”(where need) from the seams to guide tape and fabric placement.
I’m planning on a three day lamination-fest: Day 1 taping, Day 2 bottom panels, Day 3 side panels (not called for in plans; using lighter 9 oz. biax. cloth). I'm using a slow cure no-blush hardener so I should get a good chemical bond between each day's work. Friday and Saturday have forecast highs in the low to mid 60’s so I’ll do the tape on Thursday (high about 85°F) so I can do the bigger parts on cooler days.
Re: SOBX Little Big Boat GV15
Posted: Wed Apr 08, 2020 2:42 pm
by piperdown
That sounds like a good plan.
I also like the idea of putting the 9oz on the sides. Lot's of designs don't have it (per engineering it's not needed) but it's nice to have for abrasion resistance and a bit more stiffness in the design. That's not a knock on the designers at all, just a reality that people have a tendency to push their boats and get into areas where an extra layer provides a bit of protection.
Re: SOBX Little Big Boat GV15
Posted: Wed Apr 08, 2020 2:45 pm
by wegcagle
Hey Brian,
It's been WAY TOO long since I've posted, but I saw your thread and it brought back amazing memories for me! (wegcagle's GV15). This is the point that I REALLY wished that I had double checked the flatness of my planing area (8 ft forward of the stern). I ended up having some cupping from the stern forward that was about 1/4"-1/2" at the worst. It cost me tons of hours to remove, refiberglass, etc.
I would recommend running a flat edge of about 8ft long across the planing area on both sides of your now before you fiberglass. That way any cupping can be removed!
Looking fantastic, and you are doing a WAY cleaner job of building her than I did.
Will
Re: SOBX Little Big Boat GV15
Posted: Wed Apr 08, 2020 11:23 pm
by BrianC
piperdown wrote: ↑Wed Apr 08, 2020 2:42 pm
That sounds like a good plan.
I also like the idea of putting the 9oz on the sides. Lot's of designs don't have it (per engineering it's not needed) but it's nice to have for abrasion resistance and a bit more stiffness in the design. That's not a knock on the designers at all, just a reality that people have a tendency to push their boats and get into areas where an extra layer provides a bit of protection.
Eric, My thoughts exactly. This design calls for just 1/4" ply on the bottom and sides so adding a layer of 9 oz. biax all the way to the shear seemed like a good idea. - Brian
Re: SOBX Little Big Boat GV15
Posted: Wed Apr 08, 2020 11:28 pm
by BrianC
wegcagle wrote: ↑Wed Apr 08, 2020 2:45 pm
...This is the point that I REALLY wished that I had double checked the flatness of my planing area (8 ft forward of the stern). I ended up having some cupping from the stern forward that was about 1/4"-1/2" at the worst. It cost me tons of hours to remove, refiberglass, etc.
I would recommend running a flat edge of about 8ft long across the planing area on both sides of your now before you fiberglass. That way any cupping can be removed!
Will, Yours was one of the builds I read over many times. After seeing the problems others have had with cupping or hook of the planning surface (your's included), I've been paying particular attention to this issue. To keep the keel line flat and horizontal, I made a few adjustments to the keel seam when stitching and added bit of 'traction' near the bow. - Brian
Re: SOBX Little Big Boat GV15
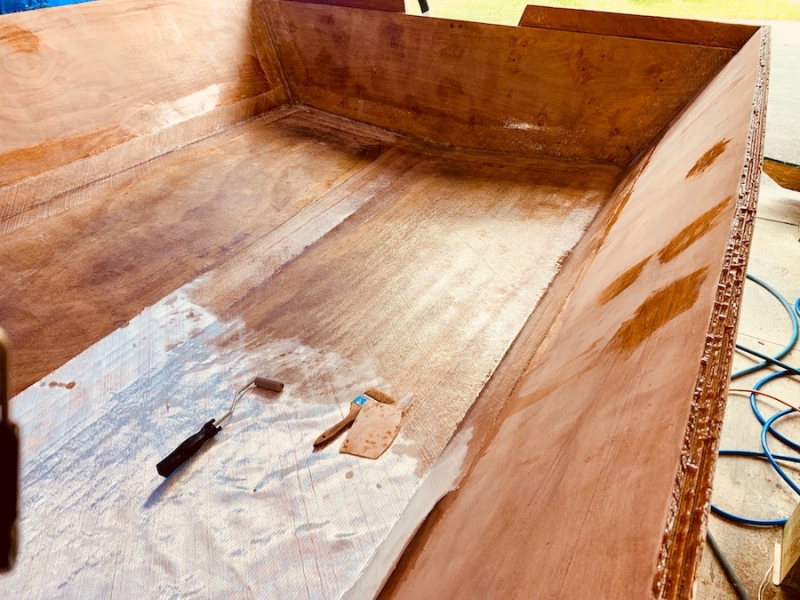
Posted: Thu Apr 09, 2020 10:16 pm
by BrianC
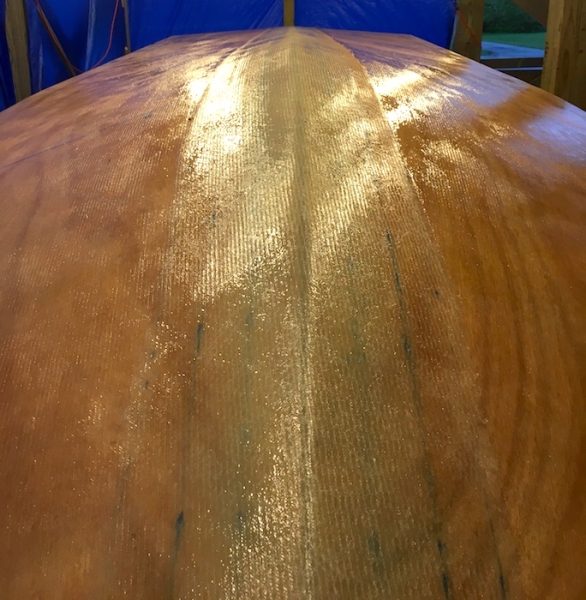
Today, I got all the tape down on the outside of the hull. Not counting the epoxy used to give the plywood a light pre-coat, I managed a 45% glass content.

Tomorrow I’ll try to lay down cloth on the bottom of the hull. This will require about twice the epoxy as the tape but should go quicker since it is just two pieces. Well, that’s my story and I’m sticking to it!
Re: SOBX Little Big Boat GV15
Posted: Thu Apr 09, 2020 11:18 pm
by Fuzz
NO, NO do not get stuck to it! You will lose some skin and a bunch of hair

Re: SOBX Little Big Boat GV15
Posted: Fri Apr 10, 2020 8:16 am
by Jeff
Great nprogress!!!! Jeff
Re: SOBX Little Big Boat GV15
Posted: Fri Apr 10, 2020 8:17 am
by Jeff
Sorry, great progress!!!! Jeff
Re: SOBX Little Big Boat GV15
Posted: Fri Apr 10, 2020 11:11 pm
by BrianC
It was howling today so I added another tarp to block some of the wind then got the main layer of cloth on the hull. Adding the tarp and doing a quick once over with the RO sander to knock off any rough spots took a few hours so the glassing didn’t get started until about noon and finished a bit after 7. It amounted to about 11 lbs. of glass cloth and well over 1.5 gallons of epoxy. This is my first time using 12 oz. biaxial cloth - it certainly is a bit more work to get it just so than the 6 oz. woven cloth I used when building the SK14. Also glad to report, I didn't get stuck, although I did go through quite a few sets for gloves!

Tomorrow I’ll added the extra cloth on the sides. Once that is done, the hull will be fully covered in glass cloth. Good thing because we have wind and rain in the forecast starting Sunday and going for four days.
Re: SOBX Little Big Boat GV15
Posted: Sat Apr 11, 2020 10:10 am
by Dougster
Looks nice and you must feel good. Sounds like an awfully long day for my old bones though. I'd be doing the alcohol and ibuprofen cocktail for sure

Dougster
Re: SOBX Little Big Boat GV15
Posted: Sat Apr 11, 2020 3:24 pm
by Fuzz
Glad you did not get stuck to the hull
Your glass work looks dang good
Re: SOBX Little Big Boat GV15
Posted: Sat Apr 11, 2020 5:56 pm
by BrianC
Yesterday was indeed a long day Dougster. Its not something I want to repeat too often. And yes Fuzz, I was pleased with yesterday’s effort. After getting cleaned up, I took a dose of vitamin I plus a nice stiff scotch on the rock.
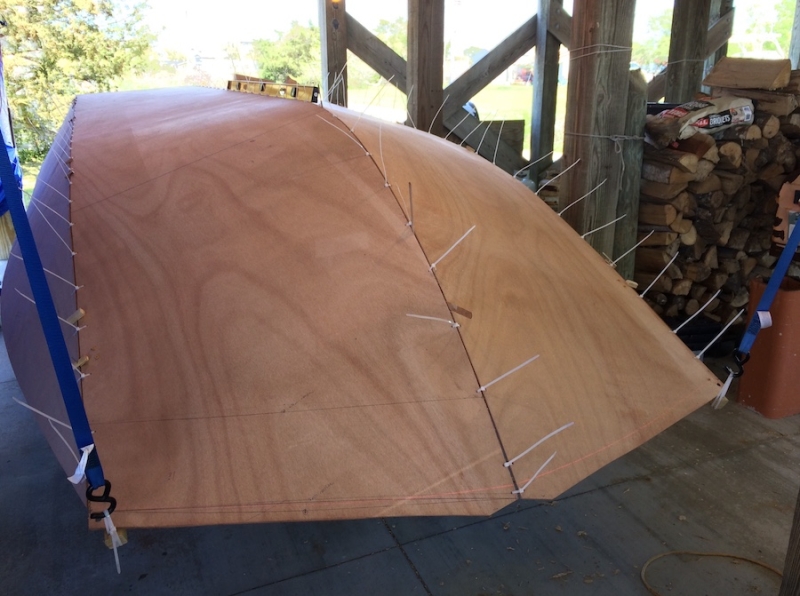
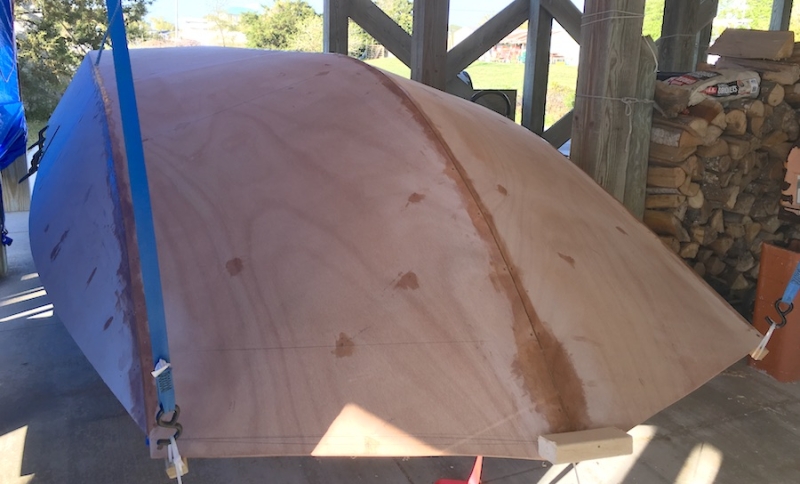
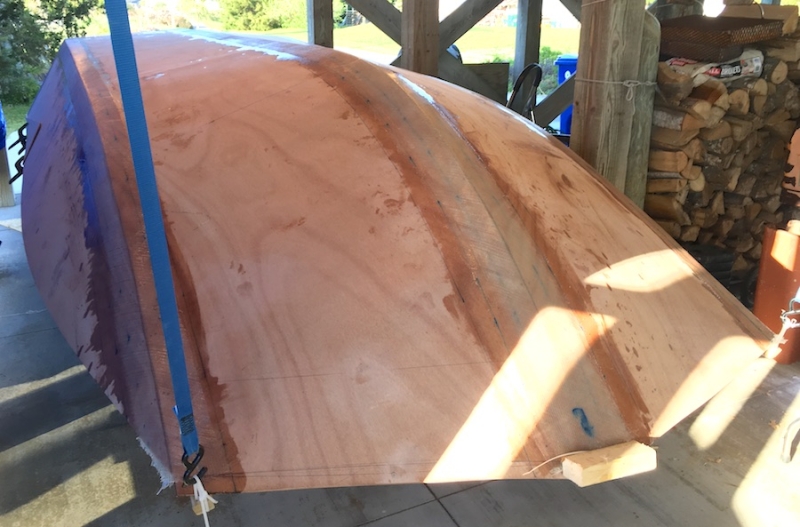
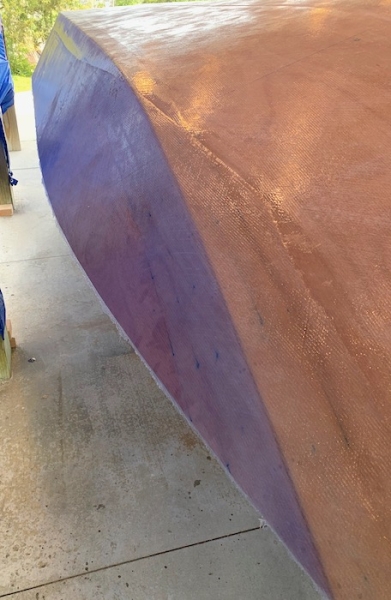
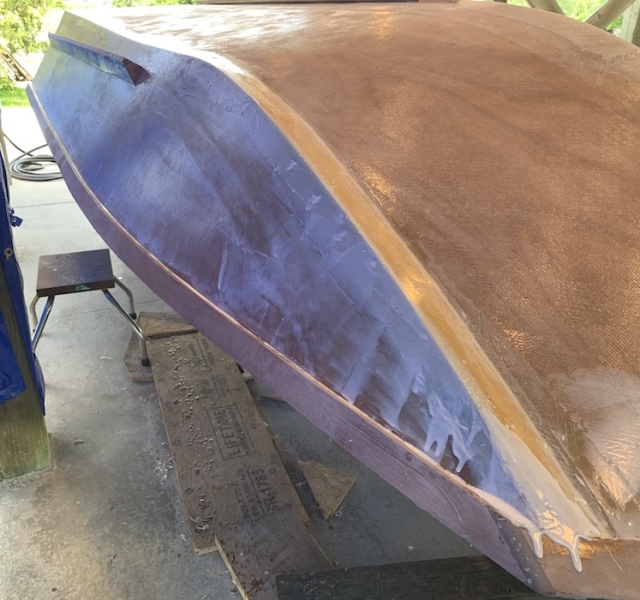
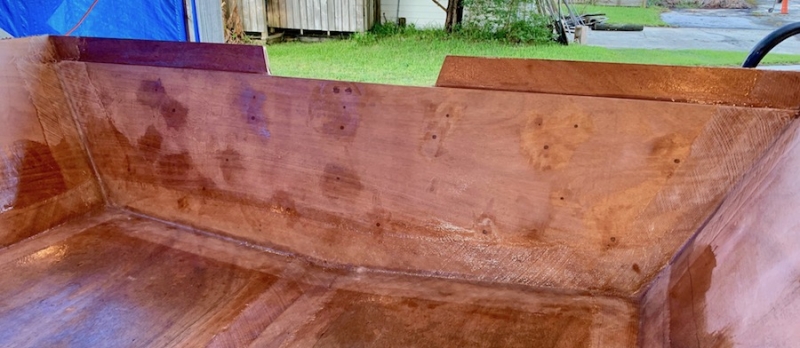
Change of plans for today. I’m not happy with the ‘wobble’ along the rear third of the shear line - this photo was taken looking forward from the transom along the shear line:

I don’t want to lock in the wobble by glassing the sides so I’ll first add rub rails which should straighten things out. I’m also adding spray rails along the back half of the hull which should remove any remaining wobble.
I did coat all exposed surfaces with neat epoxy to protect the wood from getting wet.
Re: SOBX Little Big Boat GV15
Posted: Wed Apr 15, 2020 10:42 pm
by BrianC
We’ve had a stretch of bad (for boat building) weather so I’ve spend the time planning next steps. The consensus seems to be to sharpen chines & transom, build up any reverse chines, and attach spray rails and/or keels before applying any fairing. With that in mind, I’ve drawn out the parts I’ll need:
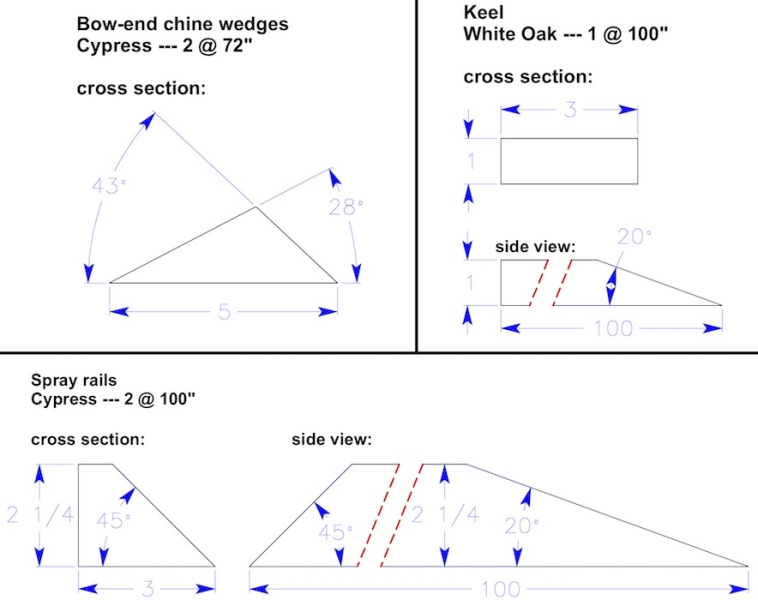
The upper left drawing is the cross section of bow-end chine wedges that will attach to the bottom at the chine running back about a third of the way from the bow. The angles are selected to provide a slightly down sloping reverse chine whose outside edge matches the hull's sides. These will create reverse chines in along the forward part of the hull - the part most likely to throw out spray when crossing boat wakes or hitting swell along the backside of the inlet.
The upper right is the keel that will start ~18” from the transom extending forward along the flat portion of the hull bottom.
The lower drawing is the spray rails which will be mounting on the sides parallel to and ~2-3” above the level of the sole. The will start 4-6" forward of the transom and extend forward for about eight feet.
This photo is marked up to show the approximate placement of these parts:
Re: SOBX Little Big Boat GV15
Posted: Sun Apr 19, 2020 10:19 pm
by BrianC
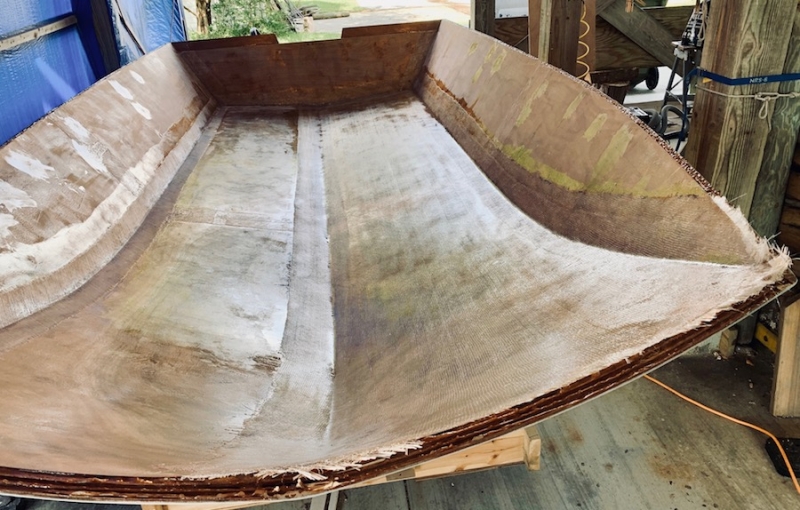
Over the past few days I finished adding the light biax cloth to the sides. Its good to get that done - no more big sheets of fiberglass cloth to do until after the flip. Lots of fairing and sanding and fairing and sanding before then.
I saved the scraps leftover from cutting the side panels so that I could use them to mark out spray rail strips that (hopefully) won’t have to be tortured into place.

I also attached support arms to the four molds that should help when attaching the spray rail strip to the hull.
We have a couple of rainy days coming up so it will be a while before the next steps: attaching the spray rails, bow-end reverse chines, and keel. There is also chine and transom sharpening that needs to be done before fairing can begin.
Re: SOBX Little Big Boat GV15
Posted: Mon Apr 20, 2020 2:28 pm
by Fuzz
Hey now..................doing the rub rail that way is cheating
I thought it was written you had to use 50 clamps and get a pint of glue on yourself when installing them. Your way is going to be too easy
Re: SOBX Little Big Boat GV15
Posted: Wed Apr 29, 2020 3:38 pm
by BrianC
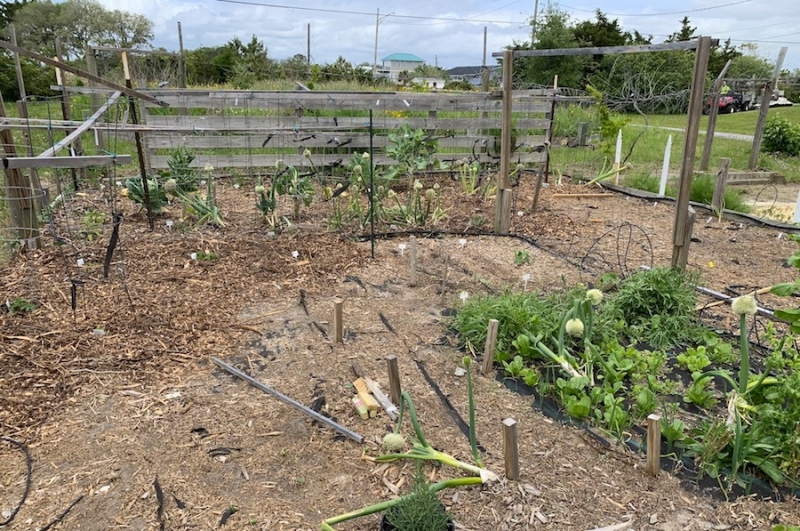
I had to take some time away from boat building to get the garden going. It is all prepped, tomatoes and a few other transplants are in, and the first batch of beans is planted.
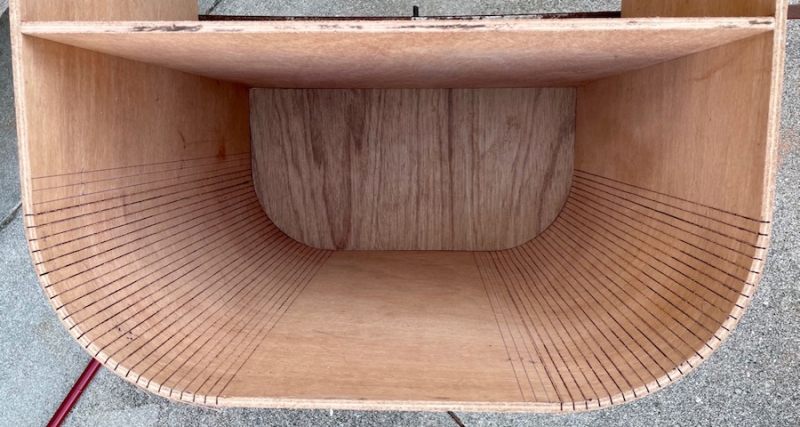
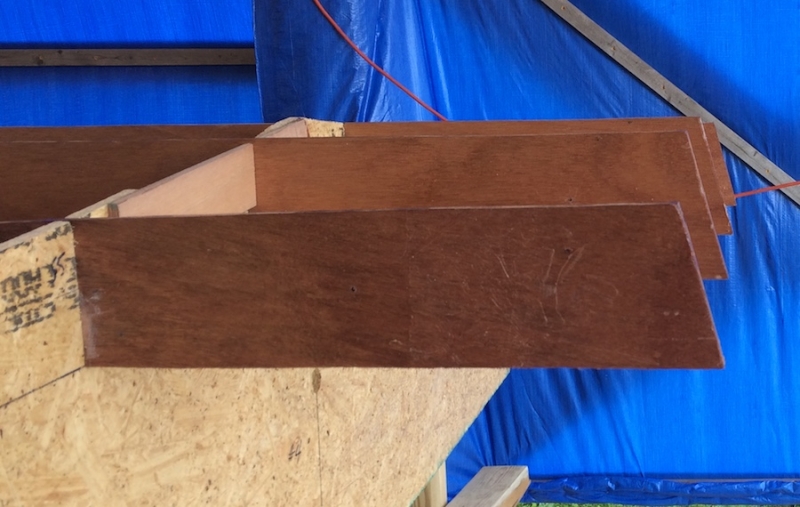
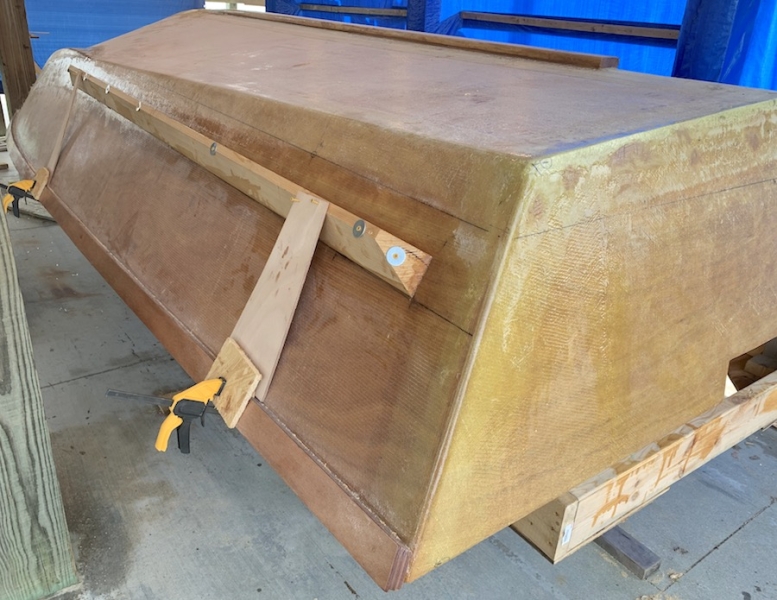
First up was to trim the white oak skeg that I had previously shaped and covered in 12 oz. biax tape.
Here is that skeg glued to the hull with a thick epoxy+cabosil+wood flour paste. I’ll be adding a full fillet along each side after it fully sets. I also plan to add a nose-piece to blend in the bow end with the hull.
I also attached the first of three rub rail layers on the starboard side. I used just about all my small clamps so I’ll be doing one side at a time.
Re: SOBX Little Big Boat GV15
Posted: Wed Apr 29, 2020 4:52 pm
by piperdown
Looking good but I thought the skeg was supposed to go width size up? I don't have the plans so I don't really know but other skegs I've seen are on the narrow side of the board the it goes up a couple of inches.
Re: SOBX Little Big Boat GV15
Posted: Wed Apr 29, 2020 6:34 pm
by BrianC
piperdown wrote: ↑Wed Apr 29, 2020 4:52 pm
Looking good but I thought the skeg was supposed to go width size up? I don't have the plans so I don't really know but other skegs I've seen are on the narrow side of the board the it goes up a couple of inches.
I think that they normally do go on with the wide dimension vertical. The plans don't call for any skeg but most small boat builds use something like a 1"x1" skeg. My thoughts on using a horizontal 1"x3" were that it would act as a skid plate when beaching the boat and would provide an effective skeg height of more like 1.5" (since that will be the height of the vertical faces once I fill the side gaps) without adding more to the hull's draft.

Re: SOBX Little Big Boat GV15
Posted: Thu Apr 30, 2020 9:59 am
by piperdown
BrianC wrote: ↑Wed Apr 29, 2020 6:34 pm
piperdown wrote: ↑Wed Apr 29, 2020 4:52 pm
Looking good but I thought the skeg was supposed to go width size up? I don't have the plans so I don't really know but other skegs I've seen are on the narrow side of the board the it goes up a couple of inches.
I think that they normally do go on with the wide dimension vertical. The plans don't call for any skeg but most small boat builds use something like a 1"x1" skeg. My thoughts on using a horizontal 1"x3" were that it would act as a skid plate when beaching the boat and would provide an effective skeg height of more like 1.5" (since that will be the height of the vertical faces once I fill the side gaps) without adding more to the hull's draft.
Ah, okay, that makes sense now. I didn't realize that it didn't call for a skeg at all.
Re: SOBX Little Big Boat GV15
Posted: Thu Apr 30, 2020 12:11 pm
by jacquesmm
Correct, the skeg is optional. For planing boats in that size, if I show a skeg or if someone wants it, I specify a 1x1 or a 1x2 on edge. Nothing fancy. See my notes about appendages here:
https://forums.bateau2.com/viewtopic.php?f=2&t=63623
Re: SOBX Little Big Boat GV15
Posted: Mon May 04, 2020 6:34 pm
by BrianC
Over the past few days I got all three layers of the starboard side rub rail installed.
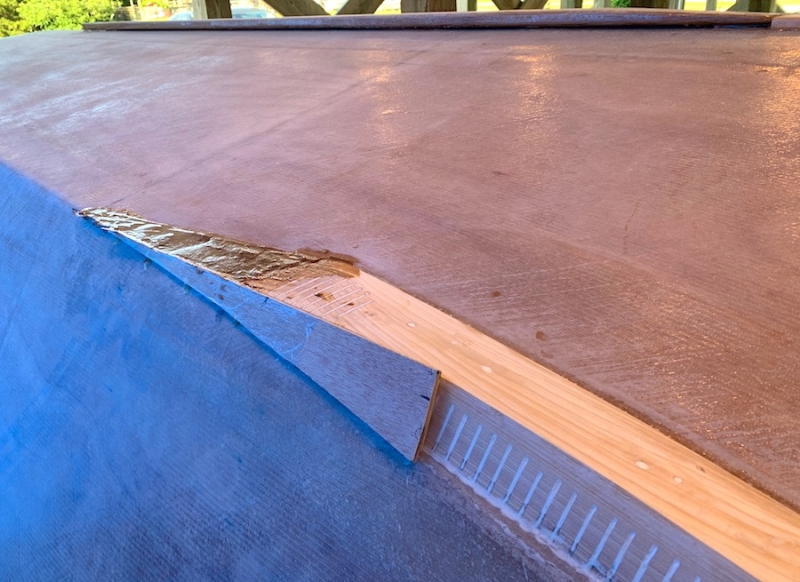
Next up was preparing the chine wedges. Since they need to bend along the forward part of the chine, I made cuts at 0.5” intervals. This is the face that will be against the hull:
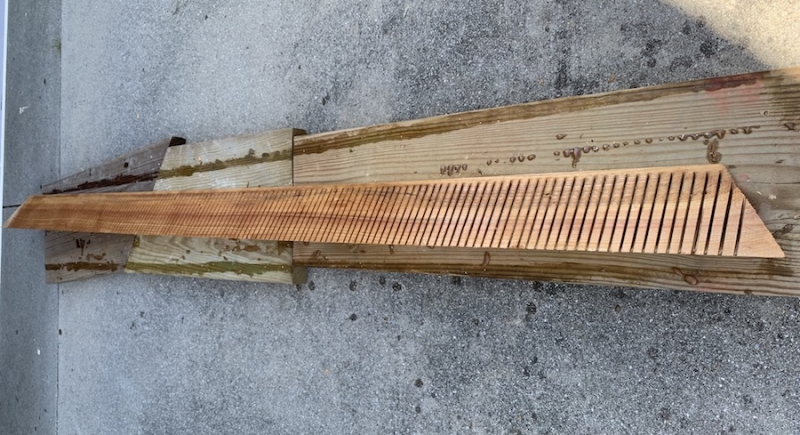
Here is the starboard chine wedge screwed down. Once it sets, I’ll shape it a bit and blend the back end to match the hull’s bottom.
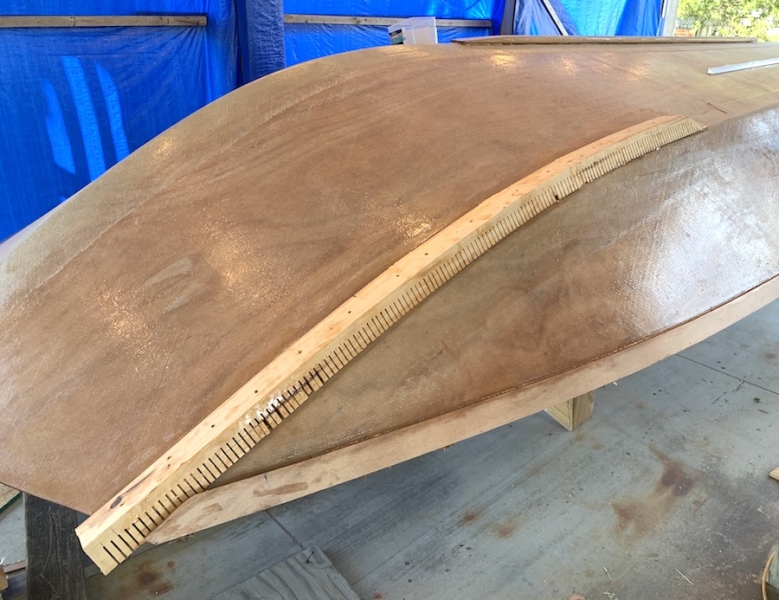
Here is the port chine wedge screwed down plus the first layer of the rub rail.
The last thing I did today was to begin the edge sharpening using a mix of epoxy+milled glass+1/4" chopped glass strands. Transom is first:

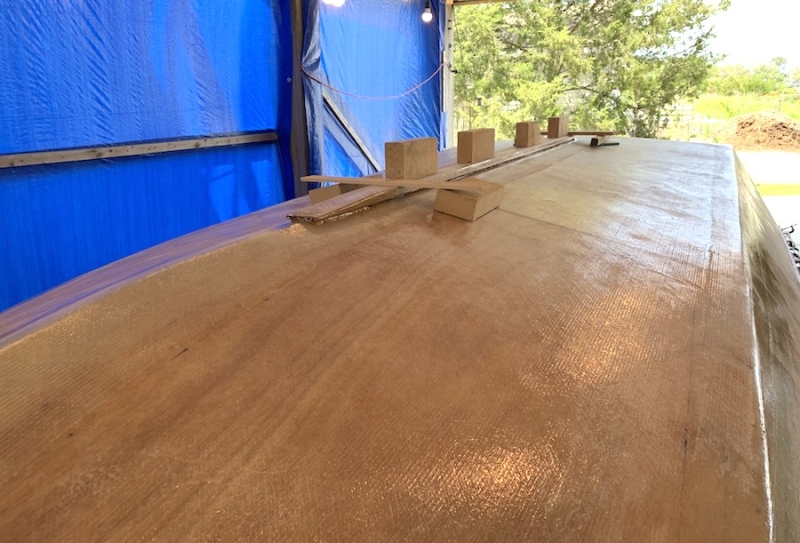
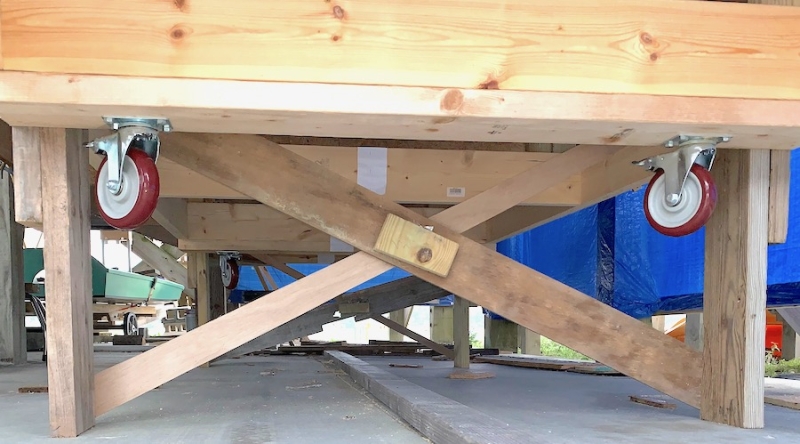
My 5” casters arrived so those will go on tomorrow.
Re: SOBX Little Big Boat GV15
Posted: Sat May 16, 2020 11:17 pm
by BrianC
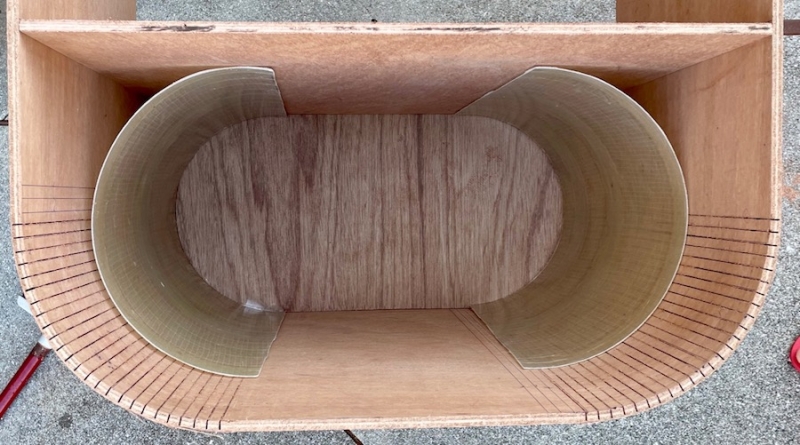
I’ve been knocking off lots of little tasks over the past (nearly) two weeks. All three layers of rub rail are install, including the ones that wrap across the bow. The chine wedges have been shaped and blended with the rub rail at the bow. Today, I added dams so that I could fill both the back end of the chine wedges as they taper down and the forward corners when the side and bow rub rails meet. Here it is pre-fill:
and post fill:
The 5” casters have been installed. I’ll leave the strongback up on its legs a bit longer though since I need the baseline reference (currently level) to mount the spray rails.
Re: SOBX Little Big Boat GV15
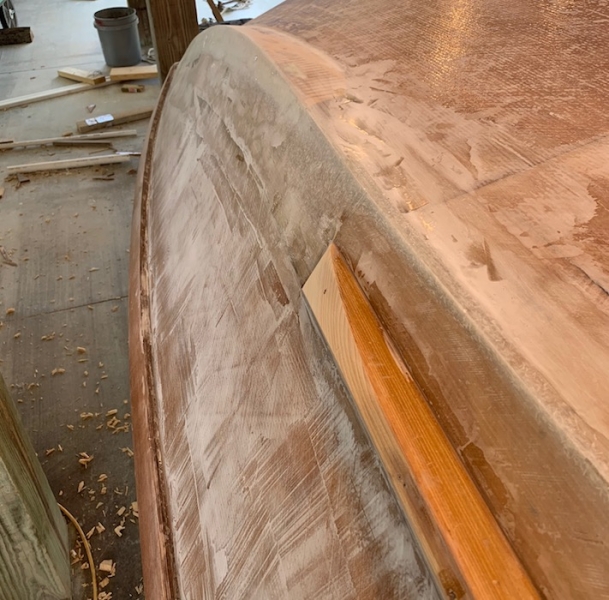
Posted: Fri May 22, 2020 7:57 pm
by BrianC
I ended up gluing the spray rail on with the bottom edge about 3” above the waterline. They start 6” forward of the transom and extend about half way to the bow.
The chine wedges got a covering of biax tape. Next I’ll fill and sharpen the edges so that they are continuous with the sides of the hull.
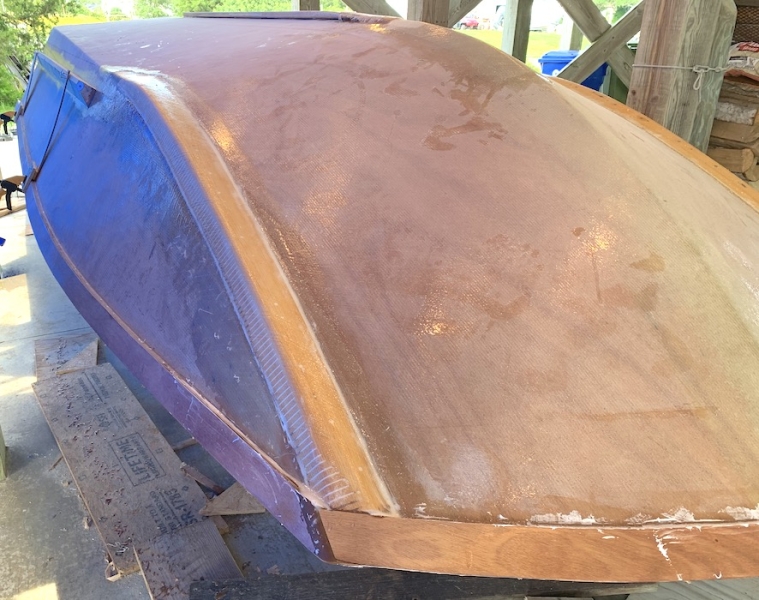
Now that the spray rails are on, I no longer need to keep the baseline horizontal so I can remove the legs and switch to wheels.
Re: SOBX Little Big Boat GV15
Posted: Sat May 23, 2020 12:03 am
by Fuzz
I hate to say this but the spray rails look a bit strange to me
Most times they are at the same level as the hull or even have a little upward angle to them.
Re: SOBX Little Big Boat GV15
Posted: Sat May 23, 2020 12:13 am
by BrianC
Fuzz wrote: ↑Sat May 23, 2020 12:03 am
I hate to say this but the spray rails look a bit strange to me
Most times they are at the same level as the hull or even have a little upward angle to them.
I was wondering about that. Initially, I thought about making them follow the shear line but I ended up making them parallel to the sole.
Re: SOBX Little Big Boat GV15
Posted: Sat May 30, 2020 11:59 pm
by BrianC
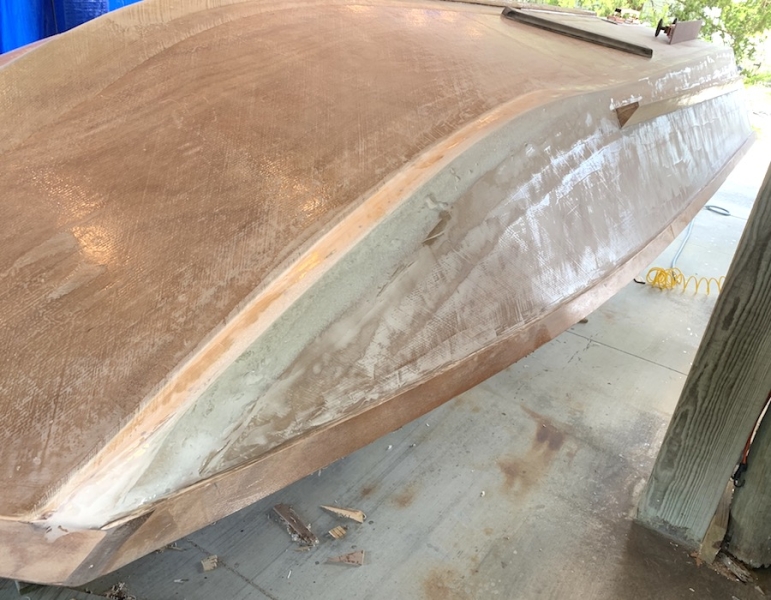
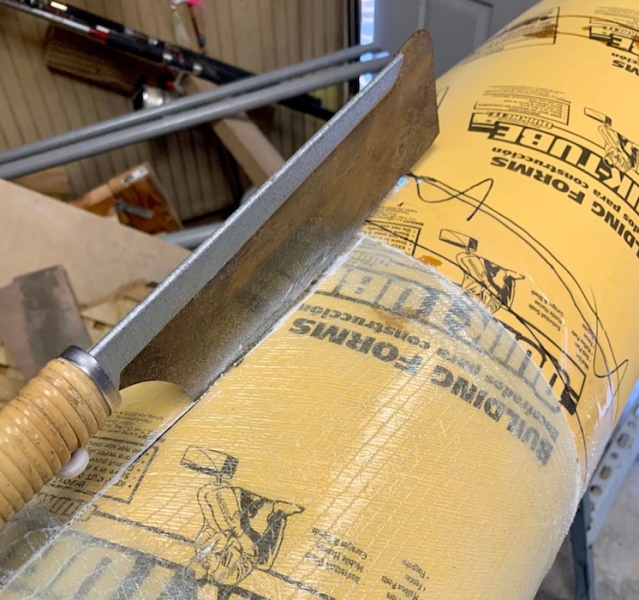
I screwed the dam to the transom when I was sharpening the transom's bottom edge, then had to fill the holes. After reading how others here use hot glue, I went that route for sharpening the chine. It was faster and there are no holes to fill — a much better technique.
Once the dams came off it was pretty ugly. There are some voids in along the sides of the forward chine wedges that will need some fill.
I used a 6” Surform plane to do a rough shaping then followed with 80 grit sandpaper on a 30” Durablock long board to do an initial shaping.
Here it is viewed from the transom:
I haven’t done any sharpening of the transom-to-side seam. I’m thinking that I’ll sharpen the lower 4-6” but not any higher up — what have others done?
Re: SOBX Little Big Boat GV15
Posted: Sun May 31, 2020 9:04 am
by Jeff
Nice work BrianC. Jeff
Re: SOBX Little Big Boat GV15
Posted: Tue Jun 02, 2020 12:33 pm
by BrianC
OK, its started. I’m in the wax on, wax off stage. I decided to leave the strongback on its legs for now since that puts the sides at chest height — ideal for fairing. I’ll fair the sides and transom first, then drop it down onto the castors to do the bottom. The first layer of “wax on” went OK if a bit drippy. This batch was mixed up by ‘feel’ — going forward I’ll be using fallguy1000’s recipe.
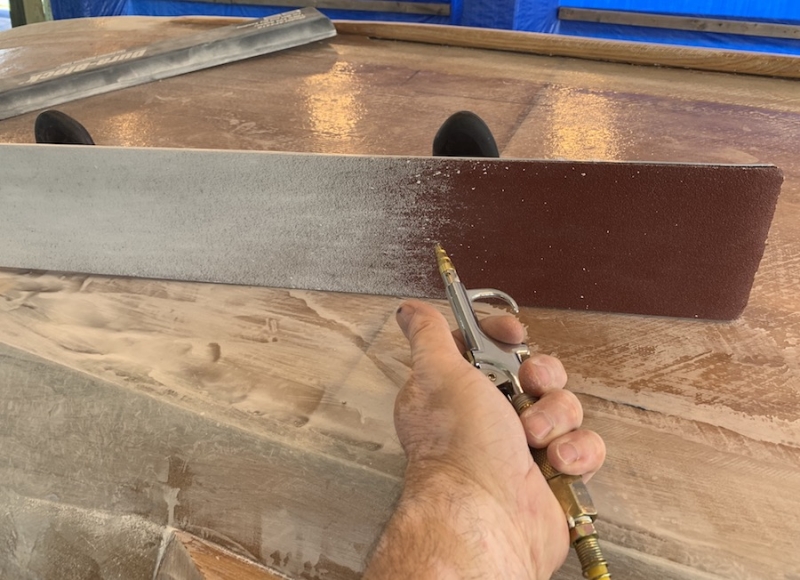
I’m using slow hardener so it was an overnight wait before fairing. I did use the 30” Durablock in a few tight places but most of it was done using a 33” FlexiSander board (thanks to fallguy1000 for that recommendation!).
My next door neighbor donated a compressor to the cause. While I won’t be using it to power any air tools, it works great to clean the sanding boards. Working outside does have its advantages — just be sure you’re standing upwind!

I wasn’t happy with the forward profile of my spray rails so I made some adjustments.
At the end off the day I put on another layer of fairing mix then went inside for a dose of vitamin I and a stiff pour of Teacher’s scotch.
Re: SOBX Little Big Boat GV15
Posted: Tue Jun 02, 2020 12:39 pm
by Jeff
Nice work!!! Jeff
Re: SOBX Little Big Boat GV15
Posted: Tue Jul 07, 2020 5:03 pm
by BrianC
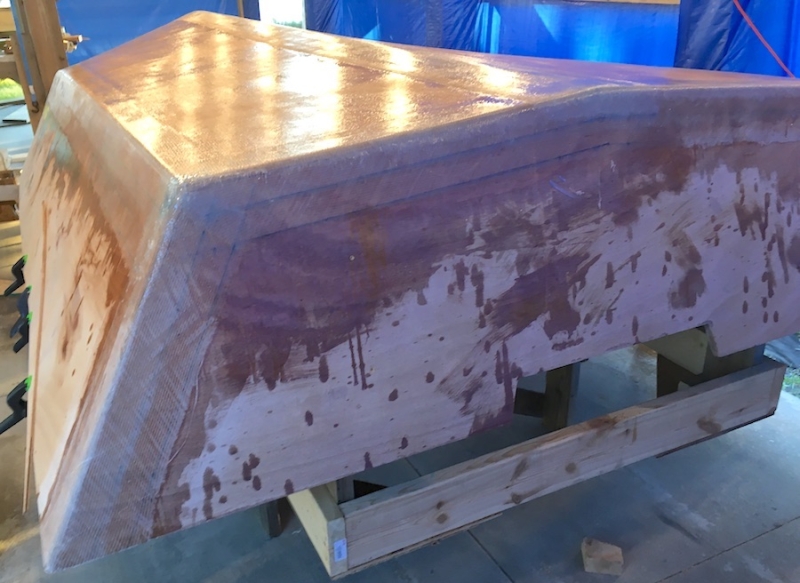
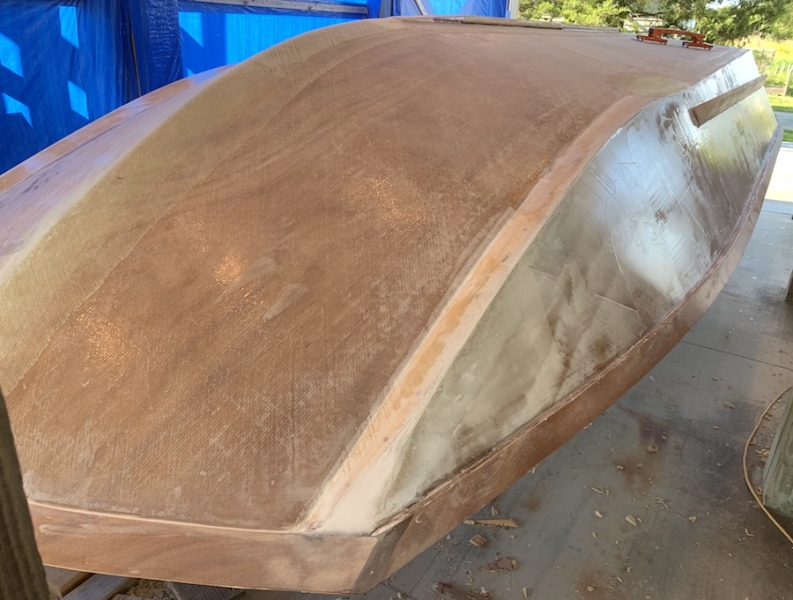
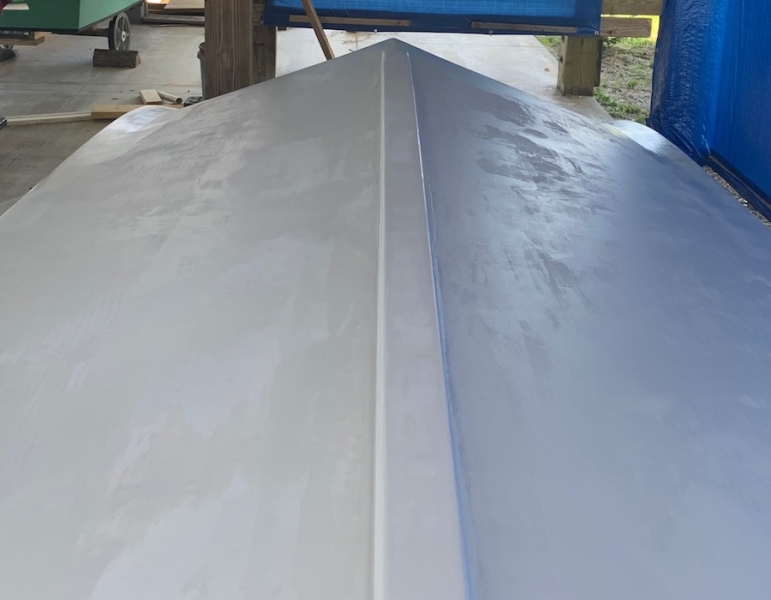
What a difference a month makes. After about 8-10 fairing cycles on the sides and transom that part is done. I’m now working on the bottom — just put on the fourth application of fairing compound. Probably one more of the homemade stuff then the last few using QuickFair. Its down on the wheels now which make it much easier to get to the bottom although I still climb up onto it to do the keel area. Also, I can now wheel it out to do the photos.
I've been using only the rigid fairing board for the rear half and I've got the bottom dead flat to better than 1/16".
I’m getting closer to primer — can’t wait!
Re: SOBX Little Big Boat GV15
Posted: Tue Jul 07, 2020 8:56 pm
by Fuzz
Lots of work to get to that point but it will be worth it
Re: SOBX Little Big Boat GV15
Posted: Tue Jul 07, 2020 11:43 pm
by BrianC
Fuzz wrote: ↑Tue Jul 07, 2020 8:56 pm
Lots of work to get to that point but it will be worth it
I certainly think it is but all anyone here sees is a blotchy mess

of course, once the primer goes on it should look much better!
Re: SOBX Little Big Boat GV15
Posted: Wed Jul 08, 2020 2:10 am
by Fuzz
I say invite the out to do some bonding time with your longboard. Then see what they have to say
Re: SOBX Little Big Boat GV15
Posted: Wed Jul 08, 2020 7:50 am
by BB Sig
Looks Good! Keep at it!
Re: SOBX Little Big Boat GV15
Posted: Wed Jul 15, 2020 3:39 pm
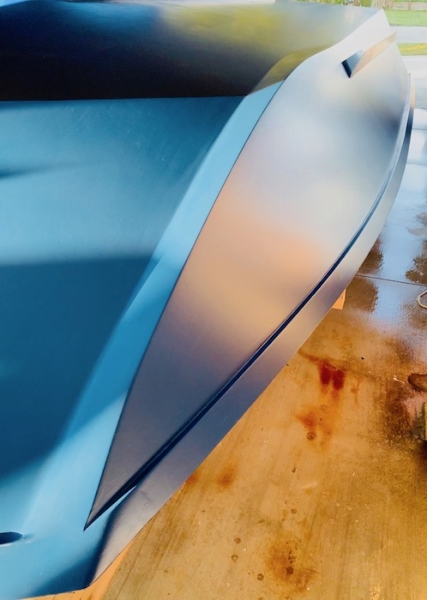
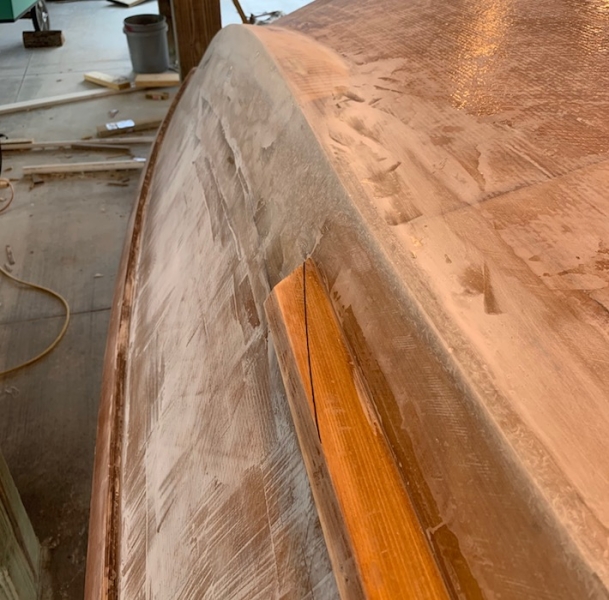
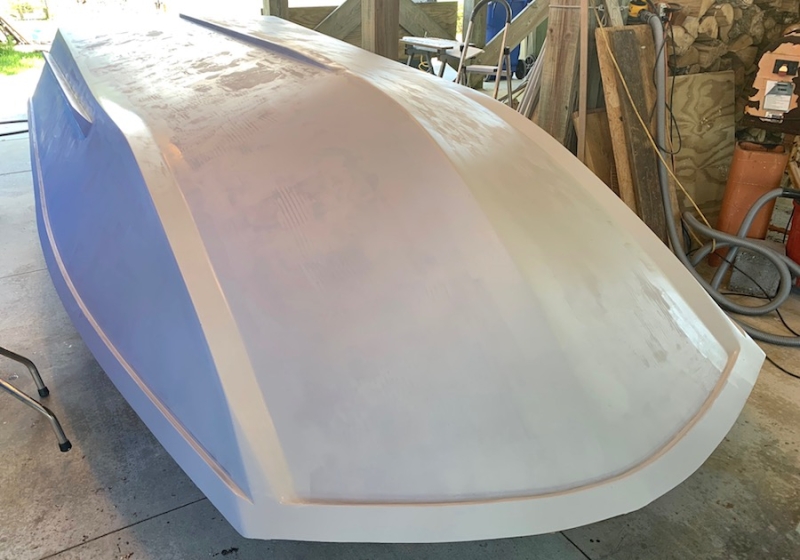
by BrianC
I finished the pre-priming fairing of the hull yesterday. The edges are a bit too sharp to get good paint adhesion -- here is what they looked like before rounding:
I used a sanding block to soften up the edges a bit. I went with about a 1/8" radius for the transom and back half of the chine edges as that seems to be the recommendation to ensure good paint adhesion. After a final go-over with the RO sander, I gave it a good wash down. Now I'll wait a few days and then comes primer (and probably a bit of fairing touch-up).
Re: SOBX Little Big Boat GV15
Posted: Fri Jul 17, 2020 1:32 pm
by BrianC
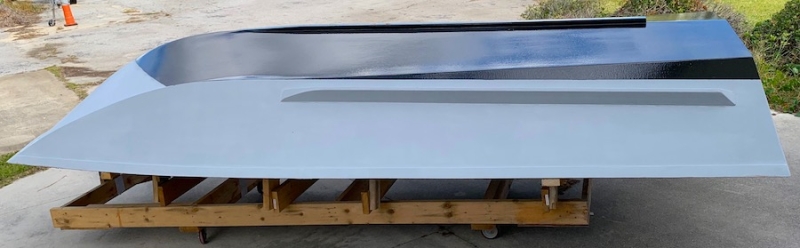
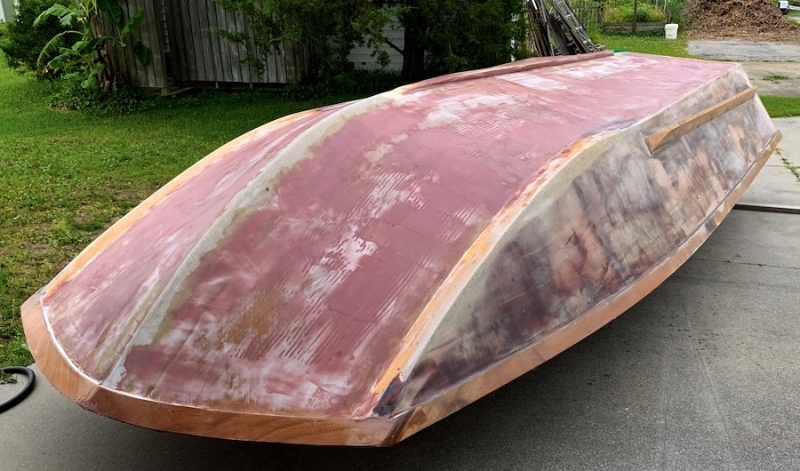
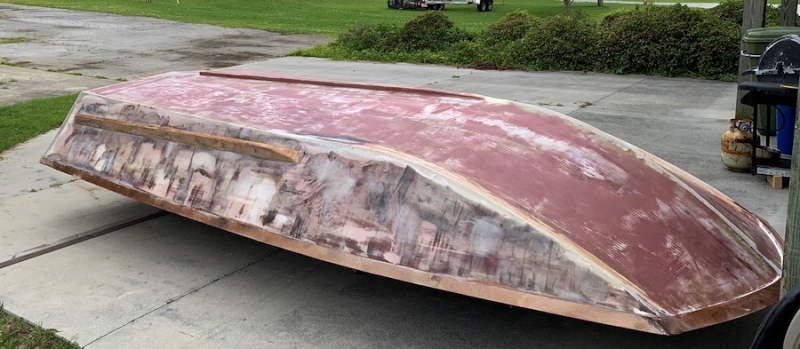
Goodbye blotches! I got the first coat of System Three primer on this morning:
Quite a few holes show up, especially in the area where I did chine and transom sharpening:
Next up, filling the holes with a bit of QuickFair, sanding, then another coat of primer.
Re: SOBX Little Big Boat GV15
Posted: Thu Aug 20, 2020 7:38 pm
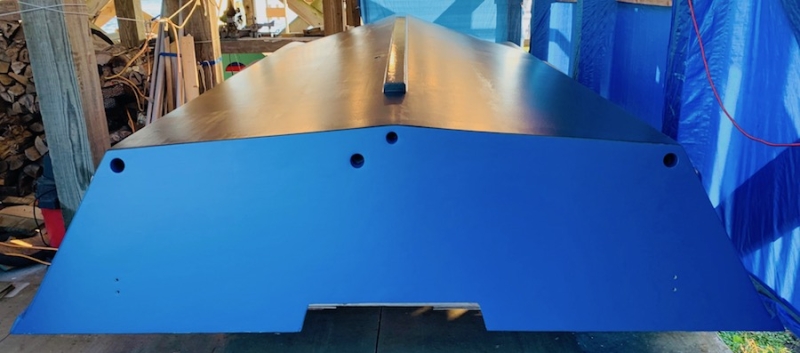
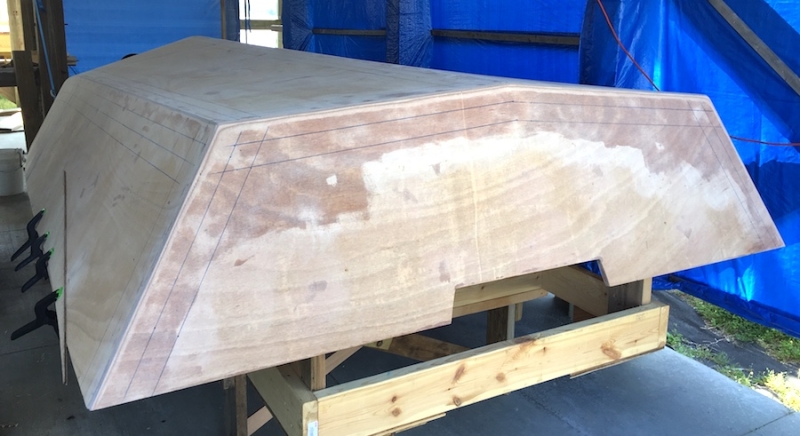
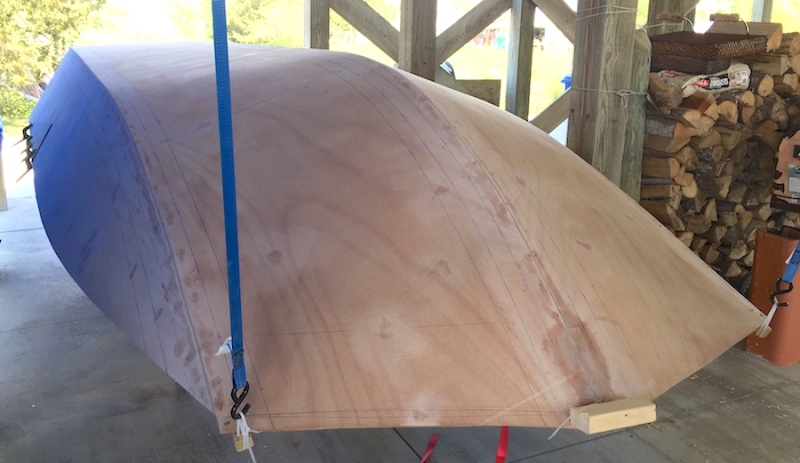
by BrianC
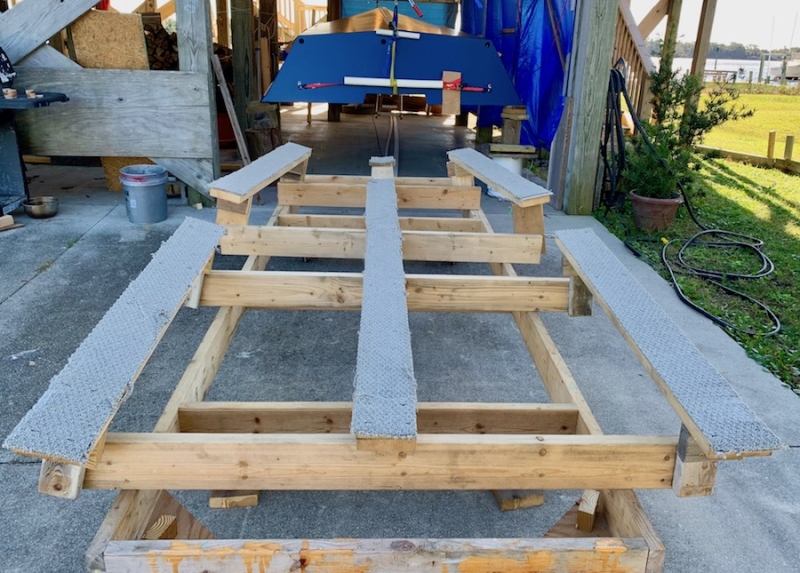
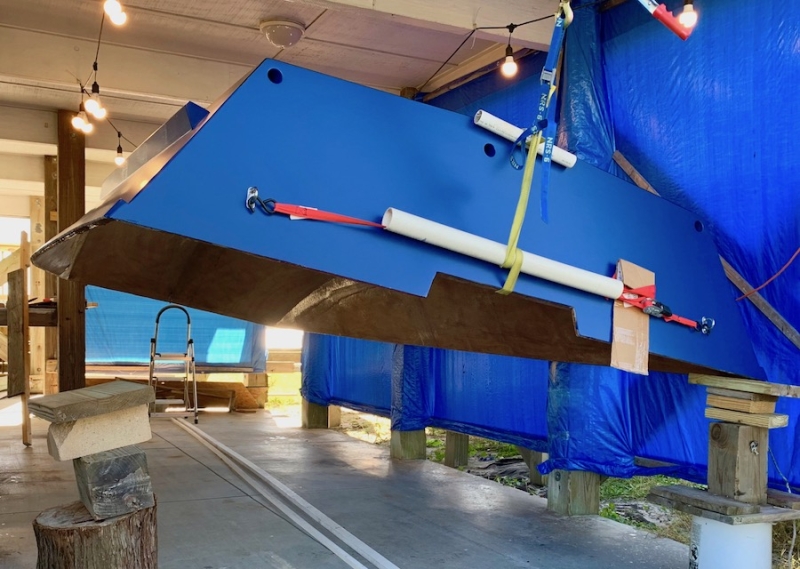
I filled all the holes and added another coat of primer. I then decided to flip now and paint the outside later since there are going to be a couple of hull penetrations (scuppers & raw water intake for live/bait well). I built a cradle inverted on the hull, lifted the hull, deconstructed the molds, attached the cradle to the strongback, flipped the boat, and lowered the hull onto the cradle.
The plans call for two layers of 12 oz. biax. on the hull bottom & carried 6” up the sides at the chines: one before adding in the stringers & frames and a second after the stringers & frames are taped into place. It seems like the second layer is done after to ensure that the stringers are fully covered with biax. If I pre-cover the stringers, do you think it would be OK to do the two inside layers before placing the stringers & frames?
Here it is after the flip:
I think I’ll give it a quick sanding to clean up the surface before I start with epoxy & glass.
Re: SOBX Little Big Boat GV15
Posted: Sat Sep 26, 2020 6:25 pm
by BrianC
A couple questions for the team:
The plans don’t seem to call for any cloth on the inside of the transom, just two layer outside plus several layers of tape on the seams both inside and out. Did I miss something or should I just go ahead with a layer of 12 oz. bias?
I’m ready for the inside cloth and just realized that I can’t do both the port and starboard sides at once like I did On the SK14. Are there any tricks or is it just do one side then wait until I can sit/walk on that side before glassing the other side?
Thanks
Re: SOBX Little Big Boat GV15
Posted: Sat Sep 26, 2020 8:46 pm
by Aripeka Angler
Very nice and clean work.

Re: SOBX Little Big Boat GV15
Posted: Sat Sep 26, 2020 8:50 pm
by Aripeka Angler
I’d glass both sides of the transom and wrap the top regardless of what the plan says or omitted. Just me, I’m 100% into overkill.
Re: SOBX Little Big Boat GV15
Posted: Sat Sep 26, 2020 9:01 pm
by BrianC
Here are today's pictures, before and after taping:

All ready for adding the 12 oz. cloth tomorrow. On the SK14 I was able to add both the port and starboard cloth pieces one right after the other since I could just reach in from the sides when applying the epoxy. Thats not going to be possible on the GV15, its just to wide to reach all the way to the centerline from the sides. Looks like I'll just do one side and then wait for it to set up before adding the other side.
Here is the transom as it is now, all taped but no cloth:
As suggested, I'll add a layer of 12 oz. biax.
Re: SOBX Little Big Boat GV15
Posted: Sun Sep 27, 2020 10:31 pm
by BrianC
Re: SOBX Little Big Boat GV15
Posted: Sun Sep 27, 2020 10:36 pm
by piperdown
Very nice!
Re: SOBX Little Big Boat GV15
Posted: Tue Sep 29, 2020 10:25 pm
by BrianC
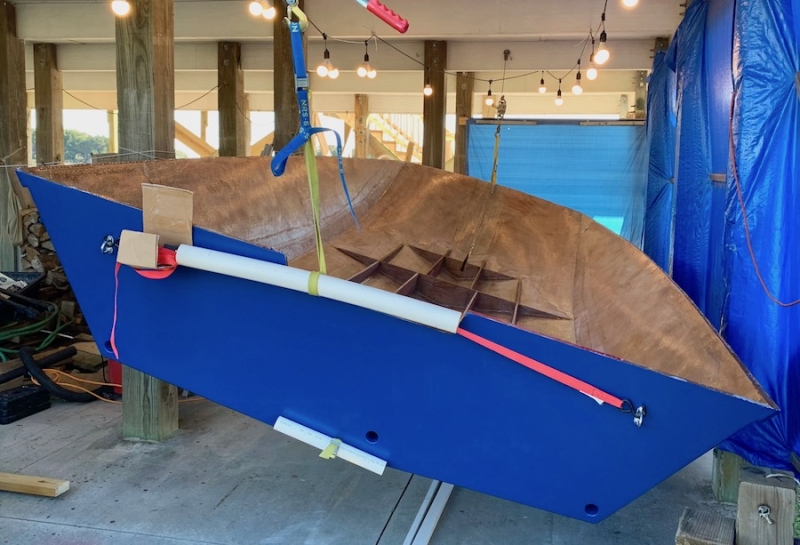
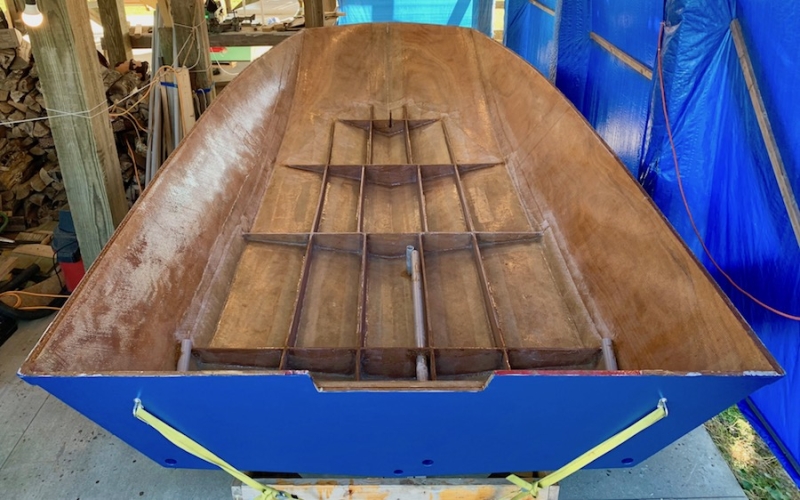
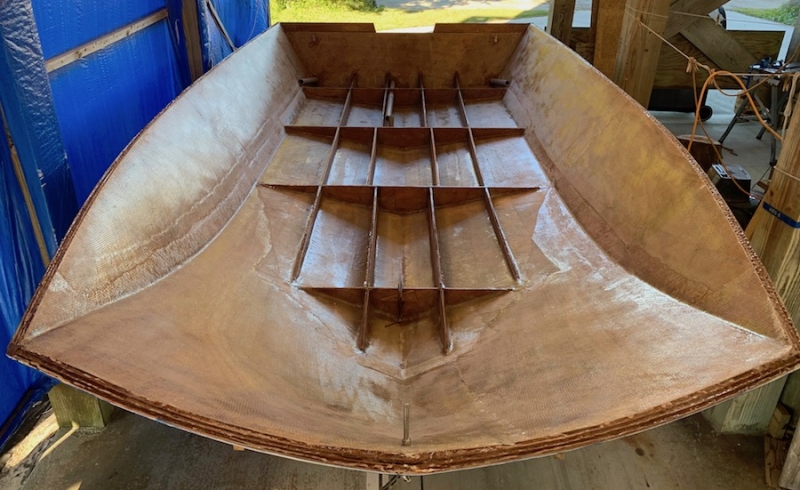
I feel I've reached something of a milestone. I’ve finished the inside fiberglass and the next step is to place the stringers and frames but I need to make those layout decisions that determine the placement of the under-sole chase tubes.
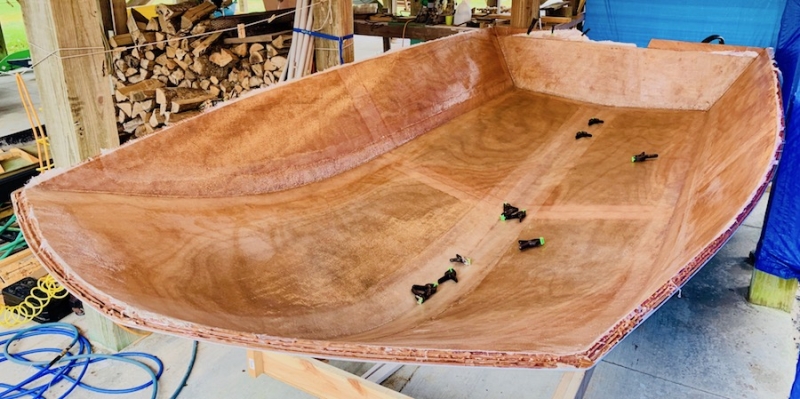
I’ve posted some question in the technical help sub-forum to help with the below-sole chase tube locations —
https://forums.bateau2.com/viewtopic.php?f=2&t=65294
Re: SOBX Little Big Boat GV15
Posted: Tue Sep 29, 2020 10:56 pm
by BB Sig
Congratulations on your milestone!
Re: SOBX Little Big Boat GV15
Posted: Tue Nov 03, 2020 12:42 pm
by BrianC
Oh well, looks like I lost all my photos in the forum upgrade.
Re: SOBX Little Big Boat GV15
Posted: Tue Nov 03, 2020 12:51 pm
by Jaysen
Are they in your phpBB gallery?
Re: SOBX Little Big Boat GV15
Posted: Tue Nov 03, 2020 1:13 pm
by BrianC
They used to be in my personal gallery under the “Gallery” tab of my “ User Control Panel” page. The subalbum heading (GV15) is still there but all the photos are gone. I have been using
![Image]()
with the image number to link them into my posts.
Re: SOBX Little Big Boat GV15
Posted: Tue Nov 03, 2020 2:38 pm
by Jaysen
BrianC wrote: ↑Tue Nov 03, 2020 1:13 pm
They used to be in my personal gallery under the “Gallery” tab of my “ User Control Panel” page. The subalbum heading (GV15) is still there but all the photos are gone. I have been using
![Image]()
with the image number to link them into my posts.
You photos are all there. I fixed the underlying issue that was preventing display. You should have all your thread images back...
Re: SOBX Little Big Boat GV15
Posted: Fri Nov 06, 2020 12:01 am
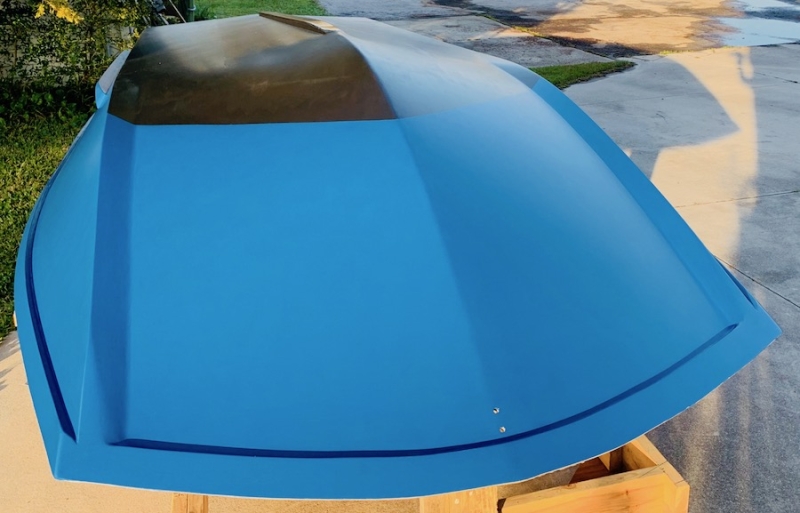
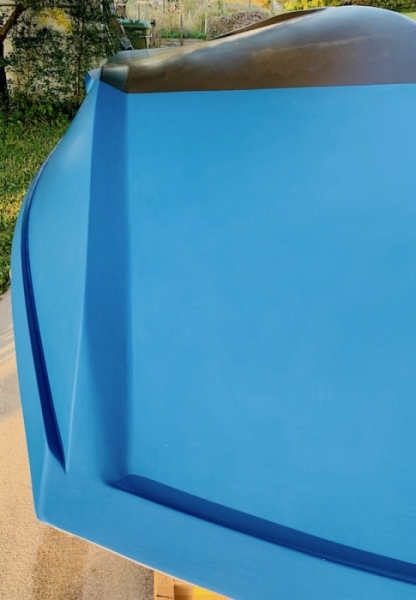
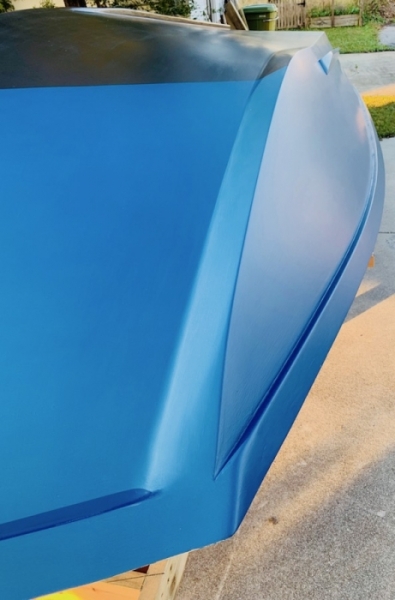
by BrianC
Re: SOBX Little Big Boat GV15
Posted: Fri Nov 06, 2020 7:55 am
by Jeff
Nice work BrianC!!! Jeff
Re: SOBX Little Big Boat GV15
Posted: Mon Nov 16, 2020 11:22 am
by BrianC
Re: SOBX Little Big Boat GV15
Posted: Mon Nov 16, 2020 11:37 am
by Jeff
Nice work!!! Jeff
Re: SOBX Little Big Boat GV15
Posted: Mon Nov 16, 2020 11:45 am
by gstanfield
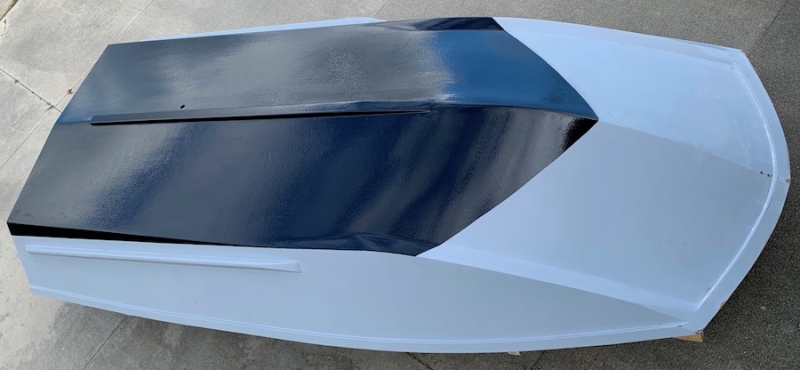
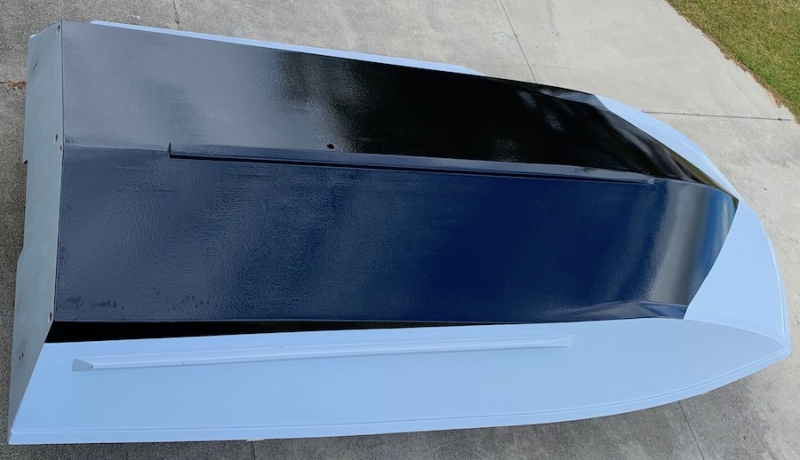
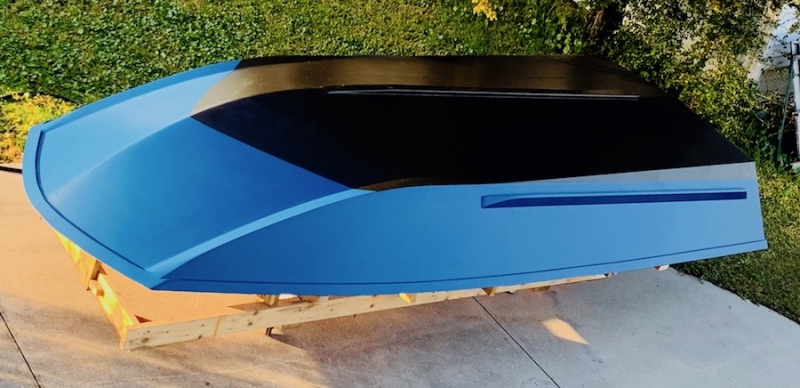
Looking good!! I love the color.
Re: SOBX Little Big Boat GV15
Posted: Wed Nov 18, 2020 8:59 am
by BrianC
Re: SOBX Little Big Boat GV15
Posted: Wed Nov 18, 2020 12:07 pm
by mattkab
Looks great.
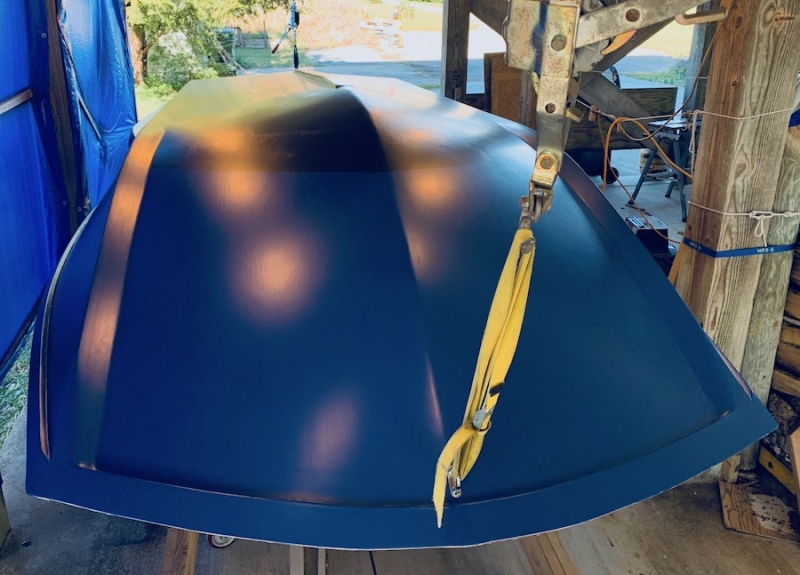
That's a BRILLIANT idea to use PVC over the straps to protect your paint job. I'm totally stealing that idea when I flip my GV-13!
Re: SOBX Little Big Boat GV15
Posted: Wed Nov 18, 2020 3:25 pm
by Fuzz
Boat looks great and I am glad the flip came off without a hitch.
Just a little heads up from an old crane operator/rigging trainer. Running a strap from eye to eye and then lifting in the middle put about 10 times the boat weight of stress on the rigging and eyes. And those eyes are not made for a side ways pull. Not trying to be a butthead just a little warning.
Re: SOBX Little Big Boat GV15
Posted: Wed Nov 18, 2020 6:47 pm
by Dan_Smullen
Coming along nicely. Glass work on the inside and the whole thing looks great!
Re: SOBX Little Big Boat GV15
Posted: Wed Nov 18, 2020 11:06 pm
by BrianC
Fuzz wrote: ↑Wed Nov 18, 2020 3:25 pm
Boat looks great and I am glad the flip came off without a hitch.
Just a little heads up from an old crane operator/rigging trainer. Running a strap from eye to eye and then lifting in the middle put about 10 times the boat weight of stress on the rigging and eyes. And those eyes are not made for a side ways pull. Not trying to be a butthead just a little warning.
Yeah, thanks for the heads up, it was slipping sideways a bit at the 90° point
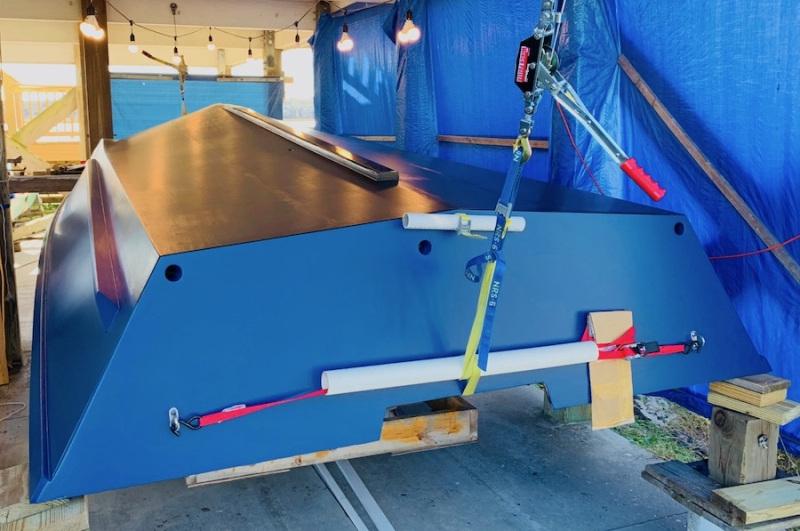
. The hull is only about 250 lbs. at this point — I'd not chance doing it this way again on anything heavier. The yellow strap that was wrapped around the white PVC section was anchored in the bilge drain tube (you can see it coming out the drain and wrapping around a small section of PVC) so that did take some of the load off of the strap going between 'U'-bolts. Again, I'll find another way on my next, larger, hull.
Re: SOBX Little Big Boat GV15
Posted: Sat Nov 21, 2020 8:36 pm
by BrianC
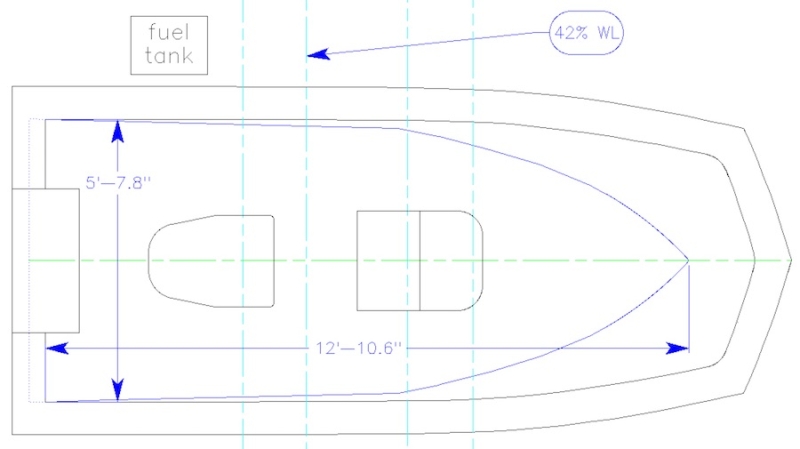
I’m using a 19 gallon Moeller plastic fuel tank that will be installed in a well under the center console:
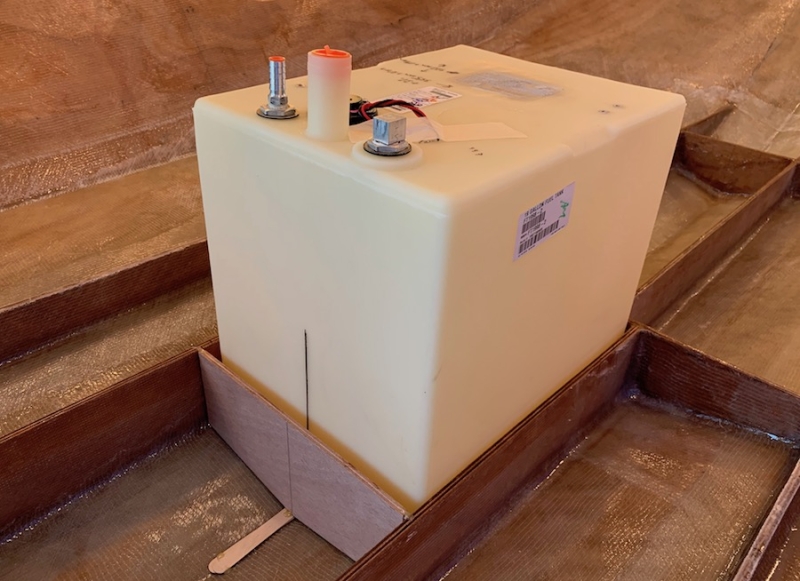
The bottom of the well has a flat plate to support the tank; the holes are for pouring in 2-part foam and will be sealed with a layer of 6 oz. cloth:
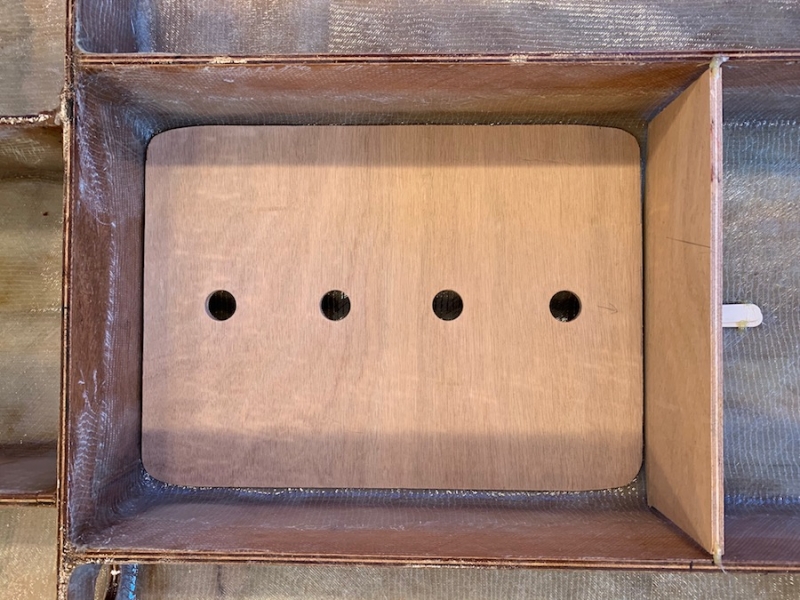
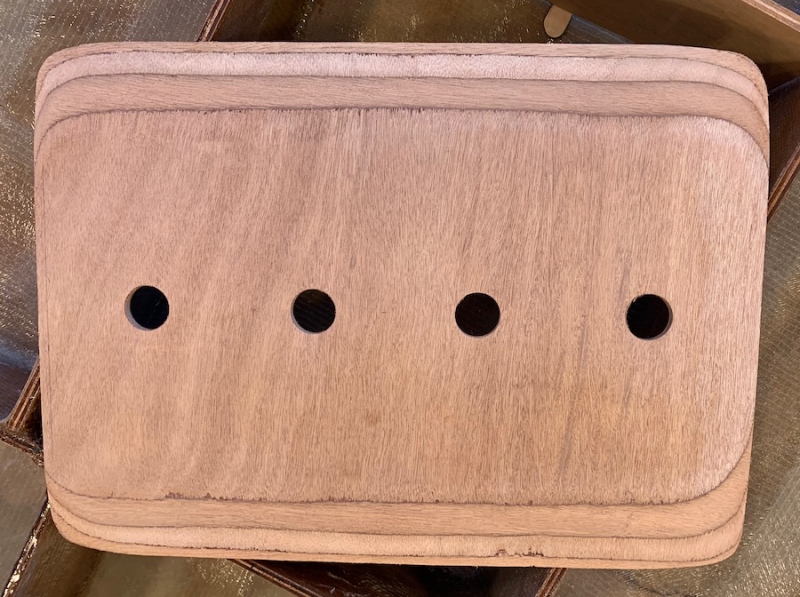
Here is a shot of the underside of the plate — a shout out to
VT_Jeff from whom I stole the idea to bevel the underside of the plate:
Not yet shown is a drain that will carry any fluids getting into the fuel tank well to the small bilge area in the rear half of the boat (hopefully, there won't be any
).
I still need to come up with a way to hold the tank in place. I’ve posted a
question to the technical questions section asking how others have held their plastic tanks in place. I want to stay away from any plain steel or plastic hardware, and friction-style buckles.
Re: SOBX Little Big Boat GV15
Posted: Tue Dec 08, 2020 5:00 am
by DAVE LUDICK
That is a beautiful GV15, I must admit that mine turned out pretty good and receives a lot of compliments. It is perfect for the weather and inland waters in our part of the world. I have a centre console and seating arrangement as per the plans, and this boat has plenty, plenty space. Well done on a great build.
Re: SOBX Little Big Boat GV15
Posted: Tue Dec 08, 2020 8:17 pm
by BrianC
DAVE LUDICK wrote: ↑Tue Dec 08, 2020 5:00 am
That is a beautiful GV15, I must admit that mine turned out pretty good and receives a lot of compliments. It is perfect for the weather and inland waters in our part of the world. I have a centre console and seating arrangement as per the plans, and this boat has plenty, plenty space. Well done on a great build.
Thanks, building is slow right now with the cold weather. I'm working inside my shed on the live well and planning the details of the center console. I'm going back and forth on seat height — its either ~23" so I can sit with my feet flat on the floor or bump it up to 30" plus some sort of foot rest so my legs aren't dangling when seated.
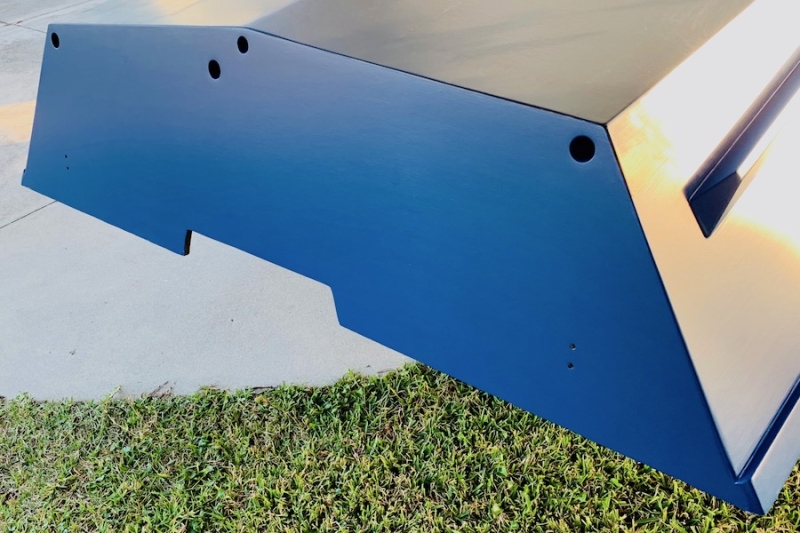
My only concern about the build is the orientation of the spray rails. Unfortunately, by the time it was pointed out that I should orient them parallel to the shear line, I'd already glued them on parallel to the waterline. We'll see how they do — I suppose the worst case is I'll have to do a spray-rail-ectomy at some point!
Re: SOBX Little Big Boat GV15
Posted: Tue Dec 08, 2020 11:19 pm
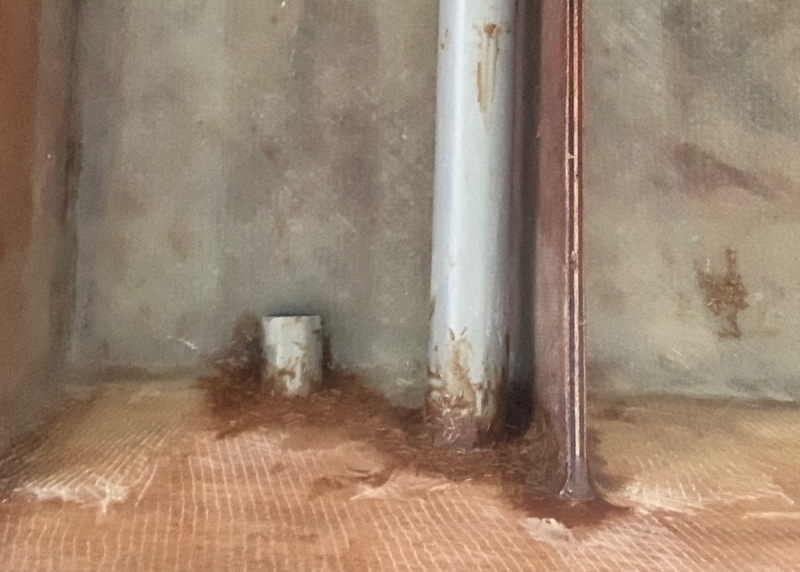
by BrianC
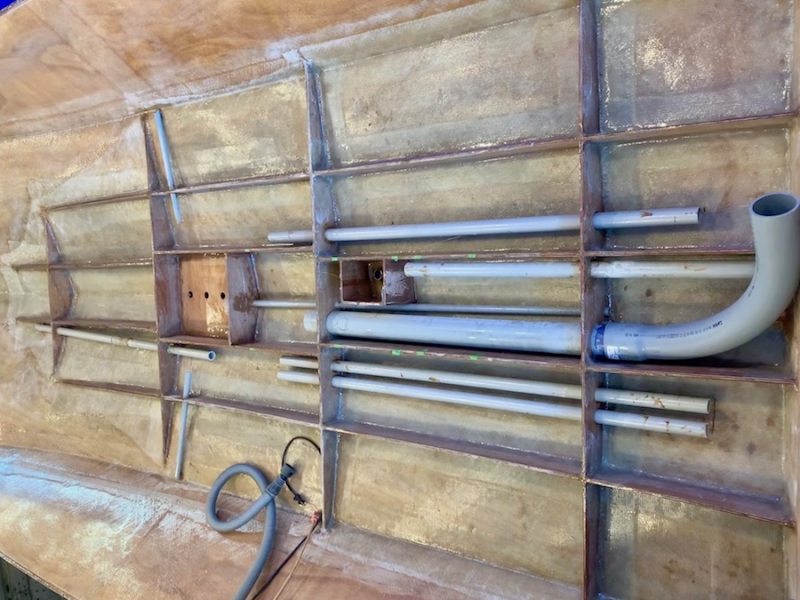
All the straight sections of the chase tubes are installed. The frames are quite short so there is no way to get 3” of ply around all the tubes so I went with fiberglass tubes that will get glued in place with epoxy glue. Only the 3” for the wiring harness is PVC:
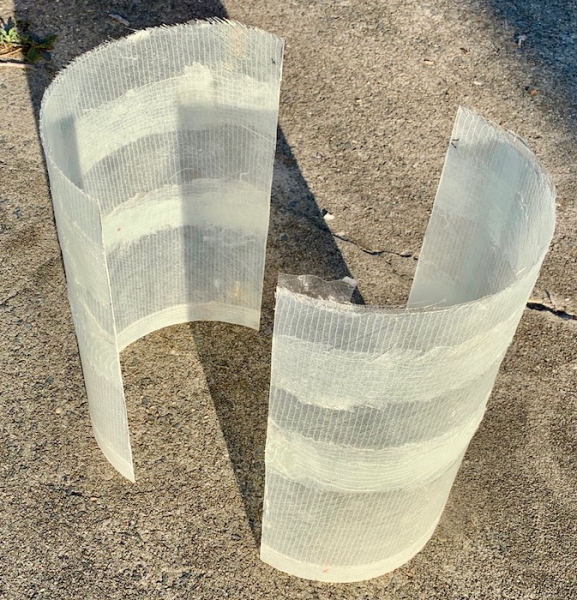
I couldn’t find a bait well that I liked so I used silentneko’s method to make a set of curved panels that will be set into a plywood frame. First, I covered the center part of a 12” concrete tube form with heavy duty packing tape. I started off with a layer of 6 oz. cloth figuring that that would give me the best surface on the inside. Next up was a layer of 9 oz. biax, followed by an extra layer of scrap 12 oz. biax strips in the center and along the edges. Here it is still on the 12” diameter concrete form tube with one side all trimmed; the second side will get trimmed to fit when I build it into the plywood frame:
I used my beater Japanese pull saw to trim one side and to cut the tube into two halves:
Here are the finished parts:
Re: SOBX Little Big Boat GV15
Posted: Sun Jan 03, 2021 8:30 pm
by BrianC
I just received a "happy new year" email from the Flexisander folks -- it included a 20% discount coupon good on all of their products, valid until Jan 31st. I'm not going to be using it so I thought I'd pass it along -- I'm pretty sure it is single use so the first one to message me gets it!
Flexisander sanding boards
Re: SOBX Little Big Boat GV15
Posted: Mon Jan 04, 2021 2:53 am
by Fuzz
Have you used any of their products and if so how did you like them?
Re: SOBX Little Big Boat GV15
Posted: Mon Jan 04, 2021 10:42 am
by BrianC
Fuzz wrote: ↑Mon Jan 04, 2021 2:53 am
Have you used any of their products and if so how did you like them?
I've used them for this build -- both a filling board (22") and a sanding board (33"). I only used the filling board a couple of times and wouldn't have gotten it if I hadn't had a bigger build planed for the future (PG25C). I used the sanding board lots! It really makes it easier to get a nice, fair, surface on those long almost-flat surfaces (easier, not easy!). Its almost impossible to find and fix shallow imperfections with a more easily deformed sanding block like the Dura-Block. I did also use a 30" Dura-Block but only for smaller areas like the chines and spray rails. The Flexisander has hook fastener on the 4.5" wide sanding surface but adhesive-backed sanding tape works fine if you blow it off good before putting it on. I work outside so dust isn't much of an issue -- if I was building indoors I'd get the one with a dust pickup. fallguy1000 uses these on his Skoota build:
fallguy1000 wrote: ↑Thu Apr 02, 2020 8:18 am
I have a 21" a 33" trowels and a 37" sander I think. We also use 12 and 14" concrete trowels. Regular sheetrock trowels work poorly with our mixes. They are a bit too stiff. If you loosen them up; they get too hard on cure.
When I bought these last spring, the prices direct from the manufacturer were way better than prices in the US, even with shipping which added about 30% to the cost. Here are the two that I got:
33" sanding board
22" filling board
Re: SOBX Little Big Boat GV15
Posted: Mon Jan 04, 2021 1:15 pm
by fallguy1000
Use the 21" and the big longboard a lot. The massive fill is best for round hulls. I avoid it ftmp.
The longboard is nice, but the abranet mesh wears out too fast per $. I like using festool papers; it takes 10-11 sheets at 50 cents each. But they last lonfer than the mesh.
Re: SOBX Little Big Boat GV15
Posted: Mon Jan 04, 2021 2:34 pm
by BrianC
fallguy1000 wrote: ↑Mon Jan 04, 2021 1:15 pm
The longboard is nice, but the abranet mesh wears out too fast per $. I like using festool papers; it takes 10-11 sheets at 50 cents each. But they last longer than the mesh.
I found some 4.5" adhesive-backed rolls which worked pretty well -- they were about $15-20 for a 30' roll. I believe the brand was Porter-Cable. What really helped extend the paper life was using compressed air to clean the surface every few minutes. Of course that only works if you are outside in a reasonable breeze (pretty common here in coastal NC) and are standing upwind!
Re: SOBX Little Big Boat GV15
Posted: Mon Jan 04, 2021 3:33 pm
by VT_Jeff
BrianC wrote: ↑Sat Nov 21, 2020 8:36 pm
Here is a shot of the underside of the plate — a shout out to
VT_Jeff from whom I stole the idea to bevel the underside of the plate:
Nice use of the beveling and of the objective case!
Re: SOBX Little Big Boat GV15
Posted: Sun Apr 11, 2021 2:56 pm
by BrianC
I've finished adding the "top hat" style cleats to bump up the sole by 0.75" or so. If I ever used them again I'll pay a lot more attention when putting in the stringers and frames. The GV15's stringers and frames are just a single layer of 3/8" ply so don't go in perfectly straight unless you take care (which I didn't). Just a bit of wobbly (1/8-1/4") means the slot in the top hat cleat needs to be opened up. I had cut the slot on a router table and then cut them to length before I discovered the wobble issue. I spent about a week opening up the slots with a chisel.
Now onto finishing the chase tubes and cutting the floor panels. I picked up a sheet of 3mm ply along with the 12" Meranti ply for the sole. I've been using the 3mm sheet to make a pattern for the final cut. Here is the first sole panel pattern and cut Meranti sheet:
Re: SOBX Little Big Boat GV15
Posted: Wed Apr 14, 2021 9:13 pm
by cape_fisherman
BrianC wrote: ↑Mon Jan 04, 2021 10:42 amI only used the filling board a couple of times and wouldn't have gotten it if I hadn't had a bigger build planed for the future (PG25C).
When you're ready to think about that new, bigger boat build, contact me & I can put you in contact with someone who cuts one heck of a jig for an awesome Carolina 25 hull. It won't be stitch & glue, but rather a cold molded boat. You'll have all the skill you need by then. And they are local to you & me here in NC. I won't post any links or mention the designer here out of respect for Bateau.
Re: SOBX Little Big Boat GV15
Posted: Thu Apr 22, 2021 1:32 pm
by BrianC
What is the best way to seal around chase tubes coming up through the sole?
Re: SOBX Little Big Boat GV15
Posted: Fri Apr 23, 2021 11:05 pm
by BrianC
All foamed and sole is in place. Rain is forecasted for tomorrow so I rolled on a quick coat of epoxy to seal it all up.
Up next, fillets and tape to firmly attach sole to hull and then a layer of 6oz. cloth. Sure is nice to be able to walk around inside without stumbling over stringers and frames!
Re: SOBX Little Big Boat GV15
Posted: Sat Apr 24, 2021 10:05 am
by piperdown
Looking good Brian!
I think most seal the tubes coming up with either thickened epoxy or some type of flexible caulk.
Re: SOBX Little Big Boat GV15
Posted: Sat Apr 24, 2021 2:24 pm
by BrianC
piperdown wrote: ↑Sat Apr 24, 2021 10:05 am
I think most seal the tubes coming up with either thickened epoxy or some type of flexible caulk.
Yeah, I found this post from Jacques that lays it all out:
jacquesmm wrote: ↑Wed Jul 01, 2020 10:36 am
...Epoxy does not bond to PVC pipes. At those points, your pipes must extend above the sole by a few inches and they must be sealed where they go through the sole. You can seal with 5200 or you can build a fiberglass sleeve all around to the top of the pipe. Think of the PVC pipe as a lost mold. To just glass a small lip around the pipe is not sufficient. Even with the methods above, if water gets over the top of the pipe, it will flood the pipe and go somewhere....
Are there alternatives to 5200 that aren't so gooey and sticky? I'm hesitant to use something not rated for the marine environment.
Re: SOBX Little Big Boat GV15
Posted: Mon Apr 26, 2021 11:30 pm
by BrianC
Today I added fillets then placed 12 oz. biax tape after the epoxy started to set.

Next up, 6 oz. woven over the exposed plywood sole.
Re: SOBX Little Big Boat GV15
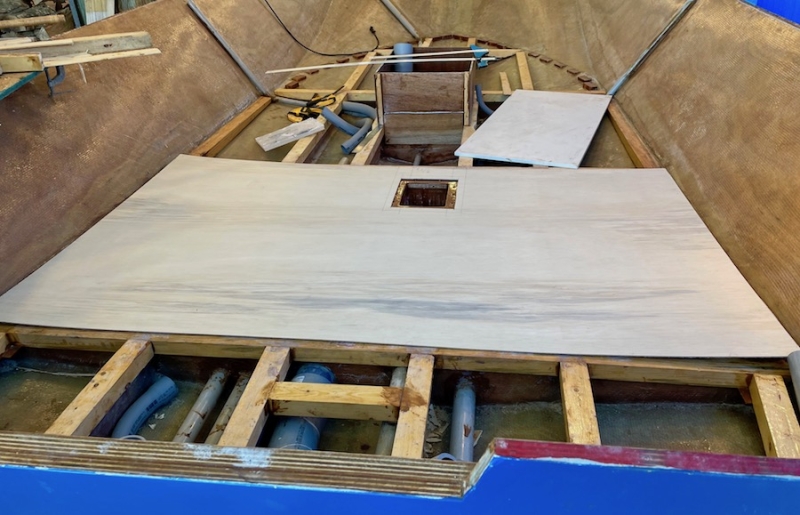
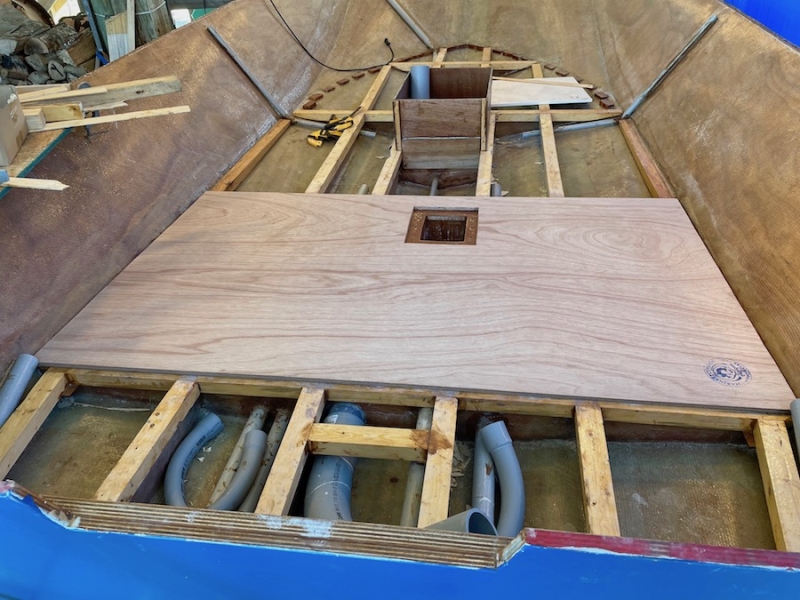
Posted: Tue Sep 21, 2021 12:43 pm
by BrianC
It has been awhile since my last update. Boatbuilding was on hold for a few months but is now going again. The sole is covered in 6 oz. woven & the motor well bulkhead and casting deck frame installed:
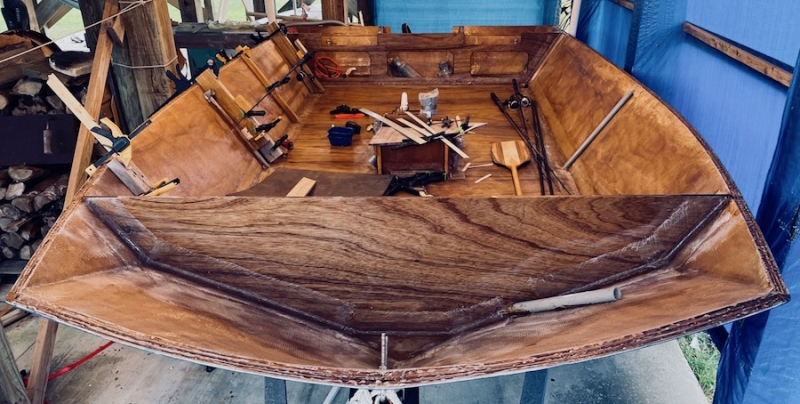
The cut-outs in the motor well frame to the left and right of the motor well are for a pair of passenger seats and double as steps to the transom / side decks.
Next up are the above sole frames with cut-outs and the bow locker. I'll be posting a separate couple of threads on those to get suggestions / guidance from the forum.
Re: SOBX Little Big Boat GV15
Posted: Wed Sep 29, 2021 11:48 pm
by BrianC
Re: SOBX Little Big Boat GV15
Posted: Thu Sep 30, 2021 12:36 am
by TomW1
Brian looks pretty good guy. Tom
Re: SOBX Little Big Boat GV15
Posted: Wed Oct 06, 2021 5:41 pm
by BrianC
Anyone have a favorite barrel-down hinge for a fore deck hatch? I did a search and got zero hits.
Re: SOBX Little Big Boat GV15
Posted: Wed Oct 06, 2021 6:43 pm
by Jeff
Really well done!!! Jeff
Re: SOBX Little Big Boat GV15
Posted: Fri Oct 15, 2021 10:50 pm
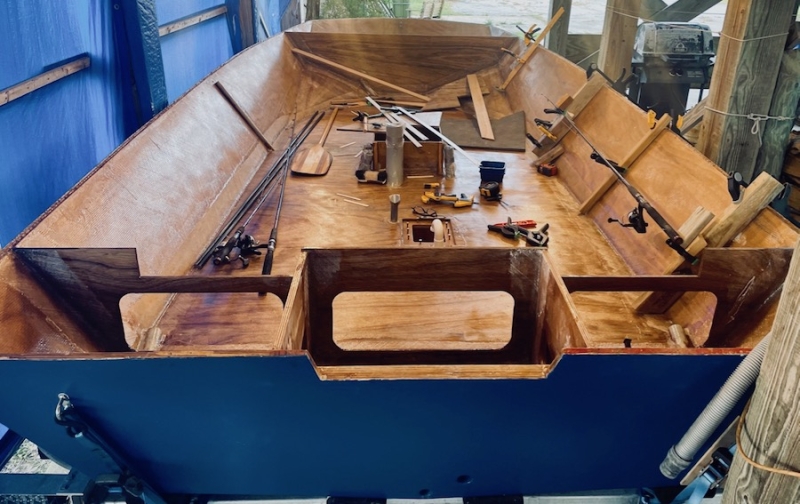
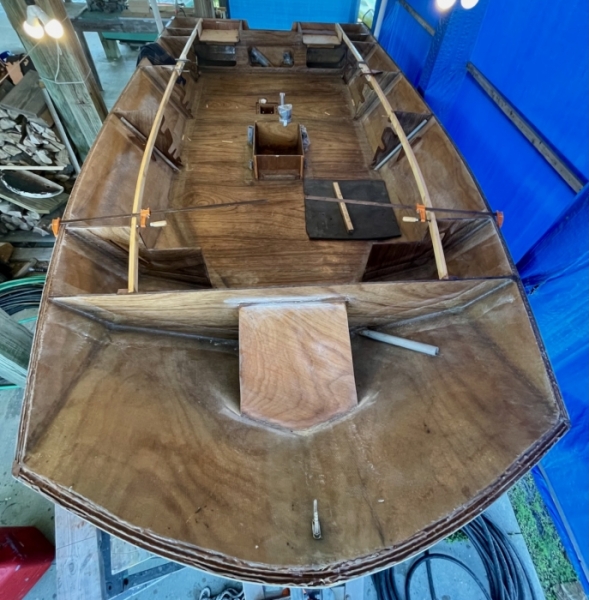
by BrianC
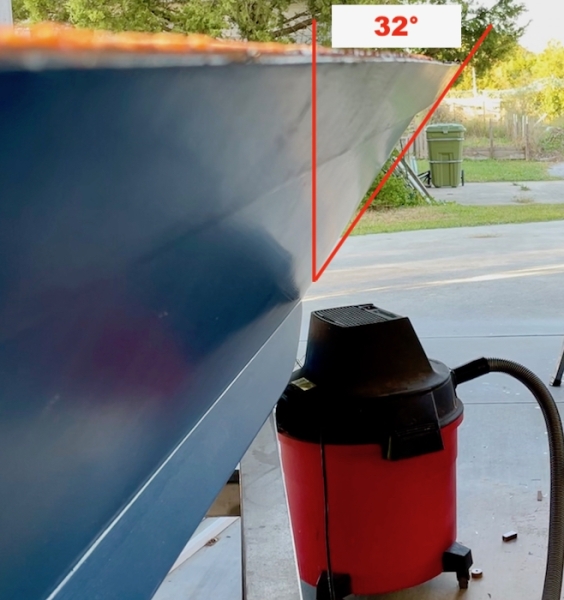
Another milestone: all above-sole frames are taped in, sanded, and ready for priming. Adding an extra ~4” to the shear allows for some really wide side decks (~12.5”) while not sacrificing any interior space as the hull has so much flair. The seat/live well combo is placed but not attached as there is quite a bit to do before it is taped to the sole. I still need to pick up some more plywood for the decks and the console.
Another issue is the angle of the rub rails. The GV15 design has a ~32° to the sides. This will make adding rub rails a problem since most commercially available ones are designed to be mounted on a (nearly) vertical surface. What have others done in this situation?
Re: SOBX Little Big Boat GV15
Posted: Wed Oct 20, 2021 2:34 pm
by VT_Jeff
BrianC wrote: ↑Fri Oct 15, 2021 10:50 pm
Another issue is the angle of the rub rails. The GV15 design has a ~32° to the sides. This will make adding rub rails a problem since most commercially available ones are designed to be mounted on a (nearly) vertical surface. What have others done in this situation?
"This will make adding rub rails a problem since most commercially available ones are designed to be mounted on a (nearly) vertical surface. "
I would first fact-check that carefully, I'm skeptical that's a big issue, but I could certainly be wrong. If you do indeed need to get it vertical, like i did, here's how I did it:
I made wedges(maybe 160 total?) and glued them all the way around. A little tedious but it's easy and effective. Starting at the stern, I measured the angle with an angle finder, cut 2 wedges at that angle and set them on the deck, and proceeded to the bow, then repeated on the other side. If you think your sides are symmetrical then you could just measure on one side and make wedges for both sides at once at that spot. I applied epoxy to each wedge and stapled it to the side to hold it in place while the epoxy cured. That gave me a relatively flat, vertical surface to glue my bright rubrail to.
I didnt take great photos but this at least shows what the wedges look like. They are just sitting on the deck in the o
Photo, staged at their install location. I numbered them all just in case. Hope this makes sense!
Re: SOBX Little Big Boat GV15
Posted: Sun Apr 10, 2022 11:17 am
by BrianC
Spring is here so I'm back at it. Got the inwales cut and glued in:
A couple of questions for folks:
First, the plans call for decks cut from 3/8” ply — what about the splices? What have others done?
Second, the plans call for 1/2" backing plates for deck hardware — how large should these be? For example, if I'm drilling a 1.5" hole for a rod holder, is an extra 1.5" (so a 4.5" round backing plate) enough? Also, should I use a thicker backing plate for the trolling motor mount?
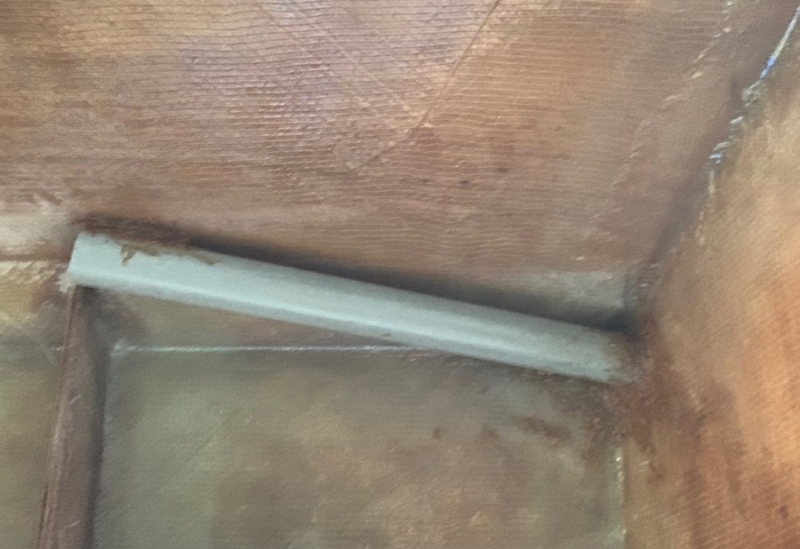
Lastly, for 1.5”x0.75” inwales, the plans say to “tab inwale to frames with 4” wide, 9 oz. FG tape.” — so just a small 1.5" tall by 4" wide piece of cloth applied on the vertical inside seam filled with a 1/2" radius epoxy putty fillet (see pic)?
Re: SOBX Little Big Boat GV15
Posted: Sun Apr 10, 2022 1:52 pm
by TomW1
BrianC wrote: ↑Sun Apr 10, 2022 11:17 am
Spring is here so I'm back at it. Got the inwales cut and glued in:
A couple of questions for folks:
First, the plans call for decks cut from 3/8” ply — what about the splices? What have others done? Add a 3/4" x 2" on the frame where the decks are meeting for a good overlap.
Second, the plans call for 1/2" backing plates for deck hardware — how large should these be? For example, if I'm drilling a 1.5" hole for a rod holder, is an extra 1.5" (so a 4.5" round backing plate) enough? Also, should I use a thicker backing plate for the trolling motor mount? Use a backing plate 3 times the size the length and width of the screw pattern. A trolling motor backing plate should be 3/4 and double the size of the mount.
Lastly, for 1.5”x0.75” inwales, the plans say to “tab inwale to frames with 4” wide, 9 oz. FG tape.” — so just a small 1.5" tall by 4" wide piece of cloth applied on the vertical inside seam filled with a 1/2" radius epoxy putty fillet (see pic)? Sounds good.
Well, I hope those make sense. Maybe Will, who has built one of these boats will chime in.
Tom
Re: SOBX Little Big Boat GV15
Posted: Mon Apr 11, 2022 5:35 pm
by Dan_Smullen
If the inwales are filleted and tabbed as neatly as the frame has been to the hull, you will be just fine. There is also an opportunity to fillet and tab the top of the inwale to the bottom of the deck, which will add considerable strength.
Re: SOBX Little Big Boat GV15
Posted: Sun Apr 17, 2022 7:29 pm
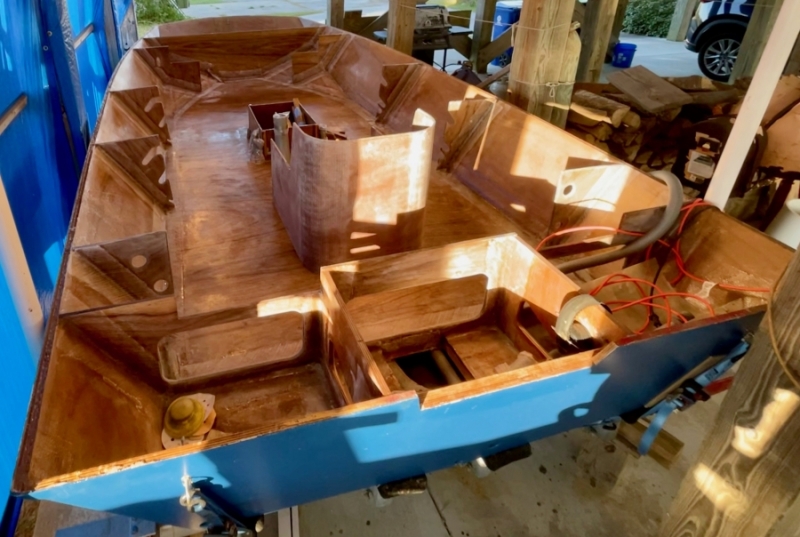
by BrianC
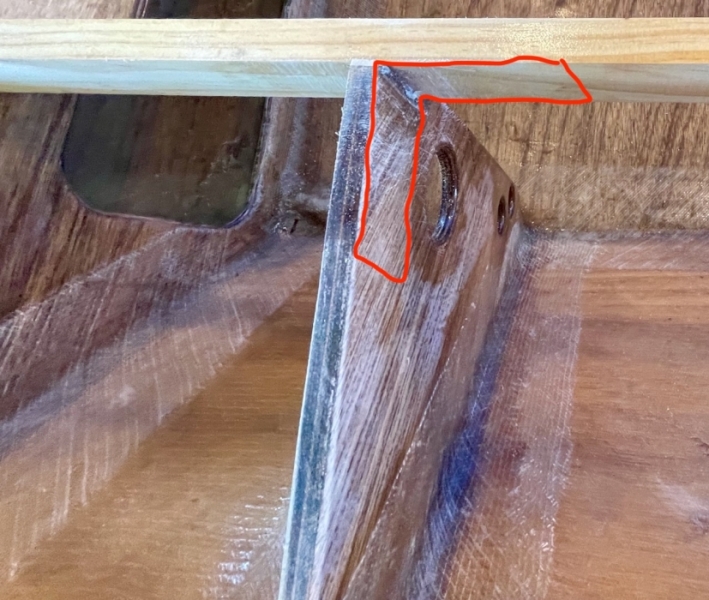
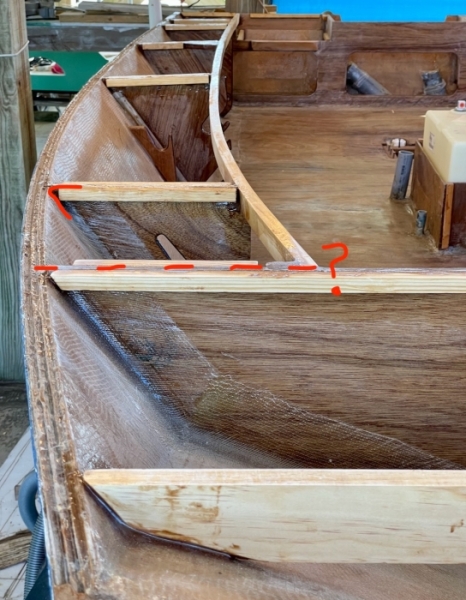
After gluing and tabbing the inwales, its been “cleats-R-us” for the last few days; I think I’m done cleatifying under the side and forward casting decks. The red rectangles are the future locations of three hatches:
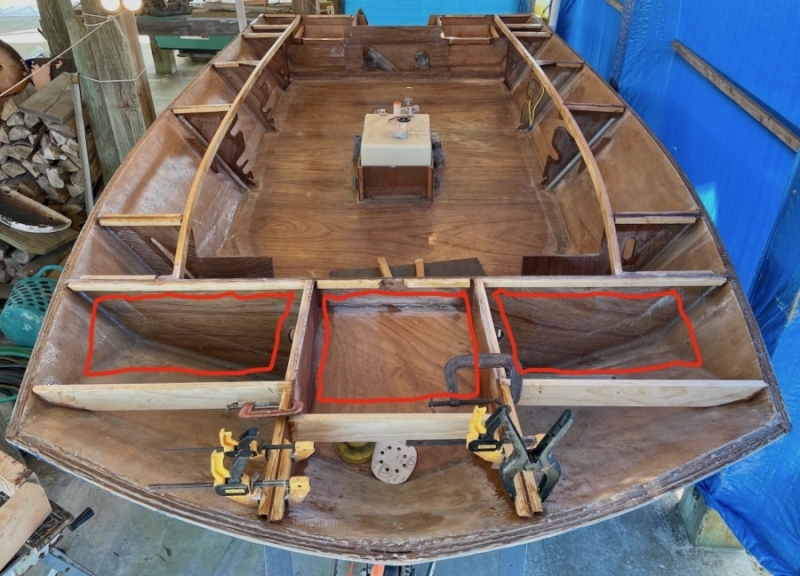
Here is a detail view showing the frames + cleats for the side decks. The solid red is where I’ll tape the underside of the side decks as many here have reccommended. The dashed red line is the location of the splice between the casting and side decks; I could move the splice back one frame if folks think that is a better location for it:
Re: SOBX Little Big Boat GV15
Posted: Mon Apr 18, 2022 10:17 am
by pee wee
If there's a way to include painting the sides of the cockpit before the side decks go on it will make that step easier; obviously you can't paint where you're planning to tape. After the side decks go on it's an awkward job. The boat is looking good, you're making fine progress. Thanks for posting and including pictures!
Re: SOBX Little Big Boat GV15
Posted: Mon Apr 18, 2022 4:59 pm
by BrianC
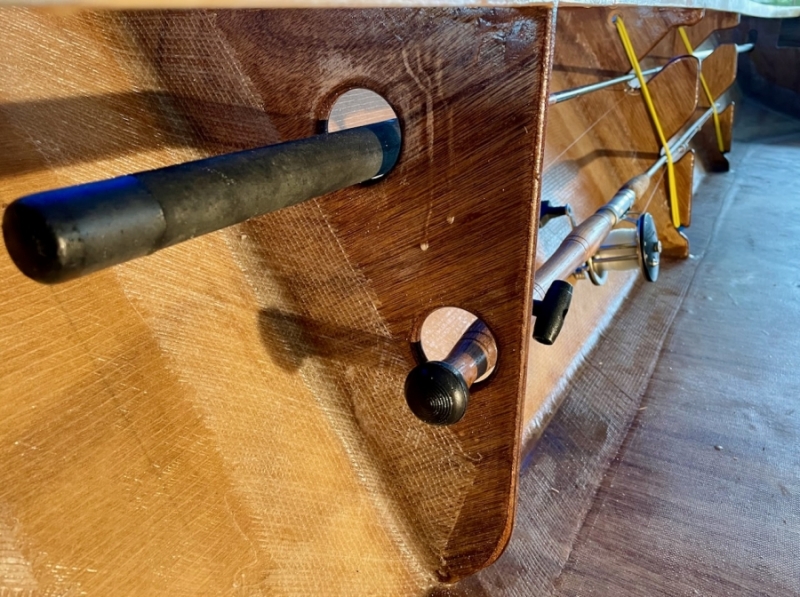
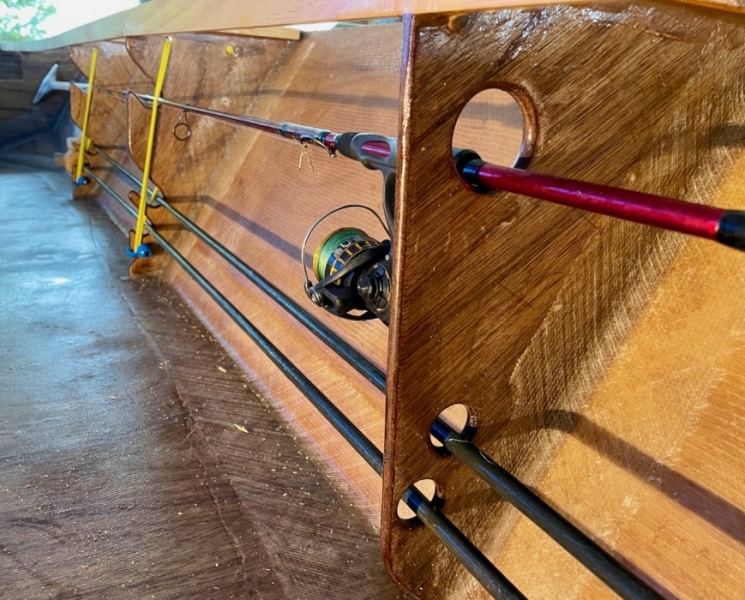
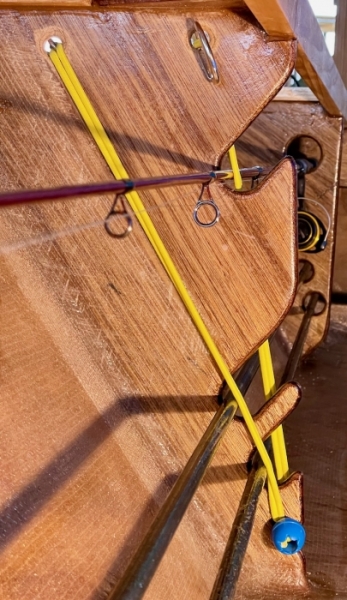
Today was rainy so no epoxy but I did get all the holes drilled for the bungees hold downs:
Dan_Smullen wrote: ↑Mon Apr 11, 2022 5:35 pm
There is also an opportunity to fillet and tab the top of the inwale to the bottom of the deck, which will add considerable strength.
Thanks, I’ve added this to the plan.
pee wee wrote: ↑Mon Apr 18, 2022 10:17 am
If there's a way to include painting the sides of the cockpit before the side decks go on it will make that step easier….
Good idea, As you suggest, I’ll leave the upper part unpainted so there isn’t an issue with tapping the deck-to-hull seam.
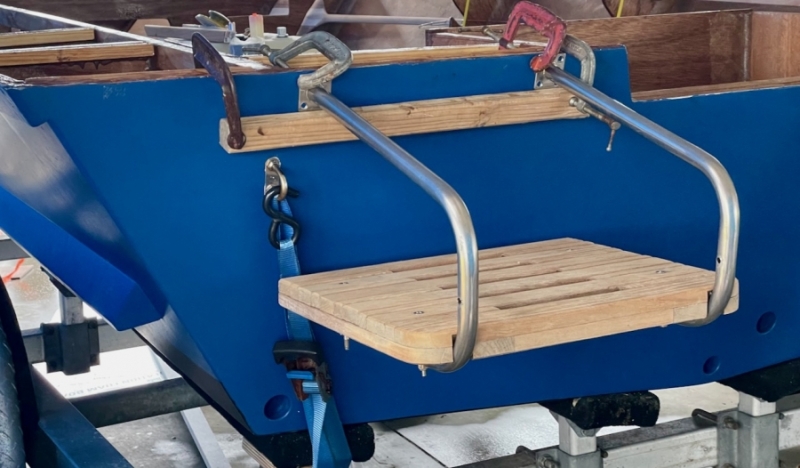
Next up, swim platform installation. Details here:
viewtopic.php?f=7&t=66072
Re: SOBX Little Big Boat GV15
Posted: Sat Apr 23, 2022 3:58 pm
by OneWayTraffic
Careful with those deep cutouts into frames. There must be enough material next to the hull side or you make a hinge point to concentrate stress. I'd seriously reinforce some of those cutouts if running through chop is ever going to be a thing this boat does.
Basically in terms of maths a reduction of 20% in thickness loses 51% of stiffness. It's a cubic relationship for the mathematically inclined.
Moreover since your frames are triangular in shape and there's a cutout in the thinnest part, essentially all of the side force will concentrate here. Worse case you will get cracking. This has happened before.
viewtopic.php?t=63093
You could consult the designer for advice, but as a guideline I'd leave at least 3" onto the hull everywhere. If you go below this then double up the thickness for each 20% cutout.