Page 1 of 1
HMD 21 starting - help
Posted: Mon Dec 07, 2020 2:33 am
by duysall83
Hello Evan and whole forum members, shelter is built. Materials for jig and all supplies including biaxial cloth etc ready except plywood sheets.
For the plywood i plan to use okume but it's really expensive. 1) Is it ok to build the hull with okume and do the rest with marine grade beech?
I've read things about beech on the web regarding rot and durability issues so i was confused but what i see after many research in the market i see that it's common here in Turkey to use beech for boat building. Can it be because it'll be encapsulated fully with epoxy and glass? 2) That fact eliminates weak points of beech? What do you know or think about this beech issue?
One more question for now, normally hull sides are laminated 3 parts. 3) May i laminate 5 parts in the required way in order to save some okume sheets?
Thanks in advance, i'll need support from all members. First time builder, please forgive my ignorance and warn me at any stage of the build.
Regards, Duysal
Re: HMD 21 starting - help
Posted: Mon Dec 07, 2020 8:53 am
by fallguy1000
Welcome and happy building.
I will give Evan a chance to answer.
The only thing I will say is ply encapsulated in 6oz glass and epoxy requires at least one extra neat coat to avoid water issues. Since I don't know the design well; I will bow out of answering where a different grade of lumber would or not work.
As for increasing joints to save lumber; it seems that would not be the route I'd go. The hull is, generally speaking, not the major cost in a boat; so saving money on it is not the way I'd go.
If you have excess okume from the hull; those panels can be used elsewhere and/or scarfed back up into bigger panels.
Re: HMD 21 starting - help
Posted: Thu Dec 10, 2020 2:50 pm
by duysall83
fallguy1000 wrote: ↑Mon Dec 07, 2020 8:53 am
Welcome and happy building.
I will give Evan a chance to answer.
The only thing I will say is ply encapsulated in 6oz glass and epoxy requires at least one extra neat coat to avoid water issues. Since I don't know the design well; I will bow out of answering where a different grade of lumber would or not work.
As for increasing joints to save lumber; it seems that would not be the route I'd go. The hull is, generally speaking, not the major cost in a boat; so saving money on it is not the way I'd go.
If you have excess okume from the hull; those panels can be used elsewhere and/or scarfed back up into bigger panels.
Thanks fallguy, already bought okume

Re: HMD 21 starting - help
Posted: Fri Dec 11, 2020 1:24 am
by Cowbro
I'm excited to see another HMD being built. I assume you plan to scale up the 19 by 10% in all dimensions. I think that is going to be an awesome boat. Make sure you keep us updated on the progress.
Re: HMD 21 starting - help
Posted: Fri Dec 11, 2020 1:36 pm
by duysall83
is it ok to use microfiber instead of woodflour for the epoxy putty?
Re: HMD 21 starting - help
Posted: Sat Dec 12, 2020 6:15 pm
by Evan_Gatehouse
If it is ground very fine it is OK. But usually it is too fine. If you can't get woodflour a mix of Colloidal Silica ("Cab-O-Sil") and microballoons is fine.
I'd be vary cautious of using beech in open areas of the boat or parts exposed to the weather. Inside furniture and frames, maybe OK, but not cockpit sole or cabin sides.
I have some clients in Turkey (medium size shipyards). I can ask them what plywood they buy and where they get it if that would help.
Re: HMD 21 starting - help
Posted: Sat Dec 12, 2020 6:16 pm
by Evan_Gatehouse
One more question for now, normally hull sides are laminated 3 parts. 3) May i laminate 5 parts in the required way in order to save some okume sheets?
Do you mean short pieces glued together to make longer pieces for the hull? Yes, that is OK.
Re: HMD 21 starting - help
Posted: Sun Dec 13, 2020 2:52 am
by duysall83
Evan_Gatehouse wrote: ↑Sat Dec 12, 2020 6:15 pm
If it is ground very fine it is OK. But usually it is too fine. If you can't get woodflour a mix of Colloidal Silica ("Cab-O-Sil") and microballoons is fine.
I'd be vary cautious of using beech in open areas of the boat or parts exposed to the weather. Inside furniture and frames, maybe OK, but not cockpit sole or cabin sides.
I have some clients in Turkey (medium size shipyards). I can ask them what plywood they buy and where they get it if that would help.
Thank you Evan,
Already bought some beech too at least i can use for frames as i understood.
Btw, woodflour is sth i can ask from any timber workshop, carpenter etc? It's not a commercial special product with any brand, right?
Re: HMD 21 starting - help
Posted: Sun Dec 13, 2020 9:38 am
by gstanfield
No brand on wood flour. It’s just really finely ground wood, like a very fine sawdust. My first boat was built with pecan flour made by grinding pecan hulls into dust. I thought it was a brilliant way to use the otherwise wasted hulls from pecans.
Re: HMD 21 starting - help
Posted: Sun Dec 13, 2020 10:06 am
by fallguy1000
Wood flour is not sawdust.
You will want finely ground particulate or the thickened resins for fillets will clump and be very hard to work.
You want flowable fillers or it becomes very difficult to apply bonding tapes to the seams over uneven areas and impossible to sand a fillet that is decorative.
In Turkey, certainly fumed silica is available if you cannot find a commercial grade of wood flour.
If you know about a place that uses filter bags in dust collection systems; sometimes those fines are suitable, but you might need to run through a sieve if not pure fines.
Re: HMD 21 starting - help
Posted: Sun Dec 13, 2020 10:26 am
by duysall83
![Image]()
First panel joint. I used microfiber i had already. Since it's quarantine for weekend in Turkey, i'l look for woodflour by tomorrow.
I tried to post pic via mobile, hope succeded. Already 30 hrs since application. I think i 've some bubbles. Need to redone or do sth? What do you think? God knows how the bottom side is.

Re: HMD 21 starting - help
Posted: Sun Dec 13, 2020 11:45 am
by duysall83
Btw there was lack of supply for west system epoxy. At least sellers told me that due to lack of enough import. So i bought half of the marin epoxy from a local supplier. After first use my observation is that cure time is very very long. Not even close to what i read about the period resin becomes gel etc. Luckily today i found available west system online at another firm. I think i'll use west system mostly for hull and related parts and the local one for the rest.
Re: HMD 21 starting - help
Posted: Sun Dec 13, 2020 1:39 pm
by gstanfield
Temperature will greatly affect curing times. Where I live it’s very cold and even with medium speed hardener my epoxy takes 14-18 hours to cure. If I use the slow hardener it takes 24+ hours to cure.
Re: HMD 21 starting - help
Posted: Sun Dec 13, 2020 2:32 pm
by duysall83
gstanfield wrote: ↑Sun Dec 13, 2020 1:39 pm
Temperature will greatly affect curing times. Where I live it’s very cold and even with medium speed hardener my epoxy takes 14-18 hours to cure. If I use the slow hardener it takes 24+ hours to cure.
Actually i made the joint in my living room. Fireplace was next to plywood and the room was 24+ celcius whole day. Still sticky but there is progress

we'll see.
Re: HMD 21 starting - help
Posted: Sun Dec 13, 2020 3:15 pm
by Jaysen
That sounds like a mix ratio error. Are you sure you have the ratio of resin and hardener measured correctly?
Re: HMD 21 starting - help
Posted: Sun Dec 13, 2020 3:33 pm
by duysall83
i measured in volume. May be i should weigh, no info received with product else than 4:1 ratio advice.
Re: HMD 21 starting - help
Posted: Sun Dec 13, 2020 4:13 pm
by fallguy1000
duysall83 wrote: ↑Sun Dec 13, 2020 2:32 pm
gstanfield wrote: ↑Sun Dec 13, 2020 1:39 pm
Temperature will greatly affect curing times. Where I live it’s very cold and even with medium speed hardener my epoxy takes 14-18 hours to cure. If I use the slow hardener it takes 24+ hours to cure.
Actually i made the joint in my living room. Fireplace was next to plywood and the room was 24+ celcius whole day. Still sticky but there is progress
we'll see.
You have a mixing error. 100%.
What happened is you are basically drying out the error.
No properly mixed epoxy will not cure at 24C overnite.
I have a good bit of epoxy experience.
What happens with too much hardener is the surface will dry and get sticky. Too much resin will result in a near no cure. Poor mixing or incomplete stirring will result in gummy cure.
Re: HMD 21 starting - help
Posted: Sun Dec 13, 2020 4:17 pm
by fallguy1000
Your panel joint looks open. You also must use a glue between the panels unless I am very mistaken.
The dark area looks devoid of a filled resin.
I want you to succeed, so not trying to beat you up.
Re: HMD 21 starting - help
Posted: Sun Dec 13, 2020 4:21 pm
by fallguy1000
Tell us resin brand or link datasheet.
A common error with a 4:1 ratio is thinking you need 3 parts resin and one part hardener. It happens very easily and you have too much hardener.
4:1 is 5 total parts.
Mixing quantities in ounces is 5,10,15,20,25,30
Mixing in ml same, 5ml, 10, 15, etc
If you mixed in 4s; it is wrong.
Re: HMD 21 starting - help
Posted: Sun Dec 13, 2020 4:40 pm
by duysall83
fallguy1000 wrote: ↑Sun Dec 13, 2020 4:17 pm
Your panel joint looks open. You also must use a glue between the panels unless I am very mistaken.
The dark area looks devoid of a filled resin.
I want you to succeed, so not trying to beat you up.
Thank you, i am open to learn. Glad to hear any feedback. I'll definetely have trials and errors. I put putty between the edges but i guess not enough. And for the resin i think i did your first guess : much hardener. Its crazy sticky even after 40 hrs.
To be honest i followed 4+1 ratio but i was not very sensitive. Tomorrow i do another batch by weighing
its a local supplier, i looked for data sheet online but couldn't find. But its popular product, i think due to lower price.
Re: HMD 21 starting - help
Posted: Sun Dec 13, 2020 4:59 pm
by fallguy1000
duysall83 wrote: ↑Sun Dec 13, 2020 4:40 pm
fallguy1000 wrote: ↑Sun Dec 13, 2020 4:17 pm
Your panel joint looks open. You also must use a glue between the panels unless I am very mistaken.
The dark area looks devoid of a filled resin.
I want you to succeed, so not trying to beat you up.
Thank you, i am open to learn. Glad to hear any feedback. I'll definetely have trials and errors. I put putty between the edges but i guess not enough. And for the resin i think i did your first guess : much hardener. Its crazy sticky even after 40 hrs.
To be honest i followed 4+1 ratio but i was not very sensitive. Tomorrow i do another batch by weighing
its a local supplier, i looked for data sheet online but couldn't find. But its popular product, i think due to lower price.
No.
Find the datasheet.
Epoxy typically weighs about 9 pounds per gallon, but that is mixed weight.
If the ratio is 4:1 by volume; the only way to know the by weight ratio is to compare hardener and resin weights back to the volumetric. It is almost never 4:1 by weight. So almost 100% will be wrong. By weight ratios will be something like 3.x to 1 on my guess. Post edit--as the hardener is heavier
Get some medicine cups and mix down into mls or drams and test by volume 4:1. And find that datasheet!
Re: HMD 21 starting - help
Posted: Sun Dec 13, 2020 6:42 pm
by Jaysen
If you can provide a link to the product or a picture of the manufacturer label we might be able to help you find a spec sheet
Re: HMD 21 starting - help
Posted: Sun Dec 13, 2020 7:36 pm
by Evan_Gatehouse
The glass for the laminating does not look too bad. But yes, you need to apply thickened epoxy to the joint in between the panels.
Wood flour: Go to a cabinet making or wood working shop and ask if you can have a bunch of their sawdust. Offer to sweep it up
Take it home and use a flour sifter with fine openings to separate out the bigger pieces. You want a fine substance like flour. It can be a bit coarse but it should feel like powder when you rub it between your fingers.
Re: HMD 21 starting - help
Posted: Sun Dec 13, 2020 8:49 pm
by fallguy1000
Evan_Gatehouse wrote: ↑Sun Dec 13, 2020 7:36 pm
The glass for the laminating does not look too bad. But yes, you need to apply thickened epoxy to the joint in between the panels.
Wood flour: Go to a cabinet making or wood working shop and ask if you can have a bunch of their sawdust. Offer to sweep it up
Take it home and use a flour sifter with fine openings to separate out the bigger pieces. You want a fine substance like flour. It can be a bit coarse but it should feel like powder when you rub it between your fingers.
He said the epoxy has not cured in 40 hours or so
Re: HMD 21 starting - help
Posted: Mon Dec 14, 2020 12:30 am
by duysall83
i called the manufacturer of epoxy. He said 4:1 by weight. So using scaled cup was not accurate.
On the other hand, after total 46 hrs this morning its not sticky and feels solid. Should i clean glass out and start from zero because of the gaps between edges?
Re: HMD 21 starting - help
Posted: Mon Dec 14, 2020 1:26 am
by Fuzz
Is it possible to flip it and fill from the back side? If not you will need to cut it out and do over.
Re: HMD 21 starting - help
Posted: Mon Dec 14, 2020 2:48 am
by duysall83
Fuzz wrote: ↑Mon Dec 14, 2020 1:26 am
Is it possible to flip it and fill from the back side? If not you will need to cut it out and do over.
I had already put 1 layer onto bottom and 2 on top side. So i should cut out the 1 sided glass and fill glue from that surface?
For cutting out any rule of thumb? Orbital grind with 40 may do the job?
Re: HMD 21 starting - help
Posted: Mon Dec 14, 2020 5:11 am
by Fuzz
That would work. Or cut it with a saw set very shallow. Might even be able to cut one layer with a sharp knife.
Re: HMD 21 starting - help
Posted: Mon Dec 14, 2020 9:46 am
by pee wee
fallguy1000 wrote: ↑Sun Dec 13, 2020 10:06 am
Wood flour is not sawdust.
If you know about a place that uses filter bags in dust collection systems; sometimes those fines are suitable, but you might need to run through a sieve if not pure fines.
Any place that has a drum sander will generate piles of fine wood dust, you can also collect it from a hand held belt sander, but it's not so easy to get the quantities you need for boat building that way. I guess the distinction is sanding dust vs. saw dust.
Re: HMD 21 starting - help
Posted: Wed Dec 16, 2020 7:36 pm
by Evan_Gatehouse
I would just cut/grind the area of 1 side glass at the joint. No need to remove all the glass.
Re: HMD 21 starting - help
Posted: Thu Dec 17, 2020 1:09 pm
by duysall83
Evan_Gatehouse wrote: ↑Wed Dec 16, 2020 7:36 pm
I would just cut/grind the area of 1 side glass at the joint. No need to remove all the glass.
Wish i knew this before
already removed glass, filled between plies and reglassed. Learning
is it just an overshoot or it has negative effect if i use butt blocks inside surfaces of side hulls? My panels are 10% bigger as you know.
Re: HMD 21 starting - help
Posted: Thu Dec 17, 2020 1:16 pm
by duysall83
Thanks fallguy and all who commented. My mixing ratio was wrong, after correction local epoxy cures at about 10-12 hrs.
By the way i received west system 2 days ago and used it on one of bottom panels. It cures much faster even at temperatures below 12 celcius.
Re: HMD 21 starting - help
Posted: Thu Dec 17, 2020 2:28 pm
by fallguy1000
I pause a bit to comment on Evan's design, but for the timeliness. Butt blocking is generally not needed and glass tapes are sufficient.
Panel seams, including blocks, are not supposed to end on bulkheads is all.
If a designer suggests blocking bs glass tapes vs scarf joins then follow the designer. Typically, a building notes item.
Re: HMD 21 starting - help
Posted: Fri Dec 18, 2020 1:11 pm
by Cowbro
duysall83 wrote: ↑Thu Dec 17, 2020 1:16 pm
Thanks fallguy and all who commented. My mixing ratio was wrong, after correction local epoxy cures at about 10-12 hrs.
By the way i received west system 2 days ago and used it on one of bottom panels. It cures much faster even at temperatures below 12 celcius.
That is good news, I'm glad you got that solved.
Re: HMD 21 starting - help
Posted: Fri Dec 18, 2020 5:26 pm
by duysall83
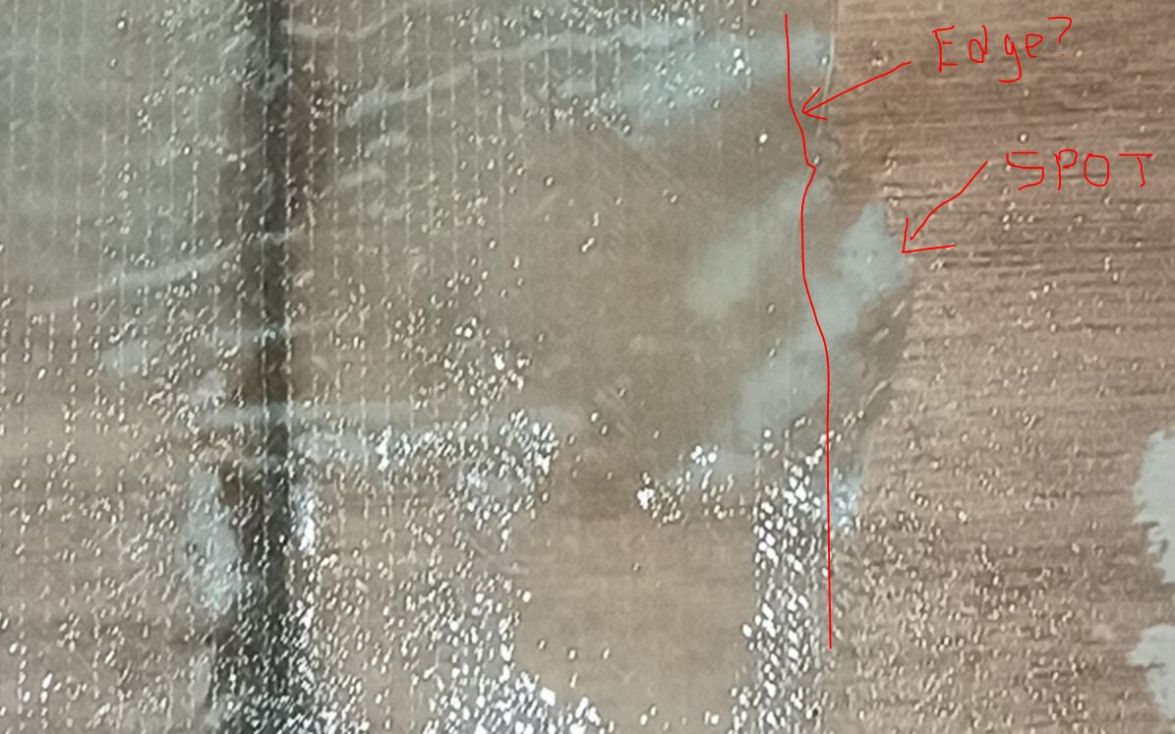
![Image]()
Hello all, this morning i applied 1 layer and in the evening put the second layer glass on this panel. I didnt notice or care while applying second layer but read many things about amine blush in last 2 hours and have paranoia now

Anyone knows what are those white spots? Should i do sth?
Re: HMD 21 starting - help
Posted: Fri Dec 18, 2020 5:42 pm
by Evan_Gatehouse
It's hard to be sure.
If I had to guess either glass that was not wet out enough or a dry spot under the glass (the wood absorbed most of the resin).
Are you using plain biaxial tape? If you are using tape with a mat layer, it will be because most mat binder does not dissolve in epoxy very well. So the mat stays white.
Also - work more tidily with your resin. Only apply resin in the area you are working. This avoids waste with coating the plywood many times with epoxy.
Re: HMD 21 starting - help
Posted: Fri Dec 18, 2020 6:00 pm
by duysall83
Evan_Gatehouse wrote: ↑Fri Dec 18, 2020 5:42 pm
It's hard to be sure.
If I had to guess either glass that was not wet out enough or a dry spot under the glass (the wood absorbed most of the resin).
Are you using plain biaxial tape? If you are using tape with a mat layer, it will be because most mat binder does not dissolve in epoxy very well. So the mat stays white.
Also - work more tidily with your resin. Only apply resin in the area you are working. This avoids waste with coating the plywood many times with epoxy.
No mat. I did those under the shelter and humidity is high these days. I had spliced the first panel inside house and there was nothing like this.
Anyway, do you think i need to do any rework?
Re: HMD 21 starting - help
Posted: Fri Dec 18, 2020 7:02 pm
by fallguy1000
Looks like air entrainment. You can test with a screwdriver and see if it moves under pressure.
If the tapes peels off easily; then you had blush.
Probably not.
If you use a consolidation roller; you can force air out real well.
I have also seen white areas if water or sweat gets in, but don't worry about it too much.
Let us knownif they are air bubbles ornif the tapes peel off.
Re: HMD 21 starting - help
Posted: Sat Dec 19, 2020 10:09 am
by Dougster
My thoughts are the same as Fallguy's, check for air bubbles. Re the roller, he means use that during the wet out, not now of course. Instead of a screwdriver I poke on places like that with a box cutter and cut them out if they are bubbles. Then you can be sure the surrounding glass is secure or wants to peel off.
Dougster
Re: HMD 21 starting - help
Posted: Sat Dec 19, 2020 11:24 am
by duysall83
I checked with screw drive the white spots. They're solid, i mean no air bubble. I suspect that excess epoxy mix after the first layer cured on and around cloth and i ignored it and applied second layer. Should i've done sth for the cured excess epoxy?
Re: HMD 21 starting - help
Posted: Sat Dec 19, 2020 7:12 pm
by Evan_Gatehouse
If the first bad cure left some sticky resin or hardener that soaked into the wood but never cured that could be it? Or cured resin/hardener that has an amine blush on it.
There is one spot where I think there is very little tape on it, just resin and you still have the white spot. Perhaps sand off the area carefully in a test area to help determine what you can see or feel better.
Re: HMD 21 starting - help
Posted: Sat Dec 19, 2020 9:26 pm
by fallguy1000
Are you using a consolidating roller?
I don't like squeegee only.
Re: HMD 21 starting - help
Posted: Sun Dec 20, 2020 6:17 am
by duysall83
![Image]()
Hello, i'll check the white spots before assembly. But now i've another concern. Frames and jig all are level now. But since the vertical supports are 120 cm length while i try to apply bottom and side panels, probably all frames will move back and forth and there'll be no level for the frames. Should i not care and relocate frames after the flip? Or any practical way anyone followed?
Re: HMD 21 starting - help
Posted: Sun Dec 20, 2020 11:32 am
by Cowbro
I dont know if there is anything in the plans about it, but I would brace the supports to each other right below the frames as well as run some diagonal supports down to the strong back. You want to keep them as close as you can to being correct.
Re: HMD 21 starting - help
Posted: Sun Dec 20, 2020 1:58 pm
by fallguy1000
Longitudinal bracing.
Re: HMD 21 starting - help
Posted: Mon Dec 21, 2020 10:34 am
by duysall83
Hello everyone, i stiched the hull, no major problem except around 20 mm gap between bottom panels. When i get them close to each other, frames' outboard edges (may be 2 cm) remain open, no panel on top of them. At current situation still some open but very little. I try to figure out why, have some ideas. I drew the curves at solidworks and used spline tool. No idea if it creates a different form than bending a batten.
Or another mistake of me. Cnc cutter forgot to cut 1 bow part of one bottom panel. So i did cut it using the other one as template but i think couldnt exactly cut.
After all, can i use epoxy putty to fill that gap around 20 mm? Should i ise piece of wood first between edges? Or any solutions you may suggest?
Thanks
Re: HMD 21 starting - help
Posted: Mon Dec 21, 2020 1:07 pm
by fallguy1000
20mm is pretty big for gap filling with mud; it will sag on a horizontal; so not really a good idea.
It looks like miscuts mostly from the pictures. I would probably add some strips of offcuts.
Otherwise, you could also insert a piece of pvc pipe with ship tape between the stations and rezip the pvc in and then there would be enough support for putty.
The practical limit on putty fills is really about 1/2" in my experience. After that; it tends to sag; even a stiff mix on a vertical landing. If you make it stiffer; you start to worry about bond strength if all fillers.
I have been able to make a sawdust or corecell thickened mix that works for thicker fills, but never tried it on a really open to the floor joint.
Re: HMD 21 starting - help
Posted: Mon Dec 21, 2020 5:07 pm
by Evan_Gatehouse
The panel cut edges are not very straight. They were CNC cut??
Did your Solidworks splines use the drawing measurements as spline vertexes? I don't know Solidworks but sometimes CAD programs do this (purple spline where vertexes are offset)
To fix - are they touching the frames at the corners of the frames?
Re: HMD 21 starting - help
Posted: Mon Dec 21, 2020 11:43 pm
by duysall83
Evan_Gatehouse wrote: ↑Mon Dec 21, 2020 5:07 pm
The panel cut edges are not very straight. They were CNC cut??
Did your Solidworks splines use the drawing measurements as spline vertexes? I don't know Solidworks but sometimes CAD programs do this (purple spline where vertexes are offset)
bobo.JPG
To fix - are they touching the frames at the corners of the frames?
Hello Evan, No touch to frames, especially c, d frame corners free of touch. 10 mm gap approximately. Towards stern and around Frame E too also, i have contact both between bottom panels and frame corners and hull.
They were cnc cut. Only one piece -bow end- of the right bottom was not cut so i cut it. But i guess deviating a little from route(also glueing not in the correct path) resulted that edges of panels overlapped towards bow. Not straight cuts you see are my effort to seperate them at the bow.
On the other hand, why i suspect of SW because i have gaps for the left side also. Around 10 mm. despite being full of cnc cut with Side panels.
i was designer and SW and autocad was my all day job but 12 yrs ago my job changed. To be honest i remember very few things. This difference may come from also "converting sw file to dwg". Recalling those issues only now. Wish didint use SW.
Re: HMD 21 starting - help
Posted: Tue Dec 22, 2020 10:53 am
by duysall83
Evan_Gatehouse wrote: ↑Mon Dec 21, 2020 5:07 pm
The panel cut edges are not very straight. They were CNC cut??
Did your Solidworks splines use the drawing measurements as spline vertexes? I don't know Solidworks but sometimes CAD programs do this (purple spline where vertexes are offset)
bobo.JPG
To fix - are they touching the frames at the corners of the frames?
Hopefully any advice? Scanning "gap fill" in the forum in last 12 hrs. Found many but most of the advices start with "if the gap at bow or between hull and frames, dont worry". What if the gap is right on the bottom

hope there is a solution.
Re: HMD 21 starting - help
Posted: Tue Dec 22, 2020 1:24 pm
by jonnymac
I think the time is here to go back to Evan’s plans(not your cad model) remeasure the panels. I realize you scaled this boat, just multiple the 110% and report back here what you get and where you are seeing differences. otherwise its hard with everyone guessing
Re: HMD 21 starting - help
Posted: Tue Dec 22, 2020 1:53 pm
by jonnymac
the other reason I say this, these are fairly large discrepancies and making sure the foundation of the boat is correct is going to pay back 10 fold in time later and frustration.
some potential areas i see could be,
1. which side of the line was the cnc told to cut on, if a 1/4” bit was used this can add up quick.
2. maybe the forms are off and the panels are correct.
3. i don’t remember a posting showing the issue, with the forms moving around, being fixed. if the forms are off even a little they could create gaps.
Re: HMD 21 starting - help
Posted: Tue Dec 22, 2020 2:53 pm
by fallguy1000
duysall83 wrote: ↑Tue Dec 22, 2020 10:53 am
Evan_Gatehouse wrote: ↑Mon Dec 21, 2020 5:07 pm
The panel cut edges are not very straight. They were CNC cut??
Did your Solidworks splines use the drawing measurements as spline vertexes? I don't know Solidworks but sometimes CAD programs do this (purple spline where vertexes are offset)
bobo.JPG
To fix - are they touching the frames at the corners of the frames?
Hopefully any advice? Scanning "gap fill" in the forum in last 12 hrs. Found many but most of the advices start with "if the gap at bow or between hull and frames, dont worry". What if the gap is right on the bottom
hope there is a solution.
Of course there is a solution; you fill it in with plywood and consider whether extra tabbing is needed. An Evan question.
Also, the reason for allowing bow fills is they are vertical and the sag doesn't fall out as bad.
I would do whatever Evan wants.
In conventional construction (boats), another thing that is best practice is the side panels need to be under the bottom panel. (Upside down). This is so loading is not on the glue seam, so if you need to move the bottom panels out for overlaps; you might be wider still.. I don't know if this is as great an issue for a displacement craft, but definitely for boats flying and experiencing forces in landings. I only mention this in case you are moving them in a lot to lower the inside margins to make things seem more right(looks a bit so). And because I know best practice is to support loads with panel and not seam. Sorry in advance. Evan may say it doesn't matter here.
Again, Evan can advise.
Re: HMD 21 starting - help
Posted: Tue Dec 22, 2020 3:08 pm
by duysall83
İ try to more visualize my chaos. From bow to stern, left side.
Re: HMD 21 starting - help
Posted: Tue Dec 22, 2020 3:13 pm
by duysall83
Transom and the right side to the bow. Part i had to cut on that side, bottom panel part near bow.
Re: HMD 21 starting - help
Posted: Tue Dec 22, 2020 3:19 pm
by duysall83
and the most dramatic part.
Re: HMD 21 starting - help
Posted: Tue Dec 22, 2020 8:40 pm
by Fuzz
Put some packing tape on the inside and fill the gap with epoxy/wood glue. I have filled bigger gaps than that. You will have lots of glass over that area so it will not matter.
Re: HMD 21 starting - help
Posted: Tue Dec 22, 2020 11:00 pm
by fallguy1000
Fuzz wrote: ↑Tue Dec 22, 2020 8:40 pm
Put some packing tape on the inside and fill the gap with epoxy/wood glue. I have filled bigger gaps than that. You will have lots of glass over that area so it will not matter.
It is a good suggestion. Anything to keep the stuff from sagging out.
I like the gorilla ship tape; it is wide and good n sticky.
Just clean the surfaces of dust.
Re: HMD 21 starting - help
Posted: Wed Dec 23, 2020 1:38 am
by Fuzz
Just make sure things are straight, square and fair. At this point fairness should be the number one thing you are looking for.
Re: HMD 21 starting - help
Posted: Wed Dec 23, 2020 7:45 am
by Browndog
Use more zip ties. They seem spaced awfully far apart.
Re: HMD 21 starting - help
Posted: Wed Dec 23, 2020 1:28 pm
by Evan_Gatehouse
Hi,
I think
- more zip ties to apply some pressure to bend the hull panels more, and help close the gaps a bit.
- you can use slivers of wood if the gaps are still big + epoxy putty. Tape on inside of the seam to prevent the putty from falling through. Use plastic packing tape (brown)
Re: HMD 21 starting - help
Posted: Wed Dec 23, 2020 1:34 pm
by Evan_Gatehouse
For a displacement hull don't worry if the side panels overlap the bottom panel. Either way is fine
Re: HMD 21 starting - help
Posted: Tue Dec 29, 2020 10:00 am
by duysall83
Hello again, tape on the bottom laid nicely. No bubbles and look very fair but i lay the sides and i see those bubbles. Actually i think they are not bubbles but gap due to uneven match of side and bottom panel. At some points bottom panel edge overshoots the side but very very little. On those points glass dont want to sit. Tried roll after but once i removed roller it stands up again. Is it a big problem? I guess i'll try to put it down after some time again before it completely cured.
Re: HMD 21 starting - help
Posted: Tue Dec 29, 2020 10:20 am
by fallguy1000
Fiberglass does not lay on 90 degree corners.
Radiuses of about 1/4" minimum are needed.
You are correct that you have poor contact.
I would sand it off and radius the corner properly and try again.
Also, none of the bottom panel can be proud of the surface below and despite me suggesting bottom over side; that does not mean beyond flush.
What I did with my build is bond seams, develop radiuses and generally, another coat of filler was needed just 30 minutes before tapes to avoid any voids.
The bottom of your boat it is vital to have no air pocketing or when underway, water will delam the boat.
Re: HMD 21 starting - help
Posted: Tue Dec 29, 2020 10:30 am
by fallguy1000
The same is true for inside corners; they need a minimum of about a 5/16" radius or perhaps 1/4" to avoid the tapes lifting. Another trick is to apply the tapes within an hour of applying the fillet or bonding material as sometimes this helps keep the tapes in and you also can avoid sanding.
It is not always possible, but preferred. Sometimes other things need to be done the make immediate taping unwise.
There is a good and easy book you ought to read.
It is called Epoxy Basics by Russell Brown. Takes about 3 hours to read.
I am not sure whether filleting and outside corners are covered in any of the tutorials here. But reading the tutorials here would be wise.
But I think some reading is in order for you before continuing.
Re: HMD 21 starting - help
Posted: Tue Dec 29, 2020 10:35 am
by fallguy1000
Just a friendly fyi; I almost never fillet anything without immediately taping. This avoids the need to sand round surfaces; and it provides all chemical bonding between the tapes and the fillet.
I realize you are not filleting, yet, but an example would be the skeg.
I would affix the skeg one day and make sure to leave no squeezeout. Then fillet and tape the next day.
Re: HMD 21 starting - help
Posted: Tue Dec 29, 2020 12:25 pm
by duysall83
fallguy1000 wrote: ↑Tue Dec 29, 2020 10:20 am
Fiberglass does not lay on 90 degree corners.
Radiuses of about 1/4" minimum are needed.
You are correct that you have poor contact.
I would sand it off and radius the corner properly and try again.
Also, none of the bottom panel can be proud of the surface below and despite me suggesting bottom over side; that does not mean beyond flush.
What I did with my build is bond seams, develop radiuses and generally, another coat of filler was needed just 30 minutes before tapes to avoid any voids.
The bottom of your boat it is vital to have no air pocketing or when underway, water will delam the boat.
Thank you, i realize i didn't round the edges prpoerly or not enough. Still not cured, i can peel it off and repeat after rounding.
Also i see why i dont have those gaps on bottom joints. My large fillets ended with a good radius without any effort. I guess big gap i caused before, helped me on that
Re: HMD 21 starting - help
Posted: Thu Dec 31, 2020 8:22 pm
by Evan_Gatehouse
There is a detail drawing that clearly shows that you have to round the outside chine to allow the tape to make good contact.
Maybe take the time to read this tutorial. Page 18 shows the rounding of the outside chine.
https://boatbuildercentral.com/support- ... ue-101.pdf
Re: HMD 21 starting - help
Posted: Fri Jan 01, 2021 7:16 am
by duysall83
Removed the tapes from both sides, used grinder to round themn applied glass over. Seems better than yesterday i guess. But still therr are some bubbles.

Re: HMD 21 starting - help
Posted: Fri Jan 01, 2021 9:12 am
by fallguy1000
The grinder is not the ideal tool for making the radiuses.
Some of the ply builders here probably have a better way, but what I have done is usually to take a low grit sandpaper (40-60) and put a moderate flat spot of say 1/4" on a 45 degree angle with a good quality sander. Then I walk up and down the chine and rock the sander.
Then I use an outside corner tool to form a decent edge-if needed or low spots, etc. Now the video is for fairing, but you need to have reasonably decent corners before laying tapes. In this video, I use fairing compound, but this can be done with any flowable filler like wood flour, not sawdust or fumed silica.
https://youtu.be/o74PwqLduus
I also use a homemade batknife to create coves, but for fillets, I use a tongue depresser. I use two different sizes so I can stretch the fillet material if I am close.
https://youtu.be/305KInGFb4E
Re: HMD 21 starting - help
Posted: Fri Jan 01, 2021 9:17 am
by fallguy1000
I looked real close at the pictures and things look pretty decent. Just don't expect too much from the tapes; the surfaces need to be reasonably fair.
If you habe any areas of air pocketing; you can spot grind them and repair by using a bit of thickened epoxy and bedding a small piece of tape into the ground area and then sand smooth later.
You can also get stub nose injection needles about 1.5mm and use a 1.5mm drill and drill two holes in each void on the high side and inject epoxy. But I prefer the grind method unless you have too many. i had a panel with maybe two hundred dime sized voids and repaired the whole panel with needle.
But things look far better!
Re: HMD 21 starting - help
Posted: Fri Jan 01, 2021 9:43 am
by duysall83
Thanks fallguy, actually i have a sander also but with even 40 grit paper it was very hard to make a radius. I think i'd consume crazy amount of paper of 40 and more than 6-8 hrs to complete both edges. I may be missing sth, i dont know.
I used 40 grit flap disc with grinder. For the rough 45 degree transition it was very quick. Then with sander i tried fine tuning.
For locally sanding white spots also you recommend sander i think. Gonna try with sander.
Thank you, i didnt realize how critical it is to round the corners till u say "glass doesnt lay in 90 degrees edges". Glad that i could remove glass before cured.
Re: HMD 21 starting - help
Posted: Fri Jan 01, 2021 10:42 am
by fallguy1000
Flap disc is fine.
Re: HMD 21 starting - help
Posted: Sat Jan 02, 2021 10:16 am
by duysall83
My new toy arrived ysterday. After trying maybe 6 kinds of rollers that one really worked. Found it online as "cloth pusher" in Turkey. I guess not a discovery and this is what Fallguy says "consolidation roller". After wetting out a surface, maybe in half an hour when i roll over the glass with patient most of small and bigger bubbles disappeared. Only very tiny ones remained but as fractions rather than air gap. Really close taken pics.
Re: HMD 21 starting - help
Posted: Sat Jan 02, 2021 6:46 pm
by fallguy1000
duysall83 wrote: ↑Sat Jan 02, 2021 10:16 am
My new toy arrived ysterday. After trying maybe 6 kinds of rollers that one really worked. Found it online as "cloth pusher" in Turkey. I guess not a discovery and this is what Fallguy says "consolidation roller". After wetting out a surface, maybe in half an hour when i roll over the glass with patient most of small and bigger bubbles disappeared. Only very tiny ones remained but as fractions rather than air gap. Really close taken pics.
IMG_20210102_180815.jpgIMG_20210102_181253.jpgIMG_20210102_181326.jpg
I won't laminate without my roller. Looks the same.
Keep doing some reading of the tutorials here and stuff.
Re: HMD 21 starting - help
Posted: Sat Jan 02, 2021 6:47 pm
by fallguy1000
I keep mine in acetone bucket with lid all the time.
Re: HMD 21 starting - help
Posted: Sun Jan 03, 2021 5:24 pm
by Evan_Gatehouse
Glad you've found a path forward with the roller.
Re: HMD 21 starting - help
Posted: Mon Jan 04, 2021 1:46 am
by duysall83
Evan_Gatehouse wrote: ↑Sun Jan 03, 2021 5:24 pm
Glad you've found a path forward with the roller.
Hello Evan,
For the skeg i was thinking what to do or buy new wood. Then i saw one of okume leftovers from cnc cut. Shape was very similar so i tried to fit, almost perfectly fitted. Little trimming then used as pattern and made 3 more of it. 4 layers and about 38 mm thick now, still in lamination. As far as i understood from threads and tutorials it was ok to joint pieces for skeg, hope so. If not doable, i can waste what i did and find new wood.
Thanks
Re: HMD 21 starting - help
Posted: Mon Jan 04, 2021 6:30 am
by fallguy1000
Skeg looks good to me. Just make sure it is straight!
Re: HMD 21 starting - help
Posted: Mon Jan 04, 2021 7:17 pm
by Evan_Gatehouse
It's fine to do it this way.
Re: HMD 21 starting - help
Posted: Mon Jan 11, 2021 12:21 pm
by duysall83
Hello, this is a view from one of the bottom panel. Which i applied glass before the magical roller. All of them smaller than 3 mm in diamater, actually most of them around 2 mm but there are many through that panel.
That requires me to remove/grind whole glass? Or that size is negligible despite the high amount? I do make progress on the boat but those are pain in the ass
i was afraid to ask but i should.
Thanks
Duysal
Re: HMD 21 starting - help
Posted: Mon Jan 11, 2021 12:51 pm
by fallguy1000
I think okay for hmd 21, not okay for 250hp planing hull
Do better, though. You are either dry or wrong consolidation roller in pic. Or drysuck from not precoating?
Try to see if resin flows into any of them. Hard to ses for sure.
Re: HMD 21 starting - help
Posted: Mon Jan 11, 2021 2:31 pm
by duysall83
fallguy1000 wrote: ↑Mon Jan 11, 2021 12:51 pm
I think okay for hmd 21, not okay for 250hp planing hull
Do better, though. You are either dry or wrong consolidation roller in pic. Or drysuck from not precoating?
Try to see if resin flows into any of them. Hard to ses for sure.
I had precoated them maybe 2 werks prior to glassing. This is first panel i applied glass without roller. Second panel i used the roller with grooves and almost no bubble, ply under visible through the panel, almost no spots.
Re: HMD 21 starting - help
Posted: Tue Jan 12, 2021 10:09 pm
by Evan_Gatehouse
OK - no, not too bad. Do try to do better. Keep the resin and hardener warm until you are going to use it. If it is too cold, it will be thick like cold honey. And then it will not wet out the glass easily.
Use your roller more firmly. Usually bubbles like that are visible a few minutes after you stop rolling.
If you put resin on bare wood, and the wood warms up (like in the sun), the wood will give off tiny amounts of gas. This can also form bubbles. So apply glass in the shade, or when the temperature is dropping, like in the later part of the afternoon.
Re: HMD 21 starting - help
Posted: Tue Jan 12, 2021 10:44 pm
by fallguy1000
Make sure after precoating that the surfsces are not greasy. That is amine blush and mist be washed with warm soapy water and dried 24 hours or warm gunned to epoxy same day.
Also, any epoxy left for a few days precoating must be sanded a bit.
It is possible the wood outgassed if you sanded into some bare wood. But you would be able to catch it watching closely and hit with consolidating roller and get air out.
Good catch Evan. It does look like some gassing off. Some epoxies are more prone to it than others; so pay attention to Evan's advice to reduce it as well.
Re: HMD 21 starting - help
Posted: Wed Jan 13, 2021 12:56 am
by duysall83
Evan_Gatehouse wrote: ↑Tue Jan 12, 2021 10:09 pm
OK - no, not too bad. Do try to do better. Keep the resin and hardener warm until you are going to use it. If it is too cold, it will be thick like cold honey. And then it will not wet out the glass easily.
Use your roller more firmly. Usually bubbles like that are visible a few minutes after you stop rolling.
If you put resin on bare wood, and the wood warms up (like in the sun), the wood will give off tiny amounts of gas. This can also form bubbles. So apply glass in the shade, or when the temperature is dropping, like in the later part of the afternoon.
Thank you Evan, very happy at least no removing the glass. When i do this panel i used only brush, no roller. Second panel is much better that i used roller with grooves.
Only thing remains amine blush. I never can be sure if i have it or no. I grind some spots which i suspect. Applied water on some areas. What should i notice to be sure its Amine blush?
Re: HMD 21 starting - help
Posted: Wed Jan 13, 2021 2:31 am
by fallguy1000
Amine blush will feel greasy
Re: HMD 21 starting - help
Posted: Wed Jan 13, 2021 9:03 pm
by Evan_Gatehouse
Sometimes you can't tell if the epoxy has blushed. Just assume it has happened. It is worse in cold, damp weather. Working outside on a hot sunny day it is less likely but some epoxies are worse than others.
Before adding more fiberglass to area with existing fiberglass or before painting, just wipe down with a green plastic scrubby pad (like you use to wash dishes) and some warm water.
Re: HMD 21 starting - help
Posted: Mon Jan 18, 2021 3:00 pm
by blueflood
Speaking of blushing....
When I knew little about epoxies, one day I had worked on my cedar strip canoe; did epoxy coating on new cloth - late, during a warm and humid day. All looked good so left it (outside uncovered).
Next day after a cool and humid morning , got up to work on it. It was

WTF totally white. The blush did come off with sanding/ washing but it gave me a wicked scare

. That was with WEST epoxy. It was the last time I bought WEST but even with S3, I am more aware now.
Pick the right time of day...keep an eye on the temp and humidity.
Marc
Re: HMD 21 starting - help
Posted: Thu Feb 04, 2021 12:55 am
by duysall83
Little progress during snow and storms for 3 weeks. Keeping on trial/error
But getting close to flip i guess. God knows how i will do it.
Installed bow eye pad. After many trials for smooth transition, ended with 3 layers glass on pad.
Remaining 3rd and last layer of rubrail.
Radius and fillet then glass the skeg. also need to cut rear extension of skeg (waiting for a saw which i ordered) Then fairing. White spots mostly dust.
I understand from threads and plan that glassing rubrail is optional, or after flip i should glass covering with side deck.
I used 3 meters long timbers for rubrail without cutting into short. Trying to bend in 2 directions was hard but mostly i was able to follow the hull upper side.
What wakes me up yesterday is that upper edges at the bow dont meet. (I mean lower edges relative to ground, not seen on the pic) Proper way is to fill that gap after flip with thickened epoxy or should i cut the bow edges of rubrail angled to form a decent triangle? Already late for the angle cut.
Re: HMD 21 starting - help
Posted: Thu Feb 04, 2021 9:41 am
by fallguy1000
You have to use putty now to fair it all. Might take awhile to get it nice. Start off filling low spots with cabosil and epoxy only; then switch to ballons and cabosil when the fills are less than 1/8" deep.
Re: HMD 21 starting - help
Posted: Sun Feb 28, 2021 7:29 am
by duysall83
Well.. applied one coat of primer. next fairing, sanding, fairing i guess.
Each single step from the start of the build is a first time for me. Since i consider that build as a learning course, i am glad but not sure if i can make a good fair hull out of this
So far what i've learned.
-I should pay crazy attention to epoxy drips during glassing.
-should be more careful cutting glass
-consolidation roller is a must have
plus many other minor/major failures
Re: HMD 21 starting - help
Posted: Sun Feb 28, 2021 9:55 am
by fallguy1000
Make sure to fair on a 45. My first hull we did not do a great job on. The guy helping me gravitated back to holding tooling vertical. When we finally got working on making it fair; we are not close due to not using angles during sanding.
We also did not do enough writing on the hull corrections in pencil. The second hull I knew before I started how mich fairing to apply.
I took the liberty of drawing the way I would fill and sand your hull.
We used 40 and 30" aluminum angles here. They rub black aluminum marks on primer and highlight high areas well. The yellow lines I drew would be the way I would run the angles and check things out. Obviously, a curve in the hull needs to be viewed differently and can't be fixed fully flat, but ftmp, the boats we are building have developable lines. A developable curve does have a radius that is higher if the tools are laid on the horizon, but typically, due to tabbing; you can find a sweet spot with the angles I approximated.

- B7088816-4B4B-4198-A6C7-655A23C03DE8.jpeg (118.55 KiB) Viewed 729 times
Re: HMD 21 starting - help
Posted: Sun Feb 28, 2021 10:20 am
by duysall83
fallguy1000 wrote: ↑Sun Feb 28, 2021 9:55 am
Make sure to fair on a 45. My first hull we did not do a great job on. The guy helping me gravitated back to holding tooling vertical. When we finally got working on making it fair; we are not close due to not using angles during sanding.
We also did not do enough writing on the hull corrections in pencil. The second hull I knew before I started how mich fairing to apply.
I took the liberty of drawing the way I would fill and sand your hull.
We used 40 and 30" aluminum angles here. They rub black aluminum marks on primer and highlight high areas well. The yellow lines I drew would be the way I would run the angles and check things out. Obviously, a curve in the hull needs to be viewed differently and can't be fixed fully flat, but ftmp, the boats we are building have developable lines. A developable curve does have a radius that is higher if the tools are laid on the horizon, but typically, due to tabbing; you can find a sweet spot with the angles I approximated.B7088816-4B4B-4198-A6C7-655A23C03DE8.jpeg
Thanks Dan,
U mean aluminum profiles as guide? How they leave marks, prepaint the profiles' edges?or using pencil for the low areas?
Btw, is there a chance to fair those drips with fairing compound? Or its luxury and i should grind the drips?
Duysal
Re: HMD 21 starting - help
Posted: Sun Feb 28, 2021 10:30 am
by fallguy1000
The raw aluminum leaves black marks when you rub across the hull; you would lay the metal the way I showed or close then move the angle forward and back about 5-15 strokes for and back and the highs get highlighted and you know where to sand, or if the tool is hitting on one side; you might be too low.
Re: HMD 21 starting - help
Posted: Sun Feb 28, 2021 10:39 am
by duysall83
fallguy1000 wrote: ↑Sun Feb 28, 2021 10:30 am
The raw aluminum leaves black marks when you rub across the hull; you would lay the metal the way I showed or close then move the angle forward and back about 5-15 strokes for and back and the highs get highlighted and you know where to sand, or if the tool is hitting on one side; you might be too low.
Thank you, i'll try .
Re: HMD 21 starting - help
Posted: Sun Feb 28, 2021 10:49 am
by rick berrey
You can also mix some color into tour fairing compound , red , blue , green ect , this will allow you to see the lows and highs after sanding .
Re: HMD 21 starting - help
Posted: Sun Feb 28, 2021 1:16 pm
by fallguy1000
rick berrey wrote: ↑Sun Feb 28, 2021 10:49 am
You can also mix some color into tour fairing compound , red , blue , green ect , this will allow you to see the lows and highs after sanding .
Oohh. I like it. Gets hard to see after awhile.
Re: HMD 21 starting - help
Posted: Tue Mar 02, 2021 4:28 pm
by Evan_Gatehouse
I use cheap black spray paint. Shows the highs and lows easily.
Sand off drips. You will use a LOT of fairing compound to cover them if you try that.
Use 60 or 80 grit sandpaper (quite coarse) for initial fairing.
Use a long board (~30" / 800mm or so) with long sandpaper glued or stapled to the ends for fairing. You can't fair with a small sander. You can make things SMOOTH but smooth is not fair.
Re: HMD 21 starting - help
Posted: Tue Mar 02, 2021 8:09 pm
by BarraMan
Evan_Gatehouse wrote: ↑Tue Mar 02, 2021 4:28 pm
I use cheap black spray paint. Shows the highs and lows easily.
Sand off drips. You will use a LOT of fairing compound to cover them if you try that.
Use 60 or 80 grit sandpaper (quite coarse) for initial fairing.
Use a long board (~30" / 800mm or so) with long sandpaper glued or stapled to the ends for fairing. You can't fair with a small sander. You can make things SMOOTH but smooth is not fair.
x 2 what Evan said! I wiped on graphite powder for the same purpose that Even uses cheap black paint - to show up the highs and lows while fairing. Also used 60 and 80 grit paper on a long board - fairing was not the big chore that I was expecting.
Re: HMD 21 starting - help
Posted: Tue Mar 02, 2021 8:20 pm
by TomW1
You really need two fairing boards, one stiff for the flat areas and one flexible for the rounded areas. Like Evan said I used black spray paint but I shook the can back and forth as I was spraying it and got dots and not a solid coat. I used a fast drying Krylon brand available from Lowes. It dried in about 30 minutes so I could get right to work sanding.
Tom
Re: HMD 21 starting - help
Posted: Wed Mar 03, 2021 9:47 am
by duysall83
Evan_Gatehouse wrote: ↑Tue Mar 02, 2021 4:28 pm
I use cheap black spray paint. Shows the highs and lows easily.
Sand off drips. You will use a LOT of fairing compound to cover them if you try that.
Use 60 or 80 grit sandpaper (quite coarse) for initial fairing.
Use a long board (~30" / 800mm or so) with long sandpaper glued or stapled to the ends for fairing. You can't fair with a small sander. You can make things SMOOTH but smooth is not fair.
Got it. Thx Evan, we'll see what i can.
Re: HMD 21 starting - help
Posted: Fri Mar 05, 2021 5:50 am
by duysall83
Hello Evan, Dan and everyone, started to sand/grind the drips. Actually mostly grind the drips because neither sander nor hand sanding removes them. Tiring job but i see that surface becomes smoother. I have a question;
As you see i remove the Primer and the initial epoxy coat from months ago mostly during sand/grinding and reach the raw okume often. So when i finish first sanding should i apply epoxy resin once more to the hull before the primer? By the way primer i use is also epoxy based.
Or i can directly apply primer (1-2 coats) and fairing compund next. Then use the long boards to locate highs/lows?
Preparing sanding boards on the other hand.
Another question. You know i build the boat outdoor but in a simple shelter. I had not epoxy coated the internal surfaces of hull parts. No rain directly over the boat but i guess humidity changes even within day. Is it a major problem in terms of moistire absorbtion?
Thank you all in advance.
Duysal
Re: HMD 21 starting - help
Posted: Fri Mar 05, 2021 8:41 am
by fallguy1000
Really, it is up to you. Epoxy neat coats are thicker than primer.
If you want to get the boat a little more fair, you can neat coat it. I read somewhere that epoxy coats are about 4 times thicker than typical paints, so you can use neat coating if you think it can help. I looked for a source to cite, but came up with nothing. We did three build coats on my brother's Windward 15 and they really made the deck look perfect, but that was for bright finishing.
There is a downside risk that your neatcoats run on your steep verticals, so you'll need to make them very smooth and with great care if you choose to do so. Another downside is raw epoxy is a bit of a bear to sand, which is why we use compounds.
Another thing for you is the boat is really dofficult to see at this point whether it is fair or not. This will not be helped by neat coating.
I personally would prime it, see how it looks. Run your hands up and down the sides with your eyes closed and feel for waviness. Personally, I would not neat coat. Hope I laid out my rationale.
The only way I would consider neat coating is if the hull were only plywood and not sheathed in glass.
Re: HMD 21 starting - help
Posted: Fri Mar 05, 2021 9:10 am
by duysall83
fallguy1000 wrote: ↑Fri Mar 05, 2021 8:41 am
Really, it is up to you. Epoxy neat coats are thicker than primer.
If you want to get the boat a little more fair, you can neat coat it. I read somewhere that epoxy coats are about 4 times thicker than typical paints, so you can use neat coating if you think it can help. I looked for a source to cite, but came up with nothing. We did three build coats on my brother's Windward 15 and they really made the deck look perfect, but that was for bright finishing.
There is a downside risk that your neatcoats run on your steep verticals, so you'll need to make them very smooth and with great care if you choose to do so. Another downside is raw epoxy is a bit of a bear to sand, which is why we use compounds.
Another thing for you is the boat is really dofficult to see at this point whether it is fair or not. This will not be helped by neat coating.
I personally would prime it, see how it looks. Run your hands up and down the sides with your eyes closed and feel for waviness. Personally, I would not neat coat. Hope I laid out my rationale.
The only way I would consider neat coating is if the hull were only plywood and not sheathed in glass.
Hello Dan,
If its up to me i dont coat epoxy
hull is glassed till 20 cm above chine as on the plans. So my concern is all after the end of glass to side upper edge. Would the primer replace what neat epoxy would do for encapsulation of wood?
Re: HMD 21 starting - help
Posted: Fri Mar 05, 2021 9:41 am
by fallguy1000
Ahh, I see...
Personally, there has been a lot of people posting with paint and finish problems on any wood that is not sheathed in glass. A lot depends on paint color plan.
A dark paint, I would sheath it with at least four ounce, but even down to 1.5 oz cloth would work.
A lighter paint, I think you can get away without sheathing. Some of this depends on where use is planned. If you are in a hot place, I would sheath it all paints.
There is some risk of me making the designer mad here, but I personally would sheath it with a light woven; a couple follow on layers of no sand neat coats over the glass plus a foot up, 8" up, 4" up until the weave vanishes; then sand the neat coats and fair the joint with a fairing board.
I would not be too worried about your plywood getting too damp. A lot depends on climate. It can happen, but you would need to be running ambient rh around 90- 100% all the time. As long as your wood is below 15% moisture; which is really quite high; you'll be okay. I would guess you are at 12, but not fully sure other than your are somewhere in Turkey.
Re: HMD 21 starting - help
Posted: Fri Mar 05, 2021 10:16 am
by duysall83
I'm close to İstanbul. Not crazy humidity here, at least compare to how i feel in Jakarta
i learned not to complain about humidity after been there many times.
Dan i dont plan to glass above chine. Actually i worry if any structural problem occur if i dont renew the neat epoxy before primer.
Re: HMD 21 starting - help
Posted: Fri Mar 05, 2021 10:52 am
by Cowbro
I might be one of the ones Dan was referring to about fighting paint/plywood issues for non-glassed plywood. And yeah, if i was at your stage in the build with the boat still upside down, i would put some 4-6oz glass on the sides for protection/longevity.
You mention that you sanded through to the plywood in some locations, I would definitely re-coat those in epoxy before continuing. I don't know if you need to spot repair or coat the entire hull, but i would not put primer over the bare wood.
Re: HMD 21 starting - help
Posted: Fri Mar 05, 2021 11:13 am
by fallguy1000
duysall83 wrote: ↑Fri Mar 05, 2021 10:16 am
I'm close to İstanbul. Not crazy humidity here, at least compare to how i feel in Jakarta
i learned not to complain about humidity after been there many times.
Dan i dont plan to glass above chine. Actually i worry if any structural problem occur if i dont renew the neat epoxy before primer.
Well, you asked me. I gave my opinion.
Both Matt Gent and Cowbro are having issues with unsheathed ply. It is basically a week's work for insurance against paint issues later.
Any epoxy coating is NOT considered structural. If you sanded through glass below waterlines; those must be repaired with glass and epoxy.
Good luck. The boat looks like it is coming along nicely.
Fairing is a pain.
What is your name?
Re: HMD 21 starting - help
Posted: Fri Mar 05, 2021 11:36 am
by duysall83
Thank you both,
Either glass or epoxy coat then. Good that i asked before continuing with primer as it is straight forward
Name is Duysal.
Re: HMD 21 starting - help
Posted: Fri Mar 05, 2021 11:37 am
by duysall83
fallguy1000 wrote: ↑Fri Mar 05, 2021 11:13 am
duysall83 wrote: ↑Fri Mar 05, 2021 10:16 am
I'm close to İstanbul. Not crazy humidity here, at least compare to how i feel in Jakarta
i learned not to complain about humidity after been there many times.
Dan i dont plan to glass above chine. Actually i worry if any structural problem occur if i dont renew the neat epoxy before primer.
Well, you asked me. I gave my opinion.
Both Matt Gent and Cowbro are having issues with unsheathed ply. It is basically a week's work for insurance against paint issues later.
Any epoxy coating is NOT considered structural. If you sanded through glass below waterlines; those must be repaired with glass and epoxy.
Good luck. The boat looks like it is coming along nicely.
Fairing is a pain.
What is your name?
F7CB034E-22EE-4409-A573-17A2F56A549E.jpeg4772B907-9087-41DB-AE68-E7DC5E51743E.jpeg
Good luck to you too. Eventhough you dont need it.
Re: HMD 21 starting - help
Posted: Sat Apr 17, 2021 11:59 am
by duysall83
after a long period of inactivity, i guess ready for flip tomorrow. Hope no incidents
Re: HMD 21 starting - help
Posted: Sat Apr 17, 2021 2:41 pm
by Doug N
Good luck with the flip. You'll be amazed with the size of the boat after the turnover. Mine sure seemed bigger when I was looking at the inside of the hull.
Re: HMD 21 starting - help
Posted: Sun Apr 18, 2021 3:53 am
by fallguy1000
Good luck flipping.
Re: HMD 21 starting - help
Posted: Sun Apr 18, 2021 8:14 am
by duysall83
Done for today. One friend and 4 manuel lifter plus many planning
. Still airborne. Will feed old tires under tomorrow.
No problem until now
Managed to flip with milimeters to the upper profile.
Re: HMD 21 starting - help
Posted: Sun Apr 18, 2021 8:46 am
by Jeff
Congrats on the flip!!!! Jeff
Re: HMD 21 starting - help
Posted: Sun Apr 18, 2021 8:59 am
by fallguy1000
Good work. Always a bit nerve wracking..now the work begins again.
Re: HMD 21 starting - help
Posted: Wed May 12, 2021 9:45 am
by duysall83
Hello again,
I started laying tapes and next laying to the fabric inside of the hull.
Should the fabric cover also top of butt blocks? Or are those areas negligible?
Re: HMD 21 starting - help
Posted: Wed May 12, 2021 5:07 pm
by fallguy1000
duysall83 wrote: ↑Wed May 12, 2021 9:45 am
Hello again,
I started laying tapes and next laying to the fabric inside of the hull.
Should the fabric cover also top of butt blocks? Or are those areas negligible?
If butt blocks are allowed, then they should be made in such fashion that allows for laminating over them I'd say. This is a Gatehouse design, iirc, so it would be best to ask him. If your butt blocks are not too thick, you would be able to fillet a triangle to get to them, but I encourage you to hear from the designer first.
Re: HMD 21 starting - help
Posted: Wed May 12, 2021 5:15 pm
by TomW1
Butt blocks are not usually used on boats the size of the HMD. Instead 6" biaxial tape is used on all the seams. It is as strong and allows for smoother lay out of the 12oz biax cloth.
Tom
Re: HMD 21 starting - help
Posted: Wed May 12, 2021 7:30 pm
by fallguy1000
TomW1 wrote: ↑Wed May 12, 2021 5:15 pm
Butt blocks are not usually used on boats the size of the HMD. Instead 6" biaxial tape is used on all the seams. It is as strong and allows for smoother lay out of the 12oz biax cloth.
Tom
I agree this would be much better. However, if the designer suggested it, then we don't cross that path.
Re: HMD 21 starting - help
Posted: Wed May 12, 2021 9:41 pm
by Cowbro
Mine has butt blocks on the two bottom panels. Not on the sides. The edges are tappered to allow the biax to lay nicely over the blocks.
Re: HMD 21 starting - help
Posted: Thu May 13, 2021 12:13 pm
by Evan_Gatehouse
Yes, fabric over the butt blocks. Butt blocks should have rounded edges so that the fabric lies easily over it.
Re: HMD 21 starting - help
Posted: Fri May 14, 2021 11:25 am
by duysall83
Evan_Gatehouse wrote: ↑Thu May 13, 2021 12:13 pm
Yes, fabric over the butt blocks. Butt blocks should have rounded edges so that the fabric lies easily over it.
Ok, thanks everyone. Had to try my chance
Re: HMD 21 starting - help
Posted: Sun Jun 20, 2021 3:44 am
by duysall83
Hello all, can i put the water tank like this? Doesn't fit paralel to water length due to a wrong purchase
Re: HMD 21 starting - help
Posted: Sun Jun 20, 2021 10:10 am
by fallguy1000
Yup. Don't forget to vent it! Center it is best. Boats are all weight sensitive.
Re: HMD 21 starting - help
Posted: Sun Jun 20, 2021 12:25 pm
by TomW1
Yes, build a platform so it doe's not set on only the end points. That looks like a pretty nice tank.
Tom
Re: HMD 21 starting - help
Posted: Sun Jun 20, 2021 12:54 pm
by duysall83
TomW1 wrote: ↑Sun Jun 20, 2021 12:25 pm
Yes, build a platform so it doe's not set on only the end points. That looks like a pretty nice tank.
Tom
There will be 2 of them. Second one for waste water. I plan to put them next to each other with a seperation. And there will be pumps close to the tanks.
For the bottom support here what i plan according to what i read on forum. Please advice, thank you.
Duysal
Re: HMD 21 starting - help
Posted: Mon Jun 21, 2021 1:33 pm
by TomW1
Never have a board rest directly on the V. Do a support on either side of it. Or run a support underneath it glued to the hull sides.
Everything else sounds great.
Tom
Re: HMD 21 starting - help
Posted: Mon Jun 21, 2021 1:59 pm
by duysall83
Thank you Tom and Dan.
Re: HMD 21 starting - help
Posted: Mon Jun 21, 2021 3:20 pm
by fallguy1000
Waste water tank is best double vented. One vent each side of boat. Mine will be...
Your drawing is the wrong angles. Put two stringers under the tank and a small flat section.
Re: HMD 21 starting - help
Posted: Mon Jun 21, 2021 4:27 pm
by duysall83
fallguy1000 wrote: ↑Mon Jun 21, 2021 3:20 pm
Waste water tank is best double vented. One vent each side of boat. Mine will be...
Your drawing is the wrong angles. Put two stringers under the tank and a small flat section.
U mean like a bridge i guess. I think i got it. Thank you

Re: HMD 21 starting - help
Posted: Mon Jun 21, 2021 6:20 pm
by fallguy1000
duysall83 wrote: ↑Mon Jun 21, 2021 4:27 pm
fallguy1000 wrote: ↑Mon Jun 21, 2021 3:20 pm
Waste water tank is best double vented. One vent each side of boat. Mine will be...
Your drawing is the wrong angles. Put two stringers under the tank and a small flat section.
U mean like a bridge i guess. I think i got it. Thank you
All waste stinks. But anaerobic bacteria exist when no oxygen is present. And they stink much worse.
Dual venting blackwater is the ideal. Another improvement is clam shelling the vent intakes open on one side and closed on the other to force the cross vent. I might just use thru hulls, but I also may put a clam shell over one of them to force odors away from the center of the ride.
Re: HMD 21 starting - help
Posted: Tue Jun 22, 2021 12:29 am
by TomW1
Fallguy totally disagree with you on needing two vents. You only need one vent so that the tank does not develop a vacuum. That vent should be led on an upward angle to the rear stern quarter with a clam shell over it so that water can not make egress into it. You do not need cross air flow in the tank. Think of how a septic tank works. It outlets to the the drain field.
Tom
Re: HMD 21 starting - help
Posted: Tue Jun 22, 2021 9:02 am
by fallguy1000
TomW1 wrote: ↑Tue Jun 22, 2021 12:29 am
Fallguy totally disagree with you on needing two vents. You only need one vent so that the tank does not develop a vacuum. That vent should be led on an upward angle to the rear stern quarter with a clam shell over it so that water can not make egress into it. You do not need cross air flow in the tank. Think of how a septic tank works. It outlets to the the drain field.
Tom
Peggy Hall is the 'potty princess' and she says multiple vents and no higher than a 3' rise to the vent is the secret.
Why?
In a houseboat or camper, when they run the vents to the ceiling; it creates an air lock. The gases get stuck and then only anaerobic bacteria work and they wreak like s..t.
A septic tank for a home stinks like hell; there is no comparison.
People get confused. Blackwater tanks stink because the bacteria that live in a non-oxygen tank are really stinky, but aerobic bacteria in a well oxygenated tank work fast and you add an odor killer to the tank and they work faster.
If the OP does it right, he can vent the tank from each side. Water ingress doesn't matter, generally. While it is certainly not desired, a little water entering a tank doesn't change much and is far better than running the vent to the roof.
Another reason to put the blackwater tank firther aft onboard is the odors will be leaving while underway. The ideal is as far back as possible. Combine that with dual vents and enzymes and proper vent placement and tanks are not terrible.
Don't disagree if you haven't done the research my friend.
Re: HMD 21 starting - help
Posted: Tue Jun 22, 2021 9:38 am
by Jaysen
Alternative solution… composting head. That’s my solution to the whole problem.
Re: HMD 21 starting - help
Posted: Tue Jun 22, 2021 9:41 am
by fallguy1000
Jaysen wrote: ↑Tue Jun 22, 2021 9:38 am
Alternative solution… composting head. That’s my solution to the whole problem.
Yes. The problem for me is I would be the only one cleaning the coffee filter misses/overages. No thanks.
Re: HMD 21 starting - help
Posted: Sun Aug 01, 2021 10:51 am
by duysall83
Hello all,, little progress. fuel (fwd one) and water tank seat and compartments almost done. Also i have a question. Can i fill the area under the berth (triangle one toward bow) with concrete. by filling i mean at least till surface levels. Also may serve as ballast? Motor will be 50-70 cm further aft compare to the original place. So that i guessed putting some weight in advance may be logical.
Thanks,
Duysal
Re: HMD 21 starting - help
Posted: Sun Aug 01, 2021 12:00 pm
by cape man
I would prefer removable ballast, and add it as needed after you launch and see how she sits and rides.
Re: HMD 21 starting - help
Posted: Mon Aug 02, 2021 12:25 am
by Doug N
Hello Duysall. I made another small compartment forward of frame e that is about 12" front to back but full width of the hull. I put 3 ten litre plastic gas cans full of water in there, through a small hatch, for ballast. Close to 70 pounds of water as they are filled to the brim. That really levels the boat out. If I was creative and used a bladder of some sort, I think I could get in about 150 pounds if needed. This way it is quite adjustable.
I left the small area that was left forward of these compartments for flotation foam. Sorry I don't have any pictures before the berth top went on.
The small hatch is the one I'm talking about. The small deckplate forward is to get at the back of the bow-eye nuts/washers.
Re: HMD 21 starting - help
Posted: Mon Aug 02, 2021 12:30 am
by Doug N
Re: HMD 21 starting - help
Posted: Mon Aug 02, 2021 12:53 am
by duysall83
Doug N wrote: ↑Mon Aug 02, 2021 12:30 am
Found a picture100_0017.JPG
Thank you Doug. That's helpful.
Re: HMD 21 starting - help
Posted: Fri Nov 26, 2021 4:14 pm
by duysall83
Hello, have read tons of threads about grounding but still not confident. Here my fuel tank and fittings. Fill cap is metalic, fitting for vent is brass and there is a level sensor. What i understand that i should run a ground wire from each metal part that is touching fuel to negative busbar ( block which all negatives from users are connected). Is that correct?
If yes, seperate wirings are needed or one from fiill cap to level flange, from there to brass fitting and finally to negative busbar is ok?
Also ss clamps should i consider too?
Thanks for any input
Re: HMD 21 starting - help
Posted: Fri Nov 26, 2021 9:42 pm
by TomW1
No you only need two ground wires. One running from the fill to the tank and one from the tank to your ground bar. The ideal place is under one of the screws of the fuel guage as it also goes to the console and you can run the two wires together. Use two different screws so you can tighten them down properly. The reason you only need the one for the tank is that every thing is grounded through the gas and the tank.
Tom
Re: HMD 21 starting - help
Posted: Sat Nov 27, 2021 1:51 am
by duysall83
TomW1 wrote: ↑Fri Nov 26, 2021 9:42 pm
No you only need two ground wires. One running from the fill to the tank and one from the tank to your ground bar. The ideal place is under one of the screws of the fuel guage as it also goes to the console and you can run the two wires together. Use two different screws so you can tighten them down properly. The reason you only need the one for the tank is that every thing is grounded through the gas and the tank.
Tom
Thank you Tom, but still have question.
1. Tank is plastic. When you say "from fill to the tank"
you mean from fill to level gauge flange?
2. May i ignore that brass fitting? İts in vent port.
3. Ground bar = negative block?
4. What size cable is proper?
5. Last one. I didnt use any thread sealing agent for tank fittings since there is no pressure but i may be totally wrong. Should i use sth or ok as it is now?
Thanks
Duysal
Re: HMD 21 starting - help
Posted: Sat Nov 27, 2021 10:36 am
by fallguy1000
duysall83 wrote: ↑Sat Nov 27, 2021 1:51 am
TomW1 wrote: ↑Fri Nov 26, 2021 9:42 pm
No you only need two ground wires. One running from the fill to the tank and one from the tank to your ground bar. The ideal place is under one of the screws of the fuel guage as it also goes to the console and you can run the two wires together. Use two different screws so you can tighten them down properly. The reason you only need the one for the tank is that every thing is grounded through the gas and the tank.
Tom
Thank you Tom, but still have question.
1. Tank is plastic. When you say "from fill to the tank"
you mean from fill to level gauge flange?
Yes
2. May i ignore that brass fitting? İts in vent port.
Yes. It might be impossible to ground it anyhow and the ground is for the fueling station and you to achieve grounding of all static before you pump.
3. Ground bar = negative block?
Yes, this ground must go all the way to your outboard motor negative battery. In a boat, all grounds must connect.
4. What size cable is proper?
#8-#10 wire is typical for grounding these types of things...usually green wire is used for earth grounds or bonding connections...I have a big spool of #10 green I am using for it all. No boat wires you install are ever under #16.
5. Last one. I didnt use any thread sealing agent for tank fittings since there is no pressure but i may be totally wrong. Should i use sth or ok as it is now?
Typically, two stainless clamps are used on each connection in the fuel system. I prefer they are turned the opposite way of each other if the fitting is accessible.
Thanks
Duysal
Re: HMD 21 starting - help
Posted: Sat Nov 27, 2021 11:44 am
by TomW1
Q 2 correct
Q2 yes the bronze fitting can be ignored
Q 3 Yes one and the same.
Q 4 Normally a 14 guage is used for the wire to the accessoriies and then 10 to the motor. If you have 10 use the appriate size fitting and crimp it to the 10GA.
Q 5 Always use a coating on the fittings, gas has a notorios way to find its way out of any unsealed cracks.
We;; I hope that helps. Tom
Re: HMD 21 starting - help
Posted: Sat Nov 27, 2021 12:22 pm
by fallguy1000
If you had threaded fittings into the tank, then you need to use fuel resistant tfe.
I missed this because I thought you meant the clamps.
Also, I air tested my tank and fittings to 2 psi pressure. The test is hard to do, but a good idea. Plug the ends of the hoses at the supply, fill, vent and pressure the tank through a shrader in the supply..
ANTI-SEIZE TECHNOLOGY 46330 Yellow PTFE Poly-Temp Extra Heavy Duty Gas Line Tape, 260" Length, 0.5" Width (Pack of 5)
https://www.amazon.com/dp/B00LX5ESYU/re ... UTF8&psc=1
Re: HMD 21 starting - help
Posted: Sat Nov 27, 2021 1:02 pm
by duysall83
Thank you Tom and Dan. Now all clear.
Re: HMD 21 starting - help
Posted: Sun Nov 28, 2021 11:26 am
by TomW1
Dan thanks for the help on the tape reference just as a reminder to him he also needs to use it on all the fittings including the bronze one that screw into the tank. The fuel guage should have a gasket on it.
Tom
Re: HMD 21 starting - help
Posted: Wed Dec 01, 2021 12:54 pm
by duysall83
Hello again,
Now time for decks. What is inwale for? İs it to soften the inner edge of deck or behave as a guide for installing cabin sides, front etc?
Also to Evan and other hmd builders ; does very front 2 deck pieces have a curve or a flat surface?
Thanks
Duysal
Re: HMD 21 starting - help
Posted: Wed Dec 01, 2021 10:07 pm
by Doug N
Hello Duysal
The front deck has a curve on it. The two pieces leading up to it have a slight slope. Is that what you are after?
Not sure about inwhale. If I understand what you are meaning, I would say that I didn't use any on my boat, from the back of the cabin forward. Main cabin sides and forecabin sides/front were stitched/taped to the deck. The upper portions of the frames give guidance and give the base for the curve of the panels. I put cleats on the frames where the decks were going to sit. After getting everything aligned in a nice curve, I glued them down with a taped joint inside and out. I used a 1x2 under the edge of the deck on the sides of the cockpit for strength. Then added a coaming around the inside of the cockpit which also helped support the deck.
Just went and looked at my plans and layout for cutting the plywood. The cutting layout shows the front deck as two pieces but should be left as one piece as you see in my picture. The plans show the inwhale in the cockpit. Sort of looks like there could be an inwhale all the way around the inside of the deck but I didn't do it that way. Would be good to hear from Evan if they were supposed to go all the way around or just in the cockpit. Have you cut your deck panels? Leave them about 3/4 to 1" wider on the outside edge, then you can overlap them over the rub rail and have a lot more gluing area.
You'll have to plane them to the same angle as the deck but was fairly straightforward to do.
Doug
Re: HMD 21 starting - help
Posted: Thu Dec 02, 2021 12:44 am
by duysall83
Hello Doug, i see that there is curve at front deck. Thank you.
I understand you didnt put any inwale not around cockpit, not around cabin. I may put around cabin but for the cockpit i need a different solution. May be correct to call what i need as "inner side panel". Since boat is 1,1 times bigger and the engine sits on bracket, i have a largee cockpit. Want side benches to have backrests. So 2 things;
1. İnner profile of side deck should be straight. I cant think anything else, pleass advice if any.
2. Put an inner side with an angle, glue it to the Side frames, to the top of side bench and to the cleats on side deck edge. Like this from Patrick's DE build.
What do u think?
Re: HMD 21 starting - help
Posted: Thu Dec 02, 2021 10:53 am
by Doug N
Your ideas look plenty strong and work out well for seating. Good backrests. Something I should have done in mine.
Re: HMD 21 starting - help
Posted: Fri Dec 10, 2021 9:56 am
by duysall83
Some progress. For 1 month i spend 2-3 hrs/week day and 7-8 hrs per weekend days. Finally put the deck but needed to trim maybe 10-12 cm from the width of front deck . I guess bow part shrinked, i remember the very front frame was loosen at hull build stage. I did not care and it was like there no frame at all. That should be reason. Still learning from experiences
hope just an estethic issue.


 hope there is a solution.
 WTF totally white. The blush did come off with sanding/ washing but it gave me a wicked scare
  . That was with WEST epoxy. It was the last time I bought WEST but even with S3, I am more aware now.