Page 1 of 1
Panga 20 West Central Florida
Posted: Wed Mar 09, 2005 11:25 am
by JASmine
The offical clock has started!!
Ordered the epoxy and precut kits on 3/4/05. Epoxy arrived 3/7!!!!
Built model to find out where the "difficult" areas of the hull might be...it's the BOW!! There are a couple of pics in my album of the model. I learned alot from building it...and I really like the shape..just the right combination of sharp entry and flat stern for my fishing needs..in Tampa Bay and the surrounding intercoastal areas.
Posted: Thu Mar 17, 2005 2:56 pm
by JASmine
Moved supplies and tools to a vacant garage a few miles from home over the last few days.
Completed the strongback this morning...
Just got the call from the freight company..they will deliver the precut kit tomorrow!
It's going to be a busy weekend..
I've also been watching Dynamo's progress and hopefully learning how to make the big camber bends..
Stay tuned..
Posted: Thu Mar 17, 2005 3:35 pm
by jacquesmm
I may go to Tarpon Springs on April 16th. If I go that way, I would love to stop by and see the assembly.
I should know more about that trip to the West Coast within 2 weeks.
Posted: Thu Mar 17, 2005 4:45 pm
by JASmine
WOW!!!!!...a possible visit from the head guy!!!

Seriously, Jacques, that would be fantastic if it fit's your schedule. Email me when you know...or call if it's more convienient.
John
Boy will this provide motivation

Posted: Thu Mar 17, 2005 5:36 pm
by smilinmatt
Jacques,
You're welcome to stop by my place and help me finish glassing in my stringers.

Posted: Fri Mar 18, 2005 7:38 pm
by JASmine
Precut kit arrived this afternoon. In 2 1/2 hrs all the parts were cut free and laid out in the driveway..it looks good! Epoxied two layers of the transom so far..later tonight will add the third layer. Tomorrow I'll start assembling the frames on the strongback.
Posted: Sat Mar 19, 2005 7:53 pm
by JASmine
Started around 9:00 this morning and worked until 6:30 (less 1 hr for some lunch and a trip to Home Depot). Learned alot thru mistakes but eventually I got the hang of setting up the verticals and aligning the frames on the strongback. Got the transom,F,E, and D set, aligned, and braced. Spliced the stringers for an overnight setup.
Found one small cutting error but nothing serious.
Will try and place A, B, and C tomorrow along with gluing the 2 stringer sides together.
Next big item is figuring out how set the small end pieces of the center frames (see my gallery for some pics).
Posted: Sun Mar 20, 2005 8:46 pm
by JASmine
Was able to get in a few hours today. Got all the stations mounted and aligned. Everything went together easily after yesterday's learning experience (mistakes!!). Glued one stringer set together for an overnight cure. I may be able to get the outside arms of frames C, D, and E set up tomorrow.
Posted: Sun Mar 20, 2005 8:47 pm
by JASmine
Sorry for the duplicate entry
Posted: Mon Mar 21, 2005 6:02 pm
by JASmine
Worked for a few hours this afternoon. Cut the starboard notch in station F and lined up the stringer. Placed the starboard-side outside frame pieces (will mount them solidly tomorrow). Glued the Port-side stringer pieces for an overnite cure.
Posted: Tue Mar 22, 2005 5:06 pm
by JASmine
Was able to get after it between 9 and 3:30 today.
Mounted the remaining stringer and finished all the "arms" for stations C, D, and E. Checked all frame spacing and level to reference again and had to make an 1/8" adjustment to E. The jig looks pretty good and is fairly rigid...able to handle all the normal bumps as you work around it.
Butt joined the two 3/8" bottom panels for overnite cure.
I would recommend to anyone who uses the precut kit to make special pieces to hold the outside-the-stringer frame pieces. If you cut pieces of regular ply like the top half of the frame drawings then you only have to make one setup rather than several if you use small patches (like I did!)
Second tip...measure everything and label each piece. Many pieces are VERY similiar to others but not exactly. There are two frames pieces for example that only differ by 1/8"..very easy to pick up the wrong one. I also found one small cutting error in the precut kit as well.
Posted: Wed Mar 23, 2005 2:49 pm
by JASmine
Not much done today..added crossbraces to stations C,D, and E with a little extra to support the side panels when they are placed. Spliced the bow section of the bottom panels and first splice for the side panels. Left them to cure overnite.
Tomorrow is a big day..kerfing and setting the bottom panels!
Early observation...talk about scaling the Panga 20 down smaller was really foolish. As it begins to take shape it's getting easier to see that it IS A SMALL BOAT. I'm thinking a cross between a flats skiff and a bay boat..which is perfect for me. I wanted a small boat that was easy to handle on/off the trailer and enough bow to allow me to cross the bay when the wind picks up.
Posted: Wed Mar 23, 2005 4:02 pm
by Dane_Ger
JAS . . . sounds like the build is getting off to a great start! I think I speak for us all when I say I hope you are taking pics and will be able to post them soon!
Keep up the good work!
Posted: Wed Mar 23, 2005 4:26 pm
by JASmine
I wish there was some easy way to automatically link a particular "builders" forum story to their particular gallery but I couldn't figure out how.
Here is the link to my gallery...I'll try and keep it current with the reports.
http://gallery.bateau2.com/thumbnails.php?album=271
Posted: Wed Mar 23, 2005 5:35 pm
by Eric
Wow, those pics are great. Can I use the pics of the parts laid out in the driveway for my web site?
Eric
Posted: Wed Mar 23, 2005 5:36 pm
by Dane_Ger
Thanks for posting the link to your gallery! Looks great!
Posted: Wed Mar 23, 2005 5:54 pm
by smilinmatt
Looks good. The pre-cut kit sure looks nice. I'd hate to lay a pre-cut kit out against my pieces. Comparatively, mine look like they were chewed out by a pack of trained rats.

Posted: Wed Mar 23, 2005 7:00 pm
by JASmine
Eric..use any pics you like.
Smilin....I've used that pack of trained rats myself in earlier projects! This time I went with the automated rats....better use of the wood
Posted: Thu Mar 24, 2005 5:53 pm
by JASmine
Big day..even though it was only 2 hours. Placed the complete starboard bottom panel (kerfed before placement) and began the process of bending the 3/8 "steel
into it's final shape. Started at the transom..ok there..fit perfect at F and then began the bending at E. So far pretty easy. Next clamped the center side of D and the outside edge of C (so the bend is at a diagonal per the ruling lines Jacques showed). Next clamped the outside edge of D..so far so good. Next finished clamping the inside of C and began clamping down outside edge of C. Almost got it before I had to quit..about a 1/2" to go. At this point there is still alot of bending to do at B but I'm going to cleat and brace what I have shaped thus far before I go any further forward. I'm also taking the weekend off so it'll sit until Monday.
As you can see from the new pics I used a 2x3 down the centerline and along the outside edge to eliminate the buckle than forms with the stress. Seems to work pretty good. I now know a little better what Dynamo was experiencing and have that same feeling that once you remove the clamps it's going to explode into firewood!!

Posted: Fri Mar 25, 2005 7:40 am
by JimW
JASmine wrote: once you remove the clamps it's going to explode into firewood!!
Oh, we forgot to tell you about that didn't we?!
Posted: Fri Mar 25, 2005 7:55 am
by Eric
Meranti burn real nice, smells a bit but you get use to it. I took a huge pallet of scrap Meranti out to the burn pile last night, weenie roast Saturday!!
Posted: Fri Mar 25, 2005 8:35 am
by JASmine
OK..OK..you guys are pretty funny
I'm thinking back to the plan description where it says "the Pangas with their vee hulls will require a little bit more skill and more labor to build but not much."...or to the tutorials where it says "Use as little fasteners as possible and do not pull the panels against the frames unless absolutely necessary"...hah..hah...joke's on me.
Actually I do think it's fairly straightforward and so far it looks like a perfect design for me. I do wish that Jacques would publish the location and angle of the ruling lines so that the kerfs could be laid out easily.
Next week I'll find out if I can make all the panels fit properly without any bulges or dips..fairness counts you know
Posted: Sat Mar 26, 2005 1:41 pm
by JASmine
Worked about 2 hours today..braced the Starboard bottom panel and removed the clamps. Stations E,D,and C are finished. B is coming along and will be doable on Monday. Attached the panel at the bow mold to get a feel for the fit. I used some scrap material to straighten out the bulges in the edges..works great (see gallery) but now I have to figure out how to glass the seams around the screw heads that are holding down the panel.
Posted: Mon Mar 28, 2005 5:46 pm
by JASmine
Kerfed and mounted the Port bottom panel today. Much easier that the first one because I had a bit more confidence. I decided to NOT SPLIT the panel even though Dynamo's experience showed that is probably the way to do it. I already had the first panel in place and I was too lazy to remove it and put it back on. The kerfs are what make it possible..and a few well placed screws! If I was starting from scratch I WOULD split the 2 bottom panels.
Was also able to get both side panels mounted..only a few more stitches to go and then I'll be ready to start placing the glass straps to hold it all together. Overall the panels fit together pretty well (thanks most likely to the precut kit..thanks Eric). As Jacques says "gaps are good"!
After I get the 'bandaids' done, I'll use duct tape under the seams and fill some of them with epoxy putty, round them off, and then start glassing the seams.
Posted: Tue Mar 29, 2005 3:31 pm
by JASmine
I was able to work 6 hours today and got alot done.
Finished adjusting the side and bottom panels (actually more trueful to say I quit adjusting
). Spot welded the chine seam on both sides. Filled in some of the larger gaps with epoxy peanut butter...more to do of that before I glass the seams.
Next BIG step is to carefully remove the "bending" screws..and HOPE that it stays fair!!!
Posted: Tue Mar 29, 2005 3:45 pm
by tech_support
Looks very nice.
Posted: Wed Mar 30, 2005 7:40 pm
by JASmine
Worked for about an hour today...removed a few screws and IT STAYED FAIR
. Made another batch of peanut butter and filled more gaps along the chines. Tomorrow plan on filling and tabbing the keel seam. I'm not out of the woods yet regarding the shape staying fair after all screws are removed but I'm more confident now (I know that's when...).
Actually one lesson I learned today is that it's wise to make braces that cross from gunwale to gunwale to keep the shape at frames C,D,and E..these probably will stay until the inside is pretty well along. Now it's on to..lots of glass work and sanding, and fairing, and sanding and.....
Posted: Thu Mar 31, 2005 9:08 am
by ks8
Looking real good! Thanks for the link to the gallery. You're moving along at quite a pace. Another boat that looks like it will be done before mine!
Have you planned the color scheme yet?
sincerely,
ks
Posted: Thu Mar 31, 2005 10:37 am
by Dane_Ger
Very nice work, JAS . . . . pretty darn rewarding when a 'boat' appears!!
Posted: Thu Mar 31, 2005 11:48 am
by Dynamo
JASmine. OK I believe at this point you've passed me. Now I can go to school on you. I plan to tack mine together on the inside so I can fair the edges of the chines and transom before taping the seams, besides that I have found that Epoxy works much better for holding my hair in place than regular hair gell. Keep up the good work.
Posted: Thu Mar 31, 2005 4:54 pm
by JASmine
Thanks to all for the kind words.
Today I finished the cross gunwale braces, filled and tabbed the keel seam, and removed ALMOST ALL the screws
... so far so good!
Dynamo..tabbing inside is a great way to keep the outside seams smooth. I don't think I could take all the bending and crawling that it requires though
... and of course using the 'non-split method' I needed LOTS of tabs.
I'm going to make mine "smooth" with the belt sander (being carefull not to cut the tabs themselves of course)...then I'll be ready to biax the seams.
Tomorrow's probably going to be a Tyvex and respirator day!
Posted: Fri Apr 01, 2005 5:01 pm
by JASmine
Only a small amount of work today...filled the last few gaps..tabbed the last of the keel seam at the bow..and sanded the chine tabs smooth on the starboard side...almost ready to biax all seams ...and only 4 screws left!!!... It really is possible to bend the 3/8" meranti to the Panga 20's camber requirements

..using kerfs.
Posted: Sat Apr 02, 2005 3:47 pm
by JASmine
Biaxed the full length of both chine seams today.
Posted: Sun Apr 03, 2005 7:20 pm
by JASmine
A BIG day...ALL screws removed and no firewood
!!
Completed smoothing and biaxing the keel seam...next, a couple of short seams on the transom and then on to the veil!
As I begin to contemplate the fairing I must say that the 1 1/2 gal Quickfair kit looks mighty
small sitting next to the hull. I know..."put it on thin"...but still
Posted: Sun Apr 03, 2005 9:01 pm
by UncleRalph
JASmine wrote:As I begin to contemplate the fairing I must say that the 1 1/2 gal Quickfair kit looks mighty
small sitting next to the hull. I know..."put it on thin"...but still
The trick, I think (and after 4 boats I'm still not sure I know the right way), is to get the fairing compound in the "right" places, i.e. the low spots. I have found that putting it on with something as wide as possible helps - like a 12" to 18" wide semi-flexible spreader. Something that can conform to the hull shape, but not be so small or flexible that it scrapes away the fairing compound from the low spots. All that being said, I still have probably seen hundreds of dollars of fairing compound go up in dust as I sand it away.

Ralph
Posted: Sun Apr 03, 2005 9:06 pm
by Dane_Ger
JASmine wrote:A BIG day...ALL screws removed and no firewood
!!
BRAVO!! Keep up the good work!
Posted: Mon Apr 04, 2005 2:30 pm
by JASmine
Started by cleaning up the work area....sanding dust everywhere.
Did a couple of seams on the transom, prepared the wide cloth for the bottom application, and started the laminations for the rubrail. Ordered the S3 primer (white). I think I 'm going to use a very very pale blue for the hull color so the white primer shouldn't effect it from underneath...(I know it wouldn't anyway with enough topcoats
)...but what the heck, everybody uses gray.
Taking a vacation day tomorrow
...life long friends visiting from up north.
Posted: Mon Apr 04, 2005 10:52 pm
by ks8
Ordered the S3 primer (white).
Ah... the joys of prepping for primer...
Posted: Wed Apr 06, 2005 4:33 pm
by JASmine
Layed the starboard veil today..would clearly be easier with two people but you work with what you have......
It's not too bad a job but you do have to be quick about everything. I used the semi-wet on wet method..layed a layer over already coated wood and let it dry to tackfree (actually mine was almost tackfree..it's better to wait
)..then layed the already cut cloth, then wetted the cloth (which took multiple batches of resin..this is where you have to work fast), then rolled everything smooth, then put the plastic sheeting on, then rolled and squegeed everything..then rested!!
Posted: Thu Apr 07, 2005 8:40 am
by Dane_Ger
Very nice . . . already ordering primer . . . woohoo!
I looked at your gallery this morning . . . She is looking super! Keep up the great work, JAS!!
Posted: Thu Apr 07, 2005 11:59 am
by tech_support
You are on a great pace, keep it up.
Joel
Posted: Thu Apr 07, 2005 6:02 pm
by JASmine
Layed and epoxied the port veil today...completed the 3 layer rubrail lamination on the starboard side.
Posted: Fri Apr 08, 2005 5:02 pm
by JASmine
-Finished all layers of the whole rubrail...
-Removed all the 'peelply substitute'...
-Laminated a 12' 1x1 for the keel..will sand to shape per plan
-Removed all of the extra braces from strongback
-Removed the motorwell sides from the jig
-WAS ABLE TO GET THE BOW MOLD OUT!! ( I expected it to be welded to the side and bottom panels)
-Loaded the sander with 120 grit...fairing starts tomorrow.

Posted: Fri Apr 08, 2005 8:07 pm
by attownsend
JASmine wrote:-Finished all layers of the whole rubrail...
-Removed all the 'peelply substitute'...
-Laminated a 12' 1x1 for the keel..will sand to shape per plan
-Removed all of the extra braces from strongback
-Removed the motorwell sides from the jig
-WAS ABLE TO GET THE BOW MOLD OUT!! ( I expected it to be welded to the side and bottom panels)
-Loaded the sander with 120 grit...fairing starts tomorrow.
Now this is where the fun begins,just kidding.Build on Dude.If isn't Boening I not going.
Evild BTW if I can do it anyone can.
Posted: Sat Apr 09, 2005 12:33 pm
by JASmine
OK....who said this was the FUN part (fairing) ??
Posted: Sat Apr 09, 2005 2:13 pm
by Yoda
JASmine wrote:OK....who said this was the FUN part (fairing) ??
FUN? We don't need no stinkin' FUN!
I'm almost 68 yrs. old now. My shoulders are so sore I can barely lift my arms. But I'm finally ready to prime. Fairing is where my discipline broke down. It took about 3 times longer than it should have.

Posted: Sat Apr 09, 2005 6:13 pm
by JASmine
Yoda...what I want to know is when does the tingling in your hands (from the sander) stop????
Posted: Sat Apr 09, 2005 6:30 pm
by Yoda
Oh, hell.............. that's from the sander? Thank God. I just thought I was having a stroke !
Posted: Mon Apr 11, 2005 12:29 pm
by JASmine
Sanding..filling..sanding...filling..and so on!
Posted: Mon Apr 11, 2005 1:32 pm
by Yoda
JASmine, when did you start your Panga? It seems like your just flying. How many hours a day are you working on it?
Posted: Mon Apr 11, 2005 4:55 pm
by attownsend
JASmine wrote:OK....who said this was the FUN part (fairing) ??
Me!
Evild.Who else gets to do something like this.
Posted: Mon Apr 11, 2005 5:02 pm
by JASmine
Yoda..I started in early March by ordering material 3/3 (my chronology is listed in this thread). I do something almost every day but each day is different..sometimes an hour and sometimes 3-4. In the beginning I spent more hours per day because there were many things to do each day. Now after I sand for an hour and mix one batch of filler that's about it till the next day. Of course there are many hours "thinking" as well..what engine, what trailer, how to build the sprayrails, color, etc????
Posted: Mon Apr 11, 2005 5:04 pm
by Yoda
Yo! attownsend!
Are you sure the FAA ever let you fly people around for hire.....
I almost said CAA. Now that would be telling now wouldn't it?
Hey, they called and told me my motor shipped today. WHEW! Now I really have to get going.
Posted: Mon Apr 11, 2005 5:13 pm
by Yoda
JASmine wrote:Yoda..I started in early March by ordering material 3/3 (my chronology is listed in this thread). I do something almost every day but each day is different..sometimes an hour and sometimes 3-4. In the beginning I spent more hours per day because there were many things to do each day. Now after I sand for an hour and mix one batch of filler that's about it till the next day. Of course there are many hours "thinking" as well..what engine, what trailer, how to build the sprayrails, color, etc????
I went back and looked. You have less than a month since starting?
That is FAST. You and DDADDY should get together and build a boat in a week
Posted: Tue Apr 12, 2005 2:27 pm
by JASmine
Financial Alert!!!!...Florida man begins to threaten national supply of aluminum oxide....
Weather Alert!!!...Large cloud of dust seen over west-central Florida beginning to change global climate...
Actually I have gone thru numerous sanding belts/disks but everything is beginning to fair nicely. Finished shaping the keel piece today and it's almost ready to install. Starting on the spray rails..I'm going to use a base of 1/2 x 3/4 and a topper of 3/4 quarter round. I'll post pics once I get it installed.
I'm expecting another 5 days or so of fairing before I roll on the primer (S3).
The lastest "big problem" is finding an appropriate trailer...one that has a 60" frame, handles the 20' length, and has a capacity of about 1600#. Almost everything I have looked at, has a 72" frame if the length is near 20'. I'd prefer one more matched to the narrow hull.
Posted: Tue Apr 12, 2005 8:21 pm
by smilinmatt
Weather Alert!!!...Large cloud of dust seen over west-central Florida beginning to change global climate...
I thought TECO opened another plant on the Bay.
Posted: Wed Apr 13, 2005 5:25 pm
by JASmine
Did one round of fairing today but I'm tiring
I've now got a near-perfectly smooth surface with more 'waves' than I care for..so more compound to come.
Decided I needed a diversion so glued the keel in place...very interesting challenge to get a 12' long flexible 1x1 to mount straight!!... but it turned out not too bad... within a 1/16 of an inch.... I think I can true it up with sanding and fairing before I put the woven cloth on it.
I also started to mount the sprayrails (1/2 x 3/4 base with a 3/4 quarterround topper)...put a couple of screws in to hold the base in place...it checked out ok..took it off and gave the pieces a cover of epoxy. Hope to glue the first layer down tomorrow.
Posted: Wed Apr 13, 2005 5:32 pm
by Yoda
I'm down to small applications of Quickfair now. I almost have it but am being very (read too) picky. I'm a little worried about painting the hull. Never used a two part like S3 before. I'm also using S3 for the finish paint. My tendency to screw something up seems to be in direct relation to the cost of the item.
Posted: Wed Apr 13, 2005 5:40 pm
by JASmine
Yoda...I'm a little nervous about the S3 primer and paint as well but I've come this far so I'll just start ....

I'm using white primer so that will help me with the color choices. I have a gal of Orca white that I'm going to split into a 1/2 gal and 2 qts and tint one of the qts to a very pale blue.
I know I'm going to roll the primer but not too sure about the paint yet.
Posted: Thu Apr 14, 2005 4:16 pm
by JASmine
..glassed in the keel, glued the first layer of the starboard sprayrail, filled in the gap at the bow on the rubrail, and finished last of the 'empty' areas with quickfair....now on to more sanding and fairing
Posted: Thu Apr 14, 2005 4:53 pm
by Dane_Ger
Yoda wrote:My tendency to screw something up seems to be in direct relation to the cost of the item.
That is funny, but it sure hits close to home!
JAS . . . your boat is coming along very nicely! Good Job!
Posted: Thu Apr 14, 2005 5:26 pm
by attownsend
Yoda wrote:Yo! attownsend!
Are you sure the FAA ever let you fly people around for hire.....
I almost said CAA. Now that would be telling now wouldn't it?
Hey, they called and told me my motor shipped today. WHEW! Now I really have to get going.
Now that's excellent,and yes they let me fly people and you lrt it slip,CAA,come on you can't be that old.By the way I'm getting my tug boat certificate so I,ve been really busy latley.Sorry for the late return.Evild
Posted: Thu Apr 14, 2005 5:36 pm
by Yoda
attownsend wrote:Yoda wrote:Yo! attownsend!
Are you sure the FAA ever let you fly people around for hire.....
I almost said CAA. Now that would be telling now wouldn't it?
Hey, they called and told me my motor shipped today. WHEW! Now I really have to get going.
Now that's excellent,and yes they let me fly people and you lrt it slip,CAA,come on you can't be that old.By the way I'm getting my tug boat certificate so I,ve been really busy latley.Sorry for the late return.Evild
Yes I can be that old. When I started flying it was CAA. I think the private exam was 50 true or false questions. Scary, huh.
Posted: Thu Apr 14, 2005 5:45 pm
by attownsend
Yoda wrote:attownsend wrote:Yoda wrote:Yo! attownsend!
Are you sure the FAA ever let you fly people around for hire.....
I almost said CAA. Now that would be telling now wouldn't it?
Hey, they called and told me my motor shipped today. WHEW! Now I really have to get going.
Now that's excellent,and yes they let me fly people and you lrt it slip,CAA,come on you can't be that old.By the way I'm getting my tug boat certificate so I,ve been really busy latley.Sorry for the late return.Evild
Yes I can be that old. When I started flying it was CAA. I think the private exam was 50 true or false questions. Scary, huh.
You damn bet,when I took mine it was over 250 guestion,with an oral exam,but you should see the exam and training I'm going thru now,Tug boat Captain School!Man I thought aircraft were hard,Jesus.that was a piece of cake.Evild.Build on Dude.
Posted: Fri Apr 15, 2005 6:45 pm
by JASmine
Worked a short day today but got the second layer of starboard sprayrail glued in place, the first layer of the port rail glued down, and the keel glass edge sanded.
Posted: Sat Apr 16, 2005 8:06 pm
by JASmine
...glued the second layer of the sprayrail on the port side..finish sanded the starboard rail...I like what it looks like... and hope it doesn't break off
Posted: Sun Apr 17, 2005 7:33 pm
by JASmine
Posted: Sun Apr 17, 2005 10:10 pm
by Yoda
Would you please hurry up ! I want to see what not to do that screws up the paint job
I'm about ready, but you're holding me up !
Posted: Mon Apr 18, 2005 7:42 am
by Oceola
Yoda,
I'm 65 and had sholder problems too...E-mail me and i'll tell you how I fixed that!
Oceola
Posted: Mon Apr 18, 2005 2:54 pm
by JASmine
Yoda...I'm hurrying!!!!!.....don't make it any harder than it already is
Every morning I keep tell myself to "keep at the fairing"... it will make a difference later....it will make a difference ..it will.....
but I'm READY to quit sanding for awhile!!!
As you can see from my reports I have used any excuse to do anything else when at the garage,,,keel, sprayrails, cover coat for the remaining pieces, ect. I probably have 2-3 more days of final fairing before I roll on the primer.
Posted: Mon Apr 18, 2005 4:13 pm
by Yoda
I know, I know. Same here. I went and bought lumber for a cradle today. And I'm sitting here drawing it up. As soon as the hull is primed and bottom painted I will flip it and set it in the cradle. That will give me a couple of days away from sanding the last little bit. I want to build cradle on the hull. Don't want to mess up paint. That's my rationale...........
works for me.
You'll have your boat before me. But I will splash before summer is over.

Posted: Tue Apr 19, 2005 4:55 pm
by JASmine
...another day closer to primer
The hull is nearly completely faired but the rubrails need additional sanding and fairing..had to rebuild the random orbital today so that took some time from sanding
I'm hopefull that 2 more days will do it!
In preparation for the primer, read the mixing instructions...4:1..ok but then why is there 103oz of part A and only 24 1/2 oz of part B....ah the details one has to contend with when building a boat
Posted: Wed Apr 20, 2005 6:55 pm
by JASmine
I think fairing and sanding the rubrails,sprayrails, and keel is about as much work as the whole hull...

....lots of edges and seams to get just right..seems like it's taking forever compared to the large surface areas...still..I'm close now..
Posted: Thu Apr 21, 2005 6:35 pm
by JASmine
I got in another couple of hours today and finished the hull surfaces..they're ready for primer...now if I could just get the spray rails finished!!!..probably finish them on Saturday
..hopefully taking the day off tomorrow for some fishing!
Posted: Fri Apr 22, 2005 6:13 am
by Dynamo
It sounds like you have the fairing process down. I should have my hull ready for fairing on Monday. Would you mind driving up to Jacksonville and doing mine? I'll supply the quickfair and the beer!
Posted: Fri Apr 22, 2005 1:45 pm
by JASmine
Posted: Fri Apr 22, 2005 7:07 pm
by JASmine
TOMORROW is primer day!!!
Have to go over the whole hull with 150 grit in the morning....vacuum the dust off..vacuum the shop floor...let the dust settle for a few hours... wipe down with alcohol..then roll on the first coat of primer
Posted: Fri Apr 22, 2005 7:16 pm
by Eric
Take a water spray bottle and mist the floor just before your ready to paint and that helps keep the dust down from your feet as well.
Good luck!!!
Posted: Sat Apr 23, 2005 6:52 pm
by JASmine
Eric...thanks for the tip..it worked great.
Rolled the first coat of S3 primer on this afternoon.
Lessons:
.....don't roll the day after you've sanded all day..it's hard on the sore arms!
.......the Panga 20 hull uses about a 1/2 to 2/3 gal of primer for the first coat..seems about right because they say 200/250 sq ft coverage per gal and the hull is about 160 sq ft
.....the primer is very easy to mix, work with , and clean up.
.....it will be interesting to see what imperfections show as the finish dries and dulls..when it's bright I can see alot
I plan on waiting a day before additional fairing/sanding but that remains to be tested.
Posted: Sat Apr 23, 2005 7:55 pm
by Mike Adams
I can't believe the speed of your progress! Looking back at your first post I see that it's only 6 weeks since you started! Congratulations - you are doing a great job and I look forward to seeing more pics.
Posted: Sun Apr 24, 2005 10:39 am
by JASmine
Checked on the first coat of primer this morning:
..a few dribbles under spray rail and on rub rail
...numerous pin holes remain but should fill with second coat
...additional fairing will be easy to target/not as bad as I first thought
...very nice overall finish..hard and smooth
I like it!!
...just the boost I needed to keep at it.
Posted: Sun Apr 24, 2005 10:42 am
by Yoda
Great Jasmine. Did you thin with the 50% water/rubbing alcohol?
Posted: Sun Apr 24, 2005 10:54 am
by JASmine
No thinning necessary for my foam roller application...at least I didn't think so. I had the alcohol ready to mix with water for the 50/50 thinnning but it seemed just fine to me so I used it without thinning.
I would guess that it would be necessary for spraying.
Posted: Sun Apr 24, 2005 10:59 am
by Yoda
Thanks coach.
Posted: Mon Apr 25, 2005 2:42 pm
by JASmine
After 200 grit scuffing, vacumming, and alcohol wipe down, rolled on the second coat of primer. The Panga 20 requires 1 gal of the S3 primer for two full coats.
Next step is to add a very small fairing fillet under the sprayrail (I thought that the primer would fill the small gap but not..) and fill the remaining pinholes.
Posted: Mon Apr 25, 2005 3:24 pm
by Dane_Ger
Looking Good!!
Posted: Tue Apr 26, 2005 2:40 pm
by JASmine
Yoda...ammendment to thinning advice...ok for the first coat but better to thin for following coats because you will get too much orange peel (small lumps) if you don't ( a lesson I learned today). I'm ok because I expect to put up to 5 coats of primer on, so I'll thin from here on out.
Faired most of the remaining pinholes today and sanded the last few drips from primer coat #2. I am going to try for a finishlike smoothness in this primer coat (after sanding) before I add primer coat #3. I now believe I MAY get the kind of finish I'd hoped for...
Jasmine's boat
Posted: Tue Apr 26, 2005 3:37 pm
by cottontop
Posted: Wed Apr 27, 2005 12:07 pm
by Yoda
O.K. Jasmine. Good input. What about the drying? Did you have to hurry, or did you have plenty of time to paint the whole hull without getting dry spots.
Posted: Wed Apr 27, 2005 12:15 pm
by tech_support
I like to thin it with about 20% water - I have not tried the alcohol
Did coat last night in fact
Posted: Wed Apr 27, 2005 12:30 pm
by JASmine
Yoda....Drying too fast wasn't a problem for me. I mixed 24 oz of part A and 6 oz of part B and that covered 1/2 the hull (approximately 80 sq ft). Then I mixed another batch the same size and did the other 1/2. I noticed that when I tipped a couple of spots on the first side after I coated the second side that it was tacky and I stopped.
I'm going to use the 50/50 thinning mix for the next coat and thin to 20%.
I'll let you know how it works.
Did a full sanding routine today using 220 grit....each iteration more and more of the total surface gets topcoat smooth
Posted: Thu Apr 28, 2005 10:08 am
by Yoda
JAS yesterday I decided to cut 6" of the rubrail off at bow. I wasn't happy with it. So I'll be setback another couple of days. Picky picky picky.
Posted: Thu Apr 28, 2005 2:21 pm
by JASmine
Yoda..you must have a fetish for sanding
Posted: Thu Apr 28, 2005 6:26 pm
by JASmine
First the good news.....the 2nd coat of primer did a terrific job of evening the surface and it is sanding nicely.
Now the bad news..it looks/feels so good that I'm going for the 'near-factory finish' vs the "5 ft finish"..which means of course much more filling and sanding will be required!!!
Posted: Fri Apr 29, 2005 5:07 pm
by JASmine
Almost 6 hrs of sanding and filling today...no big areas of fill... just lots of tiny imperfections....and lots of sanding to get rid of the 'orange peel' from the 2nd primer coat.
Tomorrow hope to sand down the mini-fill areas with 220, vacumm, wipe down with alcohol, and roll on the 3rd primer coat (thinned 20%
)
Posted: Fri Apr 29, 2005 5:39 pm
by Dane_Ger
Sounds like it is coming along nicely! Any pics of the last couple steps?
Posted: Sat Apr 30, 2005 5:18 pm
by JASmine
DG..I haven't taken any pics...of the fairing/sanding work..it's too painful to look at
..really it's pretty boring stuff at this point.
I did roll on the 3rd coat of primer today..thinned 20%...tomorrow we'll see how much orange peel this ratio produced. I was surprised at how thin the primer was at this ratio. I didn't measure the viscosity but I would guess it would spray nicely.
Posted: Sat Apr 30, 2005 6:47 pm
by Yoda
Three coats have used up how much paint?
Posted: Sat Apr 30, 2005 8:33 pm
by JASmine
Yoda
2 full coats equals one gallon of the S3 primer. I estimate the hull surface to be about 160 sq ft.
Posted: Sat Apr 30, 2005 8:52 pm
by Yoda
I better order another gal.
Posted: Sun May 01, 2005 10:48 am
by JASmine
Checked on the finish of the 3rd primer coat this morning and it looks very good..not perfect but by far the best so far...almost no orange peel. I'll try some 220 grit and see how it smooths out. It's also time to start using the high intensity light to find those last imperfections.
Posted: Sun May 01, 2005 11:10 am
by Yoda
Just ordered another quart of bottom color and gallon of primer. Now I can paint with wild abandon.
Have you thought about the cheap spray paint fogging method to find low spots? You have to use long board sander for large low places. You probably know this.
Posted: Mon May 02, 2005 6:47 pm
by JASmine
Progress today..I was able to get in 2 filling/sanding cycles...each cycle is now down to 1 1/2 tablespoons of Quickfair for the whole hull...
..won't be long now..(I hope??)
Posted: Wed May 04, 2005 1:29 pm
by JASmine
Rolled on 4th coat of primer today (thinned 20%)
Lesson..don't use the cheap yellow foam rollers...they soak up too much primer and they contribute to the orange peel. Use the white ones that are made for very smooth surfaces. You still have to change rollers 1/2 way thru but they use A LOT LESS primer. I'll see tomorrow about the orange peel.
Posted: Wed May 04, 2005 2:07 pm
by Dane_Ger
JAS,
Good work on your boat, you are moving right along!
I'm almost ready to begin priming my boat and am wondering if you have a link to the type of rollers you liked? Or a brand-name, place to buy, etc.?
Thanks,
Dane
Posted: Wed May 04, 2005 5:19 pm
by JASmine
DG..I don't have the packs here at home so I can't tell you the brand. I bought them at Home Depot. The yellow ones say "good for latex" and the white ones say "for very smooth surfaces".
Good Luck
Posted: Thu May 05, 2005 3:11 pm
by JASmine
4th coat of primer looks pretty good..very little orange peel (and that may be left over from coat #3)....moved up to 320 grit today...
Posted: Thu May 05, 2005 3:21 pm
by Dane_Ger
JAS,
Cool! I found those white rollers at home depot yesterday . . . I bought a few, hoping they were the ones you were referring to! Thanks!
Posted: Thu May 05, 2005 6:06 pm
by Yoda
I'm finishing the epoxy coat on the rub rails and am ready to prime hull.
Went and picked up motor this morning. They set it up and ran it for me.
It whispers and zero smoke. Fired up very quickly.
Posted: Thu May 05, 2005 9:02 pm
by JASmine
Yoda...brand?..2s or 4s?...hp?...weight of your boat??
Posted: Thu May 05, 2005 9:13 pm
by Yoda
Look at this HMD18.
http://www.boatplans-online.com/proddet ... prod=HMD18
The motor is a Tohatsu 9.8 hp 4 stroke. Remote steering, electric start, remote controls and alternator. 25" shaft. It should make 6.5 kts.
Posted: Sun May 08, 2005 12:11 pm
by Yoda
JASmine wrote:Yoda....Drying too fast wasn't a problem for me. I mixed 24 oz of part A and 6 oz of part B and that covered 1/2 the hull (approximately 80 sq ft). Then I mixed another batch the same size and did the other 1/2. I noticed that when I tipped a couple of spots on the first side after I coated the second side that it was tacky and I stopped.
I'm going to use the 50/50 thinning mix for the next coat and thin to 20%.
I'll let you know how it works.
Did a full sanding routine today using 220 grit....each iteration more and more of the total surface gets topcoat smooth
Hey JAS, I'm sure you meant to say...... 6 oz part A, 24 oz part B.
Then when you mix them you have 30 oz, you thinned 20%. That would be 6 oz of 50/50 thinner, right? Now you have 36 oz of primer ready for painting? That's what I'm starting with. So here I go. Will keep posted.
Posted: Sun May 08, 2005 1:19 pm
by JASmine
Yoda..I was mixing the GENERIC part A and B
..you know..some of this and some of that!...OR..I was just seeing if you were on your toes
.
Yes..24oz + 6oz + 3oz +3oz...which technically is not a 20% mix but close enough.
To be precise (which I wasn't) you would start with the total amount..say 36oz..then 20% would be 7.2oz of thinner mix..then you split 28.8 into fifths..then.......
Good Luck
PS..hopefully you saw my recommendation for foam rollers...the "smooth surface" ones use considerably less paint so if you have less than 80 sq ft you might want to start with a smaller batch.
Posted: Sun May 08, 2005 4:49 pm
by JASmine
Sunday..5/8/05...Continuing to work very small areas on the hull with quickfair..today was finishing the keel piece to my satisfaction. My continuing nemisis is the underside of the spray rails (the top on an upright hull)..the hull/rail seam has been had to get right so I have had to fill and sand small sections..sort of like grouting a tile backsplash..up-side-down.
Overall hull surface is finished and ready for paint..it's just the last 1% that's giving me fits...patience..patience..patience (If I repeat it enough maybe...)
Posted: Sun May 08, 2005 7:26 pm
by Yoda
I have the 1st coat on JAS. Looks pretty good. Only thing I learned was to have a little 50/50 thinner mixed so you can add as you go. When I start out with a batch and it's 20% thin, it goes on really nice. Once it starts to thicken(doesn't take long) it's too thick. I've decided to paint the whole hull to finish before I flip. Bottom, sides, and boot stripe. Good on you
Posted: Mon May 09, 2005 12:52 pm
by Yoda
I uploaded a pic of the first coat. Came out pretty good. I'm going to Quickfair some small spots before I apply second coat. It's staying cool and rainy. Want to take advantage of that before the hot weather comes.
Posted: Tue May 10, 2005 7:25 pm
by JASmine
Seems like it's taking forever to finish those last little spots
...but I can see the light at the end of the tunnel
Down to mixing small batches of primer now and only working certain areas...next big step will be to add one more full coat of primer..let it cure..and PAINT!!
Posted: Tue May 10, 2005 8:46 pm
by Yoda
That's where I am. Going out to sand QF right now. It's 17:45.
Posted: Fri May 13, 2005 10:57 am
by JASmine
I'm about "DONE" filling and sanding.....the spots I'm working now are small scratches, pin depressions, etc..they just keep 'appearing"!!!!! so I'm going to quit.
I decided to try out one of the cheap HVLP sprayers from Wagner that have been mentioned on this Forum. The unit I bought is a new version that is fully selfcontained..$65. Even thought I bought it for the topcoat, I had a small amount of primer to do today (18oz) so I decided to try the sprayer...it worked really well in comparison to a foam roller. The two drawbacks I see so far are that it's heavy when filled with paint..I guess I need to do some wrist exercises
..and every once in awhile it spits out a little glob of paint. I didn't filter the primer so that may prevent the spitting. Overall I was VERY pleased with it's results.
Posted: Fri May 13, 2005 11:06 am
by Yoda
On the spots that need work. Keep showing up here too. I won't live forever so I need to pick a spot to stop. I gave some thought to the sprayer but I DO have experiance painting boats. So I will finish with a very good set of brushes. Boy, a boat builders work is never done.
What's this about you going to B.C. next month. I read this morning that the Salmon have mysteriously disappeared up in Oregon. They don't know why...............

Posted: Fri May 13, 2005 11:14 am
by JASmine
Yoda..yes..I'm on special assignment to PETA during June so I plan to visit all the good Salmon spots in the Pacific Northwest and make SURE NO ONE catches any!!!
..the fish in Oregon must have gotten advance notice somehow??
Actually looking forward to a nice couple of weeks...Juneau, Sitka, Icy Strait, and spammer River..I need to give the fish here in Florida a rest.
Posted: Fri May 13, 2005 11:54 am
by Yoda
DON't DO THAT! You had me going for a second there..........
Posted: Sat May 14, 2005 10:39 am
by JASmine
After an inspection this morning I can say the $65 sprayer worked great for the primer and should be equally as good for the topcoat!
Probably spray a couple more sections of the hull with primer for practice and to cover any dark spots..then wait for the primer to cure and then....
Posted: Mon May 16, 2005 2:19 pm
by JASmine
Sprayed a full coat of primer today..and learned how to avoid the spitting I mentioned earlier..just start the spray away from the surface..all the globs are from the first air going thru the nozzle.
I'm through filling for now...I've reached the point of diminishing returns...it's not perfect ..but 160 sq ft is alot of surface to make perfect..so I guess I'll live with it....probably a total of 3-4 sq in of imperfections overall...and as my friends say " the fish won't care"
I'm sure someone with more skill could have finished the surface and joints to 'autobody' quality but I can't seem to get there so it's time to move on.
Posted: Mon May 16, 2005 2:25 pm
by Dane_Ger
JAS,
You are using the S3 primer, correct? If so, what is the ratio that you are thinning it to spray? Just wondering?
Thanks,
Dane
Posted: Mon May 16, 2005 2:36 pm
by JASmine
DG...I'm using the 20% thinning mix. It's actually the same mix I was using for the roller to eliminate the orange peel. The cheap sprayer sprays it just fine.
Posted: Mon May 16, 2005 3:05 pm
by Dane_Ger
Thanks JAS, that's just the info I was looking for . . . I noticed some orange peel as the primer began to thicken. Glad I remembered the tip to have some of the 50/50 thinning mix handy!
Dane
Posted: Tue May 17, 2005 12:07 am
by Yoda
Sanded primer today. Found a few very small spots that I won't let go. I'll fill those and add one more primer coat. It really looked pretty good.
Posted: Tue May 17, 2005 9:12 am
by handsomepete
Wow JASmine!
You are an inspiration. I too live in the Tampa area and am contemplating building a Panga. Had to bow out of the project for a while 'cause I just had some minor surgery. Everything went well, should be 100% in a couple months, and after seeing your pics and reading your play-by-play, I'm really ready. Thanks for the posts!
dave
Posted: Tue May 17, 2005 10:22 am
by tjs
JASmine wrote:.... I'm sure someone with more skill could have finished the surface and joints to 'autobody' quality but I can't seem to get there so it's time to move on.
JASmine, you certainly are a man with patience - I have enjoyed reading your sanding/priming log. From you postings and photos you must have achieved perfection by any human standard!! It is a shame your not in OZ - you're just the guy to fair my next project!!
Hope you're planning to buy an A1 trailer - trailers seem to have been invented to break boatbuilders' hearts especially those with perfect hull bottoms.
_______________
Terry Stamp
C19
Posted: Tue May 17, 2005 3:10 pm
by OzzyC
Man, it's amazing how quickly your boat is coming along. How many hours per day do you put in, and how many days per week?
Posted: Tue May 17, 2005 3:13 pm
by JASmine
Thanks to all for the kind words....I checked on the finish today and it's ready for paint.....I'll wait a few days for the primer to cure and then on to the topcoat
I also started to disassemble the frames from the inside and to build the cradle for the righted hull to sit on.
I was going to put it upright on the trailer.. but I changed my mind to a low cradle. It will be easier to work on the inside from the shop floor instead of from a ladder.
Posted: Tue May 17, 2005 7:34 pm
by JASmine
OzzyC.....I usually work on the boat from 1 to 3+ hrs four or five days a week (I have to leave some time for fishing you know
).
During the fairing and priming process sometimes an hour in the morning and an hour at night. It seems like it took about a month of elapsed time to go from rounding up supplies to a finished hull and then another month of elapsed time to get the hull faired and primed ready for topcoat. Probably be another 2 weeks before I get it painted and flipped.
Posted: Wed May 18, 2005 11:01 am
by JASmine
I couldn't resist spraying one LAST full coat of primer this morning...using the sprayer actually makes it easy
..but THAT"S IT!!!
Overall it's pretty good but as the light changes I can see more spots that could be filled..BUT NOT!!!!
Hopefully it will rain in the next few days and I can do the topcoats on a high humidity/cool temp day/night...until then I'll be cleaning out the shop/dusting/vacumming, etc in preparation.
Posted: Wed May 18, 2005 11:17 am
by Yoda
Well my last coat of primer is applied. But the weather turned rainy and cool. So it will probably take 3 days to cure. So I'm checking the hull for level all around. Now making a marking stick to lay out the boot stripe/waterline on the hull. That's after a light sanding. Then taping and masking to paint the bottom color. Then moving tape to lower edge of bottom color and paint sides. Once that has cured flip time. Need to find some carpet pieces for cradle. When sun comes back I can use curing time to lay out and cut next parts for topside. Today.....? Practice my guitar.
Posted: Thu May 19, 2005 10:28 am
by JASmine
Used the 400 grit in preparation for topcoat.....
Posted: Thu May 19, 2005 11:02 am
by Dane_Ger
With my first coat of primer I got some of the 'orange peel' effect that you mentioned a few times. My question is whether it is necessary to completely sand this smooth before a second coat or will subsequent coats primer cover these spots? I've sanded everything with 220, but I can still slightly 'feel' the orange peel in several areas.
Thanks,
Dane
Posted: Thu May 19, 2005 1:46 pm
by Bayport_Bob
I've found that subsequent coats DO NOT fill the existing orange peel.
Posted: Thu May 19, 2005 2:35 pm
by JASmine
DG..there may be a way to have following coats fill in the orange peel but my limited experience says that all you do is make more of it the next pass.
I did not sand it down smooth between the last several coats of primer but now that I have a nice thick layer over everything I will sand it smooth for the topcoat....using the 400 grit very lightly.
Posted: Thu May 19, 2005 4:59 pm
by JollyLolly
I haven't started the paint cycle yet, but on the last layer of epoxy on my NC16, I tried the "roll and tip" idea. It left a pretty smooth surface, and was wondering if anyone had tried it too.
I have looked around for the link on this forum, but it evades me. Basically you paint a small area with a thin foam roller and then lighty "burst the bubbles" with a foam paint pad.
I have built my canoe, more to learn the process, than to have a perfect vessel, so am not going to spend forever on the finish, but so far she's looking... well, OK!
Posted: Thu May 19, 2005 5:27 pm
by Yoda
I will quote from [SystemThree description and application guide]
About WR-155 they say:
"The primer loses a lot of surface profile as it dries so a little "orange peel"
in the wet primer coat is acceptable"
Posted: Sun May 22, 2005 7:05 pm
by JASmine
Prep work complete....topcoat going on tomorrow!!!
Posted: Sun May 22, 2005 7:32 pm
by Yoda
Still waiting for primer cure.
Cutting out rest of parts, Seem's as if I said that already.
Pics of finish paint please..........
Posted: Mon May 23, 2005 11:32 am
by JASmine
Mid-day report....3 light coats of topcoat this morning...taking a rest break now..more topcoat later today.
Too bad it's not more exciting..Orcas white over off-white primer doesn't look much different....
Posted: Mon May 23, 2005 5:51 pm
by JASmine
Three more light coats of topcoat this afternoon....a total of 6 today
. I used crosslinker in all the coats.
Tomorrow I will be laying out and masking the line for the side color (pale blue). Plan on using a water level referenced to the inside floor(deck)...this setup work will probably take all day..then I can paint the final coats for the sides on Wed after a light sanding for the crosslinker..I hope!!
Posted: Mon May 23, 2005 8:50 pm
by alball
How is the paint sprayer working with the paint? Are you happy with the sprayer? I am thinking of getting one.
al
Posted: Mon May 23, 2005 9:23 pm
by JASmine
Al....The jury is still out on the sprayer for the topcoat. It worked great for the primer because I sanded after each coat anyway. I'll have to see how the topcoat cures over the next day or so. When it was wet it looked like there were alot of heavy and light areas..it may be that the cheap sprayer does not maintain a constant flow. I tried both a vertical and horizontal spray pattern and that didn't seem to make a difference. I also increased the flow rate and slowed down my spray motion but with the same result...stay tuned!
Posted: Tue May 24, 2005 9:42 am
by PJPiercey
My experience spraying the top coat.
It is very difficult to control the overspray with cheap sprayers. The idea is to lay down enough paint so that it flows to a smooth surface before it starts to skin. What happens with a cheap sprayer is that tiny droplets of overspray settle on the previously painted surfaces that have already skinned. The result is areas that appear dull. When it all drys you can run your hand over it and feel the sandpaper effect of the overspray on the dull surfaces. So, the cure is to lay down enough paint so you can wet sand and buff the overspray away leaving a perfect finish with enough mills of paint.
Paul
Posted: Tue May 24, 2005 2:57 pm
by JASmine
Paul..thanks for the explanation.....and that's exactly what is happening...semigloss areas and dry areas. I lightly sanded a small area this morning with 500 grit and as you say it removes the contrast between the the two areas. I have enough coverage (6 coats) and I will lightly sand (600 grit) and wax for the finish.
Today I marked the waterline using a water level refrenced to the deck height. Tomorrow I'll mask off the hull bottom in preperation for spraying the side color.
Posted: Tue May 24, 2005 5:27 pm
by Rich_L
JASmine:
Did you thin the top coat? If so, how much?
Good job!
Rich
Posted: Tue May 24, 2005 6:26 pm
by JASmine
Rich..I thinned the topcoat with 20% water. You add the crosslinker to the water and then mix in the paint.
Posted: Wed May 25, 2005 2:13 pm
by JASmine
Masked the side paint/bottom paint line this morning and covered the finished bottom with plastic (shower cap).
I found that it's not that easy to get a smooth curve over 20' long! After I got the mask in place per the level line I used the "eyeball" method to smooth out any places where "it didn't look right". Hopefully when it sets in the water all will be well.
Hope to spray sides tomorrow morning!!!
Posted: Thu May 26, 2005 12:56 am
by PJPiercey
JASmine,
I went to a paint shop today and discussed this overspray situations with them. they sold me my problem is not vacuming the overspray out of the spray enviroment. In a commercial sprat booth they vac the air out of the spray booth and filter the incoming air. I created a spray booth with plastic sheeting but all that did was trap the overspay and let it settle on the paint job. I'm going to try spraying outside on a day that has the correct hummidity and temp, yea, lots of luck!
Paul
Posted: Thu May 26, 2005 8:21 am
by JimW
Yep, I concur with them. I used to spray paint 1500 AC vents a day in a factory. We had huge fans blowing air from behind us and a huge waterfall in front of us. The fans carried the overspray into the "wall of water". It worked awesome, but the job still sucked. Clearwater, FL in the summer with no AC.
Posted: Thu May 26, 2005 1:35 pm
by JASmine
mid-day Thursday report: mixed up my own "custom" color this morning using a tube of tint from HD...it's a very very pale blue. Sprayed two coats of color on the sides so far. Because the color is so light it doesn't look much different (the pure white areas are masked off). I will spray several more coats on this afternoon and evening.
Posted: Thu May 26, 2005 7:08 pm
by JASmine
Finished the day with six coats of side color
Removed all the masking and it looks good..no camera today so pics tomorrow.
Lessons..
..the $65 sprayer works much better than you would expect. I would recommend it for those building a boat (and not a piece of furniture...
) where you want a
very good finish but not autobody quality.
..no matter how much you mask there is always one little spot where the spray gets in
..no matter how perfect the finish was before you put the topcoat on, you can add dribbles (I'm sure they sneak in after I leave for it to dry
)
Now I wait for a couple of days for the topcoat to harden a little and then it'll be ready to FLIP!!!!
Posted: Thu May 26, 2005 7:12 pm
by PJPiercey
Sounds good JASmine
Did you paint outside? What was the temp?
Paul
Posted: Thu May 26, 2005 7:23 pm
by JASmine
Paul..temp was 85 degrees..painted inside a garage with door partially open. I'm not worried about the overspray we discussed before...I found that the finish sanding makes the surface just the way I want it....slightly dull..like an eggshell finish. I would rather not have to work real hard at keeping the finish shiney!!
Posted: Fri May 27, 2005 4:13 am
by débutant
Hey JASmine,
Are you using regular masking tape? I think I read, probably on this forum, that you can use special automotive vinyl tape which prevents the bleeding through.
Aussie
Posted: Fri May 27, 2005 7:15 am
by JASmine
DB..I did use special masking tape. I first layed the paint mask and then I taped the 'shower cap' down over that with another layer of tape. I'm embarassed to say that my 'shower cap' was not taped down in one small area and the spray got up under it along the spray rail. It's not a big deal..about and inch square and I will undoubtedly have to touch up a few areas with an airbrush later anyway.
Posted: Fri May 27, 2005 11:04 am
by alball
We are looking forward to some pix of your painting process!
al
Posted: Fri May 27, 2005 9:31 pm
by JASmine
posted a pic of the finished paint..unfortunately it's not very good and doesn't show the color well..the lighting in the garage is poor and my camera has to be too far away for the flash to do much good. If I get it outside during the flipping I'll take some good pics.
Posted: Fri May 27, 2005 9:38 pm
by Yoda
From what I can see...... looks pretty good.
I have the hull masked and draped for the 1st bottom coat early morning.
Now I'm getting nervous. Felt the same way right before I put 1st primer coat on.
Posted: Fri May 27, 2005 9:45 pm
by JASmine
Yoda...I'm sure it will turn out great..GOOD LUCK.
Posted: Fri May 27, 2005 9:57 pm
by alball
The picture looks great. I think the colors look nice too.
How did you manage to hang that big boat from the ceiling of your garage like that? Your arm must get tired holding up that heavy spraygun!
Posted: Sat May 28, 2005 7:21 pm
by Yoda
O.K. got up at 05:00 to take advantage of cooler temps. By 13:00 I had two coats on the bottom. First coat no crosslinker, second with crosslinker.
Ready for this? I used a brush.
That's the way I've always painted boats so that's what I did. Wasn't bad. Worked 2X2 sections and moved fast. My old arthritic knees are now killing me. Tomorrow morning I'll do third coat W/Xlink. Then back to laying out and cutting parts while paint cures for sanding. After sanding, fourth coat and that's it for the bottom.
Then the sides before flipping. Man I can't wait. I'm fine/wet sanding the final coat up to 1500 grit.
Posted: Sun May 29, 2005 2:33 pm
by Yoda
Posted: Sun May 29, 2005 3:16 pm
by Doug N
Wow! Looks great Yoda. Very impressive finish.
Doug
Posted: Sun May 29, 2005 3:41 pm
by Yoda
Ha, it looks better in the photo than looking at the boat. But after 4th coat and wet sanding it should be OK for a bottom. The sides are what I'm really going for. I'd like a beautifull smooth glossy finish.
Posted: Wed Jun 01, 2005 11:42 am
by OzzyC
Looks great. It's motivating me to work on the boat with Greg.
Posted: Wed Jun 01, 2005 12:10 pm
by tech_support
Probably the easiest way to get "good" results from the roll and tip. To get "yacht finish" results probably takes a sprayer or at least some wet sanding, both of which I like dislike.
Posted: Wed Jun 01, 2005 1:26 pm
by Yoda
I'm still learning "roll and tip". It really takes two people. I was alone.
The paint needs to be thinned "just right". Watch the visc. of the paint as you go. Add more thinning if needed.
I found flooding the garage floor with doors closed gets the humidity up were it needs to be. Work small areas (2X2 to 3X3) really fast . Which means, don't fiddle around.
After tipping don't go back over it. And after 4 coats you wet sand as described in literature. A really good HVLP sprayer with the hose going through a bucket of cold water is what's needed to spray paint. Either way you can do 4 coats in a day. If you don't sand between. That takes a long time between coats.
I read back over this. Almost sounds like I know what I'm talking about.
I don't
Posted: Wed Jun 01, 2005 3:47 pm
by alball
Question about Roll and Tip:
I applied S3 primer to my hull with a black foam roller, and I had a foam brush ready to pop or smooth any air bubbles or inconsistencies after rolling. I quickly discovered that the roller put the primer on very smoothly, with little or no bubbles. After a minute or so the primer got even smoother as it settled onto the surface.
My question is, what exactly do you mean by "tipping"? Is it just gently popping any bubbles after rolling, or are you actually brushing the paint smoother after rolling it on? How much pressure do you use while tipping?
It is hard for me to understand the advantage of a two person process because my experience with the primer required very little effort after rolling. Perhaps this will be different with paint.
al
Posted: Wed Jun 01, 2005 7:43 pm
by Yoda
I also rolled the primer. Since it's a high fill primer for sanding you may not need the tip. That's for finsh paint. Tipping is dragging the foam brush tip very lightly from dry back across just rolled toward the wet. If done on properly prepared surface it rivals spray application. You want it cool and humid if possible. This is from what my experiance was. All new to me
Posted: Wed Jun 01, 2005 8:01 pm
by Boo
Very nice !
Posted: Thu Jun 02, 2005 7:11 pm
by Yoda
Hey Jas.......WAKE UP!!!
Boo, if the compliment was for my paint job, thank you.
Jas, I decided I have spent enough time laying out and cutting parts this week. The bottom paint has pretty well cured. So I thought paint the sides.
Layed out a masking line and noticed the sides had some imperfection. So I just spent the whole day sanding primer. That stuff gets hard. I vacuumed up the dust, wiped the tape area, and masked. Painting begins first thing in the morning...........I hope. I'm not gonna wear my glasses. That way I won't start picking at it. I can't feel anything. That will tell if there are buggers. So. Stay tuned. If it looks good I'll post picture.
Posted: Thu Jun 02, 2005 9:16 pm
by JASmine
OK....
I have been fishing for the last week with a friend from up north so all I have done is wait for the topcoat to cure and prep for the flipping. I am making a 'sling' for the hull to set in that will hang from the garage rafters. I have the straps, hooks and pulleys so now all I have to to do is get them in place. The sling will hold the upsidedown hull where it is while I remove the strongback verticals and frames. After I get the cradle pieces in place, I'll roll the hull over inside the cradle straps and then use the pulleys to LOWER the righted hull into place...no lifting!!
Posted: Thu Jun 02, 2005 9:55 pm
by PJPiercey
Joda,
When I applied the S3 LPU I had to be very careful with the tape. The paint wanted to wick under the edge of the tape. Did you have any of this? What type of tape are you using?\n
Paul
Posted: Thu Jun 02, 2005 10:04 pm
by Yoda
I'm using 3M blue. There is also a green. This stuff can be left on much longer than the generic paper tape. Also costs more. You seal the edge down with the back of your fingernail or a plastic spoon. I had no leakage at all.
Posted: Sat Jun 04, 2005 10:36 am
by Yoda
Paul, one thing I forgot to mention. The blue comes in "multi surface" and "delicate surface". The delicate has no krinkle to it and is the one you want. #2080.
Posted: Sat Jun 04, 2005 10:48 am
by PJPiercey
Yoda,
Thanks for the info on your tape experience. I tried the blue tape with the krinkle (3M 2090) and got bleed through along the edges. Then I went to an auto paint store and got some blue vinal tape (3M 471), very expensive, and it worked great. I was hoping for something closer to the cost of the krinkle surface tape. I'll look for the 3M2080.
Paul
Posted: Sat Jun 04, 2005 7:01 pm
by JASmine
Lifting sling (or lowering sling in my case) in place..pics tomorrow. Next step is to tab in a couple of braces between the sides.
Posted: Sat Jun 04, 2005 7:27 pm
by Yoda
Gonna be a big day Jas!
Posted: Tue Jun 07, 2005 7:36 am
by JASmine
delays..delays..and more delays
but the good news is that they have all been caused by my preparations to head off to Alaska tomorrow for a couple of weeks of salmon and halibut fishing
Hull is ready for flipping on my return....lifting slings are in place, some of the frames have been removed from the strongback...cradle design is underway and looks pretty straightforward....
Happy building to all...
Posted: Tue Jun 07, 2005 4:51 pm
by Yoda
Two weeks? WOW!
We're sailing up to Anchorage in 3 mos. Can't get enough of Alaska.
Have a great time.
Posted: Thu Jun 09, 2005 12:16 am
by attownsend
JASmine wrote:delays..delays..and more delays
but the good news is that they have all been caused by my preparations to head off to Alaska tomorrow for a couple of weeks of salmon and halibut fishing
Hull is ready for flipping on my return....lifting slings are in place, some of the frames have been removed from the strongback...cradle design is underway and looks pretty straightforward....
Happy building to all...
Bring me some Haibut back.We'll do a trade.Crab legs for some fish,Ea.Evild.?Or help with the flip.
Posted: Mon Jul 04, 2005 4:37 am
by Mike Adams
Just checked the postings to the galleries and saw your pics, Jas - awesome! You've done a beautiful job on that hull.

That was also a very clever arrangement with the slings to flip the hull - I wonder if that would work with the DE23 when I get around to it?
I've returned!!
Posted: Mon Jul 04, 2005 11:30 am
by JASmine
We had a great trip to Alaska....halibut and king salmon..plus spent 3 days In BC on the spammer river..more king salmon!!! Brought home 50# of halibut and 50# of salmon for the freezer.
When I left the hull was sitting in the slings but not quite ready to flip. On my return I finished the 'finish' sanding, added two temporary cross supports, removed the last two frames by lifting the slings gently so they could be moved. Once I had the hull resting only on the slings I decided to see how easy it would be to move. To my pleasant surprise, it was soooo easy that once I had the hull lifted up on it's side I just continued to roll it over..took all of about 30 seconds
I set the hull down on a set of trailer bunks resting on half of the strongback frame. It's very easy to reach inside ..at least for the side seams.
Tomorrow I'll start on the inside
Posted: Mon Jul 04, 2005 11:37 am
by JASmine
Mike....I would bet the same sling arrangement would work with the DE23.
I bought two 20' x 2" tow straps with hooks on each end and connected one end to the rafter and the other to the cheap block and tackle (connected to the rafter). It was very easy.
Good Luck
Posted: Thu Jul 07, 2005 11:55 am
by JASmine
Grinded down all the lumpy material that seeped thru the seams from the outside...filleted and double taped the port inside side-bottom seam...hope to do the starboard seam tomorrow.
Posted: Fri Jul 08, 2005 2:16 pm
by JASmine
Filleted and double taped the inside starboard side-bottom seam...
Posted: Fri Jul 08, 2005 2:39 pm
by Yoda
First I got tired of fairing and sanding. Now it's mixing cup after cup of resin and thickened epoxy. Too hot to make more that 3 oz even with ice.
Good thing I love building the boat
Posted: Fri Jul 08, 2005 8:29 pm
by Mike Adams
Yoda wrote:First I got tired of fairing and sanding. Now it's mixing cup after cup of resin and thickened epoxy. Too hot to make more that 3 oz even with ice.
Good thing I love building the boat
I wish I had your problem, Yoda! It's been too cold and wet here in Canberra for the past week to be able to mix any epoxy at all! This morning (Saturday), I am sitting inside looking out at my boat and the rain (the boat is under cover) and feeling very frustrated!

Posted: Fri Jul 08, 2005 11:58 pm
by ArizonaBuilder
Posted: Sat Jul 09, 2005 12:44 am
by Yoda
I've been out there as early as 03:30. This morning 04:00.
Lucky I'm retired........
Posted: Sat Jul 09, 2005 8:07 am
by Yoda
Slept in this morning. Got up at 04:30.
Posted: Sat Jul 09, 2005 10:12 pm
by JASmine
Took advantage of the 20 degree cooler weather caused by hurricane Dennis ....Finished filleting and double taping the inside keel seam as well as the inside transom seams...next up ..the inside cloth
.
Posted: Mon Jul 11, 2005 6:24 am
by Dynamo
Jas, welcome back from Alaska. I wouldn't mind heading up there about now. It's a challenge working in this heat. I'm at the same point as you, the inside taped ready for the cloth (although I'm waiting untill last to paint the outside). Last week I was laying tape inside the boat on my knees and turned around to get the Epoxy mix to find that my foot was in it. That's one shoe that will never wear out!
Posted: Mon Jul 11, 2005 1:50 pm
by JASmine
Dynamo...dip the other shoe and you'll have a matching spit shine!!!
Boy was I hot today....probably sweated off 5#s...layed the starboard inside cloth..about 80 sq ft for just one half....a lot of mix/in the boat/out of the boat/mix/etc....but now it's done and hopefully on to the other half tomorrow...
Posted: Mon Jul 11, 2005 10:14 pm
by Mike Adams
JASmine wrote:Boy was I hot today....probably sweated off 5#s:D
Gee, Jas, stop rubbing it in! This morning I had to scrape the ice off my car windscreen to go to work........ definitely too cold for epoxying here in Canberra!
Posted: Tue Jul 12, 2005 7:36 pm
by JASmine
Mike...I was thinking about you as I lost ANOTHER 5#s doing the port inside cloth today.....next step.. start installing the stringers and frame A.
I plan on doing the stringers as a pair by first filleting and taping several of the mid frames and the stringers together..upside down on the shop floor...this will keep them level and square. Then I'll lift the whole assembly into the hull and fillet and tape it into place.
Frame A should be straight forward and once in place give me some ideas on how to finish the anchor locker ..I may design something that let's me store the anchor from the top instead of the backside.
Posted: Tue Jul 12, 2005 8:26 pm
by Yoda
Hey guys, I'm almost through with the transom motor well. Fuel tank and water tank installed. Getting ready for foam and wire and rigging pipes.
Then upper frames. And decking. First have to cut sole pieces and splice. May have to get help lifting into boat. Wife is 60 and 5'1". I may see a light at the end of the tunnel. Lots of stuff to order. Steering, motor cables. Deck hardware.
Posted: Thu Jul 14, 2005 2:34 pm
by JASmine
Cleaned up the overlay material,started the stringer 'box frame', and began fitting frames A and F. F fits perfect and will go in after the stringer assembly. To place A, I first put a winch strap around the hull and pulled in the sides to the design dimension at frame location B..about 2" and then fit A..it fits perfectly. I also precoated A, F and the bottom pieces of C, and D....I have a few pics but still can't upload.
Posted: Fri Jul 15, 2005 3:36 pm
by JASmine
Dry fitted the coated frames A and F for filleting and taping. Mounted my first piece of stainless...the bow eye!!!! Lesson...don't make the bow so pointy that your hardware has no place to sit flat
..not really that big of a deal but means a little more fairing/sanding/priming/and painting around the base of the bow eye....will post pic when I can access the gallery.
Posted: Fri Jul 15, 2005 4:40 pm
by Yoda
Click on this and see what happens. I'm wondering if you're
using an old address.
http://gallery.bateau2.com
Posted: Fri Jul 15, 2005 5:10 pm
by JASmine
Yoda..no luck with either site. I think Jacques is trying hard to fix it.
Posted: Mon Jul 18, 2005 1:26 pm
by JASmine
Filleted and taped both sides of frame A in place...filleted and taped the cross members of frames C,D,and E into a 'box frame" with the stringers...next step is to place the 'box' into the hull and fillet and glass it in. Still can't upload pics
Posted: Mon Jul 18, 2005 4:54 pm
by Yoda
JASmine wrote:Filleted and taped both sides of frame A in place...filleted and taped the cross members of frames C,D,and E into a 'box frame" with the stringers...next step is to place the 'box' into the hull and fillet and glass it in. Still can't upload pics
While you're waiting to see if Jacques finds anything you may want to check your browser settings. Don't laugh, I've seen that cause problems.
Posted: Tue Jul 19, 2005 1:27 pm
by JASmine
Dry fitted the stringer 'box' assembly..used frame F and B as a placement guide..it fit perfectly so I tabbed it into place. I would strongly recommend for Panga 20 builders to make the 'box' outside the hull..much easier to get everything square and aligned...(because the cross frames are multiple pieces..not notched).
It's really starting to look like a boat now...my mind is racing with all sorts of ideas for building in-hull storage...
Next steps are to fillet and tape in frame F and the motorwell sides!
I will upload a series of pics from the last two weeks once the gallery is available to my login.
Posted: Tue Jul 19, 2005 2:03 pm
by tech_support
JASmine wrote: once the gallery is available to my login.
I just looked at your account from the administrative panel, I cant see why you cant log in to the gallery. If OK by you, I will get in there as you and reset the password to see if I can post a picture - let me know.
Posted: Tue Jul 19, 2005 2:32 pm
by JASmine
Joel..please do try and login as me and post something....if you need to change my password go ahead and then email me the new one..thanks
John
Posted: Wed Jul 20, 2005 1:59 pm
by JASmine
YEA!!!!!!!! We're back in the picture business
Finished aligning and tabbing the 'stringer box'....dry fit all the motorwell components and filleted and taped frame F. Just for fun layed all the deck pieces in to see what it looked like...nice
I uploaded a series of pics to my gallery that show the changes over the last 2.5 weeks. Will start filleting and taping in the 'box' tomorrow..I estimate it will take several days...it's too hot to work too long!
Also figured out where most of the cabling and chases are going to go...however once I lay in the conduit I may have to reroute a little. I'm concerned about the 3" chase because the bend will have to lay on its side..there is only 6" below the deck and the deck exit will have to be cut at an angle.
Posted: Thu Jul 21, 2005 9:59 am
by JASmine
Filleted and taped about half of the stringer 'box' today..both full-lengths of the outside stringer edge and two of the mid-frames..might be able to finish all the rest of the 'box' tomorrow. Then I'll move on to the wings.
Picked up a 2" long elbow and 1.5" long elbow to begin figuring out exactly where the chase tubes should go..my current plan:
...one 1.5" from the cc to the bow for electrical
...one 2" from the cc to the motorwell for steering and binnacle control
...one 2" from cc to motorwell for engine cable and battery ( I plan on putting the batteries in the cc)
...one 1.5" from cc to motorwell for reserve
...one 1" from fuel tank(under casting deck) to motorwell for fuel line
Did I forget anything??
Posted: Fri Jul 22, 2005 10:57 am
by JASmine
Filleted and taped a few more of the "MILLIONS" of inches of internal seams between the hull and the stringer and under-sole frames...this hull is built like a tank!!!
Looks like it will be a few more days of this before I finish this phase.
Sealed the bow-eye shaft hole with epoxy...
Built the backing plate for the bow eye bolt...
Started filleting and taping the motorwell components...
Off to visit a couple of Yamaha dealers this afternoon.
Posted: Fri Jul 22, 2005 11:21 am
by Yoda
Jas, after you talk to the Yamaha people (great engine) Check out the Tohatsu line. Look up forums like iboat and see what they are saying.
You can save a bunch of money and owners love them. Looking into it is free also.
Posted: Sat Jul 23, 2005 10:36 am
by JASmine
Continued filleting and taping seams on the stringer box and motorwell. Dry fitted 2 of the sole panels...
Taped the seams on the port gunwale cap..into one long piece..
Layed out the chase runs on paper...
Dry fitted bow eye and backing plate...ready for 5200 mounting
Posted: Sun Jul 24, 2005 2:51 pm
by JASmine
minor projects today:
..cut a cardboard template for the bottom of the anchor locker..shows on the plans but not in the nesting diagram so it was not included in the precut kit????
..picked up a nice chrome 13" steering wheel with chrome knob..new..$80 on ebay
..layed the full port gunwale cap on the hull to see how it fit..not too bad and easily fixed during finishing..to my PLEASANT surprise!
..practice cut a couple of chase tube holes on scrap..I'm ready for the real thing now
Back to finshing the stringer tabbing tomorrow..I try for some new pics then
Posted: Mon Jul 25, 2005 11:06 am
by JASmine
Filleted and taped the center frame of B...OBSERVATION: either lay your chase tubes beforehand or plan on lots of tubing cuts and couplers..it would be very difficult to get one long piece to slide in unless you do it ahead of time
Layed in fuel chase...1" thin-wall pvc
Cut and placed chase to bow...1.5" thin-wall..for bow light and 12v outlet
Precoated two of the large sole panels..
On my way to pick up NFB steering kit..17' ( or 16'..I need to measure one more time!!)
Posted: Mon Jul 25, 2005 11:22 am
by anflyer
JASmine wrote:Filleted and taped the center frame of B...OBSERVATION: either lay your chase tubes beforehand or plan on lots of tubing cuts and couplers..it would be very difficult to get one long piece to slide in unless you do it ahead of time
Layed in fuel chase...1" thin-wall pvc
Cut and placed chase to bow...1.5" thin-wall..for bow light and 12v outlet
Precoated two of the large sole panels..
On my way to pick up NFB steering kit..17' ( or 16'..I need to measure one more time!!)
Jasmine, you have to add 18" to your final measurement (according to the service guy where I buy all of my parts). i just installed my steering this weekend on my OD16 and am glad I listened to him. It fit just perfect when adding the extra length.
anflyer
Posted: Mon Jul 25, 2005 11:29 am
by JASmine
An...thanks for the tip..I'll be sure and ask lots of questions and show them my layout.
Posted: Wed Jul 27, 2005 11:20 am
by JASmine
Finished filleting and taping second layer on stringers..
Fillet and taped several more seams around the motorwell...
Cut and dry fit bottom of anchor locker including hole for wiring chase..
Precoated several more large pieces of the sole...
Mixed up a very small batch of floation foam for anchor locker..interesting stuff..why does it pull away from the sides as it expands???
Measured one more time for the steering cable..16/17'.. to be determined when I pick it up.
Posted: Thu Jul 28, 2005 10:24 am
by Yoda
Does anyone else find they spend as much time thinking about what they're going to do as actually working ? I really slow down when I do something totally new to me. Very afraid of making big error.
Jas, I have motor well completed now. Tanks are in. Conduit and chases are all in and some wiring is pulled. All frame cleats are in.
I raised threshold to cabin 3" and now it's flush with bunk filler piece. And I don't worry about water coming into cabin. Bow hook in drilled and epoxy primed. Need to caulk and tighten nuts. Today is fit sole and then pour foam.
That's another slow down,,,,,,,,,
Need to splice sole together. Lifting that into boat will be a bugger.
Splice berths together. Cut access hatches in berths.
I also am putting in two inspection (8") covers in sole to see tanks and bilge pump.
Other than that, not much going on.
Sounds like you are on track.
Posted: Thu Jul 28, 2005 1:15 pm
by JASmine
Yoda...How did you mount your fuel tank????..rubber pieces???..hold-down metal clamps.???. I haven't recieved my tank yet so I don't have specific instructions..the 'how-to' instructions mention the rubber pieces but I don't know what they are??
Progress today included:
..foamed under the anchor locker sole..fun!
..filleted and taped anchor locker sole in place
..foamed under center portion between frame A and B
..dry fit sole for this section and glued in mounting cleats
..layed out 3" pvc for steering and control cables
..layed out fuel hose..will run in 1" pvc
..layed out steering cable..went with 17'
..ordered 'concealed-mount' control box for Yamaha
Posted: Thu Jul 28, 2005 1:52 pm
by Yoda
I put it under sole. It wasn't level so I cut two thin wedges as long as plywood I put tank on. Glued them down the width of the plywood piece.
Then glued the piece down on the wedges. Now I have a level platform above inside of hull. That's to screw down tank clamps so I don't drill into hull.
All of this was epoxy coated twice. The wedges lined up longitudinal so water can run under through the bilge. Then I bought some rubber sheeting from hardware store and put that under tank. The hold down clamps were from same company as tank. Tempo. There is a picture of installed tank in "Yoda" album.
Posted: Fri Jul 29, 2005 10:11 am
by JASmine
...Installed the sole cleats between A/B and B/C
...finished foaming A/B (not too bad for first effort but way less than the GREAT job of Stefan)..hopefully I'll get better as I go along
...installed bow eye and backing with 5200
...ripped another bunch of 1x2 for cleats
Off to Harbor Freight for a 3 1/4" hole saw and the electrical supply house for 3" wide-bend fittings
Posted: Fri Jul 29, 2005 1:53 pm
by Yoda
Last 2 pics taken this morning. Time to get boat out of garage.
http://gallery.bateau2.comdisplayimage. ... 1804&pos=1
Posted: Fri Jul 29, 2005 5:30 pm
by JASmine
Cut my first big hole for the cabling chase this afternoon..3.5"..sure hope it's in the right place. The placement is a little tricky because the tube is going thru the stringer and bending a different direction on each side ...I'll connect it up to the long tube tomorrow and see how it fits...stay tuned!
Posted: Sat Jul 30, 2005 11:48 am
by JASmine
...Tested the 3" chase tube and didn't like the way it fit..enlarged the stringer hole into an oblong one and it looks good now. I'll build a couple of extra plates with matching holes to strengthen both sides of the stringer... because there is so little room under the sole it's a challenge to get the chase tubes to have the required minimum bends and fit nicely.
...Cut the chase tube holes for the fuel line and sender wiring in the A/B sole
...Glued the A/B sole plate into place and filleted and taped the seams
...Cut the 3.5" hole in F for the steering/control chase tube
...precoated more cleat material
Posted: Sun Jul 31, 2005 12:22 am
by Yoda
I ordered 2 more gals. of foam. That will be 6 gals. total. I poured the first 2 gals. today. Went real well except for heat. I stopped and waited 'till sun went down and just poured the the rest of the 2. So Evan was right about the amount of foam. Wonder why the order page for the plans said 4 gals. Oh well.
Your gonna jump ahead because you have no cabin and bunks. And furniture to make for the Panga. So when you splash I'll be jealous. I just keep thinking of the fun of the first run.
My steering is going to be 3' longer than suggested. I ran a fish tape and then
measured that. Added 6" for tilt tube (16' 6") rounded off to next higher foot.
17' that would be. Tohatsu told me to add 18" to the control cables after measuring for them. That gives steering and tilt slack.
More careful consideration and I decided 16 will do it.
Posted: Sun Jul 31, 2005 5:31 pm
by JASmine
...drilled the rest of the chase tube holes in both the stringer and F (3.5",1",.75") and layed out the fitted pieces
...epoxy sealed all holes
...added more foam to the B/C compartment
...filleted and taped the starboard motorwell side in place (I was waiting to make sure all the tubes would work first)
...glued another 11' of cleats in place
...precoated another 40' of cleat material
...determined a location for the fuel/water seperator (Racor screw-on) on side of motorwell panel (in starboard stern compartment)
...precoated two more large pieces of the sole
...re-drew another version of the center console to account for better cable bends..I still think I can get it into a 18 x 18 console by rotating the steering helm to the 'downward" position...as Surfrider sugggested, I'm going to build the console before I complete all the sole panels to make sure all the cables work right.
Next up is to finalize the baitwell plumbing layout. I plan on going with a 17 gal oblong well in front of the console and a transom-mounted pump and drain.
Posted: Mon Aug 01, 2005 11:12 am
by anflyer
Yoda wrote:
My steering is going to be 3' longer than suggested. I ran a fish tape and then
measured that. Added 6" for tilt tube (16' 6") rounded off to next higher foot.
17' that would be. Tohatsu told me to add 18" to the control cables after measuring for them. That gives steering and tilt slack.
More careful consideration and I decided 16 will do it.
Yoda, go with the 17' cable. I was in the same situation where I had to round up to the next foot (after adding the required extra 18") and I am glad I did, since it fits just perfect. If I would have not rounded up it would not have fit the way it does.
anflyer
Posted: Mon Aug 01, 2005 12:28 pm
by JASmine
...Mostly 'fitting' today...
B/C sole panel, starboard cavity by motorwell, stringer wings for C and D.
...Also glued in another 40' of cleats.
...rounded all the sharp lips inside the PVC fittings with a dremel
Posted: Tue Aug 02, 2005 2:52 pm
by JASmine
short day today..
-cut the pipe openings in the C stringer wings and filleted and taped them in place.
-glued the rest of the main stringer cleats in place.
-finished one remaining seam on starboard motorwell side
Posted: Wed Aug 03, 2005 10:37 am
by JASmine
-filleted and taped the starboard rear compartment sole in place
-dry fit casting deck and the upper portion of frame C..cut cardboard footprint of fuel tank to test fit
-glued cleats on stringer B and C wings
-precoated another piece of sole
-pulled the steering cable to test for fit..NG..too long (17')..will exchange for 15'
-still struggling with layout for baitwell pump/pickup and overflow..a transom mounted pump will work but I'd prefer it be inside if at all possible..the only option that I can think of ( and keep the pump below the waterline) is to lay the pump horizontal..then the issue is how to make a small sump under the motorwell sole
Posted: Wed Aug 03, 2005 10:51 am
by Yoda
Jas, look at these 2 pumps. They are thru-hull. A strainer scews on outer end. Do you have room. It's the way my bass boat is setup. I pump in and have a circulator pump and a drain valve
http://www.basspro.com/servlet/catalog. ... get=browse
Posted: Wed Aug 03, 2005 2:15 pm
by JASmine
Yoda....if I don't go with a transom mount then I would use the design you suggest..only it would have to lay on it's side. There is only 6" of hull below the waterline at the stern (at rest) and since the impeller-type pumps must be below the waterline there's not enought 'under-water depth' to have it standing up on any kind of fitting. I've had them horizontal before and it's no problem but my issue is figuring out where to put it (and have access)...I was planning on foaming the entire under-sole volume so I'll have to make something (like a shower-drain box) for it to sit in.
Posted: Wed Aug 03, 2005 3:50 pm
by Yoda
You may fully understand but in case.................
The angled pump in the catalog. The horizontal pipe goes thru the hull. You can drill and mount it with the pipe. So the pickup would be about 5" below water line. The pipe is a thru hull fitting and a strainer will screw on the end ouside the hull. The upper pipe is the hose fitting. I have two low thru the transom. The water runs right into the impeller. Hope I didn't just waste your time
Posted: Wed Aug 03, 2005 6:09 pm
by gpratt
John here's to your question about how I did the fill and overflow for the bait tank.
http://gallery.bateau2.com/thumbnails.php?album=285
Ignore the dirt and stuff. Just got back from fishing today.
Don't make the mistake I did. I had to relocate the overflow exit due to the motor being in the way. Ya know about the hindsight thing right?
I brought the pipes to the bait tank up thru the console to save some desk space. It allowed me to keep the tank close to the console.
Posted: Wed Aug 03, 2005 7:15 pm
by JASmine
Yoda...the pickup would be under the waterline and would scoop up water when underway but when the boat is stopped the impeller may not be flooded..at least that's what I'm worried about. I have had production boats where the pump was 'just' at the waterline..sometimes it worked and sometimes it didn't...thanks for the suggestions though
Gary...thanks for the great pics (I see you are plumbing your 'stealth' the same as your OD16). I'm thinking of the same type of bait tank in the same position (up next to the console). One difference is that I'm thinking about building it in to hide the plumbing and then using a lid/cover as a seat.
Two questions:
..how do you get the water out of the overflow pipe at the end of the day..since the piping goes down under the sole and then comes back up to the stern drain doesn't water sit in there???
..at the end of the day do you just open the tank's drain and let the water out on the deck??
Posted: Wed Aug 03, 2005 8:48 pm
by gpratt
JASmine
Yes the water stays in the pipe. I can't get back to the tank and hasn't seemed to get foul and stink so that's OK with me.
There is a drain at the bottom of the tank below the overflow that I use to empty the tank at the end of the day. If you enclose yours inside something you'll have to come up with a way to empty yours thru the enclosure or ?. You could plumb it into the overflow pipe inside the enclosure and use a valve. FYI The bottom outlet is threaded to fit a garden hose.
I just open mine and let it drain thru the cockpit drains.
Posted: Wed Aug 03, 2005 8:55 pm
by JASmine
Gary..Thanks for the reply...I fish in saltwater and it WILL stink so I'm going to have to come up with a different design.
Thanks again for the helpful pics.
Posted: Thu Aug 04, 2005 10:24 am
by JASmine
-more foam...
-filleted and taped the port motorwell side
-committed to a baitwell plumbing layout (unless it doesn't work
). I'm going to run the 3/4" line from the console to the stern thru the mid frames all the way to the stern..plumb in a shurflo pirahna modular 500 gph pump and seacock under the motorwell sole (with a cutout for access). The 2" overflow drain will run from the same area to the stern in the port stringer wing area and exit the stern just at the waterline...I'll be using one of those removeable standpipes for an overflow...not sure about the tank yet..I may make my own or buy just a plain oblong tank and do my own plumbing.
Thanks to also of you who helped me sort out my baitwell choices.
Posted: Fri Aug 05, 2005 1:35 pm
by JASmine
...glued more cleats in place
...cut out pipe openings,precoated,filleted and taped the D stringer wings
... dry fit upper part of frame B/ tested fit with gunwale caps
...aligned and glued cleats on A and B for casting deck
...drilled and precoated 1" and 1.5" holes for baitwell supply and overflow drain from center console area to stern alone the centerline..decided on a 1100 gph shurflo modular with a 1" output to account for the long run up to in front of the CC
..going to look at some baitanks without plumbing this afternoon
Posted: Sat Aug 06, 2005 11:06 am
by JASmine
...more foam (I'll take pics tomorrow)
...filleted and taped one side of upper frame B in place (front edge of casting deck)
...made template for center console to confirm that all the pipes were in the right place (and leave room for the two batteries inside the footprint)..and ..they do!!
...laid out the final components for the livewell drain in the stern sump..and per Cracker Larry's good idea I'm going to install an emergency bilge pump..the sump itself won't need it (.5 cu ft)..but I'll run some tubes from the cockpit area with plugs that can be removed in an emergency...an emergency will be defined as any water in the cockpit that the scuppers can't/won't remove

Posted: Sun Aug 07, 2005 7:04 pm
by JASmine
...cut,precoated, filleted, and taped the E stringer wings ..all done with the stringer assembly now
..and I can finish the foam.
...started 1.5" hole in stern for livewell overflow...had to quit before I got all the way through to sharpen the hole saw
...added valve to overflow line in sump box
...layed out steering location and instrument panel and cut all 4 sides to the center console...18"x18"....cut bottom 16" of each panel to make base..started gluing pieces together. The console will hinge on this base for access (pics soon)
...seriously considering making my own livewell..even a basic shell for around 20 gallons is nearly a $100 and not quite the right fit...I'll see how the console assembly goes first.
Posted: Mon Aug 08, 2005 9:22 pm
by JASmine
...more foam..getting down to the end of it now though
..about a 1/2 gal left
...filleted and taped additional stringer cross piece to form 'sump' under motorwell sole
...finally got the 1.5" hole thru the transom for the baitwell overflow...tough stuff to drill thru!
...cut motorwell sole...for some reason this piece was not included in the precut kit??..or shown on the plans??..no big deal though
...received special transom pickup I ordered from Overton's...nothing hangs under hull but still allows for highspeed pickup (I'll take a pic once it's installed)
...glued the center console together now it's ready for taping the seams
...measured for a few more plumbing fittings
Posted: Wed Aug 10, 2005 1:28 pm
by JASmine
....a little more foam to top off some low spots
....cut the 1" hole in the transom for the baitwell pickup (had to make a special trip to the Yamaha dealer to measure the length of the mounting bracket to make sure I didn't put the inlet in the wrong spot

) Also had to make sure I left enough room along the transom edge for trim tabs if they become necessary.
....layed out the final plumbing parts and seacocks....1.5" PVC for overflow, .75" brass for pickup..sealed the holes with epoxy. Will install thruhulls with 5200 later today.
....precoated a few more bare edges and small pieces
Posted: Thu Aug 11, 2005 5:30 pm
by JASmine
...foamed under the motorwell sole saving an opening for a sump area
...5200 on thruhull fittings for baitwell pickup and overflow
...glued in cleats for motorwell sole
...filleted and taped in bottom of port stern box
...precoated and cut sump opening in motorwell sole
...ordered 'modified' fuel tank from RDS with 90 degree ells for vent and pickup...this is a must for fitting the tank in the design space below the casting deck
...cut openings in console dash for steering and binnacle (pic) to test placement
Posted: Fri Aug 12, 2005 11:12 am
by JASmine
...finished plumbing in sump area (except for 2 ss clamps)
...glued down motorwell sole
...filled in a couple more spots with foam
...working on the final details of the baitwell size and exact location so I can finish center console plumbing
Posted: Fri Aug 12, 2005 11:38 am
by tech_support
Thanks for the updates - I wish everyone did this
Posted: Sat Aug 13, 2005 2:14 pm
by skinner
Nice job on your boat, the updates are very helpful. You should charge for them, I'm about two weeks or so behind you on my pg20 and I sorta feel guilty about letting you find all the tricks and work arounds. (but not too guilty...haha) Thanks! Did you say the recommended fuel tank (rds) won't fit without modifications? I was just about to order the Tempo tank when I saw your original post...now I am hesitating on the rds one...
Thanks,
Skinner
Posted: Sat Aug 13, 2005 3:09 pm
by JASmine
Skinner...good to hear from you. I was going through my logbook and was reminded that your precut kit shipped the same day as mine... I was wondering how you were doing. Yes I did say that the Tempo and RDS 18 gal fuel tanks would not 'fit'..that is you could not bend the fill hose in the alloted space. Since the Tempo tank is plastic there is no easy way for me to modify it and it still be USCG approved. I called RDS and they modified their stock tank with ell fittings. I hope to get it on monday so stay tuned.
...filleted and taped the motorwell sole panel in place
...glued the tabs to the main deck sole panels to connect each panel together
...cut the hole for the baitwell tank overflow drain in the front sole panel. I'm going with an unplumbed tank from Aquaworld...their high profile model..20 gal...24" in length and 20" high. The fill line comes up thru the center console 'fittings' area
...ground down all the 'bumps' on the sole cleats so the sole panels fit level
Posted: Mon Aug 15, 2005 1:53 pm
by JASmine
..glued the fore and aft sole panels in place (I'm commited to my plumbing layout now
)
...precoated some more cleat material
...used some spray foam to fill the larger spaces along the edges of the sole panels prior to filleting and taping
...started precoating the bottom section of the center console
...foamed around the chase exit area of the mid sole panel
...cut the last 2 pieces of the center console dash..ready for cutouts for guages
...waiting for the 5:00 UPS delivery (the modified fuel tank)
Posted: Mon Aug 15, 2005 2:36 pm
by Yoda
I've been using foam caulking rope to fill some gaps. Primarily below the sole to keep foam from leaking through. The sole is together and am cutting notches for the hoses to come up under gunnel. I will put sole in this afternoon. Right now........it's time to make a ham and cheese sandwich. That's for me, not the boat.
Posted: Mon Aug 15, 2005 7:44 pm
by JASmine
Couldn't wait to see how the new tank fit so went over to the shop this evening..IT FITS...
.
RDS was great to work with..more expensive (the Tempo tank was $75..the modified RDS tank was $200) but the ell fittings will allow quick and clean plumbing.
...cleaned up the foam overfill..ready for filleting and taping the fore and aft sole panels
Posted: Mon Aug 15, 2005 8:02 pm
by Yoda
When it's all over and paid for tank won't seem like much.
I'm right about where you are. Lookee here.............
http://gallery.bateau2.comindex.php?cat=11804
Posted: Tue Aug 16, 2005 12:10 pm
by JASmine
...cut and precoated 2" hole for steering cable in motorwell side
...glued cleats for motorwell cap
...glued cleats for holding center console base
...started cutting rodholder holes in frame wings
...precoated center console..inside and out
...located mounting position for Racor inside starboard stern box
...order combo fuel fill/vent (I've broken several side vents off previous boats
so maybe this combo style will avoid that)
0n my way to pick up 1.5" fuel fill hose and 5/8" vent hose
Posted: Wed Aug 17, 2005 11:19 am
by JASmine
...filleted and taped the fore sole panel in place
...filleted and taped a couple of missed spots in the casting deck area
...ground down all the bumps on the mid-deck sole cleats..ready to glue the sole panel in place.. I'm going to wait until I get my baitwell installed in case I have to do any plumbing adjustments
...installed the fuel/water seperator on aft side of frame F in the starboard stern box
...filleted and taped in the backing bracket for the bow eye
and it's HOT...the medium epoxy sets up in about 10 mins!!
Posted: Thu Aug 18, 2005 10:59 am
by JASmine
...filleted and taped the aft sole panel in place
...precoated the holes drilled for the fuel/water seperator and access hatch
...glued the last motorwell cleat in place
...precoated more console parts
...precoated some 2x2 material for the edges of the stern boxes..I'm going to have cutouts on the top with starboard cutting board covers
...started taping the console seams with woven
Major milestone....used the last of the 15 gallon epoxy kit today with about 8oz of hardner left over. Also used last scrap of biax....NOTHING left of the tape or the cloth. I've been cutting my own tape out of the cloth for some time now. I would have had enough if I hadn't decided to cover the entire inside of the hull with cloth. The only biax seams I have left are the 2 cross deck seams and the mid-sole panel to hull..probably about 25' of 6". I have the whole roll of the woven to use for the frame wings, gunwale cap, and console.
Posted: Fri Aug 19, 2005 2:07 pm
by JASmine
....cut and glued extra heavy cleats in starboard stern box
....cut drain hole in bait tank (20 gal) and dry fit in front of console
....installed fuel tank per "Pascoe" method/5200 on starboard stringers
....cut more rod holder holes in E frame arms
....taped more seams on the console
Thinking about various ways to add inspection/storage access to the casting deck.. need to have access to fuel fill and sender area...hate to waste ANY above-the-sole cavity!!..
Posted: Sat Aug 20, 2005 11:26 am
by JASmine
...lots of grinding today..cleaning up the tape edges, drops of glop, etc readying the cavities for painting. Tried some splatter material..I'll see how that looks tomorrow.
...cut holes in casting deck for fuel fill, vent, and grounding wire
Posted: Sat Aug 20, 2005 8:29 pm
by Cracker Larry
You've been busy
Very nice
Posted: Sun Aug 21, 2005 6:48 pm
by JASmine
...choose an 8" round for the fuel fill/sender/supply access..screw-in type
...cut and precoated hole in casting deck for access port
...cut and precoated additional braces for under casting deck to strengthen platform. Decided against any more access in casting deck to avoid weakening it. My other option was to add 2 additional fore/aft bulkheads along each side the fuel tank and then fill the cavities with foam..mostly for sound deadening but running low on foam so decided against it.
...finished filleting and taping inside and outside console seams
Plan to start pulling some wire tomorrow!
Posted: Mon Aug 22, 2005 11:46 am
by JASmine
....filleted and taped in the extra braces under the casting deck
....filleted and taped the upper E frame wings after adjusting the spread to spec
....textured the motorwell storage/sump compartment
....textured the inside of the console base
....pulled the wiring for the fuel sender/and grounds
....precoated the 2x2 cleat material for the port stern box
....cut and precoated the extra frame for the bow (so I can stand on the bow over the anchor locker)
Posted: Tue Aug 23, 2005 12:03 pm
by JASmine
....dry fit upper C frame wings / cut and precoated rod holder holes
....cut and glued 2x2 cleats in port stern box
....finished wiring on fuel tank..sender, sender ground, tank and fill ground
....pulled wire for bow light and bow 12v plug
....painted anchor locker and starboard stern box
....modified battery holder boxes to fit inside console base (two 24 size)
Going to work on ideas for helm seating/standing this afternoon...favoring a single person leaning post at the moment.
Posted: Tue Aug 23, 2005 12:15 pm
by Yoda
When Hector took us fishing 44 mi out of Puerto Vallarta in the 26' Panga, he stood all the way out and back. Just make sure the console is well supported.....
Posted: Wed Aug 24, 2005 11:28 am
by JASmine
....glued the casting deck in place (other than the access port, it's so long to the fuel tank unless it's with a saw
)
....filleted and glued the upper C wings in place
....glued the backing plates for the helm pedestal onto the mid-sole decking
....foamed a little more around the chase tubes coming into the console
....glued the strengthening brace to the bow brace
....began to fillet and tape casting deck-to-hull seams
....precoated the chase tube cutouts in the mid sole panel
Decided on a single person leaning post that mounts to an ordinary seat pedestal for the helm (and can be changed to a chair).
Posted: Thu Aug 25, 2005 12:15 pm
by JASmine
....cut the hole for the 12v outlet in frame A (outside of anchor locker up under the gunwale)
....filleted and taped the remainder of the casting deck in place
....glued the mid-sole deck in place (deck is all glued down now)
....added ss eye screw in bow brace to tie up anchor line
....ground down 2x2 port stern box cleats to flush with hull outline
next up..final cutouts in motorwell area for harness, fuel, control cables, etc!!
Posted: Fri Aug 26, 2005 2:43 pm
by JASmine
...cut motorwell cutouts for engine harness,power,etc
...cut cross-stern chase tube holes
...tested wiring harness for correct length (16')..ok
...cleaned up shop area in prep for inside finishing
...used lifting sling to test for center of gravity of dry hull...lifted bow..put beam across cradle...lowered hull to rest on beam...moved around a few times...and although not too accurate pretty sure COG is within +/- 6" of the back edge of the console.
Posted: Sat Aug 27, 2005 11:19 am
by JASmine
...glued in cross-stern tube (acts as a wiring chase between the 2 stern boxes)
...added several small cleats for top of sump to sit on (a starboard piece with holes in it..like a grate)
...added two small cleats under bow brace
...finished foaming small openings along edge of mid-deck sole panel
...filleted the two cross beam sole panel seams
...cut the mounting hole for the tach
...glued several more small panels on the console
STARTED the sanding and fairing of the inside..hot..dirty..etc..quickly brought back the 1.5 months of similar work on the outside!!. Now it's a matter of perserverance and patience...both low quantities in my gene pool
Posted: Sun Aug 28, 2005 3:24 pm
by JASmine
...filleted and taped last remaining hull/sole seams...yea!!!
...taped one of the mid-deck cross seams..one left!
...taped the aft edge of the casting deck
...touched up the paint in the storage cavities
...filled some remaining gaps in the console edges
and lots of grinding, sanding, and vacumming on interior hull areas
Posted: Mon Aug 29, 2005 1:06 pm
by JASmine
....cut the rod holder 'slots' in the middle frame C wings and glued them in place
....touched up foam around console chase tubes
....drilled the holes for the brackets that hold down the battery boxes
....cut and precoated the 1/4 inch material to be used as a flange inside the base of the console (for the top to fit against)
....borrowed a heavy duty template from my local Yamaha dealer and drilled the engine mounting holes in the transom....had to use the car to pull the hull forward about 6 inches so I could get enough room behind the transom to work...it's heavy now!
....ground down the glue bumps on the upper console in preparation for taping
I'm off this afternoon to find some 4 ga stranded to make my own cables for the battery runs to the the port stern box.
Posted: Mon Aug 29, 2005 2:22 pm
by fishingdan
You are cranking! Any pics of the current state?
Posted: Mon Aug 29, 2005 3:49 pm
by JASmine
Posted: Tue Aug 30, 2005 11:23 am
by JASmine
....cut the mounting hole for the key switch in the console
....faired more of the console
....glued in the sealing lip in the bottom portion of the console
....layed out the wiring lengths for the stern electrical needs
....sealed the engine mounting holes
....filleted and taped the D frame upper wings in place
....painted and sealed the sole area under the console
More cable making this afternoon..
Posted: Wed Aug 31, 2005 11:13 am
by JASmine
...taped the last deck seam
...partial plumbing for the emergency bilge pump
...mounted grounding clamp on bronze thruhull
...glued and taped the starboard gunwale cap seams into one long piece (both starboard and port units done now
)
...cut starboard grate for sump area
...cut backing plates for 4 line cleats
...cut wiring hole in bow brace for running lights
...started the layout for the exterior shell for the baitwell
...more grinding and sanding on interior hull and console
Posted: Thu Sep 01, 2005 12:06 pm
by JASmine
I am doing ANYTHING to avoid getting at the inside fairing and sanding...
...drilled holes in the sump grate I cut yesterday..it fit perfect
...drilled holes for the fuel and trim gauges
...taped last remaining outside seams on the console
...built and installed the +/- power connecting block in the port stern box
...cut and glued the gunwale cleats for bow, A-B. and B-C
Posted: Fri Sep 02, 2005 3:50 pm
by JASmine
Busy day!
...glued more gunwale cleats
...cut/precoated hole in transom for bilge pump outflow
...installed thruhull fitting with 5200
...pulled all the console-to-stern wiring..engine harness, +/- power, anchor light, bilge pump, and baitwell pump (plus several extra pull cords for future use). I'm very glad I used TWO 3" chase tubes..one for electric and one for control cables)
...tinned and attached crimp fittings and heat shrink material to most wiring runs (still deciding on the specifics of the terminal/fuse arrangement at the console)
...taped the last remaing seams inside the upper console section
...fit the ss piano hinge on both console sections..works great
...sanded all installed gunwale cleats to shape of frame wings (arched)
...sanded outside of upper console section..both sections ready for outside fairing
One small obstacle..my belt sander's (25+ yrs old
) drive belt broke
..fortunately it was a Craftsman and a trip to the almost-local Sears parts counter made it all better for only $3.99
Posted: Fri Sep 02, 2005 3:55 pm
by jacquesmm
You get more done as an amateur in your spare time than many professionals I know. I'm impressed.
Posted: Sun Sep 04, 2005 11:31 am
by JASmine
...more electrical work at stern...connectors, shrinktubing, etc
...epoxied the base of the bilge pump into position..finished up the pvc work
...dry fit motorwell cover..ready for filleting and taping
...centered the base of the console..ready for gluing in place
...pulled the control cables to test for fit..ok
...precoated more cleat material for gunwales..about 2/3 already glued in place
...dry fit both gunwale caps....adjustments needed. NOTE: I taped all 4 pieces of each cap into one long piece..easier to handle with one person and ..and then fit into place. THEN I cut 2 seams on each piece to make the last curvature adjustments. I think it's very likely that your hull shape will not be exactly per the spec and you have to adjust for that before you glue them in place. Maybe it would have been easier to just fit all the pieces once you have all the frame wings installed..not sure..just something to be aware of.
Posted: Mon Sep 05, 2005 11:43 am
by JASmine
...finished terminations on + battery cables
...wired and installed battery switch (1,2,both,off)
...taped the last seam in the motorwell
...glued the port bow gunwale cap in place. Installation is a challenge because of the curved shape..it's like fitting the hull pieces over the rounded frames..and like the hull, you need a smooth surface in several directions.
Posted: Tue Sep 06, 2005 11:27 am
by JASmine
...second coat of sealer inside upper console
...drilled mounting hole for stern light and completed it's wiring
...glued more gunwale cleat material in place
...glued the mid-section gunwale caps in place...outside edge only..glued inner cleat to both bow and mid-section cap pieces to align inside edge. Will use large clamps to push cap down to upper frame wings once I have the whole cap completed. This should allow me to get a nice smooth surface in all directions for the entire length of the cap. Note: I could have let the caps be flat by filling in the outside edge but I like the look of the curves!
...started fairing the bow deck
Posted: Wed Sep 07, 2005 11:05 am
by JASmine
....glued more gunwale cleat material in place
....glued the port stern section of the gunwale cap..outside edge only
....finished all the wiring in the stern
....installed the ground bus in the console and began connections
Looks like the technique of gluing the outside edge of the gunwale caps first and then using a long straight edge to push them down into place is going to work
Posted: Thu Sep 08, 2005 1:05 pm
by JASmine
...sanded yesterday's fairing compound
...glued the port side gunwale cap (inside edge) using a long board to keep the plane smooth (will still need to beef up the inside cleats..the 1x1 material buckles up a little)
...placed more Quickfair around gunwale seams
...made up some 'custom' fairing material..thin..and 'painted' upper console
...cut pieces for the baitwell shell..hope to have a rounded shape on front edge..commercial well will fit inside shell and then I'll foam it into the shell
...cut some 6mm material for experimenting on the coaming
...finished up the ground busbar wiring in the console
One interesting consequence of having precoated all the inner surfaces is that the boat has an 'antique' feel to it. Because of the rounded deck surfaces and the wood-look you almost want to put a little american flag on it and head to 'golden'pond'! If had the skill and patience, a 'bright' inside would be gorgeous..but alas mine will be painted.
Posted: Fri Sep 09, 2005 9:25 am
by JASmine
...lots of 'fitting' today
cut heavier cleats (1x3) for inside edge of gunwales all around
marked template for coaming on 6mm material
...faired more of the outside edge of the gunwales all around
...broke first piece of baitwell shell trying to bend it around the front..even with lots of kerfs...going to try using a door skin next..it looks like it should work
...precoated heavy cleats and material for baitwell shell
At this stage I feel working with the gunwale caps and coaming is like 'sculpting' ...trying to get smooth even curves in all directions..probably going to need some quickfair to make things right!
Posted: Sat Sep 10, 2005 11:42 am
by JASmine
...glued in the a couple more of the heavy-duty inwale cleats...I can only do a couple at a time because it requires alot of large clamps
...more fairing of the console top
...cut mounting hole for 6-gang waterproof switch panel in console
...started assembling the baitwell shell. I think the door skin is going to bend into the shape I need without breaking..I hope
...sanded and shaped the outside edge of the gunwale/rubrail all around..more touchup will be needed
...started playing with the fitting layout at the bow..light and cleats
...trimmed up the fuel fill and vent hoses to correct length and added terminal to ground wire..ready for install after painting complete.
Posted: Sat Sep 10, 2005 1:03 pm
by Lackofdistinction
Where is Oldsmar in relation to Leesburg Fla. ?
Posted: Sat Sep 10, 2005 1:50 pm
by JASmine
Lack...Oldsmar is between Tampa and Clearwater...about 80 miles to the sw of Leesburg.
Posted: Sun Sep 11, 2005 9:34 am
by JASmine
...glued last beefy inwale cleat in place
...forced down and glued stern portion of gunwale cap to frames D and E
...cut,precoated, and glued port inwale trim in place
...dry fitted baitwell shell..looks good..door skin worked great
...more fairing around gunwales
It's amazing what I can find to do that AVOIDS sanding and fairing the inside!!
Posted: Sun Sep 11, 2005 10:05 am
by Cracker Larry
You sure do get a lot done in a day
Looks great.
Posted: Sun Sep 11, 2005 9:21 pm
by ks8
Avoiding sanding when you reasonably can... that sounds good to me.
Does that mean ... ah blah. That doesn't mean anything in particular! I'd rather not have to wear the respirator, and not sanding is the only way to justify it.
Though I have epoxied or sheathed huge sections on a very hot day and within minutes knew the respirator was a very good idea even without sanding.
The boat is looking very nice. ANother one that will be finished before mine.
Go for it.
ks
Posted: Mon Sep 12, 2005 2:50 pm
by JASmine
Thanks for the words of encouragement guys..I need it..my perseverance is running low!
...glued the aft portion of inwale coaming in place
...fit and started to cut excess of the bow coaming strip but broke my sabre saw blade..spares were at home
...fit and glued the drip edging along inside edge of port gunwale..unfortunately noticed a a high spot AFTER the strip was down...hopefully I will be able to sand it even without it being too apparent.
...added extra cleat to stern edge of frame F along motorwell...it will provide a wider lip to run the drip rail across
...filleted the seams in the baitwell shell
...cut mounting holes for in-gunwale rod holders...first hole a little too big (length)..ok with backing plate installed after filler....second hole perfect
..third hole..perfect size but TOO close to one of frames..the slant of the tube caused it to bump..ok.. so just drill the hole a little longer (1")..fit ok but now I have to count on the backing plate and filler again.....
SO..it was just one of those days
Posted: Mon Sep 12, 2005 4:39 pm
by BluffBuilder
That panga is looking great.
When do you estimate a float date?
Any idea what $ you think you've got invested total?
Your build looks like a quality reference for future builders. Seems to be a popular style with alot of interest.
Keep up the good work!
Posted: Mon Sep 12, 2005 6:13 pm
by Cracker Larry
SO..it was just one of those days
But look at all the experience you have gained
This will serve you well when you start your next boat. Panga 25

Now that my GF 16 is finished, I can't decide what to build next, but I think it will be a big Panga. Got to decide soon. Decisions, decisions.
Posted: Tue Sep 13, 2005 12:19 pm
by JASmine
ks....you're right about the respirator..it sort of becomes your 'friend' after awhile
..dust, fumes, etc..I seem to have it on all the time at this stage.
bluff....hopefully in the water within 30 days..which includes the 2 weeks for final cure of the S3 LPU paint. As for the amount 'invested/spent/blown/etc', I'll do a final tally when I finish..afraid to do it now
..My estimate is roughly 3k for initial materials, 3k for fittings and additional materials, and 6k for the engine..we'll see.
larry....you're right about the "experience" factor. I thought to myself many times..'this would be really helpful to know next time'. I doubt if I will take on a bigger boat. I specifically wanted a small boat but one that would handle the chop in Tampa Bay..so far this hull seems just right. We'll see when I put it in the water
Also this 20 just fits into a normal garage (for construction only..wouldn't fit on trailer)..a 22 or 25 would require more construction space than I have access to.
Today's progress:
....cut hole in baitwell shell for supply line
....glued the base of the console and the shell in place
....trimmed, precoated, and glued forward section of starboard coaming in place...all coaming installed
....faired all edges of coaming panels
....cut 2" tape from 4" tape for trimming up outside edge of gunwale/rub rail edge (to avoid any cracking along seam)
....sanded rough edges of precoat in engine mount holes to allow .5" bolt to fit smoothly (just right for a Dremel with small sanding drum
)
....cut the last rodholder hole in port gunwale and 4 backing plates..all just right (amazing how experience (read mistakes) helps..
)
Posted: Wed Sep 14, 2005 12:27 pm
by JASmine
....filleted baitwell shell/console base seams
....cut hole for spray head in baitwell
....finished quickfair on port side gunwale,drip rail, and coaming
....drilled mounting holes for 4 line cleats
....precoated backing plates for in-gunwale rod holders
....glued the starboard drip rail in place
....drilled and precoated mounting holes in transom for tie-down eyes
....rounded outer edge of gunwale/rubrail seam in preperation for taping
Off to pick up trailer this afternoon!!
Posted: Thu Sep 15, 2005 1:17 pm
by JASmine
No trailer yet..discovered that my trailer light setup was faulty so it's a repair job first
....completed the final plumbing on the baitwell and set the tank in a bed of 5200 (PS...HD sells a large caulking tube size for less than $9)
....mounted the 2 tow eyes in the transom and sealed with 5200
....AND more sanding and fairing..sanding and fairing...san...
Jasmine
Posted: Thu Sep 15, 2005 4:25 pm
by cottontop
Your boat is looking great. You will find out that in the end the sanding will make her beautiful. Cottontop
Posted: Fri Sep 16, 2005 11:47 am
by JASmine
Cotton..you're right..I find myself looking at how graceful she looks each time I sweep the sanding dust off
....taped the port outer gunwale/rubrail seam
....glued in the backing plates for the rod holders
....drilled and precoated the mounting holes for the spring cleats
....glued the bow and stern sections of the drip rail in place..drip rail completed
.....more sanding and fairing....
Trailer light wiring repaired and hopefully off to pick it up this afternoon.
Pascoe method
Posted: Sat Sep 17, 2005 8:06 am
by johna
Hi JASmine,
Nice boat. Love the custom touches for fishing and see you have big plans for tarpon possibly?
I am installing a replacement aluminum fuel tank in a renovation- 20' SeaRay, and have looked at the Pascoe Method on the Yachtsurvey webiste. What did you use for the plastic strips or did you just 5200 it to the plywood deck? Where can I get Haysite strips? And do you know what the "ledger strips" are, mentionied in the description?
Did you use anything else to secure the tank besides 5200?
Thanks,
JohnA
Posted: Sat Sep 17, 2005 12:43 pm
by JASmine
johna....From my reading of the Pascoe method I interepreted it to mean that nothing conductive or water-absorbing should touch the aluminum. I used strips of starboard set in beds of 5200. I'll watch it carefully after I start to use the boat to see if it comes loose..I don't think it will.
Todays work...sanding, fairing..sanding, fairing...
Posted: Sat Sep 17, 2005 12:53 pm
by Yoda
Hey Jas, glad to see things are going so well. I'm accelerating after getting off cruise ship. Had the blah's and had to get lined up again on what needed doing when. I'm installing decks in prep for moving out of garage. Then the topsides. Have I said this before LOL ? Your pics looked good.
Posted: Sun Sep 18, 2005 7:07 pm
by JASmine
Yoda..did you catch any salmon on your trip??
....finished the starboard gunwale/rubrail taping
..only taping left to do is the exterior sole/console seam!
....lots more fairing and sanding....
Posted: Sun Sep 18, 2005 7:53 pm
by Yoda
JASmine wrote:Yoda..did you catch any salmon on your trip??
....finished the starboard gunwale/rubrail taping
..only taping left to do is the exterior sole/console seam!
....lots more fairing and sanding....
No, didn't fish. But did take a jet boat ride up a spawning creek. Never saw so many Salmon. Ate a ton of it on the ship. Must be a God 'cause we have salmon and wine.
Got into a huge Orca pod, babys and all.
Got my sheer clamps glued in and curing. Tomorrow the deck. Interspersed with sanding, always sanding. I like my silicon bronze screws better than my epoxy. Just get tired of mixing. Still like a stitch and glue boat though.
Posted: Mon Sep 19, 2005 11:21 am
by JASmine
...lots of fairing and some sanding..had my first batch of quickfair that didn't set up..probably didn't mix it well enough..I'll let it set for another day to see if it hardens or if I have to scrape it off
...drilled the holes in the transom for the motorwell drains (1")..plan on precoating and then putting in cut-to-fit pieces of pvc for liners.
Probably get some work in tomorrow morning and then taking a few days off for fishing with some friends
Posted: Tue Sep 20, 2005 12:08 pm
by JASmine
...precoated the holes in the transom for the motorwell drains
...cut and precoated the hole for the hour meter in the console
...cut hole and mounted baitwell light with 5200 (I should have done this BEFORE I glued the tank in the shell!)
...more fairing and sanding...the console and baitwell shell are almost done..the casting deck has it's second coat...rough sanded the main deck and started fairing around the edges...gunwales are ready to prime.
Posted: Tue Sep 20, 2005 1:39 pm
by fishingdan
You really need to motivate yourself and get this project moving along. What is taking soooo long?
You are a boat building machine!
Posted: Tue Sep 20, 2005 3:49 pm
by JASmine
Dan.....
...I'll try harder tomorrow!
Posted: Wed Sep 21, 2005 4:01 pm
by JASmine
I used my visiting hands to help with the trailer modifications
....changed the tongue from 8' to 12'
....added a jack stand
....removed the standard 6' (2x4) bunks and layed out the 9' (2x6) replacements
....replaced all the standard fittings, hitch, rollers, etc
Also did a full test install of the steering cable/helm/steering to make sure it was long enough for the tilting console...it was!!
I can now say for sure that the standard layout of the Panga 20 uses a 16' cable...
Posted: Thu Sep 22, 2005 5:43 pm
by JASmine
....finished extending the trailer wiring (because of the longer tongue)...all lights tested ok
....completed a live electrical test for all wiring coming from the console (bilge and baitwell pumps, bow and anchor lights, baitwell light, etc) all tested ok
Next up...finishing the negative battery cables and adding terminations to connect gauges, switches, etc.
Posted: Fri Sep 23, 2005 3:47 pm
by JASmine
...installed the beefier bunks on the new trailer..ready to go!
...taped the skirt all around the hull to protect it while I prime and paint the topsides
I still have a good bit of fairing and sanding to do on the insides but my visiting 'helping hands' made these items much easier to do
Posted: Fri Sep 23, 2005 6:37 pm
by Mike Adams
Just checked the pics in the gallery - that is a beautiful hull. You are really fast tracking with this build! Well done.
Posted: Sat Sep 24, 2005 12:01 pm
by JASmine
...finished the battery cables..they're ready to install
...foamed in the baitwell tank (between the shell and the tank)..nice and solid feel..and insulated too!
Posted: Mon Sep 26, 2005 12:05 pm
by JASmine
...trimmed the foam in the baitwell shell...it looks good
...cut the tube inserts for the motowell drains and trimmed to fit
...filleted and taped the sole/console/shell seams..NO MORE FILLETING AND TAPING
...unless of course I have to cut something open because it's not right.
...retired my filleting tool in a brief ceremony
...cut and routed the edges of the starboard panels to cover the stern boxes. I'll mount them using ss t-nuts after I prime and paint.
...lots more quickfair..
...lot's more sanding..
Probably going to go to 2 cycle days (AM..PM) to move the fairing process along...you work for hours and everything 'looks' the same..
Posted: Mon Sep 26, 2005 12:18 pm
by fishingdan
JASmine wrote:...
Probably going to go to 2 cycle days (AM..PM) to move the fairing process along...you work for hours and everything 'looks' the same..
JASmine, you are something else. We all think that you may be one of the most productive recent builders and now you plan to do double shifts. You are my boat building hero.
Go get em!
Posted: Tue Sep 27, 2005 10:35 am
by JASmine
...sanding and fairing...(that's about all that's left
)
Posted: Tue Sep 27, 2005 12:28 pm
by Rick
JASmine wrote:...sanding and fairing...(that's about all that's left
)
So... you are about 25% done, right?
Posted: Tue Sep 27, 2005 3:30 pm
by JASmine
Rick....yes... 25% of the internal fairing and sanding !...
Posted: Tue Sep 27, 2005 3:32 pm
by tech_support
Good News, the areas that will be painted non-skid do not need to be as perfect as the other areas - it covers it up a little. My boat has a LOT of non-skid painted deck space
Posted: Wed Sep 28, 2005 10:44 am
by JASmine
Joel...I'm going to use every 'trick' I can think of to avoid more work
Today's accomplishments...more sanding and fairing...
Posted: Wed Sep 28, 2005 11:23 am
by fishingdan
I found the internal fairing and sanding to be, by far, the task I least enjoyed. All of the angles and curved surfaces sloooooow things down.
Posted: Wed Sep 28, 2005 12:13 pm
by JASmine
Dan...I couldn't agree more. This morning I was thinking how awful this part is...fair,sand, see another spot, continue.. Almost every seam is hard to get to with the RO sander. And as you say..there are alot of curves, corners, etc!! I am starting to see some progress though. I touched up the last spots on the console top this morning and after a little touch up hand sanding it will be ready for primer. I'm on my third round of fairing on the deck and it's probably got a couple more to go. I have not started yet on the sides and upper frame pieces...more corners and edges
Tomorrow I think I will work just on the hard-to-get-to corners using a dremel sander.
Posted: Wed Sep 28, 2005 12:42 pm
by tech_support
If you have a dremel tool, they make a sanding "drum" that has about 1/2" radius. It can really help on the inside corners. The "drum" I am talking about is really just a wheel with a lot of small sand paper pieces stacked up.
Posted: Wed Sep 28, 2005 1:29 pm
by JASmine
Joel...that's the one!!!...works wonders in the 90 degree seams and the corners
Posted: Thu Sep 29, 2005 12:36 pm
by JASmine
...I made a lot of dust today!!!! Upper console ready for primer, lower console and baitwell shell need another round of fairing, deck is comimg along nicely. Used the dremel and cleaned out almost all the corners and 90 degree seams. Next up..the sides!
More Quickfair should arrive this afternoon...
Posted: Fri Sep 30, 2005 11:08 am
by JASmine
....applied about 10 batches of fairing today so I'll be sanding later
..thanks Joel for the quick shipment.
...taped the last part of the paint skirt around the transom after figuring out how much of the already-finished surface I wanted exposed for overlap blending
...port gunwale precoated/lightly sanded and ready for primer
...started cleaning up the workspace in preperation for priming/painting...boxed up all the accessories and fittings so I can find them again after I move everything around!!
Progress
Posted: Fri Sep 30, 2005 9:19 pm
by ledwithjohn
How about a few pictures of the inside?
John Ledwith
Posted: Sat Oct 01, 2005 5:22 am
by Jimmiller
HI ,Jasmire Boy you are moving fast on your boat.I would like to come to see your work of art.I would like to look at your baitwell setup. I'm working on a Phanton 18.I live down in Seminole,FL.
Posted: Sat Oct 01, 2005 5:35 am
by Jimmiller
Sorry CELL-727-365-7021
E-mail-twomiller1@ij.net
Posted: Sat Oct 01, 2005 5:39 am
by Jimmiller
OLD NUMBER THIS IS THE NEW ONE 365-7061
JIM MILLER
Posted: Sat Oct 01, 2005 12:03 pm
by JASmine
...faired the inside sides for the first time today...basically filled the weave (I have wide cloth on the whole inside hull) and smoothed the taping edges. I make fairly small batches of quickfair..2 sticks of A and 1 stick of B..where a stick is a glob on the end of a paint stick. It took 9 batches for the first coat.
...filled a few small areas on the deck and it's almost ready for primer
...picked up the stainless parts to fasten the stern hatch covers and the helm pedestal..boy are they expensive!..even at ACE hardware where they're about half what a marine supply charges.
Jim..I will call you.
John..there are some pics of the inside in my gallery but once I'm ready to prime I'll take some more.
Posted: Sun Oct 02, 2005 8:00 am
by JASmine
....sanded the inside sides..messy but starting to shape up
....layed out placement for console vents (2 each side)
....drilled holes for fastening stern box covers..will be using ss t-nuts
....more cleanup of workspace
Jim...nice meeting you..good luck with your project.
Posted: Sun Oct 02, 2005 9:48 am
by Yoda
Looks as if you're getting close JAS. Nice you're in FLA so you will be able to use it in the winter. I have my deck on. I'm afraid rainy season is going to catch me. I keep thinking I'm ready to move the boat outside, but always find another thing I can do under cover. I decided to build furniture first.
I have the pieces all fitted and am glueing up the port side. I started shopping for a quality tarp last nite. One that will not bleed color onto the paint. All pieces of the cabin and pilot house are cut except windshield. I'm thinking ahead as best I can. Once I get outside I want as little left to do as possible. Once roof supports go up, no going back inside.
And I keep seeing visions of us going by spammer River. All the people out there fishing. That is one beautiful place.
I'm watching for more pics. Son! you're doing good.
Posted: Mon Oct 03, 2005 11:08 am
by JASmine
....vacummed up ALOT of dust
....more Dremel work in the corners
....more quikfair
....drilled the holes for the vents in the upper console
Now the really HARD part...resisting the temptation to quit before it's done...and knowing when it's done enough!!!
I have the sprayer all cleaned and standing ready for primer though
Posted: Tue Oct 04, 2005 11:44 am
by JASmine
...precoated holes for console vents
....more sanding throughout
...quickfair in the corners including the upper frame/rod holder pieces
....vacumm, alcohol wipe, and precoating of starboard gunwale, inside coaming all around, and the upper console section over fairing
I hope to start priming within the next couple of days
Posted: Tue Oct 04, 2005 12:09 pm
by tech_support
JASmine wrote:I hope to start priming within the next couple of days
Primer and paint heading out today
Posted: Wed Oct 05, 2005 11:32 am
by JASmine
Pulled the trigger ..as they say..of the spray gun!
Last evening I vacummed and wiped everything down. This morning I wiped down the gunwales, rubrails, coaming, and upper console with alcohol one more time and the sprayed the first coat of S3 primer on those items.
I still have more filling and sanding to do before I start priming the inside hull sides, motorwell, and sole.
After spraying the primer I was rudely reminded of how many small areas you need to touch up with fairing after you start priming
...
oh well.. I just replaced my ROS with a Craftsmen Pro/Rigid so I'll be ready for the last lap(s)
Posted: Thu Oct 06, 2005 12:06 pm
by JASmine
....sanded,faired, and sanded again the rubrail, gunwales,coaming, and upper console that was primed yesterday..these parts are ready for a second coat of primer
....faired, sanded, and precoated the last areas of the inside hull sides and sole in preperation for primer
The Craftsman Pro ROS worked great...I never thought I would use the variable speed but it was very nice for working the fairing over the primed areas..not too much off, fairly quick removal, and a nice primer- ready finish using 150 grit and 7000rpm.
Posted: Fri Oct 07, 2005 11:21 am
by JASmine
....second coat of primer on rubrail,gunwales,coaming, and upper console
....first coat of primer on casting deck, motorwell, and about half of the inside hull sides
I'm going to do more of the sides and the sole this pm..after it cools down some
Posted: Sat Oct 08, 2005 10:56 am
by JASmine
...sanded and filled....
The gunwales,rubrails,and coaming are almost done (ready for paint)..only 5 or 6 small areas to rework.
The interior still needs more work..especially the corner seams where the upper frames,sole, and hull sides come together.
Posted: Sat Oct 08, 2005 4:43 pm
by Vman777
Looking good!!
I keep checking the gallery to see your progress.
I might have to come by some day and check it out. I live over by UCF in orlando, so wouldn't be too bad of a drive some weekend.
Keep up the great work!
David
Posted: Mon Oct 10, 2005 11:46 am
by JASmine
...added second coat of primer to interior
...took the 'customized' trailer to get it weighed...with longer tongue, heavier and longer bunks, and the jack stand I added 80# (480# total).
While I'm sure the various techniques noted on these boards (
) would allow me to calculate the total weight of trailer and boat myself, I'm going to wuss out and trailer it down to same scale to get a precise hull weight once I'm finished 'finishing' and the paint is dry
Posted: Tue Oct 11, 2005 11:00 am
by JASmine
..sanded, vacummed, and faired...down to small batches of fairing now but still more spots to smooth.
I only have 12+3 oz of primer left so whenever my next spray, that will be it for the primer.
Time to go read up on how to lay the non-skid!!
Posted: Wed Oct 12, 2005 11:49 am
by JASmine
I know I'm repeating myself...more sanding, more vacumming, more filling
Maybe one more batch of filler..maybe
Got alot of stuff out of the garage and it's beginning to look like a clean workspace again!
Anybody in the Tampa Bay area interested in my strongback and accompanying pieces???
Posted: Thu Oct 13, 2005 12:23 pm
by JASmine
By official proclamation, I declare the primer fairing COMPLETE!! (at some point you just need to stop and move on.....
)
Next step is to spray the LAST coat of primer, mostly on the just-faired spots and then prepare for painting. I'm going to paint the interior in 3 steps..first the vertical surfaces inside, then the sole,then the gunwales/rubrails. I'm going to be using non-skid on the sole so that will take a couple of days to complete...first two coats around the edges and then tape the nonskid outline, then roll on the nonskid. I'll be using the Armada material mixed in the S3 topcoat.
Posted: Sat Oct 15, 2005 7:28 pm
by JASmine
....tried spraying the last coat of primer today but my $65 spayer quit
....brushed the last coat covering the small fairing spots..it's ok but not quite as even as spraying..I'll just even it out with a very light sanding
Next up..the topcoat
(and repairing the sprayer..)
Posted: Sun Oct 16, 2005 1:22 pm
by JASmine
...started the painting today..used the roller to get up under the coaming and kept using it for the inside vertical surfaces..hopefully I can get all the vertical surfaces done today with several coats.
Posted: Mon Oct 17, 2005 9:35 am
by Copro
Jas are you using the cheap wagner?? If so the spay head can be pulled apart for a really good cleaning. Just pull the pin that holds the handle and watch how the parts are stacked. I have had to do that numerous times to my cheap sprayer??? Maybe you have already doen this and it just really broke bad?? I have had lots of trouble with the primer pluging up this gun, but I put up with it because it does put on a nice even layer. For what it's worth it seems putting a couple of ice cubes in the cup slows the plugging process.
Jody
Posted: Mon Oct 17, 2005 12:24 pm
by JASmine
Jody....Good advice..I had already done exactly that..pry off the trigger, push out the pin, clean every thing, and reassemble. It still sputters, even spraying just water. It seems as though there's a vacuum leak to the paint jar...if I screw the jar on almost to the point of breaking it, it seems better..but still not perfect. I was going to do as you said "put up with it" but when I loaded the paint, no flow. I abandoned it for the moment and rolled on the last two coats.
I'm thinking about using an eggshell final coat and I was going to roll that on anyway so the sprayer may not be needed. I'll see as I go along.
Worked on finishing everything but the non-skid....Sanded with 320 grit, vacummed, wiped with alcohol and rolled on the third coat of topcoat on the vertical surfaces and the gunwales. I will probably fill a few small depressions with fairing before the last color coat. Then I'll start the masking for the non-skid.
Posted: Mon Oct 17, 2005 12:27 pm
by Copro
I bet home depot will give you a new one???
Posted: Mon Oct 17, 2005 12:33 pm
by JASmine
That's a great idea...no matter what I decide to use! Thanks, I needed that..my mind is mush from all the fairing and sanding
Posted: Wed Oct 19, 2005 11:22 am
by JASmine
Thanks to Copro, I decided to go another round of fairing for any small quarter size or less imperfections. He said something to the effect that "you should just keep sanding..a day..a week..what ever it takes"..so after 3 coats of topcoat, I now have a couple dozen quarter-size fairing patches to deal with
Fortunately once you sand them smooth there is very little fairing to prime and paint.
I'm still working on a solution for getting a flat/eggshell finish over the LPU. S3 suggested buffing as the best means to get an even flat finish...
Posted: Thu Oct 20, 2005 10:38 am
by JASmine
...sanded LOTS of 'quarters' today.....but somehow I'm at peace with the whole process. As many others have said, "you just keep at it until your done"
Posted: Fri Oct 21, 2005 10:45 am
by JASmine
...."keeping at it"....
Posted: Sat Oct 22, 2005 11:17 am
by JASmine
...more of the same....but getting close....AGAIN!
Posted: Mon Oct 24, 2005 12:16 pm
by JASmine
...took the day off yesterday for pre-Wilma preperations...no problems here but some tropical storm winds continuing at the moment.
...finished sanding the last fairing spots and put a coat of primer over all the areas that were sanded down to under the previous primer. I'll wait till tomorrow for the primer to cure a little and then sand everything and ready it for painting.
Posted: Tue Oct 25, 2005 12:06 pm
by JASmine
..sanded the primer spots today with 150 grit and then used a palm sander with 220 over eveything. The rubrails,gunwales, coaming, inside hull sides,console top and bottom and motorwell are ready for paint...almost
.
The primer makes such a good base that I decided to order another quart to cover a few spots that could be better finished. Now I'll have to wait until Joel gets back on line tomorrow and then till thursday for the shipment.
I'm beginning to wonder if I've developed a 'sanding' fetish or an 'aversion' to painting...I seem to be running in place!
Posted: Wed Oct 26, 2005 11:39 am
by JASmine
...rolled and tipped two coats of topcoat on the console and baitwell...it's starting to look finished
Posted: Thu Oct 27, 2005 6:20 pm
by JASmine
...sand and touched up a couple of dribble spots on the console and baitwell from yesterday's topcoat
...rolled and tipped the rubrails and gunwales.
...sprayed topcoat on the coaming and frame F (the front of the motorwell) vertical surfaces.
...drilled the countersinks in the starboard tops for the stern boxes
...dry fit the high-speed pickup for the baitwell
...cut the pedestal for the leaning post to 'fit' my lean
Received the extra quart of primer (thanks Joel) so tomorrow I'll use that to build up the small unwanted 'channels' along the sole-hull sides seam.
Lessons learned:
1. I should have used primer to build up a smooth surface instead of fairing whenever possible. It's so much easier to sand and does a good job on pinholes, small holes, weave, etc.
2. Getting a finish I'm satisfied with seems impossible, so I'm lowering my expectations....I rate it about 7.5 on a scale of 1-10
Posted: Fri Oct 28, 2005 12:09 am
by FLYonWALL9
Your doing great work! Wondering why though your rolling and tipping some and spraying others? My roll and tip is so so at best with some orange peel which you see more in the darker color. I am like you its really hard to get a production boat quality paint job. How are you liking the spray of your Wag, do you like it as good as say an air spray? I'm really thinking of repainting mine inside and out while its apart.
thoughts on your paint process also isn't that system 3 paint your using and how is its gloss? I really do like the colors offered by Pettit sandstone is a really nice color that hides well. But its pretty thick to flow from a gun I would think?
Posted: Fri Oct 28, 2005 10:23 am
by JASmine
Scott.....I'm using the Wagner sprayer for the vertical surfaces and rolling and tipping the gunwales. I found by experimentation that the sprayer is great at applying an even light coat of paint but I'm not able to control the overspray. So what happens is you get a mixture of shiney and dull areas. For some reason the vertical surfaces either don't show it as bad or I'm accidently better at making good spray patterns. When spraying, it depends on EVERYTHING....temp, humidty,thinning, spray pattern, flow control, etc... I'm not experienced enough to get the finish I would like on a day-to-day basis when all the factors are changing. As many others have said, when rolling and tipping, you can get a 'good' finish most of the time...even under changing conditions.
As for the S3 paint/primer..I LOVE IT. Like I said yesterday, I should have used the primer more and the quickfair less. The primer flows beautifully....sprays great with the Wagner at 20% thinning..and provides a smooth, rock-hard finish. The crosslinked paint is DURABLE. If I accidently get something on the hull I just wipe it off and it's as good as new.
Todays work was to brush un-thinned primer on the sole-to-sides seam to fill in the small gullys that occured as I sanded the sides. Once I sand these smooth, I'll finish painting the inside sides and then lay the masking for the non-skid on the sole.
Posted: Sat Oct 29, 2005 4:07 pm
by JASmine
...sanded yesterday's primer touchups..looks good
...decided another dozen quarter-sized spots could use the primer touchup so I'll have to wait until tomorrow to start painting
Posted: Sun Oct 30, 2005 3:08 pm
by JASmine
...sanded down yesterday's primer and sprayed Orcas white on the inside hull sides, rodholders (upper frames for C, D, E), and motorwell. Also touched up a couple of spots on the console and baitwell.
Hopefully another coat will go on tomorrow!
Posted: Mon Oct 31, 2005 1:37 pm
by JASmine
...applied another coat of white to the inside hullsides, etc. One more to go this afternoon.
...fit all the guages and controls in the upper half of the console
...installed the high-speed pickup for the baitwell on the transom
Posted: Tue Nov 01, 2005 2:15 pm
by JASmine
...finished all the topcoat inside except the motorwell
...started masking the sole for the non-skid...it's more complicated than I first thought..I will using a light blue color (the same as the outside hull sides). However,because the sides curve, it doesn't look very good to have a straight line next to them. I now plan on having a curved outline.. out from the sides, the width of the rodholder/frames....QUESTION>How can you tape a long (13') curved line????
I also have to try and figure out how to get a smooth curve around the front of the baitwell. I taped it, drew a curve on the tape, and cut from there...unfortunately I need to do it over..my cutting wasn't so good.
Posted: Tue Nov 01, 2005 4:27 pm
by Mike Adams
JASmine wrote:QUESTION>How can you tape a long (13') curved line????
I would get some fineline tape from an auto body shop or signwriter's supplies. This tape will take quite a good curve and still lay flat. Tape the outline of the edge with this tape to achieve a nice smooth curve, then fill in the rest behind the fineline edge with regular masking tape. (I used this method on my FL14 - but over shorter distances - and it worked well).
Mike
Posted: Tue Nov 01, 2005 6:32 pm
by JASmine
Mike..great idea..that'll work
Thanks for the tip
Posted: Tue Nov 01, 2005 10:03 pm
by FLYonWALL9
Going to sound strange but I will let you know what I did to do something just like what you are doing. If you look in my gallery you can see how I masked off my deck. and it worked great. In order to get the 13' curve take a long batten. Something that will bend even throughout its radius. I took a straight 1x2x14 and ripped it 1/4" so I ended up with a 1/4x2x14. Secure its end to the start of the curve and put a tack or small nail something easy to fill put tacks on the inside and outside of the batten until you have gone the 13'. Trace its outline with a pencil then pull up the batten and mask it with 1 to 2" blue painters tape. It will take a radius. You can also make the areas that aren't nonside as wide as the tape you use so you have a uniform throughout the boat. I think I have a good shot of this in my gal of the back deck. Just tape up a corner in several ways then come back and exacto it out.
Its all better explained in my gal or you can mail me and I can better try and walk you through it.
Posted: Wed Nov 02, 2005 7:08 am
by JASmine
Scott..Thanks for the info.
After I tried masking out the straight lines, I did exactly as you suggest..I made a batten and traced the smooth curve. That's what showed it was a much better outline. I wasn't too happy with my masking/bending, so I asked the question about 'tape bending'. I went out last night and got some thin pinstriping (like Mike suggests) and will try that this morning.
I also did the 'round' corners as you suggest....layed them square and cut them round.they look good.
Thanks again...I'll report back later today on how it works.
Posted: Wed Nov 02, 2005 1:28 pm
by JASmine
Post-taping report:
I tried using the thin pinstriping material that Mike suggested but it was difficult to keep in a smooth arc..I used .25 inch material and it was TOO flexible. I tried the 1" material Scott suggested and it worked great..thanks again Scott..and thanks to you too, Mike.
I finished masking out the areas I wanted and rolled on the 1st and second coats of non-skid. I used the Armada polyolefin mixed into my crosslinked custom color S3 LPU. I'll go back and add two more coats of crosslinked material this afternoon...then I wait for a week or more before walking on it!
No reports for awhile because I need to fly out to Oregon for a family need early tomorrow morning. I'm not quite sure when I'll return but I'll certainly be anxious to get back and finish mounting hardware..
Posted: Wed Nov 02, 2005 1:55 pm
by FLYonWALL9
Glad the idea worked out for you. Pinstripe works well but you have to be very steady which I'm far from! One or even 2 inch painters tape will make a bend but wont do a 90. I suppose thats why blue masking tape is 8 bucks a roll at HomeDeposit.
Enjoy your trip and look forward to your posts.
Scott
Posted: Wed Nov 02, 2005 4:13 pm
by Mike Adams
JASmine wrote:Post-taping report:
I tried using the thin pinstriping material that Mike suggested but it was difficult to keep in a smooth arc..I used .25 inch material and it was TOO flexible. I tried the 1" material Scott suggested and it worked great..thanks again Scott..and thanks to you too, Mike.
The thinner pinstriping worked well for me, but admittedly it was used over shorter distances and was therefore easier to control. I guess it's horses for courses. Glad it worked out for you O.K., anyway, and I'll remember Scott's tip on the wider painter's tape if I need to mask off long curves in future.
Mike
Posted: Sun Nov 13, 2005 4:07 pm
by Fishtrap
JASmine wrote:Kerfed and mounted the Port bottom panel today. Much easier that the first one because I had a bit more confidence. I decided to NOT SPLIT the panel even though Dynamo's experience showed that is probably the way to do it.
Sorry to back track so much on your project but... how did you determine where the kerfs go and/or whaddayamean "split" the panel?
Tanks el mucho,
Jim
Posted: Mon Nov 14, 2005 12:31 am
by JASmine
Fish...I'm away from home at the moment so I can't send you much detail but here's a short report.
The kerfs are in a 'chevron' pattern starting near the bow. If you look in my gallery there are several pics that show the kerfs,the direction they go, and how far apart they are. They are about an 1/8 " deep...I think there is one of inside the hull where it shows the full pattern. The idea is to cut a kerf along the line where the panel will bend..this bend is not a simple line straight out from the centerline but one that changes as you move from the mid part of the hull to the bow. I think I have a pic that shows the general idea of the layout at home..I got it from Jacques.
As for the "split" style, you actually cut all the way through the ply starting at the bow and back several feet in the bottom panels and then bend each 'tab' individually. Go to Dynamo's diary/galleryfor more info.
At this point I would cut the kerfs without hesitation and think the plans should recommend it
Good Luck
Posted: Fri Nov 18, 2005 6:56 pm
by JASmine
Well after a short power nap to recover from jetlag I went back to work.
Installed:
..the watertight inspection port for the fuel cell (in the casting deck)
..the remote power block for the engine power (port stern box)
..the hinge for the two-piece folding console
..the Racor fuel/water seperator (starboard stern box)
..the remote 12V outlet at the bow (up under the gunwale near the anchor locker)
..one of the 'boots' in the motorwell (for the engine harness)
Also sanded a couple of spots on the gunwales...I'll keep looking for spots and sanding as I do other things and then add the last coat of topcoat to the gunwales and the rubrails.
I removed the plastic skirt that had been protecting the painted hull. Unfortunately there are a few spots where goop mysteriously got through the plastic ?????
..I'll figure out how to spot repair them later.
The most intersting finding after removing the plastic is a seam on the starboard side panel..there's this very shallow channel that runs vertically, is perfectlly straight, and JUST COULDN"T HAVE BEEN THERE when I was finishing the outside hull....must have been bad lighting!
Posted: Fri Nov 18, 2005 8:52 pm
by FLYonWALL9
odd for sure. Perhaps a seam that has shrank after the paint or primer?
Thost darn boat ghosts have started and your not even done yet.
Posted: Sun Nov 20, 2005 4:59 pm
by JASmine
....installed the rubber tension latches to hold the top of the console closed
....pulled the control cables and installed the cables and binnacle
....caulked and mounted the key panel and the fused switch panel
....mounted the motorwell boot for the control cables (and fuel line)
....assembled the single leaning post box and cushion
....washed and cleaned the gunwales and did another round of fine finish sanding
Posted: Mon Nov 21, 2005 3:58 pm
by JASmine
...finished wiring the console switches and batteries
...began construction of the starboard lid for the baitwell
...started touchup of seepage areas around non-skid edge
...rolled/tipped two coats of topcoat on the rubrails
Posted: Tue Nov 22, 2005 3:10 pm
by JASmine
....dry fit finished baitwell lid..still determining exactly how to fasten
....touched up last of the areas where non-skid wicked up under the masking tape
....installed the leaning post base and upper bench/storage
....rolled/tipped another coat of topcoat on the gunwales
Posted: Tue Nov 22, 2005 9:23 pm
by FLYonWALL9
JAS,
Man movin right along. I found some pretty cool hinges that may work for your livewell then again not sure if your wanting to hinge or what but take a peek. All the way at the bottom of the page 10.99 and 9.99
http://www.fishing-catalog.com/AcconMarine/hinges.htm
Posted: Tue Nov 22, 2005 9:57 pm
by JASmine
Scott
Thanks for the link...Southern Charm is run by a local Captain here in Tampa. I have bought some fishing items from them before but had no idea they started carrying hardware. I agree..they are cool hinges!
I don't know how they might work but I'll sleep on it tonight.
Initially I thought I would hinge the lid but now I'm not so sure..I might just cut a rectangular hole in the starboard to match the existing baitwell lid.....more thinking and mockup making required to produce some good
Posted: Wed Nov 23, 2005 1:09 pm
by JASmine
Thanks to FOW9 and his hinge suggestion, I now have a design for the top of the baitwell.
I'm going to order those cool hinges he noted (the oval ones) and use them on a rectangular cutout in the larger lid. This cutout will match the existing baitwell lid underneath. I made a mockup of cardboard and it looks good and I can use the cardboard for a template on the starboard. Now the trick is to cut a perfect interior rectangle
....more sanding on the gunwales using 800 grit
....connected all the gauge lamps to the switch panel
....added another small connecting block in the upper console for all the 'upper' ground wires.
....rolled and tipped another coat of topcoat on the gunwales
Posted: Thu Nov 24, 2005 12:34 pm
by FLYonWALL9
Jas,
Man I'm glad those will work out for you. I saw them not too long ago and had hoped someone would or could use them. I know if I had a hatch issue I surely would get some. I may still get some for a mahogany bench seat I'm building.
When you say interior rectangle are you saying you have to cut that in the boat? If not just use a table saw and some type of can or jar for your edge round over. If your doing it inside I would make a template out of ply screw it to what you are cutting out then use a router. Good luck doesn't sound like a really fun job.
Posted: Thu Nov 24, 2005 7:34 pm
by JASmine
Took the day off for turkey and family..well most of the day anyway..worked on the baitwell lid here at home.
Scott...I brought the lid home (the one shown sitting on top of the baitwell in a recent pic) and used the cardboard mockup as a template for the location of the rectangular cutout. I drilled a 1/16th hole in each corner of the cutout shape and then used my router with a very small cutout bit to cut the opening. I used a straight edge clamped to the lid to make the cuts straight. I had hoped that I could reuse the cutout piece for the actual hinged lid but I wasn't happy with the fit once I was done so I just cut another piece to fit. I then routed a round edge on the larger lid and on the rectangular cutout. I'll post a pic tomorow.
I tried ordering the hinges on-line but it would not accept my order so I'll call it in.
Posted: Thu Nov 24, 2005 8:40 pm
by FLYonWALL9
Cool, I'm ready to see that picture. I figured it would be an ordeal as you made it out like. Just nothing easy about doing those I don't think. I should have my camera back from Minolta within a few days so I can start posting pics also.
Cheers and Happy Turkey Day
Posted: Fri Nov 25, 2005 4:50 pm
by JASmine
Scott...I went to order the hinges and found out that they are made in Clearwater...very close to here... so I'll wait until monday and go pick them up!
...dry fit the baitwell lid and its cutout..waiting for the hinges to finish install
...installed the steering cable and its motorwell boot
...finished a couple more electrical connections
...more 600 grit sanding on the gunwales..moving up to 800 tomorrow...
..started work on the boat storage area (requires a new gate)
Posted: Fri Nov 25, 2005 8:46 pm
by Fishtrap
Hey Jas...
I like where you put the batteries. I'm going to steal you're idea for my 22.
If you're going to use lead acid you might want to have a little ventilation for that area. All of those electrical switches and vapors from batteries can make for one big earth shattering kaboom!
Jim
Posted: Fri Nov 25, 2005 8:58 pm
by JASmine
oops..double post
Posted: Fri Nov 25, 2005 9:00 pm
by JASmine
Jim....I agree..note the two 3" vents on each side of the console!!!..two near the bottom and two near the top for a good 'chimney' draft. They should keep the batteries and electronics in good shape.
Posted: Fri Nov 25, 2005 9:28 pm
by Fishtrap
Sure enough. It's amazing what one can see when he finally puts his GLASSES on!
Looking Good
Posted: Sat Nov 26, 2005 12:32 am
by ledwithjohn
I finished hanging all the framework on the strongback today.
Epoxied the bottom panels together and the transom pieces. Tomorrow I'll epoxy the side panels together. Should be mounting the side and bottom panels by Sunday or Monday.
John Ledwith
Panga 20
Posted: Sat Nov 26, 2005 4:31 pm
by JASmine
After lots of 800 grit sanding and 3 more topcoats on the gunwales, I've declared VICTORY!!..that is.. I'm finished painting.
It's probably more accurate to say I just got tired..
Anyway now that I've finished, I wish my sanding/fairing was as good as my painting. The nicer the paint finish got, the worse my fairing and sanding looked. My plan was to work hard on the gunwales..and I did..but they're still not what I would like. I'm very satisfied with the interior paint finish and the non-skid (they are both a near-flat finish). The hull is ok and also a flat finish ( I may add a satin clear to the color area above the boot stripe) but I was hoping I could get a high-quality finish on the gunwales.
Also finished up the last of the wiring in the console
Posted: Sat Nov 26, 2005 5:46 pm
by FLYonWALL9
Man what a deal! good job, I don't think most of us are ever really happy with the quality of the paint work we do. I'm sure your job is much better based on using 800 grit paper. GEEZ MAN. lol
CONGRATS. now look take that thing to the river and float it, who cares if it has a motor or not.
Posted: Mon Nov 28, 2005 5:42 pm
by JASmine
Didn't get much done today but was able to layout all the gunwale fittings (cleats,rodholders,lights, etc) on the newly painted gunwales..they make it look REAL GOOD..
...hopefully install pics tomorrow..
I picked up the 'cool' hinges suggested by FOW9 and may get them installed tonight. I have to modify the cutout a little to make them work..why is everything so complicated!!
Also picked up a 11x 23 plastic tarp at harbor freight for temporary cover ...once I put it on the trailer it won't fit in the garage anymore
And finally, I went to a nearby ramp at a local lake to scout out if it would be easy to walk around the hull once it's in the water....to measure the waterline...
I'm going to try to get it on the trailer on Wed, weigh it, and then put it in the water to experiment with different weight distributions.
Posted: Tue Nov 29, 2005 7:19 pm
by JASmine
....installed most of the gunwale fittings..4 spring cleats..bow light..anchor light..4 rod holders..still have to finish the fuel fill fitting
....mounted the rear-mount hinges in the baitwell lid...what a production:
make a template for the hole locations, mortise a small ledge in both the lid and the hatch to allow the hidden swing mechanism to clear, buy some special washers, etc....
....set up the slings in preparation for lifting on to the trailer..
Posted: Wed Nov 30, 2005 2:07 am
by FLYonWALL9
ahhh so they are flush on the topside recessed into the lid and use screws on the bottom side. Now thats pretty slick. By the picture they show in the link that I sent its hard to gather that. But yeah thats a sweet install. Shouldn't hang on any swim wear, or scratch you from birs on screw heads. Very neat install!
She sure is looking like a fine boat my friend.
Posted: Wed Nov 30, 2005 7:19 am
by Dynamo
You're looking good! I can't wait to get to the point you're at. Right now my boat is 90% done with 90% left to go. Once I see that your's floats, I'll be motivated to "git er done".
Posted: Wed Nov 30, 2005 6:29 pm
by JASmine
....finished mounting the fuel fill/vent cap and ground
....finished mounting the hinged lid in the baitwell
....decided it was a nice enough day to put the hull on the trailer...by myself
..actually it wasn't too hard. I used the cheap block and tackle from harbor freight AND a cable come-along. I used the come-along to lift a few inches and then tighten the block and tackle..then lift a few more inches..and tighten the block..until I had the height I needed.
Then I slid the trailer under the hull and adjusted all the bunks and rollers. After everything looked right I gently lowered the hull on the trailer.
It was starting to get dark so I tucked it back in the garage for the night. Tomorrow I'll weigh it and PUT IT IN WATER..
..to test various weight distributions..measure for the boot stripe..confirm it's self-bailing, ect. If A-OK, then next up the engine install!
I still have several small items to finish up but they can be done easily on the trailer. I also decided to add a clear satin topcoat over the color portion of the hull sides but I'm going to wait until I have used the boat for awhile.
Posted: Wed Nov 30, 2005 6:56 pm
by fishingdan
Look at the size of the trailer for a 20' boat! That is one of the wonderful things about these boats that people don't understand. They are so much lighter than a comparable commercially available fiberglass boats.
Nice work!
What is the size of the trailer? Also, plan to use a bow tie-down in addition to transom tie downs. In addition to be a signifcant safety item, it will reduce (at least visually) the flexing of the trailer on the road.
Posted: Wed Nov 30, 2005 7:40 pm
by JASmine
Dan..the trailer is a 2000 # gross weight trailer. It weighs..after modifications...480#. That gives me a hull/engine capacity of 1500#. According to the design specs, the Panga 20 should weigh about 1000#. The 60hp engine will be 240#. If I've added more than 250# to the hull weight then I'm going to have a problem. If the gross weight turns out to be too close to the maximum then I'll have to have a custom trailer built. There are no standard trailers that are both narrow and 20' in length.
I've been worried about this since the beginning but decided to start with a less-expensive standard model that was easy to lengthen. I'll get some insight tomorrow when I weigh the hull.
Posted: Wed Nov 30, 2005 9:03 pm
by Fishtrap
Jasman...
Ultra sweet!!!!!!
Posted: Wed Nov 30, 2005 9:05 pm
by fishingdan
If you find you have a problem, you can probably upgrade your springs and, maybe your axle if needed.
1000 boat design weight
100 extra pounds for overbuilt boat
240 engine
117 fuel (I don't know how big your tank is - used 18 gallons)
50 battery
100 for misc rigging (steering, cables, engine control, switches, fuel cell, anchor, etc).
____
1607?
?? leaning post
?? cooler full of ice
?? fishing gear
Might be close. I will be interested in seeing what she weighs.
Posted: Thu Dec 01, 2005 8:26 am
by JimW
Saw your gallery pics, She's lookin' great!
Posted: Thu Dec 01, 2005 1:30 pm
by JASmine
She weighed in at just a hair under 1100#!!!!!
This includes:
hull design per spec
lamination schedule per spec except full cloth on inside of hull
full foam throughout
fairing, lots of primer, and 6-7 layers of topcoat throughout
aluminum fuel cell
all wiring, control cables, steering hub and cable, heavy-duty Racor
all chases and plumbing
hatch and inspection port
custom designed console
25 gal baitwell and housing
baitwell pump, emergency bilge pump, shutoff valves, filter
4 heavy-duty cast rod holders, 4 spring cleats, combo fuel fill
all lighting, buss bars, guages, switches, and binnacle
2 type 24 batteries and housings
Single leaning post and base
Plan on putting her in the water this afternoon...
Posted: Thu Dec 01, 2005 6:10 pm
by JASmine
Post splash report...
...floats off the trailer smoothly
...floats perfectly level to the sole 'dry'..no fluids, no engine
...250# at stern and skipper at helm drop stern about 1.5 " off level
...fairly stable..about what I expected for such a narrow beam
..very difficult to get on back on trailer singlehanded without rear guide posts. I also may have to adjust the bunks off level to keep the keel from banging into the trailer as it slides forward...
I'll work on these adjustments tomorrow and try and get it ready to mount the engine next week..60 hp 4-stroke Yamaha
Posted: Thu Dec 01, 2005 6:24 pm
by BilltheCat
Is that Anderson Park??? If so, she'll float a smig higher in Tampa Bay!
Otherwise ............ Whoa that's pretty boat and you haven't been lollygagging about her construction ..... great job!
Dave
Posted: Thu Dec 01, 2005 6:31 pm
by FLYonWALL9
She sure sits pretty in the water, congrats!
If adjusting the bunks wont work look at getting a keel roller. My boat did what yours is doing from what you explain. The cutwater wants to hit the center part of the trailer on its way up. Before I had a custom trailer made the keel roller helped. Just don't rest the boat on that roller or it will rubs it as you drive also get the clear ones. IF you go this route.
I have been bout to die to see one of these in the drink, sure has pretty lines!
Posted: Thu Dec 01, 2005 7:34 pm
by Yoda
JASmine wrote:Post splash report...
...floats off the trailer smoothly
...floats perfectly level to the sole 'dry'..no fluids, no engine
...250# at stern and skipper at helm drop stern about 1.5 " off level
...fairly stable..about what I expected for such a narrow beam
..very difficult to get on back on trailer singlehanded without rear guide posts. I also may have to adjust the bunks off level to keep the keel from banging into the trailer as it slides forward...
I'll work on these adjustments tomorrow and try and get it ready to mount the engine next week..60 hp 4-stroke Yamaha
Just saw the pics, Jas. Looks great.
Jasmines Panga
Posted: Thu Dec 01, 2005 7:57 pm
by cottontop
What a great job you did. I can't wait until the "spring Rendevous" to see her up close. She has been well worth it, Hasn't she? If you get the egret and a couple of his/her buddies, you can probably make her fly? What are you going to make her go with? cottontop
Posted: Thu Dec 01, 2005 9:15 pm
by fishingdan
Looks wonderful! Congratulations.
I agree with Fly's suggestion. Add one or more keel rollers to keep the boat from hitting the trailer frame(s) while loading/unloading. I had to do this on my trailer. You may also want to experiment with the depth of the trailer when loading single handed. It can make a big difference.
Dan
Posted: Fri Dec 02, 2005 8:54 am
by JASmine
FOW9/Dan...thanks for the keel roller suggestions. I have 3 small ones now (4") but I'll change them out for much larger ones.
Dan...as I was thinking about this during my sleep last night I came to the same conclusion about depth..it was too deep!! I'll try having the fenders(and bunks) just under water...this should keep the hull from having too much freedom to swing back and forth over the bunks (and rollers). I'm also going to add vertical guides at the rear of the trailer to restrict some of the side-to-side motion as I winch it forward.
Cotton...60hp 4-stroke Yamaha EFI
Thanks to all for the kind words. I appreciate the support. Now it's on to the engine
Posted: Fri Dec 02, 2005 10:06 am
by fishingdan
My trailer is very similar to yours. I agree with the addition of side guides. I would recommend the short one that are angled out for singlehanded loading and unloading. It can be hard to get a rope up and over those tall guide posts as you manipulate the boat into position before loading.
When my trailer was too deep, I had all kinds of problems from wind or current moving the boat off the side of the trailer before I could get firmly seated on it. Once I figured out the proper depth for the trailer, 95% of those problems went away. My trailer has bunks that are about 5 or 6 feet long. For my boat, backing the trailer in so that only that aft 1 foot of the bunk was in the water is the best solution.
Good luck with the engine.
Dan
Posted: Fri Dec 02, 2005 10:31 am
by tech_support
28 pages, wow
Posted: Fri Dec 02, 2005 3:25 pm
by OffshrAngler
I think that may be a record amount of pages
Posted: Fri Dec 02, 2005 5:07 pm
by jacquesmm
He posted every detail of the building, thank you.
And it was worth waiting 28 pages for: great looking boat, very clean job.
Posted: Fri Dec 02, 2005 5:15 pm
by gpratt
You did a fine job on your boat. It looks great!
Posted: Fri Dec 02, 2005 10:08 pm
by JASmine
Thanks for the nice comments guys.
I tried to keep a log of my daily activities for two reasons:
1. I thought others might benefit from my mistakes and be able to avoid them. I know I sure learned alot from others as they described their efforts.
and
2. I plan on putting a copy of this record in my grandchildren's treasure chest. It's a chest I started when my first one was born and it contains all kinds of things that were relevent in my life..only to be opened on my passing.
Thanks Jacques for providing the blog space.
I did some modifications on the trailer today and will do a few more over the weekend..12" keel rollers, side guides , etc.
I have an appointment on Monday to install the engine. Hopefully all the cables, harness wiring, guages , etc will work as expected, If every thing goes ok, I should be able to post some perfomance info on Wednesday or Thursday.
Posted: Fri Dec 02, 2005 10:56 pm
by Vman777
JASmine, Boat turned out really Great!!!!
Like jacque said was worth the wait.
I was starting to wonder if you were writing a book
I will have to come over and see it sometime, since you are only a little more then a 1 1/2 hours away.
David
Posted: Sat Dec 03, 2005 9:03 pm
by skinner
Very Nice!
I appreciate your record keeping diligence...It has helped me a ton figuring out things on my build. I am glad you are in Florida; my finished product will not look nearly as "perfect" as yours!
Good work!
Posted: Sun Dec 04, 2005 12:14 am
by Mike Adams
Congratulations, Jas - you have made yourself a beautiful boat there and your attention to detail has really paid off.
I look forward to seeing more pics of her when you get the engine fitted and can really begin to use her.
Mike
Posted: Sun Dec 04, 2005 2:26 pm
by fishingdan
Jas, that treasure chest idea is great.
Posted: Tue Dec 06, 2005 6:08 pm
by JASmine
Short status report:
...engine mounted and wired.... waiting for prop to arrive
...original control cables were too short..you need at least 17' (16' steering ok)
...all guages connected and ready for use (if you use analog Yamaha guages you need an additional console-to- engine harness for trim and temp/pressure...
)
...main engine harness needs to be at least 17'
Posted: Tue Dec 06, 2005 11:02 pm
by sgorey
All those guys with the 225s must have been drooling when they saw a 20' boat with a 60hp.
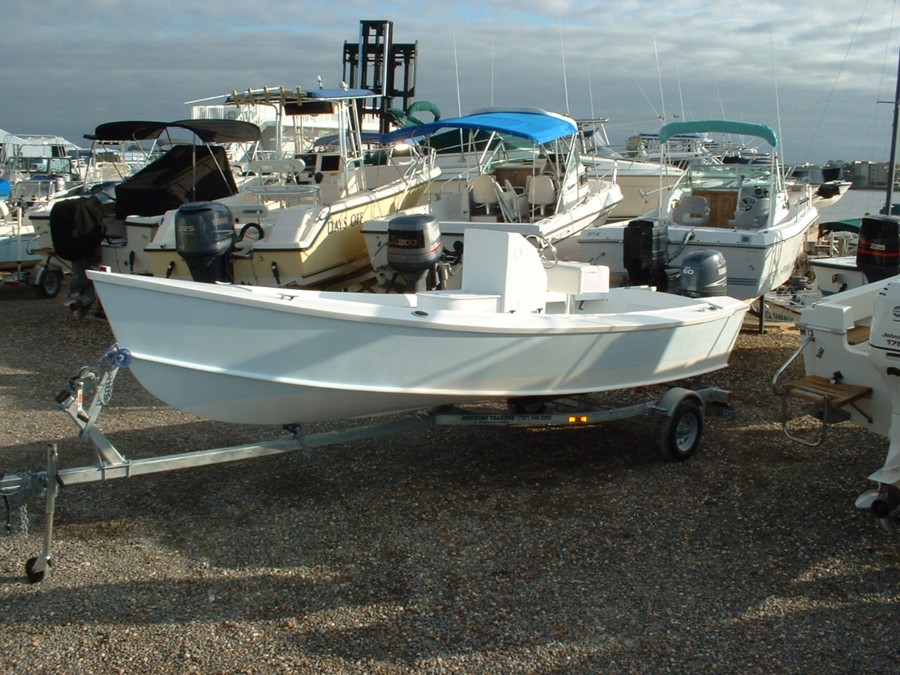
Great looking boat. Congratulations!!
Looks Great
Posted: Wed Dec 07, 2005 2:48 am
by ledwithjohn
Hope mine turns out as nice.
Let us know how she handles, and the speeds with 60 hp.
John Ledwith
Posted: Fri Dec 09, 2005 11:25 am
by Yoda
Hey JAS, we're all waiting anxiously for your " I ran the boat " report.
Waiting for the prop? Anyhow your gonna have fun. The weather and my arthritus has slowed me down.
The boat is outside with the front cabin stitched. Just need some sunny weather with a low arthritus index. I now believe in that weather stuff.
Maybe I need to move to Ariz.
Posted: Fri Dec 09, 2005 8:26 pm
by JASmine
Yoda...I'm anxious too!!!!
Today I had the state fish & game inspection (all ok), went to the motor vehicle dept and did the registeration (hull id and hull #), added another 12" keel roller and side bunks to the trailer. By the time I put the hull #s on the boat it was too dark to get much time on the water...tomorrow hopefully... but don't expect much of a performance report until I get past the first engine hour.
Joel..thanks for faxing the invoices to the mv dept. If I was to do this again in Florida I would take in the wood, epoxy/glass,paint, and engine invoices and that's all.
Posted: Fri Dec 09, 2005 8:38 pm
by tech_support
No prob. I glad we could help
I know you cant wait to take her out tomorrow.... I know I'l be check back for an update..... after I come back from fishing
Posted: Sat Dec 10, 2005 9:09 am
by Old E.
Why did you have to take in all the invoices, and why would you only take in those reciepts mentioned? I am curious as to the registration process of these boats in Fl. Thanks.
Posted: Sat Dec 10, 2005 9:55 am
by Lackofdistinction
Tell me about the trailer?
I am in the market for one was yours used or did you buy new and what brand?
Thanks
Josh
Posted: Sat Dec 10, 2005 8:11 pm
by JASmine
Old E.....The receipts are a required part of the registration..you need an inspection report from FFWC, a Builder's statement, and receipts showing you paid Fl sales tax on the materials. My comment regarding only taking the major bills is to SIMPLFY the process when working with someone at the motor vehicle dept who probably has never done one before.
Lack....the trailer is a new Performance brand trailer. It has a tilt mechanism that allowed me to easily change out the 8' tongue for a 12' one.
I'm still tuning the trailer for the Panga 20. Today I scraped another layer of paint/primer/fairing off the keel near the bow because as the hull moves away from the bunks it eventually drops down between them and hits the trailer. I'll add another large keel roller to fix the problem in the area where the drop occurs.
'I ran the boat' report:
I put it in one of our local lakes for it's first test ride this morning...nice and calm but cool.
With a 1100# hull, 240# 60hp engine, 10 gallons of fuel, two 200# men, and safety equipment, the boat runs fairly easily over 30 mph at 5000 rpm. I only ran the engine for 1/2 hour total and spent almost all the time running at 3000 rpm. Next up will be another 1/2 hour at 4000 rpm. After that I'll run it up to WOT (6000 rpm) to see what prop changes might be needed.
My initial impression is "so far so good". The ride was smooth, dry, and quiet. There is almost no 'getting up on plane' sensation. The hull starts level and stays level. At rest, the hull does rock but in a controlled way. There's no problem with another person moving around in the boat.
I'm very pleased with the layout...lots of room for two people to fish very comfortably.
I would also say that if you really want to spend time offshore you should build the 25. The 20 is a great inshore/nearshore/bay boat...easy to handle single-handed. With the 60 4-stroke I'm expecting something around 5mpg.
Another report soon...
Posted: Sat Dec 10, 2005 9:06 pm
by FLYonWALL9
Great report, great boat, great build. I give it two thumbs up.
Good stuff man, really cant wait to hear how it does in a sea.
Posted: Sun Dec 11, 2005 10:03 am
by Yoda
Jas, my 19'6" Javlin with the 175 Johnson gets 5MPG at 60 MPH. I don't believe your 60 Yamaha 4 stroke will burn that much fuel.
Posted: Sun Dec 11, 2005 10:44 am
by Cracker Larry
First class job Jas
Both with the building and documentation. I'm considering a Panga for my next build and your information will be a helpful inspiration.
Posted: Sun Dec 11, 2005 7:27 pm
by FLYonWALL9
Yeah with the correct prop and trim at cruise I think that it should get prolly 8. I get near 7 out an old tired Johnson on my 15. He's just snowballin.
Posted: Mon Dec 12, 2005 7:53 pm
by JASmine
Scott.....foiled again!!!
Put in for a saltwater test today.....10+knt winds. Trailer adjustments almost complete..two extra keel roller solved the scraping-on-the-frame problem..still need a little fine tuning.
The boat ran great..even though my passenger who was in the bow was little nervous riding into the headwind and tide of Clearwater Pass
. Into the waves, the hull was completely stable and the spray rails did their job. In the following sea, the ride was super smooth and controlled.
I wouldn't dally too long abeam in 2-4' seas though...
Today's load was perfect for determing the correct prop...currently an 11X15. I will probably go down to an 11X13 to reach the 6000 rpm max.
Posted: Mon Dec 12, 2005 8:57 pm
by Yoda
Sounds to me like it's "good to go".........................
Posted: Thu Dec 15, 2005 8:27 am
by JimW
A great looking boat on a sea trial near my home town. You know how to hurt a guy. Enjoy it, you earned it!
Posted: Wed Dec 28, 2005 6:24 pm
by JASmine
Short status report:
I've been doing mostly small finishing details...touchups, cupholders,mounting ring for fuel cap key, compass, holder for the stern light under the gunwale,firmer foam for the leaning post, first aid and document pack for inside the console, saftey equipment, etc.
I ran a smaller pitch prop today (10 3/8 x 12 cupped) and it was too small...too easy to push over 6000 even with a heavy load. My engine shop has ordered me a 13" pitch and it should arrrive this week. They had the smaller one in stock so it was worth a try...at least I know now what the botom end is.
I still haven't installed a FF/GPS...waiting for a new model to ship in early January.
Posted: Wed Jan 11, 2006 3:54 pm
by Lackofdistinction
Haven't heard from Jasmine Lately.......Is he off enjoying the fruits of his labors?
Posted: Wed Jan 11, 2006 8:52 pm
by JASmine
Lack...believe it or not I'm still working some details. I've had it in the water 3 times now trying various props. Since I didn't have a depthfinder, I was reluctant to spend too much time outside some known depths...and of course all the fish are in the shallows
I finally decided on a sonar/gps combo unit..the brand new 787c from Humminbird but it didn't start shipping until 1/2/06!! I found the first ones on the planet at Bass Pro but then I had to wait for the in-dash install kit to ship...
I have the unit installed now but haven't put it in the water since then.....all I was able to do was confirm the EXACT lat/lon of my garage
The biggest delay has been my changing the boot stripe location near the bow. When the hull was upsidedown, I marked what I thought would be the water line and painted the two color scheme from there. When I first put the hull in the water, I marked how it actually sat in the water with various loads...bottom line, I wanted to redo the bow area (the first 3 feet). This meant painting over the blue hull side color with the white bottom color. This took lots of coats and careful masking!!
Today I covered the blue color on the starboard side with S3 clear satin...4 coats. I really like the finish...very smooth but not so shiney that EVERY imperfection shows. I still have to finish the port side..probably a couple more days and then WAIT for it to cure..2 weeks!!
All in all, it's very exciting to see it become turn-key. I've added all the required CG safety items and a few fishing niceties... I've also started planning some trips to the keys!!!! I will file a performance report soon
Posted: Wed Jan 11, 2006 9:10 pm
by edaskew
I can't wait to hear how the boat handles a rough sea, and what your top speed is. I want to congratulate you on such a fine job with your boat. I've been watching this thread closely as I'm considering the Panga 22. I need a boat I can cross the few miles of Gulf between Slidell, LA and the Biloxi Marsh (also in Louisiana) for redfishing and make it back even if conditions change for the worse. I wonder if a guy cut put a short cuddy on a Panga 22?
Ed.
Posted: Wed Jan 11, 2006 9:54 pm
by JASmine
Ed...I have exactly the same need...ability to cross several miles of rough water(3-4') that was nice when I left. The one time I had it in 2-3 ft waves of the Clearwater inlet I was very impressed. It's important to keep from being abeam to waves though..the narrow hull.
So far the top speed has been 33mph loaded. The engine was running too low rpms though so once I get it propped right, the nominal top speed will be around 31-32 with the 60hp 4-stroke
As for a cuddy on the 22 (or the 25) I would prefer a canvass dodger that could be lowered when not needed
Posted: Thu Jan 12, 2006 9:24 pm
by edaskew
Yeah, thought about the canvas doger as well, but I worry about lightening and I'd like to have some sort of permanent lightening protection overhead grounded to brass ovals on the bottom. We get wicked squalls daily in the summer over here, just when the big boys are hungry! There's no way to avoid them, you just have to ride 'em out and hope you're not hit.
Ed.
Posted: Tue Jan 17, 2006 5:10 pm
by JASmine
Well I'm done..except waiting for the Satin topcoat to cure..12 more days!
Finished the decal and boot strip today. I hope to work on the cover over the next week or so during the cure.
On 1/30/06 I'll be FISHIN'
I may have to go way south for tarpon but that's my prey.
Posted: Tue Jan 17, 2006 5:24 pm
by gpratt
Bootstripe and decal look great. Hope to see it in person one of these days. Very nice job.
Posted: Tue Jan 17, 2006 10:26 pm
by Mike Adams
WOW! What a beautiful job you have made of that Panga 20! She is a real pretty boat and I love the colours. Folks will find it hard to believe you built her yourself. Congratulations.
Posted: Wed Jan 18, 2006 7:04 am
by Dynamo
Looks great! Hope mine turns out half as nice. What size prop did you end up with?
Posted: Wed Jan 18, 2006 1:53 pm
by FLYonWALL9
Jas,
Is that the F60HP? If so I really want to know how you like it in all respects, fuel econ, noise level, weight, anything you can think of. When I repower I plan on that motor or the Honda but they only come on 50 and 70hp.
Posted: Wed Jan 18, 2006 3:46 pm
by JASmine
Scott..yes it is a F60. I also looked at Hondas but they only have a 50hp in that weight range (theirs is #218 I think). This one weighs #238. If I went to a 70 4-stroke in any brand you jump about #150+. The 70-90 2-strokes weigh about the same as the F60, but I wanted the 4-stroke features.
This one is virtually silent at idle, has enough hp for my 20', and very smooth on the rpm uptake. I don't have any economy info yet because I I've only used it for prop adjustments...only 2 hours engine time so far. I'm completely finished with the hull adjustments now and hope to start regular use on 1/30/06..after the two weeks cure!
Posted: Wed Jan 18, 2006 4:27 pm
by FLYonWALL9
Jas,
I'm sure you are anxious I know I would be. I started poking around last night looking at motors and weights. My old Johnson (86mod but still like brand new) weighs what the F60 weighs so I think it will be an easy upgrade. Keep us posted on econ numbers and speeds, though it wont tell me much I'm wanting to put that motor on my OB15
Oh you can do me this favor though when you get the chance. Measure from the top of your transom to the top of the motor trimmed up. This will tell me if it will fit under a poling platform. When you get a chance.
Posted: Thu Jan 19, 2006 8:22 am
by Yoda
JASmine wrote:Scott..yes it is a F60. I also looked at Hondas but they only have a 50hp in that weight range (theirs is #218 I think). This one weighs #238. If I went to a 70 4-stroke in any brand you jump about #150+. The 70-90 2-strokes weigh about the same as the F60, but I wanted the 4-stroke features.
This one is virtually silent at idle, has enough hp for my 20', and very smooth on the rpm uptake. I don't have any economy info yet because I I've only used it for prop adjustments...only 2 hours engine time so far. I'm completely finished with the hull adjustments now and hope to start regular use on 1/30/06..after the two weeks cure!
Hey JAS, if I fly back to Fla. for the outing this summer will I get a ride in your Panga?
Posted: Thu Jan 19, 2006 4:37 pm
by JASmine
YES
Posted: Thu Jan 19, 2006 4:56 pm
by MadRus
Just had to complement you on the finish of your boat. That's a beautiful color combo. She really came out awesome. Be sure to get some pics on the water and some good "action" shots at speed.
Posted: Mon Jan 30, 2006 8:20 pm
by JASmine
Today's planned performance runs cancelled due to weather....
Tomorrow's fishing.
Wednesday's photo day and performance runs.
Posted: Tue Jan 31, 2006 11:46 am
by Lackofdistinction
[/quote]hope to start regular use on 1/30/06..after the two weeks cure!
Very Long Two Weeks I am Sure!
How do you guys edit someone's quote to keep from Using the Whole Statement when you are refering to a portion of there post?
Sorry off subject not so PC Savey.
Posted: Tue Jan 31, 2006 1:29 pm
by fishingdan
When you want to reply and include the quote from an earlier post, press the "Quote" button at the top right of the post.
When you do that, the "post a reply" window shows up the the quote in the text box. You can change that however you like. To maintain the appearence of a quote, you need to keep the beginning ( "quote" with brackets around it) and ending ("/quote" with brackets around it) tags at the beginning and end of the quote.
Posted: Tue Jan 31, 2006 1:52 pm
by Cracker Larry
I highlight the part of the post I want to reply to, then copy it (CTL C).
When I get to the place in my reply where I want it, then I click on the "Quote" tab above, then paste (CTL V) the quote, then click on the "Quote" tab again.
Posted: Tue Jan 31, 2006 3:03 pm
by Lackofdistinction
I highlight the part of the post I want to reply to, then copy it (CTL C).
Ahh Grasshopper soon the student will be the master.
Posted: Wed Feb 01, 2006 6:36 pm
by JASmine
Peformance tests today.....
Beautiful day on the water..5 knt winds on Lake tarpon, a friend with a photo boat (18.5', 115 hp flats boat), and a new friend who is interetsed in building a boat (to take pics).
The boat ran AWESOME. The 13" prop could still be tweaked abit but with one person and full fuel I could get 5700 rpm at 33 mph. The pics are not too interesting because the boat rides at nearly the same pitch throughout the full rpm range..no hole shot. The spray shape does change though at 2-4k rpm it's near the 2/3 hull point (right where the hull sides begin to curve back into the transom width). Above 5k rpm the spray is from the same spot but quite reduced.
My friends took turns driving the boat and they were amazed at how smooth and agile the hull is. One said that it seemed like they were driving a sports car!!!
With the 4-stroke being virtually silent at idle and it's smooth pickup, the ride is great. I think a 50 hp engine would work well too (for all of you who want a Honda 50).
I have more pics if anyone's interested.
PS..Fishing yesterday was NG (15-20 knt winds on the Gulf) but the hull handled the whitecaps easily. I also discovered that this setup will ride in 1.5' of water at all speeds..nice!
Posted: Wed Feb 01, 2006 7:35 pm
by Cracker Larry
Beautiful boat
Great report
What a fine job you have made of it. Tell me again how long it took you from start to finish. I know you worked like a madman at it
I think there is a Panga still in my boatbuilding future.
Posted: Wed Feb 01, 2006 9:47 pm
by Mike Adams
Congratulations, Jas - you have done a really fine job and she looks just beautiful.
So what are you going to build next....?
Mike
Posted: Wed Feb 01, 2006 10:03 pm
by FLYonWALL9
Jas,
Man she sure looks pretty on the water!
Posted: Thu Feb 02, 2006 9:32 am
by tech_support
wow, very nice boat. Makes me wish I had one.
Posted: Thu Feb 02, 2006 3:12 pm
by jacquesmm
Now that the running pictures are posted, I went back through all the others and it is impressive.
Jazmine's picture album is like a boat building course in pictures, very nice.
The boat looks great, congratulations, beautiful job.
I am very happy about the comments from your friends. I have to admit that I tweaked the traditional lines a little bit and I love the comment that it drives like a sports car.
The smoothness of the ride was a major focus in this hull design, I'm glad to see that it is working well too.
This boat could benefit from a stepped chine but that would seriously complicate the building, the sprayrail is fine.
One question for the builder: did you put the console where we show it? It looks a little further aft. Maybe to compensate for the big nice baitwell?
Posted: Thu Feb 02, 2006 5:40 pm
by JASmine
Thanks to all for the nice comments...I'm very happy with how nice it turned out. Now I have to get after the fish..
Larry..I started hull construction on March 18th (the day the precut kit arrived). In the first couple of weeks I worked 6-8 hrs a day, the the paced slowed as fairing, sanding, repeat work started..I was ready to flip the hull (painted) around the end of May/early June. I was away for a few weeks and then started the interior. By this time it was hot and I worked about 2 hours in the morning and 1 hour in the evening. I never worked after dark (poor lighting). By October I was well into the interior painting and finishing working only a couple of hours a day. I took another couple of weeks off for some family business and then started up again after Thanksgiving. From then on until this week is was lot's of tuning and cosmetic stuff..usually one to two hours at most. So the elapsed time was 10 months, less one month of time off = 9 months. And she is a pretty baby!
Mike....possibly a CS25x..
Jacques...I'm glad you're happy with the result..I am. As for the console, I did design it to fit me (standing) but the trailing edge is exactly as you specified. I have no weight at the stern except the engine..#238. There are two batteries in the console...and I hoped that the weight of the fuel (18 gal)and baitwell water (20 gal) forward of the console would somewhat balance out the engine weight and myself at the helm.
Posted: Thu Feb 02, 2006 8:55 pm
by fishingdan
Well done Jas!!! That is a beautiful boat with a unique look. I really like this picture. It really shows the shape.
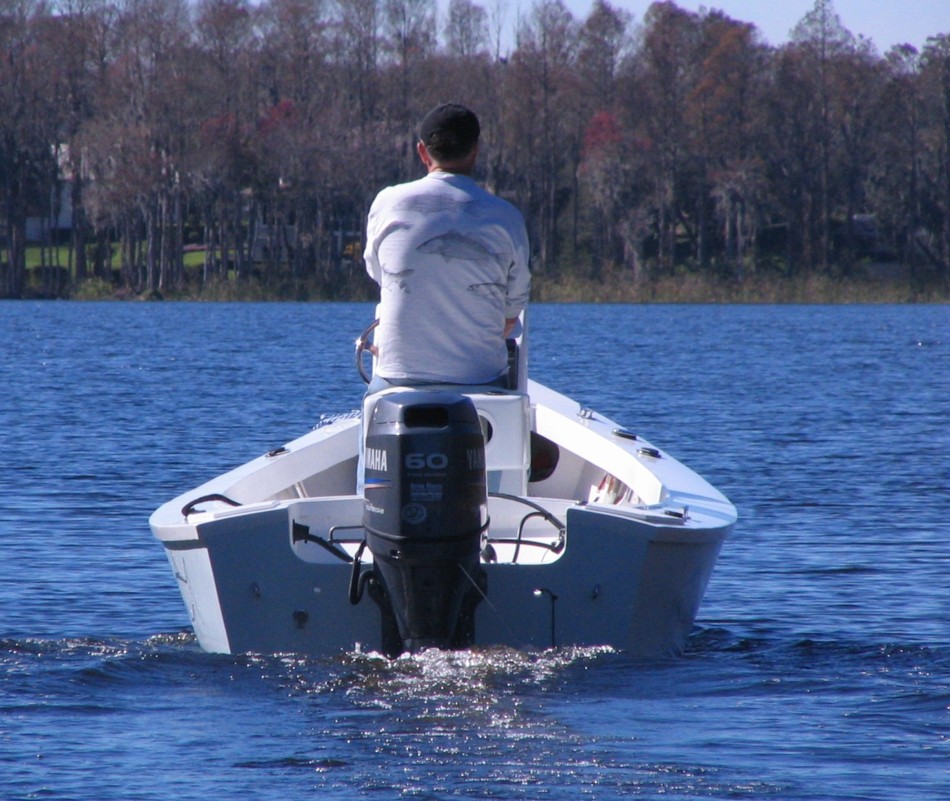
Posted: Fri Feb 03, 2006 11:17 am
by JimW
Awesome job with a very quick timeline. Congrats JAsmine. You gotta be one happy camper now.
Posted: Wed Feb 08, 2006 5:15 pm
by JASmine
Went down to the Peace river yesterday to get a feel for the road handling..all ok. Boat handled great...It looks like I will get somewhere between 8-10 mpg!!!!!..on the boat/not the car
It's so good I wonder if I made a mistake somewhere..I'll confirm next tank full,
Posted: Thu Feb 09, 2006 8:39 am
by JimW
There's no mistake. I cannot believe my economy with the C19 and a yamadog 4 stroke. When I run in reverse it makes gas and puts it back in the tank.
Posted: Thu Feb 09, 2006 10:29 am
by jacquesmm
If you stay in the speed range for which the boat is designed, she will be very economical. It is an easily driven hull.
Posted: Thu Feb 09, 2006 11:27 am
by FLYonWALL9
Jas, your fuel econ sounds right. I have an older Johnson with outstanding compression that gets in the ball park of 8 and most of that was WOT with the wrong prop.
I think your pretty close on your numbers.
Posted: Tue Mar 07, 2006 1:30 pm
by JustMe
Jas,
That's a great looking boat. You did a wonderful job.
Posted: Mon Apr 03, 2006 7:22 pm
by JASmine
Well after 2 months of using the new toy I started on some "improvements"..
.
Most important is a better drainage/scupper system...Originally I ran a 1 1/8 hose thru the stern compartment from the inside deck thru the transom....because you have to leave room for the outside diameter of the hose and the clamps...and account for the angle of the transom, I couldn't get the hose as close to the deck level as I wanted. The result was a small amount of water left in the boat (during cleanup)..and more importantly it was too slow to drain.
Today I drilled and pryed everything out, drilled a 2" hole for 1.5" ID hose, cleaned it up, and epoxy coated the raw edges. Tomorrow I'll pull the new hose thru both openings after a good gooey coating of 5200. I'm going to seal the inside opening with epoxy, fair, prime, and paint. Same for the transom opening but I have a small flange to mount over it for appearance sake so no priming or paint required (I was careful when I drilled the hole
)
I'm also going to another 12v outlet..this time in the console...first one is up at the bow for a spotlight.
And finally, I'll be changing one of the keel rollers to a self-aligning style.
So far the Panga 20 has been great for my inshore use...easy to get on/off the trailer solo..lots of fishing room. I can't wait for the water to warm up and the Tarpon to arrive!!!
Posted: Mon Apr 03, 2006 8:45 pm
by Yoda
Posted: Mon Apr 03, 2006 9:02 pm
by JASmine
oops..double post
Posted: Mon Apr 03, 2006 9:03 pm
by JASmine
Oh....I've been found out!..
Posted: Sun Aug 20, 2006 11:22 pm
by FLYonWALL9
Jas,
Can you give me an update on how she handles open
water. In different conditions from 1' to 2' chop on up
to 1' to 3' seas? Also do you think the spray rails could
be raised say 3 to 4" to deflect some of that rear spray
down? Reason why I say this is because we have SUPER
nasty water and it will screw up a paint job in no time.
Just wanting to hear some more updates now that you
have had your fun for nearly a summer
Thanks, and I cant wait to get started on mine.
Posted: Mon Aug 21, 2006 11:58 am
by JASmine
Scott
The overall performance has been great..head seas or following the boat still tracks beautifully. There is no slowing necessary for 2' or less, above that it depends on your angle of attack..straight into a head sea you need to slow at 3' to about 15 mph.
As for aft spray rails, I would ADD an additional short set above the ones I used..maybe 3-4' long. When Jacques drove my boat down at the get-together, he mentioned that a stepped chine would help but it would be much harder to build. Since most of the aft spray is deflected out, it's only a nuisance in strong winds.
The biggest shortcoming of the design is the scuppers. They are only self-bailing with an empty boat (eg. at the dock). Take that into account in your build.
Good Luck
Posted: Mon Aug 21, 2006 1:08 pm
by FLYonWALL9
THANKS FOR THE REPLY.
Scuppers, have you tried flapper type or ball valve to
see if that would stop the flow of water in? IF, thats the
problem. are you saying the sole should be a touch higher.
I looked at your numbers for speed and rpm and I cant
help but think your lay ups were great and the boat
isn't over weight. What do you think is the issue with
water getting back in? I read where you made them larger
and moved them lower to the sole. Thinking this could
only help.
Posted: Mon Aug 21, 2006 1:49 pm
by tech_support
It will not be an issue on the PG22, the PG20 is about the smallest you can go and still have selfbailing
Posted: Mon Aug 21, 2006 3:36 pm
by JASmine
Scott
As Joel says, it's in the design. The sole is just at the waterline..empty. I now use a rubber stopper on the inside when out on the water and pull it out when washing it down.
I don't think raising the sole would be too good..it would have to be over 1.5" higher to make a difference.
Good Luck
Posted: Mon Aug 21, 2006 3:43 pm
by jacquesmm
JASmine wrote:Scott
As Joel says, it's in the design. The sole is just at the waterline..empty. I now use a rubber stopper on the inside when out on the water and pull it out when washing it down.
I don't think raising the sole would be too good..it would have to be over 1.5" higher to make a difference.
Good Luck
Exactly, raising the sole is not an option.
The PG20 is a small boat, it doesn't have much buoyancy and this presents a dilemma to the designer: either make the cockpit self-bailing but raise the CG or keep the sole just high enough that it drains the rain when left at the dock.
The Pangas are narrow and don't have much static stability to start with, it's not a good idea to raise the sole. Plus the cockpit depth is already border line.
The best compromise is to have a boat that will drain when left empty at the dock but requires some kind of plugs in the scupper or flapper valves.
Posted: Mon Aug 21, 2006 4:20 pm
by FLYonWALL9
Gotcha thanks guys